Embed Size (px)
Citation preview

The Manual
Step 1: Accessing Dentigram From Denticon: Go to UTILITIES, Select LAUNCH and then DENTIGRAM 2.0.
It will ask you to press CONTINUE. Depending on your level of access it may take you one of three
places.
It may take you to this page. If it does, select L for LOCATION to access your office(s).
Then after that it’ll take you to this page. (Or after you select Dentigram 2.0 it may take you straight to
the following page.
If you have a single office then your office will appear on the page above. If you have multiple offices
that you have access to then all of the offices that you have access to. To select your office, press the
Number under the ID column. That will take you to the following page. (Step 1 may also take you
directly to the following page automatically, bypassing the two above screens)
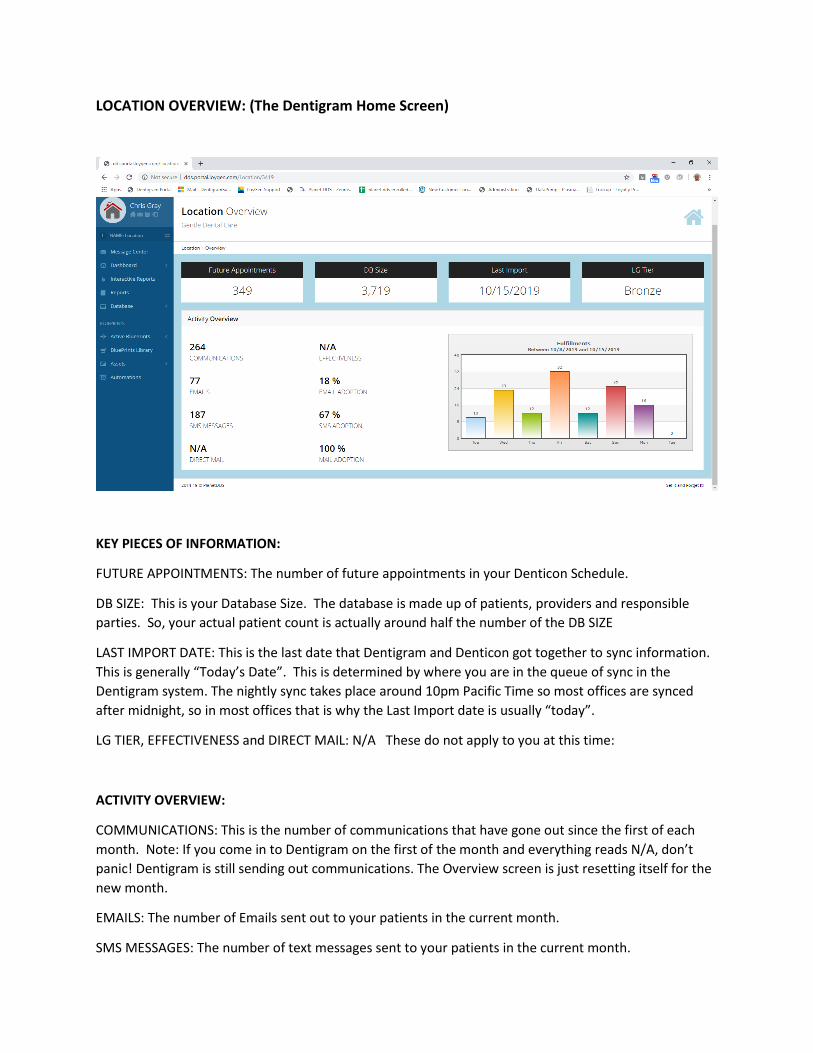
LOCATION OVERVIEW: (The Dentigram Home Screen)
KEY PIECES OF INFORMATION:
FUTURE APPOINTMENTS: The number of future appointments in your Denticon Schedule.
DB SIZE: This is your Database Size. The database is made up of patients, providers and responsible
parties. So, your actual patient count is actually around half the number of the DB SIZE
LAST IMPORT DATE: This is the last date that Dentigram and Denticon got together to sync information.
This is generally “Today’s Date”. This is determined by where you are in the queue of sync in the
Dentigram system. The nightly sync takes place around 10pm Pacific Time so most offices are synced
after midnight, so in most offices that is why the Last Import date is usually “today”.
LG TIER, EFFECTIVENESS and DIRECT MAIL: N/A These do not apply to you at this time:
ACTIVITY OVERVIEW:
COMMUNICATIONS: This is the number of communications that have gone out since the first of each
month. Note: If you come in to Dentigram on the first of the month and everything reads N/A, don’t
panic! Dentigram is still sending out communications. The Overview screen is just resetting itself for the
new month.
EMAILS: The number of Emails sent out to your patients in the current month.
SMS MESSAGES: The number of text messages sent to your patients in the current month.

**Note: The number of EMAILS and SMS MESSAGES add up to the number in COMMUNICATIONS
EMAIL ADOPTION: The percentage of patient records that have an Email address to send
communications to.
SMS ADOPTION: The percentage of patient records that have a cell phone number on file to send
communications to.
**NOTE: A Good Adoption is anywhere from 70-90% for communication.
MAIL ADOPTION: The percentage of patient records that have a residential address.
FULFILLMENT CHART: This chart shows the number of messages sent out to the patients in the last
seven days. The bar graphs on each day reflect the number of messages sent. If you click on a bar graph
it will break into two bar graphs, one showing how many of those total messages for the day were
emails and how many were texts.
Dentigram Interaction: (Left side of the screen in Blue)

RED ROOFED HOUSE: Check the Red Roofed House to make sure your Communication Profile is correct.
It is VERY important to make sure you have a CORRESPONDENCE NAME and an EMAIL in the profile
because the merge fields from Denticon use that section to fill out certain parts of your emails to
patients. If any of those are blank go to DENTICON and go to SETUP/OFFICES and click the INFO tab and
put the correct information in there. CORRESPONDENCE NAME is the name of the office. The EMAIL
that is listed is generally the office email.
SMALL HOUSE (next to red roofed house): Pressing that button will take you back to the Location
Overview no matter what screen you are on in the Dentigram Platform.
ENVELOPE: Will take you to the Message Center.
CHECKMARK: Shows Task Assignments. (Not applicable to you at this time)
ARROW TOWARD DOOR: Logs you out of Dentigram
L: NAME: LOCATION: If you press the two arrows it will take you back to the screen of our first
screenshot. If you accidentally press that, follow the directions on page 1 of the manual to get back to
your location overview.
MESSAGE CENTER: Sometimes when patients receive their messages from Dentigram,
which instruct them to press a button or click a link to confirm, the patient doesn’t and they write back.
If they write back via email the response will go to the office email, but if they write back to the text it
will go to the Message Center. This is something that you should check at least once or twice a day.
The message center receives all kind of responses. Some may say “Yes” or “I’ll be there”. Some may say
they need to reschedule or cancel. Others may put other messages or emojis. Dentigram as a software

doesn’t recognize how to respond to obscure messages. Let’s say someone has sent a message back in
the affirmative. They are probably going to make their appointment. But, technically, because they did
not confirm on Dentigram. The only way to confirm on Dentigram is to click the button in the email or
click the link in the text message. When you see a message come into the message center that affirms
the patient is coming you can do one of two things. You can just have the office staff manually confirm
the patient in the Denticon Scheduler. Or, you can write back to the patient. You would click their
name. This would take them to their profile page shown below.
You can write them back by clicking the OPTIONS arrow in the Profile box. You will see a drop down that
will say SEND SMS. If they also have an email on file it’ll give the option to send an email message. Then
you can communicate back to the patient and you can say something like, “Please click the link in the
previous message to confirm” or say whatever you want. Below the Profile box there will be a running
feed of messages you’ve sent to the patient and any responses they may have.

DASHBOARD: The Dashboard shows your office from some statistical standpoints. Feel free to
search through the different reports.
INTERACTIVE REPORTS:

Here you have reports you can look at. Under Appointments you can look at today’s appointments,
confirmed appointments and unconfirmed appointments. It is recommended that you just use the
ACTIVITY LOG (Shown below) because that’s a combination of all three reports.
REQUIRED UPDATES: If something is showing in that column, the patient does not have that
communication on file and the office needs to obtain it.
STATUS: Confirmed means the appt is confirmed. Cancelled means it’s cancelled. Missed means Missed
and Scheduled means that it is scheduled but it has not been confirmed yet.
If a Black symbol is next to their name that means that they have family members who also attend that
dental practice. If you press the black symbol it will tell you who the family members are and what it
going on with them as far as the dental practice is concerned.
If there is a black target in the far left column next to their name this means Dentigram has
communicated with them in some fashion in either email or text. If you click the black target it will
show you what the communication was, whether it was a text or email and what date it was on. If you
click VIEW it will show you the exact message the patient received. **This is good to consult when the
patient claims the message had a message that showed the wrong time. We can show the patient the
message in case they did not read it right.
EXPORT SURVEY RESPONSES: (Premium package only): Once you select this report, you would set a
date range and click EXPORT. An Excel spreadsheet will download and on it will be the names of all the
patients that took the survey during the date range that you specified. Also the report will tell you
when the patient came in, what the patient had done, and all of the results of all the survey questions
they responded to.

REPORTS: There are two categories in reports. APPOINTMENTS AND FULFILLMENT.
APPOINTMENTS: The reports are ran by selecting a date range and clicking run. The most
important report in this is the APPOINTMENT SUMMARY TASK LIST as shown below:
This report shows patients coming in to your office in the chronological order of the date range you
selected. If you click SAVE AS you can save this as a PDF document and print it out and have it on your
desk. As patient’s walk through the door you can see the required updates highlighted in pink for what’s
missing from their portal and obtain that information. This will allow you to put that missing

information in their Denticon patient portal which will sync to Dentigram and improve your email/sms
adoption.
FULFILLMENT: These reports show you what happened to the emails that you’ve sent out. You can
select a date range for each of these reports. Bounced Emails show how many emails bounced in that
date range. SENT emails show all the emails that were sent in the date range and what the subject of
those emails were. OPENED emails will show you which patients opened emails and will actually show
how many times the emails were opened. EMAIL ACTIVITY shows what happened to the emails you’ve
sent. Whether they bounced, were opened, clicked, sent, etc. BLUEPRINT DELIVERY STATISTICS pulls
percentages of what has occurred with all of the touchpoints in Dentigram.
DATABASE: In the database, you can look up your patient info by their names or by
appointment. If you choose to look up patients by APPOINTMENT you would just need to look them up
by First or Last Name. Once you have found the right patient then click their number under the column
ID.
Selecting this will take you to the Profile of the patient. There from the Profile Box you can send a
message under OPTIONS (like we do from the message center) or you can click the Person Symbol to
view Customer Profile.
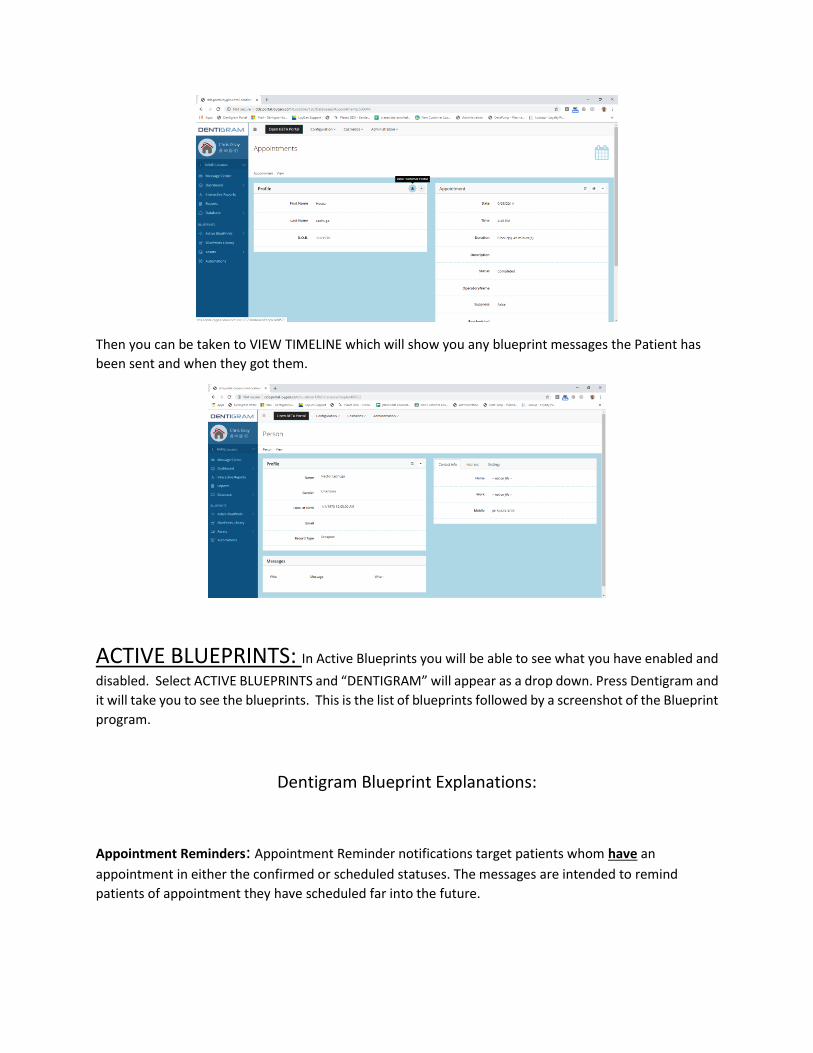
Then you can be taken to VIEW TIMELINE which will show you any blueprint messages the Patient has
been sent and when they got them.
ACTIVE BLUEPRINTS: In Active Blueprints you will be able to see what you have enabled and
disabled. Select ACTIVE BLUEPRINTS and “DENTIGRAM” will appear as a drop down. Press Dentigram and
it will take you to see the blueprints. This is the list of blueprints followed by a screenshot of the Blueprint
program.
Dentigram Blueprint Explanations:
Appointment Reminders: Appointment Reminder notifications target patients whom have an
appointment in either the confirmed or scheduled statuses. The messages are intended to remind
patients of appointment they have scheduled far into the future.

Appointment Confirmations: Appointment confirmations target patients whom have not confirmed
their upcoming appointment. The messages encourage patients to confirm the appointment online or
call the office.
Missed Appointment: The missed appointment communications target patients whom have an
appointment in the Missed status.
Lost Patient Recovery: Patient Recovery campaigns target patients who have not visited and have not
scheduled an appointment several months after their last visit.
New Patient Post Visit: The New Patient Post Visit campaign targets a thank you message to patients
whom this is their first visit to the office. Additions include a post visit survey and public review site
icons.
Post Visit Thank You: The Existing Patient Post Visit campaign targets a thank you message to patients
whom visited the office. Additions include a post visit survey and public review site icons.
Happy Anniversary: Happy Anniversary targets active patients on the Anniversary of the patients first
visit.
Happy Birthday: The Happy Birthday campaign targets active patients on their birthday.
Recall Reminders: The Recall Reminders targets patients who are overdue for a visit to the office.
Remaining Benefits: This targets patients whose benefits is about to expire. This message can be sent to
all patients or filtered to specific insurance types.

Each Blueprint has it’s own campaign. If you look to the right of the Campaign Name you were see that
each campaign is marked with a green ENABLED or a red DISABLED. Enabled means you are using that
campaign, disabled means that you are not. Some blueprints have different touchpoints for their
campaign. You can easily see what those touchpoints are and if they are enabled or disabled by clicking
the name of the campaign. For example if we were to click the Appointment Reminder campaign.
Here you can see the different touchpoints for the Reminders. You can see which one is enabled or
disabled. You could also continue to click through and select a touchpoint to see what is enabled or
disabled as far as the email and/or text communications (depending on the blueprint campaign)

From the Blueprint Communications screen you can select which communication you would like to
preview. Whether it is the text or email.

The two examples above show a preview of the Reminder text and emails. **NOTE: Keep in mind that
all previews by email will say Dr. G. Smith. When the patient gets their message, it will say the correct
provider’s name. Also, in this email preview you will see the logo as Dentigram.com but in your preview
and the patient’s message it will have your logo. If you want to preview the whole email you could scroll
down or OPEN PROOF IN NEW WINDOW. The ASSIGNED ASSETS can be used for editing but please
contact Chris Gray at [email protected] before making any edits on your own to be sure that you
don’t create an error in the messaging by changing the wrong thing. In fact, it is preferred that you ask
Chris Gray to make the change for you. Also, Chris Gray can change any of the Blueprints for you.
TROUBLESHOOTING: If you have any issues or concerns on questions you can contact Chris Gray,
Director of Customer Success, at [email protected]
What’s very important is if you have any issues PLEASE PLEASE PLEASE make sure you have the name(s)
of people who the issue is happening to. It will speed up the process of obtaining a resolution.