Embed Size (px)
Citation preview

The Liquor Shopkeeper
Business Management Software
©2003 Zephran Technologies – All Rights Reserved

Page 2 of 150

Page 3 of 150
Table of Contents
Table of Contents............................................................................................................................................................3 Where to Find Help........................................................................................................................................................8
Zephran Technologies - Product Support Services........................................................................................... 8 Self-Help .............................................................................................................................................................. 8 No-Charge Professional Support ..................................................................................................................... 8
Before you Begin.............................................................................................................................................................9 Hardware Requirements................................................................................................................................................9 Installing the Software.................................................................................................................................................10
CD “Auto Run” Menu ...........................................................................................................................................10 Specifying Setup Options.................................................................................................................................... 11
Destination Location:....................................................................................................................................... 11 Program Manager Group................................................................................................................................. 11 Starting the Installation.................................................................................................................................... 12 Installation is Complete................................................................................................................................... 12 Directories Added............................................................................................................................................. 12
Network Installation ...............................................................................................................................................13 Installing Pocket PC Software...................................................................................................................................14
Choosing the Install Directory............................................................................................................................ 14 Running the Software ..................................................................................................................................................16
Specifying Data File Locations ............................................................................................................................16 Logging into the System.........................................................................................................................................17
Setting System Defaults ...............................................................................................................................................18 Company Defaults ................................................................................................................................................ 19 Invoice Defaults .................................................................................................................................................... 20
Invoice Screen................................................................................................................................................... 20 Texas TABC.......................................................................................................................................................... 21 Product Defaults.................................................................................................................................................... 21 Pole Display........................................................................................................................................................... 21
Workstation Setup ..................................................................................................................................................23 Workstation Setup – Hardware .......................................................................................................................... 23 Cash Drawer Options........................................................................................................................................... 23 Receipt Printer Options........................................................................................................................................ 24 Pole Display Settings ........................................................................................................................................... 24
MS-DOS Config.Sys Settings........................................................................................................................ 24 Workstation Setup – Printers .............................................................................................................................. 24 Workstation Setup – Data Location................................................................................................................... 25 Workstation Setup – Miss Options.................................................................................................................... 25 Credit Card Processing ....................................................................................................................................... 26
Setting Up the System for PC Charge........................................................................................................... 26 Setting up Workstation Charge Information................................................................................................ 27 Setting Up Pay Types for PC Charge............................................................................................................ 28
The Main Menu.............................................................................................................................................................29 Background Menu...................................................................................................................................................29

Page 4 of 150
System Ring Menu ..................................................................................................................................................29 System Modules .......................................................................................................................................................30
Common Modules ............................................................................................................................................ 30 Other Modules....................................................................................................................................................... 30 Administration Modules...................................................................................................................................... 30
Employee Setup .............................................................................................................................................................31 Searching for a Employee ................................................................................................................................... 31 Adding / Editing an Employee ........................................................................................................................... 32
System Security Overview....................................................................................................................................32 Employee Security Setup.......................................................................................................................................33
Inheriting Existing Permissions.......................................................................................................................... 33 Failed Authentication........................................................................................................................................... 33 General - Security Setup...................................................................................................................................... 34 Modules - Security Setup .................................................................................................................................... 35 Reports – Security Setup ..................................................................................................................................... 36
Vendor Setup..................................................................................................................................................................37 Searching for a Vendor........................................................................................................................................ 37 Adding / Editing a Vendor.................................................................................................................................. 38
Accepting a Vendor Payment......................................................................................................................... 39 Applying a Debit .............................................................................................................................................. 39 Applying a Credit ............................................................................................................................................. 39 Bulk Paying a Vendor...................................................................................................................................... 40
Product Module.............................................................................................................................................................42 Searching for a Product........................................................................................................................................ 42
Incremental Searching ..................................................................................................................................... 42 Auto-Edit Products ........................................................................................................................................... 42
Adding / Editing a Product.................................................................................................................................. 43 Specifying a Products Price ................................................................................................................................ 44
Pricing Order..................................................................................................................................................... 44 Qty for Pricing .................................................................................................................................................. 44
Sale / Rebate Information.................................................................................................................................... 44 Rebate Information............................................................................................................................................... 44 Purchasing / Sales Information........................................................................................................................... 45 Product Sales History........................................................................................................................................... 46
Additional Product Sku’s ......................................................................................................................................47 Adding a SKU ................................................................................................................................................... 47 Deleting a SKU ................................................................................................................................................. 47 Editing a SKU................................................................................................................................................... 47
Product Pricing Module ........................................................................................................................................48 Selecting Items ...................................................................................................................................................... 49 Modifying Pricing................................................................................................................................................. 50
Customer Module..........................................................................................................................................................51 Searching for a Customer.................................................................................................................................... 51 Adding / Editing a Customer .............................................................................................................................. 52 Setting Up Customers for POS Scanning ......................................................................................................... 53 Customer Shipping Information......................................................................................................................... 54
Customer Preferences ............................................................................................................................................55 Customer Ledger.....................................................................................................................................................56
Accepting a Customer Payment..................................................................................................................... 57 Applying a Debit .............................................................................................................................................. 57

Page 5 of 150
Applying a Credit ............................................................................................................................................. 57 Customer Purchase History.................................................................................................................................58 Customer Mailing Module....................................................................................................................................59 Duplicate Customer Check Module ...................................................................................................................61
Point of Sale...................................................................................................................................................................62 Point of Sale Screen Overview........................................................................................................................... 62
Selecting a Customer for an Invoice ............................................................................................................. 62 Adding a Product to an Invoice...................................................................................................................... 63 Adding Multiple Quantities to the Invoice................................................................................................... 64 Selecting a Quick No Tax on the POS Screen............................................................................................. 64 Quick Discounting Items on an Invoice ....................................................................................................... 65 Manually Assigning a Discount..................................................................................................................... 65
Invoice Quick Keys.............................................................................................................................................. 66 Invoice Item Grid .................................................................................................................................................. 67 Invoice Item Grid Colors ..................................................................................................................................... 68 Removing an Item from the Invoice.................................................................................................................. 68 Updating Inventory with Zero Retail Prices .................................................................................................... 68 Manager Quick Discount Module...................................................................................................................... 69 Saving an Invoice to “In Progress” Queue....................................................................................................... 70 Loading an Invoice from “In Progress” Queue............................................................................................... 71 Processing an Invoice........................................................................................................................................... 72 Automatic Credit Card Processing ................................................................................................................... 73 Placing an Invoice on a Customers Account.................................................................................................... 74 Placing an Invoice on Hold ................................................................................................................................. 74 Finalizing an Invoice............................................................................................................................................ 75 Voiding an Invoice ............................................................................................................................................... 75 40 Column Receipt Sample ................................................................................................................................. 75 Accepting Product Returns.................................................................................................................................. 76 Processing a Return .............................................................................................................................................. 77 Invoice Reprinting ................................................................................................................................................ 78
Purchase Orders............................................................................................................................................................79 Overview................................................................................................................................................................. 79 Purchasing Menu Overview .............................................................................................................................. 80 Creating / Reviewing PO’s ................................................................................................................................. 81
Creating a New Purchase Order .........................................................................................................................82 Selecting a Vendor................................................................................................................................................ 82 Reviewing Vendor Information.......................................................................................................................... 82 Auto Creating PO’s for a Vendor....................................................................................................................... 83
Purchase Order Screen Overview......................................................................................................................84 Adding a Product to a PO................................................................................................................................ 84
Searching for Inventory ....................................................................................................................................... 86 Purchase Order Item Grid .................................................................................................................................... 87
Modifying Items in the PO Grid .................................................................................................................... 87 Removing an Item from the Purchase Order ............................................................................................... 87
Processing a Purchase Order............................................................................................................................... 88 Receiving a Saved Purchase Order ....................................................................................................................89
Selecting a Purchase Order ................................................................................................................................. 89 Working with the Purchase Order...................................................................................................................... 90
Reprinting Purchase Orders ................................................................................................................................91 Discount Wizard ............................................................................................................................................................92
Adding a New Discount Group.......................................................................................................................... 93
Page 6 of 150
Adding Products from a Discount Group ......................................................................................................... 94 Removing Products from a Discount Group.................................................................................................... 95
Entering Sales Prices ...................................................................................................................................................96 Working with the Sales Pricing Screen.............................................................................................................97
Adding items to the Sales Queue ....................................................................................................................... 97 Removing items to the Sales Queue.................................................................................................................. 98 Applying the Sales Prices .................................................................................................................................... 98
Future Product Prices..................................................................................................................................................99
Adding A Price Change Event.......................................................................................................................... 100 Adding Items to the Event.................................................................................................................................101 Changing Prices ..................................................................................................................................................102 Printing Price Changes.......................................................................................................................................103 Saving Price Changes.........................................................................................................................................103
Applying Pricing Changes ................................................................................................................................. 104 Shift Reporting ........................................................................................................................................................... 105
Selecting the Register.........................................................................................................................................105 Shift Report Review Screen..............................................................................................................................106
End of Day Procedure............................................................................................................................................... 107 Selecting Registers to Close............................................................................................................................... 107
End of Day Screen Overview ...........................................................................................................................108 End of Day Printouts..........................................................................................................................................109
Reprinting End of Day Reports ........................................................................................................................ 110 Real-Time Charting................................................................................................................................................... 111
Today’s Sales Statistics .....................................................................................................................................111 Today’s Payment Info ........................................................................................................................................112
Drink Recipe Screen.................................................................................................................................................. 113 Drink Recipe Search Screen .............................................................................................................................113 Printing Recipes for Customers........................................................................................................................114
Label & Sign Maker Module................................................................................................................................... 115 Label Selection....................................................................................................................................................116 Label and Sign Print Options............................................................................................................................117
Employee Shift-Change............................................................................................................................................ 118 Logging into the System....................................................................................................................................118 Logging out of the System................................................................................................................................118 Employee Shift Report.......................................................................................................................................119
Data Maintenance ..................................................................................................................................................... 120 Specifying Data File Locations........................................................................................................................120
Table Maintenance............................................................................................................................................... 121 Static Table Definitions.....................................................................................................................................121 Adding / Editing Table Information ................................................................................................................122 Viewing Table Contents ....................................................................................................................................122 Adding a Table Record ......................................................................................................................................123 Removing a Table Record .................................................................................................................................123
Packing / Re-Indexing Tables ........................................................................................................................... 123 Converting Data......................................................................................................................................................... 124 Product Audit Log...................................................................................................................................................... 125

Page 7 of 150
Clearing the Product Audit Log .......................................................................................................................125 Bulk Product Load..................................................................................................................................................... 126 Handheld Module...................................................................................................................................................... 127
Activating the Handheld Module....................................................................................................................128 Inventory Control Software File Location......................................................................................................128 Pocket PC Database Location...........................................................................................................................128 Miscellaneous Settings.......................................................................................................................................129 Compact Database..............................................................................................................................................129 ODBC Settings....................................................................................................................................................130
Copy Data to the Handheld............................................................................................................................... 131 Selecting Product Types ...................................................................................................................................131 Selecting Product Departments.......................................................................................................................131 Removing unused Products .............................................................................................................................132
Copy Data from Handheld................................................................................................................................. 133 Inventory Control ................................................................................................................................................. 134 Handheld Sign Module ....................................................................................................................................... 135
Running the Pocket Shopkeeper ............................................................................................................................ 138 Pocket PC – Main Menu....................................................................................................................................139 Pocket PC – Inventory Control Module..........................................................................................................140 Pocket PC - Sign Module ..................................................................................................................................141 Pocket PC – Restocking Module......................................................................................................................142
Reviewing Reorder Items ..............................................................................................................................143 Shelf Restocking Module.................................................................................................................................... 137
System Reporting ....................................................................................................................................................... 144 Crystal Reports Features....................................................................................................................................144 Visual FoxPro Report Writer............................................................................................................................144
The Report Menu ................................................................................................................................................. 144 Selecting Report Options...................................................................................................................................145
Quick Date Range Selector...........................................................................................................................145 Tracking Product Spiffs ........................................................................................................................................... 146
Accounting Reports............................................................................................................................................147 Customer Reports ...............................................................................................................................................147 Inventory Reports ...............................................................................................................................................147 Vendor Reports ...................................................................................................................................................148 Profit / Loss Reports...........................................................................................................................................148 Charts & Graphs..................................................................................................................................................148
Frequently Asked Questions.................................................................................................................................... 149 What are the "drawer open" codes for my ECD 200 cash drawer? ............................................................149 How often do I need to File Pack/Index? .......................................................................................................149 What does Fix Data Files Do?..........................................................................................................................149 System Locks up when processing an Invoice ..............................................................................................149
Index............................................................................................................................................................................. 150

Page 8 of 150
Where to Find Help
Zephran Technologies - Product Support Services The services and prices listed here are available in the United States & Canada only. Zephran Technologies support services are subject to then-current prices, terms and conditions where are subject to change without notice. Self-Help Zephran Technologies online support can help you get the most up-to-date answers swiftly and easily. Here you can use self-help tools, plus you can search on a wide variety of technical information and frequently asked questions (FAQ’s). This is available to you 24 hours a day, 7 days a week. Connect to on-line support at: http://www.zednem.com No-Charge Professional Support If you purchased this product directly from Zephran Technologies, you are eligible for 90 Days (beginning the first time you contact a support professional) of no-charge assisted Professional Support for this product. The Phone # for this support is: [716] 825-7537.

Page 9 of 150
Before you Begin
• Make sure your hardware components meet the minimum requirements
• You login ID must be Administrator or equivalent on the target machine for proper installation of this software
• Obtain Network information and Login Passwords for network
• Backup your entire system
Hardware Requirements The minimum recommended hardware requirements are as follows:
• Windows 95 / 98 / ME / 2000 / NT 4.0 SP3 or Higher/ XP
• Pentium II – 100 MHz Computer System
• 20 Megs of Free Hard Drive Space (New Install) Note – You must have double you current directory size free for upgrade
• 128 Megabytes of RAM
• VGA or higher resolution monitor
• VGA Card running at 800 * 600 or higher
• Keyboard
• Mouse
• CD-ROM or DVD Drive

Running the Software
Page 10 of 150
Installing the Software
1. Start your computer by running your current operating system and insert The Liquor Shopkeeper CD into the CD-ROM Drive
2. If Windows automatically detects the CD and starts the Install, Click [Next] on the The
Liquor Shopkeeper screen that is displayed.
Otherwise, Click [Start] and then [Run]. At the prompt type the following command, replacing d with the letter assigned to your CD-ROM drive: d:\setup.exe
3. Press [ENTER]
CD “Auto Run” Menu
The CD Auto run Menu will help you to install the various programs that are included on your distribution CD. Options:
• Liquor Shopkeeper Server Version – Installs All Run Time Files and Data Files Necessary
• Liquor Shopkeeper Workstation Version – Installs only Run Time Files, Data is Shared from the Server Installation
• Adobe® Acrobat Reader – Needed for Viewing Documentation
• Pocket Shopkeeper – The Pocket PC Software for Inventory Control and Sign Generation
• Pocket Shopkeeper Workstation – The Workstation files needed to synchronize the
Pocket PC and Master Databases.
• Socket Scanner Software – Support Software for the SocketScan® Handheld Scanner

Running the Software
Page 11 of 150
Specifying Setup Options Destination Location:
Choose the location to place the Liquor Shopkeeper’s (Otherwise referred to as LMS) program files and database files. If you are installing a workstation only copy of this software, we will explain how to change the database location to a common area later. Click [Next] to continue
Program Manager Group
Enter the Group you would like to place the LMS icon under. Click [Next] to Continue

Running the Software
Page 12 of 150
Starting the Installation
Click on the [Next] button to start the installation process. This will copy the necessary files to your hard drive.
Installation is Complete Press the [Finish] button to complete the installation. If this is your first LMS installation on this computer, you may need to reboot. Directories Added The Drive and Path you specified in the installation routine will contain the files The Liquor Shopkeeper needs to run. The directory structure should look like this:
You must INSTA LL The Liquor Shopkeeper for it to run. Simply copying the files from one machine to another will not work. Microsoft Visual FoxPro uses runtime files that are installed and registered in the Windows Registry.

Running the Software
Page 13 of 150
Network Installation A network install of The Liquor Shopkeeper is basically the same as the stand-alone install.
• Install local workstation copies of the Liquor Shopkeeper System • Login to the Liquor Shopkeeper System using the Demo Password • Go to Administration – Workstation • Change Data Files Location to Network Path (Can be UNC or Drive Letter)
Each Workstation must have a different Workstation #. This is how the application controls the various peripherals attached to each computer.
• Save Changes • Exit Application and Restart

Running the Software
Page 14 of 150
Installing Pocket PC Software
Choose the “Install Pocket Shopkeeper – Pocket PC” Option
Choosing the Install Directory You must choose a temporary directory location on your local workstation for the software to install. Click [Ok] when ready to continue to the next step.
* Note – You may get an error when trying to re-install the Pocket PC Software over an older version. If you get an error, change the Destination Folder.

Running the Software
Page 15 of 150
The installation program will get the necessary information from the Pocket PC and prompt you when necessary.
Choose the default Pocket PC Directory for installation and click [Yes] to continue The Pocket PC may or may not prompt you to overwrite existing files, depending on what is installed on it. Generally if the file on the Pocket PC is newer than the one that is on the installation CD then you DO NOT replace the file on the Pocket PC.
When the Installation program has completed, there will be an icon on the Pocket PC under programs.

Running the Software
Page 16 of 150
Running the Software Click on the [Start] button and navigate to the [Programs] menu option. Under the programs menu option, locate the [Liquor Shopkeeper System] shortcut.
Specifying Data File Locations If the system cannot find your data files in the location it believes they should be in, it will ask you to specify this location.
Enter in the Data Path using either a Drive Letter or UNC. Use the [Locate] button to browse the hard drive for these files. Enter in the Workstation number or leave it as #1 if this is a single user install.
Press [Save] to commit these changes. The program will have to be restarted. Setting the Workstation Number: Each machine in a Network Installation must have a Unique Work Station number. This is how the system tracks the specific printers, pole displays and cash drawers on each station.

Logging into the System
Page 17 of 150
Logging into the System
The Liquor Shopkeeper comes with a default User ID.
User ID: DEMO Password: DEMO
When logging into the system the first time you will need this ID and Password to access the system. Register – Since you can have multiple registers, you need to specify which register # this is. This is important for keeping track of individual drawer totals…
* Note – The Liquor Shopkeeper supports Touch Screens. If you wish to Utilize a touch screen, login-in using the Touch-Screen button.

Main Menu
Page 18 of 150
Setting System Defaults The Liquor Shopkeeper allows you to tailor the system to your business needs. The following screens allow you to quickly and easily enter this information to get your new POS System up and running fast.
Click [Administration] – [System / Workstation Defaults] – [System Defaults] The following screens allow you to customize options System Wide so all workstations will adhere to these values.

Main Menu
Page 19 of 150
Company Defaults
• Company Name and Address Information that Prints on Receipts • Phone Numbers • Tax ID# • 3 Different Tax Rates (A, B & C) • Stacked Tax (For Canada – Adds Tax Rate B on top of Tax Rate A) • Location / Multi-Site – For Future Enhancements

Main Menu
Page 20 of 150
Invoice Defaults
Invoice Screen Warn Out of Stock Products Warn user on Invoice Screen if Qty is Less than Zero
Allow Discount on B Pricing Allow Discounts on B prices Items on POS Screen
Allow Discount on C Pricing Allow Discounts on C prices Items on POS Screen
Ask for QTY Stop and Ask for QTY on Invoice Screen, otherwise the
system defaults the QTY to 1 Ask for Price Stop and Ask for Price on Invoice Screen, otherwise the
system defaults to Price Level A Hit Enter on Invoice Screen Hit Enter on Invoice screen for each item scanned
Freeze Invoice on SKU not found
Stop and Warn User if a SKU # is not found, user must hit [ESC] to continue
Allow Product Add from Invoice
Allow users to add new products from Invoice Screen
Print Signature line on Charges
Print out a signature line on 40 Column Receipts
Discount Level A Default Percentage for Discount ‘A’
Discount Level B Default Percentage for Discount ‘B’
Exchange Rate Exchange Rate – Not yet Active

Main Menu
Page 21 of 150
Texas TABC Settings for Texas TABC
Product Defaults
Pole Display
Message that displays on the pole display

Main Menu
Page 22 of 150
Printout Options
Receipt Type 40, 80 Column Printout Options
# of Invoices # Of Invoices to Print out. 0 Prints out None
# of Rebate Receipts # of Rebate Receipts to print out, 0 Prints out None
TABC Printer Type 40, 80 Column Printout Options
Transfer Invoice Type 40, 80 Column Printout Options
Transfer PO Type 40, 80 Column Printout Options Print Customer Information Print Customer Information on the top of 40 Column Receipts
Print Tax ID# on Receipts Prints out your Tax ID# on the Receipts
Print Credit Card Info Prints out Customers Credit Card information on the Receipt
Print “You Saved” info Tells Customer how much they saved on the Invoice End of Receipt Text 4 Lines of Text that can be printed on the bottom of every
receipt

Main Menu
Page 23 of 150
Workstation Setup The Liquor Shopkeeper workstation setup will allow you to set up the individual characteristics of your various workstations. The Workstation Setup module is located off the main menu under [Administration – System /Workstation Defaults]
Workstation Setup – Hardware
Cash Drawer Options
• Activate Cash Drawer – Check if you have a cash drawer installed • Connected to Receipt Printer – Check if your Cash Drawer is popped open by your
receipt printer • Special Open String – Check if your cash Drawer requires a series of codes to open • Drawer Type – Only Parallel Is Supported • Open Code – If you are not using the special open string, select the Open Character • String – Enter in the Drawer Opening String

Main Menu
Page 24 of 150
Receipt Printer Options
• Port – Select the LPT Port • Eject Lines - # of Lines to Eject the Receipt after printing is completed • Activate Paper Cutter – Check if your Receipt printer supports this • Paper Cut String – Fill in with the special character string to cut the paper
Pole Display Settings Specify the Communications Port, Speed and Bits for Pole Display. See Pole display manual for more information. MS-DOS Config.Sys Settings Some pole displays require the use of the MODE command in MS-DOS. The proper settings for this config.sys line will be determined by your particular Pole Display and it’s needs.
Workstation Setup – Printers

Main Menu
Page 25 of 150
Workstation Setup – Data Location The Liquor Shopkeeper allows you to run individual programs on the local machines while sharing the data on a network. You need to install the application as you would normally on each Workstation.
After completing the installation change the Data Files Location to the shared network location.
Workstation Setup – Miss Options

Main Menu
Page 26 of 150
Credit Card Processing The Liquor Shopkeeper is compatible with PC Charge. This software can be obtained from Go Software at http://www.pccharge.net. Setting Up the System for PC Charge Click on [Administration] + [System Defaults] + [CreditCard Processing]
Select the correct Charge Processor & Merchant # that has been assigned to you via your Credit Card Processing Company.

Main Menu
Page 27 of 150
Setting up Workstation Charge Information Click on [Administration] + [Workstation Defaults] + [Misc Options]
• Click on [Activate Credit Card Processing] • Locate the Directory you have PC Charge Pro Installed to • Enter User ID as it is Entered in PC Charge Pro

Main Menu
Page 28 of 150
Setting Up Pay Types for PC Charge Click on [Administration] + [Data Maintenance] + [Table Maintenance] + [Payment Options]
You must designate each payment type that is a charge card as a credit card. Highlight the Payment type and press [Edit].
Click on the [X] Credit Card Checkbox. When you designate an invoice being paid by this type, the system will prompt you for credit card information.
Note – Only the payment types you designate as Credit Card(s) will prompt for Credit Card information.

Main Menu
Page 29 of 150
The Main Menu
Background Menu The Main Background Menu allows you to quickly access the most popular features of the application. Pressing the letter that corresponds to the underlined character will invoke that module without using the mouse.
Key Module Key Module C Customer P Product I Invoicing U Purchasing V Vendor O Company Info T Today’s Info R Report Menu Alt-X Exit
System Ring Menu The system ring menu is located along the top of The Liquor Shopkeeper screen. Clicking on one of these menu items drops down the choices associated with that item.

Main Menu
Page 30 of 150
System Modules The following is a list of System Modules and their primary purposes. The manual will go into greater detail on their uses in later chapters. Common Modules
Name & Address Information Ledger Information Purchase History
Purchase Order Functions
Product Pricing Product Purchasing / Sales History Product Pictures
Data Analysis and Printouts
Point of Sale Functions
Company Wide Information
Purchase Order Functions
Exit this Application
Other Modules Sales Pricing Quick Way to Modify Product Sales End of Day Drawer / Employee Shift Close Drink Recipes Listing of Popular Drinks and their Ingredients Label Maker Print out shelf-tags and Labels Shift Report Drawer / Employee Shift Reports Login / Logout Employee Log a new person into the system
Administration Modules System Defaults Change Global System Settings Workstation Defaults Change Individual Workstation Settings Global Counters Modify the Next Invoice #, Next Po # Employee Maintenance Change / Add Employees and Information Data Maintenance General Database Repair and Re-Indexing Importing Data Add Data into the LMS from outside sources Security Setup Setup Access to individual Modules

Employee Setup
Page 31 of 150
Employee Setup The Employee Setup screen allows you to Add, Edit or Delete employees in the system.
Searching for a Employee
Type the first letters of the employees name to move the search grid near that person. Use the [F4] Key to jump from the display grid to the search boxes. Press [Enter] or click on the [Select] button to edit the hi-Lighted employee. Click [Add] to create a new employee.
Search Boxes
Display Grid

Employee Setup
Page 32 of 150
Adding / Editing an Employee
Employee Fields:
User ID: ID the Employee Uses to Login to the system Password: Changes a Users Password Name Info: Name / Address Info
Access Level: Used to determine which modules this Employee can Access
System Security Overview The Liquor Management System uses a highly customizable security system. With this system you are able to grant or deny permissions to users quickly and easily.

Employee Setup
Page 33 of 150
Employee Security Setup The Employee Security Setup is grouped into 3 different screens.
General: Invoice & Miscellaneous Options Modules: All System Modules Reports: All System Reports
Inheriting Existing Permissions The Easiest way to set up permissions for users is to base that user’s permission on a user that already has those permissions. The Liquor Management System allows you to do this via Inheritance. If Employee A has all the Permissions that Employee B should have, then you would inherit those security settings to Employee B. You can then quickly and easily Grant or deny the particular permissions that you want Employee B to have.
• Click on [Inherit] and Select the Employee to Inherit the permissions from • All the Settings will be transferred to Employee B, Leaving Employee A’s unchanged • Grant or Deny Additional Permissions for Employee B • [Save] Employee B.
This is excellent for Assigning permissions quickly for Managers, Counter People or whatever classification of Employees you see fit. The following pages describe the individual permissions in more detail.
Failed Authentication The Liquor Management System checks the logged in user’s credentials as it tries to access the various Modules, Features or Reports. When those credentials fail, the system will prompt the user for a USER ID and PASSWORD for a user that has access to that feature. If the new User ID has the proper credentials for access that feature, access is granted until that user leaves the screen. The only screen this is not true for is the invoice screen. The invoice screen retails the new credentials until an Invoice is processed or voided.
Login Screen for Module
Employee Setup
Page 34 of 150
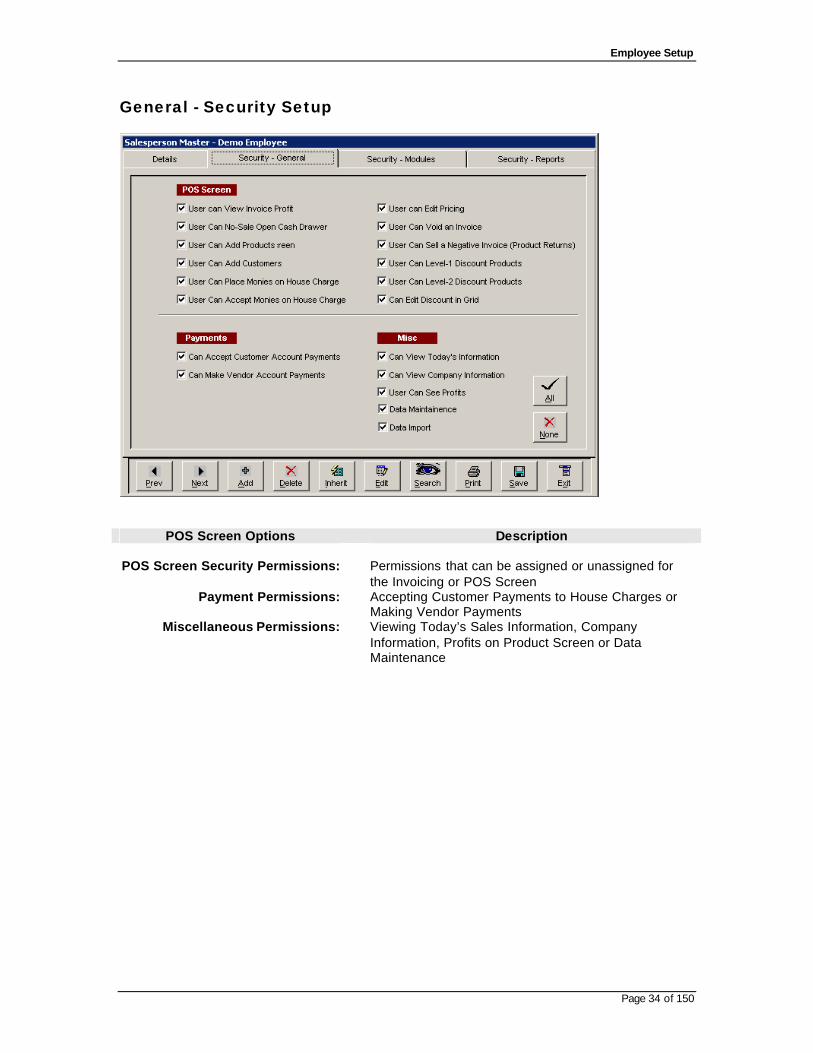
General - Security Setup
POS Screen Options Description
POS Screen Security Permissions: Permissions that can be assigned or unassigned for the Invoicing or POS Screen
Payment Permissions: Accepting Customer Payments to House Charges or Making Vendor Payments
Miscellaneous Permissions: Viewing Today’s Sales Information, Company Information, Profits on Product Screen or Data Maintenance

Employee Setup
Page 35 of 150
Modules - Security Setup
The Modules Security Setup screen allows you to assign permissions for:
Access: Allows user to Access the Module Add: Allows user to Add Data in this module Edit: Allows user to Edit Data in this Module
Delete: Allows users to Remove items from Database In the Above Example, this User can do everything in the Customer Module (Access, Add, and Edit & Delete) but can only Access the Products and Services module. This means that they can only search for products. They cannot view the main product screen. Module Quick Assign
Clicking on the Quick Assign Checkmark Selects or De-Selects all the checkboxes in that Column.
Quick Assign Checkmark
Employee Setup
Page 36 of 150
Reports – Security Setup
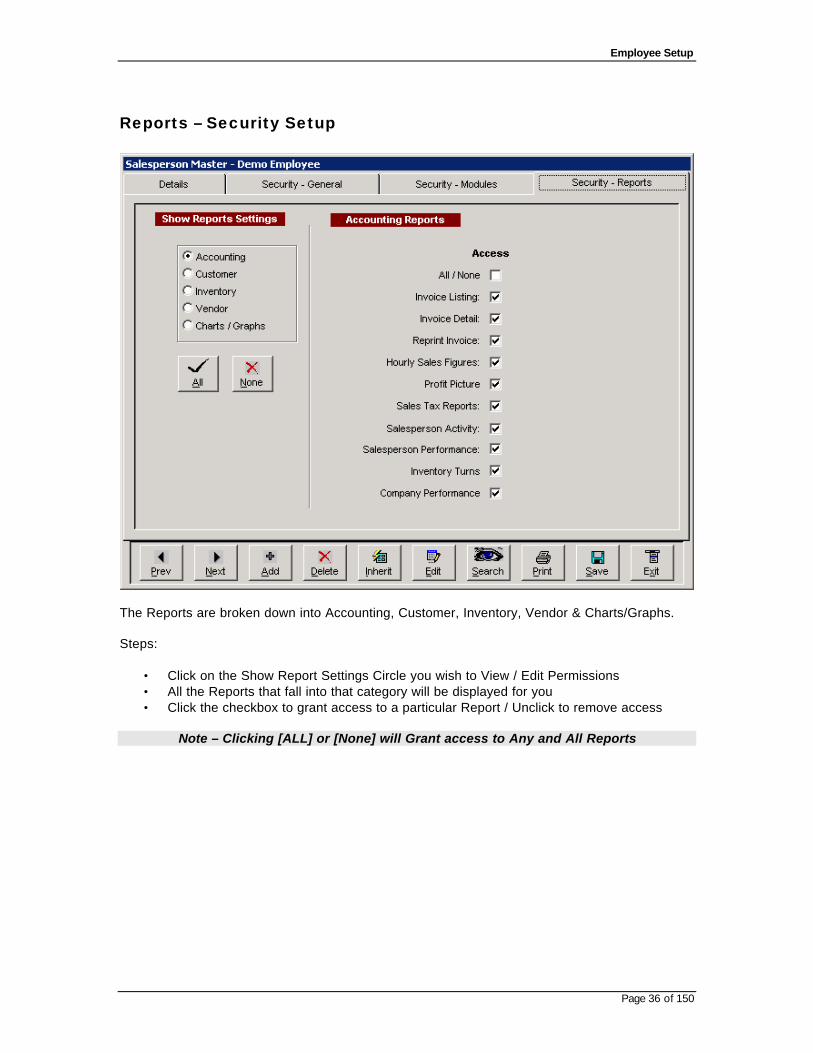
The Reports are broken down into Accounting, Customer, Inventory, Vendor & Charts/Graphs. Steps:
• Click on the Show Report Settings Circle you wish to View / Edit Permissions • All the Reports that fall into that category will be displayed for you • Click the checkbox to grant access to a particular Report / Unclick to remove access
Note – Clicking [ALL] or [None] will Grant access to Any and All Reports

Vendor Setup
Page 37 of 150
Vendor Setup The Vendor Setup screen allows you to Add, Edit or Delete Vendors in the system. Vendor payments and credits are also entered through these screens.
Searching for a Vendor Type the first letters of Vendor name to move the search grid near that vendor. Use the [F4] Key to jump from the display grid to the search boxes. Press [Enter] or click on the [Select] button to edit the hi-lighted vendor. Click [Add] to create a new vendor.
Display Grid
Search Boxes

Vendor Setup
Page 38 of 150
Adding / Editing a Vendor Vendor Fields:
Account #: Your Acct # Name: Vendor Name / Address Info
Balance Info: What you owe Purchase Info: Your Purchasing Information
Terms: Your terms The Vendor Financial information will be covered in the Vendor Payments Chapter

Vendor Setup
Page 39 of 150
Accepting a Vendor Payment Highlight a particular vendor invoice and click the [Payment] button. The vendor payment screen shows the payment detail information, including the previous payments made. Make a Debit to this purchase order if you would like to INCREASE the amount that is owed. Make a Credit to this purchase order if you would like to APPLY A PAYMENT.
Applying a Debit
Enter in the debit amount, debit type and any Miscellaneous information for this payment.
Press [Save] to record this transaction.
Applying a Credit
Enter in the credit amount, payment type and any miscellaneous information for this credit.
Press [Save] to record this transaction.
Vendor Setup
Page 40 of 150
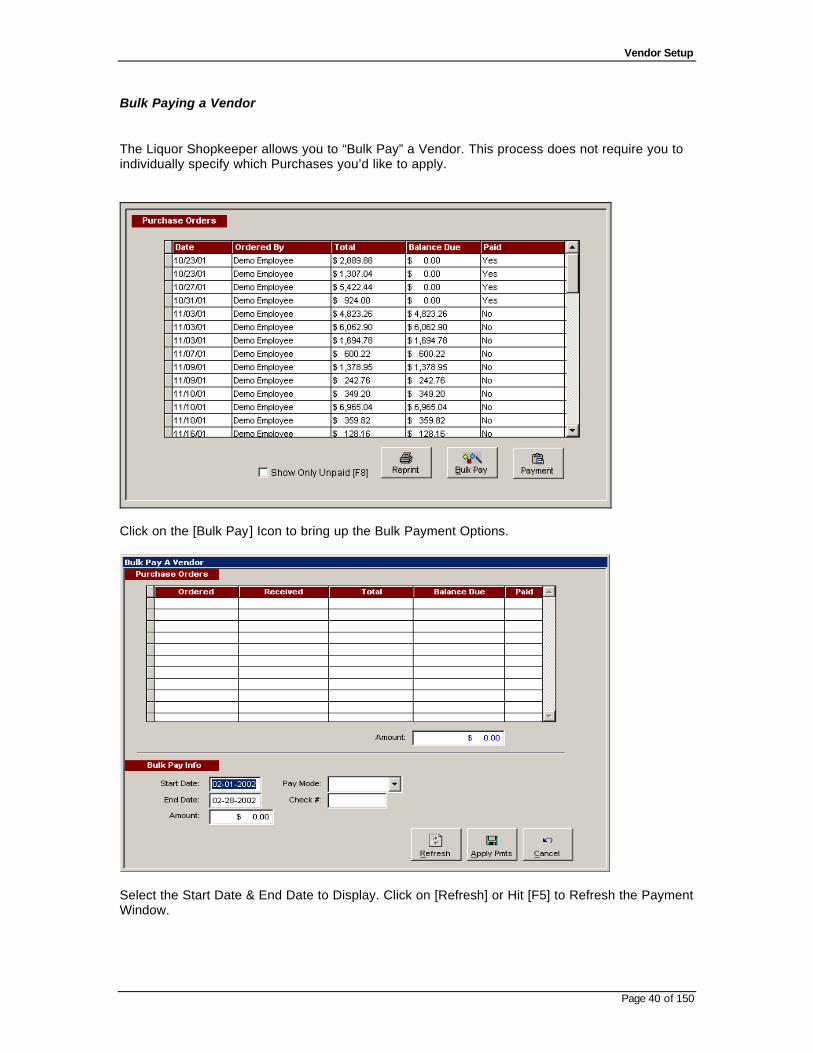
Bulk Paying a Vendor The Liquor Shopkeeper allows you to “Bulk Pay” a Vendor. This process does not require you to individually specify which Purchases you’d like to apply.
Click on the [Bulk Pay] Icon to bring up the Bulk Payment Options.
Select the Start Date & End Date to Display. Click on [Refresh] or Hit [F5] to Refresh the Payment Window.

Vendor Setup
Page 41 of 150
The Payment Amount Field automatically fills in with the Calculated Amount from all the invoices that fall in between the Starting and Ending Dates. Change this # to the Correct Amount you’d like to Apply and then click on [Apply Payments] to apply the payments to the individual invoices. The system will start with the 1st Invoice in chronological order and continue until all the funds are exhausted.
Payment Amount

Customer Module
Page 42 of 150
Product Module The Product Setup screen allows you to Add, Edit or Delete Products in the system.
Searching for a Product
Type the first letters of Product name to move the search grid near that product. Use the [F4] Key to jump from the display grid to the search boxes. Press [Enter] or click on the [Select] button to edit the hi-lighted Product. Click [Add] to create a new product. Incremental Searching Incremental Searching allows you to search for products as you type the Brand, Name or SKU # into the search boxes. You can turn this on/off by Pressing [F9] on the product search screen. If you have a lot of products, you may not want to turn on Incremental Searching because of the time it takes to look for that product after every keystroke. Auto-Edit Products Brings you right into the Edit Mode on the Master Product Screen
Display Grid
Search Boxes

Customer Module
Page 43 of 150
Adding / Editing a Product
Product Detail Fields
SKU #: SKU # for this Product – Can have Multiple Sku’s Brand / Name: Self Explanatory
Vint: Vintage Year Type: Type of Product Size: Size of Product (Example: 1.0L, 350ml)
Tax Rate: A-C Tax Rate – Defined in System Setup Taxable: Charge Tax on this item? Default = Yes
Bin: Where in the store is this item
Case Qty: How many are in a case of this item Group Disc: Displays the Discount Group this item belongs to
Discountable: Can discounts be applied to this item
Price Levels: 3 Different Price levels Qty: Do you need a specific amount to get this qty?
Expires: Does this price expire on a certain date? Reorder: Click if you want the system to report this Item on Reorder Reports
Reorder At: Qty to Reorder this product at Reorder Type: Select whether to replenish stock in Units or Cases

Customer Module
Page 44 of 150
Specifying a Products Price
Each product can have 3 different price levels. These price levels are normally based on Qty, but you can override these in the customer setup for individual customers. Price Level A is the normal price for a Qty of 1. Price Level B or Level C can be assigned if the Qty is equal to or greater than the QTY that is entered on the product screen. In addition, you may elect to have this price expire on a certain date. This is good for small in-store sales that are “3 for $9.99 until next Thursday” type sales. The Case Pricing is reserved for cases. * Note - If you have turned on the tab stop on product margin in the system setup, you can type in
the Margin (or Markup) and have the system automatically calculate the price for you. Pricing Order Prices are evaluated on the Invoice screen in the following Order: Customer Price Level Discount Group Qty for Pricing Sales Pricing Qty for Pricing Allows you to set up a product as a Qty for a Dollar Amount. An example would be 3 for $5.00, or 6 for $10.00
Sale / Rebate Information You can set up a sale price for a product by placing a dollar amount and a start/end date for the Sale to be active for. Different reports can be run to help you keep track of what is on sale, what is going on sale and what sales have finished.
Rebate Information Rebate information can be tracked and displayed on the invoice screen by utilizing this field. Use the rebate module to quickly and easily enter this information.

Customer Module
Page 45 of 150
Purchasing / Sales Information
Purchasing / Sales Info Fields
Purchasing History: How Much was Spent / Sold on this Item Sale Info: Is this item on sale – How much and when
Vendor Info: Primary and Secondary Vendor Info Sales Totals: Monthly Sales Totals
Daily Total: Daily Sales Totals Weekly History: Weekly Sales Totals
Department: Can assign a Dept for Reporting Class: Can assign a Class for Reporting

Customer Module
Page 46 of 150
Product Sales History Pressing [F8] or [F9] on the Main Product screen will bring up that product’s sales history. [F8] brings up the Weekly Sales history, [F9] brings up the daily history.
Clicking on “Dollar Values” will convert the graph and information to Dollar Values.
Customer Module
Page 47 of 150
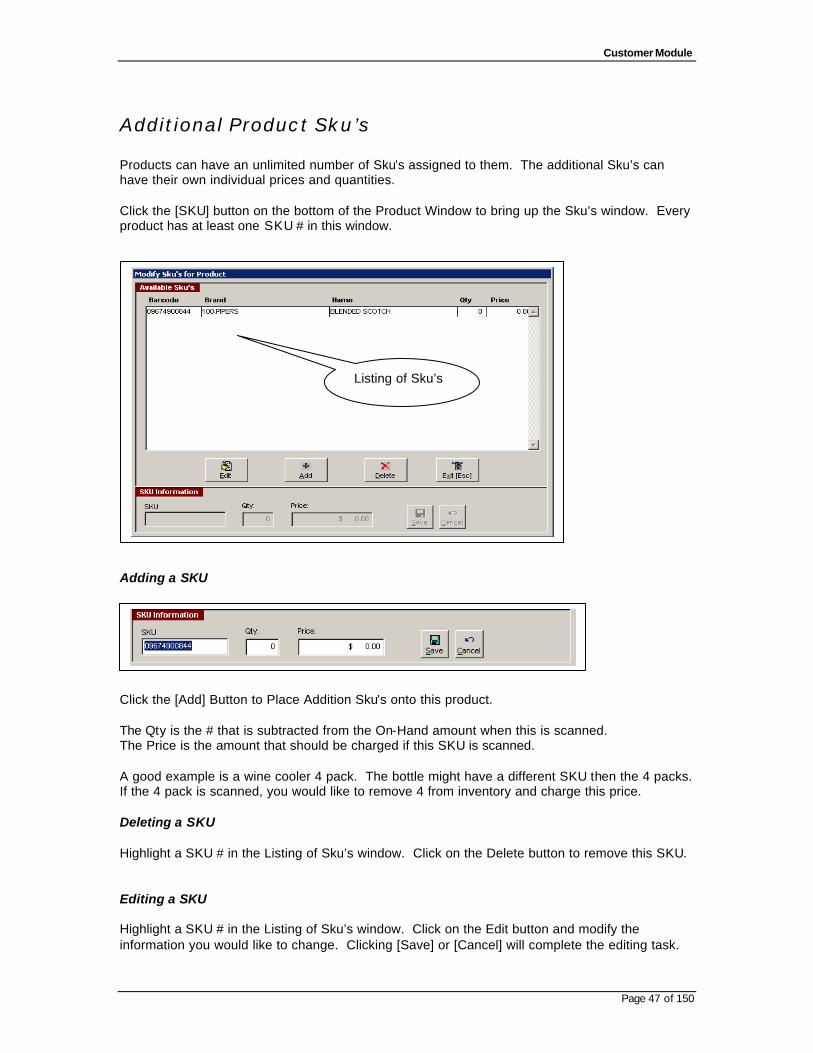
Additional Product Sku’s Products can have an unlimited number of Sku’s assigned to them. The additional Sku’s can have their own individual prices and quantities. Click the [SKU] button on the bottom of the Product Window to bring up the Sku’s window. Every product has at least one SKU # in this window.
Adding a SKU Click the [Add] Button to Place Addition Sku’s onto this product. The Qty is the # that is subtracted from the On-Hand amount when this is scanned. The Price is the amount that should be charged if this SKU is scanned. A good example is a wine cooler 4 pack. The bottle might have a different SKU then the 4 packs. If the 4 pack is scanned, you would like to remove 4 from inventory and charge this price. Deleting a SKU Highlight a SKU # in the Listing of Sku’s window. Click on the Delete button to remove this SKU. Editing a SKU Highlight a SKU # in the Listing of Sku’s window. Click on the Edit button and modify the information you would like to change. Clicking [Save] or [Cancel] will complete the editing task.
Listing of Sku’s
Customer Module
Page 48 of 150
Product Pricing Module
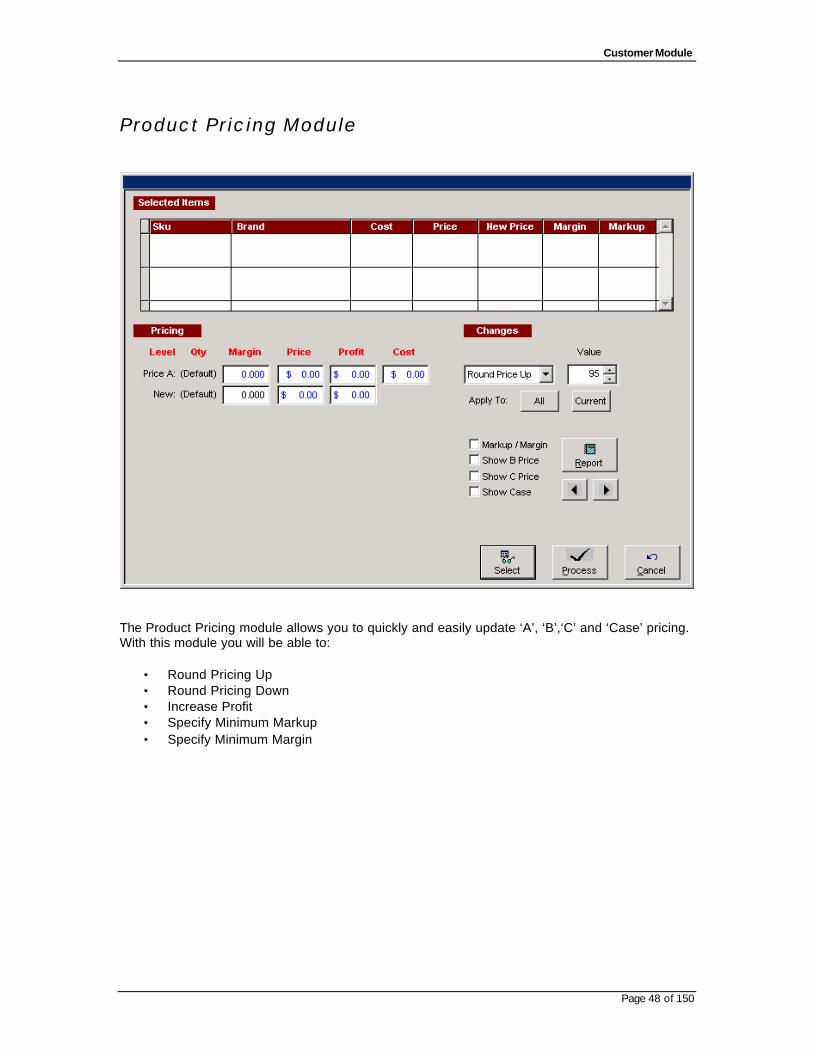
The Product Pricing module allows you to quickly and easily update ‘A’, ‘B’,‘C’ and ‘Case’ pricing. With this module you will be able to:
• Round Pricing Up • Round Pricing Down • Increase Profit • Specify Minimum Markup • Specify Minimum Margin

Customer Module
Page 49 of 150
Selecting Items
Filter the Items you wish to display in the Grid. You may filter by: Margin, Markup, Qty on Hand, Type or Size. Specify the Filtering Criteria and click [Apply] to refresh the grid. Click on the [Include] checkboxes to modify the pricing for those items. Clicking on the ‘+’ or the ‘X’ will select add all the items in the grid or de-select all the items from the grid. Clicking [Return] will bring those items to the Pricing Module screen.

Customer Module
Page 50 of 150
Modifying Pricing
As you Highlight the information in the Grid, the information will update the pricing information below it. You can type in a new Price, or use the Tools to update this or all the items.
Grid

Customer Module
Page 51 of 150
Customer Module The Customer Setup screen allows you to Add, Edit or Delete Customers in the system.
Searching for a Customer
Type the first letters of Customer name to move the search grid near that product. Use the [F4] Key to jump from the display grid to the search boxes. Press [Enter] or click on the [Select] button to edit the hi-lighted Customer. Click [Add] to create a new product.
Display Grid
Search Boxes

Customer Module
Page 52 of 150
Adding / Editing a Customer
Customer Detail Fields
Customer #: Non-Unique Customer Identification # Name & Address Info: Self Explanatory
E-Mail: E-Mail Address
Balances: Cumulative A/R Totals Terms: How Long they have to pay
Price Lev: Default Product Pricing Levels. Default is A Tax Exempt: Are they charged Tax
Total Purchases: Cumulative Purchasing Totals Last In: Last Date this Customer Bought Something
Discount: Default Discount Percentage
Customer Class: Customer Tracking Mailing Group: Customer Tracking
Notes: Misc. Info

Customer Module
Page 53 of 150
Setting Up Customers for POS Scanning The Liquor Shopkeeper allows you to set up customers for scanning a Customer Barcode at the POS. This allows you to quickly assign the proper discounts or tax rates to a customer. The Customer Screen has a Customer ID# that you can assign any Alpha-Numeric value to.
You scan in the Customer # in the Product SKU field of the POS Screen.
Any information added to this Invoice will now have this customer’s discount and price levels assigned.

Customer Module
Page 54 of 150
Customer Shipping Information The Liquor Shopkeeper allows you to assign an unlimited # of shipping addresses for each customer. You can invoice all the sales to one common location, but ship out items to many different locations.
Shipping Fields:
Contact Contact name to appear on all printed material Company Company Name
Address Shipping Address Phone Phone # to this Shipping Address
Fax Fax # to this Shipping Address Default Use this as the Default Shipping Address Active This is an active Shipping Address

Customer Module
Page 55 of 150
Customer Preferences Each of your customers can be set-up to receive mailings based on certain criteria. The customer preferences tab allows you to specify what types of product information you’d like to send each of these customers.
Highlight the Product Types you’d like this customer to be flagged for and click [Add]. In the Customer Mailing Module this will allow you to specify what customers you’d like to send a mailing to.

Customer Module
Page 56 of 150
Customer Ledger
The Customer Ledger screen shows all the invoices this customer has. You can elect to show only the Unpaid Invoices by clicking on the [Only Unpaid] Checkbox.

Customer Module
Page 57 of 150
Accepting a Customer Payment Highlight a particular customer invoice and click the [Payment] button.
The Customer Payment screen shows the payment detail information, including the previous payments made. Make a Debit to this invoice if you would like to INCREASE the amount that is owed. Make a Credit to this invoice if you would like to APPLY A PAYMENT.
Applying a Debit
Enter in the debit amount, debit type and any miscellaneous information for this payment.
Press [Save] to record this transaction.
Applying a Credit
Enter in the credit amount, payment type and any miscellaneous information for this credit.
Press [Save] to record this transaction.
Customer Module
Page 58 of 150
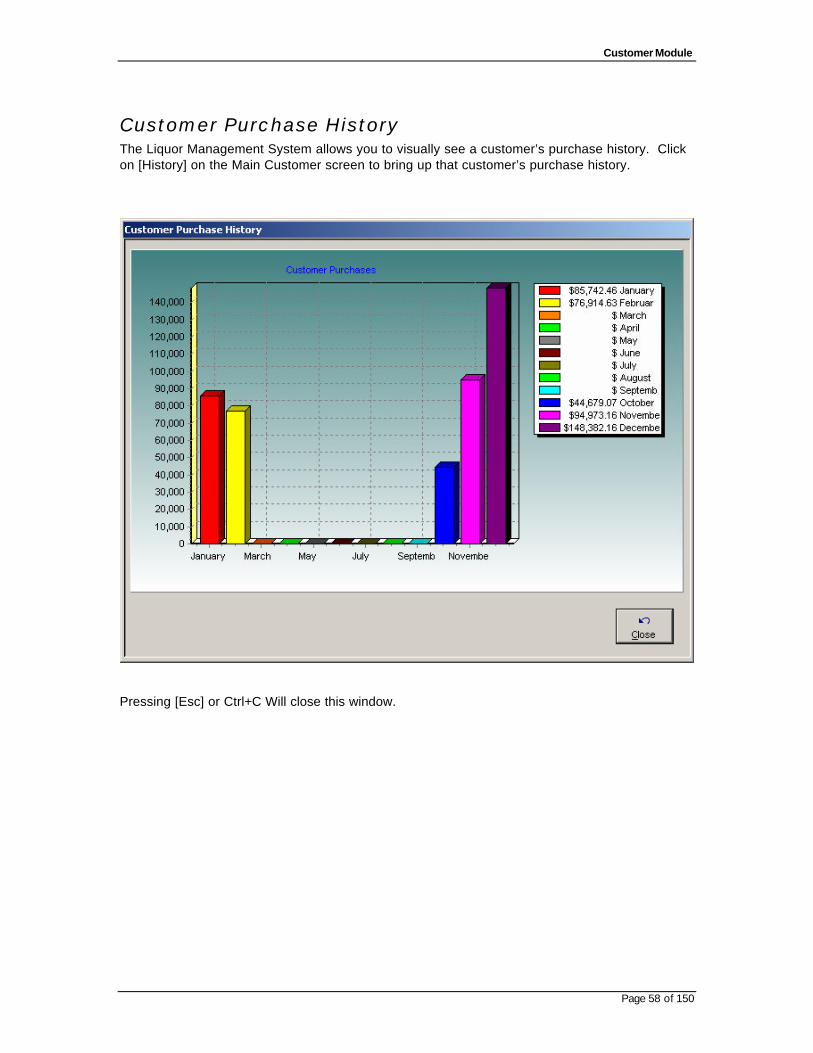
Customer Purchase History The Liquor Management System allows you to visually see a customer’s purchase history. Click on [History] on the Main Customer screen to bring up that customer’s purchase history.
Pressing [Esc] or Ctrl+C Will close this window.

Customer Module
Page 59 of 150
Customer Mailing Module The Customer Mailing Module allows you to export or print out customer information. This information can be filtered using many different criteria.
Filters
1st Filter – Purchases > Dollar Amount or Purchases < Dollar Amount 2nd Filter – Customer Classifications 3rd Filter – Date of Birth, Last Visit Click [Apply] to see the results in the Grid. Include or Exclude customers from the listing and choose [Labels] or [Export] to transfer the Dat a to many popular programs.

Customer Module
Page 60 of 150
Type Filter You can also filter customers that have bought one or many types of different products.
Hold down the CTRL Button while left clicking on the different product types.
This will allow you to select one or many different types

Customer Module
Page 61 of 150
Duplicate Customer Check Module
The duplicate customers will be displayed in the grid. Select the customers you wish to remove and press [Process] to keep customer information current.

Point of Sale
Page 62 of 150
Point of Sale
Point of Sale Screen Overview Selecting a Customer for an Invoice Pressing [F5] on the invoice screen will allow you to search for a customer and add that customer to the invoice. The invoice defaults to a Cash Sale to speed up checkouts.
* Note – You should always select a customer before adding products to an invoice
Customer Info Invoice Info
Invoice Items Grid
Invoice Item Search / Add
Invoice Totals

Point of Sale
Page 63 of 150
Adding a Product to an Invoice The Cursor defaults to the Product ID Field. This is where you can:
• Scan the Barcode or SKU of the product • Type in the Barcode or SKU # of the product • Press [F3] to search for a product
When you have typed or scanned in the Product Id or SKU, the system looks through the product database to find that product. If one is found, the system will fill in the information fields:
Product Id: Id that you scanned Brand: Brand Name Avail: # In Inventory Name: Name of Product Qty: Qty to place on invoice Size: Size of this Item
Price: Price Each Case: Qty in Case Press [Add] or [Enter] to place this item onto the invoice. When this happens, the invoice items grid will be updated with this information.
Point of Sale
Page 64 of 150
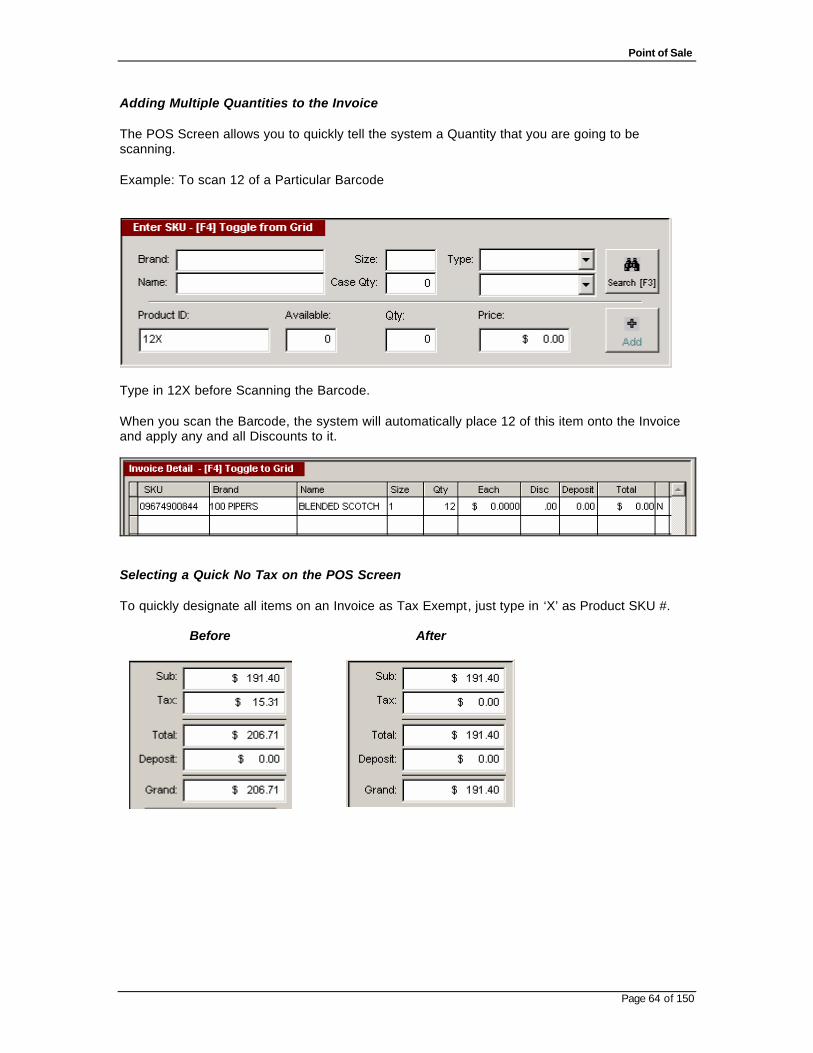
Adding Multiple Quantities to the Invoice The POS Screen allows you to quickly tell the system a Quantity that you are going to be scanning. Example: To scan 12 of a Particular Barcode
Type in 12X before Scanning the Barcode. When you scan the Barcode, the system will automatically place 12 of this item onto the Invoice and apply any and all Discounts to it.
Selecting a Quick No Tax on the POS Screen To quickly designate all items on an Invoice as Tax Exempt, just type in ‘X’ as Product SKU #.
Before After

Point of Sale
Page 65 of 150
Quick Discounting Items on an Invoice The POS Screen allows you to quickly Discount an Item by pressing one key. In the System Defaults Setup, you specified what the “A” Discount and “B” Discount should be.
You can quickly assign the following Discounts:
• Shift + F6 – Discount all Items by Discount A • Shift + F7 – Discount all Items by Discount B • Shift + F8 – Discount only the Last Item by Discount A • Shift + F9 – Discount only the Last Item by Discount B
Manually Assigning a Discount Press [F4] to edit the Invoice Detail Grid. Press [Tab] until the cursor is at the “Disc” Column and enter in the Decimal Equivalent of the Discount you wish to apply. Example: 10% = .10
It will discount the Extended Total by the proper amount. You can do this for any or all of the items in the Invoice Detail Grid.

Point of Sale
Page 66 of 150
Invoice Quick Keys
Additional Quick Keys Key Description HOLD Save / Load Invoice on Hold IP Save / Load Invoice T Today’s Info X Tax Exempt this Invoice RE Reprint Invoice Dialog Box

Point of Sale
Page 67 of 150
Invoice Item Grid The Invoice Item grid allows you to quickly and easily modify items that are on this invoice. You can also remove items from the invoice from the grid. Pressing [F4] will toggle the cursor from the SKU # field to the grid and vice-versa. When the grid is active, the headers will change color and the item you are editing changes to a yellow background.
The above example shows the cursor at the Qty field. Use the arrow keys (or mouse) to move around the grid. You are allowed to edit the following fields:
Qty: Qty to Place on this invoice Each: Price Each Disc: Discount Percentage
Deposit: Deposit amount per Item Press [F4] to return to the Product ID field and recalculate the Invoice.

Point of Sale
Page 68 of 150
Invoice Item Grid Colors
Code Color Description Y Purple On Sale R Red Rebate F Aqua Price B or Price C
Removing an Item from the Invoice To remove an Item from the invoice, change the Qty to zero in the invoice grid.
Updating Inventory with Zero Retail Prices The Liquor Shopkeeper will stop at the Price prompt on the Invoice Screen for any item that has a Zero Retail Price. The Number you type in to the Price on this screen will be saved to the Database. This is ONLY for items with a Zero Price. Any other edits to pricing will be for that Invoice only. Answer ‘Yes’ if you would like the new Price Saved to the Database.

Point of Sale
Page 69 of 150
Manager Quick Discount Module
Typing ‘MAN’ into the Product ID field will allow the user to quickly and easily set all the invoice’s product prices to the Product Cost. After typing ‘MAN’ and pressing [ENTER] the user is presented with the Manager Edit Screen.
• Click on the [Set as Cost] to quickly set all the prices to the Product’s cost • Hitting [F4] will allow you to type in different Prices or Quantities for some or all of the
products • Hit [Esc] or click on [Return] to return to the invoice module with these updates prices

Point of Sale
Page 70 of 150
Saving an Invoice to “In Progress” Queue The Liquor Shopkeeper allows you to “Save” an invoice in Progress. This allows you to quickly retail the information on one or many invoices so you can call it up later and process it. Enter items on an Invoice as you normally would
Type on “IP” as your Product ID (Short for “In Progress”) This will save the Invoice Information, Customer Information and Product Information for later retrievable.

Point of Sale
Page 71 of 150
Loading an Invoice from “In Progress” Queue With an Empty Invoice, type in “IP” into the Product ID Field:
Invoices “In Progress” Window
This window shows all the invoices that are “In Progress”. Highlight the Invoice using the mouse or Arrow Keys. Click on [Select] or Hit [Enter] to load this into the main invoice screen.
Point of Sale
Page 72 of 150
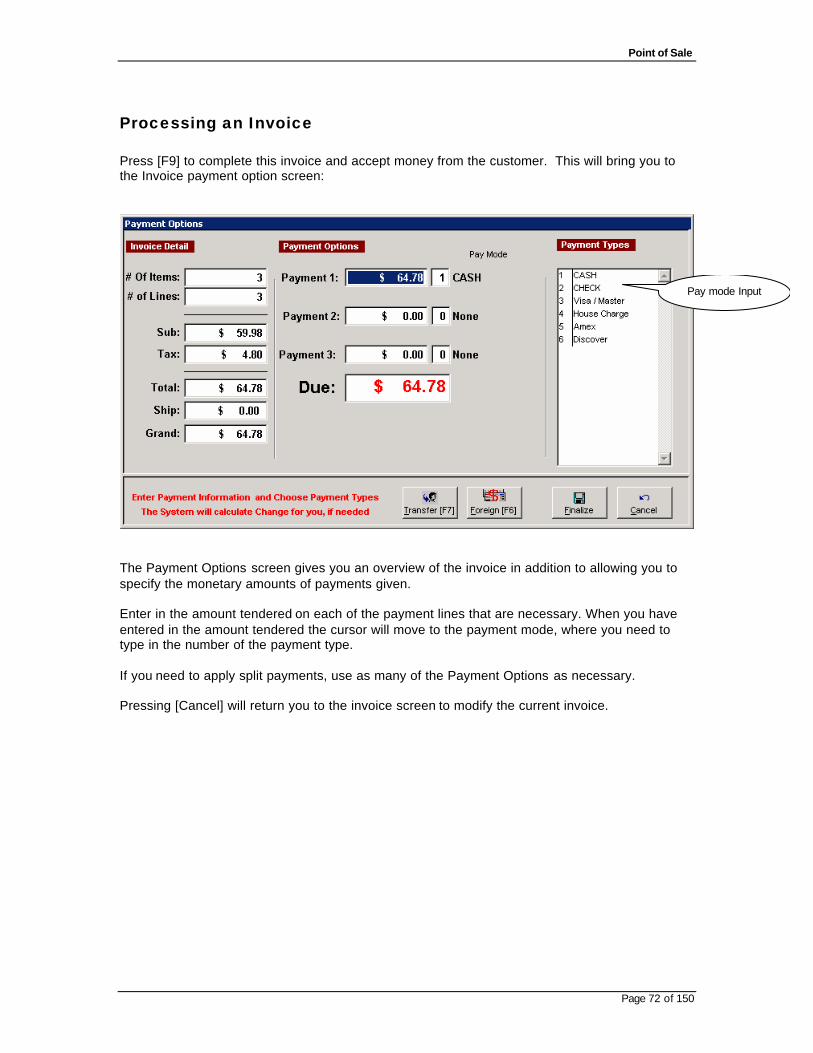
Processing an Invoice Press [F9] to complete this invoice and accept money from the customer. This will bring you to the Invoice payment option screen:
The Payment Options screen gives you an overview of the invoice in addition to allowing you to specify the monetary amounts of payments given. Enter in the amount tendered on each of the payment lines that are necessary. When you have entered in the amount tendered the cursor will move to the payment mode, where you need to type in the number of the payment type. If you need to apply split payments, use as many of the Payment Options as necessary. Pressing [Cancel] will return you to the invoice screen to modify the current invoice.
Pay mode Input

Point of Sale
Page 73 of 150
Automatic Credit Card Processing Note - You must have pre-configured PC Charge Pro has & set up the system to automatically validate Credit Card Purchases. Any Payment methods you specify to automatically validate credit card purchases will bring up the credit card information screen.
The System will allow you to override the Authorization screen. Click [No] here to have the system validate credit card information.
Swipe Credit Card Information or Manually Key in information and press [Process]. If there is a problem a warning will appear on the screen and this invoice will not be allowed to proceed until a valid payment method is entered. A Receipt will print with the Authorization # and a line for Customers to Sign the Receipt.

Point of Sale
Page 74 of 150
Placing an Invoice on a Customers Account Choosing a Payment type of House Charge will place the amount owed onto the customer’s account. This information will also show up on the End of Day reports for audit purposes.
Placing an Invoice on Hold From the Point of Sale screen you can save an invoice in its current state including all discounts by typing in “HOLD” in the Product SKU Field.
Typing in “HOLD” on the Invoice screen will also Load a previously saved Invoice.

Point of Sale
Page 75 of 150
Finalizing an Invoice Finalizing an invoice does the following:
• Removes the product from inventory • Adds the payment amounts to the end of day / drawer total count • Adds house charges to customer account • Updates sales / sales tax Information • Resets the invoice screen for the next sale
Voiding an Invoice From the master invoice screen, pressing [F4] or clicking on [Cancel] will void the current invoice. The invoice # will be marked as voided, and this will show up on reports for auditing purposes.
40 Column Receipt Sample
Receipt Shows:
• Register Sale was rung up on # of Items on this Sale
• QTY • Unit Price • Sales Price • How Paid

Point of Sale
Page 76 of 150
Accepting Product Returns The preferred way for The Liquor Shopkeeper to accept returns is via a negative sale. This will allow the system to:
• Track the products return into inventory • Apply a charge (negative) amount to the customer’s account • Deduct the amount of return from end of day totals • Deduct the amount of return from sales tax totals
Pressing [F4] will toggle the cursor from the SKU # field to the grid and vice-versa. When the grid is active, the headers will change color and the item you are editing changes to a yellow background.

Point of Sale
Page 77 of 150
This Example shows the cursor at the Qty field. Enter in the NEGATIVE amount in the quantity field to return this item. Press [F4] to return to the Product ID Field and recalculate the Invoice.
Processing a Return Press the [F9] key process this invoice. The invoice payment screen will show you your options for return this item(s). Leave the amounts as a negative # and enter the refund type. Finalize the invoice and the system will roll back all the amounts necessary.

Point of Sale
Page 78 of 150
Invoice Reprinting
Enter ‘RE’ in the Product ID field on the Invoice Screen. This will bring up the Invoice Search screen. You can type in an invoice # to search for, or use the Arrow Keys to navigate to that invoice. Click on [Print] to print out the invoice.

Discount Wizard
Page 79 of 150
Purchase Orders
Overview The Liquor Shopkeeper purchase order system is set up for the following workflow:
• Order Products • Save and print purchase order • Products Come In • Load purchase order • Enter in the quantities received • Process the PO
o Enters items into inventory o Enters A/P Info into vendor ledger
• Make payment to vendor via the vendor ledger You can choose to eliminate some of the steps by ordering the products and receiving them at the same time. This will be explained under the topic “Adding a Product to the Purchase Order”.
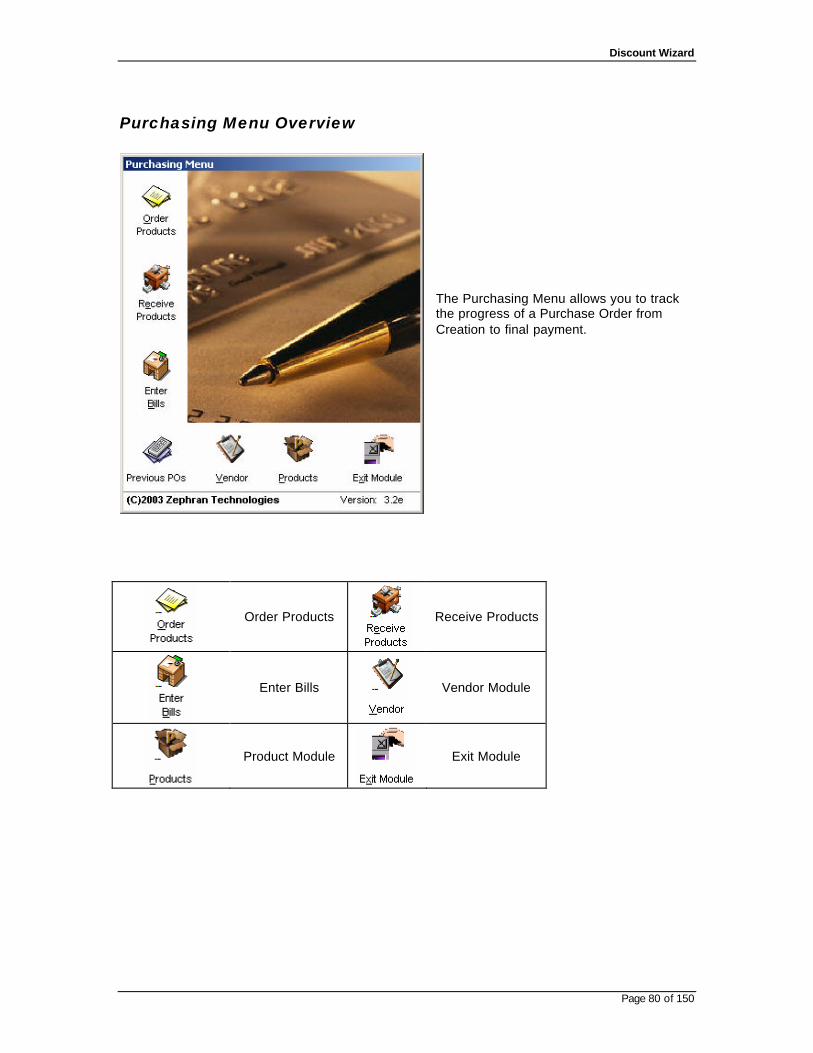
Discount Wizard
Page 80 of 150
Purchasing Menu Overview The Purchasing Menu allows you to track the progress of a Purchase Order from Creation to final payment.
Order Products
Receive Products
Enter Bills
Vendor Module
Product Module
Exit Module

Discount Wizard
Page 81 of 150
Creating / Reviewing PO’s The Purchase Order details screen shows the current open PO’s in the system sorted by PO #. You can load PO # for editing / receiving by:
• Double clicking on PO info in the window • Hi-lighting a PO and pressing the [Select] button
Current PO’s

Discount Wizard
Page 82 of 150
Creating a New Purchase Order
Selecting a Vendor
Type the first letters of the Vendor’s name to move the search grid near that name. Use the [F4] key to jump from the display grid to the search boxes. Press [Enter] or click on the [Select] button to choose the hi-lighted vendor.
Reviewing Vendor Information
Review the information to make sure this is the correct vendor to create this PO for. Pressing [Next] will continue to the next screens.

Discount Wizard
Page 83 of 150
Auto Creating PO’s for a Vendor
Auto creating a PO for a vendor does the following:
• Checks each product for the primary / secondary vendor information • Checks the reorder at field against the on hand field to see if this product needs
reordering • Checks the maximum field against the on hand field to select the qty to pre-fill the PO
order amounts
Note - If you choose to have the PO filled using case quantities then only case amounts will be ordered.

Discount Wizard
Page 84 of 150
Purchase Order Screen Overview
Adding a Product to a PO
The Cursor defaults to the Product ID field. This is where you can:
• Scan the Barcode or SKU of the product • Type in the Barcode or SKU # of the product • Press [F3] to search for a product

Discount Wizard
Page 85 of 150
When you have typed or scanned in the Product Id or SKU, the system looks through the product database to find that product. If one is found, the system will fill in the information fields:
Product Id: Id that you scanned Brand: Brand Name Avail: # In Inventory Name: Name of Product Qty: Qty to place on invoice Size: Size of this Item
Rcvd: Qty to Receive on Invoice Cost: Cost Each Case: Qty in Case
Extended: Extended Case Cost (Will
figure Per Case Cost Automatically)
You can enter either the Individual Cost of the items, or the Extended Cost of the items. If you enter the extended cost, it will figure out the individual cost for you. Entering the Vendor SKU # will allow you to quickly and easily add items from a vendor in the future without having to look up product information. Press [Add] or [Enter] to place this item onto the Purchase Order. When this happens, the Purchase Order items grid will be updated with this information. * Note – If you choose to receive items at the same time as ordering you will be able to process
this PO instantly. This will add the items to inventory and adjust the Vendor A/P accordingly.

Discount Wizard
Page 86 of 150
Searching for Inventory Pressing [F3] on the Purchase Order Screen will bring up the Product Search Screen.
Some Quick Points about this Screen
• The Search Products screen will return to the last product you picked the next time you hit [F3]
• [F7] Toggles the Product View to show Items that are specific to this Vendor. If you shut this off, it will be shut off for all subsequent searches. Turning it back on will activate it for all subsequent searches.
• [F4] as well as the Page Up / Page Down / Up Arrow / Down Arrow moves the cursor to the selection grid. Hitting Enter selects the hi-lighted item and places it on the PO.
• Auto Edit – Automatically enters the Edit mode on the Master Product Screen Type in the Alpha-Numeric information that you wish to search for. Press [Select] to add this item to the purchase order.

Discount Wizard
Page 87 of 150
Purchase Order Item Grid
Modifying Items in the PO Grid Pressing [F4] will allow you to move from the product add / lookup section to the grid and back.
The row you are currently editing has a yellow background, and the column you are editing has a light blue header. Use the arrow keys to move around to the fields you would like to change. Removing an Item from the Purchase Order To remove an item from the Purchase Order, change the qty to zero in the grid.

Discount Wizard
Page 88 of 150
Processing a Purchase Order Press [F9] to complete the Purchase Order. The following options are available to you:
• Save PO – Allows you to enter the QTY received at a later time • Receive Now – Adds product to inventory now and places money owed on vendor’s
ledger

Discount Wizard
Page 89 of 150
Receiving a Saved Purchase Order
Selecting a Purchase Order
Select a saved Purchase Order by double-clicking on the PO you would like to receive. The purchase orders are displayed in Numerical Order by default.
* Note – Right-Click on the column header to re-sort by that column
Available Purchase Orders

Discount Wizard
Page 90 of 150
Working with the Purchase Order The saved purchase order information will be displayed on the screen. This information will look exactly the same as when it was entered.

Discount Wizard
Page 91 of 150
Reprinting Purchase Orders Reprinting a Purchase Order can be done easily from the Vendor Module. Select the Vendor the Purchase order was from
Go to the Financial Tab of the Vendor Module. This will show all the Purchase Orders for this Vendor.
Highlight the Purchase Order to reprint and Click in the [Reprint] Button.
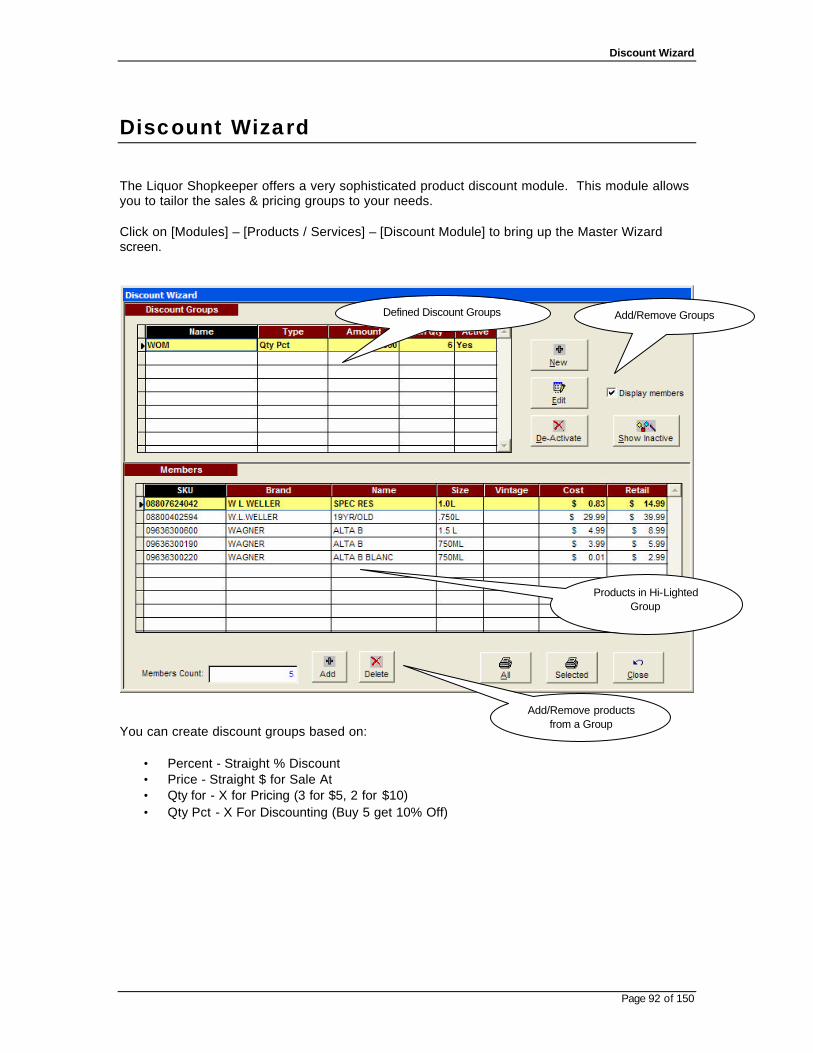
Discount Wizard
Page 92 of 150
Discount Wizard The Liquor Shopkeeper offers a very sophisticated product discount module. This module allows you to tailor the sales & pricing groups to your needs. Click on [Modules] – [Products / Services] – [Discount Module] to bring up the Master Wizard screen.
You can create discount groups based on:
• Percent - Straight % Discount • Price - Straight $ for Sale At • Qty for - X for Pricing (3 for $5, 2 for $10) • Qty Pct - X For Discounting (Buy 5 get 10% Off)
Defined Discount Groups
Products in Hi-Lighted Group
Add/Remove products from a Group
Add/Remove Groups

Discount Wizard
Page 93 of 150
Adding a New Discount Group
Click on the [New] Group button to bring up the Add / Edit group window.
• Name: Textual Reference to this particular Group
• Type: %, $, Qty For, Qty Percentage
• Value: a Dollar amount or Percentage. (8% would be entered as .08)
• Min Qty: If Applicable, the Minimum Qty needed to
be purchased to achieve this Discount level
Click [Save] to create this discount group.
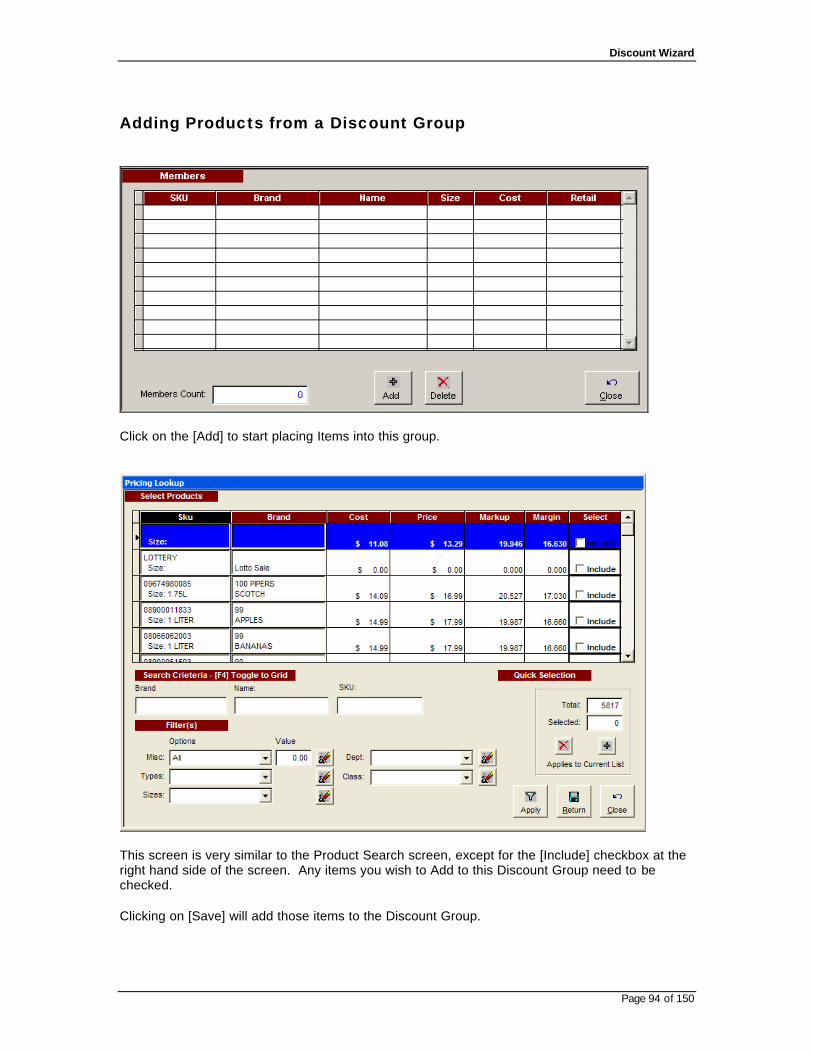
Discount Wizard
Page 94 of 150
Adding Products from a Discount Group
Click on the [Add] to start placing Items into this group.
This screen is very similar to the Product Search screen, except for the [Include] checkbox at the right hand side of the screen. Any items you wish to Add to this Discount Group need to be checked. Clicking on [Save] will add those items to the Discount Group.

Discount Wizard
Page 95 of 150
Removing Products from a Discount Group
Highlight a Product to Delete by Left-Clicking on it on the screen. Click on the [Delete] button to remove this item from the Discount Group.

Entering Sales Prices
Page 96 of 150
Entering Sales Prices The Sales Pricing Module allows you to quickly and easily assign sales prices to products. To access the module, it is located under [Modules] – [Products / Services]
If you have already access this module and have not processed the last batch of product updates, you will receive a warning message that states such.
• Click [Yes] to delete the items and start anew.
• Click [No] to continue adding products for this sales price update.

Entering Sales Prices
Page 97 of 150
Working with the Sales Pricing Screen The sales pricing screen is allows you to:
• Search for products to place on sale • Specify individual sale start / end dates and pricing • Update the database all at once or save the items for later processing
Adding items to the Sales Queue
• Type or scan in the product you wish to place on sale using the [Search Boxes]. • This will display the item in the product-listing grid. • Type in the starting and ending sale info date. Type in the price for this product • Click [Add] to add this item from the queue
Note – Inheriting Values of a Previous item allows you to keep the same
Sales Start / End Dates and only change the Sales pricing. This make s it EVEN QUICKER to update inventory.
Product Listing
Search Boxes
Sales Info Current Items
in Queue

Entering Sales Prices
Page 98 of 150
Removing items to the Sales Queue
• Highlight the item to remove in the product queue grid. • Click on the remove button to remove this item from the queue
The sales queue will update with the product information after you have pressed the [Add] button.
The Product Queue shows:
• Brand • Name • Size • Cost • Margin % • Sale Price • Sale Start Date • Sale End Date
Applying the Sales Prices Click the [Process] button to update the products with their new sales pricing info.

Future Product Prices
Page 99 of 150
Future Product Prices The Future Product Pricing module allows you to set a new price of a product in the future. This module will also place each of these products into the print queue for easy sign generation.
The Search Queue shows what Product Pricing has been defined. The information that is displayed is as follows:
• Product Name • New Pricing Start Date • # of Items
Options on this screen: [Apply] – Apply the price changes to inventory [Add] – Add a new set of price changes [Delete] - Delete Hi-Lighted Price Changes [Edit] – Edit the defined Price Changes

Future Product Prices
Page 100 of 150
Adding A Price Change Event
The Price Change event window shows the Products Currently scheduled for this event, the date the price change will become effective and margin information. Give this Event a Group Name and Select a Date for this to become effective on. You will not be able to add products until you have done this.
Add / Delete Items

Future Product Prices
Page 101 of 150
Adding Items to the Event Click the [Add] Button to start adding products.
Select products by Clicking on the [Include] checkbox or clicking the Bulk Add buttons. When you are done selecting the items, click on the [Return] button to return to the previous screen
Bulk Add

Future Product Prices
Page 102 of 150
Changing Prices
The items you selected on the previous screen will be displayed in the grid. You can change the information right in the grid or in the text boxes below it. Enter the new price:
Hitting Tab will bring you to the Start field that has been pre-filled with the Date you selected prior. You can use your arrow or mouse keys to quickly change the pricing just as you would a spreadsheet. As you change the pricing the Margin information will update.

Future Product Prices
Page 103 of 150
Printing Price Changes Click [Print] to print out a listing of the Price Changes you have defined.
Saving Price Changes Clicking [Save] will save the price changes and allow you to place these items into the print Queue so that you can print signs or labels easily.

Future Product Prices
Page 104 of 150
Applying Pricing Changes
Highlight the Group to Process and hit [Apply] The system will re-price all the products in that Group to the pricing levels that you have set up.

Shift Reporting
Page 105 of 150
Shift Reporting Users can create an End of Day report detailing their activity on the system at any time. This does not Zero out the end of day totals for that user. Click on Employee Login / Logout and Select Print Shift Report
Selecting the Register Highlight the Register and Click [Create] to create the Shift report.
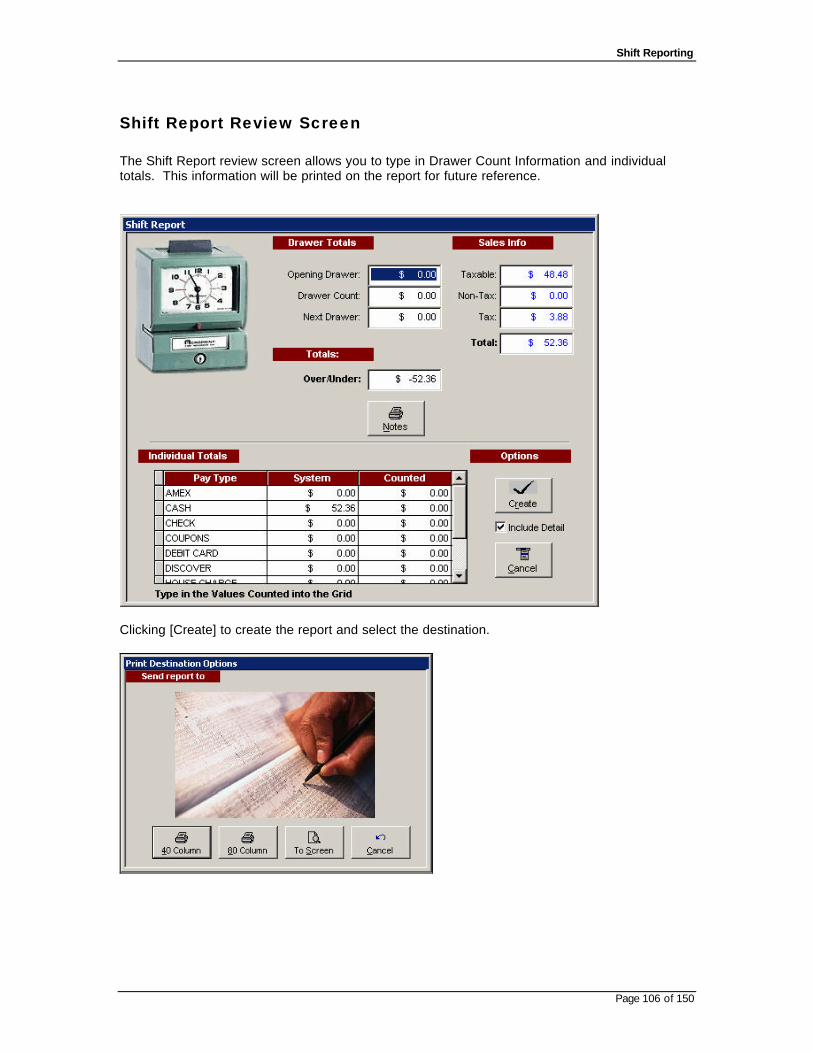
Shift Reporting
Page 106 of 150
Shift Report Review Screen The Shift Report review screen allows you to type in Drawer Count Information and individual totals. This information will be printed on the report for future reference.
Clicking [Create] to create the report and select the destination.

End of Day
Page 107 of 150
End of Day Procedure The end of day procedures does the following routine maintenance tasks:
• Closes any or all registers • Tallies up the day’s sales information • Zeroes out the register(s) totals for the next day • Updates product weekly / monthly sales history information • Prints out end of day reports
Selecting Registers to Close
The pick a register screen displays all the registers that have tallied sales since the last end of day closeout. You can Highlight individual registers or click [Select all Registers] to close all listed registers.

End of Day
Page 108 of 150
End of Day Screen Overview The End of Day screen needs the following information:
Opening Drawer Amount: Cash that was in the drawer at the beginning of the shift
Drawer Count:
How much total money was counted in the drawer including checks, charges etc.
Next Drawer:
Cash that you will leave in the drawer for the beginning of the next shift
Individual Tender Type Totals:
Individual totals for each tender type (Visa, MasterCard, etc)
Enter in the information and press [Process] to complete this function.
Individual Invoice listing
Sales Info
Individual Tender Type Amounts

End of Day
Page 109 of 150
End of Day Printouts The Liquor Shopkeeper gives you 3 options for Printing or Viewing the End of Day reports.
• 40 Column - Quick summary of the Days totals • 80 Column – Full Review of Today’s totals • Screen – View the information before printing • Cancel – Don’t view or print anything

End of Day
Page 110 of 150
Reprinting End of Day Reports
The End of Day Menu allows you to Re-print End of Day Reports. The Liquor Shopkeeper will display all the previous closeouts in Date / Time order. Highlight the Report you wish to reprint. If you would like a comprehensive product listing with this report, click on the [Include Product Detail] checkbox.

Real Time Charting
Page 111 of 150
Real-Time Charting The Liquor Shopkeeper has real-tome charting capabilities. You can use this to quickly see how your business is performing. Select the Starting and Ending Date, Click [Refresh] to update the display information.
Today’s Sales Statistics

Real Time Charting
Page 112 of 150
Today’s Payment Info

Drink Recipes
Page 113 of 150
Drink Recipe Screen
Drink Recipe Search Screen
Type in the Name of the Recipe to search for. Click on [Select] or Hit enter to view the drink information.
The Drink recipe screen allows you to quickly and easily view what ingredients are in a particular drink. This screen can be seen from the Main Menu or from the Invoice (POS) Screen via the [Shift + F3] Key.

Drink Recipes
Page 114 of 150
Printing Recipes for Customers
You can print out Recipes from the Invoice screen for your customer to take with them. This recipe will have your stores information on it as well.

Label / Sign Maker
Page 115 of 150
Label & Sign Maker Module The Label and Sign Module allows you to create full page, half page, and small shelf tag labels quickly and easily. If you have Future Product Pricing Queues set up for printing, you can choose an existing Queue or None. If you choose an existing queue, the program will pre-load the items into the queue for easy printing.
• Load – Load the Hi-Lighted Queue • None – Don’t load Any Queue, Go to Product Selection Screen • Cancel – Go back to Previous Menu

Label / Sign Maker
Page 116 of 150
Label Selection
After you have selected the items to print the queue grid should look display the products in the queue.
Search for products to add to print queue
Print queue of labels to print

Label / Sign Maker
Page 117 of 150
Label and Sign Print Options
• Avery 5160 – 3 Across Labels 1” X 2 5/8” • ½ Sheet of paper • Full sheet of paper • Custom 2X4 Paper • Custom 1X2 Paper

Employee Shift Report
Page 118 of 150
Employee Shift-Change
Logging into the System
The Liquor Shopkeeper comes with a default User ID.
User ID: DEMO Password: DEMO
When logging into the system the first time you will need this ID and Password to access the system. Register – Since you can have multiple registers, you need to specify which register # this is. This is important for keeping track of individual drawer totals…
Logging out of the System
When you choose to Log-Out of the system, the system needs to know who is now logging in. If the user cancels on this screen, the program exits and returns to the Windows menu. If the user logging out is going to return to resume a shift, make sure the new user logging in uses a new register #.
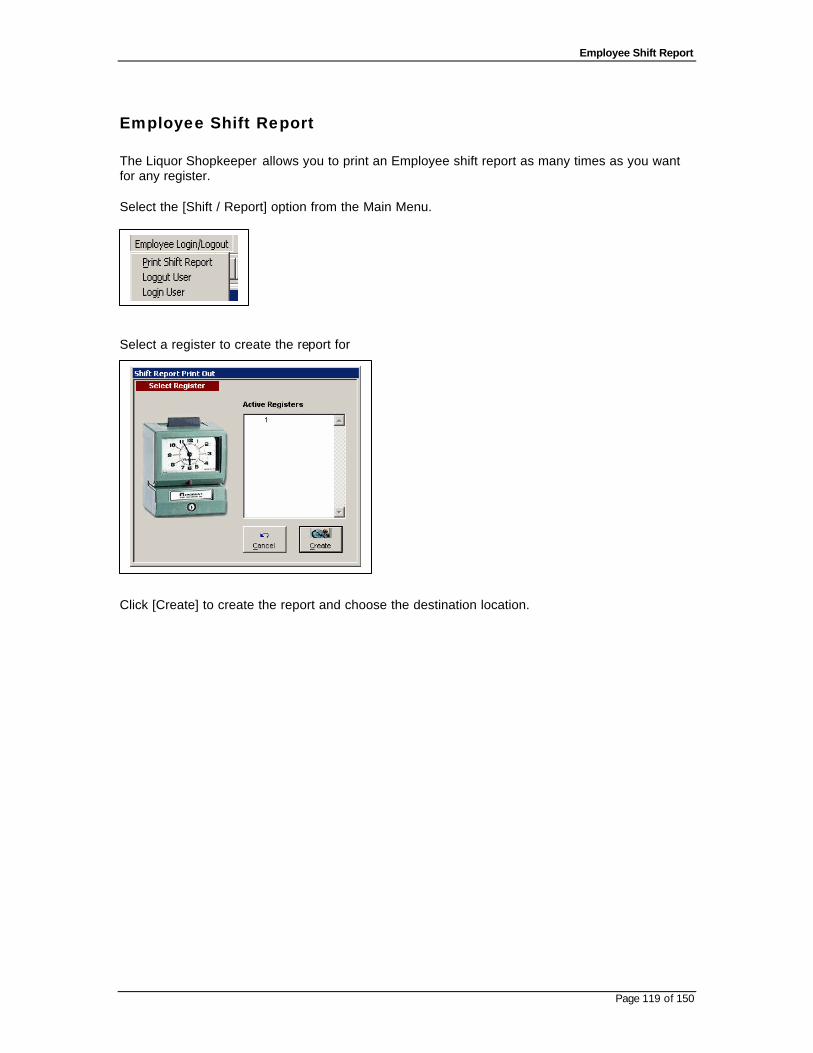
Employee Shift Report
Page 119 of 150
Employee Shift Report The Liquor Shopkeeper allows you to print an Employee shift report as many times as you want for any register. Select the [Shift / Report] option from the Main Menu. Select a register to create the report for Click [Create] to create the report and choose the destination location.

Data Maintenance
Page 120 of 150
Data Maintenance The Liquor Shopkeeper offers a comprehensive suite of utilities to ensure the proper running of the system. Function Name Description Data File Locations Specify the location of Data Files either Local or on the Network
Table Maintenance Allows you to Add / Edit / Delete Static information such as Classes or Departments
File Pack / Index Cleans up Deleted Data and Organizes data for better access Bulk Product Edit Quick and Easy editing of groups of product information Modify Product Types Add / Edit / Delete Product categorization Clear Product History Removes the sales history for products Upgrade Data Files Upgrades data from an old structure to a newer structure Export Data Extracts Data into a different data format
Specifying Data File Locations If the system cannot find your Data Files in the location it believes they should be in, it will ask you to specify this location.
Enter in the Data Path using either a Drive Letter or UNC. Use the [Locate] button to browse the hard drive for these files. Enter in the Workstation number or leave it as #1 if this is a single user install.
Press [Save] to commit these changes. The program will have to be restarted.

Data Maintenance
Page 121 of 150
Table Maintenance
From this screen you can edit table information, re-index a specific table or remove deleted records from a specific table (Pack).
Static Table Definitions Table Name Description Case Breaks For future enhancements Class Further Product Classification Department Further Product Classification Location Codes Different store locations Mail Grouping Customer mailing groups Payment Options POS Screen Payment Types Payment Terms Purchase Order Payment Terms Shipping Modes Purchase Order Shipping Methods

Data Maintenance
Page 122 of 150
Adding / Editing Table Information
Highlight the static table name and [Double-Click] or press the [Edit Table] button.
Viewing Table Contents
To Edit an Item, Highlight that item and click the [Edit] button. (Or Double-Click) To delete an Item, Highlight that item and click the [Delete] button. To Add an Item, click the [Add] button.

Data Maintenance
Page 123 of 150
Adding a Table Record
Type in the description and press [Save] to save this record. Pressing [Esc] will cancel this record creation.
Removing a Table Record
Highlight the Static Table Item you wish to remove. Click on the [Delete] Key. * Note – Do not remove a Static Table item that has been used by a module. (I.E. don’t delete a
Product Type of Blends if you have a bunch of products that are assigned that Product type.)
Packing / Re-Indexing Tables Clicking on the Pack or Re-Index button brings up this screen. You must make sure all other stations are out of the application before running this routine. Pressing the [Start] button will begin to either clean or pack depending on your choice.

Data Maintenance
Page 124 of 150
Converting Data The Liquor Shopkeeper can convert or import data from any older version. Choose the Upgrade Data option under the Administrative tasks.
Select the from and to data sources in the appropriate boxes.
The “from” data source is the OLD version of the data tables. The “to” data source is the NEW version of the data tables. Check the [Include Details file] if you would like to include company and registration data in this upgrade. The system will work on each individual file and tell you when it is completed…

Data Maintenance
Page 125 of 150
Product Audit Log The Liquor Shopkeeper allows you to view any and all edits that have been made to a product. This can be done on a global level (All Products) or on a Product Level (All Edits for a particular Product).
Click on [Administration] + [Audit Log]
This screen shows all the Edits that have been made to all products. Information that is displayed in the Description window shows the Old and New Values.
Clearing the Product Audit Log Click on the [Clear] button to remove all Audit Log Information

Data Maintenance
Page 126 of 150
Bulk Product Load The Liquor Shopkeeper allows you to quickly and easily load in products into the database. Click on [Modules] + [Bulk Inventory Load]
Scan the Product in the SKU # Field If the Product is found, it will bring up the Product’s Information and you can Add Quantities to the Quantities that already are on hand. If the Product is not found, you can Add that Product into the database and then Add the Quantities. Hit [F5] to Save the Updated Information or [ESC] to discard the Updated information.

Report Module
Page 127 of 150
Handheld Module The Liquor Shopkeeper Handheld module allows you to do many inventory tasks quickly and easily with a Handheld Pocket PC.
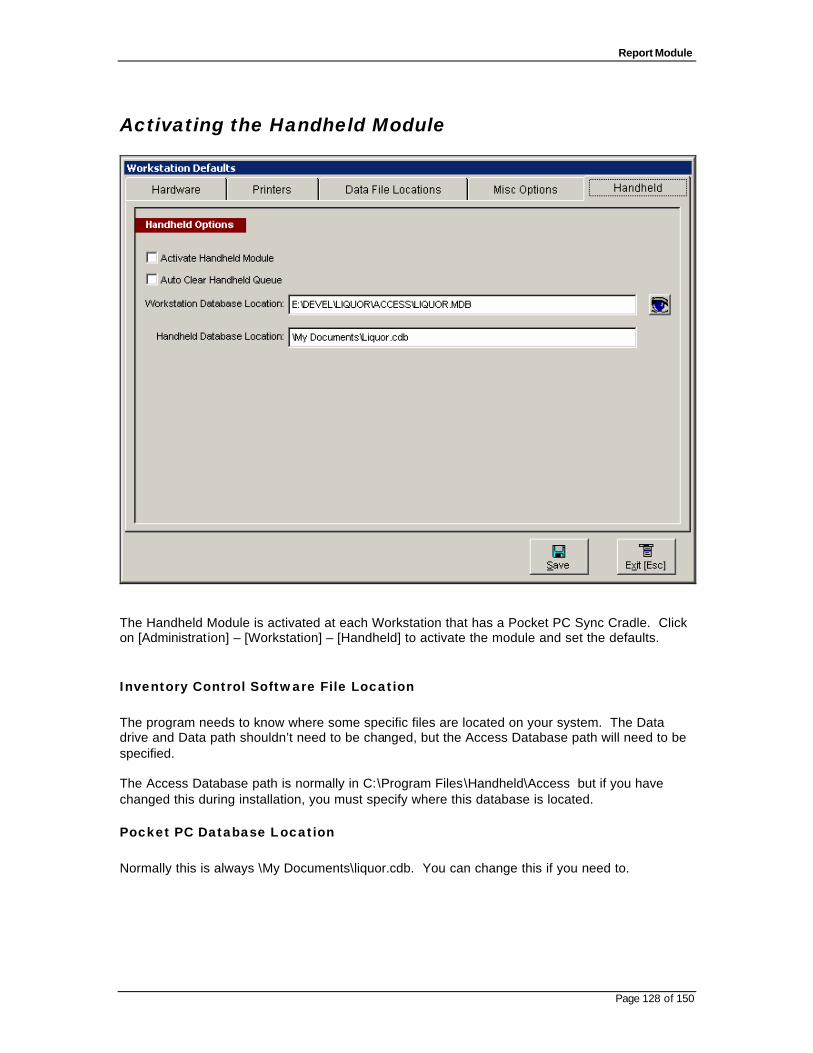
Report Module
Page 128 of 150
Activating the Handheld Module
The Handheld Module is activated at each Workstation that has a Pocket PC Sync Cradle. Click on [Administration] – [Workstation] – [Handheld] to activate the module and set the defaults.
Inventory Control Software File Location The program needs to know where some specific files are located on your system. The Data drive and Data path shouldn’t need to be changed, but the Access Database path will need to be specified. The Access Database path is normally in C:\Program Files\Handheld\Access but if you have changed this during installation, you must specify where this database is located.
Pocket PC Database Location Normally this is always \My Documents\liquor.cdb. You can change this if you need to.

Report Module
Page 129 of 150
Miscellaneous Settings Auto-Clear Queue – This clears out the temporary update figures in the held queue every time you click on the “Review Handheld Data Option”. All the data remains in the queue, only the Update Qty is reset to the Handheld’s counted quantity.
Compact Database The Access Database that is copied from the Handheld to the Managers Station can become bloated over time. Running this compact module removes all the deleted records and re-indexes the data files. This process will significantly reduce the size of the Database file. You should run this process at least once a week.

Report Module
Page 130 of 150
ODBC Settings The Portable Inventory Control Application requires an ODBC System Entry as follows:
The Installation procedure will automatically create the “Handheld” ODBC System connection that you need. Make sure that the Database Location is the correct location.
If this is not where you installed the Pocket Shopkeeper, you need to hit [Select] to specify the correct location.
This file is called liquor.mdb and will be in the C:\Program Files\Handheld\Access directory. When you have found the proper Liquor.mdb file, Highlight the file and press [Ok]
Press [Ok] on all subsequent screens and you will have properly installed the correct ODBC Driver entry that the program needs.

Report Module
Page 131 of 150
Copy Data to the Handheld Place the Handheld Pocket PC into the Docking Cradle. When the system has Sync’d up your Desktop PC and the Handheld PC, you are ready to continue. Click on the [Copy to Handheld Module] to begin the Data transfer process. The system will allow you to specify many different options when copying the data. The less data you tag (for sending to the handheld), the quicker this process will go.
Selecting Product Types Highlight the different product types you wish to transfer to the Handheld. Holding down the CTRL key while clicking with your mouse allows you to select more than one type of product.
Selecting Product Departments Highlight the different product departments you wish to transfer to the Handheld. Holding down the CTRL key while clicking with your mouse allows you to select more than one department. Click on [Start] to begin the copy process.
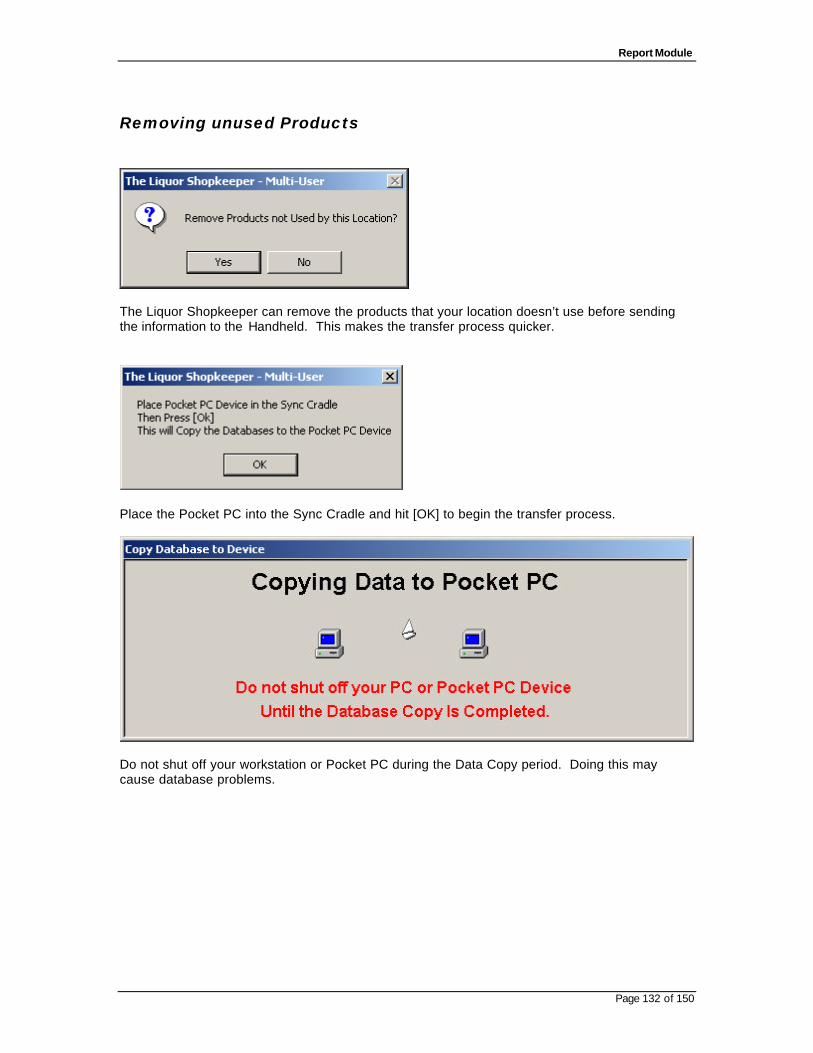
Report Module
Page 132 of 150
Removing unused Products
The Liquor Shopkeeper can remove the products that your location doesn’t use before sending the information to the Handheld. This makes the transfer process quicker.
Place the Pocket PC into the Sync Cradle and hit [OK] to begin the transfer process.
Do not shut off your workstation or Pocket PC during the Data Copy period. Doing this may cause database problems.

Report Module
Page 133 of 150
Copy Data from Handheld
Loading changes from the Handheld to the workstation is quick and easy.
• Click on the [Load Data from Handheld] menu option. • Place the Pocket PC onto the Sync Cradle • Click [Start] on the Workstation
The Database copy can take from 1-10 minutes depending on how much inventory you have in your Pocket PC’s Database.

Report Module
Page 134 of 150
Inventory Control
The Inventory Control Module lets you update the On-Hand quantities of your store’s inventory.
The “Update” Column is the Quantity that will be transferred to your master Database. It defaults to the Handheld’s Counted Values. Use this grid as you would an Excel spreadsheet. Type in the #‘s you wish to update your inventory or leave them as they are. Check the [Include] Checkbox to transfer that Items Values to the Master inventory. Click [Process] to start the inventory update procedures. When you are done, you can print out a worksheet that shows what was changed, and what effect that had on inventory values.

Report Module
Page 135 of 150
Handheld Sign Module Click the [Sign Creator Module] to transfer the products you queued on the Handheld to the Master Database.
After this message appears, you are ready to go to the sign module and create your signs.
You will see “Handheld” and the Date / Time that the Queue was created. Click on the Name of the Queue you wish to work with and hit [Edit].

Report Module
Page 136 of 150
You can now Add / Remove products you have chosen to create labels for from here.

Report Module
Page 137 of 150
Shelf Restocking Module
This module allows you to tag which items on the floor need to be Re-Stocked with Inventory from the back room.
• Scan Items on the floor to be restocked and enter the QTY to restock With • Print out Worksheet Detailing this information • Pick the products and stock the shelves

Report Module
Page 138 of 150
Running the Pocket Shopkeeper
Click on the Pocket PC
Windows Button and select the
[Programs] Menu Option
Programs menu item
Click on The Pocket Shopkeeper icon to run the application.

Report Module
Page 139 of 150
Pocket PC – Main Menu
Inventory Control Module – Allows you to update the server with correct inventory counts Signs Module – Allows you to scan products and print out signs for those products from the server Restocking Module – Allows you to scan products and set levels for your stock people to bring up from the stockroom Exit – Close The Pocket Shopkeeper & return to Pocket PC O/S

Report Module
Page 140 of 150
Pocket PC – Inventory Control Module
Pressing the Scan Button on the Hand Held (Not Shown) will activate the Barcode Scanner. When it has scanned in the barcode, it will be displayed in the “Search” Field.
Inventory Information is displayed on the Upper Portion of the screen. The User types in the Counted Amount on the Keyboard and hits Update to update this amount. The screen clears and the cursor is placed back at the “Search” field for you to scan in another Barcode.

Report Module
Page 141 of 150
Pocket PC - Sign Module
Pressing the Scan Button on the Hand Held (Not Shown) will activate the Barcode Scanner. When it has scanned in the barcode, it will be displayed in the “Search” Field.
Inventory Information is displayed on the Upper Portion of the screen. The User types in the Counted Amount on the Keyboard and hits Queue to set this product to be printed. The screen clears and the cursor is placed back at the “Search” field for you to scan in another Barcode.

Report Module
Page 142 of 150
Pocket PC – Restocking Module
Pressing the Scan Button on the Hand Held (Not Shown) will activate the Barcode Scanner. When it has scanned in the barcode, it will be displayed in the “Search” Field.
Inventory Information is displayed on the Upper Portion of the screen. The User types in the Restock Amount on the Keyboard and hits Update to set this product to be brought up from the stockroom. You can also see the information that has previously been entered by clicking on [Review]. The screen clears and the cursor is placed back at the “Search” field for you to scan in another Barcode.

Report Module
Page 143 of 150
Reviewing Reorder Items
The Reorder List is displayed on the handheld screen and sorted by Brand, Name then Size. Click [Clear] to remove these items, or clock [Close] to return to the Work screen.

Report Module
Page 144 of 150
System Reporting The Liquor Shopkeeper uses 2 reporting engines to give you quick access to hard-to reach data.
• Crystal Reports
• Visual FoxPro Report Writer What’s the difference and why do I care??
Crystal Reports Features The Crystal Report engine takes a little longer to display the data. This engine also provides you with a vehicle to “Drill-Down” into the report to reach Data that would otherwise require another report for view. Pie and Bar charts are all generated using Crystal Reports. These charts also allow you to “Drill-Down” into the data. Exporting the report Data to ASCII or Excel is available via the Crystal Reports engine
Visual FoxPro Report Writer The Visual FoxPro report writer is a quicker reporting engine, but does not allow the advanced functionality of Crystal Reports.
The Report Menu
The Drop Down report menu is broken into 5 categories for reports. Click on the report name to run that report.

Report Module
Page 145 of 150
Selecting Report Options After selecting a report, you are presented with the options for running that report.
Use the Report Filters to narrow down the amount of information that’s printed on a report. The sorting options are a powerful feature that allows you to view the information the way you want to. Quick Date Range Selector
Allow you to quickly fill in the starting and ending dates for the report.
Report Filters to narrow down the report contents.

Tracking Product Spiffs
Page 146 of 150
Tracking Product Spiffs The Liquor Shopkeeper allows you to quickly and easily track product spiffs. Click on the Product Spiff Module from the Ring Menu to access this module.
The Spiff Module allows you to specify:
• Spiff Start Date • Spiff End Date • Spiff Amount
When you generate a report for the active spiffs, the system will search through your purchase orders and tabulate the QTY of each item you have ordered. The system will provide you with a running total as well as a grand total of these amounts.

Tracking Product Spiffs
Page 147 of 150
Accounting Reports Report Name Description Hourly Sales Figures Invoice Detail Invoice Listing Reprint Invoice Sales Tax Reports Salesperson Activity
Customer Reports Report Name Description Aging Directory Open Invoices Payments Purchases Customers that owe
Inventory Reports Report Name Description Gross Margin Gross Markup Activity Detail Listing On-Hand Work Sheet Pricing Purchase History Sales History Off Sale On Sale Out of Stock

Tracking Product Spiffs
Page 148 of 150
Vendor Reports Report Name Description Items Received Open Purchase Orders Purchase Orders Aging Directory Payments Made
Profit / Loss Reports Report Name Description Report Only Report & Graph
Charts & Graphs Report Name Description Customer Graphs Product Graphs Sales by Customer Sales by Month Top Customers Vendor Graphs Vendors by Total Owed Vendors by Total Spent

Frequently Asked Questions
Page 149 of 150
Frequently Asked Questions
What are the "drawer open" codes for my ECD 200 cash drawer? The ECD 200 series are non-intelligent cash drawers, custom wired for a specific 40 column receipt printer interface. The codes required to "open the cash drawer" are printer codes found in each printer manual and should be put in the printer setup. Example: Epson (RJ-11) HEXADECIMAL = 1B, 70, 00,19,FA . DECIMAL = 27,112,0,25, 250 ASCII = ESC, p, 0, 250
How often do I need to File Pack/Index? You should run the Re-Indexing and File Packing routine at least once a week.
What does Fix Data Files Do? This routine fixes and packs all the databases without the Application. Sometimes you are unable to log into the Application in order to run the File Pack/Index. Run this start menu item to clear up any data problems you may be having.
System Locks up when processing an Invoice This is usually caused by the System being improperly shut down either by a power loss, or lock-up. To fix this: Close out of the Liquor Shopkeeper on all Workstation Run the Fix Data Files Menu option or the file: fixdata.exe that is in the \LMS\Exe directory Everything should be back to normal and you will be ready to run the application again.

Index
Page 150 of 150
Index “In Progress” Window.......................................... 71 Administration..................................................13, 30 Administrator............................................................ 9 amount tendered..................................................... 72 arrow keys.........................................................67, 87 audit....................................................................74, 75 Bin ............................................................................ 43 Brand.................................................... 43, 63, 85, 98 Case Qty .................................................................. 43 Cash Sale ................................................................. 62 Changes a Users Password................................... 32 components ............................................................... 9 Counters................................................................... 30 credentials ............................................................... 33 customer account ................................................... 75 Daily Total .............................................................. 45 Data Analysis.......................................................... 30 Data Files........................................................ 13, 120 database location.................................................... 11 display grid.......................................... 31, 37, 42, 51 Drink Recipes ......................................................... 30 Employee Security................................................. 33 End of Day ......................................30, 74, 107, 108 Expires ..................................................................... 43 Failed Authentication............................................ 33 In Progress............................................................... 71 In Progress Queue.................................................. 70 invoice screen............................................62, 72, 75 Label Maker............................................................ 30 Ledger Information................................................ 30 Login ...................................................... 9, 13, 30, 32 Logout...................................................................... 30 module ...............................................................29, 96 mouse.................................................................29, 67 network install ........................................................ 13 No Tax Sale ......................................................52, 64 Payment Options........................................... 72, 121
permissions Inherting.................................................32, 33, 35
Permissions ............................................................. 34 Inheriting ............................................................. 33
POS......................................................... 18, 113, 121 Price Levels ............................................................. 43 process ........................................................12, 77, 85 Product ID ..............................63, 67, 70, 71, 77, 84 purchase order ..................................................79, 90 Purchase Order.30, 79, 81, 82, 84, 85, 87, 88, 89,
90, 121 Purchasing History ................................................ 45 Quick POS Discounts............................................ 65 Register.................................................. 17, 107, 118 Reorder .................................................................... 43 ring menu................................................................. 29 Sale / Rebate Information..................................... 44 sales pricing ......................................................97, 98 search boxes........................................ 31, 37, 42, 51 search for a customer............................................. 62 Shift Report ............................................................. 30 Sku ..................................................43, 47, 63, 84, 85 System Locks up..................................................149 Type...31, 37, 42, 43, 51, 63, 82, 84, 97, 108, 123 UNC ..........................................................13, 16, 120 User ID .....................................................17, 32, 118 vendor credits ......................................................... 37 Vendor payments ................................................... 37 vendor’s ledger....................................................... 88 Visual FoxPro ......................................................... 12 Weekly History ...................................................... 45 Windows Registry ................................................. 12 workstation........................................................11, 13 Workstation............ 10, 13, 16, 23, 24, 25, 30, 120 Workstation number..................................... 16, 120 Workstation Number............................................. 16