Embed Size (px)
Citation preview

KenQuilt
Royal, Empress, Prince, Princess and
Duchess Quilting Machines
With
Regal Stitch Regulator
OWNER’S MANUAL
S&D Stitches, Inc. Written by Dee Dee Townzen Revised September 14, 2007

2
3
Table of Contents Foreward ......................................................................................................................................... 5
WARRANTY .................................................................................................................................... 6
The Bobbin Winder ........................................................................................................................ 7 The Bobbin ................................................................................................................................ 8 The Needle ............................................................................................................................... 9 Laser ......................................................................................................................................... 9
Getting Ready to Sew .................................................................................................................. 12 THREADING THE MACHINE ............................................................................................................. 12 LOAD FABRIC ................................................................................................................................ 13 A WORD ABOUT STITCH QUALITY .................................................................................................... 15
Regal Operation ........................................................................................................................... 16 TURN ON THE POWER .................................................................................................................... 16 TURN ON THE WORK LIGHT ............................................................................................................ 16 FRONT AND REAR CONTROLS ......................................................................................................... 16 SINGLE STITCH MODE .................................................................................................................... 17
Full stitch mode ....................................................................................................................... 17 Half stitch mode ...................................................................................................................... 17
NEEDLE UP/DOWN SWITCH ............................................................................................................ 17 LASER SWITCH .............................................................................................................................. 18 GREEN INDICATOR LIGHT ............................................................................................................... 18 MODE SELECTOR DIAL .................................................................................................................. 18 CONSTANT SPEED MODE ............................................................................................................... 18 STITCH REGULATION MODE SWITCH .............................................................................................. 18 MIN MODE .................................................................................................................................... 18 NORMAL STITCH REGULATION MODE ............................................................................................. 19 BASTING MODE ............................................................................................................................ 19
How to Care for Your Machine .................................................................................................... 20 CLEAN LINT FROM MACHINE ........................................................................................................... 20 OIL MACHINE ................................................................................................................................ 20
Repair Procedures ....................................................................................................................... 21 REPLACE CHECK SPRING .............................................................................................................. 21 SET ROTARY HOOK TIMING ........................................................................................................... 22 ADJUST NEEDLE BAR HEIGHT ........................................................................................................ 23 SET HOPPING FOOT HEIGHT ......................................................................................................... 24
Regal Setup Parameters .............................................................................................................. 25 MIN MODE SETUP ......................................................................................................................... 25 SET MIN SPEED – MOTOR NOT RUNNING ....................................................................................... 25 SET MIN SPEED – MOTOR RUNNING .............................................................................................. 25 MOTOR SPEED CALIBRATION ......................................................................................................... 26 CALIBRATE SPEED MODE .............................................................................................................. 26 SINGLE STITCH SETTINGS ............................................................................................................. 27 SETTING THE HALF STITCH SPEED ................................................................................................. 28 SETTING THE SINGLE STITCH SPEED ............................................................................................. 28 TEST SWITCH INPUTS .................................................................................................................... 28 TEST ENCODERS ........................................................................................................................... 29 SETTING THE NEEDLE STOP POSITION ........................................................................................... 29
Regal Control Board .................................................................................................................... 31

4
NEEDLE POSITIONER..................................................................................................................... 31 LEFT TO RIGHT ENCODER (X AXIS) ................................................................................................ 31 IN AND OUT ENCODER (Y AXIS) ..................................................................................................... 31 REAR RUN BUTTON ...................................................................................................................... 31 REAR SINGLE STITCH BUTTON ...................................................................................................... 31 FRONT CONTROL PANEL ............................................................................................................... 32 COMPUQUILTER MOTOR CONTROL ................................................................................................ 32 DC MOTOR DRIVE CONTROL SIGNALS ........................................................................................... 32 LASER PLUG ................................................................................................................................. 32 COMPUQUILTER MOTOR PLUG ...................................................................................................... 32 CONTROLLER BOARD POWER SUPPLY ........................................................................................... 32
Troubleshooting ........................................................................................................................... 33 POOR STITCH QUALITY. ................................................................................................................. 33
LOOSE TOP STITCH .................................................................................................................... 33 QUILT TOP PUCKERS.................................................................................................................. 33 STITCHES ARE UNEVEN LENGTH ................................................................................................. 33
STITCHES ARE SKIPPED WHEN SEWING. .......................................................................................... 33 BOBBIN THREAD BREAKS. .............................................................................................................. 33 TOP THREAD KEEPS BREAKING. ..................................................................................................... 33 THE MACHINE DRAGS MAKING IT HARD TO MOVE. ............................................................................ 34 IT’S HARD TO CONTROL WHERE YOU MOVE THE MACHINE. ................................................................ 34
Tips and Helpful Hints ................................................................................................................. 34
How to get help ............................................................................................................................ 36

5
Foreward
Thank you for your recent KenQuilt purchase. At KenQuilt, we want to make sure our customers have a great experience with our products. Before shipping or delivery, we test our products extensively to ensure they are of the highest quality. If you have any questions, want to share a positive experience or need troubleshooting advice, please feel free to contact us at:
KenQuilt Manufacturing and Supplies 866-784-5872
[email protected] We really do appreciate your business and hope that you have many enjoyable years of quilting.

6
WARRANTY
KenQuilt Manufacturing Royal, Empress, Prince, Princess Quilting Machines
1. Warranty covers 25 years metal housing.
2. Warranty covers electric components including electronic boards and the motor for a period of 1 year from date of purchase. The warranty excludes lightning strikes, electrical power surges, and dropping of the machine.
3. Warranties are null and void if a machine is tampered with or taken apart without
authorization from a KenQuilt Manufacturing technician located out of Wichita, Kansas.
4. Warranty covers parts, labor, and ground shipment back to customer only.
5. Warranty does not cover a new box if customer needs a new box to ship
machine back to us in Wichita, Kansas. Customer is provided with one box and any additional are at an additional cost.
6. Things not covered under warranty: consumables such as thread, bobbins,
bobbin cases, needles, batting, belts, check springs, hopping feet, thread guides, tension assemblies, hook assemblies, and other like items not mentioned.
7. Additional items not covered are tension adjustments or to get tension set back
to factory settings.
8. KenQuilt is not responsible for damages to the machine during shipping.
7
The Bobbin Winder
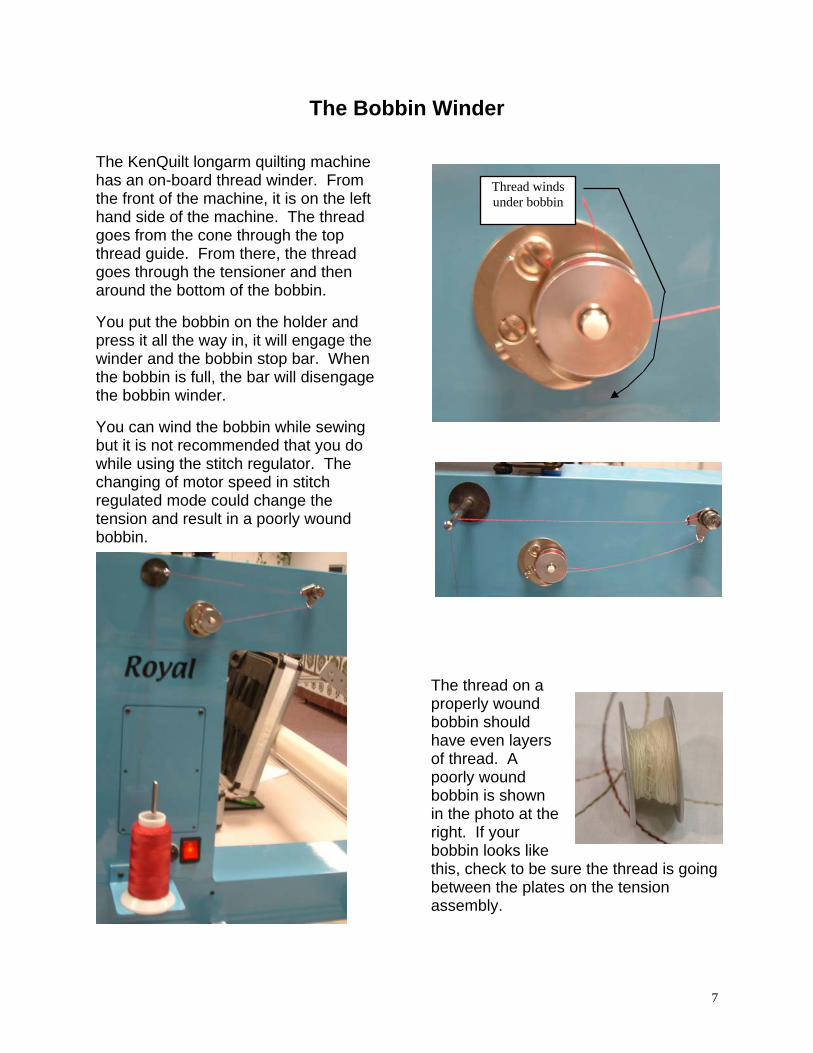
The KenQuilt longarm quilting machine has an on-board thread winder. From the front of the machine, it is on the left hand side of the machine. The thread goes from the cone through the top thread guide. From there, the thread goes through the tensioner and then around the bottom of the bobbin.
You put the bobbin on the holder and press it all the way in, it will engage the winder and the bobbin stop bar. When the bobbin is full, the bar will disengage the bobbin winder.
You can wind the bobbin while sewing but it is not recommended that you do while using the stitch regulator. The changing of motor speed in stitch regulated mode could change the tension and result in a poorly wound bobbin.
The thread on a properly wound bobbin should have even layers of thread. A poorly wound bobbin is shown in the photo at the right. If your bobbin looks like this, check to be sure the thread is going between the plates on the tension assembly.
Thread winds under bobbin
8
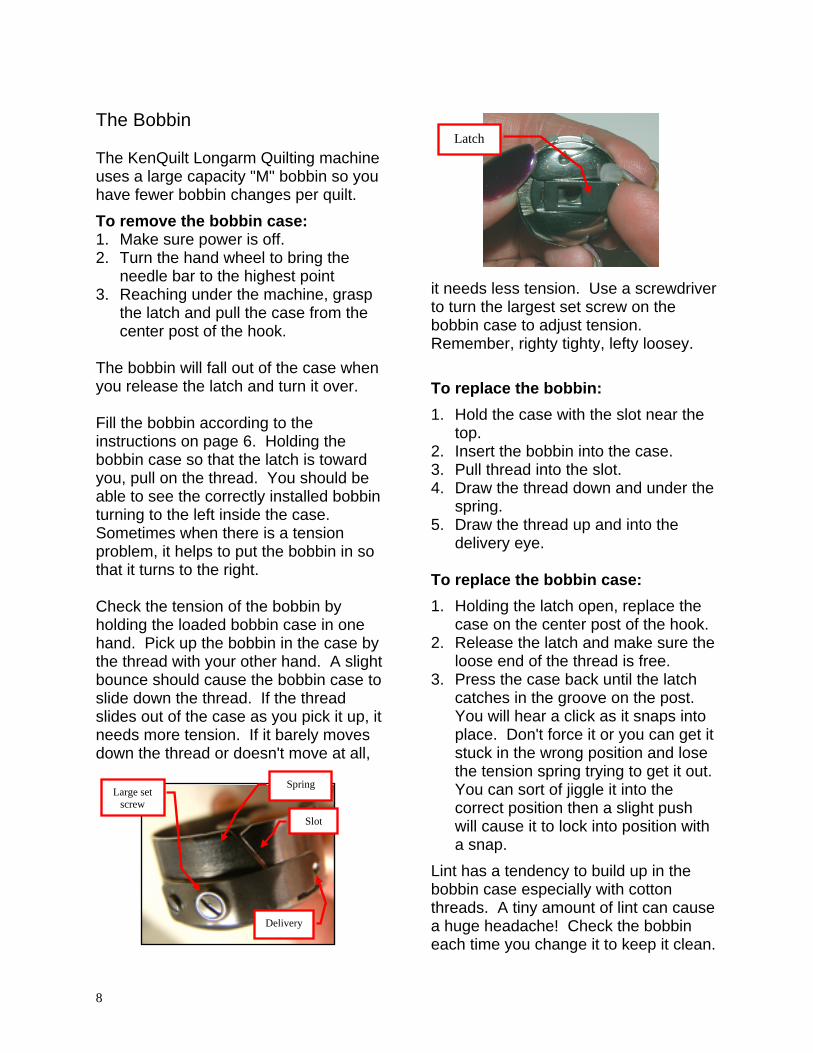
The Bobbin The KenQuilt Longarm Quilting machine uses a large capacity "M" bobbin so you have fewer bobbin changes per quilt. To remove the bobbin case: 1. Make sure power is off. 2. Turn the hand wheel to bring the
needle bar to the highest point 3. Reaching under the machine, grasp
the latch and pull the case from the center post of the hook.
The bobbin will fall out of the case when you release the latch and turn it over. Fill the bobbin according to the instructions on page 6. Holding the bobbin case so that the latch is toward you, pull on the thread. You should be able to see the correctly installed bobbin turning to the left inside the case. Sometimes when there is a tension problem, it helps to put the bobbin in so that it turns to the right. Check the tension of the bobbin by holding the loaded bobbin case in one hand. Pick up the bobbin in the case by the thread with your other hand. A slight bounce should cause the bobbin case to slide down the thread. If the thread slides out of the case as you pick it up, it needs more tension. If it barely moves down the thread or doesn't move at all,
it needs less tension. Use a screwdriver to turn the largest set screw on the bobbin case to adjust tension. Remember, righty tighty, lefty loosey. To replace the bobbin: 1. Hold the case with the slot near the
top. 2. Insert the bobbin into the case. 3. Pull thread into the slot. 4. Draw the thread down and under the
spring. 5. Draw the thread up and into the
delivery eye. To replace the bobbin case: 1. Holding the latch open, replace the
case on the center post of the hook. 2. Release the latch and make sure the
loose end of the thread is free. 3. Press the case back until the latch
catches in the groove on the post. You will hear a click as it snaps into place. Don't force it or you can get it stuck in the wrong position and lose the tension spring trying to get it out. You can sort of jiggle it into the correct position then a slight push will cause it to lock into position with a snap.
Lint has a tendency to build up in the bobbin case especially with cotton threads. A tiny amount of lint can cause a huge headache! Check the bobbin each time you change it to keep it clean.
Latch
Slot
Delivery
Spring Large set
screw
9
Scarf
Loosen screw
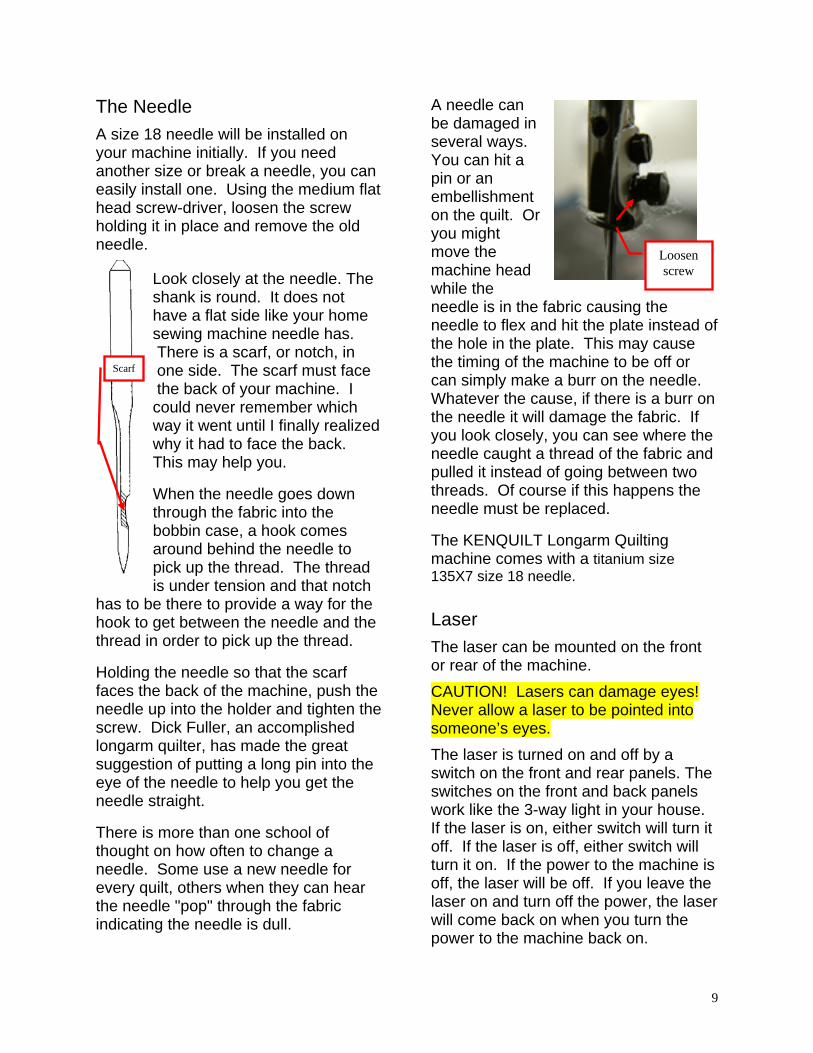
The Needle
A size 18 needle will be installed on your machine initially. If you need another size or break a needle, you can easily install one. Using the medium flat head screw-driver, loosen the screw holding it in place and remove the old needle.
Look closely at the needle. The shank is round. It does not have a flat side like your home sewing machine needle has. There is a scarf, or notch, in one side. The scarf must face the back of your machine. I could never remember which way it went until I finally realized why it had to face the back. This may help you.
When the needle goes down through the fabric into the bobbin case, a hook comes around behind the needle to pick up the thread. The thread is under tension and that notch
has to be there to provide a way for the hook to get between the needle and the thread in order to pick up the thread.
Holding the needle so that the scarf faces the back of the machine, push the needle up into the holder and tighten the screw. Dick Fuller, an accomplished longarm quilter, has made the great suggestion of putting a long pin into the eye of the needle to help you get the needle straight.
There is more than one school of thought on how often to change a needle. Some use a new needle for every quilt, others when they can hear the needle "pop" through the fabric indicating the needle is dull.
A needle can be damaged in several ways. You can hit a pin or an embellishment on the quilt. Or you might move the machine head while the needle is in the fabric causing the needle to flex and hit the plate instead of the hole in the plate. This may cause the timing of the machine to be off or can simply make a burr on the needle. Whatever the cause, if there is a burr on the needle it will damage the fabric. If you look closely, you can see where the needle caught a thread of the fabric and pulled it instead of going between two threads. Of course if this happens the needle must be replaced.
The KENQUILT Longarm Quilting machine comes with a titanium size 135X7 size 18 needle.
Laser The laser can be mounted on the front or rear of the machine. CAUTION! Lasers can damage eyes! Never allow a laser to be pointed into someone’s eyes. The laser is turned on and off by a switch on the front and rear panels. The switches on the front and back panels work like the 3-way light in your house. If the laser is on, either switch will turn it off. If the laser is off, either switch will turn it on. If the power to the machine is off, the laser will be off. If you leave the laser on and turn off the power, the laser will come back on when you turn the power to the machine back on.

10
First, to mount the laser on the side, slide the laser onto the plastic stud and tighten the finger screws. 1. Next, move the machine head to the
point where you want to start sewing on the quilt. Put the needle in the cloth to hold the machine head in place. Your machine will sew better if you will sew from right to left on this side of the machine.
2. Put your pattern under the shield and line it up with a line on the decorative cover of the table top to get it straight.
3. Be sure the edge of your quilt is far enough away from you to allow the machine to reach the part of the pattern closest to you.
4. Loosen the wing nut and position the laser holder approximately in the center of the area you will sew then retighten the nut.
5. Turn the laser on and point it at the spot on the pattern where you want to begin. The laser will swivel side to side and front to back so you can precisely align the light to the position desired.
6. Take the needle out of the fabric and move the machine along the track watching to see where the dot of light is going. If necessary, adjust the pattern so that it runs parallel with your quilt.
7. Mark the point where you want to stop sewing. Without this mark, you will continue sewing off the edge of the quilt because you are watching the dot of light following the pattern and not where the needle is sewing.
8. Go to the beginning point of your pattern. To pick up your bobbin thread, take a single stitch by pushing the black button on the handle bar. Holding the end of the top thread, move the machine an inch or so and pull on the thread. It will bring the bobbin thread to the top so you can reach it.
9. Holding both threads, take a couple of stitches to anchor the thread.
10. Check to be sure your machine is in the mode you desire (speed or stitch regulated).
11. Push the black run switch in the handle bar and begin sewing. Move the machine to follow the line of the pattern with the laser light.
12. At the end mark, turn the machine off by pushing the black button again.
13. Take an anchor stitch and bring the bobbin to the top the same way you did in the beginning.
14. Cut the threads close to the quilt.
11
15. Move your machine back to the beginning. If there is room to sew another row, move your laser and do so. If not, index your quilt and sew the next row.
A word about following patterns. You need to remember you will not give the pattern to your customer. You will give her the quilt. She will not know, nor care if you followed the pattern accurately. She will care if it looks good. If you find yourself off the pattern while sewing, gently move back toward the line. It will look great. If you jerk back onto the line, it will look like an error and you will probably frog stitch it. (Frog stitch = ripit ripit.) You may want to use the laser mounted on the top to sew a motif that is printed on paper in a block. Using this technique, you will probably be working from the front of the machine. 1. First mount the light by sliding the
bracket over the laser mount. 2. Lay your pattern on the top of the
quilt beside the block you want to sew.
3. Your laser will swivel the same way it does on the side mount. Point it so the dot of light is on the point where you want to begin sewing.
4. Pull up your bobbin thread and anchor your stitch the same as using the laser on the side.
5. Sew your pattern, again following the line with the dot of light.
6. When you finish, anchor your thread, pull up the bobbin and cut the threads the same as in the side mounted laser instructions.
Another way to use the laser is to make a pattern for CompuQuilter. If you own CompuQuilter, see “How to make a
pattern” in the Pattern manual for detailed instructions.
12
Getting Ready to Sew
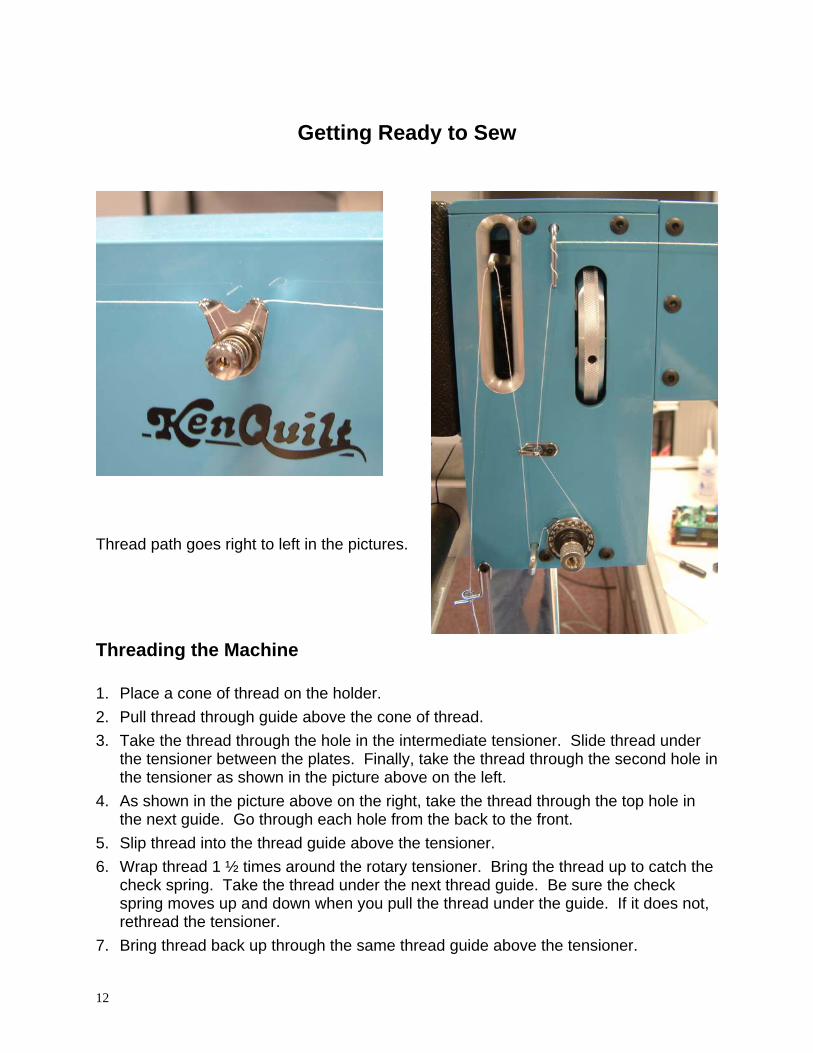
Thread path goes right to left in the pictures. Threading the Machine 1. Place a cone of thread on the holder. 2. Pull thread through guide above the cone of thread. 3. Take the thread through the hole in the intermediate tensioner. Slide thread under
the tensioner between the plates. Finally, take the thread through the second hole in the tensioner as shown in the picture above on the left.
4. As shown in the picture above on the right, take the thread through the top hole in the next guide. Go through each hole from the back to the front.
5. Slip thread into the thread guide above the tensioner. 6. Wrap thread 1 ½ times around the rotary tensioner. Bring the thread up to catch the
check spring. Take the thread under the next thread guide. Be sure the check spring moves up and down when you pull the thread under the guide. If it does not, rethread the tensioner.
7. Bring thread back up through the same thread guide above the tensioner.
13
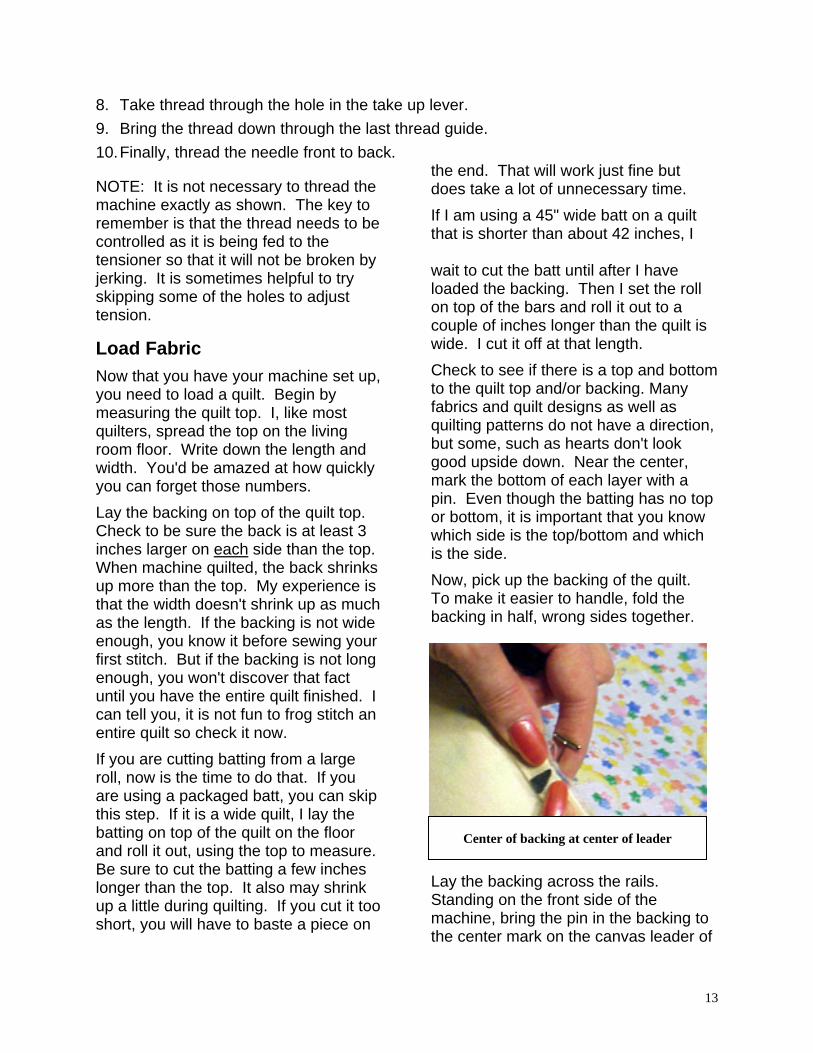
Center of backing at center of leader
8. Take thread through the hole in the take up lever. 9. Bring the thread down through the last thread guide. 10. Finally, thread the needle front to back.
NOTE: It is not necessary to thread the machine exactly as shown. The key to remember is that the thread needs to be controlled as it is being fed to the tensioner so that it will not be broken by jerking. It is sometimes helpful to try skipping some of the holes to adjust tension.
Load Fabric Now that you have your machine set up, you need to load a quilt. Begin by measuring the quilt top. I, like most quilters, spread the top on the living room floor. Write down the length and width. You'd be amazed at how quickly you can forget those numbers. Lay the backing on top of the quilt top. Check to be sure the back is at least 3 inches larger on each side than the top. When machine quilted, the back shrinks up more than the top. My experience is that the width doesn't shrink up as much as the length. If the backing is not wide enough, you know it before sewing your first stitch. But if the backing is not long enough, you won't discover that fact until you have the entire quilt finished. I can tell you, it is not fun to frog stitch an entire quilt so check it now. If you are cutting batting from a large roll, now is the time to do that. If you are using a packaged batt, you can skip this step. If it is a wide quilt, I lay the batting on top of the quilt on the floor and roll it out, using the top to measure. Be sure to cut the batting a few inches longer than the top. It also may shrink up a little during quilting. If you cut it too short, you will have to baste a piece on
the end. That will work just fine but does take a lot of unnecessary time. If I am using a 45" wide batt on a quilt that is shorter than about 42 inches, I wait to cut the batt until after I have loaded the backing. Then I set the roll on top of the bars and roll it out to a couple of inches longer than the quilt is wide. I cut it off at that length. Check to see if there is a top and bottom to the quilt top and/or backing. Many fabrics and quilt designs as well as quilting patterns do not have a direction, but some, such as hearts don't look good upside down. Near the center, mark the bottom of each layer with a pin. Even though the batting has no top or bottom, it is important that you know which side is the top/bottom and which is the side. Now, pick up the backing of the quilt. To make it easier to handle, fold the backing in half, wrong sides together.
Lay the backing across the rails. Standing on the front side of the machine, bring the pin in the backing to the center mark on the canvas leader of
14
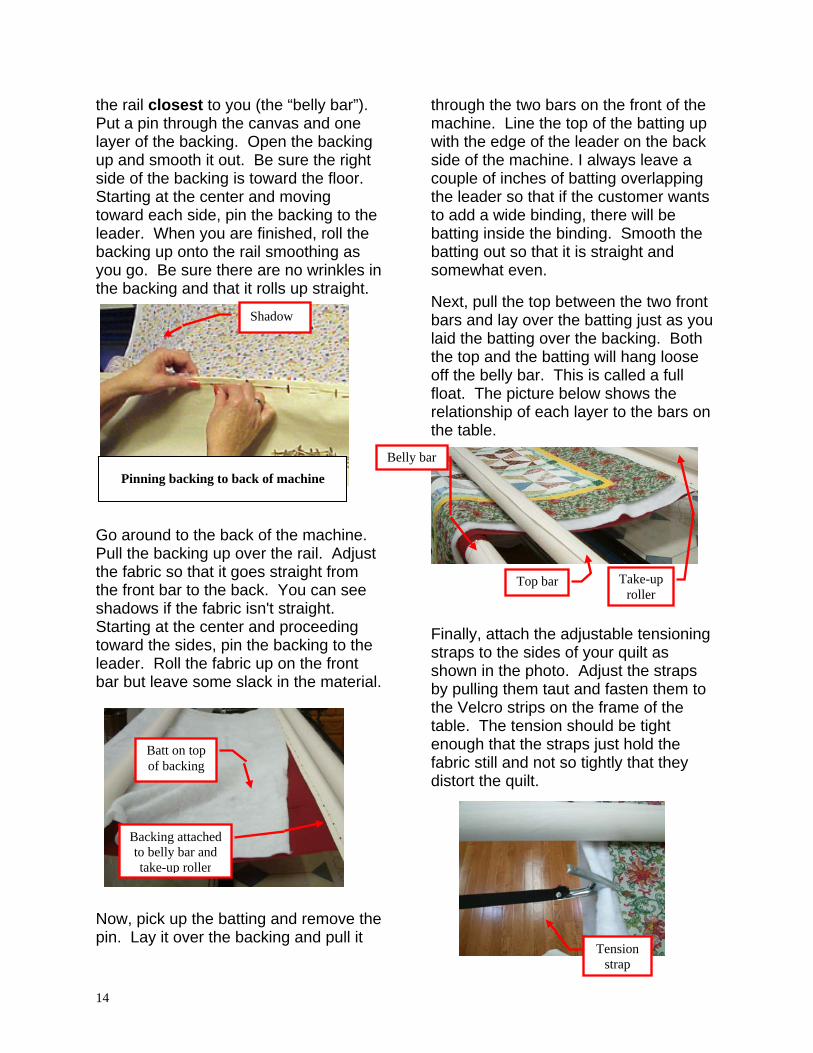
the rail closest to you (the “belly bar”). Put a pin through the canvas and one layer of the backing. Open the backing up and smooth it out. Be sure the right side of the backing is toward the floor. Starting at the center and moving toward each side, pin the backing to the leader. When you are finished, roll the backing up onto the rail smoothing as you go. Be sure there are no wrinkles in the backing and that it rolls up straight.
Go around to the back of the machine. Pull the backing up over the rail. Adjust the fabric so that it goes straight from the front bar to the back. You can see shadows if the fabric isn't straight. Starting at the center and proceeding toward the sides, pin the backing to the leader. Roll the fabric up on the front bar but leave some slack in the material.
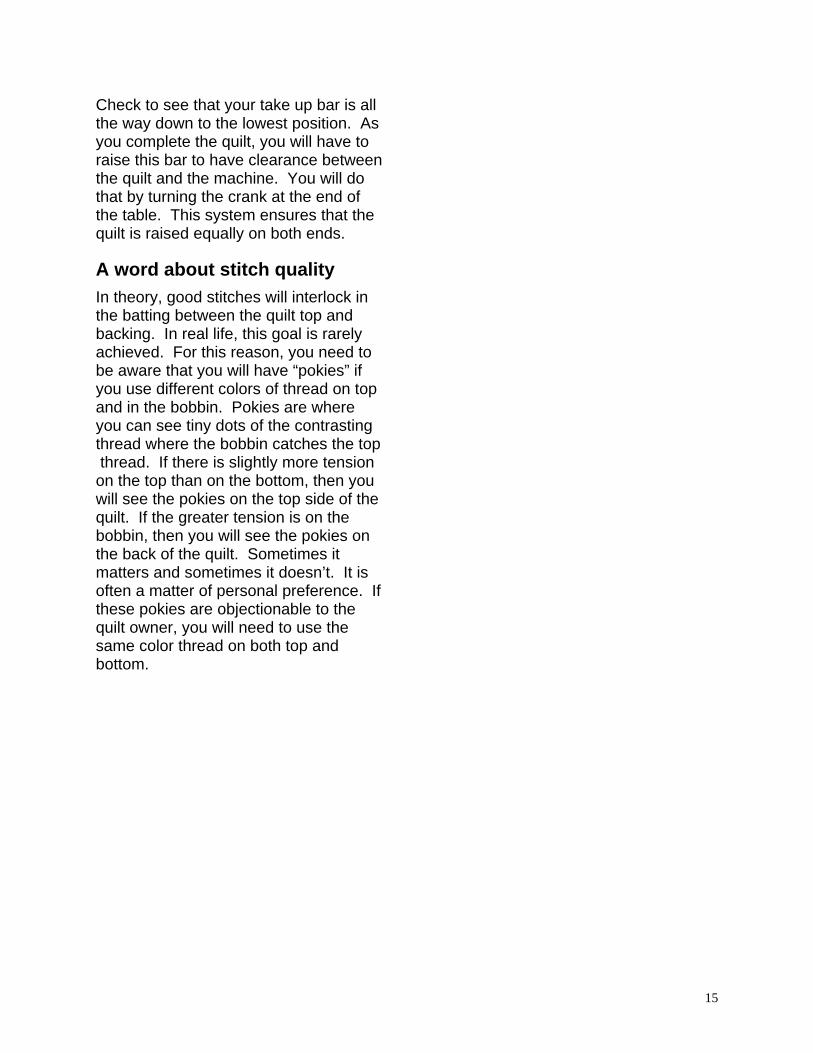
Now, pick up the batting and remove the pin. Lay it over the backing and pull it
through the two bars on the front of the machine. Line the top of the batting up with the edge of the leader on the back side of the machine. I always leave a couple of inches of batting overlapping the leader so that if the customer wants to add a wide binding, there will be batting inside the binding. Smooth the batting out so that it is straight and somewhat even.
Next, pull the top between the two front bars and lay over the batting just as you laid the batting over the backing. Both the top and the batting will hang loose off the belly bar. This is called a full float. The picture below shows the relationship of each layer to the bars on the table.
Finally, attach the adjustable tensioning straps to the sides of your quilt as shown in the photo. Adjust the straps by pulling them taut and fasten them to the Velcro strips on the frame of the table. The tension should be tight enough that the straps just hold the fabric still and not so tightly that they distort the quilt.
Pinning backing to back of machine
Shadow
Backing attached to belly bar and take-up roller
Belly bar
Top bar Take-up roller
Tension strap
Batt on top of backing
15
Check to see that your take up bar is all the way down to the lowest position. As you complete the quilt, you will have to raise this bar to have clearance between the quilt and the machine. You will do that by turning the crank at the end of the table. This system ensures that the quilt is raised equally on both ends.
A word about stitch quality In theory, good stitches will interlock in the batting between the quilt top and backing. In real life, this goal is rarely achieved. For this reason, you need to be aware that you will have “pokies” if you use different colors of thread on top and in the bobbin. Pokies are where you can see tiny dots of the contrasting thread where the bobbin catches the top thread. If there is slightly more tension on the top than on the bottom, then you will see the pokies on the top side of the quilt. If the greater tension is on the bobbin, then you will see the pokies on the back of the quilt. Sometimes it matters and sometimes it doesn’t. It is often a matter of personal preference. If these pokies are objectionable to the quilt owner, you will need to use the same color thread on both top and bottom.
16
Regal Operation
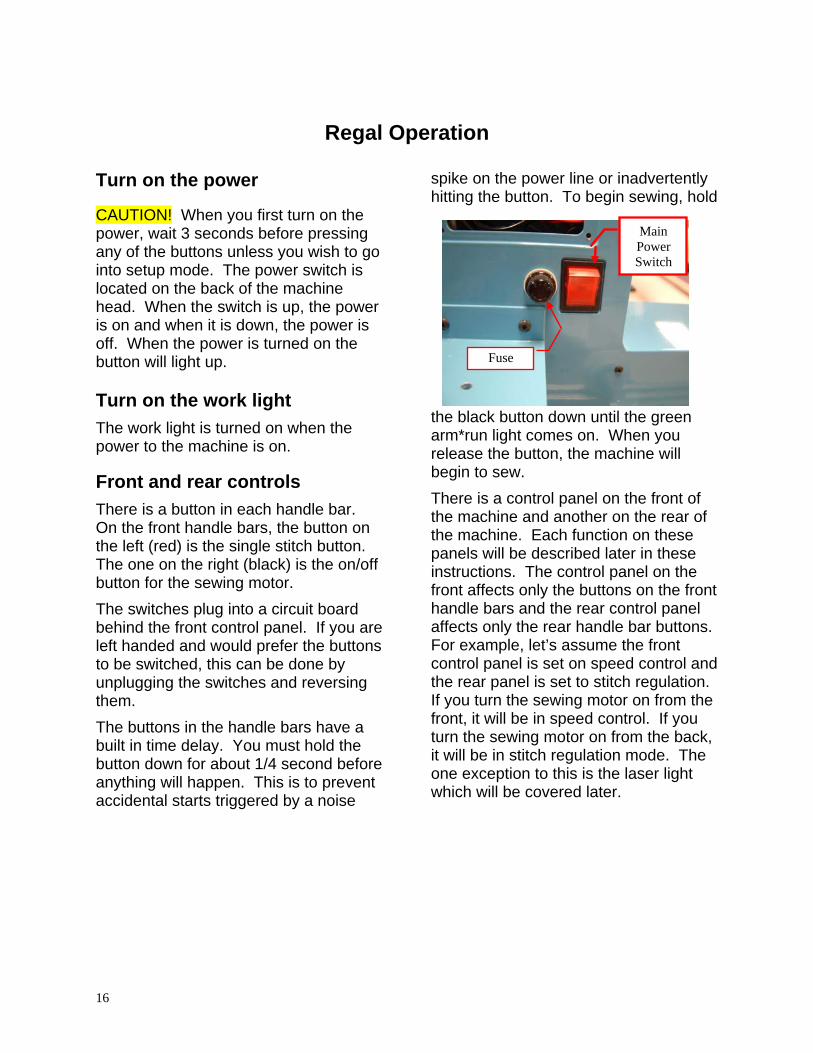
Turn on the power CAUTION! When you first turn on the power, wait 3 seconds before pressing any of the buttons unless you wish to go into setup mode. The power switch is located on the back of the machine head. When the switch is up, the power is on and when it is down, the power is off. When the power is turned on the button will light up. Turn on the work light The work light is turned on when the power to the machine is on. Front and rear controls There is a button in each handle bar. On the front handle bars, the button on the left (red) is the single stitch button. The one on the right (black) is the on/off button for the sewing motor. The switches plug into a circuit board behind the front control panel. If you are left handed and would prefer the buttons to be switched, this can be done by unplugging the switches and reversing them. The buttons in the handle bars have a built in time delay. You must hold the button down for about 1/4 second before anything will happen. This is to prevent accidental starts triggered by a noise
spike on the power line or inadvertently hitting the button. To begin sewing, hold
the black button down until the green arm*run light comes on. When you release the button, the machine will begin to sew. There is a control panel on the front of the machine and another on the rear of the machine. Each function on these panels will be described later in these instructions. The control panel on the front affects only the buttons on the front handle bars and the rear control panel affects only the rear handle bar buttons. For example, let’s assume the front control panel is set on speed control and the rear panel is set to stitch regulation. If you turn the sewing motor on from the front, it will be in speed control. If you turn the sewing motor on from the back, it will be in stitch regulation mode. The one exception to this is the laser light which will be covered later.
Main Power Switch
Fuse
17
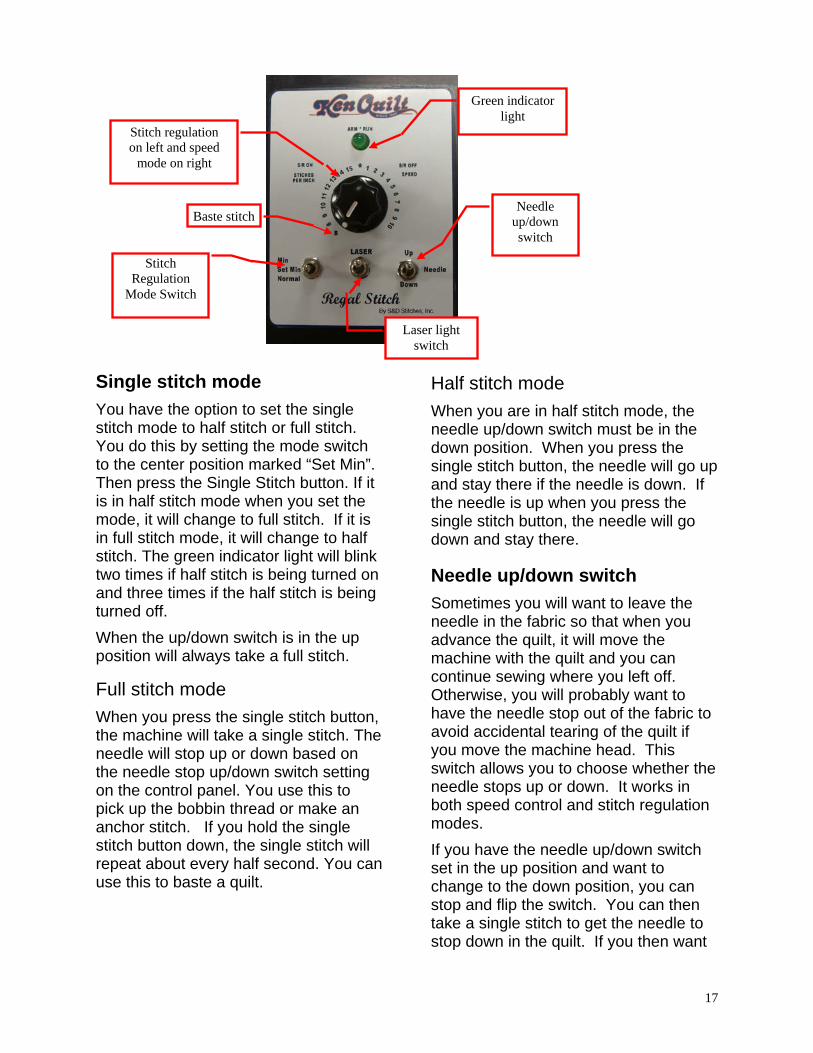
Single stitch mode You have the option to set the single stitch mode to half stitch or full stitch. You do this by setting the mode switch to the center position marked “Set Min”. Then press the Single Stitch button. If it is in half stitch mode when you set the mode, it will change to full stitch. If it is in full stitch mode, it will change to half stitch. The green indicator light will blink two times if half stitch is being turned on and three times if the half stitch is being turned off. When the up/down switch is in the up position will always take a full stitch.
Full stitch mode When you press the single stitch button, the machine will take a single stitch. The needle will stop up or down based on the needle stop up/down switch setting on the control panel. You use this to pick up the bobbin thread or make an anchor stitch. If you hold the single stitch button down, the single stitch will repeat about every half second. You can use this to baste a quilt.
Half stitch mode When you are in half stitch mode, the needle up/down switch must be in the down position. When you press the single stitch button, the needle will go up and stay there if the needle is down. If the needle is up when you press the single stitch button, the needle will go down and stay there.
Needle up/down switch Sometimes you will want to leave the needle in the fabric so that when you advance the quilt, it will move the machine with the quilt and you can continue sewing where you left off. Otherwise, you will probably want to have the needle stop out of the fabric to avoid accidental tearing of the quilt if you move the machine head. This switch allows you to choose whether the needle stops up or down. It works in both speed control and stitch regulation modes. If you have the needle up/down switch set in the up position and want to change to the down position, you can stop and flip the switch. You can then take a single stitch to get the needle to stop down in the quilt. If you then want
Needle up/down switch
Green indicator light
Laser light switch
Stitch regulation on left and speed
mode on right
Baste stitch
Stitch Regulation
Mode Switch
18
to change back to the up position, just flip the switch and begin sewing. When you stop, the needle will then stop in the up position. If you have the switch set to the needle down position and need to change the bobbin, you will need to change to the needle up position and take a single stitch. After you have installed a new bobbin, you can change the switch back to the needle down position. Laser switch The laser switch turns the laser light on and off. The switches on the front and back panels work like the 3-way light in your house. If the laser is on, either switch will turn it off. If the laser is off, either switch will turn it on. If the power to the machine is off, the laser will be off. If you leave the laser on and turn off the power, the laser will come back on when you turn the power to the machine back on.
Green indicator light You will notice that the green indicator light on the control panel is marked "arm*run". If the machine is sewing, of course that light is on to indicate the machine is running. However, it will also alert you that the machine is "armed" so the machine will begin sewing when you move the machine head.
Mode Selector Dial There is a dial on the control panel. The left half of that dial is numbered 8 through 15 followed by the letter B. The right half is numbered 1 through 10 followed by the letters FP. If the dial is set anywhere on the left side of the dial, up to the B, the machine is in stitch
regulation mode. If the dial is set all the way to the B, then the machine is in baste mode. If the dial is set anywhere on the right side of the dial up to the 10, the machine is in non-stitch regulated constant speed mode. The motor must be turned off to change modes.
Constant speed mode The numbers 1 through 10 on the speed mode side of the dial are approximately equal to a speed of 50 to 2600 RPM. You can adjust the speed while sewing. If you go past the 1 setting into stitch regulation side, the machine will run at the lowest speed. It will not change to stitch regulation mode until you turn the motor off and turn it back on. To start sewing in constant speed mode, press the motor on/off button in the handlebar, then release the button. Be prepared to move as soon as you press the button to avoid piling up several short stitches. You control the stitch length by controlling how fast you move the machine head. To stop, press the motor on/off button again. The machine will take a single stitch and stop with the needle up or down based on the needle up/down switch setting.
Stitch Regulation Mode Switch This switch sets three stitch regulation modes. In the “up” position, the machine is in stitch regulated min mode. In the middle position, it is in the set min speed mode. In the bottom position, it is in the normal stitch regulation mode. Min Mode This is a modified stitch regulation mode. In this mode, when you turn the
19
motor on, the machine will begin to sew at the min speed you have set. As your movements cause the machine to run above your min speed, the stitch regulator will start to control stitch length. To change stitch length, you must first turn off the sewing motor. Set a new stitch length and turn the sewing motor back on to continue sewing. The min speed can be changed to meet differing needs. If you are doing something very detailed and you are quilting slowly, you will want your Min speed set slow. Conversely, if you are free handing a pattern you are very comfortable with and are moving quickly, you will want to increase your Min Mode speed. If you are getting a long stitch coming out of a point, your Min speed isn’t set fast enough. Normal Stitch Regulation Mode The stitch regulation mode is selected when the selector dial is set on the left side of the dial. The numbers are approximately equal to 8 to 15 stitches per inch. The stitch length can be continuously adjusted within that range so long as the machine head is not moving. To begin sewing in stitch regulation mode, press and release the motor on/off button in the handle bar. The green indicator light will come on. When you move the machine head, it will begin sewing. To regulate stitch length, the sewing motor will speed up and slow down based on how fast you are moving the head. When you briefly stop moving the machine head, it will stop sewing. When you move again, it will sew again. If you stop for one second, the machine will position the needle according to the needle up/down switch setting without
having to hit the single stitch button. This makes it easier when using rulers to have the needle stop in the fabric and when not using rulers to be sure the needle is not in the fabric. You can take a single stitch with the sewing motor on in stitch regulation mode, so long as the head is not moving. Then just start moving again to continue sewing your pattern. To stop sewing, stop moving the machine head. When the machine stops sewing, press the motor on/off button. The machine will take a single stitch and stop with the needle up or down based on the needle up/down switch setting. The machine will not recognize the on/off button in stitch regulation mode while the machine is moving. You must stop the machine before turning the motor off. If you don’t move the head for approximately 4 seconds, the stitch regulator will turn off. When the regulator times out and shuts off, it will leave the needle where it is and not take a single stitch. This is done for safety. If you forget to turn the sewing motor off while you change the bobbin, the stitch regulator could time out and take a single stitch while your fingers are in the way. Basting Mode To enter Basting Mode, turn your selector dial fully counter clockwise to the “B”. When you push the run button and begin moving your machine head, it will take a stitch approximately every ½ inch. In this mode, single stitch will not work and the needle will not stop in the down position.

20
How to Care for Your Machine
Clean lint from machine Periodically check for lint on your machine and table. We use a paint brush to clean the tracks on the table and around the bobbin area. Each time you change bobbins, you should clean out any lint that has collected in the bobbin case as well as behind the bobbin case.
Oil machine Two to three drops of oil should be applied to the oil reservoir in the top of the quilting machine head. This distributes oil to the enclosed moving parts. Always use a high grade of sewing machine oil.
Many accomplished users oil the hook race every time they change the bobbin. This does make the machine run smoother. After oiling, be sure to run the machine on a scrap of cloth until no trace of oil can be seen on the cloth. It is easiest to see any oil on white cloth.
21
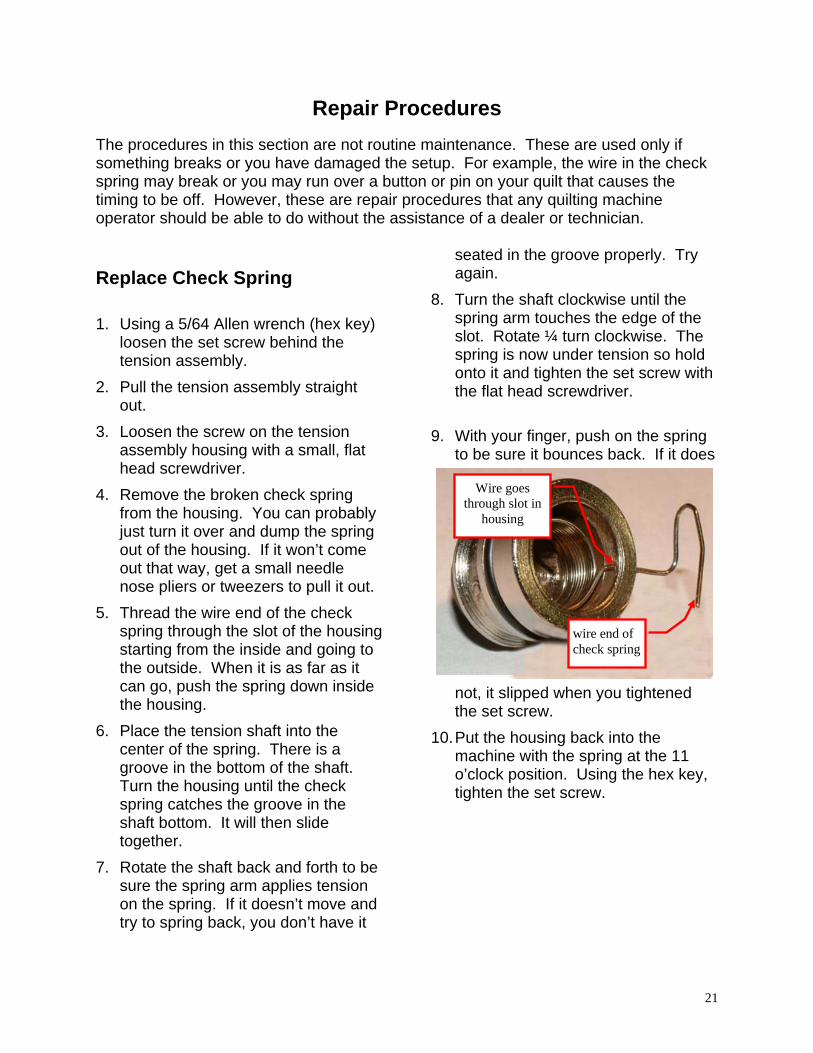
Repair Procedures The procedures in this section are not routine maintenance. These are used only if something breaks or you have damaged the setup. For example, the wire in the check spring may break or you may run over a button or pin on your quilt that causes the timing to be off. However, these are repair procedures that any quilting machine operator should be able to do without the assistance of a dealer or technician. Replace Check Spring 1. Using a 5/64 Allen wrench (hex key)
loosen the set screw behind the tension assembly.
2. Pull the tension assembly straight out.
3. Loosen the screw on the tension assembly housing with a small, flat head screwdriver.
4. Remove the broken check spring from the housing. You can probably just turn it over and dump the spring out of the housing. If it won’t come out that way, get a small needle nose pliers or tweezers to pull it out.
5. Thread the wire end of the check spring through the slot of the housing starting from the inside and going to the outside. When it is as far as it can go, push the spring down inside the housing.
6. Place the tension shaft into the center of the spring. There is a groove in the bottom of the shaft. Turn the housing until the check spring catches the groove in the shaft bottom. It will then slide together.
7. Rotate the shaft back and forth to be sure the spring arm applies tension on the spring. If it doesn’t move and try to spring back, you don’t have it
seated in the groove properly. Try again.
8. Turn the shaft clockwise until the spring arm touches the edge of the slot. Rotate ¼ turn clockwise. The spring is now under tension so hold onto it and tighten the set screw with the flat head screwdriver.
9. With your finger, push on the spring to be sure it bounces back. If it does
not, it slipped when you tightened the set screw.
10. Put the housing back into the machine with the spring at the 11 o’clock position. Using the hex key, tighten the set screw.
Wire goes through slot in
housing
wire end of check spring
22
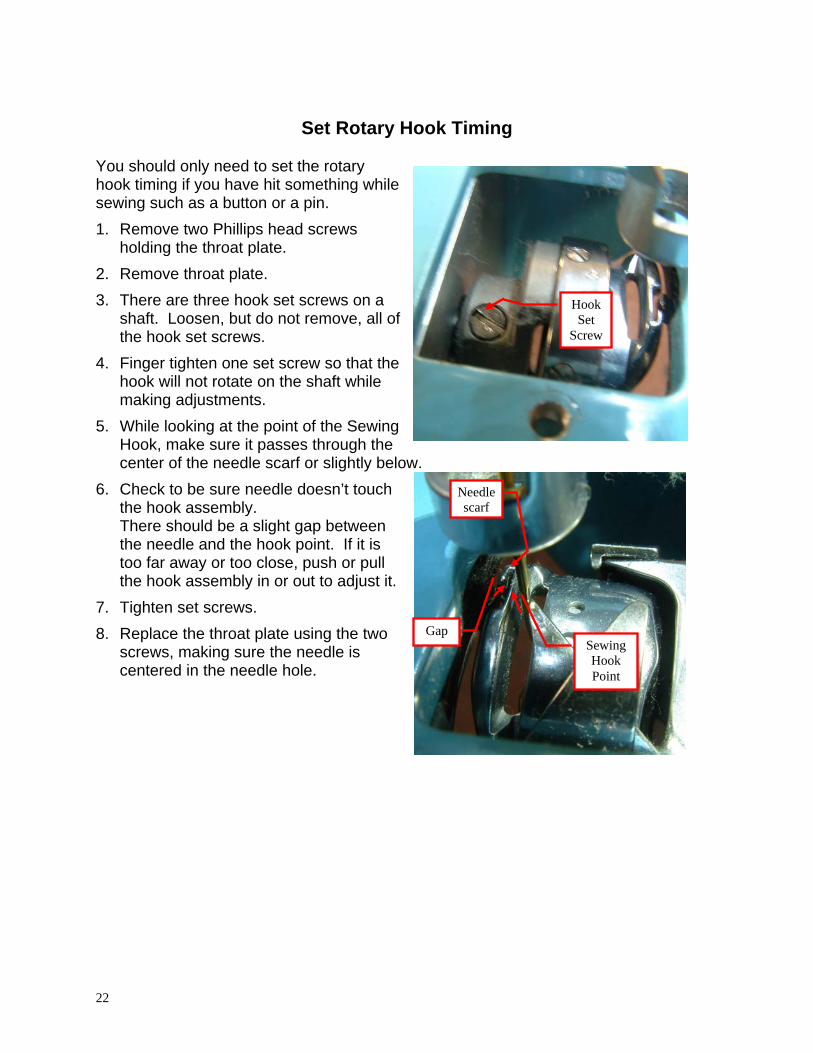
Set Rotary Hook Timing
You should only need to set the rotary hook timing if you have hit something while sewing such as a button or a pin. 1. Remove two Phillips head screws
holding the throat plate. 2. Remove throat plate. 3. There are three hook set screws on a
shaft. Loosen, but do not remove, all of the hook set screws.
4. Finger tighten one set screw so that the hook will not rotate on the shaft while making adjustments.
5. While looking at the point of the Sewing Hook, make sure it passes through the center of the needle scarf or slightly below.
6. Check to be sure needle doesn’t touch the hook assembly. There should be a slight gap between the needle and the hook point. If it is too far away or too close, push or pull the hook assembly in or out to adjust it.
7. Tighten set screws. 8. Replace the throat plate using the two
screws, making sure the needle is centered in the needle hole.
Hook Set
Screw
Needle scarf
Sewing Hook Point
Gap
23
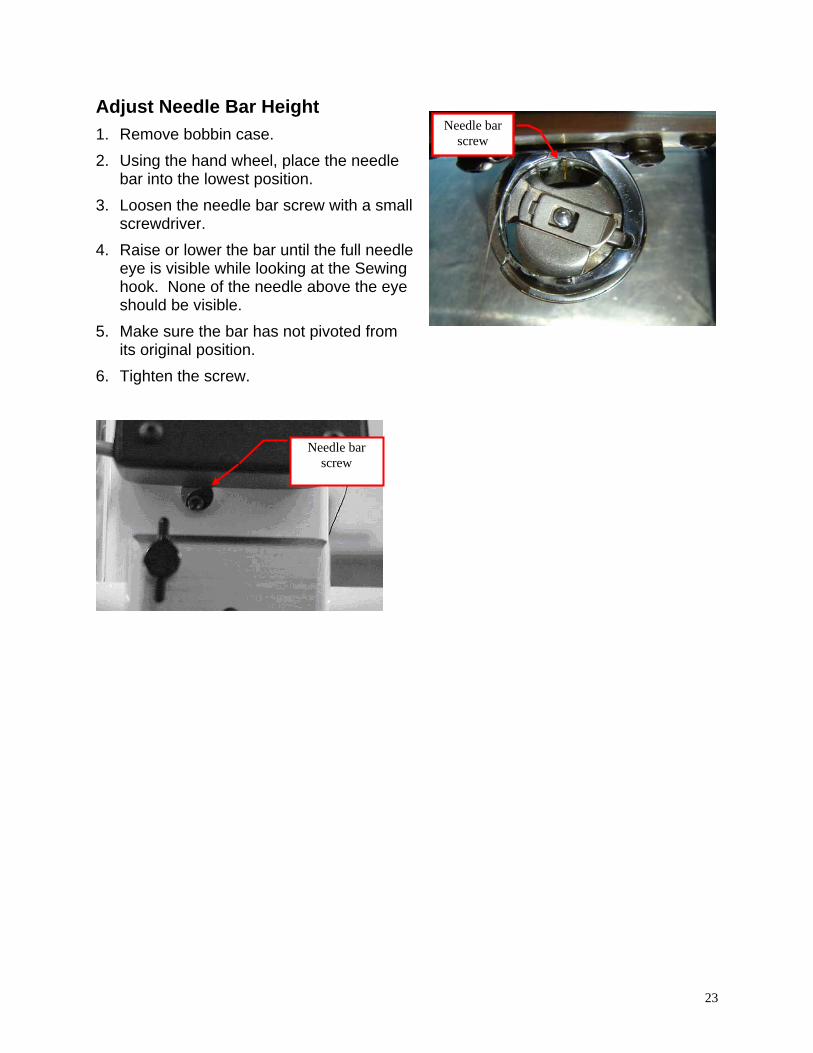
Eye of needle
Adjust Needle Bar Height 1. Remove bobbin case. 2. Using the hand wheel, place the needle
bar into the lowest position. 3. Loosen the needle bar screw with a small
screwdriver. 4. Raise or lower the bar until the full needle
eye is visible while looking at the Sewing hook. None of the needle above the eye should be visible.
5. Make sure the bar has not pivoted from its original position.
6. Tighten the screw.
Needle bar screw
Needle bar screw

24
Set Hopping Foot Height 1. Using the hand wheel, place the
needle bar into the lowest position. 2. Loosen the hopping foot screw with a
small screwdriver. 3. Raise or lower the hopping foot bar
until the distance from the bottom of the hopping foot is approximately the thickness of a dime minimum or a nickel maximum.
4. Tighten the screw keeping the needle in the center of the hopping foot.
Hopping foot screw
Dime minimum, nickel maximum
25
Regal Setup ParametersThe four switches in the handle bars are used to change the setup parameters of the machine. Be sure to note where the instructions distinguish between front and rear buttons and single stitch and run buttons.
Min Mode Setup When you set the min speed, you have two choices for how to do that. The factory default is set so that the sewing motor will not run while you set the min speed. You will become familiar with which speed works best for you while doing a particular type of job, i.e. pantograph at 6, free motion at 4, ruler work at 1, etc. Or you may choose to set the speed by watching how fast the needle runs. To make that choice, follow these directions. 1. Turn the power off. 2. Set your rear needle up/down to the
“up” position. 3. While holding the front single stitch
button down, turn on the power. Hold for 3 or 4 seconds. When the power is on, you can release the front button.
4. To set the default to the motor running while setting the min speed, press the rear single stitch button. The LED will blink two times. OR To set the default to the motor not running while setting the min speed, press the rear run button. The LED will blink three times.
Set Min Speed – Motor Not Running 1. To set the min speed, put the switch
in the center position. Put the Mode Selection Dial to the right side.
2. Hit the red run button. The green led
will blink twice indicating that your min speed has been set.
3. Move the mode selector switch to
the min position. Move the mode selector dial to the left side to the number of stitches per inch you want to run. You are now ready to sew.
Set Min Speed – Motor Running 1. To set the min speed mode, put the
switch in the center position. Put the Mode Selection Dial to the right side.
2. CAUTION: when you hit the red run
button, the machine will sew at the speed you have set on the right side of the dial. Remove the thread from the machine and be careful that you are not sewing where you don’t want to.
3. As the machine is running, turn the
dial until it is running at the speed you want your min speed to be set.
4. Hit the red run button again. It will
turn off the motor and the green led will blink twice indicating that your min speed has been set.
5. Move the mode selector switch to the min position. Move the mode selector dial to the left side to the
26
number of stitches per inch you want to run. Rethread the machine and begin to sew.
Motor Speed Calibration Calibrate Speed Mode is used when the system is setup the first time at the factory. If for some reason the DC motor drive needs to be replaced, you will use these instructions or set it back to factory defaults.
Calibrate Speed Mode First turn the power switch to the off position. While holding the front run button down, turn the power switch to the on position. The motor will start running at half the maximum speed. The Single Stitch Speed Setting and Auto Calibrate settings will be set to 0. The system is designed for the machine to run at a maximum speed of 2000 RPM so half that speed is 1000 RPM. If the speed is correct, the green indicator light on the back panel will be on continuously. You can simply turn the power off and turn it back on to exit calibrate mode. If the speed is too fast, the light will blink 3 times, pause, and repeat. If the speed is too slow, the light will blink 2 times, pause, and repeat. To set the speed, follow these steps. 1. Remove the side panel.
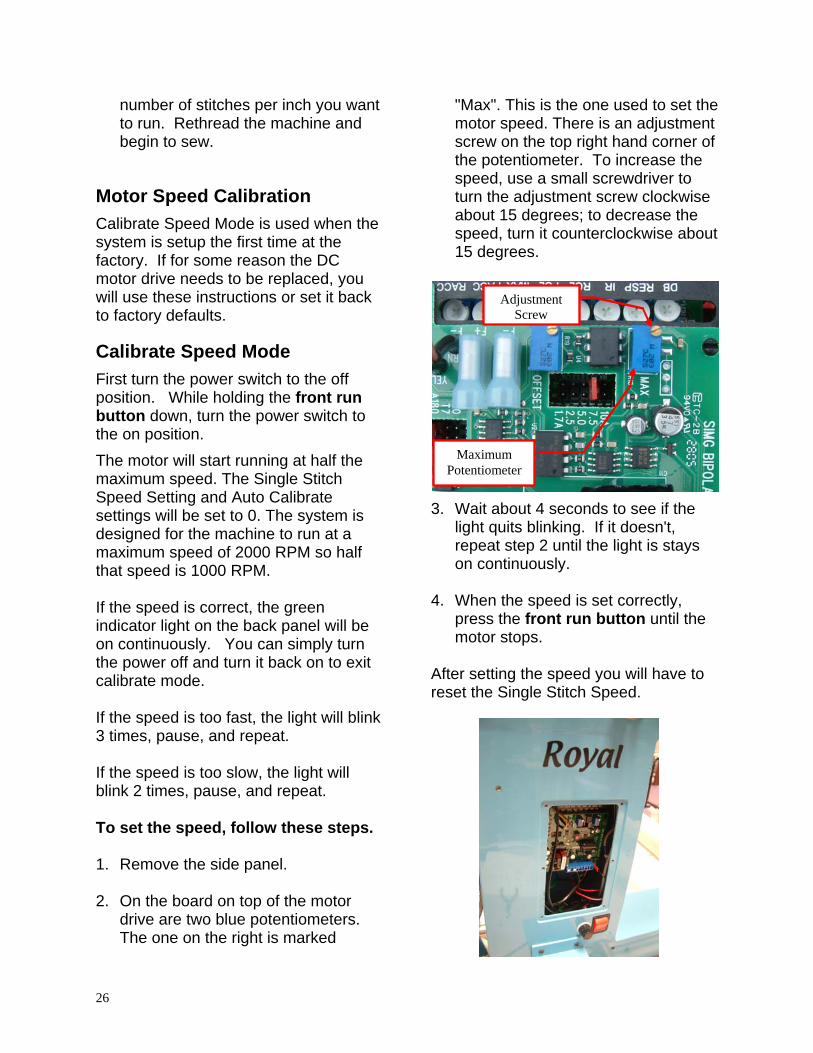
2. On the board on top of the motor
drive are two blue potentiometers. The one on the right is marked
"Max". This is the one used to set the motor speed. There is an adjustment screw on the top right hand corner of the potentiometer. To increase the speed, use a small screwdriver to turn the adjustment screw clockwise about 15 degrees; to decrease the speed, turn it counterclockwise about 15 degrees.
3. Wait about 4 seconds to see if the light quits blinking. If it doesn't, repeat step 2 until the light is stays on continuously.
4. When the speed is set correctly, press the front run button until the motor stops.
After setting the speed you will have to reset the Single Stitch Speed.
Maximum Potentiometer
Adjustment Screw
27
Single Stitch Settings The speed of the motor needs to be set so that the needle always stops in the correct position when you take a single stitch. If it is too fast or too slow, it won't stop in the correct position accurately. Stopping a motor is like stopping your automobile, neither can stop instantane-ously. To stop at a specific point, you apply the brakes before you get there. The faster you are going, the sooner you must apply the brakes. Just like your automobile, the faster the motor is going, the farther it will travel before coming to a stop.
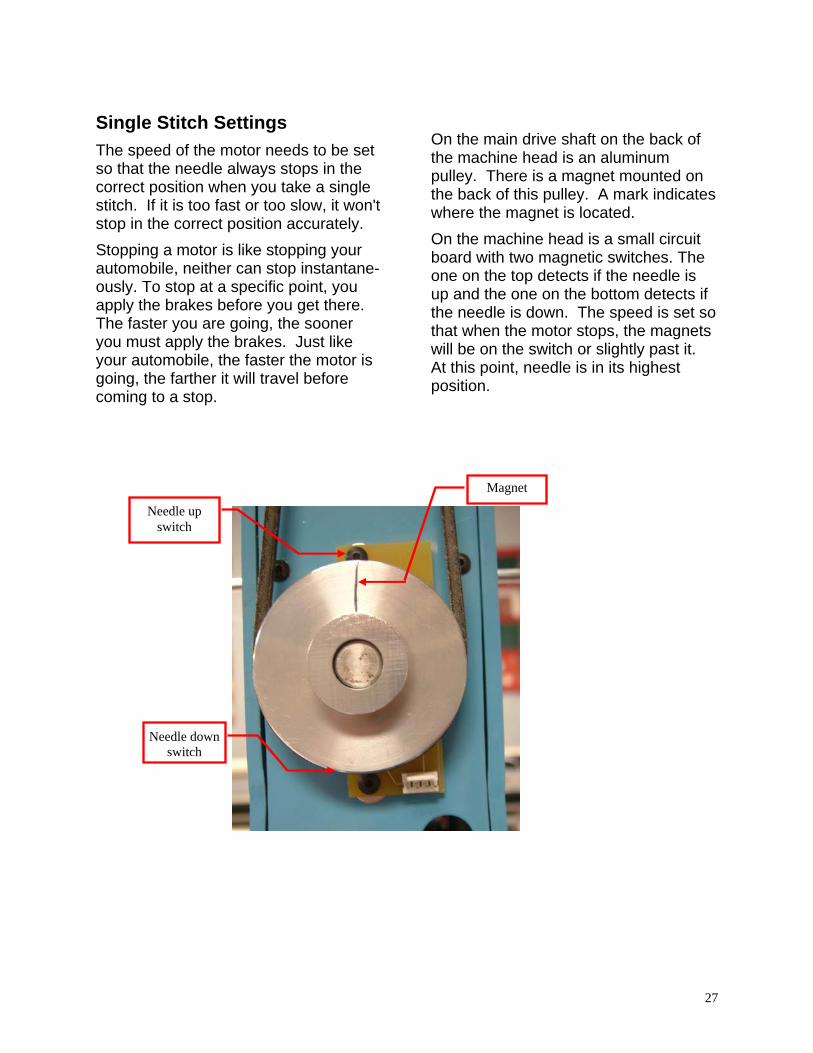
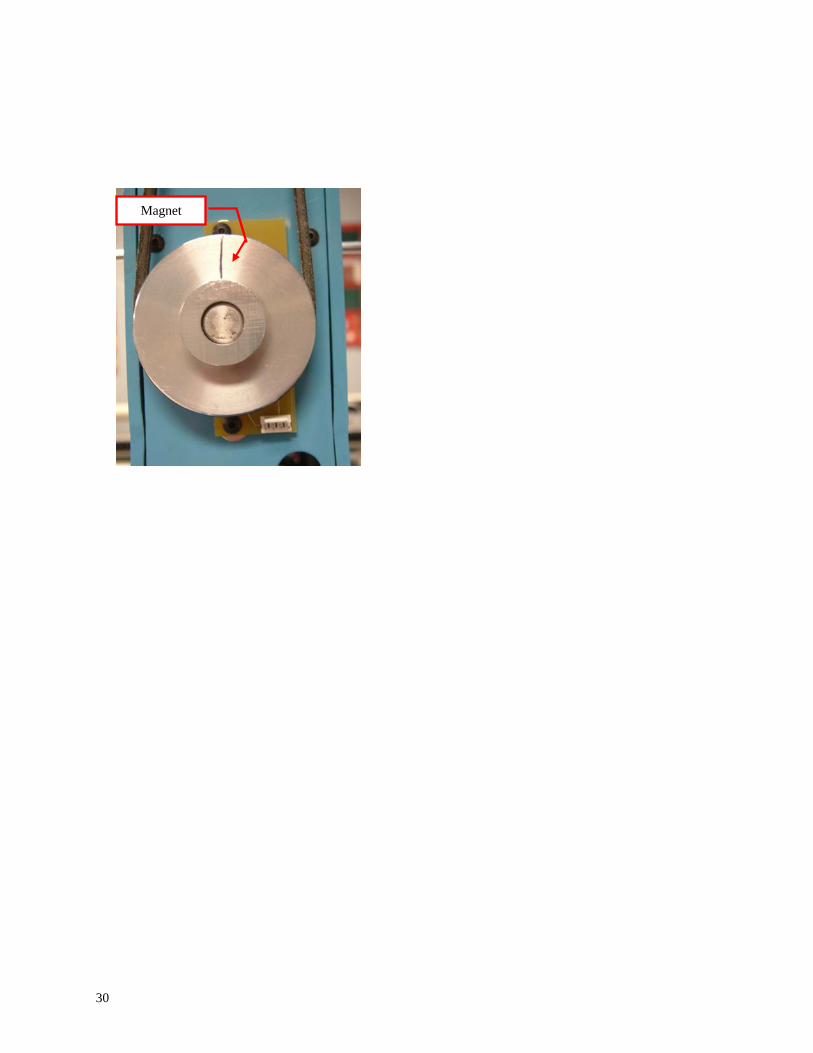
On the main drive shaft on the back of the machine head is an aluminum pulley. There is a magnet mounted on the back of this pulley. A mark indicates where the magnet is located. On the machine head is a small circuit board with two magnetic switches. The one on the top detects if the needle is up and the one on the bottom detects if the needle is down. The speed is set so that when the motor stops, the magnets will be on the switch or slightly past it. At this point, needle is in its highest position.
Needle down switch
Needle up switch
Magnet
28
Offset potentiometer
Adjustment screw
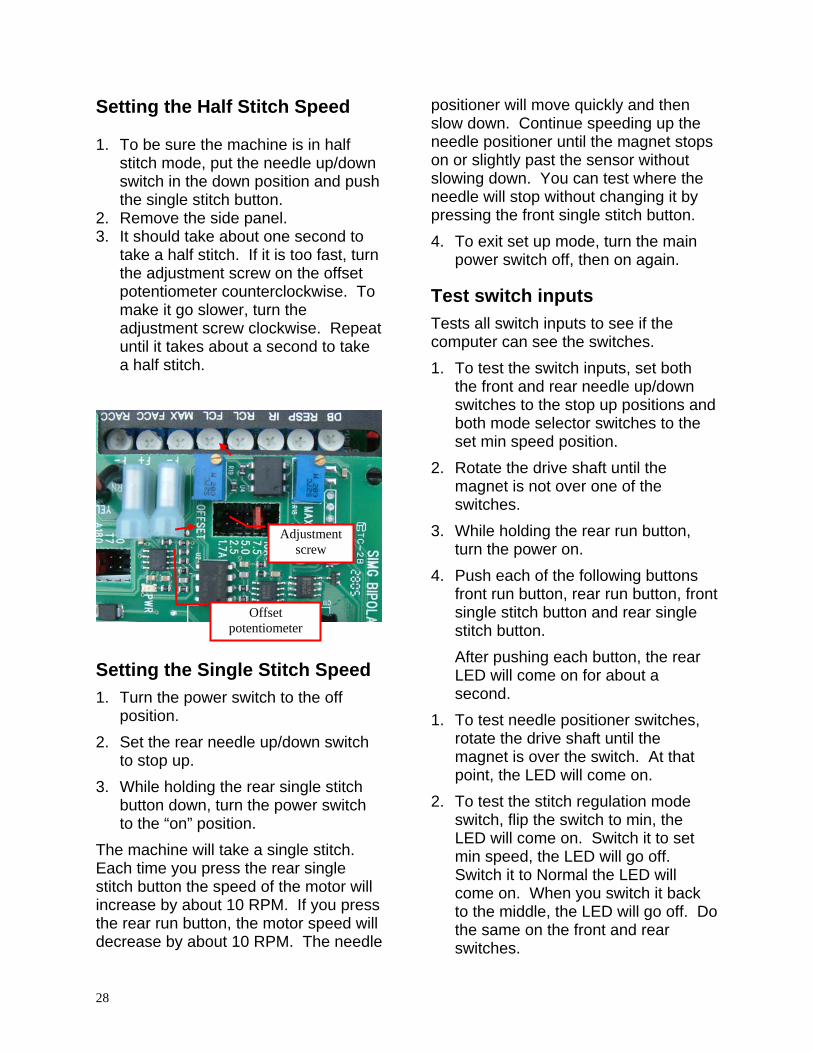
Setting the Half Stitch Speed 1. To be sure the machine is in half
stitch mode, put the needle up/down switch in the down position and push the single stitch button.
2. Remove the side panel. 3. It should take about one second to
take a half stitch. If it is too fast, turn the adjustment screw on the offset potentiometer counterclockwise. To make it go slower, turn the adjustment screw clockwise. Repeat until it takes about a second to take a half stitch.
Setting the Single Stitch Speed 1. Turn the power switch to the off
position. 2. Set the rear needle up/down switch
to stop up. 3. While holding the rear single stitch
button down, turn the power switch to the “on” position.
The machine will take a single stitch. Each time you press the rear single stitch button the speed of the motor will increase by about 10 RPM. If you press the rear run button, the motor speed will decrease by about 10 RPM. The needle
positioner will move quickly and then slow down. Continue speeding up the needle positioner until the magnet stops on or slightly past the sensor without slowing down. You can test where the needle will stop without changing it by pressing the front single stitch button. 4. To exit set up mode, turn the main
power switch off, then on again.
Test switch inputs Tests all switch inputs to see if the computer can see the switches. 1. To test the switch inputs, set both
the front and rear needle up/down switches to the stop up positions and both mode selector switches to the set min speed position.
2. Rotate the drive shaft until the magnet is not over one of the switches.
3. While holding the rear run button, turn the power on.
4. Push each of the following buttons front run button, rear run button, front single stitch button and rear single stitch button. After pushing each button, the rear LED will come on for about a second.
1. To test needle positioner switches, rotate the drive shaft until the magnet is over the switch. At that point, the LED will come on.
2. To test the stitch regulation mode switch, flip the switch to min, the LED will come on. Switch it to set min speed, the LED will go off. Switch it to Normal the LED will come on. When you switch it back to the middle, the LED will go off. Do the same on the front and rear switches.
29
3. Rotate the drive shaft until the magnet is over the other switch. The LED should come on again.
4. Flip the front needle up/down switch to the stop down position, and the rear LED will come on.
5. Flip the rear needle up/down switch to the stop down position, and the rear LED will come on.
If any of these tests fail, there is either a bad switch or a bad connection.
Test encoders This test will see if the computer is seeing the encoders. 1. Set the rear needle up/down switch
to the stop down position. 2. While holding the rear single stitch
button, turn power on. 3. With the rear needle up/down switch
set to the stop down position, move the head from left to right and the rear LED will come on. This indicates that the computer is seeing the left to right encoder.
4. Set the rear needle up/down switch to the stop up position.
5. Move the head from front to rear and the rear LED will come on again indicating the computer is seeing the front to rear encoder.
Setting the Needle Stop Position YOU SHOULD NEVER MAKE THIS CHANGE WITHOUT CALLING YOUR DEALER FIRST. IF YOUR DEALER SAYS YOU NEED TO MAKE THIS CHANGE, BE SURE TO FIRST SET THE SINGLE STITCH SPEED ACCORDING TO THE INSTRUCTIONS ON PAGE 32.
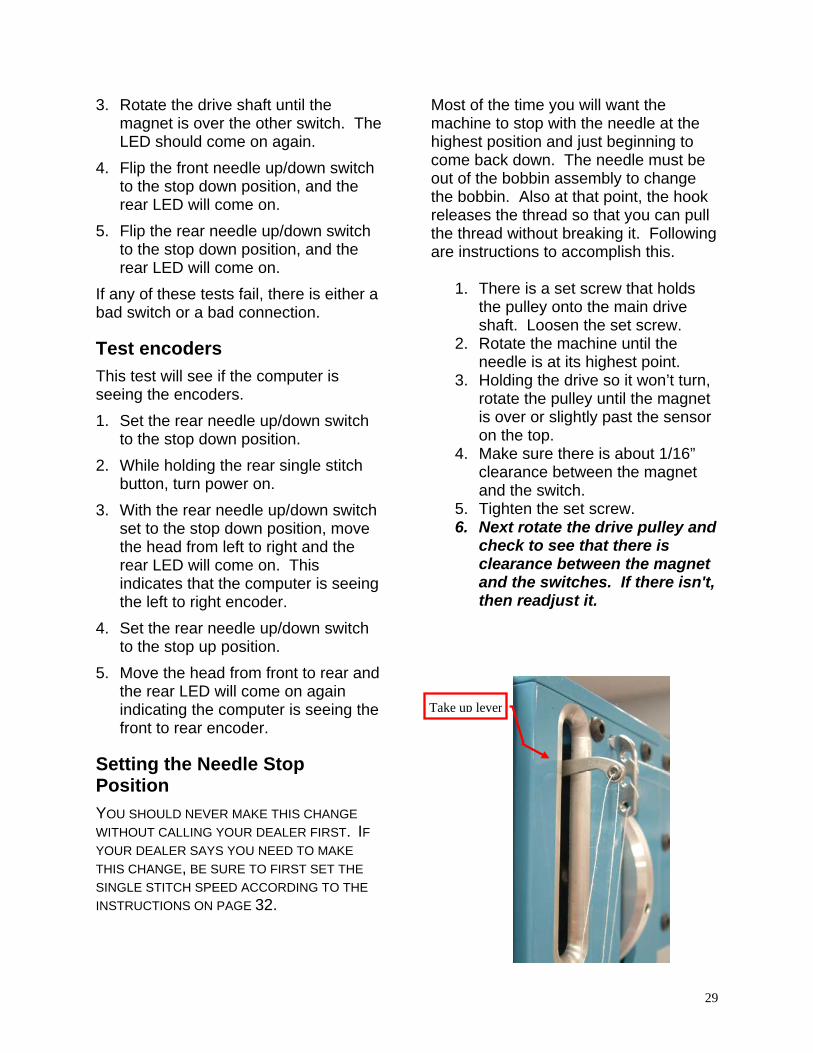
Most of the time you will want the machine to stop with the needle at the highest position and just beginning to come back down. The needle must be out of the bobbin assembly to change the bobbin. Also at that point, the hook releases the thread so that you can pull the thread without breaking it. Following are instructions to accomplish this.
1. There is a set screw that holds the pulley onto the main drive shaft. Loosen the set screw.
2. Rotate the machine until the needle is at its highest point.
3. Holding the drive so it won’t turn, rotate the pulley until the magnet is over or slightly past the sensor on the top.
4. Make sure there is about 1/16” clearance between the magnet and the switch.
5. Tighten the set screw. 6. Next rotate the drive pulley and
check to see that there is clearance between the magnet and the switches. If there isn't, then readjust it.
Take up lever
30
Magnet
31
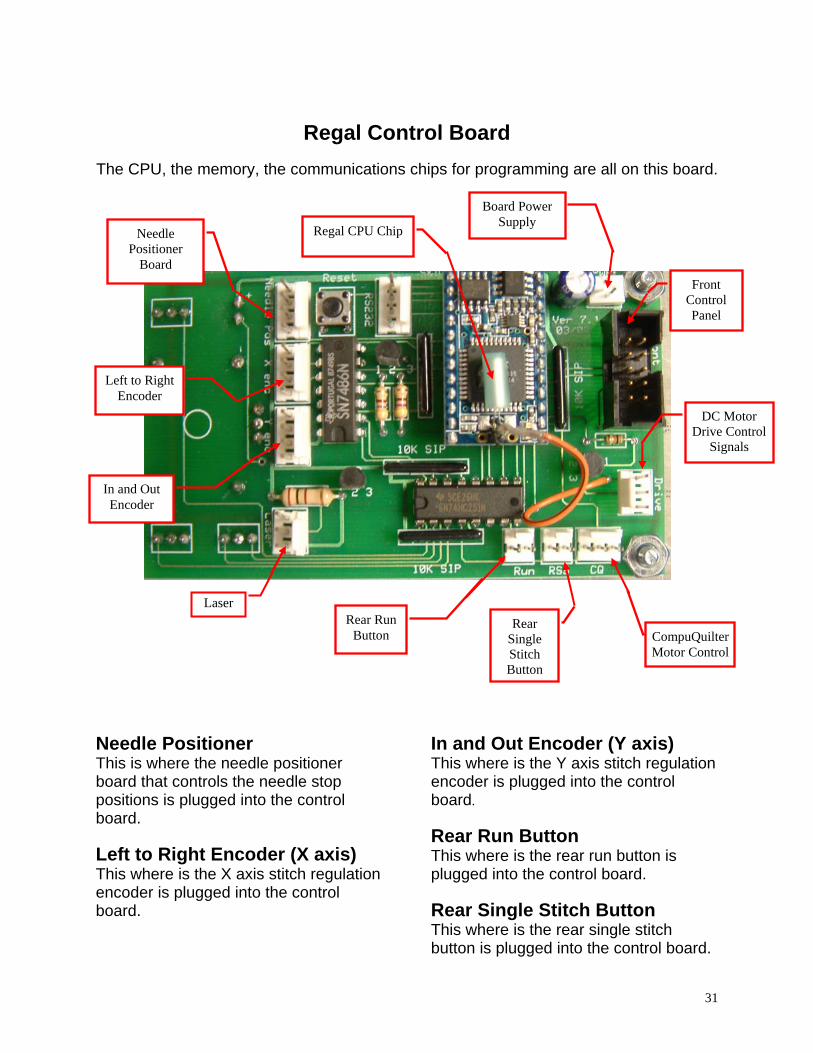
Regal Control Board
The CPU, the memory, the communications chips for programming are all on this board.
Needle Positioner This is where the needle positioner board that controls the needle stop positions is plugged into the control board.
Left to Right Encoder (X axis) This where is the X axis stitch regulation encoder is plugged into the control board.
In and Out Encoder (Y axis) This where is the Y axis stitch regulation encoder is plugged into the control board.
Rear Run Button This where is the rear run button is plugged into the control board.
Rear Single Stitch Button This where is the rear single stitch button is plugged into the control board.
Regal CPU Chip Needle Positioner
Board
Board Power Supply
Left to Right Encoder
In and Out Encoder
Rear Run Button
Rear Single Stitch Button
Front Control Panel
CompuQuilter Motor Control
DC MotorDrive Control
Signals
Laser
32
This button and the Rear Run Button can be reversed if the operator is left handed and prefers to switch the buttons. The same thing can be done on the front control panel.
Front Control Panel This is where the front control panel is plugged into the control board.
CompuQuilter Motor Control This is where CompuQuilter is plugged into the control board.
DC Motor Drive Control Signals This plug controls the motor by enabling the drive and setting the speed.
Laser Plug This is where the laser plugs in.
CompuQuilter Motor Plug This is where the CompuQuilter front control panel is plugged into the control board.
Controller Board Power Supply This is where the power supply is plugged into the control board.
33
Troubleshooting Poor stitch quality. LOOSE TOP STITCH: Turn the thread tensioner clockwise ¼ turn. Repeat until stitch quality is good.
QUILT TOP PUCKERS: Top tension is too tight. Turn thread tensioner counterclockwise ¼ turn. Repeat until stitch quality is good. Check to see that the machine is threaded correctly. Be sure the thread is not wrapped around the needle and that it goes through the check spring properly. This can cause puckering on the top (too much top tension) or loops underneath the quilt (not enough top tension). If the take up roller is too high, tension problems resulting in poor stitch quality can result.
“EYELASHES” on the back of the quilt can be caused by too little top tension. It is usually something extreme such as the machine not being threaded properly.
STITCHES ARE UNEVEN LENGTH: Check to be sure thread is not wrapped around encoder (one on rear axle and one on front of carriage) preventing it from turning.
Stitches are skipped when sewing. First, check to see that your machine is threaded correctly. It is easy to cause the thread to not go through the check spring. Tension, tension, tension. This probably causes more problems than anything else. You need correct tension on the
top and bottom threads but you also must have correct tension on the quilt. Check the tension of the bobbin following the instructions on page 9. Reduce the tension on the quilt by turning the take up roller a notch or two. If you still have problems, time the machine according to the instructions on page 25. Replace the needle. Be sure it is all the way up into the shaft and the scarf is toward the back. Take up roller may be too high. Turn the hand wheel to have a more flat surface across your quilt. Hopping foot needs to be timed. Follow instructions on page 26.
Bobbin thread breaks. Remove the bobbin from the case. Look inside the bobbin assembly to see if thread is wound around the shaft. If so, your bobbin is freewheeling inside the case. Put a small scrap of batting inside the case and replace the bobbin. This will provide friction to prevent the problem.
Top thread keeps breaking. Check your rhythm. If you are making jerky moves, the thread can break. Try slowing down and holding your elbow against your side and keeping your wrist still. This will help you control your movements because you are then moving your body instead of your wrist. Be sure your machine is properly threaded. Sometimes the thread will get caught under the spool as it comes off
34
and will prevent the thread from moving. If this happens repeatedly, lift the cone on the holder and put it back gently. This will create a small space under the cone so the thread will not get caught. Be sure the first thread guide is centered over the top of the cone of thread. Check to be sure the tension check spring is not broken. It should be in the 11 o’clock position. If it is broken, of course, replace it according to instructions on page 24. Look at your stitch quality. If it is good, the tension is good and should not be adjusted. Change the needle. A burr on the needle can be so small it is hard to see but still large enough to cut the thread. Polish the hook point with 800 grit emery cloth. Again, a tiny burr can cut the thread. Time the machine according to the instructions on page 25. Adjust needle bar according to the instructions on page 24. Very rarely, the problem could be the thread. Specialty threads may not be strong enough to withstand the tension of being used as a top thread. If that is the case, the thread will probably work in the bobbin. I know that won’t help you if you have already started the quilt but you will know next time you want to use that thread. It is possible but not likely that cotton thread may be too old. You can test its strength by pulling on it. It will stretch quite a bit but it is surprisingly hard to break without jerking on it. The thread can become too dry during storage and this will cause it to break.
This can happen in an arid region of the country or in buildings being heated in the winter. You can correct this problem by spritzing the thread with water. CAUTION: only spritz the thread, don’t get it wet. You may also prefer to put the thread in the freezer for several hours. When you take it out of the freezer, the temperature difference will cause the thread to draw moisture from the air.
The machine drags making it hard to move. Check to be sure you have clearance between the machine and the quilt. Do this by sliding your hand between the machine and quilt. You should have about the width of your finger clearance. If you do not have the clearance, turn the wheel counter clockwise to raise the take up roller.
It’s hard to control where you move the machine. There is probably lint or thread in the track and the wheels are running over it. Clean the track with a brush. Check the wheels to be sure thread or lint didn’t stick to them. If there is, remove it. Your machine should then move smoothly.
Tips and Helpful Hints Linda Taylor suggests putting a piece of scrap batting on your shoulder to catch thread clippings. Nichole Webb makes a little cup out of a coffee filter and tapes it to the side of the machine head to hold thread clippings. Nancy Barker suggests tying a string from one edge of the frame to the other over the top of the quilt to make a
35
simple reference line to help get a quilt on the machine straight. To avoid reaching under the machine to pick up or tie off the sewing thread, use the following instructions. First take a single stitch. Move the machine head several inches away then back close to where you took the stitch. Take another single stitch. Move the machine head away far enough to get hold of the threads. Clip the threads. This will leave no tail on the back of the quilt and enough thread coming from the bobbin to be able to start sewing.
When the pattern of the fabric is busy and makes it difficult to see where you are sewing, try turning off the lights or shining a light across the quilt. With directional lighting, you can see the shadow caused by the sewing thread even if you cannot see the thread itself.

36
How to get help Should you have a problem with operating your machine, first call your dealer. If for some reason your dealer is unavailable, call KENQUILT Quilting Machines. They will be able to assist you. For more information about our company and our products, please visit our web site at www.sd-stitches.com. Of course, we will always be delighted to hear your questions or comments. You may contact us at:
KENQUILT Quilting Machines 4535 E. 61st Street N. Kechi, KS 67067 866-QUILTS2 (866-784-5872) 316-303-0880 [email protected]
or
S&D Stitches, Inc. 5203 North Hwy 94 Rogers, AR 72756 e-mail: [email protected]