Embed Size (px)
Citation preview

The HELP Guide To Burn Contractures In Developing Countries
Preface . . . . . . . . . . . . . . . . . . . . . . . . . . . 2Contributors . . . . . . . . . . . . . . . . . . . . . . . 3Introduction . . . . . . . . . . . . . . . . . . . . . .4-5
Prevention. . . . . . . . . . . . . . . . . . . . . . . .6-7Initial Care of Burn Injury. . . . . . . . . . . .8-9Evaluation . . . . . . . . . . . . . . . . . . . . . .10-13
Surgical Release General Principles . . . . . . . . . . . . . .14-15 Skin Grafts . . . . . . . . . . . . . . . . . . . .16-18 Wound Dressings . . . . . . . . . . . . . .19-21 Healing and Complications. . . . . . .22-23
Region Specific Contracture Release Axilla . . . . . . . . . . . . . . . . . . . . . . . .24-25 Hand . . . . . . . . . . . . . . . . . . . . . . . . .26-27 Knee . . . . . . . . . . . . . . . . . . . . . . . . .28-29 Ankle . . . . . . . . . . . . . . . . . . . . . . . . .30-31
Physiotherapy General Principles . . . . . . . . . . . . . .32-33 Axilla . . . . . . . . . . . . . . . . . . . . . . . . . . . 34 Hand . . . . . . . . . . . . . . . . . . . . . . . . . . . 35 Knee . . . . . . . . . . . . . . . . . . . . . . . . . . . 36 Ankle . . . . . . . . . . . . . . . . . . . . . . . . . . 37
Table of Contents
Kelly Ledbetter

2 Preface
As a Global HELP Scholar, I traveled to Banepa, Nepal to volunteer at the Hospital and Rehabilitation Centre for Disabled Children (HRDC) for four months. I was drawn to HRDC because of its mission, its location, and my conversations with Dr. Spiegel, a surgeon who volunteers at HRDC every year.
HRDC is a tertiary care hospital whose goal is to provide treatment to underprivileged, physically disabled children. Their mission to help form a society in which individuals, particularly children, can live as equal citizens with optimum quality of life, independence, and participation inspired me to volunteer there. The dedication of HRDC’s faculty and the generosity of their financial supporters allowed them to realize this goal. The patients have to pay a maximum of 7% of their total hospital bill and even this minimal charge can be waived if necessary. As a result, children from across the country come to HRDC, often traveling many days to reach the hospital. This policy results in a diverse patient population of varied economic backgrounds, ethnicities, and education levels.
As a volunteer and a Global HELP Scholar I had several goals: to gain insight into global health, to dedicate time and energy to the hospital and patients, and to research a topic for a publication for Global HELP. The doctors, physiotherapists, and staff of HRDC helped me achieve these goals by allowing me to shadow them. The physicians were happy to tell me about the diseases they frequently saw, explain why they chose particular treatments, and demonstrate assessment techniques. Overall my experience at HRDC taught me an incredible amount about practicing medicine and allocating resources in a rural area of a developing country.
The first two months I spent in Nepal also provided me with a wealth of ideas for a Global HELP publication. In the end I chose to concentrate on the care and prevention of burn contractures because a large number of HRDC’s patients are children with grievous burn contractures on their upper extremities. To learn more about this topic I assisted with a basic chart review of 728 patients with post-burn contractures. As part of a follow-up study I helped design an assessment and history form for incoming post-burn contracture patients. When I returned to Nepal in April I continued investigating this topic, particularly how burn contractures can be prevented, how burn contractures are surgically treated, and how recontraction is prevented. While there are a wide array of treatments used by hospitals across the globe, with this project I hoped to compile the methods and practices that are highly valued by HRDC.
This project taught me an incredible amount and introduced me to fabulous physicians. I am so happy to have had this experience.
Sincerely, Kelly Ledbetter 2010 Global HELP Scholar
Preface

Contributors 3
NEED PICTURE
Contributors
I would like to extend my sincerest thanks to the following physicians and physiotherapists from the Hospital and Rehabilitation Centre for Disabled Children (HRDC) in Banepa, Nepal whose support and expertise made this project possible. Each person listed below contributed valuable information to this publication and taught me innumerable lessons during my stay at HRDC. I would especially like to thank Dr. Shiva Shrestha, Dr. Shiksha Shrestha, Dr. Gaurav Raj Dhakal, Dr. Basanta Mathema, Dr. K. D. Joshi, and Sudeep Ranjit. Thank you so much for letting me interview you endlessly, observe you during rounds, and take photographs in the operating room. I really appreciated your patience, wisdom, and willingness to dedicate extra time to this project. I could not have done it without you.
Sudeep Ranjit, physiotherapist
Damudar Shrestha, physiotherapist
Dr. Shiksha Shrestha, MS orthopedic surgeon, Registrar of HRDC
Dr. Shilu Shrestha, house officer
Dr. Shiva Shrestha, MS orthopedic surgeon
Dr. Nirajan Subedhi, house officer
Dr. Ruban Joshi, MSorthopedic surgeon
Dr. Binod Bijukachhe, MS orthopedic surgeon
Dr. K. D. Joshi, MS consultant plastic surgeon
Dr. Pramod Lamichhane, MS orthopedic resident
Dr. Basanta Mathema, MS consultant plastic surgeon
Dr. Gaurav Raj Dhakal, MS orthopedic surgery resident
Not Pictured:Dr. Banskota, MD, FACS orthopedic surgeon, founder of HRDC and B&B Hospital Dr. Bigyan Bhandhari, MS orthopedic surgery residentDr. Rajendra Gurung, MS orthopedic surgery resident Dr. Tarun Rajbhandary, MS orthopedic surgeon, medical in charge of HRDC
I would also like to thank the American physicians who helped edit this publication and who provided me with guidance.
Dr. Lynn Staheli, MD orthopedic surgeon, director
of Global HELP
Dr. David Spiegel, MDorthopedic surgeon
Dr. Daniel Ledbetter, MDpediatric surgeon

4 Introduction
1
2
3
4
Introduction What is a burn contracture scar?A burn contracture is an area of skin that has undergone excessive scarring as a result of healing from a deep burn injury. Contractures can begin as a slight puck-ering of scar tissue [1] but over time they can worsen, becoming thick bands of hypertrophic scars [2]. These tight bands of scar tissue can restrict joint movement, lead to the loss of joint mobility, and permanently impair normal joint function.
What causes a burn contracture?
When skin wounds heal, new collagen is synthesized to strengthen the weakened tissue. Fibroblasts also contract to pull the wound edges together and shrink the wound’s surface area. Excessive scarring and joint contracture can occur when collagen deposition and fibroblast contracture continues once the wound has closed. Without splinting or pressure pulling in the opposite direction, such contractures can continue years after the original burn injury.
What burns are likely to contract? The longer it takes a burn injury to heal, the more likely it is a burn contracture will form. More specifically, burns needing longer than 3 weeks to heal are more likely to produce unsightly hypertrophic scars and form contractures. As a result, patients who do not receive care shortly after they are burned are more likely to develop contractures. This is because this patient population is more susceptible to wound infection and less likely to have proper splinting. If there is little resis-tance to the shrinking affect of wound contraction, it is easy for a contracture to form. As a result, contractures usually appear when the scar line is vertical to the skin tension line, as in scars across a joint. Flexion contractures are more com-mon than extension contractures.
Who is most likely to be burned? In developing countries, burn injuries are very common in children, particularly infants and toddlers. Toddlers are frequently burn victims because they are too young to judge the danger of fire and are relatively uncoordinated. Burn victims typically come from poor families in rural regions, where fires are necessary for daily living and primary care is practically nonexistent.
Why are burn contractures so common? Burn contractures are a major problem in Nepal because families frequently have open fires in their homes for cooking and to provide heat. In rural districts, many homes have thin walls and lack windows [3,4] so these fires are constantly lit in the winter. These fires are not shielded, and are often at ground level. As a result, children are exposed to open flames and hot cooking equipment, the common causes of deep burns, on a daily basis.
A chart review: A retrospective chart review was completed at the Hospital and Rehabilitation Centre for Disabled Children (HRDC) in Banepa, Nepal [1, opposite page]. Patients of either sex and of all ages were eligible for the study if they: 1) were admitted to HRDC and treated for post-burn contracture between 1999 and 2007 2) had complete charts 3) had at least one operation at HRDC and 4) were native to Nepal. Data was compiled and analyzed according to the patients’ age, sex, and district such that it could be determined how many patients came from each region of Nepal, the frequency and distribution of burn contractures per patient, and the types of surgeries performed.
Introduction 5
1
Upper Extremity Burn Contractures
axilla 14%
upper arm 1%
elbow 9%
forearm
wrist 9%
hand49%
fingers only16%
Distribution of Burn Contractures
335256
218
479
0
50
100
150
200
250
300
350
400
450
500
UpperExtremities
LowerExtremities
Trunk Neck Head/face
Location of Burn Contracture
Number of Patients
PBC in this andother regions
PBC in only thisregion
Forearm 2%
Fig. 1 Patient Distribution Across Nepal
Fig. 2 Distribution of Burn Contractures
Upper Arm 1%
Elbow9%
Forearm 2%
Fingers only 16 %
Wrist9%
Hand49%
Axilla14%
Fig. 3 Upper Extremity Burn Contracture
Num
ber
of P
atie
nts
Num
ber
of P
atie
nts
Patient Distribution by Geographical Region
0
20
40
60
80
100
120
140
160
180
FarWestern
MidWestern
Western Central Eastern
Geographical Region
Number of Patients
Males
Females
Far Western
Mid Western
Western Central Eastern
Burn Contractures in Nepal
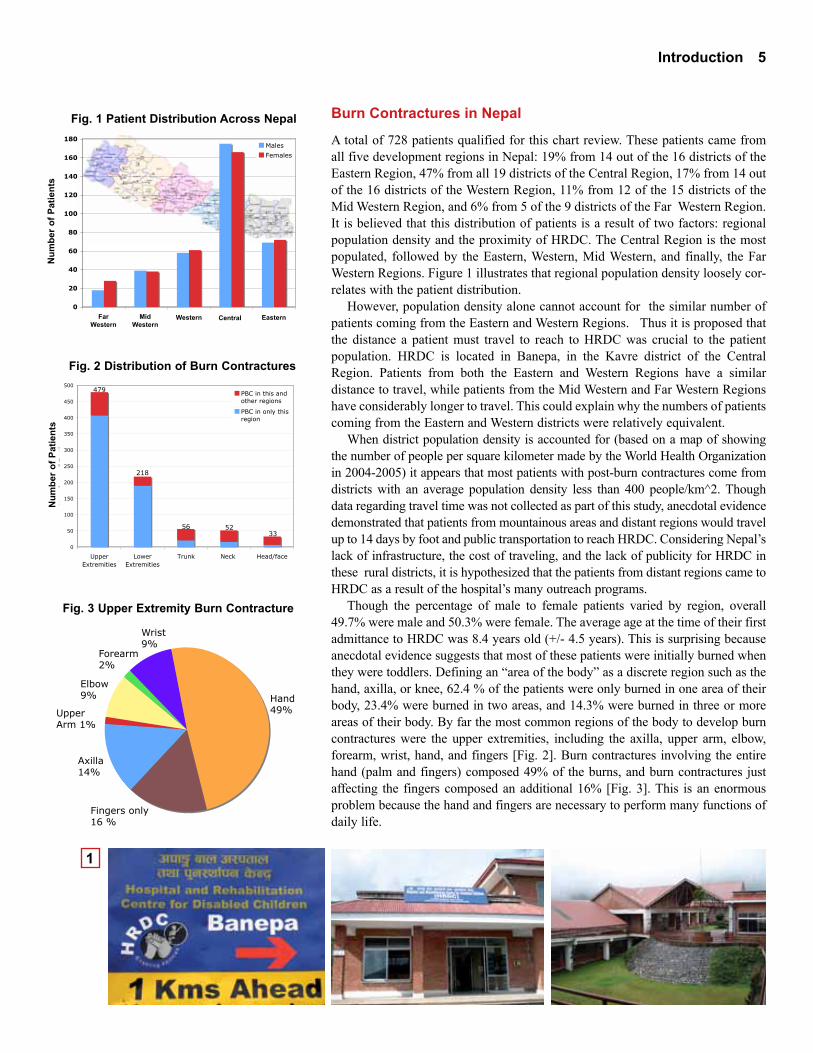
A total of 728 patients qualified for this chart review. These patients came from all five development regions in Nepal: 19% from 14 out of the 16 districts of the Eastern Region, 47% from all 19 districts of the Central Region, 17% from 14 out of the 16 districts of the Western Region, 11% from 12 of the 15 districts of the Mid Western Region, and 6% from 5 of the 9 districts of the Far Western Region. It is believed that this distribution of patients is a result of two factors: regional population density and the proximity of HRDC. The Central Region is the most populated, followed by the Eastern, Western, Mid Western, and finally, the Far Western Regions. Figure 1 illustrates that regional population density loosely cor-relates with the patient distribution.
However, population density alone cannot account for the similar number of patients coming from the Eastern and Western Regions. Thus it is proposed that the distance a patient must travel to reach to HRDC was crucial to the patient population. HRDC is located in Banepa, in the Kavre district of the Central Region. Patients from both the Eastern and Western Regions have a similar distance to travel, while patients from the Mid Western and Far Western Regions have considerably longer to travel. This could explain why the numbers of patients coming from the Eastern and Western districts were relatively equivalent.
When district population density is accounted for (based on a map of showing the number of people per square kilometer made by the World Health Organization in 2004-2005) it appears that most patients with post-burn contractures come from districts with an average population density less than 400 people/km^2. Though data regarding travel time was not collected as part of this study, anecdotal evidence demonstrated that patients from mountainous areas and distant regions would travel up to 14 days by foot and public transportation to reach HRDC. Considering Nepal’s lack of infrastructure, the cost of traveling, and the lack of publicity for HRDC in these rural districts, it is hypothesized that the patients from distant regions came to HRDC as a result of the hospital’s many outreach programs.
Though the percentage of male to female patients varied by region, overall 49.7% were male and 50.3% were female. The average age at the time of their first admittance to HRDC was 8.4 years old (+/- 4.5 years). This is surprising because anecdotal evidence suggests that most of these patients were initially burned when they were toddlers. Defining an “area of the body” as a discrete region such as the hand, axilla, or knee, 62.4 % of the patients were only burned in one area of their body, 23.4% were burned in two areas, and 14.3% were burned in three or more areas of their body. By far the most common regions of the body to develop burn contractures were the upper extremities, including the axilla, upper arm, elbow, forearm, wrist, hand, and fingers [Fig. 2]. Burn contractures involving the entire hand (palm and fingers) composed 49% of the burns, and burn contractures just affecting the fingers composed an additional 16% [Fig. 3]. This is an enormous problem because the hand and fingers are necessary to perform many functions of daily life.

6 Prevention
1
2
3
4
Prevention
Preventing Burn Injuries
The best way to prevent burn contractures is to prevent the original burn injury. There are several simple measures that could drastically reduce the number of children exposed to open flames. The key is education.
Top Five Ways to Prevent Burns: 1) Supervise children’s activities * Never leave children alone with open flame * 2) Create a safe area for toddlers 3) Move open fire from central area to a corner4) Elevate the fire or erect a barrier 5) Educate children about the dangers of fire
Many children burn themselves when left unsupervised in the same room as an open flame. This can be avoided in two ways: 1) ensuring that children are supervised or 2) ensuring that unsupervised children are not in the presence of open flames. Older children, neighbors, or grandparents could watch younger children while their parents are working [1]. People could also take turns watch-ing young children, one person watching many children for a set number of hours. This schedule would allow the most families to work while ensuring the safety of the children.
If parents are unable to find supervision for their children, they should try to ensure that their kids are not at home alone with an open flame. Children could come into the fields with them [2], play with friends, or stay at school longer. During winter when children need to be inside for warmth, the following inter-ventions should be made to decrease access to the fire: toddlers should be con-fined to a ‘safe area’ away from the fire, fires should be moved to a corner and elevated, and children should be educated about the dangers of fire.
Toddlers are frequently burn victims since they are too young to judge the danger of fire. They are also relatively uncoordinated so they are more likely to fall into a heat source and be unable to remove themselves quickly. To prevent toddlers from wandering into open flames, a ‘safe area’ should be made for them in the corner the farthest from the fire. The barrier around the ‘safe area’ does not need to be high, but should be sturdy and smooth. Suggested materials for this barrier are bamboo or mosquito netting.
Burns could also be prevented if open fires were not in the center of people’s homes. Instead, fires should be put in a corner. Also, rather than being on ground level, fires used for cooking, heat, and light should be elevated to prevent toddlers from crawling into them. Alternatively, low barriers could be erected around the fires to prevent children from stumbling, crawling, or reaching into them [3]. Such barriers could be constructed from chicken wire or even stacked bricks.
Lastly, educating older children about the dangers of fire is also a great way to prevent burns. Parents should explain about the potential pain and deformities that could result from burns. They should also explain that one can be burned by electricity, chemicals, oil, steam, and water in addition to fire. Outlets and power lines should be avoided as should hot oil and tar. Hot water should always be tested before it is used for bathing or drinking. When cooking, lids should be removed away from the face to prevent steam and oil burns [4].

Prevention 7
1
2
3
4
Preventing the Development of Burn Contractures
Positioning a burned limb appropriately while the burn is healing will markedly decrease the likelihood of developing a post burn contracture. When any part of the body is injured it is instinctive to pull the limb towards the core, putting it in a flexed position to help protect it from further damage. The problem is that this response can lead to a flexion contracture, the most common of contractures. A burned limb should always be positioned in a neutral or extended position. Fingers and toes should be bandaged separately from one another and spread. If the palm of the hand is burned do not bandage the hand in a fist position; instead, spread the hand and fingers as wide as possible [1]. See the diagrams on page 20 for more on how to position other parts of the body.
Burn contractures can also be decreased if the wounds are properly dressed and if pressure garments are applied. Covering the wound is important to decrease the risk of infection, decrease pain, and create a moist environment that promotes epithelialization. Pressure dressings hold the burned limb in the proper position and put direct pressure on the wound, pressing the tissue in the opposite way a contracture is likely to occur [2]. Physicians have found that pressure dressings and garments are the most effective way to prevent hypertrophic scarring, the type of scarring most likely to contract. If the burn takes longer than 2-3 weeks to close, early grafting should be considered. When the burn has healed, the pressure garments should be worn both during the day and night, to be removed only when doing physiotherapy. During the day they can be dynamic splints, but at night they should be static splints. These splints can be worn for up to two years, or until the scar has completely matured. Refer to pages 20 and 33 for more on splinting certain limbs.
Infection is an important factor in the development of burn contractures because it leads to delayed healing, which increases the formation of scar tissue. Infection should therefore be avoided while the initial burn injury heals. Ways to prevent wounds from becoming infected include: applying sterile dressings to the wound, utilizing sterile technique when changing dressings, and using bacteria-killing ointments that are discussed on page 23 [3].
Lastly, a patient should stretch each muscle group that could be affected by a burn contracture three times a day for approximately 30 minutes. This is the only time positive pressure splints should be removed. If a flexion contracture is likely to develop, stretches and exercises should be done to put the limb in extension. On the other hand, in the rare case that an extension contracture might develop, exercises should emphasize flexion. For joints that can move in more than two dimensions, such as the wrist, ankle, and axilla, it is important to put the joint through its entire range of motion, moving the foot, hand, or arm in slow circles so that inversion, eversion, adduction, and abduction are practiced in addition to flexion and extension. In addition to stretching the muscles that could contract, it is equally important to strengthen any muscles that will be able to counteract contraction. For example, if a patient has a flexion contracture of the elbow, the biceps should be stretched and the triceps should be strengthened. Photo demonstrates using a theraband to strengthen and stretch the ankle [4].
Top Five Ways to Prevent Burn Contractures: 1) Position burned limb appropriately 2) Cover the burn early (the first 2-3 weeks) 3) Splint during the day as well as at night 4) Prevent infection 5) Stretch
8 Initial Care of Burn Injury
1 Healthy Skin
1st Degree Burn
2nd Degree Burn
3rd Degree Burn
A
B
C
D
Types of Burns
Minor Flame Burns
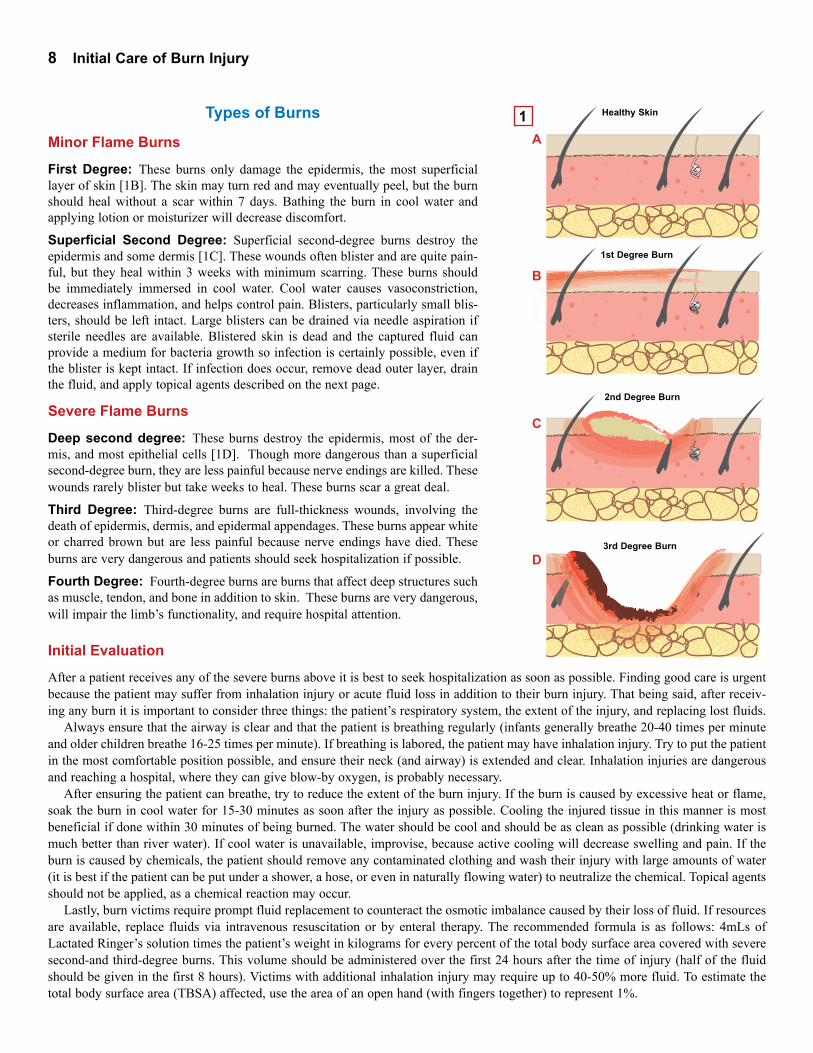
First Degree: These burns only damage the epidermis, the most superficial layer of skin [1B]. The skin may turn red and may eventually peel, but the burn should heal without a scar within 7 days. Bathing the burn in cool water and applying lotion or moisturizer will decrease discomfort.
Superficial Second Degree: Superficial second-degree burns destroy the epidermis and some dermis [1C]. These wounds often blister and are quite pain-ful, but they heal within 3 weeks with minimum scarring. These burns should be immediately immersed in cool water. Cool water causes vasoconstriction, decreases inflammation, and helps control pain. Blisters, particularly small blis-ters, should be left intact. Large blisters can be drained via needle aspiration if sterile needles are available. Blistered skin is dead and the captured fluid can provide a medium for bacteria growth so infection is certainly possible, even if the blister is kept intact. If infection does occur, remove dead outer layer, drain the fluid, and apply topical agents described on the next page.
Severe Flame Burns
Deep second degree: These burns destroy the epidermis, most of the der-mis, and most epithelial cells [1D]. Though more dangerous than a superficial second-degree burn, they are less painful because nerve endings are killed. These wounds rarely blister but take weeks to heal. These burns scar a great deal.
Third Degree: Third-degree burns are full-thickness wounds, involving the death of epidermis, dermis, and epidermal appendages. These burns appear white or charred brown but are less painful because nerve endings have died. These burns are very dangerous and patients should seek hospitalization if possible.
Fourth Degree: Fourth-degree burns are burns that affect deep structures such as muscle, tendon, and bone in addition to skin. These burns are very dangerous, will impair the limb’s functionality, and require hospital attention.
Initial Evaluation
After a patient receives any of the severe burns above it is best to seek hospitalization as soon as possible. Finding good care is urgent because the patient may suffer from inhalation injury or acute fluid loss in addition to their burn injury. That being said, after receiv-ing any burn it is important to consider three things: the patient’s respiratory system, the extent of the injury, and replacing lost fluids.
Always ensure that the airway is clear and that the patient is breathing regularly (infants generally breathe 20-40 times per minute and older children breathe 16-25 times per minute). If breathing is labored, the patient may have inhalation injury. Try to put the patient in the most comfortable position possible, and ensure their neck (and airway) is extended and clear. Inhalation injuries are dangerous and reaching a hospital, where they can give blow-by oxygen, is probably necessary.
After ensuring the patient can breathe, try to reduce the extent of the burn injury. If the burn is caused by excessive heat or flame, soak the burn in cool water for 15-30 minutes as soon after the injury as possible. Cooling the injured tissue in this manner is most beneficial if done within 30 minutes of being burned. The water should be cool and should be as clean as possible (drinking water is much better than river water). If cool water is unavailable, improvise, because active cooling will decrease swelling and pain. If the burn is caused by chemicals, the patient should remove any contaminated clothing and wash their injury with large amounts of water (it is best if the patient can be put under a shower, a hose, or even in naturally flowing water) to neutralize the chemical. Topical agents should not be applied, as a chemical reaction may occur.
Lastly, burn victims require prompt fluid replacement to counteract the osmotic imbalance caused by their loss of fluid. If resources are available, replace fluids via intravenous resuscitation or by enteral therapy. The recommended formula is as follows: 4mLs of Lactated Ringer’s solution times the patient’s weight in kilograms for every percent of the total body surface area covered with severe second-and third-degree burns. This volume should be administered over the first 24 hours after the time of injury (half of the fluid should be given in the first 8 hours). Victims with additional inhalation injury may require up to 40-50% more fluid. To estimate the total body surface area (TBSA) affected, use the area of an open hand (with fingers together) to represent 1%.
Initial Care of Burn Injury 9
Start
End
1
2
First Aid Home Care
Blisters
Blisters should be left intact. Large blisters can be drained via needle aspiration if sterile needles are available. If infection occurs, remove the dead outer layer, drain the fluid, and apply a topical agent described below.
Cleaning Apply wet, clean cloths to the burn for a few minutes each day. Use lukewarm tap water with a mild soap to remove debris, burn eschar, dead skin, and ointments. This process will be painful so it should be completed as quickly as possible.
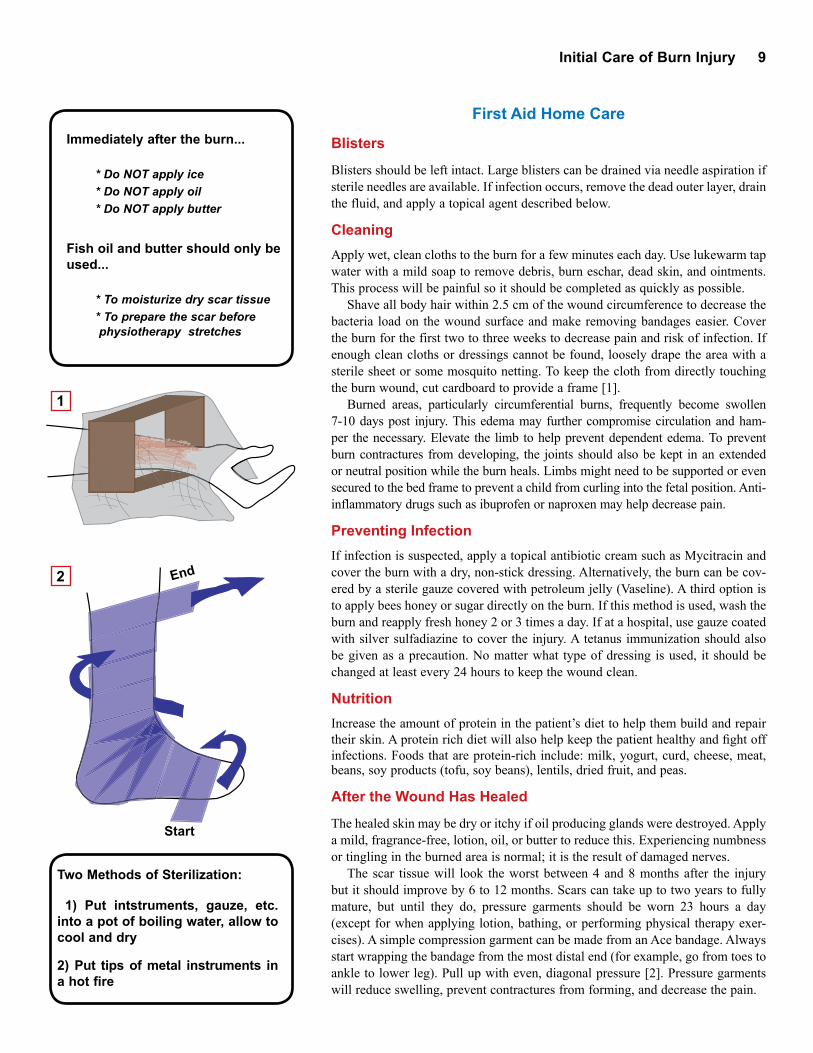
Shave all body hair within 2.5 cm of the wound circumference to decrease the bacteria load on the wound surface and make removing bandages easier. Cover the burn for the first two to three weeks to decrease pain and risk of infection. If enough clean cloths or dressings cannot be found, loosely drape the area with a sterile sheet or some mosquito netting. To keep the cloth from directly touching the burn wound, cut cardboard to provide a frame [1].
Burned areas, particularly circumferential burns, frequently become swollen 7-10 days post injury. This edema may further compromise circulation and ham-per the necessary. Elevate the limb to help prevent dependent edema. To prevent burn contractures from developing, the joints should also be kept in an extended or neutral position while the burn heals. Limbs might need to be supported or even secured to the bed frame to prevent a child from curling into the fetal position. Anti-inflammatory drugs such as ibuprofen or naproxen may help decrease pain.
Preventing InfectionIf infection is suspected, apply a topical antibiotic cream such as Mycitracin and cover the burn with a dry, non-stick dressing. Alternatively, the burn can be cov-ered by a sterile gauze covered with petroleum jelly (Vaseline). A third option is to apply bees honey or sugar directly on the burn. If this method is used, wash the burn and reapply fresh honey 2 or 3 times a day. If at a hospital, use gauze coated with silver sulfadiazine to cover the injury. A tetanus immunization should also be given as a precaution. No matter what type of dressing is used, it should be changed at least every 24 hours to keep the wound clean.
NutritionIncrease the amount of protein in the patient’s diet to help them build and repair their skin. A protein rich diet will also help keep the patient healthy and fight off infections. Foods that are protein-rich include: milk, yogurt, curd, cheese, meat, beans, soy products (tofu, soy beans), lentils, dried fruit, and peas.
After the Wound Has Healed
The healed skin may be dry or itchy if oil producing glands were destroyed. Apply a mild, fragrance-free, lotion, oil, or butter to reduce this. Experiencing numbness or tingling in the burned area is normal; it is the result of damaged nerves.
The scar tissue will look the worst between 4 and 8 months after the injury but it should improve by 6 to 12 months. Scars can take up to two years to fully mature, but until they do, pressure garments should be worn 23 hours a day (except for when applying lotion, bathing, or performing physical therapy exer-cises). A simple compression garment can be made from an Ace bandage. Always start wrapping the bandage from the most distal end (for example, go from toes to ankle to lower leg). Pull up with even, diagonal pressure [2]. Pressure garments will reduce swelling, prevent contractures from forming, and decrease the pain.
Immediately after the burn...
* Do NOT apply ice* Do NOT apply oil* Do NOT apply butter
Fish oil and butter should only be used...
* To moisturize dry scar tissue* To prepare the scar before physiotherapy stretches
Two Methods of Sterilization:
1) Put intstruments, gauze, etc. into a pot of boiling water, allow to cool and dry
2) Put tips of metal instruments in a hot fire

10 Evaluation
1
2
3
4
5
Evaluating a Burn ContractureHistory
Begin the evaluation by determining the initial cause of the burn. Was the patient burned by fire, electricity, chemicals, a road traffic accident? It is then important to establish a time line with questions such as:
• When was the patient first burned? • When did the contracture first appear? • How long has the joint been non-functional?
These questions yield important information about the maturity of the scar and the state of the joint. Scars are considered immature and potentially stretchable if they are less than 6 months old [1]. Thus, if the scar is less than 6 months old, intensive physiotherapy and splinting should be done. If the contracture is much older, surgical intervention should be considered. The longer a joint has been contracted, the less likely the joint will return to its original position.
It is also important to gather information regarding any previous treatment the patient might have had for his or her burn contracture(s). Whether or not a patient received primary care (and the reasons for why or why not) reflect the health status of the country, but are not crucial to the treatment of the burn con-tracture. What is more important is whether or not the patient has sought previous treatment for their present contracture and whether or not it has recontracted. If it is a recontracture, it is crucial to determine why it recontracted: Did the skin graft fail? Was the family noncompliant or did they forget to follow the post-operative protocols? The answers to these questions allow doctors to determine whether or not releasing the contracture again will help the patient in the long run.
Physical Examination
The physical evaluation should begin by examining the range of motion of the affected joints [2]. This will help determine whether the contracture decreases function or whether it is merely cosmetically displeasing. If the contracture involves the upper extremities one must ask if it affects the activities of daily life such as eating, grooming, or using the toilet. If the contracture involves the lower extremities, one must determine whether it affects walking, squatting, sit-ting in a chair, “tailor sitting” (sitting cross-legged), or going up and down slopes or stairs. If the contracture is found to impair function, the exact range of motion for the affected joints should be recorded in degrees. Any limitation of flexion, extension, abduction, adduction, internal rotation, external rotation, supination, and pronation should be noted as necessary. These measurements allow surgeons to compare the range of motion before and after surgery, and quantify a patient’s improvement. Examining the range of movement is also necessary because if there is little or no movement of the joint, the nutrition of the joint cartilage can be damaged and surgical intervention may not solve the problem.
The doctor should also palpate the tendons and nerves to see if they, in addition to the skin, have contracted [3]. Tendons, muscles, and skin can be stretched or severed with surgery, but nerves and arteries cannot be cut in the same manner. If the nerves and arteries would be damaged by typical surgical intervention, they can be slowly stretched with Ilizarov fixation [4] or an osteotomy can be performed.
Lastly, physicians should note if the burn contracture has caused secondary problems such as keloids, muscle atrophy, or nerve damage. Muscle atrophy and nerve damage are particularly common if the patient developed compartment syndrome [5]. Edema from initial burn injuries can cause increased compartment pressure which can lead to compromised blood circulation, ischemia, necrosis, or fibrosis.

Evaluation 11
Sample Admission FormPersonal Information: Hospital ID: Admission date: / / Name: Discharge date: / / DOB: / / Age: Counseling: Y / N Sex: m / f District: Payment: full / partial / waived amount:
History: Date burn occurred: / / Cause of burn: fire / electric / chemical / road accident / hot liquid / other: Use of fire for: cooking / heat / light / other: Supervised at time of burn: yes / no By: Distance to nearest hospital: Initial treatment: yes / no If yes, where: Previous treatment of burn contracture : Reason if treatment was delayed:
Contracture Description: Date Joint Degree of impairment Functional impairment
Range of Motion (in degrees):Date Joint Flexion Extension Abd. Add. IR ER Pronation Supination
Treatments: Date Operation Location Date Physiotherapy Location
Region Affected: (circle all that apply) Head: face / neck / scalp Right UE: shoulder/ axilla / elbow / forearm / wrist / hand / fingers Left UE: shoulder/ axilla / elbow / forearm / wrist / hand / fingers Torso: chest / abdomen / back Right LE: perineum / groin / hip / thigh / knee / leg / ankle / foot / toes Left LE: perineum / groin / hip / thigh / knee / leg / ankle / foot / toes
Chronic wound: yes / noEpileptic: yes / noCP: yes / noFunctional / Cosmetic
Complications: Wound healing: Graft rejection: Nerve damage:
Recontracture: Keloid: Pin tract infection:

12 Evaluation
1
2
3
4
Manual Muscle Testing
Manual Muscle Testing (MMT) assesses the strength of a patient’s various mus-cle groups. This test is sometimes necessary because burn contractures can cause muscle atrophy or nerve damage. MMT is also useful because it allows quantifi-cation of a patient’s improvement in addition to allowing the physiotherapist to develop a specific exercise or stretching program for their patient.
The contraction strength of each muscle group is graded on the 5-point scale explained in the following table:
Score Definition Reliability0 No muscle contraction Objective1 A ‘flicker’ but no movement Objective2 Contraction possible on horizontal plane Objective3 Contraction possible against gravity Objective4 Contraction possible against some resistance Subjective5 Full muscle power Subjective
Instead of starting in the fully flexed or fully extended position, one should
start mid-range, at approximately 45 degrees of flexion, because this is the range where muscles are strongest. To evaluate very weak patients, one might have to gently palpate the muscle group to feel a ‘flicker,’ a small contracture unable to move the limb or digit [1]. Weak patients may also struggle to contract their limbs in the presence of gravity, so it may be necessary to ask the patient to contract their limb on a horizontal plane. For example, if testing the power of the ham-strings, ask the patient to lie on their side so that the patient does not fight gravity while contracting their knee.
A sample MMT form is located on the following page.
Radiography
X-rays should be taken if the burn contracture involves an area around a joint or if there is an obvious bony deformity. The purpose of the x-ray is to determine the exact involvement of the joints and bones. X-rays serve to illuminate the patient’s anatomy, such as in the case to the upper left [2], where numerous bones have been disguised in the fleshy fist. The x-ray can also be used to identify which bones still exist. Auto-amputation is a common side effect of being badly burned and often occurs at the time of injury. It happens most frequently to distal bones, particularly digits. In the case above, the patient’s toes have autoamputated but the other bones are unaffected [3].
X-rays also show joint congruity: the joint surfaces should align with each other and be oriented in the correct direction. If they are not aligned, problems with the joint function still exist despite releasing the soft-tissue contracture. For example, in the photo on the left [4] the elbow joint has been completely destroyed: the humerus has fused with the ulna and the hand and fingers have been distorted beyond repair. In such situations, treatment options such as oste-otomies and amputations should be considered in addition to soft-tissue release.
Lastly, physicians should use X-rays to check the patient’s growth plates: are they open and intact? fused closed? partially closed? If the growth plates are intact, then the soft tissue contractures can be addressed. This is also true if the growth plates are closed (though a limb length difference will occur unless the patient is mature). However, if the growth plates are partially closed, they must be surgically fused to prevent additional angular deformity from occurring. Otherwise bones will bow outwards, as in the radius to the right.

Evaluation 13SAMPLE MMT FORM
Region of Body Muscle Group Muscle Left Right
1st 2nd 3rd 4th 1st 2nd 3rd 4thShoulder Flexors Anterior Deltoid
Extensors Latissimus Dorsi and Teres Maj.Abductors Middle DeltoidHorizontal Abd. Posterior DeltoidHorizontal Add. Pectoralis Major
Elbow Flexors Biceps BrachiiBrachioradialis
Extensors Triceps BrachiiForearm Supinators Supinator Group
Pronators Pronator Group dWrist Flexors Flex. Carpi Radialis
Flex. Carpi UlnarisPalmaris Longus
Extensors Ext. Carpi Radialis L. + Br. Ext. Carpi Ulnaris
Fingers M.P. Flexors LumbricalsP.I.P. Flexors Flex. Digitorum SuperficialisD.I.P. Flexors Flex. Digitorum Profundus M.P. Extensors Ext. DigitorumAdductors Palmar InterosseiAbductors Dorsal Interossei
Abductor Digiti MinimiOpponens Digiti Minimi
Thumb M.P. Flexor Flex. Pollicis BrevisI.P. Flexor Flex. Pollicis LongusM.P. Extensor Ext. Pollicis BrevisI.P. Extensor Ext. Pollicis LongusAbductors Abd. Poll. Br. and Abd. Poll. L
Abductor PollicisOpponens Pollicis
Knee Flexors Biceps Femoris, HamstringsExtensors Quadriceps
Ankle Plantar Flexors Gastrocnemius, SoleusFoot Invertors Tibialis Anterior
Tibialis PosteriorEvertors Peroneus Brevis
Peroneus LongusToes Flexors Flex. Digitorum Longus+Brevis
LumbricalsExtensors Ext. Digitorum Longus + Brevis
Hallux Flexors Flex. Hallucis Longus + BrevisExtensors Ext. Hallucis Longus + Brevis
14 Surgical Release
A
B
D
C
E
F
(1)
(2)
A
B
D C
E
F
(1)
(2)
A
F
(1)B
C
E (2)
A
F
D
D
(1)B C
E
(2)
2
2
2
2
1
1
1
1
1
2
4 A
B
C
D
General Surgical Principles Used by HRDCBurn contractures should be released if surgical intervention would improve the patient’s ability to perform the activities of daily living discussed on page 10. For a release to be successful, the region must have functional nerves, a good blood supply, strong muscles, and a functional joint. Releasing a burn contracture involves three main steps. First the contracture must be released, usually by a technique known as Z-plasty. Second, a skin graft must be harvested to cover subcutaneous tissues in the that were exposed by the release. Lastly, the skin graft must be sutured or stapled to the wound bed.
Decreasing Blood Loss
If operating on a distal joint, it is best to use a tourniquet above the joint to decrease blood loss. Before applying the tourniquet, wrap the limb with cotton padding to ensure uniform pressure distribution, a measure which will prevent skin injury [1]. Muscle tissue can be deprived of oxygen for two hours, so from start to finish the surgery should last a maximum of two hours. If operating on a proximal joint such as the axilla, hip, or neck, a tourniquet can obviously not be used. To help decrease the blood loss in these instances, subcutaneously inject epinephrine (adrenaline) diluted with normal saline into the surrounding region.
Surgical Release
General Principles: Before making the first incision find and mark the bands of contracture with sterile ink. One must be very careful making incisions because the underlying structures can sometimes be terribly distorted by the contracture. Always keep tension in the skin by pulling upwards with a forceps while pushing gently down with the scalpel. One can roll the scalpel from front to back or push directly down, but never scrape or make quick, deep movements. Constantly be on the lookout for nerves and tendons, which often blend in with the fibrous scar tissue since they are white.
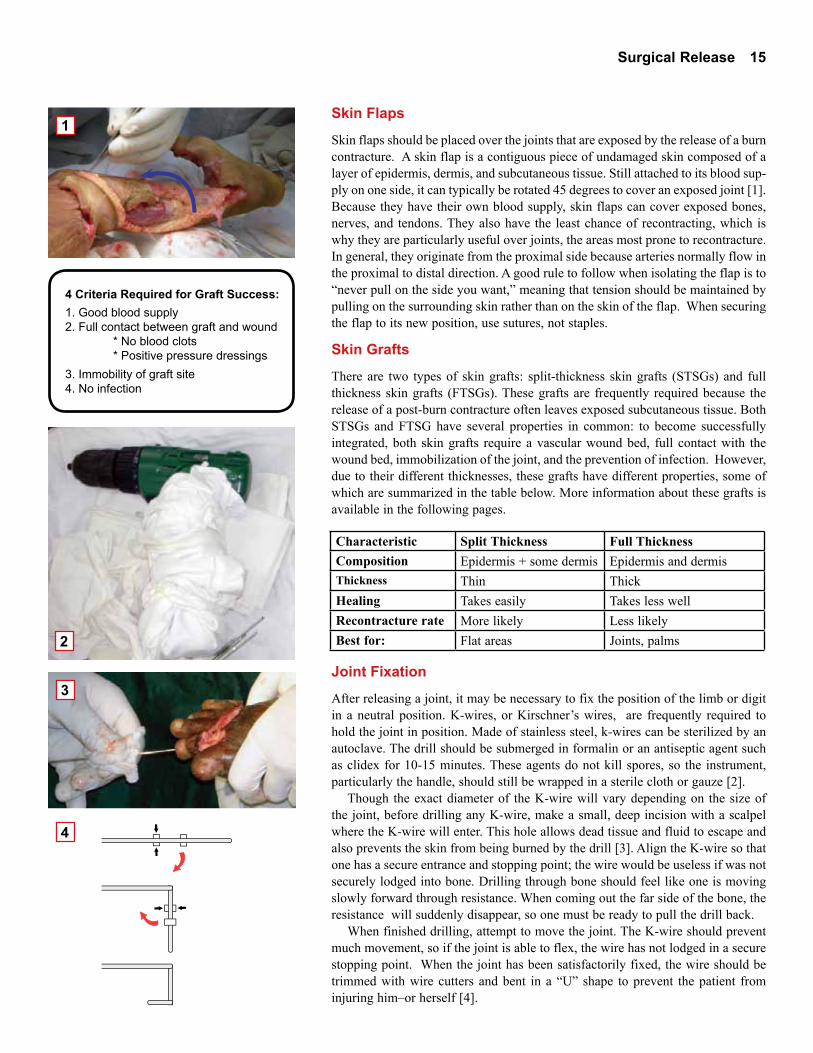
Z-plasty release: The most common technique used to release a burn con-tracture is a Z-plasty. Single Z-plasties work well on short contractures such as contracted ankles, whereas multiple Z-plasties work well on long, severe con-tractures such as contracted axillas [2].
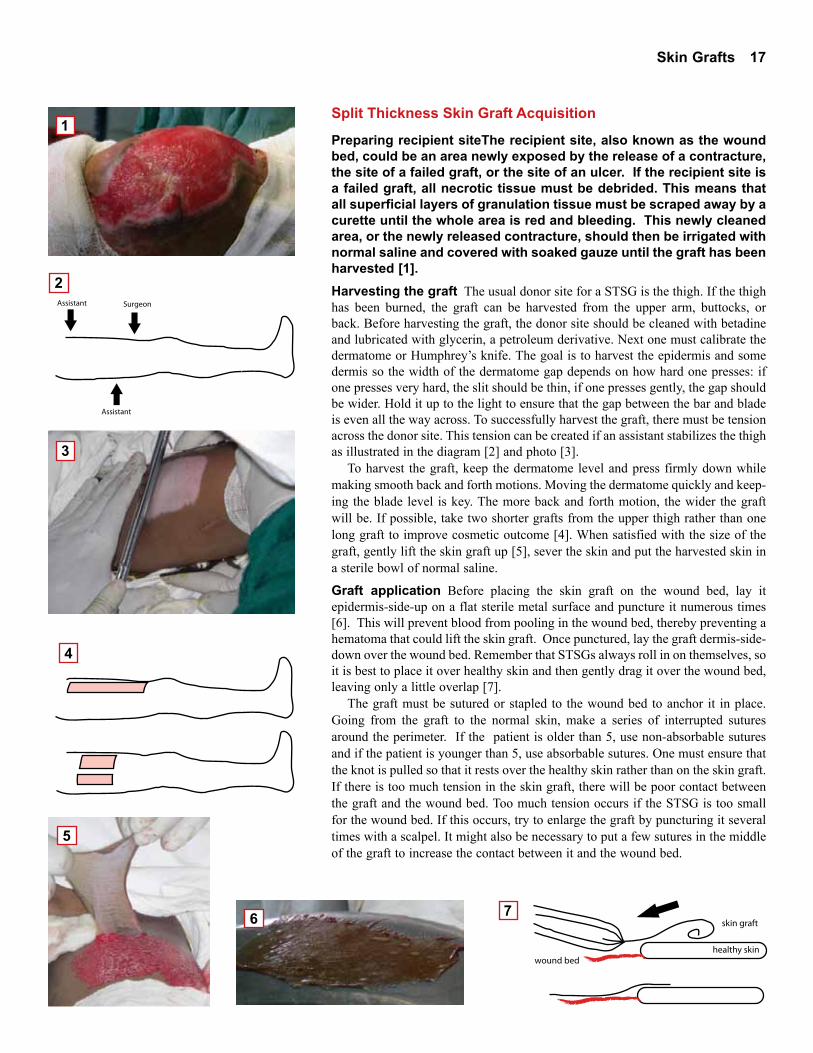
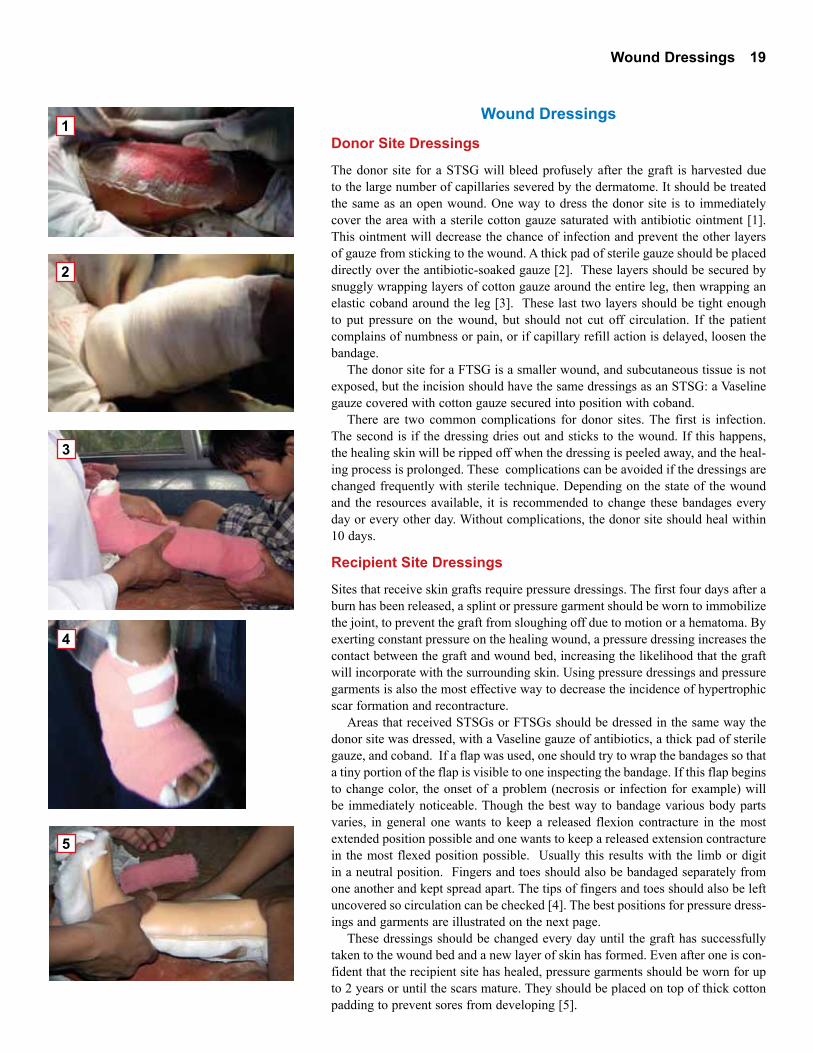
A Z-plasty makes a “Z” shaped inci-sion across a burn contracture [3]. The top, middle, and bottom incisions should all be the same length as the edges will be reat-tached in different positions. The angles between the lines should both be 45
degrees, or else parts of the flap may necrose. These 3 incisions make 2 flaps, “flap 1” on top and “flap 2” on bottom, composed of epidermis, dermis, and subcutaneous tissue.
The series of photos and diagrams to the right [4] show the four steps involved in a Z-plasty. First the “Z” incision must be made across the band of contracture [4A]. Then the resulting flaps should be freed [4B]. The elastic nature of skin will then allow the surgeon to realign these flaps by pulling them in a new direction to increase surface area. Flap 1 should be pulled downwards and flap 2 should be pulled upwards [4C]. When the flaps are sutured to their new position, the contracture will be decreased [4D]. Multiple Z-plasties can be done in much the same way. The Z incisions are merely repeated, in a lightning-bolt pattern (see diagram 4 on page 24).
This is a summary of the techniques used by HRDC. Other techniques can achieve the same outcome.
45 (
) 45
contracture band
Flap # 2
Flap # 1
Surgical Release 15
4 Criteria Required for Graft Success:1. Good blood supply2. Full contact between graft and wound * No blood clots * Positive pressure dressings3. Immobility of graft site4. No infection
1
2
4
Skin Flaps
Skin flaps should be placed over the joints that are exposed by the release of a burn contracture. A skin flap is a contiguous piece of undamaged skin composed of a layer of epidermis, dermis, and subcutaneous tissue. Still attached to its blood sup-ply on one side, it can typically be rotated 45 degrees to cover an exposed joint [1]. Because they have their own blood supply, skin flaps can cover exposed bones, nerves, and tendons. They also have the least chance of recontracting, which is why they are particularly useful over joints, the areas most prone to recontracture. In general, they originate from the proximal side because arteries normally flow in the proximal to distal direction. A good rule to follow when isolating the flap is to “never pull on the side you want,” meaning that tension should be maintained by pulling on the surrounding skin rather than on the skin of the flap. When securing the flap to its new position, use sutures, not staples.
Skin Grafts
There are two types of skin grafts: split-thickness skin grafts (STSGs) and full thickness skin grafts (FTSGs). These grafts are frequently required because the release of a post-burn contracture often leaves exposed subcutaneous tissue. Both STSGs and FTSG have several properties in common: to become successfully integrated, both skin grafts require a vascular wound bed, full contact with the wound bed, immobilization of the joint, and the prevention of infection. However, due to their different thicknesses, these grafts have different properties, some of which are summarized in the table below. More information about these grafts is available in the following pages.
Joint Fixation
After releasing a joint, it may be necessary to fix the position of the limb or digit in a neutral position. K-wires, or Kirschner’s wires, are frequently required to hold the joint in position. Made of stainless steel, k-wires can be sterilized by an autoclave. The drill should be submerged in formalin or an antiseptic agent such as clidex for 10-15 minutes. These agents do not kill spores, so the instrument, particularly the handle, should still be wrapped in a sterile cloth or gauze [2].
Though the exact diameter of the K-wire will vary depending on the size of the joint, before drilling any K-wire, make a small, deep incision with a scalpel where the K-wire will enter. This hole allows dead tissue and fluid to escape and also prevents the skin from being burned by the drill [3]. Align the K-wire so that one has a secure entrance and stopping point; the wire would be useless if was not securely lodged into bone. Drilling through bone should feel like one is moving slowly forward through resistance. When coming out the far side of the bone, the resistance will suddenly disappear, so one must be ready to pull the drill back.
When finished drilling, attempt to move the joint. The K-wire should prevent much movement, so if the joint is able to flex, the wire has not lodged in a secure stopping point. When the joint has been satisfactorily fixed, the wire should be trimmed with wire cutters and bent in a “U” shape to prevent the patient from injuring him–or herself [4].
Characteristic Split Thickness Full ThicknessComposition Epidermis + some dermis Epidermis and dermisThickness Thin ThickHealing Takes easily Takes less wellRecontracture rate More likely Less likely Best for: Flat areas Joints, palms

16 Skin Grafts
1
2
4
3
5
Skin Grafts
Split-Thickness Skin Grafts (STSG)
A STSG is composed of a layer of epidermis typically harvested from the upper thigh. To survive its transplantation the graft needs access to nutrients. Thus an STSG can be applied to an open, non-infected bed of vascularized tissue (includ-ing fat) but cannot be placed over bare nerves, tendons, or bones. For the graft to fully ‘take’ to the wound bed, there must be full contact between the graft and wound bed. This means that infection and blood clots between the wound bed and graft must be avoided and that positive pressure dressings should be used during the healing process. The affected limb should also be temporarily immobilized to prevent shearing movements that would separate the graft from the wound bed.
Split-thickness skin grafts are useful because they are readily accepted by the wound bed. The donor sites can also regenerate quickly, usually within 10 days of the surgery [1]. STSGs, particularly meshed grafts, can also cover large areas. However, STSGs are not perfect. Thin STSGs are prone to hyperpigmentation and can be cosmetically displeasing. They are also less durable and have a higher rate of recontracture when compared to full-thickness skin grafts. Because joints are sites of movement and because they are sites prone to recontracture, STSGs should not be used to directly cover them if possible.
There are two types of STSGs: sheet graft and meshed graft. A sheet graft [2] is a simple split-thickness skin graft. Relatively smooth after being harvested, it is only punctured by a scalpel a few times before it is placed upon the raw wound bed. These few punctures allow any blood that may have pooled in the wound bed to escape, decreasing the risk of a blood clot raising the graft.
A meshed graft [3] is a split-thickness skin graft that has been fenestrated by a Mesher Machine or punctured many times by a scalpel before being attached to a wound bed. The fenestrations, done in a diamond pattern (DIAGRAM), allow the graft to stretch and cover a wider area. Because these grafts allow the skin of a small donor area to cover a wound bed with a large surface area, these grafts are very useful when large portions of the body have been burned. However, when meshed grafts heal they have a mosaic-like appearance. Therefore they should be used sparingly for cosmetic reasons and should never be used on the face. The ‘holes’ in the mesh must heal by scarring so they are prone to recontracture. Therefore they cannot be placed over joints or flexion creases.
Creating a Mesh Graft
If a STSG is needed to cover a large area (that is not across a joint), a mesh graft should be created. Meshed grafts can be created by hand. To do this, spread the harvested skin dermis-side-down over a flat metal surface and make deep inci-sions in the diamond pattern illustrated in Figure A. If the cuts are long and close together, the graft will enlarge more than if they are short and spaced wide apart. When the graft is lifted, these slits will widen and the entire graft will expand as shown in Figure B.
Meshed grafts can also be created with a mesher machine [4]. After soaking the graft in normal saline, place the dermal side of the STSG facing down on the mesher board to help prevent the edges from curling. Turning the side crank will roll the skin and mesher board through the machine, puncturing the graft in a precise pattern. If the graft must cover a large area and more fenestrations are necessary, add additional punctures by hand.
Skin Grafts 17
Assistant
Assistant
Surgeon
skin graft
wound bedhealthy skin
1
2
3
4
5
6 7
Split Thickness Skin Graft Acquisition
Preparing recipient siteThe recipient site, also known as the wound bed, could be an area newly exposed by the release of a contracture, the site of a failed graft, or the site of an ulcer. If the recipient site is a failed graft, all necrotic tissue must be debrided. This means that all superficial layers of granulation tissue must be scraped away by a curette until the whole area is red and bleeding. This newly cleaned area, or the newly released contracture, should then be irrigated with normal saline and covered with soaked gauze until the graft has been harvested [1].Harvesting the graft The usual donor site for a STSG is the thigh. If the thigh has been burned, the graft can be harvested from the upper arm, buttocks, or back. Before harvesting the graft, the donor site should be cleaned with betadine and lubricated with glycerin, a petroleum derivative. Next one must calibrate the dermatome or Humphrey’s knife. The goal is to harvest the epidermis and some dermis so the width of the dermatome gap depends on how hard one presses: if one presses very hard, the slit should be thin, if one presses gently, the gap should be wider. Hold it up to the light to ensure that the gap between the bar and blade is even all the way across. To successfully harvest the graft, there must be tension across the donor site. This tension can be created if an assistant stabilizes the thigh as illustrated in the diagram [2] and photo [3].
To harvest the graft, keep the dermatome level and press firmly down while making smooth back and forth motions. Moving the dermatome quickly and keep-ing the blade level is key. The more back and forth motion, the wider the graft will be. If possible, take two shorter grafts from the upper thigh rather than one long graft to improve cosmetic outcome [4]. When satisfied with the size of the graft, gently lift the skin graft up [5], sever the skin and put the harvested skin in a sterile bowl of normal saline.
Graft application Before placing the skin graft on the wound bed, lay it epidermis-side-up on a flat sterile metal surface and puncture it numerous times [6]. This will prevent blood from pooling in the wound bed, thereby preventing a hematoma that could lift the skin graft. Once punctured, lay the graft dermis-side-down over the wound bed. Remember that STSGs always roll in on themselves, so it is best to place it over healthy skin and then gently drag it over the wound bed, leaving only a little overlap [7].
The graft must be sutured or stapled to the wound bed to anchor it in place. Going from the graft to the normal skin, make a series of interrupted sutures around the perimeter. If the patient is older than 5, use non-absorbable sutures and if the patient is younger than 5, use absorbable sutures. One must ensure that the knot is pulled so that it rests over the healthy skin rather than on the skin graft. If there is too much tension in the skin graft, there will be poor contact between the graft and the wound bed. Too much tension occurs if the STSG is too small for the wound bed. If this occurs, try to enlarge the graft by puncturing it several times with a scalpel. It might also be necessary to put a few sutures in the middle of the graft to increase the contact between it and the wound bed.

18 Skin Grafts
OR
X
X/2X/4
1 2
3
4
5
6
Full-Thickness Skin Grafts (FTSG)
A full-thickness skin graft (FTSG) is typically harvested from the abdomen. It is thicker than an STSG because it is composed of the epidermis and the dermis. Like an STSG, a full-thickness skin graft also must be placed on an open, non-infected bed of vascularized tissue to survive its transplantation. It is more difficult for these grafts to become fully incorporated into the wound bed. Maintaining full contact between the graft and wound bed, preventing hematomas, and avoiding infection are therefore imperative.
Full-thickness skin grafts are useful because they are relatively resilient and durable. Therefore they are less likely to recontract and can be placed over joints. The thicker the graft, the better the color matching, so FTSGs usually have a nice appearance once they heal. For the above two reasons, FTSGs are particularly good for contractures on the hand or face.
Full-Thickness Skin Graft Acquisition
FTSG Harvesting The skin for a FTSG is usually harvested from the abdomen or groin because these areas have redundant skin and are relatively hairless [1]. Skin could also be harvested from a region near the site of the contracture to improve color matching. For example, if releasing a hand contracture, one could take skin from a patient’s forearm. The donor area should be cleaned with beta-dine. Then a sketch should be drawn with sterile ink or methylene blue to outline the area of skin to be excised [2]. This area should be spindle (oval) shaped to allow easy closure. Sometimes the outlined region is stretched because of the patient’s position. This will cause an apparently large piece of skin to shrink after it is harvested, making it difficult to cover the wound bed. To avoid this, ensure that the outlined skin does not have too much tension or flex the patient’s leg to decrease the tension on the abdomen [3]. After drawing the sketch it is also important to pinch the edges of the donor site together to ensure that there is enough overlapping skin to close the gap by edge approximation [4].
Begin by making a shallow incision along the ink line. Angle the scalpel towards the center of the spindle rather than pushing straight down. Grip one corner of the spindle with forceps and gently pull upwards to create tension and expose the adipose tissue beneath the skin graft. As an FTSG is dermis and epidermis, not adipose tissue, angle the scalpel upwards towards the dermis when separating the graft from the donor site. When the entire graft is free, soak the graft in normal saline and cauterize any bleeding capillaries in the donor site.
The FTSG must be defatted before the graft can be applied. An easy way to defat the FTSG is to wrap the skin dermis side up around one’s gloved index finger and to use small tissue scissors to cut away the white fatty tissue [5]. Once the fat has been removed, the underside of the skin graft should appear light blue due to the collagen of the dermis.
Before closing the donor site by edge approximation, cauterize any bleeding vessels. Then close the gap with a subcutaneous stitch of absorbable suture right in the center of the spindle. Halve the two new spindle shapes again and again until there are stitches located a centimeter from the each end of the wound and from one another [6]. Repeat this with edge stitches of non-absorbable suture. If the donor site is difficult to close, remove extra adipose tissue and try again.
FTSG Application A FTSG is attached to the wound bed the same way a STSG is attached to a wound bed. The only difference is that a FTSG is not punc-tured numerous times with a scalpel unless the wound bed is bleeding profusely. Please see page 17 for more details.
Wound Dressings 19
1
2
3
4
5
Wound Dressings
Donor Site Dressings
The donor site for a STSG will bleed profusely after the graft is harvested due to the large number of capillaries severed by the dermatome. It should be treated the same as an open wound. One way to dress the donor site is to immediately cover the area with a sterile cotton gauze saturated with antibiotic ointment [1]. This ointment will decrease the chance of infection and prevent the other layers of gauze from sticking to the wound. A thick pad of sterile gauze should be placed directly over the antibiotic-soaked gauze [2]. These layers should be secured by snuggly wrapping layers of cotton gauze around the entire leg, then wrapping an elastic coband around the leg [3]. These last two layers should be tight enough to put pressure on the wound, but should not cut off circulation. If the patient complains of numbness or pain, or if capillary refill action is delayed, loosen the bandage.
The donor site for a FTSG is a smaller wound, and subcutaneous tissue is not exposed, but the incision should have the same dressings as an STSG: a Vaseline gauze covered with cotton gauze secured into position with coband.
There are two common complications for donor sites. The first is infection. The second is if the dressing dries out and sticks to the wound. If this happens, the healing skin will be ripped off when the dressing is peeled away, and the heal-ing process is prolonged. These complications can be avoided if the dressings are changed frequently with sterile technique. Depending on the state of the wound and the resources available, it is recommended to change these bandages every day or every other day. Without complications, the donor site should heal within 10 days.
Recipient Site Dressings
Sites that receive skin grafts require pressure dressings. The first four days after a burn has been released, a splint or pressure garment should be worn to immobilize the joint, to prevent the graft from sloughing off due to motion or a hematoma. By exerting constant pressure on the healing wound, a pressure dressing increases the contact between the graft and wound bed, increasing the likelihood that the graft will incorporate with the surrounding skin. Using pressure dressings and pressure garments is also the most effective way to decrease the incidence of hypertrophic scar formation and recontracture.
Areas that received STSGs or FTSGs should be dressed in the same way the donor site was dressed, with a Vaseline gauze of antibiotics, a thick pad of sterile gauze, and coband. If a flap was used, one should try to wrap the bandages so that a tiny portion of the flap is visible to one inspecting the bandage. If this flap begins to change color, the onset of a problem (necrosis or infection for example) will be immediately noticeable. Though the best way to bandage various body parts varies, in general one wants to keep a released flexion contracture in the most extended position possible and one wants to keep a released extension contracture in the most flexed position possible. Usually this results with the limb or digit in a neutral position. Fingers and toes should also be bandaged separately from one another and kept spread apart. The tips of fingers and toes should also be left uncovered so circulation can be checked [4]. The best positions for pressure dress-ings and garments are illustrated on the next page.
These dressings should be changed every day until the graft has successfully taken to the wound bed and a new layer of skin has formed. Even after one is con-fident that the recipient site has healed, pressure garments should be worn for up to 2 years or until the scars mature. They should be placed on top of thick cotton padding to prevent sores from developing [5].

20 Wound Dressings
Region
AxillaAdductionContracture
ElbowFlexion Contracture
FingersAdduction Contracture
HandExtension Contracture
Hand Flexion Contracture
Knee Flexion Contracture
Ankle Flexion Contracture
Pressure Dressing & Limb Position
Ankles often have dorsiflexion contractures. Splint in a neutral position of 90 degrees to preserve locomotion and balance.
Most contractures of the axilla involve adduction and internal rotation. Therefore set the arm at 90 degrees to the body to counteract the adduction and raise the forearm up to put the limb in external rotation.
Burned elbows are likely to develop flexion contractures.Splint in a slightly flexed position (which is still a good functional position) or, if possible, in full extension.
Fingers and thumbs are often pulled inwards. Bandage separately and spread apart. Slightly flex thumb for gripping.
Dorsal burns result in extension contractures. Splint in neutral position with fingers spread.
Palmar burns cause flexion contractures, decreasing gripping power. Splint in neutral position with fingers spread.
Flexion contractures impair locomotion. To prevent leg length differences, try to splint in slight flexion (a functional position of 85 degrees) or, if possible, full extension.
Contracture Description

Wound Dressings 21
1
2
3
4
5
Phases of Graft Healing
STSGs and FTSGs heal in three phases: imbibition, neovascularization, and maturation.
Imbibition This phase occurs 1-2 days after surgery. During this period the skin graft “imbibes” nutrients from the wound bed. At this point the skin graft is very fragile because it is only held in place by natural fibrin. As there is little resistance to shearing, the region must remain absolutely immobile.
Neovascularization This phase, 2-3 days after surgery, is when new blood ves-sels invade the graft by angiogenesis. The graft is still very fragile; any shearing could lead to hematoma formation and graft loss.
Maturation This is the period when collagen bridges form between the wound bed and the graft. In the first 1-3 months after surgery the graft becomes thick and vascular, but after 4 months the graft should begin to fade and blend into the surrounding skin.
Dressing Changes
Dressings should be changed every day or every other day, according to the sur-geon’s orders. To avoid infection, clean technique must be employed when caring for grafts. This means that anything that may come into contact with the recipient site should be boiled, autoclaved, or come from an unopened, sterile package. Gloves should be worn when available and hands must be washed in between touching different patients. When changing dressings, it is also important to pay attention to signs of infection and graft failure such as green or black color, pus or serosanguinous discharge, or foul smell. Please see page 22 for more information regarding graft complications.
At the recipient site, fluid and dead skin should be carefully removed with sterile cotton swabs saturated with normal saline. Though the swab should not be dry, remove excess saline by squeezing the cotton ball with the forceps before touching the graft [1]. Scraping, quick, or sideways motions will disturb the graft, so roll the swab gently, with even pressure, or dab up and down [2]. If the wound appears healthy, a small amount of topical antibiotics should be applied to the line of sutures. After treating the wound bed, place sterile gauze squares over the wound bed and sutures. Secure these pads in place by wrapping loosely woven cotton bandages around the limb [3]. Hold a static splint, with appropriate cotton padding, across the joint and stabilize by wrapping the limb with an elastic Ace bandage [4]. If the wound appears infected, please see pages 22 and 23 for more information on wound healing and graft complications.
Removing Stitches and Internal Fixation
If the skin graft is successfully incorporated into the wound bed, the external stitches or staples can be removed approximately two weeks after surgery. The photo to the left [5] is an example of a graft that is ready to have the stitches removed. Removing stitches is a two-step process: on day one, identify and remove alternating sutures, on day two, remove all remaining sutures. To remove sutures, one needs a sterile forceps and a small pair of scissors (with sharp tips as opposed to blunted tips). Pull the most distal end of the suture up and away from the skin with the forceps to allow the scissors to safely cut the suture below the knot. Some of the suturing material might remain in the skin even after the string is cut. Remove these pieces with forceps to prevent infection.
K-wires are usually removed three weeks after the surgery. While bracing the proximal joint with one hand, grip the exposed part of the wire with one’s other hand or with pliers and pull gently backwards while twisting slightly.

Summary Table
Characteristic Healthy ComplicationGraft color Red, pink Green, blackDischarge color Clear, yellow White or creamy red
Discharge
consistency
Thin, shiny Thick, cloudy
Smell None Foul, sourSize Slowly decreasing Static
22 Healing and Complications
Graft Healing
Signs of Healing
Four characteristics should be checked to ensure that a skin graft is healing well: color, discharge, smell, and size. Healthy skin grafts should appear red or pink in color [1]. Red means that granulation tissue is beginning to form and that there is good vasculariza-tion in the region. The photos to the right also illus-trate the appearance of a healthy mesh split thickness skin graft [2] and a healthy, new skin flap [3].
A healthy skin graft should appear wet and shiny because it should ooze a little serum, a transparent blood product pale yellow in color. A healthy wound should not smell. Lastly, the wound should continu-ally shrink in size. Superficial scar tissue should form within approximately 7 days.
1 2 3
4 5 6
Warning Signs
As opposed to the healthy skin grafts and flaps described above, unhealthy or infected skin grafts might appear green or black in color or have unusual discharge. Green tinges on the edge of the wound or on the bandage indicate infection [4,5]. Black and purple areas indicate necrosis [6]. If creamy and red, the discharge could be serosanguinous discharge, an indicator that the wound is starting to become infected. If white, thick, and creamy, the discharge is probably pus, a mix of dead cells and bacteria. Unhealthy wounds might also smell foul. Lastly, if the wound remains the same size for a long time, there might be an infection.
Healing and Complications 23
1
2
3
5
4
6
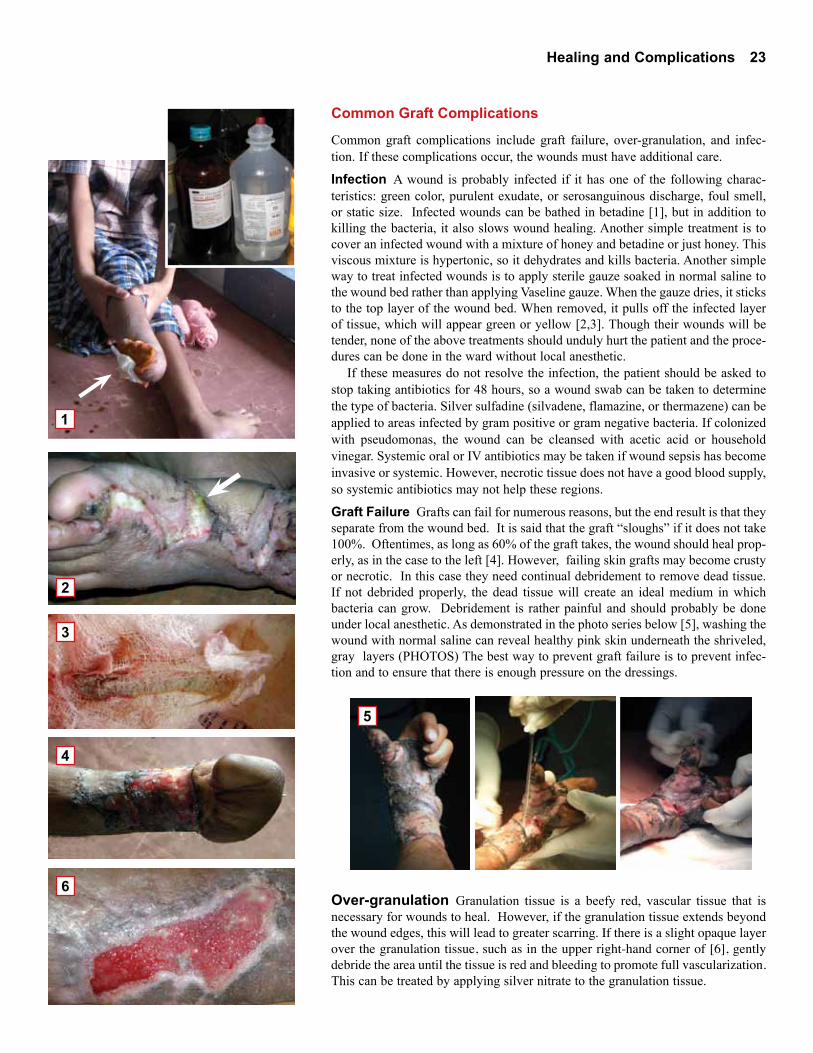
Common Graft Complications
Common graft complications include graft failure, over-granulation, and infec-tion. If these complications occur, the wounds must have additional care.
Infection A wound is probably infected if it has one of the following charac-teristics: green color, purulent exudate, or serosanguinous discharge, foul smell, or static size. Infected wounds can be bathed in betadine [1], but in addition to killing the bacteria, it also slows wound healing. Another simple treatment is to cover an infected wound with a mixture of honey and betadine or just honey. This viscous mixture is hypertonic, so it dehydrates and kills bacteria. Another simple way to treat infected wounds is to apply sterile gauze soaked in normal saline to the wound bed rather than applying Vaseline gauze. When the gauze dries, it sticks to the top layer of the wound bed. When removed, it pulls off the infected layer of tissue, which will appear green or yellow [2,3]. Though their wounds will be tender, none of the above treatments should unduly hurt the patient and the proce-dures can be done in the ward without local anesthetic.
If these measures do not resolve the infection, the patient should be asked to stop taking antibiotics for 48 hours, so a wound swab can be taken to determine the type of bacteria. Silver sulfadine (silvadene, flamazine, or thermazene) can be applied to areas infected by gram positive or gram negative bacteria. If colonized with pseudomonas, the wound can be cleansed with acetic acid or household vinegar. Systemic oral or IV antibiotics may be taken if wound sepsis has become invasive or systemic. However, necrotic tissue does not have a good blood supply, so systemic antibiotics may not help these regions.
Graft Failure Grafts can fail for numerous reasons, but the end result is that they separate from the wound bed. It is said that the graft “sloughs” if it does not take 100%. Oftentimes, as long as 60% of the graft takes, the wound should heal prop-erly, as in the case to the left [4]. However, failing skin grafts may become crusty or necrotic. In this case they need continual debridement to remove dead tissue. If not debrided properly, the dead tissue will create an ideal medium in which bacteria can grow. Debridement is rather painful and should probably be done under local anesthetic. As demonstrated in the photo series below [5], washing the wound with normal saline can reveal healthy pink skin underneath the shriveled, gray layers (PHOTOS) The best way to prevent graft failure is to prevent infec-tion and to ensure that there is enough pressure on the dressings.
Over-granulation Granulation tissue is a beefy red, vascular tissue that is necessary for wounds to heal. However, if the granulation tissue extends beyond the wound edges, this will lead to greater scarring. If there is a slight opaque layer over the granulation tissue, such as in the upper right-hand corner of [6], gently debride the area until the tissue is red and bleeding to promote full vascularization. This can be treated by applying silver nitrate to the granulation tissue.
24 Surgical Release / Axilla
Surgical Release of Axillary Contractures
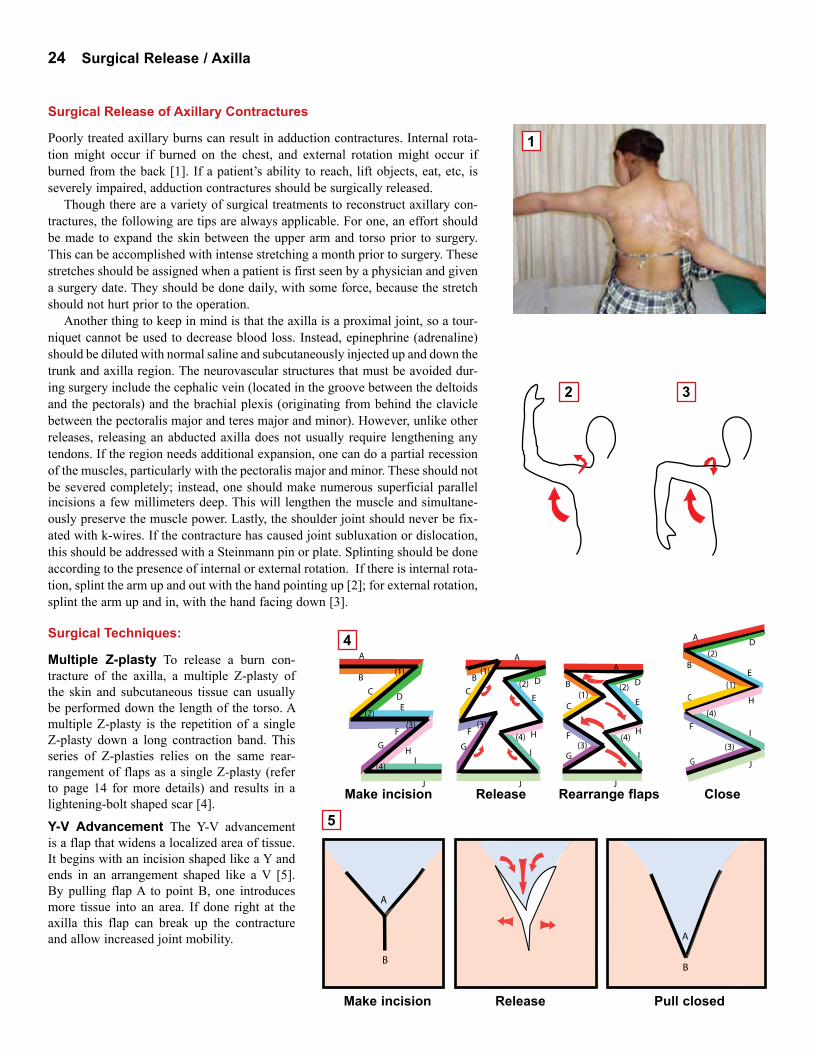
Poorly treated axillary burns can result in adduction contractures. Internal rota-tion might occur if burned on the chest, and external rotation might occur if burned from the back [1]. If a patient’s ability to reach, lift objects, eat, etc, is severely impaired, adduction contractures should be surgically released.
Though there are a variety of surgical treatments to reconstruct axillary con-tractures, the following are tips are always applicable. For one, an effort should be made to expand the skin between the upper arm and torso prior to surgery. This can be accomplished with intense stretching a month prior to surgery. These stretches should be assigned when a patient is first seen by a physician and given a surgery date. They should be done daily, with some force, because the stretch should not hurt prior to the operation.
Another thing to keep in mind is that the axilla is a proximal joint, so a tour-niquet cannot be used to decrease blood loss. Instead, epinephrine (adrenaline) should be diluted with normal saline and subcutaneously injected up and down the trunk and axilla region. The neurovascular structures that must be avoided dur-ing surgery include the cephalic vein (located in the groove between the deltoids and the pectorals) and the brachial plexis (originating from behind the clavicle between the pectoralis major and teres major and minor). However, unlike other releases, releasing an abducted axilla does not usually require lengthening any tendons. If the region needs additional expansion, one can do a partial recession of the muscles, particularly with the pectoralis major and minor. These should not be severed completely; instead, one should make numerous superficial parallel incisions a few millimeters deep. This will lengthen the muscle and simultane-ously preserve the muscle power. Lastly, the shoulder joint should never be fix-ated with k-wires. If the contracture has caused joint subluxation or dislocation, this should be addressed with a Steinmann pin or plate. Splinting should be done according to the presence of internal or external rotation. If there is internal rota-tion, splint the arm up and out with the hand pointing up [2]; for external rotation, splint the arm up and in, with the hand facing down [3].
A
BB
A
Surgical Techniques:
Multiple Z-plasty To release a burn con-tracture of the axilla, a multiple Z-plasty of the skin and subcutaneous tissue can usually be performed down the length of the torso. A multiple Z-plasty is the repetition of a single Z-plasty down a long contraction band. This series of Z-plasties relies on the same rear-rangement of flaps as a single Z-plasty (refer to page 14 for more details) and results in a lightening-bolt shaped scar [4].
Y-V Advancement The Y-V advancement is a flap that widens a localized area of tissue. It begins with an incision shaped like a Y and ends in an arrangement shaped like a V [5]. By pulling flap A to point B, one introduces more tissue into an area. If done right at the axilla this flap can break up the contracture and allow increased joint mobility.
A
B
D
C
E
F
(1)
(2)
F
H
G
I
J
(3)
(4)
A
B
D C
E
F
(1)
(2)
H G
I
J
(3)
(4)
A
(1)B
C E
(2)
H
J
(3) G I
(4)
D
F G
A
(1)B
CE
(2)
J
H(3)
I
(4)F
G
D
Make incision Release Rearrange flaps Close
Make incision Release Pull closed
1
2 3
4
5

Surgical Release / Axilla 25
A
B
D
E
F
CA
B
C
D
E
F
75B
D F
Local Flaps If there is not enough skin to cover the area directly under the axilla (due to inflexible scar tissue or a particularly severe contracture) it is better to use a flap than a skin graft to cover the joint. If the patient’s back is relatively scar-free, a good flap to use is the parascapular flap [2]. Up to 15 by 25 cm in size, this fasciocutaneous flap obtains its blood supply from the descending branch of the circumflex scapular artery. It should be dissected from inferior to superior, using the scapula as a guide. To ensure that the pedicle vessel is captured in the flap, the superior aspect of the flap must include the ‘triangular space’ within its border. The borders of the triangular space are comprised of the teres major, the teres minor, and the long head of the triceps. The triangular space is located on the lateral side of the scapula, approximately 2 centimeters (the width of one’s finger) below the midpoint of scapula. Once the flap has been rotated and secured in its new position, the donor site can usually be completely closed. Alternatively, if the back is too scarred to donate skin one could use a pectoralis major or pectoralis minor myocutaneous flap.
Below is a series of photos [3] that demonstrate the steps involved in the release of a severe axillary burn contracture. A) Evaluate the contracture—note that there has been autoamputation and joint fixation. B) Plan the surgery—outline the skin that will fold over the torso (blue) versus the skin that will fold around the upper arm (red). C) Release the contracture with multiple Z-plasty and split-thickness skin graft. D) Evaluate healing. E) Encourage the use of pressure garments.
Five Flap Plasty A five flap plasty (also known as a jumping man flap) combines a double opposing z-plasty with a Y-V advance-ment [1]. Pulling flap A to point B is the Y-V advancement. The act of pulling flap C to point D and flap E to point F is what creates the two opposing Z-plasties. This operation breaks up the contracture, has minimal displacement of the hair-bearing area, and results in a lightning-shaped scar.
1
3
2
A B C D E

26 Surgical Release / Hand
Joint Functional PositionWrist 30o of extensionMetacarpals 45o of flexionIntraphalangial Joints
Extension
Thumb Abduction
Surgical Release of the Wrist, Hand, and Fingers
Both flexion and extension contractures greatly diminish the hand’s range of motion and gripping power. Involvement of the fingers or thumbs further decreases the hand’s function. Fingers can be autoamputated, stuck in flexion, extension, or adduction. Thumbs typically have adduction contractures towards the palm. The thumb is crucial to many activities of the hand: if it is immobilized or autoamputated, the hand is only 60% functional at best.
Releasing any of the burn contractures described above is a daunting process. A good rule to remember is that though nerves and tendons look similar, they generally appear in different locations: nerves are typically embedded in fat while tendons are usually more superficial. Most of the neurovascular structures are on the volar (palmar) side of the wrist. However, one must always be cautious of the subcutaneous radial nerve and, if possible, the superficial dorsal veins.
When planning the operation, remember that the palmar skin is well vascularized, but difficult to mobilize, and that the dorsal skin is poorly vascularized but pliable and easy to mobilize. Palmar skin can therefore not be expected to cover many gaps, and dorsal skin is prone to flap necrosis. In general, it is best to use skin flaps as opposed to skin grafts on the hand and fingers, because skin grafts are prone to recontracture. However, if using flaps is infeasible, use full-thickness skin grafts harvested from the lower arm for good color matching. Alternatively, if there is some padding available, it is acceptable to use a ‘thick’ split-thickness skin graft in an effort to get good graft uptake and less contraction. However, avoid using meshed split-thickness skin grafts, or skin grafts over joints.
Flexion Contractures of the Hand and Wrist [1] To increase gripping power one must try to extend the wrist to 30 degrees. One must release the flexor retinaculum, a thick band of tendons on the volar surface of the wrist [A]. Some of the tendons contained within could be severed or lengthened by Z-plasty (see diagram [1] on page 31). Releasing a flexion contracture will expose tissue on the anterior aspect of the wrist [B]. This area should be covered with a flap to protect the tendons and median nerve. One flap that could be used is the posterior inter-osseous flap from the forearm. If forearm is too scarred to donate a flap, use a full-thickness skin graft [C].
If the tendons are retracted and lengthening the soft tissues will not correct the flexion, one can shorten the radius or do a proximal row carpectomy. Shortening or removing bones automatically lengthens the tendons, and extension is gained. A carpectomy usually removes the entire row of proximal carpals and attached ligaments. The distal carpals are then fixed to the radius in a functional position, typically extended to 30 degrees, with a steel plate. Three months in this position should result in bone-to-bone fusion so a bone graft is unnecessary. To check the progress of fusion, take an X-ray of the wrist every six weeks.
Releasing flexed fingers requires the release of skin, subcutaneous tissue, and flexor ten-dons. To release the flexor tendons one must cut through the fibrous sheath of cruciate and annular pulleys. Release all but the 2nd and 4th annular pulleys to prevent a bowstring effect from occurring. This release will expose tissue on the palmar side of the fingers. Some of the exposed areas could be covered by a Z-plasty if there is enough viable skin (too much tension can compromise circulation and cause ischemia). However, exposed metacarpophalangeal joints should be covered with an axial laterodigital flap or a rotation flap. Distal and proximal interphalangeal joints should be covered by a rotational flap. For the axial laterodigital flap, include the palmar collateral artery in the flap but try to dissect out the collateral nerve [2]. On the other hand, for the rotational flap, make the ‘hinge’ of the flap wide because neither the pedicle nor the nerve should be included in the flap. To relieve some tension on the sutures and to help avoid recontracture, make a small incision above the recipient site [3].
1
2 3
A
B
C

Surgical Release / Hand 27
B D B D A C
A
C
E F
A
C
A CE F
G
A
B
D
C
F
E
A
B
D C
F
G
E
1) Incision 2) Rearrange
Extension Contractures of the Wrist [1] Most neurovascular structures are on the palmar side, but when releasing an extension contracture one still must avoid the radial nerve and the superficial dorsal veins. Sever the transverse reti-naculum ligaments to allow extensor tendons to slide dorsally into their normal position. These tendons will likely need to be excised or extended with Z-plasty. After releasing an extension contracture, one could use an L-shaped flap to cover some of the tissues exposed. This flap will cover a rhombus-shaped area that is relatively short and wide (whether it is newly exposed tissue or a donor site). It works well on the dorsal region because the skin is stretchable and can be easily separated from the underlying structures. To use this flap, make an “L” shaped incision, pull flap A to point B, and then pull corner C to point D [2]. Other flaps that could be used to cover the exposed tissue include: distally based flaps such as a Chinese flap, an interosseous flap, or a distal ulnar flap. It is best to use fascio-cutaneous flaps to provide a smooth surface for the tendons.
Releasing a finger from an extension contracture usually exposes tissue around the web and knuckle area. To reconstruct this web space one can use a laterodigital flap. Depending on the area of tissue that needs to be covered, one or two flaps can be taken from the lateral aspect of two adjacent fingers. The incision for this flap can be made up to the PIP joint. Do not make the palmar side of the incision straight; instead add a triangular notch to decrease the chance of recontracture. To increase the rotation of the flap, extend the palmar incision down into the palm.
Cover the donor site with a full-thickness skin graft. (In the diagram to the left [3], the red area is the recipient site, the blue is the flap, and the green is the skin graft covering the donor site.)
Fixation Use crossed k-wires or a steel plate to fix the wrist in a functional position. When placing a k-wire in the wrist, start at the distal portion of the radius and end in the distal carpals. When placing k-wires in fingers, use 1-2mm wire. Begin at the fingertip, pass through the straight intramedullary canal, and end in the carpals or radius. The canals are straight, and the k-wire should pass smoothly through them, only hitting resistance when going through the cortex. Peripheral nerves tolerate < 15% traction, so do not stretch the fingers too forcefully.
Finger Adduction and Web Space Web space is frequently decreased, limiting the functionality of the hand by adducting the fingers and thumb. Increasing the first web-space, the distance between the thumb and index finger, is paramount. To increase the first web-space one can either use a 5-flap Z-plasty [5] or a 4-flap Z-plasty (also see diagrams and explanations on pages 24 and 25). To deepen the other web-spaces, create a dorsal flap that goes from the MP joint up to the PIP joint [4]. Then make a zig-zag incision: center the base of the curves or triangles so that the palmar side of the PIP and DIP joints have a flap cov-ering them. Working on the dorsal side, spread digits as far apart as possible, and begin to separate the fingers from the distal tip to the web. Once digits are separated, defat the flaps and suture closed. Cover exposed regions with a full-thickness skin graft.
A
B
C
D
E
F
A
E C
FD
1
2
3
4
5
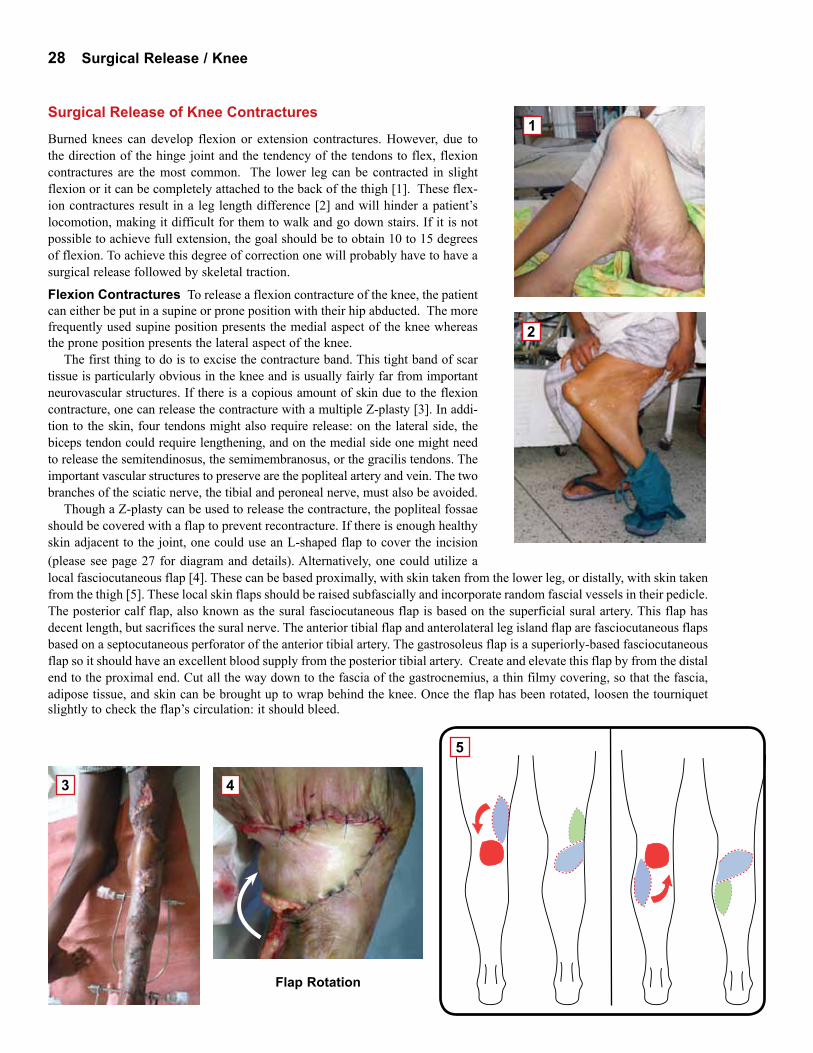
28 Surgical Release / Knee
Surgical Release of Knee Contractures
Burned knees can develop flexion or extension contractures. However, due to the direction of the hinge joint and the tendency of the tendons to flex, flexion contractures are the most common. The lower leg can be contracted in slight flexion or it can be completely attached to the back of the thigh [1]. These flex-ion contractures result in a leg length difference [2] and will hinder a patient’s locomotion, making it difficult for them to walk and go down stairs. If it is not possible to achieve full extension, the goal should be to obtain 10 to 15 degrees of flexion. To achieve this degree of correction one will probably have to have a surgical release followed by skeletal traction.
Flexion Contractures To release a flexion contracture of the knee, the patient can either be put in a supine or prone position with their hip abducted. The more frequently used supine position presents the medial aspect of the knee whereas the prone position presents the lateral aspect of the knee.
The first thing to do is to excise the contracture band. This tight band of scar tissue is particularly obvious in the knee and is usually fairly far from important neurovascular structures. If there is a copious amount of skin due to the flexion contracture, one can release the contracture with a multiple Z-plasty [3]. In addi-tion to the skin, four tendons might also require release: on the lateral side, the biceps tendon could require lengthening, and on the medial side one might need to release the semitendinosus, the semimembranosus, or the gracilis tendons. The important vascular structures to preserve are the popliteal artery and vein. The two branches of the sciatic nerve, the tibial and peroneal nerve, must also be avoided.
Though a Z-plasty can be used to release the contracture, the popliteal fossae should be covered with a flap to prevent recontracture. If there is enough healthy skin adjacent to the joint, one could use an L-shaped flap to cover the incision (please see page 27 for diagram and details). Alternatively, one could utilize a local fasciocutaneous flap [4]. These can be based proximally, with skin taken from the lower leg, or distally, with skin taken from the thigh [5]. These local skin flaps should be raised subfascially and incorporate random fascial vessels in their pedicle. The posterior calf flap, also known as the sural fasciocutaneous flap is based on the superficial sural artery. This flap has decent length, but sacrifices the sural nerve. The anterior tibial flap and anterolateral leg island flap are fasciocutaneous flaps based on a septocutaneous perforator of the anterior tibial artery. The gastrosoleus flap is a superiorly-based fasciocutaneous flap so it should have an excellent blood supply from the posterior tibial artery. Create and elevate this flap by from the distal end to the proximal end. Cut all the way down to the fascia of the gastrocnemius, a thin filmy covering, so that the fascia, adipose tissue, and skin can be brought up to wrap behind the knee. Once the flap has been rotated, loosen the tourniquet
Flap Rotation
slightly to check the flap’s circulation: it should bleed.
2
3 4
5
1

Surgical Release / Knee 29
Traction Warning Signs:Burning sensation, NumbnessPain, Loss of pulse, Puss,Swelling
1
2
3
4
Traction Located on the posterior side of the knee, several neuro-vascular structures will need to be stretched to achieve full extension. Since these struc-tures cannot be stretched or lengthened during surgery, distal tibial traction may be required after release to help gain extension. A type of skeletal traction, distal tibial traction requires a Steinmann pin to be inserted two centimeters proximal to the medial malleolar prominence [1].
Before inserting the pin, make an incision two centimeters above the medial malleolar prominence, cutting through the skin down to the bone. Then insert the Steinmann pin with a drill, moving from the medial to lateral side. When the pin starts to protrude on the lateral side of the tibia, nick the skin above it with a scal-pel to allow it to exit. This pin must be parallel to the ankle joint so that the knee is pulled evenly. Once satisfied with the pin’s location, advance the pin further through the tibia until the threaded portion of the pin is through the bone and an equal amount of pin is on either side of the leg.
Once the traction pin has been placed, attach a traction bow or stirrup. Attached to either side of the pin this bow is attached to a rope which is then threaded through a pulley and attached to weights. The amount of weight attached to the stirrup should be progressively increased. Initially, add approximately 1/6 of the patient’s body weight. Depending on the patient’s pain tolerance, neuro-logic status, and rate of correction, this can gradually be increased to 1/3 of their body weight. The length of time a patient must remain in traction will depend on the rate of correction. Typically a patient is in traction for several weeks, but there is no fixed time interval as it is completely case dependent. Eventually traction should pull the leg completely straight [2]. If a leg length difference still exists, make the child a platform shoe [3].
Complications When traction is used, one must be aware of several compli-cations: neuropraxia, vascular insufficiency, and infection. Neuropraxia occurs when nerves have been stretched too far, too quickly. Signs of neuropraxia include a burning sensation or numbness in the foot. Insufficient vascular profu-sion of the tissues can also occur when the traction has stretched the arteries and veins too much. Signs of vascular insufficiency include pain, paresthesia or the sensation of pins and needles, numbness of the foot, or the loss of the distal pulse. One can differentiate between pain due to the traction versus pain due to ischemia because pain due to the traction can easily be assuaged by simple analgesics. Both neuropraxia and ischemia are the result of having too much weight attached to the traction. When any of the above signs are noticed, decrease the weight of the traction and the problem should disappear within a few hours. If acute vascular insufficiency is suspected, a medication such as Trental could be administered to increase collateral circulation.
Infection is the third complication that one must consider. Signs of infection are redness, swelling, pus or opaque discharge, etc. To avoid infection, the pin tracts must be dressed and cleaned at least twice a day to ensure that serous dis-charge is not trapped inside the leg. As a general rule, stasis will lead to infection, so clear discharge at the site of the pins is a good sign. The pins can be cleaned with betadine or normal saline. Occlusive dressings are not necessary, but sterile dressings over the pin will decrease the rate of infection.
Serial Casting Vascular and nervous structures can also be lengthened via serial casting [4]. The first cast should be put on immediately after the contracture is released. These casts, made of plaster of Paris, should be changed every 2 to 3 days. Changing the cast every day would not allow enough time for structures to stretch and would be a waste of materials. Alternatively, changing the cast less frequently delays the stretching process as the affected area will not be stretched in the later days. Always be wary of infection.

30 Surgical Release / Ankle
1
2
3
4
5
Surgical Release of Ankle Contractures
Like the hand, the foot can develop several different contractures: dorsi flexion, plantar flexion, eversion, or inversion contractures. These contractures all affect the patient’s ability to walk comfortably, might affect leg length, and will prob-ably affect balance and strength. Things to be considered when planning the PBC release should be joint stability, foot position, and range of extension. The primary goal of releasing these contractures is to get the foot in a neutral position for stability. Ankle function is a secondary concern. If the surgeon can get the foot at approximately ninety degrees then the subject can walk by bearing weight on the plantar side of the foot [1].
Dorsiflexion contractures In a dorsiflexion contracture, the dorsal side of the foot is attached to the anterior side of the lower leg [2]. With the plantar side of their foot facing anteriorly, a patient with such a contracture is forced to use only their heel to walk [3].
Many of the neurovascular structures have already been stretched by this con-tracture since they are located posteriorly. However, one must still avoid sever-ing the tibialis anterior artery, the saphenous vein, and the perineal nerve. There are four tendons in the anterior compartment: the tibialis anterior, the extensor hallux longus, the extensor digitorum, and the peroneous tertius. Some of these tendons may have to be stretched, lengthened or cut during surgery. Tendons can be lengthened by performing a Z-plasty on them and reattaching the two pieces with non-absorbable suture [Diagram 1 on opposite page]. However, if time con-straints do not allow for this, tendons can be severed. If severed completely they will eventually heal via fibrosis, but some of their elastic nature could be lost.
A dorsiflexion contracture should be released with a Z-plasty incision across the band. The local flap that could be used to cover the exposed subcutaneous tissue is the sural or gastrocnemius flap, taken from the region just below the calf. Distally based, these flaps receive their blood supply from the posterior tibialis artery.
After the joint is released, it should be stabilized with a cast or a calcaneo- tibial pin. If the ankle seems fairly stable, then only apply an anterior splint to keep the foot in a neutral position. The splint, made of plaster of Paris, should extend just below the knee and should keep the foot close to 90 degrees [4]. If the ankle is unstable, insert a K-wire at a slight angle through the calcaneus, the talus, and into the tibia. Instability is likely if numerous ligaments were severed. The gauge of wire used will depend on the age of the patient, but in general, the diameter of the wire is 1.8 to 2 mm thick. Depending on how secure the first pin is, one might need a second or third to ensure complete immobilization. After the K-wires have been inserted, they should be bent at the ends, covered with gauze, and then an anterior splint should be applied.
Plantar flexion contracture A plantar flexion contraction is when the poste-rior structures of the lower leg have contracted, putting the foot in a permanently extended position. Such contractures force patients to walk on their toes, making their burned leg longer than their unaffected leg [5]. They also add stress to the knee and hip joints.
When releasing a plantar flexion contracture, it is likely that the tendo Achillis will require release. This tendon should be lengthened with a Z-plasty incision as shown in diagram [1] and photo [2] on the opposite page. This provides the needed length extension without decreasing ankle function. Ligaments that may need to be severed include the tibio talar ligament, the subtalar ligament, the cal-caneotibial ligament, and the calcaneofibular ligament. These structures should be cut, performing a Z-plasty to reconnect them is unnecessary.
Several neurovascular structures are important to preserve when releasing a plantar flexion contracture: the posterior tibial vessels, the posterior tibial nerve,

Surgical Release / Ankle 31
2) Eversion
1
2
3
5
4
6
1) Inversion
the saphenous nerve, and the sural nerve. The first three structures are located posterior-medially but the sural nerve is located posterior-laterally. The saphenous and sural nerves are both superficial so it is easy to accidentally damage them.
The best flap to use is an inferiorly based fasciocutaneous flap from the lower calf. This flap will have a blood supply from perforators, smaller, more superfi-cial arteries that originate from deeper arteries. An alternative would be to use a reverse sural flap, though this would lead to the loss of sensation in lateral foot and leg. Delineate the path of the sural nerve from between the two heads of the gastrocnemius to the midpoint between the Achilles tendon and the lateral mal-leolus. Then decide on the flap size along this line, maintaining the pivot point at least 5 cm above the lateral malleolus. Elevate the flap in the sub-fascial plane, include the short saphenous vein, and keep a 2 cm pedicle.
Once the release is complete, stabilize the joint in the method described in the dorsiflexion section. The only difference is that one must apply a back slab splint instead of a front slab splint to keep the foot in a neutral position.
Inversion and Eversion Contractures An inversion contracture is when the foot is pulled medially toward the midline [3]. An eversion contracture is when the foot is pulled laterally, away from the midline [4]. Both contractures make walk-ing difficult as they interfere with the normal gait cycle. Eversion contractures are more common, so their release will be discussed below.
With an eversion contracture, one must frequently release the peroneus longus and peroneus brevis tendons in addition to the skin and subcutaneous tissue. These tendons can be stretched, lengthened, or severed completely. If these measures do not provide a satisfactory release, one should consider ligament release. The ligaments one could sever are the anterior and posterior calcaneofibular ligaments.
A wedge osteotomy must be performed if the above measures fail. If the defor-mity is isolated to the hind foot, it might be necessary to take a medially based, closed wedge osteotomy of the calcaneus and talus. If the deformity involves both the hind and mid-foot, it might be necessary to take a larger wedge from the medial side of the talus and navicular. If the deformity is only in the forefoot, the metatarsals and phalanges, one might need to take small, medially based wedges from each metatarsal. Whenever a wedge of bone has been removed, it is neces-sary to fuse the remaining bones together to correct the deformity. This can either be done with staples, screws, or bone grafts.
During all of the above procedures it is necessary to avoid several structures. On the lateral side, one must avoid the peroneal nerves and vessels. On the medial side, take care to preserve the posterior tibial nerves and vessels and the deep portion of the deltoid ligament. Though the superficial deltoid ligament can be sacrificed, severing the deep deltoid ligament will result in an unstable ankle.
Amputation Amputation of the foot might be necessary if neither a soft tissue release nor an osteotomy will allow the patient to walk on the plantar side of their foot. This is frequently the case when bony fusion has occurred between joints or when the blood or nerve supply would have to be sacrificed to achieve a neutral
position. Amputation is also a good treatment option if the foot has numerous bony prominences or lacks an appropriate heel pad, conditions that would make weight bearing painful.
Syme’s amputation, an amputation at the distal part of the tibia, is the best option for a severe ankle contracture with the above characteristics. Syme’s amputation will allow a prosthetic to eliminate any leg length discrepancy, will allow patients to wear shoes and have good cosmetic outcome, and will allow easy ambulation. This procedure was done on the right ankle shown above [5], and will likely be done on the left ankle as well due to the bone distortions evident in the x-ray [6].

32 Physiotherapy / General
1
2
3
Physiotherapy
The Role of Physiotherapy
Physiotherapy is a key component to successful contracture release and should be started soon after the operation is per-formed. The main goal of the physiotherapist should be to main-tain the length gained by surgery. For contractures of the lower extremities, the secondary goal is to achieve normal ambulation. For the upper extremities, the secondary goal is to improve the patient’s ability to perform actions of daily living [1].
There are numerous ways a physiotherapist can help a post-burn contracture patient: they can provide scar massage to help decrease hypertrophic scarring, can stretch muscles that have contracted, provide appropriate pressure garments and splints to prevent recontracture, or even provide serial casting to help heal the wound and stretch tissues.
these stretches 10-15 minutes per affected muscle group at least 3 times a day.
Active mobilization is movement that the patient performs themselves with only the antagonistic muscles of their affected limb or digit. Movement is not forced. This can be done as soon as a week after surgery if the graft is healthy and has a good take.
Active assisted mobilization is when the patient attempts to move their limb by themselves but uses their other hand to increase the stretch or range of motion. If mobilizing a lower limb, it is often helpful for a physiotherapist to assist the patient. Active assisted mobili-zation is usually done 2 weeks after surgery, when the sutures are removed.
Passive mobilization is when the patient does not attempt to move their affected limb or digit themselves. Instead, they are supposed to relax and allow a physiotherapist to move their limb or digit into the appropriate stretch. Passive mobilization should be started three weeks after surgery, or when the k-wires are removed. Any attempt to do passive mobilization earlier may compromise the graft or tear sutures.
Passive mobilization can also be done pre-operatively on patients with partial contractures. This is done in attempt to stretch the nerves and arteries in addition to the muscles and tendons. It is best for a patient to do these stretches for 5-10 minutes three times a day for a month before their surgery. These stretches should not cause the patient great pain as they have not had an operation yet. Therefore the stretches can be held longer and one can use more force to gain a greater stretch as opposed to the cautious stretching
Scar Massage
After a wound has closed and scar tissue has begun to develop, it is important to massage the scar. This is particularly important to do in areas where scar forma-tion has made the skin tight, hard, or difficult to move, a condition known as adhesion. In an effort to keep the skin soft, malleable, and elastic, press one’s thumbs down over the scarred area and make circular motions [2]. One could also press one’s thumbs down on the scar and then pull them apart, stretching the skin in between them [3]. Use as much pressure as the patient can tolerate. Because it is important to do this massage for at least 10 minutes every day until the scar softens, it is crucial to teach the patients and their parents how to perform scar massage.
MobilizationIt is necessary to stretch the muscles and tendons in the region of the released
burn contracture to prevent recontracture. There are three types of mobilization: active, active assisted, and passive mobilization. With all three types of stretching it is important to stabilize the proximal joint and to achieve the stretch within the patient’s pain tolerance. Tell the patient to vocalize when they are feeling pain. It might be helpful to explain the difference between pain and a stretching sensa-tion by slightly pinching their arm to demonstrate pain and then stretching their fingers backwards to demonstrate a stretch. When the stretch becomes painful, stop advancing the stretch and hold that position for 10-30 seconds according to the patient’s pain tolerance. Give the patient a break before continuing. Repeat

Physiotherapy / General 33
1
2
Splinting
The first four days after a burn has been released a splint or pressure garment should be worn to immobilize the joint to prevent the graft from sloughing off due to motion or hematoma. This first splint should be applied while the patient is still under anesthesia, directly over the recipient site.
In addition to protecting the skin graft, splints decrease the likelihood of developing hypertrophic scars and decrease the chance of recontracture. There are two types of splints: dynamic splints and static splints. Dynamic splints allow movement against resistance while static splints immobilize the joint completely. Dynamic splints are generally worn during the day and static splints are worn at night. Splints worn during the day should only be removed when the patient is doing rehabilitation exercises.
Immediately after surgery, the recipient site should be wrapped with Vaseline dressings and sterile gauze. Cotton roll should be placed on top of this area to cushion the slab splint, made out of plaster of Paris, that will then be applied. A slab splint can be easily made by folding strips of plaster of Paris on top of one another until a ‘slab’ 8-14 layers thick has been created. The exact number of layers should depend on the size of the joint being splinted and on the length of time the splint will be used: larger joints that will be splinted longer need thicker slabs. Submerge the slab in warm water for 20 seconds, squeeze out some excess water, then mold the plaster of Paris on top of the cotton padding. The splint should be shaped as it dries so that it closely mirrors the patient’s anatomy without being too tight or too loose. If too tight, the splint could cause pressure sores but if too loose the splint will not provide the pressure needed to prevent hematomas. Wrap the area with coband or another elastic material to secure the splint to the limb or digit.
When the wound has healed, more permanent splints can be made of thermoplast, a material that can be remolded as needed to provide support for the released limb. To make such a splint, find a good correction position for the joint and cut a slab of the ther-moplast plastic that is a bit larger than the surface of the burned area. Put this slab in hot water until it is bendable and then mold it to released area. If the released burn contracture is still healing, the splint could be molded on contralateral limb. As the patient’s correc-tion improves, this splint can be heated and the position changed so that the affected limb is constantly getting the maximum amount of stretch. Minor adjustments will probably need to be made once a week. If plaster of Paris or thermoplast is not available, one could also construct a splint out of layered cardboard or smooth wood. The most important thing is that the previously contracted joint is immobilized and that pressure is put on the recipient site. Patients should continue to wear their various splints from 6 months to 2 years.
If the released contracture is difficult to splint, serial casting might be employed. Released contractures that might be difficult to splint are areas with very deformed anatomy. In such cases, casts might be put on in intervals of 2-3 days. Changing the cast every day does not allow enough time for structures to stretch and would be a waste of materials. Alternatively, changing the cast less frequently delays the stretching process as the affected area will not be stretched in the later days.
that must be done post-operatively. By stretching structures such as nerves and arteries that must be preserved during the operation, these stretches increase the success of the surgical release.
Muscle Strengthening
Most patients do not have decreased muscle power, only a decreased range of motion due to a contracture of skin and tendons. However, physiotherapists should work on strengthening the muscles that would counteract recontracture. For example, if a patient has a flexion elbow contracture, the physiotherapist should stretch the biceps and strengthen the triceps.
Another time physiotherapists must concentrate on muscle strengthening is when patients have nerve or muscle damage as a result of the initial burn. The edema caused by the burn can cause compartment syndrome, a condition that makes the muscles and nerves within a ‘compartment’ ischemic. Physiotherapists should help these patients improve the strength of the remaining muscles.
Game Therapy
Once the sutures and k-wires have been removed and the wound is healed, phys-iotherapists should introduce game therapy to their patients. Game therapy uses games or fun activities as a way to encourage their patients to stretch, increase mus-cle strength, improve their range of motion, and develop dexterity. The games will vary according to the severity of the contracture and the age of the patient but can include coloring for a released contracture of the hand, playing catch for a released axillary contracture, or playing soccer for a released knee contracture. [1,2]
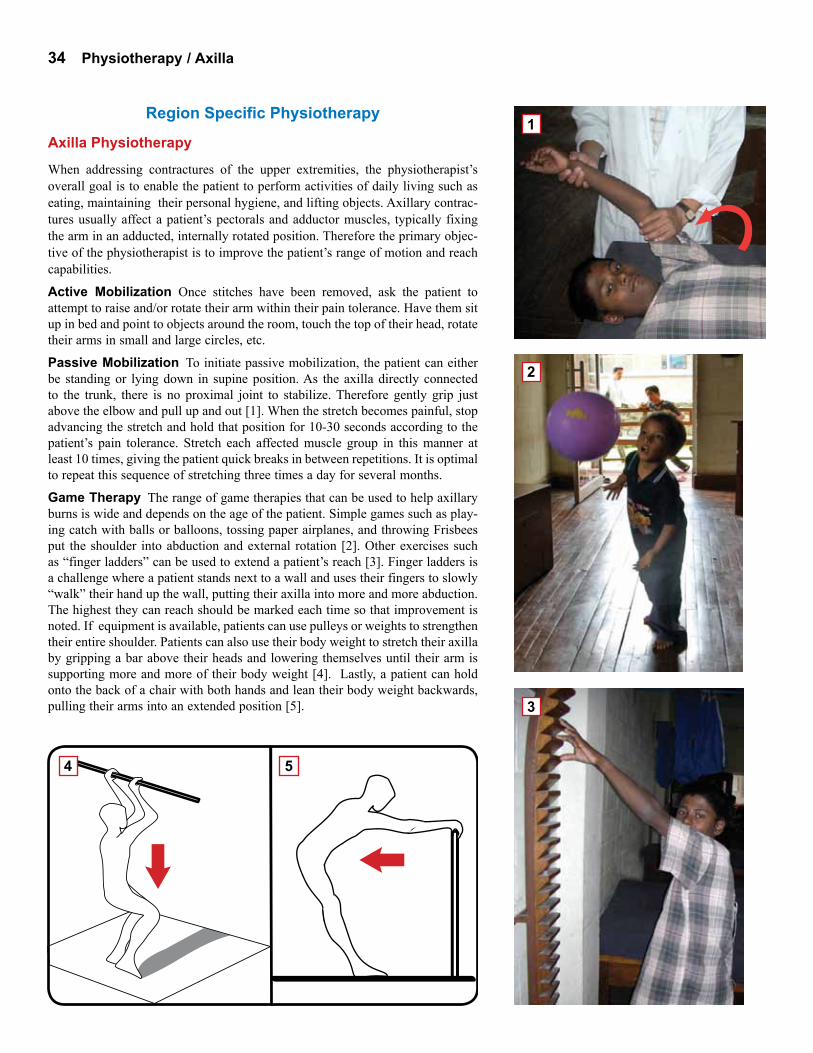
34 Physiotherapy / Axilla
2
4 5
3
1Region Specific Physiotherapy
Axilla Physiotherapy
When addressing contractures of the upper extremities, the physiotherapist’s overall goal is to enable the patient to perform activities of daily living such as eating, maintaining their personal hygiene, and lifting objects. Axillary contrac-tures usually affect a patient’s pectorals and adductor muscles, typically fixing the arm in an adducted, internally rotated position. Therefore the primary objec-tive of the physiotherapist is to improve the patient’s range of motion and reach capabilities.
Active Mobilization Once stitches have been removed, ask the patient to attempt to raise and/or rotate their arm within their pain tolerance. Have them sit up in bed and point to objects around the room, touch the top of their head, rotate their arms in small and large circles, etc.
Passive Mobilization To initiate passive mobilization, the patient can either be standing or lying down in supine position. As the axilla directly connected to the trunk, there is no proximal joint to stabilize. Therefore gently grip just above the elbow and pull up and out [1]. When the stretch becomes painful, stop advancing the stretch and hold that position for 10-30 seconds according to the patient’s pain tolerance. Stretch each affected muscle group in this manner at least 10 times, giving the patient quick breaks in between repetitions. It is optimal to repeat this sequence of stretching three times a day for several months.
Game Therapy The range of game therapies that can be used to help axillary burns is wide and depends on the age of the patient. Simple games such as play-ing catch with balls or balloons, tossing paper airplanes, and throwing Frisbees put the shoulder into abduction and external rotation [2]. Other exercises such as “finger ladders” can be used to extend a patient’s reach [3]. Finger ladders is a challenge where a patient stands next to a wall and uses their fingers to slowly “walk” their hand up the wall, putting their axilla into more and more abduction. The highest they can reach should be marked each time so that improvement is noted. If equipment is available, patients can use pulleys or weights to strengthen their entire shoulder. Patients can also use their body weight to stretch their axilla by gripping a bar above their heads and lowering themselves until their arm is supporting more and more of their body weight [4]. Lastly, a patient can hold onto the back of a chair with both hands and lean their body weight backwards, pulling their arms into an extended position [5].

Physiotherapy / Hand 35
4
6
3
2
1
5
Finger, Hand, and Wrist Physiotherapy
The overall goal is to make it possible for the patient to perform activities of daily living such as eating, personal hygiene, lifting, etc. When faced with contracture of the wrist, hand, or fingers, most important thing is to improve the patient’s dexterity and gripping ability.
Splinting Two types of splinting exist for the hand: static and dynamic splints. Static splints do not allow joint mobilization, but keep the fingers and wrist in a fixed position [1]. These are typically worn at night. On the other hand, a dynamic splint, usually worn during the day, allow for some joint movement. For example, if a child has a wrist flexion contracture, the hand will be held in an extended position by rubber bands [2]. By pressing against these rubber bands it is possible to get the hand into flexion, but it requires effort.
Active Mobilization Once stitches have been removed, ask the patient to flex and extend their wrist, move their hand in small circles, spread their fingers, flex and extend their fingers, etc. [3].
Passive Mobilization Because there are so many muscles in the hand, it normally takes at least 30 minutes to an hour to satisfactorily stretch a patient’s fingers, thumbs, and wrist. Always stabilize the proximal joint: if stretching the wrist, stabilize at the forearm, if stretching the thumb, stabilize at the metacarpal and wrist [4,5].
Game Therapy Practice fine motor skills [6]. As sensation might be limited, start with picking up small, firm, light weight objects and progress to handling large, flexible, soft, and heavy objects. Everyday activities such as writing, tying one’s shoelaces, and eating help exercise the hand. A simple task a physiotherapist can ask a patient to perform is to touch their thumb to each finger. Patients should also be encouraged to color and draw as this helps develop motor control and accuracy. To strengthen their grip and dexterity, patients can be asked to practice picking things up such as scattered marbles. More advanced version of this task is to have the patient pick up smaller objects like toothpicks or soft, flexible objects like cotton balls. One could also have patients button and unbutton a shirt or place pegs of various sizes into a board.

36 Physiotherapy / Knee
Knee Physiotherapy
When dealing lower extremity burn contractures, the primary goal of the physio-therapist is to help the patient ambulate normally. For a knee flexion contracture, the specific goal is to straighten the patient’s leg.
Early Ambulation Patients with leg grafting should be kept on bed rest for 4 days after surgery to let the graft take to the wound bed. Any movement could cause shearing which could lead to hematomas and graft failure. However, active mobilization can begin a 1-2 weeks after the surgery, whenever the stitches are removed.
Active Mobilization Once stitches have been removed, ask the patient to attempt to flex and extend their knee within their pain tolerance. Have them sit on their bed so that their feet dangle off the side and ask them to raise their foot to your hand.
Passive Mobilization For a flexion contracture, begin active mobilization by positioning the patient face down on a table so that their affected thigh is along the table and their foot is raised in the air. Stabilize the proximal side of the joint by gripping the back of the thigh, just above the knee, with one hand [1]. With the other hand, grip just below the calf and start to gently press the ankle towards the table.
Game Therapy Physiotherapist should encourage patients who had knee flex-ion contractures to play games involving their legs and feet once their wounds have completely healed. Start by having the patient walk slowly up and down stairs or sit on an exercise ball [2]. When the patient has a bit more extension, have them kick a ball back and forth. Give younger children, big, light balls and older children smaller balls to increase the difficulty. Eventually the patient can play soccer, a game that encourages knee extension. To improve balance, one can ask the child to stand on their affected leg. If they are advanced, have them stand on one leg and pick up objects on the ground, an exercise that will work on balance and strengthen their hamstrings. If the knee was severely contracted and had not been weight bearing for some time, it might be necessary to increase the muscle power of the entire limb.
Orthotics If the lower leg was disarticulated or amputated, the primary job of the physiotherapist is to teach the patient to use a prosthesis. First one must ensure that the patient can weight bear in their prosthesis without pain [3]. If standing is painful, assess whether the prosthesis is too small or ill fitting, the stump is irritated, or there is a bony prominence that is not properly padded. If the patient can bear weight, the next step is to reteach the patient the normal components of walking. The gait cycle has four steps: the heel strike, making the foot flat, the heel lift, and the toe lift. One also needs to remind patients to weight-shift to their affected limb. Normally patients try to stand on their unaf-fected leg, but distributing weight unequally can lead to joint degeneration and muscle imbalance.
One should typically have the patient begin walking between two parallel bars until they gain the confidence and stability. When they become comfortable with this, promote them to a walker. Have them advance the walker and then take two normal steps forward. When they become stronger they can use crutches and practice progressive walking. All of these exercises should, if possible, be done in front of a mirror so that the patient can see if they are straight and level.
Lastly, the physiotherapist should teach their patient that regular observation, cleaning, and prosthetic maintenance can prevent pressure sores. To keep the stump dry in the wet season, apply talcum powder. To keep from cracking in dry seasons, use oil, moisturizer, or butter.
1
2
3
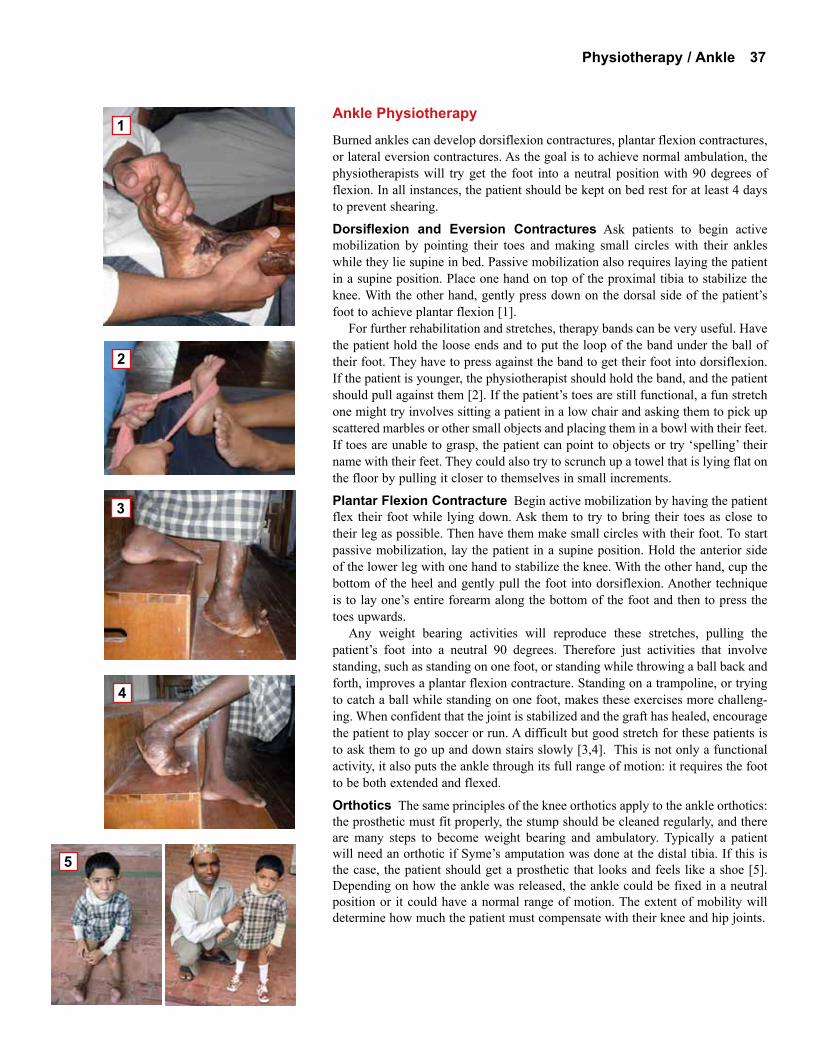
Physiotherapy / Ankle 37
Ankle Physiotherapy
Burned ankles can develop dorsiflexion contractures, plantar flexion contractures, or lateral eversion contractures. As the goal is to achieve normal ambulation, the physiotherapists will try get the foot into a neutral position with 90 degrees of flexion. In all instances, the patient should be kept on bed rest for at least 4 days to prevent shearing.
Dorsiflexion and Eversion Contractures Ask patients to begin active mobilization by pointing their toes and making small circles with their ankles while they lie supine in bed. Passive mobilization also requires laying the patient in a supine position. Place one hand on top of the proximal tibia to stabilize the knee. With the other hand, gently press down on the dorsal side of the patient’s foot to achieve plantar flexion [1].
For further rehabilitation and stretches, therapy bands can be very useful. Have the patient hold the loose ends and to put the loop of the band under the ball of their foot. They have to press against the band to get their foot into dorsiflexion. If the patient is younger, the physiotherapist should hold the band, and the patient should pull against them [2]. If the patient’s toes are still functional, a fun stretch one might try involves sitting a patient in a low chair and asking them to pick up scattered marbles or other small objects and placing them in a bowl with their feet. If toes are unable to grasp, the patient can point to objects or try ‘spelling’ their name with their feet. They could also try to scrunch up a towel that is lying flat on the floor by pulling it closer to themselves in small increments.
Plantar Flexion Contracture Begin active mobilization by having the patient flex their foot while lying down. Ask them to try to bring their toes as close to their leg as possible. Then have them make small circles with their foot. To start passive mobilization, lay the patient in a supine position. Hold the anterior side of the lower leg with one hand to stabilize the knee. With the other hand, cup the bottom of the heel and gently pull the foot into dorsiflexion. Another technique is to lay one’s entire forearm along the bottom of the foot and then to press the toes upwards.
Any weight bearing activities will reproduce these stretches, pulling the patient’s foot into a neutral 90 degrees. Therefore just activities that involve standing, such as standing on one foot, or standing while throwing a ball back and forth, improves a plantar flexion contracture. Standing on a trampoline, or trying to catch a ball while standing on one foot, makes these exercises more challeng-ing. When confident that the joint is stabilized and the graft has healed, encourage the patient to play soccer or run. A difficult but good stretch for these patients is to ask them to go up and down stairs slowly [3,4]. This is not only a functional activity, it also puts the ankle through its full range of motion: it requires the foot to be both extended and flexed.
Orthotics The same principles of the knee orthotics apply to the ankle orthotics: the prosthetic must fit properly, the stump should be cleaned regularly, and there are many steps to become weight bearing and ambulatory. Typically a patient will need an orthotic if Syme’s amputation was done at the distal tibia. If this is the case, the patient should get a prosthetic that looks and feels like a shoe [5]. Depending on how the ankle was released, the ankle could be fixed in a neutral position or it could have a normal range of motion. The extent of mobility will determine how much the patient must compensate with their knee and hip joints.
2
3
4
1
5
Copyright © 2010 Global HELP all rights reserved
www.global-help.org
Web site addresses: www.global-help.org
www.orthobooks.org
Send comments, questions or photographs of a HELP publication in use to:[email protected]
Global HELP Organization provides free health-care information to developing countries and helps to make medical knowledge accessible world-wide.
PDF for Web site and CD libraries All publications are available in PDF format. PDF files can be downloaded from our web site for free by clicking on the publication title or image. These files are then copied on your computer and can be printed on personal printers in color or black and white. CD libraries include many publication in one convenient compact disc. Some CD libraries are restricted to be used only in developing countries.
Printed PublicationsSome publications are available for “on demand” printing. Order single or multiple printed copies on our web site at www.global-help.org. These publications are available for only the cost of printing and mailing.


![Surgical treatment algorithms for post-burn contractures(Fig. 3). Many variations of Z-plasty and YV-plasty in-cluding the opposite running YV-plasty [22] have been described such](https://img.pdfslide.us/doc/110x75/60e4abd85e2cf512207a8eaf/surgical-treatment-algorithms-for-post-burn-contractures-fig-3-many-variations.jpg)

![Functional Reconstruction of Post-Burn Hand Contractures · 39% of burn injuries involve the upper extremity, three while in severe burn cases, 80% of cases result in hand contracture.[4]](https://img.pdfslide.us/doc/110x75/5f0df88e7e708231d43cfbc4/functional-reconstruction-of-post-burn-hand-39-of-burn-injuries-involve-the-upper.jpg)