Embed Size (px)
Citation preview
printed on 8/25/2010
The Heat-Kit Planning Guide
Masonry Heating 2 What’s a Masonry Heater? 2 The Benefits of Radiant Heating 3 Environmental Benefits 5
The Heat-Kit System 7 Introduction 7 Description 7
Components 7 Gas flow 8
Technical Features 9
Options 10 Domestic Bakeoven 10 Domestic Hot Water 11
Layout Guide 15 Standard dimensions 15
Clearances 15 Heater 15 Chimney 15
Layout Examples 16 Heated Benches 16 Examples of high output systems 18
Completing Your System 19 Working with a local mason 19 Foundation plans 20 Frequently asked questions 21 Finding More Information 23
Our Products and Services 24 Products 24 Services — consulting and design 24 Costs 24
Masonry Stove Builders
Norbert and Leila Senf, proprietors
Voice 819.647.5092 Fax 819.647.6082 e-mail [email protected] RR 5, Shawville, Québec J0X 2Y0
Visit our website at www.heatkit.com
The Heat-Kit Planning Guide
2
Masonry Heating
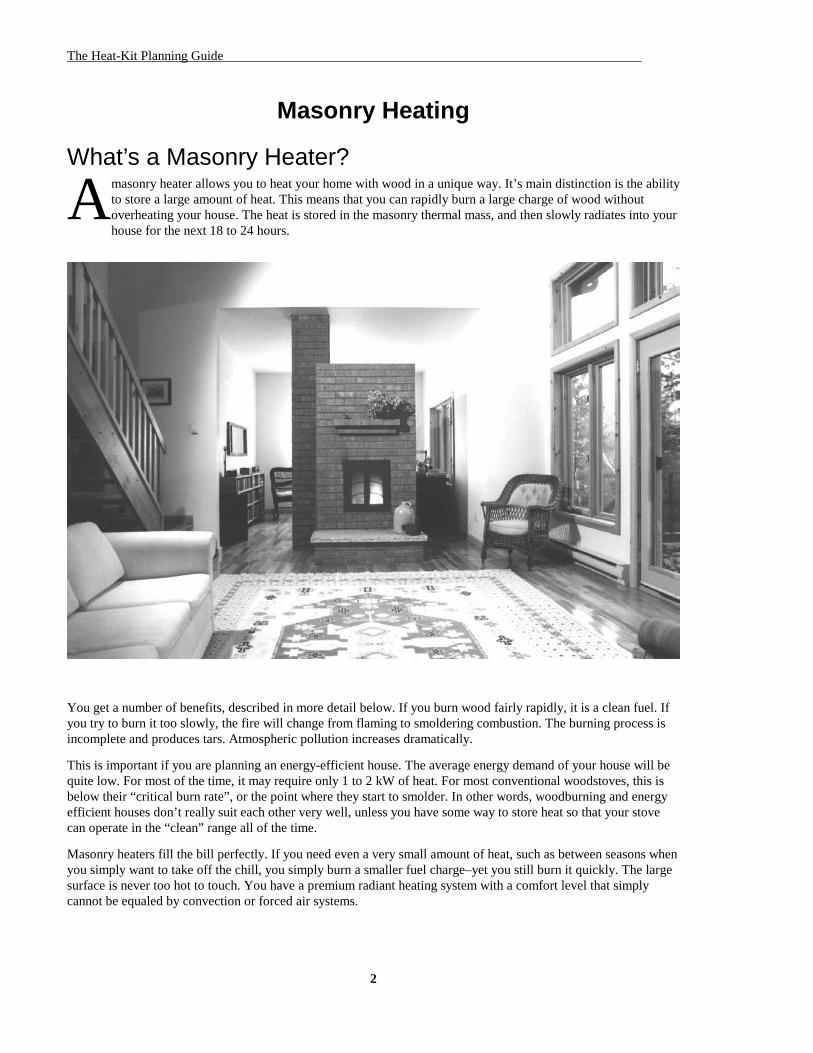
What’s a Masonry Heater?masonry heater allows you to heat your home with wood in a unique way. It’s main distinction is the ability to store a large amount of heat. This means that you can rapidly burn a large charge of wood without overheating your house. The heat is stored in the masonry thermal mass, and then slowly radiates into your house for the next 18 to 24 hours.
You get a number of benefits, described in more detail below. If you burn wood fairly rapidly, it is a clean fuel. If you try to burn it too slowly, the fire will change from flaming to smoldering combustion. The burning process is incomplete and produces tars. Atmospheric pollution increases dramatically.
This is important if you are planning an energy-efficient house. The average energy demand of your house will be quite low. For most of the time, it may require only 1 to 2 kW of heat. For most conventional woodstoves, this is below their “critical burn rate”, or the point where they start to smolder. In other words, woodburning and energy efficient houses don’t really suit each other very well, unless you have some way to store heat so that your stove can operate in the “clean” range all of the time.
Masonry heaters fill the bill perfectly. If you need even a very small amount of heat, such as between seasons when you simply want to take off the chill, you simply burn a smaller fuel charge–yet you still burn it quickly. The large surface is never too hot to touch. You have a premium radiant heating system with a comfort level that simply cannot be equaled by convection or forced air systems.
A
The Heat-Kit Planning Guide
3
The Benefits of Radiant Heating asonry heaters are radiant heating systems. Radiant heating differs in sev-eral fundamental aspects from conven-tional convection and forced air heating.
Understanding these differences is important if you plan to include a masonry heater in your house design.
Why do we heat? A good approach is to ask the question “Why do we heat?”. While this may seem trivial, it's important to consider the fact that our body produces its own heat, about 100 watts when we're resting. Strictly speaking, we don't need to heat our bodies at all. Rather, we need to prevent them from losing heat.
We exchange heat with our surroundings through two main mechanisms: radiation and convection. The proportion of each varies depending on how you are dressed and on your environment. In a T-shirt in an average house in the winter, you're losing about 60% by radiation. The exact amount can vary dramatically depending on what surface temperatures your body “sees” in surrounding objects.
A good example: When you are outside in the spring on a calm, sunny day, you can wear a T-shirt even though the air temperature might be 55 or 60
ºF. But step into the shade and you will start shivering within several minutes, even though the air temperature hasn't changed. The presence or absence of the sun changes your radiant environment dramatically. Similarly, even a slight breeze at these temperatures would change your convective environment. The word "draft" in this context immediately conjures up mental images of discomfort.
Radiant heat is electromagnetic energy, the same as visible light. The only difference is that it is in the infrared range of the spectrum, with a longer wavelength. Long wave infrared is more com-fortable than short wave infrared. As the surface temperature of a radiating body gets higher, the wavelength of the radiant energy gets shorter, until eventually it is seen as a dull glowing red. This is the piercing heat you feel from a campfire as you get close to the charcoal bed.
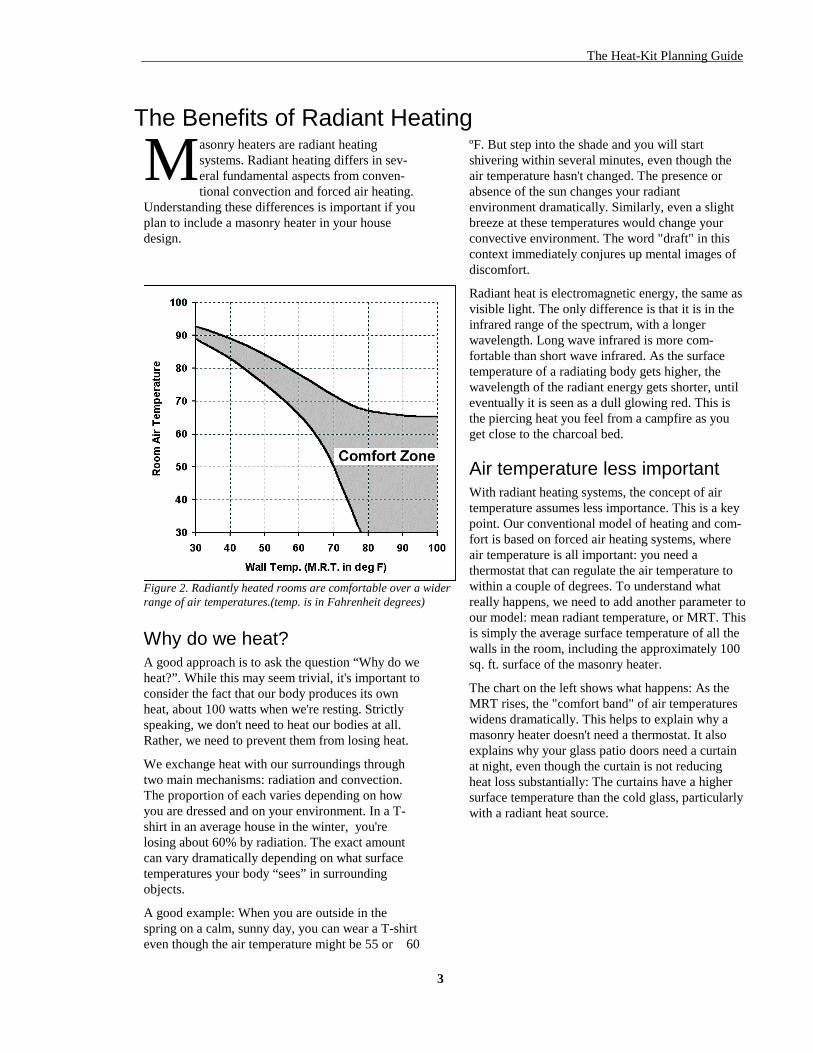
Air temperature less important With radiant heating systems, the concept of air temperature assumes less importance. This is a key point. Our conventional model of heating and com-fort is based on forced air heating systems, where air temperature is all important: you need a thermostat that can regulate the air temperature to within a couple of degrees. To understand what really happens, we need to add another parameter to our model: mean radiant temperature, or MRT. This is simply the average surface temperature of all the walls in the room, including the approximately 100 sq. ft. surface of the masonry heater.
The chart on the left shows what happens: As the MRT rises, the "comfort band" of air temperatures widens dramatically. This helps to explain why a masonry heater doesn't need a thermostat. It also explains why your glass patio doors need a curtain at night, even though the curtain is not reducing heat loss substantially: The curtains have a higher surface temperature than the cold glass, particularly with a radiant heat source.
M
Figure 2. Radiantly heated rooms are comfortable over a wider range of air temperatures.(temp. is in Fahrenheit degrees)
The Heat-Kit Planning Guide
4
Other aspects of radiant heating systems
Less dust With a conventional forced system, you use the air that you breathe as a heating medium by cycling it through your furnace blower every few minutes.
When you wake up in the morning with a “parched throat”, you associate this with dry air. In fact, it is not dry air at all, but dust. The furnace circulates very fine dust throughout your house. Furnace filters only get the larger particles, not the very fine dust that causes the most sensitivity. When you add a humidifier, what you are actually doing is using moisture to help settle the dust out of the air.
Consider this: For a person with respiratory problems, where is the best place to be in the winter? Answer: Arizona, where the air is dry.
Less stratification The reason there is less air movement with a radiant heating system is that there is a much smaller temperature difference between the air at the ceiling and at the floor. There is less overheating of upstairs bedrooms, and ceiling fans can usually be eliminated. Radiant heating gives you more mileage from a given amount of heat output by targeting it better to where it is needed: in the living space where the radiant panels are located.
Healthy heat Radiant heating is beneficial for many allergy and respiratory related problems, for the reasons outlined above.
In addition, you experience comfort at a lower air temperature. Cooler air next to your exposed skin promotes circulation and your body's own heat production. It feels invigorating and allows you to be more alert. The “sunny spring day” cited earlier demonstrates this effect.
In Europe, radiant heat has been used in medicine for therapeutic purposes for many years, and it is starting to see some use here as well.
How does this affect my choices?
Location important Understanding some of the basic principles of radiant heating is important when you decide where to locate your masonry heating system.
Generally speaking, a masonry heater creates a “comfort zone” around itself. The closer you are to the heater, the higher is the MRT that your body “sees” in its environment.
This means that you want the heater located where your family spends most of its time. An open floorplan and a central location work best. Often the masonry structure is designed to serve as a space divider between, say, kitchen and living room. The fact that only minimal clearances to combustible materials are usually required allows for greater flexibility in integrating the system into the home.
Also consider the location of the firebox loading door and its convenience to your firewood supply. Firewood storage inside the house is often not necessary, since the firebox gets loaded all at once.
Many heaters often do double duty as fireplaces, so this function should be considered as well.
Windows affect performance Many modern windows come with a special “low-E” coating that acts like a mirror for longwave radiant energy. With a masonry heater in the room, your body sees a reflection of the room’s warm surfaces in the window in addition to the cold surface of the glass itself. With large, uncovered glass surfaces such as patio doors, low-E glass will improve comfort levels noticeably with vertical radiant panels such as those in a centrally located masonry heater.
The Heat-Kit Planning Guide
5
Environmental Benefits
A sustainable technology ustainable construction is starting to come into its own. Many people are beginning to question not only the energy consumption of their houses and their lifestyles, but also wider
effects, such as the amount of embodied energy in the house materials, and the amount of pollution that has been generated as a result.
Masonry heating is an ancient technology. Its basic ingredients are earth and fire. While it is relatively new to North America, it dates back several hundred years in many of the colder regions of Europe.
All of the materials in a heater can be recyclable, if desired, and there are heaters in Europe that have been giving faithful service for over a hundred years.
Helping to reduce global warming The most important global environmental issue today is global warming and our emissions of greenhouse gases (mainly carbon dioxide). We are risking the well-being of future generations because of our consumption of fossil fuels. Every time that we fill our car with gas we add the equivalent of a hundred pound sack of carbon to the atmosphere in the form of carbon dioxide emissions from our tailpipe.
Hydrocarbons have been sequestered in the earth for millions of years by the actions of plant life on the atmosphere. Through our consumption of fossil fuels we are returning this carbon into the atmosphere at a staggering rate. As North Americans we are the worst culprits, consuming several times the world average per capita. To have an meaningful impact, we need to reduce our fossil fuel use by approximately 70 to 90%.
Our transportation choices are limited — we can drive less, or get a more efficient vehicle. We do, however, have a choice in how we heat our homes. It simply doesn’t make sense to use valuable (yet ridiculously underpriced) resources simply to make low grade heat.
Wood is a renewable resource Provided that trees are grown on a sustainable basis, there is almost zero contribution to global warming when you burn wood.
Plants use photosynthesis to store solar energy. They accomplish this by converting atmospheric carbon dioxide into stored carbohydrates such as cellulose. When a tree eventually dies, this carbon dioxide is returned to the atmosphere by the action of bacteria and fungi as the wood decomposes. Because this is a closed carbon cycle there is no net impact. When you burn wood, your are heating your house with stored solar energy and simply using a speeded up version of this cycle.
Proper use of wood as a heating fuel requires that it be harvested sustainably. As opposed to clearcutting, proper forestry practice requires thinning and culling to improve the stand. This could, in theory, generate enough fuel to heat a huge number of houses.
Minimizing emissions from woodburning Large scale woodburning can lead to air quality problems. The main environmental issue is smoke emissions. Woodsmoke is very similar to cigarette smoke from a health standpoint. It consists of tiny droplets of tar known to regulators as PM-10, or particulate matter smaller than 10 microns in size. Since a blood corpuscle is 6 microns, smoke particles can enter through the lungs directly into the bloodstream. Hence, the health issue.
As mentioned above, emissions from woodburning can vary dramatically depending on how it is burned. For airtight metal stoves, the Unites States Environmental Protection Agency (US-EPA) now requires that all models must be certified to the US-EPA Phase II standard for emissions. This has resulted in clean-burn research and significant improvements in airtight stove emissions from what were very high levels.
The Masonry Heater Association of North America (MHA) has made a major effort to establish emissions performance of masonry heaters through EPA-audited field testing. As a result, the majority of manufacturers now have emissions numbers for their systems.
S
The Heat-Kit Planning Guide
6
Masonry Stove Builders has gone one step further. In partnership with Lopez Quarries Masonry Heaters (Everett, WA), we set up an emissions testing facility, Lopez Labs, and for four years have been conducting an ongoing program of performance testing on a number of different heaters under simulated field conditions.
As a result, we now have the largest database on masonry heating performance testing in North America, with over 100 tests over a complete (24 hr) cycle, and have produced several research papersi.
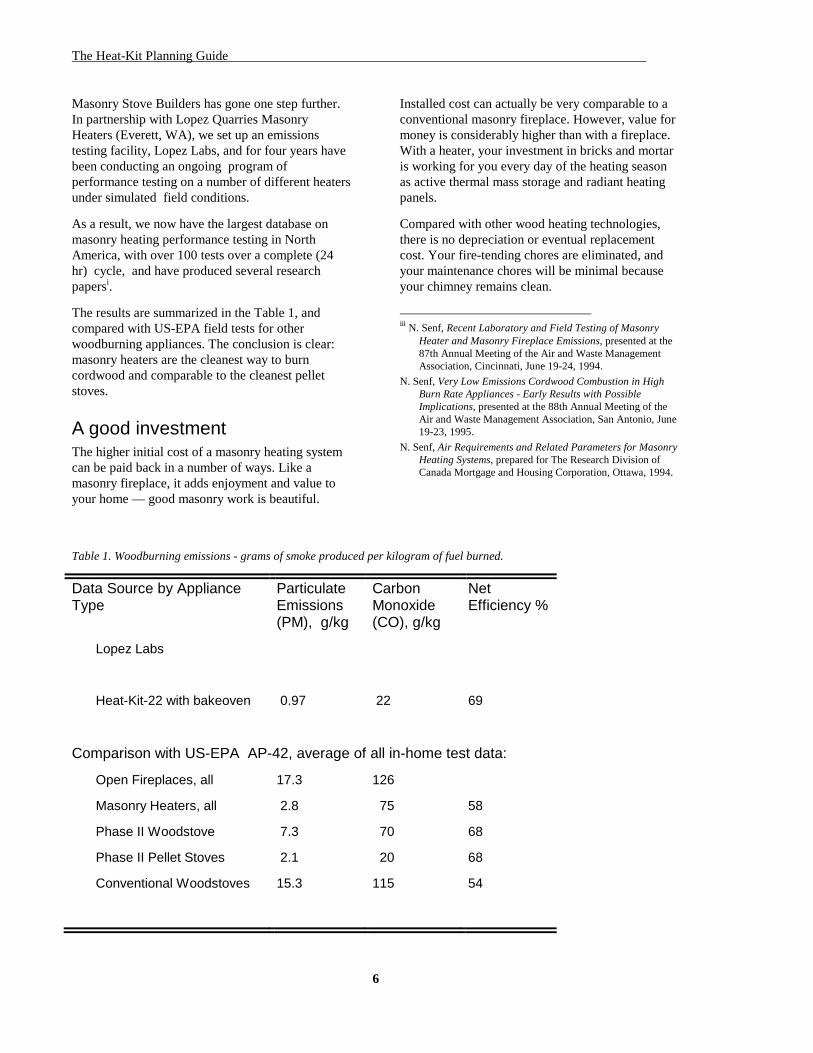
The results are summarized in the Table 1, and compared with US-EPA field tests for other woodburning appliances. The conclusion is clear: masonry heaters are the cleanest way to burn cordwood and comparable to the cleanest pellet stoves.
A good investment The higher initial cost of a masonry heating system can be paid back in a number of ways. Like a masonry fireplace, it adds enjoyment and value to your home — good masonry work is beautiful.
Installed cost can actually be very comparable to a conventional masonry fireplace. However, value for money is considerably higher than with a fireplace. With a heater, your investment in bricks and mortar is working for you every day of the heating season as active thermal mass storage and radiant heating panels.
Compared with other wood heating technologies, there is no depreciation or eventual replacement cost. Your fire-tending chores are eliminated, and your maintenance chores will be minimal because your chimney remains clean.
iii N. Senf, Recent Laboratory and Field Testing of Masonry
Heater and Masonry Fireplace Emissions, presented at the 87th Annual Meeting of the Air and Waste Management Association, Cincinnati, June 19-24, 1994.
N. Senf, Very Low Emissions Cordwood Combustion in High Burn Rate Appliances - Early Results with Possible Implications, presented at the 88th Annual Meeting of the Air and Waste Management Association, San Antonio, June 19-23, 1995.
N. Senf, Air Requirements and Related Parameters for Masonry Heating Systems, prepared for The Research Division of Canada Mortgage and Housing Corporation, Ottawa, 1994.
Table 1. Woodburning emissions - grams of smoke produced per kilogram of fuel burned.
Data Source by Appliance Type
Particulate Emissions (PM), g/kg
Carbon Monoxide (CO), g/kg
Net Efficiency %
Lopez Labs
Heat-Kit-22 with bakeoven 0.97 22 69
Comparison with US-EPA AP-42, average of all in-home test data:
Open Fireplaces, all 17.3 126
Masonry Heaters, all 2.8 75 58
Phase II Woodstove 7.3 70 68
Phase II Pellet Stoves 2.1 20 68
Conventional Woodstoves
15.3 115 54
Masonry Stove Builders
7
The Heat-Kit System
Introduction raditionally, building a good masonry heater has required craftspeople with considerable skill and training. The heater is not only required to perform well in terms of
efficiency and emissions, but also to be able to stand up to many thousand cycles of rapid heating and cooling. This severe thermal cycling places tremendous stresses on refractory materials, with which the stovemason must be intimately familiar.
Our philosophy We have been designing and building heaters for many years. We are also founding members of the Masonry Heater Association. By networking with a very capable group of heater masons all over North America, we’re able to benefit from the latest knowledge and field experience.
The Heat-Kit was the first heater core developed in North America and some of its more innovative features have been more widely adopted.
We are committed to masonry heater research and development.
We developed the Heat-Kit system in 1985 to better address both our own needs and those of our clients. It is a system of precast refractory components that has allowed us to reduce the amount of expensive on-site time required to build a heater core by 90% . Our main innovation was to retain about 50% of the firebrick construction in the core, including all critical areas such as the firebox. Firebrick are unsurpassed, for taking the heavy abuse of thermal cycling.
We have also developed the first masonry white bake oven (i.e., the flames do not pass through the oven).
Description A complete system includes a foundation, heater and chimney.
The heater consists of a core and a facing. The masonry facing has a minimum thickness of 4” and is part of the active thermal mass. It is typically installed by a local mason, and you have a wide choice of finish options.
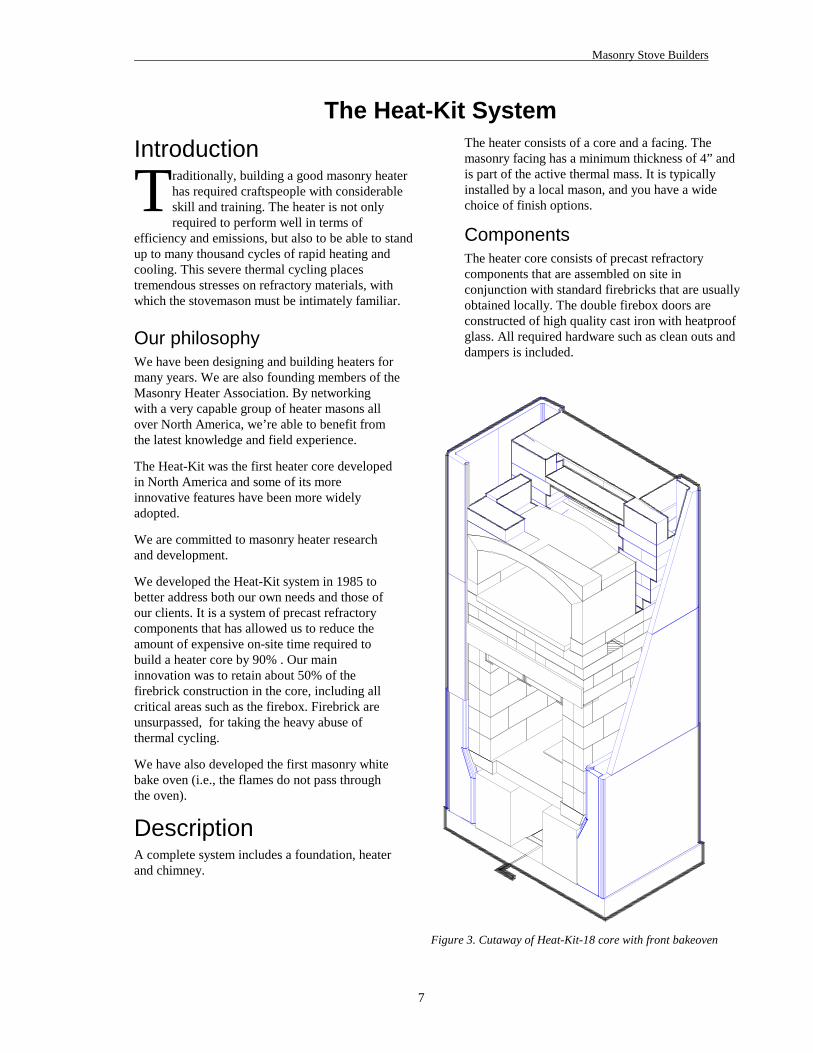
Components The heater core consists of precast refractory components that are assembled on site in conjunction with standard firebricks that are usually obtained locally. The double firebox doors are constructed of high quality cast iron with heatproof glass. All required hardware such as clean outs and dampers is included.
T
Figure 3. Cutaway of Heat-Kit-18 core with front bakeoven
The Heat-Kit Planning Guide
8
Some of this hardware is installed into the facing, i.e., it will be done by the local mason. In the northeast we offer a delivered and installed price for the core, set up ready for facing.
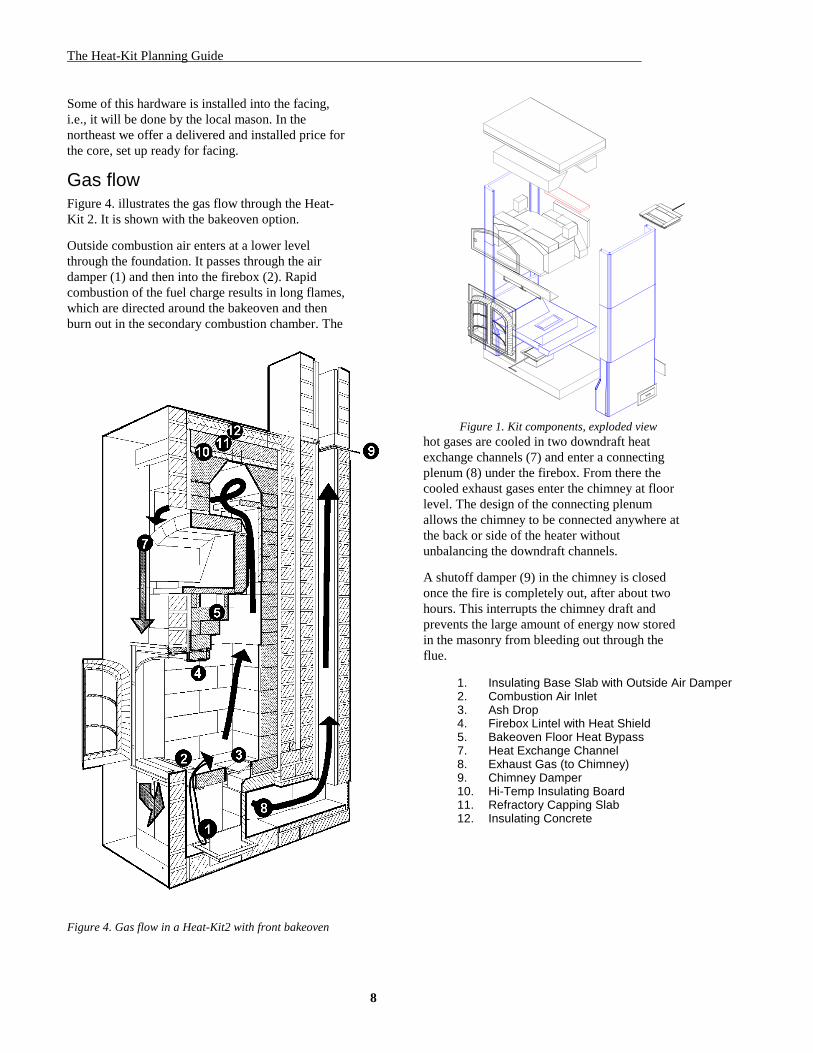
Gas flow Figure 4. illustrates the gas flow through the Heat-Kit 2. It is shown with the bakeoven option.
Outside combustion air enters at a lower level through the foundation. It passes through the air damper (1) and then into the firebox (2). Rapid combustion of the fuel charge results in long flames, which are directed around the bakeoven and then burn out in the secondary combustion chamber. The
hot gases are cooled in two downdraft heat exchange channels (7) and enter a connecting plenum (8) under the firebox. From there the cooled exhaust gases enter the chimney at floor level. The design of the connecting plenum allows the chimney to be connected anywhere at the back or side of the heater without unbalancing the downdraft channels.
A shutoff damper (9) in the chimney is closed once the fire is completely out, after about two hours. This interrupts the chimney draft and prevents the large amount of energy now stored in the masonry from bleeding out through the flue.
Figure 4. Gas flow in a Heat-Kit2 with front bakeoven
Figure 1. Kit components, exploded view
1. Insulating Base Slab with Outside Air Damper 2. Combustion Air Inlet 3. Ash Drop 4. Firebox Lintel with Heat Shield 5. Bakeoven Floor Heat Bypass 7. Heat Exchange Channel 8. Exhaust Gas (to Chimney) 9. Chimney Damper 10. Hi-Temp Insulating Board 11. Refractory Capping Slab 12. Insulating Concrete
Masonry Stove Builders
9
Technical Features Now uses high capacity 22 inch firebox We have widened the firebox from 18” to 22”, which allows a wood load of up to 60 lbs to be used.
The Heat-Kit system uses two layer, 5 inch thick firebrick construction in the firebox. The inner 2½ inch layer is field replaceable, should that ever become necessary. Our 17 year track record indicates that this is unlikely, however.
Available with white bakeoven Please refer to the more detailed description in the next section. We offer the only white bakeoven available with a contraflow heater.
Engineered performance Best masonry heater performance is achieved with the right relationship between thermal mass and burn cycle. Traditional masonry heaters in Europe were used as room heaters, and it is only with their relatively recent transfer to North America that they have been applied to modern whole house designs. As a result, most North American heaters are larger than European models, raising new design issues.
As heater walls get thicker, the surface temperature drops and the storage time and the thermal lag time increase. An optimum design needs to strike the correct balance between these opposing forces. Storage times in excess of 18–24 hours are not desirable, since there will be too much time lag between firing the heater and reaching
maximum output, in effect requiring you to predict tomorrow’s weather. Similarly, a 140 to 150°F surface temperature provides a reasonable heat output and the drop-off with lower temperatures is fairly steep.
Our precast refractory heat exchangers use special 1¼ inch thinwall construction, allowing you to build up to the ideal 5½ to 6 inch final thickness in the heater sidewalls using standard 4 inch masonry units. This gives you a wider range of finish options without incurring the performance penalties of thick sidewalls.
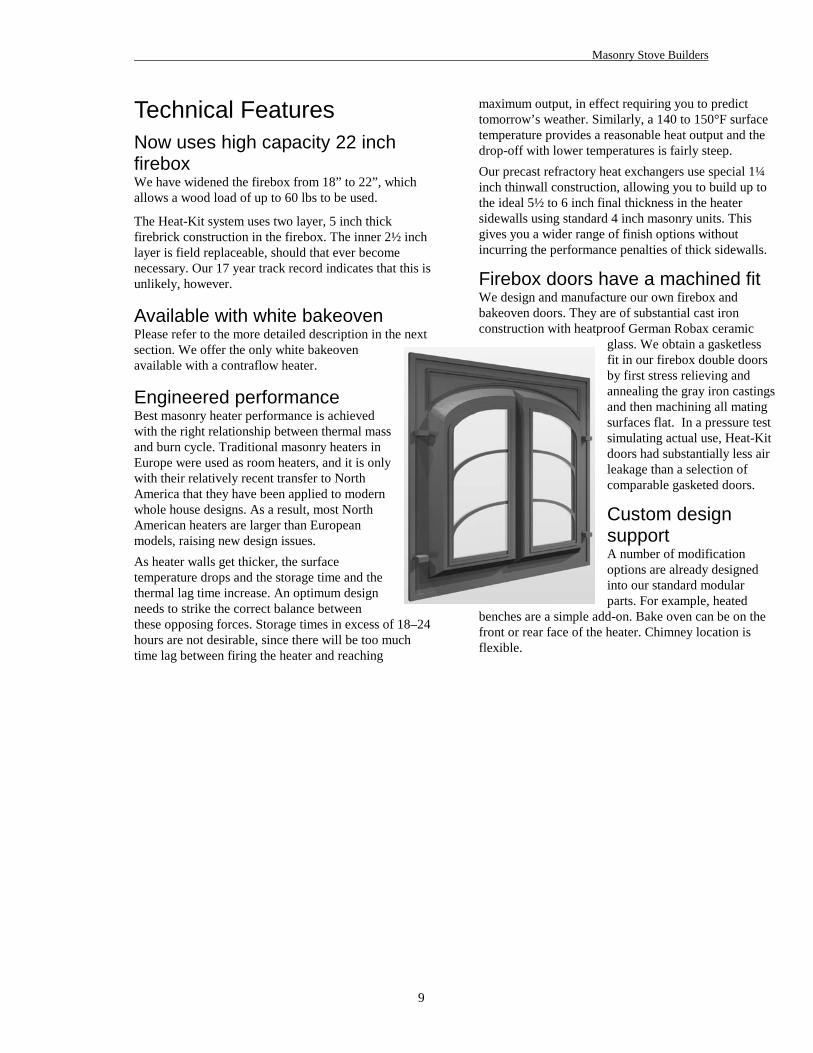
Firebox doors have a machined fit We design and manufacture our own firebox and bakeoven doors. They are of substantial cast iron construction with heatproof German Robax ceramic
glass. We obtain a gasketless fit in our firebox double doors by first stress relieving and annealing the gray iron castings and then machining all mating surfaces flat. In a pressure test simulating actual use, Heat-Kit doors had substantially less air leakage than a selection of comparable gasketed doors.
Custom design support A number of modification options are already designed into our standard modular parts. For example, heated
benches are a simple add-on. Bake oven can be on the front or rear face of the heater. Chimney location is flexible.
The Heat-Kit Planning Guide
10
Options
Domestic Bakeoven
New design optimizes performance
akeovens are readily incorporated into Contraflow heaters, and have become a very popular option in the last few years. There are two types. In the traditional “black”
oven, flames pass directly through the oven, which is then ready to bake after the fire is out.
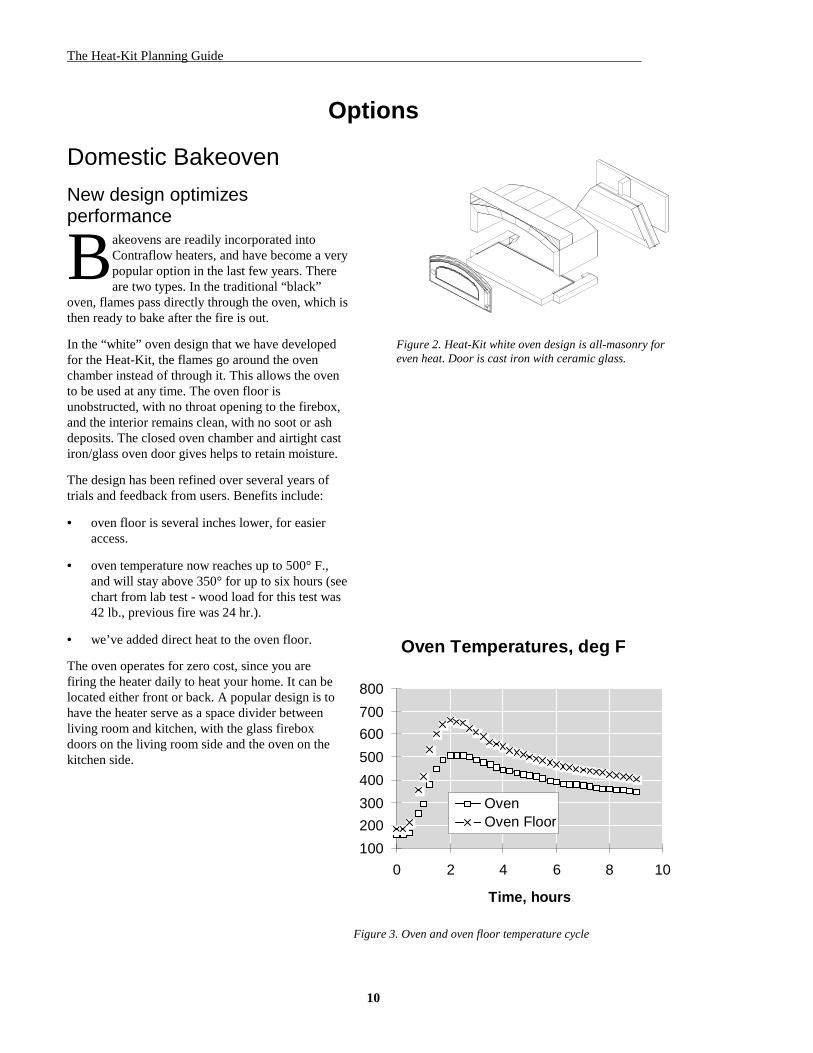
In the “white” oven design that we have developed for the Heat-Kit, the flames go around the oven chamber instead of through it. This allows the oven to be used at any time. The oven floor is unobstructed, with no throat opening to the firebox, and the interior remains clean, with no soot or ash deposits. The closed oven chamber and airtight cast iron/glass oven door gives helps to retain moisture.
The design has been refined over several years of trials and feedback from users. Benefits include:
• oven floor is several inches lower, for easier access.
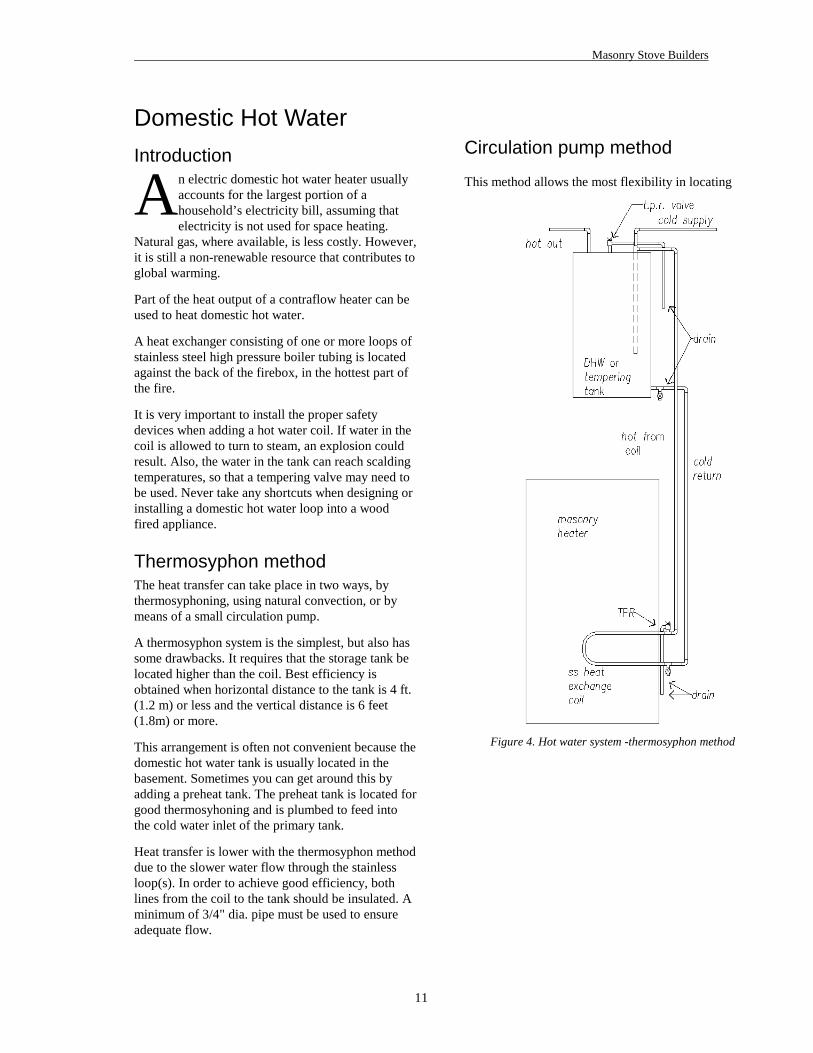
• oven temperature now reaches up to 500° F., and will stay above 350° for up to six hours (see chart from lab test - wood load for this test was 42 lb., previous fire was 24 hr.).
• we’ve added direct heat to the oven floor.
The oven operates for zero cost, since you are firing the heater daily to heat your home. It can be located either front or back. A popular design is to have the heater serve as a space divider between living room and kitchen, with the glass firebox doors on the living room side and the oven on the kitchen side.
Figure 2. Heat-Kit white oven design is all-masonry for even heat. Door is cast iron with ceramic glass.
B
Oven Temperatures, deg F
100
200
300
400
500
600
700
800
0 2 4 6 8 10
Time, hours
OvenOven Floor
Figure 3. Oven and oven floor temperature cycle
Masonry Stove Builders
11
Domestic Hot Water
Introduction n electric domestic hot water heater usually accounts for the largest portion of a household’s electricity bill, assuming that electricity is not used for space heating.
Natural gas, where available, is less costly. However, it is still a non-renewable resource that contributes to global warming.
Part of the heat output of a contraflow heater can be used to heat domestic hot water.
A heat exchanger consisting of one or more loops of stainless steel high pressure boiler tubing is located against the back of the firebox, in the hottest part of the fire.
It is very important to install the proper safety devices when adding a hot water coil. If water in the coil is allowed to turn to steam, an explosion could result. Also, the water in the tank can reach scalding temperatures, so that a tempering valve may need to be used. Never take any shortcuts when designing or installing a domestic hot water loop into a wood fired appliance.
Thermosyphon method The heat transfer can take place in two ways, by thermosyphoning, using natural convection, or by means of a small circulation pump.
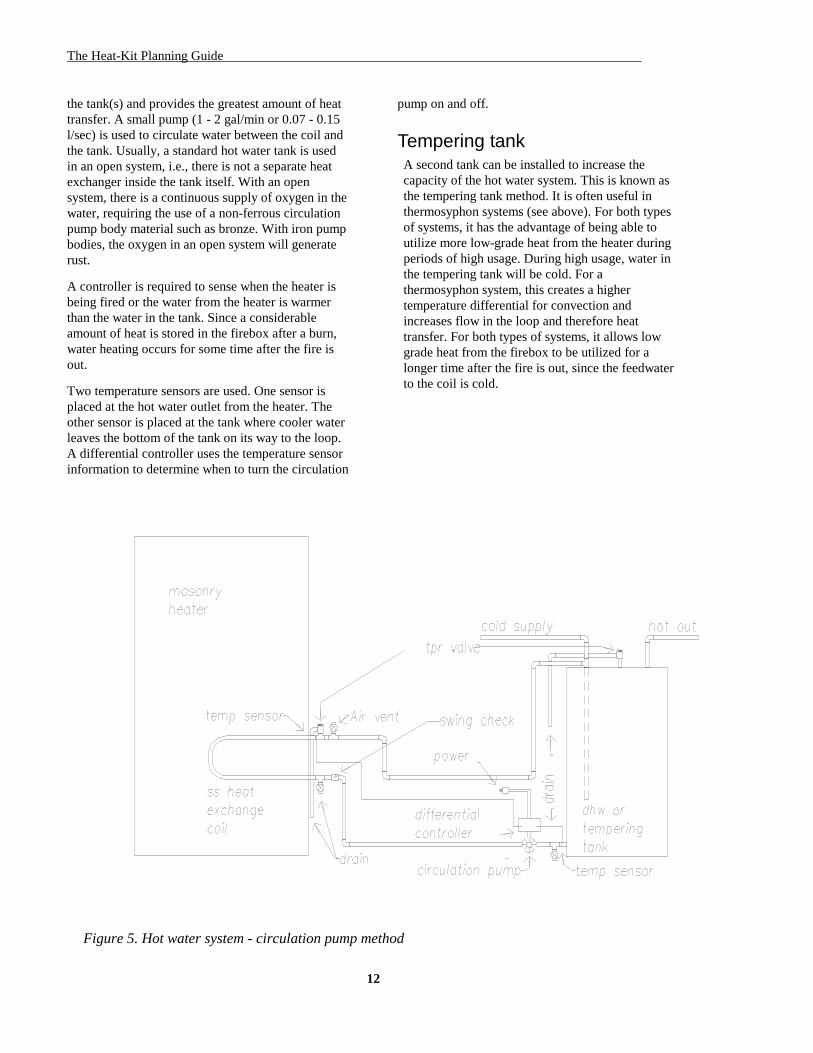
A thermosyphon system is the simplest, but also has some drawbacks. It requires that the storage tank be located higher than the coil. Best efficiency is obtained when horizontal distance to the tank is 4 ft. (1.2 m) or less and the vertical distance is 6 feet (1.8m) or more.
This arrangement is often not convenient because the domestic hot water tank is usually located in the basement. Sometimes you can get around this by adding a preheat tank. The preheat tank is located for good thermosyhoning and is plumbed to feed into the cold water inlet of the primary tank.
Heat transfer is lower with the thermosyphon method due to the slower water flow through the stainless loop(s). In order to achieve good efficiency, both lines from the coil to the tank should be insulated. A minimum of 3/4" dia. pipe must be used to ensure adequate flow.
Circulation pump method
This method allows the most flexibility in locating A
Figure 4. Hot water system -thermosyphon method
The Heat-Kit Planning Guide
12
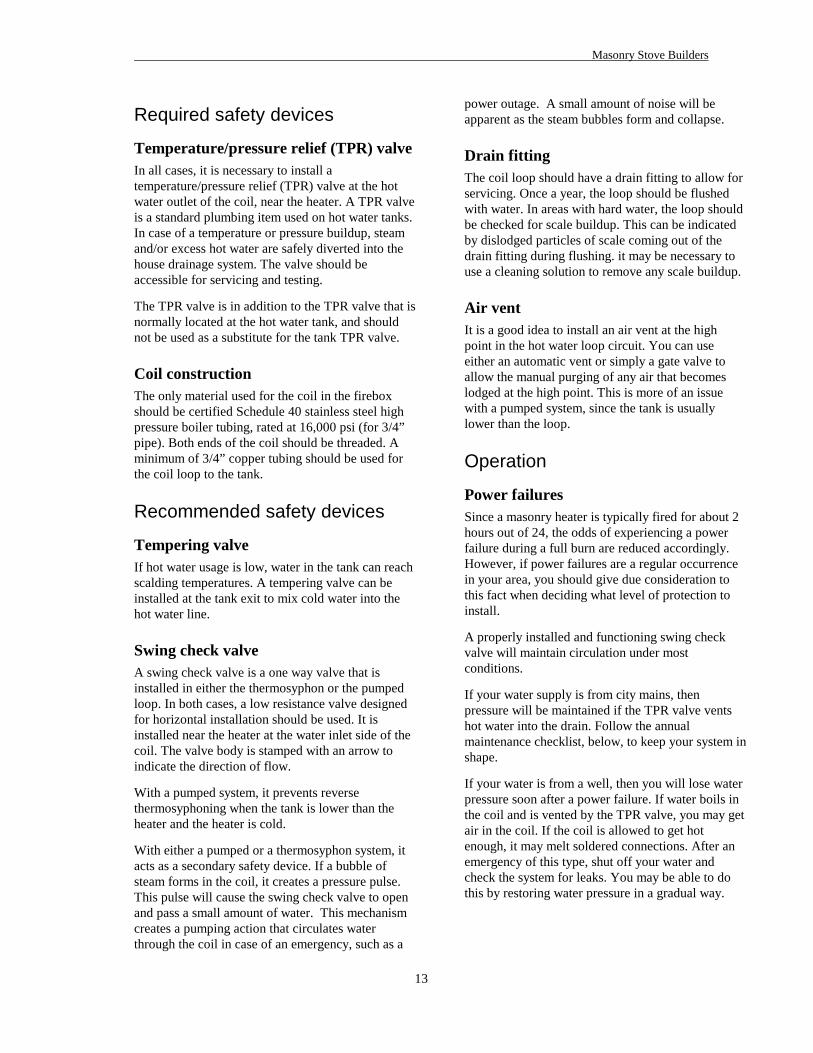
the tank(s) and provides the greatest amount of heat transfer. A small pump (1 - 2 gal/min or 0.07 - 0.15 l/sec) is used to circulate water between the coil and the tank. Usually, a standard hot water tank is used in an open system, i.e., there is not a separate heat exchanger inside the tank itself. With an open system, there is a continuous supply of oxygen in the water, requiring the use of a non-ferrous circulation pump body material such as bronze. With iron pump bodies, the oxygen in an open system will generate rust.
A controller is required to sense when the heater is being fired or the water from the heater is warmer than the water in the tank. Since a considerable amount of heat is stored in the firebox after a burn, water heating occurs for some time after the fire is out.
Two temperature sensors are used. One sensor is placed at the hot water outlet from the heater. The other sensor is placed at the tank where cooler water leaves the bottom of the tank on its way to the loop. A differential controller uses the temperature sensor information to determine when to turn the circulation
pump on and off.
Tempering tank A second tank can be installed to increase the capacity of the hot water system. This is known as the tempering tank method. It is often useful in thermosyphon systems (see above). For both types of systems, it has the advantage of being able to utilize more low-grade heat from the heater during periods of high usage. During high usage, water in the tempering tank will be cold. For a thermosyphon system, this creates a higher temperature differential for convection and increases flow in the loop and therefore heat transfer. For both types of systems, it allows low grade heat from the firebox to be utilized for a longer time after the fire is out, since the feedwater to the coil is cold.
Figure 5. Hot water system - circulation pump method
Masonry Stove Builders
13
Required safety devices
Temperature/pressure relief (TPR) valve In all cases, it is necessary to install a temperature/pressure relief (TPR) valve at the hot water outlet of the coil, near the heater. A TPR valve is a standard plumbing item used on hot water tanks. In case of a temperature or pressure buildup, steam and/or excess hot water are safely diverted into the house drainage system. The valve should be accessible for servicing and testing.
The TPR valve is in addition to the TPR valve that is normally located at the hot water tank, and should not be used as a substitute for the tank TPR valve.
Coil construction The only material used for the coil in the firebox should be certified Schedule 40 stainless steel high pressure boiler tubing, rated at 16,000 psi (for 3/4” pipe). Both ends of the coil should be threaded. A minimum of 3/4” copper tubing should be used for the coil loop to the tank.
Recommended safety devices
Tempering valve If hot water usage is low, water in the tank can reach scalding temperatures. A tempering valve can be installed at the tank exit to mix cold water into the hot water line.
Swing check valve A swing check valve is a one way valve that is installed in either the thermosyphon or the pumped loop. In both cases, a low resistance valve designed for horizontal installation should be used. It is installed near the heater at the water inlet side of the coil. The valve body is stamped with an arrow to indicate the direction of flow.
With a pumped system, it prevents reverse thermosyphoning when the tank is lower than the heater and the heater is cold.
With either a pumped or a thermosyphon system, it acts as a secondary safety device. If a bubble of steam forms in the coil, it creates a pressure pulse. This pulse will cause the swing check valve to open and pass a small amount of water. This mechanism creates a pumping action that circulates water through the coil in case of an emergency, such as a
power outage. A small amount of noise will be apparent as the steam bubbles form and collapse.
Drain fitting The coil loop should have a drain fitting to allow for servicing. Once a year, the loop should be flushed with water. In areas with hard water, the loop should be checked for scale buildup. This can be indicated by dislodged particles of scale coming out of the drain fitting during flushing. it may be necessary to use a cleaning solution to remove any scale buildup.
Air vent It is a good idea to install an air vent at the high point in the hot water loop circuit. You can use either an automatic vent or simply a gate valve to allow the manual purging of any air that becomes lodged at the high point. This is more of an issue with a pumped system, since the tank is usually lower than the loop.
Operation
Power failures Since a masonry heater is typically fired for about 2 hours out of 24, the odds of experiencing a power failure during a full burn are reduced accordingly. However, if power failures are a regular occurrence in your area, you should give due consideration to this fact when deciding what level of protection to install.
A properly installed and functioning swing check valve will maintain circulation under most conditions.
If your water supply is from city mains, then pressure will be maintained if the TPR valve vents hot water into the drain. Follow the annual maintenance checklist, below, to keep your system in shape.
If your water is from a well, then you will lose water pressure soon after a power failure. If water boils in the coil and is vented by the TPR valve, you may get air in the coil. If the coil is allowed to get hot enough, it may melt soldered connections. After an emergency of this type, shut off your water and check the system for leaks. You may be able to do this by restoring water pressure in a gradual way.
The Heat-Kit Planning Guide
14
Optional safety devices If you feel that your degree of risk warrants it, ie, you have a circulation pump system and you are in an area of frequent power failures that result in a loss of water pressure, you can drive the loop with a 12 volt circulation pump. Power the circulation pump with a 12 volt car battery that is maintained by a trickle charger.
Masonry Stove Builders
15
Layout Guide
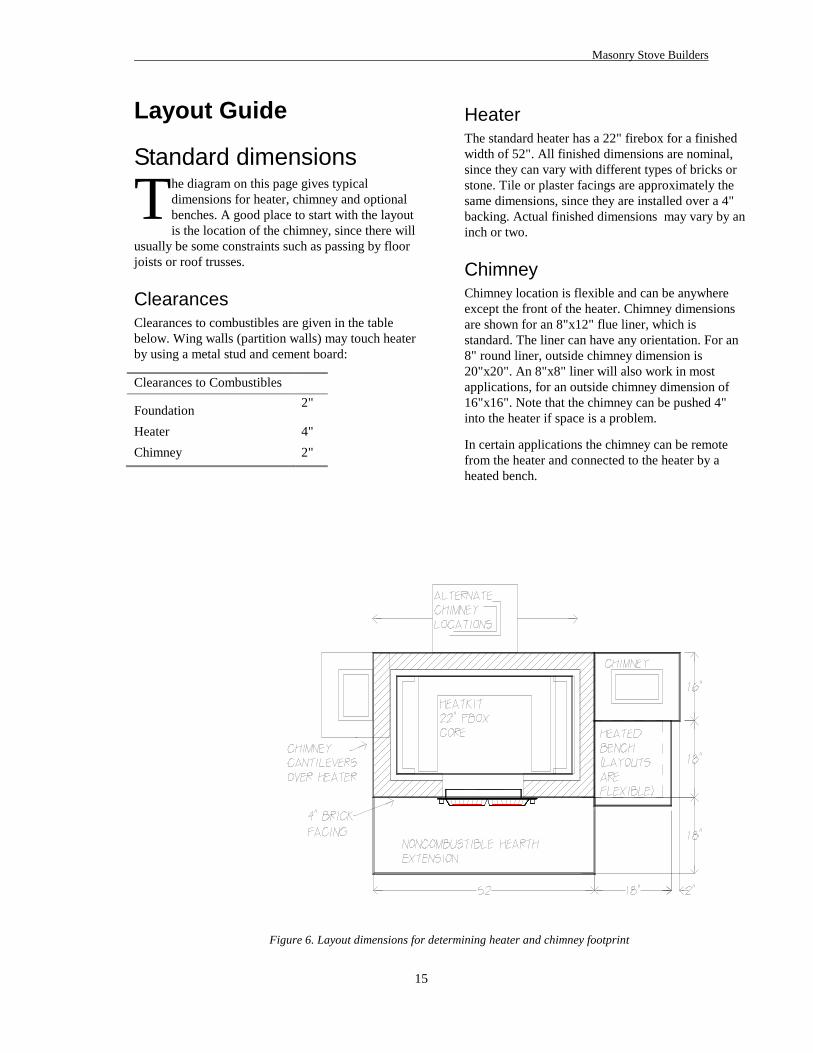
Standard dimensions he diagram on this page gives typical dimensions for heater, chimney and optional benches. A good place to start with the layout is the location of the chimney, since there will
usually be some constraints such as passing by floor joists or roof trusses.
Clearances Clearances to combustibles are given in the table below. Wing walls (partition walls) may touch heater by using a metal stud and cement board:
Clearances to Combustibles
Foundation 2"
Heater 4"
Chimney 2"
Heater The standard heater has a 22" firebox for a finished width of 52". All finished dimensions are nominal, since they can vary with different types of bricks or stone. Tile or plaster facings are approximately the same dimensions, since they are installed over a 4" backing. Actual finished dimensions may vary by an inch or two.
Chimney Chimney location is flexible and can be anywhere except the front of the heater. Chimney dimensions are shown for an 8"x12" flue liner, which is standard. The liner can have any orientation. For an 8" round liner, outside chimney dimension is 20"x20". An 8"x8" liner will also work in most applications, for an outside chimney dimension of 16"x16". Note that the chimney can be pushed 4" into the heater if space is a problem.
In certain applications the chimney can be remote from the heater and connected to the heater by a heated bench.
T
Figure 6. Layout dimensions for determining heater and chimney footprint
The Heat-Kit Planning Guide
16
Layout Examples
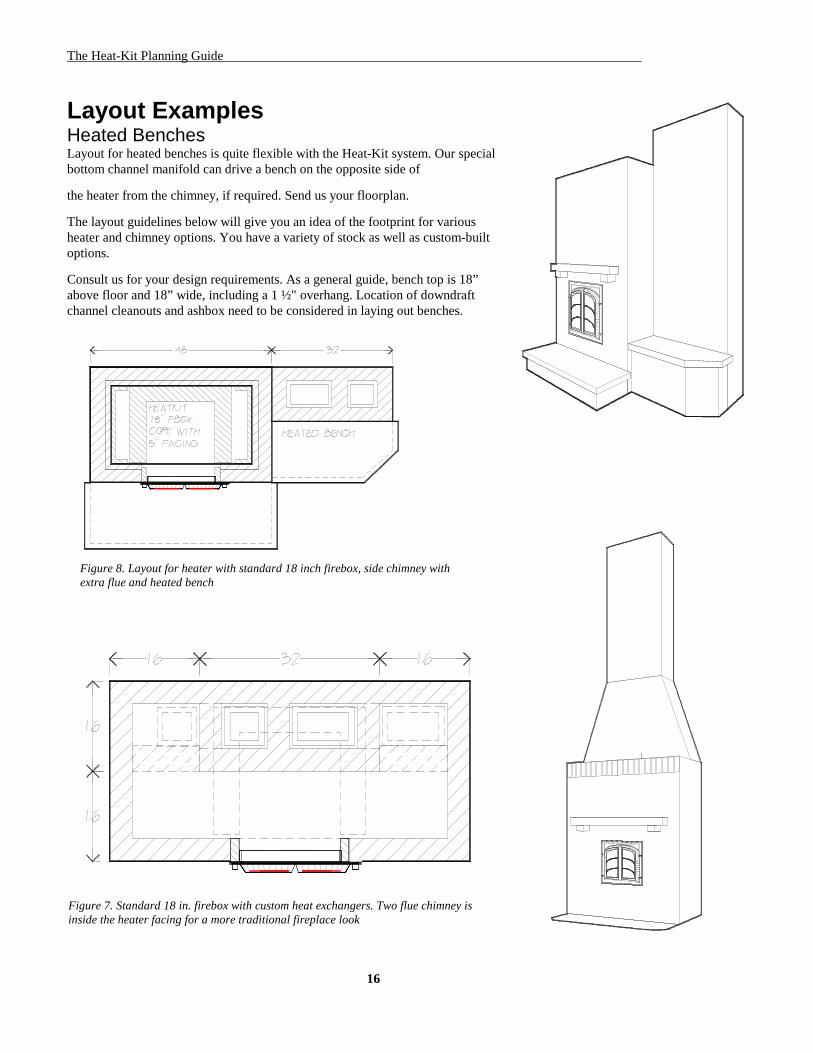
Heated Benches Layout for heated benches is quite flexible with the Heat-Kit system. Our special bottom channel manifold can drive a bench on the opposite side of
the heater from the chimney, if required. Send us your floorplan.
The layout guidelines below will give you an idea of the footprint for various heater and chimney options. You have a variety of stock as well as custom-built options.
Consult us for your design requirements. As a general guide, bench top is 18” above floor and 18” wide, including a 1 ½" overhang. Location of downdraft channel cleanouts and ashbox need to be considered in laying out benches.
Figure 7. Standard 18 in. firebox with custom heat exchangers. Two flue chimney is inside the heater facing for a more traditional fireplace look
Figure 8. Layout for heater with standard 18 inch firebox, side chimney with extra flue and heated bench
Masonry Stove Builders
17
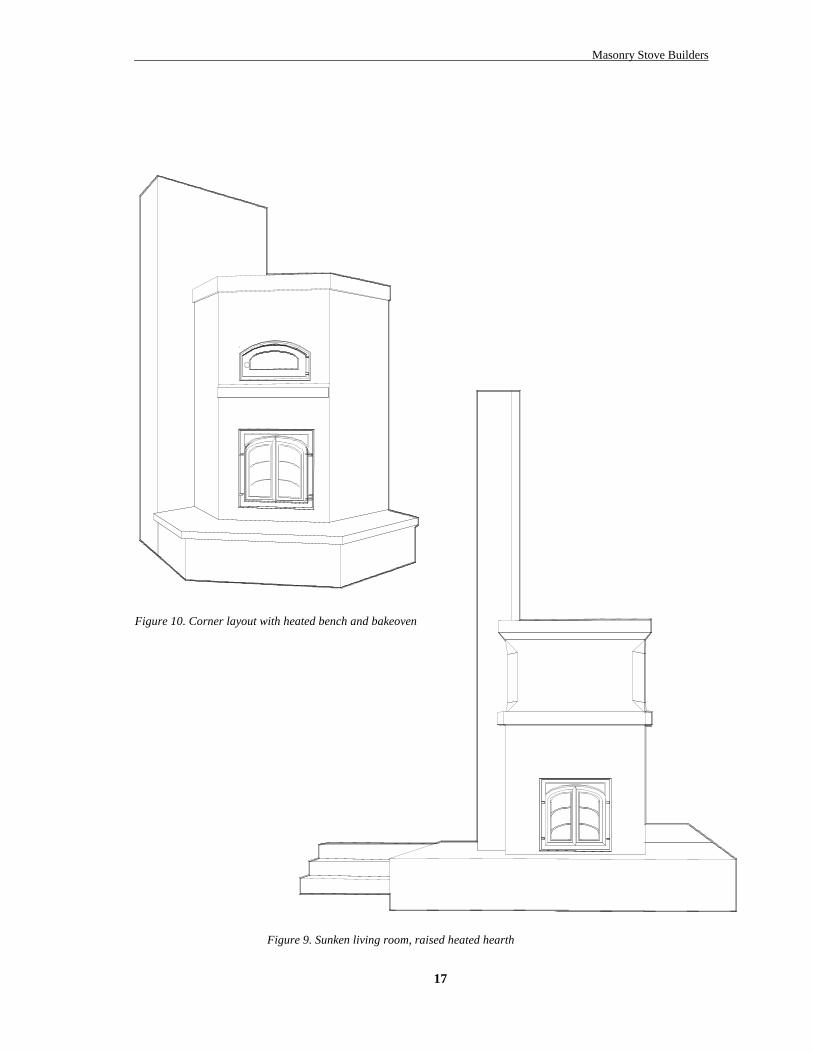
Figure 9. Sunken living room, raised heated hearth
Figure 10. Corner layout with heated bench and bakeoven
The Heat-Kit Planning Guide
18
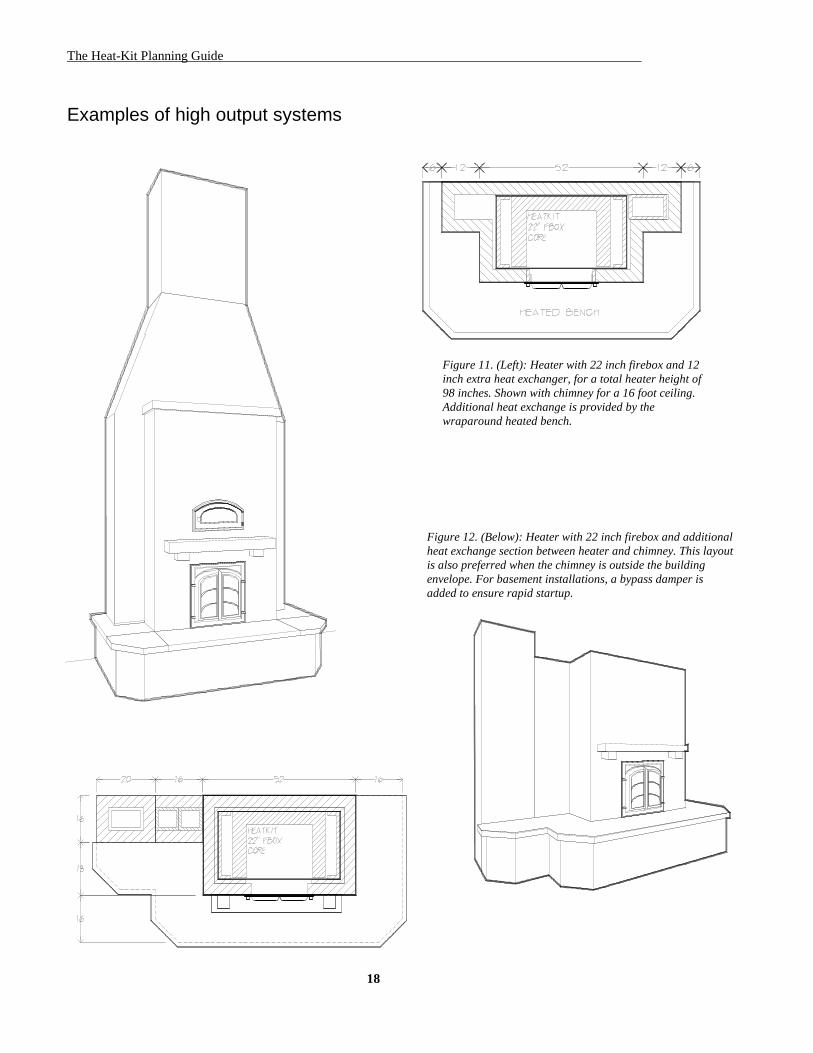
Examples of high output systems
Figure 11. (Left): Heater with 22 inch firebox and 12 inch extra heat exchanger, for a total heater height of 98 inches. Shown with chimney for a 16 foot ceiling. Additional heat exchange is provided by the wraparound heated bench.
Figure 12. (Below): Heater with 22 inch firebox and additional heat exchange section between heater and chimney. This layout is also preferred when the chimney is outside the building envelope. For basement installations, a bypass damper is added to ensure rapid startup.
Masonry Stove Builders
19
Completing Your System
Working with a local mason ou will need to hire a local mason to install the 4” masonry facing that your heater needs. Normally, you will also build a masonry chimney. We provide your mason
with support to ensure that everything proceeds smoothly. Since we have been in the masonry business ourselves for 30 years, we speak the same language as your mason.
Normally we quote both standard and custom cores on a delivered and installed basis. This means that you get a core that is ready for the facing to be installed. It will already have all of the necessary expansion joints, so that the air gap between your facing and the core is simply slushed full with mortar as the job progresses.
The firebox doors and the cleanouts are installed in the facing by your mason. We provide a complete set of written instructions. Also, you can arrange for your mason to visit during the core assembly, we will go over the instructions with him verbally to make sure that everything is clear and to let him know that he can telephone us at any time if any questions do crop up. To date we have had a 100% success rate with this approach. We find that most masons are top notch craftsmen and are eager to learn about new applications for their skills.
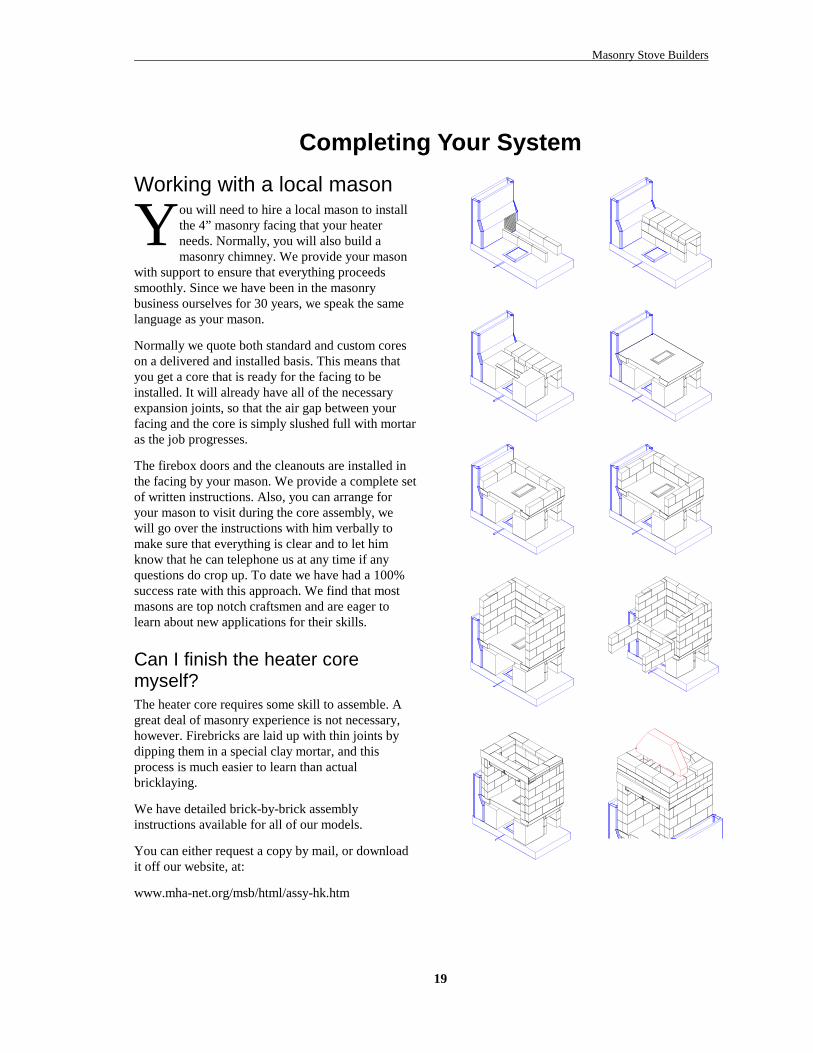
Can I finish the heater core myself? The heater core requires some skill to assemble. A great deal of masonry experience is not necessary, however. Firebricks are laid up with thin joints by dipping them in a special clay mortar, and this process is much easier to learn than actual bricklaying.
We have detailed brick-by-brick assembly instructions available for all of our models.
You can either request a copy by mail, or download it off our website, at:
www.mha-net.org/msb/html/assy-hk.htm
Y
The Heat-Kit Planning Guide
20
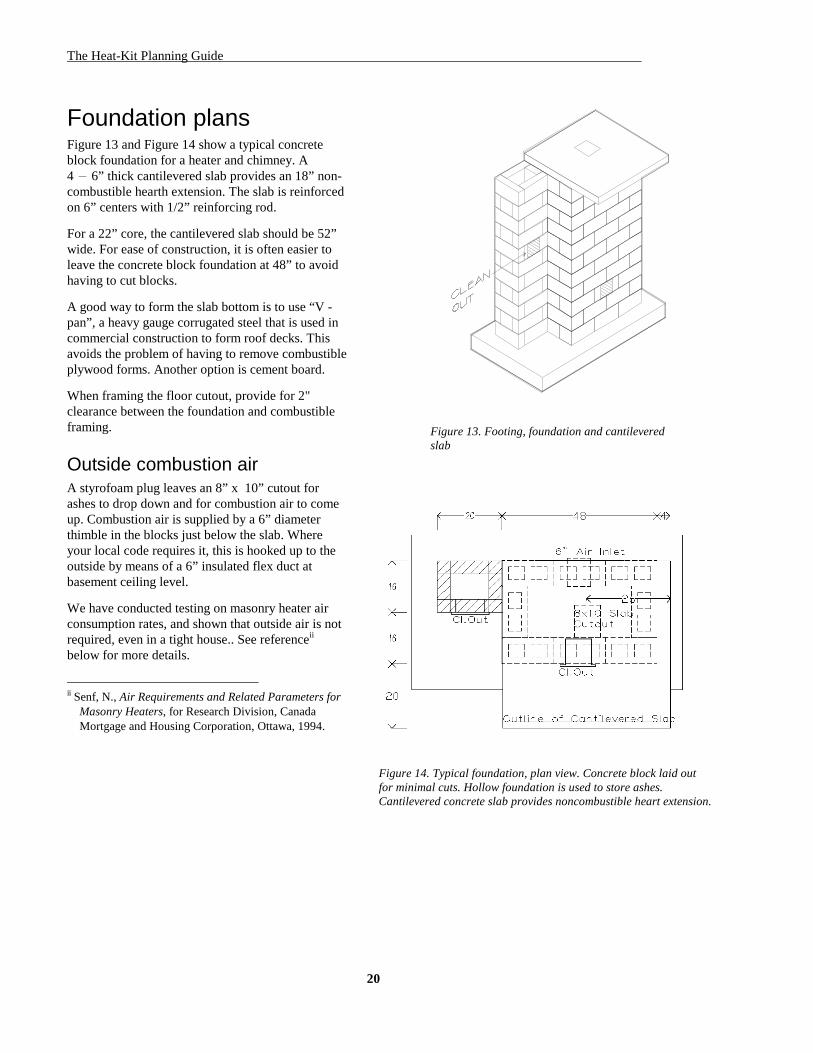
Foundation plans Figure 13 and Figure 14 show a typical concrete block foundation for a heater and chimney. A 4 − 6” thick cantilevered slab provides an 18” non-combustible hearth extension. The slab is reinforced on 6” centers with 1/2” reinforcing rod.
For a 22” core, the cantilevered slab should be 52” wide. For ease of construction, it is often easier to leave the concrete block foundation at 48” to avoid having to cut blocks.
A good way to form the slab bottom is to use “V - pan”, a heavy gauge corrugated steel that is used in commercial construction to form roof decks. This avoids the problem of having to remove combustible plywood forms. Another option is cement board.
When framing the floor cutout, provide for 2" clearance between the foundation and combustible framing.
Outside combustion air A styrofoam plug leaves an 8” x 10” cutout for ashes to drop down and for combustion air to come up. Combustion air is supplied by a 6” diameter thimble in the blocks just below the slab. Where your local code requires it, this is hooked up to the outside by means of a 6” insulated flex duct at basement ceiling level.
We have conducted testing on masonry heater air consumption rates, and shown that outside air is not required, even in a tight house.. See referenceii below for more details.
ii Senf, N., Air Requirements and Related Parameters for
Masonry Heaters, for Research Division, Canada Mortgage and Housing Corporation, Ottawa, 1994.
Figure 13. Footing, foundation and cantilevered slab
Figure 14. Typical foundation, plan view. Concrete block laid out for minimal cuts. Hollow foundation is used to store ashes. Cantilevered concrete slab provides noncombustible heart extension.
Masonry Stove Builders
21
Frequently asked questions Can I put a masonry heater into my existing house? Yes, usually. The location of the heater has to make sense, and the foundation and chimney should be located to minimize structural modifications. We offer consulting services on the design of your retrofit.
I have a big house, what if I need more heat? First, determine whether efficiency upgrades to the house itself make sense. In new construction, it makes more sense to invest in better windows, a heat recovery ventilator, etc., rather than to build a very large heater that will not only cost more but also consume more wood.
Secondly, integrate the heater into the house design to maximize the radiant heating potential. This means putting it where your family will spend the most time.
A heater with a 22” firebox increases your peak output by about 20%. Adding a supplementary heat exchanger (see figure 7) adds an additional 10–20%.
Most heater owners fire their unit once per day. If you fire it twice per day, you will double your heat output.
What if the heater is too large for my house? This is not an issue with masonry heaters. If you need less heat, you simply use a smaller fuel load. You still burn it fast, for maximum benefit. You make use of the main advantage of a masonry heater for burning cordwood, namely the ability to store heat.
A large heater does not mean thicker wall sections however, since the response time of the heater becomes too sluggish and the surface temperature will be too low.
What is the heat output for a Heat-Kit system? With a 60 lb. wood charge, output averages 3.5 Kw (12,000 BTU/h) over 24 hr. Maximum output is 20,000 BTU/h with two 50 lb fires per day (100 lbs total).
How do you control the heat output? You control the output by the weight of your wood load and by how often you fire the heater. No other controls are necessary.
This works because you have a true radiant heating system (large surface, low temperature). By heating surfaces directly, you are comfortable over a wider range of air temperatures. You don’t need to control air temperature closely as you do with forced air heating.
Most people are used to forced air heat, so you may need to experience this principle directly to convince yourself that it works.
Aren’t masonry heaters supposed to be 90% efficient? Efficiency numbers often get bandied about with great abandon by eager salesmen with meager math skills.
One source of confusion is the different methods used for measuring efficiency. The theoretical maximum efficiency obtainable from any woodburning device using North American measuring methods is 80%. That’s because some energy is needed to boil off the water in the wood, and some additional energy is needed to maintain chimney draft. European methods ignore the water loss, which is around 10% for a masonry heater burning air dry cordwood.
Combustion efficiency measures how much of the wood’s chemical energy is released during the burn, and is typically around 96 - 98% for most good masonry heaters. The loss consists of unburned carbon monoxide and smoke that exits the chimney.
Heat transfer efficiency measures how good the appliance is at delivering the released energy to your house instead of out the chimney.
The Heat-Kit Planning Guide
22
Overall efficiency
= combustion effic. × heat transfer effic.
This measures the actual percentage of the wood’s chemical energy content that heats your house.
There is also another form of efficiency measurement known as seasonal efficiency that measures how good your heating system is at targeting your heating needs under all conditions. For example, woodstoves that cannot be turned down enough can overheat your house during mild weather, resulting in wasted energy. The proof of the pudding here would be to compare woodpiles before and after the heating season for identical houses with different appliances. A well designed masonry heating system has excellent seasonal efficiency.
Is it EPA certified? No. Mandatory (in the U.S.) EPA (United States Environmental Protection Agency) certification does not cover masonry heaters. They are classed as “non-affected facilities”. This was done because EPA recognized masonry heaters as likely to be clean burningiii .
As a founding member of the Masonry Heater Association of North America (MHA) we have been active in gaining acceptance of masonry heaters in areas with woodburning restrictions. MHA has sponsored extensive emissions testing of masonry heaters by EPA-certified labs.
Masonry Stove Builders has an active research and testing program. It is a co-operative effort with three other heater companies. See www.heatkit.com/html/lopez.htm for details.
What about insurance and building codes? For insurance purposes, a wood heating system needs either to have a UL/ULC (Underwriters Laboratories/ Underwriters Laboratories of Canada) label, or be built with a valid building permit under the locally applicable building code.
Unlike woodstoves, masonry heaters are not ULC listed appliances. ULC listing is intended to test for safe clearances to non-heat-storing, portable stoves. Masonry heaters fall under the masonry fireplace and masonry chimney provisions of the building code.
Since masonry heaters are new in North America, building codes are just starting to adopt special provisions for them. Your local building code official has the authority to accept a masonry heater as equivalent to a masonry fireplace for code purposes, so check with him/her first.
To assist in this process, an ASTM Task Group on masonry heaters was established in 1985. ASTM Standard E 1602 - 03 “Standard Guide for Construction of Solid Fuel Burning Masonry Heaters” was first published in 1995. In the United States, this has now been adopted into the new IRC building code, in effect in most states.
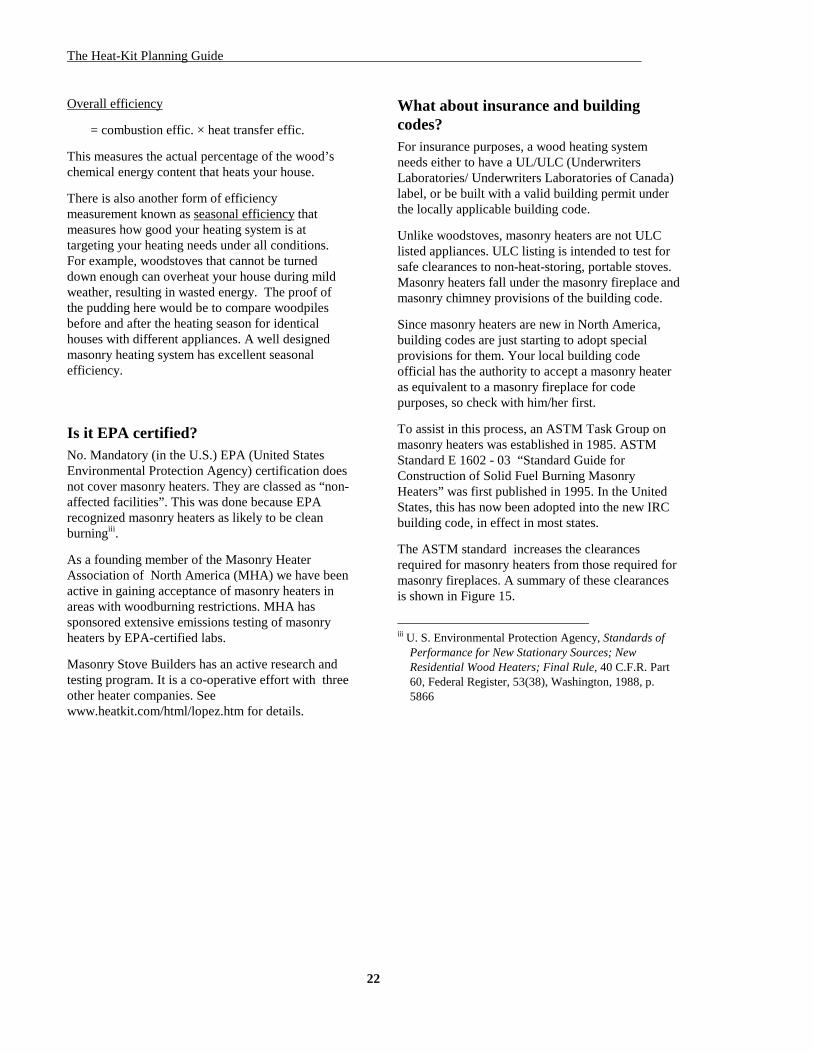
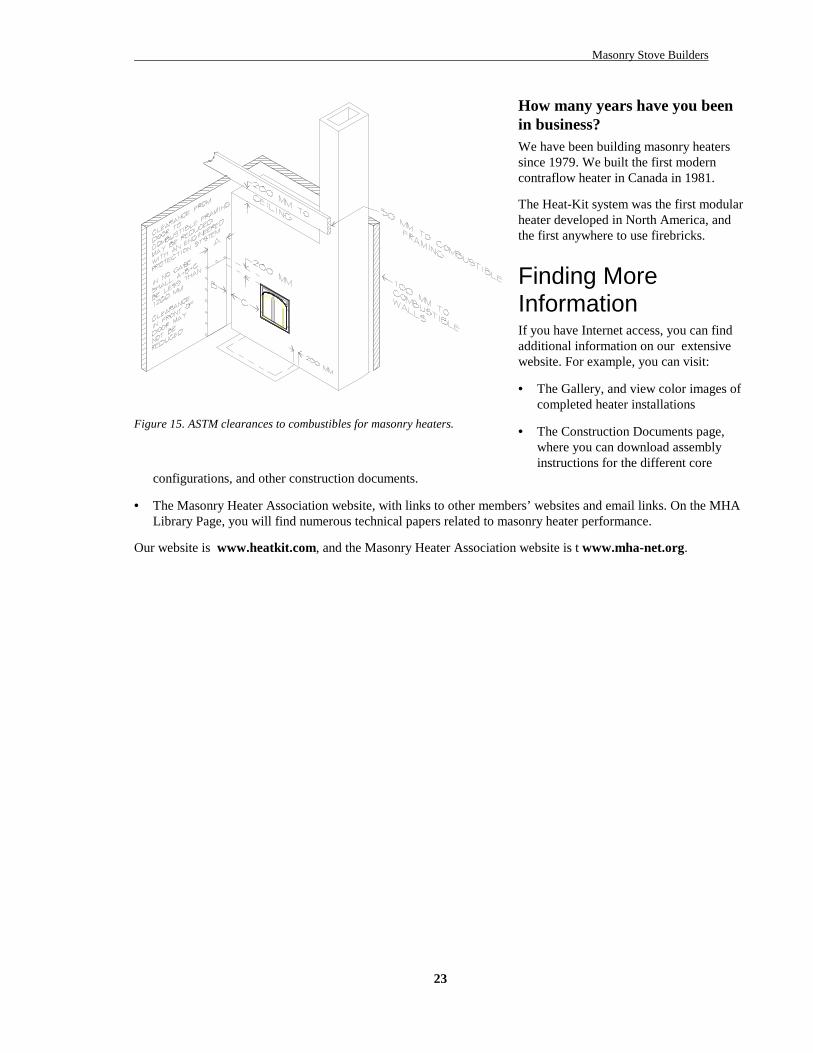
The ASTM standard increases the clearances required for masonry heaters from those required for masonry fireplaces. A summary of these clearances is shown in Figure 15.
iii U. S. Environmental Protection Agency, Standards of
Performance for New Stationary Sources; New Residential Wood Heaters; Final Rule, 40 C.F.R. Part 60, Federal Register, 53(38), Washington, 1988, p. 5866
Masonry Stove Builders
23
How many years have you been in business? We have been building masonry heaters since 1979. We built the first modern contraflow heater in Canada in 1981.
The Heat-Kit system was the first modular heater developed in North America, and the first anywhere to use firebricks.
Finding More Information If you have Internet access, you can find additional information on our extensive website. For example, you can visit:
• The Gallery, and view color images of completed heater installations
• The Construction Documents page, where you can download assembly instructions for the different core
configurations, and other construction documents.
• The Masonry Heater Association website, with links to other members’ websites and email links. On the MHA Library Page, you will find numerous technical papers related to masonry heater performance.
Our website is www.heatkit.com, and the Masonry Heater Association website is t www.mha-net.org.
Figure 15. ASTM clearances to combustibles for masonry heaters.
The Heat-Kit Planning Guide
24
Our Products and Services
Products
Masonry heater cores, ready for facing In Canada, within a 300 mile radius of Ottawa, we offer a "delivered and installed" price on our heater cores, including customized systems. We set the heater core up ready for facing, with all of the necessary expansion joints, etc., installed. Your mason will fill the gap between the core and the facing with mortar.
Firebox doors and cleanouts need to be installed in the facing by your mason. We provide a complete set of instructions. Often you can arrange for your mason to visit the site during the core installation so that we can go over everything verbally. We encourage your mason to contact us by phone if any questions arise during the job. This approach has proven to be very successful.
Masonry core kits If you would like to build your own heater, we also supply the core components, including hardware. We have step by step graphical assembly instructions for each core variation. You can download a copy for a specific configuration if you would like to evaluate the level of difficulty involved. Although we only have a rudimentary assembly video at this time, we will have a more complete one soon.
Services — consulting and design We would be happy to assist you with planning a masonry heating system into your new home design. A truly successful design approach treats the heater not only as a heating appliance, but as an integral part of the “house as a system”.
Costs A complete system consists of the following parts: - foundation - see our construction documents page http://heatkit.com/html/assy-hk.htm for a generic foundation plan
- heater core - this is the part that we manufacture components for. In addition to our components, you will need about 200 standard firebricks, obtained locally. Time to assemble the core for an experienced mason who has never seen one before would be around 2 days. You will need to find a good local mason to do the work. Best bet is to download the assembly and finishing instructions from our construction documents page, and have the mason evaluate them. He can call me if he has any questions as to how to estimate his time. - 5" thick masonry facing. Typical finishes are brick or stone, but other finishes, such as plaster or tile, are also possible - chimney. The chimney is masonry to the height of the heater. After that, it can continue in masonry or switch to 8" i.d. insulated metal. - heated bench: is built from local materials, and doesn't require anything extra from us. The biggest variable in the total cost is normally the mason's time, which can vary widely with the choice of finish, and amount of detailing.
Typical costs Enclosed is a pricelist for Heat-Kit cores. Prices are included for some of the more popular options, such as a wider firebox and a bakeoven. Options such as heated benches are quoted on an individual basis because of the large number of possible variations.