Embed Size (px)
Citation preview
1 of 10freespiritfabrics.com
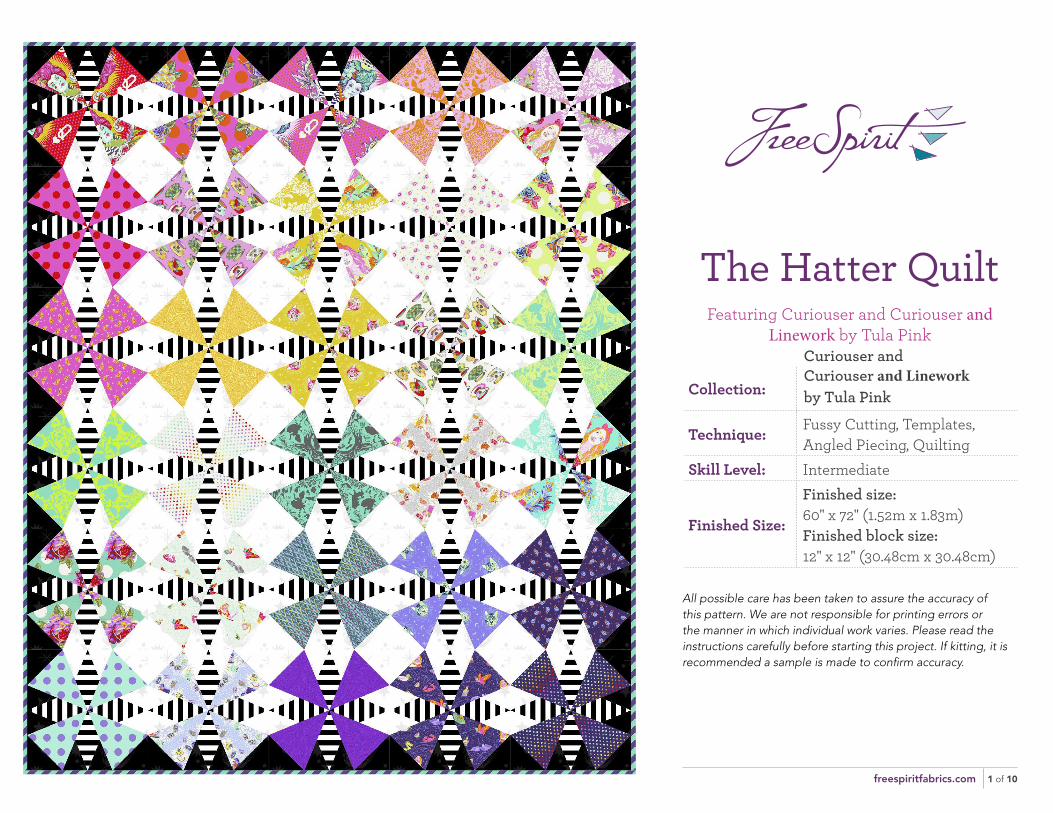
The Hatter QuiltFeaturing Curiouser and Curiouser and
Linework by Tula Pink
Collection:
Curiouser and Curiouser and Linework by Tula Pink
Technique: Fussy Cutting, Templates, Angled Piecing, Quilting
Skill Level: Intermediate
Finished Size:
Finished size: 60" x 72" (1.52m x 1.83m)Finished block size: 12" x 12" (30.48cm x 30.48cm)
All possible care has been taken to assure the accuracy of this pattern. We are not responsible for printing errors or the manner in which individual work varies. Please read the instructions carefully before starting this project. If kitting, it is recommended a sample is made to confirm accuracy.
The Hatter Quilt
2 of 10freespiritfabrics.comCopyright© 2021 All possible care has been taken to assure the accuracy of this pattern. We are not responsible for printing errors or the manner in which individual work varies. Please read the instructions carefully before starting this project. If kitting it is recommended a sample is made to confirm accuracy.
Project designed by Stacey Day Tech edited by Alison M. Schmidt and Betsy Westover
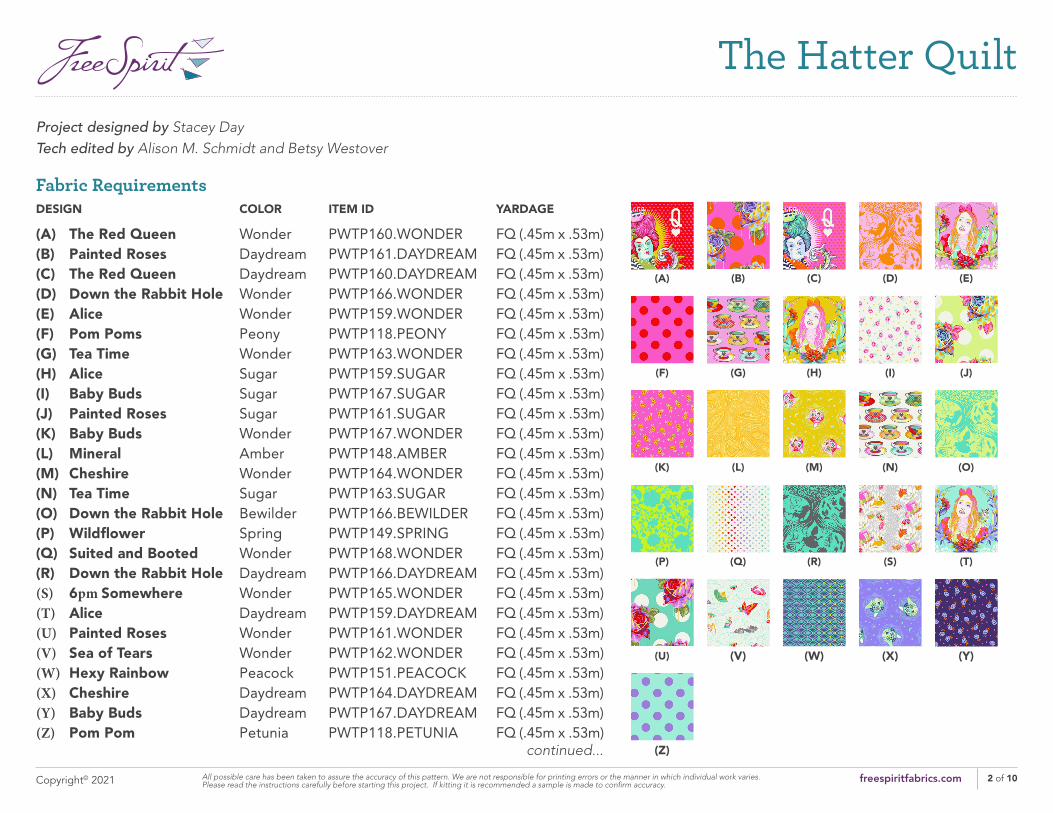
Fabric RequirementsDESIGN COLOR ITEM ID YARDAGE
(A) The Red Queen Wonder PWTP160.WONDER FQ (.45m x .53m)(B) Painted Roses Daydream PWTP161.DAYDREAM FQ (.45m x .53m)(C) The Red Queen Daydream PWTP160.DAYDREAM FQ (.45m x .53m)(D) Down the Rabbit Hole Wonder PWTP166.WONDER FQ (.45m x .53m)(E) Alice Wonder PWTP159.WONDER FQ (.45m x .53m)(F) Pom Poms Peony PWTP118.PEONY FQ (.45m x .53m)(G) Tea Time Wonder PWTP163.WONDER FQ (.45m x .53m)(H) Alice Sugar PWTP159.SUGAR FQ (.45m x .53m)(I) Baby Buds Sugar PWTP167.SUGAR FQ (.45m x .53m)(J) Painted Roses Sugar PWTP161.SUGAR FQ (.45m x .53m)(K) Baby Buds Wonder PWTP167.WONDER FQ (.45m x .53m)(L) Mineral Amber PWTP148.AMBER FQ (.45m x .53m)(M) Cheshire Wonder PWTP164.WONDER FQ (.45m x .53m)(N) Tea Time Sugar PWTP163.SUGAR FQ (.45m x .53m)(O) Down the Rabbit Hole Bewilder PWTP166.BEWILDER FQ (.45m x .53m)(P) Wildflower Spring PWTP149.SPRING FQ (.45m x .53m)(Q) Suited and Booted Wonder PWTP168.WONDER FQ (.45m x .53m)(R) Down the Rabbit Hole Daydream PWTP166.DAYDREAM FQ (.45m x .53m)
Wonder PWTP165.WONDER FQ (.45m x .53m)Daydream PWTP159.DAYDREAM FQ (.45m x .53m)Wonder PWTP161.WONDER FQ (.45m x .53m)Wonder PWTP162.WONDER FQ (.45m x .53m)Peacock PWTP151.PEACOCK FQ (.45m x .53m)Daydream PWTP164.DAYDREAM FQ (.45m x .53m)Daydream PWTP167.DAYDREAM FQ (.45m x .53m)
(S) 6pm Somewhere(T) Alice(U) Painted Roses(V) Sea of Tears(W) Hexy Rainbow(X) Cheshire(Y) Baby Buds(Z) Pom Pom Petunia PWTP118.PETUNIA FQ (.45m x .53m)
continued...
(A) (B) (C) (D) (E)
(F) (G) (H) (I) (J)
(K)
(P)
(U)
(Z)
(L)
(Q)
(V)
(M)
(R)
(W)
(N)
(S)
(X)
(O)
(T)
(Y)
The Hatter Quilt
3 of 10freespiritfabrics.comCopyright© 2021 All possible care has been taken to assure the accuracy of this pattern. We are not responsible for printing errors or the manner in which individual work varies. Please read the instructions carefully before starting this project. If kitting it is recommended a sample is made to confirm accuracy.
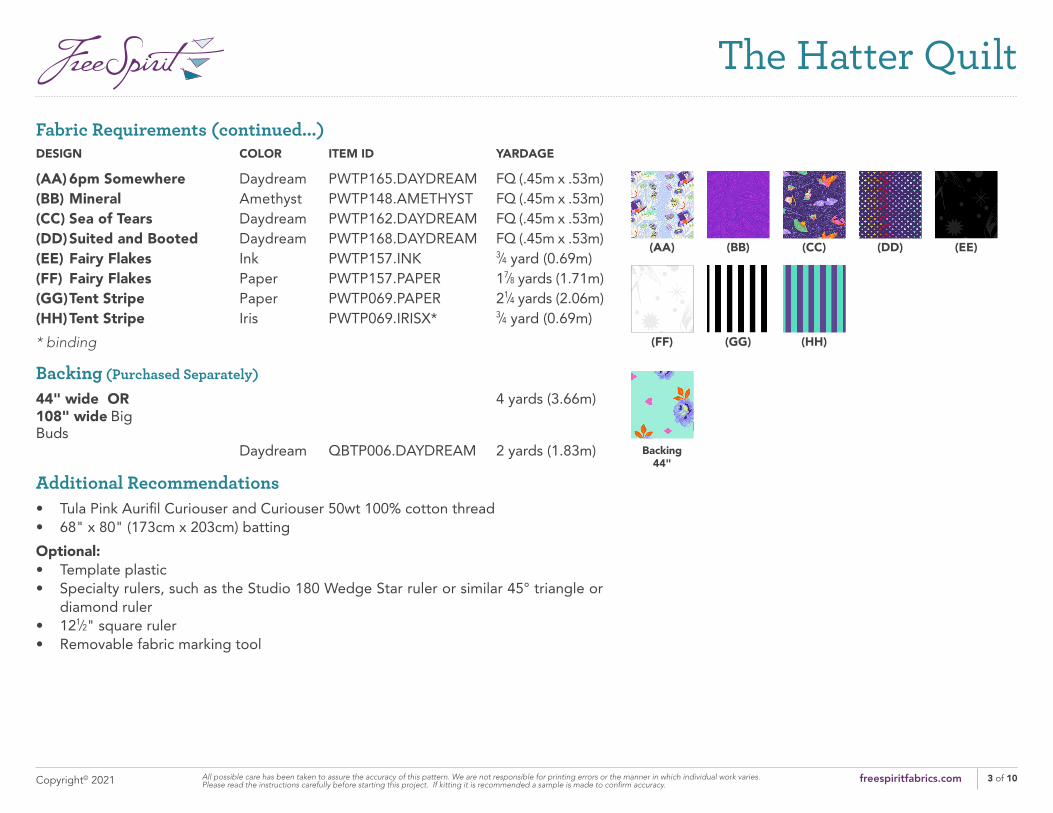
Fabric Requirements (continued...)DESIGN COLOR ITEM ID YARDAGE
(AA) 6pm Somewhere Daydream PWTP165.DAYDREAM FQ (.45m x .53m)(BB) Mineral Amethyst PWTP148.AMETHYST FQ (.45m x .53m)(CC) Sea of Tears Daydream PWTP162.DAYDREAM FQ (.45m x .53m)(DD) Suited and Booted Daydream PWTP168.DAYDREAM FQ (.45m x .53m)(EE) Fairy Flakes Ink PWTP157.INK 3⁄4 yard (0.69m)(FF) Fairy Flakes Paper PWTP157.PAPER 17⁄8 yards (1.71m)(GG) Tent Stripe Paper PWTP069.PAPER 21⁄4 yards (2.06m)(HH) Tent Stripe Iris PWTP069.IRISX* 3⁄4 yard (0.69m)
* binding
Backing (Purchased Separately)
4 yards (3.66m)44" wide OR108" wide Big Buds
Daydream QBTP006.DAYDREAM 2 yards (1.83m)
Additional Recommendations• Tula Pink Aurifil Curiouser and Curiouser 50wt 100% cotton thread• 68" x 80" (173cm x 203cm) batting
Optional:• Template plastic• Specialty rulers, such as the Studio 180 Wedge Star ruler or similar 45° triangle or
diamond ruler• 121⁄2" square ruler• Removable fabric marking tool
(AA) (BB) (CC) (DD) (EE)
(FF) (GG) (HH)
Backing44"
The Hatter Quilt
4 of 10freespiritfabrics.comCopyright© 2021 All possible care has been taken to assure the accuracy of this pattern. We are not responsible for printing errors or the manner in which individual work varies. Please read the instructions carefully before starting this project. If kitting it is recommended a sample is made to confirm accuracy.
CuttingWOF = Width of Fabric. WOF of a Fat Quarter is approximately 21".
Notes:
• Read the instructions all the way through before starting. Considermaking a test block from scrap fabrics before cutting, especially if youare new to this method of construction or are using an alternate cuttingmethod.
• Press fabrics well using starch/starch alternative before cutting to helpmanage bias edges.
• Copy the templates provided on pages 9-10 at 100%/full-size ontotemplate plastic and cut out, or compare shapes to 45° triangle ordiamond rulers and mark cut lines as needed on acrylic rulers to aid inaccurate cutting.
If using the Wedge Star Ruler, use the alternate cutting instructions on page 7 and Diamond template provided on page 10.
From Fabric A-DD cut:(4) each Large Triangles, using template provided (or your preferred ruler,following manufacturer’s cutting instructions)
From Fabric EE, cut:(2) 31⁄2" x WOF strips, cut
(44) Small Triangles, using template provided and rotating aftereach cut
(3) 43⁄4" x WOF; cut(20) 43⁄4" x 43⁄4", cut in half once diagonally into (40) half-square triangles
From Fabric FF, cut:(9) 31⁄2" x WOF strips, cut
(196) Small Triangles, using template provided and rotating aftereach cut
(5) 43⁄4" x WOF; cut(40) 43⁄4" x 43⁄4", cut in half once diagonally diagonal into (80) half-squaretriangles
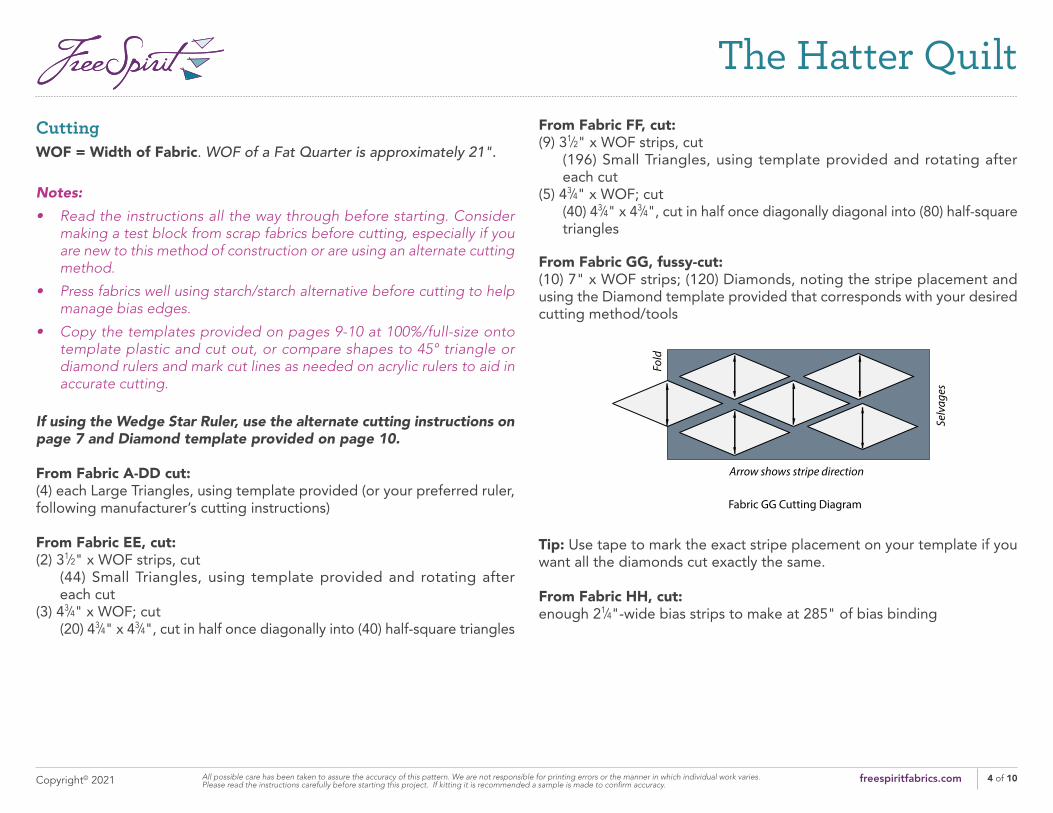
From Fabric GG, fussy-cut:(10) 7" x WOF strips; (120) Diamonds, noting the stripe placement andusing the Diamond template provided that corresponds with your desiredcutting method/tools
Arrow shows stripe direction
Fabric GG Cutting Diagram
Fold
Selv
ages
Tip: Use tape to mark the exact stripe placement on your template if you want all the diamonds cut exactly the same.
From Fabric HH, cut:enough 21⁄4"-wide bias strips to make at 285" of bias binding
The Hatter Quilt
5 of 10freespiritfabrics.comCopyright© 2021 All possible care has been taken to assure the accuracy of this pattern. We are not responsible for printing errors or the manner in which individual work varies. Please read the instructions carefully before starting this project. If kitting it is recommended a sample is made to confirm accuracy.
InstructionsNotes:
• If desired, before piecing any blocks, play around with your largetriangles to find your favorite color flow for the quilt layout and thenassemble blocks using your chosen fabric placement, making sure totake notes and/or photos noting any different choices.
• Handle gently to avoid stretching bias edges.
• All seam allowances are 1⁄4” and pieces are sewn right sides together.Press seam allowances open unless otherwise stated.
Tip: If desired, mark the 1⁄4" seam intersections on the wrong side of the pieces to help align them correctly when sewing.
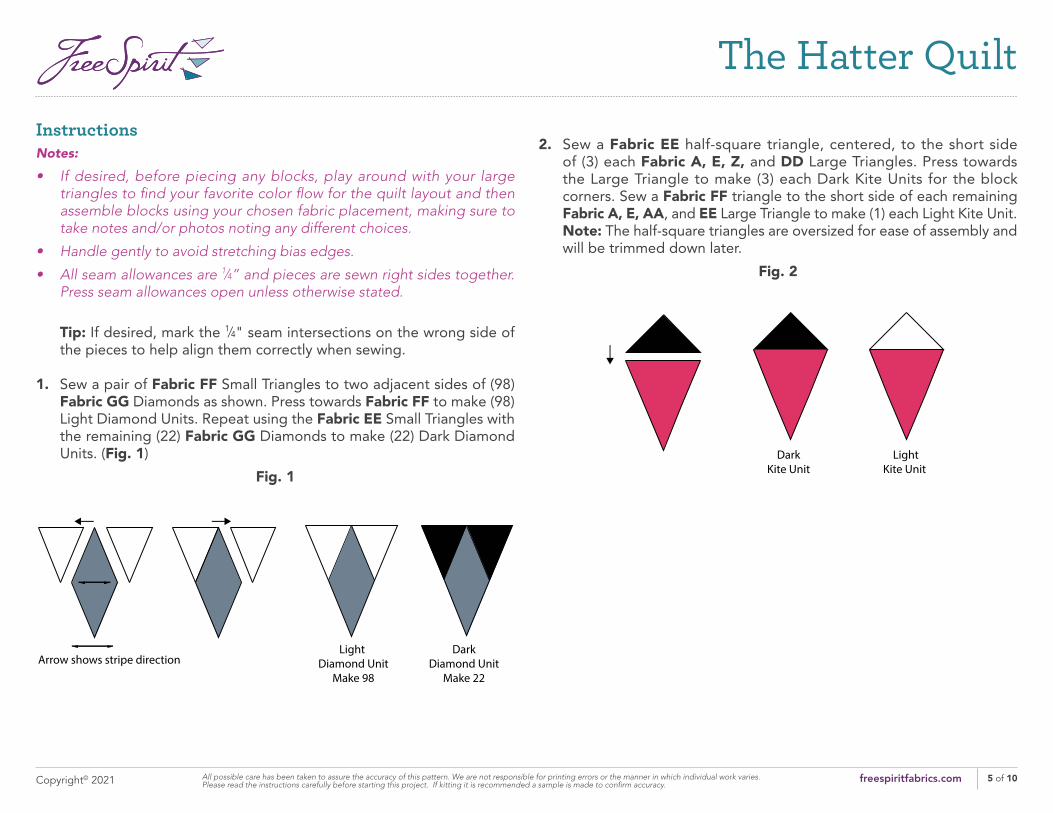
1. Sew a pair of Fabric FF Small Triangles to two adjacent sides of (98)Fabric GG Diamonds as shown. Press towards Fabric FF to make (98)Light Diamond Units. Repeat using the Fabric EE Small Triangles withthe remaining (22) Fabric GG Diamonds to make (22) Dark DiamondUnits. (Fig. 1)
Fig. 1 Fig. 1
Light Diamond Unit
Make 98
DarkDiamond Unit
Make 22
Arrow shows stripe direction
2. Sew a Fabric EE half-square triangle, centered, to the short sideof (3) each Fabric A, E, Z, and DD Large Triangles. Press towardsthe Large Triangle to make (3) each Dark Kite Units for the blockcorners. Sew a Fabric FF triangle to the short side of each remainingFabric A, E, AA, and EE Large Triangle to make (1) each Light Kite Unit.Note: The half-square triangles are oversized for ease of assembly andwill be trimmed down later.
Fig. 2
Fig. 2
Dark Kite Unit
LightKite Unit
The Hatter Quilt
6 of 10freespiritfabrics.comCopyright© 2021 All possible care has been taken to assure the accuracy of this pattern. We are not responsible for printing errors or the manner in which individual work varies. Please read the instructions carefully before starting this project. If kitting it is recommended a sample is made to confirm accuracy.
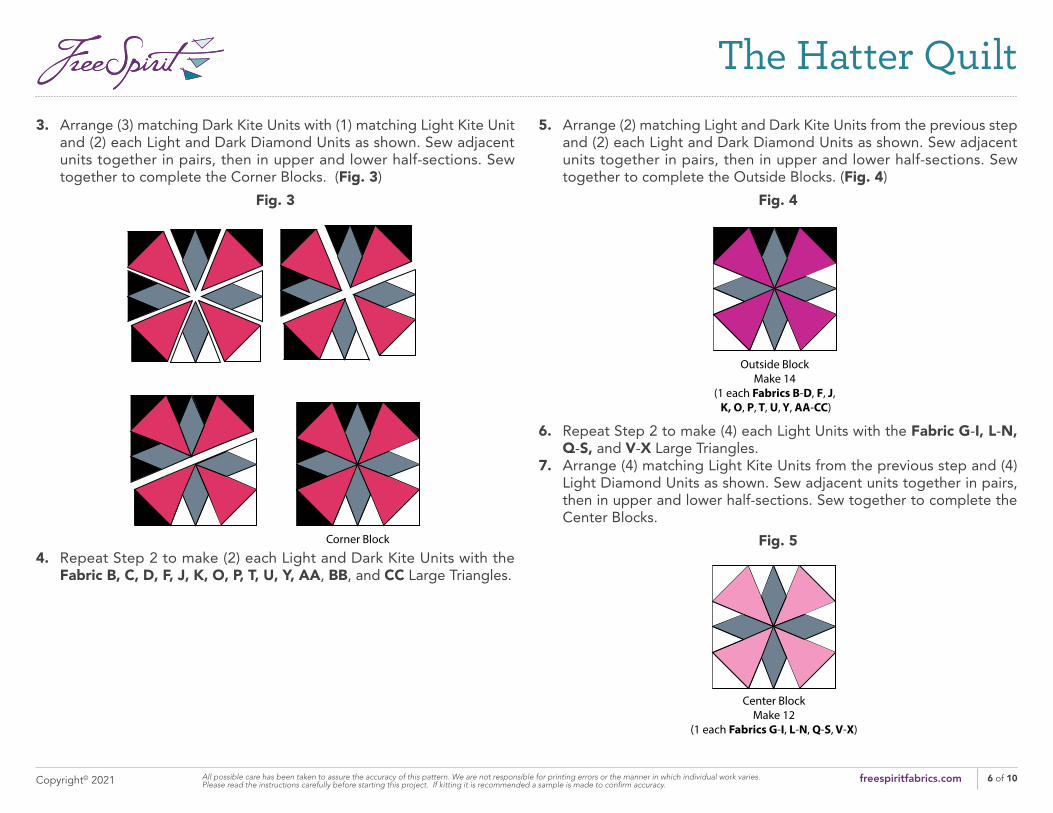
3. Arrange (3) matching Dark Kite Units with (1) matching Light Kite Unitand (2) each Light and Dark Diamond Units as shown. Sew adjacentunits together in pairs, then in upper and lower half-sections. Sewtogether to complete the Corner Blocks. (Fig. 3)
Fig. 3Fig. 3
Corner BlockMake 4
(1 each Fabrics A, E, Z, DD)
Fig. 3
Corner BlockMake 4
(1 each Fabrics A, E, Z, DD)4. Repeat Step 2 to make (2) each Light and Dark Kite Units with the
Fabric B, C, D, F, J, K, O, P, T, U, Y, AA, BB, and CC Large Triangles.
5. Arrange (2) matching Light and Dark Kite Units from the previous stepand (2) each Light and Dark Diamond Units as shown. Sew adjacentunits together in pairs, then in upper and lower half-sections. Sewtogether to complete the Outside Blocks. (Fig. 4)
Fig. 4
Fig. 4
Outside BlockMake 14
(1 each Fabrics B-D, F, J, K, O, P, T, U, Y, AA-CC)
6. Repeat Step 2 to make (4) each Light Units with the Fabric G-I, L-N,Q-S, and V-X Large Triangles.
7. Arrange (4) matching Light Kite Units from the previous step and (4)Light Diamond Units as shown. Sew adjacent units together in pairs,then in upper and lower half-sections. Sew together to complete theCenter Blocks.
Fig. 5
Fig. 5
Center BlockMake 12
(1 each Fabrics G-I, L-N, Q-S, V-X)
The Hatter Quilt
7 of 10freespiritfabrics.comCopyright© 2021 All possible care has been taken to assure the accuracy of this pattern. We are not responsible for printing errors or the manner in which individual work varies. Please read the instructions carefully before starting this project. If kitting it is recommended a sample is made to confirm accuracy.
8. Square up all the Blocks to 121⁄2" x 121⁄2", trimming off the oversizedcorner triangles, but making sure not to trim off outer points of LargeTriangles. A 121⁄2" square ruler with a diagonal line marked through thecorners helps with correct alignment.
Quilt Top Assembly9. Arrange the Corner, Side, and Center Blocks into (6) rows as shown in
the quilt assembly diagram.10. Sew the blocks together into rows, carefully matching points at the
seams. Press seam allowances open or to one side if you prefer to nestseams from row to row.
11. Sew the rows together to complete the quilt top.
Finishing12. Sew together the 21⁄4" bias binding strips end-to-end. Press seams
open. Press the binding strip in half wrong sides together.13. Layer backing (wrong side up), batting, and quilt top (right side up).
Baste the layers together and quilt as desired. Trim excess batting andbacking even with the top after quilting is completed.
14. Leaving an 8" tail of binding, sew the binding to the top of thequilt through all layers matching all raw edges. Miter corners. Stopapproximately 12" from where you started. Lay both loose ends ofbinding flat along quilt edge. Where the loose ends meet, fold themback on themselves and press to form a crease. Using this crease asyour stitching line, sew the two open ends of the binding right sidestogether. Trim seam to 1⁄4" and press open. Finish sewing binding toquilt.
15. Turn the binding to the back of quilt and hand-stitch in place.
Alternate Cutting using Wedge Star Ruler (WSR):Refer to the ruler instructions for specific details and follow the cutting chart line for a 12" finished block. Use only the Alternate Diamond Template in addition to the specialty ruler.
From Fabric A-DD cut:(1) 7" x WOF or LOF (depending upon print orientation); subcut (4) LargeWedges (for the Large Triangles) using the WSR following Wedge BlockStep 2.01 instructions.
From Fabric EE cut:Instead of 31⁄2" x WOF strips:(3) 41⁄4" x WOF strips; subcut
(44) Small Wedges (for the Small Triangles) using the WSR followingWedge Star Block Steps 1.02-1.04
43⁄4" half-square triangles as previously directed
From Fabric FF cut:Instead of 31⁄2" x WOF strips:(10) 41⁄4" x WOF strips; subcut
(196) Small Wedges (for the Small Triangles) using the WSR followingWedge Star Block Steps 1.02-1.04
43⁄4" half-square triangles as previously directed
From Fabric GG cut:(10) 7" x WOF; fussy-cut (120) Diamonds using the alternate Diamondtemplate and the cutting diagram.
From Fabric HH, cut:enough 21⁄4"-wide bias strips to make at 285" of bias binding
The Hatter Quilt
8 of 10freespiritfabrics.comCopyright© 2021 All possible care has been taken to assure the accuracy of this pattern. We are not responsible for printing errors or the manner in which individual work varies. Please read the instructions carefully before starting this project. If kitting it is recommended a sample is made to confirm accuracy.
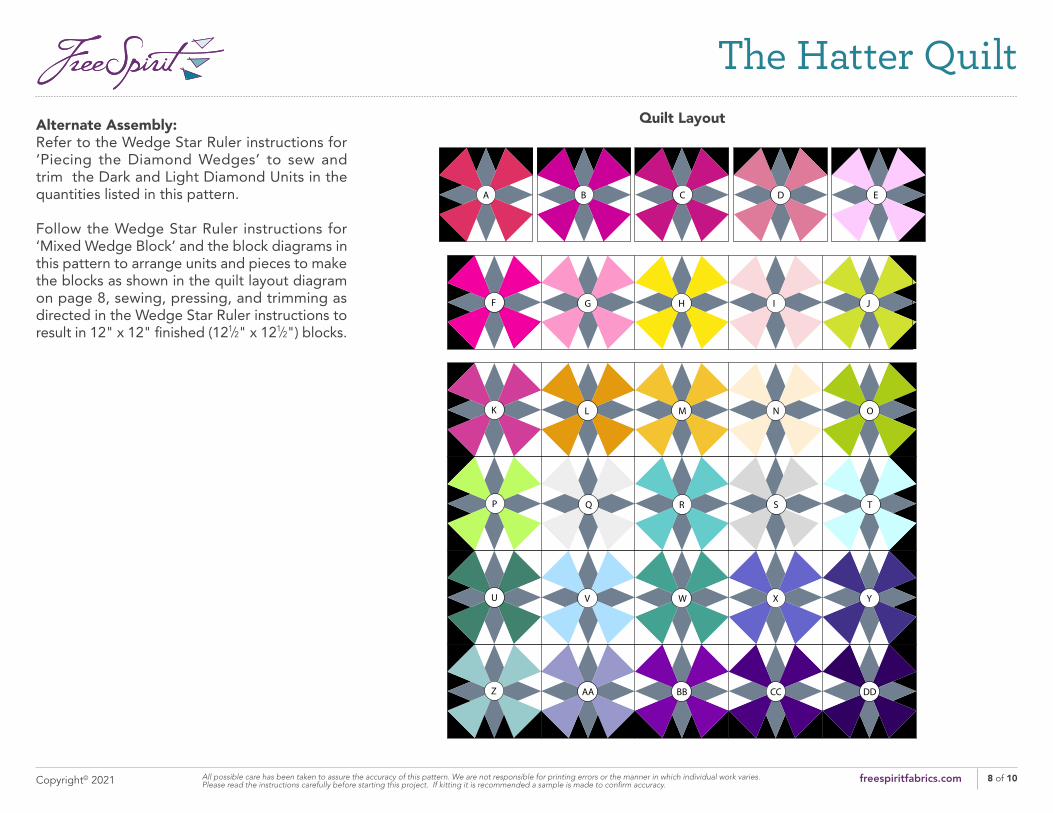
Alternate Assembly:Refer to the Wedge Star Ruler instructions for ‘Piecing the Diamond Wedges’ to sew and trim the Dark and Light Diamond Units in the quantities listed in this pattern.
Follow the Wedge Star Ruler instructions for ‘Mixed Wedge Block’ and the block diagrams in this pattern to arrange units and pieces to make the blocks as shown in the quilt layout diagram on page 8, sewing, pressing, and trimming as directed in the Wedge Star Ruler instructions to result in 12" x 12" finished (121⁄2" x 121⁄2") blocks.
Quilt Layout
A B C D
F
E
G H I J
K L M N O
P Q R S T
U V W X Y
Z AA BB CC DD
The Hatter Quilt
9 of 10freespiritfabrics.comCopyright© 2021 All possible care has been taken to assure the accuracy of this pattern. We are not responsible for printing errors or the manner in which individual work varies. Please read the instructions carefully before starting this project. If kitting it is recommended a sample is made to confirm accuracy.
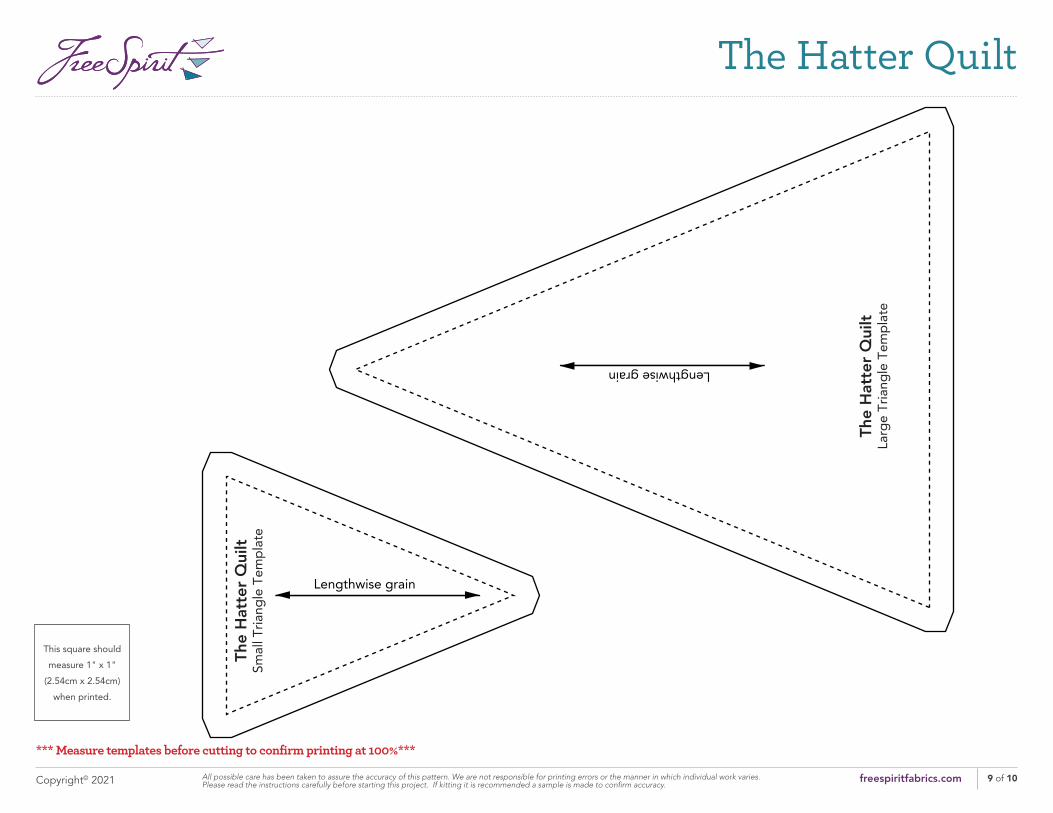
*** Measure templates before cutting to confirm printing at 100%***
This square should
measure 1" x 1"
(2.54cm x 2.54cm)
when printed.
The
Hat
ter Q
uilt
Smal
l Tria
ngle
Tem
plat
e
Lengthwise grain
The
Hat
ter Q
uilt
Larg
e Tr
iang
le T
empl
ate
Lengthwise grain
The Hatter Quilt
10 of 10freespiritfabrics.comCopyright© 2021 All possible care has been taken to assure the accuracy of this pattern. We are not responsible for printing errors or the manner in which individual work varies. Please read the instructions carefully before starting this project. If kitting it is recommended a sample is made to confirm accuracy.
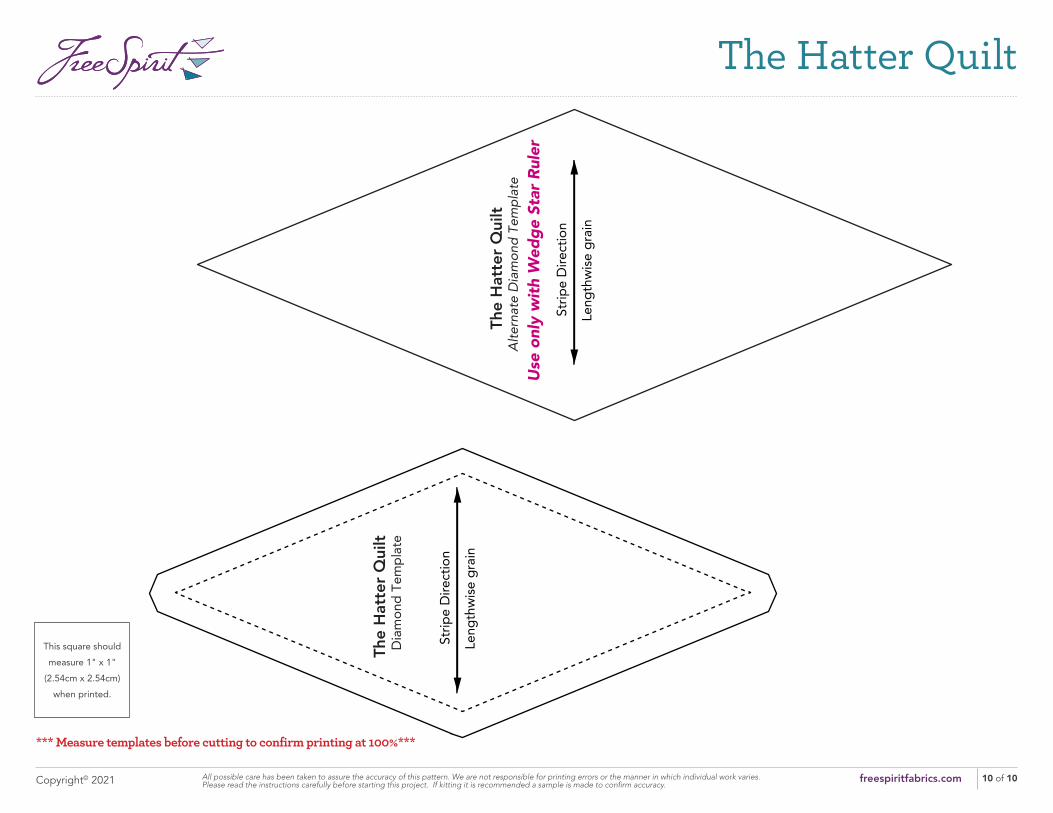
*** Measure templates before cutting to confirm printing at 100%***
This square should
measure 1" x 1"
(2.54cm x 2.54cm)
when printed.
St
ripe
Dire
ctio
n
The
Hat
ter Q
uilt
Alte
rnat
e D
iam
ond
Tem
pla
te
Leng
thw
ise g
rain
Use
onl
y w
ith W
edge
Sta
r Rul
er
St
ripe
Dire
ctio
n
The
Hat
ter Q
uilt
D
iam
ond
Tem
plat
e
Leng
thw
ise g
rain