Embed Size (px)
Citation preview
Page 1The Guild - frogbeastegg's Guide to Rome: Total War
02/11/2005 09:30:58http://forums.totalwar.org/vb/printthread.php?t=38382&pp=4
Page 1 of 45 1 2 3 4 5 11 > Last »
Show 40 posts from this thread on one page
The Guild (http://forums.totalwar.org/vb/index.php)- RTW Guides (http://forums.totalwar.org/vb/forumdisplay.php?f=78)- - frogbeastegg's Guide to Rome: Total War (http://forums.totalwar.org/vb/showthread.php?t=38382)
frogbeastegg 19/10/04 22:02
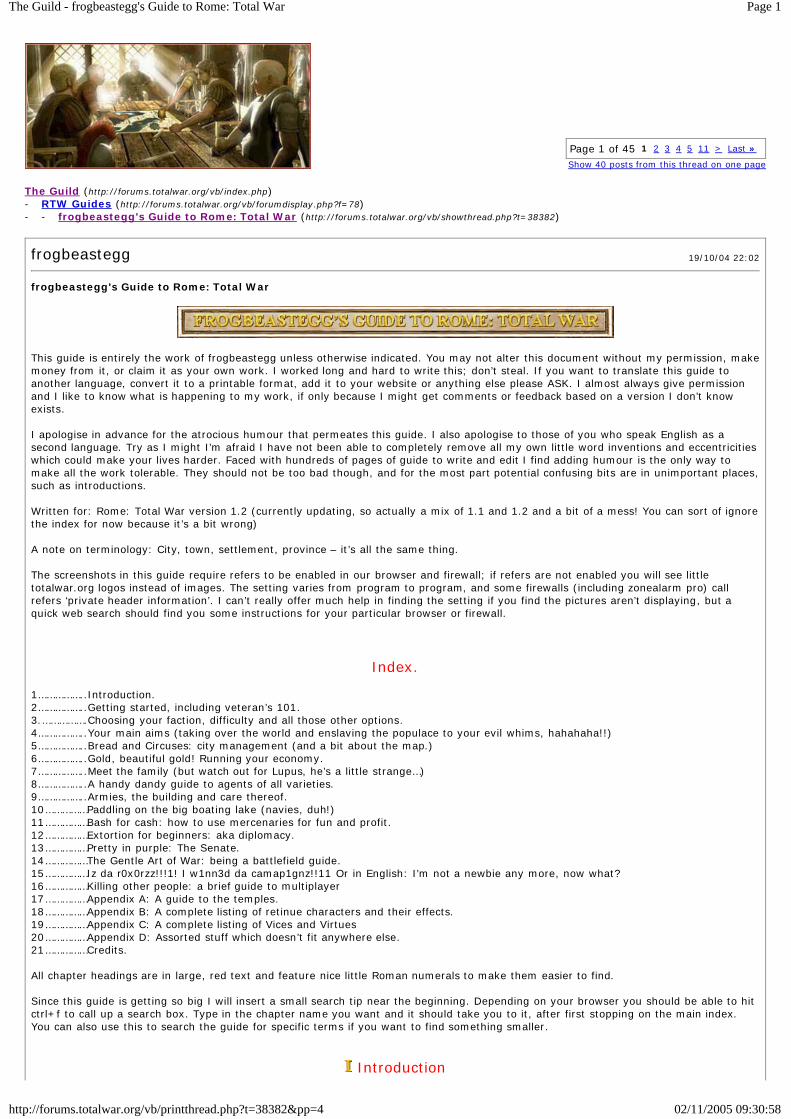
frogbeastegg's Guide to Rome: Total War
This guide is entirely the work of frogbeastegg unless otherwise indicated. You may not alter this document without my permission, makemoney from it, or claim it as your own work. I worked long and hard to write this; don’t steal. If you want to translate this guide toanother language, convert it to a printable format, add it to your website or anything else please ASK. I almost always give permissionand I like to know what is happening to my work, if only because I might get comments or feedback based on a version I don’t knowexists.
I apologise in advance for the atrocious humour that permeates this guide. I also apologise to those of you who speak English as asecond language. Try as I might I’m afraid I have not been able to completely remove all my own little word inventions and eccentricitieswhich could make your lives harder. Faced with hundreds of pages of guide to write and edit I find adding humour is the only way tomake all the work tolerable. They should not be too bad though, and for the most part potential confusing bits are in unimportant places,such as introductions.
Written for: Rome: Total War version 1.2 (currently updating, so actually a mix of 1.1 and 1.2 and a bit of a mess! You can sort of ignorethe index for now because it’s a bit wrong)
A note on terminology: City, town, settlement, province – it’s all the same thing.
The screenshots in this guide require refers to be enabled in our browser and firewall; if refers are not enabled you will see littletotalwar.org logos instead of images. The setting varies from program to program, and some firewalls (including zonealarm pro) callrefers ‘private header information’. I can’t really offer much help in finding the setting if you find the pictures aren’t displaying, but aquick web search should find you some instructions for your particular browser or firewall.
Index.
1……………..Introduction.2……………..Getting started, including veteran’s 101.3.…………….Choosing your faction, difficulty and all those other options.4……………..Your main aims (taking over the world and enslaving the populace to your evil whims, hahahaha!!)5……………..Bread and Circuses: city management (and a bit about the map.)6……………..Gold, beautiful gold! Running your economy.7……………..Meet the family (but watch out for Lupus, he’s a little strange…)8……………..A handy dandy guide to agents of all varieties.9……………..Armies, the building and care thereof.10……………Paddling on the big boating lake (navies, duh!)11……………Bash for cash: how to use mercenaries for fun and profit.12……………Extortion for beginners: aka diplomacy.13……………Pretty in purple: The Senate.14……………The Gentle Art of War: being a battlefield guide.15……………Iz da r0x0rzz!!!1! I w1nn3d da camap1gnz!!11 Or in English: I’m not a newbie any more, now what?16……………Killing other people: a brief guide to multiplayer17……………Appendix A: A guide to the temples.18……………Appendix B: A complete listing of retinue characters and their effects.19……………Appendix C: A complete listing of Vices and Virtues20……………Appendix D: Assorted stuff which doesn’t fit anywhere else.21……………Credits.
All chapter headings are in large, red text and feature nice little Roman numerals to make them easier to find.
Since this guide is getting so big I will insert a small search tip near the beginning. Depending on your browser you should be able to hitctrl+f to call up a search box. Type in the chapter name you want and it should take you to it, after first stopping on the main index.You can also use this to search the guide for specific terms if you want to find something smaller.
Introduction
Page 2The Guild - frogbeastegg's Guide to Rome: Total War
02/11/2005 09:30:58http://forums.totalwar.org/vb/printthread.php?t=38382&pp=4
This guide is intended to help the bewildered newbie find their feet and understand the basics of Rome: Total War. Well, it was intendedsolely to do that but it has now grown far beyond that initial aim to become quite comprehensive, with something for all levels of play.That’s why I changed the name from “A Beginner’s Guide to Rome: Total War”. Please note that with the sole exception of the chapter onmultiplayer this guide is for singleplayer only; that is important and I shall repeat it – singleplayer only. While there is a section on thebattlefield, and while many tactics and tips will work in multiplayer, this guide is written solely for singleplayer unless otherwise veryclearly stated.
Now for the obligatory rundown of the Total War series so far, for those of you who have just joined us. The Total War series is made byCreative Assembly, a British company.* Shogun: Total War (2000) The very first game in the series, set in Sengoku Japan. A revolutionary masterpiece.* The Mongol Invasion (2001) Shogun’s add-on pack, featuring the Mongol Invasion of Japan.* Shogun: Warlord’s Edition (2001) This is a bundle containing both the original Shogun and the Mongol Invasion add-on. The contentsare identical to what you get if you buy Shogun and Mongols separately.* Medieval: Total War (2002) The second full game and sequel to Shogun. It is set in medieval Europe, but you already knew thatbecause the name is a bit of a giveaway, right?* The Viking Invasion (2003) The add-on for Medieval; it covers the Viking invasions and factional in-fighting of Britain in the 9th – 11thcenturies AD.* Rome: Total War (2004) The third full game and quite the departure from the previous games due to its brand new engine.
Getting Started
Patch 1.2 fixes a great long list of bugs, issues, grumbles and adds a few tweaks. It also sadly adds some new problems of its own, butthe general consensus amongst players seems to be it does much more good than harm. You can download it from the official site. Ifyou want to play multiplayer the patch is compulsory.
I would suggest you read the manual; while it is lacking rather a lot of information, and can be sketchy at times, it does give you thebasics and there are some amusing jokes in it. This guide is not a replacement for the manual, nor is it a replacement for the tutorials; itis intended to compliment them.
Now fish out that lavish map and tech tree that came with your game and take a good look at it. Get a feel for the world you will befighting in; I found it very helpful to note the locations of the various cities to speed my early game exploration and diplomacy. Beingable to go straight to the city of Dimmidi is much better than wandering around the Sahara for several years trying to find the place onyour own. Veterans of the previous Total War games will be right at home with the tech tree; newbies can find an explanation of how itall works in chapter 5. You will quickly notice that there is only a Roman tech tree included on paper; the other factions have their techtrees available in-game. As of yet there are no printable versions of the other faction’s trees but I hope this will change shortly.
The official CA FAQ can be found here; I recommend taking a look.
RomeWiki is a very handy resource for the RTW player and worth at least one visit. It is a kind of RTW encyclopaedia where anyone cancontribute information.
I shall add a note about the Prima Official guide here; everything I have heard about it is bad. I didn’t buy a copy myself; I do own bothguides for Shogun and Medieval and I was going to get a copy of the one for Rome until I saw all the complaints. It does not match thequality of the previous works and has a lot of wrong information, especially in the units section. Apparently many of the unit costs arewrong.
Obviously you need to tweak the game options to get good performance and nice eye candy; that’s your problem. A small note on screenresolutions: If you wish to use a resolution not in the game by default you need to open up your preferences.txt file in your main RTWdirectory, find the lines relating to resolution and edit them to whatever you wish to use. The change you edited into place will notappear in the game menu itself, so if you alter any in-game graphics options you will have to redo your resolution edit.
Now your choice is a little more limited; when you start the game up you are forced to do the Sons of Mars tutorial campaign. Playingthe tutorial is a good idea; it acquaints you with the basics of the game. Sadly, and most frustratingly in my experience, you are forcedto use the RTS style camera throughout the tutorial. If you hate using this camera you will hate the tutorial. Once the tutorial iscompleted (Victoria will tell you when you have finished, then give you the option of quitting or continuing to play) you can accesscustom battles, multiplayer, the Imperial campaign and all those other fun bits. Alternatively, if you are feeling sneaky and don’t mindmissing all the lessons, you can just start the tutorial then immediately quit. This will also unlock all the other game modes.
If you played out the full tutorial then you are probably ready to begin a campaign, as long as you feel comfortable. If you don’t it wouldprobably be a good idea to play a few custom battles to get accustomed to the controls, how units move and react, learn some basicstrategies and so on. If you skipped the tutorial I do recommend playing a few custom battles, even if you are a veteran of the previousgames. The new engine has changed the way cavalry behave for a start, and the interface is completely different. If you can’t fighteffectively on the battlefield you will lose your campaign battles or have to rely on auto-resolve; neither option is much fun. Auto-resolvecan be a bit wacky, generating poor results with a lot of losses on your side. It also has a penchant for getting your big, expensive units(such as elephants) killed. Finally it is very risky if you have a good general or family member involved in the battle; don’t be surprised ifyour general ends up dead or collects bad vices like coward.
Argh!! They changed everything!!
That’s the heartbreaking wail of many a Total War veteran on discovering the new camera, interface and so on. This is often closelyfollowed by “How do I get the old controls back!?” So here we go, a section for all those disoriented vets who, like me, loathe the RTSstyle camera, green arrows and all that. We old timers are allowed to be crotchety; it’s our aching bones, tiny pensions and thedisrespect of the younger generations that drives us to it. Why in my day we didn’t have fancy 3D men in our battles! No, we had 2D
Page 3The Guild - frogbeastegg's Guide to Rome: Total War
02/11/2005 09:30:58http://forums.totalwar.org/vb/printthread.php?t=38382&pp=4
sprites and we were grateful for it. We fought our battles uphill, in the snow at 5AM, unlike you softies with all your sunny Greek islandsand plains and other degenerate namby pamby rubbish! Back then we were real men (except for those players who are, like myself,female. We were real women back then) and we weren’t afraid of a bit of hard work. You youngsters don’t even know you’re born! Gah!
The spinny bits of this new cameras makes me feel sickThis one is easy; just go to options either in-game or from the front end menu and choose control options. Then click on the arrow nextto the words RTS on the camera controls screen, et voila.
Left click, right click, I’m so confused.There is no way to bring back the old left click select, left click move system. You have to use the left click select, right click movesystem. This is not a bad thing; it is now impossible to accidentally order a unit to move when trying to select another one. It only takesa short time to adjust and once you do you will never want to use the old system again.
Green arrows must die!And die they shall. Simply open the RTW main directory, find the text file called ‘preferences’ and open it. Now look for the line“DISABLE_ARROW_MARKERS:False” and change it to read “DISABLE_ARROW_MARKERS:TRUE”. Now save and close the file. Done.
I hate the new banners! Feed them to the lions!They don’t bother me, but I have seen others complaining. Open the preferences file (same as in above tweak) and look for the line“SHOW_BANNERS:TRUE”, change it to “SHOW_BANNERS:FALSE”. Save and exit. Done.
Cutscenes!? We don’t need no steenkin’ cutscenes!I hate the assorted cutscenes the game spits in my face in battles, you know ‘general’s death’ cutscenes, ‘big gaping holes in city walls’cutscenes, ‘opened gate’ cutscenes and other stuff which I ALREADY KNOW THANK YOU VERY MUCH!! There is an audio cue for all theseevents anyway, and I don’t appreciate having my controls disabled at key points so I can watch some rebel general drop dead. In caseyou have not got the idea yet I really do hate those cutscenes. This is why patch 1.2 is a God send; it’s worth installing for this oneteensy little tweak alone. After installing the patch and running the game once a few new command lines are added to yourpreferences.txt file, including this gorgeous little line here: EVENT_CUTSCENES:TRUE Simply change the ‘TRUE’ to ‘FALSE’, save, andcelebrate the death of the general’s death cutscene.
I also want that fancy pants intro movie dead and buried! NOW!Yes, no matter how fancy the intro FMV of a game you only ever watch it a couple of times. Past that it becomes a minor annoyance.Right click on the shortcut to RTW on your desktop, choose properties and add “–nm” to the end of your shortcut, including a spacebetween the ” which is already there and the -, e.g. "D:\Program Files\Activision\Rome - Total War\RomeTW.exe" -nm
All this unlocking stuff is console crap and I refuse to do it!Honestly it’s probably easier to just play an easy/easy short 15 province campaign, but if you insist on modding I shall quote SteppeMerc’s short modding guide:“1) Find the file "descr_strat" in ...\Rome - Total War\Data\world\maps\campaign\imperial_campaign.txt
2)Open it up.
3)cut the faction you want to play as from the section its under (either unlockable or nonplayable, and copy it into the playable section,that should do it.
Also on that same file for those who wish to play a very long campaign, you have the start date and end date that can be modded there,it says start_date -270 summer and end_date 14 summer.”
The interface sucks!!!!Yes, this one can now be altered thanks to the general loveliness of 1.2. The chunky, view blocking interface can be swapped for thesvelte old version which featured in the old TW games. Simply open up preferences.txt and find the line MINIMAL_UI:FALSE and changeit to true. Then go and sacrifice one small goat and a chicken in gratitude for this absolutely huggable change. For those who neverplayed the old TW games I say give it a go. Once you try it you’ll never go back.
It’s too fast, it’s hard to see morale and fatigue, and other common vet complaintsI’m not going to deal with this kind of problem in this guide; half of this can’t be changed, and the speed issue is heavy modding.
There are several old Total War features that are dead and buried; sadly many of these features were useful. The time slider has gone;you are now limited to preset battle speeds. Remember how you used to break your fingers assigning units to numbers using ctrl+alt+[number], and again when recalling them with ctrl+[number]? The good news is that you no longer need to do this; the controls are nowboth customisable and sane. Use ctrl+[number] to assign and [number] to recall. Patch 1.2 has also brought back the ctrl+shift+numbersystem for the sadists amongst you. The old right click battlefield unit menus are also gone, but honestly I don’t miss them. All thecommands you need are on the interface and can be assigned to hotkeys of your choice. I never used the right click battlefield menusanyway. There is now no way to make all the units use identical ranks, so if one unit is smaller than the others it will deploy in a thinnerformation. Hold formation and hold position have been merged into a new command called ‘guard’. Wedge is now a special formationlimited to certain units only. Rally is also a special ability that only a bare handful of units (just generals, the Sacred Band cavalry hadthe ability in the demo but I haven’t used them in the full game) get. You cannot save replays in SP campaign battles. I think that coverseverything important.
Patch 1.2 has also resurrected another feature from the old games, and again it’s quite simply a handsome little tweak that makes aworld of difference. It certainly made this frog smile. They brought back alt+move. There; that will have got all the old TW vets jumpingup and down with glee, but for the newbie it needs a little explaining. You know how you set up your nice pretty army, all neatly groupedwith delightful unit arrangements and split into several hotkeyed groups? And then you need to move a bit because the dastardly enemyare not going to obligingly walk right into your front? So you try to move everyone at once while getting them to keep the exact samedeployment and facing but somehow it all goes horribly wrong, and people end up backwards, scattered in strange locations, stood ontop of each other and generally Buggered Up Royally? Not so any more! Just select all the units you want to move, hold down the altbutton and give your move order. The units will deploy where you clicked facing in the exact same direction they were and deployed inexactly the same formation they were. Even if ordered to move backwards. Even if the units are not grouped at all. Even if you told themto move a long way sideways.
Page 4The Guild - frogbeastegg's Guide to Rome: Total War
02/11/2005 09:30:58http://forums.totalwar.org/vb/printthread.php?t=38382&pp=4
Choosing your faction, difficulty and all those other important options
Another 1.2 change slots in here nicely, replacing a former section about a bug which many loved to take advantage of. It is now nolonger necessary to take advantage of a very bizarre bug to turn off those dreadful time limits in campaign battles. 1.2 adds a tickboxoption to the campaign set up screen. You can only alter this option at the start of a new campaign.
Faction
Upon selecting the Imperial campaign for the first time you will notice you only have three factions to choose from, unless you moddedyour game in which case I will ignore you until much later. It is much easier to write a guide aimed squarely at the Romans than onewhich tries to cover all the different factions, and much of this advice will work perfectly for the non-Romans. There will be some notesand tips on the non-Roman factions near the end; these factions are generally considered to be harder than the Romans for variousreasons. So, you can play as the Julii, the Scipii or the Brutii. All the Roman factions start with two cities and a bunch of preset mainfoes. The Roman factions start off in an alliance with trade agreements and they will keep this state until the civil wars start late in thegame. All Roman factions answer to the senate, and will receive missions from them. They have the same units available to them, withthe sole exception of gladiators; each of the three factions have their own unique kind of gladiator unit. Building wise they are identicalwith the sole exception of temples and shrines; each family has their own trio of Gods. While their long campaign goals are identical(hold 50 provinces, occupy Rome, and destroy or outlast the Senate) their short campaign goals are different.
The Julii are the red Romans. They start in northern Italy and are intended to fight the Gauls above all other foes. Their Gods areBacchus (large bonuses to happiness), Ceres (small bonus to happiness, increased population growth) and Jupiter (small bonus tohappiness, small bonus to law). Their gladiator is the Samnite; you can recruit them when you build an amphitheatre. Their shortcampaign goals are to destroy or outlast the Gauls and capture 15 provinces. Their game is quite easy; the Gauls are numerous but on aman to man basis they are inferior to Rome’s legions. The Julii will mostly be conquering inland provinces and this hurts their potentialtrade income as, shockingly, you need to be on the coast to build a port. However this does not mean they will be perpetually bankrupt;once you have five or so cities you can, with careful planning and construction, rake in significant piles of cash.
The Scipii are the blue Romans. They start in south-western Italy and Sicily. They are intended to take on the might of Carthage and theNumidians above all others. Their Gods are Vulcan (small happiness bonus, bonuses to armour and weapons of troops), Saturn (smallhappiness bonus, small law bonus), and Neptune (small happiness bonus, eventual ability to build the corvus quinquireme). Theirgladiator is the Mimillo and you can recruit them when you have built a coliseum. In their short campaign their goal is to destroy oroutlast Carthage and Numidia, and capture 15 provinces. The Scipii will be engaging in a lot of naval warfare, and Carthage is a tougherfoe than the Gauls. However because many of their provinces will be coastal they will really rake in cash from trade.
The Brutii are the green Romans. They start in south-eastern Italy and they are intended to crush the Greeks and Macedonians undertheir hobnailed sandals. Their Gods are Juno (small happiness bonus, small city health bonus), Mercury (small happiness bonus, smalltrade bonus), and Mars (troop experience bonus). Their gladiator unit is the Velite; you’ll be able to recruit them when you construct anarena. In their short campaign you must destroy or outlast the Greek Cities and Macedon, and hold 15 provinces. The Brutii representsomething of a middle ground between the other two factions. They will engage in some naval warfare and take quite a few coastalcities; they will also have quite a few in-land provinces. Their enemies can field strong armies but they do not have to contend with warelephants.
To unlock the other factions you need to finish any of the Roman campaigns on any difficulty; even an easy/easy short campaign will do.I did it on normal/normal with the Julii short campaign.
Difficulty
Difficulty is split into two categories; campaign map and battle map. Explaining exactly how difficulty works just now is … complicated.See, there are unknown factors, there is the known set of factors CA themselves told us, and then there is The Bug. 1.2 introduced a bugwith battlemap difficulties, and to be honest trying to understand exactly how it has broken the system has given he a headache. Isimply don’t have the time to read everything even on just one RTW dedicated forum, let alone the many that now exist. Anyway, I’llspare you the froggy snivelling about lack of time and give you what is known and what my interpretation of the problem is.
Known: Difficulty levels on the battlemap are bugged, both in custom mode and in the campaigns.
The vague froggy bit: I think the bonuses are being applied on the wrong levels. Normal is supposed to be a level field and very hard anunfair one (see below for what the bonuses should be, and were in 1.0 and 1.1). Now very hard is a level field, meaning no bonuses orthe bonuses are different. Normal is biased towards the AI somehow.
Oh, and while I’m on the subject of 1.2, bugs and difficulty: 1.2 most definitely, and I really strongly suspect all previous versions of RTWas well, have a nice issue with saving and reloading your game while the AI is besieging a settlement. If you save and reload any AIsieges will be broken. This means if you are saving and loading a lot the AI will barely be able to expand. So for best effects play RTWfor as long as possible in each play session and do as little loading as humanly possible.
Battle map(NB: this is how 1.1 and 1.0 worked, and how 1.2 probably should work) Normal is a level playing ground with no advantage to eitherside. I shall quote CA developer JeromeGrasdyke on the effects of difficulty on combat bonuses: “The combat bonuses are easy; theyapply to attack only, while on Easy the human player gets a +4 bonus, on Hard the AI is given +4, and on Very Hard +7. The moralebonuses are much more complex, as they work on a series of sliding scales.” Unfortunately the very hard bonus is rather ridiculous andit allows the AI do crazy things, such as smashing a phalanx head on with plain hastati. The AI achieves results which should neverhappen, and the general attitude I have seen expressed towards this difficulty is one of frustration. So for now I recommend sticking withnormal; it might be rather easy for veterans but at least your phalanx works …
Campaign map
Page 5The Guild - frogbeastegg's Guide to Rome: Total War
02/11/2005 09:30:58http://forums.totalwar.org/vb/printthread.php?t=38382&pp=4
I have no idea at all what difference the difficulty makes on this mode. Presumably you start with more cash on the easier difficulties. Iwould also expect the AI to be more aggressive and expansionist on the higher levels. The AI is famous for bribing your cities and armieson very hard; on normal it only seems to target your diplomats.
The readme for the 1.1 patch says that campaign map difficulty affects the results of auto-resolved battles. Although it does not actuallystate what changes are made for each difficulty it seems logical to assume that on easier difficulties the battles are most likely to giveyou favourable results, whereas on the harder levels you will take more losses and lose more battles.
Interestingly the readme for 1.2 makes no mention of autocalced battles, but I find that while playing on very hard in 1.2 my navalbattles go as they did in 1.1 on medium difficulty. So it is possible the autocalc bias has been removed or toned down in 1.2.
Other options
Advice levelThis controls the advisors, Victoria and Marcus. Unless you want them nattering away at you like in the tutorial leave them on thedefault – off.
Arcade battlesAccording to CA developer Mike B arcade mode “turns off morale, fatigue and ammunition effects in battle.”
Manage all citiesNow this one is interesting, important and will have a big effect on your game. If the box is checked you will be able to manage thedetails of all your cities regardless of whether they have a governor or not. If you de-check the box you will have to have a governorpresent to give your cities orders. In a way it’s a case of picking your flavour of micromanagement; shuttling governors about andqueuing orders, or handling all your cities each turn. Note that if the option is selected you can hand cities over to the AI to manageanyway, but if it is not selected the only way to gain control of your cities is to install a governor. I like to leave this one selected so Ican manage all my cities personally all the time, and hand the less important ones over to the AI when I get too many.
Follow AI charactersIf you want to see what the AI is doing leave this checked; if not de-check it. Default is on.
Short campaignI outlined the Roman factions short campaign goals in their blurb above. Basically on this mode you will have to take 15 provinces anddestroy or outlast set faction(s) to win, regardless of who you are playing as.
Unit sizeA lot of people have asked me about this, and a lot of people have asked on the assorted forums I read. It’s actually an option under thegraphics main menu, just check the ‘advanced settings’ box to reveal it. Unit size can ONLY be altered at the start of a campaign. Itdoesn’t matter what you get your options to after starting a campaign; you will be stuck with the unit size you had selected when youstarted. Larger units have more men (Oh golly!) and this has several …. Impacts. Firstly it makes them that little bit harder to control onthe battlefield; they take longer to react to orders, especially when altering facing by 90 degrees. This is a Good Thing in my opinion.Secondly they take more men from settlements when being built; a Bad Thing. You see the starting populations of cities in the campaignare the same for all unit sizes, and so the AI tends to drain cities of people trying to build an army. That means it’s slower and harder totech up, and so you tend to run into crappy units a lot. This can also happen to you, the super smart human player person thing, if youare not careful. Thirdly, and most obviously, larger units require more oomph from your PC. I use the largest unit size and point blankrefuse to drop below the second largest size. Small units are not fun to me.
Horse archers in 1.2A miscellaneous note on 1.2 which I can’t think of anywhere better to place at present: horse archers and chariot archers are bugged;they no longer shoot while moving correctly. There is a DIY fix for this, discovered by QWERTY on totalwar.org. You need to mod in the‘thrown’ missile attribute to all the following units:barb chariot light britonbarb horse archers scythianbarb horse archers slavebarb noble horse archers scythianbarb scythian noblewomen scythianeast persian cavalryeast cataphract archereast horse archereast chariot archeregyptian bedouinegyptian chariot archeregyptian general's bodyguard earlyrebel amazon chariotsmerc horse archersmerc bedouin archers
The only negative to this fix is that the missile attack icon turns into a little javline symbol instead of a bow and arrow.
1.2 is not as bad as it sounds, honest!I’ll also repeat that while I’ve been noting plenty of “1.2 broke this” and “1.2 added this bug” the patch really is an improvement over 1.1and should be used! Check the patch’s readme for a few hundred reasons why.
Page 6The Guild - frogbeastegg's Guide to Rome: Total War
02/11/2005 09:30:58http://forums.totalwar.org/vb/printthread.php?t=38382&pp=4
Your main aims (taking over the world and enslaving the populace to your whims,hahahahahah!!)
Yes, I can hear you saying “Look, you kill enough people of the right type, and capture enough provinces of the right type to fulfil yourcampaign victory conditions – it’s easy, you silly frog!” Shut up and stop throwing popcorn, you ingrate! If you want to conquer the worldyou must work in bite sized stages, achieving certain goals along the way. Alexander the Great didn’t go straight in India, did he? No, heunited Greece under his size 7 boot, then went off on a foreign holiday.
Everyone always divides this kind of game up into three phases; early game, mid game and late game. I could revolutionise this andinvent my own froggy division system but I’m lazy; I shall use the standard.
Early gameThis is where you start. You have barely any resources, crappy units, very little cash or income, and generally everything needs doing.
Mid gameYou have expanded a little and stabilised your situation. Your cash flow is healthier and you can now use better units. You still havesome way to go, but now you are less likely to be smushed into pulp if you make a tiny mistake.
Late gameIf you are playing the long campaign then this phase includes the Civil wars, and Senate killing, as well as collecting those final provinceswith your high tech troops. If you are in a short campaign you will most likely just need to tidy up the last couple of provinces belongingto your specified enemy(s) and reach the fifteen province count.
Roughly in order of priority you need to:-Stabilise your existing lands.-Secure your borders, by expansion if necessary.-Sort out your finances so you have a positive income.-Grow your finances so your incomes is larger.-Tech up by building army related buildings when affordable and convenient.-Organise your armies, which will probably be battered after the initial phase of expansion and battling.-Slowly begin to expand, taking strategically chosen targets.
I will now bore you with a quick discussion of those points.
Stabilise your existing landsThis does not necessarily mean being all nice and building schools and kissing babies; it can mean kicking seven shades of hell out of thenearest threat. Basically in this category you need to identify anything that could do significant harm to you in the initial turns and thiscan include unhappy cities, ambitious neighbours, rebel armies or perhaps even badly placed family members who are either vulnerableto attack/bribery or are not helping you at all.
Secure your borders, by expansion if necessary.Build however many armies you need to guard your lands. There is a snag with this one: money. Usually in the beginning you will bemaking a loss and only have a few thousand denarii in the bank. For this reason I usually use a more roundabout approach to getting myarmies – I use the initial troops thoughtfully scattered throughout the territory. If a unit of decent troops is in a city then I pull it out. If itis required to act as a garrison I train a unit of town watch to replace it; town watch are cheap and less effective in combat than mostother troops. Er, actually only peasants are worse than town watch in a fight. I have found that I can usually get two decently mixedarmies with about 10 units each, including generals, out of my initial units. You will probably still be losing money but at least you havenot exacerbated the situation by spending money on loads more troops.
“By expansion if necessary” yes, this means that if the enemy has a city located in such a place as to be a real and significant threat youshould do your best to capture it, removing the threat and boosting your situation. By threat I mean cities which are splitting your landsup, or are deep in your territory, or are very strong and likely to grow into a powerhouse pumping out army after army right into yourback yard. A good example of this kind of threat is the city of Patavium at the start of a Julii campaign. This city is large and, if left for ashort while it will send hordes down to attack the Julii on a regular, highly irritating basis. Look it up on your paper map and you shouldbegin to see why the Julii really need to take Patavium ASAP.
Note that you don’t have to kick everyone all of the time; try to use your diplomat(s) to set up a few alliances with neighbouring factionsso you will not be ganged up on.
Sort out your finances so you have a larger positive income.Well, this takes several different kinds of approaches and you will find a more in-depth discussion in the economy section. For nowsuffice it to say you should consider building basic roads everywhere, ports wherever possible, and perhaps the odd trader in citiesmaking the most money from trade. You may also need to be more proactive than that; you may need to capture an additional city ortwo. Unless you need to take another faction’s city to secure your position try to look for rebel held cities as you can capture thosewithout starting a war. While your diplomats are doing the rounds trying to collect alliances try to get trade agreements as well. Asoutlined in the diplomacy section trade agreements are easier to get than alliances.
Grow your finances so your income is stronger.At this point you being adding more trade buildings, upgrading roads and ports anywhere you can, seeking trade agreements andbuilding mines. Again you can find more in the economy section.
Tech up by building army related buildings when affordable and convenient.What is says on the tin. This one goes quite low on the priority list because you can often get by with your initial facilities for a shortwhile, and by the time you require more advanced troops being trained in more locations you should have a steady cash flow.
Organise your armies, which will probably be battered after the initial phase of expansion and battling.Again precisely what it says on the tin. You will probably need to merge and retrain units, as well as bring out a few freshly raisedreinforcements. Since the retraining versus merging argument is a long, old, rambling topic I shall cover it later in the army section.
Slowly begin to expand, taking strategically chosen targets.
Page 7The Guild - frogbeastegg's Guide to Rome: Total War
02/11/2005 09:30:58http://forums.totalwar.org/vb/printthread.php?t=38382&pp=4
Right, you have money in the bank and a profit each turn, your armies are sorted out and capable of fighting, your cities are slowlyimproving and your initial position is safe. Now you can begin expanding out to take on those foes you deem most worthy of yourattentions (clue: you will probably have several potential target factions to choose from. Try the ones who will either give you a realbenefit now, such as rich cities, or ones who will get nasty if left to tech up.)
When campaigning against your faction’s main foes in the early game you can give yourself a boost and cripple them by targeting theirbest cities first. Here’s a few examples from Maltz:Armania: ParthiaDacia/Thrace: Macedon -> Greek cities -> RomeGermania: Julii -> RomeNumidia: Carthage -> Brutii -> Scipii -> RomeCarthage: Brutii -> Scipii -> Rome
Bread and Circuses: City management (and a bit about the map)
Rome: the eternal city, the beacon of culture, the centre of the world, the jewel in the crown – you get the idea. Well, sorry folks butRome isn’t for you, not until you have grown inordinately powerful. Instead think of Backus Waterus: the eternal mud pile, the beacon ofyokels, the maggot in the apple – yup, it really is that bad. You have heard the saying “Rome wasn’t built in a day”? Well sadly it is true;to get Backus Waterus up to the level of Rome will take years, hundreds of them.
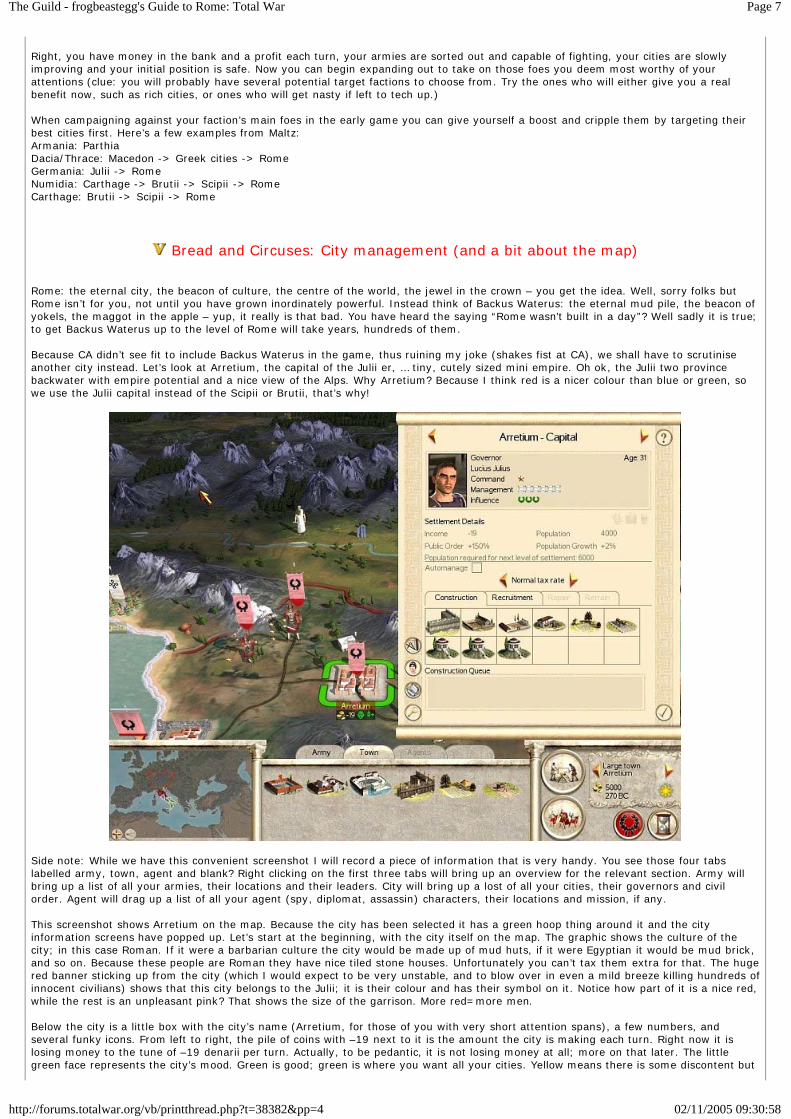
Because CA didn’t see fit to include Backus Waterus in the game, thus ruining my joke (shakes fist at CA), we shall have to scrutiniseanother city instead. Let’s look at Arretium, the capital of the Julii er, … tiny, cutely sized mini empire. Oh ok, the Julii two provincebackwater with empire potential and a nice view of the Alps. Why Arretium? Because I think red is a nicer colour than blue or green, sowe use the Julii capital instead of the Scipii or Brutii, that’s why!
Side note: While we have this convenient screenshot I will record a piece of information that is very handy. You see those four tabslabelled army, town, agent and blank? Right clicking on the first three tabs will bring up an overview for the relevant section. Army willbring up a list of all your armies, their locations and their leaders. City will bring up a lost of all your cities, their governors and civilorder. Agent will drag up a list of all your agent (spy, diplomat, assassin) characters, their locations and mission, if any.
This screenshot shows Arretium on the map. Because the city has been selected it has a green hoop thing around it and the cityinformation screens have popped up. Let’s start at the beginning, with the city itself on the map. The graphic shows the culture of thecity; in this case Roman. If it were a barbarian culture the city would be made up of mud huts, if it were Egyptian it would be mud brick,and so on. Because these people are Roman they have nice tiled stone houses. Unfortunately you can’t tax them extra for that. The hugered banner sticking up from the city (which I would expect to be very unstable, and to blow over in even a mild breeze killing hundreds ofinnocent civilians) shows that this city belongs to the Julii; it is their colour and has their symbol on it. Notice how part of it is a nice red,while the rest is an unpleasant pink? That shows the size of the garrison. More red=more men.
Below the city is a little box with the city’s name (Arretium, for those of you with very short attention spans), a few numbers, andseveral funky icons. From left to right, the pile of coins with –19 next to it is the amount the city is making each turn. Right now it islosing money to the tune of –19 denarii per turn. Actually, to be pedantic, it is not losing money at all; more on that later. The littlegreen face represents the city’s mood. Green is good; green is where you want all your cities. Yellow means there is some discontent but
Page 8The Guild - frogbeastegg's Guide to Rome: Total War
02/11/2005 09:30:58http://forums.totalwar.org/vb/printthread.php?t=38382&pp=4
it’s not really a problem. Blue means people are very unhappy and are on the verge of becoming rebellious, so you should do somethingto turn opinion immediately, if not sooner. Red means they are going to storm your posh mansion, trample the flower beds and dounspeakable things to your pet kittiekat. The third symbol, the man with a plus sign next to him, means that the city’s population isgrowing. If population grow stabilises the man will turn yellow and the plus will vanish. If growth goes into a decline the man will turnred and a minus sign will appear next to him. There are several other possible icons that can appear which are not present in thisscreenshot. A little yellow man waving a sword means the city is recruiting or retraining a unit of some kind; military or agent. A yellowhammer and saw crossed icon means the city is building or repairing a building. A pitchfork on a flaming background means the city iscurrently rioting. A symbol with walls and flames means the city is under siege; this is also visible on the map as a ring of sharp stakesaround the city and an enemy army waving a sword imposingly. A skull means the city has the plague. A gears symbol means the city isbeing auto-managed by the AI.
Looking around your city at its province will reveal details about trade and construction. Any roads present will be shown, with eachupgrade visible. Plain roads, as in this picture, are brown dirt tracks. Paved roads are grey lines. Highways are deep grey lines. Theroads will have little wagons travelling along them; these represent land trade. The more wagons you see the more trade is taking place.You will notice icons like giant pottery cups, jugs, chunks of stone and so on scattered about the map. These are trade goods. A goodmust be present in a province for that province to export it. Some goods are worth more than others and some provinces have moretrade goods than others. If you look above the flag in the screenshot you can see a white block; this is the marble trade good. If youhover your cursor over a trade good it will tell you what it is. You can see pottery trade goods just across the border, between Arretiumand the rebel city just disappearing off the edge of the picture. It is a very sound idea to look for trade goods on the map when decidingwhere to conquer next.
I should probably tell you about the slave trade good now. This good appears on the map as a pair of silver manacles. It is notpermanent, instead it has a chance to appear when you capture and enslave a city. The good will last for approximately 20 turns and willincrease population growth in cities receiving the slaves. According to thee 1.1 patch’s readme Roman factions and Roman allied factionswill have 25% of the enslaved population go to the capital of the senate faction.
Just near the bottom left corner you can see a stone walled blob; this is a port. If you see this on a map you know the city has a portand can conduct sea trade. I think every coastal province can eventually build a port.
The thick red line snaking its way through the middle of the map is the border of the province and, since you don’t own any provincesbeyond this one, of your empire.
Right, that’s it for what you can learn from just looking at the map; time to move on to the city information screens. If you look at theright hand side of the screenshot you can see a parchment; if you can’t see it you should probably get glasses. The grey box near thetop (the one with the picture of the man and scroll icons) is the governor. If there is no governor in the city the box will be empty. Thepicture is not important; the other details are. Age is displayed in the top right corner; the older the guy is the more likely he is to expireand become a small pile of ash in a ceremonial urn. Dead governors are not replaced automatically; you have to send another familymember out yourself, assuming you have a spare. Below this you can see the chap’s name; Lucius Julius. Command is battlefieldleadership; this mewling infant only has one star so you’d better hope he never has to fight anyone with more skill than he has, i.e.anyone who is more skilled than a damp piece of canvas. Management indicates his ability to manage a city, to do the job you havegiven him. While he might be an utter moron on the field of battle this guy is seriously skilled at taxing people and oppressing themasses. Below that is influence, rated in snazzy laurel wreaths. He has three of them, quite good really. Most characters have lowinfluence if they are not faction leaders/heirs or in a senate office. Influence helps a governor keep control over his citizens; a little awereally does help prevent riots.
Below that box is another labelled settlement details. This is your one-stop shop for the critical information about how your city is doing.Income is a simple repeat of the same figure on the map; to get the real meat you need to go to the detailed city information screen;more on that later. Public order represents how likely the city is to riot. Anything under 100% is bad; it means there is unrest. Ok, to behonest you can survive with slightly below 100% but it is really skating close to the edge of thin ice and any small problems will pushyou over into the happy little land of trouble. Having your governor die and your city revolt because public order was already close todanger point is severely not fun. Because this city is at 150% it’s as stable as a very stable thing. Population is the current number ofsouls stuffed into your taxation hellhole. Population growth is represented as a percentage; each turn the displayed percentage iscalculated for the population, and then added on. In this case 2% of 4,000 is 80, so at the beginning of the next turn the city will have4,080 people. Larger populations grow faster; such is the arcane magic of percentages. “Population required for next level of settlement,”means just that; when the current population hits the indicated amount (6,000 in this case) the city will grow to the next level. This is aGood Thing; larger cities allow you to build more advanced structures. Below that is a box labelled auto manage; if you get tired ofmanaging the city yourself check this box and the AI will manage the city according to priorities you assign.
Next is a blurb labelled tax rate with two arrows next to it; click them to change the tax rate. Higher taxes slow down population growthand bring in more money; they also make people unhappy. Strangely people don’t like handing their money over to the government.Weirdoes. Low taxes increase population growth and happiness but hurt your income. You will have to choose your tax level according toa bunch of factors discussed later in the guide.
Below that is a box showing a bunch of buildings with the word ‘construction’ above it. Astonishingly this is where you choose whatbuildings you want the city to construct. If you right click on a building it will display a page telling you what it is and what it does. Veryhandy. The tabs behind this, recruitment, retrain, and repair, as well as how to build and queue items were explained in the tutorial, so Iwon’t repeat.
Down the bottom left hand side of the parchment are 4 buttons. From top to bottom they are:-Tech tree for your faction. If you aren’t playing a Roman this is the only way you can see your tech tree, as there is no printout includedin the game.-Victoria’s advise on what to build next.-Show detailed information on the city.-Go to the city’s location on the main map.
Phew! Done. Anything else you need to know about this screen was mentioned in the tutorial. Now, on to the next screen; the advancedsettlement details.
Page 9The Guild - frogbeastegg's Guide to Rome: Total War
02/11/2005 09:30:58http://forums.totalwar.org/vb/printthread.php?t=38382&pp=4
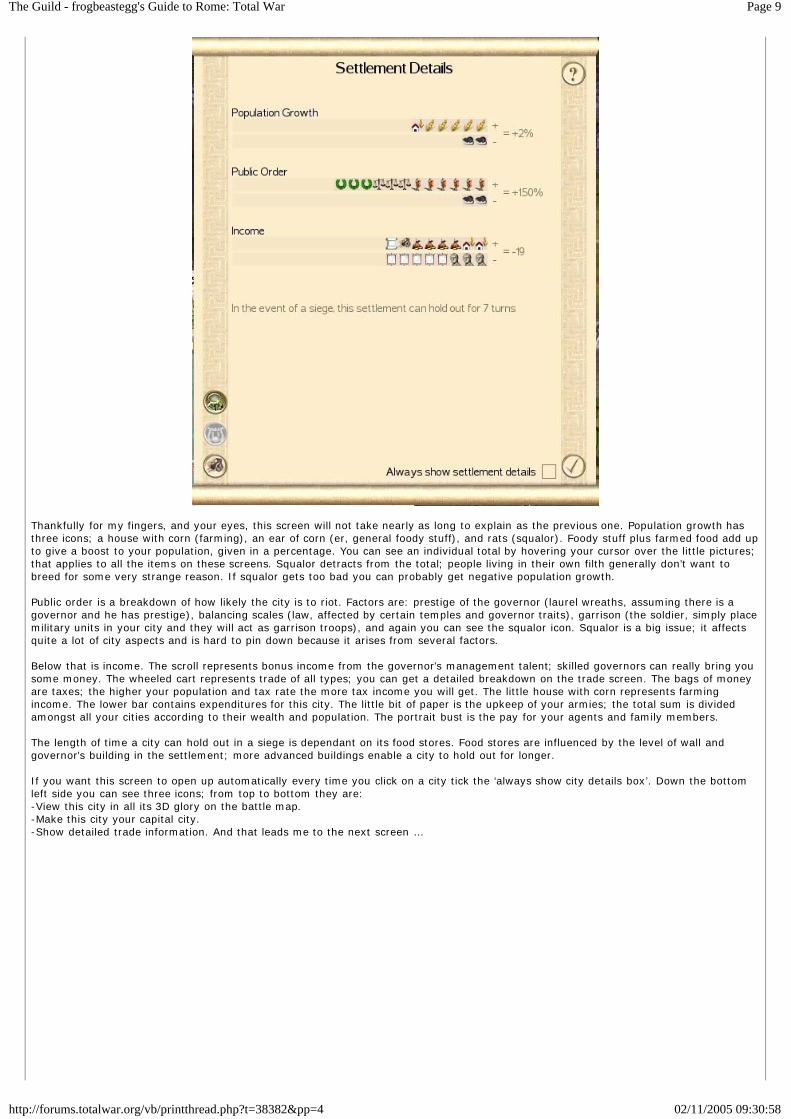
Thankfully for my fingers, and your eyes, this screen will not take nearly as long to explain as the previous one. Population growth hasthree icons; a house with corn (farming), an ear of corn (er, general foody stuff), and rats (squalor). Foody stuff plus farmed food add upto give a boost to your population, given in a percentage. You can see an individual total by hovering your cursor over the little pictures;that applies to all the items on these screens. Squalor detracts from the total; people living in their own filth generally don’t want tobreed for some very strange reason. If squalor gets too bad you can probably get negative population growth.
Public order is a breakdown of how likely the city is to riot. Factors are: prestige of the governor (laurel wreaths, assuming there is agovernor and he has prestige), balancing scales (law, affected by certain temples and governor traits), garrison (the soldier, simply placemilitary units in your city and they will act as garrison troops), and again you can see the squalor icon. Squalor is a big issue; it affectsquite a lot of city aspects and is hard to pin down because it arises from several factors.
Below that is income. The scroll represents bonus income from the governor’s management talent; skilled governors can really bring yousome money. The wheeled cart represents trade of all types; you can get a detailed breakdown on the trade screen. The bags of moneyare taxes; the higher your population and tax rate the more tax income you will get. The little house with corn represents farmingincome. The lower bar contains expenditures for this city. The little bit of paper is the upkeep of your armies; the total sum is dividedamongst all your cities according to their wealth and population. The portrait bust is the pay for your agents and family members.
The length of time a city can hold out in a siege is dependant on its food stores. Food stores are influenced by the level of wall andgovernor’s building in the settlement; more advanced buildings enable a city to hold out for longer.
If you want this screen to open up automatically every time you click on a city tick the ‘always show city details box’. Down the bottomleft side you can see three icons; from top to bottom they are:-View this city in all its 3D glory on the battle map.-Make this city your capital city.-Show detailed trade information. And that leads me to the next screen …
Page 10The Guild - frogbeastegg's Guide to Rome: Total War
02/11/2005 09:30:58http://forums.totalwar.org/vb/printthread.php?t=38382&pp=4
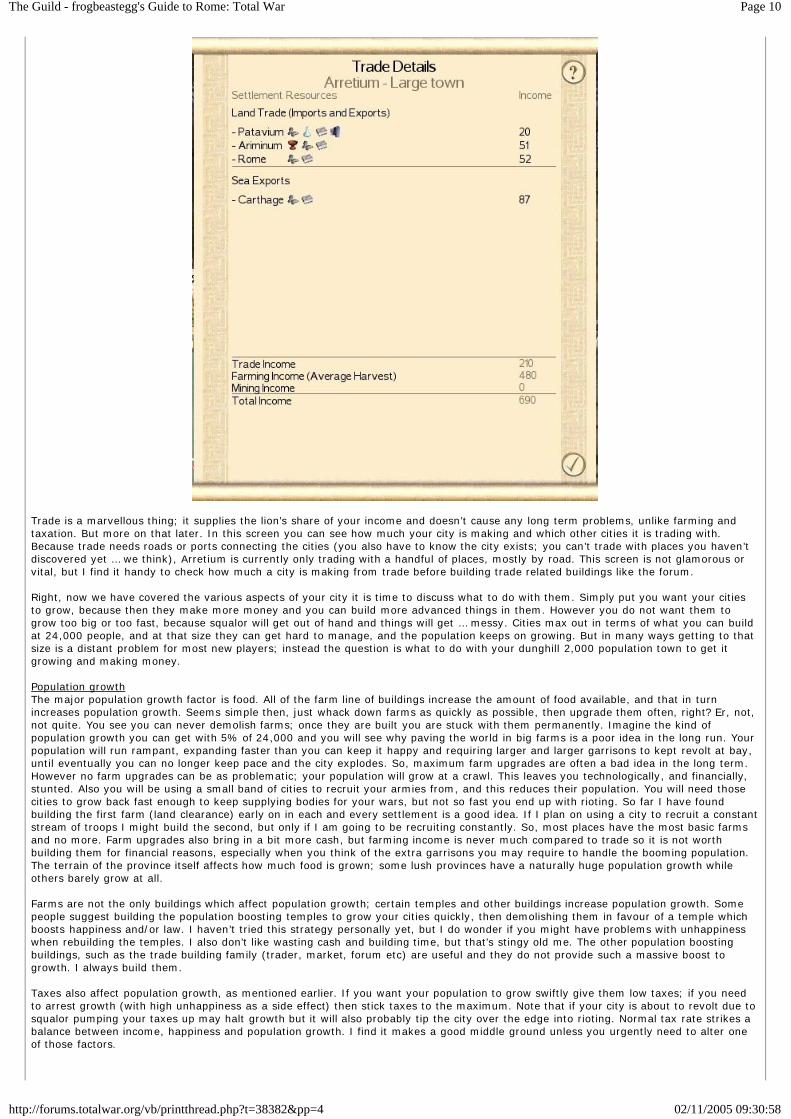
Trade is a marvellous thing; it supplies the lion’s share of your income and doesn’t cause any long term problems, unlike farming andtaxation. But more on that later. In this screen you can see how much your city is making and which other cities it is trading with.Because trade needs roads or ports connecting the cities (you also have to know the city exists; you can’t trade with places you haven’tdiscovered yet … we think), Arretium is currently only trading with a handful of places, mostly by road. This screen is not glamorous orvital, but I find it handy to check how much a city is making from trade before building trade related buildings like the forum.
Right, now we have covered the various aspects of your city it is time to discuss what to do with them. Simply put you want your citiesto grow, because then they make more money and you can build more advanced things in them. However you do not want them togrow too big or too fast, because squalor will get out of hand and things will get … messy. Cities max out in terms of what you can buildat 24,000 people, and at that size they can get hard to manage, and the population keeps on growing. But in many ways getting to thatsize is a distant problem for most new players; instead the question is what to do with your dunghill 2,000 population town to get itgrowing and making money.
Population growthThe major population growth factor is food. All of the farm line of buildings increase the amount of food available, and that in turnincreases population growth. Seems simple then, just whack down farms as quickly as possible, then upgrade them often, right? Er, not,not quite. You see you can never demolish farms; once they are built you are stuck with them permanently. Imagine the kind ofpopulation growth you can get with 5% of 24,000 and you will see why paving the world in big farms is a poor idea in the long run. Yourpopulation will run rampant, expanding faster than you can keep it happy and requiring larger and larger garrisons to kept revolt at bay,until eventually you can no longer keep pace and the city explodes. So, maximum farm upgrades are often a bad idea in the long term.However no farm upgrades can be as problematic; your population will grow at a crawl. This leaves you technologically, and financially,stunted. Also you will be using a small band of cities to recruit your armies from, and this reduces their population. You will need thosecities to grow back fast enough to keep supplying bodies for your wars, but not so fast you end up with rioting. So far I have foundbuilding the first farm (land clearance) early on in each and every settlement is a good idea. If I plan on using a city to recruit a constantstream of troops I might build the second, but only if I am going to be recruiting constantly. So, most places have the most basic farmsand no more. Farm upgrades also bring in a bit more cash, but farming income is never much compared to trade so it is not worthbuilding them for financial reasons, especially when you think of the extra garrisons you may require to handle the booming population.The terrain of the province itself affects how much food is grown; some lush provinces have a naturally huge population growth whileothers barely grow at all.
Farms are not the only buildings which affect population growth; certain temples and other buildings increase population growth. Somepeople suggest building the population boosting temples to grow your cities quickly, then demolishing them in favour of a temple whichboosts happiness and/or law. I haven’t tried this strategy personally yet, but I do wonder if you might have problems with unhappinesswhen rebuilding the temples. I also don’t like wasting cash and building time, but that’s stingy old me. The other population boostingbuildings, such as the trade building family (trader, market, forum etc) are useful and they do not provide such a massive boost togrowth. I always build them.
Taxes also affect population growth, as mentioned earlier. If you want your population to grow swiftly give them low taxes; if you needto arrest growth (with high unhappiness as a side effect) then stick taxes to the maximum. Note that if your city is about to revolt due tosqualor pumping your taxes up may halt growth but it will also probably tip the city over the edge into rioting. Normal tax rate strikes abalance between income, happiness and population growth. I find it makes a good middle ground unless you urgently need to alter oneof those factors.
Page 11The Guild - frogbeastegg's Guide to Rome: Total War
02/11/2005 09:30:58http://forums.totalwar.org/vb/clientscript/vbulletin_global.js
Squalor will negatively affect population growth; if it gets bad enough then it will counter all the positive growth factors and halt growth. Ithink it is also possible to end up with a famine, which makes population decline. If you push your taxes high enough when the city isalready experiencing slow growth you may push growth to a negative.
There is a final, rather abstract way to make your population grow: slaves. When you conquer an enemy city you are offered a choicebetween occupying, enslaving and occupying, or exterminating and occupying. If you choose enslave a certain amount of the citiescitizens will be removed from that location and divided up between all your other cities that have a governor; no governor, no slaves.This is quite handy; it allows you to boost your core cities and makes the new city easier to control. You can also get some newcharacters for the enslaving general’s retinue this way. Beyond that initial burst of slavery there is a steady, on-going +1% growth bonusfor any city connected to the newly captured settlement by road. This extra bonus lasts for 20 turns, until the slave resource on the mapdisappears.
Squalor and happiness.Squalor is a major issue in Rome: Total War. Squalor makes your population unhappy; if unhappiness gets too high they will riot. Squaloris the main cause of unhappiness in many cases. Squalor represents the general ills and upsets of a city; think crime, inequality,poverty, overcrowding and so on. On the most basic level squalor increases in proportion to your population; if you have a largepopulation then you are more likely to have squalor. Getting slightly more complex, a large population is not just one that is a bignumber. A city can have problems with squalor shortly before it reaches the required population to grow to the next size. A city can alsobegin to have problems with squalor because of the governor’s traits and retinue, but more on that in a bit. But if squalor has to begeneralised I suppose it is fair to say that squalor is more common, and generally more of an issue, in larger cities with big populations.
The government buildings, such as the Governor’s villa, affect squalor and you should always build them the instant they becomeavailable. The government buildings also have the nice benefit of enabling you to access the new level of buildings that arrives with yournew settlement size. You seem to receive a fixed squalor penalty when you do not have the appropriate level of governor’s building in acity. The government family is the only family of buildings which affect squalor. Other families may counteract its penalties, but only thisfamily reduces the penalty itself. Certain character traits and retinue characters will also affect squalor, both positively and negatively. Agovernor with one of the stingy family of traits will increase squalor with his miserly spending, but a governor with a prim and properfamily trait will reduce squalor. There are other traits and trait families which affect squalor but you don’t really need to know what theyare unless one of your governors gets them. Just keep an eye on what traits your governors pick up and send them to high/low squalorcities accordingly. The same applies to retinue members; try to transfer squalor boosting characters to family members in a city wheresqualor is not a problem.
Happiness can act as a counter to squalor, so build temples and entertainment (arena etc) family buildings to help combat the effects ofsqualor. Garrisons help keep a lid on rebellions, so if your city has high squalor you may need to increase the garrison, but rememberthat the garrison effect maxes out at 80%. Health increasing buildings are a bit of a double edged sword; the health bonus increaseshappiness in the city, but it also increases population growth. The happiness will help counter the effects of squalor, but the populationwill grow faster meaning squalor will increase faster too.
Squalor inflicts a population growth penalty. You can counter this directly with farms, and indirectly with buildings that increase publichealth. Remember that squalor grows in proportion to your population, so it may not be a good idea to try and regain positive growth ina city where the population has stabilised or begun to decline.
The best way to handle squalor involves careful management and construction. 8% population growth is a magic number; by the time acity reaches 24,000 people that 8% growth will have been completely countered by the squalor growth penalty, reducing growth to zero.To get this magic 8% you need to take your city’s natural growth rate (i.e. the one it starts with when there are no farms or growthboosting buildings, governor traits and retinue characters in play) and carefully find a combination of buildings which will add to (you canfind the bonuses they give on the in-game tech tree) that base figure to reach 8%. If there are already some farms and growth boostingbuildings present just work from that number instead; so long as the end number reaches 8% it doesn’t really matter how you get there.As your city will stop growing at 24,000 people the assorted happiness boosting buildings, along with a garrison and a decent governorshould be sufficient to keep everyone happy.
Note: It is the clumsily circled figure in this screenshot you want to reach exactly 8%, not the number given on the main city informationscreen, and not the number added up at the end.
24,000 people is an important number because it is the last population level you need for a city to upgrade; basically if the city goesmuch beyond that then you will not be able to get big enough boosts from your temples and other happiness boosting buildings tocounteract the unhappiness caused by squalor. At 24,000 or under you should be able to manage, except in a very few cases.
When squalor gets so far out of hand it becomes uncontrollable (such as if you have planned badly and growth continues after 24,000people) some people like to pull the entire garrison from the city, park an army next door and push the city into rioting with high taxes.Then they simply roll in with the army and recapture the city. The deaths caused by this take the city down to a manageable populationlevel while leaving the buildings intact. In this way you can end up with a highly advanced city with a relatively small population.
As of patch 1.2 squalor is capped at 100% public disorder penalty instead of the previous 125%. This makes life a lot easier whendealing with huge cities. Anything past 30,000 people will no longer inflict an extra penalty so long as the Imperial palace is in place.
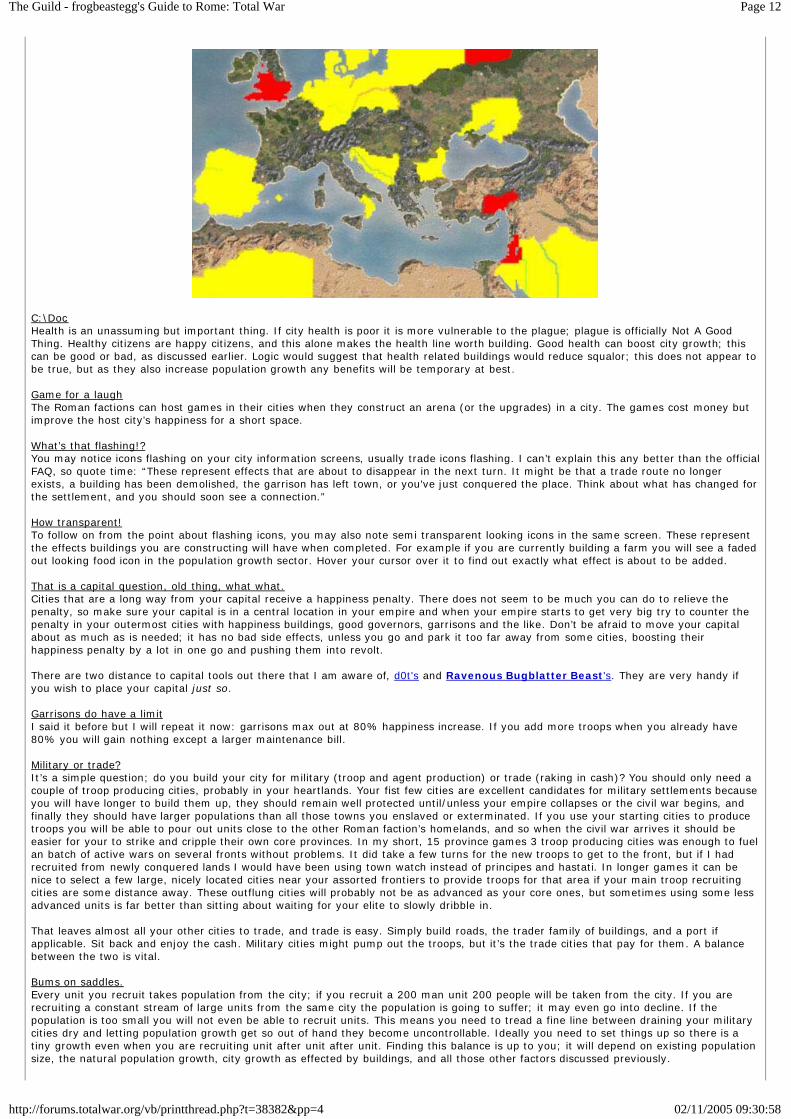
Some people just don’t appreciate how good life is!Some provinces are inherently more rebellious than others. Epistolary Richard has created this map to illustrate the problem provinces:
Page 12The Guild - frogbeastegg's Guide to Rome: Total War
02/11/2005 09:30:58http://forums.totalwar.org/vb/printthread.php?t=38382&pp=4
C:\Doc.Health is an unassuming but important thing. If city health is poor it is more vulnerable to the plague; plague is officially Not A GoodThing. Healthy citizens are happy citizens, and this alone makes the health line worth building. Good health can boost city growth; thiscan be good or bad, as discussed earlier. Logic would suggest that health related buildings would reduce squalor; this does not appear tobe true, but as they also increase population growth any benefits will be temporary at best.
Game for a laughThe Roman factions can host games in their cities when they construct an arena (or the upgrades) in a city. The games cost money butimprove the host city’s happiness for a short space.
What’s that flashing!?You may notice icons flashing on your city information screens, usually trade icons flashing. I can’t explain this any better than the officialFAQ, so quote time: “These represent effects that are about to disappear in the next turn. It might be that a trade route no longerexists, a building has been demolished, the garrison has left town, or you've just conquered the place. Think about what has changed forthe settlement, and you should soon see a connection.”
How transparent!To follow on from the point about flashing icons, you may also note semi transparent looking icons in the same screen. These representthe effects buildings you are constructing will have when completed. For example if you are currently building a farm you will see a fadedout looking food icon in the population growth sector. Hover your cursor over it to find out exactly what effect is about to be added.
That is a capital question, old thing, what what.Cities that are a long way from your capital receive a happiness penalty. There does not seem to be much you can do to relieve thepenalty, so make sure your capital is in a central location in your empire and when your empire starts to get very big try to counter thepenalty in your outermost cities with happiness buildings, good governors, garrisons and the like. Don’t be afraid to move your capitalabout as much as is needed; it has no bad side effects, unless you go and park it too far away from some cities, boosting theirhappiness penalty by a lot in one go and pushing them into revolt.
There are two distance to capital tools out there that I am aware of, d0t's and Ravenous Bugblatter Beast's. They are very handy ifyou wish to place your capital just so.
Garrisons do have a limitI said it before but I will repeat it now: garrisons max out at 80% happiness increase. If you add more troops when you already have80% you will gain nothing except a larger maintenance bill.
Military or trade?It’s a simple question; do you build your city for military (troop and agent production) or trade (raking in cash)? You should only need acouple of troop producing cities, probably in your heartlands. Your fist few cities are excellent candidates for military settlements becauseyou will have longer to build them up, they should remain well protected until/unless your empire collapses or the civil war begins, andfinally they should have larger populations than all those towns you enslaved or exterminated. If you use your starting cities to producetroops you will be able to pour out units close to the other Roman faction’s homelands, and so when the civil war arrives it should beeasier for your to strike and cripple their own core provinces. In my short, 15 province games 3 troop producing cities was enough to fuelan batch of active wars on several fronts without problems. It did take a few turns for the new troops to get to the front, but if I hadrecruited from newly conquered lands I would have been using town watch instead of principes and hastati. In longer games it can benice to select a few large, nicely located cities near your assorted frontiers to provide troops for that area if your main troop recruitingcities are some distance away. These outflung cities will probably not be as advanced as your core ones, but sometimes using some lessadvanced units is far better than sitting about waiting for your elite to slowly dribble in.
That leaves almost all your other cities to trade, and trade is easy. Simply build roads, the trader family of buildings, and a port ifapplicable. Sit back and enjoy the cash. Military cities might pump out the troops, but it’s the trade cities that pay for them. A balancebetween the two is vital.
Bums on saddles.Every unit you recruit takes population from the city; if you recruit a 200 man unit 200 people will be taken from the city. If you arerecruiting a constant stream of large units from the same city the population is going to suffer; it may even go into decline. If thepopulation is too small you will not even be able to recruit units. This means you need to tread a fine line between draining your militarycities dry and letting population growth get so out of hand they become uncontrollable. Ideally you need to set things up so there is atiny growth even when you are recruiting unit after unit after unit. Finding this balance is up to you; it will depend on existing populationsize, the natural population growth, city growth as effected by buildings, and all those other factors discussed previously.
Page 13The Guild - frogbeastegg's Guide to Rome: Total War
02/11/2005 09:30:58http://forums.totalwar.org/vb/printthread.php?t=38382&pp=4
Unit, dis-miss!This is the opposite of the previous point. When you disband a unit the soldiers will head to the nearest city and add themselves to thepopulation. If you disband inside a city then that city is guaranteed to get the people. Sneaky people may be spotting something here;good for them. If you recruit a unit of, oh, let’s say peasants from city A which has a large population and problems with squalor, thensend them on a nice route march to city B which is newly conquered and has a small population, then disband the unit inside the citythen city A has reduced population and city B has gained population. Think about this: a way to reduce overcrowding and build up thosenewly conquered cities that little bit faster. Yes, it does cost some money in recruitment and maintenance costs, and you do have tomicromanage a bit but the benefits far outweigh the negatives.
We don’t need no stinking foreigners!Again, this point builds on the last few. So, your mighty Roman army under the command of general Julius had captured a settlement ofGauls. Gauls are nasty people; they tend to be hairy and they wear trousers. It is clear to any good civilised Roman that these people areundesirable. The fact they have happiness penalties due to cultural differences is merely the final straw – they must go! When generalJulius marches into the Gaulish settlement for the first time you can occupy, enslave or massacre the inhabitants. Occupying the city willleave the population intact, along with all their nasty hair and Roman hating ways. Enslaving will take a proportion of the population anddistribute them to all your other cities which currently have a governor in place. This is good; it boosts your other cities while making thenew one easier to control. Finally you can exterminate the population. This will kill off a significant number of the Gauls and make thecity easier to control. Now, remember those peasant units you were going to send from your core cities to other cities to boost theirpopulations? They are good Roman peasants, and good Roman peasants shave, wear tunics and love being ruled by Roman factions.Send them out to settle in the Gaulish city for a population and happiness boost.
So I conquered this nice little place in Hispania …Any conquered city will be harder to manage if it is not of the same culture as the new owners; this applies to the non-Roman factionsevery bit as much as the Romans. There are several things you can do to reduce the culture shock and make the city easier to hold. Thefirst is discussed above: killing/enslaving part of the native population and replacing them with your own people. A slower, cheaperversion of this is possible if you kill/enslave the population and then let it grow back on its own. The next most important thing is todestroy any existing religious buildings of a different culture to yours. Yes, sometimes those buildings give more useful bonuses than theones you can build, but they increase the culture penalty and make the population more restless. Building your own temples bothremoves this problem and slowly converts people to your way of thinking. It’s not just temples which give that culture penalty. CAdeveloper JeromeGrasdyke gives a nice explanation of the culture issue here: “Culture penalty has a maximum of 50%. As a general ruleof thumb, the amount is determined by the proportion of buildings in the settlement which have been built by factions of your culture -for example, if you're playing the Julii, and you take over a Greek city which is split 50% between buildings built by the Greeks and theBrutii, you should see something like a 25% culture penalty. Then when you replace the buildings built by the Greeks, the culturepenalty disappears. Who last built a building-of-governance has a substantial influence as well.”
So there you go, any buildings not constructed by your culture cause culture problems. The penalty will disappear when you ‘overwrite’the old building with your own culture’s version of the upgrade, for example replacing the palisade walls with your own wooden walls.Temples cannot be upgraded in this manner unless the city already had temples belonging to your faction’s group; this is why they needrazing to the ground.
Here’s a neat list of what culture group each faction belongs to, provided by Maltz.Group I: Romans. SQPR, Julii, Brutii & Scpii.Group II: Greeks. Greek cities, Macedon, Thrace, the Selucid empire.Group III: Barbarians: Gauls, Germania, Britania, Dacia, Spain, ScythiaGroup IV: Africans: Carthage, Numidia,Group V: Easterns: Parthia, Armania, PontusGroup VI: EgyptA faction can control a city of another faction’s culture without a culture penalty if it belongs in the same group. For example the Gaulscan capture a British city and control it without cultural issues but if they take a Roman city they will have a culture penalty.
Damaged buildings.Buildings damaged in a siege or by an assassin do not function until repaired, no matter how slight the damage might be. Repairbuildings as a priority. Note that you can repair multiple buildings in the same turn, as well as begin construction on a new building.
Bribing cities.If you bribe a city, and this is far harder to do then bribing an army especially if there are enemy spies or family members in the city,you have precisely one turn, the turn you bribed them in, to get a large enough army to quash the resulting unrest in. If you do not getthat army in, or if the army is too small, then the city will revolt back to its former owners or to the rebels.
The plague.I don’t really know much about the plague. All I can say is keep city health high and hope you never catch it. Do keep family members,agents, navies and armies away from cities with the plague or they will catch it themselves. If you have a family member, agent or armyin a plague ridden city leave them there; moving them about will only spread the plague. Yes, this does mean you can deliberately infecta spy or assassin with the plague and then send them to infiltrate an enemy settlement, potentially spreading the plague there too. Youevil person you. The plague reportedly burns itself out after around 6 turns as long as no new infection source is added, and units take15 turns to be free of the infection, so quarantine, quarantine, quarantine!
The original capital of Macedon will always be hit by the plague sometime around 255BC.
Those of a … crueller persuasion may like to note that deliberately infecting an overcrowded city is a good way to reduce the population alittle. You will lose a few people from your garrison too, but they can be retrained.
It’s like talking to a stone wall!Walls are vital if you want your city to withstand an assault. Wooden palisades are flimsy and will be battered down in seconds, but epicstone walls will require dedicated siege equipment and time to break through. All three varieties of stone wall allow you to place troopsup on the walls. Missile units gain more range because of the extra height and melee troops will be able to push off ladders and fightattackers as they pour out of siege towers. Note that any unit which requires space and/or good, disciplined formations to fighteffectively will not work too well on a wall. Keep those phalanxes on the ground. Also any lazy unit which uses some poor animal to getaround instead of walking on their own two feet will not be able to climb onto a wall. Walls also add to the number of turns a city canwithstand being besieged. If you think a city is likely to be attacked, or if you want to secure a key city, then build walls. I try to get atleast wooden walls in all my cities; I build the walls when I have run out of other options, unless the city is likely to need them sooner.
Page 14The Guild - frogbeastegg's Guide to Rome: Total War
02/11/2005 09:30:58http://forums.totalwar.org/vb/printthread.php?t=38382&pp=4
My city is making –256 denarii!! Help!Actually, no it isn’t. Yes, I’m going to cop out and quote the official FAQ again: “They aren't 'earning' negative amounts of money. Whena settlement is shown with a negative cashflow it's a sign that it is not 'pulling its weight' in your economy. If possible improve its tradeincome (improve the markets and ports), look at the governor's vices very carefully, or reduce the size of your military forces. Militaryupkeep is divided between your cities according to their population, so just reducing the settlement garrison won't have a direct impact.”
froggy’s rough build order for low tech cities.1.Roads. Regardless of what and where this city is roads are number 1 if they are not already there. Roads allow your units to movequickly, bring in basic trade income, and best of all they are cheap. Plain roads only take a single turn to complete.
2.If the settlement has been recently captured or already has problems with unrest a shrine is a must because of the happiness bonus. Ifyou conquered the settlement make sure any existing shrines are razed to the ground (right click on them in the city information screen,then click the hammer icon in the bottom left corner to destroy them) and replace them with your own. This reduces the culture penalty.If a shrine is not needed at this point I build a basic farm (land clearance) to get my population growing sooner.
3.Mines, if they are available. Money is nice. Reliable income at a preset level is nice. Mines are nice. Build mines wherever you can.
4.Trader or barracks, depending on what function the city is going to have. If I build a barracks I build the trader next.
5.I build whatever I have not constructed out of the items I have just listed. Walls are the final item. Now I wait for the city to grow.
6.When the city grows to the next phase I immediately built the new government building; this combats squalor neatly. From there thecycle repeats; upgrade roads then build trade or military depending on the city. I never build any more farms, so the level 2 farms areleft off the list.
7.Repeat until you run out of stuff to build and need to wait for the city to grow, then repeat step 6 with the new building selection. Keepdoing that until the city is maxed out.
The build order is quite flexible, for example if I am in a heavy attrition war and I need more troops than my military cities can supply Iwill build barracks in my trade cities instead of trade buildings. I also tend to add the occasional military building to trade cities anyway,just in case. I always build the trade buildings in military cities; you can never have too much money.
Hit the road! (what did the poor road do to you anyway?)Roads deserve a bit more in-depth coverage. There are four levels of roads: none, dirt, paved and highways. Only Romans can buildhighways. Barbarian factions can only build dirt roads. Civilised non-Roman factions can build paved roads as well as dirt ones. Theeffects of roads are best split in two:
On trade: dirt roads add nothing to trade. Paved roads give a 100% trade income bonus to all land routes. Highways give a 50% incomebonus to all land routes.
On movement: This does not fit into neat, precise increases because there are some extra variables at work the research team workingon this topic haven’t been able to isolate yet. Also different types of units (infantry, cavalry, artillery, agents) all have different movementrates, and so roads give slightly different bonuses to each type. The movement bonuses apply to all units using roads, friendly andenemy. To try and sum up concisely I shall borrow the results tables created by therother:
% Increase from dirt[table 3 3 3]=Dirt|=Roads|=Paved|=Highways-|44.4%|88.9%|122.2%-|42.9%|71.4%|114.3%-|20.0%|60.0%|100.0%-|50.0%|83.3%|116.7%[/table]
Progressive increase[table 3 3 3]=Dirt|=Roads|=Paved|=Highways-|44.4%|30.8%|17.6%-|42.9%|20.0%|25.0%-|20.0%|33.3%|25.0%-|50.0%|22.2%|18.2%[/table]
So, to tackle the conclusion in a slightly more advanced way: dirt roads are high priority items; they are cheap, beneficial and very quickto build. Construct them ASAP everywhere. Paved roads are also very high priority items as they give a big trade boost, a big movementboost, are still quite cheap and fast to construct. Highways are less important, more a midlevel priority. They are very expensive andtake a long time to build, and their bonuses are smaller, making all this fuss too much for them to be honestly worth it the instant theyare available.
Automanage.Be careful in the priorities you set if you let the AI manage a city; you can end up with it pumping out loads of crap units and wastingyour money. I have no experience with automanage, and I would not recommend using it.
A bit about the mapNice title, no? Since I have already covered aspects of the map like trade goods and roads in this section I may as well finish it off andbung the last few details here too.
Watchtowers.
Page 15The Guild - frogbeastegg's Guide to Rome: Total War
02/11/2005 09:30:58http://forums.totalwar.org/vb/printthread.php?t=38382&pp=4
Watchtowers cost 200 denarii and are permanent; there is no known way to destroy them. They appear instantly; there is no build time.Watchtowers can only be built by generals. They act like upkeep free, stationary spies, revealing a portion of the map around them. Ifthey are placed on hills or in clear areas they can see further than if they are plonked down in an area surrounded by tree andmountains. Use logic in placing them; if something would block your view in reality then it will do so in the game.
Forts.Forts can only be built by generals and they cost 400 denarii. They also appear instantly, but they will disappear if they are leftunoccupied by any unit of any faction for one turn. I have seen people saying that forts are bugged because the AI will never attackthem. I can attest to my cost that this is wrong; I had an army of 500 wiped out by a massive marauding force of Gauls. I have alsoseen it said that the AI might attack some forts but never one in the Alps; well I can prove that wrong again. Guess where my army waslocated …
The idea behind forts is to give your army some extra protection in the case of attack; I find them to be death traps. Sallying out of afort is extremely hard, the walls are very flimsy and the towers don’t put out nearly enough arrows to be of real aid. If you decide to bebrave and wait for the enemy to come through your walls then you might die of old age first; if the AI had no units capable of knockingthe walls down then they will stand outside and do nothing. Now I can confirm that the AI really does not seem to think of bringing somekind of siege equipment with it when attacking forts, and unlike cities there is no option for them to build machinery outside the walls.Remember how back at the beginning I told you about that option to remove the time limit? Well here is the one kind of battle where thetime limit is handy. If I hadn’t disabled the timer I could have sat in my fort, listening to the shrieks of the Gauls picked off by my towersuntil the time expired and I won. Well darn; instead I had to try and sally forth, and that got incredibly messy. But anyway who wants a25 minute battle involving sitting around doing nothing at all? Even at full speed that is tedious.
Famous battles.Sometimes when you win a battle you will find a little crossed sword marker on the map. It appears being outnumbered makes it morelikely that you will get a marker, and I personally have found I tend to get them when my battle is labelled ‘a heroic victory’, but theexact details of how the markers are assigned are still mysterious. If you hover your cursor over it then you will find a few details aboutthe battle which took place there. It’s a neat little feature but nothing important; you gain nothing from it except a warm, fuzzy feelingevery time you scroll past the marker on the map.
Gold, beautiful gold! Running your economy.
Money, without it your empire is doomed. Making money seems to be one of the biggest stumbling blocks new players encounter. Itreally is quite easy when you know how.
Money is spent on many things; the only on-going expenses each turn are wages for your armies, family, and agents. You will probablylose a bit of money to corruption as your underlings decide to give themselves a well deserved bonus without bothering to ask you; wellyou are busy conquering the world so it’s quite thoughtful of them, really … kind of. Money is forked out as a one off sum each time youorder a building or unit to be constructed. Note that queuing up items takes the money from your treasury now, even if the item will notbe built for another 20 turns. Retraining or repairing a building costs money; the amount is proportional to the work needed. Retraining aunit from 1 man back up to 160 and equipping them with better weapons and armour costs much more than just re-equipping a 160man unit in need of no new men.
The Big 50kAs your treasury hits a certain preset limit you will find your family members becoming more corrupt. That limit is 50, 000 denarii. It’s agood idea to try and keep below this figure to limit the vices, unless you have a real passion for seeing your might empire run by afamily of gambling addicts, embezzlers, collectors of expensive vases, and dirty old men who spend entire fortunes on dancing girls.Every night. For the rest of their lives.
Farming.Farming provides a small part of your income, but you don’t have to do anything to start tapping into it. Your cities will farmautomatically, although you can upgrade the farms yourself to bring in more cash and boost your population growth. As we discussedearlier this is seldom a good idea. Farm income depends on the quality of the farm land; provinces like the Nile delta have greatfarmlands and naturally make more money than the Sahara. It is important to know that farm income is not stable; a bad harvest willreduce your profits and a good one will boost them. You will not be notified of the harvests your cities are getting; you can find out bycalling up the city’s trade information screen. As with so many things to do with farming you cannot influence the kind of harvests youget.
Basically farming is a nice, steady earner with no input or expenditure required. Just sit back and let the cash trickle in. You will not beable to rely on farming income alone; you must supplement it with other forms.
Taxes.Taxes can be summed up essentially as more people=more taxes. Breaking it down further than that requires some rather unpleasantlooking maths and it’s really not important for anyone but the numerically minded stat loving player. If you really want to know morecheck this thread. Increasing your tax rate gets you more money, decreasing it gets you less. How shocking. Your difficulty level alsoappears to affect tax income; harder difficulties get slightly less then the base rate (normal) and easy gives slightly more.
Taxes are a steady flow of cash; you probably won’t pay much attention to them as they hum along in the background nicely.
Mining.Mining is simple; if a province has mining resources then you can build mines to exploit them, if there are no resources there can be nomines. Mining resources can be spotted on the map; they look like little nuggets of metal. There are two different kinds of miningresources: gold and silver. I think that they bring in the same amount when mined, although in previous Total War games the amount

Page 16The Guild - frogbeastegg's Guide to Rome: Total War
02/11/2005 09:30:58http://forums.totalwar.org/vb/printthread.php?t=38382&pp=4
was dependant on the resource type. There are two levels of mines; mines and mines +1. Mines +1 will bring you more money thansimple mines but you have to build the plain mines first and the city the province belongs to must be at size 2 or more. You outlay moreand bring more back, trading cash in hand now for extra cash at the start of each subsequent turn. I find that to be a fair exchange.
Mine income is stable, unlike the other forms of income. Mines never have bad harvests, they do not get blockaded and war does not putan end to the income. If a mine says it will generate 200 denarii per turn it will do so until it is destroyed or upgraded. Small but steadyare the key words when talking about mining income. I always build mines when I have the opportunity, usually as a matter of somepriority just behind roads, basic ports and any buildings I need to get the city happy.
Trade.Ah, now we are talking about real money. Trade is more expensive to set up and gets more expensive as you try to make it moreefficient. It is unreliable; roads and ports can be blocked by enemy or rebel armies and this will hurt your income. You cannot trade withpeople you are at war with so it is easy to trash your economy with a badly timed war. Trade really requires you to send diplomats topester people for trade agreements. Those are the downsides, now the upside: huge quantities of cash.
Salivating yet? Probably, the prospect of huge piles of cash to spend on cities and armies can have that effect. I would ask that you try todribble into a bucket or something instead of making a mess on the floor; I only just had the slaves polish the mosaics.
Roads and land trade.Roads carry out land trade. Land trade is represented by little caravans rolling along the roads on the campaign map. More caravans =more trade = more money. The better road types can take more caravans; therefore it is a great idea to always upgrade your roads. Thisalso boosts your army and agents move speeds inside your empire, so that’s a win-win situation. Froggy loves roads; you should lovethem too. Um, ok if froggy is honest roads do have a single downside: they speed enemy movement too, so if someone invades you willhave less time to react. However I do find this to be a tiny fly in a very big, pleasant smelling tub of ointment. Any enemy or rebel armyparked on a road will halt the flow of caravans, cutting off part of your trade. Smack the army with extreme prejudice to restore the cashflow.
Land trade appears to take place between all of your cities automatically, as long as they are linked by a road. This nets you a smallincome which appears to grow depending on how good the roads are between the two places. It also seems that land trade will takeplace with neutral or allied factions if you have a road connection even if you do not have a trade agreement. It is suspected that youhave to know about a city (as in you can see it on the campaign map, even if it is currently under the fog of war) before you can tradewith it. Problematically you will not trade with all the cities you know about. Trading partners are selected automatically each turn byyour merchants; they will select the partner who will bring in the most profit.
Ports and sea trade.Each level of port can sustain one trade route up to a maximum of three when a dockyard is built. You will see a blue dashed line withtiny ships sailing along it flowing between your port and the trade partner. Trade partners are chosen each turn according to how muchprofit they will bring you; your merchants automatically select the best partner. You do not need to build any ships to trade. You mayfind the AI blockades your trade ports when you are at war; you will need warships to lift the blockade and restore your sea trade incometo the targeted province. Shorter sea trade routes will make more money than longer ones. If an importing city is too far away no tradewill take place, i.e. Londinium is not keen on selling to Alexandria because it’s a slightly long trip, especially when there is that nice Taraplace right nearby. This does mean that cities tend to trade with the same partners, game after game.
Trade agreements.A thorny subject and the main source of mystery. According to the manual a trade agreement boosts the amount made from tradebetween the two partners. Trade agreements increase the number of markets you can sell to, according to CA’s FAQ. I suspect thismeans potential markets you can sell to, as opposed to letting you trade with more people at once. Since your merchants willautomatically trade with the most profitable market each turn having more to chose from is a good thing. Collecting trade agreements isgenerally easy and acts as good training for your diplomats.
Trade buildings.The trade family of buildings (trader, market, forum etc) increases trade income in their home province. Thanks to the researchers overin the Ludus Magna we now know that the first trader building adds 10% to the trade income from land trade (the local settlement only),and 10% to all exporting routes. A further 10% is added for each increased level. So build trade buildings as and when you can, andrejoice in the extra benefits they bring, such as trainable agents like spies. Do note that these buildings increase population growth veryslightly. The distance between land trading partners has no affect on how much the routes make, unlike sea trade.
So, to sum up trade: build roads and ports everywhere as quickly as possible. Upgrade them whenever possible. Get trade agreements,and try to remain at least neutral with most factions as war prevents trade. Build the trade family of buildings to boost profits. Keep yourroads clear and an eye on your ports to spot those rare blockades. Combined with your farms and mines this should make you plenty ofmoney, even if it is a bit vague and arcane.
frogbeastegg 19/10/04 22:02
Re: A Beginner's Guide to Rome: Total War
Meet the family (but watch out for Lupus, he’s a little strange)
Your family, a bunch of wastrels, drunkards, fornicators, perverts, and a general drain on your economy. I’m sorry, but if your family hasended up like that then it is your own fault for the most part. Discipline! Iron discipline! You are the head of the family, you are, inessence, the paterfamilias and you should damned well get off your backside and get on with paterfamiliasing!
In Rome: Total War your family collect vices and virtues to represent their personality, deeds and abilities. They are collected in a logicalmanner; if your general fights in each and every battle personally (he doesn’t have to lead the charge, just make sure he kills someoneat some point, even a fleeing peasant is better than nothing) he will develop a reputation for being a hero. The more people he kills at
Page 17The Guild - frogbeastegg's Guide to Rome: Total War
02/11/2005 09:30:58http://forums.totalwar.org/vb/printthread.php?t=38382&pp=4
once the more likely he is to be seen as a hero. If he keeps on behaving like a hero in battle after battle he will grow in stature,becoming a more famous hero. Conversely if you leave the same man to rot in a no hope frontier town with just a temple of Bacchus andthe locals for company don’t be surprised if he takes to drinking, orgies and other less than desirable pastimes.
The best way to forge your family into a beacon of Roman virtues is to use your logic and make them do things likely to result in goodtraits, while steering them away from anything likely to give them bad ones. All your menfolk should get military experience from timeto time, even your governors. You don’t have to send them into pitched battle against 10,000 screaming Germans with just a small knifeand no army. No, a simple battle against 200 rebel slaves backed by an army of 500 veteran soldiers will more than suffice. You don’tneed your governors in the field constantly, just the odd battle every now and then to stretch their legs and let them prove their Romanmilitary prowess and general manliness. Make sure they kill a few people personally; you wouldn’t want them accused of cowardice,would you? Swap out governors of your frontier backwaters occasionally, spread the boredom and lack of decent toilet facilities fairly andyou are less likely to end up with a handful of hate filled individuals and a bunch of soft plushies with a thing for over-eating. Make sureyour generals kill someone in every battle they fight; this cannot be repeated enough times. Cowardly generals really hurt your army’smorale, and the traits fighting generals pick up are often very good.
One interesting fact is that many traits are not gained by a family member if he has moved in that turn, so if your governor pops out ofthe city and immediately returns he will not gain certain traits at all, good or bad. You don’t need to move much, just enough to depletethe movement points by a little. This does not affect those traits gained in battle; if your general fights well, or ‘fights’ like a coward, hewill potentially gain a new trait even if he had exhausted his movement limit. Some traits do require your character to have moved in histurn, such as the harsh lifestyle family of traits. The traits which are blocked by moving seem to mostly be those exacerbated bybuildings, such as the drinker line, and those to do with government, such as the farmer line. This is quite logical when you think aboutit; a chap sat around dealing with tax collectors for a full turn is more likely to gain some new skill, or lack thereof, in dealing with themthan a chap who has been travelling for part of the turn, and has therefore spend much less time with his tax collectors. On thebattlefield you are more likely to gain command stars and good traits if the numbers are even or against you. Vastly outnumbering theenemy hampers your general’s growth. Of course this does not take quality into account, so if you have 200 well equipped veteransagainst 500 peasants fresh form the fields …
If you have 50,000 denarii or more in your treasury your governors are more likely to pick up bad financial traits. This is officially a pain.It can be a good idea to give huge piles of cash to other factions when your treasury gets near 50,000 just to avoid the bad traits.
Every good Roman needs a family, as in wife and children, not as in pesky brothers to come over at 2AM and ask if they can borrow yourchariot, only they’ve met this nice girl … Your male characters will marry on their own; you cannot control this. When they finally decideto take on that good Roman responsibility you will receive a special announcement at the beginning of the turn telling you. Typically theyonly tell you after the wedding, so you don’t get to go along and eat all the cake. Bah!
I have seen many people asking how you get children. :sighs: Well you see when there’s a mummy and a daddy and they love eachother very much …oh, go ask your own parents! Yes, it works like that in the game too, but without the love. These are politicalmarriages and love is an added bonus, not a prerequisite. Both your characters know what is expected, so just leave them to it. No,posting viagra pills into your PC via the CD ROM drive will not help matters, nor can you consult a wise woman, give them aneducational puppet show, or anything else like that. There are some things your characters have to do themselves; and this is one ofthem. Note that, as in real life (what?! You mean the game isn’t real life?!), characters can be barren or have a hard time conceiving. Italso takes time; generally your characters are not prolific bunny rabbit types popping out a child every turn. Look, it takes 9 months andeach turn is only 6 months, so do the maths. What I am trying to say in a funny way is, don’t expect hordes of children and don’t panic ifit takes time, even a long time. I had to wait 20 years for one couple to finally do something other than stare resentfully at each other atbreakfast each morning. Hehe, whatever they had been arguing about for those 20 years must have been a real doozy; after the firstchild they had two more almost immediately.
Let me repeat once again for emphasis that breeding is slow, you will probably only get a couple of children from each couple, if that,and it will probably take them years to get that far. Don’t get impatient or worried if there are no children within ten years of themarriage. You know it’s all a bit perverse; in RTW older women seem more likely to have children when in real life it is the other wayaround. Confusing, no?
Now I lied when I said there was nothing you could do to help, well only slightly so put that axe down and stop menacing the frog! If youkeep your general out in the field fighting away it seems less likely he will marry or have children. Well, you can hardly expect a good,respectable Roman matron to tag along into the middle of a muddy battlefield, can you? It quite simply is not proper. Family members incities tend to have more children; this is quite logical. Actually, there is something else you should know about those prolongedcampaigns. Well, you remember how I said this was not a love match? Well, just think of poor wifey at home, alone and married to someberk she might not even like. Now that berk is not in Rome, he is in Libya and doesn’t that present a marvellous opportunity to get a weebit closer to that gorgeous Marcus who gave you a lift home in his chariot last week? Yes, it does. No, this is not the fevered imaginationof a frog at work; it does actually appear characters are more likely to get the unfaithful wife series of traits if they are away from home,day after day, year after year, decade after decade. Actually I guess those who get the traits are only the ones who are unfortunateenough for their wife to be indiscrete in her indiscretions. Not all characters who are away from home get this trait, and not allcharacters who stay at home are immune. This one does actually swing both ways, and male characters who are away from home seenslightly more likely to pick up vices about their best friend’s wives, female slaves, and so on. Well, you know what they say about theRomans … Ahem, let your generals visit a city occasionally, even if it is one they are occupying; this does seem to reduce the likelihoodof these kind of reputation destroying discoveries. Let me stress that the at home/out all day thing is not huge, it does not guaranteethat your field generals will never have children or will end up with a bunch of bad family vices; it only makes it very slightly more likelyin my own experience and letting them sit in a town once in a while did seem to help.
Certain traits and retinue members increase fertility. The retinue members can often be found by staying in a city with one of thepopulation growth boosting temples.
The number of family members is possibly tied to the number of cities you control and the number of family members you already have.This is why sometimes you experience a massive baby boom shortly after taking a load of new cities or after a lot of deaths. The gameseems to like you having enough people to play with, not too few or too many.
Children often either take after their parents or rebel and turn out their polar opposites. Picture young Gaius, “Gosh, Pater! They way youdrank the whole wine cellar dry in one go was so impressive! Can I have a go?” or “Pater, you are a disgusting drunken lout and I hateyou!” One version of Gaius will turn out to be a drunk; the other will have no drinking traits or will have sober traits. That’s not a cast
Page 18The Guild - frogbeastegg's Guide to Rome: Total War
02/11/2005 09:30:58http://forums.totalwar.org/vb/printthread.php?t=38382&pp=4
iron guarantee though; sometimes young Gaius will say, “Oh Pater, I am afraid your drinking makes no impression on me at all; I justcan’t be bothered to care.” and then not get any drink related traits. It does seem more common for children to react to their parentsthen blandly ignore their existence full stop. I wish the same applied to those noisy brats in my local shopping centre …
Daughters: these strangely dangerous creatures deserve special mention. They have no traits; you can never do anything much withthem, er actually like all female characters they are almost non-entities. The one time you do actually get to do something with them iswhen they approach you about a husband. Usually they chose the first scumbag they meet … actually I think someone must choose forthem - what sane 12 year old girl picks a 72 year old man with a bunch of pervert vices and no talent in anything? Now, you can turndown their choice or accept it. If you accept you basically never see your daughter again, outside of the occasional birth/deathannouncement. If you refuse the hunt goes on, and next time she might bring home someone a little better. Only let your daughtersmarry nice men, ones with some talent and good character. Their husbands will become part of your family; they will become yourgovernors and generals, and fathers to your next generation.
And yes, I am serious about the 12 year old girl getting married; this is historical, if not entirely palatable to a modern audience. If youdon’t like it keep refusing permission until she’s older.
Widows will never remarry, so if your darling girl marries someone at the tender age of 12 and he dies the next turn that’s it, she’scondemned to a singleton’s life. Don’t worry; I’m sure she’ll find something to do to pass the time and someone to keep her from gettingtoo lonesome, but you won’t benefit at all from it.
Rebel without a clueAfter 1.2 the rebels now appear to get many more family members, newly generated ones instead of just sad remainders of destroyedfactions. In addition to these rather random chaps it also appears that if you turn down a suitor requesting your daughter’s hand inmarriage he has a small chance of taking the refusal a bit hard and running away to join the rebels. Quite what he hopes to achieve bythis I don’t know; perhaps the pain of rejection is so great he wishes to die, perhaps he hopes to impress you, perhaps he just can’tstand the humiliation. Whatever, he’s never going to be able to marry the girl, so it’s probably kindest to just kill him and crush his littlearmy. Alternatively you could bribe in into your family and make him live the rest of his miserable life next to the woman he loves,watching her marry and live with someone else. Oooh, that is evil.
Retinues
Your characters will pick up retinues as they travel about the empire doing whatever it is they do. Generally those followers will beuseful, and relevant to the character’s work. Generals tend to pick up drillmasters and other soldier types, governors pick up cooks andother peaceful types. Each character can have up to 8 retinue members at any one time, and the retinue members vanish without tracewhen their character dies. This means it is actually a good, but not nice, idea to strip elderly characters of all their close friends and leavethem to die alone. You can swap retinue members between characters if they are in the same location, i.e. when it looks like they are inthe same army. Simply open the character information screen for the character who has the retinue member you want to move, thendrag and drop that member onto his new master’s portrait at the bottom of the screen.
Try to keep retinue members where they will do the most good; for example give those who gift a reduction in troop costs to thegovernor s of your military cities.
Academies and other education buildings have an effect on retinues, as described by CA developer JeromeGrasdyke: “The Academygenerates ancillaries for characters which are inside a settlement which contains an Academy. If you examine export_descr_ancillaries.txtyou will be able to spot them, together with a lot of other ancillaries which are linked to the presence of buildings.”
To find a complete list of retinue characters and their effects as taken directly from the game files check appendix B. The list wascompiled by Ebannon.
Adoption
You can adopt characters into your family in two ways:1.Bribe an army lead by a family member, either from another faction or rebel. You will only get the troops if you can train that kind ofunit yourself, but you will definitely get the family member and his personal guard.
2. Let an army lead by a captain win a few battles so the captain gains some rank stars, When he reaches around two stars you will beoffered the chance to adopt him into your family. I keep encountering conflicting reports on what happens when you adopt a captain; I’venever been offered the chance myself. Some say that the captain appears in your capital, leaving his army behind. Others say that heremains with his army and becomes a general without any travelling.
I have also hear mention of a third way, random adoptions, which I have not yet encountered. Reportedly a character just appears inyour capital.
Adopted characters will be added to your family tree under a sponsor form your own family, as if they were that character’s child. I haveseen people claiming that adopting someone will break your game and make it impossible for your characters to have children. This isFALSE; in all my games I have adopted people and had children born afterwards. Actually, in one (brief, for testing purposes and soonabandoned) game I had no children until after I had adopted someone.
A handy dandy guide to agents of all varieties.
The diplomat.This section, dealing with the diplomat, is written by Tamur and taken with his kind permission from his diplomacy guide.
Page 19The Guild - frogbeastegg's Guide to Rome: Total War
02/11/2005 09:30:58http://forums.totalwar.org/vb/printthread.php?t=38382&pp=4
The Birth of a Diplomat
Diplomats are trained from cities that have a Governor's Villa, and take one six-month turn to train. They become available to you withonly their name, possibly some traits, and a rating called "Influence" (which we'll discuss in great detail later). To see these details abouta diplomat, simply find a diplomat on the campaign map, and right-click on the diplomat's unit card in the unit card section of the screen.
When a diplomat is trained, he does not immediately appear on the map. He appears in the special "Agents" tab when you have a cityselected.
You can also gain diplomats by bribing cities in which there are diplomats, or if you assault and take a town that has a diplomat inside it.The enemy's diplomats (as well as spies and assassins) become yours to do with as you wish.
The Cost of a Diplomat
Diplomats aren't expensive, but they do cost denarii both to train and to keep working for you. A diplomat costs 100 denarii to train, andcosts 50 denarii per turn thereafter (presumably to pay for expensive nights out while schmoozing).
The Life of a Diplomat
For a diplomat, influence is everything. At the start of the game, your diplomats will be starting from nothing – he will come out oftraining with no Influence beyond what he might have from an inborn trait.
The way for a diplomat to gain influence is for him to find a faction to negotiate with and stick with the negotiation. Diplomats gain inInfluence more quickly by plying their craft successfully. They can gain influence in unsuccessful negotiations, but it takes considerablylonger.
Diplomats can have retinues, just as family members can. A retinue member adds to the diplomat's abilities in very specific ways. Forexample, a diplomat who has a Translator as part of his entourage can negotiate with greater fluency, giving him a bonus (+2) to hisInfluence rating.
When a diplomat has been around for a while and participated in many successful negotiations, he may become renowned throughoutthe world. This is the sort of diplomat who can bribe powerful armies into non-existence, force tribute payments from otherwiserecalcitrant factions, and generally rule the game for your faction.
However, such a man will become a target. Diplomats can and do die at the hands of assassins. Although there is no way to completelystop this from happening, you can protect your diplomat by (1) getting him to be as skilled as possible (Influence helps avoidassassination), and (2) having him travel along with a spy, whose sharp eyes can keep a watch out for enemies. To have a spy and adiplomat travel together, simply click on a spy, and then right-click on the diplomat. If needed, you can use the Agents tab to separatethem after clicking on the diplomat.
Retinues
As with other named agents, diplomats can pick up retinues as they live their lives. One very important point to bring attention to:retinue members can be swapped between diplomats until a diplomat is dead. If a diplomat dies, any retinue members he had are gone.Following are the known possible retinue members for a diplomat, with their bonuses.
TranslatorThe ability to speak to foreigners in their own tongue is very useful to a diplomat. +2 to Influence. (note: cannot have a Translator and aLinguist both as retinue members of the same diplomat)
RhetoricianA man who speaks with honeyed words is likely to teach his master some helpful techniques. +2 to Influence.
Linguist+2 to Influence. (note: cannot have a Translator and a Linguist both as retinue members of the same diplomat)
Foreign Hostage+1 to Influence. (note: cannot have both a Foreign Hostage and Foreign Diplomat as retinue members with the same diplomat)
Foreign DignitaryForeigners can be trusted, mostly, to do the right thing – for their own people. They do understand funny foreign ways, though. +1 toInfluence. [i/](note: cannot have both a Foreign Hostage and Foreign Diplomat as retinue members with the same diplomat)[/i]
Retinue Management
therother has written up an excellent summary of techniques for managing the retinues of your diplomats, quoted below:
Having ancillary characters spread across a number of diplomats is generally not such a good idea. It is better to concentrate them. Forinstance, combining a Rhetorician (+2), a foreign dignitary/hostage (+1), and a linguist/translator (+2), can turn even the most ordinarydiplomat in one whose "counsel is listened to with respect." And if you have diplomat who was born with the Diplomatic Genius trait, hespeaks with the "force of law for many people". And this is before he get any merited traits!
The better you can make the new diplomat, the greater the chance he has of developing to Expert Diplomat (+5) and even the doubleedged Foreign Tastes line.
It also makes sense to transfer ancillary characters from aged diplomats who are about to die to younger diplomats. This should giveyou an elite cadre of highly skilled, forceful, virtually impossible to assassinate, diplomats who can negotiate just about anything fromyour allies and enemies alike!
Traits
Page 20The Guild - frogbeastegg's Guide to Rome: Total War
02/11/2005 09:30:58http://forums.totalwar.org/vb/printthread.php?t=38382&pp=4
Following is a list of all known traits that help a diplomat with his profession. They fall into five categories (the last of which, ForeignTastes, affects only Romans).
Many thanks to therother from the Org, who provided almost the entirety of this section. A thousand blessings on his wife, his cattle,and his citadel walls!
Natural Abilities
Diplomatic Talent+1 to Influence
Natural Born Diplomat+2 to Influence
Diplomatic GeniusThis man is simply filled with the powers of wit, reserve, and strength of mind needed to coolly focus on achieving in difficult situations.+3 to Influence.
Good Diplomat Traits
TactfulDiplomacy is a strength of this man's character. +1 to Influence.
CourteousThis man is the essence of manners. +2 to Influence.
DiplomaticThere are few diplomatic niceties that elude this man. +3 to Influence.
Polished DiplomatThis man has the makings of a figure for generations to remember. +4 to Influence.
Expert DiplomatThis man's words hold the wisdom of the Gods. +5 to Influence.
Bad Diplomat Traits
Tactless-1 to Influence.
Discourteous-2 to Influence.
Undiplomatic-3 to Influence.
Foreign Tastes
Foreign Interests+1 to Negotiation, -5 to Popular Standing.
Dresses Like A Foreigner+2 to Negotiation, -10 to Popular Standing.
Vulgar Foreign Tastes+3 to Negotiation, -15 to Popular Standing.
Awful Foreign Affectation+4 to Negotiation, -20 to Popular Standing.
The Death of a Diplomat
As with all named agents in RTW, diplomats can die of old age or, as just mentioned, by an assassin's blade. Replacing an eight-Influence diplomat is a painful thing. A key part of using diplomats is to have more of them coming up through the ranks at all times.They require low-level management to become successful, but are very much worth the time.
And that ends Tamur’s section on diplomats. To keep the guide nice and homogenous I shall nick his format for the other two agents.
The Spy.The Birth of a SpyThe spy is trained in the level 2 trade building; for the Roman factions this is the market. Spies are rated in sneakiness, represented by alittle eye icon. Brand new spies will probably have somewhere between one and three icons depending on their natural ability.
The Cost of a SpySpies cost 150 denarii to train and 100 denarii in upkeep each turn.
The Life of a SpySpies fresh out of training will not be very sneaky. The best way to improve their sneakiness is work experience. Send them to infiltrateenemy cities, preferably low level ones without enemy spies in them. If your spy dies while trying to infiltrate a city avoid sending anymore novice spies to that city as it is probably guarded by an enemy agent and you will be wasting your agents trying to infiltrate it; at

Page 21The Guild - frogbeastegg's Guide to Rome: Total War
02/11/2005 09:30:58http://forums.totalwar.org/vb/printthread.php?t=38382&pp=4
the same time you will also be boosting the enemy spy’s experience and making him more dangerous. You can also spy on enemyarmies for a boost; armies led by general’s will probably have better security than those lead by simple captains. The more important thegeneral the harder it is to spy successfully. Each level of the talent trait gives a bonus to sneakiness and line of sight; expert spies makebetter scouts than novice ones. It does take longer to get the higher level traits, so keep on spying.
Spies have several main uses:Scouting. Spies have the largest line of sight in the game and can spot other sneaky agents, like assassins and enemy spies. You shouldalways scout ahead of your armies with at least one spy; you will avoid ambushes and have a better tactical picture of the situation thisway. It is best to use several spies to scout for each army, especially when you are working in an area paved with decent roads. Believeme it is highly embarrassing, and costly, when two massive enemy armies appear from ‘nowhere’ right on top of your invading army andannihilate it because you didn’t scout far enough ahead.
Counter spying. Put one spy in each of your cities to make the infiltration of enemy agents much harder. Attach one spy to each andevery army, especially those lead by a family member, to make bribing that army harder. This also makes it harder for the enemy toassassinate the army’s leader.
Active spying. This involves infiltrating enemy cities and finding out what is inside them. When your army attacks a city your spy hasinfiltrated there is a chance he might open the gates during an assault. The better the spy the more likely he is to be successful inopening the gates. It appears the more advanced the walls negatively affect your spy’s chance of success; this makes taking the moreadvanced cities harder. Opening the gates does not automatically give you the city, but it does make your assault a lot easier. Spies inenemy cities also cause unrest; if you place enough of them in a weakly garrisoned city you may be able to provoke a revolt. There issome evidence, however, that the AI has a special cheat which prevents cities from rebelling even with very low loyalty and minorgarrisons.
Spies do not help control unrest in your own cities; they only make it harder for enemy agents to infiltrate the settlement.
RetinuesMonkey It’s surprising how useful a monkey can be – a cover, a distraction, a trained thief … +2 to agent’s skill
Poisoner The wise ruler knows that no resource should be squandered, and that dinner guests should always be left wondering about thefish course … +2 to agent’s skill.
Courtesan The attentions of a courtesan who has skill and refinement are a welcome relief at the end of a long day’s brutal conquering.+1 to agent’s skill.
Retinue ManagementNo idea about optimal retinues or how to collect the various members.
TraitsSpying talent This man has shown a natural talent for spycraft since birth. +1 to agent’s skill.
Natural born spy This man was born with a talent for getting into places he should not be, and not getting caught. +2 to agent’s skill.
Superior spy The art of espionage is no mystery to this man, and neither are the secrets of his enemies! +3 to agent’s skill, +3 to line ifsight.
Expert spy This man is a natural in all the skills useful to a spy, and has contacts in all sorts of places. +4 to agent’s skill, +4 to line ofsight.
Plotter Plots and schemes come naturally to this man. +1 to agent's skill
Spy This man has a taste for reading other people's correspondence. +2 to agent's skill, +2 to line of sight
The Death of a SpySpies can expire if their infiltration mission goes badly wrong; you will get a little message and the spy will fall over dead on thecampaign map. Spies will be more likely to fail, and therefore die, if you send them after well guarded, difficult targets. If you have a spyyou really want to keep don’t send him on missions with low success percentages.
Spies also die of old age sometime around the ripe old age of 65.
The Assassin.Assassins are the last agent type characters you get.
The Birth of a AssassinAssassins are available when you build a level 3 trade building, a forum if you are playing a Roman faction.
The Cost of a AssassinAn assassin costs 500 denarii to build and 200 denarii per turn in upkeep.
The Life of a AssassinAssassins have two primary roles: killing people and sabotage.
Sabotage is only as useful as the target will allow; there is not much use in damaging a small town’s shrine, but knocking the advancedbarracks out in an huge city that is constantly pouring troops out to fight you can give you a turn or two of breathing space. You can onlysabotage buildings you know about, so it is useful to operate an assassin with a spy as a team. Send the spy in to infiltrate the city, thensend your assassin in afterwards. Because your spy has found out the settlement details you will be able to target all the buildings inthat settlement. If a building is only listed as a question mark then you can do nothing with it. Sabotage does not have to totally destroya building to be useful; a building with even 1% of damage stops working and its effects disappear. The size of the target city, as well asthe presence of any enemy spies or assassins affect your assassin’s chance of success. More experienced assassins will have an easiertime sabotaging.
Page 22The Guild - frogbeastegg's Guide to Rome: Total War
02/11/2005 09:30:58http://forums.totalwar.org/vb/printthread.php?t=38382&pp=4
Killing people works ��you would expect; more important targets are harder to knock off because they have better security. Generalsare harder to kill than captains, and some traits and retinue members make a general harder or easier to kill. Also each command starmakes the general slightly harder to kill. A 1 star general is relatively easy to remove; a 8 star is nearly impossible. The experienceaspect of assassination works both ways; as your assassin becomes more experienced he will find it slightly easier to kill people. If youmanage to get a very experienced assassin killing that 8 star general suddenly becomes slightly more doable.
Assassination is not always about killing the high profile targets. If you are playing on very hard campaign map difficulty the AI loves totry and bribe your people. Assassins are very handy for ‘cleaning house’ and removing other faction’s diplomats from your territory beforethey can do any harm. The AI also bribes occasionally on the lower difficulties. Finally having a load of diplomats stood around clutteringup your empire looks ugly and they can block the movement of your own units.
Just like any other unit assassins get experience by doing their job. Train low level assassins by getting them to kill low influencediplomats belonging to another faction. Captains are relatively easy targets for low skill assassins. You can also send them to sabotagean easy target in some small nowhere town. Sabotage is easier for low level assassins to perform successfully, so focus on that for awhile. Sneakily you can also kill your own agents, so if you have cash to waste and no heart you can pump out diplomats for yourassassins to practise on.
RetinuesMonkey It’s surprising how useful a monkey can be – a cover, a distraction, a trained thief … +2 to agent’s skill
Courtesan The attentions of a courtesan who has skill and refinement are a welcome relief at the end of a long day’s brutal conquering.+1 to agent’s skill.
Retinue Management
TraitsTalent for assassination This man has shown a disturbing natural talent for quietly killing and getting away with it. +1 to agent’s skill.
Cutthroat People die. Sometimes this man helps them to die. +1 to agent’s skill.
Inept Poisoner This man shows little appetite for the business of assassination as his victims show little inclination to die! -1 from agent'sskill
Natural Born Assassin This man was born with a talent for morning in and out of places without trace, and leaving fresh corpses in hiswake. + 2 to agents skill
Murderer Killing has become second nature to this man. He has no qualms about removing 'targets'. +2 to agents skill
Assassination Genius This man is a born genius when it comes to moving unseen, getting close to people, and killing silently. Withexperience he could become a true master. +3 to agent's skill
The Death of a AssassinAssassins can die if their mission goes badly wrong in exactly the same way as spies. They also die of old age at around 65.
Armies, the building and care thereof.
Both the manual and the tutorial teach you how to build and use your armies so I won’t bother reiterating. Instead I shall highlight thefiner points and give a few suggestions on make up. And no, I do not mean lipstick and mascara. Mercenaries are handled in their ownchapter.
Retraining versus merging.CA developer Dutch has this to say on retraining:“Retraining can do two things:
1) if the settlement can produce that type of unit, it will replenish the unit with new soldiers *at the units average experience level*;these soldiers are subtracted from the settlement population as normal2) if the settlement can produce armour or weapon upgrades for which the unit is eligible and which it does not already have, retrainingwill add these to the unit being retrained
If the settlement can do both, it will do so. Replenishment costs a proportion of the unit's cost in denarii, while retraining for upgradescosts a nominal amount per upgrade. You can retrain as many units as will fit into the recruitment queue in one turn, although you endup paying for all of them. Hence it is often better to retrain a lot of old units if you need troops quickly, rather than recruiting new.”
Clearly at the moment retraining is the better proposition, especially if you have veteran troops.
Ill starred omensYour generals and captains will collect command stars as they win battles. These stars make them more effective. I shall quote CAdeveloper Jerome Grasdyke on how stars work:“It currently affects both morale and combat ability - we tried it for a while with just morale, but it ended up being not enough of abonus. The combat calculations have changed so much from Rome to Medieval as to be unrecognisable, so it's no longer easy to equatestars to experience.
As a rule of thumb it's one point of attack per command rank, up to a maximum of 10, and this can become negative for very badgenerals. Experience is one point of attack and one point of defence per chevron, plus a morale bonus.
Page 23The Guild - frogbeastegg's Guide to Rome: Total War
02/11/2005 09:30:58http://forums.totalwar.org/vb/printthread.php?t=38382&pp=4
The general's command also controls his radius-of-effect, which is set to 30 m + 5 m * command + 2 m * influence. This is used toaward morale bonuses only, and is calculated between the actual general's position and the centre-point of nearby units.”
Experience is a handy thing to have.Experience is represented by those tiny bronze, silver and gold chevrons. Experience gives one point of attack and one point of defenceper chevron, plus a morale bonus.
Bribery.When you bribe an army you will only keep units you can potentially train yourself, so if you as a Roman faction bribe an army made upof two hastati you will keep both of those units. If, as the same Roman faction, you bribed a Greek army made up of hoplites then thesoldiers will simply disappear. If you bribe an army lead by a family member then that family member will join you as an adoptedmember of your family.
Captain, general.Generals are family members; they are better than captains because they can gain traits and retinue members which give battlefieldboosts. They are also harder to bribe. Captains will lead your army if there is no general present and if they win enough victories to earna couple of rank stars you will be given the option of adopting them into your family. For some reason I have found it harder to gain rankstars with captains than with generals; one particular captain won something like 5 battles and captured a settlement and remained atzero stars, whereas no star generals (the pimply youths straight out of school) who have done the same typically gain two stars.
It is important to note that only generals can hire mercenaries; captains cannot. Only generals can built forts and watchtowers; captainscannot.
They call him Marius, Marius the Reformer.The Marian Reforms alter the Roman faction’s tech trees dramatically, making an entire set of units obsolete and replacing them withnew ones. You will lose your ability to build and retrain hastati, principes, triarii, equites, Roman archers, and cavalry auxilia. You will beable to train auxilia, early legionary cohorts, legionary cohorts, urban cohorts, Roman cavalry, and archer auxilia instead. The post Marianunits are significantly stronger. Your existing units of the old type will not disappear or transform into new units.
The Reforms take place after 220BC, with 220BC being the absolute earliest the reforms can happen. In addition to this a city with thehidden resource ‘Italy’ must reach huge size. You may assume that any of the Roman cities in Italy contain this hidden resource while allothers do not.
First cohorts.After the Reforms take place you may find the Senate offers you a mission with a first cohort as a reward. First cohorts come in twoflavours: early first cohort and first cohort. The early first cohort wears mail armour and has slightly weaker stats than the plate wearingfirst cohort. First cohorts have more men than the usual legionary units; they also have a golden eagle as their standard. In battle thiseagle can prove a bit of a problem; if the eagle bearer is killed then the eagle is dropped and lost. This is a huge disgrace and morale willsuffer badly. I do not know if the eagle is replaced, or if it can be picked up by another of your soldiers on the field. I only know it ispossible to lose it, and that losing it is a Very bad Thing Indeed. The first cohort gives a morale boost to all nearby legionaries, so thiscan make them a real key unit on the battlefield. Despite the fancy blurb in their description about leading the assault you are better offkeeping them as reserves, behind the front line boosting morale and then moving to support where needed.
I shall state very clearly that you cannot built first cohorts of any type yourself, ever. You can retrain them for armour and weaponupgrades, but not to replace dead men. You can never build them yourself. Ever. Got that? You have to get them from the Senate.
Make up.You need to play to your faction’s strengths when building your armies. I would go into detail on all the factions particular strengths andweaknesses, giving recommended armies for all of them but honestly I really can’t be bothered and I don’t entirely see the point. If youplay as the Romans first then you should learn everything you need to know about how to put together a good army; when you shift tothe other factions you will only need to examine the unit information and work from there. Also, for the Romans, you will sadly have toforget any ideas about historical army make ups; you can’t built hastati or principes right off the bat. Instead you are stuck using hastatifor much of the early game, then swapping to a mix of hastati and principes when principes become available. You will probably neverget to use triarii unless you begin the campaign with some, due to the Marian Reform issue mentioned above.
So, for the Romans. The Romans have excellent heavy infantry, and some reasonable cavalry. They are a bit weak on the missile frontas they can only build some rather crappy archers and velites (javelin skirmishers). At the beginning you have quite a limited choice butyour hastati are great line infantry and should form the bulk, and backbone, of all your armies until you can replace them with principes.Support your infantry with a couple of units of cavalry, probably equites and your general’s bodyguard. I find two cavalry, including thebodyguard, is usually plenty but you might like to use more depending on who and what you are facing. You probably shouldn’t try touse a lot of ranged units in each army; too many missiles and not enough infantry can lead to you being cut apart very easily if theenemy manage to get close.
Paddling on the big boating lake (navies, duh!)
Navies are quite simple in Rome: Total War. They are only used for two things; transporting troops or naval combat. When transportingtroops only one ship is required, regardless of the size of your army. Yes, it is actually possible to put 10,000 men on one ship. Sendingout unescorted ships is a recipe for disaster; troop carrying ships can be sunk by a larger enemy fleet, killing everyone on board. Also,for each victory an admiral wins he gains rank stars, just like a general on land. High star admirals are a pain to kill, and small fleets areeasy pickings which help build enemy admirals up with cheap victories. An admiral is most likely to gain a rank star if he has a verydecisive victory which sinks the enemy instead of forcing them to row away. Ships will generally escape after a defeat unless they areopened in either by land or by other enemy fleets. Wolf pack tactics are the way to go if you want that fleet to visit Neptune. Ships will,just like land based troops, gain experience in battle. They also benefit from any weapon and armour upgrades that the city where theyare (re)trained can offer, just like normal soldiers.
You cannot bribe navies.
Page 24The Guild - frogbeastegg's Guide to Rome: Total War
02/11/2005 09:30:58http://forums.totalwar.org/vb/printthread.php?t=38382&pp=4
You can blockade ports by selecting a navy and then clicking on the target port. You know when you have your cursor in the right placebecause a little blue circle appears under the port. Blockading ports cuts off their trade income. The AI can do this to you, but it is rare.
Bash for cash: how to use mercenaries for fun and profit.
Mercenaries are quite a bit more complex than they were in Medieval: Total War, and this is a very good thing indeed. Firstly, aspreviously noted ages ago, only generals can hire mercenaries. Mercenaries are unique units; they cannot be trained by any faction, forexample mercenary hoplites are different to the assorted hoplite units the Greek factions get. Mercenary units cost one dollop of cash tohire, then a set amount each turn in upkeep. Mercenaries are more expensive than normal units but the advantages are that you getthem instantly, and that they fill roles and functions your own units may not be able to meet. This is the primary use of mercenaries:filling the gaps. If your faction has no decent heavy cavalry then find some mercenaries to fill this role, and so on with the other unittypes. Some mercenaries are better at what they do than ‘normal’ units; Balearic slingers are the best slingers out there bar none.
Mercenaries vary from region to region, for example mercenary hoplites are usually found in Greece. Each type has their own frequency(how often they appear to be hired) and regeneration rate (how quickly more of that unit type will appear to be hired); some types ofmercenaries are simply much more common than others. This does mean you can raise armies tailored to the local nature of warfare,buying hoplite to counter hoplites, or horse archers to counter horse archers. Course, this is not always the ideal tactic, and some localarmies fare better than others when turned back on their own kind. Hoplites will do well against other hoplites, but there’s really not somuch point in turning peltasts back on peltasts, not when you can just send in the cavalry and mow down the enemy skirmishers withmuch less fuss and fewer casualties. The mercenary peltasts will do a nice job of turning enemy hoplites into imitation hedgehogs though… It’s also worth remembering that some terrains give bonuses or penalties to units, for example barbarian mercenaries receive bonuseswhen fighting in forests. You can use local mercenaries to take advantage of the local terrain, gaining bonuses if you use them sensibly.
Mercenaries remain on your payroll as long as you choose to keep them. It is possible to hire them, instantly use them in a battle andthen dismiss them all in the same turn. This makes them very good cannon fodder for those tricky situations like storming gatehouses.Obviously if you have a prized unit of mercenaries you won’t want to use them in this manner, but if you hire some people in speciallythen it can be very handy indeed. Sometimes it is cheaper to send the mercs in to die in situations like this; retraining and/or replacingyour own damaged units can become costly as well as time consuming and inconvenient.
Retraining mercenaries is possible, but by slightly different rules to ordinary troops. You can retrain them in cities which have buildingsgiving bonuses to armour and weaponry to improve their equipment. You cannot, according to the Res Romanae, retrain them to replacedead men. You can replaces losses by merging mercenary units of the same type together, just like ordinary units.
Suladan has compiled this list of mercenaries and kindly allowed me to use it.
updated 3/5/05 by Suladan (Noel Anderson - [email protected])
This information was extracted from the following two files from the 1.2 version of Rome - Total War. The initial and maximum number ofunits available is also listed in these files, as well as the replenishment rate of unit availability. Note that in a few cases, the hire cost ofa unit varies depending on the province it is recruited in. Also note that in a few cases, units hired from specific provinces start with ahigher experience level. Example: Mercenary Hoplite units hired in the province of Laconia start with an experience level of 3 and cost950 instead of the normal 850. Provinces with an experience bonus will be denoted with a corresponding number of asterix in that unit'sprovince availability list.
c:\program files\rome - total war\data\world\maps\campaign\imperial_campaign\des cr_mercenaries.txt
c:\program files\rome - total war\data\export_descr_unit.txt
unit hire cost / upkeep cost
province availability
Barbarian Mercenaries 800 / 200
Britannia_Inferior Tribus_Silurii Britannia_Superior Hibernia Tribus_Saxones* Germania_Inferior* Tribus_Chattii* Agri_Decumates*Germania_Superior* Locus_Gepidae Locus_Gothi Pripet, Hyperboria Regnum_Marcomannii Boihaemum Tribus_Iazyges Dacia BelgicaArmorica Central_Gaul Aquitania Lugdinensis Transalpine_Gaul Narbonensis Cisalpine_Gaul Venetia Noricum Gallaecia CeltiberiaTaraconenis Lusitania Hispania Baetica Liguria Galatia**
Mercenary Hoplites 850-950 / 170
Tribus_Sakae Tribus_Alanni Tribus_Sarmatae Maeotis Scythia Bosphorus Thrace Propontis Tribus_Getae Bithynia Paionia MacedoniaThessalia Epirus* Aetolia* Attica* Peloponnesus* Apulia Campania Bruttium Sicilia_Poeni Sicilia_Romanus Sicilia_Graecus SardiniaLaconia*** Africa Tripolitania Cyrenaica Libya Byzacium Rhodos Crete Lycia Phrygia Ionia
Bastarnae Mercenaries 1700 / 170
Regnum_Marcomannii Boihaemum Tribus_Iazyges Dacia Thrace Propontis Tribus_Getae Bithynia
Eastern Mercenaries 650 / 150
Colchis Atropatene Armenia Pontus Cappadocia Media Elymais Assyria Syria Babylonia Coele_Syria Phoenicia Judaea
Thracian Mercenaries 800 / 130

Page 25The Guild - frogbeastegg's Guide to Rome: Total War
02/11/2005 09:30:58http://forums.totalwar.org/vb/printthread.php?t=38382&pp=4
Thrace* Propontis* Tribus_Getae* Bithynia* Paionia Macedonia Thessalia Rhodos Crete Lycia Phrygia Ionia
Spanish Mercenaries 750 / 170
Gallaecia Celtiberia Taraconenis Lusitania Hispania Baetica
Samnite Mercenaries 750 / 170
Etruria Umbria Latium Apulia* Campania* Bruttium*
Cilician Pirates 620 / 200
Cilicia Cyprus
Illyrian Mercenaries 650-700 / 130
Regnum_Marcomannii Boihaemum Tribus_Iazyges Dacia Illyria* Dalmatia* Pannonia* Paionia Macedonia Thessalia
Mercenary Peltasts 550-600 / 170
Thrace* Propontis* Tribus_Getae* Bithynia* Paionia Macedonia Thessalia Epirus* Aetolia* Attica* Peloponnesus* Assyria Syria BabyloniaCoele_Syria Phoenicia Judaea Sicilia_Poeni Sicilia_Romanus Sicilia_Graecus Sardinia Laconia Rhodos Crete Lycia Phrygia Ionia
Libyan Mercenaries 350 / 100
Mauretania Numidia Gaetulia Sahara Africa Tripolitania Cyrenaica Libya Byzacium Nile_Delta Middle_Egypt Thebais
Balearic Slingers 750 / 200
Gallaecia Celtiberia Taraconenis Lusitania Hispania Baetica Baliares** Sicilia_Poeni Sicilia_Romanus Sicilia_Graecus Sardinia MauretaniaNumidia Gaetulia Sahara
Rhodian Slingers 750 / 200
Rhodos* Crete* Lycia* Phrygia* Ionia*
Cretan Archers 750 / 200
Epirus Aetolia Attica Peloponnesus Rhodos* Crete* Lycia* Phrygia* Ionia*
Barbarian Cavalry Mercenaries 450-800 / 100
Tribus_Saxones** Germania_Inferior** Tribus_Chattii** Agri_Decumates** Germania_Superior** Locus_Gepidae Locus_Gothi Pripet,Hyperboria Belgica Armorica Central_Gaul Aquitania Lugdinensis Transalpine_Gaul Narbonensis Cisalpine_Gaul Venetia Noricum Galatia
Sarmatian Mercenaries 1200 / 170
Tribus_Sakae Tribus_Alanni Tribus_Sarmatae Maeotis Scythia Bosphorus Regnum_Marcomannii Boihaemum Tribus_Iazyges Dacia ColchisAtropatene Armenia Pontus Cappadocia
Arab Cavalry 750 / 120
Assyria Syria Babylonia Coele_Syria Phoenicia Judaea Regnum_Palmyrae* Arabia* Nabataea* Sinai*
Bedouin Warriors 700 / 110
Assyria Syria Babylonia Coele_Syria Phoenicia Judaea Regnum_Palmyrae Arabia Nabataea Sinai Nile_Delta Middle_Egypt Thebais
Numidian Mercenaries 750 / 130
Mauretania* Numidia* Gaetulia* Sahara* Africa Tripolitania Cyrenaica Libya Byzacium
Scythian Mercenaries 800 / 120
Locus_Gepidae Locus_Gothi Pripet, Hyperboria Tribus_Sakae* Tribus_Alanni* Tribus_Sarmatae* Maeotis* Scythia* Bosphorus* ColchisAtropatene Armenia Pontus Cappadocia
Bedouin Archers 750 / 110
Assyria Syria Babylonia Coele_Syria Phoenicia Judaea Regnum_Palmyrae Arabia Nabataea Sinai Nile_Delta Middle_Egypt Thebais
Mercenary War Elephants 4000 / 490
Assyria Syria Babylonia Coele_Syria Phoenicia Judaea Mauretania Numidia Gaetulia Sahara
frogbeastegg 19/10/04 22:04
Page 26The Guild - frogbeastegg's Guide to Rome: Total War
02/11/2005 09:30:58http://forums.totalwar.org/vb/printthread.php?t=38382&pp=4
Re: A Beginner's Guide to Rome: Total War
Extortion for beginner’s: aka diplomacy.
This entire section is the work of Tamur. Rather than repeat his excellent diplomacy guide I decided to include it, with his kindpermission. So, until otherwise noted this is Tamur’s work. This version of his guide dates from October 10th and is out of date on somepoints. He has also added some more advanced information to his later versions. Please find his topic, along with a download of thelatest version of his guide, here. I think that the version in this guide is better for beginners, while the latest version is perfect forintermediate and advanced players who want to go the extra mile.
Introduction
Rome: Total War offers a challenging new dimension to the Total War series – deep diplomacy. Your diplomatic agents now have manypossible offers and demands they can tender toward any faction in the game. As the game describes it, "A diplomat is an individualtrained in the arts of flattery, cajolery, smooth talking and sometimes even bullying who is sent out to deal with rival factions. It is hisjob to strike bargains, cement peace treaties or even demand a surrender. Diplomats also act as the eyes and ears of their factions in theplaces they go."
This guide is by no means complete. As new or corrected information comes available it will be updated. Because of the depth andcomplexity available on the campaign map, the Diplomatic Strategies section will be constantly added to as players find new ways toutilise this tremendous dimension of the game.
Although I would like to claim that all the words are mine, there are many others who have contributed to this document. Parts of thedescriptions have been taken from the game itself, and someone (or some few, more likely) at CA deserve a big thanks for making thispart of the game as robust as it is. Players have contributed a great deal with their insights. I'd like to thank Thoros of Myr for being thecatalyst to the project with his understanding of the diplomatic side of the game, and all the great people at the Org who express theirviews eloquently and with passion.
Note: Text in dark red points out areas where the information available is questionable, incomplete, or otherwise in need of moreresearch.
If you read something incorrect, find missing information, or have answers to questions raised in this document, please feel free tocontact me (Tamur) directly via email: [email protected]
Conducting Negotiations
The Mechanics of Haggling
To open any negotiation, you need someone to negotiate with, and you need a goal. For a quick list of possible goals, see the SenateMissions section later. For now, though, we'll assume that you want to open your first negotiation with the Gauls, who are neutral to you.You want to gain trade rights, which allows commerce to flow between your towns and the towns the Gauls occupy.
First select one of your diplomats, and move him into Gallic territory. It's often best to send a spy in before your diplomat so you can seewhere the faction's family members are, and where cities are. Although some say it makes no difference, there are those who claim tohave gotten better results from negotiating at cities, or better yet from negotiating at the faction's capital.
Once your diplomat is in Gallic territory, right-click on any agent, or a city, belonging to the Gauls. The negotiation screen will open up.Note: you don't need to be in a faction's territory to negotiate with them – you simply need to be able to right-click on a faction's agent.
On the negotiations panel, there are two main parts.
The left half contains all your diplomatic options. These change based on your standing with a faction. A faction to which you are neutralwill have different diplomatic options available than one with which you are at war, or allied.
The right half contains all the current proposals. When you first open up negotiations, this will be empty. If an emissary from anotherfaction has sought you out, then this will be full with their offers and demands.
The offers section, as well as the demands section, is split up into two (well, three, but Bribes are different) sections: Offers, andDemands. The Description of Offers & Demands section lists and describes all possible offers and demands (so far discovered anyway).
With this screen open, you can Offer something by clicking on one or more of the items under Make Offer. These are things you areproposing to do. In our example, we want to gain Trade Rights from the Gauls so our towns can start sending goods to their towns, andvice versa. We find "Trade Rights" under the Make Offer section, and click it. "Trade Rights" has now moved to the right side of thenegotiations panel. You can cancel that offer by simply clicking on it in the right panel, and it will move back into your possibilities and beremoved from your current offers.
You can Demand something by clicking on one or more of the items under the Make Demand heading. These are things that you areproposing that the other faction do. In our example, we don't want to demand anything because "Trade Rights" is an offer-only proposal.See the Offers & Demands section for more information about offer-only proposals.
Some options have further information you need to provide. For example, if you click "Attack Faction" under the Make Offer header,then you'll need to specific which faction you're offering to attack. If you demand "Regular Tribute", then you'll need to specify how muchper turn, and how many turns (half-years) you want them to pay that amount.
Propose, Give as Gift, and Inform
Page 27The Guild - frogbeastegg's Guide to Rome: Total War
02/11/2005 09:30:58http://forums.totalwar.org/vb/printthread.php?t=38382&pp=4
Once you've finished adding offers and demands, you need to "table" the proposal. There are three buttons on the bottom right corner ofthe negotiation panel.
Propose simply sends the proposal you've crafted to the faction you're negotiating with. They consider it and reply (which we'll coverlater).
Give as Gift will simply give whatever you're offering to your negotiating partner. Any of your Make Offer options that are not by naturereciprocal (such as Trade Rights or Alliance) can be given as gifts.
An earlier version of this guide reported that factions cannot turn down gifts – this is not true. Factions apparently can turn down gifts onoccasion, most often stating, "We cannot match this offer." The reasons for this are unclear.
If you give a gift, it means that the faction in question has no obligation to repay your generosity. Giving a profitable province to afaction as a gift is probably not a good idea. The friendliness of the gesture is likely to be cancelled out by the greed it generates.
Gifts can tip the balance in negotiations with a faction. However, you can either give gifts in a negotiating session, or offer/demand in astandard fashion. You cannot combine both in the same negotiating session.
It is possible to give a gift and follow that gift up immediately with a request for something like Military Access or Alliance if the factionhas been reticent before to give in to these requests previously. But again, the gift-receiver has no obligation to return the favour.
Inform is an option only when you are making a "Cancel" offer, such as Cancel Alliance. Offers such as these have no bargaininginvolved. You are cancelling the agreement, and your word is final.
Accept, Reject, and Counter-Offer
When an offer has been tabled, the other faction has the option of accepting it, rejecting it, or giving you a counter-offer. If you arereceiving a diplomat, then when the negotiations open you will have these three options immediately to reply to their proposal.
Acceptance is simply giving the thumbs up to an offer. At that point the negotiation becomes "legally binding", though of course treatiescan fall apart rather quickly sometimes.
Rejection puts an end to the current set of proposals. This doesn't mean that negotiations are necessarily over – a new proposal can betabled by you or the other party. But it does mean that the proposal as it stood was entirely unacceptable to the party who rejected it.
A counter-offer is the position between acceptance and rejection. Receiving a counter-offer (or giving one out) is a very encouraging sign.It means that your negotiating partner is serious about your proposal, but they feel that it's unfairly weighted toward your side. Mostoften they will counter-offer something weighted to their side, and the position closer to the middle of the two is where an agreement willbe reached.
Bribes
Bribes fall into their own category. You can bribe neutral or enemy units of any type. Bribe an enemy army, and they melt into thecountryside. Successfully bribe a faction family member, and they turn traitor and join your cause. Bribe another diplomat, spy, orassassin, and they are yours for the using.
When bribing, you simply need to approach the unit you want to bribe with a diplomat (right-click). Click Bribe above the Make Offerheader, and sit back to watch the fun. The bribed unit will either outright refuse, or will demand a certain number of denarii. You canhaggle with them on the amount. If your bribe is accepted, you will see their faction flag change to yours. In most cases, if you bribe anarmy, it will simply disappear.
There are two cases where this is not true. First, if you are playing one of the Roman factions, and manage to bribe the army of anotherRoman faction, then the army doesn't melt away – it becomes yours to use.
The second case is when you bribe another faction's family member. If you successfully bribe a family member, they are by defaultadopted into your family (no option to not adopt them). They appear as "sons" under a sponsoring family member. The mechanics ofwho is given the privilege of sponsoring a bribed family member is currently not understood.
Threats
One special case in the Make Offer section needs some explanation. Accept or We Will Attack is in the offer section. This translatesany demand it's attached to into a threat.
The successful use of this option is restricted to the case where you have marched in enemy lands, beaten them repeatedly in battle, andknow via spying that they have been severely weakened by your onslaught. The negotiating partner who receives a demand with Acceptor We Will Attack tagged must have been recently attacked, and beaten, before acceding to this threat.
When it works, it can get you the largest diplomatic prizes in the game (such as Protectorate Status or Region Giving). If it doesn't,you've probably killed off diplomatic possibilities with this faction for a good while to come.
How Do I...This section functions as a FAQ about the larger-scale mechanics of diplomacy, and as such does contain a lot of spoilers. If you'reinterested in digging through the diplomatic engine yourself and discovering what works and what doesn't it'd be best to skip this sectionentirely and move in to the next!
That said, those who struggle with the diplomatic engine should find many of their questions answered here in easy-to-find form. Thisinformation is scattered throughout the guide in different places.
... secure a treaty of Military Access?
Page 28The Guild - frogbeastegg's Guide to Rome: Total War
02/11/2005 09:30:58http://forums.totalwar.org/vb/printthread.php?t=38382&pp=4
If you've tried, you know it's near impossible to simply demand Military Access with an open-ended "you name the price" approach. Evengifting regions will not work in most cases.
Make Single Payment is your friend here. Approach the faction whose lands you want military access to, and demand Military Access,then offer a single payment of around 4000 denarii. If they don't go for that, or make a counter-offer, then open a new proposal andoffer them 6000 denarii. You can keep going up by 2000 denarii until you get an acceptance or a counter-offer.
If you have to go above 12000 denarii it's often not worth the price, but that depends on your situation in the game.
... pad my treasury using my diplomats?
There are a number of ways to do this.
First, if you've got a good map to offer, you can make anywhere between 2000 and 8000 denarii each time you sell your map.Remember, though, that each faction will probably only buy your map once. You'll also get a better price for your map the farther awayyou travel from your own lands.
Second, securing trade rights with as many factions as possible gives you a much better chance that the goods from your regions willfind buyers happy to fork over the denarii. Your ports especially will appreciate this, since they switch their trade lines to the mostaffluent ports available to them.
Third, a good diplomat in combination with a large army or invasion force can get you a lot. If you are attacking a faction and have beenwinning all your battles against them, then you can use the "Accept or We Will Attack" threat to coerce tribute, single payments,settlements, or protectorate status out of a faction. Of course, tribute and single payments are the only way to make some quick cash.
... add to my diplomat's influence?
Station diplomats near all of your ally's capitals, and keep pestering them for this or that little thing. The more you use your diplomats,the more influence they will gain.
Travel is a big help as well. Some traits and retinue characteristics come only from going well outside your faction's boundaries. Pickingup a Foreign Hostage, for instance, can only happen if your diplomat is in a war zone or recently conquered territory. Becoming aLinguist requires going into foreign lands. Don't keep your diplomats in safe places their entire career, or you'll have a lot of veryuninspiring diplomats to work with.
... use "Accept or We Will Attack"?
See the description of Accept or We Will Attack in the Offers & Demands Description section. Basically you need to pummel a factionthoroughly, then back off for a round or two, then send in a good diplomat to start demanding things with this threat as the only offer inthe negotiation.
Squeamish diplomats will not like doing this, but if those @#$^@! who became your worst enemy thirty years ago finally give in to anAccept or We Will Attack demand, it's a great feeling of fulfilled revenge!
Diplomatic Strategies
This section is a rough-and-ready guide to strategies on the diplomatic level. These are listed in no particular order.
1. The Caesar Maneuver
Summary Quote:
"We could destroy you, but..."
Description:
Move a diplomat around in enemy territory with a large and well-seasoned army. The army defeats anything in its way, and lays siege toa rich settlement (or even the faction capital). Then the diplomat moves in to offer a better alternative.
Offer/Demand Combos:
Ceasefire / Regular TributeCeasefire / Give RegionCeasefire / Become ProtectorateCeasefire / Military Access
When To Use:
* When a faction has refused any offers more than an in-word alliance and you need to force an issue, such as Military Access.* As punishment when a faction breaks an alliance or cancels Trade Rights.* Anytime you don't mind being seen as a bully.
2. The Cleopatra Maneuver
Summary Quote:
"Here, we know you'll like this..."
Description:
Page 29The Guild - frogbeastegg's Guide to Rome: Total War
02/11/2005 09:30:58http://forums.totalwar.org/vb/printthread.php?t=38382&pp=4
Station a diplomat at a faction's capital, and as much as you can afford it, gift cash, provinces, etc, to them. Wait a turn, then ask aboutwhat you're really after.
Offer/Demand Combos:(all offer-only gifts)Give RegionMake Single PaymentRegular TributeAttack Faction
When To Use:
* When a faction has refused demands for Military Access or Alliance.* When you're working to move a recent Ceasefire to an Alliance.* Anytime you want to be seen as a generous, kind-hearted faction with altruistic motives.
3. The Pompey Maneuver
Summary Quote:
"You idiots need this more than I do."
Description:
Fulfill another faction's Senate obligation by taking a settlement when they're unable to take, then give the settlement to the faction whoshould have taken it. Optionally, try swapping this region for one more suited to your geographic preference. A variation is to give theregion to the Senate.
Offer/Demand Combos:
Give Region (as Gift)Give Region / Give RegionGive Region / Make Single Payment
When To Use:
* When you want to gain standing with the People (giving to SPQR faction).* When you want to be seen as an insufferable snot by the other factions.* When you need cash. You can raze the settlement (Exterminate Population), then give it to another faction to repair, but sell it at ahigh price.
4. The Caelius Maneuver
Summary Quote:
"I'm sure you'd all rather just go back home and farm a bit, right?"
Description:
Prepare a large siege army on the border of a province you want to take. Send a spy and your best (or at least a four-Influence)diplomat into the province. Bribe every single one of the armies in the province, then walk your seige army in and take care of anyonewho wasn't bought off.
Offer/Demand Combos:
Can be followed up withGive Region / Make Single Payment
When To Use:
* If you spy out a province you want to take, and find that the enemy have swarms of small or large armies that you don't want theexpense and hassle of mopping up for two or three years.* If you want a quick quick way to beggar a faction (i.e. take a settlement with this maneuver, then offer it back to them at a high price).* When you have a large treasury and not much patience for battles.* If you want to quickly stun an enemy's military, and know that a significant portion of their military forces are stationed in or near thisprovince.
5. The Robin Hood Maneuver
Summary Quote:
"These saucy varlets need a good drubbing, and we will all share in the tasty proceeds."
Description:
Prepare a large siege army, and place them in a province that fulfils the following conditions:
* You can get to it without crossing territory that isn't yours or isn't Military Access-ible, and...
Page 30The Guild - frogbeastegg's Guide to Rome: Total War
02/11/2005 09:30:58http://forums.totalwar.org/vb/printthread.php?t=38382&pp=4
* The province borders a faction who you have an alliance with, and whose land you want military access to, or whom you want to haveas firmly-bound allies, and...* The province also borders a faction with whom your ally is at war
It may seem like a lot, but these are all over the map most of the time.
After you have picked out this province, move one well-skilled diplomat to your ally's capital, and one to the capital of the faction aboutto be pounced on.
Once you have your army and agents in place, besiege and capture a settlement of the faction with whom your ally is at war.Exterminate the populace, and as soon as you've got it, offer the region to your ally faction, with a generous sum of denarii (6000 or up,depending on how skilled your diplomat is) – but couple these two offers with a demand for Military Access. If they refuse outright, upthe Single Payment amount until they do accept.
Once Military Access is secured, move onward to smash the faction you took the settlement from. After you've defeated any majorforces, especially if you're able to kill one of their faction members, give them a Ceasefire proposal with either Protectorate or RegularTribute attached. Let them tribute for a couple of turns, then end the tribute early and offer an Alliance. Use the tribute money to buyMilitary Access.
This most often results in having vast regions of land in which you can move your armies. It also results in a stable section of the worldfrom which you don't have to worry about invasion.
Offer/Demand Combos:
Too much to break out, see Description.
When To Use:
* When you need to secure a troublesome border area so you can focus on matters elsewhere.* When you want to test out the diplomatic prowess of your best agents.
Diplomatic Disasters
Sometimes things don't go exactly the way you expect them to. Sometimes it's not even close. This section aims to cover the basicdiplomatic problems that happen, and how to recover from them.
1. The Wandering Army
Description:
An army from a faction who have no Military Access treaty with you moves into your territory but doesn't attack anything. This alsohappens when you mistakenly (or intentionally) move your army into a territory of another faction from whom you have not securedMilitary Access.
Results:
If you are playing a Roman faction, you will receive notification from the Senate telling you to move your army out of that faction'sterritory or suffer the consequences. The consequences of not moving are that the Senate will probably investigate your family's finances,and (if the Quaestor that year is not part of your family) will likely levy a whopping fine on you. Fines as high as 90000 denarii havebeen reported by players. They may also bar your family from Senate office for a period of two to four years.
Recovery:
If you are the perpetrator, then you need to immediately move your army back into your territory, or territory for which you havegained Military Access. This will avoid any retribution from the Senate and the neutral faction in question.
If you are on the receiving end of such a move, and you have a diplomat in the area, then you can try bribing the army (if you have thecash, of course). There are no diplomatic options currently for demanding that an army to whom you are neutral move their wanderingarmy out of your lands. Hopefully this scenario does not happen too often, though up in the steppes of Scythia and Pripet it's bound tohappen.
2. Refusal on All Offers
Description:
A faction refuses all of your offers, even Region gifts.
Results:
You should prepare for an attack from this faction. If they will accept nothing from you, it is likely that they are preparing for war. Theold MTW engine would accept peace treaties the round before it launched a major invasion. In RTW, this happens rarely (though it stillhappens).
Recovery:
Simply leave the faction alone, and move armies to the border to build forts and defend against incursions. Leaving one of yourdiplomats in their area is a good idea, because then you at least have the possibility that this faction will use your easily-accesseddiplomat to get messages to you. However, your diplomat should be on the watch for assassins.
Page 31The Guild - frogbeastegg's Guide to Rome: Total War
02/11/2005 09:30:58http://forums.totalwar.org/vb/printthread.php?t=38382&pp=4
Description of Offers and Demands
The following list is a complete list of all possible offers and demands you can use in a negotiating session.
Alliance (offer only)Stances: neutral only
Description:If you offer an alliance, you are offering to solidify relations with a faction. These solid relations will be demonstrated by you by (1) notattacking the allied faction, (2) leaving trade routes open between yourself and the allied faction. Additionally, the alliance can be madestronger by not attacking your new ally's own allies. It can also be made stronger by expanding the trade routes between you and yournew ally by building better roads between your cities and the allies' cities, or expanding ports which service your ally's harbours.
Clarification:No additional info needed.
Tips:Alliances are most often accepted when there has been some previous history of contact between two factions. The most commonnegotiated lead-in to a successful alliance proposal is to exchange map information and cement trade rights. Let trade flow for a littlewhile (a year or two). Also important is to consider the question, "Who are the allies and enemies of this faction?" If their enemies areyour allies, your diplomat is likely to walk away empty-handed unless he's got a large treasury behind him, as well as a good influencerating. It's still possible to cement an alliance in this situation, but there is no possibility for stronger ties than an in-word alliance. If youwant to move from a state of war to an Alliance with a faction, you must first negotiate a Ceasefire, then work to fulfil the qualificationsabove to secure an alliance.
Cancel Alliance (offer only)Stances: ally only
Description:If you are currently allied with a faction, you can offer to cancel the alliance. If this offer is simply placed out on its own, then the cancelis unilateral – no matter what they think, your faction will cease all formal ties to that faction. If, on the other hand, there is a Demandassociated with this offer, then this offer translates into a threat, with the demand side being "protection money".
Clarification:No additional info needed.
Tips:Although this is a simple diplomatic maneuver, in can have far-reaching consequences. If the faction you're cancelling the alliance withshare other allies with you, then there's the possibility that you will lose more than one alliance by doing this. Be sure you can handlethe sudden loss of those ties, with the resulting drop in trade income. It may not happen, but best be prepared.
Trade Rights (offer only)Stances: neutral or ally
Description:You can offer to give a faction trade rights. This is bilateral – if they accept, then trade is allowed to happen between your cities andtheirs, and your ports and theirs. Trade rights can be granted with or without an alliance. They are vital to the economic and growthability of any faction who aren't world powers. Trade rights benefit both your faction and the faction you are giving rights to. If you wantto make life difficult for a faction, cancel or do not give trade rights to them, and encourage other factions to attack your target faction,thus cutting off trade to other factions as well.
Clarification:No additional info needed.
Tips:Besides Map Information, this is the most basic relation any two factions can have. Since, as said above, it is mutually beneficial,expect little resistance when proposing a trade agreement. If they turn it down, however, it's likely that an examination of the web ofalliances and enemies will show that you've severely ticked off one of their strongest allies. If that's the case, and really do want tradewith a faction that has denied it, then patch up relations with that ally of theirs, then propose it again.
Cancel Trade Rights (offer only)Stances: neutral or ally
Description:You can offer to cancel trade rights, with or without a Demand associated with it. This works in exactly the same way as CancelAlliance.
Clarification:No additional info needed.
Tips:Again, take care to examine the web of alliances and enemies to make sure that this cancelling will have handle-able side effects.
Military Access (offer & demand)Stances: ally only
Description:If you offer Military Access to a faction, you are offering that faction the ability to move their armies into your provinces without fear ofreprisals. Conversely, if you demand Military Access from a faction, then you're asking for the ability to move your armies on their landsafely. An alliance with reciprocal military access is probably the strongest form of alliance in the game. This allows them to aid youagainst enemies in your lands, and allows you to aid them against their enemies. A side benefit of this is that you can march through an
Page 32The Guild - frogbeastegg's Guide to Rome: Total War
02/11/2005 09:30:58http://forums.totalwar.org/vb/printthread.php?t=38382&pp=4
ally's provinces to attack another faction without having the constant pressure of a border to maintain. Your ally's provinces act as thebuffer zone between you and your enemy in that situation. Your ally will be grateful for the help, and you will be grateful not to have alarge border to fortify.
Clarification:No additional info needed.
Tips:To successfully negotiate for Military Access, you must be either neutral to or enemies with a faction's enemies. Alliance with a faction'senemy will almost completely eliminate the possibility of successfully negotiating for Military Access. Also, if you currently have a MilitaryAccess treaty, then making an alliance with that faction's enemies will almost certainly spell doom for your Military Access. Since MilitaryAccess is a level of trust beyond the standard, you may be required to give more than offering bilateral Military Access. If you've assuredthat there are no alliance conflicts, and a faction turns down a request for bilateral Access, try again but offer a single payment, ortribute over a couple of turns. If you're desperate for Military Access, you can try offering a settlement.
Attack Faction (offer & demand)Stances: any
Description:Offering to attack a faction, or demanding that the faction you're negotiating with attack a faction, can be done without an alliance. Youeither offer or demand the attack, specify which faction is the target, and hope for the best. See tips on the nuances of using thisnegotiating chip.
Clarification:When either offering or demanding an attack on a faction, you need to specify which faction should be the target of the attack. If youoffer to attack, then the faction you specify is the one that you promise to launch an attack on. If you demand an attack, then the factionyou specify is the one who you want your negotiating partner's faction to attack. There is no year or turn limit set. This makes theprocess of judging whether a faction has fulfilled this obligation rather abstract. Couple this with the fact that you cannot effectively seewhere any AI faction moves it's armies, and you have a completely untraceable promise. So, take this one with a grain of salt.
Tips:When offering to attack another faction, you are throwing in a bargaining chip to gain something with a demand. Your demand will comeeither with the offer to attack, or later, and the faction you're negotiating with know this. They know there are no free gifts in the worldof diplomacy. If you go into a negotiation knowing this, then you can understand that, if you demand that a faction attack anotherfaction, then you will be expected to pay up. This either means you need to pay them enough to recover any possible losses (this couldadd up to a large amount), or you need to offer at the same time to attack one of their enemies to whom you are currently neutral.
Give Region (offer & demand)Stances: any
Description:You can offer a region to a faction as part of negotiations (or as the entirety of a negotiation), or you can demand that a region be givento you. In game terms region translates into province. When you give a region, it means that you must move your armies out of theprovince's main settlement during the turn in which you negotiate the region transfer. If you don't, you'll likely receive a message callingyou a liar and possibly breaking off diplomatic relations with you. As should be obvious, giving a province to another faction is a big step,for which you should expect a large reward. If a province is near rebellion, has large squalor problems, etc, then expect the samepayback as if you were trying to sell a rust-pitted vehicle with no engine. You can offer multiple regions at one time.
Clarification:You will need to specify the region(s) offered. This consists of going through a list of all the provinces that you own (except where you'vespecified your capitol to be) and putting a check beside the one(s) you want to offer.
Tips:Provinces mean revenue, population, and unit production power all in one nice package. This can be a very powerful bargaining chip. Itwon't work in the most severe cases (such as if you are negotiating for Military Access with someone whose enemy is your ally), but thegiving of a region can be a huge economic and social benefit to a faction. Use with care. You can couple a Give Region offer with a GiveRegion demand, effectively swapping provinces with another faction. Depending on who you talk to, this is an effective way to cement analliance, though the cases in which it is rejected are unclear.
Make Single Payment (offer & demand)Stances: any
Description:This is simply the giving of a single one-time lump of cash to another faction, or the demand of a one-time lump sum from anotherfaction. Often this is used to balance out what would otherwise be an unfair negotiation. For example, if you give a region like Attica,which has huge income potential, for a region like landlocked Tribus Iazyges, you will probably also tag in a Make Single Payment tobalance the transaction.
Clarification:You will need to specify the amount which you will give (offer), or which you expect to receive (demand).
Tips:This is the single most flexible tool in your negotiations toolkit. Use it to balance your own proposals, counter-propose to the AI faction'srequests (which are often weighted on their side quite a bit), buy large favours for your faction, and so forth. If you have a vast treasury,this is the tool to use to accomplish what would otherwise be impossible.
Regular Tribute (offer & demand)Stances: any
Description:
Page 33The Guild - frogbeastegg's Guide to Rome: Total War
02/11/2005 09:30:58http://forums.totalwar.org/vb/printthread.php?t=38382&pp=4
Like Make Single Payment, demanding and offering a regular tribute is a purely financial transaction. However, demanding tribute isdemoralising to anyone receiving such a demand, and is often viewed as a hostile action. Demanding and getting Regular Tributedamages the enemy's ability to create an army, build defences, make city improvements, and recover losses from any ongoing wars.Being under such an arrangement is often intolerable, and will often lead to renewed battle.
Clarification:When demanding tribute, you will need to specify the amount per six-month turn you wish to be given, and the number of turns that thisshould continue.
Tips:Demanding Regular Tribute is often the sign that a faction is near the end of its lifespan. If accepted, it can put a tremendous strain onthe resources of a faction, thus weakening it in all areas. A strong enemy will never accede to a request for Regular Tribute. A weak orrecently beaten enemy will accept it simply for survival's sake. A strong ally may accede to a Regular Tribute request if you've given overa lucrative province in exchange for nothing but cash, and you want to avoid hitting them up for a mountain of cash with Make SinglePayment.
Map Information (offer & demand)Stances: any
Description:This is the most basic form of interaction between factions. In a unilateral Map Information negotiation, one side gives their MapInformation to another faction either as a good-will gift, or for cash. The side that buys the map gets to see all city, resource, andinfrastructure information the map holder has seen. In a bilateral Map Information transaction, they give you their map of the world, andyou give them yours. When you do, you gain the ability to see all the cities, resources, infrastructure, etc, that your negotiation partnerhas seen, and they have the same privilege with your information. Once you have bought the Map Information of another faction, yourcampaign map changes to reflect the changing ownership of settlements that were on the map at the time you bought it. So ifThemiskyra happens to be on a map you bought from the Parthians, you can keep an eye on who owns the place for an indefinite lengthof time without needing agents in the area. Map Information is a nice prelude to a request for Trade Rights, sometimes coming in as anecessary prelude.
Clarification:No more information needed.
Tips:The simplest use of a Map Information offer is to offer it and leave your demand open (blank). This allows your negotiation partner toname their price for your map information. This is a great way to pad your treasury early in the game. You can make anywhere from2000 to 4000 denarii per transaction by offering your map information in this way. Coupled with a Map Information demand, a MapInformation offer is a simple exchange, as described above. They will appreciate the shared knowledge, and you gain some informationyou likely lacked about city ownership and province infrastructure. Map exchanges like this can help lead to friendly relations such asTrade Rights or Alliance. When you initially find another faction, a map offer or exchange is a good way to break the ice. Later, or even inthe same negotiation session after they've accepted a map from you, bargain for Trade Rights. Even if the faction in question is much tofar away to be an effective trading partner, this agreement can only help. With these two in the bag, you're well on your way to gainingan Alliance and everything that's possible after that.
Accept or We Will Attack (offer only)Stances: neutral or enemy
Description:If you add this chip to a negotiation, you are threatening your negotiating partner with painful consequences if they don't accept. Thisworks when you've had a string of victories over a faction and you know they're hurting. Time this threat badly, there is a very goodchance that the threat will be rebuffed, and you will find yourself out of diplomatic possibilities with this faction for several years.
Clarification:No more information needed.
Tips:When you've been pounding a faction into the dust and want to exert your diplomatic control over them, back off for a round or two,then send in a skilled diplomat. Demand a settlement, or that they become a protectorate, or any number of other demands, and foroffer simply click the "Accept or We Will Attack" option. If you do this right, this may be the best way to gain a faction as a Protectorate.
Ceasefire (offer only)Stances: enemy only
Description:Simple – you promise to stop butchering the other faction, and if they accept, then they promise to stop trying to attack you.
Clarification:No more information needed.
Tips:There are basically three situations in which to use Ceasefire: when you're getting your tail whipped and you want a break, when you'rein a fairly even but long-running conflict and need the resources to deal with another problem, or when you're decimating an enemy andthey are down to their last drop of life. In the first case, you'll need to offer something big, like Give Region or Regular Tribute tohave any hope of a Ceasefire being accepted. If they refuse with one of those two, then throw in a single payment if you can afford it. Inthe second case, the other side may be in the same situation, and you can simply offer the Ceasefire. They may demand more – if so, gofor Make Single Payment to balance out the difference if it's not too much. In the third case, offer a Ceasefire in conjunction with alarge demand – Regular Tribute, Give Region, or Become Protectorate are all in the realm of possibility here. Players have reportedreceiving over 12000 denarii in Regular Tribute from this Ceasefire scenario.
Page 34The Guild - frogbeastegg's Guide to Rome: Total War
02/11/2005 09:30:58http://forums.totalwar.org/vb/printthread.php?t=38382&pp=4
Become Protectorate (demand only)Stances: neutral or enemy
Description:When you demand that a faction become your protectorate, you are offering several things at once:
* All hostilities cease* You have full Military Access to their lands* Alliance and Trade Rights are guaranteed* The length of the Protectorate status is unspecified
You get no cash by default from gaining a faction as a Protectorate, nor can you use or disband their troops.
Clarification:No more information needed.
Tips:Players report that having a Protectorate seems to do no good for the conquering faction, while actually Becoming a protectorate isgreat... you can worry less about invasion, you pay no taxes to your conquerors, and you can use the time to recoup losses and buildyour economy. Protectorate status breaks down if you do anything to harm your status as Allies of the other faction.
There is not enough player experience with this option to know much more. It would be helpful to know, for example, if a faction who arein Protectorate status can be bled for cash more easily (by repeated demands for Make Single Payment, or Regular Tribute).
Senate Missions & Policy
The Senate keeps a list of its current policy toward all factions in the game. This can help you to plan your diplomatic activity, either tocoincide with the wishes of the Senate or to subtly thumb your nose at the Senate's agenda. To see this policy screen, simply click onyour faction's circular icon in the lower right section of the screen. The screen that opens up is the Faction Policy listing. Click on any ofthe faction icons to see a detailed description of current Senate policy toward that faction.
The Senate will sometimes tell you to send your diplomats on very specific missions. A list of these follow, with a description.
There are reports of players having never seen any of these in any of their games. The conditions behind their appearance remains amystery akin to those of the Good Goddess.
Send EmissaryThe Senate asks you to send an emissary to a specific faction, with no goal in mind besides diplomatic contact.
Demand TributeThe senate feels that a faction needs to recognise the superiority of Rome. It requests that you send a diplomat to demand a regulartribute payment. You will be rewarded depending on the size of the tribute you obtain.
Obtain SurrenderThe Senate feels that a faction has been weakened enough to make forcing surrender a realistic option. Send a diplomat and demandthat they become a Protectorate under Roman control.
Negotiate Return of Legionary EagleThe Senate would like to send a diplomat to negotiate the return of the Legionary Eagle a faction holds. The loss of the Eagle standard isan ongoing source of shame to the Legion that lost it, and there seems to be little chance of getting it back by military means.
Negotiate Settlement HandoverThe Senate feels that there is a realistic prospect of persuading the current owners to hand over a settlement by offering them anexchange for one less valuable to us. Send a diplomat and attempt to get them to hand it over.
Obtain Map InformationThe Senate asks that you send a diplomat to a faction and negotiate a treaty to obtain map information to extend Rome's knowledge ofthe world.
Get Trade AgreementThe Senate asks that you send a diplomat to a faction and negotiate a treaty to get trading rights for Rome.
Appease FactionThe Senate asks that you send a diplomat to a faction and get them to agree not to attack. Offer tribute or anything else that seemsreasonable. As a short term measure this is most important.
Provoke AttackThe Senate asks that you send a diplomat to a faction and see if you can provoke them in to making an attack against us. Rome wantsto be at war but does not want to appear to be the aggressor.
Peace TalksThe Senate asks that you send a diplomat to a faction and try to improve relations with this faction. No particular result is expected -just sending the diplomat and getting agreement on an offer is enough as a first step.
Make AllianceThe Senate asks that you send a diplomat to a faction and make an alliance with them.
Give CashAllied friends sometimes need financial support. The Senate asks that you make a single payment of at least one tenth of your annualincome to a faction.
Page 35The Guild - frogbeastegg's Guide to Rome: Total War
02/11/2005 09:30:58http://forums.totalwar.org/vb/printthread.php?t=38382&pp=4
That’s the end of Tamur’s section on diplomacy. Now for a few froggy notes, mostly emphasising some of Tamur’s points and giving myown experience.
Selling maps.You can sell your map for a nice profit each turn; I find I can usually get around 1,000 denarii per sale in the early game. I keep adiplomat near a city belonging to each faction I have contact with and sell them my map each turn. This is great training for thediplomats, and it keeps contact open and thereby seems to make alliances last longer. Finally it gives me more spending money in theearly, lean days while cutting back on my enemies spending money and hampering their growth. Selling maps is so powerful I wouldn’tbother if it didn’t keep my alliances alive for longer.
Bribery.This is so powerful I don’t use it any more. Bribery is dirt cheap in terms of both money and tactics; a couple of thousand denarii willremove a large, quite good army from the equation.
Keeping your alliances going.As I noted above I find my alliances will last much, much longer if I have repeated, sustained contact with that faction. Before I readTamur’s guide my alliances lasted around five turns at the most; now I have had alliances last for more than twenty turns.
Protectorates.As of 1.1 protectorates are bugged; they will inflict a significant, crippling drain on your finances each turn. Don’t use them, seriously.
Extort, bargain, negotiate.Never accept the AI’s first offer, and never ask for what you really want the first time. You can often bargain, getting a little more orreducing the price of what you want. If you want 1,000 denarii for your map start by asking for 1,500 or more, then work your waydown. You may even get the AI to agree to your outrageous request first time.
Pretty in purple: the Senate.
Ah, the Senate. A bunch of old men in togas with the feebleminded and insulting delusion that they can order you about, that they arethe true heart of the Roman Empire! What do we do with old men in togas, everybody? :everyone yells “kick their assess!”: No we donot, and Wayne, stop eating crayons! We are far more devious than that, oh yes, far more devious. Allow me to lapse off into myfictional writing and quote a character of mine, a spymaster by the abnormal name of Trempwick, here: “Love, fear, control of somethingor someone they care about; those are the three main ways to gain control over a person. Pick a person apart to see how they work,then apply that proverb and they are yours.” My Trempwick is one smart, sly, crafty, shifty beggar indeed and he has just summed upour dealings with the Senate in one bit of catchy dialogue, or at least I like to think so. The catchy, not the aim – I know about the aim,it’s the catchy that’s an issue. Maybe.
Love, ah yes, sweet, sweet love. You want the senate to love you; you want them to hang off your every word, to look after yourinterests, and to bend over backwards for you. What do you get if the Senate love you? Money, positions for your family, nice missions,support. If you are in good graces with the Senate then your job will be easier. How do you get the Senate to love you? There are twomain ways:1) Successfully complete at least some of the missions they give you. This also nets you a reward which can range from cash in hand, toa unit, to a guaranteed position in the next elections.2) Conquer nasty people. To check who the Senate want bashed look at your faction screen (click on the round thing with your logo onit), then on the senate screen, finally on policy. Work your way through the factions that are convenient for you to attack and note theones which the Senate has a hostile policy towards. Of course the old men like any conquest, so you can just pulp the lot nearest toyou.
When you are in good grace with the Senate then you are more likely to have your family assigned Senate offices. These offices are aGood Thing; they give assorted bonuses depending on the post, but even the least of them gives a bit of prestige to the recipient. Youhave to work your way up the ladder; you can’t just jump right in to consul.
When the Senate like you they give you easy tasks, ones which are useful for you to accomplish and often have good rewards at the endof them.
Fear; now we are turning things up a notch. As your family expands and becomes more powerful the Senate’s love will begin to fade,festering away under suspicion and fear. This is a delicate phase; if you keep a low profile you can easy go back to being loved; if youpush the envelope you will become truly feared. You can tell when the Senate fear you because it will say so on the Senate floor screen;check this often to find out public and Senate opinion of your family. Now, the Senate will begin to fear you for two reasons:1)You are growing large and powerful. They hate seeing power concentrated in the hands of but one family.2)You have become very popular with the people. Popularity with the plebs means they may offer you a chance to become emperor; theSenate fear this more than anything, an emperor is a king by another name and Rome hates kings.
When the Senate fear you then they begin to give you difficult, dangerous or downright impossible missions. They want you to fail. Yes,when they ask you to capture Londinium (London for those who don’t know) in 5 turns when all your armies are in Greece they want youto fail; they want to bring you down a peg or two and re-establish who is boss. If you actually manage to do the impossible and teleportyour armies to Britain the Senate will be glad Rome has gained but they will hate you for being good enough to pull it off, so expect tosee your rating with them get worse.
Note that the Senate can hate you; this is actually a different thing to fear. Hate is gained when you repeatedly fail missions and ignorethe Senate completely; often you can counter this by conquering the odd place or two which you will probably be doing anyway. Howeverif you do not conquer and do not accomplish the missions, essentially just sitting their picking your teeth, you have nothing to counterthe growing dislike. Hate has nothing to do with you being strong or beloved of the smelly populace, and everything to do with you beinga total loser.
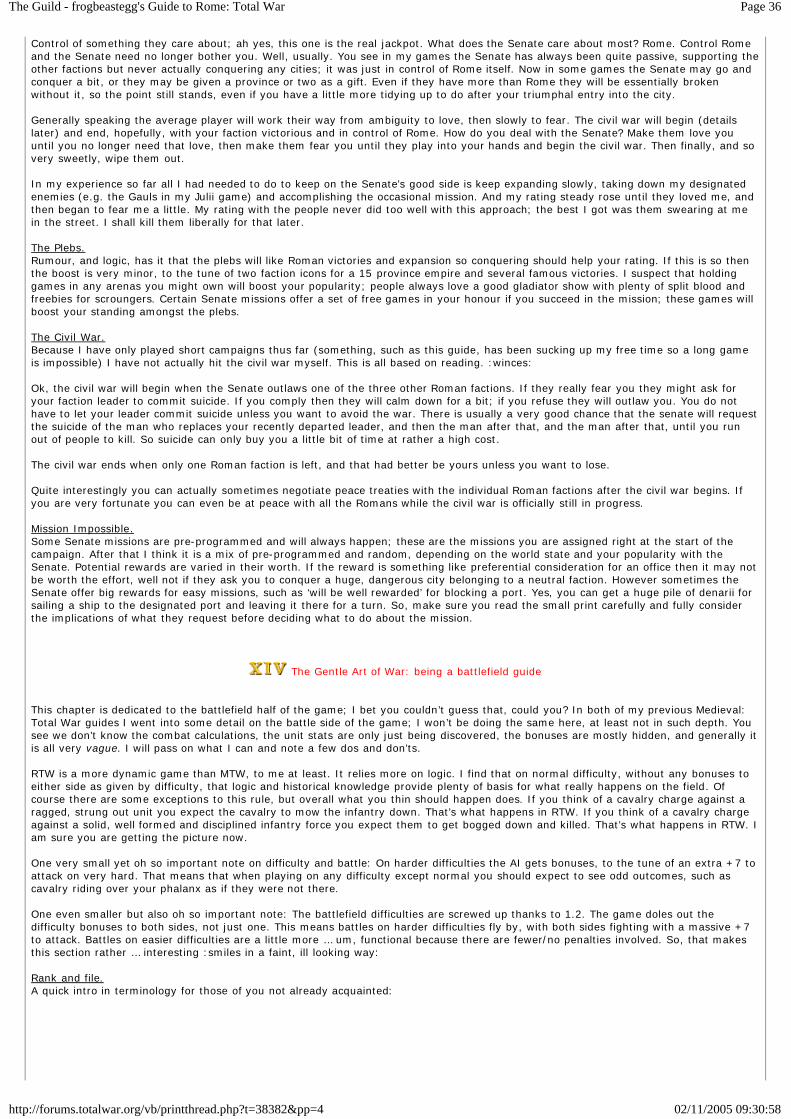
Page 36The Guild - frogbeastegg's Guide to Rome: Total War
02/11/2005 09:30:58http://forums.totalwar.org/vb/printthread.php?t=38382&pp=4
Control of something they care about; ah yes, this one is the real jackpot. What does the Senate care about most? Rome. Control Romeand the Senate need no longer bother you. Well, usually. You see in my games the Senate has always been quite passive, supporting theother factions but never actually conquering any cities; it was just in control of Rome itself. Now in some games the Senate may go andconquer a bit, or they may be given a province or two as a gift. Even if they have more than Rome they will be essentially brokenwithout it, so the point still stands, even if you have a little more tidying up to do after your triumphal entry into the city.
Generally speaking the average player will work their way from ambiguity to love, then slowly to fear. The civil war will begin (detailslater) and end, hopefully, with your faction victorious and in control of Rome. How do you deal with the Senate? Make them love youuntil you no longer need that love, then make them fear you until they play into your hands and begin the civil war. Then finally, and sovery sweetly, wipe them out.
In my experience so far all I had needed to do to keep on the Senate’s good side is keep expanding slowly, taking down my designatedenemies (e.g. the Gauls in my Julii game) and accomplishing the occasional mission. And my rating steady rose until they loved me, andthen began to fear me a little. My rating with the people never did too well with this approach; the best I got was them swearing at mein the street. I shall kill them liberally for that later.
The Plebs.Rumour, and logic, has it that the plebs will like Roman victories and expansion so conquering should help your rating. If this is so thenthe boost is very minor, to the tune of two faction icons for a 15 province empire and several famous victories. I suspect that holdinggames in any arenas you might own will boost your popularity; people always love a good gladiator show with plenty of split blood andfreebies for scroungers. Certain Senate missions offer a set of free games in your honour if you succeed in the mission; these games willboost your standing amongst the plebs.
The Civil War.Because I have only played short campaigns thus far (something, such as this guide, has been sucking up my free time so a long gameis impossible) I have not actually hit the civil war myself. This is all based on reading. :winces:
Ok, the civil war will begin when the Senate outlaws one of the three other Roman factions. If they really fear you they might ask foryour faction leader to commit suicide. If you comply then they will calm down for a bit; if you refuse they will outlaw you. You do nothave to let your leader commit suicide unless you want to avoid the war. There is usually a very good chance that the senate will requestthe suicide of the man who replaces your recently departed leader, and then the man after that, and the man after that, until you runout of people to kill. So suicide can only buy you a little bit of time at rather a high cost.
The civil war ends when only one Roman faction is left, and that had better be yours unless you want to lose.
Quite interestingly you can actually sometimes negotiate peace treaties with the individual Roman factions after the civil war begins. Ifyou are very fortunate you can even be at peace with all the Romans while the civil war is officially still in progress.
Mission Impossible.Some Senate missions are pre-programmed and will always happen; these are the missions you are assigned right at the start of thecampaign. After that I think it is a mix of pre-programmed and random, depending on the world state and your popularity with theSenate. Potential rewards are varied in their worth. If the reward is something like preferential consideration for an office then it may notbe worth the effort, well not if they ask you to conquer a huge, dangerous city belonging to a neutral faction. However sometimes theSenate offer big rewards for easy missions, such as ‘will be well rewarded’ for blocking a port. Yes, you can get a huge pile of denarii forsailing a ship to the designated port and leaving it there for a turn. So, make sure you read the small print carefully and fully considerthe implications of what they request before deciding what to do about the mission.
The Gentle Art of War: being a battlefield guide
This chapter is dedicated to the battlefield half of the game; I bet you couldn’t guess that, could you? In both of my previous Medieval:Total War guides I went into some detail on the battle side of the game; I won’t be doing the same here, at least not in such depth. Yousee we don’t know the combat calculations, the unit stats are only just being discovered, the bonuses are mostly hidden, and generally itis all very vague. I will pass on what I can and note a few dos and don’ts.
RTW is a more dynamic game than MTW, to me at least. It relies more on logic. I find that on normal difficulty, without any bonuses toeither side as given by difficulty, that logic and historical knowledge provide plenty of basis for what really happens on the field. Ofcourse there are some exceptions to this rule, but overall what you thin should happen does. If you think of a cavalry charge against aragged, strung out unit you expect the cavalry to mow the infantry down. That’s what happens in RTW. If you think of a cavalry chargeagainst a solid, well formed and disciplined infantry force you expect them to get bogged down and killed. That’s what happens in RTW. Iam sure you are getting the picture now.
One very small yet oh so important note on difficulty and battle: On harder difficulties the AI gets bonuses, to the tune of an extra +7 toattack on very hard. That means that when playing on any difficulty except normal you should expect to see odd outcomes, such ascavalry riding over your phalanx as if they were not there.
One even smaller but also oh so important note: The battlefield difficulties are screwed up thanks to 1.2. The game doles out thedifficulty bonuses to both sides, not just one. This means battles on harder difficulties fly by, with both sides fighting with a massive +7to attack. Battles on easier difficulties are a little more … um, functional because there are fewer/no penalties involved. So, that makesthis section rather … interesting :smiles in a faint, ill looking way:
Rank and file.A quick intro in terminology for those of you not already acquainted:
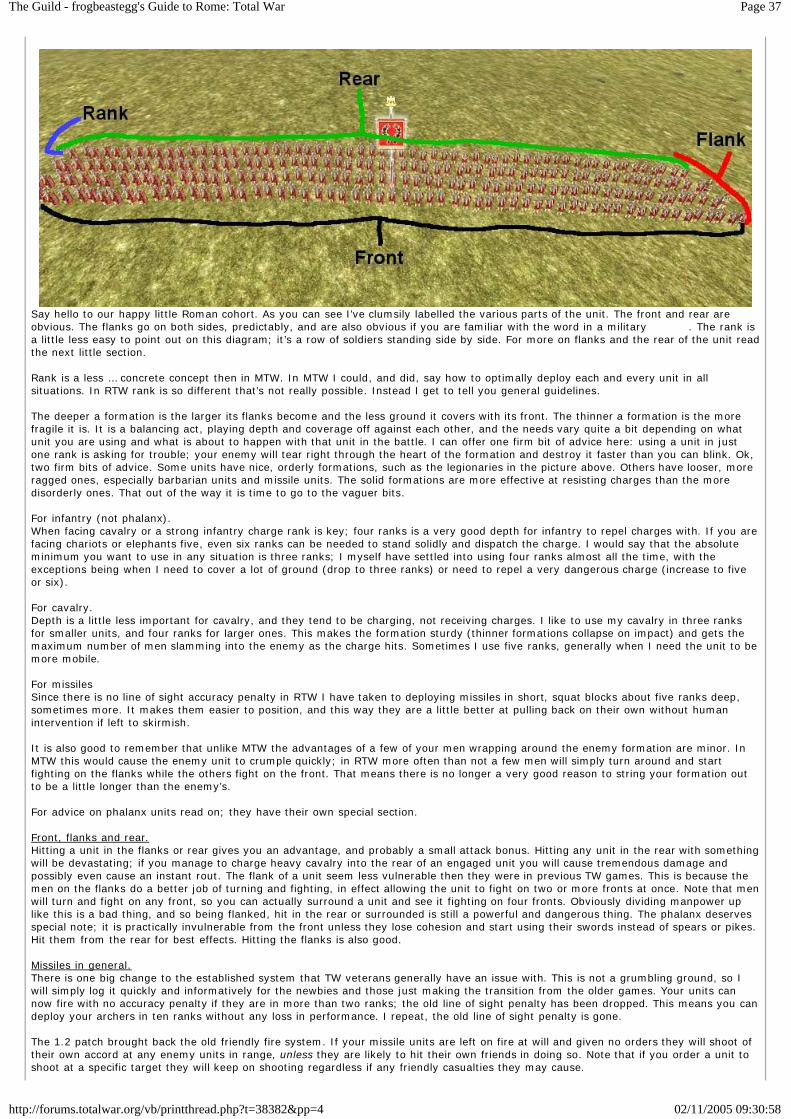
Page 37The Guild - frogbeastegg's Guide to Rome: Total War
02/11/2005 09:30:58http://forums.totalwar.org/vb/printthread.php?t=38382&pp=4
Say hello to our happy little Roman cohort. As you can see I’ve clumsily labelled the various parts of the unit. The front and rear areobvious. The flanks go on both sides, predictably, and are also obvious if you are familiar with the word in a military �������. The rank isa little less easy to point out on this diagram; it’s a row of soldiers standing side by side. For more on flanks and the rear of the unit readthe next little section.
Rank is a less … concrete concept then in MTW. In MTW I could, and did, say how to optimally deploy each and every unit in allsituations. In RTW rank is so different that’s not really possible. Instead I get to tell you general guidelines.
The deeper a formation is the larger its flanks become and the less ground it covers with its front. The thinner a formation is the morefragile it is. It is a balancing act, playing depth and coverage off against each other, and the needs vary quite a bit depending on whatunit you are using and what is about to happen with that unit in the battle. I can offer one firm bit of advice here: using a unit in justone rank is asking for trouble; your enemy will tear right through the heart of the formation and destroy it faster than you can blink. Ok,two firm bits of advice. Some units have nice, orderly formations, such as the legionaries in the picture above. Others have looser, moreragged ones, especially barbarian units and missile units. The solid formations are more effective at resisting charges than the moredisorderly ones. That out of the way it is time to go to the vaguer bits.
For infantry (not phalanx).When facing cavalry or a strong infantry charge rank is key; four ranks is a very good depth for infantry to repel charges with. If you arefacing chariots or elephants five, even six ranks can be needed to stand solidly and dispatch the charge. I would say that the absoluteminimum you want to use in any situation is three ranks; I myself have settled into using four ranks almost all the time, with theexceptions being when I need to cover a lot of ground (drop to three ranks) or need to repel a very dangerous charge (increase to fiveor six).
For cavalry.Depth is a little less important for cavalry, and they tend to be charging, not receiving charges. I like to use my cavalry in three ranksfor smaller units, and four ranks for larger ones. This makes the formation sturdy (thinner formations collapse on impact) and gets themaximum number of men slamming into the enemy as the charge hits. Sometimes I use five ranks, generally when I need the unit to bemore mobile.
For missilesSince there is no line of sight accuracy penalty in RTW I have taken to deploying missiles in short, squat blocks about five ranks deep,sometimes more. It makes them easier to position, and this way they are a little better at pulling back on their own without humanintervention if left to skirmish.
It is also good to remember that unlike MTW the advantages of a few of your men wrapping around the enemy formation are minor. InMTW this would cause the enemy unit to crumple quickly; in RTW more often than not a few men will simply turn around and startfighting on the flanks while the others fight on the front. That means there is no longer a very good reason to string your formation outto be a little longer than the enemy’s.
For advice on phalanx units read on; they have their own special section.
Front, flanks and rear.Hitting a unit in the flanks or rear gives you an advantage, and probably a small attack bonus. Hitting any unit in the rear with somethingwill be devastating; if you manage to charge heavy cavalry into the rear of an engaged unit you will cause tremendous damage andpossibly even cause an instant rout. The flank of a unit seem less vulnerable then they were in previous TW games. This is because themen on the flanks do a better job of turning and fighting, in effect allowing the unit to fight on two or more fronts at once. Note that menwill turn and fight on any front, so you can actually surround a unit and see it fighting on four fronts. Obviously dividing manpower uplike this is a bad thing, and so being flanked, hit in the rear or surrounded is still a powerful and dangerous thing. The phalanx deservesspecial note; it is practically invulnerable from the front unless they lose cohesion and start using their swords instead of spears or pikes.Hit them from the rear for best effects. Hitting the flanks is also good.
Missiles in general.There is one big change to the established system that TW veterans generally have an issue with. This is not a grumbling ground, so Iwill simply log it quickly and informatively for the newbies and those just making the transition from the older games. Your units cannow fire with no accuracy penalty if they are in more than two ranks; the old line of sight penalty has been dropped. This means you candeploy your archers in ten ranks without any loss in performance. I repeat, the old line of sight penalty is gone.
The 1.2 patch brought back the old friendly fire system. If your missile units are left on fire at will and given no orders they will shoot oftheir own accord at any enemy units in range, unless they are likely to hit their own friends in doing so. Note that if you order a unit toshoot at a specific target they will keep on shooting regardless if any friendly casualties they may cause.
Page 38The Guild - frogbeastegg's Guide to Rome: Total War
02/11/2005 09:30:58http://forums.totalwar.org/vb/printthread.php?t=38382&pp=4
Height is still a massive advantage to ranged units, increasing the damage they do and the range at which they can fire.
Rain and snow still dampens bowstrings, reducing both accuracy and range.
Armour reduces the effectiveness of missiles; heavily armoured units will only suffer a few casualties per volley as their armour protectsthem. Lightly armoured units will take heavy losses per volley.
Shields also protect men for missiles effectively; the larger the shield the better the protection. You can bypass the shield’s protection byshooting from the side or rear of a unit. You only need a 45 degree angle from the front to bypass the shield, so you do not need tostand right off to one side.
Archers.Archers are the basic ranged unit most people will understand instantly. They come in infantry and cavalry flavours; the cavalry versionis covered a bit later on. They shoot in an arc so you can position them behind your line and they will fire over the people in front. Theyhave good range, and some elite archer units like archer auxilia and Pharaoh’s bowmen have extra long range compared to other bowunits. Surprisingly arrows seem to be the most effective missile against heavily armoured enemies; I would have expected them to bethe least effective. You can send archers forward to skirmish and rely on the skirmish mode to bring them back to safety because theirrange is long enough to allow them to shoot a few volleys before the enemy close enough to force them to pull back. Note that yourarchers may pull back reliably but they may also move to a stupid location, such as in the middle of your heavy infantry line, and thencontinue shooting. If your archers stand in the middle of your infantry line and shoot you will suddenly notice half your front line is dead.For this reason I never leave archers to skirmish, preferring to control them myself or to keep them safely behind my front line firingoverhead. Arrows are not armour pericing.
Sling units.Sling units are the only unit in the game which will not shoot in an arc; they release their shot in a mostly flat trajectory, just like a gun.This means you should never place them behind another unit and leave them on fire at will or give them an order to shoot – they willvery often mow down the unit in front of them without a single bullet making it to the enemy. They have good range, though lower thanarchers, and because of their unique trajectory they cause a lot of deaths per volley. This is because any bullets which miss are likely tohit the man behind the original target. Slingers can be devastating. They have enough range that you can send them out in front of yourlines to skirmish, but due to their trajectory problems it’s best to control them yourself; if you don’t you might turn your attention backto your skirmishing slingers only to find they have wiped out half your army for you. An alternate line of skirmishing, the only one youshould drop to using after the battle lines have joined, involves running your skirmishers around to the flanks and rear of the enemy lineand unloading on them as they melee with your own front line. Slingers often have loads of ammo, in the form of bullets, so you can relyon them keeping up a sustained barrage for quite some time. You may like to know that sling bullets are not armour piercing.
Javelin units.Javelin units are short range skirmishers. They come in infantry and cavalry flavours; you can also find some units of heavy infantry(mostly Roman) who have a special variety of javelins called pilums. The heavy infantry version is covered in the section called ‘Romaninfantry and the pilum’ further down.
Javelins are more damaging per volley than arrows, as in they cause more deaths on average assuming all things are equal. They dohave a short range, shorter than the skirmish range so you will probably find your men run away without throwing so much as a singlejavelin if skirmish is on. Therefore most of the time you want to turn skirmish off, either turning it back on when you want the unit topull back to safety or withdrawing them manually. You get fewer shots per man with javelins than the other missile types; the actualnumber varies from unit type to unit type. The dedicated skirmishers have more missiles than the heavy infantry with javelins. Javelinsare thrown in an arc so you can position javelin using troops behind your front line and they will throw over the heads of the other units.Occasionally I find this courses problems with friendly fire, but not often as long as your javelins are not on a backwards slope and solower down than your front line.
Most javelin skirmishers are fast, so you can actually skirmish with them. Send them running out to throw a few volleys at the enemy asthey advance, then pull them back before the enemy reach them. Beware of cavalry when doing this; even the AI won’t miss the chanceto mow your skirmishers down and unlike the other missile units javelins have such a short range they have to get very close to theenemy to work. This means you don’t usually have time to pull them back before the cavalry hit and wipe them from the face of theplanet. Cavalry based skirmishers are usually fast enough to nip back out of the way, but they probably won’t have time to throw manyjavelins before the AI sends its cavalry to intercept. You can also send your javelin units around to throw into the flanks and rear of anenemy once battle is joined.
Ordinary javelins are not armour piercing. Pilums are.
Spears.Spear equipped units have a bonus against cavalry; the bonus is added on to the spear unit’s attack when facing cavalry of any type.Spears do not seem to receive a rank bonus in RTW, unlike in MTW. This means there is no pressing need to keep them in perfect order;remember that depth and cohesion help them take charges, so you shouldn’t spread them too thin or let them get too disordered if thatis your intent. A few hours of experimenting with spear troops against cavalry has lead me to believe that you should always but alwayscounter charge the cavalry. I found that almost every single time this lead to the spears winning faster, doing more damage and takingfewer casualties. I also found that three ranks was, quite surprisingly, the best for seeing off cavalry so long as I counter charged. If Istood to take the charge a deeper formation, four ranks, was predictably superior.
Spear units can and will beat sword units with similar stats. However my testing has revealed that the results of any such match ups areunpredictable; one time the spears will win, another the swords, and seemingly no clear reason for either outcome. Again, three ranksand counter charging really did help the spears out a lot. So remember your spears are not helpless little bunny rabbits; they can fightvery effectively, although you should probably keep a close eye on them and ensure that they are adequately supported.
The Phalanx.The phalanx is a tricky unit to use properly, although it is now much easier to get along with than in 1.0 and 1.1 thanks to some verynice changes made in the 1.2 patch. All the same it takes a little more practise and work to use these units to their best, but they can berewarding if you do master them.
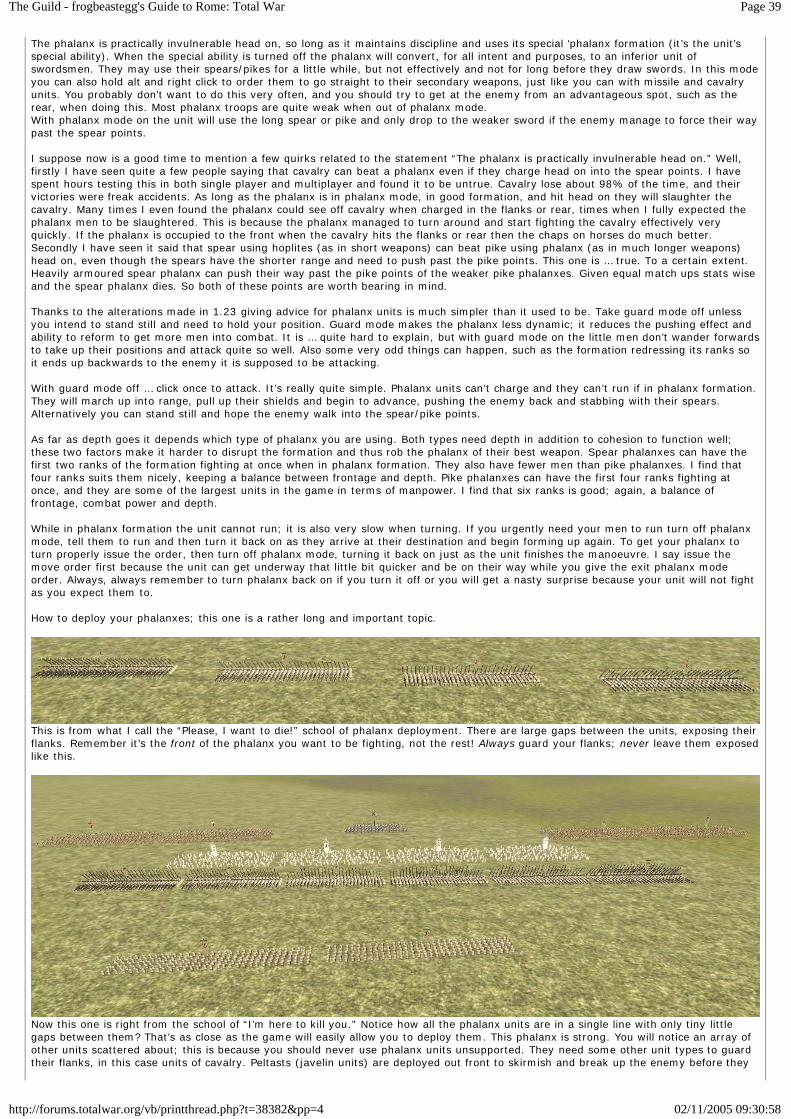
Page 39The Guild - frogbeastegg's Guide to Rome: Total War
02/11/2005 09:30:58http://forums.totalwar.org/vb/printthread.php?t=38382&pp=4
The phalanx is practically invulnerable head on, so long as it maintains discipline and uses its special ‘phalanx formation (it’s the unit’sspecial ability). When the special ability is turned off the phalanx will convert, for all intent and purposes, to an inferior unit ofswordsmen. They may use their spears/pikes for a little while, but not effectively and not for long before they draw swords. In this modeyou can also hold alt and right click to order them to go straight to their secondary weapons, just like you can with missile and cavalryunits. You probably don’t want to do this very often, and you should try to get at the enemy from an advantageous spot, such as therear, when doing this. Most phalanx troops are quite weak when out of phalanx mode.With phalanx mode on the unit will use the long spear or pike and only drop to the weaker sword if the enemy manage to force their waypast the spear points.
I suppose now is a good time to mention a few quirks related to the statement “The phalanx is practically invulnerable head on.” Well,firstly I have seen quite a few people saying that cavalry can beat a phalanx even if they charge head on into the spear points. I havespent hours testing this in both single player and multiplayer and found it to be untrue. Cavalry lose about 98% of the time, and theirvictories were freak accidents. As long as the phalanx is in phalanx mode, in good formation, and hit head on they will slaughter thecavalry. Many times I even found the phalanx could see off cavalry when charged in the flanks or rear, times when I fully expected thephalanx men to be slaughtered. This is because the phalanx managed to turn around and start fighting the cavalry effectively veryquickly. If the phalanx is occupied to the front when the cavalry hits the flanks or rear then the chaps on horses do much better.Secondly I have seen it said that spear using hoplites (as in short weapons) can beat pike using phalanx (as in much longer weapons)head on, even though the spears have the shorter range and need to push past the pike points. This one is … true. To a certain extent.Heavily armoured spear phalanx can push their way past the pike points of the weaker pike phalanxes. Given equal match ups stats wiseand the spear phalanx dies. So both of these points are worth bearing in mind.
Thanks to the alterations made in 1.23 giving advice for phalanx units is much simpler than it used to be. Take guard mode off unlessyou intend to stand still and need to hold your position. Guard mode makes the phalanx less dynamic; it reduces the pushing effect andability to reform to get more men into combat. It is … quite hard to explain, but with guard mode on the little men don’t wander forwardsto take up their positions and attack quite so well. Also some very odd things can happen, such as the formation redressing its ranks soit ends up backwards to the enemy it is supposed to be attacking.
With guard mode off … click once to attack. It’s really quite simple. Phalanx units can’t charge and they can’t run if in phalanx formation.They will march up into range, pull up their shields and begin to advance, pushing the enemy back and stabbing with their spears.Alternatively you can stand still and hope the enemy walk into the spear/pike points.
As far as depth goes it depends which type of phalanx you are using. Both types need depth in addition to cohesion to function well;these two factors make it harder to disrupt the formation and thus rob the phalanx of their best weapon. Spear phalanxes can have thefirst two ranks of the formation fighting at once when in phalanx formation. They also have fewer men than pike phalanxes. I find thatfour ranks suits them nicely, keeping a balance between frontage and depth. Pike phalanxes can have the first four ranks fighting atonce, and they are some of the largest units in the game in terms of manpower. I find that six ranks is good; again, a balance offrontage, combat power and depth.
While in phalanx formation the unit cannot run; it is also very slow when turning. If you urgently need your men to run turn off phalanxmode, tell them to run and then turn it back on as they arrive at their destination and begin forming up again. To get your phalanx toturn properly issue the order, then turn off phalanx mode, turning it back on just as the unit finishes the manoeuvre. I say issue themove order first because the unit can get underway that little bit quicker and be on their way while you give the exit phalanx modeorder. Always, always remember to turn phalanx back on if you turn it off or you will get a nasty surprise because your unit will not fightas you expect them to.
How to deploy your phalanxes; this one is a rather long and important topic.
This is from what I call the “Please, I want to die!” school of phalanx deployment. There are large gaps between the units, exposing theirflanks. Remember it’s the front of the phalanx you want to be fighting, not the rest! Always guard your flanks; never leave them exposedlike this.
Now this one is right from the school of “I’m here to kill you.” Notice how all the phalanx units are in a single line with only tiny littlegaps between them? That’s as close as the game will easily allow you to deploy them. This phalanx is strong. You will notice an array ofother units scattered about; this is because you should never use phalanx units unsupported. They need some other unit types to guardtheir flanks, in this case units of cavalry. Peltasts (javelin units) are deployed out front to skirmish and break up the enemy before they
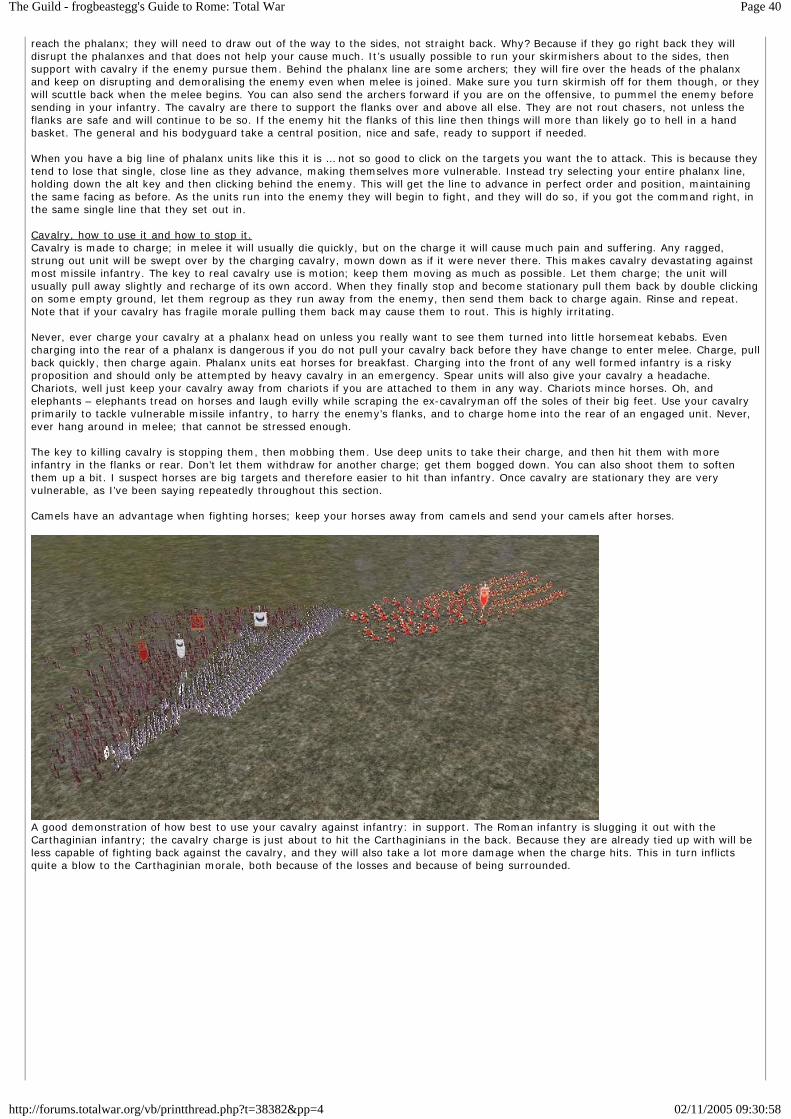
Page 40The Guild - frogbeastegg's Guide to Rome: Total War
02/11/2005 09:30:58http://forums.totalwar.org/vb/printthread.php?t=38382&pp=4
reach the phalanx; they will need to draw out of the way to the sides, not straight back. Why? Because if they go right back they willdisrupt the phalanxes and that does not help your cause much. It’s usually possible to run your skirmishers about to the sides, thensupport with cavalry if the enemy pursue them. Behind the phalanx line are some archers; they will fire over the heads of the phalanxand keep on disrupting and demoralising the enemy even when melee is joined. Make sure you turn skirmish off for them though, or theywill scuttle back when the melee begins. You can also send the archers forward if you are on the offensive, to pummel the enemy beforesending in your infantry. The cavalry are there to support the flanks over and above all else. They are not rout chasers, not unless theflanks are safe and will continue to be so. If the enemy hit the flanks of this line then things will more than likely go to hell in a handbasket. The general and his bodyguard take a central position, nice and safe, ready to support if needed.
When you have a big line of phalanx units like this it is … not so good to click on the targets you want the to attack. This is because theytend to lose that single, close line as they advance, making themselves more vulnerable. Instead try selecting your entire phalanx line,holding down the alt key and then clicking behind the enemy. This will get the line to advance in perfect order and position, maintainingthe same facing as before. As the units run into the enemy they will begin to fight, and they will do so, if you got the command right, inthe same single line that they set out in.
Cavalry, how to use it and how to stop it.Cavalry is made to charge; in melee it will usually die quickly, but on the charge it will cause much pain and suffering. Any ragged,strung out unit will be swept over by the charging cavalry, mown down as if it were never there. This makes cavalry devastating againstmost missile infantry. The key to real cavalry use is motion; keep them moving as much as possible. Let them charge; the unit willusually pull away slightly and recharge of its own accord. When they finally stop and become stationary pull them back by double clickingon some empty ground, let them regroup as they run away from the enemy, then send them back to charge again. Rinse and repeat.Note that if your cavalry has fragile morale pulling them back may cause them to rout. This is highly irritating.
Never, ever charge your cavalry at a phalanx head on unless you really want to see them turned into little horsemeat kebabs. Evencharging into the rear of a phalanx is dangerous if you do not pull your cavalry back before they have change to enter melee. Charge, pullback quickly, then charge again. Phalanx units eat horses for breakfast. Charging into the front of any well formed infantry is a riskyproposition and should only be attempted by heavy cavalry in an emergency. Spear units will also give your cavalry a headache.Chariots, well just keep your cavalry away from chariots if you are attached to them in any way. Chariots mince horses. Oh, andelephants – elephants tread on horses and laugh evilly while scraping the ex-cavalryman off the soles of their big feet. Use your cavalryprimarily to tackle vulnerable missile infantry, to harry the enemy’s flanks, and to charge home into the rear of an engaged unit. Never,ever hang around in melee; that cannot be stressed enough.
The key to killing cavalry is stopping them, then mobbing them. Use deep units to take their charge, and then hit them with moreinfantry in the flanks or rear. Don’t let them withdraw for another charge; get them bogged down. You can also shoot them to softenthem up a bit. I suspect horses are big targets and therefore easier to hit than infantry. Once cavalry are stationary they are veryvulnerable, as I’ve been saying repeatedly throughout this section.
Camels have an advantage when fighting horses; keep your horses away from camels and send your camels after horses.
A good demonstration of how best to use your cavalry against infantry: in support. The Roman infantry is slugging it out with theCarthaginian infantry; the cavalry charge is just about to hit the Carthaginians in the back. Because they are already tied up with will beless capable of fighting back against the cavalry, and they will also take a lot more damage when the charge hits. This in turn inflictsquite a blow to the Carthaginian morale, both because of the losses and because of being surrounded.
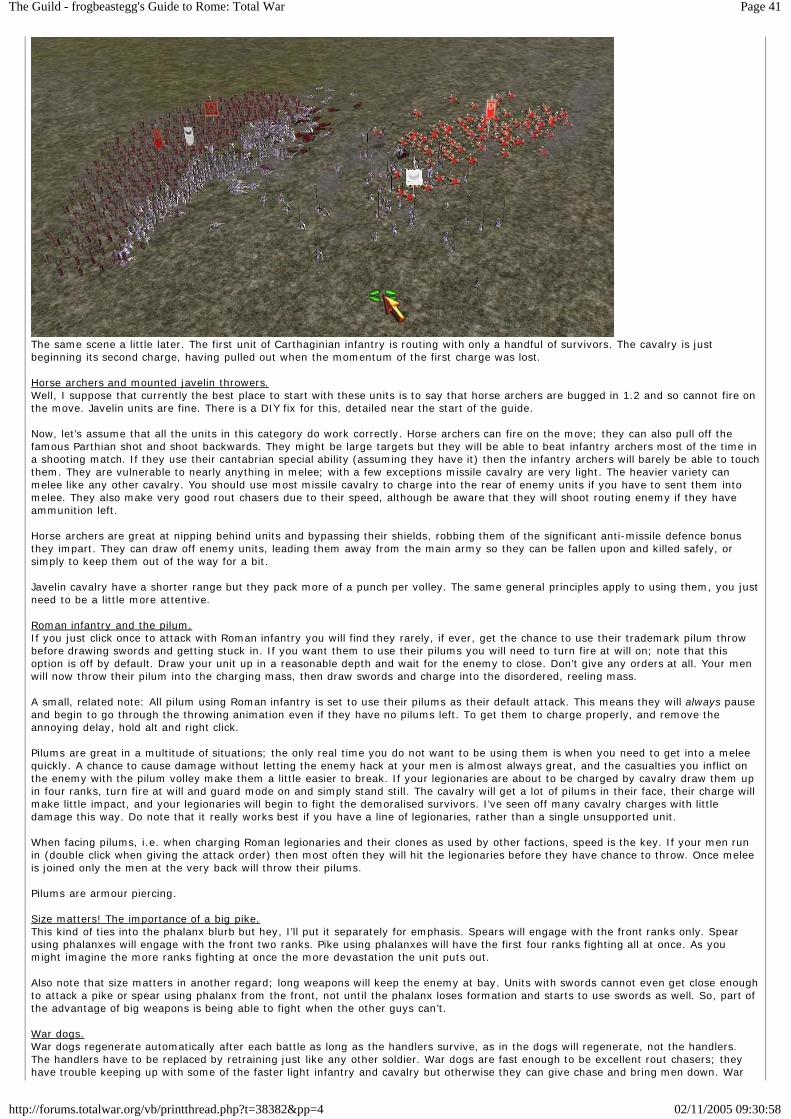
Page 41The Guild - frogbeastegg's Guide to Rome: Total War
02/11/2005 09:30:58http://forums.totalwar.org/vb/printthread.php?t=38382&pp=4
The same scene a little later. The first unit of Carthaginian infantry is routing with only a handful of survivors. The cavalry is justbeginning its second charge, having pulled out when the momentum of the first charge was lost.
Horse archers and mounted javelin throwers.Well, I suppose that currently the best place to start with these units is to say that horse archers are bugged in 1.2 and so cannot fire onthe move. Javelin units are fine. There is a DIY fix for this, detailed near the start of the guide.
Now, let’s assume that all the units in this category do work correctly. Horse archers can fire on the move; they can also pull off thefamous Parthian shot and shoot backwards. They might be large targets but they will be able to beat infantry archers most of the time ina shooting match. If they use their cantabrian special ability (assuming they have it) then the infantry archers will barely be able to touchthem. They are vulnerable to nearly anything in melee; with a few exceptions missile cavalry are very light. The heavier variety canmelee like any other cavalry. You should use most missile cavalry to charge into the rear of enemy units if you have to sent them intomelee. They also make very good rout chasers due to their speed, although be aware that they will shoot routing enemy if they haveammunition left.
Horse archers are great at nipping behind units and bypassing their shields, robbing them of the significant anti-missile defence bonusthey impart. They can draw off enemy units, leading them away from the main army so they can be fallen upon and killed safely, orsimply to keep them out of the way for a bit.
Javelin cavalry have a shorter range but they pack more of a punch per volley. The same general principles apply to using them, you justneed to be a little more attentive.
Roman infantry and the pilum.If you just click once to attack with Roman infantry you will find they rarely, if ever, get the chance to use their trademark pilum throwbefore drawing swords and getting stuck in. If you want them to use their pilums you will need to turn fire at will on; note that thisoption is off by default. Draw your unit up in a reasonable depth and wait for the enemy to close. Don’t give any orders at all. Your menwill now throw their pilum into the charging mass, then draw swords and charge into the disordered, reeling mass.
A small, related note: All pilum using Roman infantry is set to use their pilums as their default attack. This means they will always pauseand begin to go through the throwing animation even if they have no pilums left. To get them to charge properly, and remove theannoying delay, hold alt and right click.
Pilums are great in a multitude of situations; the only real time you do not want to be using them is when you need to get into a meleequickly. A chance to cause damage without letting the enemy hack at your men is almost always great, and the casualties you inflict onthe enemy with the pilum volley make them a little easier to break. If your legionaries are about to be charged by cavalry draw them upin four ranks, turn fire at will and guard mode on and simply stand still. The cavalry will get a lot of pilums in their face, their charge willmake little impact, and your legionaries will begin to fight the demoralised survivors. I’ve seen off many cavalry charges with littledamage this way. Do note that it really works best if you have a line of legionaries, rather than a single unsupported unit.
When facing pilums, i.e. when charging Roman legionaries and their clones as used by other factions, speed is the key. If your men runin (double click when giving the attack order) then most often they will hit the legionaries before they have chance to throw. Once meleeis joined only the men at the very back will throw their pilums.
Pilums are armour piercing.
Size matters! The importance of a big pike.This kind of ties into the phalanx blurb but hey, I’ll put it separately for emphasis. Spears will engage with the front ranks only. Spearusing phalanxes will engage with the front two ranks. Pike using phalanxes will have the first four ranks fighting all at once. As youmight imagine the more ranks fighting at once the more devastation the unit puts out.
Also note that size matters in another regard; long weapons will keep the enemy at bay. Units with swords cannot even get close enoughto attack a pike or spear using phalanx from the front, not until the phalanx loses formation and starts to use swords as well. So, part ofthe advantage of big weapons is being able to fight when the other guys can’t.
War dogs.War dogs regenerate automatically after each battle as long as the handlers survive, as in the dogs will regenerate, not the handlers.The handlers have to be replaced by retraining just like any other soldier. War dogs are fast enough to be excellent rout chasers; theyhave trouble keeping up with some of the faster light infantry and cavalry but otherwise they can give chase and bring men down. War
Page 42The Guild - frogbeastegg's Guide to Rome: Total War
02/11/2005 09:30:58http://forums.totalwar.org/vb/printthread.php?t=38382&pp=4
dogs are very effective against phalanx units because they get past the spears and start shredding the men who are not very wellequipped to handle dogs. Aside from phalanx units war dogs are most effective against rabble type units; heavy infantry will usually seethem off without too many problems. They are also quite effective against stationary cavalry. It is impossible for you to issue and attackorder targeting the unleashed dogs themselves; you can only give orders to attack the handlers, and that does not help much one thedogs are loose. If a unit is being eaten by dogs about all you can do is leave them to fight alone, perhaps ordering another friendly unitto stand in the same spot with the hopes that those men will also begin to attack the dogs.
Ballistae.Ballistae can shoot down the gates of wooden and palisade walls. This saves you a turn or two building siege equipment.
Alternate attacks, getting missiles to melee and so on.All missile units have a melee weapon of some sort; usually it is a crappy weapon but better than nothing in a tight pinch. You can orderthem to melee by holding alt and right clicking. Note that you do have to turn skirmish mode off if you want your unit to melee,otherwise they will keep dodging back and the whole thing begins to resemble a farce.
Most cavalry has two weapons, usually a lance or spear of some sort and then a sword, mace or other short weapon. The lance or speardoes more damage on the charge, but in melee it is not as effective. You can hold alt and right click to attack; this causes the cavalry tocharge with the spear/lance and then draw their secondary weapon, if they have one. Heaven knows why they don’t do thisautomatically ...
Skirmish mode.Skirmish mode is actually useful this time, as long as you keep an eye on skirmishing units and steer them out of any trouble they maybe working their way towards. Generally it is quite reliable at keeping your units out of enemy reach. Do remember that chaps on footcan’t outrun horses.
Cantabrian circle.This special ability is used by some missile cavalry units. It enables them to keep up a constant, morale sapping stream of missiles on atarget unit. It also makes them very hard to hit with missile weapons. It does tire them out rapidly though, and it is a reasonable targetfor hostile cavalry to charge.
Wedge.Wedge is a special formation certain units of cavalry can use, usually heavy cavalry. As you might guess from the name your cavalry willform up in a wedge shape with one man at the front, two men behind him, and so on. Because the guy at the front is the unit’s leaderyou should avoid using this formation if your general is in the unit – Alexander the Great may have survived leading many cavalrycharges but chances are your own generals will not share his luck.
In my experience wedge formation is best when facing a thinly strung out enemy formation; the wedge will punch through the centre ofthe enemy unit and keep going before wheeling around to charge into the unit’s back. Against denser formations the wedge will stallbefore more than a handful of men have started fighting. When charging dense formations it is best to use a line; you get more men intothe fight right from the start and therefore do a lot more damage. Once your cavalry charge has halted you will want to take your unitout of wedge so it can fight more effectively or you will want to order them away from the melee to charge again. Don’t let them meleein wedge; it’s not too effective.
Guard mode.Guard mode makes a unit keep its formation as best as possible and remain on the same spot as far as it possible. It prevents a unitfrom chasing routers. Giving the unit a move or attack order will override the stay put function of guard, but they will still try to keeptheir formation. If you have given an attack order they will chase the routers. Guard mode is good in some circumstances, such asholding a defensive line, but in melee it can be a real pain. I often find units with guard on don’t engage properly and then slowly rotateand reform after the charge so their back is facing the enemy. Yes, that means the enemy gets a huge advantage.
You’re test(udo)ing my patience!The testudo formation that the post Marius reform legionaries use makes them quite immune to missile fire … small missile fire, catapultboulders still squash men flat. It is terrible for melee, men tire quickly in the formation, and the transition to and from testudo is slow.It’s really only useful when you need to advance under heavy missile fire and don’t need to fight or defend yourself at the end of it all.
Pulverising problematic pachyderms.Since I have yet to encounter elephants on the battlefield I shall quote Mike B in CA’s official FAQ: “Burning pigs and siege artillery arethe classic counters. Defeating elephants depends on the circumstances where the elephants are used, but usually fighting head-to-headwith them will result in a lot of casualties before the elephants drop. We favour hanging back and hitting them with as many missileweapons as possible, as quickly as possible. Sometimes you might have to sacrifice a unit as a 'speed bump' to delay the elephants andgive your missile troops more time but nothing in Rome: Total War is invincible or undefeatable.”
I will also add that phalanx units will kill elephants quite nicely so long as the phalanx keeps formation and engages the elephants headon. If the bit grey lugs get to the phalanx’s flanks or rear expect Pain with a capital P. For this reason it’s a good idea to try and get aline of several phalanx units to tackle elephants.
The wheels on the chariot go round and round, round and round [a children’s song from 2000BC]Chariots are a bit of a problem. One rule of thumb I now obey as far as possible is to keep my own cavalry and other quite looselyformed units away from chariots. I try to shoot them as much as possible to cause what damage I can. When melee is forced I try to hitthem with densely formed, disciplined infantry. Once the chariots are stopped they are dispatched reasonably easily.
Flaming ammo.All archers along with catapult based siege equipment can fire flaming ammunition. Flaming ammunition is less accurate thanconventional ammo but it causes a bigger morale hit when (if!) it actually does hit its target. The flaming pots fired by onagers will causemore casualties than normal ammo if it hits down in the centre of a tightly packed mass of men, but it is so inaccurate this effect is rare.Flaming ammo can also set fire to buildings; burning buildings will take constant, steady damage.
Fatigue.
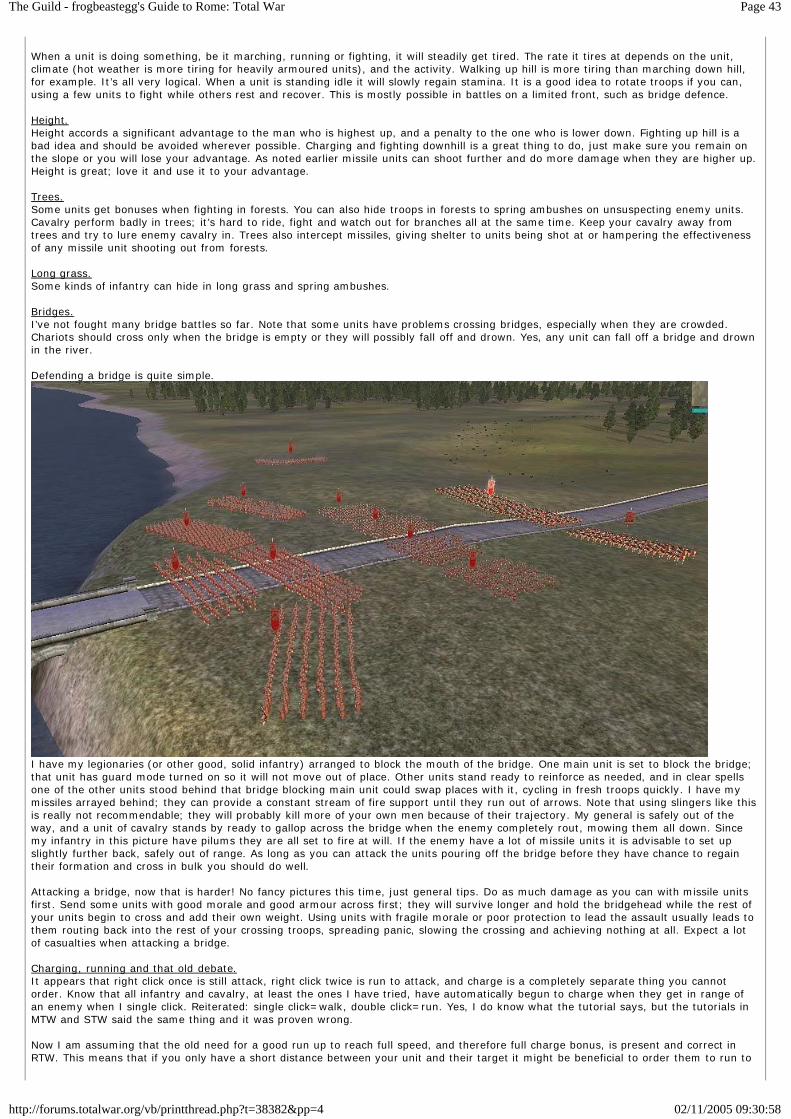
Page 43The Guild - frogbeastegg's Guide to Rome: Total War
02/11/2005 09:30:58http://forums.totalwar.org/vb/printthread.php?t=38382&pp=4
When a unit is doing something, be it marching, running or fighting, it will steadily get tired. The rate it tires at depends on the unit,climate (hot weather is more tiring for heavily armoured units), and the activity. Walking up hill is more tiring than marching down hill,for example. It’s all very logical. When a unit is standing idle it will slowly regain stamina. It is a good idea to rotate troops if you can,using a few units to fight while others rest and recover. This is mostly possible in battles on a limited front, such as bridge defence.
Height.Height accords a significant advantage to the man who is highest up, and a penalty to the one who is lower down. Fighting up hill is abad idea and should be avoided wherever possible. Charging and fighting downhill is a great thing to do, just make sure you remain onthe slope or you will lose your advantage. As noted earlier missile units can shoot further and do more damage when they are higher up.Height is great; love it and use it to your advantage.
Trees.Some units get bonuses when fighting in forests. You can also hide troops in forests to spring ambushes on unsuspecting enemy units.Cavalry perform badly in trees; it’s hard to ride, fight and watch out for branches all at the same time. Keep your cavalry away fromtrees and try to lure enemy cavalry in. Trees also intercept missiles, giving shelter to units being shot at or hampering the effectivenessof any missile unit shooting out from forests.
Long grass.Some kinds of infantry can hide in long grass and spring ambushes.
Bridges.I’ve not fought many bridge battles so far. Note that some units have problems crossing bridges, especially when they are crowded.Chariots should cross only when the bridge is empty or they will possibly fall off and drown. Yes, any unit can fall off a bridge and drownin the river.
Defending a bridge is quite simple.
I have my legionaries (or other good, solid infantry) arranged to block the mouth of the bridge. One main unit is set to block the bridge;that unit has guard mode turned on so it will not move out of place. Other units stand ready to reinforce as needed, and in clear spellsone of the other units stood behind that bridge blocking main unit could swap places with it, cycling in fresh troops quickly. I have mymissiles arrayed behind; they can provide a constant stream of fire support until they run out of arrows. Note that using slingers like thisis really not recommendable; they will probably kill more of your own men because of their trajectory. My general is safely out of theway, and a unit of cavalry stands by ready to gallop across the bridge when the enemy completely rout, mowing them all down. Sincemy infantry in this picture have pilums they are all set to fire at will. If the enemy have a lot of missile units it is advisable to set upslightly further back, safely out of range. As long as you can attack the units pouring off the bridge before they have chance to regaintheir formation and cross in bulk you should do well.
Attacking a bridge, now that is harder! No fancy pictures this time, just general tips. Do as much damage as you can with missile unitsfirst. Send some units with good morale and good armour across first; they will survive longer and hold the bridgehead while the rest ofyour units begin to cross and add their own weight. Using units with fragile morale or poor protection to lead the assault usually leads tothem routing back into the rest of your crossing troops, spreading panic, slowing the crossing and achieving nothing at all. Expect a lotof casualties when attacking a bridge.
Charging, running and that old debate.It appears that right click once is still attack, right click twice is run to attack, and charge is a completely separate thing you cannotorder. Know that all infantry and cavalry, at least the ones I have tried, have automatically begun to charge when they get in range ofan enemy when I single click. Reiterated: single click=walk, double click=run. Yes, I do know what the tutorial says, but the tutorials inMTW and STW said the same thing and it was proven wrong.
Now I am assuming that the old need for a good run up to reach full speed, and therefore full charge bonus, is present and correct inRTW. This means that if you only have a short distance between your unit and their target it might be beneficial to order them to run to
Page 44The Guild - frogbeastegg's Guide to Rome: Total War
02/11/2005 09:30:58http://forums.totalwar.org/vb/printthread.php?t=38382&pp=4
the attack, giving them more impetus. Cavalry in MTW benefited greatly from running for a bit first, because their charge threshold (thedistance at which they began their charge) was too low for them to reach full speed. If they were travelling faster when the charge beganthey gathered more of a bonus.
Um, in summery this is still under investigation and none of this should be taken as 100% fact, but in my experience charging is stillautomatic and double click is still only run. I order units with a double click if I need them to close quickly, if the enemy are alreadyclose, or if they are cavalry. Two of these three are motivated by the desire to get them moving quickly now so as to stand more changeof hitting that full bonus, one is motive solely by the desire to get close quickly for some reason, such as a vulnerability in enemy lines,or incoming missile fire.
Sieges.In the set up phase on the campaign map the siege equipment you will be able to build depends on the level of fortifications present inthe city. Wooden walls only need battering rams, and so this is all you will be able to build. Stone walls require tougher equipment soyou can choose from siege towers, sapping points and a few other bits and pieces. Note that while the more advanced types of stonewalls look as though they have exactly the same siege equipment this is not exactly the case; siege towers will be taller, tougher andarmed with more effective weaponry (including ballistae) with which to cover the assault. You can also bring your own portable siegeweaponry, such as onagers. Elephants can also ram doors down. Your army will have a certain number of build points, depending onwhat units make it up. Each item of siege weaponry costs a certain number of points to build; most of them take one turn but I havehear it is possible to build some in less than a turn if your army has enough build points. At the least large armies can build several bitsof weaponry in one turn because they have more points than small ones. Make sure you use as many of your points as possible, anddon’t skimp on siege weaponry. There is little worse than turning up with just two battering rams, only to find they are both destroyedand you can’t get in past the walls. When faced with stone walls and a lack of onagers I like sap points. I use a cheap, expendable unitto do the sapping, and then mob the dirty great hole in the wall with my shock troops. Several holes are better than one, so set upseveral sap points.
The central square, marked by those nice faction related flags, is the objective of the attacking army; if they have men in the centralsquare and there are no defenders present a countdown of three minutes will begin. Unless the defenders manage to get some men backinto the central square before the time runs out the attacks will win regardless of how many defenders are left. The siege will also endwith victory for the attackers if there are no defenders left alive, or if the last few defenders are routing. The central square gives unitsinfinite morale; they will steadfastly fight to the death and any routing units will head for the square. However if the last few men arerouting towards the square but are not actually in the flagged area the attackers will win.
Never, ever go in through the front gate in stone walls – your troops will be boiled with oil! This includes gates a spy has opened for you;the daft idiot opens the gate but leaves the boiling oil intact. Spies must get some sick pleasure from seeing their compatriots get burnedalive. Bash a hole in the walls or use siege equipment to get on top of the walls, then capture the gatehouse, then you can send yourmen in through the gate because the oil is disabled.
On stone walls towers will only stop shooting arrows if you capture them. Select a unit of infantry and click on the wall top near thetower; the infantry should enter the tower and climb up onto the walls, capturing the tower in the process. If your infantry are alreadyon the walls just tell them to walk to the walls on the other side of the tower; they will then pass through the tower and capture it. NoteI keep saying should; in my limited experience with stone walls my troops just dither around doing nothing and getting shot to bitsthanks to the dodgy pathfinding. Which brings me to my next point.
Siege towers have their own weaponry mounted on them, as I briefly mentioned before. They can only attack if you turn fire at will on.Do so; having repeating ballistas sweep the top of that epic stone wall you are assaulting really helps your men out.
The battle timer.The more units you have in a battle the longer the time you will be allotted. With patch 1.2 you can turn the timer off in the options atthe start of a campaign.
[u]Unit guide]I have not produced my own unit guide for RTW, and as far as I know there are no guides by other people in the same style as my unitguide for MTW and STW. However I have been given a link to Soulflame’s unit guide which contains all the unit stats and unit availability.
frogbeastegg 19/10/04 22:04
Re: A Beginner's Guide to Rome: Total War
15. Iz da r0x0rzz!!!1! I w1nn3d da camap1gnz!!11 Or in English: I’m not a newbie any more, now what?
So you finished your first Roman campaign and feel you know and understand everything in this guide; lucky you. Now you might wantto try playing as one of the other factions in campaign mode; they will provide a very different experience and you will have to useeverything you learned to adapt and tackle their unique challenges. You might want to try a longer campaign, if you played a short onebefore, or perhaps a short one if you did a long campaign. You can try ramping up the two difficulties. You could go and give multiplayera go. Really from here on you have plenty of options.
Details on the other factions in the same mould as details on the Roman factions would go here if I had any. Oh well, I’ll handle that in alater version.
16. Appendix A: A guide to temples
This section is entirely the work of Sinner. Many thanks to him for letting me use this.
JULII
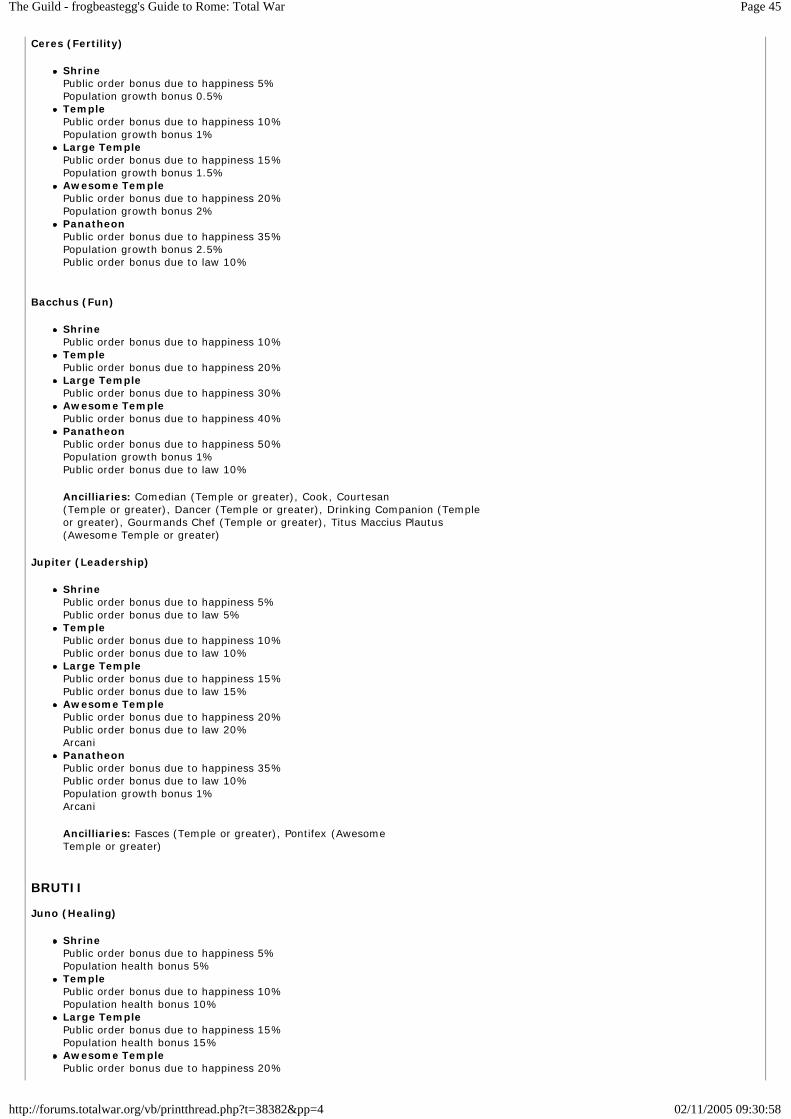
Page 45The Guild - frogbeastegg's Guide to Rome: Total War
02/11/2005 09:30:58http://forums.totalwar.org/vb/printthread.php?t=38382&pp=4
Ceres (Fertility)
ShrinePublic order bonus due to happiness 5%Population growth bonus 0.5%TemplePublic order bonus due to happiness 10%Population growth bonus 1%Large TemplePublic order bonus due to happiness 15%Population growth bonus 1.5%Awesome TemplePublic order bonus due to happiness 20%Population growth bonus 2%PanatheonPublic order bonus due to happiness 35%Population growth bonus 2.5%Public order bonus due to law 10%
Bacchus (Fun)
ShrinePublic order bonus due to happiness 10%TemplePublic order bonus due to happiness 20%Large TemplePublic order bonus due to happiness 30%Awesome TemplePublic order bonus due to happiness 40%PanatheonPublic order bonus due to happiness 50%Population growth bonus 1%Public order bonus due to law 10%
Ancilliaries: Comedian (Temple or greater), Cook, Courtesan(Temple or greater), Dancer (Temple or greater), Drinking Companion (Templeor greater), Gourmands Chef (Temple or greater), Titus Maccius Plautus(Awesome Temple or greater)
Jupiter (Leadership)
ShrinePublic order bonus due to happiness 5%Public order bonus due to law 5%TemplePublic order bonus due to happiness 10%Public order bonus due to law 10%Large TemplePublic order bonus due to happiness 15%Public order bonus due to law 15%Awesome TemplePublic order bonus due to happiness 20%Public order bonus due to law 20%ArcaniPanatheonPublic order bonus due to happiness 35%Public order bonus due to law 10%Population growth bonus 1%Arcani
Ancilliaries: Fasces (Temple or greater), Pontifex (AwesomeTemple or greater)
BRUTII
Juno (Healing)
ShrinePublic order bonus due to happiness 5%Population health bonus 5%TemplePublic order bonus due to happiness 10%Population health bonus 10%Large TemplePublic order bonus due to happiness 15%Population health bonus 15%Awesome TemplePublic order bonus due to happiness 20%
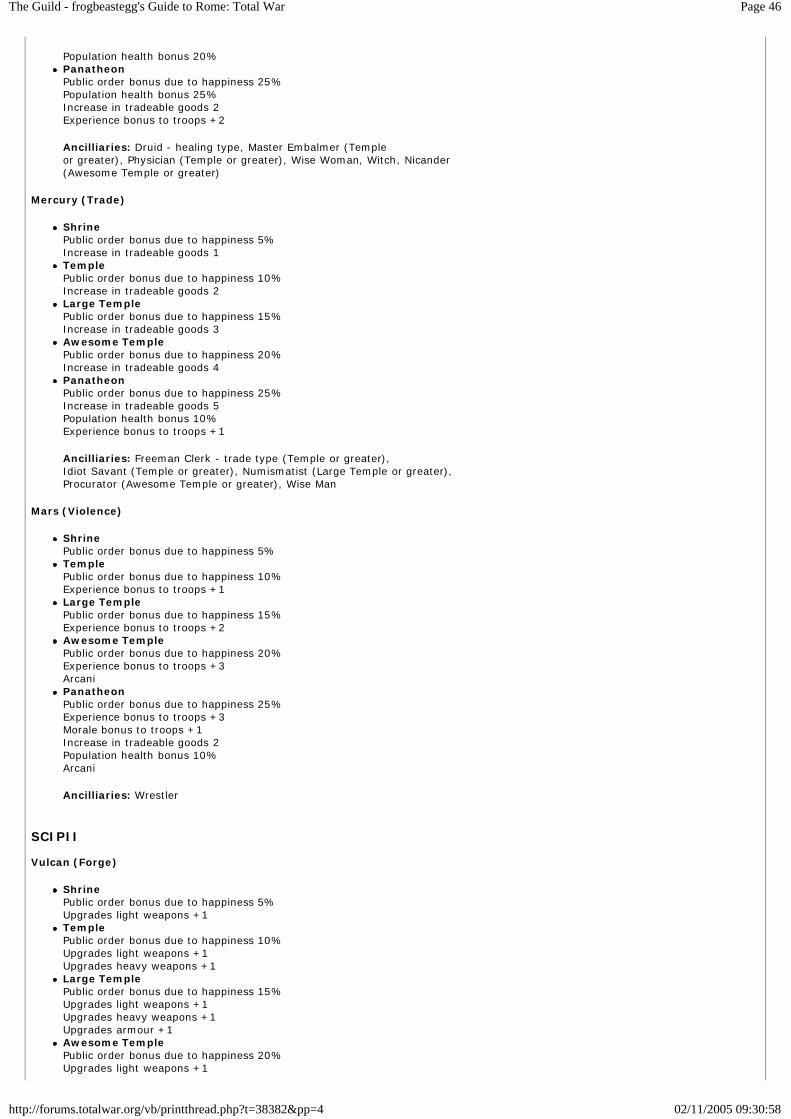
Page 46The Guild - frogbeastegg's Guide to Rome: Total War
02/11/2005 09:30:58http://forums.totalwar.org/vb/printthread.php?t=38382&pp=4
Population health bonus 20%PanatheonPublic order bonus due to happiness 25%Population health bonus 25%Increase in tradeable goods 2Experience bonus to troops +2
Ancilliaries: Druid - healing type, Master Embalmer (Templeor greater), Physician (Temple or greater), Wise Woman, Witch, Nicander(Awesome Temple or greater)
Mercury (Trade)
ShrinePublic order bonus due to happiness 5%Increase in tradeable goods 1TemplePublic order bonus due to happiness 10%Increase in tradeable goods 2Large TemplePublic order bonus due to happiness 15%Increase in tradeable goods 3Awesome TemplePublic order bonus due to happiness 20%Increase in tradeable goods 4PanatheonPublic order bonus due to happiness 25%Increase in tradeable goods 5Population health bonus 10%Experience bonus to troops +1
Ancilliaries: Freeman Clerk - trade type (Temple or greater),Idiot Savant (Temple or greater), Numismatist (Large Temple or greater),Procurator (Awesome Temple or greater), Wise Man
Mars (Violence)
ShrinePublic order bonus due to happiness 5%TemplePublic order bonus due to happiness 10%Experience bonus to troops +1Large TemplePublic order bonus due to happiness 15%Experience bonus to troops +2Awesome TemplePublic order bonus due to happiness 20%Experience bonus to troops +3ArcaniPanatheonPublic order bonus due to happiness 25%Experience bonus to troops +3Morale bonus to troops +1Increase in tradeable goods 2Population health bonus 10%Arcani
Ancilliaries: Wrestler
SCIPII
Vulcan (Forge)
ShrinePublic order bonus due to happiness 5%Upgrades light weapons +1TemplePublic order bonus due to happiness 10%Upgrades light weapons +1Upgrades heavy weapons +1Large TemplePublic order bonus due to happiness 15%Upgrades light weapons +1Upgrades heavy weapons +1Upgrades armour +1Awesome TemplePublic order bonus due to happiness 20%Upgrades light weapons +1
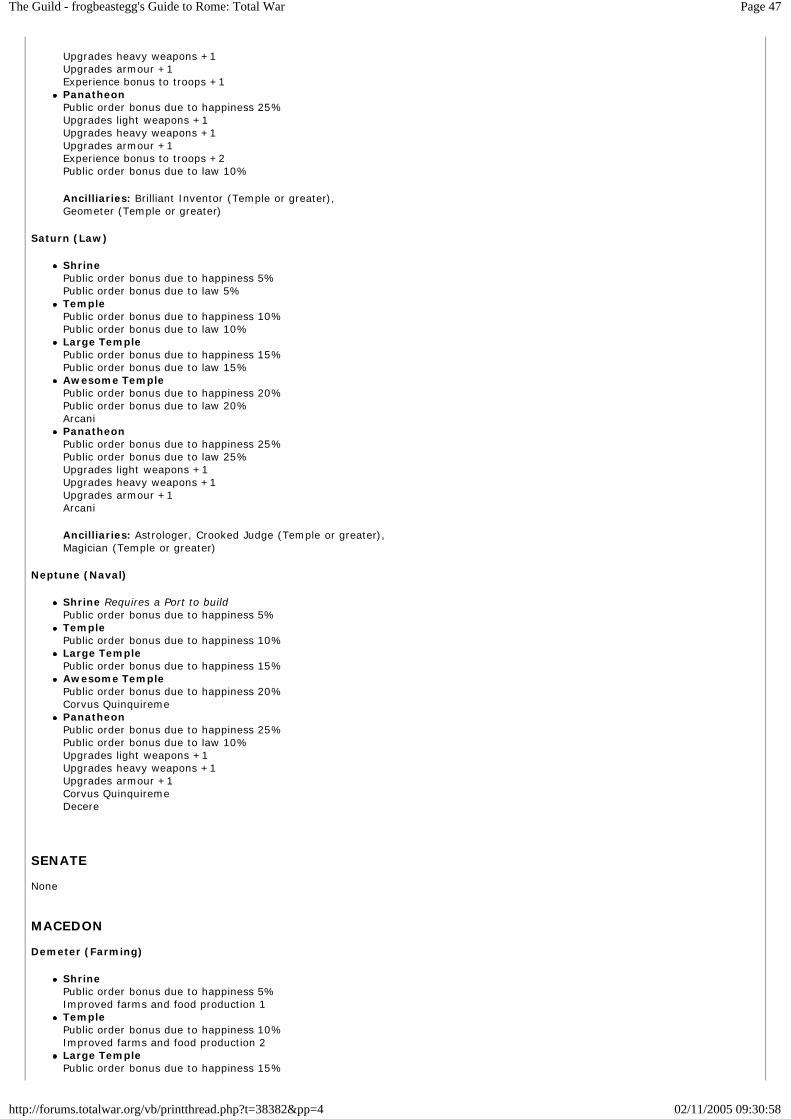
Page 47The Guild - frogbeastegg's Guide to Rome: Total War
02/11/2005 09:30:58http://forums.totalwar.org/vb/printthread.php?t=38382&pp=4
Upgrades heavy weapons +1Upgrades armour +1Experience bonus to troops +1PanatheonPublic order bonus due to happiness 25%Upgrades light weapons +1Upgrades heavy weapons +1Upgrades armour +1Experience bonus to troops +2Public order bonus due to law 10%
Ancilliaries: Brilliant Inventor (Temple or greater),Geometer (Temple or greater)
Saturn (Law)
ShrinePublic order bonus due to happiness 5%Public order bonus due to law 5%TemplePublic order bonus due to happiness 10%Public order bonus due to law 10%Large TemplePublic order bonus due to happiness 15%Public order bonus due to law 15%Awesome TemplePublic order bonus due to happiness 20%Public order bonus due to law 20%ArcaniPanatheonPublic order bonus due to happiness 25%Public order bonus due to law 25%Upgrades light weapons +1Upgrades heavy weapons +1Upgrades armour +1Arcani
Ancilliaries: Astrologer, Crooked Judge (Temple or greater),Magician (Temple or greater)
Neptune (Naval)
Shrine Requires a Port to buildPublic order bonus due to happiness 5%TemplePublic order bonus due to happiness 10%Large TemplePublic order bonus due to happiness 15%Awesome TemplePublic order bonus due to happiness 20%Corvus QuinquiremePanatheonPublic order bonus due to happiness 25%Public order bonus due to law 10%Upgrades light weapons +1Upgrades heavy weapons +1Upgrades armour +1Corvus QuinquiremeDecere
SENATE
None
MACEDON
Demeter (Farming)
ShrinePublic order bonus due to happiness 5%Improved farms and food production 1TemplePublic order bonus due to happiness 10%Improved farms and food production 2Large TemplePublic order bonus due to happiness 15%
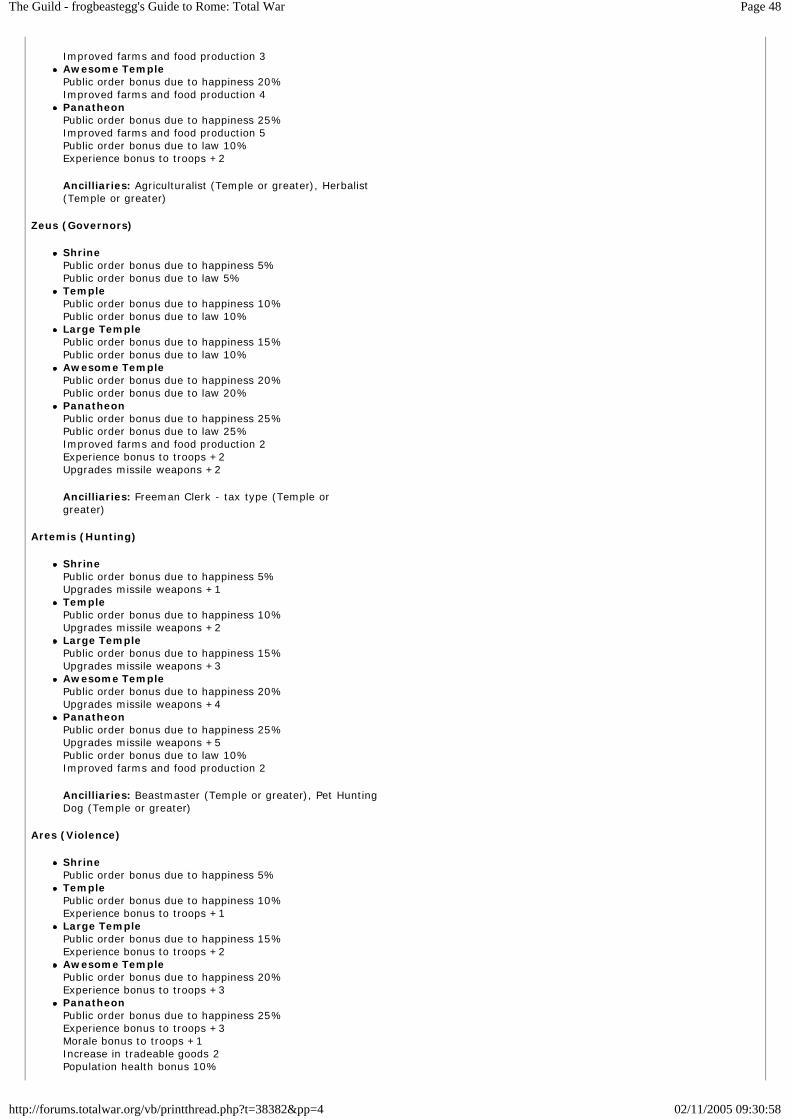
Page 48The Guild - frogbeastegg's Guide to Rome: Total War
02/11/2005 09:30:58http://forums.totalwar.org/vb/printthread.php?t=38382&pp=4
Improved farms and food production 3Awesome TemplePublic order bonus due to happiness 20%Improved farms and food production 4PanatheonPublic order bonus due to happiness 25%Improved farms and food production 5Public order bonus due to law 10%Experience bonus to troops +2
Ancilliaries: Agriculturalist (Temple or greater), Herbalist(Temple or greater)
Zeus (Governors)
ShrinePublic order bonus due to happiness 5%Public order bonus due to law 5%TemplePublic order bonus due to happiness 10%Public order bonus due to law 10%Large TemplePublic order bonus due to happiness 15%Public order bonus due to law 10%Awesome TemplePublic order bonus due to happiness 20%Public order bonus due to law 20%PanatheonPublic order bonus due to happiness 25%Public order bonus due to law 25%Improved farms and food production 2Experience bonus to troops +2Upgrades missile weapons +2
Ancilliaries: Freeman Clerk - tax type (Temple orgreater)
Artemis (Hunting)
ShrinePublic order bonus due to happiness 5%Upgrades missile weapons +1TemplePublic order bonus due to happiness 10%Upgrades missile weapons +2Large TemplePublic order bonus due to happiness 15%Upgrades missile weapons +3Awesome TemplePublic order bonus due to happiness 20%Upgrades missile weapons +4PanatheonPublic order bonus due to happiness 25%Upgrades missile weapons +5Public order bonus due to law 10%Improved farms and food production 2
Ancilliaries: Beastmaster (Temple or greater), Pet HuntingDog (Temple or greater)
Ares (Violence)
ShrinePublic order bonus due to happiness 5%TemplePublic order bonus due to happiness 10%Experience bonus to troops +1Large TemplePublic order bonus due to happiness 15%Experience bonus to troops +2Awesome TemplePublic order bonus due to happiness 20%Experience bonus to troops +3PanatheonPublic order bonus due to happiness 25%Experience bonus to troops +3Morale bonus to troops +1Increase in tradeable goods 2Population health bonus 10%
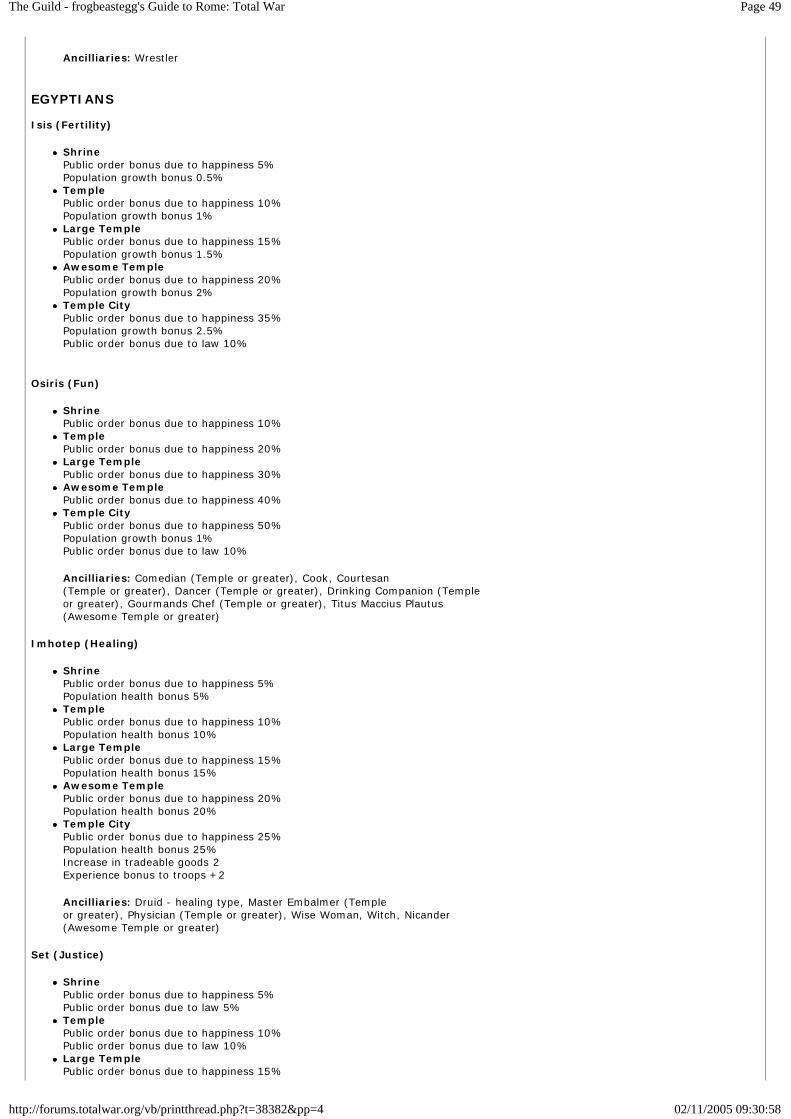
Page 49The Guild - frogbeastegg's Guide to Rome: Total War
02/11/2005 09:30:58http://forums.totalwar.org/vb/printthread.php?t=38382&pp=4
Ancilliaries: Wrestler
EGYPTIANS
Isis (Fertility)
ShrinePublic order bonus due to happiness 5%Population growth bonus 0.5%TemplePublic order bonus due to happiness 10%Population growth bonus 1%Large TemplePublic order bonus due to happiness 15%Population growth bonus 1.5%Awesome TemplePublic order bonus due to happiness 20%Population growth bonus 2%Temple CityPublic order bonus due to happiness 35%Population growth bonus 2.5%Public order bonus due to law 10%
Osiris (Fun)
ShrinePublic order bonus due to happiness 10%TemplePublic order bonus due to happiness 20%Large TemplePublic order bonus due to happiness 30%Awesome TemplePublic order bonus due to happiness 40%Temple CityPublic order bonus due to happiness 50%Population growth bonus 1%Public order bonus due to law 10%
Ancilliaries: Comedian (Temple or greater), Cook, Courtesan(Temple or greater), Dancer (Temple or greater), Drinking Companion (Templeor greater), Gourmands Chef (Temple or greater), Titus Maccius Plautus(Awesome Temple or greater)
Imhotep (Healing)
ShrinePublic order bonus due to happiness 5%Population health bonus 5%TemplePublic order bonus due to happiness 10%Population health bonus 10%Large TemplePublic order bonus due to happiness 15%Population health bonus 15%Awesome TemplePublic order bonus due to happiness 20%Population health bonus 20%Temple CityPublic order bonus due to happiness 25%Population health bonus 25%Increase in tradeable goods 2Experience bonus to troops +2
Ancilliaries: Druid - healing type, Master Embalmer (Templeor greater), Physician (Temple or greater), Wise Woman, Witch, Nicander(Awesome Temple or greater)
Set (Justice)
ShrinePublic order bonus due to happiness 5%Public order bonus due to law 5%TemplePublic order bonus due to happiness 10%Public order bonus due to law 10%Large TemplePublic order bonus due to happiness 15%
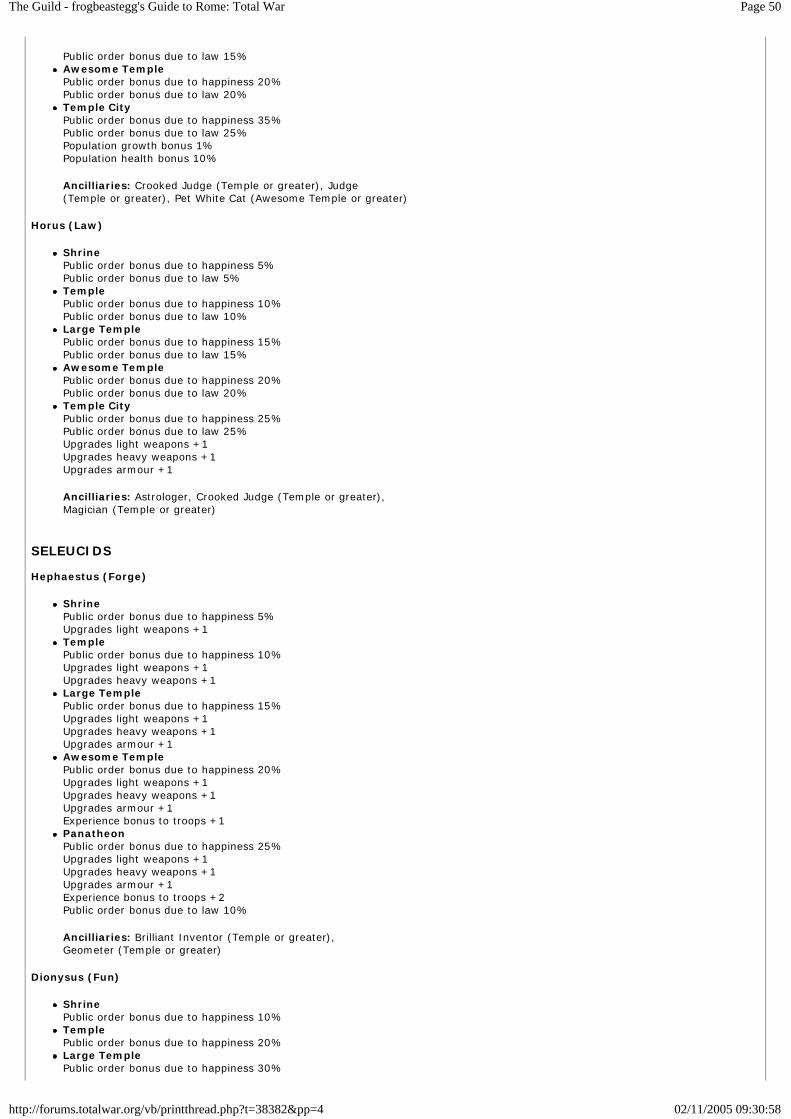
Page 50The Guild - frogbeastegg's Guide to Rome: Total War
02/11/2005 09:30:58http://forums.totalwar.org/vb/printthread.php?t=38382&pp=4
Public order bonus due to law 15%Awesome TemplePublic order bonus due to happiness 20%Public order bonus due to law 20%Temple CityPublic order bonus due to happiness 35%Public order bonus due to law 25%Population growth bonus 1%Population health bonus 10%
Ancilliaries: Crooked Judge (Temple or greater), Judge(Temple or greater), Pet White Cat (Awesome Temple or greater)
Horus (Law)
ShrinePublic order bonus due to happiness 5%Public order bonus due to law 5%TemplePublic order bonus due to happiness 10%Public order bonus due to law 10%Large TemplePublic order bonus due to happiness 15%Public order bonus due to law 15%Awesome TemplePublic order bonus due to happiness 20%Public order bonus due to law 20%Temple CityPublic order bonus due to happiness 25%Public order bonus due to law 25%Upgrades light weapons +1Upgrades heavy weapons +1Upgrades armour +1
Ancilliaries: Astrologer, Crooked Judge (Temple or greater),Magician (Temple or greater)
SELEUCIDS
Hephaestus (Forge)
ShrinePublic order bonus due to happiness 5%Upgrades light weapons +1TemplePublic order bonus due to happiness 10%Upgrades light weapons +1Upgrades heavy weapons +1Large TemplePublic order bonus due to happiness 15%Upgrades light weapons +1Upgrades heavy weapons +1Upgrades armour +1Awesome TemplePublic order bonus due to happiness 20%Upgrades light weapons +1Upgrades heavy weapons +1Upgrades armour +1Experience bonus to troops +1PanatheonPublic order bonus due to happiness 25%Upgrades light weapons +1Upgrades heavy weapons +1Upgrades armour +1Experience bonus to troops +2Public order bonus due to law 10%
Ancilliaries: Brilliant Inventor (Temple or greater),Geometer (Temple or greater)
Dionysus (Fun)
ShrinePublic order bonus due to happiness 10%TemplePublic order bonus due to happiness 20%Large TemplePublic order bonus due to happiness 30%
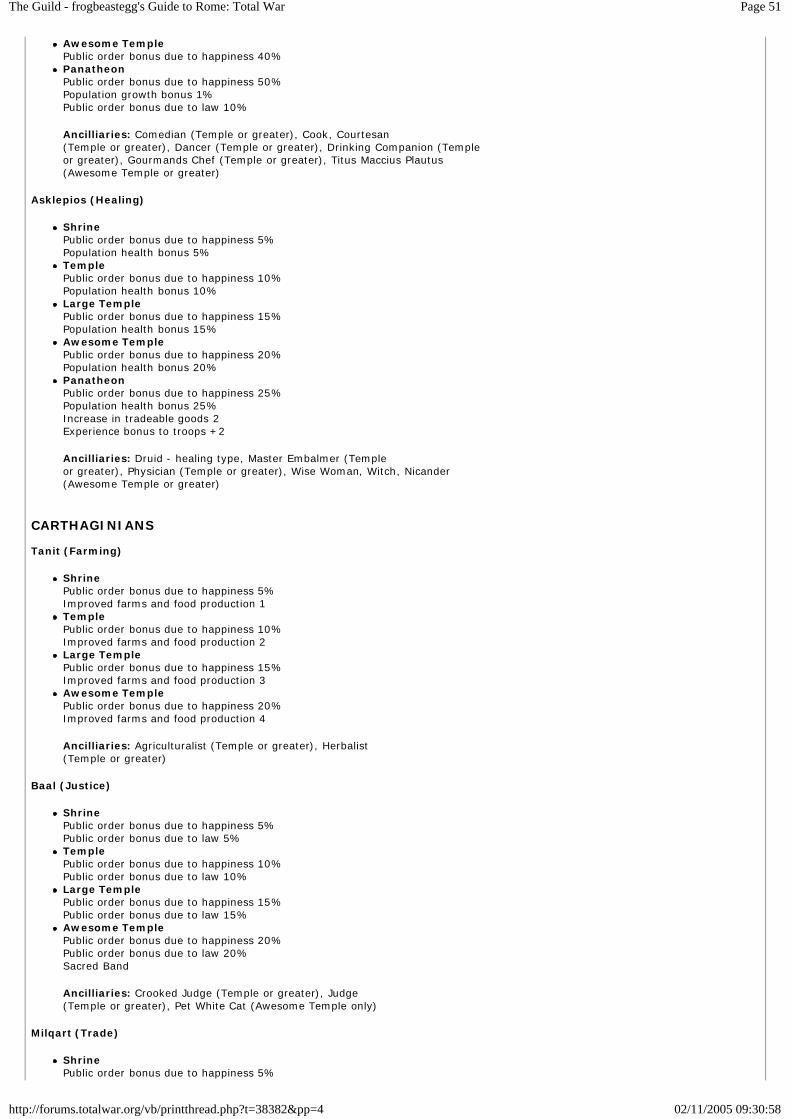
Page 51The Guild - frogbeastegg's Guide to Rome: Total War
02/11/2005 09:30:58http://forums.totalwar.org/vb/printthread.php?t=38382&pp=4
Awesome TemplePublic order bonus due to happiness 40%PanatheonPublic order bonus due to happiness 50%Population growth bonus 1%Public order bonus due to law 10%
Ancilliaries: Comedian (Temple or greater), Cook, Courtesan(Temple or greater), Dancer (Temple or greater), Drinking Companion (Templeor greater), Gourmands Chef (Temple or greater), Titus Maccius Plautus(Awesome Temple or greater)
Asklepios (Healing)
ShrinePublic order bonus due to happiness 5%Population health bonus 5%TemplePublic order bonus due to happiness 10%Population health bonus 10%Large TemplePublic order bonus due to happiness 15%Population health bonus 15%Awesome TemplePublic order bonus due to happiness 20%Population health bonus 20%PanatheonPublic order bonus due to happiness 25%Population health bonus 25%Increase in tradeable goods 2Experience bonus to troops +2
Ancilliaries: Druid - healing type, Master Embalmer (Templeor greater), Physician (Temple or greater), Wise Woman, Witch, Nicander(Awesome Temple or greater)
CARTHAGINIANS
Tanit (Farming)
ShrinePublic order bonus due to happiness 5%Improved farms and food production 1TemplePublic order bonus due to happiness 10%Improved farms and food production 2Large TemplePublic order bonus due to happiness 15%Improved farms and food production 3Awesome TemplePublic order bonus due to happiness 20%Improved farms and food production 4
Ancilliaries: Agriculturalist (Temple or greater), Herbalist(Temple or greater)
Baal (Justice)
ShrinePublic order bonus due to happiness 5%Public order bonus due to law 5%TemplePublic order bonus due to happiness 10%Public order bonus due to law 10%Large TemplePublic order bonus due to happiness 15%Public order bonus due to law 15%Awesome TemplePublic order bonus due to happiness 20%Public order bonus due to law 20%Sacred Band
Ancilliaries: Crooked Judge (Temple or greater), Judge(Temple or greater), Pet White Cat (Awesome Temple only)
Milqart (Trade)
ShrinePublic order bonus due to happiness 5%
Page 52The Guild - frogbeastegg's Guide to Rome: Total War
02/11/2005 09:30:58http://forums.totalwar.org/vb/printthread.php?t=38382&pp=4
Increase in tradeable goods 1TemplePublic order bonus due to happiness 10%Increase in tradeable goods 2Large TemplePublic order bonus due to happiness 15%Increase in tradeable goods 3Awesome TemplePublic order bonus due to happiness 20%Increase in tradeable goods 4
Ancilliaries: Freeman Clerk - trade type (Temple or greater),Idiot Savant (Temple or greater), Numismatist (Large Temple or greater),Procurator (Awesome Temple only), Wise Man
PARTHIANS
Zoroastra (One God)
ShrinePublic order bonus due to happiness 5%Public order bonus due to law 5%TemplePublic order bonus due to happiness 10%Public order bonus due to law 10%Large TemplePublic order bonus due to happiness 15%Public order bonus due to law 15%Awesome TemplePublic order bonus due to happiness 20%Public order bonus due to law 20%Temple ComplexPublic order bonus due to happiness 25%Public order bonus due to law 25%
PONTUS
Zeus (Governors)
ShrinePublic order bonus due to happiness 5%Public order bonus due to law 5%TemplePublic order bonus due to happiness 10%Public order bonus due to law 10%Large TemplePublic order bonus due to happiness 15%Public order bonus due to law 10% (Should be 15%?)Awesome TemplePublic order bonus due to happiness 20%Public order bonus due to law 20%
Ancilliaries: Freeman Clerk - tax type (Temple orgreater)
Aphrodite (Love)
ShrinePublic order bonus due to happiness 5%Population growth bonus 0.5%TemplePublic order bonus due to happiness 10%Population growth bonus 1%Large TemplePublic order bonus due to happiness 15%Population growth bonus 1.5%Awesome TemplePublic order bonus due to happiness 20%Population growth bonus 2%
Hercules (Violence)
ShrinePublic order bonus due to happiness 5%Temple
Page 53The Guild - frogbeastegg's Guide to Rome: Total War
02/11/2005 09:30:58http://forums.totalwar.org/vb/printthread.php?t=38382&pp=4
Public order bonus due to happiness 10%Experience bonus to troops +1Large TemplePublic order bonus due to happiness 15%Experience bonus to troops +2Awesome TemplePublic order bonus due to happiness 20%Experience bonus to troops +3
Ancilliaries: Wrestler
GAULS
Teutatis (Battleforge)
ShrinePublic order bonus due to happiness 5%Experience bonus to troops +1Sacred GrovePublic order bonus due to happiness 10%Upgrades light weapons +1Experience bonus to troops +1Naked FanaticsSacred CirclePublic order bonus due to happiness 15%Upgrades light weapons +1Experience bonus to troops +2Naked Fanatics (Exp 1)[/b]
Epona (Horse)
ShrinePublic order bonus due to happiness 5%Experience bonus to troops +1Sacred GrovePublic order bonus due to happiness 10%Experience bonus to troops +2Sacred CirclePublic order bonus due to happiness 15%Experience bonus to troops +3
Abnoba (Hunting)
ShrinePublic order bonus due to happiness 5%Upgrades missile weapons +1Sacred GrovePublic order bonus due to happiness 10%Upgrades missile weapons +2Sacred CirclePublic order bonus due to happiness 15%Upgrades missile weapons +3
Ancilliaries: Beastmaster (Sacred Grove or greater), PetHunting Dog (Sacred Grove or greater)
Esus (Justice)
ShrinePublic order bonus due to happiness 5%Public order bonus due to law 5%Sacred GrovePublic order bonus due to happiness 10%Public order bonus due to law 10%Sacred CirclePublic order bonus due to happiness 15%Public order bonus due to law 15%Druids
Ancilliaries: Crooked Judge (Sacred Grove or greater), Judge(Sacred Grove or greater)
GERMANS
Freyja (Fertility)
Page 54The Guild - frogbeastegg's Guide to Rome: Total War
02/11/2005 09:30:58http://forums.totalwar.org/vb/printthread.php?t=38382&pp=4
ShrinePublic order bonus due to happiness 5%Population growth bonus 0.5%Screeching WomenSacred GrovePublic order bonus due to happiness 10%Population growth bonus 1%Screeching WomenSacred CirclePublic order bonus due to happiness 15%Population growth bonus 1.5%Screeching Women
Donar (Violence)
ShrinePublic order bonus due to happiness 5%Sacred GrovePublic order bonus due to happiness 10%Experience bonus to troops +1Sacred CirclePublic order bonus due to happiness 15%Experience bonus to troops +2Berserker
Ancilliaries: Wrestler
Woden (Viking)
ShrinePublic order bonus due to happiness 5%Experience bonus to troops +1Sacred GrovePublic order bonus due to happiness 10%Experience bonus to troops +2Naked FanaticsSacred CirclePublic order bonus due to happiness 15%Experience bonus to troops +3Naked FanaticsGothic Cavalry
BRITONS
Brigantia (Healing)
ShrinePublic order bonus due to happiness 5%Population health bonus 5%Sacred GrovePublic order bonus due to happiness 10%Population health bonus 10%Sacred CirclePublic order bonus due to happiness 15%Population health bonus 15%Druids
Ancilliaries: Druid - healing type, Master Embalmer (SacredGrove or greater), Physician (Sacred Grove or greater), Wise Woman,Witch
Britannia (Trade)
ShrinePublic order bonus due to happiness 5%Increase in tradeable goods 1Sacred GrovePublic order bonus due to happiness 10%Increase in tradeable goods 2Sacred CirclePublic order bonus due to happiness 15%Increase in tradeable goods 3
Ancilliaries: Freeman Clerk - trade type (Sacred Grove orgreater), Idiot Savant (Sacred Grove or greater), Numismatist (Sacred Circleonly), Wise Man
Page 55The Guild - frogbeastegg's Guide to Rome: Total War
02/11/2005 09:30:58http://forums.totalwar.org/vb/printthread.php?t=38382&pp=4
Andrasta (Victory)
ShrinePublic order bonus due to happiness 5%Woad WarriorsSacred GrovePublic order bonus due to happiness 10%Experience bonus to troops +1Woad WarriorsHead HurlersSacred CirclePublic order bonus due to happiness 15%Experience bonus to troops +2Woad Warriors (Exp 1)[/b]Head Hurlers (Exp 1)[/b]
ARMENIA
Vahagan (Battleforge)
ShrinePublic order bonus due to happiness 5%Experience bonus to troops +1TemplePublic order bonus due to happiness 10%Upgrades light weapons +1Experience bonus to troops +1Large TemplePublic order bonus due to happiness 15%Upgrades light weapons +1Experience bonus to troops +2Awesome TemplePublic order bonus due to happiness 20%Upgrades light weapons +1Experience bonus to troops +2Upgrades armour +1
Anahit (Fun)
ShrinePublic order bonus due to happiness 10%TemplePublic order bonus due to happiness 20%Large TemplePublic order bonus due to happiness 30%Awesome TemplePublic order bonus due to happiness 40%
Ancilliaries: Comedian (Temple or greater), Cook, Courtesan(Temple or greater), Dancer (Temple or greater), Drinking Companion (Templeor greater), Gourmands Chef (Temple or greater), Titus Maccius Plautus(Awesome Temple only)
Armazd (Leadership)
ShrinePublic order bonus due to happiness 5%Public order bonus due to law 5%TemplePublic order bonus due to happiness 10%Public order bonus due to law 10%Large TemplePublic order bonus due to happiness 15%Public order bonus due to law 15%Awesome TemplePublic order bonus due to happiness 20%Public order bonus due to law 20%
Ancilliaries: Fasces (Temple or greater), Pontifex (AwesomeTemple only)
DACIANS
Hebeleysis (Battle)
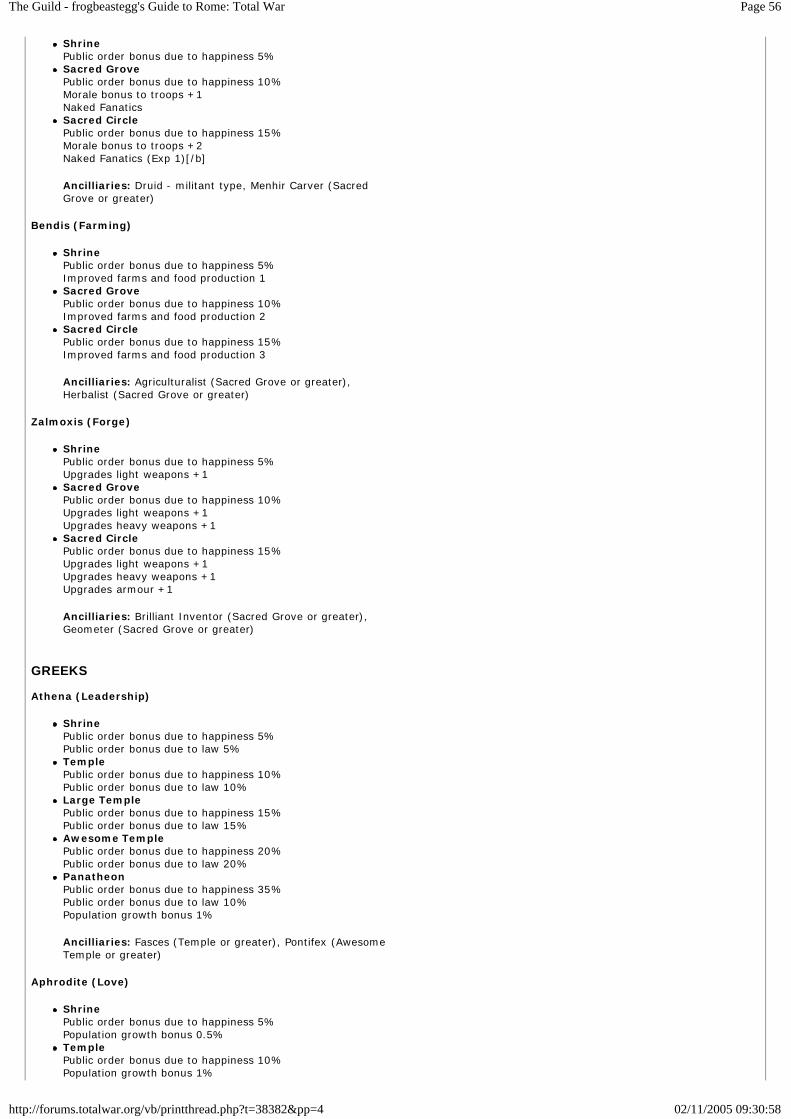
Page 56The Guild - frogbeastegg's Guide to Rome: Total War
02/11/2005 09:30:58http://forums.totalwar.org/vb/printthread.php?t=38382&pp=4
ShrinePublic order bonus due to happiness 5%Sacred GrovePublic order bonus due to happiness 10%Morale bonus to troops +1Naked FanaticsSacred CirclePublic order bonus due to happiness 15%Morale bonus to troops +2Naked Fanatics (Exp 1)[/b]
Ancilliaries: Druid - militant type, Menhir Carver (SacredGrove or greater)
Bendis (Farming)
ShrinePublic order bonus due to happiness 5%Improved farms and food production 1Sacred GrovePublic order bonus due to happiness 10%Improved farms and food production 2Sacred CirclePublic order bonus due to happiness 15%Improved farms and food production 3
Ancilliaries: Agriculturalist (Sacred Grove or greater),Herbalist (Sacred Grove or greater)
Zalmoxis (Forge)
ShrinePublic order bonus due to happiness 5%Upgrades light weapons +1Sacred GrovePublic order bonus due to happiness 10%Upgrades light weapons +1Upgrades heavy weapons +1Sacred CirclePublic order bonus due to happiness 15%Upgrades light weapons +1Upgrades heavy weapons +1Upgrades armour +1
Ancilliaries: Brilliant Inventor (Sacred Grove or greater),Geometer (Sacred Grove or greater)
GREEKS
Athena (Leadership)
ShrinePublic order bonus due to happiness 5%Public order bonus due to law 5%TemplePublic order bonus due to happiness 10%Public order bonus due to law 10%Large TemplePublic order bonus due to happiness 15%Public order bonus due to law 15%Awesome TemplePublic order bonus due to happiness 20%Public order bonus due to law 20%PanatheonPublic order bonus due to happiness 35%Public order bonus due to law 10%Population growth bonus 1%
Ancilliaries: Fasces (Temple or greater), Pontifex (AwesomeTemple or greater)
Aphrodite (Love)
ShrinePublic order bonus due to happiness 5%Population growth bonus 0.5%TemplePublic order bonus due to happiness 10%Population growth bonus 1%
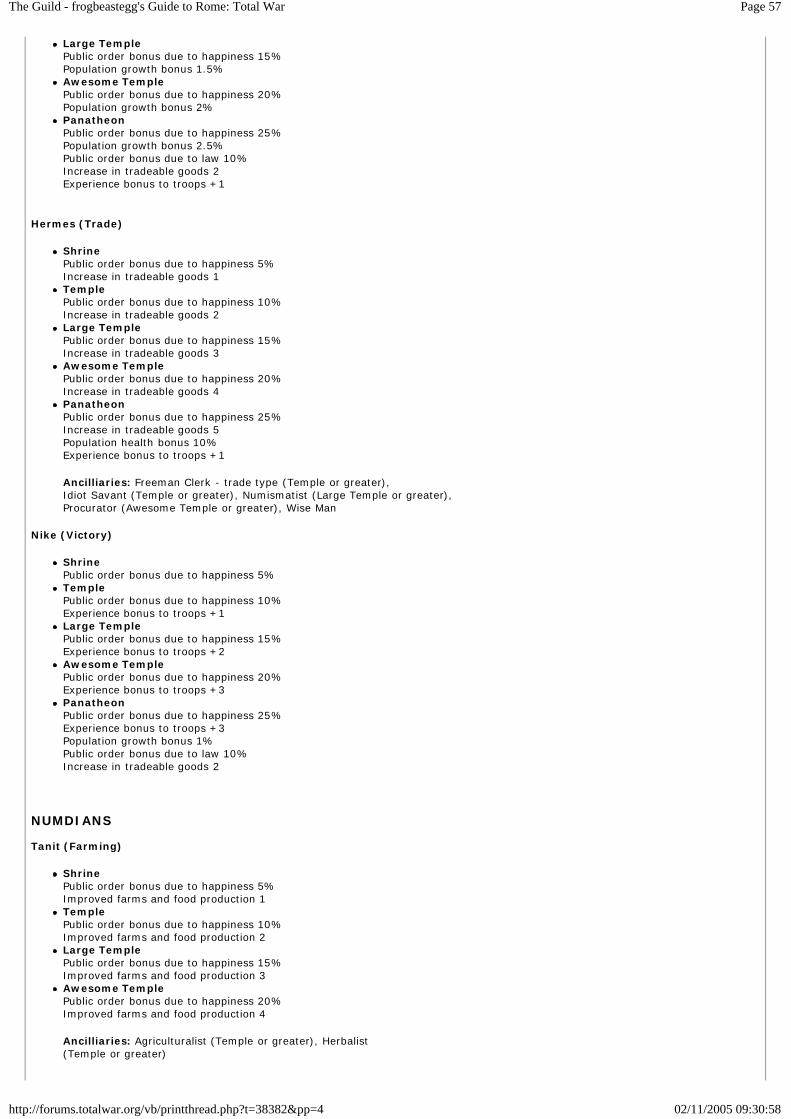
Page 57The Guild - frogbeastegg's Guide to Rome: Total War
02/11/2005 09:30:58http://forums.totalwar.org/vb/printthread.php?t=38382&pp=4
Large TemplePublic order bonus due to happiness 15%Population growth bonus 1.5%Awesome TemplePublic order bonus due to happiness 20%Population growth bonus 2%PanatheonPublic order bonus due to happiness 25%Population growth bonus 2.5%Public order bonus due to law 10%Increase in tradeable goods 2Experience bonus to troops +1
Hermes (Trade)
ShrinePublic order bonus due to happiness 5%Increase in tradeable goods 1TemplePublic order bonus due to happiness 10%Increase in tradeable goods 2Large TemplePublic order bonus due to happiness 15%Increase in tradeable goods 3Awesome TemplePublic order bonus due to happiness 20%Increase in tradeable goods 4PanatheonPublic order bonus due to happiness 25%Increase in tradeable goods 5Population health bonus 10%Experience bonus to troops +1
Ancilliaries: Freeman Clerk - trade type (Temple or greater),Idiot Savant (Temple or greater), Numismatist (Large Temple or greater),Procurator (Awesome Temple or greater), Wise Man
Nike (Victory)
ShrinePublic order bonus due to happiness 5%TemplePublic order bonus due to happiness 10%Experience bonus to troops +1Large TemplePublic order bonus due to happiness 15%Experience bonus to troops +2Awesome TemplePublic order bonus due to happiness 20%Experience bonus to troops +3PanatheonPublic order bonus due to happiness 25%Experience bonus to troops +3Population growth bonus 1%Public order bonus due to law 10%Increase in tradeable goods 2
NUMDIANS
Tanit (Farming)
ShrinePublic order bonus due to happiness 5%Improved farms and food production 1TemplePublic order bonus due to happiness 10%Improved farms and food production 2Large TemplePublic order bonus due to happiness 15%Improved farms and food production 3Awesome TemplePublic order bonus due to happiness 20%Improved farms and food production 4
Ancilliaries: Agriculturalist (Temple or greater), Herbalist(Temple or greater)
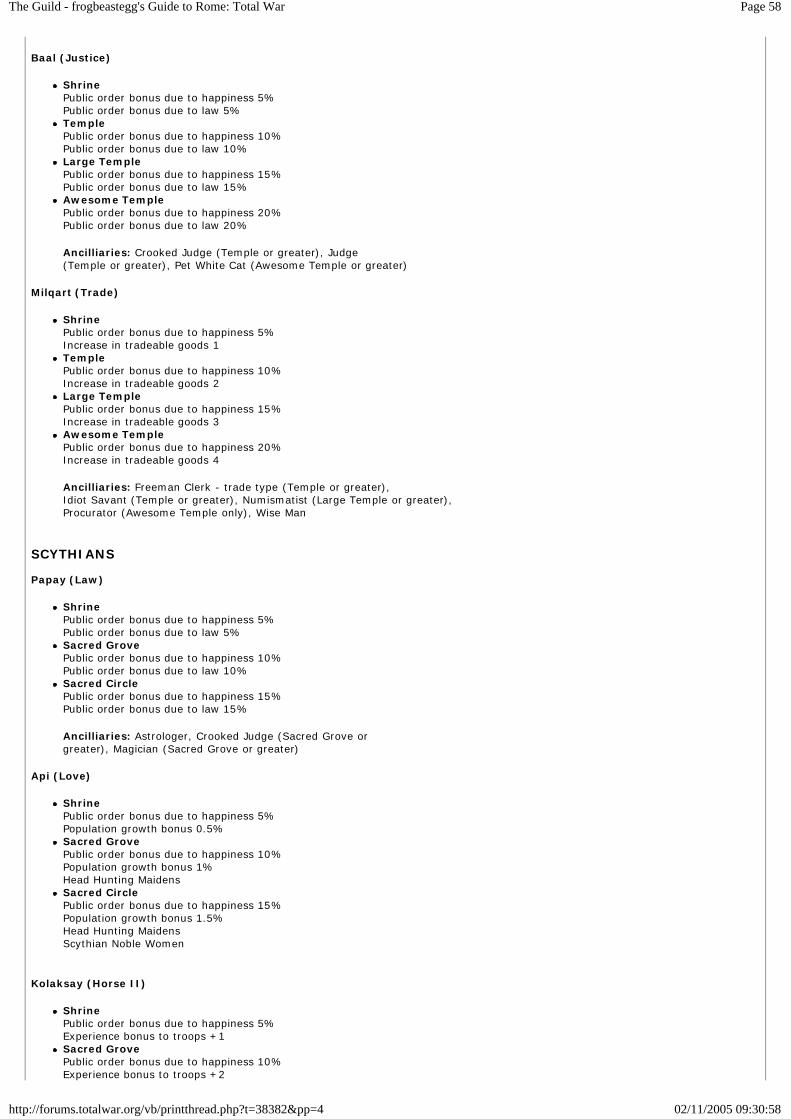
Page 58The Guild - frogbeastegg's Guide to Rome: Total War
02/11/2005 09:30:58http://forums.totalwar.org/vb/printthread.php?t=38382&pp=4
Baal (Justice)
ShrinePublic order bonus due to happiness 5%Public order bonus due to law 5%TemplePublic order bonus due to happiness 10%Public order bonus due to law 10%Large TemplePublic order bonus due to happiness 15%Public order bonus due to law 15%Awesome TemplePublic order bonus due to happiness 20%Public order bonus due to law 20%
Ancilliaries: Crooked Judge (Temple or greater), Judge(Temple or greater), Pet White Cat (Awesome Temple or greater)
Milqart (Trade)
ShrinePublic order bonus due to happiness 5%Increase in tradeable goods 1TemplePublic order bonus due to happiness 10%Increase in tradeable goods 2Large TemplePublic order bonus due to happiness 15%Increase in tradeable goods 3Awesome TemplePublic order bonus due to happiness 20%Increase in tradeable goods 4
Ancilliaries: Freeman Clerk - trade type (Temple or greater),Idiot Savant (Temple or greater), Numismatist (Large Temple or greater),Procurator (Awesome Temple only), Wise Man
SCYTHIANS
Papay (Law)
ShrinePublic order bonus due to happiness 5%Public order bonus due to law 5%Sacred GrovePublic order bonus due to happiness 10%Public order bonus due to law 10%Sacred CirclePublic order bonus due to happiness 15%Public order bonus due to law 15%
Ancilliaries: Astrologer, Crooked Judge (Sacred Grove orgreater), Magician (Sacred Grove or greater)
Api (Love)
ShrinePublic order bonus due to happiness 5%Population growth bonus 0.5%Sacred GrovePublic order bonus due to happiness 10%Population growth bonus 1%Head Hunting MaidensSacred CirclePublic order bonus due to happiness 15%Population growth bonus 1.5%Head Hunting MaidensScythian Noble Women
Kolaksay (Horse II)
ShrinePublic order bonus due to happiness 5%Experience bonus to troops +1Sacred GrovePublic order bonus due to happiness 10%Experience bonus to troops +2
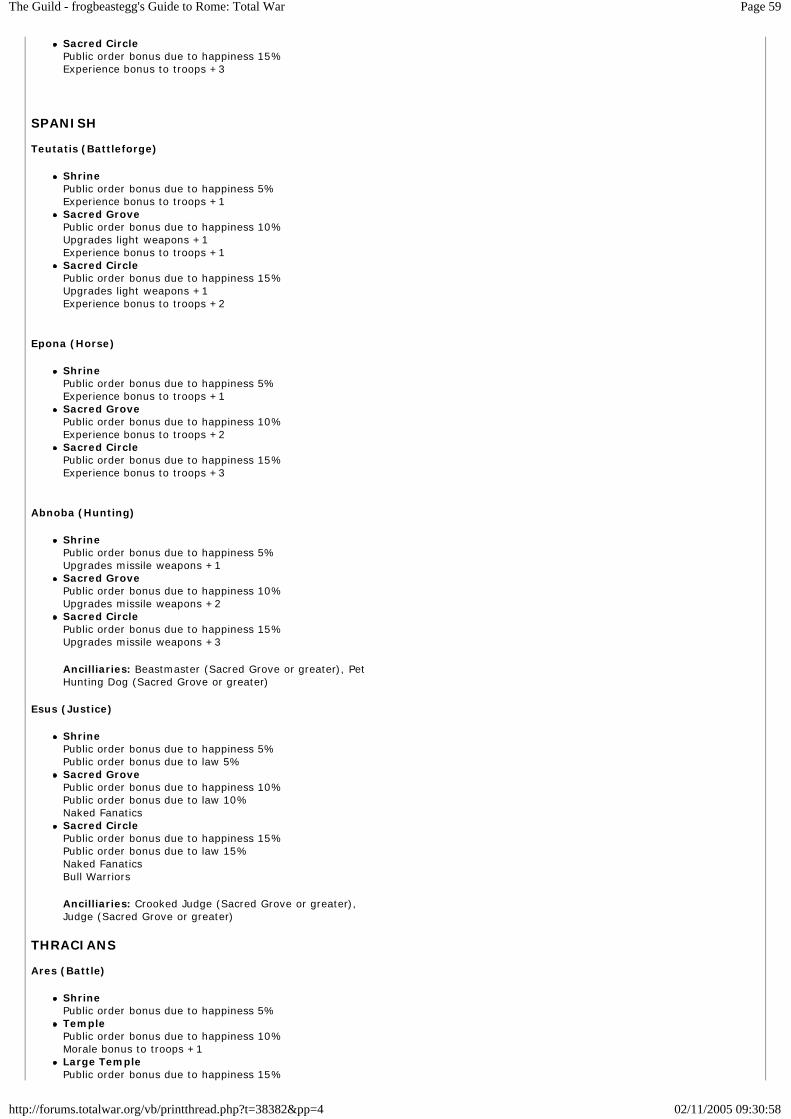
Page 59The Guild - frogbeastegg's Guide to Rome: Total War
02/11/2005 09:30:58http://forums.totalwar.org/vb/printthread.php?t=38382&pp=4
Sacred CirclePublic order bonus due to happiness 15%Experience bonus to troops +3
SPANISH
Teutatis (Battleforge)
ShrinePublic order bonus due to happiness 5%Experience bonus to troops +1Sacred GrovePublic order bonus due to happiness 10%Upgrades light weapons +1Experience bonus to troops +1Sacred CirclePublic order bonus due to happiness 15%Upgrades light weapons +1Experience bonus to troops +2
Epona (Horse)
ShrinePublic order bonus due to happiness 5%Experience bonus to troops +1Sacred GrovePublic order bonus due to happiness 10%Experience bonus to troops +2Sacred CirclePublic order bonus due to happiness 15%Experience bonus to troops +3
Abnoba (Hunting)
ShrinePublic order bonus due to happiness 5%Upgrades missile weapons +1Sacred GrovePublic order bonus due to happiness 10%Upgrades missile weapons +2Sacred CirclePublic order bonus due to happiness 15%Upgrades missile weapons +3
Ancilliaries: Beastmaster (Sacred Grove or greater), PetHunting Dog (Sacred Grove or greater)
Esus (Justice)
ShrinePublic order bonus due to happiness 5%Public order bonus due to law 5%Sacred GrovePublic order bonus due to happiness 10%Public order bonus due to law 10%Naked FanaticsSacred CirclePublic order bonus due to happiness 15%Public order bonus due to law 15%Naked FanaticsBull Warriors
Ancilliaries: Crooked Judge (Sacred Grove or greater),Judge (Sacred Grove or greater)
THRACIANS
Ares (Battle)
ShrinePublic order bonus due to happiness 5%TemplePublic order bonus due to happiness 10%Morale bonus to troops +1Large TemplePublic order bonus due to happiness 15%
Page 60The Guild - frogbeastegg's Guide to Rome: Total War
02/11/2005 09:30:58http://forums.totalwar.org/vb/printthread.php?t=38382&pp=4
Morale bonus to troops +2Awesome TemplePublic order bonus due to happiness 20%Morale bonus to troops +3PanatheonPublic order bonus due to happiness 35%Morale bonus to troops +4
Ancilliaries: Druid - militant type, Menhir Carver (Temple orgreater)
Dionysus (Fun)
ShrinePublic order bonus due to happiness 10%TemplePublic order bonus due to happiness 20%Large TemplePublic order bonus due to happiness 30%Awesome TemplePublic order bonus due to happiness 40%PanatheonPublic order bonus due to happiness 50%Population growth bonus 1%Public order bonus due to law 10%
Ancilliaries: Comedian (Temple or greater), Cook, Courtesan(Temple or greater), Dancer (Temple or greater), Drinking Companion (Templeor greater), Gourmands Chef (Temple or greater), Titus Maccius Plautus(Awesome Temple or greater)
17. Appendix B: A complete listing of retinue characters and their effects.Being formatted and edited into place as you read …
18. Appendix C: Assorted stuff which doesn’t fit anywhere else.
Mount Etna will always erupt sometime around 261BC. The lava flows kill any agents nearby, as well as causing heavy casualties to anynearby army.
19. CreditsUnlike Oscar night speeches I shall try to make this short and relevant. I also promise not to cry and thank my non-existent pet cat.
Keeping a list of individual credits for all those handy titbits I have collected on the org and official forums has proven to be nigh onimpossible, as well as very time consuming. If I credit every single person who has said even one line of vaguely helpful text I will haveliterally pages of credits and it will take me longer to write than the economy section! Instead I shall just say my grateful thanks to thecommunities of both those forums for playing, posting and researching.
A second general thanks goes to all those who have answered my questions; again it’s quite a long list and I am sure people wouldrather I spent time writing the guide rather than the credits. Thank you all for your help.
A respectful bow to those who made this guide possible, namely CA for making the game, and TosaInu for the usual help battering theforum into cooperating with this massive document and for arranging the picture hosting space.
Finally specific, named credits for people I have directly quoted or who have done something which is actually here in the guide in rawform.Duke John for my nice, snazzy title.Maltz for a few handy quotable bits and pieces.Sinner for the kind loan of his temple guide.Steppe Merc for the brief quoted guide on modding playable units.Tamur for the kind loan of his diplomacy guide.
All times are GMT. The time now is 09:29. Page 1 of 45 1 2 3 4 5 11 > Last »
Show 40 posts from this thread on one page
Powered by vBulletin Version 3.5.0Copyright ©2000 - 2005, Jelsoft Enterprises Ltd.


![Cap. 173] Pensions CHAPTER 173. PENSIONS. 173.pdf · Pensions, etc., to cease on bankruptcy. 14. Pensions, etc., may cease on sentence to term of imprisonment. 15. Pensions, etc.,](https://img.pdfslide.us/doc/110x75/5f32c41fe2aa25713c052446/cap-173-pensions-chapter-173-173pdf-pensions-etc-to-cease-on-bankruptcy.jpg)