Embed Size (px)
Citation preview
The Easiest Linux Guide You'll Ever
ReadAn Introduction to Linux for Windows users
Scott Morris
SUSE Linux 10.1
1
The Easiest Linux Guide You'll Ever Read
An Introduction to Linux for Windows users
Published by
Scott Morris – SUSE LINUX Rants
www.suseblog.com
License under which this work is released: You can make unlimited copies of this work in its entirety
under the condition that all of its contents remain intact, in the condition that they are found at the
website located at http://www.suseblog.com/ . Do not modify any part of this work prior to distributing
to other parties. Scott Morris retains all copyrights to this work. Feel free to make as many copies as
you want, and give them to as many parties as you want. Just leave the content as it is.
LIMIT OF LIABILITY/DISCLAIMER OF WARRANTY: THE PUBLISHER AND THE AUTHOR MAKE NO REPRESENTATIONS OR
WARRANTIES WITH RESPECT TO THE ACCURACY OR COMPLETENESS OF THE CONTENTS OF THIS WORK AND SPECIFICALLY
DISCLAIM ALL WARRANTIES, INCLUDING WITHOUT LIMITATION WARRANTIES OF FITNESS FOR A PARTICULAR PURPOSE. NO
WARRANTY MAY BE CREATED OR EXTENDED BY SALES OR PROMOTIONAL MATERIALS. THE ADVICE AND STRATEGIES
CONTAINED HEREIN MAY NOT BE SUITABLE FOR EVERYT SITUATION. THIS WORK IS SOLD WITH THE UNDERSTANDING THAT
THE PUBLISHER IS NOT ENGAGED IN RENDERING LEGAL, ACCOUNTING, OR OTHER PROFESSIONAL SERVICES. IF PROFESSIONAL
ASSISTANCE IS REQUIRED, THE SE4RVICES OF A COMPETENT PROFESSIONAL PERSON SHOULD BE SOUGHT. NEITHER THE
PUBLISHER NOR THE AUTHOR SHALL BE LIABLE FOR DAMAGES ARISING HEREFROM. THE FACT THAT AN ORGANIZATION OR
WEBSITE IS REFERRED TO IN THIS WORK AS A CITATION AND/OR A POTENTIAL SOURCE OF FURTHER INFORMATION DOES NOT
MEAN THAT THE AUTHOR OR THE PUBLISHER ENDORSES THE INFORMATION THE ORGANIZATION OR WEBSITE MAY PROVIDE OR
RECOMMENDATIONS IT MAY MAKE. FURTHER, READERS SHOULD BE AWARE THAT INTERNET WEBSITES LISTED IN THIS WORK
MAY HAVE CHANGED OR DISAPPEARED BETWEEN WHEN THIS WORK WAS WRITTEN AND WHEN IT IS READ.
Copyright © 2006 by SUSE LINUX Rants, Salt Lake City, UT
First Edition, 2006
Published in the United States of America
2
About the Author
Scott Morris began using computers over 20 years ago, at the age of 10. He has
used 25 different versions of 5 different operating systems over this time period. Of
those many operating systems, he has experience using MS-DOS, Windows 95,
Windows 98, Windows 2000, Windows XP, and Mac OS 9.x – X. He has enjoyed
using many different distributions of Linux, including Mandrake, Red Hat, Gentoo,
Fedora Core, Debian, and SUSE.
He has worked recently as Editor of the Novell CoolSolutions Linux
communities. During his employment there, Novell, along with many other news
outlets, has published over 110 of his articles. He gets particular enjoyment out of
helping people discover the excitement of the Linux operating system. Articles he
has written can be found on his author page, located at:
http://www.novell.com/coolsolutions/author/1012.html .
He also has a personal blog, located at http://www.suseblog.com, which he uses
for personal enjoyment and to help others. He writes opinions, news, tips, and tricks
about the SUSE Linux operating system. This blog is a light-hearted resource for
beginning Linux users. The latest version of this book can be found at this website.
3
Table of Contents
Who should read this book..............................................................................................7
An introduction before we start......................................................................................9
More familiar than you think....................................................................................................9
Common Myths......................................................................................................................10
Things to know about Linux..........................................................................................13
Getting Help and Learning More.................................................................................18
General reading material.........................................................................................................18
Forums....................................................................................................................................19
Mailing Lists...........................................................................................................................19
Other Resources......................................................................................................................20
How do I get Linux?.......................................................................................................21
Download Linux and put it onto CDs.....................................................................................21
Purchasing Linux Installation CDs.........................................................................................23
Installing SUSE Linux....................................................................................................23
Installation Options.................................................................................................................23
Linux-only Installation............................................................................................................24
Beginning the Installation...............................................................................................................25
Sharing the computer between Linux and Windows..............................................................58
Beginning the Installation...............................................................................................................59
Introduction to Users and Groups................................................................................89
Get to Know Your Desktop...........................................................................................90
What is KDE?.........................................................................................................................90
The K Menu............................................................................................................................91
The Kicker Panel.....................................................................................................................94
The KDE Control Center........................................................................................................94
4
Changing Mouse Behavior.............................................................................................................95
Changing Time and Date Display Format......................................................................................99
Window Themes...........................................................................................................................104
Desktop Preferences..............................................................................................................111
Konqueror: filesystem and web browser..............................................................................116
Browsing through your files.........................................................................................................116
As a web browser..........................................................................................................................118
Kicker Panel..........................................................................................................................119
Installing Applications.................................................................................................122
Applications..................................................................................................................129
OpenOffice............................................................................................................................129
OpenOffice Writer........................................................................................................................130
OpenOffice Calc...........................................................................................................................132
Thunderbird...........................................................................................................................135
Setting up your email account......................................................................................................136
Sending and receiving email.........................................................................................................146
Firefox...................................................................................................................................147
So you want to use the command line?.......................................................................153
View directory contents with 'ls'...........................................................................................155
Make a directory with 'mkdir'...............................................................................................156
Remove a directory with 'rmdir'............................................................................................156
Change to a directory with 'cd'..............................................................................................157
What directory am I in? Using 'pwd'....................................................................................157
Copying files with 'cp'...........................................................................................................158
Moving files with 'mv'..........................................................................................................158
Deleting files with 'rm'..........................................................................................................159
Viewing text files with 'cat'...................................................................................................159
Viewing text files with 'less'.................................................................................................160
5

What time is it? What is the date? Using 'date'...................................................................160
Using 'man' to find help........................................................................................................161
Conclusion.....................................................................................................................162
6

Who should read this book
This book is geared towards Windows users who want to take a look at Linux.
Are you interested in trying Linux on your computer? If so, you have found the
perfect book. In this book, I will give you a gentle introduction into using Linux,
and help you ease into it. The only technical skills you should have include
browsing the Internet and downloading files. It will help if you have burned your
own CDs before, but such skills are not required. If you have a computer geek
handy, that also couldn't hurt. The purpose of this book is to make it easy to try the
Linux operating system, particularly for people who are used to Microsoft Windows.
Even if you only use your Windows computer for checking email and surfing the
Internet, this book was written just for you.
Having used Windows myself for nearly 15 years, I was very used to that
platform. I didn't realize how used to it I was until I tried to use something else. As
an illustration of what I mean, let's say that you download Linux, and eventually
figure out how to download Linux. Even when you finally do get it installed, it is
somewhat of a bitter-sweet triumph. On the one hand, you feel good about having
successfully gotten that far.
On the other hand, after you have installed it, you sit there, staring blankly at
your new desktop wondering what in the world to do next. You may feel somewhat
lost. You have heard how wonderful Linux is, but don't know why, or how to make
it perform all the impressive tricks. In many cases, you don't even know what those
tricks are (at least I didn't when I first started).
If you are considering trying out Linux on your desktop, but have some anxiety
about learning everything, from this point on, you have no need to worry. We will
take it one step at a time. The top priority of this book is to make everything as easy
to learn as possible. I am going to give as much background and explanation as I
can.
7
My goal is that you understand the purpose and concepts involved with each step
that we take. I want to go over the why as well as the what. The more you
understand, the better your foundation will be. A good, strong foundation provides a
solid base upon which you can build as you learn more. This helps you learn more
efficiently, and retain more of what you learn in the future.
Before we try and get Linux to install it, we will discuss some fundamental
topics. When you are switching from Windows to Linux, there are some
expectations that you will need to change. You are going to be using a brand new
platform. You cannot assume that the new platform to be equivalent in all aspects to
the old one.
To begin with, we will mold your expectations. If you know what to plan on,
your experience will be more pleasant. In other words, there is a mental shift that
will take place as well as you switch platforms from Windows to Linux. I want to
make that shift as easy and pleasant as possible for you.
If all goes well, this introduction will be painless. At very least, I hope to make
the migration process as enjoyable and easy for you as I can.
Your experience will gradually increase as we explore the various aspects of the
Linux operating system. As this occurs, you will have questions. You will want to
learn more about different things. If, heaven forbid, something goes wrong with
your system, you may wish to seek help. You may want to interact with other Linux
enthusiasts. You may even wish to share what you have learned with others.
There is almost an endless list of online resources and communities that will
address all of these issues and plenty more. I will share with you many great
resources that you can use to learn more about Linux. Hopefully, I will be able to
help you know where to go for each of the different types of help or information that
you seek. This way, if you have a question that I do not address here, you will know
where you can find your answer.
8
An introduction before we start
When you want to learn about something new, what do you do? Research! You
likely go online and look things up, go to the library, and talk to anybody who may
know something about it. Only this time, you don't have to do any of that. I have
already done all of this for you. You have everything you need right here to get
started with Linux. How easy is that? Grab a Coke, take this book, and head to your
favorite armchair. We are going to discuss some of the things that set Linux apart
from other operating systems.
Because of how adaptable it is, there are actually several different kinds of Linux.
In the Linux world, we say that there are different distributions. The most popular
distributions of Linux include Red Hat, Ubuntu, SUSE, Mandriva, Debian, and
Fedora Core. Perhaps you have heard of some of these. One of the easiest
distributions of Linux to use is SUSE Linux. It is this distribution that I will be
working with in this text.
First, we will look at some of the ways that SUSE Linux will feel natural to you.
It is different, to be sure. However, you will be surprised at how much of it feels
familiar to you.
Conversely, we will also go over some of the ways that SUSE Linux will be
foreign to you. Because honestly, using Linux is different than using Windows. We
will look at these differences and make sure you are comfortable with them before
we move on.
More familiar than you think
To start out in your comfort zone, let's look at the parts of Linux that will feel
familiar to you. There is quite a bit more that falls into this category than you might
think. For example, you have a graphical desktop just like you do on Windows. It
has a screen saver, wallpaper, icons and windows, just like you are already used to.
You can set the wallpaper to your favorite picture. There is a mouse pointer that you
9
move around the screen. You use this mouse cursor to select and click on things.
There are icons on the desktop that you can click to open. There will be a very
familiar windowing system that functions much like what you are already used to in
Windows.
Not only will the desktop be similar to what you are familiar with, but many
applications will be, also. You have a fully-functional word processor that will work
much as you expect it to. Browsing the Internet is simple. In many cases, you will
use Firefox, the same program you may already use on Windows to surf the web.
Other functionality that Linux offers to you includes email, spreadsheets, mp3
players, video players, and printing; all concepts with which you are very likely
already used to. Truth be told, you already know much of how to use Linux. More
than you think you do.
Common Myths
To put you more at ease, I want to dispel some common myths people have about
using Linux. Peoples' interest in this amazing platform has suffered a bit because
they believe things about Linux that are not true. In some cases, they were true in
the past, but not anymore. When we see that these are mere myths, the path to
learning Linux becomes considerably easier. What are some of the most common
misconceptions about Linux?
Myth #1 : Linux is too hard for a regular computer user. I have heard that it is only
for computer geeks because it is too hard to use.
At the present time, this is complete nonsense. In the beginning, setting up and
installing Linux and its programs had to be done by hand at a command prompt.
Yucky. However, within the last few years, many types of Linux have become
simple enough that young kids are able to install and use them. I have also heard
stories about folks well-advanced in years setting up and using Linux. When you
first install most types of Linux nowadays, you don't even see the command prompt.
10
You don't have to work in the command line at any time. This is especially true
after you are done installing Linux. Almost the entire operating system can be
accessed through graphical, window-based screens. In almost all cases, this includes
things like installing software or configuring some aspect of the system. Linux, in
most situations, has become quite point-and-click. Once you learn where things are,
nearly everything can be accessed through the graphical windows. This is one of the
biggest things that makes using Linux easy.
Myth #2 : Linux has a very limited selection of software.
There is definitely a lot of software available for Windows. In reality, there is a
great overabundance. Linux provides a narrower selection of higher-quality
programs. Let's talk about email programs, for example. On Windows, I have tried
around 60 different email programs. Of those, about six are mainstream, well-
supported, widely used applications (Outlook, Outlook Express, Eudora,
Thunderbird, Pegasus, and The Bat). It makes sense that if a great number of people
are using a program that it will probably be around for a long time. Not only that,
but there are more people who you can ask for help. I recommend using such types
of programs wherever possible. For Windows, there are about five mainstream
email programs.
On Linux, there are also a handful of them, such as Thunderbird, KMail, Balsa,
Mozilla Mail, Opera, and Evolution. On average, the number of available Windows
programs is overkill several times over. With Linux, you still have a nice handful of
choices without having to sort through an ocean of options. There are fewer
applications available on Linux. That said, the quality of the good ones is very easily
just as good as, in many cases better than, what you find on Windows. This is true
especially in recent years, as some applications have reached industrial-strength,
enterprise-ready stages of development. Many such applications are employed in
full-time use at real companies throughout the world. In the case of email, I
recommend using Thunderbird. I will introduce this program along with some other
great software later in this book.
11
Myth #3 : If Linux and its software are free, they must not be very good quality.
Quite the opposite is true. Most of the software that runs on Linux is not owned
by any one person or company. It is open to the community. This means that
anyone who wants to can work on the program and make it better. They do it
because they want to improve the software, as they get no other monetary gain from
their work. Thus, many such programs have thousands and thousands of
programmers working on them to make them genuinely better.
With proprietary systems, the code is generally managed by a small team of
programmers who are under great pressure to get their software finished. In some
cases, the software is released with bugs and problems in it so that the consumer
must be dependent on the vendor for upgrades and fixes.
Because of all of this, many times Linux software is superior to Windows
software. This is one of the reasons that Linux has been and still is much more
secure than Windows. It has many thousands of people worldwide working to make
it as good as it can be. When problems are found, they are fixed within a day or two,
and many times within a few hours.
With these few things set straight, we can begin learning more about the Linux
operating system. There will be many things similar to what you have already used
on Windows. There are also some things that will be different for you. Some things
are only minor adjustments. Other things may take a little more getting used to.
In any case, we will not rush through anything in this book. I'd like to make sure
that you are as comfortable as possible with the concepts that we discuss. Using the
free Linux operating system can be quite rewarding to use. Perhaps the most
obvious benefit is in how much money you will save. Hopefully, we will also be
able to make it as fun and as enjoyable as possible for you.
12
Things to know about Linux
We have looked at ways that Linux will feel familiar to you. While there are
many, there are some things that may feel a little different. Truthfully, many things
are slightly different. These will take no time at all to get used to. That said, there
are other things that may take a little longer for you to adjust to. I would like to take
a few moments to briefly discuss some of these differences. That way, when we get
further into this book, you will know what to expect. Let's take a look at some of the
major differences between Windows and Linux, and talk about them one at a time.
This will give you greater insight and understanding into how Linux works.
#1 : Linux is very versatile and configurable.
One of the somewhat astounding strengths of Linux is its versatility. It can run as
a web server, a desktop, or embedded into other systems. There is a distribution of
Linux that runs on the Space Shuttle. There is one that controls a military vehicle
that actually drives itself. In Canada, they are using Linux to manage coin-operated
meter maids. Other distributions run on myriads of electronic devices, such as
Apple's iPod.
Because Linux is so versatile, there are many many ways to perform the same
task. This may be one of the things that makes people think Linux is so complex.
When you are trying to accomplish a task, you may find that there are several ways
to accomplish that task. In such cases, it may help to ask a friend familiar with
Linux how they do it. Having a mentor available is one great way to get help with
your Linux system. If you don't know anyone who knows Linux, please do not
worry. There are innumerable resources online where you can turn for help, which I
will discuss a little later in this book. As you visit these resources regularly, you will
meet people who can help you. Within no time, you will have many online friends
who you can ask for help.
#2 : Getting Help with Linux
13
Speaking of getting help, the Linux way is going to be a little different than what
you are used to. When you have trouble in Windows, you may be used to calling
technical support for help. I think that many people prefer to go to a live person for
help. In many cases, this does usually fix the problem.
However, with this model of problem resolution, you don't usually learn much
about what caused the problem or how to fix it next time it occurs. Because of the
nature of how you find help with Linux, you do learn quite a bit in the process.
Some of the time, this process involves research done on your own. Do not
interpret this to mean that you are completely on your own. Far from it, as it turns
out. Once you have fixed a handful of problems, the process of doing so will
become second nature for you.
At a later portion of this book, I will outline several very efficient ways of
seeking help when things go south. Some of these involve doing your own research,
and others methods involve asking other people for help. We will look at how to use
some of the great resources. I will demonstrate how easy it truly is to get help with
Linux. If you enjoy browsing and reading, many of the resources we will discuss
can be used for learning more about Linux.
#3 : The Command Line
In Windows, it is very rarely necessary to use the DOS prompt. In modern
distributions of Linux, you are perfectly able to use your computer without ever
touching the command line. In the past, this was not the case. For a long time, when
you wanted to learn Linux, you had to know the command line inside and out. With
some of the more recent flavors of Linux, you can get away without knowing
anything about the command line.
That said, one of the major differences between Windows and Linux is the power
of the command line. In Windows, it has minimal value, and provides little useful
functionality. In Linux, on the other hand, the command line interface provides a
14
wealth of powerful features, more of which we will discuss later on in this book. For
now, it is sufficient to know that if you want to truly say that you know how to use
Linux, you should take the time to learn how to use the command line. When we do
explore this powerful tool, I will take you through some of the most basic
commands.
#4 : Software Installation
I am going to assume that you have installed software on Windows. The process
is somewhat simple. You search online for a cheap or free software package that
does what you need it to do. You download it to your computer. When the
download completes, you usually will double-click on the file you just downloaded,
starting the installation process. Most of the time, you just click NEXT several
times, and eventually the software gets installed.
The way you install software on Linux is somewhat different than this. If you are
using SUSE Linux, the software is all installed with one program, called YAST.
This application makes installing software a snap. The basic premise is that you
open YAST and do a search for the software you want. In the results that come up,
you just check a little box next to the program that you wish to install. You then
click a button, and YAST goes about its business of installing your software. Most
of these programs will reside on the several different installation CDs which you will
already have. No need to go hunting around.
#5 : Security in Linux
One of the overwhelming strengths of Linux is its rock-solid security. With so
many thousands of people working on it worldwide, security holes and bugs are
found and fixed quickly. One of the great things about this is that you may only
have to wait for a few days to get updates. With Windows, studies that have been
done have found that you have to wait for about six weeks for security updates. This
is bad news. Even worse, hackers know about the security hole for at least four of
those six weeks. That means for nearly a month, you run a much higher risk of a
15
hacker using that security hole to break into your systems. With Linux, by the time
the hackers know about a security issue, there are already updates available to fix
your system. That sounds like a much better deal to me.
In addition to having quick security updates available, even an unpatched Linux
system left out in the open on the Internet is more secure than a similarly unpatched
Windows system. Studies have found that unpatched Linux systems left on the
Internet last at least four months without being broken into. Unpatched Windows
machines last, on average, about 70 minutes.
In my personal experience, I have had Windows computers broken into before I
am even done installing Windows on them! I have to keep the computer off the
Internet until I am completely done installing Windows, applying all the patches
(which you have to be connected to the Internet to even get), and installing all of the
anti-spyware, anti-virus, and firewall software. Only then do I cross my fingers and
plug it into the Internet. Rather than go through all that anxiety, it is just less hassle
to use Linux.
Because Linux is not susceptible to about 99.6% of known viruses and spyware,
there are very few anti-virus applications available for it. Do not let this deter you.
Because Linux is so secure, there is almost no need for an anti-virus software. Or
anti-spyware software. Linux does, however, have an industrial-strength firewall.
This is another reason that it provides full security.
Along this same vein, the processes, files, and directories are controlled by a very
strict privilege system. Because of this, a user will have permissions to access some
things but not others. For example, regular users do not have access to system
commands or files. If they did, you can imagine that the system could be breached
very quickly. Windows has no such clearly defined access control. This is another
reason that Linux is very secure. You can count on the solid security of the Linux
platform.
16
Especially if you have servers at your place of employment, Linux will provide a
solid solution to security concerns.
#6 : Names and Locations of Applications
Earlier, we discussed some of the similarities between Linux and Windows. One
of those similarities is the graphical desktop with icons, buttons, and a windowed
environment. You will probably intuitively know how to use many of these features
in Linux.
The system menu in Linux behaves a lot like you are used to. There is a button in
the lower left corner of your screen. You click it, and a menu appears. In the menu,
there are several submenus. You pause the mouse cursor over the submenus and
additional menus and options appear. It is very similar to what you already know
from using Windows.
What you have to learn here is where in this menu to find each of the
applications. This is no cause for concern. It will not take very long to get used to
this. There is even a way to search through the menu for the program you want to
run. The ability to search this menu is one more thing that makes Linux easy to use.
You may also very well be used to the names of certain applications. You
probably know immediately what Outlook, Word, and Excel are, just by their names.
With Linux, the applications will have different names. Again, it is only a matter of
time before you will learn the names of these applications. I will even help you
cheat just a little.
The main application that is like Microsoft Office is called OpenOffice. A great
part about this is that first, it is free. Second, it already comes installed with SUSE
Linux, so you won't have to download it separately from anywhere. Another great
perk is that by the time you are done installing SUSE Linux, OpenOffice will already
be on your computer. Isn't Linux neat?
17
Getting Help and Learning More
Previously, I said I would talk a little bit about some ways to get help with Linux.
Should you have questions or run into trouble, you will take a slightly different
approach getting help in Linux than how you do it in Windows. It really isn't all that
much harder. It is just different. Coming from Windows, you are likely used to
picking up the phone and calling technical support when you have trouble. Although
this is not the case when you need help with Linux, there are thousands of people
that you can ask for help. The biggest difference is simply that you are not talking to
them on the telephone. Instead, they can be found in scores of other places.
What if you are not having trouble? What if you just want to learn more about
Linux? You will be pleased to know that there are some great places that you can
go to browse leisurely through and learn more about this amazing operating system.
General reading material
If you want to do some general reading about SUSE Linux, there are several
places that you can go. Some of these places contain lists of other resources. Great
places to learn more about SUSE Linux are listed as follows:
• http://en.opensuse.org/Communicate
• http://www.opensuse.org/
• http://www.novell.com/linux/
• http://www.novell.com/coolsolutions/feature/17218.html
You can go to each of these places and spend time at your leisure browsing
through them These types of resources will help you learn more about SUSE Linux
in general.
18
Forums
These are arguably the most helpful resource on the Internet. Forums are
designed such that they read like conversations. One user posts a question. If
someone answers that question, that answer is posted right below the question. In
the same way, the rest of the conversation is posted below that. It is this type of
format that makes forums very user-friendly and easy to use. A good habit to get
into is to read the posting policies of the forums before you post. Some of them have
rules that they ask you to follow when posting. Some of the best forums for SUSE
Linux are as follows:
• http://forums.suselinuxsupport.de/index.php
• http://www.linuxquestions.org/questions/forumdisplay.php?forumid=60
• http://www.suseforums.net/
• http://www.linuxforums.org/forum/suse-linux-help/
In many cases, you can go to the site, create yourself an account, and post your
question. Be sure to check back often and to see if your question has been answered.
Mailing Lists
Another great resource for getting help are mailing lists. They are actually very
much like forums, except that they use email instead of a website for posting. To get
help, you will sign up for the mailing list. Then, you will send a question to the
mailing list. At some point, you should get a response from someone regarding your
question. A handful of great mailing lists are at the following locations:
• http://www.suse.com/en/private/support/online_help/mailinglists/index.html
• http://en.opensuse.org/Communicate#Mailing_Lists
• http://groups.yahoo.com/group/suse-newbie/
• http://www.novell.com/coolsolutions/forms/subscribe.html
19
There is one listed there for Yahoo. That particular mailing list was created for
new Linux users. You can go there and ask whatever question you may have about
anything relating to SUSE Linux. You will very likely find a nice person there who
would be glad to answer your question or help you.
Other Resources
If you are familiar with wikis, and would like to visit some SUSE Linux wiki
pages, here is a handful of them:
• http://susewiki.org/
• http://en.wikipedia.org/wiki/SuSE
• http://wiki.linuxquestions.org/wiki/SuSE
• http://wiki.novell.com/index.php/Cool_Solutions_Wiki_Main_Page
• http://wiki.suselinuxsupport.de/wikka.php?wakka=SuSELinuxSupport
If you are interested in reading blogs by other Linux users, you can visit some of
these links:
• http://andreasjaeger.blogspot.com/
• http://www.suseroot.com/blog/
• http://rubberturnip.org.uk/
• http://www.novell.com/ctoblog
• http://tirania.org/blog/index.html
• http://nat.org/
• http://www.suseblog.com/
• http://planetsuse.org/
20
I have listed all of these resources because I want to help you realize how much
help there is available. Take a moment to see how many places you can go when
you need help with something. SUSE Linux really has a great support community.
As we go through the rest of this book, you may have questions. Try as I might
to cover all bases, I may omit the specific answer you seek. In those cases, I don't
want you to feel like you have been left hanging. Pop into one of the forums,
introduce yourself, and ask your question. Sign up for a mailing list and fire away
with your question. There are thousands of very knowledgeable people who are able
and willing to provide help for problems you may encounter.
How do I get Linux?
We have now spent some time looking at the parts of Linux that you will already
be used to before you even start. We have also discussed some of the things you
may have to spend some time learning. We spent some time looking at ways that
you can get help, should you run into problems. With all of this background in
place, the next thing to do is get started. The next step I suggest is getting yourself a
copy of Linux. There are a number of different ways to do this. I will just cover the
two easiest for the sake of simplicity.
Download Linux and put it onto CDs
The most common way to get Linux is simply by downloading it. If you have a
fast enough Internet connection and a CD burner, this will be a great way to get
Linux. It does take a little technical knowledge. This method requires a couple of
steps. As the name of this section implies, you will first download the CD images.
Then, you will burn these disc images onto some blank CDs. Let's walk through
how to do this.
First, we will download the Disc images. These are simply files containing
everything needed to put on the CDs. To get these files, visit this URL:
21
http://mirrors.kernel.org/opensuse/distribution/SL-10.1/iso/
Towards the top of the list on this page, you will see the following files listed:
SUSE-Linux-10.1-GM-i386-CD1.iso
SUSE-Linux-10.1-GM-i386-CD2.iso
SUSE-Linux-10.1-GM-i386-CD3.iso
SUSE-Linux-10.1-GM-i386-CD4.iso
SUSE-Linux-10.1-GM-i386-CD5.iso
You can just click on each filename in the web page to download it. If that
doesn't seem to work for you, right-click on the filenames and select “Save Link
As...” or “Save Target As...” Then save each one to a location that you will
remember.
Once you have all of the files downloaded, you will want to burn them onto blank
CDs. You will want to exercise caution here. You want to burn these files as CDs.
Burning the CD image file onto a CD is not the same thing as burning the CD
image as a CD. You want to do the latter.
In many popular CD-burning software applications, there is some kind of option
somewhere that will allow you to make a CD from a CD image. It may be called
"Burn Disc from Image", "Make CD from ISO", or something similar. As not all
software is the same, I cannot tell you exactly what it will say. Fish through the
menus of your software, and find the option that will allow you to burn the image as
a CD. When you have done this, proceed to burn all five of the CD images.
After you have burned the CDs, you are ready to install Linux onto your
computer.
22
Purchasing Linux Installation CDs
Downloading and burning the CD images can be a decent amount of work and
take up valuable time. If you do not want to go this route, you can purchase CDs
with Linux already on them. This way, you can usually ensure that there will be
minimal, if any, problems with the CDs. One way that you can purchase such CDs is
from Novell. One benefit of doing this is that you will get official pressed and
silkscreened CDs and a DVD with the same data on it. In addition, you will get the
nice packaging. Perhaps the biggest benefit of doing it this way is that you will
receive complete manuals for using SUSE Linux. Additionally, by purchasing it
from Novell, you may also be entitled to some technical support. The page from
which you can make your SUSE Linux purchase is found at the following location:
Novell: http://www.novell.com/products/suselinux/pricing.html
Installing SUSE Linux
However you choose to get Linux, now you likely want to install it. This next
chapter, then, will be about installing SUSE Linux. Although there are several steps
to this process, each of them are simple. Where concepts may not be quite so
straightforward, I will do my best to explain them in a clear, concise manner. Before
we start, let's talk about what kind of installation we want to do.
Installation Options
Because we know that Linux is so versatile, we would do well to decide what
kind of installation we would like to perform. There are two main installation types.
The first is that when you are going to install Linux to work as a server (which we
are not going to do here). The second type is when you will use the computer as a
desktop. In this section, we are going to install it as a desktop.
The next thing we will look at is what kind of desktop environment to use. The
two biggest choices are KDE and Gnome. In a later chapter, we will take a closer
23
look at KDE, the K Desktop Environment. For now, just make a mental note that we
will be installing KDE as our desktop.
I would also like to take a moment to introduce another concept. It is the concept
of running two operating systems on the same computer. You cannot run them both
at the exact same time. However, when you boot up your computer, you will be able
to pick between booting into Linux and booting into Windows. Many people like to
do this. One reason is so they can transition slowly to Linux without having to
completely give up Windows all at once. I had a dual-boot machine for about a year
before switching exclusively to Linux. Another reason to dual-boot a system is so
that people can try Linux out without having to purchase another computer for this
purpose.
One reason I might not recommend this method is that it is somewhat permanent
on the Windows end. It is difficult to completely restore a computer to run only
Windows once you have chosen to dual-boot it. However, if you are planning to
eventually phase out Windows, it is very easy to convert a dual-boot computer into
one that runs only Linux.
Whether you choose to do a Linux-only installation or a dual-boot installation, I
will include instructions for both. You can simply follow the instructions for your
choice of installation, and skip the instructions for the other choice. With that, let's
take a look at a Linux-only installation, definitely the easiest if you have a spare
computer.
Linux-only Installation
You should be reading this section if you want to install Linux onto a computer
where it will be the only operating system. If you want to install Linux and also
keep Windows on the same computer, skip to the next section.
I want to let you in on a secret. During the installation, you will be taken through
a series of screens. The secret is that for most of the screens where it gives you
24
options, the default choices are usually fine. This means that if you are on a screen
where you don't know what to do, you can probably just click NEXT without
changing a thing.
While this is true in many cases, it isn't always that easy. Don't worry, though.
With the walk-through that we will do here, we will make the installation very easy.
When doing the installation, you can use either a set of CDs or the DVD. The
process should be mostly the same for either one. The obvious difference is that
with the CDs you will just provide the appropriate CD when the installation asks you
for it. With the DVD, everything is on one disc, so you won't need to change discs.
One other thing that you will need to check is that you have sufficient space on
your hard disk to hold Linux. SUSE Linux generally takes up about 3 Gigabytes. It
is recommended to use at least 5. If you have more space than this, your system
should do very well.
Beginning the Installation
Let's get started. If you are using CDs, put disc 1 into your CD-ROM. If you are
using the DVD, insert that disc now.
Power up your computer.
25
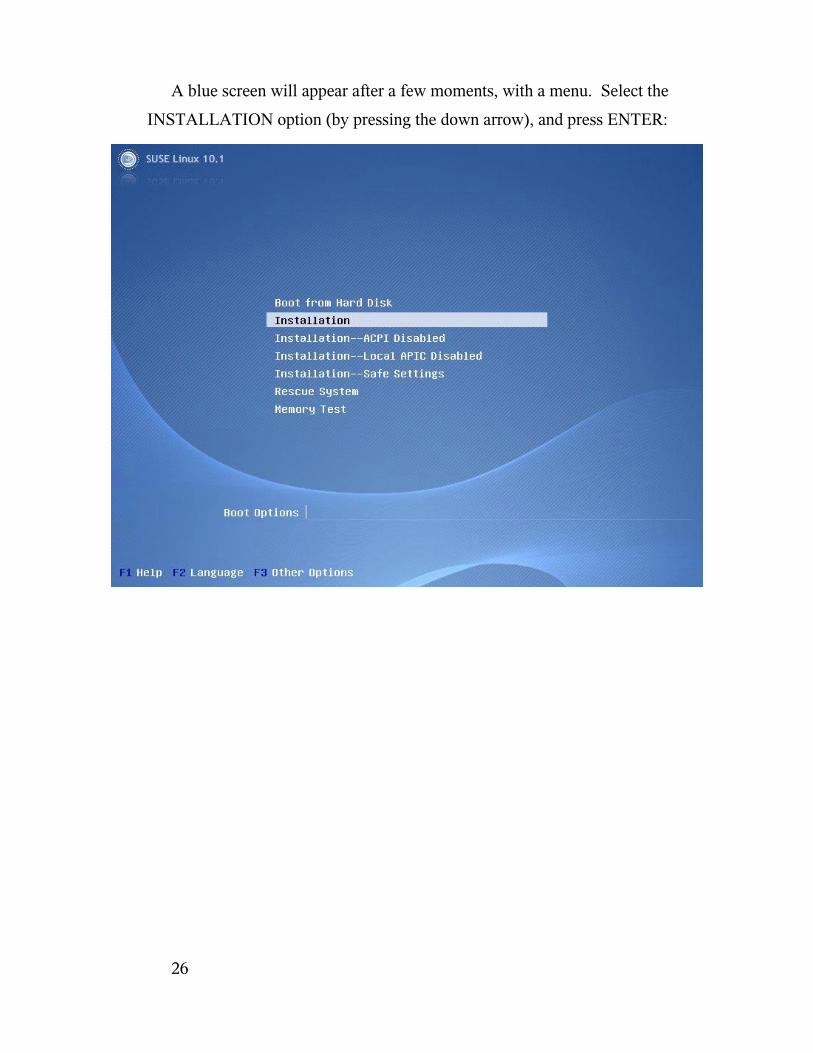
A blue screen will appear after a few moments, with a menu. Select the
INSTALLATION option (by pressing the down arrow), and press ENTER:
26

You will see a progress bar for a few seconds that says “Loading Linux kernel”,
after which the screen will go black. After a moment, another blue screen will
appear, similar to this:
This screen may remain for several minutes while the Installation system is
loading.
27

After a few minutes, you will see the LANGUAGE screen appear. This is the
first step of the installation. From this screen, select your preferred language, and
click NEXT:
28
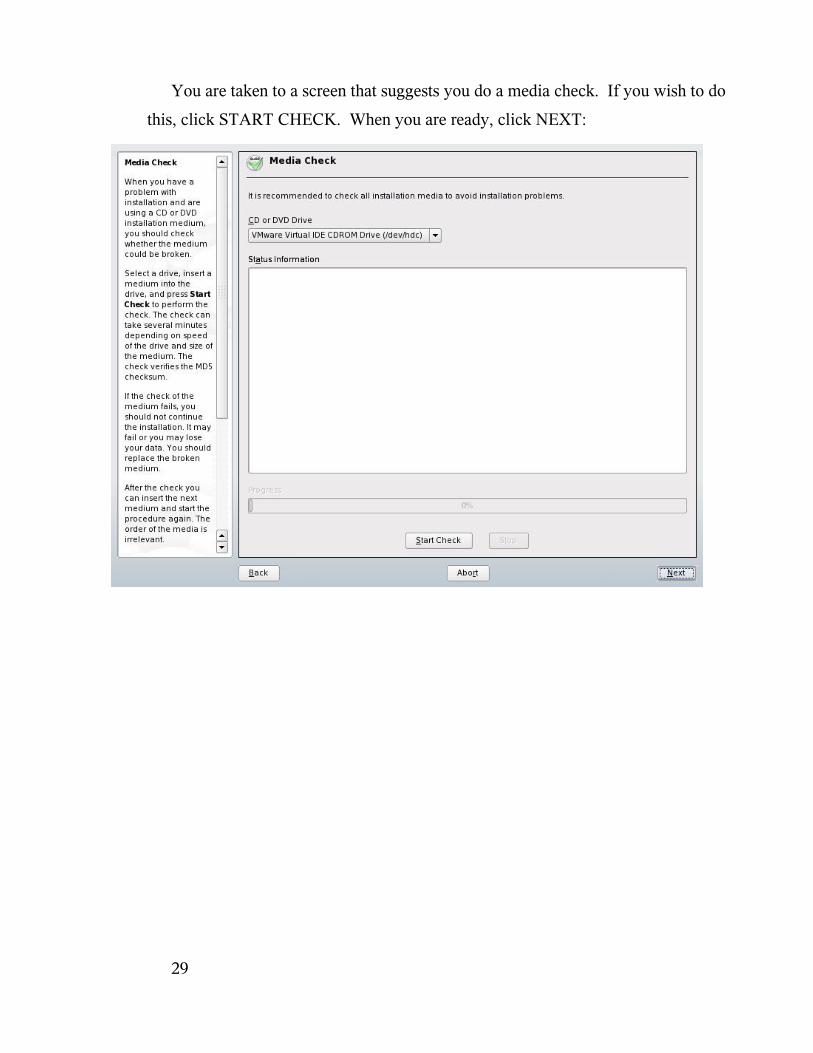
You are taken to a screen that suggests you do a media check. If you wish to do
this, click START CHECK. When you are ready, click NEXT:
29

The next screen you see is a license agreement. Make the appropriate selection at
the bottom of this screen. Then, click NEXT:
30

The Installation program will probe several of the parts of your computer. It will
stop on a screen entitled "Installation Mode". Select the "New Installation" option.
Click NEXT:
31
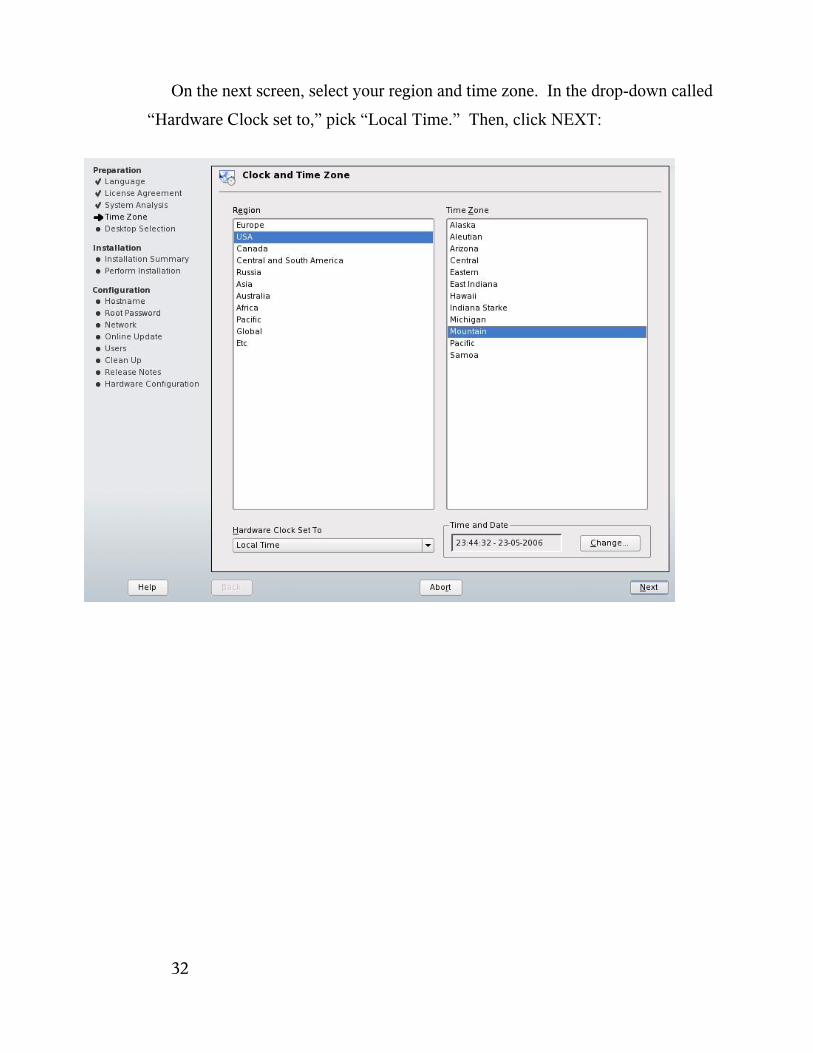
On the next screen, select your region and time zone. In the drop-down called
“Hardware Clock set to,” pick “Local Time.” Then, click NEXT:
32
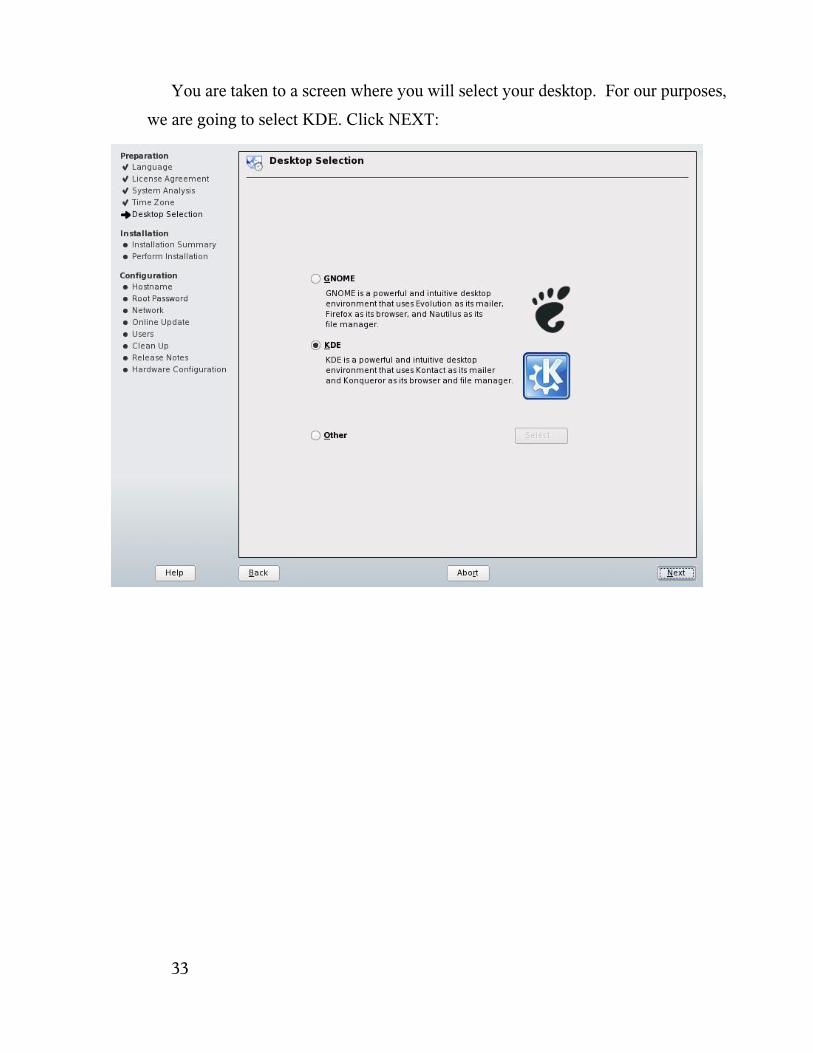
You are taken to a screen where you will select your desktop. For our purposes,
we are going to select KDE. Click NEXT:
33
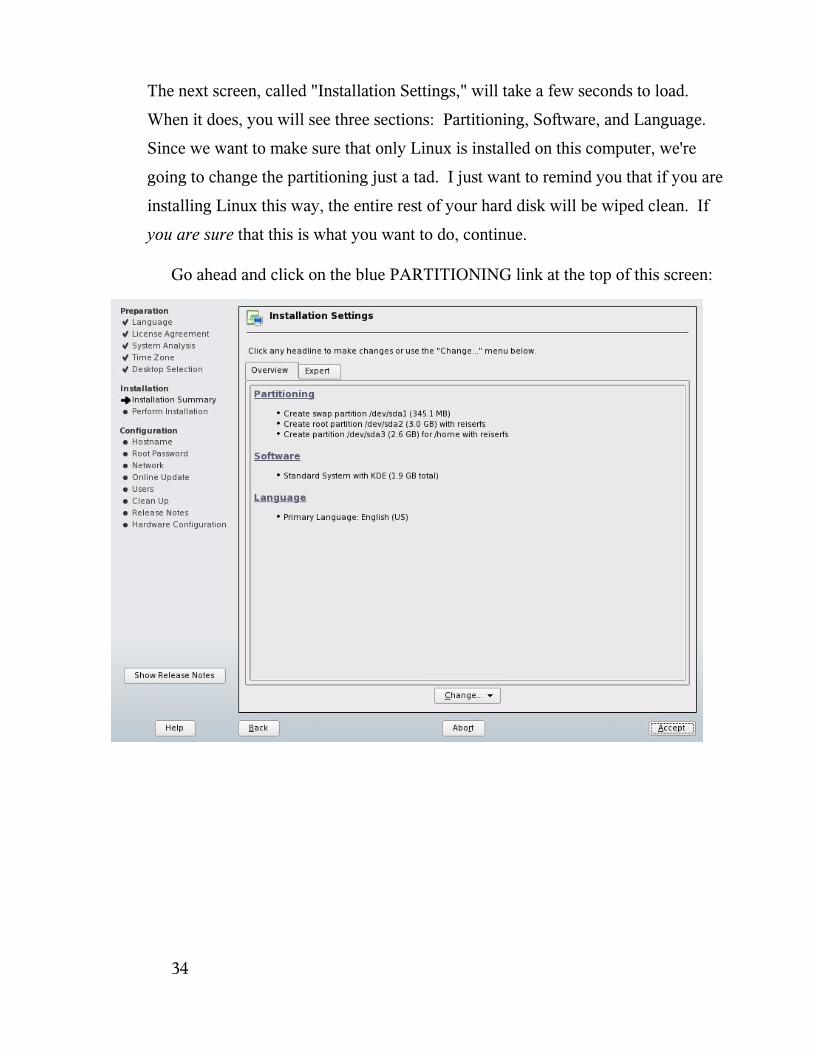
The next screen, called "Installation Settings," will take a few seconds to load.
When it does, you will see three sections: Partitioning, Software, and Language.
Since we want to make sure that only Linux is installed on this computer, we're
going to change the partitioning just a tad. I just want to remind you that if you are
installing Linux this way, the entire rest of your hard disk will be wiped clean. If
you are sure that this is what you want to do, continue.
Go ahead and click on the blue PARTITIONING link at the top of this screen:
34
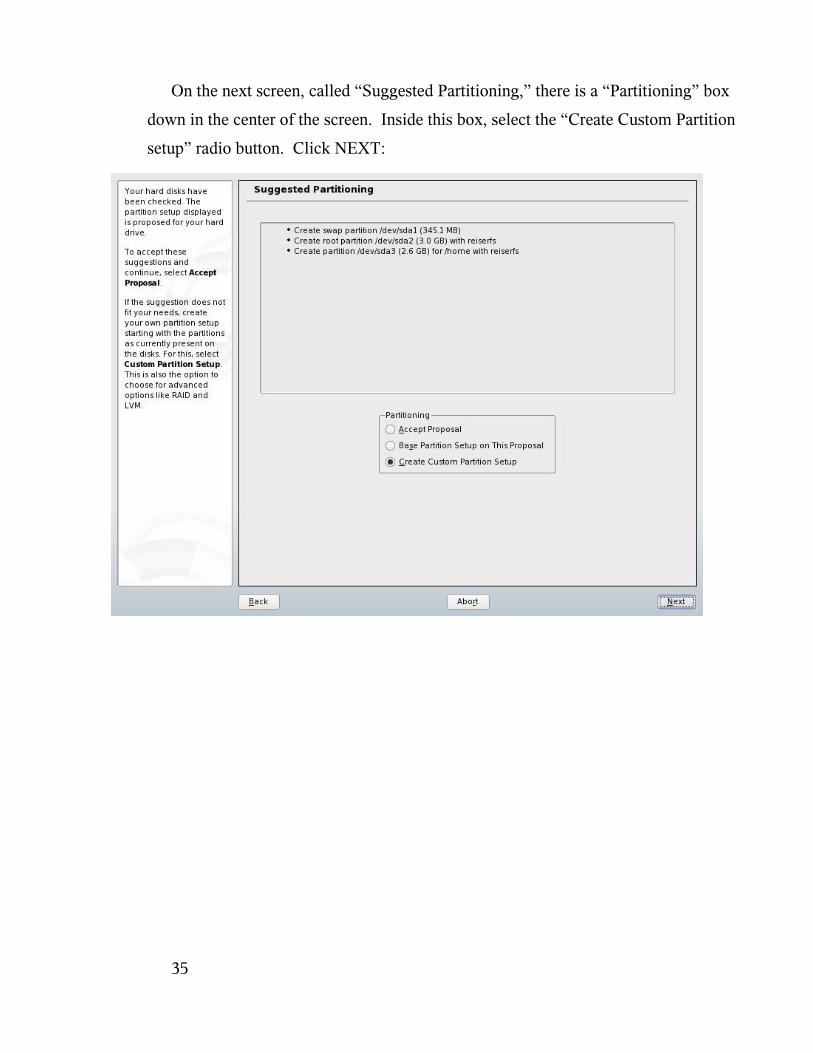
On the next screen, called “Suggested Partitioning,” there is a “Partitioning” box
down in the center of the screen. Inside this box, select the “Create Custom Partition
setup” radio button. Click NEXT:
35
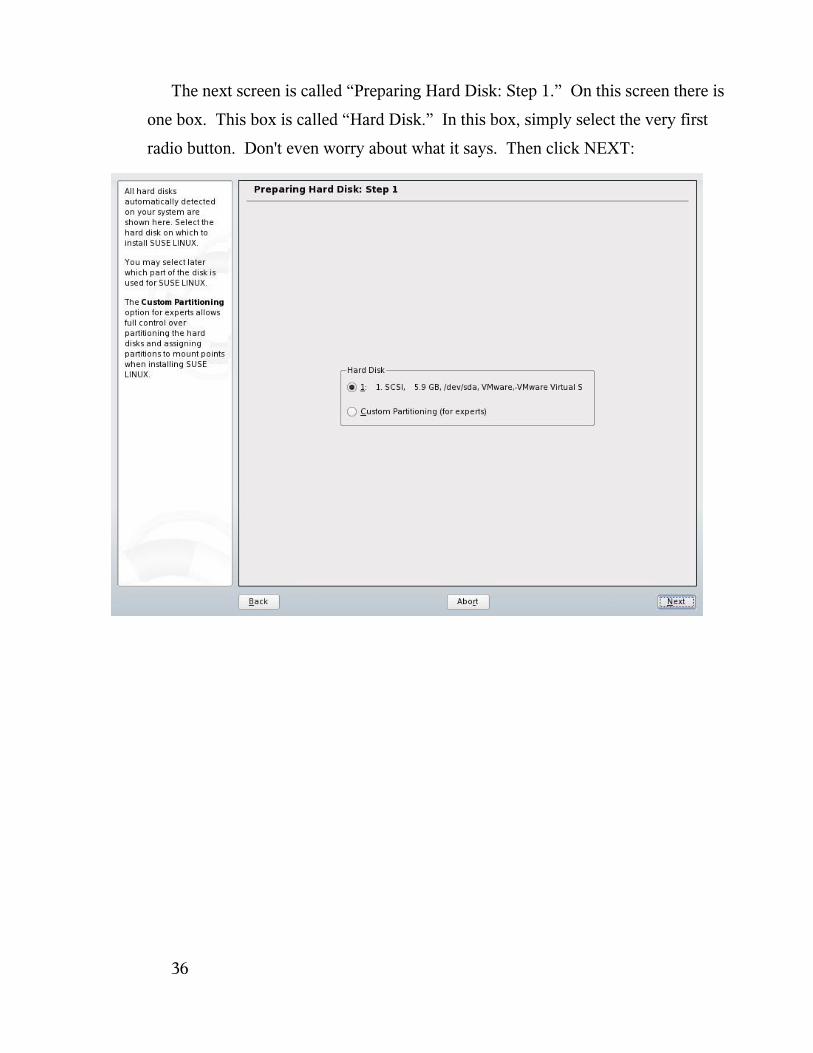
The next screen is called “Preparing Hard Disk: Step 1.” On this screen there is
one box. This box is called “Hard Disk.” In this box, simply select the very first
radio button. Don't even worry about what it says. Then click NEXT:
36

The next screen is called “Preparing Hard Disk: Step 2.” On this screen also,
there is only one box. It is called “Installing on:.” If you see a button that says “Use
entire hard disk, click it (if not, that is ok). Then, click NEXT:
37
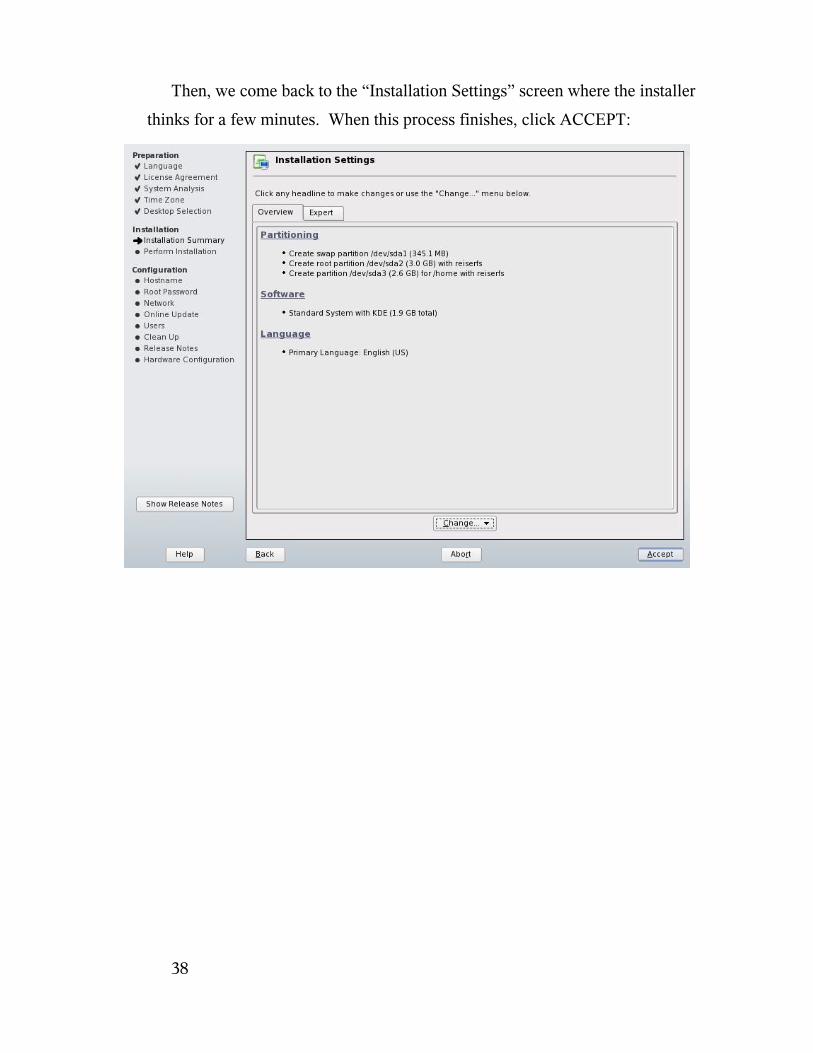
Then, we come back to the “Installation Settings” screen where the installer
thinks for a few minutes. When this process finishes, click ACCEPT:
38
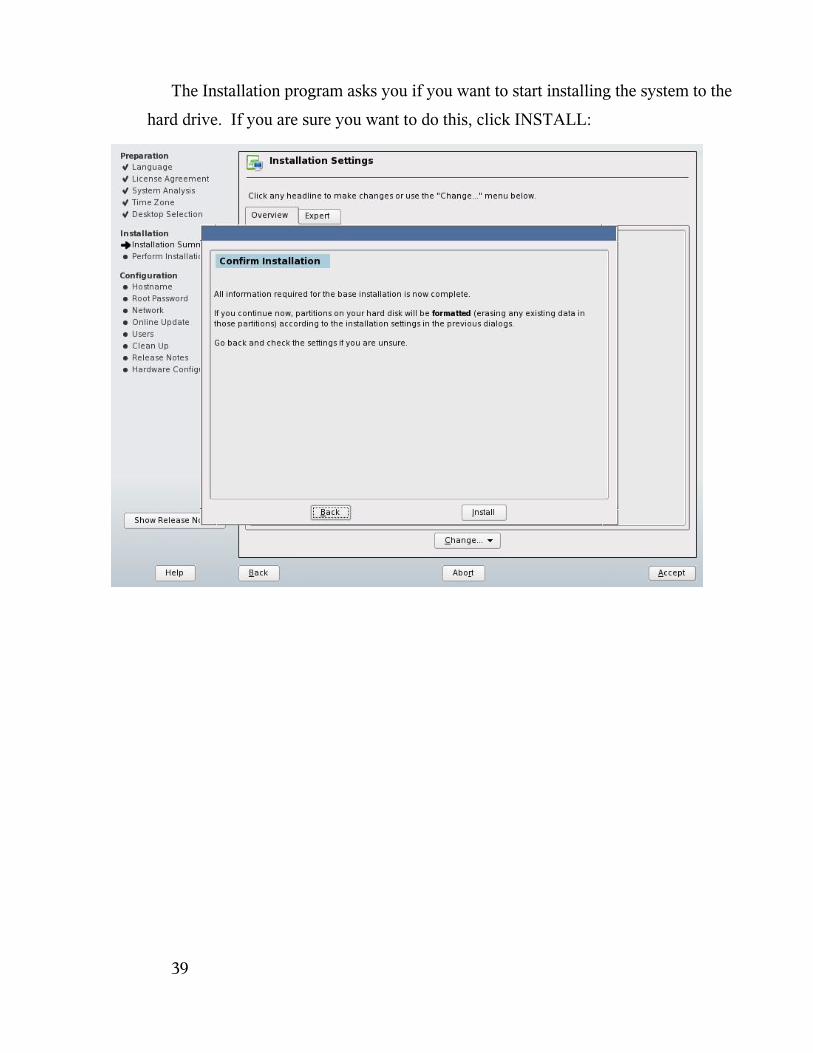
The Installation program asks you if you want to start installing the system to the
hard drive. If you are sure you want to do this, click INSTALL:
39
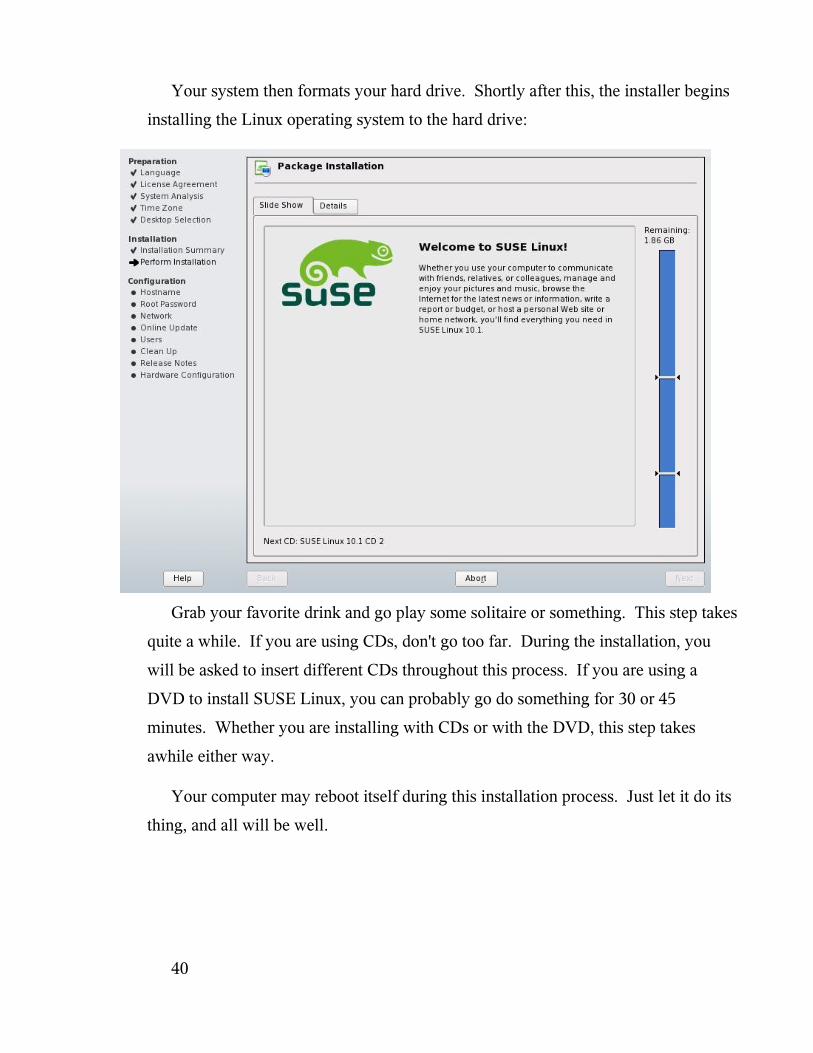
Your system then formats your hard drive. Shortly after this, the installer begins
installing the Linux operating system to the hard drive:
Grab your favorite drink and go play some solitaire or something. This step takes
quite a while. If you are using CDs, don't go too far. During the installation, you
will be asked to insert different CDs throughout this process. If you are using a
DVD to install SUSE Linux, you can probably go do something for 30 or 45
minutes. Whether you are installing with CDs or with the DVD, this step takes
awhile either way.
Your computer may reboot itself during this installation process. Just let it do its
thing, and all will be well.
40
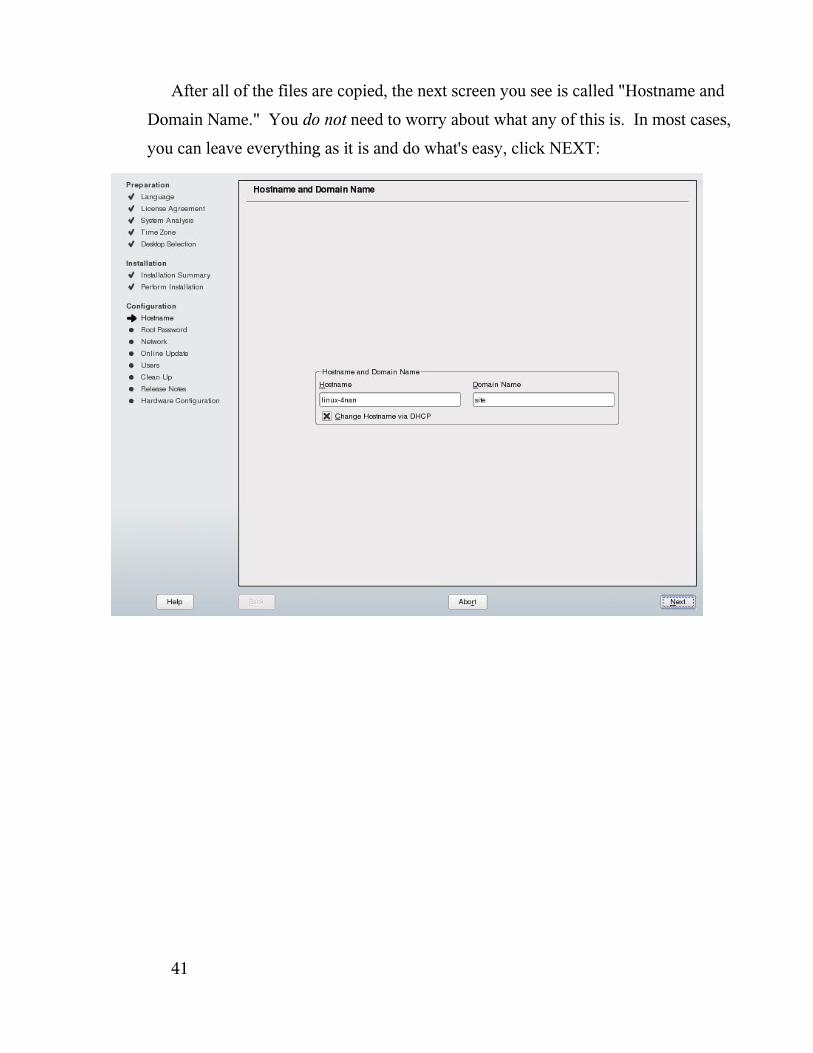
After all of the files are copied, the next screen you see is called "Hostname and
Domain Name." You do not need to worry about what any of this is. In most cases,
you can leave everything as it is and do what's easy, click NEXT:
41
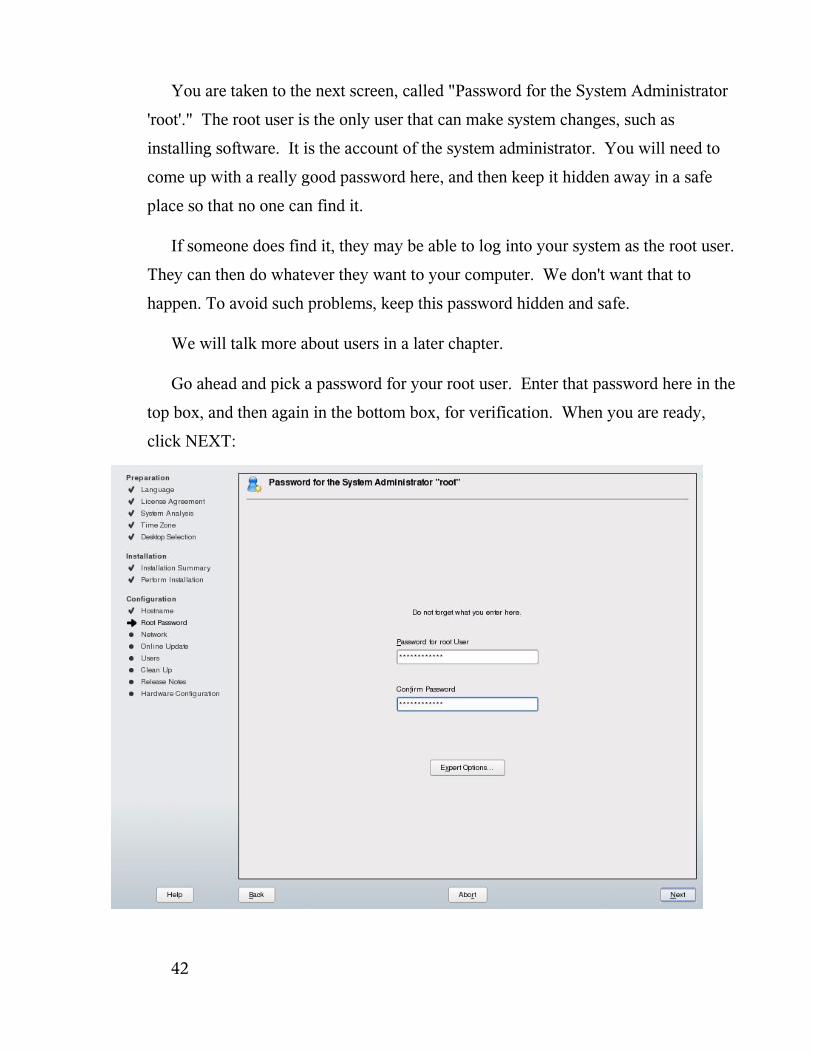
You are taken to the next screen, called "Password for the System Administrator
'root'." The root user is the only user that can make system changes, such as
installing software. It is the account of the system administrator. You will need to
come up with a really good password here, and then keep it hidden away in a safe
place so that no one can find it.
If someone does find it, they may be able to log into your system as the root user.
They can then do whatever they want to your computer. We don't want that to
happen. To avoid such problems, keep this password hidden and safe.
We will talk more about users in a later chapter.
Go ahead and pick a password for your root user. Enter that password here in the
top box, and then again in the bottom box, for verification. When you are ready,
click NEXT:
42

You may see a little box appear warning you about the password you have
selected. If you wish to change it, you may do so. If not, click YES:
43
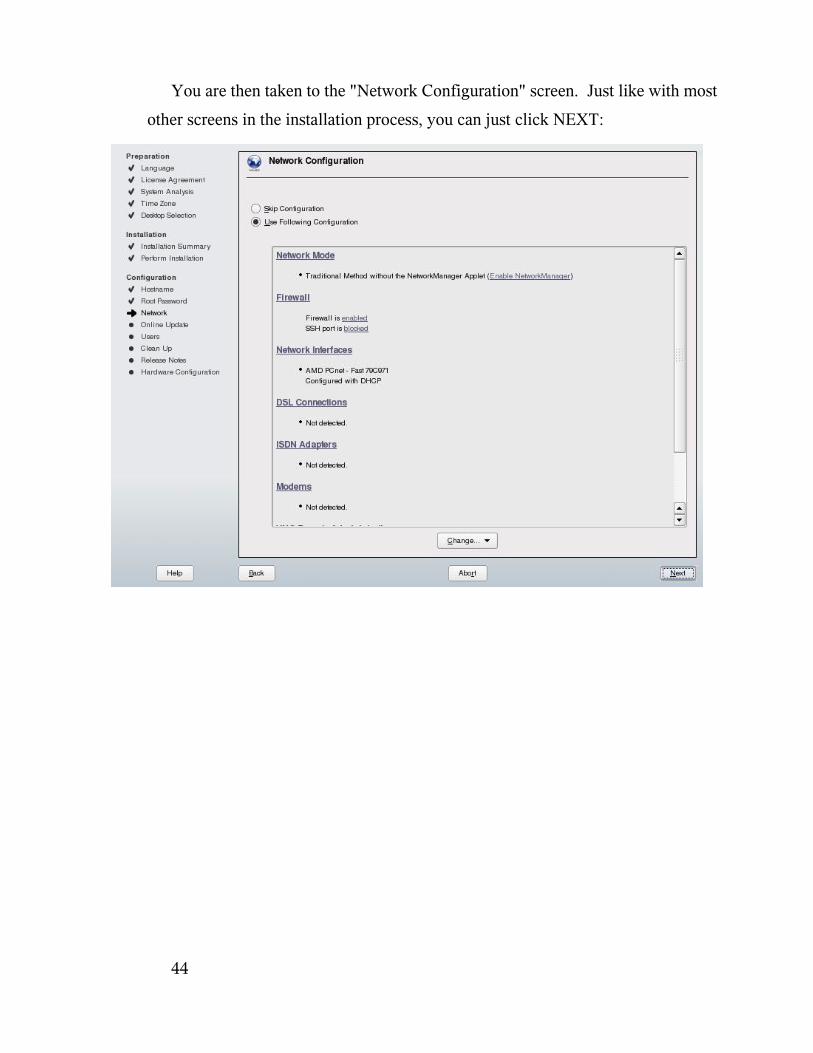
You are then taken to the "Network Configuration" screen. Just like with most
other screens in the installation process, you can just click NEXT:
44

The installer saves your network configuration. It then takes you to the next
screen, called "Test Internet Connection." This step will make sure you have a
working Internet connection. If you are connected to the Internet, you might as well
verify that the connection is working. If you don't want to do this or do not have an
Internet connection, you can skip the test. If you wish to skip the test, select “No,
Skip This Test,” and click the NEXT button. It will take you to the “User
Authentication Method” screen, further below.
That all said, I would like to show you what the test looks like.
Make sure the "Yes, Test Connection to the Internet" radio button is selected.
Then we are going to select NEXT:
45
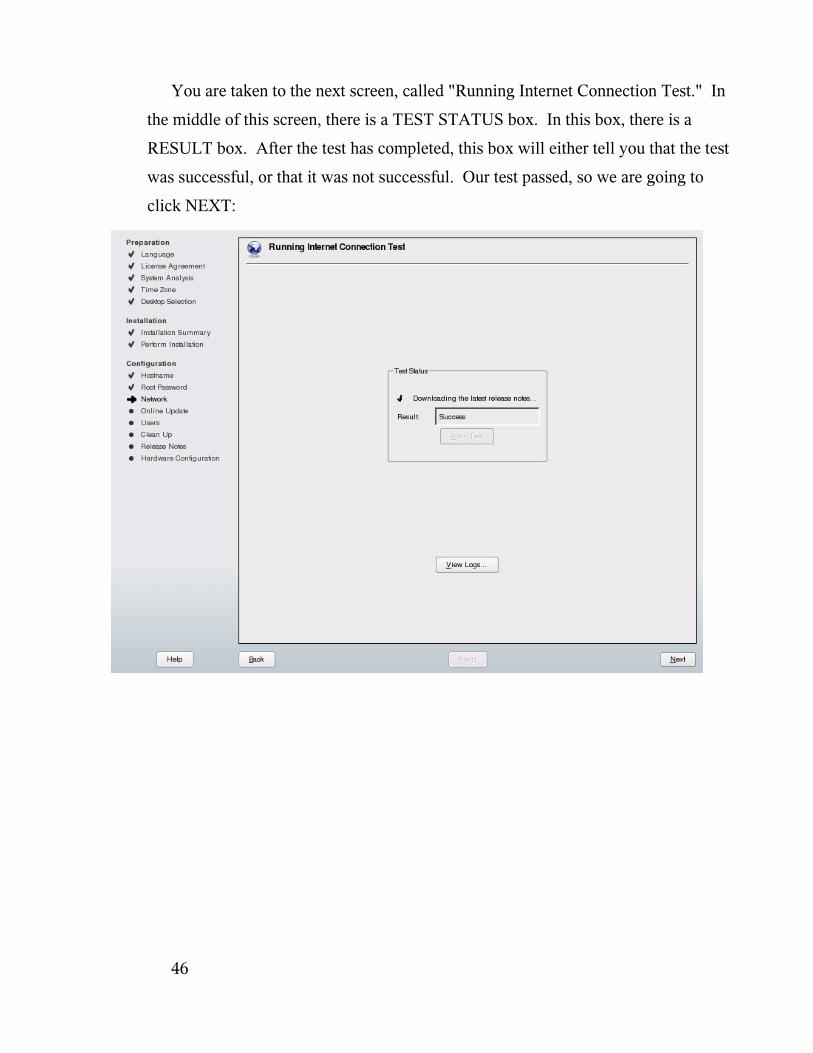
You are taken to the next screen, called "Running Internet Connection Test." In
the middle of this screen, there is a TEST STATUS box. In this box, there is a
RESULT box. After the test has completed, this box will either tell you that the test
was successful, or that it was not successful. Our test passed, so we are going to
click NEXT:
46
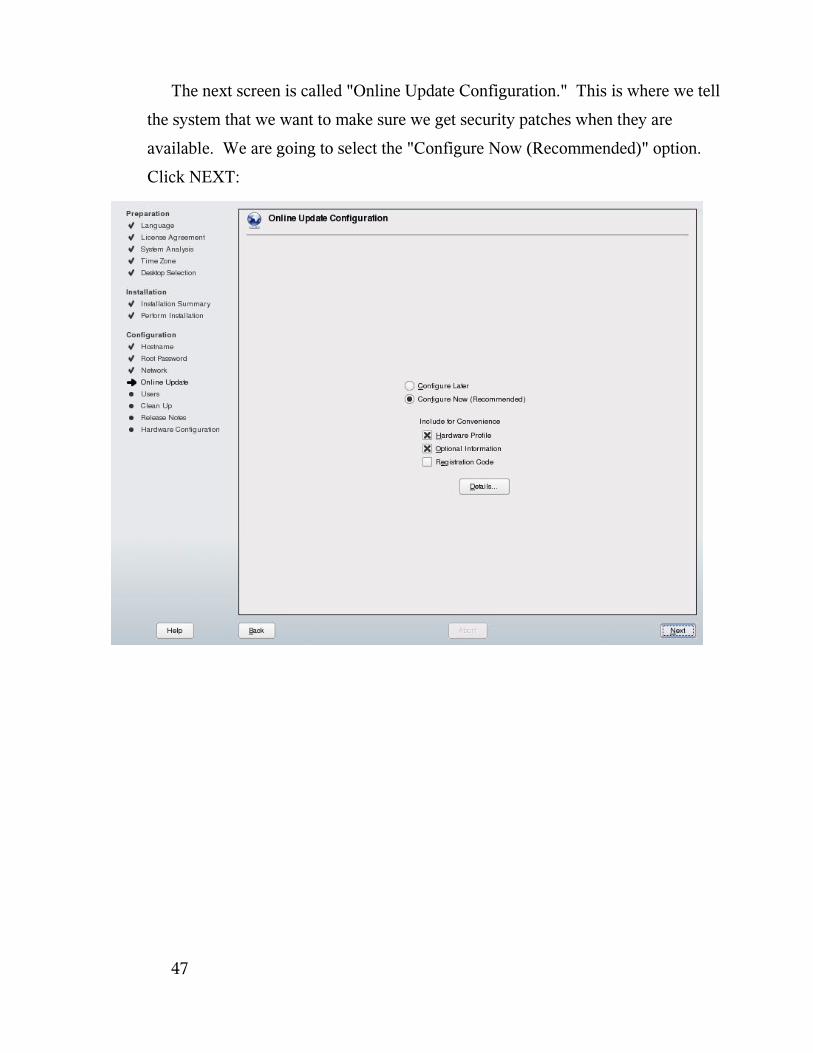
The next screen is called "Online Update Configuration." This is where we tell
the system that we want to make sure we get security patches when they are
available. We are going to select the "Configure Now (Recommended)" option.
Click NEXT:
47
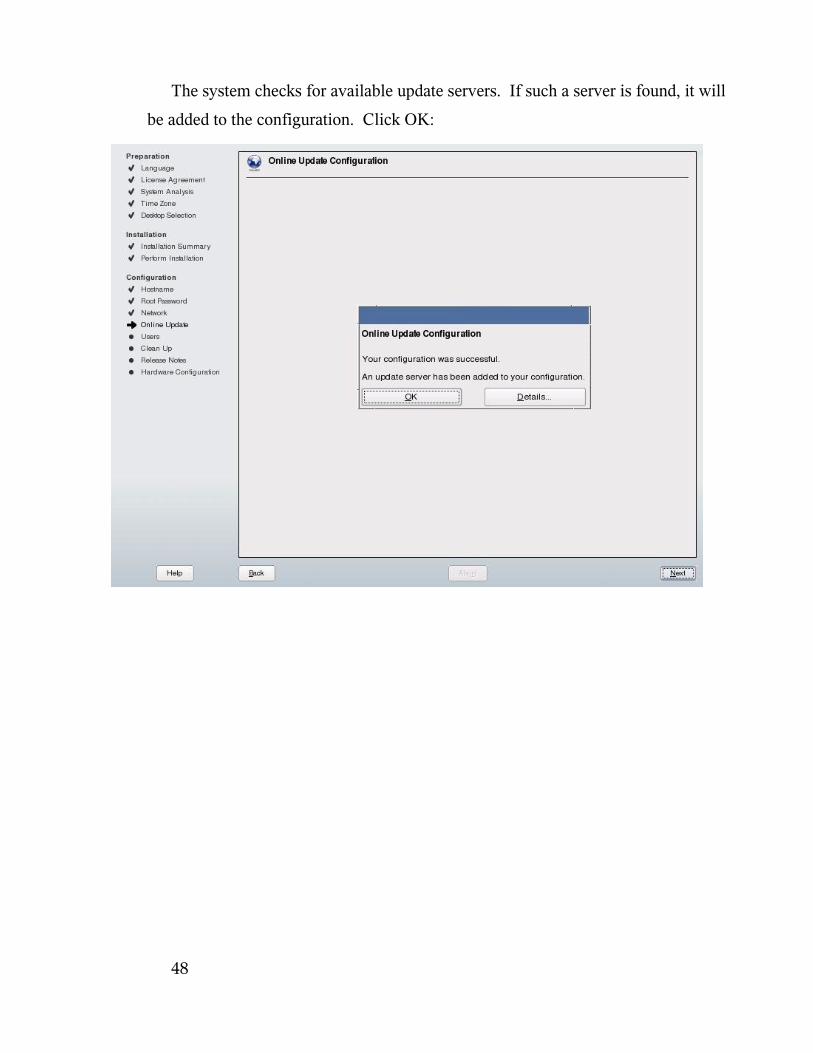
The system checks for available update servers. If such a server is found, it will
be added to the configuration. Click OK:
48
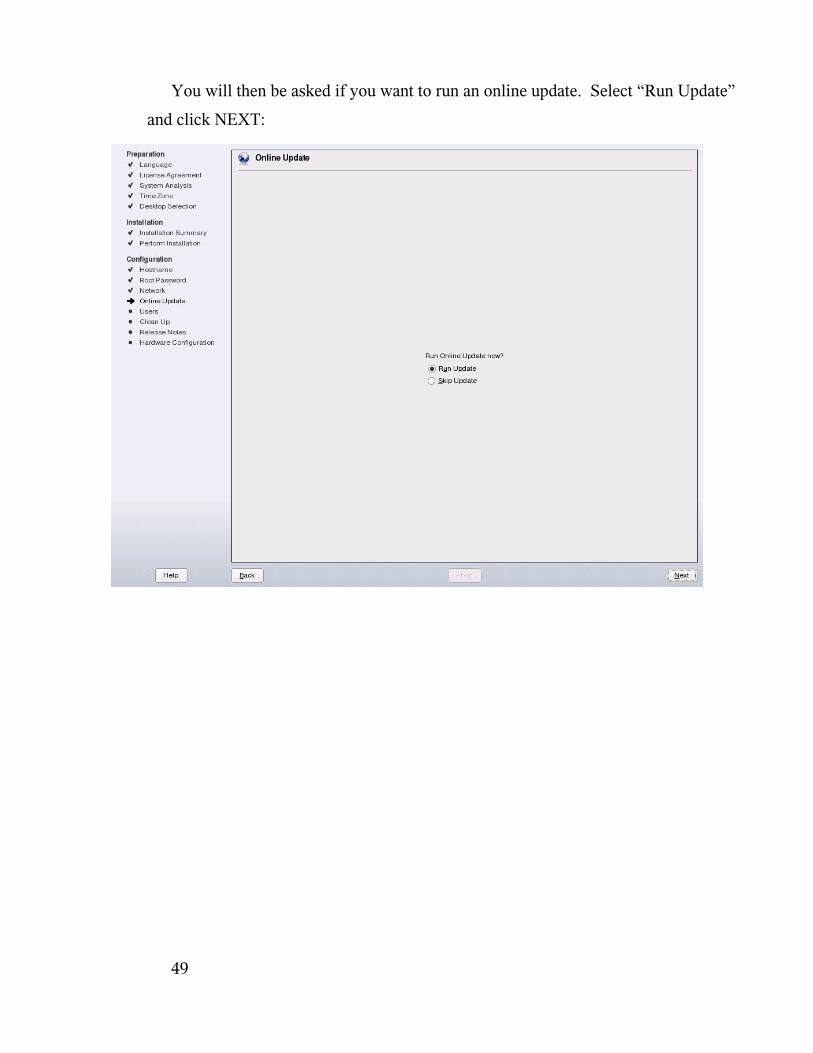
You will then be asked if you want to run an online update. Select “Run Update”
and click NEXT:
49

You are taken to the update screen. Once you get here, just click ACCEPT:
50
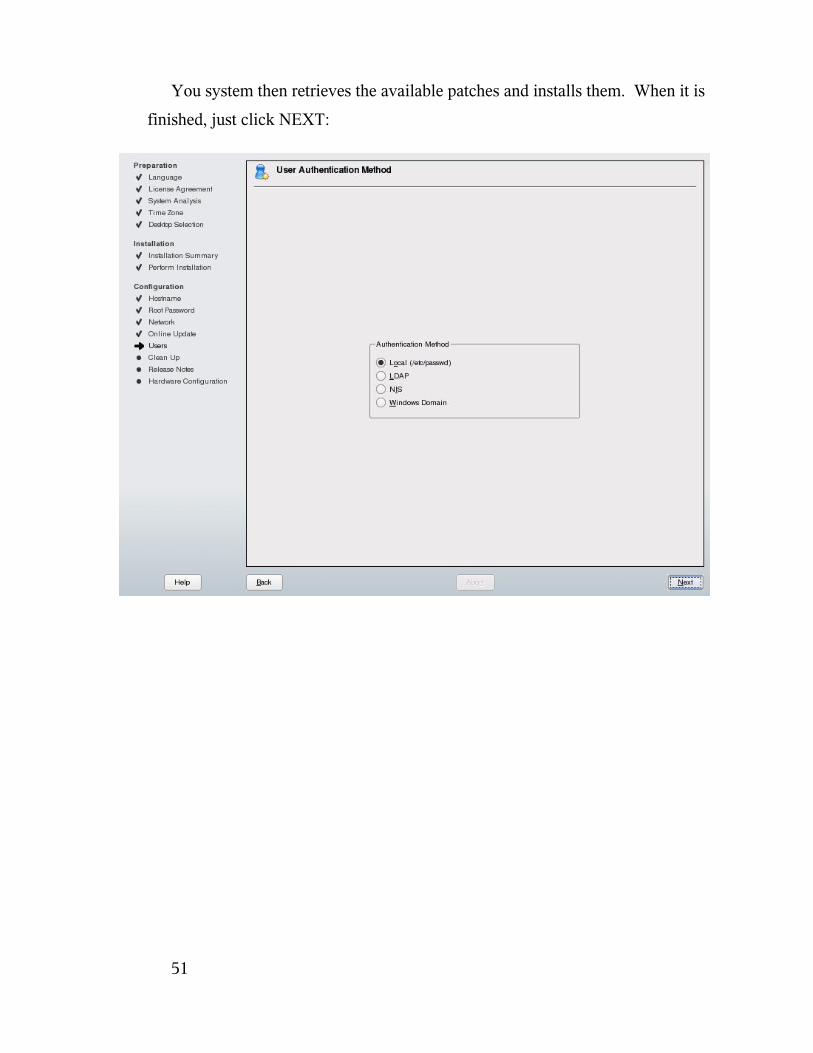
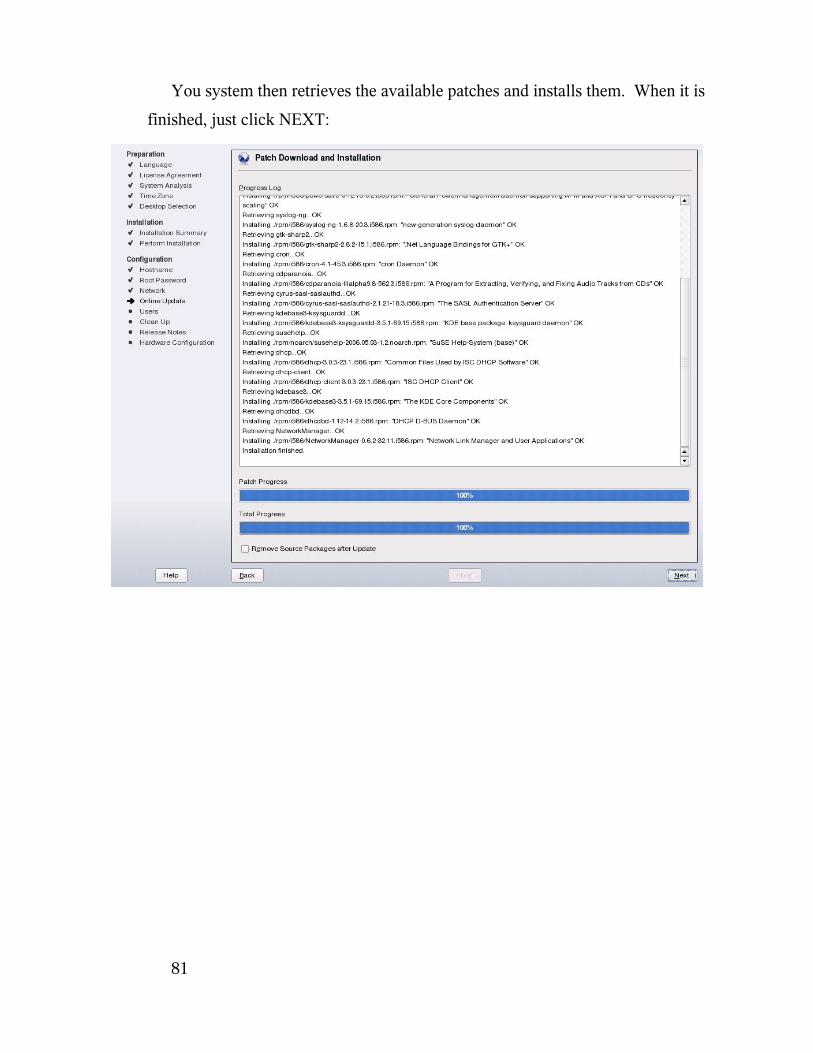
You system then retrieves the available patches and installs them. When it is
finished, just click NEXT:
51
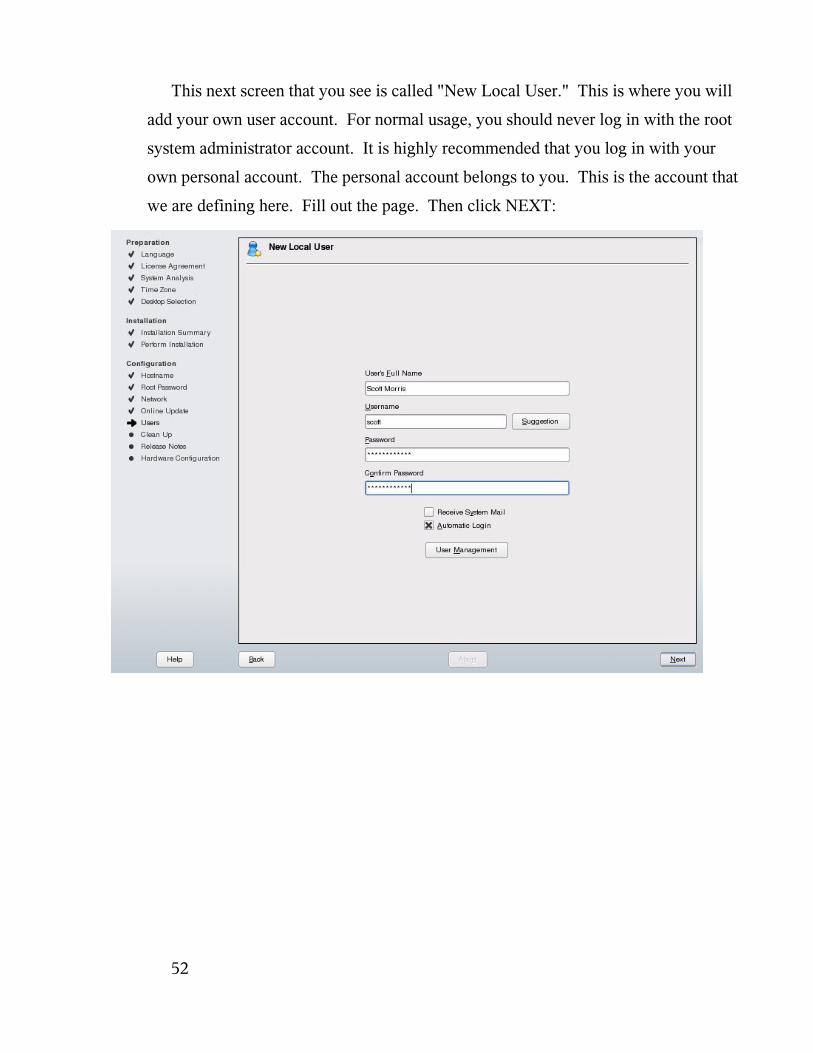
This next screen that you see is called "New Local User." This is where you will
add your own user account. For normal usage, you should never log in with the root
system administrator account. It is highly recommended that you log in with your
own personal account. The personal account belongs to you. This is the account that
we are defining here. Fill out the page. Then click NEXT:
52
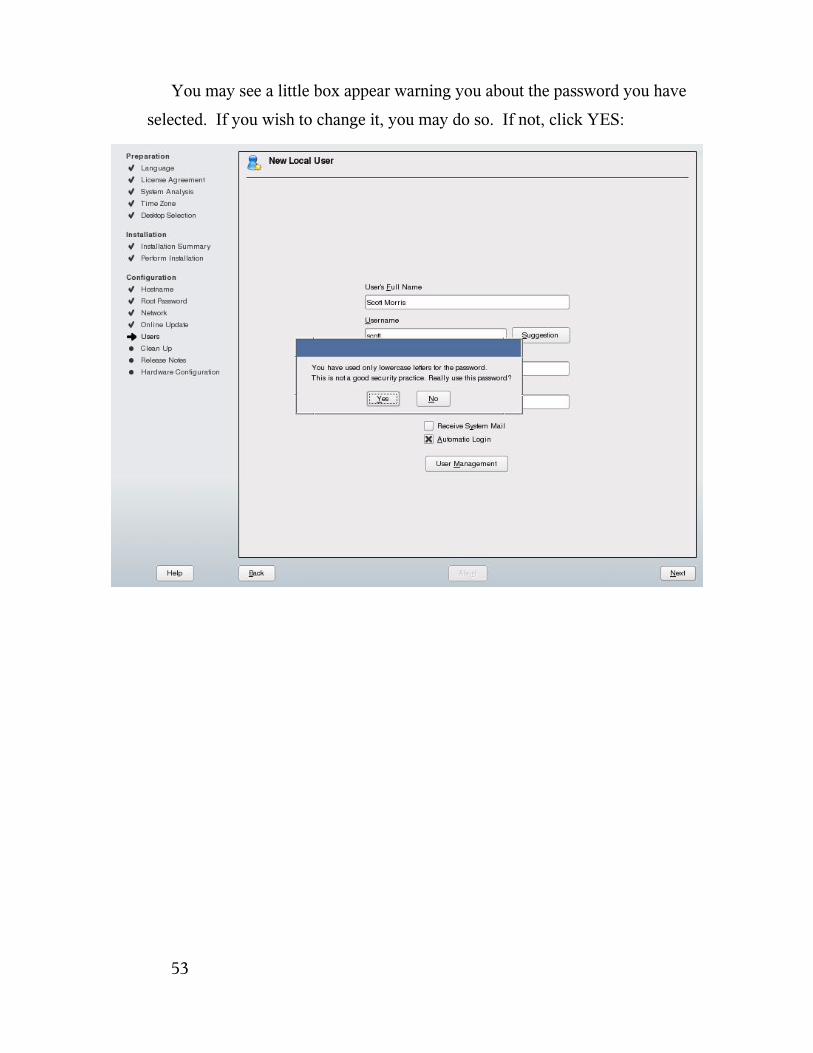
You may see a little box appear warning you about the password you have
selected. If you wish to change it, you may do so. If not, click YES:
53

You are taken to another screen, called "Writing the system configuration." You
don't need to do anything here. Just watch as it goes through, updating the system
configuration for each thing. When it is finished, it will go to the next screen, called
"Release Notes" appears. Again, click NEXT:
54
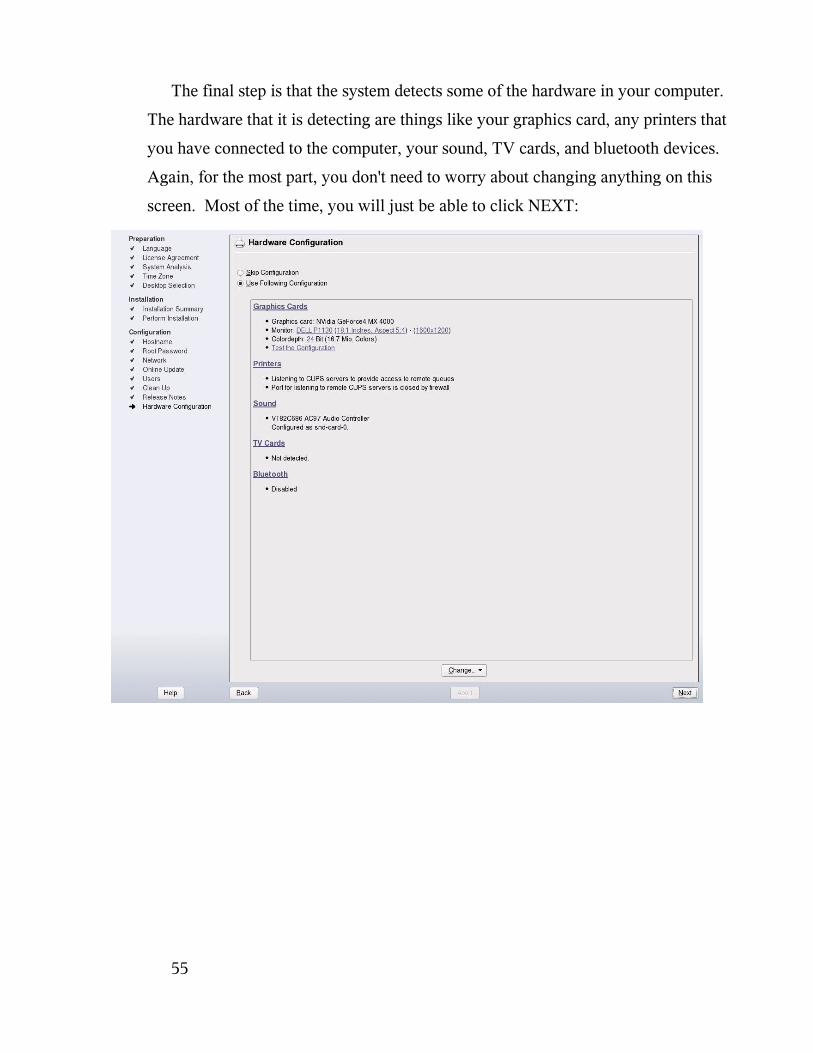
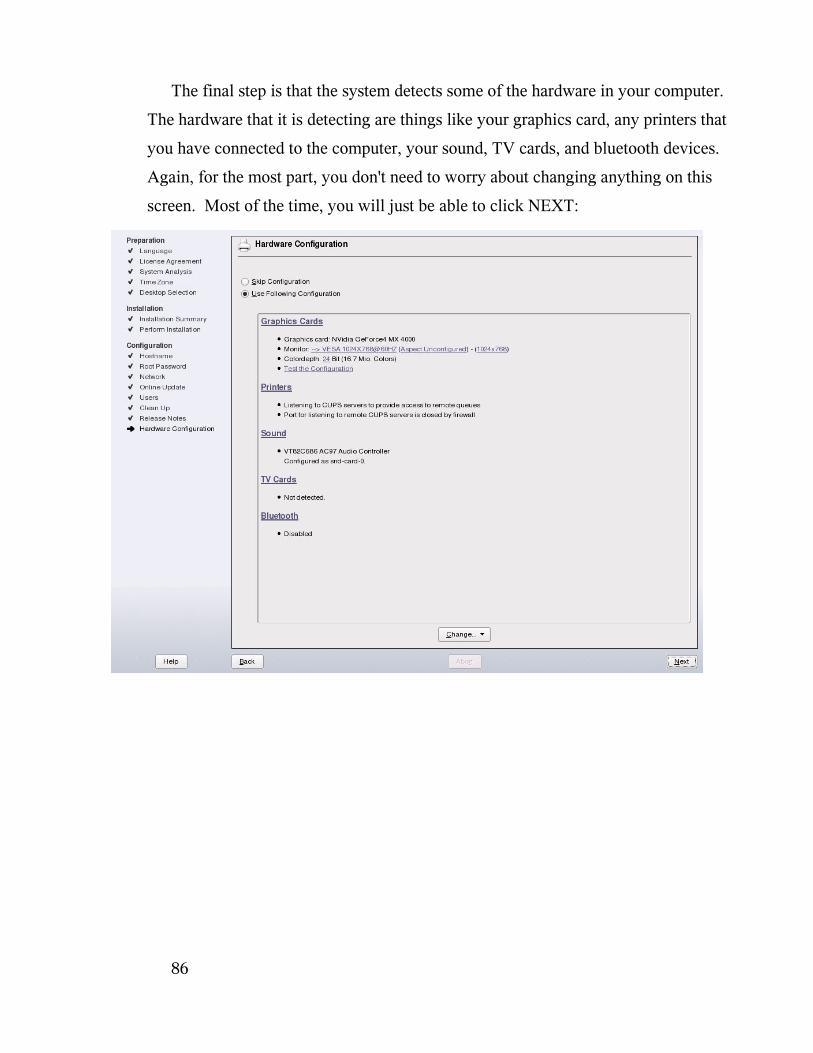
The final step is that the system detects some of the hardware in your computer.
The hardware that it is detecting are things like your graphics card, any printers that
you have connected to the computer, your sound, TV cards, and bluetooth devices.
Again, for the most part, you don't need to worry about changing anything on this
screen. Most of the time, you will just be able to click NEXT:
55

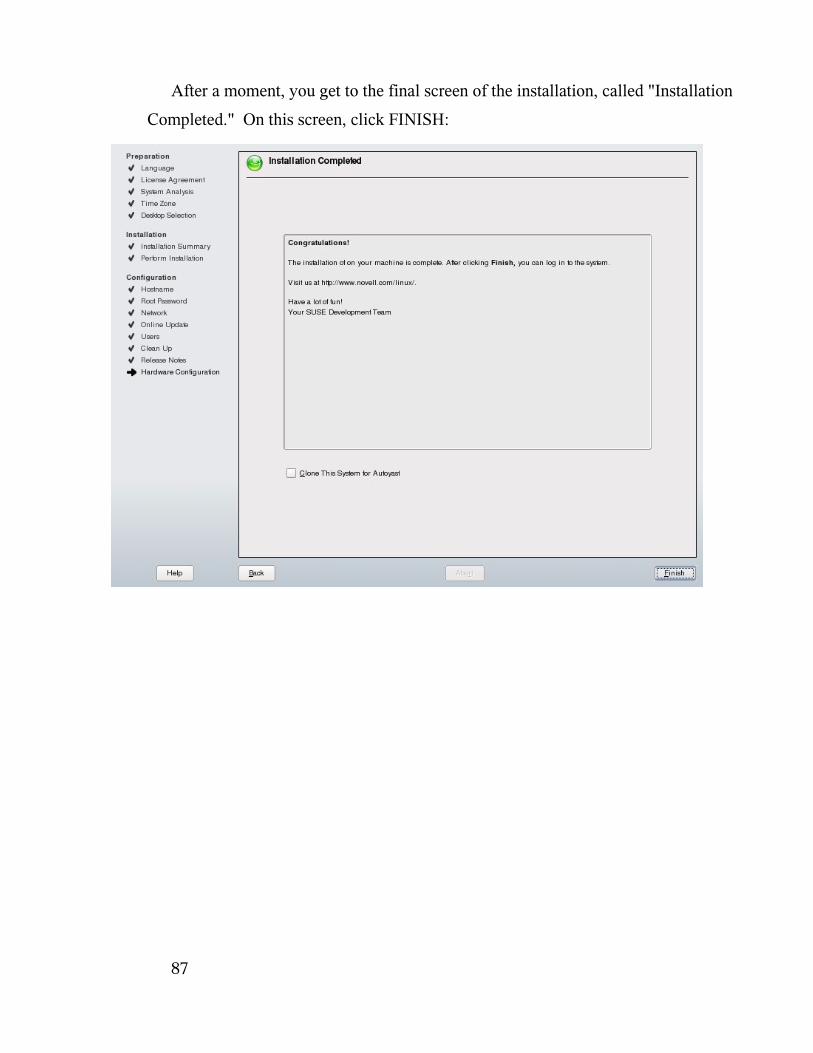
After a moment, you get to the final screen of the installation, called "Installation
Completed." On this screen, click FINISH:
56
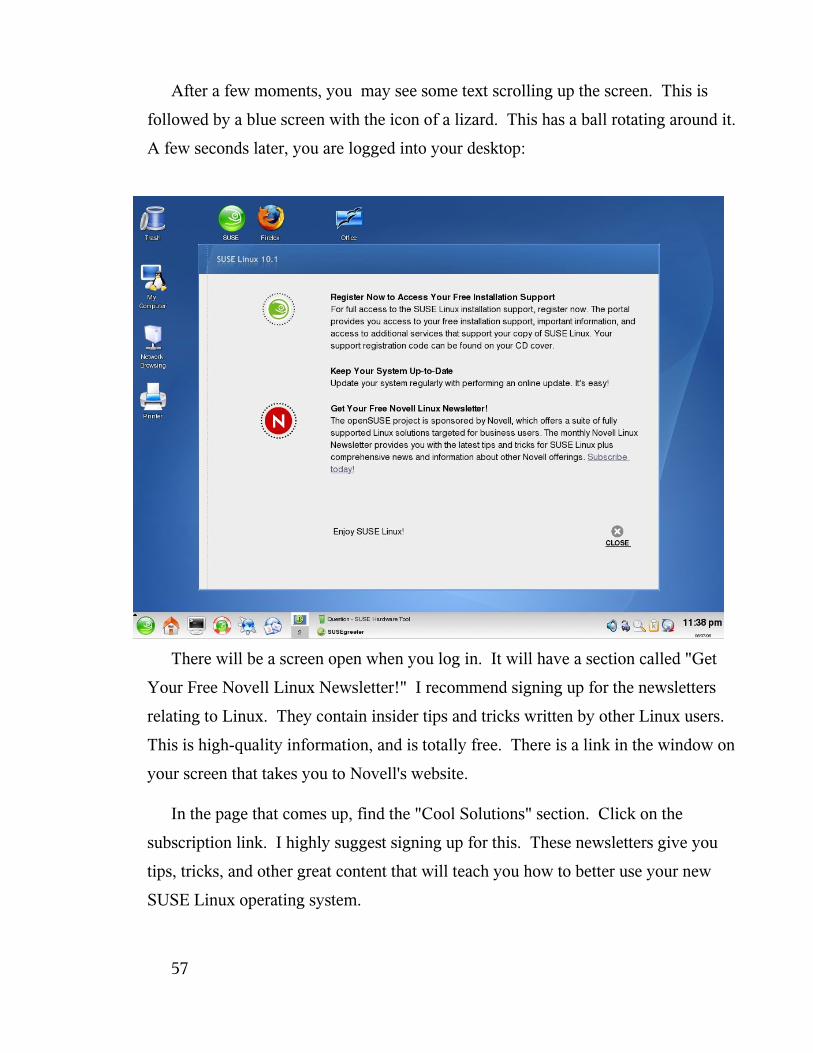
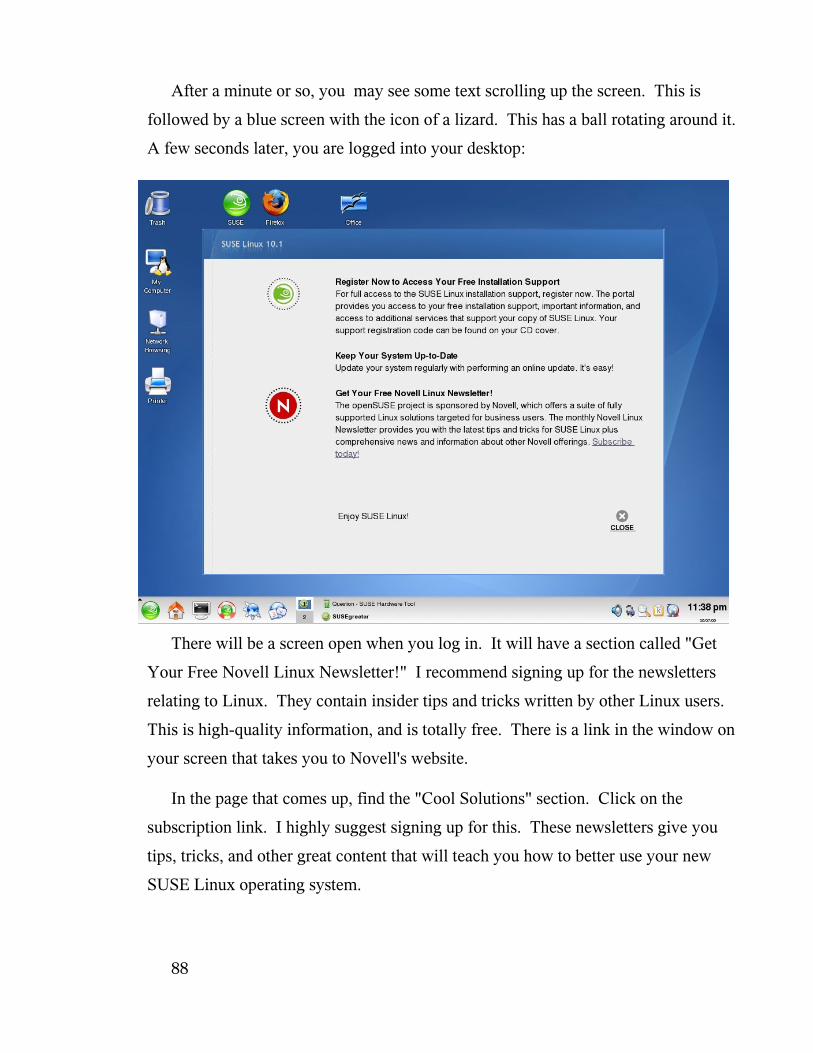
After a few moments, you may see some text scrolling up the screen. This is
followed by a blue screen with the icon of a lizard. This has a ball rotating around it.
A few seconds later, you are logged into your desktop:
There will be a screen open when you log in. It will have a section called "Get
Your Free Novell Linux Newsletter!" I recommend signing up for the newsletters
relating to Linux. They contain insider tips and tricks written by other Linux users.
This is high-quality information, and is totally free. There is a link in the window on
your screen that takes you to Novell's website.
In the page that comes up, find the "Cool Solutions" section. Click on the
subscription link. I highly suggest signing up for this. These newsletters give you
tips, tricks, and other great content that will teach you how to better use your new
SUSE Linux operating system.
57

Once you have signed up for these newsletters, you can close all open windows
on your desktop. You can skip the next section below, called "Sharing the computer
between Linux and Windows" Go to the section called "Introduction to Users and
Groups."
Sharing the computer between Linux and Windows
As with the previous section where we were installing Linux by itself on a
computer, for most of the screens where it gives you options, the default choices are
usually fine. I want to let you in on a secret. During the installation, you will be
taken through a series of screens. The secret is that for most of the screens where it
gives you options, the default choices are usually fine. This means that if you are on
a screen where you don't know what to do, you can probably just click NEXT
without changing a thing.
While this is true in many cases, it isn't always that easy. Don't worry, though.
With the walk-through that we will do here, we will make the installation very easy.
When doing the installation, you can use either a set of CDs or the DVD. The
process should be mostly the same for either one. The obvious difference is that
with the CDs you will just provide the appropriate CD when the installation asks you
for it. With the DVD, everything is on one disc, so you won't need to change discs.
Before getting started, I would suggest that you defragment your hard drive in
Windows. This may make it a little safer to put Linux on the drive with Windows.
Defragmenting simply moves all the Windows data to one part of the drive, freeing
space for the Linux installation. If you do not do this, the Windows data may be
scattered over too broad an area on the hard drive, and you may not be able to install
Linux.
If you are not familiar with how to defragment your hard drive in Windows, I
would ask someone you know to help you with this.
58
Also, this has the potential to render your computer unbootable in either
Windows or Linux. While that is extremely unlikely, I want to make you aware that
it is a possibility. I have never had this happen to me. However, I would suggest
that you back up all important data from Windows before you get started with the
process outlined below.
Beginning the Installation
Let's get started. If you are using CDs, put disc 1 into your CD-ROM. If you are
using the DVD, insert that disc now.
Power up your computer.
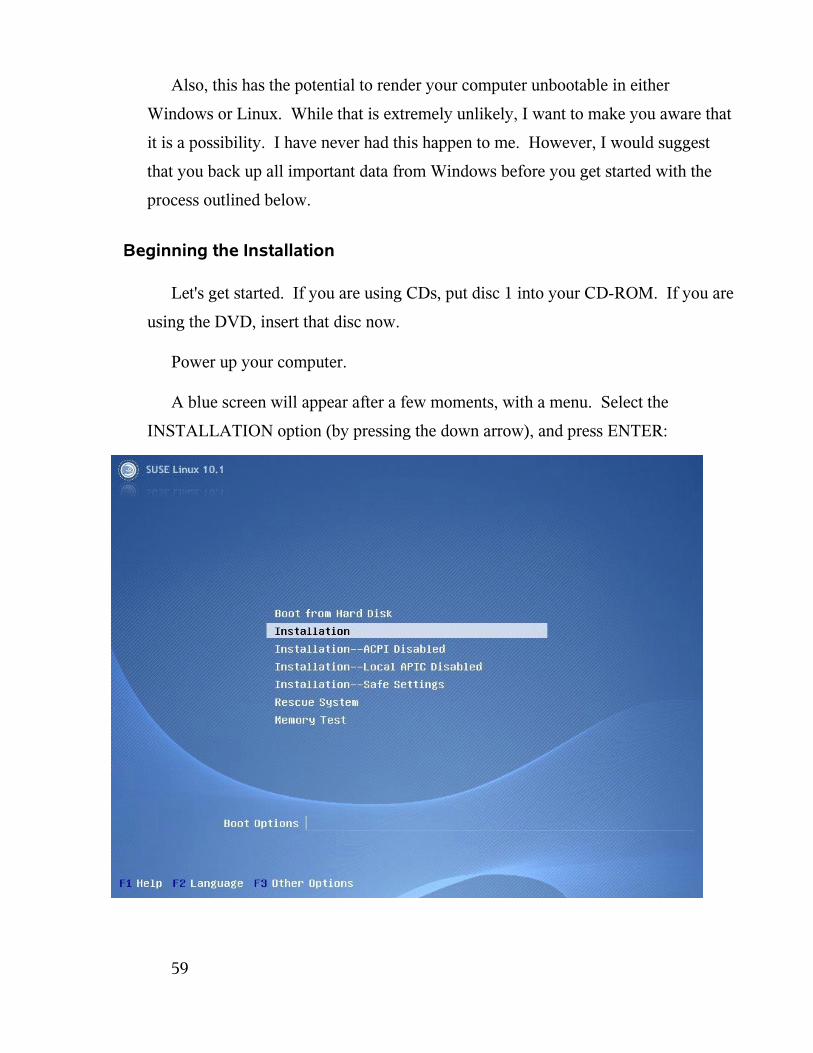
A blue screen will appear after a few moments, with a menu. Select the
INSTALLATION option (by pressing the down arrow), and press ENTER:
59
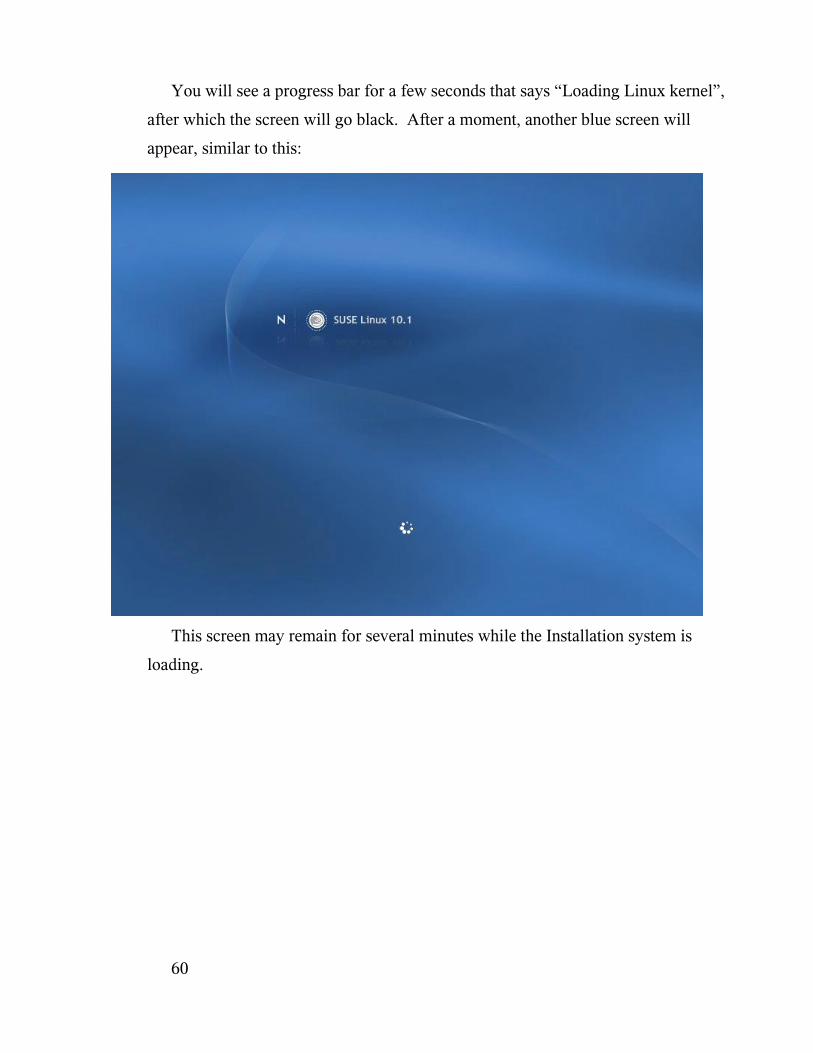
You will see a progress bar for a few seconds that says “Loading Linux kernel”,
after which the screen will go black. After a moment, another blue screen will
appear, similar to this:
This screen may remain for several minutes while the Installation system is
loading.
60
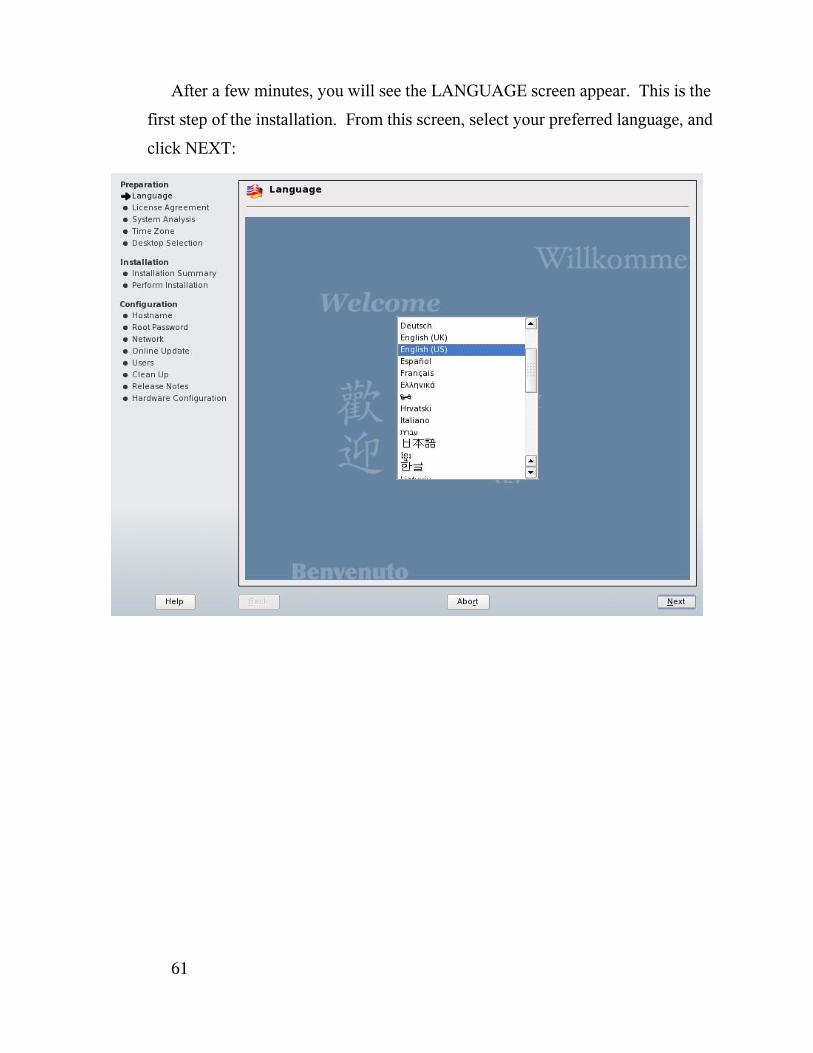
After a few minutes, you will see the LANGUAGE screen appear. This is the
first step of the installation. From this screen, select your preferred language, and
click NEXT:
61

You are taken to a screen that suggests you do a media check. If you wish to do
this, click START CHECK. When you are ready, click NEXT:
62
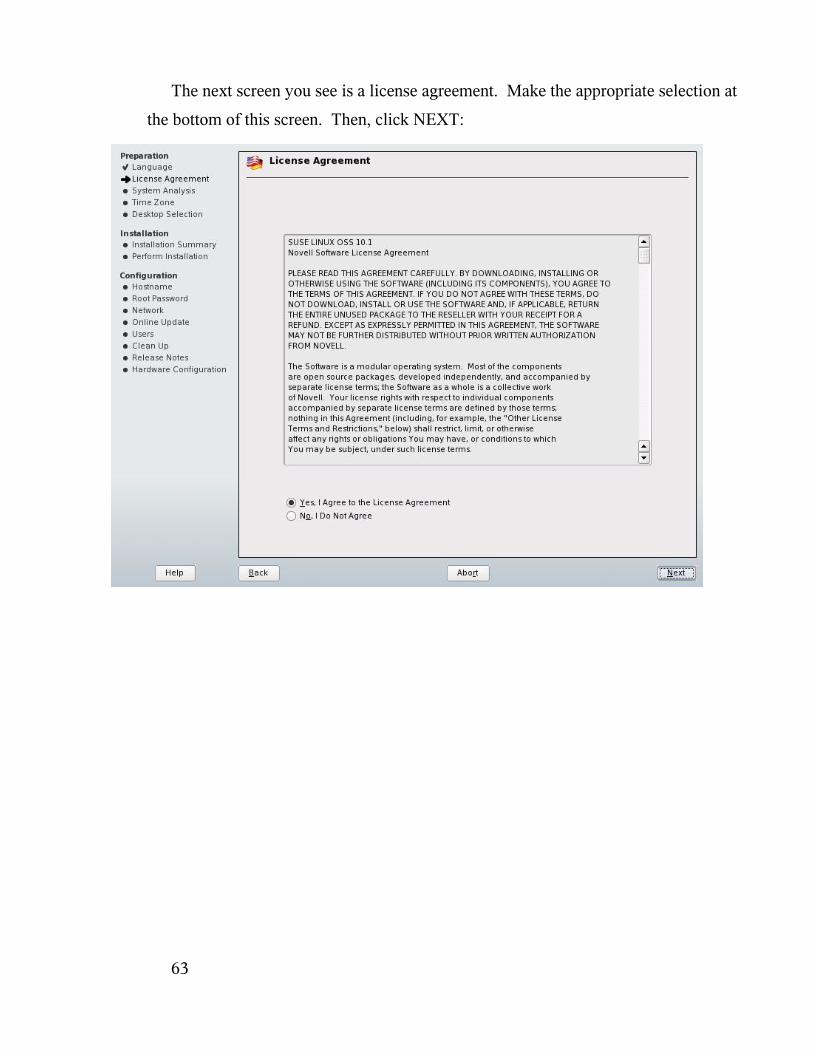
The next screen you see is a license agreement. Make the appropriate selection at
the bottom of this screen. Then, click NEXT:
63
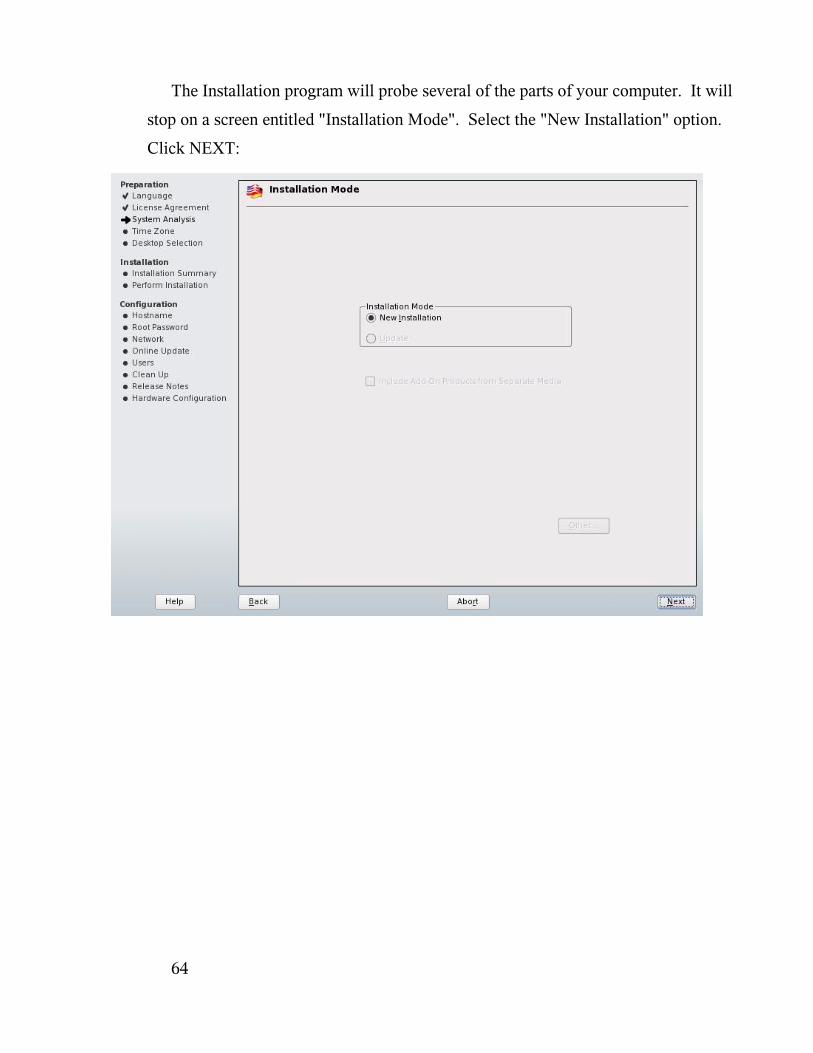
The Installation program will probe several of the parts of your computer. It will
stop on a screen entitled "Installation Mode". Select the "New Installation" option.
Click NEXT:
64
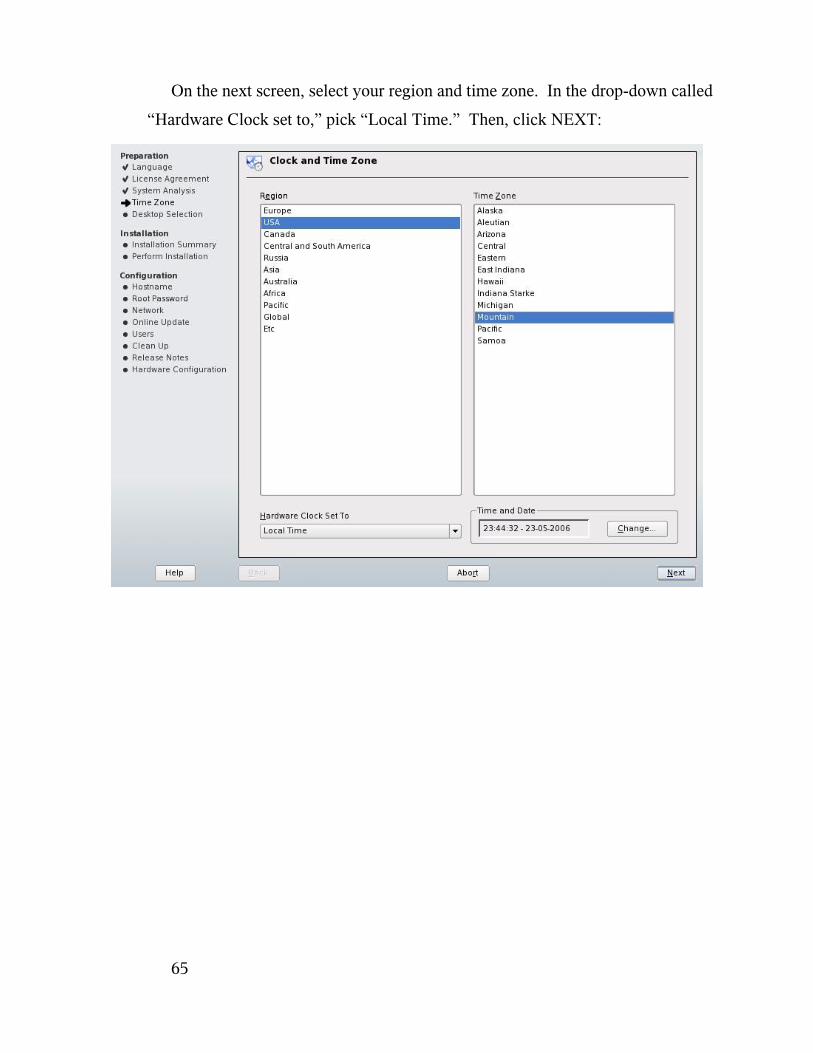
On the next screen, select your region and time zone. In the drop-down called
“Hardware Clock set to,” pick “Local Time.” Then, click NEXT:
65

You are taken to a screen where you will select your desktop. For our purposes,
we are going to select KDE. Click NEXT:
66
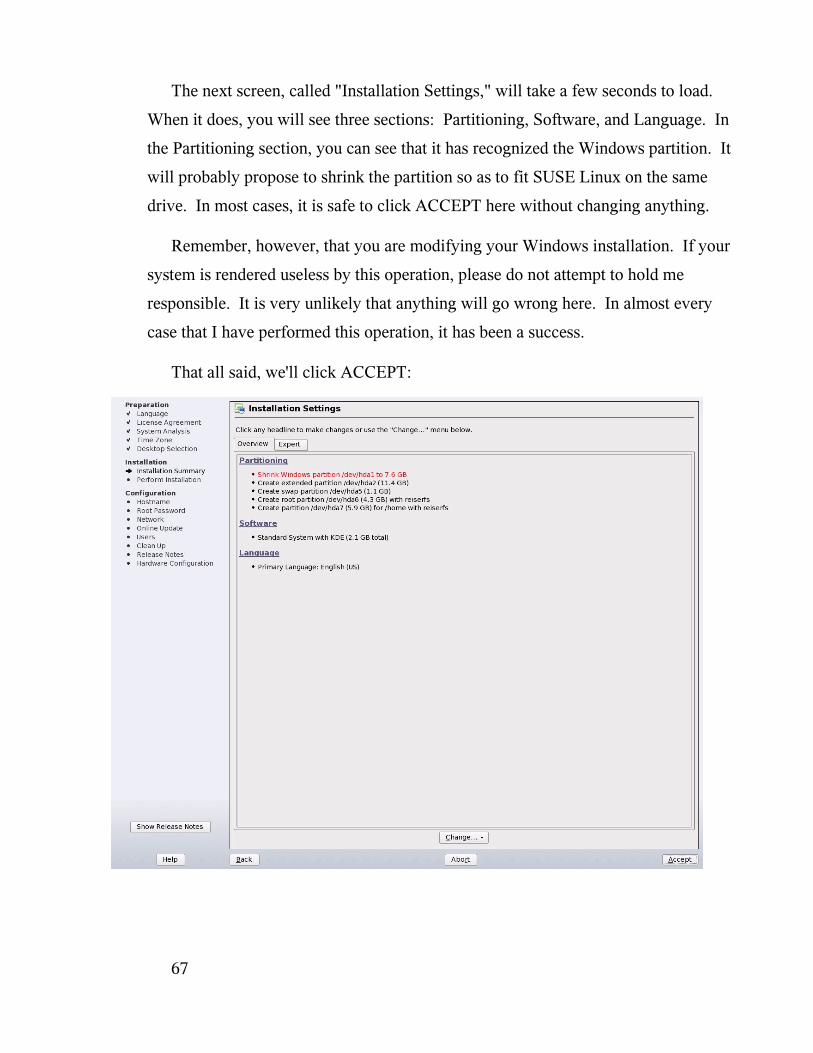
The next screen, called "Installation Settings," will take a few seconds to load.
When it does, you will see three sections: Partitioning, Software, and Language. In
the Partitioning section, you can see that it has recognized the Windows partition. It
will probably propose to shrink the partition so as to fit SUSE Linux on the same
drive. In most cases, it is safe to click ACCEPT here without changing anything.
Remember, however, that you are modifying your Windows installation. If your
system is rendered useless by this operation, please do not attempt to hold me
responsible. It is very unlikely that anything will go wrong here. In almost every
case that I have performed this operation, it has been a success.
That all said, we'll click ACCEPT:
67
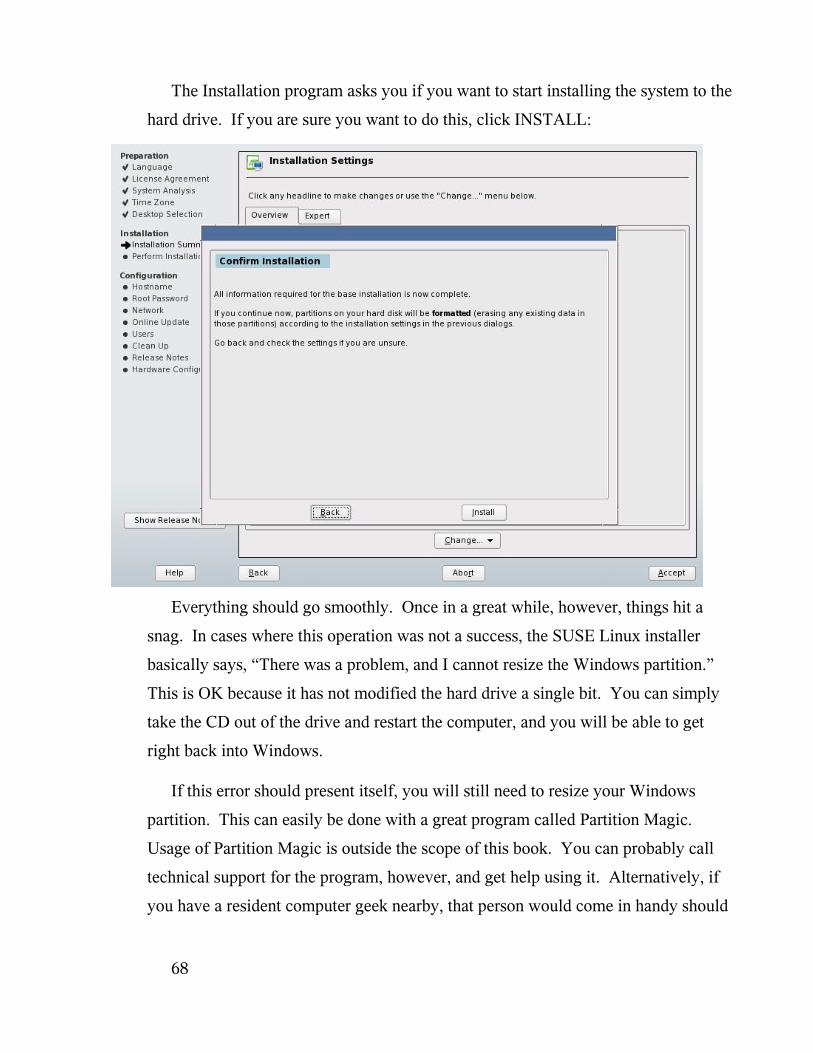
The Installation program asks you if you want to start installing the system to the
hard drive. If you are sure you want to do this, click INSTALL:
Everything should go smoothly. Once in a great while, however, things hit a
snag. In cases where this operation was not a success, the SUSE Linux installer
basically says, “There was a problem, and I cannot resize the Windows partition.”
This is OK because it has not modified the hard drive a single bit. You can simply
take the CD out of the drive and restart the computer, and you will be able to get
right back into Windows.
If this error should present itself, you will still need to resize your Windows
partition. This can easily be done with a great program called Partition Magic.
Usage of Partition Magic is outside the scope of this book. You can probably call
technical support for the program, however, and get help using it. Alternatively, if
you have a resident computer geek nearby, that person would come in handy should
68
you need to use Partition Magic to resize your Windows drive. Just be sure to tell
them that you need at least 5 Gigabytes free for your Linux installation. If you do
end up using Partition Magic to resize your drive, you can restart the SUSE Linux
installation without any problem.
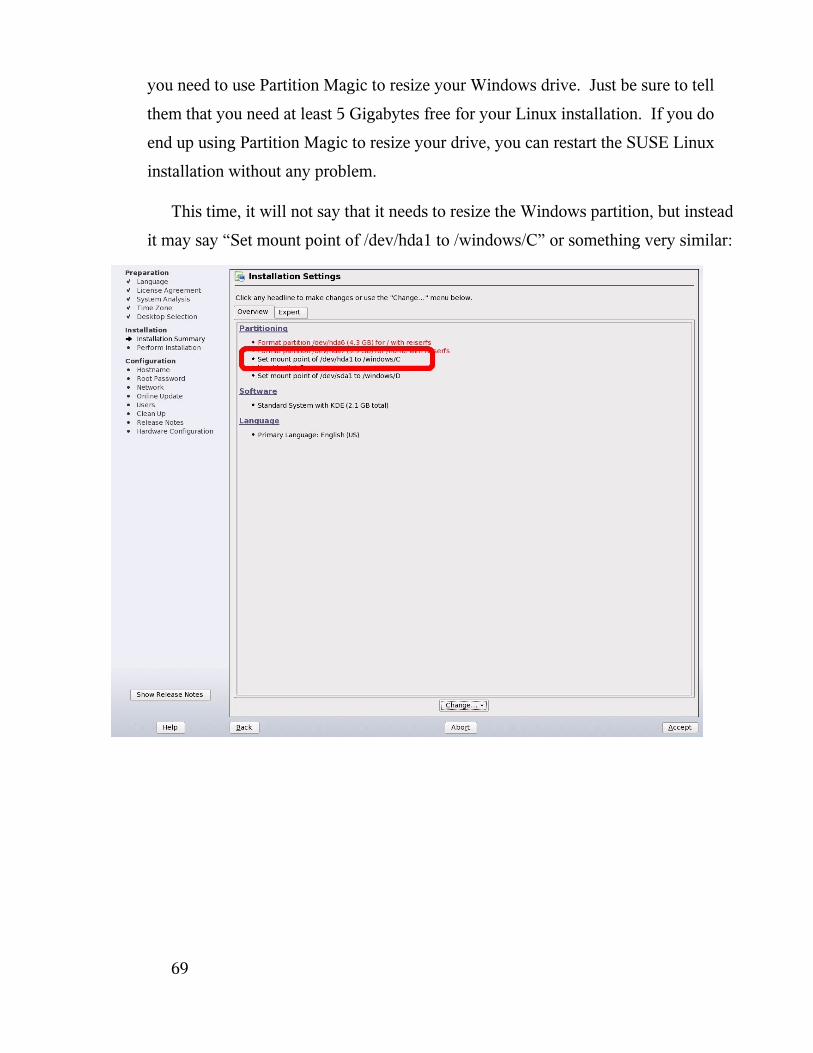
This time, it will not say that it needs to resize the Windows partition, but instead
it may say “Set mount point of /dev/hda1 to /windows/C” or something very similar:
69

If you have no problems at this stage of the installation, your system will create
some partitions to install Linux onto, and format them. Shortly after this, the
installer begins installing the Linux operating system to the hard drive:
Grab your favorite drink and go play some solitaire or something. This step takes
quite a while. If you are using CDs, don't go too far. During the installation, you
will be asked to insert different CDs throughout this process. If you are using a
DVD to install SUSE Linux, you can probably go do something for 30 or 45
minutes. Whether you are installing with CDs or with the DVD, this step takes
awhile either way.
Your computer may reboot itself during this installation process. Just let it do its
thing, and all will be well.
70
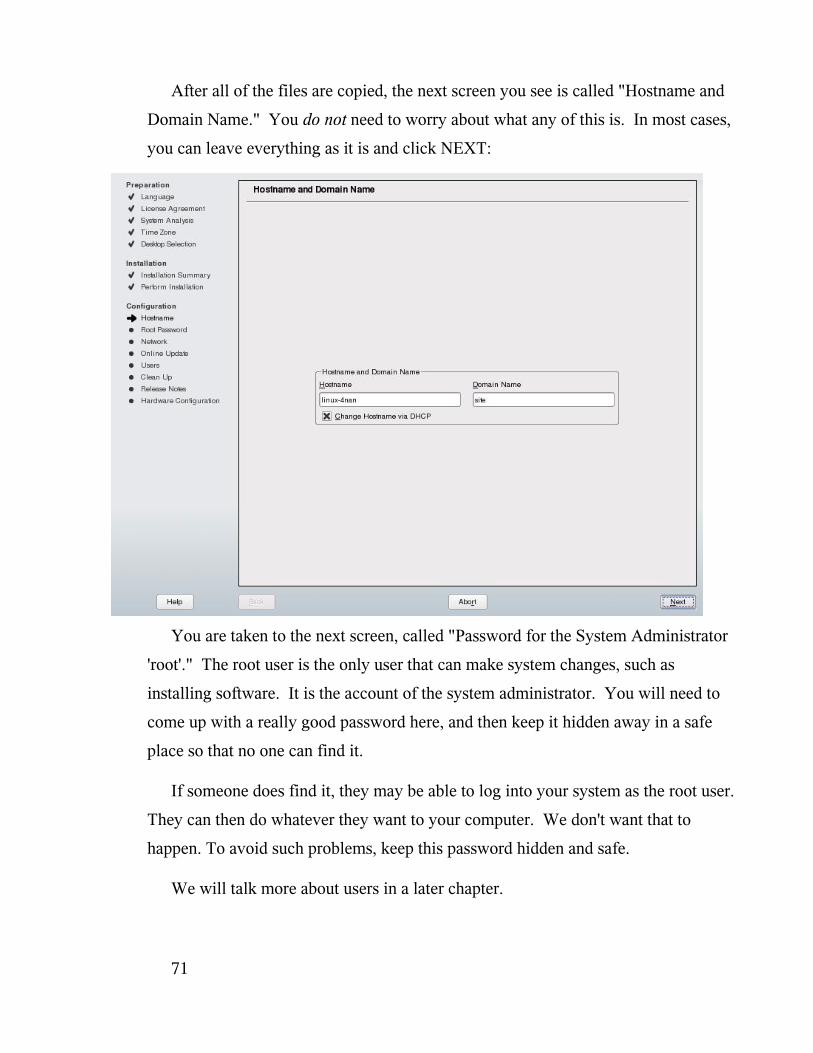
After all of the files are copied, the next screen you see is called "Hostname and
Domain Name." You do not need to worry about what any of this is. In most cases,
you can leave everything as it is and click NEXT:
You are taken to the next screen, called "Password for the System Administrator
'root'." The root user is the only user that can make system changes, such as
installing software. It is the account of the system administrator. You will need to
come up with a really good password here, and then keep it hidden away in a safe
place so that no one can find it.
If someone does find it, they may be able to log into your system as the root user.
They can then do whatever they want to your computer. We don't want that to
happen. To avoid such problems, keep this password hidden and safe.
We will talk more about users in a later chapter.
71
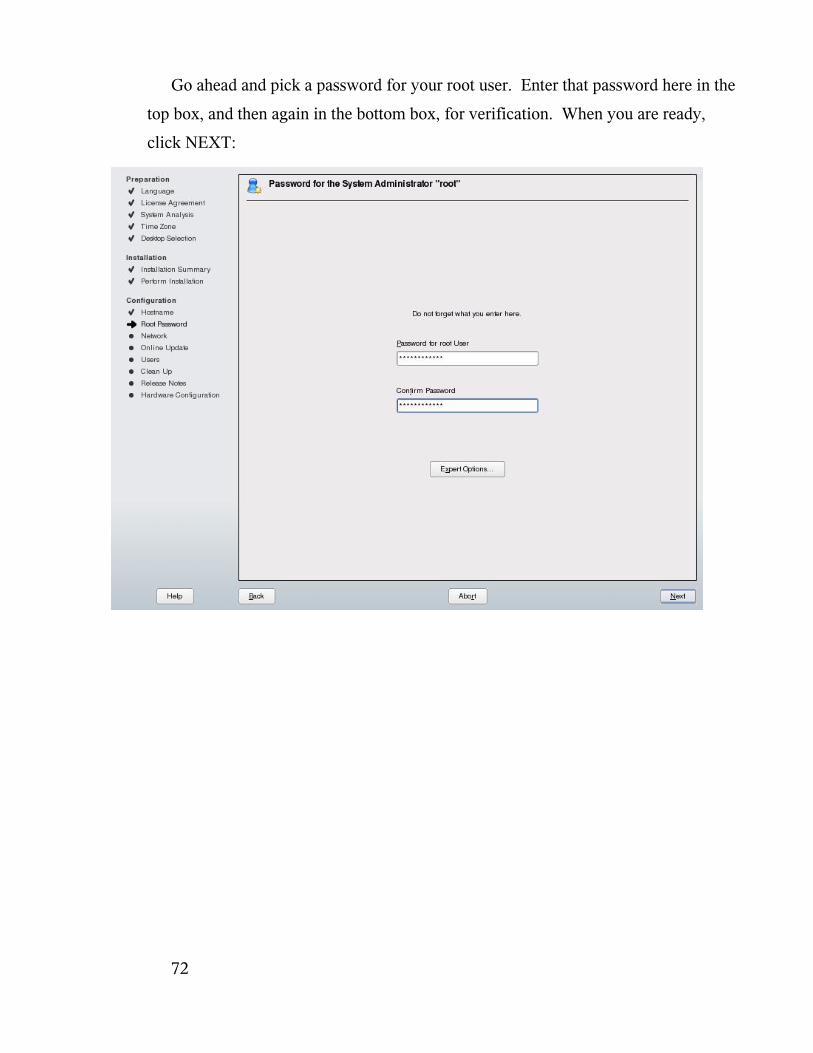
Go ahead and pick a password for your root user. Enter that password here in the
top box, and then again in the bottom box, for verification. When you are ready,
click NEXT:
72
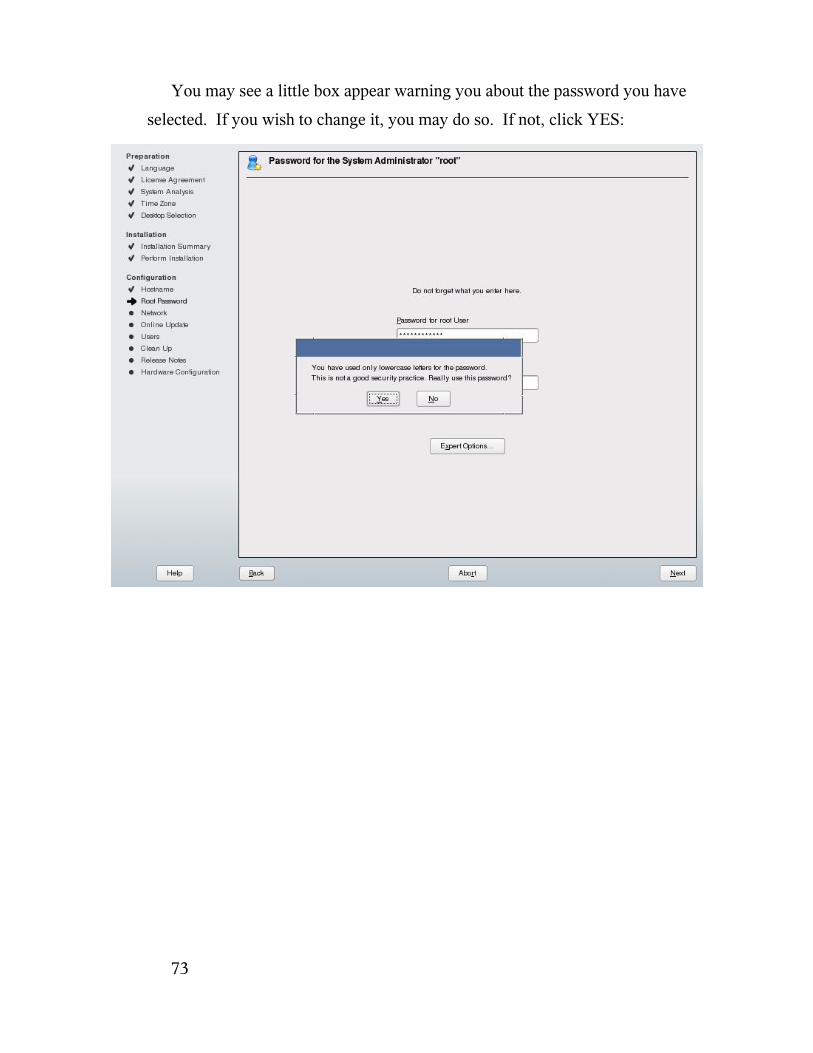
You may see a little box appear warning you about the password you have
selected. If you wish to change it, you may do so. If not, click YES:
73
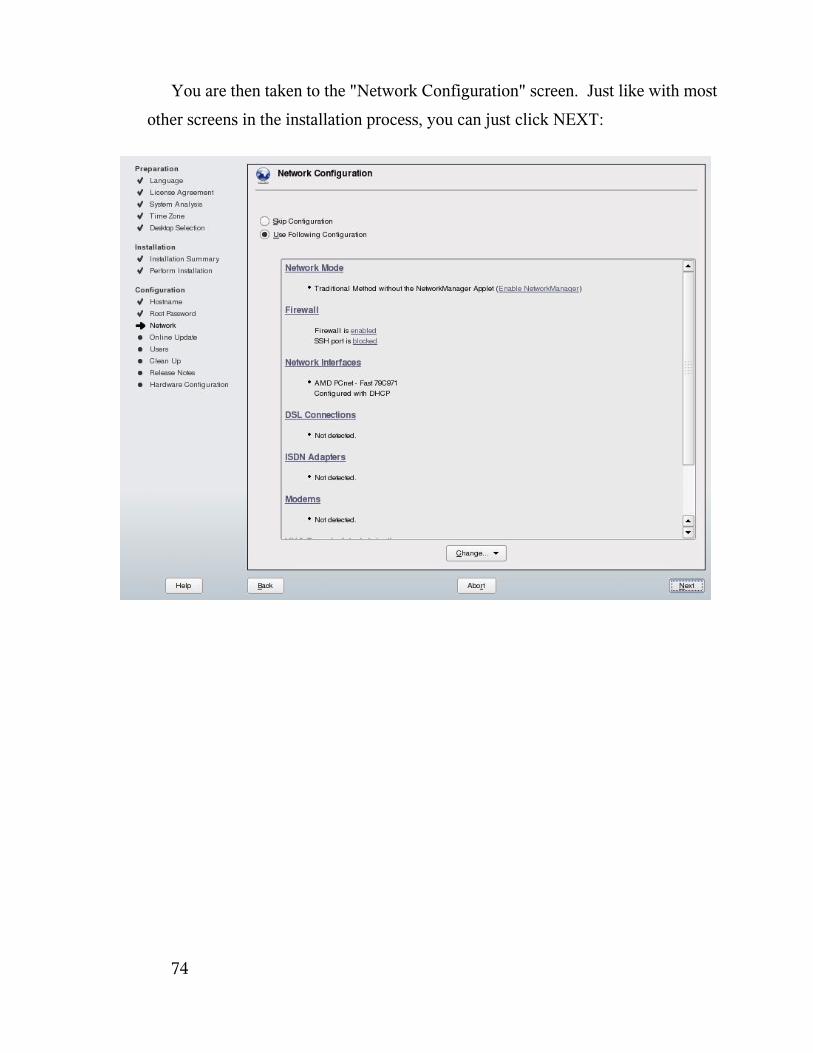
You are then taken to the "Network Configuration" screen. Just like with most
other screens in the installation process, you can just click NEXT:
74
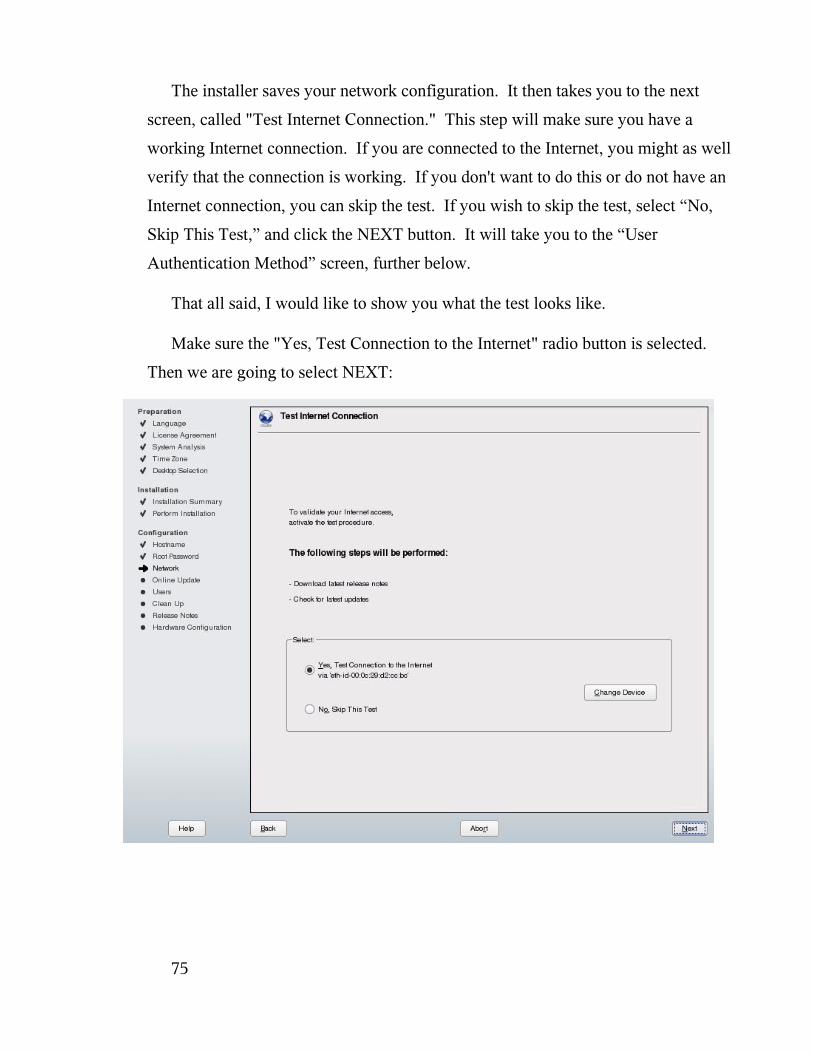
The installer saves your network configuration. It then takes you to the next
screen, called "Test Internet Connection." This step will make sure you have a
working Internet connection. If you are connected to the Internet, you might as well
verify that the connection is working. If you don't want to do this or do not have an
Internet connection, you can skip the test. If you wish to skip the test, select “No,
Skip This Test,” and click the NEXT button. It will take you to the “User
Authentication Method” screen, further below.
That all said, I would like to show you what the test looks like.
Make sure the "Yes, Test Connection to the Internet" radio button is selected.
Then we are going to select NEXT:
75

You are taken to the next screen, called "Running Internet Connection Test." In
the middle of this screen, there is a TEST STATUS box. In this box, there is a
RESULT box. After the test has completed, this box will either tell you that the test
was successful, or that it was not successful. Our test passed, so we are going to
click NEXT:
76

The next screen is called "Online Update Configuration." This is where we tell
the system that we want to make sure we get security patches when they are
available. We are going to select the "Configure Now (Recommended)" option.
Click NEXT:
77

The system checks for available update servers. If such a server is found, it will
be added to the configuration. Click OK:
78

You will then be asked if you want to run an online update. Select “Run Update”
and click NEXT:
79
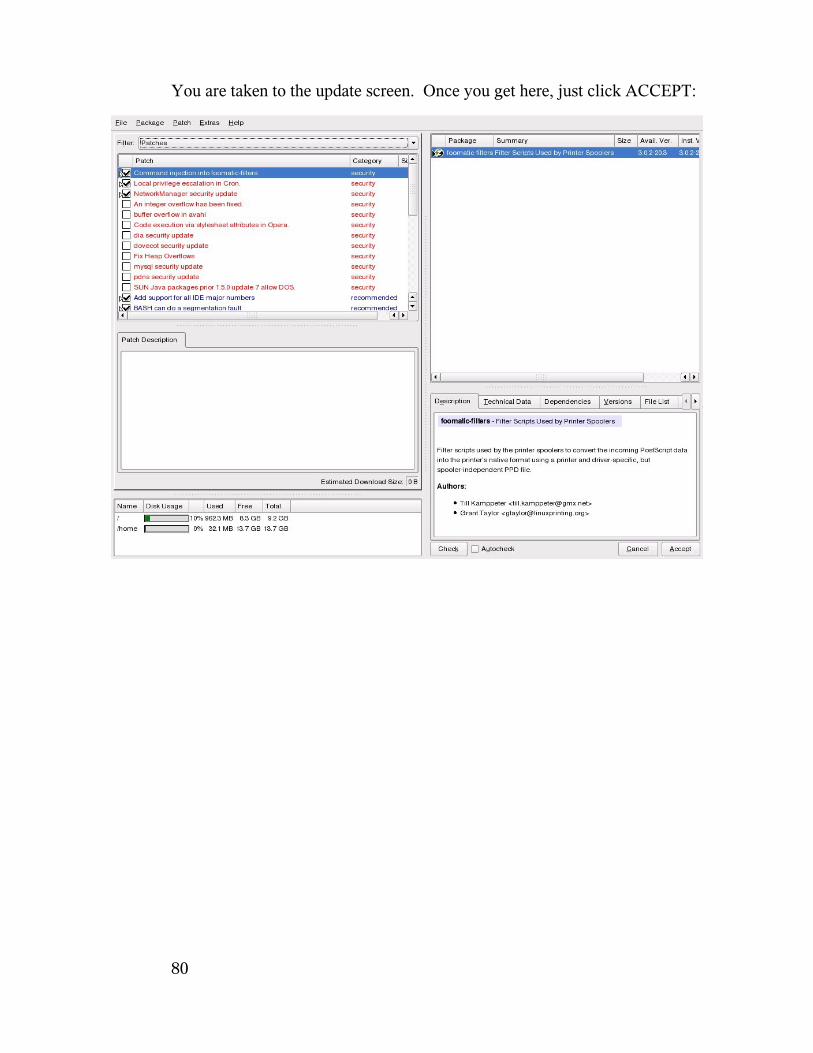
You are taken to the update screen. Once you get here, just click ACCEPT:
80
You system then retrieves the available patches and installs them. When it is
finished, just click NEXT:
81
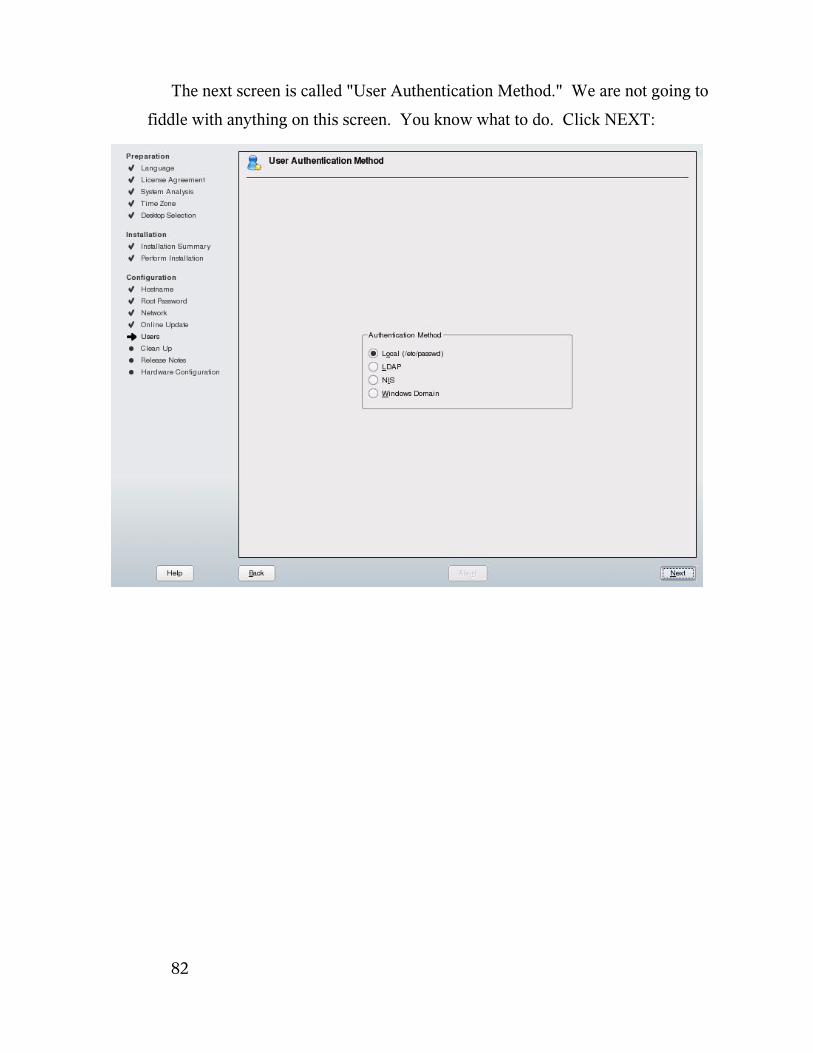
The next screen is called "User Authentication Method." We are not going to
fiddle with anything on this screen. You know what to do. Click NEXT:
82

This next screen that you see is called "New Local User." This is where you will
add your own user account. For normal usage, you should never log in with the root
system administrator account. It is highly recommended that you log in with your
own personal account. The personal account belongs to you. This is the account that
we are defining here. Fill out the page. Then click NEXT:
83
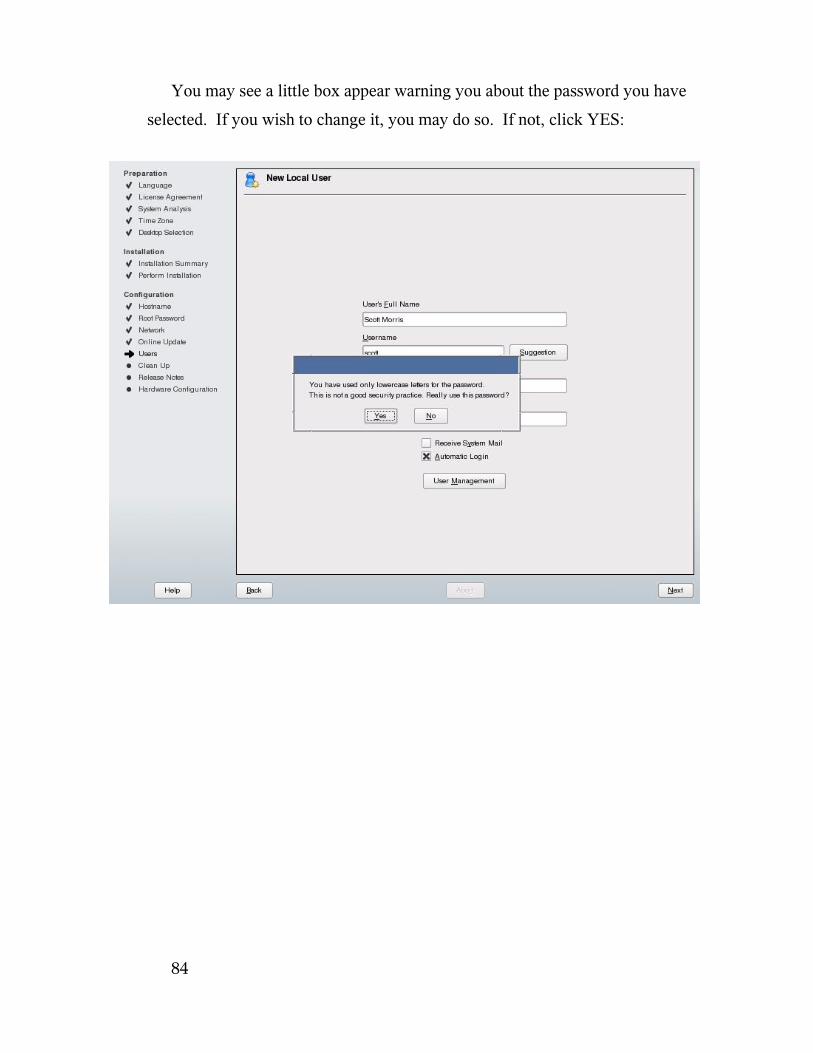
You may see a little box appear warning you about the password you have
selected. If you wish to change it, you may do so. If not, click YES:
84
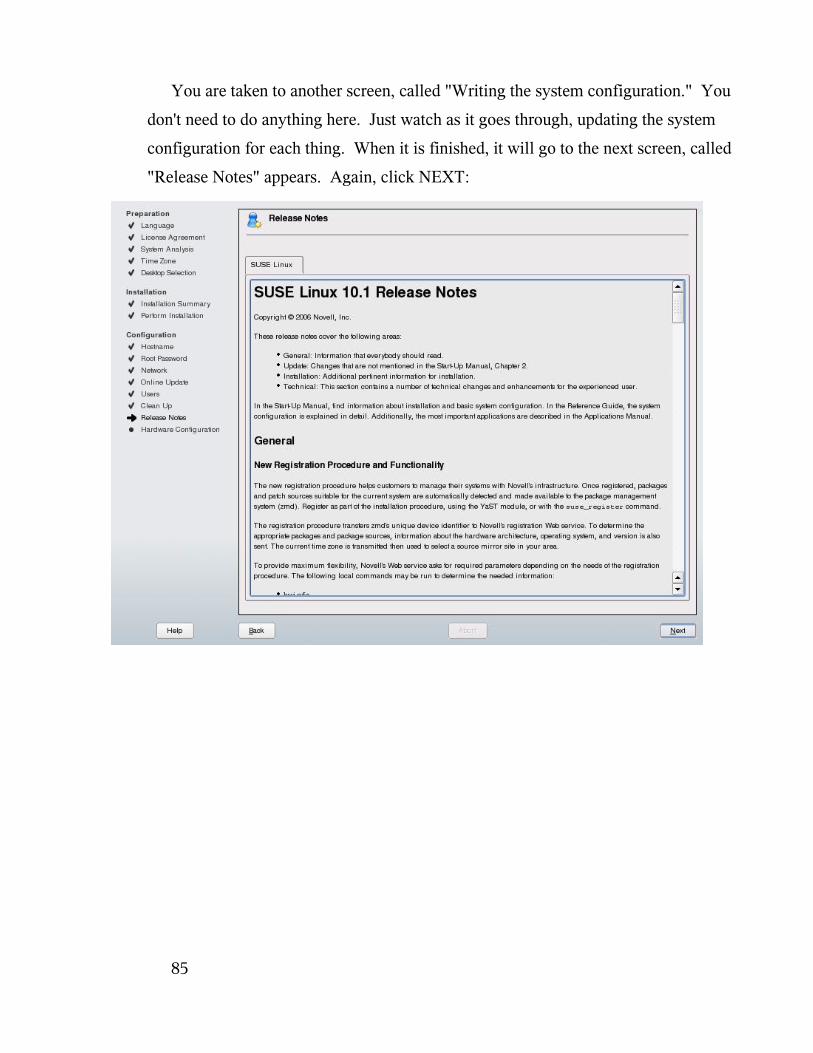
You are taken to another screen, called "Writing the system configuration." You
don't need to do anything here. Just watch as it goes through, updating the system
configuration for each thing. When it is finished, it will go to the next screen, called
"Release Notes" appears. Again, click NEXT:
85
The final step is that the system detects some of the hardware in your computer.
The hardware that it is detecting are things like your graphics card, any printers that
you have connected to the computer, your sound, TV cards, and bluetooth devices.
Again, for the most part, you don't need to worry about changing anything on this
screen. Most of the time, you will just be able to click NEXT:
86
After a moment, you get to the final screen of the installation, called "Installation
Completed." On this screen, click FINISH:
87
After a minute or so, you may see some text scrolling up the screen. This is
followed by a blue screen with the icon of a lizard. This has a ball rotating around it.
A few seconds later, you are logged into your desktop:
There will be a screen open when you log in. It will have a section called "Get
Your Free Novell Linux Newsletter!" I recommend signing up for the newsletters
relating to Linux. They contain insider tips and tricks written by other Linux users.
This is high-quality information, and is totally free. There is a link in the window on
your screen that takes you to Novell's website.
In the page that comes up, find the "Cool Solutions" section. Click on the
subscription link. I highly suggest signing up for this. These newsletters give you
tips, tricks, and other great content that will teach you how to better use your new
SUSE Linux operating system.
88
Once you have signed up for these newsletters, you can close all open windows
on your desktop.
Introduction to Users and Groups
Perhaps the biggest reason that Linux is so secure is because of the way it
controls access to parts of the system. This is done through a system of users and
groups. A user is simply someone who logs into the system. Groups are just that:
groups of users. Linux can allow access to things in the system according what user
account you are logged in with. Also, it can allow groups of users access to other
things.
For example, let's say I have a file called schedule.txt that I keep an
employee schedule in. This file can be opened and changed only by me. This is
true because my account owns the file. Linux knows that I am the owner and gives
me access to both open and change the file.
However, I am also in a group called users. Anyone else who is in this group
can read the file, but they cannot change it. This means that all of the other
employees can see when their schedule is, but they cannot change it. They can ask
me to change it.
In this way, Linux keeps a very close eye on who has access to what. Most users
have their own files and can manage them with ease.
Most importantly, there is one user account that has access to everything in the
system. This is your root user. We set up a password for this account when we were
installing the operating system. This user account can install programs, change
system settings, and can do other administrative tasks. Because of the access level of
this user, it is important to use this account as sparingly as possible.
In other words, whenever possible, use your regular user account. Far too many
people just log in as their root account and use that for day-to-day use. This is
89
dangerous for the security of your system, not recommended, and very highly
frowned upon. Just use your regular user account for normal system usage.
Get to Know Your Desktop
When you boot into Linux the first time, you are greeted by a nice, clean desktop
environment with a neat chameleon lizard set as your wallpaper. It feels pretty great
to have reached this milestone. You have your own copy of Linux, and you have
installed it successfully. But now what do you do? As nice as it looks, its greatness
does not lie in its appearance. How do we become productive in this new
environment as quickly as possible? Let's take a look around and see what KDE is
and what it does.
What is KDE?
The K Desktop Environment, or KDE, is an environment for your desktop. Its
main responsibility is to manage what your windows do and what they look like. It
provides you with a shortcut bar called the Kicker panel. It gives you several
different desktops to work on. It makes sure your fonts look right. It provides you
with a menu that you can use to run applications. This menu is like the system menu
on Windows. KDE gives you applications like Konqueror, a feature-rich yet simple
way to browse around your system and manage files. Konqueror also acts as a web
browser.
We will look at more of KDE in a bit.
90
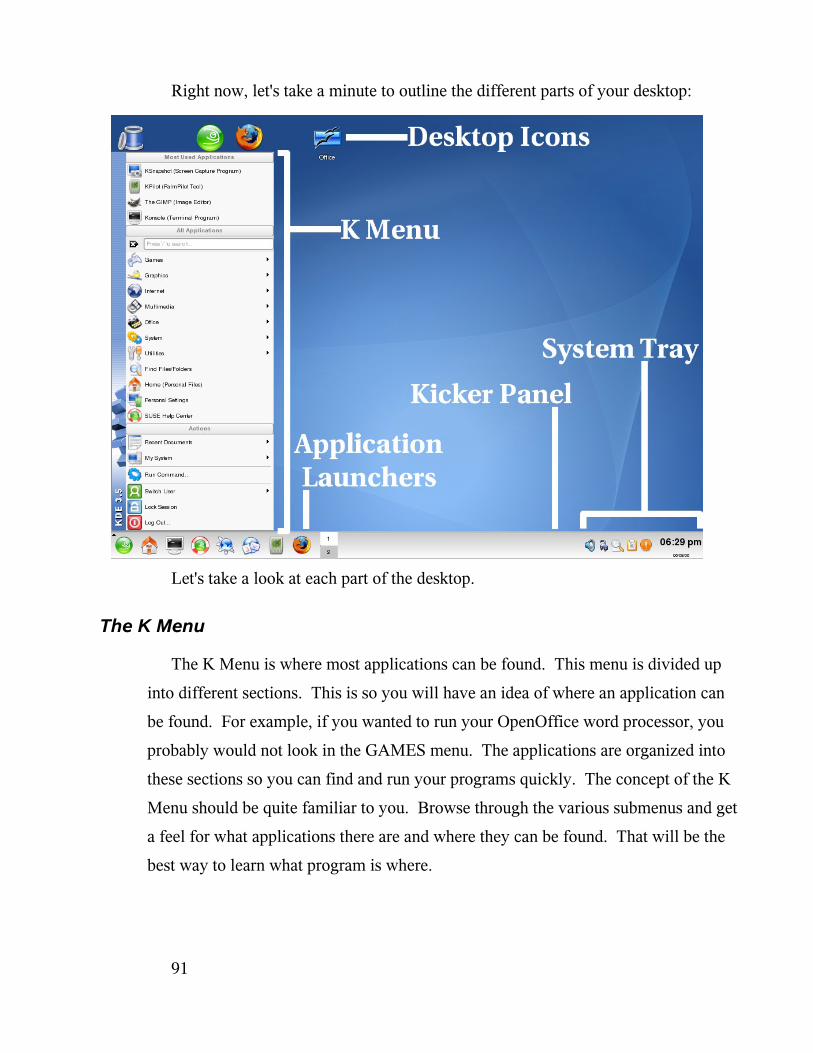
Right now, let's take a minute to outline the different parts of your desktop:
Let's take a look at each part of the desktop.
The K Menu
The K Menu is where most applications can be found. This menu is divided up
into different sections. This is so you will have an idea of where an application can
be found. For example, if you wanted to run your OpenOffice word processor, you
probably would not look in the GAMES menu. The applications are organized into
these sections so you can find and run your programs quickly. The concept of the K
Menu should be quite familiar to you. Browse through the various submenus and get
a feel for what applications there are and where they can be found. That will be the
best way to learn what program is where.
91

I mentioned earlier that this menu has a search feature. Let's check this out really
quickly. Click on your K Menu. Then press the '/' (forward slash) key. It's the one
that also has the question mark on it. You see that the search box now has a flashing
cursor in it:
92
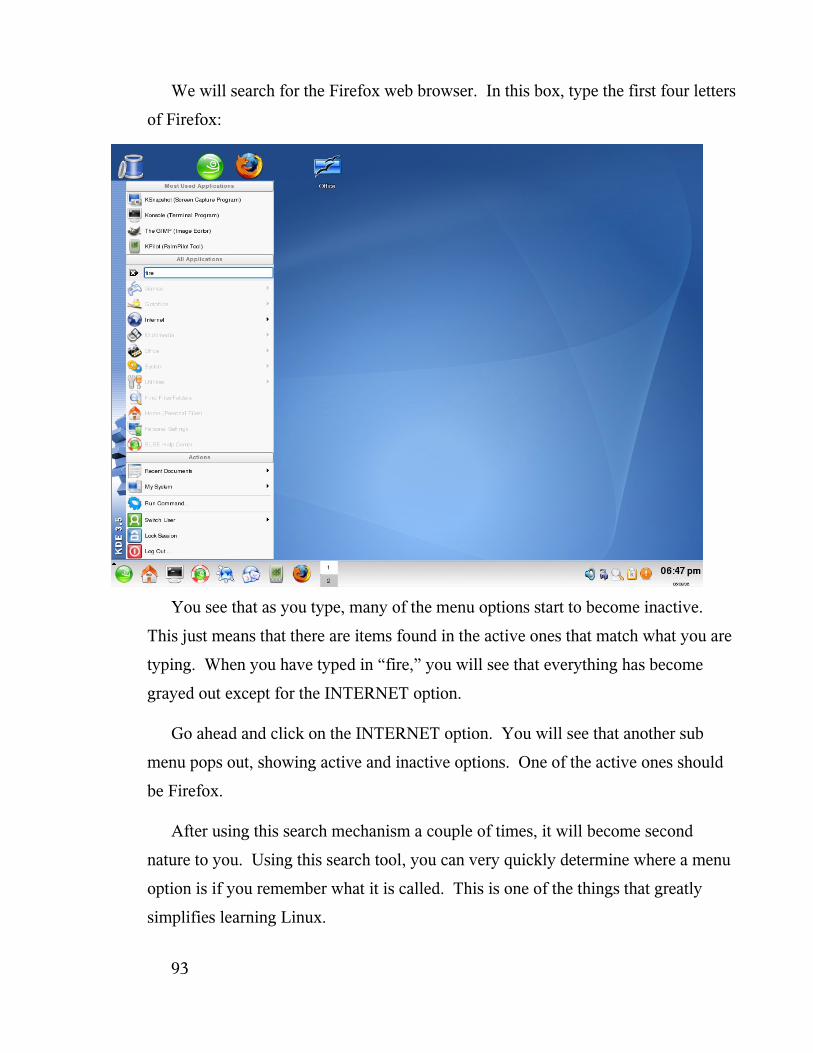
We will search for the Firefox web browser. In this box, type the first four letters
of Firefox:
You see that as you type, many of the menu options start to become inactive.
This just means that there are items found in the active ones that match what you are
typing. When you have typed in “fire,” you will see that everything has become
grayed out except for the INTERNET option.
Go ahead and click on the INTERNET option. You will see that another sub
menu pops out, showing active and inactive options. One of the active ones should
be Firefox.
After using this search mechanism a couple of times, it will become second
nature to you. Using this search tool, you can very quickly determine where a menu
option is if you remember what it is called. This is one of the things that greatly
simplifies learning Linux.
93
The Kicker Panel
You will see at the bottom of your screen a panel that will look familiar. It is a
place where your running tasks appear. This panel can be used for placing
application launchers. These are buttons or shortcuts that reside in the Kicker Panel
and will generally run a program when you click on them.
You will also see the system tray and system clock in this panel. Once you
become accustomed to its capabilities, the Kicker Panel is quite a powerful tool.
Later in this book, we will look more at how to use the Kicker Panel.
The KDE Control Center
Wouldn't it be nice if KDE had some central location where you could set all of
your personal preferences? It just so happens that there is such a place. You can set
preferences for how your desktop looks, how your windows look, and how the
buttons on the windows look. You can tell KDE what icon sets you want, what
cursor theme to use, how you want your keyboard to act, and how you want your
mouse to behave, to name a few. There are many additional settings that you can
adjust to your liking.
This is another way Linux is very diverse. If you are overwhelmed at so many
options, don't bother with them. Most things are already set to act the way most
users would probably like them. No need to mess around with any of the KDE
Control Center if you don't want to.
As a matter of fact, if you want to skip the entire next section about the Control
Center, feel free. I go over it here because it is one of the fundamental parts of the K
Desktop Environment. That, and it is one of the easiest parts of Linux to learn how
to use. Also, don't worry about messing something up in the KDE Control Center. It
is hard to cause a major system malfunction by setting something wrong there.
94
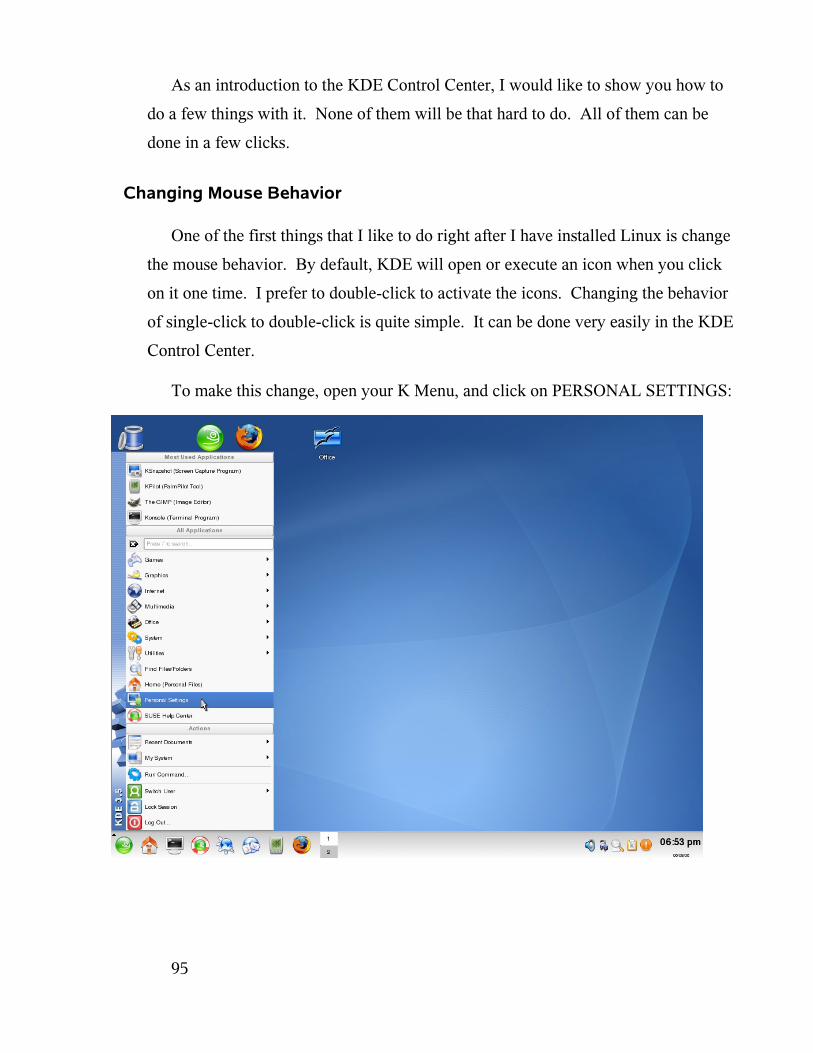
As an introduction to the KDE Control Center, I would like to show you how to
do a few things with it. None of them will be that hard to do. All of them can be
done in a few clicks.
Changing Mouse Behavior
One of the first things that I like to do right after I have installed Linux is change
the mouse behavior. By default, KDE will open or execute an icon when you click
on it one time. I prefer to double-click to activate the icons. Changing the behavior
of single-click to double-click is quite simple. It can be done very easily in the KDE
Control Center.
To make this change, open your K Menu, and click on PERSONAL SETTINGS:
95
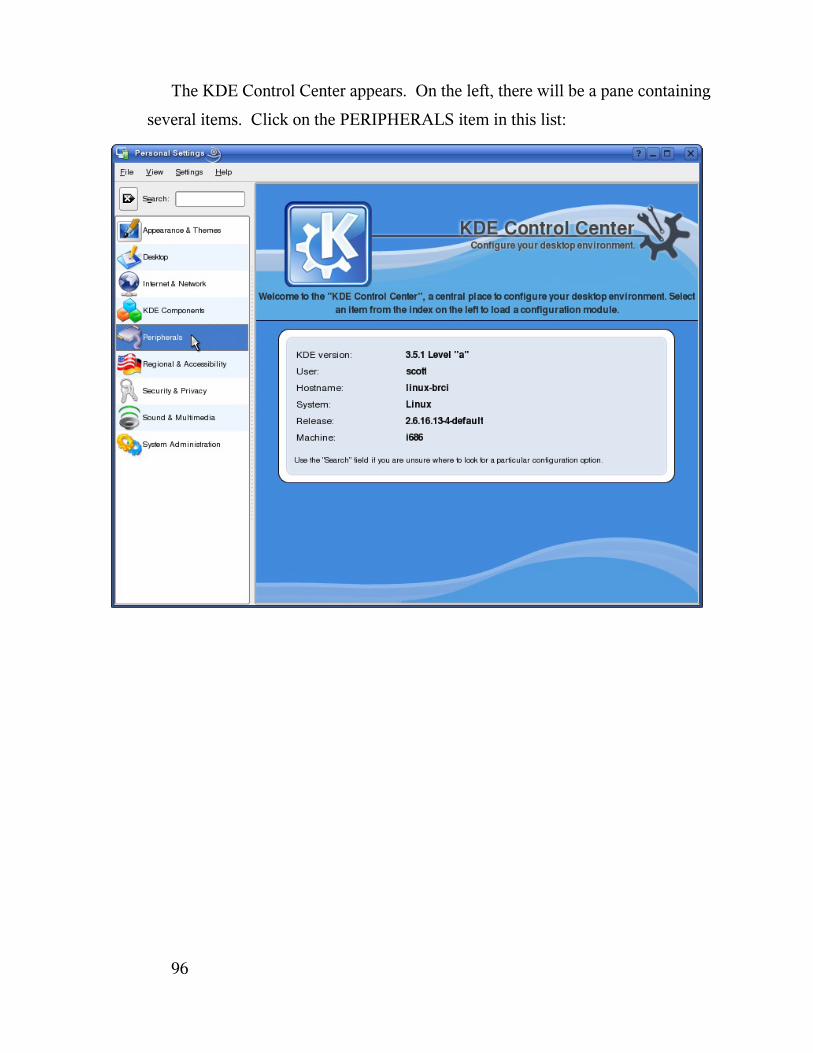
The KDE Control Center appears. On the left, there will be a pane containing
several items. Click on the PERIPHERALS item in this list:
96
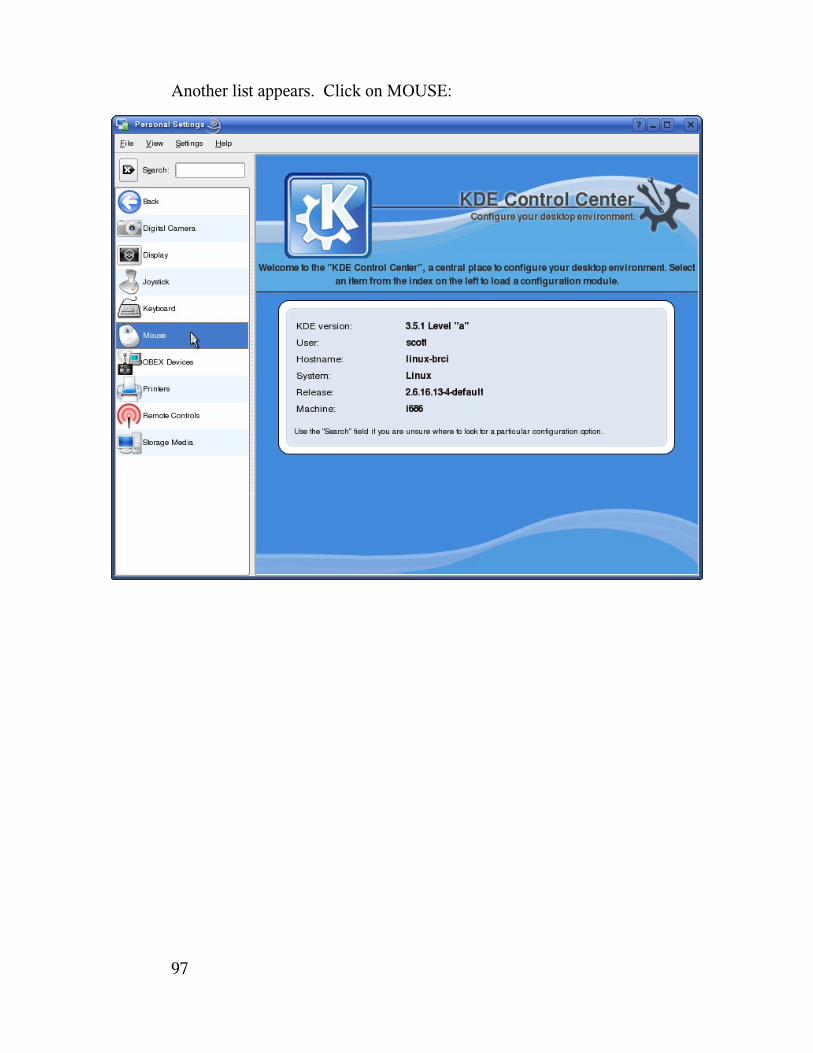
Another list appears. Click on MOUSE:
97
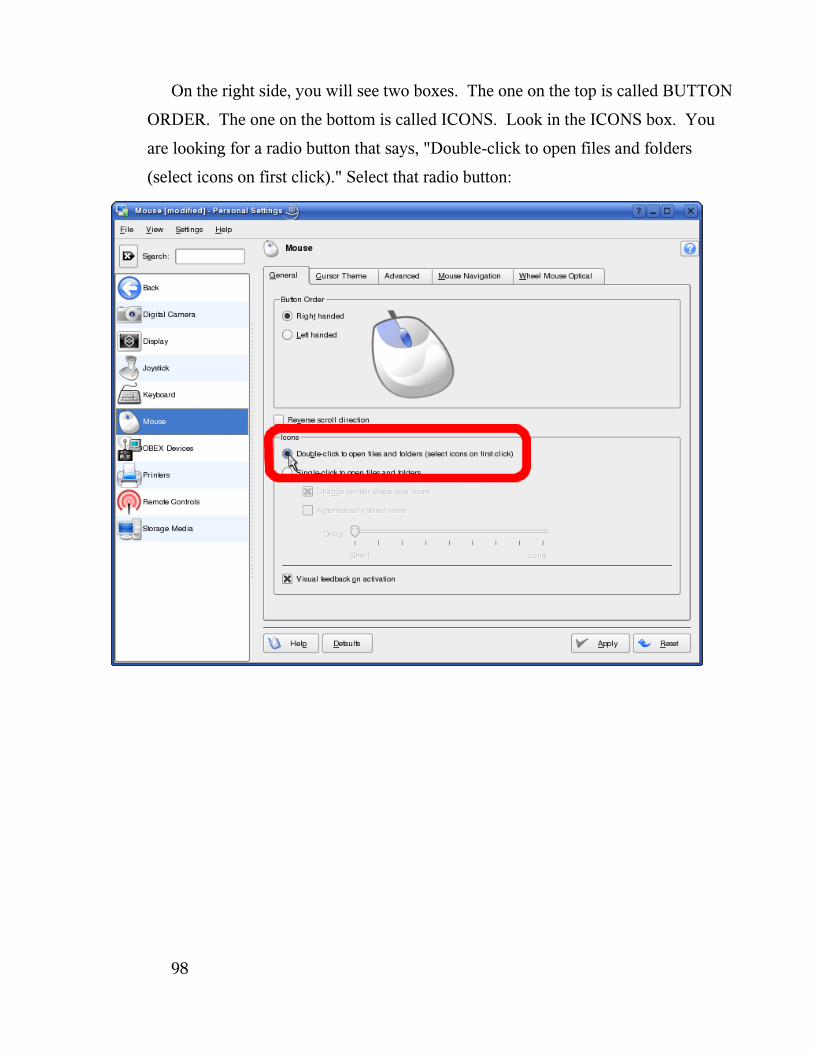
On the right side, you will see two boxes. The one on the top is called BUTTON
ORDER. The one on the bottom is called ICONS. Look in the ICONS box. You
are looking for a radio button that says, "Double-click to open files and folders
(select icons on first click)." Select that radio button:
98

Click APPLY in the lower-right corner of this window to apply your changes:
Now, you can close your window. The mouse preference has now changed.
Experiment with your desktop icons to see the new behavior.
Changing Time and Date Display Format
Another thing that I like to customize is how the date and time is displayed on my
desktop. In different parts of the world, this information is displayed differently.
KDE allows you to modify the layout according to your taste.
99
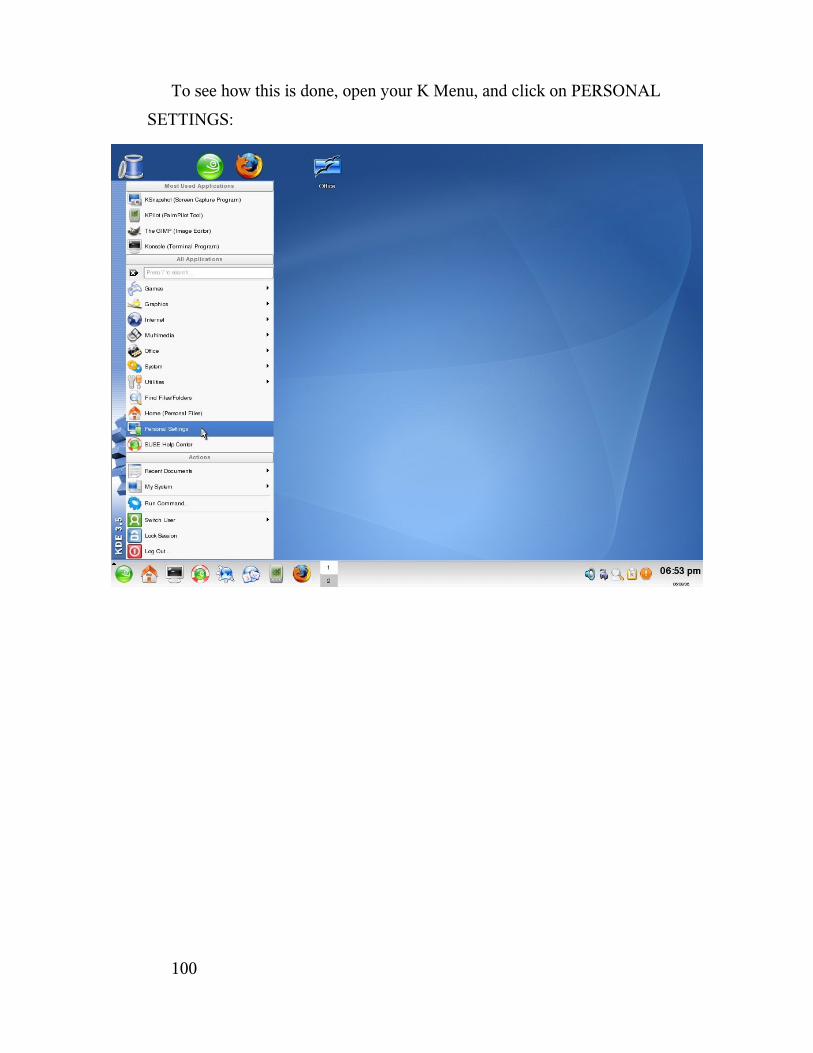
To see how this is done, open your K Menu, and click on PERSONAL
SETTINGS:
100
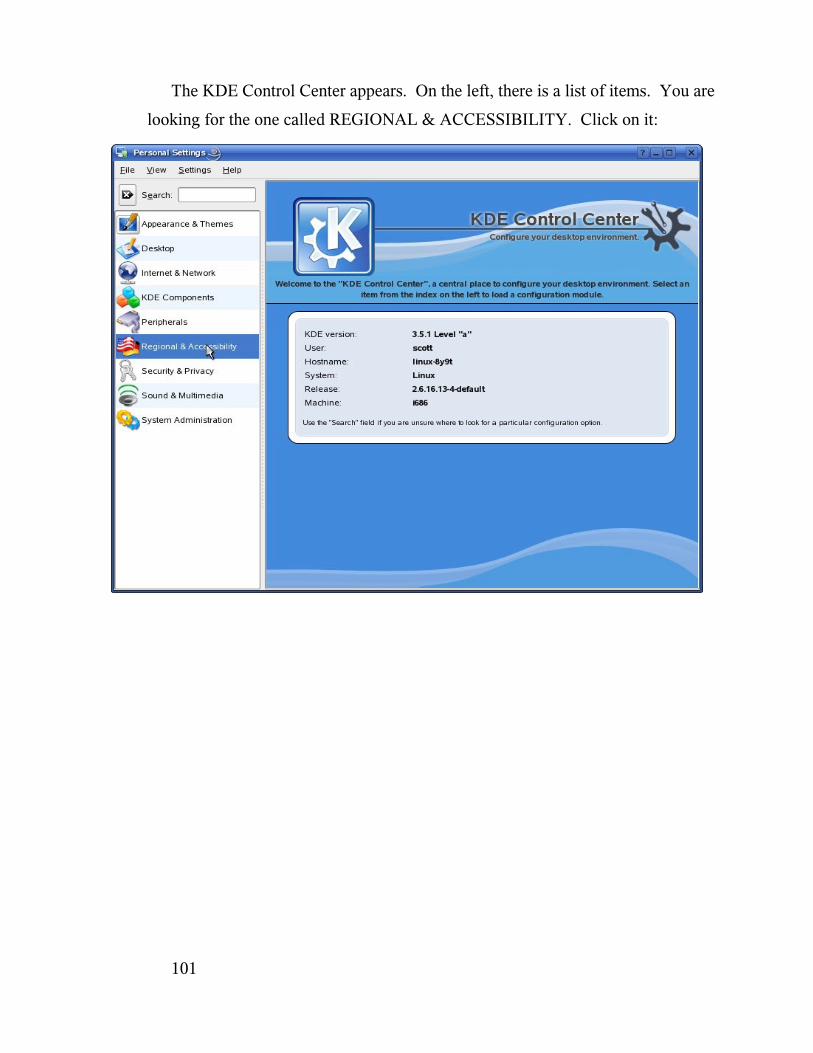
The KDE Control Center appears. On the left, there is a list of items. You are
looking for the one called REGIONAL & ACCESSIBILITY. Click on it:
101
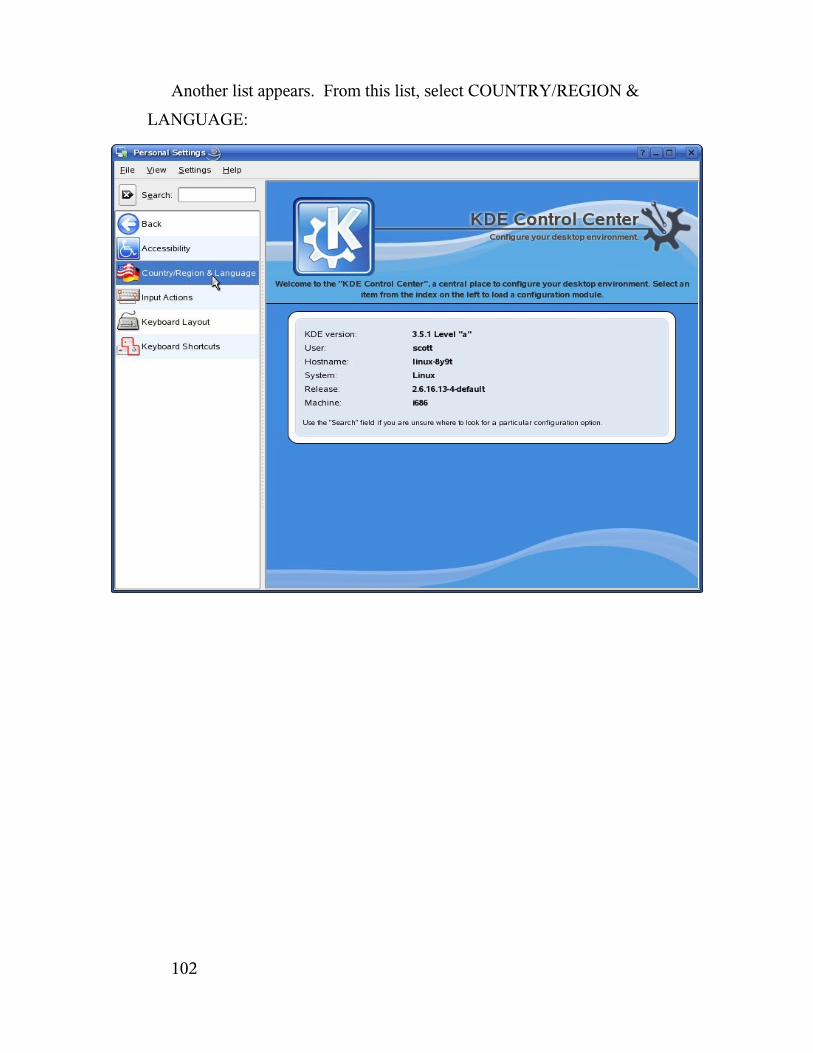
Another list appears. From this list, select COUNTRY/REGION &
LANGUAGE:
102
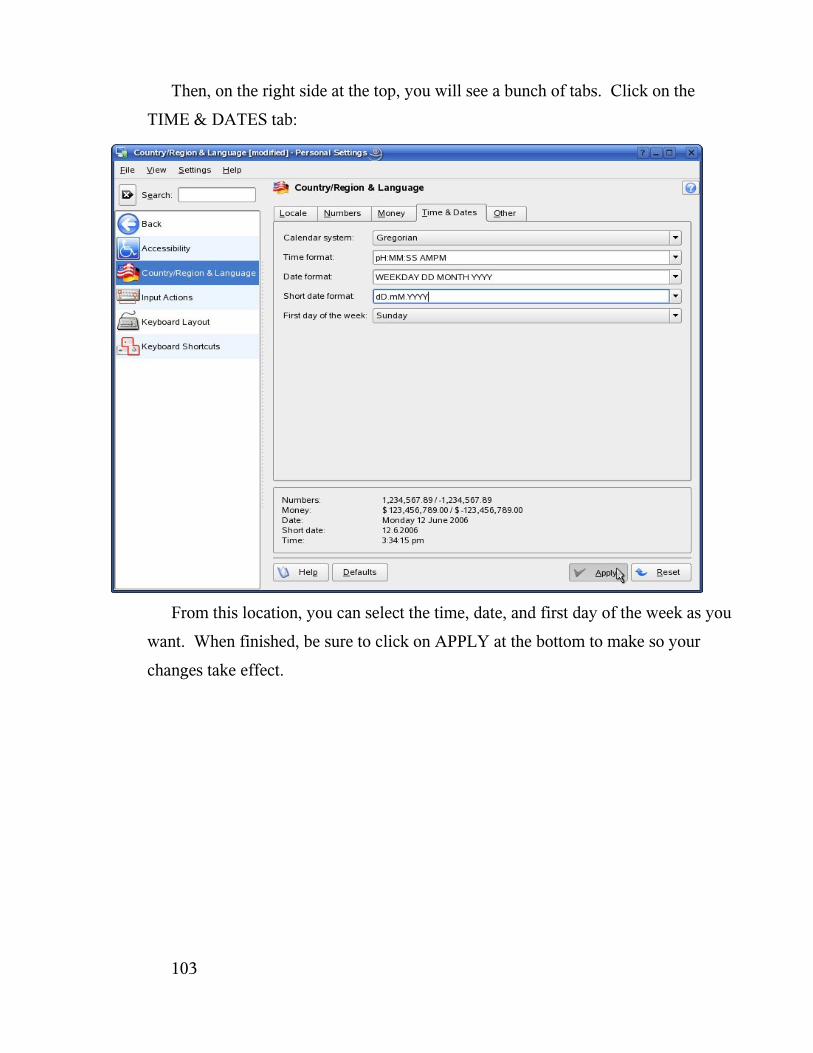
Then, on the right side at the top, you will see a bunch of tabs. Click on the
TIME & DATES tab:
From this location, you can select the time, date, and first day of the week as you
want. When finished, be sure to click on APPLY at the bottom to make so your
changes take effect.
103
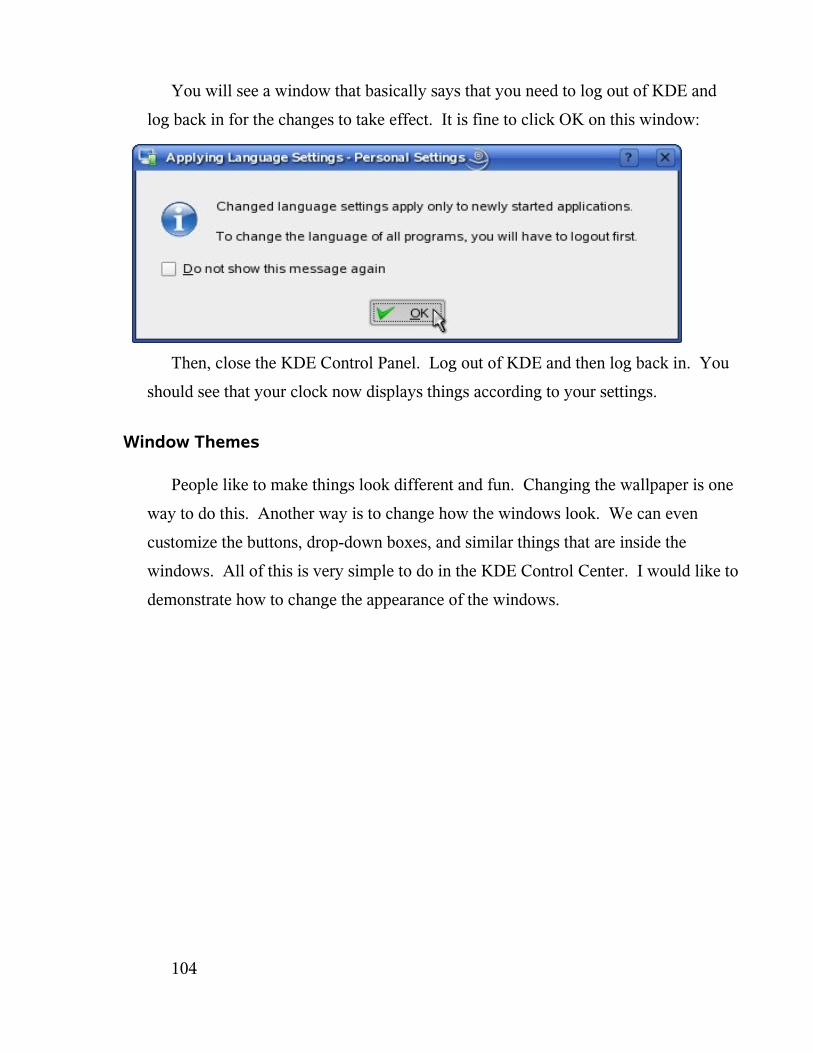
You will see a window that basically says that you need to log out of KDE and
log back in for the changes to take effect. It is fine to click OK on this window:
Then, close the KDE Control Panel. Log out of KDE and then log back in. You
should see that your clock now displays things according to your settings.
Window Themes
People like to make things look different and fun. Changing the wallpaper is one
way to do this. Another way is to change how the windows look. We can even
customize the buttons, drop-down boxes, and similar things that are inside the
windows. All of this is very simple to do in the KDE Control Center. I would like to
demonstrate how to change the appearance of the windows.
104
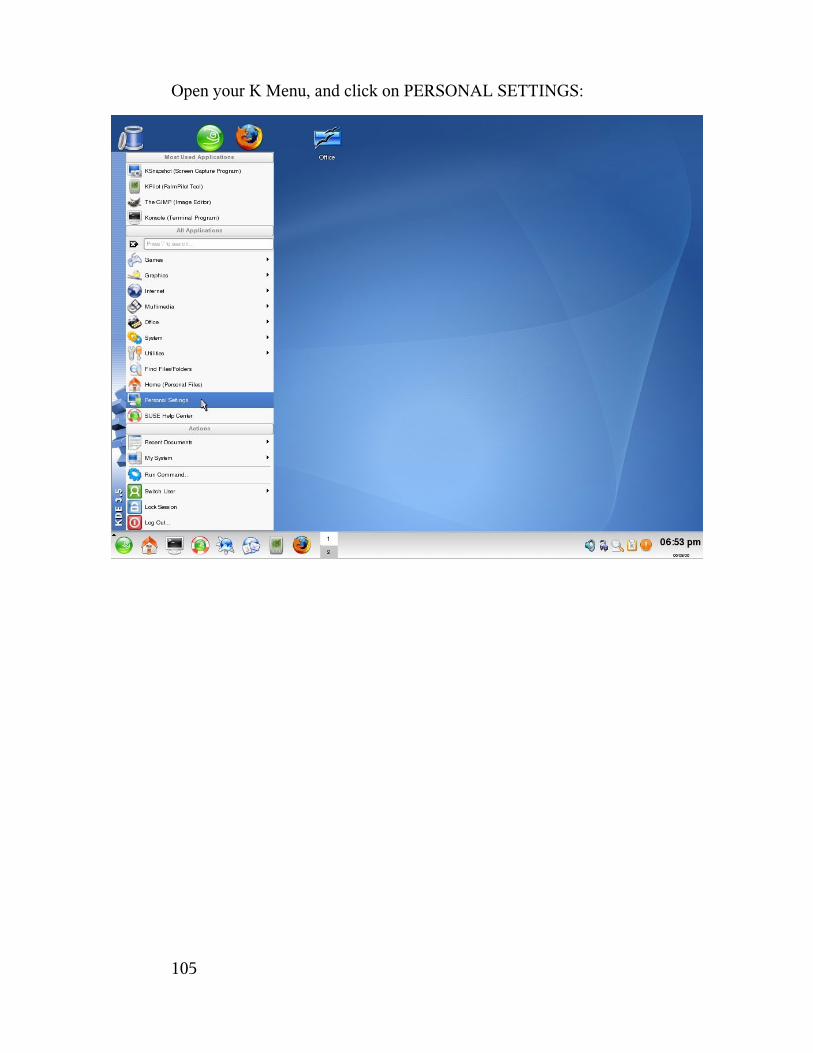
Open your K Menu, and click on PERSONAL SETTINGS:
105
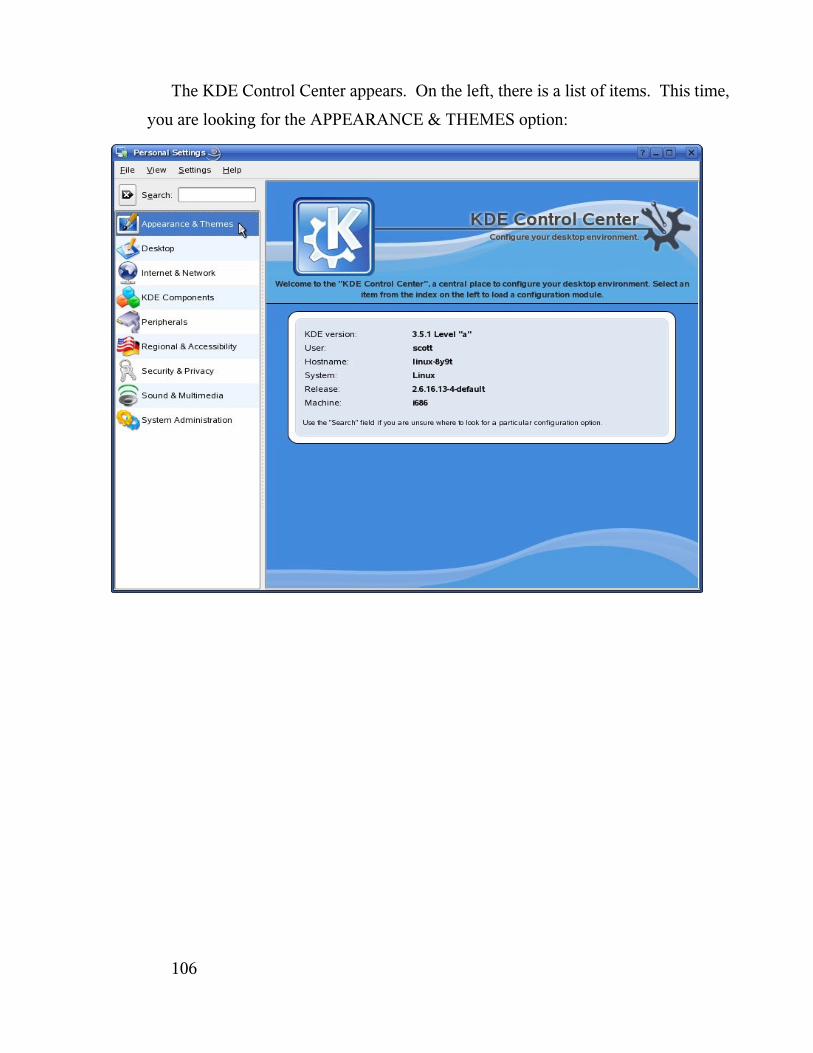
The KDE Control Center appears. On the left, there is a list of items. This time,
you are looking for the APPEARANCE & THEMES option:
106
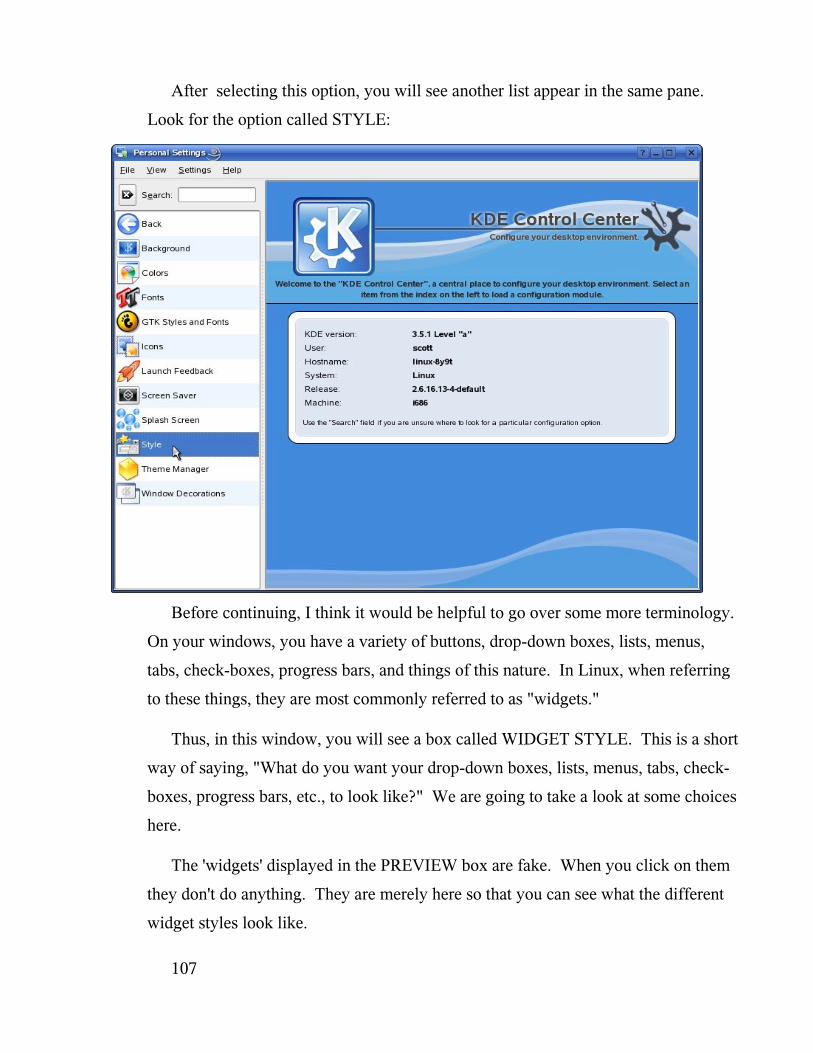
After selecting this option, you will see another list appear in the same pane.
Look for the option called STYLE:
Before continuing, I think it would be helpful to go over some more terminology.
On your windows, you have a variety of buttons, drop-down boxes, lists, menus,
tabs, check-boxes, progress bars, and things of this nature. In Linux, when referring
to these things, they are most commonly referred to as "widgets."
Thus, in this window, you will see a box called WIDGET STYLE. This is a short
way of saying, "What do you want your drop-down boxes, lists, menus, tabs, check-
boxes, progress bars, etc., to look like?" We are going to take a look at some choices
here.
The 'widgets' displayed in the PREVIEW box are fake. When you click on them
they don't do anything. They are merely here so that you can see what the different
widget styles look like.
107
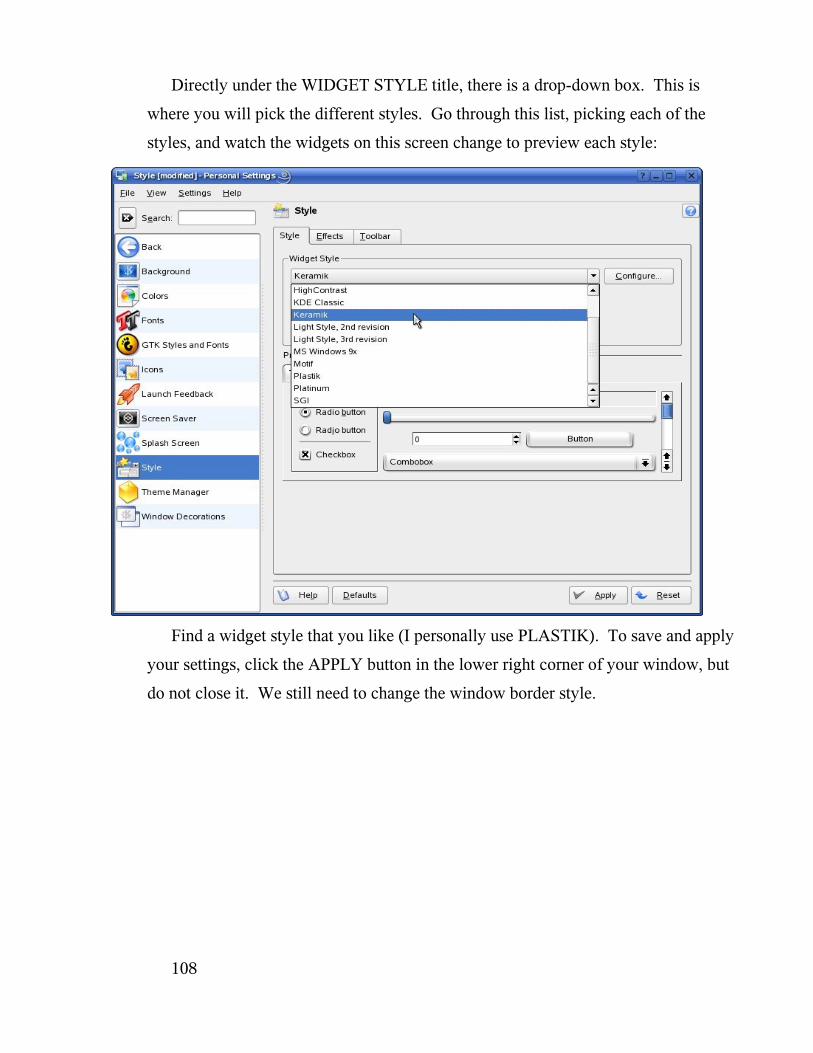
Directly under the WIDGET STYLE title, there is a drop-down box. This is
where you will pick the different styles. Go through this list, picking each of the
styles, and watch the widgets on this screen change to preview each style:
Find a widget style that you like (I personally use PLASTIK). To save and apply
your settings, click the APPLY button in the lower right corner of your window, but
do not close it. We still need to change the window border style.
108
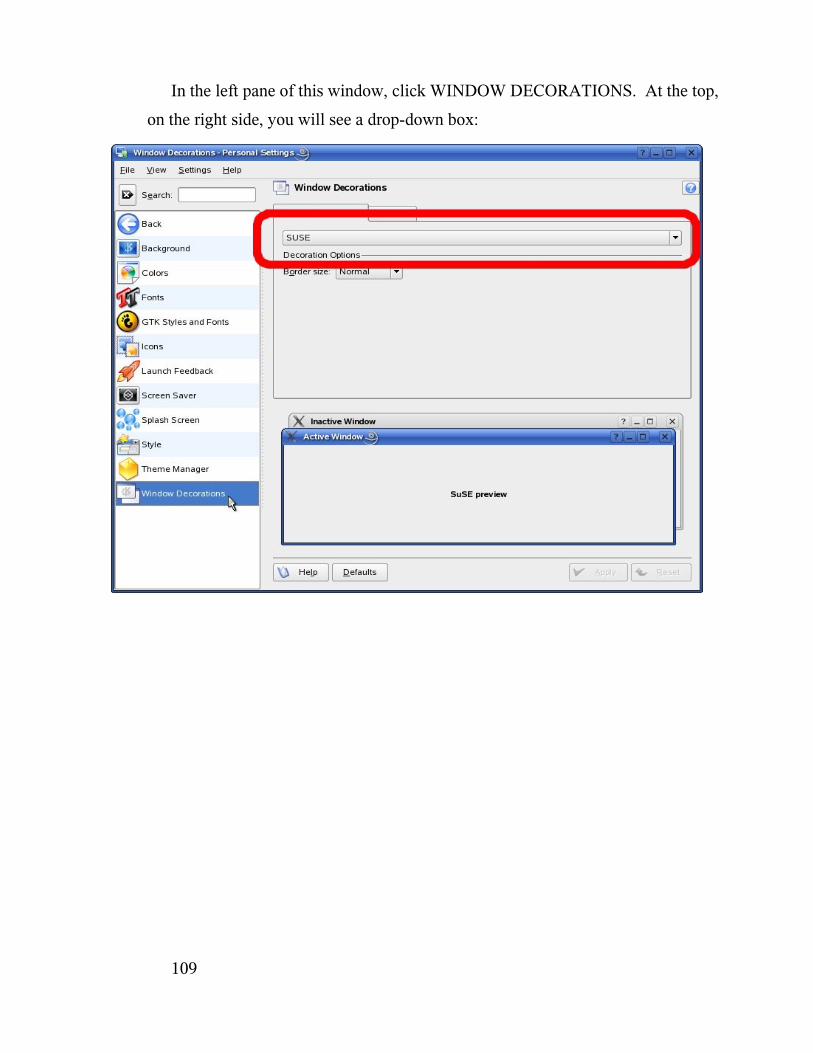
In the left pane of this window, click WINDOW DECORATIONS. At the top,
on the right side, you will see a drop-down box:
109
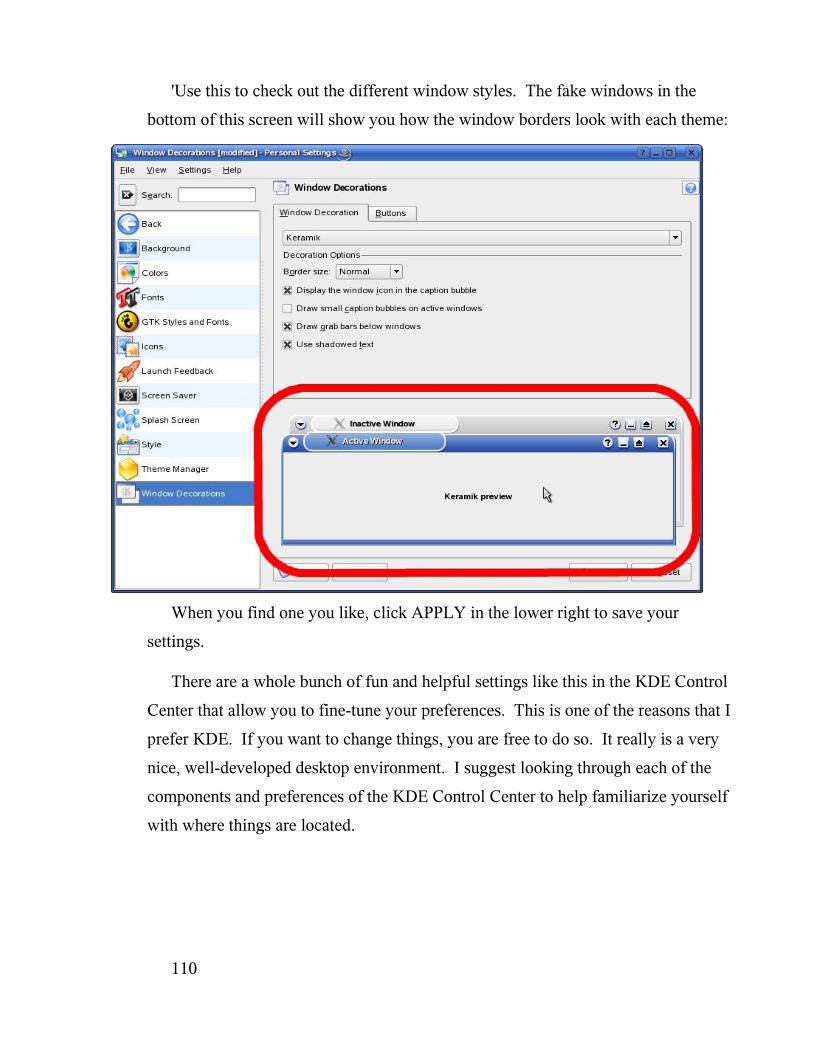
'Use this to check out the different window styles. The fake windows in the
bottom of this screen will show you how the window borders look with each theme:
When you find one you like, click APPLY in the lower right to save your
settings.
There are a whole bunch of fun and helpful settings like this in the KDE Control
Center that allow you to fine-tune your preferences. This is one of the reasons that I
prefer KDE. If you want to change things, you are free to do so. It really is a very
nice, well-developed desktop environment. I suggest looking through each of the
components and preferences of the KDE Control Center to help familiarize yourself
with where things are located.
110
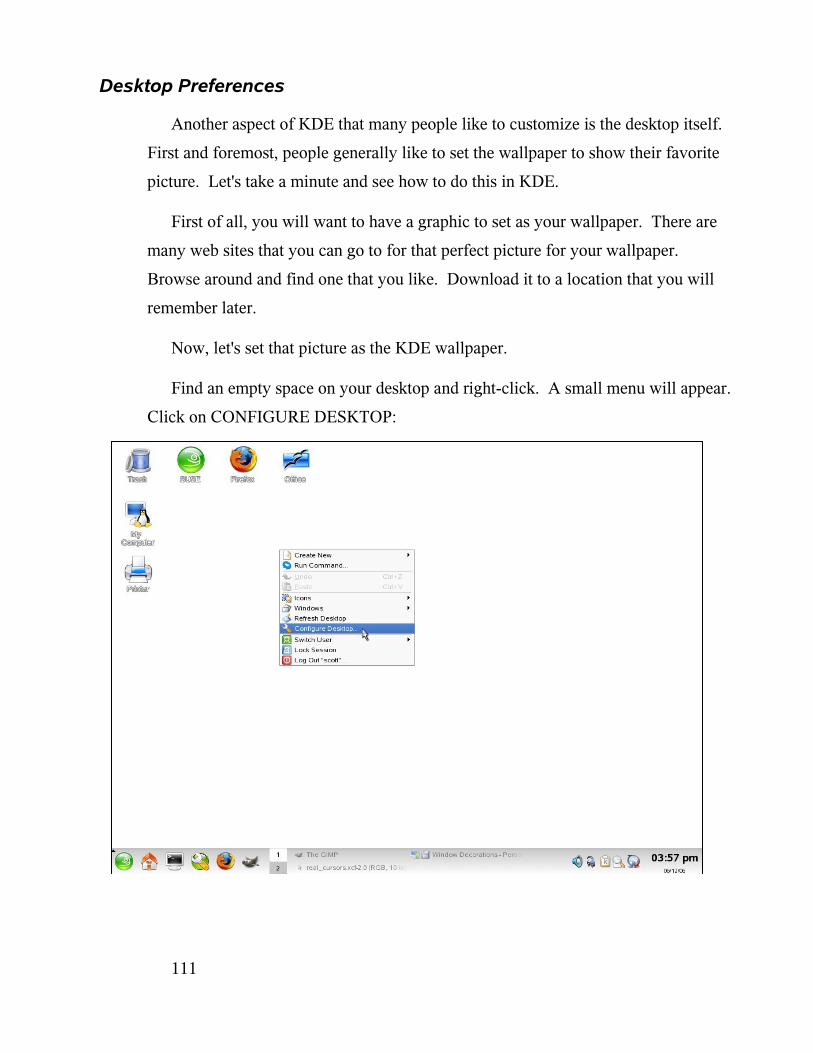
Desktop Preferences
Another aspect of KDE that many people like to customize is the desktop itself.
First and foremost, people generally like to set the wallpaper to show their favorite
picture. Let's take a minute and see how to do this in KDE.
First of all, you will want to have a graphic to set as your wallpaper. There are
many web sites that you can go to for that perfect picture for your wallpaper.
Browse around and find one that you like. Download it to a location that you will
remember later.
Now, let's set that picture as the KDE wallpaper.
Find an empty space on your desktop and right-click. A small menu will appear.
Click on CONFIGURE DESKTOP:
111
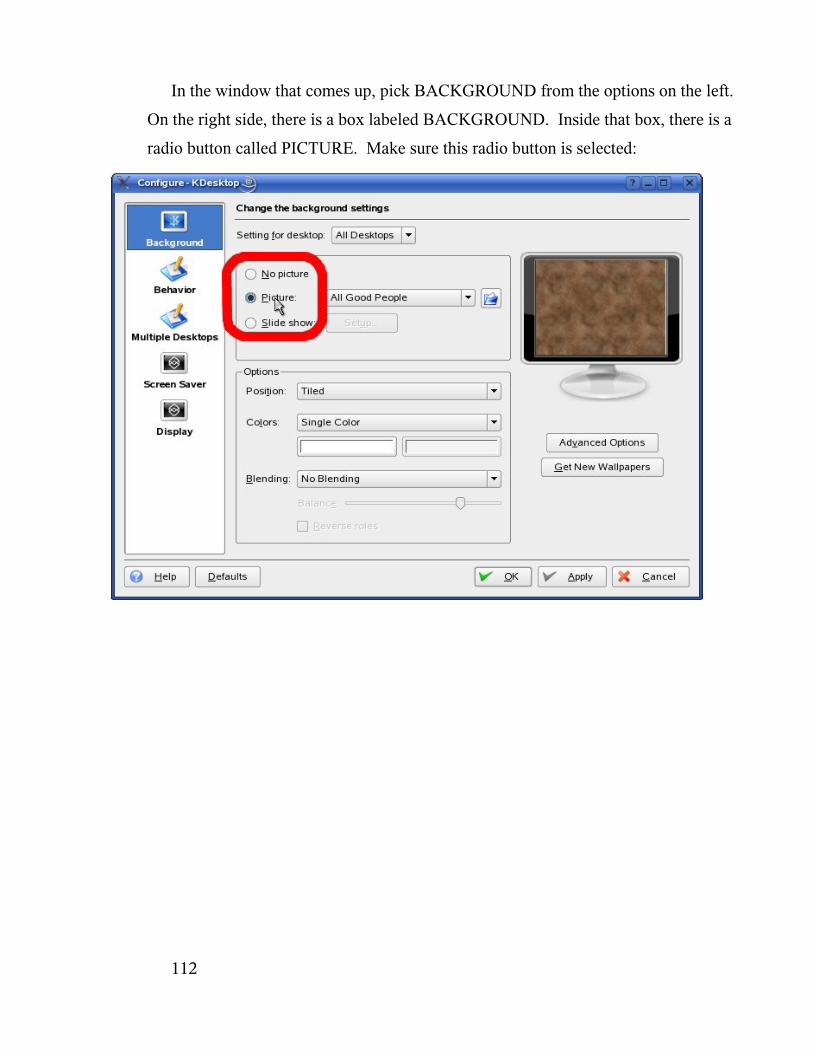
In the window that comes up, pick BACKGROUND from the options on the left.
On the right side, there is a box labeled BACKGROUND. Inside that box, there is a
radio button called PICTURE. Make sure this radio button is selected:
112
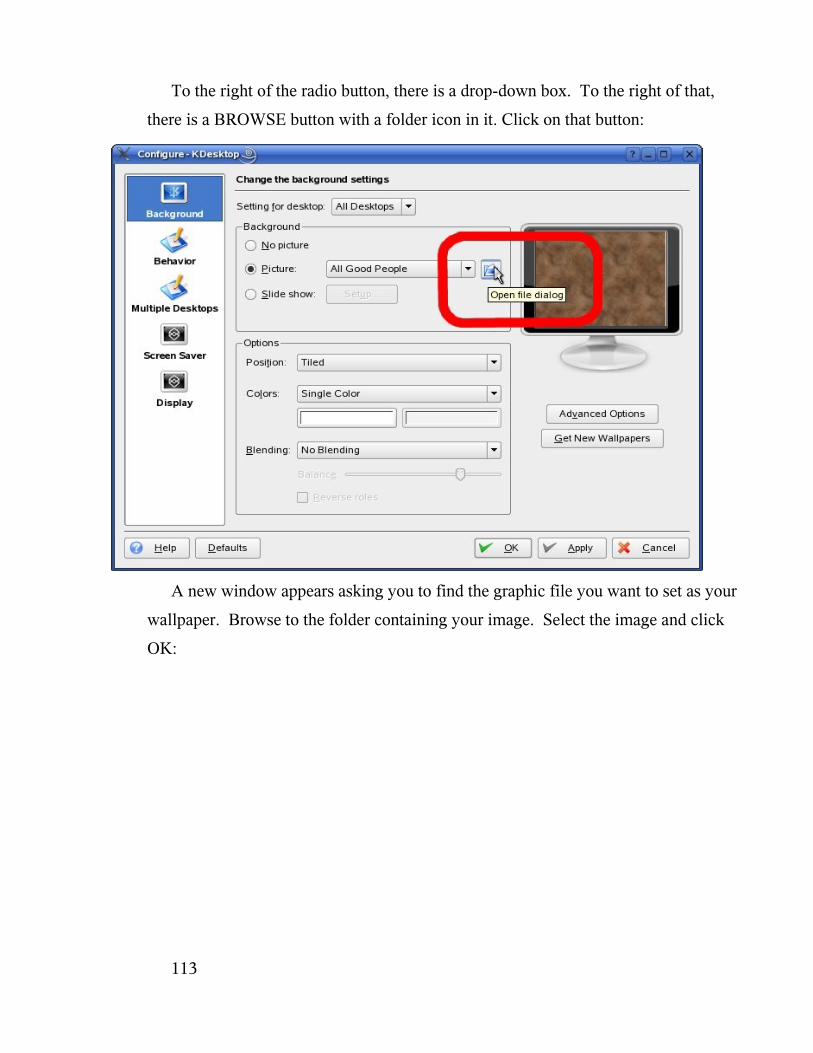
To the right of the radio button, there is a drop-down box. To the right of that,
there is a BROWSE button with a folder icon in it. Click on that button:
A new window appears asking you to find the graphic file you want to set as your
wallpaper. Browse to the folder containing your image. Select the image and click
OK:
113

114
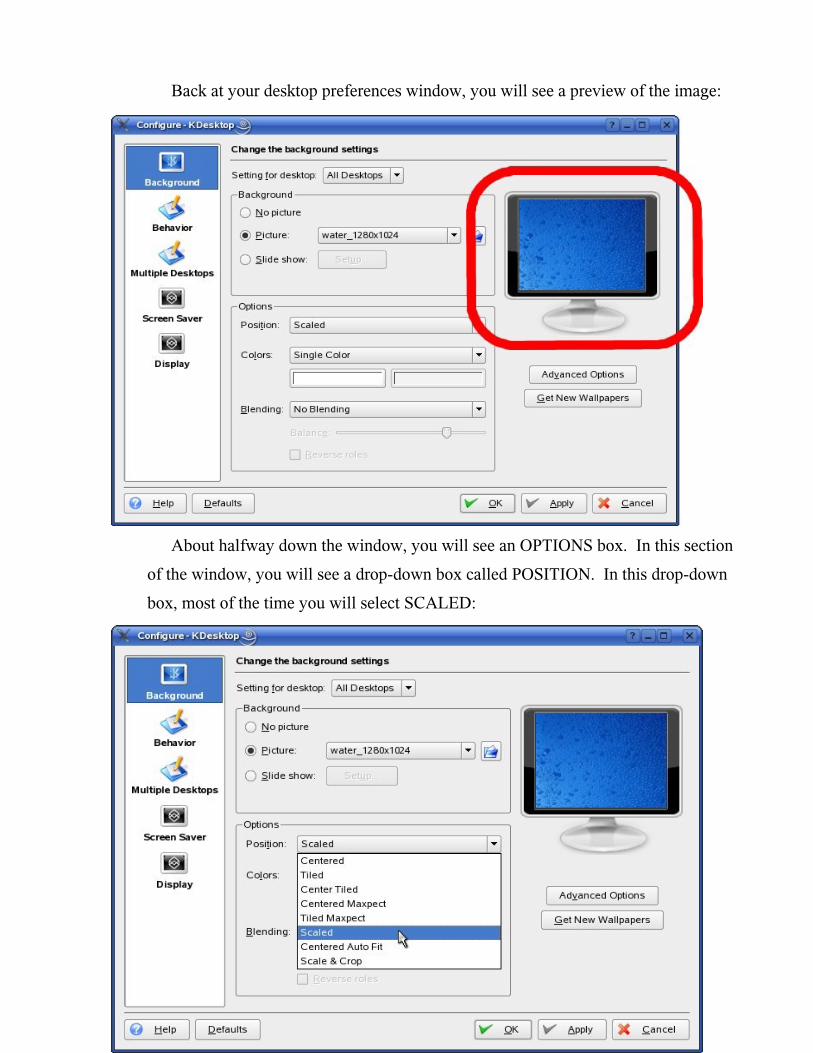
Back at your desktop preferences window, you will see a preview of the image:
About halfway down the window, you will see an OPTIONS box. In this section
of the window, you will see a drop-down box called POSITION. In this drop-down
box, most of the time you will select SCALED:
115
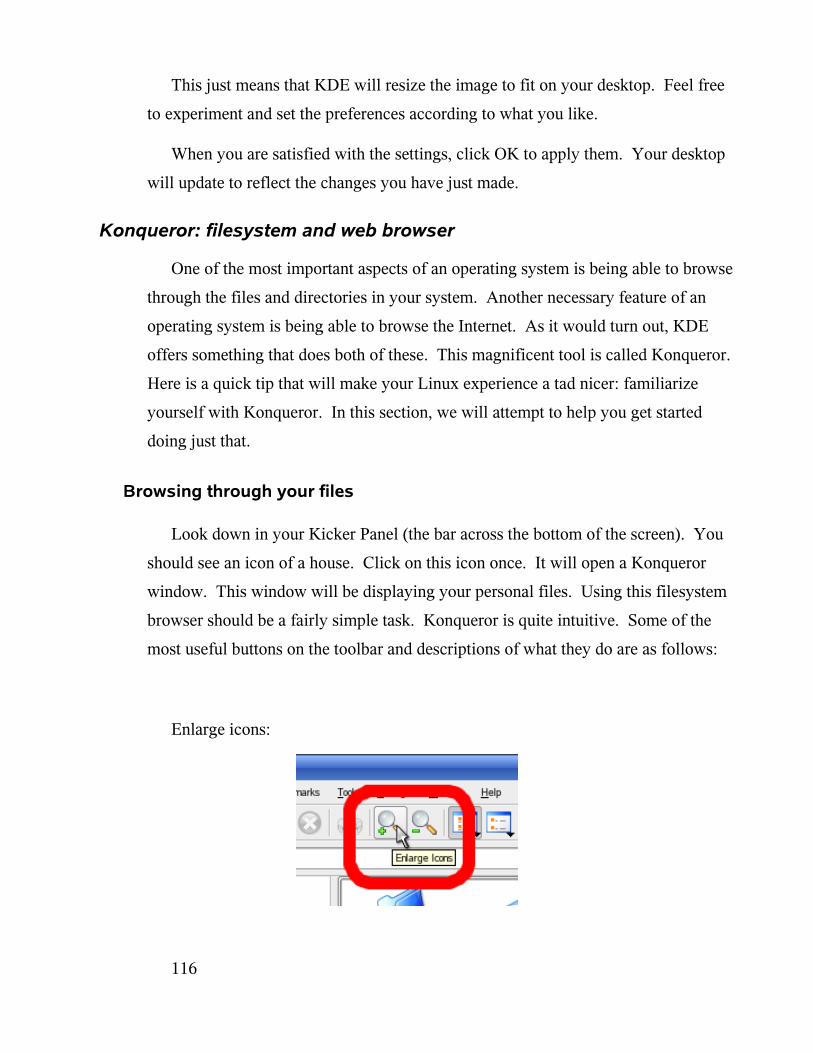
This just means that KDE will resize the image to fit on your desktop. Feel free
to experiment and set the preferences according to what you like.
When you are satisfied with the settings, click OK to apply them. Your desktop
will update to reflect the changes you have just made.
Konqueror: filesystem and web browser
One of the most important aspects of an operating system is being able to browse
through the files and directories in your system. Another necessary feature of an
operating system is being able to browse the Internet. As it would turn out, KDE
offers something that does both of these. This magnificent tool is called Konqueror.
Here is a quick tip that will make your Linux experience a tad nicer: familiarize
yourself with Konqueror. In this section, we will attempt to help you get started
doing just that.
Browsing through your files
Look down in your Kicker Panel (the bar across the bottom of the screen). You
should see an icon of a house. Click on this icon once. It will open a Konqueror
window. This window will be displaying your personal files. Using this filesystem
browser should be a fairly simple task. Konqueror is quite intuitive. Some of the
most useful buttons on the toolbar and descriptions of what they do are as follows:
Enlarge icons:
116
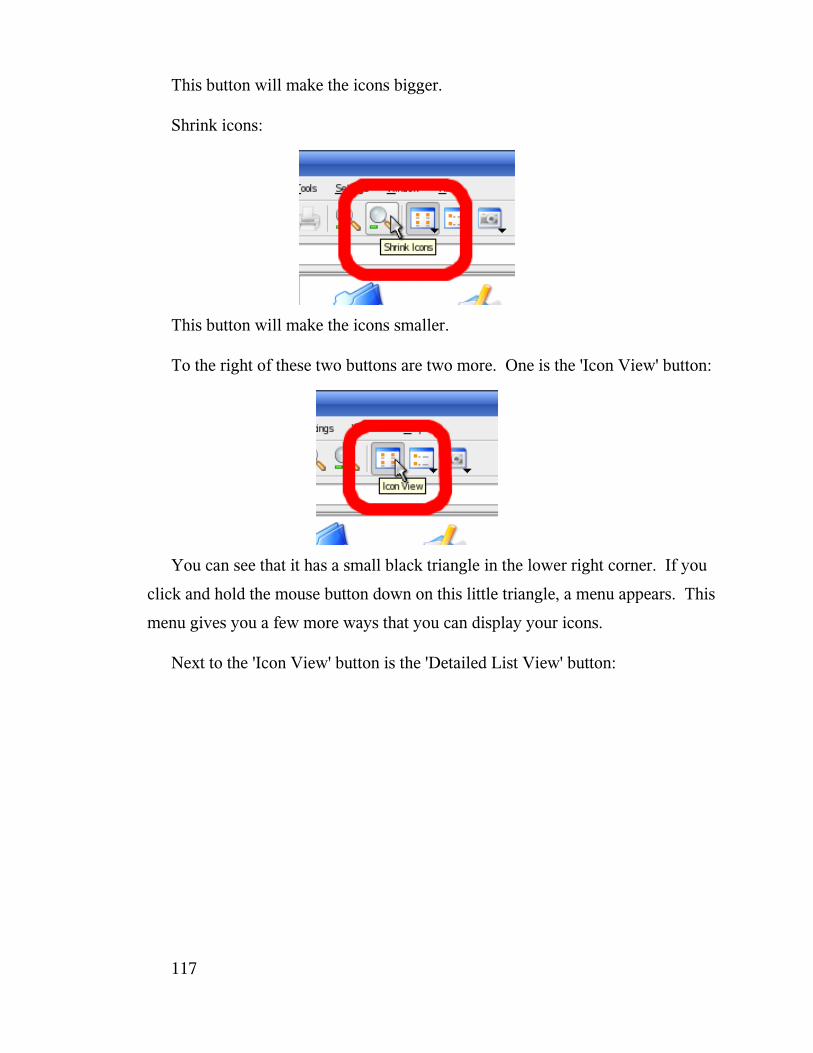
This button will make the icons bigger.
Shrink icons:
This button will make the icons smaller.
To the right of these two buttons are two more. One is the 'Icon View' button:
You can see that it has a small black triangle in the lower right corner. If you
click and hold the mouse button down on this little triangle, a menu appears. This
menu gives you a few more ways that you can display your icons.
Next to the 'Icon View' button is the 'Detailed List View' button:
117
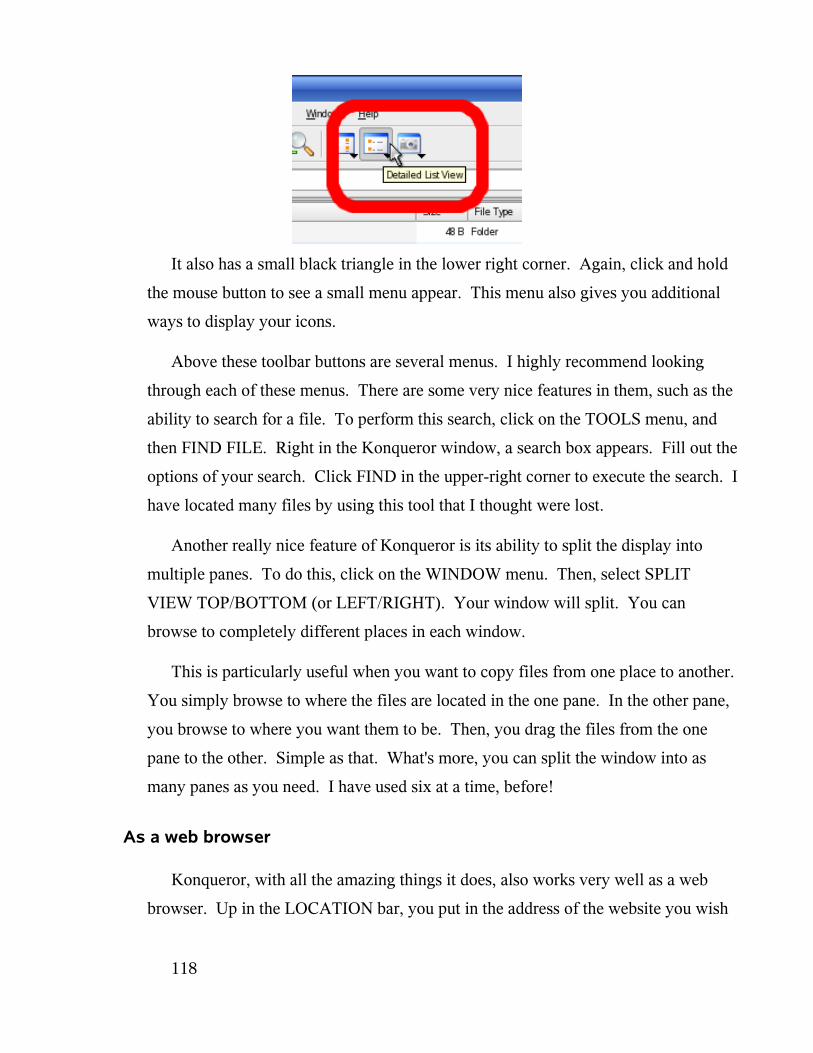
It also has a small black triangle in the lower right corner. Again, click and hold
the mouse button to see a small menu appear. This menu also gives you additional
ways to display your icons.
Above these toolbar buttons are several menus. I highly recommend looking
through each of these menus. There are some very nice features in them, such as the
ability to search for a file. To perform this search, click on the TOOLS menu, and
then FIND FILE. Right in the Konqueror window, a search box appears. Fill out the
options of your search. Click FIND in the upper-right corner to execute the search. I
have located many files by using this tool that I thought were lost.
Another really nice feature of Konqueror is its ability to split the display into
multiple panes. To do this, click on the WINDOW menu. Then, select SPLIT
VIEW TOP/BOTTOM (or LEFT/RIGHT). Your window will split. You can
browse to completely different places in each window.
This is particularly useful when you want to copy files from one place to another.
You simply browse to where the files are located in the one pane. In the other pane,
you browse to where you want them to be. Then, you drag the files from the one
pane to the other. Simple as that. What's more, you can split the window into as
many panes as you need. I have used six at a time, before!
As a web browser
Konqueror, with all the amazing things it does, also works very well as a web
browser. Up in the LOCATION bar, you put in the address of the website you wish
118
to go to. It should be fairly intuitive to use Konqueror's web browsing capabilities.
It will have FORWARD and BACK buttons, a HOME button. You can add,
remove, and edit your bookmarks, as well.
Periodically, you may get a notification from Konqueror about whatever page
you are viewing. Just read the notification carefully and answer the question.
Cookie notifications are the most common at first. Cookies are files that websites
leave on your computer that keep track of small bits of information. Thus, I would
only allow cookies on sites that I trust.
Konqueror performs very well as a web browser. If you would like to adjust your
preferences, you can go into the SETTINGS menu, and select CONFIGURE
KONQUEROR. You are probably safe leaving everything how it is, but if you want
to learn about how Konqueror works, go in and look at the menus. See what things
do.
Kicker Panel
The Kicker Panel is the bar that goes across the bottom of your screen. To its far
left, there is the K Menu. To the right of the K Menu, there are other launcher
buttons for running assorted programs. This is an ideal location to put launcher
buttons for the programs that you use most frequently. Doing this is a snap.
Let's look at a demonstration of how to do this. There is a great text editor
program called Kate. You will find it to be feature-rich and very useful. Let's add
the Kate application launcher to the Kicker Panel.
119
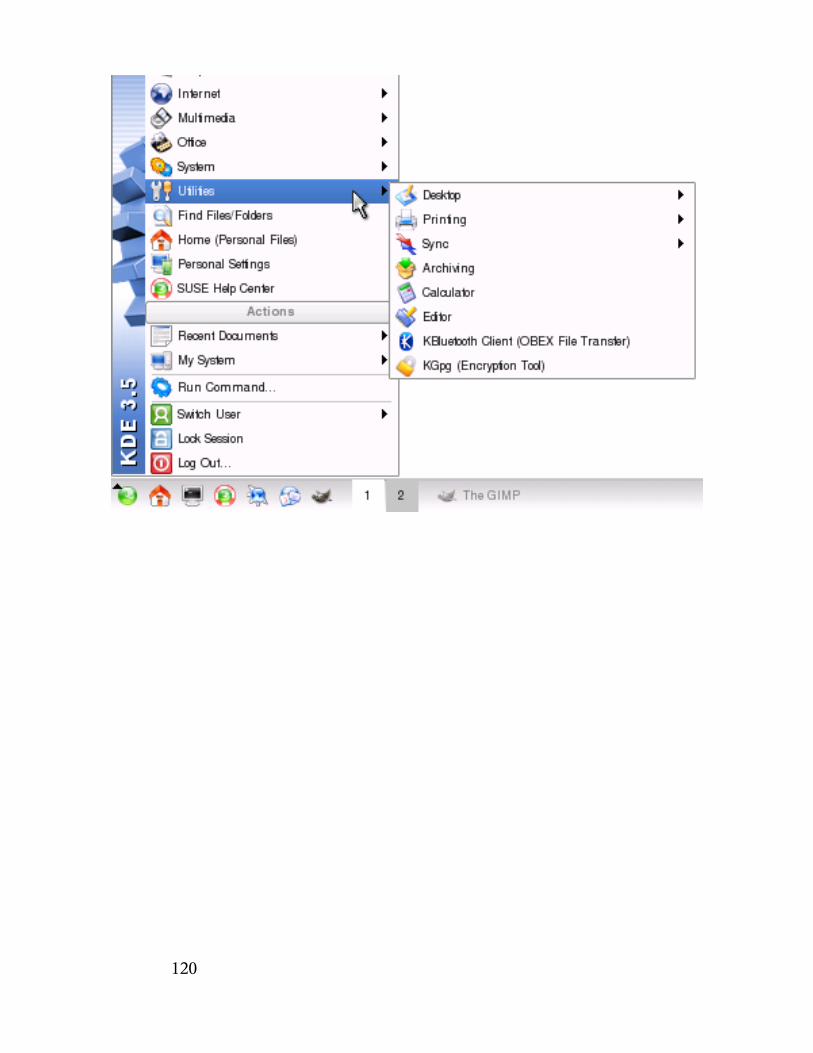
120
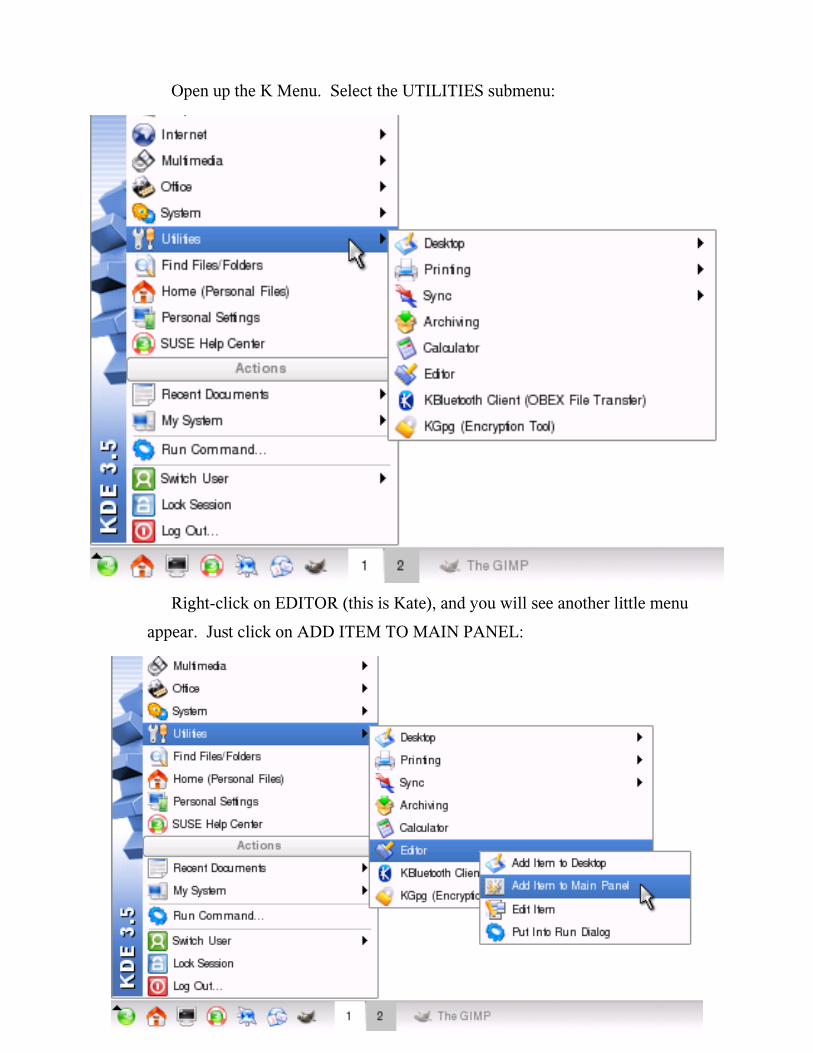
Open up the K Menu. Select the UTILITIES submenu:
Right-click on EDITOR (this is Kate), and you will see another little menu
appear. Just click on ADD ITEM TO MAIN PANEL:
121
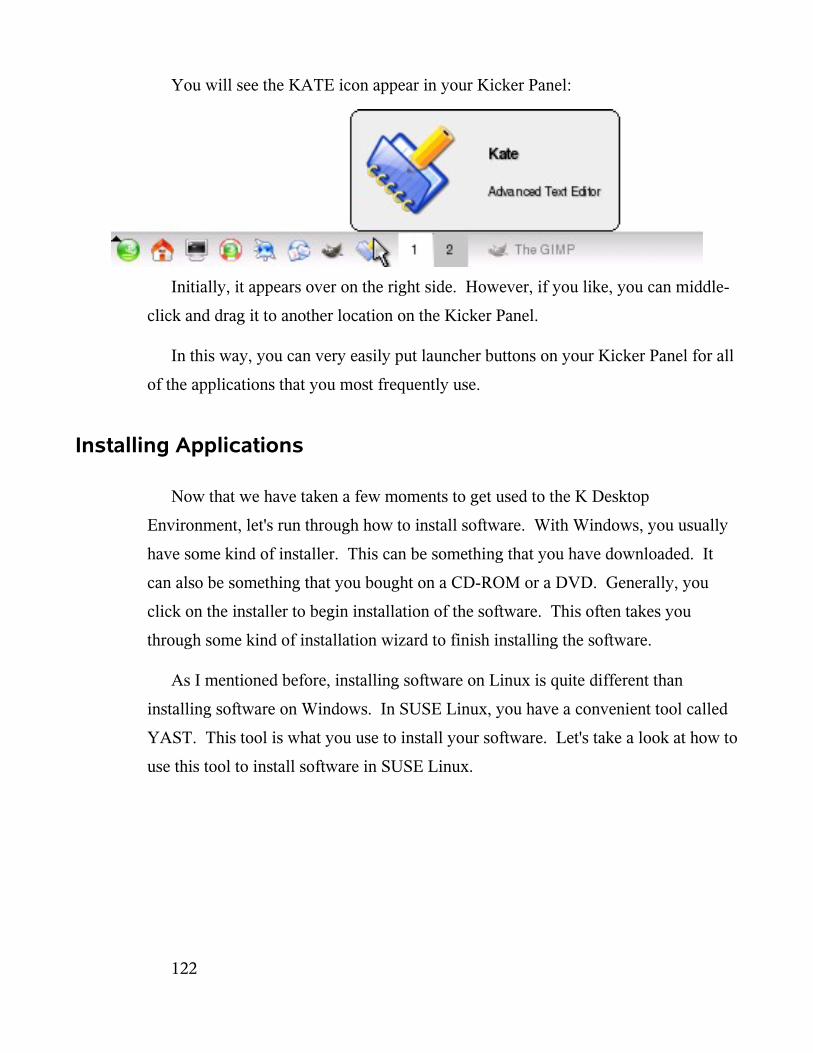
You will see the KATE icon appear in your Kicker Panel:
Initially, it appears over on the right side. However, if you like, you can middle-
click and drag it to another location on the Kicker Panel.
In this way, you can very easily put launcher buttons on your Kicker Panel for all
of the applications that you most frequently use.
Installing Applications
Now that we have taken a few moments to get used to the K Desktop
Environment, let's run through how to install software. With Windows, you usually
have some kind of installer. This can be something that you have downloaded. It
can also be something that you bought on a CD-ROM or a DVD. Generally, you
click on the installer to begin installation of the software. This often takes you
through some kind of installation wizard to finish installing the software.
As I mentioned before, installing software on Linux is quite different than
installing software on Windows. In SUSE Linux, you have a convenient tool called
YAST. This tool is what you use to install your software. Let's take a look at how to
use this tool to install software in SUSE Linux.
122
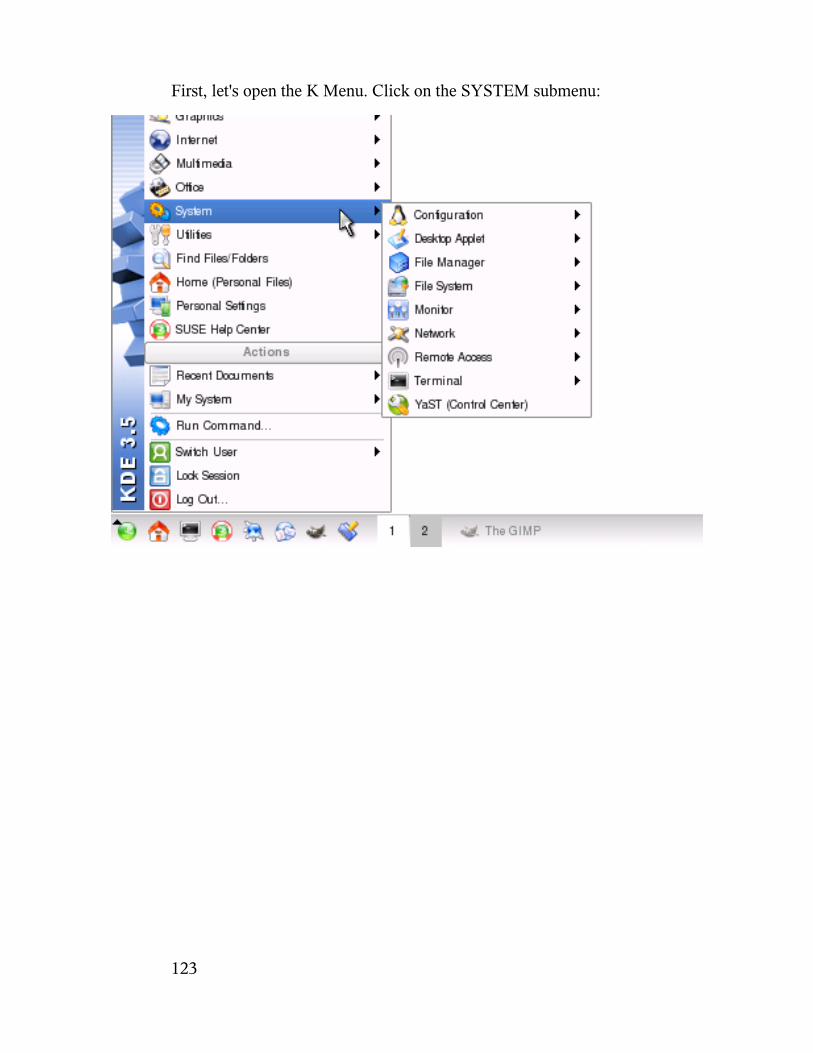
First, let's open the K Menu. Click on the SYSTEM submenu:
123
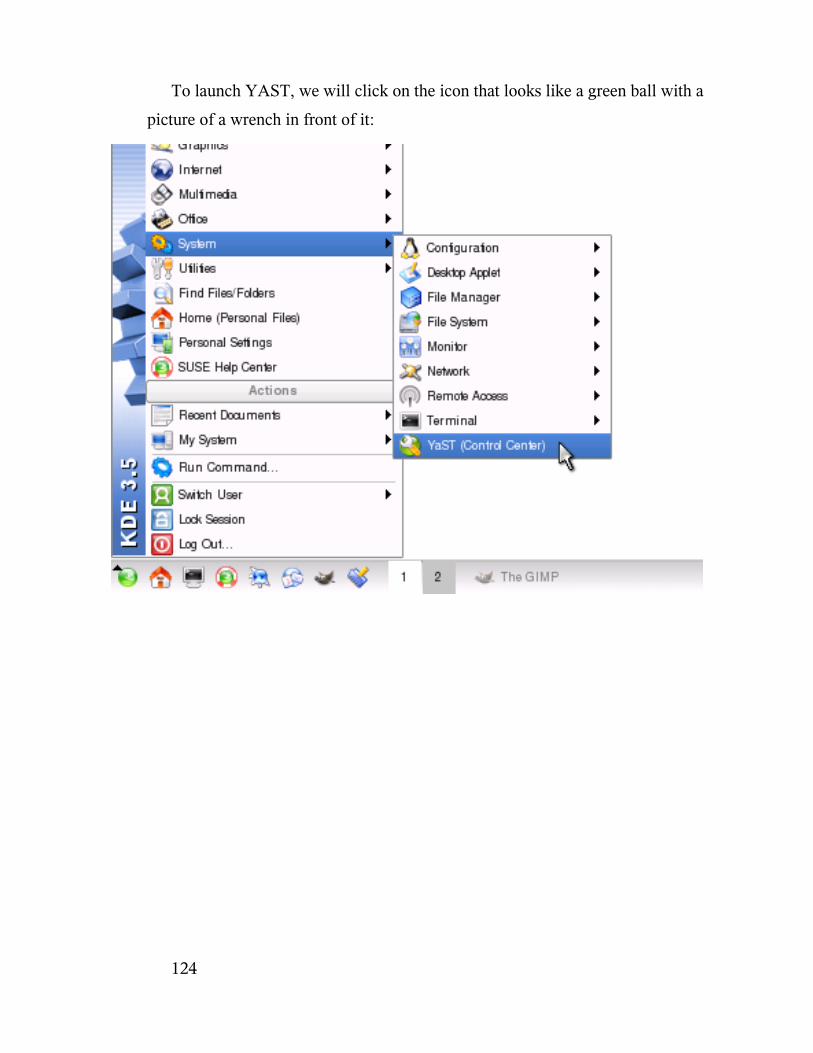
To launch YAST, we will click on the icon that looks like a green ball with a
picture of a wrench in front of it:
124
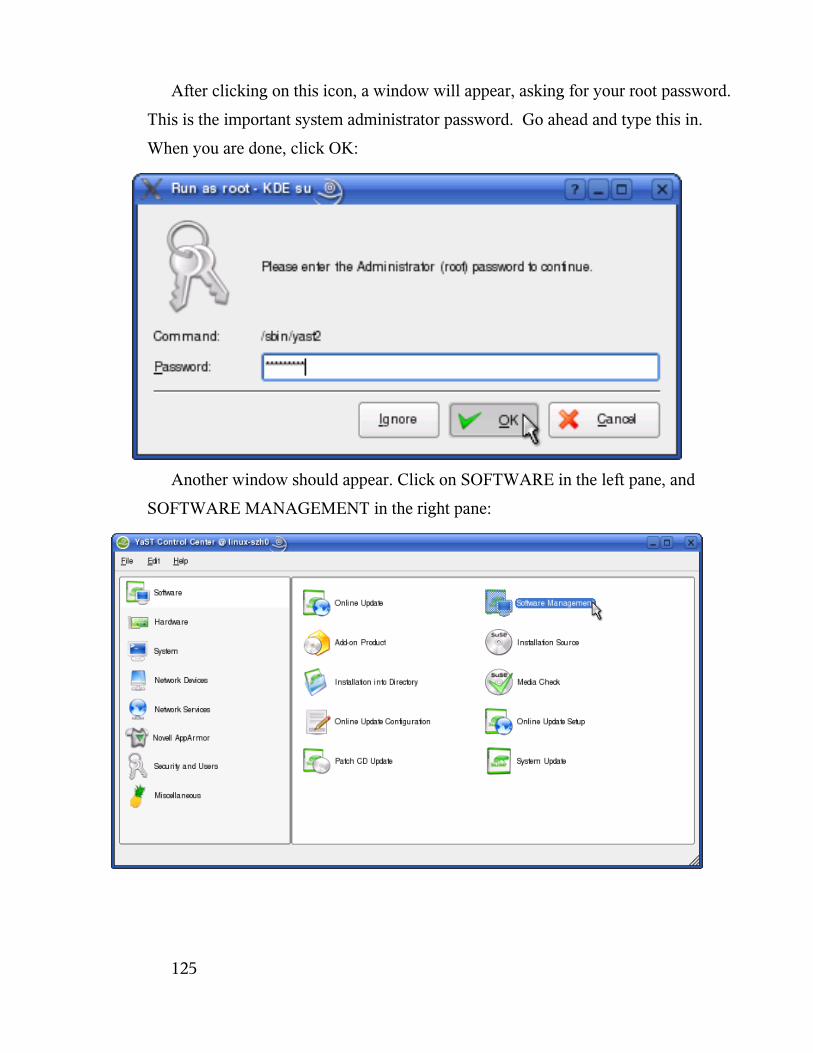
After clicking on this icon, a window will appear, asking for your root password.
This is the important system administrator password. Go ahead and type this in.
When you are done, click OK:
Another window should appear. Click on SOFTWARE in the left pane, and
SOFTWARE MANAGEMENT in the right pane:
125

After a few moments, another window will appear. This is where you will install
and uninstall software. Let's install a program that you can play your MP3s with.
This program is called 'xmms'. So, in the search box in the upper-left corner of the
window, type in 'xmms' and click SEARCH:
126
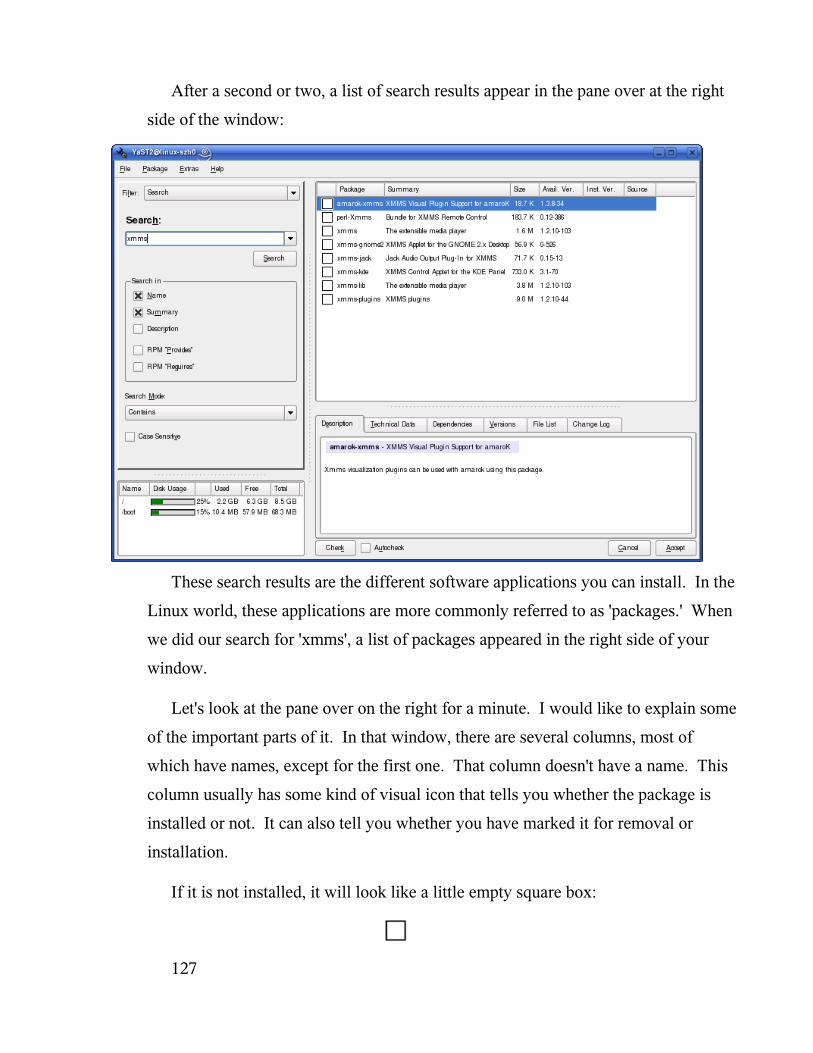
After a second or two, a list of search results appear in the pane over at the right
side of the window:
These search results are the different software applications you can install. In the
Linux world, these applications are more commonly referred to as 'packages.' When
we did our search for 'xmms', a list of packages appeared in the right side of your
window.
Let's look at the pane over on the right for a minute. I would like to explain some
of the important parts of it. In that window, there are several columns, most of
which have names, except for the first one. That column doesn't have a name. This
column usually has some kind of visual icon that tells you whether the package is
installed or not. It can also tell you whether you have marked it for removal or
installation.
If it is not installed, it will look like a little empty square box:
127
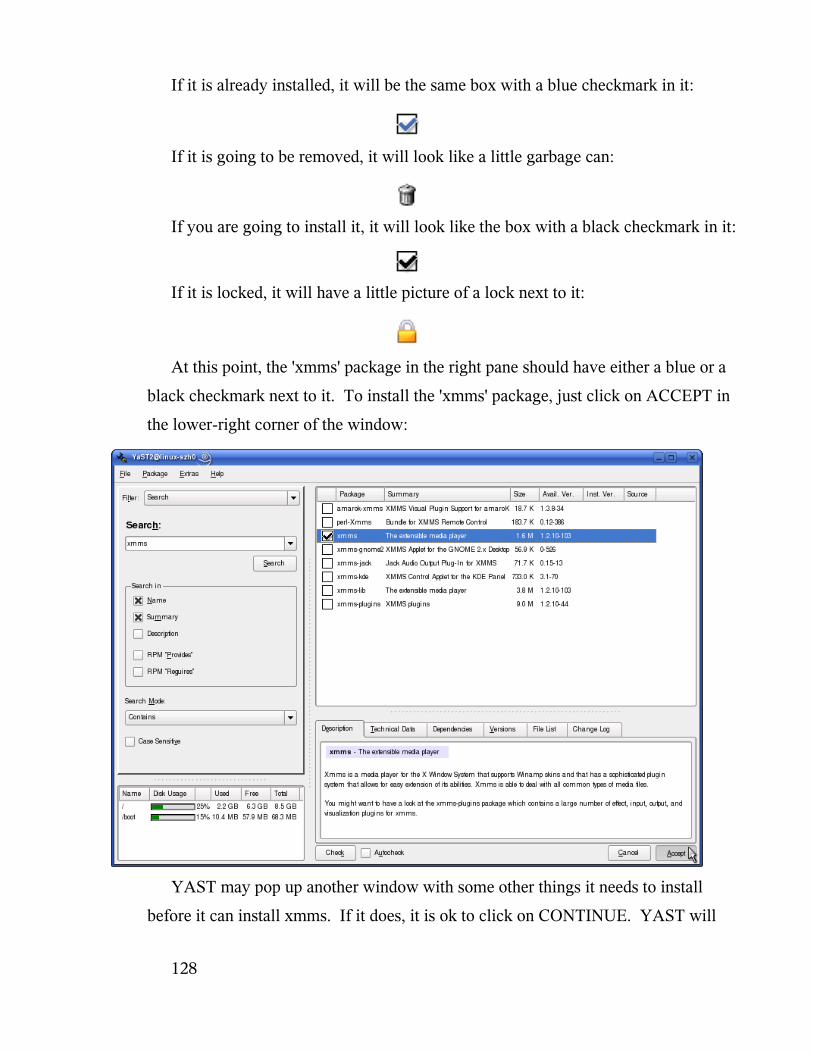
If it is already installed, it will be the same box with a blue checkmark in it:
If it is going to be removed, it will look like a little garbage can:
If you are going to install it, it will look like the box with a black checkmark in it:
If it is locked, it will have a little picture of a lock next to it:
At this point, the 'xmms' package in the right pane should have either a blue or a
black checkmark next to it. To install the 'xmms' package, just click on ACCEPT in
the lower-right corner of the window:
YAST may pop up another window with some other things it needs to install
before it can install xmms. If it does, it is ok to click on CONTINUE. YAST will
128
then begin installing the packages. As it does this, it may ask you to insert various
CDs. Insert the CDs it asks for. When it is all done, it will ask you if you need to
install any other software. Usually, you will just click NO, here. When you do, the
YAST window disappears.
That is how you install software in SUSE Linux. After you do it a few times, it
will become second nature to you. Until then, just pop open this book and follow
these steps for whatever packages you need to install.
Applications
At this point, we have explored KDE, our desktop environment. We have also
gone through the process of installing software. Next, let's go through some of the
best software available for the most common tasks. We will look at word processing
and spreadsheet software. I will also show you some of the most common software
for checking email and browsing the Internet.
OpenOffice
Many people have become accustomed to Microsoft Office. This is a collection
of applications that provide users with tools like word processing, spreadsheets,
databases, and email. This software is very expensive, costing several hundred
dollars per license. On Linux, there is an equivalent suite of applications called
OpenOffice. It is very comparable to Office in what it offers. Many people even say
that once they get used to OpenOffice, they prefer it to Microsoft Office.
It is my purpose to give a brief introduction to OpenOffice here. Due to the depth
of the subject, it would be impossible for me to cover everything about this
application suite in this book. That said, I will provide you with plenty of resources
that you can use to learn more about OpenOffice.
As an exercise, let's make sure that we have OpenOffice installed. Using the
instructions provided in the previous section, 'Installing Applications', search for the
129
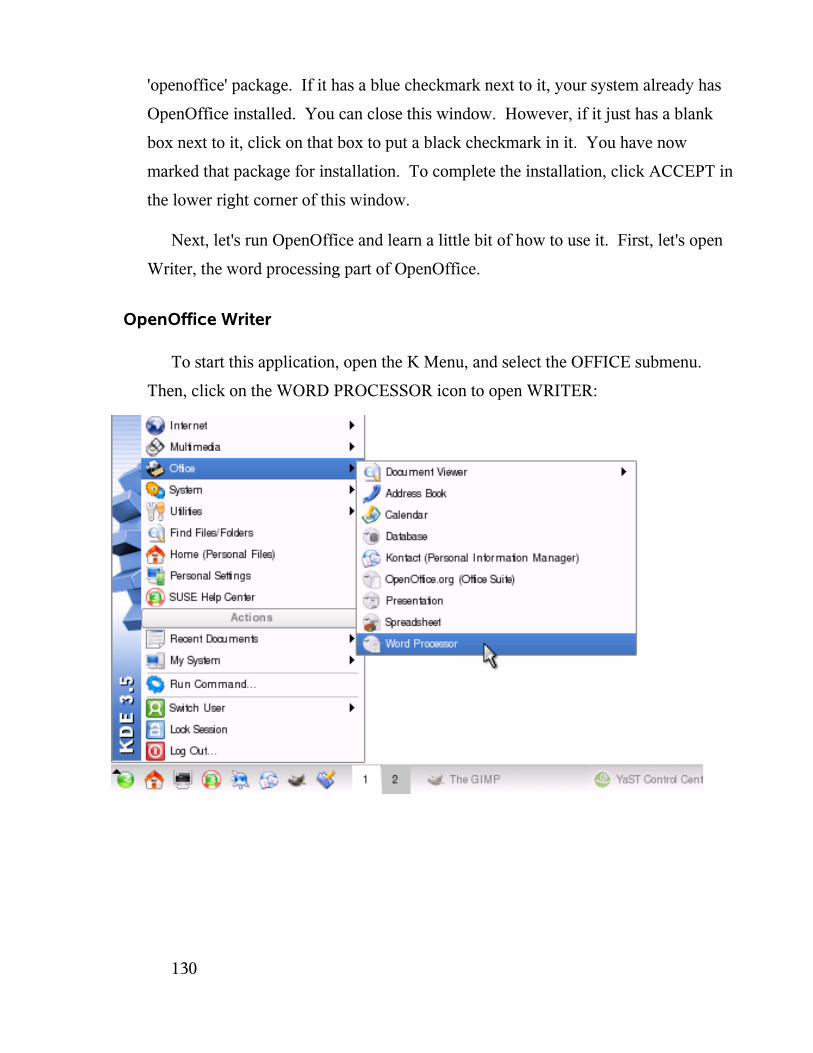
'openoffice' package. If it has a blue checkmark next to it, your system already has
OpenOffice installed. You can close this window. However, if it just has a blank
box next to it, click on that box to put a black checkmark in it. You have now
marked that package for installation. To complete the installation, click ACCEPT in
the lower right corner of this window.
Next, let's run OpenOffice and learn a little bit of how to use it. First, let's open
Writer, the word processing part of OpenOffice.
OpenOffice Writer
To start this application, open the K Menu, and select the OFFICE submenu.
Then, click on the WORD PROCESSOR icon to open WRITER:
130
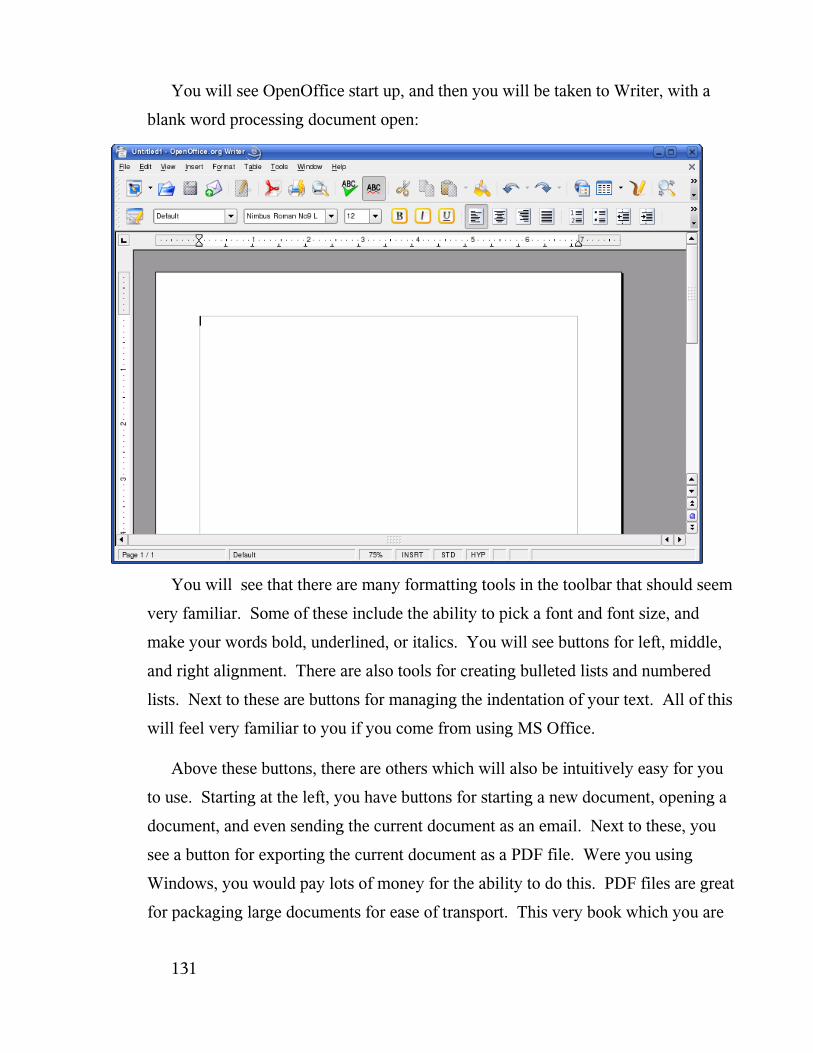
You will see OpenOffice start up, and then you will be taken to Writer, with a
blank word processing document open:
You will see that there are many formatting tools in the toolbar that should seem
very familiar. Some of these include the ability to pick a font and font size, and
make your words bold, underlined, or italics. You will see buttons for left, middle,
and right alignment. There are also tools for creating bulleted lists and numbered
lists. Next to these are buttons for managing the indentation of your text. All of this
will feel very familiar to you if you come from using MS Office.
Above these buttons, there are others which will also be intuitively easy for you
to use. Starting at the left, you have buttons for starting a new document, opening a
document, and even sending the current document as an email. Next to these, you
see a button for exporting the current document as a PDF file. Were you using
Windows, you would pay lots of money for the ability to do this. PDF files are great
for packaging large documents for ease of transport. This very book which you are
131
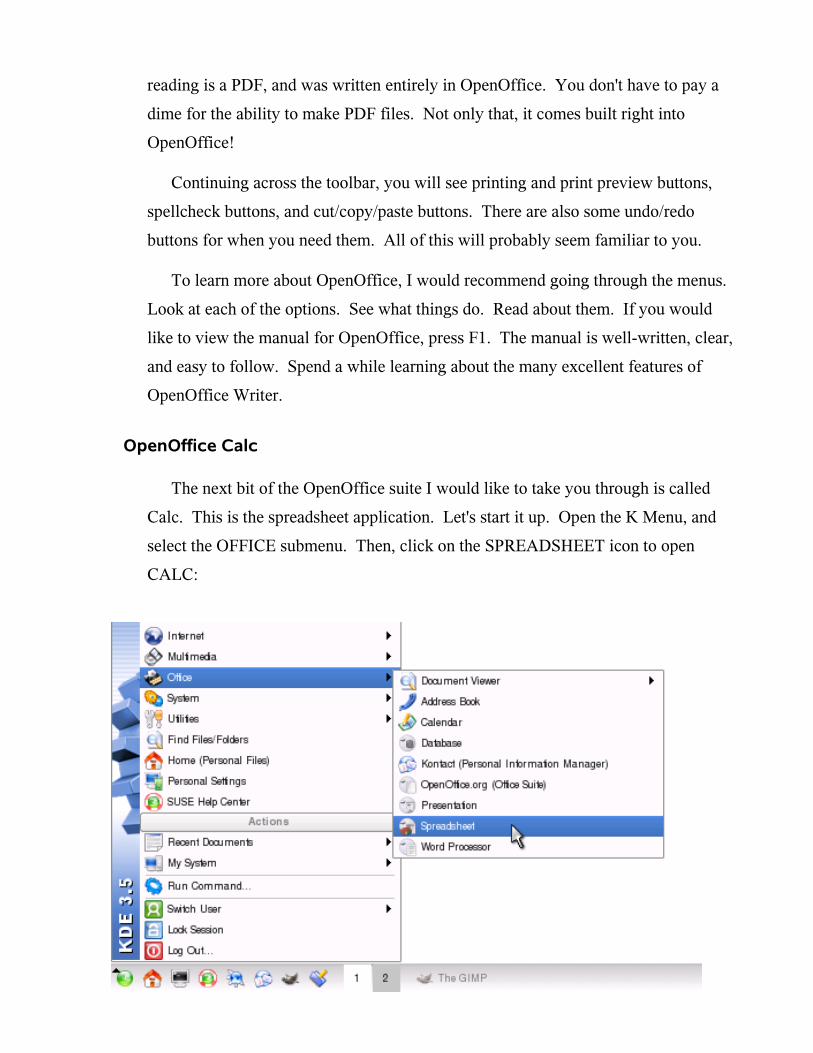
reading is a PDF, and was written entirely in OpenOffice. You don't have to pay a
dime for the ability to make PDF files. Not only that, it comes built right into
OpenOffice!
Continuing across the toolbar, you will see printing and print preview buttons,
spellcheck buttons, and cut/copy/paste buttons. There are also some undo/redo
buttons for when you need them. All of this will probably seem familiar to you.
To learn more about OpenOffice, I would recommend going through the menus.
Look at each of the options. See what things do. Read about them. If you would
like to view the manual for OpenOffice, press F1. The manual is well-written, clear,
and easy to follow. Spend a while learning about the many excellent features of
OpenOffice Writer.
OpenOffice Calc
The next bit of the OpenOffice suite I would like to take you through is called
Calc. This is the spreadsheet application. Let's start it up. Open the K Menu, and
select the OFFICE submenu. Then, click on the SPREADSHEET icon to open
CALC:
132
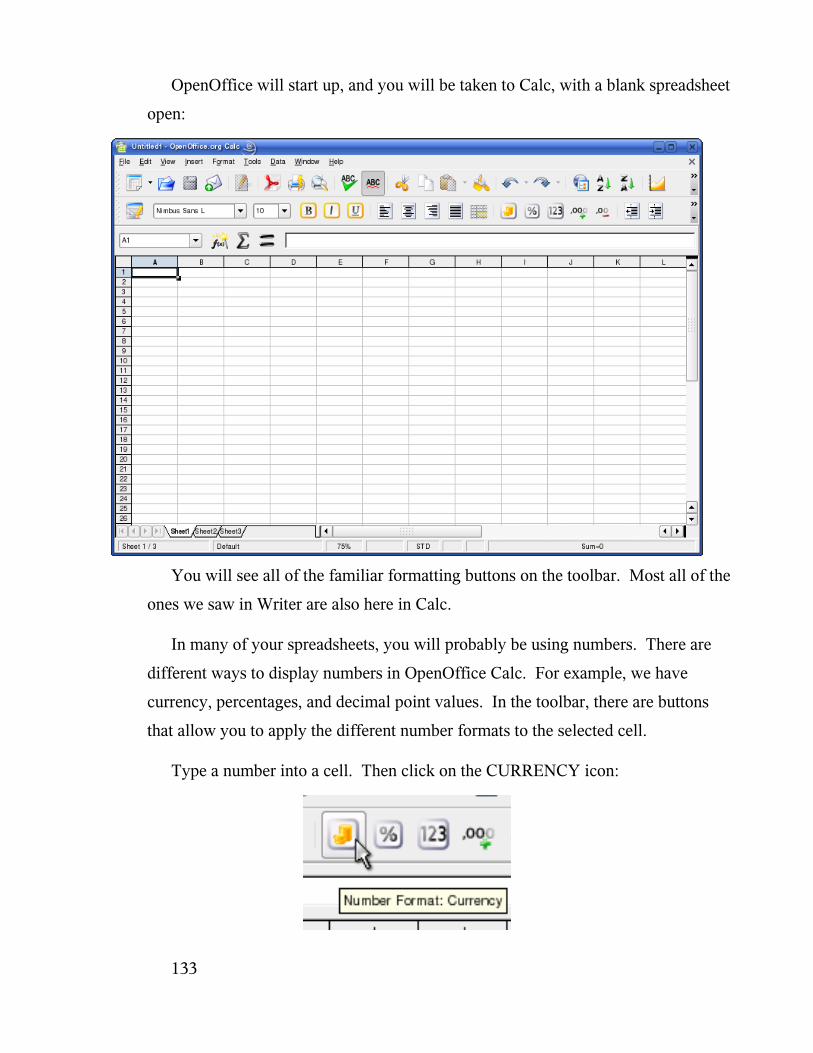
OpenOffice will start up, and you will be taken to Calc, with a blank spreadsheet
open:
You will see all of the familiar formatting buttons on the toolbar. Most all of the
ones we saw in Writer are also here in Calc.
In many of your spreadsheets, you will probably be using numbers. There are
different ways to display numbers in OpenOffice Calc. For example, we have
currency, percentages, and decimal point values. In the toolbar, there are buttons
that allow you to apply the different number formats to the selected cell.
Type a number into a cell. Then click on the CURRENCY icon:
133
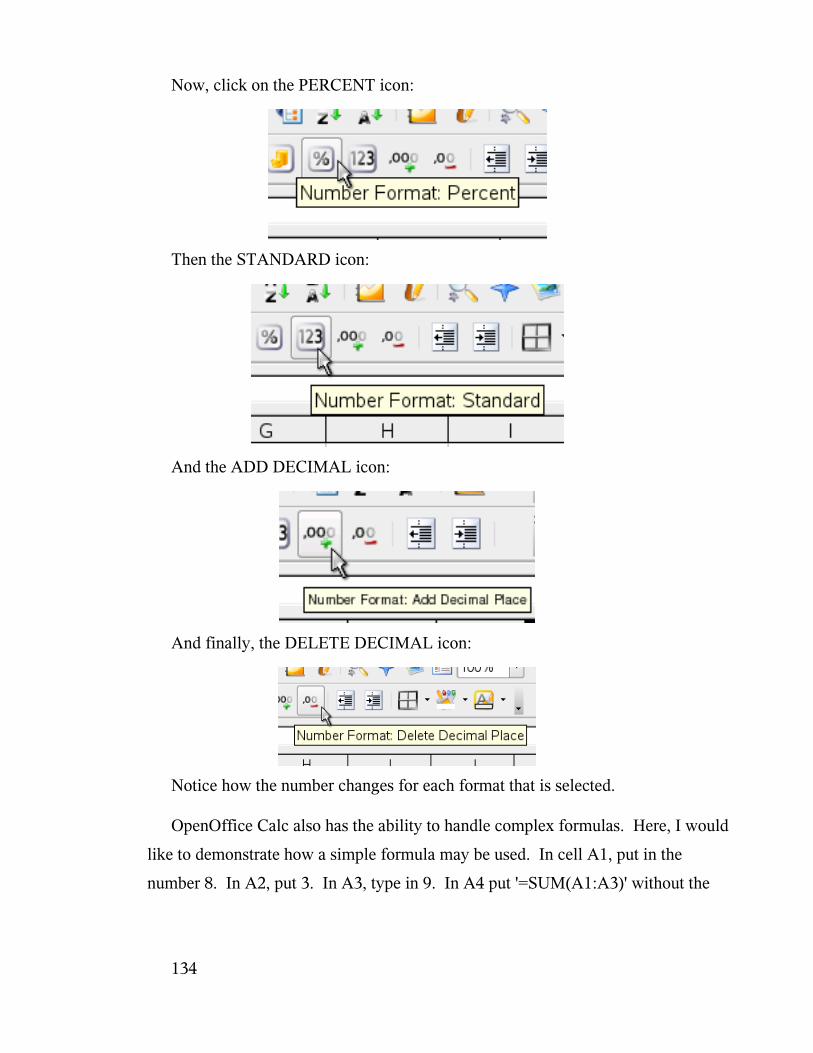
Now, click on the PERCENT icon:
Then the STANDARD icon:
And the ADD DECIMAL icon:
And finally, the DELETE DECIMAL icon:
Notice how the number changes for each format that is selected.
OpenOffice Calc also has the ability to handle complex formulas. Here, I would
like to demonstrate how a simple formula may be used. In cell A1, put in the
number 8. In A2, put 3. In A3, type in 9. In A4 put '=SUM(A1:A3)' without the
134
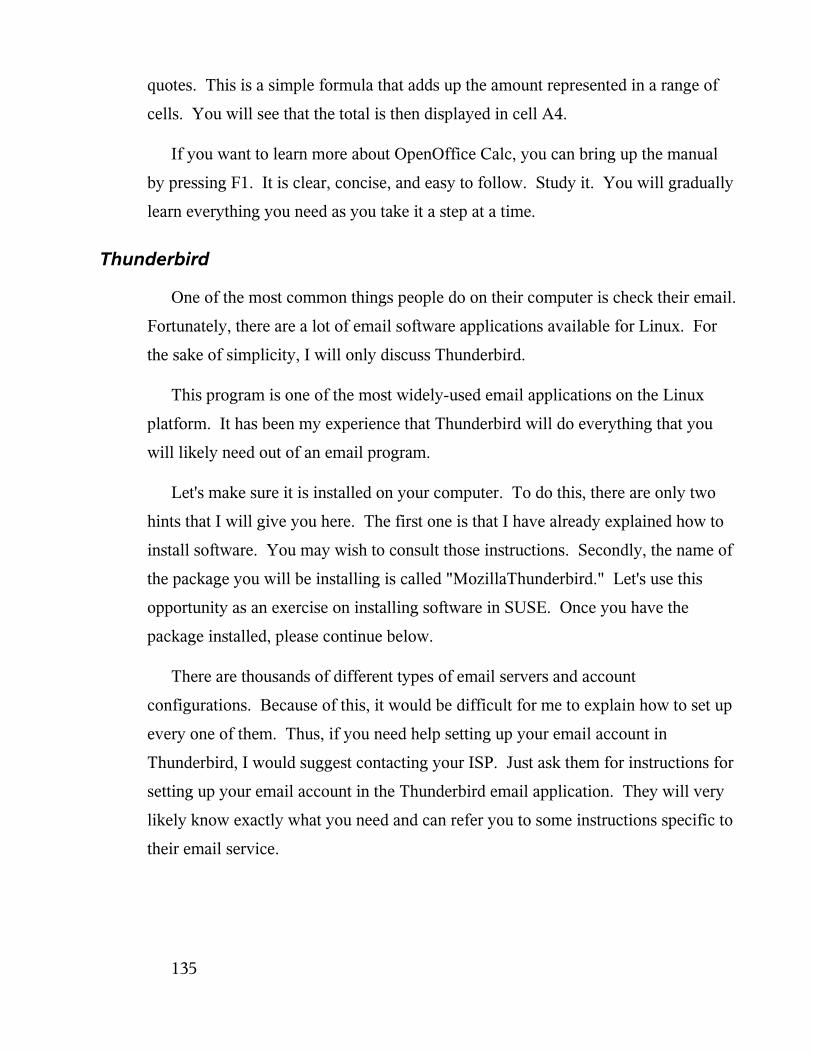
quotes. This is a simple formula that adds up the amount represented in a range of
cells. You will see that the total is then displayed in cell A4.
If you want to learn more about OpenOffice Calc, you can bring up the manual
by pressing F1. It is clear, concise, and easy to follow. Study it. You will gradually
learn everything you need as you take it a step at a time.
Thunderbird
One of the most common things people do on their computer is check their email.
Fortunately, there are a lot of email software applications available for Linux. For
the sake of simplicity, I will only discuss Thunderbird.
This program is one of the most widely-used email applications on the Linux
platform. It has been my experience that Thunderbird will do everything that you
will likely need out of an email program.
Let's make sure it is installed on your computer. To do this, there are only two
hints that I will give you here. The first one is that I have already explained how to
install software. You may wish to consult those instructions. Secondly, the name of
the package you will be installing is called "MozillaThunderbird." Let's use this
opportunity as an exercise on installing software in SUSE. Once you have the
package installed, please continue below.
There are thousands of different types of email servers and account
configurations. Because of this, it would be difficult for me to explain how to set up
every one of them. Thus, if you need help setting up your email account in
Thunderbird, I would suggest contacting your ISP. Just ask them for instructions for
setting up your email account in the Thunderbird email application. They will very
likely know exactly what you need and can refer you to some instructions specific to
their email service.
135
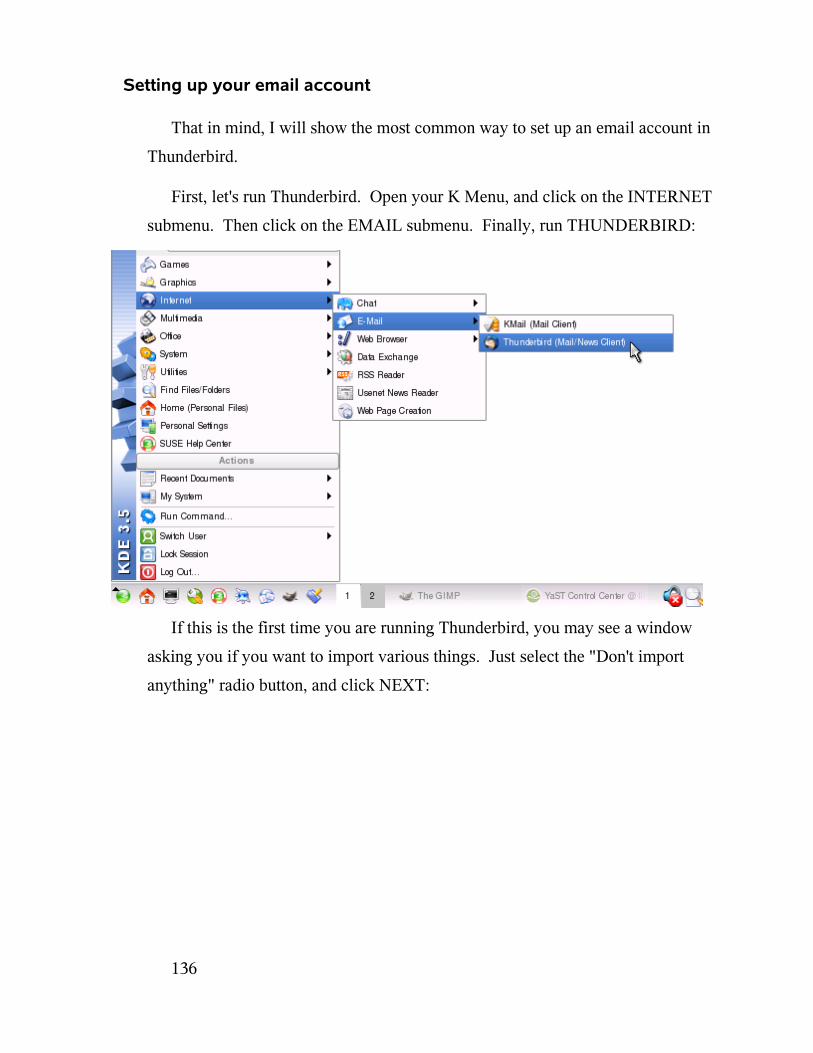
Setting up your email account
That in mind, I will show the most common way to set up an email account in
Thunderbird.
First, let's run Thunderbird. Open your K Menu, and click on the INTERNET
submenu. Then click on the EMAIL submenu. Finally, run THUNDERBIRD:
If this is the first time you are running Thunderbird, you may see a window
asking you if you want to import various things. Just select the "Don't import
anything" radio button, and click NEXT:
136
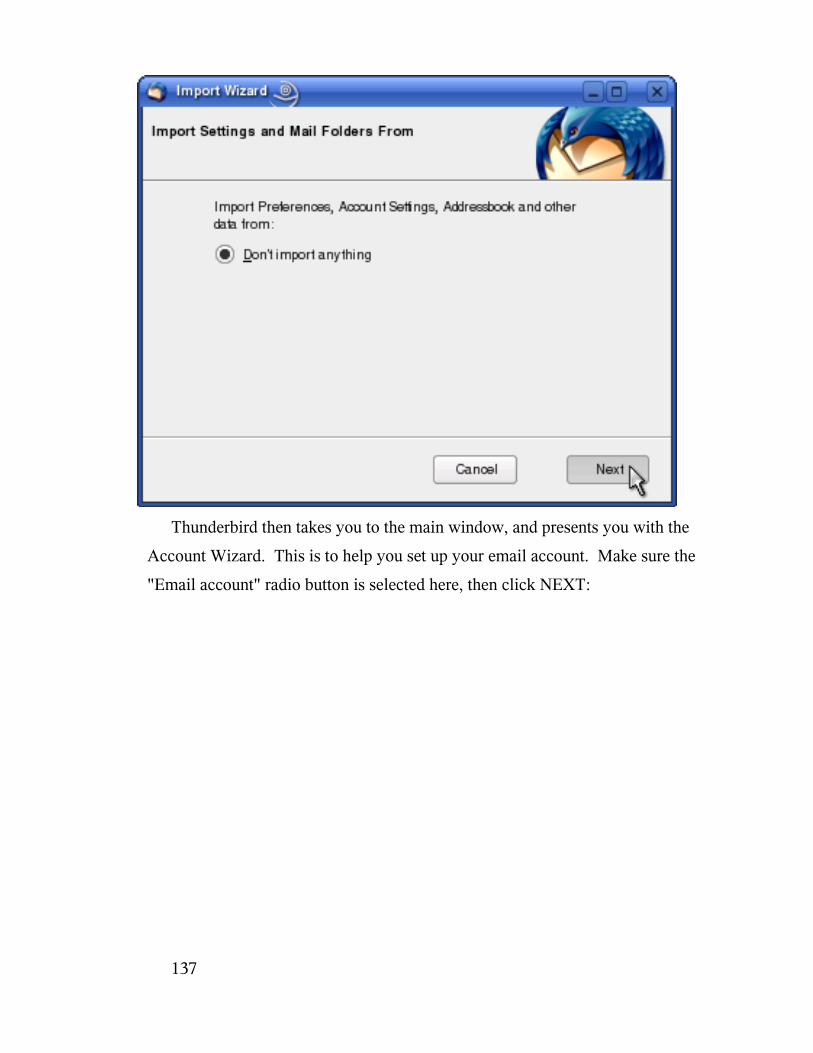
Thunderbird then takes you to the main window, and presents you with the
Account Wizard. This is to help you set up your email account. Make sure the
"Email account" radio button is selected here, then click NEXT:
137
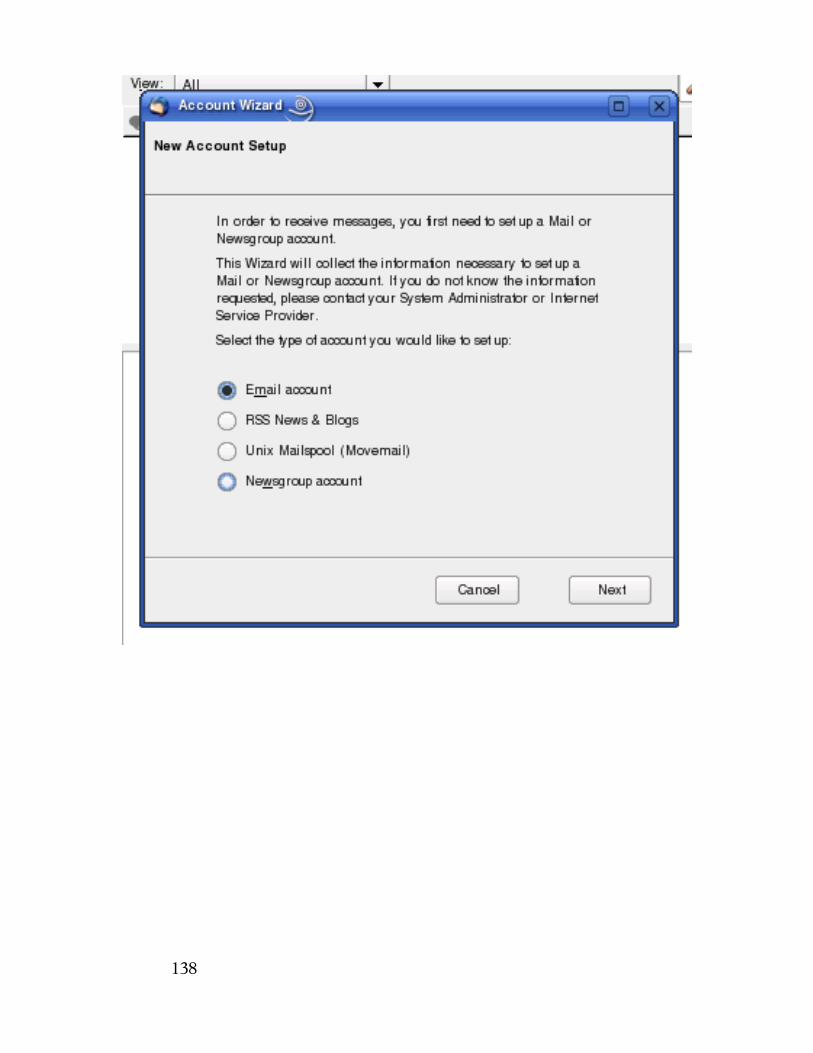
138
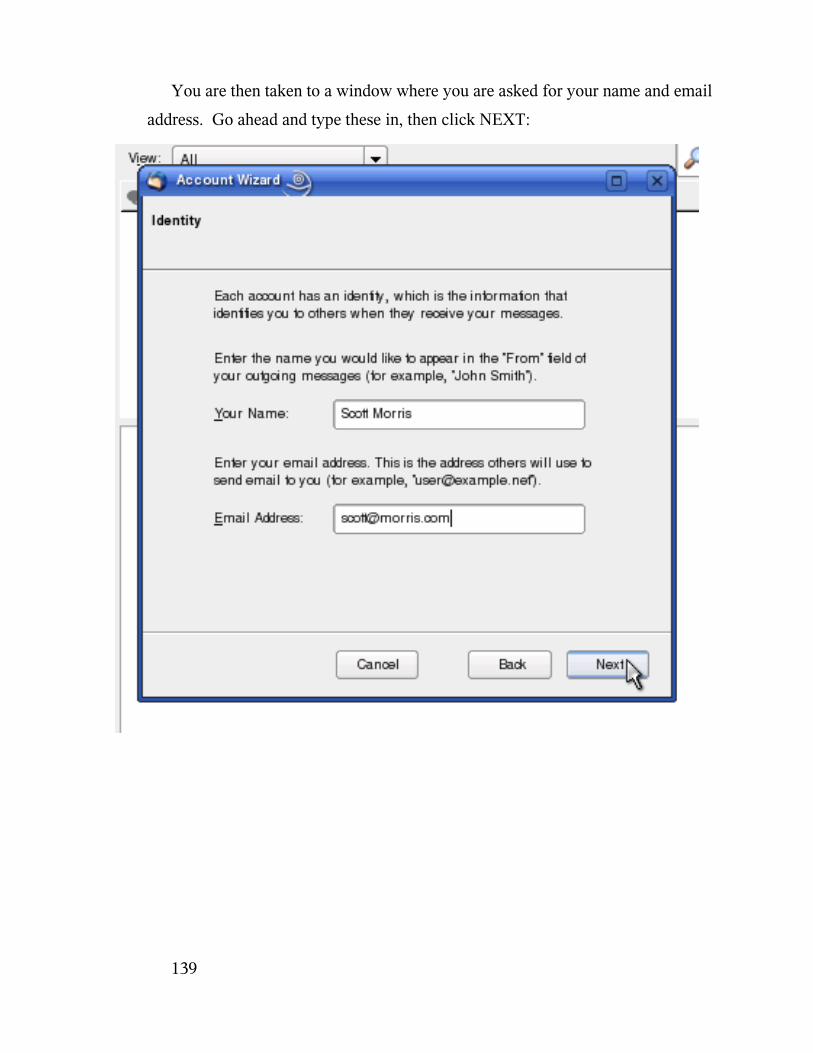
You are then taken to a window where you are asked for your name and email
address. Go ahead and type these in, then click NEXT:
139

You are then asked what kind of incoming email server you have. This is where
you may need specific instructions from your email service provider. For our
purposes, we are going to say that we have a POP server.
Leave the "Use Global Inbox (store mail in Local Folders)" box checked.
We are also going to put in the name of the outgoing mail server.
140
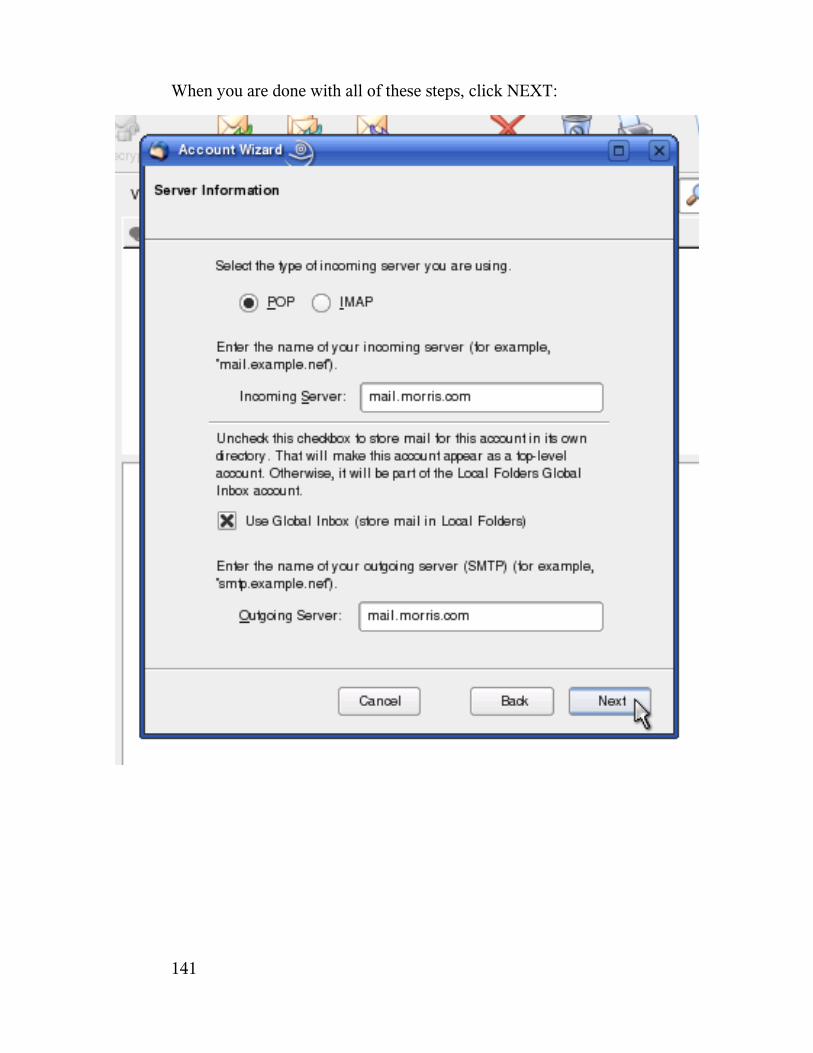
When you are done with all of these steps, click NEXT:
141
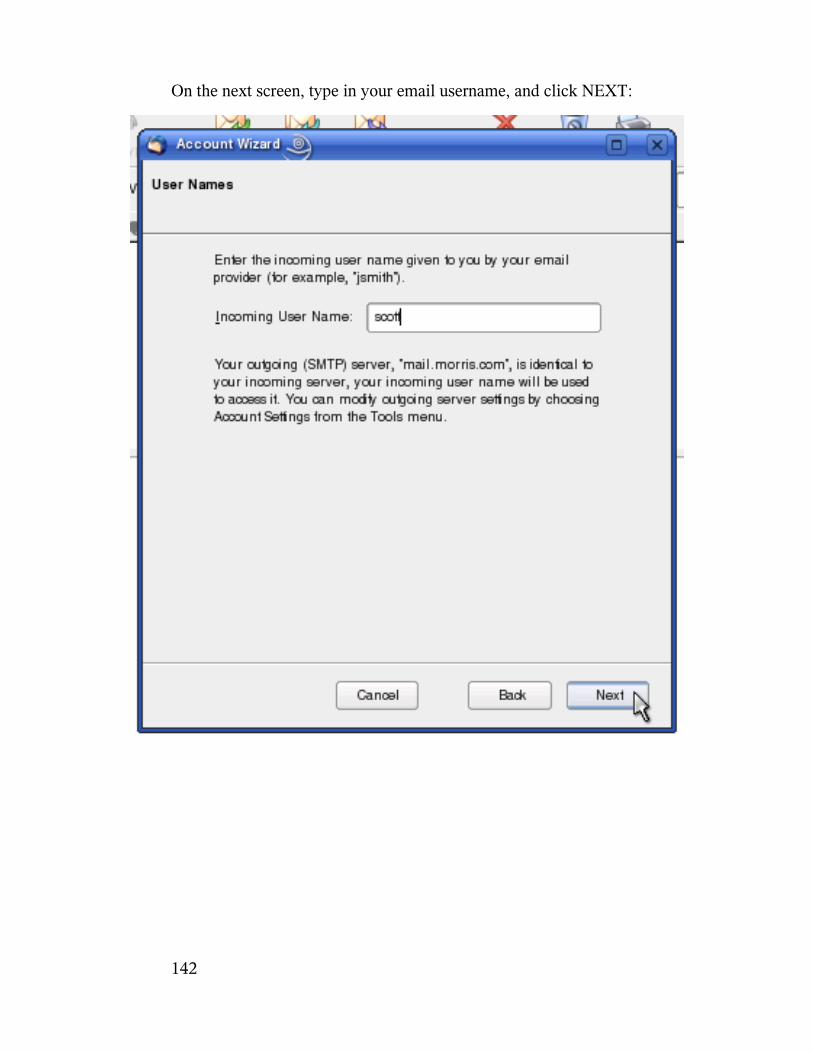
On the next screen, type in your email username, and click NEXT:
142
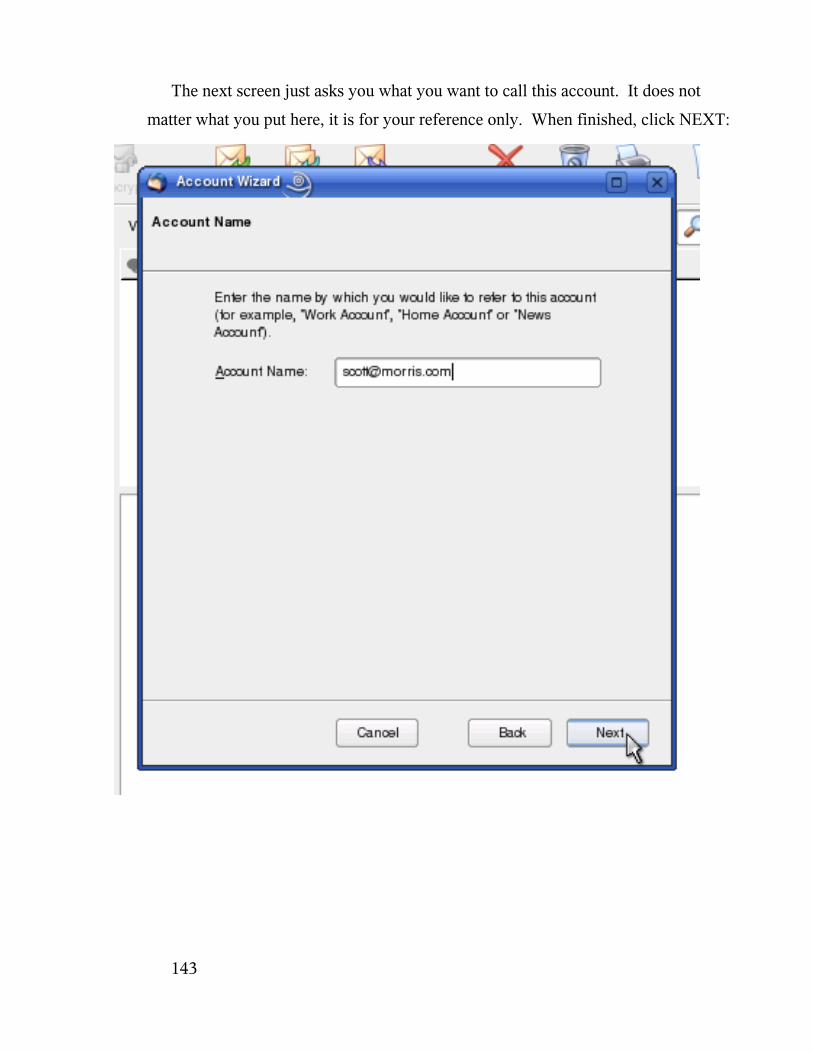
The next screen just asks you what you want to call this account. It does not
matter what you put here, it is for your reference only. When finished, click NEXT:
143

The final screen allows you to verify all of your settings. It also has a checkbox
labeled "Download messages now." If you wish to do this, leave it checked. When
you are done, click FINISH:
You may then see a small box that says, "Do you want to use Thunderbird as the
default mail application?" Check the box that says "Do not display this dialog
again". Then, click YES.
144
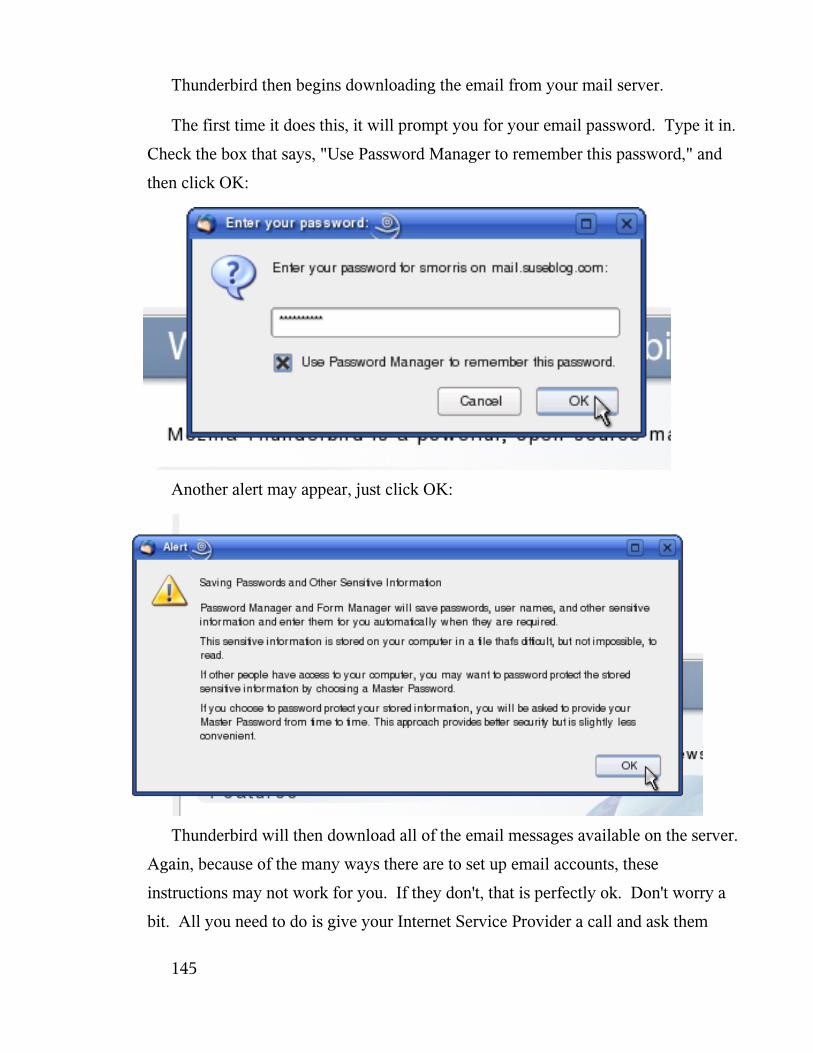
Thunderbird then begins downloading the email from your mail server.
The first time it does this, it will prompt you for your email password. Type it in.
Check the box that says, "Use Password Manager to remember this password," and
then click OK:
Another alert may appear, just click OK:
Thunderbird will then download all of the email messages available on the server.
Again, because of the many ways there are to set up email accounts, these
instructions may not work for you. If they don't, that is perfectly ok. Don't worry a
bit. All you need to do is give your Internet Service Provider a call and ask them
145
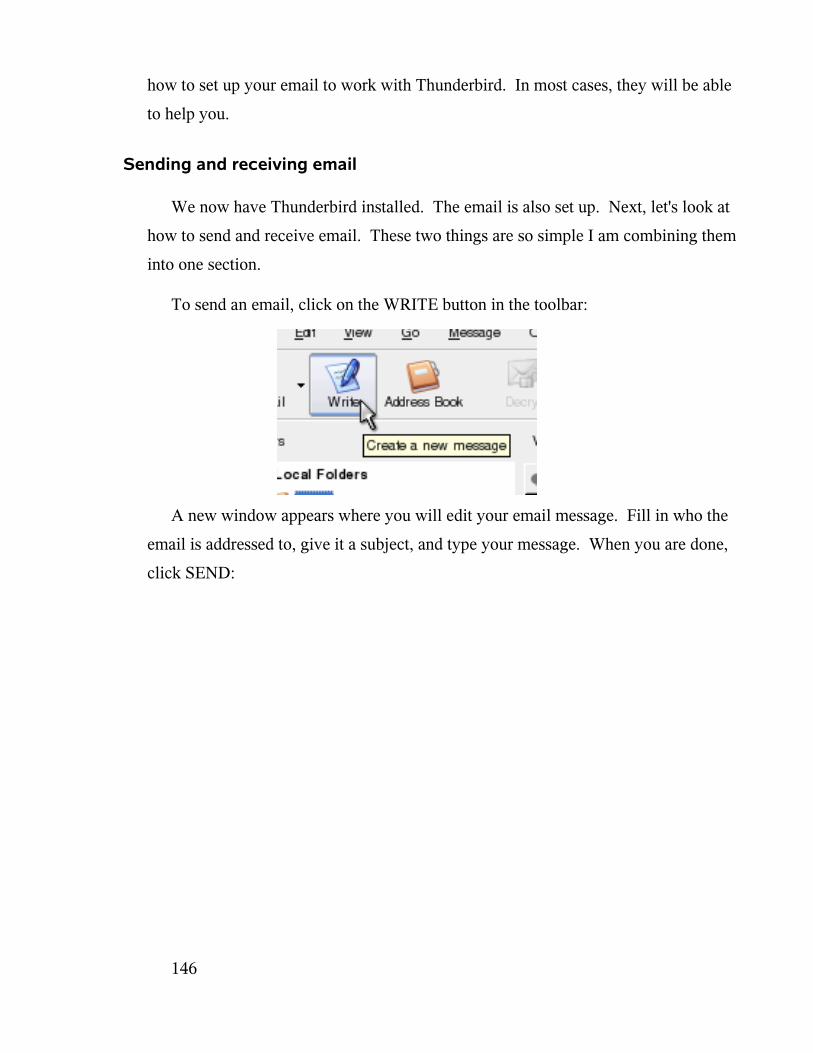
how to set up your email to work with Thunderbird. In most cases, they will be able
to help you.
Sending and receiving email
We now have Thunderbird installed. The email is also set up. Next, let's look at
how to send and receive email. These two things are so simple I am combining them
into one section.
To send an email, click on the WRITE button in the toolbar:
A new window appears where you will edit your email message. Fill in who the
email is addressed to, give it a subject, and type your message. When you are done,
click SEND:
146
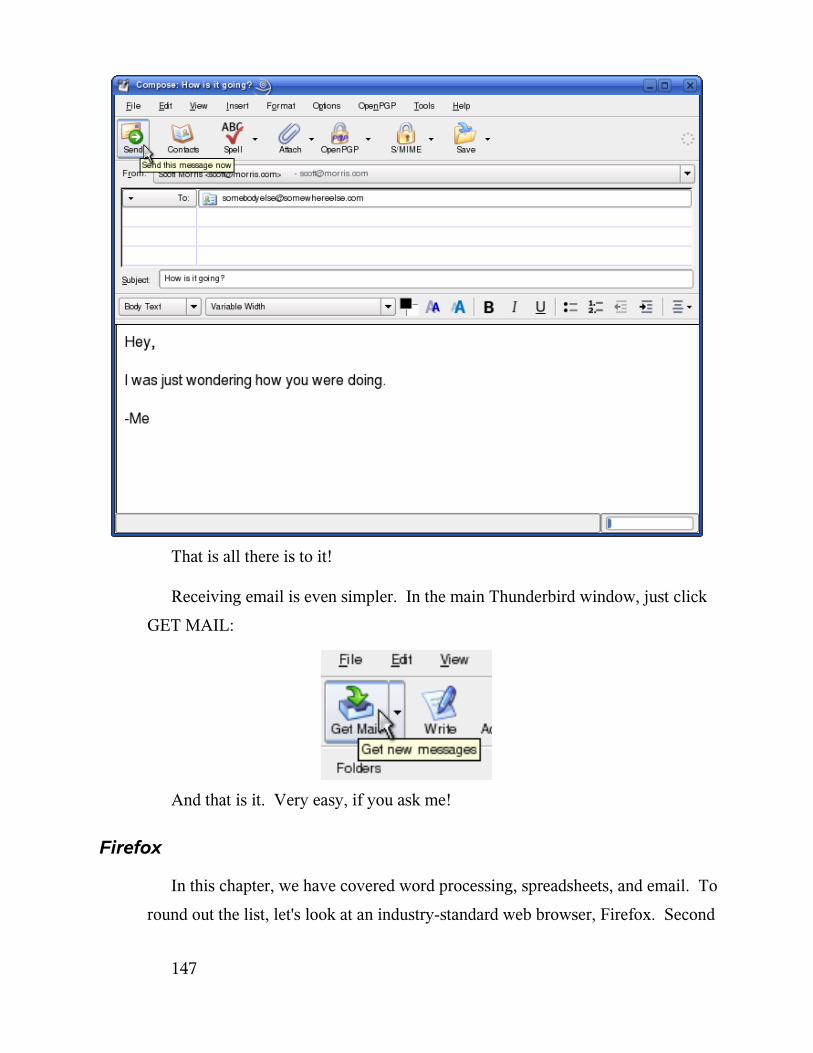
That is all there is to it!
Receiving email is even simpler. In the main Thunderbird window, just click
GET MAIL:
And that is it. Very easy, if you ask me!
Firefox
In this chapter, we have covered word processing, spreadsheets, and email. To
round out the list, let's look at an industry-standard web browser, Firefox. Second
147
only to Microsoft's Internet Explorer, Firefox boasts a huge number of users. This is
perhaps due to the incredible security it offers its users. Internet Explorer has
become known for its security problems. It allows spyware, adware, and other
unwanted applications to install themselves without any help from the user! Firefox
does not do this. This is one of the reasons that I would like to recommend it here.
The first thing to do is make sure that it is installed using the same method we
have before using the instructions I provided earlier in this book. The package you
need to have installed is called "MozillaFirefox." You may find that it is already
installed.
148
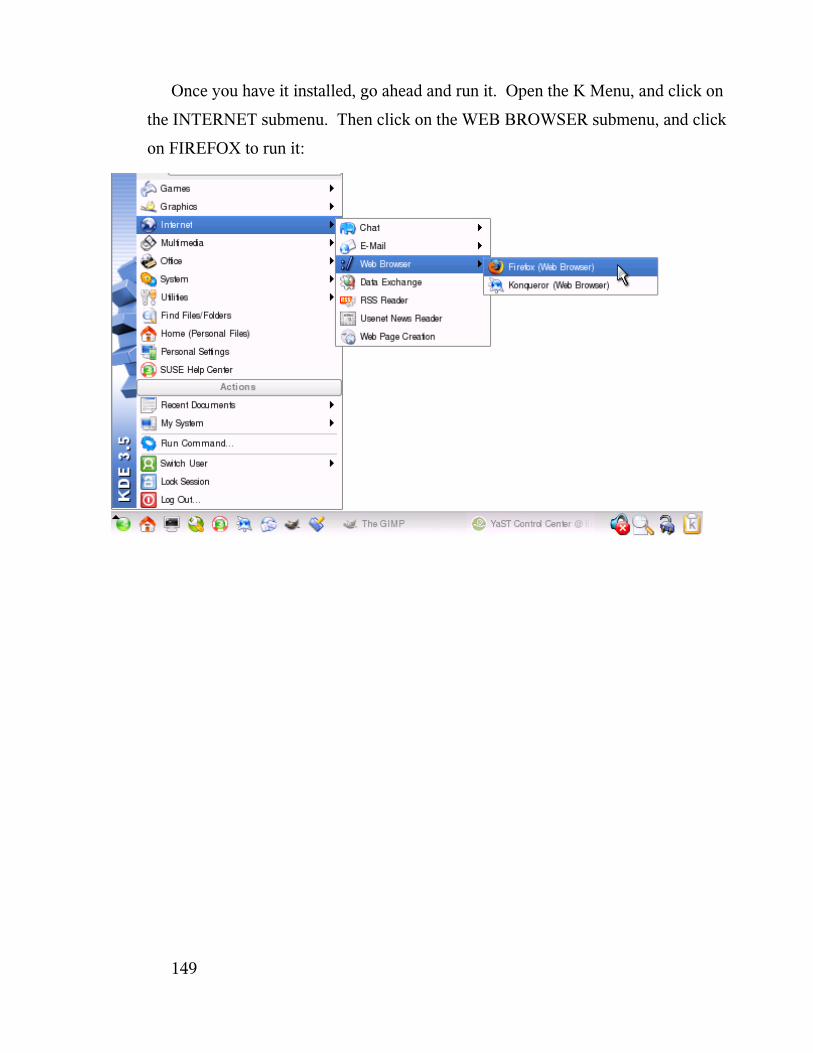
Once you have it installed, go ahead and run it. Open the K Menu, and click on
the INTERNET submenu. Then click on the WEB BROWSER submenu, and click
on FIREFOX to run it:
149
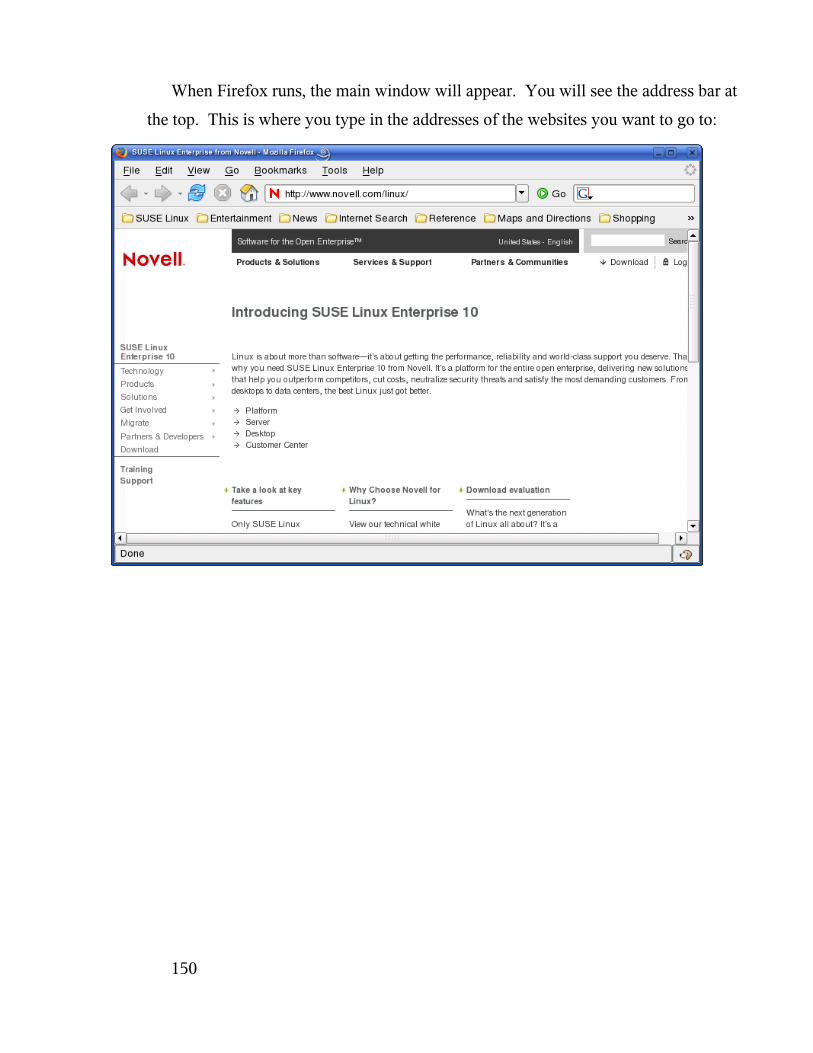
When Firefox runs, the main window will appear. You will see the address bar at
the top. This is where you type in the addresses of the websites you want to go to:
150
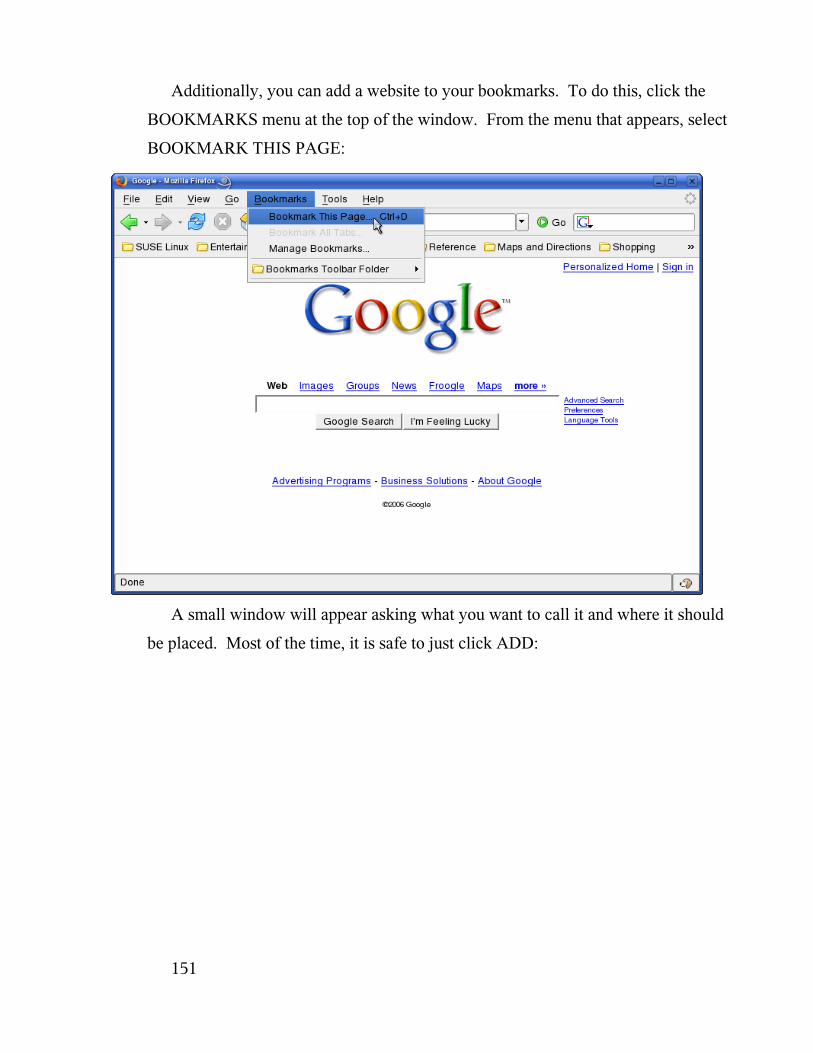
Additionally, you can add a website to your bookmarks. To do this, click the
BOOKMARKS menu at the top of the window. From the menu that appears, select
BOOKMARK THIS PAGE:
A small window will appear asking what you want to call it and where it should
be placed. Most of the time, it is safe to just click ADD:
151
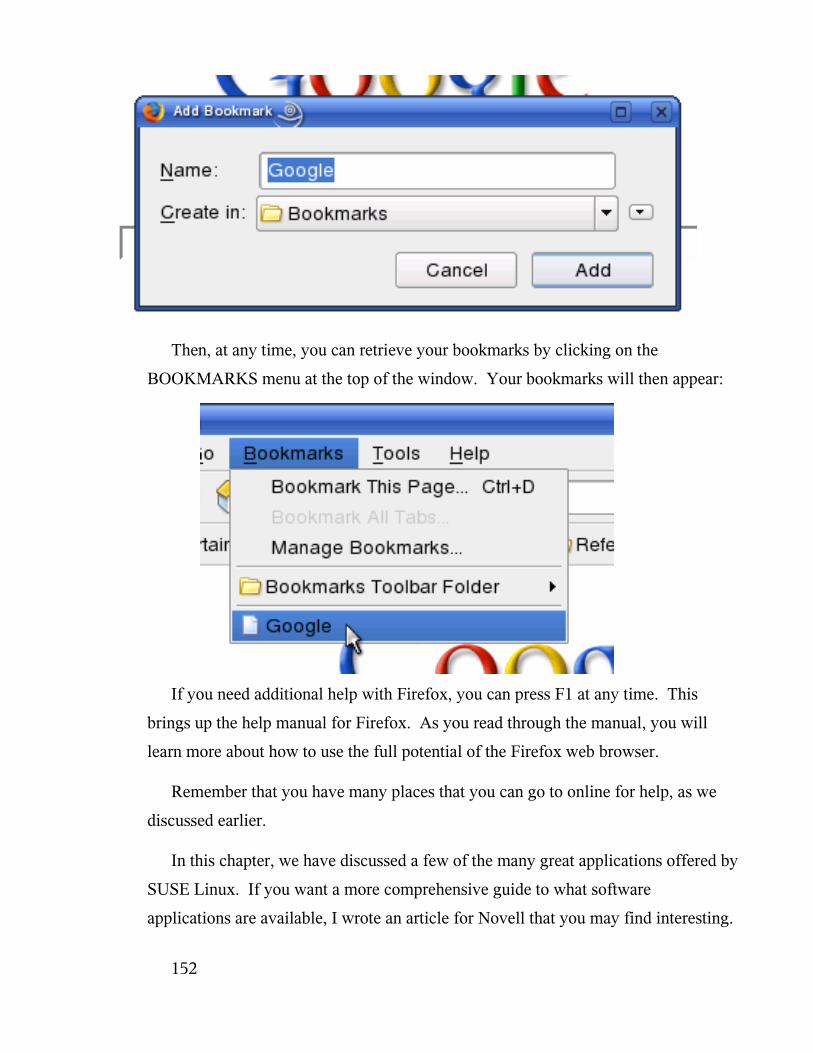
Then, at any time, you can retrieve your bookmarks by clicking on the
BOOKMARKS menu at the top of the window. Your bookmarks will then appear:
If you need additional help with Firefox, you can press F1 at any time. This
brings up the help manual for Firefox. As you read through the manual, you will
learn more about how to use the full potential of the Firefox web browser.
Remember that you have many places that you can go to online for help, as we
discussed earlier.
In this chapter, we have discussed a few of the many great applications offered by
SUSE Linux. If you want a more comprehensive guide to what software
applications are available, I wrote an article for Novell that you may find interesting.
152
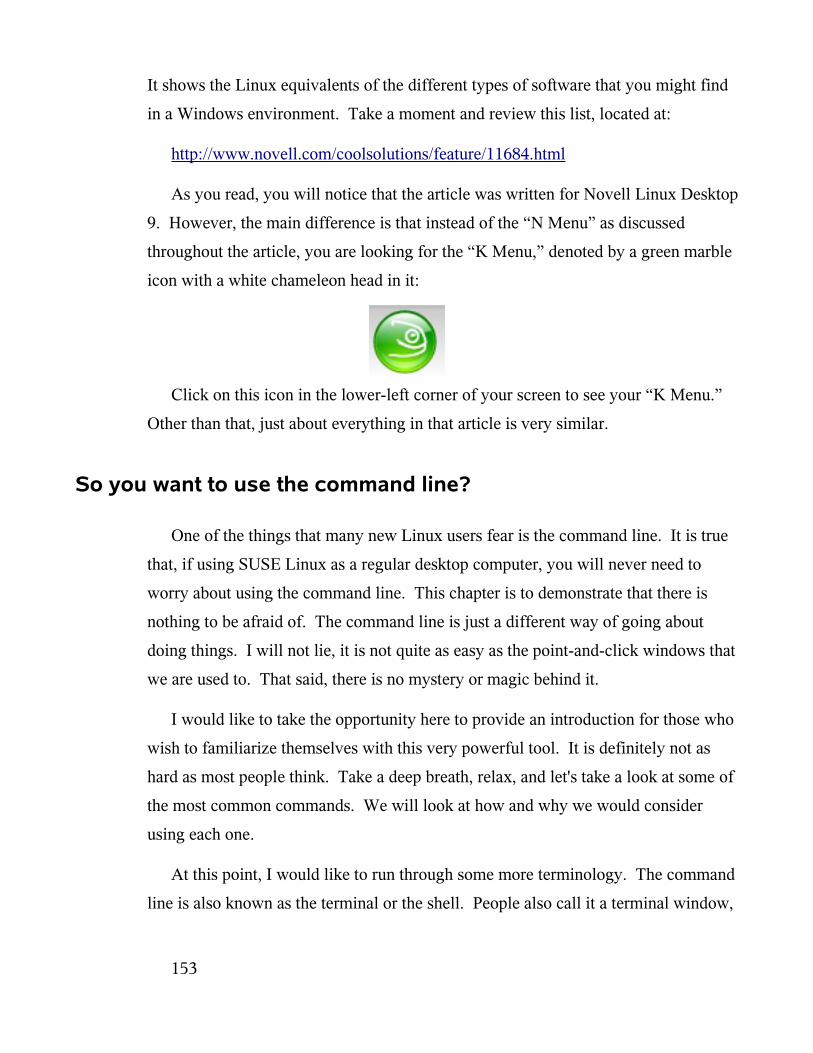
It shows the Linux equivalents of the different types of software that you might find
in a Windows environment. Take a moment and review this list, located at:
http://www.novell.com/coolsolutions/feature/11684.html
As you read, you will notice that the article was written for Novell Linux Desktop
9. However, the main difference is that instead of the “N Menu” as discussed
throughout the article, you are looking for the “K Menu,” denoted by a green marble
icon with a white chameleon head in it:
Click on this icon in the lower-left corner of your screen to see your “K Menu.”
Other than that, just about everything in that article is very similar.
So you want to use the command line?
One of the things that many new Linux users fear is the command line. It is true
that, if using SUSE Linux as a regular desktop computer, you will never need to
worry about using the command line. This chapter is to demonstrate that there is
nothing to be afraid of. The command line is just a different way of going about
doing things. I will not lie, it is not quite as easy as the point-and-click windows that
we are used to. That said, there is no mystery or magic behind it.
I would like to take the opportunity here to provide an introduction for those who
wish to familiarize themselves with this very powerful tool. It is definitely not as
hard as most people think. Take a deep breath, relax, and let's take a look at some of
the most common commands. We will look at how and why we would consider
using each one.
At this point, I would like to run through some more terminology. The command
line is also known as the terminal or the shell. People also call it a terminal window,
153
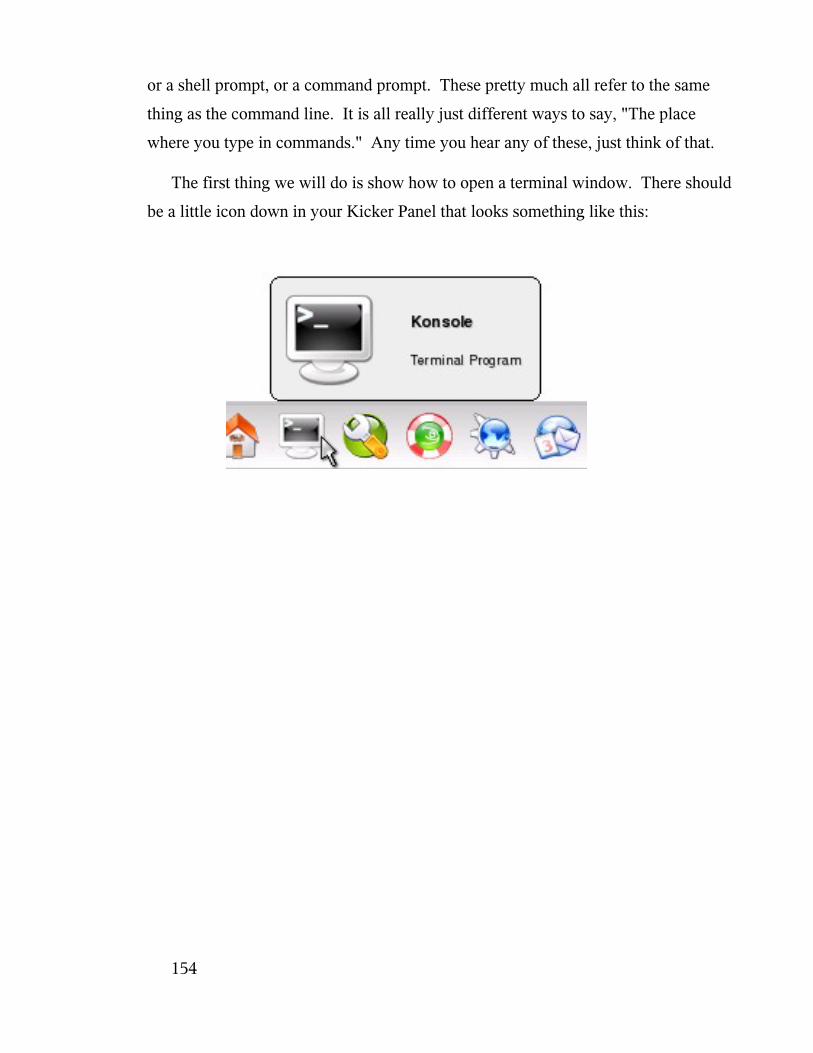
or a shell prompt, or a command prompt. These pretty much all refer to the same
thing as the command line. It is all really just different ways to say, "The place
where you type in commands." Any time you hear any of these, just think of that.
The first thing we will do is show how to open a terminal window. There should
be a little icon down in your Kicker Panel that looks something like this:
154
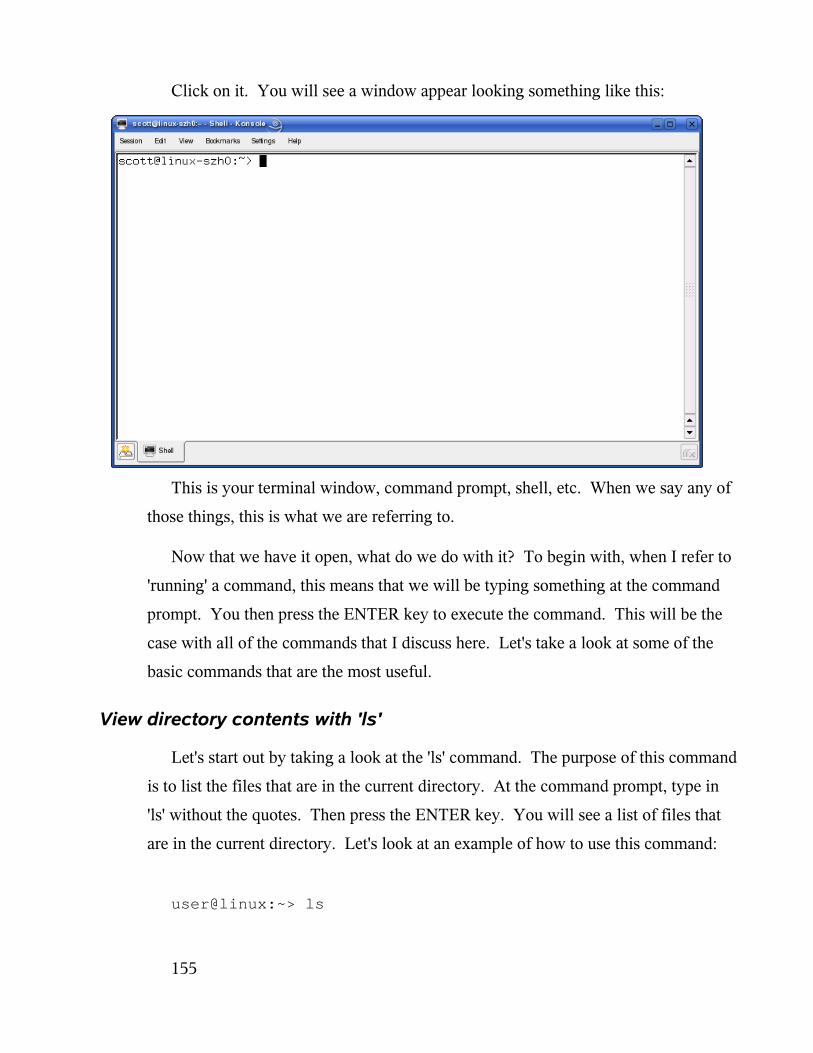
Click on it. You will see a window appear looking something like this:
This is your terminal window, command prompt, shell, etc. When we say any of
those things, this is what we are referring to.
Now that we have it open, what do we do with it? To begin with, when I refer to
'running' a command, this means that we will be typing something at the command
prompt. You then press the ENTER key to execute the command. This will be the
case with all of the commands that I discuss here. Let's take a look at some of the
basic commands that are the most useful.
View directory contents with 'ls'
Let's start out by taking a look at the 'ls' command. The purpose of this command
is to list the files that are in the current directory. At the command prompt, type in
'ls' without the quotes. Then press the ENTER key. You will see a list of files that
are in the current directory. Let's look at an example of how to use this command:
user@linux:~> ls
155
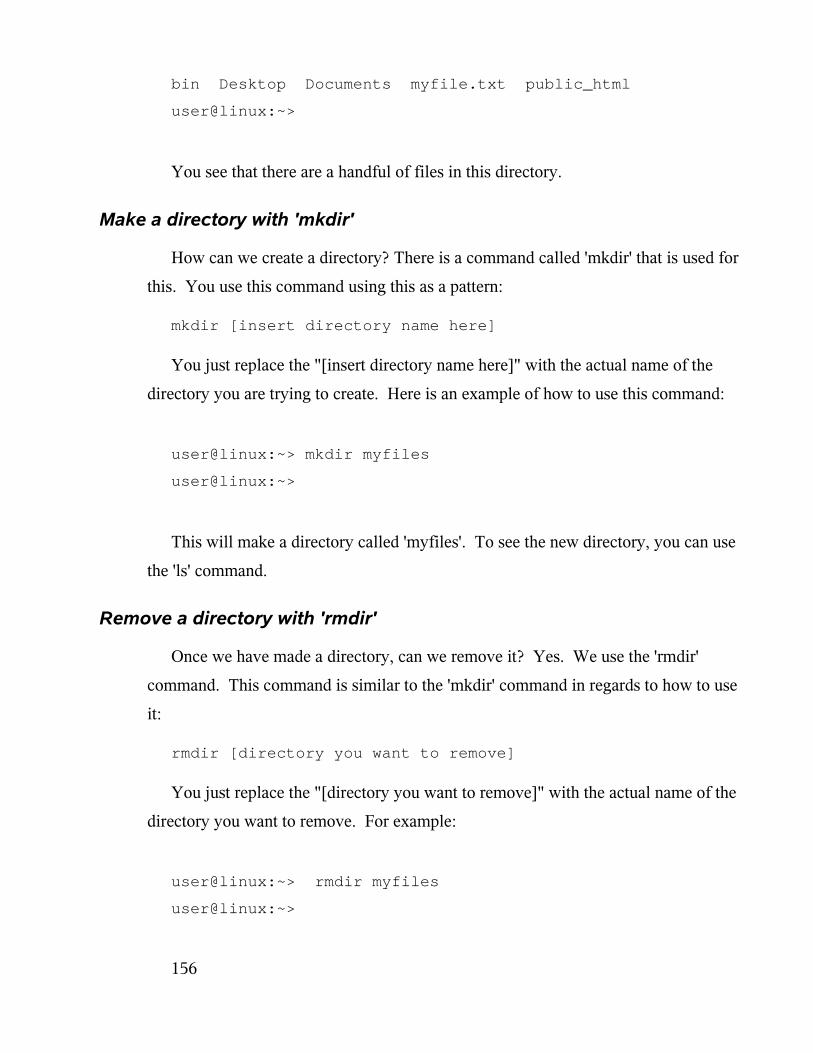
bin Desktop Documents myfile.txt public_html
user@linux:~>
You see that there are a handful of files in this directory.
Make a directory with 'mkdir'
How can we create a directory? There is a command called 'mkdir' that is used for
this. You use this command using this as a pattern:
mkdir [insert directory name here]
You just replace the "[insert directory name here]" with the actual name of the
directory you are trying to create. Here is an example of how to use this command:
user@linux:~> mkdir myfiles
user@linux:~>
This will make a directory called 'myfiles'. To see the new directory, you can use
the 'ls' command.
Remove a directory with 'rmdir'
Once we have made a directory, can we remove it? Yes. We use the 'rmdir'
command. This command is similar to the 'mkdir' command in regards to how to use
it:
rmdir [directory you want to remove]
You just replace the "[directory you want to remove]" with the actual name of the
directory you want to remove. For example:
user@linux:~> rmdir myfiles
user@linux:~>
156
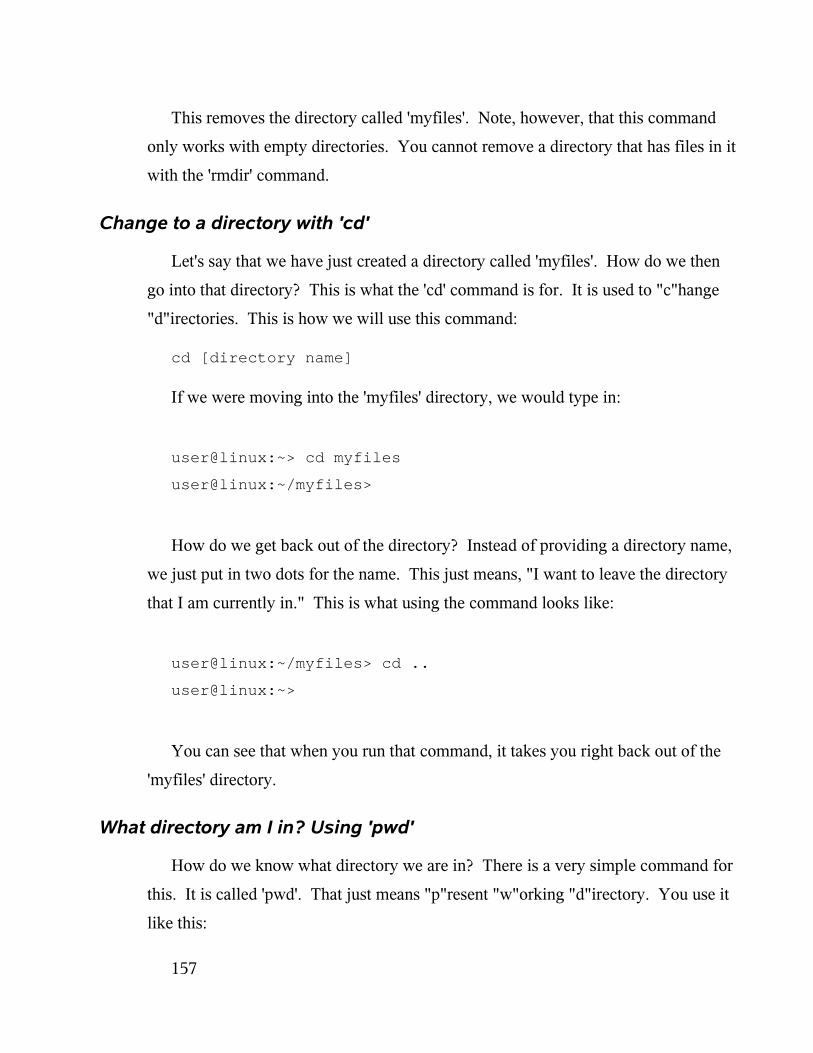
This removes the directory called 'myfiles'. Note, however, that this command
only works with empty directories. You cannot remove a directory that has files in it
with the 'rmdir' command.
Change to a directory with 'cd'
Let's say that we have just created a directory called 'myfiles'. How do we then
go into that directory? This is what the 'cd' command is for. It is used to "c"hange
"d"irectories. This is how we will use this command:
cd [directory name]
If we were moving into the 'myfiles' directory, we would type in:
user@linux:~> cd myfiles
user@linux:~/myfiles>
How do we get back out of the directory? Instead of providing a directory name,
we just put in two dots for the name. This just means, "I want to leave the directory
that I am currently in." This is what using the command looks like:
user@linux:~/myfiles> cd ..
user@linux:~>
You can see that when you run that command, it takes you right back out of the
'myfiles' directory.
What directory am I in? Using 'pwd'
How do we know what directory we are in? There is a very simple command for
this. It is called 'pwd'. That just means "p"resent "w"orking "d"irectory. You use it
like this:
157
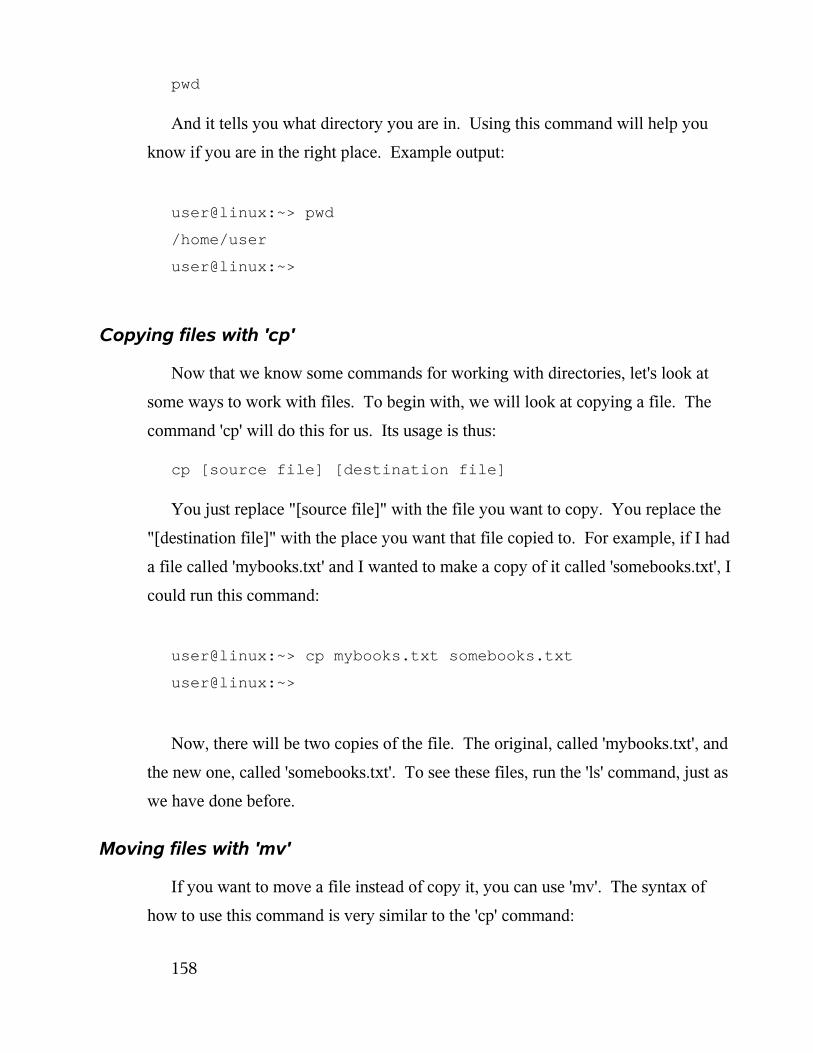
pwd
And it tells you what directory you are in. Using this command will help you
know if you are in the right place. Example output:
user@linux:~> pwd
/home/user
user@linux:~>
Copying files with 'cp'
Now that we know some commands for working with directories, let's look at
some ways to work with files. To begin with, we will look at copying a file. The
command 'cp' will do this for us. Its usage is thus:
cp [source file] [destination file]
You just replace "[source file]" with the file you want to copy. You replace the
"[destination file]" with the place you want that file copied to. For example, if I had
a file called 'mybooks.txt' and I wanted to make a copy of it called 'somebooks.txt', I
could run this command:
user@linux:~> cp mybooks.txt somebooks.txt
user@linux:~>
Now, there will be two copies of the file. The original, called 'mybooks.txt', and
the new one, called 'somebooks.txt'. To see these files, run the 'ls' command, just as
we have done before.
Moving files with 'mv'
If you want to move a file instead of copy it, you can use 'mv'. The syntax of
how to use this command is very similar to the 'cp' command:
158
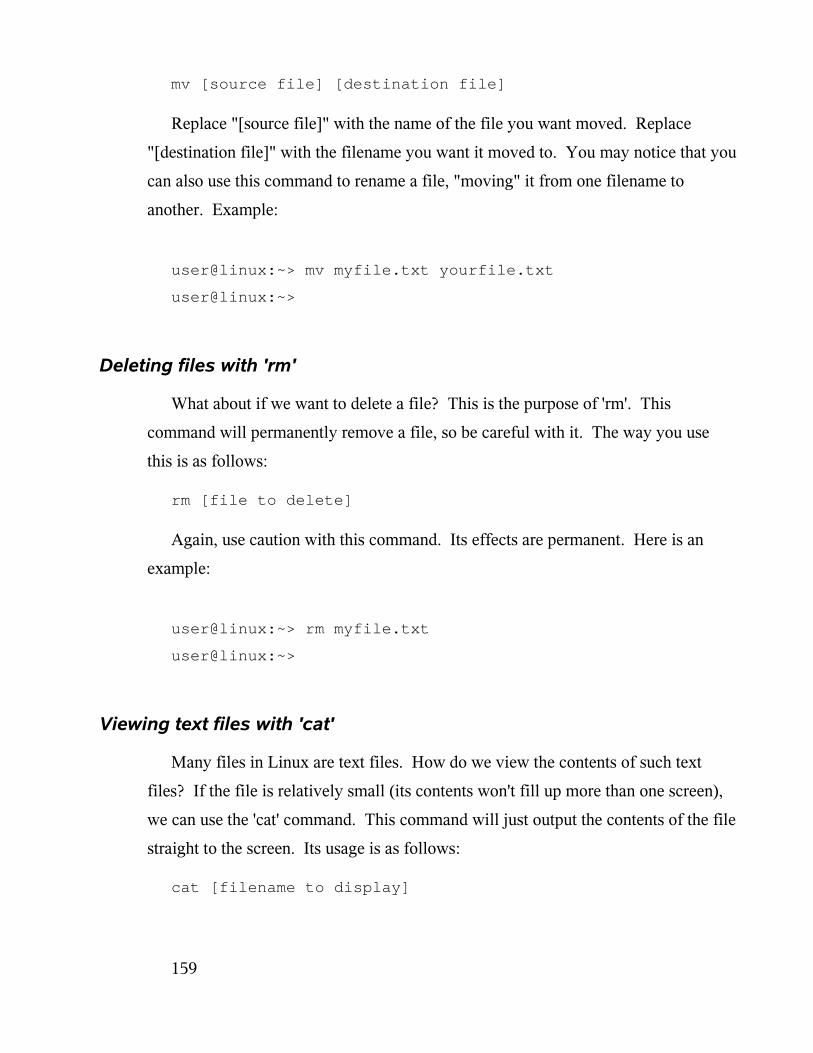
mv [source file] [destination file]
Replace "[source file]" with the name of the file you want moved. Replace
"[destination file]" with the filename you want it moved to. You may notice that you
can also use this command to rename a file, "moving" it from one filename to
another. Example:
user@linux:~> mv myfile.txt yourfile.txt
user@linux:~>
Deleting files with 'rm'
What about if we want to delete a file? This is the purpose of 'rm'. This
command will permanently remove a file, so be careful with it. The way you use
this is as follows:
rm [file to delete]
Again, use caution with this command. Its effects are permanent. Here is an
example:
user@linux:~> rm myfile.txt
user@linux:~>
Viewing text files with 'cat'
Many files in Linux are text files. How do we view the contents of such text
files? If the file is relatively small (its contents won't fill up more than one screen),
we can use the 'cat' command. This command will just output the contents of the file
straight to the screen. Its usage is as follows:
cat [filename to display]
159
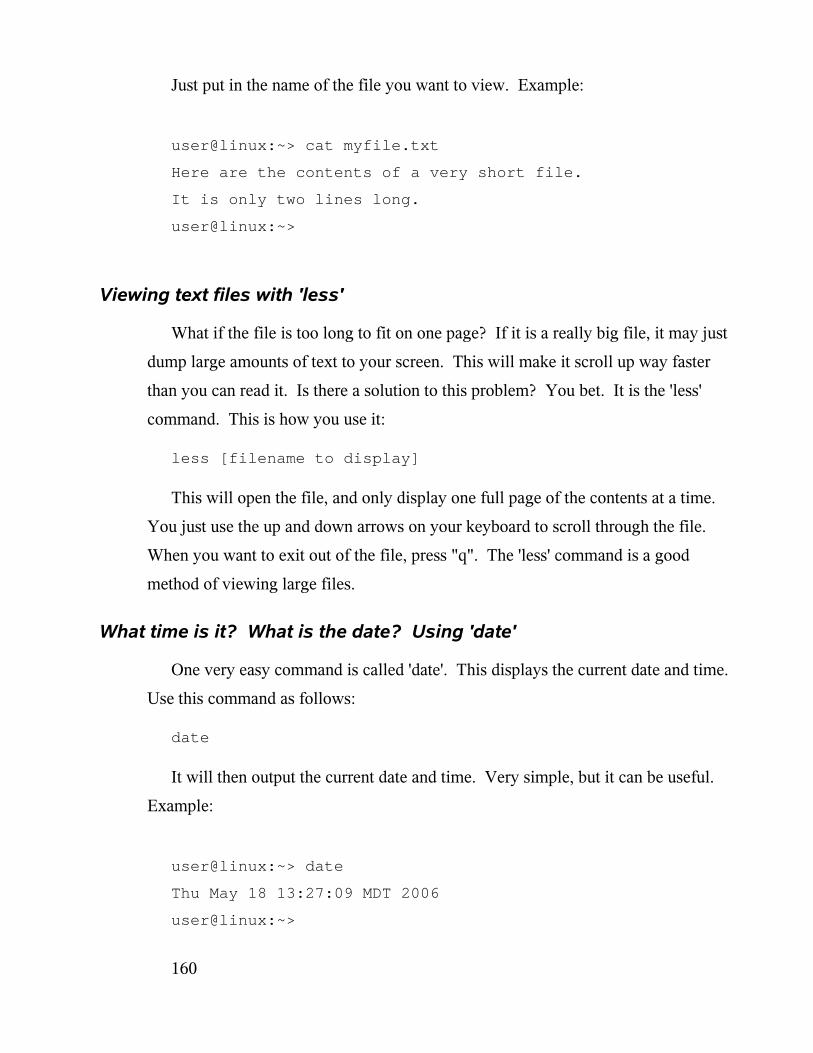
Just put in the name of the file you want to view. Example:
user@linux:~> cat myfile.txt
Here are the contents of a very short file.
It is only two lines long.
user@linux:~>
Viewing text files with 'less'
What if the file is too long to fit on one page? If it is a really big file, it may just
dump large amounts of text to your screen. This will make it scroll up way faster
than you can read it. Is there a solution to this problem? You bet. It is the 'less'
command. This is how you use it:
less [filename to display]
This will open the file, and only display one full page of the contents at a time.
You just use the up and down arrows on your keyboard to scroll through the file.
When you want to exit out of the file, press "q". The 'less' command is a good
method of viewing large files.
What time is it? What is the date? Using 'date'
One very easy command is called 'date'. This displays the current date and time.
Use this command as follows:
date
It will then output the current date and time. Very simple, but it can be useful.
Example:
user@linux:~> date
Thu May 18 13:27:09 MDT 2006
user@linux:~>
160
Using 'man' to find help
In addition to these commands, I would like to share another way to learn about
them. There is one last command I want to share with you. Sometimes, you will run
into a situation where you may need some help learning how to use a particular
command. Fortunately, there is a help system built into Linux which can assist you
with this. It is the 'man' command, which displays help on using other commands.
To use 'man', the following is the syntax:
man [command]
If I wanted help with the 'date' command, I might run:
man date
A bunch of information then appears on the screen. Like the 'less' command, you
can use the up and down arrows on your keyboard to scroll through the page. Press
'q' when you want to quit.
The 'man' command can be used to display help on almost all commands that you
will ever use. As a side-note, when you ask other, more seasoned Linux users for
help, they will almost always ask you if you read the "man page." This is the 'man'
command that I have just shown you. It is a good idea to make a habit of using 'man'
to learn about new commands. In the beginning, they will feel a little cryptic to you.
Don't let that deter you. You will get more used to them as time goes on.
The command line can be a very powerful tool. There are thousands of
incredible commands available for use in the terminal window. As you get more
familiar with Linux, you may wish to learn more about this amazing tool. If not,
don't worry. Mastery of the command line is no longer a requirement for using
Linux. Learn it at your leisure.
161
Conclusion
There is quite a new world available to you when you decide to try out Linux.
Gone are the days where you have to obsess about viruses, spyware, and all the
definition updates that go with them. It will require a bit of time and a little patience.
With a little effort, you will be cruising through your new operating system with
ease. You should now be familiar with how to get Linux, how to install it, how to
install software, and what software to use for your basic needs.
The purpose of this book has been to introduce a somewhat adept Windows user
into the world of Linux. Many of the concepts of how to use an operating system
carry over to Linux.
If you have found this book to be helpful, come by and visit. If there's something
that I can improve, please provide feedback so that I can make it better. My Linux
blog, also the home of this book, is located at: http://www.suseblog.com/ .
Come on by, visit me, leave comments or flame me. I'd like to have your
feedback, which you can leave at http://www.suseblog.com/ph33db4ck.php . As
always, good luck with your Linux endeavors.
162

![Using the EE 109 Toolsbytes.usc.edu/files/ee109/old/slides/EE109_ToolChain.pdf5 Emacs Quick Reference [Mac/Linux] • Emacs uses the keyboard for all editing commands. • Easiest](https://img.pdfslide.us/doc/110x75/5e0aff06c2158a79e1524245/using-the-ee-109-emacs-quick-reference-maclinux-a-emacs-uses-the-keyboard-for.jpg)