Embed Size (px)
Citation preview
DSLR ASTROPHOTOGRAPHYAuthor’s unpublished manuscript – March 7, 2007c© 2007 Michael A. Covington, 285 Saint George Drive, Athens, GA 30606 USA
Protected by copyright law. Do not copy without permission.
Chapter 1
The DSLR Revolution
A few years ago, I said that if somebody would manufacture a digital SLRcamera (DSLR) that would sell for under $1000 and would work as well asfilm for astrophotography, I’d have to buy one.
That happened in 2004. The Canon Digital Rebel and Nikon D70 took theworld by storm, not only for daytime photography but also for astronomy.Within two years, many other low-cost DSLRs appeared on the market,and film astrophotographers switched to DSLRs en masse.
There had been DSLRs since 1995 or so, but Canon’s and Nikon’s 2004models were the first that worked well for astronomical photography.Earlier digital cameras produced noisy, speckled images in long exposuresof celestial objects. Current DSLRs work so well that, for non-criticalwork, you almost don’t need any digital image processing at all — just usethe picture as it comes out of the camera (Fig. 1.1). The results aren’tperfect, but they’re better than we often got with film.
As you move past the beginner stage, you can do just as much computercontrol and image enhancement with a DSLR as with an astronomicalCCD camera. Some hobbyists bring a laptop computer into the field andrun their DSLR under continuous computer control. Others, including me,prefer to use the camera without a computer and do all the computerwork indoors later.
17
DSLR ASTROPHOTOGRAPHYAuthor’s unpublished manuscript – March 7, 2007c© 2007 Michael A. Covington, 285 Saint George Drive, Athens, GA 30606 USA
Protected by copyright law. Do not copy without permission.
1.2. CHOOSING A DSLR
1.2.2 Shopping strategy
Because of rapid technological progress, you generally want the newestDSLR that works well for astrophotography, not the most ruggedly builtone. It’s better to buy a low-end DSLR today and another one in threeyears with a new, improved sensor, rather than sink all your money into aprofessional-grade camera that will commit you to using today’stechnology for a decade.
Of course, if you can justify the expense for other reasons, go ahead andenjoy your Canon EOS 5D or Nikon D200; these cameras have big, brightviewfinders and are a joy to use. Apart from price, one disadvantage ofpro-grade DSLRs is that they are heavy enough to unbalance amedium-sized amateur telescope. Another is that pro-grade cameras aremore complicated to operate, and that can be a problem in the dark.Generally, professional cameras are designed for people who use them allthe time and can easily remember a large number of controls. Entry-levelcameras with simpler controls are easier to use, even for advanced work,as long as they have the features needed.
You don’t have to have the best camera on the market in order to get goodpictures. You just have to have a camera that is good enough. Allastronomical instruments, including big observatory telescopes, havemeasurable limitations. We work so close to the limits of the laws ofphysics that perfection is unobtainable.
Also, buying the very newest camera has some drawbacks. This week’shot new DSLR may not yet be supported by your software, althoughupdates usually come quickly. It also may not have fully debuggedfirmware (the software inside the camera); watch the manufacturer’s website for firmware upgrades.
One last warning. Unreliable camera vendors are common on the Internet,and they often advertise impossibly low prices. Before dealing with astranger, do some searching and find out whether others have had goodexperiences with the same merchant. You can find out the reputation of avendor from www.epinions.com and www.resellerratings.com. Rememberthat even the best large-volume dealer has a few unsatisfied customers,and a “perfect” score may mean simply that not many customers havebeen surveyed.
Highly reliable camera dealers include B&H in New York
24
DSLR ASTROPHOTOGRAPHYAuthor’s unpublished manuscript – March 7, 2007c© 2007 Michael A. Covington, 285 Saint George Drive, Athens, GA 30606 USA
Protected by copyright law. Do not copy without permission.
2.1. IMAGE FILES
with large DSLR images. Regardless of what software you use, you’ll needa computer with ample RAM (at least 1 to 2 GB recommended) and anup-to-date operating system. Smaller astronomical CCDs work well witholder, smaller laptops, but DSLRs do not.
2.1.2 Raw vs. compressed files
Most digital photographs are saved in JPEG compressed format. Forastronomy, JPEG is not ideal because it is a “lossy” form of compression;low-contrast detail is discarded, and that may be exactly the detail youwant to preserve and enhance. What’s more, operations such asdark-frame subtraction rely on images that have not been disrupted bylossy compression.
For that reason, astrophotographers normally set the camera to produceraw images which record exactly the bits recorded by the image sensor (ornearly so; some in-camera corrections are performed before the raw imageis saved).
The term raw is not an abbreviation and need not be written in all capitalletters; it simply means “uncooked” (unprocessed). Filename extensionsfor raw images include .CRW and .CR2 (Canon Raw) and .NEF (NikonElectronic Format). Adobe (the maker of Photoshop) has proposed astandard raw format called .DNG (Digital Negative) and has starteddistributing a free software tool to convert other raw formats into it.
Raw images are compressed — their size varies with the complexity of theimage — but the compression is lossless or nearly so; the exact value ofevery pixel in the original image is recovered when the file is decoded inthe computer. Canon and Nikon raw images occupy about 1 megabyte permegapixel, varying with the complexity of the image. Uncompressed, a12-bit-deep color digital image would occupy 4.5 megabytes permegapixel.
2.1.3 “Digital film” and camera software
DSLRs record images on flash memory cards, sometimes called “digitalfilm.” Unlike real film, the choice of “digital film” doesn’t affect the picturequality at all; flash cards differ in capacity and speed, but they all recordexactly the same data and are error-checked during writing and reading.
32
DSLR ASTROPHOTOGRAPHYAuthor’s unpublished manuscript – March 7, 2007c© 2007 Michael A. Covington, 285 Saint George Drive, Athens, GA 30606 USA
Protected by copyright law. Do not copy without permission.
3.1. TAKING A PICTURE MANUALLY
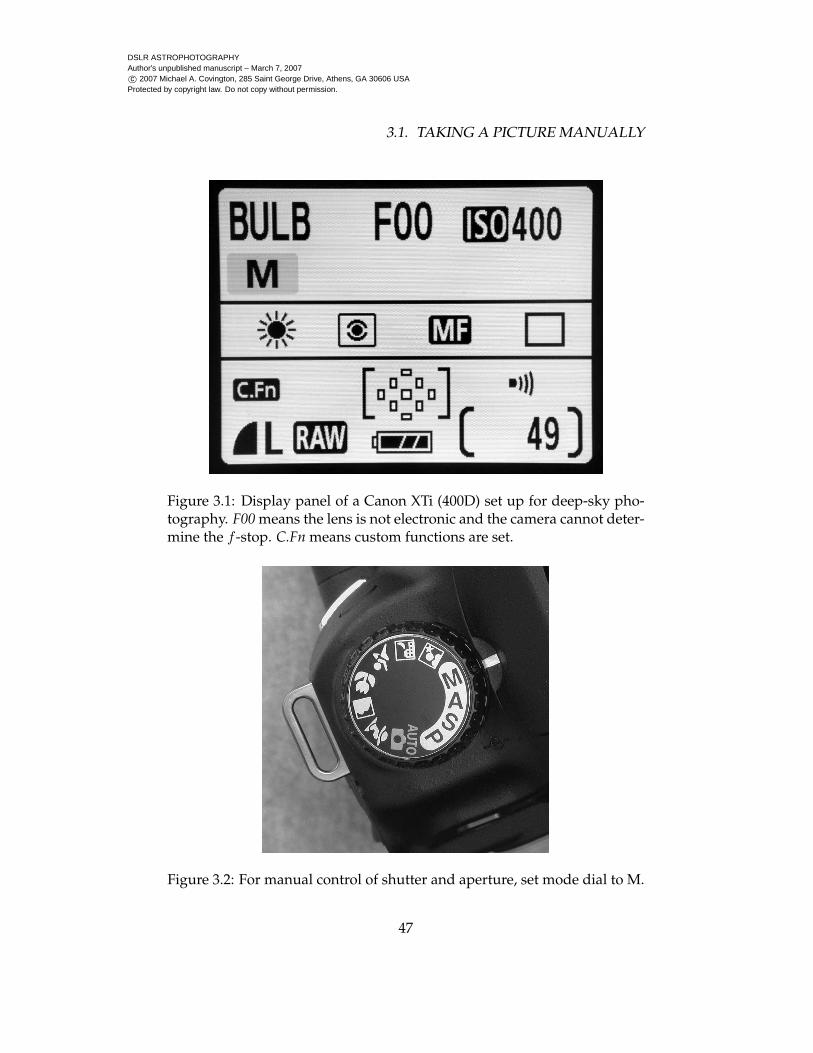
Figure 3.1: Display panel of a Canon XTi (400D) set up for deep-sky pho-tography. F00 means the lens is not electronic and the camera cannot deter-mine the f -stop. C.Fn means custom functions are set.
Figure 3.2: For manual control of shutter and aperture, set mode dial to M.
47
DSLR ASTROPHOTOGRAPHYAuthor’s unpublished manuscript – March 7, 2007c© 2007 Michael A. Covington, 285 Saint George Drive, Athens, GA 30606 USA
Protected by copyright law. Do not copy without permission.
3.4. MENU SETTINGS
High ISO NR: Normal. This is a Nikon setting that apparently improvespicture quality but does not affect the “star eater.”
Magnified View: Image Review and Playback. This is a Canon XTi(400D) setting that makes it easier for you evaluate focus right after takinga picture. With this option enabled, you don’t have to press B (“Play”) tomagnify the picture. You can press “Print” and “Magnify” together tostart magnifying the picture while it is still being displayed for review.
3.4.2 Settings for an astrophotography session
Picture Quality: Raw + JPEG. If the memory card has room, I like tohave the camera save each picture in both formats. Each file serves as abackup of the other, and the JPEG file contains exposure data that can beread by numerous software packages. This takes only 20% more spacethan storing raw images alone.
Review: Off. At an observing session with other people, you’ll want tominimize the amount of light emitted by your camera.
LCD Brightness: Low. In the dark, even the lowest setting will seemvery bright.
LCD Display When Power On: Off. On the Canon XTi (400D) andsimilar cameras that use their LCD screen to display camera settings, youprobably don’t want the display shining continuously at night. Instead,switch it on with the DISP button when you want to see it.
Auto Power Off: Never. You don’t want the camera turning itself offduring lulls in the action; at least, I don’t.
Long Exposure Noise Reduction: Your decision. If turned on, thisfeature will eliminate the hot pixels in your images by taking a dark frameimmediately after each picture and automatically subtracting it. This takes
57
DSLR ASTROPHOTOGRAPHYAuthor’s unpublished manuscript – March 7, 2007c© 2007 Michael A. Covington, 285 Saint George Drive, Athens, GA 30606 USA
Protected by copyright law. Do not copy without permission.
5.3. OPTICAL PARAMETERS
Camera
T-adapter
Telescope
T-adapter
Focal reducer,
optional
2 inches o.d.
24 threads per inchThreaded
42 x 0.75 mm
Meade SC
Accessory
Adapter
2-inch eyepiece
tube or Meade
microfocuser
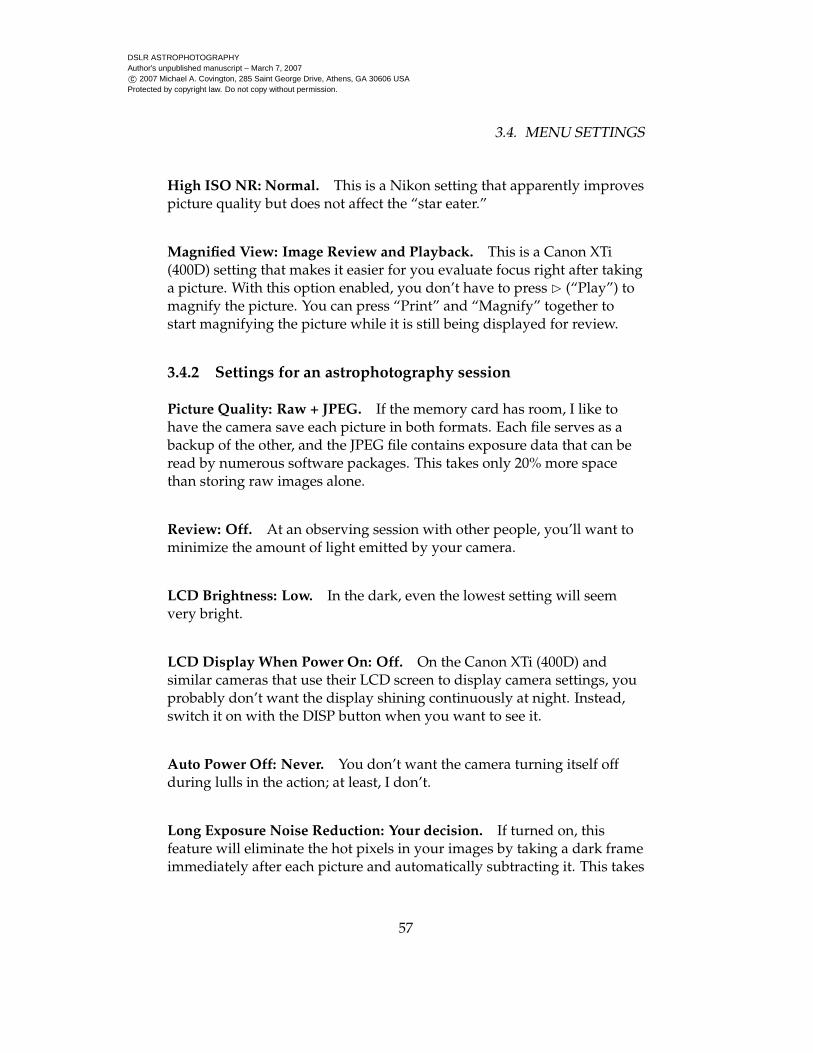
Figure 5.7: One way to use a Meade or Celestron focal reducer with a tele-scope that lacks a threaded rear cell, or with a 2-inch-diameter electric fo-cuser.
5.3 Optical parameters
5.3.1 Focal length
The focal length of a telescope or camera lens is a parameter thatdetermines the size of objects in the image (Fig. 5.8). In conjunction withthe film or sensor size, the focal length also determines the field of view.2
If your telescope is a refractor or Newtonian, the focal length is also thelength of the tube (the distance from the lens or mirror to the sensor orfilm). Technically, the focal length is the distance at which a simple lensforms an image of an infinitely distant object, such as a star.
2If you’re new to optical diagrams, you may wonder why Fig. 5.8 shows rays of lightspreading apart while Fig. 5.1 shows them coming together. The answer is that Fig. 5.1shows two rays from the same point on a distant object, but Fig. 5.8 shows one ray fromeach of two points some distance apart.
81
DSLR ASTROPHOTOGRAPHYAuthor’s unpublished manuscript – March 7, 2007c© 2007 Michael A. Covington, 285 Saint George Drive, Athens, GA 30606 USA
Protected by copyright law. Do not copy without permission.
7.5. LENS MOUNT ADAPTERS
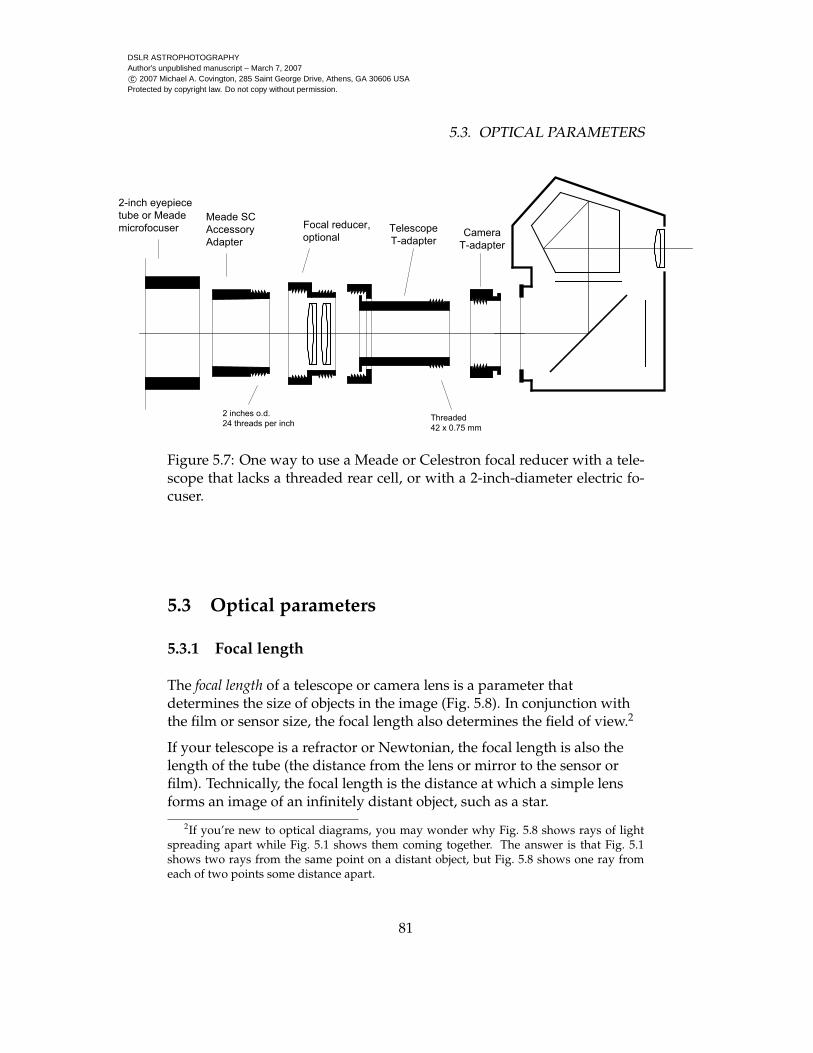
Figure 7.8: Result of using crosshairs in Fig. 7.7. Canon Digital Rebel (300D)at ISO 400, Sigma 105-mm f/2.8 lens wide open. Stack of five 3-minuteexposures of the North America Nebula, dark-frame subtracted, cropped.
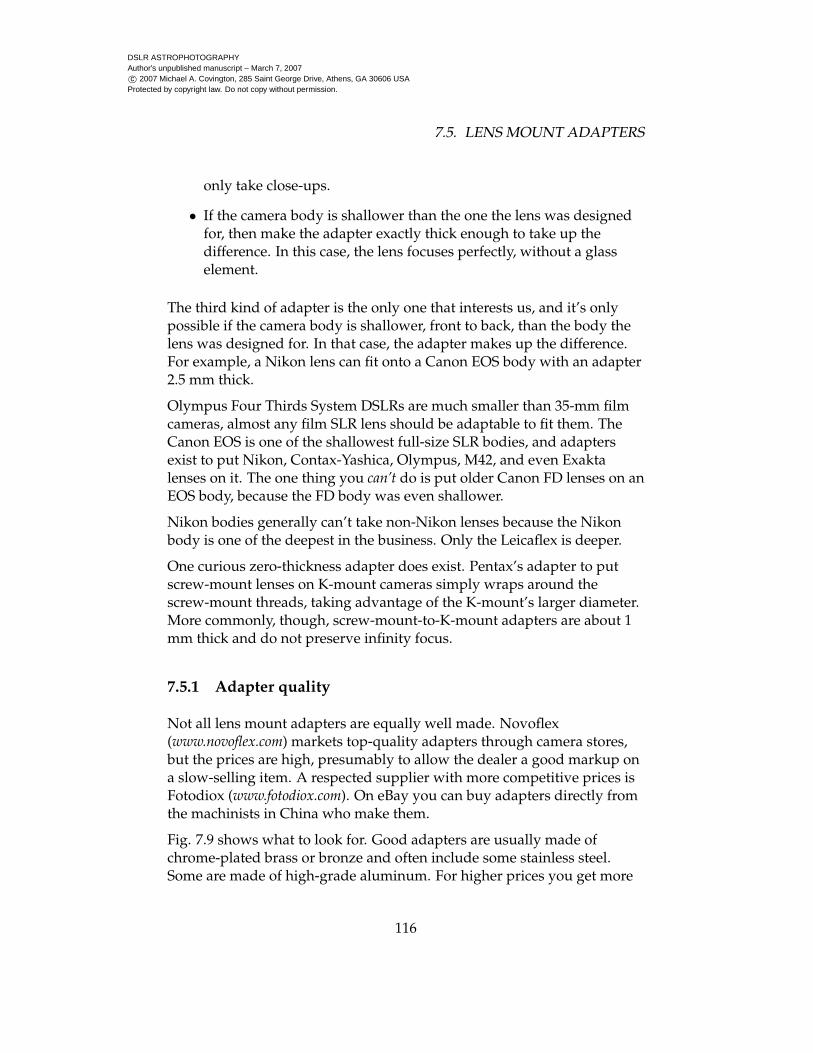
7.5 Lens mount adapters
Besides the ubiquitous T-ring, originally designed for a line of cheaptelephoto lenses, there are other adapters for putting one kind of lens ontoanother kind of camera body.
Obviously, any adapter has to contain a receptacle to fit the lens and aflange to fit the camera body. The trouble is, all of this takes up space,placing the lens farther from the film or sensor than it was designed to be.There are three ways to deal with this problem:
• Add a glass element (typically a 1.2× Barlow lens) so that the lenswill still focus correctly. This is a common practice but degrades theimage quality.
• Leave out the glass element and give up the ability to focus oninfinity. The adapter is now a short extension tube and the lens can
115
DSLR ASTROPHOTOGRAPHYAuthor’s unpublished manuscript – March 7, 2007c© 2007 Michael A. Covington, 285 Saint George Drive, Athens, GA 30606 USA
Protected by copyright law. Do not copy without permission.
7.5. LENS MOUNT ADAPTERS
only take close-ups.
• If the camera body is shallower than the one the lens was designedfor, then make the adapter exactly thick enough to take up thedifference. In this case, the lens focuses perfectly, without a glasselement.
The third kind of adapter is the only one that interests us, and it’s onlypossible if the camera body is shallower, front to back, than the body thelens was designed for. In that case, the adapter makes up the difference.For example, a Nikon lens can fit onto a Canon EOS body with an adapter2.5 mm thick.
Olympus Four Thirds System DSLRs are much smaller than 35-mm filmcameras, almost any film SLR lens should be adaptable to fit them. TheCanon EOS is one of the shallowest full-size SLR bodies, and adaptersexist to put Nikon, Contax-Yashica, Olympus, M42, and even Exaktalenses on it. The one thing you can’t do is put older Canon FD lenses on anEOS body, because the FD body was even shallower.
Nikon bodies generally can’t take non-Nikon lenses because the Nikonbody is one of the deepest in the business. Only the Leicaflex is deeper.
One curious zero-thickness adapter does exist. Pentax’s adapter to putscrew-mount lenses on K-mount cameras simply wraps around thescrew-mount threads, taking advantage of the K-mount’s larger diameter.More commonly, though, screw-mount-to-K-mount adapters are about 1mm thick and do not preserve infinity focus.
7.5.1 Adapter quality
Not all lens mount adapters are equally well made. Novoflex(www.novoflex.com) markets top-quality adapters through camera stores,but the prices are high, presumably to allow the dealer a good markup ona slow-selling item. A respected supplier with more competitive prices isFotodiox (www.fotodiox.com). On eBay you can buy adapters directly fromthe machinists in China who make them.
Fig. 7.9 shows what to look for. Good adapters are usually made ofchrome-plated brass or bronze and often include some stainless steel.Some are made of high-grade aluminum. For higher prices you get more
116
DSLR ASTROPHOTOGRAPHYAuthor’s unpublished manuscript – March 7, 2007c© 2007 Michael A. Covington, 285 Saint George Drive, Athens, GA 30606 USA
Protected by copyright law. Do not copy without permission.
8.2. LCD FOCUSING
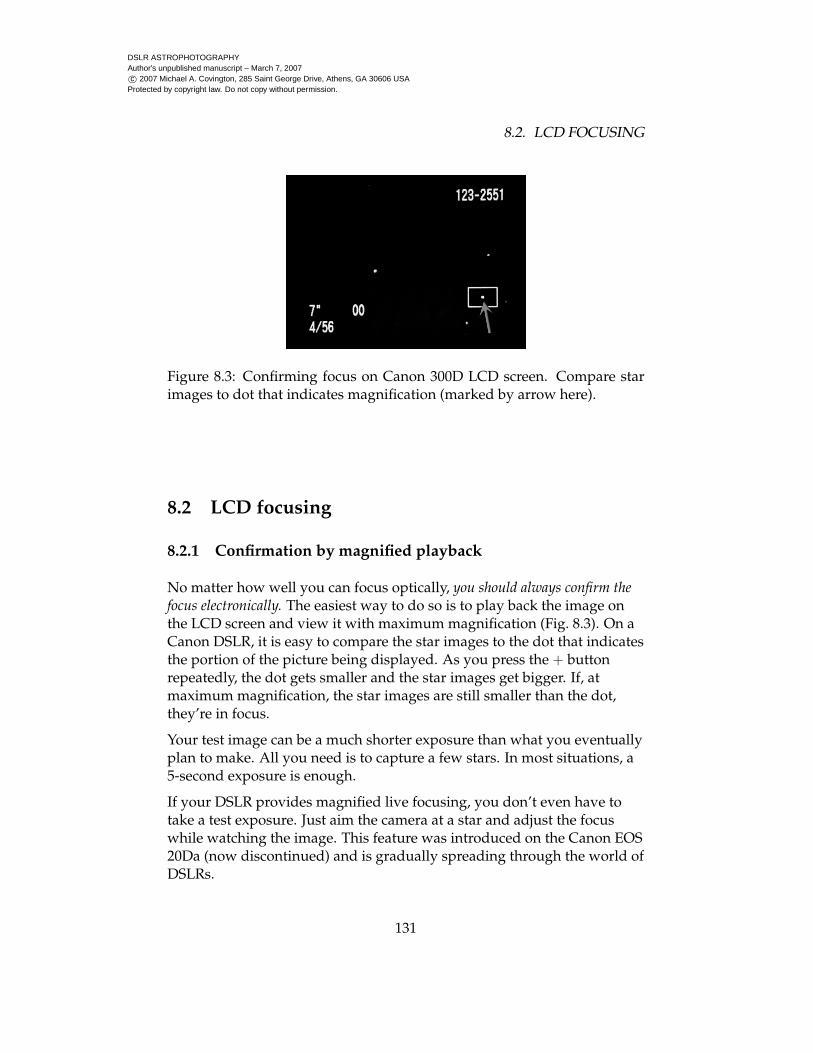
Figure 8.3: Confirming focus on Canon 300D LCD screen. Compare starimages to dot that indicates magnification (marked by arrow here).
8.2 LCD focusing
8.2.1 Confirmation by magnified playback
No matter how well you can focus optically, you should always confirm thefocus electronically. The easiest way to do so is to play back the image onthe LCD screen and view it with maximum magnification (Fig. 8.3). On aCanon DSLR, it is easy to compare the star images to the dot that indicatesthe portion of the picture being displayed. As you press the + buttonrepeatedly, the dot gets smaller and the star images get bigger. If, atmaximum magnification, the star images are still smaller than the dot,they’re in focus.
Your test image can be a much shorter exposure than what you eventuallyplan to make. All you need is to capture a few stars. In most situations, a5-second exposure is enough.
If your DSLR provides magnified live focusing, you don’t even have totake a test exposure. Just aim the camera at a star and adjust the focuswhile watching the image. This feature was introduced on the Canon EOS20Da (now discontinued) and is gradually spreading through the world ofDSLRs.
131

DSLR ASTROPHOTOGRAPHYAuthor’s unpublished manuscript – March 7, 2007c© 2007 Michael A. Covington, 285 Saint George Drive, Athens, GA 30606 USA
Protected by copyright law. Do not copy without permission.
9.1. TWO WAYS TO TRACK THE STARS
Figure 9.2: Tracking the stars with an altazimuth mount causes field rota-tion, which can be overcome by taking very short exposures and doing arotate-and-stack. (From How to Use a Computerized Telescope.)
141
DSLR ASTROPHOTOGRAPHYAuthor’s unpublished manuscript – March 7, 2007c© 2007 Michael A. Covington, 285 Saint George Drive, Athens, GA 30606 USA
Protected by copyright law. Do not copy without permission.
9.2. THE RULES HAVE CHANGED
9.2 The rules have changed
The rules of the tracking and guiding game are not what they used to be.In the film era, the telescope had to track perfectly for 20 or 30 minutes at atime. Only equatorial mounts could be used because an altazimuth mountcan only go a minute or two without excessive field rotation. Guidingcorrections had to be made constantly, either by an autoguider or by ahuman being constantly watching a star and pressing buttons to keep itcentered on the crosshairs. One slip and the whole exposure was ruined.
It was also important to guard against flexure and mirror shift. During ahalf-hour exposure, the telescope and its mount could bend appreciably.Also, notoriously, the movable mirror of a Schmidt-Cassegrain telescopewould shift slightly. For both of these reasons, guiding was usually doneby sampling an off-axis portion of the image through the main telescope.
Today, we commonly take 3- to 5-minute exposures and combine themdigitally. That makes a big difference. Tracking errors that would beintolerable over half an hour are likely to be negligible. If there is a suddenjump, we can simply throw away one of the short exposures and combinethe rest. We can even work with very short exposures on an altazimuthmount, using software to rotate as well as shift the images so that theycombine properly.
9.3 Setting up an equatorial mount
9.3.1 Using a wedge
An equatorial mount is simply an altazimuth mount tilted toward thecelestial pole. The typical fork-mounted amateur telescope becomesequatorial when mounted on a wedge of the proper inclination, pointednorth (or south in the Southern Hemisphere).
Well-made wedges are sturdy, easy to adjust, and heavy. To save weightand to take advantage of the vibration-damping properties of wood, I builtthe wooden wedge shown in Fig. 9.4. Its obvious drawback is that thereare no adjustments; the only way to adjust it is by moving the tripod legsor altering their length, and it only works at latitudes close to 34◦ north.
Would-be wedge builders should note that the mounting bolts of a Meade
143
DSLR ASTROPHOTOGRAPHYAuthor’s unpublished manuscript – March 7, 2007c© 2007 Michael A. Covington, 285 Saint George Drive, Athens, GA 30606 USA
Protected by copyright law. Do not copy without permission.
10.2. CAMERA CONTROL
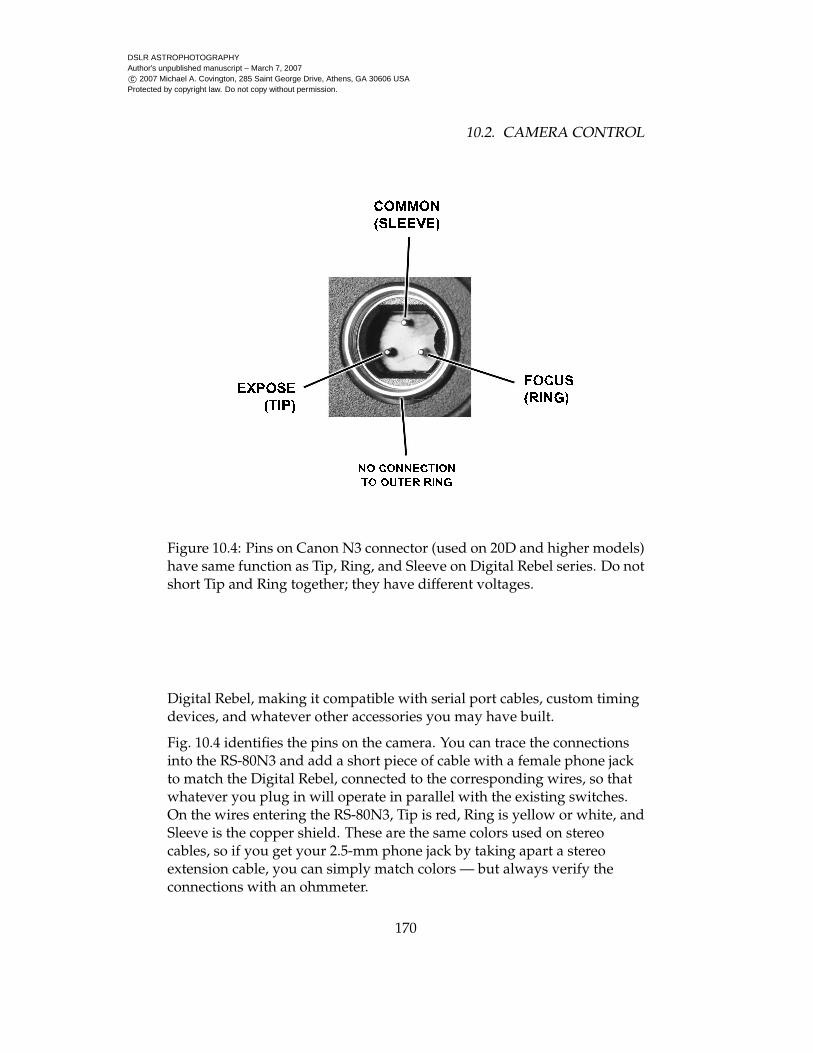
Figure 10.4: Pins on Canon N3 connector (used on 20D and higher models)have same function as Tip, Ring, and Sleeve on Digital Rebel series. Do notshort Tip and Ring together; they have different voltages.
Digital Rebel, making it compatible with serial port cables, custom timingdevices, and whatever other accessories you may have built.
Fig. 10.4 identifies the pins on the camera. You can trace the connectionsinto the RS-80N3 and add a short piece of cable with a female phone jackto match the Digital Rebel, connected to the corresponding wires, so thatwhatever you plug in will operate in parallel with the existing switches.On the wires entering the RS-80N3, Tip is red, Ring is yellow or white, andSleeve is the copper shield. These are the same colors used on stereocables, so if you get your 2.5-mm phone jack by taking apart a stereoextension cable, you can simply match colors — but always verify theconnections with an ohmmeter.
170

DSLR ASTROPHOTOGRAPHYAuthor’s unpublished manuscript – March 7, 2007c© 2007 Michael A. Covington, 285 Saint George Drive, Athens, GA 30606 USA
Protected by copyright law. Do not copy without permission.
11.3. NEBULAE, RED RESPONSE, AND FILTER MODIFICATION
It takes about a million pixels to make a pleasing full-page picture. Thismeans the output of a 10-megapixel DSLR can be binned 3×3 withpleasing results.
The easiest way to accomplish binning is simply to resize the image to 1/2or 1/3 of its original linear size using Photoshop or another photo editingprogram. Many astronomical software packages offer binning as anexplicit operation.
11.3 Nebulae, red response, and filter modification
11.3.1 DSLR spectral response
Figure 11.5 sums up a lot of information about the wavelengths of light towhich cameras respond. Reading from the top, the first thing you’ll noticeis that color film has a gap in its response between green and blue, andDSLRs don’t. This is important because the strong hydrogen-beta andoxygen-III lines from emission nebulae fall in that gap. That’s one reasonnebulae that look red on film may come out blue with a DSLR.
DSLR makers don’t publish spectral response curves, so the curves at thetop of Fig. 11.5 are estimated from Sony CCD data sheets plus a number ofpublished tests. What is most uncertain is the effect of theinfrared-blocking filter in front of the sensor. We know that with this filterremoved, the sensor has strong response up to 700 nm or further.
11.3.2 Filter modification
There are two reasons astrophotographers often have their DSLRsmodified for extended red response. One is the strong hydrogen-alpha(Hα) emission from nebulae at 656.3 nm. The other is that working indeep red light, with filters blocking out the rest of the spectrum, is a goodway to overcome skyglow in cities.
Canon’s EOS 20Da (now discontinued) and some Fuji DSLRs have beenmanufactured with extended red response. Usually, though,astrophotographers rely on third parties to modify their cameras.Reputable purveyors of this service include Hutech (www.hutech.com), HapGriffin (www.hapg.org), and LifePixel (www.lifepixel.com). For those who
186
DSLR ASTROPHOTOGRAPHYAuthor’s unpublished manuscript – March 7, 2007c© 2007 Michael A. Covington, 285 Saint George Drive, Athens, GA 30606 USA
Protected by copyright law. Do not copy without permission.
Chapter 12
Overview of image processing
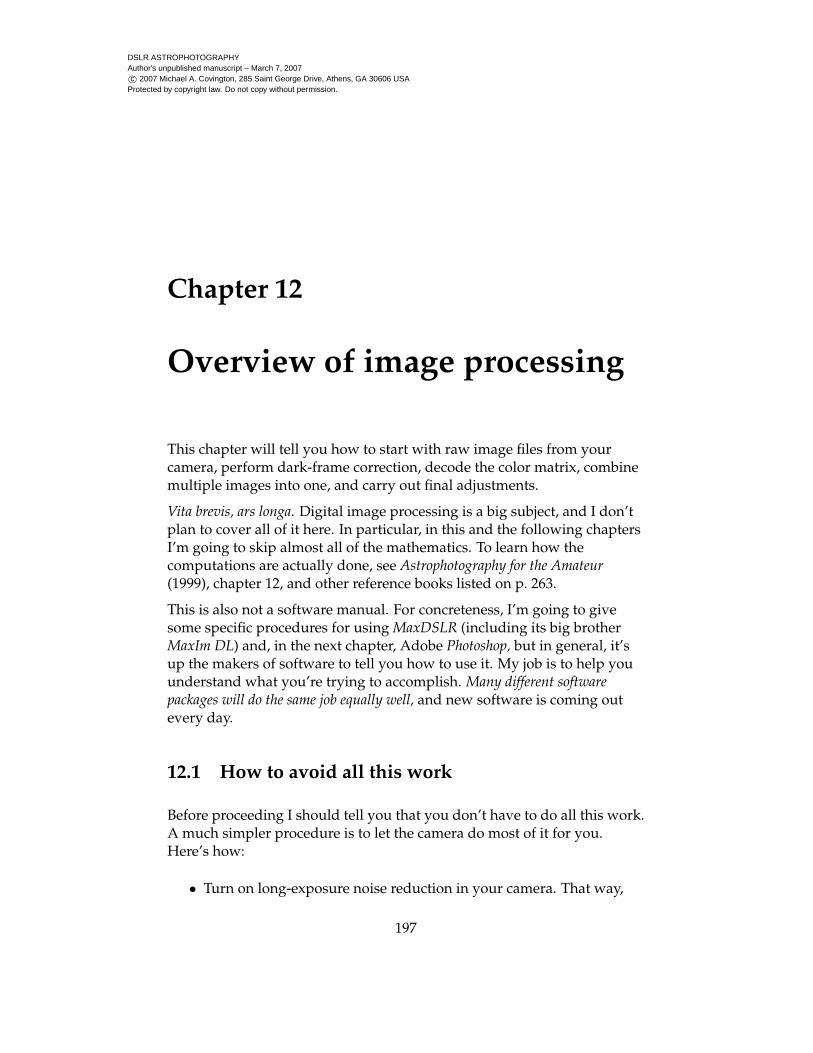
This chapter will tell you how to start with raw image files from yourcamera, perform dark-frame correction, decode the color matrix, combinemultiple images into one, and carry out final adjustments.
Vita brevis, ars longa. Digital image processing is a big subject, and I don’tplan to cover all of it here. In particular, in this and the following chaptersI’m going to skip almost all of the mathematics. To learn how thecomputations are actually done, see Astrophotography for the Amateur(1999), chapter 12, and other reference books listed on p. 263.
This is also not a software manual. For concreteness, I’m going to givesome specific procedures for using MaxDSLR (including its big brotherMaxIm DL) and, in the next chapter, Adobe Photoshop, but in general, it’sup the makers of software to tell you how to use it. My job is to help youunderstand what you’re trying to accomplish. Many different softwarepackages will do the same job equally well, and new software is coming outevery day.
12.1 How to avoid all this work
Before proceeding I should tell you that you don’t have to do all this work.A much simpler procedure is to let the camera do most of it for you.Here’s how:
• Turn on long-exposure noise reduction in your camera. That way,
197
DSLR ASTROPHOTOGRAPHYAuthor’s unpublished manuscript – March 7, 2007c© 2007 Michael A. Covington, 285 Saint George Drive, Athens, GA 30606 USA
Protected by copyright law. Do not copy without permission.
12.3. DETAILED PROCEDURE WITH MAXDSLR
Raw images
of celestial
object
Dark
frames
Combine by averaging
SubtractMaster
dark
frame
Calibrated
raw
images
Decode color (de-Bayerize)
Linear
color
images
Align and stack
Unadjusted
color
picture
The unadjusted image
may look very dark
until the next step.
Gamma correction
(Lighten midtones)
Other adjustments
as desired
Finished
picture
Astronomical
image processing
software
Photoshop or
other general-purpose
photo editor
Figure 12.1: The path to a high-quality digital image from raw image filesand dark frames. Good software automates much of the process.
201
DSLR ASTROPHOTOGRAPHYAuthor’s unpublished manuscript – March 7, 2007c© 2007 Michael A. Covington, 285 Saint George Drive, Athens, GA 30606 USA
Protected by copyright law. Do not copy without permission.
12.3. DETAILED PROCEDURE WITH MAXDSLR
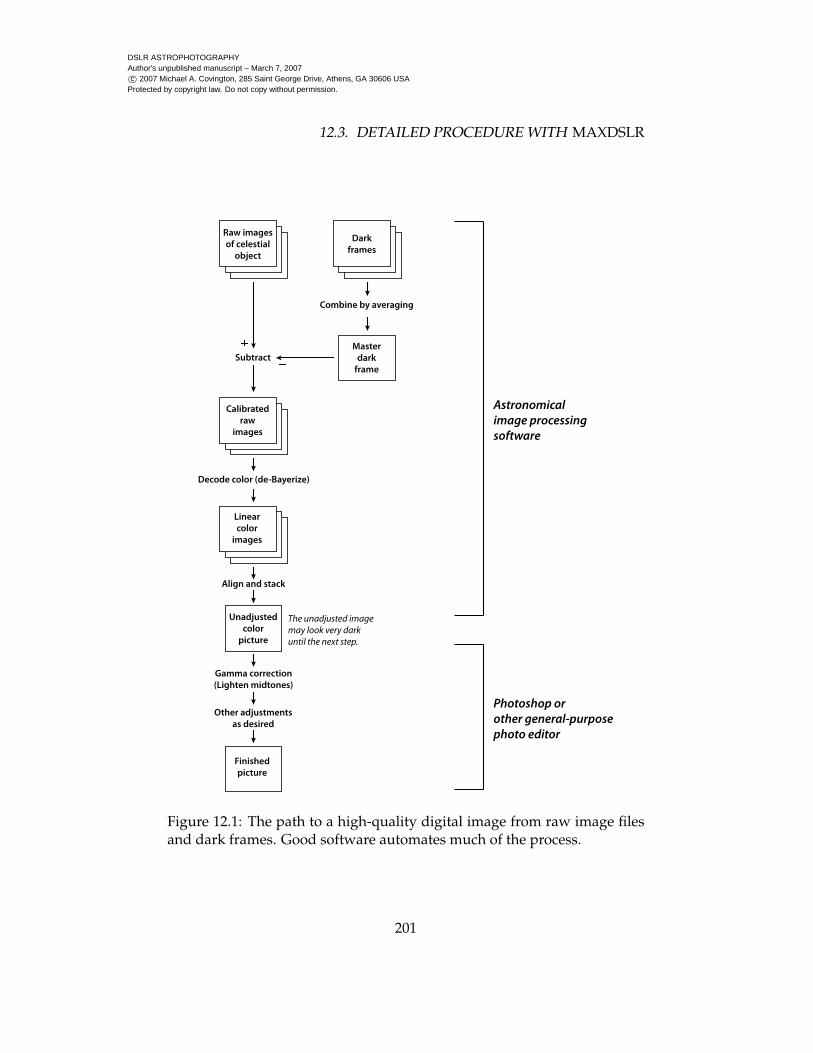
Figure 12.7: Settings to de-Bayerize (demosaic) the raw images and convertthem to color.
offset refer to. Other software packages automatically use the right offsetfor each type of camera, but for maximum versatility, MaxDSLR leaves itup to you.
To check the offset, I urge you to process a daytime picture or two (skippingthe dark-frame step, of course). It’s OK if your pictures have a color cast,but they should not swap colors, rendering yellow as blue or the like.Only a picture of a familiar, colorful daytime object can confirm this.
12.3.4 Combining images
12.3.4.1 How to align and stack
Now it’s time to stack (combine) your color images. MaxDSLR can usuallydo this automatically. But you have some decisions to make:
209
DSLR ASTROPHOTOGRAPHYAuthor’s unpublished manuscript – March 7, 2007c© 2007 Michael A. Covington, 285 Saint George Drive, Athens, GA 30606 USA
Protected by copyright law. Do not copy without permission.
13.5. SHARPENING
(a) (b)
(c) (d)
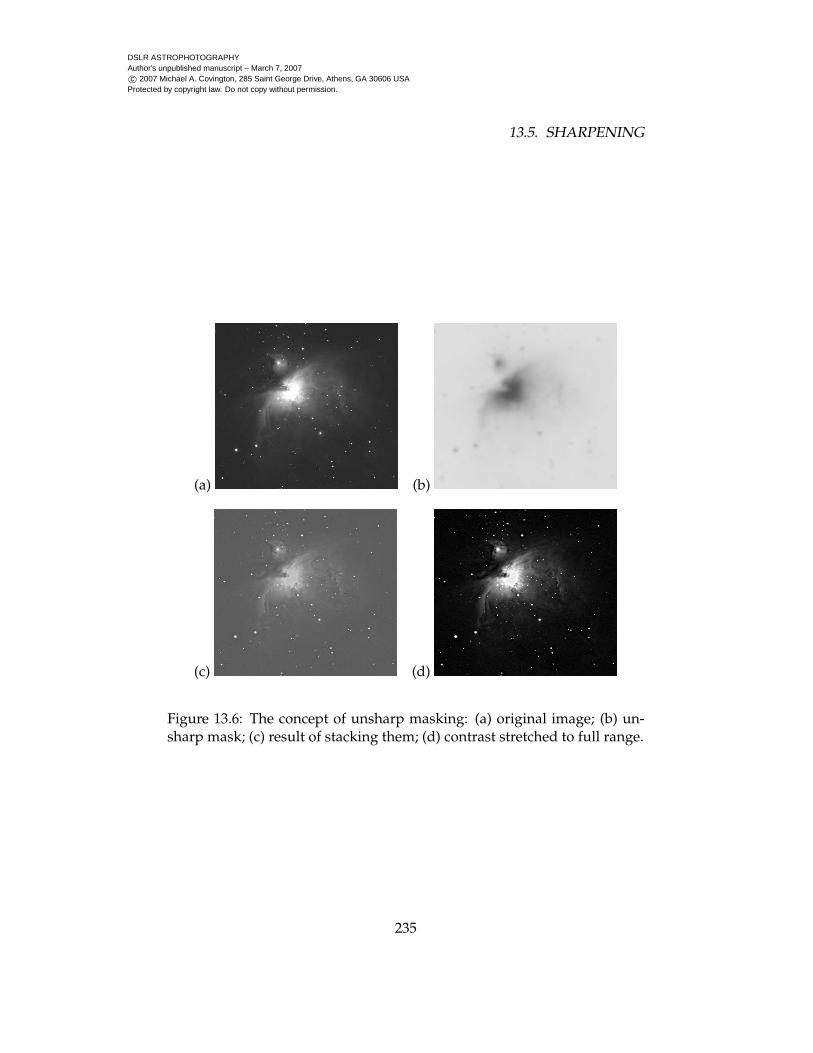
Figure 13.6: The concept of unsharp masking: (a) original image; (b) un-sharp mask; (c) result of stacking them; (d) contrast stretched to full range.
235
DSLR ASTROPHOTOGRAPHYAuthor’s unpublished manuscript – March 7, 2007c© 2007 Michael A. Covington, 285 Saint George Drive, Athens, GA 30606 USA
Protected by copyright law. Do not copy without permission.
13.5. SHARPENING
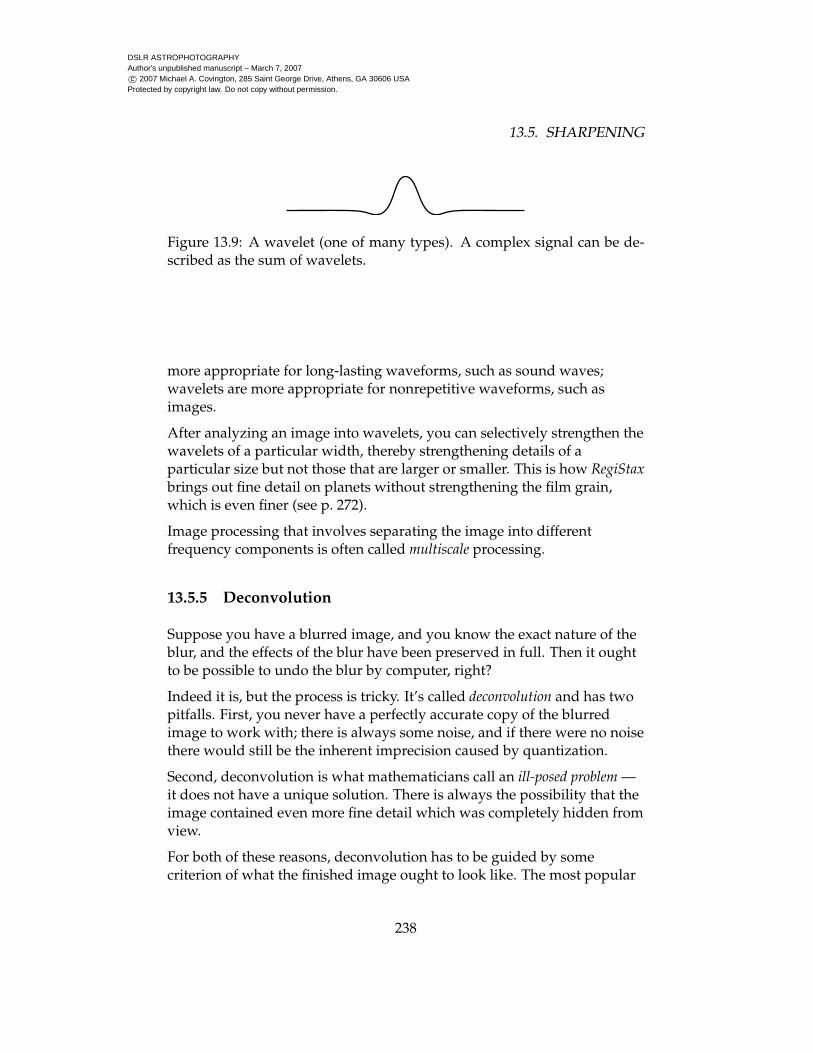
Figure 13.9: A wavelet (one of many types). A complex signal can be de-scribed as the sum of wavelets.
more appropriate for long-lasting waveforms, such as sound waves;wavelets are more appropriate for nonrepetitive waveforms, such asimages.
After analyzing an image into wavelets, you can selectively strengthen thewavelets of a particular width, thereby strengthening details of aparticular size but not those that are larger or smaller. This is how RegiStaxbrings out fine detail on planets without strengthening the film grain,which is even finer (see p. 272).
Image processing that involves separating the image into differentfrequency components is often called multiscale processing.
13.5.5 Deconvolution
Suppose you have a blurred image, and you know the exact nature of theblur, and the effects of the blur have been preserved in full. Then it oughtto be possible to undo the blur by computer, right?
Indeed it is, but the process is tricky. It’s called deconvolution and has twopitfalls. First, you never have a perfectly accurate copy of the blurredimage to work with; there is always some noise, and if there were no noisethere would still be the inherent imprecision caused by quantization.
Second, deconvolution is what mathematicians call an ill-posed problem —it does not have a unique solution. There is always the possibility that theimage contained even more fine detail which was completely hidden fromview.
For both of these reasons, deconvolution has to be guided by somecriterion of what the finished image ought to look like. The most popular
238
DSLR ASTROPHOTOGRAPHYAuthor’s unpublished manuscript – March 7, 2007c© 2007 Michael A. Covington, 285 Saint George Drive, Athens, GA 30606 USA
Protected by copyright law. Do not copy without permission.
13.5. SHARPENING
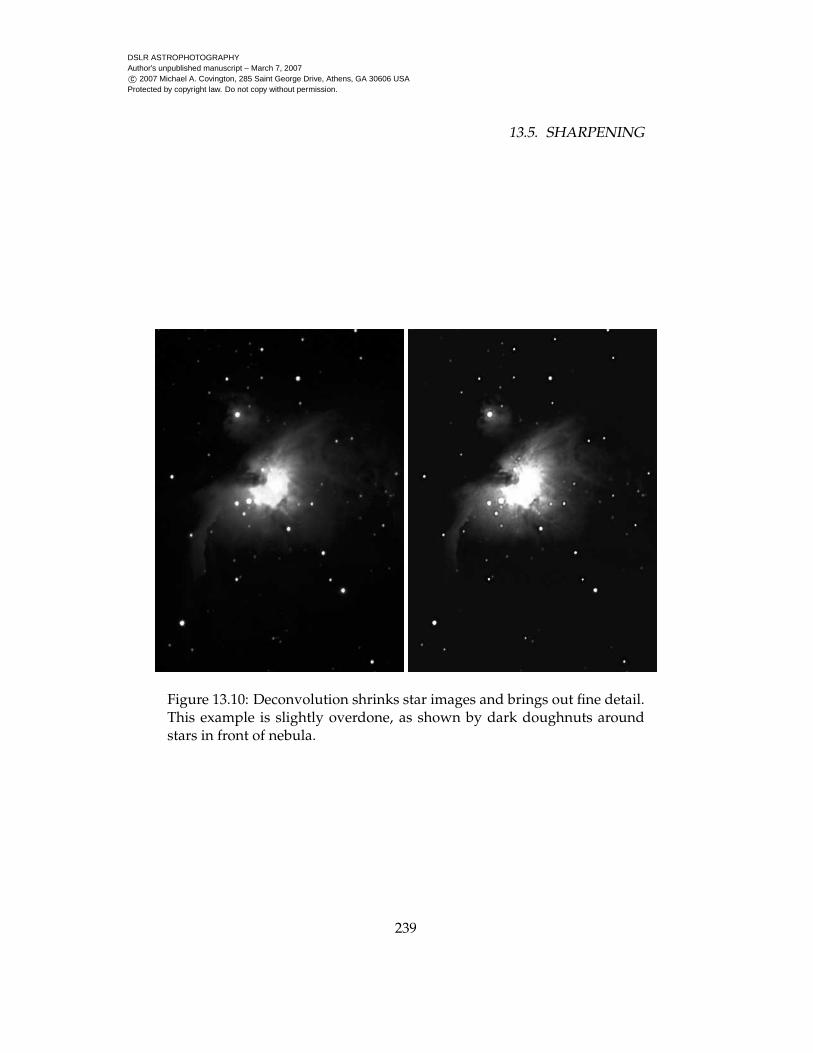
Figure 13.10: Deconvolution shrinks star images and brings out fine detail.This example is slightly overdone, as shown by dark doughnuts aroundstars in front of nebula.
239
DSLR ASTROPHOTOGRAPHYAuthor’s unpublished manuscript – March 7, 2007c© 2007 Michael A. Covington, 285 Saint George Drive, Athens, GA 30606 USA
Protected by copyright law. Do not copy without permission.
13.6. COLOR CONTROL
criterion is maximum entropy, which means maximum simplicity andsmoothness. (Never reconstruct two stars if one will do; never reconstructlow-level fluctuation if a smooth surface will do; and so on.) Variationsinclude the Richardson-Lucy and van Cittert algorithms.
Deconvolution has long been a specialty of MaxIm DL (not MaxDSLR),although several other software packages now offer it. In Fig. 13.10 yousee the result of doing it. Fine detail pops into view. The star imagesshrink and become rounder; even irregular star images (from bad trackingor miscollimation) can be restored to their proper round shape.Unfortunately, if the parameters are not set exactly right, stars are oftensurrounded by dark doughnut shapes.
Because deconvolution is tricky to set up and requires lots of CPU time, Iseldom use it. My preferred methods of bringing out fine detail areunsharp masking and wavelet-based filtering.
13.6 Color control
13.6.1 Gamut
Like film, computer monitors and printers reproduce colors, not byregenerating the spectrum of the original light source, but simply bymixing three primary colors. This works only because the human eye hasthree types of color receptors. Creatures could exist — and indeed somehuman beings do exist — for whom the three-primary-color system doesnot work.3
By mixing primaries, your computer screen can stimulate the eye’s colorreceptors in any combination, but not at full strength. That is, it has alimited color gamut. Colors outside the gamut can only be reproduced atlower saturation, as if they were mixed with white or gray. Nothing onyour computer screen will ever look quite as red as a ruby or as green asan emerald.
The gamut of an inkjet printer is also limited, more so than the screen
3Severely color-blind people have only two primary colors. There are also humans withnormal color vision whose primary red is not at the usual wavelength, and it is speculatedthat a person who inherits that system from one parent and the normal system from theother parent could end up with a working four-color system.
240
DSLR ASTROPHOTOGRAPHYAuthor’s unpublished manuscript – March 7, 2007c© 2007 Michael A. Covington, 285 Saint George Drive, Athens, GA 30606 USA
Protected by copyright law. Do not copy without permission.
14.1. COMBINING IMAGES
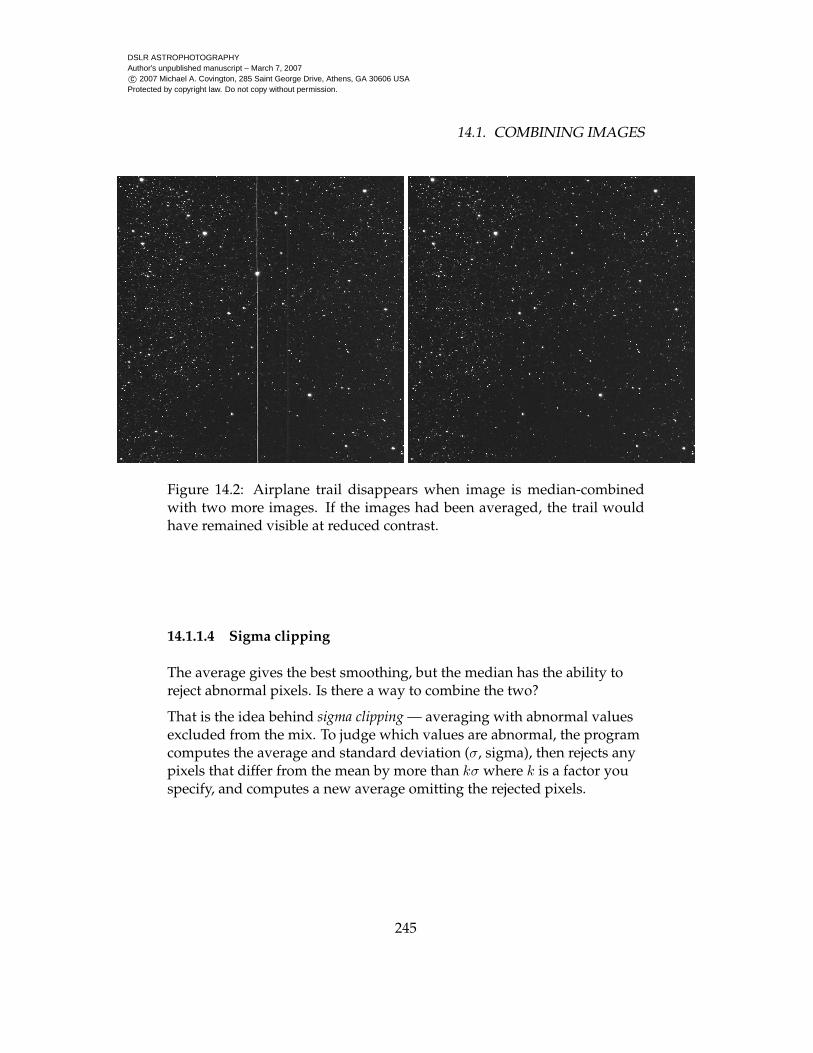
Figure 14.2: Airplane trail disappears when image is median-combinedwith two more images. If the images had been averaged, the trail wouldhave remained visible at reduced contrast.
14.1.1.4 Sigma clipping
The average gives the best smoothing, but the median has the ability toreject abnormal pixels. Is there a way to combine the two?
That is the idea behind sigma clipping — averaging with abnormal valuesexcluded from the mix. To judge which values are abnormal, the programcomputes the average and standard deviation (σ, sigma), then rejects anypixels that differ from the mean by more than kσ where k is a factor youspecify, and computes a new average omitting the rejected pixels.
245

DSLR ASTROPHOTOGRAPHYAuthor’s unpublished manuscript – March 7, 2007c© 2007 Michael A. Covington, 285 Saint George Drive, Athens, GA 30606 USA
Protected by copyright law. Do not copy without permission.
14.1. COMBINING IMAGES
14.1.2 Stacking images in Photoshop
So far we have only discussed image stacking done automatically byastronomical software. Sometimes you’ll want to stack images under fullmanual control using Photoshop or Photoshop Elements. Here is theprocedure. It introduces an important concept, layers.
1. Open both images in Photoshop.
2. In the toolbar, choose the Marquee Tool (dotted box).
3. Right-click on one of the images and choose Select All.
4. In the main menu, choose Edit, Copy.
5. Click on the title bar of the other image.
6. In the main menu, choose Edit, Paste.
You have now pasted the second image on top of the first one. However,your goal was to mix them 50-50, so you’re not finished yet. Proceed asfollows.
(7) In the main menu, choose Window, Layers to make the Layers windowvisible.
(8) In the Layers window, set the opacity of Layer 1 (the added image) to50% (Fig. 14.3).
(9) Hit Ctrl-+ several times to magnify the image so that you can seesingle pixels.
(10) Choose the Move tool, and use the mouse or the arrow keys to moveone image relative to the other (Fig. 14.4) until they are perfectlyaligned.
(11) In the main menu, choose Layer, Flatten Image. This combines thelayers into one.
Your image is now ready for further processing.
While aligning the images, you may want to set the blending mode(Normal in Fig. 14.3) temporarily to Difference. Then, when the images are
247
DSLR ASTROPHOTOGRAPHYAuthor’s unpublished manuscript – March 7, 2007c© 2007 Michael A. Covington, 285 Saint George Drive, Athens, GA 30606 USA
Protected by copyright law. Do not copy without permission.
14.2. CALIBRATION FRAMES
(a)
(b)
(c)
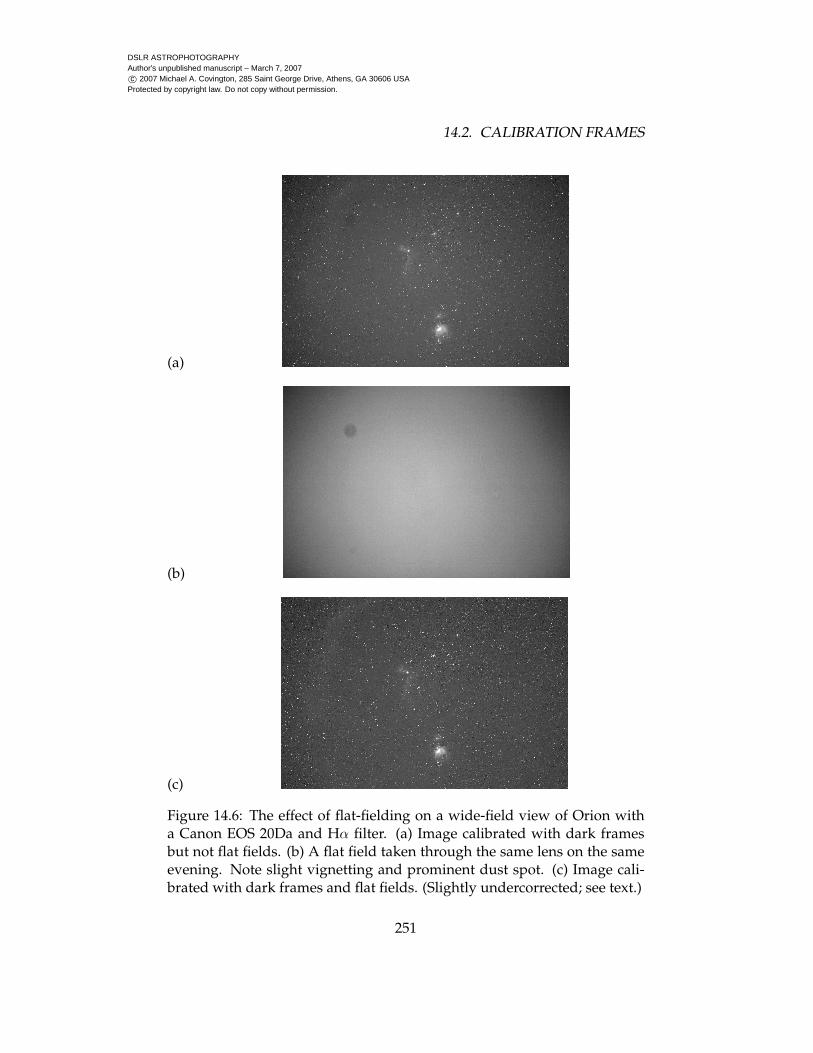
Figure 14.6: The effect of flat-fielding on a wide-field view of Orion witha Canon EOS 20Da and Hα filter. (a) Image calibrated with dark framesbut not flat fields. (b) A flat field taken through the same lens on the sameevening. Note slight vignetting and prominent dust spot. (c) Image cali-brated with dark frames and flat fields. (Slightly undercorrected; see text.)
251
DSLR ASTROPHOTOGRAPHYAuthor’s unpublished manuscript – March 7, 2007c© 2007 Michael A. Covington, 285 Saint George Drive, Athens, GA 30606 USA
Protected by copyright law. Do not copy without permission.
14.5. THE EXTREME BRIGHTNESS RANGE OF NEBULAE
(a)
(b)
(c)
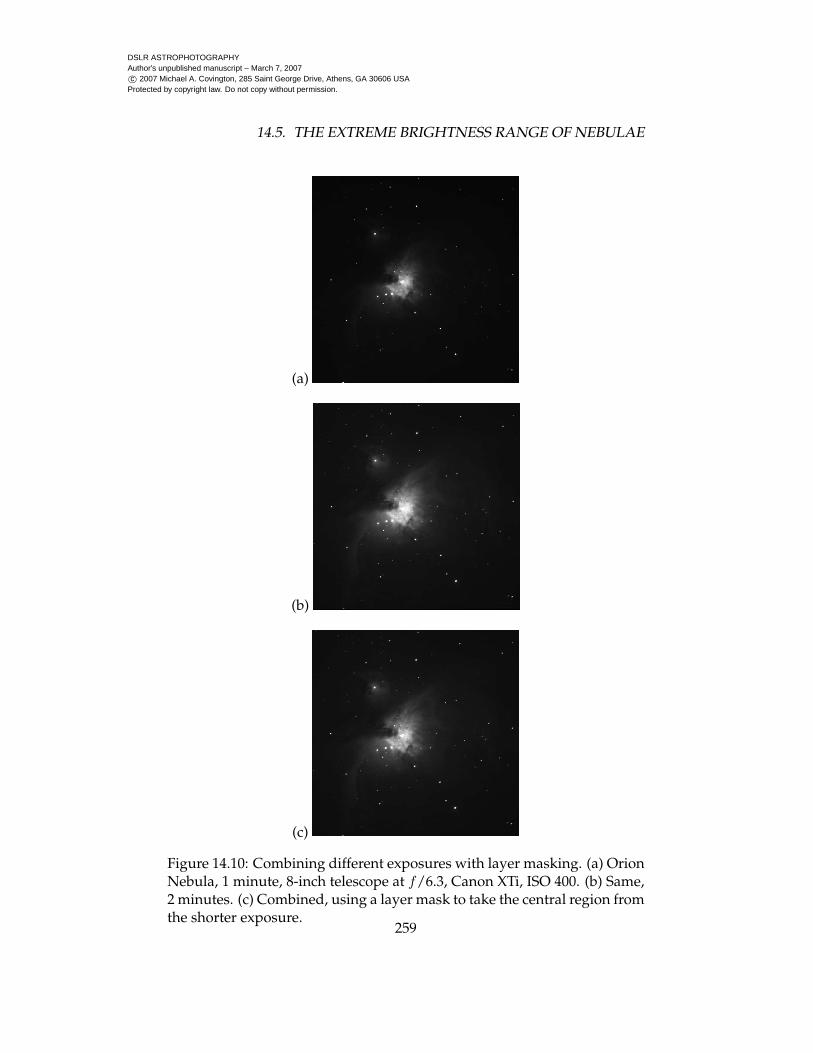
Figure 14.10: Combining different exposures with layer masking. (a) OrionNebula, 1 minute, 8-inch telescope at f/6.3, Canon XTi, ISO 400. (b) Same,2 minutes. (c) Combined, using a layer mask to take the central region fromthe shorter exposure.
259
DSLR ASTROPHOTOGRAPHYAuthor’s unpublished manuscript – March 7, 2007c© 2007 Michael A. Covington, 285 Saint George Drive, Athens, GA 30606 USA
Protected by copyright law. Do not copy without permission.
14.5. THE EXTREME BRIGHTNESS RANGE OF NEBULAE
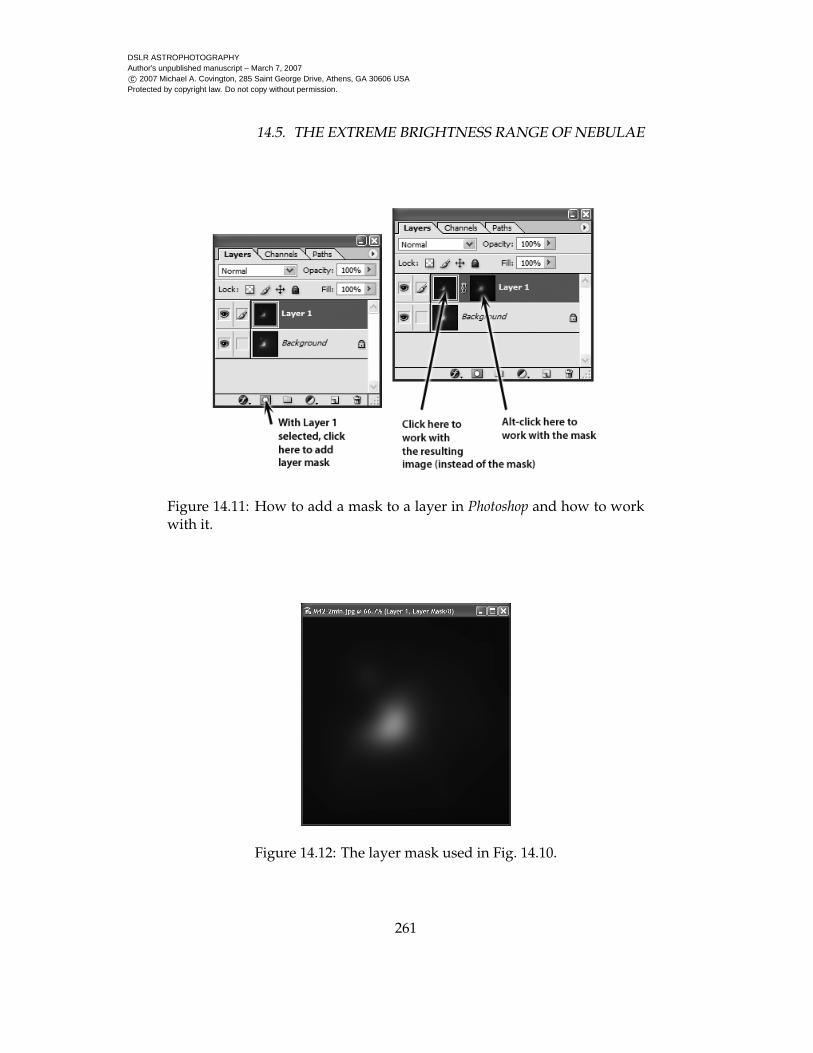
Figure 14.11: How to add a mask to a layer in Photoshop and how to workwith it.
Figure 14.12: The layer mask used in Fig. 14.10.
261
DSLR ASTROPHOTOGRAPHYAuthor’s unpublished manuscript – March 7, 2007c© 2007 Michael A. Covington, 285 Saint George Drive, Athens, GA 30606 USA
Protected by copyright law. Do not copy without permission.
14.5. THE EXTREME BRIGHTNESS RANGE OF NEBULAE
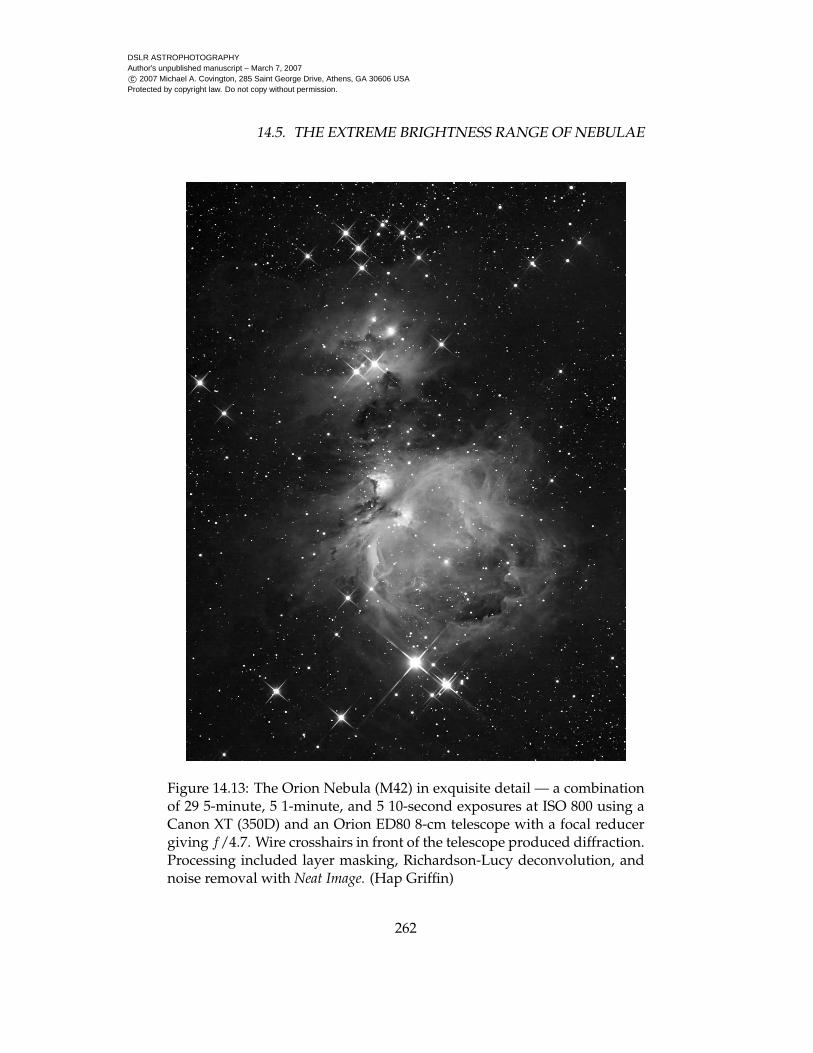
Figure 14.13: The Orion Nebula (M42) in exquisite detail — a combinationof 29 5-minute, 5 1-minute, and 5 10-second exposures at ISO 800 using aCanon XT (350D) and an Orion ED80 8-cm telescope with a focal reducergiving f/4.7. Wire crosshairs in front of the telescope produced diffraction.Processing included layer masking, Richardson-Lucy deconvolution, andnoise removal with Neat Image. (Hap Griffin)
262