Embed Size (px)
Citation preview

DOMAIN System User's Guide
Order No. 005488 Revision No. 00
Software Release 9.0
Apollo Computer Inc. 330 Billerica Road
Chelmsford, MA 01824
Copyright © 1985 Apollo Computer Inc. All rights reserved. Printed in U.S.A. First Printing: Latest Printing:
July, 1985 July, 1985
This document was produced using the lnterleaf document preparation system. (lnter1eaf Is a trademark of lnterleaf, Inc.)
APOLLO and DOMAIN are registered trademarks of Apollo Computer Inc.
AEGIS, DOMAIN/IX, D3M, DPSS, DGR, GMR, GPR, and OSEE are trademarks of Apollo Computer .
Apollo Computer Inc. reserves the right to make changes In specifications and other Information contained In this publication without prior notice, and the reader should In all cases consult Apollo Computer Inc. to determine whether any such changes have been made .
THE TERMS AND CONDITIONS GOVERNING THE SALE OF APOLLO COMPUTER INC. HARDWARE PRODUCTS AND THE LICENSING OF APOLLO COMPUTER INC. SOFTWARE CONSIST SOLELY OF THOSE SET FORTH IN THE WRITTEN CONTRACTS BETWEEN APOLLO COMPUTER INC. AND ITS CUSTOMERS. NO REPRESENTATION OR OTHER AFFIRMATION OF FACT CONTAINED IN THIS PUBLICATION, INCLUDING BUT NOT LIMITED TO STATEMENTS REGARDING CAPACITY, RESPONSE-TIME PERFORMANCE, SUITABILITY FOR USE OR PERFORMANCE OF PRODUCTS DESCRIBED HEREIN SHALL BE DEEMED TO BE A WARRANTY BY APOLLO COMPUTER INC. FOR ANY PURPOSE, OR GIVE RISE TO ANY LIABILITY BY APOLLO COMPUTER INC. WHATSOEVER.
IN NO EVENT SHALL APOLLO COMPUTER INC. BE LIABLE FOR ANY INCIDENTAL, INDIRECT, SPECIAL OR CONSEQUENTIAL DAMAGES WHATSOEVER {INCLUDING BUT NOT LIMITED TO LOST PROFITS) ARISING OUT OF OR RELATING TO THIS PUBLICATION OR THE INFORMATION CONTAINED IN IT, EVEN IF APOLLO COMPUTER INC. HAS BEEN ADVISED, KNEW OR SHOULD HAVE KNOWN OF THE POSSIBILITY OF SUCH DAMAGES,
THE SOFTWARE PROGRAMS DESCRIBED IN THIS DOCUMENT ARE CONFIDENTIAL INFORMATION. AND PROPRIETARY PRODUCTS OF APOLLO COMPUTER INC. OR ITS LICENSORS.
__ .�
PREFACE
The DOMAIN� System User's Guide is the second volume in the two-volume introduction to the DOMAIN� (Distributed On-line Multi-Access Interactive Network) Computing System. The first volume, Getting Started With Your DOMAIN System, introduces you to the basic concepts you'll need to use the DOMAIN system on your node. The DOMAIN System User's Guide follows with more detailed information about the system and describes how to use the system to perform various computing tasks.
The Organization of this Manual
We've divided this manual into three separate parts, each part describing a set of related topics. Part I describes the DOMAIN system. Pan II and Part III describe how to perform various tasks using system commands and utilities. We've separated each part with a tabbed divider for easy access.
Part I - The DOMAIN System
Chapter 1
Chapter Z
Provides an overview of the DOMAIN system and its distributed operating environment. It describes how the system organizes objects in the system naming tree, and how to use pathnames to identify these objects.
Describes how the system functions at start-up and log-in, and describes how to create, modify, and organize the various scripts that set up your node's particular operating environment. The chapter also describes procedures for changing your password and log-in home directory when you log in.
Ill Preface
Part II -- The Display Environment
Chapter 3
Chapter 4
Chapter 5
Explains the functions of the Display Manager (DM), describes how to use DM commands, and shows how to define keys to perform DM functions.
Describes how to use the DM to control your node's display. Each section describes a set of related display management tasks and the DM commands you use to perform them.
Describes how to use the DM to control the characteristics of edit pads and how to edit text. Each section in this chapter describes a set of editing tasks and the DM commands you use to perform them.
Part III -- The Command Shell
Chapter 6
Chapter 7
Chapter 8
Chapter 9
Describes the command Shell environment that processes Shell commands. The chapter includes information on: Shell commands, controlling command input and output, the command line parser, and using pathname wildcards.
Describes how to use Shell commands to manage files, directories, and links on the system.
Describes Access Control Lists (ACLs) and how to use them to control access to files and directories.
Describes how to write Shell commands, expressions.
Shell scripts using operators. and
Documentation Conventions
This manual uses the following symbolic conventions:
User Input
System Response
Preface
Information that you enter appears in color in this typeface.
Information that the system displays appears in this typeface.
lv
UPPERCASE
lowercase
< >
[
Bolded term or key
<RET>
CTRL/
Uppercase characters represent commands.
Lowercase characters represent information that you supply.
Angle brackets enclose the name of a key on the keyboard.
Square brackets enclose optional items in formats and command descriptions.
When new terms or keys are introduced, they appear in boldface.
The <RET> symbol in command lines indicates when you press <RETURN>.
The notation CTRL/ followed by the name of a key indicates a control character sequence. Hold down <CTRL> while you press the key.
Horizontal ellipsis points indictate that you can repeat the preceding item one or more times.
Vertical ellipsis points represent irrelevant part of a figure or example that have been omitted.
Related Manuals If you are using the DOMAIN system for the first time, you should read Getting Started With Your DOMAIN System (order number 002348) first. Getting Started With Your DOMAIN System teaches you the basics of using the DOMAIN system.
The DOMAIN System Command Reference (order number 002547) contains detailed descriptions of all DOMAIN system commands. The command descriptions are arranged alphabetically for quick and easy access.
For information on how to create the network environment, protect the network software, create servers, and maintain and troubleshoot the network, see Administering Your DOMAIN System (Order number 001746).
v Preface
Problems, Questions, and Suggestions
We appreciate comments from the people who use our system. In order to make it easy for you to communicate with us, we provide the User Change Request (UCR) system for software-related comments, and the Reader's Response form for documentation comments. By using these formal channels you make it easy for us to respond to your comments.
You can get more information about how to submit a UCR by consultin� the DOMAIN System Command Reference. Refer to the CRUCR (Create User Change Request) Shell command description. You can view the same description on-line by typing:
$ HELP CRUCR <RETURN>
For your documentation comments, we've included a Reader's Response form at the back of each manual.
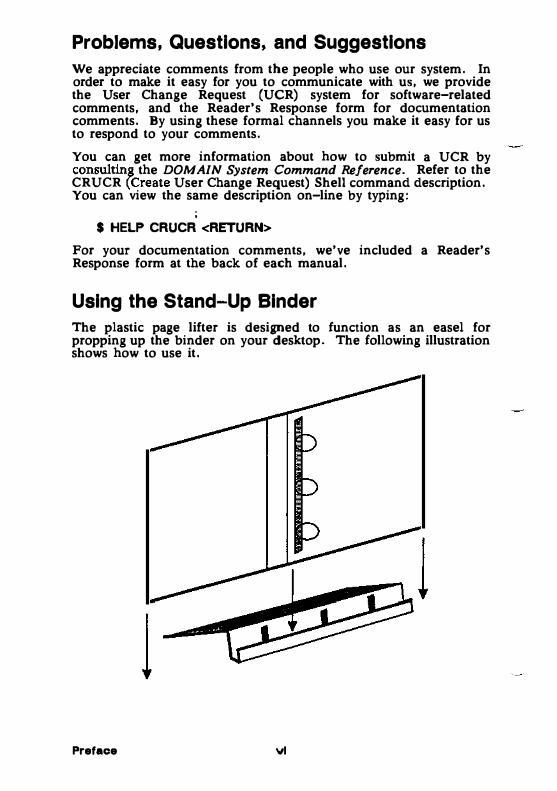
Using the Stand-Up Binder The plastic page lifter is designed to function as an easel for propping up the binder on your desktop. The following illustration shows how to use it.
1 Preface vi
CONTENTS
Chapter 1 The DOMAIN System
Overview .
The Naming Tree . Using Pathnames .....
1-2
1-3 1-5 1-9
1-10 The Working Directory The Naming Directory The Parent Directory . . 1-12 Pathname Summary . . . . . . . . . . . . . . . . .. . . . . . . 1-13
Chapter 1 Start-Up and Log-In
Understanding the System at Start-Up Disked Node Start-Up . . . . . . . Diskless Node Start-Up ...... .
Understanding the System at Log-In Logging In .............. .
Logging In as User . . . . . . . . �- Changing Your Password
Changing Your Home Directory ......... . Logging Into a DOMAIN Server Processor (DSP}
Chapter 3 Using The Display Manager
Using DM Commands ........ . DM Command Conventions .. . Defining Points and Regions . . .
Using Keys to Perform DM Functions Key Naming Conventions . . . . . . . . . Defining Keys • . • . • . • . • . • . . • . • Deletin� Key Definitions . . . . . . . . . . Displaymg Key Definitions . . . . . . . . Controlling Keys from Within a Program
Using DM Command Scripts ...... .
Chapter 4 Controlling the Display
Controlling Cursor Movement Creating Processes , , , . , . , , . . , . ,
Creating a Process with Pads and Windows . Creating a Process without Pads and Windows
vii
2-2 2-2 2-7
2-12 2-18 2-18 2-18 2-19 2-19
. 3-2
. 3-3
. 3-5
. 3-9 3-11 3-14 3-17 3-17 3-17
3-18
4-2 4-4 4-5 4-7
Contents
Creating a Server Process . . . . Controlling a Process . . . . . . . .
Stopping a Program or Process . . Suspending and Resuming a Process
Creating Pads and Windows . , . , . , , . , Creating an Edit Pad and Window . , . . Creating a Read-Only Pad and Window Copying a Pad and Window
Closing Pads and Windows Managing Windows . . . . . . . .
Changing Window Size Moving a Window , . . . . . . Pushing and Popping Windows . Changing Process Window Modes Defining Default Window Positions Responding to DM Alarms . . . . .
Moving Pads Under Windows ..... . Moving to the Top or Bottom of a Pad Scrolling a Pad Vertically .. ... Scrolling a Pad Horizontally . . . . . . Saving a Transcript Pad in a File
Using Window Groups and Window Icons Creating and Adding to Window Groups Removing Entries from Window Groups Making Windows Invisible . . . . . . . . Using Icons ................ . Setting Icon Default Position and Offset . . Displaying the Members of a Window Group
Chapter 5 Editing a Pad
Setting Edit Pad Modes . . . . Setting Read/Write Mode . Setting Insert/Overstrike Mode
Inserting Characters . . . . . . . . . Inserting a Text String . . . . , Inserting a NEWLINE Character Inserting a New Line . . . . . . Inserting an End-of-File Mark
Deleting Text . . • . • . Deleting Characters Deleting Words ... Deleting Lines . . .
Defining a Range of Text Copying, Cutting, and Pasting Text
Using Paste Buffers
4-7 4-8 4-8 4-9 4-9
4-13 4-14 4-14
4-16 4-17 4-18 4-19 4-20 4-21 4-23 4-24 4-25 4-25 4-26 4-27 4-28 4-28 4-29 4-30 4-30 4-31 4-33 4-34
5-2 5-3 5-4 5-4 5-5 5-5 5-6 5-6
S-6 5-7 5-7 5-8 S-8 5-9
S-10 5-11 Copying Text . . . . . . .
Copying a Display Image . . ...... . ...... .. 5-12
Contents viii
Cutting Text . . . . . . Pasting Text . . . . . .
Using Regular Expressions Searching for Text . .
Repeating a Search Operation Cancelling a Search Operation Setting Case Comparison . . .
Substituting Text . . . . . . . . . . . . . . Substituting All Occurrences of a String . . Substituting the First Occurrence of a String Changing the Case of Letters
Undoing Previous Commands Updating an Edit File
Chapter 6 Using the Shell
Shell Commands . . . . . . . . . Command Line Format ... Standard Command Options Command Search Rules . . Special Characters . . . . . .
Creating and Invoking Shells . . . . . Setting Up the Initial Shell Environment
Controlling Input and Output . . . . . . . . . Reading Input from a File . . . . . . . , Writing Output to a File . . . . . . . . . Appending Output to a File . . . . . . Redirecting Ouput to Other Commands
The Command Line Parser . . . . . . . . . Using Query Options . . . . . . . . . . , Reading Data from Standard Input . Reading Pathnames from Standard Input Using Pathname Wildcards ....... . . Running Programs in a Background Process
Chapter 7 Managing Files, Directories, and Links
Moving Around the Naming Tree Setting the Working Directory Setting the Naming Directory
Managing Files . . Creating Files . Renaming Files Copying Files . Moving Files . Appending Files Printing Files . .
lx
. 5-13
. 5-13 5-14 5-20 5-21 5-22 5-22
. 5-22 5-23 5-24 5-25 5-25 5-26
6-2 6-3 6-4 6-4 6-6 6-6 6-7 6-8 6-9
6-10 6-10 6-11 6-11 6-13 6-14 6-14 6 -15 6-19
. 7-2 . 7-2
7-3 . 7-4 . 7-4 . 7-5 . 7-6
7-8 7-9
. 7-9
Contents
Printing Files Using the Print Menu Interface Displaying File Attributes . .. Deleting Files . . . . . . . . . . Copying the Display to a File Comparing ASCII Files
Managing Directories . . . . Creating Directories Renaming Directories , Copying Directory Trees Replacing Directory Trees Merging Directory Trees . Comparing Directory Trees . . . Displaying Directory Information Deleting Directory Trees
Managing Links . . . . . . . . . . . . Creating Links . , , , , . . . . . . Displaying Link Resolution Names Redefining Links Renaming Links Copying Links , Deleting Links
Chapter 8 Controlling Access to Files and Directories
ACL Structure . . . . . . . . . . . . . . . . . . . . . . The Subject Identifier (SID) ........... . Access Rights . . . . . . . . . . . . . . . . . . . . . Understanding SEARCH and EXPUNGE Rights Managing ACLs
Displaying ACLs , . . . . . . . . . Editing ACLs . . . . . . . . . . . .
Rules to Specify ACL Entries Adding ACL Entries . Changing Entry Rights Adding Entry Ri�ts . Deleting Entry Rights Deleting ACL Entries
Copying ACLs ...... . Initial ACLs . . . . . . . .
Editing Initial ACLs . Copying Initial ACLs
Protected Subsystems . . . . . . . . . . How Do Protected Subsystems Work? Creating a Protected Subsystem . Assigning Protected Subsystem Status .
Contents X
7-11 7-14 7-15 7-15 7-16 7-16 7-17 7-18 7-19 7-20 7-22 7-22 7-24 7-25 7-26 7-27 7-28 7-28 7-29 7-30 7-31
8-2 8-2 8-4 8-6 8-7 8-7 8-8 8-9
8-13 . 8-13
8-14 . 8-14 . 8-15
8-15 8-15 8-17 8-18 8-19 8-19
. 8-21
. 8 -22
Chapter 9 Writing Shell Scripts
Creating Your Own Commands . . Creating Scripts . . . . . . . . Passing Arguments to Scripts . Using Quoted Strings . . . . .
______ Using In-Line Data . . . . . . . . . . . .. Executing DM Commands from Shell Scripts Debugging Shell Scripts . . . . . . . . . . . . .
Using Expressions ...... . Operands in Expressions Mathematical Operators String Operators Comparison Operators Logical Operators . . .
Shell Variables ..... . Defining Variables .. Using Shell Variables Variable Commands ..... . Defining Variables Interactively Using Active Functions ...
Controlling Script Execution . , . Using the IF Statement ... Using the WHILE Statement Using the FOR Statement . . Using the SELECT Statement
Appendix A Initial Directory and File Structure
Index
xl
. 9-1 9-2
. 9-4
. 9-7 9-7
. 9-8
. 9-9 9-10
. 9 -12
. 9 -12
. 9-13
. 9-14
. 9-14
. 9-15
. 9-15
. 9-17
. 9-18
. 9-19
. 9-20
. 9-22 9-24 9 -25 9 -27 9-29
Contents
1-1 1-2 1-3 1-4
1-5
1-6
1-7 2-1 2-2 2-3 2-4 2-5 2-6
2-7
Illustrations
A Simple DOMAIN Ring Network . . , . . A Sample Naming Tree . . . . . . , . . . . A Sample Path Through the Naming Tree A Sample Path Beginning at the Node Entry Directory . . . . .. . . . . . . . . . . .. . A Sample Path Beginning at the Current Working Directory , . . .. . , , . .. , . A Sample Path Beginning at the Current Naming Directory . . . . . . . . . . , . . . . . . . . . . . •
A Sample Path Beginning at the Parent Directory The Start-Up Sequence for Disked Nodes A Sample Boot Script (STARTUP. 19L) . . . .. . The Start-Up Sequence for a Diskless Node . . . The Boot Script Search Sequence . The Log-In Sequence .. . . . . . . A Sample Log-In Start-Up Script (STARTUP_LOGIN.19L) . . . . . A Sample OM Start-Up Script (STARTUP_DM.19L)
1-2 1-4 1-6
1-8
1-9
1-11 1-12
2-3 . 2-6 . 2-8 2-12 2-13
2-15 2-17
3-1 Invoking a DM Command Interactively . . . . . . . . 3-3 3-2 Defining a Display Region . . . . . . . . . . . . . . . . . . 3-8 3-3 Key Names for the BOO and Low-Profile Keyboards .. . 3-12 4-1 A Process Running the Shell . . . . . . . . . . . . . . 4-6 4-2 Creating an Edit Pad and Window . 4-13 4-3 4-4 4-5 4-6 4-7 4-8
s-i S-2
' 5--13 6-tl 6-2 6-3 7-1
Copying a Pad and Window . . . . . . . . Growing a Window Using Rubberbanding Pushing and Popping Windows Process Window Legend . . . . . . . . . Location of Pad Scroll Keys . . . . . . . Default Icon for Shell Process Windows The Edit Pad Window Legend . . . . . Defining a Range of Text with <MARK> Copying Text with the XC -R Command The Shell Process . . . . . . . . . . Shell Command Line Components . . . . Sample Shell Start-Up Script . , . , . . . The Print Menu . . . . . . . .
4-15 4-18 4-20 4-22 4-27 4-31 . 5-3
. . . . . . . . . . 5-9
. . . .. . . . . 5-12 . 6-2 . 6-3 . 6-7 7-11
7-2 Print "Commands" Submenu . . . . . .. . . . . . , . . . 7-12
Contents xll

7-3 Sample Display Showing File Attributes 7-4 Comparing Two ASCII Files 7-5 Sample Directory Tree . . 7-6 Copying a Directory Tree . 7-7 Replacing a Directory Tree 7-8 Comparing Directory Trees 7-9 Sample Directory Display . 7-10 Deleting a Directory Tree 7-11 Sample Display of Link Resolution Names 8-1 Structure of an ACL Entry 8-2 Sample ACL Entries . . .. . . . . . . 8-3 Sample ACL Display . .. . . . . . . .
7-14 7-16 7-19 7-20 7-21 7-24 7-25 7-26 7-28
8-2 . 8-3 . 8-7
8-4 8-5 8-6 9-1 9-2 9-3 9-4 A-1 A-2 A-3 A-4
Initial ACLs for Files and Directories . . . . . . 8-16 Controlling Access to Protected Subsystem Files 8-20 Sample of a Protected Subsystem Transcript 8-24 Including In-Line Data in a Script . . . . . . . . . . . . . . 9-8 A Sample Script Using the READ Command . . . 9 -19 Flow of Execution in a Simple Script . . . . . . . 9 -22 FlOw of Execution with a Conditional Statement . 9-23 The Node Entry Directory (/) and Subdirectories The System Software Directory . . . . . . . . . . . The Display Manager Directory (/SYS/DM) . . . The Network Management Directory (/SYS/NET)
XIII
. A-2
. A-3
. A-4
. A-5
Contents

Tables
/ 1-1 2-1
Pathname Symbols . . . . . . . . . Node Boot Script Files . . . . . . .
/ . -. . . 1-8 . .. . 2-5
2-2 Node Log-In Start-Up Script Files . .. . . . . , . . . , . 2-14 3-1 Rules for Using DM Special Characters . , . , 3-4 3-2 Formats for Specifying Points on the Display . .. . . . .. 3-6 3-3 Default Mouse Key Functions . 3-10 3-4 Key Naming Conventions , . . . , . . . , , . . .. , . . . , 3-13 4-1 Cursor Control Commands . . . . , . 4-2 4-2 Commands for Creating Processes . . . . . . . . . . . . . . 4-S 4-3 Commands for Controlling a Process .. , . . . , . . . . , . 4-8 4-4 Commands for Creating Pads and Windows . 4-10 4-5 DM Rules for Defining Window Boundaries , 4-11 4-6 Commands for Closing Pads and Windows 4-16 4-7 4-8 4-9 4-10 4-11 5-1 5-2 5-3 5-4 5-5
Commands for Managing Windows Process Window Modes . . . . . . Commands for Moving Pads . . . . Commands for Controlling Window Groups and Icons Window Paste Buffers . . . . . . . . . . . . . . . . . . . Commands for Setting Edit Modes . Commands for Inserting Characters Commands for Deleting Text . . . . Commands for Copying, Cutting, and Pasting Text Characters Used in Regular Expressions
. 4-17
. 4-21 4-25
. 4-29
. 4-35 5-2
. S-5
. 5-1 S-10 5-15
5-6 Commands for Searching for Text 5-20 5-7 Commands for Substituting Text 5-23 6-1 Standard Shell Command Options , . . . , . . . , , . . . . 6-4 6-2 110 Control Characters . . . . . . . . . . . . . . . . . . . . . 6-9 6-3 6-4 6-5
Command Line Parser Options Command Query Responses . . . . . . . . . . . . Summary of Pathname Wildcards . . . . . . . . .
7-1 Commands for Setting the Working and Naming
6-12 6-13 6-16
Directory . . . . . . . . . . . . . , . . . . . . . . . . . . . . . 7-2 7-2 Commands for Managing Files . . . . . . . . . . . . . . . . 7-4 7-3 Print "Commands .. Submenu Items . . 7-13 7-4 Commands for Managing Directories . 7-17 7-5 Commands for Managing Links . . . . 7-27
Content• xlv
8-1 Access Rights for Files and Directories . . . . . . . . . . . 8-5 8-2 Summary of Commands for Editing ACLs . . . . . . . . . 8-9 8-3 Valid Rights for Files and Directories 8-10 8-4 Class Names for Commonly Assigned Rights 8-12 8-5
8-6
Summary of Commands for Editing and Copying lnitial ACLs . . . . . . . . . . . . Options for Copying Initial ACLs . . . . . . . . .
8-17 8-18
9-1 Shell Parsing Operators . . . . . . . . 9-3 9-2 Script Verification Options . . . .. . . . . . . . . . . . . . . 9-9 9-3 Summary of Expression Operators . 9-11 9-4 Rules for Assigning Variable Types . 9-16 9-5 Variable Commands . . . . . . . . . . 9-18
XV Contents

CHAPTER 1
The DOMAIN System
The DOMAIN system is a high-speed communications network connecting two or more of our computers, called nodes. Each node loads programs into its own memory, and uses the computing functions of its own central processing unit (CPU). Because the DOMAIN system enables nodes to share information, you can log into any node and access information stored anywhere in the network.
Many of the operations you'll perform on the system involve the use of objects (files, directories, and links) that store information such as programs, data, or text. Before you can work with these objects, you must understand how the system organizes and identifies them.
This chapter describes the DOMAIN system, how it organizes objects in the system naming tree, and how to use pathnames to identify these objects.
,_, Th• DOMAIN Syatem
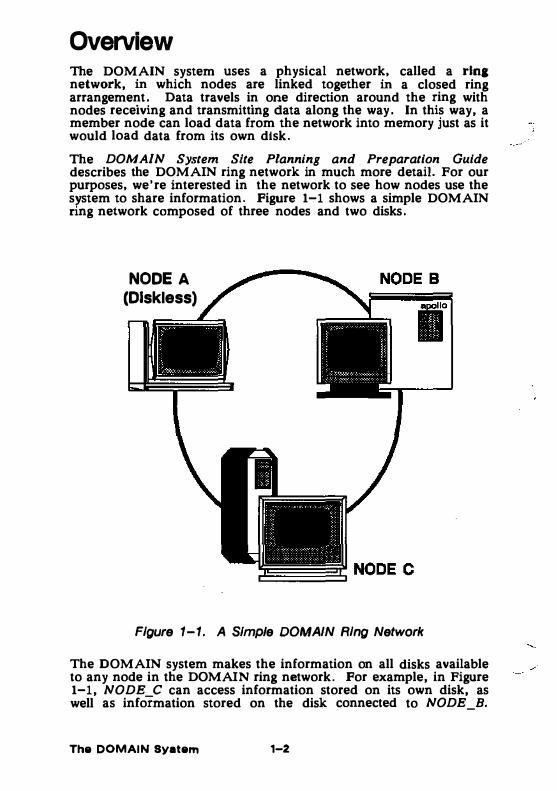
Overview The DOMAIN system uses a physical network, called a ring network, in which nodes are linked together in a closed ring arrangement. Data travels in one direction around the ring with nodes receiving and transmitting data along the way. In this way, a member node can load data from the network into memory just as it would load data from its own disk.
The DOMAIN System Site Planning and Preparation Guide describes the DOMAIN ring network in much more detail. For our purposes, we're interested in the network to see how nodes use the system to share information. Figure 1-1 shows a simple DOMAIN nng network composed of three nodes and two disks.
NODE A (Diskless)
Figure 1-1. A Simple DOMAIN Ring Network
The DOMAIN system makes the information on all disks available to any node in the DOMAIN ring network. For example, in Figure 1-1, NODE C can access information stored on its own disk, as well as info!mation stored on the disk connected to NODE_B.
The DOMAIN Syatern 1-2
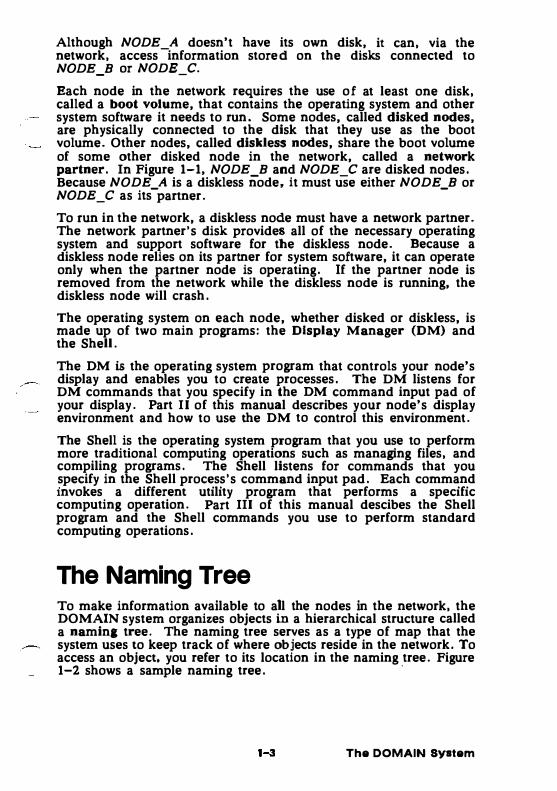
Although NODE_A doesn't have its own disk, it can, via the network, access information stored on the disks connected to NODE_B or NODE_C.
Each node in the network requires the use of at least one disk, called a boot volume, that contains the operating system and other system software it needs to run. Some nodes, called disked nodes, are physically connected to the disk that they use as the boot volume. Other nodes, called diskless nodes, share the boot volume of some other disked node in the network, called a network partner. In Figure 1-1, NODE_B and NODE_C are disked nodes. Because NODE A is a diskless node, it must use either NODE B or NODB_C as its-partner. -
To run in the network, a diskless node must have a network partner. The network partner's disk provides all of the necessary operating system and support software for the diskless node. Because a diskless node relies on its partner for system software, it can operate only when the partner node is operating. If the partner node is removed from the network while the diskless node is running, the diskless node will crash.
The operating system on each node, whether disked or diskless, is made up of two main programs: the Display Manager (DM) and the Shell.
The DM is the operating system program that controls your node's display and enables you to create processes. The DM listens for DM commands that you specify in the DM command input pad of your display. Part II of this manual describes your node's display environment and how to use the DM to control this environment.
The Shell is the operating system program that you use to perform more traditional computing operations such as managing files, and compiling programs. The Shell listens for commands that you specify in the Shell process's command input pad. Each command invokes a different utility program that performs a specific computing operation. Part III of this manual descibes the Shell program and the Shell commands you use to perform standard computing operations.
The Naming Tree To make information available to all the nodes in the network, the DOMAIN system organizes objects in a hierarchical structure called a naming tree. The naming tree serves as a type of map that the system uses to keep track of where objects reside in the network. To access an object, you refer to its location in the naming tree. Figure 1-2 shows a sample naming tree.
·
The DOMAIN System
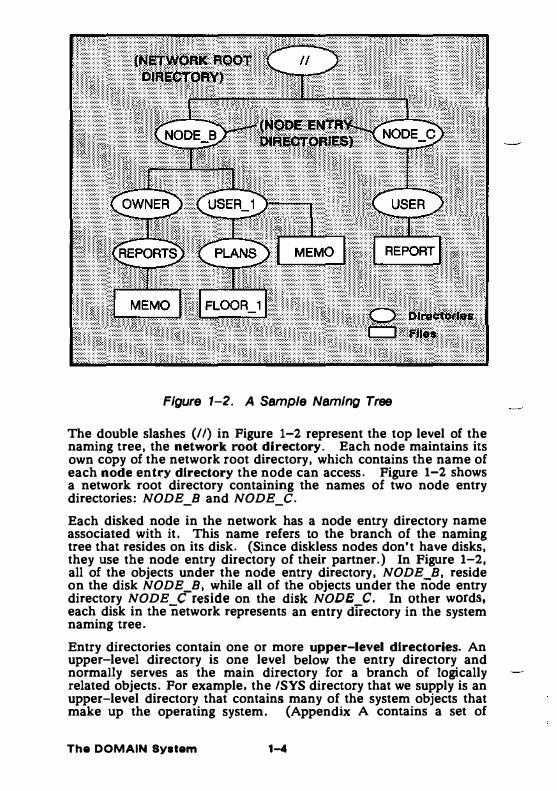
Figure 1-2. A Sample Naming Tree
The double slashes (1/) in Figure 1-2 represent the top level of the naming tree, the network root directory. Each node maintains its own copy of the network root directory, which contains the name of each node entry directory the node can access. Figure 1-2 shows a network root directory containing the names of two node entry directories: NODE_B and NODE_C.
Each disked node in the network has a node entry directory name associated with it. This name refers to the branch of the naming tree that resides on its disk. (Since diskless nodes don't have disks, they use the node entry directory of their partner.) In Figure 1-2, all of the objects under the node entry directory, NODE_B, reside on the disk NODE_B, while all of the objects under the node entry directory NODE_C reside on the disk NODB_C. In other words, each disk in the network represents an entry directory in the system naming tree.
Entry directories contain one or more upper-level directories. An upper-level directory is one level below the entry directory and normally serves as the main directory for a branch of logically related objects. For example, the /SYS directory that we supply is an upper-level directory that contains many of the system objects that make up the operating system. (Appendix A contains a set of
The DOMAIN System 1-4

figures that illustrate how the system organizes the software we supply with your node.) An upper-level directory can also serve as a user's main directory for storing files.
In Figure 1-2, the directories OWNER and USER_l are upper-level directories, one level below the entry directory NODE_B. The directory OWNER serves as the main directory for all objects that belong to the owner of the node. The upper-level directory USBR_I is the main directory for the user of a diskless node (NODE_A) that uses NODE_B as its entry directory. The directory USER serves as the main directory for the user on NODE_C.
In summary, the network root directory contains the names of node entry directories in the network. The system uses your node's network root directory to determine which node entry directories in the network it can access. Each node entry directory contains one or more upper-level directories. An upper-level directory serves as the main directory for logically related objects.
Your node can access only the node entry directories whose names appear in the local copy of the network root directory. To keep your local copy of the network root directory up to date, you should catalog new disked nodes as they are added to the network. To catalog new nodes, use the Shell command CTNODE (CATALOG_NODE) described in the DOMAIN System Command Reference.
Some network sites use the NS HELPER (Naming Server Helper) to maintain an up-to-date netWork root directory. If your site uses NS_HELPER, you don't need to use CTNODE to catalog nodes, NS_HELPER does it for you. To find out if your network site uses NS_HELPER, ask your system administrator. Administering Your DOMAIN System describes NS_HELPER and explains how to catalog nodes to update the network root directory.
Using Pathnames The system identifies each object in the naming tree by its unique location. Whenever you specify a command to create or access an object, you also specify a pathname that points to the object's location in the naming tree. The pathname tells the system what path to follow when searching for an object.
The commands you use to create and manage objects require you to specify a pathname as a command argument. When you invoke a command, the command specifies the operation, and the pathname tells the system where in the naming tree to perform it.
1-5 The DOMAIN System
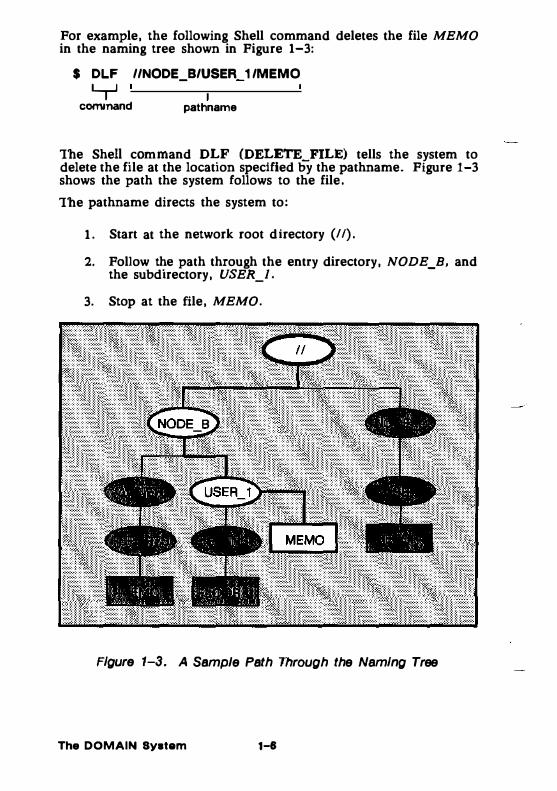
For example, the following Shell command deletes the file MEMO in the naming tree shown in Figure 1-3:
$ DLF //NODE_B/USER_1 /MEMO
'-T convnand pathname
The Shell command DLF (DELETE_FILl;) tells the system to delete the file at the location specified by the pathname. Figure 1-3 shows the path the system follows to the file.
The pathname directs the system to:
1. Start at the network root directory (II).
2. Follow the path through the entry directory, NODE B, and the subdirectory, USER_/.
-
3. Stop at the file, MEMO.
Figure 1-3. A Sample Path Through the Naming Tree
The DOMAIN System HI
When the system searches for a location in the naming tree, it begins its search at some point in the tree and follows a path to the location. The pathname in the previous examples expl�citly specified the network root directory as the starting point for the system's search through the naming tree. (The double slashes (//) at the beginning of the pathname specify the network root
....-- directory.) This type of pathname, called an absolute pathname, tells the system the full path, from the network root directory to the final location.
You don't have to begin pathnames with the network root directory specification. For example, the single slash (/) symbol directs the system to begin its search at your node's entry directory. Here is an example using the single slash to start a search at your node's entry directory:
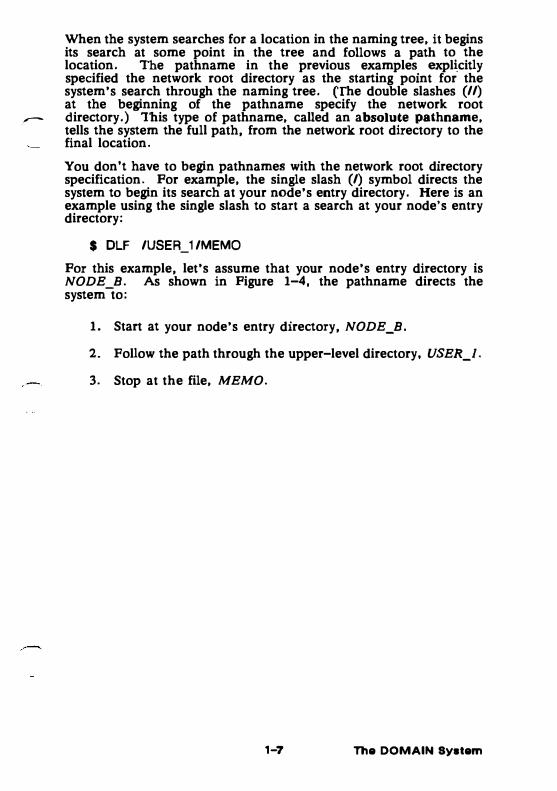
$ DLF /USER_1/MEMO
For this example, let's assume that your node's entry directory is NODE_B. As shown in Figure 1-4, the pathname directs the system to:
1. Start at your node's entry directory, NODE_B.
2. Follow the path through the upper-level directory, USER_/.
3. Stop at the file, MEMO.
1-7 The DOMAIN System
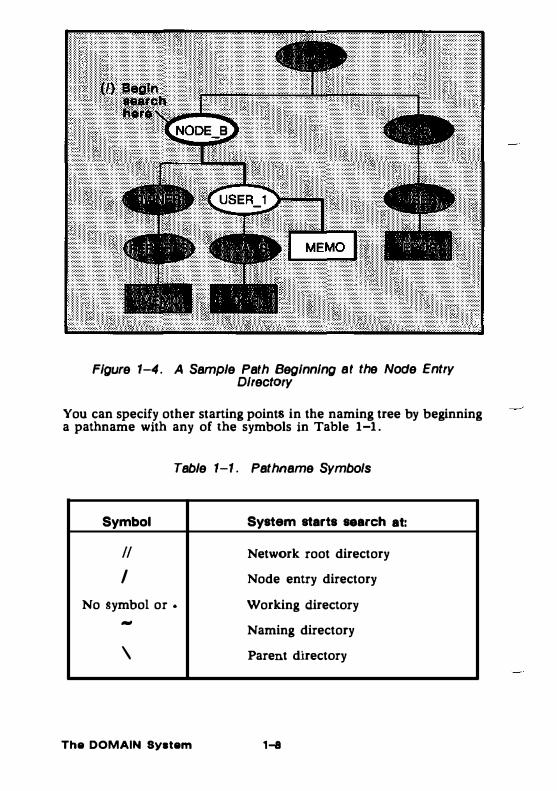
Figure 1-4. A Sample Path Beginning at the Node Entry Directory
You can specify other starting points in the naming tree by beginning a pathname with any of the symbols in Table 1-1.
Table 1-1. Pathname Symbols
Symbol System starts search at:
II Network root directory
I Node entry directory
No symbol or • Working directory -
Naming directory
\ Parent directory
The DOMAIN System 1-11
, __ _
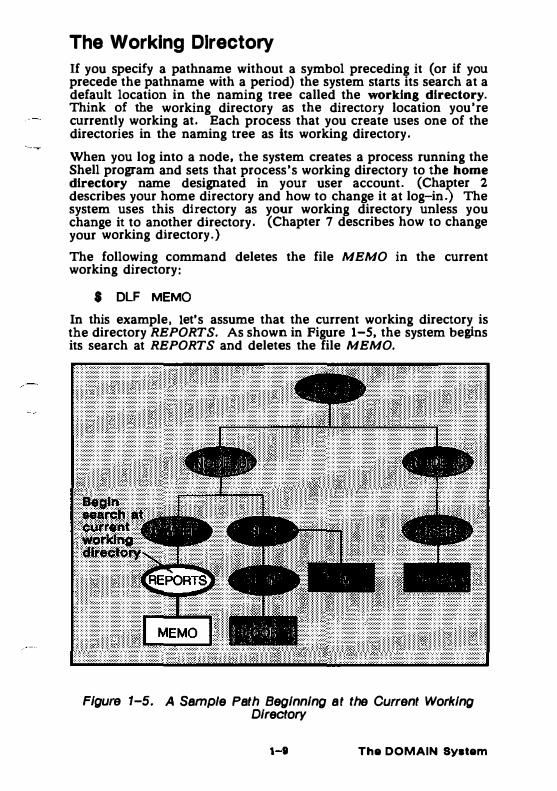
The Working Directory If you specify a pathname without a symbol preceding it (or if you precede the pathname with a period) the system starts its search at a default location in the naming tree called the working directory. Think of the working directory as the directory location you're currently working at. Each process that you create uses one of the directories in the naming tree as its working directory.
When you log into a node, the system creates a process running the Shell program and sets that process's working directory to the home directory name designated in your user account. (Chapter 2 describes your home directory and how to change it at log-in.) The system uses this directory as your working directory unless you change it to another directory. (Chapter 7 describes how to change your working directory.}
The following command deletes the file MEMO in the current working directory:
$ DLF MEMO
In this example, let's assume that the current working directory is the directory REPORTS. As shown in Figure 1-5, the system begins its search at REPORTS and deletes the file MEMO.
Figure 1-5. A Sample Path Beginning at the Current Working Directory
1-1 The DOMAIN System

You'll notice in Figure 1-5 that another file named MEMO exists at another location in the naming tree (in the directory USER_ I). If the current working directory was USER_! instead of REPORTS, the command in our example would delete this file instead. So you see, a pathname that starts at the working directory functions differently depending on the directory currently being used as the working directory.
The Naming Directory
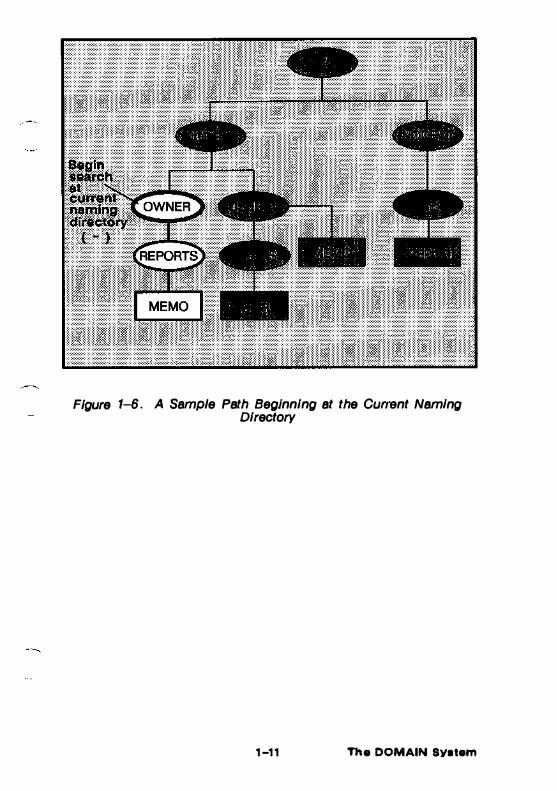
If you precede a pathname with the tilde ( - ) symbol, the system starts its search at a location in the naming tree called the naming directory. Like the working directory, each process has a naming directory that points to some directory in the naming tree.
When you log into a node, the system creates a process running the Shell program and sets that process's naming directory to the home directory name designated in your user account. The system uses this directory as your naming directory unless you change it to another directory. (Chapter 7 describes how to change your naming directory.)
The following command deletes the file MEMO in the current naming directory:
$ DLF -REPORTS/MEMO
In this example, let's assume that the current naming directory is the upper-level directory OWNER. As shown in Figure 1-6, the pathname directs the system to:
1. Start at your node's naming directory, OWNER.
2. Follow the path through the directory, REPORTS.
3. Stop at the file, MEMO.
Like pathnames that use the current working directory, pathnames starting at the naming directory work differently depending on the directory currently being used as the naming directory.
The DOMAIN System 1-10
,.---
Figure 1-6. A Sample Path Beginning at the Current Naming Directory
1-11 The DOMAIN System

The Parent Directory If you precede the pathname with a backslash (\) symbol, the system starts its search at a location called the parent directory. A parent directory is the directory one level above the current working directory. For example, the following command uses the \symbol to delete the file MEMO in the directory USER _1:
$ DLF \MEMO
In this example, let's assume that the current working directory is the directory PLANS. As shown in Figure 1-7, the system begins its search at the directory USER_l (the parent directory of the current working directory PLANS) and deletes the file MEMO.
Figvre 1-7. A Sample Path Beginning at the Parent Directory
The DOMAIN Syetem 1-12
Pathname Summary In this section, you learned how to use pathnames to point to objects in the system naming tree. The examples showed you how to use pathnames with commands to tell the system the naming tree location where you want a particular operation performed.
Pathnames also serve to identify objects. As you read through this manual, you will find that many of the objects that make up the operating system are referred to by their pathnames. For example, Chapter 2 describes many of the objects the system uses at start-up and log-in. By understanding which objects the system uses and where they are located, you'll better understand how these objects work together to make up a functioning system.
Appendix A contains a set of figures that illustrate how the system organizes the system software that we supply with your node. These figures also refer to system objects by their pathnames.
1-13 The DOMAIN System


CHAPTER 2
Start-Up and Log-In
Each time you start up a node and log in to it, the DOMAIN system executes various programs that start the operating system, and scripts that set up the node's operating environment. You can tailor the operating environment on your node by modifying the scripts the system uses at start-up and log-in. For example, you may want to start specific server processes when you start up your node. Or, you may want your own specific key definitions, default window positions, and tabs defined each time you log in.
This chapter describes how the system functions at start-up and log-in, and describes the steps you can take to tailor your operating environment. The chapter also describes procedures for changing your password and log-in home directory when you log in.
2-1 Start-Up and Log-In
Understanding the System at Start-Up The Owner's Guide for your node describes the proper procedure for starting it up. When you initiate the node's start-up by turning on the power, the node performs a series of operations to boot the operating system (load the operating system from disk into memory) and begin executing it. The operating system then executes a series of start-up files to set up the operating environment on your node.
This section explains the sequence of events occurring at start-up for both disked and diskless nodes.
Dlsked Node Start-Up H your node is a disked node, it reads the programs it needs for start-up from its own disk. The flowchart in Figure 2-1 shows the stan-up sequence on a disked node.
Stert-Up and Log-In 2-2
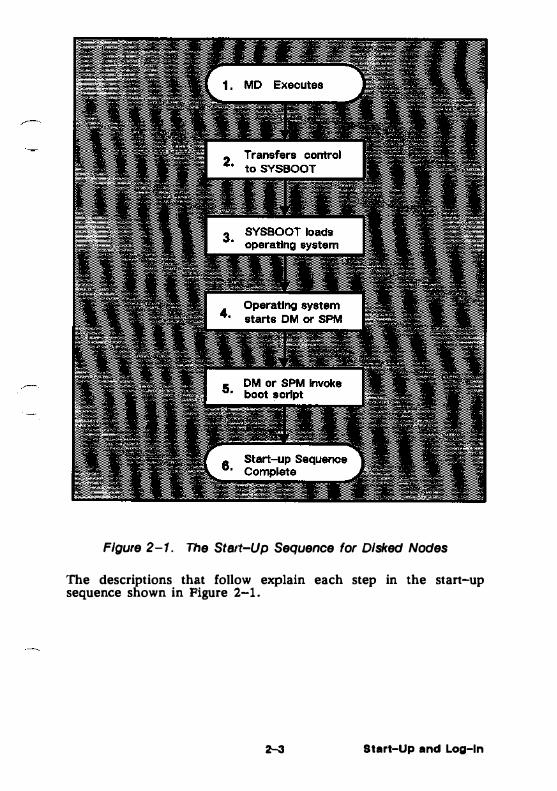
Figure 2-1. The Start-Up Sequence for Disked Nodes
The descriptions that follow explain each step in the start-up sequence shown in Figure 2-1.
2-3 Start-Up and Log-In

1. When you power on your node in NORMAL mode (by following the instructions in your Owner's Guide}, a program called the Mnemonic Debugger (MD) begins executing. The MD resides in the node's boot PROM (Programmable Read-Only Memory).
2. The MD reads a program called SYSBOOT from your node's disk and loads it into the CPU's memory. The MD then tranders control to SYSBOOT. SYSBOOT, as its name indicates, is the program responsible for booting the operating system.
3. The SYSBOOT program loads the operating system into the CPU's memory. Once loaded, the operating system begins executing and takes control.
4. The operating system starts either:
• The Display Manager (DM) on nodes with displays.
• The Server Process Manager (SPM} on DOMAIN Server Processors (DSPs). The SPM is the server program that allows you to create a process on a DSP from a remote node in the network. (For more information about the SPM, see Administering Your DOMAIN System.)
At this point, for nodes with an 880 keyboard, the DM executes the file ISYSIDMISTD_KEYS. This file, which we supply, executes a series of DM commands that define the standard key functions for the 880 keyboard. For nodes using the low-profile keyboard, the DM defines the standard key functions when it executes the boot script (see Step 5}. (See the discussion of keyboard types in Chapter 1 in Getting Started With Your DOMAIN System.)
5. The DM or the SPM executes a start-up file, called a boot script, that sets up the initial operating environment on your node. Table 2-1 lists the different boot script files used at start-up. As shown in Table 2-1, the system chooses which boot script file to execute according to the type of node.
Start-Up and Lag-In
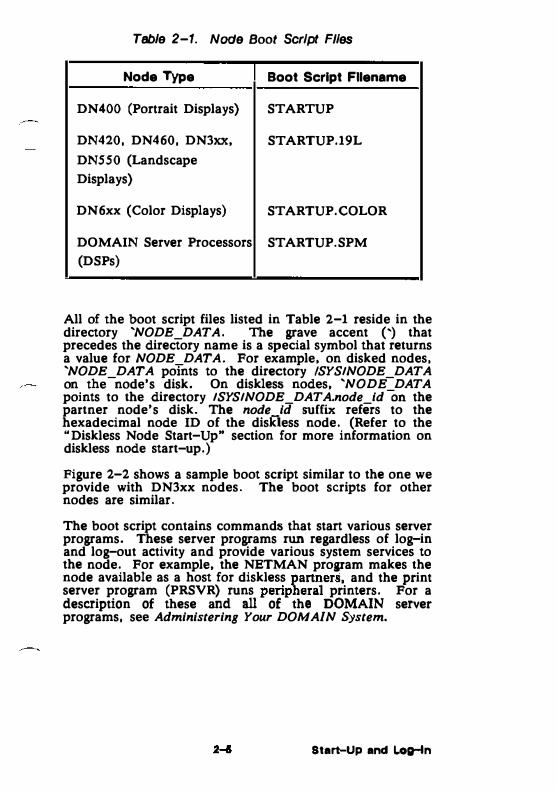
Table 2-1. Node Boot Script Flies
Node Type Boot Script Filename
DN400 (Portrait Displays) STARTUP
DN420, DN460, DN3xx, STARTUP.19L DN550 (Landscape Displays)
DN6xx (Color Displays) STARTUP.COLOR
DOMAIN Server Processors STARTUP.SPM (DSPs)
All of the boot script files listed in Table 2-1 reside in the directory 'NODE_DATA. The grave accent (') that precedes the directory name is a special symbol that returns a value for NODE_DATA. For example, on disked nodes, 'NODE_DATA points to the directory ISYSINODE_DATA on the node's disk. On diskless nodes, 'NODE DATA points to the directory ISYSINODE_DATA.node_id -on the partner node's disk. The node_id suffix refers to the hexadecimal node ID of the diskless node. (Refer to the "Diskless Node Start-Up" section for more information on diskless node start-up.)
Figure 2-2 shows a sample boot script similar to the one we provide with DN3xx nodes. The boot scripts for other nodes are similar.
The boot script contains commands that start various server programs. These server programs run regardless of log-in and log-out activity and provide various system services to the node. For example, the NETMAN program makes the node available as a host for diskless partners, and the print server program (PRSVR) runs peripheral printers. For a description of these and all of the DOMAIN server programs, see Administering Your DOMAIN System.
Start-Up and Log-tn

# 'NODE OAT A/ST ARTU'P, default system startup # commind file for 19L, 4/21/83 # (608, 744)dr; (1 023, 799)cv /sys/dm/output (556,744)dr; (608,799)cv /sys/dm/output;pb (0, 744) dr; (556, 799)cv /sys/dm/input # # To enable the diskless node boot server, # uncomment the following CPS command. # # cps /sys/netfnetman # # To startup default printer # # cps /com/sh -c '/com/prsvr' -n print_server # # To enable the summagraphic bit pad support, # uncomment the following CPS command. # # cps /sys/dm/sbp1 /dev/sio2 L # # To startup mbx (IPC) helper # # cps /sys/mbx/mbx helper #
-
# To proper!� define the keys for the low-profile # keyboard (KBD2}, uncomment the following # command # # kbd 2
Figure 2-2. A Sample Boot Script (STARTUP.19L)
If you want your node to automatically start any of these server programs, edit your node's boot script and remove the pound sign (# ) from the command line that invokes the server. Note, however, that the system will not start any of these servers until the next time you shut down and restart your node.
The boot scripts that run on nodes that have displays (STARTUP, STARTUP.l9L, and STARTUP.COLOR) also contain a set of commands that instruct the Display Manager to draw the initial display windows on the screen. One of the windows contains the "'Please log in:" prompt.
Start-Up and log-In 2-11
The STARTUP .SPM script used by DSPs is similar to the other start-up scripts. However, since DSPs don't have displays, STARTUP.SPM doesn't contain commands for creating windows.
6. Once the boot script finish-es executing, the node start-up completes. and the system prompts you to log in.
Diskless Node Start-Up
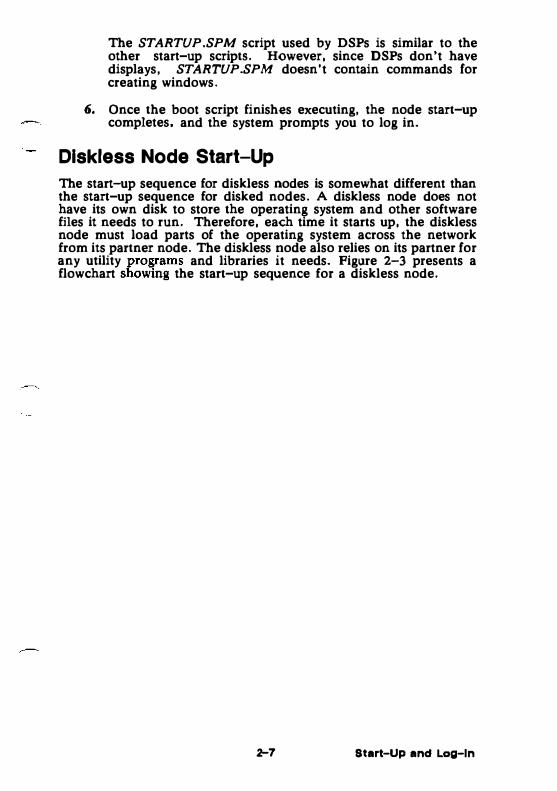
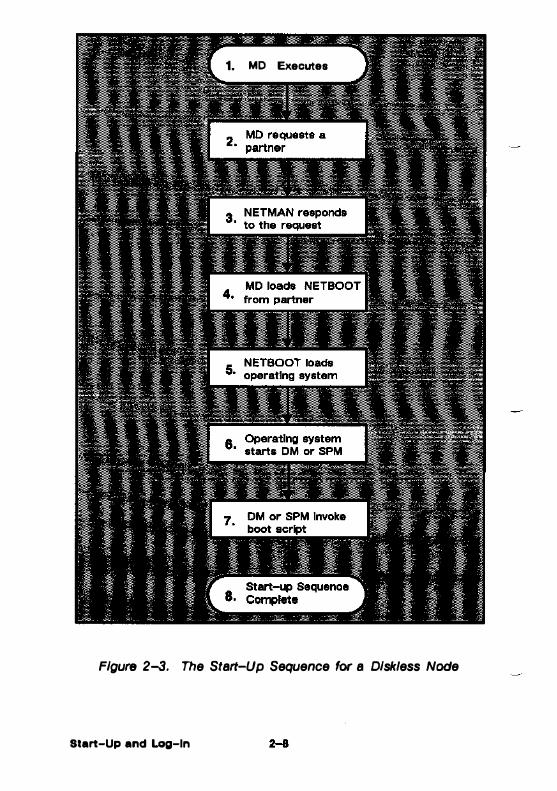
The start-up sequence for diskless nodes is somewhat different than the start-up sequence for disked nodes. A diskless node does not have its own disk to store the operating system and other software files it needs to run. Therefore, each time it starts up, the diskless node must load parts of the operating system across the network from its partner node. The diskless node also relies on its partner for any utility programs and libraries it needs. Figure 2-3 presents a flowchart showing the start-up sequence for a diskless node.
2-7 Start-Up and Log-In
1. MD Executes
Figure 2-3. The Start-Up Sequence for a Diskless Node
Slart-Up and Log-In

From your perspective as a user, starting up a diskless node is the same as starting up a disked node; you turn the power on in NORMAL mode and wait for the log-in prompt to appear. However, the start-up sequence that goes on internally is somewhat different. The descriptions that follow explain each step in the diskless node start-up sequence shown in Figure 2-3. Once you've
/- read the descriptions, go back and compare each step with the disked node start-up sequence described in the "Disked Node Start-Up" section.
1. When you power on your node in NORMAL mode (by following the instructions in your Owner's Guide), a program called the Mnemonic Debugger (MD) begins executing. The MD resides in the node's boot PROM (Programmable Read-Only Memory).
2. Because a diskless node does not have a disk, the MD cannot load SYSBOOT and transfer control to it. Instead, the MD must boot the system from another disked node in the network. The MD then broadcasts a message across the network asking for a partner node to volunteer the use of its boot volume.
3. All nodes running the NETMAN program receive these request messages (NETMAN's purpose is to respond to them) . In response to the diskless node's request, NETMAN on a disked node checks the file /SYS/NBTIDISKLESS LIST. This file on the disked node contains a list of heiadecimal node IDs for all nodes the disked node may offer partnership.
If the diskless list contains the ID of the diskless node requesting partnership, NETMAN volunteers the il.ode as a partner. The first disked node to volunteer becomes the partner of the diskless node. (It remains the diskless node's partner until the next time the diskless node boots.) At this point, the diskless node displays the partner node's node ID for your information.
You can take a look at a sample diskless list by reading the file ISYSINETISAMPLB DISKLESS LIST. For a complete description of how to Create a d'ISkless list and set up partners for diskless nodes, see Administering Your DOMAIN System.
4. Once the diskless node finds a r,artner, the MD copies the NETBOOT program from the fi e, ISYSINBTINBTBOOT on the partner node into the diskless node's memory. The NETBOOT program is a special version of SYSBOOT that diskless nodes use to boot the operating system across the
2-9 Start-Up and Log-In
network. The MD, when finished loading NETBOOT, transfers control to it.
5. The NETBOOT program, running on the diskless node, loads the operating system from the partner node's boot volume into memory.
6. The operating system starts either:
• The Display Manager (DM) on nodes with displays.
• The Server Process Manager (SPM) on DOMAIN Server Processors (DSPs). The SPM is the server program that allows you to create a process on a DSP from a remote node in the network. (Refer to Administering Your DOMAIN System for more information about the SPM.)
At this point, for nodes with 880 keyboards, the OM executes the file ISYSIDMISTD KEYS. This file, which we supply, executes a series of oM commands that define the standard key functions for the 880 keyboard. For nodes using the low-profile keyboard, the OM defines the standard key functions when it executes the boot script (see Step 7). (See the discussion of keyboard types in Chapter 1 in Getting Started With Your DOMAIN System.)
7. The OM or the SPM executes a start-up file, called a boot script, that sets up the initial operating environment on your node. Table 2-1 lists the different boot script files used at stan-up. As shown in Table 2-1, the system chooses which boot script file to execute according to the type of node.
Since diskless nodes don't have files of their own, the OM or SPM must look to the partner node to find its boot script file. Just as on a disked node, the OM or SPM on a diskless node searches for the boot script file in the directory .. NODE_DATA. (The grave accent (' ) that precedes the directory name is a special symbol that returns a value for NODB_DATA.) Unlike a disked node, however, .. NODE_DATA for the diskless node points to the directory ISYSINODB DATA.node-id on the partner's disk. (The node-id suflfx is the hexadecimal node IO of your diskless node.)
Once the OM or SPM finds the diskless node's boot script, the boot script executes. Figure 2-2 shows a sample boot script similar to the one we provide with DN3xx nodes. For information about this script refer to the "Understanding the System at Log-In" section.
S tart-Up and log-In 2-10
A single disked node can serve as the partner for several diskless nodes. Each diskless node may need to use a "node-specific.. boot script to set up its own unique operating environment. Therefore, the system uses the node-id suffix to denote a unique boot script location for each diskless node assigned to the partner.
At start-up, if the partner does not have a NODE_DATA directory set up for the diskless node, NETMAN creates one, copying it from a template stored in the partner's �NODE_DATA directory. The NETMAN program then copies the partner node's boot script file into the diskless node's 'NODE_DATA dire-ctory. If you want the newly created boot script to perform different operations at start-up than its partner, edit the
�boot script.
8. Once the boot script finishes executing, the node start-up completes, and the system prompts you to log in.
A major difference between the disked node and diskless node start-up sequence is the step where the DM or SPM searches for the node's boot script (Step 7 for diskless nodes and Step 5 for disked nodes). Figure 2-4 presents a flowchart that summarizes this search.
2-1 1 Start-Up and Log-In

Figure 2-4. The Boot Script Search Sequence
Understanding the System at Log-In Once a node is up and running, you are ready to log in. At log-in, the system executes a series of scripts that set up the working environment for your log-in session. This section describes the sequence of steps the system performs at log-in. This section also shows you how to create and modify scripts to tailor your log-in
Start-Up •nd Log-In 2-12
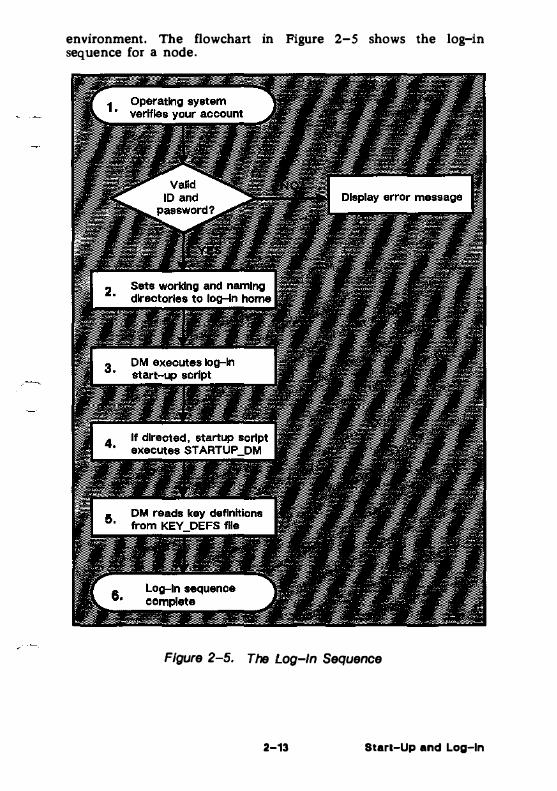
environment. The flowchart in Figure 2-5 shows the log-in sequence for a node.
Figure 2-5. The Log-In Sequence
2-13 Start-Up and Log-In
The descriptions that follow explain each step in the log-in sequence shown in Figure 2-5.
1. After you enter your usemame and password, the operating system verifies your account. (Chapter 1 in Getting Started With Your DOMAIN System describes how to log in using the L (LOGIN) command.)
The system verifies your account by checking the file ACCOUNT in the site registry directory. If the usemame and password match a valid account in the ACCOUNT file, the system executes the next step. If the system cannot verify the account, the log-in attempt fails, and the system displays a log-in error message in the DM output window. For more information about user accounts and registries, see Administering Your DOMAIN System.
l. The system sets your initial working directory and naming directory to the log-in home directory designated in your user accourit. You can change your log-in home directory anytime you log in. (See the "Changing Your Home Directory" section later in this chapter.)
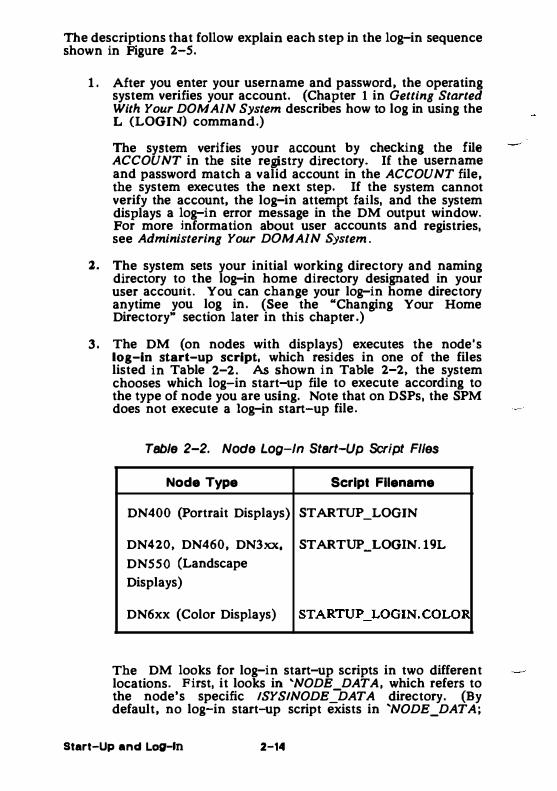
3. The DM (on nodes with displays) executes the node's log-in start-up script, which resides in one of the files listed in Table 2-2. As shown in Table 2-2, the system chooses which log-in start-up file to execute according to the type of node you are using. Note that on DSPs, the SPM does not execute a log-in start-up file.
Table 2-2. Node Log-In Start-Up Script Flies
Node Type Script Filename
DN400 (Portrait Displays) STARTUP_LOGIN
DN420, DN460, DN3xx, STARTUP_LOGIN. 19L DN550 (Landscape Displays)
DN6xx (Color Displays) STARTUP_LOGIN.COLOR
The DM looks for log-in start-up scripts in two different locations. First, it looks in 'NODE_DATA, which refers to the node's specific ISYSINODE_DATA directory. (By default, no log-in start-up script exists in 'NODE_DATA;
Start-Up and Log-In 2-14
you must put one there.) If the OM doesn't find the log-in start-up script in 'NODB_DATA, it executes one of the default log-in start-up scripts that we supply in the directory ISYSIDM.
You may want to create a log-in start-up script in 'NODB_DATA in cases where you don't want the OM to execute the default version. For example, a diskless node, by default, uses one of the log-in start-up scripts located in its partner's ISYSIDM clirectory. If you want the diskless node to execute its own unique log-in start-up script, you can create a copy in the diskless node's 'NODB_DATA directory. For more information about 'NODB_DATA for diskless nodes, refer back to the "Diskless Node Start-Up" section.
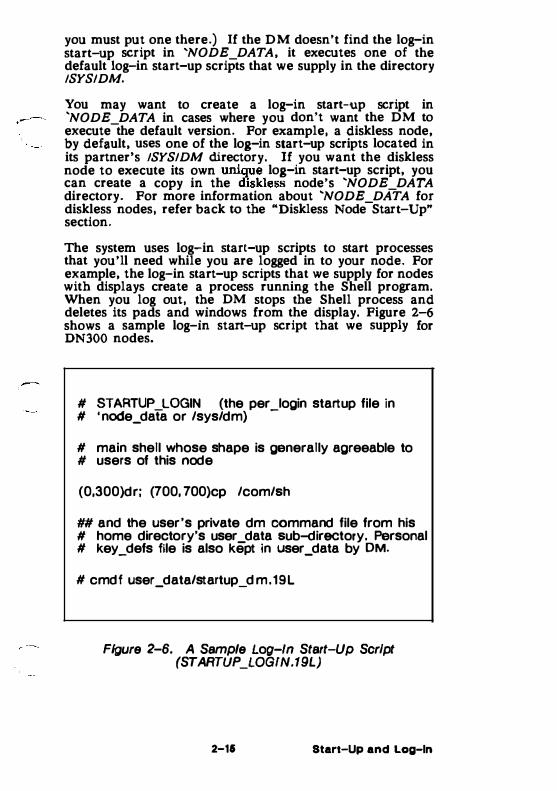
The system uses log-in start-up scripts to start processes that you'll need while you are logged in to your node. For example, the log-in start-up scripts that we supply for nodes with displays create a process running the Shell program. When you log out, the OM stops the Shell process and deletes its pads and windows from the display. Figure 2-6 shows a sample log-in start-up script that we supply for DN300 nodes.
# STARTUP_LOGIN (the per_login startup file in # 'node_data or /sys/dm)
# main shell whose shape is generally agreeable to # users of this node
(0,300)dr; (700, 700)cp /com/sh
## and the user's private dm command file from his # home directory's user_data sub-directory. Personal # key_defs file is also kept in user_data by OM.
# cmdf user_data/startup_dm.19L
Figure 2-6. A Sample Log-In Start-Up Script (STARTUP_LOGIN.19L)
2-15 Start-Up and Log-In
As shown in Figure 2-6, the command that creates the initial Shell process is the only command not commented out in the script. You may leave it in, comment it out by adding the pound sign character (#), or change it to draw the process's windows in a different location. You can also add commands that will stan certain processes that you want to run each time you log in.
You'll notice that the last line in the sample script shown in Figure 2-6 contains the DM command CMDF (COMMAND _FILE). This command invokes another script, STARTUP _DM.19L. If you remove the # character from the command line, the OM attempts to execute this additional script as pan of the log-in sequence. Otherwise, the system performs Step 5. (Note that when you remove the #, the OM will not attempt to execute the script until the next time you log in.)
4. If no # character precedes the CMDF command line, the OM looks in the USER_ DATA subdirectory of your log-in home directory for a file named STARTUP DM that has the same suffix as the log-in start-up script file-(see Table 2-2). If the DM finds the file, it executes the script; otherwise, it displays an error message in the DM output window when the log-in sequence completes.
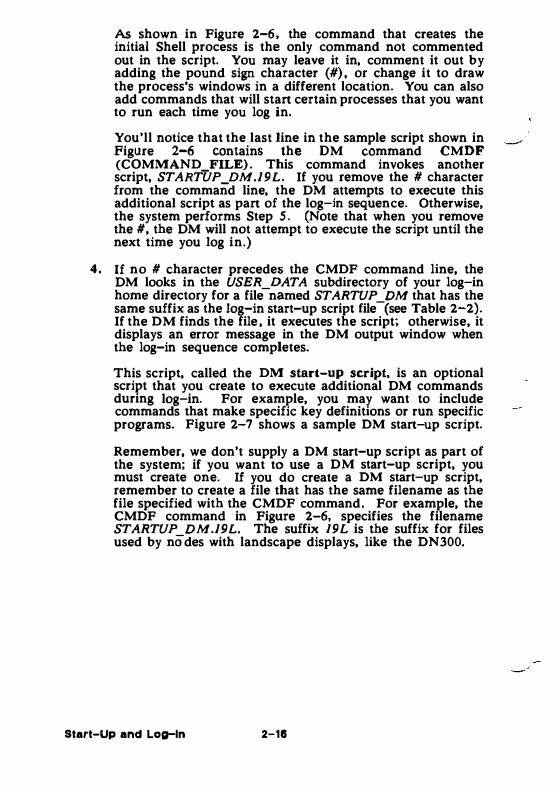
This script, called the DM start-up script, is an optional script that you create to execute additional OM commands during log-in. For example, you may want to include commands that make specific key definitions or run specific programs. Figure 2-7 shows a sample DM stan-up script.
Remember, we don't supply a DM start-up script as part of the system; if you want to use a OM start-up script, you must create one. If you do create a DM start-up script, remember to create a file that has the same filename as the file specified with the CMDF command. For example, the CMDF command in Figure 2-6, specifies the filename STARTUP DM.19L. The suffix 19L is the suffix for files used by nOdes with landscape displays, like the DN300.
Start-Up and Log-In 2-16
# USER_DATA/STARTUP _OM (In login home directory) # Some personal preference keys: # # Define < F4 > and < F5 > for easy PASCAL # indenting and undenting: # KD F4 T1 ;S/% II KE KD F5 T1 ;S/%1 I KE # # Define CTRLIJ to repeat previous substitution: # KD 'J S KE # # Set tab every 5 spaces: # TS 5 - R # # Build a Shell window and execute a personal Shell # program # (0,500)dr; (799,955) cp /com/sh -f -c 'user_data/sh' (0,770)dr;(600, 1 10) wdf1
Figure 2-7. A Sample DM Start-Up Script (STARTUP_DM.19L)
.!! . The OM reads the file KEY_DEFS2 (for nodes with low-profile keyboards) or KEY_DEFS (for nodes with 880 keyboards). These files, located in the USER_DATA directory of your log-in home directory, contain a record of any key definitions that you made the last time you were logged in. By reading these files, the OM carries over key definitions to the new log-in session. These files are non-ASCII files; therefore, you cannot edit them.
6. At this point, the log-in sequence is complete.
2-17 Start-Up and Log-In
Logging In Chapter 1 in Getting Started With Your DOMAIN System describes the basic procedure for logging in to your node. This section describes the various log-in procedures you can use to log in as USER, change your password and log-in home directory, and log in to a DOMAIN Server Processor (DSP).
Logging In as User The registry file ACCOUNT, described earlier in the "Understanding the System at Log-In" section, contains a default account named USER.NONE.NONE, or simply USER. This default account allows any user anywhere in the network to log into the DOMAIN system.
To use the default account, log in with the username USER as follows:
Please log In: L USER <RETURN>
When the system prompts you for a password, simply press <RETURN>.
Changing Your Password You can change your password anytime you log in by typing -p after your username as follows:
Please log In: L USERNAME -p <RETURN>
After you specify your current password at the "Password: .. prompt, the system displays the followmg prompt if the log-in is successful:
Enter new password:
Specify the new password next to the prompt, and press <RETURN>. Next the system prompts you to verify your new password (to ensure that you entered it correctly}. At the prompt, type the new password again and press <RETURN>. Use the new password the next time you log in.
If you want to maintain a secure account, avoid using obvious passwords such as your username or your initials. If security is not a high priority, you can use a blank password. (Note, however, that blank passwords violate system security,) To change your password to a blank, specify a space in quotation marks. For example:
Enter new password: " " <RETURN>
To enter a blank password when you log in, just press <RETURN>.
Start-Up and Log-In 2-18
Changing Your Home Directory
Each system account has a directory associated with it, called the home directory. Anytime you log in, the system sets your initial working and naming directories to your home directory. When you log in, you can change your home directory to another directory in
___ the naming tree by specifying the -h option after your username as follows:
Please log In: L USEANAME -h
Specify your current password at the "Password: .. prompt. If the log-in is successful, the system displays the following prompt along with the pathname of your current home directory:
Change home directory: pathname
To change your home directory, change the pathname to the pathname of the new home directory you want to use and press <RETURN>.
When you enter the pathname of your new home directory, the system attempts to update the file ACCOUNT in your site registry directory. This file contains information about your account, such as your username, password, and home directory. By updating the ACCOUNT file, the system stores your new home directory for logging in later. See Administering Your DOMAIN System for more information about the ACCOUNT file and system registries.
If the system succeeds in updating the ACCOUNT file, it displays a message in the DM output window verifying the update. If the system cannot update the ACCOUNT file, it displays a message in the DM output window. In the latter case, although the system could not update the file, it still uses the new home directory during the current log-in session.
Logging Into a DOMAIN Server Processor (DSP) Unlike user nodes, a DOMAIN Server Processor (DSP} doesn't have a keyboard or display. Therefore, you must log into it from a user node in the network.
As described earlier in the KDisked Node Start-Up'' section, when you start up a DSP, the system starts a program called the Server Process Manager (SPM}. The SPM makes it possible for you to create a process on the DSP, log into the process, and execute programs and commands, all while you sit at a user node in the network.
For a complete description of the procedure for logging into a DSP, see the Owner's Guide for your particular processor.
2-19 Start-Up and Log-In

CHAPIER
Using the Display Manager
3
The Display Manager (DM) is the operating system program that controls your node's display. Using DM commands, you can instruct the DM to perform specific display management operations, such as moving the cursor around the display, creating and controlling processes, creating and manipulating pads and windows, and modifying display characteristics.
ntis chaP.ter explains the functions of the DM and describes how you spectfy DM commands. It also describes how to define keys to perform OM operations. Chapter 4 describes how to use the DM to perform specific display-management tasks.
3-1 Using the Display Manager
Using DM Commands DM commands enable you to control your node's display by instructing the DM to perform specific display management operations. To use a DM command, you normally perform two basic steps:
1. Point to the spot on the display where you want the DM operation performed.
2. Specify a DM command to execute the operation.
You point to a spot on the display either by moving the cursor to the desired spot, or by explicitly defining a point on the screen as a command argument. If you don't perform a pointing operation using either method, the DM executes the command at the current cursor position.
Some DM commands require you to define an area, or region, on the screen instead of a single point. You define the size of a region by defining two points on the screen. The region is simply the area between the two points. The "Defining Points and Regions" section describes how to define points and regions.
To specify a DM command interactively:
1. Press <CMD> to move the cursor next to the Command: prompt in the DM input pad. (The DM remembers where the cursor came from so it can apply the next command to that point.)
2. Type the command along with any arguments or options.
3. Press <RETURN> to invoke the command.
Use this procedure to specify commands interactively from your keyboard. You can also specify commands in special DM programs, called scripts. When you invoke a DM script, the DM reads and executes DM commands in the order you specify them. The "Using DM Command Scripts" section describes how to use DM scripts.
The method you use to define a point depends on the DM command you use, and how you use it. When you specify a command interactively, you usually point with the cursor. In scripts, you specify a point explicitly as a command argument. Figure 3-1 illustrates the interactive procedure for invoking the WC command to delete a window.
Using the Display Manager 3-2
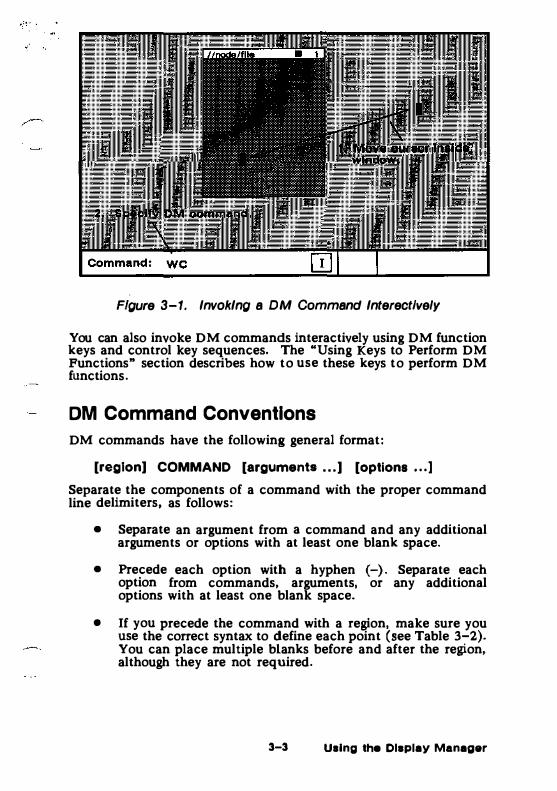
F!Qure 3-1. lnvoklnQ a DM Command lnterectively
You can also invoke DM commands interactively using DM function keys and control key sequences. The "Using Keys to Perform DM Functions" section describes how to use these keys to perform DM functions.
OM Command Conventions
DM commands have the following general format:
[region] COMMAND [arguments • • • ] [options . . . ]
Separate the components of a command with the proper command line delimiters, as follows:
• Separate an argument from a command and any additional arguments or options with at least one blank space.
• Precede each option with a hyphen (-). Separate each option from commands, arguments, or any additional options with at least one blank space.
• If you precede the command with a region, make sure you use the correct syntax to define each point (see Table 3-2). You can place multiple blanks before and after the region, although they are not required.
3-3 Using the Display Manager

• You can string mutiple commands together on the same line by separating each command with a semicolon (;) as shown below:
PT;TT;TL
This command sequence executes three separate commands to move the cursor to the first character in a pad.
When you use commands in scripts and key definitions, you can use several special characters that control how the DM interprets commands. Table 3-1 lists the rules for using these special characters.
@
#
;
&
Table 3-1. Rules for Using DM Special Characters
The escape character (@) always nullifies the meaning of any special character (such as the input request character) it precedes. When the DM reads a command line containing the escape character, it strips off the @ character, and any special meaning of the character it precedes.
If you can't remember whether a character has some special meaning, it is safe to escape the character. If the character is not special, the DM still removes the @, so the character appears as it should. Character escaping is generally confined to search and substitute operations (see Chapter S), commands requiring quoted strings, and key definitions.
When the DM reads the pound sign (#) in a DM script, it ignores the information on the remainder of the line. Use this character to add comments to your DM script.
Use the semicolon (;) specify on the same line.
to separate commands that you
The input request character (&) enables you to supply keyboard input from the DM input pad to a command in a key definition or script. When the DM reads the &, it stops reading commands and moves the cursor to the OM input pad. When you enter input (usually a command argument), the DM replaces the & character with the specified input and continues reading commands. You can also specify a prompt in the form
& "prompt"
to display a prompt in the DM input pad that requests the proper input.
Using the Display Manager

The following commands accept strings surrounded by single quotes: KD, ES, CP, CPO, CPS, and &. When you use single quotes, the only characters in the quoted string that retain their special meaning are @ and &; all other characters revert to their literal values. Note, however, that the KD command does not recognize single quotes within the definition string.
Defining Points and Regions
Most DM commands require you to either point with the cursor or define a point or region on the display. To point, simply move the cursor to the desired location. For example, to point to a window, position the cursor anywhere inside the window. Commands that operate on windows read the cursor position to determine which window you want to work on.
The block cursor actually occupies many individual screen points. When you use the block cursor to point to a spot on the screen, the lower left-hand corner of the block cursor designates the exact point. (When you point to the upper edge or right edge of a window, the DM adjusts the point position to account for the size of the cursor. See the "Creating Pads and Windows" section in Chapter 4 for more information on how the DM defines window boundaries.)
If you choose not to ,POint with the cursor, you can explicitly define a �-- point or pair of pomts (a region) using any of the point formats
descnbed in Table 3-2. Note that some formats define points in pads, and others define points on the display as a whole. You normally define points in pads when performing the pad editing operations described in Chapter S.
3-5 Using the Display Manager

Table 3-2. Formats for Specifying Points on the Display
line-number
Specifies a line location in a pad. Line numbers begin at 1 and range upward to the last line in the pad. To refer to the last line in a pad, you may specify the dollar sign ($) symbol. The edit pad window legend displays the line number of the top line in a window. You can also display the line number (plus the column number, and x- and y- coordinates) of the current cursor position by using the DM command •.
+f- n
Specifies a line location in a pad that is n lines before (-) or after ( +) the current cursor position.
[ [ line-number ] [ ,column-number ] ]
Specifies a point in a pad by line and column number. The DM assumes the current line if you omit line-number; it assumes column 1 if you omit column-number. Line numbers range from 1 to the last line in the pad. Column numbers range from 1 to 256. Some examples are:
[ 127,14[
[ 53 [
I .12 I
Line 127, column 14.
Line 53, column 1.
Column 12 of the current line.
Note that you must use the outer set of square brackets; however, when you specify line-number only, the brackets are optional. When using this format, you cannot use the dollar sign ($) to specify the last line in a pad; you must specify the number of the last line.
/regular-expression/ or \regular-expression\
Specifies a string in a pad that begins or ends a specific region. Chapter 5 describes regular expressions.
Using the Display Manager
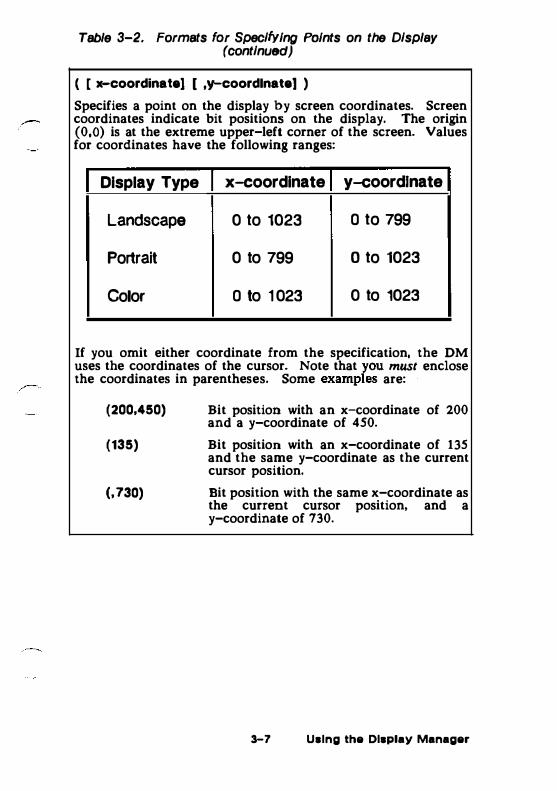
Table 3-2. Formats for Specifying Points on the Display (continued)
( [ x-coordinatel [ ,y-coordlnatel )
Specifies a point on the display by screen coordinates. Screen coordinates indicate bit positions on the display. The origin (0,0) is at the extreme upper-left corner of the screen. Values for coordinates have the following ranges:
Display Type x-coordinate y-coordlnate
Landscape 0 to 1023 o to 799
Portrait 0 to 799 o to 1023
Color o to 1 023 0 to 1023
If you omit either coordinate from the specification, the DM uses the coordinates of the cursor. Note that you must enclose the coordinates in parentheses. Some examples are:
(200,450)
(135)
(, 730)
Bit position with an x-coordinate of 200 and a y-coordinate of 450.
Bit position with an x-coordinate of 135 and the same y-coordinate as the current cursor position.
Bit position with the same x-coordinate as the current cursor position, and a y-coordinate of 730.
3-7 Using the Display Manager
When you specify any of the formats described in Table 3-2 in the OM input pad, the OM moves the cursor to the specified position. For example, to move the cursor to line 7 5, column 5 in an edit pad, specify the following in the DM input pad:
Command: [ 75,5 J
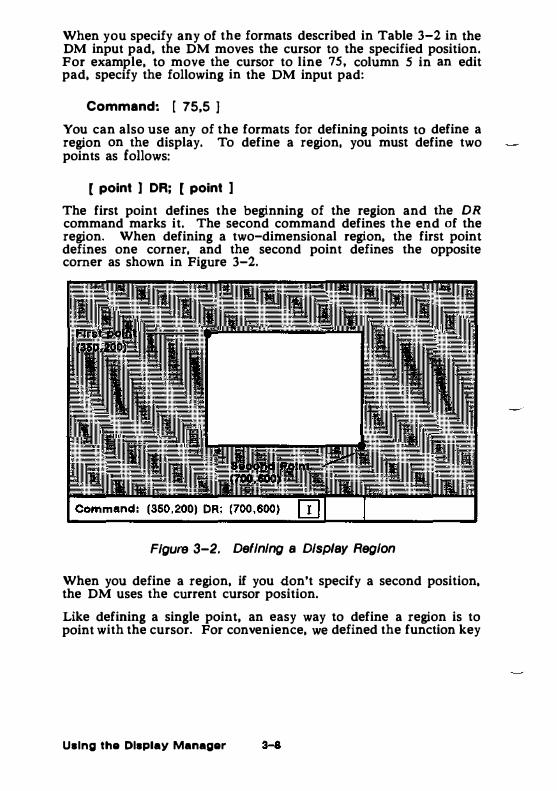
You can also use any of the formats for defining points to define a region on the display. To define a region, you must define two points as follows:
[ point ) DR; [ point ]
The first point defines the beginning of the region and the DR command marks it. The second command defines the end of the region. When defining a two-dimensional region, the first point defines one corner, and the second point defines the opposite comer as shown in Figure 3-2.
Figure 3-2. Defining a Display Region
When you define a region, if you don't specify a second position, the OM uses the current cursor position.
Like defining a single point, an easy way to define a region is to point with the cursor. For convenience, we defined the function key
Using the Display Manager
<MARK> to invoke the DR command, which marks the first point. To define a region using the cursor:
1. Move the cursor to the first point.
2. Press the <MARK> key.
3. Move the cursor to the second point.
4. Specify the OM command.
For a complete description of the OM commands used to control marks, see the DOMAIN System Command Reference.
For commands that require a region in which to operate, you have the option of specifying the region as part of the command. The CV (CREATE VIEW) command, shown below, creates a read-only pad and wfndow, It uses a region to define the size and location of the window it creates.
Command: (350,200) DR; (700,600) CV MY FILE
T' -region command
Using Keys to Perform DM Functions You can also perform display management operations using keys, called function keys, that we've defined as specific OM commands. When you press a function key, it invokes its assigned OM command or command sequence.
By default, many keys perform OM operations when pressed simultaneously with the <CTRL> key. Like function keys, these key combinations, called control key sequences, provide you with a "shorthand" method of specifying commands.
The DOMAIN system's set of predefined function keys and control key sequences enable you to execute commonly performed operations. For example, the directional keys described in Chapter 1 in Getting Started With Your DOMAIN System are predefined keys that you'll use routinely to move the cursor.
We've also defined the mouse's function keys to perform three useful OM operations. Table 3-3 describes the default mouse key functions.
Using the Display Manager
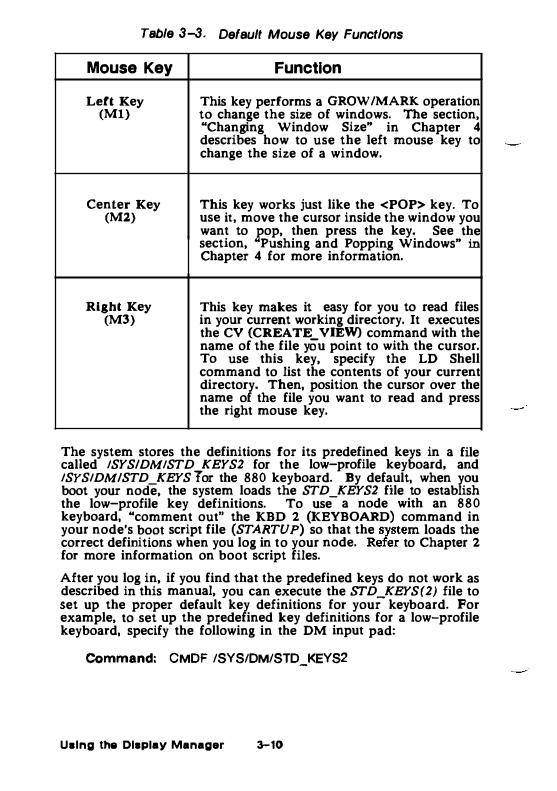
Table 3-3. Default Mouse Key Functions
Mouse Key Function
Left Key This key performs a GROW /MARK operation (Ml} to change the size of windows. The section,
"Changing Window Size" in Chapter 4 describes how to use the left mouse key to change the size of a window.
Center Key This key works just like the <POP> key. To (M2} use it, move the cursor inside the window you
want to pop, then press the key. See the section, "Pushing and Popping Windows" Chapter 4 for more information.
m
Right Key This key makes it easy for you to read files (M3} in your current working directory. It executes
the CV (CREATE VIEW) command with the name of the file yOu point to with the cursor. To use this key, specify the LD Shell command to list the contents of your current directory. Then, position the cursor over the name of the file you want to read and press the right mouse key.
The system stores the definitions for its predefined keys in a file called ISYS/DMISTD KEYS2 for the low-profile keyboard, and ISYSIDM/STD_KEYS 1or the 880 keyboard. By default, when you boot your node, the system loads the STD_KEYS2 file to establish the low-profile key definitions. To use a node with an 880 keyboard, "comment out" the KBD 2 (KEYBOARD) command in your node's boot script file (STARTUP) so that the system loads the correct definitions when you log in to your node. Refer to Chapter 2 for more information on boot script files.
After you log in, if you find that the predefined keys do not work as described in this manual, you can execute the STD_KEYS(2) file to set up the proper default key definitions for your keyboard. For example, to set up the predefined key definitions for a low-profile keyboard, specify the following in the DM input pad:
Command: CMDF /SYS/DM/STD_KEYS2
Using the Display Manager 3-10
You can also define your own function keys and control key sequences by assigning commands to specific key names. But, before you can define keys, you must understand how they are named. The next two sections describe key naming conventions and describe how to define keys.
Key Naming Conventions
The OM identifies each key on your keyboard (and mouse) by a unique name. The names of the ordinary character keys (letters and numbers) have the same name as the characters they represent. For example, the A key has the name "A". Other keys, like the OM function keys, have special names that are different than the names written on them. The <READ> key, for example, has the name R2. Figure 3-3 shows the names and locations of the keys on both the low-profile keyboard and 880 keyboard.
For example, on low-profile keyboards, the <CUT> I <COPY> function key (LlA) performs a different function when you use it with the <SHIFT> key. The name (LlA) identifies the key's normal function (when you press the key down). The name (LlAS), referred to as the key's shifted name, identifies the key's function when pressed simultaneously with the <SHIFT> key. The key's up-transition name (LlAU) identifies the function the key performs when released. Table 3-4 describes the key naming conventions you should use when defining keys.
When defining a key as a command or sequence of commands, you use the same name that the DM uses to identify the key. Some. keys, like the OM and program function keys, function differently depending on how you use them. Therefore, each of these keys has a set of additional names that identify the manner in which the key is used.
3-11 Using the Display Manager

II � � :-j' �
'iT ' ., ..
10' '
>R '•
';], � =
/ "' I /., .... '( i ' « .. E; . , • . . •
• • ·
'
' .. I I .. . .
• •
' • , . .. •
' ., " .
• •· . •
" -· •
• •
Ei' •• •
� I r!; > • •
' - • • .
.. • ' . •
•• • • •
.. • > > > •
't! , .. • . , • 0 ' •• •
• > .. • ,. •
' • • .. • ' • 0
.. • • " • •
, , � • • ,ll >;?-� i! I i
• H !
' .. • • "
.. • ' •
-- ' !I •
' ' !
• .. . . , . · ' ' · ' ' · c . . •
' . . . . ' . ' ' ' · ;..· � : .
� _: "' ...
� -:· � : ' . 9: ' .
. • •"
;.;: ; , ·� 'ic· '· !.'> ' · �- ' �; , �� � •
• . � • ' . � ;_ ' . ' · ·: '
Figure 3-3. Key Names for the 880 and Low-Profile Keyboards
Using the Display Manager 3-12

Table 3-4. Key Naming Conventions
Key Type
Ordinary Characters
ASCII Control
Control Key
Program Function
Description
These keys have the same name as the char-acters (numbers and letters) they represent. You can assign functions to lowercase letters and numbers, as well as to capital letters and special characters. When you specify ordinary characters, enclose the character in single quotes (" ') .
These are the standard line control keys. Their names are:
CR Carriage Return BS Back Space TAB Tab TABS Shifted Tab 'TAB Control Shifted Tab ESC Escape (low-profile
only) . Same as '''(' (hex lB)
DEL Delete (low-profile only) Same as " ' I ' (hex 7F)
These are ordinary character or program function keys used with the <CTRL> key. Specify a control key name as "x (where x is an ordinary character or program function key name.). For example, use 'Y for CTRLIY or "F4 for CTRL/F4.
These keys are reserved for user program control. They appear at the top of the keyboard and are named F l through F8 as labeled. Their up-transition names are F 1 U through FBU; their shifted names are FlS through FSS; and their control key names are "Fl through "'FS.
3-13 Using the Display Manager
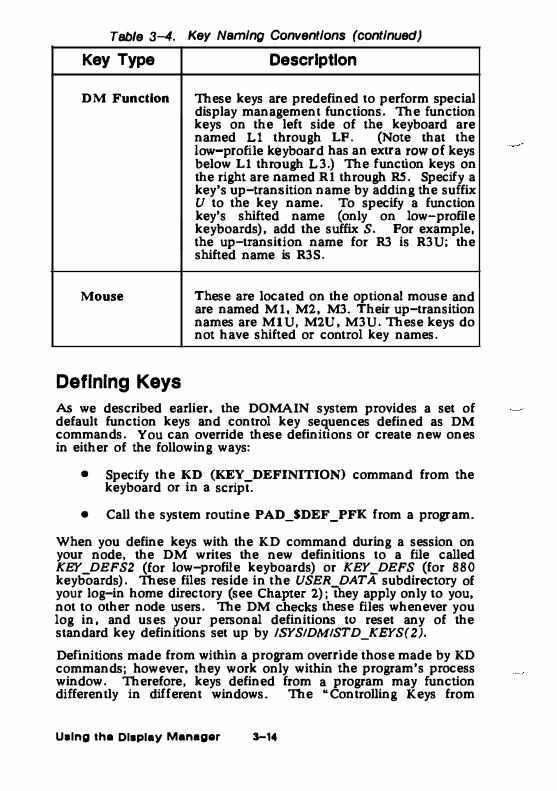
Table 3-4. Key Naming Conventions (continued)
Key Type
DM Function
Mouse
Defining Keys
Description
These keys are predefined to perform special display management functions. The function keys on the left side of the keyboard are named Ll through LF. (Note that the low-profile keyboard has an extra row of keys below L l through L3.) The function keys on the right are named R l through RS. Specify a key's up-transition name by adding the suffix U to the key name. To specify a function key's shifted name (only on low-profile keyboards), add the suffix S. For example, the up-transition name for R3 is R3U; the shifted name is R3S.
These are located on the optional mouse and are named M l, M2, M3. Their up-transition names are M l U, M2U, M3U. These keys do not have shifted or control key names.
As we described earlier. the DOMAIN system provides a set of default function keys and control key seq_uences defined as DM commands. You can override these definitions or create new ones in either of the following ways:
• Specify the KD (KEY_DEFINITION) command from the keyboard or in a script.
• Call the system routine PAD_$DEF_PFK from a program.
When you define keys with the KD command dwing a session on your node, the DM writes the new definitions to a file called KEY_DEFS2 (for low-profile keyboards) or KEY_DEFS (for 880 keyboards). These files reside in the USER_ DATA subdirectory of your log-in home directory (see Chapter 2 ) ; they apply only to you, not to other node users. The DM checks these files whenever you log in, and uses your personal definitions to reset any of the standard key definitions set up by /SYSIDMISTD_KEYS(2).
Definitions made from within a program override those made by KD commands; however, they work only within the program's process window. Therefore, keys defined from a program may function differently in different windows. The "Controlling Keys from
Using tha Display Manager 3-14
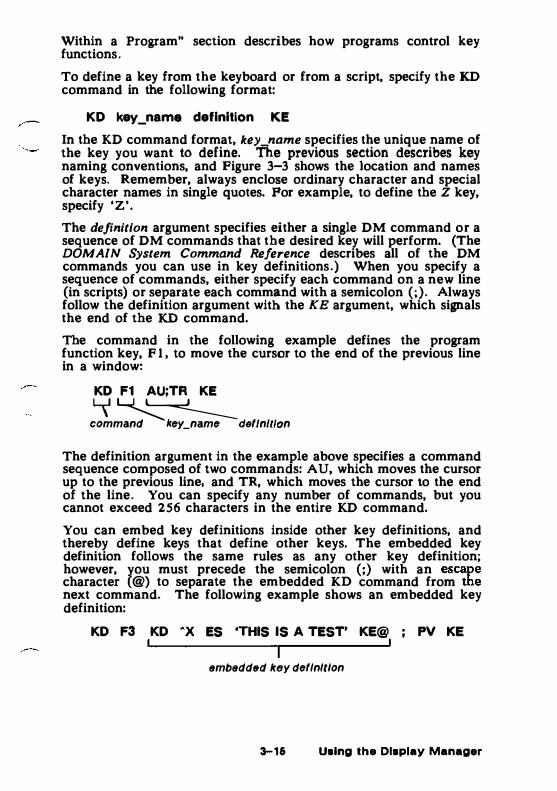
Within a Program" section describes how programs control key functions.
To define a key from the keyboard or from a script, specify the KD command in the following format:
KD key_nama definition KE
In the KD command format, key name specifies the unique name of the key you want to define. the previous section describes key naming conventions, and Figure 3-3 shows the location and names of keys. Remember, always enclose ordinary character and special character names in single quotes. For example, to define the Z key, specify •z•.
The definition argument specifies either a single DM command or a sequence of DM commands that the desired key will perform. (The DOMAIN System Command Reference describes all of the DM commands you can use in key definitions.) When you specify a sequence of commands, either specify each command on a new line (in scripts) or separate each command with a semicolon (;). Always follow the definition argument with the KE argument, which signals the end of the KD command.
The command in the following example defines the program function key, Fl , to move the cursor to the end of the previous line in a window:
KD F1 AU;TR KE
"' �� command key _name definition
The definition argument in the example above specifies a command sequence composed of two commands: AU, which moves the cursor up to the previous line, and TR, which moves the cursor to the end of the line. You can specify any number of commands, but you cannot exceed 256 characters in the entire KD command.
You can embed key definitions inside other key definitions, and thereby define keys that define other keys. The embedded key definition follows the same rules as any other key definition; however, you must precede the semicolon (;) with an escape character (@) to separate the embedded KD command from the next command. The following example shows an embedded key definition:
KD F3 KD ·x ES 'THIS IS A TEST' KE@ ; PV KE
embeddttd key definition
3-16 Using the Display Manager
This command defines the F3 key to perform the following operations when pressed:
• Define CTRL/X to print out the string, "This is a test." (The embedded key definition specifies this function.)
• Invoke the PV command to scroll the current pad one line. (Chapter 4 describes the PV command.)
Note that the DM scans embedded key definitions three times when:
1. It makes the outer key definition.
2. It executes the outer key definition and makes the inner key definition.
3. It executes the inner key definition.
To define a key that prompts you for input, specify as pan of the definition argument, the input request character (&) in the following format:
&"prompt"
where prompt specifies the prompt string. The input request character and prompt cause the DM to prompt for part of the definition argument you specified in the key definition. For example, the <READ> key (R3) has the following default key definition:
KD R3 CV &'Read Fila: KE
Whenever you press the <READ> key, the DM displays the prompt, Read File: in the DM input pad and moves the cursor next to it. When you respond to the prompt by typing the name of a file and pressing <RETURN>, the DM replaces &'Read File: from the key definition with your response. In this way, the CV command opens the file you specify. (Chapter 4 describes the CV command.)
NOTE: When you define keys in scripts, you must precede the input request character (&) with the escape character (@) .
When you enter a response to a prompt, the DM remembers the response you typed. So, the next time you press the key, the DM automatically displays the previous response next to the prompt. (This is why the <READ> and <EDIT> keys remember the last files used.} You can either move the cursor to the right of the previous response and press <RETURN> to enter the response, or delete the previous response and enter a new one.
Using the DisplaY Manager 3-16
Deleting Key Definitions To delete a key definition, specify the KD command without a definition argument. For example:
KD F1 KE
deletes the current definition for the key named F I . For keys with ordinary character names, the key reverts to its normal graphic value.
Displaying Key Definitions To display a key's current definition, specify the KD command without the definition or KE arguments. The command in the following example displays the definition for the <READ> key (R3):
KD R3
The DM displays the current key definition in the DM output window.
Controlling Keys from Within a Program The DOMAIN system enables application programs to assume control of various display and keyboard functions. For example, the character font editor, EDFONT (EDIT_FONT), displays several different menus on your screen that you control with your mouse keys (Ml through M3). When you use EDFONT, the EDFONT program defines how these keys function; the keys do not maintain their normal DM definitions. The DM restores the mouse keys to their normal DM definitions when you end your EDFONT session. The DOMAIN System Command Reference describes the EDFONT character font editor.
For your own applications, you can control key definitions through program calls to the PAD_$DEF_PFK and PAD_$DM_CMD routines. For more information on these system routines, refer to the PAD routines section of the DOMAIN System Call Reference.
You may find the normal functions of the DM keys useful even when using an application program that has redefined them. With the <HOLD> Oow-profile) and <HOLD/GO> (880 keyboard) keys, you can temporarily override the application program's key definitions and use the normal OM definitions.
To override an application program's key definitions, press the <HOLD> key. By pressing the <HOLD> key again, you restore the application program's key definitions. Note that this function of the
3-17 Ualng the Display Manager
<HOLD> key is different than the normal DM function of switching a window in and out of hold mode (see Chapter 4).
Using DM Command Scripts A DM script is a file that contains one or several DM commands. You can use DM scripts to perform any of the DM operations described in this manual, such as creating and controlling processes, manipulating pads and windows, editing files, and defining keys.
You execute scripts by specifying the pathname of the script file with the DM command CMDF (COMMAND_FILE) as follows:
CMDF pathname
The start-up scripts discussed in Chapter 2 are examples of DM command scripts that the system uses to set up your node's operating environment. In fact, your node's log-in start-up script uses the CMDF (COMMAND_FILE) command to invoke the DM start-up script that you create. Figure 2-2 in Chapter 2 shows a sample DM start-up script, STARTUP. J9L, for a DN300 node.
Using the Display Manager 3-18
CHAPTER
Controlling the Display
4
This chapter describes how to use the OM to control your node's display. Each section describes a set of related screen-management tasks and the DM commands you use to perform them.
You can execute a DM command either from a DM script or interactively by specifying the command in the DM input window. In some cases, you can also execute a DM command by typing a function key or control key sequence.
The command summary tables, at the beginning of each section, list the OM commands, and related function keys and control key sequences, used to perform a specific set of tasks. Chapter 3 explains how to specify DM commands from the keyboard and from scripts, and how to use function keys and control key sequences.
For a complete description of all the DM commands described in this chapter, refer to the DOMAIN System Command Reference.
4-1 Controlling the Display
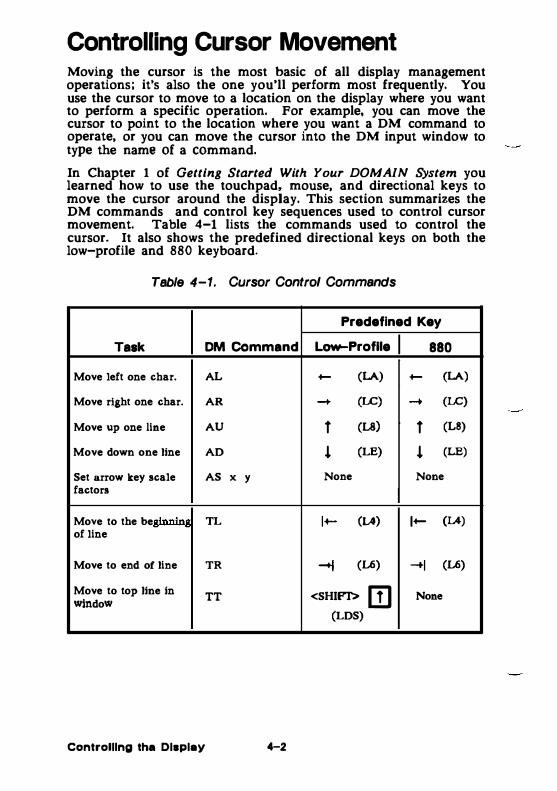
Controlling Cursor Movement Moving the cursor is the most basic of all display management operations; it's also the one you'll perform most frequently. You use the cursor to move to a location on the display where you want to perform a specific operation. For example, you can move the cursor to point to the location where you want a DM command to operate, or you can move the cursor into the DM input window to type the name of a command.
In Chapter 1 of Getting Started With Your DOMAIN System you learned how to use the touchpad, mouse, and directional keys to move the cursor around the display. This section summarizes the DM commands and control key sequences used to control cursor movement. Table 4-1 lists the commands used to control the cursor. It also shows the predefined directional keys on both the low-profile and 880 keyboard.
Table 4-1. Cursor Control Commands
Predefined Key
Task OM Command Low-Profile 880
Move left one char. AL - (LA) - (LA) Move right one char. AR - (LC) - (LC) Move up one line AU t (L8) t (L8)
Move down one line AD l (LE) l (LE) Set arrow key scale AS x ' None None factors
Move to the be TL 1- (!A) 1- (!A) of line
Move to end of line TR -I (L6) -1 (L6) Move to top line in
TT <SHIFT> rn None window
(LDS)
Controlling tha Display 4-2
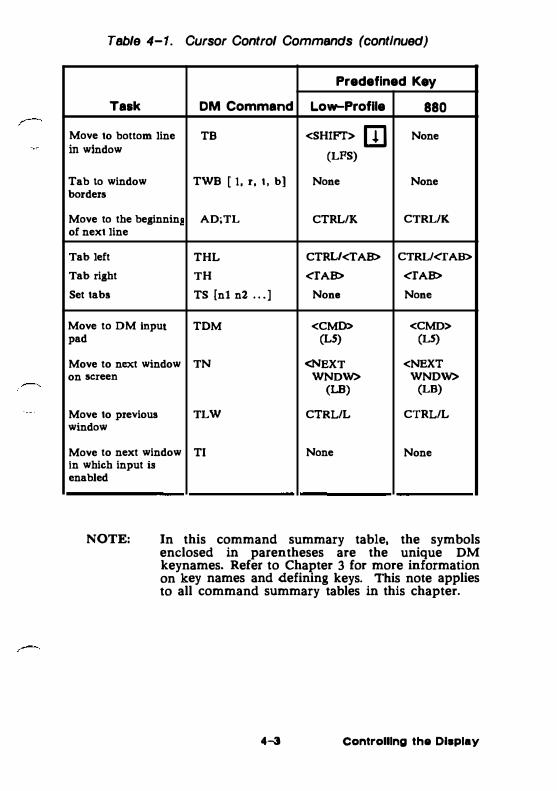
Table 4-1. Cursor Control Commands (continued)
Predefined Key
Task OM Command Low-Profile 880
Move to bottom line TB <SHIFT> [I] None in window
(LFS)
Tab to window TWB [ 1, r, t, b] None None borders
Move to the beginnin AD;TL CTRL/K CTRL/K of next line
Tab left THL CTRU<rAB> CTRL/<rAB>
Tab right TH <TAB> <TAB>
Set tabs TS [nl n2 • • • ] Nono None
Move to DM input TOM <CMD> <CMD> pad (LS) (LS)
Move to next window TN <NEXT <NEXT on screen WNDW> WNDW>
(LB) (LB)
Move to previous TLW CTRL/L CTRL/L window
Move to next window TI None None In which input is enabled
NOTE: In this command summary table, the symbols enclosed in parentheses are the unique DM keynames. Refer to Chapter 3 for more information on key names and defining keys. This note applies to all command summary tables in this chapter.
4-3 Controlling the Display
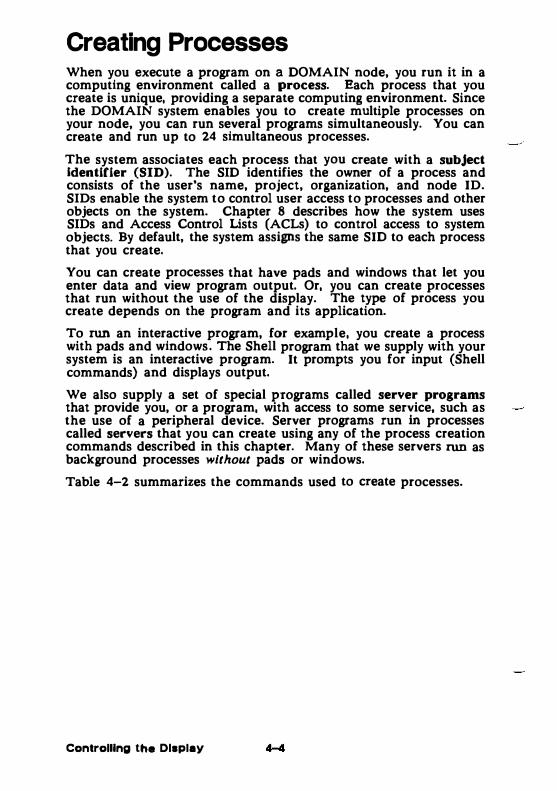
Creating Processes When you execute a program on a DOMAIN node, you run it in a computing environment called a process. Each process that you create is unique, providing a separate computing environment. Since the DOMAIN system enables you to create multiple processes on your node, you can run several programs simultaneously. You can create and run up to 24 simultaneous processes.
The system associates each process that you create with a subject Identifier (SID). The SID identifies the owner of a process and consists of the user's name, project, organization, and node ID. SIDs enable the system to control user access to processes and other objects on the system. Chapter 8 describes how the system uses SIDs and Access Control Usts (ACLs) to control access to system objects. By default, the system assigns the same SID to each process that you create.
You can create processes that have pads and windows that let you enter data and view program output. Or, you can create processes that run without the use of the display. The type of process you create depends on the program and its application.
To run an interactive program, for example, you create a process with pads and windows. The Shell program that we supply with your system is an interactive program. It prompts you for input (Shell commands} and displays output.
We also supply a set of special pTOgrams called server programs that provide you, or a program, with access to some service, such as the use of a peripheral device. Server programs run in processes called servers that you can create using any of the process creation commands described in this chapter. Many of these servers run as background processes without pads or windows.
Table 4-2 summarizes the commands used to create processes.
Controlling the Display
Table 4-2. Commands for Creating Processes
Predefined Keys
Task DM Command Low-Profile 880
Create new process, CP pathname <SHELl> <SHELL> pads, and windows (LSS) (RZ)
Create new process CPO pathname None None without pads or windows
Create a server CPS pathname None None process
Creating a Process with Pads and Windows To create a process with input and output pads and windows to view these pads, use the CP (CREATE_PROCESS) command in the followmg format:
[reglon]CP pathnama [option&]
where region specifies the coordinates of the process window and pathname specifies the pathname of the program you want the process to execute. The process pads and windows that the CP command creates enable you to supply input to programs and view program output.
The command in the following example creates a process that executes an interactive program called COUNTER.BIN. The program prompts for program input and displays its output to the process's transcript pad.
CP /HORACE/PROGS/COUNTER.BIN -N COUNTER
The -N option assigns the process the name COUNTER. When COUNTER.BIN completes (or if you stop the program or process), the input and transcnpt pads close. To delete the remaining process window, type CTRL/N. Note that in this example, since no region is specified, the DM uses its default window coordinates to create the window (see the "Defining Default Window Positions" section later in this chapter.)
One process that you'll create frequently is a process that runs the Shell program that we supply. You can create a process running
Controlling the Display
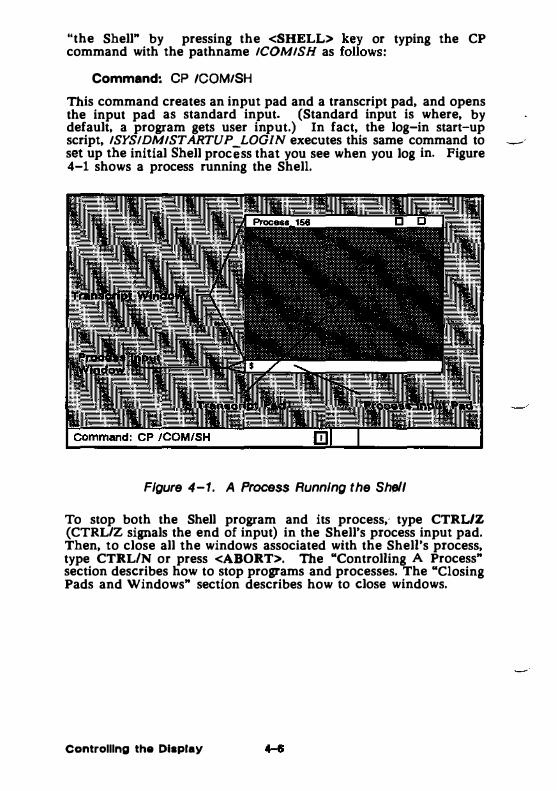
"the Shell" by pressing the <SHELL> key or typing the CP command with the pathname ICOMISH as follows:
Command: CP /COMISH
This command creates an input pad and a transcript pad, and opens the input pad as standard input. (Standard input is where, by default, a program gets user input.) In fact, the log-in start-up script, ISYS!DMISTARTUP LOGIN executes this same command to --set up the initial Shell prociss that you see when you log in. Figure 4-1 shows a process running the Shell.
Figure 4-1. A Process Running the Shell
To stop both the Shell program and its process,- type CTRUZ (CTRL/Z signals the end of input) in the Shell's process input pad. Then, to close all the windows associated with the Shell's process, type CTRL/N or press <ABORT>. The "Controlling A Process" section describes how to stop programs and processes. The "Closing Pads and Windows" section describes how to close windows.
Controlling the Display
Creating a Process without Pads and Windows To create a background process without associated pads and windows, specify the CPO (CREATE_PROCESS_ONLY) command in the following format:
CPO pathname [options]
where pathname specifies the pathname of the file that you want the process to execute.
When you invoke the CPO command, the system assigns the created process the SID of the process that invoked the CPO command. The created process runs until the owner of the process logs out.
Suppose you wanted to create a process running the alarm server program to monitor your disk usage, and to warn you when your disk becomes 90% full. To create the process and start the alarm server, specify the following command:
CPO /SYS/ALARM/ALARM_SERVER -DISK 90 In this example, the alarm server runs as a background process on your node. When you log off, the process stops. The manual, Administering Your DOMAIN System provides detailed information
,�.---- about the alarm server and other servers.
If you include the CPO command in the DM boot script, 'NODE_DATAISTARTUP (see Chapter 2), the system assigns the created process the SID, USER.SERVER.NONE.local node. In this case, the created process continues to run regardless Or who logs in or out. You can perform this same function by executing the CPS command from the DM input window.
Creating a Server Process You can create a server process without pads and windows that runs continually on your node by specifying the CPS (CREATE_PROCESS_SERVER) command in the following format:
CPS pathnam• [options]
where pathname specifies the pathname of the proaram you want the process to execute.
Use the CPS command when you want to create a server that runs regardless of whether anyone is loaged in. For example, the following command starts the mailbox server MBX_HELPER:
4-7 Controlling the Display

CPS /SYS/MBX/MBX_HELPER -N MBX_HELPER
In the example above, the -N option assigns the process the name MBX_HELPER.
You usually invoke CPS commands from your node's boot script (STARTUP) during start-up. (Chapter 2 describes the boot script files the system uses when you stan your node.) By including CPS commands in your node's boot script, you ensure that your servers restart whenever you have to restan your node. You can also invoke the CPS command from the DM input window.
Controlling a Process Once you create a process, you can use the OM's process control commands to either stop it, suspend it, or restart it. Table 4-3 summarizes the DM commands used to control processes.
Table 4-3. Commands for Controlling a Process
Predefined Key
Task OM Command Low-Profile 880
Quit, stop, or blast DQ (-bl-&1--e nn] CTRL/0 CTRL/0 a process
Suspend execution of OS None None a process
Resume execution of DC None None a suspended process
Stopping a Program or Process To stop a program or an entire process, use the DQ (DEBUG_ QUIT) command in the following format:
DQ [options]
To stop a program, position the cursor inside the window of the process and either type CTRL/Q or specify the DQ command without any options. Either operation will generate a normal quit
Controlling the Dlaplay
fault, which interrupts the execution of the current program and returns the process to the calling program (usually the Shell) .
To stop an entire process, position the cursor inside the window of the process. Then, specify the following DM command:
oo -s This command stops the current process and closes any open streams, files, and pads. To delete the remaining window, move the cursor inside the window and type CTRL/N.
If you want to stop a Shell process. move the cursor to the Shell's process input window and type CTRL/Z. Typing CTRL/Z in the Shell's process input window signals the completion of input and stops both the Shell and the process. You may find this method easier than using the DQ -s command.
Suspending and Resuming a Process
You can temporarily interrupt a process and then restart it using the DS (DEBUG SUSPEND) and DC (DEBUG CONTINUE) commands. - -
To interrupt a process, position the cursor inside the process window; then specify the DS command. Later, to restart the process, position the cursor inside the process window and specify the DC command.
Creating Pads and Windows In order to read or edit a file, you must create a pad to hold it and a window to view it. Table 4-4 summarizes the DM commands used to create pads and windows for editing and reading files.
.... Conlrolllng the Display

Table 4-4. Commands for Creating Pads and Windows
Predefined Kay
Task OM Command Low-Profile 880
Create an edit pad CE pathname <BDn> <EDIT> and window (R4) (R4)
Create a read-only CV patbname <READ> <READ> window (R3) (R3)
Create a copy of an cc None Nono existing pad and window
Before you can use the commands that create pads and windows, you should understand just how the DM determines what boundaries to assign to a new window.
When a window's size or position on the screen is changed in any way, the DM calculates the new boundaries of the window based on a pair of points on the screen called a point pair. (Usually, you define the first point in the pair with the DR command, and the second point by the current cursor position. You may also provide absolute point coordinates as described in the "Defimng Points and Regions" section in Chapter 3.)
Each point in a point pair may specify either a new or existing edge of a window, or a new or existmg corner of a window. The DM creates a new window based on the relationship between the x- and y-coordinates of the two points.
The relationship between the two points in the point pair affects the actions of the DM window-creation commands, CP, CE, CV, CC, and the window-movement commands, WM, WME, WG, and WGE (see the "Managing Windows" section). Table 4-5 shows how the DM defines window boundaries according to the points given for window-creation and window-movement commands.
Controlling the Dlaplay 4-1 0
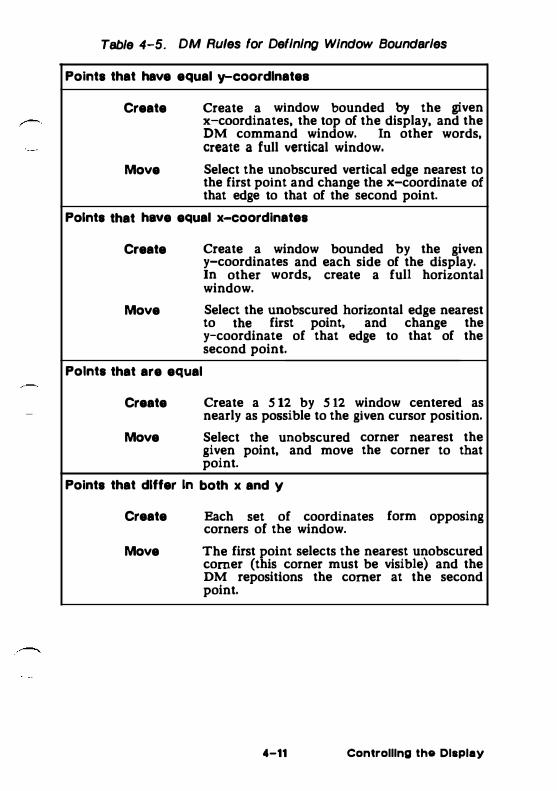
Table 4-5. DM Rules for Defining Window Boundaries
Points that have equal y-coordlnatea
Create Create a window bounded by the given x-coordinates, the top of the display, and the DM command window. In other words, create a full vertical window.
Move Select the unobscured vertical edge nearest to the first point and change the x-coordinate of that edge to that of the second point.
Points that have equal x-coordinates
Create Create a window bounded by the given y-coordinates and each side of the display. In other words, create a full horizontal window.
Move Select the unobscured horizontal edge nearest to the first point, and change the y-coordinate of that edge to that of the second point.
Points that are equal
Create Create a S 12 by S 12 window centered as nearly as possible to the given cursor position.
Move Select the unobscured corner nearest the given point, and move the corner to that point.
Points that differ In both x and v
Create
Move
Each set of coordinates form opposing corners of the window.
The first point selects the nearest unobscured corner (this corner must be visible) and the DM repositions the corner at the second point.
4-11 Controlling tho Display

Table 4-5. DM Rules for Defining Window Boundaries (continued)
Only one point Is given (no DR Is specified)
Create
Move
The OM uses one of its five default window regions (see the "Defining Default Window Positions" section) , or it determines the position by the last window creation or deletion command as follows:
• If the last command was window deletion (WC), the default region is the same as that for the deleted window.
• If the last command was a successful window-creation command, the default region is the next third of the screen
• If the last command was an unsuccessful window-creation command, the default region is the same as that specified in the unsuccessful command.
Grow is illegal and move behaves as if both points are equal.
Controlling the Display 4-12
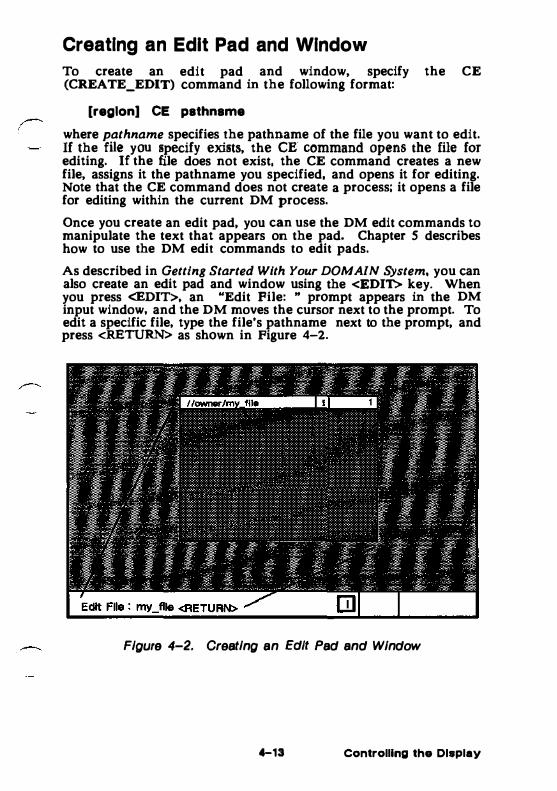
Creating an Edit Pad and Window To create an edit pad and window, specify the CE (CREATE_EDIT) command in the following format:
[region] CE pathname
where pathname specifies the pathname of the file you want to edit. If the file you specify exists, the CE' command opens the file for editing. If the file does not exist, the CE command creates a new file, assigns it the pathname you specified, and opens it for editing. Note that the CE command does not create a process; it opens a file for editing within the current DM process.
Once you create an edit pad, you can use the DM edit commands to manipulate the text that appears on the pad. Chapter 5 describes how to use the DM edit commands to edit pads.
As described in Getting Started With Your DOMAIN System, you can also create an edit pad and window using the <EDIT> key. When you press <EDIT>, an "Edit File: " prompt appears in the DM input window, and the DM moves the cursor next to the prompt. To edit a specific file, type the file's pathname next to the prompt, and press <RETURN> as shown in Figure 4-2.
Figure 4-2. Creating an Edit Pad and Window
4-13 Controlling the Display
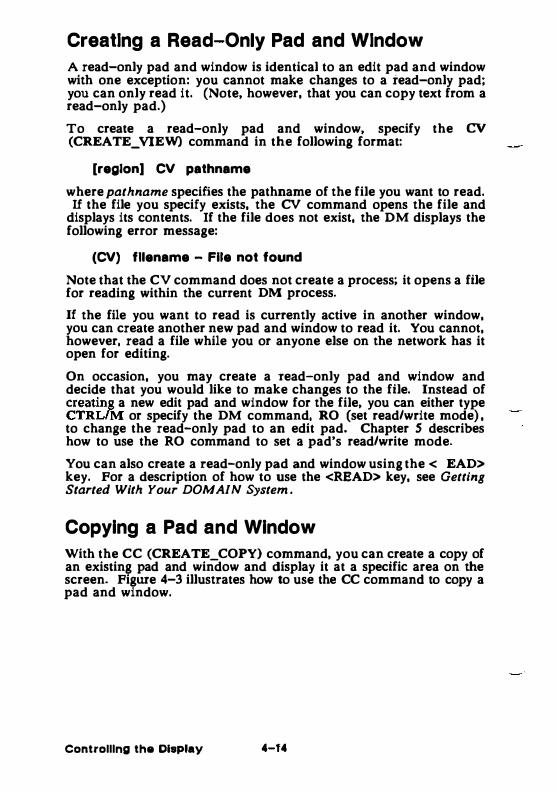
Creating a Read-Only Pad and Window A read-only pad and window is identical to an edit pad and window with one exception: you cannot make changes to a i"ead-only pad; you can only read it. (Note, however, that you can copy text from a read-only pad.}
To create a read-only pad and window, specify the CV (CREATE_ VIEW) command in the following format:
[region] CV pathname
where pathname specifies the pathname of the file you want to read. If the file you specify exists, the CV command opens the file and
displays its contents. If the file does not exist, the DM displays the following error message:
(CV) filename - File not found
Note that the CV command does not create a process; it opens a file for reading within the current DM process.
If the file you want to read is currently active in another window, you can create another new pad and window to read it. You cannot, however, read a file while you or anyone else on the network has it open for editing.
On occasion, you may create a Tead-only pad and window and decide that you would like to make changes to the file. Instead of creating a new edit pad and window for the file, you can either type CTRLIM or specify the DM command, RO (set read/write mode), to change the read-only pad to an edit pad. Chapter S describes how to use the RO command to set a pad's read/write mode.
You can also create a read-only pad and window using the <READ> key. For a description of how to use the <READ> key, see Getting Started With Your DOMAIN System.
Copying a Pad and Window With the CC (CREATE_ COPY} command, you can create a copy of an existing pad and window and display it at a specific area on the screen. Figwe 4-3 illustrates how to use the CC command to copy a pad and window.
Controlling the Display 4-f4
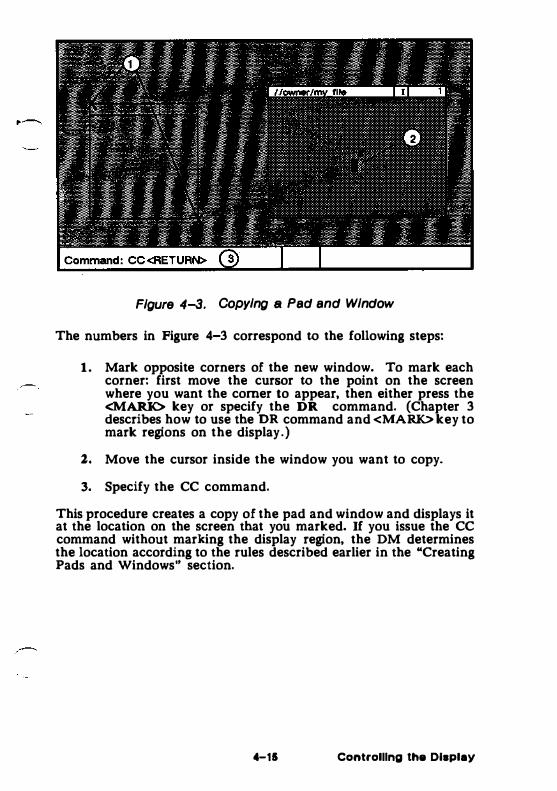
Figure 4-3. Copying a Pad and Window
The numbers in Figure 4-3 correspond to the following steps:
1. Mark opposite corners of the new window. To mark each corner: first move the cursor to the point on the screen where you want the comer to appear, then either press the <MARK> key or specify the DR command. (Chapter 3 describes how to use the DR command and <MARK> key to mark regions on the display.)
2. Move the cursor inside the window you want to copy.
3. Specify the CC command.
This procedure creates a copy of the pad and window and displays it at the location on the screen that you marked. If you issue the CC command without marking the display region, the DM determines the location according to the rules described earlier in the "Creating Pads and Windows .. section.
4-15 Controlling the Display
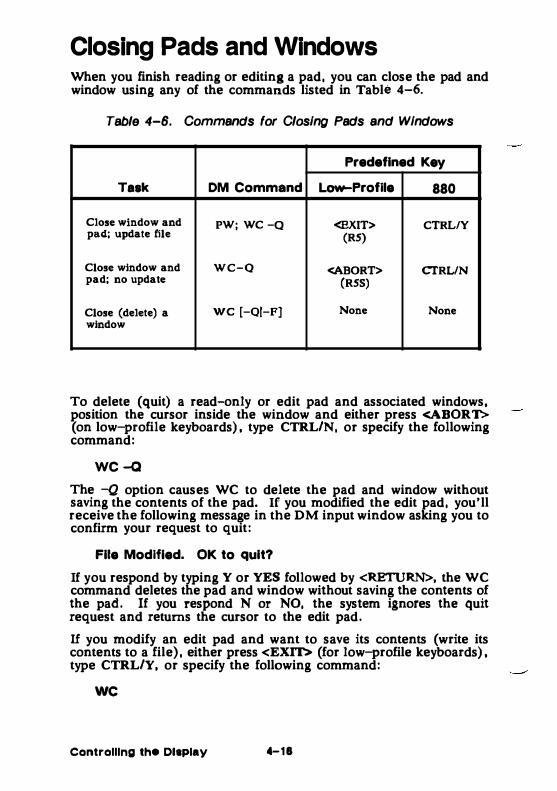
Closing Pads and Windows When you finish reading or editing a pad, you can close the pad and window using any of the commands listed in Table 4-6.
Table 4-6. Commands for Closing Pads and Windows
Predefined Key
Task DM Command Low-Profile 880
Close window and PW; WC -Q <EXIT> CTRLIY pad.; update file (RS)
Close window and WC-0 <ABORT> CIRUN pad; no update (RSS)
Close (delete) a we [-Ot-FJ None None window
To delete (quit) a read-only or edit pad and associated windows, position the cursor inside the window and either press <ABORT> (on low-profile keyboards), type CTRLIN, or specify the following command:
WC -Q
The -Q option causes WC to delete the pad and window without saving the contents of the pad. If you modified the edit pad, you'll receive the following message in the DM input window asking you to confirm your request to quit:
File Modified. OK to quit?
If you respond by typing Y or YES followed by <RETURN>, the WC command deletes the pad and window without saving the contents of the pad. If you respond N or NO, the system ignores the quit request and returns the cursor to the edit pad.
If you modify an edit pad and want to save its contents (write its contents to a file), either press <EXIT> (for low-profile keyboards), type CTRLIY, or specify the following command:
we
Controlling th• Dl8play 4-18
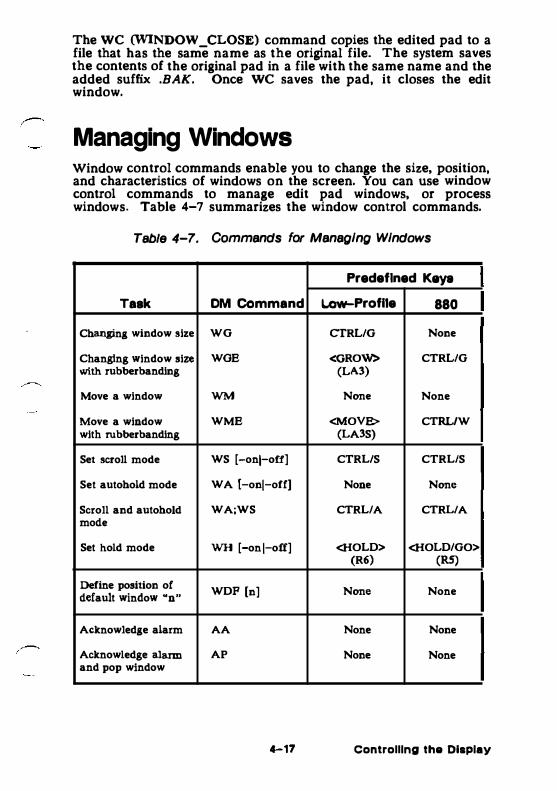
The we (WINDOW_ CLOSE) command copies the edited pad to a file that has the same name as the original file. The system saves the contents of the original pad in a file with the same name and the added suffix .BAK. Once we saves the pad, it closes the edit window.
Managing Windows Window control commands enable you to change the size, position, and characteristics of windows on the screen. You can use window control commands to manage edit pad windows, or process windows. Table 4-7 summarizes the window control commands.
Table 4-7. Commands for Managing Windows
Taak
Changing window size
Changing window size with rubberbanding
Move a window
Move a window with rubberbanding
Set scroll mode
Set autohold mode
Scroll and autohold modo
Set hold mode
Define position of default window "n"
Acknowledge alarm
Acknowledge alarm and pop window
OM Command
WG
WOE
WM
WME
WS [-on[-off]
WA [-on[-off]
WA;WS
WH [-on [-off]
WDF [n]
AA
AP
Predefined Keys
Low-Profile 880
CfRL/G None
<GROW> CTRL/G (LA3)
N=• None
<MOVE> CTRLJW (LA3S)
CTRL/S CTRLIS
None N=•
CTRLIA CTRL/A
<HOLD> <HOLD/GO> (R6) (RS)
N=• None
None None
None None
4-17 Controlling the Display
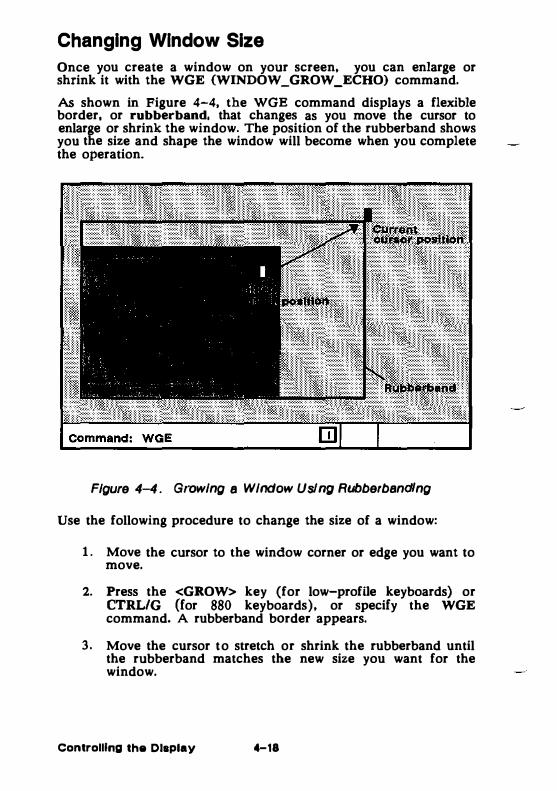
Changing Window Size
Once you create a window on your screen, you can enlarge or shrink it with the WGE (WINDOW _GROW _ECHO) command.
As shown in Figure 4-4, the WGE command displays a flexible border, or rubberband, that changes as you move the cursor to enlarge or shrink the window. The position of the rubberband shows you the size and shape the window will become when you complete the operation.
Figure 4-4. Growing a Window Using Rubberbandlng
Use the following procedure to change the size of a window:
1 . Move the cursor to the window corner or edge you want to move.
2. Press the <GROW> key (for low-profile keyboards) or CTRL/G (for 880 keyboards), or specify the WGE command. A rubberband border appears.
3. Move the cursor to stretch or shrink the rubberband until the rubberband matches the new size you want for the window.
Controlling the Display 4-18

4. Either press the <MARK> key or specify the DR command to complete the operation.
To cancel the procedure at any time, type CTRLIX or specify the ABRT command.
If you have a mouse, you can change the size of a window by using the left mouse key. To use the mouse to change the size of a window, perform the following procedure:
1. Move the cursor to the window corner or edge you want to move.
2. Press and hold the left mouse key. A rubber band border appears.
3. Holding the left key down, move the cursor to grow or shrink the window.
4. When the rubberband matches the new size you want for the window, release the left mouse key.
Moving a Window To move a window to another location on the display, use the WME
r-- (WINDOW_MOVE_ECHO) command. The WME command, like the WGE command, uses a rubberband border to show you the exact position the new window will occupy.
Use the following procedure to move a window:
1. Move the cursor to any corner of the window you want to move.
2. Press the <MOVE> key (for low-profile keyboards) or CTRL/W (for 880 keyboards), or specify the WME command. A rubberband border appears.
3. Move the cursor until the rubberband is at the new window position.
4. Either press the <MARK> key or specify the DR;ECHO command sequence to complete the operation.
To cancel the procedure at any time. type CTRLIX or specify the ABRT command.
4-111 Controlling the Display
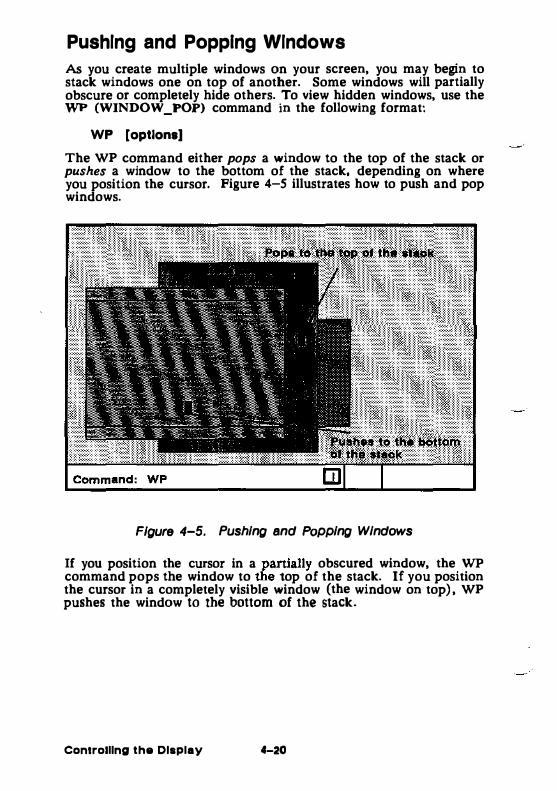
Pushing and Popping Windows
As you create multiple windows on your screen, you may begin to stack windows one on top of another. Some windows will partially obscure or completely hide others. To view hidden windows, use the WP (WINDOW _POP) command in the following format:
WP [options]
The WP command either pops a window to the top of the stack or pushes a window to the bottom of the stack, depending on where you position the cursor. Figure 4-5 illustrates how to push and pop windows.
Figure 4-5. Pushing and Popping Windows
If you position the cursor in a partially obscured window, the WP command pops the window to the top of the stack. If you position the cursor in a completely visible window (the window on top) , WP pushes the window to the bottom of the stack.
Controlling the Display 4-20

Use the following procedure to push or pop windows:
1. Position the cursor inside the window you want to push or pop.
2. Pop or push the window by either pressing the <POP> key ;---· (on low-profile keyboards), typing CTRL/P, or specifying
the WP command.
Changing Process Window Modes
The DM provides several modes that control how the DM inserts text into process input windows, and how process transcript windows display program output. Table 4-8 describes these modes.
Table 4-8. Process Window Modes
Mode Description
Insert Insert text in the input window rather than overstrike.
Scroll Output scrolls one line at a time.
Hold Content of the window does not change when the program sends output to the pad.
Autohold Window automatically enters hold mode.
You control window modes by positioning the cursor inside the process window and specifying window mode control commands. If you specify a command without any options, the command toggles the mode setting (twns it on or off depending on its current state) .
The window legend at the top of the process window displays a letter code that indicates which modes are on. Figure 4-6 shows the mode indicators and other components that make up the process
,.--. window legend.
4-21 Controlling the Display
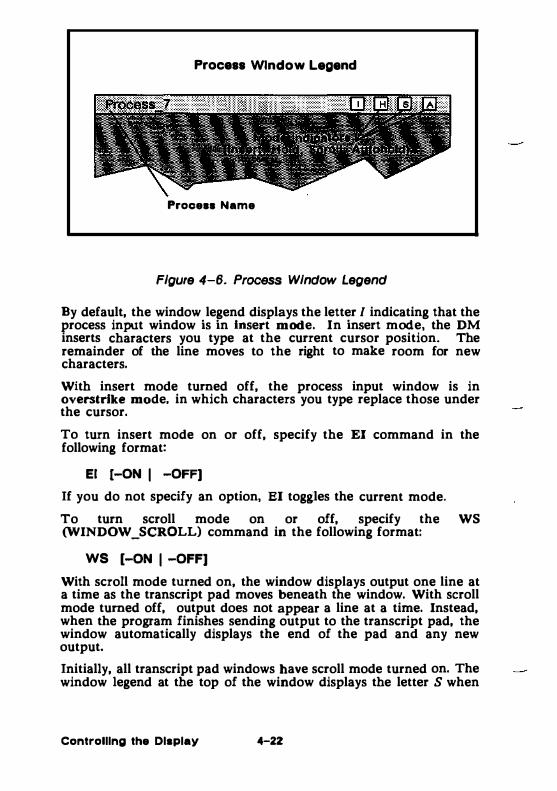
Process W1ndow Legend
Process Name
Figure 4-6. Process Window Legend
By default, the window legend displays the letter I indicating that the process input window is in Insert mode. In insert mode, the DM inserts characters you type at the current cursor position. The remainder of the line moves to the right to make room for new characters.
With insert mode turned off, the process input window is in overstrike mode. in which characters you type replace those under the cursor.
To turn insert mode on or off, specify the EI command in the following format:
El [-ON I -OFF)
If you do not specify an option, EI toggles the current mode.
To turn scroll mode on or off, specify the WS (WINDOW_SCROLL) command in the following format:
WS [-ON I -OFF]
With scroll mode turned on, the window displays output one line at a time as the transcript pad moves beneath the window, With scroll mode turned off, output does not appear a line at a time. Instead, when the program finishes sending output to the transcript pad, the window automatically displays the end of the pad and any new output.
Initially, all transcript pad windows have scroll mode turned on. The window legend at the top of the window displays the letter S when
Controlling the Display 4-22
scroll mode is on. You can also toggle scroll mode on or off by typing CTRL/S.
To turn hold mode on or off, specify the WH (WINDOW_HOLD) command in the following format:
,--. WH [-oN I -oFF!
When you turn hold mode on, the DM freezes the position of the transcript pad beneath the window. The window will not display new program output until you release the pad by turning hold mode off. When you turn hold mode off again, the window automatically displays the end of the transcript pad and any new program output.
Initially, all transcript pad windows have hold mode turned off. With hold mode turned off, the window automatically displays new output as the pad moves beneath it. The window legend displays the letter H when hold mode is on. You can also turn hold mode on or off by pressing the <HOLD> key.
To turn autohold mode on or off, specify the WA (WINDOW_AUTOHOLD) command in the following format:
WA [-oN I -oFF!
With autohold mode turned on, the window automatically turns hold mode on under either of the following conditions:
• A full window of output is available and none of it has been displayed.
• A form feed or create frame operation is output to the pad. In this case, the window displays the output preceding the form feed. When the window exits from hold mode, the output following the form feed or create frame operation starts at the top of the window.
To continue displaying output, turn hold mode off.
Initially, all transcript pad windows have autohold mode turned off. The window legend contains an A when autohold mode is on. You can also turn autohold mode on or off by typing CTRL/A (which invokes the commands WA;WS) .
Defining Default Window Positions
The DM uses default window positions to determine where to display the first five windows you create. To define any of the OM's
4-23 Controlling the Display

five default window positions, specify the WDF (WINDOW_DEFAULT} command in the following format:
[region] WDF [n]
where region specifies the position that the window will occupy on the screen (see Table 4-5), and n specifies the indentification number of the default window you are defining. If you omit n, the WDF command causes the DM to discard any current window information and begin creating windows using its default window boundaries.
The command in the following example defines the window position for default window four. Note the format of the region definition.
(0, 770) DR; (600, 1 1 0) WDF 4
region
If you want to use your own default positions for each log-in session, include WDF commands in your DM start-up script (STARTUP DM). For more information on DM start-up scripts, see "UnderStanding the System at Log-In" section in Chapter 2.
Responding to DM Alarms
Whenever the DM writes output to a partially obscured or hidden window, it sounds an alarm and displays a small pair of bells in the alarm window. (See Chapter 2 in Getting Started With Your DOMAIN System for a description of the DM alarm window.) To respond to an alarm, specify either the AA or AP commands.
The AA command acknowledges the DM alarm by turning off the current alarm and enabling further alarms (which may already be waiting).
The AP command acknowledges the DM alarm and pops to the top of the stack, the window to which the alarm pertains. This command is particularly useful when the window is completely hidden, and you can't point to it.
Controlling the Display 4-24
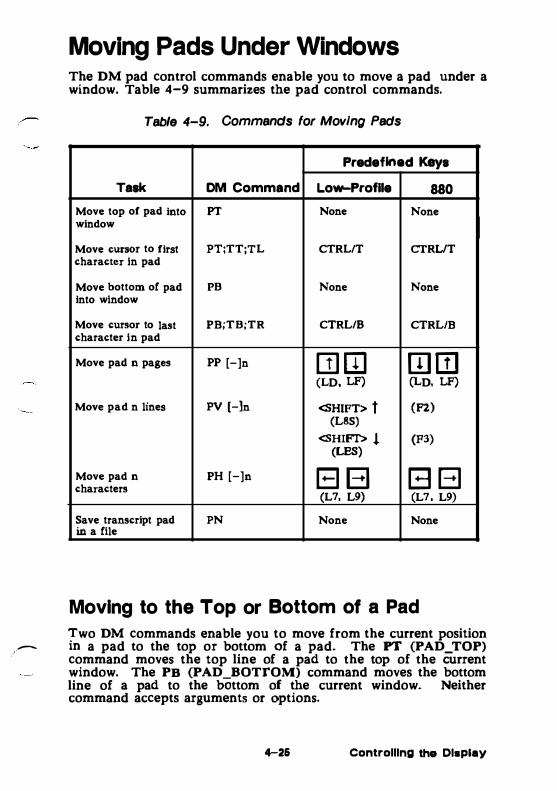
, __ _
Moving Pads Under Windows The DM pad control commands enable you to move a pad under a window. Table 4-9 summarizes the pad control commands.
Table 4-9. Commands for Moving Pads
Predeflnod Keys
Task OM Command Low-Profile 880
Move top of pad into PT None None window
Move CU1'80f to first PT;TT;TL CTRL/T CTRUT character in pad
Move bottom of pad PB None None into window
Move cursor to last PB;TB;TR CTRL/8 CTRLIB character in pad
Move pad n pages pp [-]n []] [I] m m (LD, LF) (LD, LF)
Move pad n lines PV [-]n <SHIFT> f (F2) (L8S)
<SHIFT> ! (F3) (LES)
Move pad n PH [-]n EI EI G El characters (L7, L9) (L7, L9)
Save transcript pad PN None None in a file
Moving to the Top or Bottom of a Pad
Two DM commands enable you to move from the current position --- in a pad to the top or bottom of a pad. The PT (PAD TOP)
command moves the top line of a pad to the top of the Current window. The PB (PAD BOTTOM) command moves the bottom line of a pad to the bOttom of the current window. Neither command accepts arguments or options.
4-26 Controlling the Display
We also provide two predefined control key sequences that perform the same functions as the PT and PB commands; they also move the cursor to either the first or last character in the pad. To move the cursor to the first character in the pad, type CTRL/T (defined as the command sequence PT;'IT;TL). To move the cursor to the last character in the pad, type CTRL/B (defined as the command sequence, PB;TB;TR) .
Scrolling a Pad Vertically
You can scroll a pad up or down by a specified number of lines or pages using the vertical scroll commands or associated function keys. To scroll a pad by pages, specify the PP (PAD_PAGE) command in the following format:
PP [-[n
where n specifies the number (or fraction) of pages you want to scroll. A positive n (n) scrolls the pad up n pages; a negative n (-n) scrolls the pad down n pages. The DM considers a page the smaller of the following values:
• The number of lines that fit in a window.
• The number of lines between the bottom of the window and the next form feed or frame.
The command in the following example scrolls the pad down one and one-half pages:
pp -1.5
We also provide two predefined keys that scroll a pad either up or down one-half page at a time. Figure 4-7 shows the location of these keys.
Controlling the Display 4-21
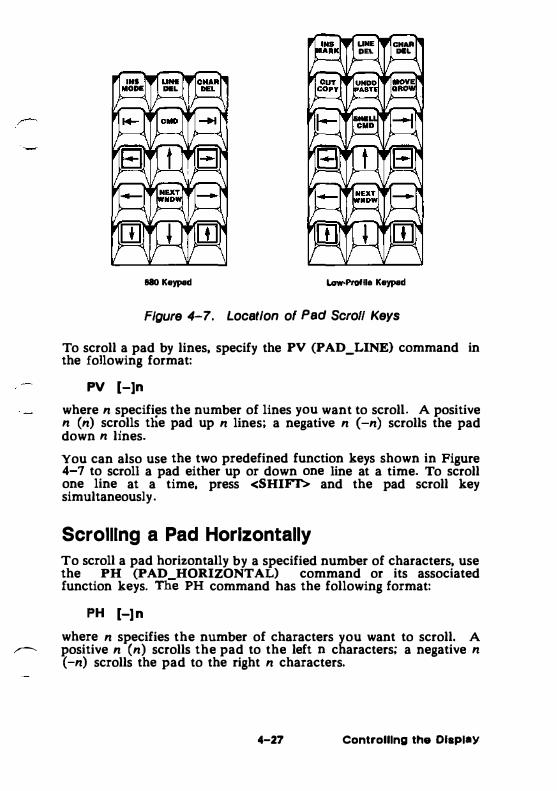
880 Keypad
UNE CHAR OE\. IIIII.
Low-Ptoflle Keypad
Figure 4-7. Location of Pad Scroll Keys
To scroll a pad by lines, specify the PV (PAD_LINE} command in the following format:
PV [-Jn
where n specifies the number of lines you want to scrolL A positive n (n) scrolls tlie pad up n lines; a negative n (-n) scrolls the pad down n lines.
You can also use the two predefined function keys shown in Figure 4-7 to scroll a pad either up or down one line at a time. To scroll one line at a time, press <SHIFI'> and the pad scroll key simultaneous! y.
Scro[[[ng a Pad Horizontally To scroll a pad horizontally by a specified number of characters, use the PH (PAD HORIZONTAL} command or its associated function keys. The PH command has the following format:
PH [-Jn
where n specifies the number of characters you want to scroll. A � positive n (n) scrolls the pad to the left n characters; a negative n
(-n) scrolls the pad to the right n characters.
4-27 Controlling the Olspi•Y
You can also use two predefined function keys to scroll a pad either right or left 10 characters. Figure 4-7 shows the location of these keys.
Saving a Transcript Pad In a File Normally, the DM deletes a transcript pad when you stop the pad's process and delete all windows. To keep a log of the current --transcript pad and save the log in a file, specify the PN (PAD_NAME) command in the following format:
PN pathname
where pathname specifies the pathname of the file where the DM saves the contents of the pad. You must specify a pathname cataloged on your node� you can not use a pathname cataloged on another node.
The PN command stores the current transcript pad in a file that remains opened and locked until you stop the process and delete all windows. Once you specify the PN command, the DM saves all current and subsequent output written to the pad.
Using Window Groups and Window Icons The DM provides several commands that enable you to create window groups, make these groups invisible, and then use Icons to represent them. Table 4-10 summarizes the commands used to control window groups and icons.
Controlling the Display 4-28
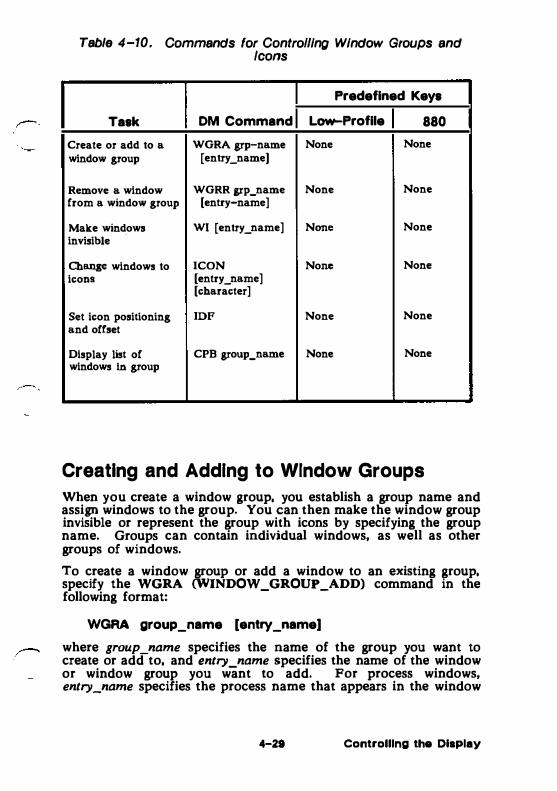
Table 4-10. Commands for Controlling Window Groups and Icons
Predefined Keys
Task DM Command Low-Profile 880
Create or add to a WGRA grp-name None None window group [entry_name)
Remove a window WGRR grp_name None None from a window group [entry-name]
Make windows WI [entry_ name] N=o None invisible
Change windows to ICON No= None icotlfl [entry_name]
[character]
Set icon positioning IDF None None and offset
Display list of CPB group_name None None windows ln group
Creating and Adding to Window Groups When you create a window group, you establish a group name and assign windows to the group. You can then make the window group invisible or represent the group with icons by specifying the group name. Groups can contain individual windows, as well as other groups of windows.
To create a window group or add a window to an existing group, specify the WGRA (WINDOW_GROUP_ADD) command in the following format:
WGRA group_name [entry_name]
where group_name specifies the name of the group you want to create or add to, and entry_name specifies the name of the window or window group you want to add. For process windows, entry_name specifies the process name that appears in the window
4-29 Controlling the Display
legend; for edit pad windows, entry_name specifies the pathname that appears in the window legend.
You must specify the group_name argument when you use this command. If you omit the entry_name argument, WGRA uses the name of the window where you last positioned the cursor.
The commands in the following example create a window group:
WGRA WGRA WGRA
The first command creates a window group named SHELL WINDOWS and adds the window named PROCESS I to the group. - The remaining commands add additional Windows (PROCESS_2 and PROCESS_J) to the SHELL_WINDOWS group.
Removing Entries from Window Groups To remove an entry (window or window group) from a window group, specify the WGRR (WINDOW_GROUP_REMOVE) command in the following format:
WGRR group_name [entry_nama)
where group_name specifies the name of the group that contains the entry you want to remove, and entry name specifies the window name or window group name you want to remove. You must specify the group name argument when you use this command. If you omit the entry -name argument, WGRR uses the pathname of the window where yoU last positioned the cursor.
The command in the following example removes a window named PROCESS_/ from the group named SHELL_ WINDOWS:
WGRR SHELL_WINDOWS PROCESS_1
Making Windows Invisible To control whether a window or window group is visible or invisible, specify the WI (WINDOW _INVISIBLE) command in the following format:
WI [enlry_namal [-WI HI where entry name specifies the name of the window or window group you Want to make visible or invisible. If you omit the entry_name argument, WI uses the pathname of the window where you last positioned the cursor.
Controlling the Display 4-30
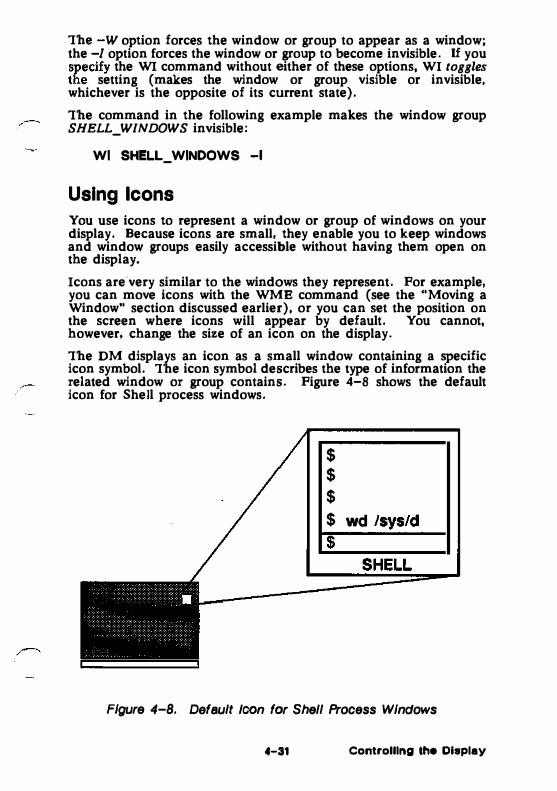
The -W option forces the window or group to appear as a window; the -1 option forces the window or group to become invisible. H you specify the WI command without either of these options, WI toggles the setting (makes the window or group visible or invisible, whichever is the opposite of its current state).
The command in the following example makes the window group SHELL_ WINDOWS invisible:
WI SHELL_ WINDOWS -1
Using Icons You use icons to represent a window or group of windows on your display. Because icons are small, they enable you to keep windows and window groups easily accessible without having them open on the display.
Icons are-very similar to the windows they represent. For example, you can move icons with the WMB command (see the .. Moving a Window" section discussed earlier), or you can set the position on the screen where icons will appear by default. You cannot, however, change the size of an icon on the display.
The DM displays an icon as a small window containing a specific icon symbol. The icon symbol describes the type of information the related window or group contains. Figure 4-8 shows the default icon for Shell process windows.
$ $ $
$ wd
Figure 4-8. Default loon for Shell Process Windows
4-31 Controlling lhe Display

To either change a window or window group into an icon, or to change an icon into the window or group it represents, specify the ICON command in the following format:
ICON [enlry_name[ [-1] [-W[ [-c 'char']
where entry_name specifies the name of the window or window group you want to change into an icon, or change back into a window. If you specify the name of a window group as the entry name, the ICON command changes each window in the group. If you omit the entry_ name argument, ICON uses the window where you last positioned the cursor.
The -w option forces the specified window or window group to appear as a window; the -1 option forces the specified window or group to change to an icon. If you specify the ICON command without either of these options, ICON toggles the setting (changes the window or group to the opposite of its current state). The easiest way to change individual windows and icons is to position the cursor inside the window or icon and specify the ICON command.
The ICON command also accepts the -C option that allows you to specify which icon you want to use. Before we look at an example, let's look at how the system uses icons, and where it stores them.
The system uses certain default icons that we supply to represent specific types of windows. For example, whenever you change a Shell process window into an icon, the system, by default, uses the icon shown in Figure 4-8. Similarly, the system uses a special EDIT icon to represent read/edit windows. Many application programs that we supply also represent their specific process windows with their own specific default icons.
The system stores the default icons in a font file named ISYSIDMIPONTSIICONS. (Note that this file is not an ASCII file; you cannot read it.) You can examine this file by using the EDFONT (EDIT_FONT) program described in the DOMAIN System Command Reference. You can also use EDFONT to create your own icons or change those the system uses by default.
Each icon in the font file ICONS is associated with a specific keyboard character. For example, the default Shell icon is associated with the lowercase "s" character. When you create an icon, you first choose a character, and then use EDFONT to transform the character into an icon symbol. (This is how we created the default icons that the system and various application programs use.) To use your own icon once you've created it, specify its associated character name with the -C option.
The -C option allows you to specify the character associated with the icon you want to use. For example, suppose you used EDFONT to create your own icon associated with the uppercase "F"
Controlling the Display 4-32

character in the ICONS file. To use this icon to represent the read/edit window JUNB_REPORT, use the following command:
ICON JUNE_REPORT -1 -C F
In this example, the ICON command directs the DM to change the read/edit window JUNB_RBPORT into an icon. Normally, the DM uses the default icon for read/edit windows. The -C option directs the DM to use the icon associated with the character F in ISYSIDMIFONTSIICONS instead of the default read/edit icon.
Setting Icon Default Position and Offset The DM alloWs you to set the position of an icon on your screen and specify an offset that the DM uses to determine the positions of the next icons you create. The offset value specifies the position of new windows relative to the position of the previous icon.
By default, the DM displays icons in a horizontal line across the top of portrait displays, and in a vertical line along the right side of landscape displays. The default offset is the width of one icon (60 bits); horizontally for portrait displays, vertically for landscape displays.
With the IDF (ICON_DEFAULT) command, you can change the default positioning and offset of an icon, or to establish the position of an icon you create in a script. You can use the IDF command in any of the following ways:
• Move the cursor to the desired default icon position. Press the <MARK> key or specify the DR command to mark the position. Specify the IDF command to set the new position. Since you did not specify an offset value, the DM places any new icons that you create at this one position.
• Move the cursor to the desired default icon position. Press the <MARK> key or specify the DR command to mark the position. Move the cursor to indicate the offset vector for the next icon. Specify the IDF command to set the new position and offset.
• Specify the icon position and offset explicitly in the following command line format:
(position) DR; (offset); IDF
where position specifies the x- and y-coordinates of the icon position and offset specifies the coordinates of the offset vector. For example, the following command line sets an icon position and offset:
(800,10) DR; (850,60); IDF
4-33 Controlling the Dlaplay
This command sets the position for the first icon at bit position (800, 10). The next icon will appear at bit position (850,60), an offset of (50,50) from the original position. Refer to the "Defining Points and Regions" section in Chapter 3 for more information.
Displaying the Members of a Window Group
To display a list of windows in a specific group, use the CPB (COPY_PASTE_BUFFER) command in the following format:
CPB group_name
where group_name specifies the name of the window group you want to list. The group_name refers to a paste buffer that contains the names of the windows in the group. The CPB command creates a window to the paste buffer you specify as the group_name and displays the paste buffer's contents. For example:
CPB MY_GROUP
This command displays the names of all the windows in the window group MY_GROUP. A paste buffer named MY_GROUP contains these window names.
The DM automatically creates three special paste buffers to help you manage your windows and icons. Table 4-11 describes these paste buffers.
To list the contents of one of these special paste buffers, specify the CPB command with the special group_name as follows:
CPB INVIS_GROUP
This command opens the paste buffer INVIS_GROUP that contains the names of all the windows you've made invisible.
Controlling the Display 4-34
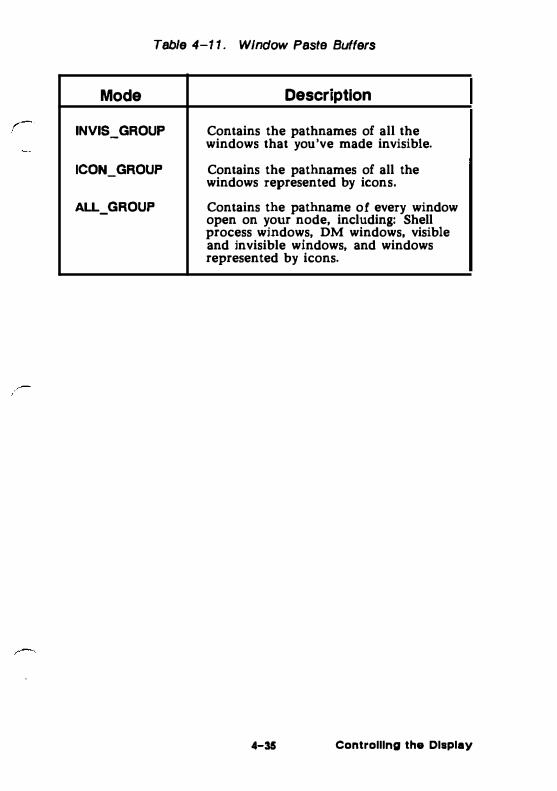
Table 4-1 1 . Window Paste Buffers
Mode
INVIS_GROUP
ICON_GROUP
ALL_GROUP
Description
Contains the pathnames of all the windows that you've made invisible.
Contains the pathnames of all the windows represented by icons.
Contains the pathname of every window open on your node, including: Shell process windows, DM windows, visible and invisible windows, and windows represented by icons.
4-35 Controlling the Display

-- j
j
j j j
j J
j
I l I I
j J
- I I
j j j j j
j j
'
j '
I
j •
I
j I

CHAPTER 5
Editing a Pad
Chapter 4 described how to create pads and windows to read and edit files. It also explained how to manage the windows and pads on your display. This chapter describes how to use the DM to control the characteristics of edit pads, and how to edit text.
Each section in this chapter describes a set of editing tasks and the DM commands you use to perform them. You can execute a DM command either from a DM script or interactively by specifying the command in the DM input window. In many cases, you can execute a DM editing command by typing a function key or control key sequence.
The command summary tables at the beginning of each section list the DM commands, related function keys, and control key sequences used to perform a specific set of editing tasks. Chapter 4 explains how to specify DM commands from the keyboard and from scripts, and how to use function keys and control key sequences.
For a complete description of all the DM editing commands described in this chapter, refer to the DOMAIN System Command Reference.
5-1 Editing a Pad
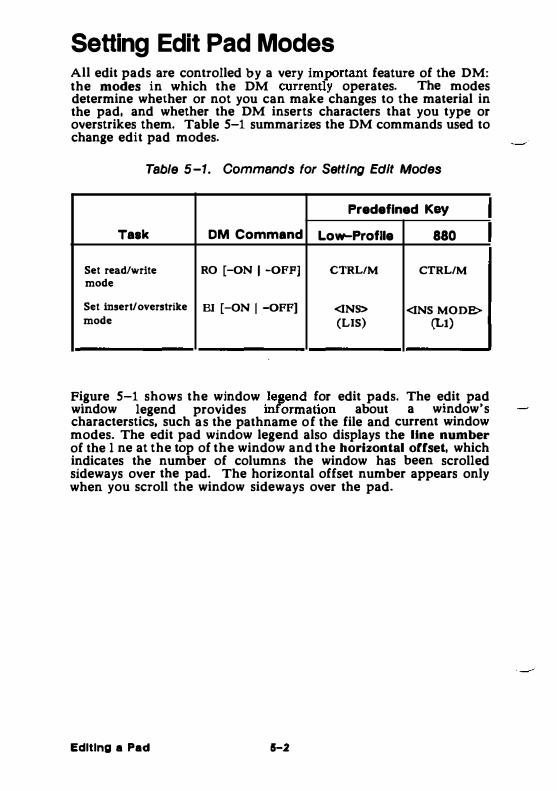
Setting Edit Pad Modes All edit pads are controlled by a very important feature of the DM: the modes in which the DM currently operates. The modes determine whether or not you can make changes to the material in the pad, and whether the DM inserts characters that you type or overstrikes them. Table 5-1 summarizes the DM commands used to change edit pad modes.
Table 5-1. Commands for Setting Edit Modes
Predefined Key
Task OM Command Low-Profile 880
Set read/write RO [-oN I -oFF] CTRL!M CTRL/M mode
Set insert/ overstrike BI [-ON I -oFF] <INS> <INS MODE> mode (LIS) (Ll)
Figure 5-1 shows the window legend for edit pads. The edit pad window legend provides information about a window's characterstics, such as the pathname of the file and current window modes. The edit pad window legend also displays the line number of the line at the top of the window and the horizontal offset, which indicates the number of columns the window has been scrolled sideways over the pad. The horizontal offset number appears only when you scroll the window sideways over the pad.
Editing a Pad ·-·
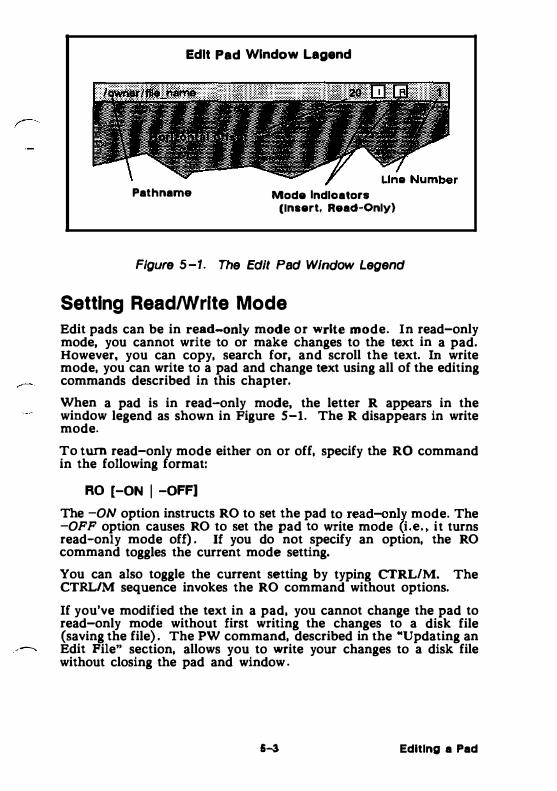
�··
Edit Pad Window Lagend
Path nama Mode Indicators (Insert, React-Only)
Figure 5-1. The Edit Pad Window Legend
Setting Read/Write Mode Edit pads can be in read-only mode or write mode. In read-only mode, you cannot write to or make changes to the text in a pad. However, you can copy, search for, and scroll the text. In write mode, you can write to a pad and change text using all of the editing commands described in this chapter.
When a pad is in read-only mode, the letter R appears in the window legend as shown in Figure 5-1. The R disappears in write mode.
To turn read-only mode either on or off, specify the RO command in the following format:
RO [-ON I -OFFI
The -ON option instructs RO to set the pad to read-onlY. mode. The -OFF option causes RO to set the pad to write mode (i.e., it turns read-only mode off) . If you do not specify an option, the RO command toggles the current mode setting.
You can also toggle the current setting by typing crRL/M. The CTRL/M sequence invokes the RO command without options.
If you've modified the text in a pad, you cannot change the pad to read-only mode without first writing the changes to a disk file (saving the file). The PW command, described in the "Updating an
.-� Edit File" section, allows you to write your changes to a disk file without closing the pad and window .
.... Editing a Pad

Setting lnserUOverstrlke Mode
The DM has two modes to control how text is added to a pad: insert mode or overstrike mode. In insert mode, the DM inserts characters you type at the current cursor position. The remainder of the line moves nght to make room for the new characters.
In overstrike mode, characters you type replace, or "overstrike," those under the cursor. Overstrike mode is useful when you want to enter text into a preformatted file without disrupting the file's format.
When a pad is in insert mode, the letter I appears in the window legend as shown in Figure 5-l. The I disappears in overstrike mode. All pads are initially in insert mode, although this is irrelevant if the pad is also read-only.
To turn insert mode either on or off, specify the EI command in the following format:
El [-ON I -oFF]
The -DN option instructs EI to set the current pad to insert mode. The -OFF option causes EI to set the pad to overstrike mode (i.e., it turns insert mode off) . If you do not specify an option, the EI command toggles the current mode.
You can also toggle the current mode by pressing <INS> (on low-profile keyboards) or <INS MODE> (on 880 keyboards). These keys invoke the EI command without options.
Inserting Characters Any pad that is in write mode automatically accepts anything that you type at the keyboard as input to that pad. The commands listed in Table S-2 perform special insertion functions.
Editing a Pad
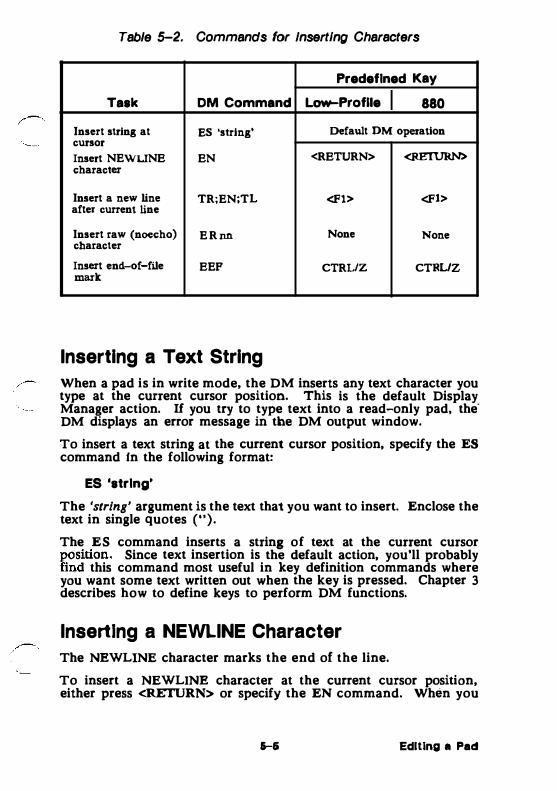
Table 5-2. Commands for Inserting Characters
Predefined Kay
Task OM Command Low-Profile 880
Insert string at BS 'string' Default DM operation cursor
Insert NEWLINE EN <RETURN> <RETURN> character
Insert a new line TR;EN;TL <Fl> <Fl> after current line
Insert raw (noecho) ERnn None None character
Insert end-of-file EEP CTRL/Z CTRLIZ muk
Inserting a Text String When a pad is in write mode, the DM inserts any text character you type at the current cursor position. This is the default Display Manager action. If you try to type text into a read-only pad, the· DM displays an error message in the DM output window.
To insert a text string at the current cursor position, specify the ES command fn the following format:
ES 'string'
The 'string' argument is the text that you want to insert. Enclose the text in single quotes (").
The ES command inserts a string of text at the current cursor position. Since text insertion is the default action, you'll probably find this command most useful in key definition commands where you want some text written out when the key is pressed. Chapter 3 describes how to define keys to perform DM functions.
Inserting a NEWLINE Character The NEWLINE character marks the end of the line.
To insert a NEWLINE character at the current cursor position, either press <RETURN> or specify the EN command. When you
6-6 Editing • Pad

insert a NEWLINE character, the cursor moves to the beginning of the next line.
Inserting a New Line To insert a new, blank line following the current line, specify the following command sequence:
TR:EN;TL
The TR command moves the cursor to the end of the line, EN inserts (or overstrikes) a NEWLINE character, and TL moves the cursor to the beginning of the next line.
By default, the <Fl> key invokes the TR;EN;TL command sequence.
Inserting an End-of-File Mark To insert an end-of-file mark (EOF) in a pad, type CTRLIZ or specify the EEF command. If the line containinJ the cursor is empty, the DM inserts the end-of-file mark on that line. Otherwise, the DM inserts the end-of-file mark following the current line.
It is a common (although not universal} convention for programs to terminate execution and return to the process that called them when they receive an end-of-file mark on their standard input stream.
The Shell is such a program. When the top-level program in a process (usually teOMISH) returns, the process stops and all of its streams are closed. The DM then closes and deletes the Shell's process input pad and window, and closes the transcript pad.
Whether or not the DM also deletes the transcript window depends on the setting of its auto-close mode. If auto-close mode is disabled (the default setting), then you must manually delete any windows associated with the closed transcript pad by using the DM command WC -Q, or CTRL/N. The "Closing Pads and Windows" section in Chapter 4 describes the we -Q command and eTRLtN. See the we command description in the DOMAIN System Command Reference for more information about auto-close mode.
Deleting Text The commands listed in Table S-3 delete characters, words, or lines of text. To delete a larger block of text, refer to the "Cutting Text" section.
Editing a Pad ·-·
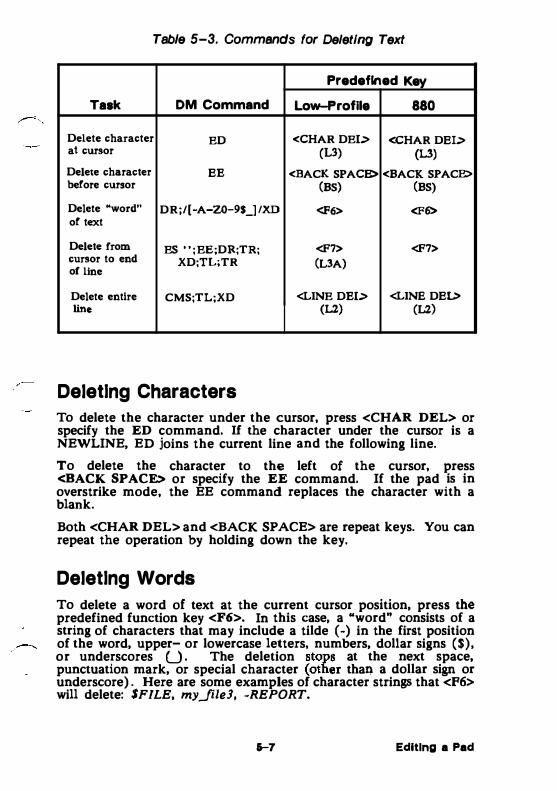
Table 5-3. Commands for Deleting Text
Predefined Key
Task DM Command Low-Profile 880
Delete character ED <CHAR DEl> <CHAR DEl> at cursor (L3) (L3) Delete character EE <BACK SPACE> <BACK SPACE> before cursor (BS) (BS)
Delete "word" DR;/[ -A-zo..-9$_] IXD <F6> <F6> of text
Delete from ES ";EB;DR;TR; <F7> <F7> cursor to end XD;TL;TR (L3A) of line
Delete entire CMS;TL;XD <LINE DEl> <LINE DEI> ... (LZ) (LZ)
Deleting Characters To delete the character under the cursor, press <CHAR DEL> or specify the ED command. If the character under the cursor is a NEWLINE, ED joins the current line and the following line.
To delete the character to the left of the cursor, press <BACK SPACE> or specify the EE command. If the pad is in overstrike mode, the EE command replaces the character with a blank.
Both <CHAR DEL> and <BACK SPACE> are repeat keys. You can repeat the operation by holding down the key,
Deleting Words To delete a word of text at the current cursor position, press the predefined function key <F6>. In this case, a "word" consists of a string of characters that may include a tilde (-) in the first position of the word, upper- or lowercase letters, numbers, dollar signs ($), or underscores U . The deletion stops at the next space, punctuation mark, or special character (other than a dollar sign or underscore) . Here are some examples of character strings that <F6> will delete: $FILE, myJileJ, -REPORT.
6-7 Editing a Pad
The <F6> function key invokes the command sequence DR;/[-A-Z0-9$_]/XD.
The DM writes the deleted word to its default paste buffer (a temporary file). You can reinsert the word elsewhere by moving the cursor to the desired location and either pressing <PASTE> or specifying the XP command. For more information about paste buffers and the XP command, see the "Copying, Cutting, and Pasting Text" section.
Deleting Lines To delete text from the current cursor position to the end of the line (excluding the NEWLINE character), press the predefined function key <F7>. The <F7> key invokes the following command sequence:
ES ' ' ;EE;DR;TR;XD;TL;TR
The DM writes the deleted line to its default paste buffer. You can reinsert the line elsewhere by either pressing <PASTE> or specifying the XP command. For more information about paste buffers and the XP command, see the "Copying, Cutting, and Pasting Text" section.
Defining a Range of Text The editing commapds that perform cut (delete), copy, and substitute functions operate on a range, or block, of text. You mark a range of text just as you would marl,c. any other region in a pad (see the "Defining Points and Regions" section in Chapter 4). However, you may not declare a range as an argument to an editing command. You must use the DR command or the <MARK> key before specifying the editing command.
To use the DR command to define a range of text, define two points as follows:
[point] DR; [point]
The first point defines the beginning of the range, and the DR command marks it. The second point defines the end of the range. If you do not specify literal pomts, DR places the marks at the current cursor position.
An easy way to define a range of text is to point with the cursor and use the <MARK> key. The <MARK> key invokes the DR and ECHO commands, which mark the first point and begin highlighting the text. Figure 5-2 illustrates how the DM highlights the text as you move the cursor to the end of the range.
Editing a Pad ....
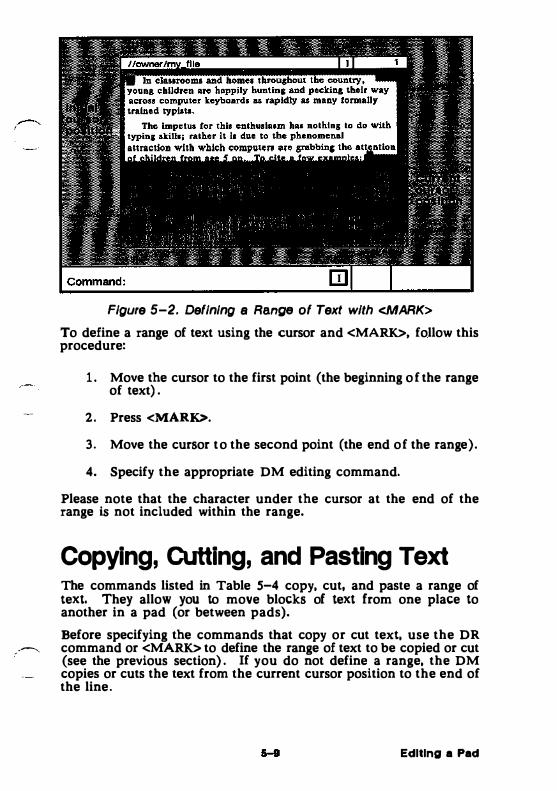
Figure 5-2. Defining e Range of Text with <MARK>
To define a range of text using the cursor and <MARK>, follow this procedure:
1. Move the cursor to the first point (the beginning of the range of text) .
2. Press <MARK>.
3. Move the cursor to the second point (the end of the range).
4. Specify the appropriate DM editing command.
Please note that the character under the cursor at the end of the range is not included within the range.
Copying, Cutting, and Pasting Text The commands listed in Table 5-4 copy, cut, and paste a range of text. They allow you to move blocks of text from one place to another in a pad (or between pads).
Before specifying the commands that copy or cut text, use the DR ..-., command or <MARK> to define the range of text to be copied or cut
(see the previous section). If you do not define a range, the DM copies or cuts the text from the current cursor position to the end of the line.
Editing a Pad
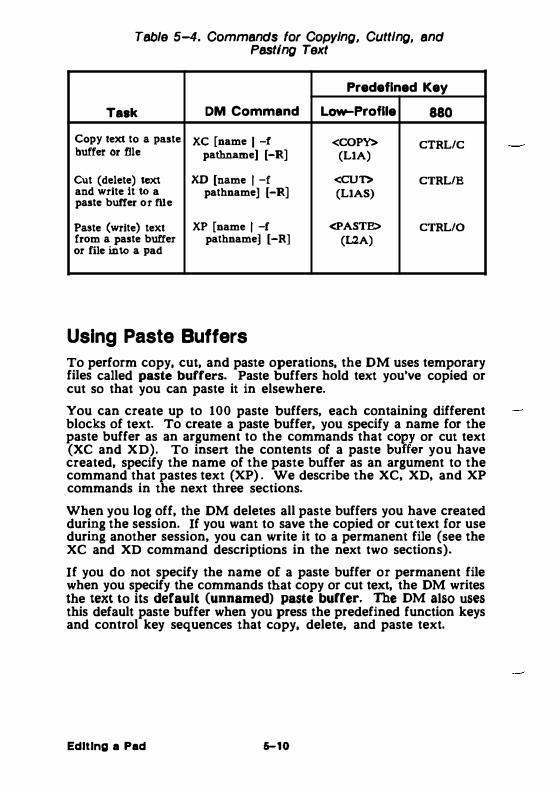
Table 5-4. Commands for Copying, Cutting, and Pasting Text
Predefined Key
Task DM Command Low-Profile 880
Copy text to a paste XC [name I -f <COPY> CTRLIC buffer or file pathnam.e] [-R] (LIA)
Cut (delete) text XD [name I -f <CU'l> CTRLIB and write it to a paste buffer or me
pathname] [-R] (LIAS)
Paste (write) text XP [name I -f <PASTE> CTRL/0 from a paste buffer pathname] [-R] (L2A) or fll.e into a pad
Using Paste Buffers To perform copy, cut, and paste operations, the DM uses temporary files called paste buffers. Paste buffers hold text you've copied or cut so that you can paste it in elsewhere.
You can create up to 100 paste buffers, each containing different blocks of text. To create a paste buffer, you specify a name for the paste buffer as an argument to the commands that copy or cut text (XC and XD). To insert the contents of a paste buffer you have created, specify the name of the paste buffer as an argument to the command that pastes text (XP) . We describe the XC, XD, and XP commands in the next three sections.
When you log off, the DM deletes all paste buffers you have created during the session. If you want to save the copied or cut·text for use during another session, you can write it to a permanent file (see the XC and XD command descriptions in the next two sections).
If you do not specify the name of a paste buffer or permanent file when you specify the commands that copy or cut text, the DM writes the text to its default (unnamed) paste buffer. The DM also uses this default paste buffer when you press the predefined function keys and control key sequences that copy, delete, and paste text.
Editing a Pad 5-10
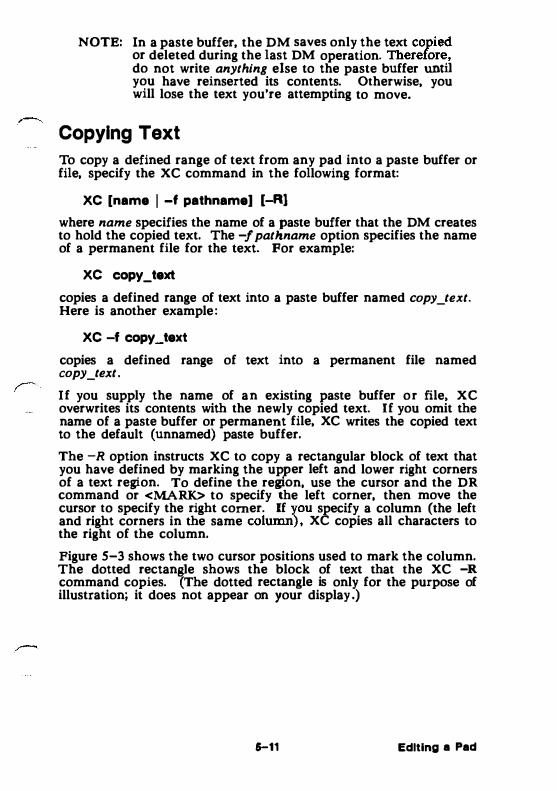
NOTE: In a paste buffer, the DM saves only the text copied or deleted during the last DM operation. Therefore, do not write anything else to the paste buffer until you have reinserted its contents. Otherwise, you will lose the text you're attempting to move.
Copying Text
To copy a defined range of text from any pad into a paste buffer or file, specify the XC command in the following format:
XC [name I -1 pathname[ [-RI
where name specifies the name of a paste buffer that the DM creates to hold the copied text. The -! pathname option specifies the name of a permanent file for the text. For example:
XC copy_text
copies a defined range of text into a paste buffer named copy_text. Here is another example:
XC -f copy_text
copies a defined range of text into a permanent file named copy_text.
If you supply the name of an existing paste buffer or file, XC overwrites its contents with the newly copied text. If you omit the name of a paste buffer or permanent file, XC writes the copied text to the default (unnamed) paste buffer.
The -R option instructs XC to copy a rectangular block of text that you have defined by marking the upper left and lower right corners of a text region. To define the reg1.0n, use the cursor and the DR command or <MARK> to specify the left corner, then move the cursor to specify the right corner. If you specify a column (the left and right corners in the same column), XC copies all characters to the right of the column.
Figure 5-3 shows the two cursor positions used to mark the column. The dotted rectangle shows the block of text that the XC -R command copies. (The dotted rectangle is only for the purpose of illustration; it does not appear on your display.)
6-11 Editing a Pad
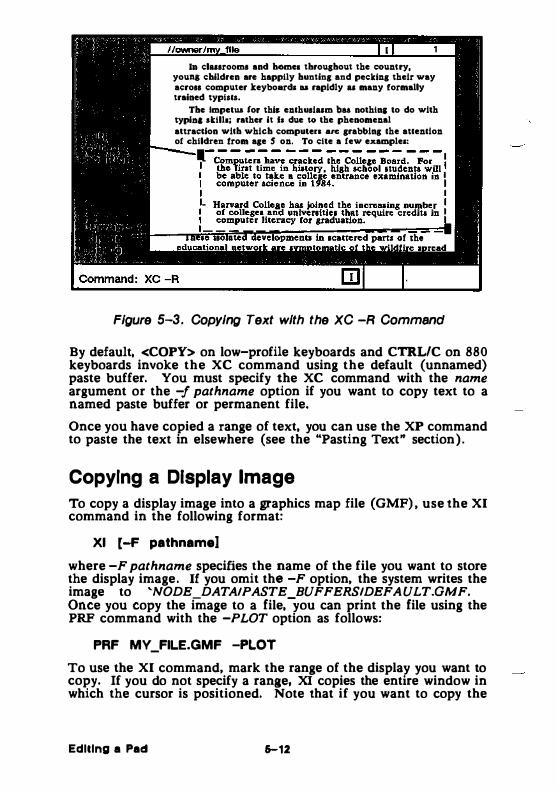
Ia clusrooms and homeo throughout the country, youq children are happily hunting and pecldng their way across computer keyboard• aa rapidly u many formally trained typists.
The lmpetua tor this enthusium baa nothina to do with typiDa skillo; rather it II due 10 the phenomenal attraedon wilh whieh computen ....., grabbing the attention of children trom age S on. To cite a few example•:
Figure 5-3. Copying Text with the XC -R Command
By default, <COPY> on low-profile keyboards and CTRL/C on 880 keyboards invoke the XC command using the default (unnamed) paste buffer. You must specify the XC command with the name argument or the -J pathname option if you want to copy text to a named paste buffer or permanent file.
Once you have copied a range of text, you can use the XP command to paste the text in elsewhere (see the "Pasting Text .. section).
Copying a Display Image To copy a display image into a graphics map file (GMF), use the XI command in the following format:
XI [-F pathnamei
where -F pathname specifies the name of the file you want to store the display image. If you omit the -F option, the system writes the image to 'NODE_DATAIPASTE_BUFFERSIDEFAULT.GMF. Once you copy the image to a file, you can print the file using the PRF command with the -PLOT option as follows:
PRF MY _FILE.GMF -PLOT
To use the XI command, mark the range of the display you want to copy. If you do not specify a range, XI copies the entire window in which the cursor is positioned. Note that if you want to copy the
Edlllng a Pad 6-12
whole screen, use the Shell command CPSCR (COPY_SCREEN). Chapter 7 describes the CPSCR command.
Cutting Text When you cut text from a pad, the DM copies the text into a paste buffer or file and then deletes it from the pad. To cut a defined range of text, specify the XD command in the following format:
XD [namo I -1 pathnamo] [-R]
where name specifies the name of a paste buffer that the DM creates to hold the deleted text. The -/ pathname option specifies the name of a permanent file for the text. You can use this command only in pads created with <EDIT> or the CE command.
If you supply the name of an existing paste buffer or file, XD overwrites its contents with the newly deleted text. If you omit the name of a paste buffer or permanent file, XD writes the deleted text to the default (unnamed) paste buffer.
The -R option instructs XD to delete a rectangular block of text that you have defined by marking the upper left and lower right corners of a text region. To define the region, use the cursor and the DR command or <MARK> to specify the left corner, then move the cursor to specify the right comer. If you specify a column (the left and right corners in the same column), XD deletes all characters to the right of the column.
By default, <CUT> on low-profile keyboards and CTRLIE on 880 keyboards invoke the XD command using the default (unnamed) paste buffer. You must specify the XD command with the name argument or the -! pathname option to write deleted text to a named paste buffer or permanent file. respectively.
Once you have cut a range of text, you can use the XP command (described in the next section) to paste the text in elsewhere.
Pasting Text To insert the contents of a paste buffer or file into a pad at the current cursor position, specify the XP command in the following format:
XP [namo I -1 pathname] [-AI
where name specifies the name of an existing paste buffer that contains the text you want to insert. The -/ pathname option specifies the name of an existing file that contains the text you want to insert. If you do not specify the name of a paste buffer or permanent file, XP inserts the contents of the default (unnamed) paste buffer.
6-13 Editing • Pad
You can use this command only in pads created with <EDIT> or the CE command.
The -R option instructs XP to insert a rectangular block of text that you have copied or deleted using the XC or XD command and the -R option. XP uses the current cursor position as the origin (upper left corner) of the block.
By default, <PASTE> on low-profile keyboards and CTRLIO on 880 keyboards invoke the XP command using the contents of the default (unnamed) paste buffer. You must specify the XP command with the name argument or the -j pathname option to insert the contents of a named paste buffer or permanent file, respectively.
Using Regular Expressions The DM search and substitute operations (described in the next several sections) allow you to use special notation, called regular expressions, to specify patterns for search and substitute text strings. You can also use regular expressions with the Shell commands ED (EDIT), EDSTR (EDIT_STREAM), FPAT (FIND_PATTERN) , FPATB (FIND_PATTERN_BLOCK), and CHPAT (CHANGE PATTERN) . See the DOMAIN System Command Reference lor descriptions of these Shell commands.
Regular expressions permit you to concisely describe text patterns without necessarily knowing their exact contents or format. You can create expressions to describe patterns in particular positions on a line, patterns that always contain certain characters and at times may include others, or patterns that match text of indefinite length.
Table S-5 provides a list of the characters used to construct regular expressions and a brief description of their functions.
CAUTION: The special characters described in Table S-5 apply only to regular expression operations. Some of these characters also have meanings (often radically different) in Shell commands and other software products. If you want to use a regular expression as a part of one of those Shell commands or products, be sure to enclose the expression in quotation marks so that it will not be misinterpreted.
Editing a Pad 6-14
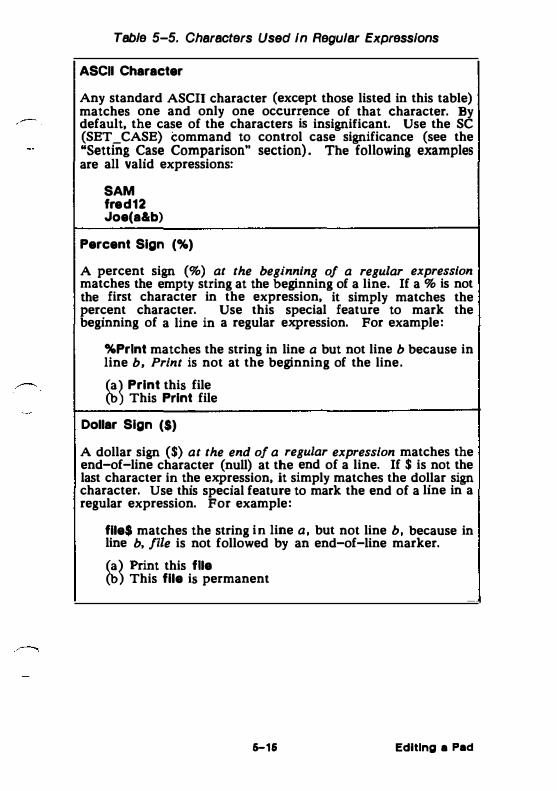
Table 5-5. Characters Used in Regular Expressions
ASCII Character
Any standard ASCII character (except those listed in this table) matches one and only one occurrence of that character. By default, the case of the characters is insignificant. Use the SC (SET_CASE) Command to control case significance (see the "Setting Case Comparison" section). The following examples are all valid expressions:
SAM fred12 Joe(a&b)
Percent Sign (%)
A percent sign (%) at the beginning of a regular expression matches the empty string at the beginning of a line. If a % is not the first character in the expression, it simply matches the percent character. Use this special feature to mark the beginning of a line in a regular expression. For example:
%Print matches the string in line a but not line b because in line b, Print is not at the beginning of the line.
�� Print this file This Print file
Dollar Sign ($)
A dollar sign ($) at the end of a regular expression matches the end-of-line character (null) at the end of a line. If $ is not the last character in the expression, it simply matches the dollar sign character. Use this special feature to mark the end of a line in a regular expression. For example:
file$ matches the string in line a, but not line b, because in line b, file is not followed by an end-of-line marker.
�� Print this file This file is permanent
5-16 Editing a Pad
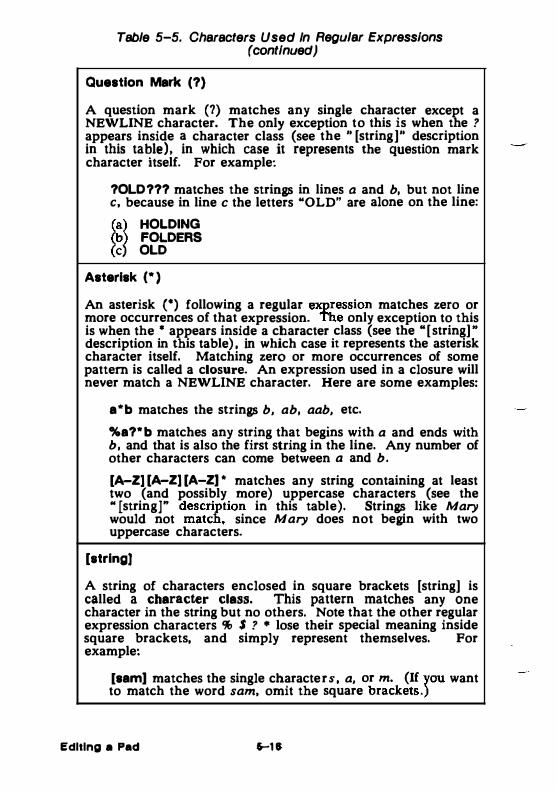
Table 5-5. Characters Used In Regular Expressions (continued)
Question Mark (?)
A question mark (?) matches any single character except a NEWLINE character. The only exception to this is when the ? appears inside a character class (see the " [string]" description in this table), in which case it represents the question mark character itself. For example:
?OLD??? matches the strings in lines a and b, but not line c, because in line c the letters "OLD" are alone on the line: �) HOLDING
) FOLDERS ) OLD
Asterisk (•)
An asterisk (*) following a regular expression matches zero or more occurrences of that expression. The only exception to this is when the • appears inside a character class (see the "[string] .. description in this table), in which case it represents the asterisk character itself. Matching zero or more occurrences of some pattern is called a closure. An expression used in a closure will never match a NEWLINE character. Here are some examples:
a*b matches the strings b, ab, aab, etc.
%a?*b matches any string that begins with a and ends with b, and that is also the first string in the line. Any number of other characters can come between a and b.
[A-Z) [A-Z) [A-Z) * matches any string containing at least two (and possibly more) uppercase characters (see the " [string]" description in this table). Strings like Mary would not match , since Mary does not begin with two uppercase characters.
[string}
A string of characters enclosed in square brackets [string] is called a character class. This pattern matches any one character in the string but no others. Note that the other regular expression characters % $ ? • lose their special meaning inside square brackets, and simply represent themselves. For example:
[sam] matches the single characters, a, or m. (If you want to match the word sam, omit the square brackets.)
Editing • Pad .... , .

-
•
Table 5-5. Characters Used In Regular Expressions (continued)
[-string]
A string enclosed in square brackets whose first character is a tilde [-string] matches any single character that does not appear in the string. If a tilde (-) is not the first character in the string, it simply matches the tilde character itseH. For example:
[-sam] matches any single character except s, a, or m.
[letter-letter] or [digit-digit)
Within a character class, you can specify any one of a range of letters or digits by indicating the beginning and ending characters separated by a hyphen (-) . For example:
[A-Z] matches any single uppercase letter in the range A through Z.
[a-z] matches any single lowercase letter in the range a through z.
[o-9] matches any single digit in the range 0 through 9.
Remember, though, that the actual search ignores case unless you have used the SC command to specify a case-sensitive search (see the "Setting Case Comparison" section). The range can be a subset of the letters or digits. However, the first and last characters in the range must be of the same type: uppercase letter, lowercase letter, or digit. For example, [a-n} and [3-8} are valid expressions. [A-9} is invalid.
Note that a hyphen (-) has a special meaning inside square brackets. If you want to include the literal hyphen character in the class, it must be either the first or last character in the class (so that it does not appear to separate two range-marking characters), or you can precede the hyphen with the escape character @ (see the @ description in this table).
6-17 Editing a Pad

Table 5-5. Characters Used In Regular Expressions (continued)
The right bracket ( ] ) also has special meaning inside a character class; it closes the class descriptor list. If you want to include the right bracket in the class, precede it with the escape character @ (see the @ description in this table). For example:
[a-d] matches any single occurrence of a, b, c, or d.
%(A-Z] matches any uppercase letter that is also the first character on the line.
5-[1-91 [G-9] • matches any of the page numbers in this chapter.
[OA-Z] matches any string containing a zero or an uppercase letter.
[ -a-z0-9] matches any uppercase letter or punctuation mark (i.e., no lowercase letter or digit).
At Sign (@)
The at sign (@) is an escape character. Characters preceded by the @ character have s�ecial meaning in regular expressions, as indicated in the followmg list:
@n matches a NEWLINE character.
@t matches a tab character. Note, however, that the <TAB> key does not insert a tab character. It simply moves the cursor to the display's next tab stop. In a regular expression, @t matches only tab characters that have been inserted with @t.
@f matches a form feed character.
In addition, you can use the escape character inside a character class to specify literal occurrences of a hypen (-) or a right bracket (1). You may also use the @ character to specify a literal occurrence of the other special characters used in regular expressions: % $ ? • @, For example:
[A-Z@-@]] matches any UJ)percase letter, a hyphen, or a right bracket.
@?@• matches a question mark followed by an asterisk, rather than zero or more occurrences of any character (?*).
Editing a Pad 6-18
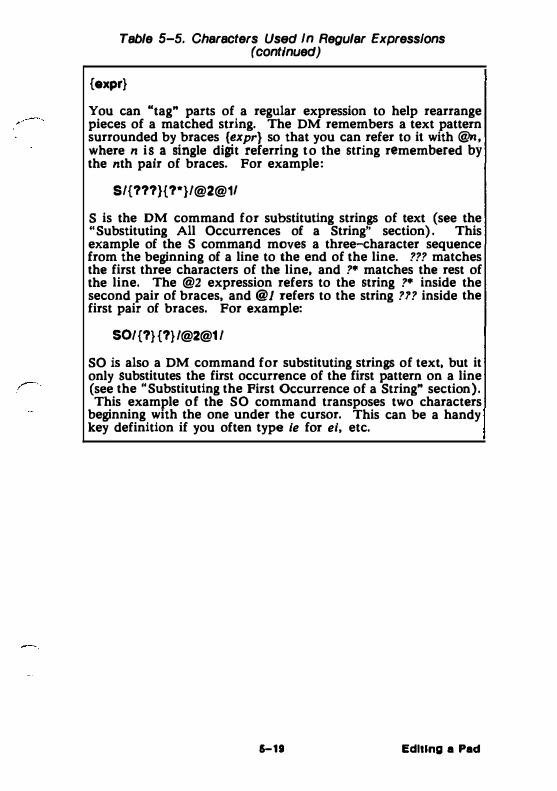
Table 5-5. Characters Used In Regular Expressions (continued)
{expr}
You can "tag" parts of a regular expression to help rearrange pieces of a matched string. The DM remembers a text pattern surrounded by braces {expr} so that you can refer to it with @n, where n is a single digit referring to the string remembered by the nth pair of braces. For example:
S/{???)(?•j/@2@11
S is the DM command for substituting strings of text (see the "Substituting All Occurrences of a String'' section). This example of the S command moves a three-character sequence from the beginning of a line to the end of the line. ??? matches the first three characters of the line, and ?• matches the rest of the line. The @2 expression refers to the string ?• inside the second pair of braces, and @! refers to the string ??? inside the first pair of braces. For example:
SO/ {?}{?}/@2@1/
SO is also a DM command for substituting strings of text, but it only substitutes the first occurrence of the first pattern on a line (see the "Substituting the First Occurrence of a String" section). This example of the SO command transposes two characters
beginning with the one under the cursor. This can be a handy key definition if you often type ie for ei, etc.
5-10 Editing a Pad
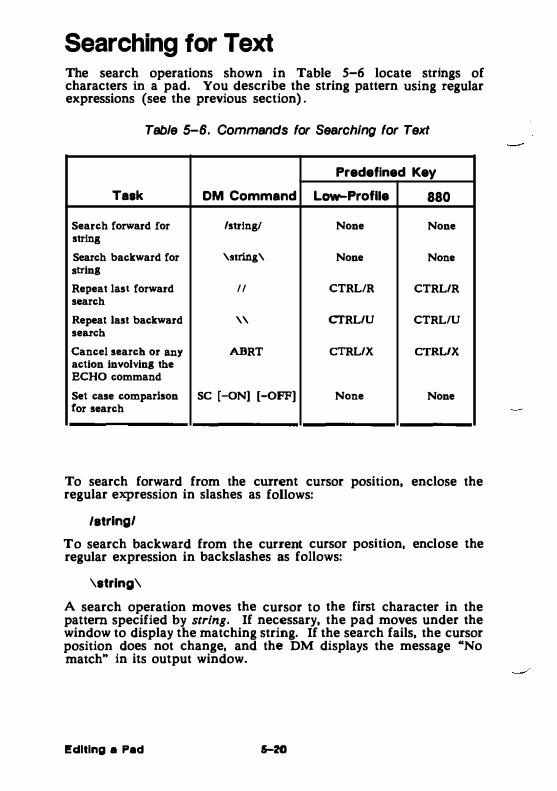
Searching for Text The search operations shown in Table 5-6 locate strings of characters in a pad. You describe the string pattern using regular expressions (see the previous section) .
Table 5-6. Commands for Searching for Text
Predefined Key
Task OM Command Low-Profile 880
Search forward for /string/ None None string
Search backward for \string\ None None •tring
Repeat last forward II CTRLJR CTRL/R search
Repeat last backward \\ CI'RL/U CTRLIU se�h
cancel search or any ABRT CTRL/X CTRUX action involving the ECHO command
Set case comparison SC [-ON] [-oFF) None None for search
To search forward from the cwrent cursor position, enclose the regular expression in slashes as follows:
/at ring/
To search backward from the current cursor position, enclose the regular expression in backslashes as follows:
\string\
A search operation moves the cursor to the first character in the pattern specified by string. If necessary, the pad moves under the window to display the matching string. If the search fails, the cursor position does not change, and the DM displays the message "No match" in its output window.
Editing • Pad 15-20
Searches do not wrap around the end or beginning of the file. Therefore, to search an entire pad, position the cursor at the beginning of the pad.
By default, searches are not case-sensitive. This means, for example, that /mary/ will locate mary, MARY, and even maRy. To perform a case-sensitive search, use the SC command (see the "Setting Case Comparison" section).
Actually, a search is not syntactically a command. It is a pointing operation. Note (as described in the "Defining Points and Regions" section in Chapter 3) that one way to specify a point in a pad is by matching a regular expression. This means that the search operation is really a pointing action followed by a null command. Consequently, you should not think of search operations as operating on a text range, but rather searching from the initial cursor position to the end (or beginning) of the file in order to properly position the cursor.
If the DM scans more than 100 lines in a search operation, it displays a "Searching for /string/ . . . " message in its output window. Then it polls for keystrokes every 10 lines it processes. At this point, you may:
• Wait for the DM to complete the operation. • Cancel the search by typing CTRL/X, or by pressing a key
that has been defined to invoke the ABRT or SQ command (see the "Cancelling a Search Operation" section).
• Use the keyboard; it works as it normally does. You can type into any pad except the one being searched. You can specify any DM command except another search or substitute command. The DM executes these commands when it completes the search. You can type input to another Shell or program (if it was previously waiting for input). The process executes these commands when the DM finishes the search.
Repeating a Search Operation To repeat the last search forward. specify the II command or type the CTRL/R sequence.
To repeat the last search backward, specify the \\ command or type the CTRL/U sequence.
The DM saves the most recent search instruction, so you may repeat it even if you have specified other (non-searching) commands since then.
5-21 Editing a Pad
Cancelling a Search Operation To cancel the current search operation, type CTRLIX. The CTRL/X sequence invokes the ABRT command. Since you cannot type DM commands for the pad being searched, you must use CTRL/X or define a key to invoke the ABRT command (see the "Defining Keys" section in Chapter 4).
The DM command SQ also cancels a search operation. As with the ABRT command, you must define a key to invoke SQ during a search.
When you type CTRL/X or press a key defined to invoke ABRT or SQ, the DM displays the message "Search aborted" in its output window.
Setting Case Comparison As we said earlier, a search operation is not case sensitive by default. In a case-insensitive search, upper- and lowercase letters are equivalent. In a case-sensitive search, the characters must match in case (i.e., lmaryl will not locate /MARY!) .
To set case comparison for a search, specify the SC (SET_ CASE} command in the following format:
sc [-oN I -oFF[
The -ON option specifies a case-sensitive search, and the -oFF option specifies a case-insensitive search. The SC command without options toggles the current case comparison setting.
Substituting Text The commands shown in Table 5-7 allow you to search a pad or part of a pad for a text string, and to replace the string with a new string. Before specifying a substitute command, use the DR command or <MARK> to define the range of text in which you want the substitution to occur (see the "Defining a Range of Text" section earlier in this chapter). If you do not defme a range, the substitution occurs from the current cursor position to the end of the line.
Unlike searches, which ignore case unless told otherwise, all substitutions are case-sensitive. You cannot make a substitution case-insensitive.
Editing a Pad 5-22
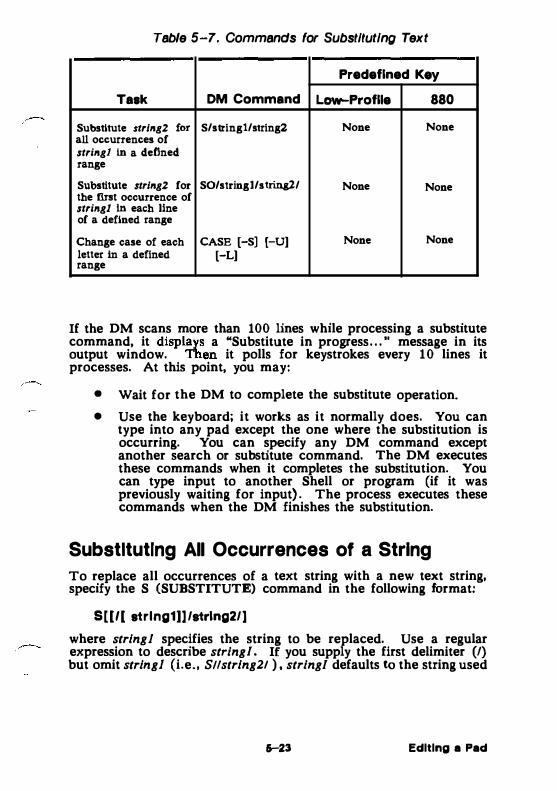
Table 5-7. Commands for Substituting Text
Predefined Key
Task DM Command Low-Profile 880
Substitute strlng2 ,., S/stringl/string2 None None all occurrences of string! in a defined range
SUbstitute strlng2 for S0/stringl/string2/ None None the first oeeurrenee of string! In eaeh line of a defined range
Change ease of eaeh CASE [-S) {-U] None None letter in a defined [-L] range
If the DM scans more than 100 lines while processing a substitute command, it displays a "Substitute in progress . . . .. message in its output window. Then it polls for keystrokes every 10 lines it processes. At this point, you may:
• Wait for the DM to complete the substitute operation. • Use the keyboard; it works as it normally does. You can
type into any pad except the one where the substitution is occurring. You can specify any DM command except another search or substitute command. The DM executes these commands when it completes the substitution. You can type input to another Shell or program (if it was previously waiting for input). The process executes these commands when the DM finishes the substitution.
Substituting All Occurrences of a String To replace all occurrences of a text string with a new text string, specify the S (SUBSTITUTE) command in the following format:
S[[l[ strlng1[]1strlng21)
where string! specifies the string to be replaced. Use a regular expression to describe string I. If you supply the first delimiter (/} but omit string! (i.e., S!lstring21 ) , string I defaults to the string used
5--23 Editing a Pad
in the last search operation. If you also omit the delimiter (i.e., Slstring21 ), then string/ defaults to the string used in the last substitute operation.
The string2 argument specifies a literal replacement string (not a regular expression). If you supply string/, then string2 is required.
You can use an ampersand (&) to instruct the S command to use string} as part of string2. For example:
S/Tom/& Smith/
This command replaces all occurrences of Tom with Tom Smith over the defined range of text.
The S command does not move the cursor or the pad, but does update the pad when the substitution is complete.
Substituting the First Occurrence of a String
The SO (SUBSTITUTE ONCE) command is like the S (SUBSTITUTE) command- except that SO replaces only the first occurrence of a string in each line of a defined range of text. Specify the SO command in the following format:
SO[[/[strlng1 [[/strlng2/l
where string I specifies the string to be replaced. Use a regular expression to describe string J , If you supply the first delimiter (/) but omit string! (i.e., SO!Istring21 ) , string! defaults to the string used in the last search operation. If you also omit the delimiter (i.e., S0Jstrlng21 ), then string! defaults to the string used in the last substitute operation.
The string2 argument specifies a literal replacement string (not a regular expression). If you supply string! , then strlng2 is required.
You can use an ampersand (&) to instruct the SO command to use string! as pan of strlng2. For example:
SO/Toml& Smith/
This command replaces the first occurrence of Tom with Tom Smith in each line of the defined range of text.
The SO command does not move the cursor or the pad, but does update the pad when the substitution is complete.
Editing • Pad 6-24

Changing the Case of Letters
To change the case of letters in a defined range of text, specify the CASE command in the following format:
CASE [-8] [-UJ [-LI
where -s swaps all uppercase letters for lowercase and all lowercase letters for uppercase. The -U option changes all letters in the defined range to uppercase, and -L changes all letters to lowercase. CASE without options swaps all uppercase letters for lowercase and all lowercase letters for uppercase.
Undoing Previous Commands To undo the most recent DM command you entered, specify the UNDO command. On low-profile keyboards, you can also undo the previous corrlmand by pressing the <UNDO> key. There is no predefined key for this command on 880 keyboards.
NOTE: The UNDO command only applies to DM operations. You cannot undo Shell commands.
The UNDO command works by compiling a history of DM operations in input and edit pads in reverse chronological order. UNDO reverses the effect of the most recent DM command you specified. Successive UNDOs reverse DM commands further back in history.
To compile its history of activities, the DM uses undo buffers (one per edit pad and one per input pad). The undo buffers are circular lists that, when full, eliminate the oldest entries to make room for new ones.
The DM groups entries together in sets. For example, an S (SUBSTITUTE) command may change five lines. While the DM considers this to be five entries, the five entries are grouped into a single set so that one UNDO will change all five lines back to their original state. When a buffer becomes full, the DM erases the oldest set of entries. This means that UNDO will never partially undo an operation; it will either completely undo the operation or do nothing.
An undo buffer for an edit pad can hold up to 1024 entries. An undo buffer for an input pad can hold up to 128 entries.
..... Editing • Pad
Updating an Edit File To update a file that you are currently editing, specify the PW (PAD_ WRITE) command. PW is valid for edit pads only. It requires no arguments or options.
The first time you specify PW during an editing session, the DM writes the contents of the edit pad to the file that is being edited, without closing the edit pad. The DM writes the previous contents of the file to a file with the same name and the added suffix .BAK. Subsequent PW or WC (WINDOW_ CLOSE) commands rewrite the new file and leave the .BAK version unchanged. (For more information about the WC command, refer to the "Closing Pads and Windows" section in Chapter 4)
PW is similar to WC with two exceptions:
1. PW leaves the edit pad open so that you can continue editing the file.
2. PW writes the new version of the file even if other windows are viewing the edit pad.
PW is useful if, for example, you want to try compiling a program you are editing. If you decide to make additional changes to the program, you can just go back to the edit pad and continue editing, since updates made by PW leave the edit pad open and active.
On low-profile keyboards, you can also update an edit file by pressing the <SAVE> key. There is no predefined key for this function on 880 keyboards. However, the CTRL/Y sequence executes PW along with other DM commands (see the .. Closing Pads and Windows" section in Chapter 4).
Editing a Pad 5-26

CHAPIER 6
Using the Shell
Chapter 3 describes the Display Manager (DM), the operating system program that you use to create processes and control your node's display. We supply another operating system pro&rarn, called the command Shell, that lets you perform more traditional computing operations. The Shell lets you enter commands to perform such operations as copying files and directories, compiling and running programs, and monitoring system activity.
This chapter describes the command Shell environment that processes Shell commands. The chapter includes information on: Shell commands, controlling command input and output, the command line parser, and using pathname wildcards.
8-1 Using the Shall
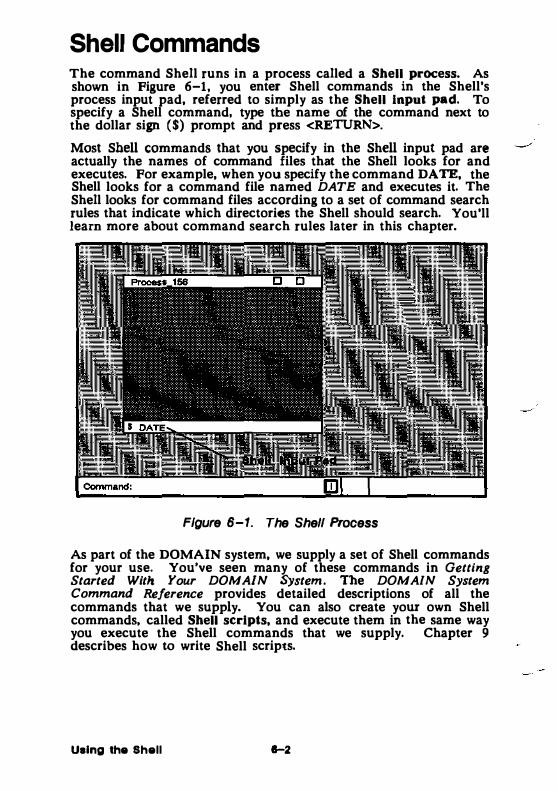
Shell Commands The command Shell runs in a process called a Shell process. As shown in Figure 6-1, you enter Shell commands in the Shell's process input pad, referred to simply as the Shell input pad. To specify a Shell command, type the name of the command next to the dollar sign ($) prompt and press <RETURN>.
Most Shell commands that you specify in the Shell input pad are actually the names of command files that the Shell looks for and executes. For example, when you specify the command DATE, the Shell looks for a command file named DATE and executes it. The Shell looks for command files according to a set of command search rules that indicate which directories the Shell should search. You'll learn more about command search rules later in this chapter.
Figure 6-1. The Shell Process
As part of the DOMAIN system, we supply a set of Shell commands for your use. You've seen many of these commands in Getting Started With Your DOMAIN System. The DOMAIN System Command Reference provides detailed descriptions of all the commands that we supply. You can also create yow own Shell commands, called Shell scripts, and execute them in the same way you execute the Shell commands that we supply. Chapter 9 describes how to write Shell scripts.
Using the Shell 11-2
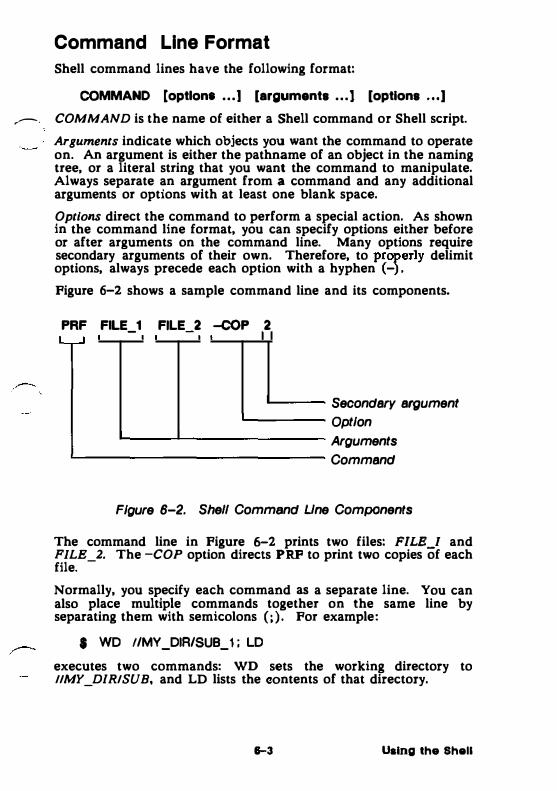
Command Line Format Shell command lines have the following format:
COMMAND [optlonl • • • ) [arguments • • • ] [options ... ]
�· COMMAND is the name of either a Shell command or Shell script.
Arguments indicate which objects you want the command to operate on. An argument is either the pathname of an object in the naming tree, or a literal string that you want the command to manipulate. Always separate an argument from a command and any additional arguments or options with at least one blank space.
Options direct the command to perform a special action. As shown in the command line format, you can specify options either before or after arguments on the command line. Many options require secondary arguments of their own. Therefore, to properly delimit options, always precede each option with a hyphen (-) .
Figure 6-2 shows a sample command line and its components.
PRF FILE_1 FILE_2 -coP 2
'----- Secondary argument '------- Option
'-------'---------- Arguments L------------- Command
Figure 6-2. Shell Command Une Components
The command line in Figure 6-2 prints two files: FILB_I and FJLB_2. The -COP option directs PRF to print two copies of each file.
Normally, you specify each command as a separate line. You can also place multiple commands together on the same line by separating them with semicolons (;). For example:
$ WD //MY_DIR/SUB_1 ; LD
executes two commands: WD sets the working directory to IIMY_DIRISUB, and LD lists the eontents of that directory.
1-3 Using the Shell
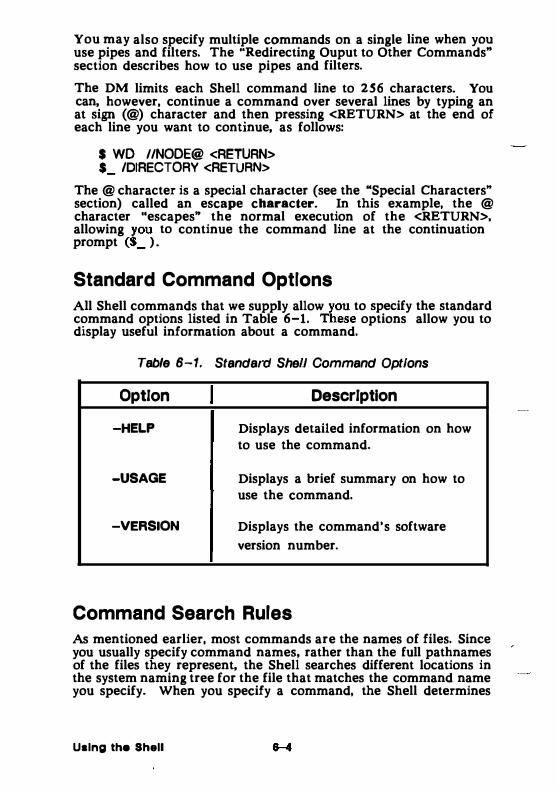
You may also specify multiple commands on a single line when you use pipes and filters. The "Redirecting Ouput to Other Commands" section describes how to use pipes and filters.
The DM limits each Shell command line to 256 characters. You can, however, continue a command over several lines by typing an at sign (@) character and then pressing <RETURN> at the end of each line you want to continue, as follows:
$ WD //NODE@ <RETURN> $_ /DIRECTORY <RETURN>
The @ character is a special character (see the "Special Characters" section) called an escape character. In this example, the @ character "escapes" the normal execution of the <RETURN>. allowing you to continue the command line at the continuation prompt ($_ ).
Standard Command Options All Shell commands that we supply allow you to specify the standard command options listed in Table 6-1. These options allow you to display useful information about a command.
Table 6-1. Standard Shell Command Options
Option Description
-HELP Displays detailed information on how to use the command.
-USAGE Displays a brief summary on how to use the command.
-VERSION Displays the command's software version number.
Command Search Rules As mentioned earlier, most commands are the names of files. Since you usually specify command names, rather than the full pathnames of the files they represent, the Shell searches different locations in the system naming tree for the file that matches the command name you specify. When you specify a command, the Shell determines
Using the Shell
which directories to search according to a set of command search rules.
Some commands, such as INLIB (INITIALIZE_LIBRARY) are not files. They invoke internal Shell functions and do not follow command search rules. The DOMAIN System Command Reference identifies which commands are internal Shell commands.
The default command search rules direct the Shell to search the following directories in the order shown:
1. Your current working directory ( . )
2. Your personal command directory ( -COM )
3. The system command directory ( /COM )
When you specify a command, the Shell searches the directories in the order specified by the command search rules. As soon as the Shell finds a file with the name that matches the command you specified, it attempts to execute the file.
For example, when you specify the Shell command:
$ LD
the Shell first looks for a file named LD in your current working directory. If the Shell does not find the file in the current working directory, it checks the directory -COM, which is a subdirectory of your naming directory. The -COM directory is your personal command directory where you store your own frequently used Shell scripts. (Please note that you don't have to create a personal command directory; if the Shell doesn't find one, it continues its search and no error occurs.)
The final directory that the Shell searches is the node's main command directory !COM, which contains all of the standard commands that we supply. Since LD is a system command, the Shell finds it in /COM and executes it, sorting MY FILE and displaying output.
-
This example assumes that you have not created an executable file or Shell script named LD in your working directory or personal command directory. Had you done so, the Shell would have executed your version of LD before the system's version.
You can set or show a Shell's command search rules using the CSR (COMMAND_SEARCH_RULES) command. For example, the
� CSR command in the following example displays the Shell's command search rules:
$ CSR . -com /com
Using th• Shell

You can use the -A option with the CSR command to append additional directories to the current list. For example, the following example adds two additional directories (�PROG and IPROG} to the current set:
$ CSR -A -PROG /PROG $ CSR • �com fcom �prog fprog
To completely change a set of command search rules, specify the CSR command along with a new set of rules. For example:
$ CSR /COM -COM $ CSR /com �com
If you change a Shell's command search rules, any subordinate Shell (created with the SH (SHELL) command), or Shell script that you invoke, inherits the new command search rules. If you create a new process running the Shell (see Chapter 4), the new Shell uses the original default command search rules, not the new rules.
Special Characters
The Shell recognizes a variety of special characters that allow you to direct the action of commands. These characters are divided into three basic categories:
• input and output (110} control characters
• pathname wildcards
• parsing operators
The followin� sections explain how to use 110 control characters and pathname wildcards. Since you will use Shell command parsing operators most frequently in Shell scripts, we describe parsing operators in detail in Chapter 9, "Writing Shell Scripts."
Creating and Invoking Shells The Shell is a command line interpreter that reads command lines that you type and interprets them as requests to execute other programs. When you press the <SHELL> key, you create a process running the Shell program. Each new Shell process that you create provides a separate environment in which the Shell runs.
You can invoke additional Shells from within a Shell process using the Shell command SH {SHELL). When you specify SH, you generate a separate subordinate Shell, in which you can carry on separate operations and execute programs and scripts. Note that the
Using the Shall
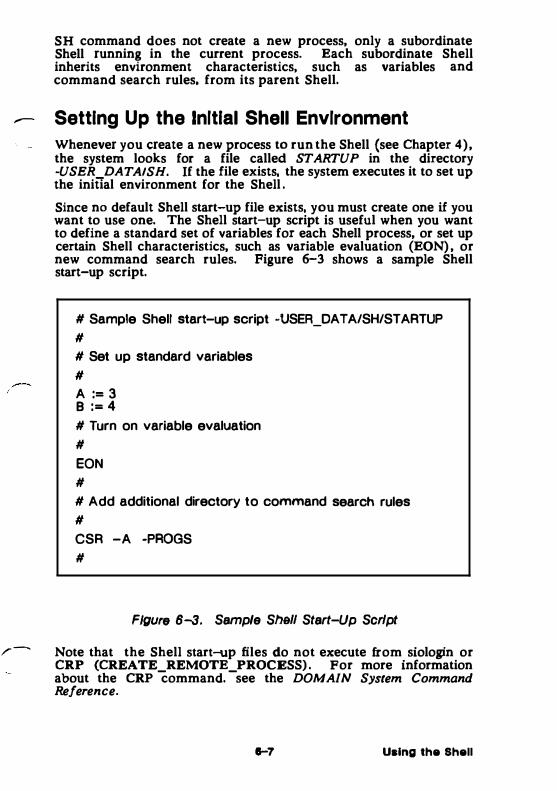
SH command does not create a new process, only a subordinate Shell running in the current process. Each subordinate Shell inherits environment characteristics, such as variables and command search rules, from its parent Shell.
� Setting Up the Initial Shell Environment
Whenever you create a new process to run the Shell (see Chapter 4), the system looks for a file called STARTUP in the directory �USER_DATAISH. If the file exists, the system executes it to set up the initial environment for the Shell .
Since no default Shell start-up file exists, you must create one if you want to use one. The Shell start-up script is useful when you want to define a standard set of variables for each Shell process, or set up certain Shell characteristics, such as variable evaluation (EON), or new command search rules. Figure 6-3 shows a sample Shell start-up script.
# Sample Shell start-up script �USER_DATA/SH/STARTUP # # Set up standard variables # A := 3 B := 4 # Turn on variable evaluation # EON # # Add additional directory to command search rules # CSR -A -PROGS #
Figure 6-3. Sample ShBII Start-Up Script
/"--------.._ Note that the Shell start-up files do not execute from siologin or CRP (CREATE_REMOTE_PROCESS). For more information about the CRP command. see the DOMAIN System Command Reference.
1-7 Using the Shell
Controlling Input and Output Processes pass data to and from programs, such as the Shell, through open system channels called streams. Every process that you create has the following streams open for program input and output:
• standard input
• standard output
• error input
• error output
Standard input and standard output are the streams that channel normal input and output between a program and a process. By default, standard input passes program input that you type in the process input pad; standard output passes program output to the process transcript pad.
Error input and error output are two streams used for additional program input and output. Like the standard streams, they use the process input pad and process transcript pad by default.
The error input stream has nothing to do with errors; it is simply another input stream for passing data to a program. For example, when a command queries you to verify wildcard names, error input passes your response to the command. (The "Using Query Options" section describes how commands query you to verify wildcard names.) Error output is the stream that passes program error messages to the process transcript pad.
Shell commands use input and output streams when processing command line data. When you specify a command in the Shell input pad, standard input passes data from the command line to the command program. Standard output passes data from the program to the transcript pad.
In certain instances, you may want the Shell to read input from and write output to locations other than the input and transcript pads. For example, you may want to save the output from a command in a file. Using 1/0 control characters, you can redirect input and output streams to pass data to and from other locations, usually files.
Table 6-2 lists the I/0 control characters and a brief summary of their functions.
Using the Shell

Table 6-2. 1/0 Control Characters
Character Function
< Redirect standard input
< 1 Redirect error input
> Redirect standard output
> 1 Redirect error output
» Append standard output
»1 Append error output
I Pipe standard output
( ) Group commands for I/0 redirection
« Redirect standard in(sut to read in-line data from scripts. See Chapter 9 for a complete description.)
« 1 Redirect error input to read in-line data from scripts. (See Chapter 9 for a complete description.)
The following sections show how to use 110 control characters. Chapter 9 describes the characters used to redirect standard input to read in-line data from scripts.
Reading Input from a File To redirect standard input to read data from a file rather than the
� -- input pad, use the less-than symbol < < ). For example, the followmg command reads data from a file named FILB_l:
$ TLC a-z A-Z < FILE_1
Using the Shell

The TLC (TRANSLITERATE CHARACTERS) command normally substitutes or deletes charaCters from text that you type in the Shell input pad. The TLC command in this example redirects standard input to read data from a file (FILE I) instead of the input pad. The command changes all lowercase characters in FILE 1 to uppercase characters, and writes the converted text to the tranScript pad.
Writing Output to a File
To redirect standard output to write output to a file rather than to the transcript pad, use the greater-than ( > ) symbol. For example, the following command writes output to a file named FILE_l .FMT:
$ FMT FILE_1 > FILE_1 .FMT
The FMT (FORMAT_TEXT) command formats FILE_l and writes the output (the formatted file) to FILE l.FMT instead of to the transcript pad.
-
Shell commands use the error output stream to report any errors found in the input file. By default, error output writes output to the transcript pad. To redirect error output to write output to a file instead of the transcript pad, use the greater-than/question mark symbol ( >? ) , For example, the following command redirects both standard output and error output:
$ FMT FILE_1 > FILE_1 .FMT >? FILE_1 .ERR
The FMT command writes the formatted file to FILE 1 .FMT, and if it discovers any errors, writes error messages- to the file FILE_! .ERR.
Appending Output to a File To redirect standard output to append output to the end of a file, use the double greater-than symbol ( >> ). For example, the following command appends output to a file named BOOK:
S CATF CH4 CHS CH6 »BOOK
The CATF (CATENATE_FJLE) command normally reads input files in order and writes them to the transcript pad. The CATF command in this example reads the files CH4, CH5, and CH6 in that order and appends them to the existing file BOOK. If the specified output file didn't exist, CATF would create a new file named BOOK and write output to it.
To redirect error output to append error output to the end of a file, use the double greater-than/question mark ( >>? ) symbol. For example, suppose you wanted to keep a record of all FMT errors.
Using the Shell 8-10
----
Each time you used the FMT command to format a file, you could direct the command to append error output to a file as follows:
$ FMT FILE_1 >>?ERROR_LOG The command in this example formats FILE_! . If it encounters any errors, it appends any error output to the file ERROR_LOG.
Redirecting Output to Other Commands
If you place two commands on one line, and separate them with a venical bar ( I ) , the Shell connects the standard output stream of the first command to the standard input stream of the next command. For example:
$ SRF FILE _1 I DLDUPL The SRF (SORT FILE) command and passes the- output to the (DELETE DUPLICATE LINES) command Strips out dupliCate lines.
sorts the contents of FILE 1 Shell command DLDUPL command. The DLDULP
The vertical bar between the commands is called a pipe. Commands such as SRF and DUDULP that copy standard input to standard output (making some changes along the way) are called filters. A command line that uses pipes and filters is called a pipeline. You can use either Shell commands or scripts as filters in pipelines.
To use a group of commands as a filter, enclose them in parentheses using the following format:
( COMMAND_1 ; CDMMAND_2 ) I COMMAND_3
The Shell passes output from the commands enclosed in parentheses (COMMAND_! and COMMAND_2) to the command to the right of the vertical bar COMMAND_J. For example:
$ (LD MY DIR1 -c -NHD; LD MY DIR2 -c -NHD) I SRF >@ $_ LIST -
-
This example concatenates the output of the two LD (LIST_DIRECTORY) commands and then sorts the reported file names, placing the output in the file called LIST.
The Command Line Parser Many of the Shell commands that we supply share a standard command line parsing procedure. This procedwe, called the command line parser, determines how each command processes command line information. The Shell command descriptions in the
11-1 1 Using the Shell
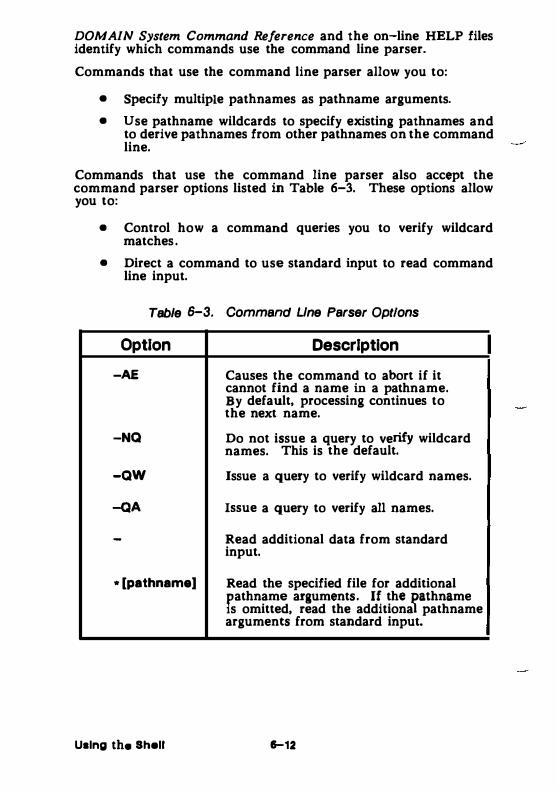
DOMAIN System Command Reference and the on-line HELP files identify which commands use the command line parser.
Commands that use the command line parser allow you to:
• Specify multiple pathnames as pathname arguments. • Use pathname wildcards to specify existing pathnames and
to derive pathnames from other pathnames on the command line.
Commands that use the command line parser also accept the command parser options listed in Table 6-3. These options allow you to:
• Control how a command queries you to verify wildcard matches.
• Direct a command to use standard input to read command line input.
Table 6-3. Command Une Parser Options
Option
-AE
-NQ
-QW
-QA
-
* [pathname]
Using th• Shell
Description
Causes the command to abort if it cannot find a name in a pathname. By default, processing continues to the next name.
Do not issue a query to verify wildcard names. This is the default.
Issue a query to verify wildcard names.
Issue a query to verify all names.
Read additional data from standard input.
Read the specified file for additional cathname arguments. If the �athname s omitted, read the additiona pathname
arguments from standard input.
6-12
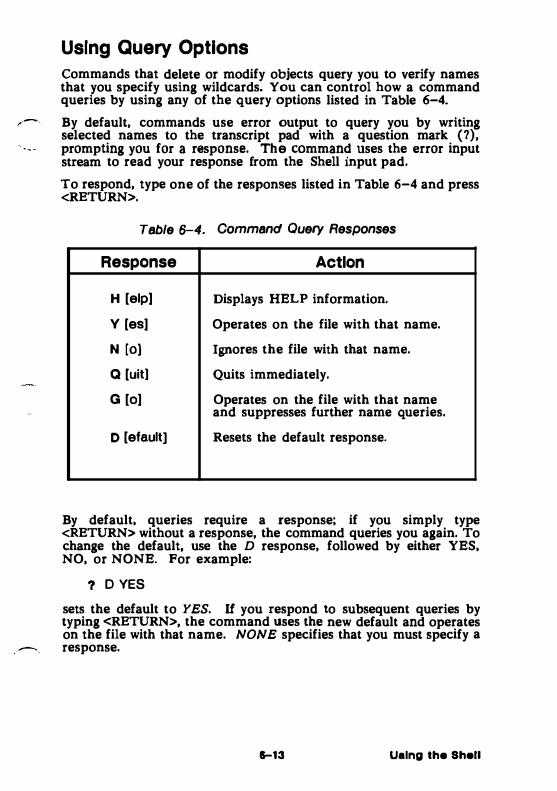
Using Query Options Commands that delete or modify objects query you to verify names that you specify using wildcards. You can control how a command queries by using any of the query options listed in Table 6-4.
,.-- By default, commands use error output to query you by writing selected names to the transcript pad with a question mark (?), prompting you for a response. The command uses the error input stream to read your response from the Shell input pad.
To respond, type one of the responses listed in Table 6-4 and press <RETURN>.
Table 6-4. Command Query Responses
Response Action
H [elp[ Displays HELP information.
Y [es[ Operates on the file with that name.
N [o[ Ignores the file with that name.
Q [uitl Quits immediately.
G [o[ Operates on the file with that name and suppresses further name queries.
D [efault] Resets the default response.
By default, queries require a response; if you simply type <RETURN> without a response, the command queries you again. To change the default, use the D response, followed by either YES, NO, or NONE. For example:
? D YES
sets the default to YES. If you respond to subsequent queries by typing <RETURN>, the command uses the new default and operates on the file with that name. NONE specifies that you must specify a
-- response.
5-13 Ualng the Shell
Reading Data from Standard Input When you enter a Shell command, the command normally reads input data from arguments that you specify in the command line. For example, the PRF (PRINT_FILE) command reads data from the specified files and prints it. To direct the command to read data from standard input instead of an input file, use the hyphen character (-) as shown in the following example:
$ PRF - <RETURN> PRINT THIS LINE ON THE LINE PAINTER <RETURN> AND THIS ONE TOO <RETURN> CTRLIZ
Standard input uses the Shell input pad by default, so PRF reads data from the input pad. To input data to the PRF command, type in data as shown in the example. The CTRLIZ control key inserts an end-of-file (EOF) that signals the end of input and causes PRF to print any data that you typed in the input pad.
Some commands and scripts receive data from both a list of files and standard input. For these commands, specify the hyphen character (-) as a pathname argument. For example:
$ FMT FILE_1 - FILE_2
The FMT command: formats FILE 1, formats data typed in standard input, and finally formats FILB_2.
Reading Pathnames from Standard Input
To diiect a command to read pathnames (rather than data) from standard input, use the asterisk symbol ("') . The PRF command in the following example reads pathname arguments that you type in the Shell input pad:
S PAF * <RETURN> FILE 1 <RETURN> FILE-2 <RETURN> FILE-3 <RETURN> CTR[/Z
The CTRL/Z control key inserts an end-of-file (EOF) that signals the end of input, which causes PRF to print the contents of each file.
You can also use the asterisk symbol and redirect standard input to read pathnames from a names file, a file that contains the pathnames of other files, as follows:
$ PRF 'JOBS
Using the Shall 1-14

In this example, PRF prints the contents of each file listed in the names file JOBS.
Using Pathname Wildcards
,.-- Most Shell commands accept pathnames as arguments. The commands that use the command line parser also accept wildcards as part of of their pathname arguments. Wildcards are characters or text strings that you can use in pathnames to represent one or more text strings in a pathname. For example, the wildcards in the following command line match every file that ends with .FTN in the current working directory:
$ LD ?•.FTN
y wildcards
The question mark wildcard (?) matches any single character except <RETURN>. The asterisk wildcard (•) matches zero or more occurrences of the character preceding it. As a result, this wildcard combination matches zero or more occurrences of any character.
Table 6-5 provides a list of pathname wildcards along with a brief ,.-. description of how they work. Chapter 7 describes how to use Shell
commands to manage files, directories, and links. Many of the examples in Chapter 7 provide specific examples of how to use pathname wildcards.
6-15 Using the Shell

Table 6-5. Summary of Pathname Wildcards
Character
?
%
•
Using the Shell
Description
Matches any single character except <RETURN>. For example:
Z? matches any two-character name begins with the letter Z (ZA and Z I).
Matches zero or more characters up to, not including, a period. For example:
that
but
%.BAK matches any name that ends in .BAK (SALES.BAK and JNV.BAK, but not SALES.BAK.BAK)
DEMO.% matches any name that begins with DEMO. up to and including (DEMO.BAK and DEMO.PAS)
the period
DEMO.%.% matches DEMO.PAS.BAK
Matches zero or more occurrences of the character that precedes it. When • follows the 1 character, it matches zero or more occurrences of any character except <RETURN>. For example:
FILES• matches FILE, FILE9, and FILE999.
DE?• matches DEMO, DESK, and DEPARTMENT.
DEMO.*% matches any name that DEMO.% matches (see the % example above), but also matches the period (DEMO.FMT and DEMO) .
.... ,.

Table 6-5. Summary of Pathname Wildcards (continued)
Character Description
[ string I Matches any single character string. For example:
listed in a
FILE[�9] matches any five-character name that begins with FILE and ends in a single digit (FILE4 and FILEB)
FILE[A-D] matches FILEA and FILEB but not FILEM
FILE[AXV] matches FILEA, FILEX, and FILBY
[ -string I Matches any single character that does not appear in a string. For example:
FILE. [ -A-Z] matches FILE and FILE.9 but not FILE.A or FILE.P
. .. Matches zero or more directories subordinate to the starting point. For example:
I/ MY NODE/... matches all the directories in MY_FiODE
/OWNER/ • • • /DEMO matches any object named DEMO in a subdirectory of OWNER
. . . /JAN?* matches any object starting with JAN in all subdirectories of the cwrent working directory
8-17
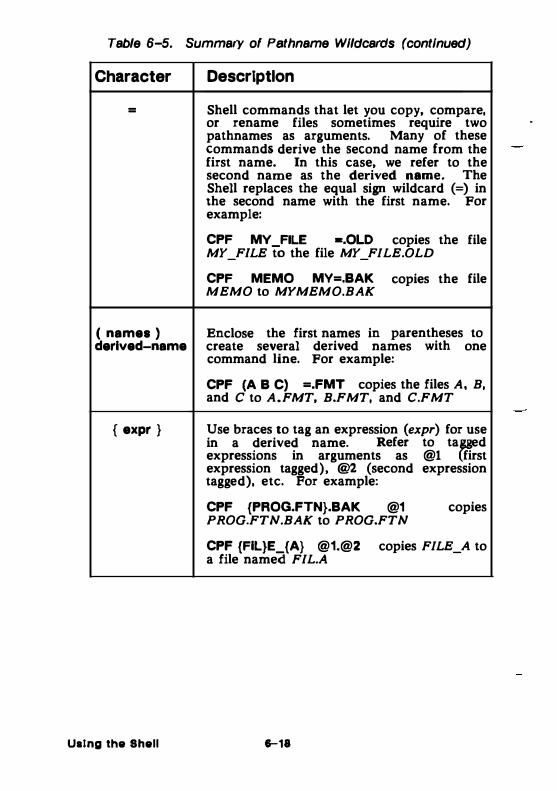
Table 6-5. Summary of Pathname Wildcards (continued)
Character
=
( names ) derived-name
{ expr }
Using the Shell
Description
Shell commands that let you copy, compare, or rename files sometimes require two pathnames as arguments. Many of these commands derive the second name from the first name. In this case, we refer to the second name as the derived name. The Shell replaces the equal sign wildcard (=) in the second name with the first name. example:
CPF MV_FILE •.OLD copies the MY_FILE to the file MY_FILE.OLD
CPF MEMO MV=.BAK copies the MEMO to MYMEMO.BAK
For
file
file
Enclose the first names in parentheses to create several derived names with one command line. For example:
CPF (A B C) =.FMT copies the files A, B, and C to A.FMT, B.FMT, and C.FMT
Use braces to tag an expression (expr) for use in a derived name. Refer to taMed expressions in arguments as @1 first expression tagged), @2 (second expression tagged), etc. For example:
CPF (PROG.FTN}.BAK @1 copies PROG.FTN.BAK to PROG.FTN
CPF (Fil}E_(A} @1.@2 copies FILE_A to a file named FIL.A
6-18
Running Programs in a Background Process The command Shell has another set of special characters, called parsing operators, that control how a command parses (interprets and categorizes) the individual components on a command line. We've already seen how to use some of these parsing operators: the semicolon (;) to separate multiple commands on a command line, the escape character (@) to continue commands on more than one line, and blank spaces to separate command arguments and options.
Another parsing operator is the ampersand character (&). It instructs the Shell to run a program in a background process (a process that runs without pads and windows), To run a command or program in a background process, enter the command line or program name in the Shell input pad, followed by the & character. For example:
$ BIND FILE_1 .BIN -MAP > PROG.MAP & This command line runs the binder as a background process to bind the file FILB_l .BIN and writes a complete map to the file PROG.MAP.
By default, the Shell directs output to the file IDEVINULL. You can display output from the background process by specifying the Shell command BON. The BON command directs the Shell where the background process was invoked to display output in its transcript pad. To turn output off (direct output to IDBVINULL), specify the BOFF command.
The remainder of the Shell parsing operators are used most frequently in scripts. Chapter 9 contains a complete list of parsing operators and describes how to use them in writing Shell scripts.
6-11 Using the Shall

•
1
0
1 � 1 1 , '
1 ! I • - l I
1 I !
CHAPTER 7
Managing Files, Directories, and Links
In Chapter 1, we looked at how the system organizes objects (files, directories, and links) in a structure called a naming tree. This chapter describes how to use Shell commands to manage these objects on your system. Shell commands let you move around the system naming tree and create, rename, copy, move, print, delete, and compare objects.
Since all of the commands described in this chapter require you to specify pathnames, you should understand the rules for pathnames described in Chapter 1. Commands that use the Shell command line parser also allow you to perform operations on groups of objects, and therefore accept one or more pathname wildcards. Many of the examples in this chapter show you how to use pathname wildcards in specific operations. For a complete description of the pathname wildcards you can use with Shefl commands. refer to Chapter 6.
7-1 Managing ObJects

Keep in mind that this chapter describes the basic functions of the commands you use to manage objects. For a complete description of a particular command and ali of its options, refer to the DOMAIN System Command Reference.
Moving Around the Naming Tree Most of the commands described in this chapter require you to use pathnames to specify locations in the naming tree where you want particular operations performed. Often, you will specify pathnames that use the current working directory or naming directory. To move around the naming tree, you need to know how to set your working directory and naming directory. Table 7-1 summarizes the commands used to move around the naming tree.
Table 7-1. Commands for Setting the Working and Naming Directory
Task Shell Command
Set or dlapla.y working directory WD (pathna.me I
Set or display naming directory NO [pathname)
Setting the Working Directory
The working directory is where the system begins its search for objects when you om1t the object's full pathname. At log-in, the system sets yow initial working directory to the home directory designated in your user account (see Chapter 2}. Each subsequent process that you create uses the working directory of the previous process as its working diiectory.
To display the name of a process's current working directory, specify the WD (WORKING_DIRECTORY) command without any arguments or options as follows:
$ WD
Managing Objects 7-2
To change a process's working directory to another directory, specify the WD command in the following format:
WD (pathname)
where pathname specifies the pathname of the directory you want to use as the working directory. For example:
$ WD //MY _NODE/OWNER/FORMS
sets the working directory for the current process to FORMS. Once set, anytime you omit the full pathname of an object, the system starts its search at the directory FORMS by default.
Setting the Naming Directory
The system searches the naming directory's COM directory (�COM) as part of the default command search rules (see Chapter 6). As described in Chapter 1, the naming directory is also where the system begins its search for an object when you precede an object's pathname with the tilde ( �) symbol.
At log-in, the system sets the naming directory to the home directory designated in your user account (see Chapter 2). Eacl). subsequent process that you create uses the naming directory of the previous process as its naming directory.
To display the name of a process's current working directory, specify the ND (NAMING_DIRECTORY) command without any arguments or options as follows:
$ NO
To change a process's naming directory to another directory, specify the ND command in the following format:
NO [pathname]
where pathname specifies the pathname of the directory you want to use as the naming directory. For example:
$ NO IUSER_11REPORTS
sets the naming directory to the directory REPORTS. Once set, you can use a tilde (�) in place of !USER_l!REPORTS at the beginning of any pathname. Thus, �CAL 85 would be the same as IUSER_JIREPORTSICAL_BS.
-
7-3 Managing Objects

Managing Files Table 7-2 summarizes the commands for managing files.
Table 7-2. Commends for Managing Files
Task Shell Command
Create a file CE pathname (OM command)
Rename a file CHN old_name [new_name]
Copy a file CPF oou.-ca (target] '
Move a fie MVF source [t--[
Append a fUe to another file CA TF SOI.roe >>target
Print • file PRF [pathname]
Display file attributes LD (pathname 1
Delete a tile DLF [pathname]
Copy display Image to a tile CPSCR pathnarne
Compare ASCII flies CMF source {target)
Compare sorted flee CMSRF (options] socrce (target)
Creating Flies To create normal text files, specify the DM command CE (CREATE_EDIT) along with the pathname of the file you want to create. By default, the <EDIT> key invokes the CE command. The CE command directs the DM to create the file and open an edit pad and window for the file on the display. Using the DM editor, you can edit the file then save its contents by typing CTRL/Y. When you save the file, the system stores it at the location in the naming tree specified by the file's pathname. Refer to the .. Creating Pads and Windows" section in Chapter 4 for a description of how to use the CE command to create and edit files.
Managing ObJecte 7 ...
The following example creates a file named MEMO in the directory !USER, and opens the file for editing:
Command: CE //NODE/USER/MEMO
The previous example uses an absolute pathname to specify the name of the new file. When you use a pathname that assumes the current working directory or naming directory, the system uses the working or naming directory of the current process. (The last process to perform an operation before you specified the CE command is the current process.)
The following example creates a file named MEMO in the current working directory:
Command: CE MEMO
The command in this example specifies the filename MEMO. Since the pathname does not specify an explicit directory location, the system uses the current process's working directory to determine where to create the new file. If the current process's working directory is //NODE/USER, then the system will create the new file with the pathname 1/NODEIUSERIMEMO.
When you run multiple Shell processes, you typically move between processes, often changing the current working directory. As a result, you may find it difficult to keep track of the current working directory. In situations where you run multiJ?le processes, you may want to specify absolute pathnames to av01d creating files at an unintended location.
Whenever you create a file, the system assigns the file a set of initial ACLs from the file's parent directory. After you create a file you can change its ACLs with the EDACL command. Chapter 8 explains ACLs and describes how to use the EDACL command.
Renaming Flies To change the name of a file, use the CHN (CHANGE_NAME) command in the following format:
CHN old_name [new_name] [options]
where old_name specifies the current pathname of the file you want to rename, and new_name specifies the new name of the file. For example:
- $ CHN /OWNER/JOHN PAUL
changes the name of the file JOHN to PAUL. Notice that the new_name argument applies to the rightmost component (JOHN) of the old_name argument.
7-6 Managing Objecta
To append a naming suffix to the new filename, specify any of the following naming options:
Option
-D
-Y
-u
Description
Appends the current month and day to the new name (new_name.mm.dd.).
Appends the current year, month, and date to the new name (new_name.yy.mm.dd).
Forces the system to create a unique new name by appending a sequence of number(s) to the end of the name.
If you omit the new_name argument, you must specify one of the options in the previous list; the system creates a new name by copying the old_name and appendmg the proper suffix as shown below.
$ CHN /OWNER/JOHN -D
This command changes the name of the file JOHN to JOHN.06.16.
Copying Flies When you copy a file, you create a copy of the file at another location in the naming tree. To copy a file or group of files, use the CPF (COPY_FILE) command in the following format:
CPF source [target) [optional
where source specifies the pathname of the file you want to copy, and target specifies the pathname of the naming tree location where you want the copy created. The rules for pathnames described in Chapter 6 apply to both command arguments.
The CPF command always creates a copy of the source file at the location specified by the target. For example:
$ CPF MEMO /USER_1/NEW_MEM0
creates a copy of the source file MEMO in the directory USER 1 . In this example, since the target specifies the pathname of a file, CPF assigns the copy the name specified by the target, which in this example is NEW_MEMO.
Managing Objecta 7-8
If the target specifies the pathname of a directory, CPF creates a copy of the source file in the target directory (the current working directory if you omit the target) and assigns the copy the filename of the source file. For example:
$ CPF MEMO /USER_1
copies the file MEMO from the current working directory to the target directory USER_/. Because CPF assigns the copy the name of the source file, the new file has the pathname IUSE!l._l!MEMO.
If you omit the target pathname entirely, CPF creates a copy of the source in the current working directory, unless the source file also resides there. In the previous example, since the source file MEMO is in the current working directory, CPF can't create another file named MEMO in the same directory. In this case, CPF displays the error message, " . . . can't copy a file or tree to itself" and does not make a copy.
By default, the system assigns the target file the default file ACLs of its parent directory (see Chapter 8). So, in the previous example, the system assigns the target file the default file ACLs of the directory USER_/.
To replace an existing file with a copy of another file, use the -R option as follows:
$ CPF /OWNER/JUNE_REPORT LATEST _REPORT -R
This command replaces the file LATEST_REPORT (in the current working directory) with a copy of JUNE_REPORT. As a result, LATEST_REPORT now contains a copy of JUNE_REPORT.
You can copy or replace several files using a single CPF command by either specifying multiple pairs of source and target pathnames (each pair separated by a space) or by using pathname wt1d.cards. The following command uses pathname wildcards to copy all the files ending with PLAN to the current working directory:
$ CPF /OWNER/?• PLAN -LF The -LF option d.irects the CPF command. to list the name of each file it copies. For more information on using pathname wildcards, see Chapter 6.
7-7 Managing Object•
Moving Files
When you move a file, you literally relocate the file in the naming tree . Use the MVF (MOVE_FILE) command the same way you use the CPF command described in the previous section. In fact, moving a file has the same effect as copying the file to another location and then deleting the original. Unlike a copy operation, however, when you move a file, it retains its original ACLs.
To move a file or group of files from one location in the naming tree to another, use the MVF command in the format:
MVF source [target] [options)
where source specifies the pathname of the file you want to move and target specifies the pathname of the file's new location in the naming tree . The rules for path names described in Chapter 1 apply to both arguments.
The following command moves the file FLOORPLAN:
$ MVF /DESIGNER/FLOORPLAN /BUILDER/PLANS/CAPE
In this example, the target specifies the pathname for a nonexistent file named CAPE. The MVF command moves the file FLOORPLAN from the directory DESIGNER to the directory BUILDER/PLANS and names the file CAPE.
If the target pathname specifies a directory, MVF moves the source file into the target directory (or current working directory if you omit the target pathname). For example. the following command moves the file FLOORPLAN into the current working directory:
$ MVF /DESIGNER/FLOORPLAN
In this example, since no target filename was specified, retains the name of the source file (FLOORPLAN) .
the file
You can move a file to replace an existing file in another directory by using the MVF command with the -R option, as follows:
$ MVF /OWNER/REPORT LATEST_REPORT -A This command replaces the contents of the file LATEST REPORT (in the current working directory) with the contents ol the file REPORT (in the directory !OWNER) .
To move several files in one operation, you can specify multiple pairs of source and target pathnames or use pathname wildcards. Chapter 6 describes how to use pathname wildcards.
Managing Object• 7-8
Appending Files To append the contents of one or more files to the end of another file, use the CATF (CATENATE_FILE) command in the following format:
.,.--. CATF (source . . . ] >> target
where source specifies the pathname of the file whose contents you want to append, and target specifies the pathname of the file to which you want to append. When you specify more than one source file, separate each file with a space. The system concatenates the source files and appends them to the target file.
The CATF command reads source files in order and normally writes them to standard output, which is, by default, the Shell's process transcript pad. The double right-angle brackets (>>), however, redirect output from standard output and append the output to the target file. For example:
$ CATF MEM0_1 MEM0_4 » PLAN_MEMOS
reads the files MEMO_/ and MEM0_4 in that order, and appends them to the file PLAN_MEMOS.
Chapter 6 provides more information on how to use 1/0 control characters.
Printing Files To print one or more files, use the PRF (PRINT _FILE) command in the following format:
PRF [pathname • • • ] [options)
where pathname specifies the name of the file you want to print. If you specify more than one file, separate each pathname with a space. The following example prints the file MY_PLAN on the printer named SPIN:
$ PRF MY_PLAN -PR SPIN
The PRF command itself doesn't actually print files; a server process, called PRINT_SERVER (PRSVR) does. (The PRSVR process runs on the node that is physically connected to the printer.) The PRF command queues a file for printing by copying the file to a directory, where it waits for PRSRV to get it and print it. By default, PRF queues files to the directory /SYSIPRINTIQUEUE.
To see which files are queued for printing in the default queue directory (ISYSIPRINT!QUEUE), use the PRF command with the -INTER[ACTWEJ option. This option causes PRF to enter interactive mode, in which you can specify PRF commands and
7-ll Managing Objects
options interactively. For example, the following example lists all of the files queued to the printer named SPIN:
$ PRF -INTER PRF> -PR SPIN PRF> READ
For more information about the PRF command and its commands and options, see the DOMAIN System Command Reference.
If you normally use a printer connected to your node, ISYSIPRINTIQUEUE is the name of the queue directory on your node. If a remote node controls the printers that you use by default, then ISYS!PRINT is a link that your System Administrator creates to point to the ISYSIPRINT directory on the remote node. This link causes PRF to queue files to the ISYSIPRINTIQUEUE directory on the remote node by default. (The "Managing Links" section describes links in more detail.)
You can queue a file to the ISYSIPRINTIQUEUE directory on another node by specifying the -S option along with the name of the node's entry directory. For example:
$ PRF MY _PLAN -S //BOSTON
queues MY PLAN to the /SYSIPRINTIQUEUE directory on the remote nodi BOSTON.
Another option that you'll find useful is the -COP[IESJ option. This option lets you print multiple copies of a file, as shown in the following example:
$ PRF MY _PLAN -cOP 1 6
This command prints 1 6 copies of the file MY_PLAN.
You can print multiple files using a single PRF command by either specifying multiple pathnames (each pathname separated by a space) or by using pathname wildcards. The following command uses pathname wildcards to print any file in the current working directory that begins with FILE and ends with a one-digit number:
$ PRF FILE_[0-9]
This command, for example, will print FILE_2 and FILE_8 but not FILE_A or FILE_B.
Managing Objects 7-10

,-'
Printing Files Using the Print Menu Interface In addition to the PRF command, you can print files using the print menu interface shown in Figure 7-1. This menu allows you to specify print arguments and select various options without having to type them on the command line. The print menu interface is useful when you routinely specify several print options for each file you print. By using the menu interface, you can select all of the options once, and print several files without respecifying the options for each file you print.
Figure 7-1. The Print Menu
To print files using the print menu interface, specify the PRFD (PRINT_FILE_DIALOG) command as follows:
$ PRFD
As shown in Figure 7-1, the PRFD command creates a special window pane at the top of the Shell process window displaying the print menu. The print menu is in control until you either print the file by selecting Print, quit the menu by selecting Quit, or selecting one of the commands submenu items (we'll learn more about the commands submenu later in this section.)
To use the print menu, move the arrow cursor to the menu item you want to select; the system highlights the item name in reverse video. To select the item, press either the <Fl> key, the space bar, or if you are using a mouse, the left mouse button (Ml). (Hereafter, we use the term select key to refer to any of these keys.) You can also display help information about an item by moving the cursor over the item and pressing <HELP>.
To specify any of the File type: items (text, bitmap, or transparent), move the cwsor over the item name. Once the item
7-11 Managing Objects
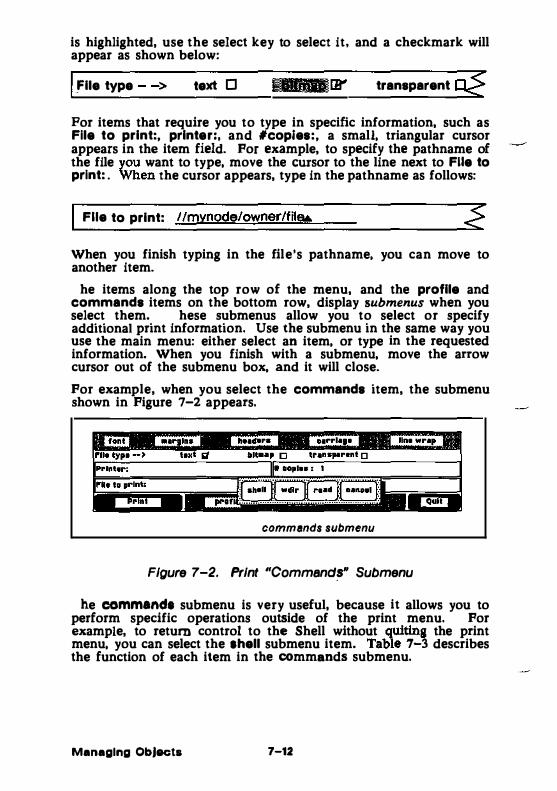
is highlighted, use the select key to select it, and a checkmark will appear as shown below:
I file type > text 0 ,, ·-[B" transparent CJIO;? For items that require you to type in specific information, such as File to print:, printer:, and #copies:, a small, triangular cursor appears in the item field. For example, to specify the pathname of the file you want to type, move the cwsor to the line next to File to print: . When the cursor appears, type in the pathname as follows:
I File to print: 1/mynode/owner/fila.a.. <?' When you finish typing in the file's pathname, you can move to another item.
The items along the top row of the menu, and the profile and commands items on the bottom row, display submenus when you select them. These submenus allow you to select or specify additional print information. Use the submenu in the same way you use the main menu: either select an item, or type in the requested information. When you finish with a submenu, move the arrow cursor out of the submenu box, and it will close.
For example, when you select the commands item, the submenu shown in Figure 7-2 appears.
commands submenu
Figure 7-2. Print "Command�" Submenu
The commande submenu is very useful, because it allows you to perform specific operations outside of the print menu. For example, to return control to the Shell without quiting the print menu, you can select the ehell submenu item. Table 7-3 describes the function of each item in the commands submenu.
Managing Ob)Kts 7-12
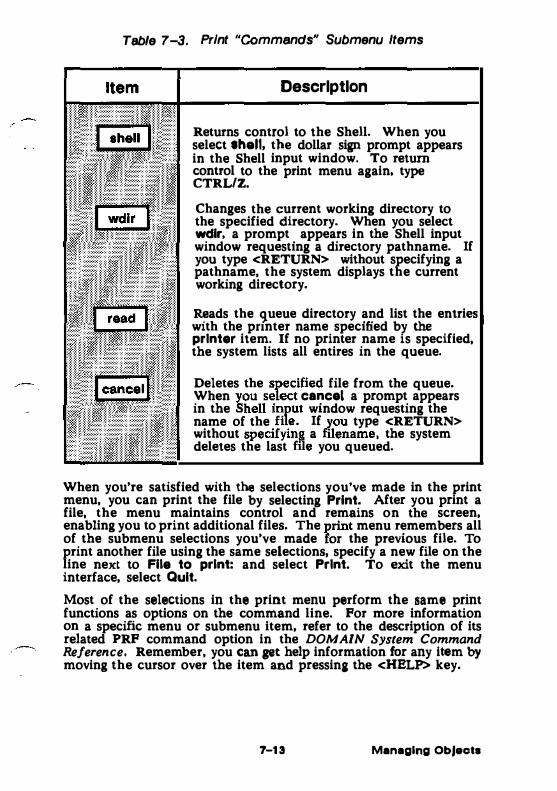
Table 7-3. Print "Commandsn Submenu Items
Description
Returns control to the Shell. When you select lhell, the dollar sign prompt appears in the Shell input window. To return control to the print menu again, type CTRL/Z.
Changes the current working directory to the specified directory. When you select wdir, a prompt appears in the Shell input window requesting a directory pathname. If you type <RETURN> without specifying a pathname, the system displays the current working directory.
Reads the gueue directory and list the enlri<" I with the pnnter name specified by the printer item. If no printer name is specified, the system lists all entires in the queue.
Deletes the specified file from the queue. When you select cancel a prompt appears in the Shell input window requesting the name of the file. If you type <RETURN> without specifying a filename, the system deletes the last file you queued.
When you're satisfied with the selections you've made in the print menu, you can print the file by selecting Print. After you print a file, the menu maintains control and remains on the screen, enabling you to print additional files. The print menu remembers all of the submenu selections you've made for the previous file. To print another file using the same selections, specify a new file on the line next to File to print: and select Print. To exit the menu interface, select Quit.
Most of the selections in the print menu perform the same print functions as options on the command line. For more information on a specific menu or submenu item, refer to the description of its related PRF command option in the DOMAIN System Command Reference. Remember, you can get help information for any item by moving the cursor over the item and pressina: the <HELP> key.
7-13 Managing ObJects
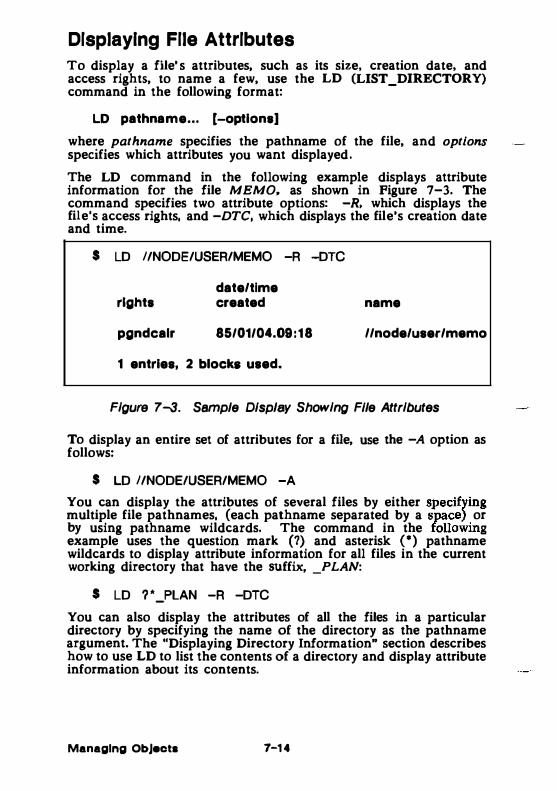
Displaying File Attributes To display a file's attributes, such as its size, creation date, and access rights, to name a few, use the LD (LIST_DIRECTORY) command in the following format:
LD pathname... (-options]
where pathname specifies the pathname of the file, and options specifies which attributes you want displayed.
The LD command in the following example displays attribute information for the file MEMO, as shown in Figure 7-3. The command specifies two attribute options: -R, which displays the file's access rights, and -DTC, which displays the file's creation date and time.
$ LD 1/NDDE/USER/MEMD -R -DTC
rights
pgndcalr
date/time created
85/01/04.09:18
1 entries, 2 blocke used.
name
//node/user/memo
Figure 7-3. Sample Display Showing File Attributes
To display an entire set of attributes for a file, use the -A option as follows:
$ LD 1/NDDE/USER/MEMD -A You can display the attributes of several files by either specifying multiple file pathnames, (each pathname separated by a space) or by using pathname wildcards. The command in the following example uses the question mark (?) and asterisk (•) pathname wildcards to display attribute information for all files in the current working directory that have the suffix, _PLAN:
$ LD ? '_PLAN -R -DTC
You can also display the attributes of all the files in a particular directory by specifying the name of the directory as the pathname argument. The "Displaying Directory Information" section describes how to use LD to list the contents of a directory and display attribute information about its contents.
Managing ObJects 7-14

Deleting Files To delete one or more files. use the DLF (DELETE_FILE) command in the following format:
DLF [pathname . . . ] (options]
where pathname specifies the pathname of the file you want to delete. If you specify multiple pathnames to delete multiple files, separate each pathname with a space.
The following command deletes the files MY _PLAN and REPORT from the current working directory:
$ DLF MY _PLAN REPORT
You can also use pathname wildcards to delete related groups of files. For example:
$ DLF %.BAK -L
The percent sign (%) wildcard character causes DLF to delete all of the files in the current working directory that end in .BAK. The -L option lists each file as DLF deletes it.
DLF is an example of a command that queries you to verify names that you specify with pathname wildcards. In the previous example, the DLF command asks you to verify the deletion of each file that matches the pathname % .BAK.
Copying the Display to a File
You can copy the image of your current display to a file using the CPSCR (COPY_SCREEN) command in the following format:
CPSCR pathname [-INV]
where pathname specifies the pathname of the file to which you want to copy the display image. The -I NV option directs CPSCR to store the file in reverse video (black on white or white on black depending on the current display setting) .
To print a file that contains a screen image, use the PRF command with the -PLOT option.
7-15 Managing Object•
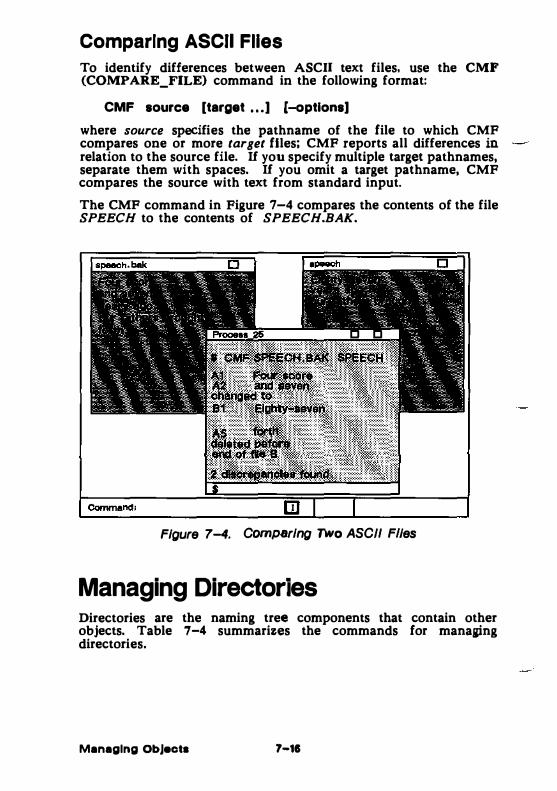
Comparing ASCII Flies To identify differences between ASCII text files, use the CMF (COMPARE_FILE) command in the following format:
CMF source [target . . . ] [-options)
where source specifies the pathname of the file to which CMF compares one or more target files; CMF reports all differences in relation to the source file. If you specify multiple target pathnames, separate them with spaces. If you omit a target pathname, CMF compares the source with text from standard input.
The CMF command in Figure 7-4 compares the contents of the file SPEECH to the contents of SPEECH.BAK.
Figure 7-4. Comparing Two ASCII Flies
Managing Directories Directories are the naming tree components that contain other objects. Table 7-4 summarizes the commands for mana&ing directories.
Managing ObJects 7-16

Table 7-4. Commands for Manaalna Directories
Task Shell Command
Create a directory CRD pathname
Rename a directory CHN olcl_name (new_name]
Copy a directory tree CPT source (target)
Replace a directory tree CPT OOU<Oe [taroetJ -R
Merge directory trees CPT so�.rce (target] -MS
Compare directory trees CMT so�.rce target
Display contents of a directory LD (pathname]
Delete a directory tree DL T pathname
Creating Directories Each directory that you create is actually a subdirectory of its parent directory (the directory above it in the naming tree). To create a directory, specify the CRD (CREATE DIREcrORY) command in the following format:
-
CRD pathname .. .
where pathname specifies the pathname of the directory you want to create. If you specify multiple pathnames to create multiple directories, separate each pathname with a space. The following command creates a directory named REPORTS:
$ CAD /OWNER/REPORTS
The CRD command creates the directory REPORTS as a subdirectory of the parent directory !OWNER. The new directory, (REPORTS) also receives an initial set of ACLs from the initial directory ACLs of the parent directory (!OWNER). You can change the initial ACLs with the EDACL command. Chapter 8 explains ACLs and describes how to use the EDACL command.
7-17 Managing ObJecta
Renaming Directories To change the name of a directory, use the CHN (CHANGE_NAME) command in the following format:
CHN old_name [naw_name] (optlona]
where old_name specifies the pathname of the directory you want to rename, and new_name specifies the new name of the directory. For example:
$ CHN /OWNER/REPORTS PROGRESS
changes the name of the directory REPORTS to PROGRESS. Notice that the new _name argument applies to the rightmost component (REPORTS) of the old_name argument. You cannot use CHN to change the name of a directory embedded in a pathname.
To append a naming suffix to the new directory name, specify any of the following naming options:
Option
-D
-Y
-u
Description
Appends the current month and day to the new name (new_name.mm.dd.).
Appends the current year, month, and date to the new name (new_name.yy.mm.dd).
Forces the system to create a unique new name by appending a sequence of number(s) to the end of the name.
If you omit the new_name argument, you must specify one of the options in the previous list; the system creates a new name by copying the old_name and appending the proper suffix as shown here:
$ CHN /OWNER/REPORTS -D
This command changes the name of the directory REPORTS to REPORTS.06.16.
Managing ObJects 7-18

Copying Directory Trees
A directory and all of the objects it contains is called a directory tree. A directory tree represents the part of a naming tree that extends from a specific directory through all its files, subdirectories, and links as shown in Figure 7-5.
Figure 7-5. Sample Directory Tree
To copy a directory tree to another location, use the CPT (COPY_TREE) command in the following format:
CPT source target
where source specifies the pathname of the directory you want to copy and target specifies the pathname of the naming tree location where you want the copy created. The rules fOr pathnames described in Chapter 1 apply to both command arguments.
Figure 7-6. illustrates how the CPT command in the following example copies a directory tree.
7-19 Managing Objects

$ CPT REPORTS //BOSTON/USER_1 /PROG -L
Figure 7-6. Copying a Directory Tree
The CPT command creates a copy of the directory tree REPORTS and names the copy PROG. CPT creates the copy in the directory USER_l. The -L option lists the name of each object as it is copied.
Replacing Directory Trees To replace one directory tree with another directory tree, specify the -R option with the CPT (COPY_TREE) command described in the previous section. The -R option directs CPT to delete the directory tree specified by the target pathname and to create a copy of the source tree in its place. Figure 7-7 illustrates how the following command replaces a directory tree.
Managing Objects 7-20
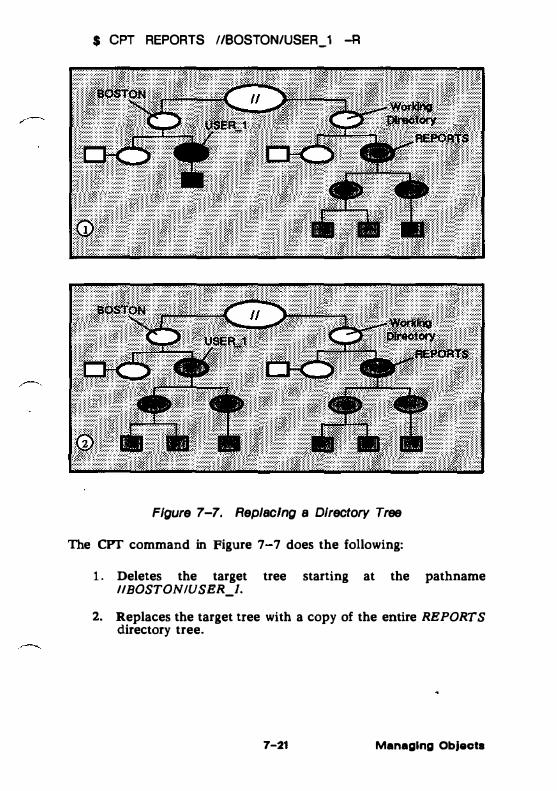
$ CPT REPORTS I/BOSTON/USER_1 -R
Figure 7-7. Replacing a Directory Tree
The CPT command in Figure 7-7 does the following:
1. Deletes the target tree starting at the pathname II BOSTON/USER_].
2. Replaces the target tree with a copy of the entire REPORTS directory tree.
7-21 Managing Objects
Merging Directory Trees
You can merge directory trees using either the -MS or -MD option with the CPT (COPY_ TREE) command described in the "Copying Directory Trees" section discussed earlier, When merging directory trees, CPT first compares the source and target directories object by object. It then merges the directories according to the option you specified.
When you specify the -MS option, CPT uses the following process to merge the source directory with the target directory:
• Objects that exist in the source but not in the target are created in the target.
• Objects that exist in the target but not in the source remain unchanged.
• Files and links with the same name in both the source and target are deleted from the target and replaced by the source version.
• Directories with the same name in both source and target are merged.
The CPT command continues this process until it reaches the end of the source tree.
The following command �erges the source directory PROGRESS with the target directory RllPORTS.
$ CPT //BOSTON/USER 1 /PROGRESS REPORTS @ $_ -MD -l -
The -L option directs CPT to list all objects that it creates in the target directory,
If you specify the -MD option, the merging process is similar to that of -MS; however, files and links with the same name in the source and target are left unchanged in the target.
Comparing Directory Trees To compare the contents of one directory tree to another, use the CMT (COMPARE_ TREE) command in the following format:
CMT source target {options]
CMT compares all of the objects in the source directory tree against all the objects in the target directory tree. CMT reports the following:
Managing ObJects 7-22
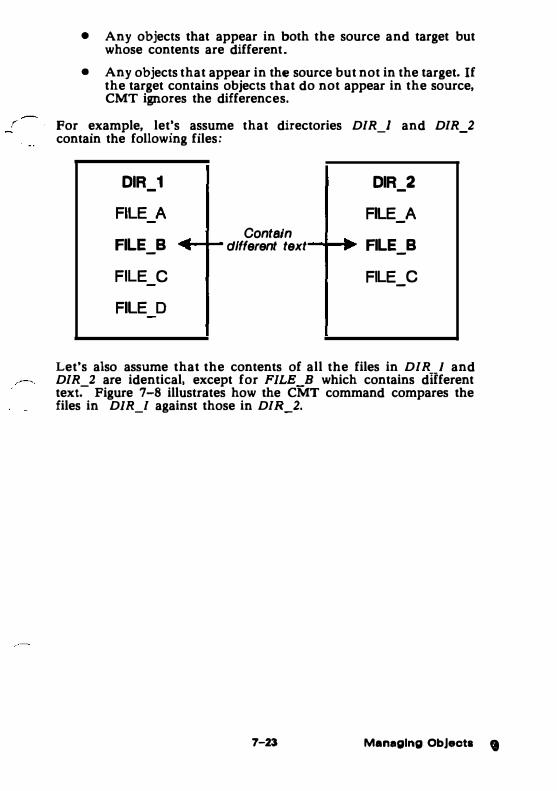
• Any objects that appear in both the source and target but whose contents are different.
• Any objects that appear in the source but not in the target. If the target contains objects that do not appear in the source, CMT ignores the differences.
r For example, let's assume that directories DIR_l and DIR_2 contain the following files:
DIR_1 DIR_2
FILE A FILE_A
FILE_B Contain
different text FILE_B
FILE C FILE_C
FILE D
Let's also assume that the contents of all the files in DIR 1 and DIR_2 are identical, except for FJLE_B which contains different text. Figure 7-8 illustrates how the CMT command compares the files in DJR_I against those in DIR_2.
7-23 Managing Objects 9
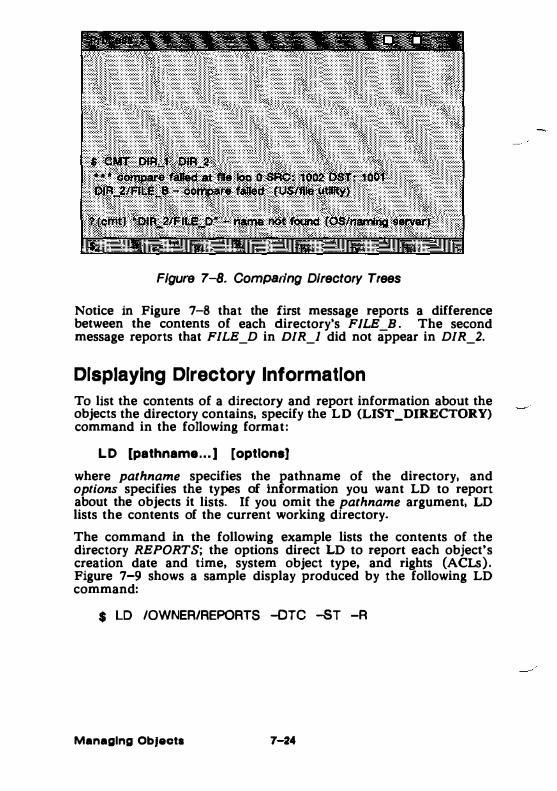
Figure 7-8. Comparing Directory Trees
Notice in Figure 7-8 that the first message reports a difference between the contents of each directory's F/LE_B. The second message reports that FILB_D in DIR_l did not appear in DIR_2.
Displaying Directory Information To list the contents of a directory and report information about the objects the directory contains, specify the LD (LIST_DIRECTORY) command in the foilowing format:
LD [pathname . • • ] [options]
where pathname specifies the pathname of the directory, and options specifies the types of information you want LD to report about the objects it lists. If you omit the pathname argument, LD lists the contents of the current working directory.
The command in the following example lists the contents of the directory REPORTS; the options direct LD to report each object's creation date and time, system object type, and rights (ACLs). Figure 7-9 shows a sample display produced by the following LD command:
$ LD /OWNER/REPORTS -OTC -5T -A
Managing Objects 7-24
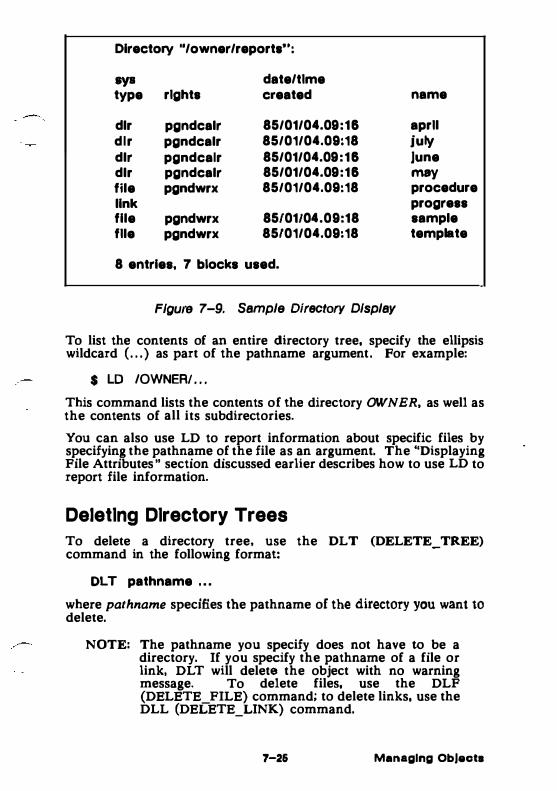
-
Directory "/owner/reports"':
sys date/time type rights created name
dlr pgndcalr 85/01/04.09:16 april dlr pgndcalr 85/01/04.09:18 july dlr pgndcalr 85/01/04.09:16 June dlr pgndcalr 85/01/04.09:16 may file pgndwrx 85/01/04.09:18 procedure link progress file pgndwrx 85/01104.09:18 sample file pgndwrx 85/01/04.09:18 template
8 entries, 7 blocks used.
Figure 7-9. Sample Directory Display
To list the contents of an entire directory tree, specify the ellipsis wildcard ( . . . ) as part of the pathname argument. For example:
$ LD /OWNER/ . . .
This command lists the contents of the directory OWN BR, as well as the contents of all its subdirectories.
You can also use LD to report information about specific files by specifying the pathname of the file as an argument. The "Displaying File Attributes" section discussed earlier describes how to use LD to report file information.
Deleting Directory Trees To delete a directory tree, use the DLT (DELETE_TREE) command in the following format:
DL T pathname , • •
where pathname specifies the pathname of the directory you want to delete.
NOTE: The pathname you specify does not have to be a directory. If you specify the pathname of a file or link, DL T will delete the object with no warning message. To delete files, use the DLF (DELETE_ FILE) command; to delete links, use the DLL (DELETE_LINK) command.
7-26 Managing ObJects

The DLT command deletes the specified directory and all of the objects it contains. For example, the following command deletes the directory tree shown in Figure 7-10:
$ DL T REPORTS -L
Figure 7-10. Deleting a Directory Tree
The command in the previous example deletes the directory tree starting at the directory REPORTS in the current working directory. -' The -L option directs DLT to list each object it deletes.
Managing Links As you use the system, you may find that many of the files and directories that you access frequently have unusually long pathnames. You can eliminate the inconvenience of typing a lengthy pathname by creating a shonhand name for the object, called a link.
A link is a special object that contains the name of another object. When you specify a link as a pathname or pan of a pathname, the system substitutes the pathname that the link contains (the resolution name) for the name of the link.
This section describes how to manage links on your system. Table 7-5 summarizes the commands used to manage links.
Managing Objects 7-28

Table 7-5. Commands for Managing Unks
Task Shell Command �
Create a link CRL llnk_name obJeot_name
Display link resolution names LD [pathname) -LL -L T
Redefine a link CAL llnk_name ob)ect_name -R
Rename a link CHN old_name (new_name]
Copy a lr,!c CPL source (target)
Delete a link DLL llnk_name
Creating Links
To create a link, specify the CRL (CREATE_LINK) command in the following format:
CRL llnk_name object_name
where link_name specifies the pathname of the link, and object_name specifies the pathname of the object to which the link points. The rules for pathnames described in Chapter 1 apply to both arguments.
The following command creates a link:
$ CAL REPORTS /OWNER/APRJLIPROGRESS_REPORTS
The command in this example creates a link named REPORTS in the process's current working directory. The link contains the pathname for the subdirectory PROGRESS_REPORTS. As shown in the following example, when you specify REPORTS as a pathname or part of a pathname, the system substitutes the pathname !OWNERIAPRILIPROJBCT _REPORTS. For example, instead of specifying
$ DLF /OWNER/APRILIPROGRESS_REPORTS/MR_JONES
to delete the file MR_JONBS, you could specify
$ DLF REPORTS/MR_JONES
7-27 Managing Objects

You can also use the CRL command to create more than one link by specifying link_name/object_name pairs as shown below:
$ CRL BUGS /MAINTENANCE/REPORTS STARTS ISYSIDM
pair pair
This command creates two links: BUGS and STARTS.
Displaying Link Resolution Names To display the resolution names for all the links listed in a particular directory, use the LD (LIST_DIRECTORY) command in the following format:
LD pathname -L T [-LL]
where pathname specifies the pathname of the directory that contains the link, and -LT directs LD to display the resolution name of each link. Normally, LD lists all the objects in the directory, including files and subdirectories. The -LL option directs LD to list only the links.
The command in the following example displays the link resolution names for all links in the node entry directory, as shown in Figure 7-11:
$ LD I -LT -LL
Directory
BUGS STARTS NEWS
" I ":
30 entries, 3 listed.
"'lmalntenance/reports" "/sya/dm" "//my_ boss/owner/projectlltatus"
Figure 7-1 1 . Sample Display of Unk Resolution Names
Redefining Links You can redefine an existing link by changing its link resolution name. To redefine a link, use the -R option with the CRL (CREATE LINK) command as follows:
$ CRL REPORTS /OWNER/MAY/PROGRESS_REPORTS -R
Managing ObJects 7-28
This command replaces the object name for the existing link REPORTS that we created in the "Creating Links" section discussed earlier. Notice that the new link name points to the subdirectory MAY instead of APRIL.
Renaming Links
To change the name of a link, use the CHN (CHANGE NAME) command in the following format:
-
CHN old_name [new_name] [options]
where old_name specifies the pathname of the link you want to rename, and new _name specifies the new name of the link. For example, the command:
$ CHN REPORTS PROGRESS
changes the name of the link REPORTS, in the current working directory, to PROGRESS.
You can specify any of the following naming options with the CHN command:
Option
-D
-Y
-u
Description
Appends the current month and day to the new name (new_name.rnm.dd.).
Appends the current year, month, and date to the new name (new_name.yy.rnm.dd).
Forces the system to create a unique new name by appending a sequence of number(s) to the end of the name.
If you omit the new name argument, you must specify one of the options in the previous list; the system creates a new name by copying the old_name and appending the proper suffix as shown here:
�-- $ CHN REPORTS -D This command changes the name of the link REPORTS to REPORTS. I .
7-H Managing Objects
;copying Links
Copying links is basically the same as copying files; when you copy a link, you create a copy of the link in another location in the naming tree. To copy a link, use the CPL (COPY LINK) command in the following format:
-
CPL source [target • . • ] [option]
where source specifies the pathname of the link you want to copy, and target specifies the naming tree location where you want the copy created. The rules for pathnames described in Chapter 1 apply to both command arguments.
The CPL command always creates a copy of the source link at the location specified by the target. For example:
$ CPL REPORTS /USER 1 /ST ATUS
creates a copy of the source link REPORTS in the directory USER_/. And, since the target specifies the pathname of a link, CPL assigns the copy the name specified by the target, which in this example is STATUS.
If the target specifies the pathname of a directory, CPL creates a copy of the source link in the target directory (the current working directory if you omit the target) and assigns the copy the name of the source link. For example:
$ CPL REPORTS /USER _1
copies the link REPORTS from the current directory to the target directory USER_!. Because CPL assigns the copy the name of the source link, the new link has the pathname IUSER_liREPORTS.
To replace an existing link with a copy of another link, use the -R option as follows:
$ CPL REPORTS /USER 2/PROGRESS -R
This command replaces the link PROGRESS with a copy of the link REPORTS (from the current working directory).
You can copy or replace several links using a single CPL command by either specifying multiple pairs of source and target pathnames (each pair separated by a space) or by using pathname wildcards. The following command copies all of the links in the current working directory to the directory IUSER_2.
$ CPL ? • /USER_ 2/MY=
The wildcards (?•) that make up the source pathname direct CPL to copy all links in the current working directory. The wildcard (=) in the target pathname directs CPL to derive the name of each new link
Managing Objects 7-30
from the source link names. For example, the link REPORTS becomes MYREPORTS in the target directory.
Deleting Links �-- To delete one or more links, use the DLL (DELETE_LINK)
command in the following format:
OLL [link_nama • . • ] [options]
where link_name specifies the pathname of the link you want to delete. If you specify multiple pathnames to delete multiple links, separate each pathname with a space.
The following command deletes the link REPORTS from the current working directory:
$ DLL REPORTS
You can also use pathname wildcards to delete related groups of links. For example:
$ DLL / . • ./STATUS
The ellipsis wildcard ( . . . ) directs the DLL command to delete every link named STATUS in all directories subordinate to the node entry directory.
7-31 Managing Objects

CHAPTER 8
Controlling Access to Files and Directories
You can protect your files and directories from unauthorized use with a system protection mechanism called an access control list (ACL), Every file and directory in the system has an access control list that defines:
• Who can use the object • What operations these users can perform on the object
An ACL for a file, for example, can authorize some users to read the file, and permit others to edit it.
This chapter describes the following ACL topics:
• The structure of an ACL and its component parts • How the system assigns initial ACLs to objects
8-1 Controlling Access
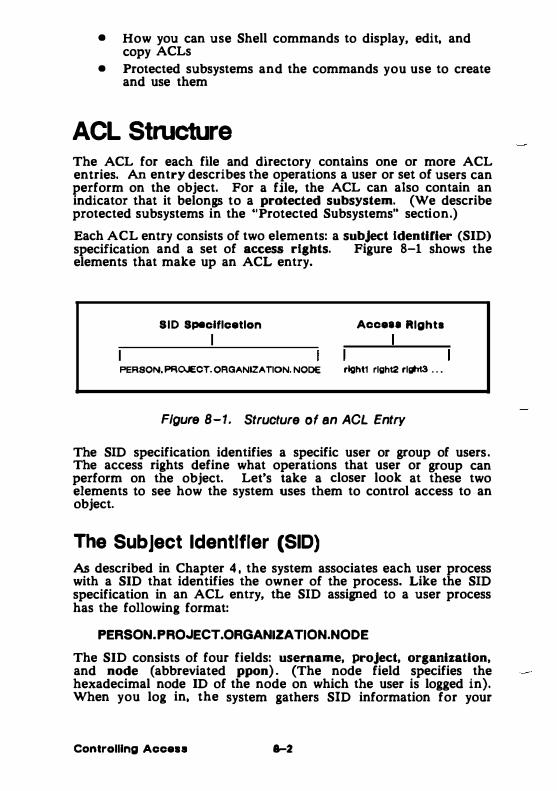
• How you can use Shell commands to display, edit, and copy ACLs
• Protected subsystems and the commands you use to create and use them
ACL Structure The ACL for each file and directory contains one or more ACL entries. An entry describes the operations a user or set of users can perform on the object. For a file, the ACL can also contain an indicator that it belongs to a protected subsystem. (We describe protected subsystems in the .. Protected Subsystems" section.)
Each ACL entry consists of two elements: a subject identifier (SID) specification and a set of access rights. Figure 8-1 shows the elements that make up an ACL entry.
SID Specification Accan Rights
PERSON. PRo..ECT. ORGANIZATION. NODE rlght1 rlght2 rlght3 . . •
Figure 8-1. Structure of an ACL Entry
The SID specification identifies a specific user or group of users. The access rights define what operations that user or group can perform on the object. Let's take a closer look at these two elements to see how the system uses them to control access to an object.
The Subject Identifier (SID) As described in Chapter 4 , the system associates each user process with a SID that identifies the owner of the process. Like the SID specification in an ACL entry, the SID assigned to a user process has the following format:
PERSON.PRO.JECT.ORGANIZATION.NODE
The SID consists of four fields: usemame, project, organization, and node (abbreviated ppon). (The node field specifies the hexadecimal node ID of the node on which the user is logged in). When you log in, the system gathers SID information for your
Controlling Accau .....

. �·
account. Then, each time you create a process, the system assigns the same SID to it to identify you as the owner.
When a user requests access to a file or directory, the system checks the object's ACL. Specifically, the system searches for an ACL entry whose SID matches the SID of the user's process. If the system doesn't find a match, it denies the user access to the object . If the system does find a match, it grants the user the set of rights specified by the ACL entry. (The "Access Rights" section describes the meaning of the various access rights.)
Figure 8-2 shows a set of two ACL entires for a file.
SID Specification
I JOE.%.ENG.%
%.%.ENG.%
Aoce .. Rights
I
- - - - - r -
Figure 8-2. Sample ACL Entries
The percent signs (%) that appear in the different fields of the SID specification are wildcards. Wildcards match any name in the network with a specific SID field. For example, the SID for the second ACL entry in Figure 8-2 (%.%.BNG.9&) contains wildcards in the PERSON, PROJECT, and NODB fields. These wildcards match any name in the corresponding fields of a user's process SID. As a result, the ACL entry for %.% .BNG.9& matches any process SID with the organization name BNG.
When a user process requests access to an object, the system stans its search for a matching SID at the most specific SID specification and continues searching toward the most general. As soon as the system finds a specification that matches the process's SID, it stops the search and grants the rights listed in that ACL entry.
For example, the SID specification for the first ACL entry in Figure 8-2 (JOB.%.BNG.9&) is more specific than that of the second entry (JOB is a specific person in the organization BNG). Suppose a process with the SID JOB.BRIDGB.BNG.IB07 tries to access the object. In this case, the SIDs for both ACL entries match the process SID. However, since the system matched the more specific SID (JOB. 9&.BNG. %) first, it grants the process the associated rights (pgndwrx).
Controlling Aooa ..

Access Rights
Access rights specify what operations, such as read, write, execute, and delete, a user process can perform on a particular file or directory. Table 8-l lists the access rights for files and directories.
For example, the following ACL entry for a file grants the specified set of access rights to all users:
%.%.%.% - - - - wrx
In this example, the wrx specification indicates that the file has WRITE (w), READ (r), and EXECUTE (x} rights. Notice the four hyphens that precede wrx rights. When you list the ACL entries for an object (see the "Displaying ACLs" section) the system displays the hyphens to represent access rights that are not valid (denied) for the entry. In the previous example, the entry denies p, g, n, and d rights (represented by hyphens) and grants w, r, and x rights.
As you'll see later in this chapter, you can also deny certain users any access to an object. For example:
%.BRIDGE. ENG.% %.%.ENG.%
pgndwrx
This ACL denies every user in the ENG group access to the file, execpt those working on the BRIDGE project.
As shown in Table 8-1, the types of access for directories are different than those for files. While PROTECT (P), GRANT (G), and NODE (N), have the same meaning for files and directories, DELETE (D) and READ (R) have different meanings. In addition, WRITE (W) and EXECUTE (X) access apply only to files; CHANGE (C), LINKS (L), ADD (A), SEARCH (S), and EXPUNGE (E) rights apply only to directories.
Controlling Acoess

Table 8-1. Access Rights for Flies and Directories
Access Right Abbrev. Meanln� for Meaning for Director ea Files
Protect p Change the object's ACLs.
Grant G Grant any subSet of your rights to other users.
Node N Change the nodes from which users can access objects.
Delete D Delete the Delete the file. directory. (See note below.)
Read R List entries. Read the file.
Write w None. Write to the file.
Execute X None. Execute object file.
Change c Change names None. and delete links.
Links L Add links None.
Add A Add files and None. subdirectories.
Search s Acce�s subdir-ector es and sub-
None.
directory objects.
Expunge E Delete subdir- None. ectories and sub-directory objects.
Note: To delete a directory tree, you need directory delete rights, directory expunQe riq_hts (see "Understanding Search and E�unR: R1ghts sectionJ , directory change rights if t directory conta ns links), and file delete rights (if the directory contains files) .
Controlling Access
Understanding SEARCH and EXPUNGE Rights For SRS.O, you could access an object as long as you had appropriate rights to that object: you did not need rights to the object's parent directory. For example, to use the following command to list the contents of the subdirectory REPORTS in the directory tOWNER, all you needed was READ (R) rights to REPORTS:
$ LD /OWNER/REPORTS
To delete the subdirectory REPORTS, you needed DELETE {D) rights to REPORTS. You did not need rights to the parent !OWNER.
For SR9.0, in addition to appropriate rights to the object, you must have appropriate rights to the object's parent directory. To access an object, its parent must grant you SEARCH (S) rights. To delete an object, its parent must grant you EXPUNGE (E) rights.
In our previous example, to list the contents of REPORTS, you must have S rights to its parent directory !OWNER, as well as R rights to REPORTS. Similarly, to delete the subdirectory REPORTS, you need E rights to tOWNER, as well as D rights to REPORTS.
U REPORTS contains additional objects, you need E rights to REPORTS to delete them. Therefore, to delete a directory tree, you must have E rights to the parent directory and all of its subdirectories except the subdirectories at the very bottom of the tree.
For reasons of compatibility, the system, by default, assigns S and E rights to all ACL entires for directories. In addition, if the directory ACL does not contain a 9&.%.%.% entry, the system adds the following entry by default whenever the object is accessed:
%.%.%.% - - - - - - - - SE
Since both DOMAIN software and user-supplied software depend on these rights, you should always leave S and E rights on. To deny S and E rights, you must explicitly delete them from the entry.
Conlrolllng Acceaa 8-8
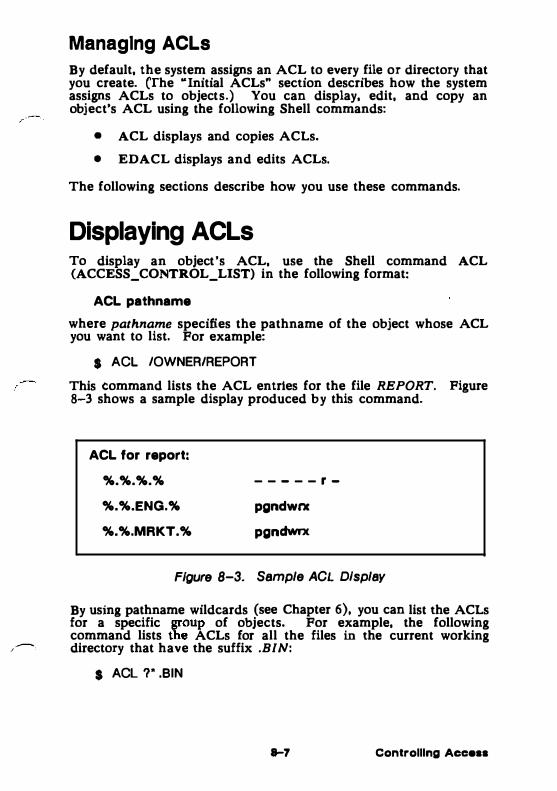
Managing ACLs
By default, the system assigns an ACL to every file or directory that you create. (The .. Initial ACLs" section describes how the system assigns ACLs to objects.) You can display, edit, and copy an object's ACL using the following Shell commands:
• ACL displays and copies ACLs. e EDACL displays and edits ACLs.
The following sections describe how you use these commands.
Displaying ACLs To display an object's ACL, use the Shell command ACL (ACCESS_CONTROL_LIST) in the following format:
ACL pathname
where pathname specifies the pathname of the object whose ACL you want to list. For example:
$ ACL /OWNER/REPORT
This command lists the ACL entries for the file REPORT. Figure 8-3 shows a sample display produced by this command.
ACL for report:
%.%.%.%
%.%.ENG.%
%.%.MRKT.%
- - - - - r -
pgndwrx
pgnctwnc.
Figure 8-3. Sample ACL Display
By using pathname wildcards (see Chapter 6), you can list the ACLs for a specific group of objects. For example, the following command lists the ACLs for all the files in the current working
/-- directory that have the suffix .BIN:
$ ACL ?" .BIN
8-7 Controlling Access
You can also display the ACL for an object using the EDACL (EDIT_ACCESS_CONTROL_LIST) command as follows:
$ EDACL /OWNER/REPORT -L
The next section, "Editing ACLs, .. provides more information on how to use the EDACL command to display and edit ACLs.
Editing ACLs You can edit an object's ACL using the Shell command EDACL (EDIT_ACCESS_CONTROL_LIST}. The EDACL command allows you to display, add, change, and delete ACL entries. You can also use the EDACL command to edit a directory's initial ACLs. (The "Editing Initial ACLs,. section describes how to use the EDACL command to edit initial ACLs).
Like most Shell commands, you can direct EDACL to perform specific operations by specifying options on the command line. In addition to its command options, the EDACL command also accepts a special set of ACL editing commands. The way you specify these editing commands depends on the mode in which EDACL operates.
The EDACL command operates in two modes: command line mode and Interactive mode. In command line mode, you specify editing commands as options on the command line. For example, EDACL in the following example uses the editing command -L to display the ACL for the file REPORT:
$ EDACL REPORT -L
U you specify the EDACL command without any editing commands on the command line, EDACL enters interactive mode and prompts you for editing commands. When you specify editing commands in interactive mode, do not precede the command with a hyphen (-) . For example:
$ EDACL REPORT report • L <RETURN>
In this example, since no editing commands appear on the EDACL command line, EDACL enters interactive mode. Specifying the L command (without a hyphen) at the. asterisk (*) prompt directs EDACL to list the ACL entries for REPORT.
Once you enter interactive mode, you can continue to specify EDACL editing commands to pedorm a series of edit operations. To exit interactive mode and save the changes you've made, type
Controlling Aocesa

CTRL/Z. The Q command quits interactive mode without saving your changes.
You can edit the ACLs of several objects either by specifying multiple pathnames (separating each pathname with a space) or by using pathname wildcards. Chapter 6 describes how to use pathname wildcards.
This section describes how to use the EDACL command to list and edit ACLs. The examples presented in this section show how to use EDACL commands in command line mode. For a complete description of EDACL, see the DOMAIN System Command Reference.
Table 8-2 summarizes the commands used to edit ACLs.
Tabla 8-2. Summary of Commands for Editing ACLs
Task Command
Display an object' s ACL EDACL pathname -L
Add an ACL entry EDACL pathname -A ppon rights
Add rlghts to an ACL entry EDACL pathname -AA ppon rights
Change access rights for an ACL EDACL pathname -c won rights entry.
Delete rights from an ACL entry EDACL patMame -DR ppon rights
Delete an ACL entry EDACL pathname -D ppon rights
Rules to Specify ACL Entries Most of the EDACL commands described in this section require you to specify SID and access right information. For example, to add an ACL entry, you must specify a SID and a set of access rights. Before you attempt to use EDACL commands, you should understand the rules for specifying SIDs and access rights.
When you specify a SID, you can use the percent sign (%) wildcard character in each field to match any name in the corresponding field
Controlling Access
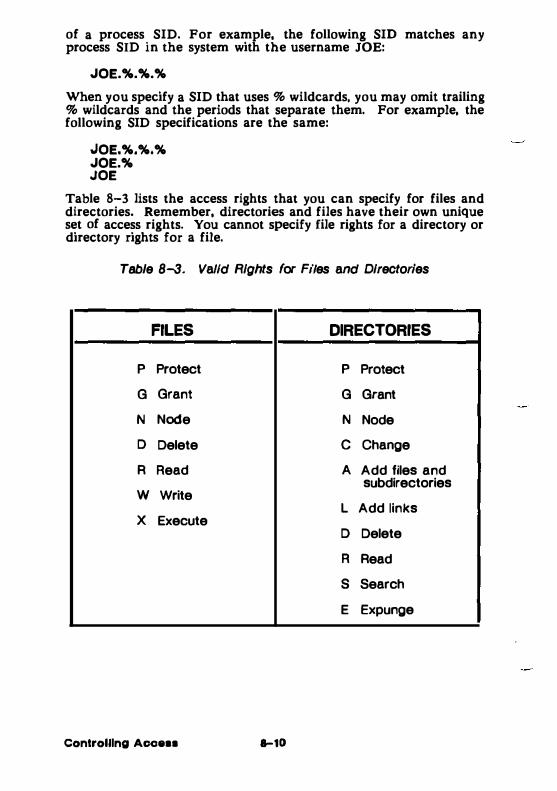
of a process SID. For example, the following SID matches any process SID in the system with the username JOE:
JOE.%.%.%
When you specify a SID that uses % wildcards, you may omit trailing % wildcards and the periods that separate them. For example, the following SID specifications are the same:
JOE.%.%.% JOE.% JOE
Table 8-3 lists the access rights that you can specify for files and directories. Remember, directories and files have their own unique set of access rights. You cannot specify file rights for a directory or directory rights for a file.
Table 8-3. Valid Rights for Files and Directories
FILES DIRECTORIES
p Protect p Protect
G Grant G Grant
N Node N Node
D Delete c Change
R Read A Add files and subdirectories
w Write L Add links
X Execute D Delete
R Read
s Search
E Expunge
Controlling Access 8-10
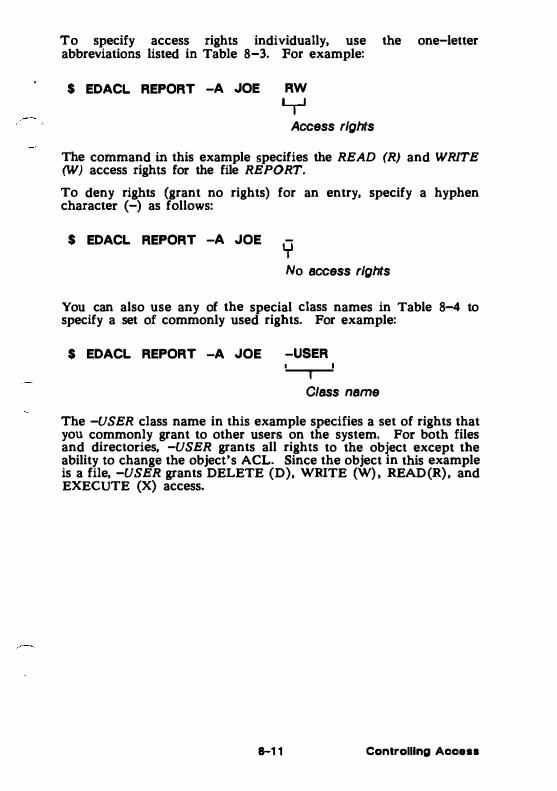
To specify access rights individually, use the one-letter abbreviations listed in Table 8-3. For example:
$ EDACL REPORT -A JOE RW
'--r' Access rights
The command in this example specifies the READ (R) and WRITE (W) access rights for the file REPORT.
To deny rights (grant no rights) for an entry, specify a hyphen character (-) as follows:
$ EDACL REPORT -A JOE y No access rights
You can also use any of the special class names in Table 8-4 to specify a set of commonly used rights. For example:
$ EDACL REPORT -A JOE -USER
I Class name
The -USER class name in this example specifies a set of rights that you commonly grant to other users on the system. For both files and directories, -USER grants all rights to the object except the ability to change the object's ACL. Since the object in this example is a file, -USER grants DELETE (D), WRITE (W), READ(R), and EXECUTE (X) access.
,,_, 1 Controlling Access

Table 8-4. Class Names for Commonly Assigned Rights
Name Meaning Directories Flies
-OWNER All rights. PGNDCALRSE PGNDRWX
-USER All rights except the ability to change ACL.
DCALRSE DWRX
-READ File read access. Not allowed R
-EXEC File read access. Not allowed RX Execute access to object files.
-LDIR List directory. Search and expunge the directory's subdir-
RSE Not allowed
ectorles.
-ADIR List directory and add entires. Search
ALRSE Not allowed
and expunge the directory's subdir-ectories.
-NONE Grants no rights SE None excefet S and E. (den es access) .
System users with the project name BACKUP may create back-up copies of files and directories on magnetic tape. Users with the project name BACKUP need READ (R) access to files and directories. EDACL issues a warning when you change an ACL in a way that denies BACKUP access; however, EDACL does make the change. You should ignore the warning only if the object(s) does not require back-up copies. If the object does require back-up copies, edit the ACL again and add an entry that grants the BACKUP project (%.BACKUP.%.%) READ (R) access. The next section, "Adding ACL Entries," describes how to add an ACL entry.
NOTE: EDACL will not allow you to perform an operation that restricts everyone from changing an ACL. At least one user must have the right PROTECT (P) to change the ACL.
Controlling Access 8-12
Adding ACL Entries
To add an entry (SID and rights) to an ACL, use the -A command in the following format:
EDACL path name •• • -A ppon rights
where ppon specifies the SID for the new entry and rights specifies the set of access rights. The -A command directs EDACL to add the specified SID and access rights to the ACL. For example:
$ EDACL REPORT -A %.%.MAN -QWNER
The command in this example adds a new ACL entry to the ACL for the file REPORT. The -OWNER rights class name (see Table 8-4) specifies a full set of rights for the entry. The new entry grants full access (pgndrwx) to anyone in the organization named MAN. Notice that the SID specification in this example omits the trailing % wildcard for the NODE field.
Changing Entry Rights To change the access rights for an existing ACL entry, use the -C command in the following format:
EDACL pathname . .. -C ppon right•
where ppon specifies the SID for the entry you want to change, and rights specifies the new set of access rights. The -C command directs EDACL to change the access rights for the specified SID.
For example, suppose the file REPORT has the following ACL entry granting full rights:
%.%.MAN.% pgndwrx
The following command changes the access rights for %.%.MAN to READ (R) access:
$ EDACL REPORT -C %.%.MAN R
As a result, the new ACL entry now looks like this:
%.%.MAN.% - - - - - r -
If you try to change the access rights for an entry that doesn't exist, you will receive an error message.
8-13 Controlling Access

Adding Entry Rights To add access rights to an existing ACL entry, use the -AR command in the following format:
EOACL path name • • . -AR ppon rights
where ppon specifies the SID for the entry you want to change, and rights specifies the new set of access rights. The -AR command directs EDACL to add rights to the existing list of access rights for the specified SID.
For example, suppose the file REPORT has the following ACL entry:
%.%.MAN.% - - - - - r -
The following command adds the rights WRITE (W) and EXECUTE (X) to the current access rights for %.%.MAN.
$ EDACL /OWNER/REPORT -AA %.%.MAN WX
As a result, the ACL entry now looks like this:
%.%.MAN.% - - - - wrx
If you try to add rights to an entry that doesn't exist, you will receive an error message.
Deleting Entry Rights To delete the set of rights from a particular ACL entry, use the -DR command in the following format:
EDACL path name • • • -DR ppon rights
where ppon specifies the SID for the entry you want to change, and rights specifies the access rights you want to delete. The -DR command directs EDACL to delete the access rights for the specified SID.
For example, suppose the file REPORT has the following ACL entry:
%.%.MAN.% - - - - wrx
The following command deletes WRITE (W) access from the current access rights for %.%.MAN:
$ EDACL /OWNER/REPORT -DR %. %.MAN W
Controlling Aooeaa 8-14
As a result, the ACL entry now looks like this:
%.%.MAN.% - - - - - rx
If you try to delete rights from an entry that doesn't exist, you will receive an error message.
Deleting ACL Entries
To delete an entry (SID and rights} from an ACL, use the -D command in the following format:
EDACL path name • . • -0 ppon
where ppon specifies the SID for the entry you want to delete. example:
$ EDACL /OWNER/REPORT -D %.%.MAN.%
For
This command deletes the entry %.%.MAN.% from the ACL for the file REPORT.
Copying ACLs To copy an ACL from one object to another, use the ACL (ACCESS_CONTROL_LIST) command in the following format:
ACL target source
where target specifies the pathname of the object to which you want the ACL copied. The source argument specifies the pathname of the object whose ACL you want to copy.
The following command copies the ACLs from the directory !OWNER to the directory /USER _I:
$ ACL IUSER_1 /OWNER
Initial ACLs Whenever you create a new file or directory, the system assigns it a default ACL by copying a special ACL, called an initial ACL, from the parent directory. Each directory, in addition to its own ACL, has two initial ACLs: an initial file ACL for new files, and an initial directory ACL for new directories.
For example, if you create a file named REPORT in the directory OWNER, the system assigns REPORT the initial file ACL of the directory OWNER. If you create a subdirectory in OWNER, the
,,_,. Controlling Access
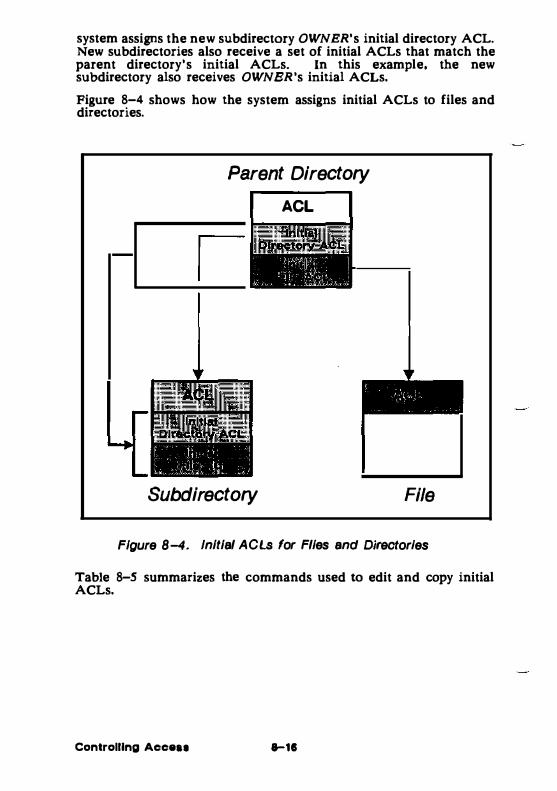
system assigns the new subdirectory OWNER's initial directory ACL. New subdirectories also receive a set of initial ACLs that match the parent directory's initial ACLs. In this example, the new subdirectory also receives OWNER's initial ACLs.
Figure 8-4 shows how the system assigns initial ACLs to files and directories.
Parent Directory ACL
Subdirectory File
Figure 8-4. Initial ACLs for Flies and Directories
Table 8-5 summarizes the commands used to edit and copy initial ACLs.
Controlling Accen 8-16
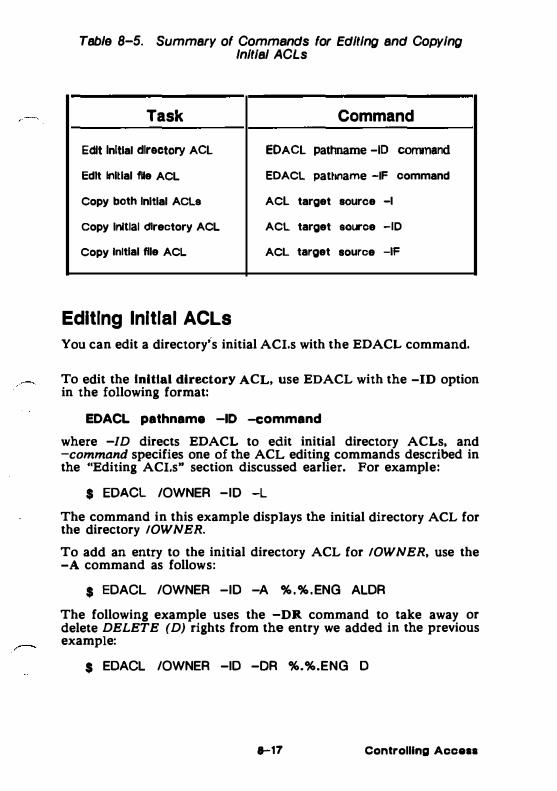
Table 8-5. Summary of Commands for Editing and Copying Initial ACLs
Task Command
Edit Initial directory ACL EOACL pathname -ID command
Edit Initial fUe ACL EDACL pathname -IF command
Copy both Initial ACL8 ACL target source _,
Copy Initial directory ACL ACL target SOLrOe -ID
Copy Initial file ACL ACL target source -IF
Editing Initial ACLs You can edit a directory's initial ACI.s with the EDACL command.
To edit the Initial directory ACL, use EDACL with the -ID option in the following format:
EDACL pathname -10 -command
where -ID directs EDACL to edit initial directory ACLs, and -command specifies one of the ACL editing commands described in the "Editing ACI.s .. section discussed earlier. For example:
$ EDACL /OWNER -ID -L
The command in this example displays the initial directory ACL for the directory !OWNER.
To add an entry to the initial directory ACL for !OWNER, use the -A command as follows:
$ EDACL /OWNER -ID -A %.%.ENG ALDR
The following example uses the -DR command to take away or delete DELETE (D) rights from the entry we added in the previous example:
$ EDACL /OWNER -ID -QR %.%.ENG D
8-17 Controlling Access

To edit the Initial file ACL, use the EDACL command with the -IF option in the following format:
EDACL pathname -IF -command
where -IF directs EDACL to edit initial file ACLs, and -command specifies one of the ACL editing commands described in the "Editing ACLs" section discussed earlier. For example:
$ EDACL REPORT -IF -L
The command in this example displays the initial file ACL for the file REPORT.
Copying Initial ACLs
You can copy a directory's initial ACLs using the ACL command in the following format:
ACL target source option
where option specifies one of the options listed in Table 8-6. The target argument specifies the pathname of the object to which you want the initial ACL copied. The source argument specifies the pathname of the object whose initial ACL you want to copy.
Table 8-6. Options for Copying Initial ACLs
Option Description
-1 Copies both the initial file and initial directory ACLs from the source to the target.
-10 Copies the initial directory ACL from the source to the target.
-IF Copies the initial file ACL from the source to the target.
The command in the following example uses the -1 option to copy the inital file and directory ACLs from the directory /OWNER to the directory /USER_l.
$ ACL /USER_1 /OWNER -1
Controlling Access 8-18
To copy only the initial file ACL, use the -IF option as shown in the following example:
$ ACL /USER_1 /OWNER -IF
For a complete description of how to use the ACL command to copy initial ACLs, see the DOMAIN System Command Reference.
Protected Subsystems Another method of controlling access to files is through a protection mechanism called a protected subsystem. Protected subsystems allow you to designate a collection of data (a protected group of files) for use solely by specific programs.
A protected subsystem is composed of one or more programs and a set of data files. The programs are called the managers of the protected subsystem: the data files, called data objects, are owned by the subsystem. Thus, files in a protected subsystem have either manager or data object status.
Protected subsystems permit broad groups of users to access data objects through the programs, or managers, of the subsystem. You typically create a protected subsystem when you want only specific programs to act on data files, regardless of the SIDs of the processes In which the programs run.
For example, you might have a group of data files produced and used by a specific program. If you want to prevent these files from being used for any other purpose, you can assign protected subsystem status to both the program and the data files. As a result, only those users authorized to run the subsystem manager program can use the files protected by the subsystem.
This section explains how to create a protected subsystem and how to assign subsystem status to files.
How Do Protected Subsystems Work?
In order to understand how to assign subsystem status to files, you must first understand how the system handles protected subsystems. Figure 8-5 presents a flowchart that shows how the system controls access to protected subsystem files.
11-19 Controlling Acceu
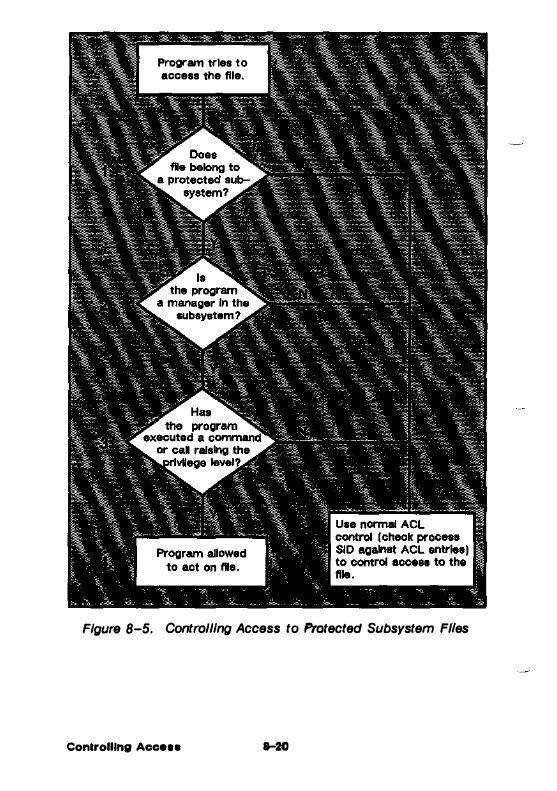
Program tries to access the file.
Figure 8-5. Controlling Access to Protected Subsystem Flies
Conlrolllng Acce .. 8-20

The following descriptions explain the sequence of events shown in Figure 8-5:
1. When a program in a protected subsystem requests access to a file, the system first checks whether the file belongs to a protected subsystem. If the file does not belong to a protected subsystem, the system uses the file's ACL information to control access.
2. If the file does belong to a protected subsystem, the system determines whether the requesting program owns the file (whether the program is a manager in that subsystem). If the program is not a manager in that subsystem, the system treats it like any other program and uses ACL information to control access.
3. If the program is a manager in that subsystem, the system verifies that the program has executed a command or system call that raises the manager program's privilege level. If a manager program hasn't raised its privilege level, the system treats it like a non-manager program and uses ACL information to control access.
The system allows you to raise a program's privilege level by using either the Shell command SUBS (SUBSYSTEM) or a set of programming calls. For more information, see the SUBS Shell command in the DOMAIN System Command Reference or the ACLM call descriptions in the DOMAIN System Call Reference.
4. If the manager program has raised its privilege level, the system allows it to operate on the file.
To use a protected subsystem, you must first create it, and then enter it to add files. The followmg sections describe how to create and enter a protected subsystem.
Creating a Protected Subsystem To create a protected subsystem, use the CRSUBS (CREATE_SUBSYSTEM) command in the following format:
CRSUBS aubayatem_name
where subsystem_name specifies the name you want to assign to the subsystem. For example, the following command creates a protected subsystem named PROTECTOR:
$ CRSUBS PROTECTOR
1-21 Controlling Access
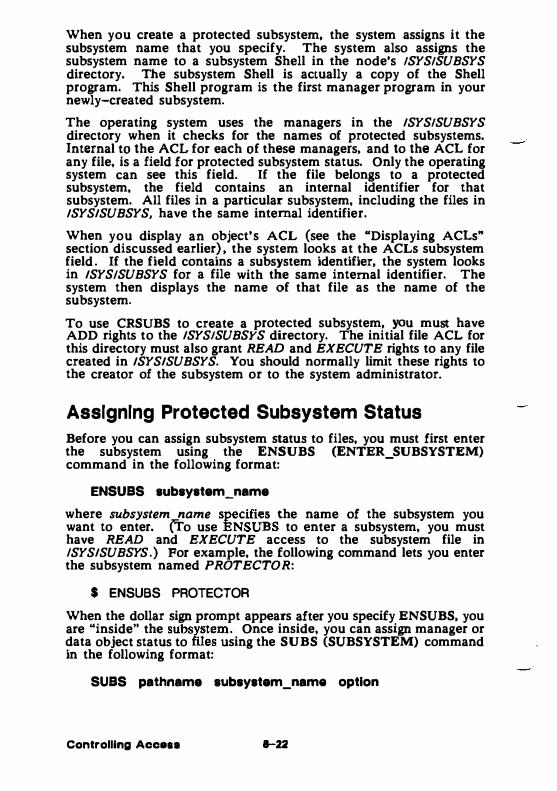
When you create a protected subsystem, the system assigns it the subsystem name that you specify. The system also assigns the subsystem name to a subsystem Shell in the node's !SYS!SUBSYS directory. The subsystem Shell is actually a copy of the Shell program. This Shell program is the first manager program in your newly-created subsystem.
The operating system uses the managers in the ISYS!SUBSYS directory when it checks for the names of protected subsystems. Internal to the ACL for each of these managers, and to the ACL for any file, is a field for protected subsystem status. Only the operating system can see this field. If the file belongs to a protected subsystem, the field contains an internal identifier for that subsystem. All files in a particular subsystem, including the files in ISYSISUBSYS, have the same internal identifier.
When you display an object's ACL (see the "Displaying ACLs" section discussed earlier), the system looks at the ACLs subsystem field. If the field contains a subsystem identifier, the system looks in ISYSJSUBSYS for a file with the same internal identifier. The system then displays the name of that file as the name of the subsystem.
To use CRSUBS to create a protected subsystem, you must have ADD rights to the ISYSJSUBSYS directory. The initial file ACL for this directory must also grant READ and EXECUTE rights to any file created in ISYSISUBSYS. You should normally limit these rights to the creator of the subsystem or to the system administrator.
Assigning Protected Subsystem Status Before you can assign subsystem status to files, you must first enter the subsystem using the ENSUBS (ENTER_SUBSYSTEM) command in the following format:
ENSUSS subsystem_name
where subsystem name specifies the name of the subsystem you want to enter. (To use ENSUBS to enter a subsystem, you must have READ and EXECUTE access to the subsystem file in /SYSISUBSYS.) For example, the following command lets you enter the subsystem named PROTECTOR:
$ ENSUBS PROTECTOR
When the dollar sign prompt appears after you specify ENSUBS, you are "inside" the subsystem. Once inside, you can assign manager or data object status to files using the SUBS (SUBSYSTEM) command in the following format:
SUSS pathname subsystem_nama option
Controlling Accau 8-22
where pathname specifies the name of the file, and subsystem_name specifies the name of the current subsystem. The option specifies either -MGR for manager status or -DATA for data object status. For example:
$ SUBS MY PROG PROTECTOR -MGR $ SUBS DA fA 1 PROTECTOR -DATA $ SUBS DATA=2 PROTECTOR -DATA
The commands in this example assi� $Ubsystem status to files of the subsystem PROTECTOR. The f1rst command assigns manager status to the program file MY _PROG. (You can assign manager status to either a binary program or a script.) The remaining commands assign data object status to the files DATA_! and DATA_2.
When you're finished assigning status to files, you can leave the protected subsystem by typing CTRL/Z. You've exited the protected subsystem when the EOF marker appears and the dollar sign prompt returns.
Figure 8-6 contains a transcript that shows how a user created a protected subsystem, entered it, created a subsystem manager and data object, and exited the subsystem.
8-23 Controlling Access
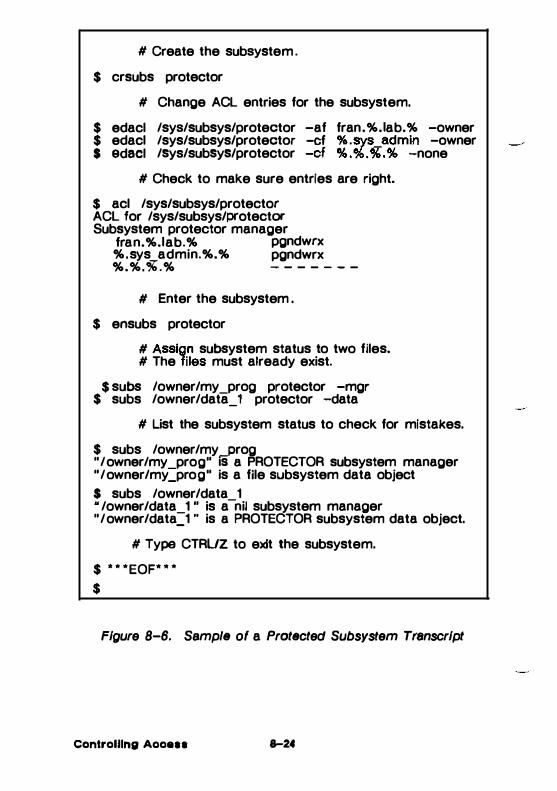
# Create the subsystem. $
crsubs protector
# Change ACL entries for the subsystem. $
edacl $ edacl
$ edacl
/sys/subsys/protector -af fran.%.1ab.% -owner /sys/subsys/protector -cf %.sys_admin -owner /sys/subsys/protector -cf %.%.%.% -none
# Check to make sure entries are right. $
acl /sys/subsys/protector ACL for /sys/subsys/protector Subsystem protector manager
fran.%.1ab.% pgndwrx %.sys admin.%.% pgndwrx %.%.%.% - - - - - - -
# Enter the subsystem . $
ensubs protector
# Assign subsystem status to two files. # The files must already exist.
$$
subs /owner/my_prog protector -mgr subs /owner/data_1 protector -data
# List the subsystem status to check for mistakes. $
subs /owner/my__.Prog "/owner/my_prog" IS a PROTECTOR subsystem manager "/owner/my _prog" is a file subsystem data object $ subs /owner/data 1 " /owner/data_1 " is a -nil subsystem manager "/owner/data_1 " is a PROTECTOR subsystem data object.
# Type CTRUZ to exit the subsystem. $
* * *EOF" " * $
Figure 8-6. Sample of a Protected Subsystem Transcript
Controlling Aooe .. 8-24

CHAPTER 9
Writing Shell Scripts
Most of the Shell command examples that you've seen so far show you how to use commands interactively by specifying them in the Shell input pad. You can also use Shell commands in Shell scripts. Shell scripts are essentially programs made up of Shell commands and other valid Shell characters, operators, and expressions. Think of scripts as programs written in the "Shell language."
This chapter describes how to write Shell scripts using Shell commands, operators, and expressions. Although you can use many of the commands and conventions presented in this chapter when you use the Shell interactively, they have their most practical applications in scripts.
Creating Your Own Commands In its simplest form, a script is a file containing Shell commands that you create to perform some customized operation. For example, a Shell script can contain a sequence of commands that you specify frequently, such as WD to set the working directory, and LD to list the directory's contents. Or, it could contain a single command with
·-· Wrlllng Shell Scrlpls

a long list of options. By including commands such as these in a script, you can execute them at any time by specifying a single command name.
For example, when you specify the LD command to list the contents of a directory, by default it displays only the name of each object. Suppose, however, that you want to display each objects' access rights, creation date, and object type. Normally, each time you specify the LD command you have to specify the same list of options. Instead, you can create a Shell script named LIST that contains the followmg command line:
LD -R -DTC -sT
Whenever you specify the command name LIST, the Shell lists the access rights, creation date, and object type of each object in the current working directory.
Of course, you can write much more complicated scripts that perform more sophisticated tasks. This section describes some of the basic components for writing scripts.
Creating Scripts To create a script, simply create a file and insert Shell command lines. Command lines in scripts use the same command line format described in Chapter 6.
Like commands that you enter in the She11 input pad, you can use parsing operators like the semicolon (;) to separate commands on a command line, and the escape character (@) to continue a command on more than one line. Other operators, like the pound sign character (#), have functions more suited for use in scripts. The # character allows you to include comments in your scripts. since it directs the Shell to ignore anything that follows it on the command line. Table 9-1 lists the Shell parsing operators you'll use when writing scripts.
Writing Shell Scripts 11-2

Table 9-1. Shell Parsing Operators
Character Function
# Direct the Shell to ignore anything that follows it on the command hne.
; Separate commands on a line.
& Run a command or program in the background without pads and windows (see Chapter 6).
·n Substitute nth parameter ( n is a number).
•• Substitute all parameters the command itself) .
(not including
!n Substitute parameter for number) and rescan it.
n ( n is a
,. Substitute and rescan all parameters (not including the command name itself).
' string ' Quoted string, no parameters inserted.
" string " Quoted string, parameter may be inserted.
@ Escape character
Space (separates arguments).
An important consideration when creating scripts is where to create them. Remember, when you specify a command name, the Shell searches for the corresponding file according to a set of command search rules. By default, the second directory the Shell searches is your personal command directory �COM. Therefore, you should normally create your own personal scripts there. In fact, all of the examples in this chapter assume that the scripts resicle in your �COM directory. For more information on command search rules, refer to Chapter 6.
Writing Shell Scripts
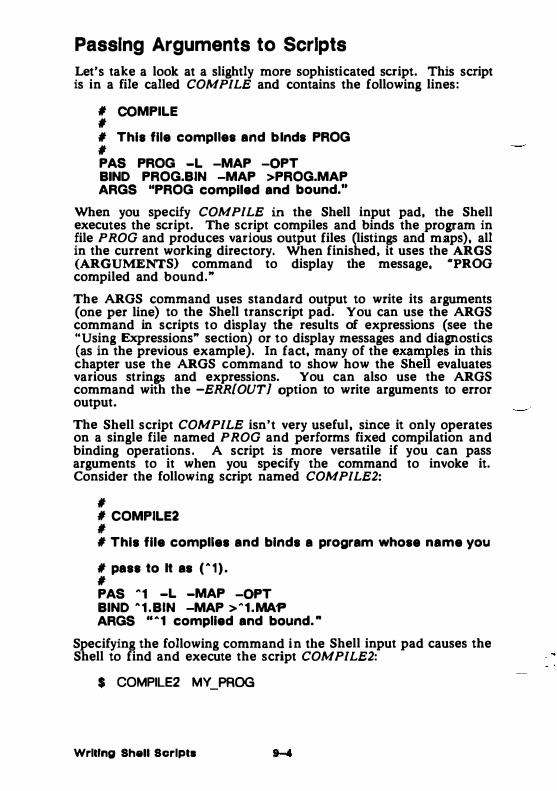
Passing Arguments to Scripts
Let's take a look at a slightly more sophisticated script. This script is in a file called COMPILE and contains the following lines:
# COMPILE # # This file complies and b-Inds PROG # PAS PROG -L -MAP -oPT BIND PROG.BIN -MAP >PROG.MAP ARGS "PROG compiled and bound."
When you specify COMPILE in the Shell input pad, the Shell executes the script. The script compiles and binds the program in file PROG and produces various output files (listings and maps), all in the current working directory, When finished, it uses the ARGS (ARGUMENTS) command to display the message, "PROG compiled and bound."
The ARGS command uses standard output to write its arguments (one per line) to the Shell transcript pad. You can use the ARGS command in scripts to display the results of expressions (see the "Using Expressions" section) or to display messages and diagnostics (as in the previous example). In fact, many of the examples in this chapter use the ARGS command to show how the Shell evaluates various strings and expressions. You can also use the ARGS command with the -ERR[OUT] option to write arguments to error output.
The Shell script COMPILE isn't very useful, since it only operates on a single file named PROG and performs fixed compilation and binding operations. A script is more versatile if you can pass arguments to it when you specify the command to invoke it. Consider the following script named COMPILE2:
# # COMPILE2 # # This file complies and binds a program whose name you
# pass to It as ("1). # PAS '1 -L -MAP -oPT BIND "1.BIN -MAP >"1.MA'P ARGS ""1 complied and bound ...
Specifying the foilowing command in the Shell input pad causes the Shell to find and execute the script COMPILE2:
$ COMPILE2 MY _PROG
Wrlllng Shell Scrlpls
The Shell substitutes MY _PROG, which is the first argument on the command line, for every occurrence of the ('"1) in the script. As a result, the script compiles MY_PROG, binds MY_PROG.BIN, writes a map to MY_PROG.MAP, and when complete, writO!S the message:
MY_PROG complied and bound.
Arguments that you specify on the command line correspond to symbols in the script, called substitution parameters. Each substitution parameter is composed of a caret character (") and a number. The caret character (") instructs the Shell to substitute an argument for the parameter; the number refers to the position the argument occupies on the command line that invoked the script. In the previous example, "1 refers to MY_PROG, which is the first argument after the command name COMPILE. You can use any number of substitution parameters in Shell scripts (beginning with "'0 which refers to the command name itself).
Our COMPILE2 script is still very specific, since the compile and bind operations are still fixed. To make those operations variable, simply pass in more parameters. Consider the following script named COMPILE3:
# # COMPILE3 # II This file complies and binds a program whose name you II pass to H as "'1, and whose options you pass to H as # "2. # # ************(THIS EXAMPLE IS WRONG)************ PAS "1 "2 BIND "'1.BIN -MAP >"'1.MAP ARGS ""'1 complied and bound."
How do we pass the multiple parameters if we want COMPILE3 to behave like COMPILE2 ? Let's take a look at what happens if we specify the following command:
$ COMPILE3 MY _PROG -L -MAP -QPT
l' Y 'T 1 2 3 4
As shown in this example, the Shell tries to substitute -L for parameter 2, -MAP for 3, and -OPT for 4. This command won't work, however, because COMPILE3 doesn't contain substitution parameters "'3 and "'4. As a result, the Shell ignores the -MAP and -OPT options.
IHi Writing Shell Scripts
Normally, we can group the arguments and pass them as a single argument by enclosing them in single quotation marks as follows:
$ COMPILE3 MY _PROG '-L -MAP ...OPT '
1 2
The single quotation marks tell the command Shell to treat the characters inside them as a single string, even if there are intervening spaces. When you specify the command, the Shell substitutes the string '-L -MAP -OPT' for substitution parameter 2 in COMPILEJ. However, this still won't work, because the Shell tries to interpret the entire string as a single argument, instead of the three separate options the string represents.
Let's look at a fourth and final COMPILE script to see how to solve our problem.
# # COMPILE4 # II Thla file complies and blnda a program whose name you 11 pass to It as "1, and whose options you pass to It as 12 # II •••••••***(THIS EXAMPLE IS CORRECT}**••••••• PAS •1 12 BIND "1,BIN -MAP >"1.MAP ARGS ""1 compiled and bound."
Now, typing the following command will work:
$ COMPILE3 MY _PROQ '-L -MAP ...OPT '
1 2
Like the caret ("), the exclamation point (!) parsing operator causes the Shell to substitute the string in quotation marks for the second parameter. However, the exclamation point directs the Shell to rescan the command line before executing it. When the Shell scans the line a second time it breaks apart the three options in the string. As a result, the Shell interprets the options correctly.
Writing Shall Scripta ....
Using Quoted Strings The proper use of quotation marks can make a big difference in the way the Shell interprets quoted strings. In order to use quoted strings correctly in scripts, you must understand the - subtle differences in the Shell's interpretation of single and double quotation marks.
When you want the Shell to interpret a string literally, you can use either single or double quotation marks as follows:
ARGS 'complied and bound"
or
ARGS "compiled and bound"
Both commands use standard output to write the message, "compiled and bound" to the Shell's transcript pad. But suppose you wanted to substitute arguments inside the quoted string.
To substitute arguments inside a quoted string, you must use double quotation marks. For example, let's use a line from the script, COMPILE4 that we created in the "Passing Arguments to Scripts,. section.
ARGS " "1 complied and bound"
When you use double quotes, the Shell performs substitutions in the quoted string. In this example, if the argument passed to the script is MY_PROG, the Shell outputs the string:
MY_PROG complied and bound.
On the other hand, if you enclose the string in single quotation marks:
ARGS '"1 complied and bound.'
the Shell will not perform the substitution. Instead, it displays the message:
"1 compiled and bound.
Using In-Line Data As we saw in Chapter 6, cenain Shell commands use standard input to read data from the Shell input pad. When you use these commands in scripts, you can redirect standard input to read data from within the script itself.
For example, the ED {EDIT) command normally uses standard input to read special editing commands that you enter in the Shell
1-7 Writing Shell Scripts
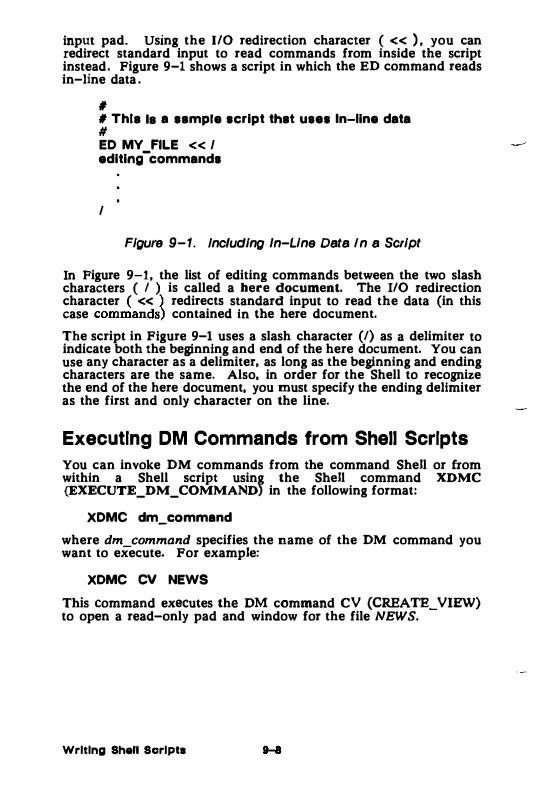
input pad. Using the 1/0 redirection character ( << ) , you can redirect standard input to read commands from inside the script instead. Figure 9-1 shows a script in which the ED command reads in-line data.
# # Thla Ia a sample script that uses In-line data # ED MY FILE << I editing
-commands
I
Figure 9-1. Including In-Line Data In a Script
In Figure 9-1, the list of editing commands between the two slash characters ( I ) is called a here document. The 110 redirection character ( << ) redirects standard input to read the data (in this case commands) contained in the here document.
The script in Figure 9-1 uses a slash character (/) as a delimiter to indicate both the beginning and end of the here document. You can use any character as a delimiter, as long as the beginning and ending characters are the same. Also, in order for the Shell to recognize the end of the here document, you must specify the ending delimiter as the first and only character on the line.
Executing DM Commands from Shell Scripts You can invoke DM commands from the command Shell or from within a Shell script using the Shell command XDMC (EXECUTE_DM_COMMAND) in the following format:
XDMC dm_command
where dm_command specifies the name of the DM command you want to execute. For example:
XDMC CV NEWS
This command executes the DM command CV (CREATE_ VIEW) to open a read-only pad and window for the file NEWS.
Writing Shell Scripts
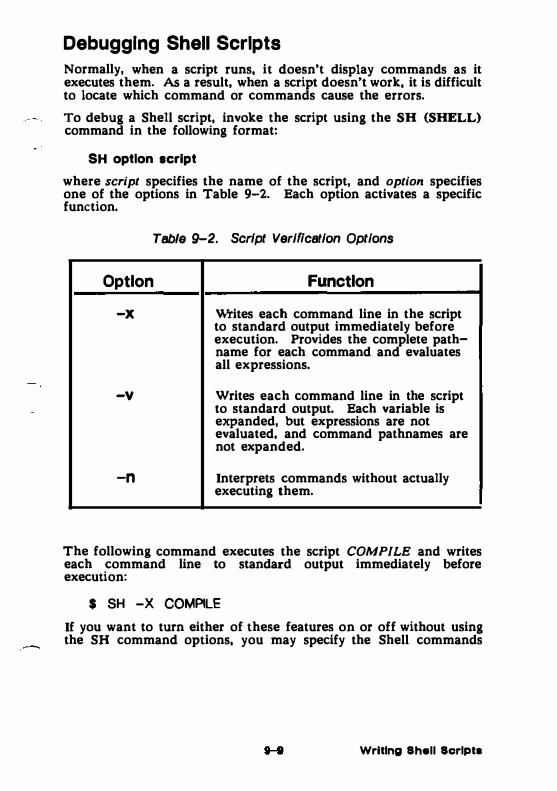
Debugging Shell Scripts Normally, when a script runs, it doesn't display commands as it executes them. As a result, when a script doesn't work, it is difficult to locate which command or commands cause the errors.
To debug a Shell script, invoke the script using the SH (SHELL) command in the following format:
SH option script
where script specifies the name of the script, and option specifies one of the options in Table 9-2. Each option activates a specific function.
Table 9-2. Script Verification Options
Option Function
-x writes each command line in the script to standard output immediately before execution. Provides the complete path-name for each command and evaluates all expressions.
-v Writes each command line in the script to standard output. Each variable is expanded, but expressions are not evaluated, and command pathnames are not expanded.
-n Interprets commands without actually executing them.
The following command executes the script COMPILE and writes each command line to standard output immediately before execution:
$ SH -X COMPILE If you want to turn either of these features on or off without using the SH command options, you may specify the Shell commands
Writing Sh•ll Scripts

VON, VOFF, XON, or XOFP and then run your script directly using the current Shell. For example, the following are equivalent:
$ SH -X COMPILE
$ XON $ COMPILE $ XOFF
You can also include these commands within the script itself to enable or disable verification. For example, to debug part of a script, you can place XON and XOFF commands around the segment of the script you want to debug. Or, to debug an entire script, include the XON command as the first line in the script. When the script completes, control of verification returns to the Shell.
Using Expressions Like programs written in a high-level programming language such as FORTRAN or Pascal, scripts allow you to use expressions to perform mathematical, string, and Boolean operations. Table 9-3 provides a summary of the operators you can use in expressions.
To evaluate an expression, you must enclose the expression within expression delimiters (a set of double parentheses) as follows:
ARGS (( 4 + 2 ))
The only exception to this rule is the case where you use the assignment operator ( :"" ) to assign an expression to a variable:
TOTAL := 4 + 2
In this example, the Shell evaluates the expression and assigns the resulting value to the variable TOTAL. While the assignment operator doesn't require you to use expression delimiters, you can use them if you prefer; no error will occur if you do use them. The "Defining Variables" section describes how to use the assignment operator to assign values to variables.
Writing Shall Scripta 9-10
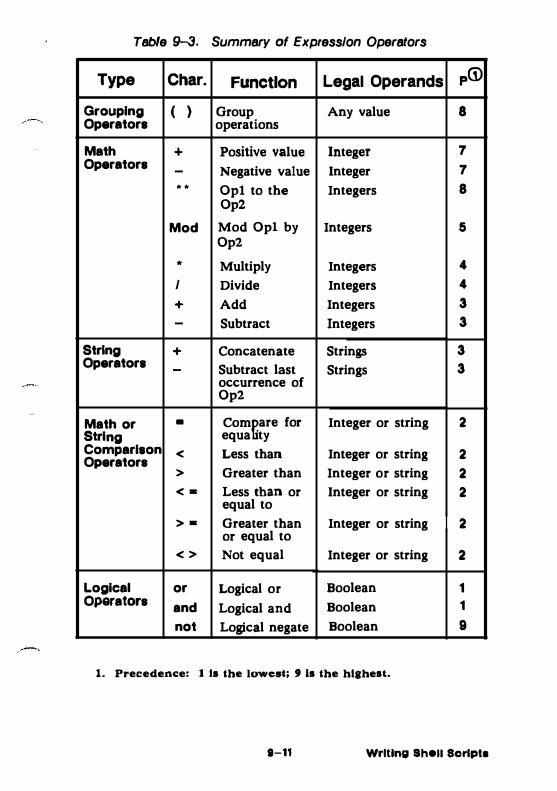
Table 9-3. Summary of Expression Operators
Type Char. Function Legal Operands
Grouping Operators
( ) Group operations
Any value
Math + Positive value Integer Operators - Negative value Integer
• • Opt to the Integers Op2
Mod Mod Opl by Integers Op2
• Multiply Integers I Divide Integers + Add Integers - Subtract Integers
String + Concatenate Strings Operators - Subtract last Strings
occurrence of Op2
Math or • Com�are for Integer or string String equa ty Comparison < Less than Integer or string Operators
> Greater than Integer or string < • Less than or
equal to Integer or string
> • Greater than or equal to
Integer or string
< > Not equal Integer or string
Logical or Logical or Boolean Operators and Logical and Boolean
not Logical negate Boolean
1. Precedence: 1 Is the lowest; 9 Is the highest.
pCD
8
7
7
8
5
4 4 3
3
3
3
2
2
2
2
2
2
1 1
9
1-11 Writing Bh•n Scripts

Operands In Expressions
You can use any of the following as operands in expressions:
• Single integer, string, or Boolean values • Operations that result in integer, string, or Boolean values
• Variables assigned integer, string, or Boolean values (the "Shell Variables" section describes variables) .
Certain types of operations in expressions take precedence over others. For example, the Shell will perform a mathematical operation in an expression before a comparison operation. As shown in Table 9-3, the Shell performs operations according to a specific order of precedence where 1 is the lowest (last performed) and 9 is the highest (first performed).
The last operation performed in an expression (the operation with the lowest precedence) determines the type of value, either integer, string, or Boolean, returned by the expression.
When you create expressions, refer to Table 9-3 to check the precedence of the operators you use. Understanding the order in which the Shell performs operations will reduce the possibility of an expression resulting in an unexpected answer. Many of the examples that we'll see in this chapter demonstrate operator precedence.
Mathematical Operators Use mathematical operators in expressions to perform calculations on integers. The result of a mathematical operation is always an integer. For example:
ARGS (( 5 + 4 • 3 - 2 ))
returns the value 15. If you're wondering why the answer isn't 9 (9 times 1), the reason is that the Shell performs multiplication operations in this expression before it performs addition and subtraction operations. In our example, the Shell multiplied 4 by 3 before it added 5 and subtracted 2.
To perform the addition and subtraction first, you could use the grouping operatorS (parentheses) to group the addition and subtraction operations within the expression as follows:
ARGS (( ( 5 + 4 ) • ( 3 - 2 ) ))
The Shell always performs operations inside parentheses first, from left to right. In this example, the Shell first adds 5 and 4 and subtracts 2 from 3, and then multiplies the resulting values. Table
Wrlllng Shell Sorlpts 1-12
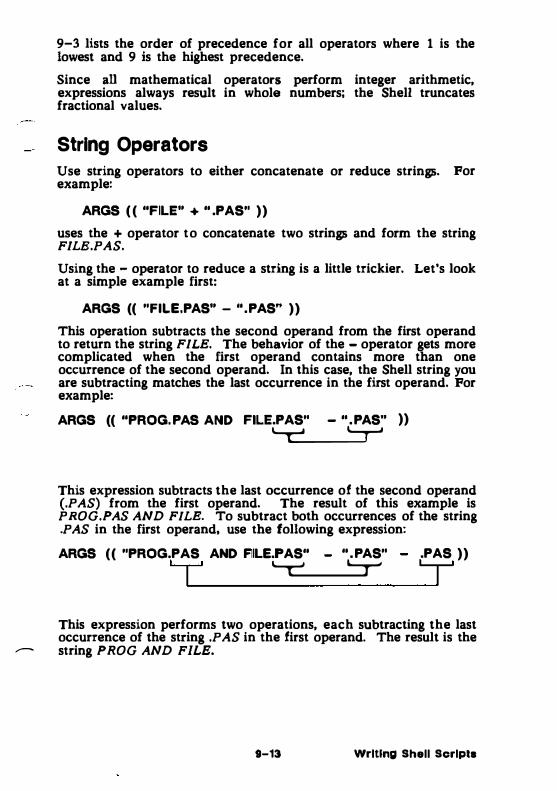
9-3 lists the order of precedence for all operators where 1 is the lowest and 9 is the highest precedence.
Since all mathematical operators perform integer arithmetic, expressions always result in whole numbers; the Shell truncates fractional values.
String Operators Use string operators to either concatenate or reduce strings. For example:
ARGS ( ( "F1LE" + " .PAS" ))
uses the + operator to concatenate two strings and form the string FILB.PAS.
Using the - operator to reduce a string is a little trickier. Let's look at a simple example first:
ARGS (( "FILE.PAS" - ".PAS" ))
This operation subtracts the second operand from the first operand to return the string FILE. The behavior of the - operator gets more complicated when the first operand contains more than one occurrence of the second operand. In this case, the Shell string you are subtracting matches the last occurrence in the first operand. For example:
ARGS (( "PROG. PAS AND FlLE.PAS" - ".PAS" ))
�
This expression subtracts the last occurrence of the second operand (.PAS) from the first operand. The result of this example is PROG.PAS AND FILE. To subtract both occurrences of the string .PAS in the first operand, use the following expression:
ARGS (( "PROG.PAS AND F1LE.PAS" - ".PAS"
'T' '--c:..___'--r-.PAS ))
"T This expression performs two operations, each subtracting the last occurrence of the string .PAS in the first operand. The result is the
------ string PROG AND FILE.
9-13 Writing Shell Scrlpls
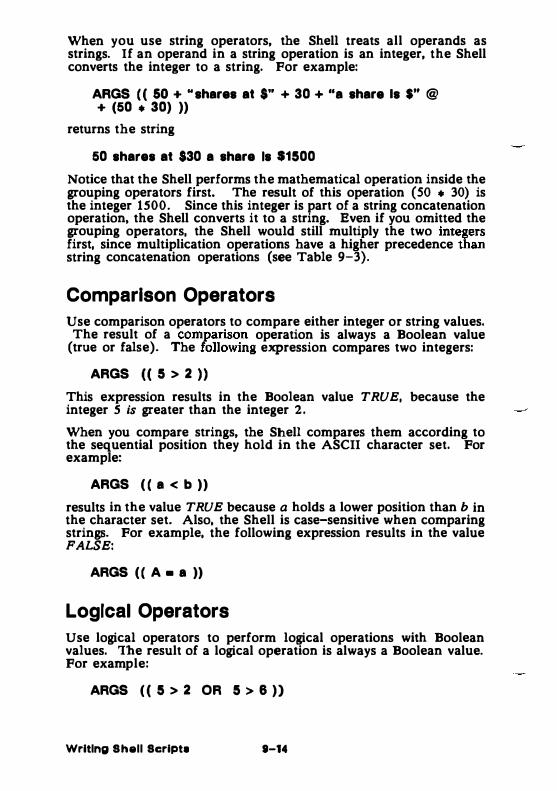
When you use string operators, the Shell treats all operands as strings. If an operand in a string operation is an integer, the Shell converts the integer to a string. For example:
ARGS (( SO + .. shares at $" + 30 + "a share Is S" @ + (50 • 30) ))
returns the string
50 shares at $30 a share Is $1500
Notice that the Shell performs the mathematical operation inside the grouping operators first. The result of this operation (50 • 30) is the integer 1500. Since this integer is part of a string concatenation operation, the Shell converts it to a string. Even if you omitted the grouping operators, the Shell would still multiply the two integers first, since multiplication operations have a higher precedence than string concatenation operations (see Table 9-3).
Comparison Operators Use comparison operators to compare either integer or string values.
The result of a comparison operation is always a Boolean value (true or false). The following expression compares two integers:
ARGS (( 5 > 2 ))
This expression results in the Boolean value TRUE, because the integer 5 is greater than the integer 2.
When you compare strings, the Shell compares them according to the sequential position they hold in the ASCII character set. For example:
ARGS (( a < b ))
results in the value TRUE because a holds a lower position than b in the character set. Also, the Shell is case-sensitive when comparing strings. For example, the following expression results in the value FALSE:
ARGS (( A • a ))
Logical Operators
Use logical operators to perform logical operations with Boolean values. The result of a logical operation is always a Boolean value. For example:
ARGS (( 5 > 2 OR 5 > 8 ))
Writing Shell Script• 1-14

results in the value TRUE. In this example, the first operand (the result of the integer comparison) is true, while the second operand is false (5 is not greater than 6). With the OR operator, if either one of the operands results in the value TRUE, then the result of the operation is TRUE.
/- When you use the AND operator, both operands must be true for the operation to result in a TRUE value. For example:
ARGS (( 5 > 2 AND 5 > 6))
This expression results in the value FALSE because both operands are not TRUE; the second operand is FALSE.
Shell Variables You use variables in Shell scripts as symbolic names for specific integer, string, or Boolean values. Once you assign a value to a variable name, you can refer to that value in the script by its variable name rather than its actual value.
The Shell allows you to use variables in any of the following:
• Command lines as commands, arguments, or options
• Here documents • Strings enclosed in double quotation marks • Expressions
Defining Variables
To define a variable, use the assignment character (:==) in the following format:
variable name :== value
where variable name specifies the name of the variable, and value specifies the value you want to assign to the variable. Variable names can contain alphanumeric characters, as well as the underscore ( _ ) and dollar sign ( $ ) , and up to 1024 characters. You MUST, however, begin all variable names with a letter. (Variables are not case-sensitive.) The following statement assigns the integer value 30 to the variable name WORK_DAYS:
WORK_DAYS :• 30
Unlike many programming languages that require you to declare variable types, the Shell automatically assigns the variable a type based on the assigned value. In the previous example, since the
9-15 Writing Shell Scripts
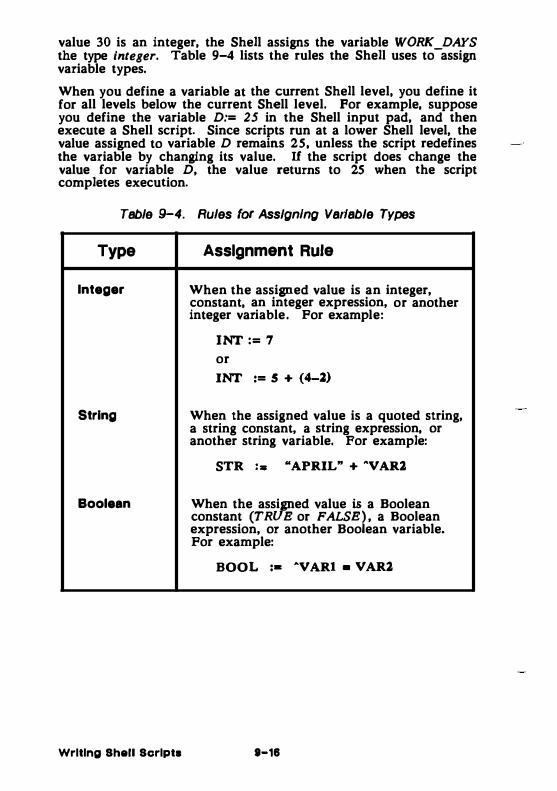
value 30 is an integer, the Shell assigns the variable WORK_DAYS the type integer. Table 9-4 lists the rules the Shell uses to assign variable types.
When you define a variable at the current Shell level, you define it for all levels below the current Shell level. For example, suppose you define the variable D:= 25 in the Shell input pad, and then execute a Shell script. Since scripts run at a lower Shell level, the value assigned to variable D remains 25, unless the script redefines the variable by changing its value. If the script does change the value for variable D, the value returns to 25 when the script completes execution.
Table 9-4. Rules for Assigning Variable Types
Type Assignment Rule
Integer When the assigned value is an integer, constant, an integer expression, or another integer variable. For example:
INT := 7 or INT := 5 + (4-2)
String When the assigned value is a quoted string, a string constant, a string expression, or another string variable. For example:
STR ,. "APRIL" + "VARl
Boolean When the assigned value is a Boolean constant (TRUE or FALSEl , a Boolean expression, or another Boo ean variable. For example:
BOOL :• "VARl • VARl
Writing Shell Scripts 1-16
Using Shell Variables To use a Shell variable, precede the variable name with the substitution character ( " ) . When the Shell encounters the substitution character in a command line, it substitutes the value of the variable for the variable name. Variable names are not case-sensitive. Let's look at an example.
Suppose we assign the variable CITIES a string value:
CITIES :=- "Boston and NY" To use the variable CITIES, simply precede it with the substitution character as follows:
ARGS (( "Cities with early flights are " + "CITIES ))
The ARGS command uses standard output to display the result of the expression to the transcript pad. In this example, the Shell substitutes the string value "Boston and NY" for the variable name CITIES. The expression concatenates the first string and the second string to form the following string:
Cities with early flights are Boston and NY
The Shell automatically substitutes values for (evaluates) Shell variables when you use them as operands in expressions (as shown in the previous example) . However, you may want to evaluate a variable that isn't part of an expression. Consider the following example:
ARGS "Cities with early flights are ACITIES"
By default, the Shell won't evaluate the variable CITIES since the variable is not used in an expression. In order for the Shell to evaluate variables outside of expressions, you must turn on evaluation using the EON command.
You can either specify the EON command before you run a script to turn on evaluation for the current Shell, or include the EON command in the script itself. The EON command, when used in a script, turns on evaluation for the script only, not for the current Shell. To turn evaluation off, use the EOFF command.
With variable evaluation turned on, the command in the previous example evaluates the variable CITIES and displays the following string:
Cities with early flights are Boston and NY
You can also turn evaluation on when you create a Shell by specifying the -E option with the SH (SHELL) command. By default, when you create a Shell, evaluation is off.
1-17 Writing Shell Scripts
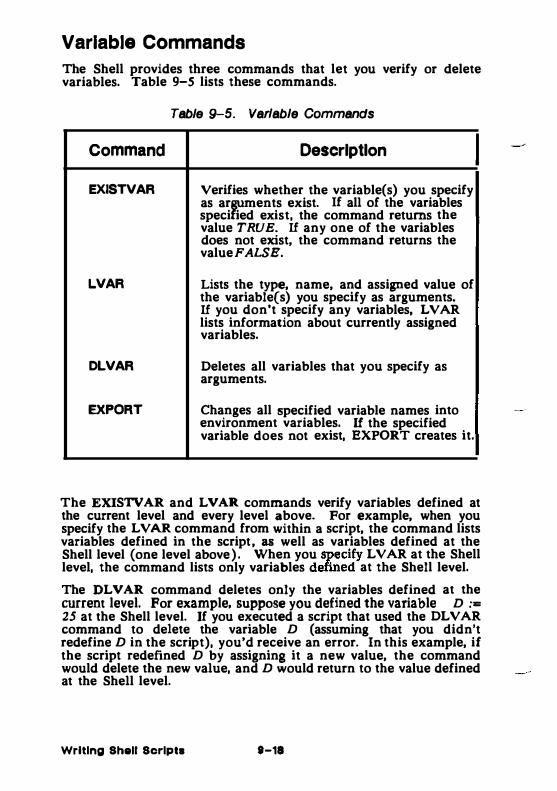
Variable Commands
The Shell provides three commands that let you verify or delete variables. Table 9-5 lists these commands.
Table 9-5. Variable Commands
Command
EXISTVAR
LVAR
DLVAR
EXPORT
Description
Verifies whether the variable(s) you specify as arrements exist. If all of the variables speci ied exist, the command returns the value TRUE. If any one of the variables does not exist, the command returns the value FALSE.
Lists the type, name, and assigned value of the variable{s) you specify as arguments. If you don't specify any variables, LVAR lists information about currently assigned variables.
Deletes all variables that you specify as arguments.
Changes all specified variable names into environment variables. If the specified variable does not exist, EXPORT creates it.
The EXIS1VAR and LVAR commands verify variables defined at the current level and every level above. For example, when you specify the LV AR command from within a script, the command lists variables defined in the script, as well as variables defined at the Shell level (one level above). When you specify LVAR at the Shell level, the command lists only variables defined at the Shell level.
The DLVAR command deletes only the variables defined at the current level. For example, suppose you defined the variable D := 25 at the Shell level. If you executed a script that used the DLVAR command to delete the variable D (assuming that you didn't redefine D in the script), you'd receive an error. In this example, if the script redefined D by assigning it a new value, the command would delete the new value, and D would return to the value defined at the Shell level.
Writing Shell Scripts t-18

Use the EXPORT command to create environment variables or change variables into environment variables. Environment variables store global state information about the system. We supply a set of default environment variables that you can list using the LVAR command.
Defining Variables Interactively
So far, we've looked at variables that you either define at the Shell level or from within scripts. When you define variables in a script, you assign them initial values. These initial values are used every time you execute the script, unless you edit the script to change the values prior to each execution.
Instead of including values for variables directly in scripts, you can direct the script to read values supplied by the user of the script. To read user input into variables, use the READ command in the following format:
READ [option] varlable_llst
where variable_llst specifies one or more variables that receive the input values. Figure 9-2 shows a sample script that demonstrates how to use the READ command to read user input.
# STOCKS # # This script calculates the value of stock holdings. It # reads in both the number of shares held by the user, and # the current market price per share. # # Read In number of shares # READ -PROMPT "Number of shares: " SHARES # # Read in currant market price # READ -PROMPT "Current market value: 11 PRICE # # Calculate value of holdings and display value. # ARGS ( ( " "SHARES shares •t $ "PRICE per •hare $ 11 + @ ( "SHARES • "PRICE ) ) )
Figure 9-2. A Sample Script Using the READ Command
9-19 Wrlllng Shell Scripts
By default, the Shell uses standard input to read values that the user of the script types in the Shell input pad. Our sample script in Figure 9-2 uses two READ commands: one reads in the number of shares and assigns the value to the variable SHARES, the other reads in the current price of each share and assigns the value to the variable PRICE. Notice that each READ command uses the -PROMPT option to prompt the user for the proper input. To see just how this script works, create your own copy and execute it.
The sample script in Figure 9-2 expects the user to supply integer values. But what if the user entered a string or Boolean value? The script would use the value, and as a result, the final calculation CSHARES • A PRICE} would result in an error. To prevent a user
from entering the wrong variable type, use the -TYPE option with the READ command as follows:
READ -PROMPT .. Number of shares: " -TYPE INTEGER @ SHARES
The -TYPE option in this example directs the READ command to accept only integer values as input. If the user specifies any other type of value, the Shell will display an error and prompt the user again tc:» enter the proper value.
Other READ commands, like READC and READLN also enable you to read user input into scripts. For more information on these commands, refer to the DOMAIN System Command Reference.
Using Active Functions You can use active functions in scripts to include string output from a command, program, or other script. When you use an active function, the system replaces it with a string containing standard output from the command, program, or script used in the function. Active functions have the following format:
""command"
where command specifies the name of a command, program, or script whose output you want to use. You can use either single or double quotes according to the rules described in the "Using Quoted Strings" section discussed earlier. Note that output from an active function cannot exceed 1024 characters. If output does exceed this limit, the system displays an error.
You can use active functions in the same way you use variables. For example, suppose you want to use a string that shows the current date and time. (The Shell command DATE displays the current date and time.) By using DATE in an active function, you can substitute the standard output string in the script as follows:
ARGS "The date Ia "'DATE' "
Writing Shell Scripts 9-20
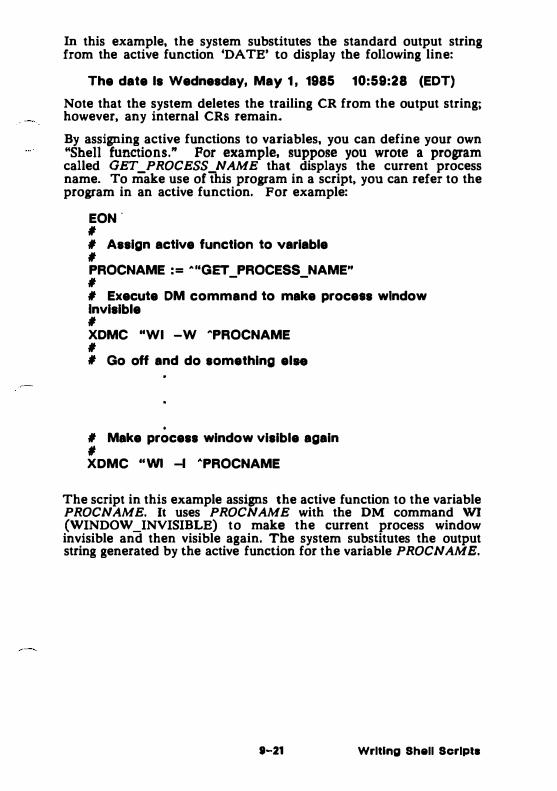
In this example, the system substitutes the standard output string from the active function 'DATE' to display the following line:
The date Is Wednesday, May 1, 1985 10:59:28 (EDT)
Note that the system deletes the trailing CR from the output string; however, any internal CRs remain.
By assigning active functions to variables, you can define your own "Shell functions." For example, suppose you wrote a program called GET _PROCESS_NAME that displays the current process name. To make use of this program in a script, you can refer to the program in an active function. For example:
EON . # # Assign active function to variable # PROCNAME := .,,GET PROCESS NAME" # - -
# Execute OM command to make procets window Invisible # XDMC "WI -W 'PROCNAME # # Go off and do something else
. # Make process window visible again , XDMC "WI -1 'PROCNAME
The script in this example assigns the active function to the variable PROCNAME. It uses PROCNAME with the DM command WI (WINDOW _INVISIBLE) to make the current process window invisible and then visible again. The system substitutes the output string generated by the active function for the variable PROCNAME.
1-21 Writing Shell Scrlpls
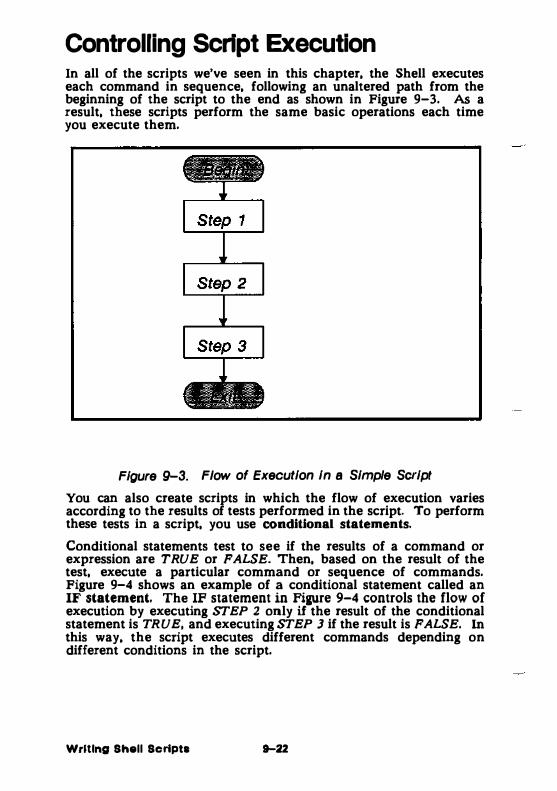
Controlling Script Execution In all of the scripts we've seen in this chapter, the Shell executes each command in sequence, following an unaltered path from the beginning of the script to the end as shown in Figure 9-3. As a result, these scripts perform the same basic operations each time you execute them.
Figure 9-3. Flow of Execution in a Simple Script
You can also create scripts in which the flow of execution varies according to the results of tests performed in the script. To perform these tests in a script, you use conditional statements.
Conditional statements test to see if the results of a command or expression are TRUE or FALSE. Then, based on the result of the test, execute a particular command or sequence of commands. Figure 9-4 shows an example of a conditional statement called an IF statement. The IF statement in Figure 9-4 controls the flow of execution by executing STEP 2 only if the result of the conditional statement is TRUE, and executing STEP J if the result is FALSE. In this way, the script executes different commands depending on different conditions in the script.
Writing Shell Scripta 9-22

Conditional Statement
Step 2
Figure 9-4. Flow of Execution with a Conditional Statement
Figure 9-4 shows a very basic example of how to use an IF statement to control execution. As you'll see later in this section, you can use one or more conditional statements to create more sophisticated flow patterns in scripts.
The Shell supports four different types of conditional statements:
• IF statement
• WHILE statement
• FOR statement
• SELECT statement
The sections that follow describe these conditional statements and the commands that execute them.
9-23 Writing Shell Scripts

Using the IF Statement The IF command and all its arguments make up an IF statement that executes one or more commands depending on the result of a Boolean test. The IF command has the following format:
IF com_1 THEN com_2 • • • [ ELSE com_3 • • • J ENDIF
where com_/ specifies a command, program, expression, or Boolean variable you want tested for "truth." A test of a command or program is TRUE, if the command or program executes successfully (returns an abort severity level of zero). A test of an expression or Boolean variable is TRUE if they result in a TRUE value.
The com_2 argument specifies one or more commands or expressions to execute if the result of the test on com_! is TRUE. The ENDIF command signifies the end of an IF statement. For example:
EON IF (( "A < 100 )) THEN ARGS " "A Is less than 100 " ENDIF
The IF statement in this example tests whether the value for variable A is less than 100. If the value for A is 55, then the result of the test is TRUE (the expression results in a TRUE value), and the ARGS command executes displaying the message:
55 Ia Ieee than 100
In this example, if the result of the test is FALSE, the next command in the script (following ENDIF} executes.
The com_J argument, which is optional, specifies one or more commands to execute if the test on com_I is FALSE. For example:
EON IF (( "A < 100 )) THEN ARGS " "'A Is less than 100 " ELSE ARGS " "A Is greater than 100" ENDIF
In this example, if the value of A is 900, then the test results in the value FALSE (900 is not less than 100). As a result, the ARGS command following the ELSE statement executes displaying the message:
900 Is greater than 100
When the IF statement completes, execution of the script continues sequentially with the next command following ENDIF.
Writing Shell Scripta 1-24
Using the WHILE Statement
The WHILE command and all its arguments make up a WHILE statement that executes one or more commands as long as the result of a Boolean test is TRUE. The WHILE command has the following format:
WHILE com_1 • • . DO com_2 • • • ENDDO
where com_l specifies a command, program, expression, or Boolean variable you want tested for "truth. " A test of a command or program is TRUE, if the command or program executes successfully (returns an abort severity level of zero), A test of an expression or Boolean variable is TRUE if it results in a TRUE value.
The com_2 argument specifies one or more commands or expressions to execute as long as the result of the test on com_! is TRUE. For example:
I :• 0 WHILE (( "I < 5 )) DO
ARGS (( "I )) i :• i+1
ENDOO
The WHILE statement in this example tests whether the value for the variable i is less than 5. As long as i is less than 5, the ARGS command displays the value of i and the next command adds 1 to its value. Thus, the WHILE statement executes the ARGS command 5 times and produces the following display:
0 1 2 3 4
On the sixth pass, the test results in a FALSE value (5 is not less than 5). As a result, the script leaves the WHILE "loop" and continues execution at the next command in sequence.
You can also use two special commands with the WHILE statement:
• NEXT
• EXIT
The NEXT command returns to the top of the WHILE loop. You normally use the NEXT command to return prematurely to the top
11-25 Writing Shell Scripta
of the loop before executing additional commands. For example, consider the following section from a Shell script:
WHILE ((TRUE)) DO READ -PROMPT "Enter number: " -TYPE INTEGER A
IF (( "A < 50 )) THEN NEXT ENDIF ARGS (( "A ))
END DO
This WHILE loop executes three commands:
• A READ command to read in an integer value.
• An IF command to test whether the value is less than 50.
• An ARGS command to display the value.
If the integer value is greater than 50, the IF statement is FALSE and the next command (ARGS) executes. If the value is less than 50, however, the IF statement is TRUE and the NEXT command executes, returning execution to the top of the WHILE loop. As a result, this section of the script displays any value that is greater than 50.
The EXIT command exits the WHILE loop. You normally use the EXIT command to exit a WHILE loop prematurely before executing additional commands. For example:
WHILE ((TRUE)) DO READ -PROMPT "Enter number: " -TYPE INTEGER A
IF ( ( ·A < 50 )) THEN EXIT END IF ARGS (( "A ))
END DO ARGS "Finished"
The WHILE loop in this example is very similar to the loop in the previous example, except that the IF statement uses the EXIT command instead of NEXT. If the integer value is greater than 50, the IF statement is FALSE, and the command (ARGS) executes. If the value is less than SO, however, the IF statement is TRUE, and the EXIT command executes.
The EXIT command causes execution to exit the WHILE loop and skip to the next command outside the loop (after ENDDO). As a result, this section of the script displays any value that is greater than 50, but exits the loop if you enter a value less than 50.
Writing Shell Scripta 9-28
Using the FOR Statement The FOR command and all its arguments make up a FOR statement that executes commands as long as the result of a Boolean test is true. The FOR command has two formats: one for using integer expressions, and one for using string expressions.
The FOR command used with integer expressions has the following format:
FOR variable := oxp_1 [ TO oxp_2 I [ BY oxp_3 I command ...
ENDFOR
where exp_I, exp_2, and exp_J are all expressions that result in integer values. The exp_l argument specifies the initial integer value assigned to variable.
The command argument specifies one or more commands to execute as long as the test on variable results in a TRUE value. Before each iteration, the FOR statement tests to see if the current variable value is less than the value specified by exp_2. As long as the variable value is less than the value for exp_2, the result is TRUE.
Like the WHILE statement, you can use the FOR statement to execute commands repetitively in a loop. The FOR statement is different, however, because it increments its variable automatically after each iteration. For example, the WHILE and FOR statements in the following example perform the same operation:
#Example using WHILE Statement # A := 0 WHILE ( ( A < • 10 )} DO
ARGS 'A
ENDDO # #
A :• "A + 2
#Example using the FOR atatemant # FOR A :• 0 TO 10 BY 2
ARGS 'A ENDFOR
In this example, both the WHILE loop and the FOR loop execute the ARGS command six times. By default, the FOR statement increments the value of the variable by one after each iteration .
. ---.. Notice, however, that this example uses BY 2 to increment the
9-27 Writing Shell Scripts
variable by two after each iteration. Instead of the FOR loop counting from 0 to 10 by 1, it counts to 10 by 2. The result is:
0 2 4 6 8 1 0
The FOR command used with string expressions has the following format:
FOR variable IN exp [ BY [CHAR] [ WORD I [LINE] J command ...
ENDFOR
where exp specifies a string expression. By default, during each iteration, FOR reads a word from the string and assigns it to variable. You can also direct FOR to read the string by character or line by specifying BY with the appropriate option.
The command argument specifies one or more commands to execute as long as the test on variable results in a TRUE value. Before each iteration, the FOR statement tests to see if any more characters, words, or lines exist (depending on the BY argument specified). As long as a value exists to assign to the variable, the result is TRUE. For example:
EON FOR FILE IN "foo bar zap" BY WORD
ARGS "'The current file le "FILE" END FOR
In this example, with each pass through the FOR loop, FOR assigns the variable FILE a word from the string. When FOR runs out of words, it exits. As a result, the FOR statement in this example displays the following lines then exits:
The current file Ia foo The current file Ia bar The current file ie zap
Writing Shall Scripts t-28
,-�--
Using the SELECT Statement The SELECT command and all its arguments make up a SELECT statement that executes commands according to the results of one or more Boolean tests. The SELECT command has the following format:
SELECT arg 1 [ONEOFIALLOF] CASE arg T TO arg]
commands • • • [ CASE ...
commands • • • 1 [OTHERWISE
commands • • • ] ENDSELECT
where arg_l specifies the argument that SELECT compares to the CASE argument, arg. All arguments are either integers, strings, variables, or expressions.
The Shell uses each CASE statement to perform a separate Boolean test on the initial SELECT argument. If the CASE argument is equal to the SELECT argument, the result of the test is TRUE, and the command following the CASE statement executes. Let's look at a simple example:
� · EON SELECT "A ALLOF
CASE 1 ARGS "First case will execute If A A = 1
CASE (( 2 + 4 )) ARGS "'Second case will execute If "A .., 8"
CASE 6 ARGS "Third case will execute If "A = 6"
ENDSELECT
In this example, the first case tests to see if the variable A equals I, and the second and third cases test to see if A equals 6. The ALLOF statement directs SELECT to execute the commands associated with all cases that result in TRUE. If A is 6, the SELECT statement in this example executes the commands for the second and third case to display the following:
Second case will execute If 6 • 8 Third case will executa If 8 = 8
If you specify ONEOF (the default). SELECT executes only the first case that results in a TRUE value. In the previous example, where A
1-29 Writing Shell Scripts
equals 6, SELECT executes only the second case to display the following:
Second case will execute If 6 = 6
You can also use the NEXT and EXIT commands to control execution within the SELECT statement. For example, when using ONEOF you can use the NEXT statement to direct SELECT to execute another case as shown in the following example:
EON SELECT • A ONE OF
CASE 1 ARGS "First case will execute If A A • 1 " NEXT
CASE (( 2 + 4 )) ARGS "Second case will execute If AA • 6" NEXT
CASE 6 ARGS "Third case will execute If A A • 6"
ENDSELECT
In this example, if variable A equals 6, the second CASE executes. Although this script uses ONEOF, the NEXT command following the second case directs SELECT to execute the next case that's TRUE. Since the third case is TRUE, the script in this example executes the third case.
Using the TO statement, you can specify a range for a case argument. The case in the following script tests for a value in the range of 1 to 10:
EON SELECT "A ALLOF
CASE 1 TO 10 ARGS "Variable A Is the number AA"
ENDS ELECT
You can also use the TO statement to test for a range of string characters. For example:
EON SELECT "A ALLOF
CASE a TO z ARGS "Variable A Is the letter A A"
ENDSELECT
The case in this example tests for a string value between a and z. Note that this range IS case-sensitive, so the case is TRUE for example, if A equals r but not R.
Writing Shell Sortpta
Use the OTHERWISE statement when you want to perform an operation if the test on a case is FALSE. For example:
EON SELECT "A
CASE 0 TO 10 ARGS "Value for A Is a number from 0 to 10"
OTHERWISE ARGS "Value for A is greater than 10" ENDSELECT
In this example, if the value for A is a number between 1 and 10, the case is TRUE. As a result, SELECT displays the following:
Value for A Ia a number from 1 to 10
If the value is a number greater than 1 0 , the case is FALSE, and the command following OTHERWISE executes displaying the following:
Value for A is greater than 10
If you include several cases o n the same line, SELEcr separates each case with an implied OR operator (see the "Logical Operators" section discussed earlier). You can also use the @ character to escape NEWLINE characters and continue an "ORed" case on more than one line. For example:
EON SELECT "A
CASE 1 CASE 3 CASE 5 ARGS "Variable A matches 1 , 3, or 5"
CASE 2 @ CASE 4 @ CASE 8
ARGS "Variable A matches 2, 4, or 6" ENDS ELECT
9-31 Writing Shell Scripta


APPENDIX A
Initial Directory and File Structure
The following illustrations show how the system organizes the software that we supply with your node:
•
•
•
Figure A-1 shows the contents of the node entry directory (I)
Figure A-2 shows the files and directories in the system software directory (tSYS)
Figure A-3 shows the files and directories in the Display Manager directory (ISYSIDM)
• Figure A-4 shows the network management directory (ISYSINET)
A-1 Initial Structures
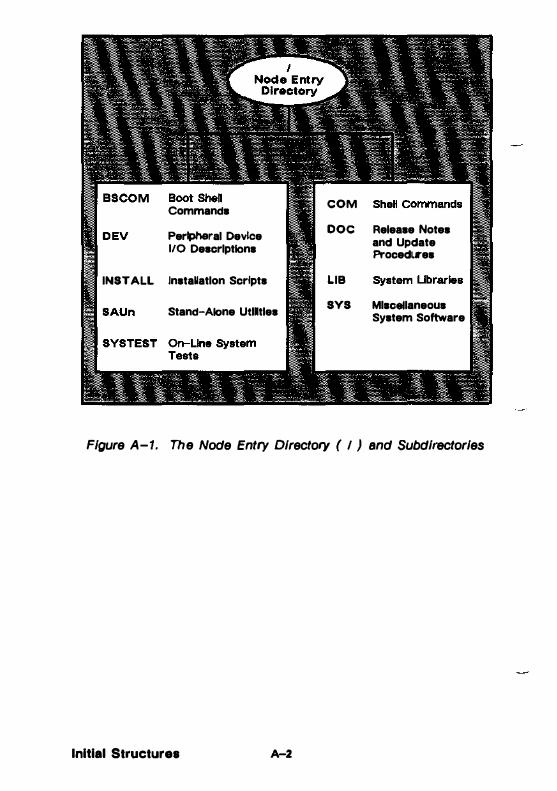
Commands COM
Peripheral Device DOC Release Notes and Update 110 Descriptions Procedl.res
INSTALL Installation Scripts LIB
Stand-Alone Utlltles SYS Miscellaneous System Software
Figure A-1. The Node Entry Directory ( I ) and Subdirectories
Initial Structures A-2
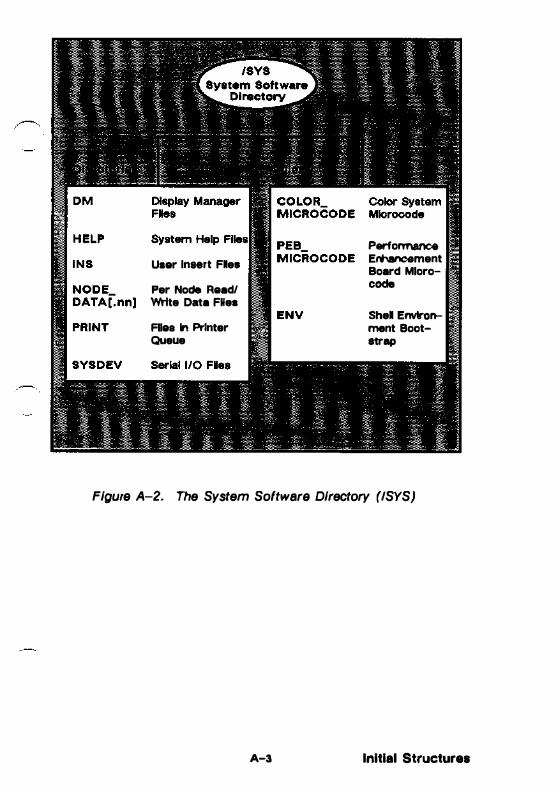
User Insert Flea
Per Node Read! Write Data Flies
Fllea h Printer Queue
Performance Enhancement Board Mloro-•-
Shel E'"""''"" ment Bootstrop
Figure A-2. The System Software Directory (ISYS)
A-3 Initial Structures

Standard Keys
Figure A-3. The Display Manager Directory (ISYSIDM)
Initial Structures A-4
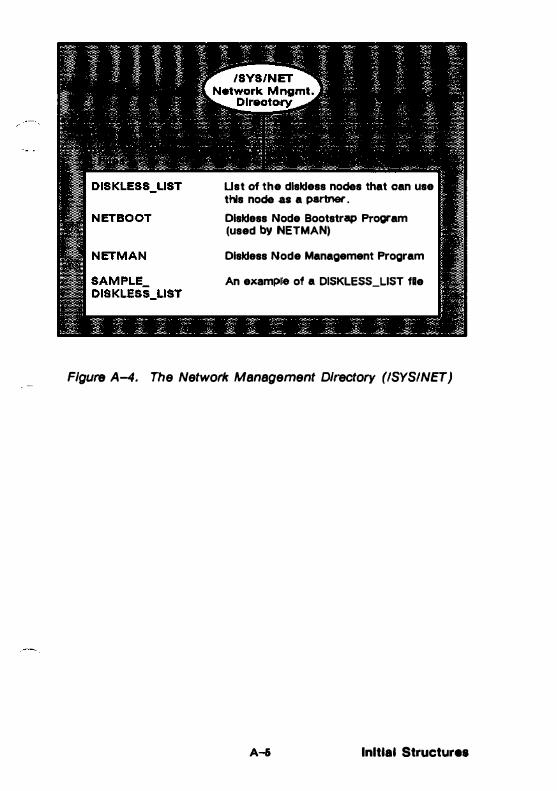
Ust of the diskless nodes that can use this node as a partner.
Diskless Node Bootstrap Program (used by NETMAN)
Diskless Node Management Program
An example of a DISKLESS_LIST fie
Figure A-4. The Network Management Directory (ISYSINET)
A-6 lnltlal Structures

INDEX
The letter f means "'and the following page"; the letters// mean "and the followin& pages.,. Symbols are listed at the beginning of the index.
Symbols
(exclamation point), as sublltltutl.on charaeter 9-6
fl (pouud sip) In DM commands 3-4 In Shell commands �2
$ (dollar u,;n) as Shell command prompt 6-2 in reJillar exprel:lions 5-15
* (pen:ent elp) as pathname wildcard dlaracter
""" u SID wtldcard 8-3, IHlf in regular expresrdona 5-15
& (ampennmd) u input request chuacler 3-4,
>-f6 u Shell pata1ng operator 6-1!1' ( ) (parentheses) u patllllame wildcar4 charaetom
6-18 (( )) (double parenthese1), as
expreulon delimiteD �10 • (asterillk)
as BDACL prompt 8-8 u multiplication operatoJ: 9-tz · as pathname wildeard charactlll'
6=-lSf in reJU}ar expressions 5-16 readinf; palhnames from standard
input 6-14 - (hyphen)
preeediDf; OM conuna.nd options ,_, prec::ediD&: Shell c:ommand options
6-3 � 4ata from standard Input
. . . (elllpsls) as pathname wildcard character
6-37 I (slash) 1-4
be!lnnlng pathnames 1-7 to search forward for text 5-20
(I (diNble sluh) 1-4 in abllolu.te pa1hnamea 1-7 to repeat search forward 5-21
lndex-1
; (senmolon) separatin& OM conunanda 3-4 separatlq; Shell conunands 6-3
< (tellS-than) as compariaon operator 9-14 redlrectiDJ standanl input 6-9
« (double leu-than), redirecting standard input ��
• {equal slgo) as comparison operator 9-14 as pathname wildcard character
6-18 > (greaNr-than)
as com.parllon operator 9-14 redlreeliDa standard output 6--10
» (double patw-than) appending files 7-11 appendinl: standard CN1pll1 6--10
»7 (double JI'Mtel'-than/quenion mark),
appendin& error outpUt 6--10 >? (greater-than/queatl.on marlr.),
redlrec1iD& error ou1pllt 6--10 ? (question mark)
as pathname wtldMld character rtst
in replar �-- $-16 @ (at sign)
U!:ape character in OM commandl 3-4 in Shell commands 6-4
in repllar expnsaions 5-18 J (� brack.ta) as pathna.me wf1dcard character
6'-17 in replar � 5-16
\ (bacblash) beginning pathnamea 1-12 to 1.rch backwards for text 5-20
" (double baeblalhj• to repeat search baQwu41 5- 1
A (care1) as subMitu.tion character 11-4,
,._,, In fl(:tive tumtions 9-20
{ } (brace!il) u pa1hname wlldcard characters IHS in regular expressions 5-19
I (vertieal. bar), as pipe 15-11 � (tilde)
as patlma.!ne Wildcard character 6-17
in regular expressions 5-17 bepmmg pathnames 1-10
A
AA (A�ledp alarm) command +-24
ABORT key 4-6, 4-16 ABRT (ABORT) command 4-19 absolute pathname 1-7, 1-5 Aece��� Control Ust see ACL aeeess d&hu 8-10
du1 names 8-12 denylna 8-4, 8-11 I!XPUNOE 8-6 for backup Illes 8-12 in ACL entries 8-2, 8-4 SI!ARCH IH5 types for cllreetoriell 8-4f types for files 8-4f
ACCOUNT eomponenu; 2-19 defaul1 aeeount (USBR) 2-18 file 2-14 Updatln& 2-19
aeCO'II.llt initial namlnJ; direetory 2-14 initial worldq: directory 2-14 verl1lcalioD at lo&-ID 2-14
ACL (Ace.� Control Ust) 8-lfr ACL (ACCBSS CONTROL_LIST)
c:omm•ncl 8--, eopylna ACLI 8-7 eopyin& initial ACLs 8-11 dlsplaylna ACLI 8-7
ACLo Becelll rl&h•
a44inJ: 8-14 ehan&1nl 8-13 class names 8-12 cleletiq 8-14 for backup lllea 8-12
eommanda for e41.1lnJ; 8-9 clbplaytna 8-7 eclitlnJ; 8-8
entries 8-2 l'ilh1S element 8-2 SID element 8-2f addlna 8-13 deleting 8-15 rulu for speeifYinl: 8-!ilf
initial 8-15f «�mmands for eclitlnJ; and copying 8-17 copyinJ 8-18 eclitina 8-17
man•&lna 8-7 on new rues 7-5 sample display 8-7 ...,._ 8-2
VaJld BCCIWI :rights 8-10 active functions 51--20
assignin& to variables 51--21 ..-, ,_
ruoning in a proc11.111 4-7 """"
rupon41nJ to 4-24 ALL_OROVP paste buffer 4-35 ampersand (&) ru It (amperaanct) AP (Acmowleclp alarm and pop)
4-24 appencHna
directories to -conunancl nareh rules ....
error output to m.. 15-10 ruu 7-51 ltandard outpUt to Illes 15-101
AROS (ARGUMBNTS) conunancl 9-4 ._mu
In DM eommandt 3-3 In Shell c:ommancls 6-3 passiq to Shell tcriptll 51-4ft
ASCH charac:ten1 In nplu --•� HS -��led Nbl)'llltem. status to
uterilt (•) - • (BI1erltlr.) at ttp (0) HI 0 (at tJp) autob.old mode 4-21
B BACK SPACE key 5-7 baetaround proeeuea 6-19
creat:�nt 4-7 baeblath (\) IU \ (badcllnb) badcu.p m. 4-17, 5-26
acceu iip1S 8-12
lndel(-2
BOPP command. 6-111 BON command. 6-111 Boolean valuell
c:ompariq; 9-14 In expreuiollll 9-12 loatcal operationl 9-14!
boo1 &mpt 2-4, 2-10 c:reatinJ proeesses from 4-7 edlt!DJ 2-6 invokJna; CPS c:ommandJ from 4-8 n�ciftc: 2-tO used by DSPI 2-7
boot volume 1-2 sharina: by no4es 1-3
-cllsked no4es 2-4 diskless nodes 2-9
braces ( { }) .ru { } (brace•) """�
for window poup11 4-35 paste see paate buffer undo 5-25
c c:anc:eillDg
Mar®. operatlOIUI 5-211 wlnd.ow gow operation 4-19 window move operatioll 4-19
c:aret e) , •• � (�)) CASB (Ch&Dp Clllll) command. 5-2S c:ase, chan&IDa; 5-25 c:ue c:om.pamon, se111nJ; 5-22 CASE statement 9-211 c:staloglna nod• 1-5 CATF CCATBNATB PI�) command
6-10", 7-11 -CC (CREATB_COPY) COIIlD1IIIld. 4-U CB
7C5_REATE_BDIT) command 4-13,
oh ...... ACL acceu rJFU 1-13 - of letters 5-25 command Mar<:h rules 6-6 ·-9
of direc:tories 7-lll of fila 7-5 of links 7-211
nsming directoty 7-3 process wtnd.ow model 4-21ft 1lzeof � 4-18 woltlnJ cfuec:tory 7-3
CHAR DEL key 5-7 c:haracter class 5-115
lndex-3
characters ASCII control 3-13 ASCII, In reJUlar expressions 5-U c:ontrol key 3-13 delet!DJ fl"l)m p.dJ 5-7 DM function 3-14 eiUi-of-llne 5-U IIO control 6-Bff In regular exprenlorul 5-U Inserting into pads 5-4ff mat�hing with regular expressions
,_,. mouse 3-14 ord.iDit.ry 3-13 pl"l)gram function 3-13 Shell c:ommand line Hmtt 6-4 1pecial Shell 6-6
CHN (CHANOB_NAME) command chanalng directory names 7-18 changing filenames 7-S <:hanging link names 7-29
c:lau ll8.lJle$ 8-12 c:losi.DJ, pads ana wmClOWS 4-6, 4-16 CMO key 3-2 CMOP (COMMAND Fl�) command
2-16, 3-18 -
CMF (COMPARB_FJLB) COIIlD1IIIld. 7-}6
C�-��MPARE_TRBE) eommeDd
-coM d.lree1ory 7-3, 9-3 /COM directory 6-5 command line paraer 6-llff c:ommand parser optloM 6-12 C:Ommand MUCh rilles 6-2, 6-4ft
appendiDJ direetorle1 to 6-6 0- 6-6 default 6-5 dbplayiq; 6-5
w...-DM see DM comm•nd• for c:ha.nglns Shell variable• 9-18 !or c:l011lq; pads arul windowt 4-16 !or eontrolll.nJ edit pad model! 5-2 for c:ontroWnr; window JI'OUPJI 4-211 for eontroWna wtnd.oW !cOilS 4-211 for eopylq; text 5-10 for creatiDJ; pads and windOIW
4-10 !o� creatlnr; proc:esses 4-5 for cuUID& text 5-10 for cUJ.stin& Shell variable• 51-18 for dsletlq text from pads .s-6 for edllillJ ACU 1-11 for <��ditin& and c:opyiDJ Initial ACLs

for insertiq charaeten� into pad!! ,_,
for managlna ACLs 8-7 for managtna direetoties 7-17 for managlna rues 7-4 for managin& linltt 7-27 for mana&in& windows 4-17 for tnovint; the eursor 4-2! for tn� pad!! under wiDdows
... , for pastlnJ text 5-10 for searehing for text 5-20 for •ettln& dim::torlu 7-2 for subsUtutina: text 5-23 for verifyinJ: SbeU variables 9-18 SheD see Shell eommand.!! undoin& 5-25
COII1111entll in DM conunand Kriptll 3-4 lD Shell Krlptll 9-2
�-ASCII files 7-1ti Boolean vatu.. 9-14 directory trees 7-22
eomparlson operators 9-14 eoml'fentll, in Shell eommand line eoneatenatln& strtnp 9-13 eondltlonal statementll 9-22
types 9-23 eontlnuiliJ, Shell �ancb � eontrol eharact.n 6-8ff eontrol kay seqllCII.cel
,..,..,... ,_, to invoke DM e� 3-3.
3-9ft eon-tloDB
for DM eommancb 3-3 for Iliiiiilna; key� 3-llff for Shell eommand lines 6-3f
COPY key 3-11 ,.,...
ACLs 1-15 dim::tory treel 7-19 dilpia)' ilnaps to files 5-12, 7-15 mu 7-ti Initial ACLI 1-11 """' ,_,. pads and windows 4-14f wrt from pads 5-11
CP �TB_PROCESS) CODUDand CPB (COPY PASTB_BUPPBR) ..........- ..... CPF (COPY_F'ILB) CODlDliUld 7-6
CPL (COPY _UNIC.) eommand eopyin& linb 7-30 replaelng linb 7-30
CPO (CREATE PROCBSS_ONLY) eomsnarr.d 4--.,
CPS (CREATE SBRVBR_PROCESS) command ._7
CPSCR (COPY _SCREEN) eotnJUnd 7-15
CPT (COPV_TRBB) e� copying trees 7-19 tner&lna trees 7-22 replaelq tree11 7-20f
CRD (CRBATE_DIRBCTORY} command 7-17 creating
directories 7-17f edit pads and windows 4-13 filelll 7-4 lcou 4-32 links 7'-27f n.w tue. 4-13 - 4-9ft pasta buffers 5-10 ... � ....
l'lliiii1nJ the Shell 4-6 without pads and windows 4-7 wttb pads and windowlll 4-51
proteehld subsystems 8-21 server pro;enn 4-7 Shell IICriptll 9-2f Shellll ti-tif subordinate Shellll H window aroupa 4-29 - 4-9ft
CRL (CRBATE_LINK) COD!Dland creatina: links 7-27 redefining links 7-28
CRSUBS (CREATE SUBSYSTEM) eOIIIII18Jid 8-21. -
lndax-4
CSR (COMMAND_SBARCH_RULBS) cotmnand 6-51
CT=;n�CATALOO_NODE) c 1-5
CTRUA by 4-23 CTRUB key 4-2ti CTRUE key 5-13 CTRUO by 4-18 CTRUM by 4-14, 5-13 CTRUN by 4-6, 4-1ti CTRUO key 5-14 CTRLIP key 4-21 CI'RUQ key 4-8 CTRUR key 5-2J CTRUS by 4-23
CTRUT key 4-26 CTRUU key 5-21 CTRLIW k')' 4-19 CTRUX key 4-19, 5-211 CTRLIY key 4-16, 5-26, 7-4 CTRLJZ key 4-6, 5-16, 6-14
savlnJ EDACL daanges 8-9 ·-
controlll.nf; movement 4-2f definln& di!lplay poinD 3--2, 3-S
CUT key l-11, 5-13 cuttlq, text frorn pads 5-U CV (CREATE VIBW) conunan4
r9f, +-t.f"
D DATB command 6-2, 9-20 DC (DBBUO_CONTINUE) �
4-0 debuutn&, Shell acripts �9 ··-
access fi&hts 8-6 account (USBR) ACLs 8-lSf command aearoh rules 6-S Icon politl.on and offset 4-33 ico111 4-32 pallte buffer 5-10
wrltln& text to 5-8 window pcmuons 4-24
,.._ a ra,nae of text in pads 5-Bf dilplay points and repons 3-Sf'f u,. 3-14ff
at start-up 2-4, 2-10, r1o from wllbin a program. 3-14,
3-17 to pron�.pt for input r16
Sholl envtronment 6-7 Yarlablel 9-U varlablel, interactively 9-19f
deleting ACL
accns riJhts 8-14 tntrla 8-15
cbaraeten froa1 padl 5-7 directory ue• 7-25 edit pads and Wldows 4-16 tntrlea froa1 window arou"" +-30 rues 7-15 k'Y defiD!tions 3-17 1illll of teet from padl H IJnb 7-31
NBWUNB chuacterl from padl 5-7
pute buffetS 5-10 rea4-onl.y pads and windOWS 4-16 text from pad& 5-Ciff, 5-U -... .... words froa1 padll 5-7
delil'Dtterl, for DM eomrnand lines 3-3 deriYed--DUillo, in padmarne wl1ckarU
6-18 /DBV /NUlL 6-19 directories
lndex-5
/COM 6-S /SYS 1--4 a�dlng 1o cornrnand search rules
colllJllal1ds for manqlo& 7-17 com.parin& 7-22ff copyln& trees 7-19 creatln& 7-171 deletina trees 7-25 dlsplaylna information 7-241 BXPUNOB riJhta 8-6 for personal commandl �3 Initial ACLI &-151 lnltial ll1:rllC1Uft: A-Iff lot-in horne 2-14 rnana.J!Da 7-16ff rnerJinl 7-22 I1lll!lin.& 1-10
chan&ina 7-3 setting 7-3
ne1Work root 1--41 node entry 1--41 JNUel11 1-12 protectin& 8-lff queue 7-10 ruaminJ; 7-11 replacln& ue• 7-201 SEARCH ri&hts 8-6 tit8 repstry 2-19 uppv-level 1--4 Ylllid &CGUI riJhts 8-10 workln& 1-9, 7-2 chaDt;iD& '7-3
lettlnf; 7-2 -coM 6-S, 7-3, �3
directory "" '7-19 disked ncKt. 1-3
'NODB_DATA 2-S u network partner 2-9 ...... ,_. IIWt-ujl 2-2ft
disklen Ust 2-9
diskl.ea node 1-3 'NODB_DATA 2-10 - >-1ft
Dbol&y Mon..., (DM) 1-3, ,._., �10, 3-11'1
dilllpla)' controlliq with OM eommanU
3-2!1 copybq: � to files 5-ll deflniq; points 3-2, 3-Stf deflDln& teJioDll 3-2, )-$ft drawin& initial wmdowl l--6 prlntinJ bnapl 5-12, 1-S
dlsplaytna; ACLI 8-7 command search ruin 6-S c:urrent namiD& directory 7-3 CUIRD.t workinJ: directory 7-2 direct<ny Information 7-24f me aurlbuta 7-14 key dellnitlODs 3-17 llDk resolu11on name. 7-21 namlnt: directory 7-3 window aroup memben 4-34
DLDUPL (DBLBTB_DUPUCATB LINES)
eommand 6-11 -DLP (DBL8TB_FlLB) command.
1�. 7-U DlL (DBlErE_LINK} I:OIIUDand
7-31 DLT (DBLBTB_TRBB) command
1-25 DLVAR (DELBTB_VAR) cmnmaud
>-18 OM see Dlllplay Manager OM commandll
AA (Ac1mowledp alarm) 4-24 ABRT (ABORT) 4-lSI AP (Aeltaowt.dp alanu and pop) .._,. CASE (Chan&e cue) 5-25 CC (CRBATB_COPY) 4-U CE (CREA.TB_BDIT) 4-U, 7-4 CMDP (COMMANO_FILB) 3-18 connntiom 3-3 CP (CRBATB_PROCBSS) 4-S �,iCOPY_PASTB_BlJFFBR)
CPO (CREATE PROCESS ONLY) +-1 - -
CPS (�TB_SERVBR_PROCBSS)
cr..�FTB_VIBW) )-10, DC (DBBUO_CONTINUB) 4-11
lndex-4
DQ (DEBUO_QUIT) 4-1 DR 3-8, 4-U OS (DBBUO_SUSPBND) 4-SI ��Delete character at cursor) Ej_� dlaracter befON cursor) BE1' (I1111ert end-of-tile) J-6 EI (Set iDsen/oventrlke mode) <-'22 , 5-4 EN (1nHrt NBWUNE) 5-S ES (Inlert atriq) 5-5 exeeutln& from OM sc:rlpu 2-16,
3-llf exewtfnt; from SheD ICripUI !1--8 format 3-3 ICON +-32 IDP 0CON_DBPAULT) 4-33 KD (KBY_DBPINITION) 3-14 PB (PAD_BOTTOM) 4-2S PN (PAD_NAMB) 4-28 PP (PAD_PAOB) 4-26 prompt 3-2 PT (PAD_TOP) 4-2! PV (PAD_UNB) 4-2? PW (PAD_ WRITB) 5-26 R��Set rw.d/write mode) 4-14, S (SUBSTITUTB) 5-23 SC (SBT_CASB) J-U, 5-22 SO (SUBSTITUTB_ONCB) 5-:U spedal eharaeten 3-4 speclf)in& inten.etlvely 3-2f UNDO (Undo prevtous eommand(s)) 3-2! uatn& 3-2ff Wt_g'INDOW_AUTOHOLD)
WC {WINDOW_CLOSB) 4-16 WD (WINDOW_DBFAULT) 4-24 W���
{WINDOW_GROW_BCHO)
WGRA (WINDOW_GROUP_ADD) .._,.
WORR (WINDOW_OROUP_RBMOVB)
4-30 WH (WINDOW_HOI.D) 4-23 �INDOW_INVISIBLB) WMB (WINDOW_MOVB_BCHO)
+-to WP (WINDOW_POP) 4-20 WS (WINDOW _SCROlL) 4-22 XC (Copy text) �11 XD (Cu1 (delete) NXI) 5-13 XI (Cop)' portion ol display) ,_12
XP (Put8 tcld) 5-U DM seripg 3-t8f
-utln& 3-l IW1-up Z...t6
de1lnin& default windoW pollitlons 4--24 � window boundaries
doUar ld&D ($) u. • (doUar alp) DOMAIN riD& network 1-l DOMAlN Scrvot Proc01101 1ee DSP DOMAIN System 1-1 ff at to,..m 2-12
at '�tart-up 2-lft DQ (DBBUO_QVIT) oomman4 4-1 DRooaunand 3-1, 4-U' OS �BBUO_SUSPBND) oOJDmand DSP (DOMAIN Server Proo..-or) 2-4 logiDa into 2-Hl
E ED � oharaoter at ounoc) oormi1and. 5-7 ED (EDIT) oomm&Dd 9-7 EDACL (BDIT_ACCBSS CONTROL_LIST)
OODilnand. 8-""'7f a.ddln& aooeu fi&hts 8-14 addlq ACL entrles 8-13 chaqiD& acun rf&hts 8-13 deletln& acoeu rl&hts 8-14 deletiq; ACL omtrie1 8-1$ edit OOIIIID&IJda 8-8 operation modes 1-8
BDFONT (EDIT FONT) program 3-17, 4-32 -
EDIT key 3-16, 4-13, 7-4 edit modes 5-3 edit pads
deMtlDJ 4-16 ....... 5-2 savlnJ oontentll or 4-16 winclow lqmd 5-2
...... ACI.o 11-S ma 4-13 initial ACU 1-17 � .. 5-tff
Be (Delete character befon oursor) _ ,_,
EEF' (lnlett en6-oHUe) CIOD!mUI.d 5-6 Bl (Set m.ertloventdU !llOibl) oommand. 4-22, 5-4
lndex-7
ellipldJ ( . .. ), as pallmame wiklcard character 6-17
BN (ln��m: NBWUNB) OOlDDWld 5-5 encl-of-flk muk. � Into pack
,_. end-of-line character, matobl.nl 5-15 eDiarliDJ; wlndowli 4-ta BNSUBS (BNT�SYSTBM)
command &-22 entry clkectory 1-41
beg!Imb:J.J pathnames t-7 environment variable� !J-19 BOPP COlrllbltiU1 !l-17 EON comiD.a!ld. 9-17 equal tiaD (•) 1ft .. (equal alp) error input H
-In readiD& query responMS 6-13
ezror outpu.t 6-8. 6-10 appendbta 10 me. 6-10 di!lpla}'inJ query opdOP 6-13 nodireo:tln& 6-10
ES (lnlett 11rinl} oommand. 5-5 escape character (0) in DM oomm•ndl �
In Shell eomtnalldl 6-4 exclamation � (1), u IUbldtutkm
character 9-6 EXISTVAR �ST VARIABLB) oOJDm&Ad 9-18 -EXIT comm.and !I-2J, 9-30 EXIT key 4-16 EXPORT oOimllalld 9-181 ...........
clellmltml 9-10 eval�atln& 9-10, !1-17 in Shell acripg 9-10ft operandi 9-12ff operatotl 9-11 reaulM 5-14
dta:racteni \Uied. in 5-tS EXPUNOB aoceu rl&hts 1-6
F
Pt key 5-6 P6 key 5-7 '"''' ,_. m.o
aw-ndlnJ 7-9 appendlnr; ttandard output 10 6-tOf .. � Input 6-JJ ASCit, compa.rlna 7-16 IU6W21D.I! � �� statui
.,- .... ,
backup 4-1, 5-26 ac"'s rl&hts 1-12
boot Kript z..-s, 2-10 COIDlllalldJ lor man•Jina 7-4 eomparill& 7-16 eopym,; 1-6 eopyiDa; diaplay lo 7-u CHatint; 4-13, 7-4 del•linl 7-15 diaplayina attribute$ 7-14 editint; 4-13 in J)f019eted ..m.y.t91DJ 8-19 initial ACLe 7-S iDltial ltlll.eture A-Iff manqlna 7-4ft' movbl& 7-1 - 6-14 prlntiDj 7-51
in llltefaetlve mod9 7-9 on othft oo4es 7-10 �f�t menu interface
pto\eetq l-1tr fM.dlD& patbames lro.m 6-14 rmamfDa 7-S � 7-7 AviD& 4-16, 7-4 tavbl& uu.edpc pads in 4-21 Sh.u -.nd 6-2 -
Sholl ... , OM 2-16
valld ace- ri&hlll 11-10 � Shell command output to wr:ltiDj Shell emn: output to 6-tO
filtenl 6-11 FMT (FORMAT_ TEXT) -.nd
6-10 font editor (BDFONT) see BDFONT FOR llommaDd 9-371 FOR ltatemllnt 9-27f fonnau
for DM llOID.ID.andl �3 for Shell llODUDaDd 1111-. 6-3
funlltlon 0,. ........... ..... to Invoke OM command� 3-3,
...... to Invoke DM llO!IliiWlds
Q
H here dollum9u.t H HOLD II:9J �17 bold mode 4-21, 4-23 home cUreetory 3-14
llhaD&iD& at Joa-ln 2-19 hyphea (-) #N- (hypheu.)
I/O control eharactenl 6-8ft ICON llOiniDUd 4-32 ICON_OROUP pute lNffw 4-U ieOD.ll 4-21tr ChanJina into � 4-32
llODtroJliDa 4-31ft' � 4-32 defaultll 4-32 group pute buffer 4-35 settln.l deflwlt position and offset ._,
IDF QCON_DEFAULT) llOII1II1aDd. .....
JF C01D.maD.d 9-24 IF statement 51-22, 9-24 In-line data, in Shell Krlpts 51-71 initial ACL. ,.. ACLI initial namiD& c�Uectory, at lo,....U.. 2-14 Initial worJdn& dircctoey, at lo,....U..
2-14 !NUB (INITIAUZB_UBRARY)
command 6-S INS ll:ey S-4 INS MODB key S-4 imlert mode 4-211, S-4 ........ blank llnel into pa48 5-6 character� into pads S-4tr end-of-file mark into pads J-6 NBWUNB c:harallten Into pachl
...,, ID.tepn, in exprnatons 9-12 intenu:tl.ve, � for �
OM eOIIIDlallds 3-2 internal Shell llOIIIID.IUI4I 6-S INVIS OROUP ,_. butrer 4-33 invokili&
.........
DMcommaadll uln.l llO!ltrol by tequeru:N ,_,, ...., UIIDJ ftmetlon key. �,. �9ft
..... ...., ............ ..... ...
K
KD (KEY _DBPINITION) command ,_,.
key deftniti.ODB deletln& 3-!7 ditplayin& 3-17 �dd!DJ key defiDlttons In 3-15
·-...
keynam.. 3-12 alart-Up deflzll.tiou 2--4,
2--10, 3-10 ......,....,.
key n- s-12 1tart-up lhftnlllou 2--4,
l--10, 3-10 ,.,.
ABORT -4-6, 4-16 BACK SPACB �7 CHAR DBL 5-7 CMD l-2 «mtrollinJ; from within a progtaJD
>-17 COP¥ 3-11 C'fRUA 4-23 CTRUB 4-26 CTRLIB 5-lS CTRUO 4-11 CTRLIM 4-14, 5-3 CTRUN 4-6, 4-1111 CTRUO 5-14 CTRUP 4-21 CTlUJQ 4-1 CTIU.Ilt 5-21 CTRUS 4-23 CTlUJT 4-215 C'rRLIU 5-21 CTRUW 4-19 CTRUX 4-19, 5-21f CfRUY 4-16, 5-26, 7-4 CTRUZ 4-6, 5-6, 6-14
.. vlnf; EDACL chaqel 8-51 CUT 3-11, 5-lS deftD1q 3-l·Uf
at 1oc-ln 2-16 at atart-up 2--4, 2-10, 3-10 from wl.tlilil • propam 3-14,
>-17 to prompt for input 3-16
deletiD& deflnltim!• 3-17 BDIT 5-lfi, 4-13, 1-4 omWdecl deftJI.ltlOU 3-1!1 BXIT 4-Ui PI s-6 F6 5-7 P7 ....
lndex-1
for suollinJ padl 4-27 OROW 4-11 HOlD 3-17 INS 5-4 INS MODB 5-4 MARK 3-!1, 4-lS MOVE 4-19 namiDI CIOD.veD.tlons 3-llff PASTE 5-14 POP 4-21 READ 3-16, 4-14 RETURN 3-2, 5-S SAVE 5-26 SIII!U. 6-6 SHIFT 3-11
with pad. acron keY' 4-27 lblfte4 name 3-11 to perfonn DM flmctlom 3-9ft UNDO s-:u up-u&Mltlon name 3-11
L
L (LOGIN) COliiJIW14 2-14 LD (UST_DIRBCTORY) eOIIUD8Il4 �wn' cl.ltectory infonoatlon
diJplaylDa file attribUtes 7:-14 dlsplaYln& llDk retOlution names
7-211 -in Shell aerlpt 9-2
less-than ( < ) 8U < (lep-than) llnb
eommands for managlna; 7-27 copylnJ; 7-30 creaful& 7-27 deletiDJ 7-31 manq!Da 7-26ff redeflniDI 7-281 renlliiliD& 7-29 replacln& 7-30 raolutlon namee, dltplayiDa 7-28
loa-tn home dinlctory 2-14 loa-m ltart-up Kript 2-14
creatln& 2-141 Cf'Ut!D& Shell �... 4-6 loeatlolul 2-141
!,.-In .xeeut!DJ DM command� 2-16 faUuR 2-14 ptherlD& SID iDiormatlon 8-2 sequeD.CI 2-12tf
loJ&I.nl ln u USBR 2-11 bulc proceduni 2-17

ellanglna home dlreetory 2-1!1 e� pauwcrnt 2-111 to a OSP 2-1!1
loJI.eal operaton !l-14f LVAR (UST VARIABLES) eommarul
9-18 -
M ma.llbox •erver see MBX_Hiq.PER MARK key 3-!1, 4-IS mar:Jdnt; a r811J41 of text in pads 5-81 malhematiea.l operaton !1-121 MBX_HBLPBR (mailbmc server) +-8 mer&lnJ, directory !rea 7-22 mess.,..
rue not fOUDd +-t• requnc 10 qu.ll .&t +-16 R�W:hlq tor text 5-21 llllbltltule In JllO&nllll 5-23
Mnemonie Debuapr (MD) 2--4, 2-!1 modu
edit 5-3 for edit � ,_2 for Jlf'OCHS w1ndotvs +-21 ...... ,_. ,_ ,_. rea4-only 5-3 readlwria. 5-3
mouse, delaul.t flmc11on keys 3-10 MOVB key +-1!1 = ....
around the nunlnj: tree 7-2 � 4-2f - ,_, pUs undeT wirulo\lrs +-25ff to bottom of pad +-25f to flrst ellaracter in pad +-26 10 last ehuaeter in pad -4--26 td top of pad -4--251 windoWI 4-1!1
MVP (MOVB_PILB) comman4 'HI
N nam• tile 6-14 J1BDiiDf directory 1-10
at lo� 2-14 chPl&lnl; 7-5 dlllplayiD.J ,_, aetUnr; 7-3
lndex-10
Namina Server Helper (NS_HBLP£!R) ,_,-
na.miD& tree 1-3ft moYiq aroUIId 7-2 search tor Shell cmntnallda 6-4
NO (NAMING DIRECTORY) command 'r-3
NBTBOOT 2-!11 NBTMAN 2-5
etutlnj 'NODB_DATA 2-10 aut'lnl dlskleu llart-up 2-!1
network partner u boot volume 1-3 .... 2-0
network root dlroctozy 1-41 In abaorute pathnames 1-7
network, rinc 1-2 NBWUNB charaeter
deletlnt; from pads 5-7 lii.Hrtlnj Into pads 5-51
NEXT commllll.d !1-25, 9-30 'NODB_DATA
on disked nodes 2-5 011. diskless nodes 2-10
'NODE DATA/PASTE B1JPi>BRS IDBI'AULT.OMF ,_12
'NOOB.Jl'ATA/STARTUP, creatlii.J proeeAa from +-7 node entry direetory 1-41
bqinnina patlmamelll 1-7 Initial content� A-2
..... boot seript files 2-5, 2-10 eataloalnl; 1-s dilbd. 1-3 dllli:ed start-up 2-2ff dlJii:leu 1-3 dlsklen stan-up 2-7ff 10s 2-!1 in DOMAIN system 1-1 -- ,_. powerJn& on 2-4, 2-!1
NS_HBLPBR 1-5
0 objeetll 1-1
cn:pnizatlon 1-3 ptotec:tlii.J 8-lff
ofhet, fen: ieoD. posi.tloml +-33 ONBOF Matement 9-291 operands, in expresMns !1-12
operatlnJ system -... ,_.
on diskless node 2-9 components 1-3 loading aerou the network 2-�f
operators comparilon 9-14 In expreAio!lll 9-11 loi!cal 9-14f mathematlcal. 9-12f pan;inj; 6-U ptee«lence 9-11f •trins 9-13
.,.._ command. pPHr 6-12 In OM cOIIIID&Ildl 3-3 in Shell u>UIDWlcb 6-3
overstrike mode 4-21, 5-4
p PAD_$DEF__I>FK call 3-14, 3-17 PAD_$DM_CMD call 3-17 , ...
cloainJ 4-16 copyin& 4-14 copylnJ text 5--11 creatlnJ 4-�IJ deflnlnJ; a ranp of text In �f odl.
lnsertin& blank lines Into !--6 creatlnJ; 4-13 cuttinJ text from !--13 deletlnJ; characters from 5-7 deleting lines of text from !--8 deleting NEWUNB characters
from !--7 deleting text from 5-6ff deleting wordl!l from 5-7 lmertin& chatacters Into !-41J insertin& end-of-me mart. into
,_, lnsertln& NEWUNB characters Into �$1 lnserlln& text miD& into 5-5
...... ,_, .,..... ,_. pastin& text Into !-13f .ublltl.tutlnJ; text In !--22 window lepnd s-2
editing s-tff movin& to bottom of 4-251 movln& to first charMter 4-26 movlnJ; to lut character 4--26
lndex-11
movln& to top or 4-251 moving under wiD.dOWII +-25ff �s lnput 6-8 proceu output 6-8 read-only 4-14 savlnJ: transcript In a tile 4-28 suollin&
horlzontally +-271 'IClll.cally by line• 4-27 vertically by paJCII 4-26
HUChiof; for text In 5-20ff Shell Input 6-2 speclfyina text panerns lD. !--14
parent � 1-12 parenthelu ( ) , u pathname wllcWel'd
characters 6--11 parser options 6-12 Pattin& operators 6-19, �3 partner node 2-9f pas�ir &rJU111Cntl to Shell scrlptl
pa.ssword challjii1J at loa-J.n 2-18 entering atloa-J.n 2-14
paste buften copyin& text Into 5-11, !--13 creatiq; !--10 default, wrltln& text to !--7 detetln& s-10 for icon .,OUP' 4-SS for windoW poupa 4-35 putlna contenlll Into pads !-13f
PASTE key 5-14 pastlnJ, text Into pads s-ur ..........
at.otute t-7, 7-5 be&irlnin& at nemln& �tory 1-10 beJbmin& at network root dlreC1ofY
1-7 bogbmin& at node entry directory
f-7 � beJf1minr; at parent dfnlctory· 1-12 beJbmlDI at wort.ln& directory t-9 readiq; from files 6-14 readiD& from ataDdard input 6-14 .,..,.,. ,_, to tderltlfy obJect� t-srr wildcarda 6-15ft
PB (PAD_80'l'TOM) commua4 4-25 petcUit siJD (,.) 6U 'Jfl (puc1111t alp) pipeUnes 6-11 plpea 6-11 PN (PAD_NAMB) command 4-28 point pair 4-10
points deflniD& 3-2fl' prti:edlnJ OM c:omma.n41 3-3
POP command 4-21 pound lipl character (I) su I (pound sign) power on
to stan up nocle 2-4, 2-!1 PP (PAD_PAOE) o:ommand 4-26 predefined function keys 3-!lf PRf-_�-PJLB) ·c:ommand 6-14,
PRPD (PRINT PILE_DIALOO) c:ommand. f-11
print menu interl'ac:e 7-llfr pl'int server (PRSVR) 2-5 PRINT_SERVER see PRSVR 7-!1 pl'intlng
display imqes 5-12, 7-15 f"lles 7-9
In Interactive mode 7-!1 on other nod.M 7-10
� flfrlnt menu interface
p[(K:en window lep:a.d 4-22 pl'(IC811SeB
bac:kJround 6-19 c:loslnJ: pads 4-6 dosin& Wiiu1cnn 4-6 c:reattna 4-4
at loJ-In 2-1St with pads and windowa 4--St without pads and windowlJ 4-7
interrupting execution of 4-9 namiq; directory chanPig 7-3
displaying 7-3 passing data 6-8 retllmint; 4-!1 runntq the Shell +-6
HI'Vel'l 4-4 Shell 6-2
«ea1in& 6-6f SID 8-3, 8-9 ........ ....... 6-M 11opplns: 4-lf
with CfRUZ 5-6 suspendlnJ; 4-9 ttanJgipt paclJ 6-8 winclow lepnd 4-22 window mo4es 4-21 worklnr; directol')'
dla.n&fn& 7-3 displaying 7-2
Programmable Read-Only Memory see PROM
programs u �tected. IIUbiiJIItem ma.naaers
8-19 EDFONT 4-32 Input and output 6-a � In bar:k&round. proee!lse��
6-19 ,_ .... Sholl
treatfna 6--6 PROM (Prosranunable Read-Only
Memocy) 2-4, 2-!1 pl'(lmpts
for c:han&J.nt; home directocy 2-t!l for DM c:OJDmallda; 3-2 Edit file: 4-13 tor c:ontlnulnJ SheU commands 6-4 for EDACL 11-1 lor Shell c:ommands 6-2 for variable anipm.ent lnput !1-20 In key detinl.tlons 3--16
protected. IIUbiiVllteml 8--19 ual.&nlnl: staru. to rues 8-22 c:ontrolllnt: a""eu to flies 8-20 ereatlng 8-21 enterint; 8-22
pl'(ltectfn&. rues and d.lrectoria s-ur PRSVR (PRJNT_SERVER) 7-9 PRSVR see print Mrver PT (PAD_TOP) c:ommand. 4-2.f pushlnt; and popl'lnl windows 4-20 PV (PAD_LINB) c:omJilaDd. 4-27 PW (PAD_ WRITE) c:ommand 5-26
Q
query options 6-13 quulion mark (?) ue ? (question
-•> queuea, print ?-9 quoted llrlnp !1-7
R READ command !1-19 READ by 3--Hi, 4-14 read-only mode 5-3 red-only pads 4-14
lielctlnJ: +-16
lndex--12
read-only wind.ows 4-14 read/write mode 5-3 READC command 9-20 READLN command. 9-20 redefining, links 7-28f redireetln&
error OQtpv.t 6-10 output to Shell eommandll 6-11 atanclard input 6-8, 9-8 standard output 6-10
ndue� strings 9-13 rCgiOJI.S
definiDj 3-SfJ precediDJ OM commands 3-3
regular expressionJ 5-14 characters used in 5-U
remov111J, omlrle• from window JWU.pl 4-30
renaming directories 7-18 rues 7-5 links 7-2!1
repeatln&, 1earch operation 5-21 replaeJ.na
all occunence�� of a atrlnJ; 5-23 dkectory treea 7-ZOf fllu 7-7 ftnt occunence of a 1tr1q 5-24 l1nb 7-30 text in pada 5-22
reslliDinJ, proc:eBIIClll 4-!1 RETURN key 3-:Z, 5-5 RO (Set readfwrite mode) command
4-14, 5-3 root directory 1--4f
In abeolute patlmamu 1-7 Nbbarba.nd 4-18 -
for asslpl.nJ; variable� !1-16 for Shell command search 6-2 for ipeCifYinl ACL entries 8-!11
running, propam8 In backpound processes F1!1
s S (SUBSTITUTE) command 5-23 SAVE key 5-26 u""'
contents of an editpad. 4-16 EDACL eha.Jlps 8-9 rues 7-4 Shell command OQ1put 6-8 tran!crl.pt padJ 4-28
lndeox-13
SC (SBT_CASI!) command 5-15, ,_, screen coordinates 3-7 scripts
boot 2-4, 2-10 DM
command 3-181 executlnJ; 3-2 lncludin& �ts 3-4 !tart-Up 2-16, 3-18
execut!nJ at loJ-in 2-12 Iorin 1tart-up 2-14, 4-6 Shell see Shell KrlptJ
S<;:IOil mode 4-2lf !l(:fO!linJ
keys 4-27 ""
horizontally 4-27f vertically by line• 4-27 vertically by paJCI 4-26
SEARCH &eceiiS rights &-6 searchiq:
cancelliii& operation 5-211 entire pad 5-21 for Shell commanda 6--4 for text in padll 5-20ff repeatfna; operation 5-21
secuziDa accounts 2-18 SBLBCT "ommand 9-2M SELECT statement 9-2M semieolon (;) ,. ; (Hmieolon) Server Proua• MaDapr see SPM server proc:euu, cnatiDJ 4-7 server prOIJamt 4--4 H-0
.-. ... , MBX_HELPER 4-8 DIUIIinl 1-5 NETMAN ,_, pr0ce11• manaaer 2-4, 2-10 PRSVR (PIUNT_5ERVER) 2-S,
,_. starting from boot Krlpt 2-5
settina default leon polltion and offset
,_, ln.l.tlal Shell .n¥1ro:nment 6-7 insert/D'mltrike mo4n 5-4 namln& directory 7-3 read/write mode• 5-3 worldn& c11Nctol1' 7-2
SH (SHELL) command 6-6, 9-!1, ,_,,
Shell 1-3, 6-1ff creatlnJ 6-6f

creatin& proceu 4-6 creation atlo,...m 2-Uf Input pad 6-2 invokiDJ 6-6f parsing operatOlll 9-3 setttn& up initial environment 6-7 start-up files 6-7 subordinate, ereatlna; 6-6
Shell commands 6-2ff ACL (ACCESS_ CONTROL UST)
8-7 -
eopyinr; ACU 11-7 cop)'lnf; initial ACU 1-7 dbpkyiDJ ACLs !-7
ARGS (ARGUMENTS) 9-4 as filters 6-11 BOPP 6-1!1 BON 6-1!1 CATF (CATBNATB FILE)
6-10, 7-9 -
chal'uter limit 6-4 CHN (CHANOB_NAMB)
rmamiDa fl1u 7-5 renamiDa; dlnu:torl• 7-18 re:namina; llnb 7-29
CMF (COMPARB_FJLB) 7-16 CMT (COMPARB_TRBB) 7-22 COiltinulDJ OD. next line 6--4 controlllq
input and CNtput Hf querl .. 6-12
CPF (COPY_FILB) 7-6 CPL (COPY_UNK) 7-30 CPSCR (COPY_SCRBBN) 7-15 CPT (COPY_TRBB) 7-19ft �JCREATB_DIRBCTORY) CRL (CREATB_LINK) 7-27f CRSUBS (CREATE SUBSYSTBM)
8-21 -
CSR (�'t1
MAND_SBARCH_RULBS)
DATE 6-2, 9-20 DLDUPL (0
6-�B_DUPI.JCATB_UNBS)
DLF (DBLBTB_FILB) 7-U DLL (DBLETB_UNK) 7-31 DLT (DELETB_TRBB) 7-25 DLVAR (DE!LBTB_VAR) !H8 ED (EDIT) 9-7 EDACL (�.P,:-ACCESS_CONTROL_UST)
ENSUBS (ENTER SUBSYSTEM) 8-22 -
entering 6-2 BOFF 9-17 EON 9-17 BXISTV AR (EXIST V ARIABLB)
9-18 -
EXIT 9-25, 9-30 EXPORT 9-18f FMT (FORMAT_TBXT) 6-10 FOR 9-27f format 6-3 fF 9-24 in active functions 9-20f ln Shoill scripts 9-lff INUB 0NITIAUZB UBRARY) .__, -illtomal 6-5 LD (UST DIRECTORY) 7-14,
7-"24, 'T-21 LVAR (UST_VARIABLBS) !1--18 MVF (MOVB_FILB) 7-1 ND (NAMINO_DJRBCI'ORY) 7-3 NEXT !1--2$, !1--30 PRF (PRINT_FILB) 6-14, 7-!1 PRFD (PRINT PILE DIALOG)
7-11 - -
proceni..DJ!: comma.Dd line lnfonnatio.D 6-11ff READ !1--19 READC 9-20 readins iDput from file• 6-9 RBADLN !1--ZU saviDJ output 6-8 seateh lulu 6-2 spec:lfyiq; 6-lt SELECT 9-291'
.SH (SHEIL) 6-6, !1-9, 9-17 SRF (SORT_FlLB) 6-11 standard optious 6-4 SUBS (SUBSYSTEM) 8-22 TLC (T�UTBRATB_CHARACTBR) VOPP 9-10 VON 9-10 Wf-2
(WORKINO_DIRECTORY) WHILB 9-25 wrltlna enor outpUt to fila 6-10 writiq output to rue. 6-10 XOPF !1--10 XDMC (�B_DM_COMMAND) XON 9-10
SHEU.by 6-6 Shell proc-
lndex-14
Shell ar:rlpll ,_trr controWDJ execution 9-22 creauna 9-2f debuJ:sina 9-11 deftnin.l variables tnwactlvtiy
9-1!1( execuq DM commands 9-1 PUllin& arpliMDts to 9-4ff quoted strlnp 9-7 ullin& ac:tlve fwlctiom 9-201 usiD& conditional statements 9-22ft usln& expreAions 9-lOtr uslnJ: variables 9-lSff
Shell variables 9-tsff asslgn1ng actin functloM 9-21 •u.lanmut rui.. 9-16 deflniD& 5I-U def!Dina: inlelaeti.Vdy ,_191 environmenl 9-1!1 evaluatlq; 9-17 IUbatirutlna 9-17
SHIFT key 3-11 with pad acroll lteyJ +-27
shifted key name 3-11 shrinkln& 'Rlndo-. 4-lS SID (11Ubjfi;1 1dmtlfl.er) 4-4
ro;_�es cnated. at aan-up
In ACL entries 1-21 s�quota (") , m. DM commanclli site registry directoly l-151 slash (/} 1H I (llub) SO (SUBSTITUTB ONCE) """""""'
,:..24 -
specla.l. c� In DM COIIIIIl&llds 3-4 In Shell ('OIIIm•nda 6--6
SP't.�� �- Manapr} 2-4, Squ&ft bract.-. (( )) $H ( ] (aquate
b...nu) SRF (SORT_PJLB) Mtnm•nd 6-11 standard iDput 6-8
c:o�mutlq to standard. output 6-11 rea4lq data from. 6-14 readln& piillm•mn from 6-14 redltwq 6-10 redlrectlq to read. in-line data ,_8
standarct opti.ODI, for Stwl commands ...
stanoanl outpUt 6-1 appeudlq to me. 6-lOf c:onntc:dDJ 10 ll&&ndud iDJNl 6-11 in Htlve flmctiorul 9-lOf red1rectin& 6-10
staiidanl 111ream11 6--lf
lndex-15
stilrt-up boot Krl.pll 2-S, l-10 definiD& keya 2-4, 2-10 4lfferences between dblr.ed 1111d dlstlea nocln 2-llf dlsked nodes l-2 dlakless noclu 2-7ff ruu
Shell 6-7 sequence for cllsked nodes 2-3ft
STARTUP_LOOIN 2-16 statemel1Uo
CASB 9-2!1 FOR ,_27! IF 9-22. 9-24 IF 9-24 ONEOF 9-291 SELECT 9-251! WHILB 9-:U
stopping, processn 4-lf stream. 6-lf
closlnJ: with CTRUZ 5-6 strinJ; operators �U '"""'
chanJint; caae of 5-25 concatenatln& �13 deletln& from pads 5-7 in expre..tons �12 IDsertiD.J Into pads ,._,. quoted �7 teducfn& �13 searchlna; for 5-20ft llllbat11UIIDJ aU occunencu of 5-23 llllbat11UIIDJ flnt occumiDCe of 5-:U subst11Utlna; In pads 5-22
slnlctlue, of ACLe IS-2 subject lde:ntlfler (SID) see SID subordinate Sh.U � cteat!na; 6-15 SUBS (SUBSYSTBM) conunand IS-22 substltut!na;
aU occurrences of a s111DJ 5-23 flnt occurrmca of a lllriDJ 5-24 for variables � 17 text in pads 5-22
substitution paramear. �5 1115pmdlq, � 4-51 symboll, for patlmames 1--1 SYSBOOT 2-4
in diQ1en start-up z.-51 .,..... ....
PAD_SDBF_PJIK 3-14, 3-17 PAD_lDM_CMD 3-17
ISYS as uppu-leve! 4ltectoly 1-4 il!.l.tlal c:ontu.UI A-3

/SYS/DM, Initial -tenta A ...... ISYS/DM/FONTS/ICONS 4-32 fSYS/DM/STARTUP_LOOIN 4-6 fSYS/DM/STD_KBYS 2-4, 2-10,
3-10 fSYS/NBT, Initial co:ntonta A-' /SYS/NBT/DISKLBSS_UST 2-9 fSYS/NBT INBTBOOT 2-11 /SYS/NODB_DATA 2-, /SY:t'�OOB_DATA/nocle_id 2-S, /SYS/PRINT/QUBUB 7-9 /USBR_OATAIKEY_OBPS 3-14 /USBR_DATAISTARTUP_DM 2-16
""'
T
chan&inJ; cue of 5-2' copylna from pads 5--11 cuttlnJ from pads 5--13 dellniq; • liUlp of s-at d.de1tDa from pads s-6ff lines, dele1ifll: from pads 5-I putlq into pa4s s-ut •earchiD& for s-20ff specifyinf; pau.m. in pads 5--14 subsliNtlq in pads 5-22
tilde (�) , .. - (tllde) TLC (TRANSUTERATB_CHARACTBR) command 6-10 transcript padl 6-1
aaving in m. 4-28
u UNDO (Undo � commuul(s)) c<>I'M'I&II4 s--2! W1do bufhn 5-21, UNDO u,. s-u \llldoiiJ&, pnvloM ..._........ 5-2' up-ttaDiitkJa, key ..- 3-ll updatbq;, edh m.. s--26 Uppef'-tev.J dlrK1orJ 1-4 USBR_DATAIKI!Y_DBFS 2-17 USBR_DATAIUY_DBPS2 2-17 -USBR_DATAISH 6-7 -
eDterlnt; at loa-in 2-14 In SID +-4, 8-2
lnd0"-18
v varlabla, In Shell see Shell variables verifyiD&, Shell Kriptl 11-11 vieW!nJ, hi4deD wlnclowJ 4-20 VOFF command 11-10 VON CO!I1lDlU1d 9-10
w W�olm�'X�UTOHOLD)
WC (WINDOW_CLOSB) � .....
WD (WINDOW DBPAULT) eommand 4-24 -
WD (WORKINO_DIRBCTORY) command. 7-2
WGB (WINDOW OROW_BCHO) command 4-11"
WGRA (WINDOW_OROUP_ADD) command 4-29
WORR (WINDOW OROUP_REMOVB)
coii1IDIU1C 4-30 WH (WINDOW_HOLD) command
... .,, WHILB COIIllllaDd 11-25 WHILB atatema.t t-25 WI �J:DOW-INVISIBLB) commaacl wlldcardli 6-IS
query veriftc&tlOD 6-12 verlflcation 6-1
window poup!l 4-llff ch&D.JIDa into icons 4-31 creatlq 4-29 diaplaJIDI � 4-34 makiD& invblble 4-301 maklq -ruibla 4-301 pasta buffen ._, nmovtna •trhs � 4-30
� icoiUI 4-21ft --
&lanD. 4-24 cance1llDi - 4-19 cancelUnJ lliD chaDp 4-19 chaD&ID& poupl lato koDII 4-32 cb&D&iDI IIiD of 4-11 dosial 4-16 copJinl 4-14 creatiDJ 4-llff dcflninlllchW.t posltlou t-Z4
- ,_. determinin& boundarlu 4-lOf dilpla)'ina; members of window
pmipB 4-34 drawiD& at lt&rt-up 2-6 edit pad window lepnd. �2 edit, ueatiDt; 4-13 JI'OUP pam buffer� 4-35 ill goups 4-21ft lepn4 4-22 mak1DJ illvilible +-301 Jnaklnj vlaible 4-lOf manaJlng 4-17tr moviD& 4-19 movlDa padll under 4-2Sff process, chanJin& I'DOdes 4-lttr pwlhlq and popplnJ; 4-20 reH-oDly 4-14 removm,; from window aroups 4-30 reprelflntlq wllh icollll 4-3lff u� icons 4-28ft
WME (WINDOW_MOVE_ECHO) conunarut 4-U
..... deleting from pads $-7
lndex-17
insenln& into pads ,_, workina directory 1-9, 7-2
at Ior-in 2-14 beJinnina; palhnamea 1-9 cluu!Jina 7-3 MltlnJ; 7-2
WP (WINDOW _POP) cOIIUD&lld 4-20 writinJ
en:or outpUt to m" 6-10 standar4 outpUt to m.. 6-10
WS �INDOW_SCROLL) c:ommand.
X xc (Copy text) commanct s-u XD (Cut (dtlece) text) COIIIII1aDd 5-13 XDMC (BXBCUTB_DM_OOMMAND)
.......... .... XI � portl.oc of dlsplaJ) command
XOPP command 9-10 XON comtMDII 9-10 XP (Paste text) MJDIDind 5-13

TAB INSTRUCTION SHEET
Insert Tabbed Divider Page: Before Page:
' DOMAIN System User's Guide Cover page
The DOMAIN System 1-1
The Display Environment 3-1
The Command Shell 6-1

)
\ I