Embed Size (px)
Citation preview


Scott Kelby
Digital
The
Book
Photography The step-by-step secrets for how to make your photos look like the pros’!

The Digital Photography Book, part 2 Team
TECHNICAL EDITORSCindy Snyder Jennifer Concepcion
EDITORIAL CONSULTANTSDavid Hobby David Ziser Steve Dantzig
TRAFFIC DIRECTORKim Gabriel
PRODUCTION MANAGERDave Damstra
GRAPHIC DESIGNJessica Maldonado
COVER DESIGNED BYJessica Maldonado
STUDIO SHOTSRafael “RC” ConcepcionBrad Moore
PUBLISHED BYPeachpit Press
Copyright ©2008, 2011 by Scott Kelby
FIRST EDITION: December 2007
All rights reserved. No part of this book may be reproduced or transmitted in any form or by any means, electronic or mechanical, including photocopying, recording, or by any information storage and retrieval system, without written permission from the publisher, except for the inclusion of brief quotations in a review.
Composed in Myriad Pro (Adobe Systems Incorporated) and Lucida Grande (Bigelow & Holmes Inc.) by Kelby Media Group.
TrademarksAll terms mentioned in this book that are known to be trademarks or service marks have been appropriately capitalized. Peachpit Press cannot attest to the accuracy of this infor mation. Use of a term in the book should not be regarded as affecting the validity of any trademark or service mark.
Photoshop, Elements, and Lightroom are registered trademarks of Adobe Systems Incorporated. Nikon is a registered trademark of Nikon Corporation. Canon is a registered trademark of Canon Inc.
Warning and DisclaimerThis book is designed to provide information about digital photog-raphy. Every effort has been made to make this book as complete and as accurate as possible, but no warranty of fitness is implied.
The information is provided on an as-is basis. The author and Peachpit Press shall have neither the liability nor responsibility to any person or entity with respect to any loss or damages arising from the information contained in this book or from the use of the discs or programs that may accompany it.
THIS PRODUCT IS NOT ENDORSED OR SPONSORED BY ADOBE SYSTEMS INCORPORATED, PUBLISHER OF ADOBE PHOTOSHOP, PHOTOSHOP ELEMENTS, AND PHOTOSHOP LIGHTROOM.
ISBN 10: 0-321-52476-4ISBN 13: 978-0-321-52476-8
25 24 23 22 21 20 19 18
Printed and bound in the United States of America
www.kelbytraining.com www.peachpit.com
The Digital Photography Book, part 2

To Jean A. Kendra
for coming along with us
on this crazy ride, and for
being such a great friend
to our family for all these years.
We love you!

iv
A c k n o w l e d g m e n t s
lthough only one name appears on the spine of this book, it takes a team of dedicated and talented people to pull a project like this together. I’m not only delighted to be working with them, but I also get the honor and privilege of thanking them here.
To my amazing wife Kalebra: I don't know how you do it, but each year you somehow get more beautiful, more compassionate, more generous, more fun, and you get me to fall even more madly in love with you than the year before (and so far, you’ve done this 18 years in a row)! They don't make words to express how I feel about you, and how thankful and blessed I am to have you as my wife, but since all I have here are words—thank you for making me the luckiest man in the world.
To my wonderful, crazy, fun-filled, little buddy Jordan: You are, hands-down, the coolest little boy any dad could ever ask for, and although I know you don’t read these acknowledgments, it means so much to me that I can write it, just to tell you how proud I am of you, how thrilled I am to be your dad, and what a great big brother you’ve become to your little sister. Your mom and I were truly blessed the day you were born.
To my beautiful baby daughter Kira: You are a little clone of your mom, and that’s the best compliment I could ever give you. You already have your mom’s sweet nature, her beautiful smile, and like her, you always have a song in your heart. You’re already starting to realize that your mom is someone incredibly special, and take it from Dad, you’re in for a really fun, exciting, hug-filled, and adventure-filled life.
To my big brother Jeff: A lot of younger brothers look up to their older brother because, well… they’re older. But I look up to you because you’ve been much more than a brother to me. It’s like you’ve been my “other dad” in the way you always looked out for me, gave me wise and thoughtful council, and always put me first—just like Dad put us first. Your boundless generosity, kindness, positive attitude, and humility have been an inspiration to me my entire life, and I’m just so honored to be your brother and lifelong friend.
To my in-house team at Kelby Media Group: You make coming into work an awful lot of fun for me, and each time I walk in the door, I can feel that infectious buzz of creativity you put out that makes me enjoy what we do so much. I’m still amazed to this day at how we all come together to hit our often impossible deadlines, and as always, you do it with class, poise, and a can-do attitude that is truly inspiring. You guys rock!
To my editor Cindy Snyder: I can’t thank you enough for stepping up to the plate and knocking one out of the park while our “Mommy of the Year” Kim Doty was off having the cutest little baby boy in the whole wide world. You did just a great job of keeping the train on the track, keeping me focused, and making sure that volume 2 kept the same voice and vision as the original. I am very grateful to have worked on this with you. Way to go!
To Dave Damstra and his amazing crew: You guys give my books such a spot-on, clean, to-the-point look, and although I don’t know how you do it, I sure am glad that you do!
A

v
To Jessica Maldonado: I can’t thank you enough for all your hard work on the cover, and on the look of this and all my books. We got very lucky when you joined our team.
To my friend and Creative Director Felix Nelson: You’re the glue that keeps this whole thing together, and not only could I not do this without you—I wouldn’t want to. Keep doin’ that Felix thing you do!
To Kim Gabriel: You’re the unsung hero behind the scenes, and I’m sure I don’t say this enough, but—thank you so much for everything you do to make this all come together. I know it’s not easy, but you somehow make it look like it is.
To my best buddy Dave Moser: Besides being the driving force behind all our books, I just want you to know how touched and honored I was that you chose me to be the Best Man at your wedding. It meant more than you know.
To my dear friend and business partner Jean A. Kendra: Thanks for putting up with me all these years, and for your support for all my crazy ideas. It really means a lot.
To my Executive Assistant and general Wonder Woman Kathy Siler: I’m writing this right before my Bucs play your Redskins, so at this point, while we’re still talking: thank you, thank you, thank you! All the mini-miracles you pull off each day enable me to continue to write books, take photos, and still have a family to come home to. I am indebted (not so much that I want the Redskins to win, but indebted nonetheless).
To my publisher Nancy Ruenzel, marketing maverick Scott Cowlin, production hound Ted Waitt, and all the incredibly dedicated team at Peachpit Press: It’s a real honor to get to work with people who really just want to make great books.
To David Ziser, David Hobby, and Steve Dantzig who acted as tech editors on three very impor-tant chapters: the wedding photography chapter, the off-camera flash chapter, and the studio chapter, respectively. I asked for your help because I knew you were the best, and the book is far better because of your input, suggestions, and ideas. I am so very grateful to you all.
To all the talented and gifted photographers who’ve taught me so much over the years: Moose Peterson, Vincent Versace, Bill Fortney, David Ziser, Jim DiVitale, Helene Glassman, Joe McNally, Anne Cahill, George Lepp, Kevin Ames, and Eddie Tapp. I give you sincere and heartfelt thanks for sharing your passion, ideas, and techniques with me and my students. As you know—I couldn’t have done it without you.
To my mentors John Graden, Jack Lee, Dave Gales, Judy Farmer, and Douglas Poole: Your wisdom and whip-cracking have helped me immeasurably throughout my life, and I will always be in your debt, and grateful for your friendship and guidance.
Most importantly, I want to thank God, and His son Jesus Christ, for leading me to the woman of my dreams, for blessing us with such amazing children, for allowing me to make a living doing something I truly love, for always being there when I need Him, for blessing me with a wonderful, fulfilling, and happy life, and such a warm, loving family to share it with.

vi
Scott Kelby's 7-Point System for Adobe Photoshop CS3
The Adobe Photoshop Lightroom Book for Digital Photographers
The Photoshop CS5 Book for Digital Photographers
The Photoshop Channels Book
Photoshop Down & Dirty Tricks
Photoshop Killer Tips
Photoshop Classic Effects
The iPod Book
InDesign Killer Tips
The Digital Photography Book
Mac OS X Tiger Killer Tips
Getting Started with Your Mac and Mac OS X Tiger
The Elements 8 Book for Digital Photographers
The iPhone Book
O t h e r B o o k s b y S c o t t K e l b y

vii
A b o u t t h e A u t h o r
Scott is Editor, Publisher, and co-founder of Photoshop User magazine, Editor-in-Chief of Layers magazine (the how-to magazine for everything Adobe), and is the host of the top-rated weekly videocast Photoshop User TV and the co-host of D-Town TV, the weekly videocast for DSLR shooters.
He is President of the National Association of Photoshop Professionals (NAPP), the trade association for Adobe® Photo-shop® users, and he’s President of the software training, education, and publishing firm, Kelby Media Group, Inc.
Scott is a photographer, designer, and award-winning author of more than 50 books, including The Photoshop CS5 Book for Digital Photographers, Photoshop Down & Dirty Tricks, The Adobe Photoshop Lightroom Book for Digital Photographers, The Photoshop Channels Book, Photoshop Classic Effects, The iPhone Book, The iPod Book, and The Digital Photography Book, volumes 1, 2 & 3.
For six years straight, Scott has been honored with the distinc-tion of being the world’s #1 best-selling author of all computer and technology books, across all categories. His books have been translated into dozens of different languages, including Chinese, Russian, Spanish, Korean, Polish, Taiwanese, French, German, Italian, Japanese, Dutch, Swedish, Turkish, and Portuguese, among others, and he is a recipient of the prestigious Benjamin Franklin Award.
Scott is Training Director for the Adobe Photoshop Seminar Tour, and Conference Technical Chair for the Photoshop World Conference & Expo. He’s featured in a series of Adobe Photoshop training DVDs and has been training Adobe Photoshop users since 1993.
For more information on Scott, visit his daily blog at www .scottkelby.com
Scott Kelby

viii
Chapter One 1Using Flash Like a ProIf You Hate the Way Photos Look with Flash, You’re Not Alone
10 Things You’ll Wish You Had Known… 2…Before Reading This Book! 3Here Are Those Last Three Things 4Pop-Up Flash: Use It as a Weapon 5The Advantages of a Dedicated Flash 6Get Your Flash Off Your Camera 7Making Your Flash Wireless 8Going Wireless (Nikon), Part I 9Going Wireless (Nikon), Part II 10Going Wireless (Canon), Part I 11Going Wireless (Canon), Part II 12“Drag the Shutter” to See More Background 13How to Soften the Light from Your Flash 14Softer Light by Bouncing It 15Softbox-Quality Light from Your Flash 16Tip for Shooting Through a Diffuser 17Putting That Nice Twinkle of Light in the Eyes 18Why You Might Want a Stand for Your Flash 19Mounting Flashes Anywhere 20Rear Sync Rocks (& Why You Should Use It) 21The Fourth Secret to Pro Flash Results 22Using Gels (& Why You Need Them) 23Using Gels to Get That SI Look 24If You Have to Use Pop-Up Flash, Do This 25Using a Second Flash 26Controlling Your Second Flash (Nikon) 27Controlling Your Second Flash (Canon) 28How Far Back Can You Stand Using Flash? 29How to Stand Back Even Farther 30Controlling Your Light to Add Drama 31Shooting Sunset Portraits with Flash 32
Table of Contents

ix
Chapter Two 35Building a Studio from ScratchIt’s Much Easier and Less Expensive Than You’d Think
Studio Backgrounds 36Using Studio Flash (Called Strobes) 37Softening Harsh Studio Strobes 38Why I Prefer Softboxes to Umbrellas 39What a Speed Ring Does (& Why You Need It) 40Using a Modeling Light 41Firing Your Studio Strobe 42Firing Your Studio Strobe Wirelessly 43Using Continuous Light Instead 44Choosing the Size for Your Softbox 45Why You Really Need to Use a Light Meter 46How to Use a Light Meter 47Adding a Hair Light 48Where to Position Your Hair Light 49Testing Your Hair Light’s Position 50Keeping Your Hair Light from Spilling 51Which Mode Should You Shoot In 52Where to Position Your Main Light 53Using a Fan for Windblown Effects 54Want Softer, More Even Light? Feather It! 55What That Extra Panel in Your Softbox Does 56Using a Pop-Up Collapsible Background 57The Least Expensive Extra Light 58Three Backgrounds for the Price of One 59Using Off-Camera Flash to Light Backgrounds 60The Advantage of Shooting Tethered 61Getting Super-Saturated Background Color 62Lighting a White Background 63Which Color Reflector to Use 64Where to Position a Reflector 65Reflectors Without an Assistant 66Seeing the Light from Your Reflector 67Keep Light from Hitting the Background 68
Table of Contents

x
Chapter Three 71Shooting Portraits Like a ProMore Tips to Make People Look Their Very Best
Don’t Leave Too Much Headroom 72Shoot in Portrait Orientation 73Shooting Portraits? Get a Battery Grip! 74The “Sun Over Your Shoulder” Rule Is Bogus 75Shoot Wide and Push in Tight 76Shoot Profile Shots in Horizontal 77Shoot Long for More Flattering Portraits 78Why Diffusers Rock for Outdoor Portraits 79Making a Better Background for Portraits 80Trendy Composition Tip 81Cropping Off the Top of Their Head 82Group Photos Are Easier Outdoors 83Tip for Posing Group Portraits 84Great Tip for Casual Group Shots 85Don’t Light Your Entire Subject Evenly 86Want Better Portraits? Don’t Count Down! 87Window Light: Where to Position the Subject 88Window Light: Where You Should Shoot From 89Window Light: Where to Position the Reflector 90Six Quick Tips for Fixing Facial Challenges 91Don’t Shoot with Their Shoulders Straight On 92Making Your Subject Look Slimmer 93Using a Posing Chair 94Keeping Your Subject “In the Zone” 95Avoid Dappled Light 96Get Couples Really, Really Close 97Which Color Reflector to Use 98Shoot Outdoor Portraits Shallow 99Minimizing Shadows Under the Eyes 100
Chapter Four 103Shooting Landscapes Like a ProMore Tips for Creating Stunning Scenic Images
The Secret to Shooting Sunsets 104Cutting Reflections in Water 105
Table of Contents

xi
For Landscapes, You Need a Clear Subject 106Using Your LCD Monitor Outdoors 107How to Shoot a Panorama That Works 108How to Have Photoshop CS3 Put It Together 109Shoot Fast When Shooting Landscape Panos 110A Timesaving Pano Trick 111The Trick for Using a Fisheye Lens 112When to Shoot Streams 113Don’t Stop Shooting at Sunset 114How to Shoot Fog 115Getting Shots of Lightning (Manually) 116Getting Shots of Lightning (Automatically) 117A Trick for Shooting Great Rainbows 118Removing Distracting Junk 119Where to Focus for Landscape Shots 120Find the Great Light First 121How to Shoot on a Gray, Overcast Day 122A Trick for Great-Looking Flower Shots 123The Full-Frame Camera Advantage 124
Chapter Five 127Shooting Weddings Like a ProHow to Get Professional Results from Your Next Shoot
Create a Shot List 128Have Backups for Everything! 129Silencing Your Camera’s Beep 130Backlighting Your Bride 131Don’t Changes Lenses, Change Cameras 132Bring a Stepladder for a Higher Vantage Point 133Why You Want a Second Shooter 134When to Shoot in RAW 135Where to Aim Your Flash 136Shoot in Lower Light Without Raising Your ISO 137A Recipe for Balanced Flash in Church 138Compose to Include the Church 139Add B&W to the Album 140The Advantage of a Flash Bracket 141Tip for Posing the Bride 142
Table of Contents

xii
Keeping Detail in the Bridal Gown 143Getting More Flashes Per Wedding 144How to Lessen Noise in Your Photos 145Tips for Shooting the Bride’s Profile 146Wedding Zoom Effect Made Easy 147Read David Ziser’s Digital ProTalk Blog Daily 148
Chapter Six 151Shooting Travel Like a ProHow to Bring Back Photos That Really Make Them Wish They Were There
In This Case, Less Gear Is More 152Working People into Your Travel Shots 153Getting People to Pose 154What to Shoot on Overcast Days 155Shooting from Your Hotel Room 156The Magic Time for Cityscapes 157Get These Shots Out of the Way First 158Shooting Famous Landmarks 159Air Travel with Photo Gear 160Shoot the Food 161Get a GPS for Your Digital Camera 162Shooting Where They Don’t Allow Flash 163Look for High Vantage Points 164Give Yourself a Theme 165
Chapter Seven 167Shooting Macro Like a ProHow to Take Really Captivating Close-Up Photos
Maximize Your Depth of Field 168Why You Should Turn Auto-Focus Off 169Don’t Touch That Shutter Button! 170Which f-Stop Works Best 171Point-and-Shoot Macro Photography 172
Table of Contents

xiii
A Trick for Visualizing Macro 173Why You Might Want to Shoot Indoors 174Buying a Macro Lens 175Perfect, Even Light for Macro Shots 176Making Your Lens into a Macro Lens 177
Chapter Eight 179Pro Tips for Getting Better PhotosTricks of the Trade for Making All Your Shots Look Better
Which Mode to Shoot In 180Choosing the Right ISO 181Which Format to Shoot In (RAW, JPEG, or TIFF) 182Which JPEG Size to Shoot In 183WHIMS Will Keep You Out of Trouble 184How to Lock Focus 185Moving Your Point of Focus 186Zooming in Close? Use a High Shutter Speed 187When It’s Okay to Erase Your Memory Card 188Why You Need to Get in Really Close 189What to Use Your Histogram For 190Leave Your Lens Cap Off 191Removing Spots and Specks After the Fact 192What Looks Good in Black & White 193Recompose, Don’t “Fix It” in Photoshop 194Want to Be Taken Seriously? Start Editing 195Label Your Memory Cards 196Go Square 197Tip for Shooting at Night (Long Exposure Noise) 198The Very Next Book You Should Get 199
Chapter Nine 201More Photo Recipes to Help You Get “The Shot”The Simple Ingredients to Make It All Come Together
Index 218
Table of Contents

SHUTTER SPEED : 1/1 6 0 SEC F-STOP: F/ 8 ISO : 100 FOCAL LENGTH : 1 6 M M PHOTOGRAPHER : SCOTT KELBY

103
In volume 1 of this book, I had a chapter on shooting landscapes, and it turned out to be one of the most popular chapters in the book. So, when I started on volume 2, I knew right then
I would have to include another chapter with even more landscape techniques. And the only way to come up with new landscape techniques is to (you guessed it) shoot more landscapes, and what better place to shoot landscapes than at a landscape photography workshop? So, since I published the last edition of this book, I’ve taught at photography workshops in beautiful locations like Yosemite National Park, Cape Cod, Great Smoky Mountains National Park, and Glacier National Park, and then I just did some shooting in Maine this summer, and some other amazing places like Utah’s Monument Valley, and the Grand Canyon, and a half-dozen other incredibly scenic spots. But when it’s all said and done, do you know what all these places really meant to me? Tax deductions. That’s right, because I went to these locations on business (the images will be used by me to teach photography), I get some really juicy write-offs for these trips. For example, you see that photo on the facing page? That’s The Wave, which is just outside Page, Arizona, and not only is access to The Wave tightly restricted by the Bureau of Land Management, it was a grueling two-hour hike in scorching 112° desert heat over rocky mountains and hot desert sand, lugging all my camera gear, tripod (and bottles of water), and I have to be honest with you—there were times when I almost gave up, but you know what kept me going? It was the fact that if I didn’t get there, and get a decent enough shot to make it into this book, I couldn’t write my trip off as a tax deduction. See, I really do care.
Chapter Four
Shooting Landscapes Like a ProMore Tips for Creating Stunning Scenic Images

104
The Digital Photography Book • Chapter 4
The Secret to Shooting Sunsets
Because you’re shooting into the sun, it can really throw your camera’s built-in light meter way off, and what looked so beautiful when you were standing there comes out…well…pretty lame. Luckily, there’s a simple trick to getting perfect sunset shots every time. The trick is to aim just above the setting sun itself (but make sure you can’t see the sun itself through your viewfinder), then hold your shutter button halfway down, which tells the camera to set the exposure for just what it sees in the viewfinder right now. This gives you a perfect sunset exposure, but don’t let go of that shutter button quite yet (keep it held down), then you can move your camera and recompose the shot as you’d like it to look. By keeping that button held down, you’ve locked in that perfect exposure, and once everything looks good to you, just press the shutter button down the rest of the way and take the shot. You will have nailed the exposure and captured the scene perfectly.
Sc
ott
ke
lby
105
Shooting Landscapes Like a Pro
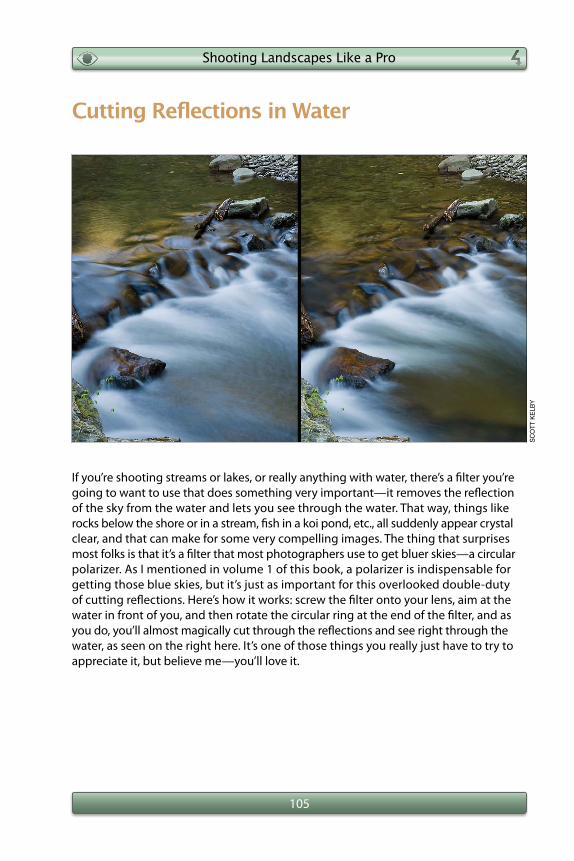
Cutting Reflections in Water
If you’re shooting streams or lakes, or really anything with water, there’s a filter you’re going to want to use that does something very important—it removes the reflection of the sky from the water and lets you see through the water. That way, things like rocks below the shore or in a stream, fish in a koi pond, etc., all suddenly appear crystal clear, and that can make for some very compelling images. The thing that surprises most folks is that it’s a filter that most photographers use to get bluer skies—a circular polarizer. As I mentioned in volume 1 of this book, a polarizer is indispensable for getting those blue skies, but it’s just as important for this overlooked double-duty of cutting reflections. Here’s how it works: screw the filter onto your lens, aim at the water in front of you, and then rotate the circular ring at the end of the filter, and as you do, you’ll almost magically cut through the reflections and see right through the water, as seen on the right here. It’s one of those things you really just have to try to appreciate it, but believe me—you’ll love it.
Sc
ott
ke
lby

106
The Digital Photography Book • Chapter 4
For Landscapes, You Need a Clear Subject
One of the things that kills a lot of landscape shots is that there’s no clear subject, and for a landscape shot to really work, you have to be able to look at it and explain what you shot in one simple sentence. It’s a lighthouse. It’s that seagull on the rocks. It’s that old barn. It’s the palm trees on the beach. If you can’t explain your landscape shot in a short sentence like that, you don’t know what the subject is, and if you don’t know, people viewing your image won’t know either, and if that happens, the photo just isn’t working. Keep this in mind when you’re composing your landscape shots, and ask yourself the question, “What’s my subject?” If you can’t come up with a solid answer immediately, it’s time to recompose your shot and find a clear subject. It makes all the difference in the world.
Sc
ott
ke
lby

107
Shooting Landscapes Like a Pro
Using Your LCD Monitor Outdoors
If it’s bright outside, you’re going to quickly run into one of the biggest challenges of shooting outdoors, and that is you can’t see anything on your LCD monitor—the sunlight washes everything out. In fact, it’s often so hard to see anything that you might as well turn off your monitor and save your battery, but then your LCD monitor becomes about useless. That’s why I’ve fallen in love with the Hoodman HoodLoupe Professional. You wear this around your neck (when you’re shooting outdoors), then you simply hold it up over your LCD monitor and its soft rubber enclosure blocks out the sun and gives you a crystal clear view of your monitor. I carry this with me to all my outdoor shoots, and after you use it even once, you won’t want to be without it. (Note: Even though it’s called a “loupe,” it doesn’t really magnify your image like a traditional loupe—it just blocks the sun out, but really, that’s all we need.) It sells for around $79 at B&H Photo.
RA
FAe
l “R
c”
co
Nc
eP
cIo
N

108
The Digital Photography Book • Chapter 4
How to Shoot a Panorama That Works
In volume 1 of this book, I told you some things you needed to do to shoot a wide panoramic image that would actually stitch together seamlessly inside Photoshop. But, that’s all changed, because Photoshop’s built-in panorama stitching feature (called Photomerge) has reached a point where it’s so good that you can toss out half the old rules and loops we used to have to jump through to make a panorama. Now you can handhold your shots (no problem), use program mode or aperture priority (or whatever mode you like), you can leave your white balance set to Auto (or what-ever you like), and you can pretty much just point-and-shoot, as long as you do just one thing: overlap each shot by around 20%. So, for example, if you’re shooting a wide panorama, you’d start from left to right, taking one shot—let’s say there’s a tree on the far right side of your frame when you take that shot—then, when you move your camera over to take the next shot, that same tree should now be in the far left of your frame (so you’re overlapping by at least 20%, as shown above). That’s the key—over-lapping—so I take a shot, move to the right, take another, and another (I’ve shot as few as three photos to make a pano and as many as 22), and Photoshop will put them to-gether into one nice, wide pano for me (simply because I overlapped by around 20%).
Sc
ott
ke
lby
oVeRlAP oVeRlAP oVeRlAP

109
Shooting Landscapes Like a Pro
How to Have Photoshop Put It Together
As long as you overlapped each frame of your panorama by 20% or more, Photoshop will not only stitch the photo together seamlessly, it will blend the color of the photos so they’re consistent through the whole pano. Once you’ve taken your overlapping shots, open those images in Photoshop. Then go under the File menu, under Automate, and choose Photomerge. When the dialog above appears, click on the Add Open Files button, leave the Layout (on the left side of the dialog) set to Auto, then click OK. That’s it. Sit back and relax because Photoshop will do the rest, and before you know it, you’ll see a stun-ning, wide, perfectly stitched panoramic image.

110
The Digital Photography Book • Chapter 4
Shoot Fast When Shooting Landscape Panos
If there are any clouds in your scene when you’re shooting your pano, then you’ll want to shoot fairly quickly (with only a second or two between shots), because the clouds may be moving, and if you let them move too much (by taking too long between shots), they won’t line up exactly, and then you’ll have to spend a bunch of time retouching and cloning them to make it look right. Basically, if you’re shooting a seven-photo pano, it should take you only around 10 to 12 seconds to shoot it. It should go like this: shoot, move to the right, shoot, move to the right, shoot, etc. As soon as your camera gets in place for the next frame—shoot. It sounds hard on paper, but it’s simple to do in person, and because it takes so little time, you’ll wind up shooting more panos, which is a good thing.
©IS
toc
kP
ho
to/m
AR
k e
VA
NS
111
Shooting Landscapes Like a Pro
A Timesaving Pano Trick
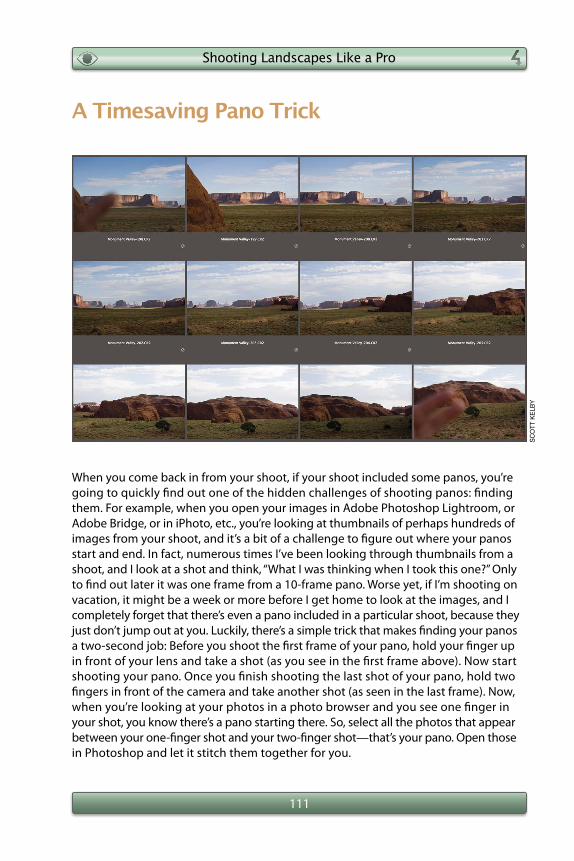
When you come back in from your shoot, if your shoot included some panos, you’re going to quickly find out one of the hidden challenges of shooting panos: finding them. For example, when you open your images in Adobe Photoshop Lightroom, or Adobe Bridge, or in iPhoto, etc., you’re looking at thumbnails of perhaps hundreds of images from your shoot, and it’s a bit of a challenge to figure out where your panos start and end. In fact, numerous times I’ve been looking through thumbnails from a shoot, and I look at a shot and think, “What I was thinking when I took this one?” Only to find out later it was one frame from a 10-frame pano. Worse yet, if I’m shooting on vacation, it might be a week or more before I get home to look at the images, and I completely forget that there’s even a pano included in a particular shoot, because they just don’t jump out at you. Luckily, there’s a simple trick that makes finding your panos a two-second job: Before you shoot the first frame of your pano, hold your finger up in front of your lens and take a shot (as you see in the first frame above). Now start shooting your pano. Once you finish shooting the last shot of your pano, hold two fingers in front of the camera and take another shot (as seen in the last frame). Now, when you’re looking at your photos in a photo browser and you see one finger in your shot, you know there’s a pano starting there. So, select all the photos that appear between your one-finger shot and your two-finger shot—that’s your pano. Open those in Photoshop and let it stitch them together for you.
Sc
ott
ke
lby
112
The Digital Photography Book • Chapter 4
The Trick for Using a Fisheye Lens
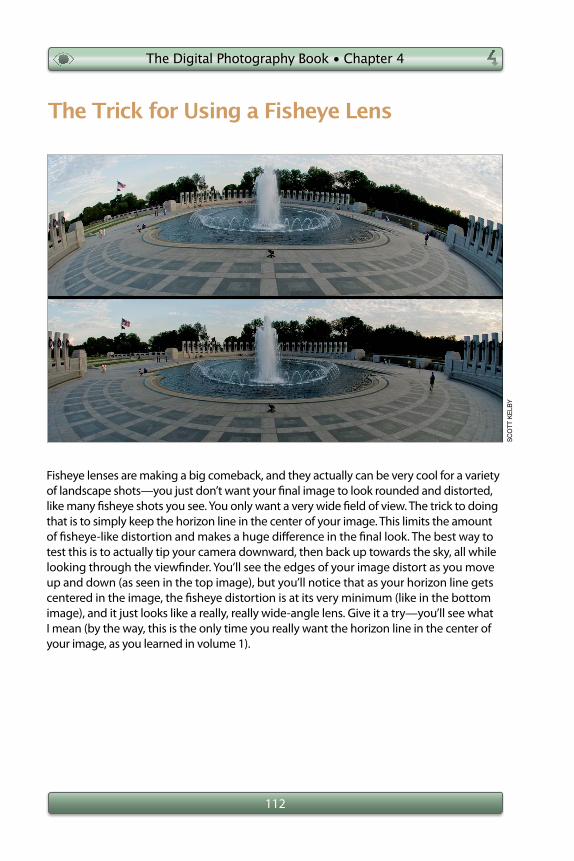
Fisheye lenses are making a big comeback, and they actually can be very cool for a variety of landscape shots—you just don’t want your final image to look rounded and distorted, like many fisheye shots you see. You only want a very wide field of view. The trick to doing that is to simply keep the horizon line in the center of your image. This limits the amount of fisheye-like distortion and makes a huge difference in the final look. The best way to test this is to actually tip your camera downward, then back up towards the sky, all while looking through the viewfinder. You’ll see the edges of your image distort as you move up and down (as seen in the top image), but you’ll notice that as your horizon line gets centered in the image, the fisheye distortion is at its very minimum (like in the bottom image), and it just looks like a really, really wide-angle lens. Give it a try—you’ll see what I mean (by the way, this is the only time you really want the horizon line in the center of your image, as you learned in volume 1).
Sc
ott
ke
lby

113
Shooting Landscapes Like a Pro
When to Shoot Streams
If it’s a gray, cloudy, rainy day (I don’t mean pouring rain—a light drizzle or soft rain), then head to a local stream, because you’re about to make some magic. The overcast, cloudy, rainy sky does two things that make it ideal for shooting streams: (1) it makes the rocks, leaves, and everything sticking out of the stream nice and wet, which looks great in stream photographs, and (2) it makes the scene much darker (and the darker it is while still daylight, the better), which lets you use long shutter speeds, and it’s those longer shutter speeds that give the stream that wonderful silky-water effect. Try shooting in aperture priority mode, and set your aperture (f-stop) to f/22 (or a higher number if your lens has it). With this darker sky, f/22 will leave your shutter open long enough to give you that silky-water look. The shot above was taken on a drizzly afternoon where there was literally nothing else to shoot, and shooting at f/22 in the forest, under that dark, cloudy sky, left my shutter open for 13 seconds (in aperture priority mode, you pick the f-stop and then your camera will leave the shutter open for however long it takes to get the right exposure—in this case, I stood there in the gentle rain for 13 seconds. How do you like the way that phrase “gentle rain” made the experience sound? Actually, I was cold and wet, but cold, annoying rain just doesn’t paint a pretty picture—but the camera sure captured one).
Sc
ott
ke
lby

114
The Digital Photography Book • Chapter 4
Don’t Stop Shooting at Sunset
More and more people have totally embraced the golden rule of landscape photogra-phy, which is to only shoot when that wonderful, magical light is available, and that only happens just before and during dawn, and just before and during sunset. However, a lot of folks pack up their gear just a few minutes after the sun has gone down, and the sad part is, they’re about to miss what is often the most magical light of all. Around 20 to 30 minutes after sunset, sometimes the clouds turn bright orange, or deep red, or purple, or if you’re lucky, a combination of all three, and some of my all-time best shots have been taken after everyone else has gone to dinner. Wait even longer (30 to 45 minutes or more after sunset), and the sky will often turn a vibrant, deep blue (not black, like the night—I’m talking blue—and it happens right before night). It only lasts for a few minutes (10 or 12 minutes usually), but what wonderful twilight photos you can get then. Try this blue twilight-hour shooting when you have a cityscape, or bridge, or other lit object in the background—it makes for a wonderful scene.
If I’m talking about white balance, and I’m showing the Canon white balance menu, but you’re not shooting with a Canon, simply breathe deeply and say to yourself,
“It’s okay, my [insert your camera name here] also has a white balance setting and it works pretty much like this one.” Remember, it’s about choosing the right white bal-ance, not exactly which buttons to push on your camera.
Remember, Your Camera Has Similar Settings
Sc
ott
ke
lby

115
Shooting Landscapes Like a Pro
How to Shoot Fog
I love the look of fog or mist in images. To me, it adds mystery and intrigue to the scene, but one unfortunate side effect is that it also is very hard for your camera’s built-in light meter to read properly, so you get what you’re seeing with your naked eye. Of course, like so many things, there’s a trick of the trade that helps you get a good exposure that keeps that foggy look. Start by aiming at the fog itself, and then hold your shutter button halfway down (which tells your camera to take a reading of that area). Now, go to your camera’s exposure compensation control and increase the amount of exposure by one stop (basically, what you’re doing is disagreeing with what the camera read for the fog, and overriding it by increasing the exposure by one stop). On Nikon cameras, you do this by holding down the exposure compensation button on the top right of the camera (just behind the shutter button), and while you’re hold-ing that button down, turn the command dial on the top back of the camera to the right until you see +1 in your camera’s viewfinder. On Canon cameras, you’ll hold the same button (it’s in the same place—behind the shutter button), and then you’ll spin the quick control dial (the big one on the back of the camera) to the right until you see +1 in the camera’s viewfinder. Just one reminder: when you’re done shooting your fog shots, set your exposure compensation back to zero, or you’ll be shooting the rest of the day with every shot overexposed by one stop.
Sc
ott
ke
lby
116
The Digital Photography Book • Chapter 4
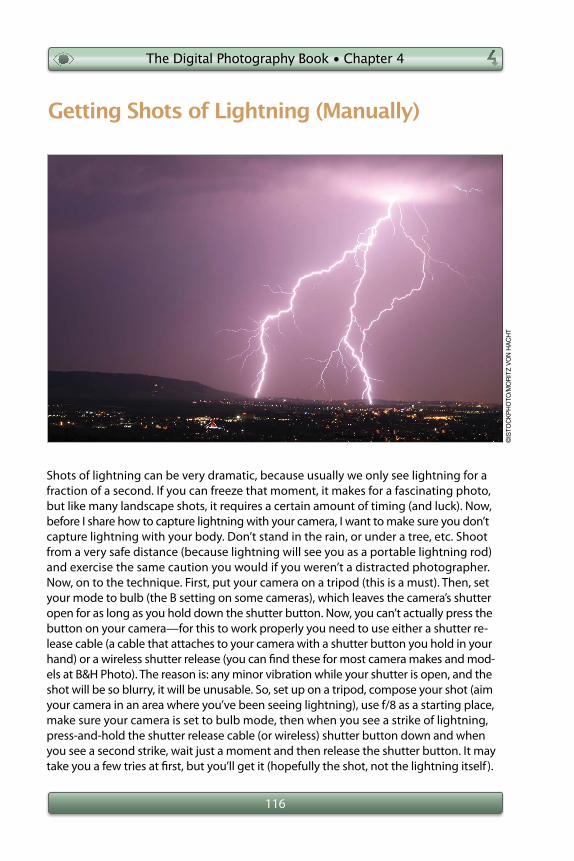
Shots of lightning can be very dramatic, because usually we only see lightning for a fraction of a second. If you can freeze that moment, it makes for a fascinating photo, but like many landscape shots, it requires a certain amount of timing (and luck). Now, before I share how to capture lightning with your camera, I want to make sure you don’t capture lightning with your body. Don’t stand in the rain, or under a tree, etc. Shoot from a very safe distance (because lightning will see you as a portable lightning rod) and exercise the same caution you would if you weren’t a distracted photographer. Now, on to the technique. First, put your camera on a tripod (this is a must). Then, set your mode to bulb (the B setting on some cameras), which leaves the camera’s shutter open for as long as you hold down the shutter button. Now, you can’t actually press the button on your camera—for this to work properly you need to use either a shutter re-lease cable (a cable that attaches to your camera with a shutter button you hold in your hand) or a wireless shutter release (you can find these for most camera makes and mod-els at B&H Photo). The reason is: any minor vibration while your shutter is open, and the shot will be so blurry, it will be unusable. So, set up on a tripod, compose your shot (aim your camera in an area where you’ve been seeing lightning), use f/8 as a starting place, make sure your camera is set to bulb mode, then when you see a strike of lightning, press-and-hold the shutter release cable (or wireless) shutter button down and when you see a second strike, wait just a moment and then release the shutter button. It may take you a few tries at first, but you’ll get it (hopefully the shot, not the lightning itself ).
Getting Shots of Lightning (Manually)
©IS
toc
kP
ho
to/m
oR
Itz
Vo
N h
Ac
ht

117
Shooting Landscapes Like a Pro
If you try some lightning shots and fall in love with this type of photography, you might want to consider buying a Lightning Trigger (they’re not cheap—so make sure you’re truly “in love” first). This unit sits on your camera and it has a sensor that detects the bright flash of light from lightning, so it opens the shutter at exactly the right moment and gets the shot for you. In fact, you can pretty much set up your camera, set your camera to shutter priority mode (with your shutter speed anywhere from 1/8 to 1/4 of a second), aim in the right direction, sit back with a cool drink, and wait for the magic to happen, knowing that your camera is doing all the hard work for you. Later, when you’re showing off your amazing work, there is no obligation (from the manufacturer’s point of view) for you to tell the people viewing your work that you used a Lightning Trigger. Hey, it’s just another tool in your bag of tricks. Go to www.lightningtrigger.com for a model that works with most cameras (it runs around $329 direct from the manufac-turer. Hey, I told you it wasn’t cheap).
Getting Shots of Lightning (Automatically)
©IS
toc
kP
ho
to/A
lle
N j
oh
NS
oN

118
The Digital Photography Book • Chapter 4
Want to really bring out the vibrance and color of your shots that have a rainbow in them? Then use a circular polarizer (now we’ve got three reasons to have a polarizer: [1] bluer skies, [2] cutting the reflections in water, and [3] making your rainbows “pop!”). Just turn the cir-cular end of the filter while you’re aimed at the rainbow and stop when the colors look their most vibrant. Easy enough to do, and the results are worth it. Now, beyond that, there’s a wonderful tip I learned from my buddy, and renowned landscape photographer, Bill Fort-ney. Bill says, “If you see a rainbow, drive like the devil until you find something interesting for the rainbow to come down in.” He doesn’t mean drive until you come to the end of the rainbow, or all you’ll get is a shot of that pot of gold. Just drive until you can find a gorge, or a water source, or something—anything interesting—for it to end with. Do those two things and you’ll wind up with a remarkable shot.
A Trick for Shooting Great Rainbows
Sc
ott
ke
lby

119
Shooting Landscapes Like a Pro
In some of my landscape photo workshops, we do a class critique of shots from the par-ticipants in the workshop (the person who took the image always remains anonymous during the critique, unless we all really love the shot, then they usually stand up and shout, ”Hey, I took that!”). Anyway, one thing that always stands out as a spoiler of some otherwise great images is that the image has a distracting element (also known as “some distracting junk”) in the photo. It can be a road sign, a sign on the beach (as you see above), an empty beer can, some telephone wires, or even a tree branch extending into the photo, and I’ve always felt if it doesn’t add to the photo, it takes away from it. There are three different ways you can deal with this “junk” that creeps into your photos: (1) Compose around it. When you’re shooting, be very aware of what’s in your shot, espe-cially in the background. Check all four sides of the frame (top, left side, right side, and bottom) for anything that you’ll wish later wasn’t there, and if you see something, change your composition to eliminate it. (2) Physically remove the distracting element (as long as you’re not a photojournalist). If there’s a beer can, a twig, some trash, etc., pick it up and move it out of the frame (be careful not to damage anything in nature—period!). Or, (3) remove it later in Adobe Photoshop using either the Healing Brush tool, Patch tool, or the Clone Stamp tool. I’ve done a quick video clip for readers of this book to show you how to use these three tools, and you can watch it at www.kelbytraining .com/books/digphotogv2.
Removing Distracting Junk
Sc
ott
ke
lby

120
The Digital Photography Book • Chapter 4
When you’re taking a landscape shot, where do you focus your camera’s focal point (that red dot in the center of your viewfinder. Well, its default spot is in the center, but you can move that spot, so if you moved yours, get it back to the middle for this)? With landscape shots, the rule is: you want to focus about one-third of the way into the image. This gives you the widest possible range of focus throughout the image. Also, another trick you can use is to shoot big, sweeping landscape shots at f/22, which gives you the most focus from front to back in your shot.
Where to Focus for Landscape Shots
Sc
ott
ke
lby
Have you ever seen a landscape photo that just has incredible clarity throughout the image? I’m not talking about sharpness—I’m talking clarity (like a total lack of haze, or fog, or any other atmospheric effect). Well, there’s a technique for getting that amazing clarity, and it’s simple: shoot in winter. The air is the clearest during winter time, and it’s the perfect time of year to get those amazingly clear shots that you just can’t get any other time of year.
Getting the Clearest Landscapes Possible

121
Shooting Landscapes Like a Pro
A few years ago, my friend, and landscape photography hero, Bill Fortney said some-thing that really had an impact on my photography and I’m going to pass it on to you. Bill feels that the single most important thing in a shot of any kind is the quality of light, and that the quality of light is so important that he’ll search for great light first, and then once he finds that great light, he’ll find a subject—something or somebody to shoot in that wonderful light. Essentially, if the light is great, you’ll find a subject, but if you’ve found a great subject, you have to be very, very lucky for great light to just magically appear. In short: ”It’s all about the light.” Once you get that, everything else falls into place. It’s deeper than it sounds.
Find the Great Light First
Sc
ott
ke
lby
122
The Digital Photography Book • Chapter 4
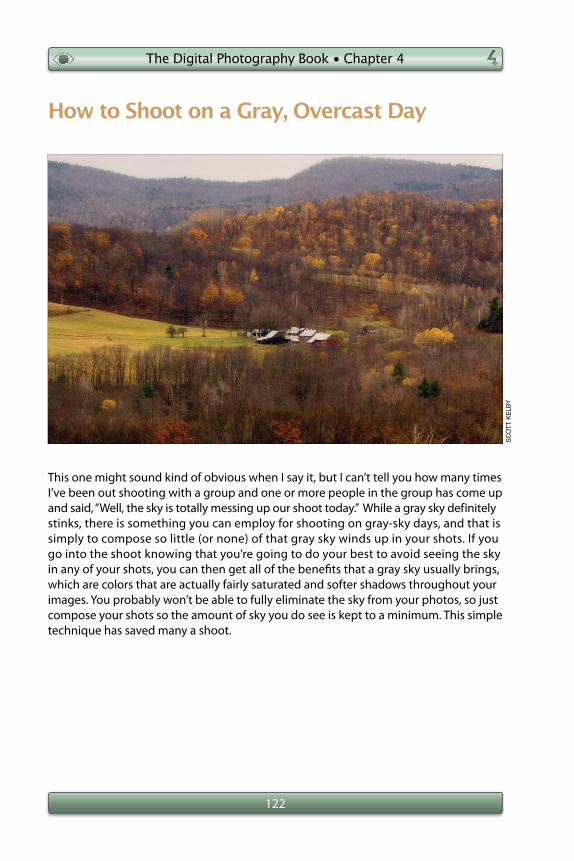
This one might sound kind of obvious when I say it, but I can’t tell you how many times I’ve been out shooting with a group and one or more people in the group has come up and said, “Well, the sky is totally messing up our shoot today.” While a gray sky definitely stinks, there is something you can employ for shooting on gray-sky days, and that is simply to compose so little (or none) of that gray sky winds up in your shots. If you go into the shoot knowing that you’re going to do your best to avoid seeing the sky in any of your shots, you can then get all of the benefits that a gray sky usually brings, which are colors that are actually fairly saturated and softer shadows throughout your images. You probably won’t be able to fully eliminate the sky from your photos, so just compose your shots so the amount of sky you do see is kept to a minimum. This simple technique has saved many a shoot.
How to Shoot on a Gray, Overcast Day
Sc
ott
ke
lby

123
Shooting Landscapes Like a Pro
Want a great quick trick for some interesting-looking flower shots? Get down low, and shoot the flowers so they’re backlit, with the sun behind them. The sunlight shining through the translucent petals creates a beautiful effect, and this is a popular trick em-ployed by serious flower shooters that works every time. Don’t forget to get down low (so low that you’re either shooting straight on or up at the flowers) to get the most from this effect.
A Trick for Great-Looking Flower Shots
Sc
ott
ke
lby

124
The Digital Photography Book • Chapter 4
The vast majority of today’s digital cameras have a built-in magnification factor because of the size of the sensors in the camera. For example, most Nikon cameras have a 1.4x magnification factor, and what that means is if you put a 100mm lens on a Nikon digital camera (like a D3000, D5000, D90, or D300s), that 100mm lens becomes a 140mm lens because of the sensor’s magnification factor. Most Canon cameras have a 1.6x magni-fication (like the Rebel XS, Rebel XSi, Rebel T1i, Rebel T2i, 50D, and 7D), which makes a 200mm lens more like a 320mm lens. Many sports shooters, birders, and a host of other photographers who routinely use zoom and telephoto lenses love this added reach from digital sensors, but when it comes to the wide-angle lenses landscape photogra-phers use, it can somewhat work against us. For example, a 12mm wide-angle Nikon lens becomes a less-wide 16mm lens. For Canon shooters, a 14mm wide-angle lens becomes a 22mm equivalent. That’s why some landscape photographers are drooling over the new full-frame digital cameras, like Nikon’s D3s or Canon’s 5D Mark II (shown above), both of which are full-frame, and when you put a 12mm on the Nikon, it’s that same, beautifully wide 12mm aspect ratio we used to enjoy back in the film days. When you put a 14mm on a Canon 5D Mark II, it’s the same thing—a real 14mm with no extra magnification. I’m not saying you need to switch, or that you bought the wrong camera, I just want you to know what all the fuss is about for landscape photographers and other people who “go wide.”
The Full-Frame Camera Advantage

This page intentionally left blank

218
The Digital Photography Book
Aabout this book, 2–4air travel, 160aperture priority mode, 180auto-focus
moving the AF point, 186turning off, 169
BB&H Photo store, 66backgrounds
black, 62collapsible, 57color saturated, 62lighting, 59, 60, 63macro photography, 173out-of-focus, 99portrait, 80, 99studio, 36, 57, 59white, 59, 63
backlightbridal portraits and, 131flower photos and, 123outdoor portraits and, 75
battery grips, 74battery packs, 144beams of light, 212Black, Dave, 24black backgrounds, 62black flags, 68black reflectors, 64, 68black-and-white images
shots conducive to, 193wedding photos converted to, 140
bounce card, 18bouncing light, 15, 90bridal portraits
backlighting, 131bridal gown in, 143photo recipe example, 209posing the bride, 142profile shots, 146See also wedding photos
business cards, 139
CCamera Raw, 135cameras. See digital camerasCanon wireless flash, 11–12, 28Capa, Robert, 189Captured by the Light (Ziser), 148casual group shots, 85chairs for portraits, 94cityscapes, 157clamshell lighting, 210clipped highlights, 190close-up lens attachment, 175close-up photography. See macro
photographycollapsible background, 57colors
background, 62reflector, 64, 98
composing photos, 194portraits, 81, 82wedding pictures, 139
continuous light, 44couple portraits, 97Cross, Stephanie, 205
DDantzig, Stephen, 67dappled light, 96dedicated flash, 6depth of field
macro photography and, 168, 171outdoor portraits and, 99
diffusion dome, 14diffusion panel, 16–17, 79digital cameras
full-frame, 124orientation of, 73, 77silencing beep on, 130
Digital ProTalk blog, 148directional light, 7drag-the-shutter technique, 13
Eediting your photos, 195egg crate grid, 51
Index

219
Index
equipment. See gear recommendationsexposure compensation, 115, 190extension tubes, 177eyes
minimizing shadows under, 100twinkle added to, 18
Ffacial fixes, 91famous landmarks, 158–159fans, studio, 54fast lenses, 137, 163feathering light, 55filters, polarizer, 105, 118fisheye lenses, 112flash, 1–32
battery pack, 144bounce card, 18dedicated, 6distance for using, 29–30drag-the-shutter technique, 13dramatic light from, 31gear recommendations, 6gels used with, 23–24, 25, 62ISO adjustment for, 30lowering power of, 22, 25mounting, 20natural looking, 22off-camera, 7, 60pop-up, 5, 25Rear Sync, 21, 25ring, 176second units, 26–28snoot for, 31softening, 14–17, 25stand for, 19studio, 37–43sunset portraits and, 32wedding photos and, 136, 138, 141wireless, 8–12, 26–28See also studio strobes
flash bracket, 141flash head, 41flower photography, 123focusing tips
landscape shots, 120locking focus, 185macro shots, 169moving point of focus, 186
out-of-focus backgrounds, 99fog or mist photography, 115food photography, 161, 203Fortney, Bill, 118, 121f-stops
for blurring backgrounds, 99for low light conditions, 137, 163for macro photography, 171for silky-water effect, 113
full-frame cameras, 124
Ggear recommendations, 3
battery packs, 144dedicated flash, 6hair lights, 48light meters, 46ring flash, 176softboxes, 45studio strobes, 37
gelshow to use, 23, 25, 62SI look with, 24
gold reflectors, 64, 98GPS units, 162gray skies, 122, 155Greenwell, Andy, 50group portraits, 83–85
casual shots, 85clustering people for, 85outdoor light for, 83posing people for, 84
Hhair
blowing, 54lighting, 48–51
hair lights, 48–51gear recommendations, 48positioning, 49preventing spill from, 51testing position of, 50
headroom in portraits, 72, 82high vantage points, 164highlight clipping, 190histogram, 190Hobby, David, 17, 25Hoodman HoodLoupe Professional, 107

220
The Digital Photography Book
horizontal orientation, 73, 77, 146hotel room views, 156
Iimage size setting, 183image stabilization, 168ISO
choosing correct, 181flash distance and, 30light meters and, 47
JJPEG mode, 135, 182, 183Justin clamp, 19, 20, 26
Kkelbytraining.com website, 2
Llandmark photography, 158–159Landscape orientation, 73landscape photography, 103–124
choosing subjects for, 106distracting elements in, 119fisheye lenses for, 112flowers and, 123focusing for, 120fog and mist, 115full-frame cameras and, 124LCD monitors and, 107lightning and, 116–117overcast days and, 122panoramas, 108–111photo recipes, 202, 207quality of light in, 121rainbows and, 118removing “junk” from, 119streams, 105, 113sunsets, 104, 114twilight images, 114water reflections, 105winter time, 120
LCD monitor accessory, 107lens cap, 191lens compression, 78
lensesextension tubes, 177fisheye, 112macro, 175super-fast, 137, 163telephoto, 78wide-angle, 76
lightbeams of, 212bouncing, 15, 90continuous, 44dappled, 96directional, 7dramatic, 31feathering, 55hair, 48–51modeling, 41outdoor, 75, 79, 96positioning, 53softening, 14–17strobe, 37–43window, 88–90See also flash
light meters, 46–47lighting
background, 59, 60, 63landscape photography, 121macro photography, 176portrait, 75, 79, 86, 88–90
lightningautomatic shots of, 117manually shooting, 116
Lightning Trigger, 117Lightroom, 135, 162locking focus, 185Long Exposure Noise Reduction
feature, 198loop lighting pattern, 53
Mmacro photography, 167–177
backgrounds for, 173depth of field in, 168, 171equipment for, 175extension tubes for, 177focusing for, 169, 170f-stop used for, 171indoor setup for, 174lighting for, 176magnifying glass for, 173
221
Index
photo recipes, 203, 215point-and-shoot, 172shutter button and, 170tripods used for, 168water drops in, 175
magnification factor, 124magnifying glass, 173manual mode, 52, 180McNally, Joe, 76, 199memory cards
erasing, 188labeling, 196
Merriam, Doug, 159modeling light, 41Moment It Clicks, The (McNally), 199monolight, 41music for travel photos, 164
Nnighttime photography, 198Nikon wireless flash, 9–10, 27noise reduction, 145, 198Noiseware Professional, 145
Ooff-camera flash, 7, 60outdoor portraits
depth of field for, 99group photos as, 83lighting for, 75, 79, 96
out-of-focus backgrounds, 99overcast days
landscape photos and, 122travel photos and, 155
Ppanoramas, 108–111
shooting photos for, 108, 110stitching in Photoshop, 108, 109time issues when shooting, 110trick for finding, 111
peoplemoving in close to, 189in travel photos, 153–154
photo recipes, 201–217Photomerge feature, 108, 109
Photoshopblack & white conversions, 140distracting “junk” removal, 119noise reduction plug-in, 145panorama stitching, 108, 109spot/speck removal, 192white balance adjustments, 135
Photoshop Elements, 140Photoshop Lightroom, 135, 162point-and-shoot macro photography, 172polarizer filter, 105, 118pop-up flash, 5, 25Portrait orientation, 73portraits, 71–100
angled shots, 81backgrounds for, 80, 99battery grips for, 74bridal, 131, 142, 143, 146camera orientation for, 73, 77composition of, 81, 82couple, 97dappled light in, 96depth of field for, 99diffusers for, 79eye shadows in, 100facial fixes, 91group, 83–85headroom in, 72, 82lighting, 75, 79, 86, 88–90moving in close for, 189natural-looking, 87outdoor, 75, 79, 83, 96, 99photo recipes, 204–206, 208–210, 217profile view, 77, 146reflectors for, 90, 98, 100seated subjects in, 94shoulder angle in, 92slimming subjects in, 93sunlight and, 75, 79, 96sunset photos and, 32talking to subjects of, 95telephoto lenses for, 78uneven light for, 86wide-angle lens for, 76window light for, 88–90
product shots, 214profiles
bridal portraits as, 146horizontal orientation for, 77, 146
program mode, 180

222
The Digital Photography Book
Qquality settings, 183Quantum flash units, 8
Rracked out lens, 78rainbow shots, 118RAW mode, 135, 182Rear Sync flash, 21, 25recipes for photos, 201–217reflectors, 64–68
black flag, 68colors of, 64, 98extra light from, 58portraits and, 90, 98, 100positioning, 65stands for, 66testing, 67
ring flash, 176
Sseamless background paper, 36seated portraits, 94second flash units, 26–28self-timer, 170shooting tethered, 61shoulder angle, 92shutter priority mode, 180shutter release cable, 170shutter speed, 187silver reflectors, 58, 64, 98slimming subjects, 93snoot for flash, 31Softbox Lighting Techniques for Professional
Photographers (Dantzig), 67softboxes
flash, 16gear recommendations, 45internal panel of, 56size of, 45strobe, 38
softening light, 14–17bouncing light for, 15diffusion dome for, 14diffusion panel for, 16–17Soft Screen for, 25softboxes for, 16, 38
speed rings, 40Sports Illustrated look, 24spot/speck removal, 192square photos, 197stands
background, 36flash, 19reflector, 66
stepladders, 133Story, Derrick, 142, 196streams, photos of, 113strobes. See studio strobesStrobist website, 17studio, 35–68
backgrounds in, 36, 57, 59, 62–63black flags in, 68continuous light in, 44fans used in, 54feathered light in, 55flash lighting in, 37–43hair lights in, 48–51light meters used in, 46–47manual mode used in, 52off-camera flash in, 60positioning lights in, 53reflectors in, 58, 64–68resource on lighting in, 67shooting tethered in, 61softboxes in, 38, 45, 56
studio strobes, 37–43firing, 42–43gear recommendations, 37modeling light and, 41off-camera flash vs., 37positioning, 53softboxes for, 38speed rings for, 40types of, 41umbrellas for, 39wireless, 43See also flash
sunlight, 75, 79, 96sunsets
flash portraits and, 32secret to shooting, 104twilight photos and, 114
super-fast lenses, 137, 163sync cords, 7, 43
223
Index
Ttelephoto lenses, 78, 175tethered shooting, 61theme assignments, 165TIFF mode, 182travel photos, 151–165
background music for, 164batteries for, 160cityscapes, 157famous landmarks, 158–159food shots, 161GPS units for, 162high vantage points for, 164hotel room view for, 156minimizing gear for, 152, 160overcast days and, 155people included in, 153–154shots of yourself in, 162super-fast lenses for, 163theme assignments for, 165
tripodscamera bags used as, 163macro photography and, 168travel photography and, 152
twilight photos, 114
Uumbrellas, 39
Vvertical orientation, 73, 74vertical shutter button, 74vibration reduction, 168video training clips
black & white conversions, 140Canon wireless flash setup, 12distracting “junk” removal, 119Nikon wireless flash setup, 10See also Web resources
Wwater
filtering reflections on, 105macro photography and, 175shooting streams of, 113
weatherlandscape photos and, 113, 122travel photos and, 155
Web resourcesabout this book, 2Digital ProTalk blog, 148gear recommendations, 3Quantum flash info, 8Strobist website, 17travel photography, 153wedding shot lists, 128See also video training clips
wedding photos, 127–148backlighting, 131battery packs for, 144black-and-white, 140bridal portraits, 131, 142, 143, 146church setting in, 139creating a shot list, 128equipment backups for, 129, 144flash used for, 136, 138, 141info for professionals, 148low light lens for, 137outdoor wedding tip, 145RAW mode used for, 135removing noise from, 145second shooter of, 134silencing camera beep for, 130stepladder for, 133two-camera strategy, 132“unofficial” shooters of, 142zoom effect, 147
WHIMS acronym, 184white backgrounds, 59, 63white balance setting, 114, 135white reflectors, 64wide-angle lenses, 76windblown effects, 54window light, 88–90winter time photos, 120wireless flash, 8–12
Canon camera, 11–12, 28channel settings, 12Nikon camera, 9–10, 27second flash units, 26–28studio strobes, 43
ZZiser, David, 139, 142, 143, 146, 148zoom effect, 147Zucker, Monte, 90