Embed Size (px)
Citation preview
The Dealer’s Guide:How to stage and
photograph your vehicles
UPDATED2018
AutoRevo - The Dealer’s Guide: How to Stage and Photograph Your Vehicles - February 2018 - 2
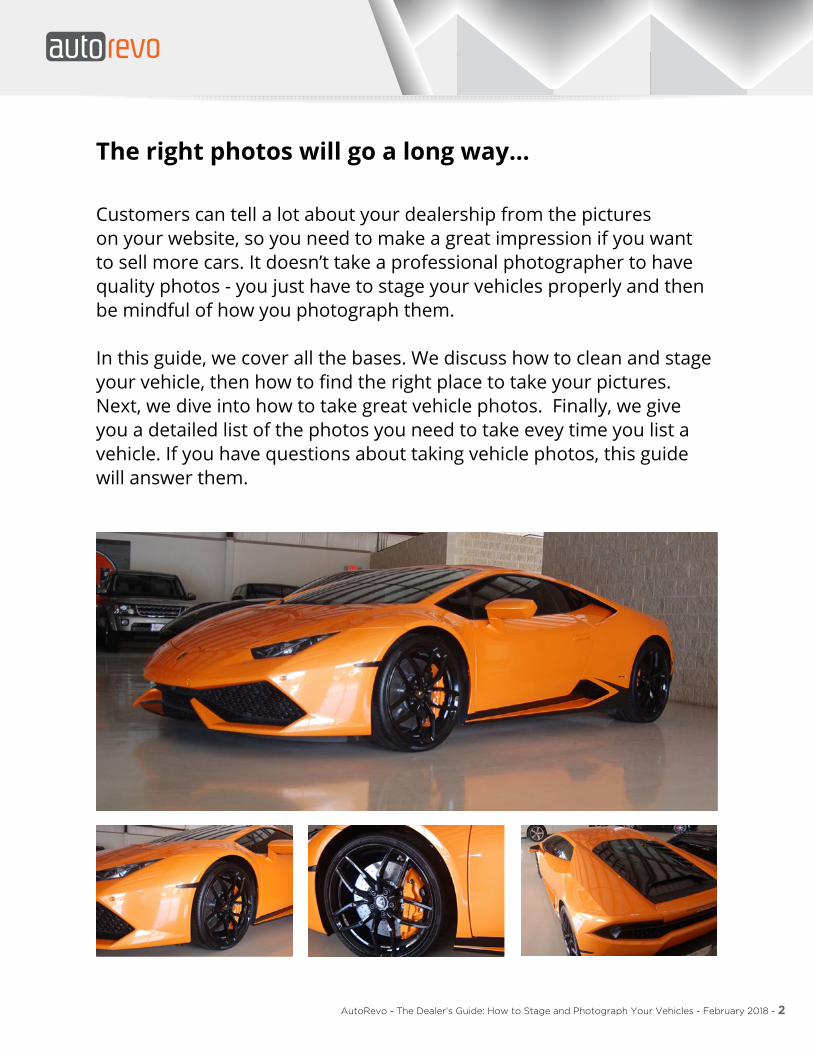
The right photos will go a long way...
Customers can tell a lot about your dealership from the pictures on your website, so you need to make a great impression if you want to sell more cars. It doesn’t take a professional photographer to have quality photos - you just have to stage your vehicles properly and then be mindful of how you photograph them.
In this guide, we cover all the bases. We discuss how to clean and stage your vehicle, then how to find the right place to take your pictures. Next, we dive into how to take great vehicle photos. Finally, we give you a detailed list of the photos you need to take evey time you list a vehicle. If you have questions about taking vehicle photos, this guide will answer them.

AutoRevo - The Dealer’s Guide: How to Stage and Photograph Your Vehicles - February 2018 - 3
Step One: Get your vehicle camera-ready.
It seems like a no-brainer, but we see so many dealers who get this part wrong. If you want to sell your cars, you need to make them look nice for the photos. We’re not talking just a car wash here - you need to clean everything.
Make sure you really clean that vehicle:• Make the metal shine.• Clean the windows inside and out.
Wipe off any water spots.• Thoroughly clean the headlights.
If the light cover is cloudy, use a cleaning kit to get the grime off.
• Vacuum the floors and any and all fabric. Vacuum lines are good: they show that the vehicle is clean.
• Wipe down all hard surfaces inside, including door pockets and cupholders. (Get those crumbs and dust out of the corners with a soft, fine-point tool.)
• Try your best to remove stains. You might not fully succeed, but untreated stains make a car look older and neglected.
• Snow is inevitable in some locations. Do whatever you can to remove as much of the snow and ice as possible from the car’s roof and hood. Absolutely do not take pictures of random tools and ice scrapers sitting on top of your vehicles.

AutoRevo - The Dealer’s Guide: How to Stage and Photograph Your Vehicles - February 2018 - 4
It’s clean now, but does it look drive-away ready? If it doesn’t belong on the car or in the car, get rid of it. Again, this should be common sense... but we still see far too many dealers shooting photos with obvious problems that could have been easily avoided.
• Remove any bumper stickers or vanity license plate covers.
• Remove trash.
• Remove the paper floor mats.
• Don’t put air fresheners in your vehicles. Those tacky cardboard shapes hanging from a string look cheap and give the impression that the vehicle smells.
• Keep your personal items out of the picture (like your cell phone and drink).

AutoRevo - The Dealer’s Guide: How to Stage and Photograph Your Vehicles - February 2018 - 5
Step Two: Fix things that are obviously broken.
Even if the vehicle is so clean you could perform surgery in it, it’s not ready for customers if it has mechanical problems. Think about what shows up in your photos - if the “check engine” light is on or if a side mirror is broken, do you think that potential buyers will want to call?

AutoRevo - The Dealer’s Guide: How to Stage and Photograph Your Vehicles - February 2018 - 6
Step Three: Find a location.
You need to shoot in a location that’s well lit, uncluttered, and clean. A cruddy background can make the most awesome cars look cruddy, too. If you’re selling high-end sedans, don’t take pictures of them in an ugly parking lot or in front of run-down buildings. If your lot is too crowded, drive up the street and shoot your cars at a park.
Keep the following in mind when deciding where to take your vehicle photos:
• Avoid locations where people might walk into the shot or be reflected in the paint job.
• Stay away from trash and dumpsters.
• Make sure damaged vehicles can’t be seen reflected in the paint job or in mirrors.
• Take pictures in front of a plain background, like a tall wooden fence, a building, or greenery. Find pavement that isn’t covered in oil stains.
• If you can’t shoot at a nearby park or empty parking lot, isolate the vehicle somewhere on your lot that’s inviting. We know you can’t avoid every obstacle, but you need to try to make your photos as inviting as possible.

AutoRevo - The Dealer’s Guide: How to Stage and Photograph Your Vehicles - February 2018 - 7
Step Four: Take your pictures at the right time.
It’s best to shoot on an overcast day because you can more easily avoid shadows and glare. On sunny days, try for mornings before 11am and evenings after 4pm. If you absolutely have to shoot at noon on a cloudless day, work around the direct light by repositioning the car and keeping the sun behind you as much as possible.
Step Five: Take great pictures.
Remember these simple rules:
Use the same background.Using the same background for all your pictures helps the viewer pay attention to the vehicle and not get distracted. It also helps to brand your dealership.
Showcase content.Take pictures of special features, major selling points, and anything you’d want to point out to a customer. If there’s anything special, make sure you shoot it!
Don’t take blurry pictures.There’s no excuse for posting blurry, out-of-focus pictures. Potential customers will think you’re lazy, and that’s not going to get you any leads. Small screens on cameras sometimes make it hard to tell when a photo is in focus so zoom in and check if there’s any question before moving on to the next shot.

AutoRevo - The Dealer’s Guide: How to Stage and Photograph Your Vehicles - February 2018 - 8
Don’t crop the edges of the vehicle.Don’t randomly crop off the roof or the front of the vehicle.
Center the vehicle horizontally.The car is the subject of your photo, it should be centered in the frame every time.
Keep the vehicle and the horizon level.Cars shouldn’t look like they’re going uphill or downhill unless they actually are. Always make sure the horizon is level.
Make sure the photo is properly lit.If there’s too much light or not enough, potential customers won’t be able to see the details.
Don’t let anything come between you and the car.Just in case you were wondering, you shouldn’t take pictures through a chain-link fence.
Take horizontal photos with the same aspect-ratio.It is important that your photos are a uniform size and orientation. Otherwise, your thumbnails appear unorganized and random.

AutoRevo - The Dealer’s Guide: How to Stage and Photograph Your Vehicles - February 2018 - 9
Aspect-ratio is the width : height relationship of a photo and technology is moving away from the formerly standard 4:3 ratio to the wider 16:9 size. To simplify things, use the same camera to shoot all of your vehicles and only hold the camera horizontal.
Now take your pictures!You should always shoot 50 to 60 photos of every vehicle, every time. If you think that sounds like a lot, it’s not - it’s the industry standard. If you take 12 photos but your competitors take 50, who do you think a potential customer is going to call?
Here’s a suggested photo list, in the order we recommend taking them:
Driver’s side front anglewith branding overlay
Driver’s side front angle Driver’s side
Driver’s side rear angle Rear

AutoRevo - The Dealer’s Guide: How to Stage and Photograph Your Vehicles - February 2018 - 10
Rear split shot (left) Rear split shot (right) Back up camera(content shot)
Rear interior Power lift gate button(content shot)
Passenger side rear angle
Passenger side Passenger side front angle Emblem(content shot)

AutoRevo - The Dealer’s Guide: How to Stage and Photograph Your Vehicles - February 2018 - 11
Front Front split shot (left) Front split shot (right)
Engine - passenger side Engine - front Engine - driver’s side
Driver’s front interior Driver’s front door panel Driver’s front interior(angled backward)
AutoRevo - The Dealer’s Guide: How to Stage and Photograph Your Vehicles - February 2018 - 12
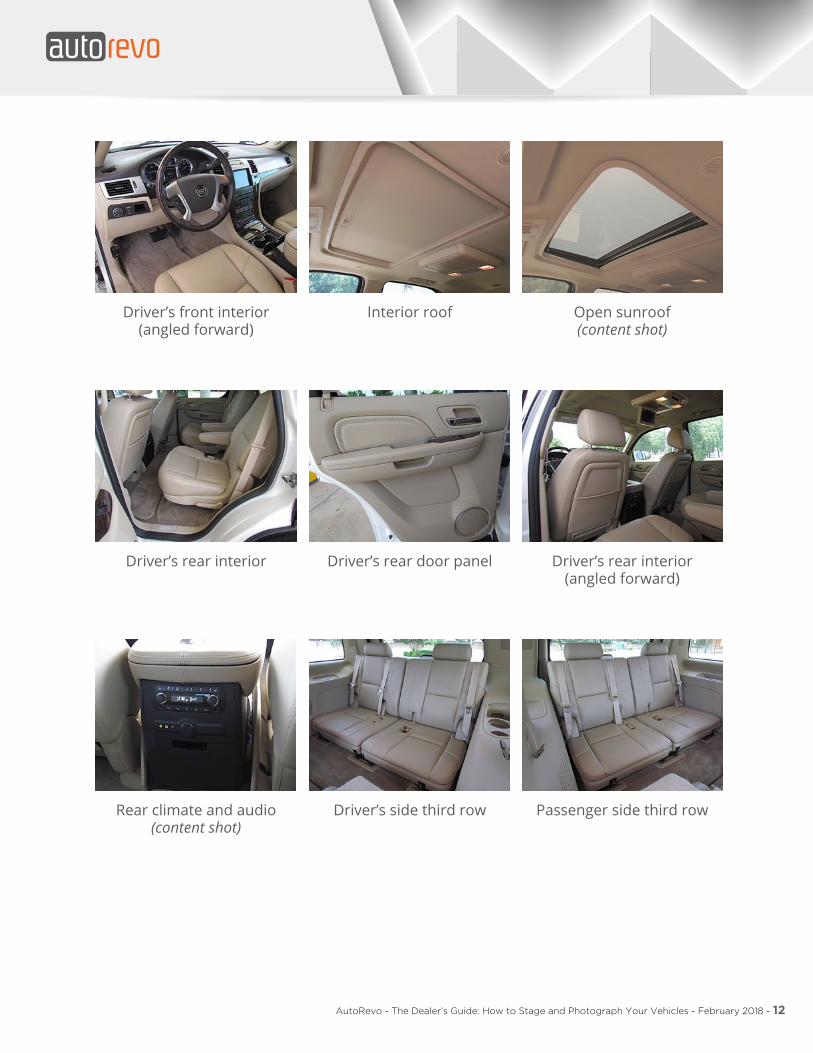
Driver’s front interior(angled forward)
Interior roof Open sunroof(content shot)
Driver’s rear interior Driver’s rear door panel Driver’s rear interior(angled forward)
Rear climate and audio(content shot)
Driver’s side third row Passenger side third row

AutoRevo - The Dealer’s Guide: How to Stage and Photograph Your Vehicles - February 2018 - 13
Passenger rear door panel Passenger rear interior Passenger rear interior(angled forward)
DVD system(content shot)
Passenger front door panel Passenger front interior
Passenger front interior(angled backward)
Passenger front interior(angled foward)
Passenger front interior(from inside)

AutoRevo - The Dealer’s Guide: How to Stage and Photograph Your Vehicles - February 2018 - 14
Center front interior(from inside)
Center front interior zoomed(from inside)
Driver’s front interior(from inside)
Navigation system(content shot)
Rear camera view(content shot)
Steering wheel(content shot)
Gauge cluster(content shot)
Driver’s side front wheel Driver’s side front tread

AutoRevo - The Dealer’s Guide: How to Stage and Photograph Your Vehicles - February 2018 - 15
Driver’s side rear wheel Driver’s side rear tread Passenger side rear wheel
Passenger side rear tread Passenger side front wheel Passenger side front tread
Books, keys, accessories Key fob(content shot)
VIN sticker
AutoRevo - The Dealer’s Guide: How to Stage and Photograph Your Vehicles - February 2018 - 16
We hope you found this guide resourceful ...
AutoRevo is dedicated to helping auto dealers succeed.
This vehicle photo guide is one of many free guides that we provide for our dealers. We’ve worked with thousands of dealers through the years, and we want to share our knowledge and experience to help them be the best they can be.
We are driven by the dealers and not by the developers.
For dealers. By dealers.