Embed Size (px)
Citation preview
The D2H by Moose Peterson / copyright 2006 This is the original, unedited text 22 July, 2003 the D2 generation began with the D2H. Are you ready? I wasn’t!
It was pouring rain inside and out. I stepped into the ballroom to the Nikon Safari at PhotoShop World in Miami. Before I knew it, I was being warmly greeted by Richard LoPinto from Nikon and a D2H being placed in my hands. Wow…what a greeting! I soon had Nikon’s top three folks showing me the D2H. I asked each three what was their favorite new features and I soon learned that the D2H just isn’t some fast shooting digital camera. I was really overjoyed to see that Nikon didn’t just try to keep up with the megapixel race, but made a camera that solves real problems for real photographers! For the next two days, ever opportunity I had, I checked out the D2H to see what was new. With no instruction book to walk me through the new menus, I just looked at the options in amazement. Without ever taking one picture, I knew I had to have the D2H (what I fondly call the 2H)!
Before proceeding, it might help you understand what I’ve written here by understanding me. I’m a photographer, a wildlife photographer trained long ago when a photographer had to get it right, right from the start. Messing up composition, exposure or anything else technical meant your image had to go to a retoucher (this is long before PhotoShop) who charged lots of money to make right what should have been gotten right when the shutter went click. Needless to say this kind of incentive trains one really fast! I’ve not forgotten those lessons whether shooting conventional or digital!
A camera, conventional or digital, is a tool that allows us to communicate visually the world we see. In my short life, I’ve found that every tool from hammers to computers have their strengths and weaknesses. Professionals typically are those who can use these tools with their inherent traits and accomplish their tasks combining their skills and talents with the tools at hand. I consider myself a professional when it comes to photography and as such make tools do what I need them to do so I can communicate. For that reason, I’m always looking at the bright side even when a tool has a downside because my being able to communicate, and make a living depends on making the most of any tool.
Having shot exclusively digital since Dec 1999 with Nikon DSLRs, I’ve staked not only my communication efforts but financial welfare on Nikon and their digital technology. I’ve learned lots, shot lots and I can say without any hesitation that the D2H is by far the best digital DSLR I have ever had the privilege to shoot with. The quality of my images have risen once again a notch because of its new technology. What you’re about to read then is how I use the D2H to communicate visually through my photographs.
This text could be seen as a rewrite of the instruction manual. It could also be seen as user manual. Mostly, it’s a “get the most out of the D2H” manual by spelling out each D2H function. There is only so many ways of saying turn the camera on or off, but when it comes to maximizing White Balance or the new AF system, you’ll find the answers here. Like everything in photography, you’ll get the most out of this book by applying what works for you and ignoring the rest.
You’re probably wondering what my favorite new features of the 2H are, well..the battery and its removable, interchangeable cap, the Battery info screen and all of its features, the eyepiece locking mechanism, the new i-TTL flash and metering, Wi-Fi, RAW + Jpeg, and most of all 8 frames per second. Heck, I love it all!
I want to say thanks for the D2H testers around the globe who helped me unlock some of the D2H features! I was very fortunate that I could email questions out to nearly 30 D2H owners asking them to try this or that so I could quickly see if what I was finding could be duplicated on other bodies. I’ve never done this before but it was great fun besides verifying operation of key features. Thanks to you all!
D2H Specs Type of Camera: Lens-interchangeable digital SLR camera Effective Pixels: 4.1 million Image Sensor: JFET image sensor LBCAST, 23.3 x 15.5mm size, 4.26 million total pixels Recording Pixels: [L] 2,464 x 1,632-pixel / [M] 1,840 x 1,224-pixel
Sensitivity: ISO equivalency 200 to 1,600 (variable in 1/2, 1/3, or 1EV steps), Sensitivity can be extended by 1 or 2 steps beyond ISO 1,600 Storage System: NEF (12-bit RAW uncompressed or lossless compression), Exif 2.2 file (uncompressed TIFF-RGB or compressed JPEG) Storage Media: CompactFlashTM (CF) Card (Type I / II) and MicrodriveTM
Shooting Modes: 1.)Single frame shooting [S] mode: advances one frame for each shutter release 2.)Continuous high shooting [CH] mode: 8 frames per second (fps) [up to 40 (JPEG) / 25 (RAW:NEF) consecutive shots 3.)Continuous low shooting [CL] mode: 1 to 7 fps (selectable from menus) 4.)Self-timer mode: time duration can be set 5.)Mirror up mode: first press: mirror up, second press: release 6.)Playback mode: Menu mode 7.)PC mode: data transfer via personal computer 8)Interval timer (Intervalometer) mode provided White Balance:1.)Auto (hybrid with 1,005-pixel CCD, LBCAST image sensor and external Ambience Light Sensor) 2.)Manual (6 steps with fine tuning) 3.)Preset (5 settings) 4.)Color temperature setting in Kelvin (select from 31steps) 5.)White Balance Bracketing (2 to 9 frames adjustable in 10, 20, 30 MIRED steps) LCD Monitor: 2.5-in., 211,200-dot, low temp. polysilicon TFT LCD with white LED backlighting; Backlight/brightness adjustment available Playback Function: 1.) Full frame, 2.) Thumbnail (4 / 9 segments), 3.) One-touch zoom, 4.) Slideshow, 5.) Histogram indication, and Highlight point display Delete Function: 1) Card format, 2) All frames delete, 3) Selected frames delete Video Output: NTSC or PAL (switchable) Interface: USB 2.0 (Hi-Speed) (Mini-B connector) FTP file transfer available with optional Wireless Transmitter WT-1 (iIEEE 802.11b) Voice Memo: Record mode: Automatic or manual recording at shooting or playback, Max. Recording time: 60 seconds Playback mode: Built-in speaker or Audio/Video cable File format: Mono WAV file Text Input: Up to 30 characters of alphanumeric text input is available with LCD monitor and multi-selector; stored in Exif header Usable Lenses: 1.)AF Nikkor (including AF-S, DX, VR and D-/G-type) : All functions possible 2.)D-type Manual-Focus Nikkor: All functions except autofocus and some exposure modes available 3.)AF Nikkor other than D-/G-type: All functions except 3D Color Matrix Metering and 3D Multi-Sensor Balanced Fill-Flash possible 4.)AI-P Nikkor: All functions except 3D Color Matrix Metering, 3D Multi-Sensor Balanced Fill-Flash and AF possible 5.)Non-CPU AI Nikkor : Usable in [A] or [M] mode with Matrix-Metering, Center-Weighted and Spot metering available. Indication of aperture No., after user inputs the aperture f/No. and focal length f=mm by multi-selector operation. Electronic Rangefinder usable with maximum aperture of f/5.6 or faster Picture Angle: Approx. 1.5x focal length in 35mm [135] format equivalent Viewfinder: Optical-type fixed eye-level pentaprism; Built-in diopter adjustment (-3 to +1 m-1), Eyepiece shutter provided Eyepoint: 19.9mm (at -1.0 m-1) Focusing Screen: B-type BrightView Clear Matte Screen III; Interchangeable with optional Finder Screen E with grid Viewfinder Frame Coverage: Approx. 100% Viewfinder Magnification: Approx. 0.86x with 50mm f/1.4 lens set to infinity and -1.0 m-1
Reflex Mirror: Automatic, instant-return type Lens Aperture: Instant-return type, with depth-of-field preview button Autofocus: TTL phase detection, Nikon Multi-CAM2000 autofocus module;
Detection range: EV -1 to +19 (ISO 100 equivalent, at normal temperature) Lens Servo: 1.) Single Servo AF [S], 2) Continuous Servo AF [C], 3) Manual focus [M] Focus Tracking automatically activated by subject's status in [S] or [C] AF Focus Area: Selectable from 11 focus areas AF Area Mode: 1.) Single Area AF, 2.) Dynamic AF with Focus Tracking and Lock-onTM, 3.) Closest Subject Priority Dynamic AF, 4.) Group Dynamic AF Focus Lock: Focus is locked by pressing AE/AF Lock button or lightly pressing shutter release button in [S] AF. Exposure Metering System: TTL full-aperture exposure metering system; 1.) D-/G-type Nikkor lenses support 3D Color Matrix Metering using the 1,005-pixel CCD while other AF Nikkor lenses with built-in CPUs support Matrix Metering (Non-CPU lenses require manual input of lens data) 2.)Center-Weighted Metering (75% of the meter's sensitivity concentrated on the 8mm dia. circle) 3.)Spot Metering (3mm dia. circle, approx. 2% of entire frame); metering position can be linked to the focus area when using Nikkor lenses with built-in CPU Exposure Metering Range: 1.)3D Color Matrix Metering: EV 0 to 20 2.)Center-Weighted Metering: EV 0 to 20 3.)Spot Metering: EV 2 to 20 [at normal temperature (20C / 68F), ISO 100 equivalent, f/1.4 lens] Exposure Meter Coupling: CPU and AI (Automatic maximum aperture Indexing) Exposure Mode: 1.)[P] Programmed Auto (Flexible program possible) 2.)[S] Shutter-Priority Auto 3.) [A] Aperture-Priority Auto 4.)[M] Manual Exposure Compensation: Exposure compensated in +/- 5.0 EV range in 1/3, 1/2 or 1 EV steps Auto Exposure Lock: Detected exposure value locked by pressing AE-L/AF-L button. Number of shots: 2 to 9 frames Compensation steps: 1/3, 1/2, 2/3, or 1EV steps Shutter: Electromagnetically controlled vertical-travel focal-plane shutter, 30 to 1/8,000 s and bulb Sync Contact: X-contact only: flash synchronization up to 1/250 second Flash Control; 1.)New Creative Lighting System: i-TTL Balanced Fill-Flash controlled by five-segment TTL Multi Sensor with Nikon Speedlight SB-800: Advanced Wireless Lighting, FV (Flash Value) -lock, Flash Color Information Communication for Auto White Balance, Auto FP High-Speed Flash Sync, Modeling Flash 2.)D-TTL Balanced Fill-Flash: When used with the Speedlight SB-80DX / 50DX and in accordance with the mounted lens, five-segment TTL Multi Sensor control makes available 3D Multi-Sensor Balanced Fill-Flash, Multi-Sensor Balanced Fill-Flash, and Standard D-TTL Balanced Fill-Flash 3.)AA (Auto Aperture)-type Flash available when used with SB-800/80DX and lens with built-in CPU 4.)Non-TTL Auto Flash (A-type Flash) with a Speedlight such as SB-30 / 27 / 22S etc. Flash Sync Mode: 1.) Front-Curtain Sync (normal sync), 2.) Red-Eye Reduction, 3.) Red-Eye Reduction with Slow Sync, 4.) Slow Sync, 5.) Rear-Curtain Sync Ready-light: Lights up when flash fully charged with Speedlight SB-800 / 80DX / 50DX / 30 / 28 / 27 / 22S; blinks for full output warning Accessory Shoe: ISO 518 standard-type hot shoe contact; Safety lock mechanism provided Sync Terminal: ISO 519 standard terminal, lock screw provided Self-timer: Electronically controlled; Timer duration: 2, 5, 10, and 20 seconds Depth-of-field Preview Button: Stop-down lens aperture by pressing depth-of-field preview button Remote Control: Via 10-pin remote terminal Power Requirements: Rechargeable Li-ion Battery EN-EL4 (11.1V DC), Quick Charger MH-21, AC Adapter EH-6 Tripod Socket: 1/4 in. (ISO1222) Battery Monitoring System: The LCD monitor on the camera back displays the following information about the EN-EL4 battery: 1.) Remaining charge (%); 2.) No. of shots taken since last charge; 3.) Calibration status (Recommended/Not required); 4.) Battery life (5 stages)
Dimensions (W x H x D): Approx. 157.5 x 149.5 x 85.5mm (6.2 x 5.9 x 3.4 in.) Weight (without battery): Approx. 1,070g (2.4 lbs.) Supplied Accessories* Rechargeable Li-ion Battery EN-EL4, Quick Charger MH-21, Body Cap, Camera Strap AN-D2H, AV Cable EG-D2, USB Cable UC-E4, LCD Monitor Cover BM-3, Nikon View Software CD-ROM Optional Accessories: Wireless Transmitter WT-1, Extended Range Antenna WA-E1, AC Adaptor EH-6, Interchangeable Focusing Screen E, Antifog Finder Eyepiece DK-16A, Eyepiece Correction Lens DK-16C series, Speedlight SB-800 / 80DX / 50DX, Nikon Capture 4 software, CompactFlashTM card.
*Supplied Accessories may differ in each country or area CompactFlashTM is a trademark of SanDisk Corporation. Digital DEETM is a technology developed by Applied Science Fiction. Specifications and equipment are subject to change without any notice or obligation on the part of the manufacturer. Nikon D2H Major Features: Unparalleled Speed and Response
• Continuous shooting at 8 fps: Continuous shooting at 8 fps for up to 40 consecutive JPEG or 25 RAW (NEF [Nikon Electronic Image File]) full-resolution (2,464 x 1,632-pixel) images.
• 37ms shutter time lag: The 37ms shutter time lag is the shortest in the industry,* and gives the D2H a responsiveness that rivals that of the Nikon F5 professional film SLR.
• Instant power-up: The D2H is ready to take pictures the instant it is turned on.
*As of Jul. 2003. Breakthrough Image Sensing
• 4.1 effective megapixels • New Nikon DX format JFET imaging sensor LBCAST: Nikon's exclusive imaging sensor
features higher speed, lower power consumption, and minimal dark noise. The sensor's innovative design also eliminates the need to perform fixed pattern noise correction at power-up.
• Optical Low Pass Filter (OLPF): New, thinner OLPF effectively suppresses moire patterns. • New Multi-CAM 2000 Autofocus (AF) Sensor Module: The advanced high-speed, high-precision
11-area AF system with 9 cross-type AF sensors ensures quick response and sharp focus regardless of shooting conditions.
• 4 AF Area Modes: o Single Area AF o Dynamic AF with Focus Tracking and Lock-on TM o Closest Subject Priority Dynamic AF o Group Dynamic AF (New)
Innovative Image Processing
• Improved Processing Algorithm: The advanced image-processing engine features 3D Matrix Image Control and innovative technologies to deliver subtle color gradations, reduce false colors, and minimize the appearance of jaggies on diagonal lines and around color edges.
• Color Reproduction System: A choice of three color modes to best match different subjects, assignment and conditions: Mode I : Optimized for portraits and natural skin tones (sRGB) Mode II : Optimized to realize a wide color gamut (Adobe RGB) Mode III : Optimized for landscapes and flora colors (sRGB)
• New JPEG and RAW (NEF) Combination Filing System: The system enables simultaneous recording of RAW (NEF [Nikon Electronic Image File]) and JPEG data for the same shot to the camera's CompactFlashTM or MicrodriveTM media to optimize and accelerate workflow operations.
• Precise, easy-to-use Auto White Balance/Auto Tone Control System: The new metering technology combines three separate sensors to realize highly precise Auto White Balance (AWB) and Auto Tone Control (ATC). The system also features new easy-to-use preset WB controls.
o Nikon's acclaimed 1,005-pixel RGB Exposure/Color Matrix Metering Sensor performs direct through-the-lens (TTL) metering of the subject.
o The new LBCAST imaging sensor calculates the lighting characteristics of the actual image to be shot.
o The new external Ambience Light Sensor meters ambient light without being affected by the color of the subject, and distinguishes artificial light from natural light.
• Real-time noise reduction: High-performance real-time noise reduction can be accomplished in a single shot.
Rugged, Functional Design
• Lightweight and durable: The magnesium alloy body is lightweight, durable and compact, combining size and strength in a functional package appreciated by professionals. Dimensions (W x H x D): 157.5 x 149.5 x 85.5 mm / 6.2 x 5.9 x 3.4 in). Weight: Approx. 1,070 g (2.4 lbs.) plus battery (180 g / 6.3 oz.)
• Weather-resistant: The body is specially sealed to be highly resistant to drops of water and dust. • Operational ease: The large buttons and controls are ergonomically designed and sensibly located
to facilitate access and maximize operational ease. • Reliable shutter unit: The shutter unit is built to endure over 150,000 cycles. • Extra-large 2.5-inch 211,200-pixel LCD monitor: Located directly below the viewfinder, the
high-resolution LCD monitor has a resilient tempered glass surface and offers clear viewing of menus, playback modes, One-touch Zoom, and the new on-demand information.
• Professional-design viewfinder: The eyelevel viewfinder provides virtually 100% frame coverage. • New lithium-ion battery system: The new Rechargeable Lithium-ion Battery EN-EL4 combines
light weight (180g / 6.3oz.), high energy capacity, and improved discharge cycle characteristics for extended battery life. Free of "memory effect," it can be recharged at any time.
• Voice memo: This new feature allows the photographer to record memos up to 60 seconds in length and play them back on the built-in speaker.
• Built-in interval timer: Time-lapse photography uses the D2H's new built-in interval timer.
Convenient Data Transfer
• USB 2.0 (Hi-Speed) interface • IEEE 802.11b Wireless Transmitter WT-1 (optional): The new wireless transmitter attaches to
the camera bottom and connects to the USB port for direct wireless transfer of images to any IEEE 802.11b compatible access point. Maximum range is approx. 150 m (500 ft) with Extended Range
Antenna WA-E1. A choice of three security protocols add data protection, while four transmission channels avoid interference and accidental firing.
• Integrated Nikon Software Solutions : o Nikon Capture 4 (optional): A comprehensive image-editing and remote camera control
package that fully supports RAW (NEF)*, TIFF and JPEG data. Among other features, the package offers Image Dust Off sensor dust and particle shade removal control; Digital DEETM scene-specific automatic dodge and burn control; and transformation of shots from the AF DX Fisheye-Nikkor 10.5mm f/2.8G ED lens to ultra-wideangle images.
o Nikon View 6: Versatile bundled software that simplifies and improves data transfer, as well as browsing and editing of image files.
*NEF images taken with the D2H are supported by Nikon Capture 4 only.
Creativity and Versatility
• Creative Lighting System: The new i-TTL system supports Advanced Wireless Lighting and versatile functions for up to four groups of Speedlights (3 remote i-TTL Speedlight groups controlled through the master SB-800). The new Nikon Speedlight SB-800 with i-TTL flash control features Flash Value Lock (FV Lock), AUTO FP High-Speed Sync, and Flash Color Information Communication. Also new is the Wide Area AF Assist Illuminator that is tailored to the D2H's new 11-area AF system. The D2H is also compatible with the D-TTL flash control of Nikon SB-80DX /50DX / (28DX) Speedlights, and with wired multiple flash control.
• Lens compatibility: The D2H is compatible with AF Nikkor lenses as well as the new DX Nikkor lenses. Designed specifically for Nikon DX Format digital SLRs, the DX line extends coverage to the ultra-wideangle range while providing high-performance optics in a lightweight, compact design. Two new lenses now join the DX Nikkor range: the AF-S DX Zoom-Nikkor 17-55mm f/2.8G IF-ED and the AF DX Fisheye-Nikkor 10.5mm f/2.8 G ED. New to the Vibration Reduction Nikkor Lens lineup is the AF-S VR Zoom-Nikkor 200-400mm f/4G IF-ED.
Wow….that’s a lot to take in, even more to actually analyze to see if the D2H is the right camera for you. And if you’re upgrading from the D1, D1X or D1H….integrating what you’ve learned and taking advantage of new might be a challenge. But I’ll be honest with you, I just picked up the D2H and started the make magic from the start. Let’s break it all down so you can get the magic of the D2H it change your world of digital photography! The EN-EL4 Battery
The adventure begins when you turn the D2H on. It’s interesting that the D2H’s battery, the EN-EL4, comes with a partial charge so you can technically begin playing with the camera from the get go. That’s not recommend though. While you don’t have to go through the 3x refresh like with the EN4 battery, you do need to charge the EN-EL4 before proceeding.
Note: The battery icon might blink for a couple of seconds when the D2H is turned on. It’s just calculating the battery charge and will soon stop blinking.
The new battery technology of the D2H, lithium-ion, is similar to that in the D100 which has been a proven performer. Lithium-ion is the latest battery technology to promise to belong lasting and “memory-free.” We won’t know for a year or more if it fulfills its promise in the D2H. Starting off from the beginning with a good battery regime is important though. Nikon and the D2H makes this a whole lot easier for you.
The EN-EL4 requires the MH-21 charger. The MH-21 is the latest in charger technology designed to maximize lithium-ion. The MH-21 has two rows of lights. The row on the right has CAL ON, 2h, 4h and
6h. The row on the left has 50% (adjacent to 2h), 80% (adjacent to 4h) and 100% (adjacent to 6h). The row on the right only applies when you are Calibrating a EN-EL4. The row of lights on the left is what you’ll be referring to the majority of the time. When you slip a totally exhausted battery into the charger, the 2hr light starts blinking. From a dead start (totally discharged battery) the EN-EL4 takes approximately 120minutes to charge. If there is any charge left in the battery, since you can charge the battery at any state of discharge, you might have any of the three green lights appear on the charger when you insert the EN-EL4. The left row of lights indicate how much of a charge is present in the EN-EL4. As the battery charges, the green lights progress until finally they hit 100%. Once the charger indicates 100%, I personally leave the EN-EL4 in the charger for at least another 15 minutes. Nikon has never made a charger that was 100% charged when the green light came on. I don’t think the MH-21 is any different.
The D2H has a battery icon on the top LCD screen, the icon contains five bars. When the first bar disappears, you have 70% charge left. When the second bar disappears you’re at 50% and when the third disappears you’re at 30% charge left. When you get down to one bar, you’re at less then 10% charge remaining. The last bar never disappears but at 1%, the battery indicator starts to blink and the D2H won’t fire. When the battery charge gets this low, a battery indicator appears in the viewfinder in the bottom left corner. In the past, this was are only means of tracking battery charge. Nikon changed that in the D2H.
In the Set Up Menu you’ll find Battery info. This is a way cool feature permitting you to know at any moment the exact state of your battery. When you access the Battery info (right Multi Select) four options of information are presented, Battery meter, Picture meter, Calibration and Charging life. The Battery meter as the name suggests tells you the in percentage the current state of your battery charge. This works really well and I find it a great way of learning just how the D2H uses power. Note: when you place a fully charge into the D2H, the Battery meter can read 99-100%.
The Picture meter informs you how many captures you’ve made on that charge. A capture is defined by the Picture meter by how many times the shutter fires and not how many files are written to the CF card (same as the Frame Counter). No matter if you’re shooting Fine mode or RAW +Jpeg, the Picture meter only counts one for each time the shutter clicks. The Calibration option tells you when it’s time to Calibrate your EN-EL4 battery (this is to clear the battery info more than condition the battery itself). No more guess work, no more sticky note reminders, the Calibration option lets you know when it’s time to calibrate your battery (of course, you have to check the Battery info to know this).
Charging life is the last item and it simply tells you how much overall battery life your EN-EL4 has left. With the D2H and this battery technology being new, we won’t know for a year or more just how many times we can charge the battery and how much life it does have. We can draw some inference from the D100 battery which is the same basic technology (but keep in mind its battery cannot be calibrated). My D100 battery is still going strong after nearly two years of constant use, I think we can expect the same from the EN-EL4.
The EN-EL4 battery is new and different in other ways. The battery is not connected to the end cap, Battery-chamber cover BL-1. The idea being that you can save money by just buying one BL-1 and a number of batteries to interchange with the BL-1 when it was time to insert the battery. This would also save you space when traveling and shooting. If you switch batteries between D2Hs, the Battery info displayed is particular to that one battery. The chip in the EN-EL4 is what keeps that info unique. Too way cool!
If you don’t check the Battery info, the MH-21 charge will also let you know when your EN-EL4 needs to be calibrated. When you insert the battery into the MH-21, if you watch the Calibration Light on the MH-21 (bottom light on the right) and it blinks for about ten seconds right when the battery is inserted, it’s time for Calibration (you don’t have to Calibrate technically at this time, though it is advised). Calibration is about an six hour process max. To Calibrate, depress the Calibrate button on the MH-21 for about one second. Now you can interrupt the Calibration by simply depressing the Calibration button which will start the normal charging process. Calibration is not the exact same thing as refresh with the EN4, it helps with maintaining accurate readout information in the Battery info options.
When not in use and inserted in the D2H, it is important the EN-EL4 has its clear white cap on the contact end in place. There are many reasons for this, the main one being that if the battery were in your pocket with no cap and you should accidentally short out the battery contacts with your keys, you could have a real rude awakening! You shouldn’t on accident or on purpose charge a fully charged battery. Cold
temperature performance of the EN-EL4 is pretty impressive. With the D2H mounted on a 600f4AFS in 17degree te mps, using the Battery info, the charge dropped only 3% in two hours of exposure to cold. That works for me!
With your EN-EL4 battery charged and inserted into your D2H, you’re ready to go! What kind of performance should you expect? Using a Lexar 4GB 40x WA card and using the Monitor sparingly to preview, shooting with an AFS lens shooting basic stuff, I routinely made 1300 RAW +Jpeg captures using only about 45% of the battery charge. During testing, I made 4609 Jpeg Fine captures and the battery meter read 18%. The only time I’ve taken the D2H to a 1% battery charge, the picture meter read 6121. That was capturing RAW +Jpeg Fine. Darn, that’s hot!
Note: The Digital Camera Battery cable for the D1 Family does not work in the D2H.
The Set Up Menu The start of getting the most out of your D2H logically starts with the Set Up Menu. To access the
Start Up Menu, depress the MENU button on the top left corner on the back of the D2H. If the menu that first comes up doesn’t say SET UP at the top, then depress the left Multi Select and then either top or bottom Multi Select until the SET UP menu appears. You have 17 options in the SET UP menu, Format, LCD brightness, Mirror lock-up, Video output, Date, Language, Image Comment, Auto image rotation, Voice memo, Voice memo protect, Voice memo button, Audio output, USB, Dust Off ref photo, Battery info, Wireless LAN and Firmware version. You access one of these by first depressing the right arrow on the Multi Select and then top or bottom arrow up and down through the selections and then right arrow to select the particular option (you navigate through the menus using the Multi Select, depressing up, down, right or left).
In selecting a particular item and then making a specific selection requires two things, knowledge of the system and knowledge of what you want. Often, problems with digital cameras come from not knowing what you want or how to get it. It is vitally important that you first, remember digital photography is still photography and then, remember that you can change your selections if things don’t work they way you want them to. One of the great advantages of digital is the ability to easily experiment.
Format is a vitally important part of digital photography. The first time you use a CF card and after each time you upload your images into your computer, you must format the CF card. You can either do this in the computer or in the camera. Formatting the CF card in the computer is now easier in that the D2H can work with FAT32 which is the default for Windows XP. However you do it, you must format after every time you upload images.
Using the Format menu in the Set Up menu is probably the slowest method of formatting. Using this method, you select Format and then right Multi Select. A screen appears that says WARNING! ALL IMAGES WILL BE DELETED and then two options, No and Yes. If you select No, your card will not be formatted. Depress the ENTER button to exit out of the options. If you want to format your card, Multi Select down selecting Yes, then depress the ENTER button to complete the action.
The fastest way to format your CF card in the camera is the two button method. To accomplish this, depress the MODE and Trash Can buttons at the same time (or nearly the same time) and hold them in for 3 seconds (can take longer is the camera is not active). When accomplished, For appears on the top LCD panel where normally the shutter speed / aperture appears. When it appears, stop depressing the two buttons. The For flashes, when it does, depress the exact same two buttons again at which time FOR appear in the frame counter. After a few seconds it disappears and the formatting process is done.
Note: this process takes longer and longer the bigger the CF card you use and longer yet if there are images on the card you’re erasing using the Format operation.
It is essential that during the formatting process you do not interrupt it. Do not remove the CF card, turn the camera off, remove the battery or unplug AC if hooked up during the formatting process. This can cause problems with your CF card.
Note: When you read the books, they say that formatting your card will erase all of your images. This is only partially correct. While after formatting you cannot put a CF card in a computer or camera and instantly see images, you can still recover images from a formatted card. Lexar media makes Image Rescue but my preferred is PhotoRescue. Either of these two programs can pull images from a CF card that has been formatted. They can also rescue images from a card that is not faithfully formatted and at some points
quits on you. PhotoRescue is only $39 and is one the best investments you can make if you’re a digital photographer!
LCD brightness effects the brightness of the Monitor. The default is 0. Personally, I’ve found to get a “feel” for the overall look of the final photograph, setting this to -1 helps me. This might help you to see the Monitor to check composition, but this does not help you with exposure or color decisions. Like most digital cameras, you cannot base your exposure or color decisions by viewing the Monitor on the D2H.
Note: changing this setting from the factory default will not improve your ability to determine correct exposure by just viewing the image on the monitor!
Mirror lock-up is a way of raising the mirror so you can clean the “CCD,” the LBCAST sensor. Technically, you’re cleaning the low-pass filter in front of the LBCAST sensor. This options is only active when you have the EH-6 AC adapter attached.
Note: The Digital Camera Battery with the D1 Family cable does not fit nor power the D2H so cannot be used with this feature.
Video output permits you to select the matching output for TV or VCR when you’re hooking the D2H up for viewing. You can view your images directly from the D2H through these mediums. You have two options, NTSC (default) or PAL. Highlight the option desired using by Multi Selecting and then select it by depressing the right arrow on the Multi Select.
Date is still one of the most important yet incorrectly set feature on digital cameras. I’m not sure how some photographers manage with the date and time not set, but they do. Personally, using the windows system, correct date and time stamp is essential. The Date and Time you set if written into both the file name as well as the EXIF. (The D2H is EXIF 2.2)
Setting the date is pretty straight forward. Select Date in the Set Up menu and right Multi Select. The first thing that is highlighted is the last two digits of the year. Toggle the Multi Select using the up and down arrow to make changes. To select next the month, they day, hour, minute and second, right Multi Select. Change the selected option with the up and down arrow. If you need to go back and change something and the menu is still active, just left Multi Select. The clock runs on a 24 hour format. 1am to 12 Noon are the numbers 1-12. One pm until midnight is 13-24. Once you have everything selected, depress the ENTER button to set your selections. If you’re in the process of making your selections and the menu/monitor should shut off, any changes you have made to the date / time will not be retained.
The D2H IB notes that the D2H doesn’t keep accurate time. Since reading that, I’ve kept track of the D2H clock with Atom Time and in 6 weeks, it lost only three seconds. The IB recommends constant checking of the clock, I’ve not found that necessary.
Language is a simple thing. The setting you select is the language in which all the menus will appear on the D2H. You have six options, Deutsch, English, Spanish (Espanol), French (Francais,) Japanese and Chinese. Highlight the language your prefer and then right Multi Select to set it.
Image Comment is a new feature to the pro line of DSLR Nikon cameras. It permits you to add a comment to your photographs, the comment being written to the EXIF text. You can include a 36 character comment/message, the first 12 characters of which being visible in fourth page of the photo info display. Entering comments is slightly tricky and you have to move kinda quick.
Note: if you’re looking for a copyright symbol for your first character, it’s not there. You’ll need to spell out the word copyright.
Start by selecting the Image comment in the Set Up menu and then right Multi Select. With this done a menu appears with three options, Done, Input comment and Attach comment. You down Multi Select to Input comment and then right Multi Select taking you into the comment text. You move through the available characters by depressing the up /down, right and left Multi Select. To move around the comment you’ve inputted, depress and hold down the checkerboard button and then depress the up / down, right / left Multi Select. The active space accepting input of a character will be blue.
Making a character selection requires only moving the white highlight box around using the up / down, right / left arrow on the Multi Selector. The character highlighted with the white box is the one that will be inputted when the center of the Multi Selector is depressed. To erase an active character selected by mistake, depress the Trash Can button. To move backwards to erase a character, depress the checkerboard button and while depressed, left Multi Select. (cursor movements are illustrated at the top of the Input comment menu as reminders.)
The very first seemingly missing character in the keyboard area is actually the space holder character. If you need to place a space between words, this is what you need to select. The other characters that are available are pretty clear cut. Most folks simply input their name. You have the option of using all caps or upper/lower case. Once you have inputted all that is desired, you must depress ENTER or you input will not be selected.
With your message completed and stored, you still have to do one more thing to input the comment into the EXIF. You need to call up the Image comment menu again and down Multi Select to Attach comment. When it is highlighted, right Multi Select placing a check mark to the left of Attach comment. You’re not finished yet. You need to now up arrow select until Done is highlighted. When it is highlighted, right Multi Select finishing the whole process. You can remove the Image comment by simply reversing this process which just stops the input and doesn’t erase what you’ve entered.
Auto image rotation is a long awaited feature that was included in the D2H seemingly at the last minute since it’s not in the instruction book (you should have read about it on an enclosed pink sheet). Auto image rotation effects the image only when you’re viewing the images on a computer, it does not rotate images on the D2H’s monitor.
You access Auto image rotation by first selecting the Set Up menu and then thumbing up or down until you reach and highlight Auto image rotation. Next right Multi Select and enter the Auto image rotation menu. You have two options, On or Off, select the one desired by highlighting it and then right Multi Select. There’s nothing more to it.
When Auto image rotation is selected, whenever you rotate the camera either clockwise or counter-clockwise the file is tagged so software previewers who recognize the tag (like DigitalPro, PhotoShop CS or NikonView) automatically rotate the file. This is a huge workflow aid! When you’re shooting in either CH or CL, the D2H tags the first image in the burst and not the rest. If for some reason during a burst, as in while you’re still shooting, you rotate the D2H from vertical to horizontal, the horizontal images may end up being tagged as verticals. If you’re shooting straight down or directly overhead, the internal switch might not pick up that you’re shooting vertically, so images might not be tagged. In those situations, you might have to rotate your previews in the computer manually like you’ve always done.
Voice memo is a means in which you can add a voice message to an image that has already been captured. It’s not like a video camera where you can talk while shooting and it records your voice. The image needs to be already captured to add a voice message. You can add a message up to 1 minute in length to the last image captured (when shooting and selected images when in Playback mode). To start, go the Set Up menu and then up or down Multi Select until Voice memo is highlighted. Once highlighted, right Multi Select to enter the Voice memo menu. You have three options in the Voice memo menu, Off, On (auto and manual) and Manual only.
Off is obvious, it turns the Voice memo off. On (auto and manual) is not obvious but operation is quite simple. Operation of the On (auto and manual) option depends if recording when still shooting or just viewing your images in Playback mode. Lets start with when you’re still shooting.
When you’re shooting, you can add a voice memo to the very last images captured. When you’ve selected the On (auto and manual), you can record a message to the maximum length of time you’ve selected. To select a record time, right Multi Select so On (auto and manual) has been highlighted. This brings up another menu with times, all in seconds, of 5s, 10s, 20s, 30s, 45s, and 60s. Highlight the desired time and then right Multi Select to complete. With this all accomplished, once you take your finger off the shutter release you can start recording a message for the length of time selected.
When you have voice memo activated, a microphone symbol is present in the top right of the viewfinder. The Rear Control Panel also indicates when the voice memo is activated. When activated, on the far right you’ll see REC and below it AM (when in On (auto or manual) mode). When the D2H is recording, a microphone symbol flashes between REC and AM and you’ll see the timer counting down how many seconds you have left to record to the far left.
When recording, a microphone symbol flashes inside the viewfinder as well in the top right corner. When recoding, you can either let the camera stop itself or you can manually stop the recording by depressing the microphone button on the back of the camera. (If you have image review tuned on (Playback menu > Image review > On) then you cannot record a voice memo with this setting.)
You can also record a message on images after the shooting is done, Playback mode. Simply depress the Monitor button and if in Thumbnail view, highlight the image to attach the voice memo. If in single image mode, you’re all set. Depress the microphone button for a least one second until the red microphone icon appears in the top left corner of the preview. Once the red icon is present, start recording and the counter will count down how much time you have left to record. You can stop the recording at anytime by depressing the microphone button. When successful, a music note icon appears in the top left corner of the image.
Once you made your voice memo, it will playback when you depress the monitor button and then depress the microphone button (you have to be sure you’ve selected Set Up menu> Audio output > Via speaker >volume, first.). When the voice memo is playing, the white music note symbol in the top left corner of the image turns green. You can delete the voice memo by simply depressing the Trash Can button, and thumbing down to highlight Sound only. Once this is done, you can rerecord a message if you so desire.
When in On (auto or manual) then, the voice memo automatically starts recording after the last image was captured or manually when you depress the microphone button. Either action records the voice memo and saves it to the CF card as a .wav file. The other option in the Voice memo menu is Manual only. When in Manual only, the voice memo is only recorded when the microphone button is depressed. You have a maximum still of 1 minute; the counter starts at 60 and counts down. You stop the voice memo by depressing the microphone button. Any recording can be stopped no matter how you initiate the recording by simply depressing the shutter release, menu or monitor buttons.
When making some changes to the options, for example turning off On (auto and manual), the icons in the rear control panel and the viewfinder do not instantly reflect the changes. Not until you either take another image or turn the camera on or off do the icons all reflect current settings.
You can change some of this operation based on what you’ve selected under Set Up menu >Voice memo button. You have the option of Press and hold or Press to start/stop, both of which are pretty self explanatory.
(Note: you cannot attach a voice memo to a Dust Off Ref Photo.) Voice memo protect option protects a recorded voice memo from being overwritten when you’re
shooting since voice memos cannot be overwritten in Playback mode. Sorry, but this seems to be a bit of a goofy option to me. If you take a photo and record a message and before you actually look at the image on the monitor (because you cannot overwrite a message in Playback) and you happen to depress and hold in the microphone button again, this option will protect that recorded message. This option does not protect a voice memo from being deleted via the Trash Can delete button. To access this vital function, go to Set Up menu and Multi Select up/down to Voice memo protect and highlight it. Once highlighted, right Multi Select either On or Off. With On selected, you cannot overwrite a voice memo, with it Off, you can.
Voice memo button can be changed to function in one of two ways. You access it by selecting Set Up menu and then up or down Multi Select to Voice memo button, then right arrow to access the menu. You have two options, Press and hold and Press to start/stop. This is pretty clear cut. With Press and hold selected, you have to depress and hold down the microphone button to effect the options mentioned under Voice memo. The Press to start/stop option permits you to depress the microphone button to start the voice memo operation and then depress the microphone button again to stop it.
Audio output is how you select the way in which you’ll hear your voice memo. You get there by going to Set Up menu and then up or down Multi Select highlighting the Audio output option. You right Multi Select to enter the menu where you can select Via speaker (the one built into the D2H), Via Video Out (when you have the D2H hooked up to a TV/VCR and you’re showing images) or Off. I think the three options are pretty self explanatory. The one exception is when you select Via speaker, you right Multi Select taking you into a menu to select speaker volume, -2 to +2.
USB is an important setting so your D2H can communicate with your computer. The selection you make is based on the operating system of your computer. To set it, access the Set Up menu, up or down Multi Select to the USB so it is highlighted and then right arrow select it to enter the menu. You have the options of Mass Storage or PTP. If you’re using Nikon Transfer and using either Windows XP or running Mac OS X, you can have it set to Mass Storage or PTP. If you’re using Nikon Transfer with Windows
2000, ME or 98 of Mac OS 9, you need to have it set to Mass Storage. If you’re using any of these operating systems and you’re connecting the D2H using Nikon capture 4.1, select PTP.
Dust Off ref photo is a method of removing “dust” specs from NEF files only using Nikon Capture 4.1. In this process, the D2H takes a “blank” (NDF) image which it used by Nikon Capture to determine dust specs and then remove them. To access this feature, head to Set Up menu and the up or down Multi Select until Dust Off ref photo is highlighted to select.
You can only use this feature with a lens, preferably 50mm or longer that has a CPU. If you have a zoom attached, zoom out to the longest focal length. Now call up the Dust Off ref photo menu and right Multi Select where a message appears, “Take photo of featureless white object 10cm from lens. Lens will be set to infinity.” At this time, REF appears on both LCD panels and in the viewfinder. (The approximate distance of 10CM is four inches.) As for a white, featureless object, I simply create a white background in PhotoShop CS and shoot it. Whatever white object you use, be sure it fills the viewfinder. It’s preferable that this procedure be taken as near the time you took the actual photo to be the most effective. Since camera with dust problem typically has dust that moves about, taking the photo later rather than sooner make the process less dependable.
With an autofocus lens, the D2H automatically focuses to infinity. If using a manual focus lens (must have a CPU) or the lens/body is set to manual focus, you must focus at infinity. Next, close the lens down to the smallest aperture (largest number). With the D2H four inches from the white, featureless object, start the process with the menu and then depress the shutter release. A photo is taken that when viewed on monitor appears to be a checkerboard pattern. You cannot view the NDF capture on any image browsing software.
If the white, featureless object is too bright or too dark, a message INAPPROPRIATE EXPOSURE CONDITIONS appears. You have to take appropriate measures to remedy the exposure problem before taking the next NDF. NDF’s are a Jpeg, Fine, large file. As for actually merging the NDF and captured image in Nikon Capture, refer to the Nikon Capture manual.
Battery info is one of the way cool new features in the D2H. This menu gives you up to date battery state information. To access, head to the Set Up menu and up or down Multi Select until Battery info is highlighted. Right Multi Select to enter the Battery info dialog. You’ll now see four options, Battery meter, Picture meter, Calibration and Charging life. Battery meter tells you exactly the percentage of charge you have left. Picture meter informs you of how many images you’ve captured on that charge. Calibration (you can think of is as refresh) lets you know if it’s time to calibrate the battery. And Charging state informs you the overall condition of the battery and if it’s time to buy a new one. This is one great new feature in the D2H! (refer to EN-EL4 battery, pg.# for more info)
Wireless LAN is only active when the WT-1a is attached. This is wonderful unit, once working. Getting the WT-1 up can going is a book in itself. While it might seem clear cut in getting it set up to talk with your computer, I personally spent four days struggling with it when I finally called Nikon Tech Support. They then spent another five hours over two days helping me figure out the exact order of things to make it work. This is not a reflection on the WT-1 but just the current state of computer, networks and all the possible variables. I can honestly tell you that once it’s up and going, it’s too way cool to describe!
You can do yourself a big favor by not using the Nikon Configurator program but using Thomas Sapiano’s ITP (http://66.34.100.243/itp/index.html). ITP takes care of the FTP at the computer side and the Configure WT-1 takes care of the WT-1 side. With a couple of clicks, you’ll be up and going and not going through the trouble I went through to use this cool tool!
A not of trivia, the setting you enter into the D2H for the WT-1 reside with the WT-1. When you attach the WT-1 on one D2H and then attach it to another, the settings will remain the same. The WT-1 has had one firmware update, so keep checking the Nikon website for future firmware updates.
Firmware version is user upgradeable. I highly recommend you check the Nikon website once a month to keep up with the latest updates (http://www.nikonusa.com/template.php?goingto=dtc_home). You’ll download the firmware from the web onto a CF card. You’ll then upload the update to the D2H via the CF card and the instructions that will be furnished at the time of the firmware update.
Moose’s Setting for the Set Up Menu
Format --
LCD Brightness -1 Mirror Lock-up OFF Video mode NTSC Date Language En Image comment ON Auto image rotation ON Voice memo OFF Voice memo protect OFF Audio output A/V-out USB P Dust Off ref photo-- Battery info -- Wireless LAN Firmware Version --
Shooting Menu The next obvious thing to program in the D2H is the Shooting Menu. The Shooting Menu has some
new cool features and some delightful new twists on old features. In either case, setting them correctly for your style of photography can greatly increase your success with the D2H. You have fourteen options under the Shooting Menu: Shooting menu bank, Reset shooting menu, Active folder, Image quality, Image size, Raw compression, White bal., ISO, Image sharpening, Tone compensation, Color mode, Hue adjustment, Intvl timer shooting, Non-CPU lens data. You access one of these by first depressing the right arrow on the Multi Selector and then top or bottom arrow up and down through the selections and then right arrow to select the particular item. (The Up, Down, Left & Right Multi Select is how you get in and out of the menus.)
Shooting menu bank provides you the ability to have a maximum of four banks of unique D2H Shooting Menu settings to be recalled and used as fast as you can access the menu (does not effect Custom Setting banks). The idea behind this is you can have one bank of specific settings for sports, another for portraits and perhaps another for some other specialized setting needs. Changes you make to one bank of settings doesn’t effect the settings in another bank, they are each unique onto themselves. You select a bank by heading to Shooting Menu and then right and down Multi Select until Shooting menu bank is highlighted. You then right Multi Select and then down Multi Select to choice the bank you which to either program or use.
The default bank is A, this the bank that most photographers have programmed and have saved all their settings to. The other three banks, B, C and D are also available to be programmed with different settings. You can change just one setting or all of them and save them to a different bank. Just be sure that you have selected a different bank (right/down/right Multi Select) when start your programming so you don’t overwrite previous settings for an established bank of settings.
What’s cool with the D2H is you can “rename” a bank (actually, it’s a subtitle). This is done by highlighting Shooting menu bank, right Multi Select, down Multi Select to highlight ABC Rename, right Multi Select, highlight the bank to be ‘renamed” and then right Multi Select again. This brings up the comment keyboard.
You “rename” a bank the same way you enter a Image comment (ref to Set Up menu pg.#). You can enter any name you want up to 20 characters long. Don’t freak when you look at the Shooting Menu > Shooting menu bank, you will only see A, B, C, D. You will only see your “rename” when you right Multi Select with one of the four banks highlighted (you will also only see A, B, C, D on the rear panel). This gives you the ability to give a bank a name that you can use as a reminder what settings you have in that bank. For example, I renamed A bank Wildlife as a reminder what settings I’ve programmed into that bank (what you see listed at the end of this section).
Reset shooting menu permits you to reset Shooting Menu settings for the selected shooting bank. Select Shooting Menu and then Multi Select up or down to highlight Reset shooting menu and the right
Multi Select to the No / Yes menu. Prior to using this option, you need to go to Shooting menu bank and select the bank you want to reset. These are the defaults you’ll be resetting the Shooting Menu to:
Image quality – Jpeg Normal Image size – Large Raw compression – Comp. NEF (Raw) White bal. - Auto ISO – 200 Image sharpening – Auto
Tone compensation – Auto Color mode – I (sRGB) Hue – 0 Intvl Timer – Now, 00:01:00, 1, 1, Off Non-CPU lens data – N/A, N/A
Note: if you use the Two-Button Reset option, just these Shooting Menu options are returned to their default settings (for current bank) Image quality – Jpeg Normal, Image size – Large, White bal. – Auto, ISO – 200
Active folder gives you the option of selecting the folder where your newly captured images are stored. Head to the Shooting Menu and then up or down Multi Select until Active Folder is highlighted. When you right Multi Select, a menu with two options appears, New, Select folder. When you highlight New and then right Multi Select a dialog appears with the next folder number. You can either right Multi Select and accept the folder number or up/down Multi Select to change the number. Right Multi Select sets the folder number you’ve created.
When you highlight Select Folder and then right Multi Select, a list of current available folders appears. These are folders on the CF card, not in the D2H. If there is only one folder, then you have to create a new folder as described above before you can change folders.
If the folder you’re currently storing in reaches file 9999, then a new folder will be automatically created. The folder number will increase by one when this is done and the file number will start 0001. If you’ve reached folder 999 and you’re not aware of that fact, when you hit file 9999 in folder 999, the camera comes to a halt. While I’ve not tested it personally, getting past this is simpler then in the past. You just have to go to Active folder > New and create a new folder with a number less than 999 and you’re good to go.
You can create a new folder when starting up the D2H. By depressing the Key button as you turn on the camera, a new folder is created. This will happen only if there are no empty folders already present on the CD card. This doesn’t work if you’re already on folder #999.
Note: folder numbers are retained in the CF cards. If you reset your folder number to a lower number then the folder number on the CF card, when that card is inserted the higher folder number might be used.
Image quality is how you set the file type you wish to capture (there is another and faster way of setting this, I’ll describe it in a moment). The D2H is the first Nikon to permit us to write two Image qualities with one click on the shutter release. An option asked for by many, the RAW + ability is pretty darn cool. You get two files, a RAW (NEF) and a Jpeg (two files are written but the D2H counts them as just one on its counters). The RAW is raw censor data, unprocessed by the camera and written directly to the CF card. The RAW is not effected by any of the sharpening, tone, white balance of other image settings you might have programmed into the D2H. You must finish the processing yourself using Nikon Capture 4.1 in post (D2H RAW/NEF files cannot be viewed by an earlier version of Nikon Capture). The Jpeg, as discussed in a moment, can be one of three compressed files processed by the camera based on the settings you have programmed into the D2H.
You have 8 options: RAW (NEF) +Jpeg Fine, RAW (NEF) +Jpeg Normal, RAW (NEF) +Jpeg Basic, RAW (NEF), TIFF, Jpeg Fine, Jpeg Normal and Jpeg Basic (you can also select Large or Medium for most, to be covered later). To access an Image quality setting, head to the Shooting Menu and then select Image quality by up/down Multi Select until Image quality is highlighted. Once accomplished, right Multi Select to access the various file options. Up or down Multi Select until the desired Image quality is highlighted and then right Multi Select to make your selection.
The fast way of accomplishing this same operation is to depress the QUAL button on the back of the D2H. While that is depressed, rotate the sub-command dial. You’ll see the various image quality setting appear in the rear LCD panel. Stop rotating the command dial once the desired setting appears.
Note: you can change file size from Large to Medium in the same way accept you rotate the sub-command dial.
Each Image quality setting in combination with Image size will have a different final file size. This is important to realize both for knowing what size CF card to load into the D2H, and eventually your hard drive storage. Nikon published a pretty good chart of this info on page 46 of the D2H instruction book (IB). The one piece of trivia they left out was the file size when shooting Compressed RAW (NEF).
Nikon doesn’t provide actual file size when you use compressed RAW (Shooting Menu>Raw compression). Using a “lossless” algorithm, the D2H compresses RAW slightly differently then the D1 Family. The result is when shooting in RAW +Jpeg Fine for example, a 9MB file ends up being 6MB (the sum total of the two files). You can expect a 40-60% file size reduction using compressed. This isn’t that really amazing, speeding up the write process though is! Shooting compressed RAW use to be the kiss of death when it comes to write times, taking nearly three times longer then shooting uncompressed. That’s all changed now with compressed taking actually less time then uncompressed to write. It’s way cool! It makes using RAW +Jpeg a real tool.
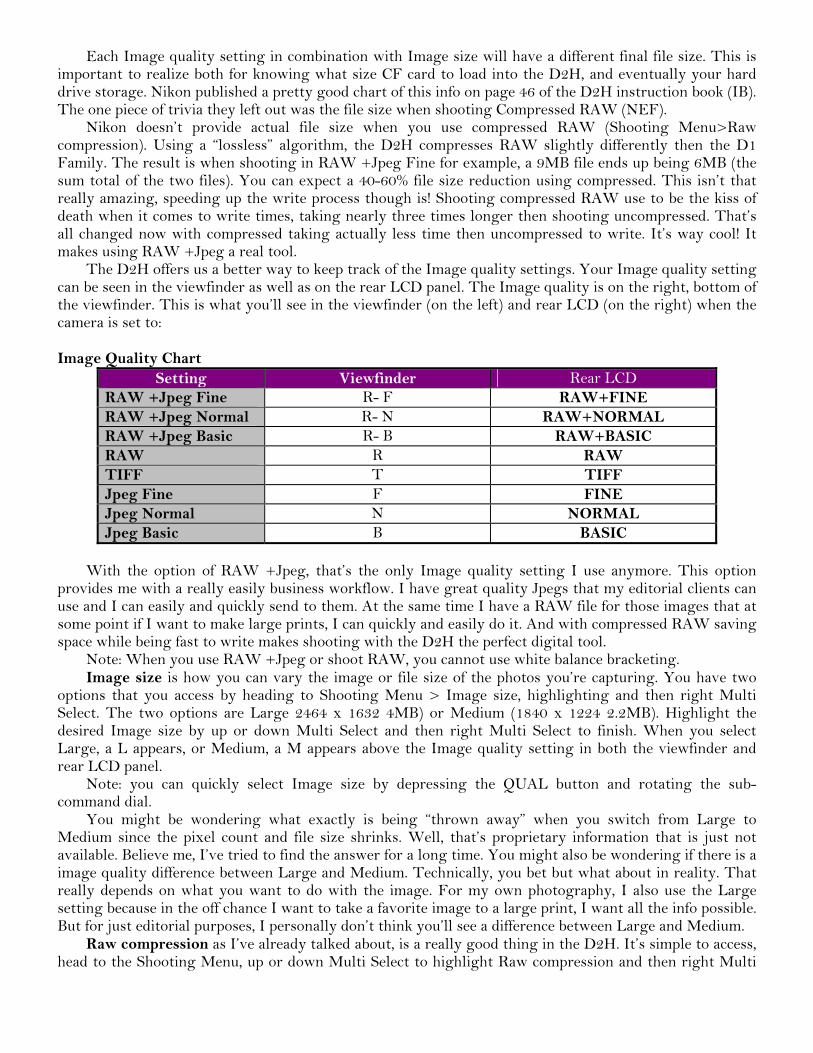
The D2H offers us a better way to keep track of the Image quality settings. Your Image quality setting can be seen in the viewfinder as well as on the rear LCD panel. The Image quality is on the right, bottom of the viewfinder. This is what you’ll see in the viewfinder (on the left) and rear LCD (on the right) when the camera is set to:
Image Quality Chart
Setting Viewfinder Rear LCD RAW +Jpeg Fine R- F RAW+FINE RAW +Jpeg Normal R- N RAW+NORMAL RAW +Jpeg Basic R- B RAW+BASIC RAW R RAW TIFF T TIFF Jpeg Fine F FINE Jpeg Normal N NORMAL Jpeg Basic B BASIC
With the option of RAW +Jpeg, that’s the only Image quality setting I use anymore. This option
provides me with a really easily business workflow. I have great quality Jpegs that my editorial clients can use and I can easily and quickly send to them. At the same time I have a RAW file for those images that at some point if I want to make large prints, I can quickly and easily do it. And with compressed RAW saving space while being fast to write makes shooting with the D2H the perfect digital tool.
Note: When you use RAW +Jpeg or shoot RAW, you cannot use white balance bracketing. Image size is how you can vary the image or file size of the photos you’re capturing. You have two
options that you access by heading to Shooting Menu > Image size, highlighting and then right Multi Select. The two options are Large 2464 x 1632 4MB) or Medium (1840 x 1224 2.2MB). Highlight the desired Image size by up or down Multi Select and then right Multi Select to finish. When you select Large, a L appears, or Medium, a M appears above the Image quality setting in both the viewfinder and rear LCD panel.
Note: you can quickly select Image size by depressing the QUAL button and rotating the sub-command dial.
You might be wondering what exactly is being “thrown away” when you switch from Large to Medium since the pixel count and file size shrinks. Well, that’s proprietary information that is just not available. Believe me, I’ve tried to find the answer for a long time. You might also be wondering if there is a image quality difference between Large and Medium. Technically, you bet but what about in reality. That really depends on what you want to do with the image. For my own photography, I also use the Large setting because in the off chance I want to take a favorite image to a large print, I want all the info possible. But for just editorial purposes, I personally don’t think you’ll see a difference between Large and Medium.
Raw compression as I’ve already talked about, is a really good thing in the D2H. It’s simple to access, head to the Shooting Menu, up or down Multi Select to highlight Raw compression and then right Multi
Select. You have the simple options of ON Comp. NEF(RAW) or OFF NEF(RAW). Refer to Image quality for a discussion on compression.
White bal is a critical element in digital photography that you must understand to get the most out of the D2H and your photography! You’ll find lots general information about white balance in the 2nd chapter. What is here is specific for the D2H.
The D2H offers 9 white balance settings. You access these by heading to Shooting Menu, up or down Multi Select until you highlight White bal. Once you reach the white balance menu, you have the options of: Auto, Incandescent, Fluorescent, Direct Sunlight, Flash, Cloudy, Shade, Choose color temp and PRE White bal. Auto, Incandescent, Fluorescent, Direct Sunlight, Flash, Cloudy and Shade can be modified +/-3 by right Multi Select after a white balance has been highlighted (see chart in appendix). Which white balance setting should you use? These white balance titles are misleading; this might shed some light on it.
The different white balance terms are not reflective of when you should use a particular white balance, but rather just poor titles representing a Kelvin temperature: Incandescent = 3000k, Fluorescent = 4200k, Direct Sunlight = 5200k, Flash = 5400k, Cloudy = 6000k and Shade = 8000k. Auto has a flexible Kelvin range of 3500-8000k. The goal in the perfect world would be to match the correct Kelvin temp / white balance setting to the Kelvin temp of the light hitting the subject. Getting this right was essential in the D1 Family since the Auto setting was not so hot. This is not at all the case with the D2H!
Note: the easiest way to change White bal is to depress the WB button on the back of the D2H and rotate sub-command dial until the desired White bal icon appears in the rear LCD panel.
As you’ll find out later, the D2H has a totally new and vastly improved methodology and software to deal with color. Called advanced White Balance (AWB) in combination with Auto Tone Control (ATC), the D2H like no other DSLR does a great job with Auto white balance. I use Auto all the time now and I’ve been quite happy with the results (talking with other pros, they too have found Auto to be killer). Auto though has an upper limit of 8000k, what if you need a higher Kelvin to match the capture to the light? Not a problem in the D2H, there is now for the first time a K setting. K Choose color temp gives you the option of selecting a Kelvin temperature from 2500 to 10000. To select a temp, highlight White bal and then right Multi Select, up or down Multi Select until K Choose color temp is highlighted and then right Multi Select. Once the temps appear, up or down Multi Select until the temp desired is highlighted. Right Multi Select to make your choice.
Note: you can depress the WB button, rotate the command dial to select K and then rotate the sub-command to set the desired Kelvin temp.
The other light situation Auto might not work as well is in mixed lighting such as an indoor arena (though I’ve had marvelous results with Auto here as well). This is when PRE White bal preset can be a marvel. The PRE in the D2H has been refined and expanded in a big way. The D2H has four PRE options for obtaining white balance and can save five PREs that you create. Creating your own PRE is really quite simple in the D2H. While you can start this process using the menu you access under the Shooting Menu, I don’t recommend it. That best and fastest way is to make use of the WB button on the back of the D2H. You have four ways of selecting a PRE, here’s the first.
Depress the WB button and rotate the sub-command dial until PRE appears. When PRE appears, d-0 appears as well (you’ll see the same thing looking through the viewfinder). d-0 is the first of the five presets that you can save your PREs to. But d-0 is where all new presets are stored, so if you’ve already created one, if you don’t copy it, it will be overwritten! Getting to PRE in this way, you must undepress and then depress the WB button until PRE starts to flash. Then, simply point the camera at a gray card/object and depress the shutter release. If you made a useable PRE, the word GOOD flashes in the rear and top LCD panel. If the D2H was unable to make a good reading, no Gd appears and flashes for about three seconds. Unlike previous Nikons, with the D2H you can use any exposure mode and you don’t have to focus. If you cannot make a GOOD by focusing on a gray object with this method, The D2H offers you a second method you can use. You can make use of the Ambient Light Sensor (white dome on the prism) to make your white bal reading. Depress the WB button until PRE is blinking and then depress the FUNC button on the front of the camera. Again, if you make a good reading, GOOD blinks and if not no GD blinks.
If you already have one PRE saved, when you head to Shooting Menu > White bal >PRE White bal preset > you’ll see a thumbnail or camera icon. The thumbnail indicates the preset was created by method one, using gray object and camera icon method two, using Ambient light Sensor.
If you need to create another preset and want to save one you’ve already created, you need to copy it. The D2H always makes the new PRE to d-0, so you must copy the current d-0 preset before creating a new one. You copy a preset by going to Shooting Menu > White bal > PRE White bal preset > PRE which displays created presets (remember you’ll either see a thumbnail or camera icon). Making sure d-0 is selected, indicated by a yellow box around the preview, depress the Multi Select button. This brings up another menu that says d-0 and has two options available, Set and Edit comment with Set highlighted. You need to up Multi Select to highlight d-0. Right Multi Select when d-0 is highlighted and change the preset number to d-1 through d-4. With that changed, you’ll now see Copy d-0 is available. Up Multi Select so Copy d-0 is highlighted. Right Multi Select OK and you’ve now copied d-0 to a new preset. You will see if you did it correctly because either the thumbnail or icon should be in both the d-0 and d- 1-4 that you copied to. You are now ready to create a new preset to d-0.
You’re able to create a comment for a preset just as you would create a image comment (see above). You can do this when you’ve selected a preset preview in the PRE menu and then depress the Multi Select button and call up the White bal menu. Multi Select to highlight Edit comment and type away. This is the first two of four ways you can create White bal presets.
The other two methods for creating White bal presets rely on images you’ve already captured. You can work from an image you’ve already captured and resided on the CF card, or you can work with an image in the computer via Nikon Capture 4.1. To work with an image on the CF card, head to Shooting Menu > White bal > PRE White bal preset > PRE where you’ll see previous stored presets. Select (yellow box around thumbnail) the d- you wish to use to create the new preset with only d-1 through d-4 being available for this. With that accomplished, depress the Multi Select button. This brings up the White bal menu. Down Multi Select until Select Image is highlighted, then right Multi Select. All the images on your CF card now appear in 3x2 thumbnails (you can see a full screen of the thumbnail by depressing the checkerboard button). Thumb through the thumbnails using the Multi Select until you arrive at the desired thumbnail. With it being selected (indicated by yellow box), depress the Multi Select button. When done correctly, you’ll see the thumbnail of the selected image appear in the PRE options. If you have an image comment, it will be used as the preset comment which you can edit with Edit comment.
You can also use the White bal from in image in the computer via Nikon Capture 4.1. You begin by connecting the D2H to your computer either by UC-E4 USB cable or WT-1 Wi_Fi unit. Open Nikon Capture 4.1 and then select the image you want to use for White bal reference. The image you select must be a RAW (NEF) file, no other format will work. Next go to Setting > White Balance > Write Settings to Camera. This brings up a box where you can write a comment to describe the preset. Click OK and then with the next dialog box that comes up I recommend you click on Write to Camera. Click OK again and then tell NC4 which preset (d-1 – d-4) you want the image saved to. Then you go back to the D2H and select the image and set it as your White bal. A nice feature about this is, you can change the White bal of the image in NC4 and whatever White bal you select is what will be loaded. That’s as customized as it comes!
Note: the D2H does not have a black and white setting. ISO is how we set the light sensitivity levels. Setting the ISO, head to the Shooting Menu, up or down
Multi Select until ISO is highlighted and then right Multi Select. A menu comes up with ISOs 200, 280, 400, 560, 800, 1100, 1600, HI-1 and HI-2. The selecting of an ISO is pretty cut and dry except for HI-1 / 2. (Note: you can select an ISO really easily by depressing the ISO button on the back of the D2H and then rotating the sub-command dial.) Selecting HI-1 is the basic equivalent of ISO 3200 and HI-2 is the basic equivalent of ISO 6400. While increasing your ISO does permit you to shoot in darker light situations with higher shutter speeds, increase in ISO does increase noise. While the D2H produces less noise then previous Nikon DSLR bodies, it still produces noise. As such, Nikon recommends Sharpening (Shooting Menu > Image sharpening) be turned off when shooting at high ISOs. The noise encountered at the higher ISOs can easily be cleaned up using Dfine. The D2H has no noise reduction system built into it.
The D2H does have a custom setting b1, ISO auto. The D2H when set to custom setting b1/ON, will change the ISO according to the available light from 200-1600 (HI not available).
Note: you can quickly change your ISO by depressing the ISO button and rotating the command dial. Image sharpening is described by Nikon in the D2H IB as Making Edges More Distinct. Image
sharpening is a controversial topic in digital photography whether it should be used or not. If you decide
you want Image sharpening, you start by heading to Shooting Menu and then up / down Multi Select until Image sharpening is highlighted, then right Multi Select bringing up Image sharpening menu. You have seven options, Auto, Normal, Low, Medium low, Medium high, High and none. You simply up/down Multi Select until the sharpening you want is highlighted, then right Multi Select.
Which is the right one to use? All I can tell you is what I do and why which might or might not be right for you. The D2H still employs a low-pass filter, a system which technically makes the photo out of focus. To get back to zero, a Image sharpening setting of Normal is required. Because of this, I set my D2Hs to Normal. Now this only effects the Jpegs and TIFF and not the RAW so with the ability to shoot RAW +Jpeg now, you kind of have the best of both worlds when it comes to the sharpening question.
Image sharpening is throughout the D2H IB in association with noise. If you feel the noise in your images is more than you can stand, turning off Image sharpening will help.
Tone compensation is a very important feature which can be loosely compared to contrast control. You access Tone compensation by heading to Shooting Menu, Multi Select up or down until Tone compensation is highlighted, then right Multi Select. The Tone compensation menu then appears with five options, Auto, Normal, Less contrast, More contrast and Custom. I’m so happy to report that it would seem all the bugs have been worked out of Nikon’s Tone compensation. I’ve been using Auto with great results!
Whatever Tone compensation you select, it only effects Jpeg and TIFF files, RAW is not effected by this setting. Tone settings are curves applied by the D2H in the processing of Jpeg and TIFF files. Regretfully there is no way to verbally or numerically describe the difference between these different Tone / curves. Normal, Less and More don’t really tell you much, so I highly recommend if you don’t know which is best for you, to either test using each setting or shoot RAW and change the Tone settings in NC4 to see the differences. Custom is a curve you can create in NC4 and then load into the D2H using it by highlighting and then right Multi Selecting it.
Color mode is an important setting that most photographers don’t know about or take advantage of in their digital photography. You reach it by going to Shooting Menu, up or down Multi Select until Color mode is highlighted and then right Multi Select. This brings up the Color mode menu with three options, I (sRGB), II (Adobe RGB) and III (sRGB). The one you highlight and then right Multi Select is the color space your Jpeg and TIFF files will be processed with in the camera. RAW is tagged with this profile but you can change it in NC4 later if you wish. What’s the differences between the three?
The descriptions in the D2H manual don’t really help you decide which color mode/space is best for your photography. sRGB is 256 color where AdobeRGB is 4000 colors. Technically there is a difference between the three color modes, but that technical difference will only matter depending on the final use of your image. It’s the game of numbers, sRGB does not have as many colors as Adobe RGB. But whether you need all those numbers for your image and its application is the big question.
Color Mode III is different from Color Mode I even though they are both sRGB. Color Mode I is a basic curve rendering color in the final photograph basically as you see it. Color Mode III on the other hand has a curve so reds are recorded “deeper” than is visually seen. If you’re working with a calibrated monitor, you might want to shoot RAW files and then look at the differences the three color modes make and decide for yourself and your photography which works best. Personally, I always shoot in Adobe RGB.
What about the magenta skin cast problem some have reported? After testing with a lot of D2Hs, I did come across one with a definite magenta skin cast problem. The interesting thing was the magenta skin cast was bad in low light and not bad in “high noon” light with this one camera. It completely disappeared when using flash. The majority “see” the magenta cast when in reality it’s a lighting or complexion problem. But since I found it in one camera, it raises the possibilities there’s more.
Is the color in the D2H perfect? To some, it’s not, to me, it’s the best Nikon has delivered to date. Can it be better, most likely. Does it matter? Well, now that really depends on the person behind the camera, like everything photographic. Conversing with other great digital shooters like Vincent Versace, John Shaw and Dave Black, we’ve all found that the D2H performs perfectly for our shooting in regards to color. You’ll have to make your own judgment call.
Hue adjustment is a specialized setting that as of yet, is one I’ve never used. You access it by heading to Shooting Menu, then up/down Multi Select until Hue Adjustment is highlighted, right Multi Select to make a change. The default is 0, but you can raise or lower the value by 9 in increments of 3.

Intvl timer shooting or intervalometer is a cool new feature Nikon has added to the D2H. I’ve used it many times already and it works like a charm. I highly recommend you play with it a couple of times before you actually need to use it since it’s operation isn’t intuitive. You start by going to Shooting Menu and then up/down Multi Select until Intvl timer shooting is highlighted. Right Multi Select which brings up the Intvl timer shooting. You’ll see Now highlighted, you can either use that selection or Multi Select down one to highlight Start time. When Now is highlighted, you skip right to Interval. When Start time is highlighted, when you Multi Select down Start Time becomes active. You have Hours and Minutes available with a maximum delay start of 24 hours, 59 minutes. You advance or retrace your moves by right / left Multi Select. With right Multi Select you come to Interval which is active for both Now and Start Time. Interval is a time setting determining the time between the shots. You can interval shots by as much as 24 hours, 59 minutes and 69 seconds. With this set, you right Multi Select bringing up a whole new dialog menu.
The first three digit place holder determines how many times the D2H will fire. The second single digit place holder determines how many images will be taken each time the D2H fires. Remaining (intvl*shots) 000x0=0000 is active only when the Intvl timer is active. This will tell you how many remaining intervals and captures are left to be made if the Intvl is active. The last setting is Start. (You can cancel out by highlighting OFF and then right Multi Select which takes you back to the first menu.) To activate Intvl timer, under Start, highlight On and then depress ENTER. You do anything else, and it won’t become active. A gray box appears with the message Timer active when you’ve done it all correctly.
While Intvl time is active, if you go to the Shooting Menu you will see Intvl time shooting ON. If you right Multi Select, you’ll see at the top of the next menu Status IN PROGRESS. Right Multi Select one more time and in the last menu you’ll see Start, Pause, Done. Highlight Pause and depress ENTER and you pause the Intvl timer. Highlight Done and depress ENTER and you’ll stop the Intvl timer all together.
Depending on how long you set the Intvl timer for, you best make sure you’ve got the power to run the D2H. The D2H doesn’t eat up batteries, but if you’ve got a 24hr session, you might need an external power source. If you have exposure or white balance bracketing engaged, whatever intervals you set for them will override any interval you have set in the Intvl timer. Finally, if you’re shooting with the camera remotely, be sure to close the viewfinder shutter to prevent light from entering the viewfinder and altering your exposure.
Non-CPU lens data is kind of a cool new option. This option is strictly for use when lenses without a CPU are attached to the D2H. This features can give owners of older Nikon lenses the benefits of Color Matrix metering, aperture value display and balanced fill flash. In the Shooting Menu, up/down Multi Select until Non-CPU lens data is highlighted. Right Multi Select taking your into the next menu. You have two options, Focal length and Maximum aperture. When you highlight one of these and right Multi Select, you’re taken into another menu starting off with N/A and then either focal lengths or apertures. Select the focal length and appropriate aperture for the lens attached and you’re good to go. Couldn’t be simpler or cooler!
Moose’s Setting for the Shooting Menu
Shooting menu bank A Reset shooting menu -- Active folder Image quality RAW+F Image size L Raw compression ON White bal. A ISO 200 Image sharpening Normal Tone compensation A Color mode II Hue adjustment 0 Intvl timer shooting OFF Non-CPU lens data --
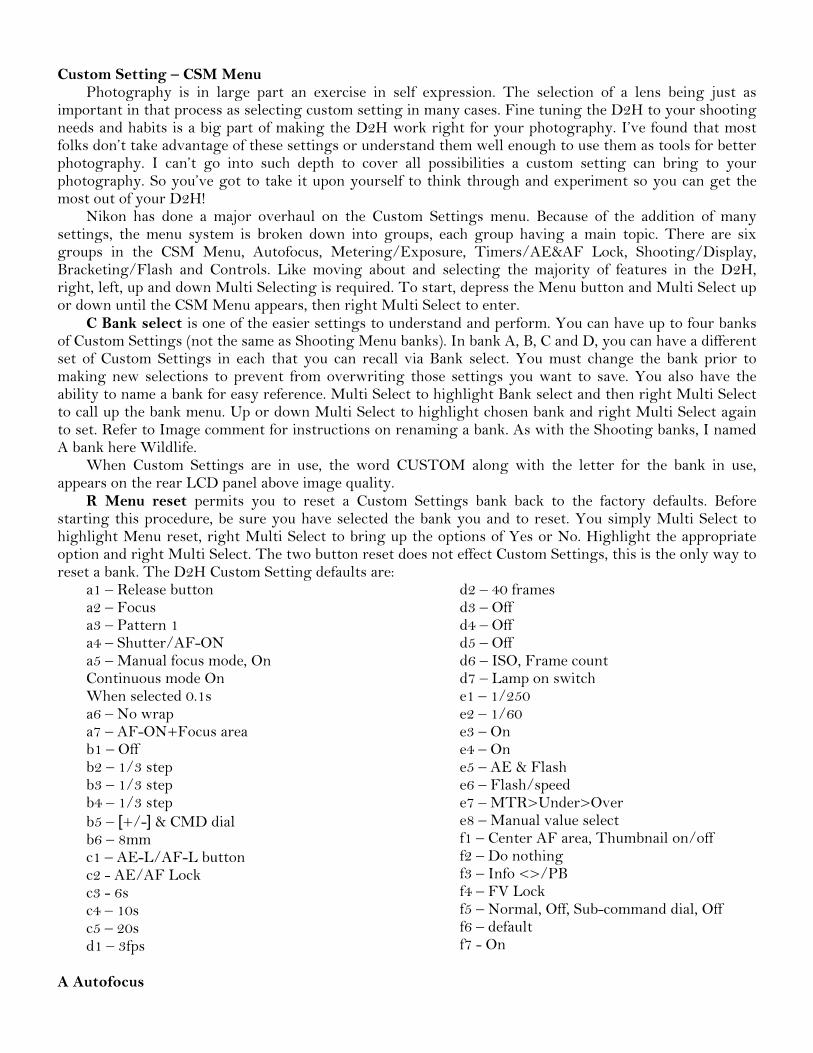
Custom Setting – CSM Menu
Photography is in large part an exercise in self expression. The selection of a lens being just as important in that process as selecting custom setting in many cases. Fine tuning the D2H to your shooting needs and habits is a big part of making the D2H work right for your photography. I’ve found that most folks don’t take advantage of these settings or understand them well enough to use them as tools for better photography. I can’t go into such depth to cover all possibilities a custom setting can bring to your photography. So you’ve got to take it upon yourself to think through and experiment so you can get the most out of your D2H!
Nikon has done a major overhaul on the Custom Settings menu. Because of the addition of many settings, the menu system is broken down into groups, each group having a main topic. There are six groups in the CSM Menu, Autofocus, Metering/Exposure, Timers/AE&AF Lock, Shooting/Display, Bracketing/Flash and Controls. Like moving about and selecting the majority of features in the D2H, right, left, up and down Multi Selecting is required. To start, depress the Menu button and Multi Select up or down until the CSM Menu appears, then right Multi Select to enter.
C Bank select is one of the easier settings to understand and perform. You can have up to four banks of Custom Settings (not the same as Shooting Menu banks). In bank A, B, C and D, you can have a different set of Custom Settings in each that you can recall via Bank select. You must change the bank prior to making new selections to prevent from overwriting those settings you want to save. You also have the ability to name a bank for easy reference. Multi Select to highlight Bank select and then right Multi Select to call up the bank menu. Up or down Multi Select to highlight chosen bank and right Multi Select again to set. Refer to Image comment for instructions on renaming a bank. As with the Shooting banks, I named A bank here Wildlife.
When Custom Settings are in use, the word CUSTOM along with the letter for the bank in use, appears on the rear LCD panel above image quality.
R Menu reset permits you to reset a Custom Settings bank back to the factory defaults. Before starting this procedure, be sure you have selected the bank you and to reset. You simply Multi Select to highlight Menu reset, right Multi Select to bring up the options of Yes or No. Highlight the appropriate option and right Multi Select. The two button reset does not effect Custom Settings, this is the only way to reset a bank. The D2H Custom Setting defaults are:
a1 – Release button a2 – Focus a3 – Pattern 1 a4 – Shutter/AF-ON a5 – Manual focus mode, On Continuous mode On When selected 0.1s a6 – No wrap a7 – AF-ON+Focus area b1 – Off b2 – 1/3 step b3 – 1/3 step b4 – 1/3 step b5 – [+/-] & CMD dial b6 – 8mm c1 – AE-L/AF-L button c2 - AE/AF Lock c3 - 6s c4 – 10s c5 – 20s d1 – 3fps
d2 – 40 frames d3 – Off d4 – Off d5 – Off d6 – ISO, Frame count d7 – Lamp on switch e1 – 1/250 e2 – 1/60 e3 – On e4 – On e5 – AE & Flash e6 – Flash/speed e7 – MTR>Under>Over e8 – Manual value select f1 – Center AF area, Thumbnail on/off f2 – Do nothing f3 – Info <>/PB f4 – FV Lock f5 – Normal, Off, Sub-command dial, Off f6 – default f7 - On
A Autofocus
a1 AF-C mode priority Custom Setting determines when in AF-C (autofocus continuous) if the D2H fires when either the subject is in focus or when you depress the shutter release. In the Custom Setting menu, Multi Select up or down until Autofocus is highlighted, then Multi Select until AF-S mode priority is highlighted. Then right Multi Select bringing up the options of Release button or Focus. Right Multi select to finalize your selection. With Release button is selected, the D2H fires when you depress the shutter release. When Focus is selected, the D2H fires when the D2H determines the subject is in focus. Depending on the type of subjects you’re photographing, the right option can make a difference in getting a sharp image.
a2 AF-S mode priority Custom Setting determines when in AF-S (autofocus single) if the D2H fires when either the subject is in focus or when you depress the shutter release. In the Custom Setting menu, Multi Select up or down until Autofocus is highlighted, then Multi Select until AF-S mode priority is highlighted. Then right Multi Select bringing up the options of Focus or Release button. Right Multi select to finalize your selection. When Focus is selected, the D2H fires when the D2H determines the subject is in focus. With Release button is selected, the D2H fires when you depress the shutter release. Remember when shooting in AF-S mode, the focus is “locked” by the mere depressing of the shutter release and will not refocus again until you undepress and then depress the shutter release again.
a3 Group dynamic AF is a new Custom Setting that determines which AF group pattern you use when in dynamic-AF. Once in the Custom Setting menu, highlight Autofocus, right Multi Select and then highlight and select Group dynamic AF. Right Multi Select and you see your two options, Pattern 1 and Pattern 2. The differences in the two patterns is Pattern 1 basically has one more active AF sensor per group except for the center group. This creates a larger overall sensor group.
No matter which pattern you’ve selected, selecting the center group no matter which group is active, is as easy as depressing the Multi Select. Once the center group is selected, if you have Custom Setting f1 set to Multi selector Center button > Shooting mode > Center AF area, then by depressing the Multi Select again, the center group will change orientation to either vertical or horizontal. You can only use the pattern you’ve selected when you’ve activated Group Dynamic-AF via the AF-area mode selector lever on the back of the D2H. I’ve found this works incredibly well!
Many have asked which is the best to use. To be honest with you, I bounce back and forth, changing not the Group but rather the AF-area mode. Most of the time, I’m shooting n Group-dynamic AF and then if I’m going to switch, it’s to Dynamic-area AF which doesn’t use information from this CS.
a4 AF activation determines if AF operation happens when you depress the shutter release / AF-ON buttons or just with one of the AF-ON buttons is depressed. Head to the Custom Setting Menu, Autofocus and Multi Select until AF activation is highlighted then right Multi Select. This is a little confusing, but when you select Shutter/AF-ON, ON appears opposite a4 AF Activation. When you select AF-ON only, OFF appears opposite a4 AF Activation. With my shooting, I’ve always preferred AF operation with the shutter release.
a5 Focus Are Illum is a custom setting that permits you to change how long the AF sensors stays lit once you’ve depressed the shutter release; illuminated when in CH/CL mode or at all in manual focus mode (manual focus via the body or lens). You have the ability to set illumination period for just CH/CL focus (never knew this was important). You can only set on/off for AF sensors in manual mode.
This is a multi menu set up. From the Custom Setting Menu, highlight Autofocus and right Multi Select on Focus area Illum, then right Multi Select again calling up the options. You’ll see Manual focus mode, Continuous mode and When selected. When you have either Manual focus mode or Continuous mode highlighted, when you right Multi Select a menu appears with On or Off. Select what’s desired.
To complete this operation, you need to lastly go to When selected. With it’s highlighted, right Multi Select bringing up a menu with two options, 0.2s and 1s. This is what determines the duration in which the AF sensors stay illuminated.
a6 Focus area is a custom setting that can speed up your use of the AF system. No matter if you’re using single AF sensors or a group, this custom setting permits you to wrap around when selecting an active AF sensor. Head to the CSM Menu and up/down Multi Select until Focus area is highlighted, right Multi Select calling up a menu. You have just two options, OFF no wrap and ON Wrap.
With this CS turned on, when you have for example a right AF sensor/group active and you want the left sensor/group active, you can Multi Select right just once to reach the left sensor/group. Or, if you
have the top sensor/group active, you can go to the bottom sensor/group but Multi Selecting up one. This saves you the time of Multi Selecting a couple of times to reach the same sensor/group.
a7 Vertical AF-ON assigns what operation the vertical AF-ON button performs. The vertical AF-ON button is the one on the lower right back corner on the D2H (when shooting vertically, this button will be top, back right). You have five options, AF-ON + Focus area, AF-ON, AE/AF-L + Focus area, AE/AF-L, Focus area only. Head to the CSM Menu, highlight Vertical AF-ON and right Multi Select to bring up the menu. Multi Select up or down to highlight the desired option and then right Multi Select to confirm selection.
The five different options assign different functions to the vertical AF-ON button. The default, AF-ON + Focus area, the vertical AF-ON button when depressed activates the AF system and when you rotate the vertical sub-command dial you can change AF sensors/groups. When AF-ON is selected, depressing the vertical AF-ON button activates the AF system. With AE/AF-L + Focus area selected, when you depress the vertical AF-ON button, you lock auto exposure, autofocus and can change focus area by rotating the vertical sub-command dial. You cannot activate the AF system when this option is selected, you have to depress the shutter release. AE/AF-L when selected permits you to lock auto exposure and autofocus when the vertical AF-ON button is depressed. Finally, when Focus area only is selected, when you depress the vertical AF-ON button, you can change AF sensors by rotating the vertical sub-command dial. b Metering/Exposure
b1 ISO auto is a simple CS that when engaged lets the D2H change the ISO automatically if the scene is too dark or too bright. You access it by going to the CSM Menu, highlighting and Multi Selecting Metering/Exposure, right Multi Selecting and then up or down until b1 ISO auto is highlighted. One more right Multi Select and you have the options of On or Off available. Off is obvious. When On is selected, if you’re in A, P or S exposure mode and HI-1 or HI-2 are not selected, the D2H automatically varies the ISO. When engaged, ISO-AUTO appears on the read LCD panel (when d6 is set to rear panel ISO) as well as appearing in the viewfinder as ISO-A, bottom right.
With all that said and done, I have a couple of observations in regard to this CS. This is not an option I would personally use but in the process of writing this book, I had to test it. I’m not impressed at all! It seems to become readily active when you’ve set a high ISO value and because of prevailing light values, it can lower the ISO and so by, improve the image (reduction in noise). I had to try really work hard to get it function at ISO 200 and increase when in low light levels. It doesn’t seem to want to increase ISO but readily will lower it. When ISO-auto actually functions, ISO-A blinks in the viewfinder and if you look at the photoinfo in playback, the ISO will be in red when ISO-auto actually worked.
b2 ISO step value permits you to change the incremental range between ISO settings. You have the option of 1/3, 1/2 or 1 stop. You select the desired value by going from the CSM Menu to Metering/Exposure group and continue Multi Selecting until you reach b2 ISO step value. Because of the dynamic range of digital, I personally prefer 1/2 stop.
b3 EV step permits you to change the incremental range between aperture and shutter speed settings. You have the option of 1/3, 1/2 or 1 stop. You select the desired value by going from the CSM Menu to Metering/Exposure group and continue Multi Selecting until you reach b3 EV step. Because of the dynamic range of digital, I personally prefer 1/2 stop.
b4 Exposure comp. EV permits you to change the incremental range when using exposure compensation. You have the option of 1/3, 1/2 or 1 stop. You select the desired value by going from the CSM Menu to Metering/Exposure group and continue Multi Selecting until you reach b4 Exposure comp. EV. Because of the dynamic range of digital, I personally prefer 1/2 stop.
b5 Exposure comp. permits you to change how you dial in exposure compensation. You normally would depress the exposure compensation button next to the shutter release and while depressed, rotate the command dial. You can change that operation with this CS so that depending on the exposure mode you’re in, you can change exposure compensation via the command or sub-command dial. To make your choice, head to the CSM Menu>Metering/Exposure>b4 Exposure comp and continue Multi Selecting to the right to reach the menu. If you select [+/-] & CMD dial then you’ll depress the exposure compensation button and rotate the command dial to dial in exposure comp. If you select CMD Dial only, then you simply rotate the command dial (S mode) or sub-command dial (A, P mode) to dial in compensation. You do not have to depress the exposure compensation button with this option.
I know a number of photographers who have opted for CMD Dial option and end up shooting themselves in the foot. Even though the +/- icon appears in the viewfinder, accidentally exposure compensation was dialed in and not until it’s too late was it discovered ruining their exposures. Just a warning that if you take advantage of this CS, be aware of the exposure compensation icon in the viewfinder.
b6 Center weight option in the CSM menu permits you to vary the size of the circle when using Center-weighted metering. You access this option to make a selection by Multi Selecting from the CSM Menu to Metering/Exposure to b6 Center weight. Right Multi Select to the right one more time to call up the menu with options. You have available, 6mm, 8mm, 10mm, 13mm and Average.
The D2H B and E screen provide only one reference circle for using Center-weighted metering. The circle you see is for the default of 8mm. You have to approximate the other sizes based on the 8mm reference circle. c Timers/AE&AF Lock
c1 AE Lock CS gives you two options for locking auto exposure. You head to CSM Menu and then Multi Select down to Timers/AE&AF Lock, right Multi Selecting and highlighting AE Lock and then right Multi Selecting one more time. The two options are AE-L/AF-L button and + Release Button. If you select the first option AE-L/AF-L button, then you can lock exposure and focus by depressing and holding in the AE-L/AF-L button on the back of the D2H. If you select + Release Button, then you can lock exposure and focus by depressing the shutter release half way down or with the AE-L/AF-L button to lock. In either case with either setting, AE-L appears in the viewfinder when in operation.
c2 AE-L/AF-L CS changes the actions the AE-L/AF-L button performs when depressed. To make the selection, head to the CSM Menu and then Timers/AE&AF Lock by Multi Selecting, and then to AE-L/AF-L. Right Multi Selecting brings up the menu with the options, AE/AF Lock, AE Lock only, AE Lock hold/reset, AE Lock hold and AF Lock. When you select AE/AF Lock which is the default (highlight and right Multi Select), you lock exposure and focus when you depress the AE-L/AF-L button (AE-L appears in the viewfinder). When AE Lock only is selected, only exposure is locked, focus in unaffected. With AE Lock hold/reset selected, exposure is locked and stay locked until either the AE-L/AF-L button is depressed again or the shutter release is depressed. AE Lock hold when selected locks exposure when AE-L/AF-L button is depressed and remains locked until the AE-L/AF-L button is depressed again or the meter goes off. When AF Lock is selected, the focus is locked when the AE-L/AF-L button is depressed and does not effect exposure.
c3 Auto meter-off is pretty straight forward, it determines how long your meter stays on after you remove your finder from the shutter release. Go the CSM Menu, Multi Select to Timers/AE&AF Lock, right Multi Select to Auto meter-off and right Multi Select to call up the options. You have the option of 4s, 6s, 8s, 16s, and No limit (as in the meter never shuts off). If the D2H is connected to the EH-6 AC adapter, no matter how you set this CS the D2H won’t power off for ten minutes.
c4 Self-timer simply sets how much time you have to run in front of the camera to take your own photo (just kidding). You can set the time duration between when you depress the shutter release and the D2H actually fires by, 2s, 5,s 10s and 20s. Go the CSM Menu, Multi Select to Timers/AE&AF Lock, right Multi Select to Self-timer and right Multi Select to call up the options.
c5 Monitor Off determines how long the monitor stays on after it’s been activated and no other buttons on the D2H have been depressed. You have the options of 10s, 20s, 1m, 5m and 20m. Set the monitor off by Multi Selecting to CSM Menu, then Timers/AE&AF Lock, right Multi Select to Monitor off and then select. If the D2H is connected to the EH-6 AC adapter, no matter how you set this CS the D2H won’t power off for ten minutes.
Having the monitor on does slowly use up battery life. I don’t have specific numbers but in writing this book, I had the monitor on all the time and it slowly ate up the battery. This would hold true if you’re viewing images as well as menu items. d Shooting/Display
d1 Shooting speed determines the number of frames per second when shooting in the CL mode (not CH). It also effects the fps for the Intvl Timer when in single frame and M-up modes. By Multi Selecting from the CSM Menu to Shooting/Display and right Multi Select to, Shooting speed and once more you come to the menu with the options of 1-7fps.
d2 Maximum shots is a way of setting the maximum number of captures on one burst. Head the CSM Menu and then Multi Select to Shooting/Display, right Multi Selecting again to d2 maximum shots and right Multi Selecting one final time to bring up the options. You can Multi Select up and down to pick a number from 1 – 40 and once the number appears, right Multi Select to select. A burst is defined here as depressing the shutter release and letting the D2H rip until it stops. The maximum number you can select is 40, that’s all the buffer will hold.
But this maximum number is when you’re shooting Jpegs. If you’re shooting TIFF the number drops to 35, uncompressed RAW the number drops to 26. Compressed RAW and uncompressed RAW +Jpeg is 25 and compressed RAW +Jpeg is 24.
Note: the buffer size by simply extrapolating number of captures per burst, the buffer is approximately 90MB.
Can you juice more out of a burst than these numbers? The answer is no, but you can avoid being hampered by the limit if you understand how it works. The variables is the image quality you have set and the CF card you’re using. The write speed of your card helps determine how fast the D2H buffer empties and has room for more images. Lexar’s WA technology for example helps.
Shooting compressed RAW +Jpeg, once the buffer fills there is a momentary lag before you can start to shoot again and then only a couple of captures. If you shoot in short burst, 18 images at a time for example, you’ll find you can keep shooting without much delay in the system. But when you remember that the RAW +Jpeg is not 24 but actually 48 files being written, it’s understandable why there is a momentary lag. If you’re just shooting Jpegs, rip boy, rip!
The Remaining frame counter in the viewfinder indicates how many images can be stored in the buffer. When the buffer is empty, it indicates the maximum number based on the image quality you’ve selected. As you shoot, this maximum number when the shutter released is depressed drops based on how many images are already in the buffer.
Note: when you depress the shutter release, a bracket with a “r” and a number appears bottom right in the viewfinder. This is the remaining number of captures you have available until the buffer is full.
d3 Exp. delay mode is to help minimize any possible camera movement in extreme conditions that might occur from shutter movement. A good example would be if you’re shooting on a microscope. You have the option of Off or On, Off being obvious and On providing you a 0.4s delay from when you depress the shutter release (manually or with a cable release) and when the shutter fires. Multi Select through CSM Menu to Shooting/Display, right Multi Select to d3 Exp. delay mode and then right Multi Select to make your selection.
d4 Long exp. NR often confuses folks. Long Exp NR (noise reduction) only works when you’re shooting with shutter speeds slower than 1/2s. It does not reduce noise when you’re shooting at shutter speeds faster than 1/2s! The D2H with this CS is removing Dark Current Noise by taking a second “dark” image and then merging the two images to “remove” noise (very similar to how you would do it in PhotoShop). Because of this, the shooting process slows down and the number of images you can capture in one burst is reduced even if you’re shooting above 1/2s. I recommend only turning this CS On only when you’re using it, leaving turned off the rest of the time.
Head to the CSM Menu, right Multi Select on Shooting/Display, Multi Selecting down to d4 Long exp. NR and then right Multi Select one more time. You have two options in the dialog box, Off and On. Off is obvious, On engages NR in exposures longer than 1/2 second. When the D2H is processing an image with NR, it comes to a halt. The top LCD panel and viewfinder both display Job nr when the D2H is processing a NR image. When NR is turned On, the buffer only accepts no matter what shutter speed you’re shooting at, 14 Compressed RAW or Compressed RAW +Jpeg, 15 RAW +Jpeg, 15 TIFF, 16 Uncompressed RAW, or 30 Jpegs. If you preview an image on the monitor when the Job nr is appearing, you’ll probably not see the image with the NR completed.
d5 File No. Seq. is a feature I couldn’t live without! When this is turned Off, every time you insert a CF card, the file numbering starts over at 0001. When it’s turned On, when you insert a CF card, the first file number will be 1 greater than the last file number. Head to the CSM Menu, right Multi Select on Shooting/Display, Multi Selecting down to d5 File No. Seq. and then right Multi Select one more time. This brings up three options, Off, On and Reset. When Off is selected, every time you create a new folder, format your CF card or insert a CF card, the first file will always be numbered 0001.
When On is selected, when a new folder is created, CF card is formatted or when a CF card is inserted, the beginning file number will be 1 greater than the last file number. This numbering will continue until you reach file number 9999 at which time a new folder will be automatically created and the file numbering will start over at 0001.
Reset when selected is just like On except when used, it will increase the file number by 1. d6 Cntrl panel/finder is a new CS that’s kind of slick. It permits you to change what’s displayed on
the rear LCD panel and inside the viewfinder in regards to ISO and Exposures remaining. You access this CS by heading to the CSM Menu, right Multi Select on Shooting/Display, Mulit Selecting down to d6 Cntrl panel/finder and then right Multi Select one more time. Highlight Rear Control panel and right Multi Select to choice either ISO or Exposures remaining. Highlight Viewfinder display and select either Frame count (how many captures you’ve made) or Exposures remaining.
Note: the Frame counter displays how many times the shutter has clicked off and not the number of captures. If you’re shooting RAW +Jpeg, while you’re writing two files to the CF card, the Frame counter only increases by 1. Exposures remaining is an estimate of how many images you can still capture in the space available on the CF card. The actual number is always greater than that displayed.
d7 Illumination controls the backlight illumination on the top and rear LCD panels. Head to the CSM Menu, right Multi Select on Shooting/Display, Multi Selecting down to d7 Illumination and then right Multi Select one more time. You have two options, OFF Lamp on switch (rotating the power switch past On) or ON any button (which means that they are basically lit all the time). e Bracketing/Flash
e1 Flash sync speed is a new CS that provides you some flexibility in how you sync the shutter speed of the D2H with flash. I just love this CS! This in turn effects how you can mesh ambient light with flash exposure. You have a range from 1/60 to 1/250. Multi Select to the CSM Menu to Bracketing/Flash, to e1 Flash sync speed finally reaching the options. It’s pretty clear cut, you have varying shutter speeds in 1/3 stop ranging from 1/60 to 1/250. The only unique one is the 1/250 (FP auto). This works in conjunction with the SB-800 flash to make use of its FP high-speed sync (you can only use this option if the Flash sync mode is set to Front-curtain sync.). If you select this option but attach a SB-80DX, the D2H will sync at 1/250.
If you’ve ever tried using FP prior to the D2H/SB-800, you probably found it painful to program and the results mixed at best. Well, that’s far from the case with the D2H/SB-800! I’m totally impressed by the FP Auto and the exposures I’m capturing. The fastest shutter speed I’ve used it at was 1/2000 and the flash fill was right on!
e2 Flash shutter spd effects the slowest possible shutter speed the D2H syncs with in Aperture Priority or Program exposure modes when in Front-curtain sync (doesn’t effect Slow or Rear-curtain sync minimum shutter speeds). You have a range available of 1/60 to 30s in one stop increments. Reach the options by Multi Selecting to the CSM Menu to Bracketing/Flash, to e2 Flash shutter spd finally reaching the options.
You might wonder why this CS is here when you can simply use Slow or Rear curtain. This CS only effects Front-curtain sync, the only mode you can access FP-auto. This CS permits then the use of FP-auto with slow shutter speeds as well as the high end afforded by FP.
e3 AA flash mode works when you have the SB-28DX or SB-80DX set to AA rather then TTL flash mode. Multi Select to the CSM Menu to Bracketing/Flash, to e3 AA flash mode finally reaching the options. You have the option of On which when selected (default), the flash level is automatically set based on the aperture selected when the flash is set to AA. This only works with the above two flash units, the SB-800 is not effected by this CS. If set to Off, you have to work with the normal AA function of the flash. If you’re shooting with a non-CPU lens, you need to specify maximum aperture via Shooting Menu>Non-CPU lens data.
e4 Modeling flash is a cool new feature I like. When using the SB-800 and this CS is activated, when the DOF button is depressed, the modeling light from the SB-800 fires. This is way cool since you can look through the lens as the modeling light fires. This is a pretty easy CS to set. You access this CS by heading to the CSM Menu, right Multi Select on Bracketing/Flash, Multi Selecting right and down to e4 Modeling light and then right Multi Select one more time. Select On or Off.
What you might not realize is that this feature effects not only the SB-800 attached to the D2H’s hot shoe, but all other SB-800 that might be wirelessly connected in groups. You can fire all the modeling lights from all the SB-800s at once by simply depressing the DOF button, and see in the viewfinder your exact lighting pattern. Is that too way cool or what?!
e5 Auto BKT set gives you the option of bracketing exposure and flash (AE & Flash), exposure only (AE only), Flash only or White balance (WB bracketing). There’s not hidden tricks here, pretty cut and dry. You access this CS by heading to the CSM Menu, right Multi Select on Bracketing/Flash, Multi Selecting right and down to e5 Auto BKT set and then right Multi Select one more time. Select the option desired. Note: WB bracketing doesn’t work with RAW or RAW +Jpeg image quality settings.
White balance bracketing doesn’t work in combination with other features such as shooting RAW. Be sure to double check when using this bracketing with you camera’s configuration.
e6 Manual mode bkting works in conjunction with CS e5 when AE & Flash or AE only are selected in e5. This is only when you’re shooting in manual (M) exposure mode. You access this CS by heading to the CSM Menu, right Multi Select on Bracketing/Flash, Multi Selecting right and down to e6 Manual mode bkting and then right Multi Select one more time. Your have the following options: +speed (shutter speed is varied when e5 is set to AE only or, shutter speed and flash is varied when AE & Flash is set in e5), +speed & aperture (shutter speed & aperture is varied when AE only is selected or shutter speed, aperture & flash is varied when AE & Flash is selected), +aperture (aperture is varied when AE only is selected in e5 or aperture & flash is varied when AE & Flash is selected), Flash only (flash output is varied).
There are two exceptions to this CS. If you’re not using flash and you’ve got CSb1 set to On, the D2H varies the ISO only no matter what is selected here. The flash bracketing only works with i-TTL on the SB-800 or AA modes in the SB-800, 80DX and 28DX.
e7 Auto BKT Order is a olde but goodie. It simply dictates the order of under/over exposure when bracketing. Multi Select to the CSM Menu to Bracketing/Flash, to e7 Auto BKT Order finally reaching the options. You have the option of MTR>Under>Over (right on>overexposed>underexposed) or Under>MTR>Over (under exposed>right on>over exposed). Highlight your selection and right Multi Select to set.
e8 Auto BKT selection CS speeds up how you use bracketing which, if you use it a lot might be a time saver. It effects what happens when you depress the BKT button on the top left of the D2H. Multi Select through CSM Menu to Bracketing/Flash, right Multi Select to e8 Auto BKT selection and then right Multi Select to make your selection. You have two options, Manual value set and Preset value set. When Manual value set is selected (highlight, right Multi Select) then when you depress the BKT button, you must rotate the command and sub-command dials to adjust and set your bracketing set. When Preset value set is selected, you have available via the sub-command dial the last bracketing set you programmed into the D2H. f Controls
f1 Center button is a new feature to a Nikon DSLR and I’m so glad they went so far as to let us program it to fit our needs. This CS permits us to change how depressing the center of the Multi Select button effects Shooting Mode and Playback mode. You head to CSM Menu and then Multi Select down to Controls, right Multi Selecting and highlighting f1 Center button and then right Multi Selecting one more time. A dialog appears with the two options, Shooting mode and Playback mode.
Highlight Shooting mode and right Multi Select, that brings up another dialog box with the options of Center AF area, Illuminate AF area and Not used. When Center AF area is selected, when you depress the center Multi Select, if you have a group-pattern set and the AF sensors are active horizontally, then pattern changes to vertical or visa a versa. This is really cool for when you switch from horizontal to vertical shooting and back again. If Illuminate AF area is selected, when you depress the center Multi Select then the AF sensors illuminate but focusing is not performed. If Not used is selected, nothing happens when you depress the center.
Note: if you select Illuminate AF area, then CS a3 Pattern 2 is no longer useable. Highlight Playback mode and right Multi Select, that brings up another dialog box with the options of
Thumbnail on/off, Histogram on/off and Zoom on/off. When Thumbnail on/off is selected, when in Playback mode, when you depress the center Multi Select you can change the preview from full screen to thumbnail and back again. With Histogram selected, when in Playback mode even if you don’t have
Histograms selected (Playback menu>Display mode>Histogram), you can turn the Histogram on and off by depressing the center Multi Select, making it appear and disappear. And with Zoom on/off selected, when in Playback you can zoom in and out of a preview. When you highlight Zoom on/off and right Multi Select another dialog box appears permitting you to select 2x, 3x or 4x (zoom amount).
Those Histogram fanatics out there should really like this option. You can have Histograms on demand without having to bother to toggle through all the photo info pages. Nice touch Nikon!
Note: if you have Histogram selected (Playback menu>Display mode>Histogram) and you have Histogram selected above and you’re displaying the Histogram in Playback via the photo info pages and you then depress the center Multi Select, the D2H won’t be happy. Don’t do it!
f2 Multi selector permits you to further program the Multi Selector. You have the option of Do Nothing, Reset mtr-off delay or Initiate autofocus. You access this CS by heading to the CSM Menu, right Multi Select on Multi Selector, Multi Selecting right and down to f2 Multi Selector and then right Multi Select one more time. When Do Nothing is selected, then the programming of the Multi Selector doesn’t change. When Reset mtr-off delay is selected, when the camera turns itself off (CS c3) if you depress the Multi Selector, the meter turns back on. And with Initiate autofocus is selected, both the metering is reactivated and the D2H autofocuses when the Multi Selector is depressed after auto-off.
f3 PhotoInfo/Playback determines how you view images or photo info when using the Multi Select button. By Multi Selecting from the CSM Menu to Controls and right Multi Select to, PhotoInfo/Playback and once more you come to the menu with the options Off or On. Off is the default where up/down Multi Select in playback mode changes images being previewed and right/left Multi Select changes photo info screens. On switches this so up/down Multi select changes photo info and right/left changes images.
f4 FUNC. Button Flash is way cool, I’m so glad Nikon added it and all of its features. This CS lets you really program the FUNC button to fit your photography. From the CSM Menu, Multi Select to Controls, FUNC. Button and then right Multi Select to enter the options. The FUNC Button is the button below the DOF button on the front of the D2H. It’s nothing like the Func button found on the D1 Family. There are nine options available: FV Lock, FV Lock/Lens data, 1 step spd/aperture, Same as AE-L/AF-L, Flash off, Bracketing burst, Matrix metering, Center-weighted, Spot metering.
When FV Lock is selected, with the SB-800 is attached the flash exposure is locked when you depress the FUNC Button. With FV Lock/Lens data selected, when the FUNC Button is depressed and an SB-800 is attached, the operation is the same as FV Lock. If a SB-800 is not attached by a Non-CPU lens is, you can set focal length and maximum aperture with the command dial. 1 step spd/aperture is kind of cool, when selected and you depress the FUNC button, if you’re in A or M, the aperture is changed by one stop increments (overriding CS#b2). If you’re in S or P, the shutter speed is change in increments of on stop. Same as AE-L/AF-L is just that, the FUNC button does the same operations as the AE-L/AF-L button. Flash off is cool. With the SB-800 attached, depressing the FUNC button prevents the SB-800 from firing even though the flash is turned on. Bracketing burst, permits you to repeat your bracketing bursts after the set duration and been achieved (be sure to set the camera to S firing mode). The last three, Matrix metering, Center-weighted, Spot metering are pretty clear cut. No which metering mode you’ve selected via the Metering Selector on the prism, you’ll have the metering pattern you’ve selected here when you depress the FUNC. Once you let up on the FUNC button, the metering pattern returns to what is selected by the Metering Selector.
f5 Command dials has four options giving you the ability to program and command and sub-command dials. Multi Select through CSM Menu to Controls, right Multi Select to f5 Command dials selection and then right Multi Select to make your selection. Each of the four options, Rotate direction, Change Main/Sub, Aperture setting and Menus and Playback have sub menus to define each CS. Rotate direction permits you to change the Normal rotation of – to + to Reverse of + to -. Change Main/Sub is to exchange the functions the sub-command and command dial perform. Selecting on reverses their functions. Aperture setting changes the sub-command dial from changing apertures to physically changing the apertures by turning the aperture ring on the lens (this doesn’t work with G lenses). Menus and Playback when switched On, the sub-command and command dial takes the please of the Multi Selector when viewing images or photo info.
Keep in mind when you set this, you can be really messing up other custom settings you might have made involving the command and sub-command dials. It can get really confusing!
f6 Buttons and dials is an unique CS. When depressing and holding down a button while rotating a dial is required to make a selection, this CS makes it so you don’t have to hold down the button anymore. You head to CSM Menu and then Multi Select down to Controls, right Multi Selecting and highlighting f6 Buttons and dials and then right Multi Selecting one more time. You have the option of Default and Hold. When Hold is selected, you depress the button once to activate that feature and then depress is again after you’ve made your selection to turn it off.
f7 No CF Card? is a cut and dry CS. You head to CSM Menu and then Multi Select down to Controls, right Multi Selecting and highlighting f7 No CF Card? and then right Multi Selecting one more time. When On is selected, the shutter release is disabled when there is no CF card in the D2H. With Off selected, the D2H will operate when there is no CF card is inserted.
Moose’s Setting for the CSM Menu
C Bank select A R Menu reset A Autofocus a1 AF-C mode priority release button a2 AF-S mode priority release button a3 Group dynamic AF Pattern 2 a4 AF activation Shutter/AF-ON a5 Focus Are Illum Manual focus mode>ON>1s Continuous mode>ON>1s a6 Focus area ON a7 Vertical AF-ON Focus area only b Metering/Exposure b1 ISO auto OFF b2 ISO step value ½ stop b3 EV step ½ stop b4 Exposure comp. EV ½ stop b5 Exposure comp. OFF b6 Center weight 8mm c Timers/AE&AF Lock c1 AE Lock OFF c2 AE-l/AF-L AE/AF Lock c3 Auto meter-off 6s c4 Self-timer 10s c5 Monitor Off 20s d Shooting/Display d1 Shooting speed 4fps d2 Maximum shots 40 d3 Exp. delay mode OFF d4 Long exp. NR OFF d5 File No. Seq. ON d6 Cntrl panel/finder >Rear control panel>Exposures remaining >Viewfinder display>Exposure remaining d7 Illumination OFF e Bracketing/Flash e1 Flash sync speed 1/250 (FP auto) e2 Flash shutter spd 1/15 e3 AA flash mode ON e4 Modeling flash ON e5 Auto BKT set AE & flash
e6 Manual mode bkting Flash/speed e7 Auto BKT Order MTR>Under>Over e8 Auto BKT selection Manual value set f Controls f1 Center button Shooting mode>Center AF area Playback mode>Zoom on/off 4x f2 Multi selector Do nothing f3 PhotoInfo/Playback On f4 FUNC. Button Flash OFF f5 Command dials Rotate direction>Normal Change Main/Sub>Off Aperture setting>Sub-command dial Menus and Playback>Off f6 Buttons and dials Default f7 No CF Card? ON
The Playback Menu This is the least feature packed of the four menus. It basically influences what you do with the image
after it’s captured. The only thing that is really new here is the Display mode and that’s just how you select what you want to see or not. The Playback Menu has only eight options, Delete, Playback folder, Slide show, Hide image, Print Set, Display mode, Image review and After delete.
Note: the Playback Menu will not appear if there is no CF card inserted into the D2H. Delete is kind of a complicated method of deleting images that you’ve captured from the CF card. To
start the procedure, head to Playback Menu and then Multi Select up/down to highlight Delete. Right Multi Selecting brings up two options, Selected and All.
Note, if you have no images on the CF card, then this option is not available. If you highlight and then right Multi Select, Selected, thumbnails appears of all the images on the CF
card. You move around the thumbnails using the Multi Select. When a thumbnail is selected, a yellow frame appears around it. You can depress the checkerboard button to take a thumbnail to full frame and then back again. To select an image for deletion, depress the center of the Multi Select button creating a trash can icon on the thumbnail. Once you have selected all the images you want to delete, depress the ENTER button. Another menu appears with Yes or No. Select Yes and depress ENTER and those images are deleted from the CF Card (sound if recorded is deleted as well).
The other option is All. This is as it implies, highlight All and right Multi Select bringing up a warning menu with No and Yes. Highlight No if you change your mind (or depress Menu button). Highlight Yes and then depress the ENTER button. When this is done, all the images on the CF card are deleted. The exception is, if any images have been protected or hidden, then they won’t be deleted.
Playback folder determines what folders you can view when playing back images. Go to the Playback Menu and Multi Select up/down to highlight Playback folder and then right Multi Select. Three options appear, NCD2H, All and Current. Selecting NCD2H, images taken by a D2H can be seen in playback. When All is selected, all images created by any camera conforming to the DCF, Nikon or any other brand can be seen in Playback. And Current, only those images in the current folder in the D2H can be seen in playback.
Slide show is a cool feature if you like to hook your camera up to a television to show your images. You can playback through the slide show all the images on the CF card (unless Hidden). Head to the Playback Menu and then Multi Select and highlight Slide show to start the process. You can simply right Multi Select, highlight Start, right Multi Select again and start the show without doing anything else. You can fine tune the show to your own likes. Highlight Frame intvl and right Multi Select, you can select between 2, 3, 5, and 10s intervals. This really determines how long your image will be visible before it’s changed. You can highlight Audio playback and any messages you might made on a image will be played (to select the speaker Set Up>Audio output).
While the slide show is being played, you can also perform a couple of other functions. By up/down the Multi Selector, you can skip or see previous image. By right/left Multi Selecting, you can select or
change photo info to be displayed. You pause the slide show by depressing ENTER and the Menu button, ending the slide show and taking yourself back to the Playback Menu. Depress the monitor button to end the show on the image being seen. And depress the shutter release to turn off the slide show, menu and continue on shooting.
Hide image is a simple process permitting you to “hide” an image from either being deleted by accident (in the camera) or being viewed in a slide show. Head to the Playback Menu and highlight Hide image and then right Multi Select again. You have two options, you can select images one by one via Select / Set or Deselect all? . When you Select / Set, you one by one view images (depress checkerboard to zoom) and depress the center of the Multi Select to “hide” and image. When an image is “hidden” a small box with a line through it icon appears on the image. When you’re done hiding images, depress ENTER to save. You can use the Deselect all? to globally unselect all hidden images (if you hide some to do a slide show for example and once the show is done, you want to remove the hide tag).
You can “protect” images when you’re simply viewing them on the monitor (depressing the Monitor button). When viewing images, depress the Key button which prevents an image from being deleted, but does not hide it. If you have tagged an image with “hide” or “protect,” when that images is viewed on a Windows platform, he file will be given a “read-only” status.
Print Set gives you the ability to create a “print order” for images on the current CF card that you can get made by taking your CF card to a DPOF-compatible printer/device. To start the process, go to the Playback Menu and highlight Print set and then right Multi Select. The first menu has two options, Select / Set and Deselect all?, the same as with Hide image. When you Select / Set, you one by one view images (depress checkerboard to zoom) and depress the center of the Multi Select to “select” and image. When an image has been selected, a printer icon appears in the image. This method of selecting only generates one print from the selected image. If you depress and hold in the Key button and then Up Multi Select, you not only select an image for printing, but you can increase your print order from 1 to as many as 9 copies. To complete your print order, depress the ENTER button. To Deselect your Print Set, go to the Deselect all? and select Yes which will cancel your print set.
If you’re shooting just RAW files, you cannot use this feature. If you’re shooting RAW +Jpeg then you’ll be able to select the Jpegs for printing. Nikon recommends that if using this feature, you set your camera to Color Mode I or III (Shooting Menu>Color mode). I’ve never, ever done this so I don’t know personally about this advise.
Note: the D2H is EXIF 2.2. Display mode is an essential feature that not enough digital photographers take advantage of! This
feature provides you four options of information to see when you’re previewing your image (chimping). Data (Photo Info), Histogram, Highlight (highlight warning or blinkies), and Focus area. You find this important feature by going to the Playback Menu and highlighting and then right Multi Select Display more. You simply Multi Select up/down to highlight the option desired, then right Multi Select to place a check mark in the box. Once accomplished, Multi Select to highlight Done and then right Multi Select to set your options. There’s a whole lot of info on the importance of these features in Chapter 2, I recommend you check it out.
Remember you have the option of viewing Histograms without setting them here. You can head to f1 Center button > Playback mode > Histogram > On and see Histograms by simply depressing the center Multi Select.
Image review is a simple feature. It makes it possible for you to see an image automatically right after it’s captured without depressing any buttons. Head to the Playback Menu and highlight Image review. Select On if you want the images to appear right after taking them, or Off if not. This works great when shooting in S Single mode like doing landscapes or portraits. But if you’re shooting CL or CH and you take a burst, the D2H previews every image. You can shut it off by simply going back to shooting, but this does slow down the system a tad as well as start to eat up battery power.
After delete is kind of different, it determines what image you see after you’ve deleted an image during chimping. You have three options, Show next, Show previous and Continue as before. You reach these options by going from the Playback Menu to After delete using the Multi Select. Show next which is the default when selected, shows the next image in order after the one that was deleted. Show previous displays the image just prior to the one deleted. Continue as before is for when you’ve scrolled back or forth
through your images and you delete one. Depending on the direction you were scrolling, the next image displayed will be previewed.
Moose’s Setting for the Playback Menu
Delete Playback folder ND2H Slide show 2s Hide image Print Set Display mode >Highlight Image review OFF After delete Show next
The D2H –Under the Hood and Layout The D2H is a whole new camera except for the lens mount. This is important for many reasons. The
main one being that we don’t have an old camera with new guts. We have a whole new camera built around new features, those that worked and improving those that needed improving. There’s no doubt that this whole new design was based around three basic, major improvements. Battery consumption, frames per second (fps) and the LBCAST sensor. Did Nikon succeed with their new design?
I wrote this book with about two months of shooting of the D2H under my belt. Because I had what I felt is a limited time with the D2H, and only was able to test shoot about a 30 different bodies, I spent a lot of time talking with other peers to see what results they were capturing with the D2H. I talked with a diverse group of shooters, folks like David Black (sports), Vincent Versace (celebrates/fashion) and John Shaw (nature) who all have different requirements and needs from their camera than I. It’s interesting that we all, without any prearrangements, instantly made large prints as one of our first tests of the D2H. We all found that in 20x and 30x prints, the quality was excellent. So from that, we all proceeded to give the D2H a true shake down. The results was for all I talked with is that the D2H was a very usable tool, one we could take to work to do our jobs.
Why am I starting off with this? I’m trying to emphasis that the D2H is a tool, one that photographers in the business to communicate with their images, find to be an good to excellent tool. Does this imply that the D2H is perfect? Not in the least and that’s not what I’m saying here or anywhere in this book. The D2H isn’t perfect for probably two reasons, neither of which I can change. The first reason is, how do we define perfection? No noise, full frame, frames per second, 100% viewfinder, incredibly fast write times, perfect flash exposure, just what is our measure for being perfect? Second, even if we can defined perfection, can technology deliver it and more to the point for many, can technology deliver it for a price the masses can afford? Since we don’t have those answers, then as photographers we have to take the tool at hand and use the skills and talents we individually have to make the images with that tool, in this case the D2H. In other words, it still depends on the person behind the camera! Under the Hood – the body
Nikon as always, went all out in the designing of the D2H. The body is made from their long proven magnesium alloy. This very durable yet lightweight material is an important part of what makes the D2H feel so good in the hand. Nikon in creating this new design had a number of requirements that the D2H had to meet. Being rugged was just part of it. Being able to deal with environmental conditions such as rain was another. The D2H sports a new and improved sealing system that is an integral part of the magnesium body. Improved button size and placement was another big factor in the D2H design. Meeting these requirements demanded the improved sealing system to deal with the larger buttons. It also meant that the layout of those buttons had to be functional for the user. Nikon brought in fame industrial designer Giorgetto Giugiaro to exclusively design this aspect of the next generation of Nikon DSLR cameras.
Note: The D2H still uses the BF-1a body cap. It is essential that when no lens is attached to the D2H that this body cap be attached. The main reason is the prevention of any foreign material possibly reaching the sensor. Under the Hood – the LBCAST sensor
All of this outward change was based on what had to be incorporated inside. The biggest advancement is the new Nikon DX Format JFET image sensor LBCAST (it was so much easier when you could just say CCD, which this is not). In the development for over a decade (folks, that long before the D1 was announced), the LBCAST is a new generation sensor. DX Formant means in plain English that the D2H still has a 1.5x focal factor. You place a 50mm lens on the D2H and you have the effective focal length of 75mm. The format of the sensor is slightly different from the D1 Family. You now have a slight aspect ratio difference with the D2H at 2464x1632 pixels where we were at 2000x1312. JFET stands for Junction Field-Effect Transistor and LBCAST stands for Lateral Buried Charge Accumulator and Sensing Transistor array. Is there plain English for these two terms?
The LBCAST sensor is not a traditional CCD nor CMOS chip. Like the CMOS chip, the LBCAST is made using conventional semiconductor technologies. While this is all basic conjecture since it’s all proprietary, based on known technologies the LBCAST uses a new kind of signal amplifier that is associated with each individual pixel (the amplifiers are the start of the speed up process getting us 8fps). Unlike the CMOS that normally uses MOSFETS’s, the LBCAST sensor uses JFET’s in the cell amplifiers. The LBCAST uses a X-Y Address-type sensor that has noise canceling functions among other benefits.
Since the LBCAST uses the X-Y Address method, the signal is read through two signal lines. These are differentiated by color, providing even faster image read (more speeding up of the process). The typical CMOS sensor also uses two output lines to read data, but their output imagery reveals an image mismatch at the division line. In the LBCAST the division is made by color (green vs. blue and red) instead of area, eliminating the traditional mismatch. Reading both output lines simultaneously boosts operating speed even more while improving image quality.
You might be saying to yourself, “This is plain English?” You might also be saying, “This is all well and good, but why is the D2H only 4.1 megapixels?” It’s a hard battle to explain to folks that it’s the quality of the pixels and not the quantity that really matters in great digital cameras. The LBCAST sensor is a great example of that! I can only conclude that at this current time with technology and costs with a goal of 8fps, 4MP is what you get.
Like I already mentioned, the LBCAST uses JFET’s rather than the traditional CMOS MOSFET’s. This directly describes the cell amplifiers for each individual pixel. Looking at the basic circuit structure of a LBCAST pixel well, the JFET functions like a pixel select switch. This “switch” is composed of three transistors: transfer, JFET and reset. CMOS using MOSFET have four transistors. With LBCAST using only three instead of four, this simpler structure means the photodiodes (what actually receives the light) can be increased in size (this is what in part was able to improve the contrast and color gradation). And since we’re trying to keep this in simple English, the structure of the interconnect (the wiring) is also much simpler, including the opacity film, fitting onto only one layer of polySi and two layers of metallization. CMOS design, in comparison, uses four layers. The fewer layers required, the less the distance is needed between the photodiode and the microlens, thereby reducing the effect of tangential light, even around the periphery, and heightening image uniformity. This means improved optical matching with Nikkor lenses.
We’re nearing the end of this new magic capturing the world we see. All of this really comes down to two thing, better image quality and better response to electricity. The LBCAST sensor overall requires less power which besides providing better battery performance minimizes dark noise while increasing speed. The LBCAST also requires a thinner Optical Low Pass Filter which again increases image quality and consumes less power. In fact, because of all of this the D2H is ready to fire as soon as the camera is turned on. It also gives the D2H an incredibly fast shutter lag of 37 millisecond.
One other part of this amazing process (keep in mind this is all happening faster than a heartbeat) is a change in the dataflow. Rather than the traditional single channel dataflow, the D2H utilizes a 2-channel data acquisition flow. This accomplishes many things. With the image sensor data being split into 2 channels, faster read and write performance is achieved. It also permits adjacent pixel data to be read not generating any separation lines.
OK..there is no real way of describing this new technology in plain English. And you really don’t need to know all of this stuff to begin to appreciate that because of this new technology in the D2H, it delivers to you the photographer, great images at 8fps while not eating up batteries. That’s really the most important thing to know about the LBCAST sensor! Under the Hood - Color
Color is an incredibly important part of digital. As far as I’m concerned, the D2H does color the best of any digital camera I’ve ever shot in the last decade! This is because Nikon has rethought and re-engineered color in the D2H. The LBCAST sensor is a big part of this improvement, but it’s really only part of the story. It actually starts outside the D2H.
That little white dome thingie on the prism is key to this improved color. The Ambient Light Sensor magically as far as I’m concerned, reads the color of the light source. (I’ve tried to full it by wearing a red baseball cap, but it wasn’t fooled.) The information from the ALS is compared and combined with that from the 1005-pixel RGB exposure and color metering sensor. This information along with that from the LBCAST sensor goes through a new image processing engine.
The new image processing engine on the system LSI has a new set of improved algorithms. When this takes in the information from the reflected light sensor (RGB sensor), the LBCAST sensor reading image area and the ALS reading the ambient light, wow!
This is what makes the new Auto White Balance (AWB) and Auto Tone Control (ATC) work (where they didn’t in previous Nikon DSLRs). The D2H is the first DSLR where I can shoot in Auto WB and rely on it delivering. This is also true for Tone which couldn’t’ be set to Auto in previous bodies. But with all of this technology, I’ve found I can completely rely on the ATC which sure is a delight.
Keep in mind that only some of the technology is applied to RAW/NEF capture. Some of this technology such as AWB and ATC is only applied during in-camera processing of TIFF and Jpeg files (thought RAW files are tagged with this info in case you select to use it in their post processing). Since I’m only shooting RAW +Jpeg now, I do see the effectiveness of this new system on the Jpegs. The color balance from Tungsten to noon has been quite excellent. (When in situations where I know the color temp is above 8000k, I switch to K and dial in the temp manually).
I’ve mentioned this before, but want to bring it up again. The magenta skin thing did appear in one of the D2Hs I shot with. While only one is a really small error margin, if it happens once I can only conclude it might happen again. If you go looking for the problem, you’ll find it. If you take into account the light, the subject’s complexion and other normal photography factors, I doubt very few truly have the magenta problem. Under the Hood - shutter
There is a departure here from the D1 Family which on the surface looks like a step backwards. The D2H utilizes a mechanical shutter which is a modified version of the F5 shutter. This double-bladed shutter delivers a top end speed of 1/8000 (slower than the D1 Family’s 1/16000) and a flash sync speed of 1/250 (one stop slower than the D1 Family’s 1/500). While technology can’t make up for the 1/16000 top shutter speed, Nikon has worked on the flash sync. While the SB-28DX and SB-80DX only syncs at the 1/250, the top mechanical sync speed, the SB-800 with FP-auto (CS#e1) can flash fill automatically with shutter speeds up to 1/8000! The amazing thing is, the quality of the FP-auto flash is, IMHO that of the F5 which is as goods as TTL flash gets. So while you mechanically cannot have a sync speed of 1/500, Nikon made up for it with technology. And it works beautifully!
Now the top end shutter speed of 1/8000 is going to remain 1/8000. That cannot be made up for with technology at this time. While you did loose this, you did gain the reliability of the F5 shutter which has already well proven itself! The sales brochure states that the D2H is good for 150,000 cycles which might make you wonder. A recent press release from Nikon states: “Service engineers at Nikon’s German Service Centre were amazed to discover during routine servicing recently that a Nikon F5 had achieved 1,092,904 shutter releases without fault. Translating into about 35 kilometers of film this figure is a testament to the durable design of the mechanism, now also shared by the latest Nikon D2H Professional Digital SLR. To put the 1,092,904 shutter releases into context, it equates to 34 hours of continuous shooting at 8 frames per second.” That’s pretty darn impressive! Under the Hood - Autofocus
The D2H is sporting the new Multi-Cam2000 AF sensor. This makes a whole lot of new things possible, the most obvious is the 11-area Autofocus System. Back in the “old” days we had just one AF sensor dead center, that progressed to five AF sensors in a cross pattern with just one cross-type sensor. Now, we have eleven in a 3 – 5 – 3 pattern with 9 cross-type sensors. Even better is, we can group these!
Nine of these eleven AF sensors area cross-type sensors (the center 9 AF sensors). Cross-type refers to the shape of the focusing area. The Cross-type sensor can read focusing information in both horizontal and
vertical sections of the viewfinder image. This feature greatly enhances the camera’s ability to recognize difficult AF subjects and work in lower light levers and contrast ranges while tracking subjects (which the D2H does stupendously). As a side benefit, this speeds up AF operation in general though there is no way to quantitatively express it. In specific though, the increased AF sensitivity at the top and bottom of the viewfinder/image does make it possible to track subjects for that type of composition that wasn’t possible before.
Note: I was a little disappointed that with this new technology, autofocus with the TC-20e was not improved, it still only works well with the center AF sensor/group.
The 11 AF sensors brings a whole new realm to using AF easily for your compositional as well as action needs. The D2H has two AF sensor groups (CS #a3) Pattern 1 and Pattern 2. When used with Group Dynamic AF, it gives you the ability to have really, a 4-5 large AF sensors rather than eleven small ones. Determining which Pattern works best for you and your photography, or if the more traditional single AF sensor fits it better, takes some time to establish. There is no doubt though when you are locked into compositional restraints and want the AF system to focus for you, you can accomplish it easily now without having to manually focus. As I already mentioned, I tend to use three of the four D2H AF systems, each filling specific needs perfectly.
Incorporated into the D2H is Nikon’s Dynamic AF with Focus Tracking and Lock-on™ systems. For those new to Nikon, these two features are really cool. Dynamic AF simply is when the subject moves (and you pan with it) and it leaves the original AF sensor/group you selected, a new AF sensor/group picks it up and maintains focus (the key here is the camera has to be moving with the subject). Lock-on™ works in conjunction with Dynamic and it’s a system that keeps the focus locked on the subject even if some should momentarily come between the subject and the camera. You don’t have to do anything to activate Lock-on™, it’s automatically on all the time. Dynamic focus is activated when the AF-area mode selector is set to one of the three dynamic AF modes.
The D2H also incorporates a favorite feature for many, Closest Subject Priority Dynamic AF (AF-area mode selector). While a complicated system to produce it’s really easy to understand. When in Closest Subject Priority, the D2H focuses on the closest subject to the camera. It’s just that simple.
The D2H incorporates the same electronic rangefinder that has been the standard in Nikons for some years. In the lower left hand corner of the viewfinder you’ll see a green left triangle, dot and right triangle. When the green dot appears, the image is in focus (based on the active AF sensor/group). This is true whether you’re manually focusing or using autofocus. If either triangle lights up, it indicates the image is out of focus and the lens needs to be rotated in the direction indicated. Under the Hood - Metering
On the right side of the prism is the Metering Selector. You have three options with the D2H: 3D Color Matrix, Center-Weighted, and Spot metering. To select a metering pattern, first depress the button in the center of the dial, and then rotate the dial so it lines up with the desired metering pattern. I still just use Matrix metering 100% of the time. It simply works for me and my photography, making my life a whole lot easier.
3D Color Matrix Metering is an amazing system! The D2H has a 1,005-pixel CCD (Charge-Coupled Device, 67 vertical x 15 horizontal), which is what actually reads the light. The amazing thing to me is not the 1,005 pixels, but that each pixel has incorporated in it one R (red), G (green), or B (blue) filter! Each sensor then not only evaluates the scene’s brightness and contrast, but also the scene’s color!
The information received from the 1,005 pixels, including scene brightness, contrast, selected focus, distance information, and the scene’s color characteristics, is analyzed. This information is then processed by a powerful microcomputer, and its database is said to hold at least 30,000 exposure possibilities. With this input, the D2H’s meter provides the photographer with an instant meter reading.
As a point of trivia, the RGB meter in the D2H can actually detect different light sources. It can “see” tungsten, fluorescent, bright yellow, tender green, and normal green light. The D2H cannot only see these light sources, but it knows how to meter for them by biasing exposure according to the light source. The D2H’s RGB meter features high sensitivity EV 0 to EV 20 (ISO 100, 50f1.4, EV 2 to EV 20 in Spot). You need to use an AF-S, AFI, or AF lens with D capability to get all of this performance. And with the D2H, you can get this same performance working with non-CPU lenses is you make use of Shooting Menu>Non-CPU lens data.
Center-Weighted Metering is the old standby. In this mode the D2H meters the entire frame but gives the most bias to 75% of the center of the frame. The percentage of the frame where this bias is placed can be changed by using CS#b6.
Spot Metering measures the exposure in a small 3mm circle. This is defined and selected by the active AF sensor. If you’re shooting in Group Dynamic or Closest Subject, the spot is based on the center sensor
D2H Layout
All that’s left to make this baby sing, understanding the functions of the varies buttons laid out on the D2H. As already mentioned, the ergonomics of the D2H as by far the best on any Nikon DSLR, perhaps any Nikon ever. The layout of the buttons as well as the size of the buttons is better and larger than on the D1 Family.
The viewfinder on the D2H is a virtual 100% viewfinder. This is a huge improvement! The most obvious is compositional, you can compose in the viewfinder knowing that what you see is what you’ll get. The D2H comes with the B-type BrightView Clear Matte Screen III. You can purchase either a E-type BrightView Clear Matte Screen III which is known as the grid screen. The other big benefit is the “tunnel” feel of the old viewfinders is no longer present which does present some like myself eye relief. The viewfinder eyepiece is higheye point which is nothing new, but the eyepiece itself is big time news. The eyepiece is lockable! When the eyepiece shutter is open, the eyepiece is locked in place and cannot unscrew. To unscrew the eyepiece to attach an eyecup (DK-2), close the viewfinder eyepiece shutter.
Note: when a eyecup is attached to the D2H, its depth is too great so the locking mechanism cannot engage. So, you can still have an eyecup accidentally become unscrewed and fall off with this new locking system.
On the side of the viewfinder is the Meter Selector and Diopter correction. The Meter Selector permits you to select between Matrix, Center-weighted and Spot Metering (refer to Under the Hood – Metering). The Diopter correction permits you to dial in corrective Diopter correction if you vision so requires. Pull out the Diopter knob and rotate it to achieve -3 to +1 correction. Be sure to push the knob back in once you’ve dialed in the correct correction. No glass wears should check the Diopter correction every so often. This knob can easily get pulled out when getting the D2H in and out of the camera bag and reset itself without your knowledge. A zero setting had the + and – parallel with the top of the body.
You might have noticed that the prism on the D2H is slightly different compared to cameras of the past. It extends out over the lens more than normal. This is to house the Ambient Light Sensor which is such and important part of the D2H color management.
To the right of the viewfinder is the top LCD panel. On the D2H, much of the information that is communicated on the top LCD is now also communicated in the viewfinder. When the camera is in stand-by mode, certain information is still displayed. The viewfinder will be vacant of any info, but the top LCD panel displays: Exposure mode, Comment (Set Up menu>Image comment refer to pg#..), Battery status (refer to pg#..), Frame count (number of shots captured), Number of exposures remaining, Flash sync mode, Focus area (refer to pg#..) and Memory card indicator. When active, there are many features that might be represented on the top LCD panel as well as in the viewfinder.
Viewfinder Information – The D2H has more information then any previous Nikon which is way cool. The information you see in the viewfinder along the right side in order from top to bottom is: Voice Memo Status (microphone icon), White Balance Bracketing (WB BKT), White Balance Mode (WB icons according to selection), Image size (L or M), Image quality (various letters refer Image Quality Chart pg#.), ISO. Along the bottom of the viewfinder reading right to left you’ll find: Flash-ready indicator (lightning bolt), Frame counter (number and K if the number is greater than 3 digits), Exposure compensation icon, Exposure mode (letter and possibly analog scale), Aperture, Aperture Lock icon (L), Aperture stop indicator (triangle/F), Shutter Speed, Sync indicator (x), Shutter speed lock icon (L), Autoexposure lock (AE-L), FV lock indicator (lightning bolt/L), Battery state (battery icon), Bracket indicator (BKT), Metering icon, Electronic ranger finder.
The icons appear or not all depending on what functions and options you have selected in programming your D2H.
Exposure mode – The D2H has four exposure modes, A (Aperture Priority), S (Shutter Priority), P (Program Mode w/flex Program) and M (Manual). Selecting a exposure mode is a simple as depressing the MODE button by the shutter release and then rotating the command dial until the desired mode appears. You will see in the viewfinder the same A, S, P and M as that’s displayed on the top LCD panel. In A, S and P modes, the aperture ring must be set to the minimum aperture (if not FEE appears). There are exceptions which will be noted.
A (Aperture Priority) mode permits you to select the desired aperture and the D2H selects the correct shutter speed (between 30s – 1/8000). When selected, an A appears in the top LCD panel and inside the viewfinder right of center. You select the aperture by either rotating the sub-command dial or if you’ve activated CS#f5 Aperture ring, you rotate the lens’ aperture ring (If you have f5 set to sub-command dial but the aperture ring is not set at it’s minimum f/stop, FEE error appears). In either case, when you select the aperture the D2H selects the shutter speed which will be stepless. If you select an aperture that requires a shutter speed slower than 30s, the warning Lo appears. You either have to select a faster aperture or use flash. If you have activated CS#b1 ISO auto, the D2H increases the ISO in this instance (refer to CS#b1 pg.# for more info). When the D2H changed the ISO, ISO-A is displayed in the viewfinder and ISO-AUTO flashes on the rear LCD panel.
The D2H has the Non-CPU lens data feature (Shooting Menu>Non-CPU lens data). When in A mode and you’re using a Non-CPU lens and you’ve taken advantage of this feature, be aware that while working in aperture priority the aperture that is selected appears being rounded to the nearest full stop. A triangle appear next to F0 aperture to indicate you’re using this mode.
If you’re shooting at shutter speeds less than 1/2s, remember you have a noise reduction (CS#d4) option that could improve your images for you.
S (Shutter Priority) is the opposite of A mode, you select the shutter speed desired between 30s and 1/8000, and the D2H selects the aperture (stepless shutter speed range based on the lens attached). When selected, a S appears in the top LCD panel and inside the viewfinder right of center. The aperture ring on the lens must be set to its minimum aperture when in S mode. If you’re using Non-CPU lens data and you switch to S mode, the D2H automatically goes to A mode. If the exposure is beyond the setting range, the D2H either displays Lo or HI depending if it’s too dark or too light. If you have activated CS#b1 ISO auto, the D2H increases the ISO in this instance (refer to CS#b1 pg.# for more info). When the D2H changed the ISO, ISO-A is displayed in the viewfinder and ISO-AUTO flashes on the rear LCD panel.
If you’re in S mode and the D2H is unable to produce the correct exposure based on the available light and settings, an analog scale appears. If the D2H cannot change the aperture to match it with the shutter speed is when the scale appears.
P (Program mode w/flex Program) is a simple exposure mode that selects both aperture and shutter speed for you (the range based on the lens attached, ISO and the light that is available). When selected, a P appears in the top LCD panel and inside the viewfinder right of center. What the D2H selects is based on the exposure data base helping the D2H to maximize shutter speed and aperture for you. If you’re using Non-CPU lens data and you switch to P mode, the D2H automatically goes to A mode.
You have the ability even though the camera is selecting shutter speed/aperture, to change this combination. It’s called Flexible Program. While you can change the shutter speed/aperture combination, you’re not changing the actual exposure value. Simply rotate the command dial and you’ll see different shutter speeds/apertures appear. When in Flex Program, an asterisk appears by the P to indicate you’re in Flex operation. You can cancel Flex Program by either rotating the command dial until the asterisk disappears or by turning the camera off.
M (Manual mode) is where you select both the shutter speed and aperture. You have the aperture range of the aperture of the attached lens and shutter speeds from Bulb, 30s to 1/8000. Depending on how you have set up CS#f5, you rotate the command and sub-command dials to change aperture and shutter speed. The D2H has the Non-CPU lens data feature (Shooting Menu>Non-CPU lens data). When in M mode and you’re using a Non-CPU lens and you’ve taken advantage of this feature, be aware that the while working in aperture priority the aperture that is selected will appear at being rounded to the nearest full stop. A triangle appear next to F0 aperture to indicate you’re using this mode.
When in M mode, a analog graph appears to help indicate proper exposure. Depending on how you’ve set CS#b3 determines how the analog graph displays the exposure increments. But with all three, if the arrow on the analog graph goes past the + or – sign, that indicates a three stop range. You can still take advantage of CS#d4 even though you’re shooting M mode.
With all four of these exposure modes, the shutter speed and aperture are displayed in the top LCD panel and in the viewfinder. Depending on the exposure mode selected, the shutter speed and aperture displayed may be accurate or just rounded off to the nearest setting. You can always check the EXIF data for more precise exposure data.
Frame Counter / Number of exposures remaining – These counters inform you how many images you’ve taken and the minimum number of captures remaining on the inserted CF card. These numbers are highly variable and are based on the image quality you’re shooting. When you’re shooting for example Compressed RAW or Jpeg, the counter determines their numbers based on the largest possible file size when in reality because of compression, your file size probably will be much smaller. Also keep in mind that if you’re shooting Compressed RAW +Jpeg that the Frame Counter increases by 1 even though 2 files are being written to the CF card. If the Frame Counter says 15 there are actually 30 files on the CF card.
Both the Frame Counter and the Number of exposures remaining are three digit counters. If you have a large CF card inserted into the D2H and you are using a image quality such as Basic, the Number of exposures remaining cannot be display beyond three digits, so it displays a number along with the letter “k” which represents 1000. The example in the IB is if there is room for 1260 exposures on the CF card, the D2H displays 1.2k.
Depending on how you CS#d6 determines what exactly you see in the viewfinder, Frame Count or Exposures remaining (this same CS can effect the counter on the rear LCD). The counter does not count or keep track of exposures as fast as the shutter flies. It counts only as files are written to the CF card. To determine exactly what the count is, wait for the green light on the back to the D2H to turn off indicating the writing to the CF card has finished.
The remaining frame counter in the viewfinder indicates how many images can be stored in the buffer. When the buffer is empty, it indicates the maximum number based on the image quality you’ve selected. As you shoot, this maximum number when the shutter released is depressed drops based on how many images are already in the buffer.
Note: when the remaining frame counter hits 0, the CF icon on the top LCD flashes as will CD in the viewfinder.
Flash sync mode – I am so happy to report that flash on a Nikon DSLR is finally truly like that on the F5! We’ve had to jump through hoops for years now, well that’s over with. When you depress the Flash sync mode button (lightning bolt on left side of the prism) and you rotate the command dial, you can cycle through the five flash sync modes: Front-curtain sync, Slow sync, Rear-curtain/Slow rear-curtain sync, Red-eye reduction and Red-eye reduction with slow sync. These various modes can work with all of Nikon’s DX flash units but to use any flash other than the SB-800 is to really not take full advantage of the D2H flash technology! To select a sync option, depress the Flash-sync mode button and rotate the command dial.
Front-curtain sync – is your basic flash operation. Front-curtain sync means the flash fires as the shutter opens. In Front Curtain sync, if we’re using A or P exposure modes, you can sync from 1/60 to 1/250. These are the shutter speeds available for syncing the flash and ambient light exposure. You can change the lower end shutter speed with CS#e2. In this case, the slowest shutter speed will be whatever you’ve selected with CS#e2.
To access higher shutter speeds when in Front-curtain mode, you’ve got to be using the SB-800 and have CS#e1 set to FP-auto. When this is the case and the shutter speed goes beyond 1/250, the D2H switches from TTL to FP flash fill sync. I’m quite impressed just how well this works! You only have FP-auto in front-curtain sync.
Slow sync – is a front-curtain sync but you have the ability to sync down to 30s and up to 1/250. You do not have use of FP-auto.
Rear-curtain/Slow rear-curtain sync – the flash fires when the shutter is closing as opposed to firing when the shutter first opens. If you’re in S or M modes, the Flash sync mode just says Rear but if you’re in A or P, it says Slow Rear. In this mode you sync at speeds of 30s to 1/250. You will see the pre-monitor flash when you first depress the shutter release.
You do not have available FP-auto. SC-29 is “the” TTL cord for the D2H/SB-800 in this mode. Red-eye reduction – is a mode in which three “pre-flashes” are sent out to constrict the subject’s pupils
to reduce red-eye. This feature is available with only the SB25, 26, 27, 28, 28DX, 80DX and 800. The sync speeds are 1/60 to 1/250 unless you’ve set CS#e1 to a slower shutter speed. Auto FP does not work with this flash sync.
Red-eye reduction with slow sync – does the exact same as above but permits you to sync down to 30s.
All of these flash sync modes are for flashes that are directly attached to the D2H flash hot shoe (or via SC17/SC29 cords). When a flash is connected to the D2H in one of these two methods, and the flash is ready to be fired, a red lightning bolt appears in the viewfinder in the lower right corner. This lightning bolt goes off and then on indicating the exposure was correct. If there was not enough light from the flash for a proper exposure, then the lightning bolt blinks for a few seconds and then go off. If you have any compensation dialed into the flash, the exposure compensation indicator appears in the viewfinder. If you have an SB-800 attached to the D2H, depressing the DOF button fires off the modeling light (refer to CS#f4 pg.# ). This is way cool because it makes it very easy to be looking through the viewfinder to see the effect of the modeling light.
On the front right of the D2H is the PC sync terminal. The above flash sync modes does not effect this terminal. This is for plugging in your standard PC cord for syncing the D2H for example with studio strobes.
Memory card indicator – is simply an icon to inform you have a CF card inserted into the D2H. If no CF card is inserted then the indicator is not present. At the same time, a –E- appears in the Frame Counter. If a CF card is not inserted, your camera may not fire depending on how you set CS#f7. When the CF card is full, this icon blinks.
D2H Buttons - back
The D2H has a bunch of buttons all over the place. The majority of these button do important operations so they need to be understood. Some have already been covered in the text, In either case, I’m going to go over them and what they perform in the operation of the D2H. Bracketing Button
Located on the top left of the D2H, the BKT button is how you engage the bracketing feature in the D2H. The D2H offers four different bracketing sets, exposure and flash (AE & Flash) exposure bracketing (AE only), flash bracketing (Flash only) and white balance bracketing (WB bracketing). You select the bracketing you which to do via CS#e5. When exposure or flash or with both bracketing, one frame is taken at a time at the various setting, no more. White balance bracketing, multiple files are produced from one capture to produce the bracketing but cannot be performed when the white balance has been set to K or shooting RAW or RAW +Jpeg.
You start the process by selecting the bracketing set you want to do via CS#e5. With AE & Flash, AE only or Flash only, you then depress the BKT button and rotate the command dial. The number on the left accompanied with the letter F dictates the number of shots in the bracketing set. This number ranges from -3 to 9, each number causing a different bracketing sequence to be fired. Refer to the large chart on pg.100 of the IB to find the set that works best for your needs. The number on the right when the BKT is depressed is how you program the bracketing exposure compensation. The range available is dictated by what you set at CS#b4. Once you have programmed you bracketing set, just depress the shutter release and depending on the advance mode selection, your images will be captured.
While capturing a bracketing set, a BKT appears in the top LCD panel as well as in the viewfinder next to the metering icon on the far left. A analog graph appears as well with hash marks. These marks disappear one by one as the bracketing set if fired off indicating where you are in the sequence.
There are a lot of variances on bracketing, so it’s important you TEST before you actual have to use it. If while capturing a bracketing set you run out of CF card space, when you insert a new card the D2H picks up the bracketing where it left off (unless you cancel it). If you have CS#b1 ISO auto activated and during your bracketing set the ISO must be changed to accomplish the bracketing, it will be done so automatically. And remember, you always have CS#e5, e6, e7 and e8 to customize your bracketing even further.
White balance bracketing in only slightly different from exposure bracketing. You first must select it via CS#e5. Then depress the BKT button and rotate the main command dial to choose the number of images you want in the bracketing sequence. Next while depressing the BKT button, rotate the sub-command dial to select the white balance adjustment desired (refer to the chart on pg.105 of the IB). The D2H White balance fine tuning chart helps you determine what white balance adjustment or direction you want the bracketing to accomplish.
Note: flash bracketing only works with i-TTL and AA.
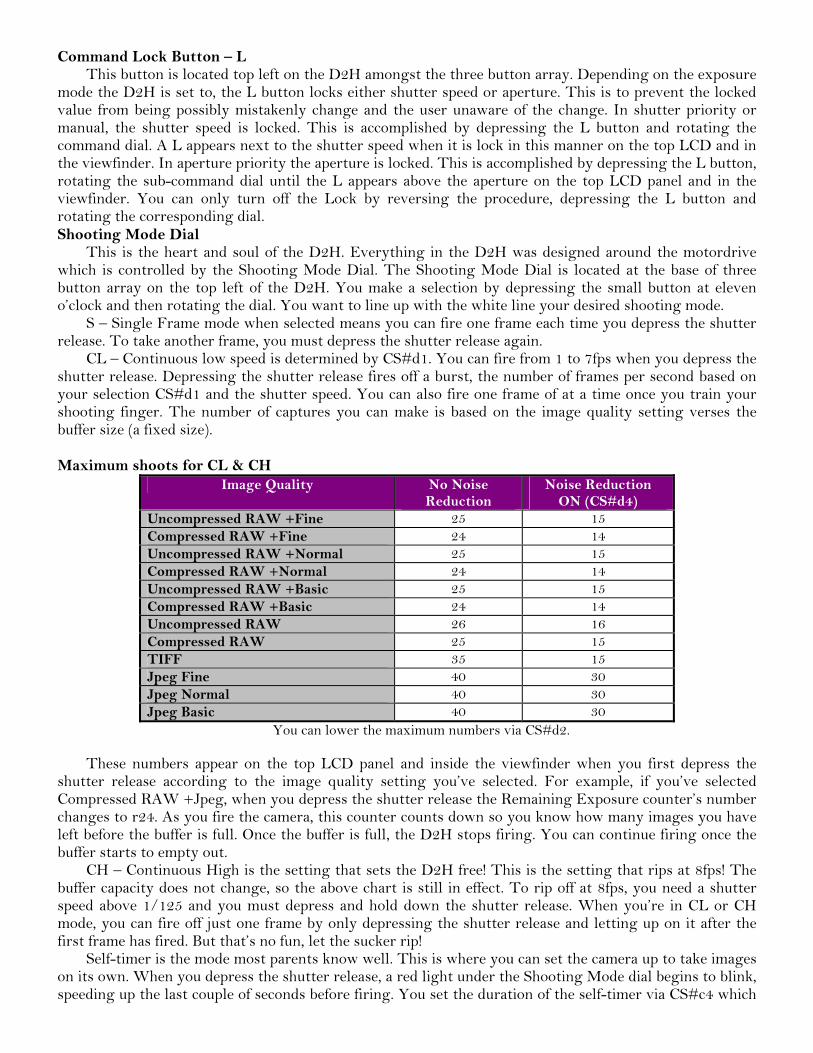
Command Lock Button – L This button is located top left on the D2H amongst the three button array. Depending on the exposure
mode the D2H is set to, the L button locks either shutter speed or aperture. This is to prevent the locked value from being possibly mistakenly change and the user unaware of the change. In shutter priority or manual, the shutter speed is locked. This is accomplished by depressing the L button and rotating the command dial. A L appears next to the shutter speed when it is lock in this manner on the top LCD and in the viewfinder. In aperture priority the aperture is locked. This is accomplished by depressing the L button, rotating the sub-command dial until the L appears above the aperture on the top LCD panel and in the viewfinder. You can only turn off the Lock by reversing the procedure, depressing the L button and rotating the corresponding dial. Shooting Mode Dial
This is the heart and soul of the D2H. Everything in the D2H was designed around the motordrive which is controlled by the Shooting Mode Dial. The Shooting Mode Dial is located at the base of three button array on the top left of the D2H. You make a selection by depressing the small button at eleven o’clock and then rotating the dial. You want to line up with the white line your desired shooting mode.
S – Single Frame mode when selected means you can fire one frame each time you depress the shutter release. To take another frame, you must depress the shutter release again.
CL – Continuous low speed is determined by CS#d1. You can fire from 1 to 7fps when you depress the shutter release. Depressing the shutter release fires off a burst, the number of frames per second based on your selection CS#d1 and the shutter speed. You can also fire one frame of at a time once you train your shooting finger. The number of captures you can make is based on the image quality setting verses the buffer size (a fixed size).
Maximum shoots for CL & CH
Image Quality No Noise Reduction
Noise Reduction ON (CS#d4)
Uncompressed RAW +Fine 25 15 Compressed RAW +Fine 24 14 Uncompressed RAW +Normal 25 15 Compressed RAW +Normal 24 14 Uncompressed RAW +Basic 25 15 Compressed RAW +Basic 24 14 Uncompressed RAW 26 16 Compressed RAW 25 15 TIFF 35 15 Jpeg Fine 40 30 Jpeg Normal 40 30 Jpeg Basic 40 30
You can lower the maximum numbers via CS#d2.
These numbers appear on the top LCD panel and inside the viewfinder when you first depress the shutter release according to the image quality setting you’ve selected. For example, if you’ve selected Compressed RAW +Jpeg, when you depress the shutter release the Remaining Exposure counter’s number changes to r24. As you fire the camera, this counter counts down so you know how many images you have left before the buffer is full. Once the buffer is full, the D2H stops firing. You can continue firing once the buffer starts to empty out.
CH – Continuous High is the setting that sets the D2H free! This is the setting that rips at 8fps! The buffer capacity does not change, so the above chart is still in effect. To rip off at 8fps, you need a shutter speed above 1/125 and you must depress and hold down the shutter release. When you’re in CL or CH mode, you can fire off just one frame by only depressing the shutter release and letting up on it after the first frame has fired. But that’s no fun, let the sucker rip!
Self-timer is the mode most parents know well. This is where you can set the camera up to take images on its own. When you depress the shutter release, a red light under the Shooting Mode dial begins to blink, speeding up the last couple of seconds before firing. You set the duration of the self-timer via CS#c4 which
gives you from 2s to 20s. Keep in mind that if you need more time, you can use the Intvl timer (Shooting Menu > Intvl timer shooting). You can also use the self-timer when you don’t have a cable release and you’re shooting at slow shutter speeds. It helps camera movement stop prior to the shutter going off.
M-up Mirror Up is a new feature that permits you to lessen the shutter lag (which is already at 37 millisecond). When set to M-up, you depress the shutter release and the mirror raises. Depress the shutter release again and the D2H fires. The mirror is lowered after the exposure but M-up is still in action until you turn it off via the Shooting Mode dial. Playback Button
Located on the back, top left of the D2H, the Playback Button often just called the monitor button, is what you depress to see images on the CF card. While depressing the Playback Button displays an image, there is a whole heck of a lot more that can be seen than just the image.
By depressing the Multi Select button left, right, up or down after you’ve depressed the Playback button, you have multi screens of info, Photo Info. There are a maximum of six pages of info, all depending on how you’ve set up Playback Menu>Display mode. In addition, what you see on a given page is determined by what you’ve activated or not activated like Voice Memo or Protect. Nikon calls these screens of info pages. You will only see the Histogram and Highlight Warning page if you’ve selected them in Playback Menu>Display mode.
Page 1: Voice memo icon (top left corner), Protect Status (top left corner), Folder number/frame (bottom right corner)
Page 2: Voice memo icon (top left corner), Protect Status (top left corner), Focus brackets (in their proper alignment), Frame number/total number of frames (top right corner), Folder name/file name (bottom left corner), Date / time (bottom left corner), image quality (bottom right corner) and number (bottom right corner).
Page 3: Voice memo icon (top left corner), Protect Status (top left corner), (listed in order) Camera, Metering, Shutter (speed), Aperture, Exposure Mode, Exp +/- (comp),
Page 4: Voice memo icon (top left corner), Protect Status (top left corner), ISO, White Bal, White Bal (fine tune), Tone, Sharpness, Color Mode, Comment
Page 5: Voice memo icon (top left corner), Protect Status (top left corner), memo icon (top left corner), Protect Status (top left corner), Highlight (if Highlight warning is active), folder number/frame number (both in lower right corner)
Page 6: Voice memo icon (top left corner), Protect Status (top left corner), Folder number/frame number (top right corner) Histogram (if Histogram graph is active)
Don’t forget you can change the Multi Selector operation in playback via CS#f3. Delete / Format Button (Trash Can)
The Trash Can button has only two functions, deleting files during playback and as one of the two format buttons. When playing back an image, you can delete it by depressing the Trash Can button. When you do depress it the first time, a warning message appears Delete? Yes. You must depress the delete button a second time to delete the image. If you have a Voice Message associated with the image, you are given the option of deleting just the image/sound or sound only when you depress the Trash Can.
When you depress the Trash Can button at the same time as the MODE button, you can format the CF card. When this is accomplished, FOR appears where the shutter speed normally appears. When you see this, you have to let up on the two buttons and then depress them again to finish the format. Menu Button
By this point, you should be very familiar with this button. When it’s depressed, you call up the D2H’s menus. Thumbnail Button (checkerboard button)
When in playback, you can depress the checkerboard button. This changes the preview from one image filling the monitor, to a 2x2 thumbnails and depress it again and you go to a 3x3 thumbnail pattern. Depress it one more time to got back to one image filling the monitor. Protect Button
The Protect Button, the key button, when depressed during playback protects the selected images from being deleted. When depressed, a Key icon appears in the top left corner indicating it’s protected. If
you want to remove the Key icon, just depress the key button again. You can remove protection from all the images on the CF card if you depress the Trash Can and Key buttons at the same time.
You can Protect images faster when you’re viewing thumbnails either in 2x2 or 3x3. Protecting an image in this way will not protect it from being erased if you format the CF card. Protected images when loaded in a Windows will be read-only.
If you depress the Key Button when you turn on the D2H, you will create a new folder. ENTER Button
The ENTER button serves two functions, finishing menu selections and Zoom during playback. The enter stuff is pretty self explanatory. The Zoom function is pretty cool. When in playback, depressing the ENTER button zooms the image 2x, depress the checkerboard button and rotate the command dial and you can zoom in more. Once zoomed in, you can depress the Multi Select to move around in the zoomed image to view different sections of the image.
Note: you can do one button zoom with the Multi Select CS#f1. ISO Button
The ISO button provides quick and easy access to ISO settings. By depressing the ISO button and rotating the command dial, you can select ISO 200 to 1600, HI-1 & HI-2 (in steps based on CS#b2). This can also be effected if you have ISO Auto CS#b1. If On, you cannot select HI-1 or HI-2. QUAL Button
This is the quick and easy way to change image quality. You can depress the QUAL button and rotate the command dial and change the image quality setting in the D2H. You can select, RAW +Fine, RAW +Normal, RAW +Basic, RAW, TIFF, FINE, Normal and Basic. You cannot select Compressed or Uncompressed RAW with the QUAL button. You can only do that via Shooting Menu>Raw compression. You can also set Large or Medium via the QUAL button and the sub-command dial. You can only do that via Shooting Menu > Image size.
Note: Image quality + Image size = file size. WB Button
The WB or White Balance button is a quick an easy way to set your white balance. By depressing the WB button and rotating the command dial, you can cycle through the various icons which represent the D2H’s white balance settings. With a white balance setting selected, you can continue to depress the WB button and rotate the sub-command dial to set the white balance fine tune. The WB settings you access are: Auto, Incandescent, Fluorescent, Direct sunlight, Flash, Cloudy, Share, K, PRE.
Note: there is no B&W mode. Note: when shooting RAW +Jpeg, only the Jpeg is previewed in Playback. Note: viewing RAW files with Nikon software can only be accomplished with Nikon View 6.1 or
Nikon Capture 4.1. Microphone Button
The Microphone Button is how you create and listen to voice messages. Refer to Voice Message on pg.# for information on how to use this button. Card Slot Door
Inserting and removing CF cards requires first the card slot button door be flipped open and then the button depressed. This opens the CF compartment. Depress the gray button completely to remove the CF card. Great care should be taken when removing and inserting a CF card as to not damage the wire leads inside the compartment.
You should never remove the CF card while the D2H is writing to the card. You’ll know the D2H is writing to the card by the presence of the green light right above the door. I personally make sure the camera is always turned off when I remove or insert a CF card.
The card door is a pain to get open! If you depress the button that opens the door for quite a while, it opens. You use two hands, one to depress the button and the other to open the door, it’s a little faster. The only thing I’ve found to make it better is simply play with it while I’m reading. I push the button and open the door, essentially “breaking in” the button/latch. AF-area Mode Selector
Actually a lever and not a button, the AF-area Mode selector is how you select Single area AF, Dynamic as AF, Group dynamic AF or Dynamic area with closest subject priority. Refer to Under the Hood – Autofocus pg# . Multi Select
Is a button you should be all too familiar with by this time. Surrounding the Multi Select button is a lever that when rotated, locks the Multi Select from moving. When locked, you cannot access the Multi Select for any operation. Vertical Command and Sub-command dials
When the you’re shooting vertically and grasping the D2H in a vertical fashion, you’ll find a vertical command and sub-command dial. You can rotate these just as the normal command and sub-command dials. You can program these dials just as you would the standard command and sub-command dial. AE-L/AF-L Button
The primary function of this button is to lock focus and exposure. It can be programmed via CS#c1 and c2 do to other functions. AF-ON / Vertical AF-ON Buttons
You can activate the AF by depressing either on of these buttons. Speaker / Microphone
On the back of the D2H is the Speaker (below the ENTER button) and the Microphone (above the WB button). These two are for use with the Voice Memo. Refer to Set Up Menu > Voice Memo pg.#. Monitor
The monitor on the D2H is bigger and better than that on the D1 Family. It is a 2.5inch, 211,200-piexl high-resolution LCD monitor. While made with a resilient tempered anti-scratch glass, it’s highly recommend to keep it covered (already seen scratched ones). It comes protected by the BM-3 clear protector. While this is an improved monitor from the past, I still find that you cannot base color or exposure by just the image you see visually displayed.
D2H Buttons - front Shutter Release
The Shutter Release is an important button. By depressing it half way down, the D2H comes alive! Depress the shutter release all the way down and the D2H fires. You must first rotate the Power Switch so ON is opposite the white line. Rotate the Power Switch past this mark and the top, rear and if attached, flash panel light up for 20 seconds. Vertical Shutter Release
When the D2H is turned vertically so the thumb of your right hand is resting on the CF door, your index finger will be on the vertical shutter release. The release works all the same functions in the same way as the normal shutter release. The only difference is the vertical shutter release as a locking ring that when rotated L is adjacent to the white line, the vertical shutter release is locked. Match the white dot and white line to unlock the shutter release. Mode Button
The mode button serves two functions, to change exposure modes and as the second format button. Depress the Mode button while rotating the command dial and you can switch between A, S, P, and M exposure modes (refer to pg.# ). Depress the MODE button the same time as the Trash Can button and you can format the CF card. Depress the two buttons simultaneously and FOR appears where the shutter speed would normally be displayed on the top LCD. Let go of the two buttons and then depress them again simultaneously and FOR appear in the Frame Counter and the CF card is formatted. Exp Comp Button
The +/- button when depressed lets you dial in exposure compensation by rotating the command dial. The increments is set via CS#b4. You can by pass depressing the Exp Comp Button via CS#b5. Lens Release Button
This is a history making button! This is the first time since 1959, the beginning of Nikon SLR line that the Lens Release Button has been changed. The button has been greatly enlarged so now you can depress it even when wearing bulky gloves on the planet. You must depress the button and then rotate a lens

clockwise to remove it. To attach a lens, merely line up the white dots on the lens barrel and the lens mount and rotate the lens counter clockwise until you hear the click. Focus Mode Selector Lever
Newly designed on the D2H, this much improve lever is how you set the AF to either M (manual focus), S (single-servo) or C (Continuous-servo). M is obvious, you must manually focus the lens. (Remember, if you’re shooting with an AF-S lens, you can manually focus even though you’re in S or C mode.) S, the camera focuses and locks focus on that subject until you release the shutter release and then depress it again. C, the camera focuses and continues to focus even if you reframe and change subjects. Refer to Under the Hood – Autofocus to learn more on how to take advantage of the D2H’s autofocus. DOF Button
The Depth-of-Field button now has two functions. Depress the DOF button and the lens aperture is closed down so you can previsualize depth-of-field through the viewfinder. The new function for the DOF button which is really cool, when a SB-800 is attached, depressing the DOF fires off the modeling light. This is a really nice feature because it permits you to view through the viewfinder as the modeling light goes off. FUNC Button
The Function Button located under the DOF button is a whole new button in a new local. This button can do many things, you program the operation of the FUNC button via CS#f4. You perform the operation by simply depressing the FUNC button. PC / 10-pin Remote Terminal
These two sockets on the front of the D2H serve simple functions. The PC socket is where you plug in a standard PC cord for firing off studio strobes. The 10-pin socket is where you attach remote firing devices such as MC-20, MC-21, MC-22, MC-23, MC-25, MC-30, ML-2 and ML-3. It is important that when either or both of these sockets are not in use, they are covered with their appropriate caps. AV out-DC in Door
On the left side of the D2H is one of the major design improvements. The AV out – DC in Door is where you plug in either the EG-D2 AV cable or the EH-6 AC adapter. You can plug in both at the same time and for most operations involving the EG-D2, you should use the EH-6. Unlike the same access points on the D1 Family, this is a much improved door location. USB 2.0 Door
Right below the AV out-DC in Door is the USB 2.0 Door. This is where you can plug the D2H into a computer with the accompanying UC-E4 cable. When using this cable and connecting to a computer, be sure you have correctly set Shooting Menu > USB is set correctly for your computer operating system. When the D2H is successfully connected to the computer, PC appears on the rear LCD panel and takes the place of the remaining frames counter on the top LCD panel. Focal Plane Indicator
On the left side of the prism, between the flash hot shoe and Shooting Mode dial is the Focal Plane Indicator. This is for precise measurement between the subject and the film plane. This is something used in scientific / criminal photography when this distance is an important part of the collection of data. The distance between the lens mounting flange and the focal plane is 46.5mm. Camera battery
You might at some point during the life of your D2H see the CLOCK icon appear in the top LCD panel. This is telling you the clock battery in the D2H must be replaced. You can continue to take photos if this battery goes dead, but the files will not be time stamped. Unlike previous cameras, this battery is not recharged by the camera’s main battery. It is a standard CR1616 battery. You must remove the EN-EL4 battery to access the battery for replacement.
SB-800 Flash and D2H
Simply put, this is a dynamo combo! I’ve found shooting flash to be a simple joy again like the days of shooting with the F5. The technology, software wise, is a vast improvement making correct exposures a snap. While the SB-800 is only glorified SB-80 with the same power and general attributes, the software changes are radically improved providing us with killer flash exposures.

The SB-800 is part of Nikon’s new CLS, Creative Light System. It starts with all that a single SB-800 when connected to the D2H can perform. It continues when you add additional SB-800s in groups for incredible creative lighting patterns. One very simple example of this can be found by depressing the DOF. This single action fires the modeling light of not just the SB-800 directly attached to the D2H, but fires all the modeling lights for all the SB-800s working wirelessly with the system. This is flash like SLR photographers let alone digital photographers have never known before.
Image quality and Image size directly effects how fast your files are written to the CF card. While this
really shouldn’t effect your decision on what settings to use for your own photography, here’s some trivia on image settings vs. write times.
D2H CompactFlash Write Time Chart
Image Quality Setting Image Size 1GB Lexar 40x WA
2GB Lexar 40x WA
RAW +Jpeg Fine (Compressed) Large 1.54sec 1.47sec Medium 1.42sec 1.34sec RAW +Jpeg Fine (UnCompressed) Large 2.18sec 2.02sec Medium 2.03sec 1.91sec RAW +Jpeg Normal (Compressed) Large 1.47sec 1.39sec Medium 1.36sec 1.29sec RAW +Jpeg Normal (UnCompressed) Large 2.05sec 1.97sec Medium 1.99sec 1.85sec RAW +Jpeg Basic (Compressed) Large 1.37sec 1.31sec Medium 1.33sec 1.26sec RAW +Jpeg Basic ( UnCompressed) Large 1.97sec 1.89sec Medium 1.90sec 1.805sec RAW (Compressed) --- 1.01sec .96sec RAW ( UnCompressed) --- 1.62sec 1.55sec TIFF Large 19.98sec 15.88sec Medium 14.04sec 13.96sec Jpeg Fine Large .622sec .622sec Medium .487sec .492sec Jpeg Normal Large .551sec .541sec Medium .457sec .437sec Jpeg Basic Large .467sec .442sec Medium .405sec .397sec
D2H White Balance Fine Tuning Chart
White balance +3 +2 +1 0 -1 -2 -3 Incandescent 2700k 2800k 2900k 3000k 3100k 3200k 3300k Fluorescent 2700k 3000k 3700k 4200k 5000k 6500k 7200k Direct Sunlight 4800k 4900k 5000k 5200k 5300k 5400k 5600k Flash 4800k 5000k 5200k 5400k 5600k 5800k 6000k Cloudy 5400k 5600k 5800k 6000k 6200k 6400k 6600k Shade 6700k 7100k 7500k 8000k 8400k 8800k 9200k
D2H Flash Compatibility Chart with DX flash units
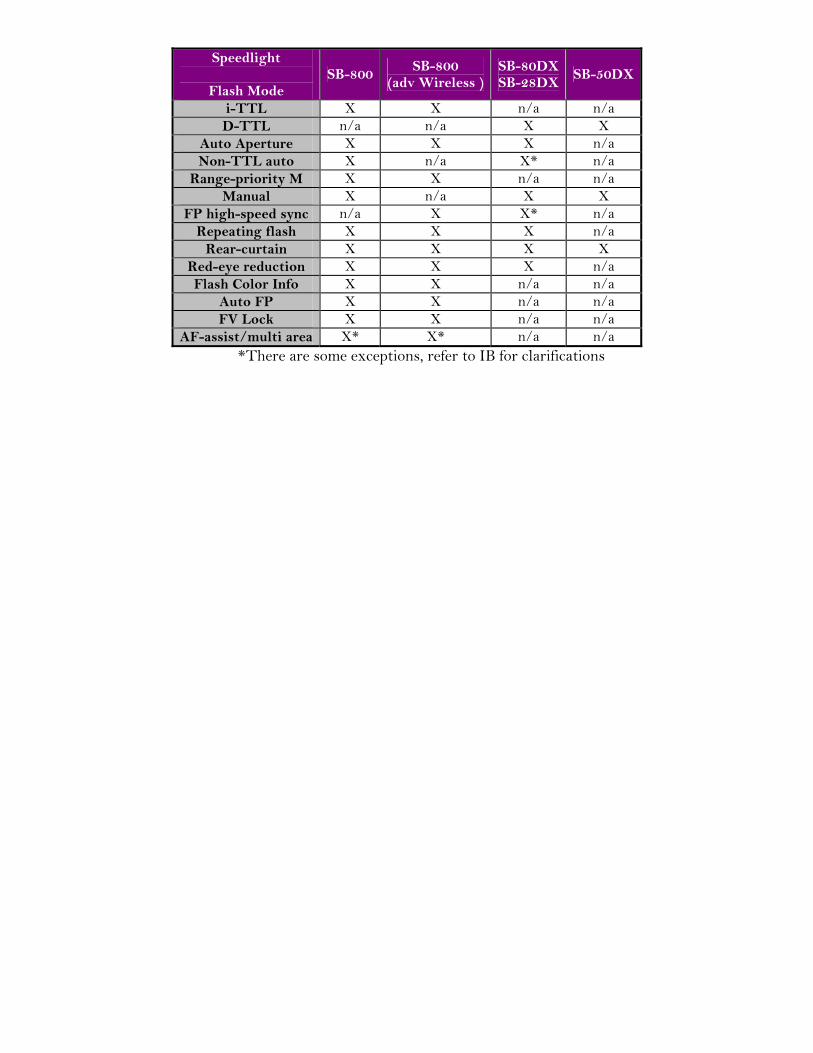
Speedlight
Flash Mode SB-800 SB-800
(adv Wireless ) SB-80DX SB-28DX SB-50DX
i-TTL X X n/a n/a D-TTL n/a n/a X X
Auto Aperture X X X n/a Non-TTL auto X n/a X* n/a
Range-priority M X X n/a n/a Manual X n/a X X
FP high-speed sync n/a X X* n/a Repeating flash X X X n/a
Rear-curtain X X X X Red-eye reduction X X X n/a Flash Color Info X X n/a n/a
Auto FP X X n/a n/a FV Lock X X n/a n/a
AF-assist/multi area X* X* n/a n/a *There are some exceptions, refer to IB for clarifications