Embed Size (px)
Citation preview

1
The Customer’s Guide to DPS

2
Filing a Claim
Things to keep in mind when filing your claim…• If you file your claim within 9 months of delivery, the TSP is REQUIRED to replace any item that is lost or destroyed with a new item, or pay the cost of a new item of the same kind and quality without deducting for depreciation.
• The TSP is not required to replace items which can be repaired for less than the Full Replacement Value of the item.
• Loss or damage to an item must be reported to the TSP within 75 days of the date of delivery.
• All loss/damaged discovered on the day of delivery must be listed on “The Notice of Loss/Damage at Delivery Report”, any discrepancies found after delivery must be annotated on “The Notice of Loss/Damage After Delivery Report”.
• DO NOT DELAY …filing past the 9-month deadline eliminates your right to receive Full Replacement Value. If your claim has been timely filed, additional information may be presented at a later time.

3
Filing a Claim
The first step for logging into DPS is to return to the website www.move.mil. From the move.mil home page, click the tab at the top of the page marked “Login to DPS” (1). The login page will have a list of system
requirements for your computer that you may want to review before proceeding to DPS. This will ensure you have a smooth process and limited errors.
It is very important to make sure your pop-up blocker is turned off. DPS is considered a “pop-up” and you will not be able to access with pop-up blockers turned on. (Check with your internet operating system for turning pop-up blocker on/off)
Finally, click “Login To DPS” at the bottom of the screen (2).
1
2

4
Filing a Claim
The next page you will receive will be your actual login page. This will require the use of your ETA User ID (your SSN or EIN without dashes), then the Password which was provided to you via email from SDDC. Check the consent form box at the top (1) then input the requested information in the blank boxes provided. Finally, click the “Log In” button (2).You will then be prompted for a verification code. Input the code as seen, then click “Finish”.
If for any reason you receive the below Certificate Error, just click the second option: Continue to this website. You are accessing a HTTPS secured/controlled website; it is safe to proceed.
1 2

5
Filing a Claim
The first step to initiate your DPS claim after logging into the DPS system is to click the “Claims” tab at the top of the page. This will lead you to your “Claims Home Page”.

6
Filing a Claim
Your claims welcome screen will provide you with information and timelines for the claim filing process to receive the full replacement value (FRV).
Remember:
• To qualify for FRV you must initiate a Loss/Damage Report if you found loss/damage not reported on the day of delivery. You must do this within 75 days of the delivery date. At this stage the dollar amount is not needed to file your report.
• A Loss/Damage Report will not start an actual claim for you. Instead, it will act as a notice that you will file a claim and qualify you for FRV.
• Once a Loss/Damage Report is filed within 75 days of delivery, you will be eligible to file your actual claim in DPS within 9 months of the delivery date.
To start, click the ‘Loss/Damage Report’ link, on the right side of your screen (1).
1

7
Filing a Loss/Damage Report
The Loss/Damage screen will re-explain the time frame of 75 days. If you are filing a claim now, you can skip this step and continue to page 8, otherwise click the link “Click Here to Add a Loss/Damage Report”(1). This will confirm your intent to file a claim within 9 months under FRV.
1

8
1
The actual report screen will come up blank in all fields (see example to the right). You should also see “No Records” on the top right of your screen (1).
If you have a number set such as “1 of 2”, you already have a report filed.
Under the main title “Loss/Damage Reports” on the left side of your screen, you will need to click the “Add” button (2).
2
Filing a Loss/Damage Report

9
Filing a Loss/Damage Report
When you add a Report, you’ll need to fill in the blanks provided. Some will already be filled in (IE: name, address, etc.) and will only require your review/confirmation.a) The first blank “BOL/GBL Number” can
be completed by clicking the check button (1). This button will bring up a list of GBLs you’ve moved (2).
b) From this list select the move you are filing a report for, then click the “Pick” button (3).
c) When all the information has been confirmed and filled out, click the “Save” button at the bottom of the reports page.
3
1
2

10
Filing a Loss/Damage Report
2
3
After you save your report, the page will refresh and your information will now be listed in the top gray area. If you need to change any of this information, just click the “Update” button at the top (1), then make any needed changes/corrections.
You can now add specific information pertaining to items lost or damaged during your move. To do this, click the “Add” button located under the ‘Add/Update Loss/Damage Items’ title (2).
The Loss/Damage area will expand and provide you with blank spaces for the information. Fill out each box appropriately, then click the “Save” button (3).
Note: You will need your paper inventory nearby to reference the item/inventory number of the damaged/lost property.
1

11
Filing a Loss/Damage Report
Your ‘Loss/Damage Reports’ and ‘Add/Update Loss/Damage Items’ should both be filled in now and grayed out. You can change the information of either by clicking the provided ‘Update’ buttons (1). If you have additional items that need to be claimed, click the ‘Add’ button just below ‘Add/Update Loss/Damage Items (2).
1
2
When filing a report/claim in DPS you will also be able to include pictures of the damaged items. This could be very useful in supporting your claim or to show actual damage. To do this:1. Click the ‘Add’ button under the “File
Attachments” title (3).2. Choose your photo attachment* by clicking
the check box, then using the provided pop-up box to located your attachment or URL. (4) When finished, click the Add button provided.
3. Complete any additional information, then click the ‘Save’ button under the “File Attachments” title .(5)
*Note: The picture(s) you want to use should be saved on your computer for uploading (.jpg format only) or available through a web URL (photobucket, snapfish, etc.). If using a URL, make sure the picture location is not locked so that all parties can view the image.
3
5 4

12
1. When all items have been added/attached, click on the “Submit” button to file the Notice of Loss/Damage After Delivery.
A dialogue box will appear asking “Are you sure you want to submit this Loss/Damage Report?” Click OK, or CANCEL to add more items.
2. The Loss/Damage Report has been successfully submitted when it can be seen in the “Loss/Damage Reports” section.
To review it, simply select the Loss/Damage number.
Filing a Loss/Damage Report

13
Remember:
* Additional lost or damaged items can only be added when the report’s status is “In Progress.”
* To add new items when in “Submitted” status, a new Loss/Damage Report will have to be accomplished.
Filing a Loss/Damage Report
14
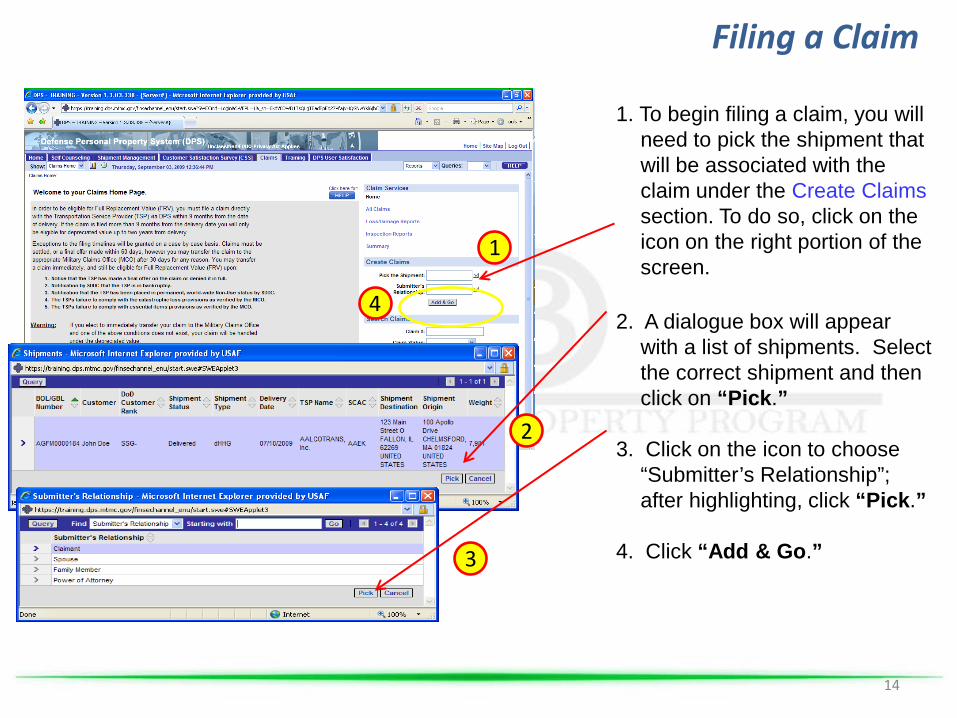
Filing a Claim
1. To begin filing a claim, you will need to pick the shipment that will be associated with the claim under the Create Claims section. To do so, click on the icon on the right portion of the screen.
2. A dialogue box will appear with a list of shipments. Select the correct shipment and then click on “Pick.”
3. Click on the icon to choose “Submitter’s Relationship”; after highlighting, click “Pick.”
4. Click “Add & Go.”
2
1
3
4

15
Filing a Claim
Here new claims can be created, updated, deleted or submitted.
Create a new claim by clicking “Add”
Items can be added/updated to a claim
Demands/Offers can be checked
Search file attachments

16
Filing a Claim
The Main Claim Page- DPS will automatically fill in the
shipment and claimant fields.
- Items with the Red Asterisk are mandatory fills.
- Unlike the Loss/Damage Report, a dollar amount is needed to file a claim.
- Click the “save” button to save entries.
- If a Quick Claims payment was made based on what was found loss/damaged on delivery, you must select “Y” and enter the amount in the boxes provided.

17
Filing a Claim
1. You can begin adding/updating your damaged items by clicking “ADD.”
2. Fill in as much information as possible.
** If an inventory number is not entered you will be required to enter comments**
3. Remember to “Save”when you have completed the information.
1
2
3

18
Filing a Claim
If a Loss/Damage Report was previously submitted, you have the option to pull items from your Loss/Damage Report by selecting “Pull Loss/Damage Items.”
If a report was not submitted, items can be added directly to the claim.
A dialogue box will appear to confirm your choice; click OK or Cancel.

19
Filing a Claim
Photos, estimates, and any other information can be attached to a claim…
1. Click on ADD under the Upload File Attachments section.
2. Browse for the documents needed by clicking on the icon.
3. A window opens; enter a file name or URL, click Add to attach the file.
*Enter desired comments and SAVE. If attached, it will be seen in the attachments section.
12
3

20
Filing a Claim
After all items have been entered, you are ready to submit your claim to the TSP. Just click “Submit” and confirm by clicking OK or Cancel in the pop up box.
If a pop up box appears telling you to go to “UPDATE”…There were items entered on the “Claims Item” page that were never annotated on the Loss/Damage Report and it has been more than 75 days since delivery.

21
Filing a Claim
When the Update button is selected the “Main Claim Page” reappears.
You must then provide an explanation for missing the 75-day deadline.
After your comments are added click “Save” and “Submit.”

22
Filing a Claim
Once the “Submit” button has been selected …- The claim status
changes to “Submitted.”
- An email is sent to the TSP letting them know that a claim has been filed.
- The TSP will update the member via email regarding the status of their claim.
- Members should check DPS regularly for updates to their claim status.

23
Filing a Claim
Once submitted, the TSP can review the claim and the status changes to “Under Review.”
- If the TSP denies a claim the status will change to “Denied.”
- A TSP can deny the whole claim or specific items.
- If your claim is denied, you can elevate it to the Military Claims Office (MCO) by selecting “Transfer to MCO.”
Read Warning and then confirm your decision.

24
Filing a Claim
When a TSP submits an offer for your damaged goods, the item will say “Offer Pending.”
You can either “Accept Offer” or submit a “Counter Offer” by clicking on the appropriate box.
If you choose to counter the TSP’s offer, the status changes to “Demand Pending.”

25
Filing a Claim
After selecting “Counter Offer”, enter your counter offer amount in the box for “DOD Costumer Offer” then Save.If Foreign currency is involved click on the icon next to the box and enter your offer using the correct currency.
Offer and counter offer can continue until the carrier makes a “Final Offer.”
If this occurs, or the carrier denies, you can accept or transfer the claim to the MCO.

26
Filing a Claim
1. Highlight the item that is being negotiated to bring up the details.
2. You can choose to accept the offer or transfer to MCO.- If transferred to the MCO the claim status
will show “MCO Adjudication.”- The MCO is alerted and will contact the
member to settle the claims in accordance with their claims policy.
3. A pop up box will appear if you choose to accept the offer or transfer the claim; click OK or Cancel.
1
2
3

27
Filing a Claim
1. When all of your claims are in the “Settled” status the “Claim Satisfaction” screen appears.- Click on “Answer.”
2. A drop down menu will appear. Select your personal level of satisfaction the click “Save.”
3. On the next page that appears click “Finished.”
1
23
28
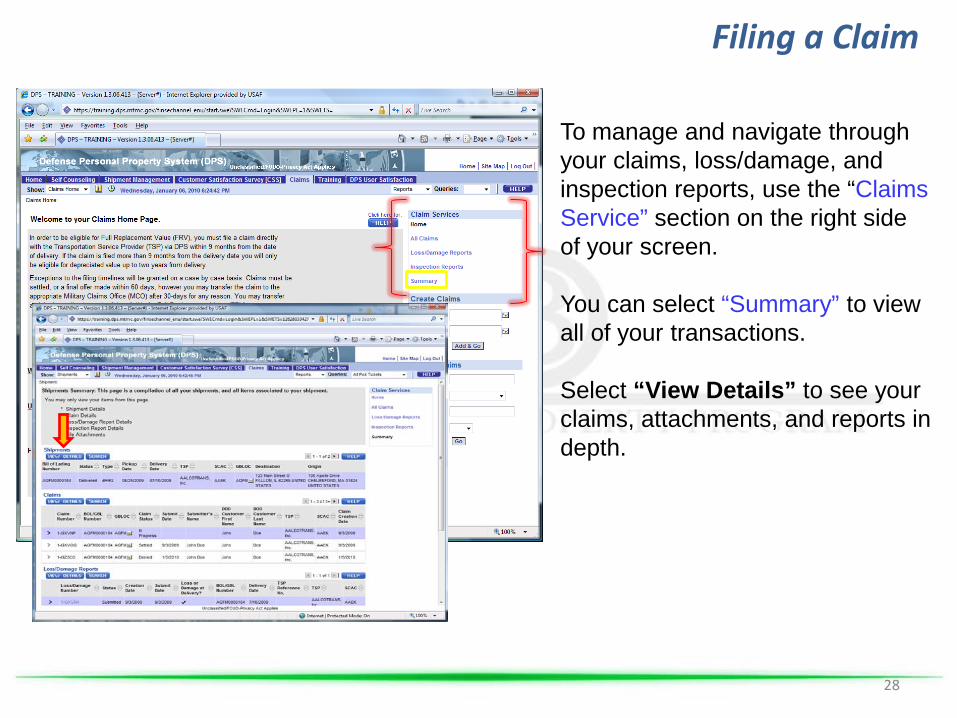
Filing a Claim
To manage and navigate through your claims, loss/damage, and inspection reports, use the “Claims Service” section on the right side of your screen.
You can select “Summary” to view all of your transactions.
Select “View Details” to see your claims, attachments, and reports in depth.

29
Information
Call or email the DPS Help Desk for any page navigation or technical issues involving DPS: 1-800-462-2176 DSN 770-7332Email: [email protected]
You can find more useful information at the following links:Air Force https://claims.jag.af.mil/legalassistance/index.phpArmy https://www.jagcnet.army.mil/8525752700444FBACoast Guard http://www.fincen.uscg.mil/hhg.htmMarine Corps https://www.manpower.usmc.mil/portal/page?_pageid=278,1965742&_dad=portal&_sNavy http://www.jag.navy.mil/organization/code_15_packets_forms.htm