Embed Size (px)
Citation preview

The ArtOf Joinery
Published by Lost Art Press LLC in 201326 Greenbriar Ave., Fort Mitchell, KY 41017, USAWeb: http://lostartpress.com
Title: The Art of JoineryAuthors: Joseph Moxon, commentary by Christopher Schwarz Publisher: Christopher Schwarz Distribution: John HoffmanEditor: Megan FitzpatrickDesign & Layout: Linda WattsIndex: Suzanne EllisonCover: Christopher Schwarz
Copyright © 2013 by Lost Art Press LLC
ISBN: 978-0-9850777-7-8
ALL RIGHTS RESERVEDNo part of this book may be reproduced in any form or by any electronic or mechanical means including information storage and retrieval systems without permission in writing from the publisher, except by a reviewer, who may quote brief passages in a review.
Printed and bound in the United States of America.

The Art Of JoineryBy Joseph Moxon
with commentary by Christopher Schwarz
Second Edition
zå
iv
Table of Contents
Introduction to the Second Edition ........................vThe Art of Joinery, Edited with Commentary ....... 1The Plates .............................................................93The Art of Joinery, Unedited ............................... 98Select Plates from André Félibien .......................141Index ..................................................................153

v
Introduction to the Second Edition
Joseph Moxon’s “Mechanick Exercises” is more than just a curiosity for his-torians of the craft of woodworking. The woodworking tools that Moxon describes and the processes he explains have remained remarkably unchanged during the intervening centuries. To be sure, we might now use fancier mate-rials for some of our tools – investment-cast bronze, ductile iron, A2 steel. But a fore plane is still a fore plane, and it is still used in the same manner to make rough boards into smooth ones.
In fact, I consider Moxon to be an excellent introduction to many hand-tool aspects of woodworking. That is, if you can decipher his 17th-century English spellings and sentence structure that are odd to our 21st-century eyes.
The “Mechanick Exercises or the Doctrine of Handy-Works” was origi-nally published in serial form beginning in 1678 in England. Moxon was a printer, cartographer, globe maker and maker of mathematical instruments. In addition to the art of joinery, the “Mechanick Exercises” included pam-phlets on blacksmithing, house carpentry, bricklaying and drawing a sundial.
Moxon (1627-1691) is perhaps best known for his treatise on the “Whole Art of Printing,” which features a long biography of his dealings, mostly as they relate to the world of printing. The version of “The Art of Joinery” in this book is adapted from the 1703 edition of “Mechanick Exercises,” which was the first complete edition, and it has been reprinted by both the Early American Industries Association and The Astragal Press. Both of those edi-tions are currently out of print and unavailable. The plates in this edition appear courtesy of the Early American Industries Association.
So I took the Astragal version and had the original text entered into a computer (the text is in the public domain). I then adapted Moxon’s work into the text you have here. This slim book is an attempt to acquaint the modern woodworker with the earliest English-language text on woodwork-ing, to update its language and spellings just enough so they’re not distract-ing, and to provide some modern commentary and illustrations that will help amplify some of the processes Moxon describes.
It’s important to mention that I am not an academic, and this book is not an attempt to provide a proper and scholarly annotated version of Moxon, a form of writing that many of us will remember from our days of

vi
reading William Shakespeare in middle school. Instead, this book is a work-ing woodworker’s attempt to illustrate and explain Moxon’s groundbreaking work in a way that you (who are also a woodworker, I hope) might be able to learn something useful for your own workshop practice.
As a result, I shortened Moxon’s run-on sentences without (I hope) eras-ing their meaning. Usually this was accomplished not by removing words, but by adding semicolons or periods. I’ve added photographs and text to attempt to illustrate Moxon’s words, so you can actually see a “dawk” or the “risings that bear against the tongue” and know instantly that they are “a gouge in the work” or “a high spot that needs to be removed.”
I’ve also added a few words and phrases throughout Moxon’s text. My words are in square brackets and Moxon’s asides are in parentheses. After each of Moxon’s 37 sections (actually 38, but more on that later), I have included my own commentary in sections titled “Analysis.”
Since I published the first edition of this book in 2008, my research into early woodworking has continued, and so many of the analysis sections have been enlarged or revised, especially in the case of the workbench.
One of the criticisms of my first edition was that I didn’t include the pure 17th-century text in the book so that the reader could analyze the original. And so we have reprinted the original text at the end of this volume with all the long “s” characters, italics and punctuation. We reset the text in a typeface named “Fell,” which is adapted from early typefaces but has been “cleaned up” for lack of a better word. In essence, the makers of Fell sought only to correct damage that had occurred to the individual pieces of type as they were set and reset in a press.
Finally, at the end of the book, I have added an appendix: A selection of plates from André Félibien’s “Principes de L’architecture” (1676), so you can see the similarities (and differences and omissions) between these two important works.
What you won’t find anywhere in Moxon (or this book) are the so-called secrets to the craft that allow you to make a highboy in a week or sharpen your handplanes to razor sharpness with primitive and coarse abra-sive technology. Those things aren’t in Moxon.
Instead, what you’ll find are the things you would find if you walked into a joiner’s shop in 17th-century England and watched the joiners at work for a few weeks and got to ask them some questions over a small beer (just remember not to dump your drink in the glue pot).

vii
Moxon’s unusual workbench. The face vise is typically on the left end of the bench for right-handers (and Moxon wrote for right-handers). What gives? Read on.
But that information is more than useful enough and is surprisingly fresh in the 21st century. That’s because so much of the modern way of teaching woodworking is based on machine work or on idiosyncratic ways of working with hand tools that have little to do with proper historical trade practice.
Another important thing to note: Moxon wasn’t a woodworker, black-smith or a turner (as far as we know), but his accounts of early workshop practice are what we have as a beginning point. And though I will point out a few modern “improvements” that have arrived in the last 330 years (metal-bodied planes, plow planes with several irons), this book is where how-to woodworking began.
– Christopher Schwarz


1
z The Art of JOINERY. å
Definition.Joinery is an art manual, whereby several pieces of wood are so fitted and joined together by straight line, squares, miters or any bevel, that they shall seem one entire piece.
Explanation.By straight lines I mean that which in joiner’s language is called a joint. That is, two pieces of wood are shot {that is, planed} or else they are pared; that is, the irregularities that hinder the closing of the two pieces are cut off with a paring chisel. They are shot or pared {as I said} to exactly straight, [so] that when they are set upon one another, light shall not be discerned betwixt them. This they call shooting of a joint or par-ing to a joint, because these two pieces are with glue commonly joined together, either to make a board broad enough for their purpose, or to clamp one piece of wood to the end of another piece of wood to keep it from casting or warping.
By squares, I mean the making of frames, for door cases or such like which is the framing of two pieces of wood, so as the four angles of the frame may comply with the square marked D [in Plate 4].
By miters are meant the joining of two pieces of wood, so as the joint makes half a square, and does comply with the miter square marked E [in Plate 4]. By bevel is meant any other angle: As frames that may be made of [a] pentagon, hexagon, octagon [and other] figures.
S.1. The Names of joiners tools described in Plate 4.A. A Workbench. b. The hook in it, to lay boards or other stuff flat against, whilst [you] are trying or planing [them]. c. The bench screw {on its hither [left] side} to screw boards in while the edges of them are planed or shot.

And then the other edge of the board is set upon a pin or pins {if the board be so long as to reach the other leg} put into the holes marked “aaaa” down the legs of the bench. [These] pins may be removed into the higher or lower holes as the breadth of the board shall require. So then, the bench screw keeps the board close to the edge of the bench, and the pins in the leg keep it to its height, that it may stand steady whilst the other edge is worked upon. For in the shooting of a joint, if the board keeps not its exact position, but shakes or trembles under the plane, your joint will very hardly be truly straight. d. The holdfast, let pretty loose into round holes marked “bbbbbb,” in the bench. Its office is to keep the work fast upon the bench whilst you either saw, tenon, mortise, or sometimes plane upon it. It performs this office with the knock of a hammer or mallet upon the head of it. [Here’s how it functions]: [T]he beak of it being made crooked downwards [with] the end of the beak falling upon the flat of the bench, keeps the head of the holdfast above the flat of the bench. The hole in the bench [that] the shank is let into [is] bored straight down and [is] wide enough to let the holdfast play. The head of the holdfast being knocked, the point of the beak throws the shank aslope in the hole in the bench and presses its backside hard against the edge of the hole on the upper surfaces of the bench, and its fore-side hard against the opposite side of the under surfaces of the bench. And so [because of ] the point of the beak, the shank of the holdfast is wedged between the upper edge and its opposite edge of the round hole in the bench. Sometimes a double screw is fixed to the side of the bench as at g; or sometimes its farther cheek [rear jaw] is laid on edge upon the flat [top] of the bench and fastened with a holdfast, or, sometimes, two [holdfasts] on the bench. c A mallet.
z AnalysisLet’s talk about Moxon’s workbench because it seems a confusing and
muddled drawing. It certainly looks like it was borrowed from André Féli-bien’s “Principes de L’architecture” (1676) and then modified with the addi-tion of an unusual double-screw vise on the right side of the bench.
Moxon’s entire book is written for right-handers, yet he shows a bench that seems more suited for a left-hander at first glance. (He also later shows a plow plane drawn in reverse, so it might be easy to think that this bench is
2 The Art of Joinery
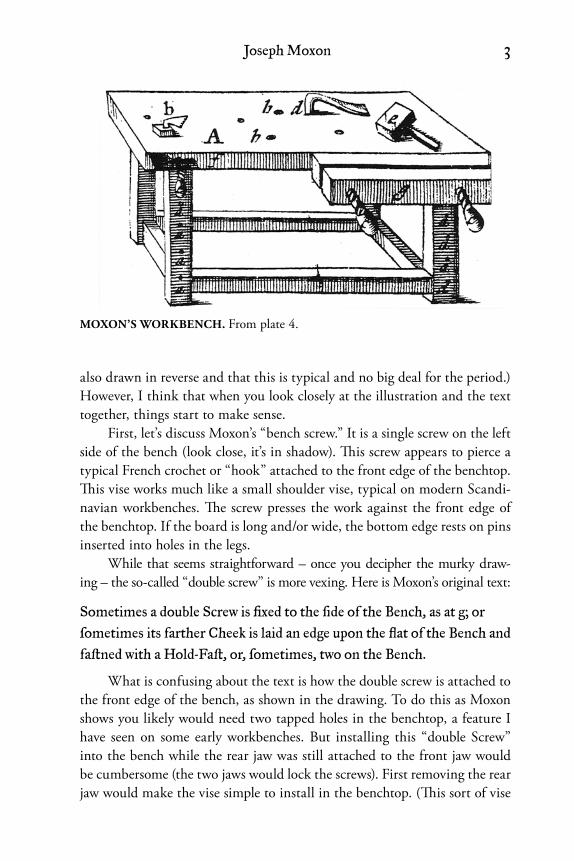
also drawn in reverse and that this is typical and no big deal for the period.) However, I think that when you look closely at the illustration and the text together, things start to make sense.
First, let’s discuss Moxon’s “bench screw.” It is a single screw on the left side of the bench (look close, it’s in shadow). This screw appears to pierce a typical French crochet or “hook” attached to the front edge of the benchtop. This vise works much like a small shoulder vise, typical on modern Scandi-navian workbenches. The screw presses the work against the front edge of the benchtop. If the board is long and/or wide, the bottom edge rests on pins inserted into holes in the legs.
While that seems straightforward – once you decipher the murky draw-ing – the so-called “double screw” is more vexing. Here is Moxon’s original text:
Sometimes a double Screw is fixed to the ſide of the Bench, as at g; or ſometimes its farther Cheek is laid an edge upon the flat of the Bench and faſtned with a Hold-Faſt, or, ſometimes, two on the Bench.
What is confusing about the text is how the double screw is attached to the front edge of the bench, as shown in the drawing. To do this as Moxon shows you likely would need two tapped holes in the benchtop, a feature I have seen on some early workbenches. But installing this “double Screw” into the bench while the rear jaw was still attached to the front jaw would be cumbersome (the two jaws would lock the screws). First removing the rear jaw would make the vise simple to install in the benchtop. (This sort of vise
Moxon’s workbench. From plate 4.
Joseph Moxon 3

4 The Art of Joinery
is shown in a detail drawing in A.-J. Roubo’s “L’Art du menuisier,” which appears 100 years after Moxon.) Yet Moxon shows both jaws in the plate.
What is more straightforward about Moxon’s discussion of the double-screw is how it sometimes sits on the benchtop and is sometimes secured with a holdfast or two. Woodworking researchers Jennie Alexander and Peter Follansbee have long used a small double-screw on the bench much like a modern handscrew clamp. It holds work to be tenoned, or to be moulded or planed on edge (when the work is pushed against a metal bench hook or stop). Several years ago I began using this double-screw as a vise for dove-tailing by fixing the rear jaw to the benchtop with holdfasts, just as Moxon advised. It works brilliantly.
Other aspects of the Moxon bench are typical of what you would find on an early workbench in a somewhat-French style. There is a metal planing stop emerging from the benchtop. Moxon calls this a bench hook. And though it indeed has a hook-like shape, the modern woodworker wouldn’t call it a bench hook. That term is reserved for a wooden accessory used for handsawing.
These metal-made planing stops have become rare in modern shops. While one manufacturer still makes some in aluminum (which aren’t worth fooling with), most woodworkers fashion their planing stops from wood. There
Metal Moxon. Several manufacturers now make double-screw vises with wood or metal screws. If you have a tap and threadbox, these vises are easy to make yourself.

Joseph Moxon 5
are two obvious downsides to the metal stops: They will damage your tools if they strike the metal stop, and the stops will mark the end grain of your work. Those marks aren’t a big deal if you build 17th-century furniture where this tool mark is found, or 18th-century furniture where the end grain is covered by moulding. But if you like exposed joinery, a metal stop can be trouble.
I’ve used a couple variants of metal stops: A beautiful one made by a blacksmith and a serviceable one made by a second blacksmith who fash-ioned it out of a railroad spike. I couldn’t much see the advantage of a metal stop compared to a wooden stop until I sharpened the teeth with a file. Both of them seemed to work fine when dealing with stock that is less than 6" wide. Both of them were tricky to use with wider stock.
Some early versions of this workbench accessory are actually made using nails that are driven through the wooden planing stop at a slight angle – so only the tips of the nails rise above the benchtop, not the heads of the nails. These stops can have a lot of bite and hold your work in place.
And then there are the holdfasts. Moxon’s description of the holdfasts is excellent. Clearly, this little metal wedge with a beak was just as curious to observers in the 17th century as it is today. The earliest image I have of a holdfast is from the 16th century in a painting titled “Le Raboteur” by the Italian artist Annibale Carracci (1560-1609). I would not be surprised if the holdfast is even older.
S.2. BBBBBBB Planes of several sorts: as, B1. A. Fore plane
a. The tote. b. The mouth. c. The wedge. d. The iron. e. The sole. f. The fore-end g. The britch. f g h The stock. All together a plane. It is called the fore plane because it is used before you come to work either with the smooth plane or with the jointer. The edge of its iron is not ground straight, as the smooth plane and the jointer are, but rises with a convex arch in the middle of it; for its [ job is] to prepare the stuff for either the smoothing plane or the jointer. Workmen set the edge of it ranker than the edge either of the smoothing plane or the jointer. And should the iron of the plane be ground to a straight edge, and it be set ever so little ranker on one end of the edge than on the other, the ranker end would {bearing as then upon a point} in working, dig gutters on the surface of the stuff. But this iron {being ground to a convex arch} though it should

6 The Art of Joinery
be set a little ranker on one end of its edge than on the other, would not make gutters on the surface of the stuff, but {at the most} little dawks [hollows] on the stuff, and that more or less, according [to how] the plane is ground, more or less arching. Nor is it the office of this plane to smooth the stuff, but only {as I said} to prepare it. That is, to take off the irregular risings, whether on the sides or in the middle. And therefore it is set somewhat ranker, that it may take the irregularities [more quickly] off the stuff [so] that the smoothing plane or the jointer may afterwards the easier work it try [flat]. The manner of trying shall be taught when I come to [discuss] the use of the rule.
You must note, that as I told you in smithing {Num. I. page 14, 15, 16} that it was the office of the coarse-toothed file to take off the prominent irregularities the hammer made in the forging, and that you were not to file them more away than you need. So the same caution is to be given you in the using of this fore plane in joinery, for the reason there alleged in smithing, whether, to avoid repetition, I refer you. Only with this consid-eration, that in smithing, iron or steel was the matter wrought upon, and there a coarse file the tool; but now wood is the matter, and a coarse, or fore plane, the tool.
z AnalysisWhen it comes to the handplane illustrations in Moxon, I wouldn’t rely
on them as being accurate representations of typical 17th-century English planes. They show typical French planes. The text, however, is quite useful. Moxon spills more ink on fore planes than he does on any other form. These tools are the equivalent of the modern electric surface planer or powered jointer. The fore plane is the tool that removes a lot of wood in a hurry thanks to its curved iron and the fact that it is set to take quite a bite. And as a plane user, I find my fore plane to be one of the most useful tools I own. Whether the plane is made of wood or iron, the fore plane is able to quickly remove wood (it’s almost shocking at first how fast it works). And I have found it is one of the tools that helps a beginning hand-tool user understand that a correctly set tool makes handwork easy.
The term “fore plane” has almost vanished from the modern vocabulary and has been replaced by the term “jack plane,” a word from the carpenter’s lexicon. Stanley Works labeled its No. 6 plane a “fore plane,” though the jobs

Joseph Moxon 7
of the fore are easily picked up by Stanley’s No. 5 jack plane. So if you’re looking for a plane that will serve as a fore, buy one that’s 14" to 18" long (wood or metal), grind the iron so it is curved (an 8"-radius curve is typical) and set the mouth wide open to pass thick shavings.
In reading Moxon, it’s easy to think that the fore plane is actually what Stanley calls a “scrub plane” – a tool still manufactured today. However, the metal scrub plane is actually a modern version of a wooden European plane for rough work. The scrub is similar to the fore, but the scrub’s sole is both shorter and narrower, and the iron has an even more pronounced curve.
Both tools work and get material out of your way. But I prefer the longer sole of the fore plane. The longer sole makes it easier to get the board flat than with a scrub, though the extra weight of a fore plane can be tiring.
The other important aspect of Moxon’s entry on fore planes is that it discusses a philosophy that Moxon developed in his pamphlets on black-smithing. That is: Use the coarsest tool possible to make the work with the finer-set tools quick. One stroke with a fore plane saves many strokes with a jointer plane. This is one of the core principles of hand work that is some-times forgotten today. Many woodworkers are quick to grab their smooth plane when they should be grabbing the fore.
S.3 Of setting the ironWhen you set the iron of the fore plane, consider the stuff you are to work upon. That is to say, whether it be hard or soft, or curling, as joiners call cross-grained stuff. If it be hard or curling, you must not set the iron very rank because a man’s strength will not cut deep into hard wood. And if it be not hard wood, but curling or knotty, and the iron is rank-set, you may indeed work with it until you come to some knot or curl, but then you may either tear your stuff, or break the edge of your iron. Therefore you may perceive a reason to set the iron fine for curling and knotty stuff.
Moxon's fore plane. It's shorter than the jointer and longer than a smooth-ing plane.

8 The Art of Joinery
But if you ask me how rank your iron ought to be set? I answer, if your wood be soft, and your stuff free and soft, that is, evenly tempered all the way, you may set the iron to take a shaving off [that is] the thickness of an old coined shilling [likely a Commonwealth shilling, or approximately .0394", or a fat 1/32"] but scarcely thicker. Whereas if your stuff be hard or curling or knotty, you shall scarcely be able to take a shaving off the thickness of an old groat [likely a Charles II groat, which would be .0236" thick, or less than 1/32"]. Therefore you must examine the temper of your stuff by easy trials [to determine] how the plane will work upon it, and set your iron accordingly. And observe this as a general rule: That the iron of the fore plane is, for the first working with it, to be set as rank as you can make good work with; and that [is] for speed sake.
If your iron be set too rank, knock with a hammer upon the britch [rear] of the stock, and afterwards upon the wedge. For this knocking upon the britch, if you knock hard enough, will raise [retract] the iron a little and set it fine. If you knock not hard enough, you must knock again until the iron does rise. But if you knock too hard, it will raise the iron so much that its edge will rise above the sole into the mouth of the stock and consequently not touch the stuff. Therefore you must knock softly at first until, by trials, you find the iron rises to a convenient fineness. But as this knocking on the britch raises the iron, so it also raises and loosens the wedge. Therefore {as said before}, whenever you knock upon the britch, you must also knock upon the wedge to fasten the iron again.
If you have raised the edge of the iron too fine, you must knock softly upon the head of the iron and then again upon the wedge. And this you may sometimes do several times until you fit your iron to a convenient fineness.
When you have occasion to take your iron out of the stock to rub it, that is, to whet [sharpen] it, you may knock pretty smart blows upon the stock, between the mouth and the fore-end [to loosen the wedge and con-sequently the iron].
These ways of setting are used with all other planes, as well as fore planes.In the using of this, and indeed, all other planes, you must begin at
the hinder end of the stuff, [with] the grain of the wood lying along the length of the bench, and plane forward until you come to the fore-end,

Joseph Moxon 9
unless the stuff [is to be] proved cross-grained in any part of its length. For then you must turn your stuff to plane it the contrary way, so far as it runs cross-grained. And in [any] planing, you must, at once, lean pretty hard upon the plane and also thrust it very hard forwards, not letting the plane totter to or from you-wards, until you have made a stroke the whole length of the stuff. And this sometimes, if your stuff be long, will require your making two or three steps forward before you come to the fore-end of the stuff. But if you do this, you must come back and begin again at the farther end, by the side of the last planed stroke, and so continue planing until the whole upside [surface] of the stuff be planed.
And if the stuff be broad that you are to plane upon, and it has warped a little with the grain [cupped], or be any ways crooked in its breadth, you must then turn the grain so it is across the workbench, and plane cross-grain. For if your work be hollow in the middle, you must plane both the bearing sides [the high edges] thinner until they are in the same plane as the middle. Then turn the other side of your work [flip the board over], and working still cross-grained, work away the middle until it is in the same plane as the sides or edges.
shilling shaving. Moxon’s instructions used coinage to explain how thick your shavings should be. For softer woods, Moxon specified an “old coined shil-ling.” This shaving is just about that thickness – or .04" thick.

10 The Art of Joinery
This way of cross-grained working is, by workmen, called “traversing.”Thus have you, in general, the use of all the other planes. But the use
of those planes are designed for other particular purposes. I shall show [them] as they come in order.
z AnalysisWooden planes work the same way they did in the 17th century, so
Moxon’s description of the process of adjusting one should seem familiar. However, what is interesting (to history dweebs especially) is when he dis-cusses the sort of shavings you should get from a fore plane. Having no digital dial caliper, Moxon used the thickness of common coins to discuss the thickness of shavings.
After consulting with a couple coin collectors of British coinage and measuring some examples (which were surprisingly consistent) here’s how to interpret Moxon’s instructions. For wood that is easy to plane, Moxon rec-ommends a shaving that is an “old coined shilling.” The coin collectors said that judging from the time period and language, that Moxon was discussing a Commonwealth shilling. The Commonwealth shillings that weren’t too worn were about .04" thick, or a fat 1 ∕ 32".
For the harder, curly or knotty woods, Moxon recommends the shav-ing be the thickness of “old groat” – likely a Charles II groat. That would be
other english planes. Randle Holme’s drawing of a fore and jack plane for the 1688 “The Academy of Armory” look more like English planes to me than the Moxon drawings.

Joseph Moxon 11
about .024" thick – or a bit less than 1 ∕ 32". Then Moxon gives a rule that is golden (in my book): Take the thickest shaving you can that will produce good work, which is “for speed sake.”
So how do you adjust the plane? Moxon’s explanation is classic. One of the few “innovations” in wooden planes since Moxon is the “strike” or “start” button on the top of some wooden planes. This is a small circle of wood that protrudes like (surprise) a button between the toe of the tool and the escape-ment. You strike the button hard to release the iron. Moxon’s instructions tell you to rap the plane there to release the iron. The strike button prevents you from denting your plane’s body.
Moxon’s instruction for applying a plane to the wood are straightfor-ward: Begin at the hinder end (for right-handers, this is the right end). Plane to the fore-end (the left end). Plane the entire length of the board (walking as you push the plane if necessary). Work the entire length of the board. Come back, overlap your strokes and repeat.
What might be curious for moderns is Moxon’s description of planing wide, crooked or cupped stock. In these cases, Moxon says you should work directly across the grain – what he calls traversing. This strategy works well and is typically under-utilized by modern woodworkers. Traversing flattens high spots with little tear-out. When you plane across the grain, the long fibers that make up the wood grain are sliced across by the plane’s iron. It’s
a groat in your throat. For difficult woods, Moxon recommends a shav-ing that is as thick as an old groat – or .024" thick.

12 The Art of Joinery
the cup is up. Traversing is most effective when you are working the cupped face of the board. The plane’s sole rides the high spots and the iron cuts them back until you hit the low spots.
Make a cup without a lathe. Plane out the middle by working with the grain. Then you’ve made a cup. Now plane across the grain to remove the cup.

Joseph Moxon 13
like a crosscut with a plane instead of a rip. Traversing is easy work – you can take a big bite when you work across the grain. It doesn’t leave a pretty surface (think: wooly worm), but it is one of the most powerful fore plane techniques I’ve found.
My personal experience with traversing has been that it works best on the cupped face of the board because you have two high spots touching the plane’s sole.
When you work the face that is bowed, you tend to just copy that bow when you are traversing. So what do you do? Moxon says to plane out the middle first. I do this using strokes with the grain until I reach the final thickness of my board. This creates a cupped board. Then I traverse across the cup. When my iron just nicks the bottom of the cup, I stop. I’m done. That’s not the gospel according to Joe, however.
S.4. Of the Jointer. B. 2.The jointer is made somewhat longer than the fore plane and has its sole perfectly straight from end to end. Its office is to follow the fore plane and to shoot an edge perfectly straight, and not only an edge, but also a board of any thickness; especially when a joint is to be shet [shot]. There-fore the hand must be carried along the whole length with an equal bear-ing weight, and [al]so exactly even and upright to the edges of the board, [so] that neither side of the plane inclines either inward or outwards, but that the whole breadth be exactly square on both its sides. Suppos-ing its sides straight, [then] so will two edges of two boards, when thus shot, lie so exactly flat and square upon one another that light will not be discerned between them. It is counted a piece of good workmanship in a joiner to have the craft of bearing his hand so curiously [in this way],
Moxon’s jointer plane. Ever wonder why the handles look so odd on the plane? I don’t think they’re particularly British. These illustrations were borrowed from the French.

14 The Art of Joinery
even the whole length of a long board. And yet it is but a sleight [task] to those [where] practice hath accustomed the hand to [it]. The jointer is also used to try tabletops with {large or small}, or other such broad work. And then joiners work as well upon the traverse with it, as with the grain of the wood, and also angularly or corner-wise, that they may be more assured of the flatness of their work.
Its iron must be set very fine, so fine, that when you wink with [close] one eye, and [look at the iron with your open] eye, there appears a little above a hairs breadth of the edge above the surfaces of the sole of the plane, and the length of the edge must lie perfectly straight with the flat breadth of the sole of the plane. [With] the iron being then well wedged up and you working with the plane thus set, [you] have the greater assurance that the iron cannot run too deep into the stuff; and consequently you have the less danger that the joint is wrought out of straight.
z AnalysisIn Moxon, the primary job of the jointer plane seems to be working
edges to make them straight and true. Not only to make them pretty but to glue them up into panels.
Now here is one area where Moxon vexes me. Moxon calls for the jointer plane to have an iron that is sharpened perfectly straight across, like a chisel. And the way you correct an edge is through skill – Moxon says it looks hard to the layman but is easy for joiners.
As one who has practiced freehand edge-planing with a jointer plane that has a straight-sharpened iron, I object. I think it’s easier to correct an edge with an iron with a slight curve. You can remove material from local-ized spots by positioning the iron to take more meat off one area.
This jointing technique with a curved iron appears in British workshop practice throughout the 20th century. It is today a fight as fierce as tails-first or pins-first in dovetailing. So give both jointing techniques a try and take your side. And just be glad Moxon doesn’t write a word about dovetailing.
One note here on long-grain shooting boards. Moxon doesn’t mention them, though they are frequently mentioned and employed starting in the 18th century. When you use a jointer plane with a shooting board to true an edge of a board, the iron of the jointer plane can be either curved or straight. Both approaches work.

Joseph Moxon 15
Several of my contemporary hand-tool woodworkers have suggested that perhaps Moxon simply could not see that the jointer plane’s iron is slightly curved. And indeed, the curve used on the edge of a jointer plane’s iron looks straight if you don’t show it to a second piece of straight material. However, I prefer to simply take Moxon at his word here. The joiners he observed use jointers with straight irons.
Other jointer techniques in Moxon are quite helpful. He says you can traverse with a jointer and that you can work diagonally (corner to corner) across the grain with wide stock. Both of these techniques help flatten your boards because the jointer’s sole is removing high spots at the corners, which is commonly known as “twist” or “wind.” Note that Moxon says joiners use this for tabletops or other boards that are quite broad.
Other period accounts discuss other long planes. Richard Neve’s “The City and Country Purchaser” (1703) calls out two long planes: “The Long Plane,” which is about 24" long, for faces of boards; and the jointer plane, which is about 30" long, for edge joints.
proper edge jointing. Whether you use a straight or curved iron, this is the proper way to joint an edge. The fingers of your off-hand serve as the fence against the work.

16 The Art of Joinery
Moxon’s instructions for setting a jointer plane can be interpreted as follows: Turn the plane over and sight down the sole. Close one eye. Peer down the sole and adjust the iron until you see it as a fine black line (about the thickness of a hair) that is even all across the width of the sole. That’s a good description of what it looks like. To my (one) eye, a hair’s breadth usu-ally gets me a shaving that’s about .004" to .006" thick.
S. 5. The use of the strike-block.The strike-block marked B 3. is a plane shorter than the jointer, having its sole made exactly flat and straight, and is used for the shooting of a short joint because it is more handy than the long jointer. It is also used
criss-cross. Working corner to corner is a powerful technique for flattening a board. You can work both ways, though you’ll get more tear-out one way than the other.

Joseph Moxon 17
Moxon’s strike-block plane. It’s shorter than the fore but longer than a smoothing plane.
for framing and fitting the joints of miters and bevels you are to fit. You must hold it very steady in your left hand with the sole of it upwards and its fore-end towards your right hand; and you must hold your work in your right hand very steady. Then apply the sawn miter or sawn bevel at the end of your stuff [work or work piece] to the fore-end of the strike-block and so thrust it hard and upright forwards until it passes over the edge of the iron. So shall the edge of the iron, with several of these thrusts continued, cut or plane off your stuff the roughness that the teeth
it takes a steady hand. With your plane in one hand and the work in the other, Moxon says you can clean up miters this way. I’ve worked miters this way, but I prefer to brace the tool against the bench.

18 The Art of Joinery
of your saw made. But if your work be so big that you cannot well wield it in your right hand, you must set the end of your work in the bench-screw and plane upon it with a smoothing plane.
z AnalysisThe strike-block entry is a curious animal. As shown in Moxon (and in
Félibien’s plate 31 – see page 152 of this book) it has no tote or knob, but it’s longer than a smoothing plane. It’s a bevel-down plane. Handplane historian John M. Whelan surmises that the strike block was a forerunner of the miter plane, and the tool’s uses listed by Moxon back that up fairly well.
It is used for shooting short edges and miters. The part about edges is easy to visualize. The part about how to shoot a miter is unusual. It’s a free-hand activity. Hold the strike block in your off-hand with the sole facing up. Point the plane at your dominant hand. Then, in your dominant hand, place the sawn miter on the sole of the plane at the toe of the tool. Push the miter across the mouth. If the miter is too big for this activity, put the miter in your vise and clean it up with a smoothing plane. This hotdogging maneuver, as you might imagine, takes a bit of skill and practice.
Moxon’s sMoothing plane. The extended sole at front and rear is unusual. No explanation is given in the text about the extensions, though they appear later in the historical record on miter planes.
S. 6. The use of the smoothing plane.The smoothing plane marked B 4. must have its iron set very fine because its office is to smooth the work from those irregularities the fore plane made.
z AnalysisMoxon doesn’t discuss smoothing planes much in “Mechanick Exer-
cises.” But what he does say is remarkably illuminating. Perhaps the early

Joseph Moxon 19
woodworker didn’t fuss as much over this tool as we do. As someone who uses handplanes like Moxon describes, this is a frustrating entry. There are clues in the text that some of the tricks we use today were well-known then (such as the fact that high-angle tools are good for difficult grain, and that different planes have different mouths). But it would be good to know more, such as how the smoothing plane was used on the work.
Most woodworkers push the smoothing plane so its body is parallel to the grain of the board. But you don’t have to do that. Experience shows that circular motions, traversing and the like can all be used with smoothing planes.
Other questions for the now-dead printer and observer: Would they skew the plane to make the work easier? Was the smoothing plane the last tool to touch the work or was it followed up with early abrasives (or scrapers made from steel or glass)? Is B 7 in Plate 4 a coffin smoothing plane? These topics are discussed in more detail starting in the 18th century.
But one thing Moxon does say about smoothing planes is important for the beginner to note:
“…its Office is to fmoothen the work from thofe Irregularities the Fore-plane made.”
So Moxon says you can go from the fore plane to the smooth plane – skipping the jointer plane. Modern practice is to use the planes in this order: fore, jointer then smoothing. I think Moxon is giving us a clue here that you can skip the jointer plane at times. Later on in the text he discusses how to take a finer shaving with a fore plane to finish up a piece of work.
After reading Moxon, I adopted the practice of planing in this way: 1. Use the fore plane with a rank-set iron to remove as much material
as possible and get the surface fairly flat.2. Use the fore with a fine-set iron to clean up the surfaces.3. Use a jointer plane to flatten any surfaces that require a face or edge
to be flat, straight and true for joinery – such as an edge or the interior of a carcase side. All other surfaces are left alone.
4. Finish with a smoothing plane all surfaces that will be seen by the owner of the piece.
This approach is consistent with Moxon’s admonition to use the coarsest plane for as long as possible. And I end up using the smoothing plane after the fore plane quite a lot.

20 The Art of Joinery
S. 7. The use of the rabbet plane.The rabbet plane marked B 5. is to cut [away] part of the upper edge of a board or other stuff straight; that is, square down into the board so that the edge of another board also cut down in the same manner may fit and join into the square of the first board cut this way. And when two boards are thus lapped on the edges over one another, this lapping over is called rabbeting.
The rabbet plane is also sometimes used to strike a fascia in a piece of moulding, as shall be shown in its proper place.
The sides of the iron are not enclosed in the stock of this plane, as the foregoing planes are, but the iron is as broad as the stock is thick, [so] that the very angles of the edge [that is, the corners] of the iron may not be born [held] off the stuff, to hinder the straight and square cutting down[ward]: Nor does it deliver its shaving at a mouth on the top of the stock as the other planes do. But it has its mouth on the sides of the plane and delivers its shavings there. Its iron is commonly about an inch broad.
z AnalysisAgain, Moxon’s rabbet plane doesn’t look like the typical English or
American rabbet plane. It looks a bit French. The typical English rabbet plane is shorter. And the escapement (where the shavings eject) is a different shape.
But the function described by Moxon is dead on. It makes square trenches on the long edges of boards, such as shiplap joints. Or a tongue that will fit into a groove. Or it creates a flat area (fascia) that will be incor-porated into a moulding.
This form of rabbet plane went through many evolutions. Moxon’s rab-bet plane has an iron that extends to both cheeks of the plane. Some later tools opened to only one side and were fitted with an integral fence and nickers for cross-grain work.
Moxon’s (and félibien’s) rabbet plane. It’s a bit long in the stock for a typical English rabbet plane, at least the kind that I typically see.

Joseph Moxon 21
If the fence was fixed in position, the tool was a standing rabbet or fil-lister. If the fence could move, it was called (no surprise) a moving fillister.
Simple rabbet planes employ the user’s fingers as the fence and the tool is used to work up to gauge lines. There also is evidence that moving fillister planes were used for roughing out the work and rabbeting planes made the finishing cuts. More research is needed here.
highly evolved rabbet. This moving fillister has an adjustable fence, a depth stop and a nicker for scoring the grain ahead of the iron. The additional features require additional attention, but the rabbeted results are more predictable, which is good for production work – not so much when you need to be flexible and fast.