Embed Size (px)
Citation preview

The Baptist College of Florida
Turabian Formatting Guide
(includes changing Word default settings, troubleshooting information,
and tips for other formatting options)
Spring 2018

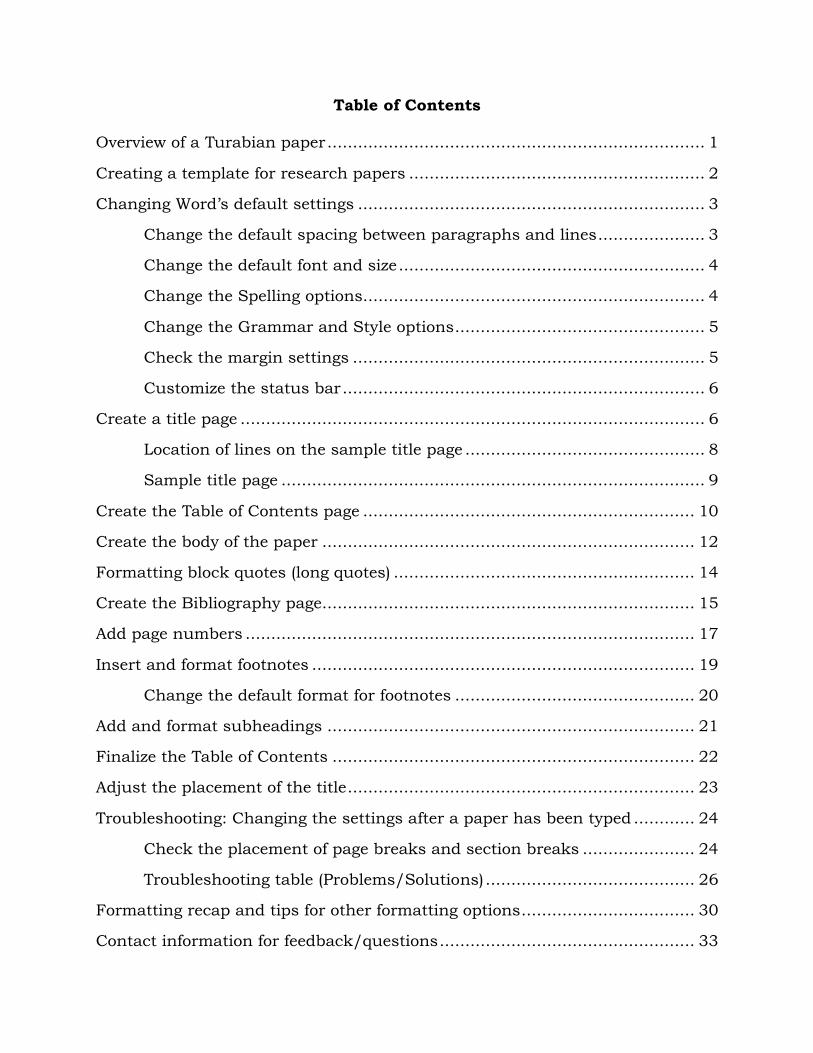
Table of Contents
Overview of a Turabian paper .......................................................................... 1
Creating a template for research papers .......................................................... 2
Changing Word’s default settings .................................................................... 3
Change the default spacing between paragraphs and lines ..................... 3
Change the default font and size ............................................................ 4
Change the Spelling options................................................................... 4
Change the Grammar and Style options ................................................. 5
Check the margin settings ..................................................................... 5
Customize the status bar ....................................................................... 6
Create a title page ........................................................................................... 6
Location of lines on the sample title page ............................................... 8
Sample title page ................................................................................... 9
Create the Table of Contents page ................................................................. 10
Create the body of the paper ......................................................................... 12
Formatting block quotes (long quotes) ........................................................... 14
Create the Bibliography page......................................................................... 15
Add page numbers ........................................................................................ 17
Insert and format footnotes ........................................................................... 19
Change the default format for footnotes ............................................... 20
Add and format subheadings ........................................................................ 21
Finalize the Table of Contents ....................................................................... 22
Adjust the placement of the title .................................................................... 23
Troubleshooting: Changing the settings after a paper has been typed ............ 24
Check the placement of page breaks and section breaks ...................... 24
Troubleshooting table (Problems/Solutions) ......................................... 26
Formatting recap and tips for other formatting options .................................. 30
Contact information for feedback/questions .................................................. 33

1
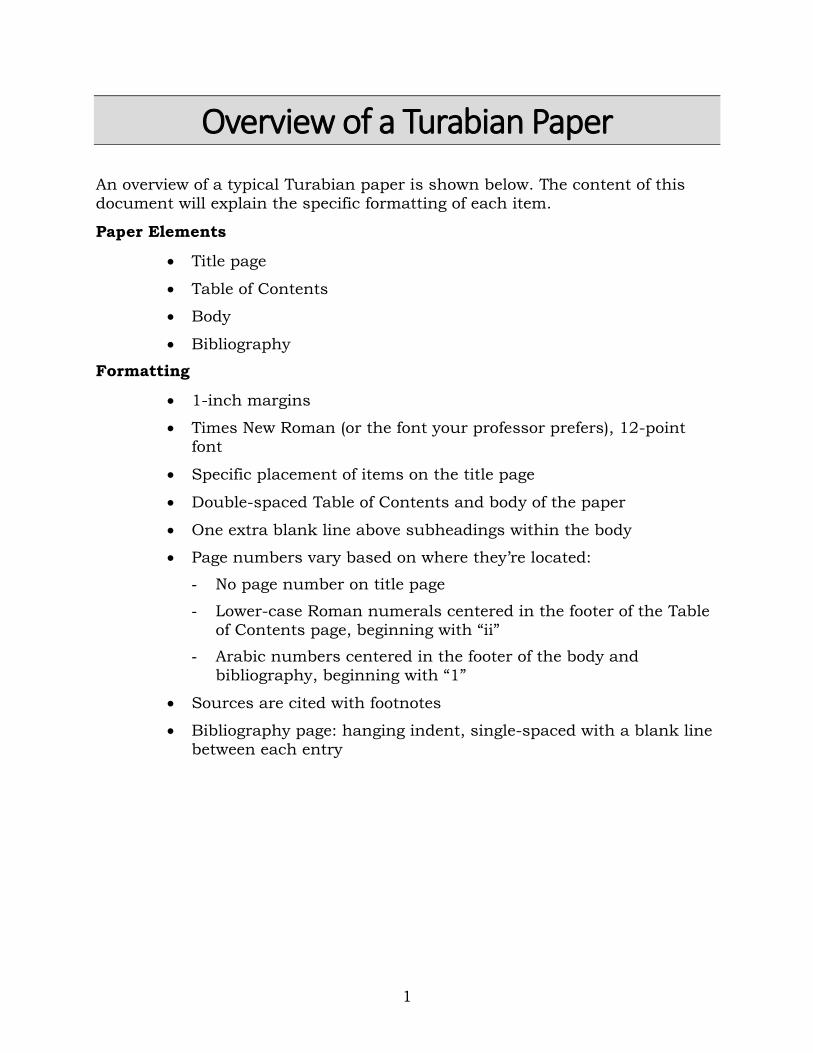
Overview of a Turabian Paper
An overview of a typical Turabian paper is shown below. The content of this
document will explain the specific formatting of each item.
Paper Elements
Title page
Table of Contents
Body
Bibliography
Formatting
1-inch margins
Times New Roman (or the font your professor prefers), 12-point
font
Specific placement of items on the title page
Double-spaced Table of Contents and body of the paper
One extra blank line above subheadings within the body
Page numbers vary based on where they’re located:
- No page number on title page
- Lower-case Roman numerals centered in the footer of the Table
of Contents page, beginning with “ii”
- Arabic numbers centered in the footer of the body and
bibliography, beginning with “1”
Sources are cited with footnotes
Bibliography page: hanging indent, single-spaced with a blank line
between each entry
2
Creating a Template for Research Papers
The information on the next few pages will walk you through changing Word’s
default settings, which will be helpful when typing most Word documents.
Changing the default settings affects the template (reusable “base” document) from which all blank Word documents are created. However, you can also
make your own research paper template if you want to save time when
formatting future research papers. The steps are listed below:
1. Follow the instructions in this document and use generic information (or
text from a short research paper).
a. Create a title page.
b. Create a Table of Contents with a sample entry.
c. Type some information in the body of the paper.
d. Change the style (format settings) for the footnotes.
e. Create a Bibliography page with a sample entry.
f. Add page numbers.
2. When saving the document, choose “Word Template” in the “Save as
Type” drop-down box, located below the file name.
3. Do not change the location! The templates are saved in a specific folder
on your computer.
4. Give the template a name, such as Turabian Template, and save it.
5. Close the document.
6. Open Word again (if necessary) and click File/New.
7. Click the word “Personal” (located above the image of the blank
document, to the right of the word “Featured”).
8. You should see your template. Double-click to open it.
9. Make any necessary changes and save it as a Word document (the
normal way you would save it). The template will remain unchanged and
can be reopened any time as a starting document.
An alternative to creating a template is to reopen a research paper you have
already completed, choose File/Save As, and save it with a new name. By doing this, you can make changes under the new file name without changing the
original file. This isn’t as safe as using a template because there is always the
chance that you would forget to use the Save As command and overwrite the
original file.
3
Changing Word’s Default Settings The term “default settings” refers to the settings used by Word when you open a new document. If you change them on your personal computer, you shouldn’t
need to change them again. Unless the original (default) settings are changed,
Word automatically adds extra spacing after each paragraph and between each line. It also begins with the font of Calibri and a font size of 11. All of these
need to be changed when typing a Turabian (or any other style) paper.
To temporarily change these settings in a blank document, you can click the “No Spacing” button, located in the Styles area of the Home tab, before you
begin typing the document. This will remove the extra space between lines and
paragraphs. You would also need to change the font to Times New Roman and
change the font size to 12, also located on the Home tab. However, this will only change these settings for the current document. Clicking the “No Spacing”
style button does not change the default settings for future documents.
In order to permanently change the default (preset) settings for all new documents, follow these instructions:
Change the default spacing between paragraphs and lines:
1. Open a new document (press Ctrl + N or click File/New/Blank Document).
2. Right-click in the blank document and choose Paragraph.
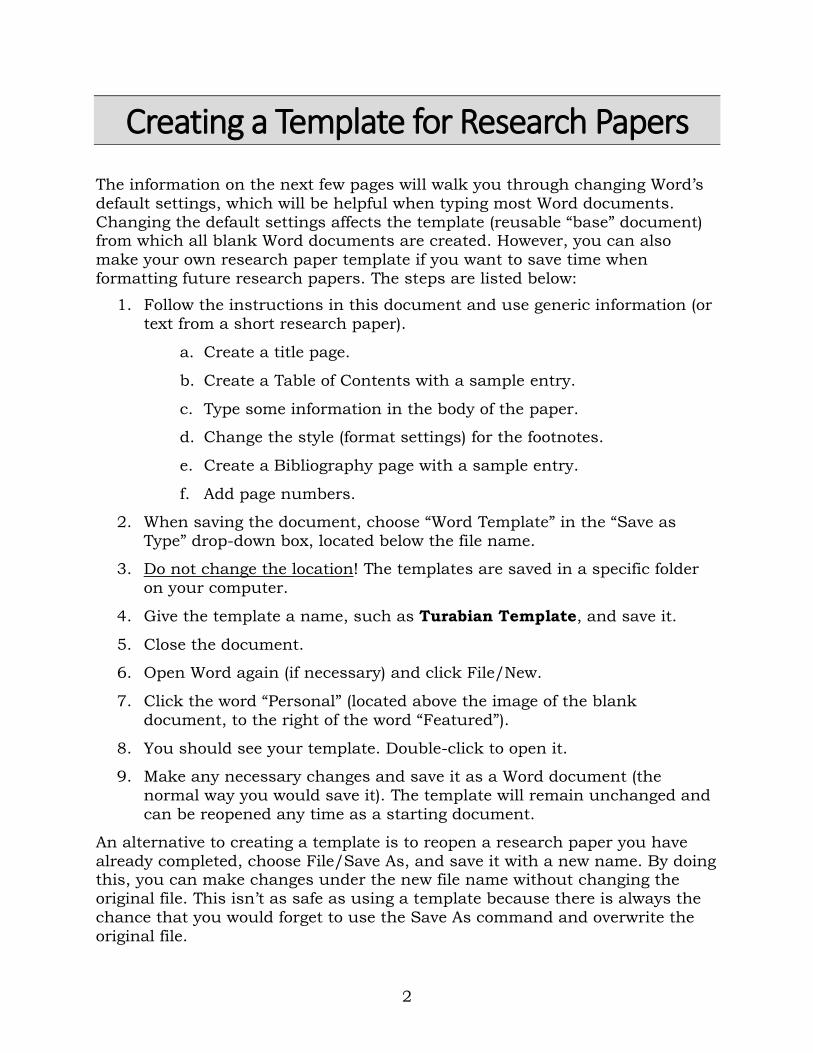
3. Change Spacing After to 0 and change Line Spacing to Single, as shown below.
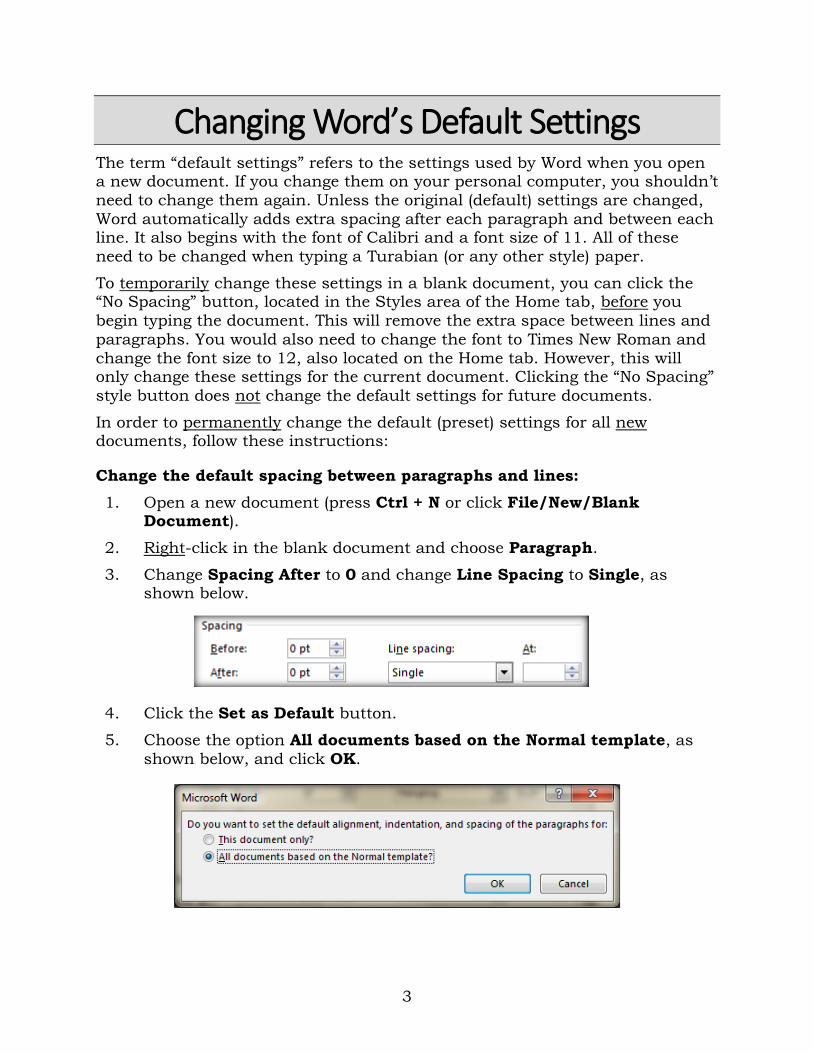
4. Click the Set as Default button.
5. Choose the option All documents based on the Normal template, as
shown below, and click OK.
4
Change the default font and size:
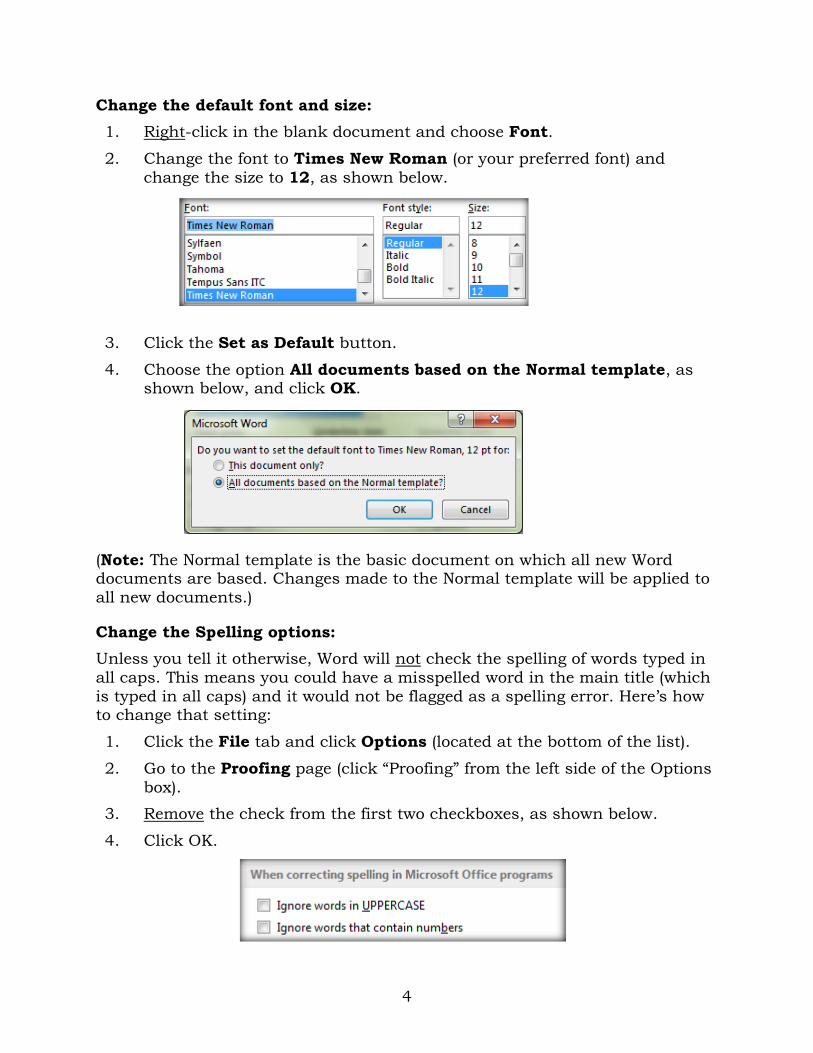
1. Right-click in the blank document and choose Font.
2. Change the font to Times New Roman (or your preferred font) and
change the size to 12, as shown below.
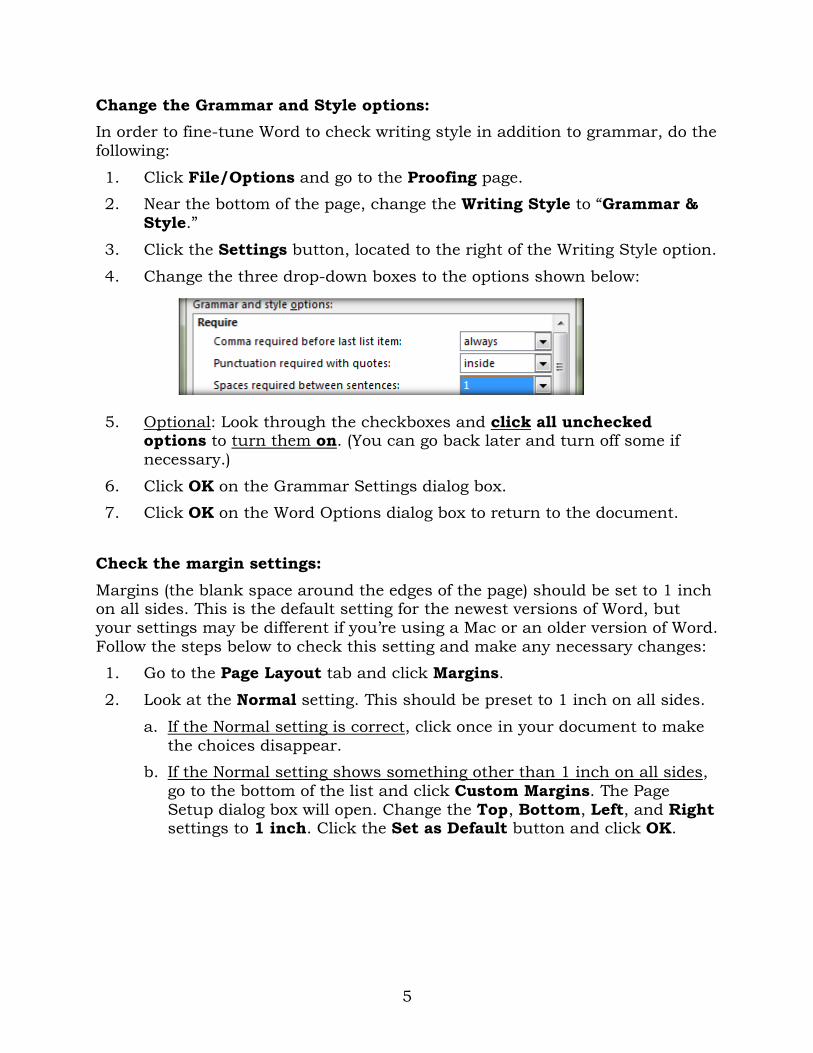
3. Click the Set as Default button.
4. Choose the option All documents based on the Normal template, as shown below, and click OK.
(Note: The Normal template is the basic document on which all new Word documents are based. Changes made to the Normal template will be applied to
all new documents.)
Change the Spelling options:
Unless you tell it otherwise, Word will not check the spelling of words typed in
all caps. This means you could have a misspelled word in the main title (which
is typed in all caps) and it would not be flagged as a spelling error. Here’s how to change that setting:
1. Click the File tab and click Options (located at the bottom of the list).
2. Go to the Proofing page (click “Proofing” from the left side of the Options
box).
3. Remove the check from the first two checkboxes, as shown below.
4. Click OK.
5
Change the Grammar and Style options:
In order to fine-tune Word to check writing style in addition to grammar, do the
following:
1. Click File/Options and go to the Proofing page.
2. Near the bottom of the page, change the Writing Style to “Grammar &
Style.”
3. Click the Settings button, located to the right of the Writing Style option.
4. Change the three drop-down boxes to the options shown below:
5. Optional: Look through the checkboxes and click all unchecked options to turn them on. (You can go back later and turn off some if
necessary.)
6. Click OK on the Grammar Settings dialog box.
7. Click OK on the Word Options dialog box to return to the document.
Check the margin settings:
Margins (the blank space around the edges of the page) should be set to 1 inch on all sides. This is the default setting for the newest versions of Word, but
your settings may be different if you’re using a Mac or an older version of Word.
Follow the steps below to check this setting and make any necessary changes:
1. Go to the Page Layout tab and click Margins.
2. Look at the Normal setting. This should be preset to 1 inch on all sides.
a. If the Normal setting is correct, click once in your document to make
the choices disappear.
b. If the Normal setting shows something other than 1 inch on all sides,
go to the bottom of the list and click Custom Margins. The Page
Setup dialog box will open. Change the Top, Bottom, Left, and Right settings to 1 inch. Click the Set as Default button and click OK.
6
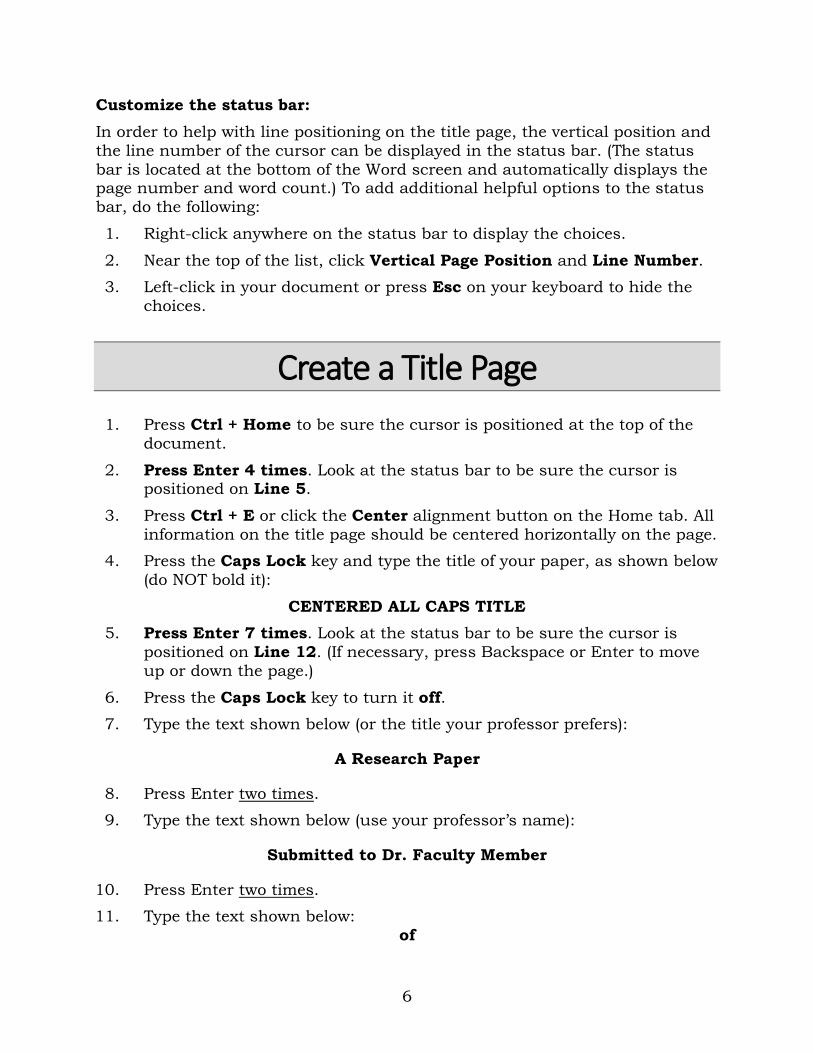
Customize the status bar:
In order to help with line positioning on the title page, the vertical position and
the line number of the cursor can be displayed in the status bar. (The status
bar is located at the bottom of the Word screen and automatically displays the page number and word count.) To add additional helpful options to the status
bar, do the following:
1. Right-click anywhere on the status bar to display the choices.
2. Near the top of the list, click Vertical Page Position and Line Number.
3. Left-click in your document or press Esc on your keyboard to hide the
choices.
Create a Title Page
1. Press Ctrl + Home to be sure the cursor is positioned at the top of the
document.
2. Press Enter 4 times. Look at the status bar to be sure the cursor is positioned on Line 5.
3. Press Ctrl + E or click the Center alignment button on the Home tab. All
information on the title page should be centered horizontally on the page.
4. Press the Caps Lock key and type the title of your paper, as shown below
(do NOT bold it):
CENTERED ALL CAPS TITLE
5. Press Enter 7 times. Look at the status bar to be sure the cursor is
positioned on Line 12. (If necessary, press Backspace or Enter to move
up or down the page.)
6. Press the Caps Lock key to turn it off.
7. Type the text shown below (or the title your professor prefers):
A Research Paper
8. Press Enter two times.
9. Type the text shown below (use your professor’s name):
Submitted to Dr. Faculty Member
10. Press Enter two times.
11. Type the text shown below:
of
7
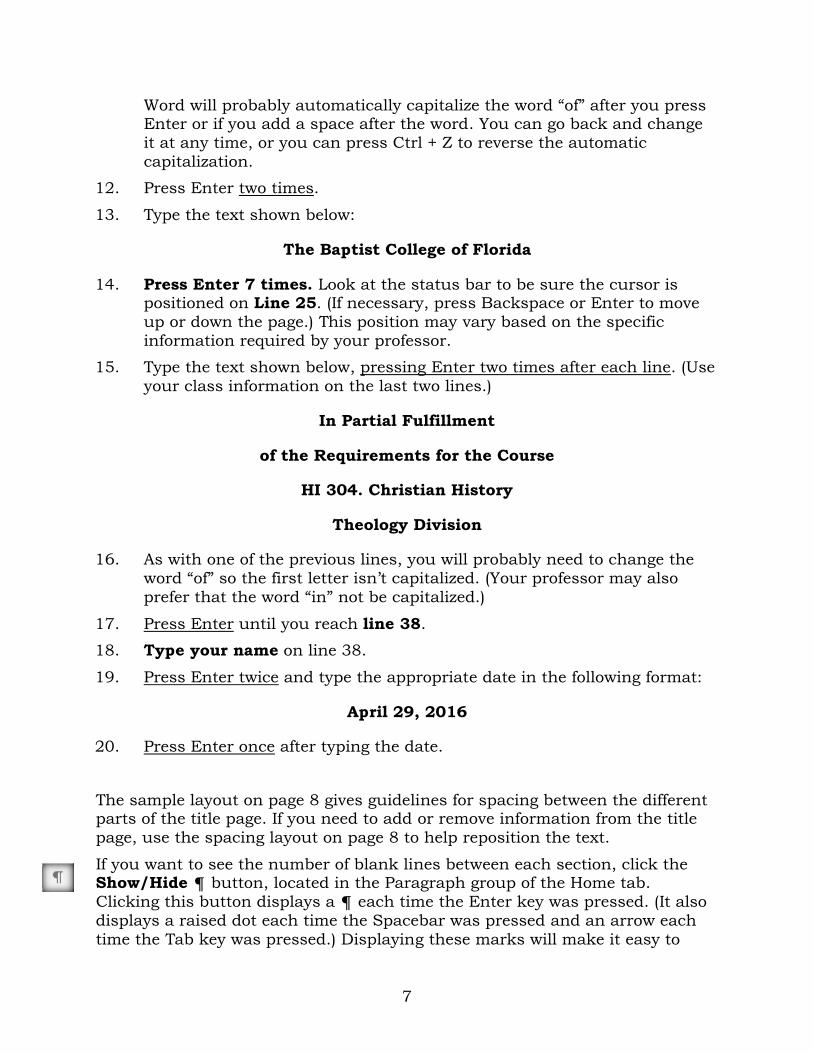
Word will probably automatically capitalize the word “of” after you press Enter or if you add a space after the word. You can go back and change
it at any time, or you can press Ctrl + Z to reverse the automatic
capitalization.
12. Press Enter two times.
13. Type the text shown below:
The Baptist College of Florida
14. Press Enter 7 times. Look at the status bar to be sure the cursor is positioned on Line 25. (If necessary, press Backspace or Enter to move
up or down the page.) This position may vary based on the specific
information required by your professor.
15. Type the text shown below, pressing Enter two times after each line. (Use
your class information on the last two lines.)
In Partial Fulfillment
of the Requirements for the Course
HI 304. Christian History
Theology Division
16. As with one of the previous lines, you will probably need to change the
word “of” so the first letter isn’t capitalized. (Your professor may also
prefer that the word “in” not be capitalized.)
17. Press Enter until you reach line 38.
18. Type your name on line 38.
19. Press Enter twice and type the appropriate date in the following format:
April 29, 2016
20. Press Enter once after typing the date.
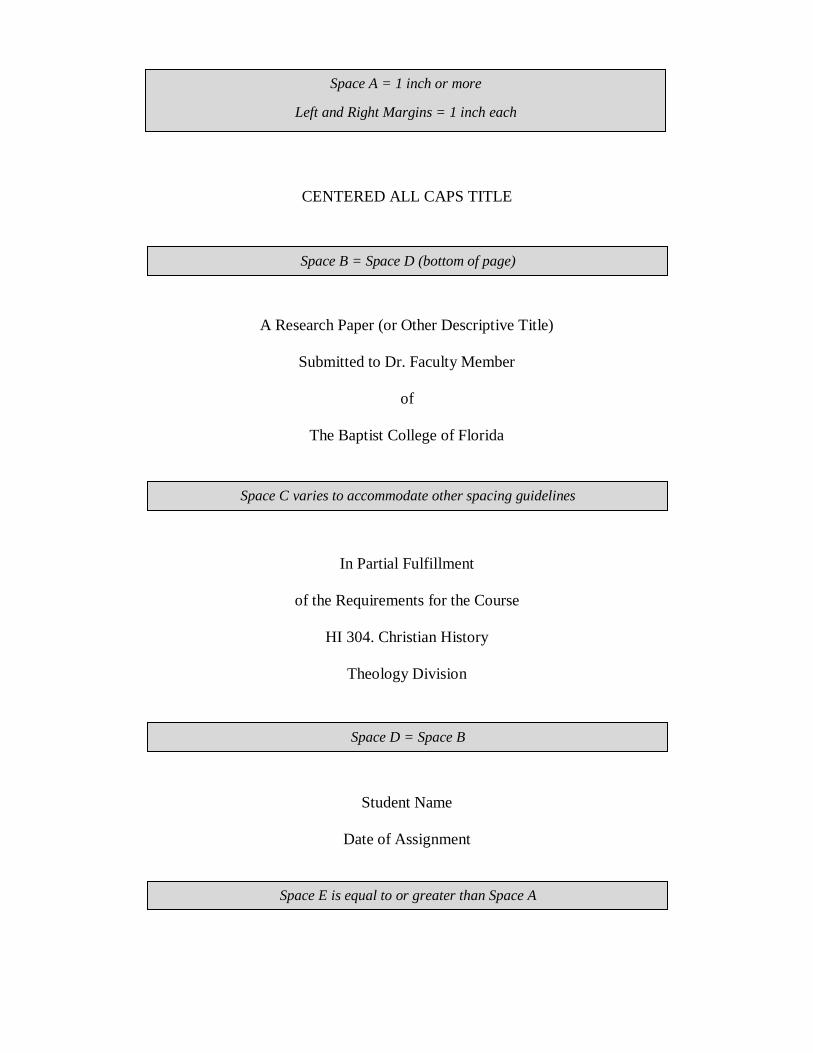
The sample layout on page 8 gives guidelines for spacing between the different parts of the title page. If you need to add or remove information from the title
page, use the spacing layout on page 8 to help reposition the text.
If you want to see the number of blank lines between each section, click the Show/Hide ¶ button, located in the Paragraph group of the Home tab.
Clicking this button displays a ¶ each time the Enter key was pressed. (It also
displays a raised dot each time the Spacebar was pressed and an arrow each
time the Tab key was pressed.) Displaying these marks will make it easy to
8
count the number of blank lines between the typed information by counting the paragraph symbols.
If you need to delete a blank line, click on the blank line and press Backspace
or Delete. To add an additional blank line, click where the new line needs to go and press Enter. You can always click the Undo button or press Ctrl + Z if you
make a mistake and need to reverse (undo) one or more actions.
Click the Show/Hide ¶ button again to turn it off when you are satisfied with
the layout of the title page.
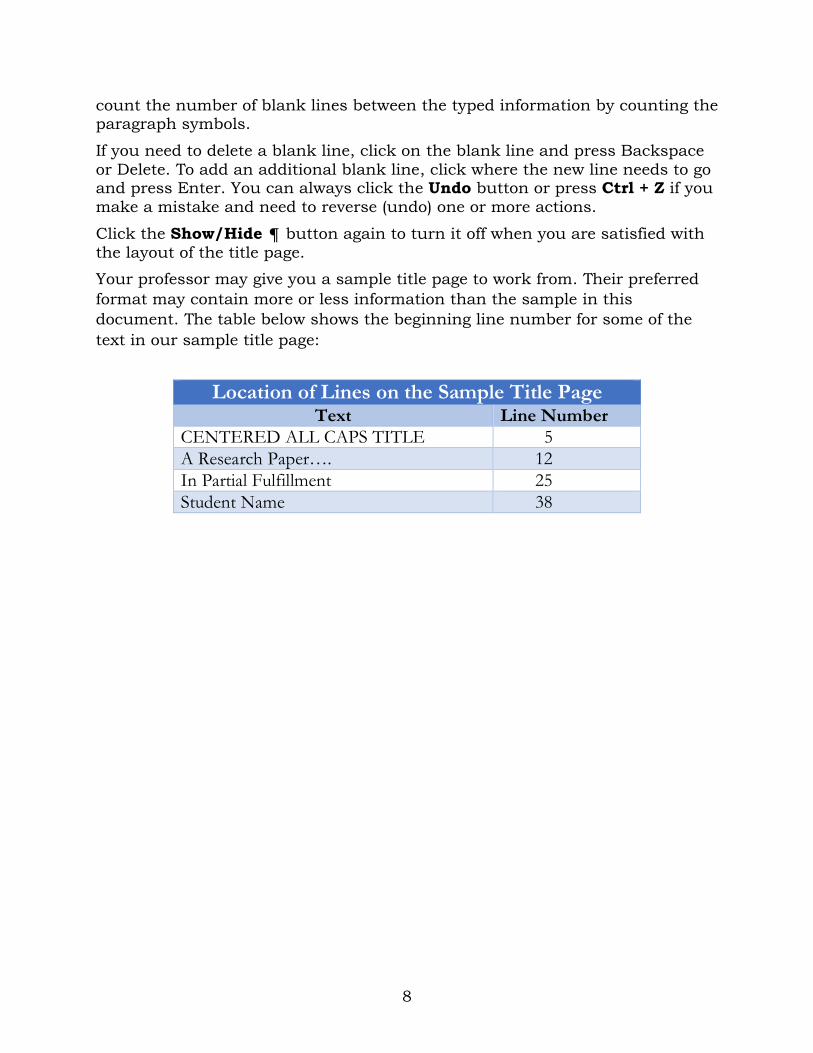
Your professor may give you a sample title page to work from. Their preferred
format may contain more or less information than the sample in this
document. The table below shows the beginning line number for some of the
text in our sample title page:
Location of Lines on the Sample Title Page Text Line Number
CENTERED ALL CAPS TITLE 5
A Research Paper…. 12
In Partial Fulfillment 25
Student Name 38
9
Space A = 1 inch or more
Left and Right Margins = 1 inch each
Space B = Space D (bottom of page)
Space C varies to accommodate other spacing guidelines
Space D = Space B
Space E is equal to or greater than Space A
CENTERED ALL CAPS TITLE
A Research Paper (or Other Descriptive Title)
Submitted to Dr. Faculty Member
of
The Baptist College of Florida
In Partial Fulfillment
of the Requirements for the Course
HI 304. Christian History
Theology Division
Student Name
Date of Assignment
10
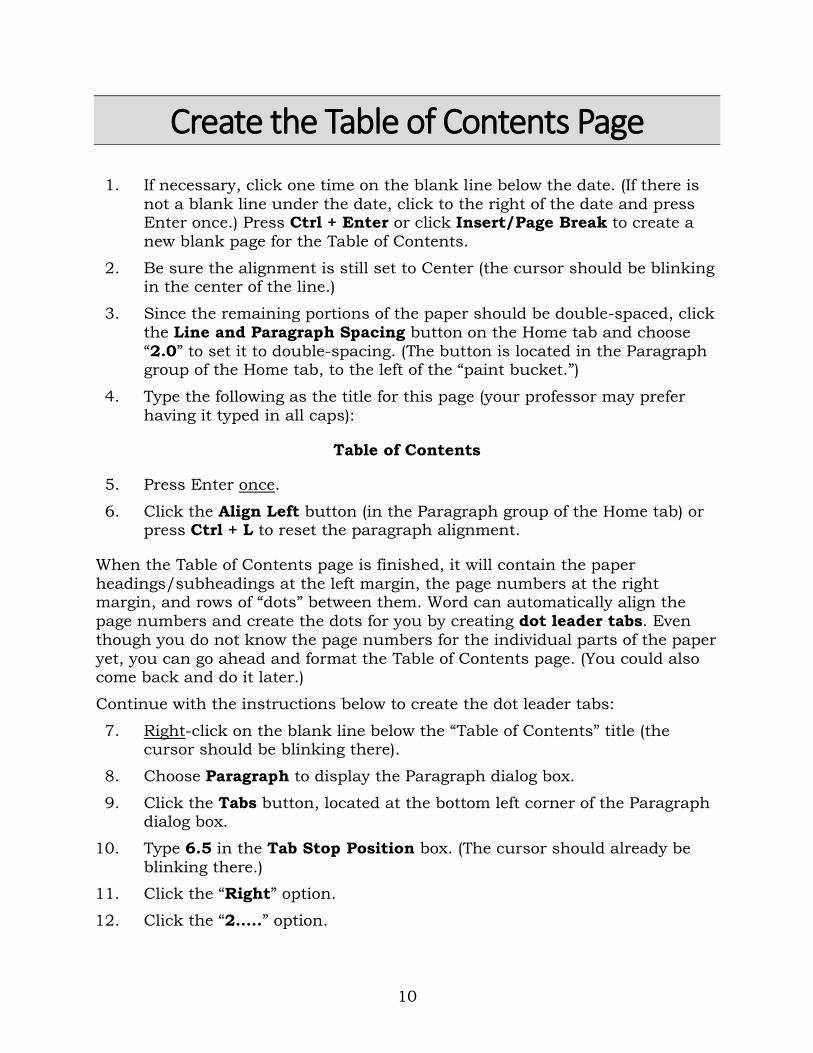
Create the Table of Contents Page
1. If necessary, click one time on the blank line below the date. (If there is
not a blank line under the date, click to the right of the date and press Enter once.) Press Ctrl + Enter or click Insert/Page Break to create a
new blank page for the Table of Contents.
2. Be sure the alignment is still set to Center (the cursor should be blinking in the center of the line.)
3. Since the remaining portions of the paper should be double-spaced, click
the Line and Paragraph Spacing button on the Home tab and choose
“2.0” to set it to double-spacing. (The button is located in the Paragraph group of the Home tab, to the left of the “paint bucket.”)
4. Type the following as the title for this page (your professor may prefer
having it typed in all caps):
Table of Contents
5. Press Enter once.
6. Click the Align Left button (in the Paragraph group of the Home tab) or press Ctrl + L to reset the paragraph alignment.
When the Table of Contents page is finished, it will contain the paper
headings/subheadings at the left margin, the page numbers at the right margin, and rows of “dots” between them. Word can automatically align the
page numbers and create the dots for you by creating dot leader tabs. Even
though you do not know the page numbers for the individual parts of the paper
yet, you can go ahead and format the Table of Contents page. (You could also come back and do it later.)
Continue with the instructions below to create the dot leader tabs:
7. Right-click on the blank line below the “Table of Contents” title (the cursor should be blinking there).
8. Choose Paragraph to display the Paragraph dialog box.
9. Click the Tabs button, located at the bottom left corner of the Paragraph dialog box.
10. Type 6.5 in the Tab Stop Position box. (The cursor should already be
blinking there.)
11. Click the “Right” option.
12. Click the “2…..” option.

11
13. The Tabs dialog box should look like the example shown below:
14. Explanations as to why these choices were made are listed below:
- 6.5 was entered as the tab stop position because it is the location of the
right margin and is the location where the right edge of each page number needs to be. (If the ruler is not visible at the top of the Word
screen, click View/Ruler to display it. You will be able to easily see the
6.5” location of the right margin when the ruler is visible.)
- “Right” was chosen in the Alignment area because the page numbers
need to be right-aligned at the 6.5” location. This means the right edge of
each page number will stop at the 6.5” mark.
- The “2….” option was chosen in the Leader area because dots need to
“lead up to” the tab at the 6.5” mark. (The other “leader” options are
dashes and underline characters.)
15. Click OK to set the tab.
16. To see if the tab works, do the following:
a. Type the word Introduction (Just type the word. Do not bold it.)
b. Press Tab. A line of dots should appear and extend to the right margin (the 6.5” mark).
c. Type the number 1 and press Enter.
d. Type the following: Next Title Goes Here (Do not bold it.)
e. Press Tab.
f. Press Enter.
12
This will prepare the Table of Contents page so the headings/subheadings and appropriate page numbers can be entered later. When entering the information,
type the name of the heading, press Tab, type the page number, and press
Enter. Repeat this procedure for each heading and subheading.
Note: If a subheading needs to be indented under a main heading on the Table
of Contents page, click the Increase Indent button, located in the Paragraph
group of the Home tab. This will indent the line ½” to the right. After finishing
the indented lines, click the Decrease Indent button to return to the previous position.
Create the Body of the Paper The page number format for the body of the paper is different than the page
number format used on the Table of Contents page. Therefore, instead of
starting a new page for the body of the paper, we need to start a new section. By creating sections within a document, each section can contain different
document formats, such as page numbers, orientation, margins, etc.
1. Click on a blank line under the Table of Contents information. (The cursor may already be blinking on a blank line.)
2. Press Enter two or three times.
3. Go to the Page Layout tab. Click Breaks/Next Page. (The “Next Page” option is under the Section Breaks heading.)
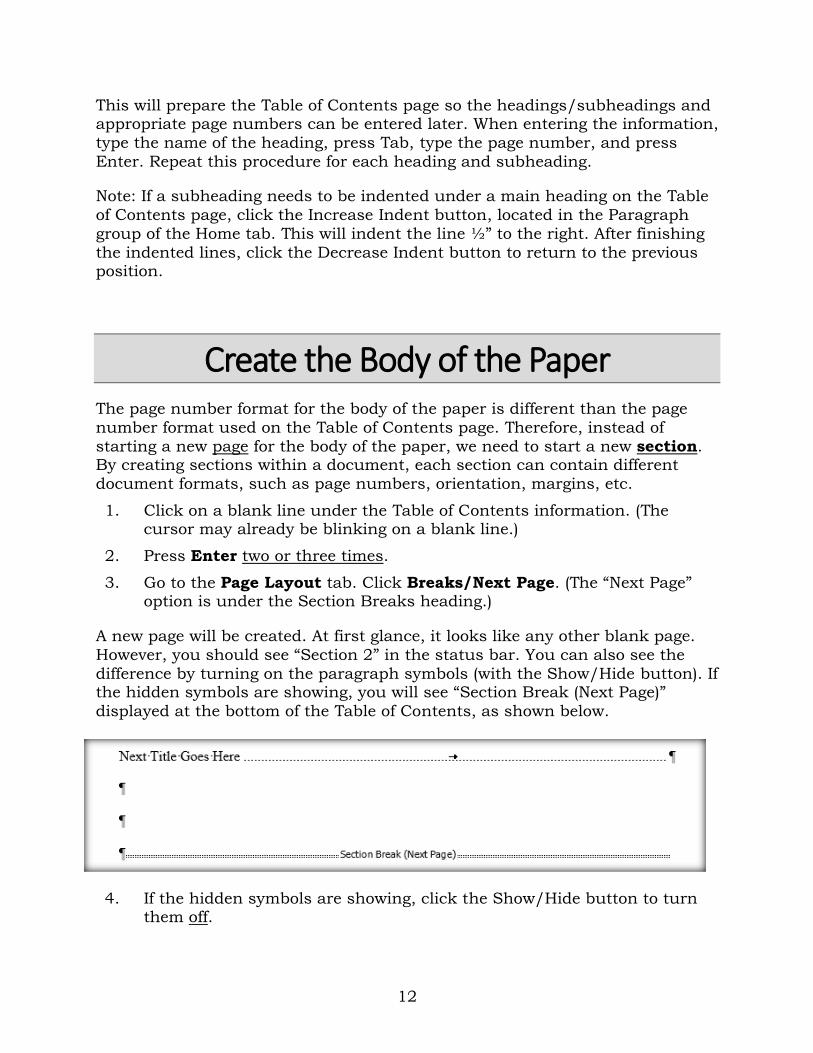
A new page will be created. At first glance, it looks like any other blank page.
However, you should see “Section 2” in the status bar. You can also see the
difference by turning on the paragraph symbols (with the Show/Hide button). If the hidden symbols are showing, you will see “Section Break (Next Page)”
displayed at the bottom of the Table of Contents, as shown below.
4. If the hidden symbols are showing, click the Show/Hide button to turn them off.
13
5. Do the following to turn OFF the dot-leader tab:
a. Right-click at the top of the new page.
b. Click Paragraph and click the Tabs button.
c. Click the Clear All button and click OK.
This does not affect the dot leader tab that was set on the Table of
Contents page. It only affects the document from this point forward.
6. Click the Center button (on the Home tab) or press Ctrl + E to change
the alignment in preparation for the title.
7. Type the title (or the word Introduction) based on one of the conditions
listed below:
a. If the first-page title needs to be typed at the top of the page, type the title (or the word Introduction) and press Enter.
b. If the first-page title needs to be typed one inch below the top margin,
press the Enter key two times and type the title (or the word Introduction). The line position shown in the status bar (at the
bottom of the page) will show the title at 1.7” instead of 2 inches.
Pressing Enter three times before typing it would have placed the title at the 2.1” mark. The placement of the title will be adjusted later.
8. Press Enter once after typing the title.
9. Click the Align Left button or press Ctrl + L to reset the alignment.
10. The first line of each paragraph of your paper should be indented ½” from the left margin. You can press the Tab key to automatically move
the cursor ½” before typing each paragraph or Word can automatically
do this for you. If you want Word to automatically indent the first line of each paragraph, do the following:
a. Right-click at the position of the cursor. (It should be blinking at the
left margin, two lines below the title.)
b. Choose Paragraph.
c. From the Paragraph dialog box, change the Special setting to First
Line.
d. Click OK. The cursor should automatically move ½” to the right.
11. Type the following (or type a sentence or two from the first paragraph of
your paper): The body of my paper begins here.
12. Press Enter two or three times.
Pressing Enter multiple times here will prepare you to format the
bibliography page. You can come back later and finish typing the actual
content of your paper. When you begin typing the body of the paper, only press Enter once at the end of a complete paragraph, at the end of a

14
short line (like a heading or subheading), or to add a blank line. If you did not add the First Line Indent setting (under #10 on the previous
page), press Tab to indent the first line of each paragraph.
Formatting Block Quotes (Long Quotes)
A “block quote” is a term often used for long direct quotations. In Turabian format, this applies if the direct quotation takes up more than four lines when
typed. Short quotations are included within the paragraph and are enclosed in
quotation marks. Long quotations begin on a new line, are indented one-half inch from the left and right margins (BCF preference), are single-spaced, and
are not enclosed in quotation marks. Here’s how to format a long (block) quote:
1. Introduce the quote in the paragraph preceding it, end the sentence
appropriately, and press Enter.
2. Right-click at the position of the cursor and choose Paragraph.
3. Change the Special setting to None.
4. Change the Line Spacing to Single.
5. Change the Left and Right settings to 0.5”
6. Compare your settings to the ones shown below.
7. Click OK.
8. Type the direct quotation, inserting a footnote at the end of the last
sentence.
9. Press Enter twice (since single-spacing is currently being used).
15
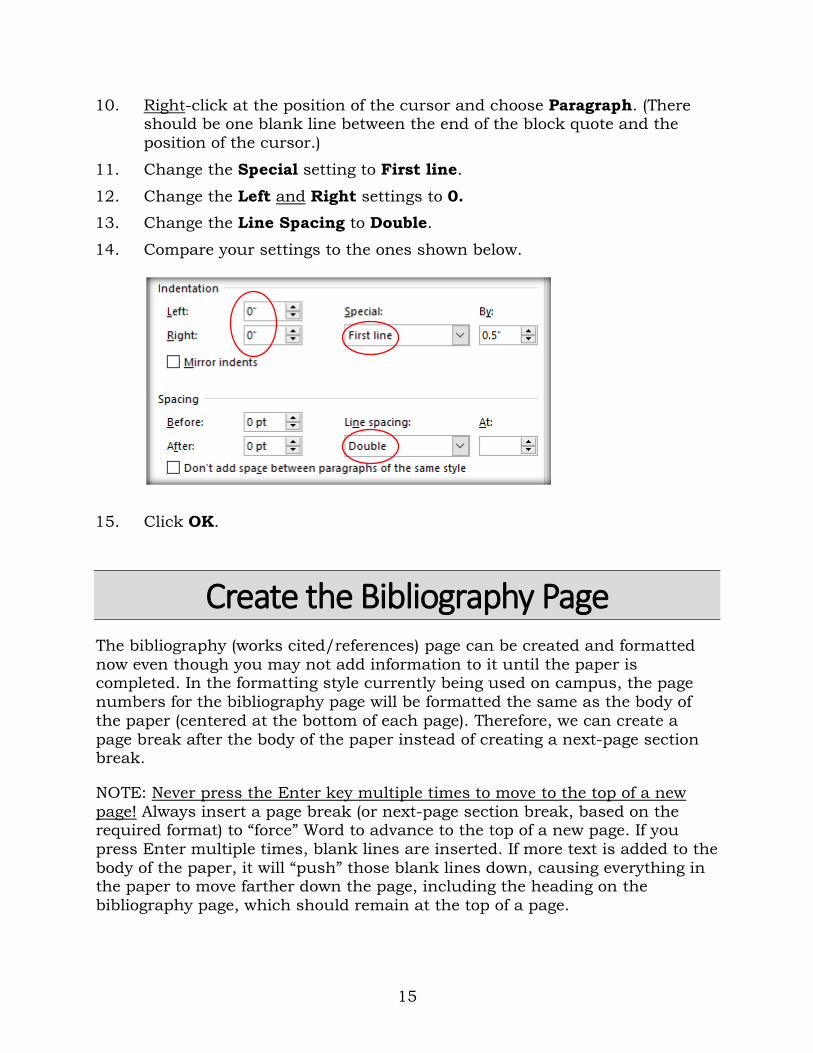
10. Right-click at the position of the cursor and choose Paragraph. (There should be one blank line between the end of the block quote and the
position of the cursor.)
11. Change the Special setting to First line.
12. Change the Left and Right settings to 0.
13. Change the Line Spacing to Double.
14. Compare your settings to the ones shown below.
15. Click OK.
Create the Bibliography Page The bibliography (works cited/references) page can be created and formatted
now even though you may not add information to it until the paper is completed. In the formatting style currently being used on campus, the page
numbers for the bibliography page will be formatted the same as the body of
the paper (centered at the bottom of each page). Therefore, we can create a
page break after the body of the paper instead of creating a next-page section break.
NOTE: Never press the Enter key multiple times to move to the top of a new
page! Always insert a page break (or next-page section break, based on the required format) to “force” Word to advance to the top of a new page. If you
press Enter multiple times, blank lines are inserted. If more text is added to the
body of the paper, it will “push” those blank lines down, causing everything in the paper to move farther down the page, including the heading on the
bibliography page, which should remain at the top of a page.
16
Follow these steps to create and format the bibliography page:
1. Press Ctrl + End to position the cursor at the bottom of the document.
2. Press Enter one or two times.
3. Press Ctrl + Enter (or click Insert/Page Break) to advance to a new page.
4. Click the Center button or press Ctrl + E to change the alignment.
5. Right-click at the position of the cursor and choose Paragraph.
6. If necessary, change the Special setting to None. This will remove the First Line indent from this paragraph. If you do not do this, the title will
be off-center. (You may not need to do this. It depends on whether or not
the First Line Indent setting was turned on.)
7. Click OK to return to the document.
8. Type the word Bibliography (Don’t bold it. Just type the word. Based on
the format of your paper and your professor’s preference, you may need to type Works Cited or References.)
9. Press Enter.
10. Press Ctrl + L or click the Align Left button to change the alignment.
11. Right-click at the cursor position and choose Paragraph.
12. Change the Special setting to Hanging. Click OK.
The format of bibliography entries and the format of the body of the
paper are opposite. For bibliography entries, the first line does not indent, but the rest of the lines do indent ½ inch. The Hanging indent
setting will cause the second and subsequent lines of a bibliography
entry to indent correctly.
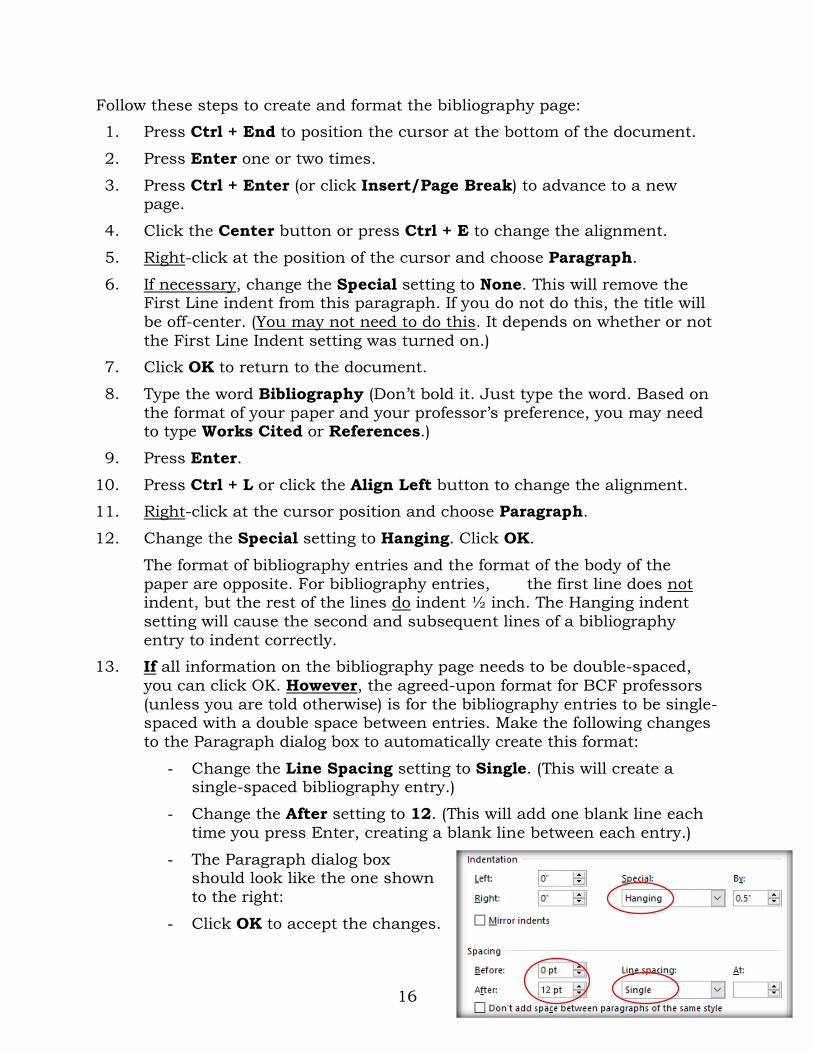
13. If all information on the bibliography page needs to be double-spaced,
you can click OK. However, the agreed-upon format for BCF professors
(unless you are told otherwise) is for the bibliography entries to be single-spaced with a double space between entries. Make the following changes
to the Paragraph dialog box to automatically create this format:
- Change the Line Spacing setting to Single. (This will create a single-spaced bibliography entry.)
- Change the After setting to 12. (This will add one blank line each
time you press Enter, creating a blank line between each entry.)
- The Paragraph dialog box should look like the one shown
to the right:
- Click OK to accept the changes.
17
When typing bibliography entries, be sure you have all the necessary
information for each source and know how each piece of information should be
formatted. For example, some words in the entry may be underlined, italicized,
or enclosed in quotes.
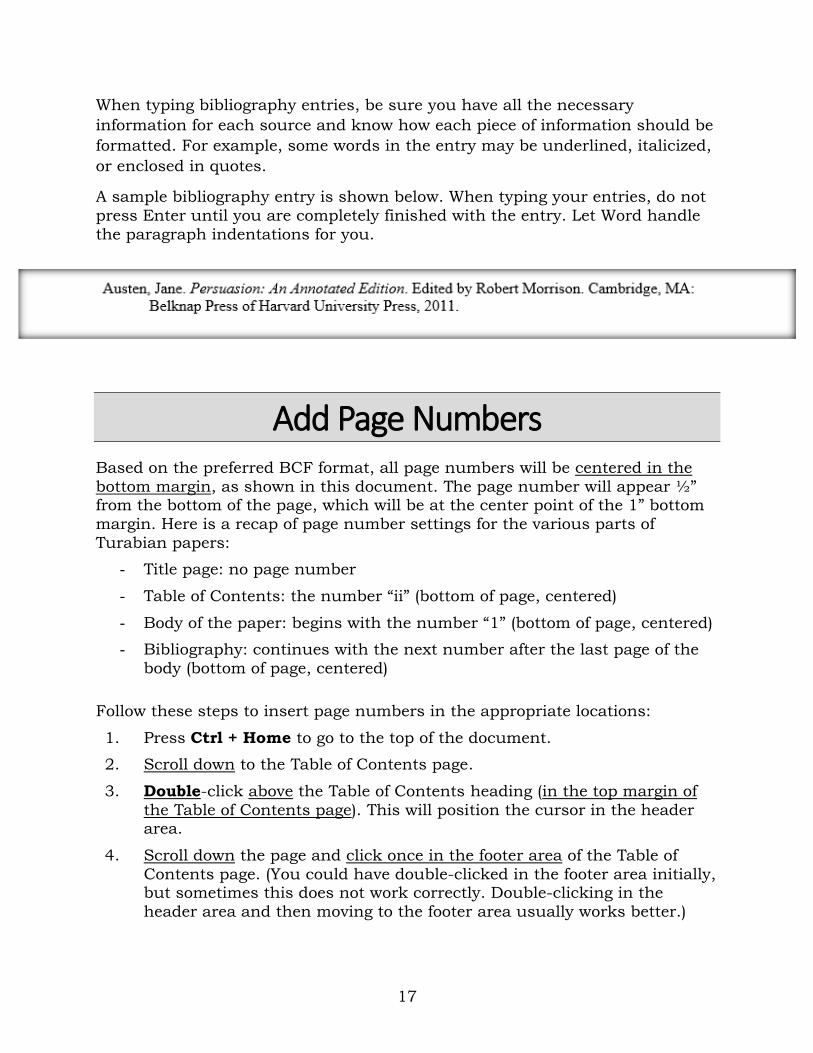
A sample bibliography entry is shown below. When typing your entries, do not
press Enter until you are completely finished with the entry. Let Word handle
the paragraph indentations for you.
Add Page Numbers Based on the preferred BCF format, all page numbers will be centered in the
bottom margin, as shown in this document. The page number will appear ½” from the bottom of the page, which will be at the center point of the 1” bottom
margin. Here is a recap of page number settings for the various parts of
Turabian papers:
- Title page: no page number
- Table of Contents: the number “ii” (bottom of page, centered)
- Body of the paper: begins with the number “1” (bottom of page, centered)
- Bibliography: continues with the next number after the last page of the
body (bottom of page, centered)
Follow these steps to insert page numbers in the appropriate locations:
1. Press Ctrl + Home to go to the top of the document.
2. Scroll down to the Table of Contents page.
3. Double-click above the Table of Contents heading (in the top margin of
the Table of Contents page). This will position the cursor in the header area.
4. Scroll down the page and click once in the footer area of the Table of
Contents page. (You could have double-clicked in the footer area initially, but sometimes this does not work correctly. Double-clicking in the
header area and then moving to the footer area usually works better.)
18
The header is located in the top margin and the footer is located in the bottom margin. Anything placed in the header or footer automatically
repeats on subsequent pages.
5. Be sure the cursor is blinking in the footer area of the Table of Contents page. Press Ctrl + E or click the Center button to change the alignment.
6. You should see a Header & Footer Tools Design tab on the right side of
the Ribbon, to the right of the View tab. This is a tab that only appears
while working in the header or footer.
7. On the Header & Footer Tools Design tab, click the Page Number
button. (The Page Number option is also found on the Insert tab.)
8. Move your mouse to Current Position and click Plain Number. The number “2” should have appeared in the footer. (If you choose the
“Bottom of Page” option for the page number, a blank line will be inserted
after the page number, pushing it too far up in the footer area.)
9. Drag your mouse over the number “2” to select it. Change the font to
Times New Roman (or the font used in the paper) and change the size to
12. You can use the pop-up mini toolbar or go back to the Home tab to change it. The format of page numbers must match the font and size
used in the rest of the paper.
10. Go back to the Header & Footer Tools Design tab. Click the Page
Number button and choose Format Page Numbers.
11. In the Format Page Number dialog box, change the Number Format to
the “i, ii, iii…” format.
12. Click OK to accept the new format and return to the footer.
13. Click the Different First Page option. This will remove the page number
from the title page.
14. Click in the header area of the third page (the page after the Table of Contents).
15. Click the Link to Previous button to turn it OFF.
16. Scroll down and click in the footer area of the same page.
17. Click the Link to Previous button to turn it OFF. (The Link to Previous
option should be turned off in the header and footer of this section.)
The cursor should now be in the footer of the third page of the document,
which is the first page of section two. (Notice the information box on the left side of each header and footer. This box will show which section you
are in.)
18. To reset the page number, click the Page Number button and choose Format Page Numbers.
19
19. Be sure the number format is set to “1, 2, 3…” Click the Start At option. Be sure the number “1” is displayed.
20. Click OK to return to the document.
21. Scroll through the document and look at the footer on all pages. Verify the following:
- There is no number on the title page.
- The number “ii” is at the bottom center of the Table of Contents page.
- The number “1” is at the bottom center of the first page of the body.
- The numbers continue consecutively throughout the remaining pages
of the document, including the bibliography page.
22. Double-click anywhere in the body of the paper to close the Header/Footer tab and return to the document. (You could also click the
red Close Header and Footer button, located on the right side of the
Header & Footer Tools Design tab.)
Insert and Format Footnotes In Turabian papers, citations are noted by inserting footnotes. A small, raised
reference number (known as a superscript) appears to the right of the
information being cited. The same raised number appears at the bottom of the page, above the page number. Word will automatically insert a two-inch
dividing line above the first footnote on each page. It will also keep track of the
footnote numbers. Your job is to type the correct reference information and be sure the footnote format is correct. You can follow these instructions to format
the footnotes even if you are not ready to add any “real” footnotes yet.
1. Scroll to the first page of the body of the paper (the page after the Table
of Contents).
2. Click at the end of a word in the body of the paper. Be sure the cursor is
positioned at the end of a word or after a period.
3. Click on the References tab and click Insert Footnote. (If this is a temporary footnote, come back and delete the footnote reference number
after the formatting procedure is finished.)
The superscripted number “1” will appear in the text. The cursor should now be positioned at the bottom of the page, below the newly created
two-inch dividing line.
For Turabian footnotes, the first line of each footnote should be indented, which is the same format as the body of the paper. Based on BCF formatting
guidelines, we will be using a font size of 10 for the footnotes and the same font
as used in the rest of the paper.
20
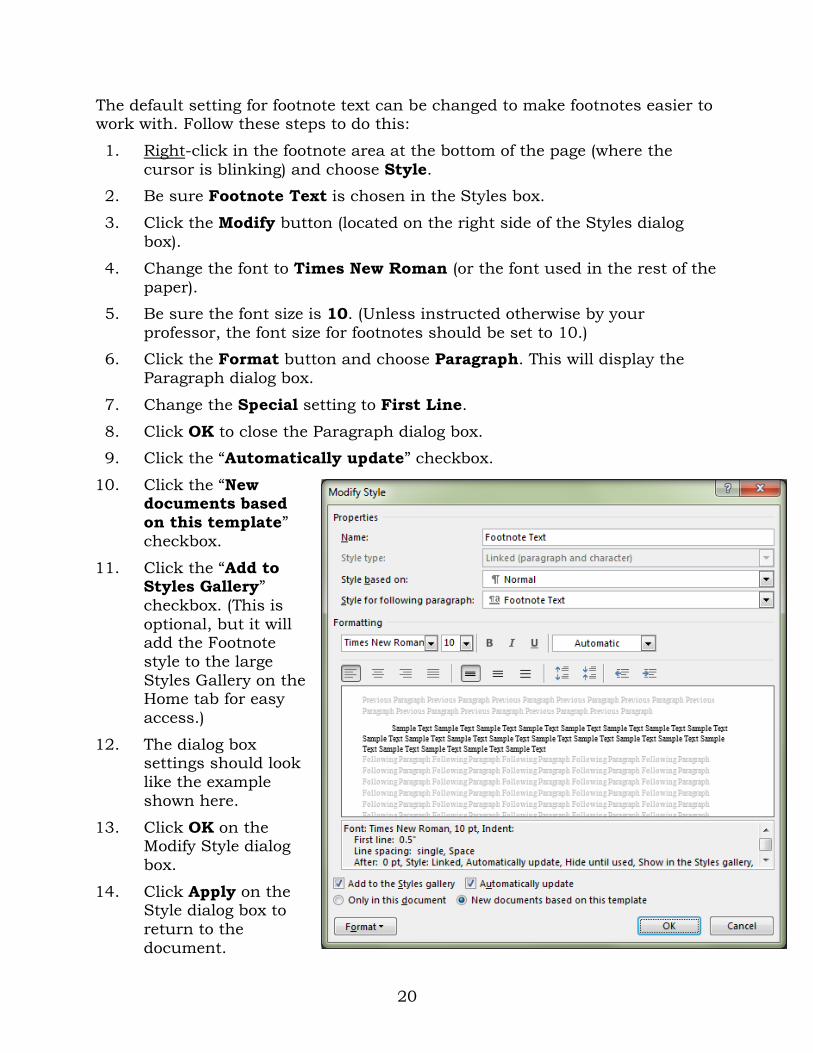
The default setting for footnote text can be changed to make footnotes easier to work with. Follow these steps to do this:
1. Right-click in the footnote area at the bottom of the page (where the
cursor is blinking) and choose Style.
2. Be sure Footnote Text is chosen in the Styles box.
3. Click the Modify button (located on the right side of the Styles dialog
box).
4. Change the font to Times New Roman (or the font used in the rest of the
paper).
5. Be sure the font size is 10. (Unless instructed otherwise by your
professor, the font size for footnotes should be set to 10.)
6. Click the Format button and choose Paragraph. This will display the
Paragraph dialog box.
7. Change the Special setting to First Line.
8. Click OK to close the Paragraph dialog box.
9. Click the “Automatically update” checkbox.
10. Click the “New documents based
on this template”
checkbox.
11. Click the “Add to Styles Gallery”
checkbox. (This is
optional, but it will add the Footnote
style to the large
Styles Gallery on the Home tab for easy
access.)
12. The dialog box settings should look
like the example
shown here.
13. Click OK on the Modify Style dialog
box.
14. Click Apply on the Style dialog box to
return to the
document.
21
15. Type the following text: This is a sample footnote.
16. Don’t press Enter! If you pressed Enter after typing the text, press
Backspace once or twice to remove the blank line.
If your professor prefers a blank line between footnotes, you can go back later, click at the end of each footnote, and press Enter to insert a blank
line. Another way to accomplish this would be to go back to the
formatting steps on the previous page and change the “After” setting to
“12” in the Paragraph dialog box. This would automatically add 12 points
(equal to one blank line) after each footnote.
Now that the format of the footnotes has been set, you can choose
References/Insert Footnote whenever text in the document needs to be cited.
Word will keep the footnote numbers in the correct order.
When you are ready to add “real” footnotes, go back to the sample reference
number on the first page of the body of the paper, select the superscript number in the text, and delete it. This will remove the footnote reference
number and the footnote text while keeping the formatting changes that were
made.
The Writing Center and/or your professor can provide examples of the type of
information needed for each footnote. If you change the footnote style as
described earlier, you should not need to do it again unless you change
computers or unless the preferred footnote format changes.
Add and Format Subheadings If the body of your paper contains subheadings, they need to be centered and
preceded by an extra blank line. Follow these steps when adding and
formatting subheadings:
1. Click at the end of the paragraph that will precede the subheading.
2. Press Enter to create a new blank line for the subheading.
3. Click the Center alignment button or press Ctrl + E to change the
paragraph alignment to Center.
4. Type the subheading and press Enter.
5. Press Ctrl + L or click the Align Left button to reset the paragraph
alignment.
6. The format of each subheading needs to be adjusted because there needs to be an extra blank line above each one. Follow these steps to add an
extra blank line above a subheading:
22
a. Click on one of the words in the subheading to position the cursor on
the subheading line.
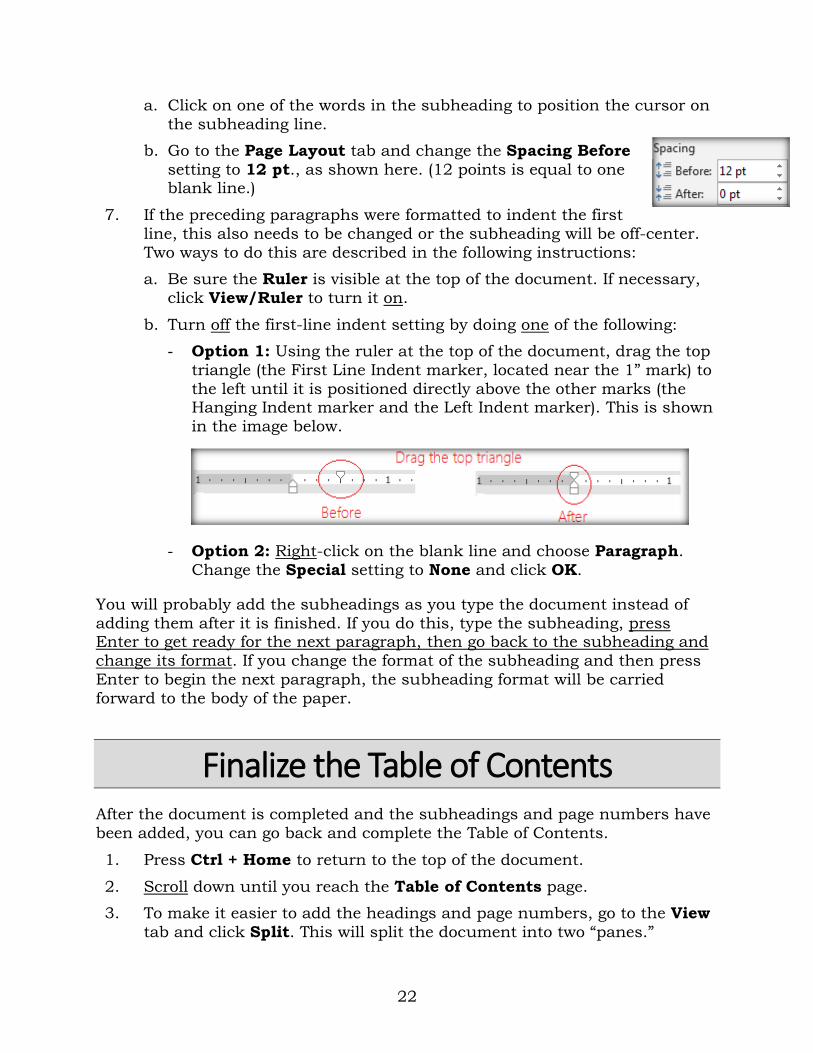
b. Go to the Page Layout tab and change the Spacing Before
setting to 12 pt., as shown here. (12 points is equal to one blank line.)
7. If the preceding paragraphs were formatted to indent the first
line, this also needs to be changed or the subheading will be off-center.
Two ways to do this are described in the following instructions:
a. Be sure the Ruler is visible at the top of the document. If necessary,
click View/Ruler to turn it on.
b. Turn off the first-line indent setting by doing one of the following:
- Option 1: Using the ruler at the top of the document, drag the top
triangle (the First Line Indent marker, located near the 1” mark) to
the left until it is positioned directly above the other marks (the Hanging Indent marker and the Left Indent marker). This is shown
in the image below.
- Option 2: Right-click on the blank line and choose Paragraph.
Change the Special setting to None and click OK.
You will probably add the subheadings as you type the document instead of
adding them after it is finished. If you do this, type the subheading, press Enter to get ready for the next paragraph, then go back to the subheading and
change its format. If you change the format of the subheading and then press
Enter to begin the next paragraph, the subheading format will be carried
forward to the body of the paper.
Finalize the Table of Contents After the document is completed and the subheadings and page numbers have
been added, you can go back and complete the Table of Contents.
1. Press Ctrl + Home to return to the top of the document.
2. Scroll down until you reach the Table of Contents page.
3. To make it easier to add the headings and page numbers, go to the View
tab and click Split. This will split the document into two “panes.”
23
4. If necessary, scroll in the top pane so you can see the Table of Contents.
5. If the Introduction heading needs to be changed, select it and type the
correct heading.
6. Scroll in the bottom pane until you see the next heading/subheading.
7. In the top pane, select the text Next Title Goes Here.
8. Type the name of the next heading.
9. If dots are already showing to the right of the heading in the Table of
Contents, click to the right of the dots and type the page number. (You can locate correct the page number by scrolling in the bottom pane until
you see the page number on which the current heading is located.)
10. If no dots are showing to the right of the heading, press Tab and type the
page number.
11. Press Enter after typing the page number.
12. Go back to the bottom pane and scroll farther down until you locate the
next heading or subheading.
13. Go back to the top pane and type the next heading name on the line
under the previous heading.
14. Press Tab, type the page number, and press Enter.
15. Repeat this process until you have entered all the headings/subheadings
in your paper. If a subheading needs to be indented farther to the right,
click the name of the subheading in the Table of Contents and click the
Increase Indent button, located in the Paragraph group of the Home tab.
When finished, click View/Remove Split. You can also double-click on the
Split separator line to remove it.
Adjust the Placement of the Title If the title on the first page of the body of the paper needs to be at the 2-inch
mark, do the following to fine-tune its placement:
1. Go to the first page of the body of the paper. Click once on the title (you
may have used the word Introduction).
2. Look on the left side of the status bar (bottom of the screen) for the
vertical position (indicated after the word “At:”).
3. Go to the Page Layout tab and click the “up” arrow in the Before setting.
Each time you click the arrow, six points will be added to the setting.
Keep looking at the status bar and stop when the position is at the 2-
inch mark. One-tenth of an inch is usually added for every six points.
24
Troubleshooting: Changing Settings After a Paper Has Been Typed
If formatting and/or page number problems are noticed after your paper has
been typed, the troubleshooting table (beginning on page 24) contains several
common issues. However, before you try to solve page number problems, you
first need to be sure the page and section breaks have been inserted correctly.
On the Home tab, click the Show/Hide button to show the hidden formatting
symbols. This button is located in the Paragraph group and is shown to the left
of this paragraph. Go to the title page and look beneath (or to the right of) the
last typed line of information. Based on the contents of the paper, follow the
instructions in the list below:
- If your paper does NOT contain a Table of Contents, you should see
several paragraph symbols (the symbol represented on the Show/Hide
button) if you pressed Enter several times at the bottom of this page, or
you may see the words Page Break if you inserted a page break after
typing the title page information (this is the correct way to force Word to
go to a new page). If you only see paragraph symbols or the words Page
Break at the bottom of the title page, proceed to the table on page 24 for
troubleshooting information.
If you see the words Section Break, click to the left of the dots/lines
leading up to the words Section Break and press Delete (on a Mac, press
fn+Delete to delete to the right of the cursor). There is no need for a
section break if you don’t have a Table of Contents. If you deleted the
section break, press Ctrl + Enter to insert a page break in its place.
- If your paper DOES contain a Table of Contents, a Next Page Section
Break should have been inserted after the last line of the Table of
Contents information, not at the bottom of the title page. If you see
paragraph symbols or the words Page Break at the bottom of the title
page and the words Section Break (Next Page) at the bottom of the
Table of Contents page, proceed to the table on page 24 for
troubleshooting information.
If you see the words Section Break at the bottom of the title page, click
to the left of the dots/lines leading up to the words Section Break and
press Delete (on a Mac, press fn+Delete to delete to the right of the
cursor). There is no need for a section break after the title page if you
have a Table of Contents. Press Ctrl + Enter to insert a page break in its
25
place. You will then need to go to the top of the Table of Contents page
and delete any extra blank lines that might have been pushed to that
location.
If you see paragraph symbols or the words Page Break at the bottom of
the title page, proceed to the Table of Contents page and check the
following:
If you only see paragraph symbols beneath the last line of information
on the Table of Contents page, click on one of the blank lines and
insert a Next Page Section Break (Page Layout tab/Breaks/Next Page).
You will then need to go to the next page (the first page of the body of
the paper) and delete any extra blank lines above the title.
If you see the words Page Break at the bottom of the Table of
Contents page, click to the left of the dots/lines leading up to the
words Page Break and press Delete (on a Mac, press fn+Delete to
delete to the right of the cursor). A section break is required here in
order to allow this page to have a different page number format than
the rest of the paper. Insert a Next Page Section Break (Page Layout
tab/Breaks/Next Page). You will then need to go to the next page (the
first page of the body of the paper) and delete any extra blank lines
above the title.
If you see the words Section Break (Next Page) at the bottom of the
Table of Contents page, proceed to the table on page 24 for
troubleshooting information.
Go to the Home tab and click the Show/Hide button again to hide the
formatting characters. Look through your paper for formatting and/or page
number issues. Proceed to the table on the next page for help in correcting any
problems you may find.
26
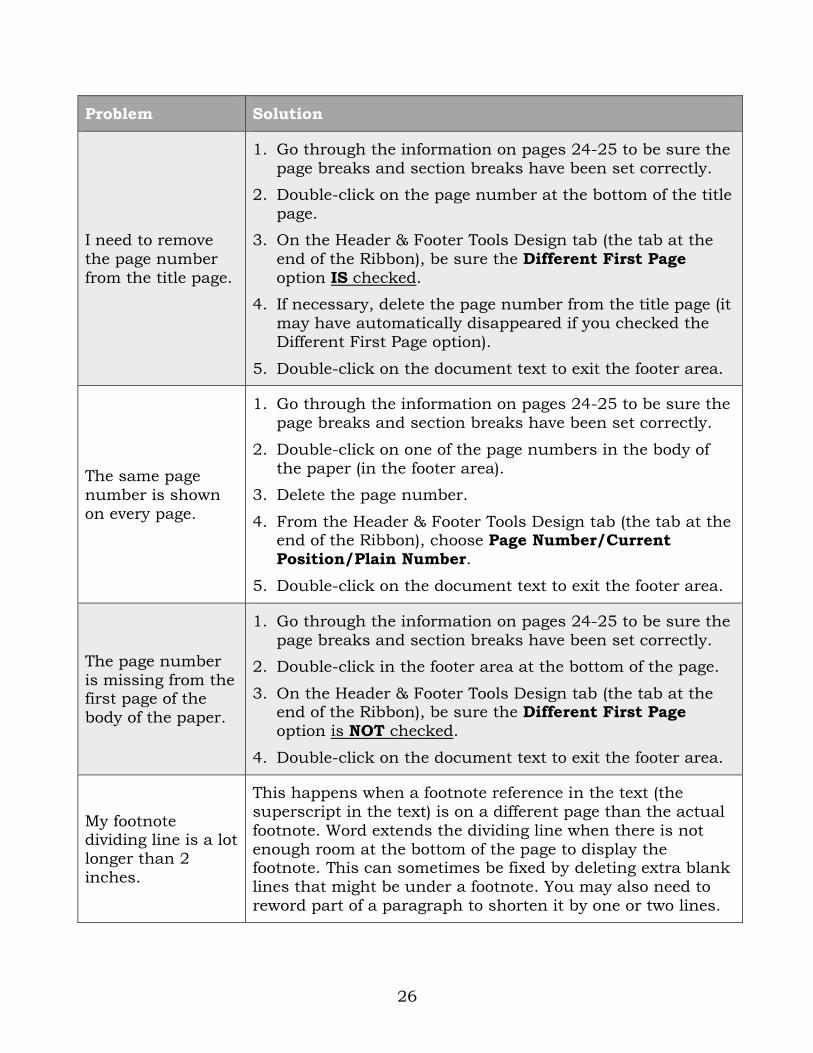
Problem Solution
I need to remove
the page number
from the title page.
1. Go through the information on pages 24-25 to be sure the
page breaks and section breaks have been set correctly.
2. Double-click on the page number at the bottom of the title
page.
3. On the Header & Footer Tools Design tab (the tab at the
end of the Ribbon), be sure the Different First Page
option IS checked.
4. If necessary, delete the page number from the title page (it
may have automatically disappeared if you checked the
Different First Page option).
5. Double-click on the document text to exit the footer area.
The same page
number is shown
on every page.
1. Go through the information on pages 24-25 to be sure the
page breaks and section breaks have been set correctly.
2. Double-click on one of the page numbers in the body of
the paper (in the footer area).
3. Delete the page number.
4. From the Header & Footer Tools Design tab (the tab at the end of the Ribbon), choose Page Number/Current
Position/Plain Number.
5. Double-click on the document text to exit the footer area.
The page number
is missing from the first page of the
body of the paper.
1. Go through the information on pages 24-25 to be sure the
page breaks and section breaks have been set correctly.
2. Double-click in the footer area at the bottom of the page.
3. On the Header & Footer Tools Design tab (the tab at the end of the Ribbon), be sure the Different First Page
option is NOT checked.
4. Double-click on the document text to exit the footer area.
My footnote dividing line is a lot
longer than 2
inches.
This happens when a footnote reference in the text (the
superscript in the text) is on a different page than the actual
footnote. Word extends the dividing line when there is not
enough room at the bottom of the page to display the footnote. This can sometimes be fixed by deleting extra blank
lines that might be under a footnote. You may also need to
reword part of a paragraph to shorten it by one or two lines.
27
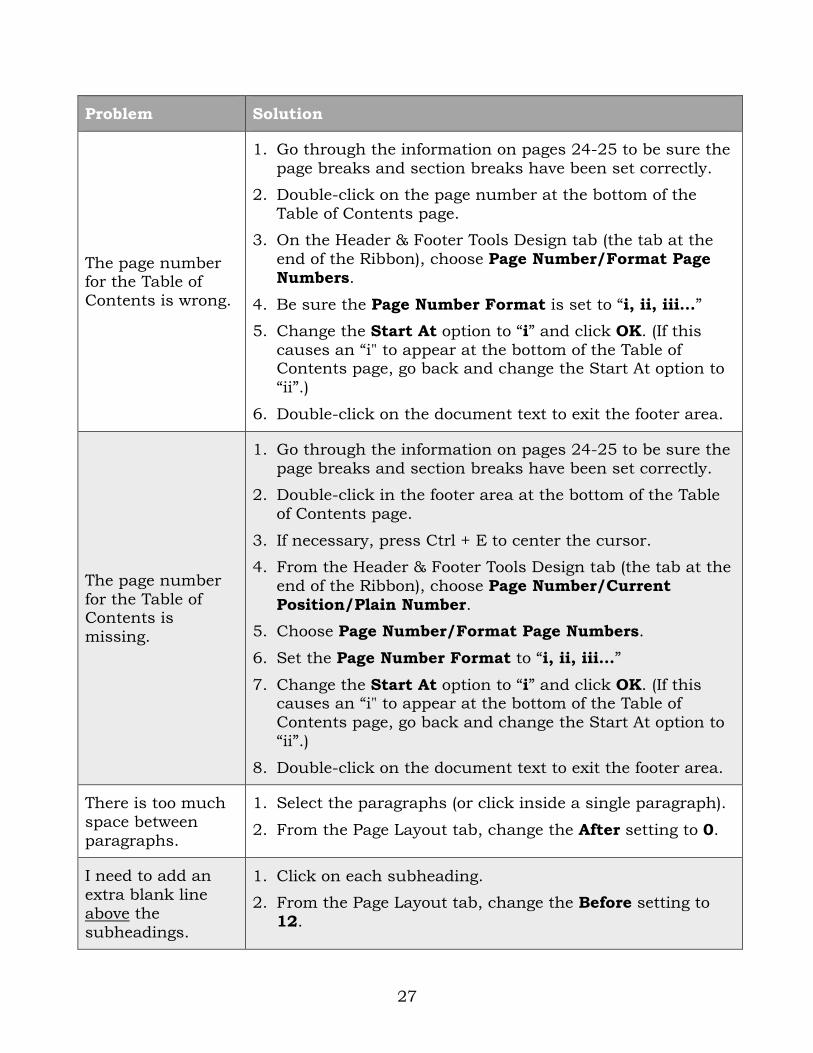
Problem Solution
The page number for the Table of
Contents is wrong.
1. Go through the information on pages 24-25 to be sure the
page breaks and section breaks have been set correctly.
2. Double-click on the page number at the bottom of the
Table of Contents page.
3. On the Header & Footer Tools Design tab (the tab at the
end of the Ribbon), choose Page Number/Format Page
Numbers.
4. Be sure the Page Number Format is set to “i, ii, iii…”
5. Change the Start At option to “i” and click OK. (If this
causes an “i" to appear at the bottom of the Table of Contents page, go back and change the Start At option to
“ii”.)
6. Double-click on the document text to exit the footer area.
The page number
for the Table of Contents is
missing.
1. Go through the information on pages 24-25 to be sure the
page breaks and section breaks have been set correctly.
2. Double-click in the footer area at the bottom of the Table
of Contents page.
3. If necessary, press Ctrl + E to center the cursor.
4. From the Header & Footer Tools Design tab (the tab at the
end of the Ribbon), choose Page Number/Current
Position/Plain Number.
5. Choose Page Number/Format Page Numbers.
6. Set the Page Number Format to “i, ii, iii…”
7. Change the Start At option to “i” and click OK. (If this causes an “i" to appear at the bottom of the Table of
Contents page, go back and change the Start At option to
“ii”.)
8. Double-click on the document text to exit the footer area.
There is too much
space between
paragraphs.
1. Select the paragraphs (or click inside a single paragraph).
2. From the Page Layout tab, change the After setting to 0.
I need to add an
extra blank line
above the
subheadings.
1. Click on each subheading.
2. From the Page Layout tab, change the Before setting to
12.
28
Problem Solution
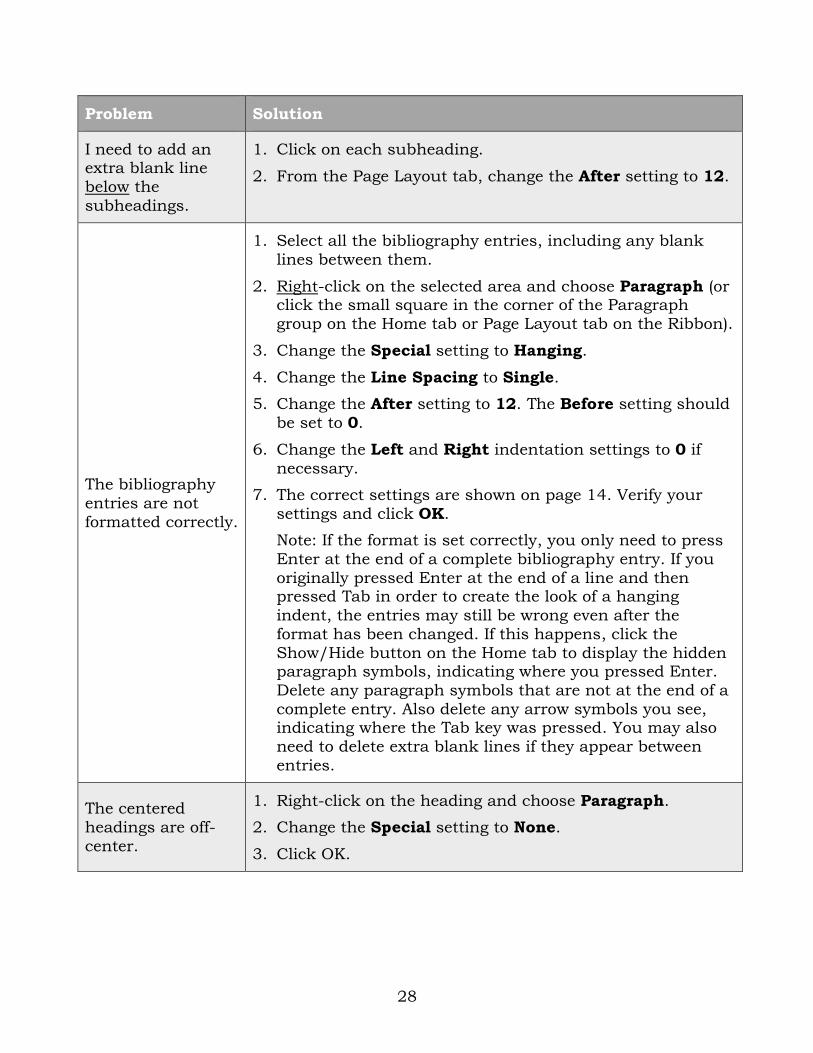
I need to add an extra blank line
below the
subheadings.
1. Click on each subheading.
2. From the Page Layout tab, change the After setting to 12.
The bibliography
entries are not
formatted correctly.
1. Select all the bibliography entries, including any blank
lines between them.
2. Right-click on the selected area and choose Paragraph (or click the small square in the corner of the Paragraph
group on the Home tab or Page Layout tab on the Ribbon).
3. Change the Special setting to Hanging.
4. Change the Line Spacing to Single.
5. Change the After setting to 12. The Before setting should
be set to 0.
6. Change the Left and Right indentation settings to 0 if
necessary.
7. The correct settings are shown on page 14. Verify your
settings and click OK.
Note: If the format is set correctly, you only need to press
Enter at the end of a complete bibliography entry. If you
originally pressed Enter at the end of a line and then pressed Tab in order to create the look of a hanging
indent, the entries may still be wrong even after the
format has been changed. If this happens, click the
Show/Hide button on the Home tab to display the hidden paragraph symbols, indicating where you pressed Enter.
Delete any paragraph symbols that are not at the end of a
complete entry. Also delete any arrow symbols you see, indicating where the Tab key was pressed. You may also
need to delete extra blank lines if they appear between
entries.
The centered
headings are off-
center.
1. Right-click on the heading and choose Paragraph.
2. Change the Special setting to None.
3. Click OK.
29
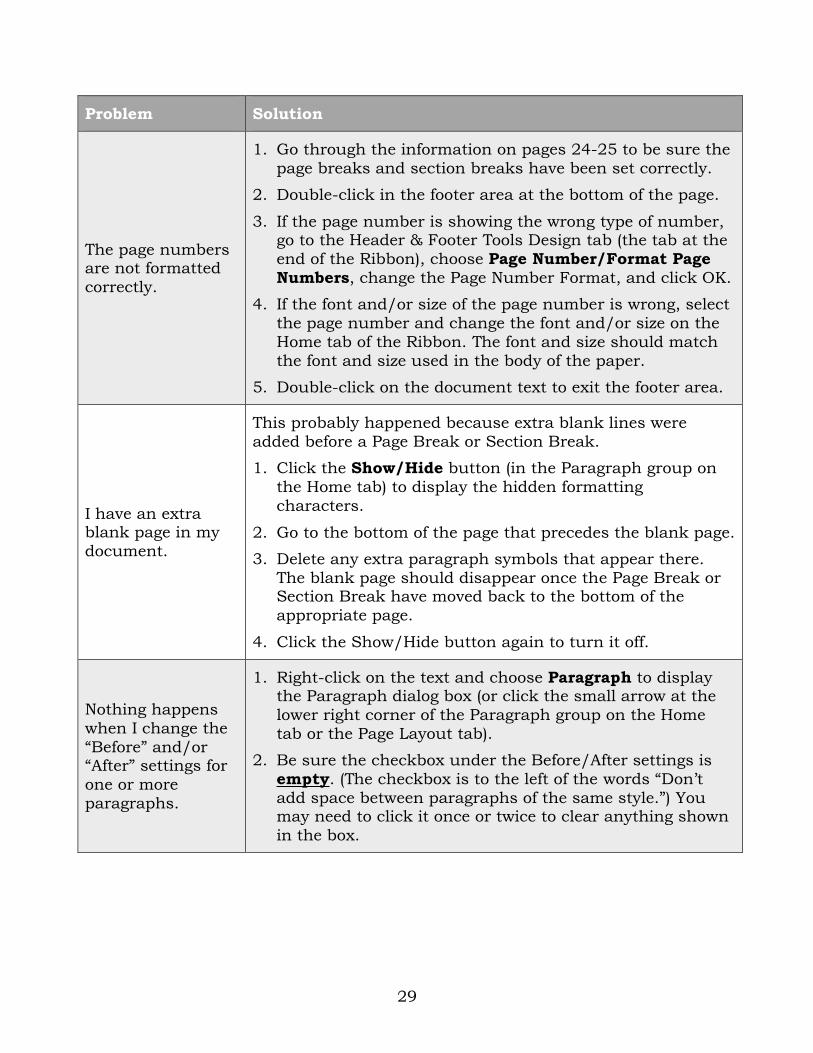
Problem Solution
The page numbers are not formatted
correctly.
1. Go through the information on pages 24-25 to be sure the
page breaks and section breaks have been set correctly.
2. Double-click in the footer area at the bottom of the page.
3. If the page number is showing the wrong type of number, go to the Header & Footer Tools Design tab (the tab at the
end of the Ribbon), choose Page Number/Format Page
Numbers, change the Page Number Format, and click OK.
4. If the font and/or size of the page number is wrong, select
the page number and change the font and/or size on the
Home tab of the Ribbon. The font and size should match
the font and size used in the body of the paper.
5. Double-click on the document text to exit the footer area.
I have an extra blank page in my
document.
This probably happened because extra blank lines were
added before a Page Break or Section Break.
1. Click the Show/Hide button (in the Paragraph group on
the Home tab) to display the hidden formatting
characters.
2. Go to the bottom of the page that precedes the blank page.
3. Delete any extra paragraph symbols that appear there.
The blank page should disappear once the Page Break or Section Break have moved back to the bottom of the
appropriate page.
4. Click the Show/Hide button again to turn it off.
Nothing happens
when I change the
“Before” and/or “After” settings for
one or more
paragraphs.
1. Right-click on the text and choose Paragraph to display the Paragraph dialog box (or click the small arrow at the
lower right corner of the Paragraph group on the Home
tab or the Page Layout tab).
2. Be sure the checkbox under the Before/After settings is
empty. (The checkbox is to the left of the words “Don’t
add space between paragraphs of the same style.”) You may need to click it once or twice to clear anything shown
in the box.
30
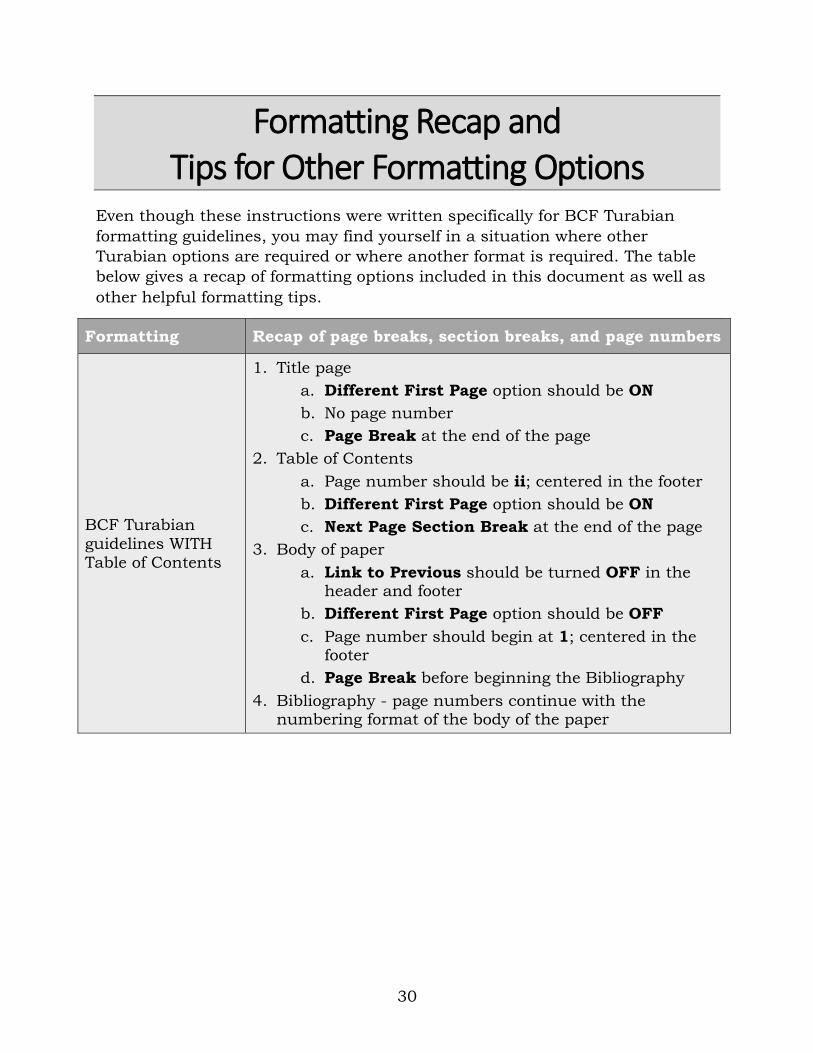
Formatting Recap and Tips for Other Formatting Options
Even though these instructions were written specifically for BCF Turabian
formatting guidelines, you may find yourself in a situation where other
Turabian options are required or where another format is required. The table
below gives a recap of formatting options included in this document as well as
other helpful formatting tips.
Formatting Recap of page breaks, section breaks, and page numbers
BCF Turabian
guidelines WITH
Table of Contents
1. Title page
a. Different First Page option should be ON
b. No page number
c. Page Break at the end of the page
2. Table of Contents
a. Page number should be ii; centered in the footer
b. Different First Page option should be ON
c. Next Page Section Break at the end of the page
3. Body of paper
a. Link to Previous should be turned OFF in the header and footer
b. Different First Page option should be OFF
c. Page number should begin at 1; centered in the footer
d. Page Break before beginning the Bibliography
4. Bibliography - page numbers continue with the numbering format of the body of the paper
31
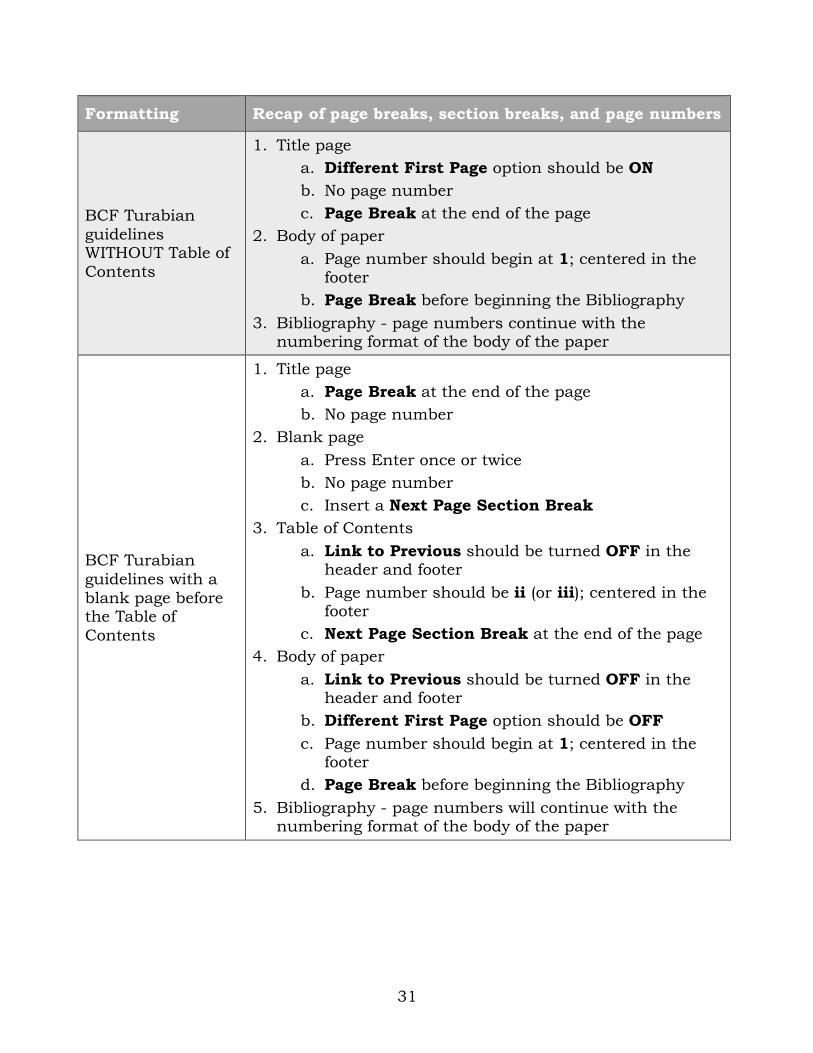
Formatting Recap of page breaks, section breaks, and page numbers
BCF Turabian
guidelines WITHOUT Table of
Contents
1. Title page
a. Different First Page option should be ON
b. No page number
c. Page Break at the end of the page
2. Body of paper
a. Page number should begin at 1; centered in the footer
b. Page Break before beginning the Bibliography
3. Bibliography - page numbers continue with the numbering format of the body of the paper
BCF Turabian
guidelines with a
blank page before the Table of
Contents
1. Title page
a. Page Break at the end of the page
b. No page number
2. Blank page
a. Press Enter once or twice
b. No page number
c. Insert a Next Page Section Break
3. Table of Contents
a. Link to Previous should be turned OFF in the header and footer
b. Page number should be ii (or iii); centered in the footer
c. Next Page Section Break at the end of the page
4. Body of paper
a. Link to Previous should be turned OFF in the header and footer
b. Different First Page option should be OFF
c. Page number should begin at 1; centered in the footer
d. Page Break before beginning the Bibliography
5. Bibliography - page numbers will continue with the numbering format of the body of the paper
32
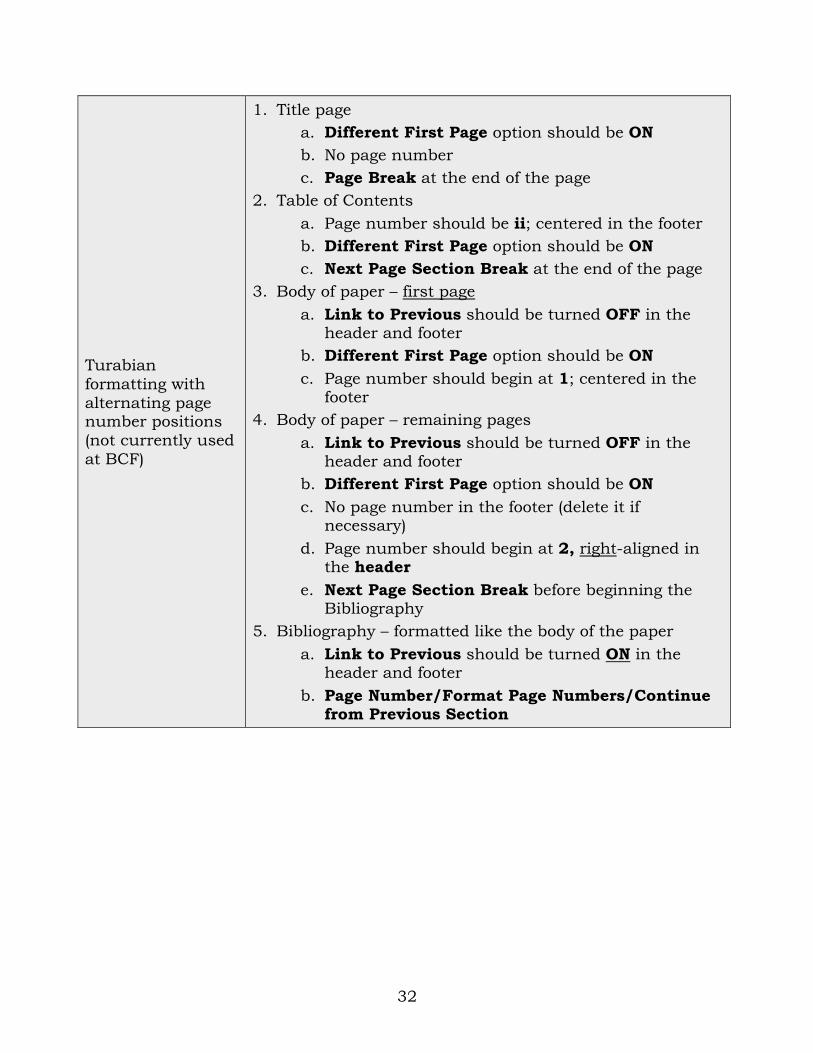
Turabian
formatting with
alternating page number positions
(not currently used
at BCF)
1. Title page
a. Different First Page option should be ON
b. No page number
c. Page Break at the end of the page
2. Table of Contents
a. Page number should be ii; centered in the footer
b. Different First Page option should be ON
c. Next Page Section Break at the end of the page
3. Body of paper – first page
a. Link to Previous should be turned OFF in the header and footer
b. Different First Page option should be ON
c. Page number should begin at 1; centered in the footer
4. Body of paper – remaining pages
a. Link to Previous should be turned OFF in the header and footer
b. Different First Page option should be ON
c. No page number in the footer (delete it if necessary)
d. Page number should begin at 2, right-aligned in the header
e. Next Page Section Break before beginning the Bibliography
5. Bibliography – formatted like the body of the paper
a. Link to Previous should be turned ON in the header and footer
b. Page Number/Format Page Numbers/Continue from Previous Section
33
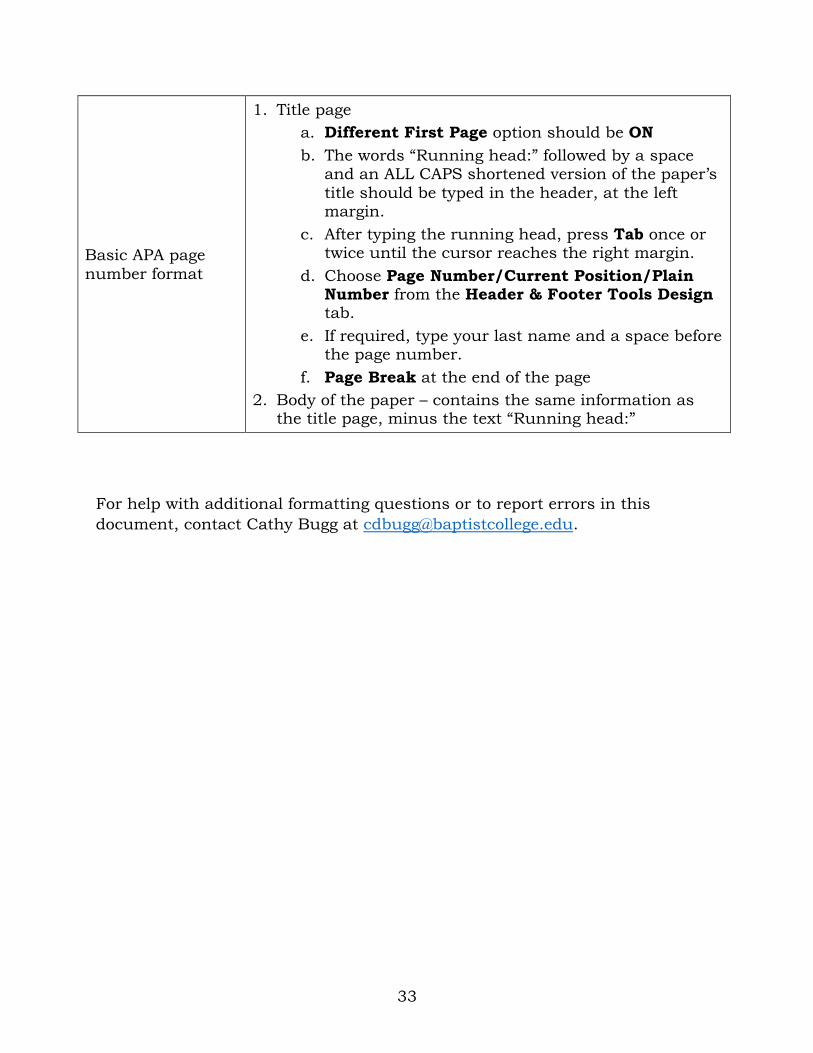
Basic APA page
number format
1. Title page
a. Different First Page option should be ON
b. The words “Running head:” followed by a space and an ALL CAPS shortened version of the paper’s
title should be typed in the header, at the left margin.
c. After typing the running head, press Tab once or twice until the cursor reaches the right margin.
d. Choose Page Number/Current Position/Plain Number from the Header & Footer Tools Design tab.
e. If required, type your last name and a space before the page number.
f. Page Break at the end of the page
2. Body of the paper – contains the same information as the title page, minus the text “Running head:”
For help with additional formatting questions or to report errors in this
document, contact Cathy Bugg at [email protected].