Embed Size (px)
DESCRIPTION
Dressmaking
Citation preview

7/17/2019 The American Lady Taylor Glove Fitting System (Elizabeth Garland))
http://slidepdf.com/reader/full/the-american-lady-taylor-glove-fitting-system-elizabeth-garland 1/160

7/17/2019 The American Lady Taylor Glove Fitting System (Elizabeth Garland))
http://slidepdf.com/reader/full/the-american-lady-taylor-glove-fitting-system-elizabeth-garland 2/160
LIBRARY OF CONGRESS.
flap
—
^mm¥
t^
UNITED
STATES
OF AMERICA.
/
m\

7/17/2019 The American Lady Taylor Glove Fitting System (Elizabeth Garland))
http://slidepdf.com/reader/full/the-american-lady-taylor-glove-fitting-system-elizabeth-garland 3/160
7/17/2019 The American Lady Taylor Glove Fitting System (Elizabeth Garland))
http://slidepdf.com/reader/full/the-american-lady-taylor-glove-fitting-system-elizabeth-garland 4/160
7/17/2019 The American Lady Taylor Glove Fitting System (Elizabeth Garland))
http://slidepdf.com/reader/full/the-american-lady-taylor-glove-fitting-system-elizabeth-garland 5/160
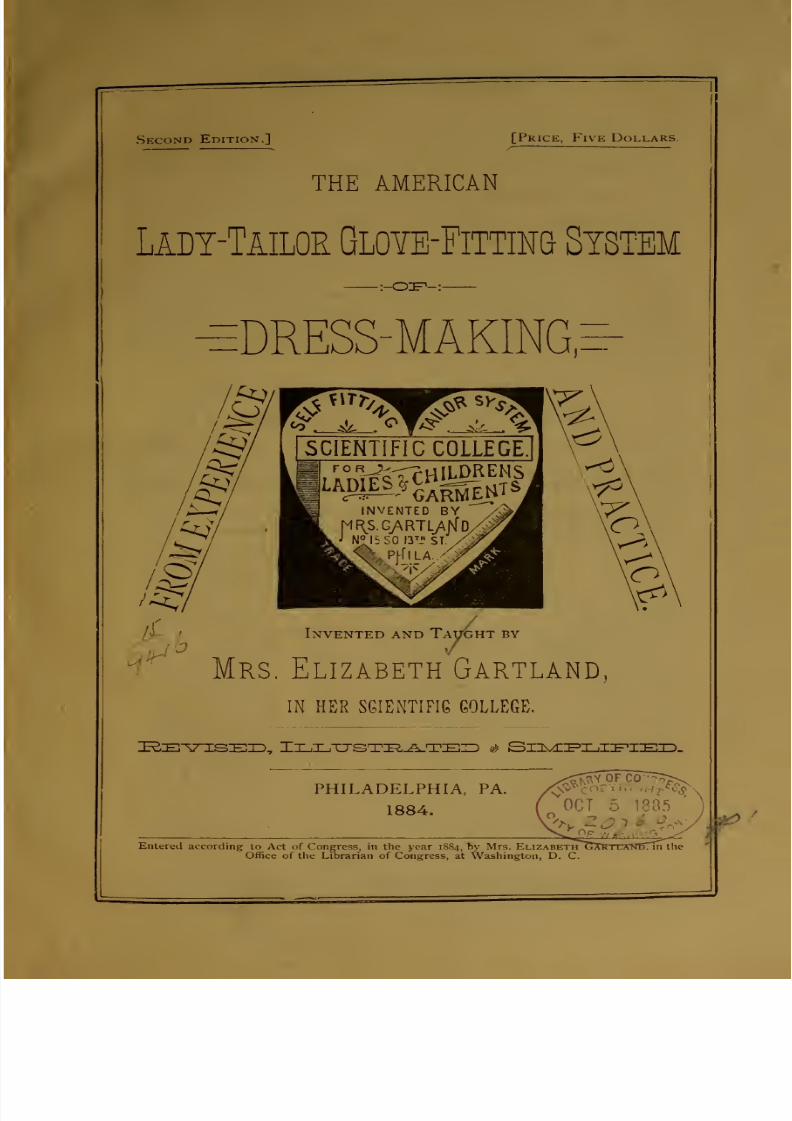
Second
Edition.]
[Price,
Five Dollars.
THE
AMERICAN
Ladt-Tailor
Gloye-Fittini}
System
:-OI^-:-
DRESS-MAKING=
Invented
and
Tavght
by
Mrs.
Elizabeth Gartland,
IN
HER
SGIENTIFIG
COLLEGE.
ISE^LJ^ISEID,
IHIjIIjTJSTI^^S^TIEID
#
3llivd:i=IjII^IE3D-
PHILADELPHIA,
PA.
1884.
Entered
according
to
Act
of
Congress, in
the year
1884,
by
Mrs. Elizabeth
Office of
the
Librarian of
Congress, at Washington, D.
C
7/17/2019 The American Lady Taylor Glove Fitting System (Elizabeth Garland))
http://slidepdf.com/reader/full/the-american-lady-taylor-glove-fitting-system-elizabeth-garland 6/160
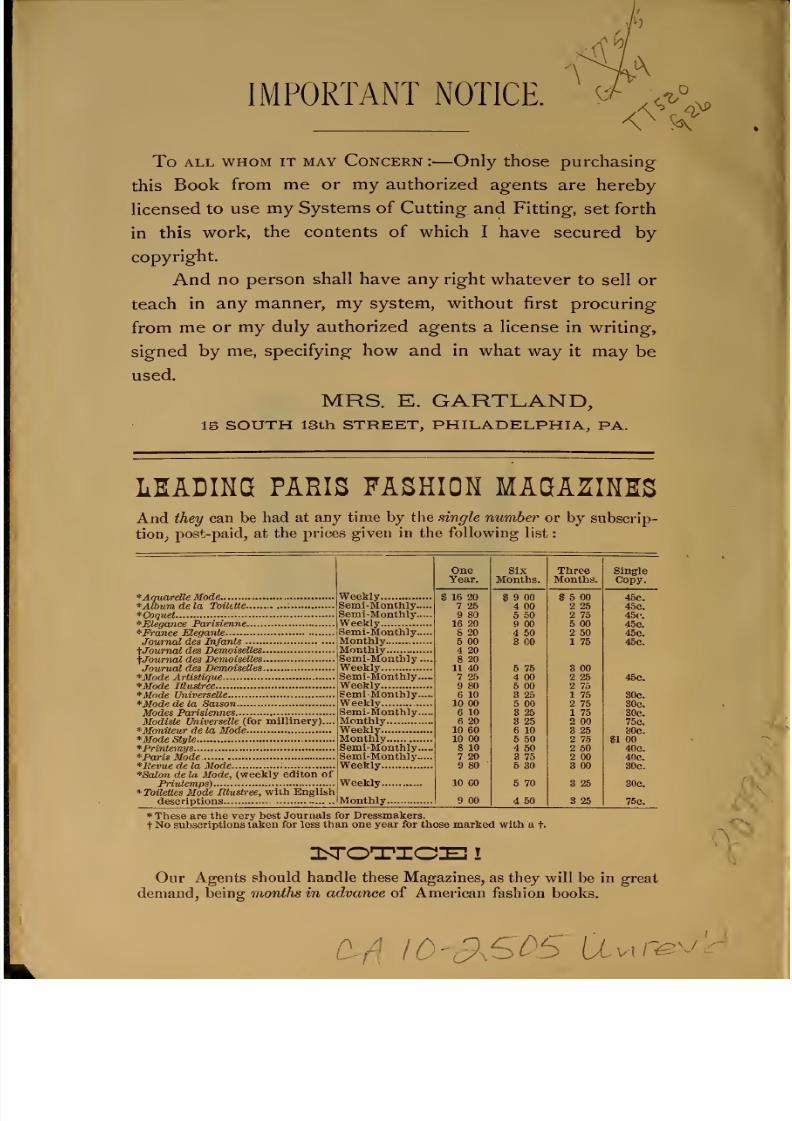
IMPORTANT
NOTICE.
To
ALL
WHOM
IT
MAY
CoNCERN
:
—
Only
thosc
purchasing
this
Book
from
me
or
my
authorized
agents
are
hereby
licensed
to
use
my
Systems
of
Cutting
and Fitting,
set
forth
in
this
work,
the
contents
of
which
I
have
secured
by
copyright.
And
no
person
shall have any
right
whatever
to
sell or
teach
in
any
manner,
my
system,
without
first
procuring
from
me
or
my
duly
authorized
agents
a
license
in
writing,
signed
by
me,
specifying how
and
in what
way
it may
be
used.
MRS. E.
GARTLAND,
15
SOUTH
ISth
STREET,
PHILADELPHIA,
PA.
LEADIKD
PARIS
FASHION
MAQAZIMS
And
they
can be
had at
any
time
by
the single
number
or
by
subscrip-
tion;
post-paid,
at
the
prices
given
in
the
following
list
*
Aquarelle
Mode
*Album
de
la
Toilttte
:
*Coquet
*Elegance
Parisienne
*France
Elegante
Journal
des
Infants
^Journal des
Demoiselles
f
Journal
des
Demoiselles
Journal
des Demoisellts
*Mode
Artistique
*Mode Illustree
*Mode
Universelle
*Mode
de la
Saison
Modes
Parisiennes
Modiste
Universelle
(for
millinery)....
*Moniteur
de la Mode
*Mode
Style
*Printemys
*Paris Mode
*Iievue
de la
Mode
*Salon
de
la Mode,
(weekly
editon
of
Priviemps)
*
Toilettes Mode
Illustree,
with
English
descriptions
Weekly
Semi-Monthly..
Semi-Monthly..
Weekly
Semi-Monthly..
Monthly
Monthly
Semi-Monthly
.
Weekly
Semi-Monthly..
Weekly
Semi
Monthly..
Weekly
Semi-Monthly.,
Monthly
,
Weekly
Monthly
Semi-Monthly..
Semi-Monthly..
Weekly
Weekly...
Monthly..
One
Year.
16
20
7
25
9
80
16
20
8
20
5
00
4
20
8
20
11
40
7 25
9
80
6 10
10 00
6 10
6
20
10
60
10 00
8
10
7
20
9 80
10 00
9 00
Six
Months.
9
00
4
00
5 50
9
00
4 50
3
CO
5
75
4
00
5 00
3 25
5 00
3 25
3 25
6 10
5
50
4 50
3 75
5 30
5 70
4
50
Three
Months.
5
00
2
25
2
75
5 00
2 50
1 75
3 00
2
25
2
75
1
75
2 75
1 75
2 00
3 25
2 75
2
50
2
00
3
00
3 25
3 25
Single
Copy.
45c.
45c.
45c.
45c.
45c.
45c.
45c.
30c.
30c.
30c.
75c.
80c.
00
40c.
40c.
30c.
30c.
75c.
*
These are the
very
best Journals for
Dressmakers.
t
No subscriptions
taken
for
less
than one year for
those
marked with a
t-
Our
Agents
should
handle these
Magazines,
as they
will
be in great
demand,
being
months in
advance of
American
fashion
books.
M
lO'cPxSOb
Uvxr^'-
7/17/2019 The American Lady Taylor Glove Fitting System (Elizabeth Garland))
http://slidepdf.com/reader/full/the-american-lady-taylor-glove-fitting-system-elizabeth-garland 7/160
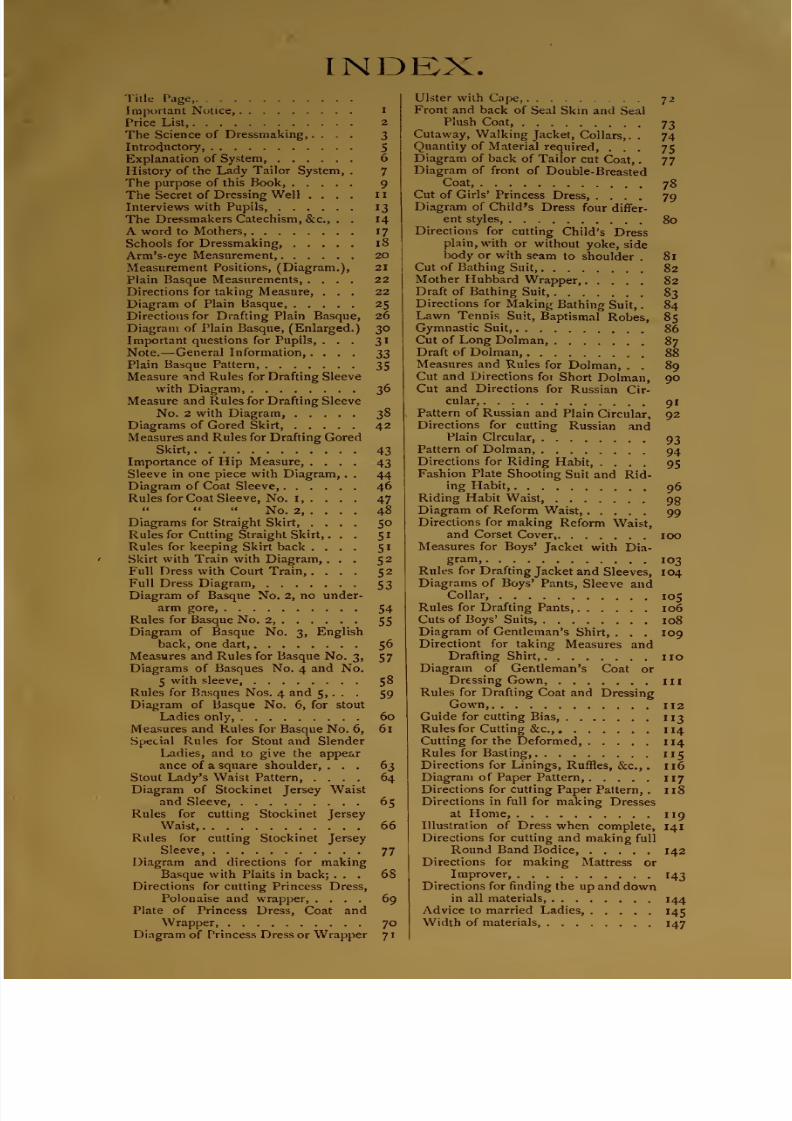
INDEX.
Title
Page,
Impurtanl Notice,
i
Price
List,
2
The
Science
of
Dressmaking,
....
3
Introductory, 5
Explanation
of
System, 6
History
of
the
Lady
Tailor
System,
.
7
The
purpose
of
this Book,
9
The
Secret
of
Dressing
Well
....
11
Interviews
with
Pupils,
13
The
Dressmakers Catechism,
&c., . .
14
A
word
to
Mothers,
17
Schools
for
Dressmaking,
18
Arm's-eye
Measurement
20
Measurement
Positions,
(Diagram.),
21
Plain
Basque
Measurements,
....
22
Directions
for
taking
Measure,
...
22
Diagram
of Plain Basque,
25
Directions
for Drafting
Plain Basque, 26
Diagram
of Plain
Basque,
(Enlarged.)
30
Important questions
for
Pupils,
...
31
Note.
—
General Information,
....
33
Plain
Basque Pattern,
35
Measure
nnd
Rules
for
Drafting
Sleeve
with
Diagram,
36
Measure
and Rules for Drafting Sleeve
No.
2
with
Diagram,
38
Diagrams
of Gored
Skirt,
42
Measures
and Rules for Drafting
Gored
Skirt,
43
Importance
of
Hip Measure,
....
43
Sleeve in
one piece
with
Diagram,
. .
44
Diagram
of
Coat
Sleeve,
46
Rules
for Coat Sleeve, No. I, . ...
47
No.
2 48
Diagrams
for Straight
Skirt,
....
50
Rules for Cutting Straight Skirt,
. . .
51
Rules for
keeping Skirt
back
....
51
Skirt
with
Train
with
Diagram,
...
52
Full Dress
with Court
Train
52
Full
Dress Diagram,
53
Diagram
of
Basque
No.
2,
no
under-
arm gore,
54
Rules
for
Basque
No.
2,
55
Diagram of Basque
No.
3,
English
back, one
dart,
56
Measures
and
Rules
for
Basque
No.
3,
57
Dia.grams
of
Basques
No.
4
and
No.
5
with
sleeve
58
Rules for Basques Nos.
4
and
5,
. . .
59
Diagram of Basque
No.
6,
for stout
Ladies
only,
60
Measures and Rules for
Basque
No.
6,
61
Special Rules
for
Stout and
Slender
Ladies, and
to give the appear
ance of
a
square shoulder,
...
63
Stout
Lady's
Waist Pattern, ....
64
Diagram
of Stockinet
Jersey
Waist
and
Sleeve,
65
Rules
for
cutting
Stockinet
Jersey
Waist, 66
Rules
for cutting
Stockinet
Jersey
Sleeve,
77
Diagram
and directions
for making
Basque with Plaits
in back; ... 68
Directions for
cutting
Princess Dress,
Polonaise
and wrapper,
....
69
Plate
of Princess Dress,
Coat
and
Wrapper
70
Diagram
of
Princess Dress
or
Wrapper
7
Ulster with Cape,
72
Front and back
of
Seal Skin and
Seal
Plush
Coat,
73
Cutaway,
Walking
Jacket,
Collars,.
.
74
Quantity
of
Material
required,
...
75
Diagram
of
back
of Tailor
cut
Coat,
77
Diagram
of
front
of
Double-
Breasted
Coat,
78
Cut
of Girls'
Princess
Dress,
....
79
Diagram of
Child's
Dress
four
differ-
ent styles,
80
Directions
for
cutting
Child's
Dress
plain,
with
or
without
yoke,
side
body
or
with
seam
to
shoulder
.
81
Cut
of Bathing
Suit,
82
Mother
Hubbard
Wrapper,
82
Draft
of
Bathing
Suit,
83
Directions
for
Making
Bathing
Suit,
84
Lawn Tennis
Suit,
Baptismal
Robes,
85
Gymnastic
Suit,
86
Cut
of
Long
Dolman,
87
Draft of
Dolman,
88
Measures and
Rules
for
Dolman,
. .
89
Cut
and
Directions
foi
Short
Dolman,
90
Cut
and
Directions
for
Russian
Cir-
cular,
91
Pattern
of
Russian
and
Plain
Circular,
92
Directions
for
cutting
Russian
and
Plain Circular,
93
Pattern
of
Dolman,
94
Directions for
Riding
Habit,
....
95
Fashion
Plate
Shooting
Suit
and
Rid-
ing Habit,
96
Riding
Habit
Waist,
95
Diagram
of
Reform
Waist,
99
Directions
for
making
Reform
Waist,
and
Corset
Cover,
100
Measures for
Boys'
Jacket with
Dia-
gram,
103
Rules
for Drafting
Jacket
and
Sleeves,
104
Diagrams
of Boys'
Pants,
Sleeve
and
Collar,
105
Rules
for Drafting
Pants
106
Cuts
of
Boys'
Suits,
108
Diagram
of
Gentleman's
Shirt,
. . .
109
Directiont
for
taking
Measures
and
Drafting
Shirt,
no
Diagram of
Gentleman's
Coat
or
Dressing
Gown,
1
1
Rules
for Drafting
Coat
and
Dressing
Gown,
112
Guide
for
cutting
Bias,
113
Rules
for
Cutting
&c.,
114
Cutting
for
the Deformed,
114
Rules
for Basting
115
Directions
for Linings,
Ruffles,
&c.,
116
Diagram of
Paper Pattern,
117
Directions
for cutting
Paper
Pattern,
118
Directions
in full
for
making
Dresses
at
Home,
119
Illustration of
Dress when
complete,
141
Directions
for
cutting and
making
full
Round Band
Bodice,
142
Directions
for making
Mattress
or
Improver,
143
Directions
for
finding
the up
and
down
in all
materials,
144
Advice
to married Ladies,
145
Width
of materials,
147
7/17/2019 The American Lady Taylor Glove Fitting System (Elizabeth Garland))
http://slidepdf.com/reader/full/the-american-lady-taylor-glove-fitting-system-elizabeth-garland 8/160
—
-:f>i5ioeis-'
—
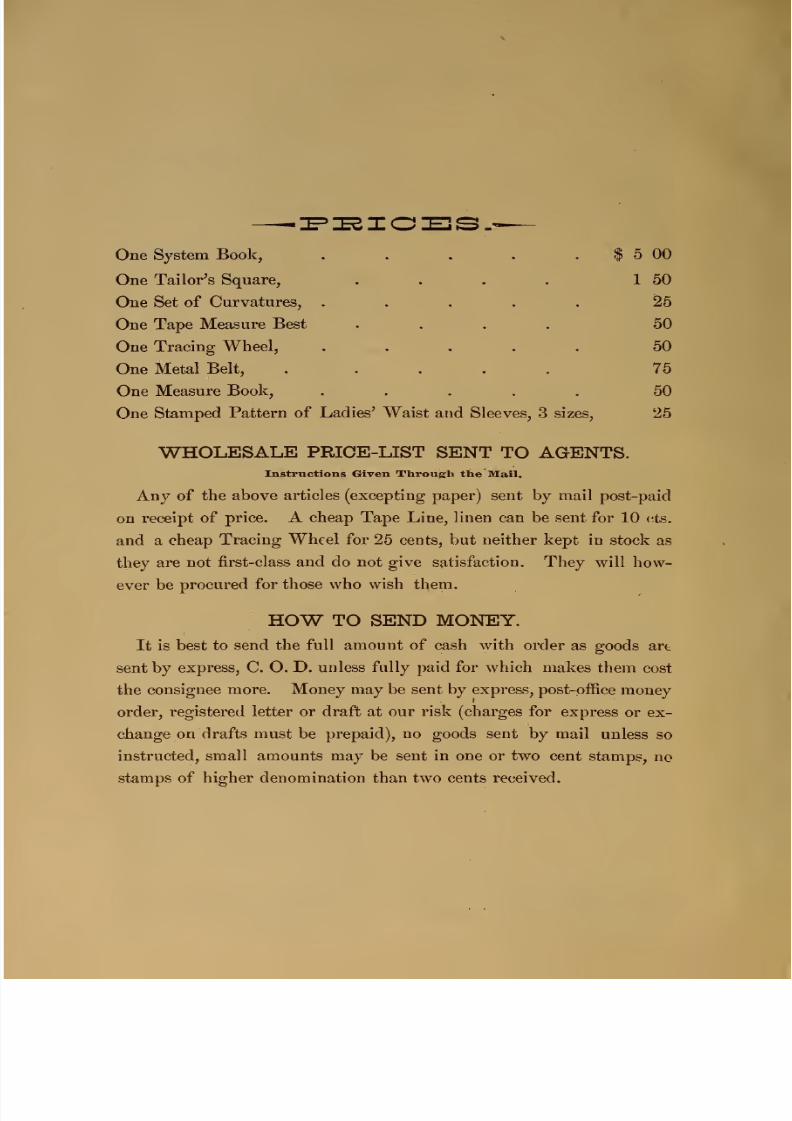
One
System
Book,
.
. . .
.
$
5
00
One
Tailor's
Square,
.
.
.
.
1
50
One
Set
of
Curvatures,
.....
25
One
Tape
Measure
Best
....
50
One
Tracing
Wheel,
.....
50
One
Metal Belt, . . . .
.
75
One
Measure
Book,
.....
50
One
Stamped
Pattern
of Ladies' Waist
and Sleeves,
3 sizes, 25
WHOLESALE
PRICE-LIST SENT
TO
AGENTS.
Instructions Given
Through
the Mail.
Any of the
above
articles
(excepting paper) sent
by
post-paid
on
receipt
of
price. A cheap Tape
Line,
linen can
be
sent
for
10
(;ts.
and
a cheap
Tracing Wheel for
25 cents,
but
neither
kept in
stock
as
they
are
not
first-class
and
do
not
give satisfaction.
They
will
how-
ever be
procured
for
those
who wish
them.
HOW TO
SEND
MONEY.
It
is
best
to
send
the
full
amount
of
cash
with
order
as
goods
art
sent
by
express,
C.
O. D.
unless
fully
paid for
which
makes
them
cost
the
consignee
more.
Money may
be
sent
by
express,
post-office
money
order,
registered letter
or draft
at
our risk (charges
for
express
or
ex-
change
on drafts must
be
prepaid),
no
goods sent
by mail
unless
so
instructed,
small amounts may
be
sent in one or
two cent
stamps,
no
stamps of
higher denomination than
two
cents received.

7/17/2019 The American Lady Taylor Glove Fitting System (Elizabeth Garland))
http://slidepdf.com/reader/full/the-american-lady-taylor-glove-fitting-system-elizabeth-garland 9/160
I
FITTING
SYSTEM
OF
DRESSMAKING.
THE
SCIENCE OF DRESSMAKING.
To
UNDERSTAND fullv
the
Art
and
Science of
Cutting
and
Fitting
is the
most
important
acquisition of
a competent
dress-
maker
;
indeed, such knowledge is absolutely
necessary to
success.
The
Glove-Fitting
Lady Tailor System,
as invented and
taught
practically
by
Mrs. E.
Gartland,
in
her
Scientific
College,
at
No. 15 South
Thirteenth
street, Philadelphia,
Pa.,
is
the
most
Simple,
Certain,
Reliable
and
Perfect
System
knoM'n,
either
in
this
country
or in Euroj)e
;
its simplicity,
style
and beauty
renders it
superior
to
all
known
methods or
systems
practised
by
the
best
modistes
of
Paris,
Berlin
or
Vienna,
and
is
peculiarly
an
Ameri-
can
system, and
when
fully understood no
re-fitting or ill-fitting
garments
will annoy the
dressmaker
or
aggravate
her customer.
The
many so-called French
and
English
systems
are
often,
as
every
dressmaker
of
any experience
has often realized,
unreliable,
defective
and
deceptive,
difficult to
comprehend, and
uncertain
as
to
the very important
matter
of
a
perfect
fit.
More work
can
be accomplished
by
the Glove-Fitting
Lady
Tailor
System, in
the
same time,
than
by
any
other system
ever
introduced.
The
key-note to all successful dressmaking is
good
tasre,
and
good
taste
depends,
to a
very
great extent,
on
what
it feeds
on
;
it
is
just as
susceptible
of
cultivation and
proper
direction
as
any
of
.the
other
faculties,
and
cultivation leads
directly
to
m.3thod,
system,
style and
taste,
and
these
are
the
groundwork or
lounda-
t: on
of
all
successful
dressmaking.
With
aproperl}'
cultivated
taste, the
practical,
skillful, methodi
7/17/2019 The American Lady Taylor Glove Fitting System (Elizabeth Garland))
http://slidepdf.com/reader/full/the-american-lady-taylor-glove-fitting-system-elizabeth-garland 10/160
THE AMERICAN
LADY
TAILOR GLOVE-
cal,
systematic dressmaker will rarely
fail
to
please,
and
this
is
a
very
important factor of
success.
Taste
in style,
form,
size
and color
—
light
and shade
—
all
ha
5v3
their positive
effect
in producing and developing consist-
ency,
symetry and
beauty.
Perfection
is
a very rare thing
to
be
found,
—
mathematics, we
believe,
comes
nearer to
this
desideratum than either
science or
philosophy
;
hence,
by
a mathematical rule, we have
found the
road
that
leads
us directly
to the goal
of perfection,
in
the
art
and
science
of
dressmaking.
Those
who
study
and follow the
system
and
rules
laid
down in
this
work
will
soon
be
surprised
to
find
how very
systematic
and
simple
a matter
it is
to
measure,
cut,
fit
and
make
a
glove-fitting
garment
on
scientific
and
mathematical
principles.
This
work is
designed
to
be
the alphabet of
the
beginner—
the
ABC
book
to the amatuer
dressmaker,
as
well
as
the
advisor,
director
and
guide
to
those
who
have
had some
experience
in
dress-
making.
Years
of
perseverance in labor,
study,
investigation
and
expe-
rience
in
the
vocation
of
a
fashionable,
practical
and
scientific
dressmaker
have taught
us
the
value
of
mathematical
rules
;
in
this
system
perfection
is as
nearly
reached
as
it is
possible
to
hope
for
or
expect.
Draping
and
Trimming
are
matters
depending
solely
on
the
taste
of
the
dressmaker,
—
cutting
and
fitting
accurately
can
only
be
performed
by
strict attention
to
certain
mathematical
rules,
which
are
clearly
laid down
in
this
work;
but
draping,
trimming
and
Basteing
are
wholly dependent
upon
taste
and
good
judgment;
popularity
and success
will
be
the
sure
and
certain
reward
of
those
who
excel in this
respect.

7/17/2019 The American Lady Taylor Glove Fitting System (Elizabeth Garland))
http://slidepdf.com/reader/full/the-american-lady-taylor-glove-fitting-system-elizabeth-garland 11/160
FITTING
SYSTEM
OF
DEESSMAKING.
INTEODUCTORY.
THE
AMERICAN
LADY
TAILOR
GLOVJ:-FITTING
SYSTEM OF
DRESSMAKING,
INVENTED AND
TAUGHT BY
MRS.
ELIZABETH
GARTLAND,
In
her
Scientific College,
Philadelphia,
Pa.
Having
investigated
and studied
every
so-called self-fitting
chart and
scale
that
has
been
published or
used in France, Eng-
land,
Germany and
America,
for
a
number of
years
past, and
found
none perfect, no,
not one
;
we
were
finally, in
self-de-
fence,
compelled
to
think
and
study
over
the
subject,
until our
patience
was
well nigh
exhausted;
but perseverance is
at
last
rewarded, and we
have
invented
an entirely new system,
which
is
based on
mathematical
and
scientific
principles.
By the
use of
this
system,
when
thoroughly understood,
we
guarantee that
there
will
be
no
time
wasted,
as in the
old-fashioned
cutting
out,
trying on,
altering
and
re-altering
of
a
dress
or
coat.
When
the
measure is once
taken,
our lady
patron may,
if she
choose,
forget
all
about
her dress, until it is furnisl^'^d to
her in all its
beautv
and
perfection of
fit.
We
have rules and
regulations in
oi
r
new
system
for
measur-
7/17/2019 The American Lady Taylor Glove Fitting System (Elizabeth Garland))
http://slidepdf.com/reader/full/the-american-lady-taylor-glove-fitting-system-elizabeth-garland 12/160
)
THE
AMEEICAN
LADY
TAILOR
GLOVE-
ing,
drafting,
tracing,
cutting,
basting, sewing and
finishing.
With
proper
attention
to
these
rules
failure
is
an
impossibility.
But
all who
attempt
to
become
professional dressmakers
should
not
expect
to
stand
on
a
pinnacle
of
fame,
to become
a Worth
cr
a
Pingat,
without
carefully
studying
and
gaining
a
practical
knowledge
of
the
art of
dressmaking in all its
details.
A
strong
desire,
a
determined will,
as
well
as a
natural ability and skilled
labor is
required of any
one
who
wishes
to
become
an
expert.
Efvery
one has
to
make
a
beginning,
however,
and
the
young
dressmaker
who,
with
pardonable
ambition,
wishes
to
stand at
the
head
of
her
profession,
will
be
saved
many an
anxious
hour,
many
an aching
head and many
a
hard-earned
dollar
by
a
faith-
ful
study
of this
new
system.
Dressmaking
requires
a very different
style of
work
from plain
sewing.
There
are parts
that
cannot
be
done
too neatly ;
there
are
other
parts that
must
be slighted
or
a
stiff
and homely
appearance
is the
result.
A
lady
who
is
an
exquisitely neat
seamstress is
seldom
successful
as
a
professional
dressmaker, as
it
is
possible
she would
be
so particular,
precise
and
slow
that she
would
scarcely
earn
her
salt
; unless she
learns
lioiv and
where
to
slight
her
work,
we
would
advise
her to
avoid
spending
money
and
time
in her
endeavors. The information and
explanations
on this
subject alone
are worth
the price of
this
book to
any
one
with
ordinary
intelligence, whether
an
amateur
or
one
who
wishes
to
become
a
successful
professional
dressmaker.
Explanation op
System.
Our
readers
will not
be
surprised
when we
inform
them that
the armhole
is
taken
as
the
centre
;
having
taken
the exact
measure,
by the
use of
the
compass
we
make a
circle
of the
same
circumference.
We
then
commence
and
from the
centre
7/17/2019 The American Lady Taylor Glove Fitting System (Elizabeth Garland))
http://slidepdf.com/reader/full/the-american-lady-taylor-glove-fitting-system-elizabeth-garland 13/160
FITTING
SYSTEM
OF
DRESSMAKING.
of
the
circle
take
the
width of
the
back, which
divides
the
whole
body.
The
remainder
will come
in
as
the
front.
Having
thus
laid a
foundation,
and
commenced in the
right
place, and in
the
right way,
all material
under
the
circle which
belongs to
the
back can
be
easil}'- tapered into
the
back, and what belongs
to
the front
can
be
tapered into the
front, and
taken
up as
darts,
which will
keep
your
waist in the grain
of the cloth,
and thus
avoid
all
wrinkles.
No proportions are taken in this
system,
as
each part or
measure
is taken
separately, direct
from the
body.
We
fit
to the body to give
a
true
fit.
Taking
the
bust measure
to
proportion
the
neck,
as
some do,
is
a
preposterous idea
All
persons
are not built in the
same
proportion,
some having
a
large bust
and
thin neck, whilst
others
may
have a
small
bust
and a
thick
neck.
This
system
is applicable
to
any
age, size,
or
style.
If
the French
style
is desired,
the
body
is
made
to
appear
tapering and long waisted;
the opposite effect
is
given should
the English style
be
preferred.
As we
mentioned before,
the measure of the arm
gives
the
circumference
of
the circle,
and
we
thus
obtain a
neat,
j)crfect
fitting
armJiole,
which never needs
alterations, whether
the person
be
lean or stout, old or young, man, woman or
child
of the
ten-
derest
age. We
give no
directions
to
take
a
seam
in
here
or
there,
should
the
armhole be too
large,
as
is
done
by
other
sys-
tems
we
could
name.
Before
closing
the
shoulder
seam
the
arm-
hole has somewhat
the
appearance
of
a
horse-shoe. The circle
is
divided into eight
equal parts, and both
ends
of each diameter
is
a
starting point ^r
some
particular
measure.
When
the
sleeve
is
sewed
in,
be
it ever so
tight,
no
complaints
are
heard of being
unable
to
lift .the
arms, for they
can
be
moved
at
will,
up
and
down,
right and
left,
around and
around
with
perfect ease.

7/17/2019 The American Lady Taylor Glove Fitting System (Elizabeth Garland))
http://slidepdf.com/reader/full/the-american-lady-taylor-glove-fitting-system-elizabeth-garland 14/160
THE AMEEICAN
LADY TAILOR
GLOVE-
THE
HISTORY
OP
THE
LADY
TAILOR
SYSTEM.
Our
system
differs
from
anything ever
before
presented
to
the
pub-
lic,
and
we
will
endeavor
to
explain
it
briefly.
Were
we
about
to
make a dress
for
a
small
doll, it
is
likely
that
in
order
to
accomplish
our task
in
as
short
a
time as possible,
we would
do what many
have
done
before
us,
and
that
is,
we
would
first
cut
a
hole
in the material,
and
slip the
doll's arm
in
it.
We
would then
taper in
the waist, by
taking
it in under the
arms,
down
the
centre
of
the back, and
take
in
another
seam between
these
two,
on
each
side
of
the
back,
curving
around
to
the
armhole.
We
would
then
take
up
the
darts,
and
adjust
the
shoulder
seams.
Thus
it Is most likely
we
would
have
quite a
neat-fitting
dress
for
Miss Dolly.
We do
much
the same
thing
in our
New
System.
Having
discovered
that the proper
fit
of the
armhole
was
of the
utmost
importance,
we
spent
many
a
sleepless
night in
thinking over
the
subject.
We
all know if
the
armhole
is
too
tight,
it is sure
to
tear
out,
and
if
too
large
it is
impossible
to
remedy
it,
^
One
cold
night
in
February,
when the
household
had
been
quietly
sleeping for
hours,
these
thoughts, as
usual,
persistently haunted
us.
Suddenly
an idea
came,
and
not
wishing to
lose
it,
we hastily jumped
out
of
bed,
crept
quietly down stairs for fear of waking the
sleepers,
and
whilst shivering
in the
cold,
we
hastily jotted
down
the first
draft
of
our New
American Lady Tailor
System,
and
then
returned to
our
bed
satisfied
with the
results, and knowing
we
had
made
one
oj the
greatest
inventions
of
the
age.
When
a
physician
is
called
upon
to
prescribe
for a
patienx, if
he
first
endeavors to
discover the
cause
of
the symptoms, the remedy is
more
easily
found.
Just so
it
was with
us.
We
were
the
physician
called upon
to
prescribe
for
the patient,
which
in
this
case
was
an ill-
fitting
dress.
It
had a
bad fit.
We
discovered
the
cause of this
severe
illness
to be
in
the
armhole,
and
we
were
fortunate
enough to
find
the
remedy
and
make
a
perfect
cure.
7/17/2019 The American Lady Taylor Glove Fitting System (Elizabeth Garland))
http://slidepdf.com/reader/full/the-american-lady-taylor-glove-fitting-system-elizabeth-garland 15/160
FITTING
SYSTEM
OF
DRESSMAKING.
THE PURPOSE
OP
THIS
BOOK.
This
book is
intended
to
explain
the Principles
of Dress-cutting,
and
is
founded
on
systematic rules,
by which any
one
can
learn
to
measure,
draft,
baste, cut,
jBt, and
make dresses,
without
further in-
struction.
To
Dressmakers.—
It
will
be of
great
use
to
professional dress-
makers,
who,
like
the Inventor,
have
had the same
sad experience in
the use of all other charts and systems.
To
Ladies
in
Private
Life.
—
It
is specially
adapted
to
the use
of those
ladies
who
wish
to
alter
or
make
their
own drosses
for
home
and mornmg
wear.
It
is as
much trouble
or more to
a
dressmaker,
to make
a
chintz
or
percale dress,
as
one
of more expensive
material
yet
few
ladies
are
willing to pay
as
much,
for
it
is
probable
that
the
making
would
often
be
three
times
as
much
as the original
cost. If
this
class of work
is done
by the
ladies
themselves,
or
if
they choose
to
superintend
it
at
home,
professional
dress-makers
will
have
more
time
to
devote
to the
finer or more artistic
work.
To
Young
Ladies.—Young
ladies,
to
you this book
and the system
it teaches
will be
invaluable.
Many
of you object
to
spending
at
least
six or
eight
months
time
in
learning
the trade.
Most of
those who
do
this
are
but
wasting their
time.
There
are
few
who
are
taught
the
art
of
measuring,
drafting,
or cutting by rule,
basting
and
fitting,
and
that
all
seams
are
put
together
diiferently
some
having to be
stretched,
while others should
be
held in.
In fact,
we have
known
dressmakers who
never
allowed
their
apprentices
to
get a
glimpse of these
necessary
things,
but
kept
them
continually em-
ployed in
one
special
branch, such
as
quilling, ruffling,
fluting,
button-
hole
making,
overcasting,
etc.
The time
has
now come
when
a
young
lady's education will
be
con-
sidered
unfinished
unless
she
is
an
adept
in
this
art.
7/17/2019 The American Lady Taylor Glove Fitting System (Elizabeth Garland))
http://slidepdf.com/reader/full/the-american-lady-taylor-glove-fitting-system-elizabeth-garland 16/160
10
THE
AMERICAN
LADY
TAILOE
GLOVE-
We
guarantee
perfect
Arm-holes,
Sleeves,
Bust, Darts, Curves, and
Neck
without
Refitting.
It
is simply
perfect in
all
its
simplicity
and
beauty,
and Ave
are pleased
to
cut
any
one
Test LiningSy to prove
its
merits.
Never
take instructions in any
System without having
Test
Linings
cut
and
tried on.
Many
claim
to
be Self-fitting,
but
judge
for your-
self whether the fit
is
good or bad.
We
have
tried
all
these
so-called
Tailor
Systems,
and do
not
wonder
that
experienced dress-makers are disgusted with
them. Practice and
experience enable
us
to say
that we have
yet
to
record
a
single failure
in the use of
our
New System.
It
IS
our
experience, and
the
basis
of
our
System, that without a
perfect
arm-hole
it
is
impossible
to
have a perfect-fitting waist and
sleeve.
Our
system
is the
only
one
by
which
a
perfect
sleeve can
be
made
without
a
particle of
alteration.
The
rules are
so
plain, both for
measuring
and drafting,
that with ordinary care
a
mistake
is almost
impossible.
Many
will
enquire,
what
is
the
difference
between
the
Lady
Tailor
System,
or
other
so-cailed
Tailor
Systems
?
taught from
pasteboard,
with
imitation
square
attached
w^hich
is only
a deception
and fraud,
as
no
person
will
ever
be
able
to
use
a
square
without the
attachment.
By
learning
the
Lady
Tailoe
System,
you
will
be
competent
to
cut
like
a tailor,
by the
tope-measure
alone,
designed
from
any
fashion
plate,
either
English,
French
or
American
styles.
This
can
be
learned
in
a
very
short
time,
a few hours
will
instruct
a
dressmaker,
without
refitting
or
the
use
of
any
pattern.
J
7/17/2019 The American Lady Taylor Glove Fitting System (Elizabeth Garland))
http://slidepdf.com/reader/full/the-american-lady-taylor-glove-fitting-system-elizabeth-garland 17/160
FITTING
SYSTEM
OF
DEESSMAKTNG.
11
The
Secret of Dressing
Well.
Good
dressing
does not consist
in
wearing
costly
apparel
only.
It matters
not
what may
be
the
cost
of
any
garment,
if
it
is
puckered
and wrinkled,
the
form
of
the
wearer
will
be
disfigured
and
distorted,
and
she cannot
be
considered
well
dressed.
On
the
other hand, we have seen ladies
wearing
cheaper
material,
properly
used
and
made to
fit
with
glove-like
accuracy,
thus
dis-
playing
to
the
best advantage
the
figure
with
which
nature
has
endowed
them,
and
adding
grace
to the
beautiful, and
beauty
to
the graceful.
It is
a
woman's
duty
to
have
her
garments
so made
that
they
add
to
the
natural
charms
of face,
figure,
age and
character,
to
conceal any
defect
or
deformity
that artistic
or
skilled
workman-
ship
can
hide.
Just here
lies
the
secret of
success in
dressing
well.
A
good
fit
makes
even
a
common
dress look
well,
and
to
look ivcll
is
the
very
acme
of
beauty
in
the
art
of
dressing.
The
young
lady
who wears
a
dress of
expensive
material,
which
is
full of
great
wrinkles on the
hips and
shoulders
and
around
the
neck,
too
tight or
too
loose across the
bust,
too long
or too
short in the waist,
and
the
shoulders
of uneven
length,
is
unavoidably considered
slovcnhj
by
those
with
whom
she
comes
in
contact.
She
may
be
a
brilliant
conversationalist,
and
a
jier-
fect Hebe in
face and form,
yet
the eff'cct
is
much
the same
as
seeing
a
mother's
big,
loose
wrinkled
stocking
upon the
beau-
tifully
formed
limb of
a
little child, the grace
and
symetry of
which is
destroyed,
lost
and
unnoticed.
Cynics may
say
what
they
choose,
but
beauty
unadorned
is
a
thing
of
the
past.
How
much more pleasant
to
the
eye
is it to
look
at
a
lady
dressed
according
to
the prevailing
style
of
the
period, which
demands the
utmost
accuracy
of fit
and the great-
est
nicety
in making,
than
to
gaze
upon
the cld-fashioned
damsel

7/17/2019 The American Lady Taylor Glove Fitting System (Elizabeth Garland))
http://slidepdf.com/reader/full/the-american-lady-taylor-glove-fitting-system-elizabeth-garland 18/160
12
THE
AMEKICAN
LADY
TAILOR
GLOVE-
of
the
backwoods,
who
has
little
time
or
inclination
for
self-
adornment,
and
thinks of
naught
but
her chickens,
cows, pigs,
and
getting
meals
ready
for
the
men folks.
dressmaking
is
not
what it
was
ten years
ago,
for
within
the
last
few
years
the
tendency of
the times
has
called
forth
the
most
artistic
skill.
The
close,
skin-like fitting
busts and
sleeves
of to-day
require
scientific
cutting
and
fitting.
A
fault
at once
shows
itself,
and
disfigures
the
wearer
;
consequently,
it
is
more
essential
to
ladies to have
perfect-fitting garments
now
than
it
has
been
at
any previous
time.
The universal
question
asked is,
Where
can
I get a dress
made that
will
not enlarge
defects
or
detract
from nature's
gifts. A
frequent
mistake
made
by dress-
makers will be
well
to
note here. How often
have
we
heard it
said,
You
are
crooked
;
one shoulder is
higher
than the
other.
The
dressmaker
may
honestly
think
she
is speaking
the truth,
but
in nine hundred
and ninety-nine cases out of a thousand
she
is
slandering
one
of the
most
perfect forms created
by
God
and
nature.
The fault
lies in her own work, but
occurs
so
frequently
that,
naturally,
the
question
arises
in
her
mind,
Why so
much
deformity
among the
noblest
work
of God ?
A
NEW
SYSTEM.
We
claim that
our system is
perfectly
original in all
its
parts,
from beginning to end.
We
cordially
and
gladly
invite
one
and
all,
professional
as
well as
amateur,
to
call
and
investigate its
merits
for
themselves.
It has been faithfully tried,
and
found
most
satisfactory
in
every case.
Its simplicity
is
one
of its
greatest charms. The
directions
are
so
explicit
that
a
child
could understand them
;
therefore,
we do not hesitate
to
invite
friend
or foe
to
examine and criticise our work,
as
we
are
certain
of a
decision in our
favor.

7/17/2019 The American Lady Taylor Glove Fitting System (Elizabeth Garland))
http://slidepdf.com/reader/full/the-american-lady-taylor-glove-fitting-system-elizabeth-garland 19/160
FITTING
SYSTEM
OF
DRESSMAKING.
13
REPORT OF
AN
INTERVIEW
WITH
A
PUPIL.
A
lady
with
an
intelligent,
pleasing
countenance, possibly about
twenty-five or thirty years
of
age, was
called into
the
room,
not
know-
ing
what was
required
of her.
Previous
to her
entrance
we
were told
that
a
short
time
before this,
she and
her family had
met
with the
loss
of
the greater part of their
fortune.
She
informed
us that
as
she
had
several sisters,
it was
thought
best for
economy's
sake,
that
one
of
them
should learn
dress-making,
so that
she
might
be
able
to cut, fit
and make dresses
for
herself and
sisters.
She knew
absolutely
nothing
before
commencing.
We give her own words.
''
I
believe
I could
thread
my
needle,
she said,
laughingly,
but
that is
near
about
all
I
could
do
;
occasionally when I wanted
to
hurry
up
things
a little,
when
we had
a
dress-maker in
the house, I
was
allowed the
privilege
of
sewing
on
a
skirt
braid,
or
stitching
up a pocket. I have been
under
Mrs.
Gartland's tuition, on an
average about four hours daily,
for
about four
M^eeks,
and in
this
comparatively
short time
have
learned
enough
to
be
trusted
to
make a
whole
dress for myself. That
is
what
I am now doing,
and
I
feel more than satisfied
with
my
suc-
cess
;
I
have
most trouble
in forming darts, that
is, in
basting
the
lines
exactly
opposite
each
other.
I
know I
shall overcome
this diffi-
culty
by
experience,
as
'practice
makes perfect.' I recommend Mrs.
Gartland's
System cheerfully
as
well
as
gratefully
to
those
who,
like
myself,- are determined
to
learn all they
can,
to
help themselves and
others,
instead
of
being
a
constant
dependent
on the
kindness
of
rela-
tives
and friends. This young
lady is
considered
by Mrs.
Gartland
perfectly
competent
to be a
professional
dress-maker
INTERVIEW
WITH
ANOTHER
PUPIL.
This
young girl
is
employed
in
the
kitchen
of
a
neighboring
hotel.
Not
liking
her
position,
the
hours
she
is
off
duty,
from
half-past two
until
half-past
five,
she
has
spent in
Mrs.
Gartland's
Class
Rooms,
for
the
last four
weeks. She
understood
plain
sewing, and
had
made
a
basque
for
herself, by
ripping and
taking an
old
one
for
a
model,
before
taking
instruction.
She
w^as
all through
except
making a
dress
for herself,
and expressed
herself
as
delighted
with
the
accomplish-
ment
of
her
wishes
in so
short a
time,
and
gladly
endorses
all
said
by
the other
pupil.

7/17/2019 The American Lady Taylor Glove Fitting System (Elizabeth Garland))
http://slidepdf.com/reader/full/the-american-lady-taylor-glove-fitting-system-elizabeth-garland 20/160
14
THE
AMERICAN
LADY
TAILOR
GLOVE-
THE
DRESS-MAKER'S
CATECHISM.
Every
Dress-maker should
test
herself
by the
following
Questions.
1.
Do
I honestly
consider myself
competent
to
take
the
goods be-
longing
to another person, and return
the
garment,
when
finished,
without
delay or fault
?
2.
Do
I honestly consider
myself perfect in
the
art
of
dress-
making
?
3.
Do
I
thoroughly
understand
each
and
all the branches connected
with
the art of
dress-making
;
namely.
Measuring,
Drafting,
Cutting,
Basting,
Fitting
and Sewing?
4.
Do I understand
these
branches
so
well that
I
can
finish
a dress
without
refitting
?
5. Do
I thoroughly understand the new system
by
which the Sleeve
is
Measured,
Drafted,
Cut,
Basted,
and
adjusted properly?
6.
Am
I competent to
arrange
the
drapery according to the
style
most
becoming
to the
figure
of
the
wearer
?
7. Am
I
competent
to
give
either
the
French
or
English
style
of
fit,
according
to the wish of the
wearer
?
8. Am
I competent to
reproduce patterns
or
styles from
any
fashion
plate
or book
?
9.
Am
I
competent
to
invent new
styles
without
patterns
?
10. Can
I
fit
a
dress
without the
aid of Charts of
any
kind,
simply
by
the
use
of shears,
tape measure
and ruler,
as
taught
by
The Origi-
nal
Lady Tailor System f
If
these
questions
can be
truthfully answered,
rest assured
you
have
the
qualifications
necessary to
insure success.
WHERE SHALL
DRESS-MAKERS LOOK FOR
HELP
9
ITelp
of
all
kinds
is
inferior
to
what
it
was
formerly,
although
the
salary
expected
is
higher, and
the
hours shorter. Being
an
American
born citizen
we
are
sorry
to
be obliged to
acknowledge it, but
it
is
our
experience that the Germans
are more systematic than other
nations
in
J

7/17/2019 The American Lady Taylor Glove Fitting System (Elizabeth Garland))
http://slidepdf.com/reader/full/the-american-lady-taylor-glove-fitting-system-elizabeth-garland 21/160
FITTING
SYSTEM
OF
DRESSMAKING.
15
the
education
of
their
children.
The
principles
of
the
Kindergarten
are carried
through
all
grades
of schools,
consequently the
people
are
more
thorough
in
everything they undertake.
A number
of
applicants
came
to
our office
in
answer
to
an
adver-
tisements
We
asked
No.
1
:
Ques.
What do you
know about Dress-making
?
Ans.
I
know
a
great
deal.
Ques.
Could
you
cut
and
fit
a
dress ?
Ans.
I could
try.
Ques.
How
long
have
you
worked
at
the
trade
?
A71S.
About
two
months
altogether.
Ques.
Can
you
sew up these seams
?
Ans.
Oh
yes
;
I
know I
can
do
that.
The
skirt is
given her
with seams
basted. When
finished
we
are
obliged
to
give
it
to
another
hand
to
rip,
as
the
stitching
is
both
sides the
basting,
and
by
the time the end of the
seam
is
reachal,
it is
fully
half
an
inch
inside the
basting.
INTERVIEW WITH
NO. 2.
Ques.
Have
you
learned the
trade regularly
?
Ans.
*'
Yes,
Ma'am
;
I
was
with Mrs. six
months.
Ques,
^'
What can
you
do
?
Ans.
•
I
used to
plait the ruffles.
Ques.
Is
that all
you
did in
six
months?
Ans,
Most
all
the
time, but
I sometimes
pulled out
basting
threads.
She
is
given
ruffles to
plait.
She
commences them
one
inch
apart,
and
finishes
them
three
inches apart, after six months
experience
in
nothing
else.
INTERVIEW
WITH
NO. 3.
Ques.
Have
you
any
experience
?
)
Ans.
I was
with
^ladam
one month.
7/17/2019 The American Lady Taylor Glove Fitting System (Elizabeth Garland))
http://slidepdf.com/reader/full/the-american-lady-taylor-glove-fitting-system-elizabeth-garland 22/160
THE AMERICAN LADY
TAILOR GLOVE-
Ques.
Why
did
you
leave
?
Ans.
I got
tired of whipping
seams
and
carrying
home
bundles.
The
seams
given
her to
overcast were
so
badly
done,
no
two stitches
being
the
same size,
that
we
did
not
wonder that
her
former
employer
made an
errand
girl
of
her.
Is it a
matter of
surprise that
dress-makers
get
desperate
when
such
specimens
as these
present
themselves for employment
? It
is
true
we
occasionally
meet with
better
success,
but
alas
very,
very
seldom among
our own country-women.
Naturally
you ask the
cause
of this
trouble.
It
is
this.
In
the
days
of our grandmothers,
when
no
such
luxury
as
the sewing-
machine
was in existence,
every
girl
was
taught
to
sew
as soon as she
was old
enough
to hold her
needle. In
these days even
the
poorest
possess
a
sewing-machine, so that
hand
sewing
is
at a
discount,
and
there
are
few
expert
or neat
seamstresses to
be found
unless they
are
foreigners.
There
are
exceptions
to
all
rules,
and
we
would
give
credit
where
it
is due,
for
there are American ladies who
are
skillful
in
the
use
of
the
needle,
but
we
fear they are few in number.
EXPERIENCED
APPLICANTS.
We
have
had
applicants
for
positions
from
those
who have
had
from ten
to
fifteen years
experience
in the old
style of
dress-making,
going
around from
house
to
house
among
their
patrons,
by
the
day
or
week.
Having had
so
much
experience, they thought
of
course they
knew
all
there
was to learn,
and
that it
was
unnecessary
to
give
them
any instruction.
Well,
not
caring
to dispute the
matter,
we set
them
to work,
and
they
invariably
began in
the
same
way.
They
first
cut
the
body
lining
according
to
the
pattern which they
always
carry with
them.
The
lining
is so
large that
two
ladies
might get in
at
one
time.
It
is
then tried on, wrong
side
out, and then
the
endeavor
is
made to
get
7/17/2019 The American Lady Taylor Glove Fitting System (Elizabeth Garland))
http://slidepdf.com/reader/full/the-american-lady-taylor-glove-fitting-system-elizabeth-garland 23/160
FITTING
SYSTEM
OF
DRESSMAKING.
17
it
small
enough, by pinning the seams in tighter.
The
lady
is told to
come again
next
day,
and it will
be
ready
to
try
on again.
The
lady arrives
next day
and
finds that
the
lining
had
been
ripped apart,
the outside
material
cut
out,
and
the whole
waist
basted
together again,
but
alas
it
is
too tight
in
some places,
too
loose
in
others.
A WORD
TO
MOTHER'S.
Mothers,
we
beg
of
you,
do
not shirk
the
responsibility
resting
on
you, but
see to
it that
your
daughters are thoroughly taught to
use
the
needle while
they are
yet under
your control.
The
sewing-machine
is
a
wonderful invention for the saving of
time and labor
;
but in order
to finish the work
neatly and fasten
the
threads,
hand
sewing
is
requisite.
HEALTH
OP AMERICAN
WOMEN.
The
statistics
show
in
the
reports
of
practicing
physicians
that
the
health of American women is
greatly injured
by the too
constant
use
of
the
sewing-machine.
The
women
of
to-day
have
not
the
same
vigorous
constitutions possessed
by
their
grandmothers
in
the
past
generation. The style
of dress
and
manner
of
living
may
have
some
influence,
but
it
is
probable
the
sewing-machine
has
more.
Why
else
do
we
hear so many
comparatively
young
women, married
and single^
complaining
of
weaknesses of
various
kinds?
SEWING-MACHINES IN
DRESS-MAKING.
The
sewing-machine
in
dress-making should
be used
only
in
stitch-
ing up seams.
The
most
important
and
particular
part
of
the sewing
is
done
by hand,
that
is the
finishing
up.
The
cut
and the
fit may be
perfect, but
if
the
finishing touches
are not
what
they
should
be,
the
dress
is
unfit
to wear.
A
STEP
IN
THE
RIGHT
DIRECTION.
We rejoice
with exceeding
great joy
to
hear that
hand sewing
has
been
introduced
in
our
Philadelphia
Normal
School. We yet

7/17/2019 The American Lady Taylor Glove Fitting System (Elizabeth Garland))
http://slidepdf.com/reader/full/the-american-lady-taylor-glove-fitting-system-elizabeth-garland 24/160
18
THE
AMEEICAN
LADY
TAILOE
GLOVE-
hope
+.0
hear that
this good
work
commenced in the
Kindergarten will
be
continued
through
the
Primary,
Secondary
and
Grammar
Schools,
so
that when our daughters^
the mothers
and
wives
of
the
future,
are
ready
to
graduate from the Normal
School,
they
will know,
by theory
and practice in
this
branch
of domestic economy, more, far more,
than
most
of
the
mothers
and
wives
of
the present.
SCHOOLS
FOR
DRESS-MAKING-.
Dress-making
should
be
taught
in
the same manner
as
other
things
are
taught
at
school. Pupils
should
learn
their
A, B,
C's,
that
is
they
should commence
in
the
beginning
and
go
step
by
step, and rule
by
rule,
in
regular
order,
and
learn
everything connected with the
business. Then those
ladies who
have
acquired
a
theoretical
as
well
as
a
practical
knowledge
in
every
branch of
the
art,
are
qualified
to
become
professional,
artistic
dress-makers,
should stern
necessity
com-
pel
them
to support
themselves.
Queen Victoria
had
a
family of nine
children,
every one of
whom
was
taught a
trade.
Why
should
not
we
follow
that
illustrious
example
?
To
become
a
dressmaker in
high
art
it
is
necessary to'
commence
in
the
same
way
as
music is
taught, that is to learn the
rudiments.
•
A
child
can
soon play
a
piece of
music
by
air
yet
know
nothing about
music, not
even
the
first
letter
and
in
this
way
never
become
a
musi-
cian.
So
you can
learn
to
make
garments
by
Charts
or
Pattern,
yet
know
nothing
of the art
;
dressmaking must be
taught
the same
as
music,
by a
thorough
study
of this Book you may become
an artist.
Trimming
and
Draping can
easy be
done
after
any
Fashion
Plate,
but
Fitting
can
never
be
copied,
but
must
be
taught
by
theory, strictly
follow
the rules
laid
down
in
the Book and
we
guarantee you
will
never
make
a
failure,
Draping
can be
easily
learned
by
taking a Avire
stand, putting over it a
skirt,
take any Fashion
Plate
and
several
7/17/2019 The American Lady Taylor Glove Fitting System (Elizabeth Garland))
http://slidepdf.com/reader/full/the-american-lady-taylor-glove-fitting-system-elizabeth-garland 25/160
I
FITTING
SYSTEM
OF
DRESSMAKING.
19
yards
of soft
material
and drape like
diagram
as
near
as
possible,
and
in
this way you will soon
be
able
to
drape
any style
you see, and also
make
original styles.
You
should
devote
a
few
hours
every
day
on
this
branch.
To
cultivate
taste do
not
waste
your
good
time by spend-
ing
six or
eight
months in
what you can
learn
at
home in
a very short
time
in
taking
a
few
lessons
in theory.
Fitting
is
generally
taught in
such places
by
holding the
pin-cushion,
you
might
as
well
take
music
lessons by
holding
book while
another
person plays.
There
are
charts
and models
which
can
be
learned
in
a
few moments,
but after
they
are
learned,
what
do
they amount to? Do they
not
conclusively
prove
the
old saying,
namely
:
There is
no
excellence without
labor.
^^
Rules
for
Cutting, Basting and
Refittingy
see
Contents,
7/17/2019 The American Lady Taylor Glove Fitting System (Elizabeth Garland))
http://slidepdf.com/reader/full/the-american-lady-taylor-glove-fitting-system-elizabeth-garland 26/160
20
THE
AMERICAN
LADY
TAILOR
GLOVE-
TO
DRAFT
THE
MEASURE
OF
ARM'S-EYE.
The
following
dimensions
will
save
trouble
to any
one
drafting
according
to this system,
or
to
any
one who is unable
to
find the
height
of the
circle given
by
the measure
of
arm's-eye.
The numbers
range
frorii
the youngest child
to the
stoutest
lady.
6
inches
in circumference
gives
a diameter
of
2/6 inches.
9
10
11
12
13
14
15
16
''
5,
finches.
17
18
Take particular care and
do
not
get
diameter
too
large. It
would
be
much
better
to
get
it
the
width
of
a line
smaller
than
larger.
Ci.
a
2i
U
<i
2i
ce
a
21
<( i(
31
t(
a
H
(e
i(
3|
<(
((
H
((
a
H
((
a
41
(C
it
5x^e
li u
H
(( ((
5t
u.
7/17/2019 The American Lady Taylor Glove Fitting System (Elizabeth Garland))
http://slidepdf.com/reader/full/the-american-lady-taylor-glove-fitting-system-elizabeth-garland 27/160
7/17/2019 The American Lady Taylor Glove Fitting System (Elizabeth Garland))
http://slidepdf.com/reader/full/the-american-lady-taylor-glove-fitting-system-elizabeth-garland 28/160

7/17/2019 The American Lady Taylor Glove Fitting System (Elizabeth Garland))
http://slidepdf.com/reader/full/the-american-lady-taylor-glove-fitting-system-elizabeth-garland 29/160
FITTING
SYSTEM
OF
DRESSMAKING.
22
''
MEASURES
FOR
DRAFTING
PLAIN
BASQUE.
1. Neck,
13
Inches.
2. Arm's
eye,
14
3. Bust,
-
36
'«
4. Waist,
-
-
- - - »
24
«
5. Length
of back,
- -
-
*
16
a Underarm,
8
*'
7.
Length
of
front,
-
-
-
-
13
8. Height
of dart,
....
5
9. Height
of
hip,
-
-
-
.
5
10.
Hip,
40
11.
Width
of back,
> - - -
13
12.
Neck
to elbow,
-
-
- >
19
13.
Shoulder,
5
''
14.
Inside
to
bend,
....
8
15.
Inside
to wrist,
-
-
-
-
16
16.
Upper arm,
-
- - -
12
17.
Middle
arm,
Hi
18.
Elbow,
11
«
19.
Lower
arm,
10
20. Wrist,
8
«
DIRECTIONS FOR
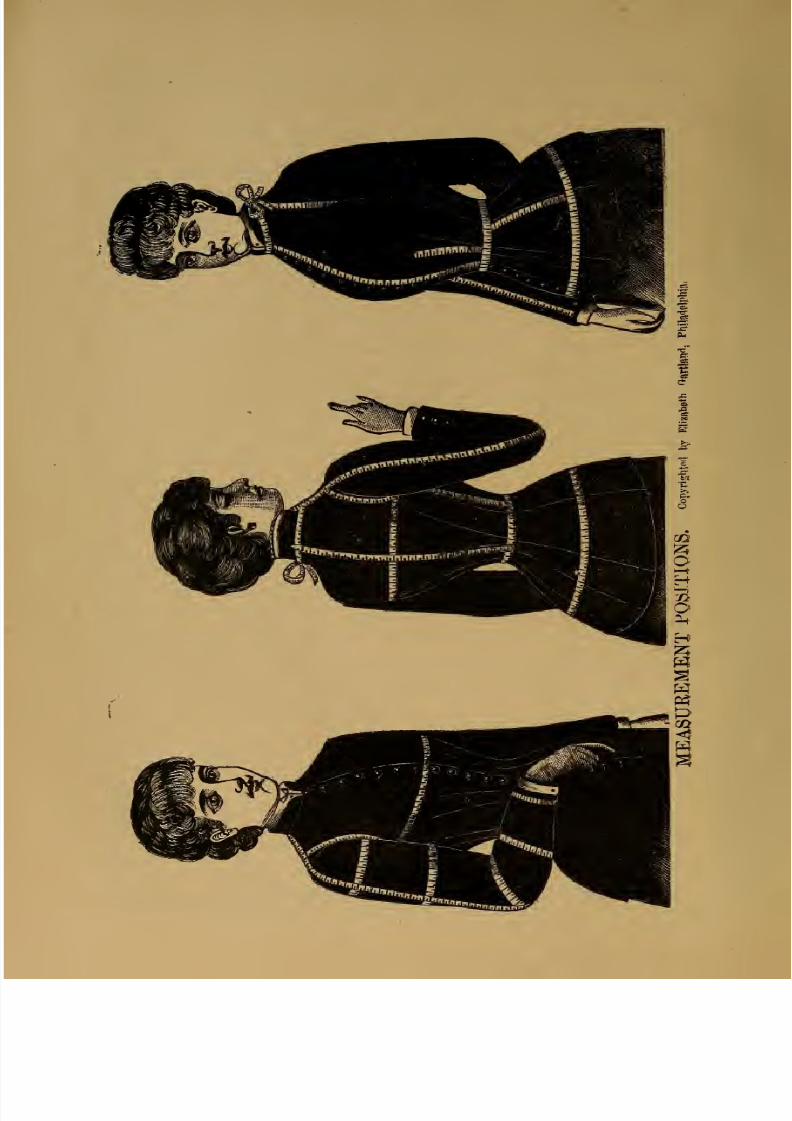
TAKING
MEASURE.
The
tape is
taken across
the
back,
very
close
under
the
arm,
around
the
front
and up
over
the shoulder
•
it
is
then
fastened
at
the
side of
the neck, as shown in
figure.
1.,
l^eck.
Take
a
close measure outside
of the
collar of dress^
removing
all
ties, handkerchiefs,
etc.,
or
take
a
moderately tight
measure
ins^ide
of
the collar,
about
as
you
would
have
the
dress
fit.

7/17/2019 The American Lady Taylor Glove Fitting System (Elizabeth Garland))
http://slidepdf.com/reader/full/the-american-lady-taylor-glove-fitting-system-elizabeth-garland 30/160
^^23
THE
AMERICAN
LADY
TAILOR
GLOVE-
2.
Width
of
Armhole.
Take
a
tight
measure,
by
putting
the
tape
under
the
arm,
up
over
the
shoulder, to
the
place
in
which
the
sleeve
is to
be
sewed.
Care
must be
taken
to avoid
having
this
measure
too
loose.
3.
Bust.
Take
a
loose
measure
over
the
fullest
part of the bust,
and
around
the
back
across
the shoulder blades.
4.
Waist.
Take a
close
measure around the
waist. The waistband
is
fastened
around
the
waist.
5.
Bach.
Take
the
measure
across
the
back,
from
right
to
left, on
each
side
above
the
socket of the
arm.
6.
Under-
arm.
This
measure is invariably taken
too
short,
and
so
causes
the
dress to
tear out
whenever
a
lady
desires
to
raise
her
arms.
The
under-arm
measure is taken
from
the
bottom
of
waistband,
close to
the
tape
which
is
in the axilla, or arm
pit.
7.
Length
of
Back.
Take
the
measure
from
bone
at
back
of
neck
just
to
the
waistband,
and not below.
Should
a
lady
be
very
long
waisted
m
the
back,
a
second measure
should
be
taken
from the
same
point at
the
neck,
down
to
the
exten-
sion
of
her
waist,
over
the
waistband.
The
difference
must
be
added
after
the
first
waist
line is
drawn on
draft.
This
will
avoid wrinkles,
so
often
seen
between
the
neck
and
shoulder
blade,
and
the
dress
can
not
fail
to
fit
into
the figure
in
the
back,
which
will
also
make
it
more
comfortable.
8.
Length
of
Front.
Take
the measure from
the
hollow of the
neck
in
front down
to
the bottom
of
waistband.
Should
the
lady be
long
waisted
in
front,
a
second
measure
should
be
taken,
and
proceed
as
in the
directions
for the
back.
9.
Dart
Measure.
The
height
of darts is
found
by
measuring
from
the
waisfc
as
high
as desired.
Distance
between darts
is
determined
at
will.
10.
Hip
Measure.
Take
measure from
waist
to
the
full
height
of
hips,
then
take the
measure
around
the
fullest
part
of
hips.
If a
lady
has
high
hips
or
stomach,
or if
she
wears
a
bustle,
or if.
7/17/2019 The American Lady Taylor Glove Fitting System (Elizabeth Garland))
http://slidepdf.com/reader/full/the-american-lady-taylor-glove-fitting-system-elizabeth-garland 31/160
FITTING
SYSTEM
OF
DRESSMAKING.
'^^
on
the
contrary,
she
has
small
hips
or
small stomach,
and
is
hollow
in
the
back,
note
should
be
taken
and
allowance made
in
the
,
right
place,,,
and
proceed
as
in
rule
27,
for
Drafting
Plain
Basq^ue.
L
The
waist
must
slope
to
the
back,
fr.om
the hip to the
second
measure
taken
for
length
of
back.,
By
following
these
directions
exactly,
we
guarantee
a
perfect
fit
around
the waist
and
over
the
hips.
11.
Sleeve
Measure.
Place
the
hand
at
waist
as
shown
in
figure.
Then
place
the
tape
at
the
neck,
on
an,
even
line
with the
shoulder,
and.
draw
it
over
the
shoulder
down
to
elbow,
deduct-
ing
Zcw^^/i
0/
shoulder
desired,
after
this
measure
is taken.
AVe
then
take
the
measures
around
the
upper
arm,
halfway
between
upi^er
arm
and
elbow,
elbow,
below
the
elbow,
and the
wrist.
Also,
from
inside of
arm
to
bend,
and
from
bend
to
wrist.

7/17/2019 The American Lady Taylor Glove Fitting System (Elizabeth Garland))
http://slidepdf.com/reader/full/the-american-lady-taylor-glove-fitting-system-elizabeth-garland 32/160
PLAIN
BASQUE.
Oopyri-gMied
by
Elizabeth
Gantland,.
Phllaxtolphiav
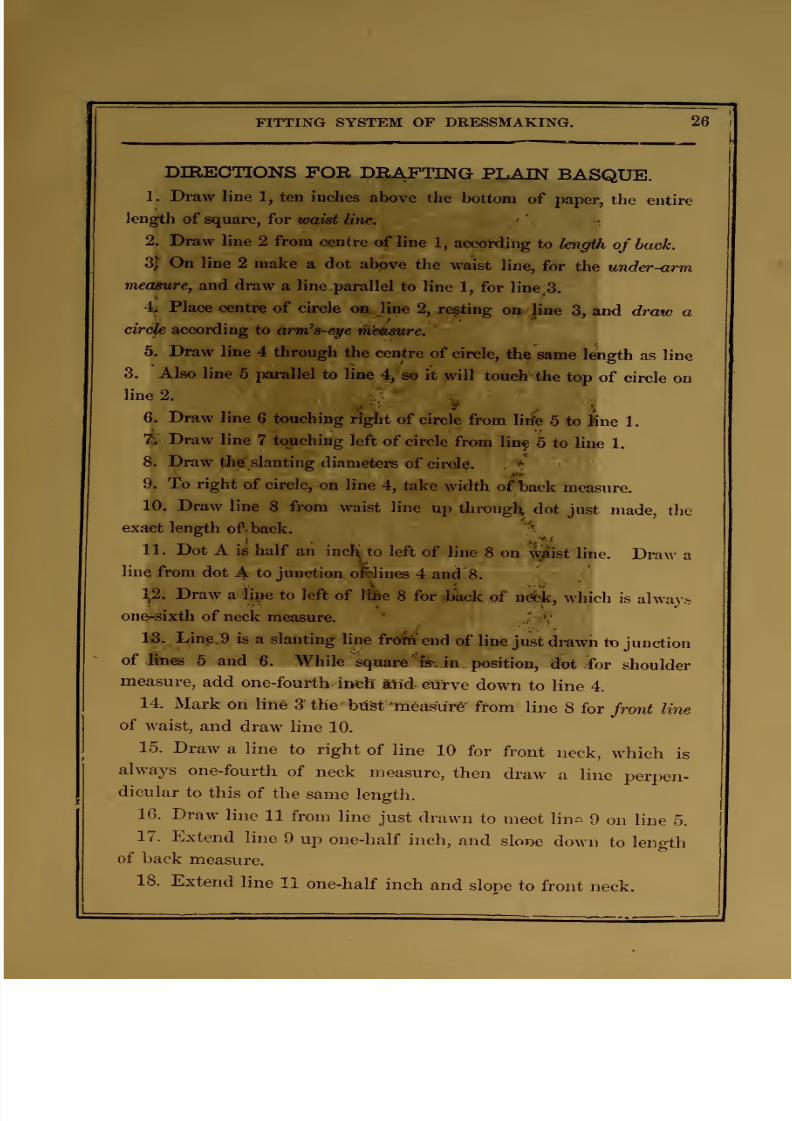
7/17/2019 The American Lady Taylor Glove Fitting System (Elizabeth Garland))
http://slidepdf.com/reader/full/the-american-lady-taylor-glove-fitting-system-elizabeth-garland 33/160
FITTING
SYSTEM OF
DRESSMAKING.
26
DIREOTIONS
FOR
DIETING
PLAIN
BASQUE.
1.
Draw line
1,
ten
inclies
above
the
bottom
of
paper,
the
entire
length
of
square,
for
waist
line.
2.
Draw line
2
from
centre
of
line
1,
according
to
length
of
back.
3|
On
line
2
make
a dot
above
the
waist
line,
for
the
under-orm
mectsure,
and
draw
a
line
parallel
to
line
1,
for
line
3.
4j
Place
centre
of
circle
on-line
2,
renting
oa
jine
3,
and
draw
a
circle
according
to
arnCs-eye
mMsure,
5.
Draw
line
4
through
the
centre
of
circle,
the
same
length
as
line
3.
Also
line
6
parallel
to line
4,'so it
will
touch
the
top
of
circle
on
line
2.
6. Draw line
6
touching
right
of
circle
from
lin'te
6
to
Kne 1.
%
Draw line
7
touching
left
of
circle
from
linf
5
to
line
1.
8.
Draw
tli^.
slanting
diameters
of
circle.
.
<t
9^
To
right
of circle,
on
line
4,
take
width
of
'back
measure.
10.
Draw
line
8
from
waist
line
up
througl]^
dot
just
made,
the
exact
length
of*,
back.
.,
*v
,
11.
Dot
A is
half
an
incl\to
left
of
line
8 on
l&t
line.
Draw
a
line
from
dot
A to
junction
ofelines
4
and
8.
1,2,
Draw
a
Ime
to
left
of Itl^e
8
for
Jblkck
of
nd?k,
which
is
always
oner-sixth
of
neck
measure.
Ii8.
Lini^
9
is
a
slanting
line
frok
end
of line
just
drawn
to
junction
of
feies
6
and
6.
While
square
-fe
in
position,
dot
for
shoulder
measure,
add
one-fourth
inch
aiid
curve
down
to
line
4.
14.
Mark
on
line
3
the
btist
measure'
from
line
8
for
frmd
line
of
waist,
and
draw
line
10.
15.
Draw
a
line
to right
of
line
10
for
front
neck,
which
is
always
one-fourth
of
neck
measure,
then
draw
a
line
perpen-
dicular
to
this
of
the
same
length.
IG.
Draw
line
11
from
line
just
drawn
to
meet
lin^
9
on line
5.
17.
Extend
line
9
up
one-half
inch,
and
slowe
down
to
length
of
back
measure.
18.
Extend
line
11
one-half
inch
and
slope
to
front
neck.
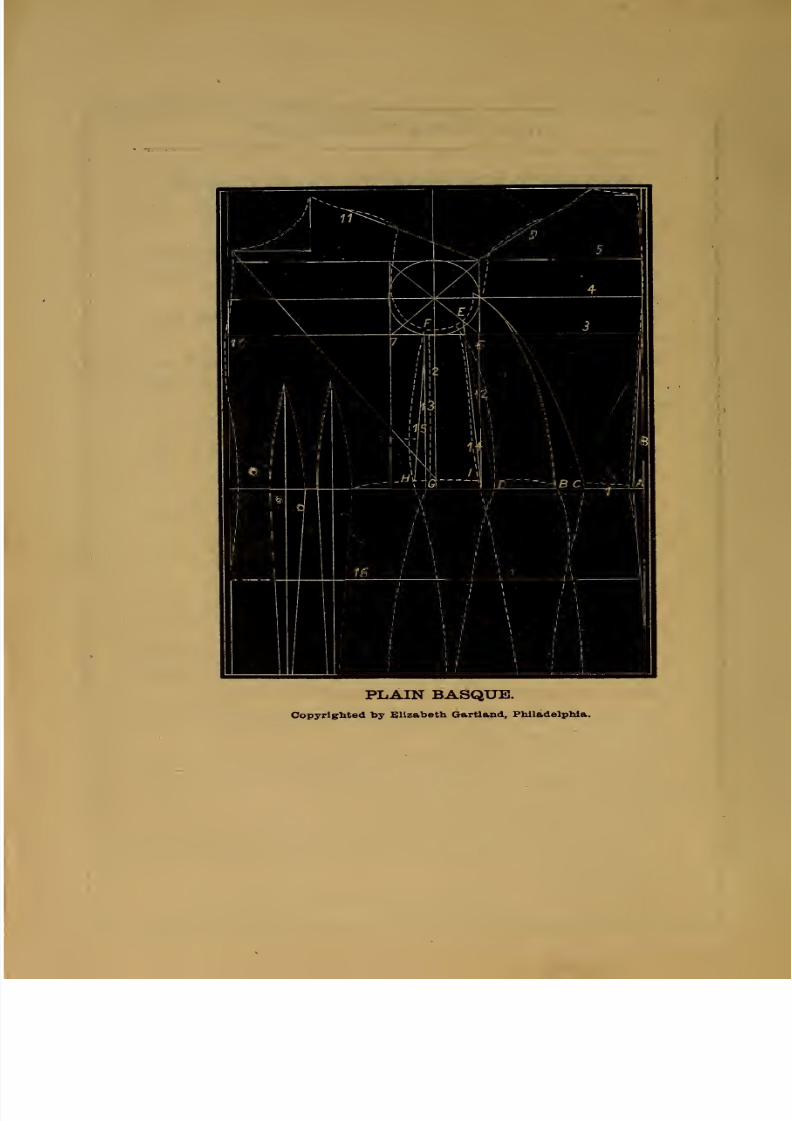
7/17/2019 The American Lady Taylor Glove Fitting System (Elizabeth Garland))
http://slidepdf.com/reader/full/the-american-lady-taylor-glove-fitting-system-elizabeth-garland 34/160
PLAIN
BASQUE.
Copyrlgbted
by
Elizabeth
Gartland,
Philadelphia.
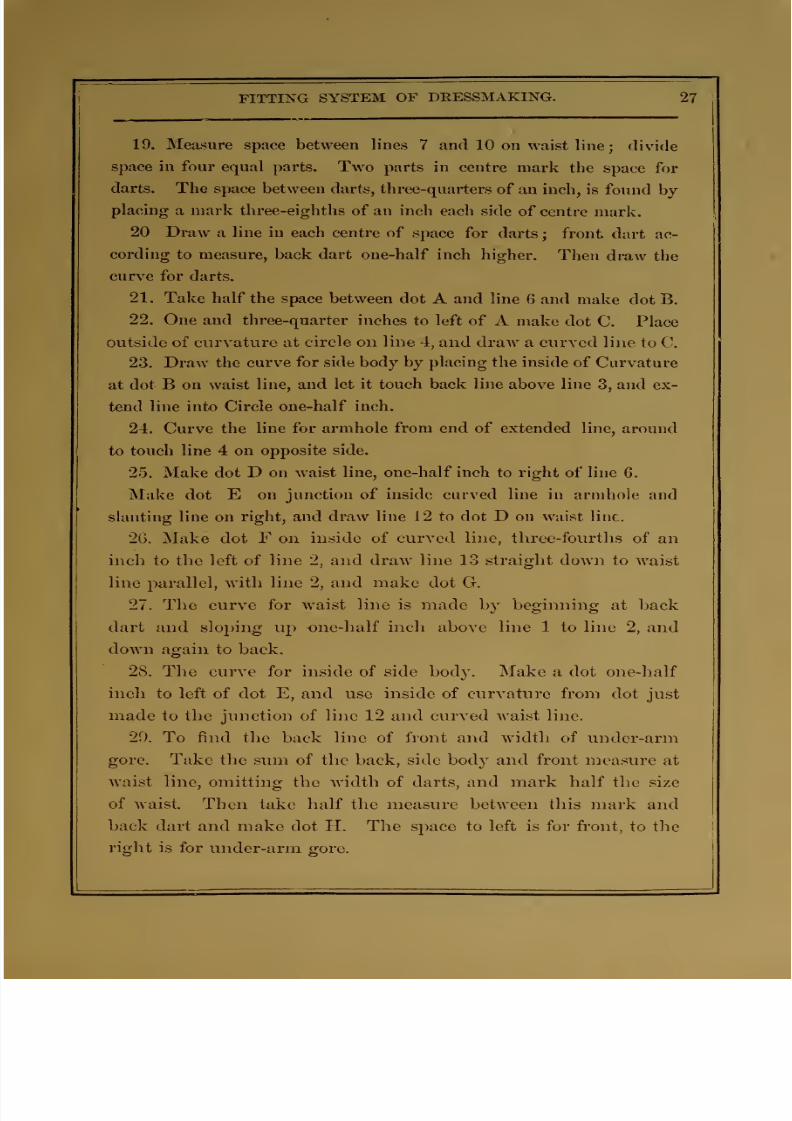
7/17/2019 The American Lady Taylor Glove Fitting System (Elizabeth Garland))
http://slidepdf.com/reader/full/the-american-lady-taylor-glove-fitting-system-elizabeth-garland 35/160
FITTING
SYSTEM
OF
DRESSMAKING.
27
19.
Measure
space
between
lines
7
and
10 on
waist
line
; divide
space in four
equal
parts. Two
parts in centre
mark
the
space for
darts.
The
space
between darts,
three-quarters
of
an
inch,
is found
by
placing
a
mark
three-eighths
of an
inch
each side
of centre
mark.
20 Draw
a
line
in
each centre
of
space
for
darts
;
front
dart
ac-
cording
to measure, back dart
one-half
inch
higher.
Then draw
the
curve for
darts.
21.
Take
half the
space between
dot
A and
line
6 and
make
dot B.
22.
One
and three-quarter
inches
to
left
of
A
make
dot
C.
Place
outside of
curvature at
circle
on
line
4,
and draw
a curved line
to
C.
23.
Draw the
curve
for side
body
by
placing
the inside
of
Curvature
at
dot B
on waist
line,
and let it
touch
back
line
above
line
3,
and
ex-
tend
line into
Circle
one-half inch.
24. Curve the
line
for
armhole
from
end of extended
line, around
to
touch
line
4
on
opposite
side.
25.
Make
dot
D
on
waist
line,
one-half
inch
to
right
of
line
6.
Make
dot
E
on
junction
of inside
curved
line
in
armhole
and
slanting
line
on
right,
and draw
line
12
to
dot
D
on
waist line.
20. Make
dot
F on
inside of curved
line,
three-fourths
of
an
inch
to
the
left of
line
2,
and draw line
13
straight down
to
waist
line parallel,
with
line
2,
and
make
dot
G.
27. The curve for waist
line is made
by beginning at
back
dart
and
sloping
up
one-half inch
above
line
1 to
line
2,
and
down
again
to
back.
28. The
curve
for inside
of
side
body.
Make
a
dot one-half
inch
to left
of
dot E, and use inside of curvature from
dot just
made
to
the
junction of
line
12 and
curved
waist
lino.
20. To
find
the
back
line
of front
and
width of
under-arm
gore. Take
the
sum
of
the back,
side
body
and
front
measure
at
waist
line,
omitting
the
width
of
darts,
and
mark
half
the
size
of
waist.
Then take
half
the
measure between
this mark and
back
dart and make
dot H.
The space to
left
is for front,
to
the
right is for
under-arm gore.

7/17/2019 The American Lady Taylor Glove Fitting System (Elizabeth Garland))
http://slidepdf.com/reader/full/the-american-lady-taylor-glove-fitting-system-elizabeth-garland 36/160
28
THE
AMERICAN
LADY
TAILOR
GLOVE-
30. Draw
line
14
from dot E parallel
to
line
6
and
make
dot
I.
Draw
line
15
from
dots
F
to
H.
31. If
the
space
between lines
13
and 14 is
too
small
for under-
arm gore,
which
is the
same
size
as
front from
dart
to back
line
on
waist
line, the difference
is
divided
equally
to left of line
13,
and
right
of line
14,
and
changes
the positions
of dots
G
and I.
32.
Curve
the
front from
dots
F
to
H
;
curve under-arm
gore
from
dots F to G and E
to
I.
33.
Make shoulder
line
from
end
of
perpendicular
line
at
neck,
to
junction of
lines
5 and
6,
for
line
11.
34.
The shortest part of
shoulder
should
be
directly on
top,
and
is found
by
placing point of square
at top
of perpendicular
line
of side neck and
top
of circle,
and make a mark
at
shoulder
measure,
then
curve from shoulder
line down
to
left of circle
on
line 4.
35. Measure
arm's
eye,
and if
too
short,
add what
is
wanting
to
front
shoulder,
sloping
to
front
neck.
36.
Draw
line
16
for hip line the height
of hip measure below
waist line.
37. Extend
lines
8
and
10,
and
slope centre
line
of
darts
a
little
to
the
back
;
extend
outside
dart lines
one-quarter
inch
each
side
of centre line;
to
prevent fullness
in
front
of long
basque, take
out
an
additional quarter
inch
to
left
of centre
line
of
dart,
from
about
one
inch
above
hip
line.
Uncommonly
stout
ladies
may
require
two under-arm
gores.
Mark
dots
B,
C,
D, I,
G
and H
on
hip
line.
38.
Slope
back line from dot A
to bottom
of line
8.
Inside
of
back is
sloped
from
dot
C
one-half
of an
inch
to
left
of dot C
on hip
line.
Back
of
side
body is
sloped
from B,
three-fourths
of an
inch to
right
of
B
on hip
line.
Back
of
under-arm piece is sloped
from I, one
and
a
quarter
inches
to
right of
I
on hip line.

7/17/2019 The American Lady Taylor Glove Fitting System (Elizabeth Garland))
http://slidepdf.com/reader/full/the-american-lady-taylor-glove-fitting-system-elizabeth-garland 37/160
FITTING
SYSTEM OF
DRESSMAKING.
29
Front
of
sidebody
is sloped
from
D, one
and
a
quarter
inches
to
left
of D
on hip
line.
Front
of
under-arm
piece
is
sloped from
G,
one and
a quarter
inches to
left
of
G.
Back
line of
front
is
sloped from
H,
one and
a half inches
to right
of
H
on
hip
line.
39.
If
too
small
after
measuring
all
pieces
on
line
16,
allowance
should
be
made
in
back seams if
a
bustle
is
worn,
or
in darts and
side
seams
if
the
lady has
a
high
stomach.
40.
The
front of waist is
curved
in from
neck about one-quarter
of
an
inch to
line
4,
curved
out
one-quarter
of
an
inch, and
into
height
of
dart,
and into
waist
line
one-half inch, then
out
to
one inch
above
hip
line.
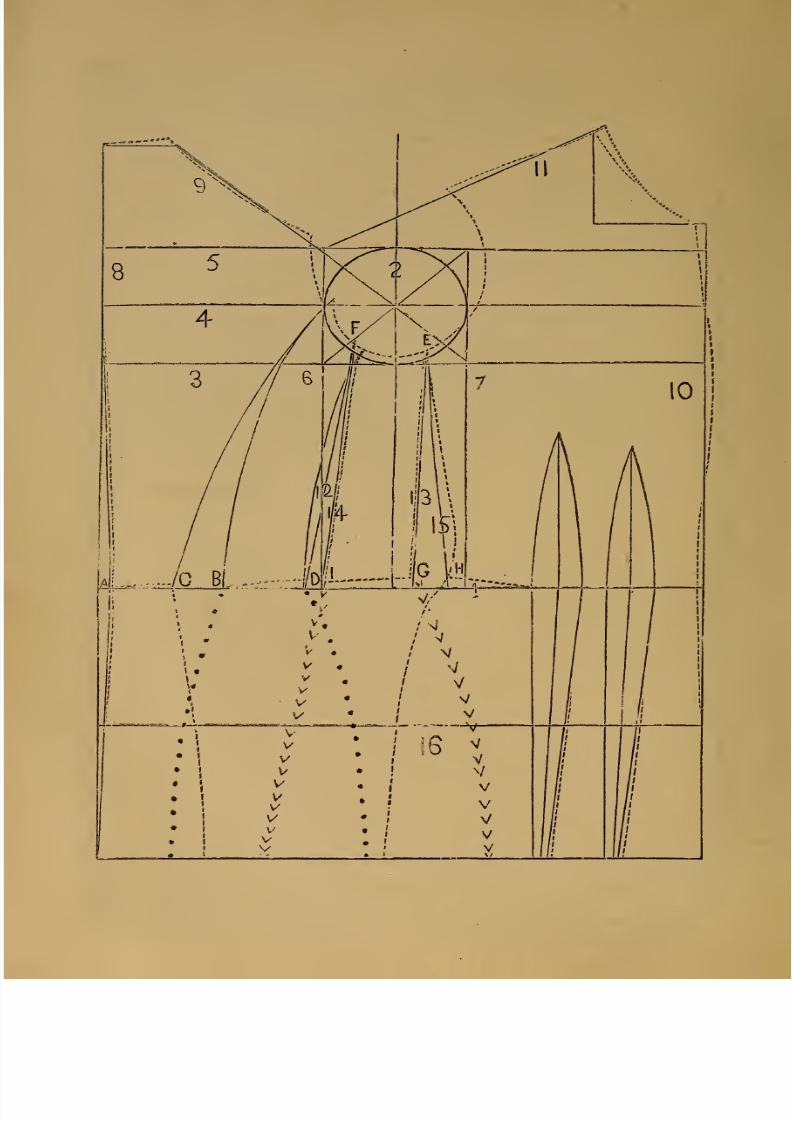
7/17/2019 The American Lady Taylor Glove Fitting System (Elizabeth Garland))
http://slidepdf.com/reader/full/the-american-lady-taylor-glove-fitting-system-elizabeth-garland 38/160

7/17/2019 The American Lady Taylor Glove Fitting System (Elizabeth Garland))
http://slidepdf.com/reader/full/the-american-lady-taylor-glove-fitting-system-elizabeth-garland 39/160
FITTING
SYSTEM
OF
DRESSMAKING.
31
IMPORTANT
QUESTIONS
FOR
PUPILS.
By
a
thorough
study of
these
questions and
answers, the
pupil will
be enabled to understand the
system
much
better.
Ques.
What is
line
1
?
Ans. It
is
intended
for
the
tvaist
line.
Ques.
What
is line
2
?
Ans.
For the
under-arm measure.
Ques.
What
is line 3?
Ans.
The bust
measure,
Ques. What
is line
4
?
Ans.
The
right
side
of
circle
is toicUh
of
back.
The
left side is
width
of
cJiesL
Ques.
What
is
line
5 ?
Ans.
The
shouldei'
lin^ ends
on line
5.
Que^.
For
what
are
lines
6
and
7
used
?
An^.
They
touch
the
right
and
left
of
circle
and
divide
the
body,
the
back
from
the
front.
Qiies.
Of what use are the slanting
diameters
?
Ans.
The
end
of
the
upper
right,
where
it
touches
line
5,
is
the
lower
end
of vshoulder line.
The end of
the
lower
left
marks the front
seam
of sleeve.
The end
of
the
upper
left
marks
where
fullness
at top
begins.
The
end
of
the
lower
right
marks
dot
E, where
inside
o{
side-body
is
drawn to
dot
D.
Ques.
What is
line
8 ?
Ans.
Length
of
back
measure.
Ques.
What
is
line
9 ?
Ans.
Line
9
is back
shoulder line.
Ques.
What
is line
10
?
Ans.
Line
10
is
front
line
of
waist.
Ques.
What
is
line
11
?
Ans.
Line
11
is
front
shoulder
line.
Ques. For
what is
line 12
used?

7/17/2019 The American Lady Taylor Glove Fitting System (Elizabeth Garland))
http://slidepdf.com/reader/full/the-american-lady-taylor-glove-fitting-system-elizabeth-garland 40/160
32
THE
AMEEICAN
LADY
TAILOK
GLOVE-
Ans.
Line
1
2 is
used to
find
the
front
line
of
side-body,
from
dot
D to dot E.
QueSo
For
what
is
line
13
used?
Ans.
Line
13
is
used
to
Und
front
line
of
under-arm gore
from dot
F
to dot G.
Ques.
For
what
is line 14
used
?
Ans,
Line
14 is used
to
find
hack
of
under-arm
gore,
from dot
E
to dot I.
Ques. For
what
is
line
15 used
?
Ans.
Line
15
is
used
to find back
line
of front,
from dot
F to
dot
H.
Ques.
For what is
line
16 used
?
Ans.
Line 16 is
used
for
hip
measure.
Ques.
For
what is
dot A
used
?
Ans. Dot A
is
on
waist
line and is
used
for slope
of
back.
Ques.
For
what
is
dot B
used
?
Ans.
Dot
B
is
on
waist
line,
and
marks
back
of
side-body.
Ques.
Fur
what
is dot
C
used
?
Ans.
Dot
C
is
on
waist
line and
marks
front
of
back.
Ques.
For
what
is dot
D
used ?
Ans.
Dot
D
is
on waist
line and
marks
front
of
side-body.
Ques.
For
what
is
dot E
used
?
Ans. Dot E is at the
junction
of inside
curve
of
circle, and
lower
right end
of
diameter,
and
is
the top
of
side-body
and
under-arm
gore.
Ques. For
what
is dot
F
used ?
Ans.
Dot F is three-fourthsof
an
inch
to
left
of
line
2
on
circle,
and
is
the tojj
of
front
and under-arm gore.
.%
Ques.
For
what
is dot
G
used
?
Ans.
Dot
G
is
on
waist
line,
and
is
the lower
front
of
under-arm
gore.
Ques. For
what
is
dot
H
used
?
Ans.
Dot
H is
on
waist
line,
and marks
the back
edge
of
front
of
body.
Ques. For what is
dot
I
used
?
Ans. Dot I is
on
waist
line,
and is the
lower
back
of
under-arm

7/17/2019 The American Lady Taylor Glove Fitting System (Elizabeth Garland))
http://slidepdf.com/reader/full/the-american-lady-taylor-glove-fitting-system-elizabeth-garland 41/160
FITTING
SYSTEM
OF
DRESSMAKING.
33
«=-A-XjXj shotjXjX)
I^:B-A.^D
this.
CAUSE
AND
EFFECT,
GENERAL
INFORMATION.
Note.
—
Those who are ^really
desirous
of
improving themselves,
would
do well to get
a few
yards
of
good
drilling,
(do not
use
cheap
goods
where you
are
testing
anything,
as
it
practically
destroys
the
test),
and after
measuring some
form, cut
several
linings
for
the same
form,
testing
the
different
embellishments
and
permissible
changes
which
we
hav-e
suggested
in
our
books.
A.
few
cents
and
hours
ex-
pended
in
this way
will
be
of
great value
and
assistance
to
any one.
THE
TRACING WHEEL.
Many ladies
purchase
the
System
and
learn
to
use
it
successfully
and
then,
thinking
to save
two
or
three
minutes
of time
by cut-
ting
out
the dress
without
a
tracing
wheel,
make
a
miserable
failure,
and then
iDlame the System for
their
failure.
This
is
absurd
I
Others
write for
instructions for
drafting on
the
cloth
in
order to
do
away
with the use
of the
tracing wheel.
It
is
an
easy
matter for
us
to
have
instructions printed so as
to
draft on cloth, and
to
do
away
with
the
tracing wheel,
but
we
think
to
much
of the reputation
of
the
System
to do
any thing
so foolish.
The
tracing
wheel is
absolutely
necessary
and
should be used
in all
cases.
It saves time
j
it prevents
inaccuracy,
and it proves the
old
adage that
^'
what
is
worth
doing
at
all, is
worth
doing well. Do not
get a double
wheel,
as
it
is
not practical, and
will cause
numerous
errors.
If you are going
to
cut a
gingham
dress
without
lining, and
the tracing wheel
will
not make a
visible
line
to
baste
by,
trace
out
a
lining
on thin
Manilla paper, baste this lining
to
your
goods, and after
dress
is
all finished
you can
tear
out
your
paper
lining,
and
at
the
same
time
your
dress
will
be
seamed
up
by
the
mark
of wheel,
which
was plainly visible
on
the paper
lining* Get
a
good
steel
.tracing
wheel
and
never
fail
to
use
it
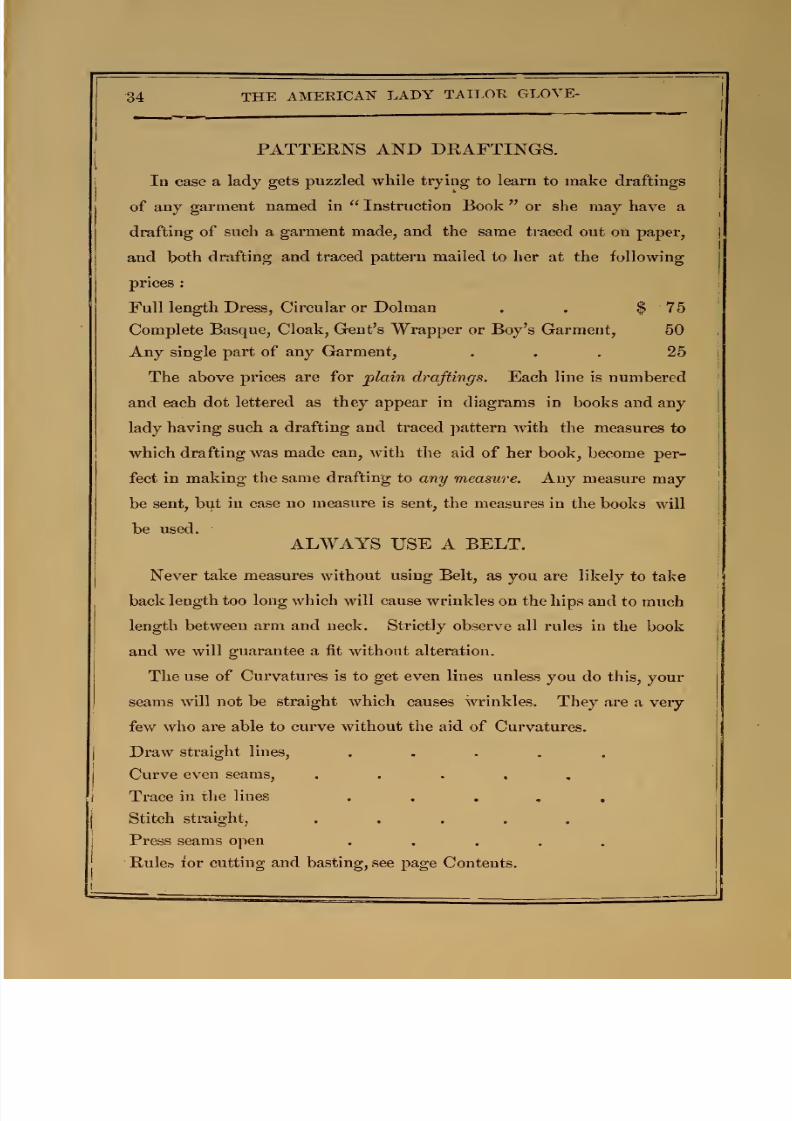
7/17/2019 The American Lady Taylor Glove Fitting System (Elizabeth Garland))
http://slidepdf.com/reader/full/the-american-lady-taylor-glove-fitting-system-elizabeth-garland 42/160
34
THE
AMEEICAN
LADY
TAILOK
GLOVE-
PATTERNS AND DRAFTINGS.
In case
a
lady
gets
puzzled
while
trying
to
learn
to make
draftings
of
any
garment
named
in
Instruction
Book
or
she may
have a
drafting
of
such
a
garment made, and
the same
traced
out
on
paper,
and
both
drafting
and traced
pattern
mailed
to
her
at the following
prices
:
Full length
Dress,
Circular
or Dolman
. .
$
75
Complete
Basque,
Cloak,
Gent's
Wrapper
or
Boy's
Garment,
50
Any
single
part
of
any Garment,
.
. ,
25
The above
prices
are for
plain
draftings.
Each
line is
numbered
and
each
dot lettered
as
they
appear
in diagrams in
books and any
lady
having
such
a
drafting and
traced
pattern
with the
measures
to
which
drafting
was
made
can,
with
the
aid
of
her
book, become
per-
fect
in
making
the same
drafting
to
any
measure.
Any
measure
may
be sent,
but
in
case no
measure is
sent, the
measures
in the
books
will
be
used.
ALWAYS
USE
A
BELT.
Never
take
measures
without
using
Belt,
as you
are
likely
to take
back
length
too
long
which will
cause
wrinkles
on
the hips
and
to much
length
between
arm
and
neck. Strictly
observe
all
rules in
the
book
and
we
will guarantee a fit
without
alteration.
The
use
of Curvatures is
to
get even
lines
unless
you
do
this,
your
seams
will not be
straight
which causes wrinkles.
They are
a very
few
who
are able to curve
without
the
aid
of
Curvatures.
Draw
straight lines,
.....
Curve
even seams,
.....
Trace
in tlie
lines
. .
,
,
,
Stitch
straight,
.....
Press
seams
open
.....
Rules)
ior
cutting and
basting,
see
page Contents.

7/17/2019 The American Lady Taylor Glove Fitting System (Elizabeth Garland))
http://slidepdf.com/reader/full/the-american-lady-taylor-glove-fitting-system-elizabeth-garland 43/160
FITTING SYSTEM
OF DRESSMAKING.
35
PLAIN
BASQUE
PATTERN.
Special
rules for
Measuring
and
Cuttting.
For
Deformed Persons.
Very
Stout
«
Very
Slender
See
Contents

7/17/2019 The American Lady Taylor Glove Fitting System (Elizabeth Garland))
http://slidepdf.com/reader/full/the-american-lady-taylor-glove-fitting-system-elizabeth-garland 44/160
MEASURES
FOR
DRAFTING
SLEEVE.
1,
Arm's-eyo,
14
inches.
6.
Upper
Arm,
12
inches
2. Neck
to
Elbow
19
7.
Middle
Arm,
m
3.
Shoulder,
5
8. Elbow, 11
4.
Inside
to
Bend,
8
9. Lower
Arm, 10
5. Inside
to Wrist, 16
10.
Wrist,
RULES
FOR
DRAFTING SLEEVE.
1.
Line
1
is
inside
measure
and
diameter
of
circle
added.
Dot
on
this line where
diameter
of
circle
begins for
A,
^
inch to
the
right
of
A mark
B.
Dot
C
marks
inside
to
bend measure
from
dot
A. Dot
D
is
half
the space
between
B and end of
line
1.
2. LiAe 2 is
f
of
arm's-eyc measure.
3.
Line
3
is
the
same length
as
line
1.
4.
Draw lines
4,
5,
6,
7,
from
dots
A,
B,
C,
D.
5.
On
line
5,
|
inch
from
dot B
make
dot
E
and
|
inch
from E
make dot F.
6.
G
is
one
inch
above line
3
on line 2.
From
G
draw
a
line
to
line
7
and make
dot H. For
every
inch that
the arm's-eye
is
larger
than
14 inches, the
space between dot
G
and line
3
is
made
J
inch
larger.
in like
manner
subtract
^
inch
for
every
inch that
the
arm's-eye
is
smaller
than
14
inches.

7/17/2019 The American Lady Taylor Glove Fitting System (Elizabeth Garland))
http://slidepdf.com/reader/full/the-american-lady-taylor-glove-fitting-system-elizabeth-garland 45/160
FITTING SYSTEM
OF
DRESSMAKING.
37
7. I
is
J
of
space
between dot
G
and line
1.
From
I
draw
a
line to
lino
7
and
make
dot J.
8. K
is
1^
the
space between
dot I and line
1.
9. On line
6
mark
dot L
2
inches
from
dot
C.
2
of
incli
frjm
dot
L
make dot
M.
10.
Draw
lines
from
E to L, and from
F
to
Maud
from
L
accord-
ing
to
inside
to
wrist measure
one
inch
above
line
1
and
make
dot
N.
11. Place point of square
on
dot N
so
the long arm
of
square touches
dot
N
on line
6
and draw line
8
for wrist
|
of
wrist
measure
fjr
upper
sleeve
and
make
dot
O.
Two
inches
to inside
of
N
make
P
and
J
of
wrist measure from
P,
mark
dot
Q
for
under-sleeve.
Take
off
from
the
upper and
add to
under-sleeve
if a wider
under-sleeve is
preferred.
12. On
line
6
to
inside of dot
L
mark for
elbow,
so that the
upper
sleeve
is
from
1 to 2
inches
wider
on
the outside than the
under-sleeve.
Mark
R
for the upper-sleeve
from
dot L and S for the
under-sleeve
from
dot
M.
13.
Then
take
tape
measure
and
place
shoulder
measure
on
dot I
and
measure for
elbow,
letting
the
tape
measure
pass
line
6
bctwevn
dots
R
and
S
and make
a
mark
where
your real
measure
comes
to
(above
or below
line
6),
then
draw
line
9
from dot
L,
passing
through mark
just made.
Then measure
again
for elbow
on line
9
and
juark
H
and
S
on this
line,
14.
Draw lines from
M
to
P,
from H to
R,
last made,
from
R
to
O
from
J
to S
and
from
S
to
Q.
15. In
curving
the
upper-sleeve
begin
at dot
E curving up to
K and
I
and down
to H.
Curve top
of
under-sleeve
from Fto
J.
16.
After
curving
the
inside
of upper
and under-sleeve measure
for
middle
and
lower arm
and
curve
outside
of sleeve
according
to
measurements.
17. Extend upper-sleeve from
dot
N
one-half
inch and
slope
down
to dot
Q.
18.
The top of
sleeve
should always
measure
at
least two inches more
than arm's
eye.
If
a
raised sleeve
is
desired,
cut the
upper-sleeve from
one-half to
one
inch
higher.*
Dotted
line
m
diagram shows where
to
increase
the
curve
for
high
sleeve.
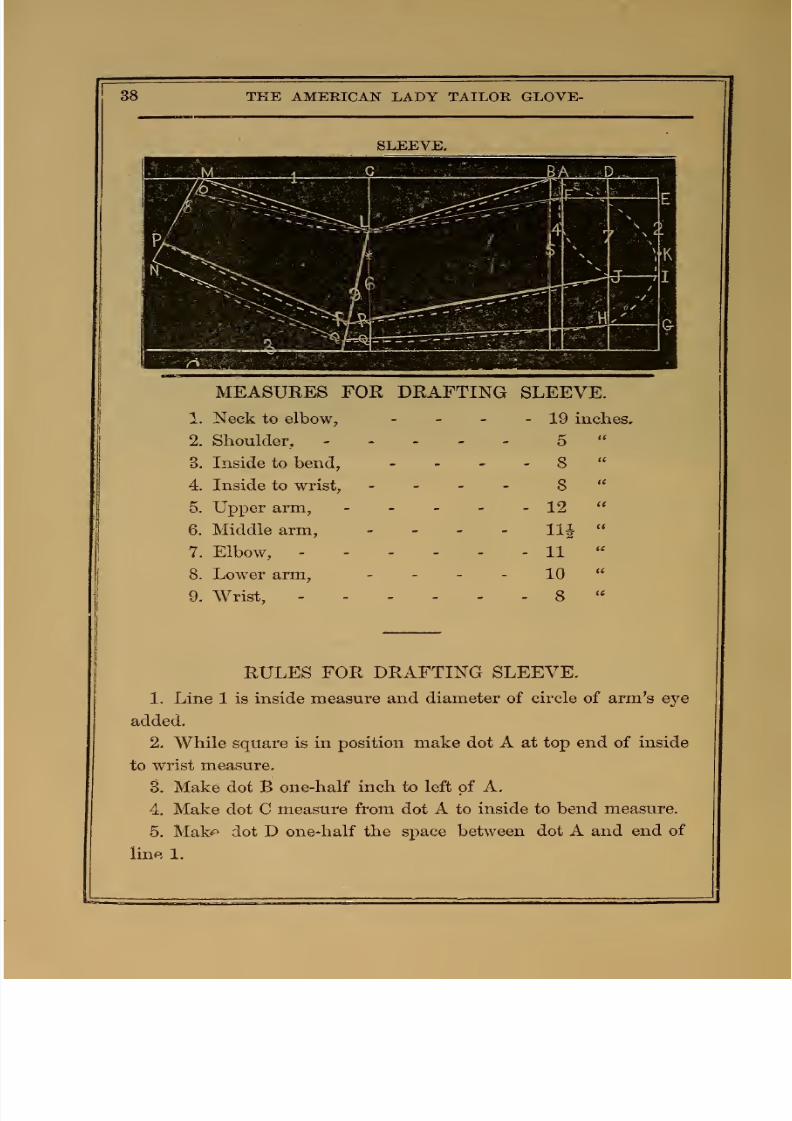
7/17/2019 The American Lady Taylor Glove Fitting System (Elizabeth Garland))
http://slidepdf.com/reader/full/the-american-lady-taylor-glove-fitting-system-elizabeth-garland 46/160
38
THE AMERICAN
LADY
TAILOR
GLOVE-
SLEEVE.
MEASURES
FOR DRAFTING
SLEEVE.
1. Neck to
elbow,
-
- -
-
19 inches.
2. Shoulder,
5
3.
Inside
to
bend,
-
-
-
-
8
4.
Inside
to
wrist,
-
- -
-
8
5.
Upper arm,
12
6.
Middle arm,
-
- - -
llf
7.
Elbow,
11
8. Lower arm,
-
- - -
10
9. Wrist,
-
8
RULES
FOR
DRAFTING SLEEVE.
1. Line
1
is inside measure
and
diameter
of
circle
of arm's
eye
added.
2. While
square
is
in
position make dot
A
at
top end of inside
to
wrist
measure,
3.
Make
dot B
one-half inch to left of
A.
4.
Make
dot
C
measure from
dot
A
to
inside
to
bend
measure.
5.
Mak^
dot D
one-half
the
space between
dot
A and
end
of
line
1.

7/17/2019 The American Lady Taylor Glove Fitting System (Elizabeth Garland))
http://slidepdf.com/reader/full/the-american-lady-taylor-glove-fitting-system-elizabeth-garland 47/160
39
FITTING
SYSTEM
OF
DRESSMAKING.
6.
Line
2
forms
a
right
angle with
line
1,
and is
two-thirds
cX
arm's-eye
measure.
7.
Line
3
is
drawn
from
end of line
2,
and is parallel with
line 1.
8. Draw lines
4, 5, 6,
7
from
dots A B C D parallel
with line 2.
9.
Make
dot
E on
line
2
one
and one-fourth
inches from line
1
;
draw a
line
parallel
to
line 1 from
dot
E
to
line
4,
and
make
dot
F.
10.
Make
dot
G
on
line
2
one
and
one-half inches
from
line
3
draw
a
line
parallel
to
line
3 from dot
G
to line
7,
and
make
dotH.
The
space
between dot G
and
line
3
is
made
one-fourth
inch
larger
or
smaller for
every
inch
the
arm's-eye
measure
is
more or
less
than
14 inches,
11. Make
dot
I
one-third of
space
between
dot
G
and line
1
draw
a
line
from
dot
I
to
line
7
and
make
dot
J.
12.
Make
dot
K one-fourth
of
space
between dot
I and line
1
on
line
2.
13. Make
dot
L
3
inches trom line
1 on
line
6,
14.
Make
*
one and one-fourth
inches
to
the inside of dot L.
The
space
between
dot L
and
C
is
made
one-third
inch
larger
or smaller
for
every
inch the
inside sleeve
measure
is
more
or
less
than
16
inches,
15.
Draw
lines from
B
to
L, F to L,
and
from L towards
end
of
line
1,
marking
dot
M
according
to
inside
to
wrist
measure.
16.
Place
point of square on dot
M
with long
arm
touching
*
on
line
6,
and draw line 8 from
M
five-eighths
of wrist
measure
for
upper
sleeve, and
make
dot
N at
end
of
line.
17.
Make
dot
one
inch inside
of
M
;
from
make
dot
P
on
line
8
three-eighths
of wrist
measure
for
under
sleeve.
18.
Make
dots
Q
and
R,
on
line
6,
so
that
the
upper
sleeve be
one inch
wider
than the lower
sleeve.

7/17/2019 The American Lady Taylor Glove Fitting System (Elizabeth Garland))
http://slidepdf.com/reader/full/the-american-lady-taylor-glove-fitting-system-elizabeth-garland 48/160
40
THE
AMERICAN
LADY
TAILOR
GLOVE-
18.
To the
inside
of
dot L,
make
dots
Q
and
R,
on
line
6,
so
that
he
upjjer
sleeve
be
one
inch
wider than
the
lower
sleeve
for
a
very
slender arm it
may be
only three quarters of an
inch.
19. Then take
tape measure
and
place shoulder measure
on
dot I,
and measure for length of
outside
measure
to
elbow,
letting the
tape
measure
pass
line
6
between
dots
Q,
and
R,
and make
a
mark
to
where
the
real
measure comes. Then draw
line
9
from line
L
passing
through mark
just made,
and
then
measure
again
for
size of
elbow
on
line
9
and
mark
9
and
R
on that line.
20.
And
then
draw
lines from P to
R
last made
N
to
G
from
G,
H,
and
from R to
I
and L
to
O.
21.
Extend bottom of upper
sleeve
three-eighths
of
an
inch from
dot M,
and draw
a
line sloping
to dot
N.
22.
The
outside curvature can
be
used for curving the inside of
sloeve.
In
curving top
of
upper
sleeve begin at dot
B
curving
in
half
inch
from
dot A,
up to dot K
and
I
on
line
2
and
down
to
dot H,
curve
top
of under
sleeve
from
F
to
J,
outside of sleeve
must
be
curved
according
to
measurement.
Remarks.
The bend
of sleeve can
be
made less
by
making
the
distance between
C
and
L smaller. Can also make the undersleeve
one
inch
narrower
on
the
inside
seam.
What
is
thus
taken
oif
must
be added to
the
inside
of
upper
sleeve, which throws the seam
farther
back. It also
can be
added
to
the
outside
of upper sleeve,
this
will
give a
little
fullness at
elbow
what
some ladies prefer.
N. B. Be
very
careful in
putting in sleeve in
the
waist,
always
have outside
seam
of
sleeve
touching line
4
in
the
back
in
all
cases.
In
basting
in
sleeve
have
the
sleeve
next
to
you as the
sleeve must
be
fulled
slightly,
particularly
in
the
upper
part
of
the
front
of shoulder.
Always
put
cotton
in
the
top
of
upper
sleeve
;
this
will
improve
the
fit.
French
canvas
may also
be
used instead.
7/17/2019 The American Lady Taylor Glove Fitting System (Elizabeth Garland))
http://slidepdf.com/reader/full/the-american-lady-taylor-glove-fitting-system-elizabeth-garland 49/160

7/17/2019 The American Lady Taylor Glove Fitting System (Elizabeth Garland))
http://slidepdf.com/reader/full/the-american-lady-taylor-glove-fitting-system-elizabeth-garland 50/160
42
THE
AMEEICAN
LADY
TAILOR
GLOVE-
V
\
V
\
{
1
1
I
\
A;
\
,
1
1
\
.
\
\
,,
\
'
I
\
1
I V
/
\
'
'
\
\
\
\
\
\
\
\
\
\
\
\
\
..1
...
1
,
..
.
')-
1
1
-c'
'
1
.
1
--.•
1
•
-
1
'.;
•
,
1
•
,
J.—-
'-
—
:
—
:
—I—
:
J
SKIRT.
Copyrighted,
by
Elizabeth.
Gartland^
Philadelphia.
\
\
SKIRT.
Copyrighted
by
Elizabeth
Gartland,
Philadelphia

7/17/2019 The American Lady Taylor Glove Fitting System (Elizabeth Garland))
http://slidepdf.com/reader/full/the-american-lady-taylor-glove-fitting-system-elizabeth-garland 51/160
FITTING
SYSTEM
OF
DRESSMAKING.
43
MEASURES
FOR
DRAFTING
GORED
SKIRT.
AVaist
Measure,
24 inches.
Hip
Measure, 40 inches.
Length
of Front, 40
inches.
Length
of Back, 41
inches.
Widtji
of
Skirt, 2
yards.
The
length
of
front
skirt should
be
taken, and the
darts
in
top
should 1
e
shaped
according
to
figure.
The side
breadth is
cut
some-
what longer
than front breadth,
and is
but
half
the width. A
dart
is
also
taken
off
the edge of front
breadth,
and
sloped
to
fit
the figure.
The
same
thing
is done
to back
edge
of
side
breadth.
The
back
breadth is
not sloped.
In sewing up
the
breadths,
a bias
and
a
straight
edge
are
put together, holding
the former toward
you.
If
the
skirt
is
preferred
wider,
the
extra fullness
is
invariably
j)Ut
in
the
back.
Those ladies
who
like
a
long,
narrow skirt,
are
sometimes
annoyed
by
the
skirt
catching
or
drawing in
front
at
the
bottom. This
is
obviated by making
two
cuts
in
the
front
breadth,
three
inches
deep,
and about
four
inches
from each
side of the centre.
To
finish off
the
skirt nicely, the skirt
braid
should
be
continued
around
these cuts.
The
trimming
falling
over
them,
hides
them from view.
IMPORTANCE OF
HIP
MEASURE
OF
SKIRT.
It
is a
mistake
for
any
one to
think
that
a
skirt
is
so
easily
made
that
no
instruction is
needed. It is of as
much
importance for
the
skirt
to
Jit
the
figure,
as
it is
for the basque
to
do
so. For
is
it
not
as
impossible for
one
universal
skirt
pattern
to
fit
all figures, either
slen-
der
or
stout,
as
it
is
to have
one
sleeve
or
basque
pattern
fit
all
sizes
of
arms or bodies ? A
slender young girl of
sixteen
or
eighteen
years
of
age
would be
lost
in
a
skirt
intended
for
a
lady of two
hun-
dred
pounds
weight, or
vice versa,
the
fully
developed lady
of
whom
we
speak
would
be
unable
to
get
into
the
skirt
intended for llie
young girl.

7/17/2019 The American Lady Taylor Glove Fitting System (Elizabeth Garland))
http://slidepdf.com/reader/full/the-american-lady-taylor-glove-fitting-system-elizabeth-garland 52/160
44 THE AMERICAN
LADY
TAILOR GLOVE-
SLEEVE IN ONE PIECE.
This
sleeve
may
be
made straight
on
the
thread of
the
material,
but
it
has
a
much prettier effect,
particularly
in plaid
goods, and
stretches
at
the
elbow
like
a jersey
sleeve
when
made
bias,
BjuUs
for
Drafting.
1. Line
1 is inside
measure
and
diameter
of
circle added
make
dot
A as
usual in
other
sleeves.
2. Dot
B
is
on
line 1
and
marks inside to bent
measure.
3. Dot
C
is
one-half the
space
to
the right
between dot
A
and
the other
end of line
1.
4. Dot D
is one-third
of
space
between dot C and end of
line
1
5.
Line
2 is
perpendicular
to
line
1,
and
is
two-thirds
the
size
of
arm's-eye.
G.
Line
3 is
parallel
to
line
1.*
7.
Draw
lines
4, 5,
6,
7,
from
dots
A,
B,
C,
D,
parallel
to
line
2.
8.
Dot
E
is
one-half
of
line
2.
Dot
F
is
one-fourth
the
space
between:
dot
E
and
end
of
line 1.
9.
Dot
G
is
on-line
7,
one
and
one-fourth
inches
less
than
one-
lialf
of
arm's-eye.
10.
Dot
H
is
on
line
5 two
inches
inside
of
dot
B.
Make
a
star
one
inch
inside
of
dot
H.
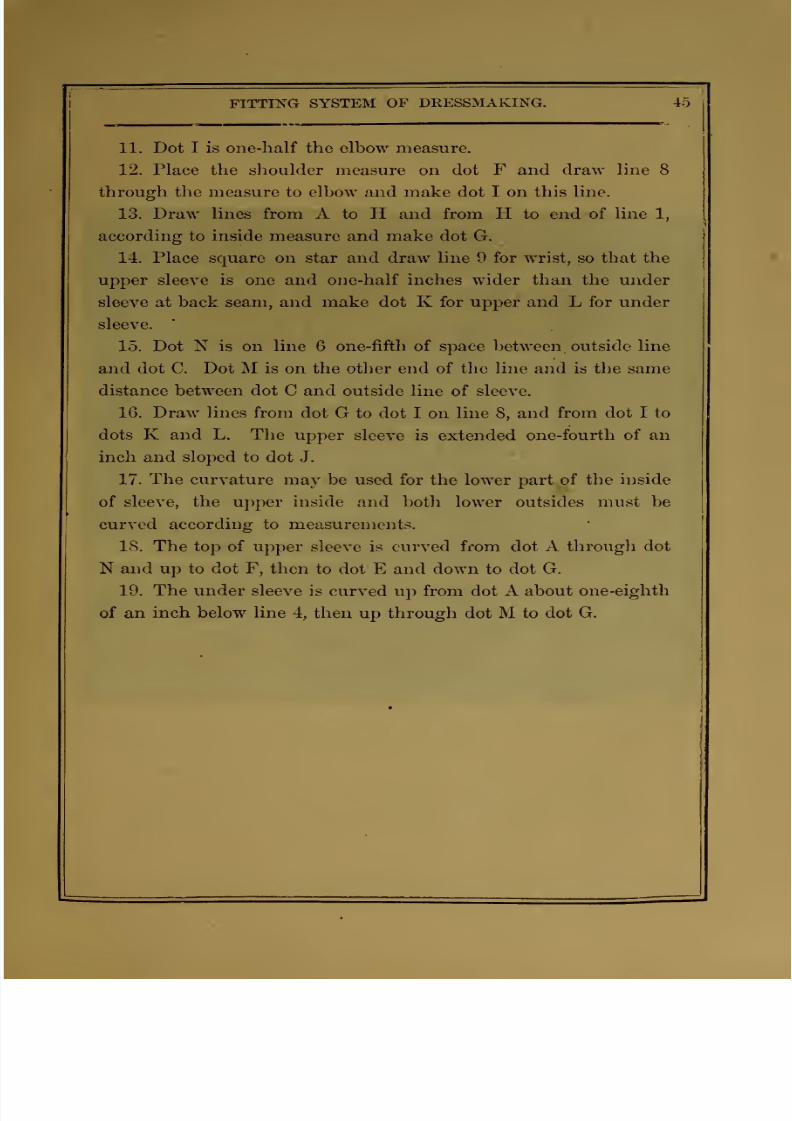
7/17/2019 The American Lady Taylor Glove Fitting System (Elizabeth Garland))
http://slidepdf.com/reader/full/the-american-lady-taylor-glove-fitting-system-elizabeth-garland 53/160
1 FITTING
SYSTEM
OF
DRESSMAKING.
45
11.
Dot
I is one-half the
elbow
measure.
12.
Place
the shoulder
measure
on
dot F and
draw
line
8
through
the measure
to elbow and
make
dot I
on
this
line.
13.
Draw
lines
from A to
H
and from H
to
end
of
line
1,
according
to inside measure and make dot
G.
14.
Place square on
star
and
draw
line
9 for wrist, so that
the
upper
sleeve
is one and
one-half
inches wider
than
the
under
sleeve
at back
seam, and
make
dot K
for upper
and
L
for
under
sleeve.
15.
Dot
N
is
on
line
6
one-fifth
of space
between
outside line
and dot C. Dot
M
is
on the
other
end
of tlie line
and
is the same
distance between
dot
C and outside
line
of
sleeve.
16.
Draw
lines from
dot
G to dot I on line
8,
and
from dot I to
dots
K and L. The
upper sleeve
is
extended
one-fourth of an
inch
and
sloped
to
dot J.
17. The curvature
may be used
for
the
lower part
of
the
inside
of
sleeve, the
upper
inside
and
both
lower outsides
must
be
curved according to
measurements.
18.
The
top
of
upper
sleeve is curved
from dot
A
through
dot
N and up to
dot
F, then
to dot
E
and
down
to
dot
G.
19.
The
under
sleeve
is
curved up from
dot
A
about
one-eighth
of an
inch below
line
4,
then
up
through
dot
M
to dot
G.

7/17/2019 The American Lady Taylor Glove Fitting System (Elizabeth Garland))
http://slidepdf.com/reader/full/the-american-lady-taylor-glove-fitting-system-elizabeth-garland 54/160
No.
1.
COAT
SLEEVES.
No.
2.

7/17/2019 The American Lady Taylor Glove Fitting System (Elizabeth Garland))
http://slidepdf.com/reader/full/the-american-lady-taylor-glove-fitting-system-elizabeth-garland 55/160
FITTING
SYSTEM
OF
DRESSMAXING.
47
RULES
FOR
COAT
SLEEVE.No.
1.
1.
Draw
line
1
from
inside
to
wrist
measure
with
diameter
of
arm's-eye
added.
2.
Dot
A
is on
line
1
at
inside
to
wrist
measure,
and
dot
±5
is
half
an
inch
to
the
left
of
dot
A.
3.
Dot
C
marks
inside
to
bend
measure,
from
dot
B
and
dot
D
is
one
third
of
space
between
dot
A
and
end
of
line
1.
4.
Line
2 is
two-thirds
the
size
of
arm's-eye
and
perpendicular
to line
1.
5.
Draw
line
3
from
end
of
line
2
parallel
to
line
1,
and
line
4
parallel
to
line
2
from
lines 1
and
3.
6. Draw
lines
from
dots
A,
B,
C
and
D,
and
make
lines
5, 6,
7
and
8.
7.
Dot
E is
in
the
centre
of
line
2;
dot
F
is
one
inch
to
the
left,
and
dot H
is
one
inch
to
the
right
of
dot
E.
8.
Draw
a
line from
dot
E to
line
8,
and
make
dot
I.
9. Dot G
is one
inch
from line
3,
allow one-fourth
of
an
inch
more
or less
space
for
every
inch
that
the
arm's-eye
is
greater or
smaller than
14
inches
;
then draw
a
line
to
line
8 from dot G,
and
make dot
J.
10.
Make dot K
on
line
7,
one
and
one-fourth
inches
from
dot
C,
and
make
a
star
one-half
inch from dot K.
11.
Make dot L on line
4,
three-fourths of an inch from line 1.
12. Slope for
inside
of
sleeve
from
dot
B
to dot
K, and down to
dot
L.
13.
Place
point of
square on dot L, the long
arm
touching
star
and
draw line
9 for bottom of sleeve.
14. Make
dots M
and N on
line
9,
so that upper sleeve measure
will be
one inch larger than
under sleeve.
15.
Make
dots
and P
on
line
7,
so
that
upper
sleeve
will
measure
two
and one-fourth
inches larger at
elboM'
than under
sleeve.

7/17/2019 The American Lady Taylor Glove Fitting System (Elizabeth Garland))
http://slidepdf.com/reader/full/the-american-lady-taylor-glove-fitting-system-elizabeth-garland 56/160
48
THE
AMERICAN
LADY
TAILOR
GLOVE-
1(3.
Slope
for
outside
of
upper sleeve
from dot
J
to and
down
to dot
M,
and
for
under
sleeve
from
dot
I^
to
dot
P,
and
down
to
dot
N.
17.
Curve
for
upper
part
of sleeve
from
dot
B,
passing
through
line
8
three-fourths
of an
inch
from
line
1,
then through dots
F,
E
and
H, down
to
dot
J.
18. Curve
for
under
sleeve
from
dot
I to
dot
B.
19.
Extend
the
outside
line
of
sleeve
one-third
of
an inch,
and
then
draw
a
line
to
dot
L
for
lower
part
of
upper
sleeve.
COAT
SLEEVE,
No.
2.
1.
Draw
line 1
from
inside
to
wrist
measure
with diameter of
arm's-eye added.
2. DotA marks
diameter
of arm's-eye ; dot B is half
an inch
to
left of
dot A.
3. Dot C marks inside
to
bend from
dot B, and dot
D
is
one-
third of distance
between
dot
B
and
end
of
line
1.
4.
Line
2 is
two-thirds
of
arm's-eye, perpendicular to
line 1.
5.
Lines
3
and
4
are parallel to lines
1
and
2,
as
in
other dia-
grams.
6.
Draw
lines
5,
6,
7
and
8,
from dots
A,
B, C and
D.
7.
Dot
G
is
one
and three-fourths of an inch from line 3
on
line
2
;
allow
one-fourth
of an
inch
more or less
space
for
every
inch
that
the
arm's
eye
is
greater or
smaller
than
14
inches.
8.
Draw
line
9
to
line
6.
9. Dot E
is
one-third
of
space between
dot
G
and end of line 1.
10. Dot
F
is
one-third of space between
dot E and end of
line
1.
11.
Draw
line
10 from dot E
to
line
6
;
make
dot
H on
line
8,
one
inch
to left
of
line
10.
12.
Dot
I
is
on
line
7,
two
inches
from dot
C.
13. Star is
one
and one-fourth
inches from dot I on line
7.
14.
Dot
J
is
one and
one-fourth
inches
from
line
1
on line 4.

7/17/2019 The American Lady Taylor Glove Fitting System (Elizabeth Garland))
http://slidepdf.com/reader/full/the-american-lady-taylor-glove-fitting-system-elizabeth-garland 57/160
FITTING
SYSTEM
OF
DRESSMAKING.
49
15.
Draw lines
from
dot
B
to dot
I
and
down to
dot J.
Place
point
of
square on
dot J, the long
arm
touching
star
and draw
Hne
12.
16.
Mark
the wrist
measure
on
line
12,
so that
the upper
sleeve
is
one inch
larger
than the
under
sleeve, and
make
dots
K
and
L.
17.
Make dots
M
and N on line
7,
so
that
upper will measure
one
inch
larger at elbow than
under sleeve,
18. Place
the
tape
measure
at
shoulder
measure on
dot
E, and
mark the
neck to
elbow
measure,
passing through dots
M
and
N
on line
7.
The
dots
thus
made
give
the
true
length to
elbow.
19. Draw
line 11 through dots just
made,
and
mark dots M
and
N
on
this
line,
20. Slope for
outside of upper sleeve
from
junction
of
line 9
and
8,
to
dot
M
on
line 11
and down
to dot
K, and
for
under
sleeve
from dot H,
passing
the junction
of
lines
10
and
6 to
dot
N
on
line
11,
and
down
dot
L.
21.
Curve for upper sleeve
from dot
B, passing through
dots
F
and I
on line
2
down to
junction
of lines
9
and
8,
22.
Curve
for
under
sleeve
from
dot H
to
dot B.
23. Extend the
outside
line
of upper sleeve at dot
K
one-third
of an inch, and
draw a
line to
dot
J
for bottom
of
upper
sleeve.
As the
under-arm seam is
alike in
the
upper
and
lower
sleeve,
material that
has
to be
washed
is
more
easily
laundried
when
made
by either of these diagrams.
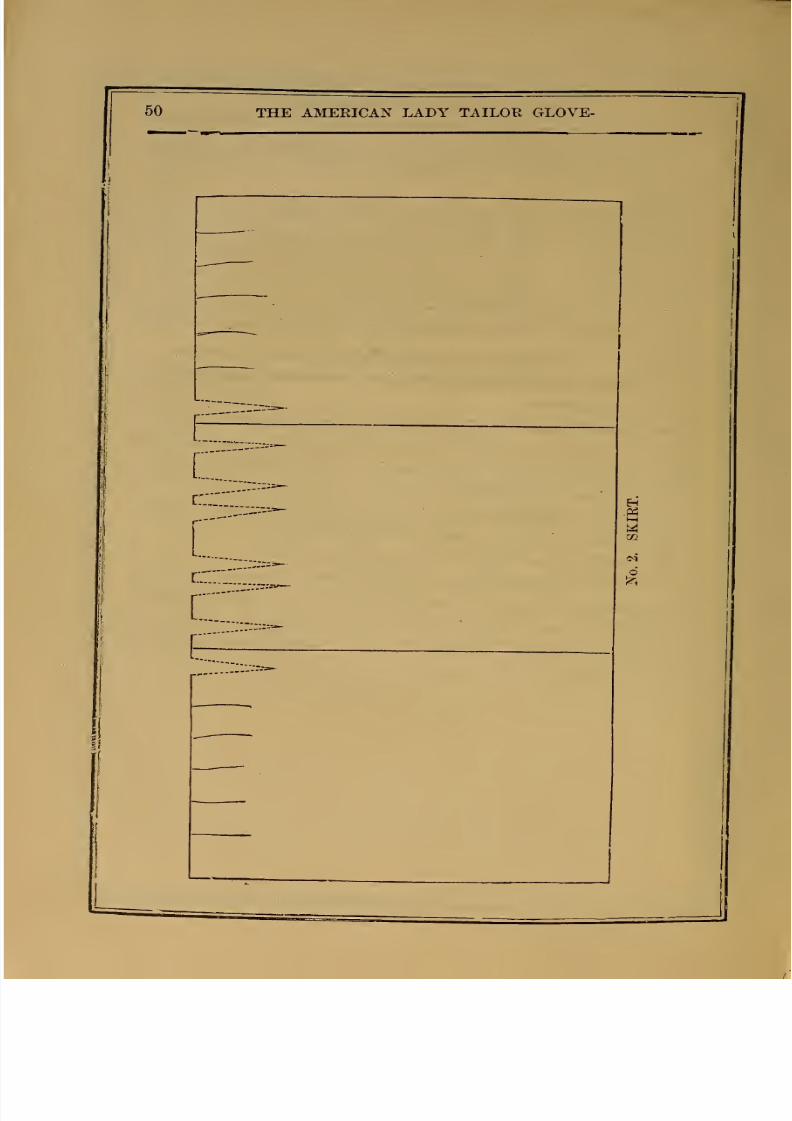
7/17/2019 The American Lady Taylor Glove Fitting System (Elizabeth Garland))
http://slidepdf.com/reader/full/the-american-lady-taylor-glove-fitting-system-elizabeth-garland 58/160
50
THE AMERICAN
LADY TAILOK GLOVE-
c
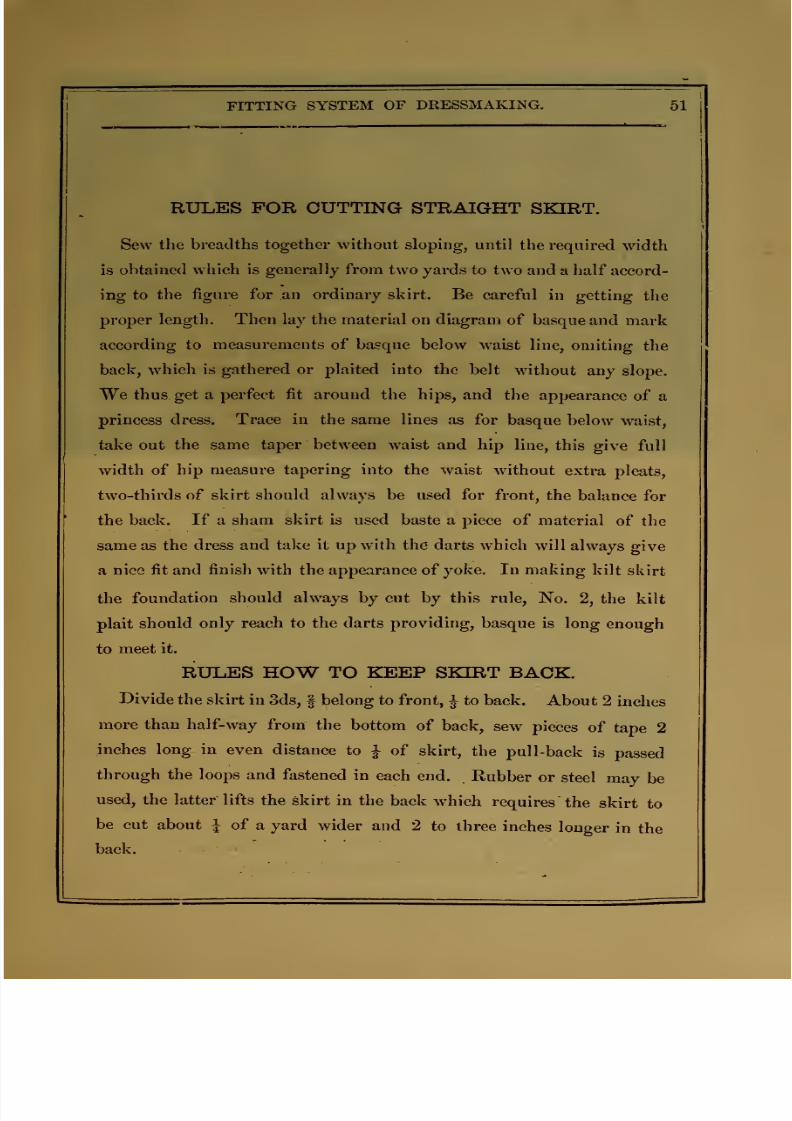
7/17/2019 The American Lady Taylor Glove Fitting System (Elizabeth Garland))
http://slidepdf.com/reader/full/the-american-lady-taylor-glove-fitting-system-elizabeth-garland 59/160
FITTING
SYSTEM
OF
DRESSMAKING.
51
RULES FOR
CUTTING STRAIGHT
SKIRT.
Sew
the
breadths together without
sloping,
until
the
required
width
is
obtained which
is
generally from
two
yards to
two
and
a
half
accord-
ing
to
the
figure
for an ordinary
skirt.
Be careful
in
getting
the
proper
length.
Then
lay
the material
on
diagram
of
basque
and
mark
according to
measurements
of basque
below waist
line,
omiting
the
back,
which
is
gathered or
plaited
into the
belt
Mdthout
any
slope.
We
thus
get
a
perfect
fit
around
the
hips,
and the
appearance
of
a
princess
dress.
Trace
in
the same
lines as
for
basque
below
waist,
take
out
the
same
taper
between
waist
and
hip
line,
this
give
full
width
of
hip
measure
tapering
into
the waist
without
extra
pleats,
two-thirds
of skirt
should always
be used for
front,
the
balance
for
the
back. If a sham
skirt
is
used
baste
a
piece of
material
of the
same as
the
dress
and take
it
up
with
the darts which
will
always
give
a
nice fit and
finish
with
the appearance of
yoke.
In making
kilt
skirt
the
foundation
should always
by
cut
by this rule,
No.
2,
the kilt
plait
should
only reach
to
the
darts providing,
basque
is
long
enough
to
meet
it.
RULES HOW
TO
KEEP
SKIRT
BACK.
Divide
the
skirt
in 3ds,
f
belong
to
front,
^
to back.
About
2
inches
more
than
half-way
from
the
bottom
of
back,
sew
pieces
of
tape
2
inches long in
even distance
to
J
of
skirt,
the
pull-back
is
passed
through the loops
and
fastened
in
each
end.
Rubber
or
steel
may
be
used,
the latter
lifts
the
skirt in
the
back
which
requires
the
skirt
to
be
cut
about
J
of
a
yard
wider
and
2
to
three
inches
longer
in
the
back.

7/17/2019 The American Lady Taylor Glove Fitting System (Elizabeth Garland))
http://slidepdf.com/reader/full/the-american-lady-taylor-glove-fitting-system-elizabeth-garland 60/160
SKIRT
WITH TRAIN.
The
dotted lines
in diafjram
are the
foundation of
skirt
;
the
solid
lines
are
the
'^utJines
ol
princess' dress
or
wrapper
with full
train; the
shori lines
are
intended for
box
plaits for
princess'
dress
or wrapper, or
may
be used
for
full
train.
FULL
DRESS SUIT
WITH
COURT
TRAIN.
The train is
cut
of three widths of
material the required
length, being
square at
the
end, and
is plaited
into
the
waist
at
back.
When
two materials
are
combined
in the
dress,
as
in
plate,
use
the
brocade
for centre of tram.
A
breadth
or
one-half breadth,
according
to
width
of
silk,
is
draped
around
the hips.
When
making
the collar,
before
it
is turned
sev-^
a
wire
on
the
edge,
or heavy
buckram
may
be
used
for
lining.

7/17/2019 The American Lady Taylor Glove Fitting System (Elizabeth Garland))
http://slidepdf.com/reader/full/the-american-lady-taylor-glove-fitting-system-elizabeth-garland 61/160
FULL
DRESS.
Twenty
to twenty-five yards
of
plain
silk
for
this
dress,
if
brocaded
as
you
like
in
cut, nine yards of each is sufficient.

7/17/2019 The American Lady Taylor Glove Fitting System (Elizabeth Garland))
http://slidepdf.com/reader/full/the-american-lady-taylor-glove-fitting-system-elizabeth-garland 62/160
54
THE AMERICAN
LADY
TAILOR GLOVE-

7/17/2019 The American Lady Taylor Glove Fitting System (Elizabeth Garland))
http://slidepdf.com/reader/full/the-american-lady-taylor-glove-fitting-system-elizabeth-garland 63/160
FITTING
SYSTEM
OF
DRESSMAKING.
55
RULES
FOR
BASQUE No. 2,
This
is
intended
for a
slender
lady,
and
has
no
undcr-arm
gore.
1.
Proceed
as
in
plain
basque.
Find
dots
B
and
C as
usual.
Move
dot
C
as much as
you
wish
the
back
made
wider,
conse-
quently
move
dot B
to
the
left
the same
distance,
in
order to
keep
the
space
between
B
and
C
the
same.
2.
Use
curvature as
usual,
exqept
that it is
moved
from one-
third
to
one-half
inch
below
the
Junction
of
lines
4 Wid' 6.
3. To'
find
the
back
line
of fr6nt
and
width
of under-arm
gore.
Take
the
sum of back
and
front measure
at
waist
line,
omitting
width
of darts, and
mark
half the size of
waist.
4.
Half the measure between
this
'mark and
back dart,
and
make
dot
H
the
same as for plain
basque.
5. Dot D
is
the
same
distance
to
right
of
IT
as
the
waist
measure
is from
B.
-:;
6.
Draw
lines
12 and 15 from dots
H
and D
up
to junction
of
line
2
and
inside
line
of circle.
7.
Extend
lines
8,
10
and
centre
line
of
darts.
Mark
dots B,
C,
D*and
II.
8. Slope
back line from dot A
to
hip line.
It
may
be extended
outside
of line 8 if
necessary.
9. Inside of
back
is
sloped from dot
C, three-fourths of
an
inch
to
left of dot
C
on
hip
line.
10. Back
of side body
is
sloped
from B
one
inch
to right
of B
on
hip line.
11.
Front
of side
body
is
sloped
from
D two and
a quarter
inches
to
left of D
on
hip
line.
12.
Back
of front is sloped from
H
two
and
a half
inches
to
right
of H
on
hip
line

7/17/2019 The American Lady Taylor Glove Fitting System (Elizabeth Garland))
http://slidepdf.com/reader/full/the-american-lady-taylor-glove-fitting-system-elizabeth-garland 64/160
BASQUE,
No.
3.
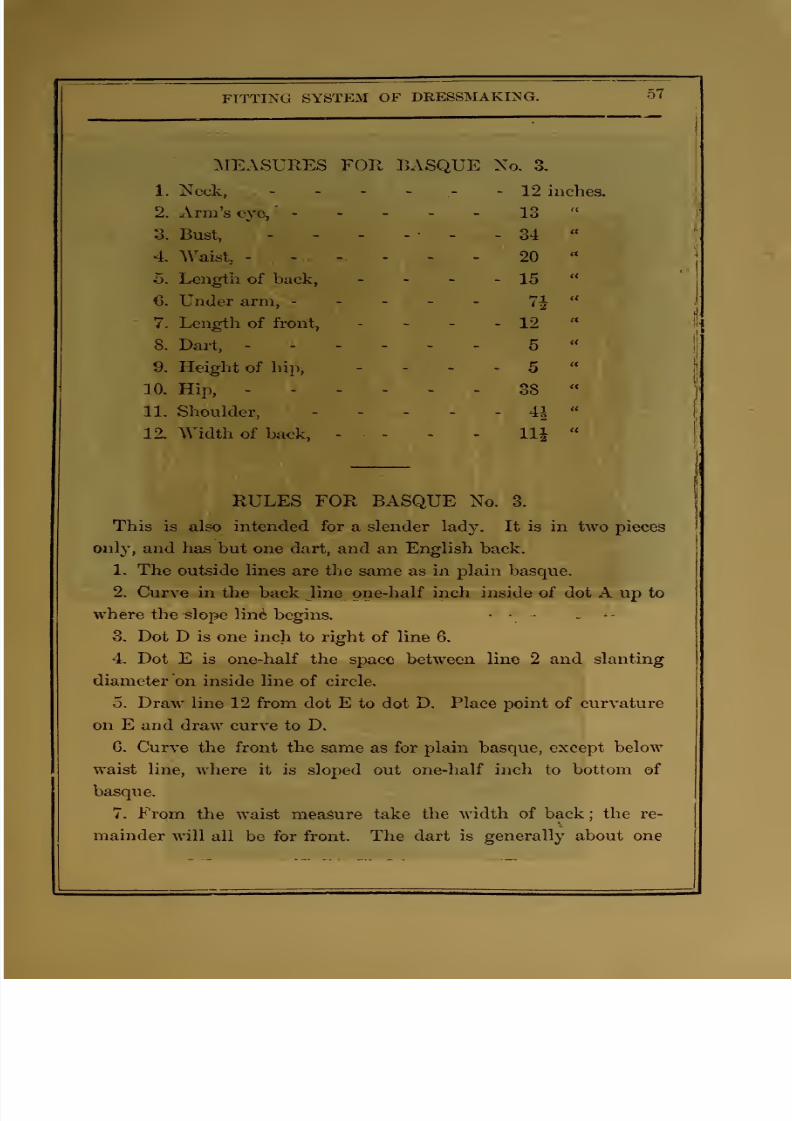
7/17/2019 The American Lady Taylor Glove Fitting System (Elizabeth Garland))
http://slidepdf.com/reader/full/the-american-lady-taylor-glove-fitting-system-elizabeth-garland 65/160
FITTING
SYSTEM
OF
DRESSMAKING.
57
^MEASURES
F{3R BASQUE
No,
3,
1.
Nock,
-
- -
- -
-
12
inches.
2.
Arm's
eye,
-----
13
3.
Bust,
-
- -
-
•
-
-
34
4.
Waist,
------
20
6. Length of
back,
- - -
-
15
6.
Under arm,
7|
7.
Length
of front,
- -
-
-
12
8.
Dart,
-
5
9. Height of hip,
- - -
-
5
10,
Hip,
------
38
11,
Shoulder,
4|
12,
Width of
back,
- -
- -
llj
RULES
FOR
BASQUE
No. 3.
This
is also
intended
for
a
slender
lady. It is in
two
pieces
only,
and has
but
one
dart, and an English
back.
1.
The outside
lines
are
the same
as
in
plain
basque.
2.
Curve in the back line
one-half
inch inside of dot
A up to
where
the «lope
lin6 begins.
3.
Dot
D
is one
inch
to
right
of
line
6,
4.
Dot
E
is
one-half the
space
between line
2 and
slanting
diameter
on inside
line
of circle.
5.
Draw
line
12 from
dot E
to dot
D. Place
point of curvature
on E and
draw
curve to
D.
C.
Curve
the
front
the
same
as
for
plain basque,
except
below
waist line,
where it is
sloped out
one-half inch to
bottom
of
basque.
7. From
the waist
measure
take
the width
of back
;
the re-
mainder
will
all
be
for front.
The dart
is
generally
about one

7/17/2019 The American Lady Taylor Glove Fitting System (Elizabeth Garland))
http://slidepdf.com/reader/full/the-american-lady-taylor-glove-fitting-system-elizabeth-garland 66/160
BASQUE
m.
4.
BASQUE
No.
5.
7/17/2019 The American Lady Taylor Glove Fitting System (Elizabeth Garland))
http://slidepdf.com/reader/full/the-american-lady-taylor-glove-fitting-system-elizabeth-garland 67/160
I FITTING
SYSTEM
OF
DRESSMAKING.
59
and
a
half
inches wide, and is placed
directly in
the centre of
front,
though
it
can be
wider or narrower, or can
be
placed
farther
to the
front, if desired.
<S. The
height of dart is found
by
taking the
difference between
the
front
and back dart, and
should slant
about
one-eighth
of an
inch
to the
back.
0. Dot
H
is
the
same
distance from back of dart as
front of
dart
is
from
front.
10. Draw
line 15
from dot
H
to
dot E.
11.
Back line is sloped one
inch
outside
of line 8 on
hip
line.
12.
Inside
of
back
is sloped two
and a
quarter inches.
13. Back of front is sloped
two
and a
half inches.
14.
The
dart is
sloped
one-eighth
of an
inch
to
back, the same
as
above
waist line,
and may
end at
hip line or
extend
in
the
smallest
possible
seam
to
the
bottom.
BASQUE
No. 4.
Proceed
the
same
as
in
plain
basque
;
the
darts
are
made
as
usual ;
then
the
back
of
back dart
is drawn
one-half
to
one
inch
larger.
What
is taken
out in
dart
is added
to
the back
of
front.
BASQUE
No. 5.
Proceed the
same
as
in
Basque
No.
4
;
then,
in
order
to
make
darts run
into one below
waist line,
draw
front
of back
dart to
centre
of
space
between
darts.
What
is
thus
added
to
back
dart
is
taken
from
front
dart
at
back
;
then get
the
centre
of
front
dart
and
find
height
of
dart the
same
as
in
plain
basque.
Front
dart
is
extended
below
waist
line
the
same
as
in
plain
basque;
the front
of back
dart
is
extended
until
it meets
the
iDack of front
dart
about
two
inches
below
the
waist
line.
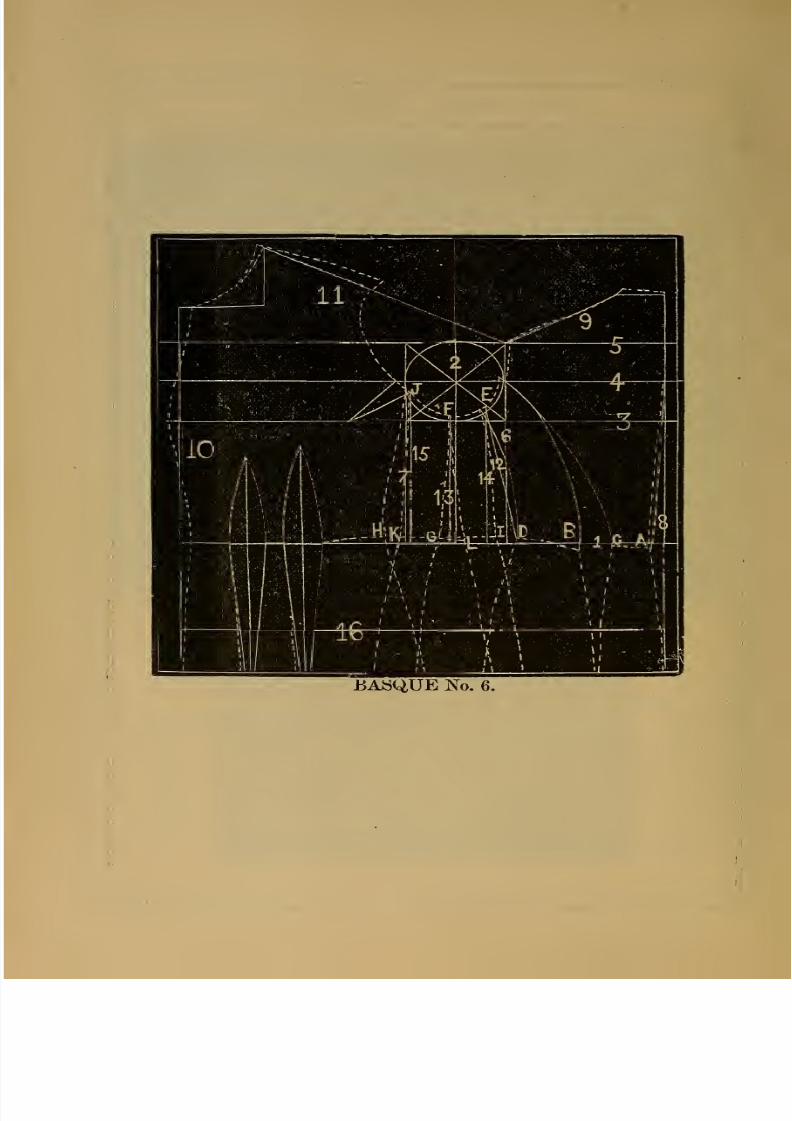
7/17/2019 The American Lady Taylor Glove Fitting System (Elizabeth Garland))
http://slidepdf.com/reader/full/the-american-lady-taylor-glove-fitting-system-elizabeth-garland 68/160
BASQUE
No.
6.

7/17/2019 The American Lady Taylor Glove Fitting System (Elizabeth Garland))
http://slidepdf.com/reader/full/the-american-lady-taylor-glove-fitting-system-elizabeth-garland 69/160
FITTING
SYSTEM
OF
DRESSMAKING.
61
MEASURES
FOR
BASQUE
No.
6.
1.
Nock,
------
15
inches.
2
Arms-eye,
-
-
-
-
-
17
3.
Bust,
-
-
50
'
4.
Waist,
-----
3G
5. Length of back^
16|
inches,
J
inch
extension.
6.
Under
arm,
-----
7j
7.
Length
of front 15 inches,
^
inch
extension.
8.
Height
of dart,
- - - -
5^
''
9.
Height
of
hip,
-
- - -
6
10. Hip,
-
54
11.
Shoulder,
6
12.
Width of back
-
- - -
16
RULES
FOR
BASQUE
No.
6.
This
basque
is intended for a stout lady
only,
and has
tw
under-arm
gores.
Proceed
as
in plain
basque, not forgetting
to
add
extensions
t(
back
and front,
as
shown
in
diagram.
If
a
greater
slope is
required
in the neck,
what
is
taken off in
front is
added to the
right
of horizontal
line
at neck, to
prevent
it
from being
too
small.
In order
to
make the
waist look more syraetrical
and bring
the
darts forward,
the
space
between
lines
7
and 10 is
made
from
one
to two inches
smaller
;
then
divide into
four
equal parts
as
usual,
allowing
a
full inch
between darts.
It
is well
to
use
this
rule
whenever
the space
between
lines
7
and 10
is
over
nine
inches.
When
the
bust
measure is more
than
forty
inches,
a
plait of one-
half
to
one
inch
and
one-half
is
laid
in
the
front,
at
arms-eye
as
in
diagram.
The lower
line
is marked dot J
where it touchef
inside
line
of
circle.
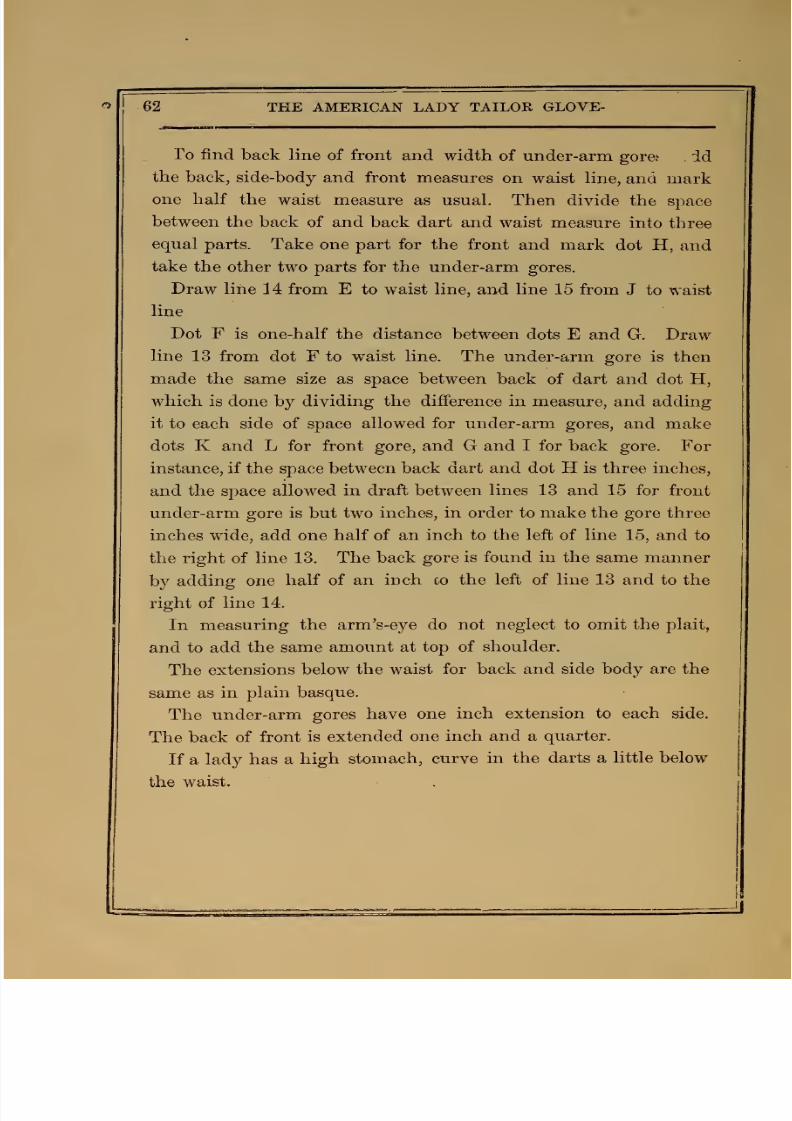
7/17/2019 The American Lady Taylor Glove Fitting System (Elizabeth Garland))
http://slidepdf.com/reader/full/the-american-lady-taylor-glove-fitting-system-elizabeth-garland 70/160
62
THE AMERICAN LADY
TAILOR GLOVE-
Po
find
back
line
of front
and
width
of
under-arm
gore^
.
id
the
back,
side-body
and
front
measures
on
waist
hne, and mark
one
half the
waist measure
as
usual.
Then
divide
the space
between
the
back of
and
back
dart and
waist
measure
into
three
equal
parts. Take one
part
for
the front and
mark
dot
H,
and
take
the other
two
parts
for the
under-arm gores.
Draw line
14
from E
to
waist line,
and
line
15 from
J to
waist
line
Dot F
is one-half the distance
between
dots
E and
G. Draw
line
13
from
dot
F to
waist
line.
The
under-arm
gore
is
then
made the
same
size
as
space
between
back
of dart and
dot H,
which is done
by
dividing
the difference
in
measure, and
adding
it
to
each side of space
allowed for under-arm
gores,
and
make
dots
K and L for front gore,
and
G
and I for
back gore. For
instance,
if
the space
between
back
dart and dot H is
three
inches,
and the
space allowed
in
draft
between
lines
13
and
15
for
front
under-arm
gore
is
but
two
inches,
in order to make the
gore
three
inches
wide,
add
one
half
of
an
inch
to the
left of line
15,
and to
the right of line
13.
The
back
gore is
found
in the same manner
by
adding
one
half of an
inch co
the
left of
line
13
and to
the
right
of
line 14.
In
measuring
the
arm's-eye do
not
neglect
to
omit the plait,
and
to
add
the
same
amount
at
top
of
shoulder.
The
extensions
below
the
waist
for back
and
side
body
are
the
same as
in
plain
basque.
The
under-arm
gores
have
one inch
extension to each side.
The
back
of
front
is
extended
one
inch and a
quarter.
If
a
lady has
a
high
stomach,
curve
in
the
darts
a
little
below
the
waist.
7/17/2019 The American Lady Taylor Glove Fitting System (Elizabeth Garland))
http://slidepdf.com/reader/full/the-american-lady-taylor-glove-fitting-system-elizabeth-garland 71/160
SPECIAL
RULES FOR
STOUT
LADIES.
The
back length
measure must be
taken diiferently
for stout
ladies
with
round shoulders.
Take
the measure
from
back
of n;
ik to
guide,
and
note
the
measure.
Then
from
guide
to
full
extent
i i
the
waist
Ladies of this
figure are
generally
long \raisted in
the
b
;,
k, and with
very
large hips.
In making
draft
this
measure must
be
used
up
an
down
on
bust
line,
the
same
as
in
measure,
as
the round f-houlder uses
up
the
cloth
and will make
the
dress short waisted
in
the back,
and
will also
drag
the seam
towards
arm's-eye.
Ladies
with
flabby
or heavy
bosom.
A tight
bust
measure must
be
taken.
After
draft
is
drawn,
from
three-quarters
to
an
inch
must
be
added
to
top of
neck, as
the veight
of
bosom
will drag it
down.
Also in
basting
shoulder
seam, from one-ealf
to
three-quarters of an
inch
is
taken up
besond
tracing
line
on
front,
from
neck to arm's-eye
A
lady of
this figure
likes
the
feeling of
a
tight
dress.
The
darts
in
front must be
thrown
back
a
trifle,
perhaps
a
half
to
three-quarters
of
an
inch
more
than
for
a
slender
fiigure;
a
little more
curve
is
required
between
height
of dart and waist line.
SPECIAL
RULES
FOR
SLENDER
LADIES.
Slender ladies
with
round shoulders.
The
length of back
is taken
the
same as
for stout ladies.
Fewer seams,
greater
space
in back
avd
between darts give
a
less
slender appearance.
An English back
should
be worn
by
a
very
slender lady.
One of
the advantages
of
this
system is
that the seams
and spaces
can
be made
to
suit both
wearer
and cutter, and
never
interfere with
the
fit
of
dress.
To
give
a
square
shoulder, cut
the
shoulder one-half
inch
to
1 inch
longer
and
put
three or
four
layers
of
cotton
between
outside
and
lining.
In
putting
in
the sleeve,
put
it over the
waist
as
short
as
you
wish
the
shoulder to
be,
do not
cut the waist under
the
sleeve,
put the
extra
fullness
on
top
of
sleeve this will
give a square
shoulder,
the
inside of
waist
may
be
boded like cut
of
Riding
Habit
waist.
To
give
the
appearance of
a
square shoulder
cut the
shoulder a
tri-
fle
longer
and put three or
for
layers of cotton
between
outside
and
lining.
In
putting
in the sleeve put
it
over the
waist
as
short
as
you
wish
the
shoulder
to be.
Do
not
cut the
waist
under
the
sleeve,
and
put
extra
fullness
on
top
of
sleeve.
This will
give
a square
shoulder.
The
inside
op
waist
may
be
padded
like
cut
of
Riding
Habit
shows.
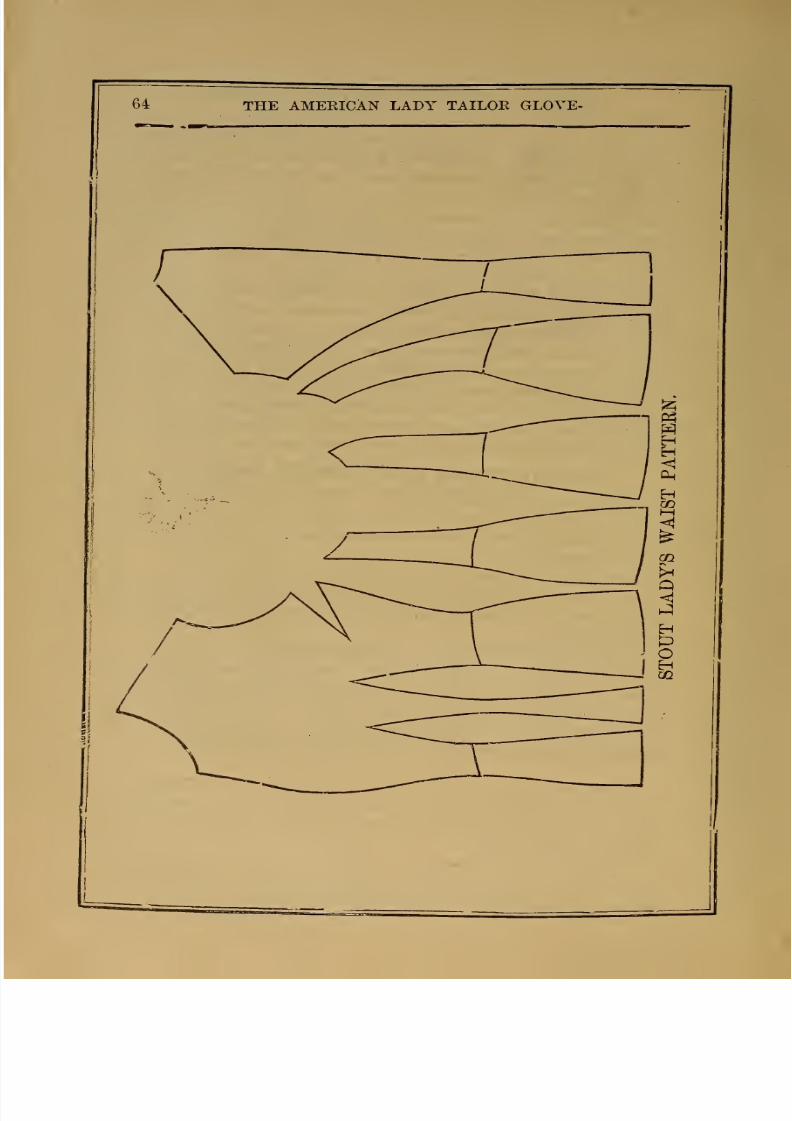
7/17/2019 The American Lady Taylor Glove Fitting System (Elizabeth Garland))
http://slidepdf.com/reader/full/the-american-lady-taylor-glove-fitting-system-elizabeth-garland 72/160
7/17/2019 The American Lady Taylor Glove Fitting System (Elizabeth Garland))
http://slidepdf.com/reader/full/the-american-lady-taylor-glove-fitting-system-elizabeth-garland 73/160
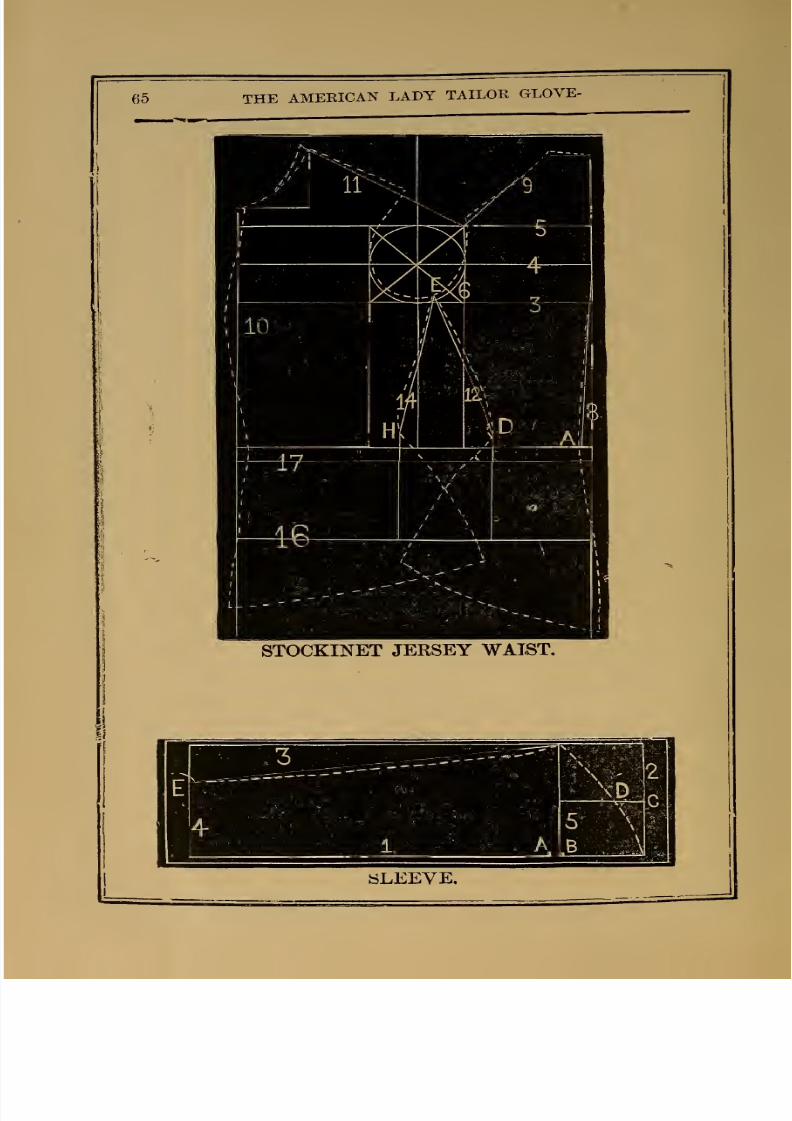
7/17/2019 The American Lady Taylor Glove Fitting System (Elizabeth Garland))
http://slidepdf.com/reader/full/the-american-lady-taylor-glove-fitting-system-elizabeth-garland 74/160
65 THE
AMERICAN
LADY
TAILOR
GLOVE-
STOCKINET
JERSEY
WAIST.
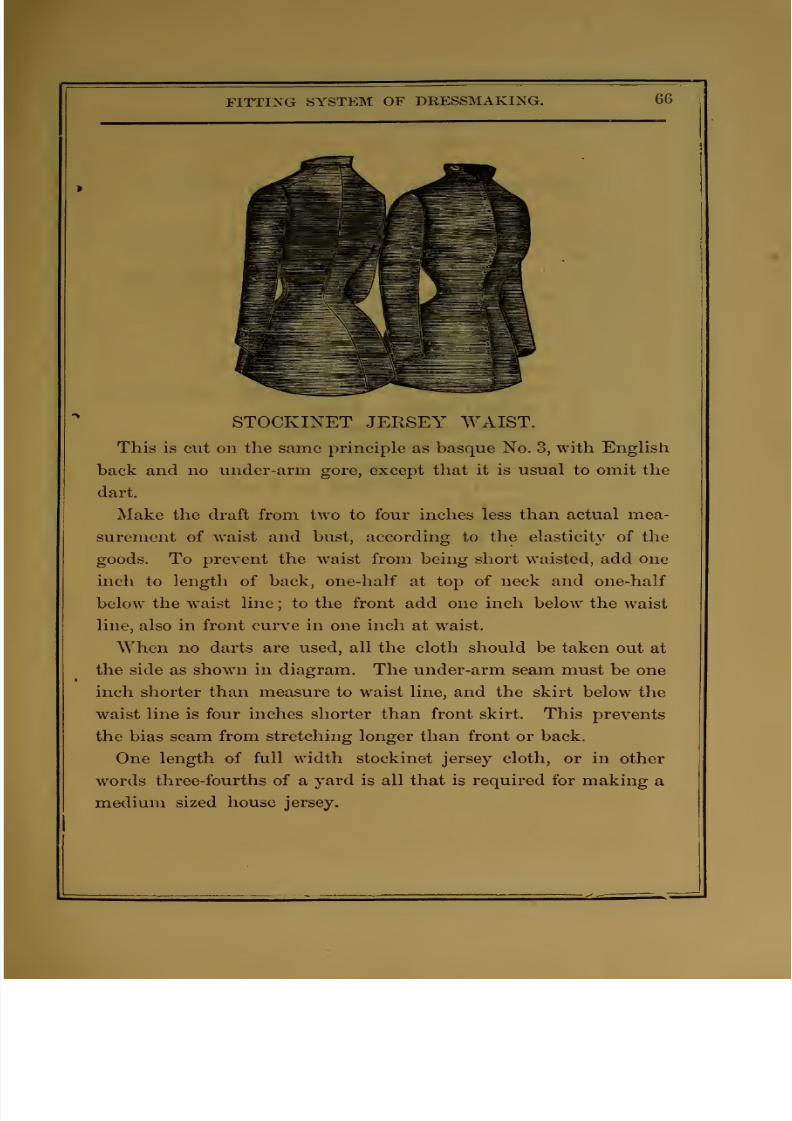
7/17/2019 The American Lady Taylor Glove Fitting System (Elizabeth Garland))
http://slidepdf.com/reader/full/the-american-lady-taylor-glove-fitting-system-elizabeth-garland 75/160
FITTING
SYSTEM
OF
DRESSMAKING.
66
STOCKINET
JERSEY
WAIST.
This
is
cut on
the
same
principle
as
basque No.
3,
with
English
back
and
no
under-arm
gore,
except
that
it
is
usual
to
omit
the
dart.
Make the
draft from two to
four inches
less than
actual
mea-
surement of waist and bust, according to
the elasticity
of
the
goods.
To
prevent
the waist from being short
waisted,
add
one
inch
to
length of
back,
one-half
at
top
of
neck
and one-half
below the
waist line
;
to the front add
one
inch
below
the
waist
line,
also
in
front
curve
in
one
inch
at waist.
When
no darts are
used, all
the cloth
should
be taken
out
at
the side
as
shown in diagram. The
under-arm
seam must
be
one
inch shorter
than
measure
to
waist
line, and the
skirt
below
the
waist line is
four
inches
shorter than
front skirt.
This
prevents
the bias
seam from stretching
longer
than front or back.
One
length
of
full width
stockinet
jersey
cloth,
or in
other
words
three-fourths
of
a
yard
is
all
that is required for
making
a
medium
sized
house
jersey.

7/17/2019 The American Lady Taylor Glove Fitting System (Elizabeth Garland))
http://slidepdf.com/reader/full/the-american-lady-taylor-glove-fitting-system-elizabeth-garland 76/160
67
THE
AMERICAN
LADY
TAILOR
GLOVE-
DIRECTIONS FOR
DRAFTING STOCKINET
JERSEY
SLEEVE.
1.
Draw line
1
the
length of inside
wrist
measure
and
diameter
of
circle
added.
2. Dot
on
this line for
it,
where
diameter
of
circle
begins.
Dot
Tl
is
one-half inch to
right of
A.
3.
Line
2
is
one-half
of
upper-arm
measure.
4.
Line
3
is the
same
length
as
line
one.
5.
Line
4
is
drawn
from
end
of
line 1 to
line
3.
6.
Line
5
from
dot B to line
3.
7.
Dot
C
marks one-half of line
2. Draw
a
line from
C to
line
5.
8.
Dot
D
is one-third of line
just drawn.
9.
Dot E
is
one-half
of
wrist
measure
from line
1.
10.
Draw
a
line
from junction of line
3
and
5 to dot E and
curve
this
line in
about
a
quarter
of
an
inch.
11.
Curve
top
of
sleeve
from junction of line
3
and
5 through
dot
D
to
junction
of
lines
1
and
2.
By
cutting this
sleeve
lay
the
material
double on line 1 and
cut
around
the
pattern.
The
sleeve
is
put in
the
waist
so the inside
soain
meets
line
2.
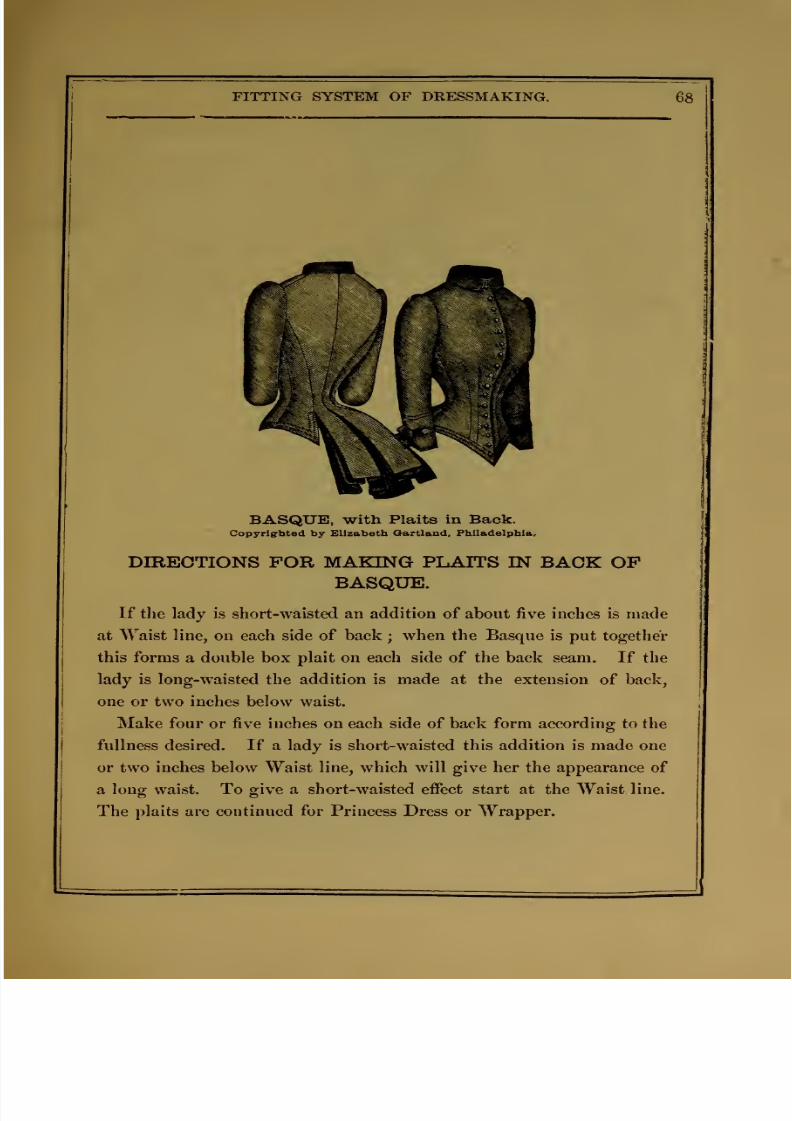
7/17/2019 The American Lady Taylor Glove Fitting System (Elizabeth Garland))
http://slidepdf.com/reader/full/the-american-lady-taylor-glove-fitting-system-elizabeth-garland 77/160
FITTING
SYSTEM
OF
DRESSMAKING.
68
BASQUE,
with
Plaits
in
Back.
Copyrigrhted by
Elizabeth
Qartland,
Philadelphia^
DIRECTIONS
FOR MAKING
PLAITS
IN
BACK
OF
BASQUE.
If
the lady
is
short-waisted an
addition
of about five inches
is
made
at
Waist line, on each
side
of
back
;
when the Basque
is
put
together
this
forms
a
double
box plait
on
each side
of
the
back
seam.
If
the
lady
is long-waisted
the
addition
is made
at
the
extension
of back,
one
or
two
inches
below
waist.
Make
four
or five
inches on each side
of back form
according
to
the
fullness desired.
If a lady
is short-waisted
this
addition
is made
one
or
two
inches below
Waist
line,
which
will
give her the appearance
of
a long
waist.
To
give a
short-waisted
effect
start
at
the
Waist
line.
The plaits
are
continued
for Princess
Dress
or Wrapper.

7/17/2019 The American Lady Taylor Glove Fitting System (Elizabeth Garland))
http://slidepdf.com/reader/full/the-american-lady-taylor-glove-fitting-system-elizabeth-garland 78/160
69
THE
AMEKICAN
LADY
TAILOE
GLOVE-
POLANAISE,
PRINCESS
DRESS AND
WRAPPER.
These
are
all
cut
on
the
same
principle
as
the
Plain Basque.
They
may
have
either
one or
two
darts,
which
are
carried
below
waist
to
hip.
Prepare
the pattern
the same
as
for
Basque. Cut each
part
of
lining
first,
and lay
front
and
under-arm
on
material,
letting the
front
side-body
touch
on hip
measure. Keep the pattern
straight
on waist
line,
without
cutting open, then
cut
down the full length
of
skirt.
Always
lay
the
pattern
so
as
to
slope
out
in front,
about
an
inch
and
a half
or
two
inches
below
the
hip
line.
By
thus
sloping
wider
it
will
meet
at
the
bottom
of
skirt,
and
always
keep the
dress
from
riding
up
in
front.
The
Waist
Lining should
reach
to about eight inches
bolow
waist,
if not lined
all
through, so as to take up a plait
below the
hip,
behind
the front
side-body,
w^hicli
will
always
keejD your
skirt from throwing unnecessary
fullness
toward the front. This
is
done
on
draft
before
the pattern is traced
on
lining.
These garments
may
all
be
cut
with or without
plaits or train.
The
dotted lines in back of
pattern
are intended for box
jolaits.
A long
or short
coat,
an
ulster
and
a polonaise,
are
also
cut
on
the
same principle. The last
named
may
be
draped according
to
taste.
The back
of
same dress. Lay
your
lining
or paper pattern
on
goods
the
same
as
front. If
double
width goods
is
used,
lay
the
centre
of back on
fold, with
the lining or
pattern about six
or
seven
inches
from
the
edge of
back.
The hack
side-body is
placed the
same
distance
from
the
back
form
as
the back
is from thp edge,
which will
allow
for
fullness
in
the back.
Cut
around
the
pattern
of
waist,
leaving
the
cloth in
one
piece
about
one-half
yard
longer
than
skirt
measure
below
waist,
which
will
make
the
drapery
of
polonaise.

7/17/2019 The American Lady Taylor Glove Fitting System (Elizabeth Garland))
http://slidepdf.com/reader/full/the-american-lady-taylor-glove-fitting-system-elizabeth-garland 79/160
PRINCESS
DRESS
COAT
&
WRAPPER
Copyrighted
fcy
Elizabeth
Gartland,
1635.
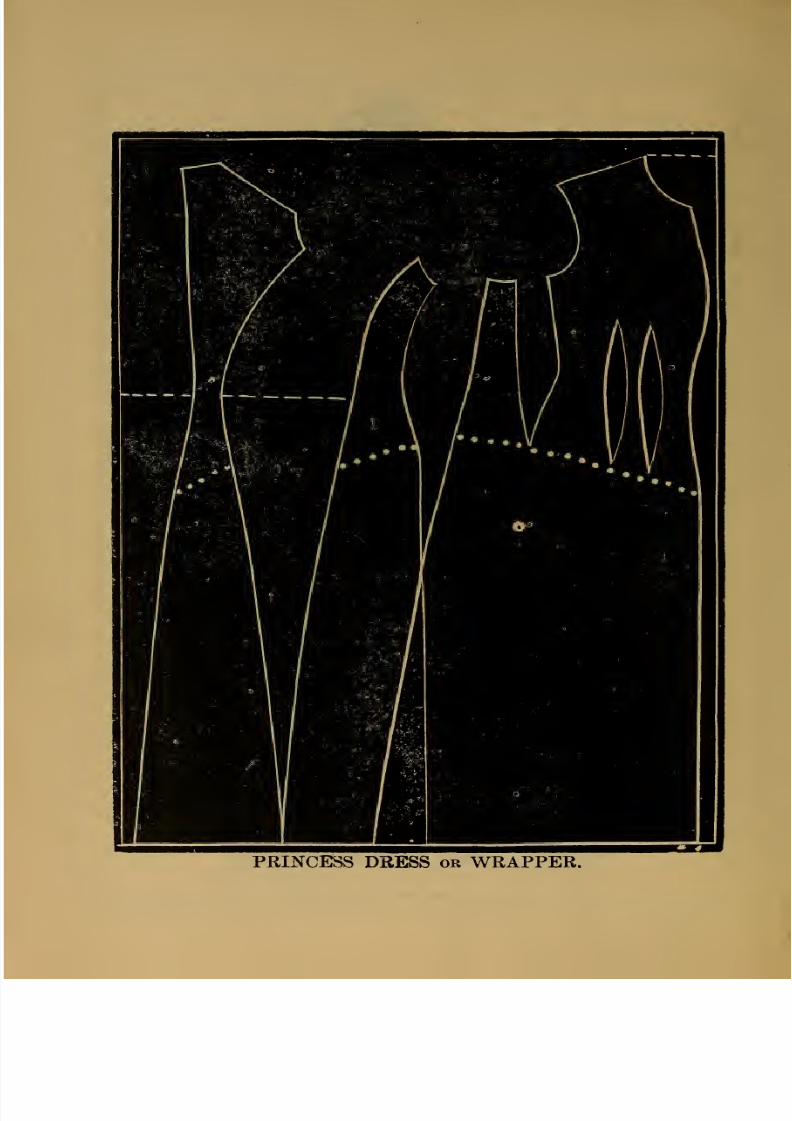
7/17/2019 The American Lady Taylor Glove Fitting System (Elizabeth Garland))
http://slidepdf.com/reader/full/the-american-lady-taylor-glove-fitting-system-elizabeth-garland 80/160
PRINCIBS
DRESS
or WRAPPER.
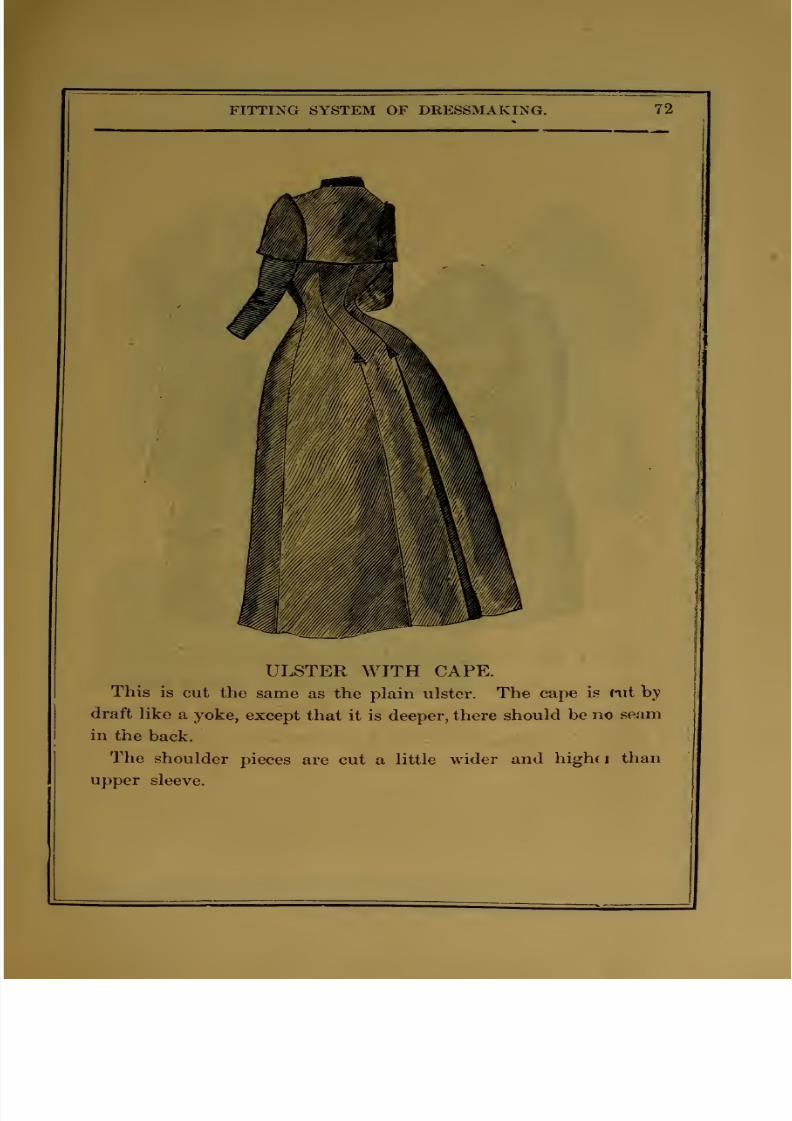
7/17/2019 The American Lady Taylor Glove Fitting System (Elizabeth Garland))
http://slidepdf.com/reader/full/the-american-lady-taylor-glove-fitting-system-elizabeth-garland 81/160
FITTING
SYSTEM OF
DRESSMAKING.
72
ULSTER
WITH
CAPE.
This
is
cut
the
same
as
the
plain ulster.
The cape
is
(lit by
draft
like
a
yoke,
except
that it is
deeper, there
should
be
no
seam
in
the
back.
The
shoulder
pieces
are cut
a
little
wider
and
highci
than
upper
sleeve.

7/17/2019 The American Lady Taylor Glove Fitting System (Elizabeth Garland))
http://slidepdf.com/reader/full/the-american-lady-taylor-glove-fitting-system-elizabeth-garland 82/160
73 THE
AMEEICAN
LADY
TAILOR
GLOVE-
FRONT
AND
BACK
OF
SEALSKIN
& SEAL
PLUSH
COAT.
This
is
cut
in
the
same
plan
as
basque
No.
2,
in
three
pieces
with
or
without
dart,
coat
sleeve
with
cuff
rolling
collar.
Double
the
length
of
material,
fifty-six
inches
wide is
sufficient
for
this
coat.
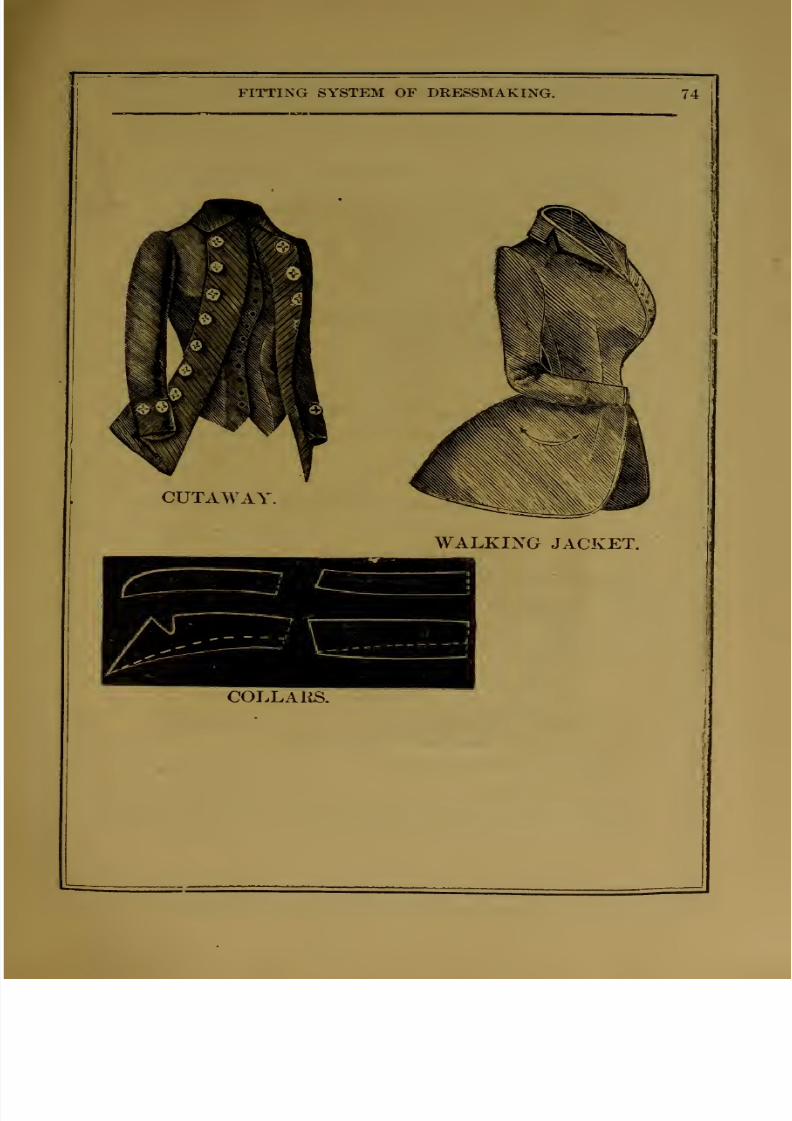
7/17/2019 The American Lady Taylor Glove Fitting System (Elizabeth Garland))
http://slidepdf.com/reader/full/the-american-lady-taylor-glove-fitting-system-elizabeth-garland 83/160
FITTING SYSTEM
OF
DRESSMAKING.
74
CUTAWAY
WALKING
JACKET.
v
-
r
~7
r
i
t-
—
yv-'
^^
L----^-i
f^
*^ .
^
.
COLLARS.

7/17/2019 The American Lady Taylor Glove Fitting System (Elizabeth Garland))
http://slidepdf.com/reader/full/the-american-lady-taylor-glove-fitting-system-elizabeth-garland 84/160
75
THE
AMERICAN
LADY
TAILOE
GLOVE-
QUANTITY
OF
MATERIAL REQUIRED.
Basque
for
Slender
Lady.
Material,
24 inches
wide,
.
-
-
3
yards.
Extra
for
plaits
in back,
- -
-
OJ
Silesia
for
lining,
.
.
.
-
2
Basque
for
Stout
Lady.
Material,
24
inches
wide,
- -
3|
to
4|
yards.
Lining
2^
Princess
Dress
and
Wrapper.
Material, 24
inches wide,
- -
6
to
7
yards
48
'' --
-
31
Lining,
-
- - -
-'
-
2
Extra allowance
must be
made
for plait in
back
and train.
Ulster
and
Coat.
Twice the length of
garment,
measured from
shoulder to
length
required
is sufficient
when the
cloth
is
one and
one-half,
to two
yards in width.
A lady's
long
coat, medium size will take six
and
one-half yards of
material,
24
inches
wide.
Polonaise.
Material,
24
inches
wide,
- -
7
to 8
yards.
Plain
Skirt without
Gores.
Material,
24
inches
wide,
-
-
-
5
yards.
u
48
''
...
21
If
tucks
are
desired,
allowance
must
be made
for extra
material.
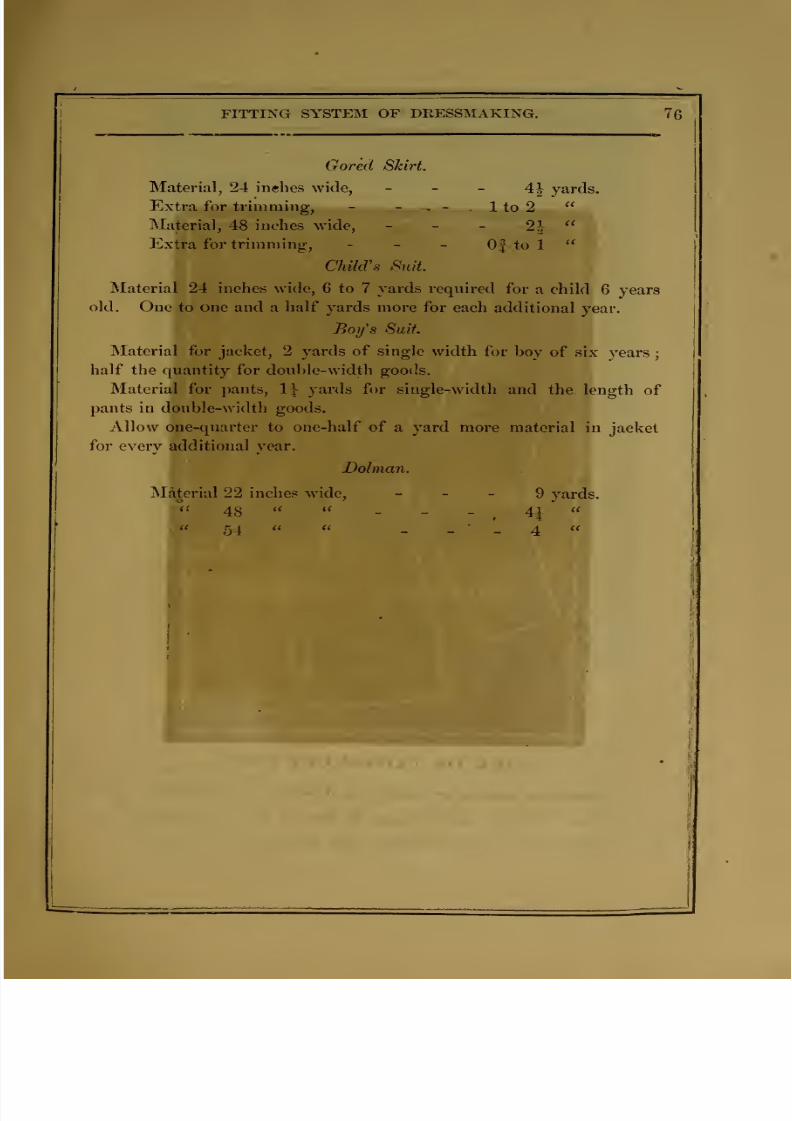
7/17/2019 The American Lady Taylor Glove Fitting System (Elizabeth Garland))
http://slidepdf.com/reader/full/the-american-lady-taylor-glove-fitting-system-elizabeth-garland 85/160
FITTING SYSTEM
OF DRESSMAKING.
76
Gored
Skirt.
Material, 24
inehes
wide, - - -
4J
yards.
Extra
for
trimming,
-
-
,
-
1
to
2
Materia],
48
inches wide, - - -
2h
^'
Extra for trimming,
-
- -
Of
to
1
Child's
Suit.
Material
24
inches
wide,
6 to 7
yards required
for
a
child
6 years
old. One
to
one
and
a
half
yards
more
for
each
additional
year.
Boy's Suit.
Material
for
jacket,
2
yards
of
single
width
for
boy
of six
years
j
half the
quantity
for
double-width
goods.
Material for pants,
1}
yards
for
single-width
and
the.
length
of
pants
in
double-width
goods.
Allow
one-quarter
to
one-half
of
a
yard more
material in
jacket
for
every
additional
year.
Dolman.
Material
22
inches wide,
-
- -
9
yards.
d'
48
«
<f
_ _ _
41
((
54
- -
-
4
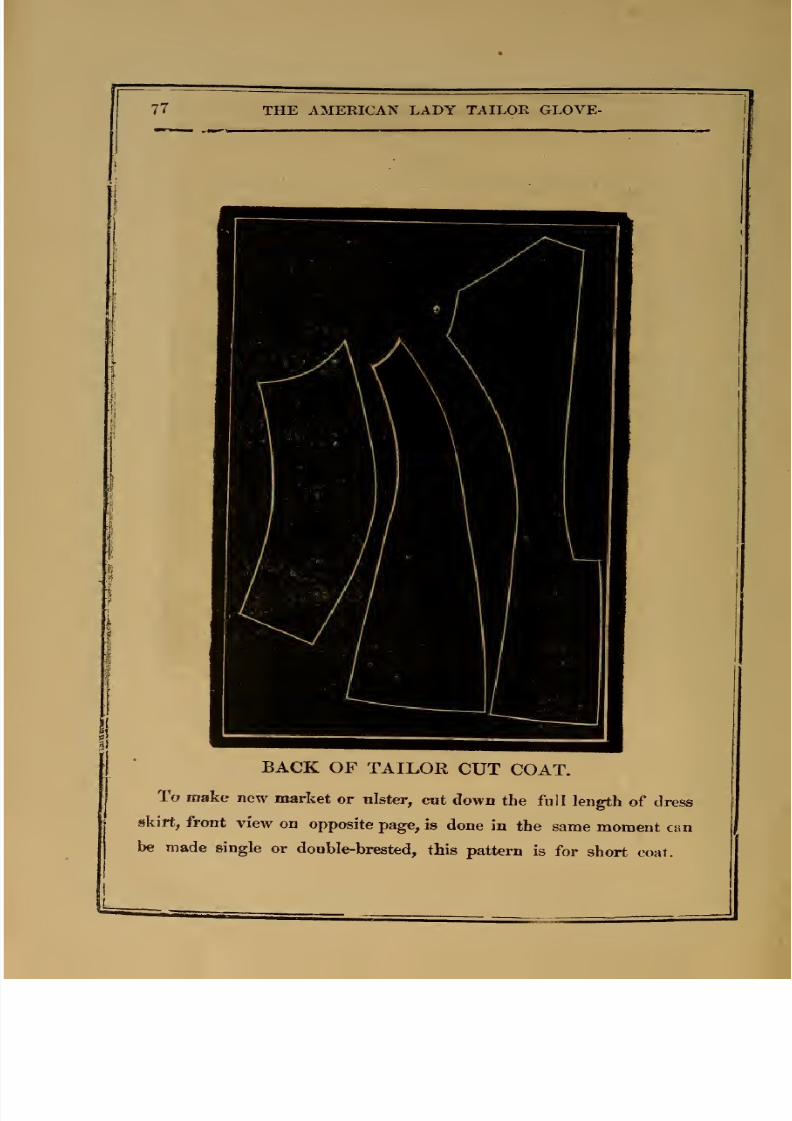
7/17/2019 The American Lady Taylor Glove Fitting System (Elizabeth Garland))
http://slidepdf.com/reader/full/the-american-lady-taylor-glove-fitting-system-elizabeth-garland 86/160
77
THE
AMERICAN
LADY
TAILOE GLOVE-
BACK
OF
TAILOR
CUT
COAT.
To
make
new
market
or
ulster,
cut
down
the
full
length
of dress
skirt,
front
view
on
opposite
page, is
done in
the
same
moment
can
be
made
single
or
double-brested,
this
pattern
is
for
short coat.
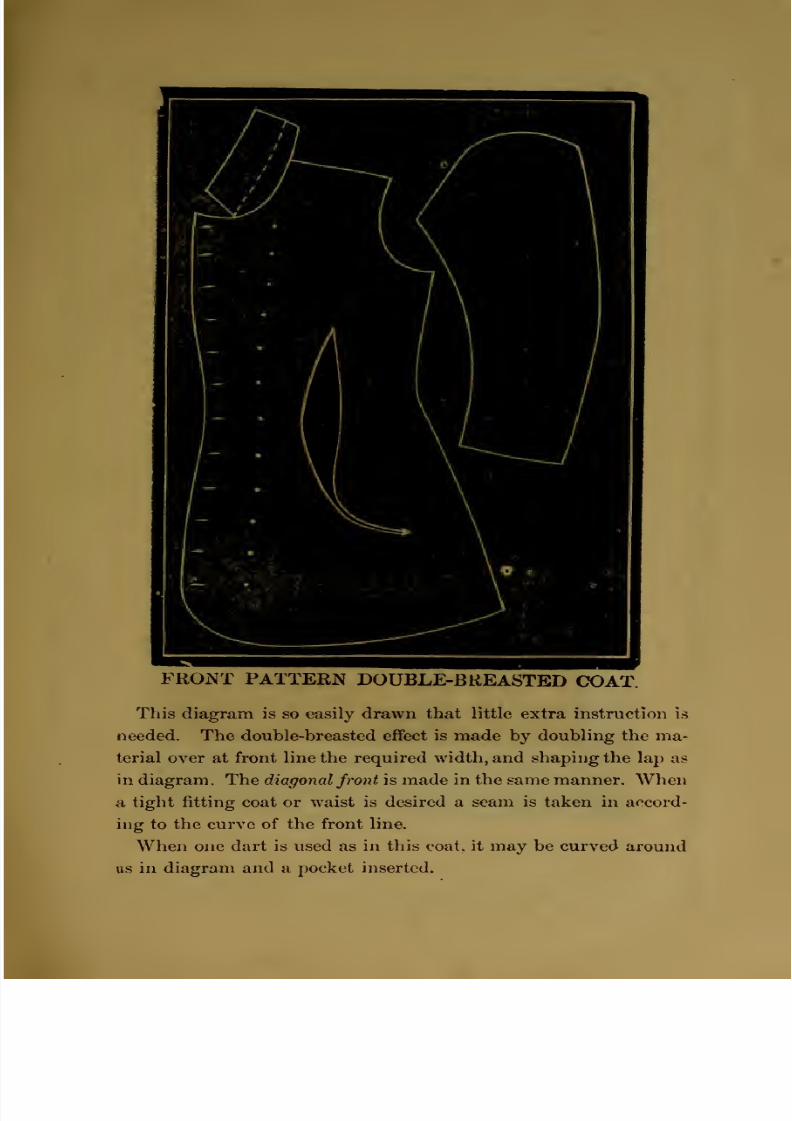
7/17/2019 The American Lady Taylor Glove Fitting System (Elizabeth Garland))
http://slidepdf.com/reader/full/the-american-lady-taylor-glove-fitting-system-elizabeth-garland 87/160
FRONT
PATTERN
DOUBLE-BREASTED
COAT.
This
diagram
is so easily drawn that little
extra instruction ii5
needed.
The double-breasted effect
is
made by
doubling
the ma-
terial
over at
front
line
the
required
width, and
shaping
the
lap as
in
diagram. The dia<7ona//ro«< is made
in the same
manner. When
a
tight
fitting
coat
or waist
is desired a
seam is
taken in
accord-
ing
to
the
curve
of the
front
line.
When
one
dart
is used
as
in
this
coat, it
may
be curved
around
as
in
diagram
and
a
inserted.

7/17/2019 The American Lady Taylor Glove Fitting System (Elizabeth Garland))
http://slidepdf.com/reader/full/the-american-lady-taylor-glove-fitting-system-elizabeth-garland 88/160
This dress is cut plain Gabriel or in
other>
words
Princess,
with
plait-
ing at
the:
bottom with a
straight
piece
gathered
and turned
up
which
forms a
puff with
a
cutaway
coat
like
dotted
line
in
diagram
opposite.

7/17/2019 The American Lady Taylor Glove Fitting System (Elizabeth Garland))
http://slidepdf.com/reader/full/the-american-lady-taylor-glove-fitting-system-elizabeth-garland 89/160
FITTING
SYSTEM
OF
DRESSMAKING.
RO
CHILD'S DRESS.
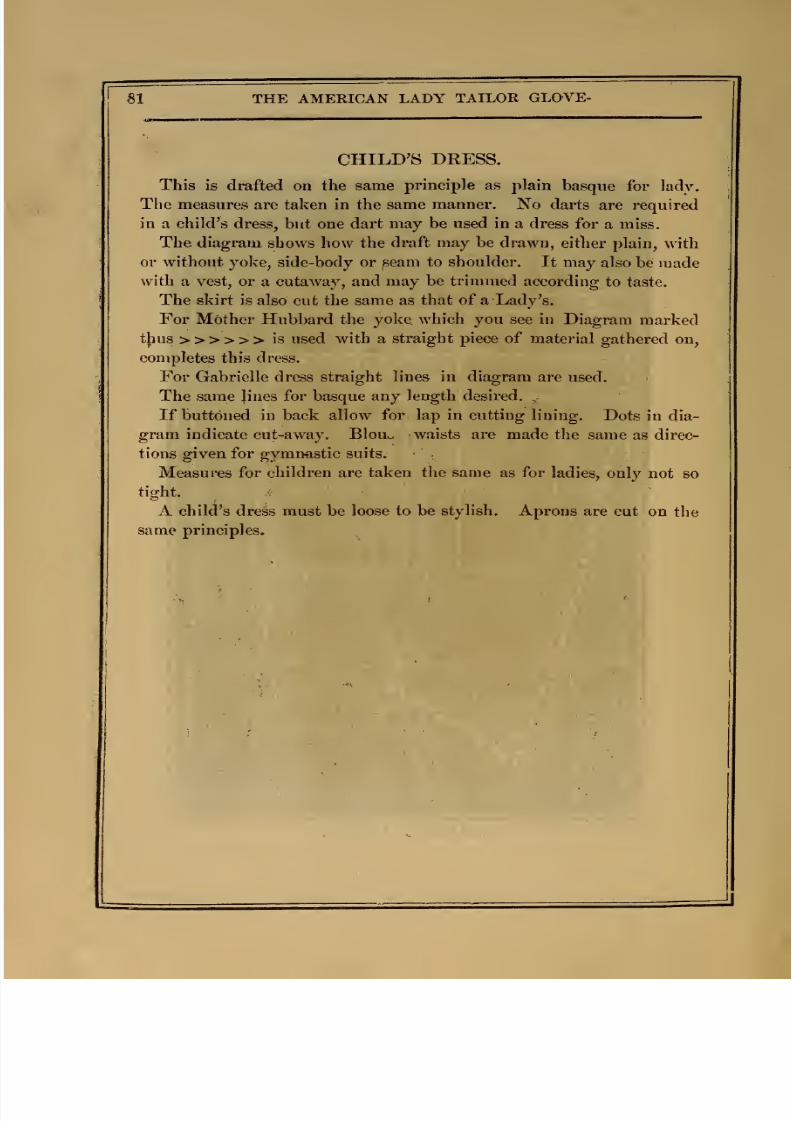
7/17/2019 The American Lady Taylor Glove Fitting System (Elizabeth Garland))
http://slidepdf.com/reader/full/the-american-lady-taylor-glove-fitting-system-elizabeth-garland 90/160
THE
AMERICAN
LADY
TAILOR
GLOVE-
CHILD'S
DRESS.
This
is
drafted
on
the same
principle as
plain
basque
for
ladv.
The
measures are
taken
in
the
same manner.
No darts
are required
in
a
child's
dress,
but one
dart
may be used in
a dress
for
a
miss.
The
diagram
shows
how the
draft may
be drawn,
either
plain,
with
or without
yoke,
side-body
or seam
to shoulder.
It
may
also
be made
with
a vest, or
a cutaway,
and
may be trimmed
according
to
taste.
The
skirt
is
also cut the
same as
that
of
a Lady's.
For Mother
Hubbard
the
yoke
which
you
see
in
Diagram
marked
tjius
>>>>>>
is used
with
a
straight piece
of
material
gathered
on,
completes this dress.
For
Gabrielle
dress
straight lines
in diagram
are
used.
The same
Jines
for basque
any length
desired.
If buttoned
in
back allow
for lap
in
cutting
lining.
Dots
in dia-
gram indicate
cut-away.
Blouo
waists are made
the
same
as
direc-
tions
given
for gymnastic
suits.
Measures
for
children are
taken
the same
as for
ladies,
only
not
so
tight.
A
child's
dress
must
be
loose to be
stylish.
Aprons
are cut
on
the
same principles.

7/17/2019 The American Lady Taylor Glove Fitting System (Elizabeth Garland))
http://slidepdf.com/reader/full/the-american-lady-taylor-glove-fitting-system-elizabeth-garland 91/160
FITTING
SYSTEM
OF
DRESSMAKING.
82
BATHING
SUIT.
MOTHER
HUBBARD
WRAPPER.
This
garment
can
be
cut by
the
opposite
plan
of
bathing suit draft
witli
extra
cloth added
to
*he
back
and front
for
gathers
which
are
continued
the full length of
skirt desired,
follow
the
same
rule
for
children.
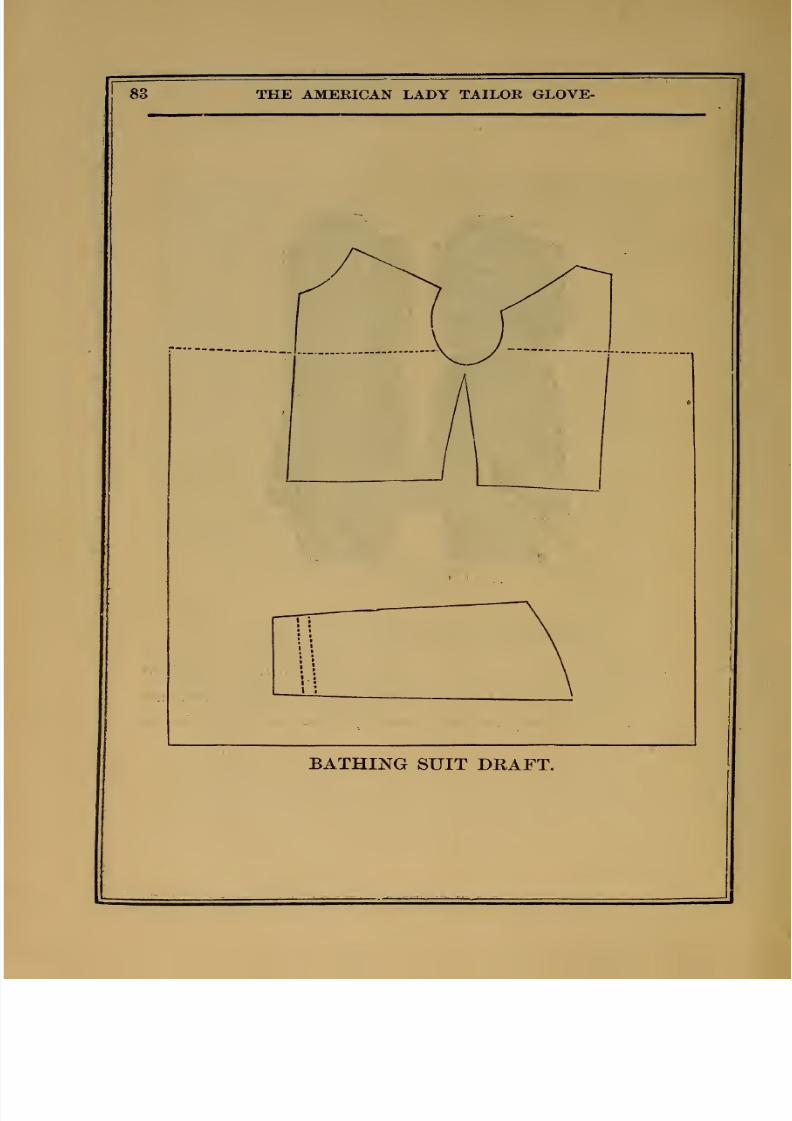
7/17/2019 The American Lady Taylor Glove Fitting System (Elizabeth Garland))
http://slidepdf.com/reader/full/the-american-lady-taylor-glove-fitting-system-elizabeth-garland 92/160
83
THE AMERICAN
LADY
TAILOR GLOVE-
BATHING
SUIT
DRAFT.
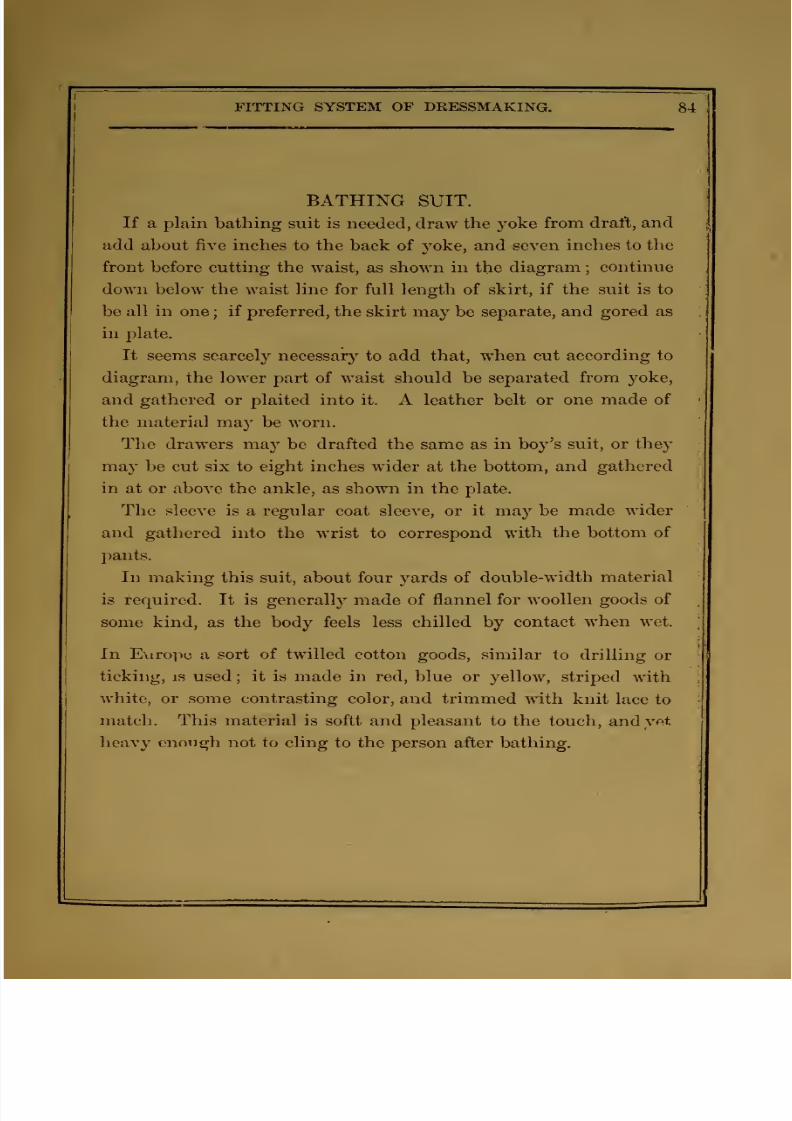
7/17/2019 The American Lady Taylor Glove Fitting System (Elizabeth Garland))
http://slidepdf.com/reader/full/the-american-lady-taylor-glove-fitting-system-elizabeth-garland 93/160
FITTING
SYSTEM OF
DRESSMAKING.
84
BATHING
SUIT.
If
a
plain bathing
suit is needed, draw
the
yoke
from
draft,
and
add
about
five inches to
the
back
of yoke,
and
seven
inches
to
the
front before
cutting
the
waist,
as
shown
in
the
diagram
;
continue
down
below
the
waist line
for
full
length
of
skirt, if the
suit
is
to
be
all
in
one
;
if
preferred,
the
skirt
may
be
separate,
and
gored
as
in
plate.
It
seems
scarcely
necessary
to add
that,
when cut
according to
diagram,
the
lower part
of
waist
should
be
separated
from yoke,
and gathered or plaited into it.
A leather
belt
or
one made
of
the
material may
be
worn.
The
drawers
may be
drafted
the
same as
in boy's
suit, or they
may
be
cut
six
to
eight
inches
wider
at
the
bottom,
and
gathered
in
at
or
above
the
ankle,
as
shown
in the plate.
The sleeve is
a regular coat sleeve, or
it
may be
made
wider
and
gathered
into
the
wrist
to
correspond with
the bottom
of
pants.
In
making
this
suit,
about
four
yards of
double-width
material
is
required.
It
is
generally made
of flannel for
woollen goods
of
some kind,
as
the
body
feels less
chilled
by
contact
when
wet.
In
Earo])c
a sort
of twilled
cotton
goods,
similar
to
drilling
or
ticking,
IS used
;
it is made in
red, blue
or yellow,
striped
with
white, or some
contrasting
color,
and
trimmed
with knit
lace
to
match.
This
material is softt
and
pleasant
to the
touch,
and
yet
heavy
enongli
not to cling
to
the
person after
bathing.
7/17/2019 The American Lady Taylor Glove Fitting System (Elizabeth Garland))
http://slidepdf.com/reader/full/the-american-lady-taylor-glove-fitting-system-elizabeth-garland 94/160
85
TKE
AMEEICAN
LADY TAILOR
GLOVE-
LAWN-TENNIS
SUIT.
The
skirt
of this
suit is
made
of
lady's
cloth,
flannel
or
striped
stockinet
in
two
or
more
bright
colors,
and
requires
four
lengths
of
single-width
material.
The
waist
may
be
made
similar
to the
blouse
of
the
gymnastic
suit,
but
a dark
jersey waist,
matching
one
of
the
colors
in
the
skirt,
is
often
worn.
BAPTISMAL
ROBES.
Are
made of
black
or
white
flannel, serge,
cashmere,
or
merino,
in
the
severest and plainest
style.
They
may
be
cut according
to
diagram for
bathing
suit
;
it is
usual
to put
lead
into the hem
of
the
skirt
to
prevent it from
flouting.
YOUNG
GIRL'S
GRADUATING
DRESSES.
Are made of
white or cream colored
nun's
veiling, or
of
very
sheer organdie. They are
made in the
simplest style,
usually
with
a
round
waist
fulled into
an embroidered yoke.
The
skirt
and apron drapery
are trimmed with ruffles,
edged
with Valen-
ciennes
lace.
Confirmation suits should have
little
or no
trimming on
them,
and
should
be
made of
white
nun's
veiling,
victoria
lawn or any
plain
white goods
that is
not
too
sheer.
The
high
neck and
long
sleeve
should
be
lined. The skirt is usually plain, and tucked
nearly
to the waist.
The
Roman
Catholic
candidates
for confirmation weer
a
long
silk illusion veil
; a
long
ribbon
sash is
worn around
the
waist,
tied
in
a
bow,
and
hangs down at
the
side.
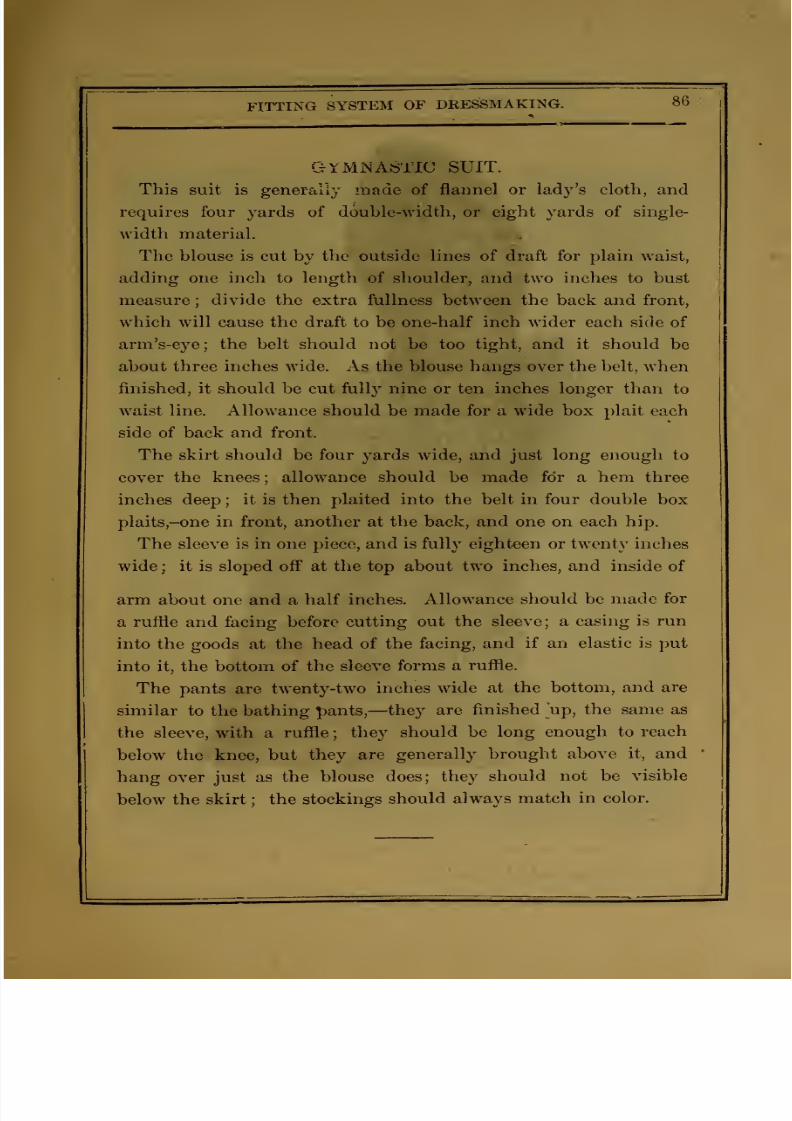
7/17/2019 The American Lady Taylor Glove Fitting System (Elizabeth Garland))
http://slidepdf.com/reader/full/the-american-lady-taylor-glove-fitting-system-elizabeth-garland 95/160
FITTING
SYSTEM
OF
DRESSMAKING.
86
GYMiNAb'iiC
SUIT.
This
suit
is generally
made
of
flannel
or lady's
cloth,
and
requires four
yards
of double-width, or
eight yards
of
single-
width material.
The
blouse is
cut by
the
outside
lines
of draft for
plain
waist,
adding one inch
to
length of shoulder, and two inches
to
bust
measure
;
divide the extra
fullness between
the back
and front,
which will
cause
the
draft
to be
one-half
inch
wider
each side
of
arm's-eye; the
belt
should not be
too
tight, and it should
be
about
three inches wide.
As the blouse hangs
over
the belt,
when
finished,
it
should
be
cut
fully
nine
or ten
inches
longer
than
to
waist line. Allowance should
be
made
for
a
wide box plait
each
side
of back
and
front.
The
skirt
should be
four
yards wide, and just
long
enough
to
cover
the knees
;
allowance
should
be
made
for
a
hem
three
inches
deep
;
it
is then
plaited
into the
belt in four
double
box
plaits,-one
in
front,
another
at
the
back,
and
one
on each hip.
The
sleeve is
in
one
piece, and
is
fully eighteen
or twent}' inches
wide ; it is sloped off at the
top
about two
inches, and inside
of
arm
about one and a
half
inches.
Allowance
should be
made
for
a ruffle and facing before
cutting
out
the
sleeve; a
casing is run
into
the
goods
at
the
head of
the
facing,
and
if an
elastic
is
put
into
it, the
bottom
of
the
sleeve
forms
a
ruffle.
The
pants
are
twenty-two
inches
wide
at
the
bottom,
and
are
similar
to the
bathing
pants,
—
they
are
finished ^up,
the same
as
the
sleeve,
with
a
ruffle
;
they
should
be
long
enough
to
reach
below
the knee,
but they
are
generally
brought above
it,
and
hang over just
as
the
blouse
does;
they
should
not
be
visible
below
the
skirt
;
the
stockings
should
always
match
in color.
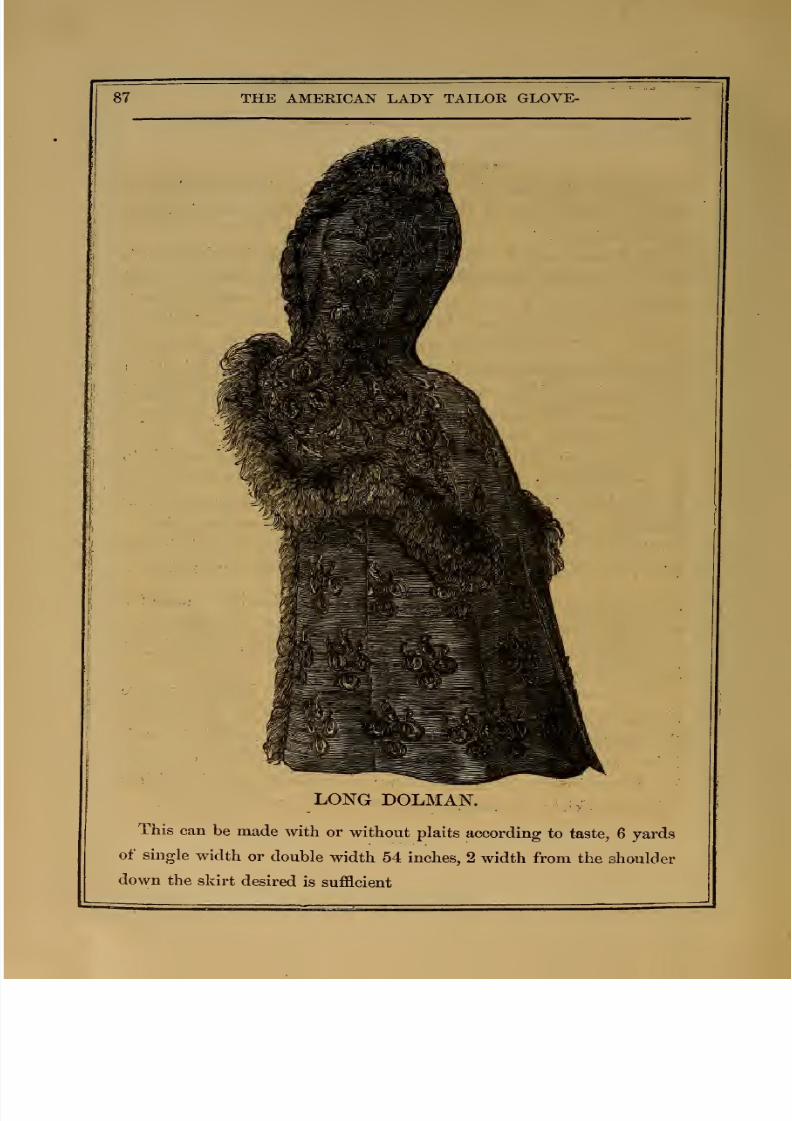
7/17/2019 The American Lady Taylor Glove Fitting System (Elizabeth Garland))
http://slidepdf.com/reader/full/the-american-lady-taylor-glove-fitting-system-elizabeth-garland 96/160
87 THE AMERICAN
LADY
TAILOR
GLOVE-
LONG
DOLMAN.
This
can
be
made
with
or
without
plaits
according
to
taste,
6 yards
of single
width
or
double
width
54
inches,
2
width from
the
shoulder
down
the
skirt
desired
is
sufficient
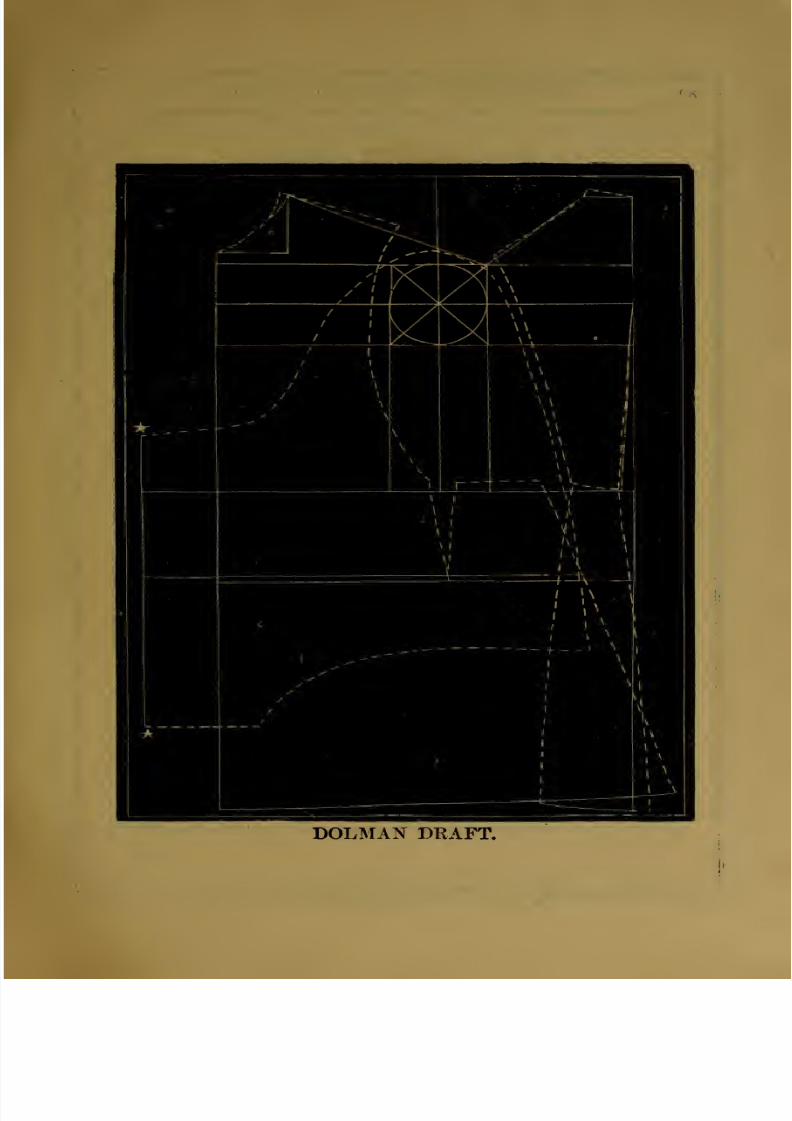
7/17/2019 The American Lady Taylor Glove Fitting System (Elizabeth Garland))
http://slidepdf.com/reader/full/the-american-lady-taylor-glove-fitting-system-elizabeth-garland 97/160
^.
_
-
'
^
\
^
\
\
\
^pi
w
»
1
\
\
'
—
1 Jill
•
—
—
_—
_
»
f
'-\
J-
'
W
'
,-
+
--'
\
1
/
.
'
\
/
1
'\
~
'
.
^
\\
1
I
\
1 V
L__
^
^=r—
H- J
DOLMAN
DRAFT.

7/17/2019 The American Lady Taylor Glove Fitting System (Elizabeth Garland))
http://slidepdf.com/reader/full/the-american-lady-taylor-glove-fitting-system-elizabeth-garland 98/160
89
THE
AMERICAN
LADY
TAILOR
GLOYE-
MEASURES FOR
DOLMAN.
The
measures
for
dolman are
taken the same
as
in
ordinary-
basque, except the sleeve,
of
which
there are
three
measures,
viz
;
First
measure,
- . . -
20i-
inches.
Second
-
- - - -
22
Third
- - -
,
-
-
21 .
1.
Place
the
hand
at waist,
then measure
from the
mi(
back,
straight
across
the centre of
arms-eye to
middle
of front.
2. Measure across
the
fullest
part of
bust,
from
back line
to
front line,
over
the
outside of
arm.
3.
Measure
from
centre of
back,
on
a
line
wath
the
elbow,
around
the
outside
of
arm
to
wrist
bone.
RULES FOR
DRAFTING
DOLMAN.
1. Draft outside lines
as
in plain
basque; make
dots B and C
as
in ordinary
basque,
and
move
dot
B
as
far
to
the
left
as
dot
G
is
moved from
its
usual place.
.Iffin
2.
Three
inches
from dot
A
make dot C.
The
back
at
waist
line
can
be
made wider, if preferred.
3. Slope
down from shoulder measure to
line
3,
about
on^l:yj^
the distance
between
lines 6
and
8,
continue
down to
dot
Ci |p^
;';
4. Front of dolman.
Slope
down
from
shoulder
measure
to
line
3
about
one
inch
to
left
of
line
7.
The
curve is continued
down
to
dart on
hip,
and
then across
to
dot B
a
little above
hip
line.
5. The
dart
is
made three-fourths of
an
inch
each
side of
line
2,
and is
sloped
down
to
hip line.
6. The
sleeve commences where
the shoulder line touches
line
2,
and
curves
down
each
side,
touching
the
top
corners
of
square
formed
on
arms-eye.
The
back
slopes
down
to
dot
C,
parallel
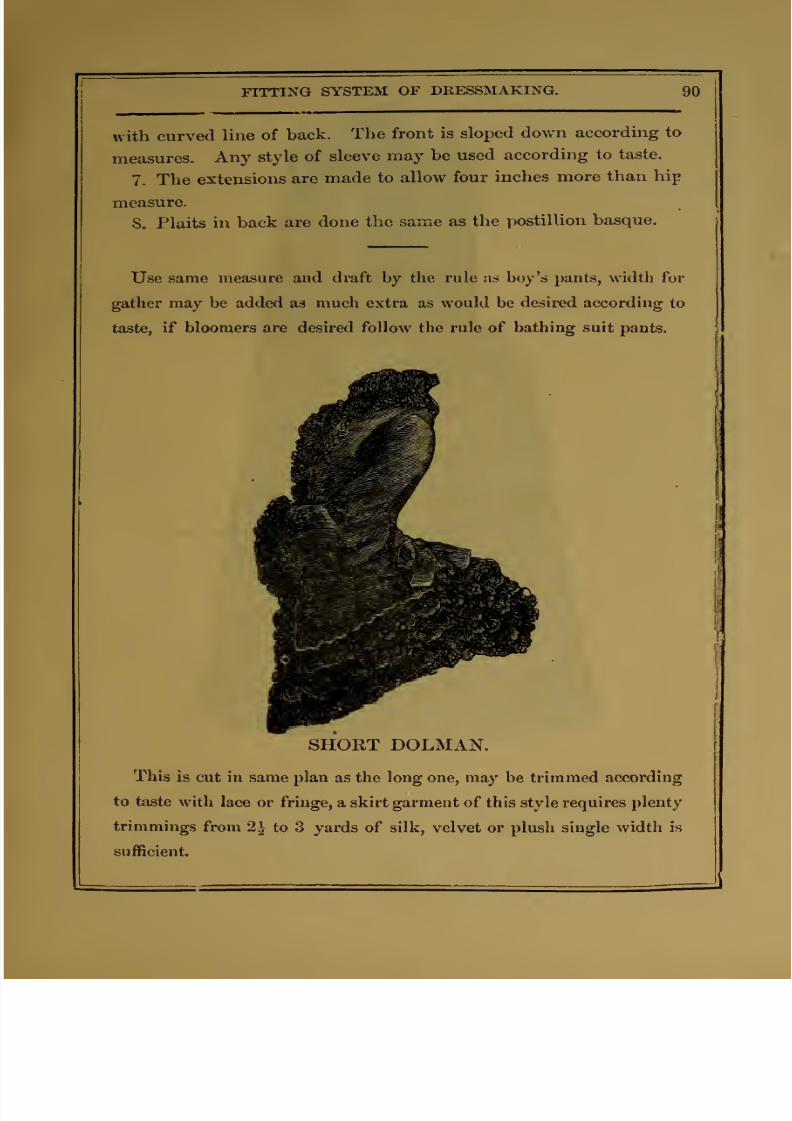
7/17/2019 The American Lady Taylor Glove Fitting System (Elizabeth Garland))
http://slidepdf.com/reader/full/the-american-lady-taylor-glove-fitting-system-elizabeth-garland 99/160
FITTING
SYSTEM
OF
DRESSMAKING.
90
with
curved
line
of
back.
The
front is
sloped
down
according to
measures.
Any
style
of sleeve
may
be
used
according
to
taste.
7.
The
extensions
are
made
to
allow
four
inches
more
than
hip
measure.
8,
Plaits
in
back
are
done
the
st
le as
the
postillion
basque.
Use
same measure
and draft
by
the rule as boy's
pants,
width for
gather
may be added as
much
extra as
would
be
desired
according
to
taste,
if
bloomers are
desired
follow
the
rule
of
bathing
suit
pants.
SHORT
DOLMAN.
This
is
cut
in same plan
as the
long one, may
be
trimmed
according
to
taste
with
lace or
fringe,
a
skirt
garment of this
style
requires
plenty
trimmings
from
2|
to 3 yards of silk,
velvet or plush
single
width Is
sufficient.
\i
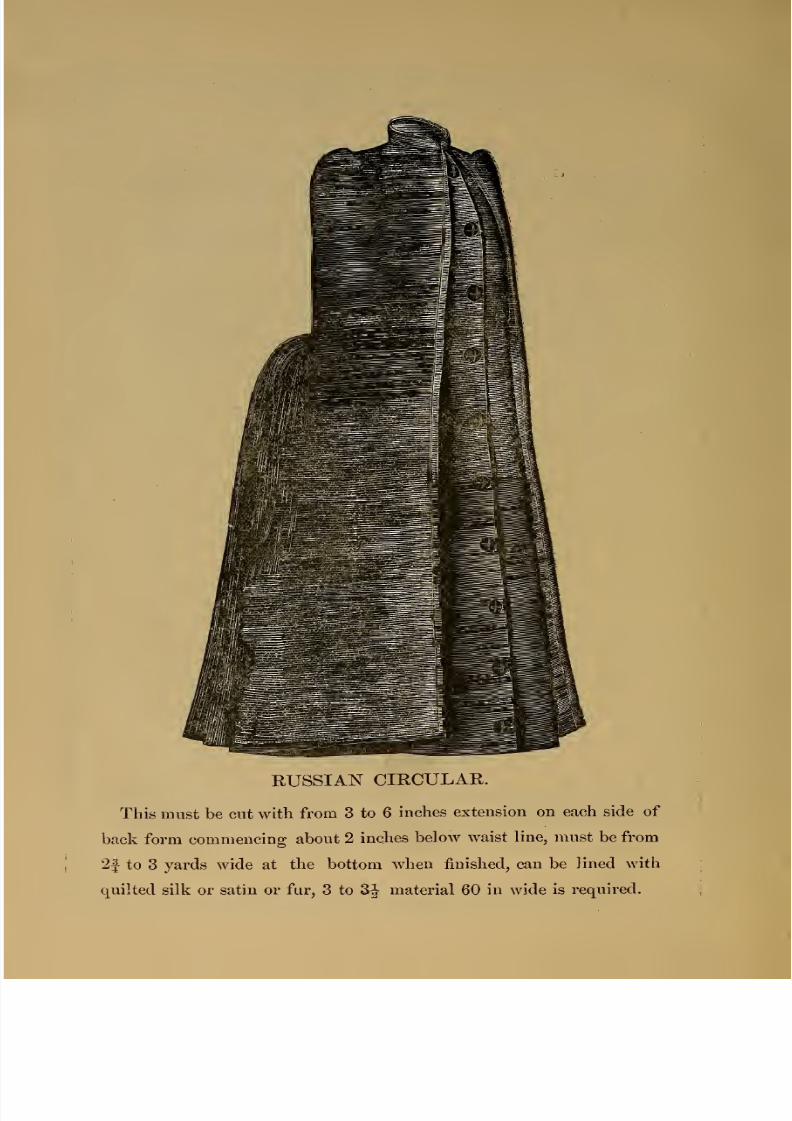
7/17/2019 The American Lady Taylor Glove Fitting System (Elizabeth Garland))
http://slidepdf.com/reader/full/the-american-lady-taylor-glove-fitting-system-elizabeth-garland 100/160
RUSSIAN
CIRCULAR.
This
must be
cut
with
from
3 to
6
inches extension
on
each
side
of
back form
commencing
about
2
inches
below
waist
line,
must
be
from
2|
to
3
yards wide
at
the bottom
when finished, can be
lined
with
quilted
silk
or
satin or fur,
3
to
3
J material
60
in
wide is
required.
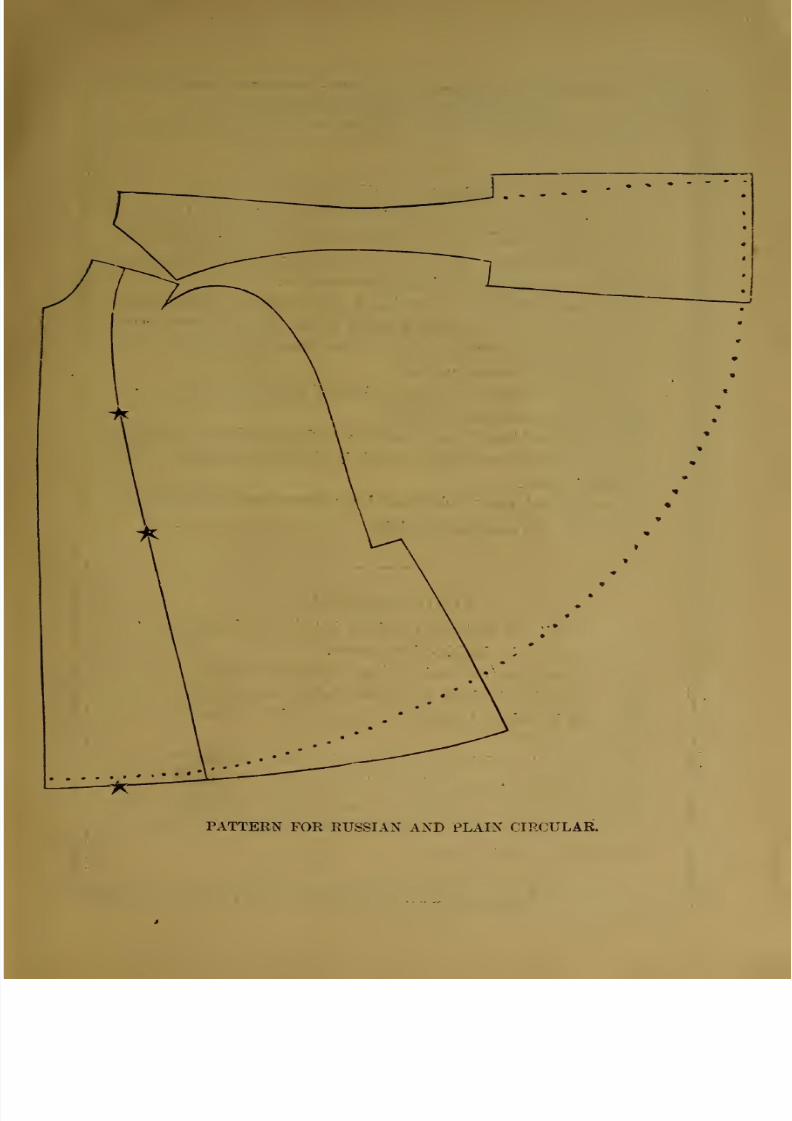
7/17/2019 The American Lady Taylor Glove Fitting System (Elizabeth Garland))
http://slidepdf.com/reader/full/the-american-lady-taylor-glove-fitting-system-elizabeth-garland 101/160
PATTERN
FOR
RUSSIAN
AND
PLAIN
CIRCULAR.

7/17/2019 The American Lady Taylor Glove Fitting System (Elizabeth Garland))
http://slidepdf.com/reader/full/the-american-lady-taylor-glove-fitting-system-elizabeth-garland 102/160
93
THE
AMERICAN
LADY
TAILOR
GLOVE-
RUSSIAN
CIRCULAR.
The
quantity of material required will
be
twice
the
length
in
double-width
goods. Care
should
be
taken
to
measure from
the
top of shoulder line.
The
other measures
are taken the
same
as
in
dolman, omitting
the
third
sleeve measure.
The
front
is drafted according
to
diagram, the
upper front
being
lapped
over
the
under front
as far as
the star
at
the
lower
part,
and
are
then
sewed
together,
excep tthe
space
between
stars
through which
the arm
passes.
The
back
is
drafted as many
inches
below
the
waist
line
as
desired,
before allowing
for plaits.
The
front
and
back
should
both
be
cut lengthwise
on
the
goods,
the nap
running down
when made
in
cloth, and
up when plush
or velvet
is
used.
When finished^
this circular
should measure
around the
bottom
from
2
to
2^
yards
not
counting
the
plaits.
PLAIN CIRCULAR.
The
quantity
of
material required,
is
twice
the length from top
of
shoulder line
in
double-width
goods.
Draft according
to
outside
lines of
Russian
circular,
except
below waist
line in back
where
the dotted
line should
be
used.
Care
must
be
taken to
keep
the_
length at
side, the
same
as
front
and
back.
In
cutting the
plain
circular,
lay
the pattern so
that the
front
and
back
lines
are
perpendicular
to
each
other.
Be
careful
to
get
both
fronts on the
selvedge,
and
the
nap
of the cloth
to
run
the
same
way.
This
garment
has
but
one seam
only in the
back
and
the
shoulder seam
as
seen
in
cut.
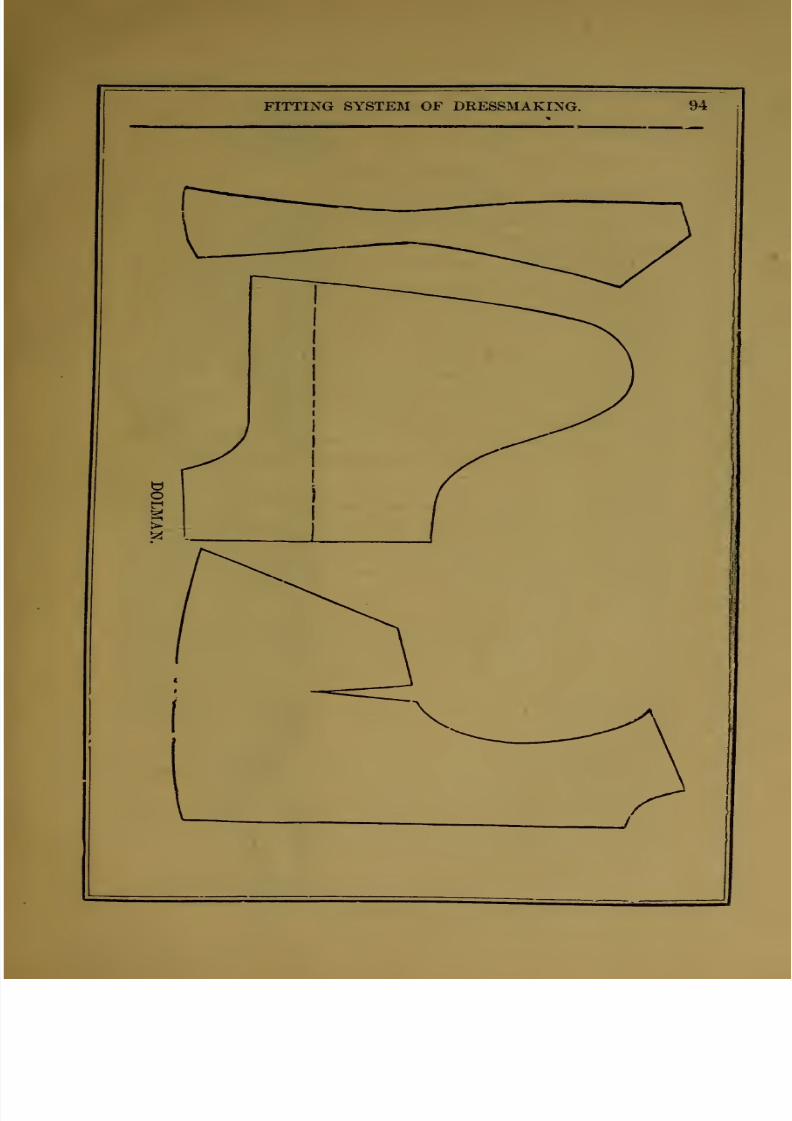
7/17/2019 The American Lady Taylor Glove Fitting System (Elizabeth Garland))
http://slidepdf.com/reader/full/the-american-lady-taylor-glove-fitting-system-elizabeth-garland 103/160

7/17/2019 The American Lady Taylor Glove Fitting System (Elizabeth Garland))
http://slidepdf.com/reader/full/the-american-lady-taylor-glove-fitting-system-elizabeth-garland 104/160
95
THE-
AMEEICAN
LADY
TAILOR
GLOVE-
RIDING
HABIT.
Tlie-M-warist of
-a
-riding habit is
made
the
.same
as
ordinary-
basque,
except that it is
quite
short
in front
and
over
the
hips.
It is
sometimes
cut off
entirely
below the
waist
line and a
postil-
lion
back is
add^d. The
basque
also is
sometimes made
with-
out
a
seam in
the back,
when
this.-is
done,
an extra slope is of
course
taken
off
at
the
sides,
in order to
taper the waist
to
the
proper
size.
The
skirt of
a riding
habit
is
cut
long enough
to lay
on
the
floor
several
inches in the back and right
side. The front and left
side
is
sloped like
a train skirt,
about
one-half yard longer. The
skirt fits
neatly
over
the front and hips. Allowance
is generally
made
in
a
tailor-cut
dress
for the bend of
the
knee.
Amateurs
should
not
attempt
to
allow
this fullness
without
great care in
measuring.
i
It
is
usual for ladies
to
wear
pants under a
riding
habit.
These
are made
by
tailors
exactly
like
a
gentleman's
pants,
fitting
neatly
to the figure,
and
may
be worn
with
a
strap
under
the
boot, or
the
boots
may
be
worn
outside. They may
be
cut
by- the
rules
given
in
this
book for
boy's
pants.
The
best material
for making
a
riding
habit,
for
wearing in
winter,
is
heavy
stockinet
or
jersey
cloth,
as
it
wears
better
and
is
much
warmer
than
lady's cloth,
which is
more
suitable
for
spring
and
autumn.
:,..,,..
The waist
should
be
lined
and
padded
thoroughly
like
a gentle-
man's
coat.
The
pants
should
be
lined
with
chamois
skin.
About
five
yards of
double-width
goods
is
sufficient
for
making
a
full
habit,
waist, skirt
and
pants.
The
colors
-mostly
used
are
dark
blue
and
black
;
green
and
brown are
sometimes
used,
but
are
more
apt
to
fade.

7/17/2019 The American Lady Taylor Glove Fitting System (Elizabeth Garland))
http://slidepdf.com/reader/full/the-american-lady-taylor-glove-fitting-system-elizabeth-garland 105/160
7/17/2019 The American Lady Taylor Glove Fitting System (Elizabeth Garland))
http://slidepdf.com/reader/full/the-american-lady-taylor-glove-fitting-system-elizabeth-garland 106/160

7/17/2019 The American Lady Taylor Glove Fitting System (Elizabeth Garland))
http://slidepdf.com/reader/full/the-american-lady-taylor-glove-fitting-system-elizabeth-garland 107/160
FITTING
SYSTEM
OF
DRESSMAKING.
98
RIDING
HABIT
WAIST.
This cut shows
how
the
inside of Habit
Waist must
be Padded to
set
nicely,
inside
of
slender ladies'
coat
or waist may
be finished
in
the
same way
with
the
exception
of the
whale bones,
the latter
should
only
be used for
stout ladies
if at
all. Rules
of
Basque
No.
5,
makes
a pretty front of
a
Riding
Habit.
A
nice
way to
put in
whale
bones is to
cover
the
bones first with
silk
or
a
piece
of
the
same
lining
as
used
in Avaist,
and
fasten along
the
seam
about
two
inches
apart,
always
stretch
the
seams
tight
against
the bones.
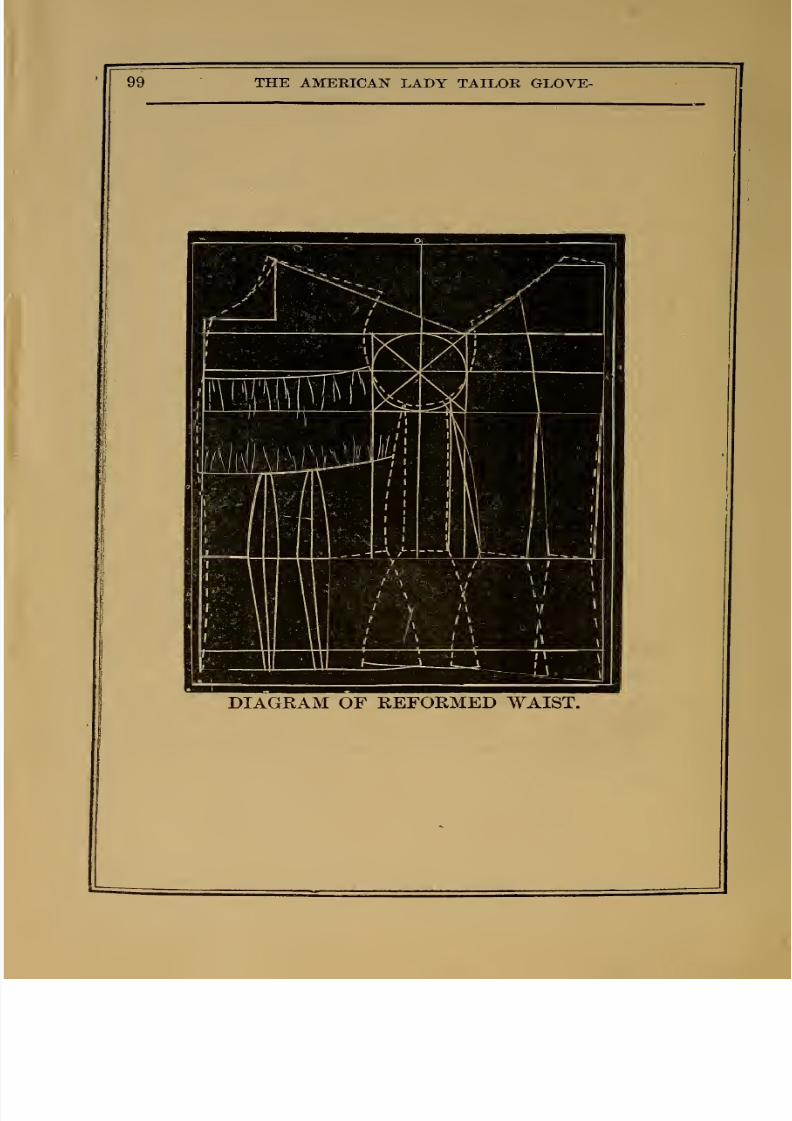
7/17/2019 The American Lady Taylor Glove Fitting System (Elizabeth Garland))
http://slidepdf.com/reader/full/the-american-lady-taylor-glove-fitting-system-elizabeth-garland 108/160
99
THE
AMERICAN
LADY TAILOR
GLOVE-
DIAGRAM
OF
REFORMED
WAIST.

7/17/2019 The American Lady Taylor Glove Fitting System (Elizabeth Garland))
http://slidepdf.com/reader/full/the-american-lady-taylor-glove-fitting-system-elizabeth-garland 109/160
FITTING
SYSTEM
OF
DRESSMAKING.
100
REFORM
WAIST
AND
CORSET
COVER.
Many
ladies
are
recommended
by
their physicians
to
discard
corsets
entirely
and
wear instead a body
with buttons attached,
so that
the
weight
of the clothing may
be
carried
by
the
shoul-
ders
instead
of the
hips. This reform
waist
may
be
bought
in
the stores,
but
they
are
rather expensive
;
a
knowledge
of the
A.
L. T.
S.
will
enable
any
one
to
make
her
own.
The
diagram
of plain
basque,
or
the
one
with
English
back,
will make
either a corset cover or
reform
waist.
For
the latter
one
row
of
buttons
should
be
placed
one
and
one-fourth
inches
below
waist
line, and
another
row
one
and
one-half
inches
below
the
first row.
The seam
in
the
back
may
be carried
up to
the
shoulder
as in
diagram
if
preferred.
When
this
is
done,
the
back
should
be
made
broader
at
waist
line
by increasing
the
distance
between
dots
A
and
C.
A basque
may be cut in
this
way, and is
becoming
to
those who
wish to
appear more
slender.
If
desired,
in mak-
ing
the
corset
cover,
one
dart
may
be used, and
the seam
may
then be
carried
to the shoulder
in
front.
This waist
is
made
according
to
fancy in
the
front
or
back,
but
is always
cut
on the same principle.
The diagram
represents
one
with
a
yoke. Below
this,
and
over the
bust
only,
a
bias
piece
may
be
inserted.
This
should
be faced
down the
front
with
a
straight
piece
of
material,
and
allowance
should
be
made
for
full-
ness of
about two inches less
than
double
the
width
of
front.
The lower
part is sloped
down
one-half inch
deeper
in
the
middle,
then
up
two
inches
to
under-arm
gore
seam if
correctly
cut the
grain of
material will
run
straight
at
this
seam.
The
body
should
be faced
below
the
waist
line
and
buttons
placed
as in
the description
for the plain reform
waist.
The
drawers and
skirts
worn
with this
waist
should
all
be

7/17/2019 The American Lady Taylor Glove Fitting System (Elizabeth Garland))
http://slidepdf.com/reader/full/the-american-lady-taylor-glove-fitting-system-elizabeth-garland 110/160
101
THE
AMERICAN
LADY
TAILOR
GLOVE-
madc with
yokes;
button-holes
should
be
placed
at
convenient
distances, so
that
they
correspond
with
the
buttons
on the
waist
to
which
they
are to
be
fastened.
The
neck
should be cut somewhat
lower
than usual
or
the
trimming
will
be
visible. A long or
short
sleeve
may
be worn
with
this
waist, or
the
trimming
may
form
a
sleeve.
Undervests
and drawers can
be
bought
woven
in
one piece,
or
if
preferred, they may be sewed together.
It
is
unnecessary
to
wear
any
other
garment
under
this
waist
;
the
merino
can
of
course
be
changed
with
the
season.
Those
ladies
who
prefer wearing corsets, may
use the
reform'
waist
as
a
corset cover.
The
buttons
may
or
may
not
be
used.
The
ease,
comfort
and
beneficial effects
from
wearing
a
waist
of
this
kind must
be
apparent to all.
7/17/2019 The American Lady Taylor Glove Fitting System (Elizabeth Garland))
http://slidepdf.com/reader/full/the-american-lady-taylor-glove-fitting-system-elizabeth-garland 111/160

7/17/2019 The American Lady Taylor Glove Fitting System (Elizabeth Garland))
http://slidepdf.com/reader/full/the-american-lady-taylor-glove-fitting-system-elizabeth-garland 112/160
103
THE
AMERICAN
LADY TAILOR
GLOVE-
BOY'S
JACKET.
MEASURES
FOR
BOYS
SUIT.
Jackei.
1.
Neck^
-....._
Ill
Inches.
2.
Arm's-eye,
11
3.
Bust,
29
4.
Waist,
25
5.
Length
of
back,
-
-
-
.
12|
^\
Length
of
front,
- - .
ni
«
7.
Under
arm,
-
- - -
-
7
'<
8.
Inside
measure
of
sleeve,
-
-
10
P.
Wrist
measure,
- . - .
7
'»

7/17/2019 The American Lady Taylor Glove Fitting System (Elizabeth Garland))
http://slidepdf.com/reader/full/the-american-lady-taylor-glove-fitting-system-elizabeth-garland 113/160
FITTING
SYSTEM
OF
DRESSMAKING.
104
Rules
for
Drafting
Jacket
Proceed
as
usual in
drafting outside lines
as in
lady's
plain
basque. There
are no darts
required,
as
children's
garments
are
loose-fitting:
Allowance
must be
made for
tucks and
plaits,
if
desired.
Rules
for
Drafting
Sleeves,
1.
Line
1,
inside
measure,
one-third
of
diameter
of arm's-eye
added, marking
dot
A, at inside
measure, and B
at
end of line.
2. Line
2
is one-half of
arm's-eye
measure.
3. Line
3,
parallel to line
1,
make dot
C
on line
2 at one-half
of
arm's-eye
measure.
4.
Line
4,
parallel
to
line
2,
from line 1 to
3
from
dot
B.
5. Line
5,
parallel to
line 2 from
dot A.
6.
Line
6,
parallel to
line
2,
one-third of
diameter
of
arm's-eye,
and mark
dot
T> on line
3.
7.
Dot E,
on
line
2,
is one-half the distance from line 1
to
dot
C ;
then draw line
7
from
dot
E
to
line
5,
parallel
with
line 1.
8.
Dot F
is
in the
centre
of
line
5.
9.
Dot
G
is in the
centre of
line
3,
between dot
D and
end
of
line
4.
10.
Place
the point of
square
on dot B, with long arm resting
on
dot
F,
and
mark
dot H
at
one-half
the
wrist
measure.
11.
Curve
for
the
top
of
upper
sleeve,
from
dot
A
to
the
junc-
tion of
line
7 and
6,
up
to dot C,
and
down
to dot
D.
12.
Curve for
lower sleeve,
from H
to
F,
and
up
to D.
13.
Curve
for the inside
of
sleeve
from B to
A,
one-half
inch
inside
of
line
1.
14.
Curve
for the
outside
of
sleeve
is from 11
to
G.
,15.
This
sleeve
can
be
made
tighter,
and used for children's
dresses.
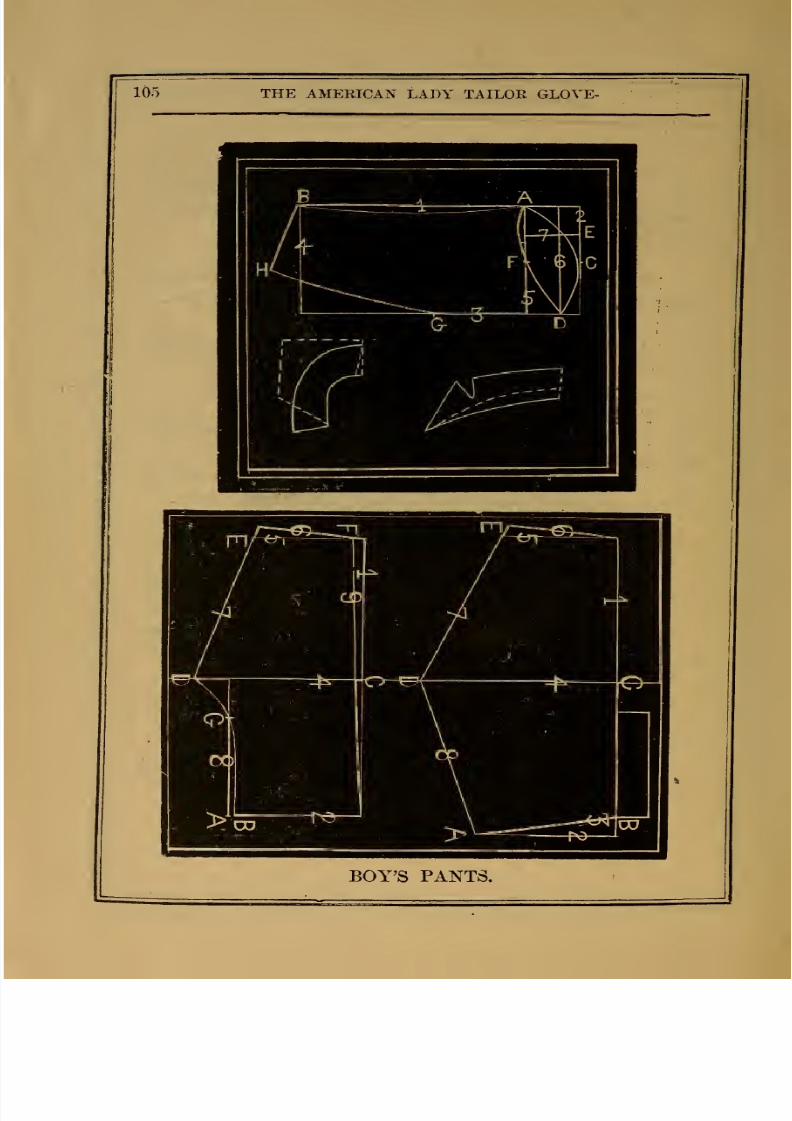
7/17/2019 The American Lady Taylor Glove Fitting System (Elizabeth Garland))
http://slidepdf.com/reader/full/the-american-lady-taylor-glove-fitting-system-elizabeth-garland 114/160
105
THE
AMERICAN
LADY TAILOE GLOYE-
BOY'S
PANTS.

7/17/2019 The American Lady Taylor Glove Fitting System (Elizabeth Garland))
http://slidepdf.com/reader/full/the-american-lady-taylor-glove-fitting-system-elizabeth-garland 115/160
FITTING
SYSTEM
OF
DRESSMAKING. 100
Outside
measure
. - .
-
15
Inches.
Inside
7i
Waist,
-----
23
''
Hip,
32
RULES
FOR
DRAFTING.
(Back
of
Pants.)
1.
Draw
line
1,
one
inch longer
than outside measure.
2.
Line
2 is one-fourth of waist
measure,
add
three-fourths
of an
inch
and
make
dot
A.
3. On
line
1,
one inch to
the
left of line
2,
make
dot
B.
4.
From dot B
draw line
3 to dot
A.
5.
Make dot
C
on
line
1
the
height of
inside
measure.
6.
Draw
line
4
from
dot C,
parallel to line
2,
to
one-fourth
of
hip measure
add three-fourths of an
inch
and
make
dot
D.
7.
Draw
line
5
from the
end of
line
1,
to one-half of
knee
mea-
sure
add one-fourth
of
an
inch,
and
make
dot E.
8. Draw lines from
A to D,
from D
to
E,
and
extend
it
half an
inch
below
dot
E,
and draw
line
6.
9.
Make
a
dart in
.centre
of line
3
three-fourths
of an
inch
wide.
(Front
of
Pants.)
1. Draw
line
1,
the
length
of
outside
measure.
2.
Draw line
2,
from
end
of line
1,
one-fourth of
waist
measure,
and
make
dot A.
3.
One-fourth
of
an inch
to
the left of A
make
dot B.
4.
Make dot
C, on
line
1,
the height of
inside
measure,
and
draw line
4,
one-fourth
of hip
measure,
less
three-fourths
of an
inch.
5.
Draw line
5,
from
end
of
line
1,
one-half of
knee
measure,
less
one-fourth
of
an
inch, and
make
dot E.
7/17/2019 The American Lady Taylor Glove Fitting System (Elizabeth Garland))
http://slidepdf.com/reader/full/the-american-lady-taylor-glove-fitting-system-elizabeth-garland 116/160
107
THE
AMEEICAN
LADY
TAILOR
GLOVE-
6.
Half
ail inch
to
the
right
of line
1,
on
line
5,
make dot
H,
draw
line
from junction of
lines
2 and 1 to dot H, for slope of
side.
7.
Draw
a
line from D
to E, and
extend it one-
half
inch,
and
draw line
6.
8. Two inches
to the left of
dot
D draw a line to dot B, and
«
curve for
front of
pants as shown
in
diagram.
9.
In cutting
out
the
pants
be
sure
to
follow
the
inside lines
3,
6
and
9.
10. Outside piece to the left of
back, can be
cut with the
pants
for
a
lap under
at
pocket,
or
it can
be
sewed
on.
For
Ladies'
and
Children's
drawers
use
same
measure
and
draft
by
the
rule
as
boy's pants,
width
for
gather
may
be added
as
much
extra
as would
be desired
according
to
taste
;
if
bloomers
are
desired
follow
the
rule
of
bathing
suit-pants.
To make
the
Boy's
Jacket
with
pleats,
allow
twice
as
much
for
every pleat
as
you
want
to
make
the
pleats
wide,
or,
if
no
lining
is
used
make
the
pleats
first,
then
lay
the
pattern
on
and
cut
around.
In
making
Boy's
Overcoat
extend
down
to desired
length.
They
are generally
double-breasted,
which
is
made
by
allowing
more lap
in
the
front.

7/17/2019 The American Lady Taylor Glove Fitting System (Elizabeth Garland))
http://slidepdf.com/reader/full/the-american-lady-taylor-glove-fitting-system-elizabeth-garland 117/160
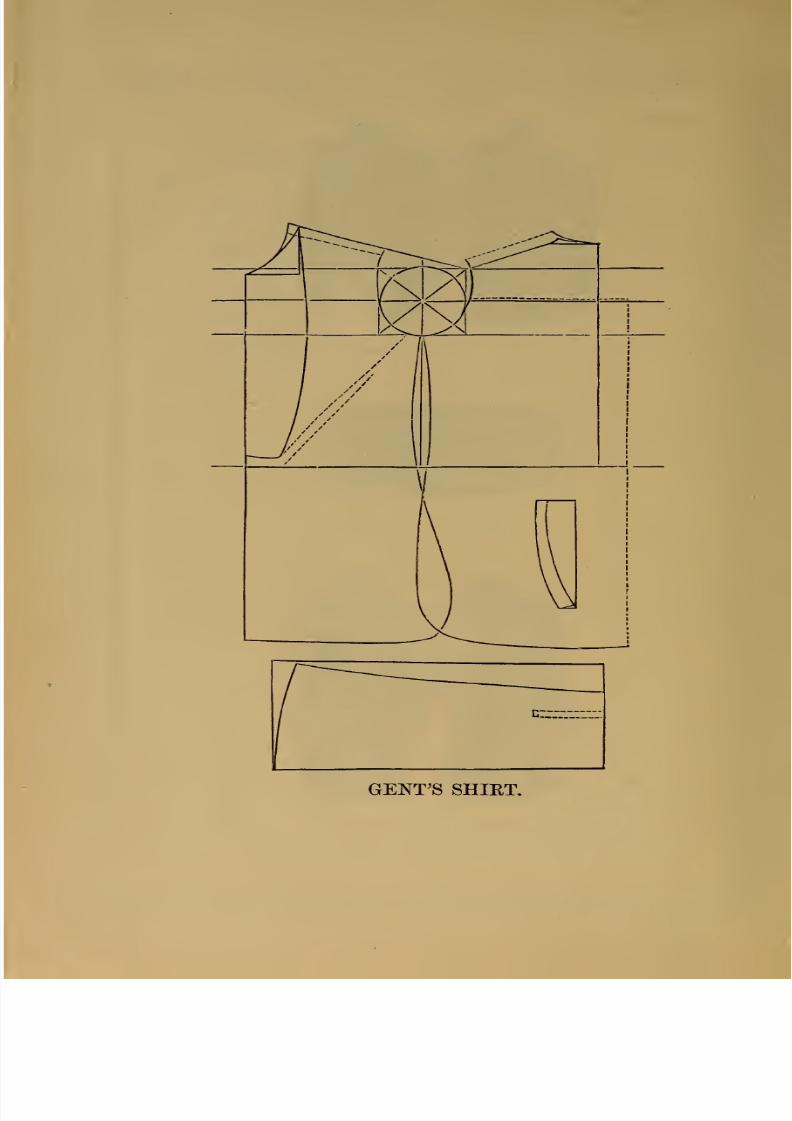
7/17/2019 The American Lady Taylor Glove Fitting System (Elizabeth Garland))
http://slidepdf.com/reader/full/the-american-lady-taylor-glove-fitting-system-elizabeth-garland 118/160
GENT'S
SHIET,

7/17/2019 The American Lady Taylor Glove Fitting System (Elizabeth Garland))
http://slidepdf.com/reader/full/the-american-lady-taylor-glove-fitting-system-elizabeth-garland 119/160
FITTING
SYSTEM
OF
DRESSMAKING.
llQ
GENT'S
SHIRT.—
(Taking
Measures).
1. For
neck
measure
use the size
of
collar
worn,
or take a smooth
measure
around
neck
next
to skin,
low
down, and
add
one
inch
to
it.
2.
Remove
coat
and
take the arm's
eye measure
as for a lady's
basque.
3.
Take
chest
measure,
measuring entirely
around
the
form,
over
the
vest.
Take
an
easy
measure.
4.
Take
under-arm
measure
same
as
for
lady's
basque, measuring
down to
the top
of hip
bone
at
side.
5.
Take
shoulder
measure same
as
for lady's basque.
6.
Take
length
of shirt measure
from
front of
neck down in
front
to
length
desired.
7.
Take
length
of
bosom
in
same
way.
8.
Take
arm
to elbow
and
arm
to
wrist measures
same
as for
a
lady's basque.
Diagram
shows
plain how
to
draft
a
shirt,
the outlines
are
the
same
as
lady's
basque,
with the
exception
of the shoulder. Take
off
the
front
from one to
two
inches
and add
it
to the back shoulder
which
is
stitched
on the
front
forming
a
yoke.
Shoulder
can be
cut
as
short
as
desired.
See
cut for shape of
sleeve.
Make
top of
sleeve
from
two to
three
inches
wider
than arm's eye measure if
gathers
desired.
Sloped
down
to wrist
and
make allowance
for
gathers
which
are
sewed
to
cuff
or
wrist-band. The seam may
be sewed
up
and cut
open
on the
top
of
wrist,
which will
prevent
the annoyance of
cuff buttons to
a
gen-
tleman
who
does a great
deal of
writing.
A
two
inch
facing
around
top of
sleeve
is necessary, and
a
shirt
that
is
faced
from
the neck to
one
inch
below
the
arm-holes
all
around,
is
far
more
durable.

7/17/2019 The American Lady Taylor Glove Fitting System (Elizabeth Garland))
http://slidepdf.com/reader/full/the-american-lady-taylor-glove-fitting-system-elizabeth-garland 120/160
GENT'S
COAT
OR
DRESSING
GOWN.
7/17/2019 The American Lady Taylor Glove Fitting System (Elizabeth Garland))
http://slidepdf.com/reader/full/the-american-lady-taylor-glove-fitting-system-elizabeth-garland 121/160
FITTING
SYSTEM
OF
DRESSMAKING.
H^
GENTLEMEN'S
COAT
OR
DRESSING GOWN MEASURES.
Remove coat and take
arm's
eye
measure same
as for
lady's
basque,
loose
not
tight.
Take
chest
or
bust
measure.
Take
waist
measure
smoothly,
not
tight. Take
back, shoulder and under-arm
measure
same
as
lady's basque. All measurures are
taken
over the vest
and
under
the
coat.
RULES
FOR
DRAFTING.
Gentlemen's coat,
smoking jacket or
dressing
gown of any kind
may
be
measured
or cut on the
same principle with the
exception
of
neck.
Back of
neck
is sloped
^
inch below
back line. On
line
11,
2
inches from neck line
make
a
mark
and
slope
the
front
neck
down.
This
throws
the
shoulder seam
over
the
arm
and away
from
the
neck,
and
gives a square shoulder
as
a
gentlemen's
garment
is cut different
from
a
lady's. As
many
inches
as
you wish to
turn
over for
collar or
to
make
it double
breasted
add
to
the
front,
which is generally
from
2|
to
3 inch.
A
small
dart
of about
J
inch deep
and
from
2
to
2J
inches
long
is required
at
the neck.
This is done
by
cutting
into the
goods and
sewing
up
again
as
you see
in
diagram.
The
Litter rule
may be
adopted
for
a
lady's
double-breasted
coat.
For
dressing
gown
or smoking
jacket
the
dotted
lines are
not
used.
For
dressing gown
and
wrapper
extend down
to
length
required.
In drafting
sleeve
for
gent's
garment use lady's coat
sleeve
and
add
from
1|
to
2
inches
to
the
average
measure. Use
less bent
as
a
gentlemen's
sleeve
is
nearly
straight.
Gentlemen's garments
should have
as
much
as
five
or
six layers
of
padding
on
top
of
shoulder tapering
with
less
layers
around
arm-hole
and
lined with canvas.
Padding
must be
catstitched on
the
canvas,
latter
should reach to
the edge
of the coat
in
the
front. Garments for
house
use
don't require
so
much pading.
Smoking jackets are gener-
ally
made of
velvet
plush,
cashmere,
and any
color
desired.
Cuffs
and
collars can
be
made of
fancy
quilted
silk or
satin of different
color, with cord and
buttons to
match.
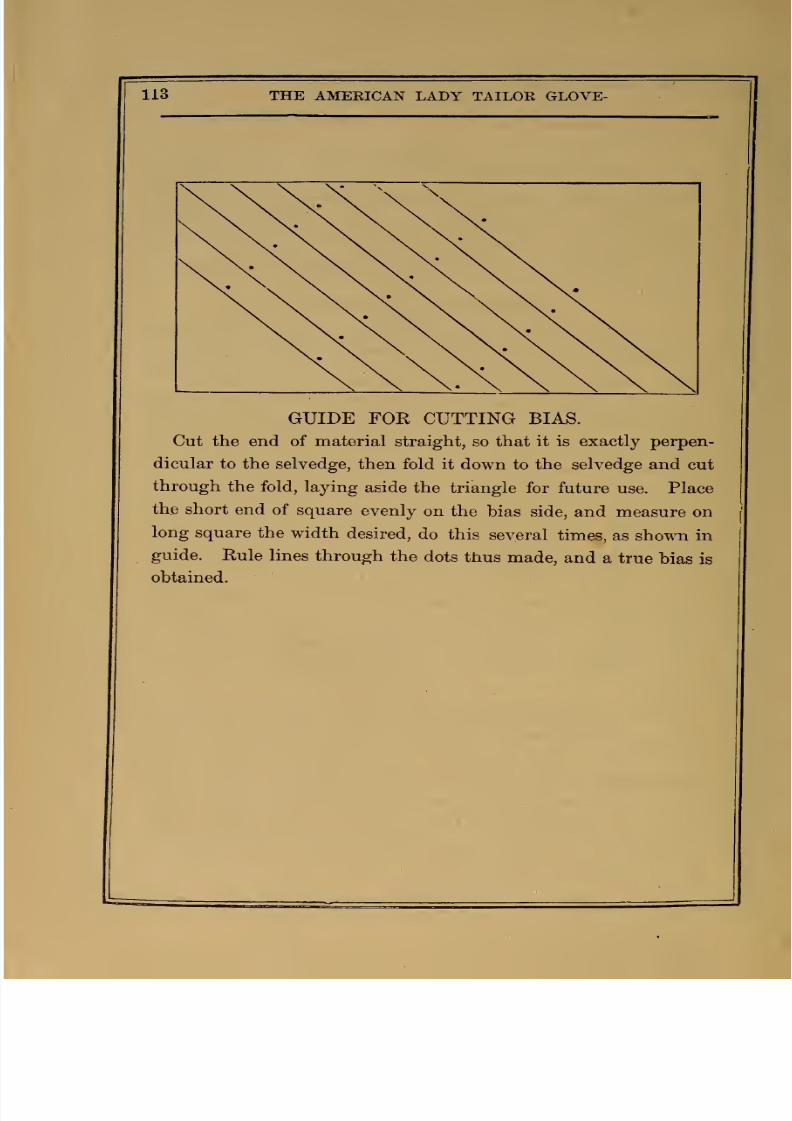
7/17/2019 The American Lady Taylor Glove Fitting System (Elizabeth Garland))
http://slidepdf.com/reader/full/the-american-lady-taylor-glove-fitting-system-elizabeth-garland 122/160
113
THE
AMERICAN
LADY
TAILOR GLOVE-
GUIDE
FOR
CUTTING BIAS.
Cut the end
of
material straight,
so
that
it is
exactly
perpen-
dicular
to the selvedge,
then
fold it
down
to
the
selvedge
and
cut
through
the
fold,
laying
aside
the
triangle for
future
use.
Place
the
short
end of
square
evenly
on
the
bias
side, and
measure
on
long
square
the
width
desired,
do
this
several
times,
as shown
in
guide.
Rule
lines
through
the
dots
thus
made,
and
a true
bias
is
obtained.

7/17/2019 The American Lady Taylor Glove Fitting System (Elizabeth Garland))
http://slidepdf.com/reader/full/the-american-lady-taylor-glove-fitting-system-elizabeth-garland 123/160
FITTING
SYSTEM
OF
DRESSMAKING.
114
RULES
FOR
CUTTING.
All
seams
must
be
allowed except
in
neck
and arm's-eye.
One-half
inch is
enough,
except
under
the
arms,
where the
seams
should be
somewhat
deeper.
It
is
absolutely necessary
to
use
a tracing wheel, in
order
to
have
your
lines
pirfeetly
true.
After the dress
is well
cut,
it
must
be
made
with great
care,
paying
strict
attention
to
the
rules.
It
is
economy
to
use
good
material for lining.
Be
careful always
to
lay the cloth
so
that
both
lining
and
outside
run
the
same
way,
as
your
dress will be sure to wrinkle
if either one
or the
other
is
on
the
bias.
In
Cutting
Velvet,
the
nap
must run up,
in
Plush
likewise,
in
Seal Plush
doion.
In
cloth
nap down
inside
of
fold
is
the
right side
of cloth,
in
cut-
ting
plaid
be
sure
to
match
stripes
in waist, skirt
and
trimming
which
can
always
be
done.
Straight fronts
and
backs
in
waist lines
should
be
cut
the
latter,
which
can
easy be
done in
our
system
of
cutting,
if
all
rules
are
carefully
observed,
we
guarantee
perfection.
GENERAL REMARKS.
Changing
seams
in
different
ways
from
the
general rules, for
instance
10
give
a
slender
lady
a
larger appearance,
throw
the front
seam
next
to
darts
further back
by
taking
off the
under-arm
gore
and adding
to
the
front. The
darts above
waist
line
may
be
drafted
more slanting
towards the
back. Be
careful
in
stiching
darts
to
run them
very
tapering,
a trifle
higher
than
traced.
The
side-body next
to back
may
be made
more
rounding,
which
some ladies prefer.
CUTTING
FOR
THE DEFORMED.
Very few forms are exactly alike
on
both
sides. One shoulder
may
be
shorter
;
one
hip higher
;
one
under-arm measure less
;
one
side
of
neck
larger,
and
so
on. The only
way to
make
a
perfect
fit
for
such
forms
is
to measure
both
sides,
and to
make
a
drafting for each
side.
But where
the
differences
are
slight,
it
is best
to
aim
to
hide
the
de-
formity
by
drafting
to the largest
shoulder,
shortest under-arm
measure,
and
so
on.
In badly
deformed
cases
take
a
piece of
chalk
and mark
down the center of back, center of front,
and also where
you wish
the
different seams
to
come.
Now
measure each piece
separ-
ately
around
bust
and
around waist, and make a
separate
drafting for
each piece,
using actual measures
as
taken for
that
piece.
The
worst
hunch-back
may
be
perfectly
fitted iu
this
way.

7/17/2019 The American Lady Taylor Glove Fitting System (Elizabeth Garland))
http://slidepdf.com/reader/full/the-american-lady-taylor-glove-fitting-system-elizabeth-garland 124/160
fr--
—
-
—
^
~~~~
115
THE AMERICAN
LADY
TAILOR
GLOVE-
RULES
FOR BASTING.
A
basting
thread
must
be
run on
the line
of
the
waist.
Baste
carefully,
so that.
lining
and outside
are
perfectly
smooth.
In
basting up the
waist,
commence at the
waist
line,
and go
up,
then
commence
again
at
the waist
line,
and
go
down. The most
troublesome seam in
the
whole waist, is
the curved
side
body
seam,
which
comes
next to the
back. In basting
this seam, on
one
side
of
the back,
commence
at
the waist line, and
go
up
as
in
other
seams,
holding
the
outward curved seam
toward you.
The
other
side
must
be
pinned
at
the
waist
line,
and
at intervals
up
the seam,
then
com-
meni;e
basting
at
the
top,
holding the
outward
curved
seam
toward
you
as
in
the other side.
Never run several
stitches
at
a
time in
basting, but take
a
single
stitch,
one by
one,
about one-fourth
of
an
inch
apart.
Use cotton
suitable
to
material.
In sewing
up
seams,
do
not
have the
machine
stitch
too
short,
or it
,,
will draw.
Nick
the seams,
so
that the
waist will spring
nicely into
the
figure,
and
then
press
them
all
open. If you
wish
to
finish
with
Tailor-like
neatness,
turn
in
the
edges and
slip stitch them
together,
instead
of
whipping the
seams
as is
the general custom.
No Hook
and Eye pieces
are
required,
but
instead
a
Waist-band
should
be
put
inside the
dress,
to
keep it
in
place.
If
Whalebones
are
used,
casings
must
be
cut
on
the
bias
and
sewed
on
loosely
by
hand. Ribbon n\Q.j be used
if preferred,
but
must also
be
sewed
on
almost as
if ruffled. This
to
keep the
bones
in
place
very
tight.
They
must each be
fastened in
several places
alo
)g
each
seam.
The
Casings
must,
as
a
rule,
be
run
about two
inches
below
the
waist
line,
and about
an
even
heighth with
the
dart
all
round. Under
the arras
they
may
be a
little higher.
In
our
system whalebones are
not necessary.
The
above
way
of turning
the
cloth
in finishing
seams is not
suita-
ble
in
heavy
material as
it
would
show
on
the
outside
of
waist
after
it is
pressed.
Neat
overhanding preferable
and
would
recommend
it
in all cases,
where
goods
will
not fray.

7/17/2019 The American Lady Taylor Glove Fitting System (Elizabeth Garland))
http://slidepdf.com/reader/full/the-american-lady-taylor-glove-fitting-system-elizabeth-garland 125/160
FITTING
SYSTEM
OF
DRESSMAKING.
116
LININGS,
PLAITINGS,
RUFFLES,
COLORS,
Etc.
If
the
silesia, drilling
or other
material
used for lining
the
waist
is cut
crosswise
it is less
apt
to stretch.
It is
economy
to
use a
good
quality
of
material
for
lining,
as
a poor
lining
will wear
oul
sooner
than
the
outside
goods, and
the
result
will be
that
the
scams
will
stretch,
and
the waist lose its
shape.
A
dress
should
not .be made so
tight
as
to draw.
The
corset
should
be
pulled
in
as required,
and the waist
should
be fitted
over
it
easily
and
without wrinkles.
The seams
will
stretch
and
fray
out,
if
this
rule
is not
followed. The
same corset
should
be
worn with
the dress
that it was
measured
and
fitted
over, as differ-
ent
corsets
change
the figure. A
dr6'ssmaker
should
make it
a
rule
never to
measure a
lady
over old or ill-fitting
corsets.
Velvet,
plush,
hernani and other thin
goods
should
be
lined
with
silk. It should
be used
with the
heavy goods
because
it
makes a
neater fit,
and with
the
thin
goods because
the}'
are
transparent,
and it will
have a
more
pleasing
effect.
A
good
silk dress should
also
be
lined
with silk
to match
the
dress in color.
Surah
or some inexpensive
silk may
be
used.
By
following
this rule,
when
the
dress
begins
to
wear out or
the
seams to draw,
the
lining
is
not visible,
as
it surely
would
be
under
other circumstances.
In making
a
close kilt plaiting for
trimming,
allow
two
and
one-half
to
three yards for every yard required.
A
close hox-
jjlaiting
requires
the
same
quantity.
Allowance
should
be
made
for
a kilt skirt on
the same principle. It is
well
to
use
a
nicked
card
to
measure each
plait, and keep
them
uniform.
For
a gathered
ruffle,
allow one-fourth
to
one-half yard
extra
for
every
yard.
•
;^
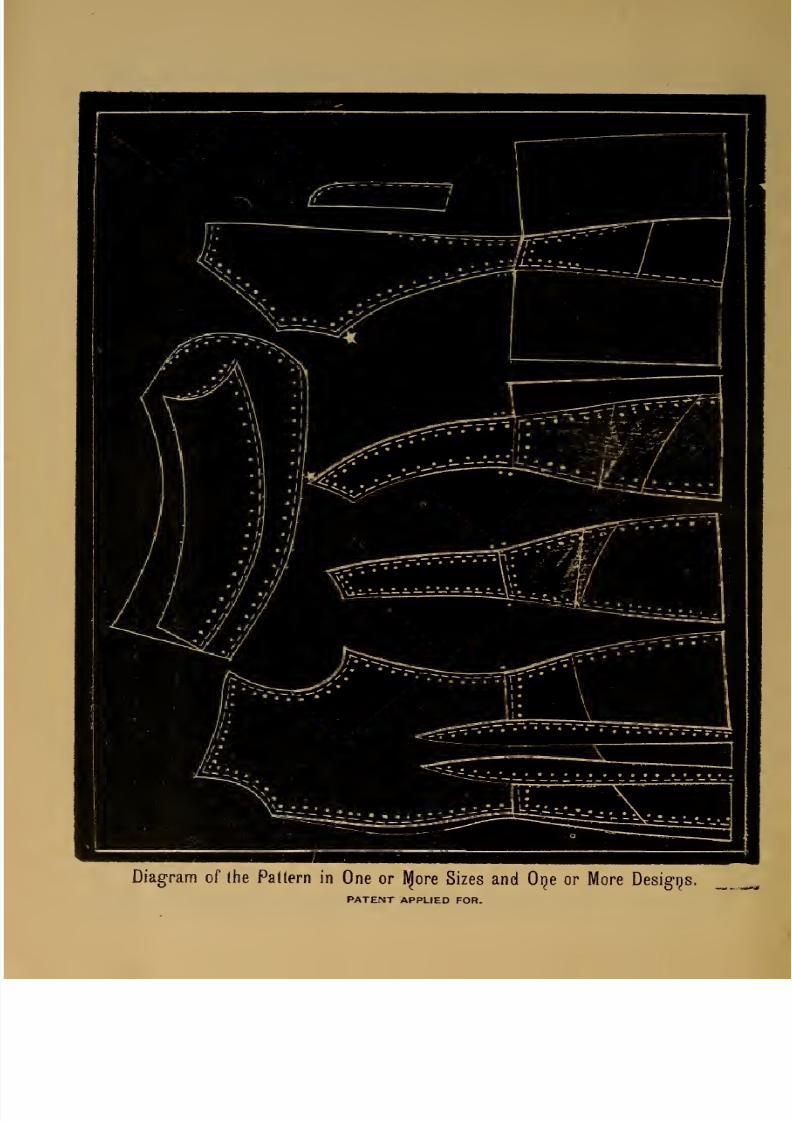
7/17/2019 The American Lady Taylor Glove Fitting System (Elizabeth Garland))
http://slidepdf.com/reader/full/the-american-lady-taylor-glove-fitting-system-elizabeth-garland 126/160
Diagram
of
(he
Pattern
in
One
or
Bjore
Sizes
and
Oije
or
More
Desigi^s.
PATENT
APPLIED
FOR.
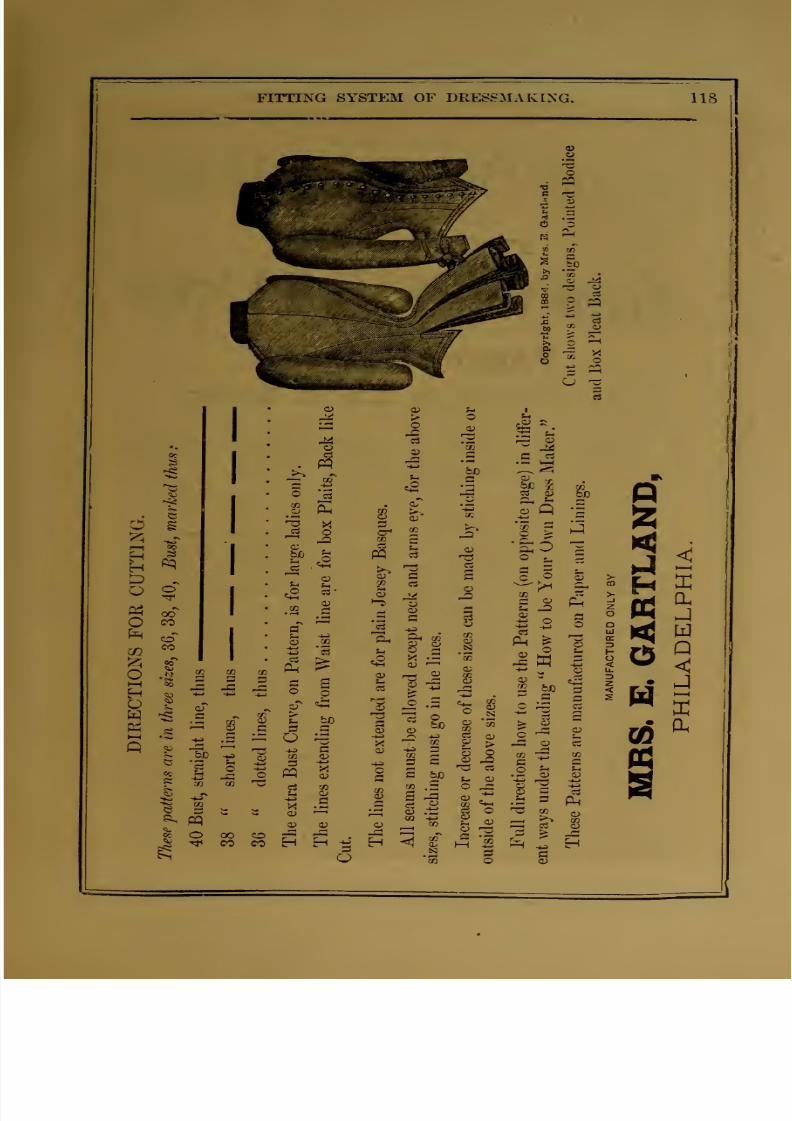
7/17/2019 The American Lady Taylor Glove Fitting System (Elizabeth Garland))
http://slidepdf.com/reader/full/the-american-lady-taylor-glove-fitting-system-elizabeth-garland 127/160
FITTING SYSTEM
OF
DRESSMAKI^'G.
118
-^
I—
H
H
O
O
f^
O
CO
O
H
O
H
o
CO
CO
CO
5-
>>
5^
^
o
-i*)
e3
as
pq
.o
c3
Plh
a.
S
5 3
-^
-C
-G
O
S
^
CD
.^
.s
^
bX)
o
o
Q
e3
g
^
a
o
73
3
n3
s
-^
^
W
::
:s
^
O
00
CO
^
E^
H
Ph
a
H
•^
a
•-a
^
-2
.2
-t->
3
cfi
a
3 d
a>
?^^-
rs
I—
V
Cf3
^
-^
c
3
=S
•
r^
•->
li-l
bO
.-^<5
c
Sd
3g
-j:3
cs
a>
c
Ph
*h
i^fi
>%
-a
O)
•&0
T3
o
--
C3
e
c
S
a>
X^
3
<D
<-*
fc^
_2
s
-M
o
-tJ
+j
a;
iS
s
bc
y^
bD
»
.3
CO
-t->
^
CO
r-.
S-
43
CD
'm
CO
^
2
a o
t^
a;
M
'5
o
OJ
'£
bJD
'
_3
-2
5
C
'^
-3
a>
CO
Tl
§
t:
a;
3
.£:
^
3
Q
z
CD
X
a
w
Q
<
DC
a.

7/17/2019 The American Lady Taylor Glove Fitting System (Elizabeth Garland))
http://slidepdf.com/reader/full/the-american-lady-taylor-glove-fitting-system-elizabeth-garland 128/160
119
THE AMERICAN
LADY
TAILOR
GLOVE-
Be
Your
Own
Dress
Maker
m
»
m
>£<« «
•
^
I^XTX^ILi
SIZE
PapeP^Pattern
O-i^T-en.
-^vTyT-itli
DEaclx IBools:.
Easy
Practical
Lessons in Cutting,
Fitting
and
Making Dresses
at
Home
INTRODUCTION.
The cost of
having
dresses, of
simple
and inexpensive material,
really
well
made
frequently
exceeds
the price
of
the material itself,
hence
the
desirability of
a
lady
understanding
how
to
make
a
dress for
herself, supposing she
has
time at her
disposal for
work of
the
kind.
Knowing how
to
cut and fit is not
knowing
how to make
a
dress.
Our
purpose
is
to
go
through
all
the
details
in as practical
a
manner
as possible to
help
those
of our readers
who may
be
desirous
of learn-
ing,
or
whose
position
demands that they
make
a
good
appearance,
yet
whose
means may
be
somewhat inadequate
to
pay
what
really clever
dressmakers
are
obliged
to
charge
for the amount of
time
which
a
well-made dress
takes to
complete.
We desire
particularly
to
indicate
that dressmakers generally
do
not
charge
too
highly
for good cut
and fit
combined
with
the
great
amount
of
work
which
modern
fashion
decrees
a
dress requires
;
and
further,
we
may
remark, that the
large
quantity
of
material which pleatings,
kiltings,
and
draperies necessitate is calculated
to
astonish those
who
really do
not
understand
how
a
dress
is made.
7/17/2019 The American Lady Taylor Glove Fitting System (Elizabeth Garland))
http://slidepdf.com/reader/full/the-american-lady-taylor-glove-fitting-system-elizabeth-garland 129/160
FITTING
SYSTEM
OF
DRESSMAKING.
120
islany
of
our
correspondents ask
this
question
:
—
How
am
I to
make
my
allowance of
so
and
so
sufficient
to
supply
me
with
the
needful
dresses
for such and
such
occasions.
Our
reply to such
a
question is,
make
some
of your
dresses
your-
self.
It
is
quite
astonishing
how some
young ladies,
who are
possessed
of
good to
taste and industry, can dress
well
upon
a
small
allowance,
while
others
spend much
money
with
a
very
inadequate
result in the
way
of
an
appearance.
If a
lady
makes
a dress
for herself
she
will
probably
be enabled
to
purchase
material
of
a
better quality,
which
will
wear
longer,
and
keep
in much
better
condition
than
comnioner
material.
As we
know not what
the future
has
in
store
for
us,
it
is
well
to
prepare
for emergencies,
and one
of
the
most
useful is
to
know
how
to keep
up a
good appearance
at a
small
cost.
Ladies who
know
enough
about dressmaking
to
be
enabled
to direct
a
maid,
or
other seamstress,
to
work
for
them
or
their
families,
will
also
find
the
practical
knowledge
useful.
When a
new
dress is required,
one
of the first things
to
consider
is
the
style
in
which it
should be
made ;
this,
in
most instances,
can be
easily
determined
by
referring
to the
numerous
fashion
illustrations in
our
Journal
and
Supplements.
Next
calculate
the quantity
of
material
it
will
take
—
this
we
shall
endeavor
to assist our
readers
in doing.
Purchase
all
the
materials
you require
before
beginning
your work
•
you
will
thus
affect
a great
saving
of time.
If
you
are
complete
novice in
dress
making, we
think
if you
will
study the
directions, in
the
order
that
we
give
them,
you
will
succeed.
If
you
desire
to
attempt
a
difficult
dress, you will
find
a
great
help
in
purchasing
a trimmed
pattern
of
the
dress
to
work from,
or
a
pat-
cern of any
difficult
part
of the dress.
In
order
to
give
ladies an
opportunity
of
estimating
for
themselves
what
materials
should
be
purchased
for
a
dress, we
will take
as
an
ex-
ample
the
illustration
shown in this
book, page
,
to
fit
a
medium
figure,
which
we
take at,
height 5
feet
4
inches;
bast,
36
inches;
waist,
23
inches.
Materials
required
for
dress shown
in illustration
:
19
yards
plain
fabric 24 inches wide. If
of striped
or
figured
ma-
terial,
20
yards.
Omit
tucks
2
yards less
will
make
a
dress with the
same
effect.
7/17/2019 The American Lady Taylor Glove Fitting System (Elizabeth Garland))
http://slidepdf.com/reader/full/the-american-lady-taylor-glove-fitting-system-elizabeth-garland 130/160
121
THE
AMERICAN
LADY
TAILOR
GLOVE-
Half-yard
sarsnet,
for
lining
basque,
sleeves, and
collar.
2
dozen
buttons.
2 yards
lining for
sleeves,
bodice,
1 yard
wide, and
pocket; i
be
lining
should
be
firm
but
soft.
4J
yards alpaca for skirt
foundation.
Cambric
muslin
or
silk
may
be used.
2 yards
Caledonian, for
lining
foot of
skirt.
3
yards
braid,
for
binding bottom of skirt.
Steels
or
whalebones for
bodice
;
one
6
inches
in
length,
four
8
inches,
four 9
inches,
one 11
inches.
Steels
for
skirt ;
one
22
inches, and
one
27 inches.
IJ
yards crinoline.
6
yards
binding
or
galloon
for
bone
casings.
1
J
oz.
curled horsehair for
small
mattress,
or dress
improver.
Three
reels
of
cotton,
color
of
dress.
One
^-oz.
reel
of
silk
or
twist.
If
yards
webbing
for
tight
size
and
skirt band.
One
packet
hooks and
eyes,
fives.
Three-quarter
yard
cotton
elastic,
about
J
inch wide.
One
piece
of
tape
IJ
inch
wide.
4
yards
ribbon
velv^^
ji
i ^^
wide.
TOOLS
AND
ARTICLES
REQUIRED
FOR
DRESS-MAKING
One
paper
short
white
pins.
One
packet
needles,
No.
7
Sharps.
One
packet
straw
needles.
No.
6.
An inch
tape
measure.
One
pair
large
sharp
scissors.
One
pair
-buttonhole
ditto.
A
lead
cushion.
A
wooden
roller,
or
cheap
rolling
pin
covered
with
flannel,
fas-
tened
on
it
with
quite
a
flat
herringoone
seam.
An
ironing
blanket.
A
tracing
wheel
and
piercer.
Tailor's
square
or
yard stick
with
inches and
parts
of
inch.
Metal
belt.
Instruction
book.
One
flat
iron.
Lap
board.
7/17/2019 The American Lady Taylor Glove Fitting System (Elizabeth Garland))
http://slidepdf.com/reader/full/the-american-lady-taylor-glove-fitting-system-elizabeth-garland 131/160
FITTING
SYSTEM
OF
DRESSMAKING.
122
DIRECTIONS
FOR
MEASUREMENT.
It
is quite
unnecessary
to
give
directions for
taking
a pattern,
as
it
needs
a
great
deal
of experience
to
take one properly. Ladies who
desire
to
make their
own
dresses,
and
who
find
tlie
bodice
pattern
given
with
our
book,
so
very
different
to
their
own
size
that
they
cannot conveniently
alter it,
can
always
have
a bodice and
sleeve
pattern cut
to their
measure, either
flat or made
up, sent
direct
from
our
Office.
When once
you
have a good
fitting
pattern, take
care
of
it,
as
it
will serve
for years,
with
trifling
alteratioas.
Always measure with a
marked
inch
tape.
We note
this,
as
some persons
use
cord for measuring
—a
great mis-
take as
cord
is
so
very elastic.
Take
all
measures
over a
dress.
Measure
around
the
waist
tightly
;
round
the
throat; round the
bust
loosely
—
just
under
the
arms
and
over
the fullest part
of
the
bust
In
front,
from the hollow
of
the
throat to the
waist.
From the
prominent
neck-bone
at the back
to
the
bend of
the waist.
From
under
the arm
to
the
waist.
Across
the
back from
point
to
point
of
join
of
side-piece
next
back.
For
the
shoulders, from the side of throat
to
top
of
arm.
For
sleeve,
round the
top
of
the
arms,
putting
the tape
about an
inch
below
arm-pit. Length
of back
of
arm,
bending
the
elbow
measuring
from
the
top
of side-piece
next
back to
the
wrist-lx)ne
Measure the
front
of
arm,
about
1
J
inch
from front
side-piece
seam
to
tlie
wrist. Another
important
measure,
now the sleeves
are
so
much arched
at the top,
is
to put the tape
from
the bone
of
the elbow
to
the
shoulder-bone,
which
gives the
measure
for
the
proper
curve
a
the top
of
sleeve.
Full directions
in measuring according
to rules
of
system
for any garment.
MEASURE
OF THE BODICE PATTERN,
Which
we give
in
these
the
size.
It
is
without
turning.
The waist
measures 22 to
28
inches.
Throat,
13|
to 16
inches.
Bust,
36,
38,
40.
Extra
Bust
curve
44.
From
throat
to
waist-front,
14
to
16
inches.
From
neck-bone
at
back
to waist,
15
to
16 inches.
Across
back,
13, 14, 15,
inches.
i
Inder
arm
to waist,
7,
8,
9
inches.
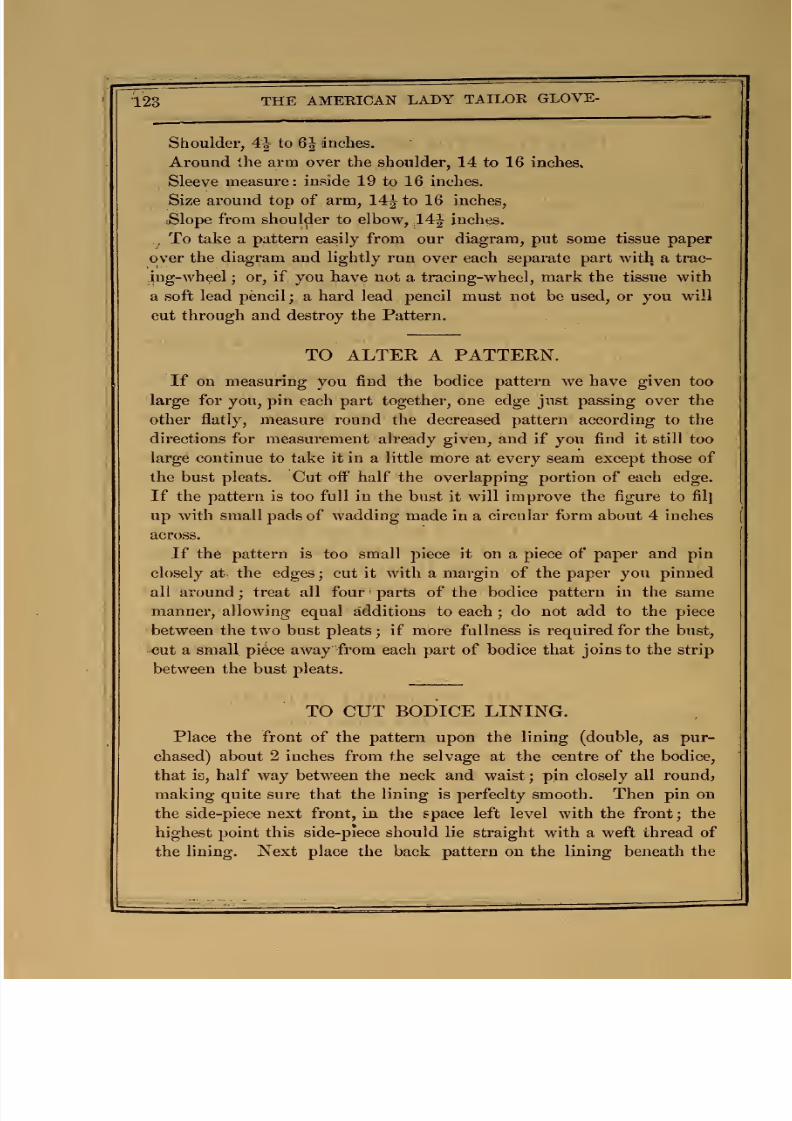
7/17/2019 The American Lady Taylor Glove Fitting System (Elizabeth Garland))
http://slidepdf.com/reader/full/the-american-lady-taylor-glove-fitting-system-elizabeth-garland 132/160
123
THE
AMERICAN
LADY
TAILOE
GLOVE-
Shoulder,
4|
to
6J
inches.
Around
the
arm
over
the
shoulder,
14
to
16
inches.
Sleeve
measure:
inside 19 to
16
inches.
Size
around
top
of
arm,
14|^to 16 inches,
(Slope
from shoulder
to
elbow,
.141^
inches.
,
To
take a
pattern
easily from
our
diagram,
put
some tissue
paper
over the
diagram and
lightly
run
over each
separate part with
a trac-
ing-wheel
;
or, if
you have not
a
tracing-wheel,
mark the tissue
with
a soft lead
pencil
; a
hard lead pencil
must
not
be used,
or you
will
cut through and destroy the
Pattern.
TO
ALTER A
PATTERN.
If on
measuring
You
find the bodice
pattern
we
have
given too
large for
you, pin
each
part
together,
one
edge just passing over
the
other flatly,
measure round
the
decreased
pattern
according
to
the
directions
for measurement already given, and
if you
find
it
still
too
large continue
to take
it
in
a
little
more
at every
seam
except
those of
the
bust pleats. Cut
off
half the overlapping portion
of
each
edge.
If
the pattern is
too
full
in
the bust
it
will
improve
the
figure to filj
up
with small
pads of wadding made in
a
circular
form
about
4
inches
across.
If the pattern is
too
small piece it on
a
piece of
paper
and
pin
closely
at the
edges;
cut
it
with
a
margin of the paper you
pinned
all around
;
treat all
four parts of
the
bodice
pattern
in the
same
manner, allowing
equal
additions to
each
;
do
not add to the
piece
between the two bust pleats
;
if
more fullness
is required for
the
bust,
cut a
small
piece
away
from
each
part
of
bodice
that
joins
to
the
strip
between the bust
pleats.
TO
CUT
BODICE
LINING.
Place
the
front
of
the
pattern
upon
the
lining (double,
as
pur-
chased)
about
2 inches from
the
selvage
at the
centre of the bodice,
that
is, half
way
between
the
neck
and
waist
;
pin
closely
all
round,
making
quite
sure
that the
lining
is
perfeclty
smooth. Then pin
on
the
side-piece next
front,
in
the
space
left
level
with
the front;
the
highest point
this
side-piece
should
lie straight
with
a weft
thread of
the
lining.
Next
place the back pattern
on
the lining beneath
the

7/17/2019 The American Lady Taylor Glove Fitting System (Elizabeth Garland))
http://slidepdf.com/reader/full/the-american-lady-taylor-glove-fitting-system-elizabeth-garland 133/160
FITTING
SYSTEM
OF
DRESSMAKING.
124
front,
and
pin
first
1^
inch
from
the selvage
at
the
top of
the
neck
smooth
it
with
your
hand
straight
down
from
neck to
waist, pin
f
rmly
and
closely
all
round.
Now
you
come
to
an
important part in
cutting,
that is,
the
side-piece
next back.
The
point
must be
carefully
placed
quite
straight
with
a
weft
thread of
the
lining
l|inch
from selvage.
The
part
marked
*
must
lie
|
inch
from
the
selvage,
straight
with
a
w'eft
thread.
By
observing this
the
side
which
joins
the
back
will
curve in
the proper
direction to
fit
with
back, and
will
be
nearly
on
the
cross
;
failing
to
ob-
serve
this,
you
will
never
make
the
back
of a
dress
look
well.
The back
of the sleeve,
must
be quite
on
the straight of
the
lining.
Place
your
sleeve
pattern
in the
space of
lining
left
by
the
back.
Now
you
have
fixed
all the
patterns upon
the
lining,
you proceed
to
cut,
leaving
|
inch
turning
all
parts but the front and bust
pleats
;
these
remain uncut
until the
material
is tacked
to
the lining.
Now, M'ith
a
small
awl,
or
piercer, pierce
all round
the
pattern
at intervals of
f
inch;
be
sure
to
pierce carefully
at
every
point
of
a
pattern
most
particular
at
waist
lines
which is
marked in
our
pattern
with
dots
. .
.
.
as
the
pieces
go
together.
You
will understand
further
on why
this
is
an
important
rule
to
observe.
Now take your pattern off the
lining,
being
careful
to
put
it
all
to-
gether, and tie it up and mark it; you should
never pin
your pattern
in
putting
it
aw^ay, as
it
is apt
to tear it,
and
a
really
good
pattern
once
taken
is valuable.
TO
CUT
BODICE
IN
MATERIAL.
For
silk, woollen,
or
cotton,
the
material
should
always
be
double,
so
that you cut
the
corresponding
parts
together.
The
lining
has
now
to be pinned
closely upon
the
material in
the
same
way as
has
been
described
for the
pattern
upon
the lining, except
that you
do
not
leave
any
material beyond
the edge
of
the
lining
If
you are using
a
fig-
ured
material
with
an
up-and-down
pattern, take care that
the
pattern
is
right
before
cutting,
or
you
may waste
a good
deal
of it. If striped
be
most
careful
in
cutting
so
the
stripes
meet
where
the
seams
join
in
the
centre
of
the
back,
and
at
the
side-piece
next
back. Now,
when
all the
separate
parts of the of the
bodice
and
sleeves
are
pinned
upon
t
ae
material
cut
; unpin the fronts
and
place
the
material upon
tht
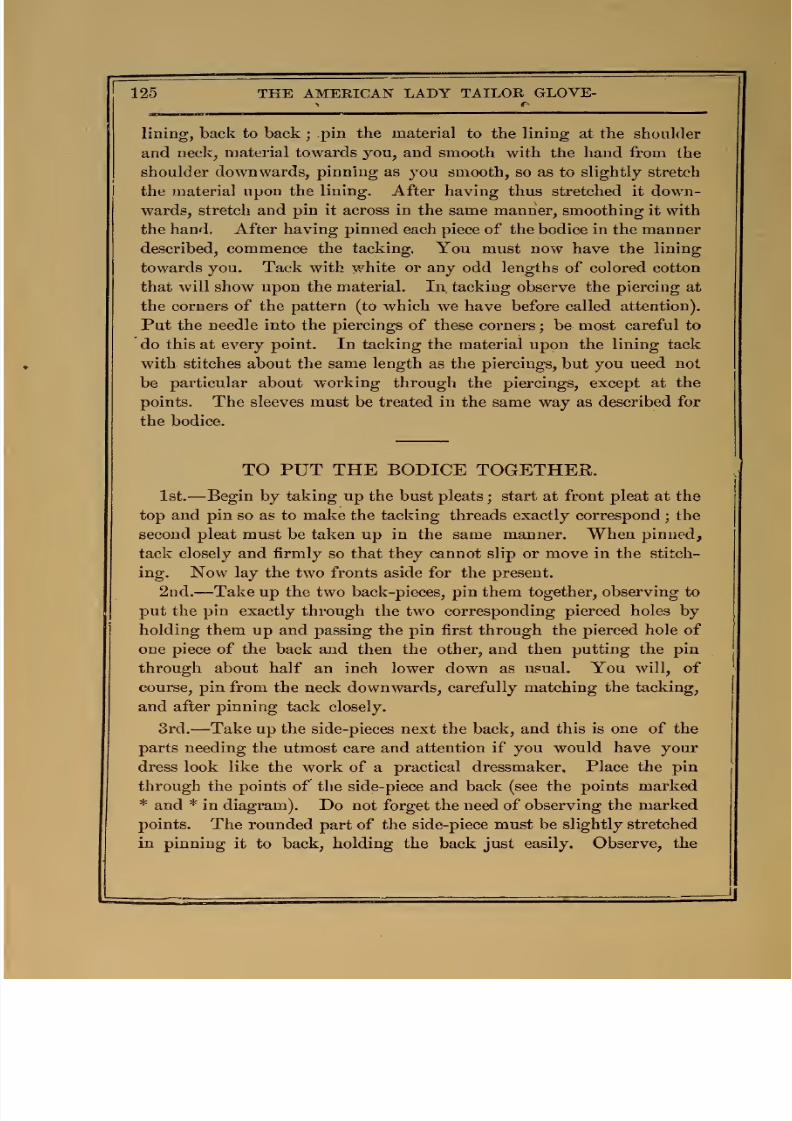
7/17/2019 The American Lady Taylor Glove Fitting System (Elizabeth Garland))
http://slidepdf.com/reader/full/the-american-lady-taylor-glove-fitting-system-elizabeth-garland 134/160
125
THE AMEEICAN LADY
TAILOR
GLOVE-
lining,
back to back
;
pin the
material
to
the
lining
at
the
shoulder
and
neck,
material
towards you, and
smooth
with the hand
from
the
shoulder downwards,
pinning
as
you
smooth, so as
to
slightly
stretch
the
material
upon
the
lining.
After having thus
stretched
it down-
wards, stretch
and
pin
it
across in the
same manner, smoothing
it
with
the
hand, After
having
pinned each
piece
of the
bodice in
the manner
described,
commence the
tacking.
You must now
have
the lining
towards
you.
Tack with
white
or
any
odd
lengths
of colored
cotton
that
will
show
upon
the
material.
In tacking
observe
the
piercing
at
the
corners
of the
pattern
(to which
we have before called
attention).
Put
the
needle
into
the
piercings
of
these
corners
;
be
most
careful
to
do
this
at
every
point.
In
tacking
the material upon the
lining
tack
with stitches
about
the
same length
as
the
piercings,
but
you ueed
not
be
particular
about
working
through the piercings, except at
the
points. The
sleeves
must
be
treated
in
the same
way
as
described
for
the
bodice.
TO
PUT THE
BODICE
TOGETHER.
1st.
—
Begin
by
taking up
the
bust
pleats
;
start
at
front pleat
at
the
top
and
pin
so as
to
make
the
tacking
threads exactly
correspond
;
the
second
pleat
must
be
taken
up
in
the
same
manner.
When
pinned,
tack
closely and
firmly
so
that
they
cannot slip or move in
the stitch-
ing.
Now
lay
the
two
fronts
aside
for
the
present.
2nd.
—
Take
up the two back-pieces, pin them
together,
observing
to
put the
pin
exactly
through
the
two
corresponding
pierced holes
by
holding
them
up
and
passing
the
pin
first
through
the
pierced
hole
of
one
piece
of
the
back
and
then
the
other,
and
then
putting
the
pin
through
about half
an
inch
lower
down as
usual. You
will,
of
course,
pin
from
the
neck
downwards,
carefully matching the
tacking,
and
after
pinning
tack closely.
3rd.
—Take
up
the
side-pieces next
the back,
and
this
is
one
of
the
parts needing
the utmost
care
and attention
if you would have your
dress look like the
work of
a
practical dressmaker.
Place
the pin
through
the points
of
the
side-piece and
back (see
the points
marked
*
and
* in
diagram).
Do
not
forget
the
need
of
observing
the
marked
points.
The
rounded
part
of
the
side-piece
must
be
slightly
stretched
in
pinning it
to back,
holding the
back
just
easily.
Observe,
the
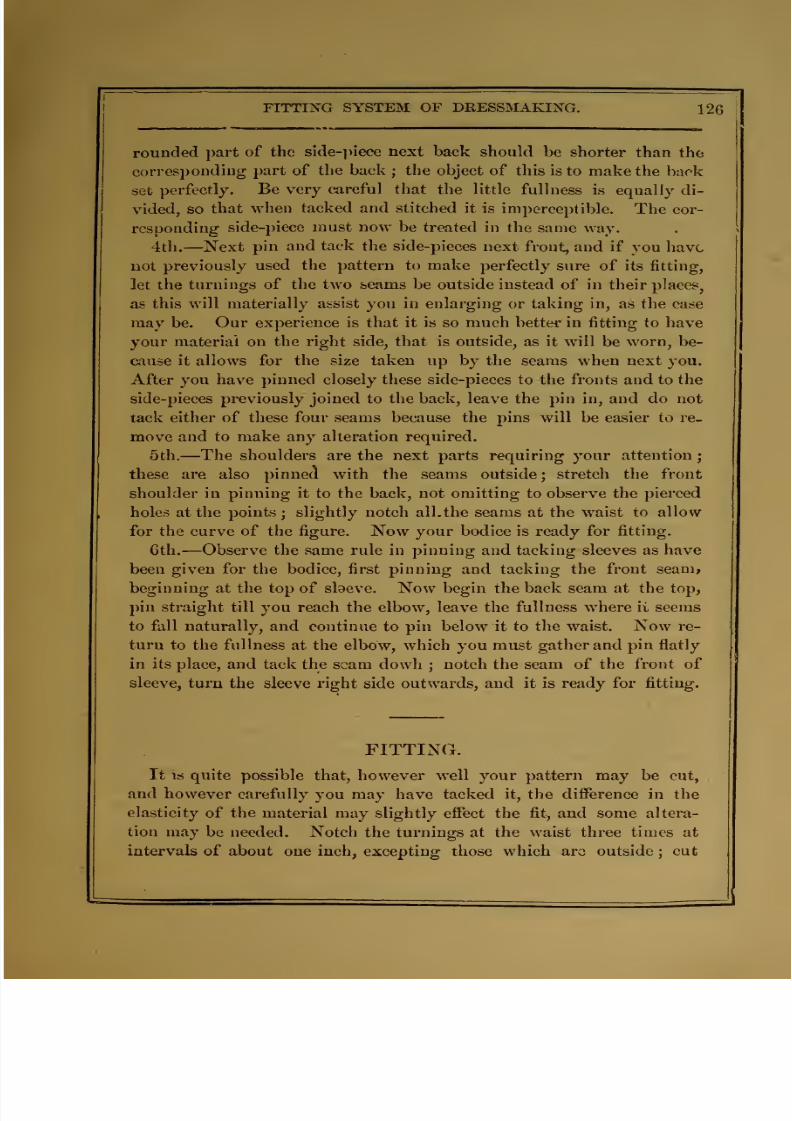
7/17/2019 The American Lady Taylor Glove Fitting System (Elizabeth Garland))
http://slidepdf.com/reader/full/the-american-lady-taylor-glove-fitting-system-elizabeth-garland 135/160
FITTING
SYSTEM
OF
DRESSMAKING.
126
rounded
part
of
the
side-])iece
next
back
should be
shorter
than
the
corresponding
part
of
the back
;
the
object
of
this
is
to make
the
back
set
perfectly.
Be
very careful
that the little
fullness
is
equally
di-
vided, so
that
when
tacked
and
stitched
it
is
imperceptible.
The cor-
responding
side-piece
must now
be
treated
in the
same
way.
4th.—Next
pin
and
tack
the
side-pieces
next
front, and if
you
have
not
previously
used
the
pattern
to
make
perfectly
sure
of its
fitting,
let the
turnings
of the
two
seams
be
outside
instead of in their
places,
as
this
will
materially
assist
you in
enlarging or
taking in,
as the case
may
be.
Our
experience is that it is
so much
better in
fitting
to
have
your
material on
the
right
side, that
is
outside,
as it will
be
worn,
be-
cause
it allows
for
the
size
taken
up by the seams
when
next you.
After
you
have
pinned
closely
these side-pieces
to
the
fronts
and
to
the
side-pieces
previously
joined
to
the back,
leave
the
pin
in, and
do not
tack
either of
these
four seams because the pins will
be
easier
to re-
move and to make any
alteration required.
5th.—
The
shoulders
are the
next
parts
requiring
your
attention
these
are
also
pinned
with
the
seams
outside
;
stretch
the front
shoulder
in pinning
it
to
the
back,
not omitting
to
observe the
pierced
holes at the
points
;
slightly notch all.the seams
at
the
waist
to
allow
for
the
curve
of the
figure.
Now your bodice
is
ready
for
fitting.
6th.
—
Observe
the same
rule
in
pinning
and
tacking sleeves as have
been given
for
the
bodice,
first
pinning
and
tacking
the
front
seani»
beginning at the top of sbeve.
Now
begin the
back
seam
at
the
top,
pin
straight
till
you
reach the elbow, leave
the
fullness
where
it
seems
to
fall
naturally,
and
continue
to
pin
below
it
to
the
waist.
Now
re-
turn
to the
fullness
at
the elbow,
which
you
must
gather
and
pin flatly
in
its place, and
tack
the scam
dowh
;
notch the seam of
the front of
sleeve,
turn the
sleeve
right
side
outwards,
and
it
is
ready
for
fitting.
FITTING.
It
IS
quite
possible
that,
however
well
your
pattern may
be cut,
and
however carefully
you may
have
tacked
it,
the
difference
in the
elasticity
of the
material
may
slightly
effect
the fit, and some
altera-
tion
may
be needed. Notch the turnings at
the
waist
three
times
at
intervals
of
about
one
inch,
excepting
those which are
outside
;
cut
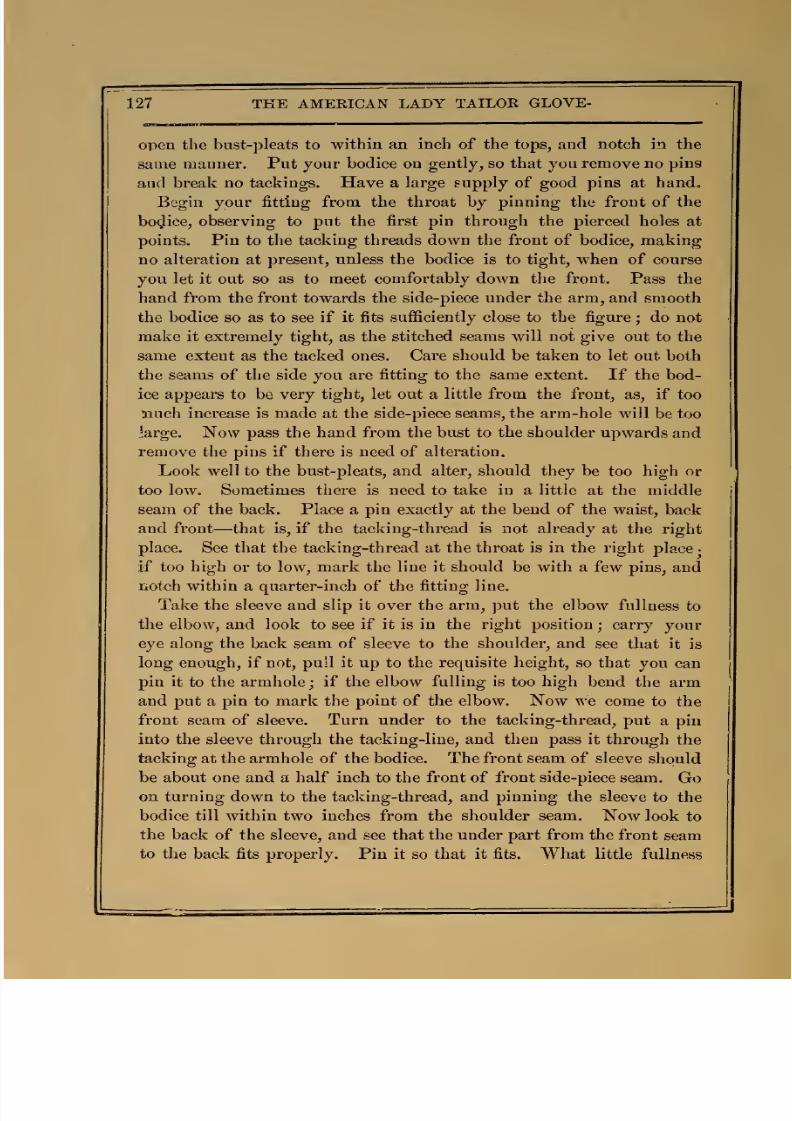
7/17/2019 The American Lady Taylor Glove Fitting System (Elizabeth Garland))
http://slidepdf.com/reader/full/the-american-lady-taylor-glove-fitting-system-elizabeth-garland 136/160
127 THE
AMERICAN LADY
TAILOR
GLOVE-
open
the
bust-pleats to
within
an
inch
of the
tops,
and
notch in
the
same
manner.
Put
your
bodice
on
gently,
so
that
you
remove
no
pins
and
break
no
tackings.
Have
a
large supply
of good pins
at
hand.
Begin
your fitting from
the
throat
by
pinning
the
front of
the
boglice,
observing
to put
the first
pin
through the
pierced
holes at
points.
Pin
to
the tacking threads
down
the
front
of
bodice,
making
no
alteration
at
present, unless the bodice is
to
tight,
when
of
course
you
let
it out so
as
to
meet
comfortably
down
the
front.
Pass the
hand
ftom the front towards the
side-piece
under
the arm, and
smooth
the
bodice
so
as
to
see
if
it
fits
sufficiently
close to
the
figure
;
do
not
make it extremely
tight, as
the
stitched seams will not
give out
to
the
same
extent
as
the tacked
ones.
Care
should
be
taken
to
let
out
both
the seams
of the
side
you
are
fitting
to the
same
extent.
If
the bod-
ice appears to
be
very
tight, let
out
a
little
from
the
front,
as,
if
too
aauch increase is made
at the
side-piece
seams,
the arm-hole
will
be
too
large.
Now pass the
hand
from
the
bust
to
the
shoulder
upwards
and
remove
the pins if
there
is need of
alteration.
Look well
to
the
bust-pleats,
and alter,
should
they
be
too
high or
too low.
Sometimes there is need
to
take
in
a
little
at
the
middle
seam
of the
back.
Place
a
pin
exactly
at
the bend
of the waist,
back
and
front
—that
is,
if
the
tacking-thread is
not
already
at
the
right
place.
See that
the
tacking-thread
at
the throat is in the right
place
•
if
too
high
or to
low,
mark
the
line
it
should
be with a
few pins, and
notch within
a quarter-inch of
the
fitting
line.
Take the
sleeve and
slip
it
over the arm, put
the
elbow
fullness
to
the
elbow,
and look
to
see
if it is in the right
position
;
carry
your
eye
along
the
back
seam
of
sleeve
to
the
shoulder,
and
see
that
it
is
long
enough, if
not,
pu'l
it
up to
the
requisite height,
so that
you
can
pin
it
to the
armhole; if the elbow
fulling
is
too
high
bend
the
arm
and
put a
pin
to mark
the point
of the elbow. Now we
come
to
the
front
seam of
sleeve.
Turn under
to
the
tacking-thread,
put
a pin
into the sleeve through the tackiug-line,
and
then pass it through
the
tacking
at
the
armhole
of
the bodice.
The
front
seam of
sleeve
should
be
about
one
and a
half inch
to
the
front
of
front side-piece
seam.
Go
on turning
down
to the tacking-thread,
and
pinning
the
sleeve
to
the
bodice
till
within two inches
from
the
shoulder seam.
Now
look
to
the
back
of the sleeve, and
see
that the
under part
from the
front
seam
to
the
back fits
properly.
Pin it
so
that it
fits.
What little
fullness

7/17/2019 The American Lady Taylor Glove Fitting System (Elizabeth Garland))
http://slidepdf.com/reader/full/the-american-lady-taylor-glove-fitting-system-elizabeth-garland 137/160
FITTING
SYSTEM
OF
DRESSMAKING.
128
remains
must be
equally
distributed
at the top
of
the shoulder.
See
to
the
length
of
sleeve,
and
turn
up
to that
required, pinning it
to
the
proper
length.
Now
remove
the bodice by
taking
out
the pins
from
the
shoulder
and
side-piece
next
front
of the
unfitted side
of
bodice.
By
this
method the
pins
are
left
in down
the
front, and
if
any altera-
tion
has
been made
you
can
tack
a
line
down
to
the pins
before
remov-
ing
them.
TO CORRECT
THE
FIT.
In some
cases you
may
find
that
your
bodice fits
perfectly,
when
the
following
observations
will
not
be
needed
;
but
lest
the condition has
not
arrived, we
will give
you directions to
follow
closely
to
correct
any
misfitting part.
This is done
by
tacking
to
the line
of pins
before
removing
them. Be
sure,
before
removing
the
pins from
the sleeve
and
armhole,
tack
closely
round both sleeve
and
armhole,
and run
a
few
stitches
down
to
mark
the exact position of
the front seam
of
the
sleeve
to
the
armhole. After
having
tacked
exactly
in
accordance
with
these directions, remove
all pins. You
will
have
fitted one side only
of the bodice, which
should
be the
right-hand
side.
Now
correct the
left-hand
side, pin all
the
original
tackings
of the two sides to corres-
pond
exactly with
each other
round
the
armhole, the
neck,
and
at the
under
arm
seams.
If
the
bust-pleats have
been
altered,
pin
the
seams
very
carefully
together,
and pin round the
corrected
tacking
;
turn
the
left-hand
front towards you and tack
to
the
pins.
TO
MAKE BODICE.
Pin
the
front side-piece in
position
to
side-piece next back,
ready
for
tacking
first and stitching afterwards.
Begin
by
stitching the front pleats,
and
be
very
careful
to
do this
with
precision, observing carefully the
tackings.
The fronts are for
the present
to
remain
detached
from the
side-pieces and shoulders
until
the
back
and
side-piece
seams are stitched, the
buttonholes made, and
the
buttons
sewn on.
Next
take the buttonhole
front, that
is
the
right-hand
front
;
take
the
bottom
part of
the
bodice
towards the
right-hand.
Turn the
front
down
a
quarter of an
incn
outside the
original front
tacking-
7/17/2019 The American Lady Taylor Glove Fitting System (Elizabeth Garland))
http://slidepdf.com/reader/full/the-american-lady-taylor-glove-fitting-system-elizabeth-garland 138/160
129
THE
AMEEICAN
LADY
TAILOR
GLOVE-
thread, and
with
a
needle and
thread
tack
as
you turn.
TSTow,
accord-
ing to
the
material of the
dress,
take a piece
of
sarsnet
ribbon,
tape, or
silk
for
facing
;
turn
the
inside
of
front
of bodice towards
you,
and
hem your
facings
just a
shade
nearer the edge of front than the tack-
ing-thread
;
be
most
careful
not
to
take
a
stitch through
the
right side.
When
you
come
to
a
bend of
the
waist you must
full
the
facing
slightly to
give
the proper
spring
when
this
is
hemmed
down
to
the
bottom
of the
bodice. If the
material
of the
bodice
is thick, you
must
turn up
the
facing
and
cut away
tne
material
and
lining
to
within
an
eighth of
an
inch
of
the facing
hem.
If
a
thin
material,
cut
only
the
lining
in the
same
way.
Now
cut the
material
so that
when
the fac-
ing
is hemmed down
the second
time
it covers
the edge,
and
makes
the
front neat
inside.
With
the second
hem
of
the
facing,
as
with
the
first,
be
careful
that your
stitches
are
not
taken
through.
Now
turn
the
outside
of
bodice
uppermost,
throat towards the right
hand. Take
an
inch
tape,
and
according
to
the size of the
buttons
measure
for the
hole
;
the
small fashionable
button used
at
present
will take a
half-inch bottonhole.
A
button the size of
a
three-cent
piece
will
take
a
five-eighths
of
an
inch
buttonhole,
and
one the size
of a
10
ct. piece must
have
a
three-
quarter-inch
buttonhole,
and
so
on in
proportion.
To
ensure
the
but-
tonholes
being
correctly
cut
to
one
size
you
must
place a pin
in
the
inch
tape
to
the
required measure, lay
a
pin on
to
the front
edge
tack-
ing-thread, and tack a
line
down
to
the
end
of
the measure, putting
in a stitch, each
time
you
shift
the measure, till
you get to
the
bottom
of
bodice.
It
is
always
well
to
have
proper
tools
for
your
work,
therefore
you
will
find
that a
pair of buttonhole scissors will cut much
better button-
holes
than
an
ordinary pair of scissors. When
you
have cut
a
button-
hole to the measure,
turn
the bodice
round,
with the
front
edge oppo-
site
you,
and
cut
a
tiny triangular piece out
of
the
top
of the
button-
hole
by
making
two slanting
cuts
of
about
an
eighth of
an
inch, and
then
a
straight
cut
crosswise.
For
small buttons the buttonholes
should
be
about three-quarters
of
an
inch
apart. In
this
you
must
of
course be
ruled
by
the
size
of
the
button.
Now, to
work
a
buttonhole
properly,
take
the front edge
of
bodice
towards
you,
have
a
needleful of
the
twist
with
which
you
intend
working
the
buttonholes.
Begin
at
the
left
side
close
end
of
button-
7/17/2019 The American Lady Taylor Glove Fitting System (Elizabeth Garland))
http://slidepdf.com/reader/full/the-american-lady-taylor-glove-fitting-system-elizabeth-garland 139/160
FITTING
SYSTEM
OF
DRESSMAKING.
130
hole (not the
end from
which the
triangle
is cut),
and sew over
all
round, taking
care
not
to
stretch
the
edge
of
the
buttonhole
;
now
bar
the buttonhole
all
round
by
taking
a
stitch from
the narrow end
to
the
broad
end, put
your needle
back above
the
opening
of
the triangle,
and
work
a
bar above
it
just the
width
of
the cut;
work
to
the close
end of the
other
side,
and
repeat, so
that you have
a
double
bar
of
twist
to
work
over,
which
raises
and
strengthens the
buttonhole.
Be-
gin
to
work
the
buttonhole from the
same end
as
you
began to
over-
sew it,
let
your
left
thumb-nail
rest
just
below
the bar of
twist,
and
work
closely
and
evenly
all
round.
The buttonholes
finished,
take
the
button
side of front, with the
same
kind
of
facing
as
was used for
buttonhole side. Take
the
neck
of
front to the
right hand, the outer
side
towards
you,
hemming
the
facing
one
and a
half inch from the
tacking line, hem
to
the
waist,
where
full in the
same way
as
you
did
the facing
of
the
first
side; then
continue
plain
to
the bottom
of the
bodice.
Now
turn the
inside
of front
to you,
and
cut
off the
surplus part
of
front
to
within
a
quarter of
an inch of the
stitches
of
facing
;
turn
the
right side of
bodice
towards
you and turn
down
the
edge
of
front,
so
that the facing
is
just edge
to
edge
with
the
material.
Now tack
the
facing
down
through from
the
outside just
at
the tack
of
the
button
line
;
when
you
have
tacked
to
the button line,
hem the facing from
bottom
to
top
of
bodice;
take care
that
no stitch
appears
through.
To
mark
for
buttons, take
the
two
fronts,
neck towards left
hand,
put
a
pin
through the
top
stitch of buttonhole
side of tacking thread
where
the
tacking
for throat
begins
put
the
pin through
to
the
corres-
ponding
tacking
of
button
side
of
front
;
pin
firmly
together.
Now
get
some
one
to
hold the bodice just
where
you have
pinned
it,
or pin
it
to
a
lead
cushion
;
put
a
pin
into
the centre
of the ^riangle
at
the
top
of buttonhole and through
to
the tacking
line
for
the botton ex-
actly
opposite
it. Continue
to place
the
pins
through
all
the
button-
holes
fcr the entire
length
of
the
bodice, holding
the
buttonhole
side
rather
tightly.
Buttons
without
shanks
must
be
sewn
on
loosely
;
the cotton
should
be
left
about
an
eighth of
an
inch
as
a
substitute
for
a
shank,
and
after
sewing
the
buttons
strongly
twist the cotton
several times
round*
the threads
that form
the
substitute for
the
shank
;
this
done,
pin
the
fronts
to
the side-pieces,
stretching
the
fronts
to
the side-pieces.
7/17/2019 The American Lady Taylor Glove Fitting System (Elizabeth Garland))
http://slidepdf.com/reader/full/the-american-lady-taylor-glove-fitting-system-elizabeth-garland 140/160
131
THE
AMEEICAN
LADY
TAILOE
GLOVE-
Next
measure
the
waist from the inside of the bodice,
holding
the
tape
tightly
immediately
above
the
tacking
line
of
the
waist,
with
the
end
of the
tape
exactly to
the
edge
of the
waist
buttonhole and
to the
cor-
responding
button,
holding
the
bottom
of
the bodice towards you. If
the
size
of
the
waist
needs alteration,
enlarge or
decrease equally
from
side-piece
and
front
; begin by
pinning
from
the waist
line upwards
gradually
and
carefully,
so that
the
line
remains quite
even
;
after this,
pin
from the
waist
line
to
the bottom
of
the bodice,
tack
it
carefully.
Now
pin
the
shoulders,
beginning
at the
pierced
points
of
the
neck
on
each
side
stretching
the fronts
of
the shoulders
in
putting
in
each
pin,
so
that
the
pierced
points
at
the
armhole end of shoulder meet.
When closely
tacked stitch
the
seams
;
remove
all
tacking-threads
from
the
bodice
except those
round the
throat
and
armhole.
Now
cut the
edges
of
all
the
turnings
or
seams
very
narrow
and
even,
say
^
of an
inch
is
sufficient,
next
cut them
in notches,
this
is
to
make
them look neat,
and
lie flat,
and
to prevent the
bodice
from
creasing
when put
on
;
over-sew
all
the turnings, material
side
towards
you, this
makes the
work neater.
If the
material
is of a
very
frail
description
you must
bind with
narrow
sarsnet
ribbon
instead
of
over-
sewing.
It
will
now be needful
to
open
the
seams
;
lay them quite
flat,
and
press
them
on
a board
covered with an ironing-blanket.
If
the
bodice is
of
silk
or
velvet a
second person
must
assist in
holding
it while the other
passes the
iron
over it ; the person
holding
the
bodice
should
have
the top of
the seam
in the
hand.
To
press the
bust
pleats the person
assisting
should
hold the
seam under
the
arm
and the
front
of bodice
in
a
line
with the top of the
bust
pleats. If
you
use whalebones
you
must next
run
on the
casings,
which
should
be of galloon or stay-binding.
The casings should
be
under the
but-
tons
to the
same
height
as front
bust pleat,
on
all
the bust
pleats, and
all
other
seams
except
the curve
seams of side-piece next
back.
The
back
casing
should
be
about
six inches
long
—
five
inches above
the
waist
and
one
or two
below it.
Turn
down
a loop of
the
casing
about three-quarters of an
inch
in
length.
Begin
by
sewing
at
the
bottom
of
the
loop
so
as to
make
it
strong,
run on the
casing,
easing it
with the thumb
so
as
to
make it
sufficiently
loose for
the
bend
of
the bone.
If
you
use the
new
bodice-
steels
you
will not
need
casings
as these
steels
are
already covered
they
are
sewn
through
the
hole
at
the top
and at distances
of
about

7/17/2019 The American Lady Taylor Glove Fitting System (Elizabeth Garland))
http://slidepdf.com/reader/full/the-american-lady-taylor-glove-fitting-system-elizabeth-garland 141/160
FITTING
SYSTEM
OF
DRESSMAKING.
132
two
inches,
stretching
the
seam
after
each
sewing.
Steels
would
not,
however,
need your
attention until after
you have
turned
up
the bot-
tom
of
bodice,
but, unlike bones, they
must
be secured
before
sewing
on
the facing
at
bottom of the bodice.
Turn up the bottom of the bodice, beginning
at
the button
side,
fixing
it
with
pins. As
you
turn
it,
see that
you
have
it turned
to
a
nice shape; when satisfactory,
tack
it
up
if
you intend to
have
it
sim-
ply
ficed. If
you
desire
to have it corded,
run
a
tacking-line
to
where
the edge
turns,
remove
the pins.
To make
the
second
side exactly
like
the
first
put a
pin through
the point
of the
first
pleat and
through
the
top
of
corresponding
pleat of
the
other
front
;
repeat
this
with
the second
pleats.
Put a
pin through
the waist buttonhole
to
the
waist
button,
then pin
to
the
top of side-piece next front
at
the
point,
pass-
ing
through
the
corresponding
point of the other side-piece
;
you have
your
bodice
right
side out,
pin
closely
the
two
tacking-lines round
the
under
part of
armhole from
the point already indicated
to
the second
seam
of
side-piece
next back.
This
done,
see
that the
two sides
of
bodice are
quite flat
at
the seams,
and
along
the
line
of
the
side
turned
up and
tacked, put pins
through
to
the
second
side,
and before
remov-
ing
the pins
run
a
line
of
tacking
on
the second
side in
the
same
place
as
the pins, after
which remove the
pins on
tlie
first
side
and you
will
have
the bottom
of
the
bodice perfectly
even,
when turn and tack it
up
;
cut
off all surplus material and
face.
Should
you
prefer
a
corded
M^aist,
after having made
the cording,
for which
we
will
give
directions further on, you
must lay jour
cord-
ing
upon
the
tacking
line
and
stitch
as close to
the
cord
as
possible
from the
under side of it. When the
cording is
firmly stitched
on,
the
bodice
is made
neat by
hemming
up
the
facing
left
on the
cord,
with
great
care
that
not
a
stitch
goes
through to
the right side.
Now,
if
you
use bones
you
must
cut
them
to
the
length of the
casings,
scrape
them until
they are
quite
thin
at both
ends
;
if
this is
not done
they
will
soon
wear through the
bodice.
Now put
the bones
in
their
casings
through
the
loops
left
at
the top,
then run the
loop
so
as
to
se-
cure
the
bones
in
their
places
at
the top,
push
the
bones close
to
the
bottom
of
the bodice and
sew
through the
bones
to
the
casing
and
turning
of
the
bodice
about
an
inch
from the
bottom of
the
bodice.
Now
take
the
top of
the turning and
bone
casing
together
and
push
the
bone
down
as
tightly
as
you
can
hold
it in
place
and sew it

7/17/2019 The American Lady Taylor Glove Fitting System (Elizabeth Garland))
http://slidepdf.com/reader/full/the-american-lady-taylor-glove-fitting-system-elizabeth-garland 142/160
133
THE
AMERICAN
LADY
TAILOR
GLOVE-
strongly
at
the
top
just
below
the
loop.
Sew
a
webbing
band
a
quarter
of
an
inch
smaller than the size
of waist
of bodice to the bone
casing and
turning of
the
back
seam
immediately
above
the
waist-
line
;
fasten
at
the
ends
with
two
small
hooks
and
eyes. This is
called
the size
;
it
pulls
and keeps
the
bodice in place
at the back.
For
the
collar,
measure the
neck
of
bodice,
place
the
pattern
on a
double
piece
of
stiff muslin on the cross, pierce
round
the
pattern and
cut
the muslin,
allow
half inch turnings all
round,
cut
the
collar
and
facing
also
on the cross
;
pin
the
four thicknesses
together,
the wrong
side of the
material
next the
muslin,
then
the facing
upon the
mater-
ial
;
pin smoothly
and tack
altogether through
the
pierced
holes along
the
sides
and across
the
toy.
Next take
the
musliu
and
material
at
the bottom of
the
collar
and
tack
it
together,
leaving
the
sarsnet free.
This
tacking
is to
mark the depth of collar
as to where
it should
be
stitched to
the
bodice.
Stitch
the
ends
and
top, remove the tacking
except
at the bottom,
turn
the
collar right
side out and
tack round
about
a
quarter
of
an
inch from
the edge
to
hold
the
facing in
its
place.
Put
the
lower
tacking
Ime
of
collar
to
the
tacking
line
of
neck
of
bodice
;
the collar
is held
towards
you,
and
great
care
must
be
taken
not
to
stretch
the neck
of
the bodice
;
stitch
through the
ma-
terial, leaving
the
facing free
to be
hemmed
down
on
the inside. Put
two
small
hooks
and
two
loops
on
the
collar,
the
hooks
on
the
button-
hole
side
about the
same distance
in as the buttonholes. The loops
are
placed
in
a
line with the buttons.
Take
a
piece
of
ribbon
or
binding
about
half an inch wide, tack it round
the
armhole
inside
the
bodice,
beginning
at
the seam of side-piece
next
front
;
tack it
about
an
eighth
of
an
inch from
the
lower
edge,
continue all round
the armhole;
be
sure not to
stretch the
armhole nor
full
it ;
this must
be
tacked
exactly
to
the armhole tacking, cut off, and turn down the
end
of the ribbon
or binding.
TO
MAKE
THE SLEEVE.
Stitch
exactly
to your tacking,
being
quite
sure
that
you
have
the
fullness at
the
elbow
in
its
right place
;
stitch
the seams,
open
them,
and over-sew
if the sleeve is
of
woollen
material
;
pass
a
roller covered
with
flannel
down
it,
and
press
the seams flat
; of
course
the
sleeve
must
be
mside
out. Now
turn
up
the bottom
of sleeve to
the
required
7/17/2019 The American Lady Taylor Glove Fitting System (Elizabeth Garland))
http://slidepdf.com/reader/full/the-american-lady-taylor-glove-fitting-system-elizabeth-garland 143/160
FITTING
SYSTEM
OF
DRESSMAKING.
134
length
and
face
with
sarsnet
or a
piece
of
silk.
Take
care that
not
a
stitch
of
the
hem
of
facing
goes
through
to
the right
side
of
sleeve.
Turn the
sleeve
right
side
out
and
put
on
the trimming,
supposing
it
is
considered
necessary.
Next
put
in
the sleeve; take
the
front
seam
of
sleeve
and
put
it
exactly to the
tacking
which
marks
its position
;
have
the
inside of
sleeve
and
bodice towards
you, pin
the
sleeve and
bodice
tacking lines
exactly
to
each other until within
two inches
of
the
should jr
seam
;
now
go
back
to
the under-seam
from
which
you
started
and pin
in
the
second side. When you come
towards
the
top
distribute
the
fullness
equally
along about
three
inches
at
tlie
top.
After
pinning
in tack
closely
;
stitch
the sleeve in
strongly,
cut the
turnings off within
about half an
inch
of the
stitching,
and
over-sew
the edge
of
armhole, sleeve,
and
binding
together
neatly.
SKIRT OF
DRESS—
LIKE
ILLUSTRATION, No. 1.
IN THIS BOOK.
Foundations
of skirts
vary
very
little
in
shape. From
the illus-
tration
we
have given
it
will
be
quite easy to make
the
needful
altera-
tions for other styles ot
dresses.
Begin
by
cutting the
foundation
of
skirt
— for
this
alpaca
is
fre-
quently used
—
it
measures
26
inches
in
width.
For
a skirt
propor-
tionate
with
the
tlie
bodice
pattern given
:
length
of
back,
allowing
for a
medium-size
crinolette, 43
inches; cut foundation
45J
inches,
to
allow
for 2 inch hem
and
half-inch
turning
at waist.
Skirt
2
to
2^
yards wider. Length of front 40
inches;
cut 42|^ (for
hem
and turning);
width of
bottom
of
skirts
2|
yards.
The
breadth
next the front
is
cut
into
two
gores, the straight sides
of
thess gores
join
the
front breadth
;
the
length for cutting this
breadth is
43J
inches.
Fold
this
breadth straight
down
the
mid-
dle,
and fold
over
at
the
double part
of
breadth, that
is
the
middle
of
breadth,
5 inches
at
the
top,
smoothing
it
with
your hand so
that
it
graduates
off and slopes
to
within
a
quarter of
yard
of
bottom
of
skirt
;
cut
off
the slope
and
cut
down
the
remaining
quarter
of
yard.
Now
take
the slope
that
you have cut off the gored
sides,
cut
it
down
the middle,
and
join
the
straight sides to
the
gores.
7/17/2019 The American Lady Taylor Glove Fitting System (Elizabeth Garland))
http://slidepdf.com/reader/full/the-american-lady-taylor-glove-fitting-system-elizabeth-garland 144/160
135
THE
AMERICAN
LADY
TAILOR
GLOVE-
F'
-
-
Next
spread
the front
gores
of
the
skirt
on
a
table,
wrong side
np
take
the
stiff
lining
that
is
to
go
round
the
foot,
cut it about
12 inches
in
depth^ this
must
be taken
across
the
lining, not
selvage-wise
;
cut
enough to go
along
the joined breadths,
edge
to edge at
the
bottom,
Avhere
tack
it
and
fix
it
at
the top,
turning
in
about
half
an
inch
;
tack
it again, shaping
it
to
the gores
by
turning
it
in
at
the
joins.
Now
take
the back
breadth
and
line it
in the same
way,
and
hem along
the
top
and
down
the joins.
Face the whole with
about
5
inches of the
material
of the dress, turn
down
and hemmed on
the right
side of
the
foundation,
leaving
edge
of
material
to
edge
of foundation at
the
bottom.
Now
join
back
breadths
to
sides
•
this
done,
turn
up
the
hem
at
the bottom.
First pin
the breadths
together
at
the
seams at the
top
of the skirt
(that
is,
the
waist),
folding
the
front
breadths
down the
middle.
Take
an
inch
tape,
and
put
the end
of it
half
an inch
below the
top
edge of
skirt; pin it firmly through the inch
tape
and material
to
a
lead
cushion
or let some one hold
it for
you.
Take
the
foot
of the
skirt in
your
left
hand, hold
the inch tape
in
your
right
hand
tightly,
being quite sure
that
you have both sides of
your skirt flat and
even.
Put
the pin
through
at the
exact
length
you
require the
front
of your
skirt
to
be
when finished;
leave the
pin
through
both
breadths.
Next
measure the
back
breadth
folded,
as
described
for
the front ; measure
the
back
as you
have done
the
front,
leaving
it
the
exact length re-
quired
for the
dress
when finished.
Take
the middle
of backb readth
of
skirt
and
turn
up
from the pin
at the
back
to the pin in front,
graduating it
to
the
front
pin
;
this
makes
the sides
the proper
length.
Pin
the
bottom edge
quite
through
the facing, foundation,
and
lining
turn skirt inside out
and hem
up,
taking care
that
the stitiches
do not
go
through
to
the
facing
on
the
right side.
Now put
on
the
braid.
Next,
over-sew
the seams, and
press
with
a hot iron
on the wrong side.
Take
a
piece of webbing and cut it five inches longer
than the
waist
is to be
when
finished.
Take
a
strip
of the
material
of the
dress, the
length
of
the webbing and half inch
wider,
run it
closely
along
one
edge
of the
webbing,
material
towards
you,
leaving
a
very
narrow
turning
at
the
top, so as
not
to
thicken
the waist-band.
Turn
the
ma-
terial
from
you,
tack along
the
top.
Now you
have the material
towards you, take a narrow
turning
and
tack
along to
the
other
side
of
the webbing,
leaving
the turned-down
edge
of the material
quite

7/17/2019 The American Lady Taylor Glove Fitting System (Elizabeth Garland))
http://slidepdf.com/reader/full/the-american-lady-taylor-glove-fitting-system-elizabeth-garland 145/160
FITTING
SYSTEM
OF
DRESSMAKING.
136
level
with the
webbing
;
this
will
be secured
by
sewing
the
skirt
to it,
Turn
down
one
inch
at
each end, sew
round
and
hem
across.
Now
sew
three hooks
on
the
webbing
side
at
the right
hand end
of the
band,
two
quite
at
the
end,
and
one in
the centre
of
the band,
three
inches
from
the
others.
At
the
other end of the band,
on
the material
side,
sew
one eye
at
the
centre
and
two
eves
three
inches
from
the end.
Take
the
foundation
skirt
and
fold in
the
middle
of the front
breadth.
Three
inches
from the
middle
on
each
side take
up a
pleat
4 inches
in
length,
|
inch
wide
at
the top, and
graduating
to nothing
at
the
bottom
of
the
lour
inches.
A
similar
pleat
is
required
over
each
hip.
Cut
down
the
placket-hole in
the
centre
of
back
width,
13
inches
long,
hem it
round. Next
take the band, hook
it
into all
the
eyes,
double
from the
centre between the
hooks
and
eyes
at
the middle of
the back,
s(\
that the ends
of
the
band
are
exactly
even
;
this will
give you
the
exact
middle
of the
band
in
front.
Take
the
foundation
of
skirt,
turn down
the
|
inch
allowed
for,
and
place
the
material side of band towards right
side
of skirt,
pin-
ning
through
both together
;
slightly full the skirt
until
you
have
passed
over
the
hip pleats as
far
as
the
seam of
back
breadth.
On
the
eye
side of
band
fold
what
fullness
you
may have
into
a double
or
triple box
pleat,
leaving
a
piece
at
the
back
quite plain
from inner
to
outer eye.
Return
1o
the
other side of
front,
sewing
to
band
in
the
same
way
as
described
for the
first
side,
with
this
exception
that
the box pleats
are
at
the
end
of
band from hook
to
hook.
Run
the
casings
for
steels
on
the
inside
of
foundation
;
the lower
casing
15
inches
from the bottom, the
entire
width
of back
breadth.
(The
casings
must
be wide enough to run the
steels
in
easily). The
upper casing should
be 10
inches
higher.
The steels
should
be
bound
at
the ends with a piece of
wash-leather or
an
old
kid
glove,
and
should
be put
into
the
casings and
secured
at
the ends just
before
putting
on
the drapery.
The
elastic and tapes
for
tying
skirt back
are
best
put
on
after
the
drapery.
We
will
now
state
how
At the
ends of
the casings five inches of
elastic
should
be
firmly
sewn.
To
the
loose
ends
of
the
elastic
sew tape about
fourteen
inches
long
;
this
must
be
very
strongly
sewn
to the elastic.
7/17/2019 The American Lady Taylor Glove Fitting System (Elizabeth Garland))
http://slidepdf.com/reader/full/the-american-lady-taylor-glove-fitting-system-elizabeth-garland 146/160
137
THE
AMERICAN
LADY
TAILOE
GLOVE-
We
will
now give
directions for
trimming
the
foundation to the
illustration
shown on the front
of
this
Supplement.
First,
cut ten widths
of
the material, four
and
a
half
inches
wide,
join
•
if the
material
has not
a
self-colored
selvage,
the
selvage
must
be
cut
off and
the edges
must be over-sewn when
joined,
turn
up
and
hem
one
edge by
hand
or machine ; if
by
hand,
the
stitches
must
be almost
invisible
on the
right
side.
Begin
kilting from the
hemmed
edge,
and pleat
each
width to
a
quarter
of a yard.
Have
a
needleful
of tacking
cotton,
and tack each
pleat
as
you
make
it, being
sure
that
all
are equal
in
size ;
finish
the bottom length.
Next,
tack
a
second
line
along
the
middle,
arranging
the
plaats
quite
evenly,
according
to the
grain
of
the
material. Now
take
cotton
the
color
of the
material
and
tack
the pleats
along the
top
edge
;
this
done,
press with
a
hot
iron ;
if
the
material is thick and
stubborn,
damp
it
previous
to
ironing
it.
Turn down the
top
edge
about
half
an inch,
and tack it along with cotton
of its
color. This done, press
the
turn-down
quite
flat with a hot iron.
Your
kilting
is
now
ready for placing on the skirt ; the hemmed
edge should
be
one-eighth
of
an inch
above
the
bottom
of
skirt.
Sew
the
kilting
on
by
hand.
For the
box-pleated
skirt,
which has three
tucks,
cut five
breadths
forty-five
inches
long,
and
five
breadths
twenty-seven
inches
long
join all
the
long
lengths
together,
then all
the
short
ones,
and
join
the
short
to
the
long.
Now turn
up
a hem
all round
three
inches
deep.
If
for machining,
it
must
be be
tacked
;
if
for
hemming,
pinning
will
be
sufficient.
Take
a
piece
of
card
five inches in depth,
and
make
a
mark on it
three
and
a
quarter
inches
from
the
bottom,
put
the
bottom
of
the
card
to
the
bottom of the hem, turn
the
material to the exact
depth
of
the
card.
Now tack
your
tuck
to
the
three and
a
quarter inch mark on
the
card.
Now
fix
the
second
and
third
tucks
by
leaving
one and
a
half inch,
between
each
tuck,
as
only the
stiches
of the
top
tuck are
shown
in
our illustration.
You
will
easily keep your
tucks
even
by
cutting
the
card
three inches
deep,
and
marking
it
at
one and
a
half
inch.
Place
one edge of card
at the
tacking
of the
tuck
below
the
one
you
are
fixing, turn the tuck
to the
other
edge
of card. The
tucks
must
now
be
stitched and
pressed.
7/17/2019 The American Lady Taylor Glove Fitting System (Elizabeth Garland))
http://slidepdf.com/reader/full/the-american-lady-taylor-glove-fitting-system-elizabeth-garland 147/160
FITTING
SYSTEM
OF
DRESSMAKING.
138
You
must
next
double
the
five
front
breadths,
putting
in
a
pin
to
mark the
middle
of
the
front.
The
front middle
pleat
is
twelve
inches
in width
;
it
takes
rather more
than
one breadth
for
this pleat,
as
the folds
must
wrap
over
under
the
centre
of pleat
at back.
Leave
spaces
of
two
inches
each
side of
this
pleat.
The two
side
pleats
measure
ten
inches
each when finished
;
they
must
be
made in the
same
way as
described
for
front
pleats. The five
back breadths
must
be
pleated into
three ten inch pleats, with spaces
as before.
Now
tack all these pleats,
beginning
at
the
hem,
and
tack the
front
breadths
six
times
at
regular
intervals
;
for
the
back
breadths
four
times
will
be sufficient. Press
with
a
hot
iron on
the wrong
side.
After
pressing
keep the wrong
side
to
you,
and
put
two tapes
across
the
pleats
at
the front breadths, sewing
the tapes
to
the back
of the
pleats.
You
must
not
tighten
the
tapes,
nor
must
you
take
the
stitches
through
to
the
front
of pleats.
One
tape
is
to
go
across
the
middle
of
the
pleats,
and
one
between
this
and
the top
of
the
breadths.
The
back
pleating
will
not
need tapes.
Next
take the
middle
of front
breadth
of foundation
and
the middle
of
the
front centre box-pleat
;
pin the pleating to
the
foundation
centre
to
centre.
The bottom of
the
hem
must
fall one
inch
over
the kilting
at
the foot
all round. Place the foundation and pleating
on
a table,
and
pin
closely
;
hold
the skirt up, shake it,
and
see
that it is
even
before
stitching it
to
the
foundation. When you
are
satisfied
that it
hangs
evenly
sew
strongly.
For the
front drapery,
cut one breadth of the
material
twenty-two
inches
long,
and two
breadths each
sixteen
inches
long;
join
these
three breadths together straight at the
top,
the
long
breadth
in
the
middle.
Slope the
middle
breadth
at
the bottom so
that
it
graduates
to
the
side
breadths.
To
put
this
drapery
exactly in
the
proper
curve run
a
tacking
thread
on
the skirt,
beginning
at
the side seam
nine
inches
below
the waist,
and
twenty inches
below
the
waist
in
the centre of
front. Look well
at
the illustration,
and
put
the tacking
line
in
the
same
slope
as
is
shown
in
the
illustration
;
both sides
are
alike
at
the bottom
of
front
drapery.
You
will
not
find
it
necessary,
for
arrangin'g
the front and
back drapery
properly, to
put the
skirt
either
on
a
stand or
on a
person.
.
,
7/17/2019 The American Lady Taylor Glove Fitting System (Elizabeth Garland))
http://slidepdf.com/reader/full/the-american-lady-taylor-glove-fitting-system-elizabeth-garland 148/160
139
THE AMEEICAN
LADY
TAILOE
GLOVE-
Fold the
front
drapery exactly
in half,
then
pin
it
to the centre
tacking-line
and
run
it
to
the
skirt,
taking
care
not to
tighten
the
dra-
pery;
sew both sides
on and
begin
the pleating
at
the
waist, first put-
ting
a
mark in
tlie
centre
of
drapery.
Pleat
the
whole of the right
side
of
drapery
into
a
number of small
deep pleats
and pin it
to the
foundation
from
the front
to the
seam
of
the back breadth.
Now
arrange
the left side of
drapery,
at
about
two
inches
from the
front make
five
pleats
close together about
two inches
deep.
When
this is pleated
fasten
it just
below
the
waistband
to
the foundation,
there
will
be
a
straight
unpleated
piece
from
these
pleats to
the
seam
of back
breadth
of foundation ; now
take
the end
of the drapery and
pleat
it
up
towards
the
waist.
The drapery must
fall quite loosely
over
the line it
was
tacked
on at the
bottom
;
sew
the
drapery strong-
ly to the foundation
just below
the
waistband, where
it has
been
pin-
ed,
and make it
neat
by
hemming
a
piece of ribbon
or
binding
over
it.
The sides
will
be
made
neat when
placing
the back
drapery over
them.
For
the
pocket, take
a
piece
of the bodice-lining fifteen inches long
and
fourteen
inches wide, double this
lengthwise, turn
over
two cor-
ners together
to
form
a
triangle
of
six
inches, cut them
off,
face
up
the
slanted
top of
the
with
a piece of the dress material, turn the
faced side
out and
stitch
down
the short side
and
along the
bottom,
turn
the pocket and
stitch
again about a
quarter of
an
inch
from
the
last stitching.
Unpick
the side
seam
of
skirt, commencing ten inches
below
the waist, and
pick
out
seven
and
a
half
inches
of the seam.
Turn the skirt inside out,
sew
in the pocket
so
that
the
facing
shows
on
the
right
side
of
skirt.
At
the
top
of
the
a
piece
of
tape
ten inches
long must be
sewn
to
it,
and
afterwards fastened to the
waistband.
For the crinolette, divide the
crinoline into
three pieces, join them
together,
turn
up a
hem
so
that
the
crinolette
will
be
fourteen
inches
deep, pleat in three double
box-pleats,
allowing the
centre pleat
a
little
larger
than those at the
sides, bind it
along
the
top
with
a
piece
of
tape,
sew
it
to
the
inside of foundation-
skirt just on the lowest
steel
casing,
and
sew
it
down the
sides
to
the seam
of
skirt.
Now
sew
on
the
tie-strings
as
before directed.
Take the three
yards
of
material
left
for back
drapery,
cut
in
two,
join
and
press
the
seam, turn
under
at each
side at
least
three
inches.

7/17/2019 The American Lady Taylor Glove Fitting System (Elizabeth Garland))
http://slidepdf.com/reader/full/the-american-lady-taylor-glove-fitting-system-elizabeth-garland 149/160
FITTING
SYSTEM
OF
DRESSMAKING.
140
Pleat
the
drapery into a large
triple
box
pleat
wide enough
to
cover
the
back as
far as
the
joints of the side
drapery
The
middle
of this
box
pleat
must go
exactly
to
the middle
of
the back, pin
it
there
firm-
ly
On the
left
side
sew
the turn-down piece
over the ends
of the
front
drapery.
Carry the pleat
down
17
inches,
turn
under
8 inches,
so
that
it
forms
a
deep
puff;
sew this
pleat
under
the
puff
to
the
skirt
and
slip-stitch the
outer pleat an inch
from the
edge
down
to the
skirt.
The
remainder of thiu side of the
drapery
must
be turned
under to
form a
second
deep
puff, which should terminate nine
inches
above
the
foot
of
the
skirt.
Now
go
to
right
side
and
loop
it
up
in
the
same way,
this
will
leave
the centre
hanging
loose, which must
be
looped up
and
sewn
to the skirt about
24
inches
below
the
waist,
waijt. Pleat
the lower end of the drapery,
turn
it
under,
allowing
it
to
fall
three
inches lower
in
the
centre
than
at
the
sides
; sew
firmly
to
the
skirt. This
is
dress complete.
JSee cut
next page.
I
IJ
Bse
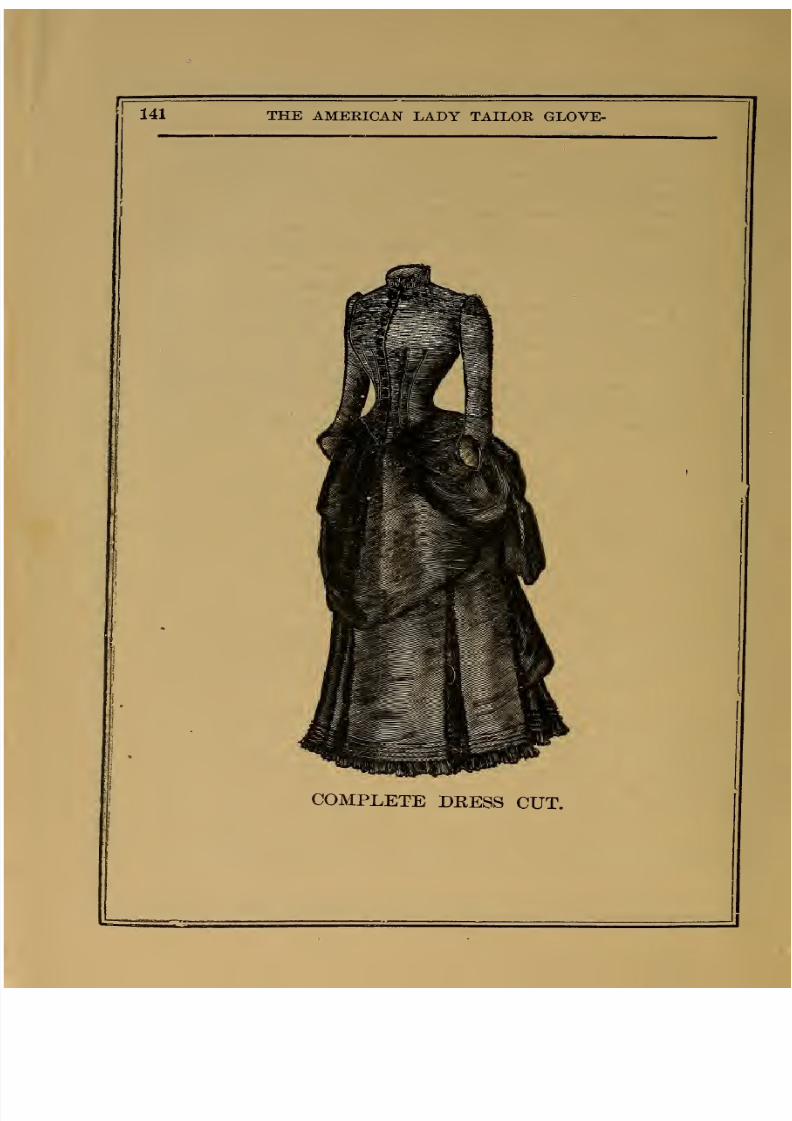
7/17/2019 The American Lady Taylor Glove Fitting System (Elizabeth Garland))
http://slidepdf.com/reader/full/the-american-lady-taylor-glove-fitting-system-elizabeth-garland 150/160
141
THE
AMERICAN
LADY TAILOR
GLOVE-
COMPLETE
DEESS
CUT.

7/17/2019 The American Lady Taylor Glove Fitting System (Elizabeth Garland))
http://slidepdf.com/reader/full/the-american-lady-taylor-glove-fitting-system-elizabeth-garland 151/160
FITTING
SYSTEM
OF
DRESSMAKING.
142
CUTTING
AND
MAKING FULL ROUND BAND
BODICE.
Cut and piece the
lining as directed
for
a
pointed
bodice,
with
tlie exception tliat
you
cut
it
only
two
inches below
the waist
all
round.
Tuck
the
bust-pleats, which have to be stitched
in
the
lining
only
;
put
the side-pieces on
to
the
back.
Next put
the
two
under-
side-pieces
on
to
those
next back, stitch
all the seams, and
press
them.
The
seams
of
the
lining
for a
full
bodice, after being snipped,
are
turned
towards the material
;
this
prevents the
need
of
over-sewing.
Put
the
lining
upon
the
material,
allowing
fifteen
inches
from the
edge
of
material
to
edge
of
the
front
lining
;
this
is
for
the
fulness.
If
you
wish
more fulness
you
must
allow it
here.
Cut
the
material
away
to
the lining
at
the
armholes,
the
shoulders, and side.
Tack
across
the
shoulder, round
the armhole, and down the
side-seam,
being
sure
to attend
to
the pierce holes. Place
a
pin here and
there
between
the
under
arm-seam
and
first
bust-pleat.
Now
go to the throat. If you wish
to
have
a
pleated
bodice com-
mence
about two inches from
the
shoulder, and pleat up all the
mate-
rial
in
small
single
or
box
pleats as preferred.
When
this
is
done,
pleat
at
the
waist,
arranging
the pleats to
cover
the
two
bust-pleat
seams
on
each side. If
you
wish
the
fulness
gathered,
run
a
thread in
a curved
direction
at
the throat,
commencing
the same
distance from
the
shoulder
as
you
would for
the
pleats.
Now draw
up
the
gather-
ing;
see that it
fits
round
to
the
pierced throat
of
lining,
and
if
it
should
be
too
high
or
too
low
place
another
gathering
abovo
or below,
as
the case may
be. At the waist
gather three or four
times,
com-
mencing
from
the
second bust-pleat.
For
the
back,
cut
a piece of material
twenty-four
inches
wide,
and
the
length
for
the
back
;
fold
it
in half, and
pin
the
lining of
the back
upon
it,
with
the armhole
side next selvage
of
material.
Cut
round
as
described
for fronts,
open
out
the
lining
and
material,
pleat
or
gather
the
material
to
the size of back
of
neck,
and
also
at
waist;
when
this
is
drawn
up to
the size,
required,
lay
the
lining
on the
material
and tack
down the
shoulder,
round the
armhole,
and
down
the
side. Now pin
and
tack the
shoulder
and
side-piece
together
as
directed
for
pointed
bodice,
put
it
on
to
see
that
it
fits
properly,
cor-
rect
the
two
sides
as
described for
pointed
bodice.
When
corrected
stitch
the backs to
the front. When
stitching
do
not
join
the
side-
seams
next front
below
the
waist.
The
fronts
are
turned
down as
described
for
pointed
bodice,
and
the
bottom
is
bound
with
ribbon
or
tppe,
The
sleeves
and collar are made and
put
on also as
directed
for
pointed
bodice.

7/17/2019 The American Lady Taylor Glove Fitting System (Elizabeth Garland))
http://slidepdf.com/reader/full/the-american-lady-taylor-glove-fitting-system-elizabeth-garland 152/160
143
THE
AMERICAN
LADY
TAILOR
GLOVE-
TO
MAKE THE MATTEESS
OR
IMPROYEE.
Take
a piece
of
bodice
lining,
and make
a
bag
measuring
nine
inches
across the
bottom and
seven inches
across
the
top,
seven
inches
deep
;
leave
the
top unsewn, put
in
the horsehair
and
turn
in
the top
and
sew closely.
To
keep the
horsehair in
its place
take a needle and
thread
and
knot
it
at
intervals
quite
through
as
a
mattress
is knotted,
This
is
sewn
to the
eye side of
band, putting
the
centre
to
centre
of
band
;
put
a
hook on the loose side of improver and
an
eye
on
the
baud of
skirt to
fasten
it to.
TO
MAKE
A
DOUBLE
CORDING FOR FACING
A
BASQUE.
Cut a piece
of material
on
the cross three
inches
wide,
take
a
cord
and
place it
on
the
wrong
side of material a
quarter of an inch from
the edge, turn
the material down
over
the
cord
and
tack it with
a
needle
and
cotton quite
close
to
the
cord for
the
required
length,
put
a
second
cord half
an
inch from the first, fold
the
material
back
with the
cord
in it
so that
this
second
lies
immediately
above
the first cord, and run
on
the tacking-line
with silk or
cotton
the
color of
the material, tack
through
the
material
under both
the lines
of
cord,
so
that they
are
firmly
held
together
;
pull
out the tacking,
and stitch on the
bottom
of
basque
to directions already
given.
Our
readers
may think that
telling them
how to
make
one
dress is
not
teaching
them
dressmaking
;
but the
illustration
we
have selected
gives
kilting,
box-pleating,
tucking,
and
a
drapery,
which,
though it
looks
simple,
needs
a
good
deal
of
careful
management
to
make
it
set
properly;
as
all
these
trimmings
are employed
in
various ways
in
different dresses,
showing
how
to
do
them
properly
in this
shows
how
to
do them
in
any
other arrangements, as
the
same
principle will
apply,
though the
kilts
be wide
and
box-pleating
narrow.
We
have
told
them
how
to
make
a
pointed bodice and a
bodice
with
full
back
and
front.
If
a
basque-bodice is required, the
plan of
cutting, fitting, and
putting
it
together
must
be
the same
as
for a
plain
bodice, leaving
the
additional
lining
and
material at
the bottom
of
bodice
to
form
the
basque.
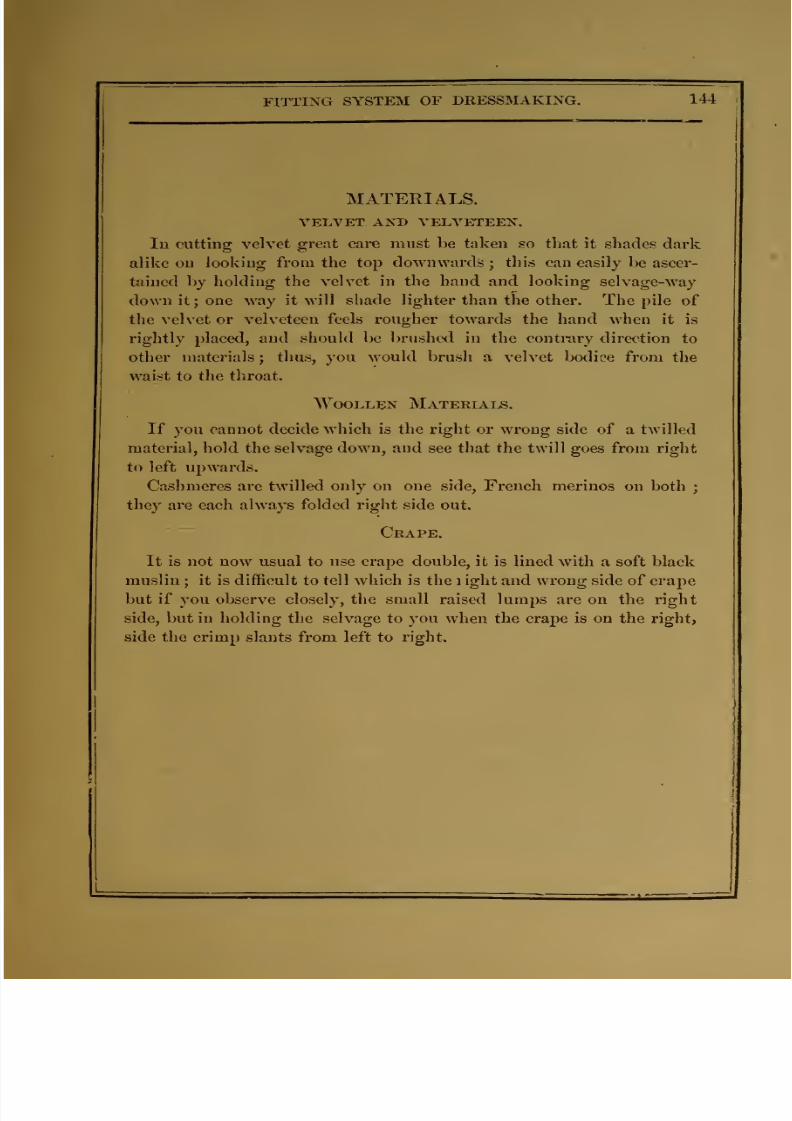
7/17/2019 The American Lady Taylor Glove Fitting System (Elizabeth Garland))
http://slidepdf.com/reader/full/the-american-lady-taylor-glove-fitting-system-elizabeth-garland 153/160
FITTING
SYSTEM OF
DRESSMAKING.
144
MATERIALS.
VELVET
AND VELVETEEN.
lu
cutting velvet
great
care must
be
taken
so
that
it
shades
dark
alike
on
looking
from
the
top downwards
;
this
can
easily
be ascer-
tained
by
holding the
velvet
in
the hand
and hooking
selvage-way
down it;
one
way
it will
shade lighter than the
other.
The
pile
of
the velvet or
velveteen
feels
rougher
towards the hand
when it
is
rightly placed, and
should
be
brushed
in
the
contrary direction
to
other
materials
;
thus,
you
would
brush
a velvet
bodiee
from
the
waist
to
the
throat.
Woollen
Materials.
If
you
cannot
decide which is the right or
wrong
side
of
a twilled
matei'ial,
hold
the selvage
down, and
see
that
the twill goes from
right
to
left
upwards.
Cashmeres are twilled
only
on
one side,
French
merinos on
both
;
they are each always
folded
right side
out.
Crape.
It
is
not now
usual
to
use crape double, it
is lined
with
a
soft black
muslin
;
it
is
difficult to
tell which is
the i
ight and wrong side
of crape
but if
you observe closely,
the
small
raised
lumps
are
on
the
right
side,
but
in
holding
the
selvage
to you
when
the
crape is on the
right,
side
the
crimp
slants from
left
to
right.

7/17/2019 The American Lady Taylor Glove Fitting System (Elizabeth Garland))
http://slidepdf.com/reader/full/the-american-lady-taylor-glove-fitting-system-elizabeth-garland 154/160
145
THE
AMERICAN
LADY
TAILOR
GLOVE-
ADVICE
TO
MARRIED
LADIES.
Ladies who
are stout or
corpulent should
never
wear
a
basque
or
polonaise fastened
below
the waist line.
The
princess' dress
and tight-fitting
wrapper in one piece, is
particularly
unsuitable.
The skirt
should
be
lengthened at the
top
only, and made
by the
diagram of
skirt
No.
2,
in this book. A dressy half-fitting
basque
or sacque
made of either
a
bright
or
delicate
tinted
basket
cloth,
according
to
fancy,
and
trimmed
with
full
ruches
and
jabots of
creamy Oriental lace,
or
some such fluffy trimming
from
the
neck
to
the waist, and then carried around
both
sides of
basque,
will
be becoming
and
stylish. White
aprons
and
ribbon
bows
at the
waist
line in front should
be avoided.
As all drapery
at
the
back
is
now
worn extremely full,
wide
whalebones can
be
run
in
the
back breadths of skirt, to increase the bouffant effect where
it is
most
desired.
The
blending
of
colors
requires
good judgment
and
refinement,
as
well
as
knowledge.
Custom and
fashion
govern
many
things,
and colors are now
put
together
which
a
few years
ago
would
have been
considered
not only in
very
bad
taste,
but
also exceed-
ingly
vulgar. For instance, pink and red, red and
orange,
green
and
blue,
as
well
as
purple
and blue,
although contrasting colors
are frequently
shaded
one
into the other,
with great skill
and
charming
effect. Rich warm
colors
blend well
with
those
that
are
delicate
and
pale.
As dark
crimson or
scarlet
with pale
blue
or
gray
;
pink with
gray, white or
black, and
green with violet.
Those colors
which
form
the
greatest
contrast
to
hair and
com-
plexion
are considered
the
most
becoming.
Black and
white
are
worn
by
all
ladies, and
considered in
good
taste
for any
one
;
but
the first
is
not favorable
to
a very dark complexion, or
the
last
for
a
very
pale
one.
The
rosiest
complexion
loses
much
of
its
fresh-
ness by
coming
in
contact
with
the
same
color;
light
crimson
and maroon
are
apt to
cast
a
green shade
over the face. A
white

7/17/2019 The American Lady Taylor Glove Fitting System (Elizabeth Garland))
http://slidepdf.com/reader/full/the-american-lady-taylor-glove-fitting-system-elizabeth-garland 155/160
FITTING
SYSTEM
OF
DRESSMAKING.
146
fichu
or ruching should
be
worn to
separate
the bright
face
from
the
brighter dress, and the
effect
will
be
charming.
White is par-
ticularly becoming
to a
fresh
complexion, as it
relieves it
of
much
color
;
but, on
the
contrary, those ladies who
have
the
whole
face
tinted a
deep
reddish hue,
particularly
the
nasal
organ,
should
avoid
white,
unless separated
from the skin in
some
manner
by
edging
the draperies
with black.
The material, color,
make
and
fit of the
dress
may
be
as near
perfection as
possible,
yet
it
is
the
trimming,
lace
around
the
neck, bosom
and sleeves, the jewelry,
ribbons
and
flowers,
that
gives
the
finishing touches that
impart
tone to
a lady's
costume.
Sufficient attention
is
not
paid
to
these details,
or
we
would
never
see costly
jewels worn
with a
common
dress, and
cheap
lace
on
a
royal
velvet
robe,
either
in the street, the
market-places,
or
the
fashionable reception
room.
Then,
too,
care
should
be
taken to
suit the
style
of
costume
to
the
figure,
as
some
goods
impart
height
and
others
have
the
oppo-
site effect.
Stripes
should
not
be
worn
by
tall,
slender
persons,
unless
made
crosswise.
Broad
plaids
and large
figured
goods
make
a
short person
look
dumpy
;
reverse these styles
and
you
will
do
well.
It
is
unnecessar}'-
to
describe
the
infant's
robe, lady's
night
dress
and
low-necked yoke,
as
they are
all
cut on the
same
princi-
ple
as
the
bathing
robe.
The yoke
for
a
skirt
may
be cut any
depth
by
laying
the
material on
the diagram
below waist line,
as
in skirt
No.
2.
This
system
can never
become old
fashioned,
as
the
measures
are
taken
direct
from the body,
any
change
of style, such
as
longer
or
shorter
shoulder,
higher
or
lower
dart,
or
looser
sleeve,
can
be
made
at will.
The diagram of plain basque is
the
key-note
to
the
American
Lady
Tailor
System, and
when
once
mastered,
any
lady will
be
enabled to
cut,
without a
pattern, every article
^f
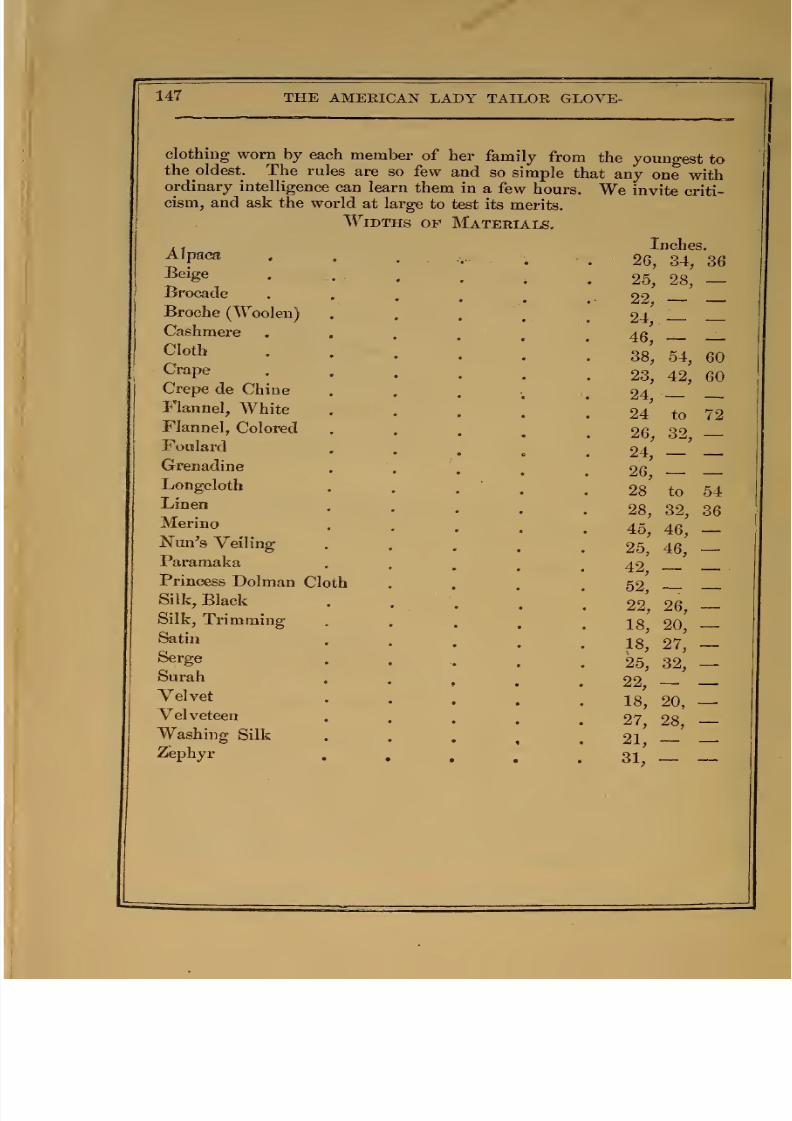
7/17/2019 The American Lady Taylor Glove Fitting System (Elizabeth Garland))
http://slidepdf.com/reader/full/the-american-lady-taylor-glove-fitting-system-elizabeth-garland 156/160
147
THE
AMERICAN
LADY
TAILOR
GLOVE-
clothing
worn
by
each
member
of
her family
from
the
youngest
to
the oldest.
The
rules
are
so
few
and
so
simple
that
any
one
with
ordinary
intelligence
can
learn
them
in
a
few
hours.
We
invite
criti-
cism,
and
ask
the
world
at
large
to
test
its
merits.
Widths
of
Materials.
Alpaca
Beige
Brocade
Broche
(Woolen)
Cashmere
Cloth
Crape
Crepe
de
Chine
Flannel,
White
Flannel,
Colored
Foulard
Grenadine
Longcloth
Linen
Merino
Nun's
Veiling
Paramaka
Princess
Dolman
Cloth
Silk,
Black
Silk,
Trimming
Satin
Serge
Surah
Velvet
Velveteen
Washing
Silk
Zephyr
Inches.
26,
34,
36
25,
28,
—
22,
— —
24,
:
46,
-
_
38,
54,
23, 42,
24,
-
to
32,
24
26,
24,
26,
28
28,
60
60
72
to
32,
45,
46,
25,
46,
42,
-
62,
-
22,
26,
18,
20,
18,
27,
25,
32,
22,
—
18,
20,
27,
28,
21,
-
31,
—
54
36
7/17/2019 The American Lady Taylor Glove Fitting System (Elizabeth Garland))
http://slidepdf.com/reader/full/the-american-lady-taylor-glove-fitting-system-elizabeth-garland 157/160
7/17/2019 The American Lady Taylor Glove Fitting System (Elizabeth Garland))
http://slidepdf.com/reader/full/the-american-lady-taylor-glove-fitting-system-elizabeth-garland 158/160

7/17/2019 The American Lady Taylor Glove Fitting System (Elizabeth Garland))
http://slidepdf.com/reader/full/the-american-lady-taylor-glove-fitting-system-elizabeth-garland 159/160

7/17/2019 The American Lady Taylor Glove Fitting System (Elizabeth Garland))
http://slidepdf.com/reader/full/the-american-lady-taylor-glove-fitting-system-elizabeth-garland 160/160


![Cyborg Glove ExcerptNick and Tesla’s Super Cyborg Gadget Glove [Excerpt]](https://img.pdfslide.us/doc/110x75/577cc47a1a28aba711996e65/cyborg-glove-excerptnick-and-teslas-super-cyborg-gadget-glove-excerpt.jpg)