Embed Size (px)
Citation preview

1
The Metal-Free PracticeThe
Triturator-lessPractice
TheFront Desk-less
Practice
TheLab-lessPractice
TheDoctor-less
Practice
Looks
Longevity
versus

2
Common Public Perception of a Crown
Sticks out like a headlightDoesn’t matchToo opaqueBlack line at gum
The All-Ceramic Restoration
• Increased translucency and vitality
• Supra-gingival margins possible
• Does not contain metal
• Potentially best esthetics
All-Ceramic RestorationAdvantages
PFM vs All-Ceramic Crown
PFM Crown
All-Ceramic Crowns
• More exacting and extensive preparation
• Often exacting cementation procedures
• Post-operative sensitivity
• More prone to fracture
• Often higher lab bill (not pure Zr)
All-Ceramic RestorationChallengesChallenges

3
• All Zirconia
• Porcelain fused to Zirconia ?
• Monolithic Lithium Disilicate
• Lithium Disilicate w/ cutback
• Pressed Ceramic
• Feldspathic
All-Ceramic Restoration Materials-2015 • Esthetic expectations
• Specific tooth
• Occlusal habits and trauma
• Amount of tooth preparation
• Color of underlying tooth structure
• Periodontium biotype
• Type of core or post
• Bonding vs conventional cementation
• Cost
• Patient cooperation
All-Ceramic Selection Factors
Cardoso JA, Almeida PJ, Fischer A, Phaxay SL. Clinical decisions for anterior restorations: the concept of restorative volume. J Esthet Restor Dent. 2012; 24:367-83
Uses of Dental Photography Laboratory Communication
““Singular SuccessSingular Success””
Uses of Dental Photography Laboratory Communication
Root fractureRoot fracture
Uses of Dental Photography Laboratory Communication
Paint tints onto shade tabPaint tints onto shade tab
Uses of Dental Photography Laboratory Communication
Take photos and send to labTake photos and send to lab
Print JPEG

4
Uses of Dental Photography Laboratory Communication
““Singular SuccessSingular Success””
Everything the Lab would Love to tell you, but is Afraid to Ask For!
• Give me a readable impression
• Give me enough room
• Give me the option of asking for a new impression or new preparation
• Give me pictures of the prep, adjacent teeth and the desired shade
• Give me a guide of desired incisal edge, midline, angulations, position of the anterior teeth & preferably impression of temps
Feldspathic Porcelain
• Potential for best esthetic results
• Primary use-Laminate Veneers
• 60-70 MPa flexural strength
• Must be meticulously bonded
I want an extreme makeover
Retracted View

5
Lateral Views
8 Teeth Prepared for Feldspathic Porcelain Laminate Veneers
Select desired shade before beginning preparation
Selective Etch Technique Apply etch to enamel only for 15 seconds Wash thoroughly Place self-etching primer
Frankerger R, Lohbauer U, Roggendorf MJ, Naumann M, Taschner M. Selective enamel etching reconsidered:better than etch-and-rinse and self etch? J. Adhes Dent. 2008;10:339-344.
Selective Etch Technique High Viscosity allows precise placement Contains BAC
Total, Self or Selective Etch Universal Bonding
Materials
Total-etch, self-etch or selective-etch technique
Can be used for direct and indirect restorations
Bond to all indirect substrates-metal, ceramics, zirconia, porcelain and lithium disilicate.
Compatible with light-cured, self-cured and dual-cured composite and luting cements.
Universal Bonding Materials
Total, Self or Selective Etch

6
All-Bond Universal Total-etch, self-etch or selective-etch
Single bottle for direct and indirectrestorations
High bond strengths to metal, ceramics, zirconia, porcelain & lithium disilicate.
Compatible with light-cured, self-cured and dual-cured composite and luting cements since pH is 3.2
Becomes hydrophobic upon setting
Total, Self or Selective Etch Total Etch vs. Self EtchShear bond strength of Universal Adhesives on Tooth Structures MPa*
*Manufacturer supplied data
Universal Bonding Materials
Total, Self or Selective Etch Universal Bonding
Materials
Total, Self or Selective Etch
Universal Bonding Materials
Total, Self or Selective Etch
Light Cured Dual Cured
OOPS!

7
Endodontic Root Canal Endodontic Root Canal Therapy?Therapy?
Asymptomatic
Single small exposure
Able to achieve hemostasis
Perhaps not IF:
Traditional Pulpal ProtectionIndirect Pulp Capping
Best not to expose pulp• Asymptomatic• Sound 2mm around margins• Stop when next scoop will expose pulp• Place GI or Ca(OH)2
Traditional Pulpal ProtectionIndirect/Direct Pulp Capping
What are we trying to accomplish?
• Mechanical Sealing of the Pulp• Stimulate hydroxyapatite formation• Dentin bridge formation
Traditional Pulpal ProtectionIndirect/Direct Pulp Capping
How does this happen?
• Material sets hard and adheres to dentin• Alkaline pH• Release of Ca++ ions Ca+2
OH-
H2O
Ca+2
OH-
Traditional Pulpal ProtectionIndirect/Direct Pulp Capping
Ca(OH)2 Paste• DyCal– Dentsply/Caulk (paste/paste)
• Multi-Cal– Pulpdent (non-setting)
Ca(OH)2 in VLC resin• Prisma VLC DyCal (light cured)
• Life– Kerr (light cured)
Unproven Pulpal ProtectionIndirect/Direct Pulp Capping
Resin Dentin Bonding?• Dentin Bonding Agent-Composite
“Contact with acid and pulp tissue started the bleeding process thus damaging the bonding technique resulting in no cellular differentiation and new dentin formation. The use of dentin bonding agents should be avoided for vital pulp therapy.”
Silva GA, Lanza LD, Lopes-Junior N, MoreiraA, Alves JB. Direct pulp capping with a dentin bonding system in human teeth: a clinical and histological evaluation. Oper dent. 2006;31:291-307.

8
Unproven Pulpal ProtectionIndirect/Direct Pulp Capping
Glass Ionomer/RMGI?
“Poly Acrylic Acid (PAA) inhibits apatite formation in the body environment. PAA released from the glass-ionomer cements inhibits the apatite formation on tooth surfaces. It might be considered difficult to obtain bioactive glass-ionomer cements”
Kawashita M, Kokubo T, Nakamura T. Effect of polyacrylic acid on the apatite formation of a bioactive ceramic in a simulated body fluid: fundamental examination of the possibility of obtaining bioactive glass-ionomer cements for orthopaedic use. Biomaterials. 2001;22:3191-6.
Improved Pulpal ProtectionIndirect/Direct Pulp Capping
Ca(OH)2 Paste• Ultra-Blend Plus– Ultradent
Pulpal Protection – Indirect/DirectPulp Capping
MTA (Mineral Trioxide Aggregate)
• ProRoot-Dentsply• Biodentine-Septodont• Thera-Cal LC-Bisco
Bismuth oxide Bi2O3
Gypsum CaSO4 · 2 H2O
Tetracalcium aluminoferrite (CaO)4.Al2O3.Fe2O3
Tricalcium aluminate (CaO)3.Al2O3
Dicalcium silicate (CaO)2.SiO2
Tricalcium silicate (CaO)3.SiO2

9
Biodentine Latest Pulpal ProtectionIndirect/Direct Pulp Capping
Resin Modified Calcium Silicate• Theracal
Latest Pulpal ProtectionIndirect/Direct Pulp Capping
Light cured apatite forming MTA in a unique hydrophilic resin (polyethylene glycol methacrylate) that releases calcium
Hilton TJ. Keys to Clinical Success with Pulp Capping: A Review of the Literature. Op Dent 2009;34:615-625.
Bonding Porcelain Laminate Veneers
DO NOT USE:
Self-Cured Cements (Contain elevated levels of Tertiary Amines which may yellow)
Self Curable Cements which you can add a dual-cured catalyst (May yellow)
Dual-Cured Cements (May Yellow)
Cement Do’s and Don’ts
Dr Nasser Barghi UTHSCSA
Delta “E” Values for Veneer CementsStored at 500 C

10
Bonding Porcelain Laminate Veneers
DO NOT USE:
Self-Adhesive “Cem” Cements-lower bond strength-(12-15 MPA vs 24-36 MPA) Rely X Unicem
Smart Cem
Bis Cem
G Cem
Mono Cem
Cement Do’s and Don’tsBonding Porcelain Laminate Veneers
DO NOT USE:
Self-Etching Primer (Poor enamel bonding) MUST ACID ETCH ENAMEL
Cement Do’s and Don’ts
Bonding Porcelain Laminate Veneers
DO USE:
Fourth Generation Total Etch multi-bottle
Fourth Generation Total Etch 2 component
Fifth Generation Total Etch
Universal Bond Total Etch Mode
Cement Do’s and Don’ts
All-Bond Universal Bond
All-Bond III (ACE TE)
All-Bond II One Step Bond
Bonding Porcelain Laminate Veneers
DO USE:
Light Cured Only Resin Cements
Cement Do’s and Don’ts
Choice 2 (delta E<1.2)
Bonding Porcelain Laminate VeneersTreatment of Porcelain Surface
Only glass beads should be applied under pressure to internal surface of laminate
If not etched apply 9% HF for 90 seconds
Bonding Porcelain Laminate VeneersTreatment of Porcelain Surface
Wash thoroughly
Ultrasonic in Et OH or apply 32-27% phosphoric acid to remove hexafluorosilica salts on surface if over-etched
Over-etched

11
Bonding Porcelain Laminate VeneersTreatment of Porcelain Surface
If not silanated dry & apply silane-wait 90 seconds (BEST to silanate when received from lab
Silane to Porcelain
Condensation Reaction
Porcelain
-H2O
Bonding Porcelain Laminate VeneersTreatment of Porcelain Surface 2 Forms of Silane
Pre-Hydrolyzed Silane + Acid Non-Hydrolyzed
O
OSi
OH
HO
HO
Bonding Porcelain Laminate VeneersTreatment of Porcelain Surface Tryin with water soluble gels
Clean in ultrasonic or apply phosphoric acid wash and dry thoroughly
Bonding Porcelain Laminate VeneersTooth Surface Preparation
Place 32-37% Phosphoric Acid on enamel for 15 seconds then on dentin for 5 seconds
Wash thoroughly and dry enamel but leave dentin moist
Place GLUMA on exposed dentin
Bonding Porcelain Laminate VeneersTooth Surface Preparation
All Bond 2:Apply 3-5 coats A&B, gently air dry, light cure 10 sec, apply D/EBond do not light cure
All-Bond 3 (ACE TE): Apply 1-2 coats of mixed, gently air dry and light-cure 10 sec
One-Step Plus: Apply 1-2 coats, gently air dry and light cure for 10 sec
All-Bond Universal: Apply 1-2 coats, lightly air dry at an angle and light cure for 10 sec
Bonding Porcelain Laminate VeneersPlacement
Optional-w thick cements (Provi-Link) Apply a thin layer of Porcelain Bonding Resin (HEMA free) to internal surface of veneer, do NOT light-cure
Apply selected shade of CHOICE 2 to internal surface of veneer and guide into place
Tack cure for 3-5 seconds, then remove excess cement

12
Bonding Porcelain Laminate VeneersPlacement
Use rubber tip to remove excess
Wave cure (1:1,000, one inch away)
Use scaler to remove excess
Floss contacts
Place glycerin around margins and thoroughly cure for 1 minute from buccal and lingual
Bonding Porcelain Laminate VeneersFinal Adjustments
Check occlusion in Centric Occlusion
Carefully adjust protrusive and lateral excursions
Smooth lingual with fine diamond football, white stone, successive points
Have patient return in 2 weeks for photos and to check occlusion
Before
After
Porcelain Laminate Veneers Seated
Laboratory prostheses fabricated by Valley Dental Arts Stillwater MN
Veneer Technique Resource
A1 tryin paste
Clear tryin paste
Milky White tryin paste
Immediate Smile
Bond Bridge first, then seat laminates
13
Before
After
Laboratory prostheses fabricated by Valley Dental Arts Stillwater MN
Lithium Disilicate (E-Max)
• Strength and translucency
• Posterior crowns-monolithic
• Pressed or CAD produced
• Anterior crowns-w/ layered porcelain
• 360-400 MPA flexural strength
• Better to be bonded unless thick
• Best esthetics
Single Central Incisor Crown•2-5 Appointments•Higher Fee
Lithium Disilicate (E-Max)Endodontically Treated
Old Bonding
Lingual View
Remove facial compositeRemove AO compositeRemove most stainUse perio probe to remove subgingivalBond bleach white compositePrepare toothPhoto w/stump shade
Make custom temp for lab
•Make quick bis-acryl
•Laminate prep on facial
•Add composite and custom stains
Send photo and temp to lab

14
OR Make custom shade tab for lab
•Core Shade
•Add tints
•Overlay with Incisal Shade for value
Send photo and tab to lab
Pre Operative Smile
Post Operative Smile
Laboratory prosthesis fabricated by Valley Dental Arts Stillwater MN
Monolithic E Max CrownsLoad to Failure*
*Data from Ivoclar/Vivadent
Selecting Bonding Agent w Duo-Link
Bonding Agent Clinical situation
AllAll--Bond SE (light cure) + DuoBond SE (light cure) + Duo--Link (Light Cured)Link (Light Cured)
Vital tooth
AllAll--Bond TE (light cure) + Duo Bond TE (light cure) + Duo Link (Self Cured)Link (Self Cured)
Endo tooth, post & core
9%HF 60s
Li2Si2O5
Dentin______
CoreResin Cement
Sila
ne
Bonding to Lithium Disilicate(Retentive)
15 MPa

15
Li2Si2O5
Dentin______
CoreResin Cement
Sila
ne
Adhesive
Bonding to Lithium Disilicate-(Non Retentive)
35 MPa
Duo-Link Universal
•Increased radiopacity
•2 shades‐milky white & translucent
•Dual curing
•Completely cures w/o light exposure
•Easier cleanup
Duo-Link Universal
•Usable with Universal, total etch, self‐etch bonding agents
e Cement•All‐inclusive kit
•Dual and light cure
Duo-Link used with All-Bond Universal vs. Primersfor Ceramics & Zirconia/Metals (Indirect Substrates)
Indirect Substrate
All-Bond Universal + Duo-Link
(Pure) Primer + Duo-Link
Porcelain (etched) 21.5 (3.4) 34.6 (w/ Porcelain Primer)
Lithium Disilicate (etched)
32.8 (7.7) 35.5 (w/ Porcelain Primer)
Zirconia 26.9 (5.1) 28.7 (w/ Z-Prime Plus)
Alumina 33.7 (8.2)
Stainless Steel 39.8 (6.8)
Gold 21.7 (4.6)
*Cements were cured using the L/C mode.
*All Bond Universal can be used as a Universal Primer for Porcelain & Zirconia substrates , but it MUST BE LIGHT‐CURED prior to cementation of the restoration. Although the initial Shear Bond Strengths may be statistically similar, a separate pure Silane primer for lithium disilicate and separate Metal primer for Zirconia results in better long‐term durability of the bond.
Temporary Crown
Bonding Technique
Place Divots with 330 bur
Anesthetize if vital
16
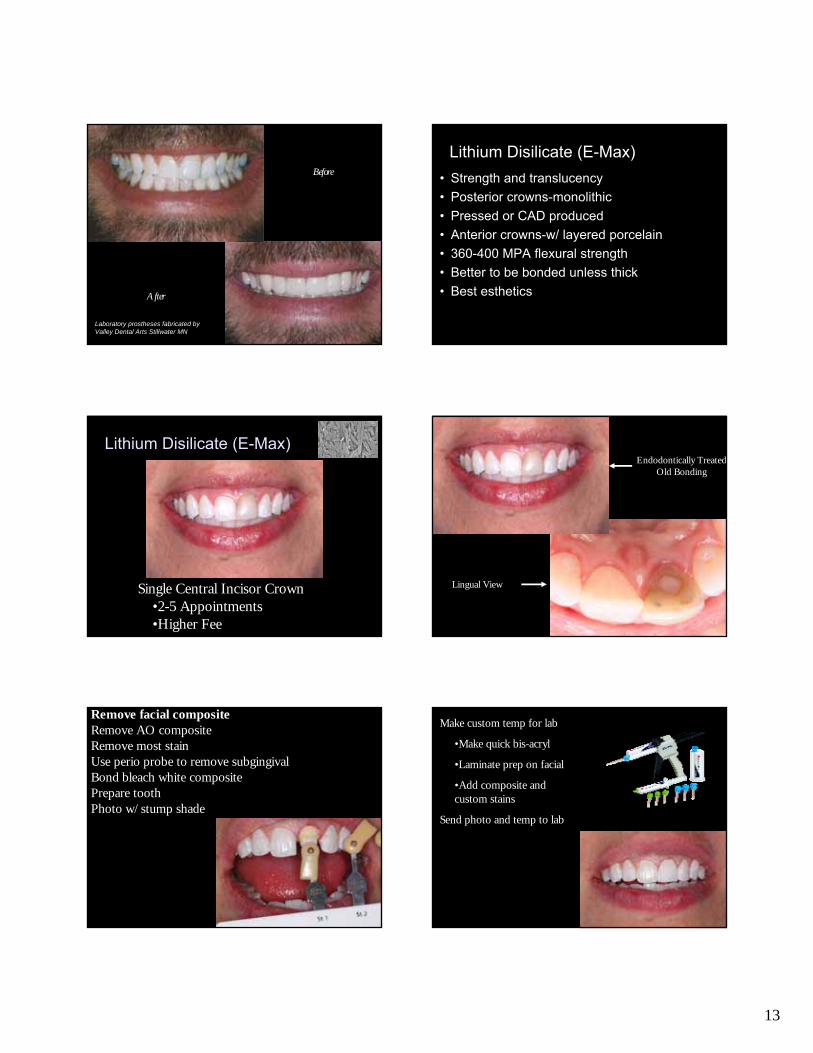
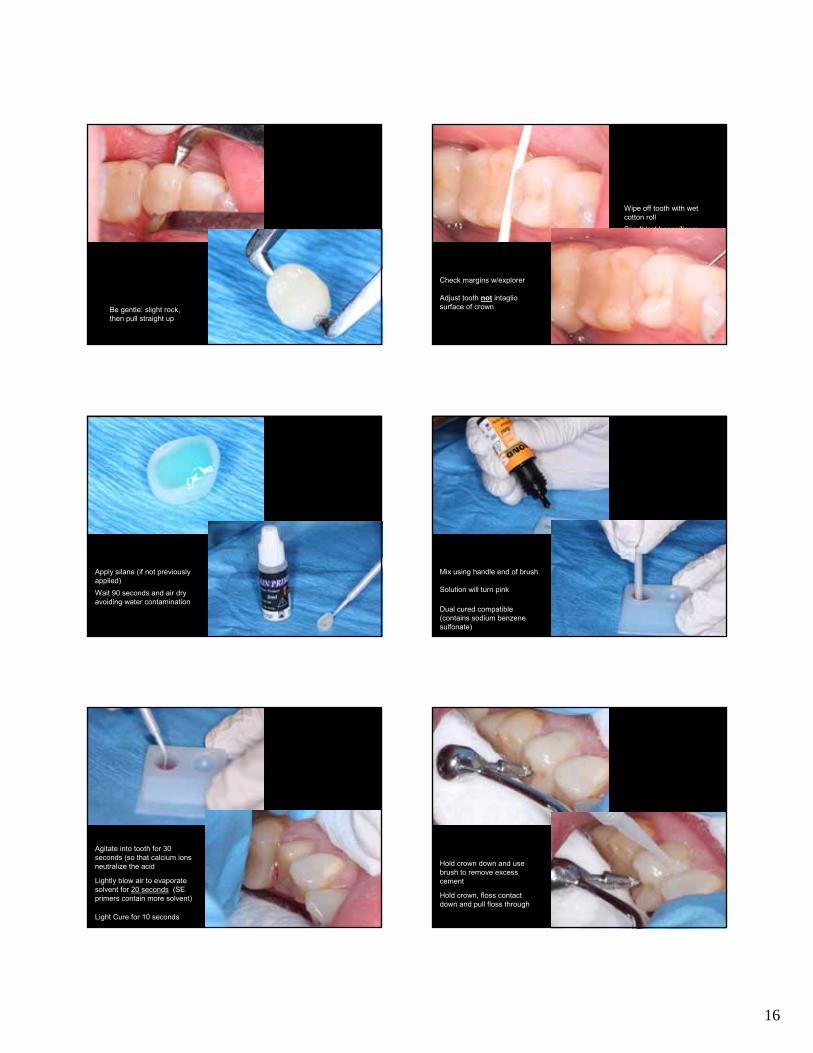
Seat Pointed Forceps-Easy back and forth
Be gentle: slight rock, then pull straight up
(Optional) Roughen surface w diamond for immediate dentin sealing
Sandblast bases/liners (place gingival protection)
Wash and remove excess moisture
Wipe off tooth with wet cotton roll
Check interproximal contacts with floss-avoid causing bleeding
Adjust contacts with white stone-re-polish areas
Check margins w/explorer
Adjust tooth not intaglio surface of crown
Re-acidify surface with Phosphoric Acid
Wash and dry thoroughly
Apply silane (if not previously applied)
Wait 90 seconds and air dry avoiding water contamination
Dispense one drop each of Self-Etching Primer into well
Mix using handle end of brush
Solution will turn pink
Dual cured compatible (contains sodium benzene sulfonate)
Dip brush in well
Agitate into tooth for 30 seconds (so that calcium ions neutralize the acid
Lightly blow air to evaporate solvent for 20 seconds (SE primers contain more solvent)
Light Cure for 10 seconds
Mix Cement and place in tooth
Lightly coat to avoid overfilling (hydraulic pressure can impede seating)
Quickly seat crown and push down
Hold crown down and use brush to remove excess cement
Hold crown, floss contact down and pull floss through

17
Wave cure margin 1 second
Use scaler to remove excess cement then explorer
Floss
Place glycerin around margins
Light cure for 1 minute
Check Occlusion
Adjust with fine diamond
Then white stone and polish
Crown complete
Laboratory prosthesis fabricated by Valley Dental Arts Stillwater MN
Porcelain fused to Zirconia (Lava, Cercon, Procera Zr)
• Strong core, but reported interface chipping
• 900-1100 MPA flexural strength (Zr)
• 90-160 MPA veneered ceramic
Can be used for bridges
Can use conventional cementation
Opaqueness masks out metal posts
Full-mouth rehabilitation
ZrDentin______
CoreResin Cement
Z P
rime
Adhesive
Bonding to Zirconia
Short/Tapered, Non-retentive Zr Crown adhesively bond with Resin Cement
Universal Primer
• Can be used with Self-Etch, Total-Etch or Selective Etch techniques
• Compatible with Light-cured, Dual-cured & Self-cured resin cements, composites or core materials
• Universal adhesive for direct & indirect bonding procedures
Universal Primer
• Advantages– Contains MDP-long term stable bonds
– Does not need to be light cured-posts
– Low film thickness (5 microns)
– Excellent bond strengths

18
Universal Primer Z-Prime Plus (Surface Primer)
• Phosphate Monomer (MDP), BPDM, Et OH
• Indications– Zirconia (LAVA, Cercon, Implant)
– Alumina (Procera)
– Metal (Titanium, Non-Precious, Semi-precious, High Noble)
– Composite Indirect
– Endodontic Posts (Zirconia, Fiber, Metal)
– Intra-oral repairs
Bonding Zirconia CrownsTreatment of Zirconia Surface
MDP to Zirconia
Addition Reaction
Zirconia
Bond Strengths to Intaglio Surface*
*Data from Bisco
107
Phosphates contaminate Zr surface
• Saliva contains phosphates that tie up receptor sites
• DO NOT clean with Phosphoric Acid
108
Composition (wt%):Zirconium oxide 10 - 15Water 65 - 80Polyethylene glycol 8 - 10Sodium hydroxide ≤ 1 (pH = 13 -13.5)Pigments, additives 4 - 5
Ivoclean
Phosphates contaminate Zr surface
• Treat contaminated surface with Ivocleanthen apply Z Prime

19
P < 0.05 (ANOVA, T-Test)
Contamination Clean/Treat SBS, MPa (n = 8)
No contamination Z-Prime 31.5 (8.4)a
Saliva Water 20.6 (7.1)b
Saliva Ethanol 20.3 (4.2)b
Saliva Ivoclean 32.0 (6.2)a
Saliva Sandblast 30.3 (6.7)a
Pre Z-Prime-Saliva Ethanol 28.8 (7.7)a
AADR/IADR 2013 Abstract
Effects of Saliva ContaminationBefore
After
After (2 Years)
Laboratory prostheses fabricated by Valley Dental Arts Stillwater MN
All Zirconia
• Opaque but glazes added
• Able to use on second molars
• Perhaps on grinders
• Less preparation needed
• Hard to make adjustments
• Promoted as gold alternative
• Wears opposing tooth structure
All Zirconia
DT Posts/XRO
• Quartz fiber post
• 825 MPa flexural strength
• Radiopaque
• Changing temperature changes color
• Excellent micro-mechanical retention
Four Sizes
1.25 1.5 1.8 2.2mm
1.2mm1.00.90.8
TAPER #2:
.04
.02 .02 .02 .02
.06 .08 1.0
TAPER #1:
Diameter
DT Posts/XRO

20
Core Flow DC Lite
• High Compressive Strength
• High Flexural Strength
• Low Polymerization volumetric shrinkage (for a resin core)
• Used as a cement for the post as well as the buildup
• Non-slumping
• Cuts like dentin
Broken post removed
Post drill prepared 2/3’s length of root
Take radiographic to measure canal length
Try-in postClean post and dry
Apply Z Prime
Etch canal with Phosphoric Acid for 5 seconds
Irrigate thoroughly with water
Use paper points to dry canalClick once and mix Universal Primer Place 2 coats of bonding agent
Leave for 20 secondsUse paper point to remove excess liquids
Evaporate for 20 seconds

21
Coat post with Core Flow
Seat quickly
Light cure through post for 10 seconds
Express Core Flow and shape
Light cure thoroughlyBuilding Up Core
Core Buildup CompleteInitial Core Buildup
Diode laser used to crown lengthen and increase ferrule
Crown Seated
Hands-On Crown Seating Hands-On Crown Seating

22
Hands-On Crown Seating Hands-On Post and Core BuildupZ Prime
Hands-On Post and Core BuildupZ Prime
Hands-On Post and Core BuildupUniversal Primer
Hands-On Post and Core BuildupUniversal Primer
Hands-On Post and Core BuildupUniversal Primer