Embed Size (px)
Citation preview

______________________________________________________________________________ A Beginners Guide to Resetting the S50 Version 1.3 Page 1 of 39
The “3 Finger Salute” A Beginners Guide to
Resetting the S50
Copyright © 2006 by Mike Rubin (ME_RUBIN) for the Sirius Backstage S50 Radio Community. ® “SIRIUS”, My Sirius Studio, the SIRIUS Dog logo, channel names and logos are trademarks of SIRIUS Satellite Radio Inc. Last Printed: 9/10/2006 8:51:00 AM
______________________________________________________________________________ A Beginners Guide to Resetting the S50 Version 1.3 Page 2 of 39
Table of Contents “OH MY GOD” It Does Not Work .................................................................................... 3 What is “The 3 Finger Salute”? .......................................................................................... 4 “You Have Been Warned”.................................................................................................. 4 Preparation .......................................................................................................................... 5
The S50 Buttons.............................................................................................................. 7 Starting Fresh- Recycle the Power................................................................................ 13
It’s 3 Finger Time! ............................................................................................................ 18 Step 1 - Turn the POWER OFF .................................................................................... 18 Step 2 – Lock ON Button.............................................................................................. 18 Step 3 – Volume UP Button ......................................................................................... 19 Step 4 - Play Button ...................................................................................................... 20 Step 5 – Power Button .................................................................................................. 20
The 3 finger Process.......................................................................................................... 21 Get ready to let go of the buttons.................................................................................. 21 What else might I see.................................................................................................... 23
Formatting the S50............................................................................................................ 24 Copying Firmware to S50 Unit..................................................................................... 25 The Second Format ....................................................................................................... 26 Data Creation ................................................................................................................ 27 Your Radio should now Work… BUT ......................................................................... 28 Reset back to Factory Defaults ..................................................................................... 29 Completing the Factory Restore ................................................................................... 32
S50 Final Restart............................................................................................................... 33 Safely Disconnecting the S50 ....................................................................................... 33 You are now free to remove the USB Cable! ............................................................... 35 The Final Update........................................................................................................... 36
Removing the Car Dock Firmware Files .......................................................................... 38 What’s Next ...................................................................................................................... 39

______________________________________________________________________________ A Beginners Guide to Resetting the S50 Version 1.3 Page 3 of 39
“OH MY GOD” It Does Not Work Imagine spending over 300 dollars for the ultimate Sirius Satellite Radio. A radio that has features of a MP3 player, works like a TiVo® to record, pause, and playback recorded content and just plain looks cool. Then all of a sudden it stops working. Oh My God! It does not work! Help; what do I do? Have no fear; all it probably needs is a little reset, just a quick “3 Finger Salute” to get that baby refreshed and ready to go again. Ok you ask how do you do it? Well you could call Sirius Support and wait the obligatory 24-48 hours for a return call, or venture here to try it yourself. Just in case things don’t work out so well, here’s the support info: If you need S50 technical support, please contact: SIRIUS S50 Product Support @ 1-800-869-5364 For SIRIUS Customer Care: 1-888-539-7474 or email: [email protected] For S50’s that finally bit the dust, but are still under warranty, contact warranty support at: 866-257-7726 TiVo® and the TiVo logo are registered trademarks of TiVo Inc.'s subsidiaries worldwide
______________________________________________________________________________ A Beginners Guide to Resetting the S50 Version 1.3 Page 4 of 39
What is “The 3 Finger Salute”? The 3 finger Salute is a process by which you can press a series of buttons to perform a low level format to reset the flash drive of your S50 Radio. This is often used as a “Last Resort” to being able to reset your radio back to the factory defaults. This is necessary due to issues resulting from real life use of the S50 radio.
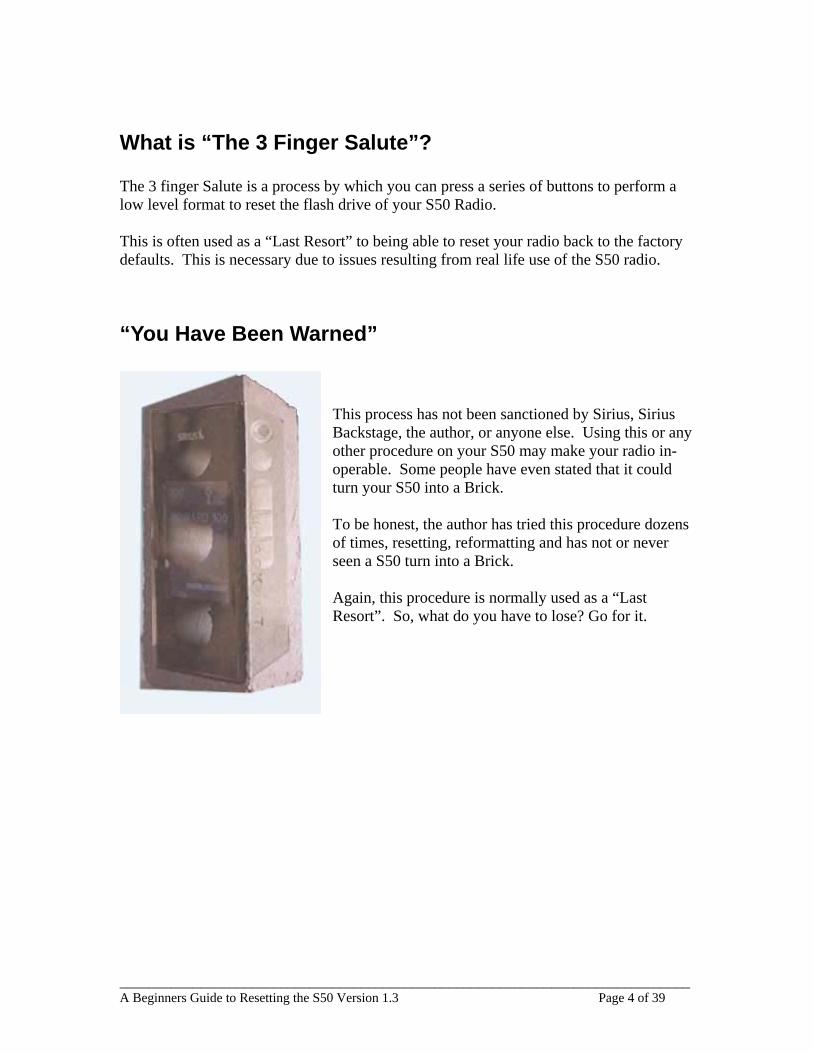
“You Have Been Warned”
This process has not been sanctioned by Sirius, Sirius Backstage, the author, or anyone else. Using this or any other procedure on your S50 may make your radio in-operable. Some people have even stated that it could turn your S50 into a Brick. To be honest, the author has tried this procedure dozens of times, resetting, reformatting and has not or never seen a S50 turn into a Brick. Again, this procedure is normally used as a “Last Resort”. So, what do you have to lose? Go for it.
______________________________________________________________________________ A Beginners Guide to Resetting the S50 Version 1.3 Page 5 of 39
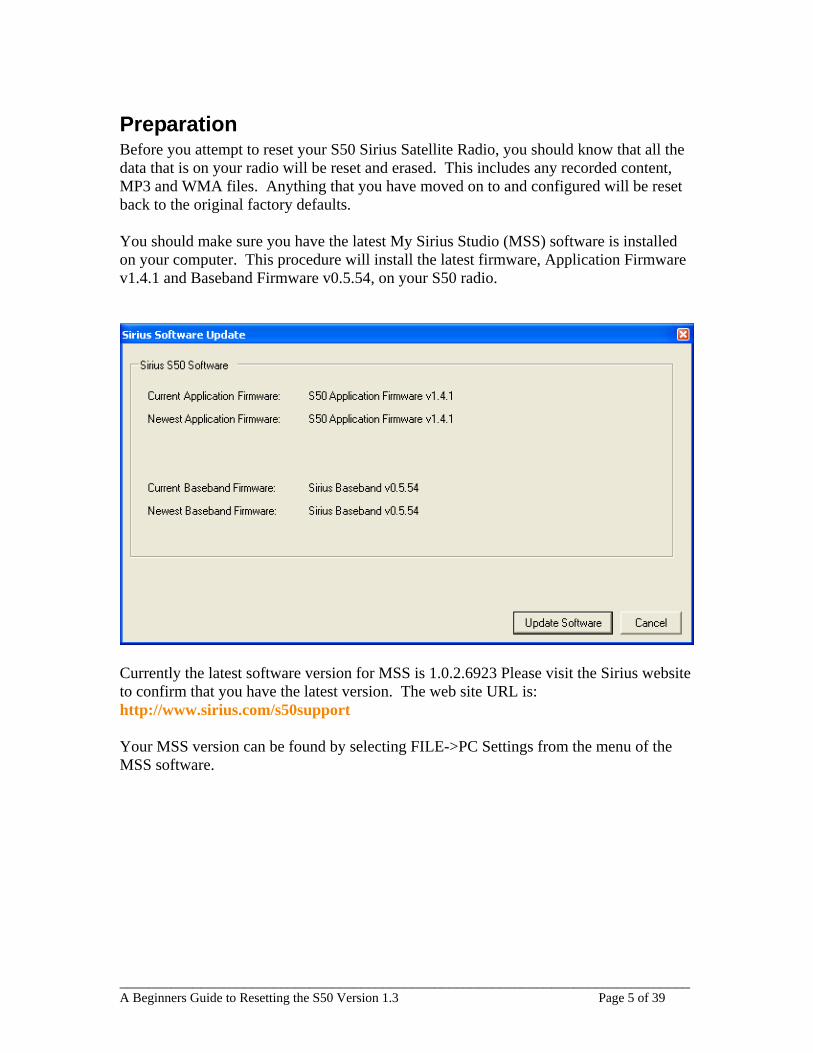
Preparation Before you attempt to reset your S50 Sirius Satellite Radio, you should know that all the data that is on your radio will be reset and erased. This includes any recorded content, MP3 and WMA files. Anything that you have moved on to and configured will be reset back to the original factory defaults. You should make sure you have the latest My Sirius Studio (MSS) software is installed on your computer. This procedure will install the latest firmware, Application Firmware v1.4.1 and Baseband Firmware v0.5.54, on your S50 radio.
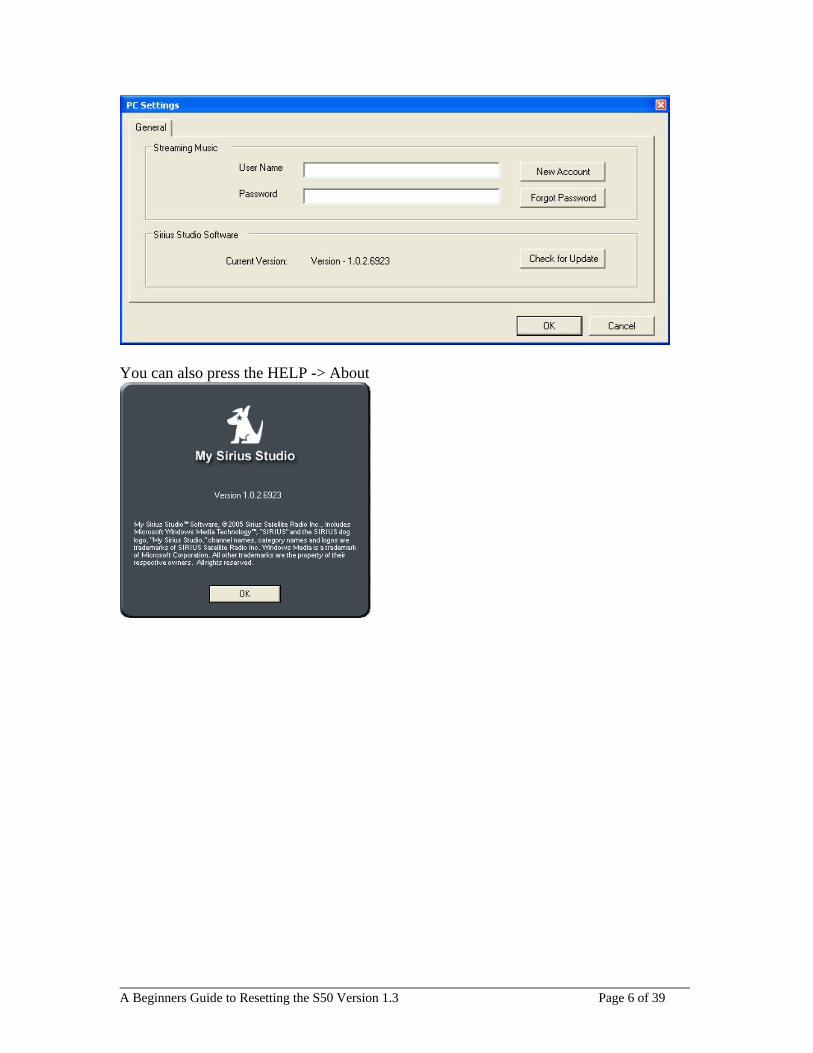
Currently the latest software version for MSS is 1.0.2.6923 Please visit the Sirius website to confirm that you have the latest version. The web site URL is: http://www.sirius.com/s50support Your MSS version can be found by selecting FILE->PC Settings from the menu of the MSS software.
______________________________________________________________________________ A Beginners Guide to Resetting the S50 Version 1.3 Page 6 of 39
You can also press the HELP -> About

______________________________________________________________________________ A Beginners Guide to Resetting the S50 Version 1.3 Page 7 of 39
The S50 Buttons You need to insure you know where the correct buttons for the reset procedure are. Before I tell you which buttons to press we need to do a little navigation of the S50 Itself. We need to identify some buttons and what we call them. The Lock Button – Located on the left hand side of your S50. It is the top button with the picture of the little lock above it.
The Lock
Button
______________________________________________________________________________ A Beginners Guide to Resetting the S50 Version 1.3 Page 8 of 39
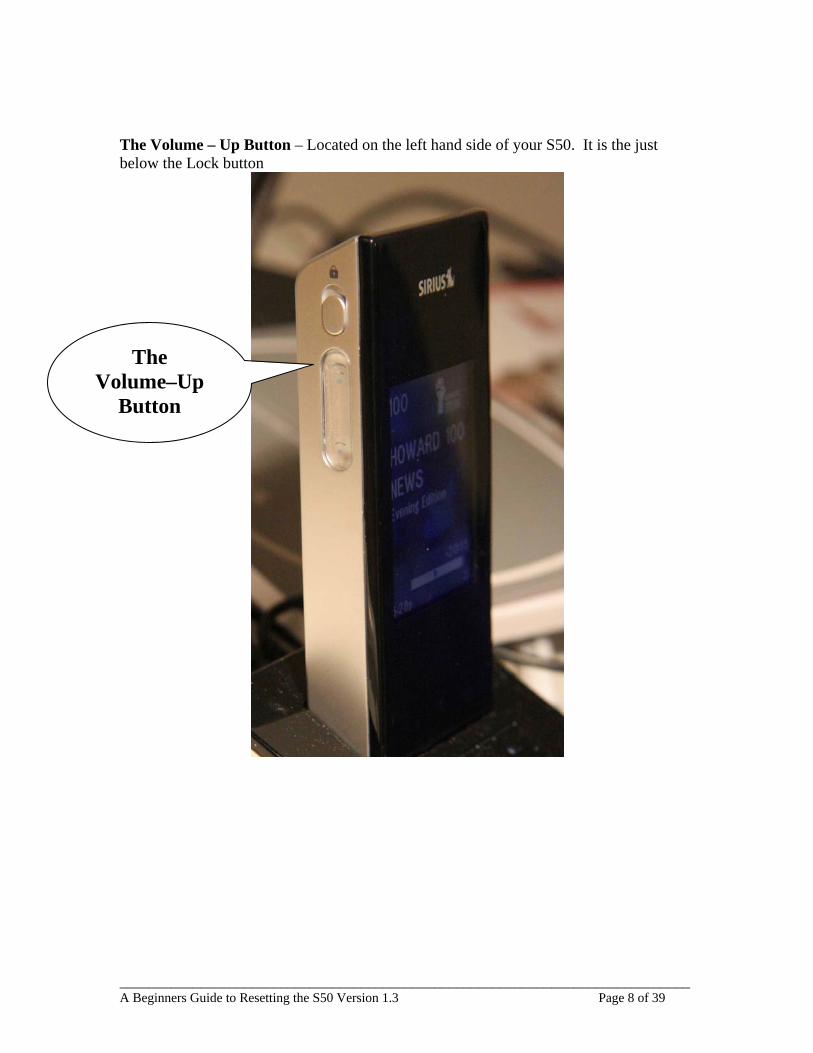
The Volume – Up Button – Located on the left hand side of your S50. It is the just below the Lock button
The Volume–Up
Button

______________________________________________________________________________ A Beginners Guide to Resetting the S50 Version 1.3 Page 9 of 39
Note that the Volume-Up button is actually part of the Volume button. Depending on which half you press the top (Volume –UP) or bottom (Volume-Down), the button rocks towards that side of the button. Specifically the Volume Up button has markings of a Dot with two expanding parentheses above the dot. As shown below:
Volume-UP is the top portion of the Button. It is the one with two expanding parentheses above the Dot

______________________________________________________________________________ A Beginners Guide to Resetting the S50 Version 1.3 Page 10 of 39
Play Button- Located on the right side of the S50. The button is the second from the bottom located in the middle of the three button grouping.
While we are showing you the play button, Notice the Sync Button on the Home Dock. If you are using the Home Dock you will need to press the SYNC button when you connect your S50 to your computer.
The SYNC Button
The Play Button
______________________________________________________________________________ A Beginners Guide to Resetting the S50 Version 1.3 Page 11 of 39
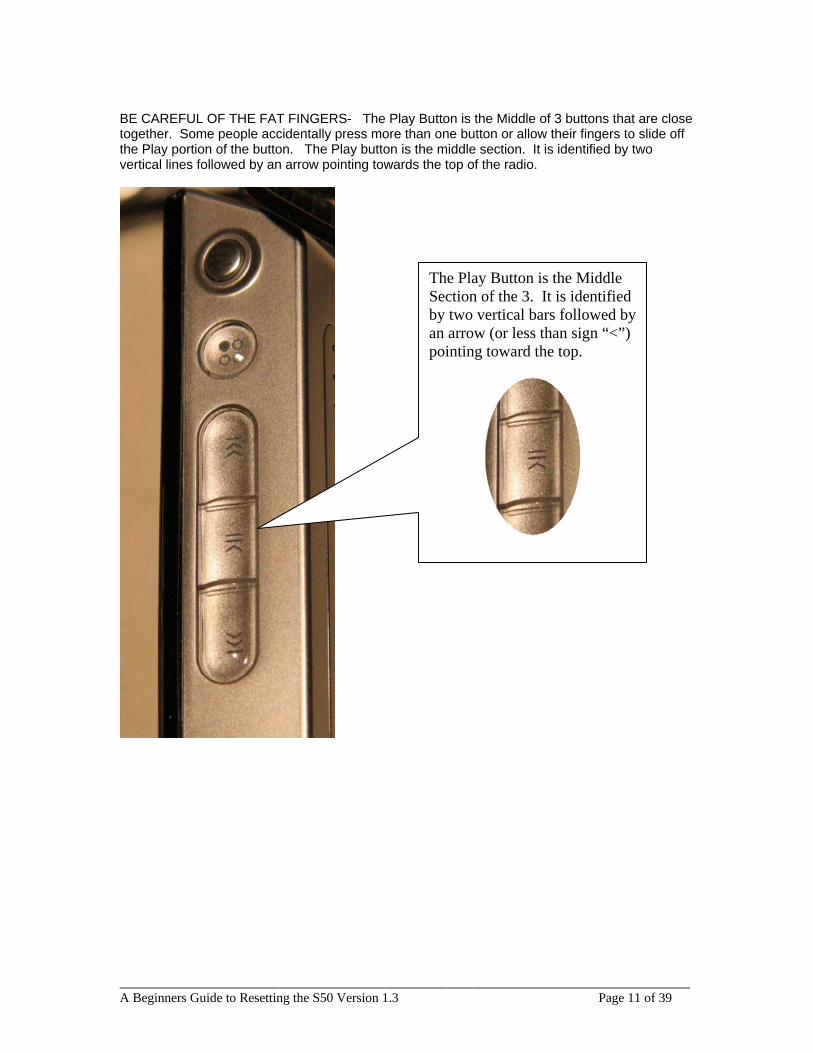
BE CAREFUL OF THE FAT FINGERS- The Play Button is the Middle of 3 buttons that are close together. Some people accidentally press more than one button or allow their fingers to slide off the Play portion of the button. The Play button is the middle section. It is identified by two vertical lines followed by an arrow pointing towards the top of the radio.
The Play Button is the Middle Section of the 3. It is identified by two vertical bars followed by an arrow (or less than sign “<”) pointing toward the top.

______________________________________________________________________________ A Beginners Guide to Resetting the S50 Version 1.3 Page 12 of 39
The Power Button- The Top button on the right hand side of the S50. This button is confused by name because it is also the Playlist button.
The Power Button
is sometimes
referred to as the playlist button. This button is located on the right side of the S50 unit and is on
top
______________________________________________________________________________ A Beginners Guide to Resetting the S50 Version 1.3 Page 13 of 39
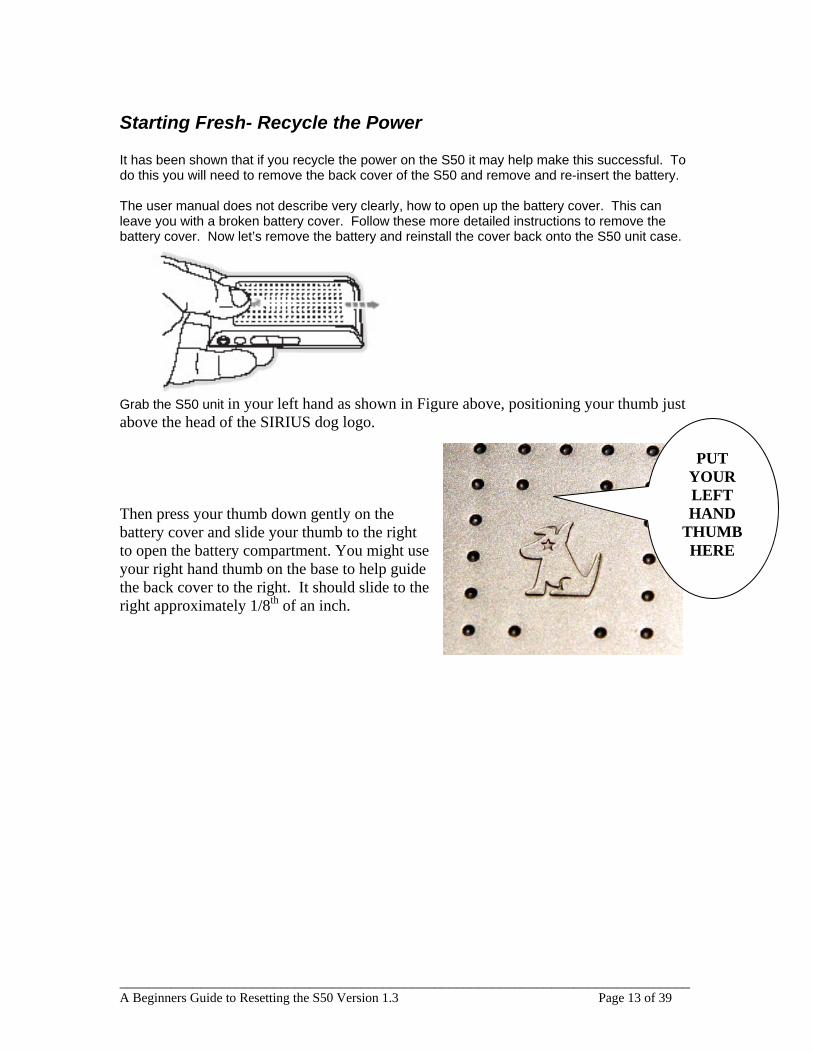
Starting Fresh- Recycle the Power It has been shown that if you recycle the power on the S50 it may help make this successful. To do this you will need to remove the back cover of the S50 and remove and re-insert the battery. The user manual does not describe very clearly, how to open up the battery cover. This can leave you with a broken battery cover. Follow these more detailed instructions to remove the battery cover. Now let’s remove the battery and reinstall the cover back onto the S50 unit case.
Grab the S50 unit in your left hand as shown in Figure above, positioning your thumb just above the head of the SIRIUS dog logo. Then press your thumb down gently on the battery cover and slide your thumb to the right to open the battery compartment. You might use your right hand thumb on the base to help guide the back cover to the right. It should slide to the right approximately 1/8th of an inch.
PUT YOUR LEFT HAND
THUMB HERE
______________________________________________________________________________ A Beginners Guide to Resetting the S50 Version 1.3 Page 14 of 39
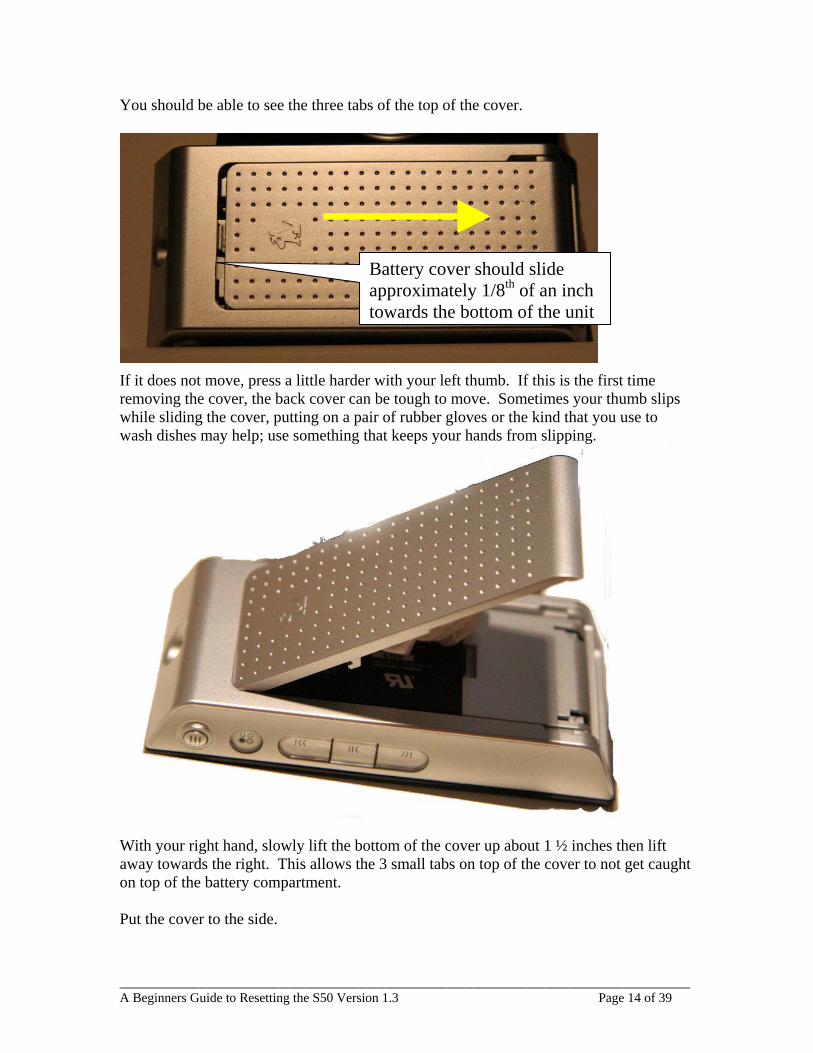
You should be able to see the three tabs of the top of the cover. If it does not move, press a little harder with your left thumb. If this is the first time removing the cover, the back cover can be tough to move. Sometimes your thumb slips while sliding the cover, putting on a pair of rubber gloves or the kind that you use to wash dishes may help; use something that keeps your hands from slipping.
With your right hand, slowly lift the bottom of the cover up about 1 ½ inches then lift away towards the right. This allows the 3 small tabs on top of the cover to not get caught on top of the battery compartment. Put the cover to the side.
Battery cover should slide approximately 1/8th of an inch towards the bottom of the unit

______________________________________________________________________________ A Beginners Guide to Resetting the S50 Version 1.3 Page 15 of 39
Once the cover is removed, you will see the battery below. Note that the battery has the label side facing you. Also notice the contacts on the upper right portion of the battery. This is important to remember when you put the battery back in the device.
At the base of the battery you will see that the battery has a small tab with the case indented so you can use your fingernail to lift up the bottom of the battery.
Battery Tab

______________________________________________________________________________ A Beginners Guide to Resetting the S50 Version 1.3 Page 16 of 39
Using your right hand index fingernail, position it under the tab and lift the battery up to pull it out of the back of the case Once you have lifted it up, gently grab the bottom of the battery and pull it out of the case. Leave it out for 10 seconds then place it back into the compartment, remembering to put it back with the label facing you and the contacts on the top right side. Push it all the way into the compartment. Now we need to put the battery cover back onto the case. Here we need to be very careful not to force it back as there are some small tabs that could be broken if done incorrectly.
Just as you removed the cover, angle the top 3 tabs under the top lip of the battery compartment. Notice the two Hook like tabs located about 1/3 of the way down from the top of the cover. There is one on each side and they must fit into two holes on each side of the battery. Carefully angle the top 3 tabs into the back of the unit while lowering the bottom of the cover. You may need to pull the cover to the right slightly to get the two bottom hook tabs to fit into the holes.
Carefully insure that the Hook Tabs go into the holes located on each side of the battery
These 3 top tabs will slide under and inside the top of the battery compartment
______________________________________________________________________________ A Beginners Guide to Resetting the S50 Version 1.3 Page 17 of 39
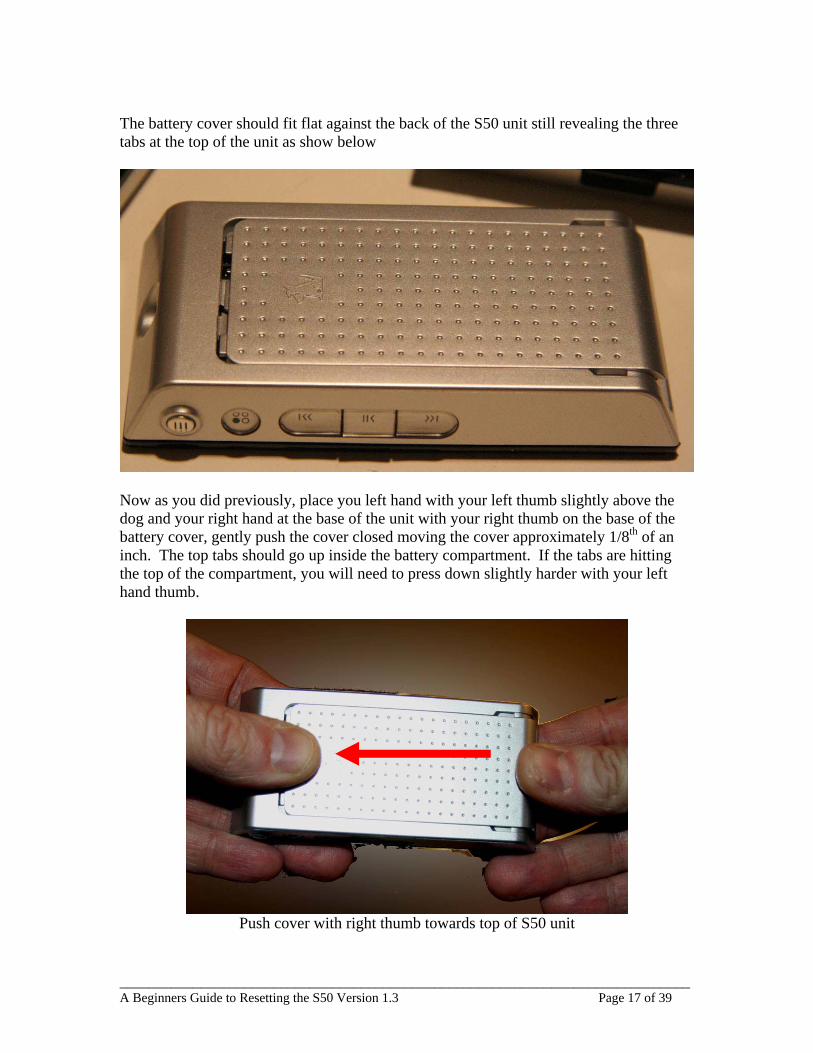
The battery cover should fit flat against the back of the S50 unit still revealing the three tabs at the top of the unit as show below
Now as you did previously, place you left hand with your left thumb slightly above the dog and your right hand at the base of the unit with your right thumb on the base of the battery cover, gently push the cover closed moving the cover approximately 1/8th of an inch. The top tabs should go up inside the battery compartment. If the tabs are hitting the top of the compartment, you will need to press down slightly harder with your left hand thumb.
Push cover with right thumb towards top of S50 unit
______________________________________________________________________________ A Beginners Guide to Resetting the S50 Version 1.3 Page 18 of 39
When Complete the top 1/8” gap should now be closed and the battery cover should be flat against the back of the unit.
It’s 3 Finger Time! Ok the battery’s reset and we are ready to begin. First take a deep breath… The process goes like this.
Step 1 - Turn the POWER OFF The unit should be out of the docking unit with no cables attached. You need to start with the Power Off. (It should be this way because you just pulled the battery and replaced it). If for some reason it is on, push the Power button holding it in until the unit does power off. You may see the “Shutting Down” message. Again if it does not power off repeat the battery removal procedure.
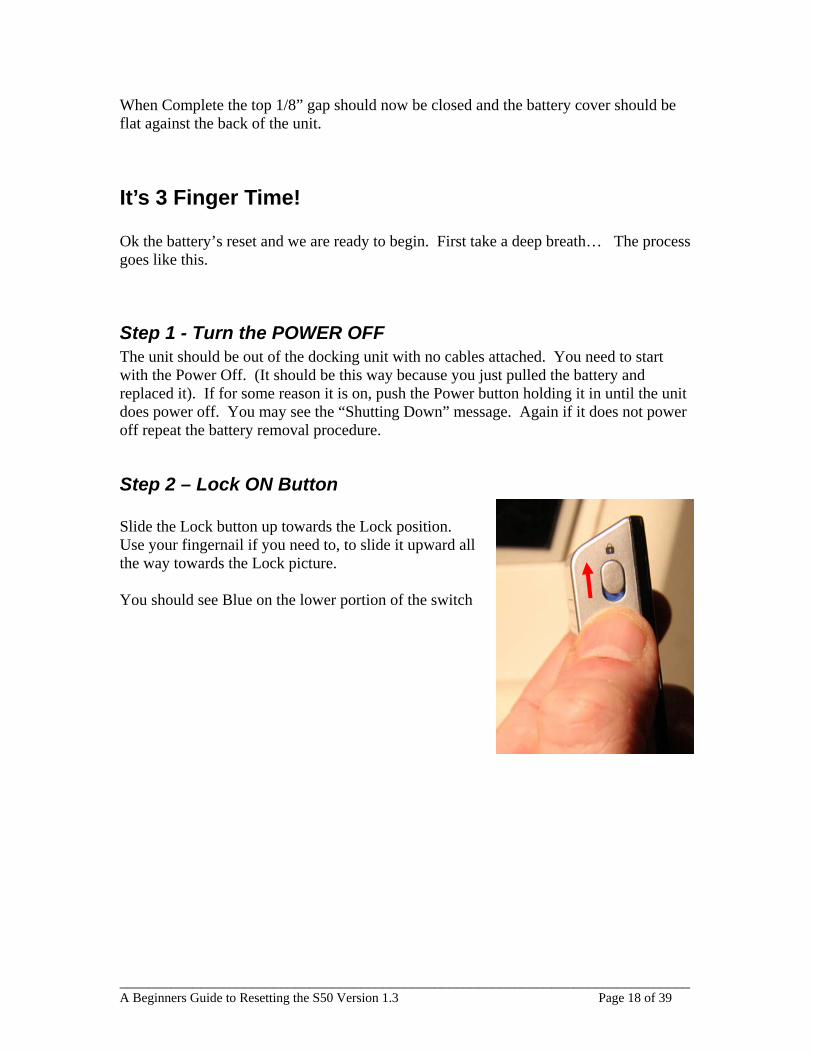
Step 2 – Lock ON Button Slide the Lock button up towards the Lock position. Use your fingernail if you need to, to slide it upward all the way towards the Lock picture. You should see Blue on the lower portion of the switch
______________________________________________________________________________ A Beginners Guide to Resetting the S50 Version 1.3 Page 19 of 39
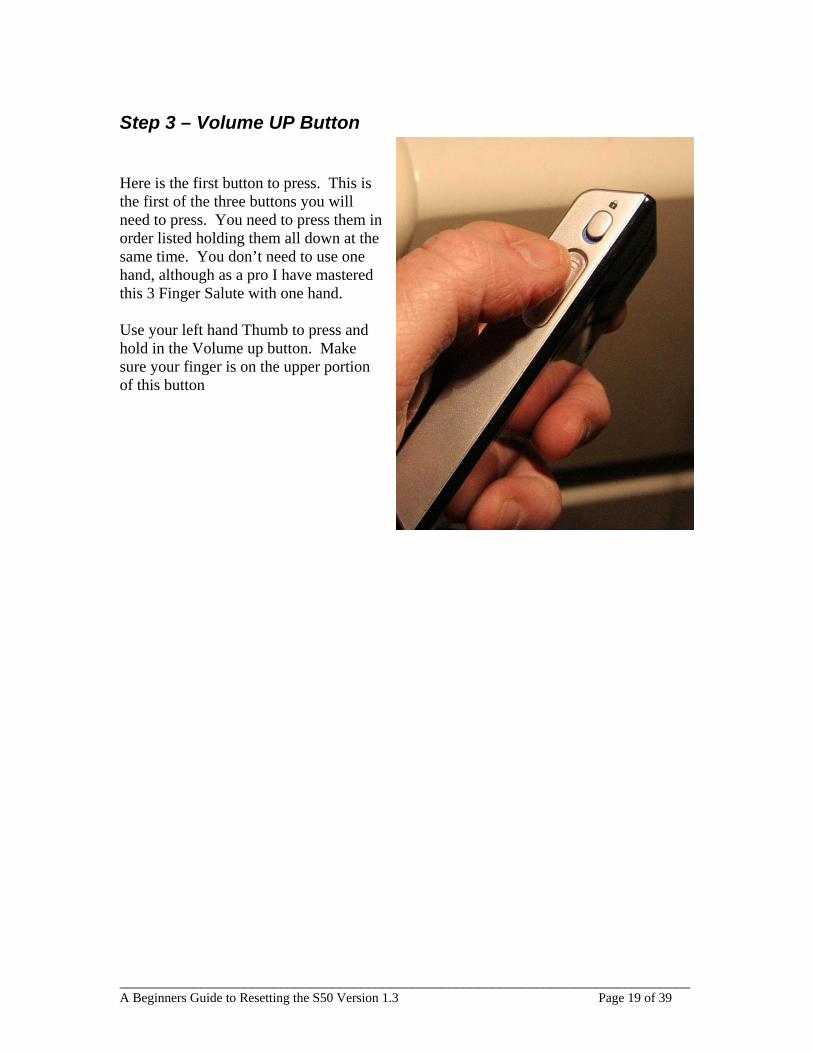
Step 3 – Volume UP Button Here is the first button to press. This is the first of the three buttons you will need to press. You need to press them in order listed holding them all down at the same time. You don’t need to use one hand, although as a pro I have mastered this 3 Finger Salute with one hand. Use your left hand Thumb to press and hold in the Volume up button. Make sure your finger is on the upper portion of this button

______________________________________________________________________________ A Beginners Guide to Resetting the S50 Version 1.3 Page 20 of 39
Step 4 - Play Button The next button to press is the Play button. Again while holding the unit and pressing the volume up button turn the unit over and use your middle finger to press and hold the Play button. (Those that are not holding a camera with their right hand can use it to press this button)
Step 5 – Power Button
The final button to press is the power button. You should now be holding the Volume up and Play button. With your left index finger press and hold the final button the top Power button. Just to review:
• Power off • Lock On • Press and hold
o Volume UP o Play o Power
This should begin reformat process.

______________________________________________________________________________ A Beginners Guide to Resetting the S50 Version 1.3 Page 21 of 39
The 3 finger Process
Get ready to let go of the buttons The 3 finger salute not only allows one option, there are actually 3 different procedures that this can do.
• Upgrade Firmware – Firmware Upgrade Mode • Erase Data - Format Nand Mode Erase Data Only • Erase Data and upgrade Firmware – Format Nand Mode Erase Data AND
Firmware Each of these modes will be displayed in succession on the S50 display screen. When you get to the one you want you will let go of the buttons as the way to select the option. Here we will walk through the process and show you what you will see. After about 3 seconds the display turns on and shows the S50 logo
______________________________________________________________________________ A Beginners Guide to Resetting the S50 Version 1.3 Page 22 of 39
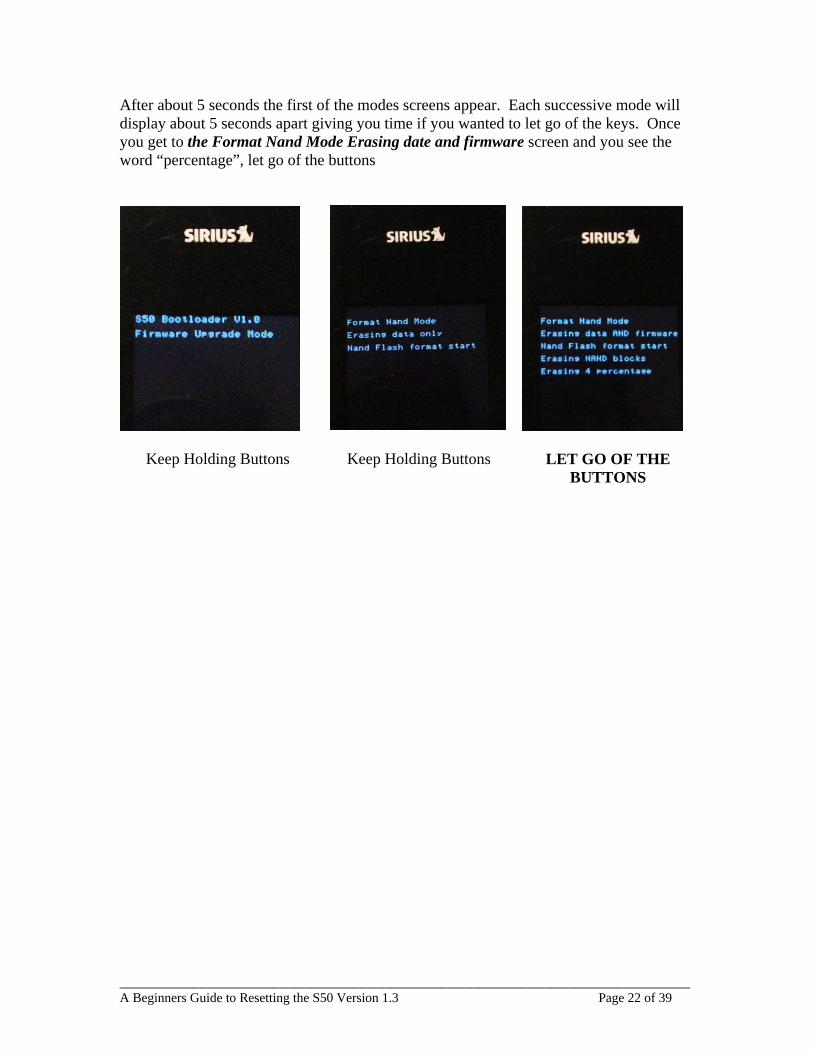
After about 5 seconds the first of the modes screens appear. Each successive mode will display about 5 seconds apart giving you time if you wanted to let go of the keys. Once you get to the Format Nand Mode Erasing date and firmware screen and you see the word “percentage”, let go of the buttons
Keep Holding Buttons
Keep Holding Buttons
LET GO OF THE BUTTONS
______________________________________________________________________________ A Beginners Guide to Resetting the S50 Version 1.3 Page 23 of 39
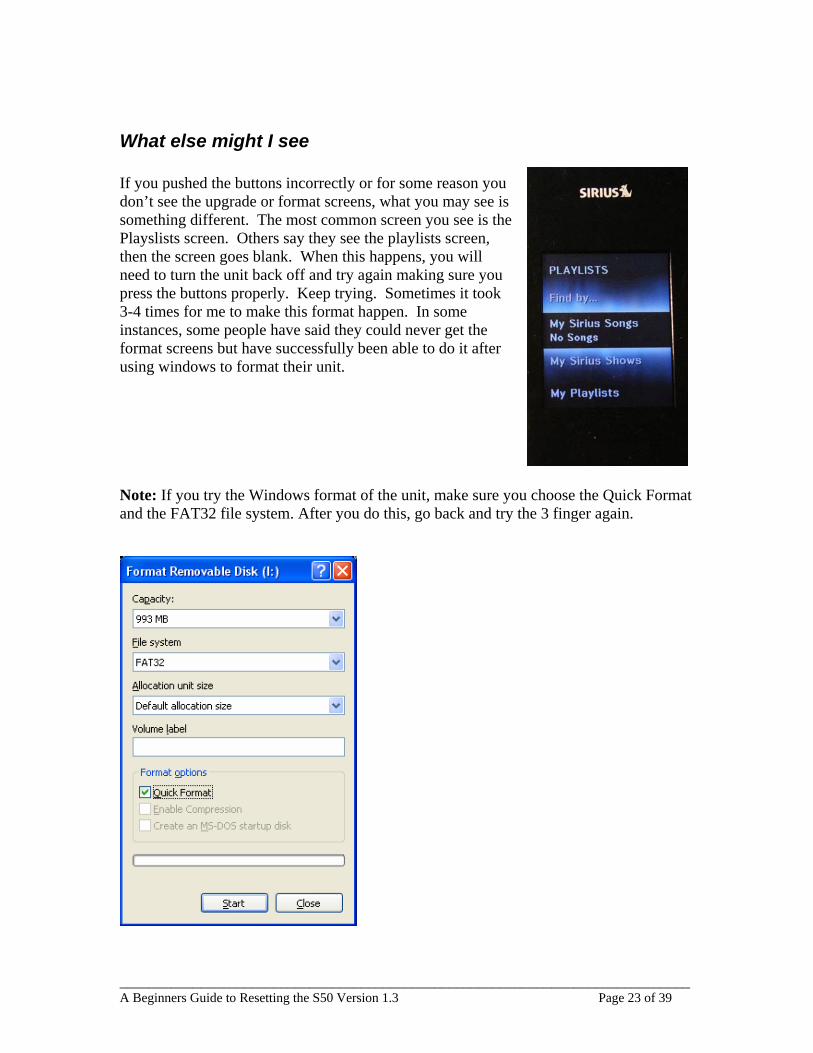
What else might I see If you pushed the buttons incorrectly or for some reason you don’t see the upgrade or format screens, what you may see is something different. The most common screen you see is the Playslists screen. Others say they see the playlists screen, then the screen goes blank. When this happens, you will need to turn the unit back off and try again making sure you press the buttons properly. Keep trying. Sometimes it took 3-4 times for me to make this format happen. In some instances, some people have said they could never get the format screens but have successfully been able to do it after using windows to format their unit. Note: If you try the Windows format of the unit, make sure you choose the Quick Format and the FAT32 file system. After you do this, go back and try the 3 finger again.
______________________________________________________________________________ A Beginners Guide to Resetting the S50 Version 1.3 Page 24 of 39
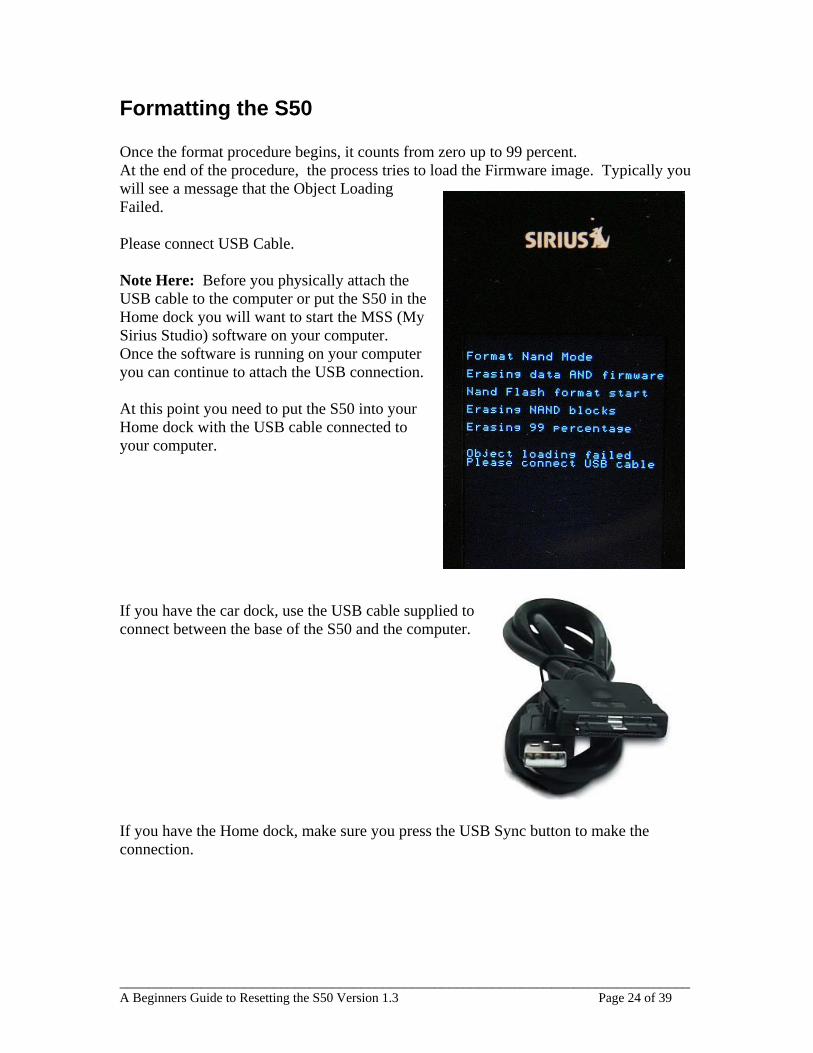
Formatting the S50 Once the format procedure begins, it counts from zero up to 99 percent. At the end of the procedure, the process tries to load the Firmware image. Typically you will see a message that the Object Loading Failed. Please connect USB Cable. Note Here: Before you physically attach the USB cable to the computer or put the S50 in the Home dock you will want to start the MSS (My Sirius Studio) software on your computer. Once the software is running on your computer you can continue to attach the USB connection. At this point you need to put the S50 into your Home dock with the USB cable connected to your computer. If you have the car dock, use the USB cable supplied to connect between the base of the S50 and the computer. If you have the Home dock, make sure you press the USB Sync button to make the connection.

______________________________________________________________________________ A Beginners Guide to Resetting the S50 Version 1.3 Page 25 of 39
Copying Firmware to S50 Unit After syncing with the USB cable, The Removable Disk folder should be available on your PC. Once available, you will need to move over the firmware file S50Main.MI4 Several ways of doing this can be achieved. Here we will discuss using the MSS Software to do this. Other options can be to download and manually copy the firmware file. The manual method would be used in a non-pc ie MAC environment. That file is available at the following URL: http://download.sirius.speedera.net/xena/Firmware/S50main.mi4 Ok, since we have already started the MSS Software, once the MSS software detects the S50 Device, a message should be displayed from the Service Provider:
Once this is displayed, you should press the OK button. On the S50, You will see the following screen: Once you see the Safe to Disconnect, unplug the S50 from the dock or disconnect the USB cable from the bottom of the S50 unit. You will then see the Exit USB2.0 MSD message along with the Loading and writing object messages. Finally the Resetting the system is displayed. After this the screen should go blank. At this point you should use the Power button to startup the S50.
______________________________________________________________________________ A Beginners Guide to Resetting the S50 Version 1.3 Page 26 of 39
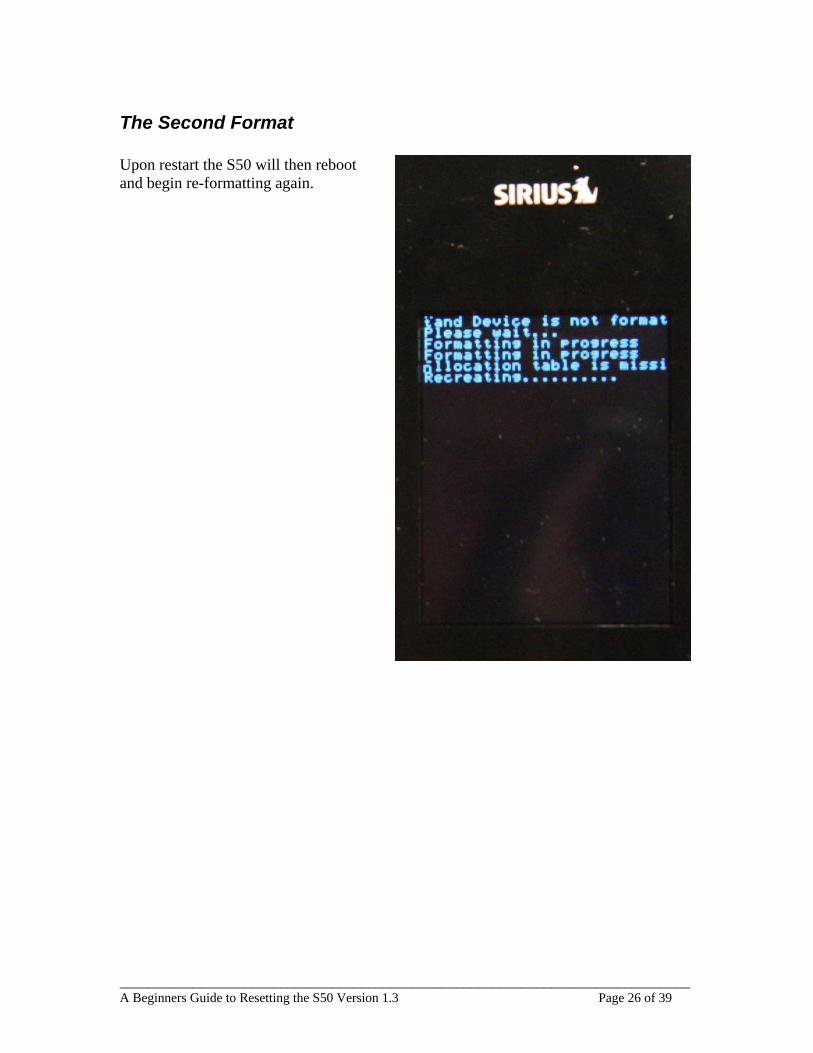
The Second Format Upon restart the S50 will then reboot and begin re-formatting again.
______________________________________________________________________________ A Beginners Guide to Resetting the S50 Version 1.3 Page 27 of 39
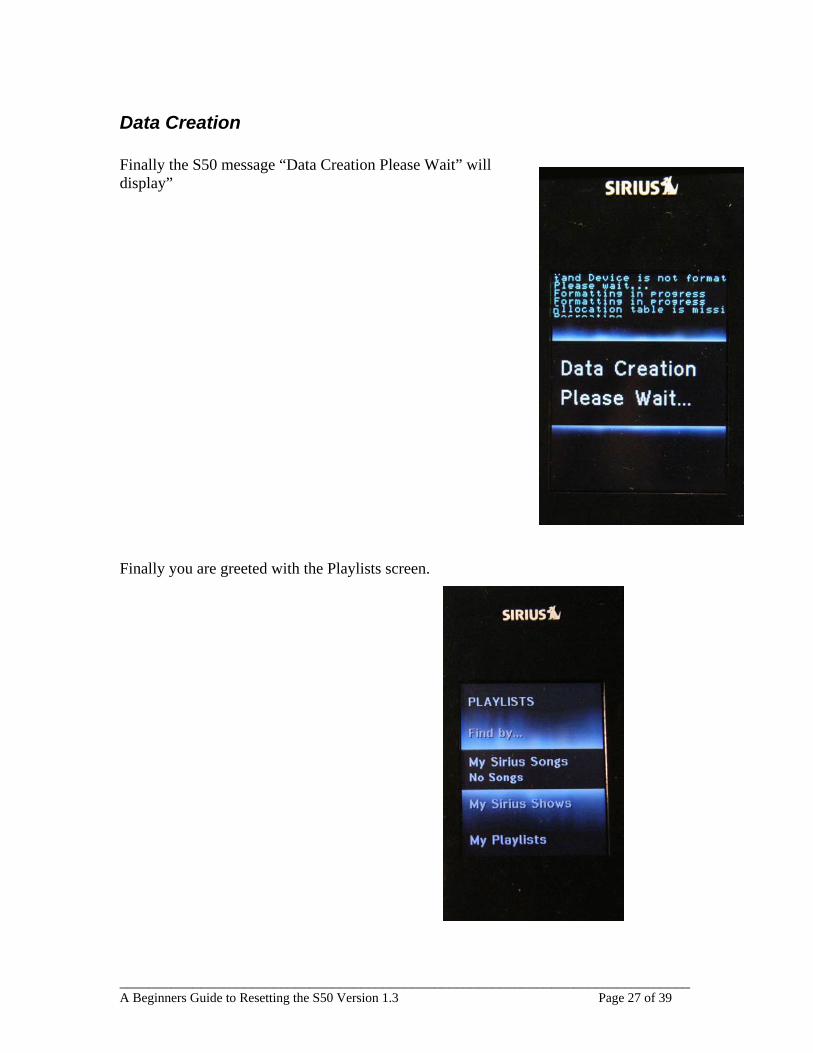
Data Creation Finally the S50 message “Data Creation Please Wait” will display” Finally you are greeted with the Playlists screen.

______________________________________________________________________________ A Beginners Guide to Resetting the S50 Version 1.3 Page 28 of 39
Your Radio should now Work… BUT At this point your radio should be working. You can, if you want put it back into a dock and listen to radio but there still is a problem. You don’t have all the bitmaps, voice tags and channel wallpapers and bitmaps. If you connect to your computer you will see the DO NOT DISCONNECT message but not the one with the arrows. The USBCONNECT.BMP bitmap is
missing and thus you will not see this image when you connect your S50 to your computer
NOTE: One thing here that always happens. Don’t forget to unlock the S50. You might have trouble turning the unit off or on because the lock is still on.
______________________________________________________________________________ A Beginners Guide to Resetting the S50 Version 1.3 Page 29 of 39
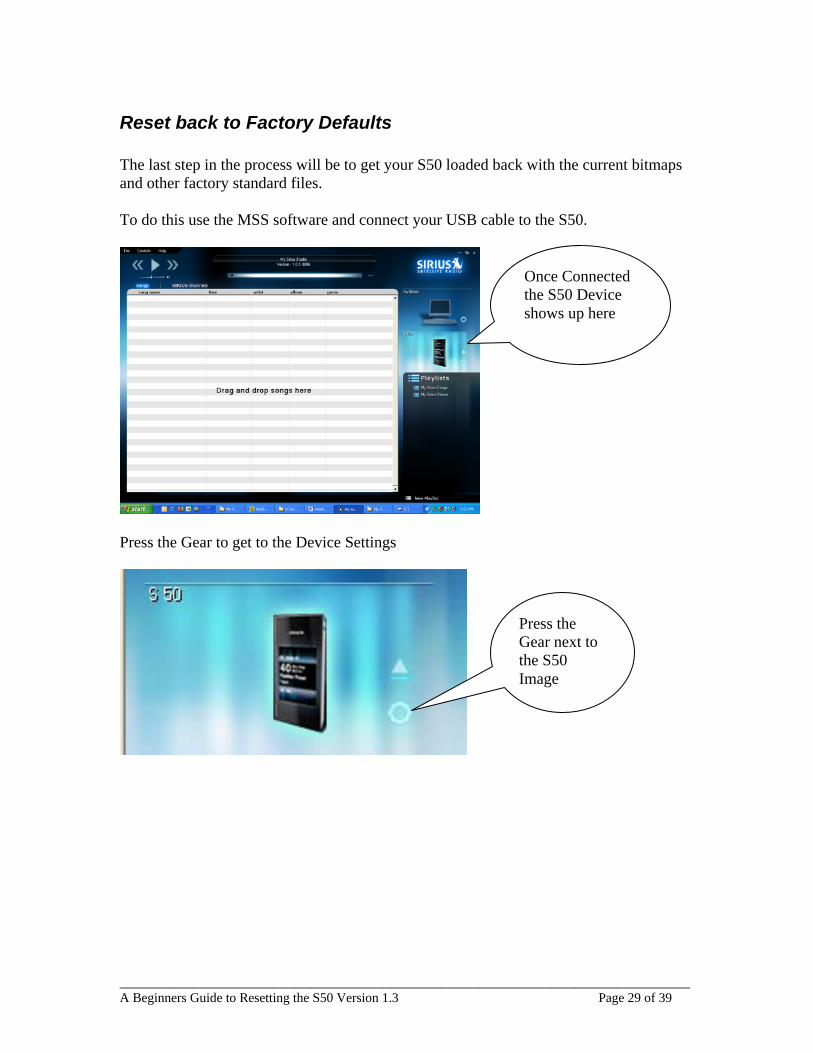
Reset back to Factory Defaults The last step in the process will be to get your S50 loaded back with the current bitmaps and other factory standard files. To do this use the MSS software and connect your USB cable to the S50.
Press the Gear to get to the Device Settings
Once Connected the S50 Device shows up here
Press the Gear next to the S50 Image
______________________________________________________________________________ A Beginners Guide to Resetting the S50 Version 1.3 Page 30 of 39
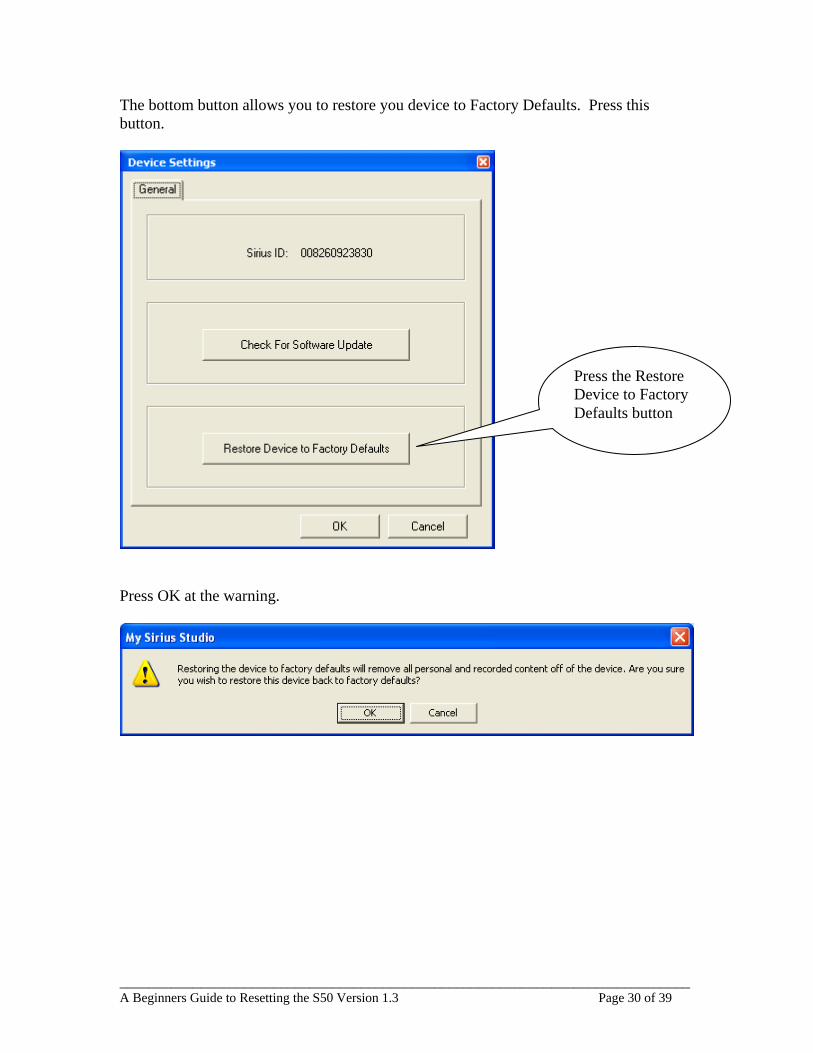
The bottom button allows you to restore you device to Factory Defaults. Press this button.
Press OK at the warning.
Press the Restore Device to Factory Defaults button
______________________________________________________________________________ A Beginners Guide to Resetting the S50 Version 1.3 Page 31 of 39
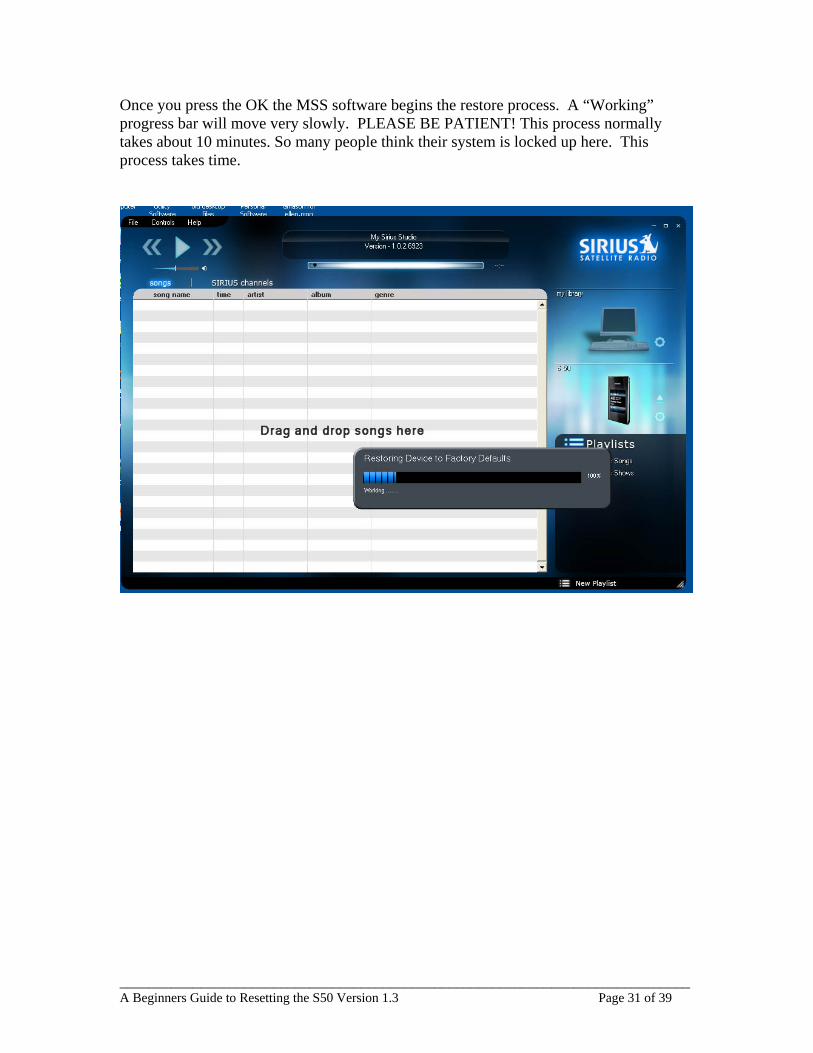
Once you press the OK the MSS software begins the restore process. A “Working” progress bar will move very slowly. PLEASE BE PATIENT! This process normally takes about 10 minutes. So many people think their system is locked up here. This process takes time.

______________________________________________________________________________ A Beginners Guide to Resetting the S50 Version 1.3 Page 32 of 39
Completing the Factory Restore Once the factory restore is complete, the following screen is displayed.
You can follow these instructions if they match up. In some cases, you will find that the S50 will automatically do the eject and the s50 picture will disappear from the MSS software window. In this case, you will skip steps 1,2 and 3 and continue on with step 4.

______________________________________________________________________________ A Beginners Guide to Resetting the S50 Version 1.3 Page 33 of 39
S50 Final Restart Following step 1, you will need to eject the S50 from the computer. The instructions tell you to use the Eject Button on the MSS software. This may or may not work in all cases. If it does not work, follow these directions to safely remove and disconnect the S50. Depending on whether you are using the Home Dock or the USB cable you may have to use the Safely Remove Hardware icon. Using the Home Dock with the built in USB connection, the S50 will automatically disconnect and continue onto the Software Updating Screen. If not you will have to manually use the Safely Remove Hardware icon and disconnect the S50 from the USB Cable.
Safely Disconnecting the S50 To use the Safely Remove Hardware Icon, follow the steps below:
Once you press the icon the Safely Remove Hardware window displays. Highlight the Sirius Satellite Radio S50 and press the Stop button.
Safely Remove Hardware Icon. – Click here if you need to eject the S50.

______________________________________________________________________________ A Beginners Guide to Resetting the S50 Version 1.3 Page 34 of 39
Pressing the Stop button brings up the Stop a Hardware device screen. Highlight the Sirius Satellite Radio S50 and press the OK.

______________________________________________________________________________ A Beginners Guide to Resetting the S50 Version 1.3 Page 35 of 39
You are now free to remove the USB Cable! Once the USB Cable plug is pulled on your S50 you get the “Restart for Update” screen displayed
If the unit does not turn off, press the playlist (Power) button to power the unit off. Sometimes with the Home Dock unit the dock powers off by itself. So simply remove the cable.

______________________________________________________________________________ A Beginners Guide to Resetting the S50 Version 1.3 Page 36 of 39
The Final Update Once the USB Device is disconnected, the S50 will update the software then tell you that the update is complete. You will see two more screens on the S50 At this point the S50 should power itself off. If you did not do so already pull the S50 out of the Home dock or disconnect the USB cable and power the unit back on using the Power button. If you did not unlock the unit with the unlock button, you may have to do this as well.
______________________________________________________________________________ A Beginners Guide to Resetting the S50 Version 1.3 Page 37 of 39
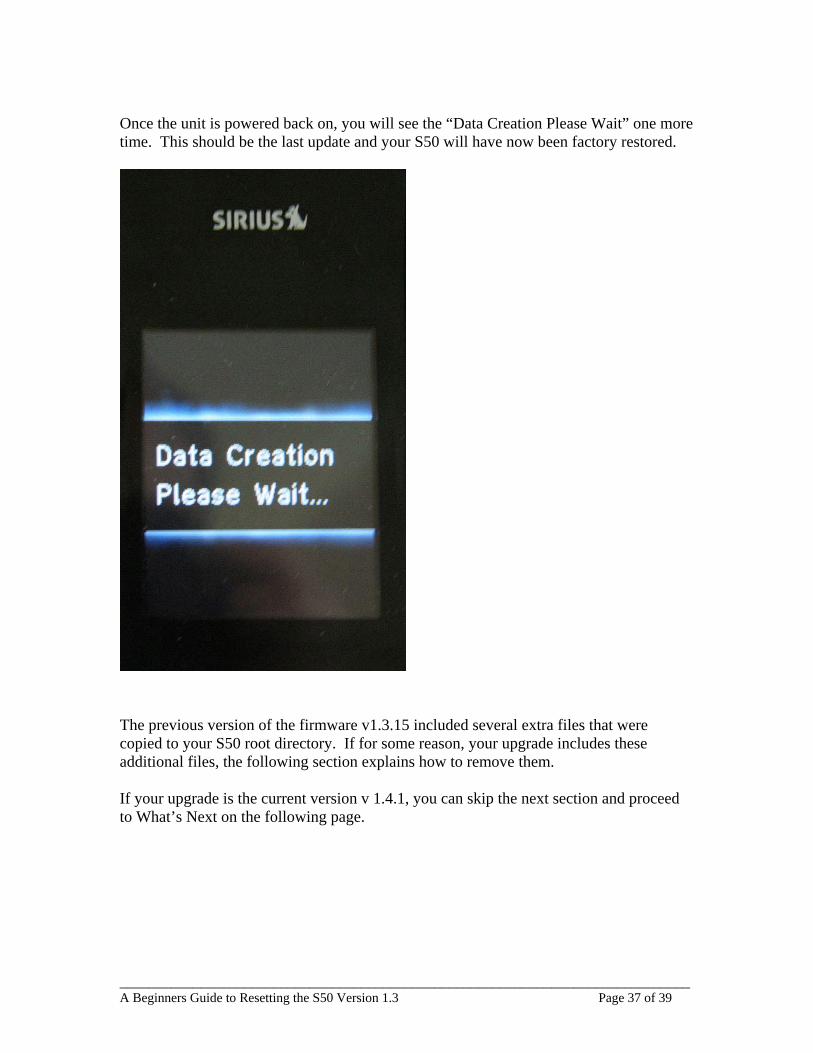
Once the unit is powered back on, you will see the “Data Creation Please Wait” one more time. This should be the last update and your S50 will have now been factory restored.
The previous version of the firmware v1.3.15 included several extra files that were copied to your S50 root directory. If for some reason, your upgrade includes these additional files, the following section explains how to remove them. If your upgrade is the current version v 1.4.1, you can skip the next section and proceed to What’s Next on the following page.
______________________________________________________________________________ A Beginners Guide to Resetting the S50 Version 1.3 Page 38 of 39
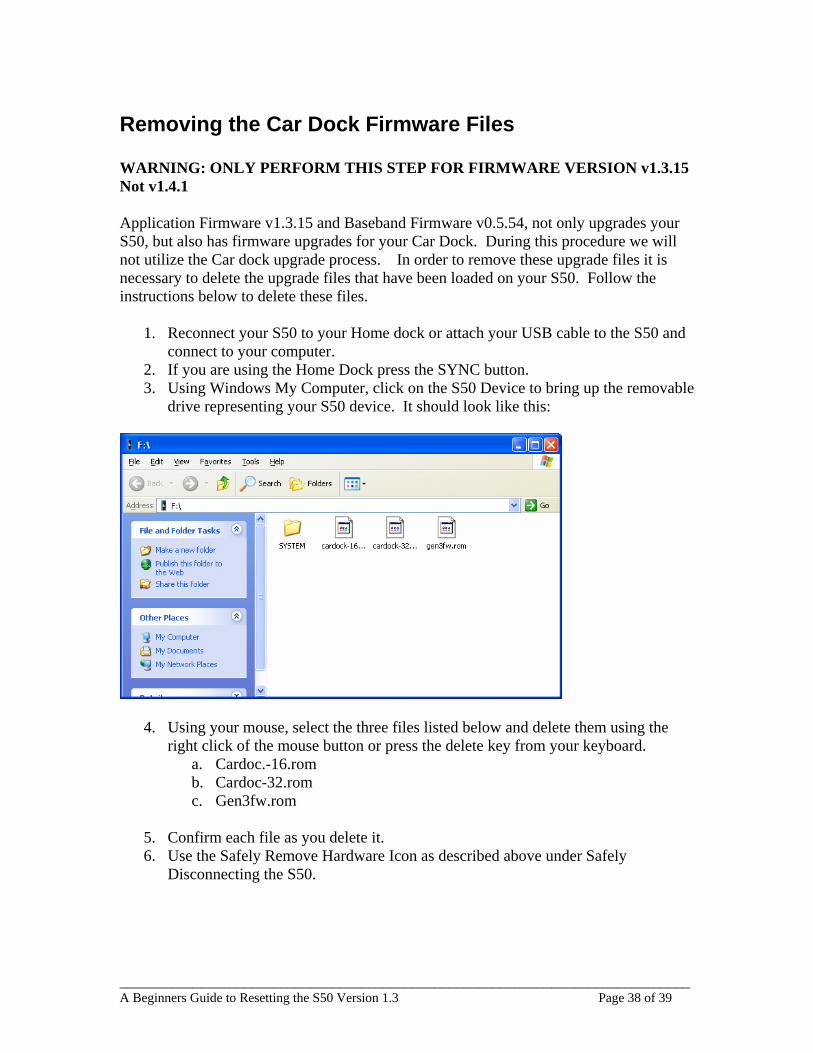
Removing the Car Dock Firmware Files WARNING: ONLY PERFORM THIS STEP FOR FIRMWARE VERSION v1.3.15 Not v1.4.1 Application Firmware v1.3.15 and Baseband Firmware v0.5.54, not only upgrades your S50, but also has firmware upgrades for your Car Dock. During this procedure we will not utilize the Car dock upgrade process. In order to remove these upgrade files it is necessary to delete the upgrade files that have been loaded on your S50. Follow the instructions below to delete these files.
1. Reconnect your S50 to your Home dock or attach your USB cable to the S50 and connect to your computer.
2. If you are using the Home Dock press the SYNC button. 3. Using Windows My Computer, click on the S50 Device to bring up the removable
drive representing your S50 device. It should look like this:
4. Using your mouse, select the three files listed below and delete them using the right click of the mouse button or press the delete key from your keyboard.
a. Cardoc.-16.rom b. Cardoc-32.rom c. Gen3fw.rom
5. Confirm each file as you delete it. 6. Use the Safely Remove Hardware Icon as described above under Safely
Disconnecting the S50.

______________________________________________________________________________ A Beginners Guide to Resetting the S50 Version 1.3 Page 39 of 39
What’s Next That completes the reset process. The next time connect the S50 to the MSS software it will go to the Sirius download site and download all the latest bitmaps, voice tags and channel logo’s. This is normal for the MSS software. When disconnecting and ejecting the device you may be interrupting this final update process and in some cases you may see the message: “My Sirius Studio is currently modifying the device. If you eject the device, it could lead to corruption. Are you sure that you wish to eject the device?”
Just say cancel and wait a little while longer before you eject. In some cases it could be as long as 10 minutes. In the worst case, you might go ahead and eject the unit. If you do eject it while still downloading file, the file that could be corrupt would be the one of the bitmap displays or wallpaper files. The next time you reconnect the S50 to the MSS software you would uncorrupt this file. If for some reason those files are not available, the system will show a default wallpaper or no bitmap, so this is really not an issue. We all hope that the firmware gets better and more stable. Eventually it will so that we may never need to reset again, but until next time, keep your fingers crossed but ready to do the “3 finger Salute.”

![Lenovo S50 Series - CNET Contentcdn.cnetcontent.com › a1 › cb › a1cbe111-977a-4bab-87d7-64a8d78a674c.pdfVersion 2.0 Machine type: F0BA [S50-30] 2015.02 Lenovo S50 Series User](https://img.pdfslide.us/doc/110x75/60bc5e9cced4c810a35b3bc3/lenovo-s50-series-cnet-a-a1-a-cb-a-a1cbe111-977a-4bab-87d7-64a8d78a674cpdf.jpg)