Embed Size (px)
Citation preview
Testbed for Predicate Routing inDTN over MANET
User Manual
Flavio Esposito and Gabriele Ferrari AggradiBoston University
Email: {flavio, gfa}@cs.bu.edu
September 11, 2008
Abstract
This guide describes how to rebuild a User-Mode-Linux (UML) basedtestbed we have used to test our Predicate Routing for DTN over MANET [5].Following these instructions a number of UML virtual machines can beset up to emulate DTN-MANET nodes, connected by a simulated networkthrough ns-2 [19].
1 Installing Ubuntu on a Virtual MachineThe testbed has been installed on an Ubuntu Linux distribution. A user can
follow herein the instructions for installing the testbed even with a different oper-ating system or a different Linux distribution given a virtual machine support. Inthis case an image of Ubuntu has to be installed. The version we used is Ubuntu7.10 (Gutsy Gibbon) and the image we mounted has been:
ubuntu-7.10-desktop-i386.iso
downloadable from [7].Examples of virtual machines are VMware [17] or the free KVM [6] (that has
to be used with QEMU [3]); in particular, the management tool needed to run theOS image with KVM is called virt-manager.
1

In any case, the user who wishes to use a virtual machine has to make surethe network adaptor is configured to share the host’s internet connection (NAT1).We found that both virtual machines work well except when we used VMware,together with a Virtual Private Network (VPN) running; the NAT protocol wasconflicting with VPN.
We solved the problem bringing down the network interfaces associated withthe virtual machine vmnet8 and vmnet1, shutting down VMware, disconnectingthe VPN and starting again the virtual machine; then the VMware network con-figuration file needed to be run again; of course a user can reset manually thenetwork interfaces that need to be up again.
Notice also that whenever a change in the VMware network configurationsetting is done (for example from NAT to bridge), the virtual machine needs to berebooted and it does not do automatically.
If the user wish to use virt-manager to run ubuntu, here below are listed someof the not intuitive instructions to create the virtual machine:
• Create a new virtual system and load the ISO image.
• We suggest to be safe in the space allocation or not to assign the storagespace in advance unless the user is confident about how much is needed forthe purpose of the experiments.
• Connect to host Network via virtual network if the host is disconnected,connected via wireless or dynamically configured with NetworkManager orvia shared physical device if the host is statically connected to the wiredethernet, to gain the ability to migrate the virtual system.
• Allocate properly the memory and the cpu to the virtual machine
• It is common to get error of unable complete install:”the virDominCreateLinux() failed. QEMU quits during console startup.”Sometimes this error can be solved just by pressing the finish button again,some other time the user needs to add his username to the kvm group, logoff and log in again. To solve, execute:
sudo adduser [username] kvm
Alternatively, the user can create an image and the QEMU system call as fol-lows:
1The Network Address Translator protocol allows multiple nodes (in this case one node wouldbe the host machine and the other is the virtualized machine) to share a single internet (or localnetwork) IP address.
2

/path1/qemu -hda /path2/NameImage.img -m 256
for 256 Mbyte of RAM allocated to the virtualized system. If the user is not theinstaller of QEMU, “path1” should be “/usr/bin/”.
2 The TestbedThe architecture of the Linux based testbed we used can be described with a
set containing the following components:
• User-Mode-Linux: to emulate more than one machine (node).
• The DTN Reference Implementation Code: so that every emulated node isa DTN-node.
• A Mobile Ad-hoc NETwork (MANET) Routing Protocol Implementation,necessary to run the routing protocol at MANET level.
• The network simulator ns-2 (ns-emulation version), useful to simulate themobility of both DTN and MANET nodes.
In Figure 1, four emulated nodes are configured to communicate with the hostmachine. For each emulated node, we need two network interfaces: one to in-terconnect the hosts creating a control network, and the other one to interconnectwith the ns-2 simulator. The control network has been created to remotely con-trol the application on the emulated nodes during a testbed execution. A Linuxsoftware bridge with the IP address 10.0.1.254 connects all guest control networkinterfaces to the host system and to each other.
The user who wishes to implement the set of elements described, has to makea choice:
1. To download a pre-compiled kernel for User-Mode-Linux with a filesystemconfigured to work with that kernel [9] or,
2. To compile the kernel from source and to create the filesystem following theinstructions in the sections below.
Even though the first choice seems the easiest one, the associated tree sourcesof the kernel have to be configured to support the addition of external modules.For example, for our DTN over MANET testbed, we had to install in addition thekaodv module.
3
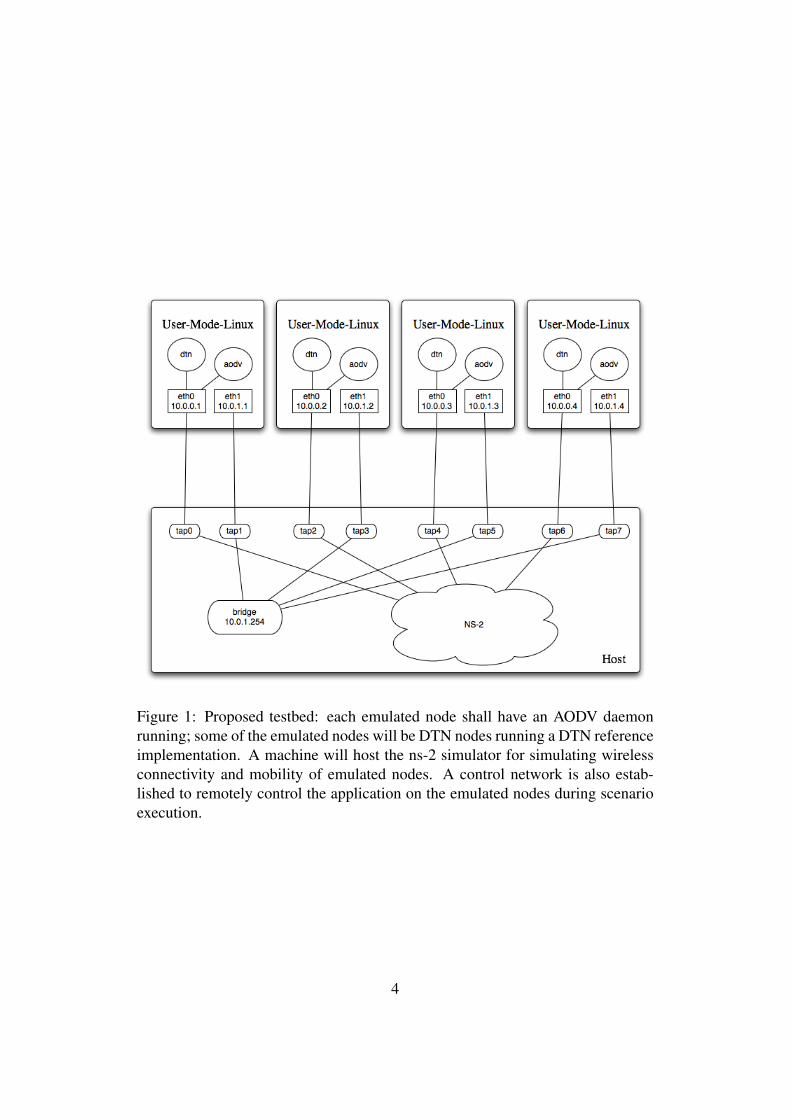
Figure 1: Proposed testbed: each emulated node shall have an AODV daemonrunning; some of the emulated nodes will be DTN nodes running a DTN referenceimplementation. A machine will host the ns-2 simulator for simulating wirelessconnectivity and mobility of emulated nodes. A control network is also estab-lished to remotely control the application on the emulated nodes during scenarioexecution.
4

Some references to a pre-compiled kernel with a filesystem that suits our needsare: UML home page [2], VNUML website [13] and the Nagafix website [8].2
3 User Mode LinuxThis section provides compiling instructions for the kernel when a user wish
to use the User Mode Linux virtualization. Moreover, how to install the necessarykernel module needed is explained.
Before starting we report the definition of UML from [18]: User-Mode-Linux(UML) is an extended Linux kernel that works as a guest virtual machine on aLinux host machine. It is possible to assign a root filesystem and other physicalresources different from the host machine. Technically, UML is a port of Linux toLinux. Linux has been ported to many different processors, including the ubiqui-tous x86, Sun’s SPARC, IBM and Motorola’s PowerPC, DEC’s (then Compaq’sand HP’s) Alpha, and a variety of others. UML is a port of Linux in exactly thesame sense as these. The difference is that it is a port to the software interfacedefined by Linux rather than the hardware interface defined by the processor andthe rest of the physical computer.
3.1 How To Compile the Kernel For UMLThis section explains how to compile and configure the kernel for User Mode
Linux. We underline again that we considered compiling our own kernel becausewe think is the better way to have full control on the testbed features. The firstthing to do is to get the latest version source of the kernel tree from the LinuxKernel Archives [15]. Then follow the instructions:Unpack the tree as root:
[root@host]# bunzip2 linux-<version>.tar.bz2
Configure the kernel for User Mode:
[root@host]# apt-get update[root@host]# apt-get upgrade[root@host]# apt-get install ncurses-dev[root@host]# cd linux-<version>[root@host]# make defconfig ARCH=um[root@host]# make menuconfig ARCH=um
2We do not guarantee that all of them have been compiled enabling the addition of new mod-ules, such as kaodv.
5

The option “ARCH=um” is vitally important while building UML, since it causesthe kernel built to work as a separate Linux architecture.
In the rest of this section, the options that we used in our testbed are listed.The user may need to enable or disable others in order to build a fully function-ing kernel. We report the options that we have set after running the system callmenuconfig:
• Load module support → Enable: To add modules or external modules tothe kernel and to permit the automatic load.
• UML Specific Options → Host Processor Type Features → Generic x86support→ Disable
• UML Specific Options→ Host Processor Type Features→ Process Family→ Choose your processor
• Networking→ Amateur Radio→ Disable
• Networking→ IRDA (infrared) Subsystem Support→ Disable
• Networking→ Blue tooth Subsytem Support→ Disable
• Enable the Block Layer→ Block Devices→ Virtual block devices→ En-able
• Character devices→ stderr console→ Enable
• Character devices→ virtual serial line→ Enable
• Character devices→ port channel support→ Enable
• Character devices→ pty channel support→ Enable
• Character devices→ tty channel support→ Enable
• Character devices→ xterm channel support→ Enable
• File systems: To make the kernel build faster enable the filesystems that youwould need (ext3 was one of them).
• SCSI support→ Disable
• Multi-device support (RAID and LVM)→ Multiple devices driver support(RAID and LVM)→ Disable
6

• Memory Technology Devices (MID)→Memory Technology Device (MID)support→ Disable
• Kernel Hacking→ Show timing information on printks→ Enable
• Kernel Hacking→ Kernel debugging→ Enable
• Kernel Hacking→ Compile the Kernel with Debug Info→ Enable
• Netfilter Options: Networking→ Networking Options→ Network PacketFiltering (replaces ipchains)→ IP: Netfilter configuration.You have to enable all the options to <M> to use the modularized features.We suggest to follow the instructions in the original source [16]. If thesource is no longer available, we also report the same page at [4].Beginning with kernel 2.6.20, the Netfilter kernel configuration was com-pletely changed. It is split into “Core Netfilter Configuration” and “IP Net-filter Configuration”.Netfilter configuration is needed to use some network modules in the kernelas AODV in our use case.
At this stage, after having complete the previous setting, we suggest to backupthe .config file:
[root@host]# cp .config .config.bkp
Now we can start with the compilation of the kernel. To do so we use the com-mand:
[root@host]# make ARCH=um
3.2 How to Install the Kernel ModulesThe following two commands are needed to install the modules of the kernel
and also to install the external modules.
[root@host]# make modules ARCH=um[root@host]# make modules_install ARCH=um
After these commands the modules will be loaded in the /lib/modules/<kernel version>of the host system. At this point, the user shall copy this directory in the sameplace in the guest file system, after having mounted it.
Notice that in the directory /lib/modules/, the user might have two differentkernel versions, one for the host (for example 2.6.22.14-generic) and one for theemulated system (for example 2.6.26). The latter is the kernel version to use.
7

4 About the FilesystemAt the end of this section the software necessary for the testbed will be com-
pleted. A User Mode Linux instance requires a kernel and a root filesystem inorder to run. The filesystem is stored in a file on the host system. The UML ker-nel uses an user block device (ubd), mapped to this file, to access its root filesys-tem. The UML can also use the copy-on-write (COW) feature of the ubd driver toshare a single filesystem among a number of virtual machines: the root filesystemin this case is used as a read-only file and all the writes are done on a separatecopy-on-write file for each virtual machine. The following subsections explainhow to install the AODV kernel module, the DTN reference implementation, andfinally how to create, mount and configure the filesystem.
4.1 Create the FilesystemAmong all the common distributions we used the Debian [12], following the
user mode linux tradition. To begin, the user shall initialize the files using thesystem call dd. Assuming that the user image files are root fs in the directory/home/<user>, in terminal as root we type:
[root@host]# dd if=/dev/zero of=/home/<user>/root_fs bs=1024K count=1000
With the call above, we have created a filesystem of 1024 Mb. Of course the usermight need a different size. The next step is to initialize the filesystems inside ofeach of these files. We will be using ext3 as our root filesystem. If the system doesnot recognize root fs as a block special device, proceed anyway.
[root@host]# mkfs.ext3 /home/<user>/root_fs
Now the user needs to mount the root filesystem before calling debootstrap.
[root@host]# mkdir /mnt/uml[root@host]# mount -o loop /home/<user>/root_fs /mnt/uml
Next step is to install debootstrap and bootstrap a base Debian installation. This isa barebones installation that is less than 200 megabytes. We used the latest testingdistribution whose codename is lenny.
[root@host]# apt-get install debootstrap[root@host]# debootstrap --arch i386 lenny /mnt/uml http://ftp.us.debian.org/debian
8

4.2 Mount the filesystemThis section lists the commands the user needs to execute in the filesystem:
In terminal as root:
[root@host]# cd /mnt[root@host]# mkdir uml[root@host]# cd uml[root@host]# mkdir proc[root@host]# mount -o loop /<path>/<filesystem> /mnt/uml[root@host]# mount -t proc none /mnt/uml/proc[root@host]# chroot /mnt/uml
At this stage the user has access to the filesystem as root and can use com-mands like:
apt-get updateapt-get upgradeapt-get install <name_of_package>
For the sake of completeness, we report also how to unmount the filesystem:In terminal as root
[root@host]# umount /mnt/uml/proc[root@host]# umount /mnt/uml
4.3 Configure the FilesystemIn order to configure the filesystem the user needs to edit the following files in
order to have your system in a valid configuration as follows:
• /etc/fstab
• /etc/hostname
• /etc/hosts
• /etc/network/interfaces
• /etc/apt/sources.list
• /etc/securetty
• /etc/inittab
• /deb/ubd0
9

1. check if /etc/fstab contains
/dev/ubd0 / ext3 defaults 0 1proc /proc proc defaults 0 0
2. check if /etc/hostname contains
<umluser>
it will be the name of the user who will start the emulated node of the testbed
3. check if /etc/hosts (or /etc/hosts.allow) contains
127.0.0.1 localhost
4. check if /etc/network/interfaces contains
auto loiface lo inet loopback
5. check if /etc/apt/sources.list contains
http://ftp.us.debian.org/debian
6. check if /etc/securetty contains
#echo "tty0" >> /etc/securetty#echo "ttys/0" >> /etc/securetty
7. modify /etc/inittab like this:
1:2345:respawn:/sbin/getty 38400 tty0#2:23:respawn:/sbin/getty 38400 tty2#3:23:respawn:/sbin/getty 38400 tty3#4:23:respawn:/sbin/getty 38400 tty4#5:23:respawn:/sbin/getty 38400 tty5#6:23:respawn:/sbin/getty 38400 tty6
10

8. Since the testbed uses a Debian distribution, every time an instance of theOperating System is generated with UML, an user would need to enter lo-gin and password. To speed up the process of instantiating many nodes inthe testbed, and since there are no real security issues in the virtualization,the user might consider an autologin funtionality. One package which pro-vides the autologin is the package mingetty. After installing the package asfollows,
[root@host]# apt-get install mingetty
the user needs to modify /etc/inittab like this:
1:2345:respawn:/sbin/mingetty --autologin root tty0#2:23:respawn:/sbin/getty 38400 tty2#3:23:respawn:/sbin/getty 38400 tty3#4:23:respawn:/sbin/getty 38400 tty4#5:23:respawn:/sbin/getty 38400 tty5#6:23:respawn:/sbin/getty 38400 tty6
4.4 How to Install the DTN Reference ImplementationAt this stage, we need to install the DTN Reference Implementation code on
the root fs; to do so, the user shall mount the filesystem root fs and download thelatest reference code from the official website [14]. Then, the packages Tcl/Tk,Xerces and BerkeleyDB need to be installed. Before doing that, in order to runour convergence layer, the user may need also to install the perl packages:
[root@host]# apt-get install libdatetime-perl \libdbi-perl libdbd-mysql-perl \libclass-autouse-perl libmd5-perl libdigest-sha1-perl \libhtml-template-perl libimage-size-perl libmime-lite-perl \libmime-perl libcompress-zlib-perl libnet-dns-perl \liburi-perl libhtml-tagset-perl libhtml-parser-perl \libwww-perl libwww-perl libgd-gd2-perl \libmailtools-perl libunicode-maputf8-perl libxml-simple-perl \libio-stringy-perl libdigest-hmac-perl
And likewise for the optional modules:
[root@host]# apt-get install libgd-graph-perl \libproc-process-perl librpc-xml-perl \
11

libsoap-lite-perl libxml-rss-perl libstring-crc32-perl \libxml-atom-perl libmath-bigint-gmp-perl liburi-fetch-perl \libcrypt-dh-perl perlmagick libclass-accessor-perl \libclass-trigger-perl libclass-data-inheritable-perl libgnupg-interface-perl \libmail-gnupg-perl libtext-vcard-perl
During your installation, the user can ignore the warning:Can not write log, openpty() failed (/dev/pts not mounted?)
[root@root_fs]# apt-get install tcl8.4[root@root_fs]# apt-get install tcl8.4-dev[root@root_fs]# apt-get install libxerces28[root@root_fs]# apt-get install libxerces28-dev[root@root_fs]# apt-get install libdb4.5[root@root_fs]# apt-get install libdb4.5-dev[root@root_fs]# apt-get install libdb4.5++[root@root_fs]# apt-get install libdb4.5++-dev[root@root_fs]# apt-get install libdb4.5-tcl[root@root_fs]# cd dtn-<version>/[root@root_fs]# ./configure[root@root_fs]# make[root@root_fs]# make install
From the version dtn-2.5.0, released in October 2007, the user can also use thebinary debian package for the stable release (etch), as well as the source files,through the apt package management system. The user needs to add the followinglines to /etc/apt/sources.list:
deb http://www.dtnrg.org/debian etch contribdeb-src http://www.dtnrg.org/debian etch contrib
and finally run:
[root@host]# apt-get install dtn
4.5 Install the AODV Kernel ModuleThe routing protocol is a kernel module that needs to run as a daemon dur-
ing our emulation. We have implemented our predicate routing starting from theAODV-UU implementation of University of Uppsala. In order to reproduce thetestbed, the first thing to do is therefore to install that module on the guest filesys-tem. The module can be found at [1].
12

After downloading, the user needs to modify the Makefile in the main direc-tory and in the directory /lnx, in particular, the version of the kernel, the installdirectory and the uninstall directory. The default options is the directory /lib/mod-ules of the host, but we need it in the same directory of the guest since we arerunning the kernel in the guest. After changing the makefile, the installation ofthe AODV kernel module will run with:
[root@host]# make ARCH=um[root@host]# make install ARCH=um
As a final stage of the testbed installation, since the installation of the kernel mod-ules writes the AODV modules in the /lib/modules/ < kernel version > of thehost system, the user again shall copy this directory in the same place in the guestfilesystem.
5 Configuring the TestbedHaving created the testbed, i.e. having installed the kernel filesystem, let us
give instructions on how to configure the host machine. This section will explainhow to create the virtual network structures and how to connect these with thenetwork simulator (ns-2).
5.1 Create User and GroupWe need to create a group to have access to the virtual network interface on
the host machine. To do so:in the terminal as root:
[root@host]# groupadd <group_name>
Then we need to add the user to the group created previously.This user will be able to use network emulation in ns-2 in the terminal as root:
[root@host]# useradd <user_name> -G <group_name>
5.2 Install NS2-Emulation on the HostSince the node whose mobility is simulated by ns-2 are emulated, the modified
version of ns-2 (ns2emulation) shall be used.Ns-2 acts like a bridge between the virtual Ethernet interfaces TAP. It reads
packets from a source TAP device, it passes them through a simulated wirelessnetwork and it writes them back to the TAP device destination. Each ns-2 in the
13

simulated network represents an UML virtual machine in the real network. Evenin this case there are two ways to install ns-2 in the host machine with emulatedextension: the first one is to build it from the source, the second one is to use aDebian package.Here we used simply one of the two, the Debian package, downloading from thewebsite of the original project [11] and adding the following lines to the reposito-ries list in /etc/apt/source.list:
deb http://bode.cs.uni-magdeburg.de/˜aherms/debian sid ns2deb-src http://bode.cs.uni-magdeburg.de/˜aherms/debian sid ns2
to install from the new repository you have to update the packages listin terminal as root, type:
[root@host]# apt-get update[root@host]# apt-get install nsemulation[root@host]# apt-get source nsemulation
The ns-2 emulation is made from network objects and tap agents.The network objects are used to send and receive packets to and from a network.The ns-2 network object at the link layer uses the pcap library to read packetsfrom a network device. The emulation version of ns-2 implements a new networkobject to read and write packets to a network device at the link layer using theLinux packet sockets for this purpose. The network object for link layer access iscalled Network/Raw. It supports the commands open and close with the followingsyntax:
<Network Object> open <Interface Name>[readwrite | readonly | writeonly]<Network Object> close
The user can use it for example in the following way:
set raw0 [new Network/Raw]$raw0 open tap0 readwrite[...]$raw0 close
The tap agents are connected to network objects and to ns-2 nodes, obtainingnetwork packets from the network objects and sending them through the sim-ulated network. In the emulation version of ns-2 the new tap agent is calledAgent/Tap/Raw. It implements additionally address mapping between MACaddresses of the virtual machines and IP addresses of ns-2 nodes. Each Agentis assigned to one virtual network interface via a network object Network/Raw.
14

The only difference in using Agent/Tap/Raw is that at the creation the user hasto specify the MAC address of the machine that the agent corresponds to. Forexample:
set a0 [new Agent/Tap/Raw "FE:FD:0A:00:00:01"]
In this case the tap agent registers in a common mapping table that it is re-sponsible for receiving frames with the specified MAC address. The tap agentsthen use this mapping table to determine the destination network address withinthe simulation.
To test the installation the user can use the example in [11] with the commandas normal user
[user@host]# nse ns2emulation.tcl
If launched at this stage, the script will generate an error since there are no tapinterfaces installed yet.
An exemplifying script is the following:
#! /bin/nse
# An example script for the usage of ns-2 in emulation mode:# Uses:# 1. Network/Raw agents to access to a network device at level II# 2. Tap/Raw agents to map between real MAC addresses and# NS-2 IP addresses# 3. In-memory compression of the trace file to reduce disk write# operations during simulation## Common variablesset scriptname routingdemoset val(chan) Channel/WirelessChannelset val(prop) Propagation/TwoRayGroundset val(netif) Phy/WirelessPhy ;set val(mac) Mac/802_11 ;set val(ifq) Queue/DropTail/PriQueue ;set val(ll) LL ;set val(ant) Antenna/OmniAntenna ;set val(ifqlen) 50 ;set val(x) 800 ;set val(y) 600 ;set val(rp) DumbAgent ;set val(nn) 4 ;
15
set val(stime) 180.0 ;#set val(stime) 360000.0 ;set val(sc) "mobility.tcl"
set ns_ [new Simulator]$ns_ use-scheduler RealTime
#use this for file traceset tracefd [open "|gzip > $scriptname.tr.gz" w]set namtrace [open "|gzip > $scriptname.nam.gz" w]
#use this to pipe the namtrace to nam (only do this in X)set namtrace [open "|nam -r 0.1 -" w]
#use this to disable tracing#set tracefd [open "/dev/null" w]#set namtrace [open "/dev/null" w]
$ns_ trace-all $tracefd$ns_ namtrace-all-wireless $namtrace $val(x) $val(y)
#set tr0 [new BaseTrace/ShmGZ test.tr.gz 16 400 104857600]
#Procedure needed when running nam in real-timeproc NamTime {} {#Send time to nam periodicallyglobal ns_ namtraceset now [$ns_ now]set next [expr $now + 0.05]puts $namtrace "T -t $now"flush $namtrace$ns_ at $next "NamTime"}
$ns_ at 1.0 "NamTime"
proc UniformErr {} {set err [new ErrorModel]$err unit packet$err set rate_ 0.01$err ranvar [new RandomVariable/Uniform]
16

$err drop-target [new Agent/Null]return $err
}
set topo [new Topography]
$topo load_flatgrid $val(x) $val(y)
# Create GODset god_ [create-god $val(nn)]
# Create channelset chan_1_ [new $val(chan)]
# Configure node parameters$ns_ node-config -adhocRouting $val(rp) \-llType $val(ll) \-macType $val(mac) \-ifqType $val(ifq) \-ifqLen $val(ifqlen) \-antType $val(ant) \-propType $val(prop) \-phyType $val(netif) \-topoInstance $topo \-agentTrace OFF \-routerTrace OFF \-macTrace ON \-movementTrace OFF \-channel $chan_1_ \-IncomingErrProc UniformErr
#Procedure to configure an ns-2 node initially#proc setup_node {id x y z color} {## global ns node_# set node_($id) [$ns_ node]# $node_($id) set X_ $x# $node_($id) set Y_ $y# $node_($id) set Z_ $z# $node_($id) color $color# $ns_ at 0 "$node_($id) setdest $x $y 0"
17

# $ns_ at 0 "$node_($id) color $color"# $node_($id) random-motion 0#}
#setup_node 1 100 300 0 "black"#setup_node 2 250 300 0 "green"#setup_node 3 350 300 0 "blue"#setup_node 4 500 300 0 "cyan"
for {set i 0} {$i <= 3} {incr i} {global ns_ node_set node_($i) [$ns_ node]$node_($i) random-motion 0$ns_ at 0 "$node_($i) start";
$ns_ at $val(stime) "$node_($i) reset";}
$node_(0) color black$node_(1) color green$node_(2) color blue$node_(3) color cyan
#Network objects to access the TAP devices at the link layerset raw1 [new Network/Raw]set raw2 [new Network/Raw]set raw3 [new Network/Raw]set raw4 [new Network/Raw]
$raw1 open tap0 readwrite$raw2 open tap1 readwrite$raw3 open tap2 readwrite$raw4 open tap3 readwrite
#Tap Agent for each nodeAgent/Tap set maxpkt_ 3100set a1 [new Agent/Tap/Raw "FE:FD:C0:A8:2F:01"]set a2 [new Agent/Tap/Raw "FE:FD:C0:A8:2F:02"]set a3 [new Agent/Tap/Raw "FE:FD:C0:A8:2F:03"]set a4 [new Agent/Tap/Raw "FE:FD:C0:A8:2F:04"]
puts "install nets into taps..."
18
#Assign network objects to TAP agents$a1 network $raw1$a2 network $raw2$a3 network $raw3$a4 network $raw4
#Assign TAP agents to ns-2 nodes$ns_ attach-agent $node_(0) $a1$ns_ attach-agent $node_(1) $a2$ns_ attach-agent $node_(2) $a3$ns_ attach-agent $node_(3) $a4
puts "loading scenario..."source $val(sc)puts "scenario loaded!!!"
$ns_ at $val(stime) "stop"$ns_ at $val(stime) "puts \"NS EXITING ...\" ; $ns_ halt"
proc stop {} {global ns_ tracefd raw1 raw2 raw3 raw4$ns_ flush-traceclose $tracefd$raw1 close$raw2 close$raw3 close$raw4 close}
puts "okey"
$ns_ run
5.3 Create the Virtual Tnterface tap<X>
One of the possible transport mechanisms for User Mode Linux is the TAPvirtual Ethernet device. To use the TAP devices the TUN/TAP driver should beincluded in the kernel configuration. If the kernel does not have this option onecan download a patch from the TUN/TAP home page [10]. The user needs alsothe tunctl tool which is used to configure TUN/TAP devices. This is included in
19

the uml − utilities package in the Debian-based system:
[root@host]# apt-get install uml-utilities
Now we can set up TAP devices for User Mode Linux machines and preparethem for the network emulation. If the device /dev/net/tun does not exist, createit in terminal as root:
[root@host]# mkdir /dev/net[root@host]# mknod /dev/net/tun c 10 200
Create the permissions to read/write for the group created previously:In terminal as root:
[root@host]# chown :tun /dev/net/tun[root@host]# chmod g+rw /dev/net/tun
The general command to create a virtual interface is:
[root@host]# tunctl -b -u <user_name> -t tap<X>
and to destroy a virtual interface is:
[root@host]# tunctl -d tap<X>
5.4 Create the BridgeA network bridge is needed to create a control network to control the nodes
during the test by a ssh session.In terminal as root, type:
[root@host]# ./bridge_up
this script is:
#!/bin/bash#brctl addbr br0brctl stp br0 offbrctl addif br0 tap4brctl addif br0 tap5brctl addif br0 tap6brctl addif br0 tap7ifconfig br0 10.0.1.254 netmask 255.255.255.0 up
20

with this netmask configuration, the control network will be 10.0.1.xTo destroy the bridge at the end of the test:
in terminal as root
[root@host]# ./bridge_down
this script is:
#!/bin/bash#ifconfig br0 downbrctl delbr br0
6 How to Run the TestbedHaving installed and configured the testbed, we can finally play with it. This
section describes the scripts needed to run it. First of all, we need to initialize themachine in terminal as root:
[root@host]# ./init
The script contains the following instructions:
#!/bin/bash#script init#groupadd tunuseradd ubuntu -G tunchown :tun /dev/net/tunchmod g+rw /dev/net/tun
Then, we need to start the virtual interface tap<X> as many as the number ofnodes in the emulation.Calling the following script as root:
[root@host]# ./tap_up <numbers_of_nodes>
which exactly does (for seven interfaces):
#!/bin/bash#tunctl -u ubuntu -t tap0 -bifconfig tap0 uptunctl -u ubuntu -t tap1 -b
21

ifconfig tap1 uptunctl -u ubuntu -t tap2 -bifconfig tap2 uptunctl -u ubuntu -t tap3 -bifconfig tap3 uptunctl -u ubuntu -t tap4 -bifconfig tap4 uptunctl -u ubuntu -t tap5 -bifconfig tap5 uptunctl -u ubuntu -t tap6 -bifconfig tap6 uptunctl -u ubuntu -t tap7 -bifconfig tap7 up
In order to start more than one terminal for each emulated node with commandas user (for example for the first emulated machine with number 1) the followingcommand shall be used:
[user@host]# ./node <number_of_nodes>
Where node is the following script:
#!/bin/bash#echo " "echo "node "${1}" starting..."echo " "A=$[${1}-1]B=$[A+4]xterm -T node${1} -e ./linux ubd0=cow_uml$A,root_fs eth0=tuntap,tap$A eth1=tuntap,tap$B &
Notice that the command cow umlX makes a local copy of the general filesystemroot fs
6.1 Configuring Emulated NodesIn order to configure the emulated nodes, in each virtual machine UML the
user shall execute the following commands:
[root@vm]# ./init_node <number_of_node>
this script is (the MAC address must be the same as in the ns2emulation.tcl con-figuration file):
22

#!/bin/bash#echo "configure node "${1}hostname node${1}ifconfig eth0 10.0.0.${1}
netmask 255.255.255.0 hw ether FE:FD:C0:A8:2F:0${1} upifconfig eth1 10.0.1.${1} netmask 255.255.255.0 upecho "node "${1}" configured"
At this stage, we need to initialize the AODV kernel module and to run theAODV daemon:
[root@vm]# ./aodv
this script is:
#!/bin/bash#modprobe kaodvaodvd -d -i eth0 -l -r 3
Where the option -d means that it will run in daemon mode;the option -i eth0 means that the interface eth0 will be used;the option -l enables the logging in the file /var/log/aodv.log;the option -r 3 enables the logging every 3 seconds of the routing table in the file/var/log/aodv.rtlog.
We also need to initialize the database of the DTN node and we do so calling:
[root@vm]# ./init_dtn
This script is:
#!/bin/bash#dtnd --init-db
To run the DTN daemon for running the node as a DTN node:
[root@vm]# ./dtn
and this script is:
#!/bin/bash#dtnd -d -o /var/log/dtn.log -t
23

where the option -d means that it will run in daemon mode;the option -o /var/log/dtn.log means that the log file will be in /var/log/dtn.log(option needed if you use the option -d)and the option -t clears the database and initializes the tables on startup. We arenow ready to run the ns2 simulations on the testbed having only the AODV routingprotocol.
24

References[1] AODV Module. Uppsala University, Sweden. http://core.it.uu.
se/core/index.php/AODV-UU.
[2] http://user-mode-linux.sf.net/.
[3] http://bellard.org/qemu.
[4] http://cs-people.bu.edu/flavio/kernelConfiguration4Testbed.htm.
[5] http://csr.bu.edu/preda/.
[6] http://kvm.qumranet.com/kvmwiki/HOWTO1.
[7] http://releases.ubuntu.com/7.10/.
[8] http://uml.nagafix.co.uk/.
[9] http://user-mode-linux.sourceforge.net/.
[10] http://vtun.sourceforge.net/tun/.
[11] http://www-ivs.cs.uni-magdeburg.de/EuK/forschung/projekte/nse/.
[12] http://www.debian.org/.
[13] http://www.dit.upm.es/vnumlwiki/index.php/Main_Page.
[14] http://www.dtnrg.org/wiki/Code.
[15] http://www.kernel.org/.
[16] http://www.shorewall.net/kernel.htm.
[17] http://www.vmaware.com.
[18] Jef Dike. User Mode Linux. Bruce Perens’ Open Source Series. PrenticeHall, 2006.
[19] Daniel Mahrenholz and Svilen Ivanov. Real-time network emulation withns-2. In In Proc. of DS-RT, pages 29–36, 2004.
25
![Time [s] 1002003004005001.20.20.410 1.40.60csr.bu.edu/preda/PreDA_files/Globecom2009PosterToPrint.pdfPreDA: Predicate Routing for DTN Architectures over MANET Flavio Esposito avio@cs.bu.edu](https://img.pdfslide.us/doc/110x75/5e55dbde3451ee76671cebc7/time-s-10020030040050012020410-14060csrbuedupredapredafilesglobe-preda.jpg)