Embed Size (px)
Citation preview
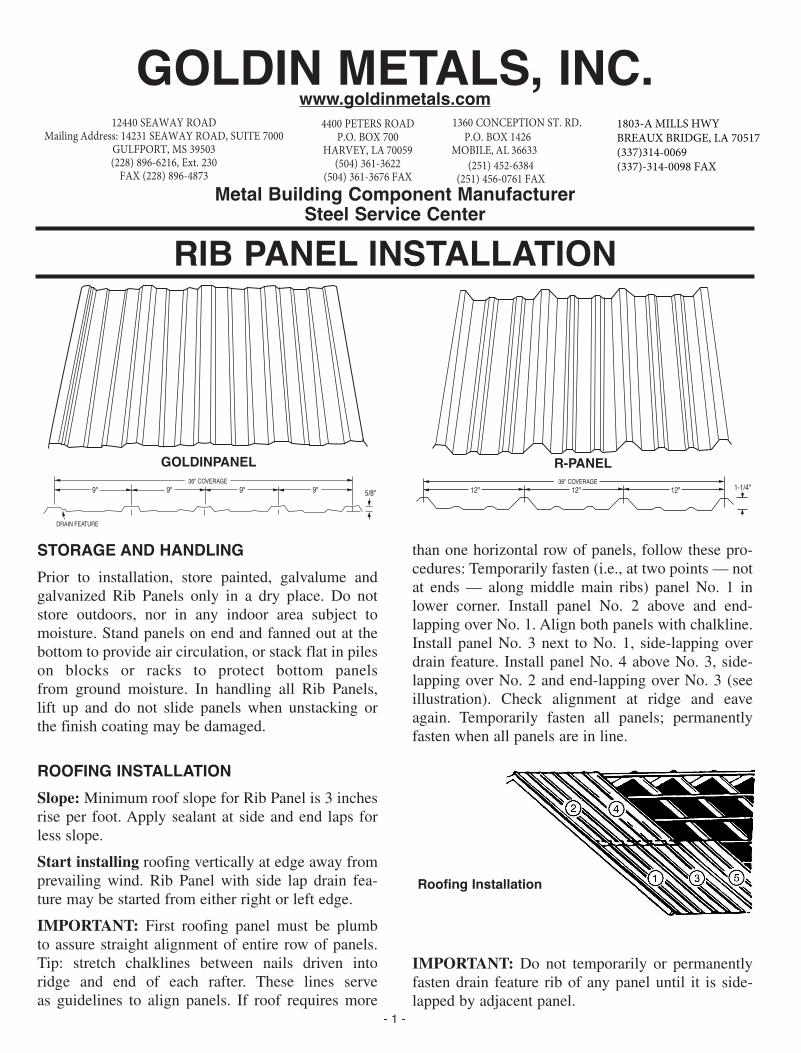
GOLDIN METALS, INC.www.goldinmetals.com
1360 CONCEPTION ST. RD.P.O. BOX 1426
MOBILE, AL 36633
12440 SEAWAY ROADMailing Address: 14231 SEAWAY ROAD, SUITE 7000
GULFPORT, MS 39503(228) 896-6216, Ext. 230
FAX (228) 896-4873
4400 PETERS ROAD P.O. BOX 700
HARVEY, LA 70059 (504) 361-3622
(504) 361-3676 FAX(251) 452-6384
(251) 456-0761 FAXMetal Building Component Manufacturer
Steel Service Center
9" 9" 9" 9" 5/8"
DRAIN FEATURE
GOLDINPANEL R-PANEL1-1/4"12" 12" 12"
36" COVERAGE 36" COVERAGE
Roofing Installation
STORAGE AND HANDLINGPrior to installation, store painted, galvalume andgalvanized Rib Panels only in a dry place. Do notstore outdoors, nor in any indoor area subject tomoisture. Stand panels on end and fanned out at thebottom to provide air circulation, or stack flat in pileson blocks or racks to protect bottom panelsfrom ground moisture. In handling all Rib Panels,lift up and do not slide panels when unstacking orthe finish coating may be damaged.
ROOFING INSTALLATIONSlope: Minimum roof slope for Rib Panel is 3 inchesrise per foot. Apply sealant at side and end laps forless slope.
Start installing roofing vertically at edge away fromprevailing wind. Rib Panel with side lap drain fea-ture may be started from either right or left edge.
IMPORTANT: First roofing panel must be plumbto assure straight alignment of entire row of panels.Tip: stretch chalklines between nails driven intoridge and end of each rafter. These lines serveas guidelines to align panels. If roof requires more
than one horizontal row of panels, follow these pro-cedures: Temporarily fasten (i.e., at two points — notat ends — along middle main ribs) panel No. 1 inlower corner. Install panel No. 2 above and end-lapping over No. 1. Align both panels with chalkline.Install panel No. 3 next to No. 1, side-lapping overdrain feature. Install panel No. 4 above No. 3, side-lapping over No. 2 and end-lapping over No. 3 (seeillustration). Check alignment at ridge and eaveagain. Temporarily fasten all panels; permanentlyfasten when all panels are in line.
IMPORTANT: Do not temporarily or permanentlyfasten drain feature rib of any panel until it is side-lapped by adjacent panel.
- 12 -- 1 -
RIB PANEL INSTALLATION
TERMS AND CONDITIONS OF SALEGoldin makes no warranty, express or implied, as to the merchantability or fitness for any ordinary or particu-lar purpose of any goods sold. Goldin will not be liable to Buyer for any actual, special, direct, indirect, inci-dental, or consequential damages including loss of use which Buyer may suffer.
The customer is responsible for filing freight claims for shortages and damage in transit, whether visible or con-cealed. Goldin’s responsibility ceases when the carrier signs for the shipment in good order. Failure to indicateshortages or damages on the signed Bill of Lading shall immediately waive any claim of shortage or damage.It is Buyer’s responsibility to retain the Bill of Lading. Loss of the Bill of Lading shall also waive any claim ofshortage or damage to goods.
Goldin is not responsible for bodily injuries or material damage due to improper handling during unloading,storage, or job-site placement.
Goldin shall not be liable to Buyer for any direct or consequential damages, including loss of use to Buyer, aris-ing out of any delays due to transportation difficulties, priorities of any kind, failure of equipment, accidents,weather, fire, strikes, act of God, war, insurrection, mob action, act of government, loss, damage or delay ofmaterial, floods, storms, inability to obtain materials, or other acts or circumstances, and no penalties or liqui-dated damages are provided for herein.
Full payment of the C.O.D. invoice amount, including taxes and freight charges if any, must be made to the truckdriver before any goods can be unloaded.
Buyers are responsible for sending suitable vehicles, capable of hauling the size and weight of the Buyer’s order.Since Goldin loads with overhead cranes and forklifts, a flatbed trailer without side boards is most suitable.Goldin cannot load open end, closed trailers, such as horse trailers. Goldin shall not be responsible for any dam-ages to a vehicle or goods as a result of the type of vehicle used. Buyer shall be responsible for providing amethod for securing the goods to the vehicle and for securing the goods. Goldin shall not be responsible for anydamage or loss of goods, or damage to vehicles or persons caused from unsecured or improperly secured goodsshifting or falling from Buyer’s vehicle during transport, or caused from Buyer rearranging or loading goods.Buyer shall indemnify and hold Goldin harmless, including costs and attorney’s fees, from any and all claimsmade against Goldin relating thereto. Loading or rearranging of goods by Buyer shall not be allowed onGoldin’s premises.
Any order which has not been shipped or picked up within 15 days of completion risks damage from prolongedstorage and excessive handing within the loading area. Goldin shall not be responsible for any damage to, orloss of, any part of such an order. Buyer will reimburse Goldin for the cost of handling and storing materials ifshipment is delayed by Buyer.
The type, size, length and/or gage of materials required is always the Buyer’s responsibility and it is Buyer’sresponsibility to confirm that the product meets their specifications, including but not limited to type, size,length and/or gage of materials. Salespeople will offer information on its products which Buyer needs to com-pose the list, but under no circumstances will Goldin be responsible for a goods take-off. Goldin does not offeror provide engineering or design advice or expertise. Goldin shall not be responsible for any damage or injuryresulting from design problems of any kind.
Goldin’s goods should be installed by qualified professionals. If Buyer is not a qualified professional himself,Buyer should hire an erector who is trained and experienced with installing and erecting steel building materi-als. Goldin shall not be responsible for damages to property or injuries to persons due to negligent or improperinstallation by any person.
#5002
1803-A MILLS HWY BREAUX BRIDGE, LA 70517 (337)314-0069 (337)-314-0098 FAX
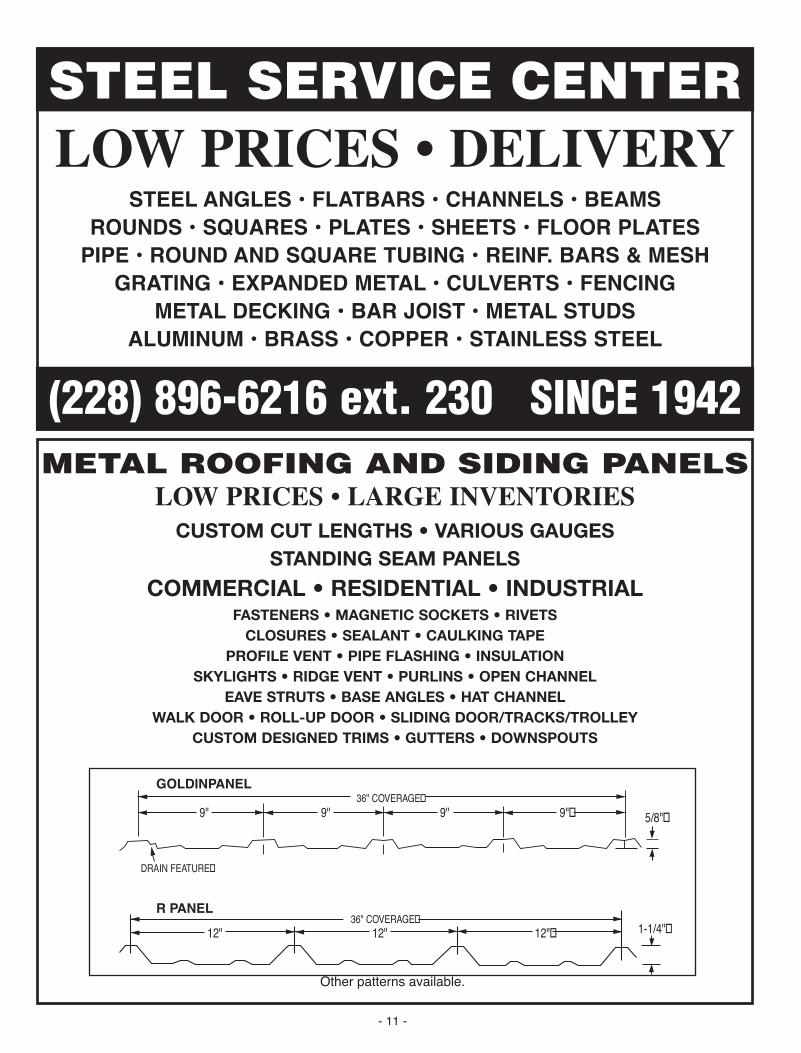
STEEL SERVICE CENTERLOW PRICES • DELIVERY
STEEL ANGLES • FLATBARS • CHANNELS • BEAMSROUNDS • SQUARES • PLATES • SHEETS • FLOOR PLATESPIPE • ROUND AND SQUARE TUBING • REINF. BARS & MESH
GRATING • EXPANDED METAL • CULVERTS • FENCINGMETAL DECKING • BAR JOIST • METAL STUDS
ALUMINUM • BRASS • COPPER • STAINLESS STEEL
(228) 896-6216 ext. 230 SINCE 1942
- 11 -
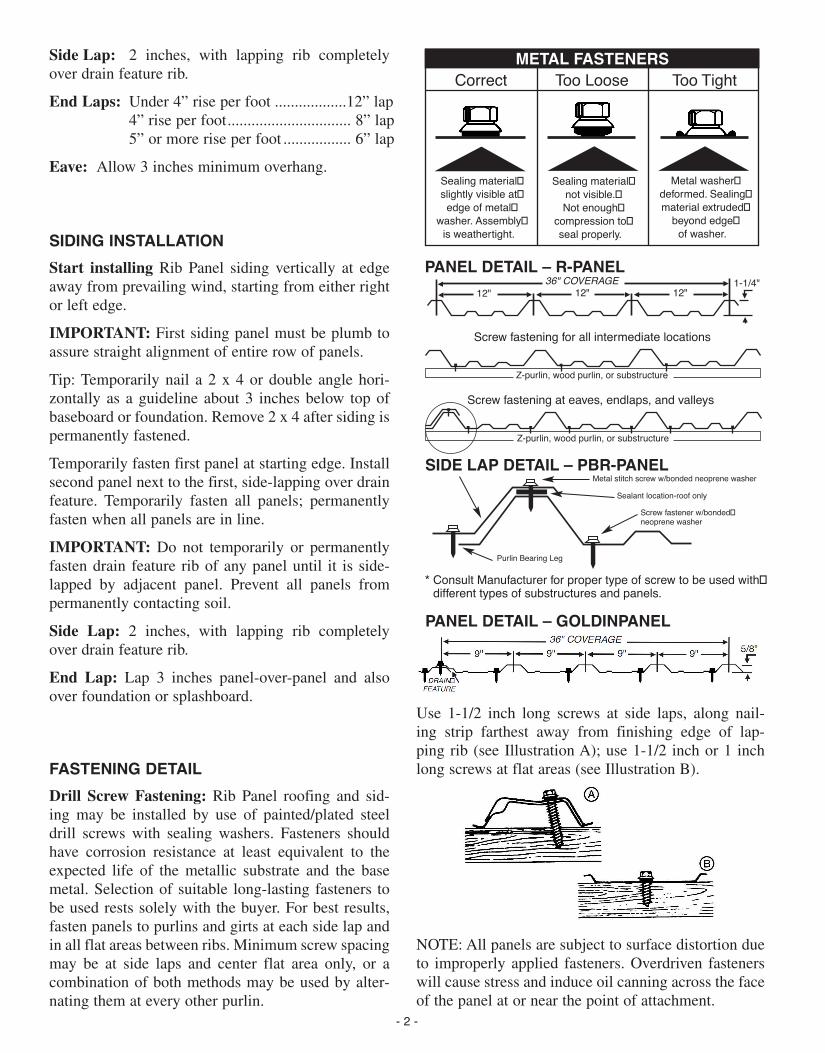
Side Lap: 2 inches, with lapping rib completelyover drain feature rib.
End Laps: Under 4” rise per foot ..................12” lap4” rise per foot............................... 8” lap5” or more rise per foot ................. 6” lap
Eave: Allow 3 inches minimum overhang.
SIDING INSTALLATIONStart installing Rib Panel siding vertically at edgeaway from prevailing wind, starting from either rightor left edge.
IMPORTANT: First siding panel must be plumb toassure straight alignment of entire row of panels.
Tip: Temporarily nail a 2 x 4 or double angle hori-zontally as a guideline about 3 inches below top ofbaseboard or foundation. Remove 2 x 4 after siding ispermanently fastened.
Temporarily fasten first panel at starting edge. Installsecond panel next to the first, side-lapping over drainfeature. Temporarily fasten all panels; permanentlyfasten when all panels are in line.
IMPORTANT: Do not temporarily or permanentlyfasten drain feature rib of any panel until it is side-lapped by adjacent panel. Prevent all panels frompermanently contacting soil.
Side Lap: 2 inches, with lapping rib completelyover drain feature rib.
End Lap: Lap 3 inches panel-over-panel and alsoover foundation or splashboard.
FASTENING DETAILDrill Screw Fastening: Rib Panel roofing and sid-ing may be installed by use of painted/plated steeldrill screws with sealing washers. Fasteners shouldhave corrosion resistance at least equivalent to theexpected life of the metallic substrate and the basemetal. Selection of suitable long-lasting fasteners tobe used rests solely with the buyer. For best results,fasten panels to purlins and girts at each side lap andin all flat areas between ribs. Minimum screw spacingmay be at side laps and center flat area only, or acombination of both methods may be used by alter-nating them at every other purlin.
Use 1-1/2 inch long screws at side laps, along nail-ing strip farthest away from finishing edge of lap-ping rib (see Illustration A); use 1-1/2 inch or 1 inchlong screws at flat areas (see Illustration B).
NOTE: All panels are subject to surface distortion dueto improperly applied fasteners. Overdriven fastenerswill cause stress and induce oil canning across the faceof the panel at or near the point of attachment.
- 2 -
Correct Too Loose Too Tight
Sealing material slightly visible at
edge of metal washer. Assembly
is weathertight.
Sealing material not visible. Not enough
compression to seal properly.
Metal washer deformed. Sealing material extruded
beyond edge of washer.
METAL FASTENERS
PANEL DETAIL – R-PANEL
SIDE LAP DETAIL – PBR-PANEL
PANEL DETAIL – GOLDINPANEL
DRAIN FEATURE
36" COVERAGE
36" COVERAGE
Purlin Bearing Leg
Sealant location-roof only
Screw fastener w/bonded neoprene washer
Consult Manufacturer for proper type of screw to be used with different types of substructures and panels.
*
Screw fastening at eaves, endlaps, and valleys
Screw fastening for all intermediate locations
12" 12" 12"1-1/4"
Z-purlin, wood purlin, or substructure
Z-purlin, wood purlin, or substructure
9"9"9"9" 5/8"
Metal stitch screw w/bonded neoprene washer
9" 9" 9" 9" 5/8"
DRAIN FEATURE
GOLDINPANEL
R PANEL1-1/4" 12" 12" 12"
36" COVERAGE
36" COVERAGE
Other patterns available.
METAL ROOFING AND SIDING PANELSLOW PRICES • LARGE INVENTORIES
CUSTOM CUT LENGTHS • VARIOUS GAUGESSTANDING SEAM PANELS
COMMERCIAL • RESIDENTIAL • INDUSTRIALFASTENERS • MAGNETIC SOCKETS • RIVETS
CLOSURES • SEALANT • CAULKING TAPEPROFILE VENT • PIPE FLASHING • INSULATION
SKYLIGHTS • RIDGE VENT • PURLINS • OPEN CHANNELEAVE STRUTS • BASE ANGLES • HAT CHANNEL
WALK DOOR • ROLL-UP DOOR • SLIDING DOOR/TRACKS/TROLLEYCUSTOM DESIGNED TRIMS • GUTTERS • DOWNSPOUTS
- 3 -- 10 -
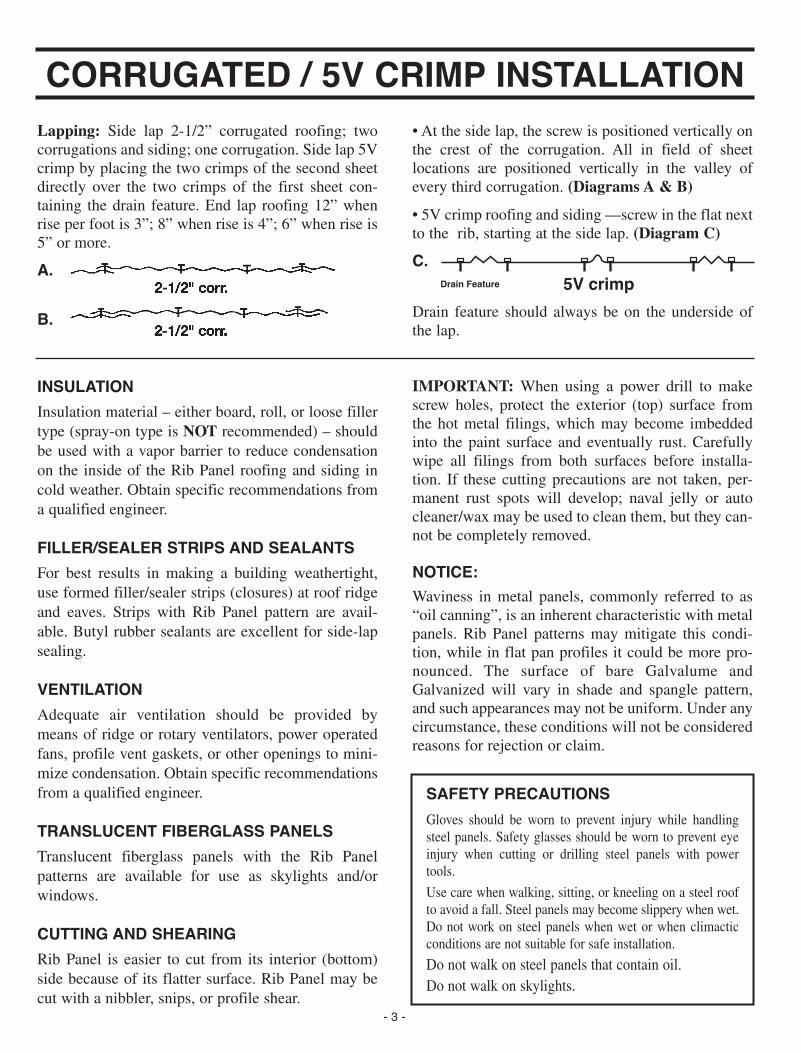
CORRUGATED / 5V CRIMP INSTALLATIONLapping: Side lap 2-1/2” corrugated roofing; twocorrugations and siding; one corrugation. Side lap 5Vcrimp by placing the two crimps of the second sheetdirectly over the two crimps of the first sheet con-taining the drain feature. End lap roofing 12” whenrise per foot is 3”; 8” when rise is 4”; 6” when rise is5” or more.
A.
B.
• At the side lap, the screw is positioned vertically onthe crest of the corrugation. All in field of sheetlocations are positioned vertically in the valley ofevery third corrugation. (Diagrams A & B)
• 5V crimp roofing and siding —screw in the flat nextto the rib, starting at the side lap. (Diagram C)
C.
Drain feature should always be on the underside ofthe lap.
INSULATIONInsulation material – either board, roll, or loose fillertype (spray-on type is NOT recommended) – shouldbe used with a vapor barrier to reduce condensationon the inside of the Rib Panel roofing and siding incold weather. Obtain specific recommendations froma qualified engineer.
FILLER/SEALER STRIPS AND SEALANTSFor best results in making a building weathertight,use formed filler/sealer strips (closures) at roof ridgeand eaves. Strips with Rib Panel pattern are avail-able. Butyl rubber sealants are excellent for side-lapsealing.
VENTILATIONAdequate air ventilation should be provided bymeans of ridge or rotary ventilators, power operatedfans, profile vent gaskets, or other openings to mini-mize condensation. Obtain specific recommendationsfrom a qualified engineer.
TRANSLUCENT FIBERGLASS PANELSTranslucent fiberglass panels with the Rib Panelpatterns are available for use as skylights and/orwindows.
CUTTING AND SHEARINGRib Panel is easier to cut from its interior (bottom)side because of its flatter surface. Rib Panel may becut with a nibbler, snips, or profile shear.
IMPORTANT: When using a power drill to makescrew holes, protect the exterior (top) surface fromthe hot metal filings, which may become imbeddedinto the paint surface and eventually rust. Carefullywipe all filings from both surfaces before installa-tion. If these cutting precautions are not taken, per-manent rust spots will develop; naval jelly or autocleaner/wax may be used to clean them, but they can-not be completely removed.
NOTICE:Waviness in metal panels, commonly referred to as“oil canning”, is an inherent characteristic with metalpanels. Rib Panel patterns may mitigate this condi-tion, while in flat pan profiles it could be more pro-nounced. The surface of bare Galvalume andGalvanized will vary in shade and spangle pattern,and such appearances may not be uniform. Under anycircumstance, these conditions will not be consideredreasons for rejection or claim.
SAFETY PRECAUTIONSGloves should be worn to prevent injury while handlingsteel panels. Safety glasses should be worn to prevent eyeinjury when cutting or drilling steel panels with powertools.
Use care when walking, sitting, or kneeling on a steel roofto avoid a fall. Steel panels may become slippery when wet.Do not work on steel panels when wet or when climacticconditions are not suitable for safe installation.
Do not walk on steel panels that contain oil.Do not walk on skylights.
SERVING ALL YOUR BUILDING NEEDS
5V crimpDrain Feature
3070 & 3068 WALK DOORS
MOTOR DRIVEN & CHAIN OPERATORS
W
LATCHES & HARDWARE
GOLDIN METALS OFFERS A
COMPLETE LINE OF COMMERCIAL ROLL UP DOORS,
MINI SELF STORAGE DOORS
AND ACCESSORIES.
SPECIAL ORDERS TO FIT ANY NEED.
S
ASK ABOUT THESE ADDITIONAL PRODUCTS
FRAMED WINDOWS3618 3636
3625 4425
3
BRACKETS & HARDWARE
S
STEEL JOIST & METAL DECK
SLIDING DOORS TRACKS & RAILS
L
WALL LOUVERS
B
- 9 -
- 4 -
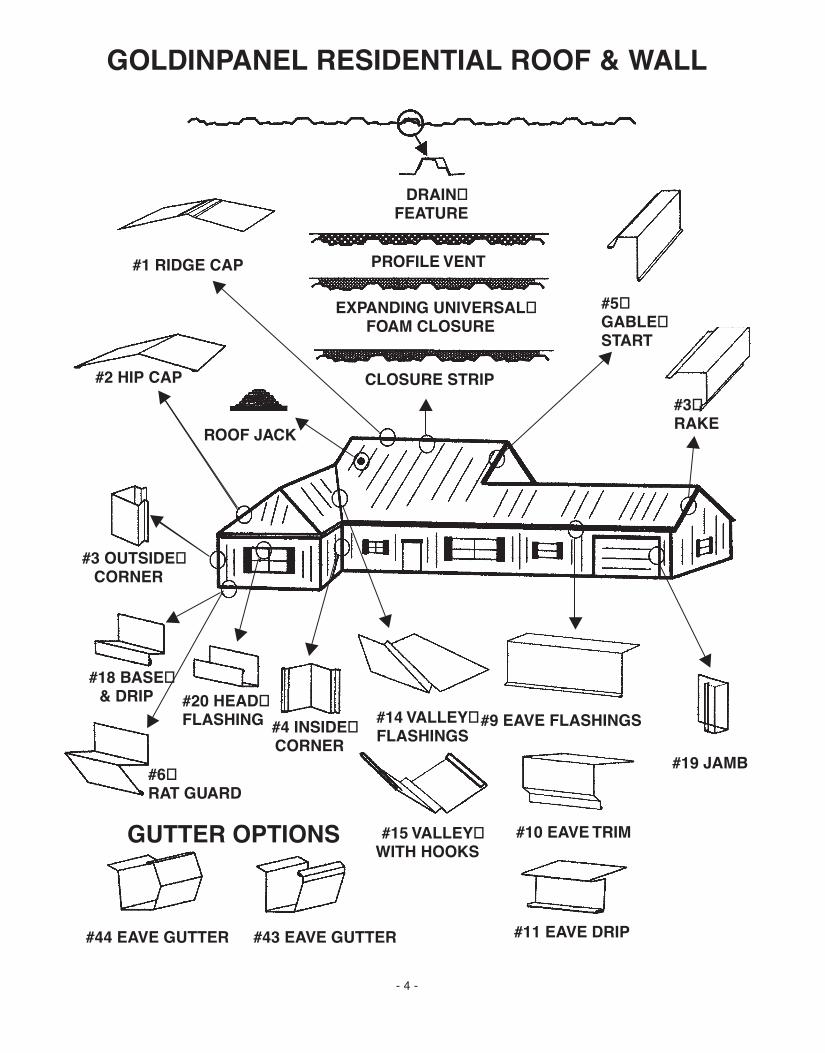
GOLDINPANEL RESIDENTIAL ROOF & WALL
DRAIN FEATURE
PROFILE VENT
EXPANDING UNIVERSAL FOAM CLOSURE
CLOSURE STRIP
ROOF JACK
#2 HIP CAP
#1 RIDGE CAP
#3 OUTSIDE CORNER
#5 GABLE START
#3 RAKE
#19 JAMB
#14 VALLEY FLASHINGS
#9 EAVE FLASHINGS
#10 EAVE TRIM#15 VALLEY WITH HOOKS
#11 EAVE DRIP#43 EAVE GUTTER#44 EAVE GUTTER
#6 RAT GUARD
#4 INSIDE CORNER
#20 HEAD FLASHING
#18 BASE & DRIP
GUTTER OPTIONS
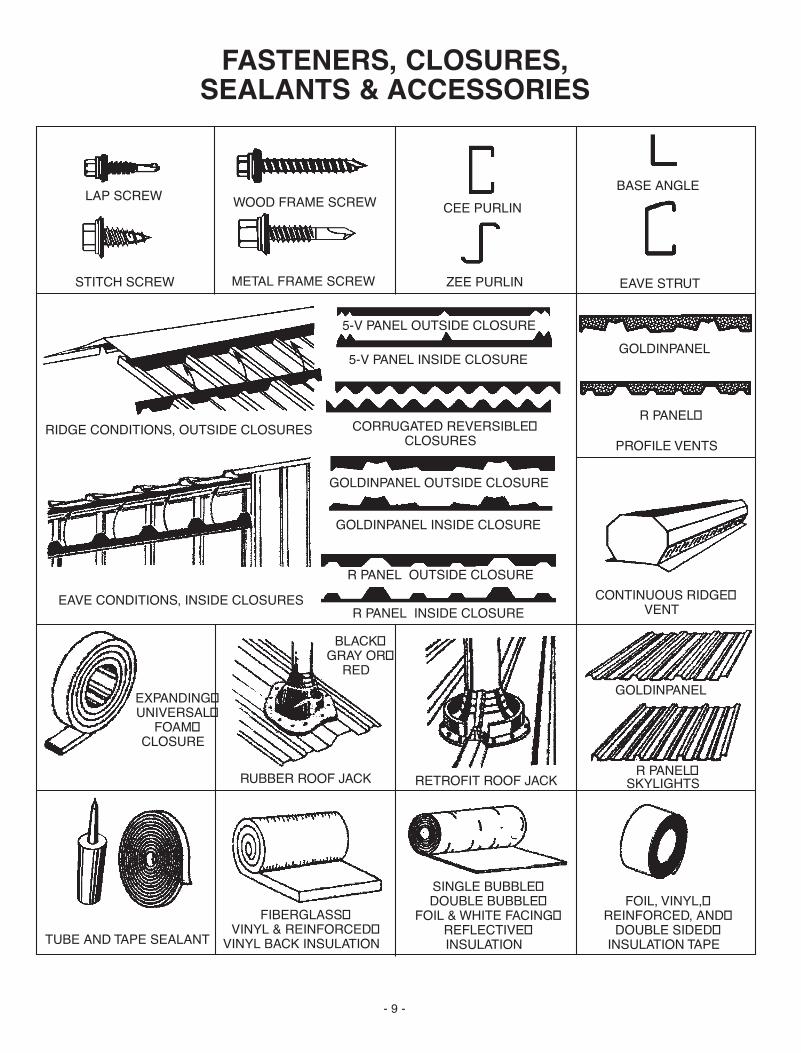
LAP SCREW
STITCH SCREW
WOOD FRAME SCREW
METAL FRAME SCREW
CEE PURLIN
ZEE PURLIN EAVE STRUT
BASE ANGLE
GOLDINPANEL
R PANEL
PROFILE VENTS
5-V PANEL OUTSIDE CLOSURE
5-V PANEL INSIDE CLOSURE
CORRUGATED REVERSIBLE CLOSURES
GOLDINPANEL OUTSIDE CLOSURE
GOLDINPANEL INSIDE CLOSURE
R PANEL OUTSIDE CLOSURE
R PANEL INSIDE CLOSURECONTINUOUS RIDGE
VENT
GOLDINPANEL
R PANEL SKYLIGHTS
BLACK GRAY OR
RED
RUBBER ROOF JACK RETROFIT ROOF JACK
EAVE CONDITIONS, INSIDE CLOSURES
RIDGE CONDITIONS, OUTSIDE CLOSURES
EXPANDING UNIVERSAL
FOAM CLOSURE
TUBE AND TAPE SEALANTFIBERGLASS
VINYL & REINFORCED VINYL BACK INSULATION
SINGLE BUBBLE DOUBLE BUBBLE
FOIL & WHITE FACING REFLECTIVE INSULATION
FOIL, VINYL, REINFORCED, AND
DOUBLE SIDED INSULATION TAPE
FASTENERS, CLOSURES,SEALANTS & ACCESSORIES
- 5 -
- 8 -
ACTUAL DIMENSIONS MAY VARY CERTAIN RESTRICTIONS APPLY
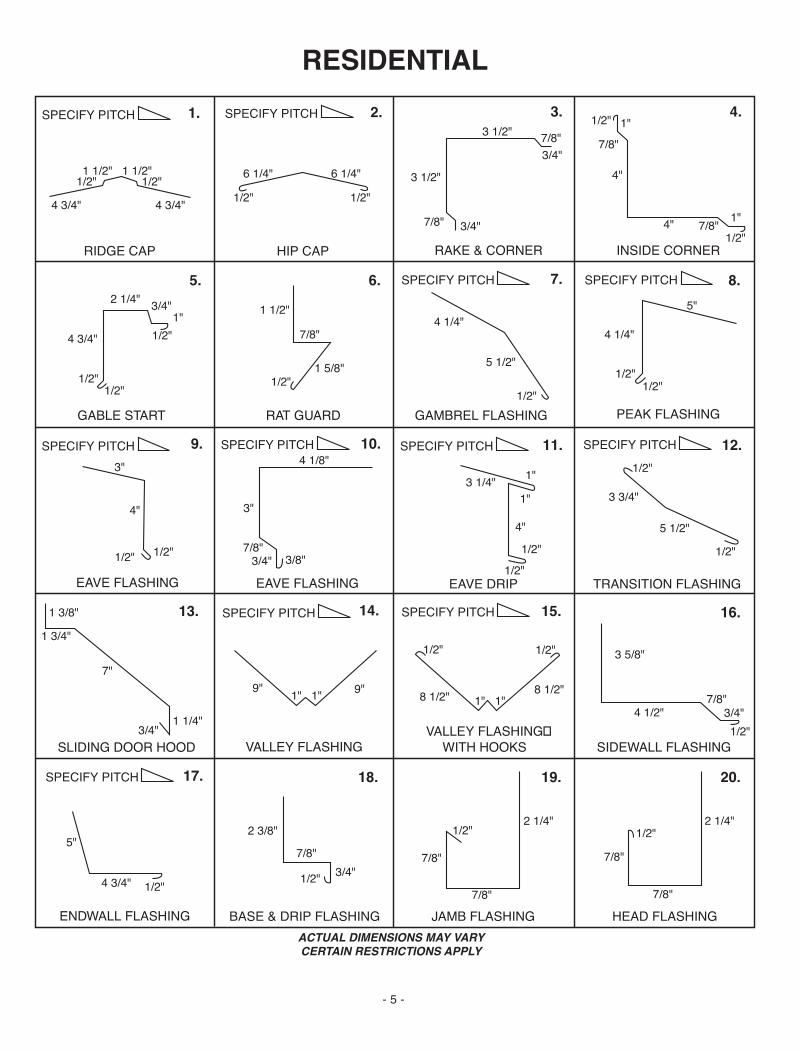
RSPECIFY PITCH 1.
RIDGE CAP
1 1/2" 1 1/2"
SPECIFY PITCH 2.
SPECIFY PITCH 14.
HIP CAP RAKE & CORNER INSIDE CORNER
GABLE START RAT GUARD GAMBREL FLASHING PEAK FLASHING
EAVE FLASHING EAVE FLASHING EAVE DRIP TRANSITION FLASHING
SLIDING DOOR HOOD VALLEY FLASHINGVALLEY FLASHING
WITH HOOKS SIDEWALL FLASHING
ENDWALL FLASHING BASE & DRIP FLASHING JAMB FLASHING HEAD FLASHING
SPECIFY PITCH 17.
13. 15. 16.
20.19.18.
5.
3. 4.
6. 7. 8.
12.11.10.9.
SPECIFY PITCH SPECIFY PITCH
SPECIFY PITCHSPECIFY PITCHSPECIFY PITCHSPECIFY PITCH
SPECIFY PITCH
1/2" 1/2"
4 3/4" 4 3/4" 1/2" 1/2"
6 1/4" 6 1/4"
3 1/2" 7/8"3/4"
3 1/2"
7/8" 3/4"
7/8"
1/2" 1"
4"
4" 7/8" 1"1/2"
5"
4 1/4"
1/2"1/2"
1/2"
5 1/2"
4 1/4"1 1/2"
7/8"
1 5/8"1/2"
1/2"
1/2"1/2"
4 3/4"
2 1/4" 3/4"1"
3"
4"
1/2"1/2"
4 1/8"
3"
7/8"3/4" 3/8"
3 1/4"
1/2"1/2"
1"
1"
4"
1/2"
1/2"
5 1/2"
3 3/4"
3 5/8"
4 1/2"7/8"
3/4"1/2"
1/2" 1/2"
8 1/2"8 1/2" 1" 1" 1" 1" 9"9"
1 3/8"
1 3/4"
7"
3/4"1 1/4"
5"
4 3/4" 1/2" 1/2"
1/2"
3/4"7/8"
2 3/8"
7/8"
7/8"
2 1/4"
7/8"
7/8"
1/2"2 1/4"
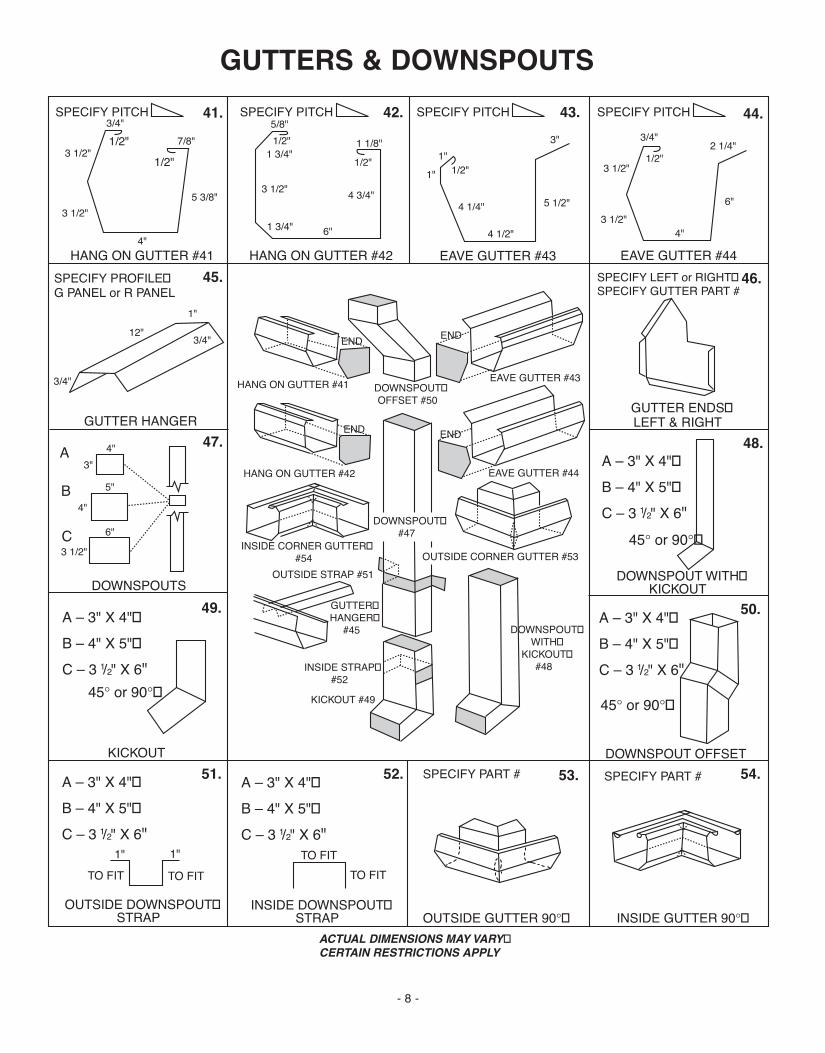
HANG ON GUTTER #41
41.
SPECIFY PART #
1/2"
SPECIFY PITCH SPECIFY PITCH SPECIFY PITCH SPECIFY PITCH
SPECIFY PART #
SPECIFY PROFILE G PANEL or R PANEL
42. 43. 44.
45.
47. 48.
46.
50.49.
51. 52. 53. 54.
GUTTER HANGER
HANG ON GUTTER #42 EAVE GUTTER #43 EAVE GUTTER #44
GUTTER ENDS LEFT & RIGHT
DOWNSPOUT WITH KICKOUT
DOWNSPOUT OFFSET
INSIDE GUTTER 90° OUTSIDE GUTTER 90° INSIDE DOWNSPOUT
STRAPOUTSIDE DOWNSPOUT
STRAP
KICKOUT
DOWNSPOUTS
SPECIFY LEFT or RIGHT SPECIFY GUTTER PART #
TO FIT TO FITTO FIT
TO FIT
KICKOUT #49
INSIDE STRAP #52
GUTTER HANGER
#45 DOWNSPOUT WITH
KICKOUT #48
OUTSIDE STRAP #51
INSIDE CORNER GUTTER #54 OUTSIDE CORNER GUTTER #53
HANG ON GUTTER #42 EAVE GUTTER #44
ENDEND
DOWNSPOUT #47
ENDEND
EAVE GUTTER #43HANG ON GUTTER #41 DOWNSPOUT OFFSET #50
1/2"7/8"
5 3/8"3 1/2"
3 1/2"
3/4"
4"
2 1/4"
6"
4"3 1/2"
3 1/2"1/2"
3/4"3"
6 1/4"
1"1" 1/2"
4 1/4"
4 1/2"6"1 3/4"
3 1/2" 4 3/4"
1/2"
1/2"5/8"
1 3/4"
1"12"
3/4"
3/4"
3 1/2"6"
5"
4"A
B
C
A – 3" X 4" B – 4" X 5" C – 3 / " X 6"
45° or 90° 1 2
A – 3" X 4" B – 4" X 5" C – 3 / " X 6"1 2
1" 1"
A – 3" X 4" B – 4" X 5" C – 3 / " X 6"1 2
A – 3" X 4" B – 4" X 5" C – 3 / " X 6"1 2
45° or 90°
45° or 90°
A – 3" X 4" B – 4" X 5" C – 3 / " X 6"1 2
ACTUAL DIMENSIONS MAY VARY CERTAIN RESTRICTIONS APPLY
G
1 1/8"
3"
4"
GUTTERS & DOWNSPOUTS RESIDENTIAL
- 6 -- 7 -
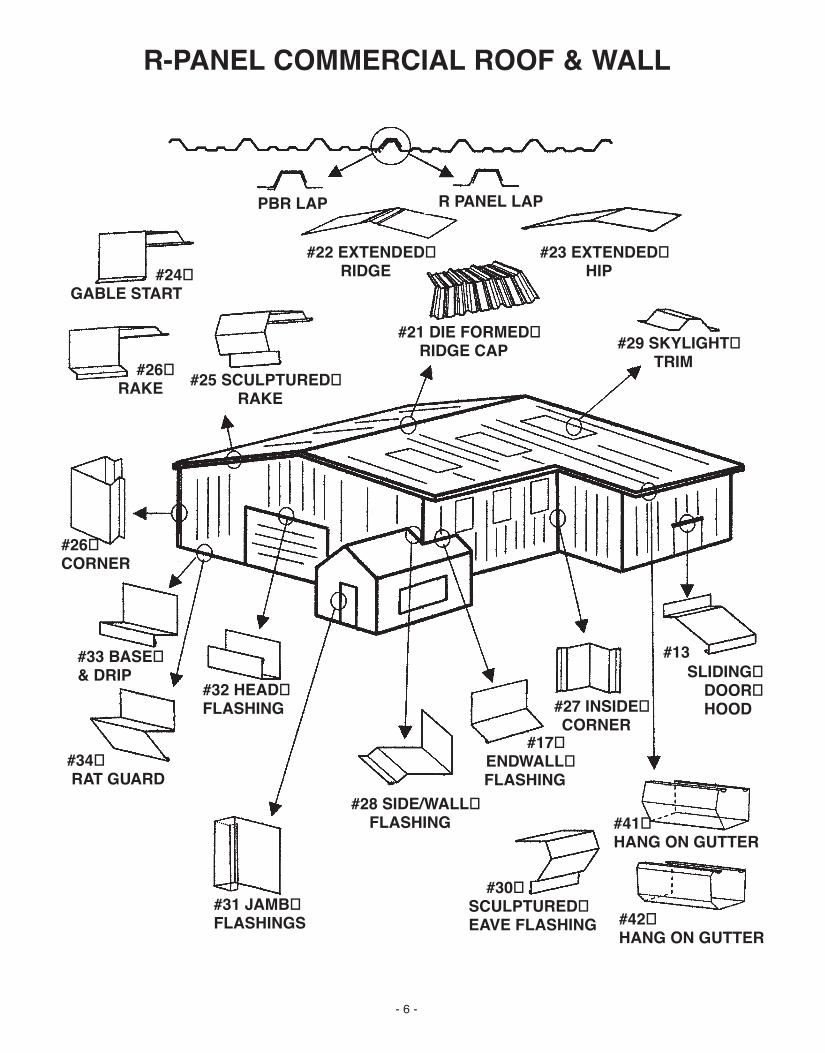
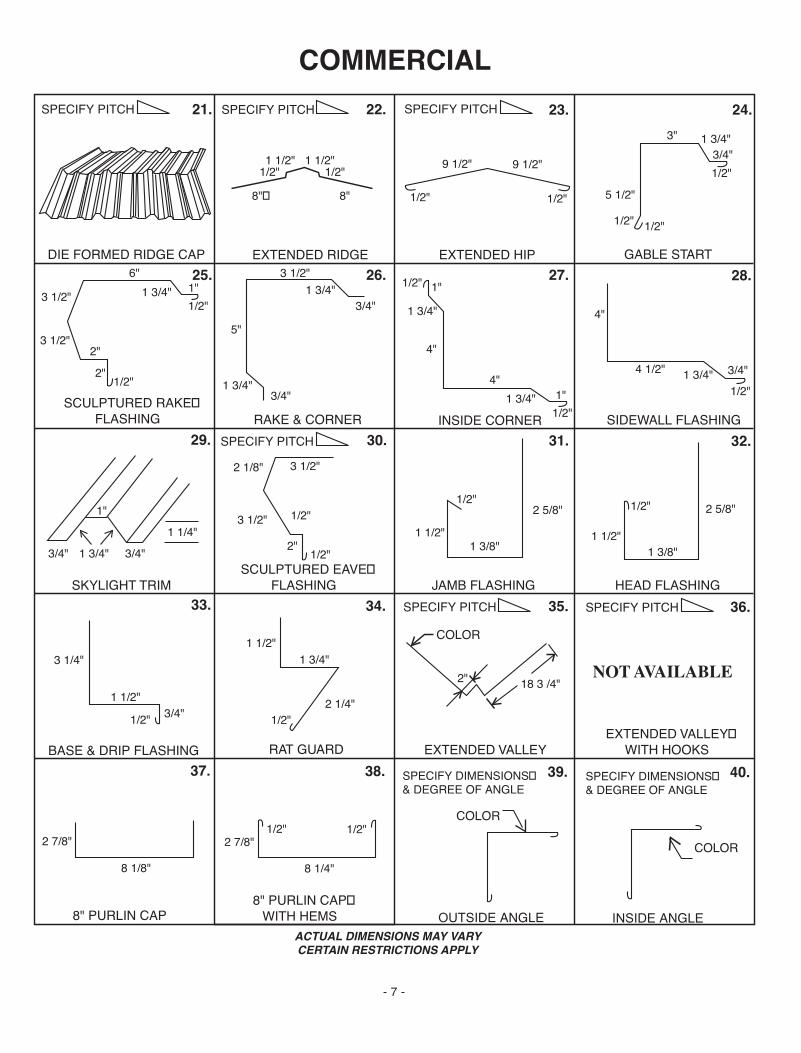
R-PANEL COMMERCIAL ROOF & WALL COMMERCIALSPECIFY PITCH SPECIFY PITCH SPECIFY PITCH21. 22. 23. 24.
28.27.26.25.
29. 30. 31. 32.
36.35.34.33.
37. 38. 39. 40.
SPECIFY PITCH
DIE FORMED RIDGE CAP EXTENDED RIDGE EXTENDED HIP GABLE START
SIDEWALL FLASHINGINSIDE CORNERRAKE & CORNERSCULPTURED RAKE
FLASHING
SKYLIGHT TRIMSCULPTURED EAVE
FLASHING JAMB FLASHING HEAD FLASHINGSPECIFY PITCH SPECIFY PITCH
COLOR
BASE & DRIP FLASHING RAT GUARD EXTENDED VALLEYEXTENDED VALLEY
WITH HOOKS
INSIDE ANGLE OUTSIDE ANGLE
COLOR
COLOR
8" PURLIN CAP8" PURLIN CAP
WITH HEMS
SPECIFY DIMENSIONS & DEGREE OF ANGLE
SPECIFY DIMENSIONS & DEGREE OF ANGLE
9 1/2" 9 1/2"
1/2" 1/2"
1 1/2" 1 1/2"1/2" 1/2"
8" 8" 5 1/2"
1/2" 1/2"
1/2"
3" 1 3/4"3/4"
4"
4 1/2" 1 3/4" 3/4"1/2"
1/2"
1 3/4"
1"
4"
4"1 3/4" 1"
1/2"
3 1/2"1 3/4"
3/4"
5"
3/4"1 3/4"
6"1"1/2"
1 3/4"3 1/2"
3 1/2"2"2" 1/2"
1"1 1/4"
3/4" 1 3/4" 3/4"
2 1/8"
3 1/2"
3 1/2"
1/2"
1/2"2"1 1/2"
1/2"2 5/8"
1 3/8"1 1/2"
1/2"
1 3/8"
2 5/8"
18 3 /4"2"
1 1/2"1 3/4"
2 1/4"1/2"1/2"
3 1/4"
1 1/2"3/4"
1/2" 1/2"2 7/8"
8 1/4"
2 7/8"
8 1/8"
ACTUAL DIMENSIONS MAY VARY CERTAIN RESTRICTIONS APPLY
NOT AVAILABLE
PBR LAP
#22 EXTENDED RIDGE
R PANEL LAP
#21 DIE FORMED RIDGE CAP
#23 EXTENDED HIP
#29 SKYLIGHT TRIM
#25 SCULPTURED RAKE
#26 RAKE
#24 GABLE START
#26 CORNER
#33 BASE & DRIP
#32 HEAD FLASHING
#34 RAT GUARD
#31 JAMB FLASHINGS
#28 SIDE/WALL FLASHING
#17 ENDWALL FLASHING
#30 SCULPTURED EAVE FLASHING #42
HANG ON GUTTER
#41 HANG ON GUTTER
#27 INSIDE CORNER
SLIDING DOOR HOOD
#13
- 6 -
- 7 -
R-PANEL COMMERCIAL ROOF & WALL COMMERCIALSPECIFY PITCH SPECIFY PITCH SPECIFY PITCH21. 22. 23. 24.
28.27.26.25.
29. 30. 31. 32.
36.35.34.33.
37. 38. 39. 40.
SPECIFY PITCH
DIE FORMED RIDGE CAP EXTENDED RIDGE EXTENDED HIP GABLE START
SIDEWALL FLASHINGINSIDE CORNERRAKE & CORNERSCULPTURED RAKE
FLASHING
SKYLIGHT TRIMSCULPTURED EAVE
FLASHING JAMB FLASHING HEAD FLASHINGSPECIFY PITCH SPECIFY PITCH
COLOR
BASE & DRIP FLASHING RAT GUARD EXTENDED VALLEYEXTENDED VALLEY
WITH HOOKS
OUTSIDE ANGLE INSIDE ANGLE
COLOR
COLOR
8" PURLIN CAP8" PURLIN CAP
WITH HEMS
SPECIFY DIMENSIONS & DEGREE OF ANGLE
SPECIFY DIMENSIONS & DEGREE OF ANGLE
9 1/2" 9 1/2"
1/2" 1/2"
1 1/2" 1 1/2"1/2" 1/2"
8" 8" 5 1/2"
1/2" 1/2"
1/2"
3" 1 3/4"3/4"
4"
4 1/2" 1 3/4" 3/4"1/2"
1/2"
1 3/4"
1"
4"
4"1 3/4" 1"
1/2"
3 1/2"1 3/4"
3/4"
5"
3/4"1 3/4"
6"1"1/2"
1 3/4"3 1/2"
3 1/2"2"2" 1/2"
1"1 1/4"
3/4" 1 3/4" 3/4"
2 1/8"
3 1/2"
3 1/2"
1/2"
1/2"2"1 1/2"
1/2"2 5/8"
1 3/8"1 1/2"
1/2"
1 3/8"
2 5/8"
18 3 /4"2"
1 1/2"1 3/4"
2 1/4"1/2"1/2"
3 1/4"
1 1/2"3/4"
1/2" 1/2"2 7/8"
8 1/4"
2 7/8"
8 1/8"
ACTUAL DIMENSIONS MAY VARY CERTAIN RESTRICTIONS APPLY
NOT AVAILABLE
PBR LAP
#22 EXTENDED RIDGE
R PANEL LAP
#21 DIE FORMED RIDGE CAP
#23 EXTENDED HIP
#29 SKYLIGHT TRIM
#25 SCULPTURED RAKE
#26 RAKE
#24 GABLE START
#26 CORNER
#33 BASE & DRIP
#32 HEAD FLASHING
#34 RAT GUARD
#31 JAMB FLASHINGS
#28 SIDE/WALL FLASHING
#17 ENDWALL FLASHING
#30 SCULPTURED EAVE FLASHING #42
HANG ON GUTTER
#41 HANG ON GUTTER
#27 INSIDE CORNER
SLIDING DOOR HOOD
#13
- 5 -
- 8 -
ACTUAL DIMENSIONS MAY VARY CERTAIN RESTRICTIONS APPLY
RSPECIFY PITCH 1.
RIDGE CAP
1 1/2" 1 1/2"
SPECIFY PITCH 2.
SPECIFY PITCH 14.
HIP CAP RAKE & CORNER INSIDE CORNER
GABLE START RAT GUARD GAMBREL FLASHING PEAK FLASHING
EAVE FLASHING EAVE FLASHING EAVE DRIP TRANSITION FLASHING
SLIDING DOOR HOOD VALLEY FLASHINGVALLEY FLASHING
WITH HOOKS SIDEWALL FLASHING
ENDWALL FLASHING BASE & DRIP FLASHING JAMB FLASHING HEAD FLASHING
SPECIFY PITCH 17.
13. 15. 16.
20.19.18.
5.
3. 4.
6. 7. 8.
12.11.10.9.
SPECIFY PITCH SPECIFY PITCH
SPECIFY PITCHSPECIFY PITCHSPECIFY PITCHSPECIFY PITCH
SPECIFY PITCH
1/2" 1/2"
4 3/4" 4 3/4" 1/2" 1/2"
6 1/4" 6 1/4"
3 1/2" 7/8"3/4"
3 1/2"
7/8" 3/4"
7/8"
1/2" 1"
4"
4" 7/8" 1"1/2"
5"
4 1/4"
1/2"1/2"
1/2"
5 1/2"
4 1/4"1 1/2"
7/8"
1 5/8"1/2"
1/2"
1/2"1/2"
4 3/4"
2 1/4" 3/4"1"
3"
4"
1/2"1/2"
4 1/8"
3"
7/8"3/4" 3/8"
3 1/4"
1/2"1/2"
1"
1"
4"
1/2"
1/2"
5 1/2"
3 3/4"
3 5/8"
4 1/2"7/8"
3/4"1/2"
1/2" 1/2"
8 1/2"8 1/2" 1" 1" 1" 1" 9"9"
1 3/8"
1 3/4"
7"
3/4"1 1/4"
5"
4 3/4" 1/2" 1/2"
1/2"
3/4"7/8"
2 3/8"
7/8"
7/8"
2 1/4"
7/8"
7/8"
1/2"2 1/4"
HANG ON GUTTER #41
41.
SPECIFY PART #
1/2"
SPECIFY PITCH SPECIFY PITCH SPECIFY PITCH SPECIFY PITCH
SPECIFY PART #
SPECIFY PROFILE G PANEL or R PANEL
42. 43. 44.
45.
47. 48.
46.
50.49.
51. 52. 53. 54.
GUTTER HANGER
HANG ON GUTTER #42 EAVE GUTTER #43 EAVE GUTTER #44
GUTTER ENDS LEFT & RIGHT
DOWNSPOUT WITH KICKOUT
DOWNSPOUT OFFSET
INSIDE GUTTER 90° OUTSIDE GUTTER 90° INSIDE DOWNSPOUT
STRAPOUTSIDE DOWNSPOUT
STRAP
KICKOUT
DOWNSPOUTS
SPECIFY LEFT or RIGHT SPECIFY GUTTER PART #
TO FIT TO FITTO FIT
TO FIT
KICKOUT #49
INSIDE STRAP #52
GUTTER HANGER
#45 DOWNSPOUT WITH
KICKOUT #48
OUTSIDE STRAP #51
INSIDE CORNER GUTTER #54 OUTSIDE CORNER GUTTER #53
HANG ON GUTTER #42 EAVE GUTTER #44
ENDEND
DOWNSPOUT #47
ENDEND
EAVE GUTTER #43HANG ON GUTTER #41 DOWNSPOUT OFFSET #50
1/2"7/8"
5 3/8"3 1/2"
3 1/2"
3/4"
4"
2 1/4"
6"
4"3 1/2"
3 1/2"1/2"
3/4"3"
5 1/2"
1"1" 1/2"
4 1/4"
4 1/2"6"1 3/4"
3 1/2" 4 3/4"
1/2"
1/2"5/8"
1 3/4"
1"12"
3/4"
3/4"
3 1/2"6"
5"
4"A
B
C
A – 3" X 4" B – 4" X 5" C – 3 / " X 6"
45° or 90° 1 2
A – 3" X 4" B – 4" X 5" C – 3 / " X 6"1 2
1" 1"
A – 3" X 4" B – 4" X 5" C – 3 / " X 6"1 2
A – 3" X 4" B – 4" X 5" C – 3 / " X 6"1 2
45° or 90°
45° or 90°
A – 3" X 4" B – 4" X 5" C – 3 / " X 6"1 2
ACTUAL DIMENSIONS MAY VARY CERTAIN RESTRICTIONS APPLY
G
1 1/8"
3"
4"
GUTTERS & DOWNSPOUTS RESIDENTIAL
- 9 -- 4 -
GOLDINPANEL RESIDENTIAL ROOF & WALL
DRAINFEATURE
PROFILE VENT
EXPANDING UNIVERSAL FOAM CLOSURE
CLOSURE STRIP
ROOF JACK
#2 HIP CAP
#1 RIDGE CAP
#3 OUTSIDE CORNER
#5 GABLE START
#3 RAKE
#19 JAMB
#14 VALLEY FLASHINGS
#9 EAVE FLASHINGS
#10 EAVE TRIM#15 VALLEY WITH HOOKS
#11 EAVE DRIP#43 EAVE GUTTER#44 EAVE GUTTER
#6 RAT GUARD
#4 INSIDE CORNER
#20 HEAD FLASHING
#18 BASE & DRIP
GUTTER OPTIONS
LAP SCREW
STITCH SCREW
WOOD FRAME SCREW
METAL FRAME SCREW
CEE PURLIN
ZEE PURLIN EAVE STRUT
BASE ANGLE
GOLDINPANEL
R PANEL
PROFILE VENTS
5-V PANEL OUTSIDE CLOSURE
5-V PANEL INSIDE CLOSURE
CORRUGATED REVERSIBLE CLOSURES
GOLDINPANEL OUTSIDE CLOSURE
GOLDINPANEL INSIDE CLOSURE
R PANEL OUTSIDE CLOSURE
R PANEL INSIDE CLOSURECONTINUOUS RIDGE
VENT
GOLDINPANEL
R PANEL SKYLIGHTS
BLACK GRAY OR
RED
RUBBER ROOF JACK RETROFIT ROOF JACK
EAVE CONDITIONS, INSIDE CLOSURES
RIDGE CONDITIONS, OUTSIDE CLOSURES
EXPANDING UNIVERSAL
FOAM CLOSURE
TUBE AND TAPE SEALANTFIBERGLASS
VINYL & REINFORCED VINYL BACK INSULATION
SINGLE BUBBLE DOUBLE BUBBLE
FOIL & WHITE FACING REFLECTIVE INSULATION
FOIL, VINYL, REINFORCED, AND
DOUBLE SIDED INSULATION TAPE
FASTENERS, CLOSURES,SEALANTS & ACCESSORIES

- 3 -- 10 -
CORRUGATED / 5V CRIMP INSTALLATIONLapping: Side lap 2-1/2” corrugated roofing; twocorrugations and siding; one corrugation. Side lap 5Vcrimp by placing the two crimps of the second sheetdirectly over the two crimps of the first sheet con-taining the drain feature. End lap roofing 12” whenrise per foot is 3”; 8” when rise is 4”; 6” when rise is5” or more.
A.
B.
• At the side lap, the screw is positioned vertically onthe crest of the corrugation. All in field of sheetlocations are positioned vertically in the valley ofevery third corrugation. (Diagrams A & B)
• 5V crimp roofing and siding —screw in the flat nextto the rib, starting at the side lap. (Diagram C)
C.
Drain feature should always be on the underside ofthe lap.
INSULATIONInsulation material – either board, roll, or loose fillertype (spray-on type is NOT recommended) – shouldbe used with a vapor barrier to reduce condensationon the inside of the Rib Panel roofing and siding incold weather. Obtain specific recommendations froma qualified engineer.
FILLER/SEALER STRIPS AND SEALANTSFor best results in making a building weathertight,use formed filler/sealer strips (closures) at roof ridgeand eaves. Strips with Rib Panel pattern are avail-able. Butyl rubber sealants are excellent for side-lapsealing.
VENTILATIONAdequate air ventilation should be provided bymeans of ridge or rotary ventilators, power operatedfans, profile vent gaskets, or other openings to mini-mize condensation. Obtain specific recommendationsfrom a qualified engineer.
TRANSLUCENT FIBERGLASS PANELSTranslucent fiberglass panels with the Rib Panelpatterns are available for use as skylights and/orwindows.
CUTTING AND SHEARINGRib Panel is easier to cut from its interior (bottom)side because of its flatter surface. Rib Panel may becut with a nibbler, snips, or profile shear.
IMPORTANT: When using a power drill to makescrew holes, protect the exterior (top) surface fromthe hot metal filings, which may become imbeddedinto the paint surface and eventually rust. Carefullywipe all filings from both surfaces before installa-tion. If these cutting precautions are not taken, per-manent rust spots will develop; naval jelly or autocleaner/wax may be used to clean them, but they can-not be completely removed.
NOTICE:Waviness in metal panels, commonly referred to as“oil canning”, is an inherent characteristic with metalpanels. Rib Panel patterns may mitigate this condi-tion, while in flat pan profiles it could be more pro-nounced. The surface of bare Galvalume andGalvanized will vary in shade and spangle pattern,and such appearances may not be uniform. Under anycircumstance, these conditions will not be consideredreasons for rejection or claim.
SAFETY PRECAUTIONSGloves should be worn to prevent injury while handlingsteel panels. Safety glasses should be worn to prevent eyeinjury when cutting or drilling steel panels with powertools.
Use care when walking, sitting, or kneeling on a steel roofto avoid a fall. Steel panels may become slippery when wet.Do not work on steel panels when wet or when climacticconditions are not suitable for safe installation.
Do not walk on steel panels that contain oil.Do not walk on skylights.
SERVING ALL YOUR BUILDING NEEDS
5V crimpDrain Feature
3070 & 3068 WALK DOORS
MOTOR DRIVEN & CHAIN OPERATORS
W
LATCHES & HARDWARE
GOLDIN METALS OFFERS A
COMPLETE LINE OF COMMERCIAL ROLL UP DOORS,
MINI SELF STORAGE DOORS
AND ACCESSORIES.
SPECIAL ORDERS TO FIT ANY NEED.
S
ASK ABOUT THESE ADDITIONAL PRODUCTS
FRAMED WINDOWS3618 3636
3625 4425
3
BRACKETS & HARDWARE
S
STEEL JOIST & METAL DECK
SLIDING DOORS TRACKS & RAILS
L
WALL LOUVERS
B
STEEL SERVICE CENTERLOW PRICES • DELIVERY
STEEL ANGLES • FLATBARS • CHANNELS • BEAMSROUNDS • SQUARES • PLATES • SHEETS • FLOOR PLATESPIPE • ROUND AND SQUARE TUBING • REINF. BARS & MESH
GRATING • EXPANDED METAL • CULVERTS • FENCINGMETAL DECKING • BAR JOIST • METAL STUDS
ALUMINUM • BRASS • COPPER • STAINLESS STEEL
(228) 896-6216 ext. 230 SINCE 1942
Other patterns available.
- 11 -
Side Lap: 2 inches, with lapping rib completelyover drain feature rib.
End Laps: Under 4” rise per foot ..................12” lap4” rise per foot............................... 8” lap5” or more rise per foot ................. 6” lap
Eave: Allow 3 inches minimum overhang.
SIDING INSTALLATIONStart installing Rib Panel siding vertically at edgeaway from prevailing wind, starting from either rightor left edge.
IMPORTANT: First siding panel must be plumb toassure straight alignment of entire row of panels.
Tip: Temporarily nail a 2 x 4 or double angle hori-zontally as a guideline about 3 inches below top ofbaseboard or foundation. Remove 2 x 4 after siding ispermanently fastened.
Temporarily fasten first panel at starting edge. Installsecond panel next to the first, side-lapping over drainfeature. Temporarily fasten all panels; permanentlyfasten when all panels are in line.
IMPORTANT: Do not temporarily or permanentlyfasten drain feature rib of any panel until it is side-lapped by adjacent panel. Prevent all panels frompermanently contacting soil.
Side Lap: 2 inches, with lapping rib completelyover drain feature rib.
End Lap: Lap 3 inches panel-over-panel and alsoover foundation or splashboard.
FASTENING DETAILDrill Screw Fastening: Rib Panel roofing and sid-ing may be installed by use of painted/plated steeldrill screws with sealing washers. Fasteners shouldhave corrosion resistance at least equivalent to theexpected life of the metallic substrate and the basemetal. Selection of suitable long-lasting fasteners tobe used rests solely with the buyer. For best results,fasten panels to purlins and girts at each side lap andin all flat areas between ribs. Minimum screw spacingmay be at side laps and center flat area only, or acombination of both methods may be used by alter-nating them at every other purlin.
Use 1-1/2 inch long screws at side laps, along nail-ing strip farthest away from finishing edge of lap-ping rib (see Illustration A); use 1-1/2 inch or 1 inchlong screws at flat areas (see Illustration B).
NOTE: All panels are subject to surface distortion dueto improperly applied fasteners. Overdriven fastenerswill cause stress and induce oil canning across the faceof the panel at or near the point of attachment.
- 2 -
Correct Too Loose Too Tight
Sealing material slightly visible at
edge of metal washer. Assembly
is weathertight.
Sealing material not visible. Not enough
compression to seal properly.
Metal washer deformed. Sealing material extruded
beyond edge of washer.
METAL FASTENERS
PANEL DETAIL – R-PANEL
SIDE LAP DETAIL – PBR-PANEL
PANEL DETAIL – GOLDINPANEL
DRAIN FEATURE
36" COVERAGE
36" COVERAGE
Purlin Bearing Leg
Sealant location-roof only
Screw fastener w/bonded neoprene washer
Consult Manufacturer for proper type of screw to be used with different types of substructures and panels.
*
Screw fastening at eaves, endlaps, and valleys
Screw fastening for all intermediate locations
12" 12" 12"1-1/4"
Z-purlin, wood purlin, or substructure
Z-purlin, wood purlin, or substructure
9"9"9"9" 5/8"
Metal stitch screw w/bonded neoprene washer
9" 9" 9" 9" 5/8"
DRAIN FEATURE
GOLDINPANEL
R PANEL1-1/4" 12" 12" 12"
36" COVERAGE
36" COVERAGE
METAL ROOFING AND SIDING PANELSLOW PRICES • LARGE INVENTORIES
CUSTOM CUT LENGTHS • VARIOUS GAUGESSTANDING SEAM PANELS
COMMERCIAL • RESIDENTIAL • INDUSTRIALFASTENERS • MAGNETIC SOCKETS • RIVETS
CLOSURES • SEALANT • CAULKING TAPEPROFILE VENT • PIPE FLASHING • INSULATION
SKYLIGHTS • RIDGE VENT • PURLINS • OPEN CHANNELEAVE STRUTS • BASE ANGLES • HAT CHANNEL
WALK DOOR • ROLL-UP DOOR • SLIDING DOOR/TRACKS/TROLLEYCUSTOM DESIGNED TRIMS • GUTTERS • DOWNSPOUTS
GOLDIN METALS, INC.www.goldinmetals.com
12440 SEAWAY ROAD 4400 PETERS ROAD 1360 CONCEPTION ST. RD.Mailing Address: 14231 SEAWAY ROAD, SUITE 7000 P.O. BOX 700 P.O. BOX 1426
GULFPORT, MS 39503 HARVEY, LA 70059 MOBILE, AL 36633(228) 896-6216, Ext. 230 (504) 361-3622 (251) 452-6384FAX (228) 896-4873 FAX (504) 361-3676 FAX (251) 456-0761
Metal Building Component ManufacturerSteel Service Center
9" 9" 9" 9" 5/8"
DRAIN FEATURE
GOLDINPANEL R-PANEL1-1/4"12" 12" 12"
36" COVERAGE 36" COVERAGE
Roofing Installation
STORAGE AND HANDLINGPrior to installation, store painted, galvalume andgalvanized Rib Panels only in a dry place. Do notstore outdoors, nor in any indoor area subject tomoisture. Stand panels on end and fanned out at thebottom to provide air circulation, or stack flat in pileson blocks or racks to protect bottom panelsfrom ground moisture. In handling all Rib Panels,lift up and do not slide panels when unstacking orthe finish coating may be damaged.
ROOFING INSTALLATIONSlope: Minimum roof slope for Rib Panel is 3 inchesrise per foot. Apply sealant at side and end laps forless slope.
Start installing roofing vertically at edge away fromprevailing wind. Rib Panel with side lap drain fea-ture may be started from either right or left edge.
IMPORTANT: First roofing panel must be plumbto assure straight alignment of entire row of panels.Tip: stretch chalklines between nails driven intoridge and end of each rafter. These lines serveas guidelines to align panels. If roof requires more
than one horizontal row of panels, follow these pro-cedures: Temporarily fasten (i.e., at two points — notat ends — along middle main ribs) panel No. 1 inlower corner. Install panel No. 2 above and end-lapping over No. 1. Align both panels with chalkline.Install panel No. 3 next to No. 1, side-lapping overdrain feature. Install panel No. 4 above No. 3, side-lapping over No. 2 and end-lapping over No. 3 (seeillustration). Check alignment at ridge and eaveagain. Temporarily fasten all panels; permanentlyfasten when all panels are in line.
IMPORTANT: Do not temporarily or permanentlyfasten drain feature rib of any panel until it is side-lapped by adjacent panel.
- 12 - - 1 -
RIB PANEL INSTALLATION
TERMS AND CONDITIONS OF SALEGoldin makes no warranty, express or implied, as to the merchantability or fitness for any ordinary or particu-lar purpose of any goods sold. Goldin will not be liable to Buyer for any actual, special, direct, indirect, inci-dental, or consequential damages including loss of use which Buyer may suffer.
The customer is responsible for filing freight claims for shortages and damage in transit, whether visible or con-cealed. Goldin’s responsibility ceases when the carrier signs for the shipment in good order. Failure to indicateshortages or damages on the signed Bill of Lading shall immediately waive any claim of shortage or damage.It is Buyer’s responsibility to retain the Bill of Lading. Loss of the Bill of Lading shall also waive any claim ofshortage or damage to goods.
Goldin is not responsible for bodily injuries or material damage due to improper handling during unloading,storage, or job-site placement.
Goldin shall not be liable to Buyer for any direct or consequential damages, including loss of use to Buyer, aris-ing out of any delays due to transportation difficulties, priorities of any kind, failure of equipment, accidents,weather, fire, strikes, act of God, war, insurrection, mob action, act of government, loss, damage or delay ofmaterial, floods, storms, inability to obtain materials, or other acts or circumstances, and no penalties or liqui-dated damages are provided for herein.
Full payment of the C.O.D. invoice amount, including taxes and freight charges if any, must be made to the truckdriver before any goods can be unloaded.
Buyers are responsible for sending suitable vehicles, capable of hauling the size and weight of the Buyer’s order.Since Goldin loads with overhead cranes and forklifts, a flatbed trailer without side boards is most suitable.Goldin cannot load open end, closed trailers, such as horse trailers. Goldin shall not be responsible for any dam-ages to a vehicle or goods as a result of the type of vehicle used. Buyer shall be responsible for providing amethod for securing the goods to the vehicle and for securing the goods. Goldin shall not be responsible for anydamage or loss of goods, or damage to vehicles or persons caused from unsecured or improperly secured goodsshifting or falling from Buyer’s vehicle during transport, or caused from Buyer rearranging or loading goods.Buyer shall indemnify and hold Goldin harmless, including costs and attorney’s fees, from any and all claimsmade against Goldin relating thereto. Loading or rearranging of goods by Buyer shall not be allowed onGoldin’s premises.
Any order which has not been shipped or picked up within 15 days of completion risks damage from prolongedstorage and excessive handing within the loading area. Goldin shall not be responsible for any damage to, orloss of, any part of such an order. Buyer will reimburse Goldin for the cost of handling and storing materials ifshipment is delayed by Buyer.
The type, size, length and/or gage of materials required is always the Buyer’s responsibility and it is Buyer’sresponsibility to confirm that the product meets their specifications, including but not limited to type, size,length and/or gage of materials. Salespeople will offer information on its products which Buyer needs to com-pose the list, but under no circumstances will Goldin be responsible for a goods take-off. Goldin does not offeror provide engineering or design advice or expertise. Goldin shall not be responsible for any damage or injuryresulting from design problems of any kind.
Goldin’s goods should be installed by qualified professionals. If Buyer is not a qualified professional himself,Buyer should hire an erector who is trained and experienced with installing and erecting steel building materi-als. Goldin shall not be responsible for damages to property or injuries to persons due to negligent or improperinstallation by any person.
#5002