Embed Size (px)
Citation preview

LizardSystems
Terminal Services ManagerGetting Started

2
Table of Contents
Introduction 3
Installing Terminal Services Manager 3
Before starting the application 4
Starting the application 5
Connect to a Remote Desktop Services Servers 6
User Interface 10
Main Window 10
Main menu 11
Administrative tools 16
Network tools 16
Toolbar 17
Computer list 18
Servers tab 19
Users tab 20
Sessions tab 22
Processes tab 23
Dialog boxes 25
Add Computer 25
Create New Group 26
Add Computers Wizard 26
Import computers from network 27
Import computers from Active Directory 28
Import computers from IP Range 28
Import computers from file 30
Search for computers 30
Select grouping type for computers 31
Add computers to list 32
Preferences 33
General 33
Computer list 34
Terminal services 35

Terminal Services Manager - Getting Started
3
Introduction
Using Terminal Services Manager, you can see the details of users connected to a remote host, their
sessions, and their active processes. For several hosts simultaneously, you can monitor each user, session,
and process's usage of remote host resources (CPU, memory, etc.) in real-time. Using Terminal Services
Manager, you can easily perform various administrative tasks to manage resources and users on a remote
host, for example, disconnecting all inactive users, closing inactive users' sessions, or terminating a remote
host process.
You may use Terminal Services Manager to view information and monitor servers, users, sessions, and
processes on servers running Windows Server. You can also perform certain administrative tasks; for
example, you can disconnect or log off users from their Remote Desktop Services sessions.
Installing Terminal Services Manager
• You can install Terminal Services Manager after downloading it from the Download page.
• Click the Save button to save the installation file. You will see the window showing the progress of
downloading of installation file to your computer.
• Run the installation file after it is downloaded.

Terminal Services Manager - Getting Started
4
• Follow the Installation Wizard instructions after you run the installation file. After the installation is over,
you can start working with the application.
Before starting the application
Software doesn't work with Windows Home editions because remote administrating is disabled in these
versions. Software works with Windows 7, 2008R2, 8, 8.1, 2012, 2012R2, 10, 2016.
You must have administrative privileges to connect to the remote computer.
1. Make sure the administrator account has a password. Blank password will NOT work. Go to Control
Panel → User Accounts → Create a password for the admin user.
2. Make sure simple file sharing is disabled. - Go to Control Panel → Folder Options → View tab → Scroll
right to the bottom at Advanced Settings → Uncheck Use simple file sharing.
3. Make sure file and printer sharing exception is allowed in the firewall or simply turn off the Windows
Firewall. - Go to Start → Run → type netsh firewall set service type = FILEANDPRINT mode = ENABLE
and click OK.
4. Start → Settings → Control Panel → Administrative Tools → Local Security Policy → Network access:
Sharing and security model for local accounts option → Set Classic: Local users authenticate as
themselves.
As a rule these parameters are set by default in corporate network because it is impossible to
provide remote administrating without these settings.

Terminal Services Manager - Getting Started
5
Starting the application
You can start Terminal Services Manager either from the Start menu
or by clicking its desktop shortcut.
After you start the application, you will see the main window of the program.

Terminal Services Manager - Getting Started
6
Connect to a Remote Desktop Services Servers
When you install and open Terminal Services Manager for the first time, there will be no data on the
reports. The first thing you should do is add servers for monitoring.
When you are running the program at the first time a warning message appears informing the computer list
is empty. Just click Yes and search on the computers with wizard.
Computers can also be added from the List menu by selecting the Add computer menu item

Terminal Services Manager - Getting Started
7
or Add computer button from the toolbar.
Enter server name and description
Click OK and a new server will be added to address list.

Terminal Services Manager - Getting Started
8
Also, you may import address list from a file. It could be an usual text file, that has IP address or computer
name in each line. For example:
192.168.1.2
server1
server2.corp.local
To load file select List item in main menu and select Import computers list in drop-down menu.
Select the file you need in opened window.
Click Open, and addresses will be loaded and added to address list.
To connect to server, click checkbox near to server name in server list.

Terminal Services Manager - Getting Started
9
After checkbox is set the application will connect to remote server to get information about connected users,
sessions and processes run on the remote server. This information will be shown on Servers, Users,
Sessions, Processes tabs, and time variation of gotten parameters will be shown on graphics at the bottom
of the page.
Terminal Services Manager will remember the connection state of terminal servers when you exit
Terminal Services Manager.
To get access to commands of monitoring servers, sessions, users and processes, right click on the line you
want and select the command you need in context menu.

Terminal Services Manager - Getting Started
10
User Interface
In this section you can find description of Main window elements and program settings window.
Main Window
The main window of the program consists of four areas.
1. Menu and toolbar provide access to program control commands.
2. Computer list – allows to create a structured computer list available for quick monitoring connection.
3. Information panel – shows lists of connected servers, users, sessions, processes. Also, the panel
shows parameters for each object, such as CPU usage, Memory etc.
4. This section shows parameter summary information and graphics for objects selected in information
panel.
When a user creates a session by connecting to a remote desktop from a client computer, the following
information is available in Terminal Services Manager:
• On the Servers tab, information about terminal server, such as how much server resources (CPU and
memory) they are using.
• On the Users tab, information about the users connected to the remote desktop services server, such as
the name of the user account that is logged on to the session.
• On the Sessions tab, information about the sessions running on the remote desktop services server,
such as whether the session is active.
• On the Processes tab, information about which programs are running in the user's session on the
remote desktop services server.
Terminal Services Manager - Getting Started
11
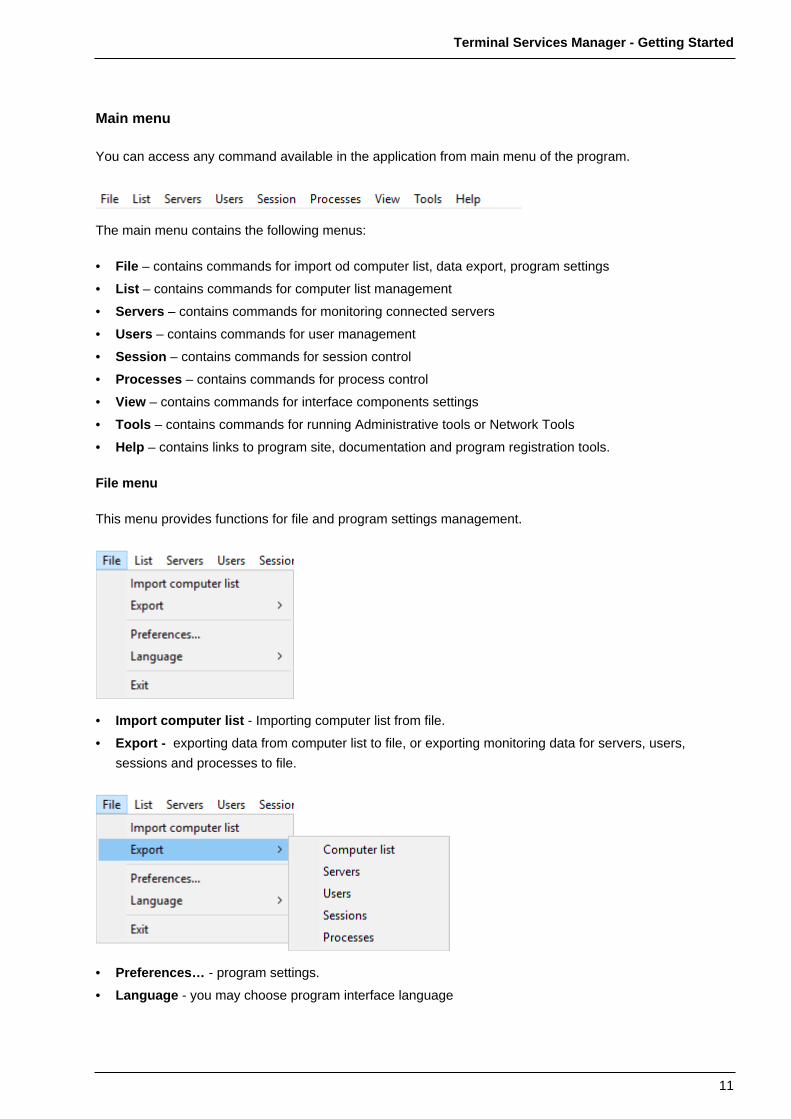
Main menu
You can access any command available in the application from main menu of the program.
The main menu contains the following menus:
• File – contains commands for import od computer list, data export, program settings
• List – contains commands for computer list management
• Servers – contains commands for monitoring connected servers
• Users – contains commands for user management
• Session – contains commands for session control
• Processes – contains commands for process control
• View – contains commands for interface components settings
• Tools – contains commands for running Administrative tools or Network Tools
• Help – contains links to program site, documentation and program registration tools.
File menu
This menu provides functions for file and program settings management.
• Import computer list - Importing computer list from file.
• Export - exporting data from computer list to file, or exporting monitoring data for servers, users,
sessions and processes to file.
• Preferences… - program settings.
• Language - you may choose program interface language
Terminal Services Manager - Getting Started
12
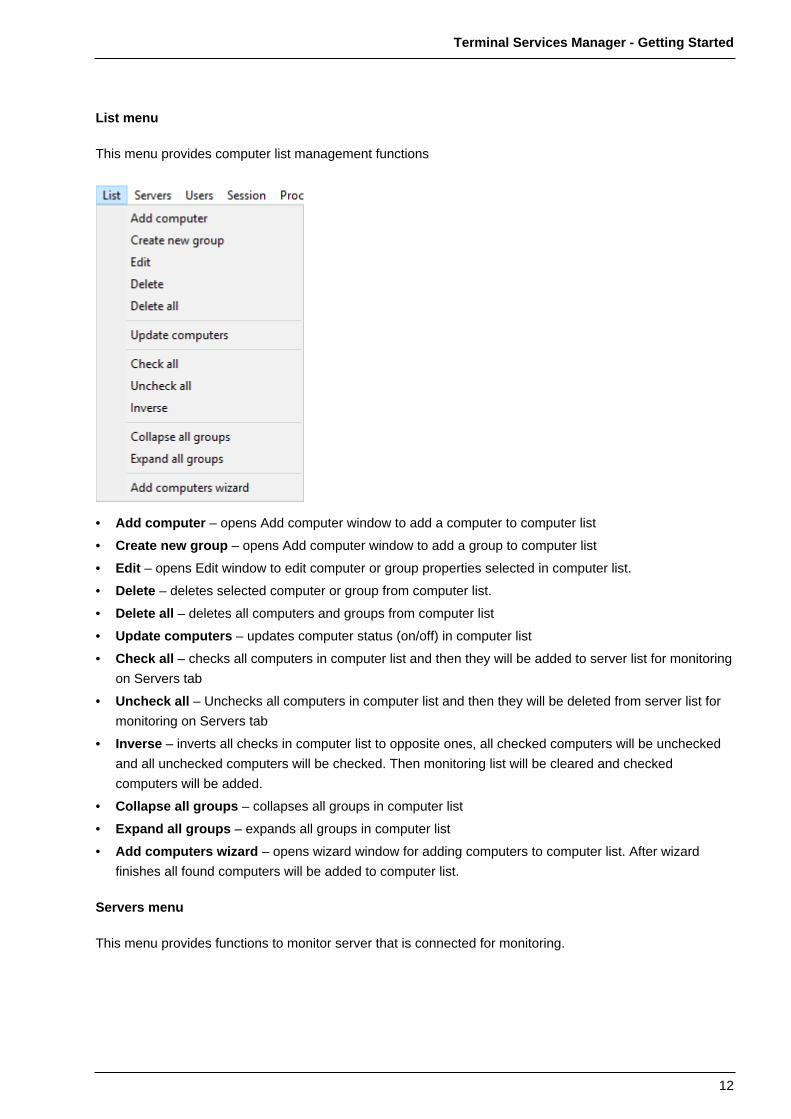
List menu
This menu provides computer list management functions
• Add computer – opens Add computer window to add a computer to computer list
• Create new group – opens Add computer window to add a group to computer list
• Edit – opens Edit window to edit computer or group properties selected in computer list.
• Delete – deletes selected computer or group from computer list.
• Delete all – deletes all computers and groups from computer list
• Update computers – updates computer status (on/off) in computer list
• Check all – checks all computers in computer list and then they will be added to server list for monitoring
on Servers tab
• Uncheck all – Unchecks all computers in computer list and then they will be deleted from server list for
monitoring on Servers tab
• Inverse – inverts all checks in computer list to opposite ones, all checked computers will be unchecked
and all unchecked computers will be checked. Then monitoring list will be cleared and checked
computers will be added.
• Collapse all groups – collapses all groups in computer list
• Expand all groups – expands all groups in computer list
• Add computers wizard – opens wizard window for adding computers to computer list. After wizard
finishes all found computers will be added to computer list.
Servers menu
This menu provides functions to monitor server that is connected for monitoring.

Terminal Services Manager - Getting Started
13
• Remote desktop – connects to remote desktop of the server selected on Servers tab.
• Send message to all users – opens window for sending message to all users logged in to server.
• Enable or Disable Remote Desktop – opens window for enabling/disabling the working with selected
server via Remote Desktop.
• Disconnect users – disconnects all active users from the remote server.
• Disconnect idle users – disconnects all users who have been idle longer than given period.
• Log off users – finishes sessions of both active and inactive users.
• Log off disconnected users – finishes sessions of all disconnected users.
• Log off idle users – finishes sessions of all users who have been idle longer than given period.
• Users’ activities – shows window with users’ log: logging in, logging off, connecting and disconnecting
to server.
• Failed logons – shows window with log of failed logons to server.
• User profiles – shows window with information about user profiles on selected server.
• Power off server – powers off the server.
• Reboot server – reboots the server.
• Refresh server – refreshes parameters values (CPU, Mem, Users etc.) of selected server.
• Refresh all servers – refreshes parameters values (CPU, Mem, Users etc.) of all servers on Servers
tab.
Users menu
This menu provides functions for managing users connected to servers.

Terminal Services Manager - Getting Started
14
• Disconnect – disconnects a current session of selected user from server.
• Send message – sends message to selected user.
• Shadow – connects to selected active session of user. An administrator may use this command to view
and monitor active terminal session of any user.
• User activity – shows window with logon/logoff and connection/disconnection log for selected user.
• Failed logons – shows window with log of failed logons for selected user.
• Reset session – resets sessions of selected users. Attention! All unsaved user’s data will be lost.
• Log off – logs off session of selected user.
Sessions menu
This menu provides functions for session management.
• Disconnect – disconnects selected session
• Send message – sends a message to selected session
• Shadow – connects to selected active session.
• Reset – resets a session. Attention! All unsaved data will be lost.
Processes menu
This menu provides functions to manage processes on servers.

Terminal Services Manager - Getting Started
15
• Terminate process – terminates selected process.
• Remote desktop – connects to remote desktop of the server, where selected process is running.
• Shadow user – connects to desktop of the user, who has run selected process.
• Disconnect user – disconnects user, who has run selected process, from server.
• Reset session – resets session of the user who has run selected process.
• Log off user – on server logs off session of the user, who has run selected process.
• Send message – sends a message to user, who has run selected process.
• Shutdown server – shutdowns the server on which selected process is running.
• Reboot server – reboots server, on which selected process is running.
View menu
This menu provides access to functions to customize program interface elements.
• Hide when minimized – when window is minimized the application icon will not be shown on taskbar. You
may find the application in system tray.
• Show process filter – shows/hides panel with process filter settings.
Tools menu
This menu provides access to functions to monitor remote servers, and to network tools.
This menu provides access to administrative tools for monitoring selected server.

Terminal Services Manager - Getting Started
16
Administrative tools
• You may find in this menu: Explore, Remote desktop, Computer management, Services management,
Event viewer, Local users and groups manager, Shared folders.
• Manage tools – shows customization window for administrative tools, here you may add/delete a tool
to/from menu.
Network tools
This menu provides access to network tools which may help you to fix network issues.
• In this menu you may find Ping, Pathping, Tracert, Nbtstat, nslookup.
• Manage tools - shows customization window for network tools, here you may add/delete a tool to/from
menu.
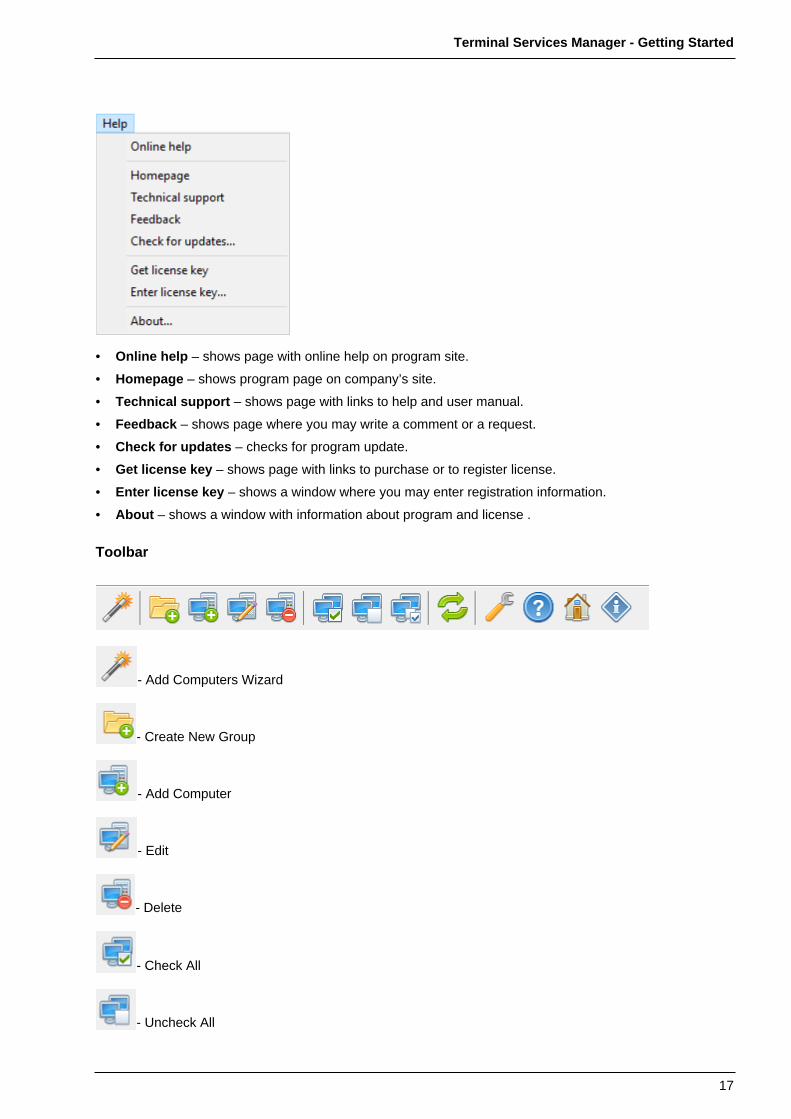
Help menu
This menu contains links to additional information and program registration functions.
Terminal Services Manager - Getting Started
17
• Online help – shows page with online help on program site.
• Homepage – shows program page on company’s site.
• Technical support – shows page with links to help and user manual.
• Feedback – shows page where you may write a comment or a request.
• Check for updates – checks for program update.
• Get license key – shows page with links to purchase or to register license.
• Enter license key – shows a window where you may enter registration information.
• About – shows a window with information about program and license .
Toolbar
- Add Computers Wizard
- Create New Group
- Add Computer
- Edit
- Delete
- Check All
- Uncheck All
Terminal Services Manager - Getting Started
18
- Inverse
- Refresh all servers
- Preferences
- Online Help
- Home page
- About
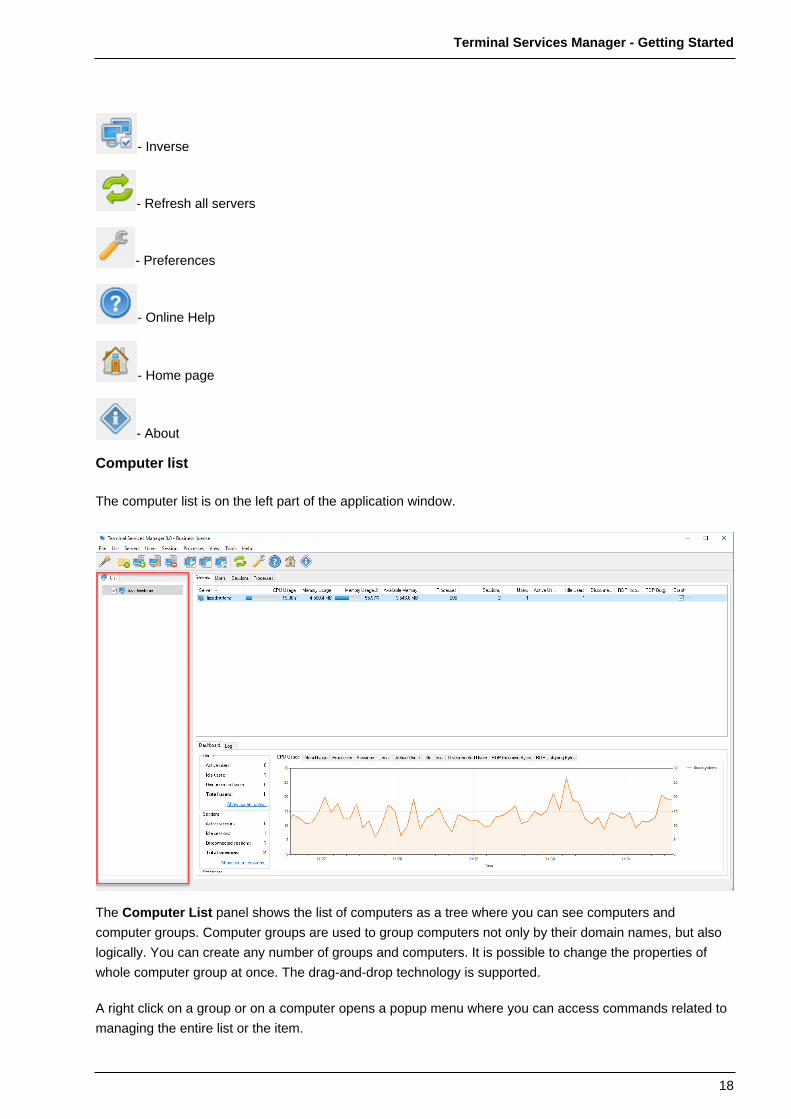
Computer list
The computer list is on the left part of the application window.
The Computer List panel shows the list of computers as a tree where you can see computers and
computer groups. Computer groups are used to group computers not only by their domain names, but also
logically. You can create any number of groups and computers. It is possible to change the properties of
whole computer group at once. The drag-and-drop technology is supported.
A right click on a group or on a computer opens a popup menu where you can access commands related to
managing the entire list or the item.

Terminal Services Manager - Getting Started
19
Servers tab
When you are connected to a Remote Desktop Services server in Terminal Services Manager, Terminal
Services Manager actively queries the server for information about the users, sessions and processes
running on that server.
If you do not need to monitor the users, sessions, and processes on the Remote Desktop Services server
actively, you may disconnect from the server, just simply uncheck checkbox in server list on the left panel.

Terminal Services Manager - Getting Started
20
On the bottom part of the window there is a dashboard, where summary information about users, sessions,
and processes is shown, also graphs by CPU Usage, Memory Usage, Processes, Sessions, Users,
Active users, Idle Users, Disconnected Users, RDP Incoming and Outgoing Bytes for each server are
shown.
Choose a tab above graph to view a parameter.
Users tab
You can view information about users which are connected to a terminal server on the Users tab in
Terminal Services Manager.

Terminal Services Manager - Getting Started
21
You can interact with any of the connected users you see simply by right clicking him.
You will call up a shortcut menu that contains several options which allow you to disconnect users, send a
message to them, or even remotely control their sessions. The shortcut menu even allows you to view the
user activity, failed logons of the user, to reset user session or to log off user.
There are graphs for each user on the bottom part of the window. Graphs by CPU Usage, Memory Usage,
Processes, RDP Incoming and Outgoing Bytes are available.

Terminal Services Manager - Getting Started
22
Choose a tab above graphs to view a parameter.
Sessions tab
You can view information about sessions running on a terminal server on the Sessions tab in Terminal
Services Manager.
The Sessions tab presents basically the same information as the Users tab, but the information is
organized into sessions rather than users. This screen shows even sessions that wouldn’t appear on the
Users tab because they aren’t related to users, such as the Services session.
You can interact with any of the sessions you see simply by right clicking it.
You’ll call up a menu that contains several options which allow you to disconnect session, send a message
to them, shadow (remotely control) their sessions or even allow you to reset a session.
Graphs for each session are shown on the bottom part of the window. Graphs by CPU Usage, Memory
Usage, Processes, RDP Incoming and Outgoing Bytes are available.

Terminal Services Manager - Getting Started
23
Choose a tab above graphs to view a parameter.
Processes tab
You can view information about processes that are running on a terminal server on the Processes tab in
Terminal Services Manager.
You can interact with any of the process you see simply by right-clicking it.

Terminal Services Manager - Getting Started
24
You may terminate a process running in a user session by using the Terminate action in Terminal Services
Manager.
You may filter process list by some parameters.
e.g. filter processes by memory used
Graphs for each selected process are shown on the bottom part of the window. Graphs by CPU Usage,
Memory Usage, Pagefile Usage, Threads and Handles are available.

Terminal Services Manager - Getting Started
25
Choose a tab above graphs to view a parameter.
Dialog boxes
Add Computer
You can use Add Computer dialog box to specify a name or IP address of the computer that you want to
add to the computer list.
Computer name or IP address
Type computer name or IP address. Also you may choose a computer from network neighborhood by
pressing '…' button.
Description
Also, you may specify a friendly name of the computer as you like, for example «Backup Server #1»
Click ■■, and a new computer will be added to computer list.

Terminal Services Manager - Getting Started
26
Create New Group
You can specify the name of the new group in the computer list in the Create New Group dialog box. After
you created the group, you can move computers to it or add new ones to it.
Group name
Type group name as you like, for example, «RDP servers»
Click ■■, and a new group will be added to computer list, then you may add new computers to this group or
move existing ones to it.
Add Computers Wizard
The Add Computers Wizard will help you to add computers to the list.

Terminal Services Manager - Getting Started
27
Import computers from network
You may import all computers from your network.
You can select the types of computers that will be added to the computer list on this page. For example: to
add only workstations to the list, leave only the Workstation checkbox selected or you can select the Servers
that not DC checkbox if you need only servers.
Click the Next button after the necessary options are specified.

Terminal Services Manager - Getting Started
28
Import computers from Active Directory
You may add all computers from your corporate Active Directory.
Include disabled computers
Computers disabled in Active Directories will be added to the list.
Click the Next button after the necessary options are specified.
Import computers from IP Range
You may scan your local network in specified IP address range and add them to the computer list.

Terminal Services Manager - Getting Started
29
Start IP
Specify the beginning of IP address range.
Stop IP
Specify the end of IP address range.
Detect IP Range
This option will set Start IP and Stop IP according to network interface preferences of the computer, if there
are few network interfaces, the interface list will be shown to choose required one.
Class B
Start and stop IP range will be set according to network class B. For example, 192.168.1.1 -
192.168.255.254.
Class C
Start and stop IP range will be set according to network class ■. For example, 192.168.1.1 - 192.168.1.254.
Resolve computer names
Also computer names will be resolved during scanning IP range.
Add only live computers
Only computers that are active during scanning will be added to computer list.
Click Next button after necessary options are specified.

Terminal Services Manager - Getting Started
30
Import computers from file
You may add computers to a computer list from a text file.
Text file must be plain text file with one IP address or computer name per line.
192.168.1.1
192.168.1.2
192.168.1.3
192.168.1.4
192.168.1.5
192.168.1.6
192.168.1.7
192.168.1.8
192.168.1.9
192.168.1.10
192.168.1.11
Click the Next button after the necessary options are specified.
Search for computers
When you switch to this page, the wizard will start scanning the network neighborhood for computers.

Terminal Services Manager - Getting Started
31
You will see the list of found computers after the scanning process is over. To change the search
parameters, click the Back button. If the results are okay, move to the next page by clicking the Next button.
Select grouping type for computers
You can specify how to add the found computers to the list on this page.

Terminal Services Manager - Getting Started
32
Leave original grouping
If you select the Leave original grouping option, you will add the computers the way they were shown on
the previous page and computer groups will correspond to the domains and workgroups detected in the
network neighborhood.
Add computers to a new group
If you want the computers to be in one group for some reason, you should select Add computers to a new
group. After you select this option, you can specify the name of a new group.
Add computers to an existing group
After you select this option, you can specify an existing group to add the computers
Then you will be able to move on by clicking the Next button.
Add computers to list
You may specify option, what to do, if found computers are already in the list.
Add new computers
Found computers will be added even if they are already in the list.
Delete old computers
Found computers will be added. If the computer is in the list then the old one will be deleted and the new
computer will be added.
Terminal Services Manager - Getting Started
33
Do not add new computers
New computer will not be added if they are already in the list.
After you click the Finish button, all found computers will be added to the computer list in the main window.
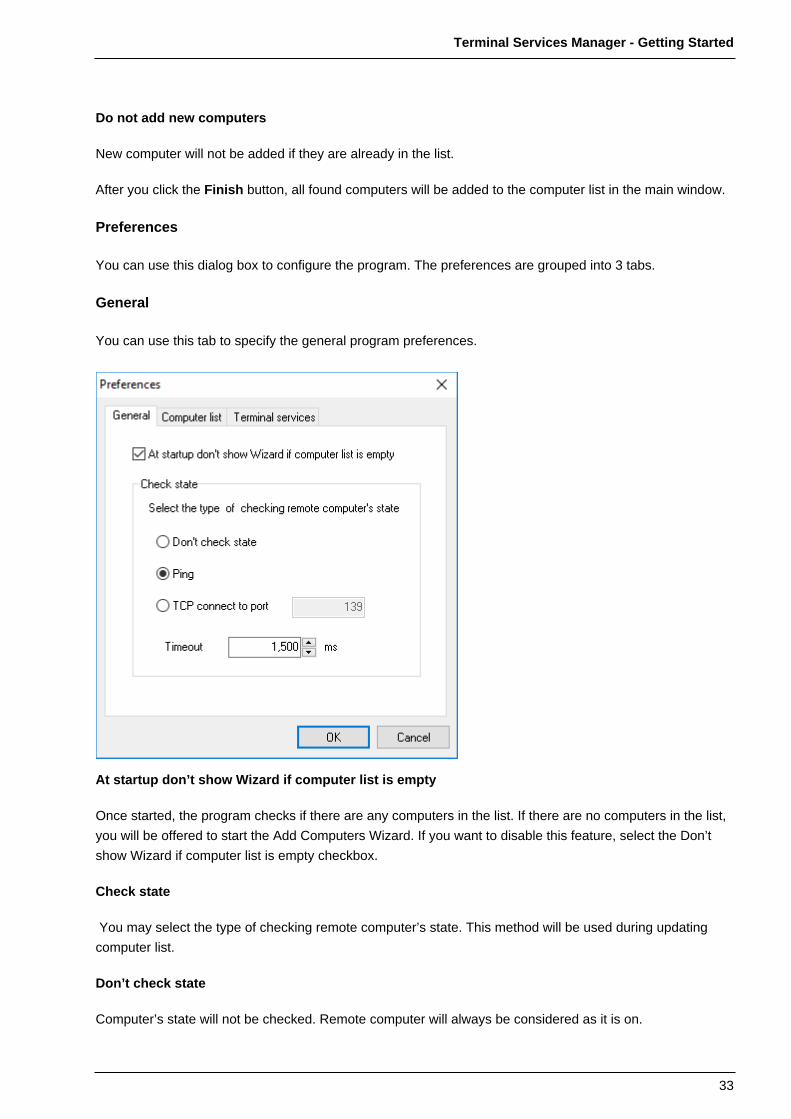
Preferences
You can use this dialog box to configure the program. The preferences are grouped into 3 tabs.
General
You can use this tab to specify the general program preferences.
At startup don’t show Wizard if computer list is empty
Once started, the program checks if there are any computers in the list. If there are no computers in the list,
you will be offered to start the Add Computers Wizard. If you want to disable this feature, select the Don’t
show Wizard if computer list is empty checkbox.
Check state
You may select the type of checking remote computer’s state. This method will be used during updating
computer list.
Don’t check state
Computer’s state will not be checked. Remote computer will always be considered as it is on.
Terminal Services Manager - Getting Started
34
Ping
Computer’s state will be checked with ping command.
TCP connect to port
Computer’s state will be checked by connecting to specified port. If connection is successful, the computer is
considered as it is on.
Timeout
Timeout to check the computer is on/off. If computer responds earlier than specified period of time then
computer is considered as it is on.
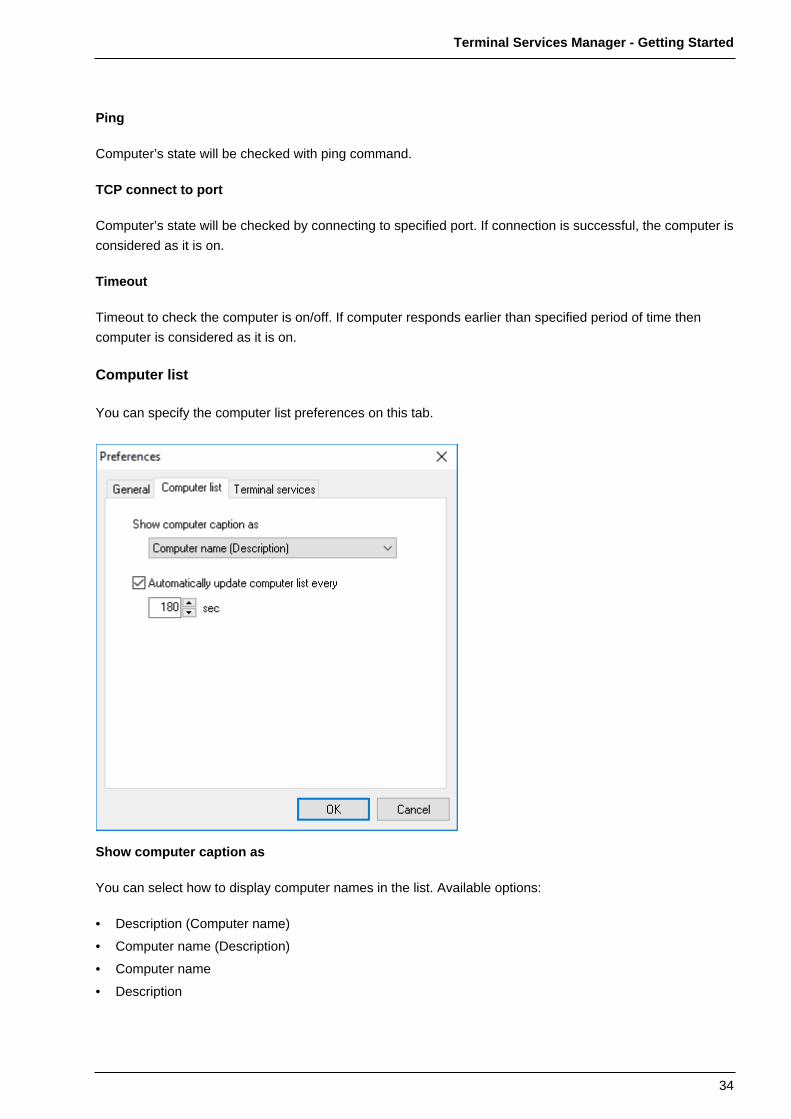
Computer list
You can specify the computer list preferences on this tab.
Show computer caption as
You can select how to display computer names in the list. Available options:
• Description (Computer name)
• Computer name (Description)
• Computer name
• Description

Terminal Services Manager - Getting Started
35
Automatically update list every
If you select this checkbox, the program will update the state of computers (on/off) using the specified time
interval. The state of computers is checked with the methods selected in the properties of each computer. If
you do not select this checkbox, all computers in the list will be shown as active (on).
Terminal services
You can specify the monitoring terminal services preferences on this tab.
Automatically refresh server list every
You may specify after what period of time data for servers should be updated. Default value is 5 seconds.
We recommend to specify a value more than 5 seconds in order not to overload servers.
Also, you may disable automatic data refresh by unchecking this option.
Time window
Time window will be shown on graphs. Default value is 5 minutes. We don’t recommend to specify value
more than few hours in order not to overload memory with the program data.
Decrease memory consuming
To decrease memory consumption, history for some parameters may be disabled. If you disable history for
parameters, then you can not view graphs for these parameters.

Terminal Services Manager - Getting Started
36
Connect with /admin option
By default, the Connect with /admin option check box is selected. If you connect to a session by using the
/admin option, membership in the Administrators group on the remote computer is the minimum required.
If you do not want to connect to a session by using the /admin option, clear the Connect with /admin option
check box.
LizardSystems
lizardsystems.com