Embed Size (px)
Citation preview
Telstra Digital Business®
CommPilot
Administrator Reference Guide
September 2011

Sept 11 Page 2 of 74
Telstra Digital Business®, CommPilot Administrator Reference Guide
This work is copyright. Apart from any use as permitted under the Copyright Act 1968, information contained within this manual cannot be used for any other purpose other than the purpose for which it was released. No part of this publication may be reproduced, stored in a retrieval system, or transmitted in any form or by any means, electronic, mechanical, photocopying, recording or otherwise, without the written permission of Telstra Corporation Limited.
® Registered trade mark of Telstra Corporation Limited ABN 33 051 775 556.
Sept 11 Page 3 of 74
Welcome to Telstra Digital Business®
This guide will help you get set up your service, make changes to it, and find more information when you need it.
More Information
If you have questions beyond this guide, we want to help.
To learn more about your Digital Business tools and features, visit the Digital Business Online Support page at telstra.com/digitalbusiness/support
To speak with a Digital Business consultant, or set up a Digital Business training session, phone us on 13 2000 and say “Digital Business” when prompted. Our consultants are available 24 hours a day.
When phoning, please have your Account Number or phone number, including area code, ready for the consultant.
Conventions Used in this Guide
The following typographical convention has been used in this guide for simplici ty and readability.
Web addresses, email addresses and hyperlinks are shown in bold italics, for example telstra.com/digitalbusiness/support.
Button names and titles/features on your computer screen are shown in italics.
Keys, buttons and menu selections on your phone are shown in bold.
User input is shown in typewriter font.
Sept 11 Page 4 of 74
Table of Contents
Section 1. Introduction 7
The Purpose of this Guide ............................................................................................................................7
Section 2. Getting Started 8
Log In ..............................................................................................................................................................8
Role Type Indicator .......................................................................................................................................8
Navigation Pane and Content Pane ...........................................................................................................9
Help, Home, Logout Links ......................................................................................................................... 10
Buttons ........................................................................................................................................................ 10
Section 3. Searching within a window 11
Search List Pages ........................................................................................................................................ 11
Define Search Criteria ............................................................................................................................................ 11 Change Sort Order of Data ................................................................................................................................... 12 Display another Page ............................................................................................................................................ 13
Section 4. Profile Menu 14
Users ............................................................................................................................................................. 14
Managing Each User ............................................................................................................................................. 15
Profile ........................................................................................................................................................... 16
Change Password ....................................................................................................................................... 16
Administrators ............................................................................................................................................ 17
Schedules .................................................................................................................................................... 18
Display Holiday Schedules ................................................................................................................................... 18 Add Schedules ........................................................................................................................................................ 18 Modify or Delete a Schedule ................................................................................................................................ 19
Call Processing Policies .............................................................................................................................. 20
Communication Barring Auth Codes ....................................................................................................... 21
Dial Plan Policy ........................................................................................................................................... 21
Section 5. Resources Menu 22
Section 6. Services Menu 23
Auto Attendant ........................................................................................................................................... 23
Activate Auto Attendant ....................................................................................................................................... 23 Setting Up Auto Attendant on your existing Main Business Number ........................................................... 24 Customise/Modify Auto Attendant ..................................................................................................................... 25 Customising the Greeting and Dial Menus ........................................................................................................ 27
Hunt Group .................................................................................................................................................. 28
Music/Video On Hold ................................................................................................................................. 28
Add or Modify Music/Video On Hold ................................................................................................................... 28
Session Admission Control Group ............................................................................................................ 30
Third-party Voicemail Support................................................................................................................. 30
Section 7. Calling Plan Menu 31
Digit Strings ................................................................................................................................................. 31
View Digit Strings ................................................................................................................................................... 31 Modify a Digit String ............................................................................................................................................. 32 Add Digit Strings..................................................................................................................................................... 32
Incoming Calling Plan ................................................................................................................................ 33
Sept 11 Page 5 of 74
Outgoing Calling Plan ................................................................................................................................ 33
Outgoing Digit Plan .................................................................................................................................... 33
Section 8. Utilities Menu 35
Common Phone List ................................................................................................................................... 35
Custom Contact Directory ......................................................................................................................... 35
View Custom Contact Directories ........................................................................................................................ 36 Add a Custom Contact Directory ......................................................................................................................... 36 Modify/remove users from a Custom Contact Directory ................................................................................. 36 Delete a Custom Contact Directory..................................................................................................................... 37
Feature Access Codes ................................................................................................................................. 37
Enterprise Directory ................................................................................................................................... 39
Inventory Report ........................................................................................................................................ 40
Password Rules ........................................................................................................................................... 41
Configure Device ......................................................................................................................................... 42
Extension Dialling ...................................................................................................................................... 42
Intercept Group .......................................................................................................................................... 42
Section 9. User‟s Profile Menu 43
User – Profile Menu .................................................................................................................................... 43
Modify or Delete a User Profile ............................................................................................................................ 44 Addresses ................................................................................................................................................................ 45 Passwords ............................................................................................................................................................... 45 Schedules ................................................................................................................................................................ 45 Call Application Policies ........................................................................................................................................ 46 Call Policies ............................................................................................................................................................. 46 Call Processing Policies ......................................................................................................................................... 47 Communication Barring Auth Codes .................................................................................................................. 47
Section 10. User‟s Incoming Calls Menu 48
Calling Name Retrieval .............................................................................................................................. 48
Call Forwarding Always ............................................................................................................................ 49
Call Forwarding Busy ................................................................................................................................. 49
Call Forwarding No Answer ...................................................................................................................... 50
Call Forwarding Not Reachable ............................................................................................................... 50
External Calling line ID Delivery ............................................................................................................... 51
Internal Calling line ID Delivery ................................................................................................................ 51
Sequential Ring .......................................................................................................................................... 52
Simultaneous Ring Personal ..................................................................................................................... 53
Section 11. User‟s Outgoing Calls Menu 55
Call Return ................................................................................................................................................... 55
Calling Line ID Delivery Blocking .............................................................................................................. 55
Personal Phone List .................................................................................................................................... 56
Section 12. User‟s Call Control Menu 57
Call Waiting ................................................................................................................................................. 57
Customer Originated Trace ....................................................................................................................... 58
Flash Call Hold ............................................................................................................................................ 58
Call Transfer ................................................................................................................................................ 58
Three-Way Call ........................................................................................................................................... 59

Sept 11 Page 6 of 74
Music/Video On Hold ................................................................................................................................. 59
Remote Office ............................................................................................................................................. 60
Shared Call Appearance ............................................................................................................................ 61
Section 13. User‟s Calling Plan Menu 63
Incoming Calling Plan for a User .............................................................................................................. 63
Outgoing Calling Plan for a User .............................................................................................................. 64
Configure Outgoing Digit Plan .................................................................................................................. 65
Section 14. User‟s Messaging Menu 66
Third-Party Voicemail Support ................................................................................................................. 66
Section 15. User‟s Utilities Menu 68
Authentication ............................................................................................................................................ 68
Feature Access Codes ................................................................................................................................. 68
Enterprise Directory ................................................................................................................................... 69
Intercept User ............................................................................................................................................. 70
Registrations ............................................................................................................................................... 71
Section 16. Need More Help? 72
Section 17. Acronyms and Abbreviations 73

Sept 11 Page 7 of 74
Section 1. Introduction
Telstra‟s Digital Business Voice Service delivers hosted IP Telephony with a broad and innovative range of telephony technology as we commonly know it. With CommPilot, Business owners can now independently configure and manage incoming and outgoing calls to and from their business.
CommPilot allows business owners to remotely access their company‟s telephony system to:
• customise how the business will respond to calls
• manage incoming and outgoing calls
• manage employees‟ phone numbers
• manage employees‟ rights
The Purpose of this Guide
This Administrator Guide is designed for the Telstra Digital Business® account holder or an employee authorised to manage the telephone service.
Using the Administrator login details the administrator can perform a wide ran ge of functions, described in the following sections.

Sept 11 Page 8 of 74
Section 2. Getting Started
Log In
The Login page (Figure 1) is used to log in to the CommPilot. The User ID and password assigned by Telstra are required to log into CommPilot. You can find your user ID and original password in the Configuration Summary email you received when you signed up for Telstra Digital Business®.
Figure 1 The Login window
To log into CommPilot:
1. Launch your web browser. To access CommPilot, you can click on the CommPilot link from the telstra.com/digitalbusiness/tools page, or type https://ews.digitalbusiness.telstra.com/ in the address bar.
2. Enter your User ID and password.
3. Click Login, or press ENTER on your keyboard.
Note: If this is your first time logging in or if your password has expired, the Password Change page will be displayed. Follow the steps below if this page is displayed.
4. Enter your new password. (Re-enter the password if prompted – only for first login).
5. To save your changed password, click OK – the Home page will be displayed. Click Cancel to display the previous page.
IMPORTANT INFORMATION
Do NOT log in to the same computer as both a group administrator and as a user at the same time.
Role Type Indicator
Telstra Digital Business® provides a cascading system of user types or roles, in which the top role (system provider - Telstra) can perform any system function, followed by sub roles that in turn can perform a subset of the functions than the preceding role. Examples of roles are system provider, group administrator and User. One person can perform more than one role.
Section 2. Getting Started
Sept 11 Page 9 of 74
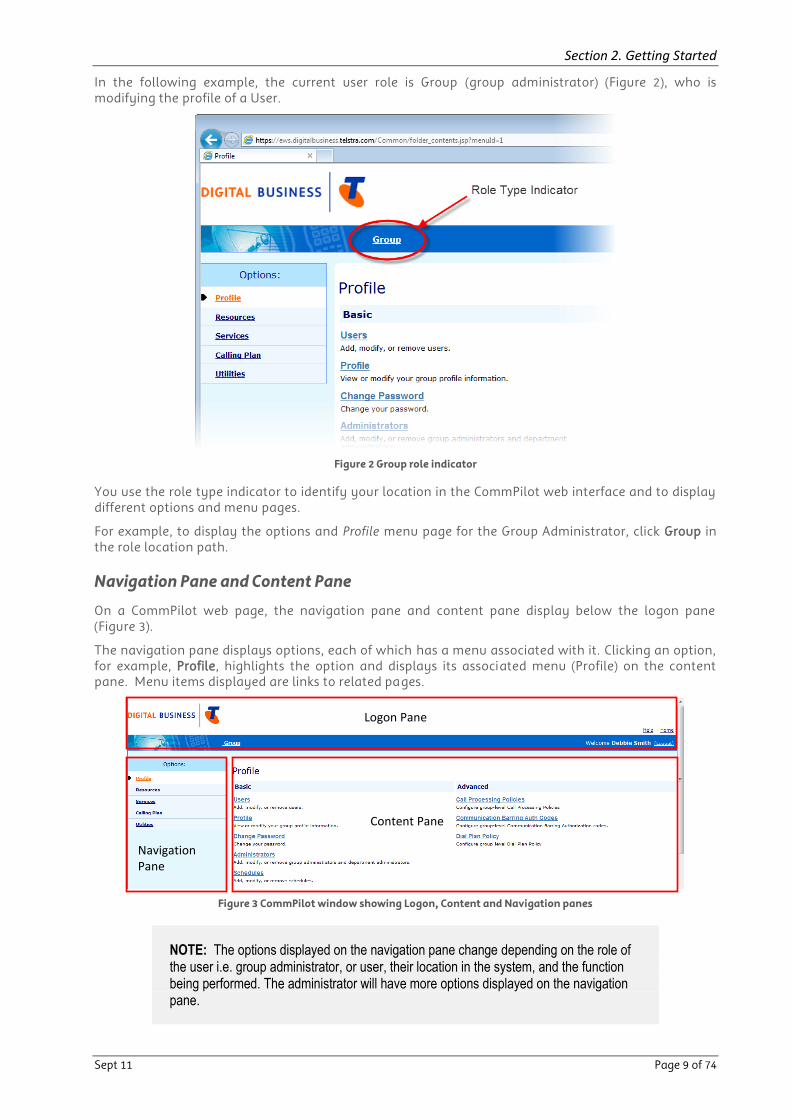
In the following example, the current user role is Group (group administrator) (Figure 2), who is modifying the profile of a User.
Figure 2 Group role indicator
You use the role type indicator to identify your location in the CommPilot web interface and to display different options and menu pages.
For example, to display the options and Profile menu page for the Group Administrator, click Group in the role location path.
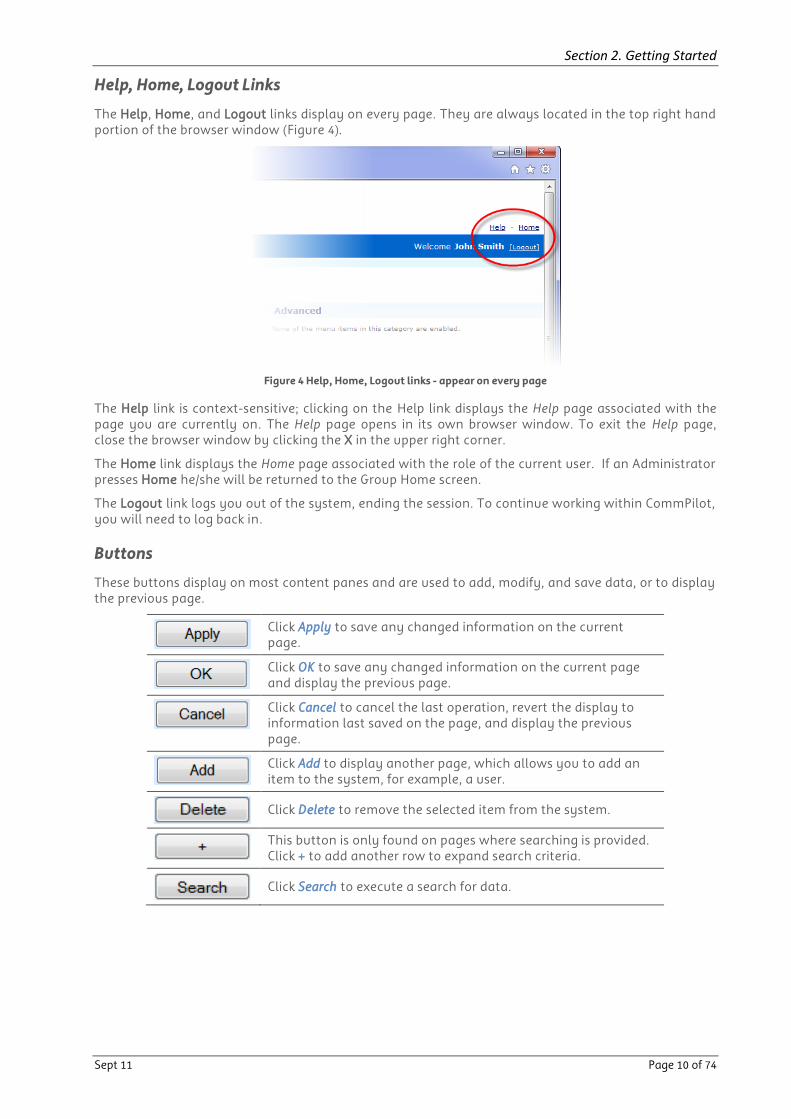
Navigation Pane and Content Pane
On a CommPilot web page, the navigation pane and content pane display below the logon pane (Figure 3).
The navigation pane displays options, each of which has a menu associated with it. Clicking an option, for example, Profile, highlights the option and displays its associated menu (Profile) on the content pane. Menu items displayed are links to related pages.
Figure 3 CommPilot window showing Logon, Content and Navigation panes
NOTE: The options displayed on the navigation pane change depending on the role of the user i.e. group administrator, or user, their location in the system, and the function being performed. The administrator will have more options displayed on the navigation pane.
Logon Pane
Content Pane
Navigation Pane
Section 2. Getting Started
Sept 11 Page 10 of 74
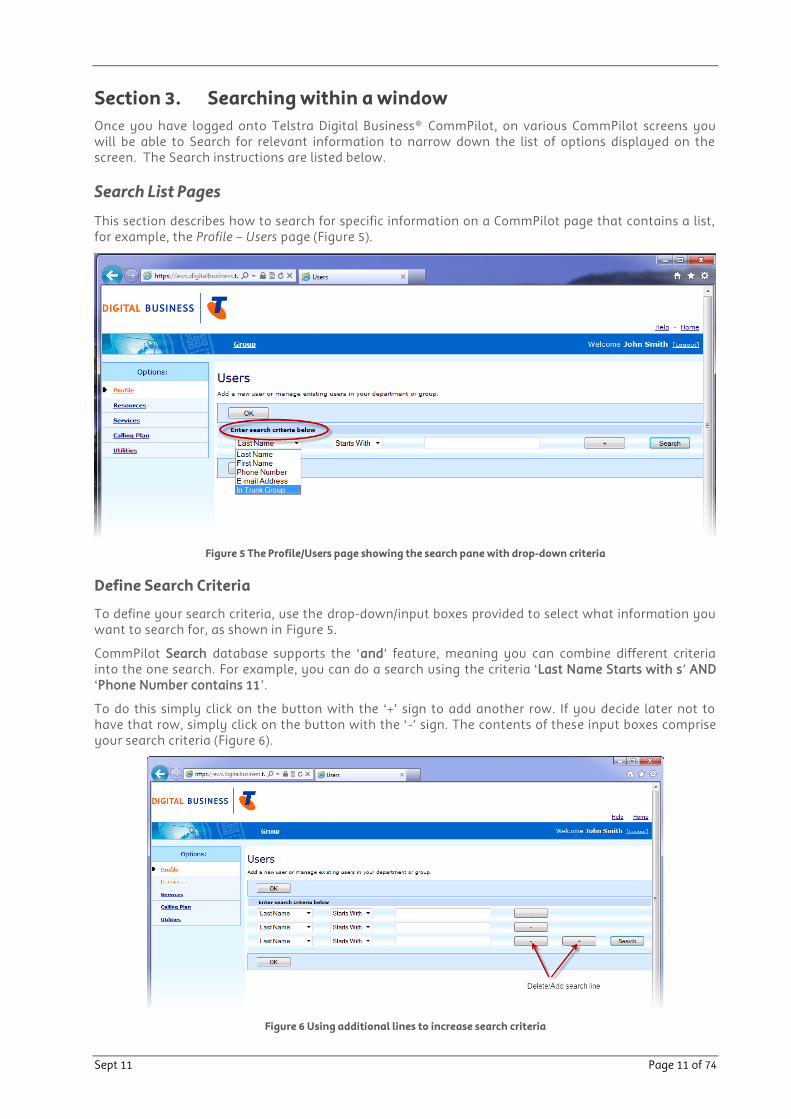
Help, Home, Logout Links
The Help, Home, and Logout links display on every page. They are always located in the top right hand portion of the browser window (Figure 4).
Figure 4 Help, Home, Logout links - appear on every page
The Help link is context-sensitive; clicking on the Help link displays the Help page associated with the page you are currently on. The Help page opens in its own browser window. To exit the Help page, close the browser window by clicking the X in the upper right corner.
The Home link displays the Home page associated with the role of the current user. If an Administrator presses Home he/she will be returned to the Group Home screen.
The Logout link logs you out of the system, ending the session. To continue working within CommPilot, you will need to log back in.
Buttons
These buttons display on most content panes and are used to add, modify, and save data, or to display the previous page.
Click Apply to save any changed information on the current page.
Click OK to save any changed information on the current page and display the previous page.
Click Cancel to cancel the last operation, revert the display to information last saved on the page, and display the previous page.
Click Add to display another page, which allows you to add an item to the system, for example, a user.
Click Delete to remove the selected item from the system.
This button is only found on pages where searching is provided. Click + to add another row to expand search criteria.
Click Search to execute a search for data.
Sept 11 Page 11 of 74
Section 3. Searching within a window
Once you have logged onto Telstra Digital Business® CommPilot, on various CommPilot screens you will be able to Search for relevant information to narrow down the list of options displayed on the screen. The Search instructions are listed below.
Search List Pages
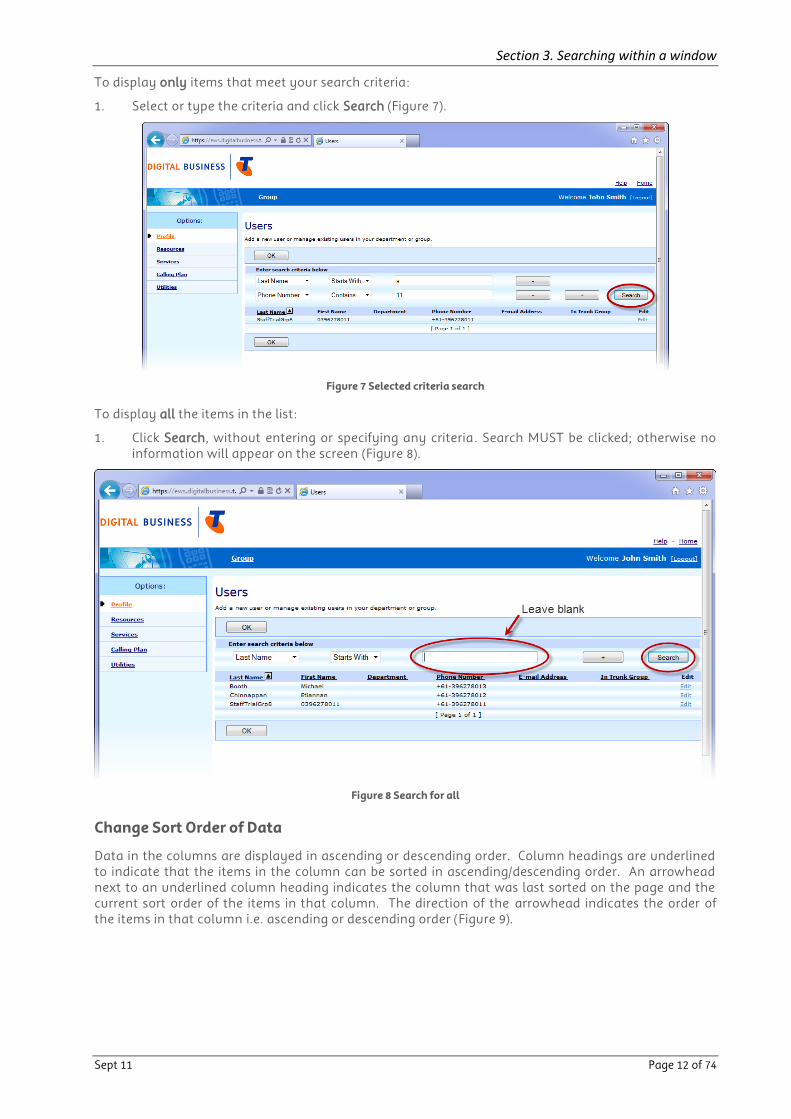
This section describes how to search for specific information on a CommPilot page that contains a list, for example, the Profile – Users page (Figure 5).
Figure 5 The Profile/Users page showing the search pane with drop-down criteria
Define Search Criteria
To define your search criteria, use the drop-down/input boxes provided to select what information you want to search for, as shown in Figure 5.
CommPilot Search database supports the „and‟ feature, meaning you can combine different criteria into the one search. For example, you can do a search using the criteria „Last Name Starts with s‟ AND „Phone Number contains 11‟.
To do this simply click on the button with the „+‟ sign to add another row. If you decide later not to have that row, simply click on the button with the „-‟ sign. The contents of these input boxes comprise your search criteria (Figure 6).
Figure 6 Using additional lines to increase search criteria
Section 3. Searching within a window
Sept 11 Page 12 of 74
To display only items that meet your search criteria:
1. Select or type the criteria and click Search (Figure 7).
Figure 7 Selected criteria search
To display all the items in the list:
1. Click Search, without entering or specifying any criteria. Search MUST be clicked; otherwise no information will appear on the screen (Figure 8).
Figure 8 Search for all
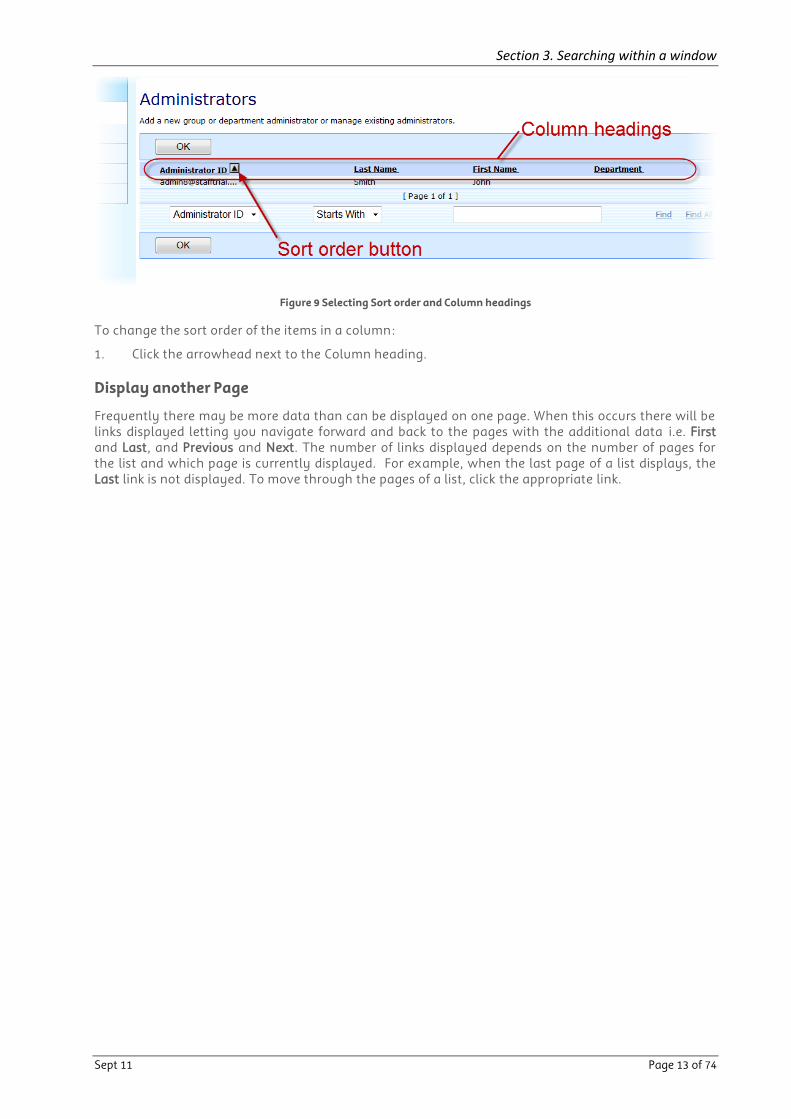
Change Sort Order of Data
Data in the columns are displayed in ascending or descending order. Column headings are underlined to indicate that the items in the column can be sorted in ascending/descending order. An arrowhead next to an underlined column heading indicates the column that was last sorted on the page and the current sort order of the items in that column. The direction of the arrowhead indicates the order of the items in that column i.e. ascending or descending order (Figure 9).
Section 3. Searching within a window
Sept 11 Page 13 of 74
Figure 9 Selecting Sort order and Column headings
To change the sort order of the items in a column:
1. Click the arrowhead next to the Column heading.
Display another Page
Frequently there may be more data than can be displayed on one page. When this occurs there will be links displayed letting you navigate forward and back to the pages with the additional data i.e. First and Last, and Previous and Next. The number of links displayed depends on the number of pages for the list and which page is currently displayed. For example, when the last page of a list displays, the Last link is not displayed. To move through the pages of a list, click the appropriate link.
Sept 11 Page 14 of 74
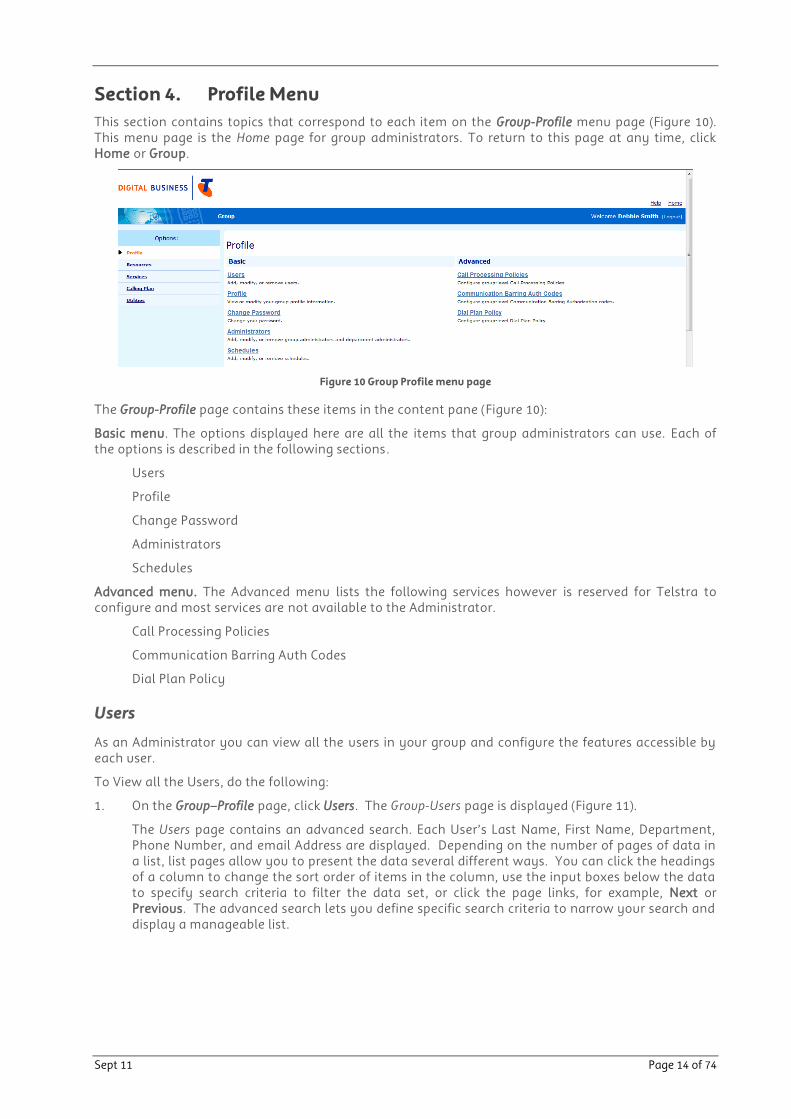
Section 4. Profile Menu
This section contains topics that correspond to each item on the Group-Profile menu page (Figure 10). This menu page is the Home page for group administrators. To return to this page at any time, click Home or Group.
Figure 10 Group Profile menu page
The Group-Profile page contains these items in the content pane (Figure 10):
Basic menu. The options displayed here are all the items that group administrators can use. Each of the options is described in the following sections.
Users
Profile
Change Password
Administrators
Schedules
Advanced menu. The Advanced menu lists the following services however is reserved for Telstra to configure and most services are not available to the Administrator.
Call Processing Policies
Communication Barring Auth Codes
Dial Plan Policy
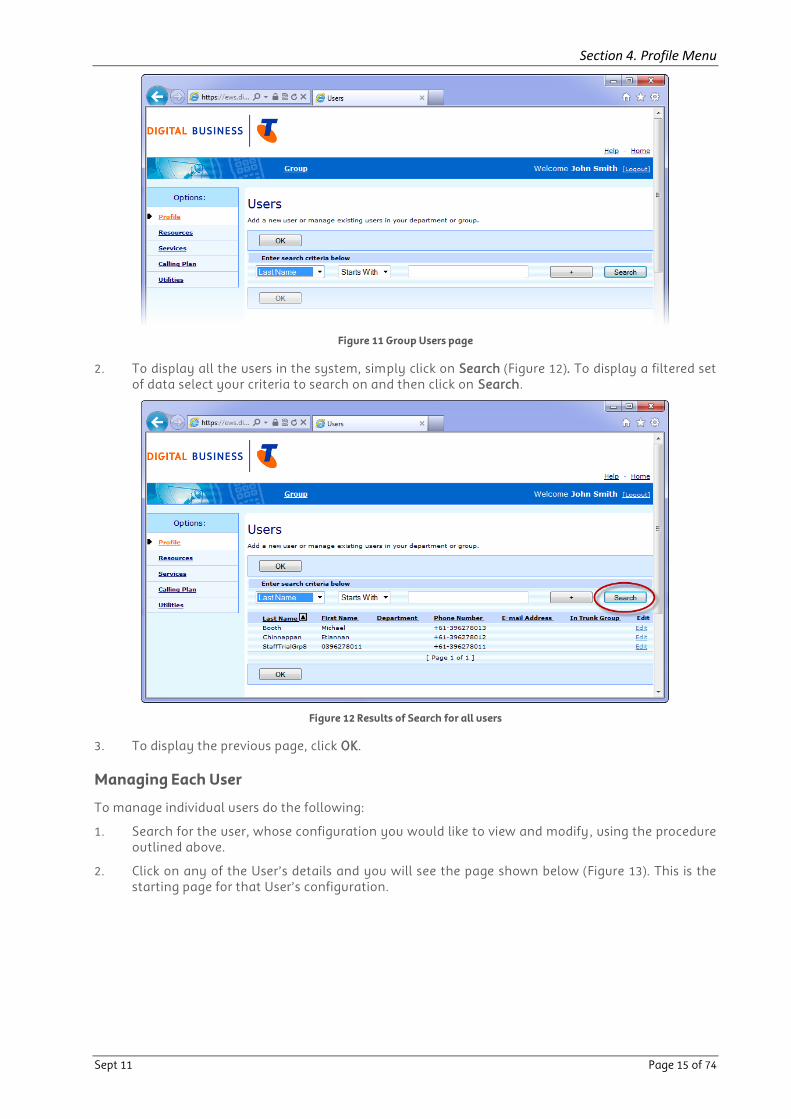
Users
As an Administrator you can view all the users in your group and configure the features accessible by each user.
To View all the Users, do the following:
1. On the Group–Profile page, click Users. The Group-Users page is displayed (Figure 11).
The Users page contains an advanced search. Each User‟s Last Name, First Name, Department, Phone Number, and email Address are displayed. Depending on the number of pages of data in a list, list pages allow you to present the data several different ways. You can click the headings of a column to change the sort order of items in the column, use the input boxes below the data to specify search criteria to filter the data set, or click the page links, for example, Next or Previous. The advanced search lets you define specific search criteria to narrow your search and display a manageable list.
Section 4. Profile Menu
Sept 11 Page 15 of 74
Figure 11 Group Users page
2. To display all the users in the system, simply click on Search (Figure 12). To display a filtered set of data select your criteria to search on and then click on Search.
Figure 12 Results of Search for all users
3. To display the previous page, click OK.
Managing Each User
To manage individual users do the following:
1. Search for the user, whose configuration you would like to view and modify, using the procedure outlined above.
2. Click on any of the User‟s details and you will see the page shown below (Figure 13). This is the starting page for that User‟s configuration.

Section 4. Profile Menu
Sept 11 Page 16 of 74
Figure 13 User Profile page
Note that the Role Location Path displays Group Users [email protected].
‟Users 0392026705‟ means you are viewing the user whose number is 0392026075. The „@telstradb.com‟ simply refers to the installed customer domain. Always refer to the Role Location Path to be certain of the User whose configuration you are changing. All of the menu options that appear are related to that User only.
Refer to Section 9 for instructions on each menu option and how to manage the User‟s configuration.
Profile
Use the Group-Profile page (Figure 14) to view your group profile, e.g. the contact person for the group, the group identification number, the maximum number of users and address of the service.
Figure 14 The Group-Profile-Profile page
On the Group-Profile menu page (Figure 10):
1. Click Profile to display the Profile page (Figure 14).
2. View the group information.
3. Click OK to return to the previous page.
Change Password
This menu allows you to change the Administrator password

Section 4. Profile Menu
Sept 11 Page 17 of 74
The Administrator can change their password through the Group-Profile page. Simply click on the Change Password link to display the Change Password page (Figure 15). A few points to note are:
• The Password must be at least seven characters long.
• The Password can be alphanumeric.
• The Password is case sensitive i.e. a lower case „m‟ is not the same as an upper case „M‟.
• Passwords will expire after 30 days. If you forget your password and try to login, after five failed login attempts your account will be disabled. You will need to call 13 2000 and say “Digital Business” when prompted to speak with a consultant. They will be able to reset your password and provide a temporary password.
Figure 15 Change Password page
On the Group–Profile menu page (Figure 10):
1. Click Change Password. The Group–Change Password page is displayed (Figure 15).
2. Type the information for your current and new password.
3. Click Apply and then OK to save your changes. To exit without saving, click Cancel to return to the previous page.
Administrators
Use this menu item on the Group-Profile menu page to view the Administrator for your group.
Figure 16 Administrators page

Section 4. Profile Menu
Sept 11 Page 18 of 74
On the Group-Profile menu page:
1. Click Administrators. The Administrators page is displayed (Figure 16).
2. View the Administrators configured for your group.
3. Click OK to return to the previous page.
Schedules
The Group-Profile – Schedules menu page will allow you to view and define your time and holiday schedules i.e. after hours and non-working days. During scheduled holidays, features that play daily greetings and dialling menus, for example the Auto Attendant feature, will automatically play the after-hours greeting and dialling menu. Schedules provide the flexibility to configure recurrence patters based on the day of the month, the day of the week, the day of the week in a month, or the month. Schedules can be created at Group or User level and are visible to all users at that level and below. For example a schedule created at Group level is visible and available (but cannot be modifie d) to all users in that Group. A user defined schedule can only be used and modified by the user that created it.
The Administrator can perform the following:
• Display Schedules
• Add Time Schedules
• Add Holiday Schedules
• Modify or Delete a Time or Holiday Schedule
Display Holiday Schedules
The Schedules page displays all the schedules in the group (Figure 17). From this page, you can add, modify, or delete a schedule.
On the Group-Profile menu page:
1. Click Schedules
2. To display the previous page, click OK or Cancel.
Figure 17 Schedules page
Add Schedules
Use the Schedule Add page to add a time or holiday schedule for the group (Figure 18). After you have added a schedule, you can assign it to the Auto Attendant, Sequential Ring or Simultaneous Ring features for a user.

Section 4. Profile Menu
Sept 11 Page 19 of 74
Figure 18 Schedule Add page
On the Group-Profile options page:
1. Click Schedules. The Group- Schedule page is displayed (Figure 17).
2. Click Add. The Schedule Add page is displayed (Figure 18).
3. Type a name for the schedule
4. Select a schedule type: Holiday or Time
5. Click OK to save the details entered and go back to the previous page. To exit without saving, select another page or click Cancel.
6. Click Edit to select the Schedule
7. Click Add to enter your requirements. The Event – Add page displays (Figure 19).
8. Type an Event Name enter its beginning date (Start Date), and its end date (End Date). If the time or holiday is only one day, select the Start and End date as being the same date, and choose the All Day Event check box. If you type the date note that the date is in US format. To select a date, click the calendar icon to the right of the text box. A calendar box will appear. To select the date simply click the date displayed. For future months, click on the arrow keys. The number of schedules is not limited. Required data is indicated with an asterisk (*).
9. Select a recurrence pattern from the Recurs drop down list. Options available are Never, Daily, Weekly, Monthly, Yearly.
10. If the schedule is for the same day each year i.e. Australia Day, ensure you select Yearly from the Recurs drop down list, enter 26 in the Day field, ensure January is appearing in the month field.
11. Ensure Never is selected in the End field
12. Click OK to save your changes
13. Click OK to return to the main Schedule page
Modify or Delete a Schedule
Use the Schedules Modify page to delete or to modify a holiday schedule. On the Profile options page:
Figure 19 Event Add page

Section 4. Profile Menu
Sept 11 Page 20 of 74
1. Click Schedules. The Group –Schedules page is displayed (Figure 17).
2. Click the Edit button next to the Schedule that you would like to delete or modify (Figure 20). The Schedule Modify page will be displayed (Figure 21).
3. Click Edit to access the Event Modify page. To edit the schedule, modify the details under Holiday/Time field, Start Date and End Date, and click OK to save. To exit without saving, click Cancel. To delete a schedule, select Delete next to the schedule to be deleted
4. Click Apply or OK to save changes.
Figure 20 Main Holiday Schedule showing Edit link
Figure 21 Schedule Modify page
Call Processing Policies
Use the Group – Call Processing Policies page to configure the Group Calling Line ID and the group name for Outgoing calls.
On the Group-Profile options page:
1. Click Call Processing Policies. The Call Processing Policies page is displayed (Figure 22).
Figure 22 Call Processing Policies page
Section 4. Profile Menu
Sept 11 Page 21 of 74
2. Select the required option for Calling Line Identity
3. Select the required option for Non-Emergency Calls
4. Select the required option for Emergency Calls
5. Select Block Calling Name for External Calls if required
6. Click OK to save changes
Communication Barring Auth Codes
IMPORTANT INFORMATION
This feature is NOT supported. Do NOT change these settings in this feature.
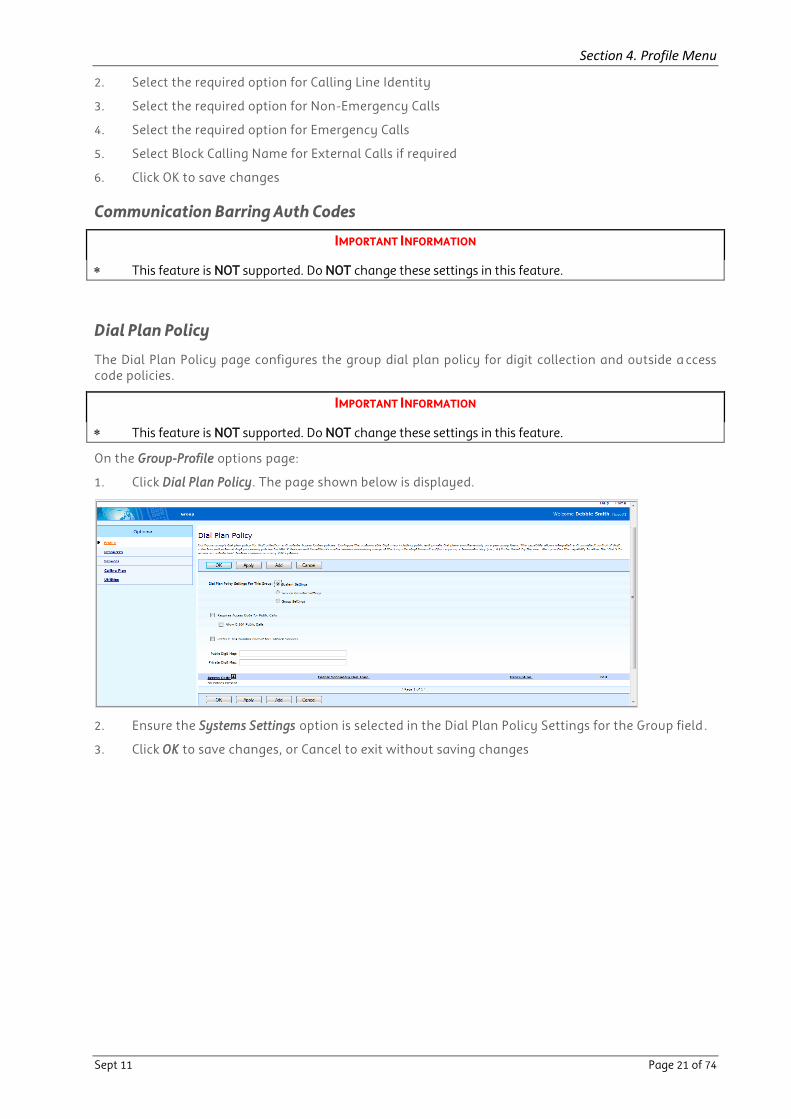
Dial Plan Policy
The Dial Plan Policy page configures the group dial plan policy for digit collection and outside a ccess code policies.
IMPORTANT INFORMATION
This feature is NOT supported. Do NOT change these settings in this feature.
On the Group-Profile options page:
1. Click Dial Plan Policy. The page shown below is displayed.
2. Ensure the Systems Settings option is selected in the Dial Plan Policy Settings for the Group field .
3. Click OK to save changes, or Cancel to exit without saving changes

Sept 11 Page 22 of 74
Section 5. Resources Menu
This page has no configurable options.
Sept 11 Page 23 of 74
Section 6. Services Menu
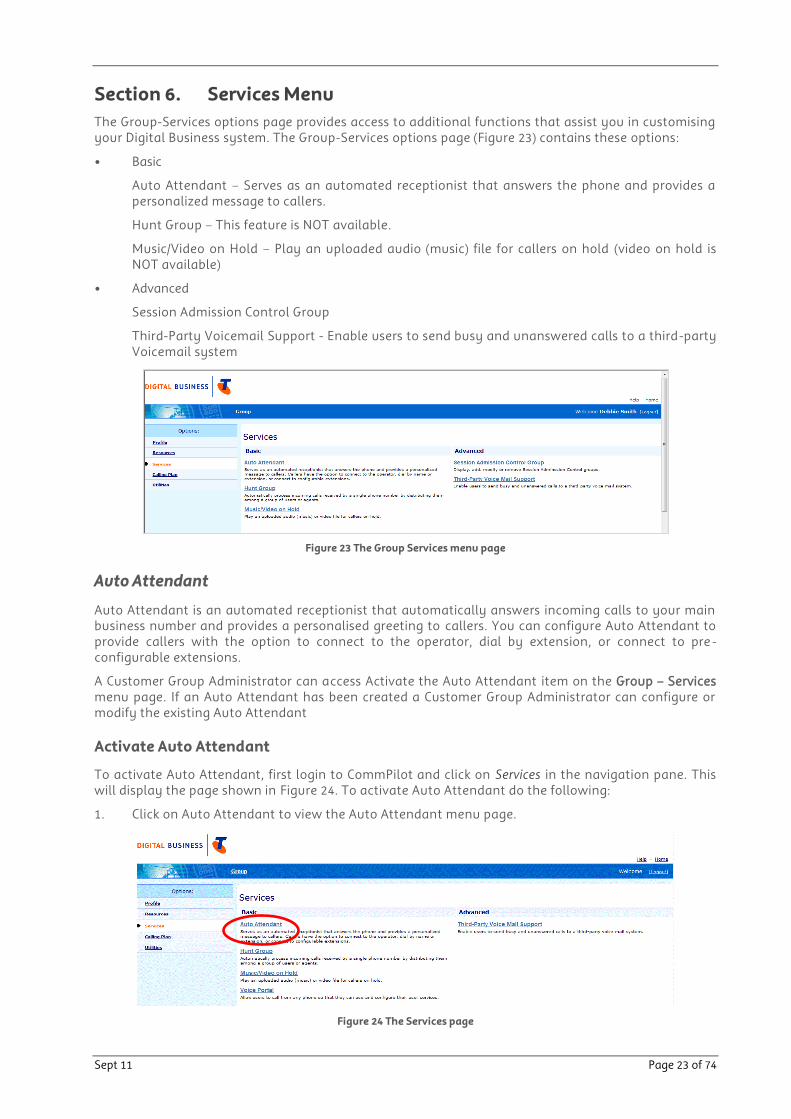
The Group-Services options page provides access to additional functions that assist you in customising your Digital Business system. The Group-Services options page (Figure 23) contains these options:
• Basic
Auto Attendant – Serves as an automated receptionist that answers the phone and provides a personalized message to callers.
Hunt Group – This feature is NOT available.
Music/Video on Hold – Play an uploaded audio (music) file for callers on hold (video on hold is NOT available)
• Advanced
Session Admission Control Group
Third-Party Voicemail Support - Enable users to send busy and unanswered calls to a third-party Voicemail system
Figure 23 The Group Services menu page
Auto Attendant
Auto Attendant is an automated receptionist that automatically answers incoming calls to your main business number and provides a personalised greeting to callers. You can configure Auto Attendant to provide callers with the option to connect to the operator, dial by extension, or connect to pre -configurable extensions.
A Customer Group Administrator can access Activate the Auto Attendant item on the Group – Services menu page. If an Auto Attendant has been created a Customer Group Administrator can configure or modify the existing Auto Attendant
Activate Auto Attendant
To activate Auto Attendant, first login to CommPilot and click on Services in the navigation pane. This will display the page shown in Figure 24. To activate Auto Attendant do the following:
1. Click on Auto Attendant to view the Auto Attendant menu page.
Figure 24 The Services page

Section 6. Services Menu
Sept 11 Page 24 of 74
2. Click on the Active check box (Figure 25) to activate Auto Attendant. Auto Attendant is now activated.
Figure 25 Auto Attendant activation
Setting Up Auto Attendant on your existing Main Business Number
Your main business number is most likely your Digital Business Core Plan phone number. If you want to use the Auto Attendant feature you will need to redirect all incoming calls to your Auto Attendant number. The Auto Attendant number can be found on the Auto Attendant page (Figure 26).
You may also choose to use the default Auto Attendant number as your new business number. If you choose to do so, you will need to make note of your account‟s Auto Attendant phone number (as circled in Figure 26 below) and communicate it as business primary contact number. All customers calling this number will be greeted with Auto Attendant greeting.
Figure 26 Auto Attendant number
To redirect all incoming calls you will need to do the following:
1. Click on Group at top of page.
2. Click on Users in the main window.
3. Select Phone Number from left drop down.
4. Select Equal To from right drop down.
5. Enter the main business number in the empty field.
6. Click on Search. This will display the main business number.
7. Click on Edit to display the Profile page.
8. On the Profile page, click the Incoming Calls link. The Incoming Calls page will open (Figure 27).
Section 6. Services Menu
Sept 11 Page 25 of 74
Figure 27 Incoming Calls page
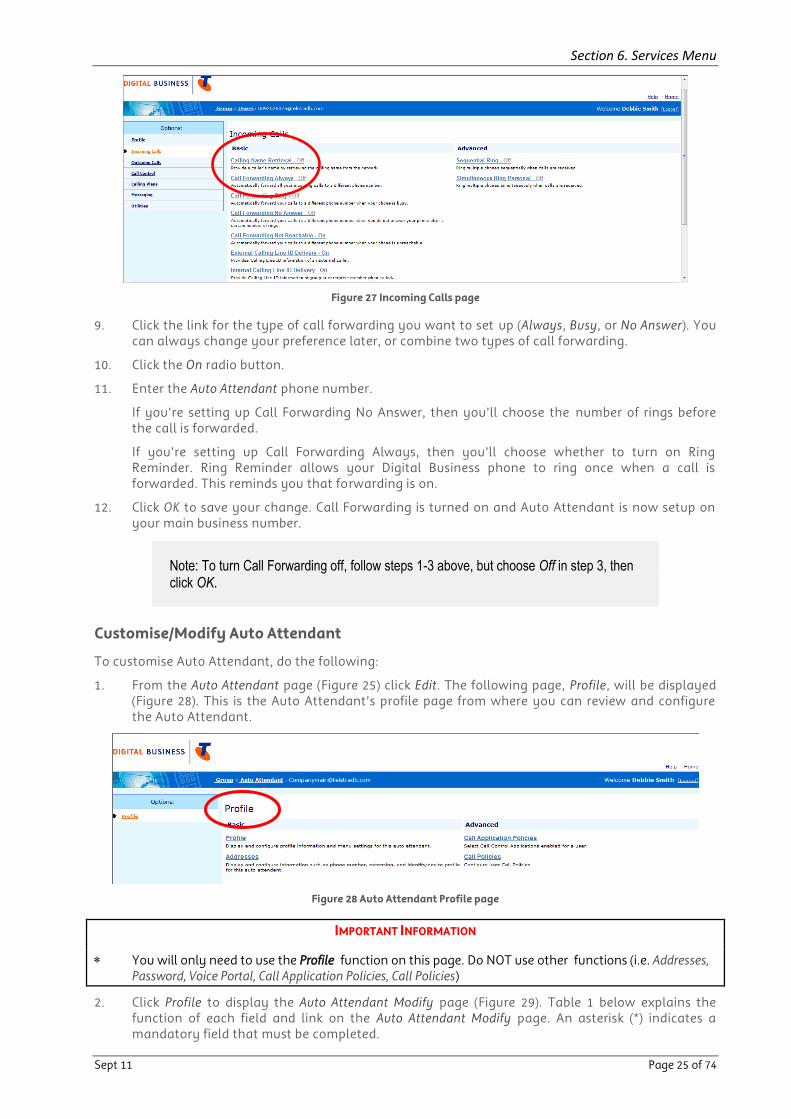
9. Click the link for the type of call forwarding you want to set up (Always, Busy, or No Answer). You can always change your preference later, or combine two types of call forwarding.
10. Click the On radio button.
11. Enter the Auto Attendant phone number.
If you‟re setting up Call Forwarding No Answer, then you‟ll choose the number of rings before the call is forwarded.
If you‟re setting up Call Forwarding Always, then you‟ll choose whether to turn on Ring Reminder. Ring Reminder allows your Digital Business phone to ring once when a call is forwarded. This reminds you that forwarding is on.
12. Click OK to save your change. Call Forwarding is turned on and Auto Attendant is now setup on your main business number.
Note: To turn Call Forwarding off, follow steps 1-3 above, but choose Off in step 3, then click OK.
Customise/Modify Auto Attendant
To customise Auto Attendant, do the following:
1. From the Auto Attendant page (Figure 25) click Edit. The following page, Profile, will be displayed (Figure 28). This is the Auto Attendant‟s profile page from where you can review and configure the Auto Attendant.
Figure 28 Auto Attendant Profile page
IMPORTANT INFORMATION
You will only need to use the Profile function on this page. Do NOT use other functions (i.e. Addresses, Password, Voice Portal, Call Application Policies, Call Policies)
2. Click Profile to display the Auto Attendant Modify page (Figure 29). Table 1 below explains the function of each field and link on the Auto Attendant Modify page. An asterisk (*) indicates a mandatory field that must be completed.

Section 6. Services Menu
Sept 11 Page 26 of 74
Table 1 Fields and features on the Auto Attendant Modify page
INPUT DESCRIPTION
* Name Name for the auto attendant.
* Calling Line ID Last Name Auto Attendant‟s Last name that will be displayed when Caller ID is ON. This can be a person or a department name.
* Calling Line ID First Name Auto Attendant‟s First name that will be displayed when Caller ID is ON. This can be a person or a department name.
Department Not Available
Language Only English is available
Time Zone Click the drop-down arrow to choose a time zone.
Business Hours • Defines the business hours for the auto attendant. During business hours, callers hear the Business hours greeting and dialling menu.
• “EveryDayAllDay” means that no schedule for business hours is in effect.
• Business Hours can be defined by clicking on the Schedules option from the main Profile page after logging in. After you define the Time Schedule, it will automatically appear in the Business Hours drop down list.
• See the next section for more detail on modifying the Business Hours.
Holiday Schedule • Defines the non-business hours for the auto attendant. On a scheduled holiday or after-hours, callers will hear the after-hours greeting and dialling menu.
• After Hours/Holiday Schedule can be defined by clicking on the Schedules option from the main Profile page after logging in. After you define the Holiday Schedule, it will automatically appear in the Holiday Schedule drop down list.
• See the next section for more detail on modifying the Holiday Schedule.
Business Hours Menu • Defines the business hours greeting and dialling menu
• Specifies the description, actions and phone numbers for each number (option) the calling customer is presented with. Please see the following section for more information
After Hours Menu • Defines the non-business hours greeting and dialling menu
• Specifies the description, actions and phone numbers for each number (option) the calling customer is presented with. Please see the following section for more information
Scope of extension dialling Do NOT modify this setting.
Scope of name dialling Do NOT modify this setting.
Name Dialling Entries Do NOT modify this setting.
3. When all modifications have been made, click on Apply to save your changes.
4. Click on OK to go back to the Auto Attendant page. To go back to the Auto Attendant page without saving your changes, click Cancel.

Section 6. Services Menu
Sept 11 Page 27 of 74
Figure 29 The Auto Attendant Modify page
Customising the Greeting and Dial Menus
Customising what your customers hear when they call your business is a good way to enhance their experience of your company. Whether it‟s routing them quickly to the right area or keeping them engaged while waiting, the Auto Attendant is where the options are held. Options that can be modified include the auto attendant greetings and the dialling menu prompts. An example of a dialling prompt is “Dial 1 for Sales”. It is recommended that you plan and record a personalised welcome greeting and dialling instruction for your customers.
Note: The recording to be used must be saved as a .WAV file. You will need a microphone connected to your laptop/PC to record the greeting. This guide does not cover the production of a .WAV file. Refer to your computer Help or documentation.
Customising Business Hours
To configure your business hours greeting and menu prompts, do the following:
1. Click on the Business Hours Menu link in the Auto Attendant Modify page (see red circle in Figure 29). This will open the Business Hours Menu page (Figure 30).
2. Select either Default Greeting or Personal Greeting. The default greeting plays a generic system recording which does not identify a company by name. The default greeting cannot be modified.
Figure 30 Setting the Business Hours Menu options page
Section 6. Services Menu
Sept 11 Page 28 of 74
3. Select Personal Greeting to play your customised recording. Click Browse to select the audio file on your computer.
4. Click the check box Enable First-Level Extension Dialling to allow callers to skip the welcome greeting by dialling the extension of the person they would like to reach. The caller will be successfully connected to the person they are trying to only if they know that person‟s extension number.
5. Specify the menu options (Table 2).
6. Make sure that your welcome greeting and dialling instruction, which is the recorded audio file , matches the Key, Description, Action and Phone numbers that you create. Under Action you can choose how to handle the calls to the destination number. Click on Help located at the top right hand side of the page for a description of each option under Action.
The following is an explanation of the Menu options:
Table 2 Business Hours menu description
OPTION DESCRIPTION
Key List of the numbers on the telephone keypad to which you assign actions.
Description Description of where the caller will end-up after pressing the Key above.
Action A drop-down list of actions. Options available are; Transfer with prompt, Transfer without prompt, Transfer to Operator, Name Dialling, Extension Dialling, Repeat menu, Exit. Refer to Help for more information
Phone Number The destination phone that the caller will be transferred to after pressing the Key
7. Click OK to save your changes.
Customising Non-Business Hours
Click on After Hours at the Auto Attendant Modify page to configure the auto attendant greetings and to specify the dialling menu prompts that customer will use during afterhours or holidays periods. To configure the settings, follow the instructions for Business Hours (see above).
Hunt Group
This feature is visible however NOT configurable to the Customer Group Administrator
Music/Video On Hold
Music/Video On Hold enables you to play an audio file when callers are on hold. The Music On Hold feature supports WAV audio files.
NOTE: Video on Hold is currently NOT available.
Under Group – Services you can select Music/Video on Hold to customise this feature and install an audio file of your choice.
IMPORTANT INFORMATION
It is your responsibility to obey any copyright laws associated with the audio file you use with this function. Telstra is not responsible for any content, audio or video, added by you to this system.
Add or Modify Music/Video On Hold
After selecting Music/Video On Hold on the Group-Services page (Figure 23), the following page is displayed (Figure 31):
Section 6. Services Menu
Sept 11 Page 29 of 74
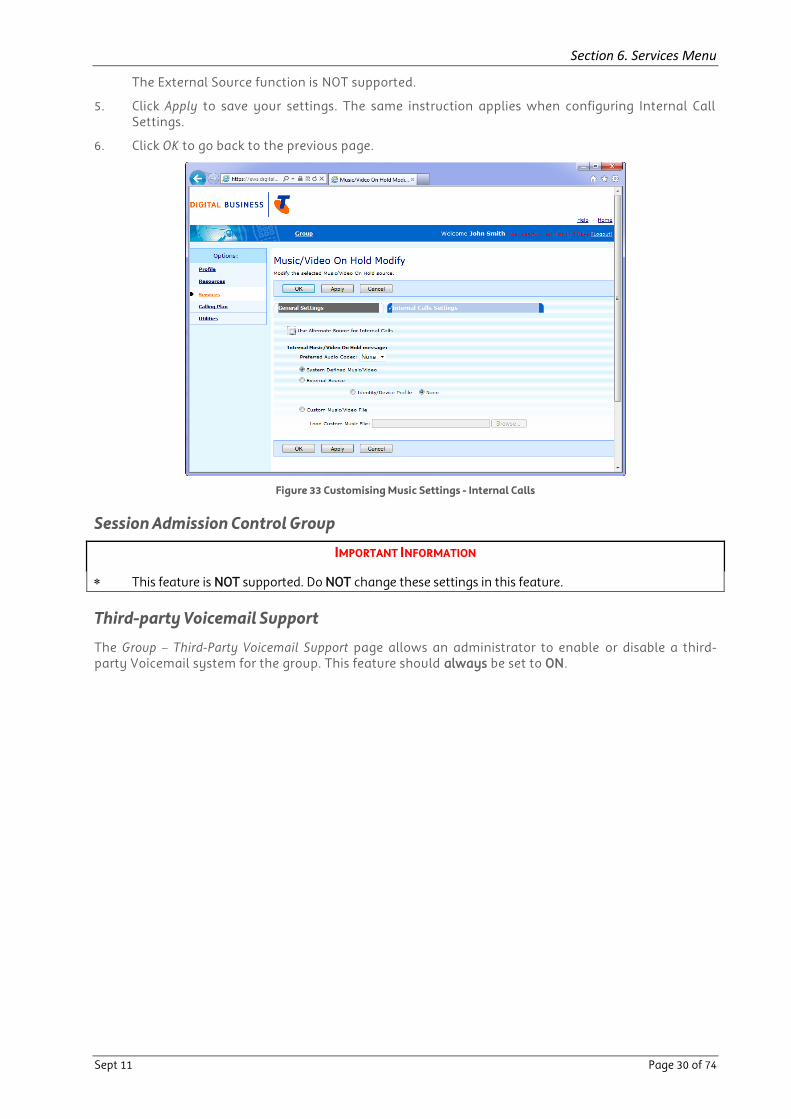
Figure 31 Music/Video On Hold page
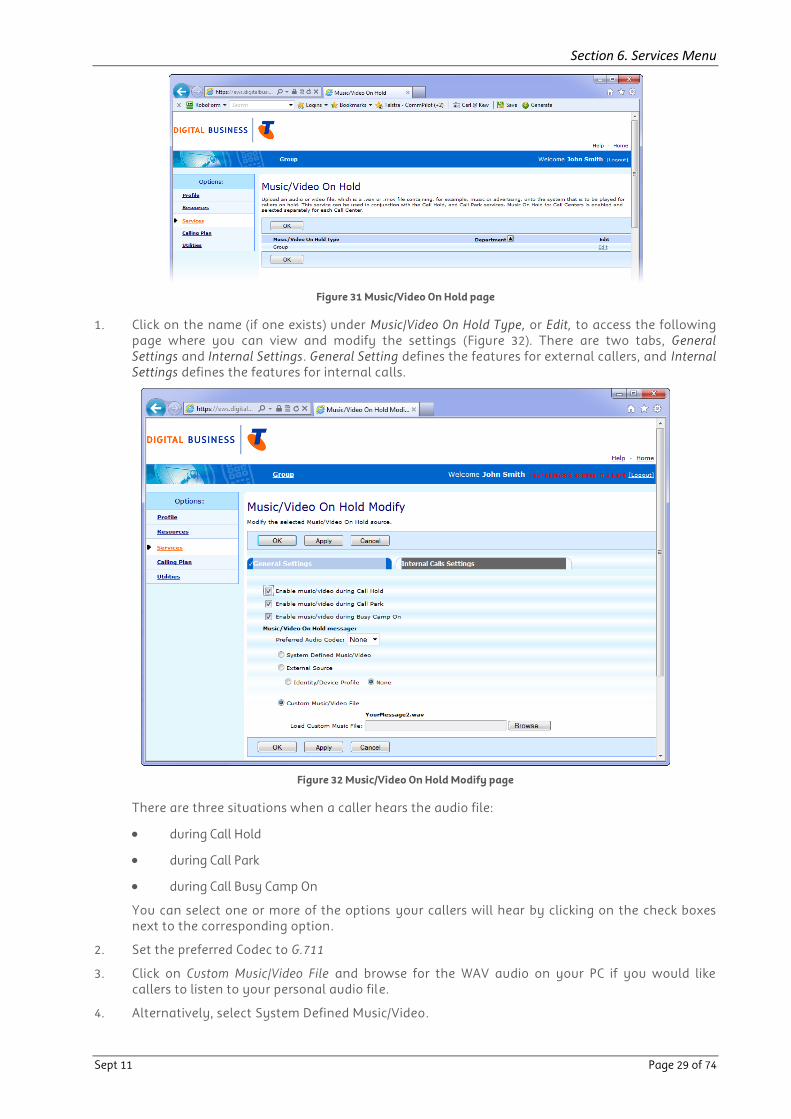
1. Click on the name (if one exists) under Music/Video On Hold Type, or Edit, to access the following page where you can view and modify the settings (Figure 32). There are two tabs, General Settings and Internal Settings. General Setting defines the features for external callers, and Internal Settings defines the features for internal calls.
Figure 32 Music/Video On Hold Modify page
There are three situations when a caller hears the audio file:
during Call Hold
during Call Park
during Call Busy Camp On
You can select one or more of the options your callers will hear by clicking on the check boxes next to the corresponding option.
2. Set the preferred Codec to G.711
3. Click on Custom Music/Video File and browse for the WAV audio on your PC if you would like callers to listen to your personal audio file.
4. Alternatively, select System Defined Music/Video.
Section 6. Services Menu
Sept 11 Page 30 of 74
The External Source function is NOT supported.
5. Click Apply to save your settings. The same instruction applies when configuring Internal Call Settings.
6. Click OK to go back to the previous page.
Figure 33 Customising Music Settings - Internal Calls
Session Admission Control Group
IMPORTANT INFORMATION
This feature is NOT supported. Do NOT change these settings in this feature.
Third-party Voicemail Support
The Group – Third-Party Voicemail Support page allows an administrator to enable or disable a third-party Voicemail system for the group. This feature should always be set to ON.
Sept 11 Page 31 of 74
Section 7. Calling Plan Menu
This section contains topics explaining how to manage and control incoming and outgoing calls within your organisation.
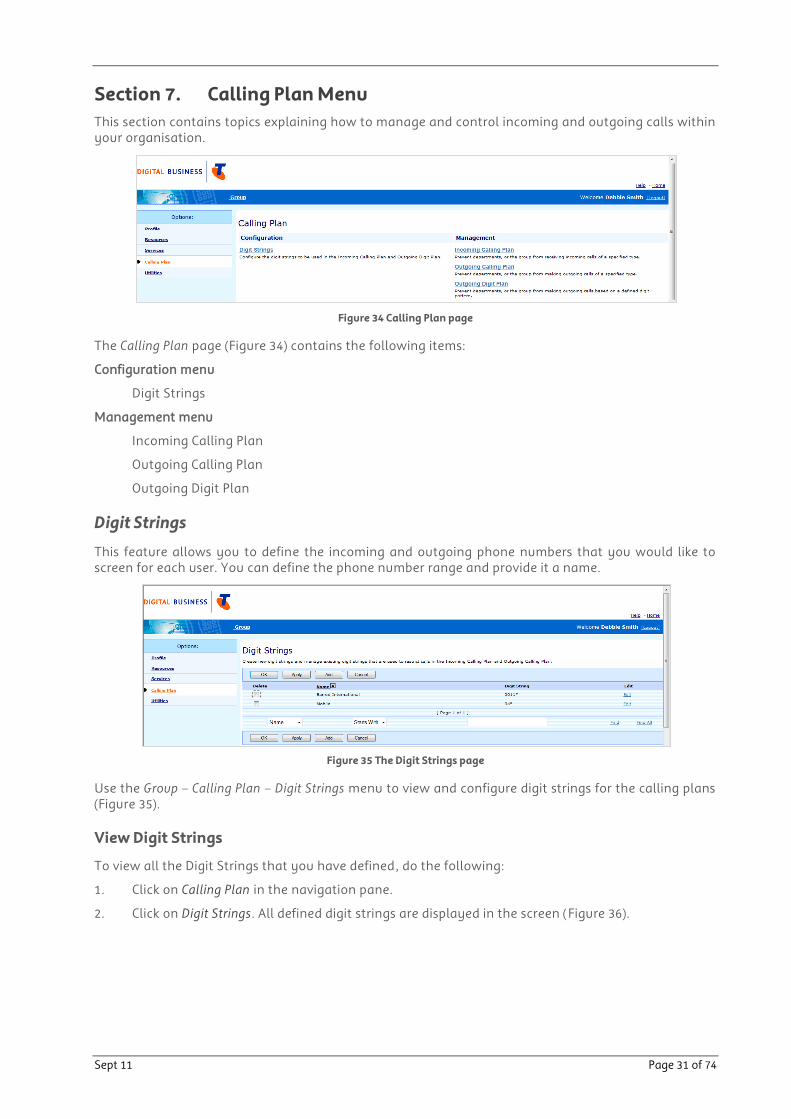
Figure 34 Calling Plan page
The Calling Plan page (Figure 34) contains the following items:
Configuration menu
Digit Strings
Management menu
Incoming Calling Plan
Outgoing Calling Plan
Outgoing Digit Plan
Digit Strings
This feature allows you to define the incoming and outgoing phone numbers that you would like to screen for each user. You can define the phone number range and provide it a name.
Figure 35 The Digit Strings page
Use the Group – Calling Plan – Digit Strings menu to view and configure digit strings for the calling plans (Figure 35).
View Digit Strings
To view all the Digit Strings that you have defined, do the following:
1. Click on Calling Plan in the navigation pane.
2. Click on Digit Strings. All defined digit strings are displayed in the screen (Figure 36).
Section 7. Calling Plan Menu
Sept 11 Page 32 of 74
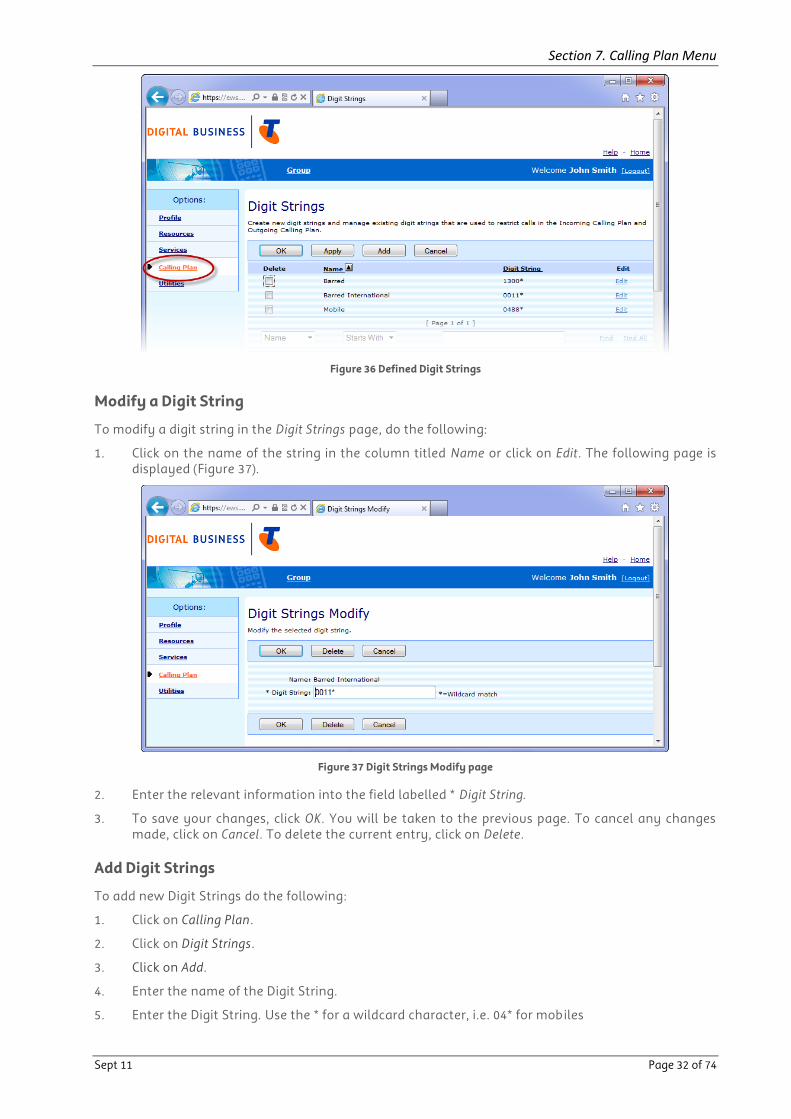
Figure 36 Defined Digit Strings
Modify a Digit String
To modify a digit string in the Digit Strings page, do the following:
1. Click on the name of the string in the column titled Name or click on Edit. The following page is displayed (Figure 37).
Figure 37 Digit Strings Modify page
2. Enter the relevant information into the field labelled * Digit String.
3. To save your changes, click OK. You will be taken to the previous page. To cancel any changes made, click on Cancel. To delete the current entry, click on Delete.
Add Digit Strings
To add new Digit Strings do the following:
1. Click on Calling Plan.
2. Click on Digit Strings.
3. Click on Add.
4. Enter the name of the Digit String.
5. Enter the Digit String. Use the * for a wildcard character, i.e. 04* for mobiles
Section 7. Calling Plan Menu
Sept 11 Page 33 of 74
6. Click Apply to save your changes. Click OK to leave the page.
7. To exit without saving, click Cancel.
8. Once you have configured the Digit Plans, you can access each user‟s Calling Plan menu and set the type of incoming and outgoing calls for each user.
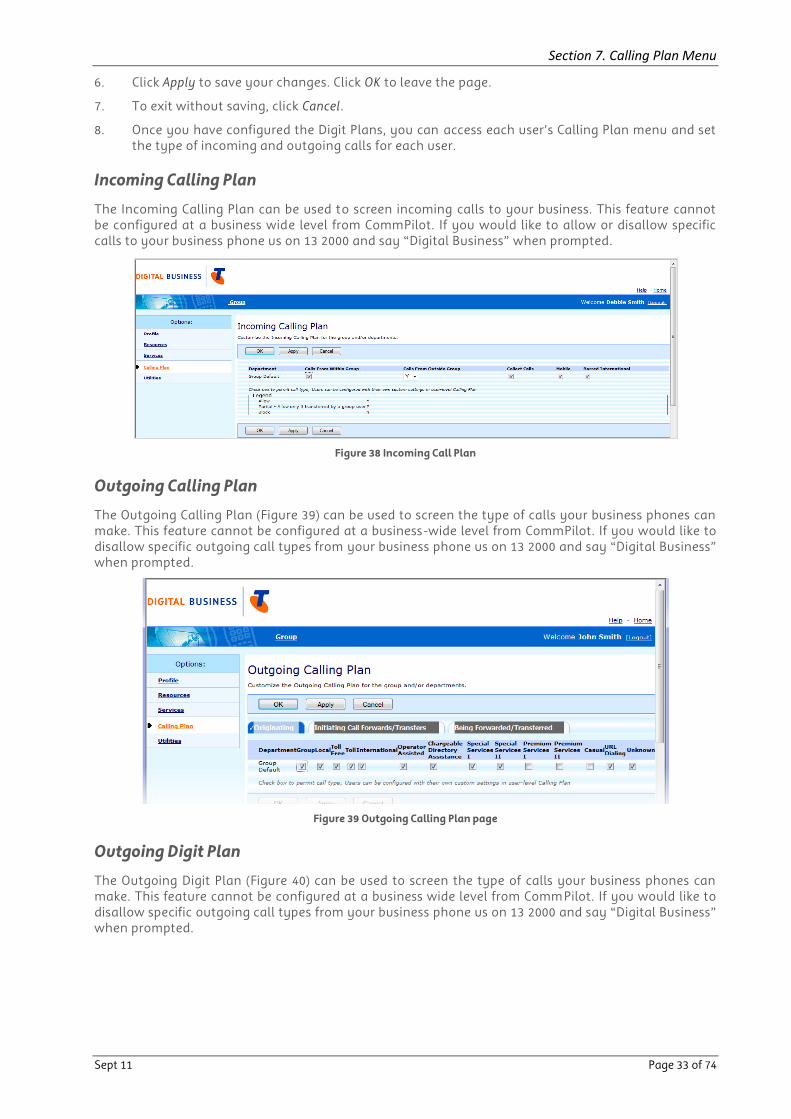
Incoming Calling Plan
The Incoming Calling Plan can be used to screen incoming calls to your business. This feature cannot be configured at a business wide level from CommPilot. If you would like to allow or disallow specific calls to your business phone us on 13 2000 and say “Digital Business” when prompted.
Figure 38 Incoming Call Plan
Outgoing Calling Plan
The Outgoing Calling Plan (Figure 39) can be used to screen the type of calls your business phones can make. This feature cannot be configured at a business-wide level from CommPilot. If you would like to disallow specific outgoing call types from your business phone us on 13 2000 and say “Digital Business” when prompted.
Figure 39 Outgoing Calling Plan page
Outgoing Digit Plan
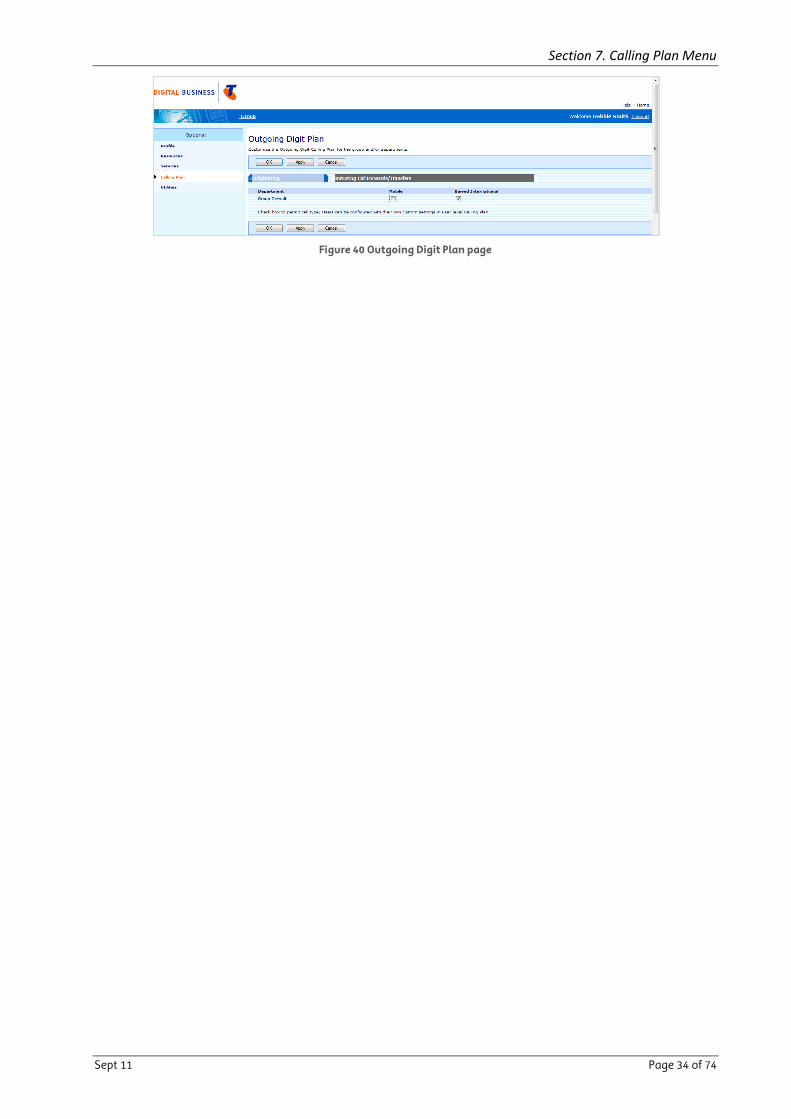
The Outgoing Digit Plan (Figure 40) can be used to screen the type of calls your business phones can make. This feature cannot be configured at a business wide level from CommPilot. If you would like to disallow specific outgoing call types from your business phone us on 13 2000 and say “Digital Business” when prompted.
Section 7. Calling Plan Menu
Sept 11 Page 34 of 74
Figure 40 Outgoing Digit Plan page
Sept 11 Page 35 of 74
Section 8. Utilities Menu
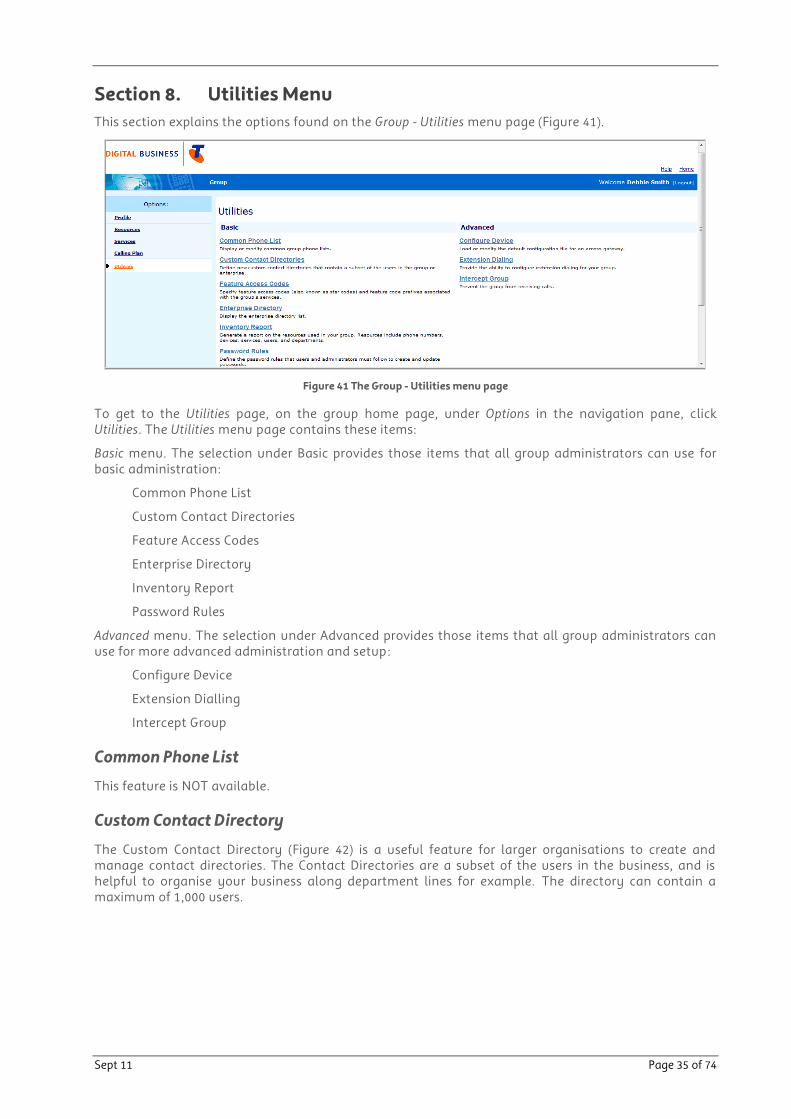
This section explains the options found on the Group - Utilities menu page (Figure 41).
Figure 41 The Group - Utilities menu page
To get to the Utilities page, on the group home page, under Options in the navigation pane, click Utilities. The Utilities menu page contains these items:
Basic menu. The selection under Basic provides those items that all group administrators can use for basic administration:
Common Phone List
Custom Contact Directories
Feature Access Codes
Enterprise Directory
Inventory Report
Password Rules
Advanced menu. The selection under Advanced provides those items that all group administrators can use for more advanced administration and setup:
Configure Device
Extension Dialling
Intercept Group
Common Phone List
This feature is NOT available.
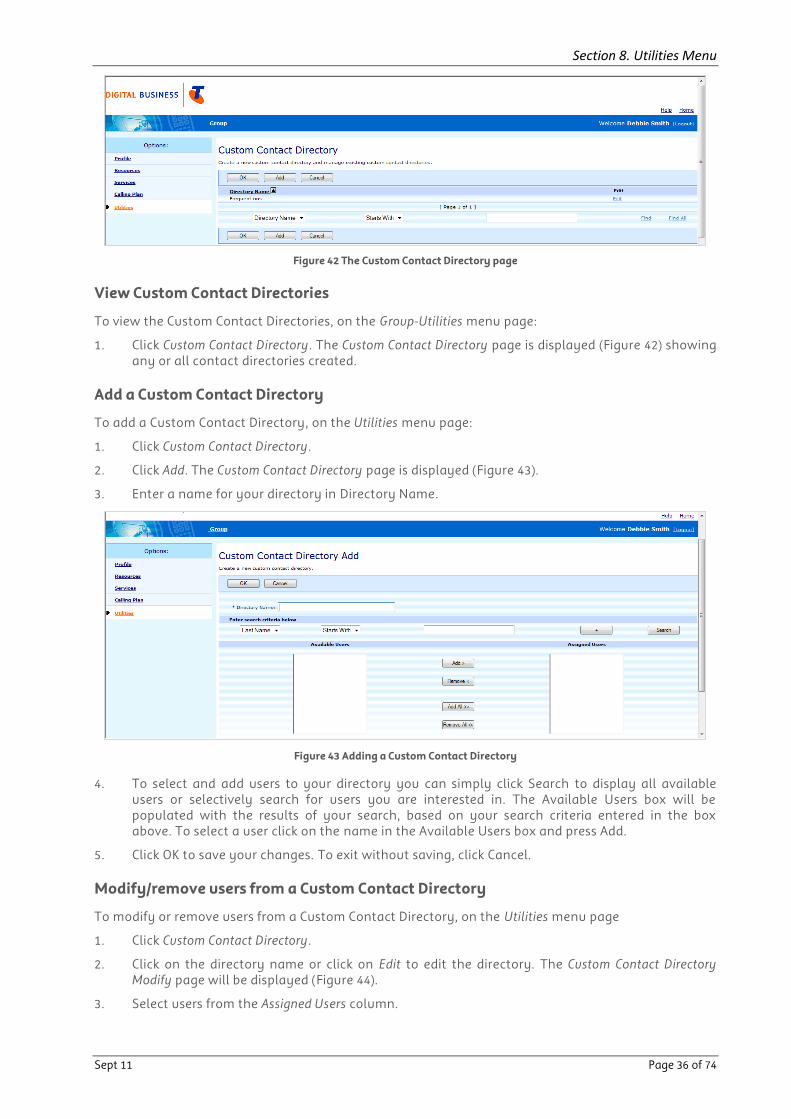
Custom Contact Directory
The Custom Contact Directory (Figure 42) is a useful feature for larger organisations to create and manage contact directories. The Contact Directories are a subset of the users in the business, and is helpful to organise your business along department lines for example. The directory can contain a maximum of 1,000 users.
Section 8. Utilities Menu
Sept 11 Page 36 of 74
Figure 42 The Custom Contact Directory page
View Custom Contact Directories
To view the Custom Contact Directories, on the Group-Utilities menu page:
1. Click Custom Contact Directory. The Custom Contact Directory page is displayed (Figure 42) showing any or all contact directories created.
Add a Custom Contact Directory
To add a Custom Contact Directory, on the Utilities menu page:
1. Click Custom Contact Directory.
2. Click Add. The Custom Contact Directory page is displayed (Figure 43).
3. Enter a name for your directory in Directory Name.
Figure 43 Adding a Custom Contact Directory
4. To select and add users to your directory you can simply click Search to display all available users or selectively search for users you are interested in. The Available Users box will be populated with the results of your search, based on your search criteria entered in the box above. To select a user click on the name in the Available Users box and press Add.
5. Click OK to save your changes. To exit without saving, click Cancel.
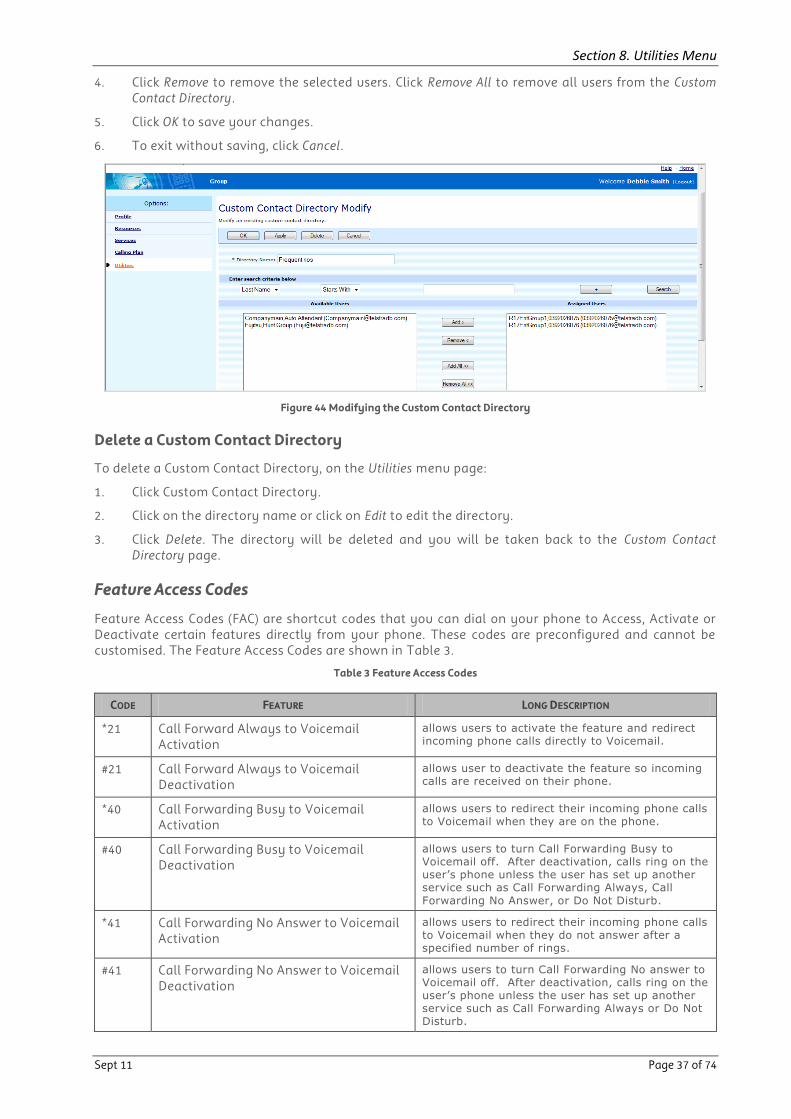
Modify/remove users from a Custom Contact Directory
To modify or remove users from a Custom Contact Directory, on the Utilities menu page
1. Click Custom Contact Directory.
2. Click on the directory name or click on Edit to edit the directory. The Custom Contact Directory Modify page will be displayed (Figure 44).
3. Select users from the Assigned Users column.
Section 8. Utilities Menu
Sept 11 Page 37 of 74
4. Click Remove to remove the selected users. Click Remove All to remove all users from the Custom Contact Directory.
5. Click OK to save your changes.
6. To exit without saving, click Cancel.
Figure 44 Modifying the Custom Contact Directory
Delete a Custom Contact Directory
To delete a Custom Contact Directory, on the Utilities menu page:
1. Click Custom Contact Directory.
2. Click on the directory name or click on Edit to edit the directory.
3. Click Delete. The directory will be deleted and you will be taken back to the Custom Contact Directory page.
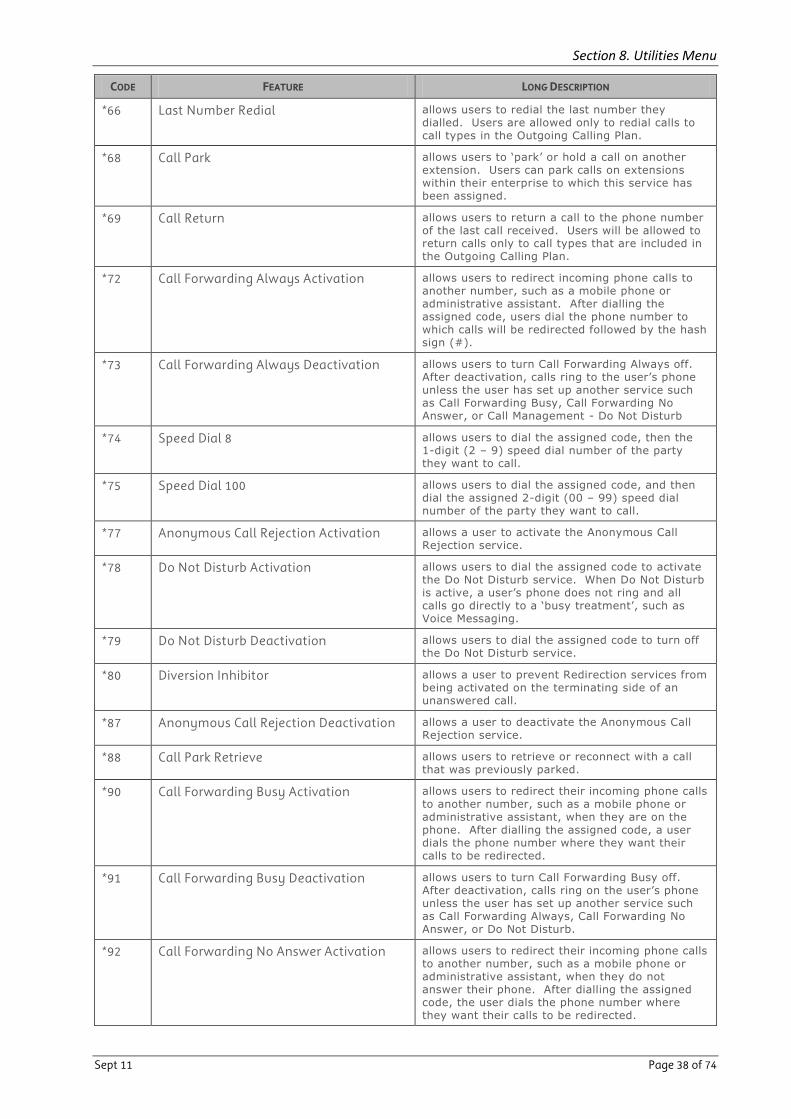
Feature Access Codes
Feature Access Codes (FAC) are shortcut codes that you can dial on your phone to Access, Activate or Deactivate certain features directly from your phone. These codes are preconfigured and cannot be customised. The Feature Access Codes are shown in Table 3.
Table 3 Feature Access Codes
CODE FEATURE LONG DESCRIPTION
*21 Call Forward Always to Voicemail Activation
allows users to activate the feature and redirect incoming phone calls directly to Voicemail.
#21 Call Forward Always to Voicemail Deactivation
allows user to deactivate the feature so incoming calls are received on their phone.
*40 Call Forwarding Busy to Voicemail Activation
allows users to redirect their incoming phone calls to Voicemail when they are on the phone.
#40 Call Forwarding Busy to Voicemail Deactivation
allows users to turn Call Forwarding Busy to Voicemail off. After deactivation, calls ring on the user’s phone unless the user has set up another service such as Call Forwarding Always, Call
Forwarding No Answer, or Do Not Disturb.
*41 Call Forwarding No Answer to Voicemail Activation
allows users to redirect their incoming phone calls to Voicemail when they do not answer after a specified number of rings.
#41 Call Forwarding No Answer to Voicemail Deactivation
allows users to turn Call Forwarding No answer to Voicemail off. After deactivation, calls ring on the user’s phone unless the user has set up another service such as Call Forwarding Always or Do Not Disturb.
Section 8. Utilities Menu
Sept 11 Page 38 of 74
CODE FEATURE LONG DESCRIPTION
*66 Last Number Redial allows users to redial the last number they dialled. Users are allowed only to redial calls to call types in the Outgoing Calling Plan.
*68 Call Park allows users to ‘park’ or hold a call on another extension. Users can park calls on extensions within their enterprise to which this service has been assigned.
*69 Call Return allows users to return a call to the phone number of the last call received. Users will be allowed to return calls only to call types that are included in the Outgoing Calling Plan.
*72 Call Forwarding Always Activation allows users to redirect incoming phone calls to another number, such as a mobile phone or administrative assistant. After dialling the assigned code, users dial the phone number to which calls will be redirected followed by the hash sign (#).
*73 Call Forwarding Always Deactivation allows users to turn Call Forwarding Always off. After deactivation, calls ring to the user’s phone unless the user has set up another service such as Call Forwarding Busy, Call Forwarding No Answer, or Call Management - Do Not Disturb
*74 Speed Dial 8 allows users to dial the assigned code, then the 1-digit (2 – 9) speed dial number of the party they want to call.
*75 Speed Dial 100 allows users to dial the assigned code, and then dial the assigned 2-digit (00 – 99) speed dial number of the party they want to call.
*77 Anonymous Call Rejection Activation allows a user to activate the Anonymous Call Rejection service.
*78 Do Not Disturb Activation allows users to dial the assigned code to activate the Do Not Disturb service. When Do Not Disturb is active, a user’s phone does not ring and all calls go directly to a ‘busy treatment’, such as Voice Messaging.
*79 Do Not Disturb Deactivation allows users to dial the assigned code to turn off the Do Not Disturb service.
*80 Diversion Inhibitor allows a user to prevent Redirection services from being activated on the terminating side of an unanswered call.
*87 Anonymous Call Rejection Deactivation allows a user to deactivate the Anonymous Call Rejection service.
*88 Call Park Retrieve allows users to retrieve or reconnect with a call that was previously parked.
*90 Call Forwarding Busy Activation allows users to redirect their incoming phone calls to another number, such as a mobile phone or administrative assistant, when they are on the phone. After dialling the assigned code, a user dials the phone number where they want their calls to be redirected.
*91 Call Forwarding Busy Deactivation allows users to turn Call Forwarding Busy off. After deactivation, calls ring on the user’s phone unless the user has set up another service such as Call Forwarding Always, Call Forwarding No Answer, or Do Not Disturb.
*92 Call Forwarding No Answer Activation allows users to redirect their incoming phone calls to another number, such as a mobile phone or administrative assistant, when they do not answer their phone. After dialling the assigned code, the user dials the phone number where they want their calls to be redirected.
Section 8. Utilities Menu
Sept 11 Page 39 of 74
CODE FEATURE LONG DESCRIPTION
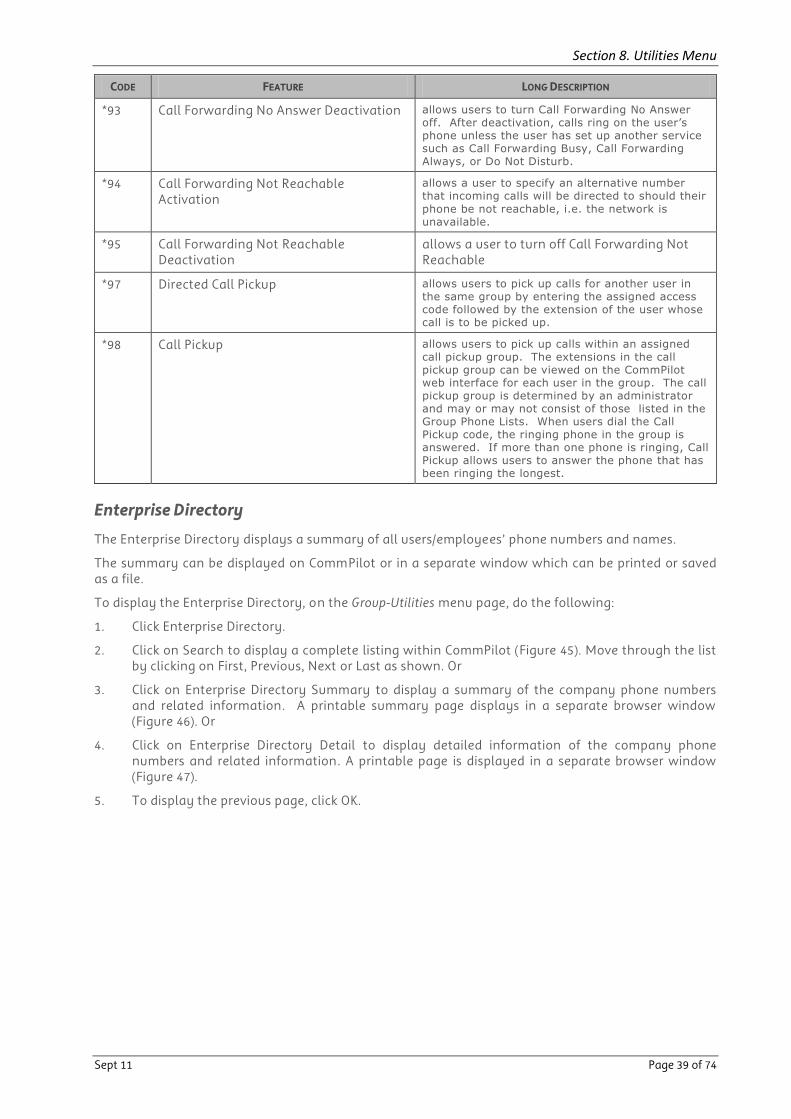
*93 Call Forwarding No Answer Deactivation allows users to turn Call Forwarding No Answer off. After deactivation, calls ring on the user’s phone unless the user has set up another service such as Call Forwarding Busy, Call Forwarding Always, or Do Not Disturb.
*94 Call Forwarding Not Reachable Activation
allows a user to specify an alternative number that incoming calls will be directed to should their
phone be not reachable, i.e. the network is unavailable.
*95 Call Forwarding Not Reachable Deactivation
allows a user to turn off Call Forwarding Not Reachable
*97 Directed Call Pickup allows users to pick up calls for another user in the same group by entering the assigned access code followed by the extension of the user whose call is to be picked up.
*98 Call Pickup allows users to pick up calls within an assigned call pickup group. The extensions in the call pickup group can be viewed on the CommPilot web interface for each user in the group. The call pickup group is determined by an administrator and may or may not consist of those listed in the Group Phone Lists. When users dial the Call Pickup code, the ringing phone in the group is answered. If more than one phone is ringing, Call Pickup allows users to answer the phone that has been ringing the longest.
Enterprise Directory
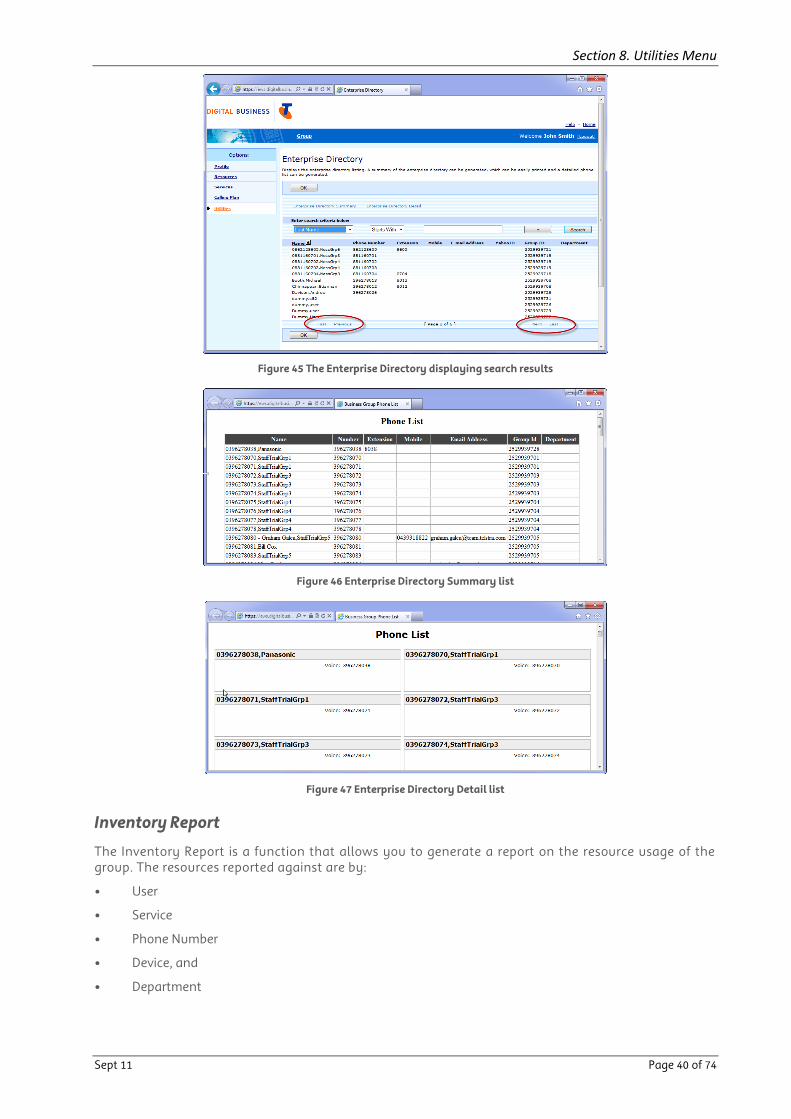
The Enterprise Directory displays a summary of all users/employees‟ phone numbers and names.
The summary can be displayed on CommPilot or in a separate window which can be printed or saved as a file.
To display the Enterprise Directory, on the Group-Utilities menu page, do the following:
1. Click Enterprise Directory.
2. Click on Search to display a complete listing within CommPilot (Figure 45). Move through the list by clicking on First, Previous, Next or Last as shown. Or
3. Click on Enterprise Directory Summary to display a summary of the company phone numbers and related information. A printable summary page displays in a separate browser window (Figure 46). Or
4. Click on Enterprise Directory Detail to display detailed information of the company phone numbers and related information. A printable page is displayed in a separate browser window (Figure 47).
5. To display the previous page, click OK.
Section 8. Utilities Menu
Sept 11 Page 40 of 74
Figure 45 The Enterprise Directory displaying search results
Figure 46 Enterprise Directory Summary list
Figure 47 Enterprise Directory Detail list
Inventory Report
The Inventory Report is a function that allows you to generate a report on the resource usage of the group. The resources reported against are by:
• User
• Service
• Phone Number
• Device, and
• Department

Section 8. Utilities Menu
Sept 11 Page 41 of 74
Figure 48 Inventory Report page
Reports can be generated against one resource or all resources. To generate an Inventory Report, from the Group-Utilities page, do the following:
1. Click Inventory Report. The Inventory Report page is displayed (Figure 48).
2. Check the boxes against the items you want included in the report.
3. Enter an email address to send the report to.
4. Click OK to start the generation and go back to the previous page.
Password Rules
The Password Rules page (Figure 49) allows you as the Administrator to manage, edit or view the criteria currently set for user passwords.
NOTE: Unless you require tighter security over the format of passwords, to ensure business continuity it is highly recommended that you do NOT change this section.
Figure 49 Password Rules page
Section 8. Utilities Menu
Sept 11 Page 42 of 74
Configure Device
IMPORTANT INFORMATION
DO NOT CHANGE. This page is used to access the configuration of devices on your Digital Business system. Changes to this page may result in your system malfunctioning. Phone us on 13 2000 and say “Digital Business” when prompted to speak with a consultant for any changes required to your Device configuration.
Extension Dialling
This feature is NOT available.
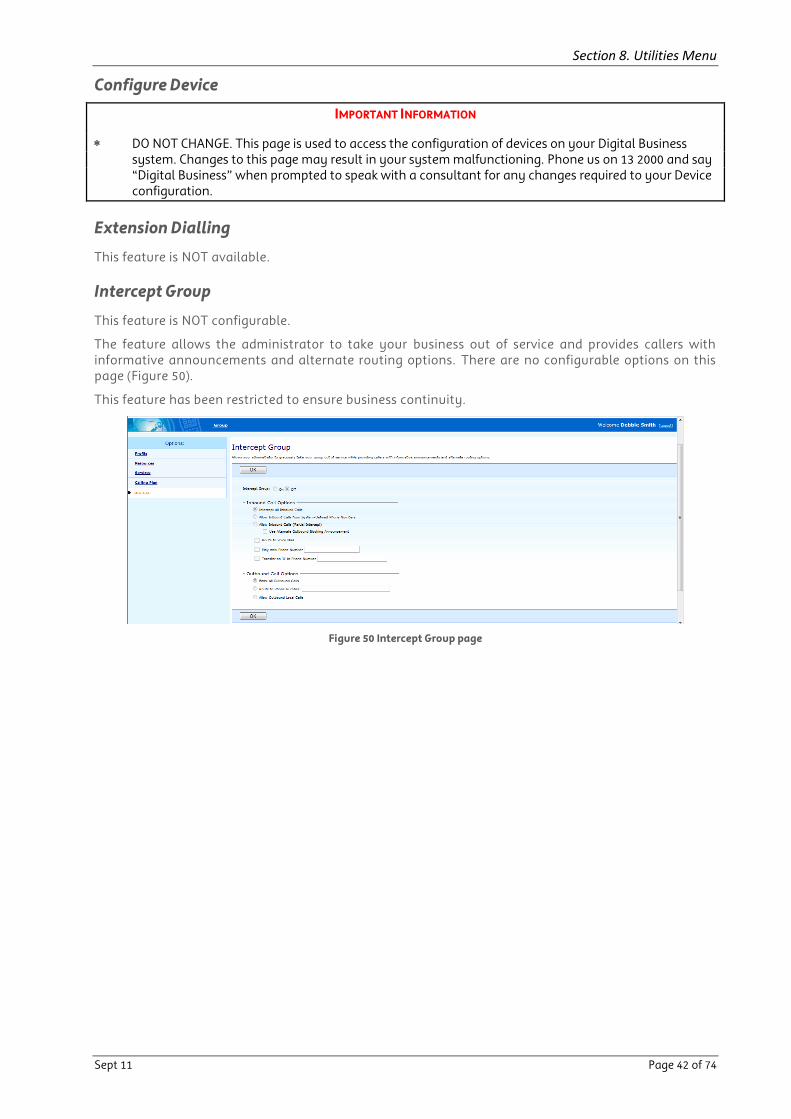
Intercept Group
This feature is NOT configurable.
The feature allows the administrator to take your business out of service and provides callers with informative announcements and alternate routing options. There are no configurable options on this page (Figure 50).
This feature has been restricted to ensure business continuity.
Figure 50 Intercept Group page
Sept 11 Page 43 of 74
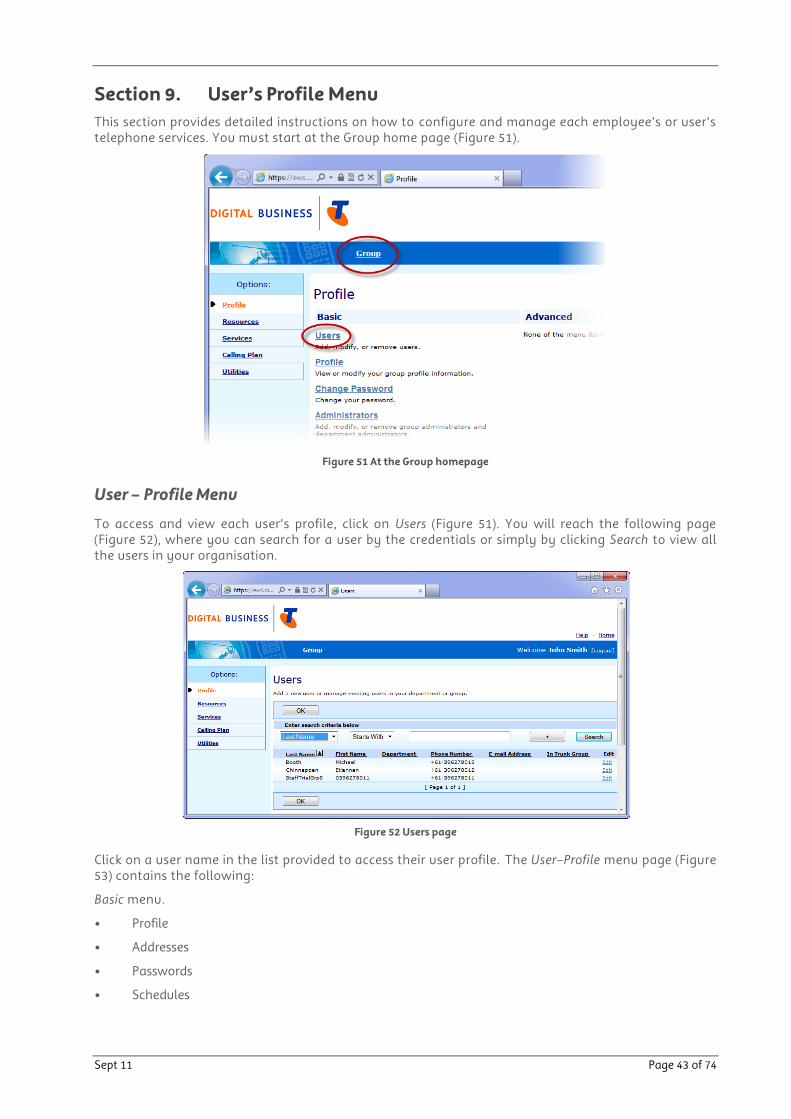
Section 9. User’s Profile Menu
This section provides detailed instructions on how to configure and manage each employee‟s or user‟s telephone services. You must start at the Group home page (Figure 51).
Figure 51 At the Group homepage
User – Profile Menu
To access and view each user‟s profile, click on Users (Figure 51). You will reach the following page (Figure 52), where you can search for a user by the credentials or simply by clicking Search to view all the users in your organisation.
Figure 52 Users page
Click on a user name in the list provided to access their user profile. The User–Profile menu page (Figure 53) contains the following:
Basic menu.
• Profile
• Addresses
• Passwords
• Schedules
Section 9. User’s Profile Menu
Sept 11 Page 44 of 74
Advanced menu.
• Call Application Policies
• Call Policies
• Call Processing Policies
• Communication Barring Auth Codes
Figure 53 The User Profile page
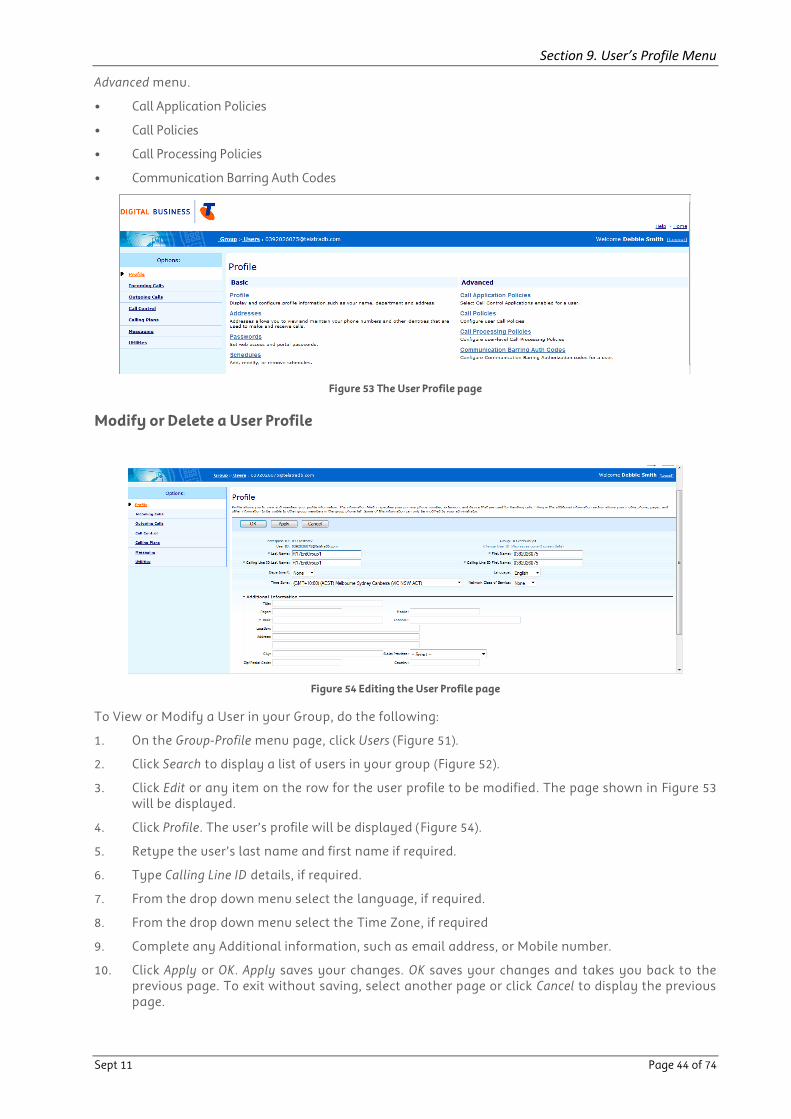
Modify or Delete a User Profile
Figure 54 Editing the User Profile page
To View or Modify a User in your Group, do the following:
1. On the Group-Profile menu page, click Users (Figure 51).
2. Click Search to display a list of users in your group (Figure 52).
3. Click Edit or any item on the row for the user profile to be modified. The page shown in Figure 53 will be displayed.
4. Click Profile. The user‟s profile will be displayed (Figure 54).
5. Retype the user‟s last name and first name if required.
6. Type Calling Line ID details, if required.
7. From the drop down menu select the language, if required.
8. From the drop down menu select the Time Zone, if required
9. Complete any Additional information, such as email address, or Mobile number.
10. Click Apply or OK. Apply saves your changes. OK saves your changes and takes you back to the previous page. To exit without saving, select another page or click Cancel to display the previous page.
Section 9. User’s Profile Menu
Sept 11 Page 45 of 74
Addresses
IMPORTANT INFORMATION
Do NOT modify this page.
Passwords
Use the User-Passwords page to reset a User‟s Password. A new password is valid for 30 days, after which the user will be prompted to change on the next login.
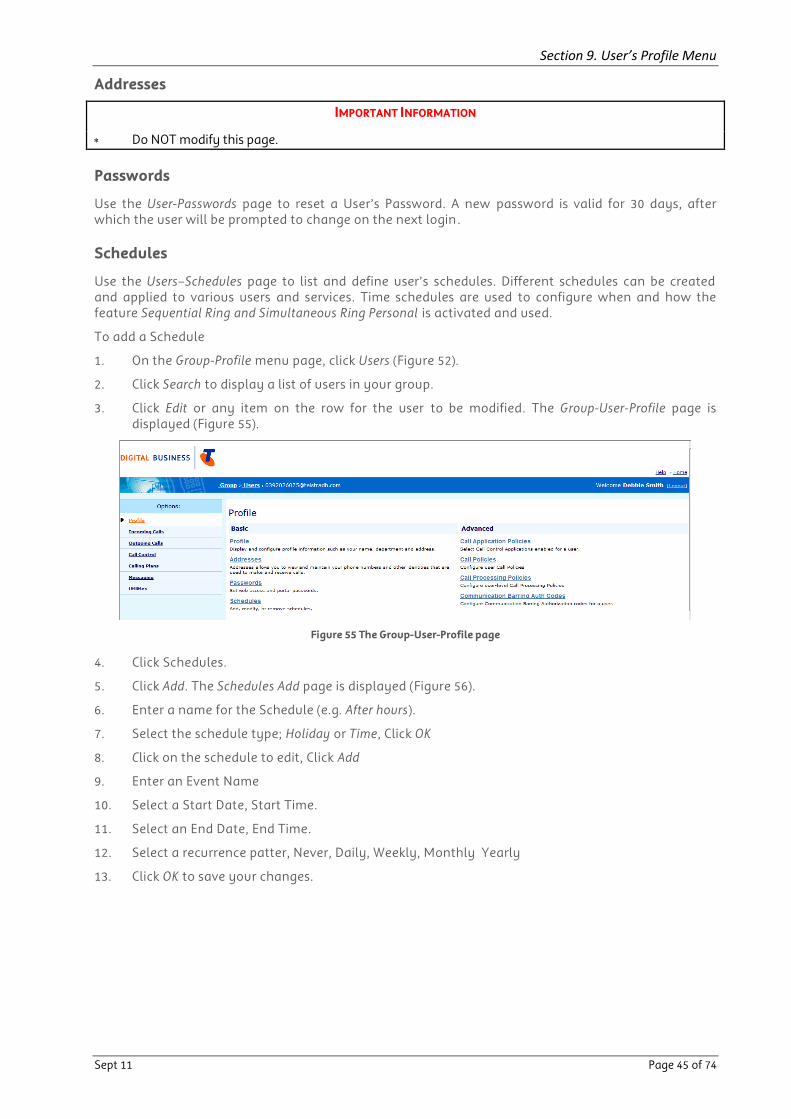
Schedules
Use the Users–Schedules page to list and define user‟s schedules. Different schedules can be created and applied to various users and services. Time schedules are used to configure when and how the feature Sequential Ring and Simultaneous Ring Personal is activated and used.
To add a Schedule
1. On the Group-Profile menu page, click Users (Figure 52).
2. Click Search to display a list of users in your group.
3. Click Edit or any item on the row for the user to be modified. The Group-User-Profile page is displayed (Figure 55).
Figure 55 The Group-User-Profile page
4. Click Schedules.
5. Click Add. The Schedules Add page is displayed (Figure 56).
6. Enter a name for the Schedule (e.g. After hours).
7. Select the schedule type; Holiday or Time, Click OK
8. Click on the schedule to edit, Click Add
9. Enter an Event Name
10. Select a Start Date, Start Time.
11. Select an End Date, End Time.
12. Select a recurrence patter, Never, Daily, Weekly, Monthly Yearly
13. Click OK to save your changes.
Section 9. User’s Profile Menu
Sept 11 Page 46 of 74
Figure 56 Adding a Schedule for a User
Call Application Policies
This feature is NOT available.
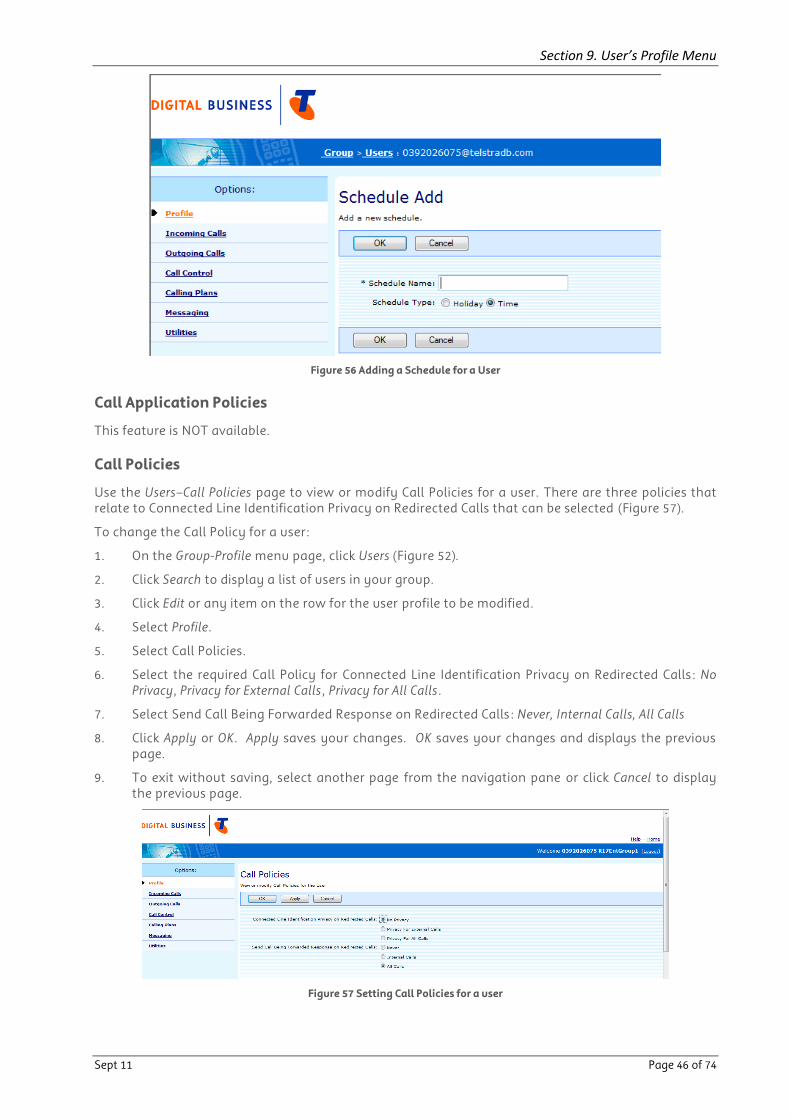
Call Policies
Use the Users–Call Policies page to view or modify Call Policies for a user. There are three policies that relate to Connected Line Identification Privacy on Redirected Calls that can be selected (Figure 57).
To change the Call Policy for a user:
1. On the Group-Profile menu page, click Users (Figure 52).
2. Click Search to display a list of users in your group.
3. Click Edit or any item on the row for the user profile to be modified.
4. Select Profile.
5. Select Call Policies.
6. Select the required Call Policy for Connected Line Identification Privacy on Redirected Calls : No Privacy, Privacy for External Calls, Privacy for All Calls.
7. Select Send Call Being Forwarded Response on Redirected Calls : Never, Internal Calls, All Calls
8. Click Apply or OK. Apply saves your changes. OK saves your changes and displays the previous page.
9. To exit without saving, select another page from the navigation pane or click Cancel to display the previous page.
Figure 57 Setting Call Policies for a user
Section 9. User’s Profile Menu
Sept 11 Page 47 of 74
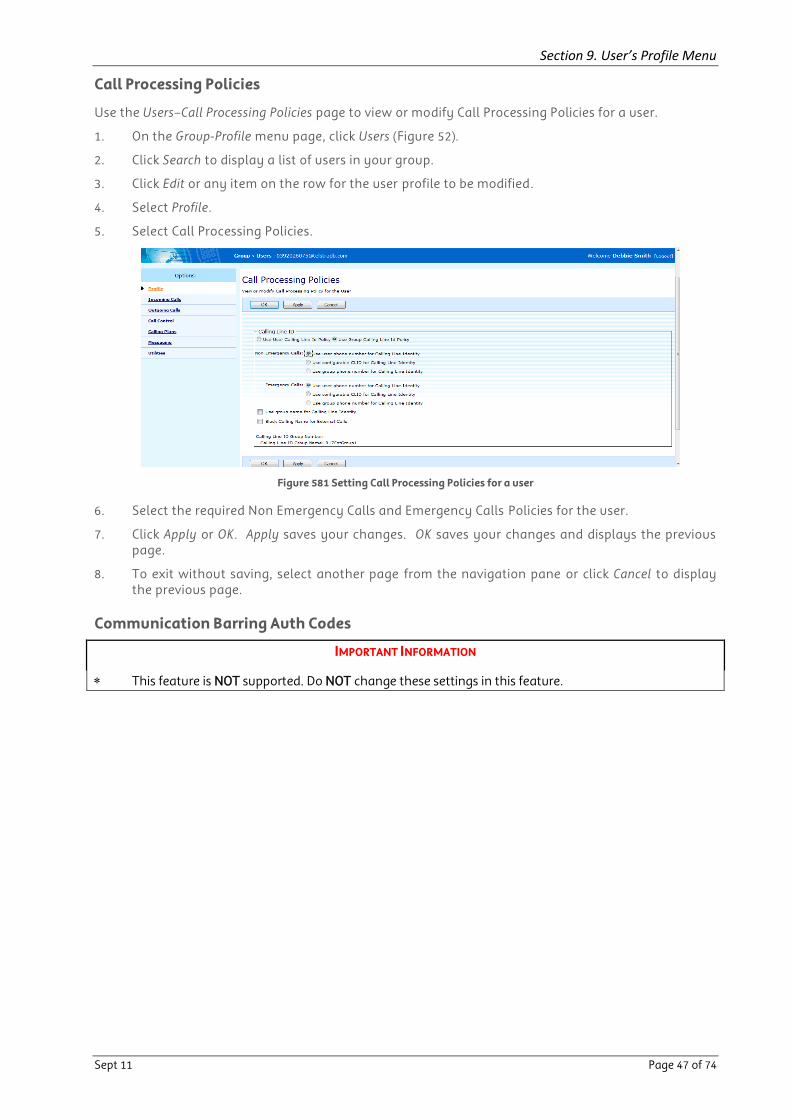
Call Processing Policies
Use the Users–Call Processing Policies page to view or modify Call Processing Policies for a user.
1. On the Group-Profile menu page, click Users (Figure 52).
2. Click Search to display a list of users in your group.
3. Click Edit or any item on the row for the user profile to be modified.
4. Select Profile.
5. Select Call Processing Policies.
Figure 581 Setting Call Processing Policies for a user
6. Select the required Non Emergency Calls and Emergency Calls Policies for the user.
7. Click Apply or OK. Apply saves your changes. OK saves your changes and displays the previous page.
8. To exit without saving, select another page from the navigation pane or click Cancel to display the previous page.
Communication Barring Auth Codes
IMPORTANT INFORMATION
This feature is NOT supported. Do NOT change these settings in this feature.
Sept 11 Page 48 of 74
Section 10. User’s Incoming Calls Menu
Listed below are the different options that can be configured for a user‟s Incoming Calls option. This page also provides you, as the Administrator, an „at a glance‟ reference to what is activated or what is deactivated – look for On or Off against each menu option in the content pane to learn whether a feature is turned on or off (Figure 59). The User – Incoming Calls menu page contains these items:
Basic menu.
• Calling Name Retrieval
• Call Forward Always
• Call Forward Busy
• Call Forward No Answer
• Call Forward Not Reachable
• External Calling line ID Delivery
• Internal Calling line ID Delivery
Advanced menu. This menu displays the items that group administrators can use only if such functions have been assigned to them.
• Sequential Ring
• Simultaneous Ring Personal
Figure 592 User Incoming Calls page
Calling Name Retrieval
The Calling Name Retrieval feature provides a caller‟s name by retrieving the calling name from the network.
To activate Calling Name Retrieval:
1. On the Group-Profile menu page, click Users (Figure 52).
2. Click Search to display a list of users in your group.
3. Click Edit or any item on the row for the user to be modified.
4. Click Incoming Calls. The page shown in Figure 59 is displayed.
5. Click Calling Name Retrieval.
6. Click On (to activate the feature), OR
7. Click Off (default setting, to deactivate the feature).
8. Click Apply or OK. Apply saves your changes. OK saves your changes and displays the previous page. To exit without saving, select another page or click Cancel to display the previous page.
Section 10. User’s Incoming Calls Menu
Sept 11 Page 49 of 74
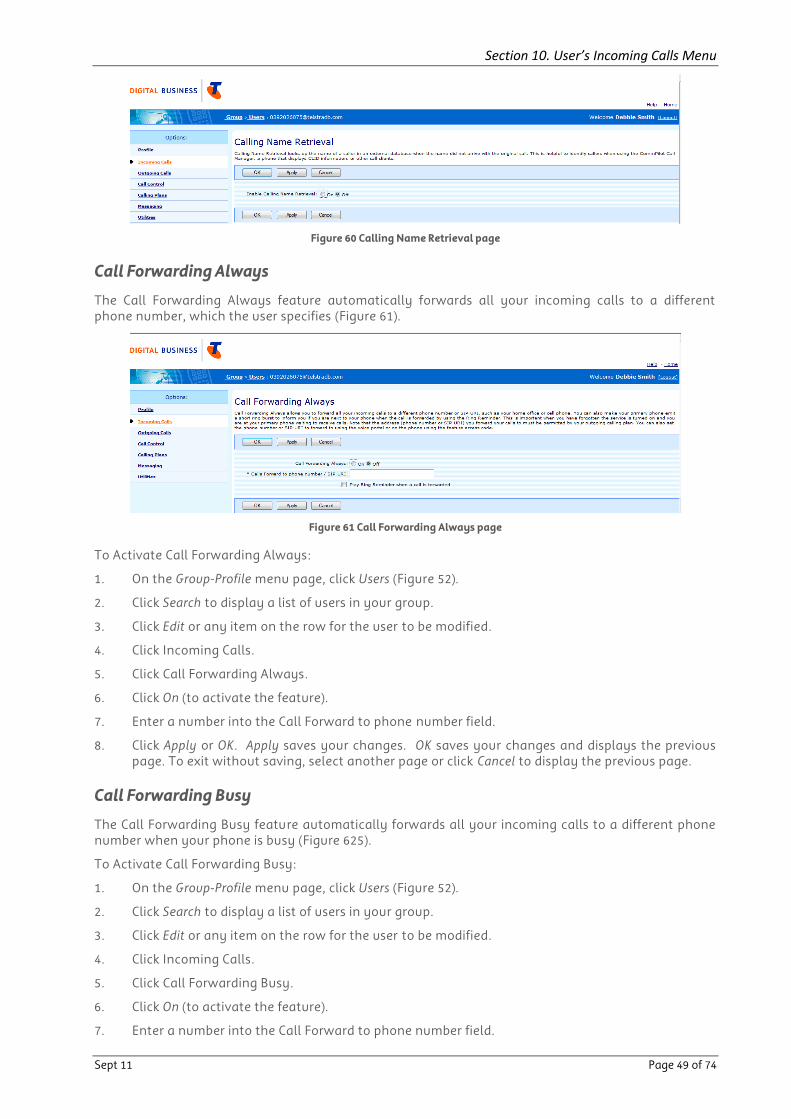
Figure 60 Calling Name Retrieval page
Call Forwarding Always
The Call Forwarding Always feature automatically forwards all your incoming calls to a different phone number, which the user specifies (Figure 61).
Figure 61 Call Forwarding Always page
To Activate Call Forwarding Always:
1. On the Group-Profile menu page, click Users (Figure 52).
2. Click Search to display a list of users in your group.
3. Click Edit or any item on the row for the user to be modified.
4. Click Incoming Calls.
5. Click Call Forwarding Always.
6. Click On (to activate the feature).
7. Enter a number into the Call Forward to phone number field.
8. Click Apply or OK. Apply saves your changes. OK saves your changes and displays the previous page. To exit without saving, select another page or click Cancel to display the previous page.
Call Forwarding Busy
The Call Forwarding Busy feature automatically forwards all your incoming calls to a different phone number when your phone is busy (Figure 625).
To Activate Call Forwarding Busy:
1. On the Group-Profile menu page, click Users (Figure 52).
2. Click Search to display a list of users in your group.
3. Click Edit or any item on the row for the user to be modified.
4. Click Incoming Calls.
5. Click Call Forwarding Busy.
6. Click On (to activate the feature).
7. Enter a number into the Call Forward to phone number field.
Section 10. User’s Incoming Calls Menu
Sept 11 Page 50 of 74
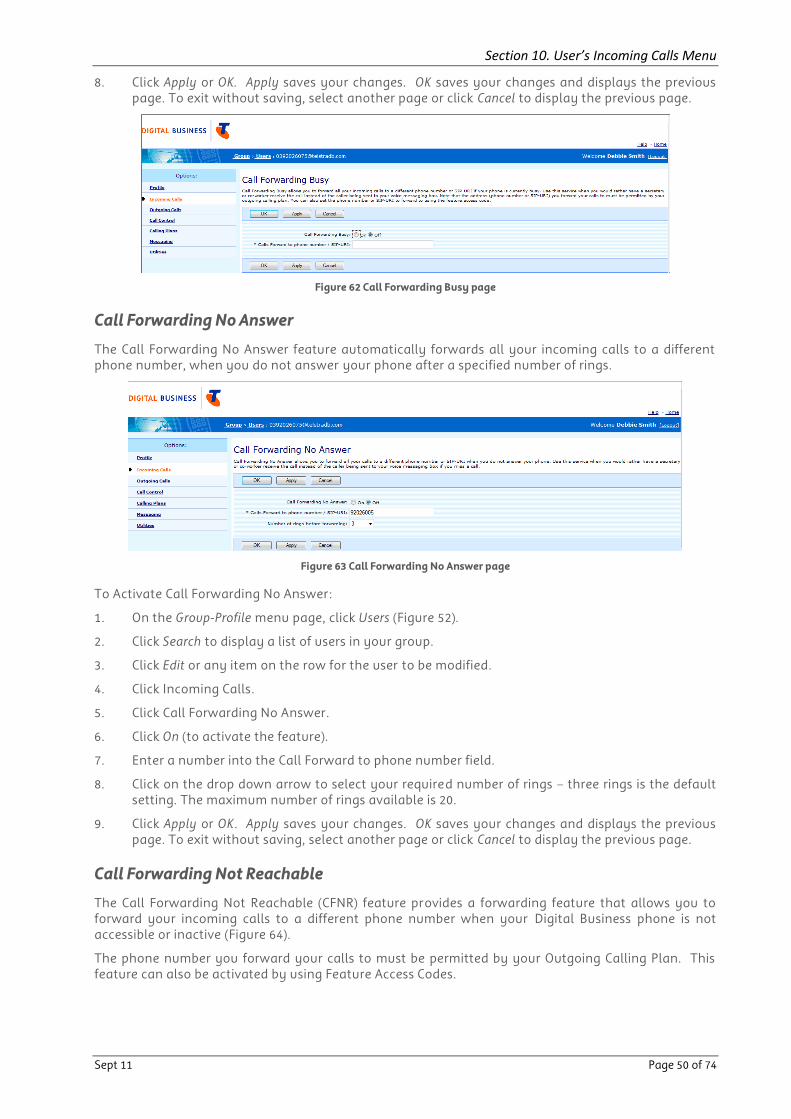
8. Click Apply or OK. Apply saves your changes. OK saves your changes and displays the previous page. To exit without saving, select another page or click Cancel to display the previous page.
Figure 62 Call Forwarding Busy page
Call Forwarding No Answer
The Call Forwarding No Answer feature automatically forwards all your incoming calls to a different phone number, when you do not answer your phone after a specified number of rings.
Figure 63 Call Forwarding No Answer page
To Activate Call Forwarding No Answer:
1. On the Group-Profile menu page, click Users (Figure 52).
2. Click Search to display a list of users in your group.
3. Click Edit or any item on the row for the user to be modified.
4. Click Incoming Calls.
5. Click Call Forwarding No Answer.
6. Click On (to activate the feature).
7. Enter a number into the Call Forward to phone number field.
8. Click on the drop down arrow to select your required number of rings – three rings is the default setting. The maximum number of rings available is 20.
9. Click Apply or OK. Apply saves your changes. OK saves your changes and displays the previous page. To exit without saving, select another page or click Cancel to display the previous page.
Call Forwarding Not Reachable
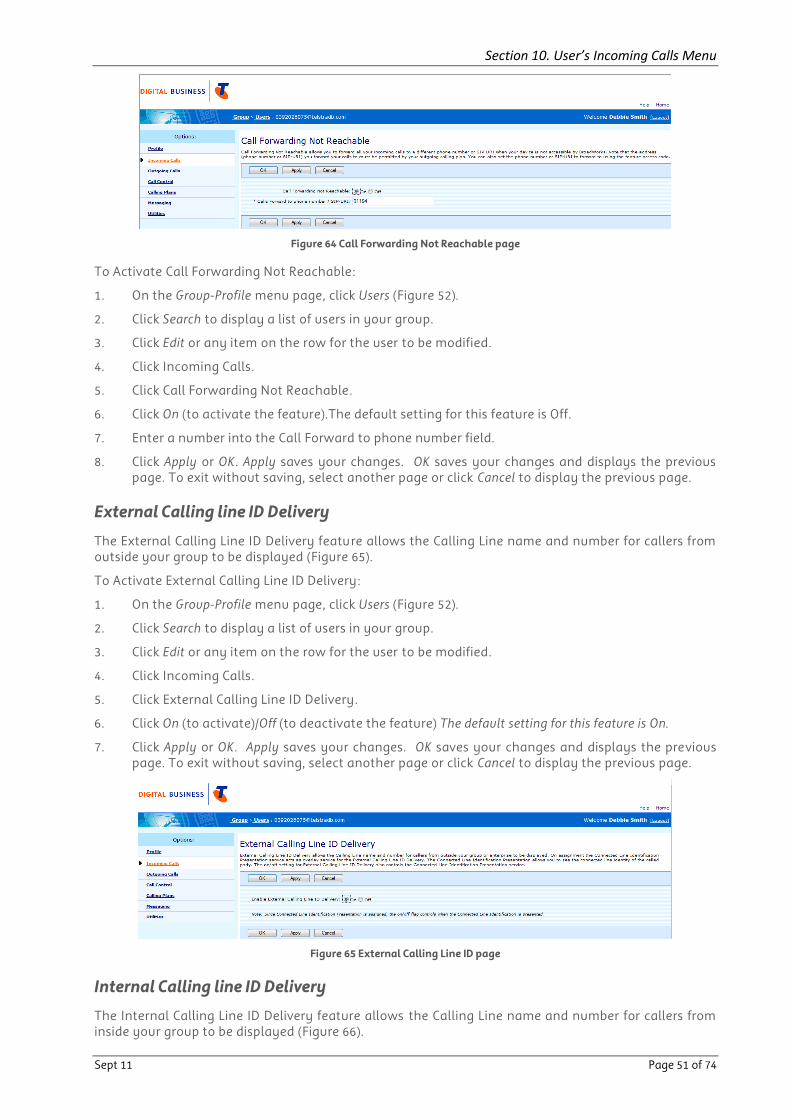
The Call Forwarding Not Reachable (CFNR) feature provides a forwarding feature that allows you to forward your incoming calls to a different phone number when your Digital Business phone is not accessible or inactive (Figure 64).
The phone number you forward your calls to must be permitted by your Outgoing Calling Plan. This feature can also be activated by using Feature Access Codes.
Section 10. User’s Incoming Calls Menu
Sept 11 Page 51 of 74
Figure 64 Call Forwarding Not Reachable page
To Activate Call Forwarding Not Reachable:
1. On the Group-Profile menu page, click Users (Figure 52).
2. Click Search to display a list of users in your group.
3. Click Edit or any item on the row for the user to be modified.
4. Click Incoming Calls.
5. Click Call Forwarding Not Reachable.
6. Click On (to activate the feature).The default setting for this feature is Off.
7. Enter a number into the Call Forward to phone number field.
8. Click Apply or OK. Apply saves your changes. OK saves your changes and displays the previous page. To exit without saving, select another page or click Cancel to display the previous page.
External Calling line ID Delivery
The External Calling Line ID Delivery feature allows the Calling Line name and number for callers from outside your group to be displayed (Figure 65).
To Activate External Calling Line ID Delivery:
1. On the Group-Profile menu page, click Users (Figure 52).
2. Click Search to display a list of users in your group.
3. Click Edit or any item on the row for the user to be modified.
4. Click Incoming Calls.
5. Click External Calling Line ID Delivery.
6. Click On (to activate)/Off (to deactivate the feature) The default setting for this feature is On.
7. Click Apply or OK. Apply saves your changes. OK saves your changes and displays the previous page. To exit without saving, select another page or click Cancel to display the previous page.
Figure 65 External Calling Line ID page
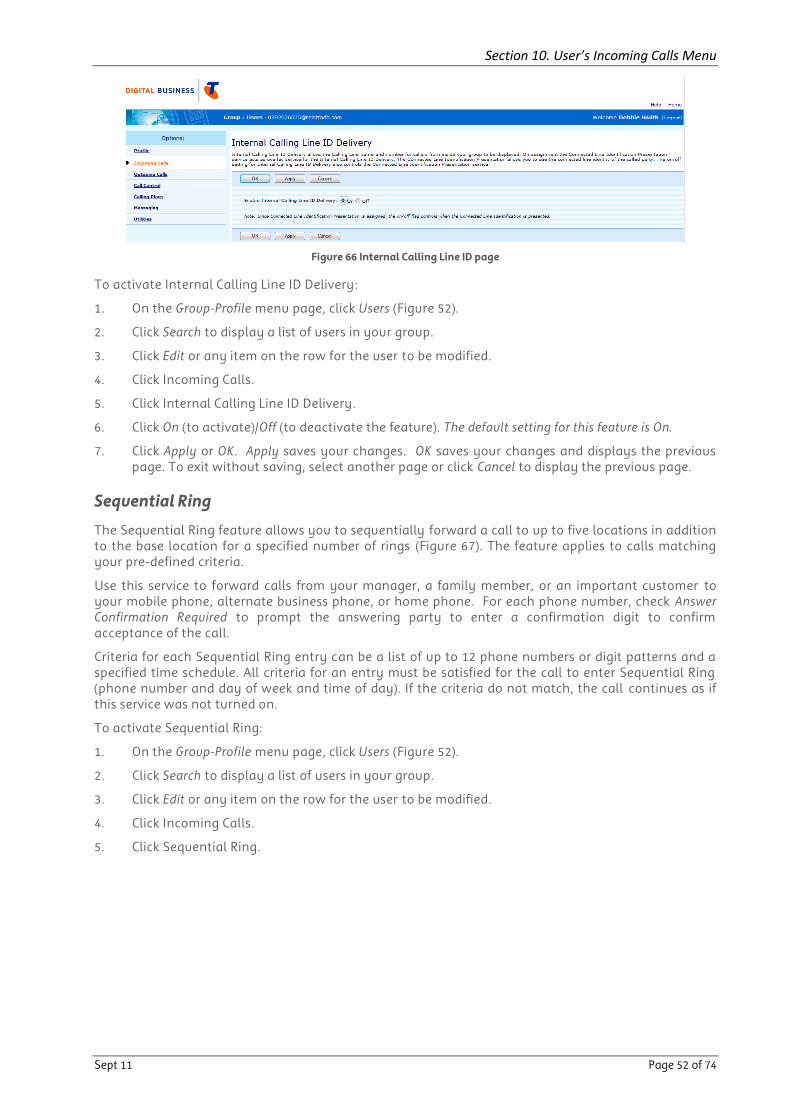
Internal Calling line ID Delivery
The Internal Calling Line ID Delivery feature allows the Calling Line name and number for callers from inside your group to be displayed (Figure 66).
Section 10. User’s Incoming Calls Menu
Sept 11 Page 52 of 74
Figure 66 Internal Calling Line ID page
To activate Internal Calling Line ID Delivery:
1. On the Group-Profile menu page, click Users (Figure 52).
2. Click Search to display a list of users in your group.
3. Click Edit or any item on the row for the user to be modified.
4. Click Incoming Calls.
5. Click Internal Calling Line ID Delivery.
6. Click On (to activate)/Off (to deactivate the feature). The default setting for this feature is On.
7. Click Apply or OK. Apply saves your changes. OK saves your changes and displays the previous page. To exit without saving, select another page or click Cancel to display the previous page.
Sequential Ring
The Sequential Ring feature allows you to sequentially forward a call to up to five locations in addition to the base location for a specified number of rings (Figure 67). The feature applies to calls matching your pre-defined criteria.
Use this service to forward calls from your manager, a family member, or an important customer to your mobile phone, alternate business phone, or home phone. For each phone number, check Answer Confirmation Required to prompt the answering party to enter a confirmation digit to confirm acceptance of the call.
Criteria for each Sequential Ring entry can be a list of up to 12 phone numbers or digit patterns and a specified time schedule. All criteria for an entry must be satisfied for the call to enter Sequential Ring (phone number and day of week and time of day). If the criteria do not match, the call continues as if this service was not turned on.
To activate Sequential Ring:
1. On the Group-Profile menu page, click Users (Figure 52).
2. Click Search to display a list of users in your group.
3. Click Edit or any item on the row for the user to be modified.
4. Click Incoming Calls.
5. Click Sequential Ring.
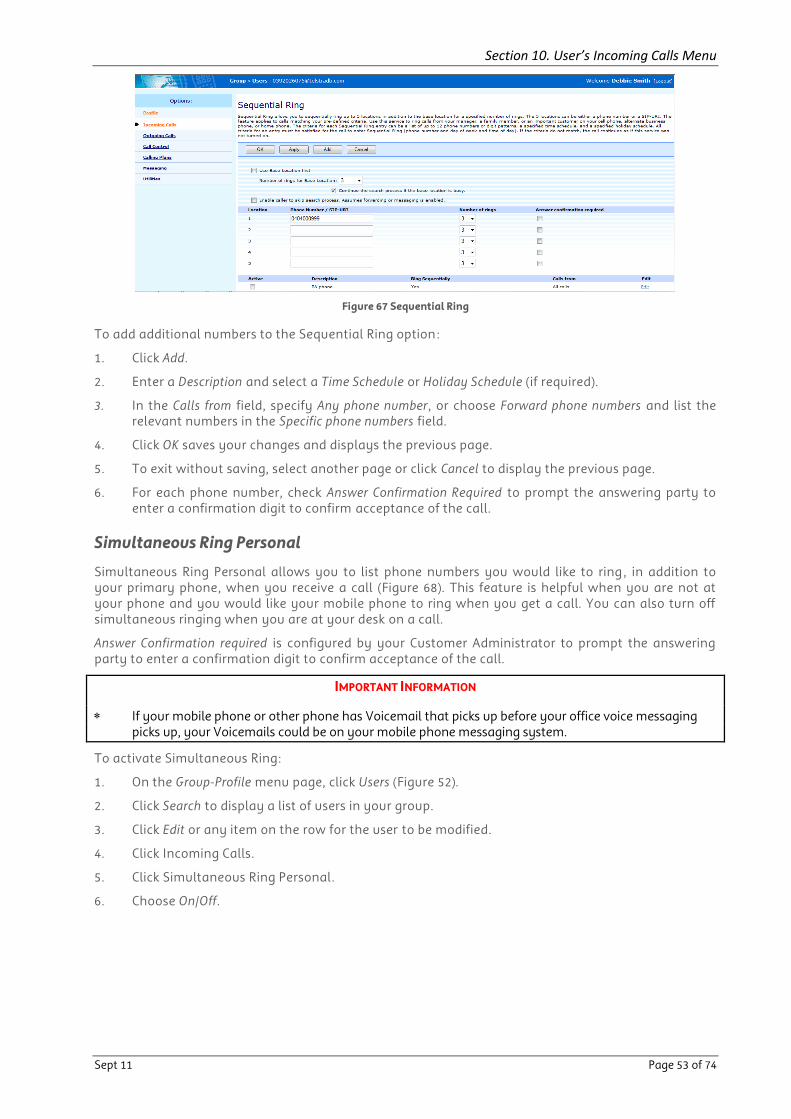
Section 10. User’s Incoming Calls Menu
Sept 11 Page 53 of 74
Figure 67 Sequential Ring
To add additional numbers to the Sequential Ring option:
1. Click Add.
2. Enter a Description and select a Time Schedule or Holiday Schedule (if required).
3. In the Calls from field, specify Any phone number, or choose Forward phone numbers and list the relevant numbers in the Specific phone numbers field.
4. Click OK saves your changes and displays the previous page.
5. To exit without saving, select another page or click Cancel to display the previous page.
6. For each phone number, check Answer Confirmation Required to prompt the answering party to enter a confirmation digit to confirm acceptance of the call.
Simultaneous Ring Personal
Simultaneous Ring Personal allows you to list phone numbers you would like to ring , in addition to your primary phone, when you receive a call (Figure 68). This feature is helpful when you are not at your phone and you would like your mobile phone to ring when you get a call. You can also turn off simultaneous ringing when you are at your desk on a call.
Answer Confirmation required is configured by your Customer Administrator to prompt the answering party to enter a confirmation digit to confirm acceptance of the call.
IMPORTANT INFORMATION
If your mobile phone or other phone has Voicemail that picks up before your office voice messaging picks up, your Voicemails could be on your mobile phone messaging system.
To activate Simultaneous Ring:
1. On the Group-Profile menu page, click Users (Figure 52).
2. Click Search to display a list of users in your group.
3. Click Edit or any item on the row for the user to be modified.
4. Click Incoming Calls.
5. Click Simultaneous Ring Personal.
6. Choose On/Off.
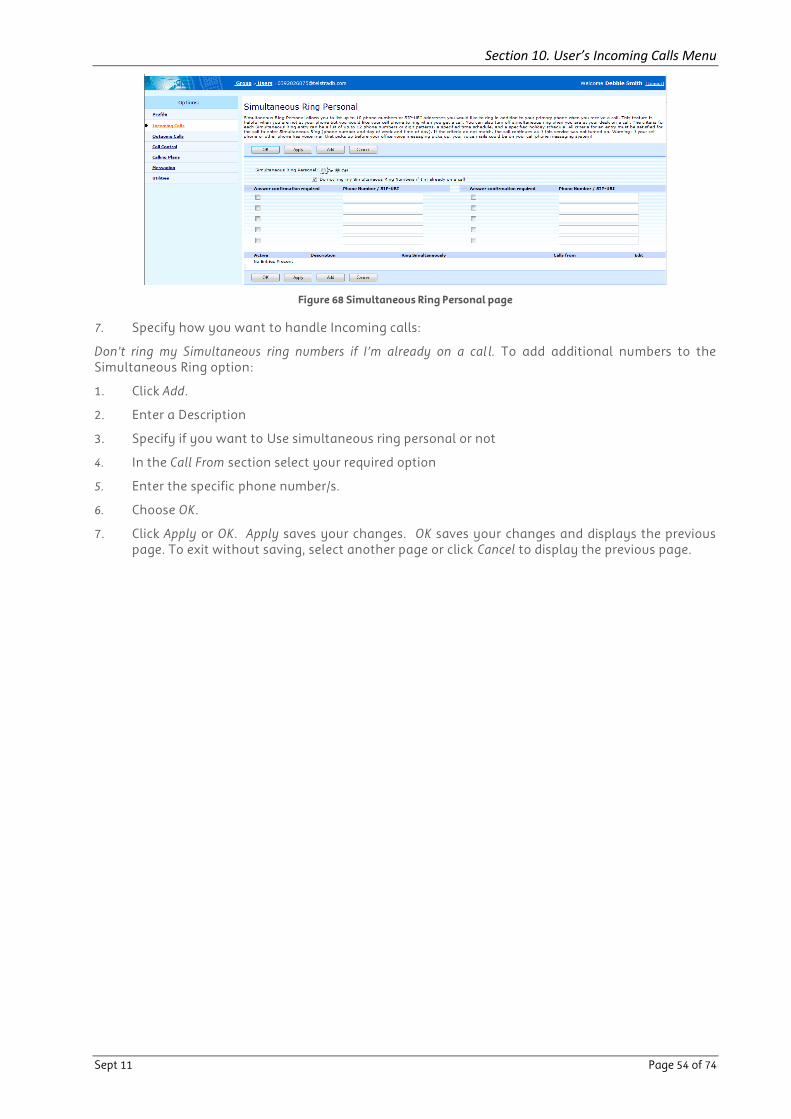
Section 10. User’s Incoming Calls Menu
Sept 11 Page 54 of 74
Figure 68 Simultaneous Ring Personal page
7. Specify how you want to handle Incoming calls:
Don’t ring my Simultaneous ring numbers if I’m already on a cal l. To add additional numbers to the Simultaneous Ring option:
1. Click Add.
2. Enter a Description
3. Specify if you want to Use simultaneous ring personal or not
4. In the Call From section select your required option
5. Enter the specific phone number/s.
6. Choose OK.
7. Click Apply or OK. Apply saves your changes. OK saves your changes and displays the previous page. To exit without saving, select another page or click Cancel to display the previous page.
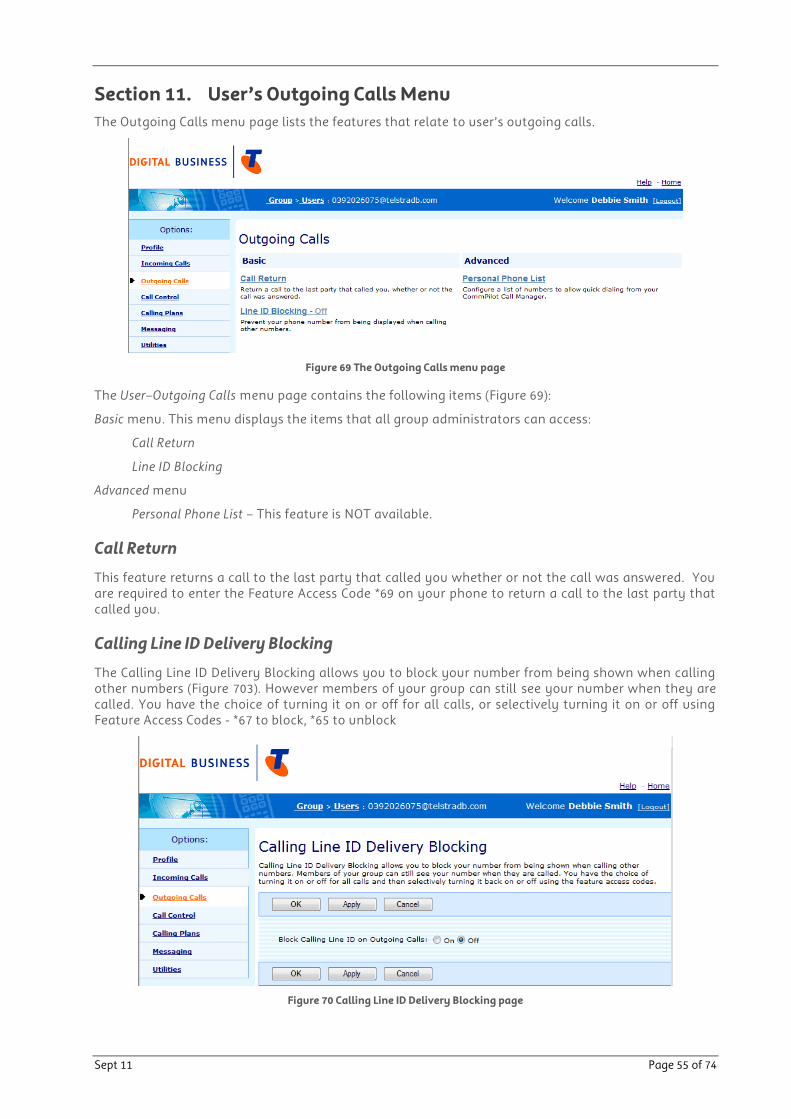
Sept 11 Page 55 of 74
Section 11. User’s Outgoing Calls Menu
The Outgoing Calls menu page lists the features that relate to user‟s outgoing calls.
Figure 69 The Outgoing Calls menu page
The User–Outgoing Calls menu page contains the following items (Figure 69):
Basic menu. This menu displays the items that all group administrators can access:
Call Return
Line ID Blocking
Advanced menu
Personal Phone List – This feature is NOT available.
Call Return
This feature returns a call to the last party that called you whether or not the call was answered. You are required to enter the Feature Access Code *69 on your phone to return a call to the last party that called you.
Calling Line ID Delivery Blocking
The Calling Line ID Delivery Blocking allows you to block your number from being shown when calling other numbers (Figure 703). However members of your group can still see your number when they are called. You have the choice of turning it on or off for all calls, or selectively turning it on or off using Feature Access Codes - *67 to block, *65 to unblock
Figure 70 Calling Line ID Delivery Blocking page
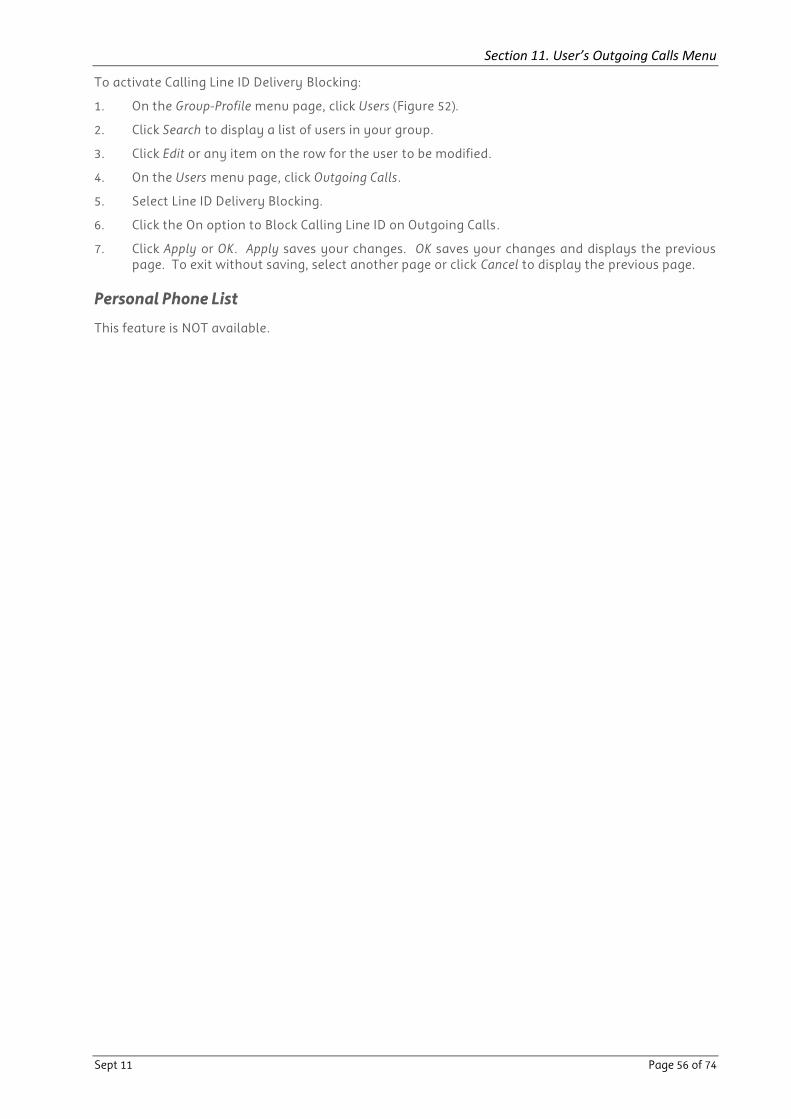
Section 11. User’s Outgoing Calls Menu
Sept 11 Page 56 of 74
To activate Calling Line ID Delivery Blocking:
1. On the Group-Profile menu page, click Users (Figure 52).
2. Click Search to display a list of users in your group.
3. Click Edit or any item on the row for the user to be modified.
4. On the Users menu page, click Outgoing Calls.
5. Select Line ID Delivery Blocking.
6. Click the On option to Block Calling Line ID on Outgoing Calls.
7. Click Apply or OK. Apply saves your changes. OK saves your changes and displays the previous page. To exit without saving, select another page or click Cancel to display the previous page.
Personal Phone List
This feature is NOT available.
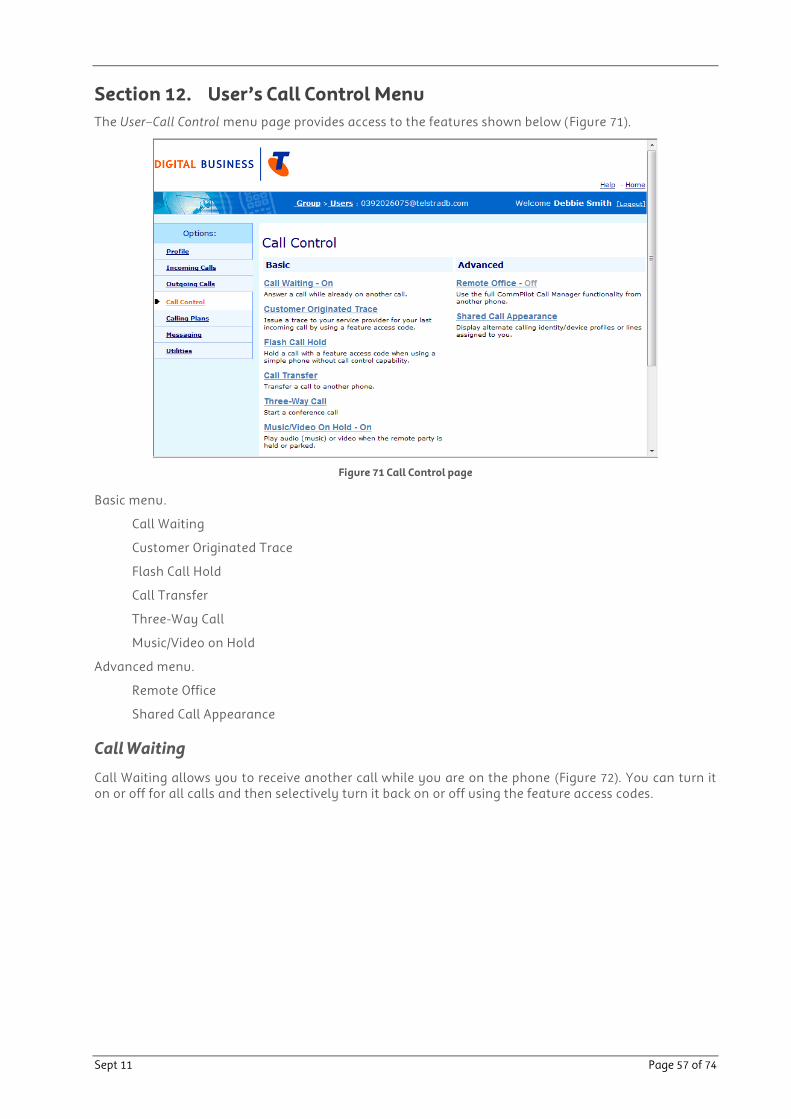
Sept 11 Page 57 of 74
Section 12. User’s Call Control Menu
The User–Call Control menu page provides access to the features shown below (Figure 71).
Figure 71 Call Control page
Basic menu.
Call Waiting
Customer Originated Trace
Flash Call Hold
Call Transfer
Three-Way Call
Music/Video on Hold
Advanced menu.
Remote Office
Shared Call Appearance
Call Waiting
Call Waiting allows you to receive another call while you are on the phone (Figure 72). You can turn it on or off for all calls and then selectively turn it back on or off using the feature access codes.
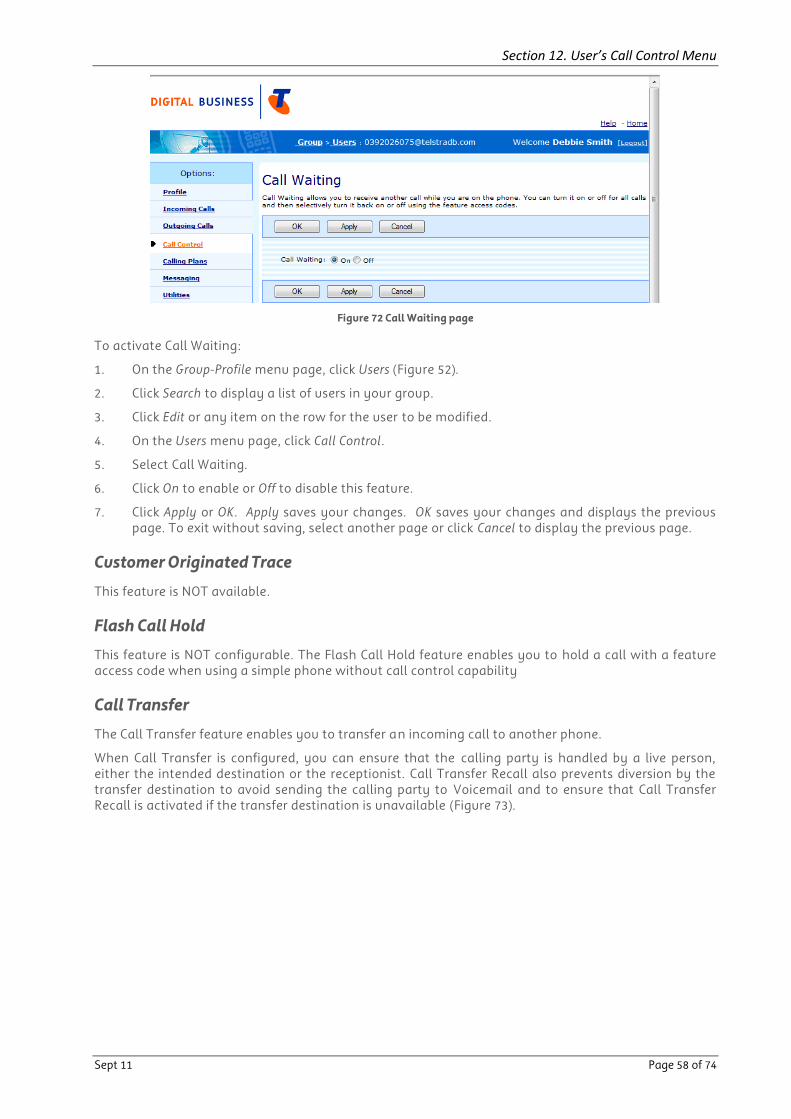
Section 12. User’s Call Control Menu
Sept 11 Page 58 of 74
Figure 72 Call Waiting page
To activate Call Waiting:
1. On the Group-Profile menu page, click Users (Figure 52).
2. Click Search to display a list of users in your group.
3. Click Edit or any item on the row for the user to be modified.
4. On the Users menu page, click Call Control.
5. Select Call Waiting.
6. Click On to enable or Off to disable this feature.
7. Click Apply or OK. Apply saves your changes. OK saves your changes and displays the previous page. To exit without saving, select another page or click Cancel to display the previous page.
Customer Originated Trace
This feature is NOT available.
Flash Call Hold
This feature is NOT configurable. The Flash Call Hold feature enables you to hold a call with a feature access code when using a simple phone without call control capability
Call Transfer
The Call Transfer feature enables you to transfer an incoming call to another phone.
When Call Transfer is configured, you can ensure that the calling party is handled by a live person, either the intended destination or the receptionist. Call Transfer Recall also prevents diversion by the transfer destination to avoid sending the calling party to Voicemail and to ensure that Call Transfer Recall is activated if the transfer destination is unavailable (Figure 73).
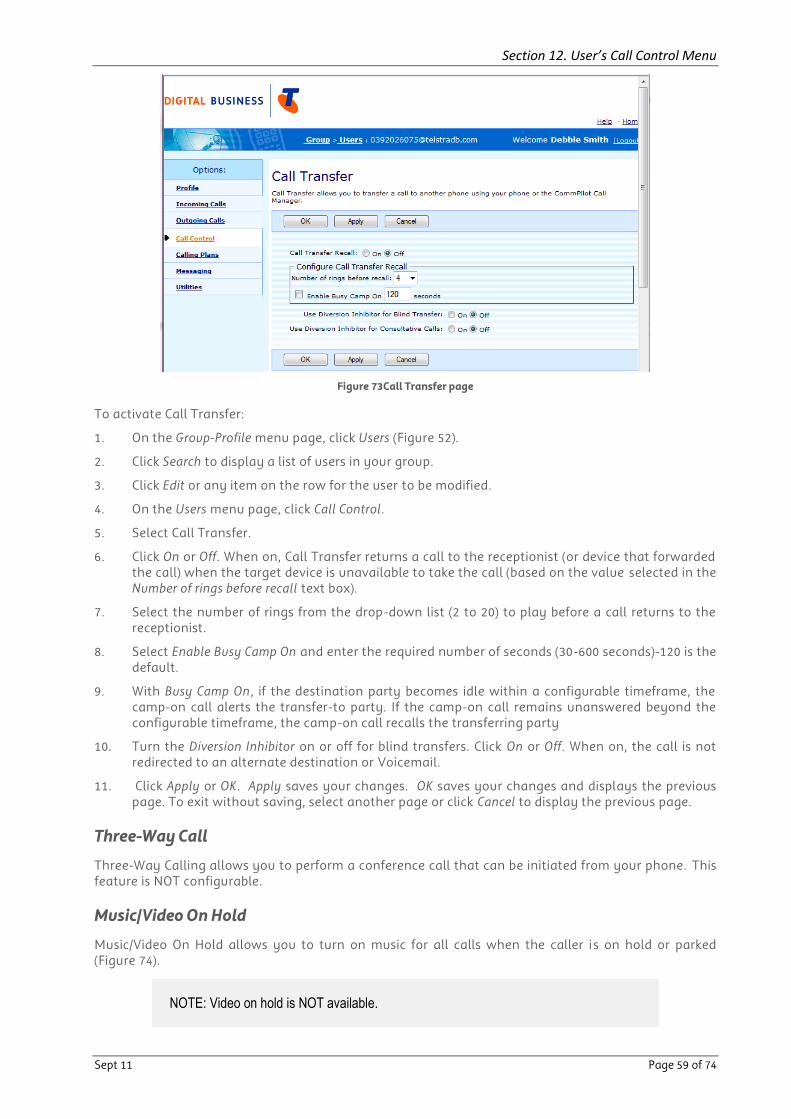
Section 12. User’s Call Control Menu
Sept 11 Page 59 of 74
Figure 73Call Transfer page
To activate Call Transfer:
1. On the Group-Profile menu page, click Users (Figure 52).
2. Click Search to display a list of users in your group.
3. Click Edit or any item on the row for the user to be modified.
4. On the Users menu page, click Call Control.
5. Select Call Transfer.
6. Click On or Off. When on, Call Transfer returns a call to the receptionist (or device that forwarded the call) when the target device is unavailable to take the call (based on the value selected in the Number of rings before recall text box).
7. Select the number of rings from the drop-down list (2 to 20) to play before a call returns to the receptionist.
8. Select Enable Busy Camp On and enter the required number of seconds (30-600 seconds)-120 is the default.
9. With Busy Camp On, if the destination party becomes idle within a configurable timeframe, the camp-on call alerts the transfer-to party. If the camp-on call remains unanswered beyond the configurable timeframe, the camp-on call recalls the transferring party
10. Turn the Diversion Inhibitor on or off for blind transfers. Click On or Off. When on, the call is not redirected to an alternate destination or Voicemail.
11. Click Apply or OK. Apply saves your changes. OK saves your changes and displays the previous page. To exit without saving, select another page or click Cancel to display the previous page.
Three-Way Call
Three-Way Calling allows you to perform a conference call that can be initiated from your phone. This feature is NOT configurable.
Music/Video On Hold
Music/Video On Hold allows you to turn on music for all calls when the caller is on hold or parked (Figure 74).
NOTE: Video on hold is NOT available.

Section 12. User’s Call Control Menu
Sept 11 Page 60 of 74
Figure 74 Music/Video On Hold page
To activate Music/Video On Hold:
1. On the Group-Profile menu page, click Users (Figure 52).
2. Click Search to display a list of users in your group.
3. Click Edit or any item on the row for the user to be modified.
4. On the Users menu page, click Call Control.
5. Select Music/Video On Hold. The Music/Video On Hold page displays.
6. Click On to enable Music on Hold or Off to disable Music On Hold.
7. Click Apply or OK. Apply saves your changes. OK saves your changes and displays the previous page. To exit without saving, select another page or click Cancel to display the previous page.
Remote Office
Remote Office allows you to use your home phone or your mobile phone as your business phone. By using the CommPilot Call Manager, you can make phone calls from this remote phone and have them billed to your business. This service also directs all calls coming to your business phone to ring the remote office phone (Figure 75).
To activate Remote Office:
1. On the Group-Profile menu page, click Users (Figure 52).
2. Click Search to display a list of users in your group.
3. Click Edit or any item on the row for the user to be modified.
4. On the Users menu page, click Call Control.
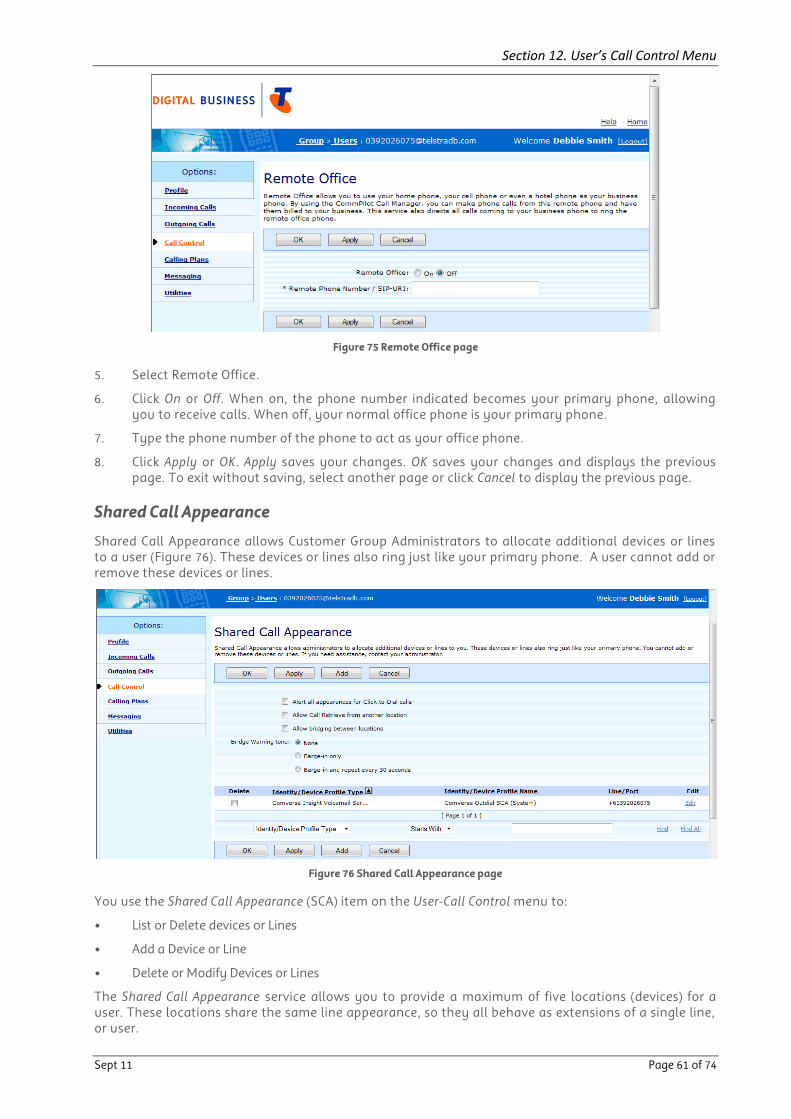
Section 12. User’s Call Control Menu
Sept 11 Page 61 of 74
Figure 75 Remote Office page
5. Select Remote Office.
6. Click On or Off. When on, the phone number indicated becomes your primary phone, allowing you to receive calls. When off, your normal office phone is your primary phone.
7. Type the phone number of the phone to act as your office phone.
8. Click Apply or OK. Apply saves your changes. OK saves your changes and displays the previous page. To exit without saving, select another page or click Cancel to display the previous page.
Shared Call Appearance
Shared Call Appearance allows Customer Group Administrators to allocate additional devices or lines to a user (Figure 76). These devices or lines also ring just like your primary phone. A user cannot add or remove these devices or lines.
Figure 76 Shared Call Appearance page
You use the Shared Call Appearance (SCA) item on the User-Call Control menu to:
• List or Delete devices or Lines
• Add a Device or Line
• Delete or Modify Devices or Lines
The Shared Call Appearance service allows you to provide a maximum of five locations (devices) for a user. These locations share the same line appearance, so they all behave as extensions of a single line, or user.
Section 12. User’s Call Control Menu
Sept 11 Page 62 of 74
One of these provisioned locations is the user‟s primary location while the other locations are called alternate locations. A user can be assigned any type of device for their primary and alternate locations.
The Shared Call Appearance Call Retrieve feature allows a user to dial an FAC to retrieve an existing active call from another phone by dialling *11.
The Shared Call Appearance Call Location Control feature enables the user to activate or deactivate an alternate phone.
1. To activate an alternate phone, lift the telephone handset, enter the assigned code *12.
2. To deactivate an alternate phone, lift the telephone handset, enter the assigned code *13.
The Shared Call Appearance Call allows bridging between locations. Allowing bridging implies that it allows one or more users to pick up the device at a user‟s shared call appearance locations and barge in on the user‟s current call. Additional to this is:
• Bridge warning tone. This allows you to configure a warning tone to alert all the users on a call that the call has been bridged. Options available are „None‟, „Barge-in-only‟, ‟Barge-in and repeat every 30 seconds‟.
• This feature can be implemented within a Telstra Digital Business® account, and you need to have at least 2 Digital Business voice services to utilise this service. To View, Add, Modify or Delete users in the Shared Call Appearance feature phone us on 13 2000 and say “Digital Business” when prompted.
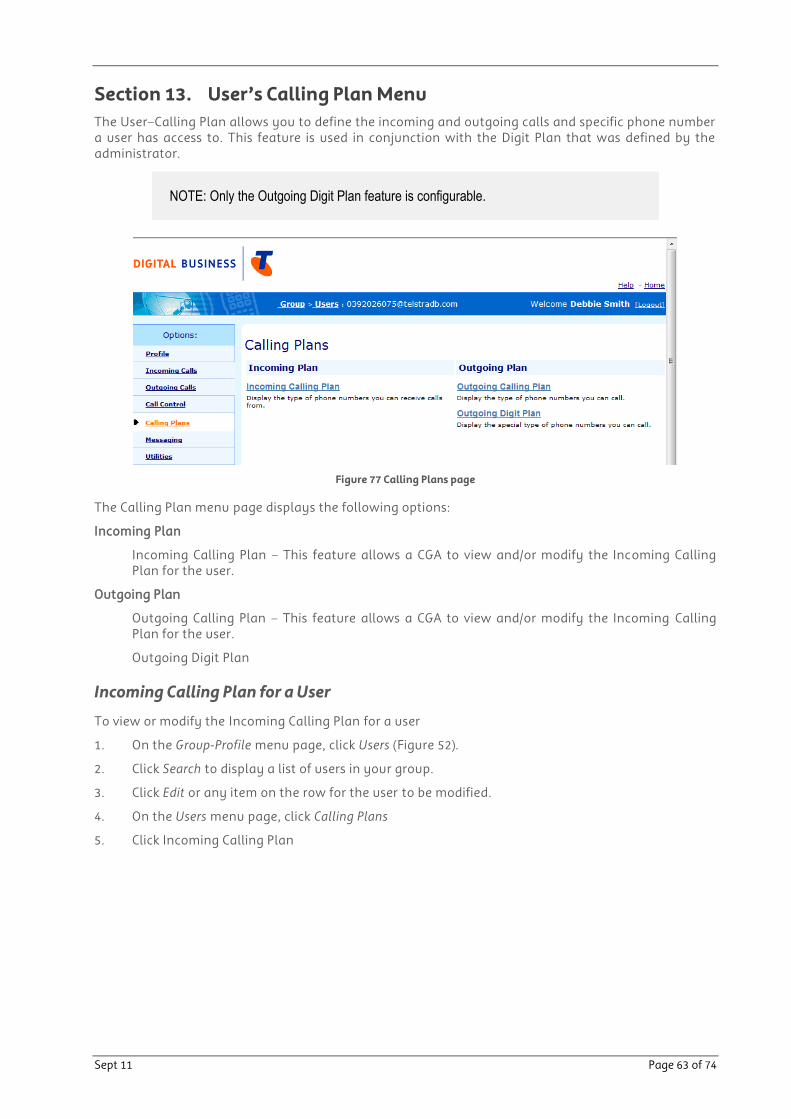
Sept 11 Page 63 of 74
Section 13. User’s Calling Plan Menu
The User–Calling Plan allows you to define the incoming and outgoing calls and specific phone number a user has access to. This feature is used in conjunction with the Digit Plan that was defined by the administrator.
NOTE: Only the Outgoing Digit Plan feature is configurable.
Figure 77 Calling Plans page
The Calling Plan menu page displays the following options:
Incoming Plan
Incoming Calling Plan – This feature allows a CGA to view and/or modify the Incoming Calling Plan for the user.
Outgoing Plan
Outgoing Calling Plan – This feature allows a CGA to view and/or modify the Incoming Calling Plan for the user.
Outgoing Digit Plan
Incoming Calling Plan for a User
To view or modify the Incoming Calling Plan for a user
1. On the Group-Profile menu page, click Users (Figure 52).
2. Click Search to display a list of users in your group.
3. Click Edit or any item on the row for the user to be modified.
4. On the Users menu page, click Calling Plans
5. Click Incoming Calling Plan

Section 12. User’s Call Control Menu
Sept 11 Page 64 of 74
Figure 78 Incoming Calling Plan page.
6. Click Custom Settings.
7. Deselect/select the relevant option from the Permitted check box.
8. Click Apply or OK. Apply saves your changes. OK saves your changes and displays the previous page. To exit without saving, select another page or click Cancel to display the previous page.
Outgoing Calling Plan for a User
To view or modify the Outgoing Calling Plan for a user:
1. On the Group-Profile menu page, click Users (Figure 52).
2. Click Search to display a list of users in your group.
3. Click Edit or any item on the row for the user to be modified.
4. On the Users menu page, click Calling Plans
5. Click Outgoing Calling Plan
Figure 79 Outgoing Calling Plan page
6. Deselect/select the relevant option from the Permitted check box on the Originating Calls tab.
7. Click on the Initiating Call Forwards/Transfers tab.
8. Deselect/select the relevant option from the Permitted check box.
9. Click on the Being Forwarded/Transferred tab.
10. Deselect/select the relevant option from the Permitted check box.
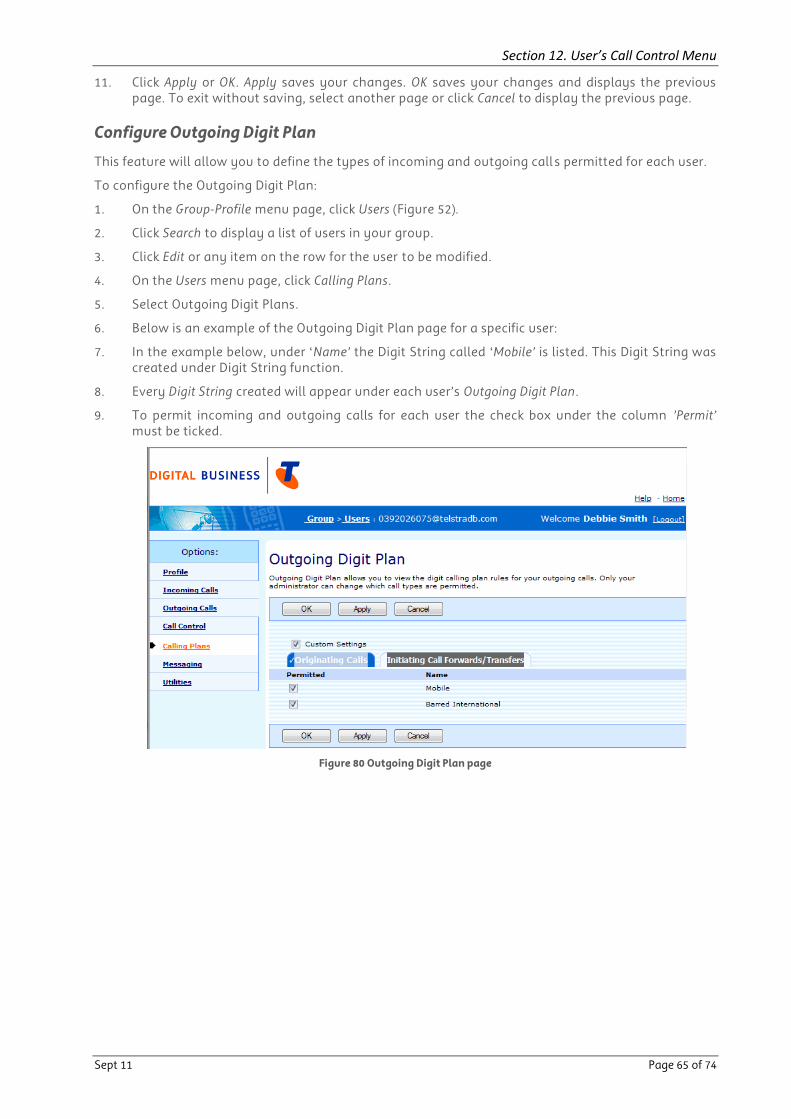
Section 12. User’s Call Control Menu
Sept 11 Page 65 of 74
11. Click Apply or OK. Apply saves your changes. OK saves your changes and displays the previous page. To exit without saving, select another page or click Cancel to display the previous page.
Configure Outgoing Digit Plan
This feature will allow you to define the types of incoming and outgoing call s permitted for each user.
To configure the Outgoing Digit Plan:
1. On the Group-Profile menu page, click Users (Figure 52).
2. Click Search to display a list of users in your group.
3. Click Edit or any item on the row for the user to be modified.
4. On the Users menu page, click Calling Plans.
5. Select Outgoing Digit Plans.
6. Below is an example of the Outgoing Digit Plan page for a specific user:
7. In the example below, under „Name’ the Digit String called „Mobile’ is listed. This Digit String was created under Digit String function.
8. Every Digit String created will appear under each user‟s Outgoing Digit Plan.
9. To permit incoming and outgoing calls for each user the check box under the column ’Permit’ must be ticked.
Figure 80 Outgoing Digit Plan page
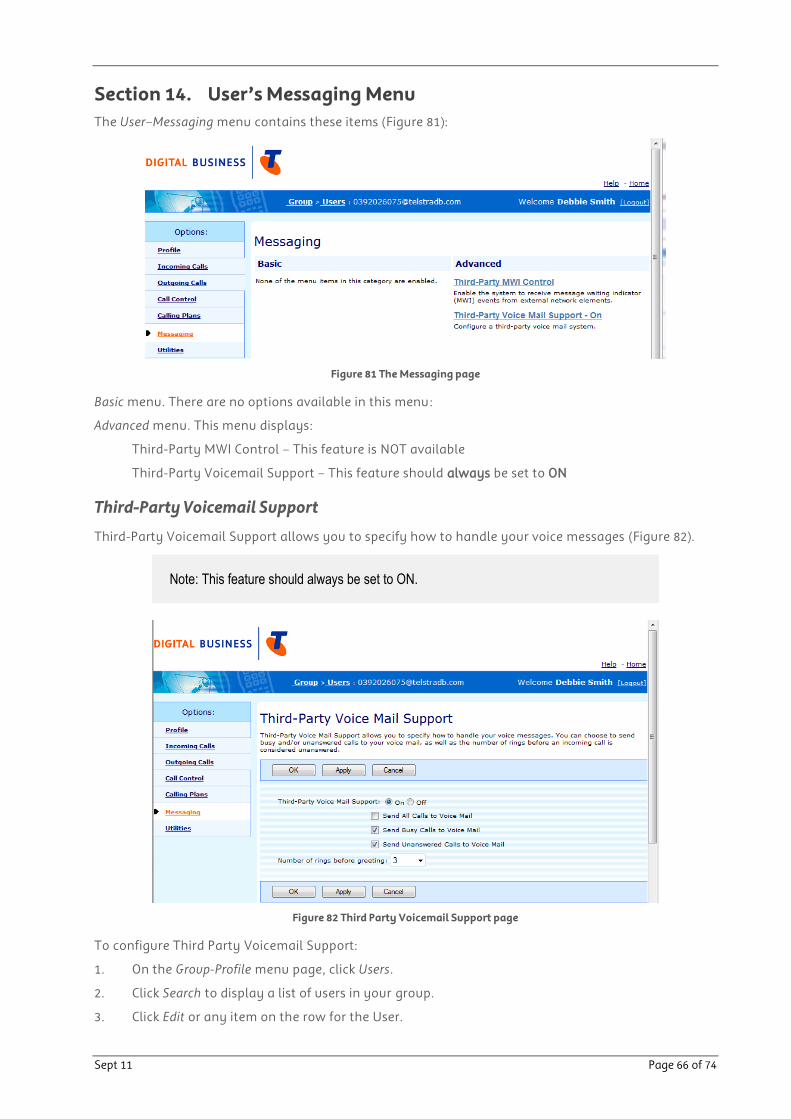
Sept 11 Page 66 of 74
Section 14. User’s Messaging Menu
The User–Messaging menu contains these items (Figure 81):
Figure 81 The Messaging page
Basic menu. There are no options available in this menu:
Advanced menu. This menu displays:
Third-Party MWI Control – This feature is NOT available
Third-Party Voicemail Support – This feature should always be set to ON
Third-Party Voicemail Support
Third-Party Voicemail Support allows you to specify how to handle your voice messages (Figure 82).
Note: This feature should always be set to ON.
Figure 82 Third Party Voicemail Support page
To configure Third Party Voicemail Support:
1. On the Group-Profile menu page, click Users.
2. Click Search to display a list of users in your group.
3. Click Edit or any item on the row for the User.

Section 14. User’s Messaging Menu
Sept 11 Page 67 of 74
4. For a selected user, click Messaging.
5. Select Third-Party Voicemail Support.
6. Select On (always select ON).
7. Specify the following required options: Send All Calls to Voicemail; Send Busy Calls to Voicemail; Send Unanswered Calls to Voicemail. The default setting is On and Send Busy and unanswered Calls to Voicemail.
8. Specify the number of rings before the greeting, by clicking on the drop down arrow and choosing a number.
9. Click Apply or OK. Apply saves your changes. OK saves your changes and displays the previous page. To exit without saving, select another page or click Cancel to display the previous page.
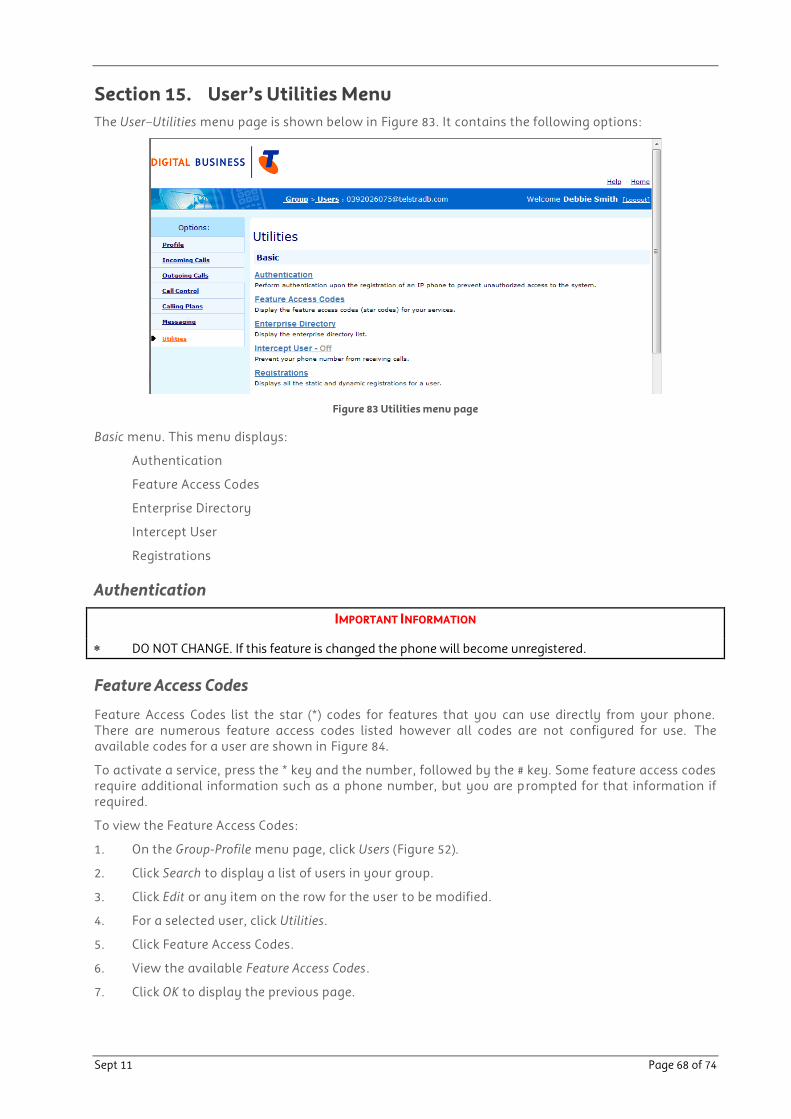
Sept 11 Page 68 of 74
Section 15. User’s Utilities Menu
The User–Utilities menu page is shown below in Figure 83. It contains the following options:
Figure 83 Utilities menu page
Basic menu. This menu displays:
Authentication
Feature Access Codes
Enterprise Directory
Intercept User
Registrations
Authentication
IMPORTANT INFORMATION
DO NOT CHANGE. If this feature is changed the phone will become unregistered.
Feature Access Codes
Feature Access Codes list the star (*) codes for features that you can use directly from your phone. There are numerous feature access codes listed however all codes are not configured for use. The available codes for a user are shown in Figure 84.
To activate a service, press the * key and the number, followed by the # key. Some feature access codes require additional information such as a phone number, but you are prompted for that information if required.
To view the Feature Access Codes:
1. On the Group-Profile menu page, click Users (Figure 52).
2. Click Search to display a list of users in your group.
3. Click Edit or any item on the row for the user to be modified.
4. For a selected user, click Utilities.
5. Click Feature Access Codes.
6. View the available Feature Access Codes.
7. Click OK to display the previous page.
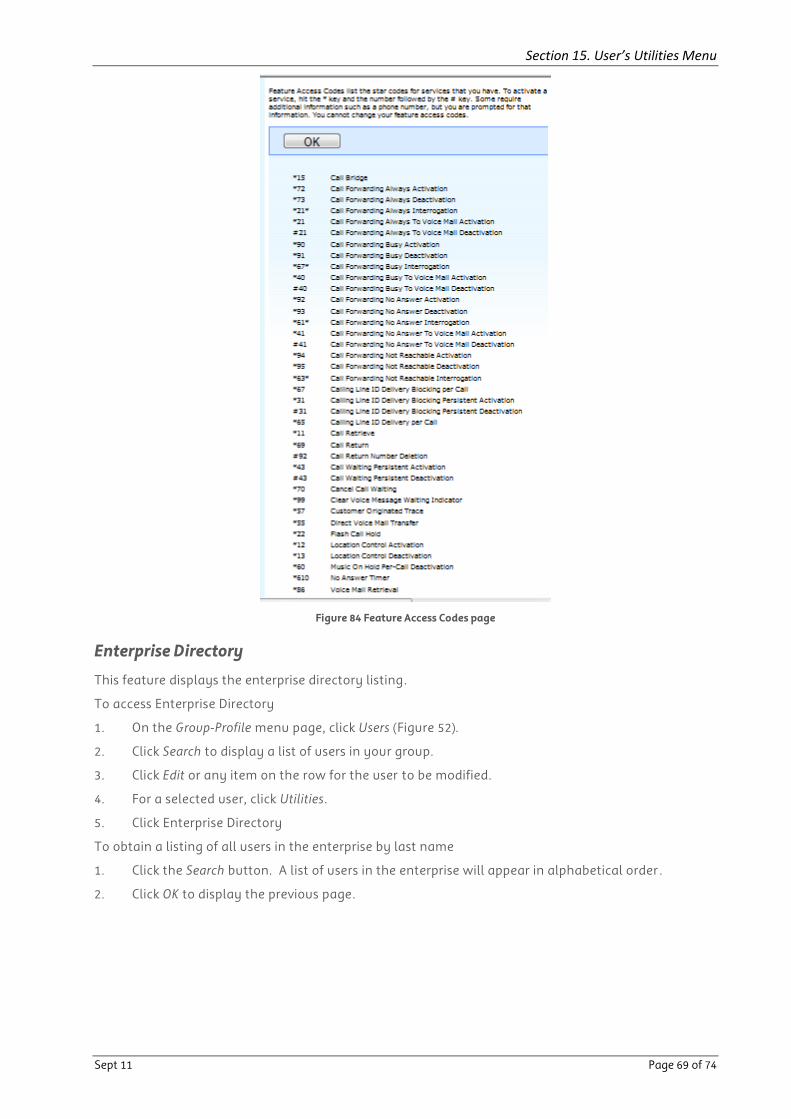
Section 15. User’s Utilities Menu
Sept 11 Page 69 of 74
Figure 84 Feature Access Codes page
Enterprise Directory
This feature displays the enterprise directory listing.
To access Enterprise Directory
1. On the Group-Profile menu page, click Users (Figure 52).
2. Click Search to display a list of users in your group.
3. Click Edit or any item on the row for the user to be modified.
4. For a selected user, click Utilities.
5. Click Enterprise Directory
To obtain a listing of all users in the enterprise by last name
1. Click the Search button. A list of users in the enterprise will appear in alphabetical order .
2. Click OK to display the previous page.
Section 15. User’s Utilities Menu
Sept 11 Page 70 of 74
Figure 85 Enterprise Directory page
Intercept User
Use the User – Intercept User page to block all calls to a specific user. You can also configure the announcement played to callers and include a new or alternate phone number (Figure 86).
To access Intercept User:
1. On the Group-Profile menu page, click Users (Figure 52).
2. Click Search to display a list of users in your group.
3. Click Edit or any item on the row for the user to be modified.
4. For a selected user, click Utilities.
5. Click Intercept User.
Use the Intercept User control to determine whether or not the system will block this user‟s calls. Click On to block this user‟s calls. Click Off to return the user‟s account to normal service.
Figure 86 Intercept User page
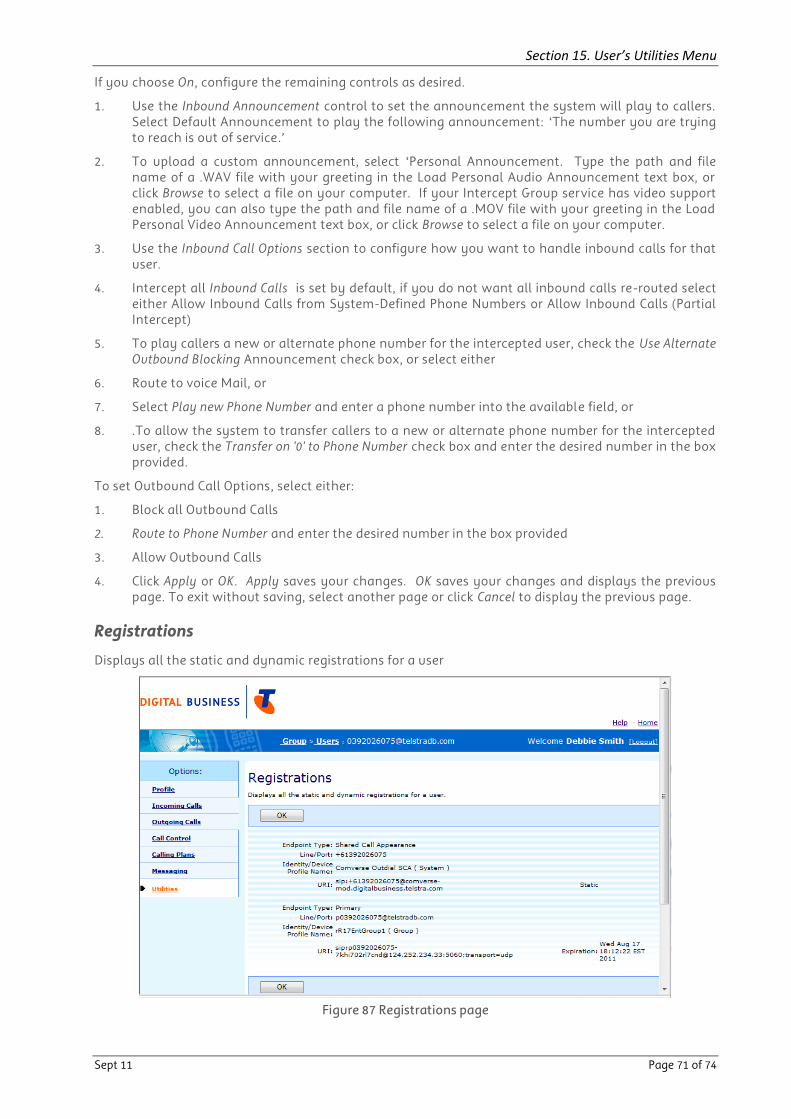
Section 15. User’s Utilities Menu
Sept 11 Page 71 of 74
If you choose On, configure the remaining controls as desired.
1. Use the Inbound Announcement control to set the announcement the system will play to callers. Select Default Announcement to play the following announcement: „The number you are trying to reach is out of service.‟
2. To upload a custom announcement, select „Personal Announcement. Type the path and file name of a .WAV file with your greeting in the Load Personal Audio Announcement text box, or click Browse to select a file on your computer. If your Intercept Group service has video support enabled, you can also type the path and file name of a .MOV file with your greeting in the Load Personal Video Announcement text box, or click Browse to select a file on your computer.
3. Use the Inbound Call Options section to configure how you want to handle inbound calls for that user.
4. Intercept all Inbound Calls is set by default, if you do not want all inbound calls re-routed select either Allow Inbound Calls from System-Defined Phone Numbers or Allow Inbound Calls (Partial Intercept)
5. To play callers a new or alternate phone number for the intercepted user, check the Use Alternate Outbound Blocking Announcement check box, or select either
6. Route to voice Mail, or
7. Select Play new Phone Number and enter a phone number into the available field, or
8. .To allow the system to transfer callers to a new or alternate phone number for the intercepted user, check the Transfer on '0' to Phone Number check box and enter the desired number in the box provided.
To set Outbound Call Options, select either:
1. Block all Outbound Calls
2. Route to Phone Number and enter the desired number in the box provided
3. Allow Outbound Calls
4. Click Apply or OK. Apply saves your changes. OK saves your changes and displays the previous page. To exit without saving, select another page or click Cancel to display the previous page.
Registrations
Displays all the static and dynamic registrations for a user
Figure 87 Registrations page

Sept 11 Page 72 of 74
Section 16. Need More Help?
If you have questions beyond this guide, we want to help.
To learn more about your Digital Business tools and features, visit the Digital Business Online Support page at telstra.com/digitalbusiness/support
To speak with a Digital Business consultant, or set up a Digital Business training session, phone us on 13 2000 and say “Digital Business” when prompted. Our consultants are available 24 hours a day.
When phoning, please have your Account Number or phone number, including area code, ready for the consultant.
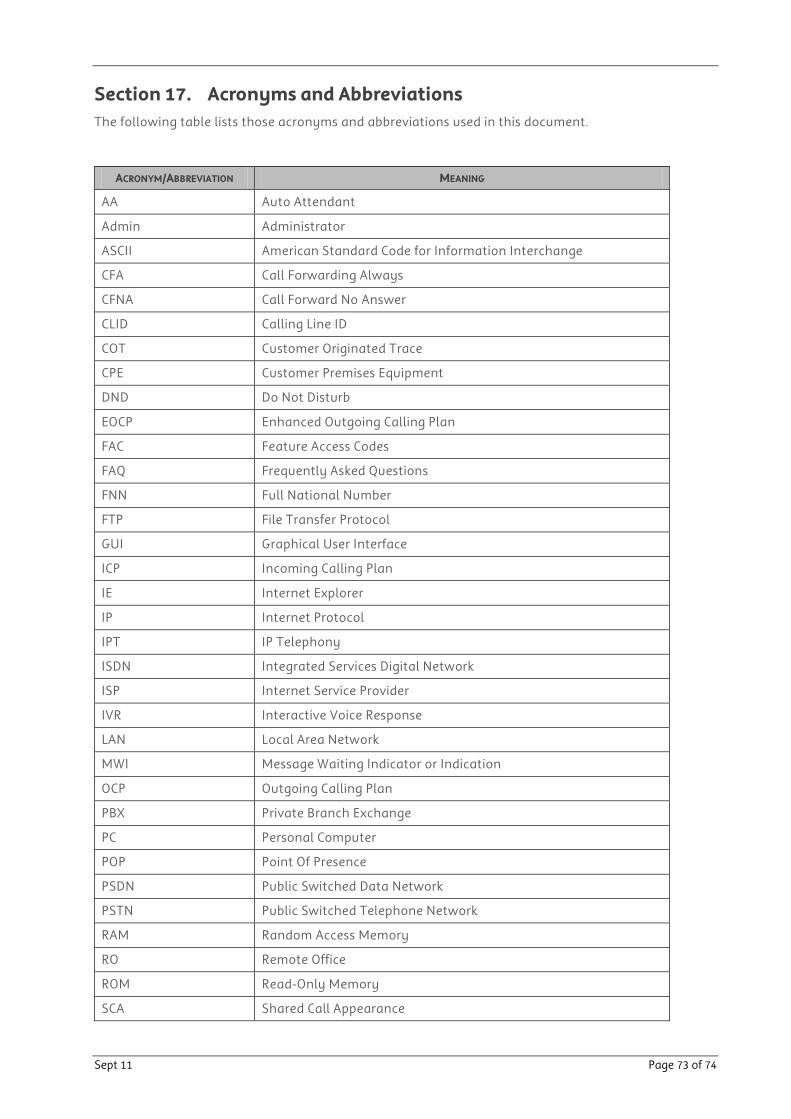
Sept 11 Page 73 of 74
Section 17. Acronyms and Abbreviations
The following table lists those acronyms and abbreviations used in this document.
ACRONYM/ABBREVIATION MEANING
AA Auto Attendant
Admin Administrator
ASCII American Standard Code for Information Interchange
CFA Call Forwarding Always
CFNA Call Forward No Answer
CLID Calling Line ID
COT Customer Originated Trace
CPE Customer Premises Equipment
DND Do Not Disturb
EOCP Enhanced Outgoing Calling Plan
FAC Feature Access Codes
FAQ Frequently Asked Questions
FNN Full National Number
FTP File Transfer Protocol
GUI Graphical User Interface
ICP Incoming Calling Plan
IE Internet Explorer
IP Internet Protocol
IPT IP Telephony
ISDN Integrated Services Digital Network
ISP Internet Service Provider
IVR Interactive Voice Response
LAN Local Area Network
MWI Message Waiting Indicator or Indication
OCP Outgoing Calling Plan
PBX Private Branch Exchange
PC Personal Computer
POP Point Of Presence
PSDN Public Switched Data Network
PSTN Public Switched Telephone Network
RAM Random Access Memory
RO Remote Office
ROM Read-Only Memory
SCA Shared Call Appearance

Section 17. Acronyms and Abbreviations
Sept 11 Page 74 of 74
ACRONYM/ABBREVIATION MEANING
SIP Session Initiation Protocol
SMTP Simple Mail Transfer Protocol
SP Service Provider
VM Voicemail
VoIP Voice over IP
VPN Virtual Private Network
WAV Wave (file extension)
WWW World Wide Web