Embed Size (px)
Citation preview

CL210A
TELEPHONE & ANSWERING MACHINE
CONTENTS 1 INTRODUCTION 3 Unpacking the Telephone 4 DESCRIPTION 5 General Description 5 INSTALLATION 7 Setting Up 7 Wall Mounting 7 SETTINGS 8 Ringer Volume Settings 8 Notification of Incoming Call Settings 8 Receiving Volume and Tone Settings 9 Dialling Mode (Tone/Pulse) Setting 11 USING THE TELEPHONE 12 Making a Call 12 Making a Call – Hands Free 12 Receiving a Call 13 Receiving a Call – Hands Free 13 Last Number Redial 13 R Button on Private Branch Exchanges 13 Headset Use 13 OPTIONAL ACCESSORIES 14 Shaker 14 QUICK DIAL 15 Create a Quick Dial Number 15 Dial a Quick Dial Number 15
ANSWERING MACHINE 16 Switching the Answering Machine On/Off 16 The Outgoing Message 16 Recording an Outgoing Message 17 Checking an Outgoing Message 17 Answering Machine Settings 18 Listening to Messages 19 Delete an Incoming Message 20 Call Screening 20 Operating the Answering Machine Remotely 20 Remote Code 20 Remote Control 21 Remote Control Commands 21 Recording a Memo 22 Recording a Telephone Call 22 Room Monitoring 23 Remotely Activate the Answering Machine 23 Out of Memory 23 TROUBLESHOOTIING 24 SAFETY INFORMATION 25 GUARANTEE 26 RECYCLING DIRECTIVES 28
CONTENTS
2 1
CONTENTS
Congratulations on purchasing your Geemarc CL210A telephone. This is a multifunction telephone which offers features such as hands free use, quick dial and an answering machine. It is important that you read the instructions below in order to use your Geemarc telephone to its full potential. Keep this user guide in a safe place for future reference. This guide explains how to use the following telephone: CL210A
Unpacking the Telephone When unpacking the telephone, you should find the following in the box:
• 1 CL210A unit • 1 CL210A handset with curly cord
• 1 Mains power adaptor
• 1 Telephone line cord
• 1 User Guide
For product support and help visit our website at www.geemarc.com Telephone 01707 384438
Or fax 01707 372529
INTRODUCTION
4
INTRODUCTION
3
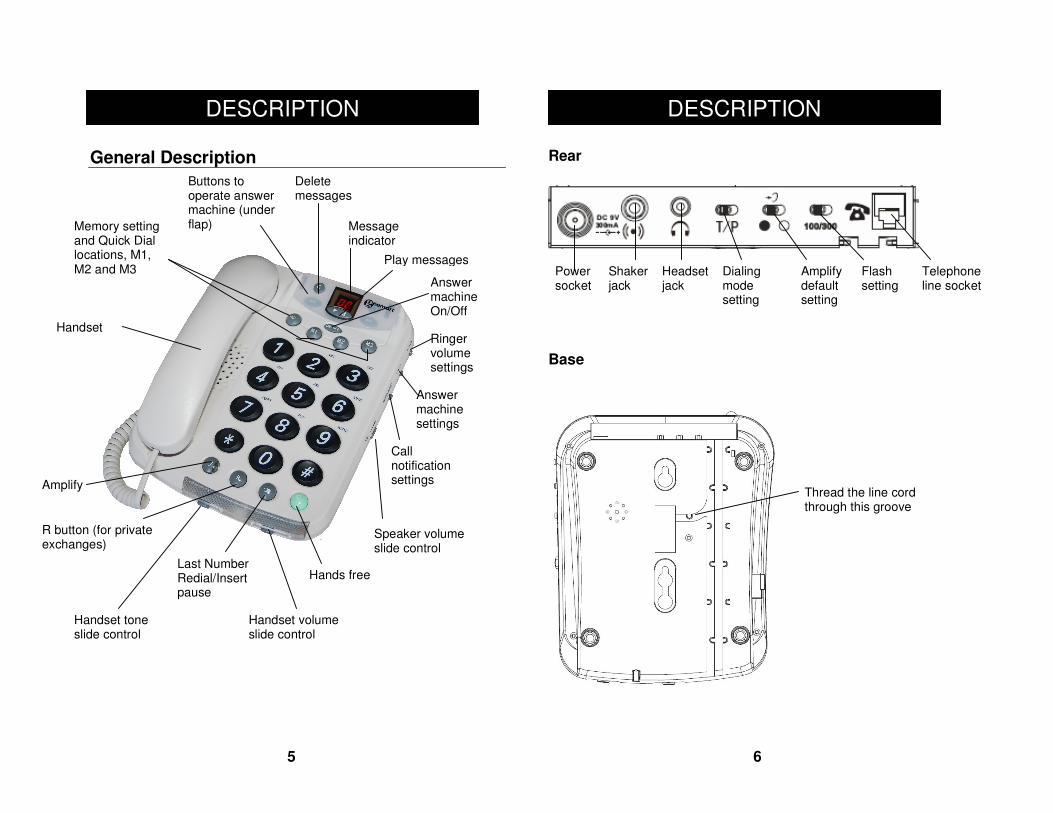
General Description
Rear
Base
DESCRIPTION
6 5
Amplify
R button (for private exchanges)
Handset
Last Number Redial/Insert pause
Hands free
Memory setting and Quick Dial locations, M1, M2 and M3
Delete messages
Message indicator
Play messages
Answer machine On/Off
Handset volume slide control
Call notification settings
Ringer volume settings
Answer machine settings
Buttons to operate answer machine (under flap)
Speaker volume slide control
Handset tone slide control
DESCRIPTION
Telephone line socket
Flash setting
Amplify default setting
Dialing mode setting
Headset jack
Shaker jack
Power socket
Thread the line cord through this groove
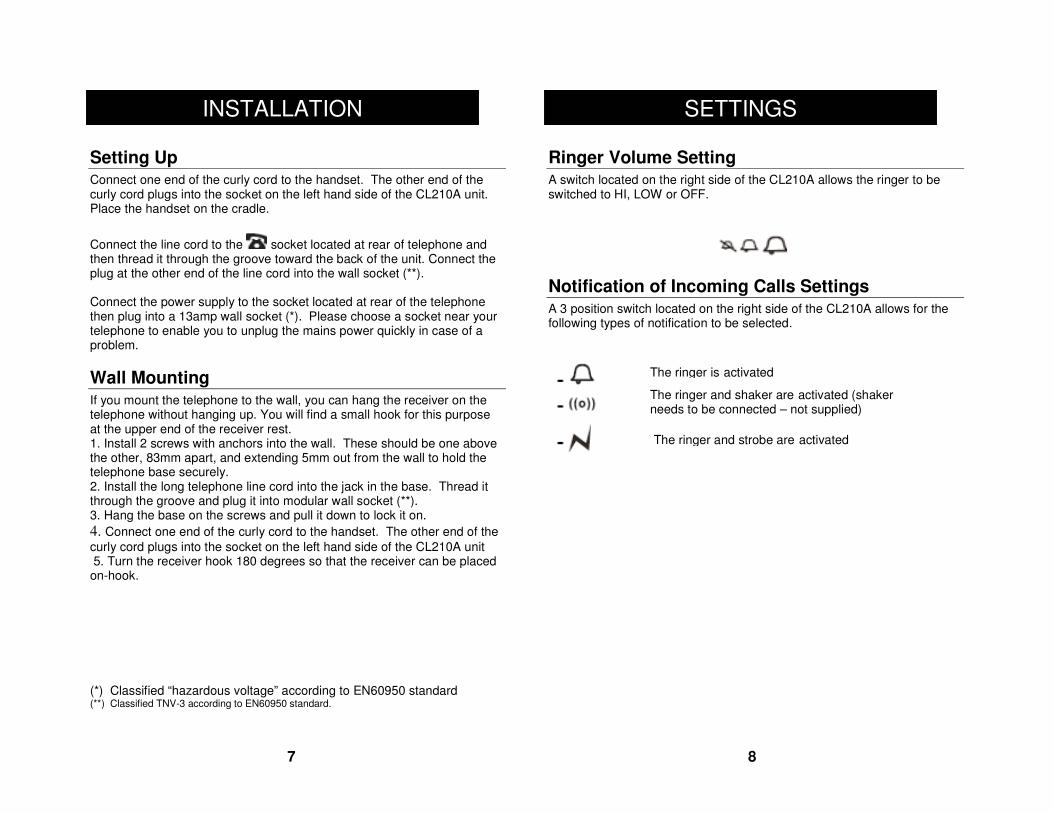
Setting Up Connect one end of the curly cord to the handset. The other end of the curly cord plugs into the socket on the left hand side of the CL210A unit. Place the handset on the cradle.
Connect the line cord to the socket located at rear of telephone and then thread it through the groove toward the back of the unit. Connect the plug at the other end of the line cord into the wall socket (**). Connect the power supply to the socket located at rear of the telephone then plug into a 13amp wall socket (*). Please choose a socket near your telephone to enable you to unplug the mains power quickly in case of a problem.
Wall Mounting If you mount the telephone to the wall, you can hang the receiver on the telephone without hanging up. You will find a small hook for this purpose at the upper end of the receiver rest. 1. Install 2 screws with anchors into the wall. These should be one above the other, 83mm apart, and extending 5mm out from the wall to hold the telephone base securely. 2. Install the long telephone line cord into the jack in the base. Thread it through the groove and plug it into modular wall socket (**). 3. Hang the base on the screws and pull it down to lock it on. 4. Connect one end of the curly cord to the handset. The other end of the curly cord plugs into the socket on the left hand side of the CL210A unit 5. Turn the receiver hook 180 degrees so that the receiver can be placed on-hook.
(*) Classified “hazardous voltage” according to EN60950 standard (**) Classified TNV-3 according to EN60950 standard.
Ringer Volume Setting A switch located on the right side of the CL210A allows the ringer to be switched to HI, LOW or OFF.
Notification of Incoming Calls Settings A 3 position switch located on the right side of the CL210A allows for the following types of notification to be selected.
INSTALLATION SETTINGS
The ringer is activated
The ringer and shaker are activated (shaker needs to be connected – not supplied)
The ringer and strobe are activated
7 8
Receiving Volume and Tone Settings You can alter the receiving volume and tone during a conversation according to your hearing requirements. Use the Volume slide control on the front edge of the telephone base to adjust the level.
The button on the telephone base provides additional amplification (a further 40dB). When the amplify function is activated, the red light on
the key is lit.
Setting a default for Amplification.
A switch ON/OFF located at the rear allows the amplification facility to be switched ON or OFF as a default each time you use the telephone.
ON/OFF Switch at ON Position The additional amplification and tone controls are automatically activated each time you use the telephone. The LED light next to the amplify button will be lit. Pressing the Amplify button during a call will turn off the additional amplification and tone controls. However, you can still adjust the handset receive volume with the Volume slide bar. Irrespective of how many times you press the amplify key throughout a call, the next time you pick up the handset to make a new call, these functions will be activated once again.
ON/OFF Switch at OFF Position The additional amplification and tone controls are turned off each time you use the telephone. The LED light next to the amplify button will be off. Pressing the Amplify button once during a call will enable tone control and additional amplification. The LED light next to the amplify button will turn on to reflect this change. If you press the amplify button once more, the additional amplification and tone control features will be turned off once again. The LED light will turn off to reflect this change. Irrespective of how many times you press the amplify key throughout a call, the next time you pick up the handset, these functions will be turned off once again.
Tone Receiving Adjustment If the receiver volume has been amplified, the tone control can also be adjusted. You can adjust and increase the low frequency or high frequency sounds with the tone slide control on the front edge of the unit.
Note: The tone adjustment function will not be affective when the receiver volume is set to normal level.
12
SETTINGS
10
SETTINGS
9 8
10
Dialling Mode (Tone/Pulse) Setting The Tone/Pulse switch is factory pre-set to Tone position (T). In the UK, all telephone exchanges now use Tone dialing. If your telephone does not dial out, it is probably being used from an older private switch- board (PBX). In this case, the Tone/Pulse switch (at rear of the unit) must be moved to Pulse.
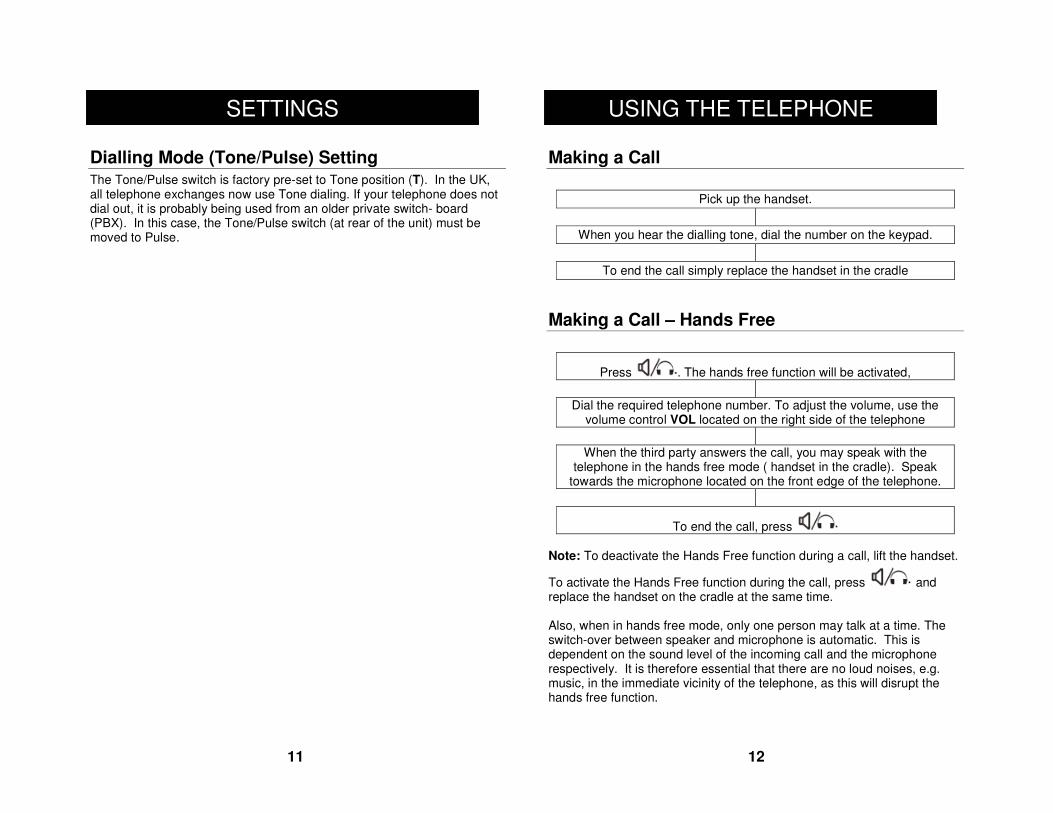
Making a Call Pick up the handset.
When you hear the dialling tone, dial the number on the keypad.
To end the call simply replace the handset in the cradle
Making a Call – Hands Free
Press . The hands free function will be activated,
Dial the required telephone number. To adjust the volume, use the
volume control VOL located on the right side of the telephone
When the third party answers the call, you may speak with the
telephone in the hands free mode ( handset in the cradle). Speak towards the microphone located on the front edge of the telephone.
To end the call, press
Note: To deactivate the Hands Free function during a call, lift the handset.
To activate the Hands Free function during the call, press and replace the handset on the cradle at the same time. Also, when in hands free mode, only one person may talk at a time. The switch-over between speaker and microphone is automatic. This is dependent on the sound level of the incoming call and the microphone respectively. It is therefore essential that there are no loud noises, e.g. music, in the immediate vicinity of the telephone, as this will disrupt the hands free function.
SETTINGS USING THE TELEPHONE
11 12
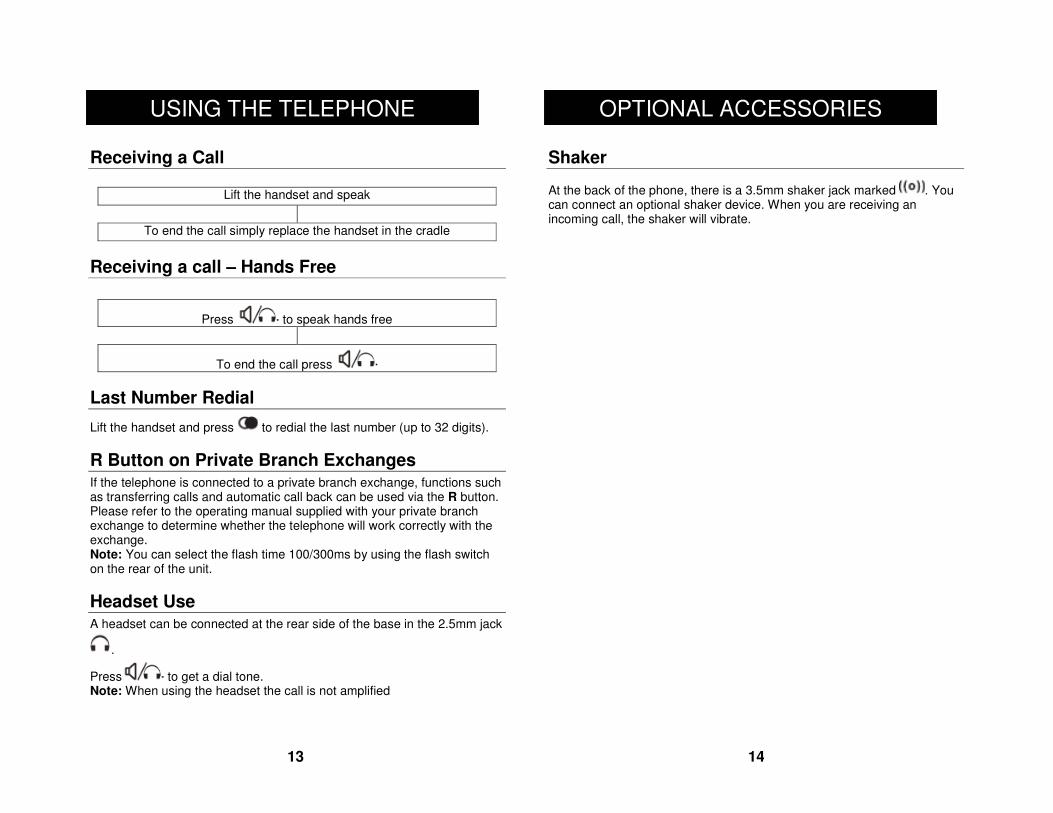
Receiving a Call Lift the handset and speak
To end the call simply replace the handset in the cradle
Receiving a call – Hands Free
Press to speak hands free
To end the call press
Last Number Redial
Lift the handset and press to redial the last number (up to 32 digits).
R Button on Private Branch Exchanges If the telephone is connected to a private branch exchange, functions such as transferring calls and automatic call back can be used via the R button. Please refer to the operating manual supplied with your private branch exchange to determine whether the telephone will work correctly with the exchange. Note: You can select the flash time 100/300ms by using the flash switch on the rear of the unit.
Headset Use A headset can be connected at the rear side of the base in the 2.5mm jack
.
Press to get a dial tone. Note: When using the headset the call is not amplified
Shaker
At the back of the phone, there is a 3.5mm shaker jack marked . You can connect an optional shaker device. When you are receiving an incoming call, the shaker will vibrate.
USING THE TELEPHONE
14 13 14
OPTIONAL ACCESSORIES
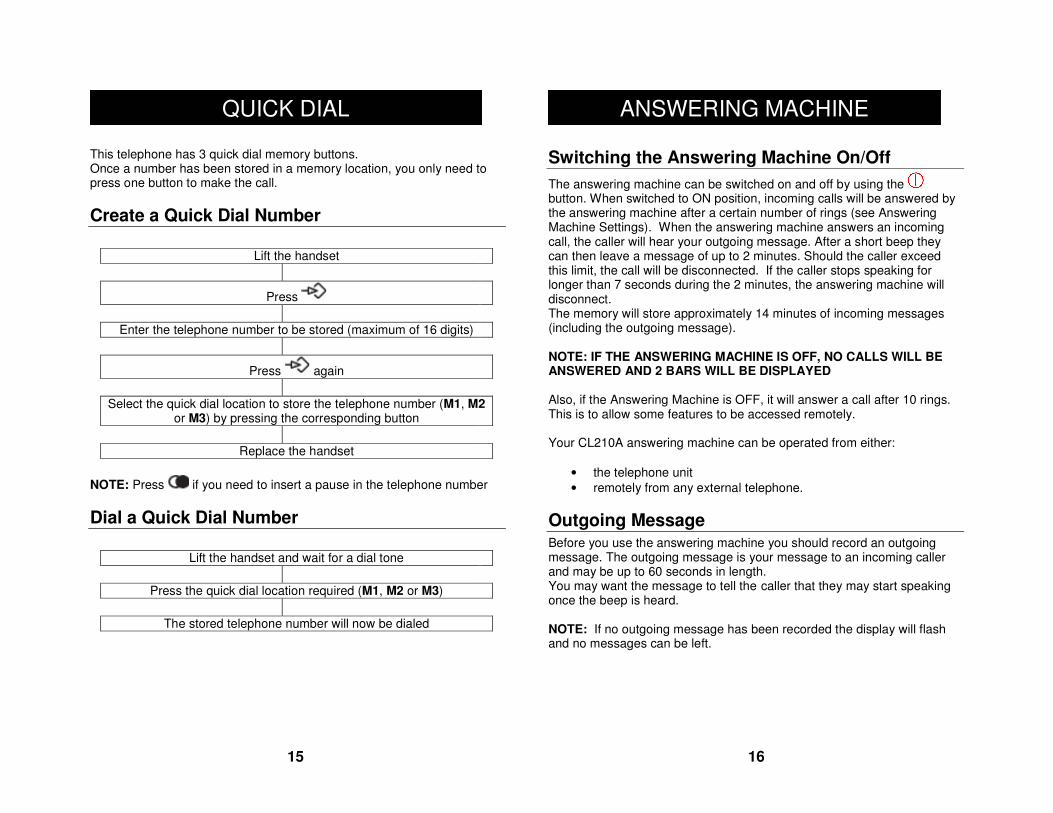
This telephone has 3 quick dial memory buttons. Once a number has been stored in a memory location, you only need to press one button to make the call.
Create a Quick Dial Number
Lift the handset
Press
Enter the telephone number to be stored (maximum of 16 digits)
Press again
Select the quick dial location to store the telephone number (M1, M2 or M3) by pressing the corresponding button
Replace the handset
NOTE: Press if you need to insert a pause in the telephone number
Dial a Quick Dial Number
Lift the handset and wait for a dial tone
Press the quick dial location required (M1, M2 or M3)
The stored telephone number will now be dialed
Switching the Answering Machine On/Off The answering machine can be switched on and off by using the button. When switched to ON position, incoming calls will be answered by the answering machine after a certain number of rings (see Answering Machine Settings). When the answering machine answers an incoming call, the caller will hear your outgoing message. After a short beep they can then leave a message of up to 2 minutes. Should the caller exceed this limit, the call will be disconnected. If the caller stops speaking for longer than 7 seconds during the 2 minutes, the answering machine will disconnect. The memory will store approximately 14 minutes of incoming messages (including the outgoing message). NOTE: IF THE ANSWERING MACHINE IS OFF, NO CALLS WILL BE ANSWERED AND 2 BARS WILL BE DISPLAYED Also, if the Answering Machine is OFF, it will answer a call after 10 rings. This is to allow some features to be accessed remotely. Your CL210A answering machine can be operated from either:
• the telephone unit • remotely from any external telephone.
Outgoing Message Before you use the answering machine you should record an outgoing message. The outgoing message is your message to an incoming caller and may be up to 60 seconds in length. You may want the message to tell the caller that they may start speaking once the beep is heard. NOTE: If no outgoing message has been recorded the display will flash and no messages can be left.
QUICK DIAL ANSWERING MACHINE
15 16

Recording an Outgoing Message
Press and hold . You will hear a short beep and the display will show rA
Record your outgoing message. Speak clearly towards the machine
from a distance of 6-8 inches (minimum of 5 seconds and maximumof 60 seconds)
Release to stop recording
The outgoing message will be repeated after a few seconds. Repeat this procedure if you want to change the message, any old outgoing message will automatically be erased when a new one is recorded.
Checking the Outgoing Message Press . The current outgoing message will now be played. To stop playing the outgoing message, press on the answering machine.
Answering Machine Settings Use the 2\ 6 \TS switch on the right side of the telephone to select the number of rings before the answering machine is activated and responds to an incoming call. • 2 = calls are answered after two rings • 6 = calls are answered after six rings • TS (TOLL SAVER) = activates the toll saver function In Toll Saver mode incoming calls are answered after six rings until the first new message has been recorded. Once a message has been recorded the answering machine will answer after approximately two rings. This is useful when trying to remotely access the answering machine. If the answering machine has not answered at the fourth ring, no messages have been recorded and you can hang up before you are charged for the call. If the machine answers after two rings, new messages have been recorded.
ANSWERING MACHINE ANSWERING MACHINE
17 18
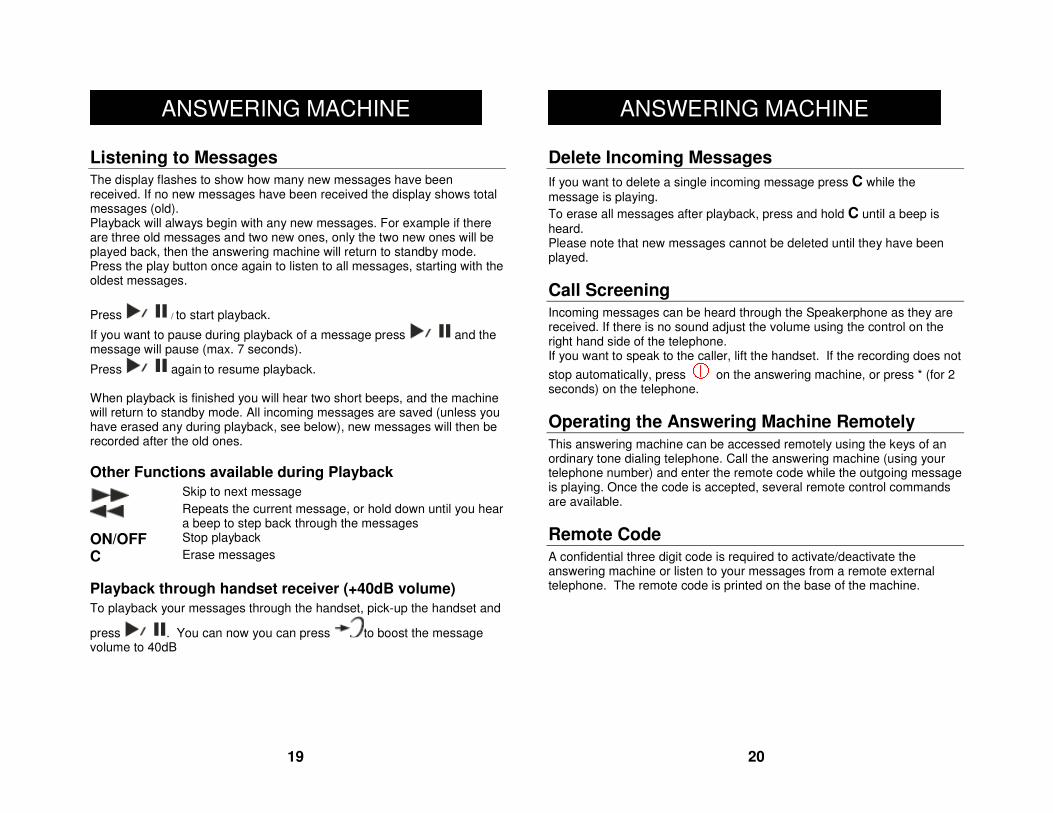
Listening to Messages The display flashes to show how many new messages have been received. If no new messages have been received the display shows total messages (old). Playback will always begin with any new messages. For example if there are three old messages and two new ones, only the two new ones will be played back, then the answering machine will return to standby mode. Press the play button once again to listen to all messages, starting with the oldest messages.
Press / to start playback.
If you want to pause during playback of a message press and the message will pause (max. 7 seconds).
Press again to resume playback. When playback is finished you will hear two short beeps, and the machine will return to standby mode. All incoming messages are saved (unless you have erased any during playback, see below), new messages will then be recorded after the old ones.
Other Functions available during Playback
Skip to next message
Repeats the current message, or hold down until you hear a beep to step back through the messages
ON/OFF Stop playback
C Erase messages
Playback through handset receiver (+40dB volume) To playback your messages through the handset, pick-up the handset and
press . You can now you can press to boost the message volume to 40dB
Delete Incoming Messages If you want to delete a single incoming message press C while the message is playing. To erase all messages after playback, press and hold C until a beep is heard. Please note that new messages cannot be deleted until they have been played.
Call Screening Incoming messages can be heard through the Speakerphone as they are received. If there is no sound adjust the volume using the control on the right hand side of the telephone. If you want to speak to the caller, lift the handset. If the recording does not stop automatically, press on the answering machine, or press * (for 2 seconds) on the telephone.
Operating the Answering Machine Remotely This answering machine can be accessed remotely using the keys of an ordinary tone dialing telephone. Call the answering machine (using your telephone number) and enter the remote code while the outgoing message is playing. Once the code is accepted, several remote control commands are available.
Remote Code A confidential three digit code is required to activate/deactivate the answering machine or listen to your messages from a remote external telephone. The remote code is printed on the base of the machine.
ANSWERING MACHINE ANSWERING MACHINE
19 20
Remote Control
Call the answering machine (using your telephone number)
While the outgoing message is playing, enter the remote code. If the code is accepted you will hear two beeps
Select a remote control command (within 20 seconds) from the list below
When you have finished accessing the machine replace the
handset.
Remote Control Commands Command Functions
25 Play new messages
2# Stop playback
During Playback
3# Erase single message during playback
6# Skip to previous message
7# Skip to next message
8# Repeat message
## Stop playback
After Playback
3# Erase all messages
7# Record a new outgoing message, to stop recording press 7# again
8# Record a MEMO, to stop recording press 8# again
9# Turn the answering machine either On or Off. Three beeps indicate Off- Two beeps indicate On
0# Room monitor, press 5# to stop the room monitoring
When you remotely listen to messages for longer than 2 minutes and 30 seconds, you will hear a tone and you then need to press any key
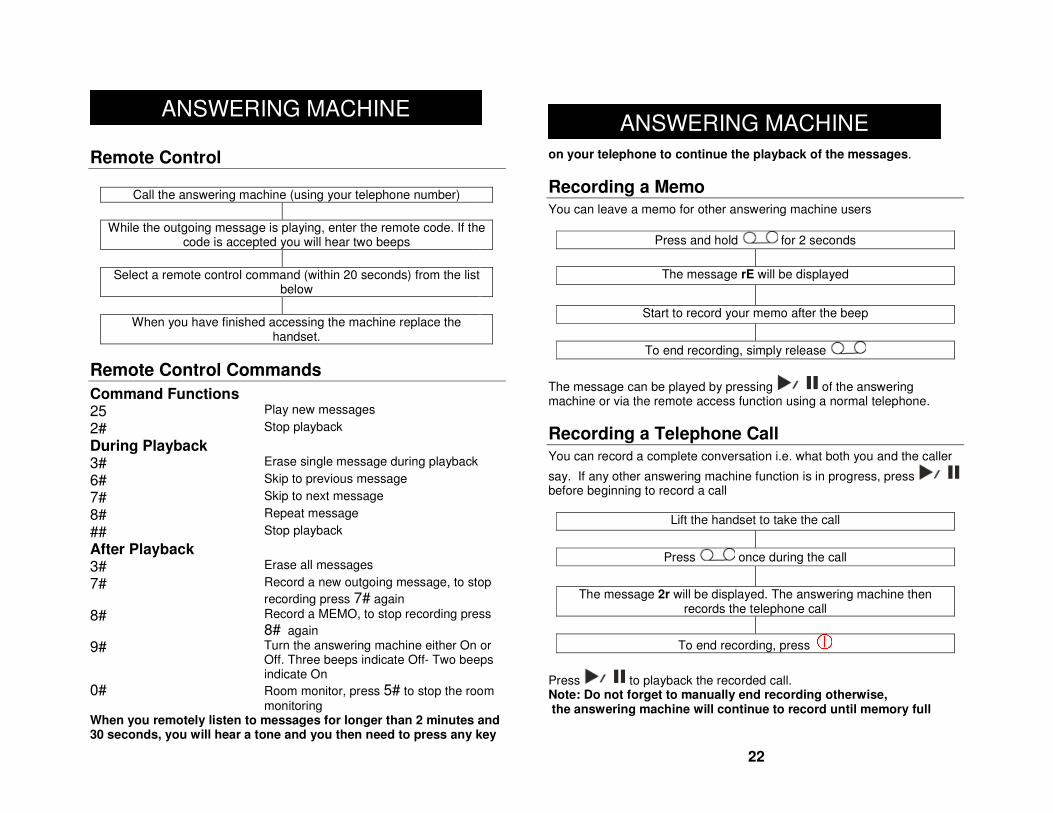
on your telephone to continue the playback of the messages.
Recording a Memo You can leave a memo for other answering machine users Press and hold for 2 seconds
The message rE will be displayed
Start to record your memo after the beep
To end recording, simply release
The message can be played by pressing of the answering machine or via the remote access function using a normal telephone.
Recording a Telephone Call You can record a complete conversation i.e. what both you and the caller
say. If any other answering machine function is in progress, press before beginning to record a call Lift the handset to take the call
Press once during the call
The message 2r will be displayed. The answering machine then
records the telephone call
To end recording, press
Press to playback the recorded call. Note: Do not forget to manually end recording otherwise, the answering machine will continue to record until memory full
ANSWERING MACHINE ANSWERING MACHINE
22
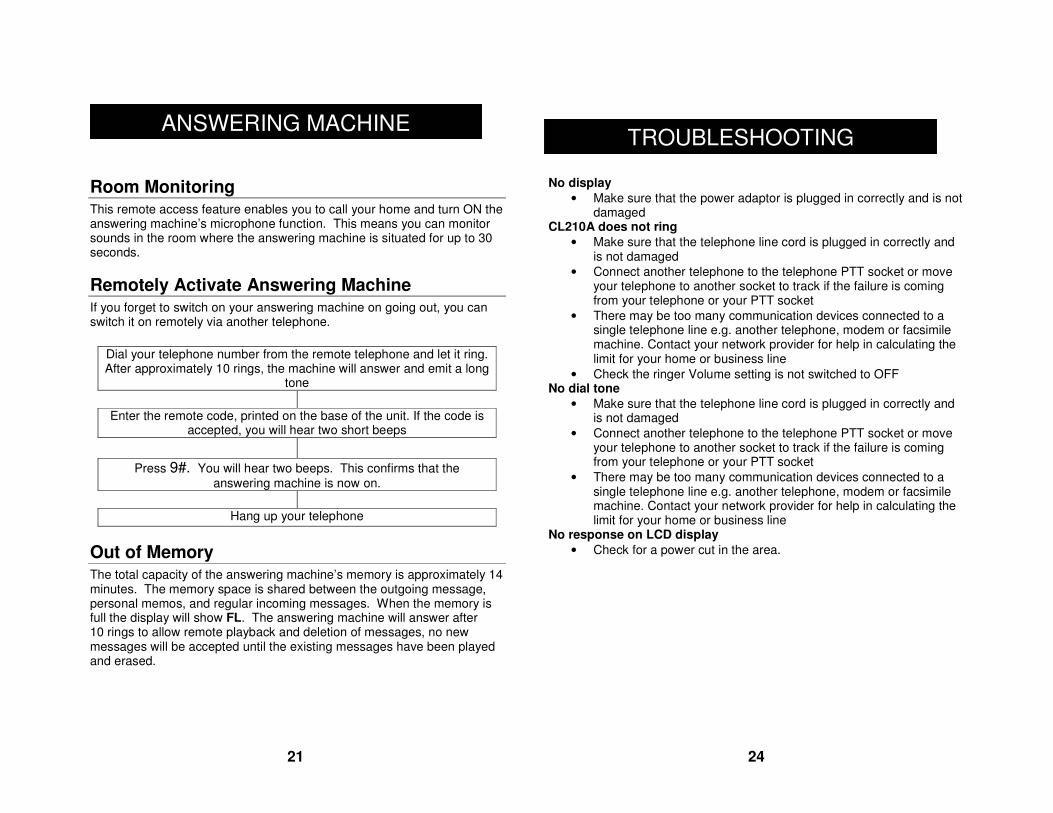
Room Monitoring This remote access feature enables you to call your home and turn ON the answering machine’s microphone function. This means you can monitor sounds in the room where the answering machine is situated for up to 30 seconds.
Remotely Activate Answering Machine If you forget to switch on your answering machine on going out, you can switch it on remotely via another telephone. Dial your telephone number from the remote telephone and let it ring.
After approximately 10 rings, the machine will answer and emit a long tone
Enter the remote code, printed on the base of the unit. If the code is
accepted, you will hear two short beeps
Press 9#. You will hear two beeps. This confirms that the
answering machine is now on.
Hang up your telephone
Out of Memory The total capacity of the answering machine’s memory is approximately 14 minutes. The memory space is shared between the outgoing message, personal memos, and regular incoming messages. When the memory is full the display will show FL. The answering machine will answer after 10 rings to allow remote playback and deletion of messages, no new messages will be accepted until the existing messages have been played and erased.
No display • Make sure that the power adaptor is plugged in correctly and is not
damaged CL210A does not ring
• Make sure that the telephone line cord is plugged in correctly and is not damaged
• Connect another telephone to the telephone PTT socket or move your telephone to another socket to track if the failure is coming from your telephone or your PTT socket
• There may be too many communication devices connected to a single telephone line e.g. another telephone, modem or facsimile machine. Contact your network provider for help in calculating the limit for your home or business line
• Check the ringer Volume setting is not switched to OFF No dial tone
• Make sure that the telephone line cord is plugged in correctly and is not damaged
• Connect another telephone to the telephone PTT socket or move your telephone to another socket to track if the failure is coming from your telephone or your PTT socket
• There may be too many communication devices connected to a single telephone line e.g. another telephone, modem or facsimile machine. Contact your network provider for help in calculating the limit for your home or business line
No response on LCD display • Check for a power cut in the area.
TROUBLESHOOTING ANSWERING MACHINE
21 24
General Only use the power supply included with the product. Do not open the unit. Contact the helpline for all repairs.
Cleaning Clean the telephone with a soft cloth. Never use polishes or cleaning agents - they could damage the finish or the electrics inside.
Environmental Do not expose to direct sunlight. Always ensure there is a free flow of air over the surfaces of the telephone. Do not place any part of your product in water and do not use it in damp or humid conditions e.g. bathrooms. Do not expose your product to fire or other hazardous conditions. Unplug your phone from the telephone socket during thunderstorms because it could damage your telephone. Your guarantee does not cover thunderstorm damage. The telephone is designed for working within a temperature range of 5°C to 45°C.
From the moment your Geemarc product is purchased, Geemarc guarantee it for the period of one year. During this time, all repairs or replacements (at our discretion) are free of charge. Should you experience a problem then contact our help line or visit our website at www.geemarc.com. The guarantee does not cover accidents, negligence or breakages to any parts. The product must not be tampered with or taken apart by anyone who is not an authorized Geemarc representative. The Geemarc guarantee in no way limits your legal rights. IMPORTANT: YOUR RECEIPT IS PART OF YOUR GUARANTEE AND MUST BE RETAINED AND PRODUCED IN THE EVENT OF A WARRANTY CLAIM. DECLARATION: Geemarc Telecom SA hereby declares that this product is in compliance with the essential requirements and other relevant provisions of the Radio and Telecommunications Terminal Equipment Directive 1999/5/EEC and in particular article 3 section 1a, 1b and section 3. The telephone does not operate if the line current is lower than 18 mA.
Please note: The guarantee applies to the United Kingdom only
SAFETY INFORMATION GUARANTEE
26 23 25
Electrical connection: The apparatus is designed to operate from a 230V 50Hz supply only. (Classified as ‘hazardous voltage’ according to EN60950 standard). The apparatus does not incorporate an integral power on/off switch. To disconnect the power, either switch off supply at the mains power socket or unplug the AC adaptor. When installing the apparatus, ensure that the mains power socket is readily accessible. Telephone connection: Voltages present on the telecommunication network are classified TNV-3 (Telecommunication Network Voltage) according to the EN60950 standard.
The WEEE (Waste Electrical and Electronic Equipment) has been put in place for the products at the end of their useful life are recycled in the best way. When this product is finished with, please do not put it in your domestic waste bin. Please use one of the following disposal options: - Remove the batteries and deposit them in an appropriate WEEE skip. Deposit the product in an appropriate WEEE skip. - Or, hand the old product to the retailer. If you purchase a new one, they should accept it. Thus if you respect these instructions you ensure human health and environmental protection.
For product support and help visit our website at www.geemarc.com
Telephone 01707 384438 Or fax 01707 372529
UGCL210A.v01
GUARANTEE
28
RECYCLING DIRECTIVES
27