Embed Size (px)
Citation preview
Association for Biology Laboratory Education (ABLE) ~ http://www.zoo.utoronto.ca/able 153
Chapter 10
Techniques of Anesthesia and Catheter Placement in the Rat (Rattus rattus)
Mary H. Gray
Department of Biological Science Lilly Hall of Life Science
Purdue University West Lafayette, IN 47907
(317) 494-8185
Mary (M.S., Purdue University, 1979, D.V.M., Purdue University, 1984) is an Instructional Coordinator in the Department of Biological Sciences at Purdue. She taught mammalian anatomy from 1985–1988 in the School of Veterinary Medicine. Before joining the Department of Biology, she was a small animal practitioner. She currently coordinates the first semester of the introductory majors lab and teaches advanced physiology laboratories.
© 1996 Department of Biological Science—Purdue University

Gray, M. H. 1996. Techniques of anesthesia and catheter placement in the rat (Rattus rattus). Pages 153-165, in Tested studies for laboratory teaching, Volume 17 (J. C. Glase, Editor). Proceedings of the 17th Workshop/Conference of the Association for Biology Laboratory Education (ABLE), 255 pages.
• Copyright policy: http://www.zoo.utoronto.ca/able/volumes/copyright.htm
Although the laboratory exercises in ABLE proceedings volumes have been tested and due consideration has been given to safety, individuals performing these exercises must assume all responsibility for risk. The Association for Biology Laboratory Education (ABLE) disclaims any liability with regards to safety in connection with the use of the exercises in its proceedings volumes.
154 Anesthesia and Catheter Placement
Contents
Introduction.................................................................................................154 Materials .....................................................................................................154 Notes for Instructors ...................................................................................155 Student Outline ...........................................................................................156 Literature Cited ...........................................................................................162 Appendix A: Materials and Vendors ..........................................................163 Appendix B: Additional Methods...............................................................166
Introduction
For our upper division physiology students, this is the introductory laboratory to working with live animals. Most of them have not worked with live specimens before. We begin with rodent restraint procedures, give guidelines for the administration and monitoring of anesthesia, introduce them to basic surgical instrumentation, allow them to practice the techniques they will need in subsequent labs, and teach humane euthanasia practices. In my experience, students take the live animal laboratories very seriously. They are very concerned about maintaining adequate anesthesia during procedures. Since most of my students are pre-med or plan to do graduate research, they are appreciative of the opportunity to do these types of experiments.
Materials
Materials listed are per group of students (4 is the ideal group number)
Essential Materials
Rat. We use male Harlan-Sprague-Dawley rats, approx. 300 gm Scales Rodent Restrainer Clippers, with #40 blade IV catheters (made in-house, instructions included) and 3-way valves Anesthetic (we place 1cc of 100 mg/ml Xylazine (trade name Rompun) in a 10 ml vial of Ketamine) Heparinized Saline Exam Gloves Surgical Supplies. (Our surgery boxes contain a scalpel handle, #15 blade, sharp and blunt scissors,
iris scissors, 3 small hemostats, a Senn retractor, 2 thumb forceps, 1, 3, 6, and 12 cc syringes, 25 ga needle, gauze sponges, and 2-0 surgical silk). We also use microfine dissecting scissors to cut vessel walls.
Euthanasia Solution
Non-Essential Materials
Delta-Phase Operating Boards.
Anesthesia and Catheter Placement 155
Notes for Instructors TA Training
We run this lab with four student groups, the lab instructor, and one teaching assistant. I do this lab one-on-one with each TA prior to doing it with the students. Only one of my three TA’s has had prior vascular cannulation experience. All were able to perform the procedures successfully.
Level of Difficulty
At Purdue, this lab is utilized for seniors and for first year medical students. Their dissection experience has been limited to fetal pigs. This is their first experience using live animals. We have a four hour lab period. The students utilize it all the first time through and improve time-wise as the semester progresses. I would advise using this laboratory for upper division students since it involves the use of live animals. We have utilized this laboratory for two years. Success rate runs about 90% with the students.
Alternative Materials
I provide the students with a high-quality photographic dissection manual of the rat in the laboratory. We also show a videotape of the procedure prior to lab. The tape is from the 1960’s and our current equipment is better, but it gives them an idea of what to expect.
Common Pitfalls
1. The first time the students administer anesthesia by intraperitoneal injection, they are very nervous. It helps to talk them through it the first time. It is beneficial to have them practice injecting saline into oranges prior to injecting the rat. If using a plexiglass rodent restrainer, students must not turn the rat upside-down as it will attempt to right itself.
2. Students must be taught to use blunt dissection. They are very prone to pick up the scalpel and the scissors when looking for structures. This will lead to excessive bleeding!
3. Students often forget to fill the catheter with heparinized saline prior to inserting it into a vessel. 4. When clamping the sternohyoid muscle, students may inadvertently clamp the trachea as well. 5. Give them instructions on what to do if there is bleeding from cut muscle or other structures.
First use positive pressure with a gauze sponge and then clamp the source of the bleeding with a hemostat.
Subsequent Experiments
1. Respiratory Control Mechanisms. This lab measures the rate and depth of respiration in the anesthetized rat, comparing it to the effects of an acid load, increased CO2 in the inspired air, vagal stimulation, and epinephrine injection. We also demonstrate the Hering-Breuer Reflex.
2. The Cardiac Cycle. This lab records the ECG. We then stimulate the right and left vagus nerves, looking for changes in the ECG pattern. The effect of epinephrine on the heart rate is done.
156 Anesthesia and Catheter Placement
Finally, atropine is administered and vagal stimulation is done to demonstrate the parasympathetic blocking effects of atropine.
3. Factors Influencing Urine Formation in the Rat. This lab records baseline urine production and Na+, K+, and CL– content of the urine. Students then look at the effects of saline diuresis, osmotic diuresis, furosemide, and vasopressin.
Student Outline
Objectives
1. To learn proper handling and restraint methods for rodents. 2. To learn the technique of giving an intraperitoneal injection. 3. To learn how to monitor depth of anesthesia. 4. To practice the surgical techniques necessary for the placement of arterial and venous catheters. 5. To identify and tag the vagus nerve. 6. To learn humane euthanasia methods.
Background
Restraint
Most laboratory bred rodents may be picked up without undue risk. Using slow, deliberate motions as opposed to quick, jerky movements will help in not frightening the animal. The main risk when handling rodents is being bitten. You will learn techniques to help minimize the chance of being bitten.
Anesthesia
General anesthesia is the total loss of sensation in the whole body which has been induced by the administration of a drug which depresses the activity of the central nervous system. In practical terms, the animal is asleep, feels no pain, and is hyporeflexic. When an animal is undergoing general anesthesia, it will pass through a number of stages:
Stage I: The stage of analgesia. This lasts from the moment of induction to the loss of
consciousness. The animal will appear disoriented and may urinate or defecate. Reflexes are normal at this stage.
Stage II: The stage of delirium. This occurs at the earliest loss of consciousness. The animal will react to any sort of external stimuli with exaggerated reflex struggling. It is preferable for this stage to be as short as possible.
Stage III: This stage is subdivided into four planes. Plane 1: This plane is characterized by full rhythmic and mechanical respiration. The
animal is still able to respond to reflex stimuli. Plane 2: Tidal volume of respiration is somewhat decreased and the respiratory rate may
be either increased or decreased. Cardiovascular function is mildly depressed.
Anesthesia and Catheter Placement 157
Plane 3: This plane is marked by the beginning of paralysis of the intercostal muscles. Cardiovascular function is noticeably depressed.
Plane 4: There is complete paralysis of the intercostal muscles. There is a cessation of any respiratory effort. Blood pressure drops.
Stage IV: Respiratory arrest followed shortly by circulatory collapse.
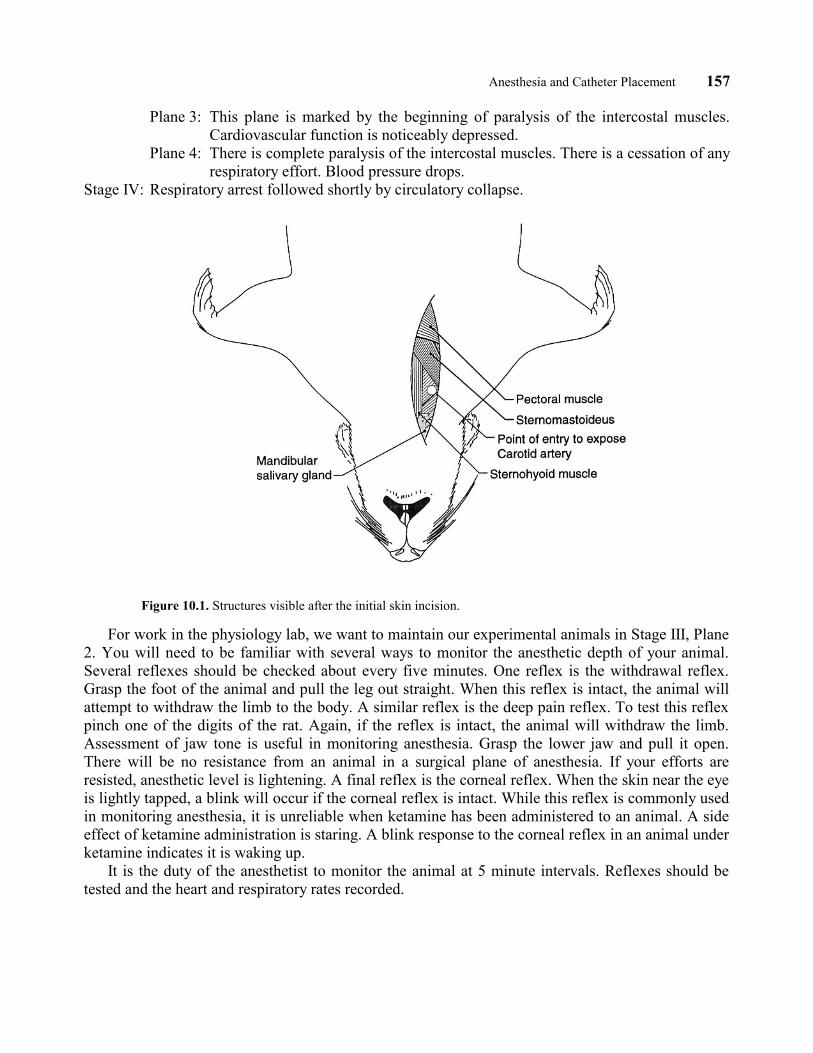
Figure 10.1. Structures visible after the initial skin incision.
For work in the physiology lab, we want to maintain our experimental animals in Stage III, Plane 2. You will need to be familiar with several ways to monitor the anesthetic depth of your animal. Several reflexes should be checked about every five minutes. One reflex is the withdrawal reflex. Grasp the foot of the animal and pull the leg out straight. When this reflex is intact, the animal will attempt to withdraw the limb to the body. A similar reflex is the deep pain reflex. To test this reflex pinch one of the digits of the rat. Again, if the reflex is intact, the animal will withdraw the limb. Assessment of jaw tone is useful in monitoring anesthesia. Grasp the lower jaw and pull it open. There will be no resistance from an animal in a surgical plane of anesthesia. If your efforts are resisted, anesthetic level is lightening. A final reflex is the corneal reflex. When the skin near the eye is lightly tapped, a blink will occur if the corneal reflex is intact. While this reflex is commonly used in monitoring anesthesia, it is unreliable when ketamine has been administered to an animal. A side effect of ketamine administration is staring. A blink response to the corneal reflex in an animal under ketamine indicates it is waking up.
It is the duty of the anesthetist to monitor the animal at 5 minute intervals. Reflexes should be tested and the heart and respiratory rates recorded.
158 Anesthesia and Catheter Placement
Materials
Decapicones Scales Gloves 1 cc syringe 25 gauge needle 10:1 ketamine:xylazine Rat Rodent Restrainer Heparinized saline Clippers #15 blade Surgical instruments Surgical silk IV catheters Euthanasia Solution Three-way valves 12 cc syringes Deltaphase operating board
Procedure
1. Obtain a rat from the holding cage. Pick the rat up by grasping it at the base of the tail and then cradling the body with your other hand to give it support.
2. Weigh the rat on the scales provided. The weight will be in grams. 3. Transfer the rat to the rodent restrainer. If the rat is too large for the restrainer, you will need to
use one of the decapicones. The decapicones may be used for any size rat. Both of these devices will be demonstrated by the teaching staff.
4. Calculate the dose of anesthetic that your rat will require. The dose is 0.1 cc of 10:1 ketamine/xylazine per 100 grams of rat. Stock solutions of both ketamine and xylazine are 100 mg/ml. Use a 1 cc syringe and a 25 gauge needle. Check your calculation with a staff member before administering it.
5. Administer the anesthetic rapidly by intraperitoneal injection. This is an injection into the peritoneal (abdominal) cavity. Insert the needle fully into the abdomen. Pull back slightly on the syringe plunger to make sure that you have not entered the intestine or bladder. If so, prepare a fresh syringe and try it again. Quickly inject the anesthetic. Place the rat and restrainer back into the holding cage. The rat may be released from the restrainer at this point. Observe the behavior of the rat as the general anesthetic takes effect. Can you discern the stages or planes of anesthesia?
6. When the rat has reached the level of surgical anesthesia, remove it from its cage. Using the #40 blade on the clippers, clip the hair on the ventral side of the neck from the chin to the sternum.
7. Place a #15 blade on your scalpel handle. Make a skin incision from the chin to the sternum of the rat (Figure 10.1, page 157). Free up the skin on either side of the incision using blunt dissection (e.g. no scissors or scalpel). Next locate the jugular vein as it passes under the cranial end of the superficial pectoral muscle (Figure 10.2). Rat veins are challenging to catheterize because they contain smooth muscle within their walls. Whenever these vessels are manipulated the smooth muscle constricts, greatly reducing the diameter of the vessel. If this occurs, you may attempt to fill the vein by massaging the muscles of the face and head. Carefully clean the surrounding fat and connective tissue from a segment of the vein. Obtain a catheter with a 3-way valve. Fill the catheter with heparinized saline; then close the 3-way valve to the catheter and remove the syringe. When you are ready to attempt to catheterize this vessel, get help from your instructor. Special surgical instruments are needed. Place one cranial and two caudal ligatures of 2-0 or 4-0 silk under the vessel. Tie off the cranial ligature with a square knot. Do not trim the ends of the ligature. Place the handle end of a small thumb forceps under the vessel to stabilize it. Use the microfine dissecting scissors to make an incision about
Anesthesia and Catheter Placement 159
1/3 of the way through the vessel to produce a V-shaped flap. The base of the V should point toward the heart. You may need to use a magnifying glass to do this. Position the catheter with the bevel up and attempt to slide it into the incision in the vessel wall. If you are successful, the vessel will expand around the catheter. It is often helpful to hold the ties of the cranial ligature when attempting this to give you some leverage. To check whether you are in the vessel, apply negative pressure with the syringe and look for blood to enter the catheter. Flush any blood back into the animal. Tie the two caudal ligatures around the catheter. Provide further stability by tying the catheter to the cranial ligature.
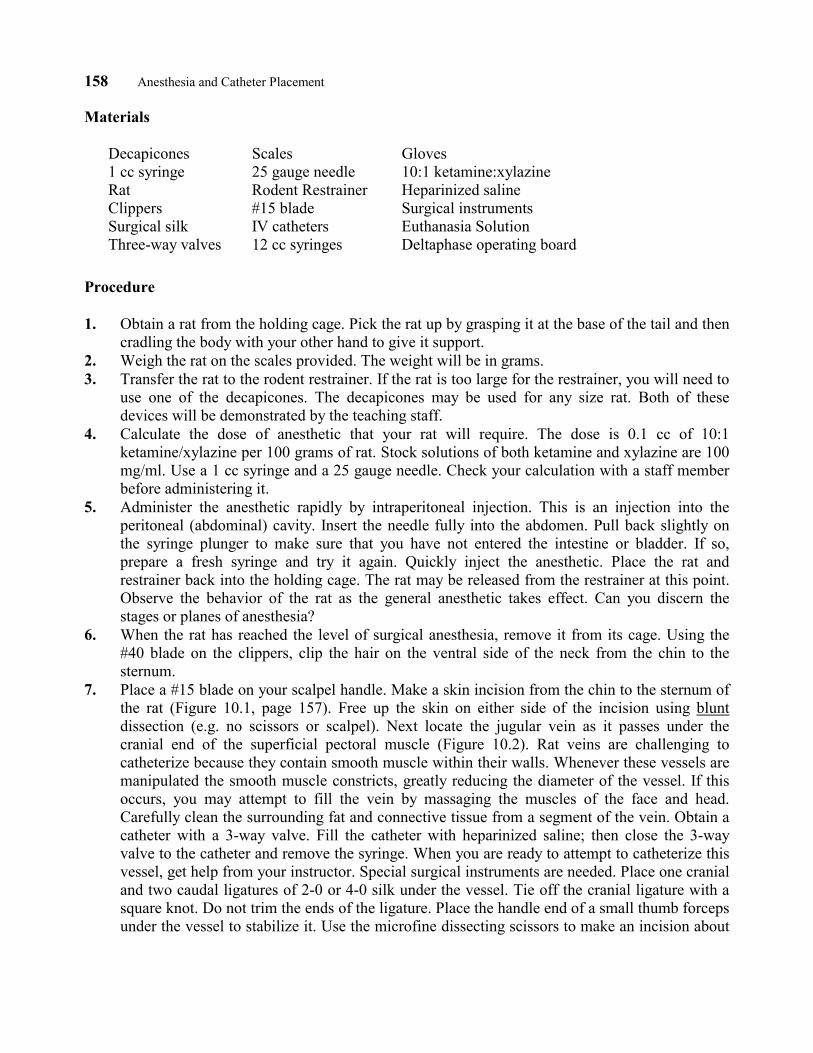
Figure 10.2. Superficial musculature of the Rat.
8. The rat has two large mandibular salivary glands on either side of the neck (Figure 10.2). These must be removed in order to visualize the carotid artery/vagus nerve. Remove the mandibular salivary gland on either side of the neck. Grasp the gland with your thumb forceps and use a hemostat to bluntly dissect it away from the underlying fat. When the gland is free, clamp its base (where the blood supply enters) with the hemostat. Cut the gland out of the rat. Release the hemostat after about 30 seconds and check for any residual bleeding.
9. Next look for a wide, flat muscle (the sternomastoideus) that extends from the sternum to the side of the neck (Figure 10.1). This muscle will also need to be removed. Begin by using your closed hemostats to free the middle portion of the muscle from the underlying tissue. Then clamp the end of the muscle attached to the sternum with your hemostats. Wait approximately 30 seconds. Release the hemostat and cut the muscle from its attachment through the crushed area. Repeat this procedure at the other end of the muscle. You should now have a clear area to
160 Anesthesia and Catheter Placement
work in. It may also be necessary to remove the sternohyoid muscle (Figure 10.2). If you choose to remove this muscle take care not to clamp the trachea.
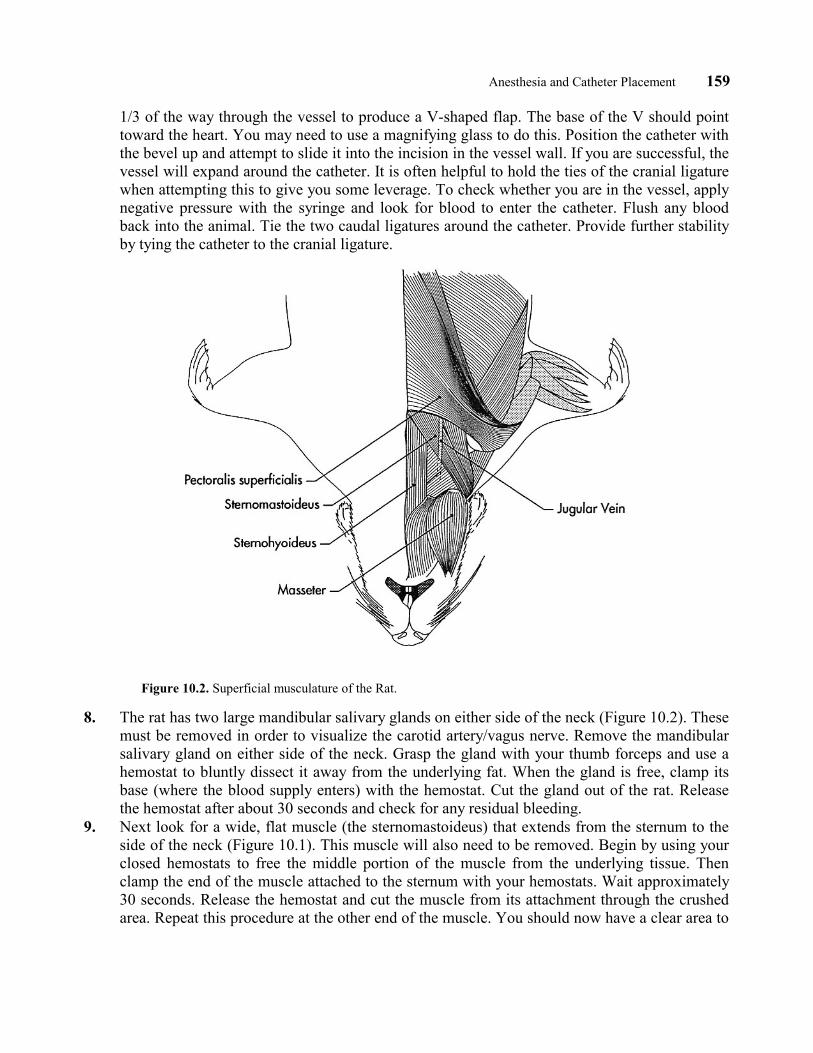
10. Identify the trachea. It is on the midline and is a white tube containing sequential cartilage rings. The carotid artery and the vagus nerve lie lateral and deep to the trachea. Dissect lateral to the trachea to locate the carotid artery and vagus nerve. Use blunt instruments in this dissection. DO NOT USE SCISSORS OR YOUR SCALPEL!!!! The vagus nerve is attached to the side of the carotid artery by connective tissue. When you locate the carotid artery, first free it up from the surrounding tissues. Then free the vagus nerve from the carotid artery and place a piece of surgical silk under it so that it can be retrieved at a later point. Place three silk ligatures under the carotid artery, one proximally (toward the head) and two distally (toward the body).
Figure 10.3. Carotid artery ligated proximally.
11. Next attempt to place the arterial catheter. This will require the use of an assistant. Place a three-way valve on the arterial catheter. Fill the catheter with heparinized saline and then close the three-way valve to the catheter. This fills the catheter with a liquid and prevents leakage when the catheter is inserted into the artery. Tie off the carotid artery as far proximally as possible (Figure 10.3). The assistant should obstruct blood flow into the artery by holding the
Anesthesia and Catheter Placement 161
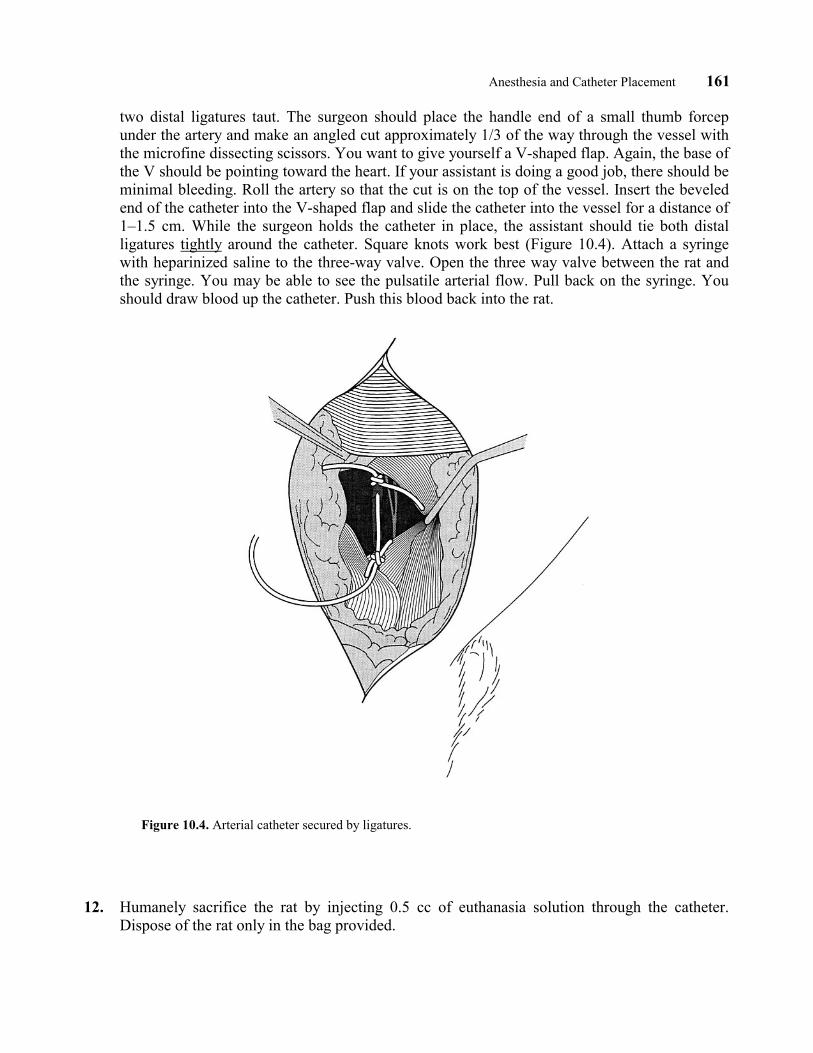
two distal ligatures taut. The surgeon should place the handle end of a small thumb forcep under the artery and make an angled cut approximately 1/3 of the way through the vessel with the microfine dissecting scissors. You want to give yourself a V-shaped flap. Again, the base of the V should be pointing toward the heart. If your assistant is doing a good job, there should be minimal bleeding. Roll the artery so that the cut is on the top of the vessel. Insert the beveled end of the catheter into the V-shaped flap and slide the catheter into the vessel for a distance of 1–1.5 cm. While the surgeon holds the catheter in place, the assistant should tie both distal ligatures tightly around the catheter. Square knots work best (Figure 10.4). Attach a syringe with heparinized saline to the three-way valve. Open the three way valve between the rat and the syringe. You may be able to see the pulsatile arterial flow. Pull back on the syringe. You should draw blood up the catheter. Push this blood back into the rat.
Figure 10.4. Arterial catheter secured by ligatures.
12. Humanely sacrifice the rat by injecting 0.5 cc of euthanasia solution through the catheter. Dispose of the rat only in the bag provided.
162 Anesthesia and Catheter Placement
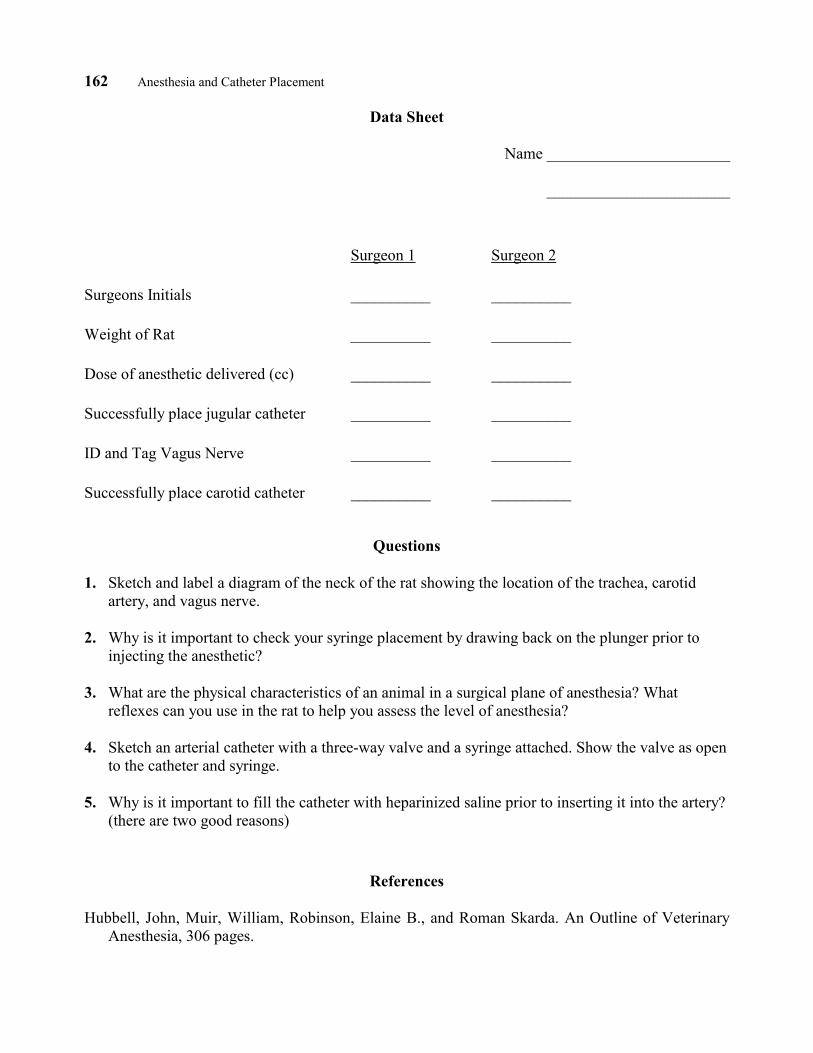
Data Sheet
Name _______________________
_______________________
Surgeon 1 Surgeon 2
Surgeons Initials __________ __________
Weight of Rat __________ __________
Dose of anesthetic delivered (cc) __________ __________
Successfully place jugular catheter __________ __________
ID and Tag Vagus Nerve __________ __________
Successfully place carotid catheter __________ __________
Questions
1. Sketch and label a diagram of the neck of the rat showing the location of the trachea, carotid artery, and vagus nerve.
2. Why is it important to check your syringe placement by drawing back on the plunger prior to
injecting the anesthetic? 3. What are the physical characteristics of an animal in a surgical plane of anesthesia? What
reflexes can you use in the rat to help you assess the level of anesthesia? 4. Sketch an arterial catheter with a three-way valve and a syringe attached. Show the valve as open
to the catheter and syringe. 5. Why is it important to fill the catheter with heparinized saline prior to inserting it into the artery?
(there are two good reasons)
References
Hubbell, John, Muir, William, Robinson, Elaine B., and Roman Skarda. An Outline of Veterinary Anesthesia, 306 pages.
Anesthesia and Catheter Placement 163
APPENDIX A Materials and Vendors
Harlan Sprague Dawley P.O.Box 29176 Indianapolis, IN 46229-0176 Phone: (317) 894-7521
I normally purchase 1 rat per student for this lab. It is possible for two students to utilize the same rat, each doing the structures on one side. In my current catalog, a male rat of 275–299 grams is $14.75. 250 gram rats are the minimum size I would recommend for this lab.
Braintree Scientific, Inc. P.O. Box 860929 Braintree, MA 02185-0929 Phone: (617) 843-2202
Deltaphase TM Operating Board Supplied with two Deltaphase isothermal pads Model 39 OP $70.00 each Decapicones- tapered plastic film tubes for rodent restraint. Includes 4 dispensers, 50 bags each Model DC-200 $60.00
Arista Surgical Supply Co., Inc. 67 Lexington Avenue New York, N.Y. 10010-1898 Customer Service: (212)-679-3694
Very good supplier for surgical instruments at reasonable cost.
Sigma Chemical Company P.O. Box 14508 St. Louis, MO 63178 Phone: 800-325-3010
3-way Leur-lock stopcocks, 10/pkg. Cat. # S 7521 $28.85/pkg.
Fine Science Tools Inc. 373-G Vintage Park Drive 202-277 Mountain Highway Foster City, CA 94404 North Vancouver, B.C. Phone: 800-523-2109 Canada V7J 3P2 Phone: 800-665-5355
Student Vannas spring scissors, straight. Cat.# 15100-09 $56.15 each. Can be resharpened @ $15 per pair.
164 Anesthesia and Catheter Placement
The Harvard Bioscience Whole Rat Catalog An Ealing Division Pleasant Street South Natick, MA 01760 Phone (617) 655-7000
Acrylic Restrainers Catalog # 52-0916 for 250–500 gm rats (my catalog is OLD, call for current pricing)
Henry Schein 5 Harbor Park Drive Port Washington, NY 11050
Avian and Exotic Scale, Cat. # 5086443 $134.95
Owens and Minor (Midwest Hospital Supply) 9727 Bauer Drive East Indianapolis, IN 46280
Leur Stub Adapters, 23 ga, 25/bx Cat. #1444-7565 $31.75/bx Clay Adams Intramedic polyethylene tubing, PE-50, manufacturer # 7411, 100 ft.
Butler Company 8010 Woodland Dr. Bldg. 59 Indianapolis, IN 46278-1349
2-0 Silk, Look Brand, 200 Yd spool $20.04/spool Ketamine, 100 mg/ml x 10 ml (requires DEA number) 6 for $59.70 Xylazine (Rompun), 100 mg/ml is also available from veterinary drug distributors Heparin, 10 cc $1.25/btl prepare heparinized saline by adding 1cc heparin to 1 liter of 0.9% saline. Euthanasia Solution. These are marketed under a variety of names. Succumb and Beuthanasia are
two. Most are based on pentobarbital sodium. You could effectively use Nembutal as well. 25 g needles x 5/8" 100/bx $7.85/bx. If you have a Laboratory Animal Veterinarian at your facility, he/she could probably help you in obtaining the anesthetic drugs. If not, you will need a DEA number.
Anesthesia and Catheter Placement 165
APPENDIX B Additional Methods
Use of Deltaphase Operating Boards
I have found that I must keep the isothermal pads in a water bath close to 50° C in order for them to be fully activated. They can also be microwaved but it is pretty time-consuming and it cuts down on their longevity. Mine have been in use for two years and I haven’t had to replace any yet. The boards hold up well with student use and are easy to clean.
Construction of IV Catheters for Rats
Materials
Intramedic polyethylene tubing, size pe-50 23 gauge leur-stub adapters Scissors Super glue 22 g x 1" needle Gauze sponge
Methods
1. Cut a length of PE-50 tubing approximately 15 cm in length. Trim one end to have a bevel. Watch for sharp points on the tip of the bevel as this may puncture through a vein wall.
2. Expand the non-beveled end of the PE-50 tubing by carefully sliding it onto the 22 g needle. You only need to expand about 0.5–1 cm. This will aid in fitting the tubing to the leur-stub adapter.
3. Slide the expanded end of the tubing onto the leur-stub adapter. If you are unable to slide it the whole length of the leur-stub adapter, you can use the gauze sponge to improve your grip.
4. Once the tubing is in place and is flush up against the stub, glue it in place with the superglue. Once the glue has dried, test the catheter for leaks. We do not dispose of these. We have the students clean them at the end of lab so they can be reused.