Embed Size (px)
Citation preview

TECHNICAL TRAINING GUIDE
Date Revision Description Author Information
01/02/2015 1.0 Initial Draft Tyrone Nason Initial Document Draft


Contents:
• Hardware Overview
• eCost Software Installation
• Hardware Driver Installation
• eCost Software
o Technical Setup � Filter Selection � Com Port Selection � Hardware programming
o Basic Features
� Reports � Add / Edit Structure
o Advanced Features
� Updates / New release
� Help / Support

Welcome The purpose of this manual is to guide the technical installation person on how to identify, install and maintain
the eCost telephone management solution effectively.
eCost Hardware Options: (1) eCost Smart Storage Device {SSD 9001}
� Dimensions o Length = 135mm o Width = 75mm o Height = 40mm o Weight = 0.4kg
� Indicators
o Power LED o PC LED o Pbx LED o Status LED
� Power
o USB Powered o Current < 150ma o External 12dc input o Internal Battery
� Communication
o eCost Software over USB o Pbx over LAN
NB: Switch Internal Battery ON!

eCost DX10 Dongle
� Power o USB Power {5v}
� LED Indicators {On Insert}
eCost Software installation: Installation of the eCost Software can be easily accomplished in just a few minutes (often less than 5 minutes). CD-ROM Installation: If the eCost solution is being installed from a cd-rom or similar, insert the eCost installation CD into your host system and locate the “eCost Setup.exe installation file.
Once you have started the installation process, you will see a series of setup screens. We recommend that you review each screen and make the appropriate selections to complete or abort the successful installation of eCost Software Application. Where possible, select default options as this simplifies the eCost setup configuration.

• Click ‘ NEXT > ’ to begin the setup process. Click ‘ Cancel ’ to abort the installation process from any screen
• “Accept” or “Decline the License Agreement

• Select the components to install: (a) eCost Software Files (b) Shortcuts (Short Cuts and Start-up Short Cut)

• Choose the installation location where eCost must be installed
• Choose Start Menu Folder Description and press Install to begin the installation

• eCost software installation will start and the progress will be shown
eCost Hardware Driver installation:
(a) Smart Storage Device (SSD 9001)
The SSD buffer box hardware is installed when large buffered storage is required. The standard SSD9001 can buffer about 25000 records.
(b) DX10 Dongle
The D10 Dongle is installed when the internal onboard buffer (320 Call records) of the SL1000 is Sufficient. Once the DX10 Dongle has been installed, a direct TCP/IP connection from the eCost software
is opened, allowing direct communication with the SL1000 TCP/IP ports.
The driver installation process of the SSD buffers and D10 Dongle are very similar. The only difference is where
you collect the driver from. So during the installation process (documented below), it will be highlighted on what driver you loaded for what hardware.
Driver installation Procedure
(1) Insert the hardware (SSD or DX10 Dongle) into an available USB port on the customers PC.
Once you install the hardware, depending on the windows operating systems being used, a installing drive detection window will appear in the bottom right corner.

Open the device manager from the control panel
You will notice, under “Other Devices”, USB Serial Port. Right click on the ‘USB Serial Port’, select properties. The “USB port properties window is displayed. Select Driver Tab page
Press the “Update Driver” button
You will be show a “Update Driver Software” window. This window allow you to load the particular driver for the
SSD and DX10 Dongles.

Select the “Browse my computer for driver software” button.
At this stage of the driver installation, it is important to select the correct path for the correct equipment being installed.
(a) USB Driver Folder
When installing the USB driver for the SSD9000 or SSD9001 buffer box hardware, you must select the USB
Driver folder
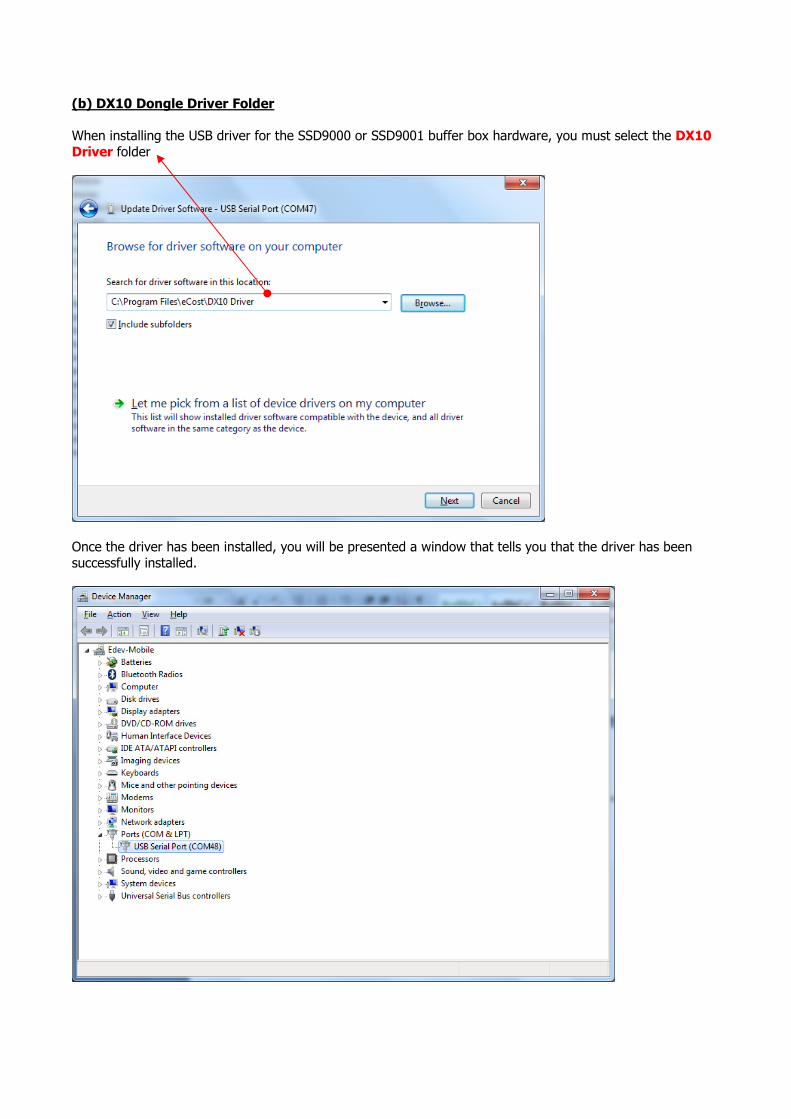
(b) DX10 Dongle Driver Folder
When installing the USB driver for the SSD9000 or SSD9001 buffer box hardware, you must select the DX10
Driver folder
Once the driver has been installed, you will be presented a window that tells you that the driver has been
successfully installed.

You will see that under the “Ports (COM & LPT)”, there is new hardware installed. The USB Serial Port (when
DX10 dongle is installed). You will also see the com port that has been assigned to the device. It will display “AT91 USB Serial device” when a SSD9001 is used.
eCost Software: eCost Software home screen is where you will find and locate all the feature rich option available in the eCost software. eCost menu / option toolbar was designed to be simple and easy to navigate. The multi-tabbed tool bar
menu system, similar to popular Microsoft products of the day, allow the user to quickly find and use the correct feature without intensive product understanding or training.
Toolbar Status bar Download Screen System Menu
The download screen is a grid will all checked and verified call data from the phone system. It has many columns
and each column represents respective data.
Date / Time: The show when and what time the call was made.
Extension: This indicates who made the call Extension Name: The extension name will be completed from the extension list.
Type: The Type column indicates what type of call was made, • O = Outgoing Call
• O/T = Outgoing Transfer
• I = Incoming Call
• I/T = Incoming Transfer Call
• U = Unanswered Call
Place: The place column show where in what area you called
Number: The Telephone number that was dialed on the call or inbound CLI number for incoming
Duration: The duration column shows how long the call was. Cost: For outbound calls, the cost will indicate how much the call cost
Ring: The ring Column show for incoming calls, how long it took to answer the call Trunk: The trunk column shows what telephone line was used to make / receive the call
Division, Department: The division / department columns show the structure of the organization.
Account & Pin Number: These additional codes help track user phone usage.

eCost Software Technical Setup:
1. Load Filters
2. Setting SSD … Select USB port

3. Setting … Ethernet Settings
NB: Buffer Must Beep!
eCost Software Basic Features:
Basic Reports
All reports that need to be generated from eCost are done from a single area / place – basic reports. The reports have been divided and group to allow the user to recognize / find the report when needed.
Edit

To arrange the organizational structure of the company, you need to setup the list’s ie. Extensions names /
numbers, Pin Number names / numbers.
Tools
The tools menu has additional functions that allow the user to cost telephone calls, Recost calls, delete calls and
see the hardware properties of the buffer box.
Help
The help toolbar has all the support options the user will need. A remote support function for technical
administrators.
The support item will show the support contact information.

eCost Software Upgrade Procedure:
1. Install eCost Software Over Current Version
Make Sure Path is Correct!

NOTES