Embed Size (px)
Citation preview

Technical Report
Using Puppet to Manage NetApp Storage Infrastructure Solution Deployment
Amit Borulkar, NetApp
December 2015 | TR-4477-DEPLOY
Abstract
This guide walks you through the procedures necessary to integrate a Puppet configuration
management system with the NetApp® clustered Data ONTAP
® storage operating system
(OS). We also demonstrate a Puppet module managing a NetApp storage appliance.

2 Using Puppet to Manage NetApp Storage Infrastructure - Solution Deployment © 2015 NetApp, Inc. All Rights Reserved.
TABLE OF CONTENTS
1 Using Puppet to Manage NetApp Storage Infrastructure ................................................................. 4
1.1 Overview .........................................................................................................................................................4
1.2 Solution Architecture .......................................................................................................................................7
1.3 Use Case Summary ...................................................................................................................................... 13
2 Environment Setup and Configuration............................................................................................. 13
2.1 Prerequisites ................................................................................................................................................. 13
2.2 Puppet Master and Puppet Agent Setup with Passenger ............................................................................. 14
2.3 Configuring Data ONTAP Device Module ..................................................................................................... 17
3 Using Puppet to Perform Cluster-Scoped Operations ................................................................... 17
3.1 Technology Requirements ............................................................................................................................ 18
3.2 Deployment Procedures ............................................................................................................................... 18
4 Using Puppet to Perform Storage Virtual Machine–Scoped Operations ...................................... 21
4.1 Technology Requirements ............................................................................................................................ 22
4.2 Deployment Procedures ............................................................................................................................... 23
5 Using Puppet to Perform Role-Based Access Control Operations ............................................... 26
5.1 Technology Requirements ............................................................................................................................ 27
5.2 Deployment Procedures ............................................................................................................................... 27
6 Scaling Out .......................................................................................................................................... 29
7 Limitations ........................................................................................................................................... 30
8 Conclusion .......................................................................................................................................... 31
Common Troubleshooting ....................................................................................................................... 31
Acknowledgements .................................................................................................................................. 32
References ................................................................................................................................................. 32
Version History ......................................................................................................................................... 32
LIST OF TABLES
Table 1) Resources supported by Data ONTAP device module .....................................................................................9
Table 2) Hardware requirements for cluster-scoped operations. .................................................................................. 18
Table 3) Software requirements for cluster-scoped operations. ................................................................................... 18
Table 4) Device configuration details for cluster-scoped operations. ........................................................................... 19
Table 5) Hardware requirements for SVM-scoped operations. ..................................................................................... 23

3 Using Puppet to Manage NetApp Storage Infrastructure - Solution Deployment © 2015 NetApp, Inc. All Rights Reserved.
Table 6) Software requirements for SVM-scoped operations. ...................................................................................... 23
Table 7) Device configuration details for SVM-scoped operations. .............................................................................. 23
Table 8) Hardware requirements for performing role-based access control operations. .............................................. 27
Table 9) Hardware requirements for performing role-based access control operations. .............................................. 27
Table 10) Device configuration details for cluster-scoped operations. ......................................................................... 27
Table 11) Device configuration details for a user scoped at SVM level. ....................................................................... 28
LIST OF FIGURES
Figure 1) Flow diagram for applying configuration. .........................................................................................................6
Figure 2) Solution architecture. ......................................................................................................................................7
Figure 3) NetApp SVM-scoped operations. .................................................................................................................. 22
Figure 4) Scaled-out Puppet deployment. .................................................................................................................... 30

4 Using Puppet to Manage NetApp Storage Infrastructure - Solution Deployment © 2015 NetApp, Inc. All Rights Reserved.
1 Using Puppet to Manage NetApp Storage Infrastructure
As companies pivot toward software-defined service delivery, optimal management of compute, network,
and storage resources is critical for operational success. Virtualization, cloud technologies, and IT
automation have significantly improved the operational agility of enterprises and have enabled them to
meet tight service level agreements (SLAs). Storage administrators must maintain traditional
infrastructure and deal with an increasing demand for data storage.
As compute resources are commissioned or decommissioned, new iSCSI targets and NFS exports must
be created, and access must be managed. Storage automation is essential for operational efficiency.
However, existing script-based solutions or manual workflows performed through the CLI or GUI of the
storage platform are restricted to a particular task, do not scale well, and cannot be integrated with other
data-center components.
Puppet Labs is an industry leader in IT automation that has achieved wide popularity with datacenter
administrators because of its support for device management. NetApp, along with Puppet Labs, has
developed an Apache 2–licensed Puppet module for managing the configuration of storage systems
based on NetApp clustered Data ONTAP. This module is hosted on Puppet Forge.
The clustered Data ONTAP storage OS extends the core strengths of the NetApp unified storage
architecture, integrated data protection, and storage efficiency. Clustered Data ONTAP also provides the
foundation for a virtualized, shared-storage infrastructure structured for nondisruptive operations.
The Data ONTAP device module complements clustered Data ONTAP with resources that manage the
storage infrastructure state. Maintaining the state of the infrastructure helps you to quickly and reliably
transition between different configurations. This module also maintains consistency within the
infrastructure.
Note: This module is written in Ruby and extends the Puppet resource abstraction layer for types and providers. It also uses the corresponding Ruby libraries from the NetApp Manage ONTAP
®
software development kit (SDK) to provide day-one functionality for clustered Data ONTAP. Although this module supports both clustered Data ONTAP and Data ONTAP operating in 7-Mode (the previous version of the Data ONTAP OS), only cluster-mode operations are covered in this document.
1.1 Overview
Puppet typically runs a client-server architecture. A Puppet Master server controls important configuration
information, and the managed agent nodes only request their individual configuration catalogs. All
configurations are written in Puppet manifest files in the master. Puppet manifests are a collection of
resource instances that define the state of the system. Manifest files are written in Puppet domain-specific
language. Puppet provides metaparameters that define the relationship between resources in manifests.
These attributes are before, require, notify, and subscribe.
The following text shows a sample manifest:
node 'puppet-dev-01'{
netapp_aggregate{'aggr01_node01':
ensure => present,
option_free_space_realloc => "on",
state => "online",
blocktype => "64_bit",
checksumstyle => "block",
diskcount => "8",
raidtype => "raid_dp",
nodes => ['puppet-dev-01']
}
netapp_vserver { 'vserver01' :
ensure => present,
require => netapp_aggregate[“aggr01_node01”],
allowedprotos => "iscsi",
5 Using Puppet to Manage NetApp Storage Infrastructure - Solution Deployment © 2015 NetApp, Inc. All Rights Reserved.
rootvol => "rootdir",
language => "c",
rootvolsecstyle => "unix",
rootvolaggr => "aggr01_node01",
aggregatelist => ["aggr01_node01"]
}
}
This manifest creates the aggregate aggr01_node01 and the storage virtual machine (SVM; formerly
known as Vserver) vserver01 using, respectively, the netapp_aggregate and netapp_vserver
resource types.
Note: The require parameter in the netapp_vserver resource type makes sure that the aggregate aggr01_node01 has been created before the SVM creation operation.
Puppet resources are the fundamental building blocks used to model the system state in Puppet. They
describe the desired end state of unique elements managed by Puppet on the system. The fundamental
characteristics of resources are as follows:
Declarative. These resources describe the state of the system at the end of the operation without specifying the procedure or process used.
For example, the resource type netapp_nfs describes the state of the element svm1.
netapp_nfs { “svm1”:
ensure => present,
state => “on”
}
Note: We briefly describe the functions of different resource types in the NetApp Data ONTAP device module in later sections.
Idempotent. You can apply these resources to a system many times and the result are always the same.
For example, you can apply the resource netapp_nfs to the element svm1 multiple times. If the
state is off, it changes to on. If the state is already on, it remains on.
Unique. Because each resource declares a desired end state, duplicates of the same resource with the same type and title can result in a conflicting end state.
For example, in the previous example, we can have a single combination of the netapp_nfs type
with svm1 because its title is in the manifest file. We can have the netapp_nfs type again, but it
must have a different title (for example, svm2).
The Puppet Agent contains the device configuration file. By default, a device management configuration
file is named device.conf. The Puppet Agent acts as a proxy system for modifying the configuration of
NetApp storage devices.

6 Using Puppet to Manage NetApp Storage Infrastructure - Solution Deployment © 2015 NetApp, Inc. All Rights Reserved.
Figure 1) Flow diagram for applying configuration.
Figure 1 depicts the flow for applying configurations by using the following steps:
1. Connect to the devices (cluster or SVM) specified in the device configuration file.
2. Gather facts (system information such as node name) from the devices.
3. Request a catalog corresponding to the device.
4. Puppet Agent downloads the catalog from Puppet Master.
5. The proxy device establishes a connection to the device through Secure Shell (SSH), authenticates the user specified in the device configuration file, and requests the resources specified in the manifests (initial state).
6. The proxy device retrieves the resources specified in the manifests from the managed device.
7. The retrieved initial state of the system is compared to the desired state specified in the manifests.
8. The device is transitioned to the desired state by invoking the appropriate Manage ONTAP calls.
9. The results of the configuration changes are reported back to Puppet Master.
Multi-tenancy is an innate characteristic of clustered Data ONTAP. SVMs enable isolation between
multiple tenants. NetApp storage administrators typically provision storage by using either greenfield
(new) operations or by making modifications to existing storage provisioned to clients. These tasks range
from cluster-scoped operations, such as the creation of SVMs, to SVM-scoped operations, such as the
creation of a volume.
This module describes the management of a cluster and an SVM independently of one another through
the device management configuration file. This process upholds the multi-tenancy characteristics of
clustered Data ONTAP. The resources provided by the module can be broadly categorized into two types:

7 Using Puppet to Manage NetApp Storage Infrastructure - Solution Deployment © 2015 NetApp, Inc. All Rights Reserved.
Cluster-scoped resources. These resources usually perform operations such as aggregate creation, SVM creation, network interface creation, cluster peering, adding licenses, and so on. The cluster is the managed device for these resources.
SVM-scoped resources. These resources perform operations such as volume creation, LUN creation, the enablement of NFS services, initiator group creation, and so on. A specific SVM is the managed device for these resources.
1.2 Solution Architecture
The NetApp Data ONTAP device module provides a declarative programing paradigm solution that
obscures the programming complexities required to manage multiple device states. An operator
describes how they want to configure a NetApp storage system, and the module performs the necessary
implementation and configuration commands. In addition, the solution upholds the differentiating multi-
tenancy feature of clustered Data ONTAP.
The configuration management system requires the installation of an agent application on the server
under management. However, clustered Data ONTAP does not support the installation of software in its
user space. Therefore, we use the Puppet device application running on a Linux-based machine to act as
a proxy agent to the clustered Data ONTAP storage device. Puppet Master and Puppet Agent
deployment enables you to increase performance by adding additional agent nodes when the number of
managed entities increases. These systems also maintain the configuration centrally at Puppet Master.
Figure 2) Solution architecture.
As is depicted in Error! Reference source not found., there are three major components for this
solution:
Manifest files that use NetApp Data ONTAP device module resources at Puppet Master
A device configuration file that manages the storage device at Puppet Agent

8 Using Puppet to Manage NetApp Storage Infrastructure - Solution Deployment © 2015 NetApp, Inc. All Rights Reserved.
The devices to which automation is applied
Device Configuration Using Puppet Agent
In a typical Puppet deployment, the Puppet Agent application pulls the resource catalog from Puppet
Master and applies the resources to the node. Because Data ONTAP cannot be a Puppet Agent, a Linux-
based system can act as the Puppet Agent instead. The Linux system relays the resource catalog to the
NetApp storage device.
Puppet Agent uses an application called Puppet Device (introduced in Puppet version 2.7.0) that makes
sure that the devices listed in the device configuration file are managed. The Puppet Agent connects to
the Puppet Master on behalf of the managed device and retrieves the catalog, which only contains the
resources provided by the module. The Agent then applies this catalog to the device by translating the
resources to NetApp-specific API calls (Manage ONTAP or the NetApp Zephyr API, a SOAPy and XML-
like interface to Data ONTAP). These calls report to the Puppet Master changes or failures that occurred
during catalog application.
Note: The Puppet Device application is not daemonized. However, you can schedule it to run periodically as a cron job.
The following text provides a sample device.conf operation:
[puppet-dev.netapp.com]
type netapp
url https://admin:[email protected]/
The configuration file has three listings:
The device certificate name. The name Puppet Master uses for the device [puppet-
dev.netapp.com].
Note: It is a NetApp best practice to use a fully qualified domain name (FQDN) for the cluster name.
The device type. For this module, it is always netapp.
The device URL. The URL should mention the following things:
The access method. SSH and Telnet are currently supported.
The authentication credentials used to connect to the device. Currently, only password authentication is supported.
The network host name of the device
The certificate name of the device enhances the security of the system. The master must sign the
device’s certificate. This process allows you to revoke the devices when needed. Puppet Device acts like
Puppet Agent; it waits for the managed device certificate if it has not yet been signed.
Note: Puppet uses SSL certificates to secure the connection between nodes and the master. A certificate authority, which is automatically created on Puppet Master when you start it for the first time, issues the Puppet certificates.
Manifests at Puppet Master
The Puppet module for clustered Data ONTAP provides a solution for storage automation. The storage
management operations are specified as manifest files at the Puppet Master. A storage administrator can
create manifest templates that perform certain tasks and that modify only the attribute values of the
resources based on the request. You can extend this process by creating manifests for storage catalogs
utilized in a storage-as-a-service deployment scenario.
Puppet manifests specify the device on which you would like to apply the configuration. The device can
be either the FQDN for the cluster or the FQDN for the SVM, based upon the operations you would like to

9 Using Puppet to Manage NetApp Storage Infrastructure - Solution Deployment © 2015 NetApp, Inc. All Rights Reserved.
perform. Various clustered Data ONTAP OS entities are configured by using resources from the NetApp
Data ONTAP device module.
You can view the resource type description and the parameters supported with the following command:
puppet describe resource_type
Table 1 describes the resources supported by the module and their scope.
Table 1) Resources supported by Data ONTAP device module
Resource Type Equivalent clustered Data ONTAP
API
Comments Scope
netapp_aggregate aggr-create
aggr-add
aggr-online
aggr-offline
aggr-set-option
aggr-destory
Manage aggregate
creation,
modification, and
deletion
Cluster
netapp_volume volume-create
volume-size
volume-autosize-set
volume-options-list-info
volume-set-option
volume-restrict
volume-online
volume-offline
volume-destroy
Manage volume
creation,
modification, and
deletion
SVM
netapp_server vserver-create
vserver-modify
vserver-rename
vserver-destroy
vserver-start
vserver-stop
Manage SVM
creation,
modification, and
deletion
Cluster
netapp_lif net-interface-create
net-interface-modify
net-interface-delete
Manage logical
interface (LIF)
creation,
modification, and
deletion
Cluster
netapp_export_policy export-policy-create Manage export policy
creation,
SVM
10 Using Puppet to Manage NetApp Storage Infrastructure - Solution Deployment © 2015 NetApp, Inc. All Rights Reserved.
export-policy-destroy
export-policy-get-iter
modification, and
deletion
netapp_export_rule export-rule-create
export-rule-destroy
export-rule-modify
Manage export policy
rules creation,
modification, and
deletion
SVM
netapp_nfs nfs-service-create
nfs-service-destroy
nfs-service-modify
nfs-enable
nfs-disable
Manage NFS
enabling and
disabling on an SVM
SVM
netapp_vserver_optio
n
options-set
options-modify-iter
Set the SVM options Cluster
netapp_vserver_peer vserver-peer-create
vserver-peer-modify
vserver-peer-destroy
Manage SVM peer
creation,
modification, and
deletion
Cluster
netapp_cluster_id cluster-identity-get
cluster-identity-modify
Acquire cluster
information
Cluster
netapp_cluster_peer cluster-peer-create
cluster-peer-modify
cluster-peer-delete
Manage cluster peer
creation,
modification, and
deletion
Cluster
netapp_sis_config sis-enable
sis-disable
sis-set-config
Perform volume
efficiency operations
such as compression
SVM
netapp_sis_policy sis-policy-create
sis-policy-delete
sis-policy-modify
Manage schedule
creation,
modification, and
deletion for volume
optimizations
SVM
netapp_user useradmin-user-create
useradmin-user-add
useradmin-user-modify
Manage user
creation,
modification, and
deletion
Cluster
netapp_security_logi
n
security-login-create
security-login-delete
Manage user
creation,
modification, and
deletion associated
Cluster

11 Using Puppet to Manage NetApp Storage Infrastructure - Solution Deployment © 2015 NetApp, Inc. All Rights Reserved.
security-login-modify
security-login-modify-
password
security-login-lock
security-login-unlock
with specified
application and
authentication
netapp_security_logi
n_role
netapp_security_login_role
-create
netapp_security_login_role
-delete
netapp_security_login_role
-modify
Manage security
login role creation,
modification, and
deletion
Cluster
netapp_lun lun-create-by-size
lun-destory
lun-resize
lun-online
lun-offline
Manage LUN
creation,
modification, and
deletion
SVM
netapp_lun_map lun-map
lun-unmap
Manage LUN
mapping to an
initiator group
(igroup)
SVM
netapp_iscsi iscsi-service-create
iscsi-service-destroy
iscsi-service-modify
iscsi-service-start
iscsi-service-stop
Manage iSCSI
operations for an
SVM
SVM
netapp_iscsi_interfa
ce_accesslist
iscsi_interface_accesslist
-add
iscsi_interface_accesslist
-remove
Add or remove the
iSCSI LIFs from the
accesslist of the
specified initiator
SVM
netapp_iscsi_securit
y
iscsi-initiator-add-auth
iscsi_initiator-delete-
auth
Manage NetApp
iSCSI initiator (client)
authentication
SVM
netapp_license license-v2-list-info
license-v2-add
license-v2-delete
Manage NetApp
license
Cluster
netapp_igroup igroup-create, Manage NetApp SVM

12 Using Puppet to Manage NetApp Storage Infrastructure - Solution Deployment © 2015 NetApp, Inc. All Rights Reserved.
igroup-destroy
igroup-add
igroup-remove
igroup-bind-portset
igroup-unbind-portset
igroup-set-attribute
ISCSI initiator groups
netapp_quota quota-add-entry
quota-delete-entry
quota-modify-entry
quota-resize
quota-off
quota-on
quota-status
Manage NetApp
quota entries.
Clustered Data
ONTAP uniquely
identifies a quota
entry by the type,
target, and volume.
SVM
netapp_kerberos_conf
ig
Kerberos-config-modify Kerberos
configuration
information for a LIF
SVM
netapp_kerberos_real
m
kerberos-realm-create
kerberos-realm-delete
kerberos-realm-modify
Kerberos realm
configuration
specifies the
locations of key
distribution center
(KDC) servers and
administration
daemons for the
Kerberos realms of
interest. When
returned as part of
the output, all
elements of this
typedef are reported,
unless limited by a
set of desired
attributes specified by
the caller.
SVM
netapp_ldap_client ldap-client-create
ldap-client-delete
ldap-client-modify
Manage Lightweight
Directory Access
Protocol (LDAP)
client configuration
for the cluster
SVM
netapp_ldap_config ldap-config-create
ldap-config-delete
Create a new
association between
an LDAP client
configuration and an
SVM

13 Using Puppet to Manage NetApp Storage Infrastructure - Solution Deployment © 2015 NetApp, Inc. All Rights Reserved.
ldap-config-modify SVM. An SVM can
have only one client
configuration
associated with it.
netapp_snapmirror snapmirror-create
snapmirror-initialize
snapmirror-destroy
snapmirror-modify
Manage NetApp
SnapMirror® creation,
modification, and
deletion
Cluster
This list might change over time as the module evolves to support more features. For the most up-to-date
list, see the GitHub puppetlabs-netapp site.
Managed Device
A managed device can be either a cluster or an SVM. If the managed device is the cluster, the device
name must match the certificate name in the device configuration file. If the managed device is an SVM,
then this agreement is not necessary.
Multiple devices can be specified in the device configuration file at Puppet Agent, and the corresponding
manifests are applied to the device. This enables the storage administrator to maintain an audit trail for
configurations applied to these devices, an arrangement useful for troubleshooting.
1.3 Use Case Summary
Using Puppet to manage clustered Data ONTAP devices standardizes storage operations across the data
center. Storage operations are written in the form of manifest files that can be version controlled. You can
recognize common storage workflows across the data center and create manifest templates for these
operations. Moreover, you can apply the configuration in the manifests to more than one device by
running a single command, resulting in time savings.
Storage operations provided by clustered Data ONTAP can be classified into two main categories
depending on their scope: cluster-scoped operations and SVM-scoped operations. In addition, this
module supports role-based access control (RBAC) segmentation using specific user accounts at the
SVM level. We demonstrate these capabilities with three use cases. The initial Puppet Master and client
setup for all three use cases is the same:
Puppet is used to perform cluster-scoped operations in clustered Data ONTAP
Puppet is used to perform SVM-scoped operations in clustered Data ONTAP
RBAC is supported
Note: These use cases demonstrate the value of a Puppet manifest combined with NetApp Data ONTAP device module resources. You can modify and extend these manifests to cover your NetApp storage environment and service-level requirements.
2 Environment Setup and Configuration
2.1 Prerequisites
The following list describes some of the physical and logical configurations required for the use of the
NetApp Data ONTAP device module:
You must create a cluster in which all of the nodes have been joined and correctly configured
All of the physical cabling between the network and nodes must follow best practices

14 Using Puppet to Manage NetApp Storage Infrastructure - Solution Deployment © 2015 NetApp, Inc. All Rights Reserved.
If the cluster is not a two-node switchless cluster, you must properly configure the cluster interconnect switches and ports, and you must properly connect the nodes
You must install version 8.2 or later of clustered Data ONTAP
You must install the feature licenses required by any automation commands performed by the module. These licenses must be active on all the nodes where automation is targeted.
Puppet on the master and device proxy system must be version 3.7 or later
NetApp Manageability SDK Ruby libraries must be available
Faraday gem (an HTTP client library) must be installed on the master and device proxy system. This software is included as a part of the rack and passenger gem installation.
The device proxy system must be able to connect to Puppet Master(default port 8140) and to Data ONTAP (default port 443)
2.2 Puppet Master and Puppet Agent Setup with Passenger
This section describes the steps you must follow to configure a Passenger and Apache stack Puppet
application on a Centos 7–based Linux virtual machine (VM). This configuration is the most familiar and
thoroughly tested stack.
Note: Puppet can be deployed with different configurations, for example, by using a Unicorn and nginx stack instead of Passenger and Apache stack, or by using different varieties of Linux. Discussing and evaluating different Puppet configurations are not within the scope of this document.
Note: You can skip this section if you have an existing Puppet Master and Puppet Agent environment.
Note: We performed this validation using an RPM-based Linux distribution. However, other Linux distributions (such as Debian) are also supported.
Puppet Master and Puppet Agent setup is divided into preinstallation tasks and postinstallation tasks.
Preinstallation Tasks
To perform all needed preinstallation tasks, complete the following steps:
1. On both the Master and the Agent VMs, enable the Puppet Labs Package Repository.
sudo rpm -ivh https://yum.puppetlabs.com/puppetlabs-release-el-7.noarch.rpm
2. On the master VM, run the following commands:
sudo yum install puppet-server
sudo puppet master –no-daemonize –-verbose
3. Open port 8140 at the master.
firewall-cmd --zone=public --add-port=8140/tcp --permanent
firewall-cmd --reload
4. On the agent VM, run the following command:
sudo yum install puppet
Postinstallation Tasks
Set Up Puppet Master
1. Install Apache 2.
sudo yum install httpd httpd-devel mod_ssl ruby-devel rubygems gcc
2. Install the necessary dependencies.
sudo yum install gcc-c++ libcurl-devel openssl-devel zlib-devel

15 Using Puppet to Manage NetApp Storage Infrastructure - Solution Deployment © 2015 NetApp, Inc. All Rights Reserved.
3. Install Rack and Passenger.
sudo gem install rack passenger
sudo passenger-install-apache2-module
Note: You might get a command not found error for the passenger-install-apache2-module command. If this error occurs, include /usr/local/share/gems/gems/passenger-5.0.20/bin in the environment variable PATH. The installer guides you through the process.
4. Create and enable the Puppet Master Vhost. The Apache Vhost configures Puppet Master on the default Puppet Master port (8140).
Create puppetmaster.conf in the /etc/httpd/conf.d directory and copy the LoadModule
directive output from the previous passenger installation step. Follow this step with the Vhost configuration.
The following text provides a sample puppetmaster.conf file:
LoadModule passenger_module /usr/local/share/gems/gems/passenger-
5.0.13/buildout/apache2/mod_passenger.so
<IfModule mod_passenger.c>
PassengerRoot /usr/local/share/gems/gems/passenger-5.0.13
PassengerDefaultRuby /usr/bin/ruby
</IfModule>
# And the passenger performance tuning settings:
PassengerHighPerformance On
#PassengerUseGlobalQueue On
# Set this to about 1.5 times the number of CPU cores in your master:
PassengerMaxPoolSize 6
# Recycle master processes after they service 1000 requests
PassengerMaxRequests 1000
# Stop processes if they sit idle for 10 minutes
PassengerPoolIdleTime 600
Listen 8140
<VirtualHost *:8140>
SSLEngine On
# Only allow high security cryptography. Alter if needed for compatibility.
SSLProtocol All -SSLv2
SSLCipherSuite HIGH:!ADH:RC4+RSA:-MEDIUM:-LOW:-EXP
SSLCertificateFile /var/lib/puppet/ssl/certs/master.localdomain.pem
SSLCertificateKeyFile /var/lib/puppet/ssl/private_keys/master.localdomain.pem
SSLCertificateChainFile /var/lib/puppet/ssl/ca/ca_crt.pem
SSLCACertificateFile /var/lib/puppet/ssl/ca/ca_crt.pem
SSLCARevocationFile /var/lib/puppet/ssl/ca/ca_crl.pem
SSLVerifyClient optional
SSLVerifyDepth 1
SSLOptions +StdEnvVars +ExportCertData
# These request headers are used to pass the client certificate
# authentication information on to the puppet master process
RequestHeader set X-SSL-Subject %{SSL_CLIENT_S_DN}e
RequestHeader set X-Client-DN %{SSL_CLIENT_S_DN}e
RequestHeader set X-Client-Verify %{SSL_CLIENT_VERIFY}e
#RackAutoDetect On
DocumentRoot /usr/share/puppet/ext/rack/puppetmasterd/public/
<Directory /usr/share/puppet/ext/rack/puppetmasterd/>
Options None
AllowOverride None
Order Allow,Deny
Allow from All
</Directory>
</VirtualHost>
Note: The SSLCertificateFile and SSLCertificateKeyFile parameters contain the master FQDN.

16 Using Puppet to Manage NetApp Storage Infrastructure - Solution Deployment © 2015 NetApp, Inc. All Rights Reserved.
5. Install the Puppet Master Rack application. To install Rack in a form that Passenger can use, complete the following steps:
a. Create three directories for the application: a parent directory, a public directory, and a temp directory.
b. Copy the config.ru file from the Puppet source code
(/usr/share/puppet/ext/rack/config.ru_) into the parent directory.
c. Set ownership of the config.ru file.
sudo mkdir –p /usr/share/puppet/ext/rack/puppetmasterd
sudo mkdir /usr/share/puppet/ext/rack/puppetmasterd/{tmp,public}
sudo cp /usr/share/puppet/ext/rack/config.ru /usr/share/puppet/ext/rack/puppetmasterd/
sudo chown puppet:puppet /usr/share/puppet/ext/rack/puppetmasterd/config.ru
Note: The location of the Puppet source code varies by OS.
6. Apache requires access to the three directories you just created. To provide access, run the following command:
setfacl -m u:apache:rx /usr/share/puppet/
Note: With the HTTPD process, the user name is apache on our Linux system.
7. Start or restart the Apache service.
Note: Stop any WEBrick Puppet Master processes before starting the Apache service. Only one process can be bound to TCP port 8140.
sudo systemctll stop puppetmaster.service
sudo systemctl start httpd.service
sudo chkconfig puppetmaster off
sudo chkconfig httpd on
Note: In some cases, you might have to disable SELinux and allow connections to the firewall on port 8140.
8. To make sure that there are no errors, run the following command:
/sbin/apachectl
Set Up Puppet Agent
1. Start the Puppet service.
sudo systemctl start puppet.service
2. With Puppet Master, verify that the certificate request from the agent has been received. If it has been received, accept it.
puppet cert list
puppet cert sign --all
3. To verify the Puppet installation, run the following command from the agent:
puppet agent –test
The following text provides a sample output for the correct configuration of Puppet Master and Puppet Agent:
Info: Retrieving pluginfacts
Info: Retrieving plugin
Info: Caching catalog for agent1.localdomain
Info: Applying configuration version '1447708730'
Notice: Finished catalog run in 0.02 seconds

17 Using Puppet to Manage NetApp Storage Infrastructure - Solution Deployment © 2015 NetApp, Inc. All Rights Reserved.
2.3 Configuring Data ONTAP Device Module
Perform the following steps on both the Puppet Master and the Puppet Agent:
1. Download the NetApp Manageability SDK. To do so, you must have a NetApp Support account.
2. Install the NetApp Data ONTAP device module.
puppet module install puppetlabs-netapp
3. Copy the Ruby SDK libraries to the module.
cp netapp-manageability-sdk-5.*/lib/ruby/NetApp/*.rb
/etc/puppet/modules/netapp/lib/puppet/netapp_sdk/
To verify the setup, write the device configuration file at Puppet Agent. You can write the
configuration in the default device.conf file. You can also write the configuration in a separate file
and specify it at the puppet device run using the optional deviceconfig parameter.
For more information about the device.conf parameter, see the Puppet Labs device.conf
information page.
The following text provides a sample device.conf configuration file:
[puppet-dev.netapp.com]
type netapp
url https://admin:MyP@[email protected]
Note: In this example, puppet-dev.netapp.com is the FQDN of the cluster.
4. Test the configuration by doing a puppet device run. You can add an optional parameter verbose
to get more information about the tasks running in the background.
Note: Depending on the parameter autosign, you might have to run the Puppet Device command again after signing the certificate at Puppet Master.
If the Puppet Device run is successful, then the system has been configured correctly. The following text
provides a sample output for the correct configuration:
[root@agent1 rack]# puppet device --verbose
Info: starting applying configuration to puppet-dev.netapp.com at https://puppet-
dev.netapp.com:443/
Info: Retrieving pluginfacts
Info: Retrieving plugin
Info: Caching catalog for puppet-dev.netapp.com
Info: Applying configuration version '1447770423'
Notice: Finished catalog run in 0.06 seconds
3 Using Puppet to Perform Cluster-Scoped Operations
Cluster administrators have access to all resources of the cluster and are responsible for managing the
various components of the cluster. For example, administrators create SVMs, create users, associate
users with roles, create aggregates, create logical interfaces, and so on. Admin is the default
administrative user of the cluster that is created when the cluster is configured for the first time.
The initial tasks needed to fulfill any storage request, such as the creation of a SVM, the creation of a
user, the association of a user with an access role, or the creation of a LIF, are almost always the same.
Creating Puppet manifests for these tasks using the NetApp Data ONTAP device module reduces the
response time for the request and makes the operations consistent across different requests.
In this section, we provide manifests for the following tasks:
Creating the aggregate aggr02_node01
Creating the data SVM vserver01

18 Using Puppet to Manage NetApp Storage Infrastructure - Solution Deployment © 2015 NetApp, Inc. All Rights Reserved.
Creating the management LIF vserver01_mgmt
Creating the data LIF vserver01_data
Creating the security login role volume_only
Creating the user volume_user
3.1 Technology Requirements
This section covers the technology requirements for using the NetApp Data ONTAP device module to
perform cluster-scoped operations.
Hardware Requirements
Table 2 lists the hardware components required to implement these use cases.
Table 2) Hardware requirements for cluster-scoped operations.
Hardware Quantity
NetApp FAS device 1
Software Requirements
Table 3 lists the software components required to implement these use cases.
Table 3) Software requirements for cluster-scoped operations.
Software Version
Clustered Data ONTAP 8.2 or later
Two Linux-based VMs, with one running Puppet Master and the other running Puppet Agent
2.7.0 or later
3.2 Deployment Procedures
To perform cluster-scoped operations, connect to the cluster with cluster administrator credentials.
In this section, we perform the following high-level tasks using Puppet:
Creating the aggregate aggr02_node01
Creating the data SVM vserver01
Creating the management LIF vserver01_mgmt
Creating the data LIF vserver01_data
Creating the security login role volume_only
Creating the user volume_user
Device Configuration at Puppet Agent
The device configuration file at the Puppet Agent contains information about the device under
management. In this scenario, because we are performing cluster-scoped operations, we connect directly
to the cluster management interface and use cluster administrator credentials to perform operations on
the cluster.
Table 4 lists the different components of the device configuration file.

19 Using Puppet to Manage NetApp Storage Infrastructure - Solution Deployment © 2015 NetApp, Inc. All Rights Reserved.
Table 4) Device configuration details for cluster-scoped operations.
Attribute Value Comments
Device name puppet-dev.netapp.com FQDN of the cluster
management
interface
Type netapp Default for this
module
URL https://admin:MyPassw0rd@puppet-
dev.netapp.com/
Connects to the
cluster using cluster
admin credentials
The following text provides a sample device.conf configuration file.
[puppet-dev.netapp.com]
type netapp
url https://admin:MyP@[email protected]
Writing Manifests at Puppet Master
To find the documentation for a resource type from the NetApp Data ONTAP device module, run the
following command:
puppet describe resource_type
Here resource_type refers to the resource name for which you need documentation (for example,
netapp_aggregate). The Family type in the documentation specifies whether a resource is a cluster-
scoped or an SVM-scoped resource type. This documentation also specifies the different parameters
supported by the resource type.
Consider the following manifest, cluster_scope.pp.
node 'puppet-dev.netapp.com'{
#Create an aggregate
netapp_aggregate{'aggr02_node01':
ensure => present,
option_free_space_realloc => "on",
state => "online",
blocktype => "64_bit",
checksumstyle => "block",
diskcount => "6",
raidtype => "raid_dp",
nodes => ['puppet-dev-01']
}
#Creates a svm "vserver01"
netapp_vserver { 'vserver01' :
ensure => present,
allowedprotos => "iscsi",
rootvol => "rootdir",
language => "c",
rootvolsecstyle => "unix",
rootvolaggr => "aggr02_node01",
aggregatelist => ["aggr02_node01"]
}
#Creates a management LIF
netapp_lif { 'vserver01_mgmt':
ensure => present,
vserver => "vserver01",

20 Using Puppet to Manage NetApp Storage Infrastructure - Solution Deployment © 2015 NetApp, Inc. All Rights Reserved.
role => "data",
administrativestatus => "up",
address => "172.21.10.127",
firewallpolicy => "mgmt",
homenode => "puppet-dev-01",
homeport => "e0c",
netmask => "255.255.255.0",
failoverpolicy => "disabled"
}
#Creates an iscsi data LIF
netapp_lif { 'vserver01_iscsi':
ensure => present,
vserver => "vserver01",
role => "data",
administrativestatus => "up",
dataprotocols => ["iscsi"],
address => "172.21.10.128",
homenode => "puppet-dev-01",
homeport => "e0c",
netmask => "255.255.255.0",
failoverpolicy => "disabled"
}
#Creates a security login role “volume_only”
netapp_security_login_role {‘volume:volume_only:vserver01’:
ensure => present,
}
#Creates a user “volume_user”
netapp_security_login {‘ontapi:password:volume_user:vserver01’:
ensure => present,
role_name => “volume_only”,
password => “MyP@$$w0rd”
}
}
Resource Type Definitions
This section provides a brief description of the operations performed with the resource types listed in the
section “Writing Manifests at Puppet Master”:
Aggregate creation. Perform aggregate management operations using the netapp_aggregate
resource type. To see the available parameters for this resource type, run the following command:
puppet describe netapp_aggregate
In a previous manifest example, we used the netapp_aggregate resource type to create the
aggregate aggr02_node01 on the disks owned by the node puppet-dev-01.
SVM creation. Perform SVM management operations using the netapp_vserver resource type.
To see the available parameters for this resource type, run the following command:
puppet describe netapp_vserver
In a previous manifest example, we created the SVM vserver01 and associated it with the
aggregate aggr02_node01.
Management LIF and data LIF creation. Perform LIF management operations using the
netapp_lif resource type. To see the supported options for this resource type, run the following
command:
puppet describe netapp_lif
21 Using Puppet to Manage NetApp Storage Infrastructure - Solution Deployment © 2015 NetApp, Inc. All Rights Reserved.
In a previous manifest example, we created the management LIF vserver01_mgmt and associated
it with the IP address 172.21.10.127. We then created the data LIF vserver01_iscsi, which
supports the iSCSI protocol for data access, and associated it with the IP address 172.21.10.128.
Role creation. Perform all access-related operations with the netapp_security_login_role
resource type. To see the supported options for this resource type, run the following command:
puppet describe netapp_security_login_role
In a previous manifest example, we created the role volume_only, which only has access over the
volume command directory.
User creation. Perform all user management operations with the netapp_security_login
resource type. To see the supported options for this resource type, run the following commands:
puppet describe netapp_security_login
In a previous manifest example, we created a user volume_user for the SVM vserver01 and
associated it with the volume_only role created previously.
Note: Puppet usually applies the resources in the order that they are defined in the manifests. However, to make sure of the orderly application of resources, you can use Puppet constructs.
Triggering Automation from the Puppet Agent
You can apply the configuration written in the manifests by running the Puppet Device application from
the Puppet Agent. To see the tasks performed during execution, add the optional flag verbose.
puppet device verbose
The following text provides a sample output:
[root@agent1 rack]# puppet device --verbose
Info: starting applying configuration to puppet-dev.netapp.com at https://puppet-
dev.netapp.com:443/
Info: Retrieving pluginfacts
Info: Retrieving plugin
Info: Caching catalog for puppet-dev.netapp.com
Info: Applying configuration version '1447770443'
Notice: /Stage[main]/Main/Node[puppet-dev.netapp.com]/Netapp_aggregate[aggr02_node01]/ensure:
created
Notice: /Stage[main]/Main/Node[puppet-dev.netapp.com]/Netapp_vserver[vserver01]/ensure: created
Notice: /Stage[main]/Main/Node[puppet-dev.netapp.com]/Netapp_lif[vserver01_mgmt]/ensure: created
Notice: /Stage[main]/Main/Node[puppet-dev.netapp.com]/Netapp_lif[vserver01_iscsi]/ensure: created
Notice: /Stage[main]/Main/Node[puppet-
dev.netapp.com]/Netapp_security_login_role[volume_only]/ensure: created
Notice: /Stage[main]/Main/Node[puppet-
dev.netapp.com]/Netapp_security_login[ontapi:password:volume_user:vserver01]/ensure: created
Notice: Finished catalog run in 6.23 seconds
4 Using Puppet to Perform Storage Virtual Machine–Scoped
Operations
SVMs securely isolate the shared virtualized data storage and network, appearing as a single dedicated
storage resource to the client by abstracting the underlying storage infrastructure. Each tenant
independently manages the SVM associated with the respective tenant account. SVM management does
not require access credentials for the whole system. SVM management operations usually include the
management of volumes, protocols, policies, policy rules, and so on. Figure 3 illustrates what is available
at the SVM level.

22 Using Puppet to Manage NetApp Storage Infrastructure - Solution Deployment © 2015 NetApp, Inc. All Rights Reserved.
Figure 3) NetApp SVM-scoped operations.
Automating SVM-scoped operations benefits multiple stakeholders in the storage provisioning workflow.
For a storage administrator, housekeeping tasks across multiple SVMs (performing volume efficiency
operations and so on) can be performed with a single command run. The NetApp Data ONTAP device
module allows a user to connect to the SVM directly, thus complementing the inherent multi-tenancy
nature of clustered Data ONTAP.
The following tasks are SVM-scoped operations:
Creating an export policy
Creating an export policy rule
Crating a data volume
Creating a LUN
Enabling the SCSI service in the SVM
Creating igroups
Mapping LUNs to igroups
Note: These operations are a subset of the SVM-scoped operations supported by the module and server. You can create manifests to address specific use cases in your environment.
4.1 Technology Requirements
This section covers the technology requirements for the primary use case.

23 Using Puppet to Manage NetApp Storage Infrastructure - Solution Deployment © 2015 NetApp, Inc. All Rights Reserved.
Hardware Requirements
Table 5 lists the hardware components required to implement the primary use case.
Table 5) Hardware requirements for SVM-scoped operations.
Hardware Quantity
NetApp FAS device 1
Software Requirements
Table 6 lists the software components required to implement the primary use case.
Table 6) Software requirements for SVM-scoped operations.
Software Version
Clustered Data ONTAP 8.2 or later
Two Linux-based virtual machines running the Puppet Master and Puppet Agent applications
2.7.0 or later
In addition to these hardware and software requirements, you must create the following storage entities:
An SVM named vserver01
A management LIF and a data LIF with IP addresses of 172.21.10.127 and 172.21.10.128,
respectively
4.2 Deployment Procedures
To perform SVM-scoped operations, connect directly to the SVM management LIF. Because we are
performing operations that span multiple command directories and subdirectories, we use the vsadmin
user for simplicity in this use case.
There are three main steps needed to configure the SVM:
1. Configuring devices at Puppet Agent
2. Writing manifests at Puppet Master
3. Triggering automation from Puppet Agent
Configuring Devices at Puppet Agent
The device configuration file at Puppet Agent contains information about the managed device. The
different components of the device configuration file are listed in Table 7.
Table 7) Device configuration details for SVM-scoped operations.
Attribute Value Comments
Device
name
vserver01.netapp.com FQDN of the
SVM
vserver01
Type netapp Default for this
module
URL https://vsadmin:MyP@[email protected]/vserver01 Connects to
the SVM

24 Using Puppet to Manage NetApp Storage Infrastructure - Solution Deployment © 2015 NetApp, Inc. All Rights Reserved.
vserver01
using
volume_user
credentials
The following text provides a sample device.conf configuration file:
[vserver01.netapp.com]
type netapp
url https://vsadmin:MyP@[email protected]/vserver01
Writing Manifests at Puppet Master
To see the documentation for a resource type provided by the NetApp Data ONTAP device module, run
the following command:
puppet describe resource_type
Here resource_type refers to the resource type name for the desired documentation (for example,
netapp_volume). The Family type in the documentation specifies whether the resource is a cluster-
scoped resource type or an SVM-scoped resource type. The documentation also specifies the different
parameters supported by the resource type.
These manifests are stored at Puppet Master. Consider the following manifest vserver_scope.pp,
which describes SVM-scoped operations. The following text demonstrates how to perform operations,
such as creating an export policy, creating an export policy rule, creating a volume, creating a LUN,
enabling the iSCSI server in the SVM, creating an igroup, and mapping a LUN to an igroup, on the newly
created SVM vserver01.
node 'vserver01.localdomain'{
#Creates an export policy
netapp_export_policy { 'exp_vserver01':
ensure => present,
}
#Creates an export rule
netapp_export_rule {'exp_vserver01:1':
ensure => present,
clientmatch => "0.0.0.0/0",
rorule => ["any"],
rwrule => ["any"],
}
#Creates a volume
netapp_volume { 'vol1_iscsi' :
ensure => present,
aggregate => "aggr02_node01",
initsize => "1g",
state => "online",
exportpolicy => "exp_vserver01",
snapreserve => "0"
}
#Creates a lun
netapp_lun { '/vol/vol1_iscsi/vserver01_lun':
ensure => present,
ostype => "windows",
size => '300m',
spaceresenabled => 'false'
}
#enables iscsi
netapp_iscsi {'vserver01':
ensure => present,

25 Using Puppet to Manage NetApp Storage Infrastructure - Solution Deployment © 2015 NetApp, Inc. All Rights Reserved.
state => 'on'
}
#Creates an igroup
netapp_igroup {'vserver01_iscsi':
ensure => present,
group_type => "iscsi",
members => ["iqn.1991-05.com.microsoft:cis-jump85.cis.netapp.com"],
os_type => "windows",
name => 'vserver01_iscsi'
}
#maps lun to igroup
netapp_lun_map {'/vol/vol1_iscsi/vserver01_lun:1' :
ensure => present,
initiatorgroup => 'vserver01_iscsi'
}
}
Resource Type Definitions
This section contains a brief description of the operations performed using these resource types.
Export policy creation. Export policy management operations are performed using the
netapp_export_policy resource type. To see the parameters available for the resource, run the
following command:
puppet describe netapp_export_policy
In a previous manifest example, the netapp_export_policy resource type was used to create an
export policy exp_vserver01 for the SVM vserver01.
Export rule creation. The netapp_export_rule resource type supports the creation of rules and
their association with an export policy. To see the parameters available for the resource, run the following command:
puppet describe netapp_export_rule
In a previous manifest example, exp_vserver01:1 specified the policy associated with the rule and
the rule index number.
Volume creation. Volume creation, deletion, and modification operations are performed using the
netapp_volume resource type. To see the available parameters for this resource, run the following
command:
puppet describe netapp_volume
In a previous manifest example, we created a volume vol1_iscsi and specified the aggregate and
export policy associated with it.
LUN creation. LUN creation, deletion, and modification operations are performed using the
netapp_lun resource type. To see the available parameters for the resource, run the following
command:
puppet describe netapp_lun
In a previous manifest example, we created a LUN at the /vol/vol1_iscsi/vserver01_lun
junction path and specified the size and other parameters.
iSCSI operations. iSCSI enabling and disabling operations for an SVM are performed using the
netapp_iscsi resource type. To see the available parameters for the resource, run the following
command:
puppet describe netapp_iscsi
In an earlier manifest example, we enabled iSCSI protocol on the SVM vserver01.

26 Using Puppet to Manage NetApp Storage Infrastructure - Solution Deployment © 2015 NetApp, Inc. All Rights Reserved.
Igroup operations: Igroup creation, modification, and deletion operations are performed using the
netapp_igroup resource type. To see the supported parameters, run the following command:
puppet describe netapp_igroup
In an earlier manifest example, we created an igroup vserver01_iscsi and specified the iSCSI
initiator included in the group.
Mapping of a LUN to an igroup: The netapp_lun_map resource type maps the igroup to the LUN.
puppet describe netapp_lun
In an earlier manifest example, we mapped the igroup vserver01_iscsi to the LUN at the junction
path /vol/vol1_iscsi/vserver01_lun.
Triggering Automation from Puppet Agent
You can apply configurations written in the manifests by running the Puppet Device application from
Puppet Agent. You can add the optional verbose flag to trace the different tasks performed during
execution.
puppet device –verbose
The following text provides a sample output:
[root@agent1 rack]# puppet device --verbose
Info: starting applying configuration to vserver01.netapp.com at
https://vserver01.netapp.com:443/vserver01
Info: Retrieving pluginfacts
Info: Retrieving plugin
Info: Caching catalog for vserver01.netapp.com
Info: Applying configuration version '1447770564'
Notice: /Stage[main]/Main/Node[vserver01.netapp.com]/Netapp_export_policy[exp_vserver01]/ensure:
created
Notice: /Stage[main]/Main/Node[vserver01.netapp.com]/Netapp_export_rule[exp_vserver01:1]/ensure:
created
Notice: /Stage[main]/Main/Node[vserver01.netapp.com]/Netapp_volume[vol1_iscsi]/ensure: created
Notice:
/Stage[main]/Main/Node[vserver01.netapp.com]/Netapp_lun[/vol/vol1_iscsi/vserver01_lun]/ensure:
created
Notice: /Stage[main]/Main/Node[vserver01.netapp.com]/Netapp_iscsi[vserver01]/ensure: created
Notice: /Stage[main]/Main/Node[vserver01.netapp.com]/Netapp_igroup[vserver01_iscsi]/ensure:
created
Notice:
/Stage[main]/Main/Node[vserver01.netapp.com]/Netapp_lun_map[/vol/vol1_iscsi/vserver01_lun:1/ensur
e: created
Notice: Finished catalog run in 9.32 seconds
5 Using Puppet to Perform Role-Based Access Control Operations
One of the primary use cases for Puppet is the configuration management for multiple nodes using a
single configuration manifest written at Puppet Master. For storage system configuration management,
you can extend these processes to include performing operations on multiple clusters or performing
concurrent operations on multiple SVMs. The ability to replicate the configuration of multiple storage
entities with a single command is very useful for storage administrators.
Clustered Data ONTAP is an inherently multi-tenant storage OS. You can create users and define custom
roles that specify the type of access a user is allowed over command directories, command
subdirectories, and commands. This Puppet module allows a user with a specific role to connect to the
cluster or SVM and perform the corresponding operations.
In this section, we demonstrate the following workflows:
27 Using Puppet to Manage NetApp Storage Infrastructure - Solution Deployment © 2015 NetApp, Inc. All Rights Reserved.
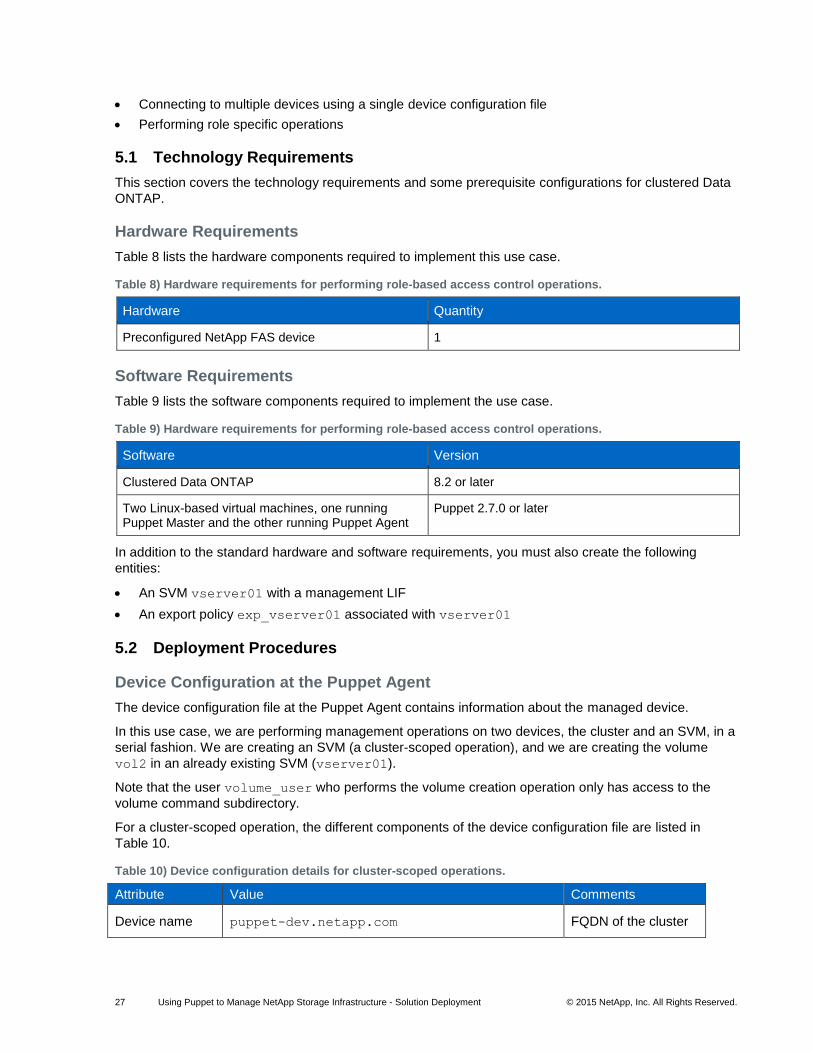
Connecting to multiple devices using a single device configuration file
Performing role specific operations
5.1 Technology Requirements
This section covers the technology requirements and some prerequisite configurations for clustered Data
ONTAP.
Hardware Requirements
Table 8 lists the hardware components required to implement this use case.
Table 8) Hardware requirements for performing role-based access control operations.
Hardware Quantity
Preconfigured NetApp FAS device 1
Software Requirements
Table 9 lists the software components required to implement the use case.
Table 9) Hardware requirements for performing role-based access control operations.
Software Version
Clustered Data ONTAP 8.2 or later
Two Linux-based virtual machines, one running Puppet Master and the other running Puppet Agent
Puppet 2.7.0 or later
In addition to the standard hardware and software requirements, you must also create the following
entities:
An SVM vserver01 with a management LIF
An export policy exp_vserver01 associated with vserver01
5.2 Deployment Procedures
Device Configuration at the Puppet Agent
The device configuration file at the Puppet Agent contains information about the managed device.
In this use case, we are performing management operations on two devices, the cluster and an SVM, in a
serial fashion. We are creating an SVM (a cluster-scoped operation), and we are creating the volume
vol2 in an already existing SVM (vserver01).
Note that the user volume_user who performs the volume creation operation only has access to the
volume command subdirectory.
For a cluster-scoped operation, the different components of the device configuration file are listed in
Table 10.
Table 10) Device configuration details for cluster-scoped operations.
Attribute Value Comments
Device name puppet-dev.netapp.com FQDN of the cluster

28 Using Puppet to Manage NetApp Storage Infrastructure - Solution Deployment © 2015 NetApp, Inc. All Rights Reserved.
Type netapp Default for this
module
URL https://admin:MyPassw0rd@puppet-
dev.netapp.com/
Connects to the
cluster using cluster
administrative
credentials
For a SVM-scoped operation, Table 11 lists the components of the device configuration file.
Table 11) Device configuration details for a user scoped at SVM level.
Attribute Value Comments
Device name vserver01.netapp.com FQDN of the SVM
vserver01
Type netapp Default for this
module
URL https://volume_user:MyP@$$w0rd@vserver01
.netapp.com/vserver01
Connects to the SVM
vserver01 using
volume_user
credentials
The following text depicts the final device configuration file:
#Connecting to the cluster
[puppet-dev.netapp.com]
type netapp
url https://admin:[email protected]/
#Connecting to the SVM “vserver01”
[vserver01.netapp.com]
type netapp
url https://vsadmin:MyP@[email protected]/vserver01
Writing Manifests at the Puppet Master
In this section, we create two manifest files (to highlight the differences) and import them in the site.pp
file at Puppet Master.
The vserver_create.pp manifest uses the netapp_vserver resource type and creates a new SVM
vserver02. We use the different attributes of the resource type to specify the option values (for
example, supported protocols, associated aggregates, the rootvol, and so on).
Note: netapp_vserver is a cluster-scoped resource type.
The following text depicts the SVM creation operation.
node “puppet-dev.netapp.com” {
netapp_vserver { ‘vserver02’ :
ensure => present,
allowedprotocols => “iscsi”,
rootvol => “rootdir”,
language => “c”,
rootvolsecstyle => “unix”,
rootvolaggr => “aggr02_node01”,
aggregatelist => [“aggr02_node01”]
}
}

29 Using Puppet to Manage NetApp Storage Infrastructure - Solution Deployment © 2015 NetApp, Inc. All Rights Reserved.
The volume_create.pp operation creates a volume vol2 and associates it with the SVM vserver01.
We use the different attributes of the resource type, such as initisize, exportpolicy,
unix_permissions, and so on, to specify the values for the options for vol2.
This is an SVM-scoped operation, and it uses the volume create command present in the volume
command directory.
The following text depicts the volume creation operation:
node ‘vserver01.localdomain’ {
netapp_volune {‘vol2’:
ensure => present,
initsize => “1g”,
state => “online”,
export_policy=> “exp_vserver01”,
unix_permissions => “rwxr-x,r-x”,
snapreserve => “0”
}
}
Triggering Automation from Puppet Agent
You can apply the configuration written in the manifests by running the Puppet Device application from
Puppet Agent. You can also add the optional flag verbose to trace the different tasks performed during
execution.
The following text depicts a sample output for the puppet device –-verbose operation.
[root@agent1 rack]# puppet device --verbose
Info: starting applying configuration to puppet-dev.netapp.com at https://puppet-
dev.netapp.com:443/
Info: Retrieving pluginfacts
Info: Retrieving plugin
Info: Caching catalog for puppet-dev.netapp.com
Info: Applying configuration version '1447770443'
Notice: /Stage[main]/Main/Node[puppet-dev.netapp.com]/Netapp_vserver[vserver02]/ensure: created
Notice: Finished catalog run in 11.66 seconds
Info: starting applying configuration to vserver01.netapp.com at
https://vserver01.netapp.com:443/vserver01
Info: Retrieving pluginfacts
Info: Retrieving plugin
Info: Caching catalog for vserver01.netapp.com
Info: Applying configuration version '1447770494'
Notice: /Stage[main]/Main/Node[vserver01.netapp.com]/Netapp_volume[vol2]/ensure: created
Notice: Finished catalog run in 12.30 seconds
6 Scaling Out
You can evaluate the robustness of a solution by analyzing its performance characteristics under high
workload conditions. Clustered Data ONTAP systems are deployed to serve storage in diverse use cases.
Some of these cases include deployment at both a local site and a remote site or deployment in a private
cloud. Such deployments might require the management of multiple clusters. Also, because SVMs are
also managed devices, you might need to manage multiple SVMs based on the storage policy for SVM
provisioning in a data center.
As the number of managed devices increases, the requests for storage management operations
increase. Therefore, a single Puppet Master and Puppet Agent deployment could become an SLA
bottleneck. An increase in requests might also make it difficult to maintain configuration logs for
troubleshooting.

30 Using Puppet to Manage NetApp Storage Infrastructure - Solution Deployment © 2015 NetApp, Inc. All Rights Reserved.
Puppet Master can be integrated to run in a webserver stack such as Apache plus Passenger or Unicorn
plus nginx. These web servers have been shown to work efficiently at high request rates. Therefore, an
increase in the number of Puppet Master deployments might not be necessary.
Because a single Puppet Agent acts as a proxy for multiple devices, the response rate might drop as the
number of devices increases. To address this situation, you might want to increase the number of Puppet
Agent deployments. This is where the decoupled nature of Puppet deployment and clustered Data
ONTAP storage is valuable. Increasing the number of Puppet Agents is hassle-free even for brownfield
deployments of Puppet used to manage NetApp storage.
After deploying Puppet Agent, you must edit the device configuration file to add or remove a managed
device. You can group multiple storage devices together in the form of zones based on policies such as
geographical proximity, SVMs that serve a single client, and so on. Each zone can be managed through a
different Puppet Agent. Figure 4 illustrates this ability.
Figure 4) Scaled-out Puppet deployment.
As is depicted in Figure 4, managed devices are categorized into different zones. Multiple instances of
Puppet Agent are deployed and manage these different zones. The orchestration of storage operations in
the cluster is distributed among different Puppet Agents, which decreases response time and avoids a
single point of failure.
7 Limitations
The NetApp Data ONTAP device module is an Apache 2–licensed module hosted on Puppet Forge. This
module charts a path for storage automation, decreases turnaround time, and increases infrastructure

31 Using Puppet to Manage NetApp Storage Infrastructure - Solution Deployment © 2015 NetApp, Inc. All Rights Reserved.
agility. While this module provides resource types for the most frequently used clustered Data ONTAP
storage OS operations, there are a few operations that are not currently supported by the module that
would make module function more comprehensive.
Functionality not currently supported at the time of this writing includes the following items:
Support for CIFS share operations
Operations for managing portset operations, such as portset-create and portset-add
Job schedule management operations
Operations such as snapmirror update
Note: Catalog application from Puppet Master might fail for the first time, citing resource not found. This problem arises because resources are defined in the module and therefore are not core Puppet resources. Feel free to report any other issues on the Puppet Labs issues page.
8 Conclusion
The ability of an IT department to adapt to changing business requirements plays a critical role in the
success of an enterprise. The integration of Puppet Labs with NetApp FAS devices creates a path for
storage automation in the data center. Integration also reveals opportunities for the management of
compute, network, and storage operations in the data center through a single manageability plane
supported by Puppet. The Puppet declarative model makes operations in a data center consistent, it
makes transitioning between different configurations more reliable, and it accelerates the provisioning of
resources. These processes provide an organization with exceptional operational agility and efficiency.
Common Troubleshooting
Certificates are critical for managed devices. To list all of the nodes that have certificates defined at the Puppet Master, run the following command:
puppet cert list –all
Note: The + symbol preceding the certificate name indicates that a certificate is not signed.
To sign the certificate manually using the HostName, run the following command:
puppet cert sign HostName
To sign all unsigned certificates, run the following command:
puppet cert sign –all
The autosign parameter in the Puppet configuration file can be set to true. However, this is not a
recommended practice because it might compromise security.
The presence of an old certificate at the master or node is a common problem with certificates. Old certificates prevent the node from being authenticated. To correct this problem, remove old certificates from the master and node. To do so, run the following command:
puppet cert clean HostName
HostName is the name of the host for which the certificate has been deleted. This command removes
certificates from the /var/lib/puppet/ssl directory. At the agent, delete the
/var/lib/puppet/ssl and /var/lib/puppet/devices/device_name directories.
Here, device_name refers to the name of the device managed by the proxy agent.
If Puppet Agent is not able to connect to the device, verify that you can connect to the device using its FQDN and verify that ports 443 (SSH) and 8140 (Puppet Master) are not blocked on Puppet Agent.

32 Using Puppet to Manage NetApp Storage Infrastructure - Solution Deployment © 2015 NetApp, Inc. All Rights Reserved.
Acknowledgements
The creation of this document has depended upon work, documentation, and assistance provided by
David Cain, Reference Architect with Converged Infrastructure Solutions at NetApp. I would also like to
thank Troy Mangum, Senior Manager of the Platform and Integration Group at NetApp, for allowing me to
explore the module and guiding me throughout the process.
References
This report references the following documents and resources:
Puppet module for FAS devices https://github.com/puppetlabs/puppetlabs-netapp
Data ONTAP guide http://mysupport.netapp.com/documentation/productlibrary/index.html?productID=30092
Puppet Device Management https://puppetlabs.com/blog/puppet-network-device-management
Puppet set up on Linux-based machines https://docs.puppetlabs.com/guides/passenger.html
Version History
Version Date Document Version History
Version 1.0 December 2015 Initial release

33 Using Puppet to Manage NetApp Storage Infrastructure - Solution Deployment © 2015 NetApp, Inc. All Rights Reserved.
Refer to the Interoperability Matrix Tool (IMT) on the NetApp Support site to validate that the exact
product and feature versions described in this document are supported for your specific environment.
The NetApp IMT defines the product components and versions that can be used to construct
configurations that are supported by NetApp. Specific results depend on each customer's installation in
accordance with published specifications.
Trademark Information
NetApp, the NetApp logo, Go Further, Faster, AltaVault, ASUP, AutoSupport, Campaign Express, Cloud
ONTAP, Clustered Data ONTAP, Customer Fitness, Data ONTAP, DataMotion, Fitness, Flash Accel,
Flash Cache, Flash Pool, FlashRay, FlexArray, FlexCache, FlexClone, FlexPod, FlexScale, FlexShare,
FlexVol, FPolicy, GetSuccessful, LockVault, Manage ONTAP, Mars, MetroCluster, MultiStore, NetApp
Insight, OnCommand, ONTAP, ONTAPI, RAID DP, RAID-TEC, SANtricity, SecureShare, Simplicity,
Simulate ONTAP, SnapCenter, Snap Creator, SnapCopy, SnapDrive, SnapIntegrator, SnapLock,
SnapManager, SnapMirror, SnapMover, SnapProtect, SnapRestore, Snapshot, SnapValidator,
SnapVault, StorageGRID, Tech OnTap, Unbound Cloud, WAFL, and other names are trademarks or
registered trademarks of NetApp Inc., in the United States and/or other countries. All other brands or
products are trademarks or registered trademarks of their respective holders and should be treated as
such. A current list of NetApp trademarks is available on the web at
http://www.netapp.com/us/legal/netapptmlist.aspx. TR-4477-DEPLOY-1215
Copyright Information
Copyright © 1994–2015 NetApp, Inc. All rights reserved. Printed in the U.S. No part of this document
covered by copyright may be reproduced in any form or by any means—graphic, electronic, or
mechanical, including photocopying, recording, taping, or storage in an electronic retrieval system—
without prior written permission of the copyright owner.
Software derived from copyrighted NetApp material is subject to the following license and disclaimer:
THIS SOFTWARE IS PROVIDED BY NETAPP "AS IS" AND WITHOUT ANY EXPRESS OR IMPLIED
WARRANTIES, INCLUDING, BUT NOT LIMITED TO, THE IMPLIED WARRANTIES OF
MERCHANTABILITY AND FITNESS FOR A PARTICULAR PURPOSE, WHICH ARE HEREBY
DISCLAIMED. IN NO EVENT SHALL NETAPP BE LIABLE FOR ANY DIRECT, INDIRECT,
INCIDENTAL, SPECIAL, EXEMPLARY, OR CONSEQUENTIAL DAMAGES (INCLUDING, BUT NOT
LIMITED TO, PROCUREMENT OF SUBSTITUTE GOODS OR SERVICES; LOSS OF USE, DATA, OR
PROFITS; OR BUSINESS INTERRUPTION) HOWEVER CAUSED AND ON ANY THEORY OF
LIABILITY, WHETHER IN CONTRACT, STRICT LIABILITY, OR TORT (INCLUDING NEGLIGENCE OR
OTHERWISE) ARISING IN ANY WAY OUT OF THE USE OF THIS SOFTWARE, EVEN IF ADVISED
OF THE POSSIBILITY OF SUCH DAMAGE.
NetApp reserves the right to change any products described herein at any time, and without notice.
NetApp assumes no responsibility or liability arising from the use of products described herein, except as
expressly agreed to in writing by NetApp. The use or purchase of this product does not convey a license
under any patent rights, trademark rights, or any other intellectual property rights of NetApp.
The product described in this manual may be protected by one or more U.S. patents, foreign patents, or
pending applications.
RESTRICTED RIGHTS LEGEND: Use, duplication, or disclosure by the government is subject to
restrictions as set forth in subparagraph (c)(1)(ii) of the Rights in Technical Data and Computer Software
clause at DFARS 252.277-7103 (October 1988) and FAR 52-227-19 (June 1987).