Embed Size (px)
Citation preview

Technical Manual Manual Técnico

E N G L IS H
TECHNICAL SERVICE MANUAL SCL - SC
MODELS:
SCL 400 - SC 400
SCL 600 - SC 600
SCL 1T - SC 1TN
SCL 2T - SC 2TN
SCL 3T - SC 3TN
SCL 5T - SC 5TN
SCL 10T - SC 10TN
SCL 15T - SC 15TN
TABLE OF CONTENTS
1. INTRODUCTION 4
Warnings 4
Overview 5
Wiring Diagram 6
2. SPECIFICATIONS 8
Production Tables 11
3. DELIVERY AND UNPACKING 13
4. INSTALLATION 13
Recommended Placement of Unit 13
Installation Procedure 14
5. OPERATION 14
Preliminary Checks 14
Starting up 14
Stop 15
6. MAINTENANCE AND CLEANING INSTRUCTIONS 15
7. TROUBLESHOOTING 16
3

E N G L IS H
CAREFULLY READ THE INSTRUCTIONS CONTAINED IN THIS MANUAL SINCE THEY PROVIDE IMPORTANT INFORMATION RELATIVE TO SAFETY DURING INSTALLATION, USE, AND MAINTENANCE.
THIS APPLIANCE SHOULD BE INSTALLED BY APPROVED TECHNICAL SERVICE PERSONNEL.
INTRODUCTION
Thank you for choosing SCL - SC Ice Maker. You have purchased one of the most reliable ice-making products on the market today. Carefully read the instructions contained in this manual since they provide important information relative to safety during installation, use, and maintenance.
1. Warnings
This appliance should be installed by approved Technical Service Personnel. This plug should be accessible at all times.
To reduce the risk of electrical shock, ALWAYS disconnect the machine BEFORE cleaning or maintaining the equipment. Do not attempt to install, service, or modify this machine. Improper use by other than specially trained technicians is extremely dangerous and may result in a fire or electric shock.
This machine should not be placed outdoors or exposed to rain.
Connect to drinking water mains.
This appliance is not intended for use by young children or infirm persons without supervision.
Young children should be supervised to ensure that they do not play with the appliance.
IMPORTANT!
DO NOT ATTEMPT TO SERVICE THIS MACHINE AS IT IS DANGEROUS AND COULD CAUSE SEVERE DAMAGE TO THE UNIT.
SERVICE SHOULD ONLY BE CARRIED OUT BY TRAINED, QUALIFIED PERSONNEL.
WE STRONGLY RECOMMEND USING ONLY ORIGINAL REPLACEMENT PARTS AVAILABLE FROM AN AUTHORIZED DISTRIBUTOR.
WASTE AND OTHER MATERIAL SHOULD BE DISPOSED OF ACCORDING TO LOCAL REGULATIONS AND PROCEDURES FOR WASTE DISPOSAL.
CLEANING AND MAINTENANCE ARE NOT COVERED BY THE WARRANTY.
4

E N G L IS H
2. Overview
Read this service manual carefully before installation, debugging and operation of this ice machine. This Service Manual gives an introduction of operation conditions, performance parameters, installation and debugging and operating procedures of SCL - SC ice machines.
The ice machine system is of vertical, internal ice scraping type.
The machine is equipped with an electric box with different protections and status lights, namely:
(1) Ice level (2) Water pressure (3) Normal operation of reducer’s electromotor (it uses a speed driver) (4) Low and high pressure switch (compact models) (5) Water pump on/off (6) Unit on/off
In addition, an alert indicator lights up to indicate the cause of stoppage, thus facilitates the trouble shooting and maintenance.
5

E N G L IS H
3. Wiring Diagram
COMPACT SCL - SC
6

E N G L IS H
COMPACT SCL - SC with V/f driver

E N G L IS H
SCL SPLIT - SC SPLIT
E N G L IS H 7
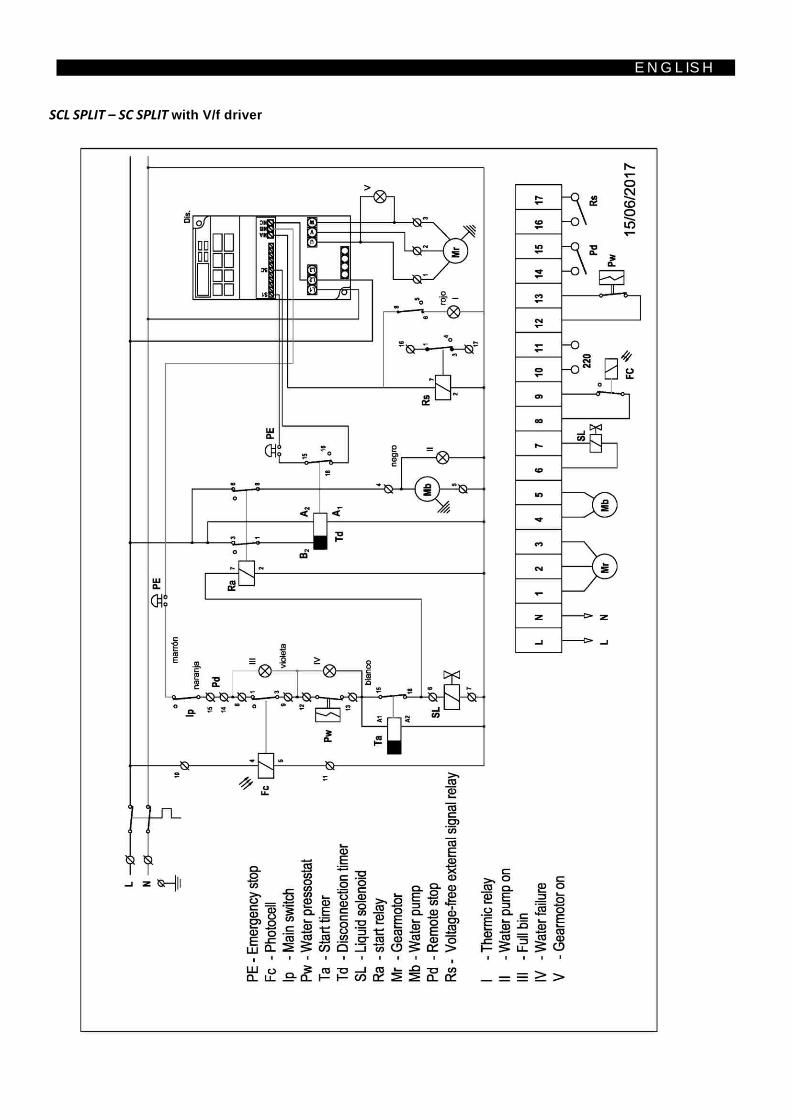
SCL SPLIT – SC SPLIT with V/f driver

E N G L IS H
SPECIFICATIONS
SCL 400 - SC4 00 / SCL 600 - SC 600
MODEL 400 600
PRODUCTION 0,4T 0,6T
REFRIGERANT R449A
POWER 1425W 2350W
AMBIENT TEMPERATURE 25oC
WATER TEMPERATURE 16oC
WATER CONSUMPTION 17 L/H 25 L/H
WATER INLET 3/4 GAS
DRAIN 21mm
ELECTRICAL REQUIREMENTS 380/50Hz/3N
DIMENSIONS 1090x700x720 1250x750x820
WEIGHT 180 290
DIMENSION OF ICE OUTLET 326mm
8

E N G L IS H
SCL 1T - SC 1TN / SCL 2T - SC 2TN / SCL 3T - SC 3TN
Pipe connection diagram and installation measurement and size of ice outlet of 1-3-ton ice-maker.
PIPE CONNECTION PIPE CONNECTION
DIMENSIONS OF ICE OUTLE
MODEL A B C D E L W H Ø
SCL 1T - SC 1TN 150 750 198 490 310 1050 850 870 480
SCL 2T - SC 2TN 150 750 198 490 310 1050 850 1080 480
SCL 3T - SC 3TN 150 750 198 490 310 1050 850 1300 480
9

E N
G L
I S H
Pipe connection diagram and installation measurement and size of ice outlet of 5-ton and above ice-maker.
PIPE CONNECTION PIPE CONNECTION DIMENSIONS OF ICE OUTLE
MODEL A B C D E F G H I J L M Ø
SCL 5T - SC 5TN 1850 1150 1000±1 250 1050±1 50 775 575 1100 950 650 150 900
SCL 10T - SC10TN 1850 1150 1000±1 250 1050±1 50 775 575 1600 1500 650 150 900
SCL 15T - SC 15TN 2510 1800 1230±1 285 1700±1 50 900 900 2200 1950 960 250 1580
SCL 20T - SC 20TN 2510 1800 1230±1 285 1700±1 50 900 900 2400 2250 960 250 1580
SCL 25T - SC 25TN 2510 1800 1230±1 285 1700±1 50 900 900 2600 2450 960 250 1580
SCL 30T - SC 30TN 2835 2135 1514±1 280 2035±1 50 1067.5 1067.5 2700 2550 1150 250 1915
SCL 35T - SC 35TN 2835 2135 1514±1 280 2035±1 50 1067.5 1067.5 3200 3050 1150 250 1915

1. Production Tables
SCL 400 - SC 400
Ta/Tw 5 10 15 20 26 32 38
10 460 450 440 410 360 340 300
25 420 410 400 370 330 290 250
30 350 340 330 300 260 200 200
38 320 310 290 260 220 180 150
SCL 600 - SC 600
Ta/Tw 5 10 15 20 26 32 38
10 680 670 640 610 560 550 500
25 640 610 600 580 550 530 510
30 560 540 530 500 480 460 450
38 500 490 480 460 440 430 400
SCL 1T - SC 1TN
Ta/Tw 5 10 15 20 26 32 38
10 1200 1100 1050 1000 900 830 750
25 1100 1000 950 900 850 780 690
30 900 950 850 800 680 600 580
38 880 850 780 700 620 580 500
SCL 2T - SC 2TN
Ta/Tw 5 10 15 20 26 32 38
10 2350 2300 2100 1900 1800 1700 1500
25 2200 2100 1900 1850 1700 1500 1300
30 1900 1800 1650 1500 1300 1200 1100
38 1700 1650 1600 1400 1250 1000 900
11

E N G L IS H
SCL 3T - SC 3TN
Ta/Tw 5 10 15 20 26 32 38
10 3400 3300 3200 3000 2700 2500 2200
25 3300 3200 3000 2800 2500 2300 2000
30 2900 2700 2500 2300 2000 1800 1700
38 2600 2500 2400 2100 1900 1700 1580
SCL 5T - SC 5TN
Ta/Tw 5 10 15 20 26 32 38
10 5600 5500 5200 5000 4600 4200 3800
25 5400 5300 5000 4600 4300 3900 3400
30 4900 4600 4300 3900 3400 3000 2900
38 4400 4300 4000 3600 3200 2900 2500
SCL 10T - SC 10TN
Ta/Tw 5 10 15 20 26 32 38
10 11500 11200 10900 10000 9000 8300 7500
25 10900 10700 10000 9200 8500 7800 6900
30 9900 9000 8500 7900 7800 6000 5500
38 8700 8500 8000 7100 6300 5900 5700
12

E N G L IS H
DELIVERY AND UNPACKING
Upon receipt, thoroughly inspect the packing container. If there appears to be damage to the container contact the shipper immediately. Unpack unit in the presence of delivery personnel noting any damage on the waybill. ITV packing bears the “Green Point” on all models according to the European Directives on management of Packaging and Waste Disposal.
Be sure to include model name and serial number on all claims. Serial number is located in the following three places:
1) Packing There is a label stuck onto the cardboard packing bearing this serial number (1).
2) Machine body On the back of the machine (1).
3) Machine body Located at the back of the machine, rating plate.
Verify that the installation KIT is inside the bin, and has the following pieces: . 3/4’ water hose, two small filters and user manual. . Dischareg hose.
(1)
WARNING: DO NOT LEAVE PACKING MATERIALS (PLASTIC BAGS, CARDBOARD BOXES, ETC.) WITHIN REACH OF CHILDREN.
INSTALLATION
1. Recommended Placement of Unit
Sockets and wiring must comply with local standards for electrical appliances and requirements set forth on the rating plate of the machine.
Air switch must be installed within an immediate touch and shall be chose in line with the current of various types of machines, and earth wires shall be installed in assigned position on the baseboard or in the electric case according to relevant standards.
Continual water supply shall be guaranteed for the machine (Pressure is at 1.5 to 6 Bar) and water supply switch shall be mounted near the ice machine. Inlet pipeline shall be of independent type and drainage outlet shall be also not far from the ice machine. Two separate water drainage pipelines shall be required for draining the ice machine and the ice storage bin.
The ice machine shall not be placed in an airproof environment, next to heat sources, or outdoors.
To ensure ice quality, personnel responsible for installation shall be consulted about whether or not water filter or processor shall be installed according to user’s local water-quality conditions.
13

E N G L IS H
2. Installation procedure
The ice-maker shall be lifted using the four shackles fixed on its base plate (for small-sized machine) or on its top (for large-sized machine) and shall be laid down slowly on the support or ice storage bin that has been put in place. For large-sized ice-maker, the correct steel cable lifting is as shown in this figure.
CORRECT LIFTING WRONG LIFTING
OPERATION
1. Preliminary Checks
a) Is machine levelled? b) Are voltage and frequency of mains supply the same as indicated on rating plate? c) Is drainage system working properly?
Minimum value Maximum value
Ambient temperature 5º 40º
Water temperature 5º 35º
Water pressure 1,5kg/cm2 5kg/cm2
Desviation from voltage rating -10% 6%
NOTE: To install a pressure reducer If water inlet pressure is more than 6 Bar.
ATENTION: Check that voltage and mains frequency is the same as in the rating plate.
2. Starting up
Open feed water valve and fill up the water tank, and the floating valve automatically closes when water level reaches the spillover port.
During trial operation, pneumatic mains switch (K1) shall be turned to “ON”, then the power indicator on the panel of electrical box (see Figure 5). Switch on the Start/Stop button on the electrical cabinet to enable the ice-maker to enter a 3-minute-delay state (indicator of Start Delay blinks) which is followed by the automatic start of gear box and water pump by the control system, and then the machine goes into operation. Observation shall be conducted at this time to verify that (1) ice blade is rotating in correct direction or the shaft and rotation is in normal status; (2) water dispensing disc is aligned with the red mark and water-dispensing pipes have normal output. In case above-stated items are all in normal operation, the Start/Stop button shall be switched off to stop the ice machine. (3) Ice production stage: Start refrigeration system and open return air valve and Freon feed valve.
14

E N G L IS H
3. Stop
When the “Start/Stop” button is switched off, water pump and solenoid valve stop working immediately, and the gear box stops working too after a 3-minute delay so as to remove the ice left on the interior of the vaporization cylinder. Now the pneumatic switch shall not be turned off before being delayed for 3 minutes.
Stoppage due to alarm Stoppage due to ice full level alarm (normal stop): When microprocessor of computer’s main board detects full level of ice storage tank, the programmed process of ice full level shall be implemented: water pump and solenoid valves stop first, and then gear box motor stops after 3-minute delay and ice full level indicator turns on at the same time. Now the system is in stand-by mode. After ice is discharged, the system automatically restore to normal operating status: gear box motor, water pump and solenoid valve will be started in sequence.
IMPORTANT! ADVISE THE FINAL USER ON MAINTENANCE PROCEDURES WHICH ARE NOT INCLUDED IN WARRANTY, AS WELL AS THOSE BREAKDOWNS CAUSED BY NEGLECT OF PROPER MAINTENANCE PROCEDURES.
MAINTENANCE AND CLEANING INSTRUCTIONS
IMPORTANT!
**Maintenance and cleaning procedures as well as problems derived from failing to carry them out are not covered by the warranty. Proper maintenance is essential to obtain favourable ice quality and optimum functioning of unit. Frequency depends on water quality and characteristics of room where unit is installed. ** Maintenance/cleaning procedures should take place at least once every six months. If concentration of air pollutants is high,
complete procedures on a monthly basis.
Important Maintenance for Removable Electromagnetic Valve (See Figure9 and Figure10)
1. During the preliminary stage of ice production (Approx one-week or one month), cleaning for Electromagnetic valve shall be carried out by well-trained (or professional) maintenance staff to avoid solenoid core, fore-guide valve hole and piston from being block or stuck. Before dismantling and cleaning the solenoid’s pipeline, the refrigerant in it shall be completely discharged. 2. Tap water quality shall be guaranteed and periodic cleaning shall be carried out for water tank and feed water pipelines to ensure smooth access of water system, and all pipe fittings shall be free of leak. 3. Regular inspection shall be carried on the level of water dispensing pan, which shall be in line with the red mark, and can be regulated by the water valve beside the water dispersing pan, and on the status of water outflow to prevent water from dripping into ice storage tank or ice conveying system. 4. Regular inspection shall be conducted on the connections to verify they are not loose or dummy connections, and earth wire is fixed, insulation of electrical parts not damaged. 5. Frequent inspection on refrigeration pipelines and valves shall be conducted to identify their leakages and loosing or leaking at flange fittings. 6. Good housekeeping shall be maintained for main parts of ice machine like gear box and control cabinet 7. Regular inspection on ice blade spacing shall be conducted. Too big spacing between ice blades will affect the removal of ice. 8. Lube oil for gear box shall be checked and changed on a regular basis 9. Maintenance and use of valves. Regular application of rustproof oil shall be carried out on surface of valve rod and lock nuts to ensure smooth diverting and keep valve rod and seal free of damag.
15

E N G L IS H
TROUBLESHOOTING
Fault Description
Possible Causes
Recommendations
Machine inactive
(1) Power indicator not on
(2) Ice full level indicator on
(3) low water level indicator on
Main switch is set to OFF position Knob selector need to be set to ON position
Connection wire get loosened
Check the wiring
Malfunction of ice level control assembly Clean or replace ice level control assembly
Blocked filters Please refer to recommendations for low water level alarm
Low water pressure
Clean or replace filters
Ice production decreases
Regulation valve partially blocked or improperly adjusted
Adjust or replace float valve
Low water level of water bin
Adjust float valve to set water level
Insufficient feed of refrigerant
Identify gas leakage and make a refrigerant load
Ice machine in operation but no ice produced
No water production
in water cylinder for ice Check water pump operation or replace it
Gear box motor gets stuck
Check or replace it
Noise of gear box is too high
Gear box damaged or leaks lubrication oil
Check or replace it
Gear box’s bearing and teeth get worn out

87