Embed Size (px)
Citation preview

Subject: New TIS2Web feature; Techline Data Service (TDS)
GM Customer Care and Aftersales (CCA) recognizes the increase in data size related to vehicle software
files. For the past couple of years, Infotainment software has been distributed to dealerships via DVD
and USB due to the large size of files. Feedback from dealership personnel and the call center indicates
the media is often misplaced or damaged. As well, handling the media can be time consuming. Going
forward, the trend shows the number and size of Infotainment files will continue to increase over time.
An alternative method to move large files from a central server to the dealership has been developed
and eliminates the need for service department personnel to handle other media. This new method will
ultimately replace the distribution of DVDs and USBs.
The new application is referred to as “Techline Data Service” (TDS). In short, the application can be
configured to slowly trickle software files to a dedicated in-dealership computer during hours
designated through the applications configuration, including non-business hours. Other Techline
computers in the service department access the files from the dedicated PC.
Recommendation to get started:
• Desktop computer that can stay powered on to receive files
• Windows 7 Professional, 64 bit operating system
• 500GB of hard drive space
• 4GB RAM
Detailed documentation has been developed and is attached to this communication.
• Quick Install Guide, server and client (page 1)
• Detailed Installation Guide
o Server (page 2-14)
o Client (page 15-21)
• Configuration and User Guide (page 22-29)
• Troubleshooting (page 30-33)
Initially, downloading TDS is optional. However, having the large files at the dealership in advance of
needing the software saves valuable time. The benefit of time savings includes the transfer of software
files to the vehicle. Declining to use the new TDS application has drawbacks. Continuing to use the
current method of waiting to download the files when needed is not optimal. As file sizes increase, so
will the time to download files from the central server.
Over the next few months additional communications will be distributed to support this activity. In the
meantime, if you have questions, please contact the Techline Customer Support Center (TCSC) at 1-800-
828-6860.
Thank you.
Techline Brand Quality Manager

V15.12.4
1
The following quick guides cover the bare essentials for setting up the Techline Data Service. A highly detailed install
procedure can be found in the next section of this document.
SERVER INSTALL QUICK GUIDE 1. Designate ONE computer in the shop to be the “server” that will download files for all the other
shop computers to use.
2. On that computer open the TDS tab in TIS2Web and click the “Start TDS Installation” button.
3. Use all default settings for the install.
4. While the Techline Data Service installation is loading, if a “Windows Security Alert” appears
check all check boxes then click the “Allow access” button.
5. Once the installation has completed a window titled “Techline Cache (TLC) Administration” will
appear. Take note of what value the “TDS Server (Share):” option shows. This value will be used
during the install on the “client” computers.
6. Close the “Techline Cache (TLC) Administration” window. The server setup is now complete.
CLIENT INSTALL QUICK GUIDE 1. Start SPS from TIS2Web.
2. While the SPS startup procedure is loading, if a “Windows Security Alert” appears check all
check boxes then click the “Allow access” button.
3. Once SPS has launched close the SPS window.
4. Click the “GM Techline Cache” icon , located in the system tray or notification area near the
clock on the computer, to open the Techline Cache TLC Administration application.
5. Once the “Techline Cache (TLC) Administration” window has opened verify that the “TDS Server
(Share):” is the same as the value reported on the “server” computer.
6. If the “client” and “server” computers both have the same value for “TDS Server (Share):”
Techline Data Service installation is complete. The “Techline Cache (TLC) Administration”
window can now be closed.
7. Repeat the Client Install Quick Guide for all computers that need access to the TDS server.
If the value of the “TDS Server (Share):” on the “client” computer does not match the value on the
“server” computer, see the troubleshooting section located in the last section of this document.

V15.12.4
2
TechlineDataServiceInstallationGuideThis guide is broken down into two sections, a “Server Installation” section and a “Client Installation”
section. The “server” should be a computer that will be always on in order to download large update
files during user specified hours. The client computer(s) will then be setup to access the update files
stored on the “server” computer.
Note: if the installation prompts for proxy information, the IT personnel in charge of the network
will need to supply the requested proxy information.
V15.12.4
3
I) Server Installation
1) Designate one computer in the shop to act as the Techline Data Service server. It is
recommended that this installation be performed on only one computer on the network. The
computer that will be setup as the server should meet the following criteria:
i) Operating system should be Windows Vista Business or Windows 7 Professional.
ii) File and Printer Sharing should be turned on. This can be verified in the Windows Control
Panel under “Network and Sharing Center -> Change advanced sharing settings”.
The installation procedure will automatically setup a shared directory. The server will store
downloaded information in this directory and client computers will access this data as needed.
2) Logon to TIS2Web.
The logon procedure will not be discussed in this guide, it is assumed that the reader will either
already know how to logon or will be following logon instructions from elsewhere.
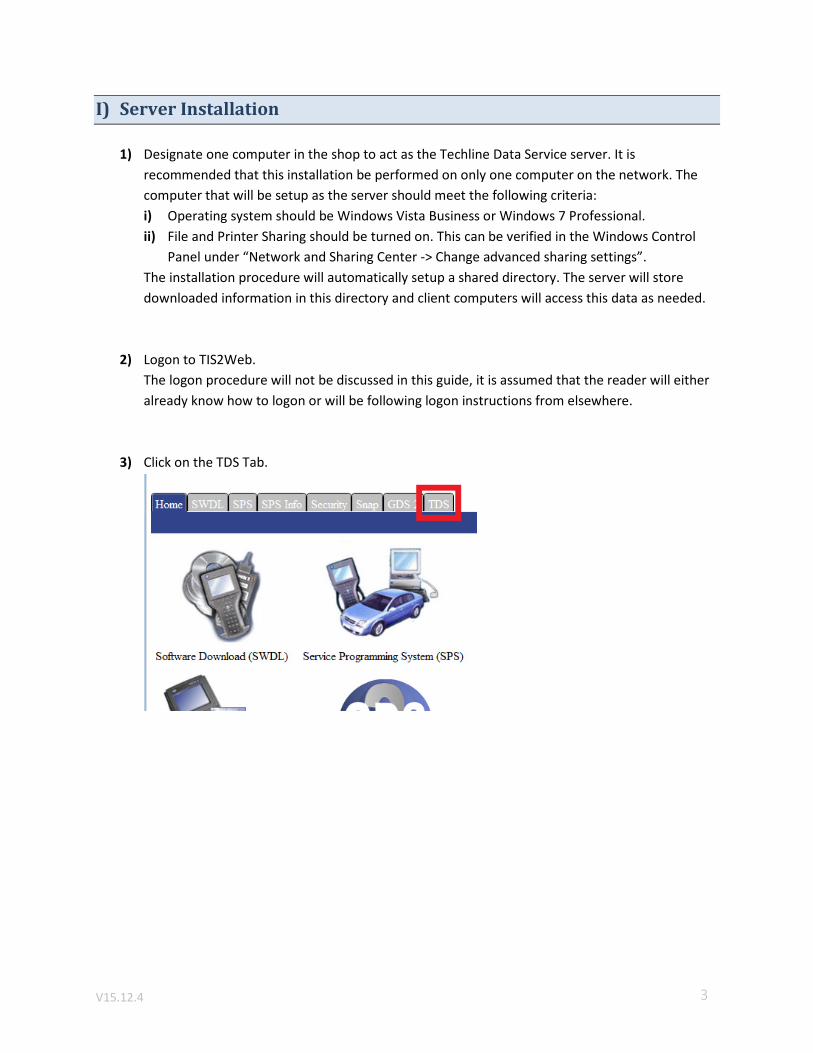
3) Click on the TDS Tab.
V15.12.4
4
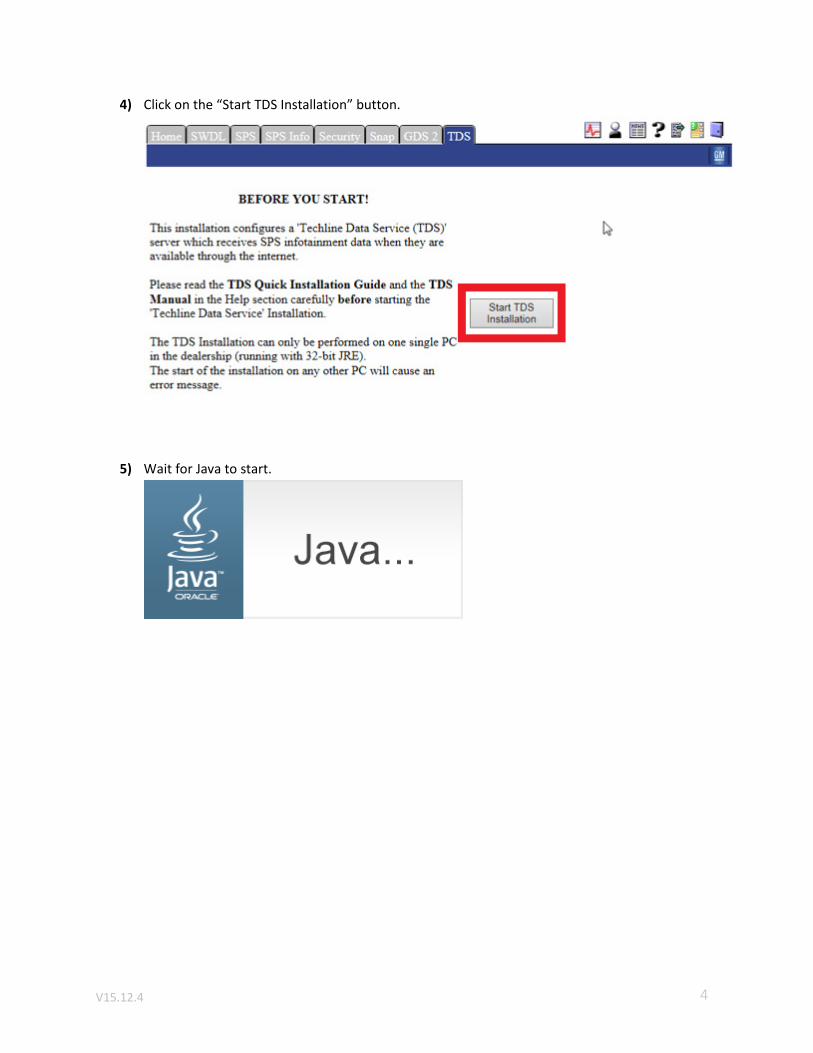
4) Click on the “Start TDS Installation” button.
5) Wait for Java to start.

V15.12.4
5
6) During the process of “Starting application…” click on any “Run” or “Install” buttons that may
appear. Depending on the state of the computer, the “Starting application…” process may finish
without the additional prompts appearing.

V15.12.4
6
7) Wait for the “M6445: Installing newest version of ‘Techline Cache (TLC) Administration’” to
finish.
8) During the next step, a “Windows Security Alert” may pop up. Make sure all check boxes are
checked (there are two in the example below, but there could be more depending on the
computer’s settings). Then click the “Allow access” button.
If the Windows Firewall is not enabled or is not setup to prompt when a new program is being
blocked this prompt will not appear, continue to the next step.

V15.12.4
7
9) Wait for the install to finish checking for any existing TDS servers on the network.
10) Wait for the “M6305: Installing newest version of ‘TIS2Web Maintenance Service’” to finish.
11) While waiting for the “M6741: Installing newest version of ‘TIS2Web Techline Data Service
(TDS)’” progress to finish the “InstallAnywhere” window will popup. Wait for both the “M6741”
and “InstallAnywhere” windows to finish.

V15.12.4
8
12) Wait for the software installation window to appear. Select the appropriate language and click
“OK” on this window.
13) Wait for the installer startup progress to complete.
V15.12.4
9
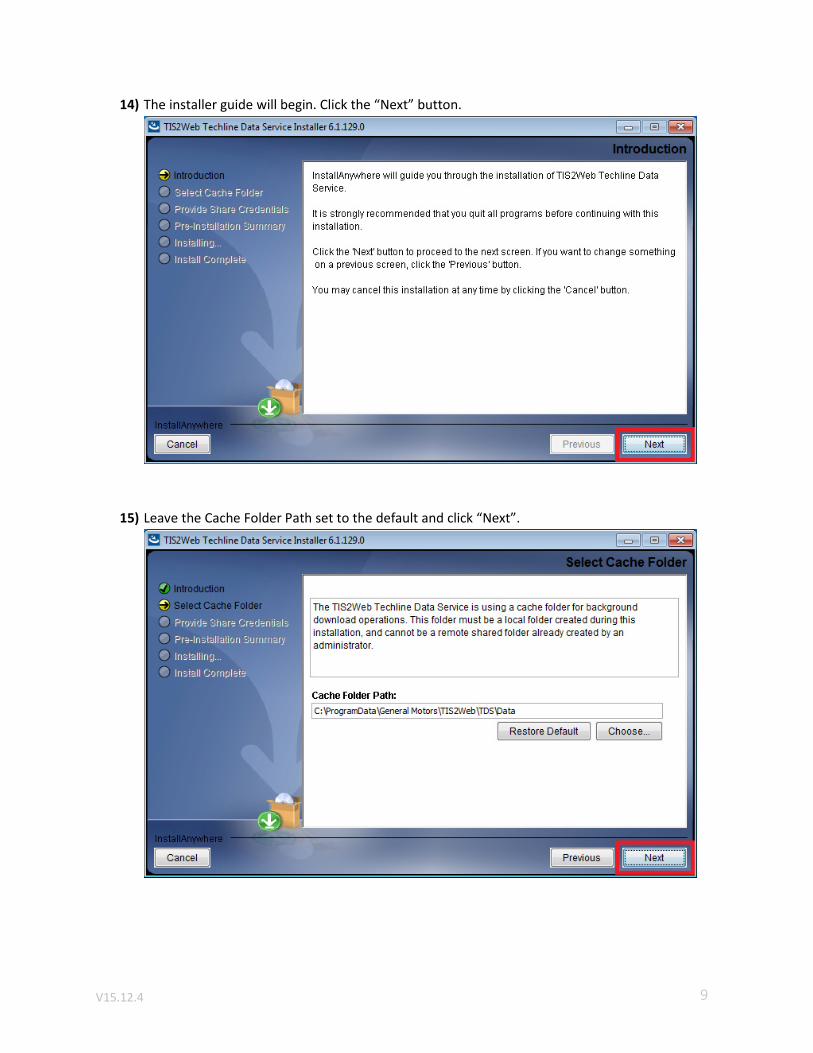
14) The installer guide will begin. Click the “Next” button.
15) Leave the Cache Folder Path set to the default and click “Next”.

V15.12.4
10
16) A progress bar will pop up briefly while the installer determines if the necessary ports are open
on the computer, this will automatically continue to the next screen, no action is required.
17) Once the installer has finished determining the configuration options, a prompt will appear that
shows the configuration options that will be used for the install. Click “Install”.

V15.12.4
11
18) Wait for the progress screen to complete.
19) Click “Done”

V15.12.4
12
20) The message “M6743: Finished! (TIS2Web Techline Data Service (TDS) is installed and running)”
will pop up after the installation has completed. This popup window may pop up behind other
windows, so it may be necessary to minimize other windows to find this popup. If the popup
does not appear, please wait at least one minute while the newly installed Techline Data Service
starts on the computer. The popup should appear after the Techline Data Service has been
successfully started.
Click “OK”

V15.12.4
13
21) Wait for the Techline Cache (TLC) Administration window to appear. Depending on the
computer this may take a minute for the window to appear. Take note of what value the “TDS
Server (Share):” option shows. This value will be used during the install on the “client”
computer.
This window can be closed at this time, the configuration options on this window will be
covered in the Techline Data Service Configuration and User Guide.

V15.12.4
14
Now that the “server” computer has been setup, continue to setup the “client” computer(s) covered in
the next section of this guide.

V15.12.4
15
II) Client Installation
1) Logon to TIS2Web.
2) Click the SPS Tab or Icon.
3) Click the “Start SPS” button.

V15.12.4
16
4) Wait for Java to load.
5) During the process of “Starting application…” click on any “Run” or “Install” buttons that may
appear. Depending on the state of the computer, the “Starting application…” process may finish
without the additional prompts appearing.

V15.12.4
17
6) During the next step, a “Windows Security Alert” may pop up. Make sure all check boxes are
checked (there are two in the example below, but there could be more depending on the
computer’s settings). Then click the “Allow access” button.
If the Windows Firewall is not enabled or is not setup to prompt when a new program is being
blocked this prompt will not appear, continue to the next step.
7) Wait for the progress popups to complete.
There will be a few of progress popups which may take a couple minutes each to complete
(depending on network/internet connection speed).

V15.12.4
18
8) If the latest versions of MDI and/or Tech2 drivers are not installed a prompt will appear asking
to install the latest version of each driver. The installation of these drivers will not be covered in
this guide.
9) The “Downloading native libraries archive” progress window may appear. If the libraries are
already up to date this window will not appear.
V15.12.4
19
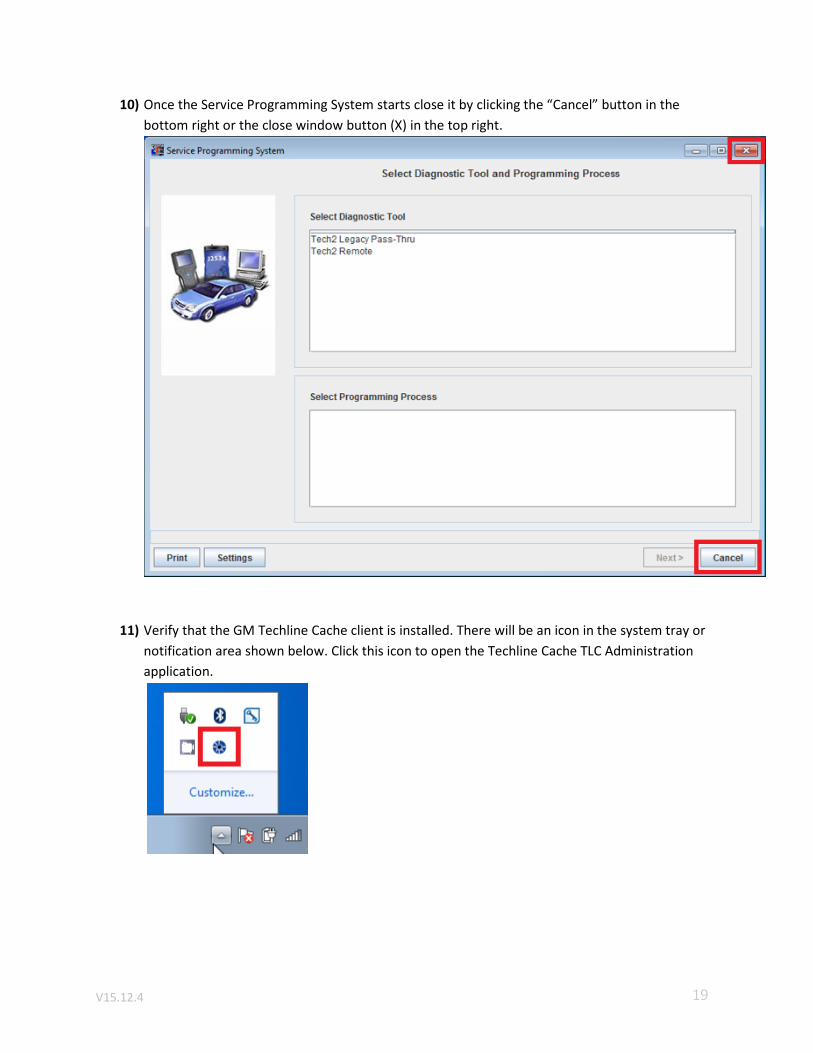
10) Once the Service Programming System starts close it by clicking the “Cancel” button in the
bottom right or the close window button (X) in the top right.
11) Verify that the GM Techline Cache client is installed. There will be an icon in the system tray or
notification area shown below. Click this icon to open the Techline Cache TLC Administration
application.

V15.12.4
20
12) To verify that the client has connected to the server, the “TDS Server (Share)” should be the
same as the “TDS Server (Share)” found on the TDS server.
This window can be closed at this time, the configuration options on this window will be
covered in the Techline Data Service Configuration and User Guide.
V15.12.4
21
At this point the Techline Data Service setup is complete and ready to use.
To learn more about configuration and usage options continue on to the “Techline Data Service
Configuration and User Guide”.
V15.12.4
22
TechlineDataServiceConfigurationand
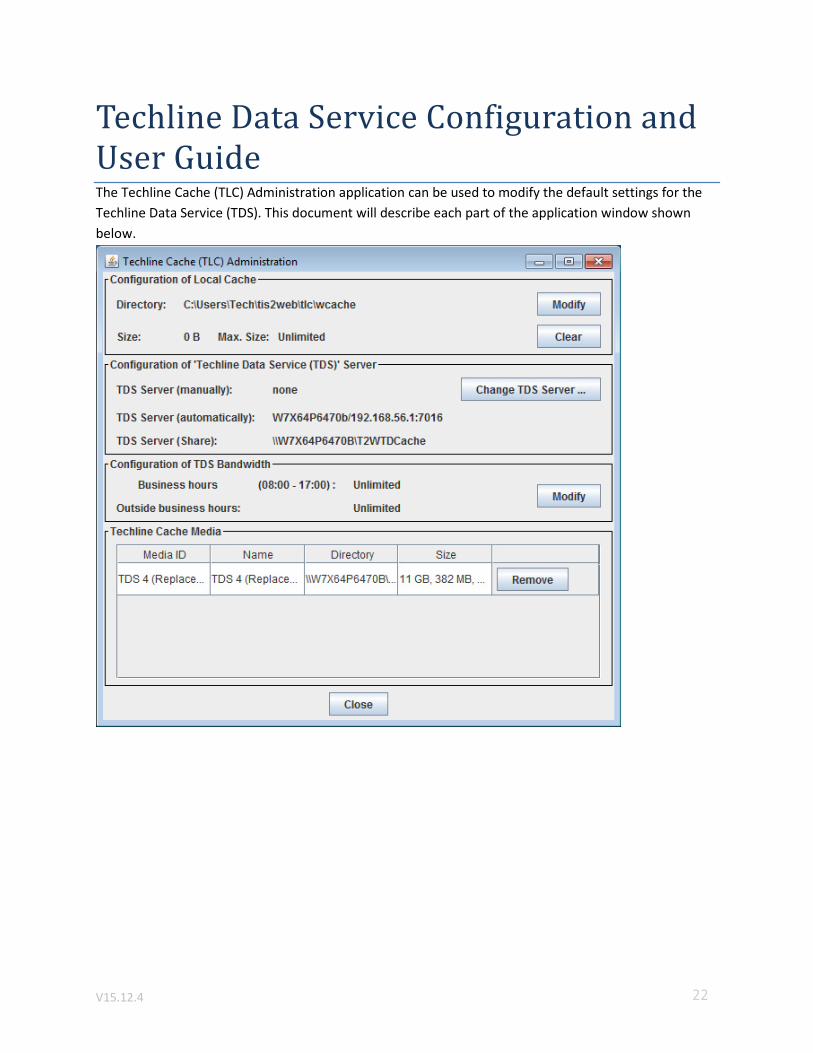
UserGuideThe Techline Cache (TLC) Administration application can be used to modify the default settings for the
Techline Data Service (TDS). This document will describe each part of the application window shown
below.

V15.12.4
23
III) Configuration of Local Cache
The local cache is not shared by the TDS server and is only used by Service Programming System
(SPS) to store files that are downloaded during normal programming events. For the purpose of this
guide, a normal programming event is where a program is delivered to a vehicle through a tool, such
as the MDI or Tech2, and does not require data transfer using a USB drive or any other media. Each
computer, including client/non TDS server computers and the TDS server, has its own Local Cache
used by SPS.
Directory
- Shows the location where SPS downloads files to.

V15.12.4
24
“Modify” button
- Used to change the directory where SPS will store downloaded files.
- Used to set the Max. Size of hard drive space allowed for SPS to store downloaded files.
Size
- Shows the current total size of all files that have been downloaded by SPS.
Max. Size
- Shows the current limit of hard drive space SPS will be allowed for storing files.
“Clear” button
- Used to clear all files that have been previously downloaded by SPS. The Clear button is
primarily used during troubleshooting of certain SPS programming errors, and does not
delete the files downloaded by TDS. Deleting the Techline Cache Media files, which TDS
downloads, will be covered later.

V15.12.4
25
IV) Configuration of ‘Techline Data Service (TDS) Server
This section of the Techline Cache (TLC) Administration window shows information about the TDS
server that the client is connected to and also allows the user to manually set the TDS server that
the client should connect to.

V15.12.4
26
TDS Server (manually)
- Shows the manually set location of the TDS server. If automatic detection of the TDS
server is working this option should be left as none.
“Set server location” button
- If the client computer does not automatically connect to the TDS server this button can
be used to set TDS server that the client will connect to.
TDS Server (automatically)
- Shows the automatically discovered TDS server name/IP address and port.
TDS Server (Share)
- Shows the path to the shared cache directory on the TDS sever.

V15.12.4
27
V) Configuration of TDS Bandwidth
The Configuration of TDS Bandwidth section allows the user to configure how much Bandwidth the
TDS server is allow to use during and outside of user defined business hours.

V15.12.4
28
Business hours
- Shows the currently defined business hours and the bandwidth usage allowed during
these hours.
Outside business hours
- Represents any hours that do not fall into the defined business hours and shows the
bandwidth usage allowed during these hours.
“Modify” button
- Used to define business hours and the amount of bandwidth TDS is allowed to use during
business hours and outside of business hours.

V15.12.4
29
VI) Techline Media Cache
This section shows the media files that have been downloaded by TDS. Each file will be listed
with its Media ID, Name of the file, Directory where the file is stored, and Size of the file. There
is also a “Remove” button that will be shown next to each file in the list, which will allow for
removal of that file from the list and from the computer’s hard drive.

V15.12.4
30
TechlineDataServiceTroubleshooting
In some cases the “client” computers will not connect to the “server” computer. The “TDS Server
(Share)” will show “n/a” or some other unexpected value. This guide will cover some of the most
common issues that may be encountered when attempting to connect a “client” computer to the
Techline Data Service server.
V15.12.4
31
VII) Network Configuration
The TDS server must be on the same network as the client computers that are trying to connect to it.
For example, if the “server” computer is on the shop network and a “client” laptop is connected to a
guest or customer network the “client” will not be able to connect to the “server”
VIII) Firewall Configuration
To allow client computers to connect to the Techline Data Service “server” it may be necessary to add
an exception to the firewall on the “server” computer. Because there are many different firewall
solutions available this process will not be covered in detail, instead please consult with your IT
personnel and provide the following information to them.
The program that needs to be allowed access through the firewall is the “tds.exe” program.
For 64-bit versions of Windows this program will be found in
“C:\Program Files (x86)\General Motors\TIS2Web\TDS”.
For 32-bit versions of Windows this program will be found in
“C:\Program Files\General Motors\TIS2Web\TDS”.
IX) File and Sharing Settings
Another scenario where the “client” computers are unable to read the data from the TDS “server”
would be permissions of the shared folder on the TDS “server” are not configured to allow the “client”
computers sufficient access. By default this shared folder is located at “C:\ProgramData\General
Motors\Tis2web\TDS” on the “server” computer.
When TDS is installed these permissions should be set by automatically the installer. Follow the steps
below to change the access permission level of the shared folder, if needed.
V15.12.4
32
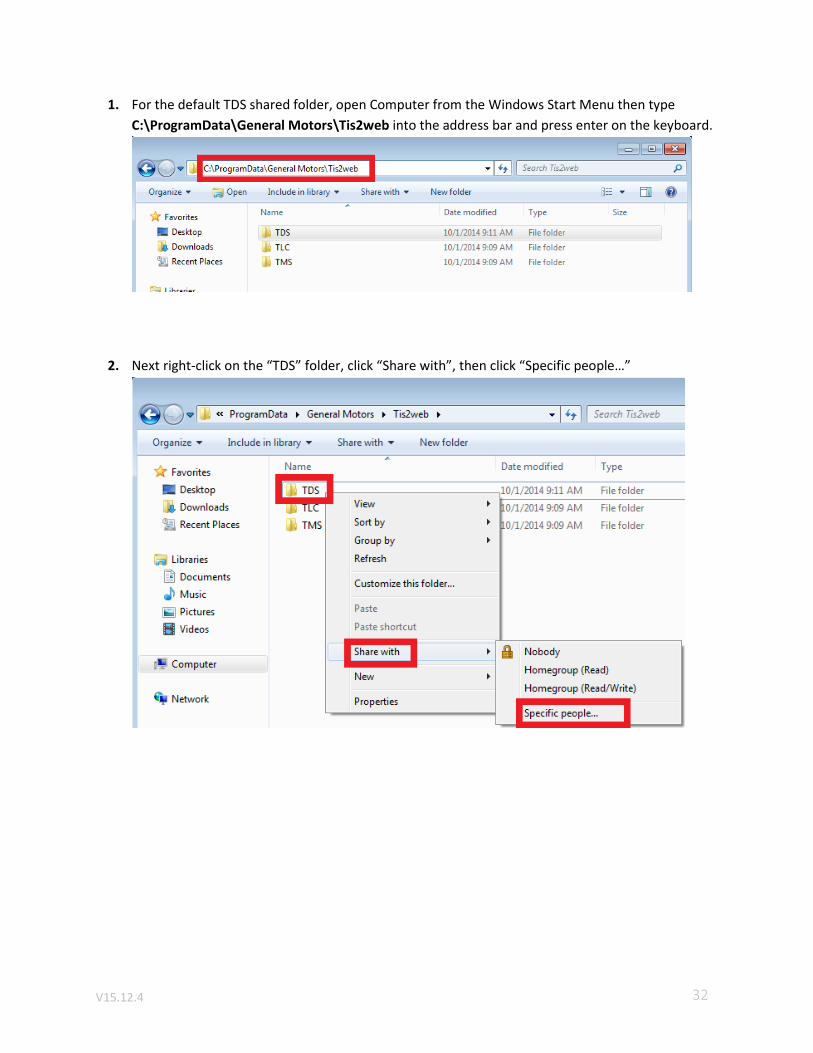
1. For the default TDS shared folder, open Computer from the Windows Start Menu then type
C:\ProgramData\General Motors\Tis2web into the address bar and press enter on the keyboard.
2. Next right-click on the “TDS” folder, click “Share with”, then click “Specific people…”

V15.12.4
33
3. Select “Everyone” from the dropdown, then click the “Add” button.
4. Ensure “Permission Level” is set to “Read” for “Everyone” then click the “Share” button.