Embed Size (px)
Citation preview
Association of Canadian Mountain GuidesProtecting the public interest in mountain travelASSO
CIAT
ION
OF CANADIAN MOUNTAIN
GUIDES
MC GATechFiles
In This Issue
TechFilesWelcome To The Inaugural Issue OfAs many of you are aware, the ACMG is un-dertaking a rewrite of the Technical Hand-books. When the ACMG developed the original handbook it was one of the first and best in class. It was followed by quality handbooks for Climbing Gym Instructors and Hiking Guides. It is time the ACMG moved to the forefront again by creating a manual that takes advan-tage of new technology and delivery systems, and speaks to a new generation of guides and instructors.
Single Online Manual• One manual would cover skills for all ACMG
certification streams (Mountain Guide, Hik-ing Guide and Climbing Instructor)
• It will include technical as well as core skills (client care, instruction technique, risk management etc.)
• Combining skills from all streams will help promote consistency, flow and sharing
Inaugural Issue ...... 1
Fixed-Point Anchors 4
Auto Braking ........... 7
Belay Devices ........ 10
Snow Anchors ........ 11
Videos .................... 14
Key Concepts• Develop a manual using digital formats
such as ePub and PDF• Combine traditional content of written
word, photos and illustrations with rich me-dia such as video and interactive elements
• Publish to the website and other media sources as soon as an ‘article’ is finished. In other words rather than waiting for the whole manual to be completed, sections would be published as soon as they are written and approved
• Members can review and comment before final publishing of the manual in its com-plete form
Continued on the next page
Volume 1 Number 1
Technical EditorMarc Piché
Editorial Consultant Peter Tucker
Design and Layout Chris Miller
Assistant Alpine Exam on Surfs Up, Bugaboos Photo: Marc Piché
Association of Canadian Mountain GuidesProtecting the public interest in mountain travelASSO
CIAT
ION
OF CANADIAN MOUNTAIN
GUIDES
MC GA 2
TechFiles
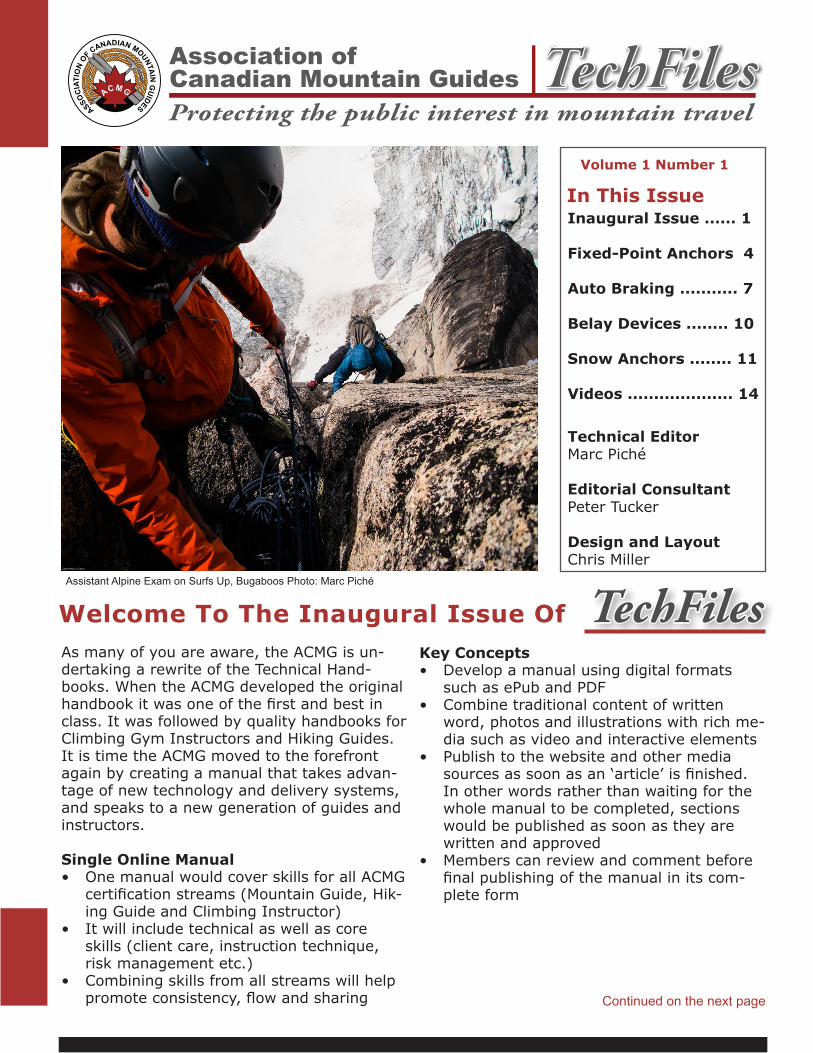
First stepsDue to the size and complexity of the manual we plan on publishing articles as they are finished in a PDF newsletter called TechFiles, the first of which you are currently reading. This will allow us to start circulating updates and corrections to the membership in a timely manner as well as developing and testing the workflow of the project.We have also created an ACMG branded video channel on Vimeo. We will be uploading and storing TechVideos to this channel: https://vimeo.com/channels/acmgtechnical
OverviewThe Manual Project
Advantages• Articles can be easily updated or corrected• Material will be formatted so it can be accessed at home or in
the field using alternative devices such as smart phones and tablets
• Because there are few space or size limitations online, topics can be explored in greater depth, supplementary reference ma-terial can be linked and additional photos or other media can be utilized
• Resources can be repurposed for other projects such as teach-ing presentations and online learning
• Greater continuity within and between all disciplines is promoted• There are numerous opportunities for partner involvement• Valuable community service is provided • The profile and credibility of the ACMG is increased
Continued from page 1
On Demand PrintingMany still find it easier to read extensive copy in a paper format and there are applications when paper copies of certain sections of the manual would be beneficial. To that end we intend to build in functions that would allow for the searching and printing of user defined segments of the manual.

Copyright © Association of Canadian Mountain Guides 2012No part of this newsletter can be reproduced without permission
333
TechFilesOverview
The Manual Project
Content Organization, Production and Branding
Tech SeriesAll content will be published as part of the Tech Series. The abbreviation ‘Tech’, standing for technical or tech-nique, will be used as a common theme to help identify content in the series.
TechFilesWe will use this PDF newsletter to publish articles and updates as soon as they are developed. This will allow us to get current information to members in a timely manner and will give you, the member, an opportu-nity to comment before the content is formalized into manual form. TechFiles will be available on the ACMG Member Site for viewing and download, and you will be informed via email whenever a new issue is published.
www.acmg.ca/02member/technical/TechFiles.asp
TechVideosMuch of what we do as guides and instructors is dy-namic in nature and rich media such as videos works best for capturing complex skills. Many of the articles will have accompanying videos. These will be refer-enced in TechFiles and will be available for view and download on our video channel.
TechManualEventually all the material from the TechFiles and TechVideos will be collected along with addi-tional material from the current print handbooks and published in digital formats such as ePub and iBooks. These formats will allow for reflowable content so they will adapt their presentation to the output device. This means content will be optimized for view on whatever device you are using, be it a smart phone, tablet or computer.
FeedbackWe would like to hear from you. We are rolling the new manual out in a progressive manner so we can get feedback on both the format and the content. Please send your feedback to:
Association of Canadian Mountain GuidesProtecting the public interest in mountain travelASSO
CIAT
ION
OF CANADIAN MOUNTAIN
GUIDES
MC GA 4
TechFiles
Fixed-point Belay
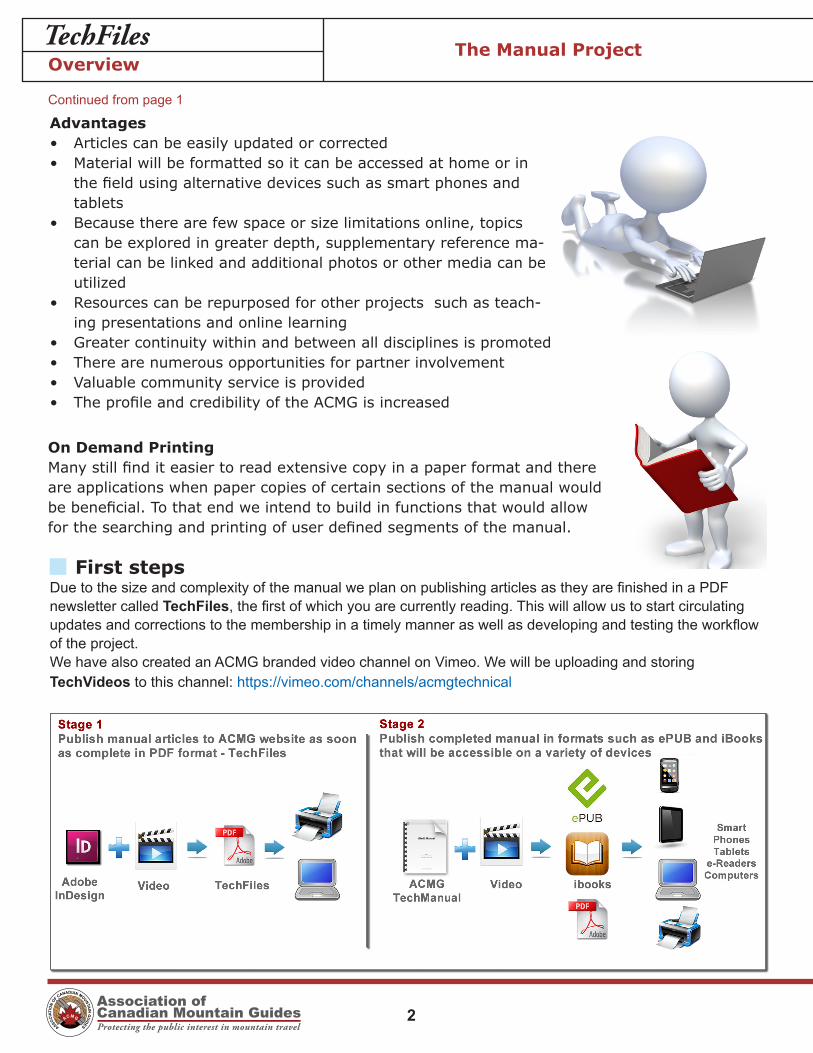
This is a method of belaying the leader using a manual braking device such as a tube or Munter hitch attached to a fixed-point of the anchor. Force is transferred directly to anchor in the event of a fall. The belayer provides the braking action only.
ApplicationConsider using a fixed-point belay when there is:• Higher potential for a leader fall (difficult grade, wet rock)• Potential for high impact force (high fall factor)• Potential for a long leader fall (slab routes or alpine ice routes)• Problem maintaining the integrity of the belay (inexperienced belayer, icy ropes, poor stance)
Technique• Use modified anchor configurations with tied-off loop (small) at fixed-point for braking device• Italian-hitch is often the most versatile• Use belay plate only in combination with a re-direct on brake strand or reliable leader protec-
tion near belay• If the option exists, vertical placement orientation works best• Webbing or accessory cord (minimum 7mm) can be used• Use a minimum of two multi-directional pieces of good quality (2 bolts, horizontal cams, ice
screws etc.)• Minimize fixed-point travel distance to 20 cm (fixed-point plus carabiner plus belay device)• Anchor should allow for efficient rope handling, i.e. the fixed-point should be about chest
height
Considerations• The fixed point must be anchor strength
(~20kN). With many common anchor building materials it may be necessary to use two strands of material at the fixed-point to achieve ad-equate strength
• It is recommended to clip the fixed-point loop to the anchor with a small locking carabiner
• It is recommended that ice screw anchors be clipped through the fixed-point loop as well as the shelf (see illustration) to equalize load to both screws
• Consider having belayer wear gloves (as in any potential for high impact belay)
• Avoid clipping the belay carabiner directly to a bolt or ice screw hanger. Clipping the belay carabiner to the welded ring on the Fixe ring an-chor is acceptable.
• As in all new techniques, client training is re-quired for comfort and ease of use
BelayingFixed-point Belay
Copyright © Association of Canadian Mountain Guides 2012No part of this newsletter can be reproduced without permission
555
TechFilesBelaying
Fixed-point Belay
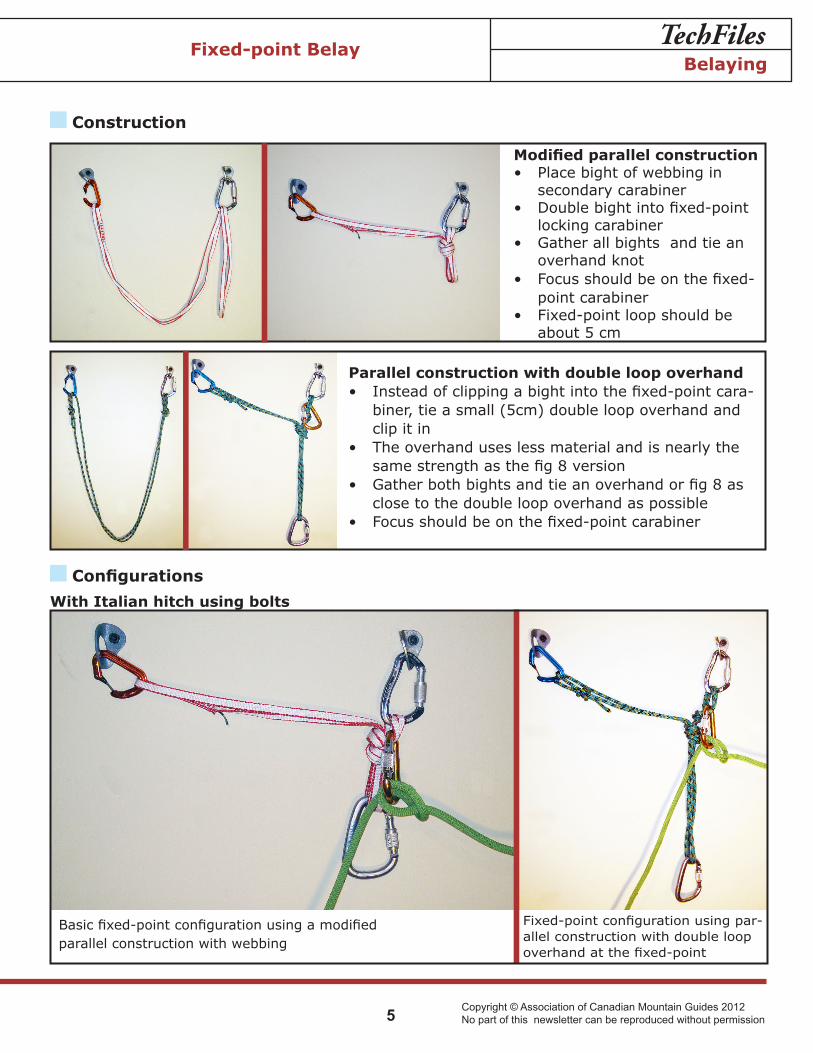
Basic fixed-point configuration using a modified parallel construction with webbing
Fixed-point configuration using par-allel construction with double loop overhand at the fixed-point
ConfigurationsWith Italian hitch using bolts
Construction
Modified parallel construction• Place bight of webbing in
secondary carabiner• Double bight into fixed-point
locking carabiner• Gather all bights and tie an
overhand knot• Focus should be on the fixed-
point carabiner• Fixed-point loop should be
about 5 cm
Parallel construction with double loop overhand• Instead of clipping a bight into the fixed-point cara-
biner, tie a small (5cm) double loop overhand and clip it in
• The overhand uses less material and is nearly the same strength as the fig 8 version
• Gather both bights and tie an overhand or fig 8 as close to the double loop overhand as possible
• Focus should be on the fixed-point carabiner
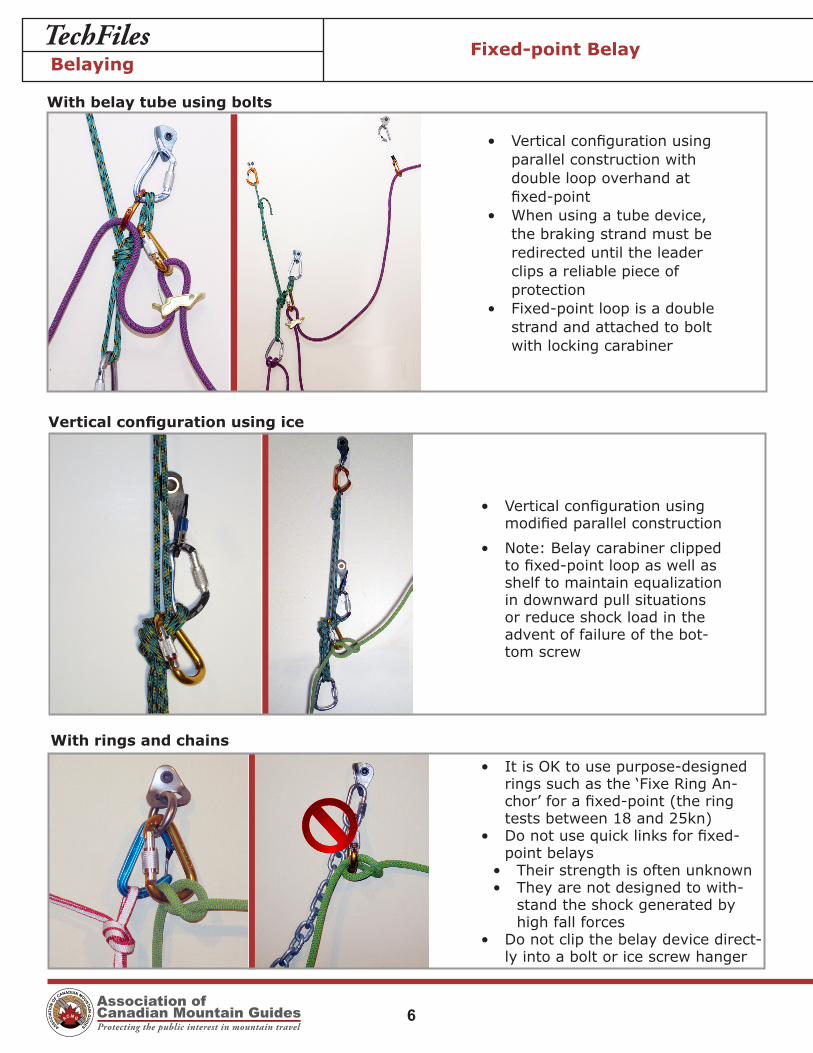
• Vertical configuration using parallel construction with double loop overhand at fixed-point
• When using a tube device, the braking strand must be redirected until the leader clips a reliable piece of protection
• Fixed-point loop is a double strand and attached to bolt with locking carabiner
With belay tube using bolts
Association of Canadian Mountain GuidesProtecting the public interest in mountain travelASSO
CIAT
ION
OF CANADIAN MOUNTAIN
GUIDES
MC GA 6
TechFiles
• It is OK to use purpose-designed rings such as the ‘Fixe Ring An-chor’ for a fixed-point (the ring tests between 18 and 25kn)
• Do not use quick links for fixed-point belays
• Their strength is often unknown• They are not designed to with-
stand the shock generated by high fall forces
• Do not clip the belay device direct-ly into a bolt or ice screw hanger
• Vertical configuration using modified parallel construction
• Note: Belay carabiner clipped to fixed-point loop as well as shelf to maintain equalization in downward pull situations or reduce shock load in the advent of failure of the bot-tom screw
Vertical configuration using ice
With rings and chains
BelayingFixed-point Belay

Copyright © Association of Canadian Mountain Guides 2012No part of this newsletter can be reproduced without permission
777
TechFiles
Use of Auto-braking Belay Devices
Auto-braking belay devices are usually at-tached directly to the anchor and used to belay one or two ropes from above. When a force is applied to the active rope(s) the device automatically brakes (locks). They are one way devices and can be problem-atic to reverse (pay out rope).
They are often multi-purpose devices and can also be used as manual or assisted be-lay devices and for rappelling.
Application• Belaying one or two ropes from above• They can be operated from a distance with-
out loss of security although handling may suffer
• Can be used as “ratchet” in rescue or raising scenarios
Considerations Belaying• Most devices are designed to be used only with specific rope sizes• It is possible for rope to slip though device if not used in accordance with manufacturers rec-
ommendation - particularly in situations where one rope is weighted and the other is not.• Slippage may also occur in wet or icy ropes, small diameter ropes, slick ropes and when two
ropes of different sizes are belayed.• The brake strand should be managed at all times• It can be very difficult to move the second rope if one rope is weighted• Device positioning is important as they tend to work most effectively when attached to an
anchor at waist height or higher and do not contact the rock• For more efficient rope movement use a round radius locking carabiner• Rope diameter and texture will influence ease of movement through the device; gener-
ally smaller diameter, slicker ropes will require less pull effort than larger, rougher textured ropes.
Lowering a short distanceThis is a common method for lowering clients a short distance.• Re-direct the brake hand to a high point on the anchor• Try to leverage ratchet carabiner back and forth by hand to “walk” enough rope through the
device• Some devices are designed with a leverage hole on one end of the device. Leverage device
with the nose of a carabiner or nut tool
Auto-braking Belay DevicesBelay Devices
Association of Canadian Mountain GuidesProtecting the public interest in mountain travelASSO
CIAT
ION
OF CANADIAN MOUNTAIN
GUIDES
MC GA 8
TechFiles Auto-braking Belay DevicesBelay Devices
Lowering on a loaded line These devices are not designed for lowering longer distances in ‘auto-braking mode and the load should be transferred to a purpose-built system.The following is a common technique for transferring a loaded line to a brake for lowering:• Using the brake rope from behind the auto-brake device create a tied-off Italian hitch on a
separate carabiner • Attach a prusik to the loaded strand below the auto-brake device and attach it to a carabiner
with tied-off Italian hitch • Transfer load to the prusik using one of the techniques described in the ‘Lowering a short dis-
tance’ section• Remove auto-brake device and lower on Italian hitch (you may want to keep the prusik as a
backup)
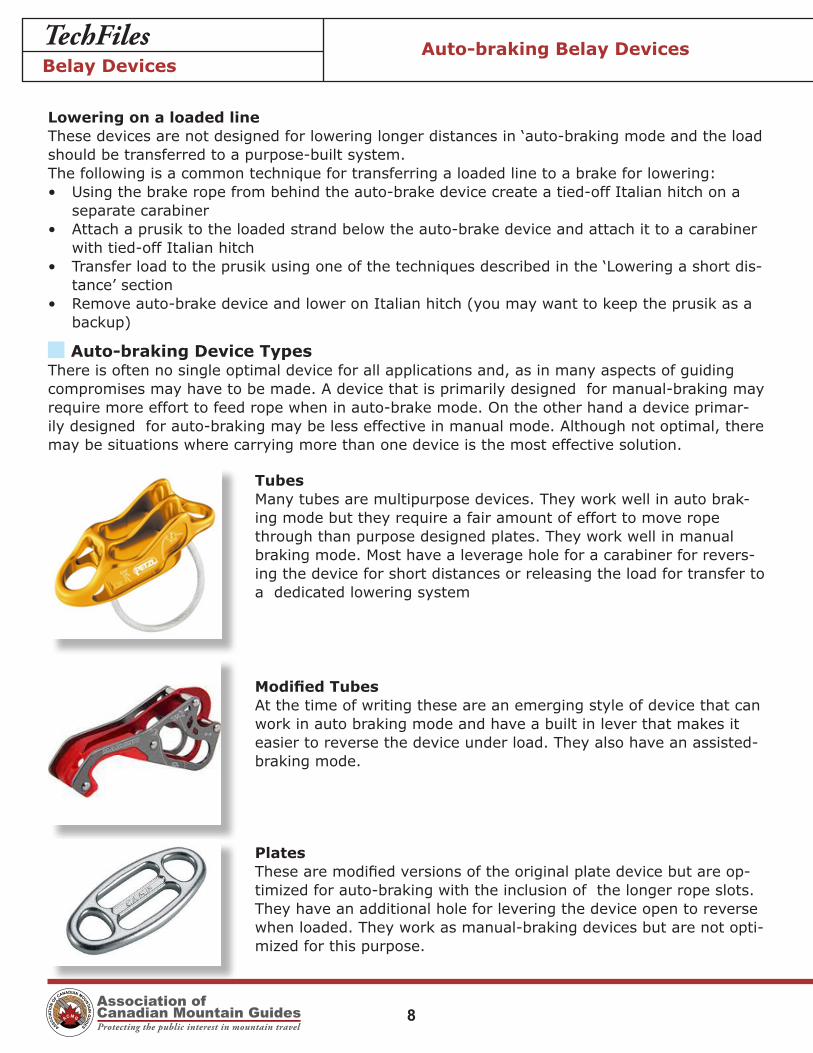
Auto-braking Device TypesThere is often no single optimal device for all applications and, as in many aspects of guiding compromises may have to be made. A device that is primarily designed for manual-braking may require more effort to feed rope when in auto-brake mode. On the other hand a device primar-ily designed for auto-braking may be less effective in manual mode. Although not optimal, there may be situations where carrying more than one device is the most effective solution.
TubesMany tubes are multipurpose devices. They work well in auto brak-ing mode but they require a fair amount of effort to move rope through than purpose designed plates. They work well in manual braking mode. Most have a leverage hole for a carabiner for revers-ing the device for short distances or releasing the load for transfer to a dedicated lowering system
Modified TubesAt the time of writing these are an emerging style of device that can work in auto braking mode and have a built in lever that makes it easier to reverse the device under load. They also have an assisted- braking mode.
PlatesThese are modified versions of the original plate device but are op-timized for auto-braking with the inclusion of the longer rope slots. They have an additional hole for levering the device open to reverse when loaded. They work as manual-braking devices but are not opti-mized for this purpose.
Copyright © Association of Canadian Mountain Guides 2012No part of this newsletter can be reproduced without permission
999
TechFilesBelay Devices
Auto-braking Belay Devices
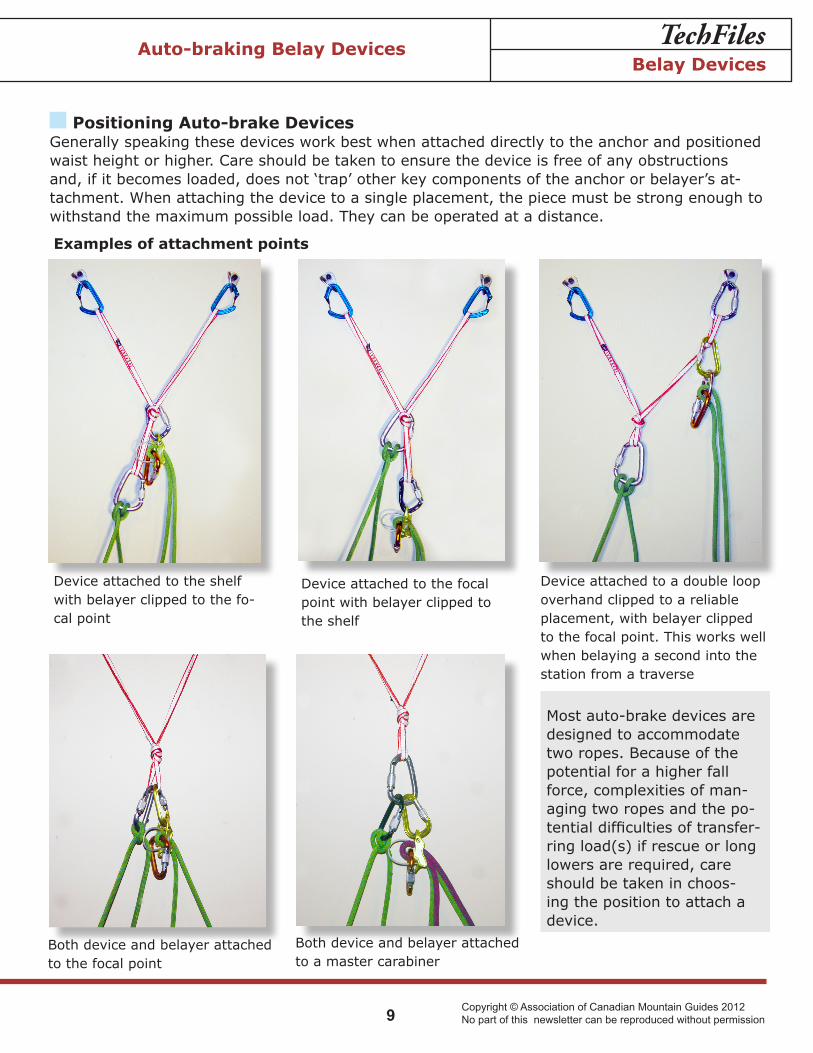
Positioning Auto-brake DevicesGenerally speaking these devices work best when attached directly to the anchor and positioned waist height or higher. Care should be taken to ensure the device is free of any obstructions and, if it becomes loaded, does not ‘trap’ other key components of the anchor or belayer’s at-tachment. When attaching the device to a single placement, the piece must be strong enough to withstand the maximum possible load. They can be operated at a distance.
Examples of attachment points
Device attached to the shelf with belayer clipped to the fo-cal point
Device attached to a double loop overhand clipped to a reliable placement, with belayer clipped to the focal point. This works well when belaying a second into the station from a traverse
Device attached to the focal point with belayer clipped to the shelf
Most auto-brake devices are designed to accommodate two ropes. Because of the potential for a higher fall force, complexities of man-aging two ropes and the po-tential difficulties of transfer-ring load(s) if rescue or long lowers are required, care should be taken in choos-ing the position to attach a device.
Both device and belayer attached to the focal point
Both device and belayer attached to a master carabiner
Association of Canadian Mountain GuidesProtecting the public interest in mountain travelASSO
CIAT
ION
OF CANADIAN MOUNTAIN
GUIDES
MC GA 10
TechFiles
Belay Devices Categories
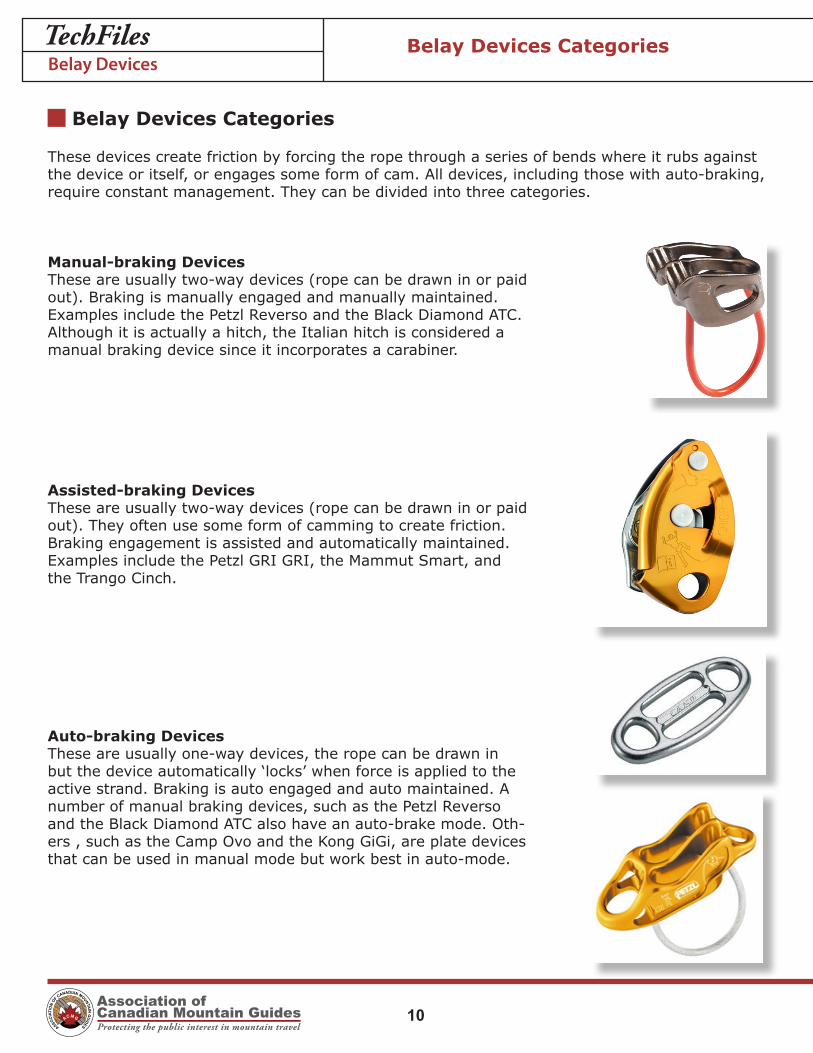
These devices create friction by forcing the rope through a series of bends where it rubs against the device or itself, or engages some form of cam. All devices, including those with auto-braking, require constant management. They can be divided into three categories.
Manual-braking DevicesThese are usually two-way devices (rope can be drawn in or paid out). Braking is manually engaged and manually maintained. Examples include the Petzl Reverso and the Black Diamond ATC. Although it is actually a hitch, the Italian hitch is considered a manual braking device since it incorporates a carabiner.
Assisted-braking DevicesThese are usually two-way devices (rope can be drawn in or paid out). They often use some form of camming to create friction. Braking engagement is assisted and automatically maintained. Examples include the Petzl GRI GRI, the Mammut Smart, and the Trango Cinch.
Auto-braking DevicesThese are usually one-way devices, the rope can be drawn in but the device automatically ‘locks’ when force is applied to the active strand. Braking is auto engaged and auto maintained. A number of manual braking devices, such as the Petzl Reverso and the Black Diamond ATC also have an auto-brake mode. Oth-ers , such as the Camp Ovo and the Kong GiGi, are plate devices that can be used in manual mode but work best in auto-mode.
Belay DevicesBelay Devices Categories

Copyright © Association of Canadian Mountain Guides 2012No part of this newsletter can be reproduced without permission
111111
TechFiles
Many factors contribute to the strength of snow anchors. The four main ones are:
• The strength of the snow
• The type of anchor built
• The direction of pull
• The strength and surface area of the equipment used to build the anchor
Tests done in recent years have focused on how snow strength affects anchor strength and the differences between traditional horizontal t-slot and vertical picket type anchors.
TerminologyUpright: Any anchor placed perpendicular or at an angle from perpendicular to the surface
Horizontal: Any anchor placed horizontally and at a right angle to the direction of load (T-Slot)
Top-Clip: Any upright anchor attached at the snow surface (see illustration below)
Mid-Clip: Any upright anchor attached at or near its mid-point below the snow surface (see illustration below)
Potential loads in snow applicationsClimbing ropes are designed to keep the forces transferred to the anchor or climber to less than 12kN. Most manufacturers exceed this standard with many limiting the maximum force to 8-9kN. It is unlikely that one would use a snow anchor in situations where a climber can freefall onto the anchor without introducing other forms of friction. The friction generated while sliding on a 45° snow-slope will reduce the forces produced by a fall by as much as 30%.
Examples of potential anticipated loadsLoad ForceLeading on 45° snow slope or belaying over crevasse 4kN-8kNRunner (top piece of protection with ~1.6 X multiplication of force) 8kN-12kNTop roping 1 person or rappelling 2kN-3kNTop roping 2 People 3kN-4kN
Anticipated strengths of snow anchorsSnow compression and shearSnow fails either in shear or compression with snow anchors. Compression failure happens when the anchor pulls through the snow (usually slowly) under load. Shear failure occurs when a stress cone of snow in front of the buried object fails suddenly.
Snow Anchors
Snow AnchorsT-Slots and Pickets
Association of Canadian Mountain GuidesProtecting the public interest in mountain travelASSO
CIAT
ION
OF CANADIAN MOUNTAIN
GUIDES
MC GA 12
TechFilesSnow Anchors
T-Slots and Pickets
Anchor strength vs. snow hardnessTests show that if the snow is moist (able to make a snowball), it is advisable to compact it before building the anchor. If the snow if dry and cold, it is best to leave it undisturbed. It was also noted that in tests where the anchor failed at greater than 10kN, the failure involved a component of the anchor (picket, cable, sling) and not a failure of the snow structure. Most standard picket and ice axe anchors fail at ~7kN in hard snow (>1F) however, often fail at much lower loads in softer snow conditions. Snow anchor strength is directly related to four factors;
• Surface area and strength of buried anchor
• Direction of pull
• Snow harness
• Craftsmanship
Horizontal vs. Upright anchorsAlthough buried ice axe t-slot anchors have been a mainstay of Canadian guiding for many years, recent studies have shown that upright pickets clipped at their mid point can achieve strengths equal to or greater than many t-slot anchors. All other factors being equal, a t-slot needs to be buried the same depth as the bottom of a vertical picket to achieve the same strength. In shallow snow conditions or when using an ice axe as the buried anchor, T-slot an-chors are often a preferable option to vertical mid-clipped pickets.
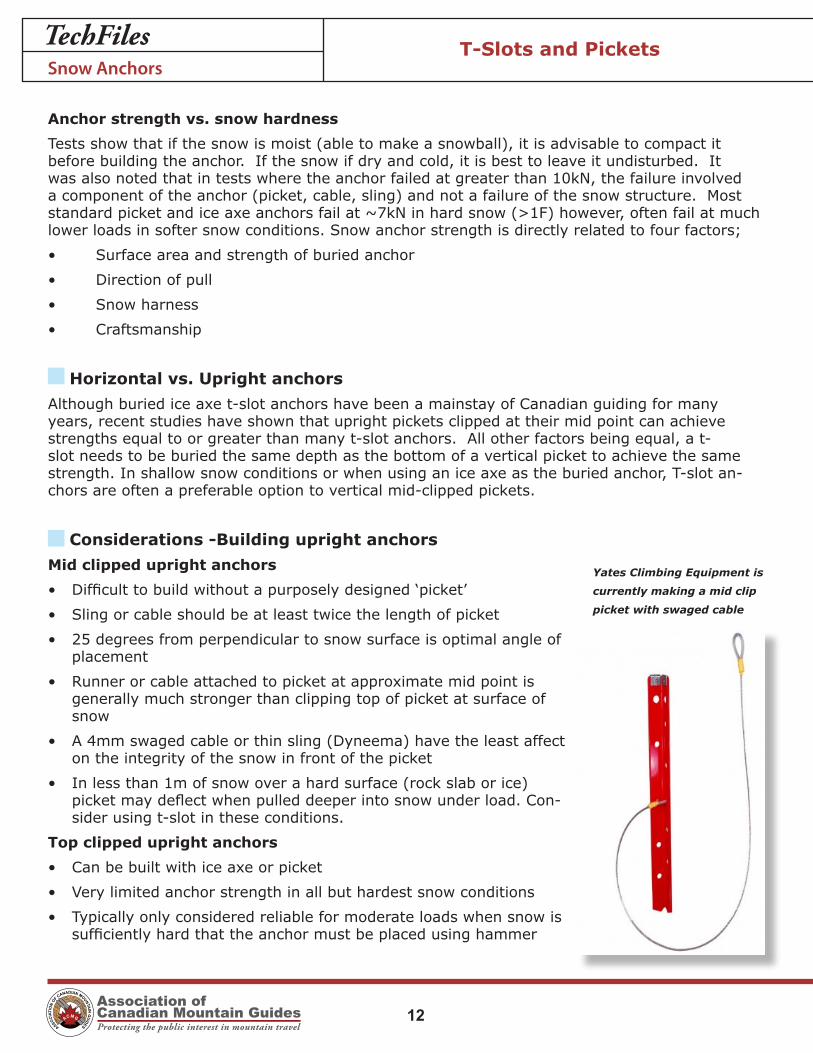
Considerations -Building upright anchorsMid clipped upright anchors• Difficult to build without a purposely designed ‘picket’
• Sling or cable should be at least twice the length of picket
• 25 degrees from perpendicular to snow surface is optimal angle of placement
• Runner or cable attached to picket at approximate mid point is generally much stronger than clipping top of picket at surface of snow
• A 4mm swaged cable or thin sling (Dyneema) have the least affect on the integrity of the snow in front of the picket
• In less than 1m of snow over a hard surface (rock slab or ice) picket may deflect when pulled deeper into snow under load. Con-sider using t-slot in these conditions.
Top clipped upright anchors• Can be built with ice axe or picket
• Very limited anchor strength in all but hardest snow conditions
• Typically only considered reliable for moderate loads when snow is sufficiently hard that the anchor must be placed using hammer
Yates Climbing Equipment is
currently making a mid clip
picket with swaged cable
Copyright © Association of Canadian Mountain Guides 2012No part of this newsletter can be reproduced without permission
131313
TechFilesSnow Anchors
T-Slots and Pickets
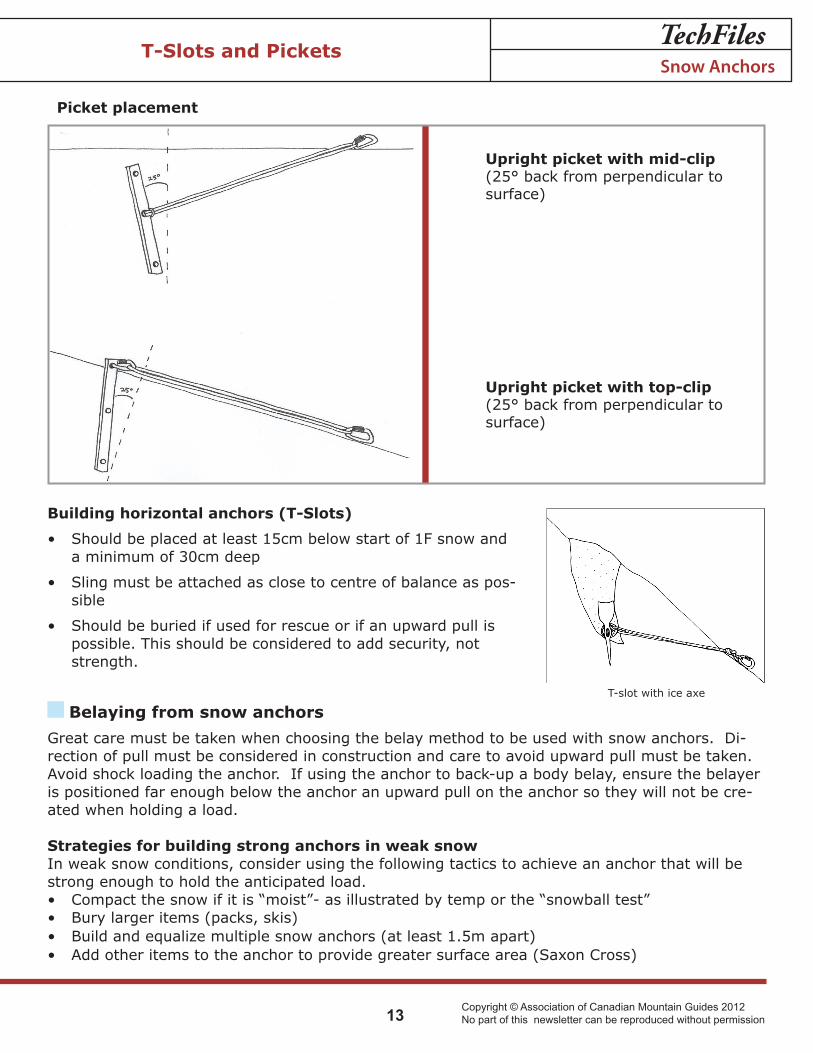
Building horizontal anchors (T-Slots)
• Should be placed at least 15cm below start of 1F snow and a minimum of 30cm deep
• Sling must be attached as close to centre of balance as pos-sible
• Should be buried if used for rescue or if an upward pull is possible. This should be considered to add security, not strength.
Belaying from snow anchorsGreat care must be taken when choosing the belay method to be used with snow anchors. Di-rection of pull must be considered in construction and care to avoid upward pull must be taken. Avoid shock loading the anchor. If using the anchor to back-up a body belay, ensure the belayer is positioned far enough below the anchor an upward pull on the anchor so they will not be cre-ated when holding a load.
Strategies for building strong anchors in weak snowIn weak snow conditions, consider using the following tactics to achieve an anchor that will be strong enough to hold the anticipated load. • Compact the snow if it is “moist”- as illustrated by temp or the “snowball test”• Bury larger items (packs, skis)• Build and equalize multiple snow anchors (at least 1.5m apart)• Add other items to the anchor to provide greater surface area (Saxon Cross)
Upright picket with mid-clip (25° back from perpendicular to surface)
Upright picket with top-clip (25° back from perpendicular to surface)
Picket placement
T-slot with ice axe
Association of Canadian Mountain GuidesProtecting the public interest in mountain travelASSO
CIAT
ION
OF CANADIAN MOUNTAIN
GUIDES
MC GA 14
TechFiles
Resources
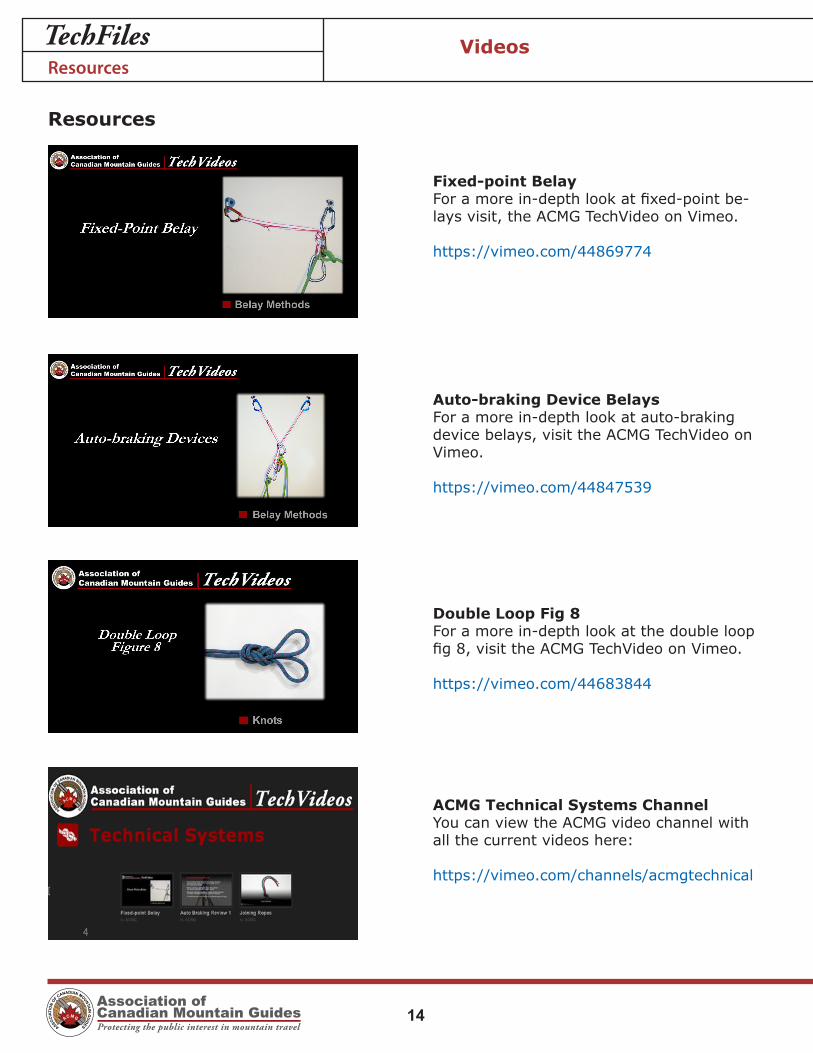
Fixed-point BelayFor a more in-depth look at fixed-point be-lays visit, the ACMG TechVideo on Vimeo.
https://vimeo.com/44869774
ResourcesVideos
Auto-braking Device BelaysFor a more in-depth look at auto-braking device belays, visit the ACMG TechVideo on Vimeo.
https://vimeo.com/44847539
Double Loop Fig 8For a more in-depth look at the double loop fig 8, visit the ACMG TechVideo on Vimeo.
https://vimeo.com/44683844
ACMG Technical Systems ChannelYou can view the ACMG video channel with all the current videos here:
https://vimeo.com/channels/acmgtechnical