Embed Size (px)
Citation preview
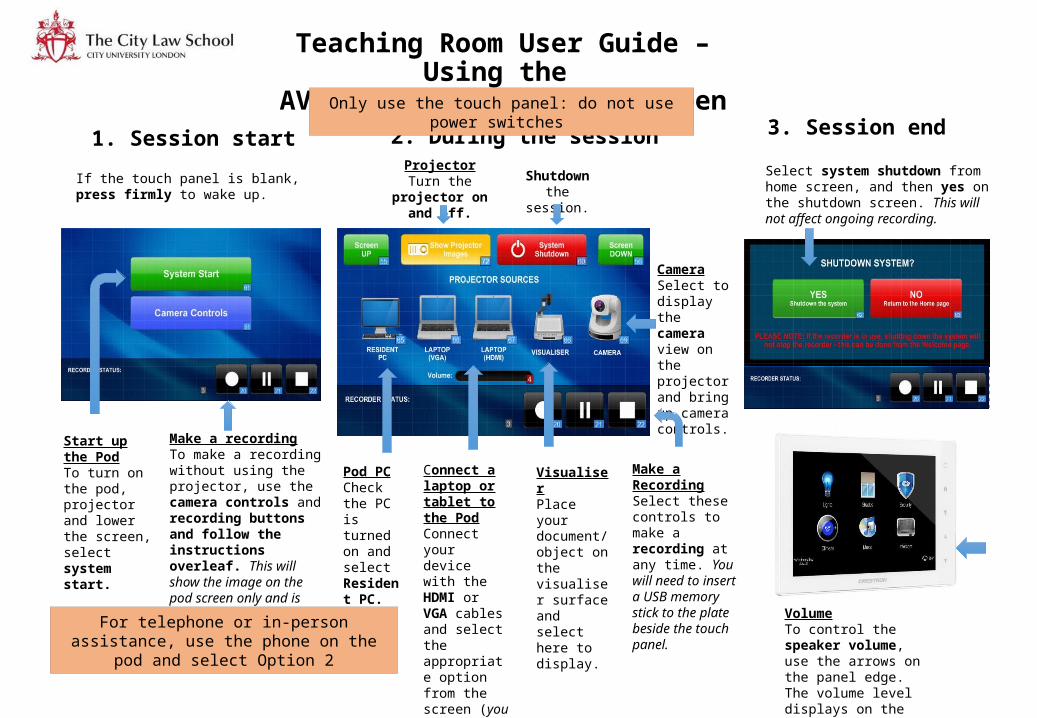
Teaching Room User Guide – Using the AV Pod, Projector and Screen
If the touch panel is blank, press firmly to wake up.
Start up the PodTo turn on the pod, projector and lower the screen, select system start.
Make a recordingTo make a recording without using the projector, use the camera controls and recording buttons and follow the instructions overleaf. This will show the image on the pod screen only and is ideal if you are not teaching with slides etc.
Pod PCCheck the PC is turned on and select Resident PC.
Connect a laptop or tablet to the Pod Connect your device with the HDMI or VGA cables and select the appropriate option from the screen (you may need an adaptor).
ProjectorTurn the projector
on and off.
VisualiserPlace your document/ object on the visualiser surface and select here to display.
CameraSelect to display the camera view on the projector and bring up camera controls.
Make a RecordingSelect these controls to make a recording at any time. You will need to insert a USB memory stick to the plate beside the touch panel.
1. Session start 2. During the session
VolumeTo control the speaker volume, use the arrows on the panel edge. The volume level displays on the home screen.
3. Session end
Select system shutdown from home screen, and then yes on the shutdown screen. This will not affect ongoing recording.
Shutdown the session.
Only use the touch panel: do not use power switches
For telephone or in-person assistance, use the phone on the pod and select Option 2
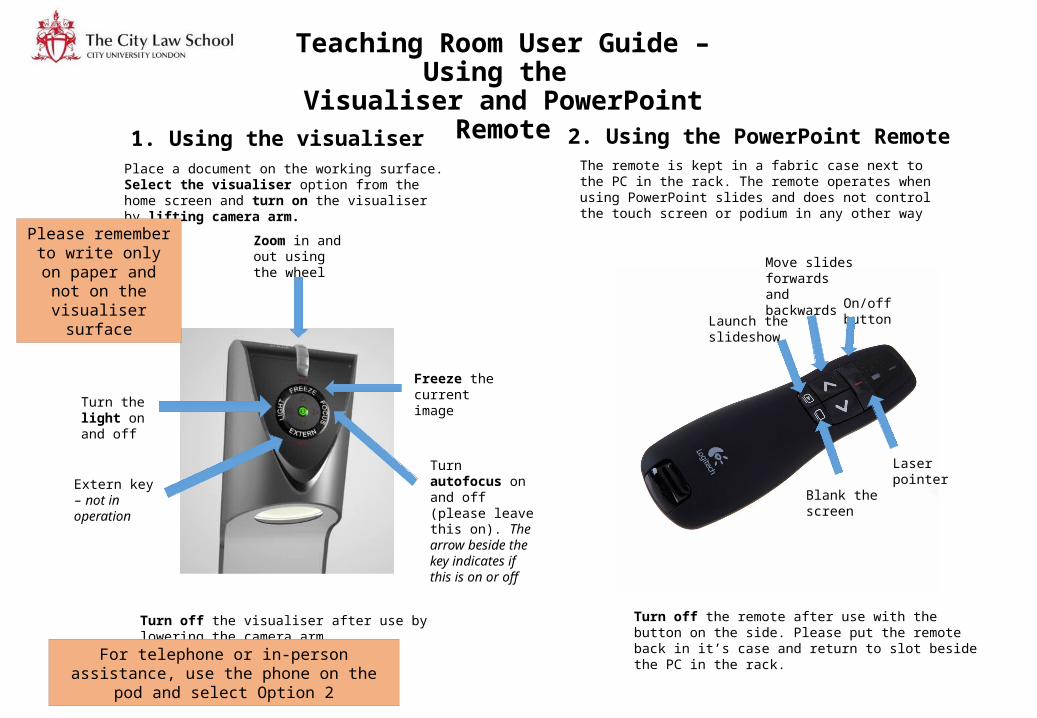
Teaching Room User Guide – Using the Visualiser and PowerPoint Remote
1. Using the visualiser 2. Using the PowerPoint RemotePlace a document on the working surface. Select the visualiser option from the home screen and turn on the visualiser by lifting camera arm.
The remote is kept in a fabric case next to the PC in the rack. The remote operates when using PowerPoint slides and does not control the touch screen or podium in any other way
Move slides forwards and backwards
Laser pointer
Blank the screen
Launch the slideshow
Zoom in and out using the wheel
Freeze the current image
On/off button
Turn the light on and off
Turn autofocus on and off (please leave this on). The arrow beside the key indicates if this is on or off
Extern key – not in operation
Turn off the visualiser after use by lowering the camera arm Turn off the remote after use with the button on the side. Please put the remote back in it’s case and return to slot beside the PC in the rack.
Please remember to write only on paper
and not on the visualiser surface
For telephone or in-person assistance, use the phone on the pod and select Option 2

Teaching Room User Guide – Making a Recording
If the touch panel is blank, press firmly to wake up the system.
1. Session Start
4. Finishing the Recording
When you have finished recording, press the stop button, the Stopping screen message will appear (i.e. wait until done).
3. To make a recording
Insert USB memory stick into the input slot (on the top of the pod) until it clicks – this must be USB 3.0 standard (contact the School if you need a USB 3.0 memory stick).
2. Control the Camera
Use the record, pause and stop buttons at the bottom of the screen.Using pause will temporarily halt recording but not remove the Recording screen message, (the pause button will be highlighted). Press record to resume.
Select camera control from the welcome screen or camera from the home screen
Pan left, right, up and down.
Press buttons firmly and wait – the system takes a moment to operate.
Please insert USB stick
The recorder status message will show whether the system is:• Capture Ready (system awaiting
USB stick insertion)• USB Back Ready (USB stick inserted
and ready)• Recording• Stopping (i.e. wait until done)• Done
When the home screen displays the message Done you can remove your USB memory stick.
Leave the system as it is ready for the next user.
Camera control can be changed at any time, before or during recording, by selecting camera controls from the welcome screen or camera from the home screen.
For telephone or in-person assistance, use the phone on the pod and select Option 2
5. Playback the recordingTo watch a recording, insert USB memory stick into the pod PC (you cannot play back via the surface-mounted USB slot).
Select the file you want to play by opening My Computer from the Start Menu, then navigating to the USB memory stick folder. The file is time stamped with the room, date and time of the recording.
The file should open in MPC-HC player which provides the best playback quality
Sometimes the message displayed is the last action the system has undertaken, such as ‘USB Back Removed’. Inserting a USB stick should correct this.