Embed Size (px)
Citation preview

Technical Guide
Series 8 They’re Racing Toolbox
Supporting Certificate II from the Racing Industry Training Package (RGR202)RGRH207A Handle Horses SafelyRGRH206A Apply Occupational Health & Safety Procedures in Horse codes RGRG206A Handle Greyhounds Safely RGRG205A Apply Occupational Health & Safety Procedures in Greyhound codes
9/12/2005 Version 1.0
flexiblelearning.net.au

Technical Guide – Series 8 They’re Racing Toolbox
© Commonwealth of Australia 2005
The views expressed herein do not necessarily represent the views of the Commonwealth of Australia.
This work is copyright. It may be reproduced in whole or in part for study or training purposes, subject to the inclusion of an acknowledgement of the source and it is not used for commercial use or sale.
Reproduction for purposes other than those indicated above requires the prior written permission from the Commonwealth. Requests and enquiries concerning reproduction and copyright should be addressed to the Branch Manager, Technology and

Technical Guide - Series 8 - They’re Racing Toolbox
Information Services Branch, Industry Skills Development Group, Department of Education, Science and Training, GPO Box 9880 Canberra City, ACT, 2601.
flexiblelearning.net.au

Technical Guide - Series 8 - They’re Racing Toolbox
Contents
List of tables and figures....................................................................................................... ivIntroduction........................................................................................................................... 1System Requirements...........................................................................................................2
To Play............................................................................................................................. 2To Customise...................................................................................................................2To Serve........................................................................................................................... 3What features can be customised?...................................................................................4Basic HTML Editing..........................................................................................................5File Structure.................................................................................................................... 5Customising content pages...............................................................................................6Customising Flash Interactions.........................................................................................6Basic Flash activity customisation.....................................................................................7Advanced Flash Activities customisation...........................................................................8Customising images........................................................................................................20Customising a Toolbox for single unit delivery.................................................................21Keeping to the Standards................................................................................................22
Visual Design...................................................................................................................... 23Global formatting with CSS.............................................................................................23Navigation...................................................................................................................... 24Communication area.......................................................................................................24Accessibility.................................................................................................................... 25
Technical Support...............................................................................................................27Installation on a Web Server...........................................................................................27Installing into a SCORM compliant LMS..........................................................................27Producing CDs for distribution.........................................................................................27Known Issues................................................................................................................. 28The Help Desk................................................................................................................29
References......................................................................................................................... 30Appendices......................................................................................................................... 30
Appendix A1 – Types of activities....................................................................................30Appendix A2 - Maximum Number of items per activity.....................................................31Appendix A3 – Image sizes for activities..........................................................................32Appendix B1 – Dreamweaver Library Items.....................................................................32Appendix B2- Dreamweaver Template Items...................................................................33Video compression.........................................................................................................33
Part of the Australian Flexible Learning Framework iii

Technical Guide – Series 8 They’re Racing Toolbox
LIST OF TABLES AND FIGURES
Table1: Customisable Elements............................................................................................4Diagram 1: Activities data structure.......................................................................................8Table 2: Common data in activities......................................................................................10Table 3: Video compression settings...................................................................................11Table 4: Photo gallery activity data......................................................................................12Table 5: Image with rollovers activity data...........................................................................13Table 6: Text drag and drop activity data.............................................................................14Table 7: Quiz activity data...................................................................................................14Table 8: Sequence activity data...........................................................................................16Table 9: Fill in the blanks activity data.................................................................................17Table 10: Offline activity data..............................................................................................17Table 11: Connect the dots activity data..............................................................................18Table 12: Drag and drop with one image activity data..........................................................19Table 13: Video activity data...............................................................................................19Table 14: Audio activity data...............................................................................................20Diagram 2: Content levels...................................................................................................21Table 15: CSS Style List.....................................................................................................23Table 16: left navigation library items...................................................................................24
Part of the Australian Flexible Learning Framework iv

Technical Guide - Series 8 - They’re Racing Toolbox
INTRODUCTIONThis Technical Guide has been developed to support you in delivering the Certificate II and III in Racing.
This Technical Guide is divided into three sections:
System Requirements
Customising Toolbox Content
Technical Support (FAQs, Troubleshooting, Help Desk)
Part of the Australian Flexible Learning Framework 1

Technical Guide – Series 8 They’re Racing Toolbox
SYSTEM REQUIREMENTS
To PlayMinimum hardware requirements
600 MHz or Pentium III or equivalent OR Macintosh PowerPC 500 MHz
128 MB of RAM
4 Gb hard disk
800 x 600 display
CD ROM drive
Recommended hardware requirementsThe above plus:
Sound card and speakers
1024 x 768 display
28.8 k modem or higher configuration (To follow links)
Access to a printer would also be useful as you may have to print out pages from within the toolbox.
Minimum software requirements Microsoft® Windows 2000/ME/XP OR Apple Macintosh OS9 or OSX
Browser: Internet Explorer 6.0+, Netscape 6.2+, Firefox 1.0+, Safari 1.0+, Opera 6.0+
A word processing program capable of opening Microsoft® Word documents
Recommended software requirementsThe above plus:
Macromedia® Flash Player® plug-in. You can download and install the latest free version from the Macromedia® website (www.macromedia.com/go/getflashplayer/).
Javascript enabled
To Customise
In order to customise this toolbox the following is needed:
600 MHz or Pentium III or equivalent processor
HTML Editor (Macromedia Dreamweaver strongly recommended. http://www.macromedia.com/software/dreamweaver/)
Part of the Australian Flexible Learning Framework 2
Technical Guide - Series 8 - They’re Racing Toolbox
Flash MX2004 development software (http://www.macromedia.com/software/dreamweaver/)
Adobe Illustrator CS for editing illustrationshttp://www.adobe.com/products/illustrator/main.html
Fireworks (or equivalent) for editing still imageshttp://www.macromedia.com/software/fireworks/
To Serve
Internet Server (e.g. Apache)
300 MB Available hard disk space
High bandwidth internet connection
Server must be configured to serve .FLV and .MP3 MIME Types. For .FLV files use "video/x-flv" as the content type. For .MP3 files use “audio/x-mp3” as the content type.
Part of the Australian Flexible Learning Framework 3

Technical Guide – Series 8 They’re Racing Toolbox
CUSTOMISING TOOLBOX CONTENTIn most cases, Toolboxes are able to be modified and redistributed with minimal licensing or copyright encumbrance. However, before commencing any modifications we recommend that you check the license details of the Toolbox, to ensure that any customisation undertaken does not contravene the conditions of that license.
For licensing conditions visit: http://www.flexiblelearning.net.au/toolbox/license.htm
Remember to retain the original files in their CD-ROM format so that you always have an original copy of the Toolbox as a backup.
What features can be customised?
Toolboxes can be customised by users under the flexible licensing arrangements, as long as they are not on-sold. You are therefore encouraged to customise the Toolboxes. However, before embarking on any modifications or customisation, we suggest that you:
Check the licensing details of the Toolboxes to ensure that any customisation does not contravene the conditions of the licence.
You have the required trained personnel.
Remember to retain the original files in the CD-ROM format as a backup (should you require them at a later stage).
Some design aspects of the Toolboxes can be easily customisable. However, there are other aspects of the Toolboxes that are more difficult. For this complex customisation we recommend that you proceed only if you have the relevant trained technical personnel.
Table1: Customisable Elements
Section Description Difficulty See
Getting startedResource centreMain content
Text is in standard HTML Easy Customising content pages
Flash Interactions All flash interactions in this toolbox pull data from standard XHTML files. These interactions can be easily customised by anyone with HTML editing skills.
Intermediate Customising Flash interactions
Part of the Australian Flexible Learning Framework 4

Technical Guide - Series 8 - They’re Racing Toolbox
Basic HTML Editing
There are numerous ways of editing the content of this Toolbox. The approach is similar to editing pages that might be found on any website.
The two simplest ways are:
1. Using a Web development package (Macromedia Dreamweaver or Macromedia Contribute highly recommended)
2. Using a straight text editor (e.g. Notepad). This is only recommended for experienced users.
Editing procedure
Download the complete Toolbox contents onto your machine.
Identify the pages you would like to edit (these are displayed in the address bar at the top of the browser page when viewing).
Locate these files in the downloaded files, following the paths displayed in the browser.
Open each file in your web editing software (e.g. Macromedia Dreamweaver) or text editor (e.g. Notepad)
Make appropriate changes.
Save each file.
Check your edits in a web browser to see if it displays properly.
File Structure
The file structure of this toolbox tries to mimic as much as possible the navigation on it.
For example:
If the user navigates to:
“Thoroughbred” then “Job 1 catch and restrain” then “Identify a horse” then “Colours of the horse”
This file will be located in:
/thoroughbred/1_catch_and_restrain/1_identify/20_colours/colours.htm
The structure has been done in this way so it will be intuitive to find the required page to customise in the file structure.
Folders in this toolbox
The root folder has the following sub-folders:
site\assessments contains the assessments
Part of the Australian Flexible Learning Framework 5
Technical Guide – Series 8 They’re Racing Toolbox
site\common contains the safety sections for all three codes
site\getting_started contains the getting started section
site\glossary contains the glossary
site\home contains the files for the home page
site\resource_centre contains the pages and images for the resource centre
site\shared includes all scripts, styles and images that are used commonly in this toolbox.
site\sitemap contains the sitemap for the whole site
site\greyhound, site\harness, site\thoroughbred contain all learning materials and activities for the three codes.
Source_files contains source Flash and artwork files
Templates contains Dreamweaver templates
Library contains Dreamweaver library items
Customising content pages
This section explains how to customise the content pages of this toolbox. These pages are located in the following directories:
site\common\…
site\harness\ …
site\thoroughbred\ …
site\greyhound\...
site\resource_centre\...
site\assessments\...
These are plain HTML pages and can be customised as described in the “Basic HTML editing” section.
Customising Flash Interactions
This section explains how to customise the Flash interactions of this toolbox
The folders containing these interactions can be recognised because they have the keyword “_act_” on them.
These folders contain all the activity specific elements. E.g. Pictures and data. These are the files you will need to edit.
The rest of the required elements are located in the “site\shared” folder. E.g. Flash files that are common to more than one activity. You should not edit these files.
Part of the Australian Flexible Learning Framework 6

Technical Guide - Series 8 - They’re Racing Toolbox
See Appendix A1 for a list of the available types of activities.
Finding the activity to customise
To find the folder that you need to edit do the following:
- navigate the site to the activity you want to edit
- open the activity
- Right click on the top part of the page or ctrl click on Mac (Not in the Flash content). This part can be recognised because it has a different background than the Flash content.
- In the context menu that appears:
o If using Internet Explorer click “properties”
o If using Firefox click “view page info”
- Select and copy the URL that appears on the window
- In the file explorer: Using the address found locate the folder containing the activity you want to customise
In the activity folder you will find the following files:
- activity.htm : this is the file containing the flash interaction, you don’t need to modify this file.
- activity_nf.htm : this doubles as the text version and the data for the activity, this is the file you will be modifying.
- Images files used in the activity
Basic Flash activity customisation
The Flash activities themselves are located in the “shared” folder in the root of the resource; you don’t need to modify these files.
To customise an activity you will need to modify the activity_nf.htm file. Follow these steps:
- Locate the activity_nf.htm file you want to modify
- Make a backup copy of this activity_nf.htm before editing
- Open the file activity_nf.htm using an html editor (Macromedia Dreamweaver recommended)
- Make the appropriate changes (More on this later)
- Save the file
- Test the activity in a browser
If you want to change a few words you can do that visually in the html editor using the standard tools provided. E.g. changing some words for contextualisation.
Part of the Australian Flexible Learning Framework 7
Technical Guide – Series 8 They’re Racing Toolbox
After you have finished customising an activity make sure to try the activity to see if it works well. Also you should run the activity_nf.htm page through the w3c validator to make sure that the page is well formed. This validator can be found on: http://validator.w3.org/
If you want to do more extensive customisation you will need to work with the html source code. You will need to get familiar with how the activities data is structured. See the next section.
Advanced Flash Activities customisation
In order to do more advanced customisation you will need to understand how the data files are structured. These data files are the “activity_nf.htm” files. For changing a few words in the activity see the “Basic Flash activity customisation” section above.
Common data in all activities
All activities use Dreamweaver templates. These templates help the user locate the information that needs to be updated. They also help in preventing the user from making changes in the wrong places. It is highly recommended that you use Macromedia Dreamweaver.
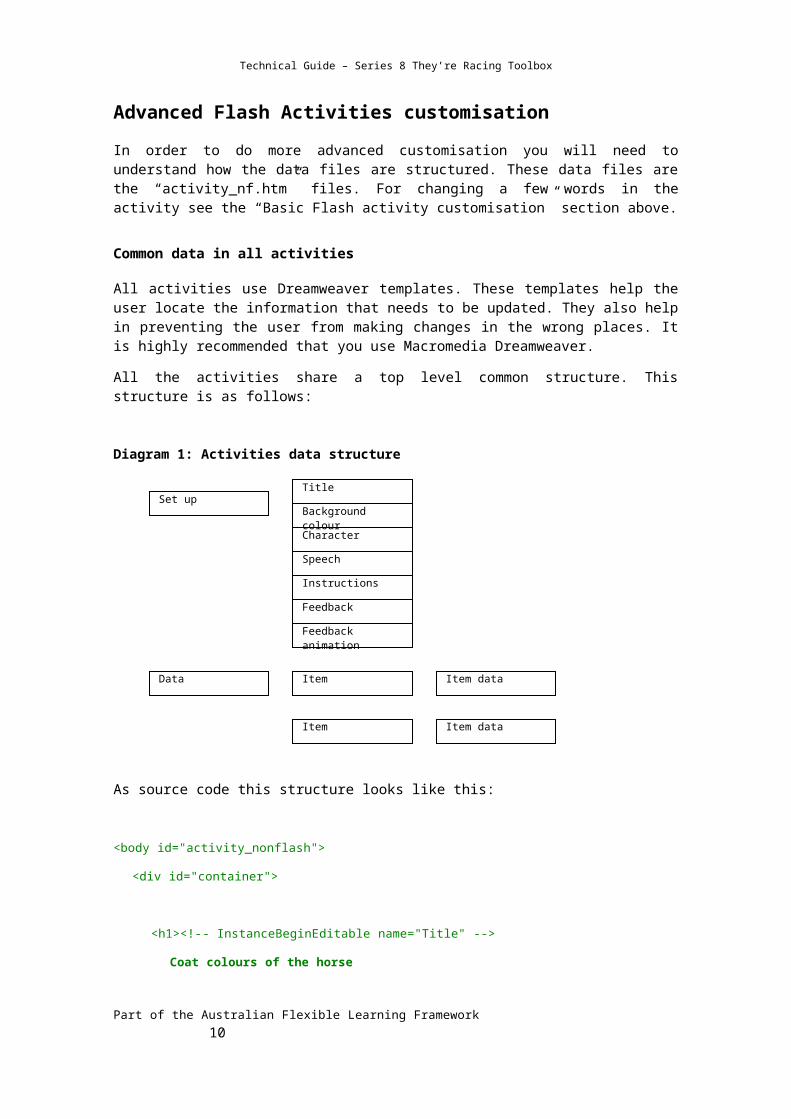
All the activities share a top level common structure. This structure is as follows:
Diagram 1: Activities data structure
As source code this structure looks like this:
<body id="activity_nonflash">
<div id="container">
<h1><!-- InstanceBeginEditable name="Title" -->
Part of the Australian Flexible Learning Framework 8
Set up
Data
Title
Speech
Instructions
Feedback
Feedback animation
Item Item data
Item Item data
Character
Background colour

Technical Guide - Series 8 - They’re Racing Toolbox
Coat colours of the horse
<!-- InstanceEndEditable --></h1>
<!-- InstanceBeginEditable name="setup" -->
<input name="bgcolour" type="hidden" value="827668" />
<input name="character" type="hidden" value="char-trisha1" />
<input name="instructions" type="hidden" value="Type t…h image " />
<input name="feedback" type="hidden" value="Well done! " />
<input name=" feedbackAnim " type="hidden" value="common1" />
<!-- InstanceEndEditable -->
<div class=”speech”>
<!-- InstanceBeginEditable name="Speech" -->
<p>Speech here …</p>
<!-- InstanceEndEditable -->
</div>
<span class="resource">
<!-- InstanceBeginEditable name="Resource" -->
<input name="video" type="hidden" id="video" value="resource_path" />
<!-- InstanceEndEditable -->
</span>
<div id="data">
<!-- InstanceBeginEditable name="Data" -->
<div class="item">
…item data
</div>
<div class="item">
…item data
</div>
</div>
<!-- InstanceEndEditable -->
</div>
</div>
</body>
Part of the Australian Flexible Learning Framework 9
Technical Guide – Series 8 They’re Racing Toolbox
The following table shows the common tags that can be edited and their meaning.Table 2: Common data in activities
Tag Description E.g.
<h1>…</h1>Title of the activity <h1>Coat colours of the
horse</h1>
<input name="bgcolour" …Background colour of the activity. Must be an hexadecimal value.
FFFFFF for white000000 for black
<input name="character” …Character that will explain the activity. This is a reference to a swf file in the “shared” folder.
char-jean1
<div class="speech" …Text that is going to appear in the speech bubble of the character. Because there is corresponding audio file for this text it is not recommended to modify this.
Test your understanding of ….
<input name="instructions" …Text instruction that appear on the screen below the activity title.
Click on the images on the left to learn about…
<input name="feedback" …Feedback that will be given to the user when the activity is finished. Not all activities display this (e,g, Photo gallery)
“Well done! You have finished the activity.”
<input name="feedbackAnim" …Feedback animation that is shown when the activity is finished. This is a reference to a swf file in the shared folder.
common1
<span class="resource">Main resource (image, audio or video) for the activity. This is activity specific and will be discussed in more details later.
<div id="data">Container for the activity items.
<div class="item">Each of the items for the activity. The structure of these items is specific to each type of activity. See next section.
Activity specific data
Apart from the common data explained in the ‘Common data in all activities’ section, each type of activity has a special structure for defining the data. For example the structure for the photo gallery is different from the drag and drop activities. This structure is located in the <div id=”data”>…</div> section of the activity_nf.htm pages.
<div id="data">
<!-- InstanceBeginEditable name="Data" -->
<div class="item">
…item data
</div>
<div class="item">
…item data
</div>
Part of the Australian Flexible Learning Framework 10

Technical Guide - Series 8 - They’re Racing Toolbox
</div>
<!-- InstanceEndEditable -->
</div>
In this section each <div class=”item”>...</div> represents an activity item. For example a picture in the photo gallery or a drag and drop element in the drag and drop activity.
You can create or delete items in an activity by copying and pasting the whole <div class="item">…</div> code. The easiest way to customise an activity is to copy and paste this section of the code and change the content.
Note that some different types of activities support a maximum number of items. See Appendix A2.
Following is an explanation of the item structure for each type of activity. The text that you should edit is marked in bold.
Note about referencing to videos:
All paths to videos should be relative to the directory shared\swf\interactions. So for example if the activity is located in:
thoroughbred/1_catch_and_restrain/2_approach/50_fit_head/1_act_sequence
The URL will be:
../../../thoroughbred/1_catch_and_restrain/2_approach/50_fit_head/1_act_sequence/v001
The extension .flv should NOT be present in the URL.
Each video should be compressed in 2 versions:
A low bandwidth and a high bandwidth version. The following table explains the required settings:Table 3: Video compression settings
Version To be used Is shown when Compression settings
Naming
Low bandwidth For dial up users The applications detects that the connection speed is below 300kbps
Size: 240x180Compressed for 56K
File name must end with a “s”. E.g. 3000s.flv
High bandwidth For broadband, network and CD users
The application detects that the connection speed is above 300kbps
Size: 240x180Compressed for 384K
File name must end with a “m”. E.g. 3000m.flv
See Appendix C for more details on video compression
A – Photo Gallery
This model uses the following structure for describing the data:
…common data…
<div id=”data”>
<!-- InstanceBeginEditable name="Data" -->
Part of the Australian Flexible Learning Framework 11
Technical Guide – Series 8 They’re Racing Toolbox
<div class="item">
<h2>Image title</h2>
<span class="resource">
<img src="image_thumbnail.jpg" alt="alt text" width="60" height="60" />
</span>
<span class="resource">
<img src="image.jpg" alt=" alt text " width="270" height="360" />
</span>
<div class="description">Image long description</div>
</div>
… more items …
<!-- InstanceEndEditable -->
</div>
Table 4: Photo gallery activity data
<h2>Title of the image
<span class="resource">…The first tag of this type contains the image to be used as the thumbnail
<span class="resource">…The second tag of this type contains the images that is going to appear when the user clicks on the image
<div class="description">Contains the description that appears when the images is clicked
B – Image with rollover
…common data…
<span class="resource">
<!-- InstanceBeginEditable name="Resource" -->
<img src="image.jpg" alt="alternative text" width="540" height="360"/>
<!-- InstanceEndEditable -->
</span>
<div id="data">
<!-- InstanceBeginEditable name="Data" -->
<div class="item">
<h2>Image title</h2><span class="resource">
<img src="image.jpg" alt="alt text" width="360" height="270" />
Part of the Australian Flexible Learning Framework 12

Technical Guide - Series 8 - They’re Racing Toolbox
</span>
<input name="x" type="hidden" value="220" />
<input name="y" type="hidden" value="46" />
<div class="description">
<p>Long image description</p>
</div>
</div>
… more items …
<!-- InstanceEndEditable -->
</div>
Table 5: Image with rollovers activity data
<span class="resource">Image that will be displayed on the left side.
Inside DIV item:
<h2>Title of the image
<span class="resource">…URL for the image that will be displayed when the user click on a spot
<input name="x" type="hidden" value="220" />
X coordinate for the clickable spot that appears over the left side image, this coordinate is relative to the top left corner of the left side image
<input name="y" type="hidden" value="46" />
Y coordinate
<div class="description">Contains the description that appears when the images is clicked
D - Text drag and drop
Example code:
…common data…
<div id=”data”>
<!-- InstanceBeginEditable name="Data" -->
<div class="item">
<span class="target">Target text </span>
<span class="source">Source text … </span>
</div>
… more items …
<!-- InstanceEndEditable -->
</div>
Part of the Australian Flexible Learning Framework 13

Technical Guide – Series 8 They’re Racing Toolbox
Table 6: Text drag and drop activity data
<div class="item">Each item represents a source and target combination. This activity takes a maximum of 6 items.
<span class="target"> Target text … </span>
Source text
<span class="source">Source text … </span>
Target text
F – Quiz
Apart from the common data explained in the ‘Common data in all activities’ section, this model uses the following structure for describing the data:
…common data…
<div id=”data”>
<!-- InstanceBeginEditable name="Data" -->
<div class="item">
<span class="resource">
<img src="image.jpg" alt="alt text" title="Black" width="270" height="360" />
</span>
<p class="question">Question here.</p>
<ol type="a" class="options">
<li>True</li>
<li value="true">False</li>
</ol>
<p class="answer">Answer text here …</p>
</div>
<div class="item">
<p class="question">Question here?</p>
<textarea cols="60" rows=""></textarea>
<p class="answer">Answer text here …</p>
</div>
… more items …
<!-- InstanceEndEditable -->
</div>
Table 7: Quiz activity data
Part of the Australian Flexible Learning Framework 14

Technical Guide - Series 8 - They’re Racing Toolbox
<span class="resource">…Image or video that will be displayed with the question. This is optional. If not present, the activity will display the previous image or video with the question.
For image use the following code:
<span class="resource"><img src="image.jpg" alt="Alt text" width="270" height="360" /></span>
For videos use the following code:
<span class="resource"><input name="video" type="hidden" id="video" value="video_path" /></span>
Please note that the path to the video must be relative to the location of the swf file not the html file. See note above.
<p class="question">White markings only occur on the head of a horse.</p>
Text for the question
<ol type="a" class="options">…</ol>
Options for the question. Each question can have 2 to 5 options.
<li>False</li>Text for an option. For marking the correct option use the value=”true” attribute in the <li> tag:
<li value="true"> … </li>Alternatively a question can be a text entry instead. The second <div class="item"> in the example shows this case.
<textarea cols="60" rows=""></textarea>
Text entry area
<p class="answer">Suggested answerp>
Suggested answer to be shown when the user clicks the “Check” button
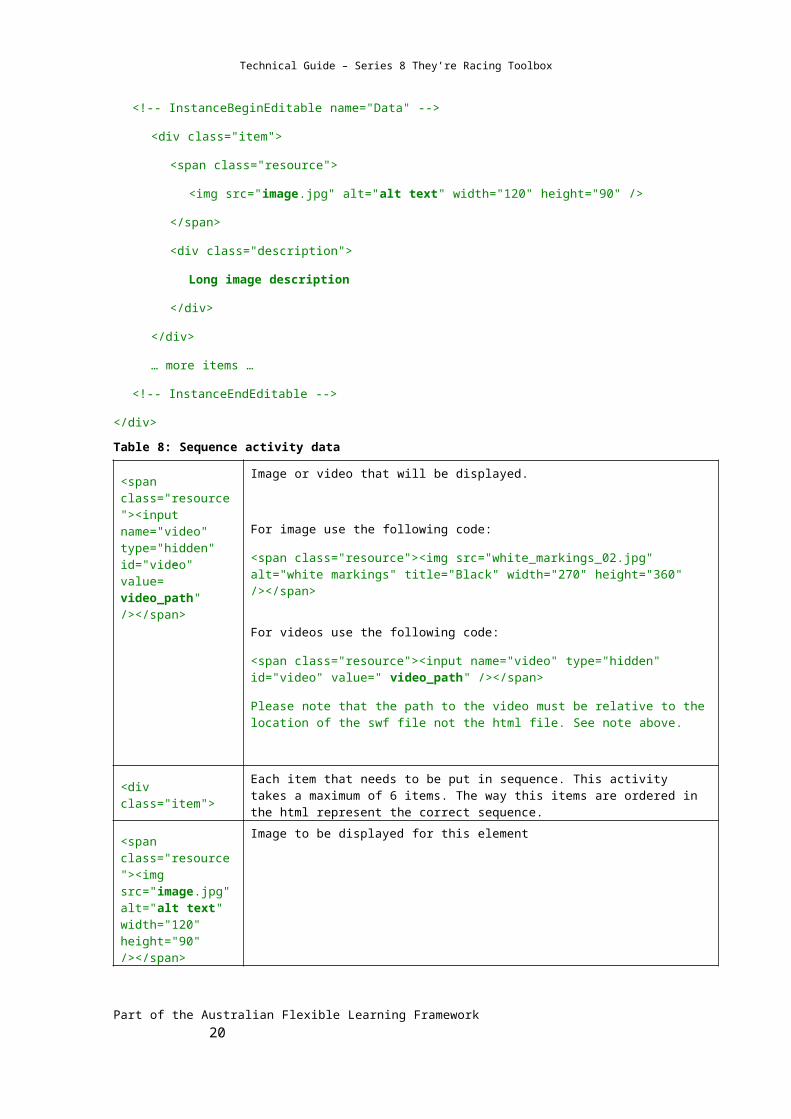
H –Sequence
This model uses the following structure for describing the data:
…common data…
<span class="resource">
<!-- InstanceBeginEditable name="Resource" -->
<input name="video" type="hidden" id="video" value="video_path" />
<!-- InstanceEndEditable -->
</span>
Part of the Australian Flexible Learning Framework 15

Technical Guide – Series 8 They’re Racing Toolbox
<div id=”data”>
<!-- InstanceBeginEditable name="Data" -->
<div class="item">
<span class="resource">
<img src="image.jpg" alt="alt text" width="120" height="90" />
</span>
<div class="description">
Long image description
</div>
</div>
… more items …
<!-- InstanceEndEditable -->
</div>
Table 8: Sequence activity data
<span class="resource"><input name="video" type="hidden" id="video" value=” video_path" /></span>
Image or video that will be displayed.
For image use the following code:
<span class="resource"><img src="white_markings_02.jpg" alt="white markings" title="Black" width="270" height="360" /></span>
For videos use the following code:
<span class="resource"><input name="video" type="hidden" id="video" value=" video_path" /></span>
Please note that the path to the video must be relative to the location of the swf file not the html file. See note above.
<div class="item">Each item that needs to be put in sequence. This activity takes a maximum of 6 items. The way this items are ordered in the html represent the correct sequence.
<span class="resource"><img src="image.jpg" alt="alt text" width="120" height="90" /></span>
Image to be displayed for this element
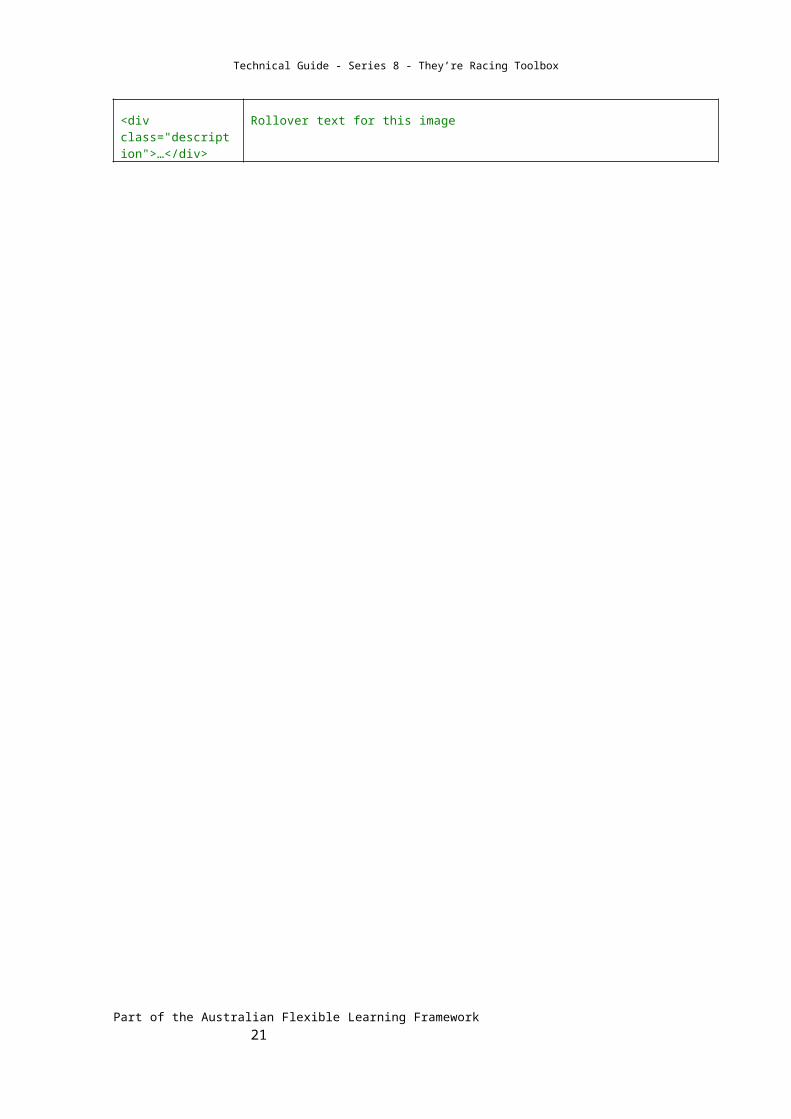
<div class="description">…</div>
Rollover text for this image
Part of the Australian Flexible Learning Framework 16

Technical Guide - Series 8 - They’re Racing Toolbox
J – Fill the blanks
Example code:
…common data…
<div id=”data”>
<!-- InstanceBeginEditable name="Data" -->
<div class="item">
<h2>Image title</h2>
<span class="resource">
<img src="image.jpg" alt="Alt text" width="360" height="270" />
</span>
</div>
… more items …
<!-- InstanceEndEditable -->
</div>
Table 9: Fill in the blanks activity data
<div class="item">Each item represents a fill in the blank image. This activity takes a maximum of 8 items.
<h2>Title of the image that needs to be typed by the user
<span class="resource">…URL to the Image to be displayed
K - Offline
Example code:
…common data…
<div id="data">
<!-- InstanceBeginEditable name="Data" -->
<div class="item">
<a href="document.doc" target="_blank">Worksheet</a>
</div>
<!-- InstanceEndEditable -->
</div>
Table 10: Offline activity data
Part of the Australian Flexible Learning Framework 17

Technical Guide – Series 8 They’re Racing Toolbox
<a href="document.doc" target="_blank">Worksheet</a>
Link to an external document to be downloaded. There can be more than one link. To do this repeat the whole <div class=”item”>…</div> element.
L – Connect the dots
Example code:
…common data…
<div id=”data”>
<!-- InstanceBeginEditable name="Data" -->
<div class="item">
<span class="source">Touch</span>
<span class="target">Horses feel … one surface to another.</span>
</div>
… more items …
<!-- InstanceEndEditable -->
</div>
Table 11: Connect the dots activity data
<div class="item">Each item represents a source and target combination. This activity takes a maximum of 6 items.
<span class="source">Touch</span>
Source text
<span class="target">Horses feel … one surface to another.</span>
Target text
N – Drag and drop with one image
Apart from the common data explained in the ‘Common data in all activities’ section, this template uses the following structure for describing the data:
…common data…
<span class="resource">
<!-- InstanceBeginEditable name="Resource" -->
<img src="image.jpg" alt="Alt text" width="540" height="360"/>
Part of the Australian Flexible Learning Framework 18

Technical Guide - Series 8 - They’re Racing Toolbox
<!-- InstanceEndEditable -->
</span>
<div id=”data”>
<!-- InstanceBeginEditable name="Data" -->
<div class="item">
<input name="x" type="hidden" value="6" />
<input name="y" type="hidden" value="134" />
<input name="source" type="hidden" value="muzzle" />
</div>
… more items …
<!-- InstanceEndEditable -->
</div>
Table 12: Drag and drop with one image activity data
<span class="resource">…Image that is going to be used as the target for the drag and drop activity
<div class="item">Each item represents a drag and drop element. This activity can take a maximum of 8 elements. See below for a description of the sub elements.
<input name="x" type="hidden" value="6" />
X coordinate in pixels of the dragable element. This is relative to the top left corner of the main image.
<input name="y" type="hidden" value="134" />
Y coordinate in pixels of the dragable element. This is relative to the top left corner of the main image.
<input name="source" type="hidden" value="muzzle" />
Text for the dragable element
O – Video
…common data…
<span class="resource">
<!-- InstanceBeginEditable name="Resource" -->
<input name="video" type="hidden" id="video" value=" video_path" />
<!-- InstanceEndEditable -->
</span>
<div id="data">…
Table 13: Video activity data
<span class="resource">…URL to the video. This has to be a full path to the video starting from shared\swf\interactions. See note above.
Part of the Australian Flexible Learning Framework 19
Technical Guide – Series 8 They’re Racing Toolbox
P – Audio
…common data…
<div id="data">
<!-- InstanceBeginEditable name="Data" -->
<div class="item">
<h2>Audio title</h2>
<span class="resource">
<input name="audio" type="hidden" id="audio" value="audio.mp3" />
</span>
<div class="description">
Audio description.
</div>
</div>
… more items …
<!-- InstanceEndEditable -->
</div>
Table 14: Audio activity data
<h2>Title for the sound
<span class="resource">
<input name="audio" type="hidden" id="audio" value="audio.mp3" />
</span>
Url for the audio file. This file should be in MP3 format.
<div class="description">Long description for the sound
Customising images
If you want to customise the images on the activities do the following:
- Create the images in the sizes specified in Appendix A3. If an image is larger, flash will resize the image dynamically.
- Images must be JPG format (no GIF or PNG). JPG must be encoded as non progressive.
- Copy your new images to the activity directory.
- Change the references in the activity_nf.htm document (see “Customising Flash Interactions” section for this).
Part of the Australian Flexible Learning Framework 20
Technical Guide - Series 8 - They’re Racing Toolbox
Customising a Toolbox for single unit delivery
You may want to offer one or two units from the Toolbox, or limit access to certain units and/or streams. Read this section for an explanation on how to do this.
First it is important to understand how this toolbox is organised. The diagram below shows the common structure of this toolbox:
Diagram 2: Content levels
You can either disable access to a section of the toolbox or delete the entire section. Disabling access is useful when you don’t want users to access that section but there is no need of deleting the unneeded files.
Deleting a section of the toolbox is useful when there is a need to provide a smaller version of toolbox (file size). Disabling access to the deleted sections may also be needed to avoid broken links.
Disable access to a CODE
CODEs are the three main sections on this toolbox: Thoroughbred, Harness and Greyhound.
To disable access to a CODE do the following:
- Open the flashlinks.txt file in the root folder in a text editor
- Change the link for the CODE you wish to disable to point to disabled.htm. E.g. &greyhound_home=disabled.htm
Now when users click these buttons they will see an html page saying that this content is not available at this time. You can modify this message by editing disabled.htm.
You will also need to disable the access to this page through the site map. For this do the following:
- Open the “sitemap.htm” file in the “sitemap” directory in Dreamweaver
- Delete the whole column containing the CODE you want to disable. (e.g. delete the whole column containing Harness)
Disable access to JOBS
To disable access to a JOB in the Toolbox (e.g. JOB1: Identify, catch and restrain a horse for the vet) do the following:
- Open the flashlinks.txt file in the root folder in a text editor
Part of the Australian Flexible Learning Framework 21
Code (e.g. Harness)
Jobs (e.g. Identify, catch and restrain a horse for the vet)
Tasks (e.g. Identify a horse)
Activities (e.g. Points of the horse)
Menu

Technical Guide – Series 8 They’re Racing Toolbox
- Change the link for the JOB you wish to disable to point to disabled.htm. E.g. & greyhound_job1=disabled.htm
Now when uses click these links they will see an html page saying that this content is not available at this time. You can modify this message by changing disabled.htm.
You will also need to disable the access to this page through the site map. For this do the following:
- Open the “sitemap.htm” file in the “sitemap” directory in Dreamweaver
- Delete the Dreamweaver Library reference for the section that you want to disable. E.g. delete the library entry for Greyhound Job1
Disable TASKS
If you want to disable specific tasks within the toolbox you will need to do the following:
- Using Dreamweaver open the “Library” folder in the root directory.
- Locate the Library item containing the TASK that you want to disable. For example if you want to disable TASK 3 of JOB 2 in Harness you will need to open the file nav-h2-main.lbi. See Appendix B1 for a table with references.
- Open the library item in Dreamweaver
- Delete the links to unnecessary pages
- Save the document. Dreamweaver will update all the links automatically for you. This will also remove the links in the sitemap.
Delivering a smaller version of the toolbox
If you want to distribute a smaller version by pruning the unnecessary content, you will need to follow the above process for disabling access to those sections first.
After you have done that, you delete the appropriate folders. E.g. delete the whole Greyhound folder if not needed.
Note that the “shared” folder must always stay. Also note that the current file structure of the toolbox must always be maintained even if it appears to have unnecessary levels.
Keeping to the Standards
This Toolbox has been developed in accordance with a number of international conventions and standards. These standards may be related to accessibility, cross-browser compatibility, or just to enable the easy location and customisation of content.
Keep this in mind when you are customising, as whatever you produce will need to be accessible, cross-browser compatible, and able to be further customised.
Try to ensure that any changes you make are conformant with the following standards.
W3C Priority One - Web Accessibility Initiative - http://www.w3.org/WAI/
XHTML transitional 1.0 - http://www.w3.org/TR/xhtml1/
CSS 2 - http://www.w3.org/TR/REC-CSS2/
Part of the Australian Flexible Learning Framework 22

Technical Guide - Series 8 - They’re Racing Toolbox
VISUAL DESIGNThis Toolbox uses Cascading Style Sheets (CSS1) for visual layout and site structure. If your browser or browsing device does not support style sheets at all, the content and menu structure of each page is still readable.
Global formatting with CSS
This Toolbox has been created with Cascading Style Sheets (CSS). This will enable you to make global changes to the look and feel of this Toolbox. If you don’t have a good understanding of HTML and at least a beginner’s level understanding of CSS you may wish to get somebody to help you.
The main CSS file is located at \shared\styles\web.css
You will also find a file called ..\print.css. This file specifies the styles used for printing
CSS style descriptions
The following table describes the relevant styles you may want to customise
Table 15: CSS Style List
Style Descriptionbody Specifies the font type and size for the whole toolbox#main h1#main h2#main h3{
Font size and colour of headings
#leftnav Font size and colour of left hand navigation.resource_centre_link Font size and colour of links to the resource centre.assignment_link{.assignment_link a
Font size and colour of links to assignments
.activity{ Font size and colour of links to activities
.introtext { Font size and colour of introductory text
.instructions{ Font size and colour of instructional text#alt_version az Font size and colour of links to alternative versions#resource_centre_nav Font size and colour of left hand navigation in the resource centre
.glossary_link
.didyouknow .glossary_linkFont size and colour of links to the glossary
You can find out more about CSS at: http://www.htmlhelp.com/reference/css/.
Part of the Australian Flexible Learning Framework 23

Technical Guide – Series 8 They’re Racing Toolbox
Navigation
Top navigation
This navigation uses a combination of plain links and JavaScript to work. What this means is that when JavaScript is disabled, the navigation still works by using plain html code. To change a link in this navigation all you need to do is change the link in the images. You don’t need to edit the JavaScript code. Since there are many pages using this navigation, this code has been put in a Dreamweaver library for easy updates. In order to update this do the following in Dreamweaver:
- Open the file “utilsnav.lbi” located in the “Library” folder
- Change the links in the images as needed
- Save the page. Dreamweaver will ask you if you want to update all pages. Click yes.
Left navigation in Jobs
In order to customise this navigation Dreamweaver library files are provided. These library files can be found in the “Library” folder.
For each section of this toolbox there are different files to customise. The following table specifies the section of the toolbox and the files that need to be edited.Table 16: left navigation library items
Section Job Library item for the job title Library item for the navigation
Thoroughbred Job 1 nav-t1-title.lbi nav-t1-main.lbiJob 2 nav-t2-title.lbi nav-t2-main.lbiJob 3 nav-j3-title.lbi nav-j3-main.lbi
Harness Job 1 nav-h1-title.lbi nav-h1-main.lbiJob 2 nav-h2-title.lbi nav-h2-main.lbiJob 3 nav-j3-title.lbi nav-j3-main.lbi
Greyhound Job 1 nav-g1-title.lbi nav-g1-main.lbiJob 2 nav-g2-title.lbi nav-g2-main.lbiJob 3 nav-j3-title.lbi nav-j3-main.lbi
After editing the required file, Dreamweaver will ask you to update all the related pages.
Communication area
When users click on the communication link they are directed to the following page:
site\shared\html\communication.htm
In order to open the right link with your communication tools you will need to create a redirection in the mentioned page. To do this follow these steps:
- Open the file site\shared\html\communication.htm using a html editor
Part of the Australian Flexible Learning Framework 24

Technical Guide - Series 8 - They’re Racing Toolbox
- Find the line <meta http-equiv="Refresh" content="0;URL=communication2.htm" />
- Replace the URL attribute (e.g. communication2.htm) with the link to your communication tool.
- Find the link <a href="communication2.htm">this link</a> in the body of the page.
- Replace the href attribute (e.g. communication2.htm) with the link to your communication tool.
- Save the file.
Accessibility
This toolbox is compliant with W3C Content Accessibility Priority 1 guidelines and XHTML Transitional.
Priority 1 requires the following checkpoints:
- 1.1If an image conveys important information beyond what is in its alternative text, provide an extended description.
- 2.1 If you use colour to convey information, make sure the information is also represented another way.
- 4.1 Identify any changes in the document's language.
- 6.1If style sheets are ignored or unsupported, ensure that pages are still readable and usable.
- 6.3 Provide alternative content for each SCRIPT that conveys information or functionality.
- 6.3 Make sure pages are still usable if programmatic objects do not function.
- 7.1 Make sure that the page does not cause the screen to flicker rapidly.
- 8.1 Provide accessible alternatives to the information in scripts, applets, or objects.
- 14.1 Use the simplest and most straightforward language that is possible.
Flash interactions
Each Flash Interaction has a link on the bottom of the page that takes the user to the text alternative version. If a screen reader, such as JAWS comes across a Flash piece with the ICON, JAWS will alert the user of the alternative version by speaking, “Flash Interaction – To access alternate content follow the link below”.
When you modify a Flash interaction as described in the customisation section you are also modifying the text version by default. So you don’t need to worry about modifying two version of the content.
However for the welcome screens (Home, Thoroughbred, Harness and Greyhound you will need the text alternative as well. For example if you modify the flash file home.swf you will also need to modify the html file home_nf.htm.
Part of the Australian Flexible Learning Framework 25

Technical Guide – Series 8 They’re Racing Toolbox
Text equivalents of rich elements
All content images used in this site include descriptive ALT attributes. Complex images include LONGDESC attributes or inline descriptions to explain the significance of each image to non-visual readers. Purely decorative graphics include null ALT attributes.
If you replace any image with another, it is important that you update the Alt tag or Longdesc tag appropriately.
Links
Title attributes have been used on links to describe the link in greater detail. If the text of the link already fully describes the target, (such as the headline of an article), then the title attribute may be skipped.
Links have been written so users with screen readers can make sense of them out of context.
Part of the Australian Flexible Learning Framework 26

Technical Guide - Series 8 - They’re Racing Toolbox
TECHNICAL SUPPORTTechnical support is available from the help desk, which is detailed at the end of this section, however, before calling, or emailing, please make sure that the answer you seek is not located elsewhere in this document. Please review the “Known Issues” section.
Installation on a Web Server
Copy the entire contents (except for autorun.inf and the source directory) from the CD to the appropriate directory on your web server.
There are no server side technologies utilised by this Toolbox, so no server configuration will be necessary. However you need to make sure that the server is configured to use “default.htm” as the default page.
Installing into a SCORM compliant LMS
If you wish to make content from this Toolbox available through your LMS, and your LMS is SCORM compliant, then you can install the relevant Learning Objects (LOs) by using the following process:
1. Browse to the Toolbox Repository at http://Toolbox.flexiblelearning.net.au/.
2. Search on the name of this Toolbox, you will find a number of Learning Objects, each relating to a section of the Toolbox CD.
3. Download each object that you wish to place on your LMS. They will be delivered as IMS content packages, which look exactly like .zip files.
4. Follow your LMS’s specific instructions for uploading these IMS content packages.
Be aware that not all LMSs are SCORM compliant, and that some that claim they are compliant cannot process IMS content packages (therefore they aren’t).
Please refer issues with the uploading of content to your LMS administrator, not the Toolbox Help Desk. The administrator or LMS vendor will contact us if necessary.
Producing CDs for distribution
Whether producing one-off copies of CDs, or class sets, use the following procedure:
1. Start up your favourite CD burning software
2. Select the Data CD option (don’t simply copy the whole CD)
3. Drag and drop all files (except the source directory)
4. You may wish to delete the teacher guide and technical guide
5. Burn
Before you burn yourself a class set, it might be wise to test that the first one works as expected.
Part of the Australian Flexible Learning Framework 27
Technical Guide – Series 8 They’re Racing Toolbox
Known Issues
The following are known technical issues that users may experience when using this Toolbox.
Windows XP Service Packs 2 blocks the Flash content when using from a CD-ROM
The first time a page containing Flash content is loaded Internet Explorer will display the following message:
“Active content can harm your computer or disclose personal information. Are you sure that you want to allow CDs to run active content on your computer?”
The user should click “Yes” in order to run the Toolbox.
If Internet Explorer has already been set to block Active Content from CDs. The following pop up will appear when trying to load the Toolbox:
In this case the user needs to click on the message and select "Allow Blocked Content...". Then click "Yes"
Windows XP Service Pack 2 blocks pop up windows
When clicking on a link on the resources the user may get this message:
In this case the user needs to click on the message and select "Always Allow Pop-ups from This Site..." from the pop up menu. Then click "Yes".
Part of the Australian Flexible Learning Framework 28

Technical Guide - Series 8 - They’re Racing Toolbox
Flash plug in version 8 blocks calls to JavaScript
This is an issue with the new flash player 8 introduced by Macromedia while this toolbox was under development. This issue affects some navigation links inside the flash files (e.g. top links in the main menu).
You will need to configure this content to be trusted in order to continue. To do this follow these steps.
In Windows Click OK
Go to the Start menu and click on My Computer
Open the C: drive
Go to the directory WINDOWS\system32\Macromed\Flash\
In that folder create a new folder called FlashPlayerTrust
Inside that new folder create a new text file
In that text file copy write the path to the toolbox content. E.g D:\ if running from a CD-ROM
Save the text file and close it
rename this text file as WebServerRunningLocal.cfg
Refresh the toolbox content in your browser
Glossary links don't work from Flash
Some pop-up blockers will prevent Flash from opening the links to the glossary. Yahoo! toolbar is known to do this. If you have the Yahoo! toolbar installed please upgrade to the latest version.
An "Action cancelled” page appears when trying to access Word documents from Flash
There is a known bug with Internet Explorer and SP2 when trying to open a pop-up window from Flash. In this case refresh the opened page.
The Help Desk
If you need technical assistance with a Toolbox, a single Help Desk call is all that is needed.
email: [email protected]
phone: 1300 736 710
Before Contacting the Help desk
The Toolbox Help desk is available to help you with installing Toolboxes and solving technical issues. However, before contacting the Help desk you should follow these steps:
Part of the Australian Flexible Learning Framework 29

Technical Guide – Series 8 They’re Racing Toolbox
Updates, patches and any small but necessary changes to Toolbox products will be uploaded to the Toolbox support section of the Flexible Learning Toolboxes website at http://www.flexiblelearning.net.au/toolbox/support/index.htm. Notification of any changes will be advised on the preview page for each product.
Access links to the preview pages at http://www.flexiblelearning.net.au/toolbox/preview/index.htm. Check these pages regularly for any relevant information.
Check if your question has already been answered in the Frequently Asked Questions (FAQs) section of this website.
If you are still unable to find an answer in the support section you should then email or phone the Help desk with the following information:
o the Toolbox name and product code (Racing toolbox 801) o your name, phone number and email address o the problem you need help with.
The Flexible Learning Toolbox Help Desk will contact you as soon as possible.
REFERENCESMacromedia : www.macromedia.com
Sorenson Squeeze : http://www.s-vision.com/
Adobe : www.adobe.com
W3C validator : http://validator.w3.org/
WebXact Accesibility validator : http://webxact.watchfire.com/
APPENDICES
Appendix A1 – Types of activities
Type of activity
Description Example
A – Photo Gallery
Shows a series of thumbnails on the left. When the user clicks on a thumbnail, shows a big version of the image on the right and a description.
thoroughbred\1_catch_and_restrain\1_identify\20_colours\1_act_photos\activity.htm
B – Image with rollover
Shows a big image on the left side with hotspots. When the user clicks on a hotspot a second image appear on the right with a description.
D - Text drag and drop
Drag and drop activity using text thoroughbred\1_catch_and_restrain\3_restrain\30_other_restraint\2_act_dragndrop\activity.htm
E – Image drap The user has to drag and drop a series of images over
Part of the Australian Flexible Learning Framework 30

Technical Guide - Series 8 - They’re Racing Toolbox
and drop some target text.F – Quiz Quiz activity, can be true or false, multiple options or
text entry.thoroughbred\1_catch_and_restrain\1_identify\30_markings\2_act_quiz\activity.htm
H –Sequence The activity shows a video or an image. Then the user has to put a series of images in the right sequence.
thoroughbred\1_catch_and_restrain\2_approach\50_fit_head\1_act_sequence\activity.htm
J – Fill the blanks
Name a series of images thoroughbred\1_catch_and_restrain\1_identify\20_colours\2_act_fillblanks\activity.htm
K - Offline Text and document download activity thoroughbred\1_catch_and_restrain\2_approach\10_body_language\2_offline\activity.htm
L – Connect the dots
Connect two sentences with a line thoroughbred\1_catch_and_restrain\2_approach\20_senses\2_act_connect\activity.htm
N – Drag and drop with one image
Drag and drop activity using one big image as the target
thoroughbred\1_catch_and_restrain\1_identify\10_points\points.htm\1_act_dragdrop\activity.htm
O – Video Shows a videoP – Audio Shows and plays a list of audio resources.
Appendix A2 - Maximum Number of items per activity
Type of activity Maximum number of itemsA – Photo Gallery InfiniteB – Image with rollover InfiniteD - Text drag and drop 6E – Image drag and drop 6F – Quiz InfiniteH –Sequence 6J – Fill the blanks 8K - Offline N/AL – Connect the dots 6N – Drag and drop with one image 8O – Video 1P – Audio 6
Appendix A3 – Image sizes for activities
Type of activity
Main image Thumbnail images
Horizontal images
Vertical images
Videos
Part of the Australian Flexible Learning Framework 31
Technical Guide – Series 8 They’re Racing Toolbox
A – Photo Gallery
- 60x60 360x270 270x360 -
B – Image with hotspot
240x180-
320x240 240x320-
D- Text Drag and drop
- - - - -
E – Image drag and drop
-136x102
- - -
F – Quiz - - 360x270 270x360 240x180H –Sequence
- 120x90 360x270 - 240x180
J – Fill the blanks
- 136x102 - - -
N – Drag and drop with one image
570 x 380 - - - -
O - Video 240x180P - Audio
Appendix B1 – Dreamweaver Library Items
Library item Descriptionnav-g-footer.lbi Footer for the left hand side navigation in Greyhoundnav-g1-main.lbi Left hand side navigation in Greyhound for job 1nav-g1-title.lbi Left hand side navigation title in Greyhound for job 1nav-g2-main.lbi Left hand side navigation in Greyhound for job 2nav-g2-title.lbi Left hand side navigation title in Greyhound for job 2nav-h-footer.lbi Footer for the left hand side navigation in Harnessnav-h1-main.lbi Left hand side navigation in Harness for job 1nav-h1-title.lbi Left hand side navigation title in Harness for job 1nav-h2-main.lbi Left hand side navigation in Harness for job 2nav-h2-title.lbi Left hand side navigation title in Harness for job 2nav-j-footer.lbi Footer for the left hand side navigation for job 3 in all three codesnav-j3-main.lbi Left hand side navigation for job 3 in all three codesnav-j3-title.lbi Left hand side navigation title for job 3 in all three codesnav-t-footer.lbi Footer for the left hand side navigation in Thoroughbrednav-t1-main.lbi Left hand side navigation in Thoroughbred for job 1nav-t1-title.lbi Left hand side navigation title in Thoroughbred for job 1nav-t2-main.lbi Left hand side navigation in Thoroughbred for job 1nav-t2-title.lbi Left hand side navigation title in Thoroughbred for job 2utilsnav.lbi Top navigation in all pages
Part of the Australian Flexible Learning Framework 32
Technical Guide - Series 8 - They’re Racing Toolbox
Appendix B2- Dreamweaver Template Items
Template Descriptionactivity_f.dwt Template for all flash activitiesactivity_nf.dwt For all text version activitiesgetting_started.dwt For getting started sectionjobnav.dwt For all content pagesmain_f.dwt For all main flash pages (Intro, Home, Trisha stables, Fred Stables
and Bill Kennels)noticeboard.dwt For noticeboardsresource.dwt Resource pages
Video compression
The videos in this toolbox have been compressed using Sorenson Squeeze 4.2 for Flash MX (http://www.s-vision.com/). The following explains the setting used so you can recreate them.
Part of the Australian Flexible Learning Framework 33

Technical Guide – Series 8 They’re Racing Toolbox
Low bandwidth videos:
56K_Dial_Up_Stream preset was used as starting point
Frame size was changed to 240 x 180
Audio was disabled
No other settings were modified
High bandwidth videos:
384K_Stream preset was used as starting point.
Frame size was changed to 240 x 180
Audio was disabled
No other settings were modified
Toolbox contact details:Flexible Learning Toolbox Help Desk
Phone: 1300 736 710Email: [email protected]
Website: flexiblelearning.net.au/toolbox
For more information contact:2005 Australian Flexible Learning Framework
National CommunicationPhone: (07) 3247 5511Fax: (07) 3237 0419
Email: [email protected] Website: flexiblelearning.net.au
Locked Mail Bag 527 GPOBrisbane QLD 4001
Part of the Australian Flexible Learning Framework 34
![EOL Guidelines [DRAFT] - ehsod.org · Web viewStoryboard (EHS) A Word or PDF version of the final learning content. Storyboard (elearning Industry) a storyboard for eLearning is](https://img.pdfslide.us/doc/110x75/5c723ddf09d3f2ad198b9532/eol-guidelines-draft-ehsodorg-web-viewstoryboard-ehs-a-word-or-pdf-version.jpg)