Embed Size (px)
Citation preview
Teacher Resource: Makey Makey Piano
This activity is a guide for running a Makey Makey activity with your students, based on Questacon Smart
Skills Teacher Workshop 3. Potential curriculum links are provided at the end of this document, but this
activity can be used in many ways across stages 3 to 5. There are many cross-subject links that can be
explored through this activity which can focus on digital technologies and coding or tend towards STEAM
(Science Technology Engineering Arts and Maths).
In this workshop, participants use simple materials and a Makey Makey to build a peg piano, augmenting
a computer based keyboard into physical objects. Makey Makey is an invention kit that turns everyday
objects into touchpads and combines them with your computer. It can be used for art, engineering, and
everything in between. The product name comes from the combination of two words: Make + Key =
Makey Makey!
The activity is quite directed and doesn’t leave much room for inquiry and design. However, completing
this activity will help people to realize the potential of the Makey Makey. The possibilities with the Makey
Makey are almost endless and it can be a great way to encourage creativity and enhance engagement
for a range of topics, especially digital technologies and programming.
Resources and requirements The main requirement for this workshop is a Makey Makey. These can be purchased online from a range
of websites. You should choose a supplier that best meets your requirements. We have previously
sourced ours from:
The original creators, Makey Makey, who ship from the USA
Local supplier Little Bird Electronics, who ship from Australia
When using the Makey Makey, you will need a laptop or computer to plug it into via the USB port
For this activity, you will also need:
A graphite (lead) pencil and paper
3 x large popsticks/tongue depressors
3 x small popsticks
6 x wooden pegs
2 x wooden beads, slightly larger in diameter than the width of the peg
Copper tape (about 5mm across)
o This can be bought from online suppliers, or from hardware stores where it is sold as
“Snail And Slug Barrier”
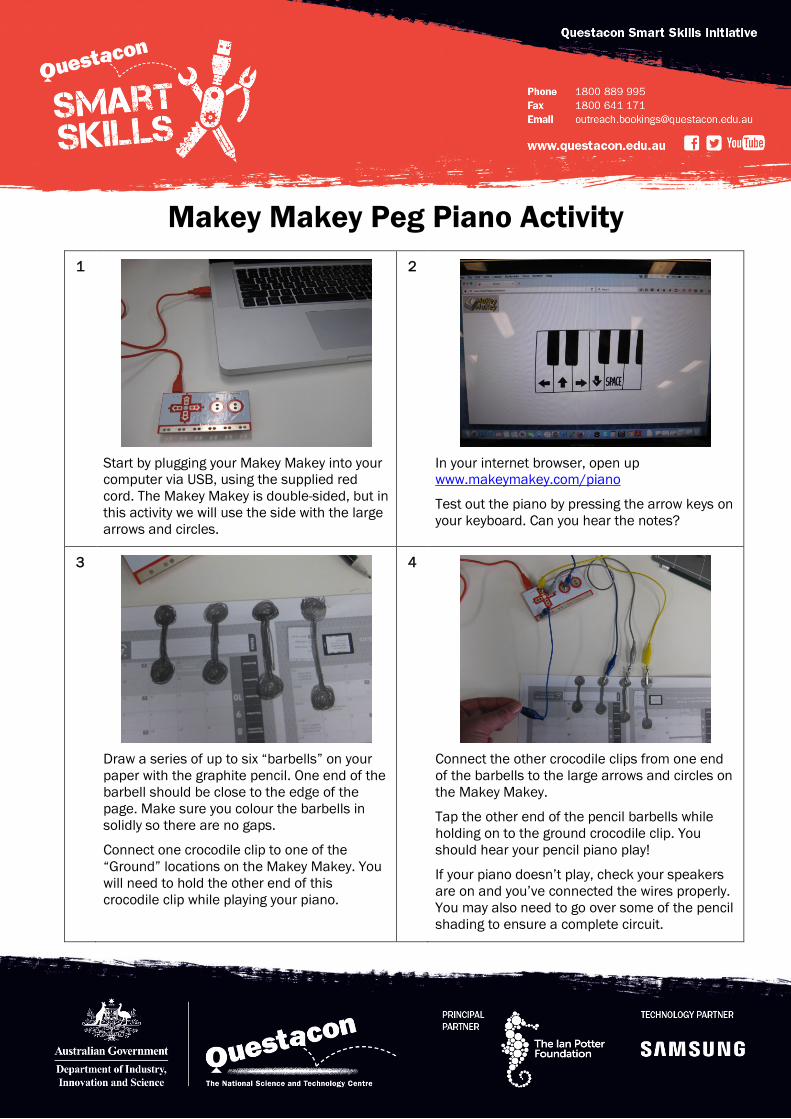
Makey Makey Peg Piano Activity
1
Start by plugging your Makey Makey into your
computer via USB, using the supplied red
cord. The Makey Makey is double-sided, but in
this activity we will use the side with the large
arrows and circles.
2
In your internet browser, open up
www.makeymakey.com/piano
Test out the piano by pressing the arrow keys on
your keyboard. Can you hear the notes?
3
Draw a series of up to six “barbells” on your
paper with the graphite pencil. One end of the
barbell should be close to the edge of the
page. Make sure you colour the barbells in
solidly so there are no gaps.
Connect one crocodile clip to one of the
“Ground” locations on the Makey Makey. You
will need to hold the other end of this
crocodile clip while playing your piano.
4
Connect the other crocodile clips from one end
of the barbells to the large arrows and circles on
the Makey Makey.
Tap the other end of the pencil barbells while
holding on to the ground crocodile clip. You
should hear your pencil piano play!
If your piano doesn’t play, check your speakers
are on and you’ve connected the wires properly.
You may also need to go over some of the pencil
shading to ensure a complete circuit.
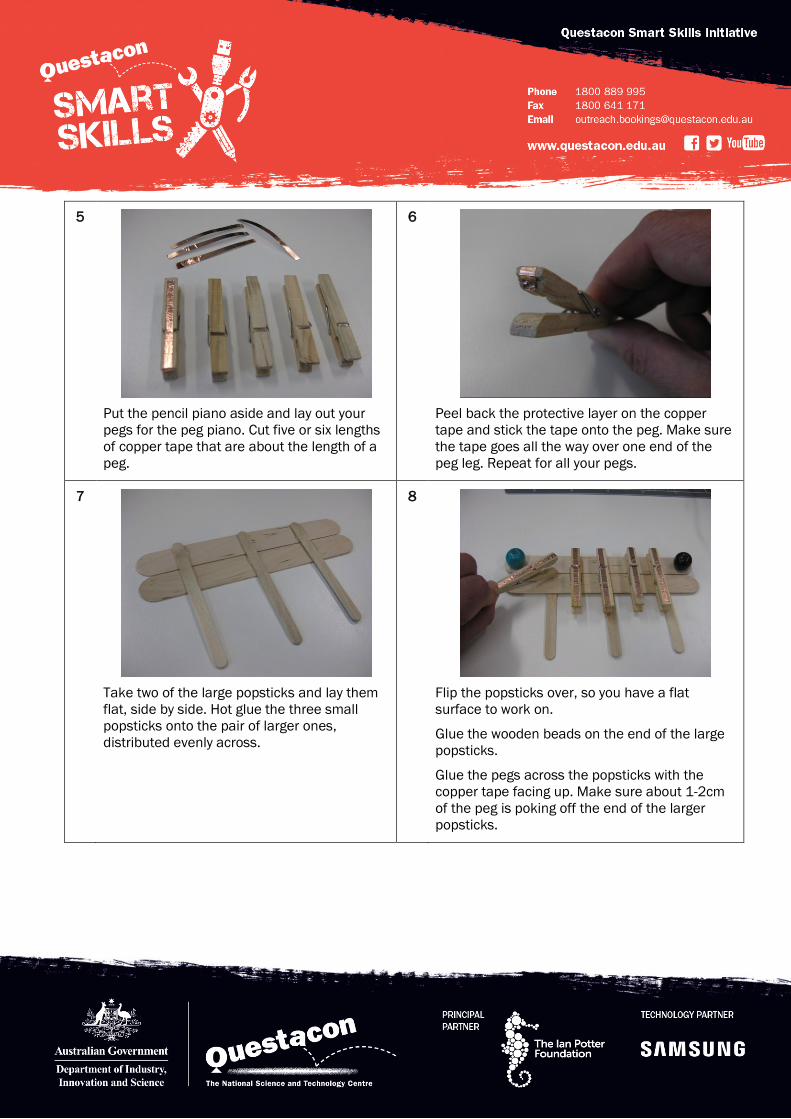
5
Put the pencil piano aside and lay out your
pegs for the peg piano. Cut five or six lengths
of copper tape that are about the length of a
peg.
6
Peel back the protective layer on the copper
tape and stick the tape onto the peg. Make sure
the tape goes all the way over one end of the
peg leg. Repeat for all your pegs.
7
Take two of the large popsticks and lay them
flat, side by side. Hot glue the three small
popsticks onto the pair of larger ones,
distributed evenly across.
8
Flip the popsticks over, so you have a flat
surface to work on.
Glue the wooden beads on the end of the large
popsticks.
Glue the pegs across the popsticks with the
copper tape facing up. Make sure about 1-2cm
of the peg is poking off the end of the larger
popsticks.
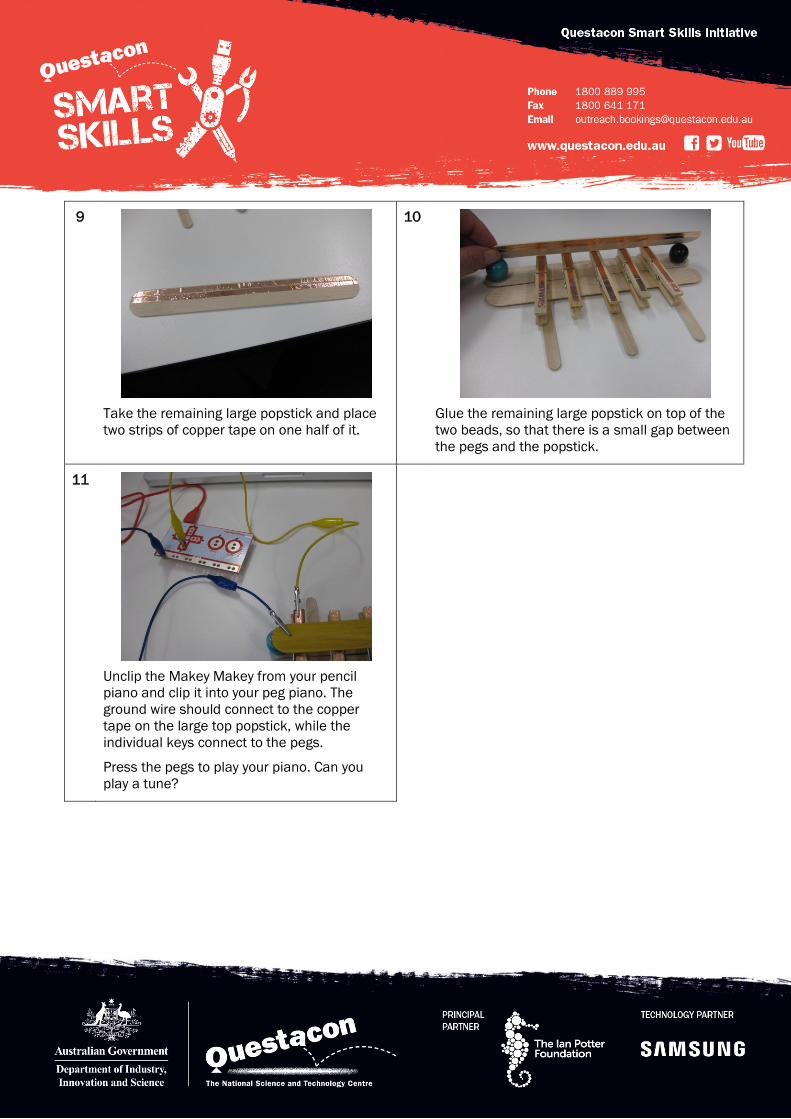
9
Take the remaining large popstick and place
two strips of copper tape on one half of it.
10
Glue the remaining large popstick on top of the
two beads, so that there is a small gap between
the pegs and the popstick.
11
Unclip the Makey Makey from your pencil
piano and clip it into your peg piano. The
ground wire should connect to the copper
tape on the large top popstick, while the
individual keys connect to the pegs.
Press the pegs to play your piano. Can you
play a tune?

Curriculum Links
Australian Curriculum: Design and Technology
Digital Technologies Processes and Production Skills Strands Using the Makey Makey with programming tools such as Scratch, would meet the curriculum content
listed below. Makey Makey gives students a way to extend their digital programming into the physical
world. The Makey Makey also forces students to think about user-centered design, as they create
physical objects to control the computer.
Years 3 and 4
Implement simple digital solutions as visual programs with algorithms involving branching (decisions)
and user input (ACTDIP011)
Years 5 and 6
Implement digital solutions as simple visual programs involving branching, iteration (repetition), and user
input (ACTDIP020)
Years 7 and 8
Implement and modify programs with user interfaces involving branching, iteration and functions in a
general-purpose programming language (ACTDIP030)
Years 9 and 10
Implement modular programs, applying selected algorithms and data structures including using an
object-oriented programming language (ACTDIP041)
Other subjects This project is a simple and easy way to use the Makey Makey and augment your computer keyboard into
larger physical forms, but there are many more ways to use the Makey Makey to enhance lessons in a
range different subject areas. For some ideas, follow the links below.
This YouTube playlist shows many different ways to use the Makey Makey and might provide
some inspiration.
Makey Makey have their own lesson guides, with suggestions for all age groups. While this is
based around the US School Curriculum, the ideas are still applicable in Australia
Makey Makey also have their own Educators Forum where educators can share the ideas that
they’ve developed for using Makey Makey in their own classroom

![MaKey Cover [Year] Sheet - Literacy Link South Central MaKey_final.pdf · MaKey MaKey Cover Sheet.docx [Pick the date] [Year] [Type the abstract of the document here. The abstract](https://img.pdfslide.us/doc/110x75/5aff65e07f8b9a944d90654a/makey-cover-year-sheet-literacy-link-south-makeyfinalpdfmakey-makey-cover.jpg)