Embed Size (px)
Citation preview

TDY Settlement – No Authorization
Introduction This guide provides the procedures for entering a TDY Settlement where
no previous Authorization was entered in TPAX.
Before you
Begin If you have not already done so, you should follow the help guide to pair
your CAC card with TPAX.
After completing a settlement, you will be required to attach a scanned
document file containing an image of the Original Authorization and all
required receipts. It is recommended BEFORE YOU BEGIN the
settlement, to complete the required scan file to attach to the claim before
forwarding to the AO for approval.
Procedures
Step Action
1 Log into TPAX.
2 The TPAX Inbox will display. Click the View drop-down and select if the
settlement is being entered by the Traveler or by Proxy.
Then click the Create New drop-down and select Settlement Request.
3 The Travel Order Selection will display.
Enter the Travel Order Number (TONO) for this settlement. Then click the OK
button.
Continued on next page

TDY Settlement – No Authorization, Continued
Procedures,
continued
Step Action
4 The Travel Order section will display.
Select the Grade/Rank drop-down and select your current paygrade. Then click
the Type of Order drop-down and make a selection (see options below).
Type of Order Description
Normal Default option. For most TDY orders, leave at this default
setting.
Doc Type 13 Used if creating authorization where multiple claims will be
submitted for the orders.
Invitational Used if creating one time Invitational Orders.
PCS Used if creating a PCS Settlement
Local Used if submitting a local travel claim.
Continued on next page

TDY Settlement – No Authorization, Continued
Procedures,
continued
Step Action
4
(cont)
Complete the next section of information (see options below). Some
information will auto populate based on your unit information.
Field Description
Purpose of Trip Defaults to Site Visit. In most cases leave at
default option.
Trip Name You may enter a specific identifier for the
settlement.
Issuing Organization/
Paying Organization
Defaults to your permanent duty station Operating
Facilities Code.
Group Travel Check the box if the settlement is for Group
Travel.
Funds Defaults to Coast Guard. In most cases leave at
the default option.
Continued on next page
TDY Settlement – No Authorization, Continued
Procedures,
continued
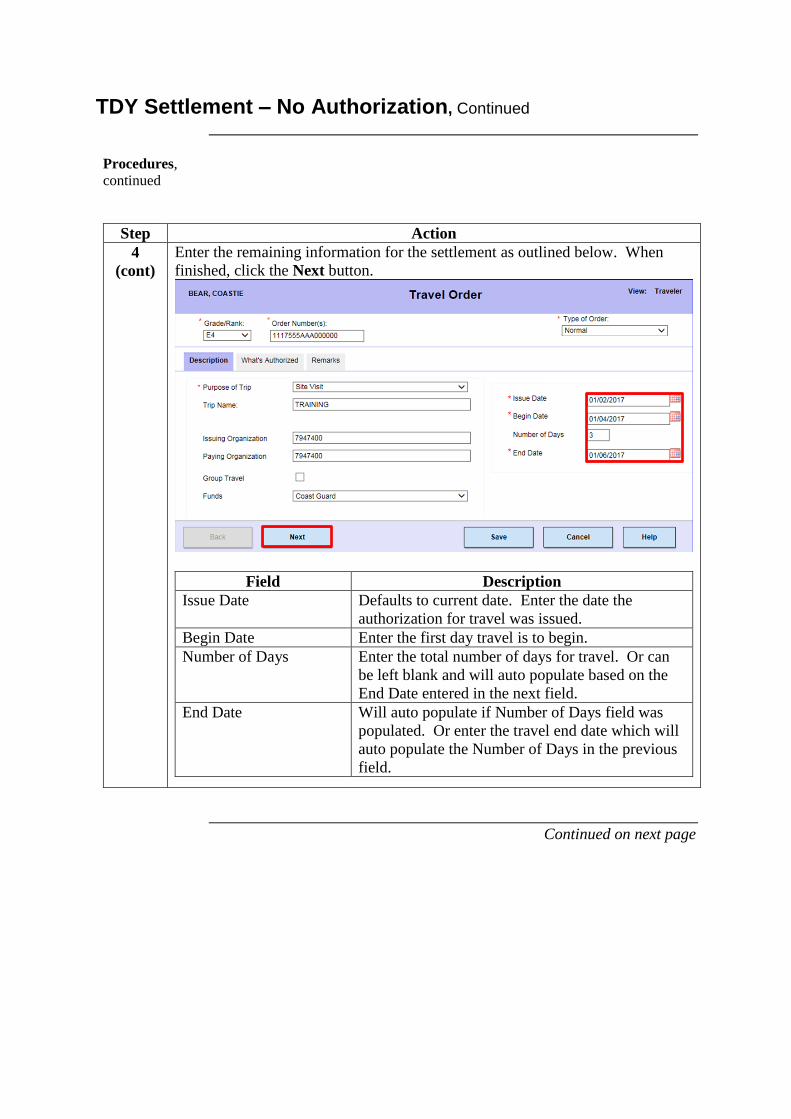
Step Action
4
(cont)
Enter the remaining information for the settlement as outlined below. When
finished, click the Next button.
Field Description
Issue Date Defaults to current date. Enter the date the
authorization for travel was issued.
Begin Date Enter the first day travel is to begin.
Number of Days Enter the total number of days for travel. Or can
be left blank and will auto populate based on the
End Date entered in the next field.
End Date Will auto populate if Number of Days field was
populated. Or enter the travel end date which will
auto populate the Number of Days in the previous
field.
Continued on next page
TDY Settlement – No Authorization, Continued
Procedures,
continued
Step Action
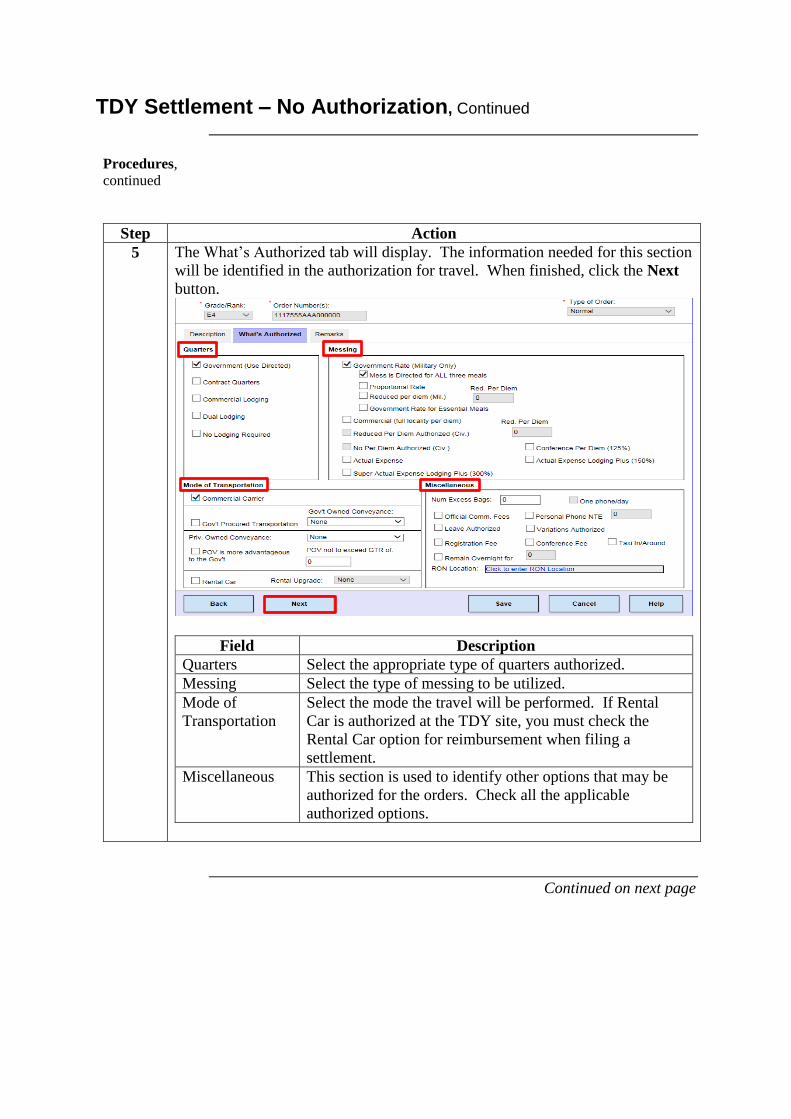
5 The What’s Authorized tab will display. The information needed for this section
will be identified in the authorization for travel. When finished, click the Next
button.
Field Description
Quarters Select the appropriate type of quarters authorized.
Messing Select the type of messing to be utilized.
Mode of
Transportation
Select the mode the travel will be performed. If Rental
Car is authorized at the TDY site, you must check the
Rental Car option for reimbursement when filing a
settlement.
Miscellaneous This section is used to identify other options that may be
authorized for the orders. Check all the applicable
authorized options.
Continued on next page
TDY Settlement – No Authorization, Continued
Procedures,
continued
Step Action
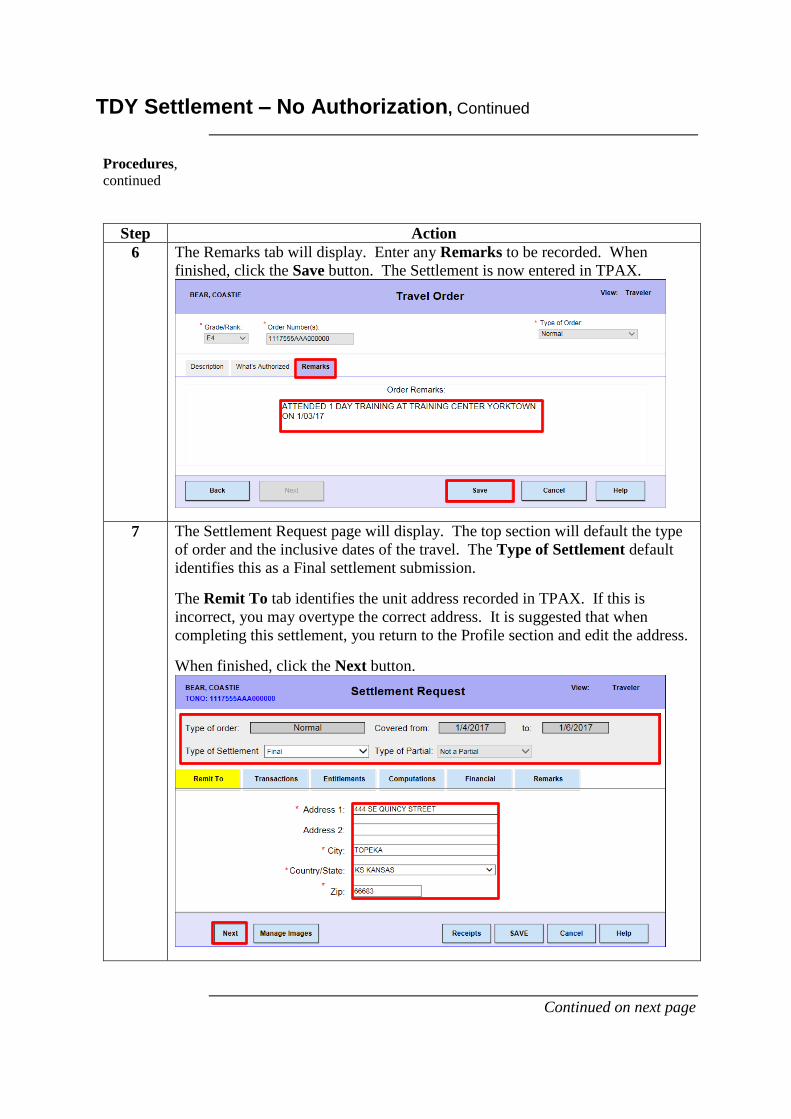
6 The Remarks tab will display. Enter any Remarks to be recorded. When
finished, click the Save button. The Settlement is now entered in TPAX.
7 The Settlement Request page will display. The top section will default the type
of order and the inclusive dates of the travel. The Type of Settlement default
identifies this as a Final settlement submission.
The Remit To tab identifies the unit address recorded in TPAX. If this is
incorrect, you may overtype the correct address. It is suggested that when
completing this settlement, you return to the Profile section and edit the address.
When finished, click the Next button.
Continued on next page
TDY Settlement – No Authorization, Continued
Procedures,
continued
Step Action
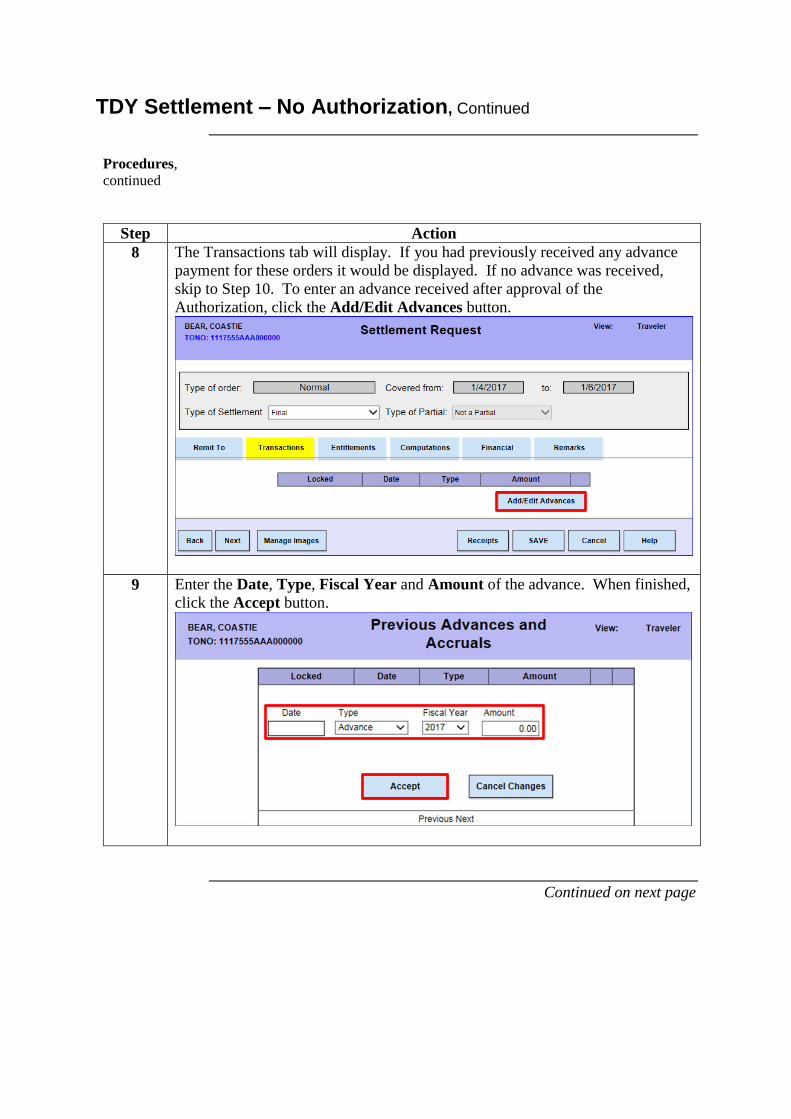
8 The Transactions tab will display. If you had previously received any advance
payment for these orders it would be displayed. If no advance was received,
skip to Step 10. To enter an advance received after approval of the
Authorization, click the Add/Edit Advances button.
9 Enter the Date, Type, Fiscal Year and Amount of the advance. When finished,
click the Accept button.
Continued on next page
TDY Settlement – No Authorization, Continued
Procedures,
continued
Step Action
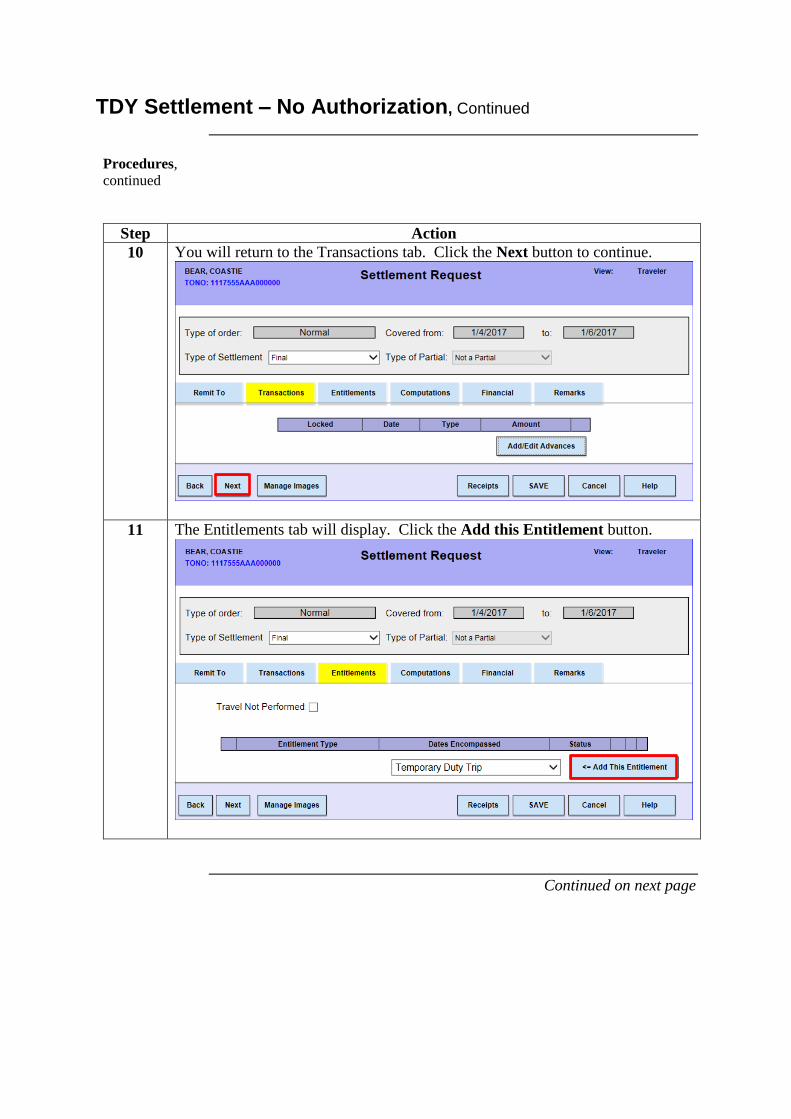
10 You will return to the Transactions tab. Click the Next button to continue.
11 The Entitlements tab will display. Click the Add this Entitlement button.
Continued on next page

TDY Settlement – No Authorization, Continued
Procedures,
continued
Step Action
12 The What’s Authorized tab will display. Enter the specific details for the
settlement. The Owner Operator of POV box will auto check. This will
ensure reimbursement for any Local Travel on these orders.
Click the Transportation Restrictions drop-down and select the applicable
option. The travel restrictions should be identified in the authorization for
travel. When finished, click the Next button.
13 The Itinerary tab will display. Click the Duration of Travel drop-down and
select the appropriate option for these orders.
Continued on next page

TDY Settlement – No Authorization, Continued
Procedures,
continued
Step Action
14 The Itinerary page will display. You are now ready to enter specific travel
information for each leg of the travel.
The Departure Date will default to the date previously entered. The Duty Day
field defaults to the correct option. Do NOT edit this field anywhere in the
Itinerary section.
Next, click the link in the Departure Location.
Using the chart below, enter the information where the travel is to begin. When
finished, click the Accept button.
Field Description
Country State Enter the two letter abbreviation for the country/state or
click the drop-down and chose an option.
Zip Code/City Enter the city name or zip code, then hit the tab key. The
information will auto populate. If the auto populated
information is NOT accurate, click the Zip Code/City
drop down and choose an option.
Country/Locality Will auto populate based on the data entered in the
previous fields.
Continued on next page

TDY Settlement – No Authorization, Continued
Procedures,
continued
Step Action
15 Click the Method of Transportation drop-down and select how travel will be
performed.
Continued on next page

TDY Settlement – No Authorization, Continued
Procedures,
continued
Step Action
16 If traveling via Private Auto, Check the Is Local box. This will ensure local
mileage reimbursement. TPAX will calculate the number of miles authorized.
Click the link in the Arrival Location.
Using the chart below, enter where the first stop will take place. When finished,
click the Accept button.
Field Description
Country State Enter the two letter abbreviation for the country/state or
click the drop-down and chose an option.
Zip Code/City Enter the city name or zip code, then hit the tab key. The
information will auto populate. If the auto populated
information is NOT accurate, click the Zip Code/City
drop down and choose an option.
Country/Locality Will auto populate based on the data entered in the
previous fields.
Continued on next page

TDY Settlement – No Authorization, Continued
Procedures,
continued
Step Action
17 Click the Reason for Stop drop-down and chose an option. Then, click the
Accept Leg button.
18 The first leg of the itinerary is complete and will display at the top of the section.
Continued on next page

TDY Settlement – No Authorization, Continued
Procedures,
continued
Step Action
19 Click the Method of Transportation drop-down and select the option for the
next step of travel.
Continued on next page

TDY Settlement – No Authorization, Continued
Procedures,
continued
Step Action
20 Click the link in the Arrival Location section.
Enter the information using the chart below. When finished, click the Accept
button.
Field Description
Country State Enter the two letter abbreviation for the country/state or
click the drop-down and chose an option.
Zip Code/City Enter the city name or zip code, then hit the tab key. The
information will auto populate. If the auto populated
information is NOT accurate, click the Zip Code/City
drop down and choose an option.
Country/Locality Will auto populate based on the data entered in the
previous fields.
Continued on next page

TDY Settlement – No Authorization, Continued
Procedures,
continued
Step Action
21 Click the Reason for Stop drop-down and make a selection.
22 Click the Method of Reimbursement drop-down and select an option.
The Daily Lodging Cost will default to the current Per diem rate for the TDY
location. Enter the daily Lodging Tax if paid. If there was no charge for
lodging, edit the Daily Lodging Cost to $0.00.
Continued on next page

TDY Settlement – No Authorization, Continued
Procedures,
continued
Step Action
23 Next click the Lodging Type drop-down and select the lodging authorized and
used during Temporary Duty.
24 Click the Meals Type drop-down and select the meal option authorized.
Continued on next page

TDY Settlement – No Authorization, Continued
Procedures,
continued
Step Action
25 Click the Accept Leg button. The second leg of the travel is completed and will
be listed at the top of this section.
26 Next, record the travel authorized and performed upon completion of the TDY.
Ensure the Departure Date and Location display the correct information.
Click the Method of Transportation drop-down and select the mode of travel
authorized.
Continued on next page

TDY Settlement – No Authorization, Continued
Procedures,
continued
Step Action
27 Click the link in the Arrival Location section.
Enter the information using the chart below. When finished, click the Accept
button.
Field Description
Country State Enter the two letter abbreviation for the country/state or
click the drop-down and chose an option.
Zip Code/City Enter the city name or zip code, then hit the tab key. The
information will auto populate. If the auto populated
information is NOT accurate, click the Zip Code/City
drop down and choose an option.
Country/Locality Will auto populate based on the data entered in the
previous fields.
Continued on next page

TDY Settlement – No Authorization, Continued
Procedures,
continued
Step Action
28 Click the Reason for Stop drop-down and select the mode of travel authorized
and used. Then, click the Accept Leg button.
29 The third leg of travel has been recorded and will be displayed at the top of the
section.
Continued on next page

TDY Settlement – No Authorization, Continued
Procedures,
continued
Step Action
30 Click the Method of Transportation drop-down and make a selection. Check
the Is Local box to ensure reimbursement for travel.
Continued on next page

TDY Settlement – No Authorization, Continued
Procedures,
continued
Step Action
31 Click the link in the Arrival Location section.
Enter the information using the chart below. When finished, click the Accept
button.
Country State Enter the two letter abbreviation for the country/state or
click the drop-down and chose an option.
Zip Code/City Enter the city name or zip code, then hit the tab key. The
information will auto populate. If the auto populated
information is NOT accurate, click the Zip Code/City
drop down and choose an option.
Country/Locality Will auto populate based on the data entered in the
previous fields.
Continued on next page

TDY Settlement – No Authorization, Continued
Procedures,
continued
Step Action
32 Click the Reason for Stop drop-down and make a selection. When finished,
click the Accept Leg button.
33 The Travel Itinerary is complete. Review the Itinerary for accuracy. If
necessary, click the Edit, Insert or Del links to edit the information. When
finished, click the Accept Changes button.
Continued on next page

TDY Settlement – No Authorization, Continued
Procedures,
continued
Step Action
34 The Itinerary tab will display. Click the Next button to continue.
35 The Constructed Itinerary tab will display. This section is only used when the
traveler is limited to the constructed cost of a Government Transportation
Request (GTR). If not filing constructed itinerary click the Next button to
continue.
Continued on next page

TDY Settlement – No Authorization, Continued
Procedures,
continued
Step Action
36 The Reimbursables tab will display. Click the Add/Edit Trip Expenses button
to enter reimbursable expenses.
37 Click the Expense Description drop-down and make a selection. Then enter the
amount Claimed.
Check the Split box if you want the amount claimed to be forwarded directly to
your Government charge card account. When finished, click the Accept
Expense button.
Continued on next page

TDY Settlement – No Authorization, Continued
Procedures,
continued
Step Action
38 The Reimbursable Expense page will display. Repeat Step 36-37 to add all
reimbursable expenses. When finished, click the Accept Changes button.
39 The Reimbursables tab will display. Click the Accept Changes button to
continue.
Continued on next page

TDY Settlement – No Authorization, Continued
Procedures,
continued
Step Action
40 The Entitlements tab will display. The Entitlement section is complete. All
information entered may be edited by clicking the Edit link. Click the Calcs
link.
41 The Daily Expenses page will display listing the Per diem calculations for each
day of TDY. When finished click the Done button.
Continued on next page

TDY Settlement – No Authorization, Continued
Procedures,
continued
Step Action
42 The Computations tab will appear. This section provides a financial
breakdown of the settlement. The first section will identify all entitlements and
deductions. The total entitlement cannot exceed the amount authorized for
travel, and entered into Federal Procurement Desktop (FPD) system by the order
authorizing official.
The next section will identify a Computed Split payment based on the items
checked for split payment in the Entitlements tab. Enter the amount you wish to
be forwarded directly to your government travel charge card in the Split
Payment field.
You can enter any amount up to the Total Entitlement f or this settlement. For
example, if you used the government travel charge card for meals totaling $50,
you can enter a total split payment for $325.00. Click the Next button.
Continued on next page
TDY Settlement – No Authorization, Continued
Procedures,
continued
Step Action
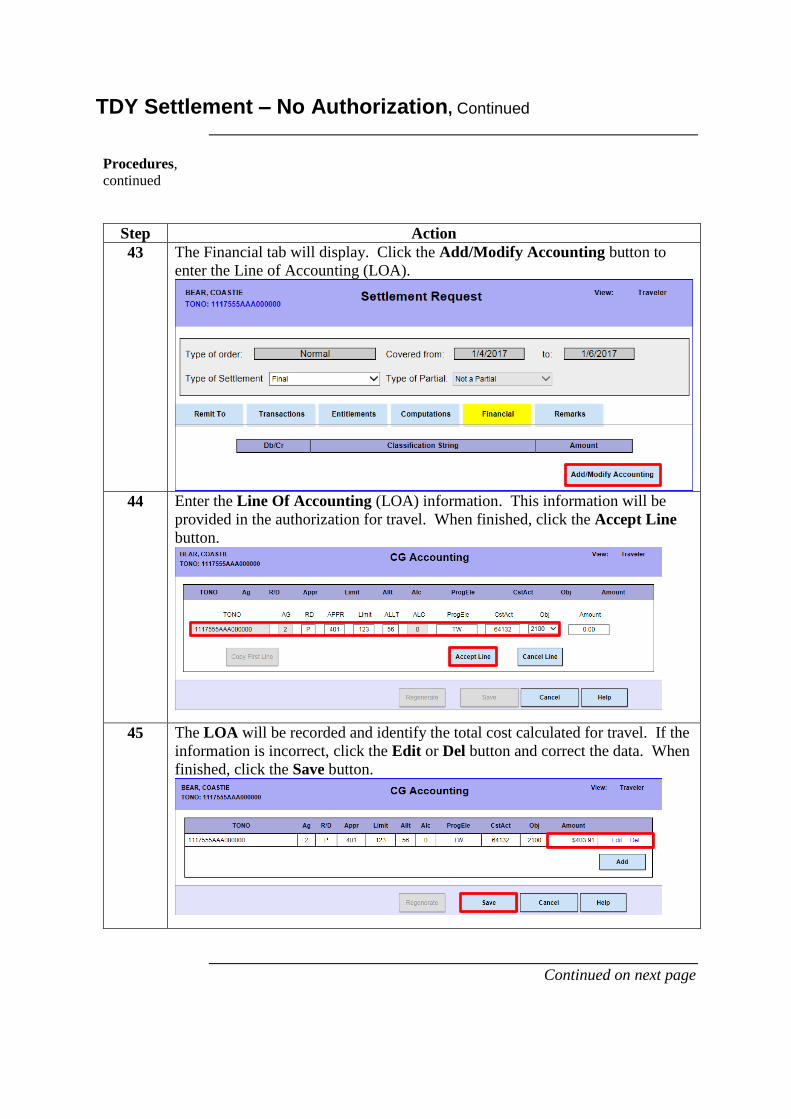
43 The Financial tab will display. Click the Add/Modify Accounting button to
enter the Line of Accounting (LOA).
44 Enter the Line Of Accounting (LOA) information. This information will be
provided in the authorization for travel. When finished, click the Accept Line
button.
45 The LOA will be recorded and identify the total cost calculated for travel. If the
information is incorrect, click the Edit or Del button and correct the data. When
finished, click the Save button.
Continued on next page

TDY Settlement – No Authorization, Continued
Procedures,
continued
Step Action
46 The Settlement Request page will display. Click the Next button to continue.
47 The Remarks tab will display. Enter any additional or amplifying information,
then click the Save button.
Continued on next page
TDY Settlement – No Authorization, Continued
Procedures,
continued
Step Action
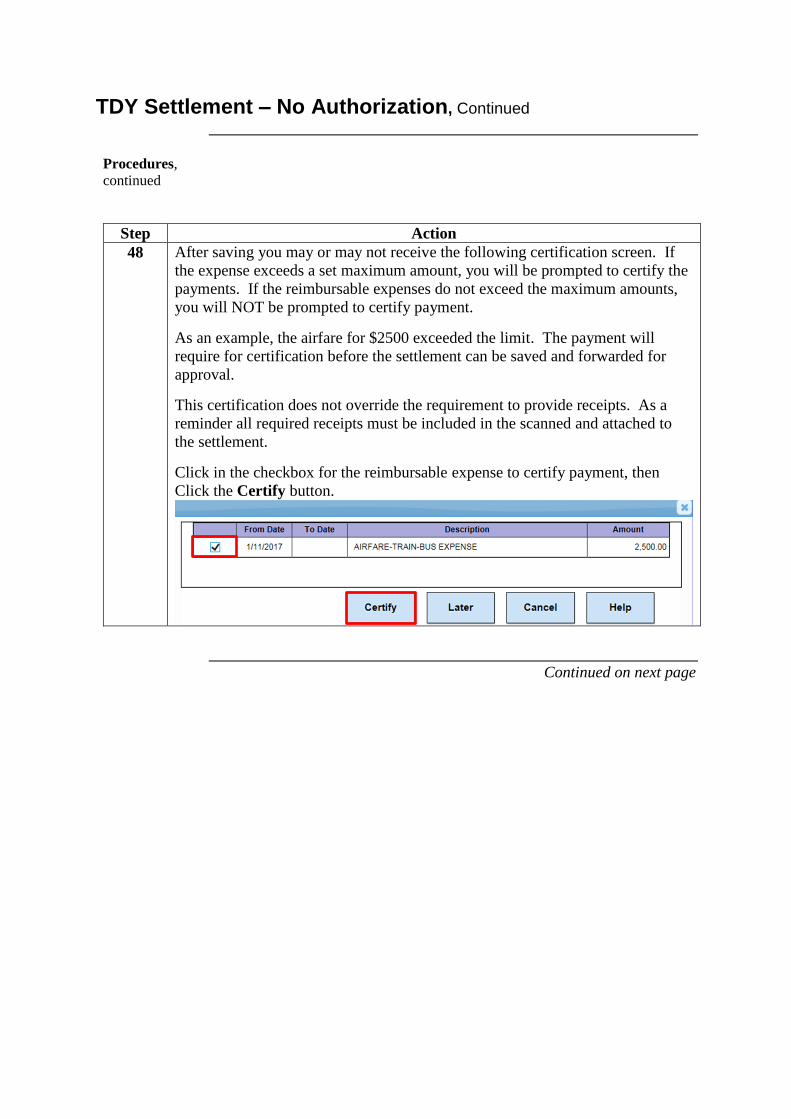
48 After saving you may or may not receive the following certification screen. If
the expense exceeds a set maximum amount, you will be prompted to certify the
payments. If the reimbursable expenses do not exceed the maximum amounts,
you will NOT be prompted to certify payment.
As an example, the airfare for $2500 exceeded the limit. The payment will
require for certification before the settlement can be saved and forwarded for
approval.
This certification does not override the requirement to provide receipts. As a
reminder all required receipts must be included in the scanned and attached to
the settlement.
Click in the checkbox for the reimbursable expense to certify payment, then
Click the Certify button.
Continued on next page

TDY Settlement – No Authorization, Continued
Procedures,
continued
Step Action
49 The TPAX Inbox will display. The settlement status will update to Entered
into TPAX.
Prior to forwarding to the Approving Official, the Authorization and any
required receipts must be scanned and attached to the settlement. To attach the
scanned documents, click the Check Box for the settlement, then click the
View/Modify button.
50 The Settlement Request page will display. Click the Manage Images button.
Continued on next page

TDY Settlement – No Authorization, Continued
Procedures,
continued
Step Action
51 Click the Browse button to locate the scan file. Name the Scan file in the Image
description field, then click the Upload Image button.
The Scan file should appear confirming the file is now attached to the
settlement. Click the Done button.
52 The TPAX Inbox will display. The settlement is ready to forward to the
Approving Official. Click the Check Box for the claim to be forwarded, then
click the Release for Approval button.
Continued on next page
TDY Settlement – No Authorization, Continued
Procedures,
continued
Step Action
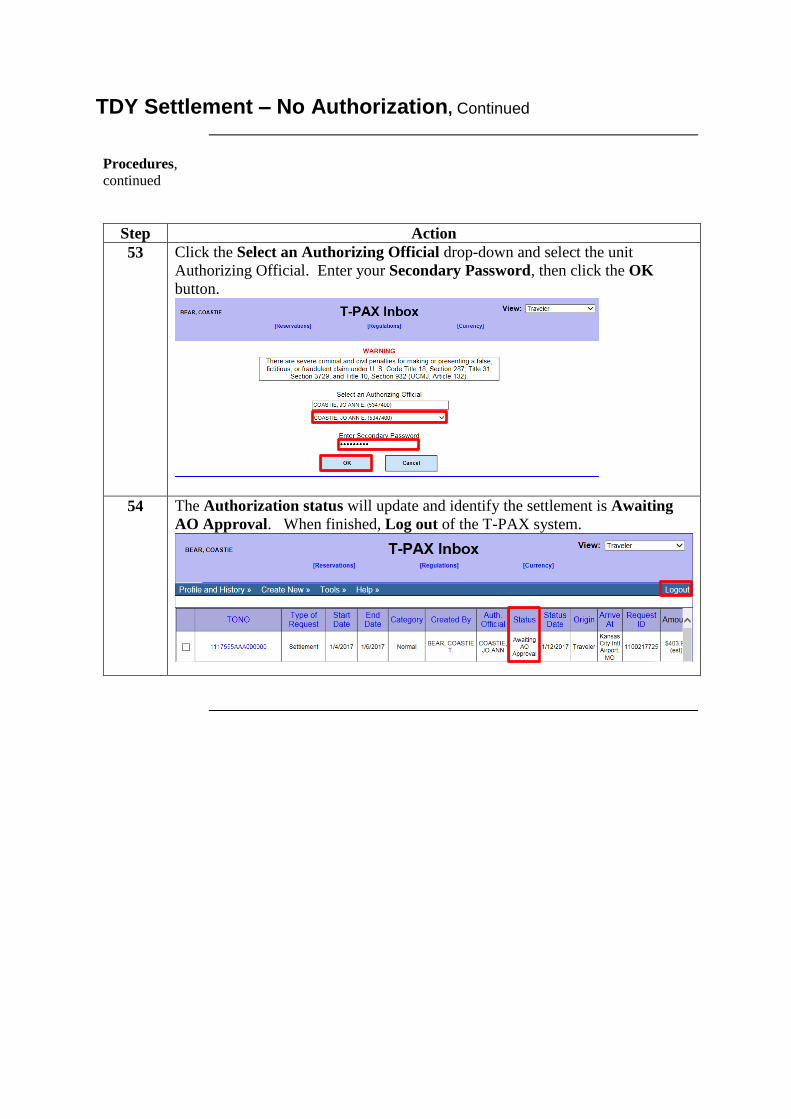
53 Click the Select an Authorizing Official drop-down and select the unit
Authorizing Official. Enter your Secondary Password, then click the OK
button.
54 The Authorization status will update and identify the settlement is Awaiting
AO Approval. When finished, Log out of the T-PAX system.