Embed Size (px)
Citation preview
Government of the People’s Republic of Bangladesh
National Board of Revenue
Segunbagicha, Dhaka
-------------------------
STRENGTHENING GOVERNANCE MANAGEMENT PROJECT (SGMP)
(ONLINE FILING AND DIGITIZATION OF TAX RETURN)
TAXPAYER MANUAL
ONLINE RETURN SUBMISSION
WITHHOLDING RETURN
VERSION 1.0
Page 2/ 25
Contents
1. INTRODUCTION ................................................................................................................... 3
1.1. Definition of Terminologies Used ............................................................................. 3
2. INSTRUCTION FOR SUBMISSION OF WITHHOLDING RETURN .................................... 4
2.1 Login TPOS .............................................................................................................. 4
2.2 Save Draft Tax Return form ..................................................................................... 6
(a) Inf: Interface ................................................................................................ 9
(b) Main Return ................................................................................................. 13
2.3 Process Draft Tax Return form ................................................................................ 17
2.4 Submit return ............................................................................................................ 20
2.5 View and print confirmation ...................................................................................... 21
2.6 View filing history...................................................................................................... 23
2.7 Print return ................................................................................................................ 25
2.8 View/Print Certificate ................................................................................................ 25
Page 3/ 25
1. INTRODUCTION
1.1. Definition of Terminologies Used
Terminologies Used Description
TIN Taxpayer’s Identification Number
UTIN Unified Taxpayer’s Identification Number
TCAN Tax Collectable Amount Number
BP Business Partner
FBN Form Bundle Number
CA Contract Account
CO Contract Object
FBT Form Bundle Type
CoCode Company Code
Ast year Assessment Year
NBR National Board of Revenue
CT Commissioner of Tax
DCT Deputy Commissioner of Tax
VAT Value Added Tax
TPOS Taxpayer Online Service
Page 4/ 25
2. INSTRUCTION FOR SUBMISSION OF WITHHOLDING RETURN
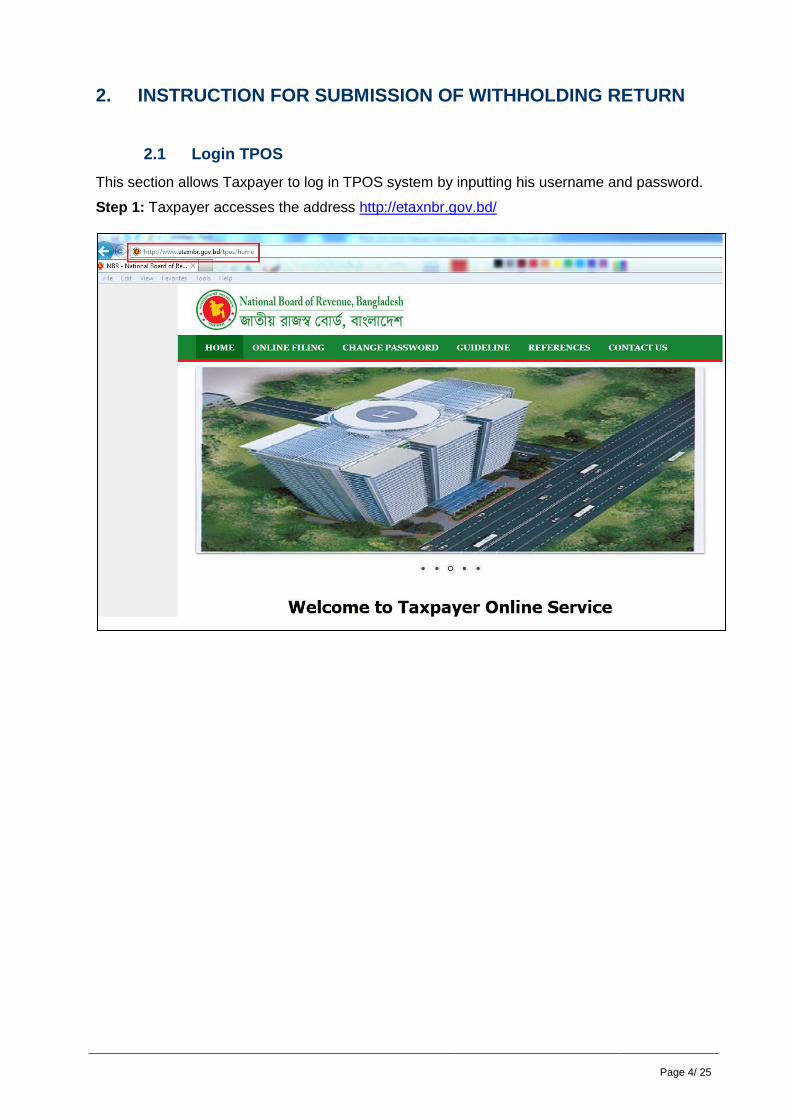
2.1 Login TPOS
This section allows Taxpayer to log in TPOS system by inputting his username and password.
Step 1: Taxpayer accesses the address http://etaxnbr.gov.bd/
Page 5/ 25
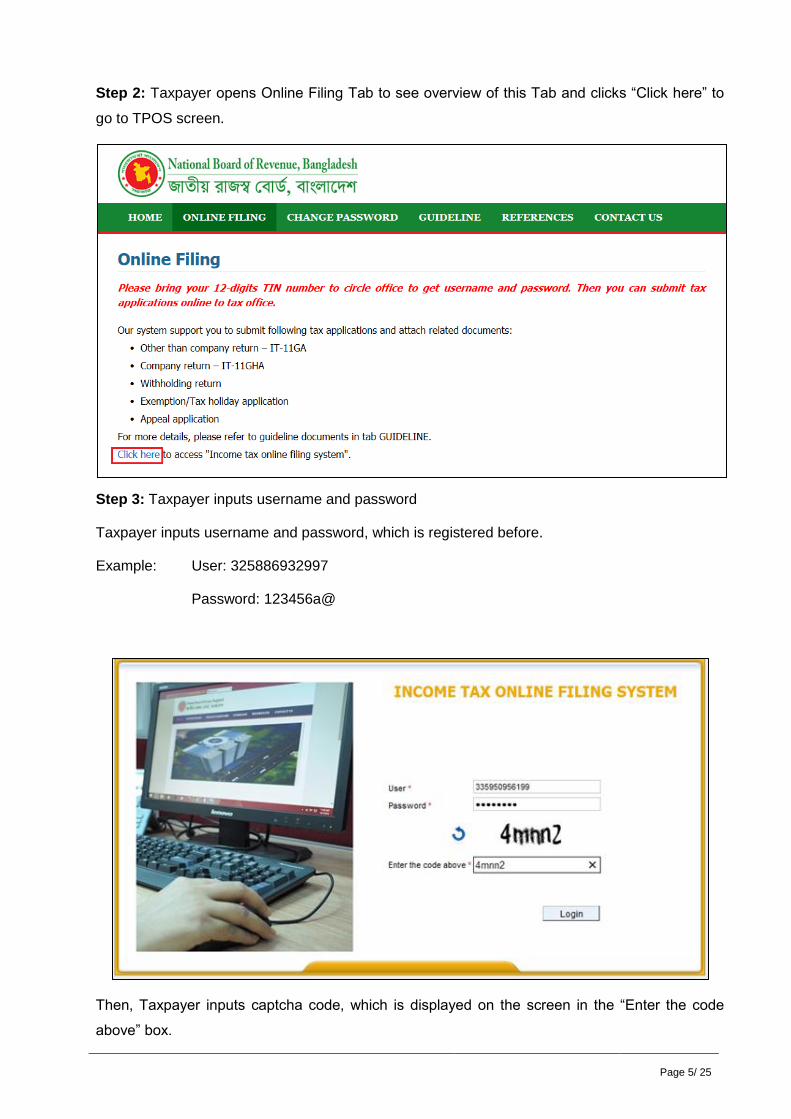
Step 2: Taxpayer opens Online Filing Tab to see overview of this Tab and clicks “Click here” to
go to TPOS screen.
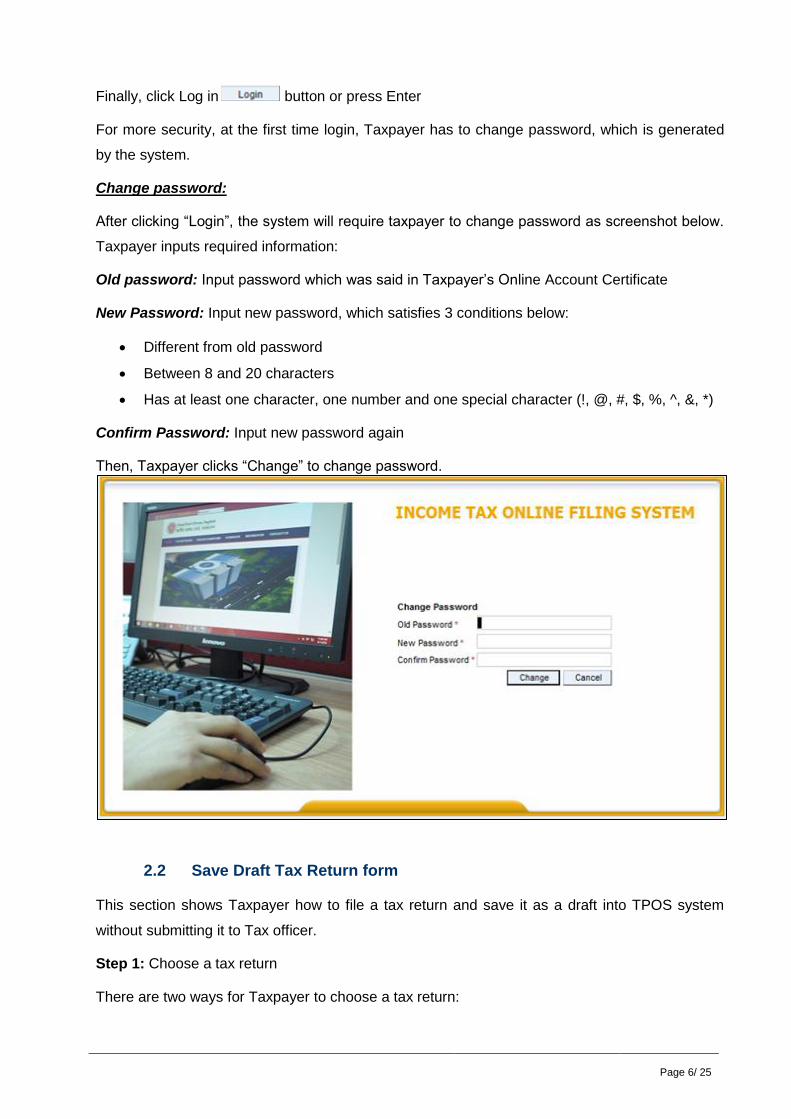
Step 3: Taxpayer inputs username and password
Taxpayer inputs username and password, which is registered before.
Example: User: 325886932997
Password: 123456a@
Then, Taxpayer inputs captcha code, which is displayed on the screen in the “Enter the code
above” box.
Page 6/ 25
Finally, click Log in button or press Enter
For more security, at the first time login, Taxpayer has to change password, which is generated
by the system.
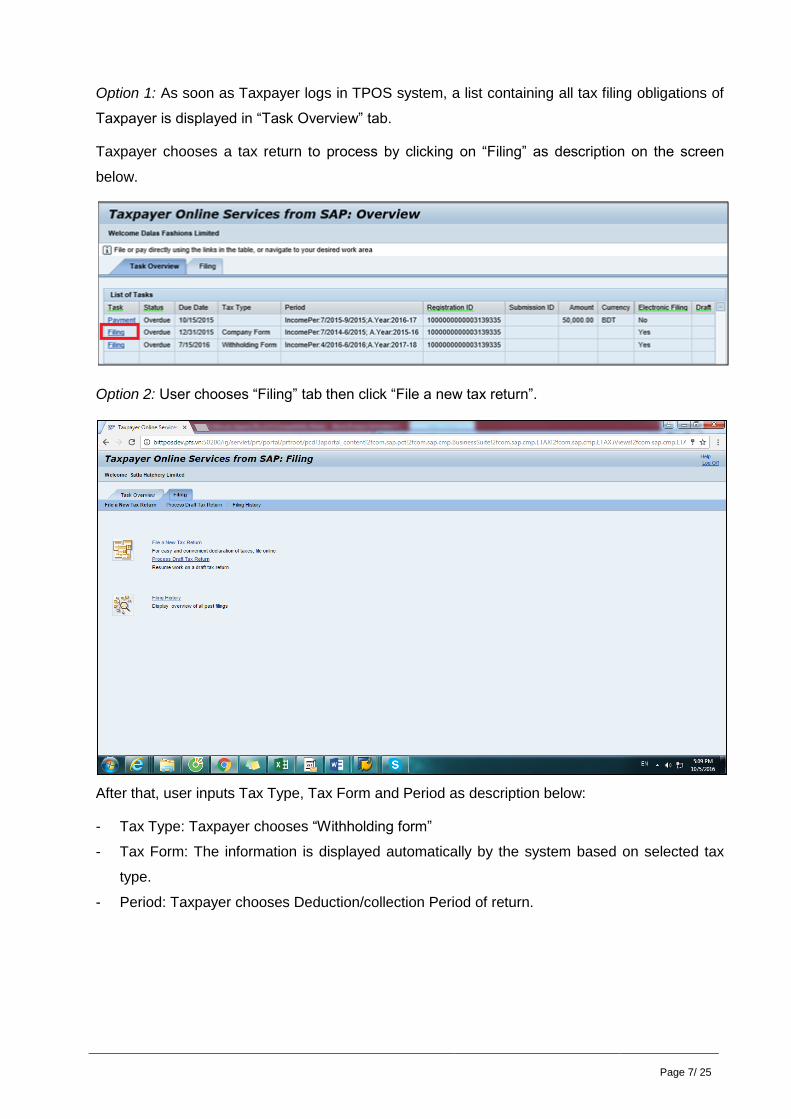
Change password:
After clicking “Login”, the system will require taxpayer to change password as screenshot below.
Taxpayer inputs required information:
Old password: Input password which was said in Taxpayer’s Online Account Certificate
New Password: Input new password, which satisfies 3 conditions below:
Different from old password
Between 8 and 20 characters
Has at least one character, one number and one special character (!, @, #, $, %, ^, &, *)
Confirm Password: Input new password again
Then, Taxpayer clicks “Change” to change password.
2.2 Save Draft Tax Return form
This section shows Taxpayer how to file a tax return and save it as a draft into TPOS system
without submitting it to Tax officer.
Step 1: Choose a tax return
There are two ways for Taxpayer to choose a tax return:
Page 7/ 25
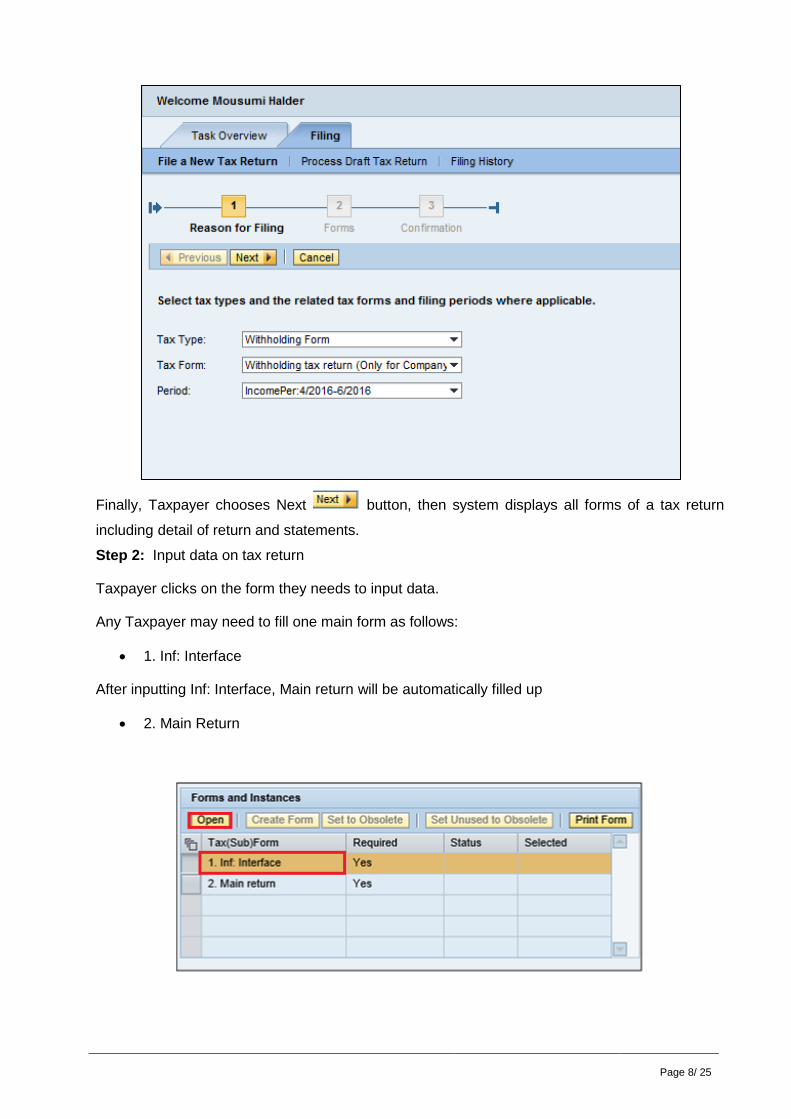
Option 1: As soon as Taxpayer logs in TPOS system, a list containing all tax filing obligations of
Taxpayer is displayed in “Task Overview” tab.
Taxpayer chooses a tax return to process by clicking on “Filing” as description on the screen
below.
Option 2: User chooses “Filing” tab then click “File a new tax return”.
After that, user inputs Tax Type, Tax Form and Period as description below:
- Tax Type: Taxpayer chooses “Withholding form”
- Tax Form: The information is displayed automatically by the system based on selected tax
type.
- Period: Taxpayer chooses Deduction/collection Period of return.
Page 8/ 25
Finally, Taxpayer chooses Next button, then system displays all forms of a tax return
including detail of return and statements.
Step 2: Input data on tax return
Taxpayer clicks on the form they needs to input data.
Any Taxpayer may need to fill one main form as follows:
1. Inf: Interface
After inputting Inf: Interface, Main return will be automatically filled up
2. Main Return
Page 9/ 25
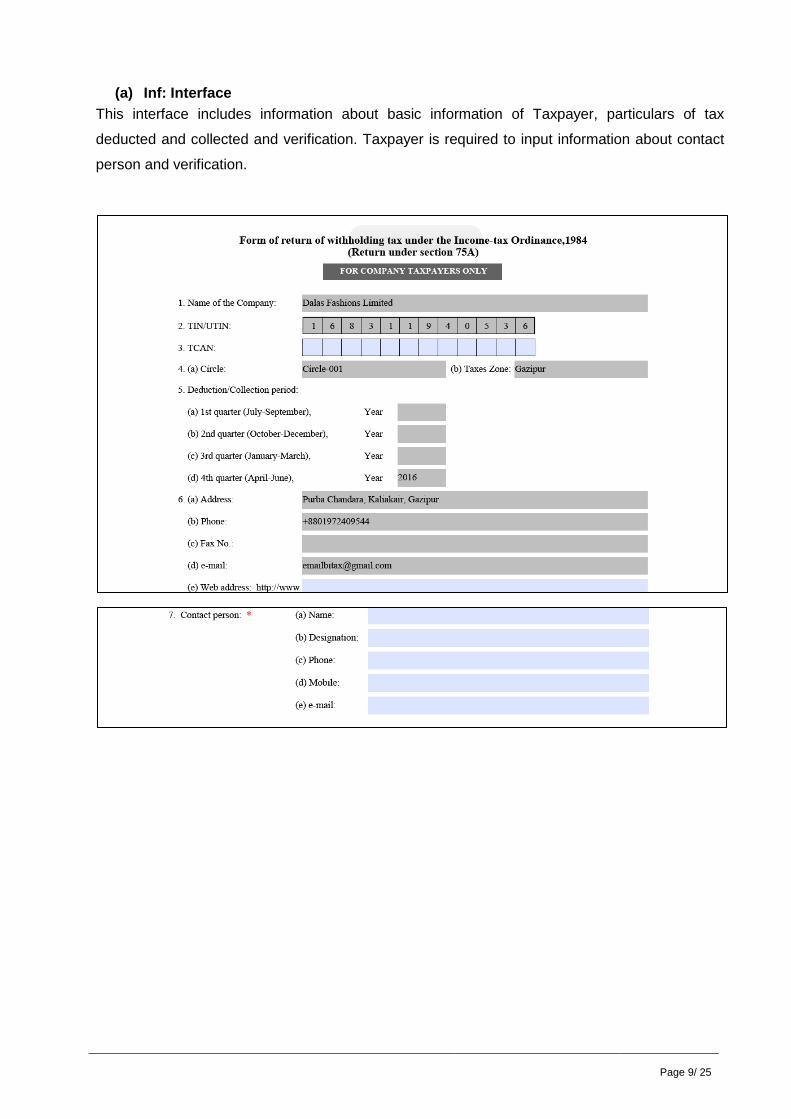
(a) Inf: Interface
This interface includes information about basic information of Taxpayer, particulars of tax
deducted and collected and verification. Taxpayer is required to input information about contact
person and verification.
Page 10/ 25
Name Description
[01] Name of the Company Display name of Company.
[02] TIN/UTIN Display TIN/UTIN number of Taxpayer.
[03] TCAN Allow Taxpayer to input TCAN number of Taxpayer.
[04a] Circle Display automatically only name of Circle
[04b] Taxes Zone Display automatically Taxes Zone.
[05]Deduction/Collection Display automatically the deduction/collection period of

Page 11/ 25
Name Description
Period company.
[06a] Address Display automatically the address of company.
[06b] Phone Display automatically phone of company.
[06c] Fax No. Display automatically fax no. of company.
[06d] E-mail Display automatically email address of company.
[06e] Web address Allow Taxpayer to input web address of company.
[07] Contact person
[07a] Name Allow Taxpayer to input name of contact person.
Note: This is mandatory field.
[07b] Designation Allow Taxpayer to input designation of contact person.
Note: This is mandatory field.
[07c] Phone Allow Taxpayer to input phone number of contact person.
Note: This is mandatory field.
[07d] Mobile Allow Taxpayer to input mobile number of contact person.
Note: This is mandatory field.
[07e] E-mail Allow Taxpayer to input e-mail address of contact person.
Note: This is mandatory field.
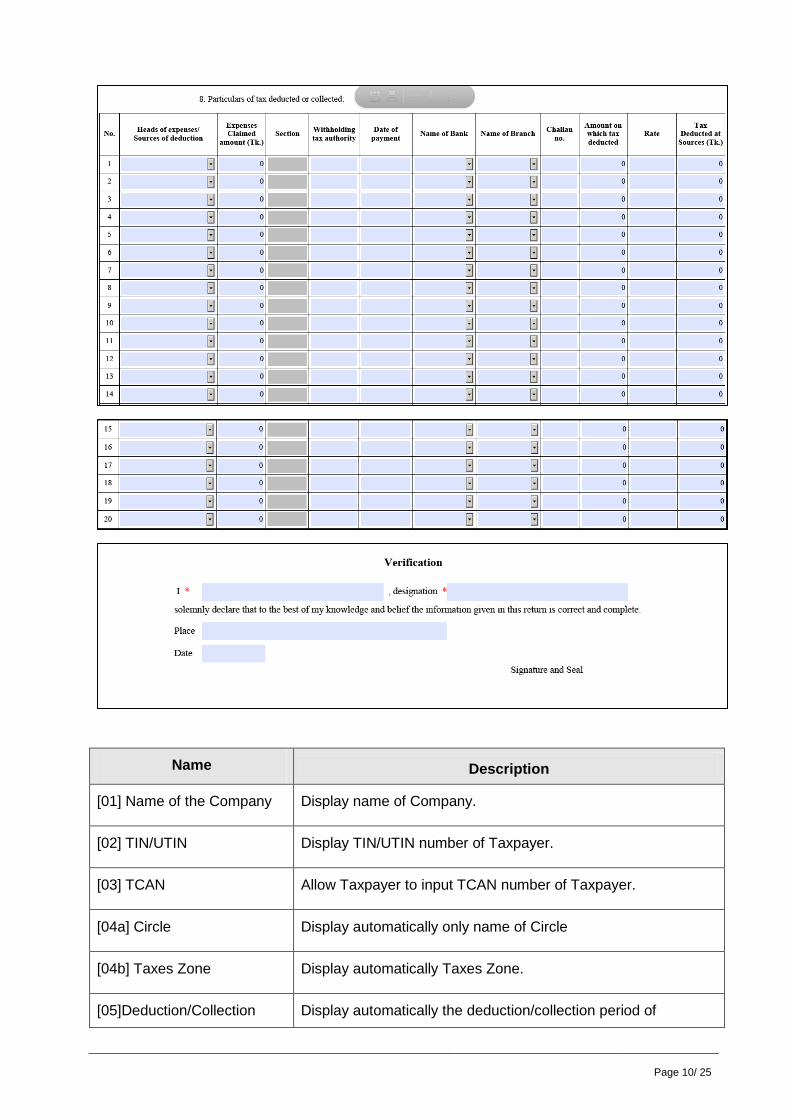
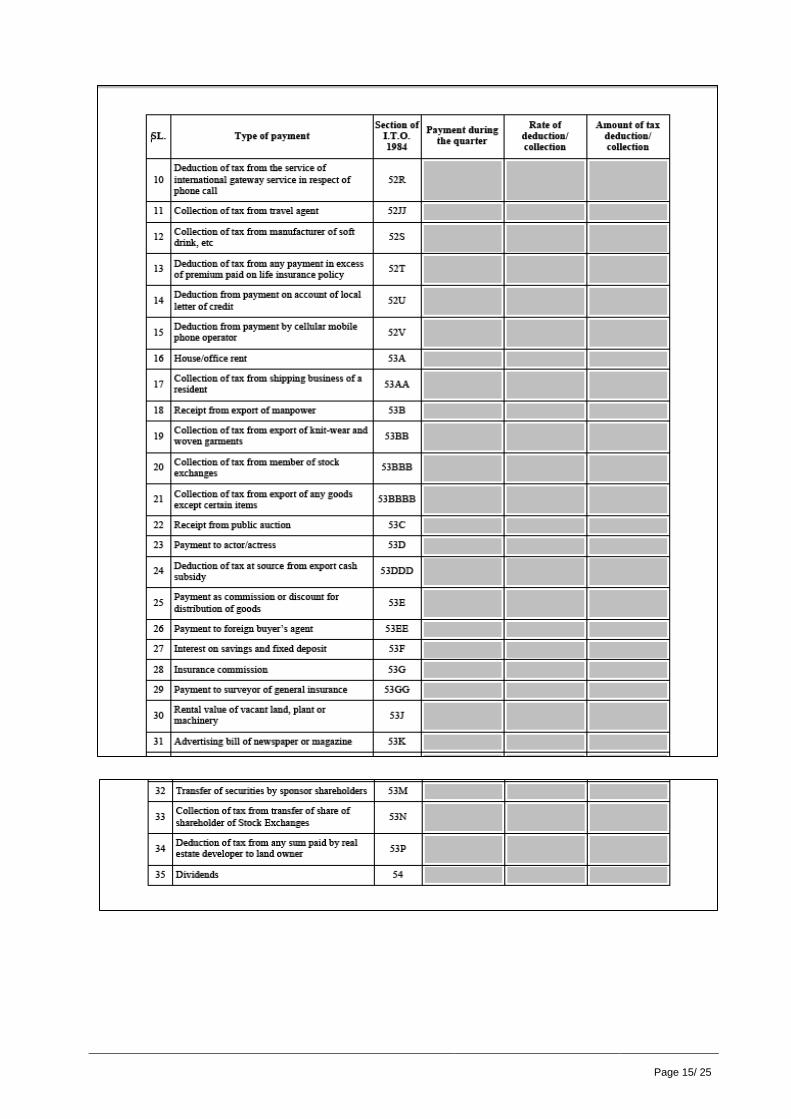
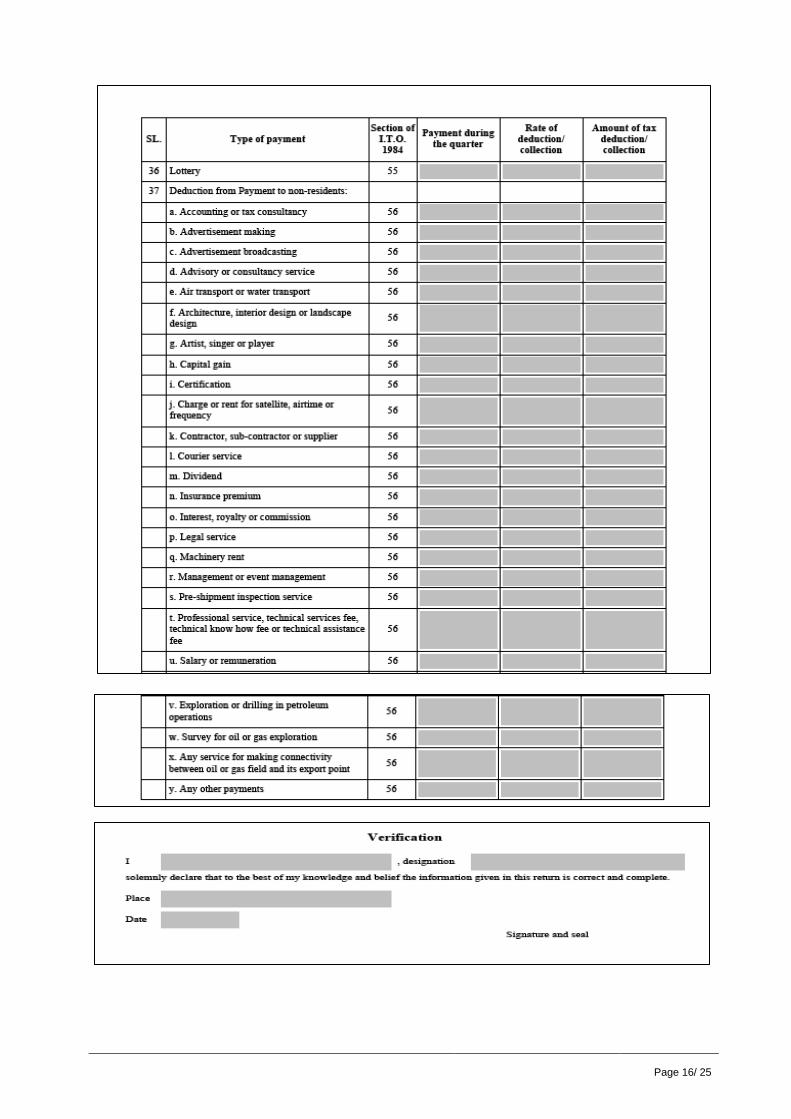
[08] Particulars of tax deducted or collected:
No. Display order of type of payment.
Heads of expenses/Sources
of deduction
Allow Taxpayer to choose value in list of income heads in
respect of which Tax payable shall be deducted or collected at
source.
Expenses claimed amount
(Tk.)
Allow Taxpayer to input the amount.
Page 12/ 25
Name Description
Section System automatically shows the section.
Withholding tax authority Allow Taxpayer to input the name of withholding tax authority.
Date of payment Allow Taxpayer to input the date of payment.
Name of Bank Allow Taxpayer to choose a value from list.
Name of Branch Allow Taxpayer to choose a value from list.
Challan no. Allow Taxpayer to input challan number.
Amount on which tax
deducted
Allow Taxpayer to input the amount.
Rate Allow Taxpayer to input the rate.
Tax deducted at sources
(Tk)
Allow Taxpayer to input the amount.
Verification
I…… Allow Taxpayer to input the name of person who submits this
return.
Note: This is mandatory field
Designation Allow Taxpayer to input designation of person who submits this
return.
Note: This is mandatory field
Place Allow Taxpayer to input the location from which the return is
submitted.
Date Allow Taxpayer to input the date when the return is submitted.

Page 13/ 25
After inputting all information Taxpayer clicks Check and Calculate button for
automatic calculation and error checking of Withholding return.
In this step, Taxpayer clicks save draft button to save tax return as a draft. Taxpayer
can save draft of Withholding return without processing all forms of a Withholding tax return.
(b) Main Return
This form contains the basic information of Taxpayer, particulars of tax deducted and collected
and verification. All information in this form is automatically extracted from interface. However,
Taxpayer still has to open it and then click "Apply and Close" button.
Page 14/ 25
Page 15/ 25
Page 16/ 25
Page 17/ 25
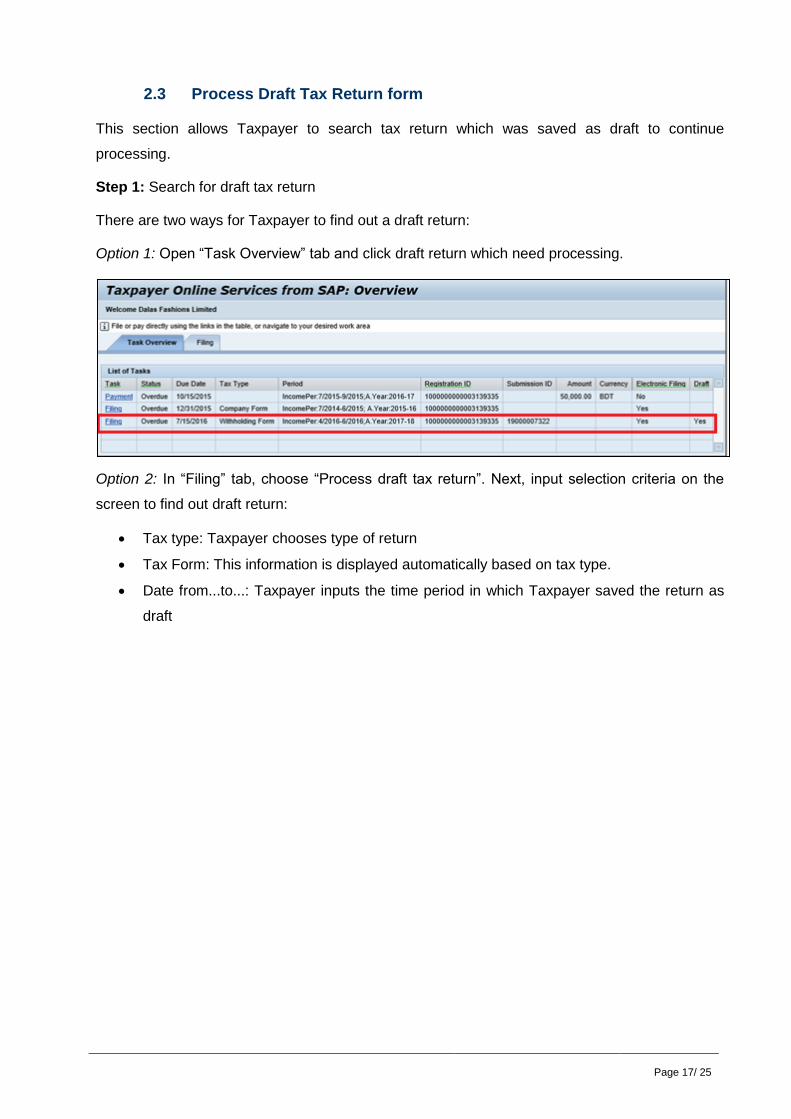
2.3 Process Draft Tax Return form
This section allows Taxpayer to search tax return which was saved as draft to continue
processing.
Step 1: Search for draft tax return
There are two ways for Taxpayer to find out a draft return:
Option 1: Open “Task Overview” tab and click draft return which need processing.
Option 2: In “Filing” tab, choose “Process draft tax return”. Next, input selection criteria on the
screen to find out draft return:
Tax type: Taxpayer chooses type of return
Tax Form: This information is displayed automatically based on tax type.
Date from...to...: Taxpayer inputs the time period in which Taxpayer saved the return as
draft
Page 18/ 25
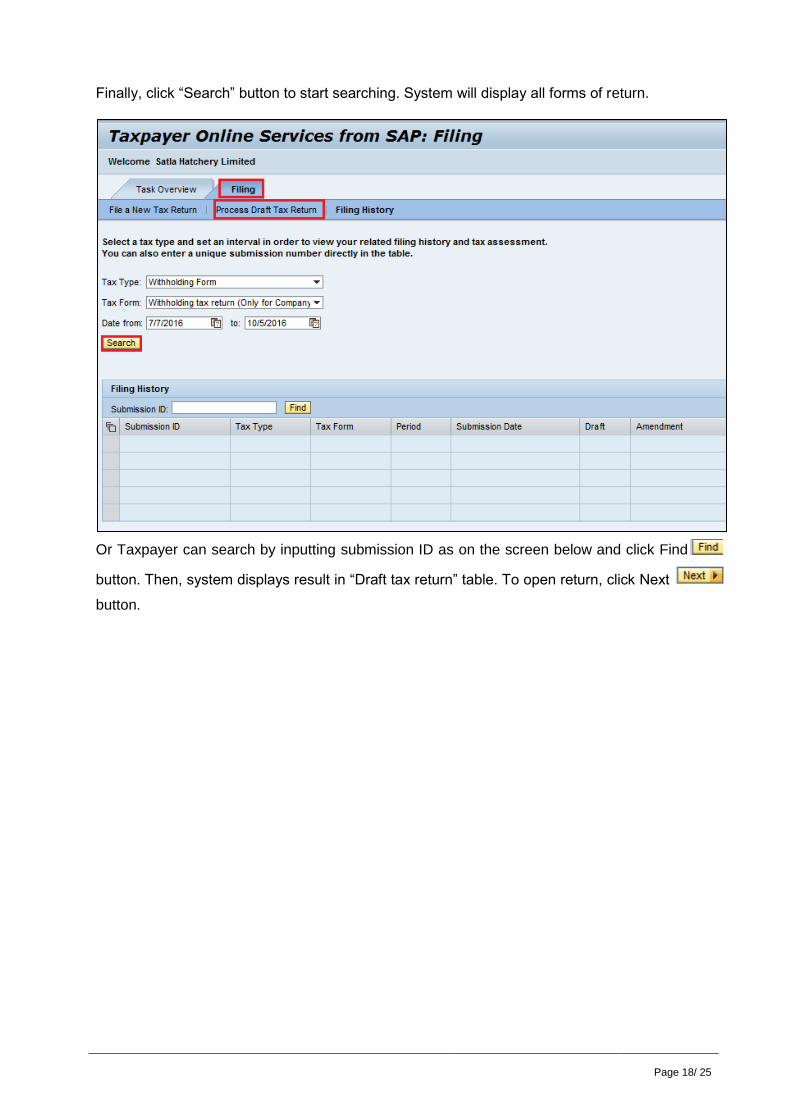
Finally, click “Search” button to start searching. System will display all forms of return.
Or Taxpayer can search by inputting submission ID as on the screen below and click Find
button. Then, system displays result in “Draft tax return” table. To open return, click Next
button.
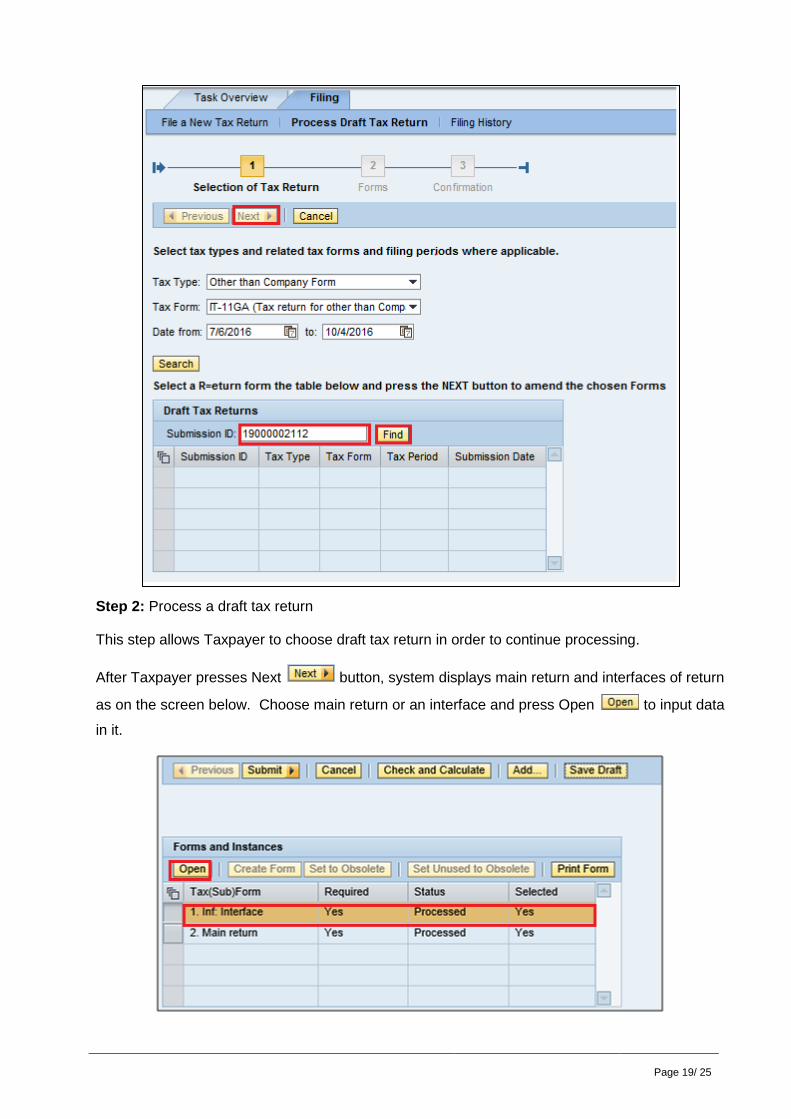
Page 19/ 25
Step 2: Process a draft tax return
This step allows Taxpayer to choose draft tax return in order to continue processing.
After Taxpayer presses Next button, system displays main return and interfaces of return
as on the screen below. Choose main return or an interface and press Open to input data
in it.
Page 20/ 25
2.4 Submit return
This section guides Taxpayer how to submit a tax return after processing all forms included in
that return.
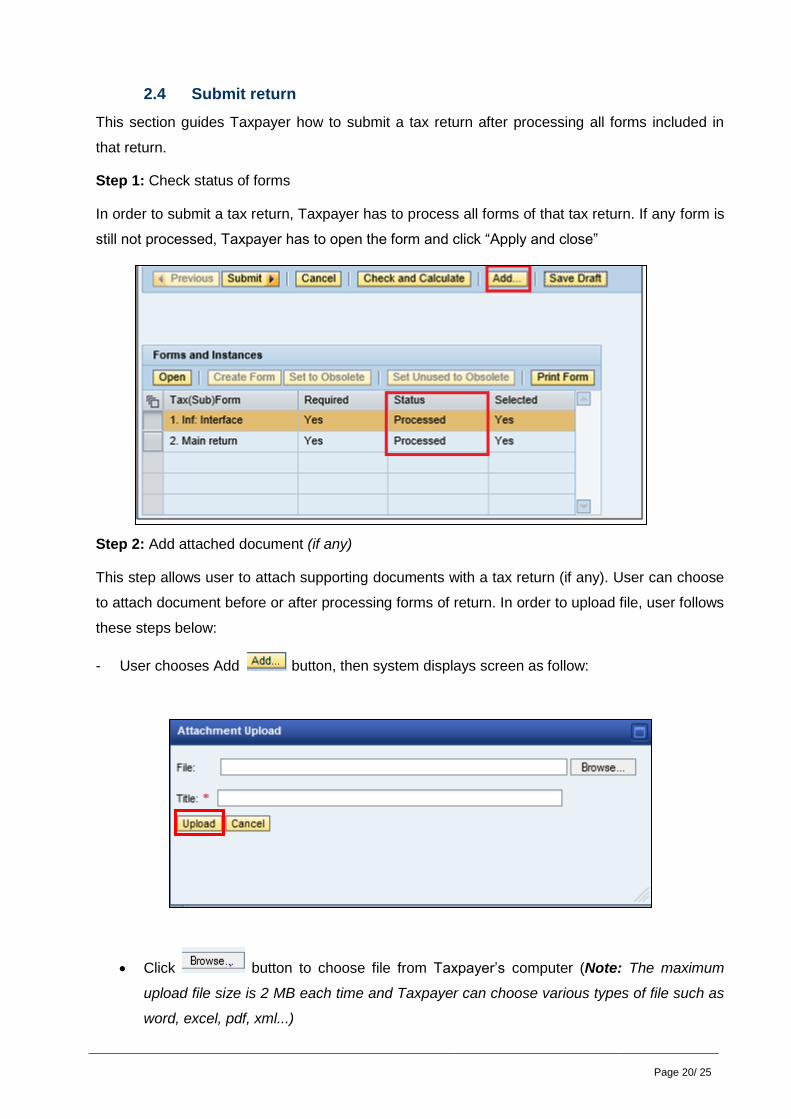
Step 1: Check status of forms
In order to submit a tax return, Taxpayer has to process all forms of that tax return. If any form is
still not processed, Taxpayer has to open the form and click “Apply and close”
Step 2: Add attached document (if any)
This step allows user to attach supporting documents with a tax return (if any). User can choose
to attach document before or after processing forms of return. In order to upload file, user follows
these steps below:
- User chooses Add button, then system displays screen as follow:
Click button to choose file from Taxpayer’s computer (Note: The maximum
upload file size is 2 MB each time and Taxpayer can choose various types of file such as
word, excel, pdf, xml...)
Page 21/ 25
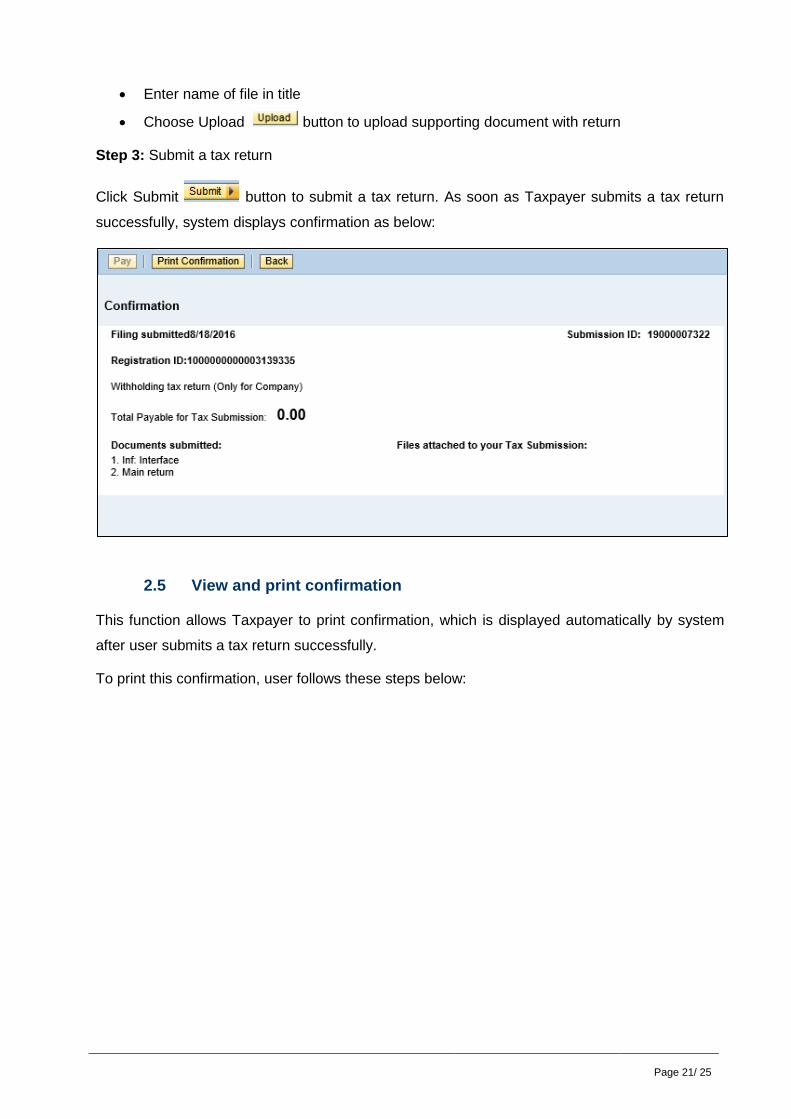
Enter name of file in title
Choose Upload button to upload supporting document with return
Step 3: Submit a tax return
Click Submit button to submit a tax return. As soon as Taxpayer submits a tax return
successfully, system displays confirmation as below:
2.5 View and print confirmation
This function allows Taxpayer to print confirmation, which is displayed automatically by system
after user submits a tax return successfully.
To print this confirmation, user follows these steps below:

Page 22/ 25
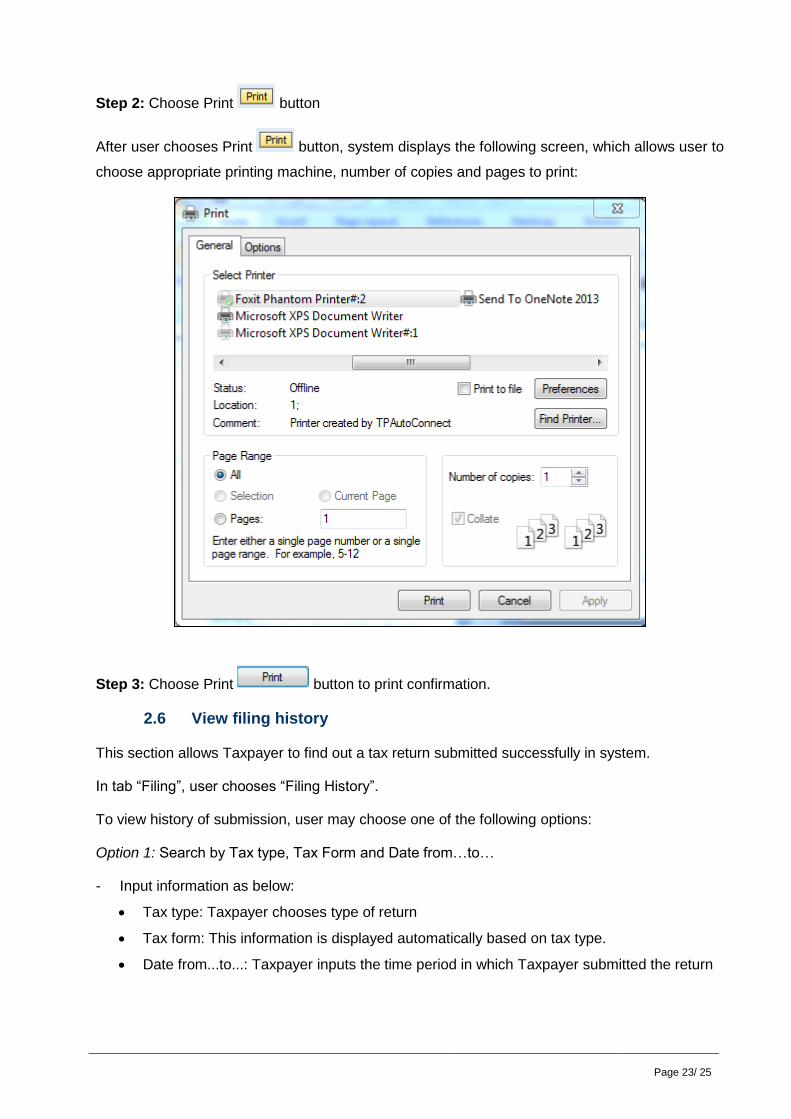
Step 1: Choose Print Confirmation button
After Taxpayer chooses Print Confirmation , system displays the following screen
for Taxpayer to preview confirmation before printing:
Page 23/ 25
Step 2: Choose Print button
After user chooses Print button, system displays the following screen, which allows user to
choose appropriate printing machine, number of copies and pages to print:
Step 3: Choose Print button to print confirmation.
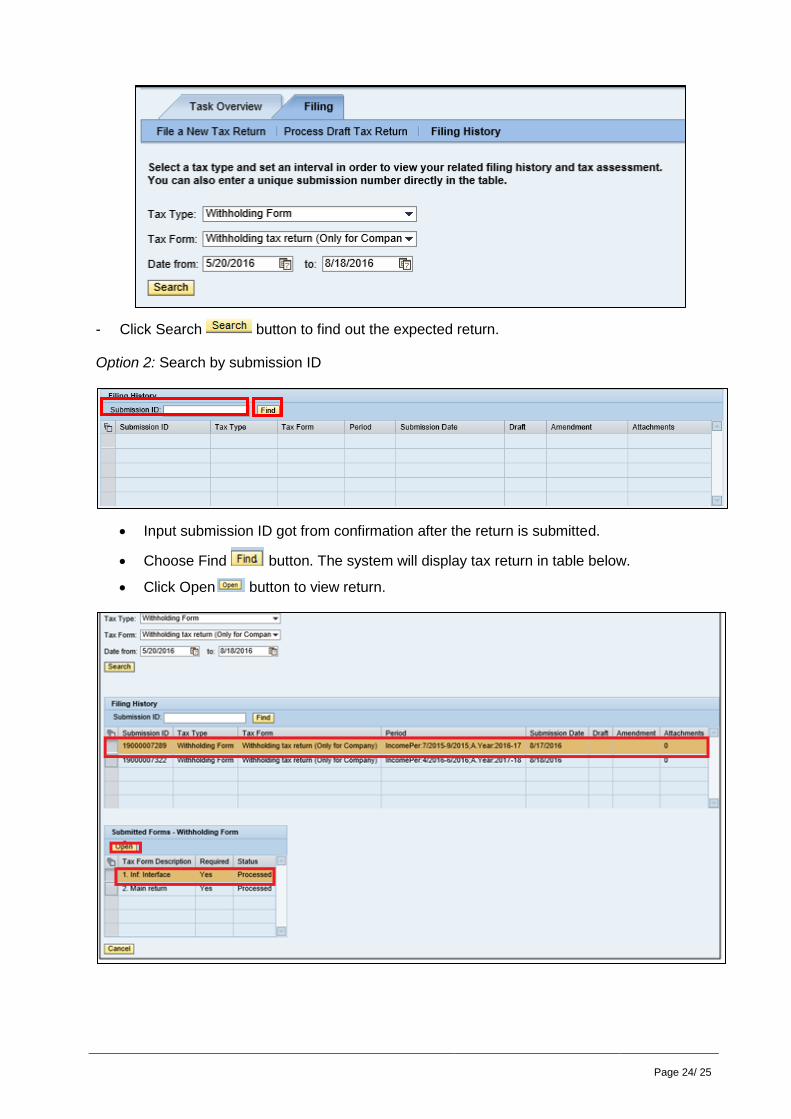
2.6 View filing history
This section allows Taxpayer to find out a tax return submitted successfully in system.
In tab “Filing”, user chooses “Filing History”.
To view history of submission, user may choose one of the following options:
Option 1: Search by Tax type, Tax Form and Date from…to…
- Input information as below:
Tax type: Taxpayer chooses type of return
Tax form: This information is displayed automatically based on tax type.
Date from...to...: Taxpayer inputs the time period in which Taxpayer submitted the return
Page 24/ 25
- Click Search button to find out the expected return.
Option 2: Search by submission ID
Input submission ID got from confirmation after the return is submitted.
Choose Find button. The system will display tax return in table below.
Click Open button to view return.
Page 25/ 25
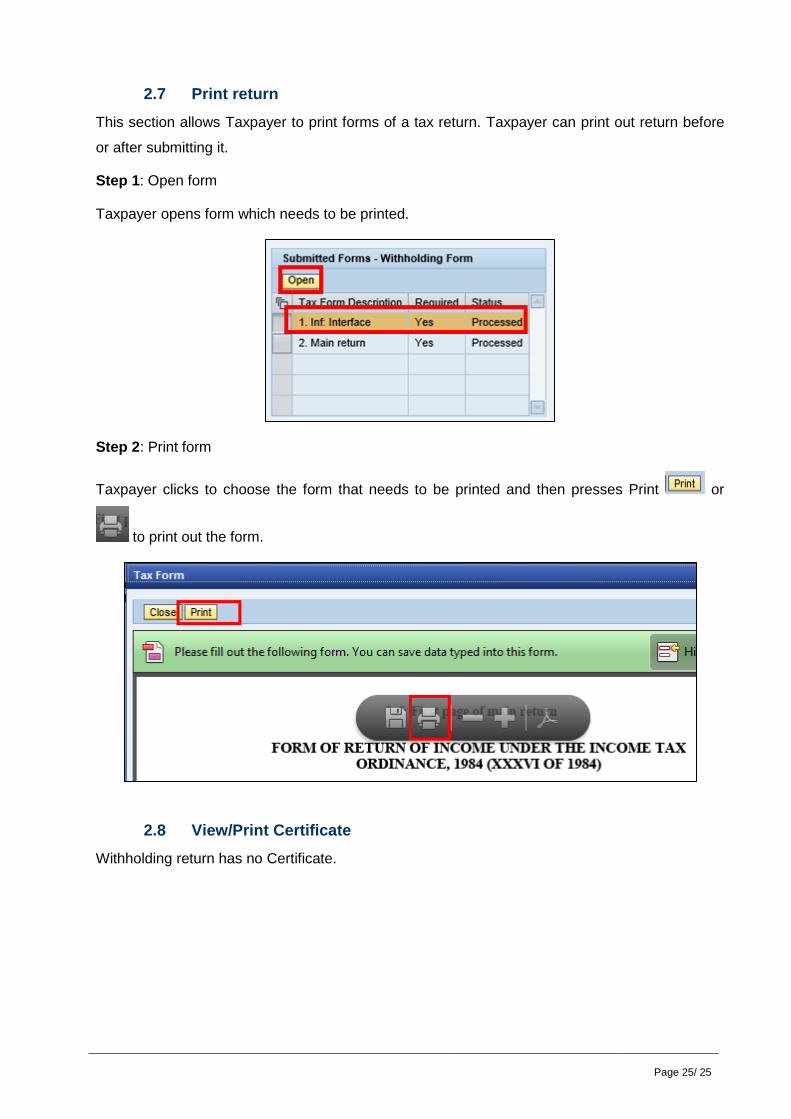
2.7 Print return
This section allows Taxpayer to print forms of a tax return. Taxpayer can print out return before
or after submitting it.
Step 1: Open form
Taxpayer opens form which needs to be printed.
Step 2: Print form
Taxpayer clicks to choose the form that needs to be printed and then presses Print or
to print out the form.
2.8 View/Print Certificate
Withholding return has no Certificate.