Embed Size (px)
Citation preview

Turbonomic 5.5Target Configuration Guide
Turbonomic, Inc.
500 Boylston St, 8th floorBoston, MA 02116 USAPhone: (866) 634 5087www.turbonomic.com
Turbonomic 5.5Target Configuration Guide

ii Turbonomic, Inc. www.turbonomic.com
COPYRIGHT
Copyright© Turbonomic 2010 — 2016, all rights reserved
END-USER LICENSE AGREEMENT
http://www.turbonomic.com/terms-of-use/

Target Configuration Guide iii
Table of Contents
Target Configuration 1Adding and Removing Target Virtual Management Servers 2
Adding Targets 2Editing and Removing Targets 3
Hypervisor Targets 5IBM PowerVM 9Hyper-V 11Red Hat Enterprise Virtualization (RHEV-M) 14vCenter Server 15XenServer 19
Cloud Management Targets 20Private Cloud 21
CloudStack 23OpenStack 24vCloud Director 25Virtual Machine Manager 26
Public Cloud 29Amazon Web Services 32IBM SoftLayer 33Microsoft Azure 33
Storage Manager Targets 35Dell Compellent 38EMC VMAX 40EMC VNX 42EMC XtremIO 44HP 3PAR 45NetApp 47Nutanix 50Pure Storage 54
Application Server Targets 56JBoss 59Apache Tomcat 61Oracle WebLogic 63IBM WebSphere 64
Database Server Targets 66MySQL 69Oracle 70SQL Server 72
iv Turbonomic, Inc. www.turbonomic.com
Adding Windows® Applications as Targets 74
Network Flow Targets 79Arista 82NetFlow 82sFlow 84
Application Container Targets 85
Adding PaaS Managers as Targets 89
Fabric Manager Targets 91
Adding Load Balancers as Targets 95
Adding Turbonomic Targets for Aggregation 98
Appendix — Target Configuration 100Enabling WinRM Via PowerShell 100Enabling WinRM Via Global Policy Objects 101Enabling Management via WMI 102
Target Configuration Guide 1
Target Configuration
A target is a service that performs management in your virtual environment. Turbonomic uses targets to monitor workload and to execute actions in your environment. Target Configuration specifies the ports Turbonomic uses to connect with these services. You must install Turbonomic on a network that has access to the specific services you want to set up as targets.
For each target, Turbonomic communicates with the service via the management protocol that it exposes — The REST API, SMI-S, XML, or some other management transport. Turbonomic uses this communication to discover the man-aged entities, monitor resource utilization, and execute actions.
You can assign instances of the following technologies as Turbonomic targets:
• Hypervisors- Citrix XenServer 5.6.x and 6.x- IBM PowerVM- Microsoft Hyper-V 2008 R2, Hyper-V 2012, and Hyper-V 2012 R2- RHEV-M (RedHat Enterprise Virtualization Manager) versions 3.x- VMware vCenter 4.1 — 6.0 running with ESX 3.x, 4,x, 5.x, and 6.x
• Cloud Managers- CloudStack 3.0.2 — 4.1- Microsoft System Center 2012 Virtual Machine Manager and System Center 2012 R2 Virtual Machine
Manager- VMware vCloud Director 1.0 — 5.1- OpenStack havana, Icehouse, juno, and kilo- Amazon AWS- Microsoft Azure- IBM SoftLayer
• Application Servers- IBM WebSphere Application Server, version 8.0.0.9 or greater- Oracle WebLogic versions 11g or 12c- JBoss Application Server 7.0 and later — JBoss Deployment Manager using jboss-eap-6.3- Apache Tomcat, versions 7.x and 8.0.x
• Database Servers- Microsoft SQL Server 2008 R2, 2012, and 2014- Oracle 11g R2 and 12c- MySQL 5.5.26 and higher, and all 5.6 releases
Target Configuration
2 Turbonomic, Inc. www.turbonomic.com
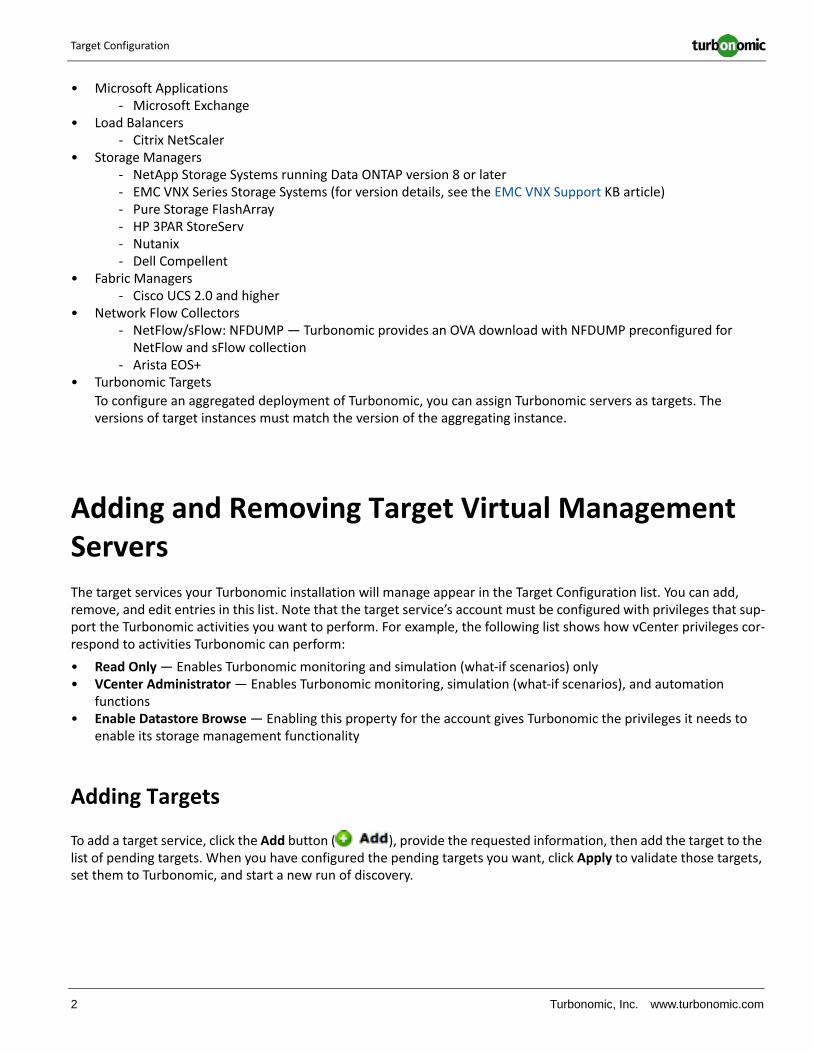
• Microsoft Applications- Microsoft Exchange
• Load Balancers- Citrix NetScaler
• Storage Managers- NetApp Storage Systems running Data ONTAP version 8 or later- EMC VNX Series Storage Systems (for version details, see the EMC VNX Support KB article)- Pure Storage FlashArray- HP 3PAR StoreServ- Nutanix- Dell Compellent
• Fabric Managers- Cisco UCS 2.0 and higher
• Network Flow Collectors- NetFlow/sFlow: NFDUMP — Turbonomic provides an OVA download with NFDUMP preconfigured for
NetFlow and sFlow collection- Arista EOS+
• Turbonomic Targets
To configure an aggregated deployment of Turbonomic, you can assign Turbonomic servers as targets. The versions of target instances must match the version of the aggregating instance.
Adding and Removing Target Virtual Management Servers
The target services your Turbonomic installation will manage appear in the Target Configuration list. You can add, remove, and edit entries in this list. Note that the target service’s account must be configured with privileges that sup-port the Turbonomic activities you want to perform. For example, the following list shows how vCenter privileges cor-respond to activities Turbonomic can perform:
• Read Only — Enables Turbonomic monitoring and simulation (what-if scenarios) only• VCenter Administrator — Enables Turbonomic monitoring, simulation (what-if scenarios), and automation
functions• Enable Datastore Browse — Enabling this property for the account gives Turbonomic the privileges it needs to
enable its storage management functionality
Adding Targets
To add a target service, click the Add button ( ), provide the requested information, then add the target to the list of pending targets. When you have configured the pending targets you want, click Apply to validate those targets, set them to Turbonomic, and start a new run of discovery.

Adding and Removing Target Virtual Management Servers
Target Configuration Guide 3
Typical information you provide includes:
• Target Type — Choose among the supported VM Management technologies (Hypervisor, Cloud Management, Load Balancer, etc.)
After you choose the technology, then choose the specific target type for that technology. For example, for Hypervisor technology, the types you can choose include vCenter, RHEV, Hyper-V, and XenServer.
• Hostname or IP address — The address of the target service you want to add• User Name — A valid account username for the target service• Password — A password for the target service account
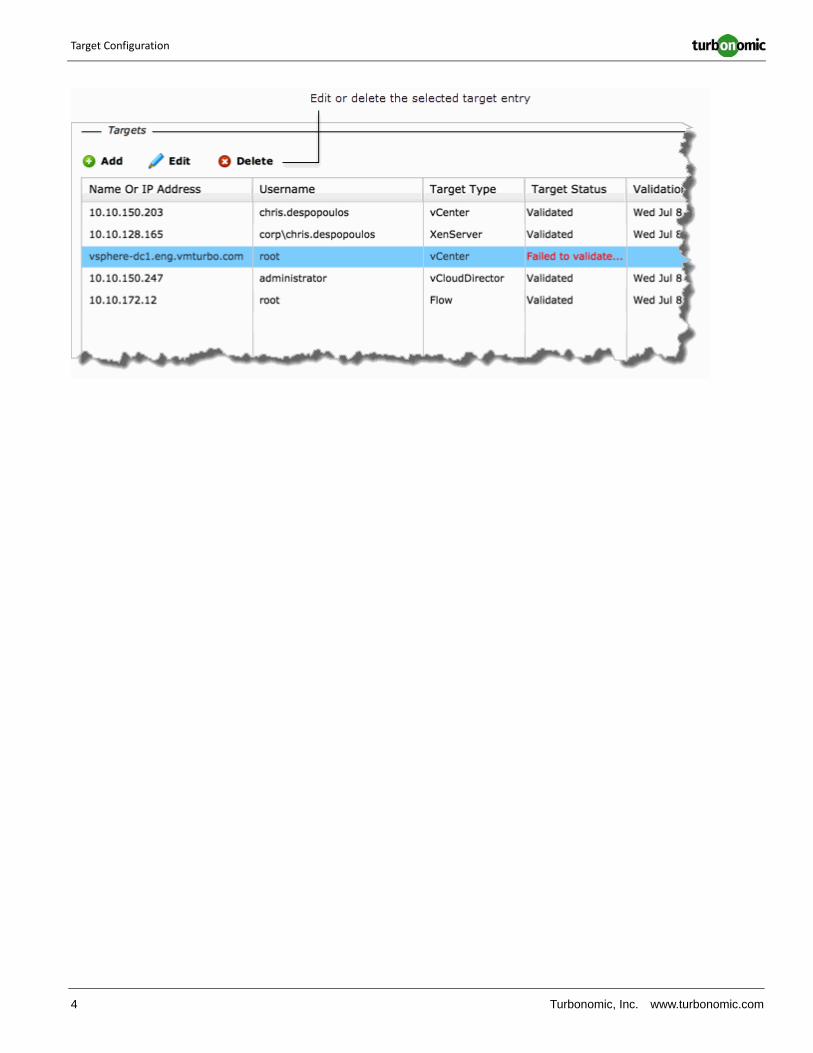
Editing and Removing Targets
To edit a target entry, select it in the list and then click Edit. The Target Configuration Form opens, where you can make your settings.
To remove a target, select the entry in the list and then click Delete.
Target Configuration
4 Turbonomic, Inc. www.turbonomic.com
Target Configuration Guide 5
Hypervisor Targets
A hypervisor is a service that creates and runs virtual machines (VMs), providing the VMs compute and storage resources. When you connects Turbonomic to hypervisor targets your environment, Turbonomic can monitor perfor-mance and resource consumption to assure application performance while also utilizing resources as efficiently as possible.
One of the first steps in any Turbonomic deployment is to connect to the hypervisors within your environment. Once connected, Turbonomic discovers the VMs, the physical machines that host the VMs, the datastores that provide stor-age resources to the physical machines, and the virtual datastores that provide storage resources to the VMs.
License Requirements
The base Turbonomic license supports all hypervisor targets.

Hypervisor Targets
6 Turbonomic, Inc. www.turbonomic.com
Supply Chain
Each hypervisor requires a physical machine (host) and one or more datastores to provide compute and storage resources. Virtual machines (VMs) run on those physical resources, and the VMs in turn provide resources to applica-tions.
At the bottom of the supply chain, physical machines consume resources from data centers.
If your environment includes SAN technologies such as disk arrays, then you know that the storage resources ulti-mately consume resources from that underlying technology. If you install the Storage Control Module, then Turbo-nomic extends the supply chain analysis into the components that make up the disk array. For more information, see Storage Manager Targets on page 35.
To understand how Turbonomic depicts the supply chain, consider the example below. It shows a virtual machine (test2_CO) within the Inventory tree. The "VC" designation indicates that the VM is running in a vCenter.
By expanding the VM node of the tree, you can see the supply chain entities the VM consumes resources from ("Con-sumes") and the entities it provides resources to ("Hosts"). In this example, the resource providers are a physical machine (hp-esx45) and a datastore (ESXDC7DS2), and the resource consumer is one or more applications (labeled as GuestLoad).

Adding and Removing Target Virtual Management Servers
Target Configuration Guide 7
Actions
Turbonomic recommends actions for the hypervisor supply chain as follows.
NOTE: This is a general list of actions for entities discovered for hypervisors. You can see how actions differ per technology in each section that describes adding a specific type of hypervisor target.
Entity Type Resources
Application With the basic license, Turbonomic doesn’t perform actions on applications. Instead, it performs actions on the host VMs. If utilization is high enough on an application, Turbonomic can create a new copy of the host VM. When an application is idle, it loses budget. Ultimately, if the budget falls enough, Turbonomic will recommend to suspend or terminate the host VM.
Virtual Machine
• Terminate (Remove) VMFor a VM that has been suspended for a long period.
• Suspend VMFor low utilization of VM’s resources.
• Provision additional resources for:
– High resource utilization on VM
• Move VM for:
– High resource utilization on VM
– High resource utilization on hosting PM
– Excess IOPS or Latency in VStorage
– Workload placement violation
– Hosting PM is underutilized (move before suspending PM)
• Move VM StorageFor excess utilization of the current datastore, or for more efficient utilization of datastores in the environment.
• Reconfigure StorageFor overutilized storage resources, add VStorage capacity.For underutilized storage resources, remove VStorage capacity.
• Reconfigure VMChange network and storage configuration. For example, Turbonomic recommends this action if the VM is configured to use a network that it cannot access.
Physical Machine
• Start PMFor increased demand on physical resources, start up a suspended PM.
• Provision PMFor increased demand of physical resources, install a new PM in the environment. Turbonomic will then move workload to that host.
• Suspend PMFor underutilized resources on a PM, move existing workload to other hosts and suspend the PM.
• Terminate (Remove) PMFor a PM that has been suspended for a period of time, remove the PM.

Hypervisor Targets
8 Turbonomic, Inc. www.turbonomic.com
Monitored Resources
Turbonomic monitors the following resources for the hypervisor supply chain:
Storage • Start StorageFor high utilization of storage resources, start a suspended datastore.
• Provision StorageFor high utilization of storage resources, provision a new datastore.
• Suspend StorageFor low utilization of storage resources, move served VMs to other datastores and suspend this one.
• Terminate Storage (Remove)For a datastore that has been suspended for a period of time, remove the datastore.
• Move (only with the Storage Control Module)For high utilization of physical storage, move datastore to a different disk array (aggregate).
• Resize (only with the Storage Control Module)Increase or decrease the datastore capacity.
Entity Type Resources
Application • VMemThe percentage utilization of the VMem (in Kbytes) that was allocated to the hosting VM.
• VCPUThe percentage utilization of the VCPU (in MHz) allocated for the hosting VM.
• Transaction (transactions per second)For virtual applications discovered through a Load Balancer target or for application servers, the percentage utilization of the allocated transactions per second.
• HeapFor application servers, the percentage utilization of the application server’s heap.
• TransactionsFor application servers and database servers, the percentage utilization of the server’s transaction capacity, in transactions per second.
• Response TimeFor application servers, the percentage utilization of the server’s allocated response time.
• ThreadsFor application servers, the percentage utilization of the server’s thread capacity.
• DBMemFor database servers, the percentage utilization of the database’s memory capacity.
• ConnectionFor database servers, the percentage utilization of the connection capacity.
• TransactionLogFor database servers, the percentage utilization of the server’s capacity for storage devoted to transaction logs.
Entity Type Resources

IBM PowerVM
Target Configuration Guide 9
IBM PowerVM
Turbonomic connects with IBM PowerVM servers through the IBM Hardware Management Console (HMC) to manage your logical partitions (LPARs), virtual I/O servers (VIOS), and the associated network and storage. The target you spec-ify will be the HCM.
VM • VMemThe percentage utilization of the virtual memory (measured in Kbytes) allocated for the VM.
• VCPUThe percentage utilization of the virtual CPU capacity (measured in MHz) allocated for the VM.
• VStorageThe percentage utilization of the virtual storage capacity (measured in Kbytes) allocated for the VM.
• IOPS (Storage Access Operations per Second)The percentage utilization of IOPS allocated for the VStorage on the VM.
• LatencyThe percentage utilization of latency (measured in ms) allocated for the VStorage on the VM.
Physical Machine
• MemThe percentage of the PM’s memory that is reserved or in use, measured in Kbytes.
• CPUThe percentage of the PM’s CPU cycles that are reserved or in use, measured in Kbytes.
• IOThe data rate through the PM’s IO adapters. Charts show the percentage of the PM’s IO capacity that is in use, measured in Kbytes per second.
• NetThe data rate through the PM’s network adapters. Charts show the percentage of the PM’s network throughput capacity that is in use, measured in Kbytes per second.
• SwapThe percentage of the PM’s allocated swap space that is in use, measured in Kbytes.
• BalloonThe sharing of memory among VMs running on the host. Charts show percentage of the PM’s ballooning capacity that is in use, measured in Kbytes.
• 1, 2, 4 CPU ReadyThe percentage of the PM’s allocated ready queue capacity (measured in Kbytes) that is in use, for 1, 2, and 4 CPU ready queues. Charts show the percentage of wait time for all the VMs on a given host PM.
Storage • StorageThe percentage of the datastore’s capacity (measured in Kbytes) that is in use.
• IOPSStorage access operations per second. Charts in the user interface show the percentage of allocated IOPS capacity that is used on a datastore.
• LatencyThe percentage of allocated latency (measured in ms) that is in use on the datastore. This measures the latency experienced by all VMs and hosts that access the datastore.
Entity Type Resources

Hypervisor Targets
10 Turbonomic, Inc. www.turbonomic.com
The components of IBM PowerVM map to entities in the Turbonomic supply chain as follows:
Prerequisites
• IBM Hardware Management Console (HMC) 8.0 or higher with the Performance and Capacity Monitoring API and data collection enabled.
• A service account Turbonomic can use to connect to your HMC. To generate actions, the account must have HMC Viewer permission and access to the HMC Capacity and Performance Monitoring API. To automate actions the account must have HMC Root permissions.
Adding PowerVM Targets
To add PowerVM targets, select the Hypervisors > IBM PowerVM option on the Target Configuration page and pro-vide the following information:
• Addresss
The name or IP address of the Hardware Management Console.
• Username/Password
Credentials for the service account Turbonomic can use to connect to the HMC.
Supported Actions
Turbonomic supports the following actions for IBM PowerVM entities:
If you do not want to receive "Resize down" recommendations for your virtual I/O servers, you can disable this on the Policy tab as follows:
PowerVM Name Turbonomic Entity
Frame Physical Machine
Node N/A — A pluggable unit of compute resources in the frame, but there is no entity for this appear in the Turbonomic user interface
LPAR or VIOS Virtual Machine
Fabric Storage
Entity Type Can Be Automated Recommendations Only
Virtual Machine Start, Move, Suspend, Storage Move, Resize Down, Resize UpTerminate, Provision, Reconfigure
Physical Machine Start, Suspend, Terminate, Provision
Storage Provision

Hyper-V
Target Configuration Guide 11
• In the Policy Editor, select Action > VM• In the Scope pane, expand Folders and select AIX-vioses-auto• For the Resize down action in the Action Mode Settings table, enable Override and change the value to Disabled• Click Apply Settings Change
Hyper-V
If you have a small number of Hyper-V hosts in your environment, you can add them individually as Turbonomic tar-gets. Also, if you have deployed the Hyper-V hosts in a clustered domain (for example as a failover cluster), you can specify one Hyper-V host as a target and Turbonomic automatically add the other members of that cluster.
Note that for large Hyper-V environments, it’s typical to manage the hosts via System Center Virtual Machine Man-ager (VMM). You can specify the VMM server as a target and Turbonomic will use it to discover and manage its child Hyper-V hosts. If you use VMM, you should not add individual Hyper-V hosts as targets. For information about adding VMM targets, see Virtual Machine Manager on page 26.
NOTE: Even if you manage Hyper-V using a VMM target, you must still configure remote management on each Hyper-V server. This Hyper-V topic includes instructions to configure remote management — see Enabling Windows Remote Management on page 12.
Prerequisites
• Create a service account that Turbonomic can use to connect to your Hyper-V servers.• Configure remote management on each Hyper-V server. Refer to the relevant section below:
- Turbonomic 5.4 or higher: See Enabling Windows Remote Management on page 12- Turbonomic 5.3 or below: See Enabling Management via WMI on page 102
Creating a Service User Account
The service account Turbonomic uses to connect to a Hyper-V host must be an Active Directory domain account. The account must have full access to the cluster. To create such an account, execute the following command at a Power-Shell prompt:
Grant-ClusterAccess <domain>\<service_account> -Full
Additionally, the service account must have specific local access rights on each host. The easiest way to grant Turbo-nomic the access it requires is to add the domain account to the Local Administrators group on each Hyper-V server.

Hypervisor Targets
12 Turbonomic, Inc. www.turbonomic.com
Some enterprises require that the service account does not grant full administrator rights. In that case, you can create a restricted service account on every Hyper-V host:
1. Add the service account to each of the following local groups:• WinRMRemoteWMIUsers__ (or Remote Management Users)• Hyper-V Administrators• Performance Monitor Users
NOTE: These groups are standard Windows Server 2012 security groups. If you are using an earlier version of Windows Server and do not see these groups, contact Turbonomic Support for assistance.
2. Grant permissions to the service account.
In the WMI Management console, grant the Enable Account and Remote Enable advanced security permissions to the service account:• Open the WMI Management console (wmimgmt).• Right-click WMI Control (Local) and choose Properties.• Go to the Security tab and then click Security to display the Security for Root dialog.• Click Advanced, select the service account, and click Edit.• Confirm that This namespace and subnamespace is selected.• Select Enable Account and Remote Enable and click OK.
3. Configure the WinRM security descriptor to allow access by the service account:• At a PowerShell prompt, execute winrm configSDDL default.• In the "Permissions for Default" dialog box, grant the service account Read and Execute access.
Enabling Windows Remote Management
NOTE: This section applies to Turbonomic 5.4 or higher. If you are using Turbonomic 5.3 or below, see Enabling Management via WMI on page 102.
Turbonomic communicates with your Hyper-V servers using Web Services Management (WS-Management), which is implemented on Microsoft platforms using Windows Remote Management (WinRM). The following steps show how to enable WinRM on a single host, using the command line.
1. Ensure Windows Firewall is running on the host.
For you to configure WinRM successfully, Windows Firewall must be running on the host. For more information, see the Microsoft Knowledge Base article #2004640 (http://support.microsoft.com/kb/2004640).
2. Set up an SPN for the host machine.
The machine must have an SPN of the form, protocol/host_address. For example, WSMAN/10.99.9.2.
To get a list of SPNs for the machine, execute the following in the command window:
setspn -l <vmm-server-name>If there is no valid SPN in the list, create one by running the command:
setspn -A protocol/host-address:port where port is optional
For example, setspn -A WSMAN/10.99.9.2:VMM-02
Hyper-V
Target Configuration Guide 13
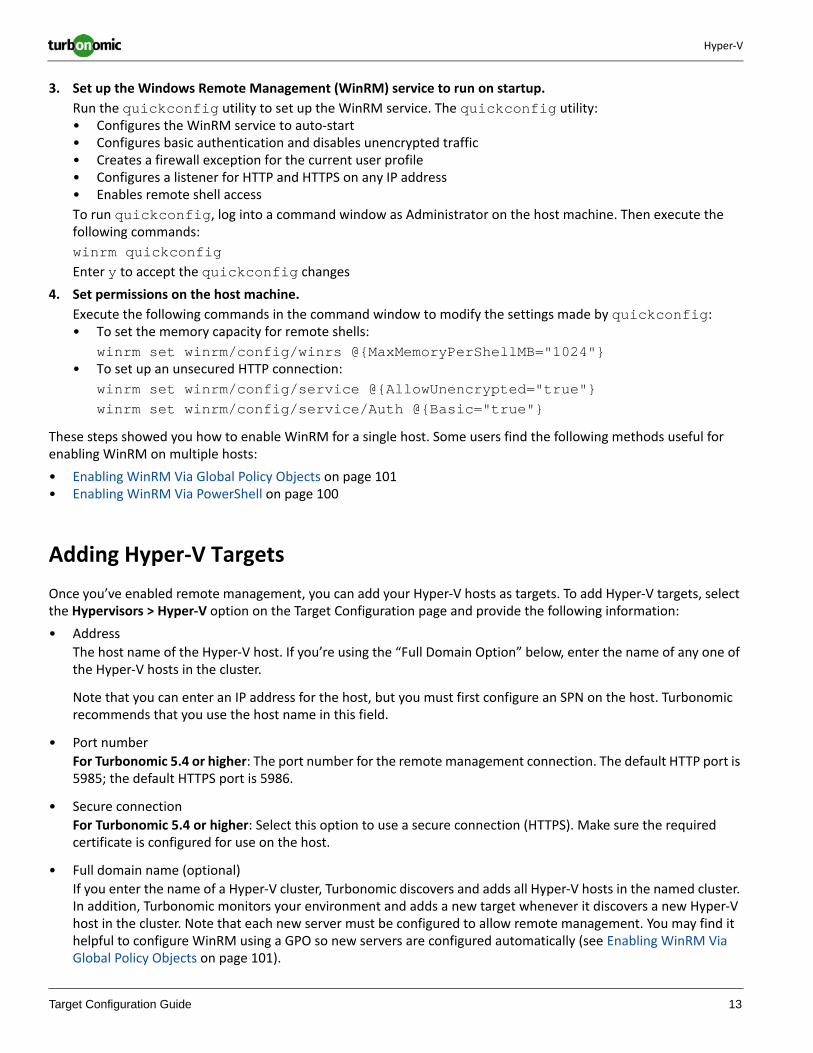
3. Set up the Windows Remote Management (WinRM) service to run on startup.
Run the quickconfig utility to set up the WinRM service. The quickconfig utility:• Configures the WinRM service to auto-start• Configures basic authentication and disables unencrypted traffic• Creates a firewall exception for the current user profile• Configures a listener for HTTP and HTTPS on any IP address• Enables remote shell access
To run quickconfig, log into a command window as Administrator on the host machine. Then execute the following commands:
winrm quickconfigEnter y to accept the quickconfig changes
4. Set permissions on the host machine.
Execute the following commands in the command window to modify the settings made by quickconfig:• To set the memory capacity for remote shells:
winrm set winrm/config/winrs @{MaxMemoryPerShellMB="1024"}• To set up an unsecured HTTP connection:
winrm set winrm/config/service @{AllowUnencrypted="true"}winrm set winrm/config/service/Auth @{Basic="true"}
These steps showed you how to enable WinRM for a single host. Some users find the following methods useful for enabling WinRM on multiple hosts:
• Enabling WinRM Via Global Policy Objects on page 101• Enabling WinRM Via PowerShell on page 100
Adding Hyper-V Targets
Once you’ve enabled remote management, you can add your Hyper-V hosts as targets. To add Hyper-V targets, select the Hypervisors > Hyper-V option on the Target Configuration page and provide the following information:
• Address
The host name of the Hyper-V host. If you’re using the “Full Domain Option” below, enter the name of any one of the Hyper-V hosts in the cluster.
Note that you can enter an IP address for the host, but you must first configure an SPN on the host. Turbonomic recommends that you use the host name in this field.
• Port number
For Turbonomic 5.4 or higher: The port number for the remote management connection. The default HTTP port is 5985; the default HTTPS port is 5986.
• Secure connection
For Turbonomic 5.4 or higher: Select this option to use a secure connection (HTTPS). Make sure the required certificate is configured for use on the host.
• Full domain name (optional)
If you enter the name of a Hyper-V cluster, Turbonomic discovers and adds all Hyper-V hosts in the named cluster. In addition, Turbonomic monitors your environment and adds a new target whenever it discovers a new Hyper-V host in the cluster. Note that each new server must be configured to allow remote management. You may find it helpful to configure WinRM using a GPO so new servers are configured automatically (see Enabling WinRM Via Global Policy Objects on page 101).
Hypervisor Targets
14 Turbonomic, Inc. www.turbonomic.com
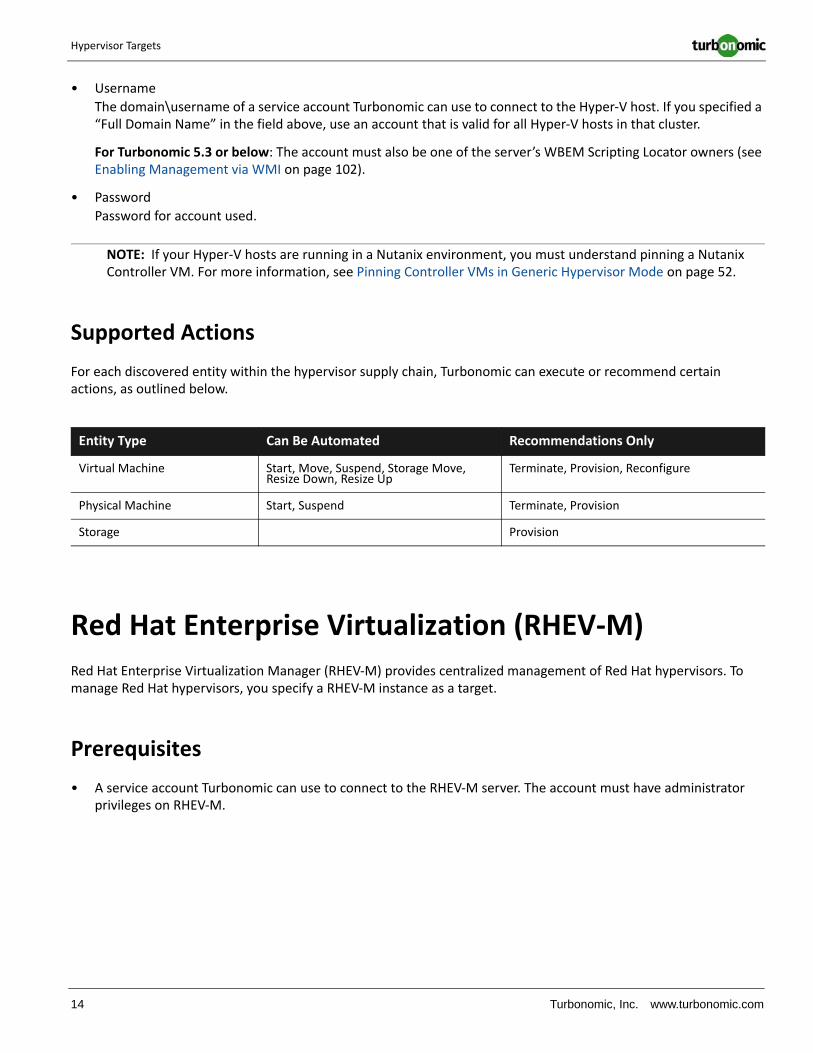
• Username
The domain\username of a service account Turbonomic can use to connect to the Hyper-V host. If you specified a “Full Domain Name” in the field above, use an account that is valid for all Hyper-V hosts in that cluster.
For Turbonomic 5.3 or below: The account must also be one of the server’s WBEM Scripting Locator owners (see Enabling Management via WMI on page 102).
• Password
Password for account used.
NOTE: If your Hyper-V hosts are running in a Nutanix environment, you must understand pinning a Nutanix Controller VM. For more information, see Pinning Controller VMs in Generic Hypervisor Mode on page 52.
Supported Actions
For each discovered entity within the hypervisor supply chain, Turbonomic can execute or recommend certain actions, as outlined below.
Red Hat Enterprise Virtualization (RHEV-M)
Red Hat Enterprise Virtualization Manager (RHEV-M) provides centralized management of Red Hat hypervisors. To manage Red Hat hypervisors, you specify a RHEV-M instance as a target.
Prerequisites
• A service account Turbonomic can use to connect to the RHEV-M server. The account must have administrator privileges on RHEV-M.
Entity Type Can Be Automated Recommendations Only
Virtual Machine Start, Move, Suspend, Storage Move, Resize Down, Resize Up
Terminate, Provision, Reconfigure
Physical Machine Start, Suspend Terminate, Provision
Storage Provision
vCenter Server
Target Configuration Guide 15
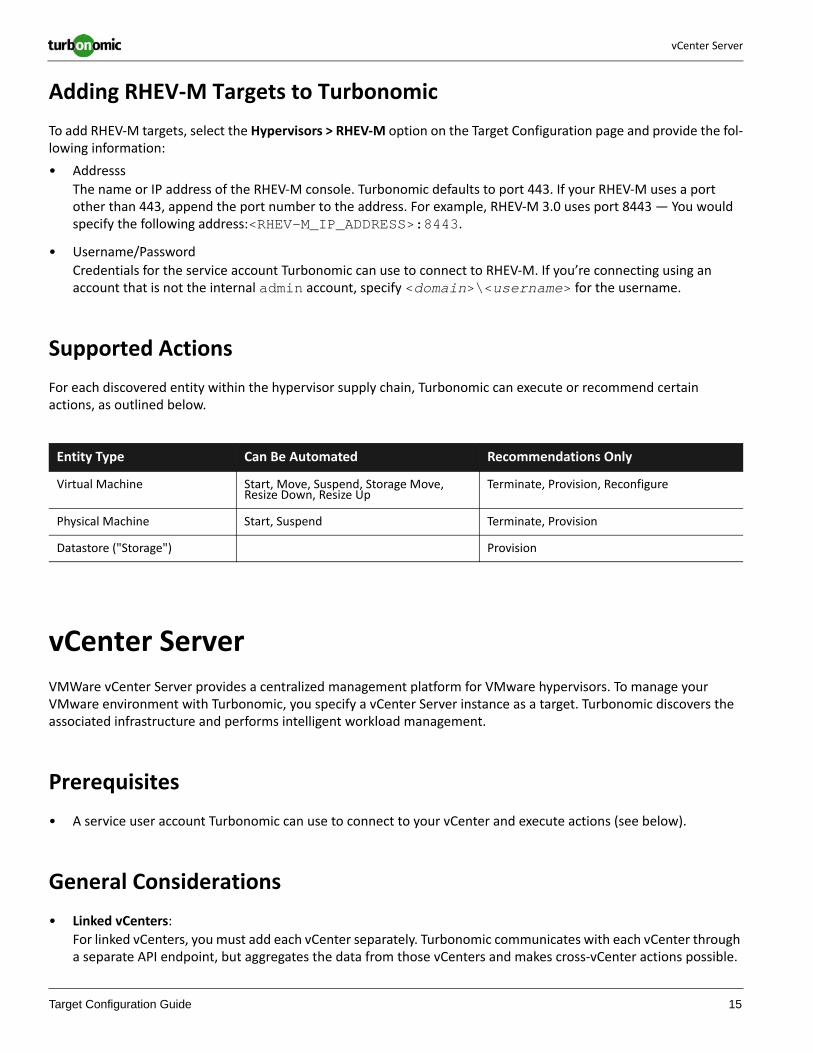
Adding RHEV-M Targets to Turbonomic
To add RHEV-M targets, select the Hypervisors > RHEV-M option on the Target Configuration page and provide the fol-lowing information:
• Addresss
The name or IP address of the RHEV-M console. Turbonomic defaults to port 443. If your RHEV-M uses a port other than 443, append the port number to the address. For example, RHEV-M 3.0 uses port 8443 — You would specify the following address:<RHEV-M_IP_ADDRESS>:8443.
• Username/Password
Credentials for the service account Turbonomic can use to connect to RHEV-M. If you’re connecting using an account that is not the internal admin account, specify <domain>\<username> for the username.
Supported Actions
For each discovered entity within the hypervisor supply chain, Turbonomic can execute or recommend certain actions, as outlined below.
vCenter Server
VMWare vCenter Server provides a centralized management platform for VMware hypervisors. To manage your VMware environment with Turbonomic, you specify a vCenter Server instance as a target. Turbonomic discovers the associated infrastructure and performs intelligent workload management.
Prerequisites
• A service user account Turbonomic can use to connect to your vCenter and execute actions (see below).
General Considerations
• Linked vCenters:
For linked vCenters, you must add each vCenter separately. Turbonomic communicates with each vCenter through a separate API endpoint, but aggregates the data from those vCenters and makes cross-vCenter actions possible.
Entity Type Can Be Automated Recommendations Only
Virtual Machine Start, Move, Suspend, Storage Move, Resize Down, Resize Up
Terminate, Provision, Reconfigure
Physical Machine Start, Suspend Terminate, Provision
Datastore ("Storage") Provision

Hypervisor Targets
16 Turbonomic, Inc. www.turbonomic.com
• Shared Datastores:
If you add more than one vCenter target that manages the same datastore, you may see conflicts in the metadata Turbonomic maintains for each vCenter. For example, datastore browsing may display a conflict between active and wasted files, or each vCenter may define the same datastore as a member of a different storage cluster. Turbonomic recommends that you do not add multiple vCenter targets that manage the same datastore.
• Restricting Turbonomic Access to Specific Clusters:
When you add a vCenter target, Turbonomic discovers all of the connected entities that are visible based on the account you’re using to connect to the vCenter. If there are clusters or other entities you want to exclude, you can do this by setting the role for the Turbonomic account to No access in the vSphere management client.
Creating a service user account
The service account you use must have specific permissions on the vCenter. The easiest way to grant Turbonomic the access it requires is to grant full administrator rights.
If you prefer to assign only specific privileges, refer to the table below for the privileges required to support Turbo-nomic activities.
Some enterprises require that the service account does not grant full administrator rights. In that case, you can create a restricted service account that grants the following permissions to enable the required Turbonomic activities:
Turbonomic Activity Required Privileges
Monitoring Read-only for all entity types
Recommend Actions Read-only for all entity types
Wasted Storage Reporting Datastore > Browse Datastore
Execute VM Move (vMotion) Resource > MigrateResource > Query VmotionResource > Modify Resource PoolResource > Assign VM to Resource Pool
Execute VM Storage Move (svMotion) Datastore > Allocate SpaceDatastore > Browse DatastoreDatastore > Configure DatastoreDatastore > Move DatastoreDatastore > Remove FileDatastore > Update Virtual Machine FilesDatastore Cluster > Configure a Datastore ClusterResource > Assign VM to Resource PoolResource > MigrateResource > RelocateResource > Modify Resource PoolResource > Move Resource PoolResource > Query VMotionVirtual Machine > Configuration > Change ResourceVirtual Machine > Configuration > Swap File PlacementNOTE: Datastore Cluster permissions only apply to vSphere 5.x

vCenter Server
Target Configuration Guide 17
Adding vCenter Targets to Turbonomic
To add vCenter targets, select the Hypervisors > vCenter option on the Target Configuration page and provide the fol-lowing information:
• Addresss
The name or IP address of the vCenter server.
• Username/Password
Credentials for the service account Turbonomic can use to connect to the vCenter Server. Include the domain if required (<domain>\<username>).
NOTE: If your VMware hypervisors are running in a Nutanix environment, you must understand pinning a Nutanix Controller VM. For more information, see Pinning Controller VMs in Generic Hypervisor Mode on page 52.
Other Information Imported from vCenter
In addition to discovering entities managed by the vSphere hypervisors and their resources, Turbonomic:
• Imports any vSphere DRS rules and displays them on the Policy > Workload Placement view, under Imported Placement Policies. Imported rules are enabled by default, but you can disable specific rules if you want. The example below shows a single imported DRS rule.
• Imports any custom annotations and displays related groupings in the Inventory > Groups tree view, under VC Annotations.
• Discovers resource pools and displays them as folders in the Inventory tree and as components in the Supply Chain Navigator. If you have the Cloud Control Module license, Turbonomic manages resource pools as Virtual Datacenters (VDCs) and can recommend resize actions. Root resource pools appear as Provider VDCs in the supply chain, whereas child resource pools appear as Consumer VDCs.
Execute VM Resize Virtual Machine > Configuration > Change CPU CountVirtual Machine > Configuration > Change ResourcesVirtual Machine > Configuration > MemoryVirtual Machine > Interaction > ResetVirtual Machine > Interaction > Power OffVirtual Machine > Interaction > Power On
Turbonomic Activity Required Privileges

Hypervisor Targets
18 Turbonomic, Inc. www.turbonomic.com
• Imports vSphere HA cluster settings and translates them into CPU and memory utilization constraints. These are displayed as cluster-level overrides under Folders on the Policy > Analysis > Host view. The example below shows the constraints for a cluster of four hosts with HA enabled.
Support for Cross vCenter vMotions
VMware vSphere 6.0 introduced the ability to move VMs between vCenters. If you enabled this feature in your VMware environment, you can configure Turbonomic to include cross vCenter vMotions in its recommendations.
To configure Turbonomic to support cross vCenter vMotion recommendations, you must create a Workload Place-ment Segment that merges the clusters on the different vCenters. To create a merge segment:
• On the Policy > Workload Placement page, click the Add Segment button.• In the Segment Editor window, select the Merge option and add the vCenter clusters to merge.
NOTE: Since Turbonomic can only execute vMotions between clusters that use the same switch type (VSS or VDS), make sure any clusters you merge use the same switch type. Although Turbonomic will not initiate VSS → VDS vMotions, vSphere may do so. If this happens, Turbonomic displays a compliance violation notification.
Supported Actions
For each discovered entity within the hypervisor supply chain, Turbonomic can execute or recommend certain actions, as outlined below.
Entity Type Can Be Automated Recommendations Only
Virtual Machine Start, Move, Suspend, Storage Move, Resize Down, Resize Up
Terminate, Provision, Reconfigure
Physical Machine Start, Suspend Terminate, Provision
Storage Provision

XenServer
Target Configuration Guide 19
XenServer
XenServer a virtualization platform that provides centralized management of virtual resources. The XenServer envi-ronment configures hosts as resource pools with shared storage. A resource pool always has at least one physical node that serves as the resource pool master. The master exposes an administration interface, and forwards commands to other members of the pool. Turbonomic connects to a pool through the resource pool master — you specify the resource pool master as a target.
Prerequisites
• A service account Turbonomic can use to connect to the XenServer host that serves as a resource pool master. In addition, this account must have administrator privileges on all hosts in the resource pool.
• For full integration, XenServer 6.1 or higher with the Performance Monitoring Enhancements Pack is required. Earlier versions of the API do not provide Turbonomic with storage IOPS and latency information.
• All hosts in the environment must have their clocks synchronized via NTP. Turbonomic is unable to collect utilization data from XenServer hosts if they are not time synchronized.
Adding XenServer Targets
To add XenServer targets, select the Hypervisors > XenServer option on the Target Configuration page and provide the following information:
• Addresss
The name or IP address of the Resource Pool Master.
• Username/Password
Credentials for the service account Turbonomic can use to connect to the Resource Pool Master.
Supported Actions
Entity Type Can Be Automated Recommendations Only
Virtual Machine Start, Move, Suspend, Resize Down, Resize Up
Terminate, Provision, Storage Move, Reconfigure
Physical Machine Start, Suspend, Terminate, Provision
Datastore ("Storage") Provision
Target Configuration Guide 20
Cloud Management Targets
Cloud-based datacenters support scalability, resource pooling, multi-tenancy, and self-service management of virtual resources. Turbonomic supports the following cloud technologies:
• Private cloud- Apache CloudStack- Microsoft Virtual Machine Manager (VMM)- OpenStack Cloud Operating System- VMware vCenter Server
• Public cloud- Amazon Web Services (AWS)- IBM SoftLayer- Microsoft Azure
• Hybrid clouds
A combination of private and public clouds — Turbonomic can burst workload out to the public cloud to accommodate peaks in demand.
Turbonomic can manage private and public clouds, ensuring that applications running on the cloud have enough resources to assure performance. For example, if applications on private cloud need more resources, Turbonomic can recommend that the self-service customer add more virtual resources. Or if necessary, Turbonomic can provision more physical machines to increase the pool of resources available to all the self-service customers.
Cloud infrastructures declare resource pools to serve business needs for multi-tenancy, authorized visibility into the infrastructure, and regional distribution of resources. These pools manage resources such as compute, storage, mem-ory, and network bandwidth in ways that support the cloud’s business requirements. Turbonomic discovers and man-ages these resource pools in relation to the whole datacenter. This enables Turbonomic to:
• Display cloud resources within each pool• Analyze workload distribution across the entire datacenter• Control the distribution of workload at each level of the cloud infrastructure

Private Cloud
Target Configuration Guide 21
Private Cloud
A private cloud manages resources in pools to support multi-tenancy and self-service provisioning of virtual work-loads. Turbonomic manages these resource pools in real time as demand fluctuates. This includes demand across resource pools, virtual datacenters (VDCs), and tenants.
On the private cloud, you can use Turbonomic to:
• Set up charge-back and show-back for private cloud or service-provider scenarios• For service-providers, set up scoped views to limit exposure to the customer base• Plan hardware requirements — the planning scenarios takes cloud architectures into account
License Requirements
The base Turbonomic license supports all private cloud targets.
Supply Chain
For private clouds, Turbonomic discovers resource partitions that are managed by the cloud manager, as well as the workload running on these partitions (the VMs and applications) and, where applicable, the supply that hosts work-load (the physical machines and storage). Turbonomic represents these partitions as the following types of Virtual Datacenters (VDCs):
• Provider VDC
A collection of physical resources (PMs and datastores) within a private cloud. The cloud administrator has access to these resources, and defines the datacenter members. Administrators allocate Provider VDCs to manage resources that will be allocated to external customers through one or more Consumer VDCs.
• Consumer VDC
A collection of resources that are available for customers to perform self-service management of workload through the cloud. It is an environment customers can use to store, deploy, and operate virtual systems. Consumer VDCs use the resources supplied by a Provider VDC.
Cloud Management Targets
22 Turbonomic, Inc. www.turbonomic.com
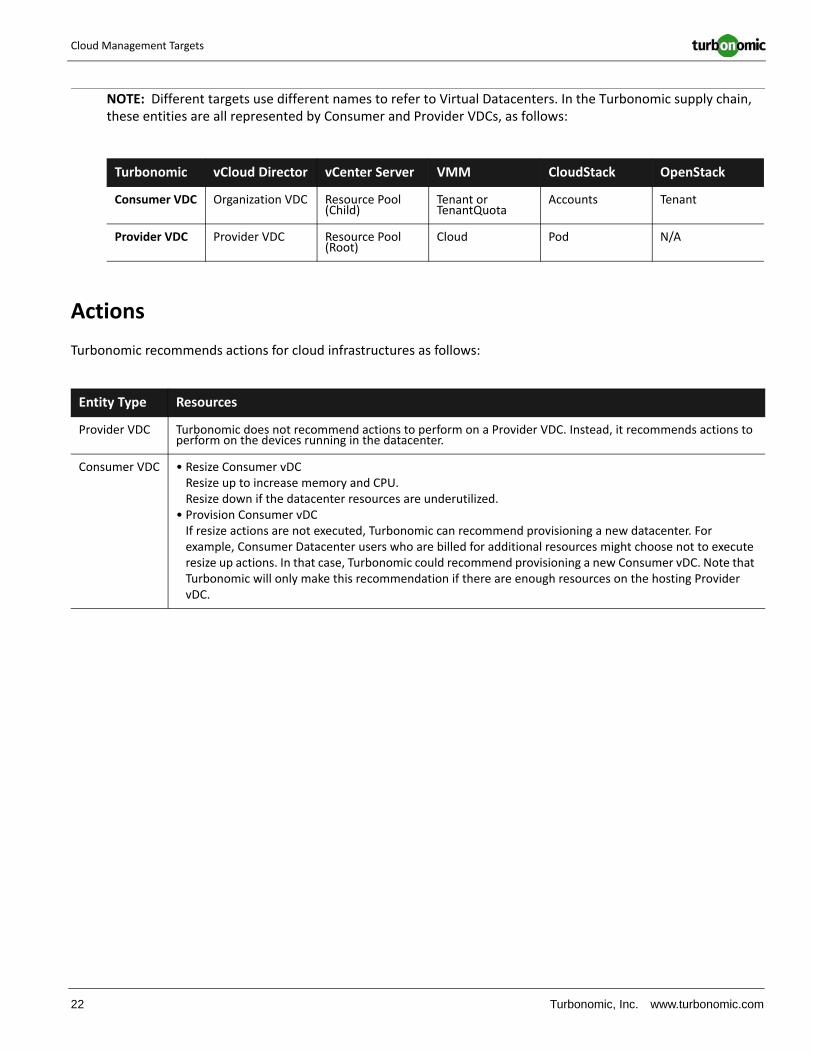
NOTE: Different targets use different names to refer to Virtual Datacenters. In the Turbonomic supply chain, these entities are all represented by Consumer and Provider VDCs, as follows:
Actions
Turbonomic recommends actions for cloud infrastructures as follows:
Turbonomic vCloud Director vCenter Server VMM CloudStack OpenStack
Consumer VDC Organization VDC Resource Pool (Child)
Tenant or TenantQuota
Accounts Tenant
Provider VDC Provider VDC Resource Pool (Root)
Cloud Pod N/A
Entity Type Resources
Provider VDC Turbonomic does not recommend actions to perform on a Provider VDC. Instead, it recommends actions to perform on the devices running in the datacenter.
Consumer VDC • Resize Consumer vDCResize up to increase memory and CPU.Resize down if the datacenter resources are underutilized.
• Provision Consumer vDCIf resize actions are not executed, Turbonomic can recommend provisioning a new datacenter. For example, Consumer Datacenter users who are billed for additional resources might choose not to execute resize up actions. In that case, Turbonomic could recommend provisioning a new Consumer vDC. Note that Turbonomic will only make this recommendation if there are enough resources on the hosting Provider vDC.

Private Cloud
Target Configuration Guide 23
Monitored Resources
Turbonomic monitors the following cloud infrastructure resources:
CloudStack
Apache CloudStack deploys and manages VMs and storage on a multi-tenancy infrastructure. It supports most hyper-visors, including VMware, KVM, Citrix XenServer, and Microsoft Hyper-V.
NOTE: After setting a CloudStack server as a target, you must then set the hypervisors that server will manage as Turbonomic targets. See Hypervisor Targets on page 5.
Adding CloudStack Targets
To add CloudStack targets, select the Cloud Management > CloudStack option on the Target Configuration page, and provide the following information:
• Host Name or IP Address
Name or IP of the CloudStack Management Server, or the primary server in a Management Server Cluster.
Turbonomic assumes port 443 by default. If your system communicates over a different port, specify that port in the address field.
For example: 10.10.123.45:444
• Username and Password
The credentials must be for a Root Administrator user on the Management Server. In addition, this user must have a generated pair of API and Secret keys for the CloudStack API. Turbonomic uses the credentials you provide here to log into the CloudStack server and discover the user’s key values.
Entity Type Resources
Provider VDC • MemThe percentage of physical machine memory that is reserved or in use for this datacenter, measured in Kbytes.
• CPUThe percentage utilization of CPU resources allocated to the datacenter.
• StorageThe percentage usage of storage that is allocated to the Consumer vDC.
Consumer VDC • MemThe percentage of physical machine memory that is reserved or in use for this datacenter, measured in Kbytes.
• CPUThe percentage utilization of CPU resources allocated to the datacenter.
• StorageThe percentage usage of storage that is allocated to the Consumer vDC.

Cloud Management Targets
24 Turbonomic, Inc. www.turbonomic.com
OpenStack
To manage your OpenStack® environment, Turbonomic connects to the Keystone identity service endpoint. Through this connection, Turbonomic discovers the other services it needs to control your OpenStack environment. If it discov-ers the necessary services, then it considers the OpenStack target to be validated.
Turbonomic has been tested with KVM hypervisors on Red Hat Enterprise Linux OpenStack and Red Hat RDO.
Validation Requirements
Turbonomic supports OpenStack version Icehouse or later.
You must have the following services installed and enabled, and Turbonomic must have access to each service at its administrative endpoint:
• Keystone — Identity service, to support discovery of OpenStack tenants• Nova — Host and manage cloud computing systems (hypervisors)• Cinder — Manage block storage (Cinder volumes)• Ceilometer — Collect and persist data on the utilization of physical and virtual resources (telemetry)
To verify that these services are enabled, Open the Horizon dashboard to the Admin/System page, or execute the fol-lowing command at the OpenStack command line:
[root@openstack ~(keystone_admin)]# keystone service-list
You should see each of the required services in the list.
Adding OpenStack Targets
To add OpenStack targets, select the Cloud Management > OpenStack option on the Target Configuration page, and provide the following information:
• Hostname or IP Address
Provide the public URL of the Keystone service. The default port is 5000 — Do not provide a port if you want to use the default. For the default port, validation assumes a standard HTTP connection. If you provide a port value (for a port other than 5000), validation assumes a secure HTTPS connection.
For example, 10.10.123.45:5001
• Username
The account must have an administrator role on the specified tenant. This account must be authenticated by OpenStack.
• Password
The password for the administrator account.
• Tenant Name
The organizational structure within the Compute service that you want to manage. In a basic OpenStack installation this tenant is usually named admin.

Private Cloud
Target Configuration Guide 25
Enabling Turbonomic Reservations
When you add a valid OpenStack target, Turbonomic can perform its analysis, recommend actions, and perform actions to assure performance and efficiency in your environment. To support these actions, you do not need to per-form other configuration.
Turbonomic also includes reservations — deployment capabilities that can act as workload orchestration, or be inte-grated into an existing orchestration system (see the Deploy View in the Turbonomic user interface). These capabili-ties include:
• Calculate optimal placement for new workload• Reserve resources for proposed workload, and include the reservations in real-time and planning analysis
An OpenStack user can use the Turbonomic placement proposals to deploy workload to the optimal locations.
To enable these capabilities, you must install the Turbonomic Nova Scheduler plugin that matches your version of OpenStack. Turbonomic delivers the following versions of this plugin on the Turbonomic Github repository:
• Icehouse
https://raw.githubusercontent.com/vmturbo/nova/stable/icehouse/nova/scheduler/vmt_scheduler.py
• Juno
https://raw.githubusercontent.com/vmturbo/nova/stable/juno/nova/scheduler/vmt_scheduler.py
• Kilo
https://github.com/vmturbo/nova/blob/stable/kilo/nova/scheduler/vmt_scheduler.py
To fetch the scheduler plugin you want, execute the following commands on the Nova controller (substituting the url to the version of scheduler plugin that you want):
cd /usr/lib/python2.6/site-packages/nova/scheduler/curl -O <URL TO CORRECT VERSION OF vmt_scheduler.py>
After you execute these commands to add the plugin to your controller, add the following entries to the file, /etc/nova/nova.conf under the [DEFAULT] section, where you provide the IP address of your Turbonomic server, and credentials for a Turbonomic user account that has administrator privileges:
scheduler_driver = nova.scheduler.vmt_scheduler.VMTSchedulervmturbo_rest_uri = < Turbonomic_IPAddress >vmturbo_username = < Turbonomic_UserName >vmturbo_password = < Turbonomic_Password >
After you restart the Nova scheduler, it can use the plugin to communicate with your Turbonomic instance.
vCloud Director
A vCloud Director environment has one or more vCloud Director servers (sometimes called cells) to build a multi-tenant private cloud by pooling resources managed by vCenter Servers. For typical installations, each vCloud Director cell manages one vCenter Server instance.
A Provider Virtual Datacenter combines the compute and memory resources from a single vCenter Server with the storage available to that vCenter Server into a single pool of resources to provide to an organization.
An Organization Virtual Datacenter uses the resources in a Provider Virtual Datacenter to present virtual compute and storage to the user.

Cloud Management Targets
26 Turbonomic, Inc. www.turbonomic.com
To add a vCloud Director server as a target, specify the login address and credentials for the server, as well as user name and password that can access the vCenter servers managed by this cell.
Adding vCloud Director Targets
A vCloud Director target must specify the address and user of a vCloud Director server and also a service account on the associated vCenter Server instance.
The vCloud Director account must have a System Administrator role.
The credentials for the vCenter Server instance must specify a valid service account, with privileges to execute Turbo-nomic actions. For information about service accounts on vCenter Server, see Creating a service user account on page 16.
If the credentials for the vCenter Server service account are not valid, then the target will fail to validate in Turbo-nomic.
To add vCloud Director targets, select the Cloud Management > vCloud Director option on the Target Configuration page, and provide the following information:
• Address
Host name or IP address of the vCloud Director Server.
• Username
The username for an account on the vCloud Director server that has a System Administrator role.
• Password
The password for the System Administrator account.
• VC User Name (optional)
If you provide a value, the username for a service account on the vCenter Server that is managed by this vCloud Director.
If you do not provide a value, Turbonomic will obtain the username from the vCloud Director server. Even if you do not provide a VC User Name value, you still must provide a VC Password.
• VC Password
The password for the service account on the vCenter Server.
Virtual Machine Manager
In a VMM environment, the VMM management server processes commands and controls communications with the Hyper-V hosts. To manage VMM, you set the management server as a target. Turbonomic communicates with that target, and also with the Hyper-V hosts that the VMM server manages. You must grant Turbonomic access to the VMM management server, and also to all the associated Hyper-V machines.
Private Cloud
Target Configuration Guide 27
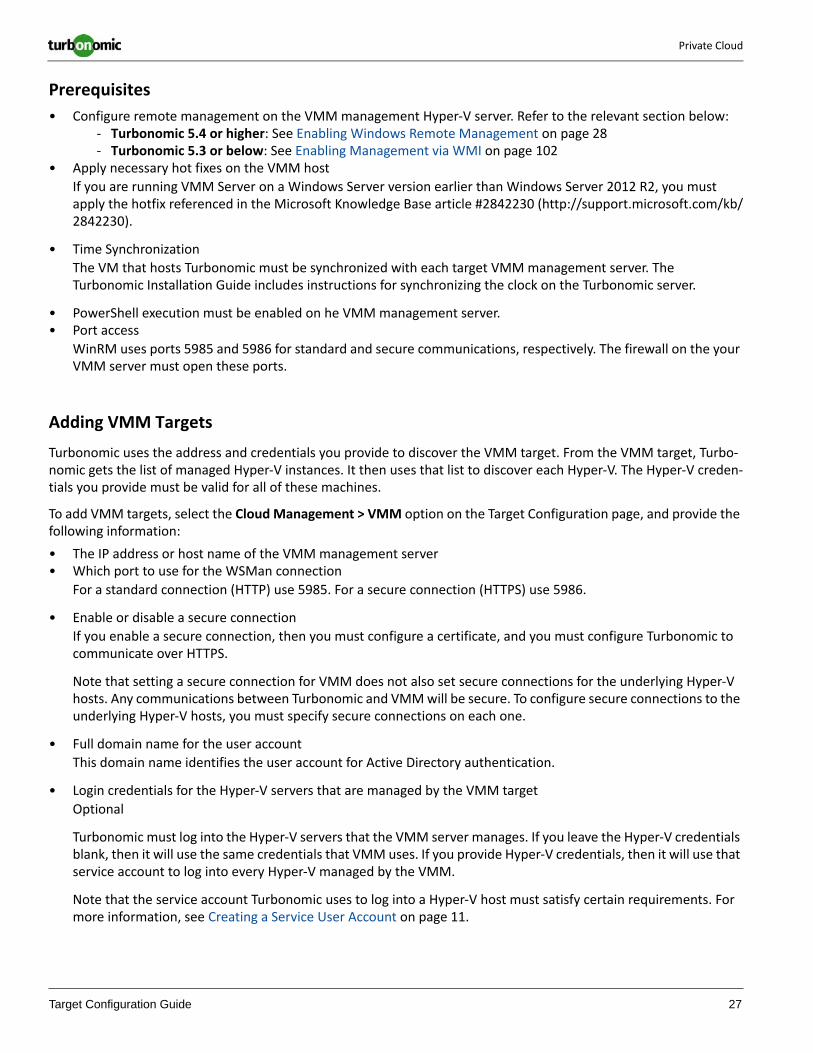
Prerequisites
• Configure remote management on the VMM management Hyper-V server. Refer to the relevant section below:- Turbonomic 5.4 or higher: See Enabling Windows Remote Management on page 28- Turbonomic 5.3 or below: See Enabling Management via WMI on page 102
• Apply necessary hot fixes on the VMM host
If you are running VMM Server on a Windows Server version earlier than Windows Server 2012 R2, you must apply the hotfix referenced in the Microsoft Knowledge Base article #2842230 (http://support.microsoft.com/kb/2842230).
• Time Synchronization
The VM that hosts Turbonomic must be synchronized with each target VMM management server. The Turbonomic Installation Guide includes instructions for synchronizing the clock on the Turbonomic server.
• PowerShell execution must be enabled on he VMM management server.• Port access
WinRM uses ports 5985 and 5986 for standard and secure communications, respectively. The firewall on the your VMM server must open these ports.
Adding VMM Targets
Turbonomic uses the address and credentials you provide to discover the VMM target. From the VMM target, Turbo-nomic gets the list of managed Hyper-V instances. It then uses that list to discover each Hyper-V. The Hyper-V creden-tials you provide must be valid for all of these machines.
To add VMM targets, select the Cloud Management > VMM option on the Target Configuration page, and provide the following information:
• The IP address or host name of the VMM management server• Which port to use for the WSMan connection
For a standard connection (HTTP) use 5985. For a secure connection (HTTPS) use 5986.
• Enable or disable a secure connection
If you enable a secure connection, then you must configure a certificate, and you must configure Turbonomic to communicate over HTTPS.
Note that setting a secure connection for VMM does not also set secure connections for the underlying Hyper-V hosts. Any communications between Turbonomic and VMM will be secure. To configure secure connections to the underlying Hyper-V hosts, you must specify secure connections on each one.
• Full domain name for the user account
This domain name identifies the user account for Active Directory authentication.
• Login credentials for the Hyper-V servers that are managed by the VMM target
Optional
Turbonomic must log into the Hyper-V servers that the VMM server manages. If you leave the Hyper-V credentials blank, then it will use the same credentials that VMM uses. If you provide Hyper-V credentials, then it will use that service account to log into every Hyper-V managed by the VMM.
Note that the service account Turbonomic uses to log into a Hyper-V host must satisfy certain requirements. For more information, see Creating a Service User Account on page 11.
Cloud Management Targets
28 Turbonomic, Inc. www.turbonomic.com
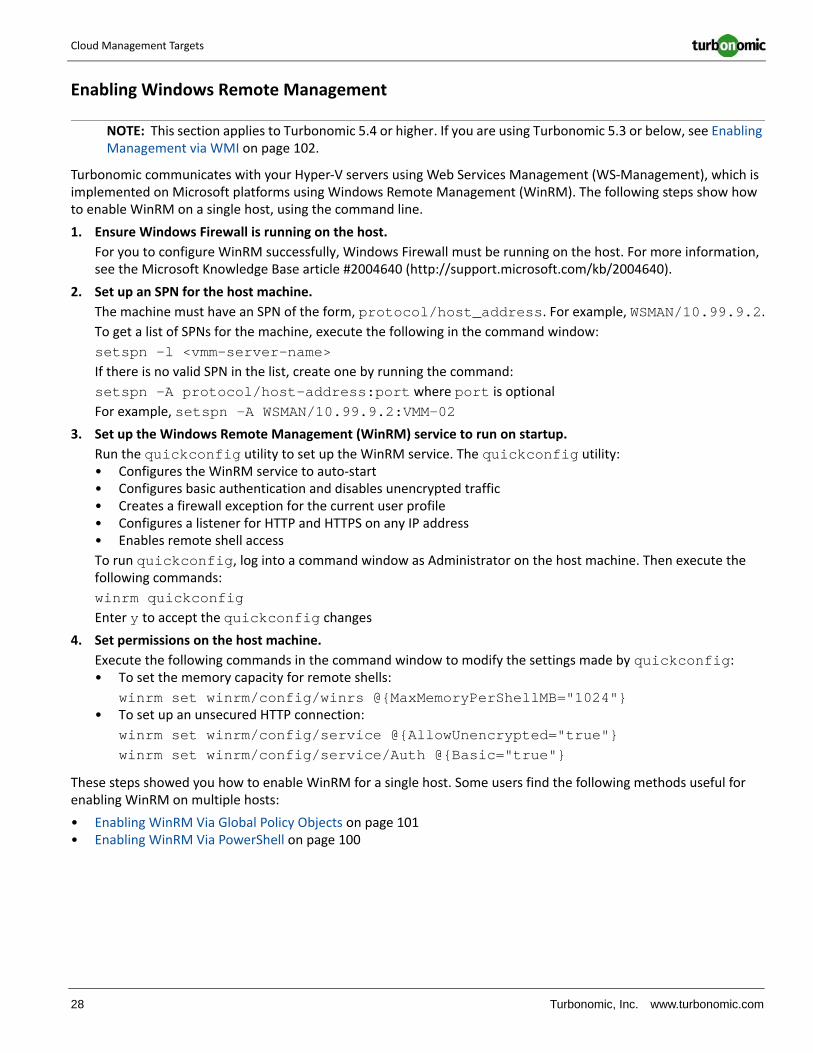
Enabling Windows Remote Management
NOTE: This section applies to Turbonomic 5.4 or higher. If you are using Turbonomic 5.3 or below, see Enabling Management via WMI on page 102.
Turbonomic communicates with your Hyper-V servers using Web Services Management (WS-Management), which is implemented on Microsoft platforms using Windows Remote Management (WinRM). The following steps show how to enable WinRM on a single host, using the command line.
1. Ensure Windows Firewall is running on the host.
For you to configure WinRM successfully, Windows Firewall must be running on the host. For more information, see the Microsoft Knowledge Base article #2004640 (http://support.microsoft.com/kb/2004640).
2. Set up an SPN for the host machine.
The machine must have an SPN of the form, protocol/host_address. For example, WSMAN/10.99.9.2.
To get a list of SPNs for the machine, execute the following in the command window:
setspn -l <vmm-server-name>If there is no valid SPN in the list, create one by running the command:
setspn -A protocol/host-address:port where port is optional
For example, setspn -A WSMAN/10.99.9.2:VMM-02
3. Set up the Windows Remote Management (WinRM) service to run on startup.
Run the quickconfig utility to set up the WinRM service. The quickconfig utility:• Configures the WinRM service to auto-start• Configures basic authentication and disables unencrypted traffic• Creates a firewall exception for the current user profile• Configures a listener for HTTP and HTTPS on any IP address• Enables remote shell access
To run quickconfig, log into a command window as Administrator on the host machine. Then execute the following commands:
winrm quickconfigEnter y to accept the quickconfig changes
4. Set permissions on the host machine.
Execute the following commands in the command window to modify the settings made by quickconfig:• To set the memory capacity for remote shells:
winrm set winrm/config/winrs @{MaxMemoryPerShellMB="1024"}• To set up an unsecured HTTP connection:
winrm set winrm/config/service @{AllowUnencrypted="true"}winrm set winrm/config/service/Auth @{Basic="true"}
These steps showed you how to enable WinRM for a single host. Some users find the following methods useful for enabling WinRM on multiple hosts:
• Enabling WinRM Via Global Policy Objects on page 101• Enabling WinRM Via PowerShell on page 100
Public Cloud
Target Configuration Guide 29
Microsoft VMM and Hyper-V VLANs
Windows Server Hyper-V provides support for VLANs on host and VM partitions. If your Hyper-V environment makes use of this VLAN support, then your VM moves must be sensitive to which hosts provide networking access to your defined VM networks. If a VM is a member of a given VM network, then any move of that VM must be to a host that has access to the same network.
For Hyper-V targets in a VMM environment, the Cloud Control Module is aware of the VM networks, and ensures that a move is to a host that provides connectivity over the given VM network.
Configuring SMB 3.0 File Shares for Turbonomic Discovery
With VMM, Turbonomic can discover SMB 3.0 shares as datastores, assuming these shares have been properly added to your VMM service center. When you add shares to your VMM environment, be sure to:
• Use the Fully Qualified Domain Name of the file server
As you the associated file server to your VMM environment (via the Add Storage Devices Wizard), be sure to specify the FQDN of the file server on the Specify Discovery Scope page of the wizard. Do not use the file server’s IP address.
• Ensure that file server names are unique
Do not specify file servers with the same name, even if they belong to different domains. Turbonomic requires the file server names to be unique.
For information about setting up SMB 3.0 shares, please refer to your Microsoft documentation. For example, see “HowtoAssignSMB 3.0 File Shares to Hyper-V Hosts and Clusters in VMM”.
Public Cloud
A public cloud provides compute, storage, and other resources on demand. You can run all of your infrastructure on a public cloud, or you can set up a hybrid environment where you burst workload to the public cloud as needed. Turbo-nomic can analyze the performance of applications running on the public cloud, and provision more instances as demand requires. For a hybrid environment, Turbonomic can provision copies of your application VMs on the public cloud to satisfy spikes in demand, and as demand falls off it can suspend those VMs if they’re no longer needed.
On the public cloud, you can use Turbonomic to:
• Extend resource allocation across hybrid clouds• Locate the most efficient workload placement within the hybrid environment, while assuring performance• Perform elastic load balancing for application groups deployed to the public cloud
Cloud-based datacenters support scalability, resource pooling, multi-tenancy, and self-service management of virtual resources. Turbonomic supports the following cloud technologies:
Cloud Management Targets
30 Turbonomic, Inc. www.turbonomic.com
License Requirements
To specify public cloud targets and to take advantage of hybrid cloud management, you must install the Hybrid Cloud Control Module.
For hybrid cloud management, Turbonomic strongly recommends that you use the Application Control Module along with the Hybrid Cloud Control Module. In addition, the Application Control Module is required if you want to take advantage of NetScaler Global Server load balancing.
Supply Chain
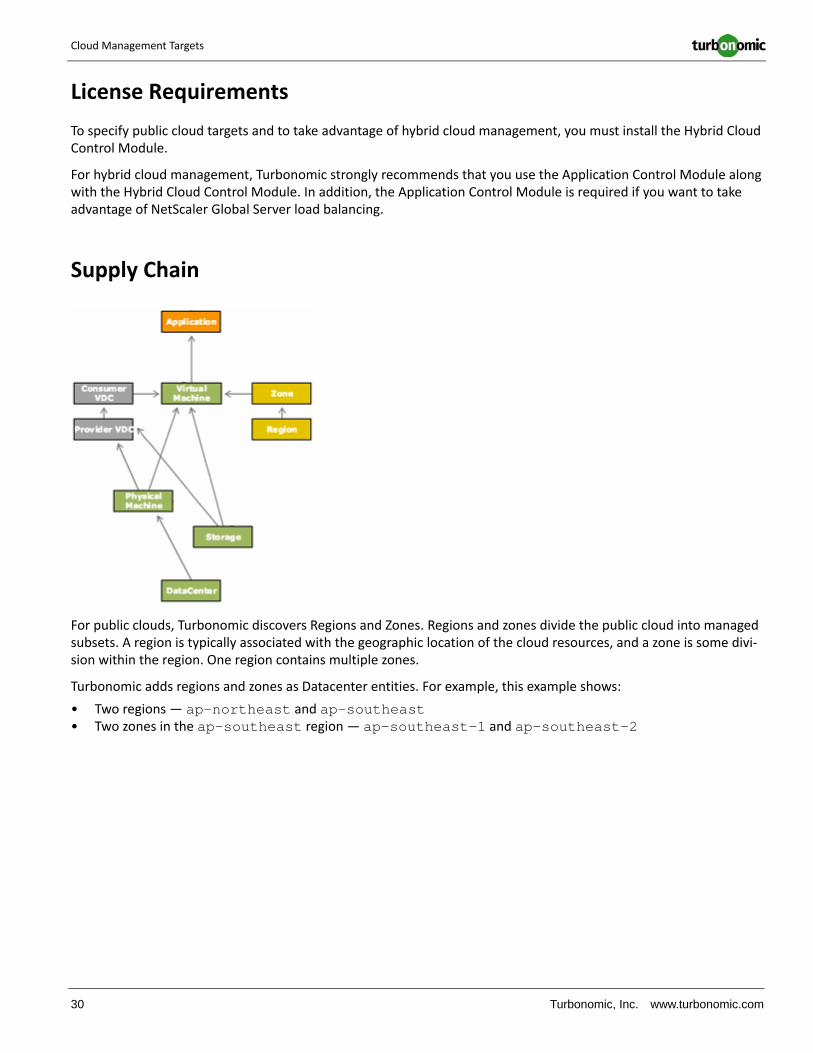
For public clouds, Turbonomic discovers Regions and Zones. Regions and zones divide the public cloud into managed subsets. A region is typically associated with the geographic location of the cloud resources, and a zone is some divi-sion within the region. One region contains multiple zones.
Turbonomic adds regions and zones as Datacenter entities. For example, this example shows:
• Two regions — ap-northeast and ap-southeast• Two zones in the ap-southeast region — ap-southeast-1 and ap-southeast-2

Public Cloud
Target Configuration Guide 31
Actions
Turbonomic recommends actions for cloud infrastructures as follows:
Entity Type Resources
Zone • Start a VM on the Zone• Suspend a VM running on the Zone
Region Turbonomic does not recommend actions for a Region.
Cloud Management Targets
32 Turbonomic, Inc. www.turbonomic.com
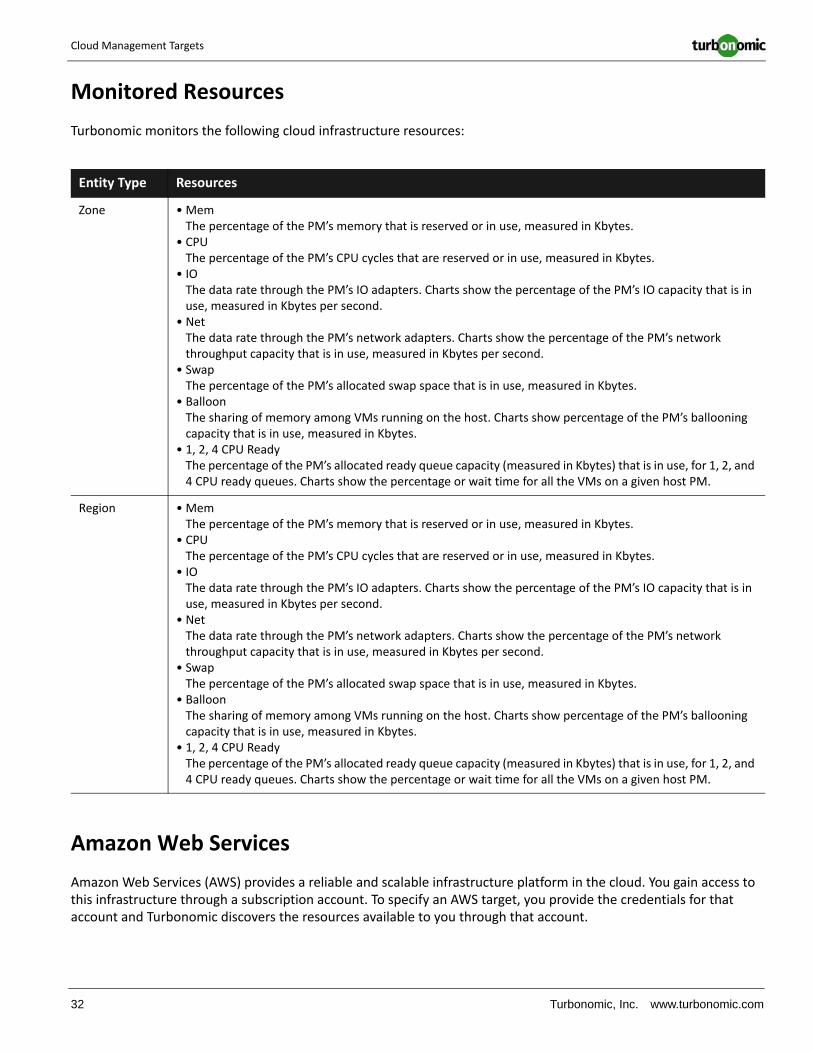
Monitored Resources
Turbonomic monitors the following cloud infrastructure resources:
Amazon Web Services
Amazon Web Services (AWS) provides a reliable and scalable infrastructure platform in the cloud. You gain access to this infrastructure through a subscription account. To specify an AWS target, you provide the credentials for that account and Turbonomic discovers the resources available to you through that account.
Entity Type Resources
Zone • MemThe percentage of the PM’s memory that is reserved or in use, measured in Kbytes.
• CPUThe percentage of the PM’s CPU cycles that are reserved or in use, measured in Kbytes.
• IOThe data rate through the PM’s IO adapters. Charts show the percentage of the PM’s IO capacity that is in use, measured in Kbytes per second.
• NetThe data rate through the PM’s network adapters. Charts show the percentage of the PM’s network throughput capacity that is in use, measured in Kbytes per second.
• SwapThe percentage of the PM’s allocated swap space that is in use, measured in Kbytes.
• BalloonThe sharing of memory among VMs running on the host. Charts show percentage of the PM’s ballooning capacity that is in use, measured in Kbytes.
• 1, 2, 4 CPU ReadyThe percentage of the PM’s allocated ready queue capacity (measured in Kbytes) that is in use, for 1, 2, and 4 CPU ready queues. Charts show the percentage or wait time for all the VMs on a given host PM.
Region • MemThe percentage of the PM’s memory that is reserved or in use, measured in Kbytes.
• CPUThe percentage of the PM’s CPU cycles that are reserved or in use, measured in Kbytes.
• IOThe data rate through the PM’s IO adapters. Charts show the percentage of the PM’s IO capacity that is in use, measured in Kbytes per second.
• NetThe data rate through the PM’s network adapters. Charts show the percentage of the PM’s network throughput capacity that is in use, measured in Kbytes per second.
• SwapThe percentage of the PM’s allocated swap space that is in use, measured in Kbytes.
• BalloonThe sharing of memory among VMs running on the host. Charts show percentage of the PM’s ballooning capacity that is in use, measured in Kbytes.
• 1, 2, 4 CPU ReadyThe percentage of the PM’s allocated ready queue capacity (measured in Kbytes) that is in use, for 1, 2, and 4 CPU ready queues. Charts show the percentage or wait time for all the VMs on a given host PM.
Public Cloud
Target Configuration Guide 33
Adding AWS Targets
For Turbonomic to manage an AWS account, you provide the Access Key credentials that you use to access that account. For information about getting an Access Key for an AWS account, see the Amazon Web Services documenta-tion.
To add AWS targets, select the Cloud Management > AWS option on the Target Configuration page, and provide the following information:
• Address
You can leave this blank, or enter aws.amazon.com
• Username
Provide the Access Key for the account you want to manage.
• Username and Password
Provide the Access Key Secret for the account you want to manage.
IBM SoftLayer
IBM SoftLayer is an infrastructure platform for the public cloud. You gain access to this infrastructure through a sub-scription account. To specify a SoftLayer target, you provide the credentials for that account and Turbonomic discov-ers the resources available to you through that account.
Adding SoftLayer Targets
To identify the target Turbonomic uses to manage a SoftLayer account, you provide credentials to log in and manage that account:
• Address
You can leave this blank, or enter control.softlayer.com
• Username
For this field, provide the user name for the account you want to manage.
• Password
Provide the Authentication Key for the account you want to manage.
Microsoft Azure
Microsoft Azure is Microsoft’s infrastructure platform for the public cloud. You gain access to this infrastructure through a subscription account. To specify an Azure target, you provide the credentials for that account and Turbo-nomic discovers the resources available to you through that account.
Cloud Management Targets
34 Turbonomic, Inc. www.turbonomic.com
Configuring Access to an Azure Subscription
For Turbonomic to manage a subscription, the subscription must have a Management Certificate uploaded to its cer-tificate store, and that certificate must be installed and registered on the Turbonomic server. The Management Certif-icate grants Turbonomic access to the subscription so it can discover and manage the subscription entities.
For information about creating and uploading a Management Certificate for Azure, see the Microsoft documentation.
For information about installing the certificate on the Turbonomic server, see the Turbonomic Support Knowledge Base article, “Assign an Azure Cloud ManagementCertificate to the Turbonomic Server”.
Adding Azure Targets
To identify the target Turbonomic uses to manage a Microsoft Azure subscription, you provide credentials to log in and manage that subscription:
• Address
You can leave this blank, or enter management.core.windows.net
• Username
For this field, provide the name of the subscription you want to manage.
• Username and Password
Provide the signature of a Management Certificate that has been uploaded in the subscription’s certificate store.

Target Configuration Guide 35
Storage Manager Targets
The Storage Control Module (SCM) enables Turbonomic to connect to your storage subsystem through an SMI-S pro-vider API or the controller’s native API. Through the API, Turbonomic has access to information about each of the underlying disk arrays, and uses this information to set disk performance characteristics appropriately. This leads to improved workload placement. Similarly, Turbonomic knows the relationships between storage controllers and disk arrays, and about the location of datastores within those arrays. This information also helps optimize workload place-ment.
The section below describes the storage supply chain. For information on how to add specific storage targets, the resources Turbonomic can monitor for the various supply chain entities, and the actions it can take to optimize the environment, refer to the target configuration instructions for your specific storage type.
License Requirements
The Storage Control Module.

Storage Manager Targets
36 Turbonomic, Inc. www.turbonomic.com
Supply Chain
Storage Control Module targets (storage controllers) add Disk Array and Storage Controller entities to the supply chain. Disk Array entities then host Storage entities (datastores).
For example, the inventory tree shows that the disk array FC_r5 hosts the datastore 3Par:R5Volume3. Also, the disk array consumes (is hosted by) the storage controller 3PAR7200.
If you expand the entry for datastore 3Par:R5Volume3, you can then see the VMs and applications that use that datastore.
Public Cloud
Target Configuration Guide 37
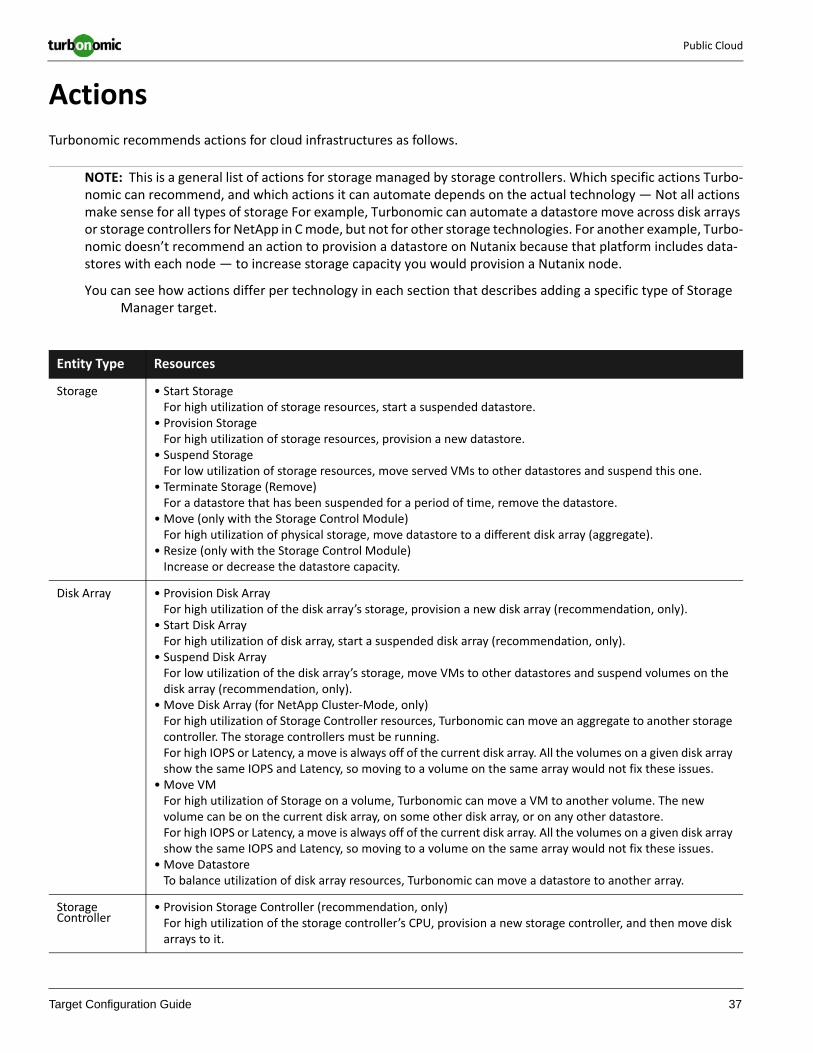
Actions
Turbonomic recommends actions for cloud infrastructures as follows.
NOTE: This is a general list of actions for storage managed by storage controllers. Which specific actions Turbo-nomic can recommend, and which actions it can automate depends on the actual technology — Not all actions make sense for all types of storage For example, Turbonomic can automate a datastore move across disk arrays or storage controllers for NetApp in C mode, but not for other storage technologies. For another example, Turbo-nomic doesn’t recommend an action to provision a datastore on Nutanix because that platform includes data-stores with each node — to increase storage capacity you would provision a Nutanix node.
You can see how actions differ per technology in each section that describes adding a specific type of Storage Manager target.
Entity Type Resources
Storage • Start StorageFor high utilization of storage resources, start a suspended datastore.
• Provision StorageFor high utilization of storage resources, provision a new datastore.
• Suspend StorageFor low utilization of storage resources, move served VMs to other datastores and suspend this one.
• Terminate Storage (Remove)For a datastore that has been suspended for a period of time, remove the datastore.
• Move (only with the Storage Control Module)For high utilization of physical storage, move datastore to a different disk array (aggregate).
• Resize (only with the Storage Control Module)Increase or decrease the datastore capacity.
Disk Array • Provision Disk ArrayFor high utilization of the disk array’s storage, provision a new disk array (recommendation, only).
• Start Disk ArrayFor high utilization of disk array, start a suspended disk array (recommendation, only).
• Suspend Disk ArrayFor low utilization of the disk array’s storage, move VMs to other datastores and suspend volumes on the disk array (recommendation, only).
• Move Disk Array (for NetApp Cluster-Mode, only)For high utilization of Storage Controller resources, Turbonomic can move an aggregate to another storage controller. The storage controllers must be running.For high IOPS or Latency, a move is always off of the current disk array. All the volumes on a given disk array show the same IOPS and Latency, so moving to a volume on the same array would not fix these issues.
• Move VMFor high utilization of Storage on a volume, Turbonomic can move a VM to another volume. The new volume can be on the current disk array, on some other disk array, or on any other datastore.For high IOPS or Latency, a move is always off of the current disk array. All the volumes on a given disk array show the same IOPS and Latency, so moving to a volume on the same array would not fix these issues.
• Move DatastoreTo balance utilization of disk array resources, Turbonomic can move a datastore to another array.
Storage Controller
• Provision Storage Controller (recommendation, only)For high utilization of the storage controller’s CPU, provision a new storage controller, and then move disk arrays to it.
Storage Manager Targets
38 Turbonomic, Inc. www.turbonomic.com
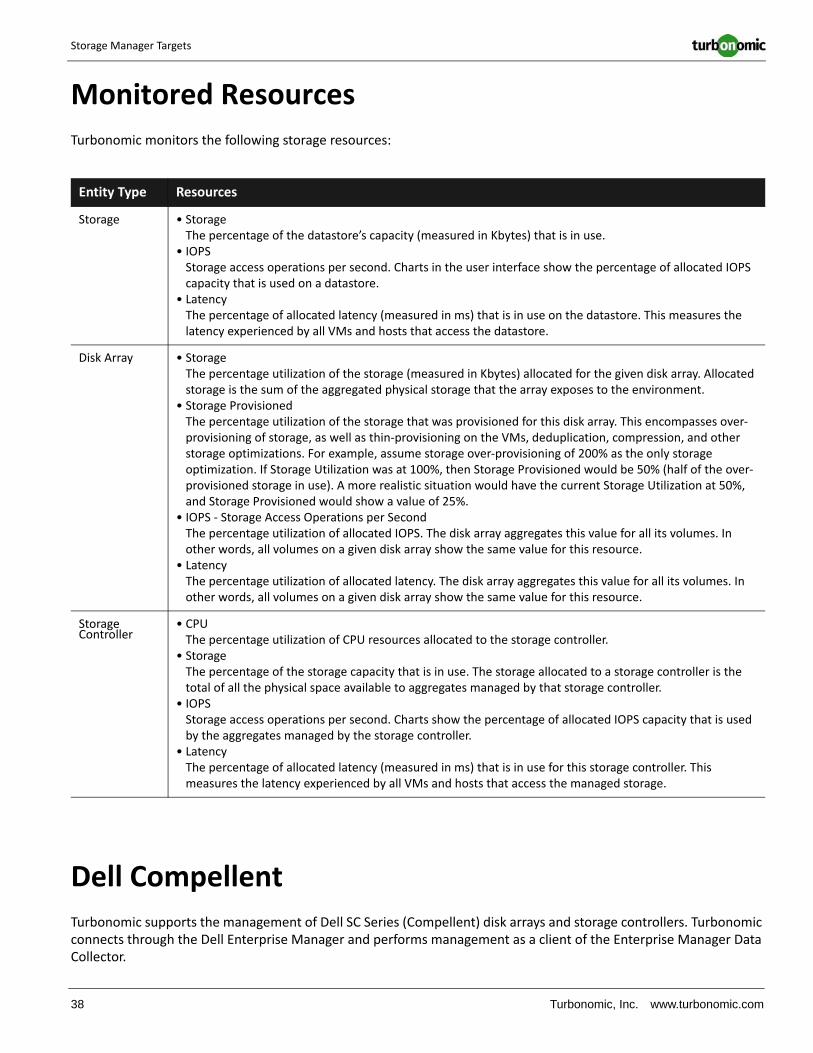
Monitored Resources
Turbonomic monitors the following storage resources:
Dell Compellent
Turbonomic supports the management of Dell SC Series (Compellent) disk arrays and storage controllers. Turbonomic connects through the Dell Enterprise Manager and performs management as a client of the Enterprise Manager Data Collector.
Entity Type Resources
Storage • StorageThe percentage of the datastore’s capacity (measured in Kbytes) that is in use.
• IOPSStorage access operations per second. Charts in the user interface show the percentage of allocated IOPS capacity that is used on a datastore.
• LatencyThe percentage of allocated latency (measured in ms) that is in use on the datastore. This measures the latency experienced by all VMs and hosts that access the datastore.
Disk Array • StorageThe percentage utilization of the storage (measured in Kbytes) allocated for the given disk array. Allocated storage is the sum of the aggregated physical storage that the array exposes to the environment.
• Storage ProvisionedThe percentage utilization of the storage that was provisioned for this disk array. This encompasses over-provisioning of storage, as well as thin-provisioning on the VMs, deduplication, compression, and other storage optimizations. For example, assume storage over-provisioning of 200% as the only storage optimization. If Storage Utilization was at 100%, then Storage Provisioned would be 50% (half of the over-provisioned storage in use). A more realistic situation would have the current Storage Utilization at 50%, and Storage Provisioned would show a value of 25%.
• IOPS - Storage Access Operations per SecondThe percentage utilization of allocated IOPS. The disk array aggregates this value for all its volumes. In other words, all volumes on a given disk array show the same value for this resource.
• LatencyThe percentage utilization of allocated latency. The disk array aggregates this value for all its volumes. In other words, all volumes on a given disk array show the same value for this resource.
Storage Controller
• CPUThe percentage utilization of CPU resources allocated to the storage controller.
• StorageThe percentage of the storage capacity that is in use. The storage allocated to a storage controller is the total of all the physical space available to aggregates managed by that storage controller.
• IOPSStorage access operations per second. Charts show the percentage of allocated IOPS capacity that is used by the aggregates managed by the storage controller.
• LatencyThe percentage of allocated latency (measured in ms) that is in use for this storage controller. This measures the latency experienced by all VMs and hosts that access the managed storage.

Dell Compellent
Target Configuration Guide 39
The main components of a Dell Compellent installation are:
• Dell Enterprise Manager
A management service that provides administration, management, and monitoring of multiple Storage Centers — Typically installed on a Windows VM.
• Storage Centers
A storage domain. Turbonomic represents the Storage Center as a Storage Controller entity.
• Storage Types, Disks, and Disk Folders
Pools of storage, represented in Turbonomic as Disk Array entities
• Volumes
Datastores — Represented in Turbonomic as Storage entities
When you specify a Dell Compellent target, you provide the IP address of the Dell Enterprise Manager. Turbonomic discovers the Compellent infrastructure through the SMI-S component which is typically installed as part of the Enter-prise Manager.
Prerequisites
• Storage Control Module license• Dell Enterprise Manager Data Collector Service 6.2 or higher• Dell Compellent SMI-S Provider• Storage Centers added to Dell Enterprise Manager
Setting Up the Dell Compellent SMI-S Provider
Your Dell Compellent storage environment must include an enabled Dell Compellent SMI-S Provider. Configure the SMI-S Provider as described in the “SMI-S” section of the Dell Compellent Enterprise Manager Administrator’s Guide. The guide provides detailed steps to:
• Open the required ports on the server hosting the Enterprise Manager Data Collector.• Enable SMI-S for the Data Collector.• Add a user for SMI-S.• If using HTTPS, associate the SSL certificate with the SMI-S Provider.
Adding Storage Centers to Dell Enterprise Manager
Before adding the Dell Compellent target to Turbonomic, confirm that the Storage Centers you want to manage show up in Dell Enterprise Manager (see “Storage Center Administration” in the Dell Compellent Enterprise Manager Administrator’s Guide). The SMI-S user account must be able to access all of the Storage Centers. If you add or remove Storage Centers later, Turbonomic will detect the changes during its next discovery cycle.

Storage Manager Targets
40 Turbonomic, Inc. www.turbonomic.com
Adding Dell Compellent Targets to Turbonomic
To add Dell Compellent targets, select the Storage > Dell Compellent option on the Target Configuration page and pro-vide the following information:
• Addresss
The name or IP address of the Dell Enterprise Manager.
By default, Enterprise Manager provides SMI-S data over port 5988 (HTTP) or port 5989 (HTTPS). If your installation uses a different port for SMI-S, include the port number in the Address field.
• Username/Password
Credentials for the SMI-S user you added when setting up the SMI-S provider.
After validating the new target, Turbonomic discovers the connected storage entities. This table compares terms used in the Dell Enterprise Manager to those used in Turbonomic:
Supported Actions
Turbonomic supports the following actions for Dell Compellent entities:
EMC VMAX
Turbonomic supports management of EMC (Symmetrix) VMAX Series storage arrays. The VMAX series is a family of enterprise storage arrays designed for SAN environments. Turbonomic connects to VMAX storage systems via an EMC SMI-S provider that has the disk arrays added to it. A single SMI-S provider can communicate with one or more disk arrays. When you specify an SMI-S provider as a target, Turbonomic discovers all the added disk arrays.
Dell Name Turbonomic Entity
Storage Center Storage Controller
Storage Type Disk Array
Volume Storage
Entity Type Can Be Automated Recommendations only
Storage Move, Provision, Resize Up
Disk Array Provision, Resize Up
Storage Controller Provision
EMC VMAX
Target Configuration Guide 41
Prerequisites
• Storage Control Module license• EMC SMI-S Provider 8.1• A service account that Turbonomic can use to connect to the EMX SMI-S Provider (typically the default admin
account)
EMC SMI-S Provider Setup
To collect metrics for your storage arrays, you must install the EMC SMI-S provider. To collect performance metrics (IOPS and latency) the storage arrays must be local to the given SMI-S provider. For example, if a target SMI-S provider connects to a disk array via an SRDF link, Turbonomic can discover the datastores in that array, but it cannot discover or monitor IOPS and latency for those datastores.
NOTE: If you are running a Vblock environment or are using the Cisco UCS Converged Fabric, you might already have a Cisco SMI-S provider running in your environment. To support EMC VMAX, Turbonomic requires the EMC SMI-S Provider. Since both providers use the same TCP ports, you should install the EMC provider on its own host.
To install the EMC SMI-S provider:
1. Download Solutions Enabler 8.1 from the EMC Support website.
The Solutions Enabler package includes the required SMI-S Provider 8.1.
2. Install the Solutions Enabler
Follow the installation instructions in the EMC Solutions Enabler Installation Guide. When installing the Solutions Enabler:• Select “Custom” install (or add the non-default features below if installing from the command line)• Install the “SMIS_PROVIDER” component• Install and start the “EMC SE SYMAPI Server Daemon” service
3. Add the disk arrays/pools you want to manage.
The SMI-S Provider communicates over UDP port 427 and TCP ports 5988 and 5989. If a firewall is running on the server hosting the provider, these ports must be open. The SMI-S Provider service must be running at all times.
For more information, some customers find the following Green Circle article useful: https://greencir-cle.vmturbo.com/docs/DOC-2251
Adding Targets
To add EMC VMAX targets, select the Storage > EMC VMAX option on the Target Configuration page and provide the following:
• Addresss
The name or IP address and port for the SMI-S provider. For example 10.10.123.45:5989.
By default, Enterprise Manager provides SMI-S data over port 5988 (HTTP) or port 5989 (HTTPS).
• Username/Password
Credentials for the service user account on the SMI-S provider.
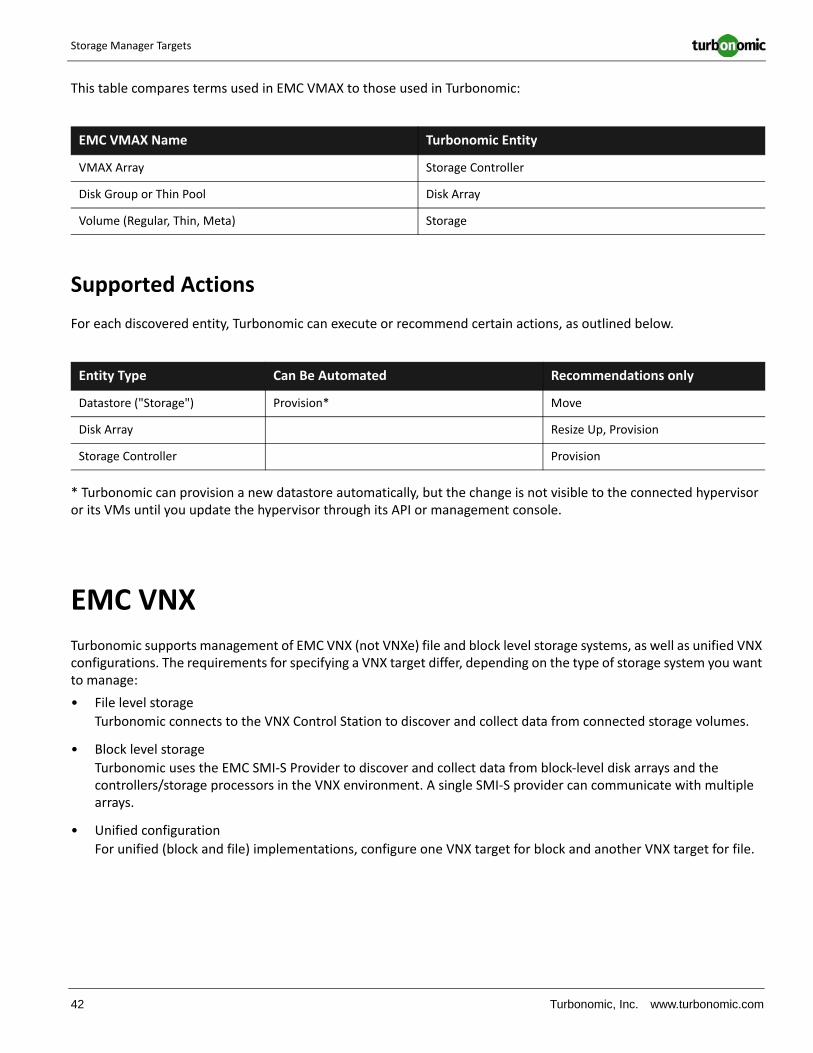
Storage Manager Targets
42 Turbonomic, Inc. www.turbonomic.com
This table compares terms used in EMC VMAX to those used in Turbonomic:
Supported Actions
For each discovered entity, Turbonomic can execute or recommend certain actions, as outlined below.
* Turbonomic can provision a new datastore automatically, but the change is not visible to the connected hypervisor or its VMs until you update the hypervisor through its API or management console.
EMC VNX
Turbonomic supports management of EMC VNX (not VNXe) file and block level storage systems, as well as unified VNX configurations. The requirements for specifying a VNX target differ, depending on the type of storage system you want to manage:
• File level storage
Turbonomic connects to the VNX Control Station to discover and collect data from connected storage volumes.
• Block level storage
Turbonomic uses the EMC SMI-S Provider to discover and collect data from block-level disk arrays and the controllers/storage processors in the VNX environment. A single SMI-S provider can communicate with multiple arrays.
• Unified configuration
For unified (block and file) implementations, configure one VNX target for block and another VNX target for file.
EMC VMAX Name Turbonomic Entity
VMAX Array Storage Controller
Disk Group or Thin Pool Disk Array
Volume (Regular, Thin, Meta) Storage
Entity Type Can Be Automated Recommendations only
Datastore ("Storage") Provision* Move
Disk Array Resize Up, Provision
Storage Controller Provision
EMC VNX
Target Configuration Guide 43
Prerequisites
• Storage Control Module license• For block level storage or unified configurations: EMC SMI-S Provider 4.6.2• Firewall ports for the SMI-S provider
On the system that hosts the SMI-S provider you might need to open the following ports:
- UDP port 427- TCP ports 5988 and 5989
• A service account Turbonomic can use to connect to the target:- File level storage: An account with administrator privileges on the VNX Control Station (nasadmin).- Block level storage: An account with administrator privileges on the SMI-S provider host.
EMC SMI-S Provider Setup Requirements
NOTE: The SMI-S Provider is required for block level storage and unified configurations only. If you are using file level storage only, you do not need the SMI-S Provider.
1. Download EMC SMI-S Provider 4.6.2 from the EMC Support website.
2. Install the SMI-S Provider.
Perform installation according to the installation instructions in the EMC SMI-S Provider Release Notes. When installing the provider:• In the Providers list, select the “Array Provider” (not the “Host Provider”).• If prompted to select which Stordaemon Services to install and start, select “EMC SE SYMAPI Server Daemon.”
3. Add storage resources to the SMI-S provider.
Use the “testsmiprovider” utility to add the disk arrays/pools you want to manage. Find instructions in the “Out-of-band discovery method” section of the EMC SMI-S Provider Release Notes.
The SMI-S Provider communicates over UDP port 427 and TCP ports 5988 and 5989. If a firewall is running on the server hosting the provider, these ports must be open. Also, the SMI-S Provider service must be running at all times.
NOTE: If you are running a Vblock environment or are using the Cisco UCS Converged Fabric, you may be using a Cisco SMI-S provider. Turbonomic requires the EMC SMI-S Provider. Since both providers use the same TCP port, install the EMC provider on its own system.
Adding EMC VNX Targets to Turbonomic
To add EMC VNX targets, select the Storage > EMC VNX option on the Target Configuration page and provide the fol-lowing information:
• Addresss
File level storage: The address of the primary VNX Control Station. You can get this from the EMC Unisphere management console.
Block level storage: The name or IP address of the server with the EMC SMI-S provider (see the section above for SMI-S Provider Setup Requirements).

Storage Manager Targets
44 Turbonomic, Inc. www.turbonomic.com
• Username/Password
File level storage: Credentials for an administrator user on the primary VNX Control Station.
Block level storage: The name or IP address of the EMC SMI-S provider (see the section above for SMI-S Provider Setup Requirements).
NOTE: For unified configurations, configure one VNX target for block and another VNX target for file.
Monitored Resources
When calculating available storage, Turbonomic excludes disks devoted to the VNX operating system.
Supported Actions
For each discovered entity, Turbonomic can execute or recommend certain actions, as outlined below.
EMC XtremIO
EMC® XtremIO® is a flash-based (SSD) storage solution, designed to push data to applications at higher speeds. The system building blocks are SAN appliances called X-Bricks. A deployment is organized into clusters of X-Bricks, and the clusters are managed by the XtremIO Management Server (XMS).
Turbonomic connects to X-Bricks through the XMS. The XMS presents a unified view of each connected X-Brick cluster, rather than exposing the individual X-Bricks within each cluster. Within Turbonomic, each X-Brick cluster displays as a single storage controller with an associated disk array.
The relationship between Storage entities and individual X-Bricks within the cluster is not exposed through the XMS — Turbonomic cannot make recommendations to move datastores from one X-Brick to another. Additionally, the X-Brick has a fixed form factor — Turbonomic does not recommend resize actions for disk array or storage controller resources.
Turbonomic recognizes XtremIO arrays as flash storage and sets the IOPS capacity on discovered arrays accordingly.
Entity Type Can Be Automated Recommendations only
Storage Move, Provision, Resize Up
Disk Array Provision, Resize Up
Storage Controller Provision
HP 3PAR
Target Configuration Guide 45
Prerequisites
• Storage Control Module license• A service user account on the XMS — typically the default xmsadmin account
Turbonomic uses this account to connect to the XMS and execute commands through the XtremIO API.
Adding XtremIO Targets to Turbonomic
For EMC XtremIO targets, select the Storage > EMC XtremIO option on the Target Configuration page and provide the following information:
• Addresss
The name or IP address of the XtremIO Management Server (XMS).
• Username/Password
Credentials for a user account on the XMS.
After initial validation, Turbonomic discovers the XtremIO clusters managed by the specified XMS.
Supported Actions
For each discovered entity, Turbonomic can execute or recommend certain actions, as outlined below.
HP 3PAR
HP 3PAR StoreServ systems use controller nodes to manage pools of storage resources and present a single storage system to consumers. Turbonomic communicates with the HP 3PAR system via an SMI-S provider that is installed on the 3PAR controller node.
Prerequisites
• Storage Control Module license• SMI-S Provider enabled and configured on the controller node• A service account on the controller node that Turbonomic can use to connect to the SMI-S provider
Entity Type Can Be Automated Recommendations only
Storage Provision, Resize Up
Disk Array
Storage Controller Provision
Storage Manager Targets
46 Turbonomic, Inc. www.turbonomic.com
Setting Up the SMI-S Provider
The HP 3PAR SMI-S Provider should be installed on the controller node. It is disabled by default — you must ensure that it is installed properly and running on the controller node.
To enable the SMI-S provider:
1. Log into the HP 3PAR Command Line Interface (CLI).
Open a secure shell session (ssh) on the controller node. Default credentials are 3paradm/3pardata.
2. Check the current status of the SMI-S provider.
In the shell session, execute the command, showcim.
3. If the CIM service is not running, start it.
Execute the command startcim to enable the CIM service and the SMI-S provider.
To stop the SMI-S provider, execute the command stopcim -f -x.
Adding HP 3PAR Targets to Turbonomic
To add an HP 3PAR target, select the Storage > HP 3Par option on the Target Configuration page and provide the fol-lowing information:
• Addresss
The name or IP address of the 3PAR controller node.
By default, the controller provides SMI-S data over port 5988 (HTTP) or port 5989 (HTTPS). If your installation uses a different port for SMI-S, include the port number in the Address field.
• Username/Password
Credentials for a user account on the controller node.
Supported Actions
For each discovered entity, Turbonomic can execute or recommend certain actions, as outlined below.
Entity Type Can Be Automated Recommendations only
Storage Move, Provision, Resize Up
Disk Array Resize Up
Storage Controller Provision

NetApp
Target Configuration Guide 47
NetApp
The Storage Control Module adds support for NetApp filers running the Data ONTAP operating system. NetApp stor-age controllers are Storage Virtual Machines that manage storage arrays — Vfilers for 7-Mode and Vservers for C-Mode. Turbonomic connects to these storage controllers to support NetApp targets in 7-Mode and Cluster-Mode (C-Mode).
Prerequisites
• Storage Control Module license• Transport Layer Security (TLS) is enabled• A service account Turbonomic can use to connect to the NetApp target
Enabling TLS
Starting with version 5.4, by default Turbonomic requires Transport Layer Security (TLS) version 1.2 to establish secure communications with targets. NetApp filers have TLS disabled by default, and the latest version they support is TLSv1. If your NetApp target fails to validate on Turbonomic 5.4 or later, this is probably the cause.
If target validation fails because of TLS support, you might see validation errors with the following strings:
• No appropriate protocol
To correct this error, ensure that you have enabled the latest version of TLS that your target technology supports. If this does not resolve the issue, please contact Turbonomic Technical Support.
• Certificates does not conform to algorithm constraints
To correct this error, refer to your NetApp documentation for instructions to generate a certification key with a length of 1024 or greater on your target server. If this does not resolve the issue, please contact Turbonomic Technical Support.
For information about enabling TLS, see the Data ONTAP System Administration Guide for sections on the SSL proto-col.
Service User Account — Admin Role
To discover and fully manage NetApp disk arrays, Turbonomic must have a service account that grants privileges to execute commands through the NetApp filer’s OnTap API (ontapi). In most cases, you can provide a user account with Administrator privileges:
• NetApp 7-Mode: Create the administrator account from the NetApp command line — For example:
useradmin user add Turbonomic -g Administrators
• NetApp C-Mode: Create the administrator account via the NetApp OnCommand System Manager, or from the NetApp command line — For example:
security login create -role admin -username Turbonomic -application ontapi -authmethod password

Storage Manager Targets
48 Turbonomic, Inc. www.turbonomic.com
If you prefer not to grant full administrator rights:
• NetApp 7-Mode: See NetApp 7-Mode Restricted Service Account Setup on page 48• NetApp C-Mode: See NettApp C-Mode Restricted Service Account Setup on page 49
NetApp 7-Mode Restricted Service Account Setup
If you prefer to use a service account that does not have full administrator rights:
1. Log into the NetApp filer from a command shell.
2. Create a role with API privileges.
For example:
useradmin role add TurbonomicRole <capabilities>]where <capabilities> is a comma-separated list of capabilities assigned to the role. The required capabilities are listed below.
Inspection capabilities:
api-aggr-list-info, api-disk-list-info, api-fcp-node-get-name, api-flash-device-list-info, api-igroup-list-info, api-iscsi-node-get-name, api-lun-initiator-list-map-info, api-lun-map-list-info, api-lun-list-info, api-net-ifconfig-get, api-nfs-exportfs-list-rules-2, api-options-list-info, api-system-get-info, api-system-get-version, api-volume-list-info, api-snapshot-list-info, api-perf-object-get-instances, api-perf-object-instance-list-info, api-perf-object-counter-list-info, api-qtree-list, security-api-vfiler, api-vfiler-list-info, api-volume-options-list-info, login-http-admin, login-*
Note that the last login capability (login-*) may be necessary for external users.
Execution capabilities:
api-volume-create, api-volume-size, api-volume-offline, api-volume-online, api-volume-destroy, api-aggr-add, api-aggr-create, api-aggr-offline, api-aggr-online, api-aggr-destroy
3. Create a group and assign the role.
For example:
useradmin add TurbonomicGroup -r TurbonomicRole
4. Create a user that is a member of the group.
For example:
useradmin user add Turbonomic -g TurbonomicGroup
5. Enter a password for the new user when prompted.
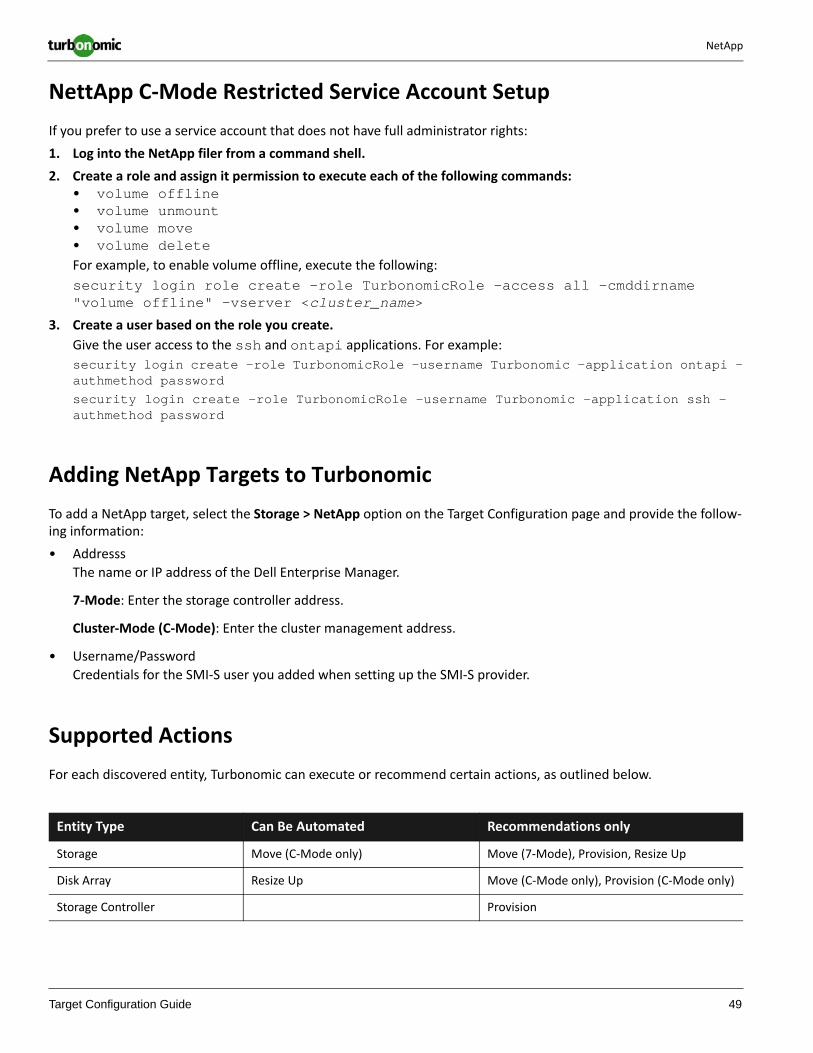
NetApp
Target Configuration Guide 49
NettApp C-Mode Restricted Service Account Setup
If you prefer to use a service account that does not have full administrator rights:
1. Log into the NetApp filer from a command shell.
2. Create a role and assign it permission to execute each of the following commands:• volume offline• volume unmount• volume move• volume deleteFor example, to enable volume offline, execute the following:
security login role create -role TurbonomicRole -access all -cmddirname "volume offline" -vserver <cluster_name>
3. Create a user based on the role you create.
Give the user access to the ssh and ontapi applications. For example:
security login create -role TurbonomicRole -username Turbonomic -application ontapi -authmethod passwordsecurity login create -role TurbonomicRole -username Turbonomic -application ssh -authmethod password
Adding NetApp Targets to Turbonomic
To add a NetApp target, select the Storage > NetApp option on the Target Configuration page and provide the follow-ing information:
• Addresss
The name or IP address of the Dell Enterprise Manager.
7-Mode: Enter the storage controller address.
Cluster-Mode (C-Mode): Enter the cluster management address.
• Username/Password
Credentials for the SMI-S user you added when setting up the SMI-S provider.
Supported Actions
For each discovered entity, Turbonomic can execute or recommend certain actions, as outlined below.
Entity Type Can Be Automated Recommendations only
Storage Move (C-Mode only) Move (7-Mode), Provision, Resize Up
Disk Array Resize Up Move (C-Mode only), Provision (C-Mode only)
Storage Controller Provision
Storage Manager Targets
50 Turbonomic, Inc. www.turbonomic.com
Note that for NetApp in C-Mode, Turbonomic can automate moving a datastore to a disk array on the same storage controller, and also moves to a disk array on a different storage controller.
Nutanix
Nutanix products provide hyperconverged platforms that include VM hosting and a distributed storage fabric. The platform presents storage in two tiers — Local HDD storage and server-attached flash (hot storage).
Nutanix environments include:
• One or more Nutanix appliances
An appliance contains up to four server nodes.
• Nutanix nodes
Servers that expose compute and storage resources. Each node provides local HDD and hot storage. Nodes combine to form a unified cluster that pools resources.
• Controller VMs
Each node includes a Controller VM that manages the node’s resources within the cluster pool. To minimize storage latency, the Controller VM keeps the most frequently accessed data in the hot storage.
Turbonomic supports management of Nutanix fabrics, where the supply chain treats a Nutanix Storage Pool as a disk array. Turbonomic recognizes Nutanix storage tiers when calculating placement of VMs and VStorage. In addition, Tur-bonomic can recommend actions to scale flash capacity up or down by adding more hosts to the cluster, or more flash drives to the hosts.
To specify a Nutanix target, you will provide the Cluster External IP address. This is a logical IP address that always con-nects to one of the active Controller VMs in the cluster. In this way, you can specify a Nutanix target without having to specify an explicit Controller VM.
NOTE: The Controller VM must remain pinned to its host machine — You must not move the Controller VM to a different host. If the Nutanix cluster uses the Nutanix Acropolis OS to manage VMs, Turbonomic automatically pins the COntroller VMs. However, if you use vCenter Server or Hyper-V to manage VMs on the hosts, you must configure a group to pin the Controller VMs. For more information, see Pinning Controller VMs in Generic Hyper-visor Mode on page 52.
Prerequisites
• Storage Control Module license• A service account with administrator rights on the Nutanix target
Finding the Cluster External IP Address
To set a Nutanix target, you will provide the Cluster External IP address for the given Nutanix cluster.

Nutanix
Target Configuration Guide 51
The Cluster External IP address is a logical IP that resolves to the cluster’s Prism Leader. If the Prism Leader fails, then the Cluster External IP address will resolve to the newely electer Prism Leader.
To find this IP address, open the Web Console (the Prism Element) on the cluster and navigate to the Cluster Details view. In this view you can see the Cluster External IP address. If there is no IP address specified, you can specify the address at this time. For more information, see the Nutanix documentation.
Operating Modes
A Nutanix node is a server that hosts VMs — In this sense the node functions as a hypervisor. A cluster of nodes can host VMs using the following Hypervisor technologies:
• Nutanix Acropolis
The native Nutanix host platform, which combines software-defined storage with built-in virtualization.
• VMware ESXi• Microsoft Hyper-V
Turbonomic divides Nutanix cluster management into two modes:
• Standalone Mode (Acropolis)
In this mode you:
- Enable standalone mode and restart the Turbonomic server- Specify the Nutanix Cluster External IP address as the target address — This adds the cluster as a
Turbonomic target to manage both VM and storage resources• Generic Hypervisor Mode (ESXi or Hyper-V)
In this mode you:
- Add each Hyper-V host or vCenter as a hypervisor target — This enables VM workload control for the respective hypervisor technologies
- Specify the Nutanix Cluster External IP address as the target address — This adds the cluster as a Storage Controller target to enable Turbonomic storage control
NOTE: These operating modes are mutually exclusive for a Nutanix cluster. You cannot mix operating modes in the same cluster.
Enabling Standalone (Acropolis) Operating Mode
By default, Turbonomic supports the Generic Hypervisor operating mode. To enable management of Acropolis VMs, you must modify the Turbonomic targets configuration file and then restart the Turbonomic server.
NOTE: These operating modes are mutually exclusive for a Nutanix cluster. You cannot mix operating modes in the same cluster.
To enable Acropolis management for a cluster:
1. Add the Nutanix cluster as a target.
Add the cluster as a target using the Cluster External IP address. Be sure you have added the target, and that Turbo-nomic has validated the target. Keep a note of the IP address you used.

Storage Manager Targets
52 Turbonomic, Inc. www.turbonomic.com
2. Open a secure session on the Turbonomic server.
ssh root@<server_ip_address>The default password is vmturbo.
3. Navigate to the configuration directory.
Change directory to /srv/tomcat/data/config.
4. Back up the config file.
Create a backup of disc.config.topology.
5. Locate the target entry for the cluster you added.
Open disc.config.topology in a text editor.
In this file, search the <targets> section for the nutanix:NutanixTarget entry that has the IP address you supplied for the Nutanix cluster.
For example, assume you added a Nutinax cluster with the IP address, 10.10.64.88. Then you would search for the following entry in the config file:
<targets xsi:type="nutanix:NutanixTarget" uuid="_pRSdsFheEeWgpfmffIwmXw" name="VMTTarget_10.10.64.88" displayName="10.10.64.88" nameOrAddress="10.10.64.88" timeout="30000" template="_2kieMIMcEeCC5PhGZd6dJj" ... </targets>
6. Modify the entry’s TEMPLATE attribute.
Note the template attribute. In the example above, the value is _2kieMIMcEeCC5PhGZd6dJj.
Change the last character in the template attribute from j to i. Following the example, the config file entry would now be:
<targets xsi:type="nutanix:NutanixTarget" uuid="_pRSdsFheEeWgpfmffIwmXw" name="VMTTarget_10.10.64.88" displayName="10.10.64.88" nameOrAddress=“10.10.64.88" timeout="30000" template="_2kieMIMcEeCC5PhGZd6dJi" ... </targets>
7. Save your changes to the configuration file.
8. Restart Turbonomic.
Pinning Controller VMs in Generic Hypervisor Mode
Each Nutanix node hosts a Controller VM that runs the Nutanix software andmanages I/O for the hypervisor and all VMs running on the host. Each Controller VM must remain on its host node —The Controller VM must be pinned to that host, and must not be moved to any other host.
For a cluster in Standalone mode (running Acropolis hypervisors), Turbonomic recognizes the Controller VMs, and never recommends move actions for them.
For a cluster in Generic Hypervisor mode (using vCenter or Hyper-V hypervisors), you must use Turbonomic policies to pin the Controller VMs to their respective nodes. To do this, you will create a dynamic group of Nutanix Controller VMs, and then disable move actions for all members of this group.
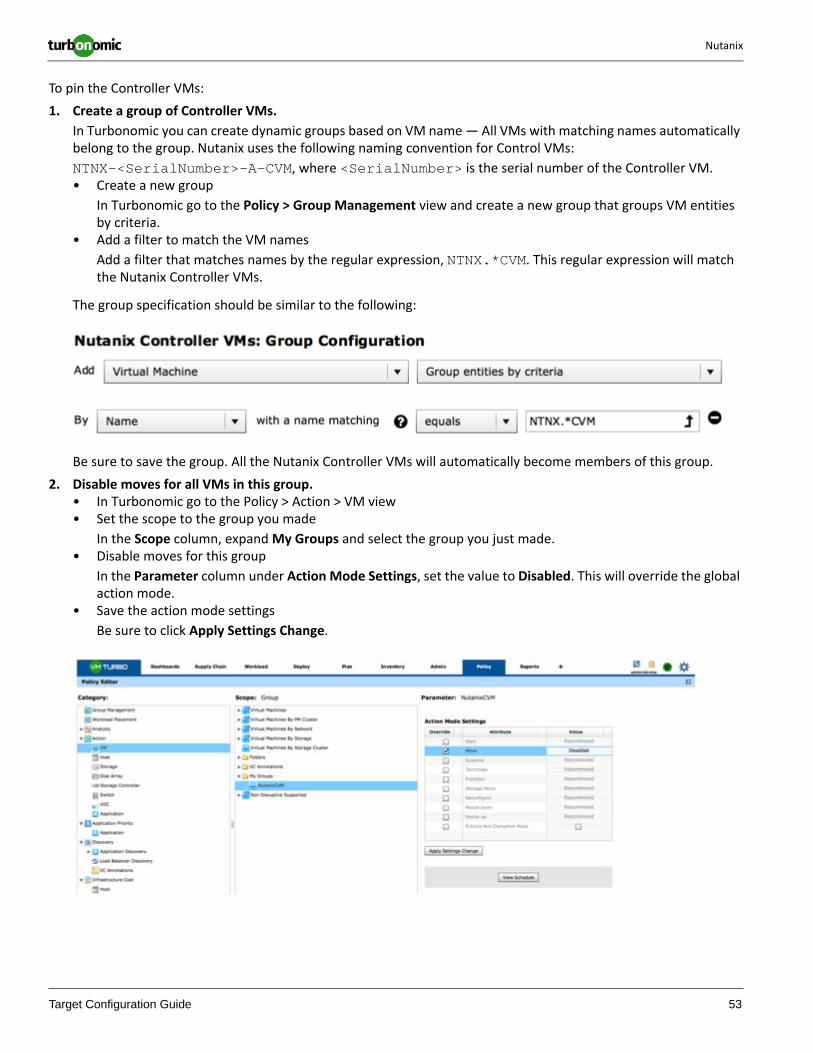
Nutanix
Target Configuration Guide 53
To pin the Controller VMs:
1. Create a group of Controller VMs.
In Turbonomic you can create dynamic groups based on VM name — All VMs with matching names automatically belong to the group. Nutanix uses the following naming convention for Control VMs:
NTNX-<SerialNumber>-A-CVM, where <SerialNumber> is the serial number of the Controller VM.• Create a new group
In Turbonomic go to the Policy > Group Management view and create a new group that groups VM entities by criteria.
• Add a filter to match the VM names
Add a filter that matches names by the regular expression, NTNX.*CVM. This regular expression will match the Nutanix Controller VMs.
The group specification should be similar to the following:
Be sure to save the group. All the Nutanix Controller VMs will automatically become members of this group.
2. Disable moves for all VMs in this group.• In Turbonomic go to the Policy > Action > VM view• Set the scope to the group you made
In the Scope column, expand My Groups and select the group you just made.• Disable moves for this group
In the Parameter column under Action Mode Settings, set the value to Disabled. This will override the global action mode.
• Save the action mode settings
Be sure to click Apply Settings Change.
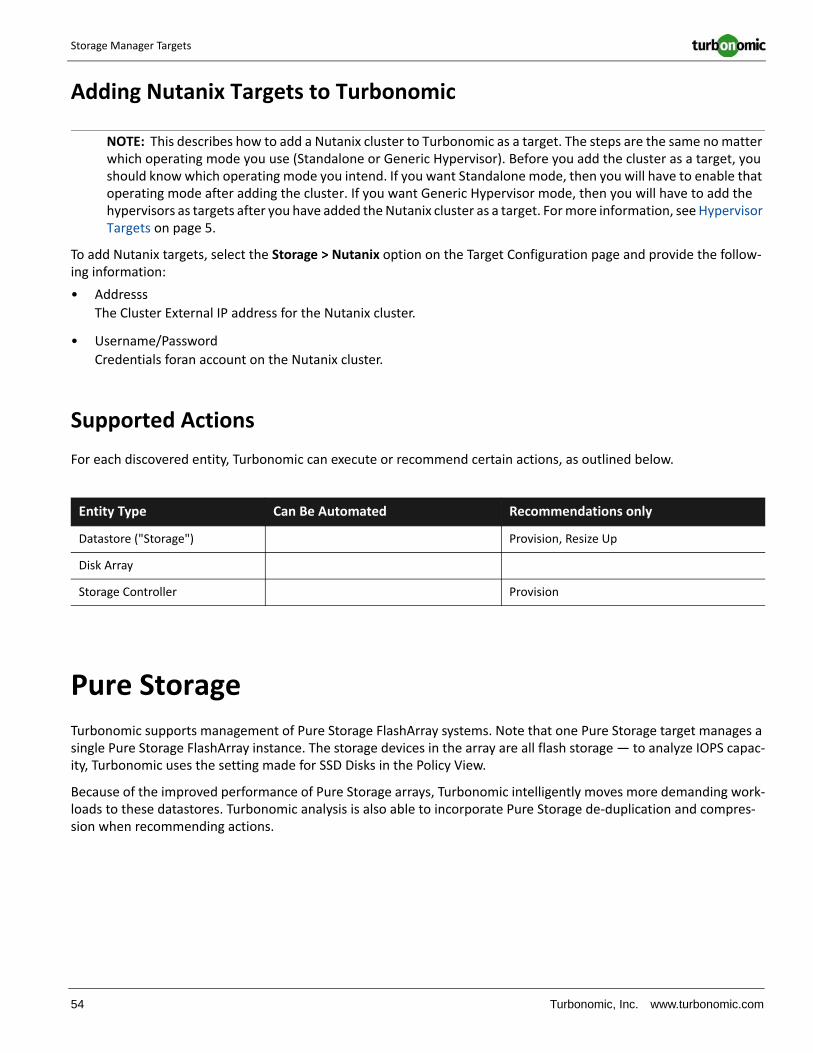
Storage Manager Targets
54 Turbonomic, Inc. www.turbonomic.com
Adding Nutanix Targets to Turbonomic
NOTE: This describes how to add a Nutanix cluster to Turbonomic as a target. The steps are the same no matter which operating mode you use (Standalone or Generic Hypervisor). Before you add the cluster as a target, you should know which operating mode you intend. If you want Standalone mode, then you will have to enable that operating mode after adding the cluster. If you want Generic Hypervisor mode, then you will have to add the hypervisors as targets after you have added the Nutanix cluster as a target. For more information, see Hypervisor Targets on page 5.
To add Nutanix targets, select the Storage > Nutanix option on the Target Configuration page and provide the follow-ing information:
• Addresss
The Cluster External IP address for the Nutanix cluster.
• Username/Password
Credentials foran account on the Nutanix cluster.
Supported Actions
For each discovered entity, Turbonomic can execute or recommend certain actions, as outlined below.
Pure Storage
Turbonomic supports management of Pure Storage FlashArray systems. Note that one Pure Storage target manages a single Pure Storage FlashArray instance. The storage devices in the array are all flash storage — to analyze IOPS capac-ity, Turbonomic uses the setting made for SSD Disks in the Policy View.
Because of the improved performance of Pure Storage arrays, Turbonomic intelligently moves more demanding work-loads to these datastores. Turbonomic analysis is also able to incorporate Pure Storage de-duplication and compres-sion when recommending actions.
Entity Type Can Be Automated Recommendations only
Datastore ("Storage") Provision, Resize Up
Disk Array
Storage Controller Provision

Pure Storage
Target Configuration Guide 55
Prerequisites
• Storage Control Module license• A service account Turbonomic can use to connect to the FlashArray
This account needs privileges to execute commands through the Pure Storage API — Typically the default pureuser administrative account.
Adding Pure Storage Targets to Turbonomic
To add a Pure Storage target, select the Storage > Pure Storage option on the Target Configuration page and provide the following information:
• Addresss
The name or IP address of the Pure Storage FlashArray.
• Username/Password
Credentials for the service account Turbonomic can use to connect to the FlashArray.
Supported Actions
For each discovered entity, Turbonomic can execute or recommend certain actions, as outlined below.
Pure Storage assigns all the disks managed by a storage controller to a single array, with a fixed form-factor. There are no actions to perform for an array — For example, there is no action to move a disk array from one storage controller to another. Likewise, there are no actions to move or provision volumes because of the fixed form-factor.
Entity Type Can Be Automated Recommendations only
Storage Resize Up
Disk Array
Storage Controller Provision
Target Configuration Guide 56
Application Server Targets
This version of Turbonomic supports the following application servers as targets:
• IBM WebSphere• Oracle WebLogic• JBoss• Apache Tomcat
With the exception of Apache Tomcat, these target types support domains of application servers that are controlled by management servers. For such managed domains you can add the management server as a target, and Turbo-nomic will discover the managed application servers. You can also add an individual application server as a target, or you can add all matching targets within a given scope.
To add any of these servers as a target, you specify:
• The IP address of the VM hosting the management server
You can optionally specify the IP address of an individual application server.
• The port that the target server listens on• Administrator credentials for the target server instance
License Requirements
The Application Control Module.
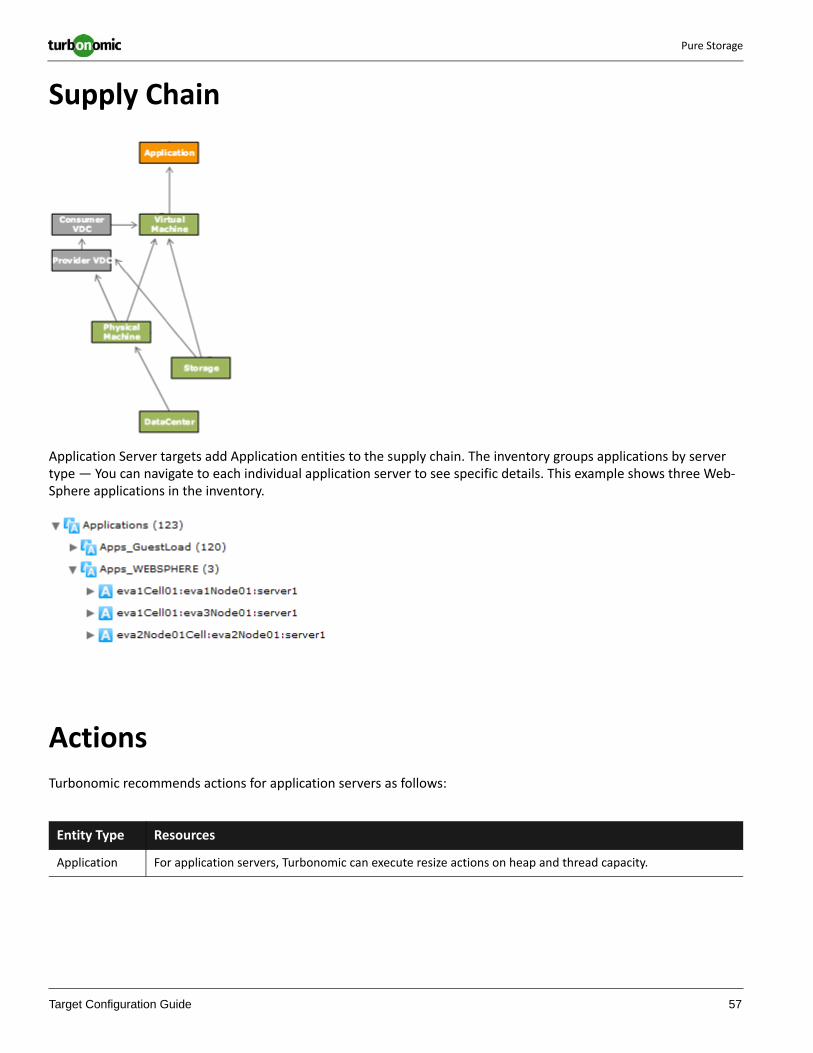
Pure Storage
Target Configuration Guide 57
Supply Chain
Application Server targets add Application entities to the supply chain. The inventory groups applications by server type — You can navigate to each individual application server to see specific details. This example shows three Web-Sphere applications in the inventory.
Actions
Turbonomic recommends actions for application servers as follows:
Entity Type Resources
Application For application servers, Turbonomic can execute resize actions on heap and thread capacity.

Application Server Targets
58 Turbonomic, Inc. www.turbonomic.com
Resource Monitoring
To manage application servers, Turbonomic monitors the resources that affect application performance, as listed in the following table. Note that because WebLogic performs its own tuning of thread pools, Turbonomic does not mon-itor threads for WebLogic application servers.
In addition to monitoring these resources and recommending associated actions, Turbonomic:
• Monitors garbage collection in the application memory space, and uses that information when recommending actions for heap resizes.
• Discovers JDBC connection pools and through these pools can discover relationships between an application server and a given database server. As a result, Turbonomic sees the JDBC connection pool as a consumer of database connections, and can recommend resize actions for that connection pool.
Application Server Scaling Policy
After you specify an application server target, Turbonomic discovers the resource utilization for that server, and rec-ommends appropriate actions. These actions will follow one of the two following scaling policies:
• Provision
Scaling by Provision enables horizontal scaling, where the environment adjusts to increased demand by provisioning new application servers.
• Resize
Scaling by Resize enables vertical scaling, where the environment adjusts to increased demand by resizing the application server, or the VM that hosts the application server.
Monitored Resource WebSphere WebLogic JBoss Tomcat
Heap
Threads
Transactions
Response Time
QoS (requires integration with external QoS monitoring)
VMem (for underlying VM)
VCPU (for underlying VM)
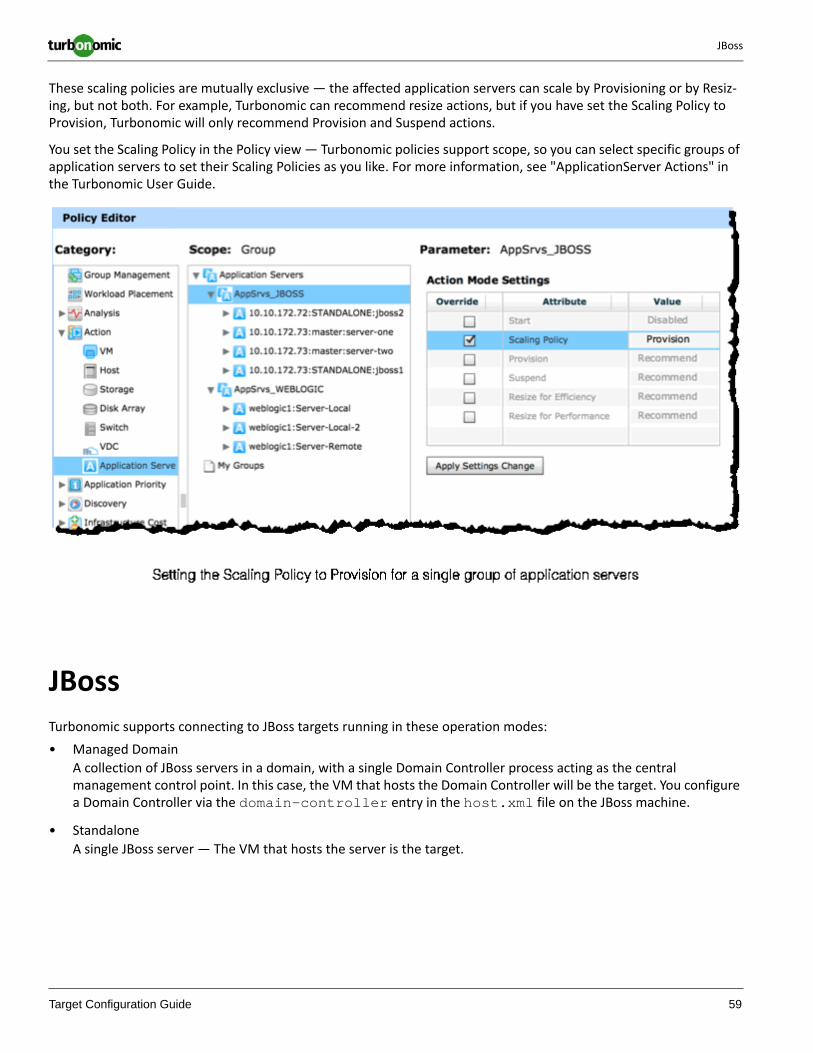
JBoss
Target Configuration Guide 59
These scaling policies are mutually exclusive — the affected application servers can scale by Provisioning or by Resiz-ing, but not both. For example, Turbonomic can recommend resize actions, but if you have set the Scaling Policy to Provision, Turbonomic will only recommend Provision and Suspend actions.
You set the Scaling Policy in the Policy view — Turbonomic policies support scope, so you can select specific groups of application servers to set their Scaling Policies as you like. For more information, see "ApplicationServer Actions" in the Turbonomic User Guide.
JBoss
Turbonomic supports connecting to JBoss targets running in these operation modes:
• Managed Domain
A collection of JBoss servers in a domain, with a single Domain Controller process acting as the central management control point. In this case, the VM that hosts the Domain Controller will be the target. You configure a Domain Controller via the domain-controller entry in the host.xml file on the JBoss machine.
• Standalone
A single JBoss server — The VM that hosts the server is the target.

Application Server Targets
60 Turbonomic, Inc. www.turbonomic.com
Prerequisites
• Application Control Module• The target VM is properly configured as Domain Controller or standalone, depending on the operations mode• Discovered infrastructure
Turbonomic discovers JBoss servers that are running on VMs or containers. The hosting VM or container must already be in your Turbonomic inventory.
To set the target for a server running on a VM, you must have first discovered the hosting VM through a Hypervisor target. To set the target for a server running in a container, you must have configured container discovery for JBoss applications.
- For information about hypervisor targets, see Application Container Targets on page 85- For information about container targets, see Hypervisor Targets on page 5
• To monitor Threads (utilization of thread pool capacity), threads must be configured for the JBoss server
Turbonomic monitors the Threads resource in application servers to track utilization of thread pool capacity. To monitor threads in JBoss, each JBoss server must define a thread pool in its configuration files. To specify thread pools, see your JBoss documentation.
Adding a JBoss Server to Turbonomic
You can add an individual JBoss server as a target, or you can add all matching targets within a given scope.
To add a server as a target, specify:
• Address: The name or IP address of the VM hosting the JBoss server
If you are adding a Domain Controller, give the IP address of the VM that hosts the Domain Controller. For a standalone JBoss server, give the address of the VM that hosts the JBoss server.
• Scope (optional): A cluster or group of VMs that host JBoss servers or Domain Controllers
If you set target scope, Turbonomic scans each VM within that group or cluster and tries to connect to a JBoss server over the specified port. Turbonomic adds any JBoss servers it finds as targets.
• Port Number: The port that connects to the JBoss server
The default port for HTTP access is 9990.
• Username/Password: Valid admin credentials for the JBoss server or Domain Controller
Application Names
Turbonomic displays discovered JBoss servers and displays them in the user interface. The names Turbonomic displays indicates whether they’re standalone or in a managed domain.
The name is divided in three sections:
• IP Address• Domain Controller name or “STANDALONE”• The server name

Apache Tomcat
Target Configuration Guide 61
This image shows examples of standalone JBoss servers, and servers that are in a managed domain with a Domain Controller named master.
Apache Tomcat
Turbonomic supports connecting to individual Tomcat targets. Turbonomic connects to the Tomcat process as a remote client via remote JMX access. Target configuration includes the port used by the JMX/RMI registry.
Prerequisites
• Application Control Module• A valid service user account on the Tomcat server
If Tomcat security is enabled, this must be a Tomcat JMX user with a readonly role.
• Tomcat should run on JDK version 7 or 8• For VMware environments, VMware Tools must be installed on the VM that hosts the Tomcat
This ensures that the VM hosting the Tomcat can get its IP address
• Remote JMX access is enabled through a port that is opened to the firewall
Application Server Targets
62 Turbonomic, Inc. www.turbonomic.com
• Discovered infrastructure
Turbonomic discovers Tomcat servers that are running on VMs or containers. The hosting VM or container must already be in your Turbonomic inventory.
To set the target for a server running on a VM, you must have first discovered the hosting VM through a Hypervisor target. To set the target for a server running in a container, you must have configured container discovery for Tomcat applications.
- For information about hypervisor targets, see Application Container Targets on page 85- For information about container targets, see Hypervisor Targets on page 5
Configuring JMX Remote Access
Turbonomic monitors and controls the Tomcat server via JMX Remote access. You must configure a JMX Remote port.
Note that to work with a firewall you should also set the RMI Server port — If you don’t set an RMI port, then JMX sets an arbitrary ephemeral port, and you can’t guarantee that the port will be open to your firewall.
There are two ways to set JMX Remote port on Linux platforms:
• Ports specified as system properties
You can set the port via the system property, com.sun.management.jmxremote.port. For example:
com.sun.management.jmxremote.port=8050A common way to set this property is to declare it in the CATALINA_OPTS system variable — You can set this in the setenv.sh script. For example:
CATALINA_OPTS="$CATALINA_OPTS -Dcom.sun.management.jmxremote-Dcom.sun.management.jmxremote.port=8050"export CATALINA_OPTSNote that this sets the JMX Remote port, but it does not set the RMI Server port — Tomcat startup will specify an ephemeral port for the RMI server.
• Ports specifed in a JMX Remote Lifecycle Listener
This listener component fixes the ports used by the JMX/RMI Server. When you configure the listener, you specify both the JMX Remote port and the RMI Server port. This is the preferred method when working with a firewall. For more information, see the Apache Tomcat documentation.
On Windows, the typical installation is with Tomcat as a service. There are two ways to set the JMX Remote port:
• Via setenv.bat
Add the property to the CATALINA_OPTS environment variable:
set "CATALINA_OPTS=%CATALINA_OPTS% -Dcom.sun.management.jmxremote.port=8050"• Use the Tomcat configuration utility (tomcat7w or tomcat8w)
Set the port with the following command:
-Dcom.sun.management.jmxremote.port=8050"

Oracle WebLogic
Target Configuration Guide 63
To discover the JMX port that is set to an already running Tomcat, you can look in the following locations:
• For Linux platforms, look in the configuration files — Either:- setenv.sh — Assuming you configured the port by adding it to the CATALINA_OPTS environment
variable- $CATALINA_HOME/conf/server.xml — Assuming you configured a JMX Remote Lifecycle Listener
in this file• For Windows platforms, look in:
- setenv.bat — Assuming you configured the port by adding it to the CATALINA_OPTS environment variable
- The Windows registry — Assuming you installed Tomcat as a Windows service using the Tomcat Configuration utility
Adding a Tomcat Server to Turbonomic
You can add an individual Tomcat server as a target, or you can add all matching servers within a given scope.
To add a server as a target, specify:
• Address: The name or IP address of the VM hosting the Tomcat server• Scope (optional): An Turbonomic group of VMs that host Tomcat servers
If you set target scope, Turbonomic scans each VM within that group or cluster and tries to connect to a Tomcat server over the specified port. Turbonomic adds any Tomcat servers it finds as targets.
• Port Number: The JMX Remote port• Username/Password: Credentials for a user account with an Admin role
Oracle WebLogic
The typical WebLogic deployment is a managed domain with one Administration Server that provides a single point of entry for administration and management of the domain. The domain can include other WebLogic Servers which are the Managed Servers. You set the WebLogic Administration Server as a Turbonomic target.
For a standalone WebLogic deployment, the single server acts as its own Administration Server — You can set the standalone server as a Turbonomic target.
WebLogic deployments can include clusters to distribute workload across multiple WebLogic servers. Turbonomic rec-ommended actions respect the cluster architecture. For example, if you have enabled horizontal scaling for your Web-Logic servers, then Turbonomic can recommend provisioning new servers for a given cluster.
Prerequisites
• Application Control Module• A service user account with an Admin role
To execute actions the service account must have an Admin role. For read-only monitoring and analysis, you can set the target with a more restricted role, but then you will have to execute all recommended actions manually, through the WebLogic interfaces.

Application Server Targets
64 Turbonomic, Inc. www.turbonomic.com
• Discovered infrastructure
Turbonomic discovers WebLogic servers that are running on VMs or containers. The hosting VM or container must already be in your Turbonomic inventory.
To set the target for a server running on a VM, you must have first discovered the hosting VM through a Hypervisor target. To set the target for a server running in a container, you must have configured container discovery for WebLogic applications.
- For information about hypervisor targets, see Application Container Targets on page 85- For information about container targets, see Hypervisor Targets on page 5
Finding the T3 Listen Port
To configure a WebLogic target, you need to know the port that the server listens on for administrative communica-tions. Launch the WebLogic Administration Console:
• Navigate to Domain Structure and display the domain you’re interested in• Navigate to Environment > Servers and select the Domain Administration Server you’re setting as a target
The console displays configuration information for the server, including the T3 listen port.
Adding a WebLogic Server to Turbonomic
You can add an individual WebLogic server as a target, or you can add all matching targets within a given scope.
To add a server as a target, specify:
• Address: The name or IP address of the VM hosting the WebLogic server• Scope (optional): A cluster or group of VMs that host WebLogic servers
If you set target scope, Turbonomic scans each VM within that group or cluster and tries to connect to a WebLogic server over the specified port. Turbonomic adds any WebLogic servers it finds as targets.
• Port Number: The T3 listen port that’s configured on the WebLogic server
The default port for HTTP access is 9990.
• Username/Password: Credentials for a wluser account with an Admin role
IBM WebSphere
The typical WebSphere deployment is a cell of WebSphere servers, controlled by a Deployment Manager. A cell makes up a managed domain that incorporates multiple VMS that host managed application servers. The Deployment Man-ager is a WebSphere instance that provides a single point of entry for the managed domain.
To configure the WebShpere installation, you can use the WebShpere Integrated Solutions Console. This is a client that exposes configuration settings including the SOAP port and the PMI settings.

IBM WebSphere
Target Configuration Guide 65
To manage the servers in an installation, WebSphere uses the Performance Monitoring Infrastructure (PMI). Each WebSphere server runs a PMI service that collects performance data from the various application server components. Turbonomic uses PMI for monitoring and control of the WebSphere installation.
Prerequisites
• Application Control Module• The PMI service is set to monitor at the Basic level or greater• A service user account with an Administrator role
To execute actions the service account must have an Administrator role. For read-only monitoring and analysis, you can set the target with a more restricted role (Monitor), but then you will have to execute all recommended actions manually, through the WebSphere interfaces.
• Discovered infrastructure
Turbonomic discovers WebSphere servers that are running on VMs or containers. The hosting VM or container must already be in your Turbonomic inventory.
To set the target for a server running on a VM, you must have first discovered the hosting VM through a Hypervisor target. To set the target for a server running in a container, you must have configured container discovery for WebSphere applications.
- For information about hypervisor targets, see Application Container Targets on page 85- For information about container targets, see Hypervisor Targets on page 5
Finding the SOAP Connector Address
To configure a WebSphere target, you need to know the port that the server listens on for administrative communica-tions. Launch the WebSphere Administration Console:
• Navigate to System Administration > Deployment Manager• Under Additional Properties, click Ports
The entry for SOAP_CONNECTOR_ADDRESS gives the currently set port number.
Adding a WebSphere Server to Turbonomic
You can add an individual WebLogic server as a target, or you can add all matching targets within a given scope.
To add a server as a target, specify:
• Address: The name or IP address of the VM hosting the WebSphere server• Scope (optional): A cluster or group of VMs that host WebSphere servers
If you set target scope, Turbonomic scans each VM within that group or cluster and tries to connect to a WebSphere server over the specified port. Turbonomic adds any WebSphere servers it finds as targets.
• Port Number: The server’s SOAP_CONNECTOR_ADDRESS port number• Username/Password: Credentials for a wluser account with an Admin role
Target Configuration Guide 66
Database Server Targets
This version of Turbonomic supports the following database servers as targets:
• Oracle 11g R2 and 12c• Microsoft SQL Server 2008 R2, 2012, and 2014• MySQL 5.5.26 and higher, and all 5.6 releases
You can add an individual database server as a target, or you can add all matching targets within a given group or clus-ter. The
License Requirements
The Application Control Module.

IBM WebSphere
Target Configuration Guide 67
Supply Chain
Database targets add Application entities to the supply chain. The inventory groups applications by database type — You can navigate to each individual database to see specific details. This example shows four Microsoft Sql Server databases.

Database Server Targets
68 Turbonomic, Inc. www.turbonomic.com
Actions
Turbonomic recommends actions for database applications as follows:
Monitored Resources
Turbonomic monitors the following cloud infrastructure resources:
For most of these resources, the allocated capacity is determined by the database configuration. For Transactions and Response Time, you set the capacity in the Policies view of Turbonomic.
NOTE: For database servers, resize actions based on the TransactionLog resource depend on support for vStorage in the underlying hypervisor technology. Because current versions of Hyper-V do not provide API support for vStorage, Turbonomic cannot support TransactionLog resize actions for database servers running on the Hyper-V platform.
Entity Type Resources
Application For database servers, Turbonomic can execute resize actions on database memory, connections, and the transaction log.
Entity Type Resources
Application • DBMemThe memory utilized by the database, as a percentage of the memory capacity that is allocated to the database. Note that this resource is more accurate than the VMEM resource on the hosting VM. With this resource, Turbonomic can drive resize and move actions based on the memory consumed by the database, not the memory consumed by the VM.
• ConnectionThe active connections, as a percentage of the maximum number of connections for the database. Tooltips in charts also show the absolute count of connections.
• TransactionsActive transactions, as a percentage of allocated capacity.
• Response TimeAveraged response time, as a percentage of the allocated capacity. Turbonomic measures response time in ms.
• Transaction LogConsumption of storage dedicated to transaction logs, as a percentage of the capacity that is allocated to the database.

MySQL
Target Configuration Guide 69
MySQL
To manage a MySQL databases, Turbonomic can connect:
• To an individual database server• To all the database servers within a group or cluster
This version of Turbonomic supports MySQL 5.5.26 and higher, and all 5.6 releases.
Prerequisites
• Application Control Module• Target is properly configured as Domain Controller or standalone, depending on the operations mode
Enabling User Permissions on the MySQL Server
1. Edit the MySQL server’s configuration file.
You must edit the .conf file on the MySQL server to grant user permissions. Open a secure shell session on the server and edit the file. Depending on the platform your MySQL is running on, you’ll fin the file at different loca-tions:• Debian Linux:
/etc/mysql/my.cnf• Red Hat Linux (Fedora or Centos):
/etc/my.cnf• FreeBSD Linux:
You must create the file at /var/db/mysql/my.cnf
Open the file in an editor and find the section, [mysqld]. Then make the following changes:• Comment out the line:
skip-networkingCommenting out this line enables remote connections over TCP/Is.
• Add the line
bind-address=<MySQL_IP_Address>
For example, if your MySQL server has the address, 123.45.66.77, then the section of the .conf file should appear as follows:
[mysqld] user = mysql pid-file = /var/run/mysqld/mysqld.pid socket = /var/run/mysqld/mysqld.sock port = 3306 basedir = /usr datadir = /var/lib/mysql tmpdir = /tmp language = /usr/share/mysql/English bind-address = 123.45.66.77 # skip-networking ....
When you are done, save the .conf file.

Database Server Targets
70 Turbonomic, Inc. www.turbonomic.com
2. Give your Turbonomic server remote access to the database.
Execute the following command to log into to the MySQL server:
$mysql -u root -p mysql
Then execute the following command:
Assume a user named USER_NAME with a password PWD_STRING. Then assume that your Turbonomic has an IP address of 10.10.123.45. The following command grants privileges to that Turbonomic, if it connects with the specified user account:
GRANT ALL PRIVILEGES ON *.* TO 'USER_NAME'@'10.10.123.45' IDENTIFIED BY 'PWD_STRING' WITH GRANT OPTION;
When you’re finished, log out of MySQL.
Adding a MySQL Database to Turbonomic
You can add an individual database server as a target, or you can add all matching targets within a given scope.
To add a database server as a target, you specify:
• Address: The name or IP address of the VM hosting the database server• Scope (optional): A cluster or group of VMs that host MySQL servers
If you set target scope, Turbonomic scans each VM within that group or cluster and tries to connect to a MySQL database server over the specified port. Turbonomic adds any database servers it finds as targets.
• Port Number: The port that connects to the MySQL browser
You must open the firewall on the MySQL server to allow access through this port.
• Username/Password: Valid client credentials for the database service
For Turbonomic to execute actions, the account must have administrator privileges. Also, you must have enabled user permissions to this user account, including remote access from the Turbonomic server.
Oracle
To connect to an Oracle database, you will:
• Add a Dynamic Performance view to the Oracle database• Configure a service account on the database that Turbonomic can use to log on• Find the Service Name (SID) and port for the database
This version of Turbonomic supports Oracle versions 11g R2 and 12c
Prerequisites
• Application Control Module• User permissions that grant access to Turbonomic through a specific user account• Access through the firewall to the MySQL database port that you specify for the Turbonomic target connection

Oracle
Target Configuration Guide 71
Adding a Dynamic Performance View
In order to collect data from the Oracle database, Turbonomic uses the Dynamic Performance View (referred to as V$). V$ is not enabled by default, and users must run a script to build the tables and views that are necessary to enable V$. In some environments only the DBA has privileges to run this script.
To enable V$:
• Open a secure shell session (ssh) on the database host as a system user or a user with the sysdba role• In the shell session enter the following commands:
sqlplus /nolog
connect /as sysdba
@?/rdbms/admin/catalog.sql
Creating a Service User Account
To collect data from the Oracle database, Turbonomic requires a service account that has privileges to access the V$ Dynamic Performance view. To create this account:
• Open a secure shell session (ssh) on the database host as a system user or a user with the sysdba role• In the shell session enter the following commands:
sqlplus /nolog
connect /as sysdba
CREATE USER My_Username IDENTIFIED BY My_Password container=all;
GRANT CONNECT TO My_Username container=all;
GRANT sysdba TO My_Username container=all;
This creates a user account named My_Username with full privileges to access the V$ Dynamic Performance view.
NOTE: The above example uses a fictitious username. To comply with Oracle 12C norms, the username should include a prefix of c##.
Some enterprises don’t allow accounts with sysdba access. Turbonomic recommends using sysdba, according to the Oracle documentation. However, you can work with your Oracle DBA staff to provide read access to the following views, which are the ones that Turbonomic needs:
• V$INSTANCE• V$LOG• V$LOGFILE• V$PARAMETER• V$PGASTAT• V$RESOURCE_LIMIT• V$SGASTAT• V$SYS_TIME_MODEL• V$SYSMETRIC• V$SYSSTAT
Database Server Targets
72 Turbonomic, Inc. www.turbonomic.com
Finding the Service Name (SID) and Port
To specify a target, you must provide the SID and port that you want to connect to. To find the SID for your database:
• Open a secure shell session (ssh) on the database host as a system user or a user with the sysdba role• In the shell session, enter the command, lsnrctl status
Find the line that has the string PROTOCOL=tcp and note the port number.
• In the shell session enter the following commands:
sqlplus /nolog
connect /as sysdba
SELECT SYS_CONTEXT('userenv', 'db_name') FROM dual;
Note the SID that displays as a result of these commands.
Adding an Oracle Database to Turbonomic
You can add an individual database server as a target, or you can add all matching targets within a given scope.
To add a database server as a target, you specify:
• Address: The name or IP address of the VM hosting the database server• Scope (optional): A cluster or group of VMs that host Oracle database servers
If you set target scope, Turbonomic scans each VM within that group or cluster and tries to connect to an Oracle database server over the specified port. Turbonomic adds any database servers it finds as targets.
• Port Number: The port that connects to database SID
You must open the firewall on the database server to allow access through this port.
• Service: The SID for the database that you are connecting to• Username/Password: Valid client credentials for the database server
For Turbonomic to execute actions, the account must have administrator privileges. Also, you must have enabled user permissions to this user account, including remote access from the Turbonomic server.
SQL Server
When connecting to a SQL Server database, you provide a “service” name. This is the name of the actual database, so the target is the database itself, and not a service on the database.
This version of Turbonomic supports Microsoft SQL Server 2008 R2, 2012, and 2014.

SQL Server
Target Configuration Guide 73
Prerequisites
• Application Control Module• A user account with SQL permissions on the database• The following services must be running, and set to enabled:
- Net.Tcp Listener Adapter- Net.Tcp Port Sharing Service
• TC/IP is enabled on the port that you set for the Turbonomic specification
Creating a Service User Account
The user account that Turbonomic uses for its service login must include the following:
• The account must exist in the Security folder within the SQL Server Object Explorer, with the following properties:- Enable SQL Server Authentication- Disable Enforce password policy
• The account’s security properties must include:- Permission to connect to the database through SQL- Permission to view the server state
Adding a SQL Server Database to Turbonomic
You can add an individual database server as a target, or you can add all matching targets within a given scope.
To add a database server as a target, you specify:
• Address: The name or IP address of the VM hosting the database server• Scope (optional): A cluster or group of VMs that host SQL Server databases
If you set target scope, Turbonomic scans each VM within that group or cluster and tries to connect to a SQL Server database server over the specified port. Turbonomic adds any database servers it finds as targets.
• Port Number: The port this database uses to communicate over TCP/IP
The default port for SQL Server is 1443. You must enable TCP/IP over the port you specify here, and open the firewall on the database server to allow access through it.
• Full Domain Name: Optional — The Windows domain for the user account• Username/Password: Valid client credentials for an account
For Turbonomic to execute actions, the account must have administrator privileges. Also, you must have enabled user permissions to this user account, including remote access from the Turbonomic server.

Target Configuration Guide 74
Adding Windows® Applications as Targets
This version of Turbonomic supports adding Microsoft® Exchange® servers as targets. With the Application Control Module, Turbonomic can monitor the application server resources and recommend actions to scale server capacity horizontally (provision new servers) or vertically (resize existing servers).
You can add an individual Exchange server as a target, or you can add all matching targets within a given scope.
License Requirements
The Application Control Module.
Prerequisites
• Configure remote management on the Exchange server. Refer to the relevant section below:- Turbonomic 5.4 or higher: See Enabling Windows Remote Management on page 76- Turbonomic 5.3 or below: See Enabling Management via WMI on page 102
• Port access
WinRM uses ports 5985 and 5986 for standard and secure communications, respectively. The firewall on the your VMM server must open these ports.
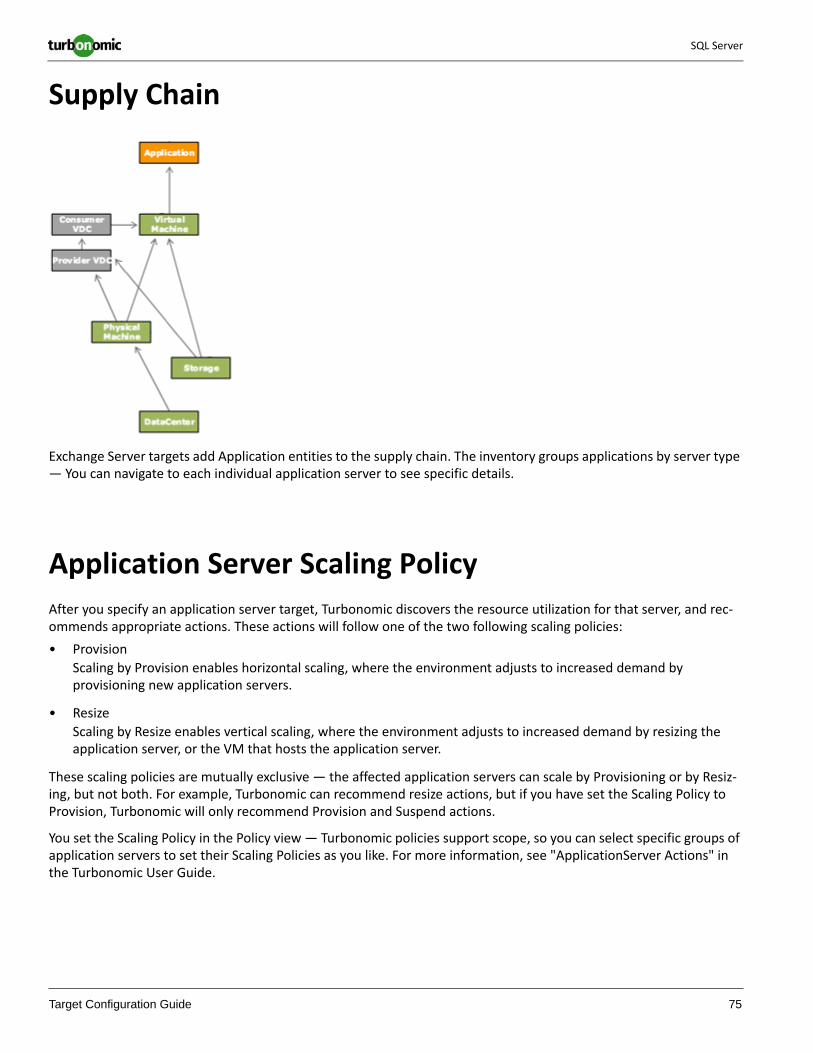
SQL Server
Target Configuration Guide 75
Supply Chain
Exchange Server targets add Application entities to the supply chain. The inventory groups applications by server type — You can navigate to each individual application server to see specific details.
Application Server Scaling Policy
After you specify an application server target, Turbonomic discovers the resource utilization for that server, and rec-ommends appropriate actions. These actions will follow one of the two following scaling policies:
• Provision
Scaling by Provision enables horizontal scaling, where the environment adjusts to increased demand by provisioning new application servers.
• Resize
Scaling by Resize enables vertical scaling, where the environment adjusts to increased demand by resizing the application server, or the VM that hosts the application server.
These scaling policies are mutually exclusive — the affected application servers can scale by Provisioning or by Resiz-ing, but not both. For example, Turbonomic can recommend resize actions, but if you have set the Scaling Policy to Provision, Turbonomic will only recommend Provision and Suspend actions.
You set the Scaling Policy in the Policy view — Turbonomic policies support scope, so you can select specific groups of application servers to set their Scaling Policies as you like. For more information, see "ApplicationServer Actions" in the Turbonomic User Guide.

Adding Windows® Applications as Targets
76 Turbonomic, Inc. www.turbonomic.com
Enabling Windows Remote Management
NOTE: This section applies to Turbonomic 5.4 or higher. If you are using Turbonomic 5.3 or below, see Enabling Management via WMI on page 102.
Turbonomic communicates with your Hyper-V servers using Web Services Management (WS-Management), which is implemented on Microsoft platforms using Windows Remote Management (WinRM). The following steps show how to enable WinRM on a single host, using the command line.
1. Ensure Windows Firewall is running on the host.
For you to configure WinRM successfully, Windows Firewall must be running on the host. For more information, see the Microsoft Knowledge Base article #2004640 (http://support.microsoft.com/kb/2004640).
2. Set up an SPN for the host machine.
The machine must have an SPN of the form, protocol/host_address. For example, WSMAN/10.99.9.2.
To get a list of SPNs for the machine, execute the following in the command window:
setspn -l <vmm-server-name>If there is no valid SPN in the list, create one by running the command:
setspn -A protocol/host-address:port where port is optional
For example, setspn -A WSMAN/10.99.9.2:VMM-02

SQL Server
Target Configuration Guide 77
3. Set up the Windows Remote Management (WinRM) service to run on startup.
Run the quickconfig utility to set up the WinRM service. The quickconfig utility:• Configures the WinRM service to auto-start• Configures basic authentication and disables unencrypted traffic• Creates a firewall exception for the current user profile• Configures a listener for HTTP and HTTPS on any IP address• Enables remote shell access
To run quickconfig, log into a command window as Administrator on the host machine. Then execute the following commands:
winrm quickconfigEnter y to accept the quickconfig changes
4. Set permissions on the host machine.
Execute the following commands in the command window to modify the settings made by quickconfig:• To set the memory capacity for remote shells:
winrm set winrm/config/winrs @{MaxMemoryPerShellMB="1024"}• To set up an unsecured HTTP connection:
winrm set winrm/config/service @{AllowUnencrypted="true"}winrm set winrm/config/service/Auth @{Basic="true"}
These steps showed you how to enable WinRM for a single host. Some users find the following methods useful for enabling WinRM on multiple hosts:
• Enabling WinRM Via Global Policy Objects on page 101• Enabling WinRM Via PowerShell on page 100
Resource Monitoring
To manage windows applications, Turbonomic monitors the following resources:
• Heap
Utilization of the heap memory that is allocated to the application. With this resource, Turbonomic can drive resize and move actions based on the memory consumed by the application, not the memory consumed by the VM.
• Threads
Utilization of the threads capacity allocated to the application.
• Transactions
Active transactions, as a percentage of allocated capacity.
• Response Time
Averaged response time, as a percentage of the allocated capacity. Turbonomic measures response time in ms.
• QoS
A measure of impact on the QoS for an application or group of applications. QoS requires integration with external QoS monitoring.

Adding Windows® Applications as Targets
78 Turbonomic, Inc. www.turbonomic.com
• VMem
Memory consumption for the underlying VM
• VCPU
Virtual CPU consumption for the underlying VM
Adding Microsoft Exchange Server Targets
Once you’ve enabled remote management, you can add your Exchange servers as targets. To add an Exchange Server target, select the Windows Application > MS Exchange option on the Target Configuration page and provide the fol-lowing information:
• Host
The host name of the Exchange server.
Note that you can enter an IP address for the host, but you must first configure an SPN on the host. Turbonomic recommends that you use the host name in this field.
• Scope (optional)
A cluster or group of VMs that host Exchange servers
If you set target scope, Turbonomic scans each VM within that group or cluster and tries to connect to an Exchange server over the specified port. Turbonomic adds any servers it finds as targets.
• Port number
For Turbonomic 5.4 or higher: The port number for the remote management connection. The default HTTP port is 5985; the default HTTPS port is 5986.
• Username
The domain\username of an Active Directory account that Turbonomic can use to connect to the Exchange server.
For Turbonomic 5.3 or below: The account must also be one of the server’s WBEM Scripting Locator owners (see Enabling Management via WMI on page 102).
• Password
Password for account used.

Target Configuration Guide 79
Network Flow Targets
With the Network Control Module, Turbonomic can calculate costs associated with network proximity when manag-ing workload placement. For example, two VMs that show a lot of network traffic between each other should be placed close together. They would see the best network performance if they were placed on the same physical host, and latency would increase as traffic has to hop more switches to pass data between them. With the Network Control Module, Turbonomic can include the benefits of localizing network traffic in its analysis.
For network analysis, Turbonomic groups entities into two types of group:
• VPods
Sets of consumers that communicate frequently with each other over the network — For example, VMs that run processes for the same distributed application.
• DPods
Sets of closely connected providers (providers underneath the same switch) — For example a storage controller, its datastores, and the hosts that consume the storage resources. A unified fabric chassis can also make up a DPod, as can the providers under a switch in an Arista network..
In this scheme, DPods provide network flow to VPods, and VPods provide flow to their constituent consumers. For example, as Turbonomic calculates the placement of a VM on a host or datastore, it considers the cost of the network flow so that VMs can reside closer together if that will lower the overall cost of their placement.
There are four levels of cost for network flow:
• Zero
The consumers use the same provider — For example VMs that reside on the same host. Such consumers have infinite net throughput capacity.
• Low
The consumers reside within the same DPod. Net throughput capacity for these consumers is determined by the capacity of the providers on the DPod.
• Medium
The consumers communicate across DPods (communicate through multiple switches). Throughput capacity is the capacity of the uplink, divided by the number of providers sharing it.
• High
The consumers communicate across the cloud.
Turbonomic takes these costs into account when making workload placement decisions.
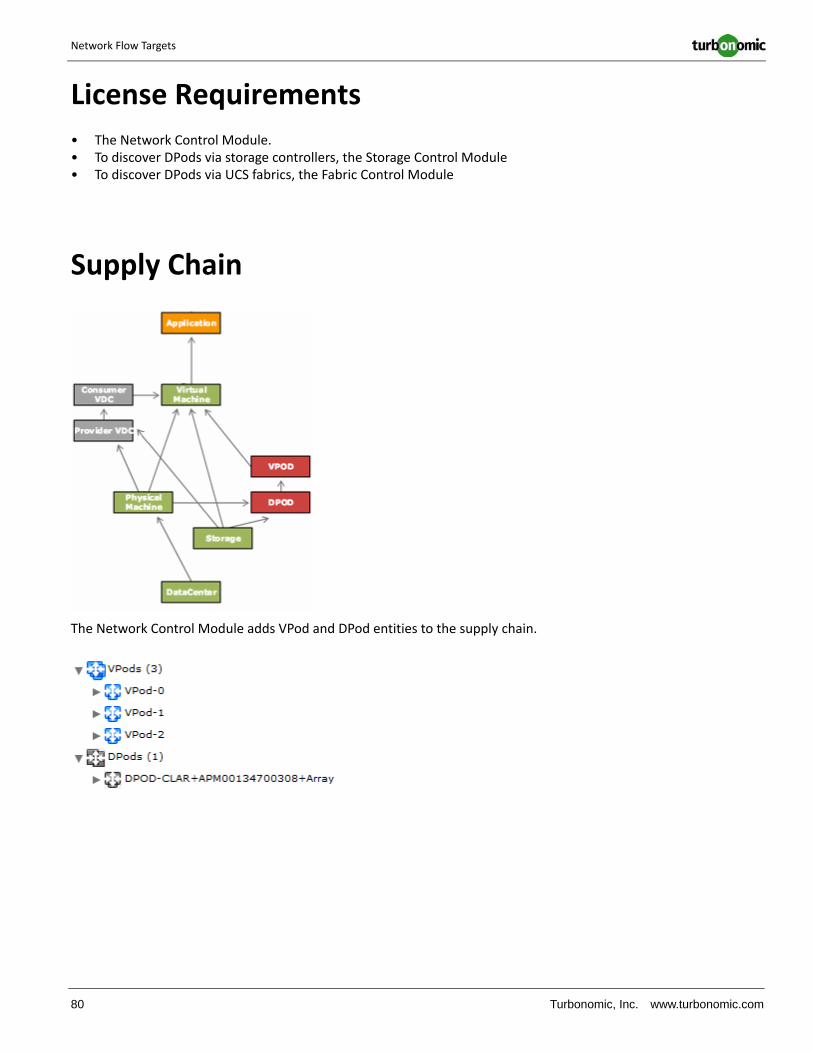
Network Flow Targets
80 Turbonomic, Inc. www.turbonomic.com
License Requirements
• The Network Control Module.• To discover DPods via storage controllers, the Storage Control Module• To discover DPods via UCS fabrics, the Fabric Control Module
Supply Chain
The Network Control Module adds VPod and DPod entities to the supply chain.
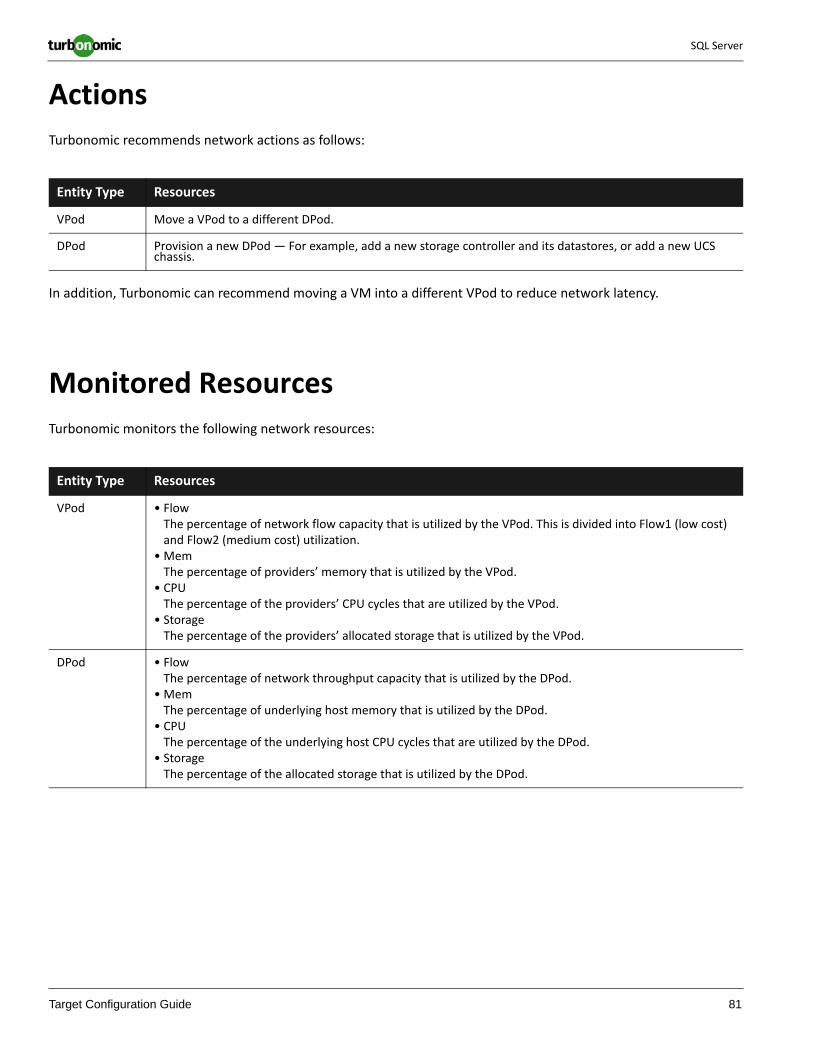
SQL Server
Target Configuration Guide 81
Actions
Turbonomic recommends network actions as follows:
In addition, Turbonomic can recommend moving a VM into a different VPod to reduce network latency.
Monitored Resources
Turbonomic monitors the following network resources:
Entity Type Resources
VPod Move a VPod to a different DPod.
DPod Provision a new DPod — For example, add a new storage controller and its datastores, or add a new UCS chassis.
Entity Type Resources
VPod • FlowThe percentage of network flow capacity that is utilized by the VPod. This is divided into Flow1 (low cost) and Flow2 (medium cost) utilization.
• MemThe percentage of providers’ memory that is utilized by the VPod.
• CPUThe percentage of the providers’ CPU cycles that are utilized by the VPod.
• StorageThe percentage of the providers’ allocated storage that is utilized by the VPod.
DPod • FlowThe percentage of network throughput capacity that is utilized by the DPod.
• MemThe percentage of underlying host memory that is utilized by the DPod.
• CPUThe percentage of the underlying host CPU cycles that are utilized by the DPod.
• StorageThe percentage of the allocated storage that is utilized by the DPod.
Network Flow Targets
82 Turbonomic, Inc. www.turbonomic.com
Arista
To monitor an Arista network, choose a single Top-Of-Rack switch from the network you want to monitor and add it as a Turbonomic target. Turbonomic can discover the rest of the network through that single switch. As a result of dis-covery, Turbonomic builds one DPod per switch.
note: An Arista target only discovers DPods from the Arista switches. To include VPods in your network analysis, you must also add flow connectors. For more information, see NetFlow on page 82or sFlow on page 84.
Prerequisites
• Network Control Module license• The Arista Command eAPI must be enabled for HTTPS communication (see the Arista documentation for details)• A service account Turbonomic can use to connect to Arista
Service Account Requirements
The service account must be able to connect to the Arista eAPI.
Adding Arista Targets to Turbonomic
To add an Arista target, select the Network > Arista option on the Target Configuration page and provide the following information:
• Address: The IP address of the top-of-rack switch• Username/Password: The credentials of an account Turbonomic can use to connect to the Arista switch.
NetFlow
Turbonomic can connect to NetFlow data collectors to gather information about traffic between VMs, hosts, and stor-age. Using this information, Turbonomic can build VPods and make recommendations that reduce network latency.
NOTE: The NetFlow target builds VPods and includes them in Turbonomic analysis. To get the most benefit from the Network Control Module, you should also build DPods. To do this, you must add targets for Arista networks, storage controllers, or fabrics.
For information about adding these targets, see:
• Arista on page 82• Storage Manager Targets on page 35• Fabric Manager Targets on page 91
NetFlow
Target Configuration Guide 83
Prerequisites
• Network Control Module license• A NetFlow data collector• A service account Turbonomic can use to connect to the NetFlow data collector
The service account Turbonomic uses must have permission to remotely SSH into the data collector and run NFDUMP.
NetFlow Data Collector Requirements
The NetFlow data collector that you use must include NFDUMP tools, and the nfcapd service (NetFlow capture dae-mon) must be running on the NetFlow system.
Turbonomic uses nfdump to import the NetFlow data from the collector.
Turbonomic provides a NetFlow data collector OVA with NFDUMP preconfigured. You can download this from http://download.vmturbo.com/appliance/release/vmturbo64-flow.ova.
To verify that the data collector is capturing data, open a secure shell on the collector’s host, log in using the service account that you specify for the Turbonomic target, and execute the following command:
nfdump -R /var/netflow
vSphere Distributed Switch Requirements
If you are collecting NetFlow data from a vSphere Distributed Switch (vDS):
• The vDS must be configured to point to the NetFlow data collector• NetFlow Monitoring must be enabled on the distributed port group associated with each vDS
For information about these configuration steps, refer to your vSphere documentation.
Adding NetFlow Targets to Turbonomic
To add a NetFlow target, select the Network > NetFlow option on the Target Configuration page and provide the fol-lowing information:
• Address: The IP address of the Netflow data collector• Username/Password: The credentials of an account Turbonomic can use to connect to the data collector.

Network Flow Targets
84 Turbonomic, Inc. www.turbonomic.com
sFlow
Turbonomic can connect to SFlow data collectors to gather information about traffic between VMs, hosts, and stor-age. Using this information, Turbonomic can build VPods and make recommendations that reduce network latency.
NOTE: The sFlow target builds VPods and includes them in Turbonomic analysis. To get the most benefit from the Network Control Module, you should also build DPods. To do this, you must add targets for Arista networks, storage controllers, or fabrics.
For information about adding these targets, see:
• Arista on page 82• Storage Manager Targets on page 35• Fabric Manager Targets on page 91
Prerequisites
• Network Control Module license• An SFlow data collector
You must have an SFlow data collector running on your network. Make sure the sflow-rt service is running. Turbonomic connects to the data collector through its REST API on port 8008. Credentials are not typically required to access the SFlow API. If you require a secure connection, contact Turbonomic Technical Support for assistance.
Adding sFlow Targets to Turbonomic
To add a NetFlow target, select the Network > sFlow option on the Target Configuration page and provide the follow-ing information:
• Address: The IP address of the sFlow data collector• Username/Password: The credentials of an account Turbonomic can use to connect to the data collector.
Target Configuration Guide 85
Application Container Targets
If you have installed the Container Control Module license, Turbonomic will discover application containers in your environment, recommend resize actions, and display discovered containers in the Inventory view. This release of Tur-bonomic supports Docker containers.
To use the Container Control Module, you do not specify any container target. Instead, Turbonomic discovers Docker containers running on VMs in your environment. To perform this discovery, Turbonomic uses a combination of the fol-lowing:
• Groups
You create one or more groups of VMs that host Docker containers. It’s useful to assign naming conventions to the VMs so you can create a dynamic group that automatically contains the VMs you want.
• Port-based access
Within a group, each VM should expose Docker through the same port. If you want to expose different container groups through different ports, then naming conventions for the hosting VMs should take that level of grouping into account.
• Application discovery
Use Turbonomic discovery policies to identify the signatures of the applications you want to discover running in containers, and the credentials to access those applications. One of the credentials you set is the Docker port that you have exposed for the group of VMs. You then assign those credentials to the group of VMs.
After you set up the container discovery, Turbonomic discovers the applications and their containers. It recommends actions to assure application performance and also actions to resize the containers.
License Requirements
The Container Control Module.
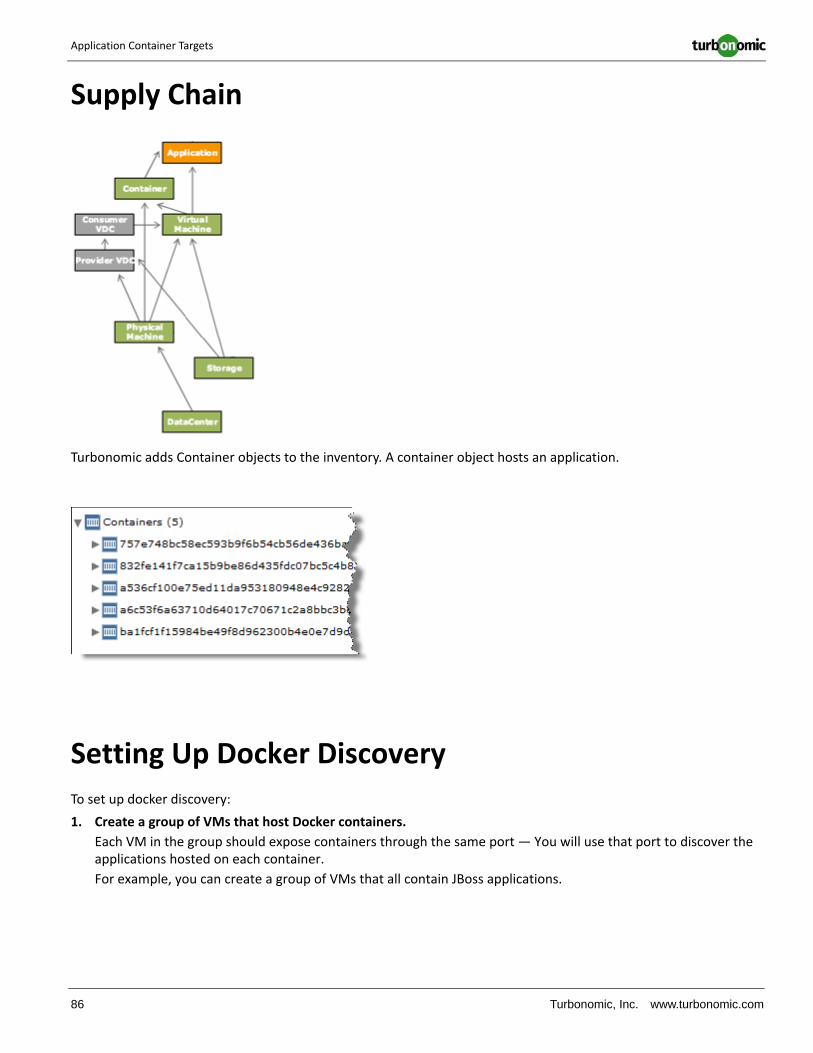
Application Container Targets
86 Turbonomic, Inc. www.turbonomic.com
Supply Chain
Turbonomic adds Container objects to the inventory. A container object hosts an application.
Setting Up Docker Discovery
To set up docker discovery:
1. Create a group of VMs that host Docker containers.
Each VM in the group should expose containers through the same port — You will use that port to discover the applications hosted on each container.
For example, you can create a group of VMs that all contain JBoss applications.
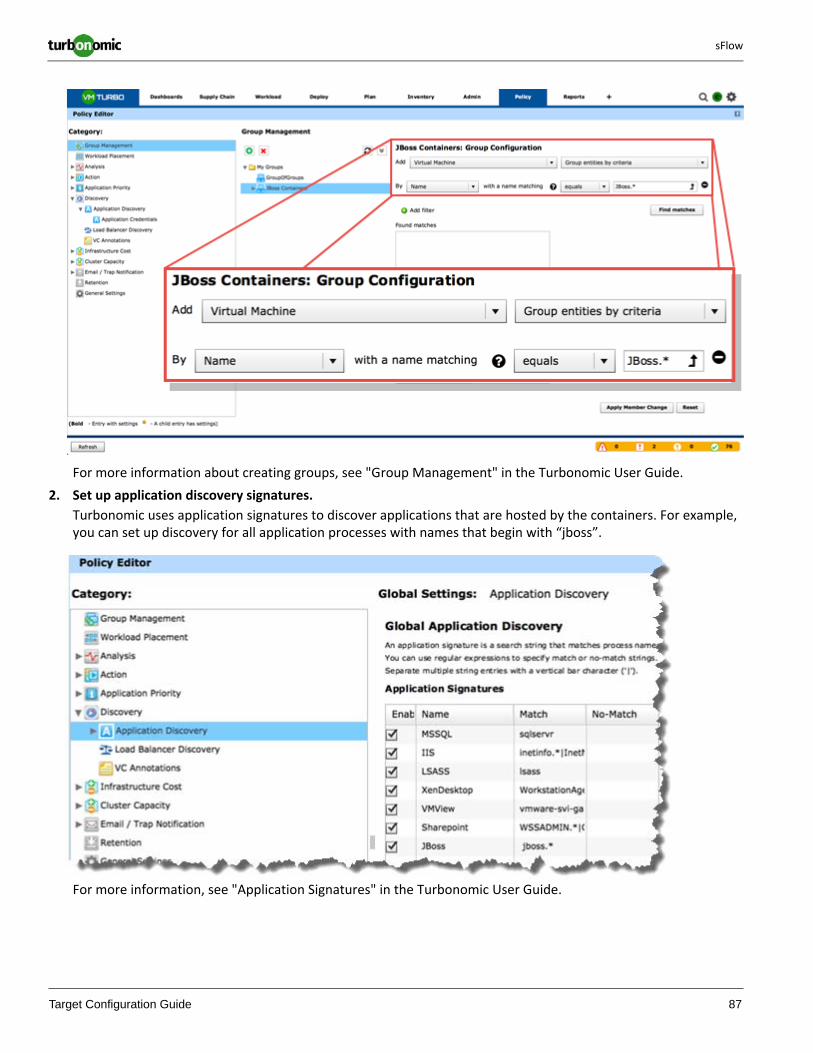
sFlow
Target Configuration Guide 87
For more information about creating groups, see "Group Management" in the Turbonomic User Guide.
2. Set up application discovery signatures.
Turbonomic uses application signatures to discover applications that are hosted by the containers. For example, you can set up discovery for all application processes with names that begin with “jboss”.
For more information, see "Application Signatures" in the Turbonomic User Guide.

Application Container Targets
88 Turbonomic, Inc. www.turbonomic.com
3. Specify the Docker port for each group of VMs that hosts containers.
When you created the group, you should have made sure that every group member exposes containers through the same port. This step tells Turbonomic which port to use.
Select Application Credentials, then set the credentials scope to the group of VMs you created. Then you can specify the Docker port for that group.
For more information, see "VM Access Credentials" in the Turbonomic User Guide.
Actions
Turbonomic recommends actions for cloud infrastructures as follows:
Monitored Resources
Turbonomic monitors the following cloud infrastructure resources:
Entity Type Resources
Container Resize.
Entity Type Resources
Container • MemAllocationThe percentage of memory cpacity the container utilizes.
• CPUAllocationThe percentage of CPU capacity the container utilizes.
Target Configuration Guide 89
Adding PaaS Managers as Targets
Platform as a Service (PaaS) is a management model to deliver applications over the internet. A PaaS provider delivers hardware and software tools as a service, and customers use the service to build and deploy applications.
Turbonomic supports the CloudFoundry platform. For targets, you can specify PaaS implementations that use the CloudFoundry SDK v.2. Turbonomic has tested implementations of HP Stackato, but Turbonomic should support other implementations on v.2, such as Pivotal.
License Requirements
The Container Control Module.
Identifying the CloudFoundry API Endpoint
To specify a target, you attach to a CloudFoundry API endpoint. The following steps describe how to identify the end-point in HP Stackato:
• Open the Management Console• Navigate to Admin > Cluster Management• Find the entry for API Endpoint — That shows the IP address you need for the Turbonomic target
Adding PaaS Managers as Targets
90 Turbonomic, Inc. www.turbonomic.com
Adding CloudFoundry Targets to Turbonomic
To add CloudFoundry targets, select the PaaS > CloudFoundry option on the Target Configuration page and provide the following information:
• Addresss
The address of the API endpoint.
• Username/Password
Credentials for an account on the endpoint with administrator privileges.

Target Configuration Guide 91
Fabric Manager Targets
A fabric infrastructure integrates host and network resources in a scalable multi-chassis platform to converge adminis-tration onto a single point of management. Managing compute resources on a network fabric enables automation at the hardware level, including automated provisioning of hosts.
Turbonomic supports the Cisco UCS fabric platform.
If you have installed the Fabric Control Module license, you can add fabric managers as targets. When you add these targets, Turbonomic can discover the associated fabric components.
License Requirements
The Fabric Control Module.
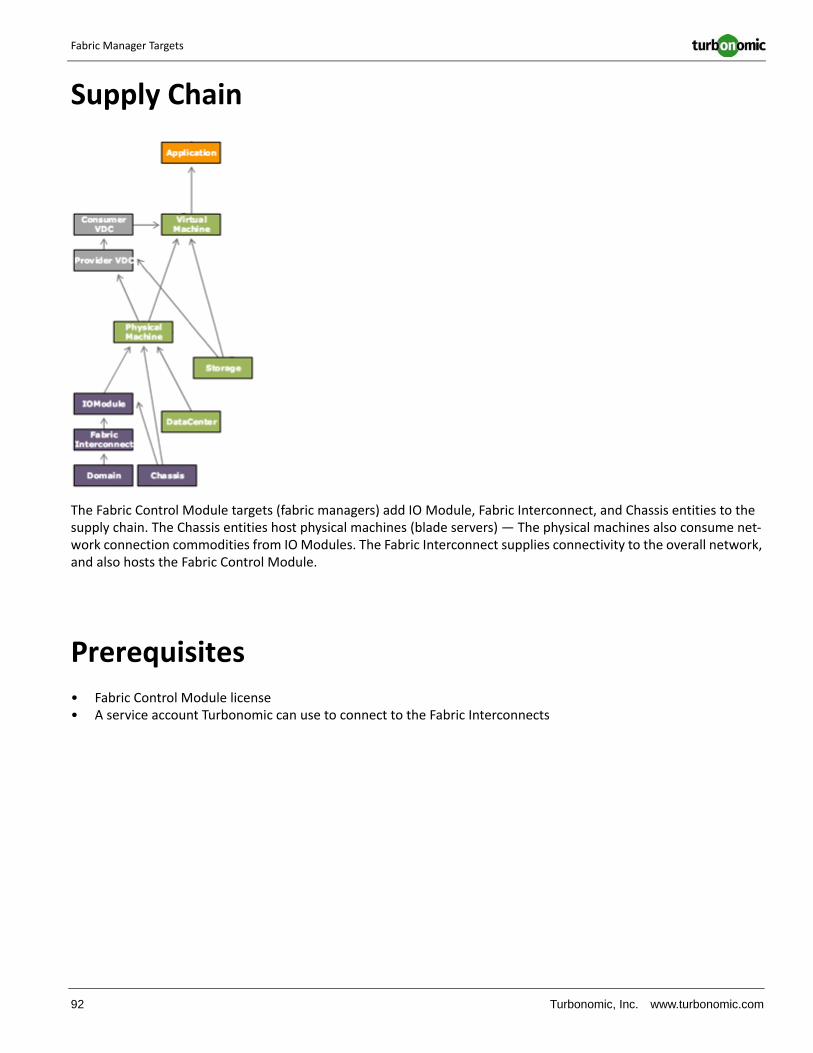
Fabric Manager Targets
92 Turbonomic, Inc. www.turbonomic.com
Supply Chain
The Fabric Control Module targets (fabric managers) add IO Module, Fabric Interconnect, and Chassis entities to the supply chain. The Chassis entities host physical machines (blade servers) — The physical machines also consume net-work connection commodities from IO Modules. The Fabric Interconnect supplies connectivity to the overall network, and also hosts the Fabric Control Module.
Prerequisites
• Fabric Control Module license• A service account Turbonomic can use to connect to the Fabric Interconnects
sFlow
Target Configuration Guide 93
Configuring UCS for Blade Provisioning
When managing a UCS fabric, Turbonomic can provision any blade servers that are installed in a chassis but not cur-rently in operation. If the workload demands more physical compute resources, Turbonomic can automatically direct UCS to provision a blade, or it can recommend that you provision a blade and you can execute the action from the To Do list. To enable this capability, you must perform two basic steps:
• Configure the way UCS and vCenter Server manage information as blades are provisioned
To enable Turbonomic to perform automatic provisioning of UCS blades, you must configure UCS to work with vCenter Server so they can work together as they manage resources such as server pools, policies, and Service Profile Templates. This is necessary to ensure that as Turbonomic directs the UCS Manager to provision a new blade, vCenter Server will recognize that the new physical host is available. Once vCenter Server can recognize the new blade, Turbonomic can direct vCenter Server to move workloads onto the server.
Turbonomic provisions new blades based on the service profiles of operating blades. To enable this, the configuration must include Service Profile Templates, and the operating blades must be bound to these templates.
This level of UCS and vCenter Server configuration is beyond the scope of this documentation. For information about configuration that enables automated provisioning of blades, see the Cisco Communities post, “UCS PowerTool and VMware PowerCLI automated management of Auto-deploy” at the following location:
https://communities.cisco.com/community/technology/datacenter/ucs_management/cisco_ucs_developed_integrations/blog/2013/09/16/ucs-powertool-and-vmware-powercli-automated-management-of-auto-deploy
This post includes a video that shows “a joint PowerShell integration utilizing both Cisco UCS PowerTool and VMware PowerCLI.” You can also download the scripts from this post and modify them as necessary for your deployment.
• Set the Host Provision action to Automate or Manual for the blade servers. You create a dynamic group in Turbonomic that contains your UCS blades, and set the action automation to that group.
Setting the Host Provision Action Mode
By default, Turbonomic sets the Host Provision action to Recommend. For any hosts other than blade servers man-aged by UCS, Turbonomic cannot provision hosts automatically or manually. Instead, it recommends that you provi-sion a host, and you then install the physical machine and wire it to the network.
In a UCS deployment you can have blade servers installed in the chassis and ready to provision. In that case, Turbo-nomic can direct UCS to provision a new blade to meet workload demands. For these servers, you can set the Host Provision action to Automated or Manual.
NOTE: It’s important that you only set Automated or Manual host provisioning to UCS blades. If you set Host Provision to Automated for other types of hosts, Turbonomic will attempt to perform the action and fail. As a result, you might never see the recommendation to provision a new host of that type.
Turbonomic groups blade servers by chassis. To restrict Automated or Manual settings to blade servers, use this group. You can set the action mode for all blade servers in your environment, or you can set the mode differently for individual chassis.

Fabric Manager Targets
94 Turbonomic, Inc. www.turbonomic.com
The following image shows how to set Host Provisioning to Automated for all blade servers in the environment.
Adding UCS Fabric Manager Targets
To add a UCS fabric manager as a target, select the Fabric category and choose one of the UCS Fabric options to match the version of UCS you want to manage. Then provide the following information:
• Address: The IP address of the primary Fabric Interconnect
This gives access to the Fabric Manager that resides on the interconnect.
• Username/Password: The credentials of an account Turbonomic can use to connect to the Fabric Interconnect.
specify the IP address and credentials for the fabric manager. Turbonomic discovers the fabric interfaces associated with the fabric manager.
NOTE: When providing a user name, if the account is managed in Active Directory you must include the domain, in case-sensitive spelling. For example, MyDomain\john is not the same as mydomain\john. For local user accounts, just provide the username.
Target Configuration Guide 95
Adding Load Balancers as Targets
A load balancer is a network appliance that provides Level 4 load balancing of requests to application services. Level 4 load balancing routes traffic according to business rules so that servers with the least load or fastest response times will receive requests from the load balancer.
Turbonomic supports Citrix NetScaler load balancers.
If you have installed the Application Control Module license, you can add load balancers as targets. When you add these targets, Turbonomic can discover the associated virtual applications.
Turbonomic recommends actions on the VMs that host the underlying applications. If the VM hosts an application with a signature that is associated with a virtual application, then provisioning the new VM will automatically bind the underlying application to the virtual application. In this way, Turbonomic can control the underlying resources that support the load balancer’s demand.
License Requirements
The base Turbonomic license supports Load Balancer targets.
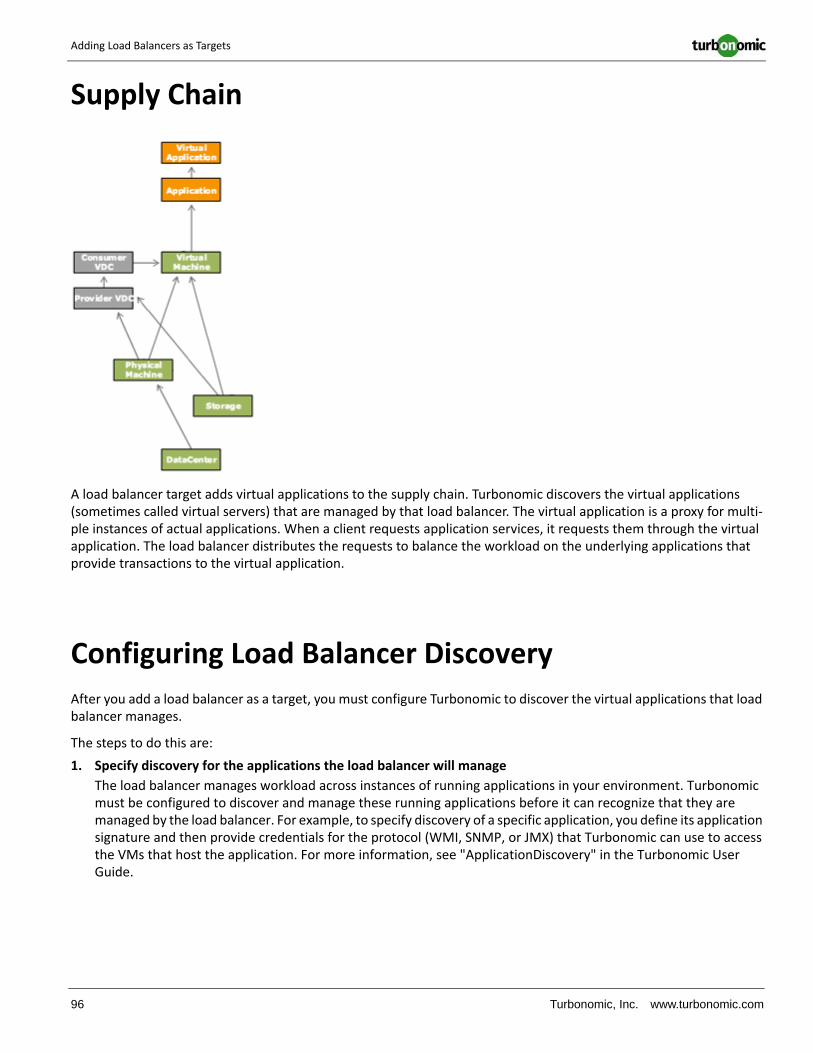
Adding Load Balancers as Targets
96 Turbonomic, Inc. www.turbonomic.com
Supply Chain
A load balancer target adds virtual applications to the supply chain. Turbonomic discovers the virtual applications (sometimes called virtual servers) that are managed by that load balancer. The virtual application is a proxy for multi-ple instances of actual applications. When a client requests application services, it requests them through the virtual application. The load balancer distributes the requests to balance the workload on the underlying applications that provide transactions to the virtual application.
Configuring Load Balancer Discovery
After you add a load balancer as a target, you must configure Turbonomic to discover the virtual applications that load balancer manages.
The steps to do this are:
1. Specify discovery for the applications the load balancer will manage
The load balancer manages workload across instances of running applications in your environment. Turbonomic must be configured to discover and manage these running applications before it can recognize that they are managed by the load balancer. For example, to specify discovery of a specific application, you define its application signature and then provide credentials for the protocol (WMI, SNMP, or JMX) that Turbonomic can use to access the VMs that host the application. For more information, see "ApplicationDiscovery" in the Turbonomic User Guide.

sFlow
Target Configuration Guide 97
2. Assign application signatures to specific virtual applications
Turbonomic discovers the virtual applications that the load balancer uses to manage applications. After you have specified signatures and discovery for the applications you want the load balancer to manage, you can then assign those application signatures to specific virtual applications. For more information, see "Load Balancer Discovery" in the Turbonomic User Guide.
For example, assume the load balancer uses virtual applications named web and sql to manage web servers and SQL databases. Also assume that you have defined an application signature named IIS for IIS Web Server applica-tions, and another signature named SQL for Microsoft SQL Server applications. In that case, you need to map the IIS signature to the web virtual application, and SQL to the sql virtual application (as explained in the Load Balancer Discovery section). Now Turbonomic can discover these applications and represent them as the running compo-nents within the load balancer.
Adding Citrix NetScalar Targets
To add NetScaler targets, select the Load Balancers > NetScaler option on the Target Configuration page and provide the following information:
• Address: The IP address of the primary NetScaler load balancer server
Turbonomic discovers the service types that are assigned to that load balancer. These service types appear in the Turbonomic supply chain as virtual applications. To enable discovery of virtual applications, you must configure load balancer discovery.
• Username/Password: The credentials of an account Turbonomic can use to connect to the Fabric Interconnect.

Target Configuration Guide 98
Adding Turbonomic Targets for Aggregation
For large virtual environments, you can use more than one Turbonomic instance to manage your workload. By aggre-gating multiple instances in this way, you can view the entire environment through a single GUI. One special installa-tion of Turbonomic serves as the aggregating instance to display the combined data of each underlying target instance. For more information about Turbonomic aggregation, see "Aggregated Turbonomic Installations" in the Tur-bonomic User Guide.
License Requirements
The base Turbonomic license supports aggregated deployments.
Prerequisites
The Turbonomic instance that aggregates other Turbonomic servers cannot have any other targets — It can only man-age other instances of Turbonomic.

sFlow
Target Configuration Guide 99
Adding Turbonomic Targets
To add an aggregated instance of Turbonomic, select the Turbonomic Appliance option on the Target Configuration page and provide the following information:
NOTE: All the targets of an aggregating instance must be target instances of Turbonomic. You cannot use an aggregating instance to manage other types of targets.
• Addresss
The name or IP address of the Turbonomic server.
• Username/Password
Credentials for the administrator account on the Turbonomic server.
• Appliance ID
An ID string that you can use to identify this particular Turbonomic server.
The Server ID appears in the aggregating user interface when the user needs to access an underlying server. For example, assume you’re logged into an aggregating server and want to run a plan. When you display the Plan view, you will see the underlying target servers, listed by their Server IDs.

Target Configuration Guide 100
Appendix — Target Configuration
This appendix contains topics that are related to configuring Turbonomic targets.
Enabling WinRM Via PowerShell
Using PsExec, you can run quickconfig on all your Hyper-V servers and change the default settings remotely. PsExec is a component of PsTools, which you can download from https://technet.microsoft.com/en-us/sysinternals/bb897553.aspx.
1. Create a text file containing the Hyper-V host names, for example:
hp-dl590hp-dl591
2. Since Turbonomic requires changes to the default quickconfig settings, create a batch file containing the following commands:
@echo off Powershell.exe Set-WSManQuickConfig -Force Powershell.exe Set-Item WSMan:\localhost\Shell\MaxMemoryPerShellMB 1024If using an HTTP connection, include the following command:
Powershell.exe Set-Item WSMan:\localhost\Service\AllowUnencrypted -Value $True
3. Use PsExec to enable WinRM on the remote servers:
.\PsExec.exe @<hosts_file_path> -u <username> -p <password> -c <batch_file_path>
NOTE: If you get an error message when executing this command, add the -h option (.\PsExec.exe -h).
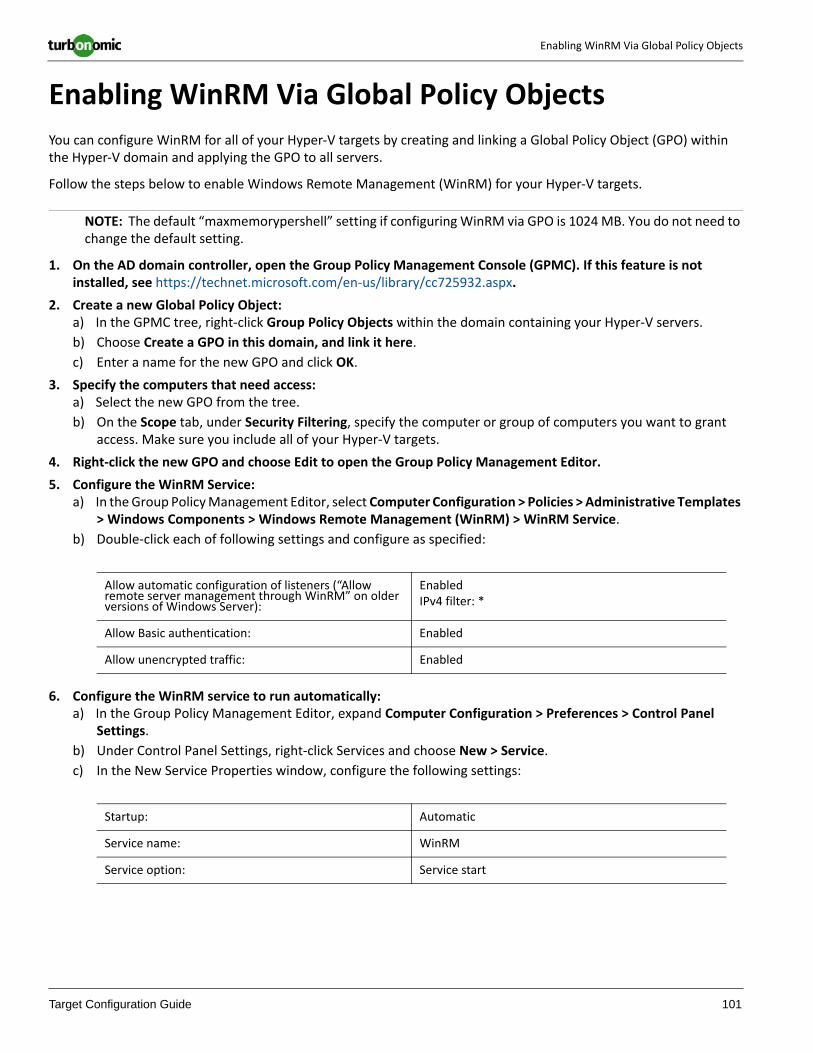
Enabling WinRM Via Global Policy Objects
Target Configuration Guide 101
Enabling WinRM Via Global Policy Objects
You can configure WinRM for all of your Hyper-V targets by creating and linking a Global Policy Object (GPO) within the Hyper-V domain and applying the GPO to all servers.
Follow the steps below to enable Windows Remote Management (WinRM) for your Hyper-V targets.
NOTE: The default “maxmemorypershell” setting if configuring WinRM via GPO is 1024 MB. You do not need to change the default setting.
1. On the AD domain controller, open the Group Policy Management Console (GPMC). If this feature is not installed, see https://technet.microsoft.com/en-us/library/cc725932.aspx.
2. Create a new Global Policy Object:a) In the GPMC tree, right-click Group Policy Objects within the domain containing your Hyper-V servers.
b) Choose Create a GPO in this domain, and link it here.
c) Enter a name for the new GPO and click OK.
3. Specify the computers that need access:a) Select the new GPO from the tree.
b) On the Scope tab, under Security Filtering, specify the computer or group of computers you want to grant access. Make sure you include all of your Hyper-V targets.
4. Right-click the new GPO and choose Edit to open the Group Policy Management Editor.
5. Configure the WinRM Service:a) In the Group Policy Management Editor, select Computer Configuration > Policies > Administrative Templates
> Windows Components > Windows Remote Management (WinRM) > WinRM Service.
b) Double-click each of following settings and configure as specified:
6. Configure the WinRM service to run automatically:a) In the Group Policy Management Editor, expand Computer Configuration > Preferences > Control Panel
Settings.
b) Under Control Panel Settings, right-click Services and choose New > Service.
c) In the New Service Properties window, configure the following settings:
Allow automatic configuration of listeners (“Allow remote server management through WinRM” on older versions of Windows Server):
EnabledIPv4 filter: *
Allow Basic authentication: Enabled
Allow unencrypted traffic: Enabled
Startup: Automatic
Service name: WinRM
Service option: Service start
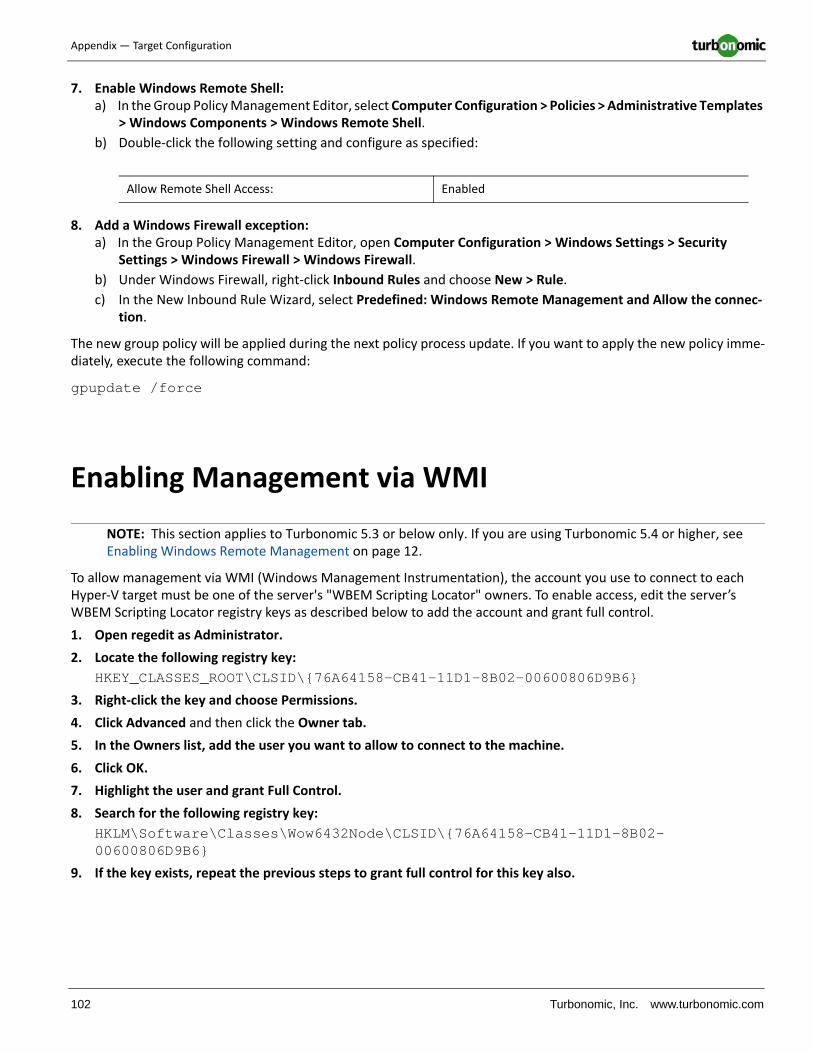
Appendix — Target Configuration
102 Turbonomic, Inc. www.turbonomic.com
7. Enable Windows Remote Shell:a) In the Group Policy Management Editor, select Computer Configuration > Policies > Administrative Templates
> Windows Components > Windows Remote Shell.
b) Double-click the following setting and configure as specified:
8. Add a Windows Firewall exception:a) In the Group Policy Management Editor, open Computer Configuration > Windows Settings > Security
Settings > Windows Firewall > Windows Firewall.
b) Under Windows Firewall, right-click Inbound Rules and choose New > Rule.
c) In the New Inbound Rule Wizard, select Predefined: Windows Remote Management and Allow the connec-tion.
The new group policy will be applied during the next policy process update. If you want to apply the new policy imme-diately, execute the following command:
gpupdate /force
Enabling Management via WMI
NOTE: This section applies to Turbonomic 5.3 or below only. If you are using Turbonomic 5.4 or higher, see Enabling Windows Remote Management on page 12.
To allow management via WMI (Windows Management Instrumentation), the account you use to connect to each Hyper-V target must be one of the server's "WBEM Scripting Locator" owners. To enable access, edit the server’s WBEM Scripting Locator registry keys as described below to add the account and grant full control.
1. Open regedit as Administrator.
2. Locate the following registry key:
HKEY_CLASSES_ROOT\CLSID\{76A64158-CB41-11D1-8B02-00600806D9B6}
3. Right-click the key and choose Permissions.
4. Click Advanced and then click the Owner tab.
5. In the Owners list, add the user you want to allow to connect to the machine.
6. Click OK.
7. Highlight the user and grant Full Control.
8. Search for the following registry key:
HKLM\Software\Classes\Wow6432Node\CLSID\{76A64158-CB41-11D1-8B02-00600806D9B6}
9. If the key exists, repeat the previous steps to grant full control for this key also.
Allow Remote Shell Access: Enabled
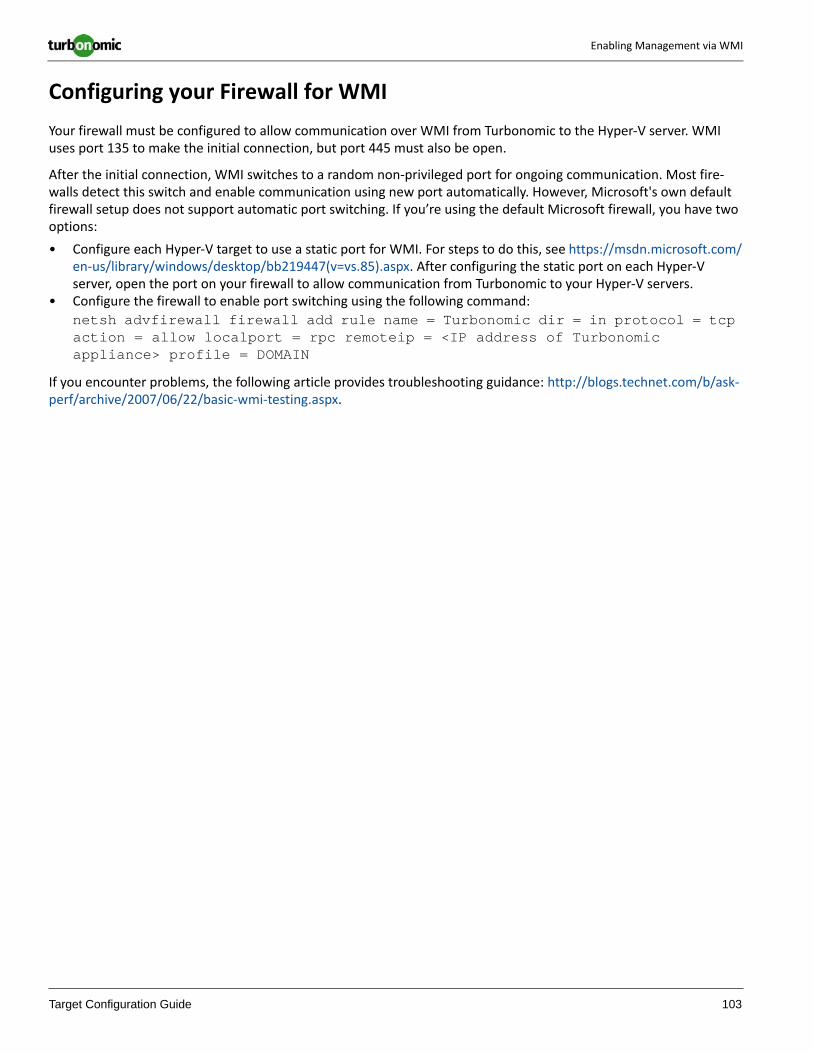
Enabling Management via WMI
Target Configuration Guide 103
Configuring your Firewall for WMI
Your firewall must be configured to allow communication over WMI from Turbonomic to the Hyper-V server. WMI uses port 135 to make the initial connection, but port 445 must also be open.
After the initial connection, WMI switches to a random non-privileged port for ongoing communication. Most fire-walls detect this switch and enable communication using new port automatically. However, Microsoft's own default firewall setup does not support automatic port switching. If you’re using the default Microsoft firewall, you have two options:
• Configure each Hyper-V target to use a static port for WMI. For steps to do this, see https://msdn.microsoft.com/en-us/library/windows/desktop/bb219447(v=vs.85).aspx. After configuring the static port on each Hyper-V server, open the port on your firewall to allow communication from Turbonomic to your Hyper-V servers.
• Configure the firewall to enable port switching using the following command:
netsh advfirewall firewall add rule name = Turbonomic dir = in protocol = tcp action = allow localport = rpc remoteip = <IP address of Turbonomic appliance> profile = DOMAIN
If you encounter problems, the following article provides troubleshooting guidance: http://blogs.technet.com/b/ask-perf/archive/2007/06/22/basic-wmi-testing.aspx.

Appendix — Target Configuration
104 Turbonomic, Inc. www.turbonomic.com