Embed Size (px)
Citation preview

7/23/2019 Tambour Topped Box
http://slidepdf.com/reader/full/tambour-topped-box 1/7
“America’s leading woodworking authority”™
Premium Plan
n this plan you’ll find:
Step-by-step constructioninstruction.A complete bill of materials.Construction drawings and
related photos.ips to help you complete
the project and become abetter woodworker.
Tambour-toppedBox
Tese plans are best viewed withdobe Reader installed on your
omputer. If you want to get aee copy, visit:ttp://adobe.com/reader.
Copyright Woodworker’s Journal © 2015 www.woodworkersjournal.com WJ181
7/23/2019 Tambour Topped Box
http://slidepdf.com/reader/full/tambour-topped-box 2/7
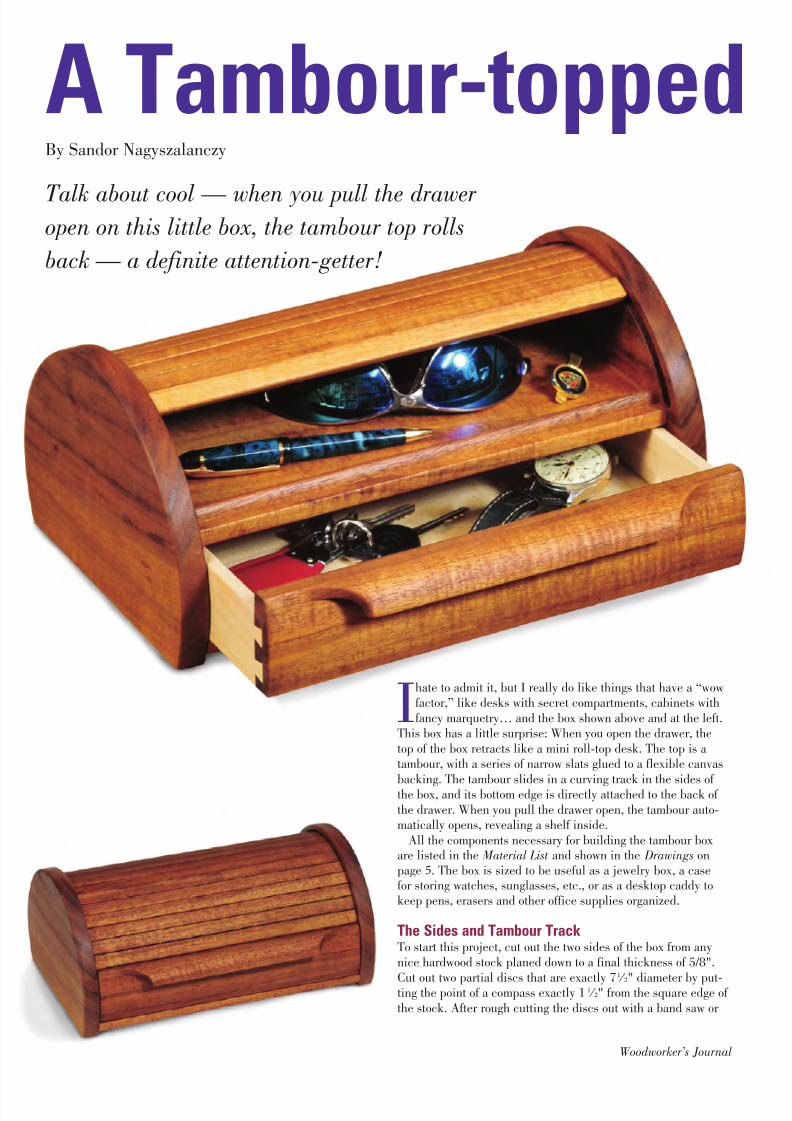
Ihate to admit it, but I really do like things that have a “wowfactor,” like desks with secret compartments, cabinets with
fancy marquetry… and the box shown above and at the left.This box has a little surprise: When you open the drawer, the
top of the box retracts like a mini roll-top desk. The top is atambour, with a series of narrow slats glued to a flexible canvas
backing. The tambour slides in a curving track in the sides of the box, and its bottom edge is directly attached to the back of
the drawer. When you pull the drawer open, the tambour auto-matically opens, revealing a shelf inside.
All the components necessary for building the tambour box are listed in the Material List and shown in the Drawings on page 5. The box is sized to be useful as a jewelry box, a case for storing watches, sunglasses, etc., or as a desktop caddy to keep pens, erasers and other office supplies organized.
The Sides and Tambour Track
To start this project, cut out the two sides of the box from anynice hardwood stock planed down to a final thickness of 5/8".
Cut out two partial discs that are exactly 71
⁄ 2" diameter by put-ting the point of a compass exactly 11 ⁄ 2" from the square edge of
the stock. After rough cutting the discs out with a band saw or
Talk about cool — when you pull the draweropen on this little box, the tambour top rolls
back — a definite attention-getter!
A Tambour-toppedBy Sandor Nagyszalanczy
Woodworker’s Journal
7/23/2019 Tambour Topped Box
http://slidepdf.com/reader/full/tambour-topped-box 3/7
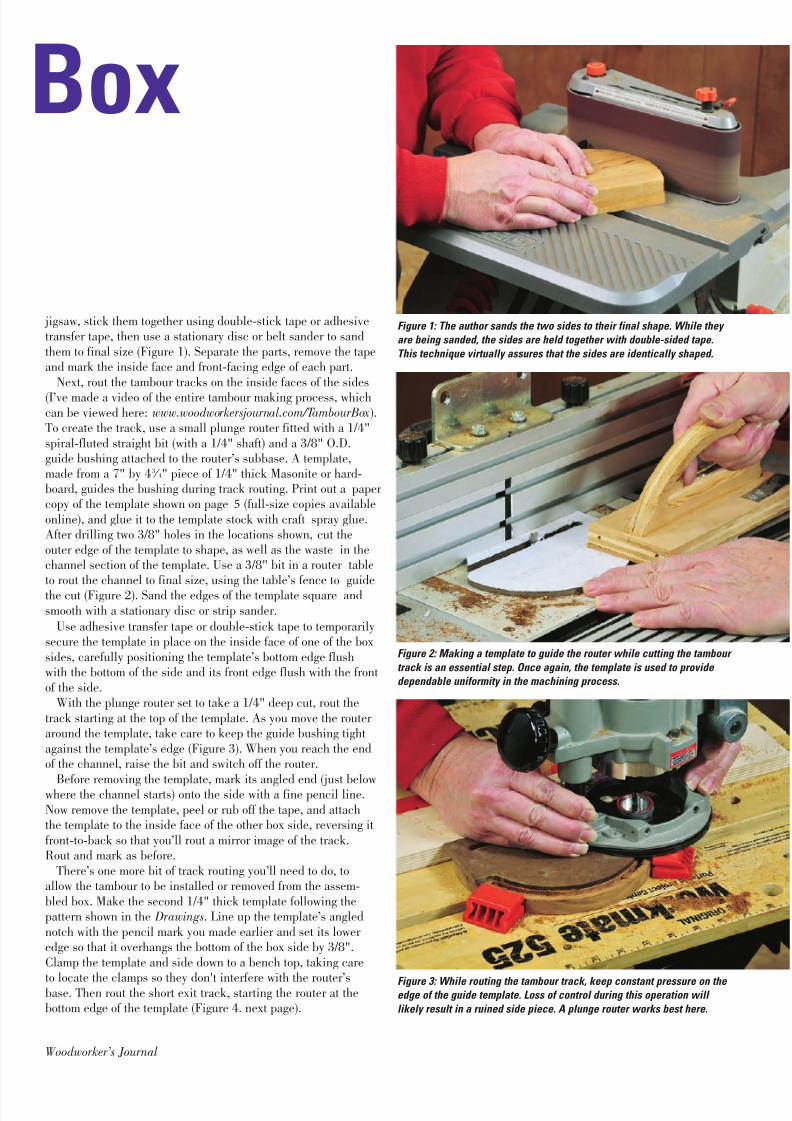
Figure 1: The author sands the two sides to their final shape. While they
are being sanded, the sides are held together with double-sided tape.
This technique virtually assures that the sides are identically shaped.
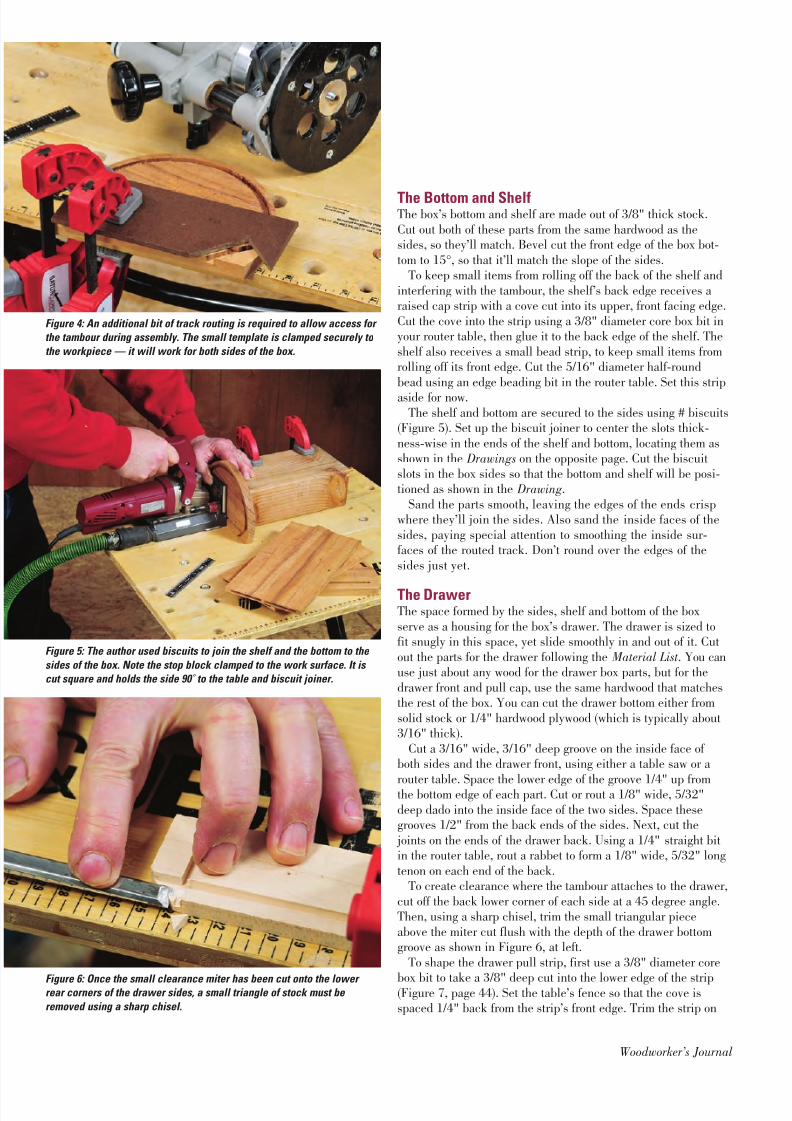
Figure 2: Making a template to guide the router while cutting the tambour
track is an essential step. Once again, the template is used to provide
dependable uniformity in the machining process.
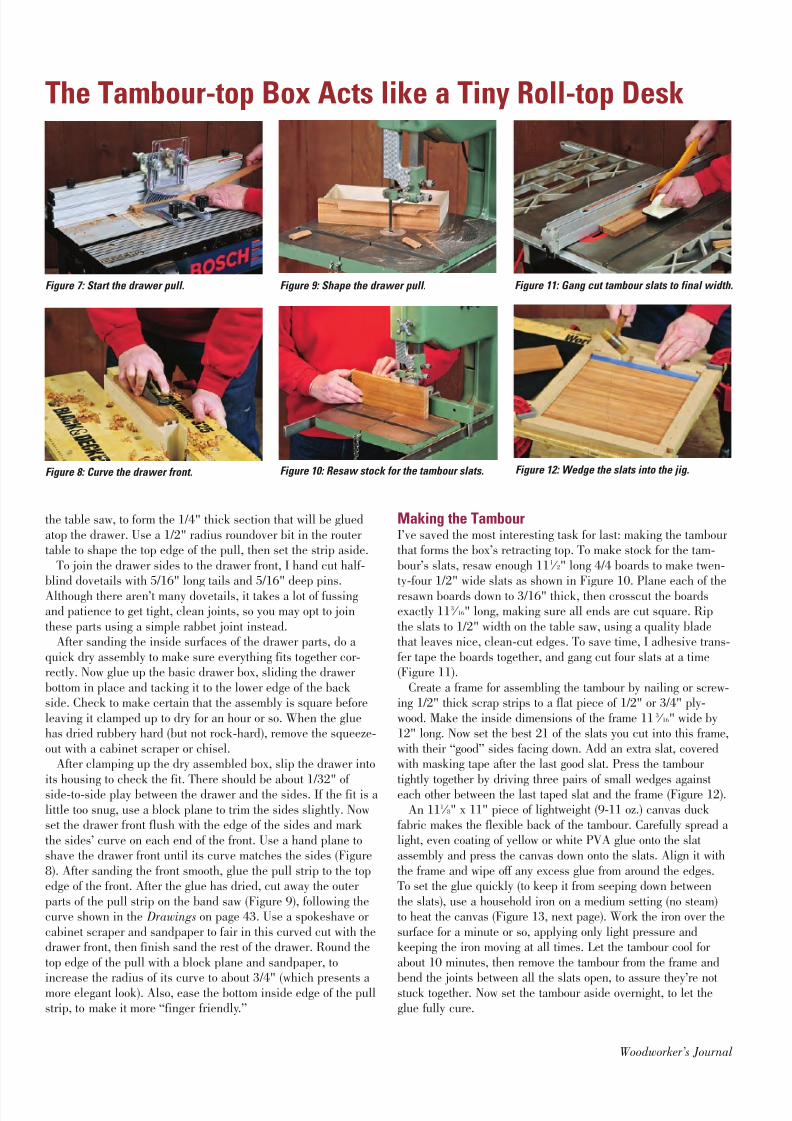
Figure 3: While routing the tambour track, keep constant pressure on the edge of the guide template. Loss of control during this operation will
likely result in a ruined side piece. A plunge router works best here.
jigsaw, stick them together using double-stick tape or adhesivetransfer tape, then use a stationary disc or belt sander to sand
them to final size (Figure 1). Separate the parts, remove the tapeand mark the inside face and front-facing edge of each part.
Next, rout the tambour tracks on the inside faces of the sides
(I’ve made a video of the entire tambour making process, whichcan be viewed here: www.woodworkersjournal.com/TambourBox).To create the track, use a small plunge router fitted with a 1/4"
spiral-fluted straight bit (with a 1/4" shaft) and a 3/8" O.D.
guide bushing attached to the router’s subbase. A template, made from a 7" by 43 ⁄ 4" piece of 1/4" thick Masonite or hard-board, guides the bushing during track routing. Print out a papercopy of the template shown on page 5 (full-size copies available
online), and glue it to the template stock with craft spray glue.After drilling two 3/8" holes in the locations shown, cut theouter edge of the template to shape, as well as the waste in thechannel section of the template. Use a 3/8" bit in a router tableto rout the channel to final size, using the table’s fence to guidethe cut (Figure 2). Sand the edges of the template square and
smooth with a stationary disc or strip sander.
Use adhesive transfer tape or double-stick tape to temporarilysecure the template in place on the inside face of one of the box
sides, carefully positioning the template’s bottom edge flushwith the bottom of the side and its front edge flush with the front
of the side.With the plunge router set to take a 1/4" deep cut, rout the
track starting at the top of the template. As you move the router around the template, take care to keep the guide bushing tight
against the template’s edge (Figure 3). When you reach the endof the channel, raise the bit and switch off the router.
Before removing the template, mark its angled end (just belowwhere the channel starts) onto the side with a fine pencil line.
Now remove the template, peel or rub off the tape, and attachthe template to the inside face of the other box side, reversing it
front-to-back so that you’ll rout a mirror image of the track.Rout and mark as before.
There’s one more bit of track routing you’ll need to do, toallow the tambour to be installed or removed from the assem-
bled box. Make the second 1/4" thick template following thepattern shown in the Drawings. Line up the template’s angled
notch with the pencil mark you made earlier and set its lower edge so that it overhangs the bottom of the box side by 3/8".
Clamp the template and side down to a bench top, taking care
to locate the clamps so they don't interfere with the router’sbase. Then rout the short exit track, starting the router at thebottom edge of the template (Figure 4. next page).
Woodworker’s Journal
Box
7/23/2019 Tambour Topped Box
http://slidepdf.com/reader/full/tambour-topped-box 4/7
The Bottom and ShelfThe box’s bottom and shelf are made out of 3/8" thick stock.
Cut out both of these parts from the same hardwood as thesides, so they’ll match. Bevel cut the front edge of the box bot-
tom to 15°, so that it’ll match the slope of the sides.To keep small items from rolling off the back of the shelf and
interfering with the tambour, the shelf’s back edge receives araised cap strip with a cove cut into its upper, front facing edge.
Cut the cove into the strip using a 3/8" diameter core box bit inyour router table, then glue it to the back edge of the shelf. The
shelf also receives a small bead strip, to keep small items fromrolling off its front edge. Cut the 5/16" diameter half-round
bead using an edge beading bit in the router table. Set this strip
aside for now.The shelf and bottom are secured to the sides using # biscuits
(Figure 5). Set up the biscuit joiner to center the slots thick-
ness-wise in the ends of the shelf and bottom, locating them asshown in the Drawings on the opposite page. Cut the biscuit
slots in the box sides so that the bottom and shelf will be posi-tioned as shown in the Drawing.
Sand the parts smooth, leaving the edges of the ends crispwhere they’ll join the sides. Also sand the inside faces of the
sides, paying special attention to smoothing the inside sur-faces of the routed track. Don’t round over the edges of the
sides just yet.
The DrawerThe space formed by the sides, shelf and bottom of the box
serve as a housing for the box’s drawer. The drawer is sized tofit snugly in this space, yet slide smoothly in and out of it. Cut
out the parts for the drawer following the Material List. You canuse just about any wood for the drawer box parts, but for the
drawer front and pull cap, use the same hardwood that matchesthe rest of the box. You can cut the drawer bottom either from
solid stock or 1/4" hardwood plywood (which is typically about3/16" thick).
Cut a 3/16" wide, 3/16" deep groove on the inside face of both sides and the drawer front, using either a table saw or a
router table. Space the lower edge of the groove 1/4" up fromthe bottom edge of each part. Cut or rout a 1/8" wide, 5/32"
deep dado into the inside face of the two sides. Space thesegrooves 1/2" from the back ends of the sides. Next, cut the
joints on the ends of the drawer back. Using a 1/4" straight bitin the router table, rout a rabbet to form a 1/8" wide, 5/32" long
tenon on each end of the back.To create clearance where the tambour attaches to the drawer,
cut off the back lower corner of each side at a 45 degree angle.Then, using a sharp chisel, trim the small triangular piece
above the miter cut flush with the depth of the drawer bottomgroove as shown in Figure 6, at left.
To shape the drawer pull strip, first use a 3/8" diameter core
box bit to take a 3/8" deep cut into the lower edge of the strip(Figure 7, page 44). Set the table’s fence so that the cove isspaced 1/4" back from the strip’s front edge. Trim the strip on
Woodworker’s Journal
Figure 4: An additional bit of track routing is required to allow access for
the tambour during assembly. The small template is clamped securely to
the workpiece — it will work for both sides of the box.
Figure 5: The author used biscuits to join the shelf and the bottom to the
sides of the box. Note the stop block clamped to the work surface. It is
cut square and holds the side 90˚ to the table and biscuit joiner.
Figure 6: Once the small clearance miter has been cut onto the lower rear corners of the drawer sides, a small triangle of stock must be
removed using a sharp chisel.

7/23/2019 Tambour Topped Box
http://slidepdf.com/reader/full/tambour-topped-box 5/7
7
8
9
1/ 2"
1
/ 8
"5/ 32"
1
1
2
3
45
6
Woodworker’s Journal
MATERIAL LIST
Box Exploded View
Box: T x W x L
1 Sides (2) 5/8" x 51 ⁄ 4" x 71 ⁄ 2"
2 Bottom (1) 3/8" x 55 ⁄ 8" x 1013 ⁄ 16"
3 Shelf (1) 3/8" x 55 ⁄ 16" x 1013 ⁄ 16"
4 Rear Cap for Shelf (1) 5/8" x 1/2" x 1013 ⁄ 16"
5 Front Bead Strip (1) 5/16" x 5/16" x 1013 ⁄ 16"
6 Joinery Biscuits (8) #10 plate joinery biscuits
Drawer:
7 Sides (2) 5/16" x 13 ⁄ 4" x 65 ⁄ 16"
8 Back (1) 1/2" x 15 ⁄ 16" x 107 ⁄ 16"
9 Bottom (1) 3/16" x 57 ⁄ 8" x 103 ⁄ 8"
10 Front (1) 5/8" x 17 ⁄ 8" x 103 ⁄ 4"
11 Pull Strip (1) 5/8" x 15 ⁄ 16" x 103 ⁄ 4"
Tambour:
12 Slats (21) 3/16" x 1/2" x 113 ⁄ 16"
13 Cap Strip (1) 7/16" x 9/16" x 103 ⁄ 4"
14 Lightweight Canvas Duck Fabric (1) 111 ⁄ 8" x 11"
15 Screws (2) #6 x 1/2" long
11
1" R.
1"5/ 8"
1213
14
7/ 16"
The slot in the cap strip
is
13
/ 64
" wide x
5
/ 16
" deep.
20°
1/ 2"
Drawer Handle Cutout (Top View)
DrawerCorner (Top View)
Tambour Slats and Cap Strip (Side View)
Side Pattern
Track RoutingTemplate
Track Access Template
Each square = 1/4"
Each square = 1/4"
Each square = 1/4"
10
7
7
8
9
11
DrawerExploded View
Lay out dovetails so the groove for the bottom is not exposed.
7/23/2019 Tambour Topped Box
http://slidepdf.com/reader/full/tambour-topped-box 6/7 Woodworker’s Journal
the table saw, to form the 1/4" thick section that will be glued
atop the drawer. Use a 1/2" radius roundover bit in the router table to shape the top edge of the pull, then set the strip aside.
To join the drawer sides to the drawer front, I hand cut half-blind dovetails with 5/16" long tails and 5/16" deep pins.
Although there aren’t many dovetails, it takes a lot of fussingand patience to get tight, clean joints, so you may opt to join
these parts using a simple rabbet joint instead.After sanding the inside surfaces of the drawer parts, do a
quick dry assembly to make sure everything fits together cor-rectly. Now glue up the basic drawer box, sliding the drawer
bottom in place and tacking it to the lower edge of the backside. Check to make certain that the assembly is square before
leaving it clamped up to dry for an hour or so. When the gluehas dried rubbery hard (but not rock-hard), remove the squeeze-
out with a cabinet scraper or chisel.After clamping up the dry assembled box, slip the drawer into
its housing to check the fit. There should be about 1/32" of side-to-side play between the drawer and the sides. If the fit is a
little too snug, use a block plane to trim the sides slightly. Nowset the drawer front flush with the edge of the sides and mark
the sides’ curve on each end of the front. Use a hand plane toshave the drawer front until its curve matches the sides (Figure
8). After sanding the front smooth, glue the pull strip to the topedge of the front. After the glue has dried, cut away the outer
parts of the pull strip on the band saw (Figure 9), following thecurve shown in the Drawings on page 43. Use a spokeshave or
cabinet scraper and sandpaper to fair in this curved cut with thedrawer front, then finish sand the rest of the drawer. Round the
top edge of the pull with a block plane and sandpaper, to
increase the radius of its curve to about 3/4" (which presents amore elegant look). Also, ease the bottom inside edge of the pullstrip, to make it more “finger friendly.”
Making the TambourI’ve saved the most interesting task for last: making the tambour that forms the box’s retracting top. To make stock for the tam-
bour’s slats, resaw enough 111 ⁄ 2" long 4/4 boards to make twen-ty-four 1/2" wide slats as shown in Figure 10. Plane each of the
resawn boards down to 3/16" thick, then crosscut the boardsexactly 113 ⁄ 16" long, making sure all ends are cut square. Rip
the slats to 1/2" width on the table saw, using a quality bladethat leaves nice, clean-cut edges. To save time, I adhesive trans-
fer tape the boards together, and gang cut four slats at a time(Figure 11).
Create a frame for assembling the tambour by nailing or screw-ing 1/2" thick scrap strips to a flat piece of 1/2" or 3/4" ply-
wood. Make the inside dimensions of the frame 113 ⁄ 16" wide by12" long. Now set the best 21 of the slats you cut into this frame,
with their “good” sides facing down. Add an extra slat, coveredwith masking tape after the last good slat. Press the tambour
tightly together by driving three pairs of small wedges againsteach other between the last taped slat and the frame (Figure 12).
An 111 ⁄ 8" x 11" piece of lightweight (9-11 oz.) canvas duck
fabric makes the flexible back of the tambour. Carefully spread alight, even coating of yellow or white PVA glue onto the slat
assembly and press the canvas down onto the slats. Align it with
the frame and wipe off any excess glue from around the edges.To set the glue quickly (to keep it from seeping down between
the slats), use a household iron on a medium setting (no steam)to heat the canvas (Figure 13, next page). Work the iron over the
surface for a minute or so, applying only light pressure andkeeping the iron moving at all times. Let the tambour cool for
about 10 minutes, then remove the tambour from the frame and
bend the joints between all the slats open, to assure they’re notstuck together. Now set the tambour aside overnight, to let theglue fully cure.
Figure 7: Start the drawer pull.
Figure 8: Curve the drawer front. Figure 10: Resaw stock for the tambour slats. Figure 12: Wedge the slats into the jig.
Figure 9: Shape the drawer pull. Figure 11: Gang cut tambour slats to final width.
The Tambour-top Box Acts like a Tiny Roll-top Desk
7/23/2019 Tambour Topped Box
http://slidepdf.com/reader/full/tambour-topped-box 7/7
The next day, trim back the canvas at the sides of the tambour
3/16" from the ends of the slats (Figure 14). On the band saw,trim 7/16" off of both ends of the last slat (at the rear of the tam-
bour), so it can be attached to the drawer. Also reduce the widthof the first slat (at the front) to 5/16" wide using a table saw or
jointer. To finish off the tambour, the front slat receives a capstrip, cut to the size and profile shown on page 43. Glue this strip
in place, centering it on the length of the slat (Figure 15). Nowsand the entire tambour surface smooth, easing the edges between
slats and rounding their ends slightly. Wax the slat ends a little,so that the tambour will slide more easily within the track.
To attach the tambour to the drawer, dry-assemble the box andclamp the sides, bottom and shelf together (Figure 16). Slide the
drawer into place and turn the whole thing upside down on thebench. Slip the tambour into its track with the capped end first
(Figure 17). With the drawer held fully closed and the tambour cap tight against the pull strip, press the last trimmed slat against
the drawer bottom and drill a pair of small diameter countersunkholes into the edge of the drawer back, spaced about an inch from
the ends (Figure 18). Drive 3/4" long #6 screws into the counter-sunk holes, then flip the assembly over and make sure the tam-
bour retracts smoothly when you pull the drawer open.
Sandor Nagyszalanczy is a furniture designer/craftsman, writer/photographer and regular contributor to Woodworker’sJournal.
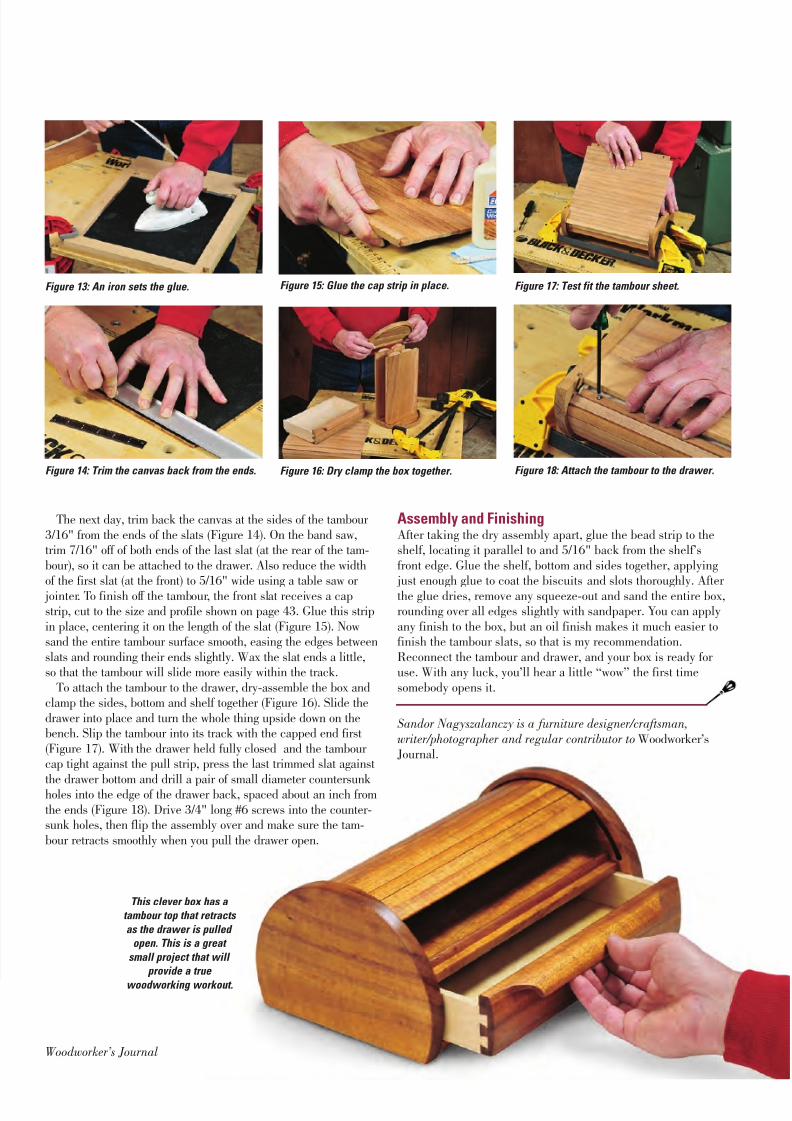
Figure 13: An iron sets the glue.
Figure 14: Trim the canvas back from the ends. Figure 16: Dry clamp the box together. Figure 18: Attach the tambour to the drawer.
Figure 15: Glue the cap strip in place. Figure 17: Test fit the tambour sheet.
Assembly and FinishingAfter taking the dry assembly apart, glue the bead strip to theshelf, locating it parallel to and 5/16" back from the shelf’s
front edge. Glue the shelf, bottom and sides together, applying just enough glue to coat the biscuits and slots thoroughly. After
the glue dries, remove any squeeze-out and sand the entire box,rounding over all edges slightly with sandpaper. You can apply
any finish to the box, but an oil finish makes it much easier tofinish the tambour slats, so that is my recommendation.
Reconnect the tambour and drawer, and your box is ready for use. With any luck, you’ll hear a little “wow” the first time
somebody opens it.
This clever box has a
tambour top that retracts
as the drawer is pulled
open. This is a great
small project that will
provide a true
woodworking workout.
Woodworker’s Journal