Embed Size (px)
Citation preview
1
Taller Gestion de Redes WALC 2010 Cacti Additional Exercises:
- Plugin Architecture - Settings Plugin
o Email to Request Tracker - Installing and Configuring the thold Plugin - CDEFs (Control DEFinitions)
Notes:
• Commands preceded with "$" imply that you should execute the command as a general user - not as root.
• Commands preceded with "#" imply that you should be working as the root user. • Commands with more specific command lines (e.g. "RTR-GW>" or "mysql>") imply that you
are executing commands on remote equipment, or within another program. • If a command line ends with “\” this indicates that the command continues on the next line and
you should treat this as a single line. Exercises Exercise 0 Log in to your PC or open a terminal window as the sysadmin user. Exercise 1 Install the Cacti Plugin Architecture (Cacti PA) This assumes that you have already installed and configured Cacti on your system. You must do this first. You can find the Cacti Plugin Architecture here: http://cactiusers.org/ With additional installation information here: http://cactiusers.org/wiki/PluginArchitectureInstall The major issue with installing the Cacti Plugin Architecture is that it is a patch made directly to the Cacti code. This means that you cannot simply download the latest version of the PA and expect it to work. You must download the version that matches exactly the version of Cacti you are running. In addition, you should patch your Cacti installation immediately after installation and initial configuration before adding hosts and graphs to your installation.
2
As May 2010 using Ubuntu Server 9.10 the Cacti version installed by “apt-get” is 0.8.7.d, or one version behind the current Cacti version of 0.8.7.e. To download the correct PA patch for Cacti version 0.8.7.d do: $ cd /usr/local/src $ sudo mkdir cacti-pa $ cd cacti-pa
$ sudo wget http://mirror.cactiusers.org/downloads/plugins/cacti-plugin-0.8.7d-PA-v2.4.zip $ sudo unzip cacti-plugin-0.8.7d-PA-v2.4.zip
This particular zip file unzips contents directly in to the directory where you are located. It does not make a new directory (proper behavior). Next, to update Cacti with the supplied patch do the following. We do a “dry run” first for testing purposes: $ cd /usr/share/cacti/site $ patch -p1 -N --dry-run < /usr/local/src/cacti-pa/cacti-plugin-0.8.7d-PA-v2.4.diff
If you see any error messages and you have not updated your Cacti installation, then you can copy over the files that failed from /usr/local/src/cacti-pa/files-0.8.7d to /usr/share/cacti/site and place them in the appropriate locations.
If you see error message and you have already updated Cacti, then you must decide whether you wish to re-install Cacti from scratch before applying the Cacti Plugin Architecture patch.
Assuming no errors were reported, then execute the “patch” command without the “—dry-run” option:
$ patch -p1 -N < /usr/local/src/cacti-pa/cacti-plugin-0.8.7d-PA-v2.4.diff
Please note: As Cacti is installed in Ubuntu several Cacti files have been updated by the Ubuntu package team. You will most likely encounter some error messages when attempting to patch Cacti. In the case of Cacti version 0.8.7.d in Ubuntu the following files were not patched:
- /usr/share/cacti/site/include/global_constants.php - /usr/share/cacti/site/include/global.php - /usr/share/cacti/site/lib/html.php
To resolve this issue, after you have issued the patch command you must do:
$ sudo cp /usr/local/src/cacti-pa/files-0.8.7d/include/global_constants.php /usr/share/cacti/site/include/. $ sudo cp /usr/local/src/cacti-pa/files-0.8.7d/include/global.php /usr/share/cacti/site/include/. $ sudo cp /usr/local/src/cacti-pa/files-0.8.7d/lib/html.php /usr/share/cacti/site/lib/. As you can see patching a packaged version of Cacti can be a bit tricky. Another option would be to download Cacti from source and install this on your server. Your next step in the installation process is to update the file /usr/share/cacti/site/include/global.php. $ cd /usr/share/cacti/site $ vi include/global.php

3
Near the top of this file you will see: /* Default database settings*/ … $database_username = "cactiuser"; $database_password = "cactiuser";
Edit this lines and change them to:
/* Default database settings*/ … $database_username = "root"; $database_password = "PASSWORD USED IN CLASS";
Next find the entry that reads: $config['url_path'] = '/’;
And change this to read: $config['url_path'] = '/cacti/';
Save the file and quit. Now we need to fix two small bugs in the this particular patch file under Ubuntu: $ cd /usr/share/cacti/site/lib $ sudo ln -s /usr/share/php/adodb/ adodb $ cd /usr/share/cacti/site $ ln –s /var/lib/cacti/rra/ rra Now we need to import a patch to the Cacti MySQL database: $ cd /usr/local/src/cacti-pa $ mysql –uroot –p cacti < pa.sql When prompted for the “root” password for MySQL enter in the password you used while installing Cacti. Finally restart MySQL and Apache to make sure that the changes take effect. $ sudo /etc/init.d/mysql restart $ sudo /etc/init.d/apache restart And, that’s it. The Cacti Plugin Architecture is now installed. If you go to your running Cacti instance and log in you won’t notice any changes: http://localhost/cacti/ In the next exercise we’ll install a Cacti Plugin.
4
Exercise 2 Install the Cacti Settings Plugin The Cacti Settings Plugin will give us additional settings that we can set from within the Cacti web interface. Including the ability to tell Cacti where to send alert emails. To install this plugin do the following: $ cd /usr/local/src $ sudo wget http://cactiusers.org/downloads/settings.tar.gz $ sudo tar xvzf settings.tar.gz $ cd /usr/share/cacti/site/plugins $ sudo mkdir settings $ cd settings $ sudo cp –r /usr/local/src/settings/* . $ cd /usr/share/cacti/site/include/ Now we must update our Cacti configuration to tell it to look for a Settings plugin. $ sudo vi global.php Inside this configuration file, as you proceed down a few lines, you will find a line that looks like this:
$plugins = array(); Directly after this, you may see an example line like this
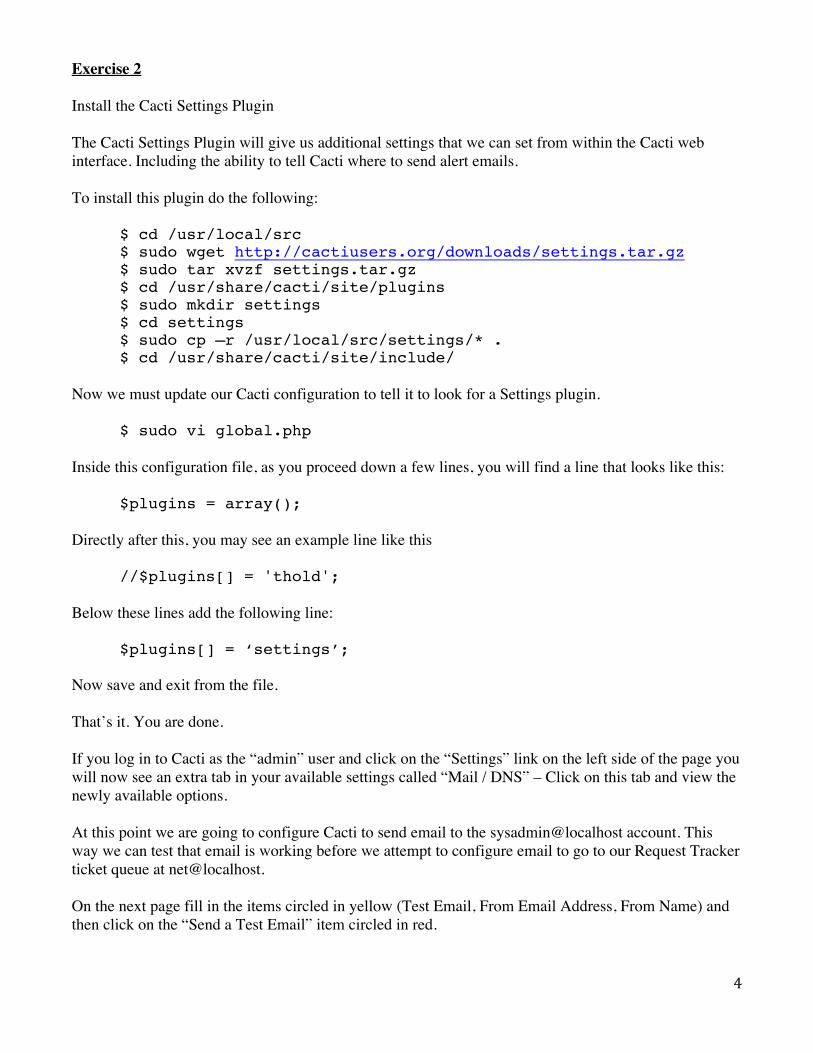
//$plugins[] = 'thold'; Below these lines add the following line: $plugins[] = ‘settings’; Now save and exit from the file. That’s it. You are done. If you log in to Cacti as the “admin” user and click on the “Settings” link on the left side of the page you will now see an extra tab in your available settings called “Mail / DNS” – Click on this tab and view the newly available options. At this point we are going to configure Cacti to send email to the sysadmin@localhost account. This way we can test that email is working before we attempt to configure email to go to our Request Tracker ticket queue at net@localhost. On the next page fill in the items circled in yellow (Test Email, From Email Address, From Name) and then click on the “Send a Test Email” item circled in red.
5
Settings Test Email: sysadmin@localhost From Email Address: cacti@localhost From Name: Cacti Systems Monitor One you press “Send a Test Email” you should see a popup window like this:
6
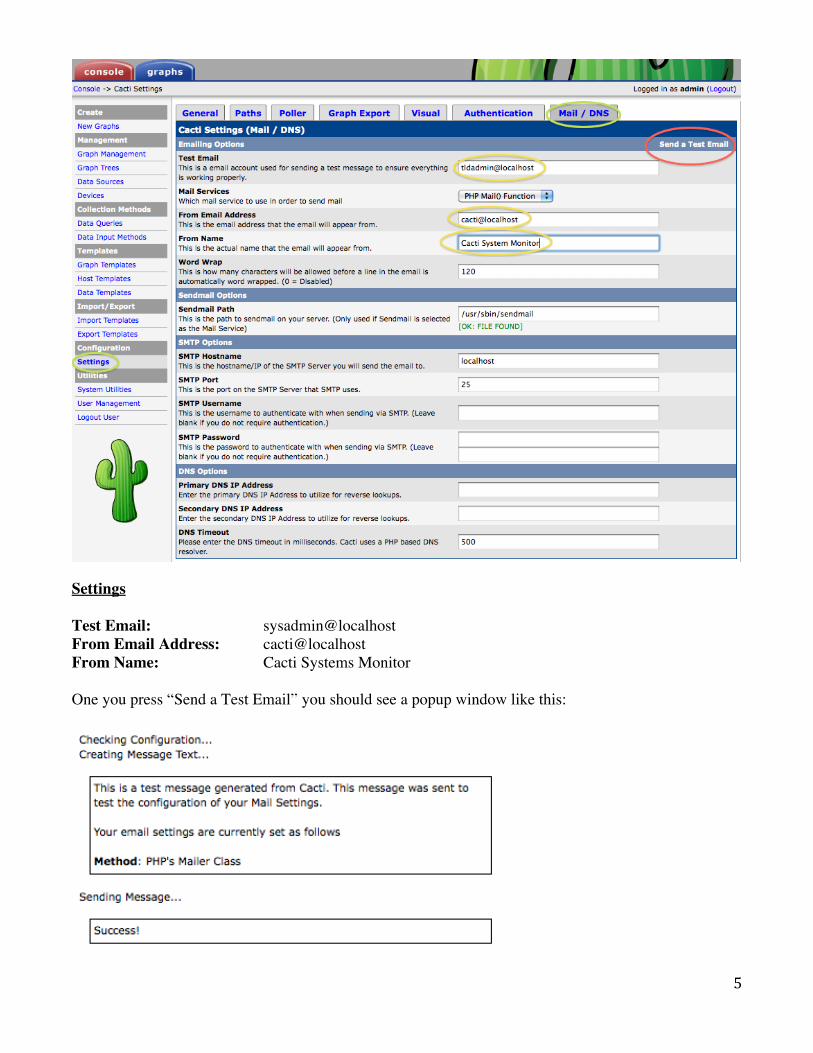
You can verify that your sysadmin account received the email by viewing your mail: $ mutt Be sure to do this as the sysadmin user on your machine. Once you are sure that email is working, then go back to your Cacti web interface, click on Settings, then click the “Mail / DNS” tab and change the “Test Email” field from: sysadmin@localhost to net@localhost If you press the “Send a Test Email” link on the upper right of the page this should send an email to the Net queue in your Request Tracker instance. You can do this, then log in on RT: http://localhost/rt/ as your “sysadmin” account. You should see an initial ticket with the subject of “Cacti Test Message” in the main page of RT. Cacti will now generate tickets for any hosts that it detects as being down. You can update how Cacti detects down hosts by clicking on the “Settings” tab, then “Poller” – The last two sections of this screen allow you to configure Cacti host down settings:
Most installations that use Cacti with a ticketing system install the thold (threshold) plugin (next exercise). This plugin requires that the settings plugin be installed first in order to work. Exercise 3 Installing and Configuring the thold Plugin There are many plugins available for Cacti. A number of them are available here:
7
http://cactiusers.org/ and here: http://docs.cacti.net/plugins and, if you want a plugin that lets you view Nagios from within Cacti go here:
http://trac2.assembla.com/npc/
One of the most widely used plugins for Cacti is thold. This plugin allows you to define detailed thresholds for hosts and services. One of the critical implications of this is that you can, then, generate a ticket when a threshold is reached. The thold plugin allows you to define thresholds in almost any conceivable way you might need. To install the thold plugin do the following: $ cd /usr/share/cacti/site/plugins $ sudo mkdir thold $ cd thold $ sudo wget http://cactiusers.org/downloads/thold.zip $ unzip thold.zip Now we must edit our /usr/share/cacti/site/include/global.php file to indicate that the plugin has been installed: $ sudo vi /usr/share/cacti/site/include/global.php Find the lines that look like this:
$plugins = array(); //$plugins[] = 'thold'; $plugins[] = 'settings';
And, remove the comment from “//$plugins[] = ‘thold’;” so that this section looks like this:
$plugins = array(); $plugins[] = 'thold'; $plugins[] = 'settings';
Now save and exit from the file. The plugin has been installed, but you must now log in to Cacti as the “admin” user and take some additional steps to activate the plugin. Go to http://localhost/cacti/ and log in as “admin”. On the main log in page click on the “User Management” option on the lower right.
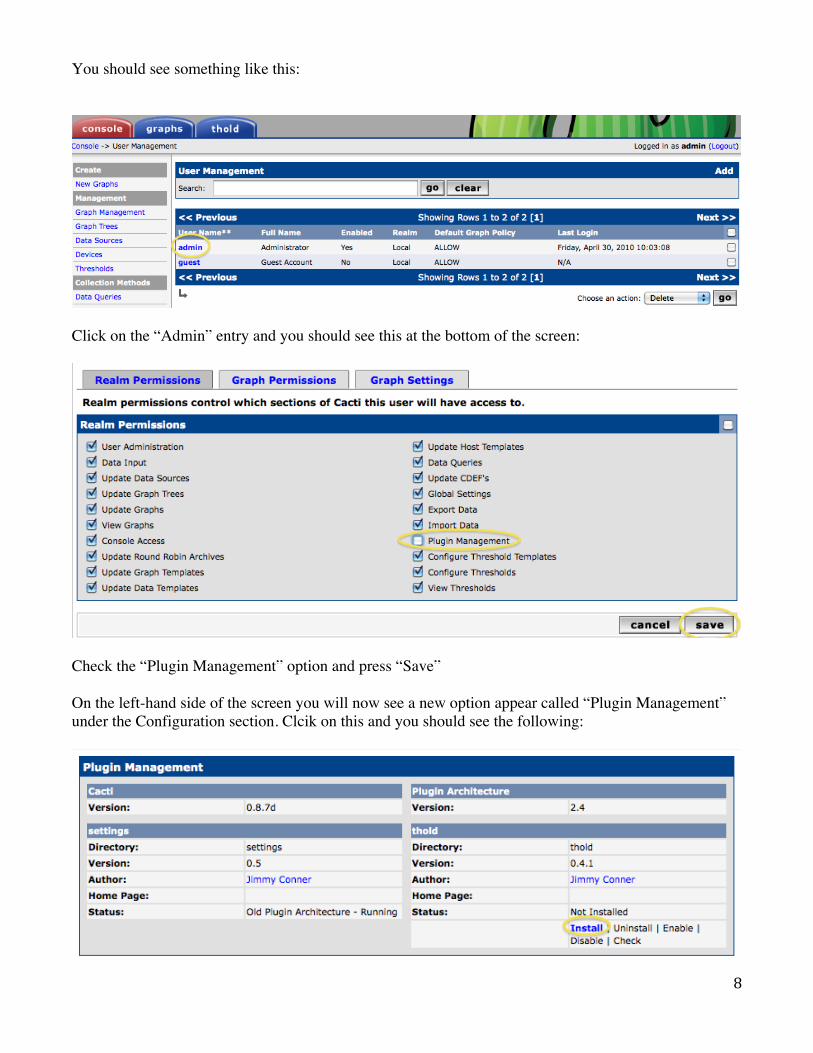
8
You should see something like this:
Click on the “Admin” entry and you should see this at the bottom of the screen:
Check the “Plugin Management” option and press “Save” On the left-hand side of the screen you will now see a new option appear called “Plugin Management” under the Configuration section. Clcik on this and you should see the following:
9
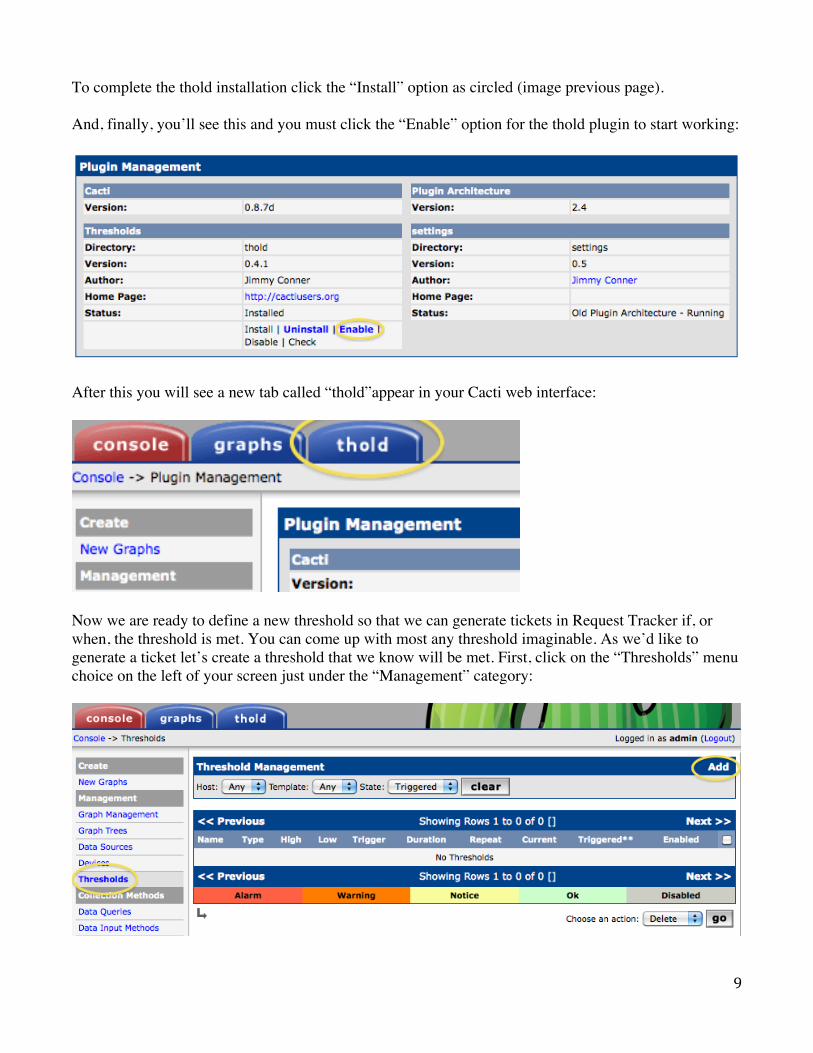
To complete the thold installation click the “Install” option as circled (image previous page). And, finally, you’ll see this and you must click the “Enable” option for the thold plugin to start working:
After this you will see a new tab called “thold”appear in your Cacti web interface:
Now we are ready to define a new threshold so that we can generate tickets in Request Tracker if, or when, the threshold is met. You can come up with most any threshold imaginable. As we’d like to generate a ticket let’s create a threshold that we know will be met. First, click on the “Thresholds” menu choice on the left of your screen just under the “Management” category:
10
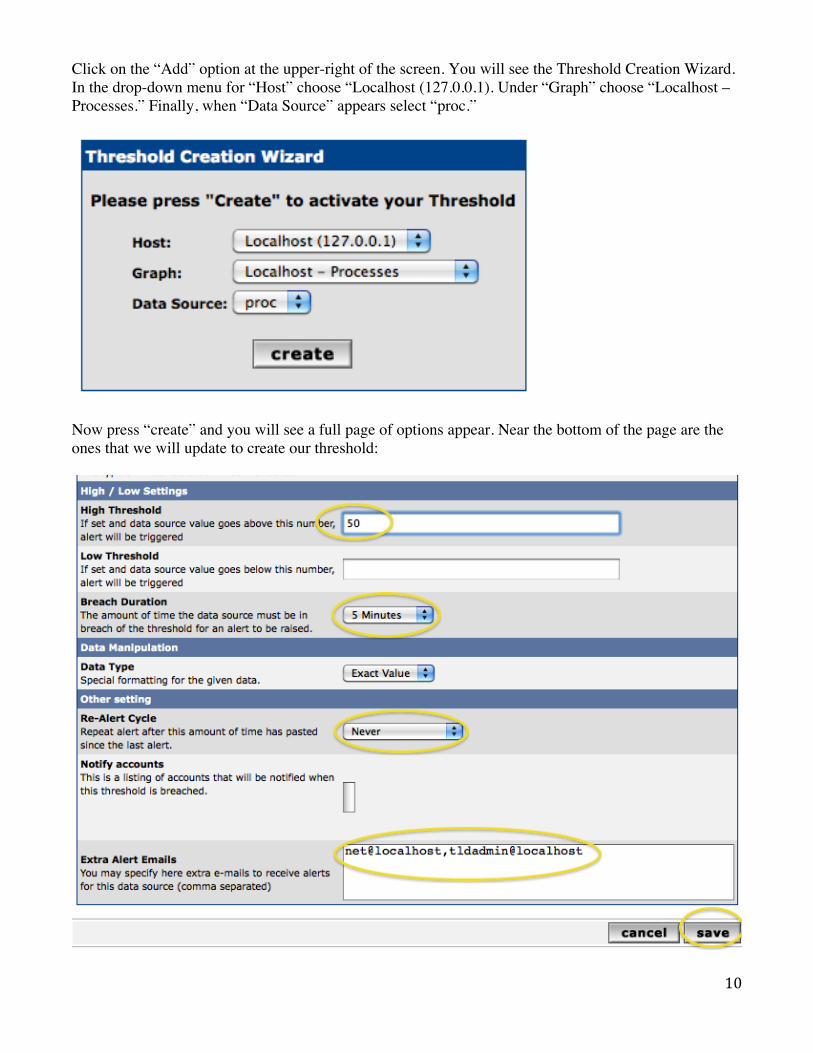
Click on the “Add” option at the upper-right of the screen. You will see the Threshold Creation Wizard. In the drop-down menu for “Host” choose “Localhost (127.0.0.1). Under “Graph” choose “Localhost – Processes.” Finally, when “Data Source” appears select “proc.”
Now press “create” and you will see a full page of options appear. Near the bottom of the page are the ones that we will update to create our threshold:
11
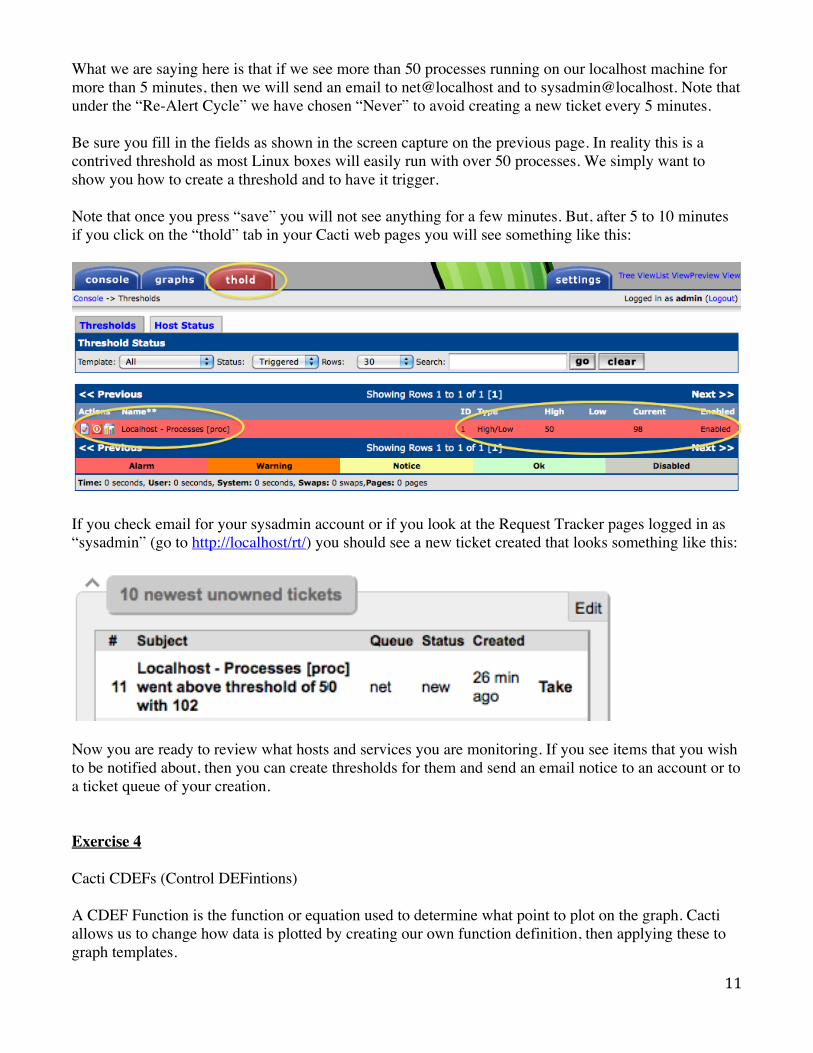
What we are saying here is that if we see more than 50 processes running on our localhost machine for more than 5 minutes, then we will send an email to net@localhost and to sysadmin@localhost. Note that under the “Re-Alert Cycle” we have chosen “Never” to avoid creating a new ticket every 5 minutes. Be sure you fill in the fields as shown in the screen capture on the previous page. In reality this is a contrived threshold as most Linux boxes will easily run with over 50 processes. We simply want to show you how to create a threshold and to have it trigger. Note that once you press “save” you will not see anything for a few minutes. But, after 5 to 10 minutes if you click on the “thold” tab in your Cacti web pages you will see something like this:
If you check email for your sysadmin account or if you look at the Request Tracker pages logged in as “sysadmin” (go to http://localhost/rt/) you should see a new ticket created that looks something like this:
Now you are ready to review what hosts and services you are monitoring. If you see items that you wish to be notified about, then you can create thresholds for them and send an email notice to an account or to a ticket queue of your creation. Exercise 4 Cacti CDEFs (Control DEFintions) A CDEF Function is the function or equation used to determine what point to plot on the graph. Cacti allows us to change how data is plotted by creating our own function definition, then applying these to graph templates.

12
The actual process of creating a CDEF function would require many pages of text and images. Instead, we suggest you watch this tutorial:
http://gregsowell.com/?p=280
The main idea to understand is that you can adjust or create calculations on any data collected or being graphed by Cacti.
![DataManager Plugin - d36j349d8rqm96.cloudfront.net Plugin - M… · DataManager Plugin 6Version History 6 Version History 6.1Plugin Version Plugin-Version Date [dd.mm.yyyy] Notes](https://img.pdfslide.us/doc/110x75/5f05b5577e708231d4144e44/datamanager-plugin-plugin-m-datamanager-plugin-6version-history-6-version.jpg)


![DIALux4[1].0- · PDF filedialux 2 plugin. 1.X. plugin , plugin. luminaire selection Plugin plugin . home page, Intenet Explorer](https://img.pdfslide.us/doc/110x75/5a715aac7f8b9a98538cccda/dialux410-wwwpowerengineeringblogfacomssuacirkhadamatkarkonanarticlesbarghdialux4-learningpdfpdf.jpg)