Embed Size (px)
Citation preview

Instruction Manual
TalkingWristDigital Blood
Pressure Monitor
Please read this guidebookcompletely before operating this unit.
Item # 04-895-001
English • Spanish

1
Introduction . . . . . . . . . . . . . . . . . . . . . . . . . . . . . . . . . . . . . . . . . . . . . . . . . . . . . . . . . . . . . . . 2
Product Identification and Caution . . . . . . . . . . . . . . . . . . . . . . . . . . . . . . . . . . . . . . . . . 3
General Blood Pressure Information . . . . . . . . . . . . . . . . . . . . . . . . . . . . . . . . . . . . . . 4-6
Important Information Before Use . . . . . . . . . . . . . . . . . . . . . . . . . . . . . . . . . . . . . . . . . 7
World Health Organization (WHO) Indicator . . . . . . . . . . . . . . . . . . . . . . . . . . . . . . . . 8
Irregular Heartbeat Detection . . . . . . . . . . . . . . . . . . . . . . . . . . . . . . . . . . . . . . . . . . . . . . 9
Battery Installation/Replacement . . . . . . . . . . . . . . . . . . . . . . . . . . . . . . . . . . . . . . . . . 10
Setting the Date/Time . . . . . . . . . . . . . . . . . . . . . . . . . . . . . . . . . . . . . . . . . . . . . . . . . . . . .11
Voice Language Setting . . . . . . . . . . . . . . . . . . . . . . . . . . . . . . . . . . . . . . . . . . . . . . . .12-13
Applying Your Blood Pressure Cuff . . . . . . . . . . . . . . . . . . . . . . . . . . . . . . . . . . . . . 14-15
Taking Your Blood Pressure Reading . . . . . . . . . . . . . . . . . . . . . . . . . . . . . . . . . . . 16-17
Recalling Measurements in Memory . . . . . . . . . . . . . . . . . . . . . . . . . . . . . . . . . . . . . . 18
Description of Display Symbols . . . . . . . . . . . . . . . . . . . . . . . . . . . . . . . . . . . . . . . . 19-20
Troubleshooting . . . . . . . . . . . . . . . . . . . . . . . . . . . . . . . . . . . . . . . . . . . . . . . . . . . . . . . . . . 21
Care and Maintenance . . . . . . . . . . . . . . . . . . . . . . . . . . . . . . . . . . . . . . . . . . . . . . . . . . . . 21
Product Specifications . . . . . . . . . . . . . . . . . . . . . . . . . . . . . . . . . . . . . . . . . . . . . . . . . . . . 22
Sample Blood Pressure Log . . . . . . . . . . . . . . . . . . . . . . . . . . . . . . . . . . . . . . . . . . . . . . . 23
Blood Pressure Log . . . . . . . . . . . . . . . . . . . . . . . . . . . . . . . . . . . . . . . . . . . . . . . . . . . . . . . 24
IndexThe warrantor guarantees that its Digital Blood Pressure Monitor will be free from manufacturingdefects under normal use for five years from the original purchase date. This warranty covers onlynormal use, and does not apply to use in any clinical or commercial applications. This warranty doesnot cover batteries or other power sources that may be provided with or used with the Digital BloodPressure Monitor. This warranty is voided if the Digital Blood Pressure Monitor product is misused orabused in any manner.
If the Digital Blood Pressure Monitor fails to operate during the first five years from the time originallypurchased, please call our Customer Care Help Line at 800-622-4714 and we will try to resolve the issueas soon as possible. If the warrantor determines the unit failed to operate due to a manufacturingdefect, the unit will be replaced at the option of the warrantor. Replacement is the sole remedy underthis limited warranty. This warranty gives you specific legal rights, which vary from state to state. As acondition of this warranty, the enclosed warranty registration card must be completed and sent to uswithin 10 days of the purchase date or can be filled out online at www.mabisdmi.com.
This warranty constitutes the warrantor’s only responsibility and obligation to replace materials orcomponents. We make no other express or implied warranties, arising by operation of law orotherwise, or any warranty of merchantability or fitness for a particular use or purpose whetheror not the use or purpose has been disclosed to the warrantor in specifications, drawings orotherwise, and whether or not the warrantor’s products are specifically designed and/ormanufactured by the warrantor for the buyer’s use or purposes, except for the limitedwarranty stated above. The warrantor will not be responsible for any indirect, incidental, special,consequential, or punitive damages or other loss, including, but not limited to, damage to or lossof other property or equipment and personal injuries, whether to purchaser or others. Thewarrantor shall in no event be liable to the purchaser for any amount in excess of the cost of repairand/or replacement of the unit.
Limited Five-Year Warranty
1931 Norman Drive South • Waukegan, IL 60085Toll-Free Customer Care Help Line: 1-800-622-4714Monday - Friday 8:00 am - 4:30 pm CST

3
CAUTIONWhile taking a measurement, you can stop the inflation or deflation process ofthe cuff at any time by pressing the POWER button.
Digital Display
Wrist Cuff
BatteryCompartment
POWER(on/off)Button
MEMORYRecallButton
2
To achieve the maximum benefit from your blood pressure monitor, werecommend that you first consult with your physician or trained health careprofessional.
Thank you for purchasing an Automatic Blood Pressure Monitor. Withproper care and use, your monitor will provide you with many years ofreliable readings.
The method of measurement that your Automatic Monitor uses is called theoscillometric method. The monitor detects your blood’s movement through theartery in your wrist and converts the movements into a digital reading. Theoscillometric method does not require a stethoscope, making themonitor easy-to-use. The preformed cuff requires little effort to apply and iscomfortable to wear.
Clinical research has proven a direct relationship between blood pressure in thewrist and blood pressure in the arm. Because the arteries in the wrist and arm areconnected, changes in wrist blood pressure reflect changes in arm bloodpressure. Frequent wrist blood pressure measurements willprovide you and your physician with an accurate indication of change in yourtrue blood pressure.
People with severe hypertension, severe arteriosclerosis or severediabetes should consult their physician about monitoring blood pressure atthe wrist.
Blood pressure readings determined with this device are equivalent tomeasurements obtained by a trained observer using the cuff/stethoscopeauscultation method, within the limits prescribed by the American NationalStandard for Electronic or Automated Sphygmomanometers.
Introduction Product Identification and Caution
Speaker

5
What Influences Blood Pressure?
Many factors such as genetics, age, sex, altitude, physical activity, anxiety,muscular development, certain medications or even the time of day caninfluence blood pressure. Influences such as sleep or relaxation decreases bloodpressure, while anxiety or exercise increases blood pressure.
WhyMonitor Your Blood Pressure at Home?
A visit to a physician’s office can be a stressful situation for a patient. And,anxiety is a known factor in raising blood pressure. This temporaryoccurrence of elevated blood pressure at the physician’s office iscommonly referred to as “white coat syndrome”.
Whether or not you experience “white coat syndrome”, home bloodpressure monitoring provides you with the opportunity to supplement yourphysician’s office measurements. These home readings, when taken over aperiod of time, can show an accurate indication of change. Furthermore, yourrecords can assist your physician in evaluating your health and in makingimportant decisions in the diagnosis and treatment of yourcondition. Because of this, it is important to take consistent, dailymeasurements of your blood pressure.
The variations in your individual readings should only be interpreted by yourphysician or a trained health care professional.
WHO Blood Pressure Classifications
Standards for assessment of high or low blood pressure, regardless of age, havebeen established by the World Health Organization (WHO) as shown in thechart on the following page.
4
What is Blood Pressure?
Blood pressure is the pressure that is exerted by blood flowing against the wallsof the blood vessels throughout your body.
Your heart, which is the center of the circulatory system, provides the force forthe blood to flow or circulate. When your heart contracts or beats, the blood isforced through the blood vessels increasing the pressure. This is the highestpressure in the cycle or what is referred to as SYSTOLIC BLOOD PRESSURE. Inbetween beats, your heart relaxes and your blood pressure decreases. This isreferred to as DIASTOLIC BLOOD PRESSURE.
This complete series of events which occurs in a single heartbeat is known asthe CARDIAC CYCLE.
Your Digital Blood Pressure Monitor will automatically read your bloodpressure and display both systolic and diastolic readings on the screen. Yoursystolic will be positioned as the upper number and the diastolicreading will be the lower number.
(systolic) 120/80 (diastolic)
Blood pressure is measured in millimeters (mm) of Mercury (Hg) and isgenerally recorded with the systolic pressure (120) listed first and thediastolic pressure (80) listed second. The numbers are typically separated by aslash mark (/ ) as shown above.
Both pressure readings, the SYSTOLIC and the DIASTOLIC, are necessary for aphysician to evaluate the status of a patient’s blood pressure.
Please contact your physician for specific information regarding your own bloodpressure.
General Blood Pressure Information

6
This chart is only a general guideline. Please contact your physician to determineyour NORMAL BLOOD PRESSURE..
Variations in Blood Pressure
Blood pressure can be influenced by many factors. This change can occur frommoment to moment. Normally, blood pressure is lowest during the sleepingperiod and rises during the day. The graph below represents the variations inblood pressure shown over a day with measurements taken every 5 minutes.
The dotted linerepresents the sleepperiod. The rise in bloodpressure at 1p.m. (A in thegraph) corresponds to astressful occurrence andat 7 p.m. (B in the graph) aperiod of exercise.12 1 2 3 4 5 6 7 8 9 10 11 12 1 2 3 4 5 6 7 8 9 10 11
AMPM Time
BloodPressure(mmHg
)
II II II II II II II II II II II II II II II II II II II II II II II IIsleep
OptimalNormalHigh - NormalStage 1 - Mild
Borderline HypertensionStage 2 - Moderate
HypertensionStage 3 - Severe Hypertension
Isolated Systolic Hypertension
CATEGORY
<120120-129130-139
140-159
160-179≥180
≥140140-159160-179
≥180
<8080-8485-89
90-99
100-109≥110
<90<90<90<90
SYSTOLIC(mmHg)
DIASTOLIC(mmHg)
1. Blood pressure measurements should only be interpreted by a physician or a trainedhealth care professional who is familiar with your medical history. Through regularuse of this device and recording of your measurements, you can keep your physicianinformed of the changes in your blood pressure.
2. Perform your measurement in a quiet place. You should be seated in arelaxed position.
3. Avoid smoking, eating, taking medication, alcohol consumption or physical activity30 minutes prior to taking a reading. If you are exhibiting signs of stress, avoid takingyour measurement until the feeling subsides.
4. Rest 15 minutes prior to taking a reading.
5. Remove any constrictive clothing or jewelry that may interfere with the cuffplacement.
6. Apply the cuff to the proper position on the left wrist. The unit should be located onthe inside of your left wrist with the display panel in view.
7. Keep the monitor stable during measurement to achieve an accurate reading.Remain still; do not talk during the measurement.
8. Record your daily readings on the chart provided.
9. Take your readings at the same time, each day (or as recommended by yourphysician) to get an accurate indication of change in your true blood pressure.
10. Wait a minimum of 15 minutes between readings to allow for the blood vessels toreturn to normal. The wait time may vary depending on your individual physiologicalcharacteristics.
11. Although such cases are rare, for those with an extremely weak pulse or irregularpulse, errors may result which prevent proper measurement. If abnormal variationsare noticed, consult with your physician or trained healthcare professional.
12. This device is intended for adult use.
While taking a measurement, you can stop the inflation or deflation process of the cuff at anytime by pressing the POWER button.
Important Information Before Use
7
COLORINDICATOR
GREENGREENGREEN
YELLOW
ORANGERED
YELLOWORANGE
RED

98
The WHO Indicator, located on the left side of the LCDscreen, will identify your reading within a range inaccordance with the guidelines set by the WorldHealth Organization (WHO). See the chart below forreference.
Your digital blood pressure monitor features IrregularHeartbeat Detection. This feature allows users to accuratelymonitor blood pressure even if an irregular heartbeat shouldoccur.
When an irregular heartbeat is detected, the IHB icon willappear on the display, Fig. 1.
NOTE: Please consult with your physician or trained healthcareprofessional for further information regarding an irregularheartbeat if this symbol appears frequently at the end of areading.
Fig. 1
World Health Organization (WHO) Indicator Irregular Heartbeat Detection
Stage 3 HypertensionSystolic pressure: ≥180 mmHg
Diastolic pressure: ≥110 mmHg
Stage 2 HypertensionSystolic pressure: 160-179 mmHg
Diastolic pressure: 100-109 mmHg
Stage 1 HypertensionSystolic pressure: 140-159 mmHg
Diastolic pressure: 90-99 mmHg
High NormalSystolic pressure: 130-139 mmHg
Diastolic pressure: 85-89 mmHg
NormalSystolic pressure: 120-129 mmHg
Diastolic pressure: 80-84 mmHg
OptimalSystolic pressure: <120 mmHg
Diastolic pressure: <80 mmHg
DIA
SYS
DIA
SYS
DIA
SYS
DIA
SYS
DIA
SYS
DIA
SYS
-or-
-or-
-or-
-or-
-or-
-and-

To change the batteries:
1. Open the battery cover, Fig. 2.
2. Making sure the battery polarity is correct,install two AAA alkaline batteries, Fig. 3.
3. Close the battery cover, Fig. 4.
NOTE: It is recommended to remove the batteries if the unit will not be used foran extended period of time.
10
Replace the batteries when the Low Batterysymbol appears on the display, Fig. 1, or when thedisplay remains blank when the POWERButton is pressed.
Fig. 1
Fig. 2
Fig. 3
Fig. 4
Battery Installation/Replacement Setting the Date/Time
11
NOTE: When the unit is off, the date and time will still appear at the top of the screen.
1. When the unit is off, press and release both the POWER and MEMORY button atthe same time. The month will begin to flash, Fig. 1.
2. Press the MEMORY button to change until the desired number appears.
NOTE: To scroll through the numbers quicker, hold down the MEMORY button.
3. Press the POWER button to set the entry.
4. The date, Fig. 2, followed by the hour and minutes will blink. Repeat steps 2 and3 to adjust the date/time setting.
5. After setting the minutes, the unit will automatically exit out ofthe date/time setting mode, Fig. 3.
NOTE: The time is expressed in 24hr military time. The chart below explains the timeconversion.
Fig. 1
Regular Time(12 hours)
Military Time(24 hours)
Regular Time(12 hours)
Military Time(24 hours)
12 amMidnight 0 12 pm
Noon 12
1 am 1 1 pm 13
2 am 2 2 pm 14
3 am 3 3 pm 15
4 am 4 4 pm 16
5 am 5 5 pm 17
6 am 6 6 pm 18
7 am 7 7 pm 19
8 am 8 8 pm 20
9 am 9 9 pm 21
10 am 10 10 pm 22
11 am 11 11 pm 23
Fig. 3
Fig. 2

Voice Language Setting
12 13
To set the desired voice language:
1. When the unit is off, you can select the desired voice language by pressingand holding the MEMORY button.
2. Now the screen will cycle through L0, L1 and L2 as shown in Fig. 1.L0 - voice function is offL1 - voice is in EnglishL2 - voice is in SpanishThe monitor will say the corresponding language with the displayedlanguage code.
3. Once the desired language has been selected, release the MEMORY button.
Fig. 2
4. After the desired language has been selected, you can adjust the volume bypressing and holding down the MEMORY button until the bars on the sideof the screen begin to increase Fig. 2.
5. Continue to hold the MEMORY button down until the volume reaches thedesired level, then release the MEMORY button to set.
6. The unit will automatically turn off after the desired volume level has beenset.
Fig. 1
Voice Language Setting
15
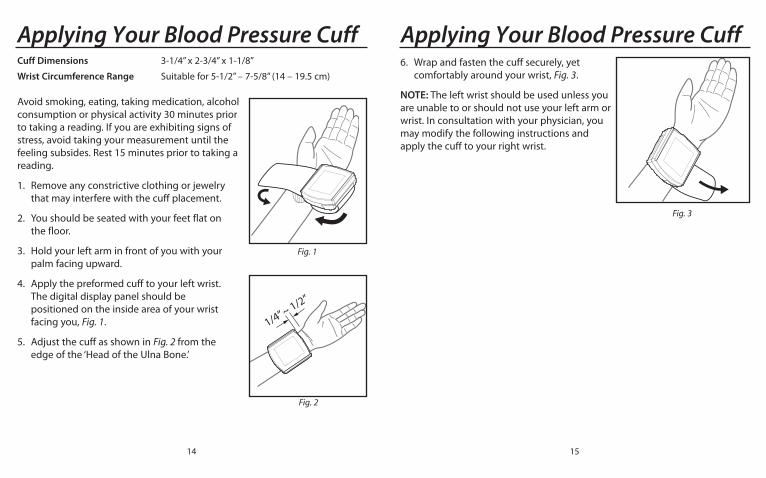
6. Wrap and fasten the cuff securely, yetcomfortably around your wrist, Fig. 3.
NOTE: The left wrist should be used unless youare unable to or should not use your left arm orwrist. In consultation with your physician, youmay modify the following instructions andapply the cuff to your right wrist.
Fig. 3
Cuff Dimensions 3-1/4” x 2-3/4” x 1-1/8”
Wrist Circumference Range Suitable for 5-1/2” – 7-5/8” (14 – 19.5 cm)
Avoid smoking, eating, taking medication, alcoholconsumption or physical activity 30 minutes priorto taking a reading. If you are exhibiting signs ofstress, avoid taking your measurement until thefeeling subsides. Rest 15 minutes prior to taking areading.
1. Remove any constrictive clothing or jewelrythat may interfere with the cuff placement.
2. You should be seated with your feet flat onthe floor.
3. Hold your left arm in front of you with yourpalm facing upward.
4. Apply the preformed cuff to your left wrist.The digital display panel should bepositioned on the inside area of your wristfacing you, Fig. 1.
5. Adjust the cuff as shown in Fig. 2 from theedge of the ‘Head of the Ulna Bone.’
Fig. 1
14
Fig. 2
Applying Your Blood Pressure Cuff Applying Your Blood Pressure Cuff

16
1. Rest your elbow on a solid surface with your palm facing upward.Elevate your hand so that the cuff is at the same level as your heart,Fig. 1. Relax your left hand.
2. Press the POWER button to turn the unit on and select thememory bank you want your reading to be stored in by pressing theMEMORY button to alternate between, memory bank 1 or 2. Press thePOWER button to confirm your selection.
3. The monitor will begin to guide you with voice prompts if the voicefunction is turned on. This unit will run a self-test, Fig. 2, and show thelast measured reading, Fig. 3, or if there is no previous measurement,“0” as shown in Fig. 4.
4. When the display appears as shown, Fig. 5, the monitor is ready andwill begin to guide you with voice prompts if the voice function is on.The cuff will automatically begin to inflate.
5. The display will show the increasing pressure in the cuff. Along withthe measurement progress on the left side of the screen.
6. The cuff will automatically inflate to approximately 190 mmHg or 40mmHg higher than the last systolic pressure stored in memory.
7. Once the cuff inflates to the appropriate pressure level, themeasurement will begin.
Proceed only after reading the previous sections of this manual.
17
Taking Your Blood Pressure Reading Taking Your Blood Pressure Reading8. The unit will begin to automatically delfate and the numbers
appearing on the display will decrease.
9. When all the air is deflated, the measurement is complete. The unitwill display your blood pressure (systolic and diastolic)measurements and pulse rate, Fig. 6.
With the voice function on (L1 or L2), the monitor will say the measurementwith the language you selected according to the classification standard ofWHO (World Health Organization).
10. Record your readings on a chart.
11. At this point, your measurements will be automatically saved inmemory.
12. To conserve the batteries, press the POWER button to turn the poweroff. Otherwise, the unit will automatically shut off after approximately1 minute.
NOTE: This monitor inflates the cuff to approximately 190 mmHg or 40mmHg higher than the last systolic pressure stored in memory. If thesystem detects that the cuff needs additional pressure, it will automaticallyreinflate to approximately 40mmHg higher than the last pressure level.
Fig. 2
Fig. 5
Fig. 4
Fig. 3
Fig. 6Fig. 1

You can recall up to 120 total measurements in memory (60 permemory bank). These measurements can be shared with yourphysician or trained healthcare professional.
1. Press and release the MEMORY button. The unit will display eitherU1 or U2 depending upon the user bank selected. It will also showhow many measurements are stored within that bank, Fig. 1.
2. To select the appropriate user bank press the POWER button toswitch between U1 and U2.
3. Once the desired user memory bank is selected, press the MEMORYbutton again to scroll through the saved measurements. Afteryou’ve scrolled through all the readings, the unit will automaticallyturn off.
NOTE: Each memory bank can store up to 60 readings. When thenumber of readings exceeds 60, the oldest data will be replaced withthe new record.
To erase all stored measurements:
1. Press and release the MEMORY button. The unit will display eitherU1 or U2 depending upon the user bank selected and how manymeasurements are stored within that bank.
2. Select the desired user bank by pressing and releasing theMEMORY button.
3. Press and hold down the Memory button until two horizontal linesflash. This indicates that all measurements within the selectedmemory bank have been erased.
18
Recalling Measurements in Memory Description of Display Symbols
19
Fig. 1
Fig. 2
Indicates a measurementwithin Stage 3 Hypertension.
Indicates a measurementwithin Stage 2 Hypertension.
Indicates a measurementwithin Stage 1 Hypertension.
Appears when batteries should be replaced.
DIA
SYS
DIA
SYS
DIA
SYS
-- Description of Display Symbols Continued
Troubleshooting
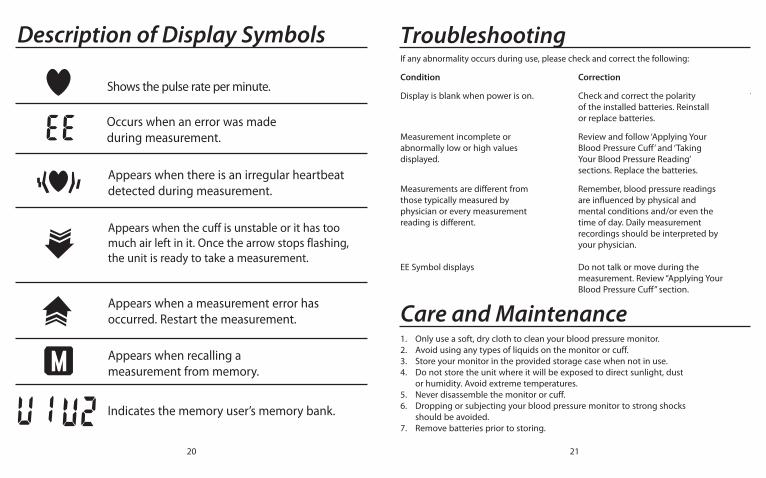
1. Only use a soft, dry cloth to clean your blood pressure monitor.2. Avoid using any types of liquids on the monitor or cuff.3. Store your monitor in the provided storage case when not in use.4. Do not store the unit where it will be exposed to direct sunlight, dust
or humidity. Avoid extreme temperatures.5. Never disassemble the monitor or cuff.6. Dropping or subjecting your blood pressure monitor to strong shocks
should be avoided.7. Remove batteries prior to storing.
Care and Maintenance
If any abnormality occurs during use, please check and correct the following:
Condition Correction
Display is blank when power is on. Check and correct the polarityof the installed batteries. Reinstallor replace batteries.
Measurement incomplete or Review and follow ‘Applying Yourabnormally low or high values Blood Pressure Cuff’ and ‘Takingdisplayed. Your Blood Pressure Reading’
sections. Replace the batteries.
Measurements are different from Remember, blood pressure readingsthose typically measured by are influenced by physical andphysician or every measurement mental conditions and/or even thereading is different. time of day. Daily measurement
recordings should be interpreted byyour physician.
EE Symbol displays Do not talk or move during themeasurement. Review “Applying YourBlood Pressure Cuff” section.
20
Description of Display Symbols
Shows the pulse rate per minute.
Occurs when an error was madeduring measurement.
Appears when there is an irregular heartbeatdetected during measurement.
Appears when a measurement error hasoccurred. Restart the measurement.
Appears when the cuff is unstable or it has toomuch air left in it. Once the arrow stops flashing,the unit is ready to take a measurement.
Appears when recalling ameasurement from memory.
Indicates the memory user’s memory bank.
21

23
Sample Blood Pressure Log
22
Name and Model Number Talking Wrist Digital BloodPressure Monitor, 04-895-001
Display System Digital display/LCD
Measuring Method Oscillometric MethodAutomatic Air Inflation and Measurement
Power Source 2 AAA batteries
Measuring Range Pressure: 0 to 300 mmHgPulse: 30-180 beats/minute
Accuracy Pressure: ±3 mmHg; Pulse: ±5% of reading
Pressurization Automatic pressurization by pump
Deflation Automatic pressure release valve
Memory Built-in memory enabling display of up to120 (60 per memory bank) measurements
Automatic Power Off Approximately 1 minute after last buttonoperation
Battery Life Approximately 1 month with normal usage
Operation Environment Temperature 41°F – 104°F (5°C – 40°C)Humidity <85% RH max
Storage Environment Temperature -4°F – 131°F (-20°C – 55°C)Humidity <95% RH max
Weight 4.6 oz. (without batteries)
Dimensions 3-1/4” x 2-3/4” x 1-1/8”
Wrist Circumference Range Suitable for 5-1/2” – 7-5/8” (14 – 19.5 cm)
Accessories Storage case, Instruction Guidebook, twoAAA alkaline batteries, Quick Start Guides
Specifications are subject to change without notice.
#91-032-895 07/10©2010 Briggs Medical Service Company
Product Specifications

Manual de InstruccionesBlood Pressure Log
24
Monitor Digital dePresión Arterial para la
Muñeca - Voz
Sírvase leer toda esta guíaantes de operar la unidad.
Artículo n.º 04-895-001
Inglés • Español

25
Introducción . . . . . . . . . . . . . . . . . . . . . . . . . . . . . . . . . . . . . . . . . . . . . . . . . . . . . . . . . . . . . 26
Indentificación del Producto y Precaución . . . . . . . . . . . . . . . . . . . . . . . . . . . . . . . . 27
Información General Acerca de la Presión Arterial . . . . . . . . . . . . . . . . . . . . . . 28-30
Información Importante Previo al Uso . . . . . . . . . . . . . . . . . . . . . . . . . . . . . . . . . . . . 31
Indicador de la WHO (Organización Mundial de la Salud) . . . . . . . . . . . . . . . . . . 32
Detección de Latidos del Corazón Irregulares . . . . . . . . . . . . . . . . . . . . . . . . . . . . . 33
Colocación/Cambio de Baterías . . . . . . . . . . . . . . . . . . . . . . . . . . . . . . . . . . . . . . . . . . . 34
Cómo Colocar la Fecha/Hora . . . . . . . . . . . . . . . . . . . . . . . . . . . . . . . . . . . . . . . . . . . . . 35
Configuración de idioma de la voz . . . . . . . . . . . . . . . . . . . . . . . . . . . . . . . . . . . . 36-37
Cómo Colocar el Brazalete de Presión Arterial . . . . . . . . . . . . . . . . . . . . . . . . . . 38-39
Cómo Tomar la Lectura de la Presión Arterial . . . . . . . . . . . . . . . . . . . . . . . . . . 40-41
Cómo Llamar Mediciones de la Memoría . . . . . . . . . . . . . . . . . . . . . . . . . . . . . . . . . . 42
Descripción de los Símbolos del Visor . . . . . . . . . . . . . . . . . . . . . . . . . . . . . . . . . 43-44
Análisis de Fallas . . . . . . . . . . . . . . . . . . . . . . . . . . . . . . . . . . . . . . . . . . . . . . . . . . . . . . . . . 45
Cuidado y Mantenimiento . . . . . . . . . . . . . . . . . . . . . . . . . . . . . . . . . . . . . . . . . . . . . . . . 45
Especificaciones del Producto . . . . . . . . . . . . . . . . . . . . . . . . . . . . . . . . . . . . . . . . . . . . 46
Ejemplo de Registro de Preción Arterial . . . . . . . . . . . . . . . . . . . . . . . . . . . . . . . . . . . 47
Registro de Preción Arterial . . . . . . . . . . . . . . . . . . . . . . . . . . . . . . . . . . . . . . . . . . . . . . 48
ÍndiceGarantía Limitada por Cinco AñosEl garante garantiza que su Monitor Digital de Presión Arterial estará libre de defectos defabricación bajo condiciones de uso normal durante cinco años a partir de la fecha decompra original. Esta garantía cubre solamente el uso normal y no se aplica al uso enninguna aplicación clínica o comercial. Esta garantía no cubre las baterías ni otras fuentesde energía que se puedan proveer con o usar con el Monitor Digital de Presión Arterial. Estagarantía no tendrá validez si el producto Monitor Digital de Presión Arterial no se usacorrectamente o se maltrata de cualquier manera.
Si el Monitor Digital de Presión Arterial presenta fallas de operación durante los primeroscinco años a partir del momento original de compra, llame a nuestra Línea de Ayuda deAtención al Cliente al 800-622-4714 y trataremos de resolver su problema tan pronto comosea posible. Si el garante determina que la unidad presentó fallas de operación debido a undefecto de fabricación, la unidad se reemplazará a discreción del garante. El reemplazo esel único recurso de reparación cubierto por esta garantía limitada. Esta garantía le brindaderechos legales específicos, que varían según el estado. Como una condición de estagarantía, se debe completar la tarjeta de registro de garantía adjunta y nos la debe enviardentro del plazo de 10 días a partir de la fecha de compra. También puede rellenar latarjeta en línea en www.mabisdmi.com.
Esta garantía constituye la única responsabilidad y obligación del garante respecto delreemplazo de materiales y componentes. No prometemos ninguna otra garantía, expresao implícita, que surja de la intervención legal u otra, ni ninguna garantía de comerciabili-dad o ajuste para un uso u objetivo en particular, independientemente de que se hayarevelado el uso o el objetivo al garante en especificaciones, planos u otro, e independien-
temente de que los productos del garante estén específicamente diseñados y/o fabricadospor el garante para el uso u objetivo del comprador, excepto por la garantía limitadamencionada más arriba. El garante no será responsable de ningún daño indirecto,incidental, especial, consecuencial o punitivo u otra pérdida, que incluye, pero no se limitaa, daño o pérdida de otra propiedad o equipo y lesiones personales, ya sea que afecten alcomprador o a otros. El garante no será, en ningún caso, responsable ante el compradorpor ninguna suma que supere el costo de reparación y/o reemplazo de la unidad.
1931 Norman Drive South • Waukegan, IL 60085Toll-Free Customer Care Help Line: 1-800-622-4714Monday - Friday 8:00 am - 4:30 pm CST

27
Precaución
Mientras toma una medición, puede detener el proceso de inflado odesinflado del brazalete en cualquier momento con sólo pulsar el botón dePOWER.
Identificación del Producto y Precaución
26
Para obtener el máximo beneficio del monitor de presión arterial, se recomiendaconsultar primero con el médico o profesional capacitado del área de salud.
Gracias por comprar un Monitor de Muñeca Digital Automático de PresiónArterial. Con el debido cuidado y uso, obtendrá lecturas confiables durantemuchos años.
El método de medición que emplea el Monitor de Muñeca se denominaoscilométrico. El monitor detecta el movimiento de la sangre por laarteria de la muñeca y lo convierte en lectura digital. El método oscilométricono requiere del uso de un estetoscopio; por lo que elmonitor resulta fácil de usar. El brazalete preconformado se coloca con muypoco esfuerzo y es cómodo.
Las investigaciones clínicas han demostrado que existe una relacióndirecta entre la presión arterial en la muñeca y la presión arterial en el brazo.Debido a que las arterias de la muñeca y del brazo estánconectadas, los cambios en la presión arterial de la muñeca reflejancambios en la presión arterial del brazo. Las mediciones frecuentes de la presiónarterial de la muñeca le servirán a usted y a su médico comoindicador exacto del cambio de su presión arterial real.
Las personas que padacen de hipertensión severa, arterioesclerosis severa odiabetes severa, deben consultar con su médico paradeterminar si pueden monitorear la presión en la muñeca.
Las lecturas de presión arterial determinadas con este dispositivoequivalen a las obtenidas por un observador capacitado que emplee el método deauscultación con brazalete/estetoscopio, dentro de los límites prescritos por laAmerican National Standard for Electronic or Automated Sphygmomanometers(Norma Nacional Estadounidense de Esfigmomanómetros Electrónicos oAutomatizados).
Introducción
Visor Digital
Brazalete para elMuñeca
Compartimientode las baterías
Botón deencendido
(encendido/apagado)
Botón parallamar la
MEMORIA
Parlante

29
¿Qué influye en la presión arterial?
Muchos factores relacionados con la genética, edad, sexo, altitud,actividad física, ansiedad, desarrollo muscular, ciertos medicamentos e inclusoel momento del día pueden influir en la presión arterial. Factores como eldormir y la relajación disminuyen la presión arterial, mientras que la ansiedad oel ejercicio físico la aumentan.
Por Qué Controlar la Presión Arterial en Hogar?
La visita al consultorio de un médico puede resultar estresante para unpaciente. Y, la ansiedad, es un factor que, se sabe, eleva la presiónarterial. Esta situación temporal de presión arterial elevada en econsultorio del médico se conoce comúnmente con el nombre de‘síndrome del delantal blanco’.
Experimente o no dicho síndrome, el control de la presión arterial en el hogarle brinda la oportunidad de complementar las mediciones realizadas en el con-sultorio del médico. Cuando dichas lecturas en el hogar se toman durante unperíodo de tiempo, pueden indicar un cambio preciso. Asimismo, sus registrospueden serle de utilidad a su médico en laevaluación de la salud y en la toma de importantes decisiones en cuanto aldiagnóstico y tratamiento de su condición. Debido a ello, es importante tomarmediciones diarias y consistentes de la presión arterial.
Las variaciones en las lecturas individuales sólo debe interpretarlas su médico o unprofesional capacitado del área de salud.
OMS (Organización Mundial de la Salud) Clasificaciones de la Presión Arterial
La Organización Mundial de la Salud (OMS) ha establecido normas para la eval-ución de la presión arterial baja or alta, independientemente de la edad, segúnse indica en el siguiente diagrama:
28
¿Qué es la presión arterial?
La presión arterial es la que ejerce la sangre al fluir por las paredes de los vasossanguíneos del organismo.
El corazón, centro del sistema circulatorio, ofrece la fuerza para que la sangrefluya o circule. Cuando se contrae o late, la sangre se impulsa a través de losvasos sanguíneos y aumenta la presión. Esta es la presión más alta en el ciclo ola denominada PRESIÓN ARTERIAL SISTÓLICA. Entre cada latido, el corazón serelaja y la presión arterial disminuye; lo cual se conoce con el nombre dePRESIÓN ARTERIAL DIASTÓLICA.
Esta serie completa de eventos que tiene lugar en un solo latido del corazón sedenomina CICLO CARDÍACO.
El Monitor Automático MABIS leerá automáticamente su presión arterial ymostrará las lecturas sistólica y diastólica en la pantalla. La presiónsistólica estará indicada por el número superior y la diastólica, por elinferior.
(sistólica) 120/80 (diastólica)
La presión arterial se mide en milímetros (mm) de mercurio (Hg) y, por lo gen-eral, al registrarla, se indica primero la presión sistólica (120) y la diastólica (80)después. Típicamente, los números están separados por una barra ( / ) según seindica más arriba.
Ambas lecturas, la SISTÓLICA y la DIASTÓLICA, son necesarias para que unmédico pueda evaluar el estado de la presión arterial de un paciente.
Póngase en contacto con su médico para recibir información específica acerca desu presión arterial.
Información General Acerca de la Presión

30
Variaciones de la Preción Arterial
Muchos factores influyen en la presión arterial y puede variar de un momentoa otro. Normalmente, la presión arterial es más baja durante el sueño y se elevadurante el día. El gráfico a continuación representa las variaciones de la presiónarterial durante el día con mediciones tomadas cada 5 minutos.
La línea de puntosrepresenta el período desueño. El aumento de lapresión arterial a la 1 p.m.(A en el gráfico) corre-sponde a un hecho estre-sante y a las 7 p.m. (B en elgráfico) a unperíodo de ejerciciosfísicos.
1. Las mediciones de la presión arterial sólo debe interpretarlas un médico oprofesional capacitado del área de salud familiarizado con su historia clínica.Con el uso periódico de este dispositivo y el registro de las mediciones, podrámantener informado al médico de los cambios registrados en su presión arterial.
2. Tome las mediciones en un lugar tranquilo. Debe estar sentado y relajado.
3. Evite fumar, comer, tomar medicamentos, el consumo de alcohol o la actividadfísica 30 minutos antes de la lectura. Si evidencia signos de estrés, evitetomarse la presión mientras esa sensación no haya desaparecido.
4. Descanse 15 minutos antes de tomar una lectura.
5. Retire toda indumentaria o accesorio apretado que pudiere interferir con lacolocación del brazalete.
6. Coloque el brazalete en la posición correcta de la muñeca izquierda. La unidaddebe estar localizada en la parte interior de la muñeca izquierda, con el panelvisor digital a la vista.
7. Mantenga el monitor estable durante la medición para lograr una lecturaprecisa. Permanezca quieto; no hable durante la medición.
8. En el cuadro que se suministra anote las lecturas diarias.
9. Tome las lecturas todos los días a la misma hora (o según lo recomendado porel médico) a fin de obtener una indicación precisa del cambio en la presiónarterial real.
10. Espere, como mínimo, 15 minutos entre lecturas a fin de permitir que los vasossanguíneos regresen a su condición normal. El tiempo de espera puede variar;lo cual dependerá de las características fisiológicas individuales.
11. Si bien es raro, en el caso de personas con pulso extremadamente débil oirregular pueden producirse errores que impedirán obtener una mediciónadecuada. En caso de observarse variaciones anormales, consulte con sumédico o un profesional capacitado en el área de salud.
12. Este dispositivo ha sido diseñado para uso en adultos.
Se puede detener el proceso de inflado y desinflado con sólo pulsar el botón de POWER.
Información Importante Previo al Uso
31
Este cuadro es sólo una guía general. Consulte a su médico o profesional capacitado en elcampo de la salud para determinar su presión arterial NORMAL.
OptimaNormalAlto - NormalGrado 1 - Hipertensión leve Enel límiteGrado 2 - Hipertensión mod-eradaGrado 3 - Hipertensióngrave
Hipertensión Sistólica Aislada
CATEGORIA
<120120-129130-139
140-159
160-179
≥180
≥140140-159160-179
≥180
<8080-8485-89
90-99
100-109
≥110
<90<90<90<90
SISTOLICA(mmHg)
DIASTOLICA(mmHg)
INDICADOR DECOLOR
VERDEVERDEVERDE
AMARILLO
ANARANjADO
ROjO
AMARILLOANARANjADO
ROjO

33
Su monitor digital para la presión arterial presenta unDetección de Latidos del Corazón Irregulares. Estacaracteristica permite a los usuarios controlar la presiónarterial con exactitud aún cuándo los latidos del corazónsean irregulares.
Cuando se detectan latidos del corazón irregulares,aparecerá el ícono IHB, Fig. 1.
NOTA: Solicite más información a su médico o profesional dela salud capacitado sobre los latidos del corazón irregulares yen caso que este símbolo aparezca con frecuencia al final dela medición.
Indicador de la WHO (Organización Mundial de la Salud) Detección de Latidos del Corazón Irregulares
32
El Indicador de la Organización Mundial de la Salud – WHO - (por sus siglas eninglés), ubicado a la izquierda del visor identificará su lectura dentro de unrango, de acuerdo con las pautas establecidas por la Organización Mundial dela Salud (WHO). Consulte el siguiente cuadro a los fines de referencia.
Grado 3 de HipertensiónPresión arterial sistólica: ≥180 mmHg
Presión arterial diastólica: ≥110 mmHg
Grado 2 de HipertensiónPresión arterial sistólica: 160-179 mmHg
Presión arterial diastólica: 100-109 mmHg
Grado 1 de HipertensiónPresión arterial sistólica: 140-159 mmHg
Presión arterial diastólica: 90-99 mmHg
Alta NormalPresión arterial sistólica: 130-139 mmHg
Presión arterial diastólica: 85-89 mmHg
NormalPresión arterial sistólica: 120-129 mmHg
Presión arterial diastólica: 80-84 mmHg
ÓptimaPresión arterial sistólica: <120 mmHg
Presión arterial diastólica: <80 mmHg
DIA
SYS
DIA
SYS
DIA
SYS
DIA
SYS
DIA
SYS
DIA
SYS
Fig. 1
-o-
-o-
-o-
-o-
-o-
-y-

35
Cómo Fijar la Fecha/Hora
34
Colocación/Cambio de Baterías
Para cambiar las baterías:
1. Abra la tapa del compartimiento de las baterías, Fig. 2.
2. Asegúrese de que la polaridad de las bateríassea la correcta y luego coloque dos bateríasAAA alcalinas, Fig. 3.
3. Cierre la tapa del compartimiento de las baterías, Fig. 4.
NOTA: Recomendamos quitar las baterías si la unidad permanecerá fuera de funcionamientodurante un prolongado período.
Cambie las baterías cuando aparezca el símbolo de PocaBatería en el visor, Fig. 1, o cuando el visor permanezcaen blanco al presionar el botón de POWER.
Fig. 1
Fig. 2
Fig. 3
Fig. 4
NOTA: Aún cuando la unidad esté apagada, la fecha y hora seguirán apareciendo enla parte superior de la pantalla.
1. Cuando la unidad está apagada, presione y suelte el botón de ENCENDI-DO/APAGADO (POWER) y el de MEMORIA (MEMORY) al mismo tiempo. El mescomenzará a titilar, Fig. 1.
2. Presione el botón de MEMORIA (MEMORY) para cambiar hasta que aparezca ennúmero que busca.
NOTA: Para desplazarse por los números más rápidamente, mantenga presionado elbotón de MEMORIA (MEMORY).
3. Presione el botón de ENCENDIDO/APAGADO (POWER) para marcar el ingreso.
4. La fecha, Fig. 2, seguida de la hora y minutos titilará en forma intermitente. Repitalos pasos 2 y 3 para establecer la configuración de fecha/hora.
5. Después de establecer los minutos, la unidad automáticamentesaldrá del modo fecha/hora, Fig. 3.
NOTA: La hora está expresada en formato militar de 24 horas. Elsiguiente cuadro explica la conversión.
Fig. 1
Fig. 3
Hora formatoestándar(12 horas)
Hora formato mili-tar
(24 horas)
Hora formatoestándar(12 horas)
Hora formato mili-tar
(24 horas)
12 amMedianoche 0 12 pm
Mediodía 12
1 am 1 1 pm 13
2 am 2 2 pm 14
3 am 3 3 pm 15
4 am 4 4 pm 16
5 am 5 5 pm 17
6 am 6 6 pm 18
7 am 7 7 pm 19
8 am 8 8 pm 20
9 am 9 9 pm 21
10 am 10 10 pm 22
11 am 11 11 pm 23
Fig. 2

Configuración de Idioma de la Voz
37
Configuración de Idioma de la Voz
36
Para establecer el idioma de voz deseado:
1. Cuando la unidad está apagada, usted puede seleccionar el idioma de voz que deseepresionando y manteniendo presionado el botón de MEMORIA (MEMORY).
2. Ahora la pantalla pasará por los ciclos L0, L1 y L2 como se muestra en la Fig. 1.L0 - la función de voz está apagadaL1 - la voz está en inglésL2 - la voz está en españolEl monitor dirá el correspondiente idioma con el código de idioma que se muestra.
3. Una vez seleccionado el idioma deseado, suelte el botón de MEMORIA (MEMORY).
Fig. 2
4. Una vez seleccionado el idioma deseado, puede ajustar el volumen presionando ymanteniendo presionado el botón de MEMORIA (MEMORY) hasta que las barras en laparte lateral de la pantalla comiencen a aumentar, Fig. 2.
5. Continúe manteniendo presionado el botón de MEMORIA (MEMORY) hasta que elvolumen alcance el nivel deseado, luego suelte el botón de MEMORIA (MEMORY) paramarcarlo.
6. La unidad se apagará automáticamente luego de marcar el nivel de volumendeseado.
Fig. 1
3938
Cómo Colocar el Brazalete de Presión Arterial
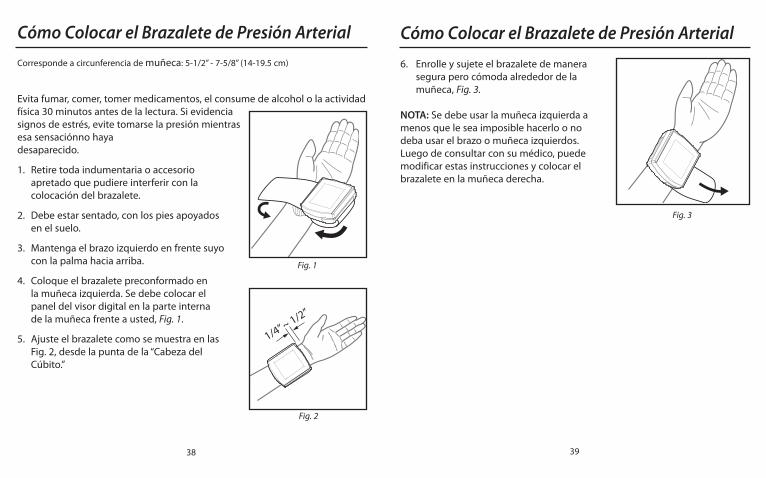
6. Enrolle y sujete el brazalete de manerasegura pero cómoda alrededor de lamuñeca, Fig. 3.
NOTA: Se debe usar la muñeca izquierda amenos que le sea imposible hacerlo o nodeba usar el brazo o muñeca izquierdos.Luego de consultar con su médico, puedemodificar estas instrucciones y colocar elbrazalete en la muñeca derecha.
Fig. 3
Corresponde a circunferencia de muñeca: 5-1/2” - 7-5/8” (14-19.5 cm)
Evita fumar, comer, tomer medicamentos, el consume de alcohol o la actividadfísica 30 minutos antes de la lectura. Si evidenciasignos de estrés, evite tomarse la presión mientrasesa sensaciónno hayadesaparecido.
1. Retire toda indumentaria o accesorioapretado que pudiere interferir con lacolocación del brazalete.
2. Debe estar sentado, con los pies apoyadosen el suelo.
3. Mantenga el brazo izquierdo en frente suyocon la palma hacia arriba.
4. Coloque el brazalete preconformado enla muñeca izquierda. Se debe colocar elpanel del visor digital en la parte internade la muñeca frente a usted, Fig. 1.
5. Ajuste el brazalete como se muestra en lasFig. 2, desde la punta de la “Cabeza delCúbito.”
Fig. 1
Fig. 2
Cómo Colocar el Brazalete de Presión Arterial

41
Cómo Tomar la Lectura de la Presión Arterial
40
Cómo Tomar la Lectura de la Presión Arterial
1. Coloque el codo sobre la mesa, con la palma de la mano hacia arriba.Elévela de manera tal que el brazalete se encuentre al mismo nivelque el corazón, Fig. 1. Relaje la mano.
2. Presione el botón de POTENCIA (POWER) para encender la unidad y pre-sione el botón de MEMORIA (MEMORY) para alternar entre banco dememoria 1 ó 2 para seleccionar el banco de memoria donde deseaguardar su lectura. Presione el botón de ENCENDIDO/APAGADO(POWER) para confirmar laselección.
3. El monitor comenzará a guiarlo con instrucciones habladas si se ha acti-vado la función de voz. La unidad realizará una auto-evaluación, Fig. 2, ymostrará la última lectura, Fig. 3, o mostrará “0” si no hay ninguna lec-tura, como se muestra en la Fig. 4.
4. Cuando el visor aparezca como se muestra, Fig. 5, el monitor está listo ycomenzará a guiarlo con instrucciones habladas si se ha activado la fun-ción de voz. El brazalete comenzará a inflarseautomáticamente.
5. El visor mostrará la presión creciente en el brazalete, junto con el pro-greso de la medición a la izquierda de la pantalla.
Proced luego de haber leído las secciones anteriores de este manual.
Fig. 2
Fig. 5
Fig. 4
Fig. 3
Fig. 1
6. El brazalete se inflará automáticamente hasta aproximadamente190 mmHg o 40 mmHg a más arriba que la presión sistólica pasada almacenada en memoria.
7. Una vez que el brazalete infla al nivel apropiado de la presión, la medidacomenzará.
8. La unidad comenzará a desinflarse automáticamente y losnúmeros que aparecen en el visor disminuirán.
9. Una vez que se ha desinflado todo el aire, la medición estácompleta. La unidad mostrará su presión arterial (sistólica y diastólica) y elpulso, Fig. 6.
Con la función de voz activada (L1 o L2), el monitor dirá la medición en el idioma queseleccionó, de acuerdo con la norma de clasificación de la Organización Mundial de laSalud (WHO).
10. Anote las lecturas en un cuadro.
11. En este momento, sus lecturas se guardarán en la memoriaautomáticamente.
12. Para conservar las baterías, presione el botón de ENCENDIDO/APAGADO (POWER) paraapagar la unidad, de lo contrario la unidad se apagará automáticamente al cabo dealrededor de 1 minuto.
13. Desconecte el tubo del monitor antes de guardar la unidad.
NOTA: Este monitor infla el brazalete a aproximadamente 190 mmHg 40 mmHg a másarriba que la presión sistólica pasada almacenada en memoria. Si el sistema detecta queel brazalete necesita más presión, automáticamente lo volverá a inflar a aproximada-mente 40mmHg más que el nivel pasado de la presión.
Fig. 6

42
Usted puede guardar hasta 120 mediciones totales en la memoria (60 porbanco de memoria). Puede compartir estas mediciones con su médico oprofesional de la salud capacitado.
1. Presione y suelte el botón de MEMORIA (MEMORY). La unidad mostraráU1 o U2 según el banco que el usuario ha seleccionado. Tambiénmostrará cómo se guardan muchas memorias en ese banco, Fig. 1.
2. Para seleccionar el banco de usuario adecuado presione el botónde ENCENDIDO/APAGADO (POWER) para alternar entre U1 y U2.
3. Una vez seleccionado el banco de memoria deseado, presione el botónde MEMORIA (MEMORY) nuevamente para desplazarse por lasmediciones guardadas. Una vez que se haya desplazado por las lec-turas, la unidad se apagará automáticamente.
NOTA: Cada banco de memoria puede guardar hasta 60 lecturas. Cuandoel número de lecturas es mayor de 60, los datos más antiguos se reem-plazarán por los más recientes.
Para borrar todas las mediciones guardadas:1. Presione y suelte el botón de MEMORIA (MEMORY). La unidad mostrará U1 o U2 según
el banco que el usuario ha seleccionado y según cuántas mediciones se han guardadoen ese banco.
2. Para seleccionar el banco de usuario deseado presione y suelte el botón de MEMORIA(MEMORY).
3. Presione y mantenga presionado el botón de MEMORIA (MEMORY) hasta que titilendos líneas horizontales. Esto indica que se han borrado todas las mediciones dentrodel banco de memoria seleccionado.
Cómo Llamar Mediciones de Memoria Descripción de los Símbolos del Visor
43
Fig. 1
Fig. 2
Indica una medición dentro del Grado3 de Hipertensión.
Indica una medición dentro delGrado 2 de Hipertensión.
Indica una medición dentro del Grado 1de Hipertensión.
Aparece cuando se debencambiar las baterías.
DIA
SYS
DIA
SYS
DIA
SYS
-- Descripción de los Símbolos del Visor Continuado

45
Si ocurriera una anomalía durante el use, verifique y corrija lo siguiente:
Condición Corrección
El visor está en blanco cuando el Revise y corrija la polaridad de lasbotón de encendido está prendido. baterías. Vuelva a colocar o cambie
las baterías.
Medición incompleta o aparecen Revise y siga las secciones ‘Cómovalores anormalmente altos o Colocar el Brazalete de Presiónbajos. Arterial’ y ‘Cómo Tomar una Lectura
de Presión Arterial.’ Cambie lasbaterías.
Las medicciones son diferentes de Recuerde que las condicioneslas mediciones usuales que realiza mentales y físicas y/o el momentoel médico o cada lectura de del día influyen en las lecturas demedición es diferente. la presión arterial. Su médico es
quien debe interpretar lasmediciones diarias.
Aparece el símbolo EE ?Se movió o conversó durante la medición?Refiérase a la sección “Cómo Aplicar
el Brazalete de Presión Arterial”.
Análisis de Fallas
Cuidado y Mantenimiento1. Quite las baterías antes de guardar la unidad.2. Use solamente un paño seco y suave para limpiar el monitor de presión arterial.3. Evite usar cualquier tipo de líquido en el monitor o brazalete.4. No guarde la unidad donde esté expuesta a la luz directa del sol, polvo o humedad.5. Evite las temperaturas extremas.6. Nunca desarme el monitor o brazalete.7. Evite que se caiga o golpee el monitor de presión arterial.
Descripción de los Símbolos del Visor
44
Muestra las pulsaciones por minuto.
Ocurre cuando se comete un errordurante la medición.
Aparece cuando se detecta ritmo cardíacoirregular durante la medición.
Aparece cuando se produce un error demedición. Comience la medición nuevamente.
Aparece cuando el brazalete está inestable ocontiene demasiado aire. Una vez que la flechaha dejado de titilar, la unidad está lista paratomar una medición.
Aparece cuando trae una medición de lamemoria.
Indica el banco de memoria del usuario.

47
Ejemplo de Registro de Presión
46
Nombre y Monitor Digital de Presión Arterial para laNúmero de Modelo Muñeca - Voz. 04-895-001Tipo de Visor Visor digital/LCDMétodo de Medición OscilométricoFuente de Energía 2 baterías tipo AAAAlcance de la Medición Presión: 0 - 300 mmHg
Pulso: 30-180 pulsaciones/minutoPrecisión Presión: ±3 mmHg; Pulso: ±5% de la lecturaPresurización Presurización automática por bombaDesinflado Válvula automática de liberación de la presiónMemoria Visor con memoria incorporada que permite
hasta 120 mediciones (60 por banco de memoria)Apagado Automático Aproximadamente 1 minuto después de la
última operación importanteVida Útil de las Baterías Aproximadamente 200 medicionesOperaciónTemperatura 41°F – 104°F (5°C – 40°C)Humedad 85% RH máx.
AlmacenamientoTemperatura 4°F – 131°F (-20°C 55°C)Humedad 95% RH máx.
Peso 4.6 oz. (sin baterías)Dimensiones 3” x 1/4” x 2-3/4” x 1-/8”Circunferencia de la Adecuado para 5-1/2” – 7-5/8” (14 – 19.5 cm)MuñecaAccesorios Estuche, guía detallada, dos baterías AAA,
Guía para un Inicio Rápido
Las especificaciones están sujetasa cambios sin previo aviso.
Especificaciones del Producto
#91-032-895 07/10©2010 Briggs Medical Service Company

48
Registro de Presión