Embed Size (px)
Citation preview

81
Tactics and SkillsTactics and Skills
As your athletes play games in practice, their experiences in these games—and your subsequent discussions with them about their expe-riences—will lead them to the tactics and skills they need to develop to succeed. In the games approach, teaching tactics and teaching skills go hand in hand.
In this chapter we’ll provide information to help you teach your players team tactics and individual offensive and defensive skills. We’ll also include suggestions for identifying and correcting common errors. Remember to use the IDEA approach to teaching skills—introduce, demonstrate, explain the skill, and attend to players practicing the skill.
chapter 8

82 Coaching Youth Softball
For a refresher on IDEA, see chapter 5.If you aren’t familiar with softball skills, rent or purchase a video to
see the skills performed. While this chapter ties directly to the season plans in chapter 9, describing the tactics and skills that you’ll teach in practices, it also includes skills not earmarked to be formally taught. Use these additional skill descriptions as reference points. You may also find advanced books on skills helpful.
We’ve only provided information about the basics of softball in this book. As your players advance in their skills, you’ll need to advance your knowledge as a coach. You can do so by learning from your ex-periences, watching and talking with more experienced coaches, and studying advanced resources.
Offensive TacticsThe offensive tactics you teach should never exceed your players’ abili-ties to perform the necessary skills. However, given that your players understand and can perform the required individual skills, you can teach them a variety of basic strategies and develop their sense of when to use those strategies. Here is a list of the offensive tactics you might teach your team. (Note that leagues at certain levels may not allow all these tactics; check your league rules book.)
Steal—When a baserunner takes off for the next base on the pitch and advances safely to the base. Considerations include watching the delivery of the pitcher, getting a jump on the pitch, running hard, and sliding to avoid the tag.
Delayed steal—Similar to a straight steal, except the runner waits until the catcher’s attention is diverted or relaxed. For instance, a runner may wait to take off until a catcher begins to lazily lob the ball back to the pitcher. By the time the pitcher can catch the throw, the runner can be safely sliding into the base. Another opportunity to use the delayed steal is when the middle infielders do not cover second base after the pitch.
Double steal—Like a straight steal, except two runners are involved. One version of the double steal calls for the trailing runner to break for the next base and draw a throw. The lead runner then breaks quickly for the next base.
Hit-and-run—When a runner takes off on the pitch and the batter makes contact with the ball. This helps break up double play possibili-ties and move runners into scoring position. Don’t use this strategy if the opposing pitcher is wild (thus making it difficult for the batter to make

Tactics and Skills 83
contact) or if the hitter is not skilled enough to make frequent contact. Drag bunt—Requires slightly different footwork from the bunting
technique described on pages 120-121, but the basic difference between the two is that a drag bunter waits longer to drop down from a hitting to a bunting position. This strategy is best used if the first or third base player is playing deep.
Sacrifice bunt—Like a regular bunt, except the batter’s sole respon-sibility is to lay down a bunt so a baserunner can advance successfully. The batter will most likely be thrown out at first, but the lead runner will be one base closer to home.
Sacrifice fly—When a batter hits a fly ball that scores a runner from third. Young hitters will have difficulty doing this intentionally, and you should discourage hitters from doing it if you think it may cause them to drop the back shoulder habitually. More often than not, a sacrifice fly just happens in the course of trying for a hit, rather than being planned strategy.
Hit to opposite field—Generally used in two instances: when a coach wants the hitter to advance a runner and when a hitter is always trying to “pull” the ball or is swinging too hard. (A right-handed batter pulls the ball by hitting it down the third base line or to left field.) By concentrating on hitting to the opposite field, the hitter will see the ball longer and won’t swing as hard.
Take on 3-0 count—A good strategy against a pitcher who is strug-gling to get the ball across the plate. The hitter takes the pitch in hopes of getting a free pass to first base.
Offensive Tactics Games
FaST FeeT
GoalTo steal a base
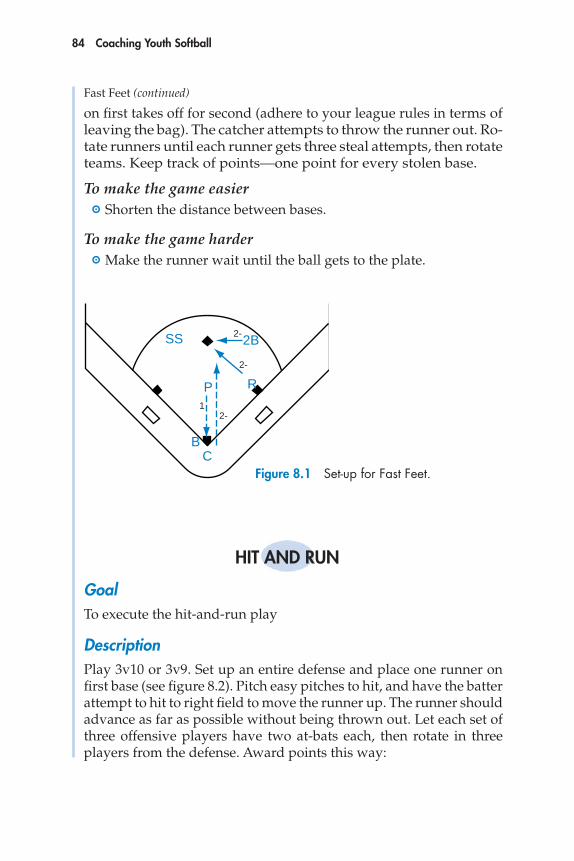
DescriptionPlay 4v4, with a pitcher, catcher, second-base player, and shortstop (see figure 8.1). The offense has a runner on first and a batter at the plate, but the batter does not swing. When the pitcher pitches, the runner
(continued)
84 Coaching Youth Softball
on first takes off for second (adhere to your league rules in terms of leaving the bag). The catcher attempts to throw the runner out. Ro-tate runners until each runner gets three steal attempts, then rotate teams. Keep track of points—one point for every stolen base.
To make the game easier Shorten the distance between bases.
To make the game harder Make the runner wait until the ball gets to the plate.
Figure 8.1 Set-up for Fast Feet.
HiT and Run
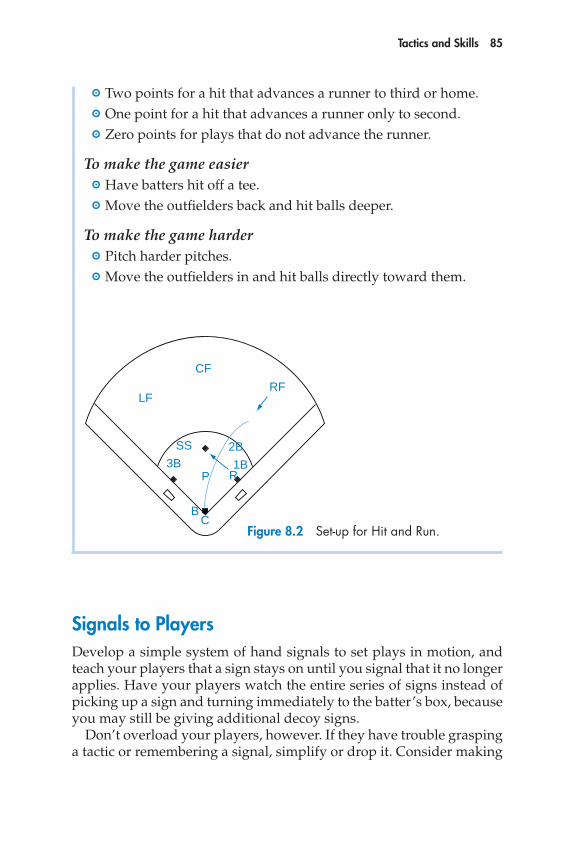
GoalTo execute the hit-and-run play
DescriptionPlay 3v10 or 3v9. Set up an entire defense and place one runner on first base (see figure 8.2). Pitch easy pitches to hit, and have the batter attempt to hit to right field to move the runner up. The runner should advance as far as possible without being thrown out. Let each set of three offensive players have two at-bats each, then rotate in three players from the defense. Award points this way:
Fast Feet (continued)
e2224/asep/fig.08.01/tomr/rd#2
BC
R
2BSS
P
2-1
2-
2-
Tactics and Skills 85
Two points for a hit that advances a runner to third or home. One point for a hit that advances a runner only to second. Zero points for plays that do not advance the runner.
To make the game easier Have batters hit off a tee. Move the outfielders back and hit balls deeper.
To make the game harder Pitch harder pitches. Move the outfielders in and hit balls directly toward them.
e2224/asep/fig.08.02/tomr/rd#2
BC
R
2BSS
P
CF
RFLF
1B3B
Figure 8.2 Set-up for Hit and Run.
Signals to PlayersDevelop a simple system of hand signals to set plays in motion, and teach your players that a sign stays on until you signal that it no longer applies. Have your players watch the entire series of signs instead of picking up a sign and turning immediately to the batter’s box, because you may still be giving additional decoy signs.
Don’t overload your players, however. If they have trouble grasping a tactic or remembering a signal, simplify or drop it. Consider making

86 Coaching Youth Softball
Table 8.1 Coaches’ Signs Sign Message
To batters Right hand across chest Swing away Right hand to nose Take pitch Right hand to belt Bunt Right hand to ear Sacrifice bunt Rubbing hands together Wipe-off sign
To baserunners Left hand to face Steal Left hand to bill of cap Delayed steal Left hand pointing Double steal Left hand patting top of cap Stay, unless a wild pitch, passed ball, or hit Left hand across chest Go on contact
the “real” sign the first sign you give. Players can’t execute what they can’t understand. Table 8.1 shows a sample of some hitting and base-running signals you might use (see also figure 8.3).
In addition, instruct your players to react to situations that allow them to take advantage of the defense, even when you haven’t called
Figure 8.3 Hitting and baserunning signals.

Tactics and Skills 87
a specific play. For example, if a catcher loses control of a pitch, your baserunners should be ready to take the next base without your telling them to do so.
You may also need to shout instructions to baserunners when a de-fensive player loses the flight of the ball. Think ahead each time a batter comes up to bat, keeping in mind
the speed of your baserunners, the strength of the infielders’ and outfielders’ arms, playing conditions, and the score.
Hitting StrategiesThe batter, more than any other offensive player, dictates the offensive strategy. You will more likely tell baserunners to run with the pitch if you have a good contact hitter at the plate who has limited power than with a power hitter up who strikes out a lot. Why?
The contact hitter will probably get the bat on the ball, preventing a “strike-’em-out, throw-’em-out” double play (a strikeout and a caught stealing). Second, the batted ball often won’t make it out of the infield, making it easier to get a force-out if the lead runner is not moving on the pitch. But with a power hitter up, you don’t want to take the chance that she or he will swing and miss and leave the baserunner an easy target for the catcher. And because the power hitter is likely to get the ball beyond the infield if contact is made, there is not a big advantage to sending the runner, because a force-out is unlikely.
A good hitter should observe the pitcher during warm-ups and on pitches to teammates who bat earlier in the lineup. The hitter can also ask teammates for information about the speed, location, and type of pitches thrown.
Once in the batter’s box, the hitter must always be aware of the count, the number of outs, and the coach’s signal. A missed sign can result in an easy double play. In contrast, a sign that is received and executed can be the start of a big inning. So go over all these signals regularly during your practices. Make corrections when a sign is missed so it doesn’t happen in a game.
A good hitter is a confident hitter. You can boost any player’s hitting confidence by staying positive. If you’re praying for a hitter to walk because you doubt he or she can get the bat on the ball, then what do you suppose the team is thinking? Be positive, even when your lineup is retired one, two, three.

88 Coaching Youth Softball
Baserunning StrategiesFor your players to be effective baserunners, they must know how, when, and why to remain at a base or try to advance. Here are a few simple rules about baserunning:
Watch the pitcher. Instruct your players to watch the hurler prepare to pitch the ball. Your runners must time their leadoffs so they do not leave the base too early.
Listen to and watch the base coach. Explain that the base coach’s job is to watch what’s going on in the field and help players run the bases safely. Runners on first base should listen to instructions from the first-base coach; runners on second and third base should follow the instructions of the third-base coach.
Do not run unless you are forced to. Baserunners are not always forced to run. For example, if a runner is on first base and a fly ball is caught in the outfield, the runner is not forced to go to second base. She or he can stay at first base. The base coach will tell the baserunners when a force is in effect.
Stay close to the base and tag up on fly balls. At the 8 - to 9-year-old level, you can send runners halfway to the next base on fly balls to the outfield because about as many fly balls will be dropped as caught. However, if a fly ball is caught, a runner who has left a base must tag up (touch the base he or she was occupying before the play started) before advancing.
Baserunning Game
FiRST TO THiRd
GoalTo show good judgment in running the bases. A secondary goal—for the defense—is to execute proper relays.
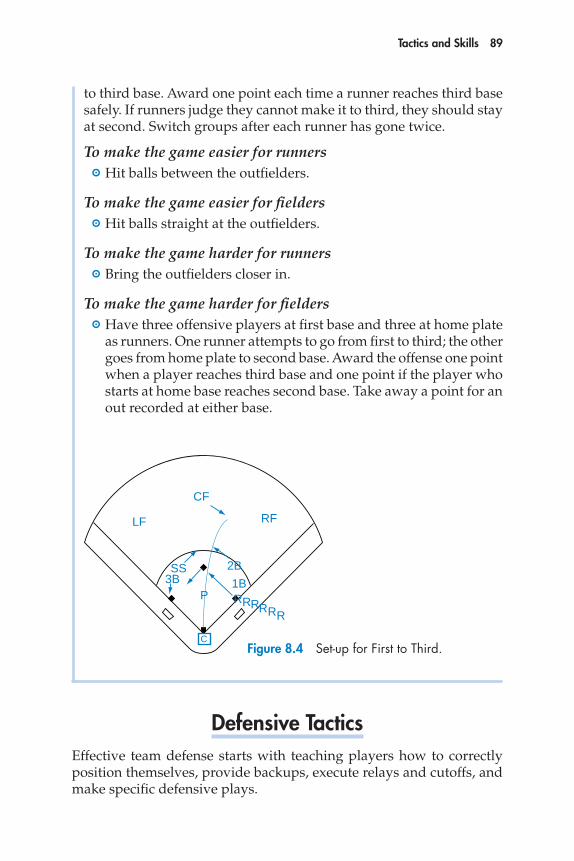
DescriptionPut three or four defensive players in the outfield and three more in the infield (at second base, third base, and shortstop). Line up the other players at first base; they will rotate in as runners (see figure 8.4). Hit singles to the outfield, and the runners attempt to go from first
Tactics and Skills 89
to third base. Award one point each time a runner reaches third base safely. If runners judge they cannot make it to third, they should stay at second. Switch groups after each runner has gone twice.
To make the game easier for runners Hit balls between the outfielders.
To make the game easier for fielders Hit balls straight at the outfielders.
To make the game harder for runners Bring the outfielders closer in.
To make the game harder for fielders Have three offensive players at first base and three at home plate
as runners. One runner attempts to go from first to third; the other goes from home plate to second base. Award the offense one point when a player reaches third base and one point if the player who starts at home base reaches second base. Take away a point for an out recorded at either base.
e2224/asep/fig.08.04/tomr/rd#2
C
2BSS
P
CF
RFLF
1B3B
R RRRRR
C
Figure 8.4 Set-up for First to Third.
defensive TacticsEffective team defense starts with teaching players how to correctly position themselves, provide backups, execute relays and cutoffs, and make specific defensive plays.
90 Coaching Youth Softball
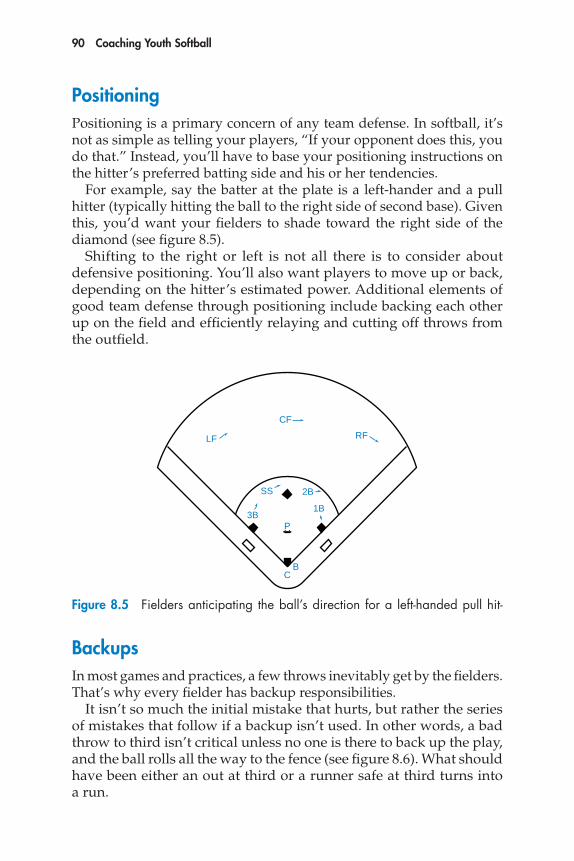
PositioningPositioning is a primary concern of any team defense. In softball, it’s not as simple as telling your players, “If your opponent does this, you do that.” Instead, you’ll have to base your positioning instructions on the hitter’s preferred batting side and his or her ten dencies.
For example, say the batter at the plate is a left-hander and a pull hitter (typically hitting the ball to the right side of second base). Given this, you’d want your fielders to shade toward the right side of the diamond (see figure 8.5).
Shifting to the right or left is not all there is to consider about defensive positioning. You’ll also want players to move up or back, depend ing on the hitter’s estimated power. Additional elements of good team defense through positioning include backing each other up on the field and efficiently relaying and cutting off throws from the outfield.
Fig. 137 Coaching Y Winners Baseball
YMCA
Fig. 137Coaching Y Winners Baseball
YMCA
RF
CF
CB
P
LF
2B
1B
SS
3B
Figure 8.5 Fielders anticipating the ball’s direction for a left-handed pull hit-
BackupsIn most games and practices, a few throws inevitably get by the fielders. That’s why every fielder has backup responsibilities.
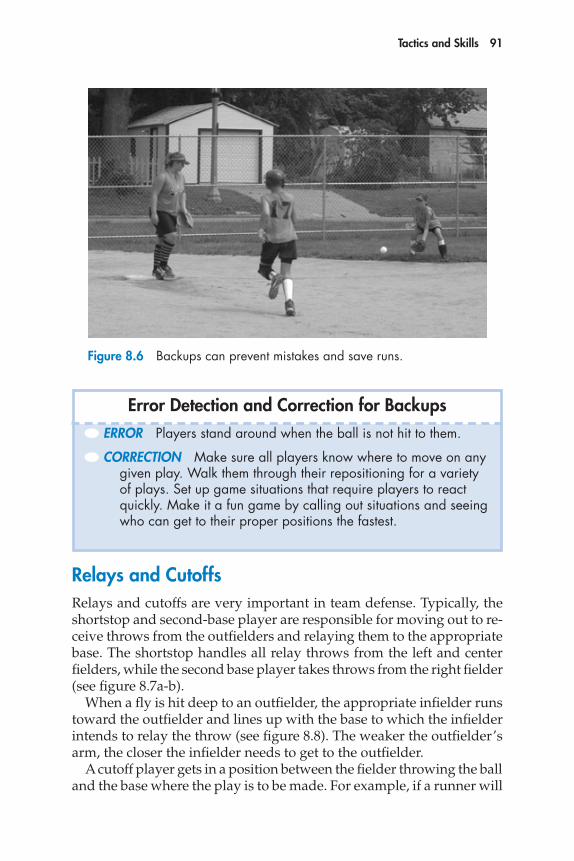
It isn’t so much the initial mistake that hurts, but rather the series of mistakes that follow if a backup isn’t used. In other words, a bad throw to third isn’t critical unless no one is there to back up the play, and the ball rolls all the way to the fence (see figure 8.6). What should have been either an out at third or a runner safe at third turns into a run.
Tactics and Skills 91
error detection and Correction for Backups● ERROR Players stand around when the ball is not hit to them.
● CORRECTION Make sure all players know where to move on any given play. Walk them through their repositioning for a variety of plays. Set up game situations that require players to react quickly. Make it a fun game by calling out situations and seeing who can get to their proper positions the fastest.
Relays and CutoffsRelays and cutoffs are very important in team defense. Typically, the shortstop and second-base player are responsible for moving out to re-ceive throws from the outfielders and relaying them to the appropriate base. The shortstop handles all relay throws from the left and center fielders, while the second base player takes throws from the right fielder (see figure 8.7a-b).
When a fly is hit deep to an outfielder, the appropriate infielder runs toward the outfielder and lines up with the base to which the infielder intends to relay the throw (see figure 8.8). The weaker the outfielder’s arm, the closer the infielder needs to get to the outfielder.
A cutoff player gets in a position between the fielder throwing the ball and the base where the play is to be made. For example, if a runner will
Figure 8.6 Backups can prevent mistakes and save runs.

92 Coaching Youth Softball
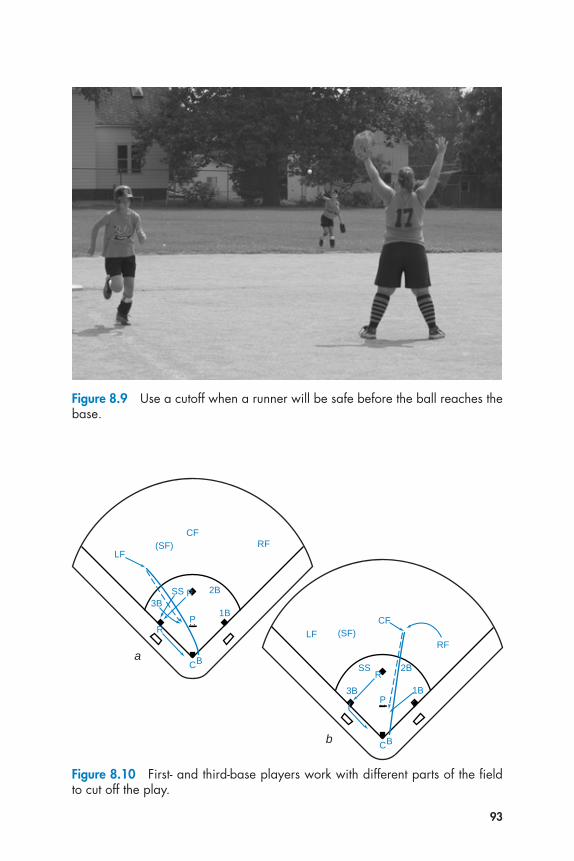
definitely reach the next base before a throw reaches the base, the ball should be cut off before it reaches the base (see figure 8.9). The player cutting off the throw either relays the throw to the base or throws to another base to make a play on a trailing runner.
Cutoff players should position themselves 15 to 25 feet ahead of the base where the play is to be made. Most throws that are cut off are to third base or home plate. The third base player is the cutoff player on throws from left field to home, and the first base player takes all throws from center field and right field to home (see figure 8.10a-b). The short-stop is the cutoff player for throws to third base (see figure 8.11), and the pitcher backs up these throws either at third or home.
Fig. 139a Coaching Y Winners Baseball
YMCA
Fig. 139aCoaching Y Winners Baseball
YMCA
RFCF
(SF)
LF
B
P
C
R
SS 2B
1B3B
Fig. 139b Coaching Y Winners Baseball
YMCA
Fig. 139bCoaching Y Winners Baseball
YMCA
RF
CF
(SF)
LF
3B1B
B
P
C
2BSS
R
Figure 8.7 Relays keep the ball moving.
Figure 8.8 The second-base player relays a throw from the right fielder to third base.
Fig. 140 Coaching Y Winners Baseball
YMCA
Fig. 140Coaching Y Winners Baseball
YMCA
RF
CF
(SF)
LF
3B1B
B
P
R
C
2BSS
b
a
93
Figure 8.9 Use a cutoff when a runner will be safe before the ball reaches the base.
Fig. 142a �Coaching Y Winners Baseball�
YMCA
Fig. 142a�Coaching Y Winners Baseball�
YMCA
RFCF
(SF)LF
3B
B
P
C
R
R
SS
1B
2B
Fig. 142b Coaching Y Winners Baseball
YMCA
Fig. 142bCoaching Y Winners Baseball
YMCA
RF
CF(SF)LF
1B
B
P
C
R
3B
2BSS
Figure 8.10 First- and third-base players work with different parts of the field to cut off the play.
b
a

94 Coaching Youth Softball
Relay Game
HiT THe RelaY
GoalTo execute efficient relay throws
DescriptionThis game is for three players. Assign the players to right field, second base, and third base (see figure 8.12). Have the coach hit or throw the ball so the right fielder needs to move to get it, then complete the relay to third base.
Figure 8.11 The shortstop cuts off throws to third base.
Fig. 143 Coaching Y Winners Baseball
YMCA
Fig. 143Coaching Y Winners Baseball
YMCA
RF
CF
(SF)
LF
3B
B
P
C
R
SS
1B
2B
e2224/asep/fig.08.12/tomr/rd#2
C
2B
RF
3B 1-
1-
1-
3
2
Figure 8.12 Set-up for Hit the Relay.
Tactics and Skills 95
Award one point for a throw caught in the air by the second-base player. Award one point for the relay to third base in which the third-base player catches the ball either straddling the bag or with one foot touching the side of the bag. After the players have scored six points, rotate them to different positions.
To make the game easier Have the coach make shorter hits.
To make the game harder Add a runner on first base who is attempting to go to third.
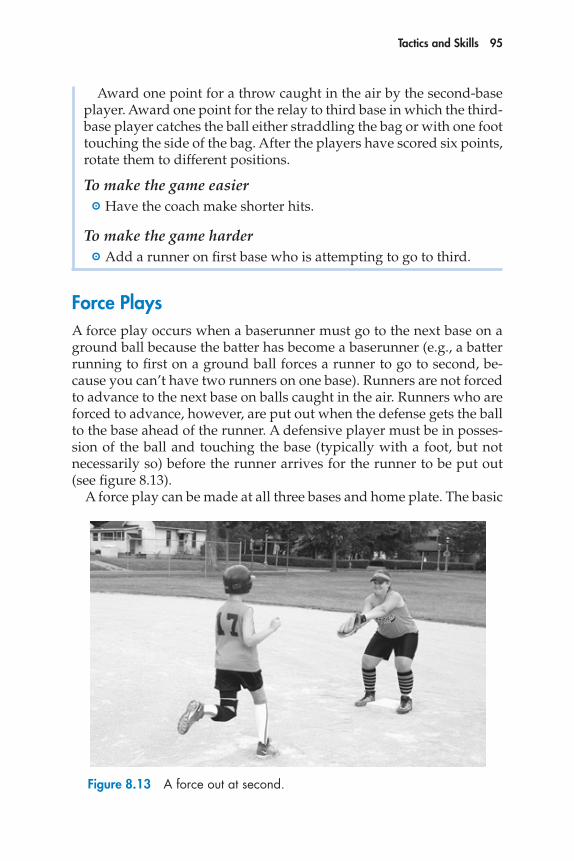
Force PlaysA force play occurs when a baserunner must go to the next base on a ground ball because the batter has become a baserunner (e.g., a batter running to first on a ground ball forces a runner to go to second, be-cause you can’t have two runners on one base). Runners are not forced to advance to the next base on balls caught in the air. Runners who are forced to advance, however, are put out when the defense gets the ball to the base ahead of the runner. A defensive player must be in posses-sion of the ball and touching the base (typically with a foot, but not necessarily so) before the runner arrives for the runner to be put out (see figure 8.13).
A force play can be made at all three bases and home plate. The basic
Figure 8.13 A force out at second.

96 Coaching Youth Softball
techniques are the same, regardless of the base. The player throwing the ball should make the throw about chest-high. The player covering the base should move to the side of the base nearest the source of the throw (see figure 8.14). This shortens the throw’s length and, thus, the time it takes to arrive, making it more likely an out will be made.
Once the throw is on the way and the covering player knows where the throw will arrive, that player should place one foot on the base and stretch out to meet the throw with the glove hand and the other foot (see figure 8.15). If the throw is slightly off target to the side, the player should step to meet the ball with the foot on the ball side and contact the base with the other foot. If the play is going to be close, the player should stretch as far as she or he can and catch the ball in the glove hand only. If the play is not going to be close, the player should stretch a comfortable distance and catch the ball with both hands. The player catching the ball should always look to shorten the distance and time of the throw so the throw will get there before the runner does.
Figure 8.14 The covering player moving toward a throw.

Tactics and Skills 97
Force Play Game
lead RunneR
GoalTo execute force plays at second base
DescriptionPlay 6v6. Field an entire infield. The offense begins with a runner on first (see figure 8.16). Pitch balls that are easy to hit. Batters hit grounders; the defense tries to make force plays at second. Each batter hits until he or she hits a ground ball. Each play begins with a run-ner on first. All six batters for the offense take one turn hitting, then they go through their rotation and hit one more ground ball each (so they hit 12 ground balls in all). Then switch the offense and defense and repeat the game. Score one point for the defense for every force made at second; score two points if they turn a double play.
Figure 8.15 Stretch out to meet a throw.
(continued)

98 Coaching Youth Softball
To make the game easier Don’t allow the runner to take off on the pitch. Instead, the runner
must wait until the ball gets to the plate. Have batters hit off a tee. Hit or throw the ball yourself to locations that will make the play
easier.
To make the game harder Shorten the distance between first and second. Allow the runner to take off on the pitch. Hit or throw the ball yourself to locations that will make the play
difficult.
Figure 8.16 Set-up for Lead Runner.
e2224/asep/fig.08.16/tomr/rd#2
C
2B
3B
1-
2-
2-2- 1B
SS
P
B
R
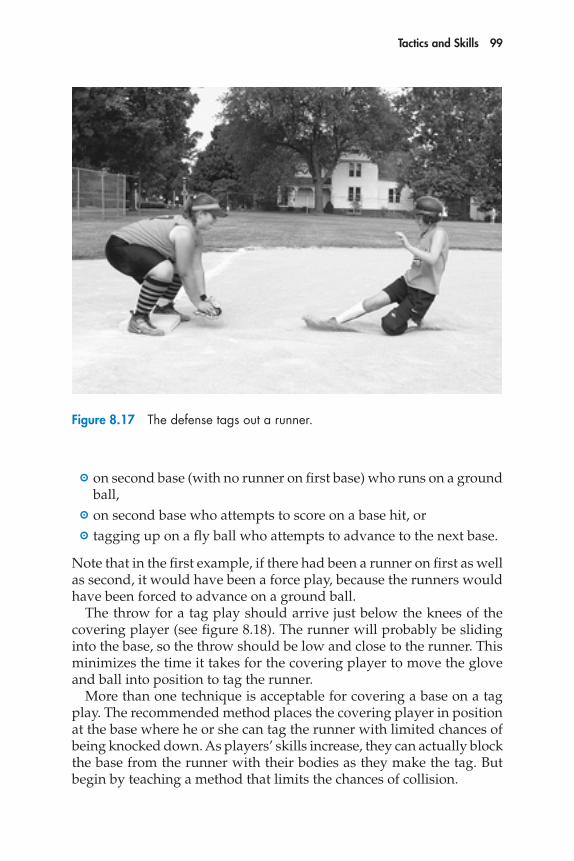
Tag PlaysThe tag play is another fundamental defensive concept. A tag play situ-ation occurs any time a runner is not in contact with a base and is not allowed to move to any base freely. For example, a runner overrunning second base can return safely to second by retouching the base before being tagged. To put out a baserunner with a tag play, the defensive player must tag or touch the runner with the ball, or with the glove holding the ball, when the runner is off the base (see figure 8.17).
The tag play is required when a runner is not forced to advance to the next base. Examples of tag play situations include a runner
Lead Runner (continued)
Tactics and Skills 99
on second base (with no runner on first base) who runs on a ground ball,
on second base who attempts to score on a base hit, or tagging up on a fly ball who attempts to advance to the next base.
Note that in the first example, if there had been a runner on first as well as second, it would have been a force play, because the runners would have been forced to advance on a ground ball.
The throw for a tag play should arrive just below the knees of the covering player (see figure 8.18). The runner will probably be sliding into the base, so the throw should be low and close to the runner. This minimizes the time it takes for the covering player to move the glove and ball into position to tag the runner.
More than one technique is acceptable for covering a base on a tag play. The recommended method places the covering player in position at the base where he or she can tag the runner with limited chances of being knocked down. As players’ skills increase, they can actually block the base from the runner with their bodies as they make the tag. But begin by teaching a method that limits the chances of collision.
Figure 8.17 The defense tags out a runner.

100 Coaching Youth Softball
The covering player’s position at the base depends on the paths of the runner and the incoming ball. In general, the player should straddle the base or stand just to the side of the base facing the direction of the incoming runner (see figure 8.19a-b). Players should never place a leg between the base and the incoming runner. They should leave the path to the base open to the runner.
Covering players should position themselves so that they can catch the ball and bring the gloved ball down to the edge of the base where the runner will arrive. As the runner slides in, the player should let the runner tag himself or herself out by sliding into the gloved ball. The player should then sweep the ball out of the way of the runner to avoid losing control of the ball. If the runner doesn’t slide, the runner’s foot will be the first part of the runner to touch the base, so the covering player should tag the foot (see figure 8.20). When the player reaches out to tag the chest of an incoming runner who doesn’t slide, the runner is often safe because he or she has gotten a foot on the base first.
When a defensive player tags out a runner who is running past him or her between bases, the defensive player should hold the ball securely with both hands with the ball in the glove and tag the runner with the back of the fingers of the glove (see figure 8.21). The fielder should then pull both hands away immediately so the contact doesn’t knock the ball out of the glove.
Figure 8.18 Fielder in good position for tag play.

101
Figure 8.19 Covering the base for a tag play by (a) straddling the base or (b) standing to the side of the base facing the direction of the incoming runner.
Figure 8.20 A runner tagged on the foot.
a b

102 Coaching Youth Softball
Figure 8.21 A runner tagged out between bases.
Tag Play Game
TaG-OuT
GoalTo tag out baserunners
DescriptionThis game involves six players; get two games going at once to keep all players involved. Place defenders at second base, third base, short-stop, and right field. Place a runner on second base (see figure 8.22). Another runner will alternate with that runner, each one running every other play. Each play starts with the runner on second. The runner must attempt to go to third on each play. Alternate hits—hit fly-outs to the right fielder in which the runner must tag up, and hit ground balls to second base and shortstop. (Don’t hit to third, as the runner wouldn’t attempt to advance in such a situation.) The defense tries to get the runner out at third base; if the runner is tagged out, the defense scores a point. After six plays, rotate the two baserunners
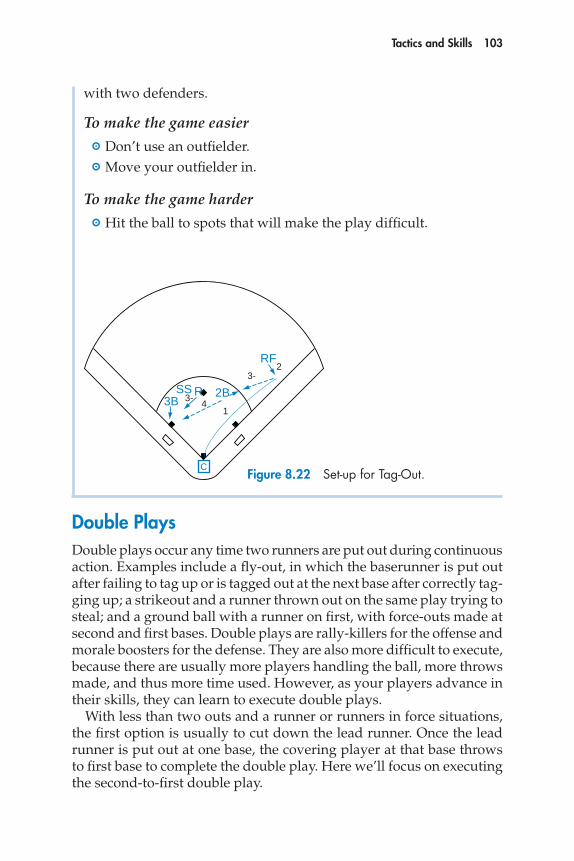
Tactics and Skills 103
with two defenders.
To make the game easier Don’t use an outfielder. Move your outfielder in.
To make the game harder Hit the ball to spots that will make the play difficult.
e2224/asep/fig.08.22/tomr/rd#2
2B3B
14
2
RSS
RF
3-
3-
CFigure 8.22 Set-up for Tag-Out.
double PlaysDouble plays occur any time two runners are put out during continuous action. Examples include a fly-out, in which the baserunner is put out after failing to tag up or is tagged out at the next base after correctly tag-ging up; a strikeout and a runner thrown out on the same play trying to steal; and a ground ball with a runner on first, with force-outs made at second and first bases. Double plays are rally-killers for the offense and morale boosters for the defense. They are also more difficult to execute, because there are usually more players handling the ball, more throws made, and thus more time used. However, as your players advance in their skills, they can learn to execute double plays.
With less than two outs and a runner or runners in force situations, the first option is usually to cut down the lead runner. Once the lead runner is put out at one base, the covering player at that base throws to first base to complete the double play. Here we’ll focus on executing the second-to-first double play.
104 Coaching Youth Softball
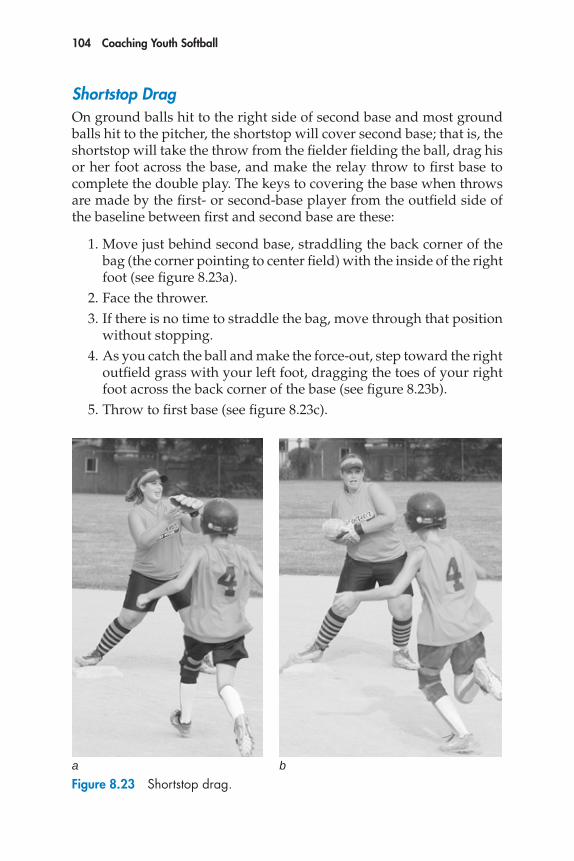
Shortstop DragOn ground balls hit to the right side of second base and most ground balls hit to the pitcher, the shortstop will cover second base; that is, the shortstop will take the throw from the fielder fielding the ball, drag his or her foot across the base, and make the relay throw to first base to complete the double play. The keys to covering the base when throws are made by the first- or second-base player from the outfield side of the baseline between first and second base are these:
1. Move just behind second base, straddling the back corner of the bag (the corner pointing to center field) with the inside of the right foot (see figure 8.23a).
2. Face the thrower. 3. If there is no time to straddle the bag, move through that position
without stopping. 4. As you catch the ball and make the force-out, step toward the right
outfield grass with your left foot, dragging the toes of your right foot across the back corner of the base (see figure 8.23b).
5. Throw to first base (see figure 8.23c).
Figure 8.23 Shortstop drag.ba

Tactics and Skills 105
Shortstop Inside PivotOn balls fielded by the pitcher or catcher, the shortstop covers second and uses an inside pivot to make the force-out and complete the throw to first. Here are the keys for making an inside pivot:
1. Step on the inside corner of the base with the left foot, facing the player with the ball (see figure 8.24a).
2. Bend the knees as you catch the ball, place weight fully on the left foot, and spring off that foot toward the pitcher’s mound, landing on the right foot out of the path of the runner (see figure 8.24b).
3. Step toward first and make the throw (see figure 8.24c).
Second-Base PivotsOn ground balls hit to the left side of second base, the second-base player must use either a crossover pivot or a rocker pivot. He or she uses a crossover pivot on any throw from the third-base player and long throws from the shortstop. A rocker pivot is used on short throws by the shortstop.
c
Figure 8.23 (continued)

106
Figure 8.24 Shortstop inside pivot.
a
b
c

Tactics and Skills 107
Here are the keys to making the crossover pivot:
1. Cover second so you can cross the base in a direct line toward the player feeding you the ball (see figure 8.25a).
2. If time allows, move to a position just short of the base, facing the thrower.
3. As the ball approaches, step on the base with your left foot, move over the base, and catch the ball on the far side of the base while still in contact with it (see figure 8.25b).
4. Stop your forward momentum by landing on your right foot; with this step you should be out of the basepath.
5. Shift your weight to the left side; step left and throw to first (see figure 8.25c).
Figure 8.25 Second-base player’s crossover pivot.
a b
c

108 Coaching Youth Softball
Here are the keys to executing the rocker pivot:
1. Move to the base and place the toes of your right foot in contact with the outfield side of the base (see figure 8.26a).
2. With the weight on your left foot, catch the ball, make the force-out, step back onto the right foot (see figure 8.26b), step left toward first base, and throw the ball (see figure 8.26c).
Figure 8.26 Second-base player’s rocker pivot.
a b
c

Tactics and Skills 109
Figure 8.27 Set-up for Double Trouble.
e2224/asep/fig.08.27/tomr/rd#2
C
R
1
2-
2- 43B 3
SS
P
B
2B
1B2-
2-
2-
(continued)
Players can also execute the rocker pivot by standing with their weight on their right foot, kicking the base with their left foot for the force-out, and stepping left to throw. This move is quicker by one step, but leaves the fielder in the baseline. If the runner is far away, this version of the rocker pivot is fine to use.
double Play Game
dOuBle TROuBle
DescriptionPlay 6v6. Field an entire infield. The offense begins with a runner on first (see figure 8.27). Pitch balls that are easy to hit. Batters hit grounders; the defense tries to make a double play. Each batter hits until he or she hits a ground ball. Each play begins with a runner on first. All six batters for the offense hit one ground ball, then they go through their rotation and hit one more ground ball (so they hit 12 ground balls in all). Then switch the offense and defense and re-peat the game. Score one point for the defense for every force made at second; score two points if they are able to turn a double play.
To make the game easier Don’t allow the runner to take off on the pitch. Instead, the runner
must wait until the ball gets to the plate. Have batters hit off a tee. Hit or throw the ball yourself to locations that will make the play
easier.

110 Coaching Youth Softball
To make the game harder Shorten the distance between first and second. Hit or throw the ball yourself to locations that will make the play
difficult.
RundownsRundown situations occur when a runner is caught between bases by the defense. When one runner is in a rundown and another runner is on third base, the defense needs to keep an eye on the runner on third, who may try to score. Fielders must be ready to throw the ball home to cut down the runner trying to score.
The two defenders closest to the bases between which the runner is caught are the primary defenders; the two fielders next closest to these bases are backup fielders in the rundown. Backup fielders should stay at least 10 feet behind the primary fielders unless the play has moved close to a base. If a primary fielder throws the ball to a teammate, the player who threw the ball becomes a backup fielder as the player back-ing him or her up assumes a primary fielding role. Here are keys to executing a rundown:
1. The fielder with the ball initiates the play by holding the ball up, ready to throw, and running directly at the baserunner until the runner commits to moving toward one base or the other.
2. If this first fielder can’t make the tag, the ball is thrown to the player toward whom the runner is going.
3. The runner should be forced to run back to the last base, rather than forward to the next base. For example, a runner caught between third base and home should be forced to run back toward third.
4. Try to get the runner out with one throw. Two throws are all right, but more than two are too many, opening the gate for errors or for other runners advancing. Throws should be by the side of the runner, rather than over the runner’s head (see figure 8.28).
5. Tag the runner with the ball in the glove, not just held in the hand. In fact, it’s preferable to use the bare hand to cover the ball in the glove to make sure it’s secure.
Double Trouble (continued)

Tactics and Skills 111
Figure 8.28 The proper throw for a rundown.
(continued)
Rundown Game
PiCkle
GoalTo execute effective rundowns
DescriptionSet up four stations placed about 30 feet apart. Each station consists of two bases placed 30 feet apart (see figure 8.29). Designate one base to be second base and one to be third. Assign three players to each station, two fielders and one runner. The runner starts in a rundown and then tries to reach a base safely.
Award points to the defense using the following system:
Three points for getting the runner out with one throw Two points for getting the runner out with two throws One point for getting the runner out with three throws No points for getting the runner out with four or more throws
To make the game easier The runner can be thrown out with any number of throws.
To make the game harder The runner must be thrown out in two or fewer throws.

112 Coaching Youth Softball
When a rundown is completed, restart by having the runner begin halfway between the bases again. Players rotate whenever the defen-sive players at that station score four points.
e2224/asep/fig.08.29/tomr/rd#2
30feet
2nd base
3rdbase
X
X
X
30 feet X
X
X
30 feet X
X
X
30 feet X
X
X
Figure 8.29 Set-up for Pickle.
Other defensive PlaysIn addition to the plays we’ve already talked about, your players need to know other plays to execute well defensively. Consider introducing the following defensive tactics to your team:
Get the lead runner. The lead runner is the one farthest advanced on the bases. The defense’s objective is to stop the player closest to scoring by throwing the ball to the base ahead of the lead runner (see figure 8.30).
Look the runner back. On ground balls in certain tag play situa-tions, a fielder can look a runner back to the base before throwing to first for the out, thus keeping the runner from advancing. For example, when a runner is on second and a ground ball is hit to the third-base player, that fielder should field the ball (focusing entirely on fielding it first!), and as he or she begins the throwing motion, look quickly at the runner to “freeze” the runner from advancing. Unless the runner tries to advance, the fielder should not stop or slow the throwing motion. If the runner does try to advance, the fielder is ready to make a play on the runner. If the fielder doesn’t pay attention to the runner, the runner likely will be able to advance.
Back up the throw. Every player not directly involved in a play should back up throws to different parts of the field. The pitcher backs up the base that the lead runner is moving toward, especially if it’s
Pickle (continued)

Tactics and Skills 113
home plate. Infielders back up each other when a throw is coming from the catcher.
Back up the hit. Outfielders not directly involved in a play back up each other. If the ball gets away from one outfielder, the backup can make the play and prevent runners from taking an extra base.
Give up a run. Sometimes you’ll decide to give up a run in exchange for an out because you have a comfortable lead. In this case you might let a runner on third score on a ground ball to get the easier out at first.
Get the first out. In a double play situation, the first out must be the lead runner. If infielders retire the lead runner, they can attempt to complete the double play.
Again, keep your defensive strategies simple and the number man-ageable. Defense requires quick reactions. If you overload players with too much information or it’s too difficult, they won’t be able to respond quickly and properly when the ball is hit.
Pitching StrategiesYou’ve probably heard the distinction between a pitcher and a thrower. A pitcher is a surgeon, exposing each hitter’s weakness. (Every hitter has at least one.) The pitcher rarely throws the ball far from the strike zone and thus seldom walks a batter.
In contrast, a thrower simply rears back and fires the ball at the catcher’s mitt, figuring the velocity of the pitch will prevent the hitter from making contact. Throwers walk many hitters because of their wildness.
Fig. 158 Coaching Y Winners Baseball
YMCA
Fig. 158Coaching Y Winners Baseball
YMCA
1B
B
P
C
R
RSS
3B
2B
Figure 8.30 A throw to third to stop the lead runner.
114 Coaching Youth Softball
Teach your pitchers to pitch, not just throw. Help them to understand why they shouldn’t lob the ball right over the plate when the count is 3-1. Along with a pitching mind-set, help pitchers develop their mechanics early; they’ll have more success and fewer arm problems.
Offensive SkillsOffensive skills include hitting and baserunning. Hitting a ball is probably the most difficult skill to master in fast-pitch softball. Combine this fact with your players’ ages and inexperience, and you’ve got your work cut out for you. Helping your players improve their hitting fundamentals will certainly make their experience more rewarding. And baserunning is just as vital to a successful offense. Unfortunately, many youth teams get runners on base, then make inning-ending baserunning blunders. These next two sections should help you coach your players to be better hitters and base runners.
HittingGood hitters perform the skill in one fluid motion. However, four separate hitting components should be taught to young players: grip, stance, stride, and swing.
GripTeach your players to grip the bat with their fingers, not with the palms of their hands (middle knuckles should be lined up; see figure 8.31). They should hold the bat loosely until they get ready to swing; then they should tighten the grip.
StancePlayers need to be comfortable in the batter’s box. The stance that feels good to one player may feel awkward to another. Figure 8.32 shows an appropriate stance. Don’t try to make every batter assume the same stance at the plate, but do stress these basics:
Feet comfortably wider than shoulders, set in a square stance The back foot parallel to the back line of the batter’s box The front foot parallel with the front line of the box, toes pointing
toward the plate
Knees bent slightly with weight centered on the balls of the feet,

115
Figure 8.32 Proper stance at the plate.
Figure 8.31 The proper way to grip the

116 Coaching Youth Softball
distributed 60 percent over the back foot and 40 percent over the front
Upper body bent slightly at the waist, eyes focused on the ball
Bat held at a 45-degree angle to the hands
Elbows out from the body and flexed, pointing down toward the ground
Feet far enough back from the plate so the bat passes slightly across the outer edge of the plate when the arms are fully extended
StrideThe hitter starts by rotating the front shoulder, hip, and knee inward. This is the trigger motion. The slight rotation causes the hands to move three to four inches backward. The hip rotation and the turning of the knee inward cause the player’s weight to shift to 60 percent over the front foot and 40 percent over the back foot. A hitter doesn’t need to stride to hit. As the saying goes, “Bury the toe and put on a show.”
However, if a player does stride, it should be very small. The weight is on the inside part of the back foot after a player completes the stride, and the hands are cocked in a trigger position just off the back shoulder. If a player is going to stride, be sure he or she strides before contact, not at contact.
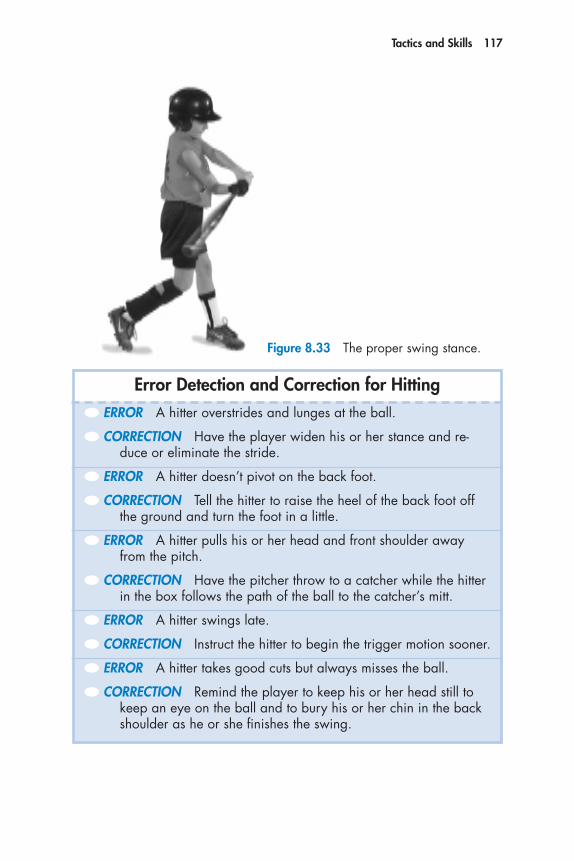
SwingThe legs and hips initiate the swing. As the hitter shifts the weight to the front foot, the back foot pivots and the back knee rotates. During this sequence there is a transfer of weight from the back foot onto the front foot, resulting in 60 percent being over the front foot and 40 percent being over the back foot. The front foot remains straight and firm, the shoulders open, and the hands come down and through (see figure 8.33). The hitter should keep the barrel of the bat level with or above the hands during the swing. The lead elbow points toward the ground. The hitter should keep the head still during the swing. The bat should be parallel to the ground as it moves through the hitting zone. Teach your players to hit down and through the ball.
Tactics and Skills 117
error detection and Correction for Hitting● ERROR A hitter overstrides and lunges at the ball.
● CORRECTION Have the player widen his or her stance and re-duce or eliminate the stride.
● ERROR A hitter doesn’t pivot on the back foot.
● CORRECTION Tell the hitter to raise the heel of the back foot off the ground and turn the foot in a little.
● ERROR A hitter pulls his or her head and front shoulder away from the pitch.
● CORRECTION Have the pitcher throw to a catcher while the hitter in the box follows the path of the ball to the catcher’s mitt.
● ERROR A hitter swings late.
● CORRECTION Instruct the hitter to begin the trigger motion sooner.
● ERROR A hitter takes good cuts but always misses the ball.
● CORRECTION Remind the player to keep his or her head still to keep an eye on the ball and to bury his or her chin in the back shoulder as he or she finishes the swing.
Figure 8.33 The proper swing stance.

118 Coaching Youth Softball
Slow-Pitch Hitting AdjustmentsThe same basic fast-pitch hitting mechanics apply to slow-pitch softball. However, because the ball is pitched slower and with a much higher arc, slow-pitch hitters should take advantage of their additional re-action time.
Hitting to a certain spot (e.g., behind a runner) is easier in slow-pitch, because hitters can make adjustments in their stance. For example, a hitter who is in a squared stance (see figure 8.34a) when the pitcher releases the ball can move the front foot forward to close the stance (see figure 8.34b). By doing so, the hitter can more easily hit the ball to the opposite field, if he or she is patient enough to wait on the pitch.
Also unlike the fast-pitch hitters, a hitter in slow-pitch may swing level or even drop the back shoulder and uppercut on the ball (see figure 8.35). Again, this depends on the game situation and the ideal location for the ball to be hit in the field of play.
Figure 8.34 The proper slow-pitch stances (a) squared stance, (b) closed a b

Tactics and Skills 119
Figure 8.35 Dropping the back shoulder to upper-cut the ball.
(continued)
Hitting Game
HiTTinG dOwn
GoalTo encourage players to hit down on the ball and emphasize con-tact
DescriptionPlay 4v4 with defensive players at first, second, and third bases and at shortstop (see figure 8.36). Each play begins with a runner on first base; all four players on offense will bat once. Place a batting tee at home plate. The batter must hit a ground ball. The defense attempts to force the runner at second base.
Award the offense one point if the runner is safe at second base and another point if the runner is safe at first base. Switch the offense and defense after each player on the offensive team has batted.
To make the game easier Have no runners on base. The offense gets a point if the batter/
runner is safe at first.

120 Coaching Youth Softball
To make the game harder Use live pitching.
Figure 8.36 Set-up for Hitting Down.
BuntingEvery team needs a variety of offensive weapons. One of these weap-ons is the bunt. So teach every player on your team how to bunt, and provide practice time so each player feels confident about the skill. The main purpose of the bunt is to advance baserunners, but it’s also a good surprise strategy to get on base. The bunt is a good tactic for your players to use against overpowering pitchers and pitchers who end up in a poor fielding position on the follow-through.
With runners on first or second base, a successful sacrifice bunt will advance the runners into scoring position. As the pitcher starts the windup, the batter squares around either by moving the back foot up nearly parallel with the front foot or by pivoting on the heel of the front foot and the toe of the back foot.
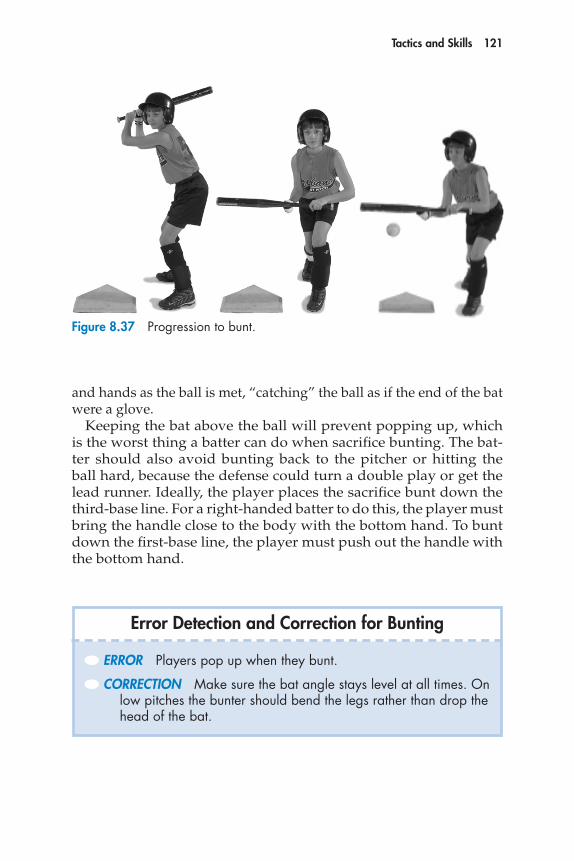
The bat is held level or at a 45-degree angle (the 45-degree technique is harder to master). The knees bend, and the weight is forward to prevent lunging. The upper hand slides 12 inches up the bat, and the bottom hand stays on the handle. Players should grip the bat lightly with the upper hand, keeping the fingers underneath and the thumb on top in the form of a V. Figure 8.37 shows the progression from a normal stance to squaring away and bunting.
From the start of the pitcher’s delivery to the actual contact of ball with bat, the player must focus on the ball. The hitter’s arms are extended to position the bat at the top of the strike zone, covering the entire plate. Letting the ball come to the bat, the batter gives with the arms
Hitting Down (continued)
e2224/asep/fig.08.34/tomr/rd#2
R
1-
3B
SS
B
2B
1B
1-
1-
2
1-
Tactics and Skills 121
Figure 8.37 Progression to bunt.
and hands as the ball is met, “catching” the ball as if the end of the bat were a glove.
Keeping the bat above the ball will prevent popping up, which is the worst thing a batter can do when sacrifice bunting. The bat-ter should also avoid bunting back to the pitcher or hitting the ball hard, because the defense could turn a double play or get the lead runner. Ideally, the player places the sacrifice bunt down the third-base line. For a right-handed batter to do this, the player must bring the handle close to the body with the bottom hand. To bunt down the first-base line, the player must push out the handle with the bottom hand.
error detection and Correction for Bunting
● ERROR Players pop up when they bunt.
● CORRECTION Make sure the bat angle stays level at all times. On low pitches the bunter should bend the legs rather than drop the head of the bat.

122 Coaching Youth Softball
Figure 8.38 Set-up for Squeeze Play.
e2224/asep/fig.08.36/tomr/rd#2
R
3
3B
SS
B
2B
1B
2-
1
2-
C
R
2-
2-
2- P
Bunting Game
Squeeze PlaY
GoalTo practice defending the sacrifice bunt with runners on first and third bases
DescriptionPlay 6v6. Assign a complete infield and place runners on first and third bases (see figure 8.38). The pitcher should pitch a ball so the batter can bunt it. The runners cannot leave their bases until the ball reaches home plate, but the runner on third must attempt to score. The defense attempts to throw the runner out at home plate or force the runner at second base.
Award three points to the defense if the runner is out at home, two points if the runner is out at second, and one point if the runner is out at first. Switch teams after everyone on the offensive side has bunted.
To make the game easier Place a runner on first base only. Keep runners on first and third, but the runner on third doesn’t
have to try to score.
To make the game harder Move third base closer to home.

Tactics and Skills 123
BaserunningThe last thing you want to do on the bases is to waste scoring opportuni-ties. So stress baserunning at every practice. Baserunners must always know where the ball is, how many outs there are, and what they will do when the ball is hit. They must also pick up signals given by coaches. Teach your players to be heads-up, aggressive baserunners.
Before you can teach players how to run the bases, however, they first must know how to run. Teach them proper sprinting form: head up, body leaning forward, on the toes, high knee lift, and arms pumping front to back (not across the body; see figure 8.39).
Running to First BaseWhen a hitter makes contact, he or she should drop the bat at the end of the swing, then move quickly and efficiently out of the batter’s box. The player turns in the direction of first base, stays low, drives out of the box, and starts down the line with a jab step of the back foot.
The run to first base should be an all-out sprint, and the player should run “through” the bag, like a sprinter hitting a finish-line tape. Tell your players not to lunge or jump at the bag because that is not as fast as a running step. Make sure your players are ready to advance to second if the throw to first is a bad one.
If the player gets a hit into the outfield, she or he should “think sec-ond” by running a flat arc to first base and continuing hard past the bag,
Figure 8.39 The proper baserunning technique.

124 Coaching Youth Softball
looking for an opportunity to advance to second. The runner begins the flat arc about 6 feet out of the batter’s box, curving no more than 3 feet outside the line, and hits the left inside corner of the base with the left foot. On extra base hits, baserunners should continue the pattern of flat arcs to each base (see figure 8.40).
If a baserunner takes the turn at first, instruct him or her to sprint about a third of the distance to second base. The player will know by the first-base coach’s commands whether to go to second or return to first.
When the pitcher’s body motion indicates the start of the pitch, the runner takes a quick crossover step to initiate the attempted steal. Get-ting that split-second jump on the pitcher is often the difference between being out or safe at second base.
SlidingWhen approaching a base, a player must decide in an instant whether or not to slide. If the play at the base appears close or if a coach or team-mate is yelling to get down, the player should slide. Once the decision is made, it should be carried out. Players often change their minds at the last second, which increases the chance of injury. However, most injuries result from poor sliding technique. Teach your players how to slide safely and correctly, and give them plenty of opportunities to practice so they become comfortable with the actual correct motion.
Fig. 170 Coaching Y Winners Baseball
YMCA
Fig. 170Coaching Y Winners Baseball
YMCA
Figure 8.40 The flat arc.

Tactics and Skills 125
Here is the sequence of the bent-leg slide you should teach players:
1. Start the slide 10 to 12 feet from the bag. 2. Don’t drop down to the ground—slide to the bag. 3. As you approach the bag, bend your knees (which will drop your
hips). Then extend one leg toward the bag and bend your other leg under your opposite knee (see figure 8.41).
4. Slide on your buttocks, not on your side or hips. 5. Tuck chin to chest to prevent banging your head. 6. Your extended foot should be 6 to 8 inches off the ground to slide
over the bag. 7. Keep your hands up; don’t drag them across the ground as you
slide.
error detection and Correction for Sliding
● ERROR Players keep jamming their ankles into the bag.
● CORRECTION Designate a spot at which players should start their slide—about 10 to 12 feet before the bag. Teach players to run hard and try to extend their slides across the top of the ground.
Figure 8.41 In the bent-leg slide, legs form a “4.”
126 Coaching Youth Softball
Tagging UpWhen a ball is hit in the air, the runner must decide whether to go halfway to the next base or to tag up (remain in contact with the base during the fly ball, with the intention of advancing to the next base after the ball is caught). The first- or third-base coach can help make the call. There’s no decision to make on foul fly balls: The runner should always tag up. Outfield flies are tougher, requiring a quick assessment of how deep the ball is hit, the positioning of the outfield, and the throwing arm of the outfielder who is likely to make the catch. Tell your runners that, in most situations, they should play it safe and not try to advance, unless a coach tells them to do so (though it doesn’t hurt to force a hard throw to the next base by bluffing a run; the hur-ried throw could be off-line). If a runner is going to tag up, she or he needs to stay low, keep the knees bent, and push hard off the bag on the coach’s command to “Go!”
defensive SkillsIndividual defensive skills include throwing, pitching, and catch-ing (including catching pitches and throws, fielding grounders, and catching fly balls). The team with the best hitters won’t neces-sarily win the game if their pitching is weak and their defense is poor. Especially in youth competition, teams with strong pitch-ing and defense have a leg up on victory—it is for these reasons that we have emphasized learning defensive skills in the season plans.
ThrowingThrowing is one of the most important skills in softball. Stress to your players that accuracy is more important than speed. Many players throw wildly in their attempts to put some zip on the ball.
Teach your players to throw over the top (overhand) and not sidearm. Throwing the ball over the top will give players greater control and ac-curacy. Conversely, throwing sidearm can lead to bad throwing habits, wildness, and undue strain on young elbows.
Overhand ThrowA player’s throwing motion is like a set of fingerprints: Everyone has one, but it’s slightly different from anyone else’s. However, to throw a

Tactics and Skills 127
softball well, every player must use some type of grip, windup, delivery, and follow-through. Here is the overhand throwing technique to teach your players.
Grip. The player should grip the ball in the throwing hand. Windup. Bringing the throwing arm back and up, the player turns
so the front shoulder is pointed at the target. At this point, the weight is on the back foot. The glove hand points toward the target. The arm extends behind the body with wrist cocked and elbow bent (see figure 8.42a).
Delivery. Now the player picks up the lead foot and strides toward the target. As the lead foot touches the ground, the hips are turned so that the throwing-side hip drives toward the target (see figure 8.42b). The player transfers weight from the back foot to the front foot and brings the throwing arm forward just before releasing the ball. Encour-age players to look at the target when throwing.
Follow-Through. The player points the throwing hand at the tar-get and swings the back leg around. The follow-through ends with the throwing arm down in the front of the body and the feet almost parallel, in a balanced ready position (see figure 8.42c).
Figure 8.42 The steps of the overhand throw.a b c

128 Coaching Youth Softball
error detection and Correction for Overhand Throws
● ERROR Players rush their throws after fielding the ball, which causes them to miss their targets.
● CORRECTION Remind players that they must first field the ball properly, then pick the ball from their glove, set their feet, and use good mechanics for the grip, windup, delivery, and follow-through.
Sidearm and Three-Quarter-Arm ThrowsAlthough you may teach the proper overhand throwing technique to all your players, count on having to correct them for dropping the arm in delivery. Many players use the three-quarter-arm throw, but it is often the sign of a tired arm. A player should use the sidearm throw only when there is no other choice or when throwing to a base from a short distance. Improper throwing technique at an early age can lead to bad throwing habits and injury later in a player’s career.
The best way to monitor throwing technique is to watch players dur-ing warm-up. If you see them using improper mechanics or lapsing into a three-quarter-arm or sidearm motion, immediately show them the correct grip, windup, delivery, and follow-through of the overhand throwing technique.
Snap ThrowA better choice than the sidearm or three-quarter-arm throw for close distances is the snap throw. Like the overhand throw, it can be taught in a simple progression:
1. Facing a partner, the player brings the ball up to the ear with the arm bent (see figure 8.43a).
2. The player extends the throwing arm toward the person receiving the ball, aiming to hit the player in the chest (see figure 8.43b).
3. The thrower’s arm should be parallel to the ground after the follow-through, with the hand and fingers pointed toward the target (see figure 8.43c).

Tactics and Skills 129
b
Figure 8.43 The steps of the snap throw.
a
c
Make sure that the hand and the arm go straight toward the partner. If the player brings the throwing arm across the body or follows through past a point parallel to the ground, the ball will go wide of the target or too low. At higher levels, this is the throw used in rundowns, so it is important that players learn from the beginning to be accurate with their throws.

130 Coaching Youth Softball
error detection and Correction for Snap Throws
● ERROR Players make poor short throws, either too low or off to one side.
● CORRECTION Remind players to stop the throwing arm at the point perpendicular to the ground when initiating the delivery (see figure 8.43 on page 129). On the follow-through, players must throw directly at the target and not across the body.
Crow HopBecause of the distances involved in most throws from the outfield, an outfielder needs to learn a crow hop, a move that uses the body to provide additional power in the throw. Many players throw strictly with the arm, which greatly restricts how far they can throw and leads to arm injuries. The fundamentals are basically the same as for the overhand throw except the hop allows the outfielder to quickly shift the weight back and gather momentum in order to use the body as well as the arm in the throw.
As the fielder catches the ball, he or she steps forward with the ball-side, or back, leg (right leg for a right-handed thrower).
The player skips on the ball-side foot (right foot for a right-handed thrower), rotating the shoulders so that the glove-side shoulder (left shoulder for a right-handed thrower) is now pointed toward the target (see figure 8.44a). Maintaining weight on the back leg, the player extends the throwing arm back (see figure 8.44b).
The player executes the throw, shifting the weight forward to the front foot (see figure 8.44c). The player’s shoulders rotate back square to the target, allowing the throwing arm to come through with the throwing hand ending down by the glove-side knee. The back leg should always step toward the target.

Tactics and Skills 131
a b cFigure 8.44 The steps of the crow hop.
(continued)
Throwing Game
MakinG THe PlaY
GoalTo make an accurate throw to the appropriate base
DescriptionPlay 6v6. Field an entire infield. Offensive runners rotate in as needed. You will hit ground balls to the fielders, who must field the ball and make the appropriate throw.
Throws to first—Hit one ground ball to each fielder (including a bunt for the catcher). Each fielder must field and throw to first. A runner at home runs to first on contact and tries to beat the throw (see figure 8.45a). On the ball hit to the first-base player, the pitcher must cover first. A perfect score is six points (six outs recorded).
Throws to second—Hit one ground ball to each fielder (including a bunt for the catcher). Each fielder must field and throw to second (see figure 8.45b). A runner at first runs to second on contact and tries to beat the throw. A perfect score is six points (six outs recorded).
Throws to home—Hit one ground ball to each infielder (except the catcher). Each fielder must field and throw home (see figure 8.45c).

132 Coaching Youth Softball
e2224/asep/fig.08.45a/tomr/rd#2
33B
SS
P
2B
1B2-
1
2-
CR
2-
C
e2224/asep/fig.08.45c/tomr/rd#2
R3
3B
SS 2B
1B2-
1
C
P2-
C
A runner at third runs home on contact and tries to beat the throw. A perfect score is five points (five outs recorded).
Keep track of points and rotate offense and defense after these three sets of plays.
To make the game easier Hit easy grounders directly to the players.
e2224/asep/fig.08.45b/tomr/rd#2
3B
SS
P
1B
1
CC
R
2B2-
2-
32-
b
a
Figure 8.45 Set-up for Making the Play.c
Making the Play (continued)
Tactics and Skills 133
To make the game harder Hit harder ground balls. Hit ground balls that force the fielders to move one direction or
another.
PitchingIn softball, the pitcher uses an underhand motion to throw the ball. In fast-pitch, speed, movement, and location are the keys to pitching suc-cess. In slow-pitch, arc and location are most important.
In fast-pitch, a team’s success is often determined by the perfor-mance of its pitcher, so the position deserves considerable attention. Fast- pitching is a specialized skill, requiring specialized instruction. If you are a beginning coach, try to find an experienced pitching coach to work with the pitchers on your team. Also, read books on pitching and attend clinics to become a better coach for your pitchers.
Slow-pitching, although not as mechanically complex, requires excel-lent control. Nothing is worse than playing the field or watching when a slow-pitch pitcher can’t find the plate. So you must work with your pitchers to develop their accuracy.
Maintaining BalanceOne of the most crucial points in the fast-pitch delivery is the balance point. That is where the throwing hand is at its highest point above the head and the glove-side foot is at its highest point above the ground (see figure 8.46). This is a critical point in the delivery. Failure to keep the weight back means the weight is shifted forward too soon, forcing the pitcher to throw with just the arm. Trying to generate power or speed too early in the delivery often leads to this problem. The signs of transfer ring weight too early are overstriding, putting weight on the front foot only, and moving the head and shoulders forward ahead of the hips and hand.
Shoulder PositionYoung pitchers often err by pitching with the shoulder instead of the wrist, leading the action forward with the throwing-arm shoulder as the arm begins the downward swing from the balance point. The hand with the ball should always lead the action.
Wrist-Hand PositionA strong wrist snap is crucial for creating speed and movement on the ball. The pitcher must cock the wrist on the downward swing and then snap it at the power point by the hip, as in figure 8.47. With the fast ball,

134
Figure 8.47 The wrist snap in softball pitch-
Figure 8.46 Balance point in softball deliv-
Tactics and Skills 135
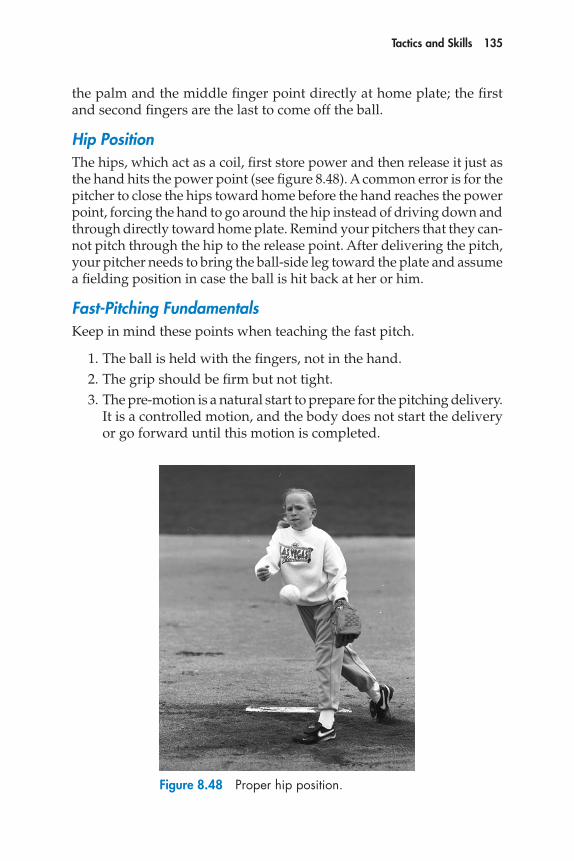
Figure 8.48 Proper hip position.
the palm and the middle finger point directly at home plate; the first and second fingers are the last to come off the ball.
Hip PositionThe hips, which act as a coil, first store power and then release it just as the hand hits the power point (see figure 8.48). A common error is for the pitcher to close the hips toward home before the hand reaches the power point, forcing the hand to go around the hip instead of driving down and through directly toward home plate. Remind your pitchers that they can-not pitch through the hip to the release point. After deliver ing the pitch, your pitcher needs to bring the ball-side leg toward the plate and assume a fielding position in case the ball is hit back at her or him.
Fast-Pitching FundamentalsKeep in mind these points when teaching the fast pitch.
1. The ball is held with the fingers, not in the hand. 2. The grip should be firm but not tight. 3. The pre-motion is a natural start to prepare for the pitching de livery.
It is a controlled motion, and the body does not start the delivery or go forward until this motion is completed.

136 Coaching Youth Softball
Figure 8.49 Half-circle motion.
4. The arm acts like a whip and should be relaxed throughout the motion.
5. A pitcher needs maximum acceleration on the downward swing with complete arm extension for leverage and rotation in a smooth plane parallel to the body.
6. The stride of the glove-side foot should be thought of as a step, not a lunge or a falling action. It is a controlled movement.
7. The step should be straight toward home plate, with the foot land-ing at no more than a 45-degree angle to home.
8. The stride should be long enough to maintain the pitcher’s balance and allow for sufficient weight transfer.
9. The weight must be kept back until that explosive movement when the ball is snapped and all the power resources are thrust forward.
Slow-Pitching FundamentalsThe mechanics of delivering a slow pitch are much the same as those described for a fast pitch. However, you should note these important differences:
1. The throwing arm motion is not whiplike but rather an easy, semi-circle movement (see figure 8.49).

Tactics and Skills 137
Figure 8.50 Releasing ball in front of body.
2. The weight transfer to the front foot is gradual, not explosive. 3. The ball is released in front of the body and tossed upward, unlike
hip-released bullets in fast-pitch (see figure 8.50). 4. The wrist helps in the throwing motion, but it is not snapped
quickly as it is in fast-pitch. 5. Immediately after the follow-through, the pitcher takes several
steps back for protection and fielding purposes.

138 Coaching Youth Softball
error detection and Correction for the Balance Point
● ERROR The pitcher can’t get any speed on the ball, even though she or he has a strong arm.
● CORRECTION Have the pitcher start the delivery and then stop at the balance point. The weight should remain back. Check the pitcher’s stride to make sure it is not too long (the glove-side leg should be just slightly ahead of the pitcher’s body at the release point).
Pitching Game
BullS-eYe!
GoalTo throw strikes
DescriptionSplit your pitchers into two teams. You’ll also need two catchers (see figure 8.51). You and an assistant or another player will call balls and strikes. The two teams throw to their catchers at the same time to keep the game moving. Each pitcher throws five pitches, then gives way to the next pitcher. They repeat this so that each pitcher throws 10 pitches. The team with the highest number of strikes wins.
Figure 8.51 Set-up for Bulls-Eye!
e2224/asep/fig.08.48/tomr/rd#1
C AC
C
P
P
P
C
P
P
P
Tactics and Skills 139
To make the game easier Shorten the pitching distance.
To make the game harder Make pitchers throw strikes to certain locations (e.g., low and to
one side of the plate).
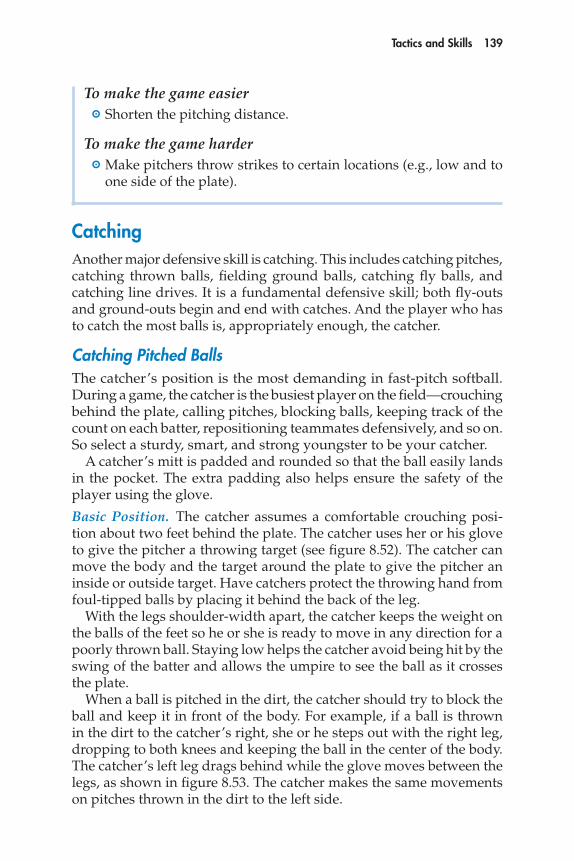
CatchingAnother major defensive skill is catching. This includes catching pitches, catching thrown balls, fielding ground balls, catching fly balls, and catching line drives. It is a fundamental defensive skill; both fly-outs and ground-outs begin and end with catches. And the player who has to catch the most balls is, appropriately enough, the catcher.
Catching Pitched BallsThe catcher’s position is the most demanding in fast-pitch softball. During a game, the catcher is the busiest player on the field— crouching behind the plate, calling pitches, blocking balls, keeping track of the count on each batter, repositioning teammates defensively, and so on. So select a sturdy, smart, and strong youngster to be your catcher.
A catcher’s mitt is padded and rounded so that the ball easily lands in the pocket. The extra padding also helps ensure the safety of the player using the glove.
Basic Position. The catcher assumes a comfortable crouching posi-tion about two feet behind the plate. The catcher uses her or his glove to give the pitcher a throwing target (see figure 8.52). The catcher can move the body and the target around the plate to give the pitcher an inside or outside target. Have catchers protect the throwing hand from foul-tipped balls by placing it behind the back of the leg.
With the legs shoulder-width apart, the catcher keeps the weight on the balls of the feet so he or she is ready to move in any direction for a poorly thrown ball. Staying low helps the catcher avoid being hit by the swing of the batter and allows the umpire to see the ball as it crosses the plate.
When a ball is pitched in the dirt, the catcher should try to block the ball and keep it in front of the body. For example, if a ball is thrown in the dirt to the catcher’s right, she or he steps out with the right leg, dropping to both knees and keeping the ball in the center of the body. The catcher’s left leg drags behind while the glove moves between the legs, as shown in figure 8.53. The catcher makes the same movements on pitches thrown in the dirt to the left side.

140 Coaching Youth Softball
Figure 8.52 Catcher’s basic position.
When a pitch is thrown in the dirt just in front of the catcher, he or she drops both knees to the ground and slides into the ball. With the back side of the glove on the ground, the catcher places the glove between the legs to execute the block. Bowing the back and bringing the chin down to the chest protects the throat area and helps the catcher keep the eyes on the ball.
Up Position. With runners on base, your catcher should be in the up position: feet shoulder-width apart and the right foot slightly in front of the left. The catcher should extend the glove hand away from the body, providing a large target. He or she should keep the back almost parallel to the ground (see figure 8.54). This position will allow your catcher to receive the pitch and throw to a base quickly.
When a runner attempts a steal, the catcher should lean into the ball just before catching it, making sure not to come forward too soon, which could lead to an interference call if the batter swings and hits the catcher.
While catching the ball, the catcher should quickly move the glove-
Figure 8.53 Catcher blocking the ball.

Tactics and Skills 141
side leg forward into the throwing position (jump turn), rotate the shoulders to be parallel to the batter’s box, and bring the glove hand near the ear, where it should meet the throwing hand (see figure 8.55). The catcher makes the throw by transferring weight from the back leg to the front leg, staying low, rotating the shoulders, and following through (see figure 8.56). The follow-through involves bringing the throwing
Figure 8.55 Catcher getting into throwing position.
Figure 8.54 Catcher in up position.

142 Coaching Youth Softball
Catching Game
BaCkSTOP
GoalTo execute the skills needed to be a catcher
DescriptionYou need four people for this game—a pitcher (which could be you), a catcher, a runner, and a fielder. This game highlights five skills re-quired of a catcher. You can split any one of the following skills into a separate game, or you can do all five in one.
Blocking pitches—Throw three wild pitches in the dirt in front of the catcher (see figure 8.57a). The pitch must be within reach of the catcher (not too far to the side or over the catcher’s head). The
hand to the opposite knee while stepping toward the base being thrown to with the throwing-side leg.
Figure 8.56 Catcher throwing.

143
e2224/asep/fig.08.54e/tomr/rd#2
CC
Figure 8.57 Set-up for Backstop.
e2224/asep/fig.08.54a/tomr/rd#2
C
C
e2224/asep/fig.08.54b/tomr/rd#2
C
R
SS
P
2-1
2-
2-
e2224/asep/fig.08.54c/tomr/rd#2
SS
1
2-
3
2-
2-
R
C
e2224/asep/fig.08.54d/tomr/rd#2
1B
1
C
2-
3
2- 2-
RC
a
b
c
d
e
(continued)

144 Coaching Youth Softball
catcher attempts to block each pitch. Catcher scores one point for each success ful block.
Throwing out runners—The fielder plays shortstop. A runner on first tries to steal second as the pitcher pitches. The catcher throws to the shortstop covering second, who tries to tag the runner out (see figure 8.57b). Do this play three times. The catcher scores one point for each throw to second that arrives in time to get the runner out (the point is scored even if the shortstop drops the ball at second or misses the tag).
Blocking the plate—The runner is on third base. The catcher (or you) throws a ground ball to the fielder, who is playing shortstop (see figure 8.57c). The runner breaks for home and tries to score. The catcher blocks the plate and attempts to tag out the runner. Do this play three times, scoring one point for each successful tag.
Fielding a bunt and throwing to first base—A runner is at home and the fielder is at first base (see figure 8.57d). Roll a bunt down the first- or third-base line; the runner heads for first base as the ball leaves your hand. The catcher, starting from a crouched position, springs up as the ball is rolled and the runner takes off for first. The catcher attempts to throw the runner out. Do this play three times, scoring a point for the catcher for each out at first (if the ball arrives in time to get the runner out, score the point for the catcher even if the fielder at first base drops the ball).
Catching a foul pop—Hit or throw high foul pops near home plate (see figure 8.57e). The catcher, starting from a crouched position and with a mask on, tracks the pop-up, discards the mask, and attempts to catch the ball. Do this play three times, scoring a point for each caught pop-up.
Catching Thrown BallsA fielder may receive a ball when covering a base or not covering a base. Many of the same principles apply in either case. First we’ll address catching principles in general, and then we’ll look at covering a base.
General Principles. To catch a thrown ball, the player should position the glove according to the flight of the ball. If the ball is below the waist, the fingers and the palm of the glove hand should be pointed down with the mitt fully open (see figure 8.58a). If the ball is chest-high, the fingers and the palm of the glove should be pointing out, with the thumbs pointing to the sky (see figure 8.58b). If the ball is above the chest, the fingers should point toward the sky (see figure 8.58c).
Backstop (continued)
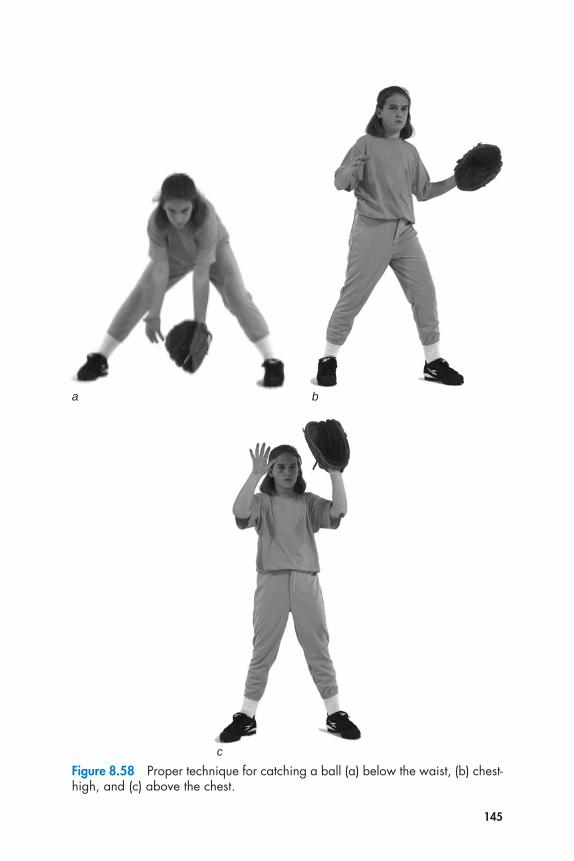
145
Figure 8.58 Proper technique for catching a ball (a) below the waist, (b) chest-high, and (c) above the chest.
a b
c

146 Coaching Youth Softball
In all catching attempts, players should
1. keep their eyes on the ball; 2. have both hands ready, with arms relaxed and extended toward
the ball (see figure 8.59); 3. bend the elbows to absorb the force of the throw; and 4. watch the ball into the glove and squeeze it (see figure 8.60).
After the catch, the player should immediately grip the ball with the throwing hand in the correct overhand throwing technique.
Covering a Base. When accepting a throw at a base, an infielder needs to sprint to the bag and get in position to receive the ball in the middle of the body. The fielder should face the thrower, bend the knees, and have the legs slightly more than shoulder-width apart for a good base of support (see figure 8.61).
As with catching a thrown ball anywhere, the player should fully extend the glove arm, keep the head still, and watch the ball into the glove, giving with the ball as it enters the glove.
On force-outs, players shouldn’t commit a foot to the bag too early (see figure 8.62). If the throw is off target, it is harder to adjust to the
Figure 8.60 Fielder gripping ball with glove.
Figure 8.59 Preparing to catch.
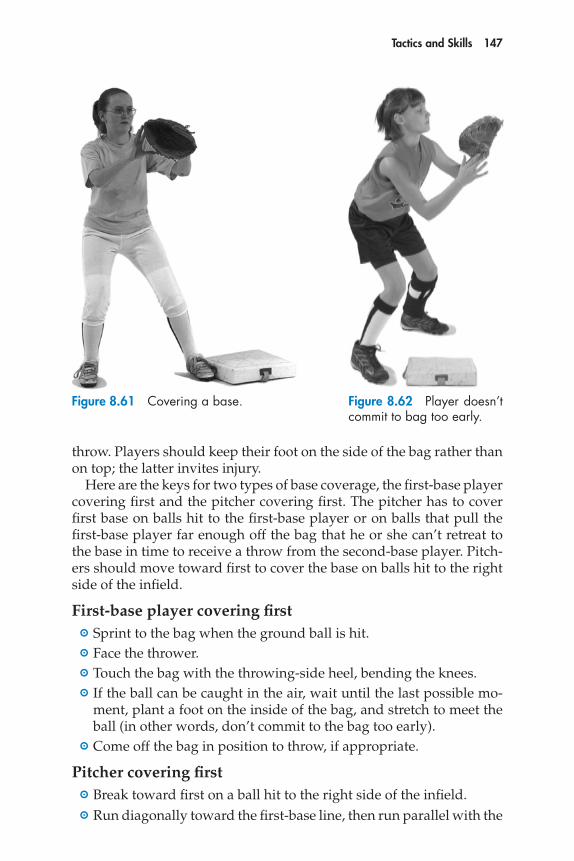
Tactics and Skills 147
throw. Players should keep their foot on the side of the bag rather than on top; the latter invites injury.
Here are the keys for two types of base coverage, the first-base player covering first and the pitcher covering first. The pitcher has to cover first base on balls hit to the first-base player or on balls that pull the first-base player far enough off the bag that he or she can’t retreat to the base in time to receive a throw from the second-base player. Pitch-ers should move toward first to cover the base on balls hit to the right side of the infield.
First-base player covering first Sprint to the bag when the ground ball is hit. Face the thrower. Touch the bag with the throwing-side heel, bending the knees. If the ball can be caught in the air, wait until the last possible mo-
ment, plant a foot on the inside of the bag, and stretch to meet the ball (in other words, don’t commit to the bag too early).
Come off the bag in position to throw, if appropriate.
Pitcher covering first Break toward first on a ball hit to the right side of the infield. Run diagonally toward the first-base line, then run parallel with the
Figure 8.61 Covering a base. Figure 8.62 Player doesn’t commit to bag too early.

148 Coaching Youth Softball
baseline once you’re within a few feet of the line. Focus on the base and the ball. As you near the base, the focus should
be on the ball. Extend your glove, giving the fielder a good target. Catch the ball and step on the nearest inside portion of the base.
error detection and Correction for Catching Balls at First Base
● ERROR The first-base player has trouble catching high, but not bad, throws.
● CORRECTION Encourage the player to wait longer before stretch-ing out and shift the weight off the heels in case he or she needs to jump. As the throw approaches, then the first-base player extends upward for the catch.
Fielding Ground BallsNow let’s look at how you can instruct players to catch ground balls. Emphasize these five components of the skill: assume ready position, move to the ball, field, skip-and-throw, and follow-through.
Assume Ready Position. To assume the ready position, your players should have their feet slightly wider apart than the shoulders, their knees bent, and their weight over the balls of their feet (see figure 8.63). The hands hang low between the legs, with the glove open wide. From this ready position, the player can get a good jump on the ball and move quickly in the direction it is hit.
Figure 8.63 Ready position for ground balls.

Tactics and Skills 149
Move to the Ball. When a ground ball is hit in the direction of an infielder, the player moves to position his or her body in front of the ball. Teach your players always to lead with the glove, no mat-ter which direction they move. This will help them stay low to the ground, the correct position for fielding a ball. Infielders should judge the speed and spin of the ball to determine where they need to move for good fielding position. With practice, players will learn to “pick a hop,” or anticipate where the ball will bounce nearest to them and then move there to catch the ball. It’s best to stay low and catch the ball on a low hop near the glove rather than on an “in-between hop” a few to several feet in front of the glove. In-between hops are much harder to gauge and fielders are much more likely to make an error on them. Therefore, fielders will need to learn to charge the ball—move toward it—to get that low hop. In this way they actively “play the ball” rather than letting it play them. It’s much easier to field a ball when moving toward it than when rocking back on the heels and moving away from it.
Field. Here are the steps for teaching your players the proper fielding position for ground balls:
1. Bend your knees and keep the glove open. 2. Extend your arms in front of your body and reach out for the ball.
The glove-side foot is forward. 3. Watch the ball all the way into the glove and trap it with your
throwing hand (see figure 8.64a). 4. Keep the backside low and field the ball in the middle of your body,
cushioning it with “soft” hands into the body to the belt area.
Skip-and-Throw. The skip-and-throw technique will help your in-fielders get rid of the ball quickly after they’ve fielded it. While cushion-ing the ball into the glove, the infielder lines up the glove-side shoulder and hip with the throwing target. With eyes focused on the target and the glove in the center of the chest, the player skips forward and prepares to throw (see figure 8.64b). As the throwing hand leaves the glove, the arm extends down and back in a comfortable, relaxed posi-tion (see figure 8.64c). Pushing off the back leg, the player then throws over the top, moving the throwing shoulder and arm forward quickly (see figure 8.64d). A strong wrist snap at the point of release will result in better accuracy.

150 Coaching Youth Softball
Follow-Through. During the follow-through, the player points the throwing-side shoulder toward the target and lifts the back leg off the ground. The player’s momentum should be forward, in the direction of the throw (see figure 8.64e).
Figure 8.64 Steps for fielding ground balls.
a b c
d e

Tactics and Skills 151
error detection and Correction for Fielding Ground Balls
● ERROR Players misfield the ball when they have to field it on the run.
● CORRECTION
1. Tell players to concentrate on the ball as they move toward it.
2. Instruct them to keep the seat and hands low and the hands in front of the body.
3. Remind players to watch the ball into the glove.
4. Emphasize that players should cushion the ball to the belt area by pulling the arms in toward the midsection.
Fielding Ground Balls Game
aiRTiGHT d
GoalTo field grounders and throw to the appropriate base
DescriptionPlay 5v5. On defense, have a pitcher and players at first, second, third, and shortstop (see figure 8.65). Rotate the five offensive players in as runners (sometimes you’ll need more than one runner). Complete these plays in sequence:
1. No runners on base. A runner is at home, ready to run to first. Hit a ground ball to a fielder (you choose, but don’t tell the fielders where you’re hitting it). The fielder tries to throw the runner out at first (see figure 8.65a).
2. Runner on first. A runner is at home, ready to run to first. Hit a ground ball to a fielder, who makes the appropriate play (prefer-ably to second base to get the lead runner, but depending on the hit, the throw might need to go to first base; see figure 8.65b).
3. Runner on second. A runner is at home, ready to run to first. Hit a ground ball to a fielder, who attempts to hold the runner to second and throw the runner out at first (or throw the runner out at third
(continued)

152
Airtight D (continued)
e2224/asep/fig.08.62b/tomr/rd#2
2B
3B
1
2-
2-1B
SS
P
R2-
3
C
Figure 8.65 Set-up for Airtight D.
e2224/asep/fig.08.62b/tomr/rd#2
2B3B
1
2-
2- 2- 1B
SS
P R
R2-
3
C
e2224/asep/fig.08.62c/tomr/rd#2
2B3B
1
2-
2-
SS
P
R2-
C
R
1B2-3
e2224/asep/fig.08.62d/tomr/rd#2
R3
3B
SS 2B
1B2-
1
C
2-
C
a
b
c
d
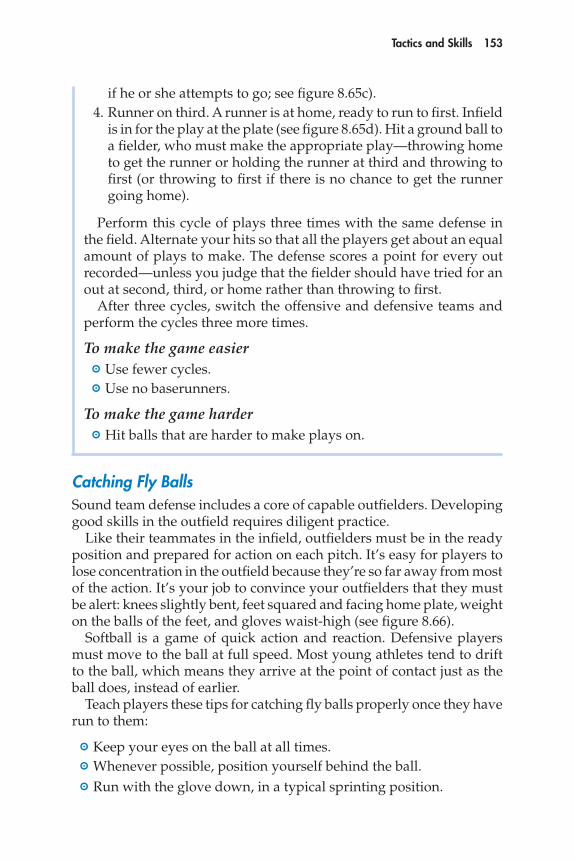
Tactics and Skills 153
if he or she attempts to go; see figure 8.65c). 4. Runner on third. A runner is at home, ready to run to first. Infield
is in for the play at the plate (see figure 8.65d). Hit a ground ball to a fielder, who must make the appropriate play—throwing home to get the runner or holding the runner at third and throwing to first (or throwing to first if there is no chance to get the runner going home).
Perform this cycle of plays three times with the same defense in the field. Alternate your hits so that all the players get about an equal amount of plays to make. The defense scores a point for every out recorded—unless you judge that the fielder should have tried for an out at second, third, or home rather than throwing to first.
After three cycles, switch the offensive and defensive teams and perform the cycles three more times.
To make the game easier Use fewer cycles. Use no baserunners.
To make the game harder Hit balls that are harder to make plays on.
Catching Fly BallsSound team defense includes a core of capable outfielders. Developing good skills in the outfield requires diligent practice.
Like their teammates in the infield, outfielders must be in the ready position and prepared for action on each pitch. It’s easy for players to lose concentration in the outfield because they’re so far away from most of the action. It’s your job to convince your outfielders that they must be alert: knees slightly bent, feet squared and facing home plate, weight on the balls of the feet, and gloves waist-high (see figure 8.66).
Softball is a game of quick action and reaction. Defensive players must move to the ball at full speed. Most young athletes tend to drift to the ball, which means they arrive at the point of contact just as the ball does, instead of earlier.
Teach players these tips for catching fly balls properly once they have run to them:
Keep your eyes on the ball at all times. Whenever possible, position yourself behind the ball. Run with the glove down, in a typical sprinting position.
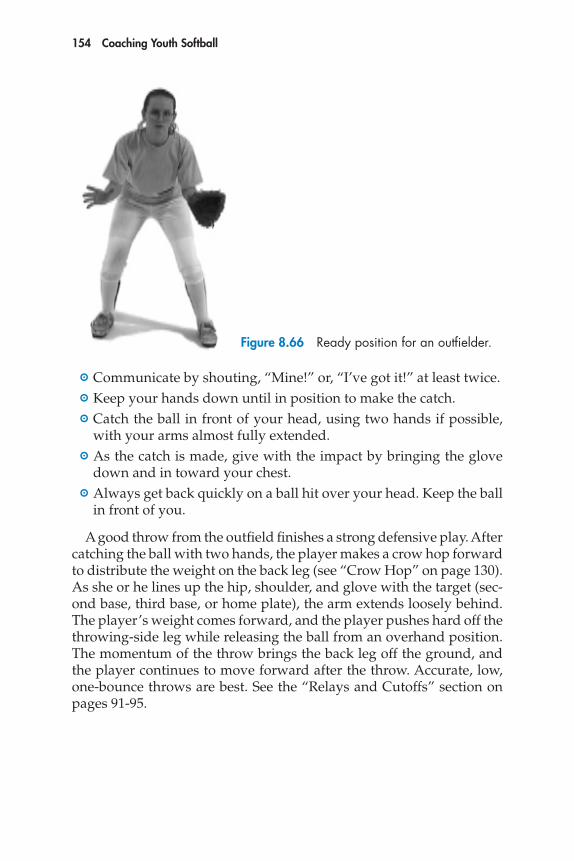
154 Coaching Youth Softball
Communicate by shouting, “Mine!” or, “I’ve got it!” at least twice. Keep your hands down until in position to make the catch. Catch the ball in front of your head, using two hands if possible,
with your arms almost fully extended. As the catch is made, give with the impact by bringing the glove
down and in toward your chest. Always get back quickly on a ball hit over your head. Keep the ball
in front of you.
A good throw from the outfield finishes a strong defensive play. After catching the ball with two hands, the player makes a crow hop forward to distribute the weight on the back leg (see “Crow Hop” on page 130). As she or he lines up the hip, shoulder, and glove with the target (sec-ond base, third base, or home plate), the arm extends loosely behind. The player’s weight comes forward, and the player pushes hard off the throwing-side leg while releasing the ball from an overhand position. The momentum of the throw brings the back leg off the ground, and the player continues to move forward after the throw. Accurate, low, one-bounce throws are best. See the “Relays and Cutoffs” section on pages 91-95.
Figure 8.66 Ready position for an outfielder.
Tactics and Skills 155
(continued)
Catching Fly Balls Game
On THe FlY
GoalTo catch fly balls and throw the ball to the appropriate base
DescriptionPlay 6v6. The defense has three outfielders, two infielders (who will play different positions depending on the play), and a catcher. The offense rotates runners in as needed. Alternate hitting or throwing fly balls to the three outfielders, who must catch the ball and make the appropriate play in each of these situations:
Runner on first, none out. Infielders are at second and short (see figure 8.67a).
Runner on second, none out. Infielders are at second or short and third (see figure 8.67b).
Runner on third, none out. Infielders are at second or short and third (see figure 8.67c).
Runners on first and second, none out. Infielders are at second or short and third (see figure 8.67d).
Runners on second and third, none out. Infielders are at second or short and third (see figure 8.67e).
(For plays to right field, use a second-base player; for plays to center or left, use a shortstop.)
Each outfielder gets a fly ball for each situation. Runners tag up and advance at their own risk. The defense gets one point for every out—whether by fly balls caught or baserunners put out. Subtract a point from the defense if one or more baserunners advance on the play. Keep track of points; switch offense and defense after each outfielder has had five catchable fly balls.
To make the game easier Throw or hit shallower fly balls. Throw or hit fly balls directly at the outfielders.

156
On the Fly (continued)
e2224/asep/fig.08.65e/tomr/rd#2
C
CF
RFLF
1
2-
2-
4
C
3B
3-
3-
SS3-
R
R
e2224/asep/fig.08.65d/tomr/rd#2
R
R
C
CF
RFLF
1
2-
C
3-
2B3-
2-2-3B
3-
e2224/asep/fig.08.65b/tomr/rd#2
R
C
2B
CF
RFLF
1
3-
2-
2-
2-4
C
3B
3-
e2224/asep/fig.08.65c/tomr/rd#2
R
C
CF
RFLF
1
2-
2-
4
C
3B
3-
3-
SS
e2224/asep/fig.08.65a/tomr/rd#2
C
R
2BSS
CF
RFLF
1
3
2-
2-
2-2- 4
C
Figure 8.67 Set-up for On the Fly.
a
b
c
d
e
Tactics and Skills 157
To make the game harder Throw or hit deeper fly balls. Throw or hit fly balls that make the outfielders move.
Catching Line DrivesA line drive is a hard hit that moves directly in a line low to the
ground (usually at the height of the player or lower). Teach your play-ers to try to catch line drives above the waist, if possible. They can do this by crouching down. That way, if they try to catch the ball with the glove fingers up and the ball pops out, they still have the ability to quickly turn the glove over and get the dropped ball.