Embed Size (px)
DESCRIPTION
Army ROTC Warrior Forge (LDAC) Tacsop for 2012.
Citation preview
i
Infantry Platoon Tactical Standing Operating Procedure
This publication is generally comprised of extracts from FM 3-21.8 Infantry Rifle Platoon
and Squad, but also references multiple sources. It provides the tactical standing operating
procedures (TACSOP) for infantry platoons and squads as applied to Warrior Forge (WF),
focusing on ROTC cadet use. The procedures included in this TACSOP apply unless
leadership makes a decision to deviate from them based on METT-TC. Deviations from
this TACSOP must be narrow and apply only to specific situations.
CHAPTER 1: LEADERSHIP................................................................................................1-1
SECTION I: LEADERSHIP DIMENSION........................................................................1-1
SECTION II: LIFE SUPPORT AREA.................................................................................1-2
SECTION III: DUTIES AND RESPONSIBILITIES.............................................................1-3
SECTION IV: DEPLOYMENT PACKING LIST.................................................................1-7
UNIFORM AND EQUIPMENT STANDARDS...........................................1-10
SECTION V: FACE PAINT..................................................................................................1-19
SECTION VI: TRAINING SAFETY & COMPOSITE RISK MANAGEMENT.................1-21
SECTION VII: FORCE SUSTAINMENT..............................................................................1-25
CHAPTER 2: MISSION COMMAND..................................................................................2-1
SECTION I: TROOP LEADING PROCEDURES..............................................................2-1
SECTION II: ORDERS..........................................................................................................2-3
SECTION III: TERRAIN MODEL KIT.................................................................................2-13
CHAPTER 3: LAND NAVIGATION………………………………………………….......3-1
CHAPTER 4: FIRST AID……………………………………………………………..........4-1
EVALUATE A CASUALTY..........................................................................4-1
CONTROL HEMORRHAGE.........................................................................4-4
TRAUMA DRESSING...................................................................................4-5
PRESSURE DRESSING.................................................................................4-6
TOURNIQUET...............................................................................................4-7
TREAT FOR SHOCK.....................................................................................4-8
INSERT AN AIRWAY...................................................................................4-9
TRANSPORT CASUALTY...........................................................................4-10
REQUEST MEDEVAC..................................................................................4-18
CASUALTY CARD.......................................................................................4-22
FLRC KEYS TO SUCCESS..........................................................................4-25
CHAPTER 5: OPERATIONS……………………………………………………………...5-1
SECTION I: FIRE CONTROL AND DISTRIBUTION…………………………….........5-1
SECTION II: COMMUNITIONS.........................................................................................5-2
SECTION III: REPORTS.......................................................................................................5-18
SECTION IV: WEAPONS.....................................................................................................5-20
ii
SECTION V:.. RANGE CARDS AND SECTOR SKETCHES………………………….....5-24
SECTION VI: MOVEMENT………………………………………………………….........5-29
CHAPTER 6: TACTICS.......................................................................................................6-1
SECTION I: UNIT LEADER RESPONSIBILITIES.........................................................6-1
SECTION II: CROSSING DANGER AREAS....................................................................6-1
SECTION III: PATROLLING..............................................................................................6-4
SECTION IV: RAID..............................................................................................................6-6
SECTION V: AMBUSH.......................................................................................................6-9
SECTION VI: PATROL BASE.............................................................................................6-12
SECTION VII: CORDON AND SEARCH............................................................................6-14
CHAPTER 7: CHEMICAL, BIOLOGICAL, RADIOLOGICAL AND NUCLEAR..........7-1
Send recommendations for change with a summary letter to:
DEPARTMENT OF THE ARMY
CDR, 8TH
BDE, TRAINING DIVISION (WF Planning Branch)
BUILDING 11D39, 32ND
STREET
BOX 339500 – MS 83
JOINT BASE LEWIS-MCCHORD, WA 98433-9500
1-1
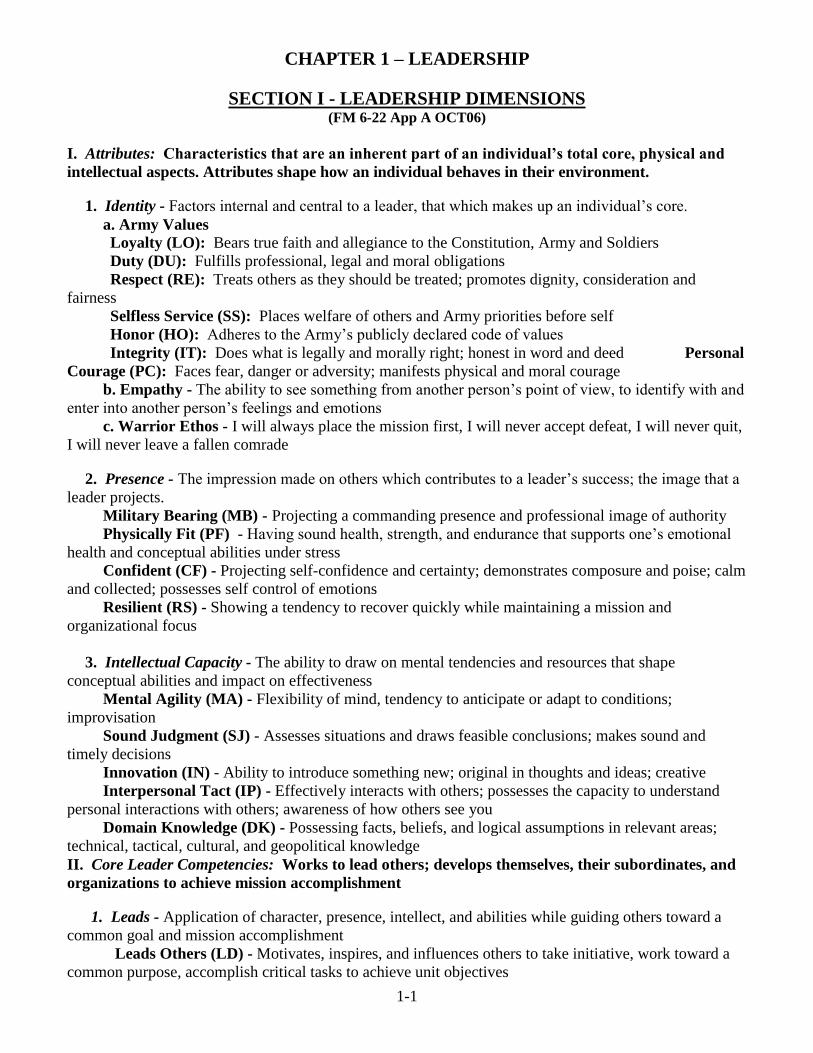
CHAPTER 1 – LEADERSHIP
SECTION I - LEADERSHIP DIMENSIONS (FM 6-22 App A OCT06)
I. Attributes: Characteristics that are an inherent part of an individual’s total core, physical and
intellectual aspects. Attributes shape how an individual behaves in their environment.
1. Identity - Factors internal and central to a leader, that which makes up an individual’s core.
a. Army Values
Loyalty (LO): Bears true faith and allegiance to the Constitution, Army and Soldiers
Duty (DU): Fulfills professional, legal and moral obligations
Respect (RE): Treats others as they should be treated; promotes dignity, consideration and
fairness
Selfless Service (SS): Places welfare of others and Army priorities before self
Honor (HO): Adheres to the Army’s publicly declared code of values
Integrity (IT): Does what is legally and morally right; honest in word and deed Personal
Courage (PC): Faces fear, danger or adversity; manifests physical and moral courage
b. Empathy - The ability to see something from another person’s point of view, to identify with and
enter into another person’s feelings and emotions
c. Warrior Ethos - I will always place the mission first, I will never accept defeat, I will never quit,
I will never leave a fallen comrade
2. Presence - The impression made on others which contributes to a leader’s success; the image that a
leader projects.
Military Bearing (MB) - Projecting a commanding presence and professional image of authority
Physically Fit (PF) - Having sound health, strength, and endurance that supports one’s emotional
health and conceptual abilities under stress
Confident (CF) - Projecting self-confidence and certainty; demonstrates composure and poise; calm
and collected; possesses self control of emotions
Resilient (RS) - Showing a tendency to recover quickly while maintaining a mission and
organizational focus
3. Intellectual Capacity - The ability to draw on mental tendencies and resources that shape
conceptual abilities and impact on effectiveness
Mental Agility (MA) - Flexibility of mind, tendency to anticipate or adapt to conditions;
improvisation
Sound Judgment (SJ) - Assesses situations and draws feasible conclusions; makes sound and
timely decisions
Innovation (IN) - Ability to introduce something new; original in thoughts and ideas; creative
Interpersonal Tact (IP) - Effectively interacts with others; possesses the capacity to understand
personal interactions with others; awareness of how others see you
Domain Knowledge (DK) - Possessing facts, beliefs, and logical assumptions in relevant areas;
technical, tactical, cultural, and geopolitical knowledge
II. Core Leader Competencies: Works to lead others; develops themselves, their subordinates, and
organizations to achieve mission accomplishment
1. Leads - Application of character, presence, intellect, and abilities while guiding others toward a
common goal and mission accomplishment
Leads Others (LD) - Motivates, inspires, and influences others to take initiative, work toward a
common purpose, accomplish critical tasks to achieve unit objectives
1-2
Extends Influence Beyond CoC (EI) - Uses indirect means to influence others outside normal
chain of command; involves diplomacy, negotiation, conflict resolution, and mediation
Leads by Example (LE) - Provides the example to others; serves as a role model; maintains high
standards in all aspects of behavior and character
Communicates (CO) - Clearly expresses ideas to ensure understanding, actively listens to others,
and practices effective communication techniques
2. Develops - Taking actions to foster teamwork, encourage initiative, and to accept personal
responsibility while demonstrating care
Creates a Positive Environment (CP) - Creates a positive and ethical environment
Prepares Self (PS) - Self-study; self-development toward becoming multi-skilled; ensures
preparation for leadership
Develops Others (DO) - Encourages and supports others to grow as individuals and teams;
prepares others for success; makes the organization more versatile
3. Achieves - Sets objectives and focuses on mission accomplishment
Gets Results (GR) - Structuring what needs to be done so results are consistently produced;
developing and executing plans while providing direction, guidance, and clear priorities towards mission
accomplishment; manages the resources required for mission accomplishment
SECTION II - Life Support Area (LSA) Overview at Warrior Forge
Barracks - Upon arrival at LDAC, cadets will be housed in WWII-era open-bay barracks. Each building
accommodates up to 50 cadets. The limited number of latrines and showers in each building are
augmented by separate shower buildings and chemical latrines in the barracks area. Most barracks also
contain one washer and dryer; however these are intended only for occasional use. Cadets are expected to
utilize the bulk laundry service provided. Cadets will stay in the barracks for the first four or five days of
LDAC while they complete in-processing orientation, then occupy bivouac sites, assembly areas, and
tactical training bases as they progress through the individual and unit training and tactical deployment
phases. At the completion of the tactical phase, cadets will return to the barracks for the final seven or
eight days of LDAC.
Bivouac (BIV) Sites - Bivouac sites are non-tactical sleeping areas with limited support facilities; usually
only chemical latrines, water trailers, and trash dumpsters. Cadets will either construct individual poncho
shelters or simply use sleeping bags with bivouac covers for nighttime shelter. Bivouac sites are utilized
during Land Navigation, Cultural Awareness, and U.S. Weapons training.
Assembly Areas (AA) - Assembly areas are non-tactical semi-permanent military compounds. They
contain sleeping tents (GP Medium tents with flooring and cots to accommodate up to 18 cadets), a
command post with radio and telephone communications and electric power, a medical aid station, lighted
mess/meeting tents, shower trailers, chemical latrines, personal hygiene stations, water trailers, and trash
dumpsters. AAs are enclosed in a concertina wire perimeter fence and have exterior lighting. There are
no lights in the sleeping tents however so cadets will need personal flashlights/headlamps. Cadets will
spend four nights in an assembly area during CBRN, Confidence 1, First Aid, and FLRC training.
Tactical Training Bases (TTB) - Tactical training bases are tactical (temporary) military compounds.
The internal arrangement of the TTBs is similar to the AA with the same sustainment facilities. External
differences include a perimeter wire mesh fence covered with sniper screening to prevent long-range
observation of occupants, guard towers, and entry control points (ECPs) equipped with concertina wire
1-3
and Hesco barriers and movable barricades. Cadets will occupy a tactical training base for six nights
during the tactical phase of LDAC while conducting Squad Tactical Exercises (STX) and preparing for
Patrolling. While in the TTB, cadets will conduct security operations to include manning the guard
towers, operating the ECPs, and reacting to non-combatant and enemy activity.
Patrol Base (PB) - Patrol bases are temporary, usually clandestine, sites without facilities other than
chemical latrines. Patrol bases are used by small units (squads and platoons) during tactical operations for
maintenance, resupply, planning, and rest. Cadets will occupy patrol bases during Squad Maneuver
training and during the Patrolling exercise in the tactical phase of LDAC.
SECTION III - DUTIES AND RESPONSIBILITIES (FM 3-21.10 Chap 1, Sect IV JUL06)
COMPANY COMMANDER (CO) - leads by personal example and responsible for everything the
company does or fails to do. Principle duties include the key areas of tactical employment, training,
administration, personnel management, maintenance, force protection, and sustainment of the company.
Given the asymmetrical, noncontiguous environment, he must now integrate and synchronize a greater
mix of forces for full spectrum operations, including other combined arms and combat support elements,
civil affairs (CA), psychological operations (PSYOP), interpreters, media, unmanned aerial system (UAS)
and robotics teams. Among other things, the commander:
- Mission Command through subordinate leaders.
- Employs company to accomplish its mission according to battalion commander's intent and concept.
- Selects the best location to maneuver the platoons and other elements.
- Conducts mission analysis and troop-leading procedures (TLP) and issues operation orders for
company tactical operations.
- Maintains and expresses situation awareness and understanding.
- Resources the platoons and other elements and requests battalion support when needed.
- Ensures the company command post (CP) effectively battle tracks the situation and status.
- Provides timely and accurate tactical picture to battalion commander and subordinate units.
- Implements measures for force protection, security, and accountability of forces and systems.
- Develops the leadership and tactical skill of platoon leaders.
Warrior Forge (Cadet Company Commander)
-Coordinate with the company cadre for detailed instructions.
-Organize, control and move the Cadet Company.
-Develop a Cadet OPORD for the days of training. Publish the OPORD to Cadet PLs.
-Promote effective time management.
-Properly and efficiently manage subordinates.
EXECUTIVE OFFICER (XO) - Second in command. Primary role is to assist the commander in
mission planning and accomplishment. Assumes command of the company as required and ensures that
tactical reports from platoons are forwarded to battalion tactical operations center (TOC). Locate where to
maintain communications with the company commander and battalion. Along with the 1SG, plans and
supervises the company's sustainment operations; ensures that pre-combat inspections are complete. Plans
and coordinates logistical support with agencies outside the company while the 1SG does the same
internally. Prepares, or aids in preparing, paragraph four of the company operation order (OPORD). Assist
the company commander in planning the mission. Coordinate with higher headquarters, adjacent and
supporting units. May aid in control of critical events of the battle such as a passage of lines, bridging a
gap, breaching an obstacle or may assume control of a platoon attached to the company during movement.
1-4
Might lead a quartering party, an element consisting of representatives of various company elements
whose purpose is to precede the company and reconnoiter, secure, and mark an assembly area. Might lead
a detachment with other tactical tasks, including shaping or sustaining force leader in a company raid or
attack, control company machine guns, or mortar section. May also—
- Lead the reserve. Lead the detachment left in contact during a withdrawal.
- Control attachments to the company.
- Serve as movement control officer.
Warrior Forge (Cadet Company XO)
- Coordinate with cadre support staff for supplies, transportation and equipment to support training.
- Perform duties as assistant to the CO.
- Act as CO in the absence of the commander.
- Act as liaison between PLs and CO.
- Coordinate and follow up as the CO directs.
- Supervise distribution of supplies and equipment.
- Establish bivouac sites.
- Serve as the Company Safety Officer (prepare OPORD’s safety paragraph).
FIRST SERGEANT (1SG) - leads by personal example and is responsible for everything the company
does or fails to do. The senior noncommissioned officer (NCO) and normally the most experienced
Soldier in the company. The commander's primary tactical advisor and expert on individual and NCO
skills. Helps the commander plan, coordinate, and supervise all activities that support the unit mission.
Operates where the commander directs or where can best influence a critical point or what is viewed as
the unit's decisive point. In addition:
- Supervises routine operations, including enforcing tactical standing operating procedures; planning
and coordinating both training and full spectrum operations; and administering replacement operations,
logistics, maintenance, communications, field hygiene, and casualty evacuation operations.
- Supervises, inspects, and influences matters designated by the commander as well as areas that
depend on expertise such as Soldier care, force protection, security, and accountability.
- Assists the XO and keeps self prepared to assume the XO's duties, if needed.
- Leads task-organized elements or subunits for the company's shaping effort or designated missions.
Warrior Forge (Cadet Company 1SG)
- Organize the company for formations.
- Organize details to accomplish company tasks.
- Prepare and submit morning personnel reports.
- Monitor Cadet sick call and account for all absences during the day.
- Control the company’s movement.
- Supervise field mess feeding.
- Perform other duties as the CO may direct.
- Enforce First Call and Lights Out.
- Utilize Cadet PSGs to accomplish company-wide requirements.
PLATOON LEADER (PL) - Responsible for all the platoon does or fails to do. In the conduct of duties,
consults platoon sergeant in all matters related to the platoon. Knows Soldiers and therefore how to
employ the platoon and its organic and supporting weapons. During operations, the platoon leader—
1-5
- Leads platoon in supporting higher headquarters missions. Bases actions on assigned mission and
intent and concept of higher commanders.
- Maneuvers squads and fighting elements.
- Synchronizes the efforts of squads.
- Looks ahead to the next ―move‖ for the platoon.
- Requests and controls supporting assets.
- Employs C2 systems available to the squads and platoon.
- Ensures 360-degree, three-dimensional security is maintained
- Controls the emplacement of key weapon systems.
- Issues accurate and timely reports.
- Places self where most needed to accomplish the mission.
- Assigns clear tasks and purposes to squads.
- Understands the mission and commanders’ intent two levels up (the company and battalion).
The platoon leader works to develop and maintain situational understanding (SU) by:
- attempting to know what is happening in the present in terms of friendly, enemy, neutral, and terrain
situations.
- knowing the end-state that represents mission accomplishment.
- determining critical actions and events that must occur to move unit from present to end-state.
-assessing risk throughout all phases of operations.
Warrior Forge (Cadet Platoon Leader)
- Coordinate with the CO and XO.
- Control platoon organization.
- Complete all required platoon tasks.
- Establish platoon plan of action.
- Create and issue platoon operations orders (OPORD).
- Conduct platoon inspections and rehearsals.
- Organize physical training activities.
PLATOON SERGEANT (PSG) - Senior NCO in the platoon and second in command. Sets the example
in everything. Tactical expert in Infantry platoon and squad operations, including maneuver of platoon-
sized elements and employment of all organic and supporting weapons. Advises the PL in all
administrative, logistical, and tactical matters. Responsible for the care of personnel, weapons, and
equipment of the platoon. As second in command, assumes duties as assigned by the PL. Traditionally—
- Ensures platoon is prepared to accomplish mission, to include supervising pre-combat checks and
inspections.
- Prepares to assume the role and responsibilities of platoon leader.
- Acts where best needed to help mission command the engagement (either in base of fire or with
assault element).
- Receives squad leaders’ administrative, logistical, and maintenance reports, and requests for rations,
water, fuel, and ammunition.
- Coordinates with higher headquarters to request logistical support (usually 1SG or XO).
- Manages platoon’s combat load prior to operations and monitors logistical status during operations.
1-6
- Establishes and operates platoon’s casualty collection point (CCP), including directing platoon
medic and aid/litter teams in moving casualties; maintains platoon strength levels information;
consolidates and forwards platoon’s casualty reports; receives and orients replacements.
- Employs digital mission command systems available to the squads and platoon.
- Understands the mission and commanders intent two levels up (the company and battalion).
Warrior Forge (Cadet Platoon Sergeant)
- Assist the PL.
- Coordinate with Cadet 1SG and Cadet SLs.
- Organize platoon formations.
- Account for platoon attendance.
- Prepare and submit morning reports.
- Control sick call and account for absences.
- Supervise issue/turn in of supplies and equipment.
- Supervise barracks maintenance.
- Control movement of the platoon.
SQUAD LEADER (SL) - Senior Infantryman in the squad, is responsible for all the squad does or fails
to do. Directs team leaders and leads by personal example. Has authority over subordinates and overall
responsibility for those subordinates’ actions. Centralized authority enables the SL to act decisively while
maintaining troop discipline and unity. Even in the course of carefully-planned actions, must accomplish
assigned missions using initiative without constant guidance from above. Responsible for the care of
personnel, weapons, and equipment. During operations, the squad leader—
- Is SME on all battle drills and individual drills?
- Is SME in squad’s organic weapons employment and the employment of supporting assets?
- Knows weapon effects, surface danger zone(s) (SDZ), and risk estimate distance(s) (RED) for all
munitions.
- Effectively uses control measures for direct fire, indirect fire, and tactical movement.
- Controls movement of squad and its rate and distribution of fire (including call for and adjust fire).
- Fights the close fight by fire and movement with two fire teams and available supporting weapons.
- Selects the fire team general locations and sectors in the defense.
- Communicates timely and accurate spot reports (SPOTREPs) and status reports, including—
o Size, activity, location, unit, time, and equipment (SALUTE) SPOTREPs.
o Status to PL (including squad location and progress, enemy situation, enemy killed in action [KIA],
and security posture).
o Status of ammunition, casualties, and equipment to the PSG.
- Employs digital C2 systems available to the squad and platoon.
- Operates in any environment to include the urban environment.
- Conducts troop-leading procedures (TLP).
- Assumes duties as the PSG or PL as required.
- Understands the mission and commander’s intent two levels up (platoon and company).
Warrior Forge (Cadet Squad Leader)
- Ensure the squad is in proper uniform with proper equipment for training.
- Lead and supervise up to 13 squad members.
- Ensure that the squad draws all necessary equipment and rations required for training.
- Personally prepare and inspect the squad for all missions.
1-7
- Keep squad accountability and report to the PSG.
- Control movement of the squad.
- Prepare and submit reports.
- Prepare and issue the squad operation order (OPORD).
SECTION IV – DEPLOYMENT PACKING LIST This packing list consists of items on the Warrior Forge Cadet Checklist (CC 145-05) and is
supplemented by a Warrior Forge CIF draw.
Basic Issue Items (BII) are the items issued by the government at the university, Warrior Forge
Central Issue Facility (CIF) and the regiment. Additional Authorized Items (AAI) are not required
items but can be purchased at the cadet’s expense to aid training or increase convenience. WF or
the government will not pay for any of these items, but here are some suggested (not limited to)
AAIs: Micro fleece cap, moisture wicking socks, gloves other than US Army issue i.e. nomex,
shooters however palm must be leather(tan, black, green, ACU pattern), optional boots, etc.
1. CARRIED OR WORN
a. ACU (COMPLETE), **BOOTS
b. HELMET, KEVLAR OR ACH (Name in Block Letter Professional Looking with Permanent
Marker and Sewn on is Authorized. No other marking is authorized.)
c. ID TAGS worn IAW AR 670-1 W/MED TAGS (If required)
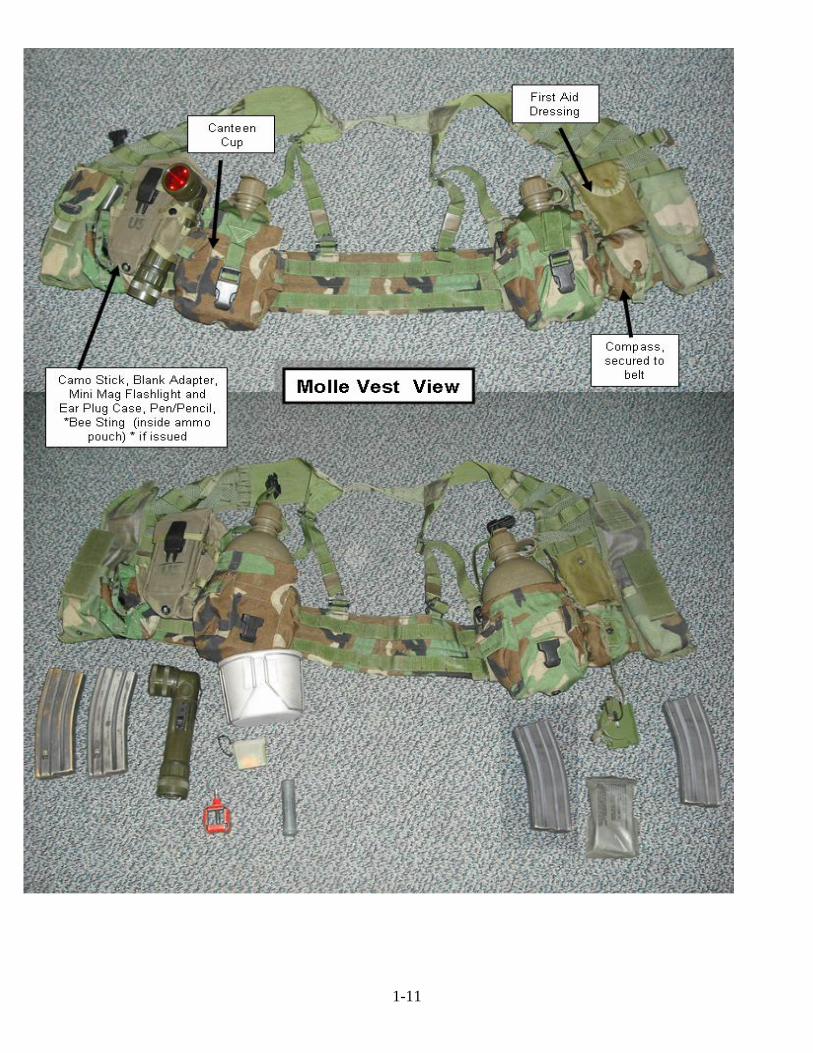
d. MOLLE LBV (LOAD BEARING VEST), TO INCLUDE:
1) POUCH, 30RD MAGAZINE, 3 EA
2) MAGAZINES, 4 EA
3) POUCH, CANTEEN, 2 EA
4) CUP, CANTEEN (Inside left canteen cover)
5) FIRST-AID CASE W/DRESSING (Front right of vest) (OPTIONAL ITEM)
6) FLASHLIGHT Elbow type or Mini-Mag w/red lens & extra batteries. (Mini-Mag inside
left ammo pouch, elbow type secured in grenade carrier on left ammo pouch)
7) POUCH, GRENADE, 2 EA
8) LENSATIC COMPASS (In right grenade pouch, secured with lanyard to waist belt)
9) EARPLUG CASE W/EARPLUGS (Inside left ammo pouch)
10) CAMO STICK/COMPACT (Green, Loam or ACU color) (Inside left ammo pouch)
e. TACSOP (waterproof inside ACU cargo pocket)
f. M-16 RIFLE W/BLANK ADAPTER (Store blank adapter inside left ammo pouch)
g. MAP AND PROTRACTOR (Right trouser cargo pocket)
h. NOTEBOOK W/PEN & PENCIL( Left cargo pocket)
i. KNEE & ELBOW PADS (WHEN DIRECTED) or (IN RUCK WHEN NOT WORN)
j. GLOVES, LEATHER (WHEN DIRECTED) or (IN RUCK WHEN NOT WORN)
k. EYE PROTECTION (WHENEVER WEARING ACH/HELMET)
l. WATCH
m. PACE COUNT BEADS (ATTACHED TO LBV)
n. WHISTLE (ATTACHED TO LBV)
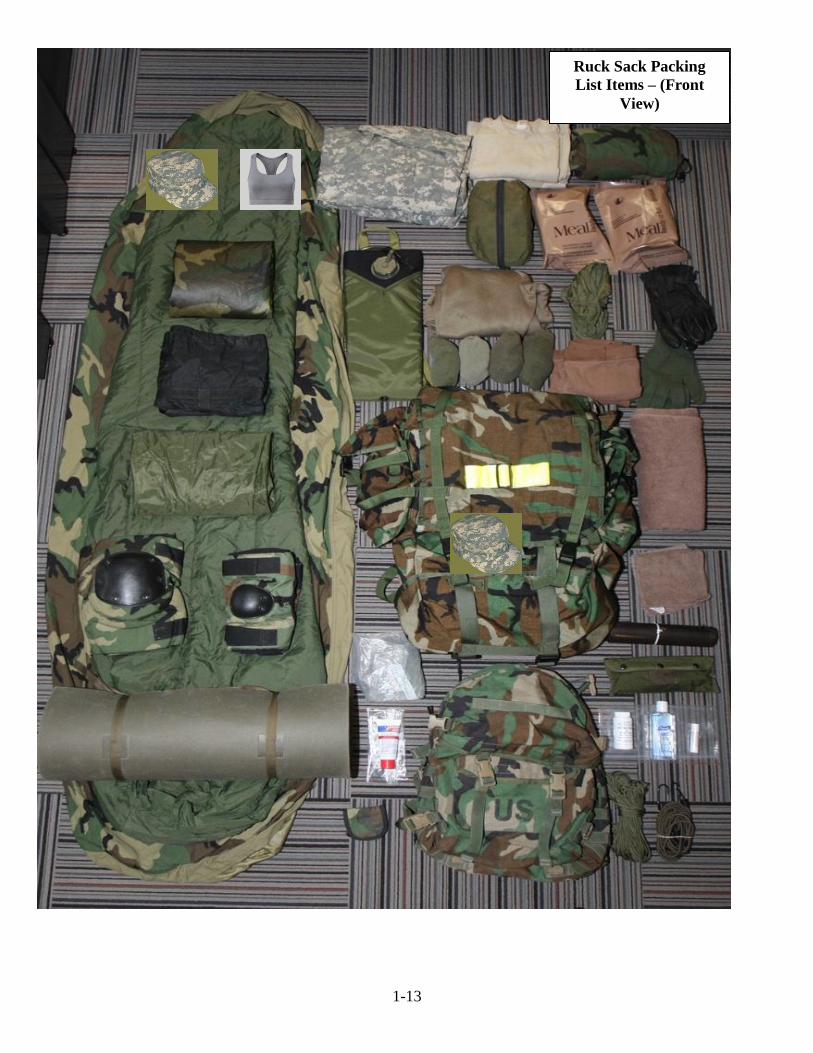
2. RUCK SACK
a. BAG, WATERPROOF
1) ACU TOP & BOTTOM, 1 EA
1-8
2) T-SHIRTS, TAN (3 EA MINIMUM), SOCKS (3 PR MINIMUM)
3) POLY PRO COLD WEATHER TOP
4) PERSONAL HYGIENE KIT (FEMALES include famine/hygiene products)
5) BATH TOWEL (Dark Solid Color)
6) WASHCLOTH, 2 EA (Dark Solid Color)
7) BRA, 2 EA (FEMALES)
8) COTTON UNDERWEAR, 3 EA (OPTIONAL)
b. LINER, PONCHO
c. PARKA W/W( right sustainment pouch)
d. WEAPONS CLEANING KIT( inside Center Pocket)
e. 550 CORD (inside top flap min 50 ft)
f. PATROL CAP( inside top flap, Worn or in Ruck)
g. TERRAIN MODEL KIT (See Chapter 2 pg 2-5)
h. BUNGEE CORDS, 4 EA
i. MREs, 2 EA (ISSUED BY REGIMENT WHEN REQUIRED)
j. TRASH BAGS, 2 EA (in center pocket)
k. INSECT REPELLENT/SUNSCREEN COMBINATION IN ZIPLOC BAG
l. FOOT POWDER IN ZIPLOC BAG
m. CARRIER, HYDRATION w/BLADDER (secured under top flap of rucksack or Worn)
n. PAD, SLEEPING (secured on top of rucksack)
o. MOLLE SLEEP SYSTEM includes: STUFF SACK(Black), BIVY COVER (Gore-Tex),
PATROL SLEEPING BAG(Green)
p. MOSQUITO HEAD NET(IF ISSUED in center pocket)
q. REFLECTIVE BELT (secured around outside of rucksack WHEN DIRECTED)
r. SEWING KIT, MOLESKIN, HAND SANTITIZER, FLEECE CAP,CHAP STICK, NECK
GATOR (Some AAI, but NOT Required)
s. ASSAULT PACK
t. PONCHO
u. **COMBAT BOOTS**
v. LAUNDRY BAG
3. A BAG
a. BAG, WATERPROOF:
1) ACU TOP & BOTTOM, 4 EA
2) SOCKS, 4 EA (recommended more due to field time)
3) UNDERSHIRT, 4 EA (recommended more due to field time)
4) COTTON UNDERWEAR, 4 EA (recommended more due to field time)
5) T-SHIRT, IPFU, 2 EA
6) TRUNKS, IPFU, 2 EA
7) BATH TOWEL, 2 EA
8) WASHCLOTH
9) WHITE SOCKS, 2 EA
b. PARKA, GORTEX
c. PADLOCK
d. SHOWER SHOES
e. RUNNING SHOES
f. BRA (Females)
g. POLY PRO COLD WEATHER BOTTOM
1-9
h. TROUSERS W/W
i. LAUNDRY BAG, 1 EA
j. SET OF VELCRO (Name Tapes/US Flag/Unit Patch (Name Tapes/US Army/Skill Badges are
authorized to be sewn on).
k. DUFFLE BAG (Shoe Tag provided by the REGT and each PLT will have a different marking to
help identify Platoon movement to AA/TTBs.)
l. BUTT PACK from MOLLE KIT
m. COMBAT BOOTS (OPTIONAL placement during Patrolling phase)
n. ADDITIONAL PERSONAL HYGIENE ITEMS
4. ASSAULT PACK – (WHEN WORN) will contain but not limited to 1 MRE, 2 PR socks, 1 T-Shirt,
Wet Weather Top, Poncho, Poncho Liner, Weapons Cleaning Kit and additional items according to
mission requirements.
5. B BAG
a. COTTON UNDERWEAR, BRA (Females)
b. ACU TOP & BOTTOM
c. IPFU JACKET, IPFU PANTS
d. T-SHIRT, IPFU, TRUNKS, IPFU
e. WHITE SOCKS, 4PR
f. PADLOCKS, 2 EA
g. T-SHIRT, TAN, 2EA
h. SOCKS, 2 EA
i. PATROL CAP
*ARMY COMBAT BOOTS – (HOT WEATHER AND TEMPERATE WEATHER) MADE OF TAN
ROUGH SIDE OUT CATTLEHIDE LEATHER WITH A PLAIN TOE AND TAN RUBBER
OUTSOLES. THE BOOTS ARE LACED DIAGONALLY WITH TAN LACES, WITH THE EXCESS
LACE TUCKED INTO THE TOP OF THE BOOT UNDER THE BLOUSED TROUSERS, OR
WRAPPED AROUND THE TOP OF THE BOOT. METAL CLEATS AND SIDE TABS, AND SEWN-
IN OR LACED-IN ZIPPER INSERTS ARE NOT AUTHORIZED. A RUBBER OUTSOLE IS THE
ONLY OUTSOLE MATERIAL THAT CURRENTLY MEETS THE NEED FOR DURABILITY AND
TRACTION ON SURFACES. OTHER MATERIALS (THAT MAY BE OF A LIGHTER WEIGHT)
MAY HAVE SIGNIFICANT PROBLEMS IN THESE AREAS.
**OPTIONAL/COMMERCIAL BOOTS - SOLDIERS MAY WEAR COMMERCIAL BOOTS OF A
DESIGN SIMILAR TO THAT OF THE ARMY COMBAT BOOT (TAN), 8 TO 10 INCHES IN
HEIGHT AS AUTHORIZED BY THE COMMANDER. THE BOOTS MUST BE MADE OF TAN
ROUGH SIDE OUT CATTLEHIDE LEATHER, WITH A PLAIN TOE, AND HAVE A TAN, RUBBER
OUTSOLE. SOLDIERS MAY WEAR OPTIONAL BOOTS IN LIEU OF THE STANDARD ISSUE
ARMY COMBAT BOOTS (TAN) - HOT WEATHER AND TEMPERATE WEATHER; HOWEVER,
THEY DO NOT REPLACE ISSUE BOOTS AS A MANDATORY POSSESSION ITEM. OPTIONAL
BOOTS ARE NOT AUTHORIZED FOR WEAR WHEN THE COMMANDER ISSUES AND
PRESCRIBES STANDARD ORGANIZATIONAL FOOTWEAR FOR SAFETY OR
ENVIRONMENTAL REASONS. UNAUTHORIZED BOOTS INCLUDE BUT ARE NOT LIMITED
TO CORCORAN JUMP BOOTS, TANKERS BOOTS, BOOTS W/ ZIPPERS OR ANY OTHER
BOOTS NOT IN COMPLIANCE WITH AR 670-1.
1-10
UNIFORM AND EQUIPMENT STANDARDS
Right Cargo: MAP, Protractor
Compass in grenade pouch secured to waist belt
Camo Stick, Blank Adapter, Mini Mag or Army Elbow type Flashlight, Ear Plug Case, Pen/Pencil, Bee Sting Kit (if issued)
Cadet Uniform Eye protection w/clear lenses
TACSOP
(Inside pocket of
LBV)
1-11
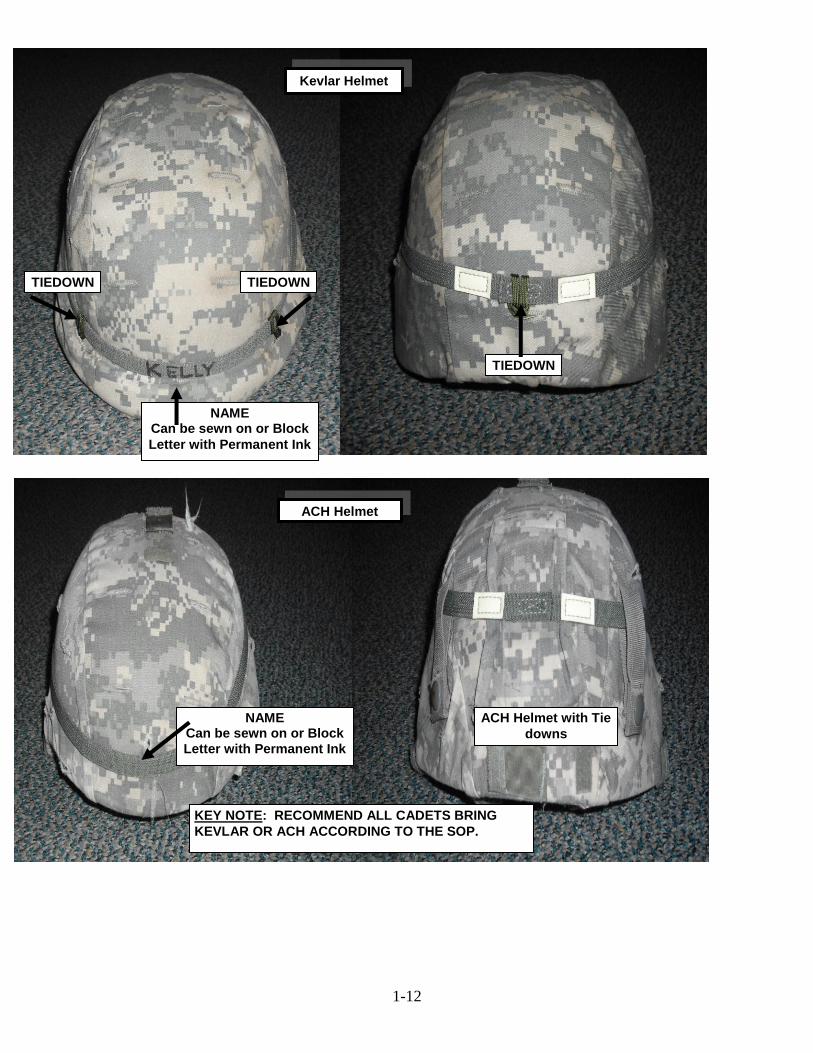
1-12
ACH Helmet with Tie
downs
ACH Helmet
NAME Can be sewn on or Block
Letter with Permanent Ink
KEY NOTE: RECOMMEND ALL CADETS BRING
KEVLAR OR ACH ACCORDING TO THE SOP.
TIEDOWN TIEDOWN
TIEDOWN
NAME Can be sewn on or Block
Letter with Permanent Ink
Kevlar Helmet
1-13
Ruck Sack Packing
List Items – (Front
View)
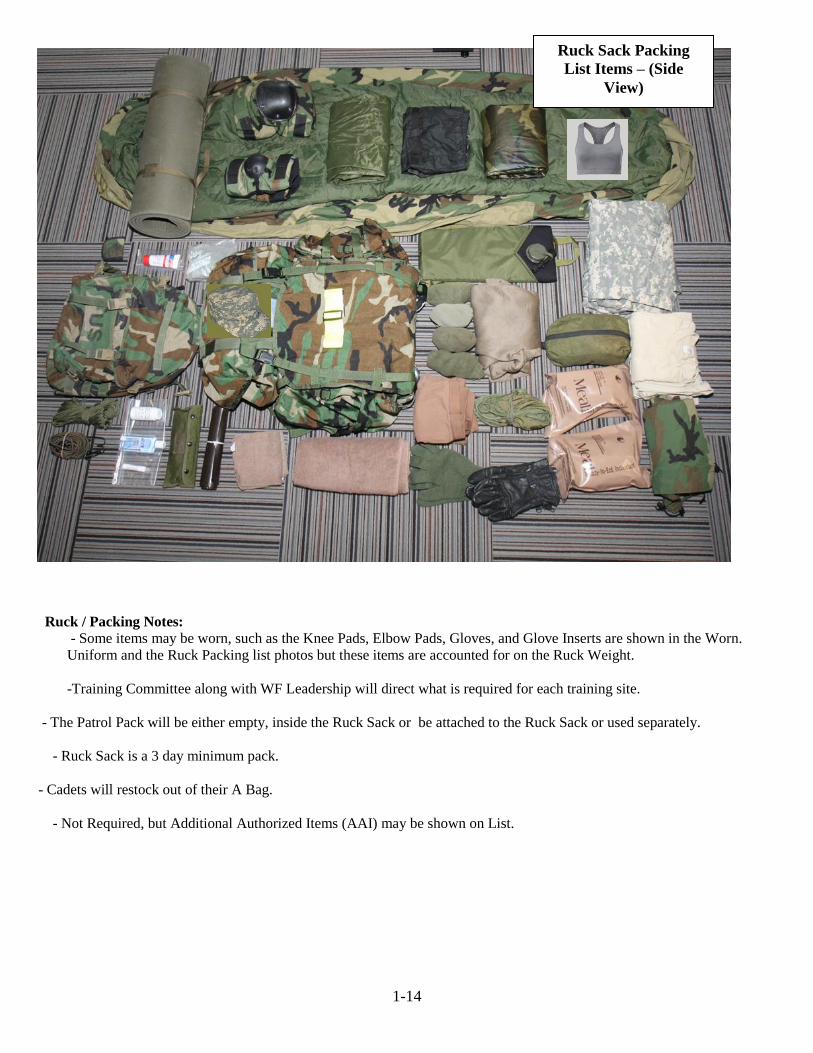
1-14
Ruck / Packing Notes:
- Some items may be worn, such as the Knee Pads, Elbow Pads, Gloves, and Glove Inserts are shown in the Worn.
Uniform and the Ruck Packing list photos but these items are accounted for on the Ruck Weight.
-Training Committee along with WF Leadership will direct what is required for each training site.
- The Patrol Pack will be either empty, inside the Ruck Sack or be attached to the Ruck Sack or used separately.
- Ruck Sack is a 3 day minimum pack.
- Cadets will restock out of their A Bag.
- Not Required, but Additional Authorized Items (AAI) may be shown on List.
Ruck Sack Packing
List Items – (Side
View)
1-15
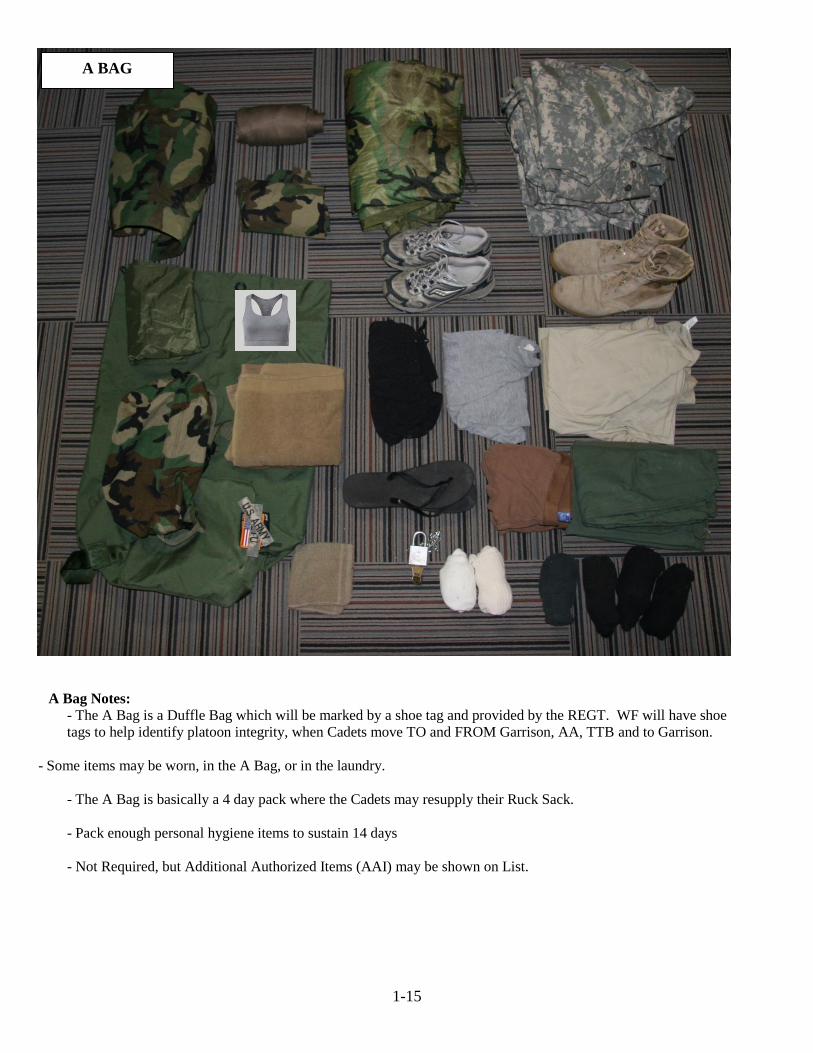
A Bag Notes:
- The A Bag is a Duffle Bag which will be marked by a shoe tag and provided by the REGT. WF will have shoe
tags to help identify platoon integrity, when Cadets move TO and FROM Garrison, AA, TTB and to Garrison.
- Some items may be worn, in the A Bag, or in the laundry.
- The A Bag is basically a 4 day pack where the Cadets may resupply their Ruck Sack.
- Pack enough personal hygiene items to sustain 14 days
- Not Required, but Additional Authorized Items (AAI) may be shown on List.
A BAG
1-16
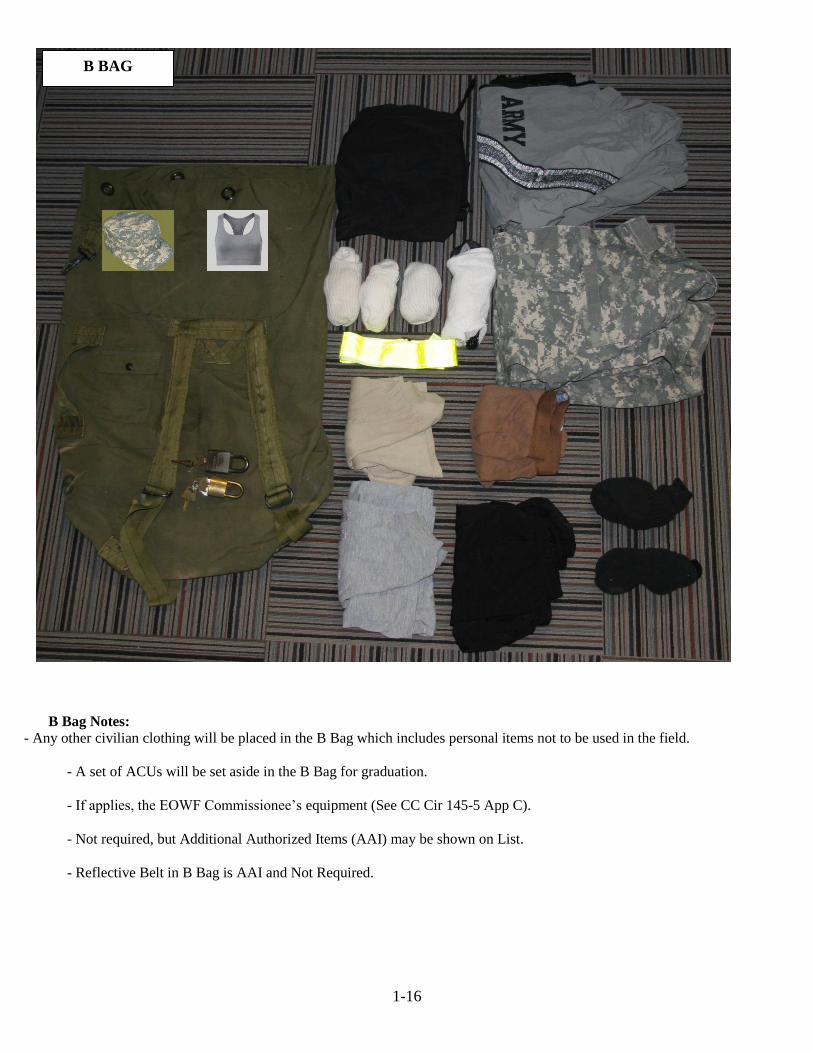
B Bag Notes:
- Any other civilian clothing will be placed in the B Bag which includes personal items not to be used in the field.
- A set of ACUs will be set aside in the B Bag for graduation.
- If applies, the EOWF Commissionee’s equipment (See CC Cir 145-5 App C).
- Not required, but Additional Authorized Items (AAI) may be shown on List.
- Reflective Belt in B Bag is AAI and Not Required.
B BAG
1-17
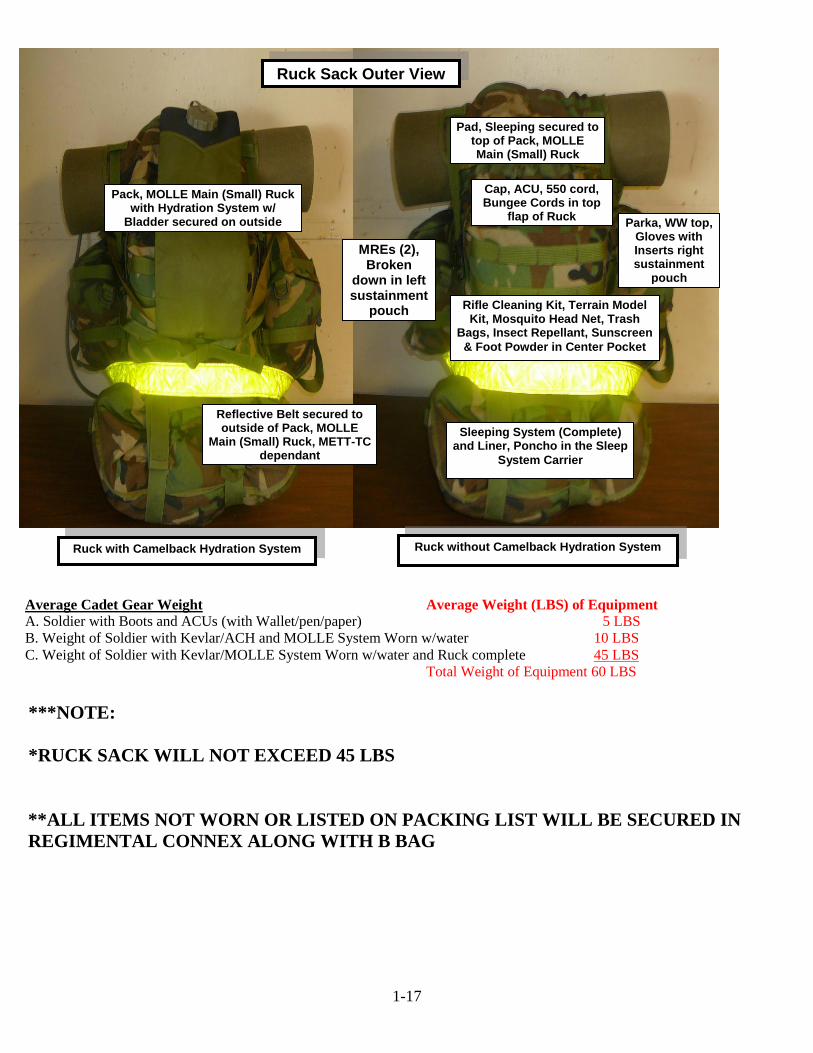
Average Cadet Gear Weight Average Weight (LBS) of Equipment
A. Soldier with Boots and ACUs (with Wallet/pen/paper) 5 LBS
B. Weight of Soldier with Kevlar/ACH and MOLLE System Worn w/water 10 LBS
C. Weight of Soldier with Kevlar/MOLLE System Worn w/water and Ruck complete 45 LBS
Total Weight of Equipment 60 LBS
***NOTE:
*RUCK SACK WILL NOT EXCEED 45 LBS
**ALL ITEMS NOT WORN OR LISTED ON PACKING LIST WILL BE SECURED IN
REGIMENTAL CONNEX ALONG WITH B BAG
Pack, MOLLE Main (Small) Ruck with Hydration System w/
Bladder secured on outside
Cap, ACU, 550 cord, Bungee Cords in top
flap of Ruck
Rifle Cleaning Kit, Terrain Model Kit, Mosquito Head Net, Trash
Bags, Insect Repellant, Sunscreen
& Foot Powder in Center Pocket
MREs (2), Broken
down in left sustainment
pouch
Reflective Belt secured to outside of Pack, MOLLE
Main (Small) Ruck, METT-TC dependant
Pad, Sleeping secured to top of Pack, MOLLE Main (Small) Ruck
Ruck Sack Outer View
Sleeping System (Complete) and Liner, Poncho in the Sleep
System Carrier
Parka, WW top, Gloves with Inserts right sustainment
pouch
Ruck with Camelback Hydration System Ruck without Camelback Hydration System
1-18
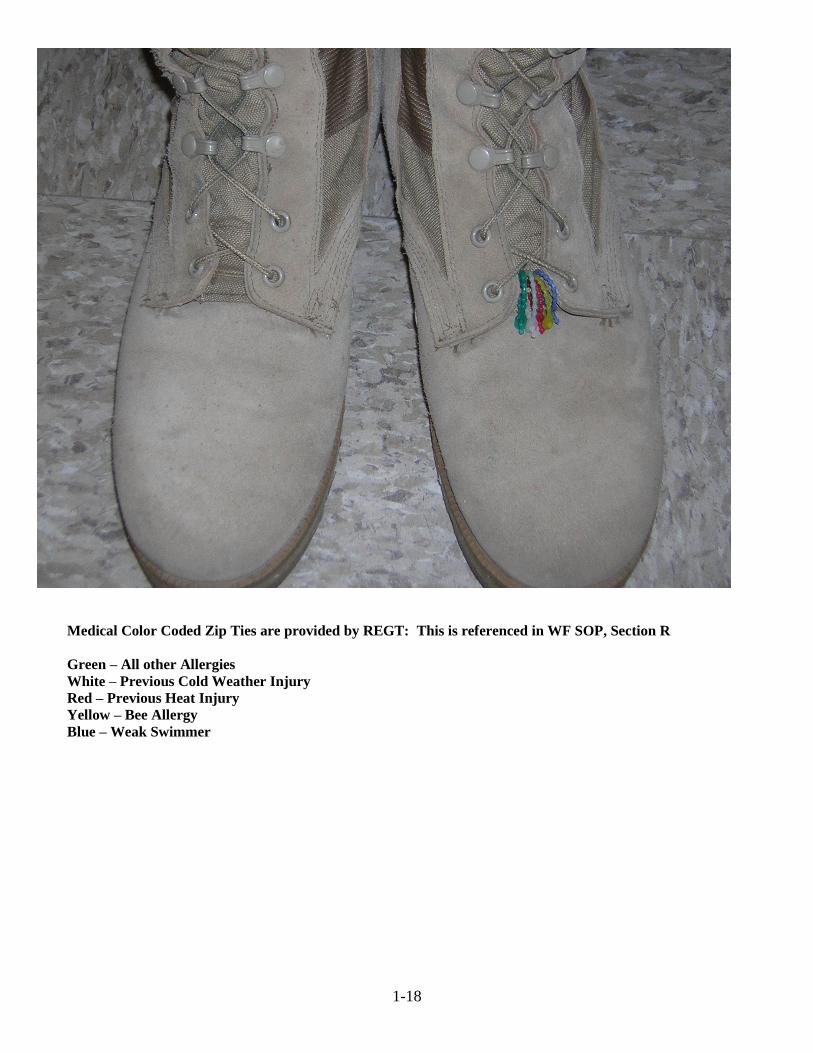
Medical Color Coded Zip Ties are provided by REGT: This is referenced in WF SOP, Section R
Green – All other Allergies
White – Previous Cold Weather Injury
Red – Previous Heat Injury
Yellow – Bee Allergy
Blue – Weak Swimmer
1-19
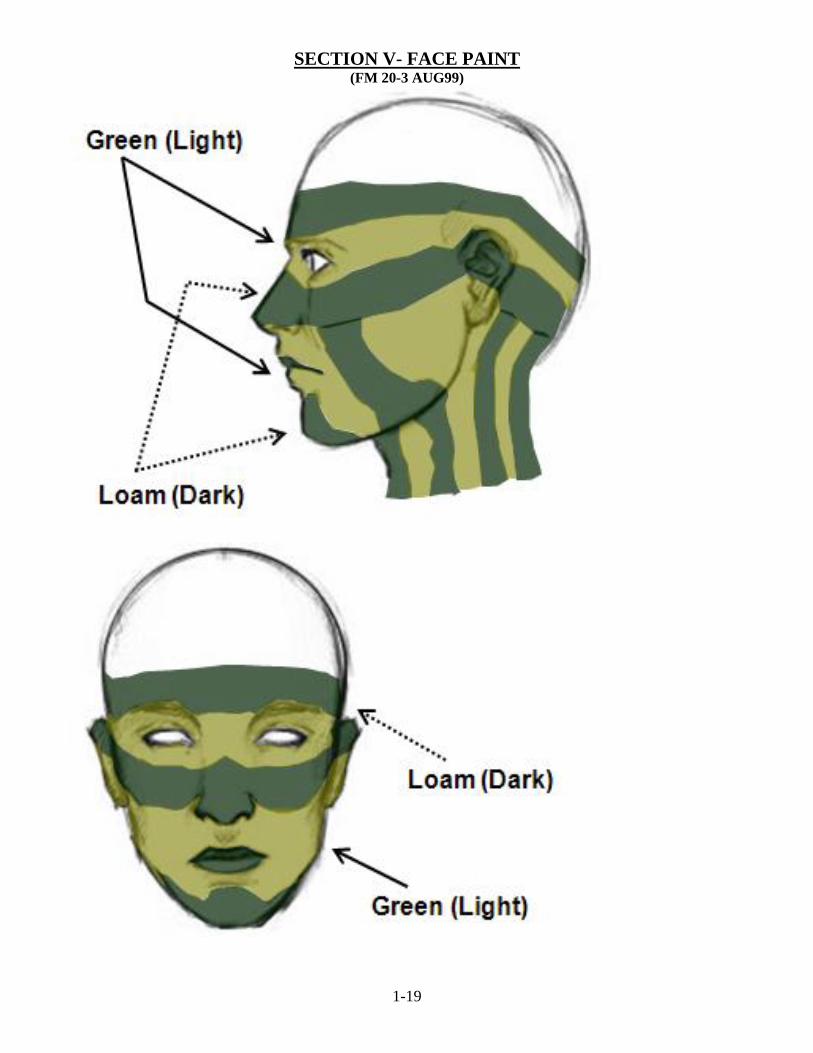
SECTION V- FACE PAINT (FM 20-3 AUG99)

1-20
FACE PAINT CONT. (FM 20-3 AUG99)
• Exposed skin reflects light and may draw
attention. Even very dark skin requires camouflage
because natural oils, will reflect light. Paint sticks
cover these oils and help blend skin with the
background.
• Avoid using oils or insect repellent to soften the
paint stick because doing so makes skin shiny and
defeats the purpose of paint.
• Cadets applying paint should work in pairs and
help each other. Self-application may leave gaps,
such as behind ears and exposed skin on the neck.
Use the following technique:
• Paint high, shiny areas (forehead, cheekbones,
nose, ears, chin) with a dark color.
• Paint low, shadow areas with a light color.
Paint exposed skin (back of neck, arms, hands)
with an irregular pattern.
1-21
SECTION VI - TRAINING SAFETY
1. TRAINING SAFETY LIST a. Incorporate the buddy system into all training and other events. Ensure buddy teams understand
the importance of individual safety overwatch. (e.g. recognition and first aid for heat/cold injuries)
b. Designate safety officers to assist in the planning and execution of training.
c. Use training SOPs that include the use of the Risk Assessment Management Program (RAMP).
Continuously update them.
d. Check appropriate qualifications for instructors, trainers, drivers, lifeguards, etc.
e. Require special or preliminary training prior to engaging in medium or high risk training. (e.g.
PMI)
f. Establish/enforce appropriate uniform and equipment requirements and prohibitions
g. Make known the dangers inherent in a training event (risks associated with terrain, off - limits
areas, weather, animals, vegetation, water, vehicles, equipment, weapons, ammunition and pyrotechnics.)
h. Make known the location and responsibilities of safety personnel
i. Make known the location/use of safety equipment/materials.
j. Make known the type of medical support, evacuation plans and medical facility to be used if
evacuation is needed. Make known emergency radio frequencies/call-signs and telephone numbers.
k. Conduct safety briefings for all participants prior to and during training as needed.
l. Establish reporting procedures for unsafe acts/conditions and accidents.
m. Integrate sensitive items (weapons, night vision equipment, COMSEC, etc.) in RAMP and
incorporate appropriate operational and security safeguards.
2. HAZARD REPORTING a. All soldiers and cadets will correct identified hazards if they are capable of doing so without
endangering themselves or others.
b. Where soldiers and cadets cannot correct a hazard, they will report informally to their supervisors
or to the regiment/committee Safety Coordinator. Such reports may also be submitted directly to the
Warrior Forge Safety Office or other appropriate points within the command.
c. A formal method of reporting of unsafe or unhealthy working conditions is the completion of DA
Form 4755 (Employee Report of Alleged Unsafe or Unhealthy Working Conditions). Normally reports
will be signed. However, anonymous reports will be investigated in the same manner as those signed.
Submission may be made directly to the Warrior Forge Safety Office or through supervisory and
command channels.
d. All hazard reports will be investigated, and the originator (if known) will be notified in writing
within 10 working days of receipt of the report. Notification will include the results of the investigation
or an interim response of actions taken or anticipated.
e. If investigation determines that a hazardous condition does not exist, the reply to the soldier will
include the basis for that determination and a point of contact for further explanation.
f. Hazard Reporting Appeal Process. Appeals may be submitted through the Warrior Forge Safety
Office.
1-22
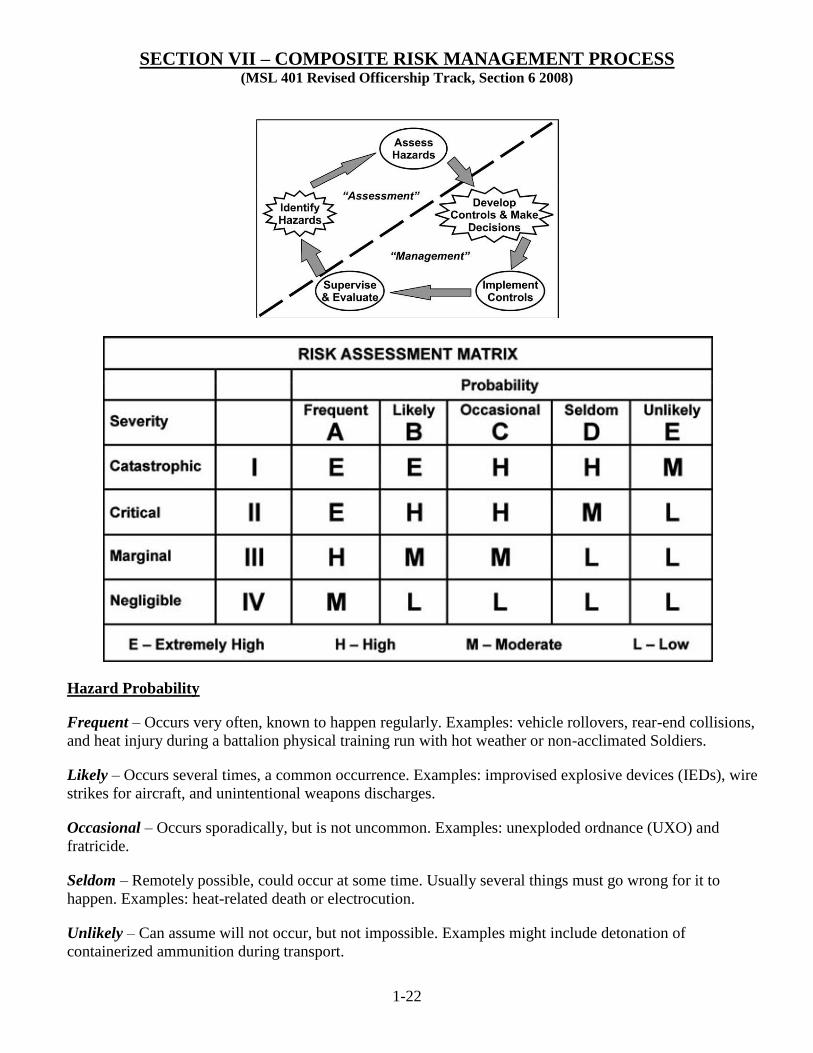
SECTION VII – COMPOSITE RISK MANAGEMENT PROCESS (MSL 401 Revised Officership Track, Section 6 2008)
Hazard Probability
Frequent – Occurs very often, known to happen regularly. Examples: vehicle rollovers, rear-end collisions,
and heat injury during a battalion physical training run with hot weather or non-acclimated Soldiers.
Likely – Occurs several times, a common occurrence. Examples: improvised explosive devices (IEDs), wire
strikes for aircraft, and unintentional weapons discharges.
Occasional – Occurs sporadically, but is not uncommon. Examples: unexploded ordnance (UXO) and
fratricide.
Seldom – Remotely possible, could occur at some time. Usually several things must go wrong for it to
happen. Examples: heat-related death or electrocution.
Unlikely – Can assume will not occur, but not impossible. Examples might include detonation of
containerized ammunition during transport.

1-23
Hazard Severity
Catastrophic:
• Complete mission failure or the loss of ability to accomplish a mission
• Death or permanent total disability
• Loss of major or mission-critical systems or equipment
• Major property or facility damage
• Severe environmental damage
• Mission-critical security failure
• Unacceptable collateral damage.
Critical:
• Severely degraded mission capability or unit readiness
• Permanent partial disability or temporary total disability exceeding three months
• Extensive major damage to equipment or systems
• Significant damage to property or the environment
• Security failure
• Significant collateral damage.
Marginal:
• Degraded mission capability or unit readiness
• Minor damage to equipment or systems, property, or the environment
• Lost days due to injury or illness not exceeding three months
• Minor damage to property or the environment.
Negligible:
• Little or no adverse impact on mission capability
• First aid or minor medical treatment
• Slight equipment or system damage, but fully functional or serviceable
• Little or no property or environmental damage.
Risk Tolerance
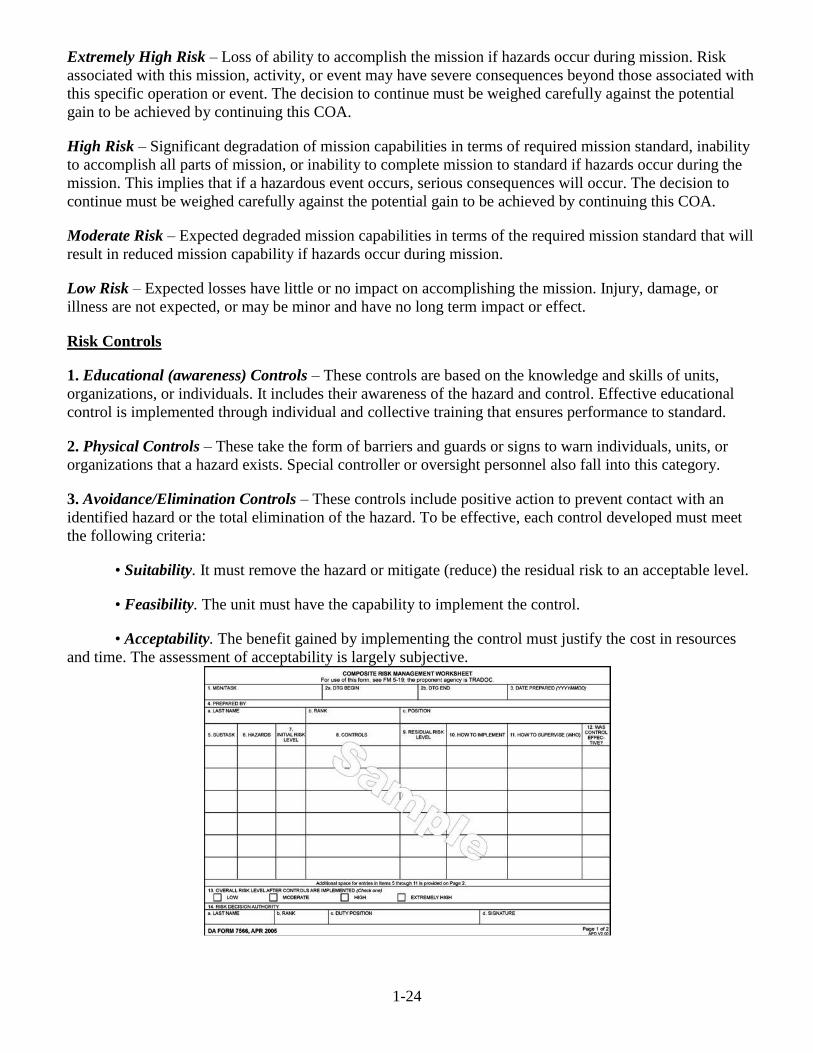
1-24
Extremely High Risk – Loss of ability to accomplish the mission if hazards occur during mission. Risk
associated with this mission, activity, or event may have severe consequences beyond those associated with
this specific operation or event. The decision to continue must be weighed carefully against the potential
gain to be achieved by continuing this COA.
High Risk – Significant degradation of mission capabilities in terms of required mission standard, inability
to accomplish all parts of mission, or inability to complete mission to standard if hazards occur during the
mission. This implies that if a hazardous event occurs, serious consequences will occur. The decision to
continue must be weighed carefully against the potential gain to be achieved by continuing this COA.
Moderate Risk – Expected degraded mission capabilities in terms of the required mission standard that will
result in reduced mission capability if hazards occur during mission.
Low Risk – Expected losses have little or no impact on accomplishing the mission. Injury, damage, or
illness are not expected, or may be minor and have no long term impact or effect.
Risk Controls
1. Educational (awareness) Controls – These controls are based on the knowledge and skills of units,
organizations, or individuals. It includes their awareness of the hazard and control. Effective educational
control is implemented through individual and collective training that ensures performance to standard.
2. Physical Controls – These take the form of barriers and guards or signs to warn individuals, units, or
organizations that a hazard exists. Special controller or oversight personnel also fall into this category.
3. Avoidance/Elimination Controls – These controls include positive action to prevent contact with an
identified hazard or the total elimination of the hazard. To be effective, each control developed must meet
the following criteria:
• Suitability. It must remove the hazard or mitigate (reduce) the residual risk to an acceptable level.
• Feasibility. The unit must have the capability to implement the control.
• Acceptability. The benefit gained by implementing the control must justify the cost in resources
and time. The assessment of acceptability is largely subjective.
1-25
SECTION VIII - FORCE SUSTAINMENT (FM 3-21.10 Ch 11 JUL06)
SOLDIER’S LOAD - Determining the soldier’s load is a critical leader task. The soldier’s load is always
METT-TC dependent and must be closely monitored. Soldiers cannot afford to carry unnecessary equipment
into the battle. Every contingency cannot be covered. The primary consideration is not how much a soldier
can carry, but how much he can carry without impaired combat effectiveness.
1. SUPPLY - Policies and procedures are applied for supply requests and resupply operations. Force
Sustainment operations are driven by the tactical setting for the infantry platoon. Resupply operations
are planned in advance so as to not interfere with combat operations. The team leader and squad leader
implement Force Sustainment by inspecting their soldiers for shortages and shortcomings in equipment
and supplies. Once the squads have compiled their lists, they report their status to the platoon
sergeant who in turn reports his status to the company XO. To standardize resupply operations, requests
are submitted to the company XO for resupply.
a) Requests and Priority for Resupply. Leaders must constantly assess the need for resupply,
prioritize, and request as required.
2. MAINTENANCE - All weapons (daily or more frequently as needed) and equipment are cleaned by the
user and inspected by squad leaders.
a) Priority for Cleaning and Maintenance. The priority is mission and situational dependent but
will normally be anti-armor, crew-served weapons, and individual weapons.
b) Stand-Down for Maintenance. Stand-down occurs by having no more than 50 percent of the
anti-armor and crew-served weapons at any time out of actions for maintenance. The rest of the
squads' small-arms weapons will stand-down at no more than 33 percent at one time.
c) PMCS Requirements. All weapons systems and equipment receive an operator's cleaning
inspection.
d) Evacuation Responsibilities and Procedures. Once the soldier completes the inspection of his
weapons system, the squad leader verifies the work, and if a problem occurs, the squad leader
fixes it or informs the platoon sergeant of the problem. The platoon sergeant then consolidates all
of the maintenance requests, and informs the company XO during scheduled resupply. The XO
evacuates the weapons and equipment to the battalion trains. The XO makes arrangement for a
float from higher support.
3. PERSONNEL a) Strength Reports. The platoon's strength is reported at least twice daily on a secure net or land
line from the platoon battle roster.
EPWs and Civilian Detainees. All EPWs and civilians are handled IAW with the Law of Land Warfare.

THIS PAGE INTENTIONALLY LEFT BLANK
2-1
CHAPTER 2 MISSION COMMAND
SECTION I – TROOP LEADING PROCEDURES (FM 3-21.8 Ch 5 MAR07; FM 3-21.10 Ch 2-1 JUL06; FM 5-0 App C MAR10)
ASSUMPTION OF COMMAND - When it is necessary for a new leader to assume command of the platoon,
as the situations allows, they will accomplish the following tasks:
a. Inform higher headquarters of the change
b. Reestablish the platoon chain of command and ensure all subordinates are made aware of changes
c. Check the platoon’s security and the emplacement of key weapons
d. Check the platoon’s equipment and personnel status
e. Pinpoint the platoon’s location
f. Assess the platoon’s ability to continue the mission
g. Inform higher command of assessment
h. Continue the mission / initiate Troop Leading Procedures
TROOP LEADING PROCEDURES
1. Receive the Mission
(1) Determine mission and time available (develop timeline)
(2) Detailed analysis of METT-TC
(3) 1/3-2/3 rule (1/3 for higher planning; 2/3 for subordinate planning)
2. Issue a Warning Order
3. Make a Tentative Plan
(1) Mission
Enemy
Terrain and Weather
Observation and Fields of Fire
Avenues of Approach
Key Terrain
Obstacles
Cover and Concealment
Visibility, Winds, Precipitation, Cloud cover,
Temperature/humidity
Troops Available
Time Available
Civil considerations
(2) Mission and intent of commander two levels up
(3) Mission and intent of immediate commander
(4) Platoon or Squad mission
(5) Constraints
(6) Identification of tasks (Specified, Implied, Essential)
(7) Identification of risks
(8) Restated mission
(9) Analysis of Enemy
(a) Composition
2-2
(b) Disposition
(c) Strength
(d) Capabilities
(e) Anticipated Enemy Courses of Action
(10) Course of Action Development
(a) Analyze Relative Combat Power
(b) Generate Options
(c)Array Initial forces
(d) Develop Schemes of Maneuver
(e) Assign Headquarters
(f) Prepare COA Statements and Sketches
(g) War gaming of COA(s)
(f) COA Comparison and Selection
4. Initiate movement
5. Conduct Reconnaissance
(1) Confirm Priority Intelligence Requirements (PIRs)
(2) If leaving the platoon or squad to conduct leader’s reconnaissance, leave a five
point contingency plan, or GOTWA
(a) Where the leader is Going
(b) Others going with the leader
(c) Amount of Time the leader plans to be gone
(d) What to do if the leader does not return
(e) Unit’s and leaders Actions on chance contact while the leader is gone
6. Complete the Plan
7. Issue the Operations Order
8. Supervise and Refine
(1) Confirmation briefs, rehearsals, and inspections
(a) Ensure subordinates know the mission, the commander’s intent, the concept
of the operation, and their assigned tasks.
(b) Rehearsals include map rehearsal, sand table or terrain model, radio
rehearsal, reduced-force rehearsal, and full-force rehearsal (preferred if time
permits)
(2) The leader should establish a priority for rehearsals based on available time.
The priority of rehearsals flows from the decisive point of the operation. Thus
the order of precedence is:
(a) Actions on the objective
(b) Actions on enemy contact
(c) Special teams
(d) Movement techniques
(e) Others as required
(3) Security must be maintained during the rehearsal.
(4) Inspections
(a) Squad leaders should conduct initial inspections shortly after receipt
of the WARNO
(b) The PSG should conduct spot checks throughout the preparation
(c) The PL and PSG conduct final inspections
(5) Inspections should include:
(a) Weapons and ammunition
(b) Uniforms and Equipment
(c) Mission-essential equipment
(d) Soldier understands the mission and their specific
responsibilities
(e) Communications
(f) Rations and water
2-3
(g) Camouflage
(h) Deficiencies noted during earlier inspections
SECTION II – ORDERS (FM 5-0 App E MAR11)
Commanders direct operations and communicate their visualization, commander’s intent, and decisions through
plans and orders. Effective plans and orders clearly describe how the commander intends to combine offensive,
defensive, and stability or civil support operations throughout the conduct of operations. They synchronize
subordinate activities in time, space, and purpose to achieve objectives and accomplish missions. Plans and orders
not only direct subordinate units but provide information to facilitate coordination among organizations outside the
command. Effective plans and orders account for those joint, interagency, intergovernmental, multinational, and
host-nation organizations involved in the operation.
The amount of detail provided in a plan or order depends on several factors, including the cohesion and experience
of subordinate units and complexity of the operation. Effective plans and orders encourage subordinate’s initiative
by providing the what and why of tasks to subordinate units, and leave the how to perform the tasks to
subordinates. (Paragraphs 2-73 through 2-80 discuss mission orders in detail.) To maintain clarity and simplicity,
the base plan or order is kept as short and concise as possible. Detailed information and instructions are addressed
in annexes as required.
1. ORDERS GROUP
a. Platoon Orders – at a minimum, the following individuals will attend platoon orders:
(1) Platoon leader
(2) Platoon sergeant
(3) Squad leaders
(4) Platoon FO
(5) PLT Medic
(6) Attachment leaders
b. Squad Orders – at a minimum, the following individuals will attend squad orders:
(1) Squad leader
(2) Team leaders
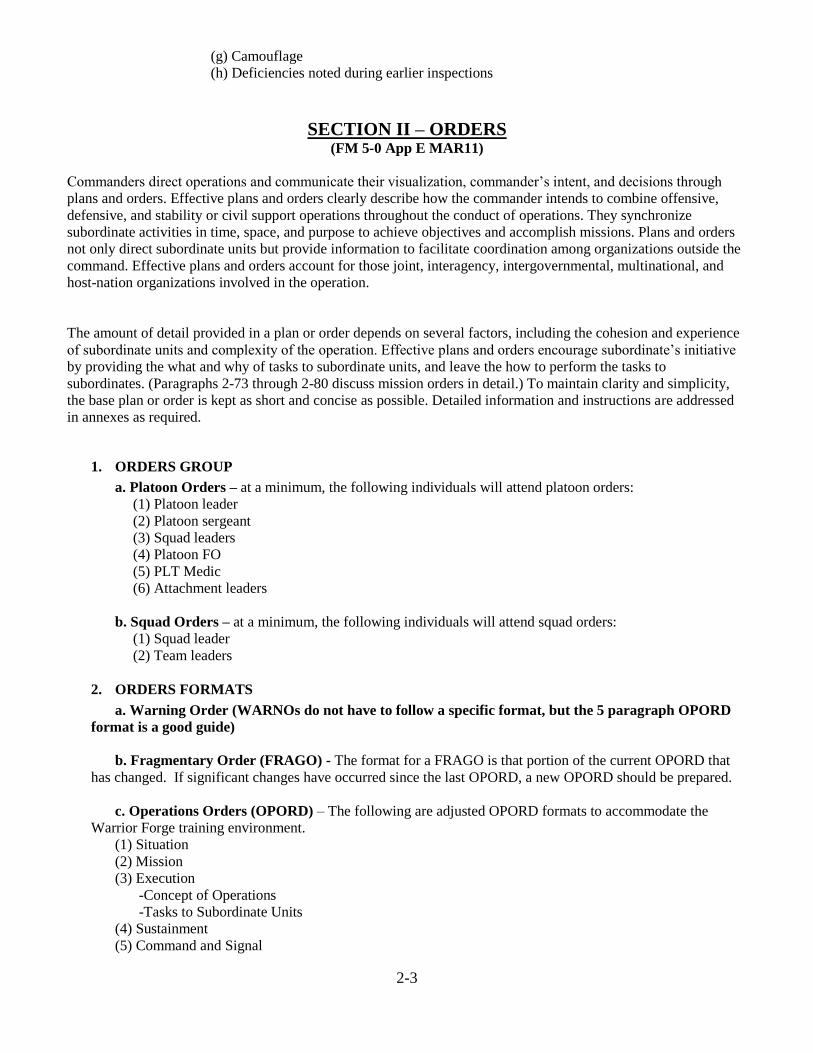
2. ORDERS FORMATS
a. Warning Order (WARNOs do not have to follow a specific format, but the 5 paragraph OPORD
format is a good guide)
b. Fragmentary Order (FRAGO) - The format for a FRAGO is that portion of the current OPORD that
has changed. If significant changes have occurred since the last OPORD, a new OPORD should be prepared.
c. Operations Orders (OPORD) – The following are adjusted OPORD formats to accommodate the
Warrior Forge training environment.
(1) Situation
(2) Mission
(3) Execution
-Concept of Operations
-Tasks to Subordinate Units
(4) Sustainment
(5) Command and Signal
2-4
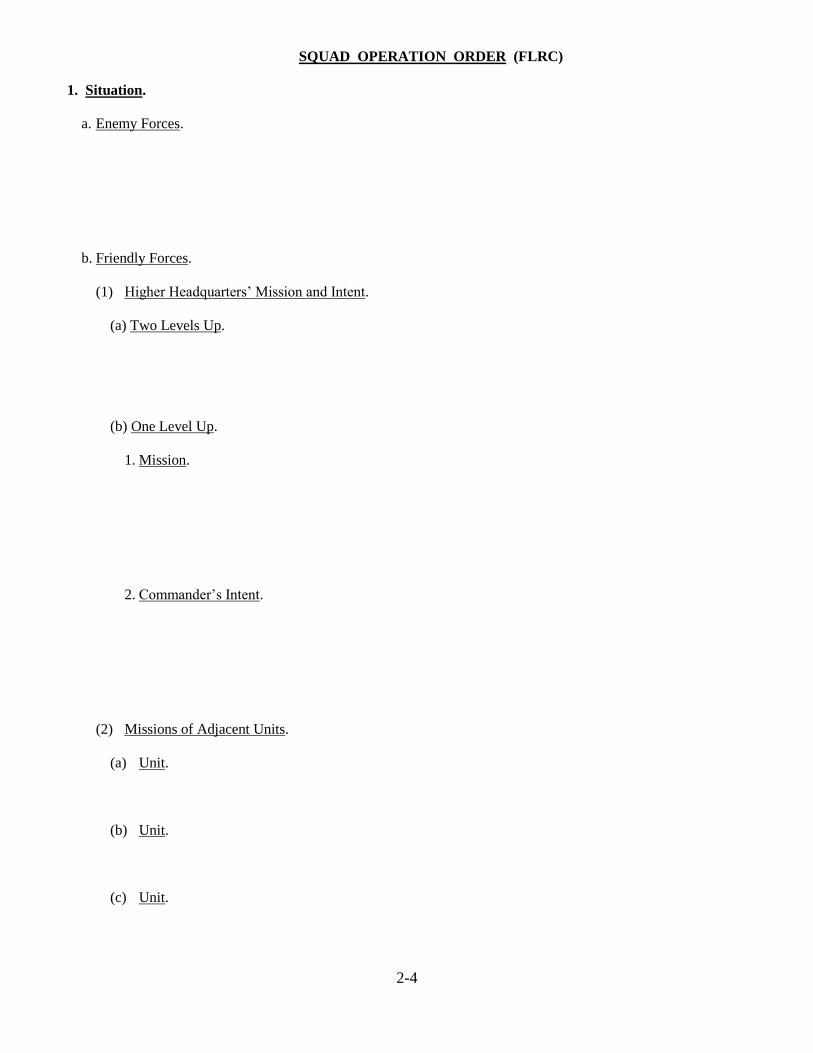
SQUAD OPERATION ORDER (FLRC)
1. Situation.
a. Enemy Forces.
b. Friendly Forces.
(1) Higher Headquarters’ Mission and Intent.
(a) Two Levels Up.
(b) One Level Up.
1. Mission.
2. Commander’s Intent.
(2) Missions of Adjacent Units.
(a) Unit.
(b) Unit.
(c) Unit.
2-5
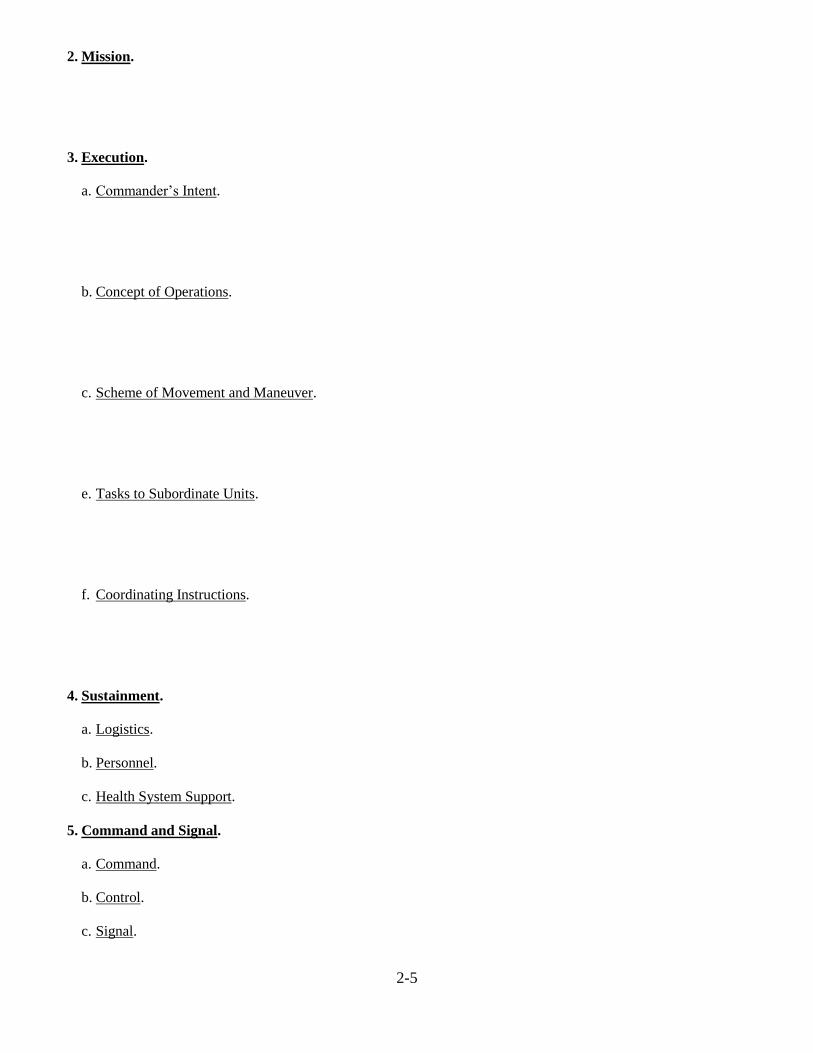
2. Mission.
3. Execution.
a. Commander’s Intent.
b. Concept of Operations.
c. Scheme of Movement and Maneuver.
e. Tasks to Subordinate Units.
f. Coordinating Instructions.
4. Sustainment.
a. Logistics.
b. Personnel.
c. Health System Support.
5. Command and Signal.
a. Command.
b. Control.
c. Signal.
2-6
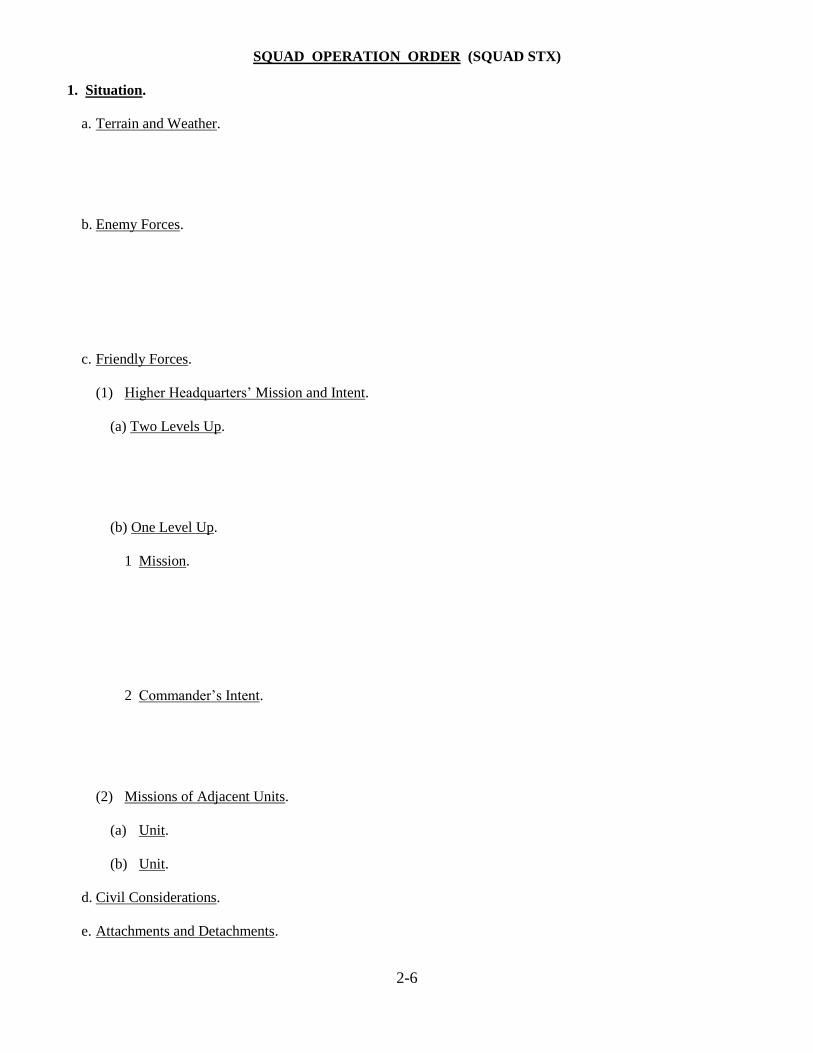
SQUAD OPERATION ORDER (SQUAD STX)
1. Situation.
a. Terrain and Weather.
b. Enemy Forces.
c. Friendly Forces.
(1) Higher Headquarters’ Mission and Intent.
(a) Two Levels Up.
(b) One Level Up.
1 Mission.
2 Commander’s Intent.
(2) Missions of Adjacent Units.
(a) Unit.
(b) Unit.
d. Civil Considerations.
e. Attachments and Detachments.

2-7
2. Mission.
3. Execution.
a. Commander’s Intent.
b. Concept of Operations.
c. Scheme of Movement and Maneuver.
d. Scheme of Fires.
e. Tasks to Subordinate Units.
f. Coordinating Instructions.
(1) Timing.
(2) Priority Intelligence Requirements.
2-8
4. Sustainment.
a. Logistics.
b. Personnel.
c. Health System Support.
5. Command and Signal.
a. Command.
(1) Location of Commander.
(2) Succession of Command.
b. Control.
(1) Command Post Location.
(2) Reporting Requirements.
c. Signal.
(1) Frequencies and Call Signs.
(a) Frequencies
(b) Call Signs
(2) Passwords.
(a) Number Combination
(b) Challenge / Password
(c) Running Password
2-9
PLATOON/SECTION OPERATION ORDER (PATROLLING)
1. Situation.
a. Terrain and Weather.
b. Enemy Forces.
c. Friendly Forces.
(1) Higher Headquarters’ Mission and Intent.
(a) Two Levels Up.
(b) One Level Up.
1 Mission.
2 Commander’s Intent.
(2) Missions of Adjacent Units.
(a) Unit.
(b) Unit.
d. Civil Considerations.
e. Attachments and Detachments.

2-10
2. Mission.
3. Execution.
a. Commander’s Intent.
b. Concept of Operations.
c. Scheme of Movement and Maneuver.
d. Scheme of Fires.
e. Tasks to Subordinate Units.
f. Coordinating Instructions.
(1) Timing.
(2) Priority Intelligence Requirements.
2-11
4. Sustainment.
a. Logistics.
(1) Resupply.
(2) Rations.
(3) Water.
(4) Transportation.
(5) Services.
(6) Miscellaneous.
b. Personnel.
EPW Collection Point.
c. Health System Support.
MEDEVAC.
5. Command and Signal.
a. Command.
(1) Location of Commander.
(2) Succession of Command.
2-12
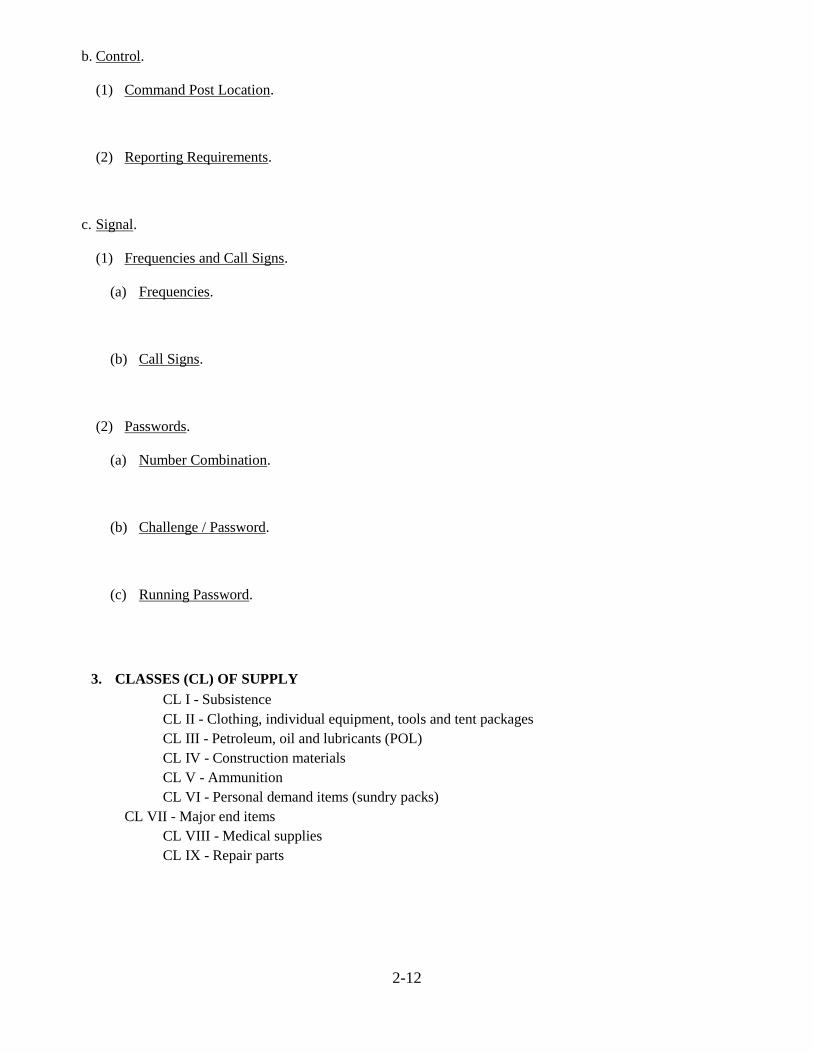
b. Control.
(1) Command Post Location.
(2) Reporting Requirements.
c. Signal.
(1) Frequencies and Call Signs.
(a) Frequencies.
(b) Call Signs.
(2) Passwords.
(a) Number Combination.
(b) Challenge / Password.
(c) Running Password.
3. CLASSES (CL) OF SUPPLY
CL I - Subsistence
CL II - Clothing, individual equipment, tools and tent packages
CL III - Petroleum, oil and lubricants (POL)
CL IV - Construction materials
CL V - Ammunition
CL VI - Personal demand items (sundry packs)
CL VII - Major end items
CL VIII - Medical supplies
CL IX - Repair parts
2-13
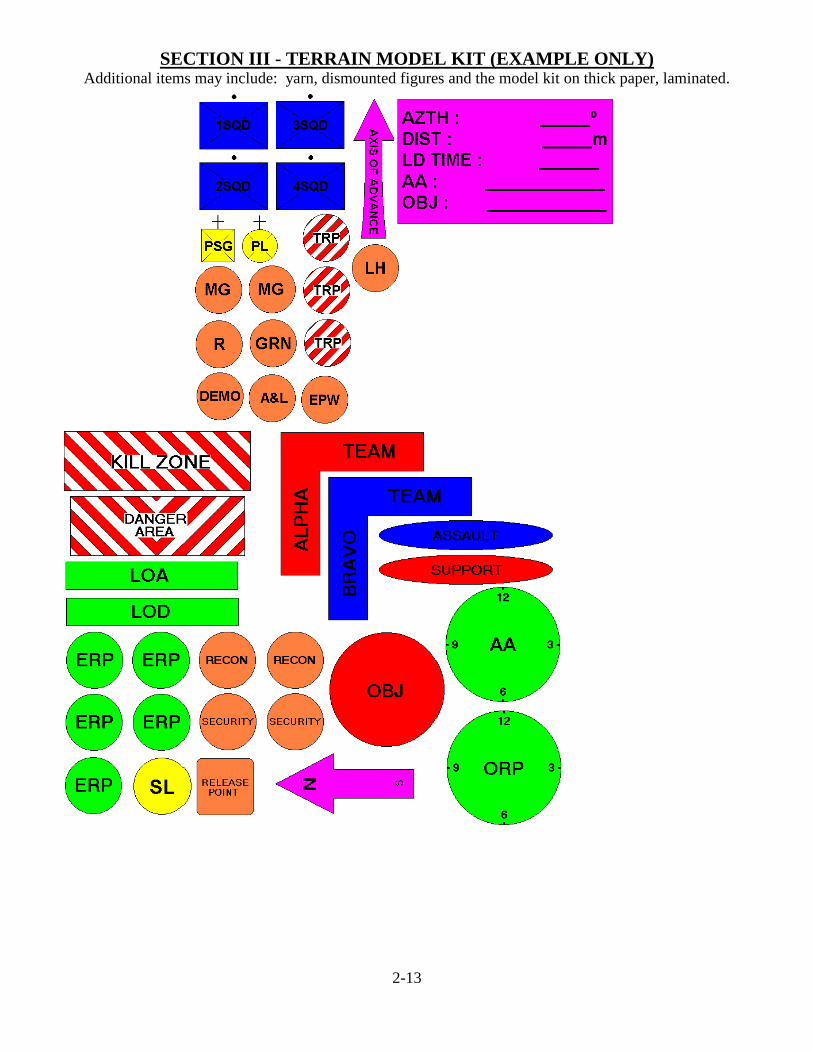
SECTION III - TERRAIN MODEL KIT (EXAMPLE ONLY) Additional items may include: yarn, dismounted figures and the model kit on thick paper, laminated.

THIS PAGE INTENTIONALLY LEFT BLANK
3-1
CHAPTER 3 – LAND NAVIGATION (FM 3-25.26 w/ Change 1 AUG06, MSL 301/302 2008)
1. REQUIREMENTS.
a. Written Examination. Examination is administered in garrison prior to conducting the practical.
Cadets must correctly answer 14 out of 20 questions to pass (20 questions in 75 minutes).
b. Day Land Navigation. Cadets must correctly navigate to 5 out of 8 points. Total point to point
distance will cover approximately 7-8 KMS with an average distance between each point of 650-1000 m.
Total time allotted for the course is 5 hours.
c. Night Land Navigation. Cadets must correctly navigate to 3 out of 5 points. Total point to point
distance will cover approximately 3-4 KMS with an average distance between each point of 600-800 m.
Total time allotted for the course is 3.5 hours.
d. RECONDO. Cadets must EXCEED normal passing scores as outlined above to qualify for
RECONDO. Without retest, achieve a score of 80% or higher on each event – Written: 16/20 correct
answers; Day: 40/50 (6 of 8 points); Night: 24/30 (4 of 5 points).
2. SUCCESS AT WARRIOR FORGE a. Understand that the land navigation practical is conducted on Joint Base Lewis-McChord (JBLM)
terrain. The terrain at JBLM is naturally flat, with a rise in elevation of up to about 20 meters. This
makes terrain association difficult, as there are few to no prominent land marks. Given the nature of the
terrain, recognize that dead reckoning skills are applicable, but will not guarantee complete success
because the density of the underbrush prevents this technique in some areas, particularly at night.
Therefore, the ability to navigate by roads and trails, using an attack point is necessary to ensure success.
b. Hard ball, dirt roads, and trails are accurately depicted on the JBLM map; however, trail depicturing
is not completely reliable as some trails are reflected on the map, while others are not. Cadets should
primarily rely upon their pace counts and reference trails to ensure they maintain situational awareness
of their current location. The land navigation committee will cover reference trails during the overview
on site.
c. Checkpoints are established on the course to aid Cadets in determining their exact location. Cadets
should not use these as a ―Crutch‖ but should instead refer to them as a means to verify their information.
d. Confidence in pace count is critical. At a minimum, Cadets must know:
1) Day Road and Wooded Terrain Pace Counts (DRPC & WTPC)
2) Night Road and Wooded Terrain Pace Counts (NRPC & WTPC)
e. During your campus training and within your resource/training constraints, attempt to mimic the
WF land navigation assessment to the best of your ability.
1) Employ a terrain model of your course.
2) Use similar point markings.
3) Ensure distances between points are comparable to distances used at WF for both day and night
course. If time permits, use the same number of points.
4) Due to the size of the training area, recognize that the night course may not take place over the
exact same terrain as the day course. This is an important as Cadets may not have had the benefit of the
day course familiarity, when they conduct the night course.
5) Use comparable times for planning and course conduct for both day and night.
6) Use land navigation lane strips so Cadets are forced to practice plotting their course and
thinking through ―best strategy‖ for completing the course based upon their knowledge of the terrain,
roads and trails.

3-2
f. The G-M Angle Conversion for JBLM is 17.5 degrees. You can use 17 degrees and maintain
accuracy on your land navigation exam and the practical exams in the field. You must SUBTRACT 17
DEGREES from the Grid Azimuth (GA) for Magnetic Azimuth (MA) which is an easterly GM angle.
g. Land Navigation Score Sheets. (Cadets receive at site)
h. WF Land Navigation Markings.
(1) Land Navigation Point. 12” orange and white placard with alpha numeric labeling. Point
has “clacker” hanging off the point. The 12‖ placard is tied off to a tree or stake
Land Navigation TA13 Score Card
NAME:________________________________________
REGIMENT:_____________ COMPANY_____________
PLATOON:_____________________________________
START TIME:__________________________________
FINISH TIME:__________________________________
COURSE (DAY/NIGHT):__________________________
LANE #:________ DATE:_________________________
TOTAL VALUE OF POINTS:____________________
PENALTY POINTS:___________________________
FINAL SCORE:______________________________
LETTER/NUMBER
LETTER/NUMBER
LETTER/NUMBER
LETTER/NUMBER LETTER/NUMBER
LETTER/NUMBER
LETTER/NUMBER
LETTER/NUMBER
STAMP
STAMP
STAMP
STAMP
STAMP
STAMP
STAMP
STAMP
CADET SMITH, JOHN
1 A
1
1230
1
10001 JUN 2008
A7
::
..:B3
C6
D4
H1
F8
.:.
:.:
:::
…:
5 / 8
35
1630
GRADER’S INITIALS
3-3
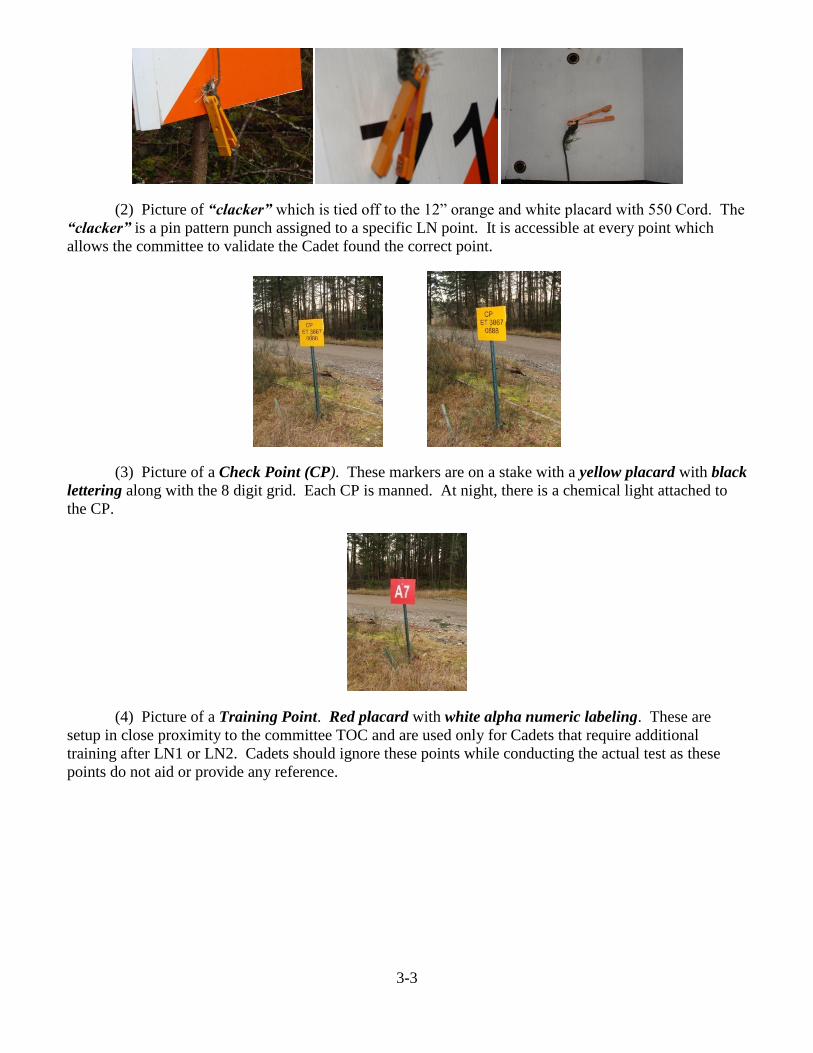
(2) Picture of “clacker” which is tied off to the 12‖ orange and white placard with 550 Cord. The
“clacker” is a pin pattern punch assigned to a specific LN point. It is accessible at every point which
allows the committee to validate the Cadet found the correct point.
(3) Picture of a Check Point (CP). These markers are on a stake with a yellow placard with black
lettering along with the 8 digit grid. Each CP is manned. At night, there is a chemical light attached to
the CP.
(4) Picture of a Training Point. Red placard with white alpha numeric labeling. These are
setup in close proximity to the committee TOC and are used only for Cadets that require additional
training after LN1 or LN2. Cadets should ignore these points while conducting the actual test as these
points do not aid or provide any reference.
3-4
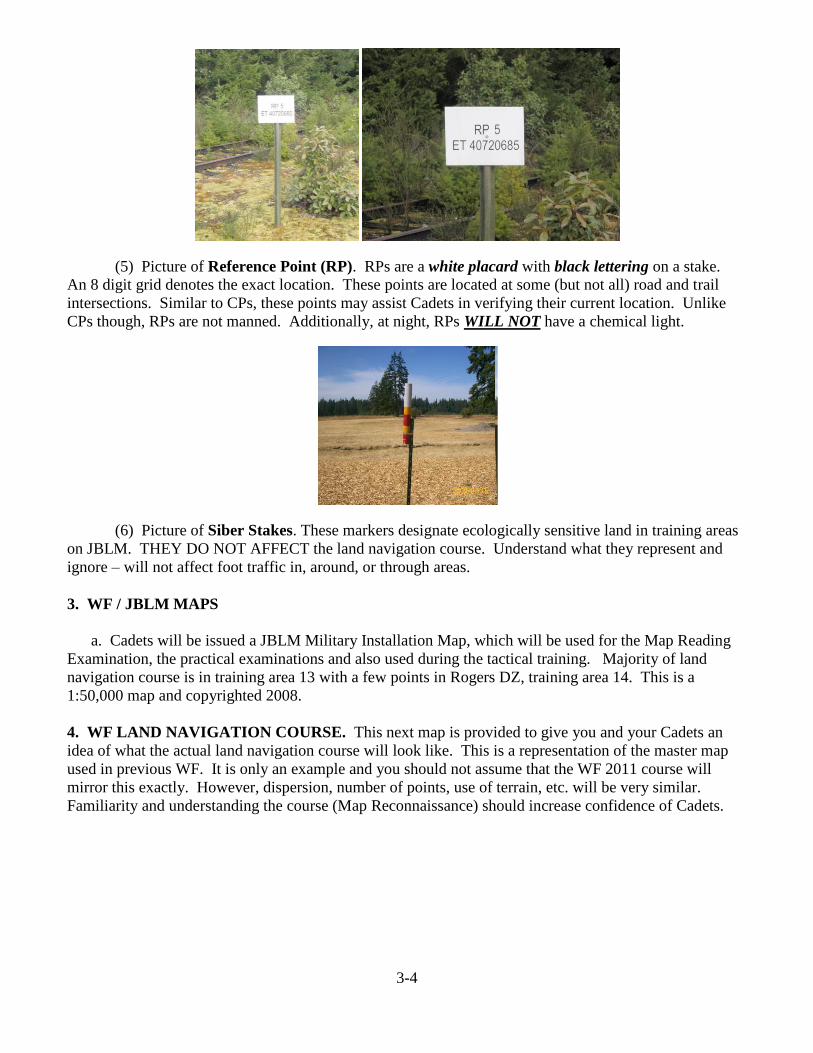
(5) Picture of Reference Point (RP). RPs are a white placard with black lettering on a stake.
An 8 digit grid denotes the exact location. These points are located at some (but not all) road and trail
intersections. Similar to CPs, these points may assist Cadets in verifying their current location. Unlike
CPs though, RPs are not manned. Additionally, at night, RPs WILL NOT have a chemical light.
(6) Picture of Siber Stakes. These markers designate ecologically sensitive land in training areas
on JBLM. THEY DO NOT AFFECT the land navigation course. Understand what they represent and
ignore – will not affect foot traffic in, around, or through areas.
3. WF / JBLM MAPS
a. Cadets will be issued a JBLM Military Installation Map, which will be used for the Map Reading
Examination, the practical examinations and also used during the tactical training. Majority of land
navigation course is in training area 13 with a few points in Rogers DZ, training area 14. This is a
1:50,000 map and copyrighted 2008.
4. WF LAND NAVIGATION COURSE. This next map is provided to give you and your Cadets an
idea of what the actual land navigation course will look like. This is a representation of the master map
used in previous WF. It is only an example and you should not assume that the WF 2011 course will
mirror this exactly. However, dispersion, number of points, use of terrain, etc. will be very similar.
Familiarity and understanding the course (Map Reconnaissance) should increase confidence of Cadets.
3-5
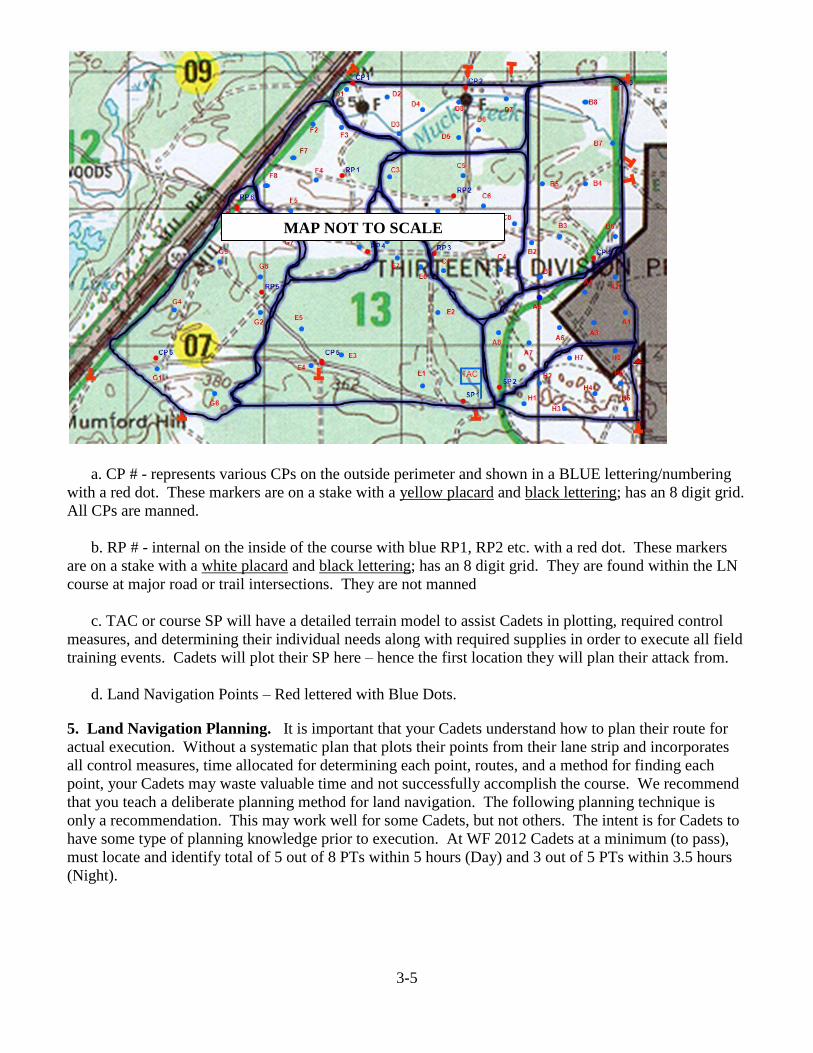
a. CP # - represents various CPs on the outside perimeter and shown in a BLUE lettering/numbering
with a red dot. These markers are on a stake with a yellow placard and black lettering; has an 8 digit grid.
All CPs are manned.
b. RP # - internal on the inside of the course with blue RP1, RP2 etc. with a red dot. These markers
are on a stake with a white placard and black lettering; has an 8 digit grid. They are found within the LN
course at major road or trail intersections. They are not manned
c. TAC or course SP will have a detailed terrain model to assist Cadets in plotting, required control
measures, and determining their individual needs along with required supplies in order to execute all field
training events. Cadets will plot their SP here – hence the first location they will plan their attack from.
d. Land Navigation Points – Red lettered with Blue Dots.
5. Land Navigation Planning. It is important that your Cadets understand how to plan their route for
actual execution. Without a systematic plan that plots their points from their lane strip and incorporates
all control measures, time allocated for determining each point, routes, and a method for finding each
point, your Cadets may waste valuable time and not successfully accomplish the course. We recommend
that you teach a deliberate planning method for land navigation. The following planning technique is
only a recommendation. This may work well for some Cadets, but not others. The intent is for Cadets to
have some type of planning knowledge prior to execution. At WF 2012 Cadets at a minimum (to pass),
must locate and identify total of 5 out of 8 PTs within 5 hours (Day) and 3 out of 5 PTs within 3.5 hours
(Night).
MAP NOT TO SCALE
3-6
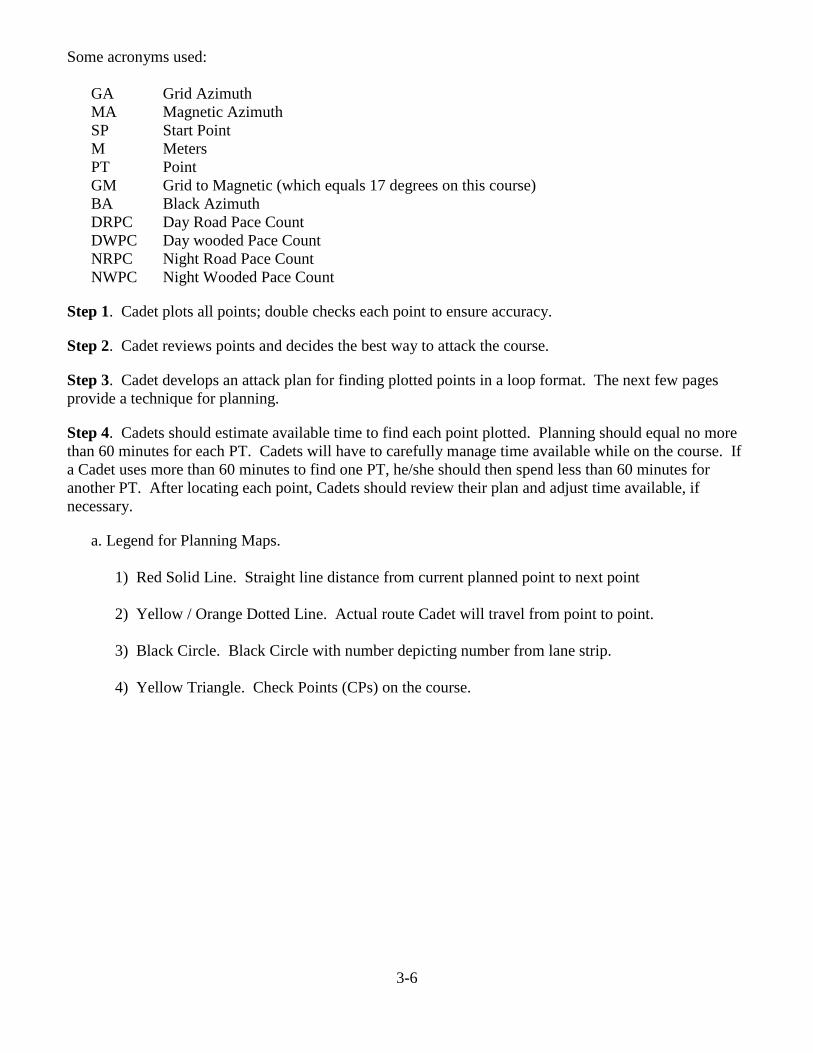
Some acronyms used:
GA Grid Azimuth
MA Magnetic Azimuth
SP Start Point
M Meters
PT Point
GM Grid to Magnetic (which equals 17 degrees on this course)
BA Black Azimuth
DRPC Day Road Pace Count
DWPC Day wooded Pace Count
NRPC Night Road Pace Count
NWPC Night Wooded Pace Count
Step 1. Cadet plots all points; double checks each point to ensure accuracy.
Step 2. Cadet reviews points and decides the best way to attack the course.
Step 3. Cadet develops an attack plan for finding plotted points in a loop format. The next few pages
provide a technique for planning.
Step 4. Cadets should estimate available time to find each point plotted. Planning should equal no more
than 60 minutes for each PT. Cadets will have to carefully manage time available while on the course. If
a Cadet uses more than 60 minutes to find one PT, he/she should then spend less than 60 minutes for
another PT. After locating each point, Cadets should review their plan and adjust time available, if
necessary.
a. Legend for Planning Maps.
1) Red Solid Line. Straight line distance from current planned point to next point
2) Yellow / Orange Dotted Line. Actual route Cadet will travel from point to point.
3) Black Circle. Black Circle with number depicting number from lane strip.
4) Yellow Triangle. Check Points (CPs) on the course.
3-7
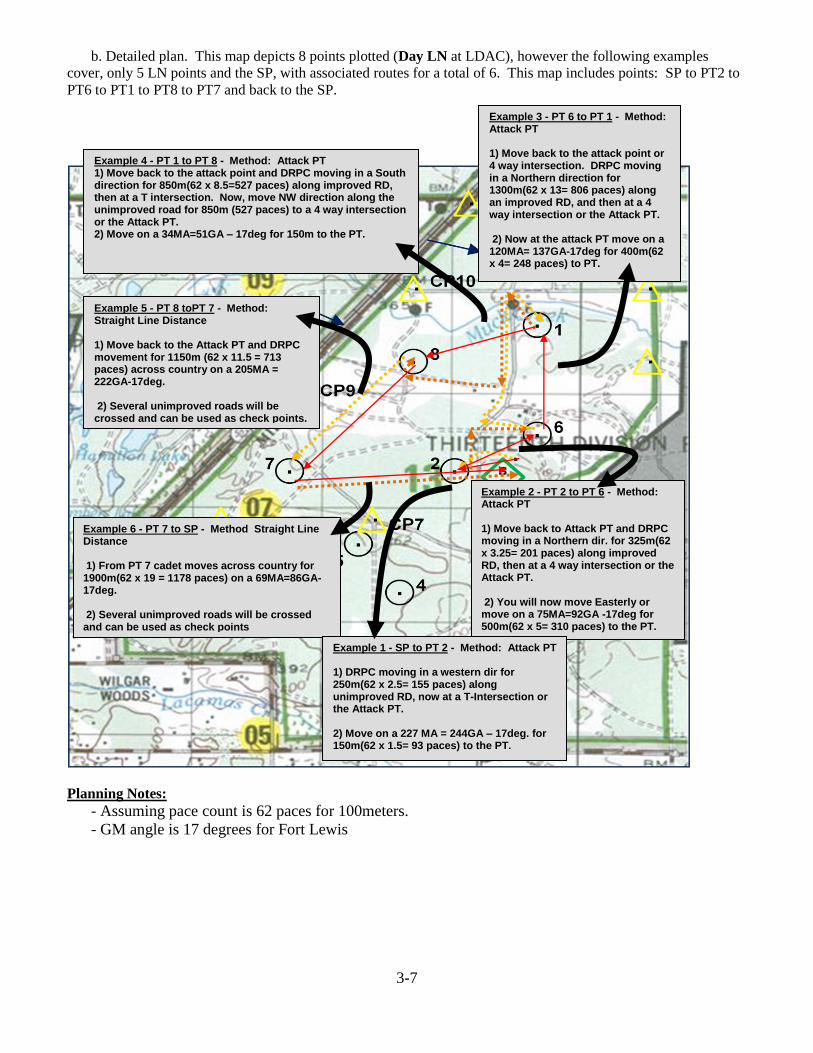
b. Detailed plan. This map depicts 8 points plotted (Day LN at LDAC), however the following examples
cover, only 5 LN points and the SP, with associated routes for a total of 6. This map includes points: SP to PT2 to
PT6 to PT1 to PT8 to PT7 and back to the SP.
Planning Notes:
- Assuming pace count is 62 paces for 100meters.
- GM angle is 17 degrees for Fort Lewis
Example 2 - PT 2 to PT 6 - Method: Attack PT 1) Move back to Attack PT and DRPC moving in a Northern dir. for 325m(62 x 3.25= 201 paces) along improved RD, then at a 4 way intersection or the Attack PT. 2) You will now move Easterly or move on a 75MA=92GA -17deg for 500m(62 x 5= 310 paces) to the PT.
Example 6 - PT 7 to SP - Method Straight Line Distance 1) From PT 7 cadet moves across country for 1900m(62 x 19 = 1178 paces) on a 69MA=86GA-17deg. 2) Several unimproved roads will be crossed and can be used as check points
Example 5 - PT 8 toPT 7 - Method: Straight Line Distance 1) Move back to the Attack PT and DRPC movement for 1150m (62 x 11.5 = 713 paces) across country on a 205MA = 222GA-17deg. 2) Several unimproved roads will be crossed and can be used as check points.
Example 4 - PT 1 to PT 8 - Method: Attack PT 1) Move back to the attack point and DRPC moving in a South direction for 850m(62 x 8.5=527 paces) along improved RD, then at a T intersection. Now, move NW direction along the unimproved road for 850m (527 paces) to a 4 way intersection or the Attack PT. 2) Move on a 34MA=51GA – 17deg for 150m to the PT.
Example 1 - SP to PT 2 - Method: Attack PT 1) DRPC moving in a western dir for 250m(62 x 2.5= 155 paces) along unimproved RD, now at a T-Intersection or the Attack PT. 2) Move on a 227 MA = 244GA – 17deg. for 150m(62 x 1.5= 93 paces) to the PT.
Example 3 - PT 6 to PT 1 - Method: Attack PT 1) Move back to the attack point or 4 way intersection. DRPC moving in a Northern direction for 1300m(62 x 13= 806 paces) along an improved RD, and then at a 4 way intersection or the Attack PT. 2) Now at the attack PT move on a 120MA= 137GA-17deg for 400m(62 x 4= 248 paces) to PT.

THIS PAGE INTENTIONALLY LEFT BLANK
4-1
CHAPTER 4 FIRST AID and FLRC
FIRST AID (STP 21-1-SMCT Area 2 MAY11; STP 21-1-24 SMCT Area 2 SEP09;
CLS Course: Student Self-Study Sub Course ISO871)
BATTLEFIELD CASUALTY ASSESSMENT
TASK: Evaluate a Casualty (081-831-1001)
OUTCOME: You will demonstrate an understanding of patient evaluation by employing proper
technique to identify all life threatening injuries while performing this task at a hands-on evaluation
station; you will not be required to provide any treatment to your simulated casualty. Failure to perform
to the prescribed standard will result in retraining and retesting until proficiency is achieved.
PERFORMANCE MEASURES - Identify the stages of care in Tactical Combat Casualty Care
- Form a general impression of the casualty as you approach (extent of injuries, chance of survival).
- Check Responsiveness (AVPU)
- Position the casualty and open the airway.
- Assess for breathing and chest injuries.
- Identify and control bleeding.
- Check for fractures.
- Check for burns.
- Administer pain medications and antibiotics (the casualty's combat pill pack) to any Soldier
wounded in combat.
- Document the casualty’s injuries and the treatment given on the TCCC Casualty Card – DA
7656).
- Transport the casualty to the site where evacuation is anticipated.
BATTLEFIELD CASUALTY ASSESSMENT
CARE UNDER FIRE
Determine best route of access to the casualty and egress
Scan the area for danger
Plan what you will do before you go to the casualty’s aid
Return fire as directed or required. Request covering fire.
Do not expose yourself to enemy fire in order to provide care.
If possible, direct casualty to return fire, move to cover, and administer self-aid; ―Play dead‖ if
necessary.
Casualties should be extricated from burning vehicles or buildings and moved to places of relative
safety. Stop burning process.
Airway management is generally best deferred until the Tactical Field Care phase
Stop life-threatening external hemorrhage if tactically feasible:
– Direct casualty to control hemorrhage by self-aid if able.
– Use a tourniquet for hemorrhage that is anatomically amenable to tourniquet application.
– Apply tourniquet proximal to bleeding site, over uniform, tighten, move casualty to cover.
4-2
– Move casualty to safe place to perform Tactical Field Care.
Secure weapons and equipment if possible.
NOTE: Treat any severe, life threatening, bleeding not treated during care under fire.
Then… - Form a general impression of the casualty as you approach (extent of injuries, chance of survival).
- Check Responsiveness (AVPU)
- Position the casualty and open the airway.
- Assess for breathing and chest injuries.
- Identify and control bleeding.
- Check for fractures.
- Check for burns.
- Administer pain medications and antibiotics (the casualty's combat pill pack) to any Soldier
wounded in combat.
- Document the casualty’s injuries and the treatment given on the TCCC Casualty Card – DA
7656).
- Transport the casualty to the site where evacuation is anticipated.
EVACUATION CARE
– Consider requesting MEDEVAC
– Double check all dressings and treatment
– Assist in loading casualty onto vehicle or aircraft
TACTICAL COMBAT CASUALTY CARE
- CARE UNDER FIRE
- TACTICAL FIELD CARE
- EVACUATION CARE
Consider this…
– The three primary preventable causes of death from injury on the battlefield are:
– Severe bleeding (apply a tourniquet or emergency trauma dressing)
– Collapsed lung (perform needle chest decompression)
– Airway blockage (insert a nasopharyngeal airway)
– Circumstances in which you should not treat a casualty while you are under enemy fire:
– Your own life is in imminent danger
– Other Soldiers in area require more urgent treatment
– The casualty does not have vital (life) signs (breathing, pulse)
– You should not treat a casualty while under enemy fire if the casualty’s injury is not survivable
without immediate evacuation to a medical treatment facility and such evacuation is not possible
– Penetrating head trauma with brain tissue exposed
– Severe burns covering a large part of the body
– Mutilating blast injuries
CHECK RESPONSIVENESS
— Gently shake or tap the casualty on the shoulder and ask in a loud, but calm, voice: ―Are you
okay?‖
— AVPU (Alert, Verbal, Painful, Unresponsive)
— If conscious, ask where it hurts or where his body feels different than usual.
— Casualties with an altered mental status should be disarmed
4-3
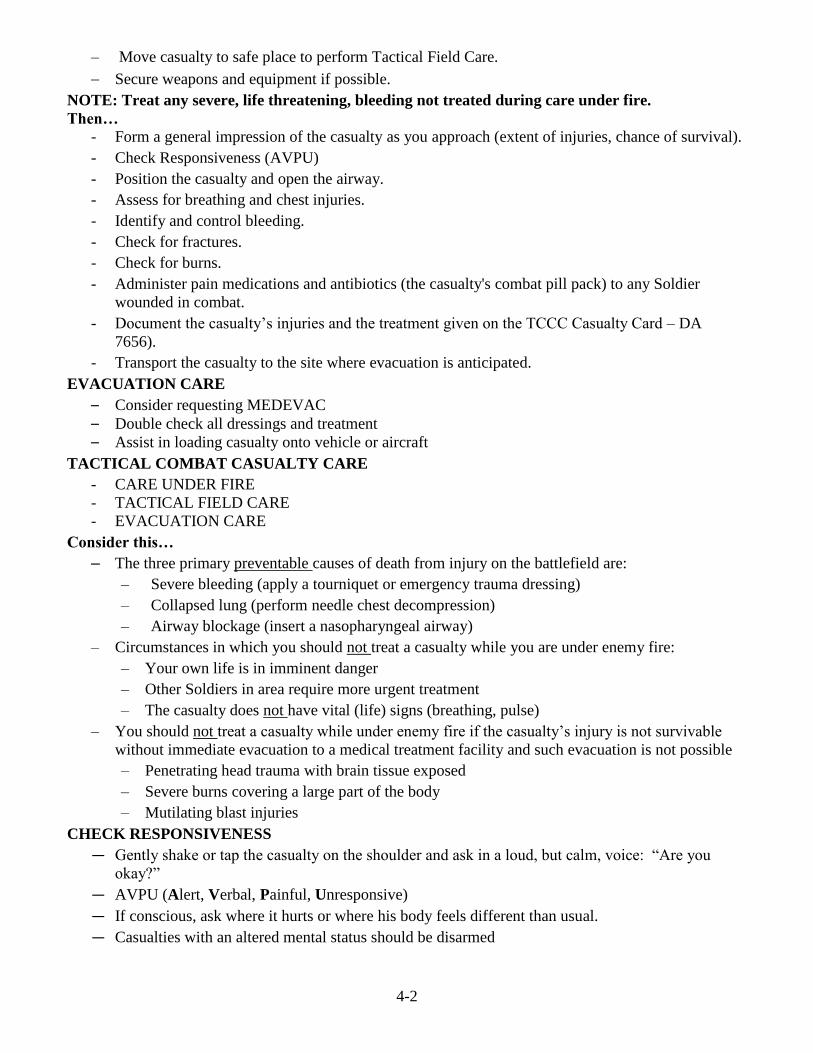
POSITION THE CASUALTY AND OPEN THE AIRWAY
— Head-Tilt/Chin-Lift
— Jaw Thrust
— Airway Adjuncts (NPA)
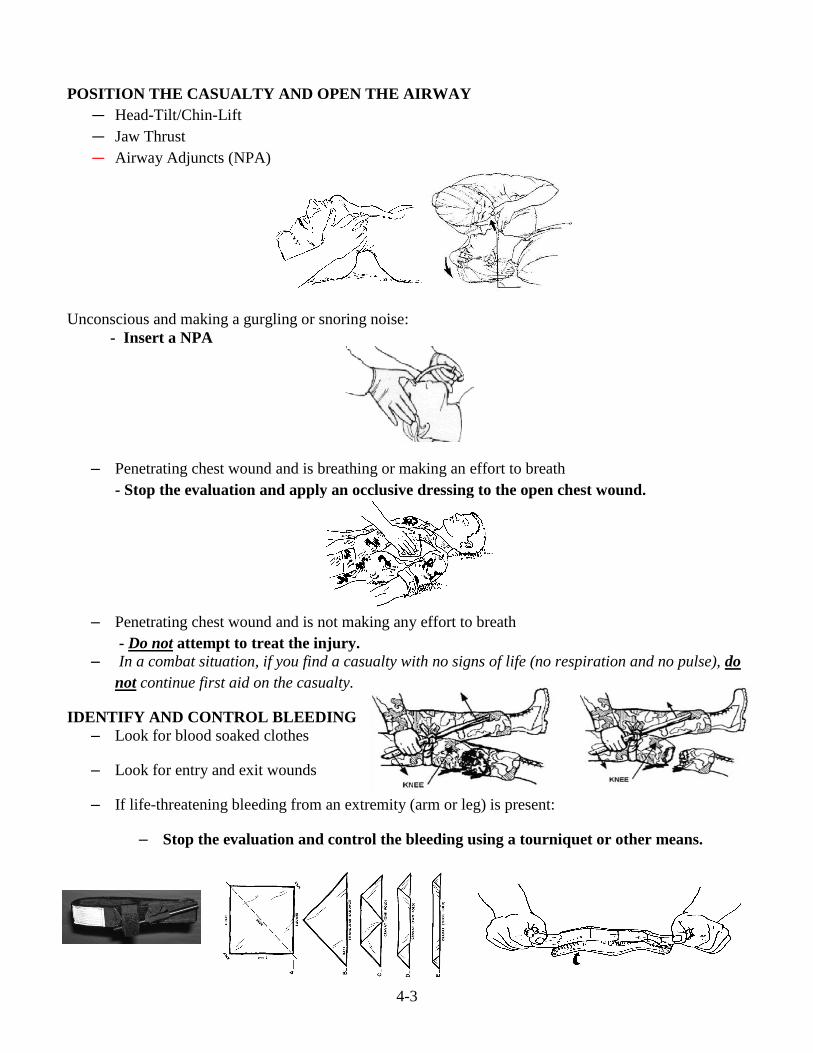
Unconscious and making a gurgling or snoring noise:
- Insert a NPA
– Penetrating chest wound and is breathing or making an effort to breath
- Stop the evaluation and apply an occlusive dressing to the open chest wound.
– Penetrating chest wound and is not making any effort to breath
- Do not attempt to treat the injury.
– In a combat situation, if you find a casualty with no signs of life (no respiration and no pulse), do
not continue first aid on the casualty.
IDENTIFY AND CONTROL BLEEDING
– Look for blood soaked clothes
– Look for entry and exit wounds
– If life-threatening bleeding from an extremity (arm or leg) is present:
– Stop the evaluation and control the bleeding using a tourniquet or other means.
4-4
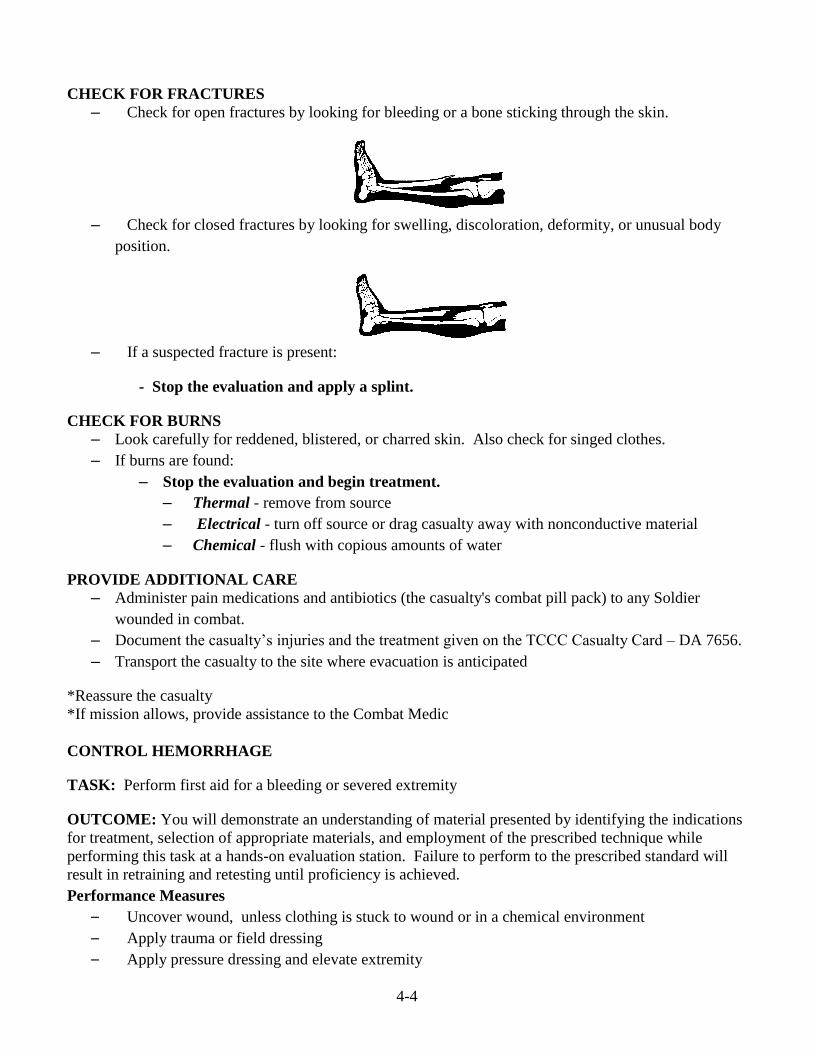
CHECK FOR FRACTURES
– Check for open fractures by looking for bleeding or a bone sticking through the skin.
– Check for closed fractures by looking for swelling, discoloration, deformity, or unusual body
position.
– If a suspected fracture is present:
- Stop the evaluation and apply a splint.
CHECK FOR BURNS
– Look carefully for reddened, blistered, or charred skin. Also check for singed clothes.
– If burns are found:
– Stop the evaluation and begin treatment.
– Thermal - remove from source
– Electrical - turn off source or drag casualty away with nonconductive material
– Chemical - flush with copious amounts of water
PROVIDE ADDITIONAL CARE
– Administer pain medications and antibiotics (the casualty's combat pill pack) to any Soldier
wounded in combat.
– Document the casualty’s injuries and the treatment given on the TCCC Casualty Card – DA 7656.
– Transport the casualty to the site where evacuation is anticipated
*Reassure the casualty
*If mission allows, provide assistance to the Combat Medic
CONTROL HEMORRHAGE
TASK: Perform first aid for a bleeding or severed extremity
OUTCOME: You will demonstrate an understanding of material presented by identifying the indications
for treatment, selection of appropriate materials, and employment of the prescribed technique while
performing this task at a hands-on evaluation station. Failure to perform to the prescribed standard will
result in retraining and retesting until proficiency is achieved.
Performance Measures
– Uncover wound, unless clothing is stuck to wound or in a chemical environment
– Apply trauma or field dressing
– Apply pressure dressing and elevate extremity
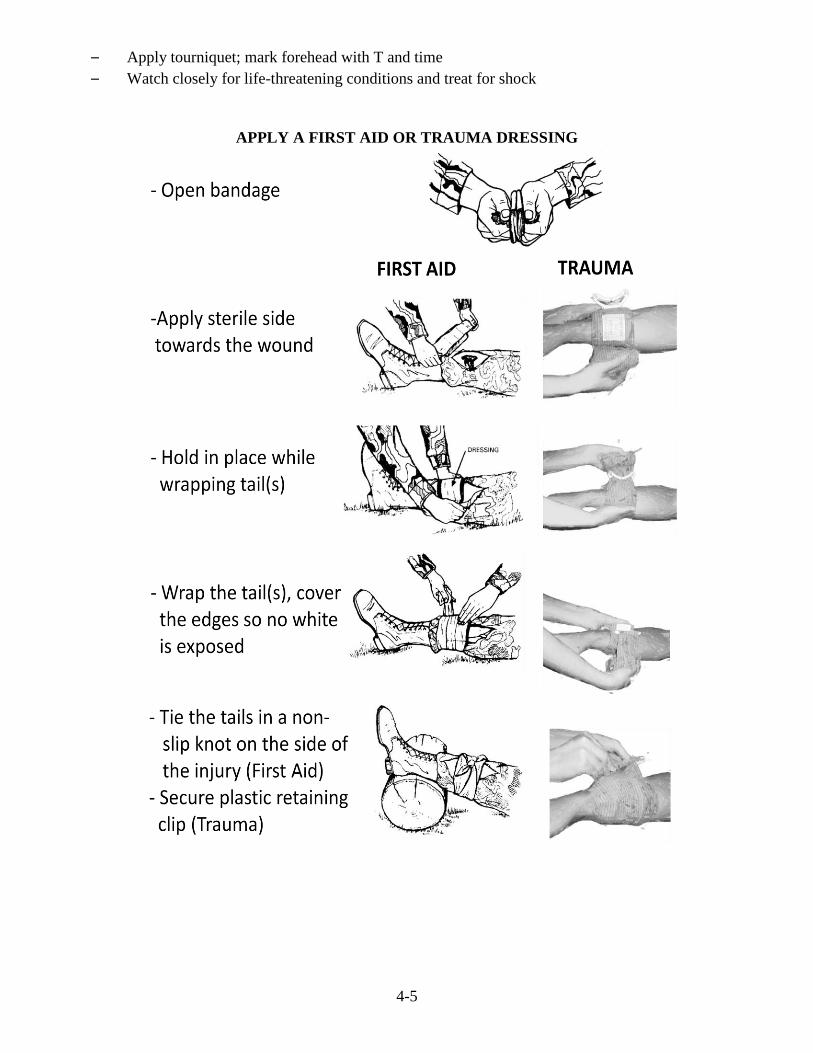
4-5
– Apply tourniquet; mark forehead with T and time
– Watch closely for life-threatening conditions and treat for shock
APPLY A FIRST AID OR TRAUMA DRESSING
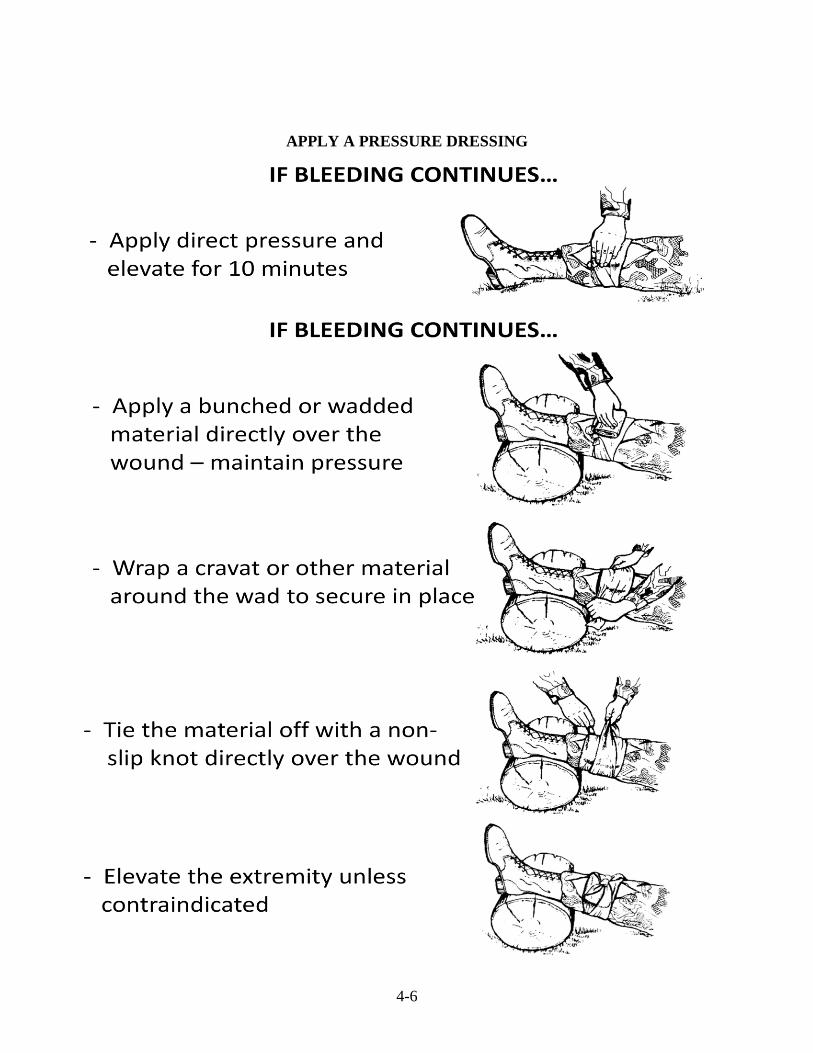
4-6
APPLY A PRESSURE DRESSING
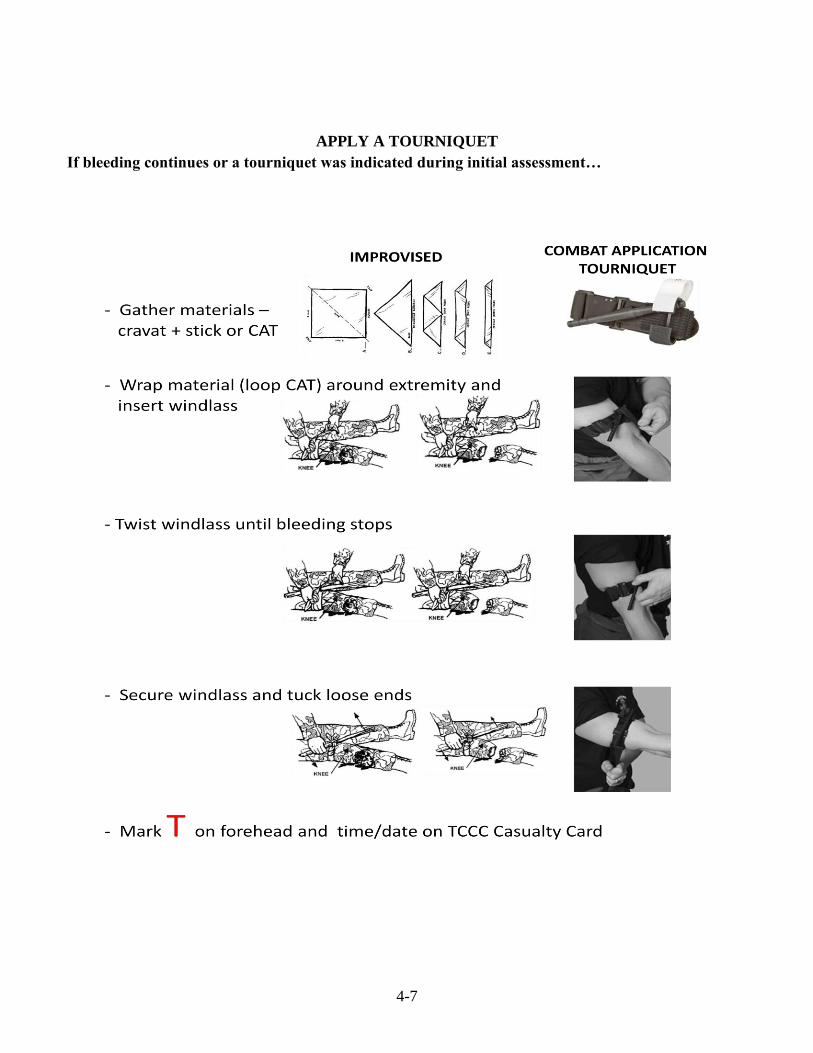
4-7
APPLY A TOURNIQUET
If bleeding continues or a tourniquet was indicated during initial assessment…
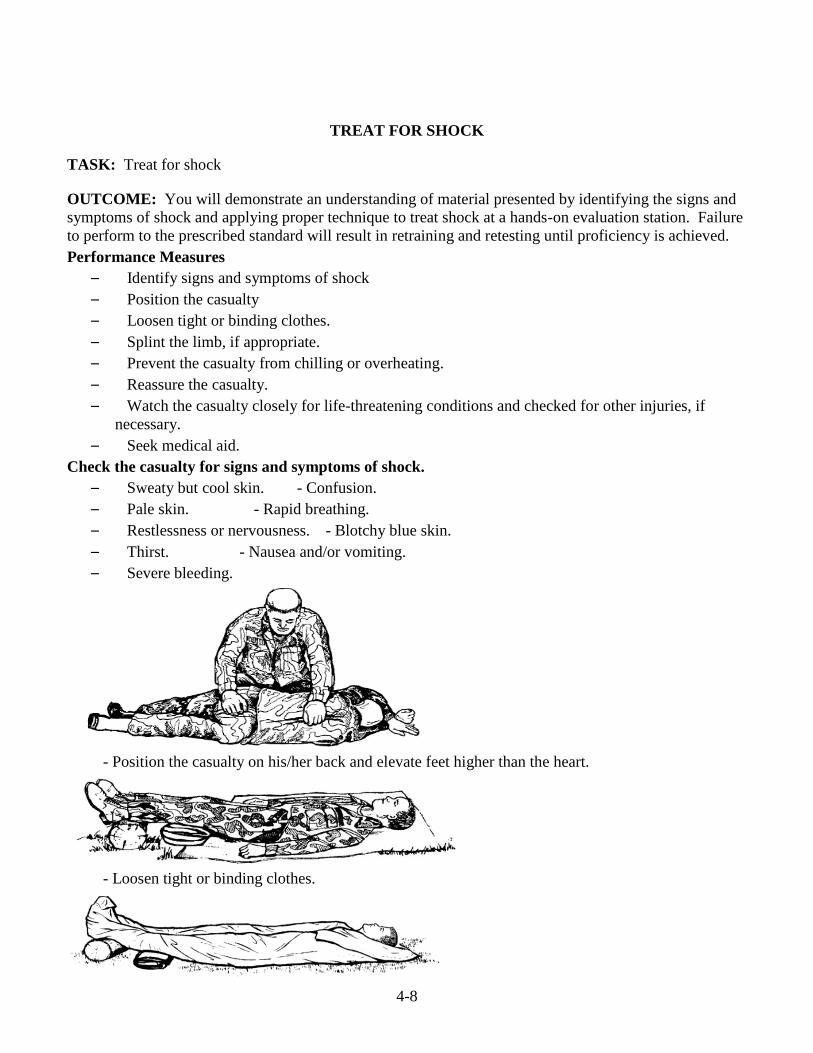
4-8
TREAT FOR SHOCK
TASK: Treat for shock
OUTCOME: You will demonstrate an understanding of material presented by identifying the signs and
symptoms of shock and applying proper technique to treat shock at a hands-on evaluation station. Failure
to perform to the prescribed standard will result in retraining and retesting until proficiency is achieved.
Performance Measures
– Identify signs and symptoms of shock
– Position the casualty
– Loosen tight or binding clothes.
– Splint the limb, if appropriate.
– Prevent the casualty from chilling or overheating.
– Reassure the casualty.
– Watch the casualty closely for life-threatening conditions and checked for other injuries, if
necessary.
– Seek medical aid.
Check the casualty for signs and symptoms of shock.
– Sweaty but cool skin. - Confusion.
– Pale skin. - Rapid breathing.
– Restlessness or nervousness. - Blotchy blue skin.
– Thirst. - Nausea and/or vomiting.
– Severe bleeding.
- Position the casualty on his/her back and elevate feet higher than the heart.
- Loosen tight or binding clothes.
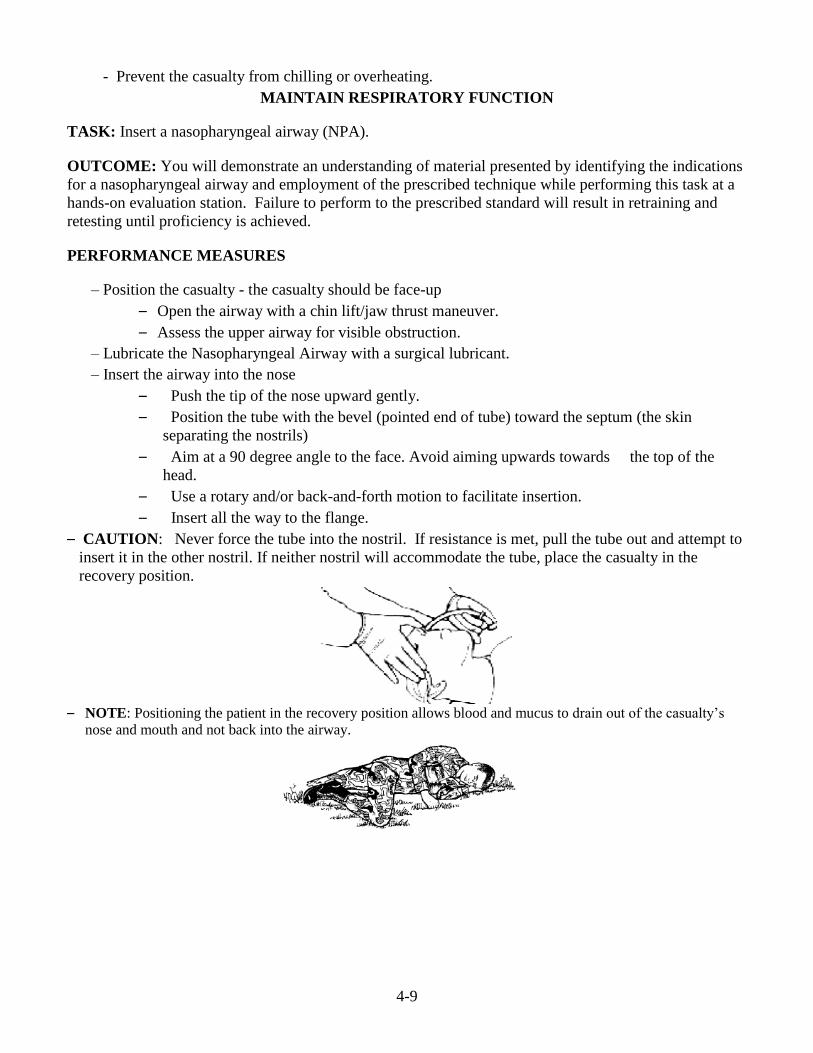
4-9
- Prevent the casualty from chilling or overheating.
MAINTAIN RESPIRATORY FUNCTION
TASK: Insert a nasopharyngeal airway (NPA).
OUTCOME: You will demonstrate an understanding of material presented by identifying the indications
for a nasopharyngeal airway and employment of the prescribed technique while performing this task at a
hands-on evaluation station. Failure to perform to the prescribed standard will result in retraining and
retesting until proficiency is achieved.
PERFORMANCE MEASURES
– Position the casualty - the casualty should be face-up
– Open the airway with a chin lift/jaw thrust maneuver.
– Assess the upper airway for visible obstruction.
– Lubricate the Nasopharyngeal Airway with a surgical lubricant.
– Insert the airway into the nose
– Push the tip of the nose upward gently.
– Position the tube with the bevel (pointed end of tube) toward the septum (the skin
separating the nostrils)
– Aim at a 90 degree angle to the face. Avoid aiming upwards towards the top of the
head.
– Use a rotary and/or back-and-forth motion to facilitate insertion.
– Insert all the way to the flange.
– CAUTION: Never force the tube into the nostril. If resistance is met, pull the tube out and attempt to
insert it in the other nostril. If neither nostril will accommodate the tube, place the casualty in the
recovery position.
– NOTE: Positioning the patient in the recovery position allows blood and mucus to drain out of the casualty’s
nose and mouth and not back into the airway.

4-10
TRANSPORT A CASUALTY
TASK: Transport a casualty
OUTCOME: You will demonstrate an understanding of manual carries by determining and executing
the appropriate carry based on enemy threat, distance to travel, and patient injuries. You must employ
proper technique to avoid causing unnecessary injury to the patient or yourself. This task will be
performed at a hands-on evaluation station. Failure to perform to the prescribed standard will result in
retraining and retesting until proficiency is achieved.
Performance Measures
– Select appropriate movement technique
– Transport casualty
– Does not cause unnecessary injury
Manual Carries
WARNING: Do not use manual carries to move a casualty with a neck or spine injury unless a life-
threatening hazard is in the immediate area. Seek medical personnel for guidance on how to move
and transport the casualty.
Fireman’s carry: Use for an unconscious or severely injured casualty.
Four Hand Seat Carry: Use in combat for moderate distances with two Soldiers.
Improvised Litters: Use for moderate to long distances, or if manual carries will cause further
injury. Ensure stability of materials.
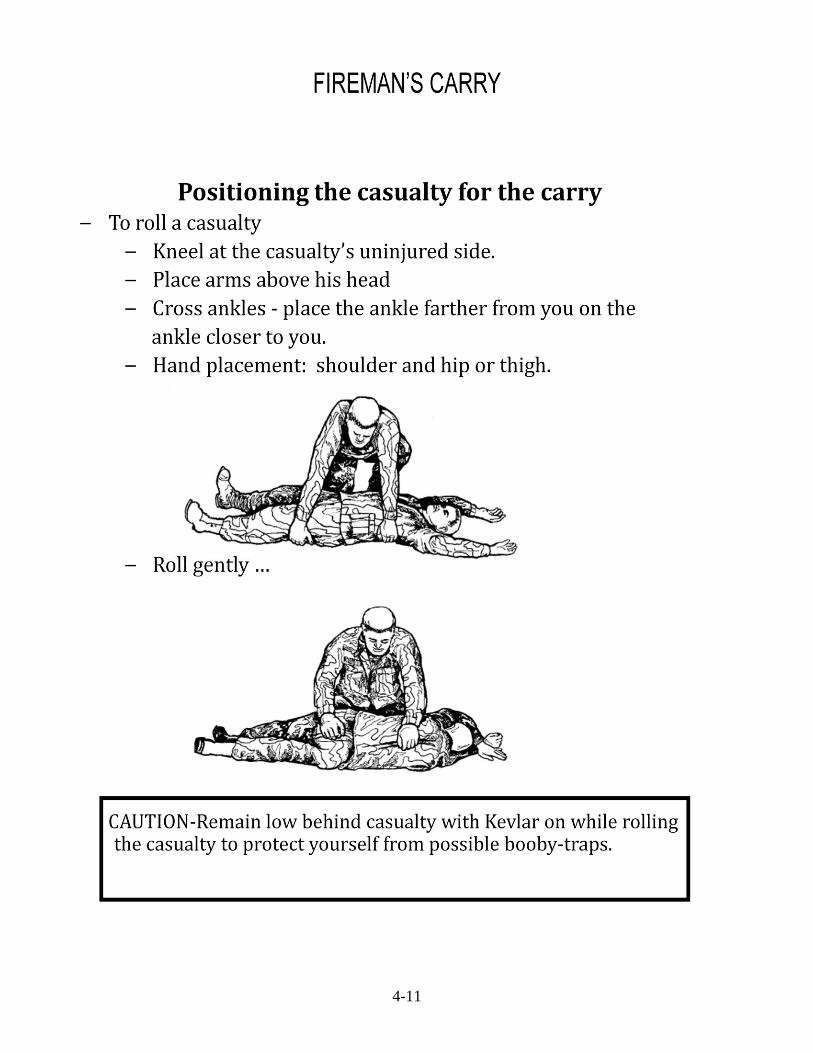
4-11

4-12
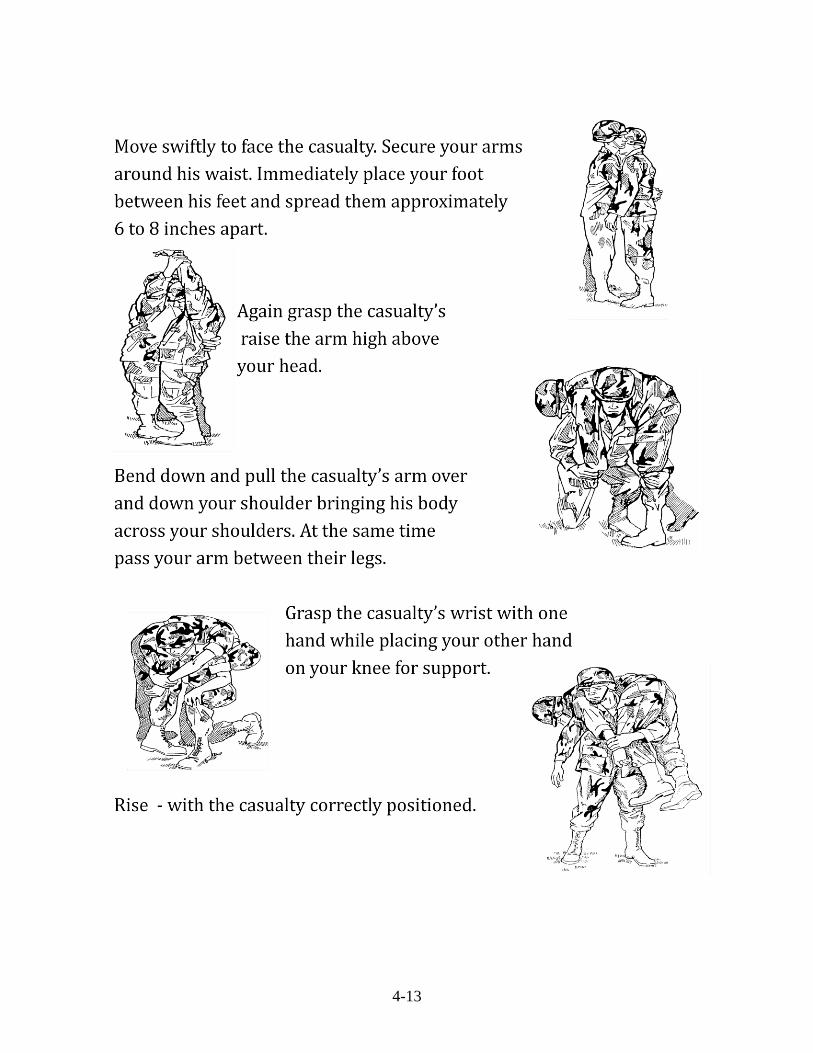
4-13
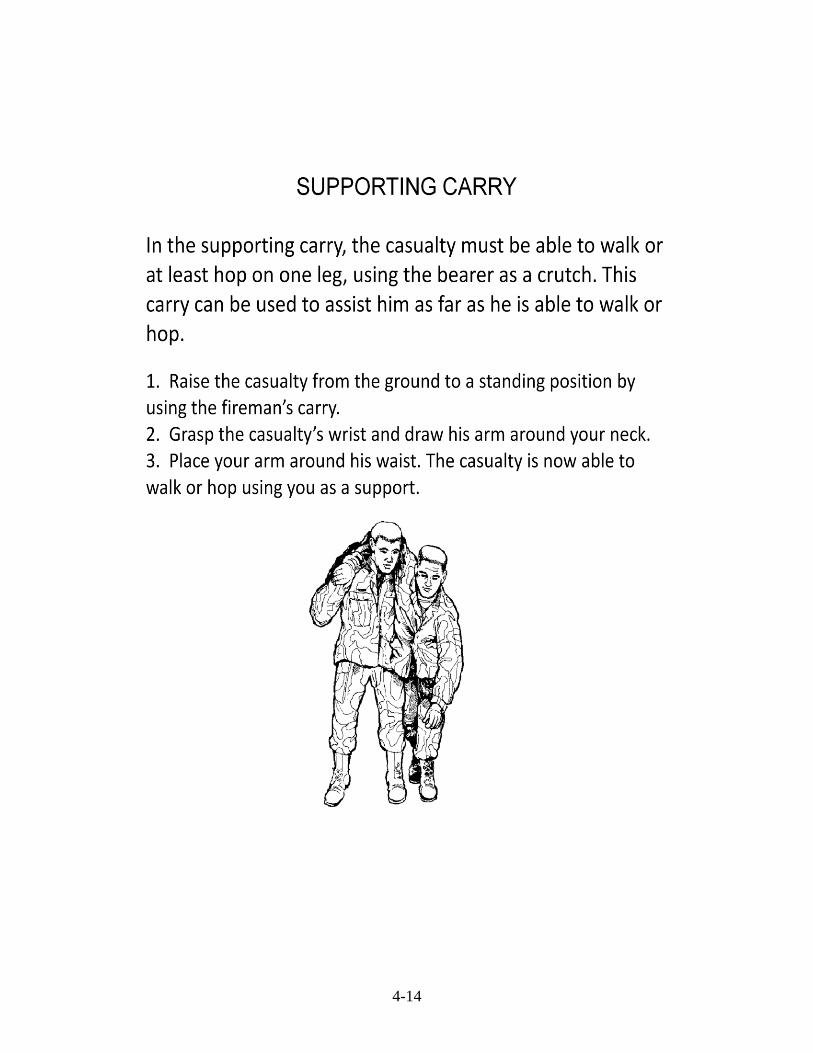
4-14
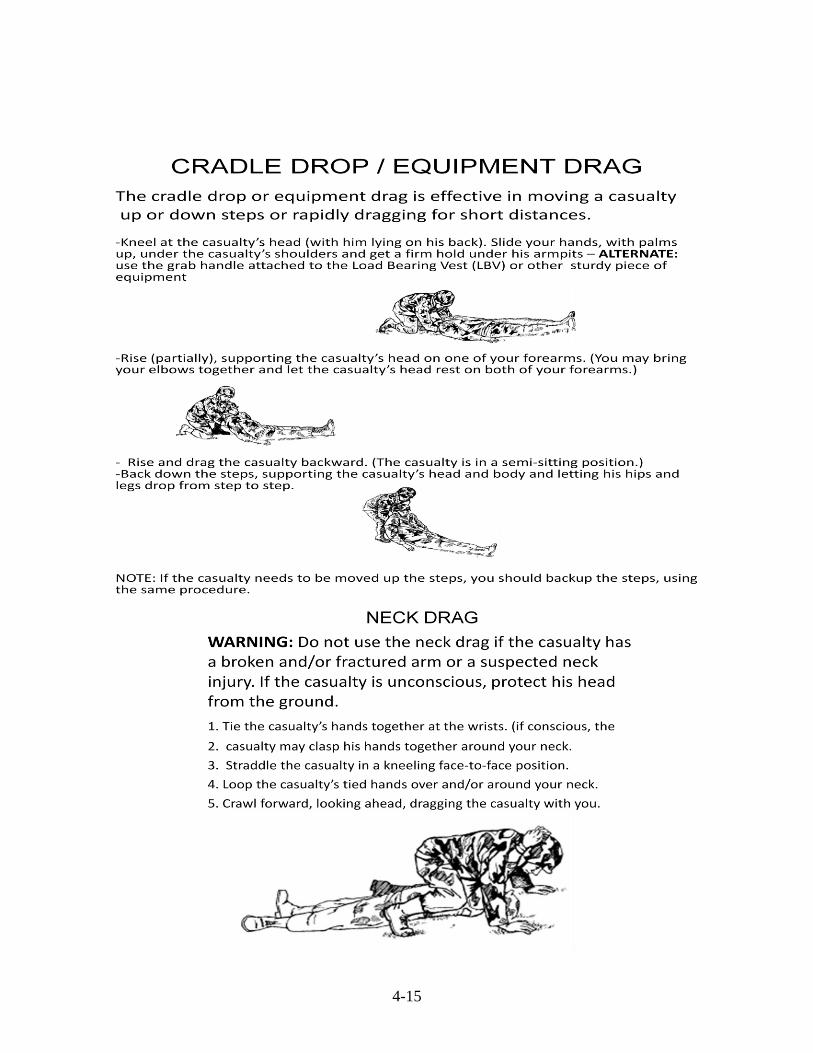
4-15
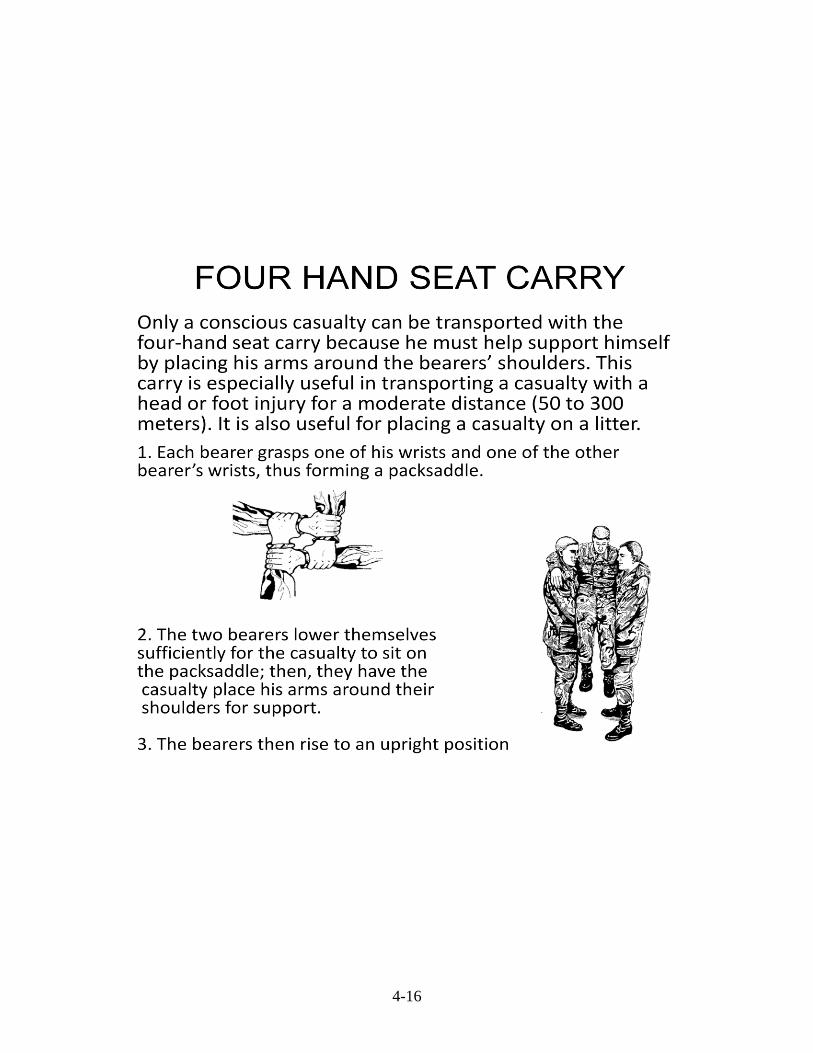
4-16
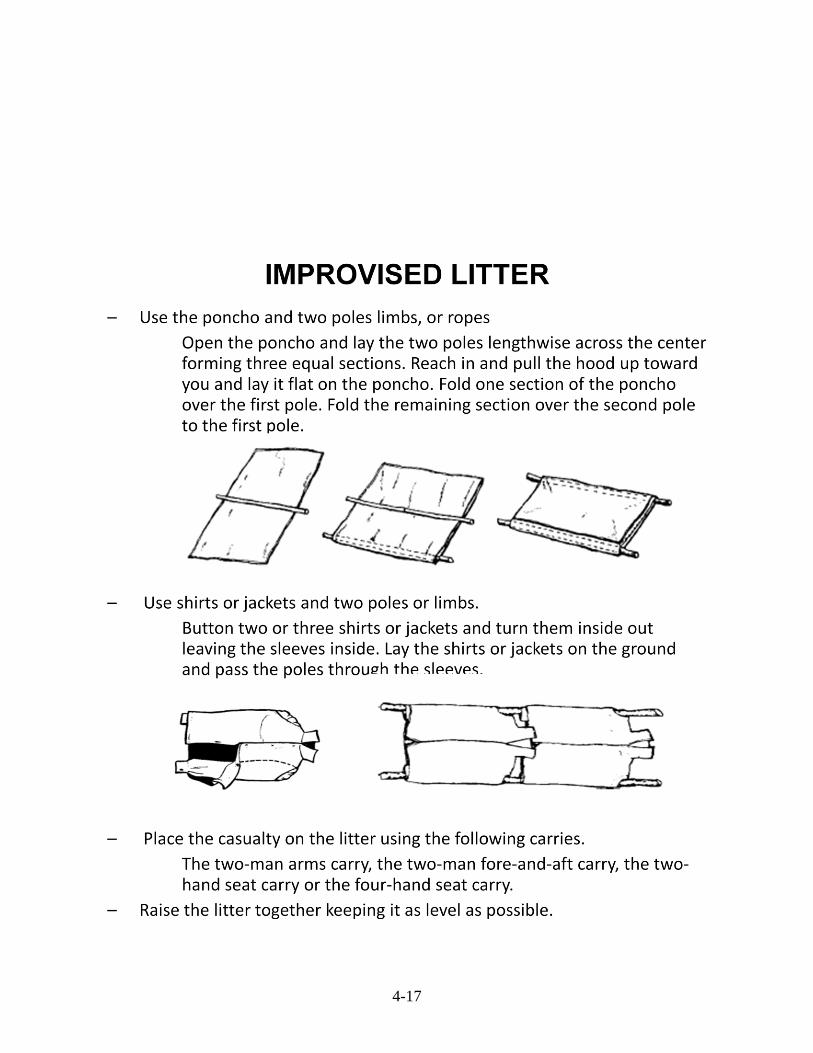
4-17
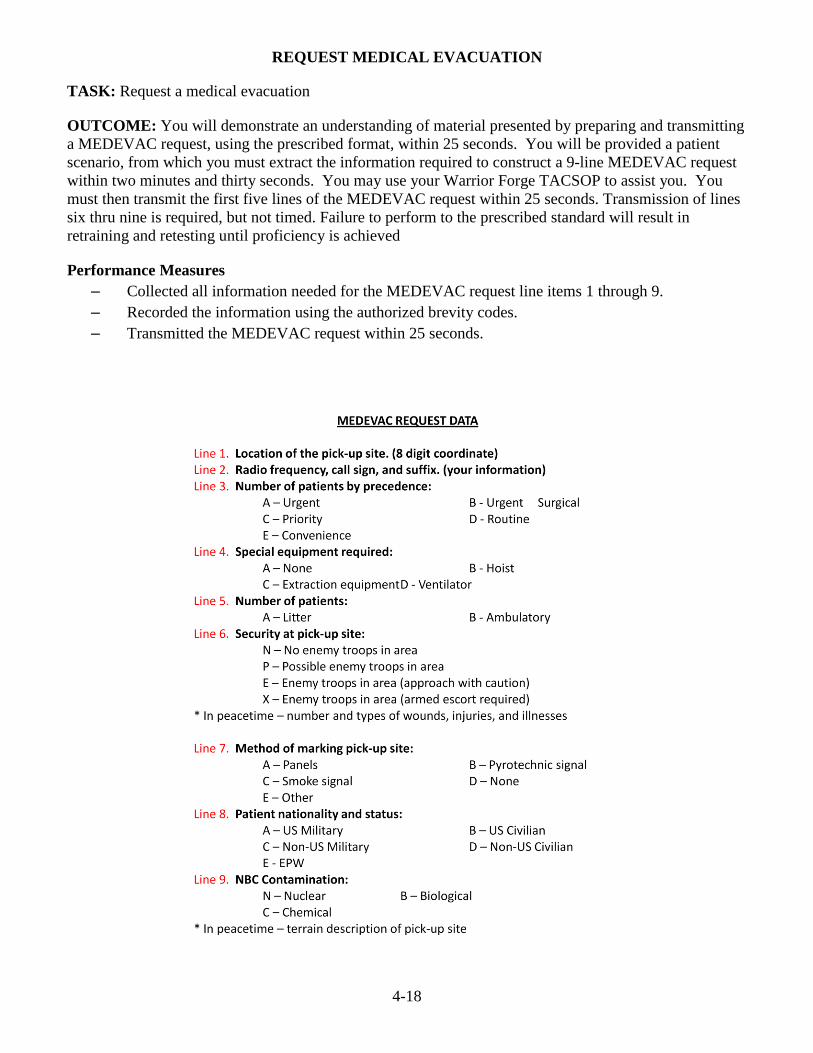
4-18
REQUEST MEDICAL EVACUATION
TASK: Request a medical evacuation
OUTCOME: You will demonstrate an understanding of material presented by preparing and transmitting
a MEDEVAC request, using the prescribed format, within 25 seconds. You will be provided a patient
scenario, from which you must extract the information required to construct a 9-line MEDEVAC request
within two minutes and thirty seconds. You may use your Warrior Forge TACSOP to assist you. You
must then transmit the first five lines of the MEDEVAC request within 25 seconds. Transmission of lines
six thru nine is required, but not timed. Failure to perform to the prescribed standard will result in
retraining and retesting until proficiency is achieved
Performance Measures
– Collected all information needed for the MEDEVAC request line items 1 through 9.
– Recorded the information using the authorized brevity codes.
– Transmitted the MEDEVAC request within 25 seconds.
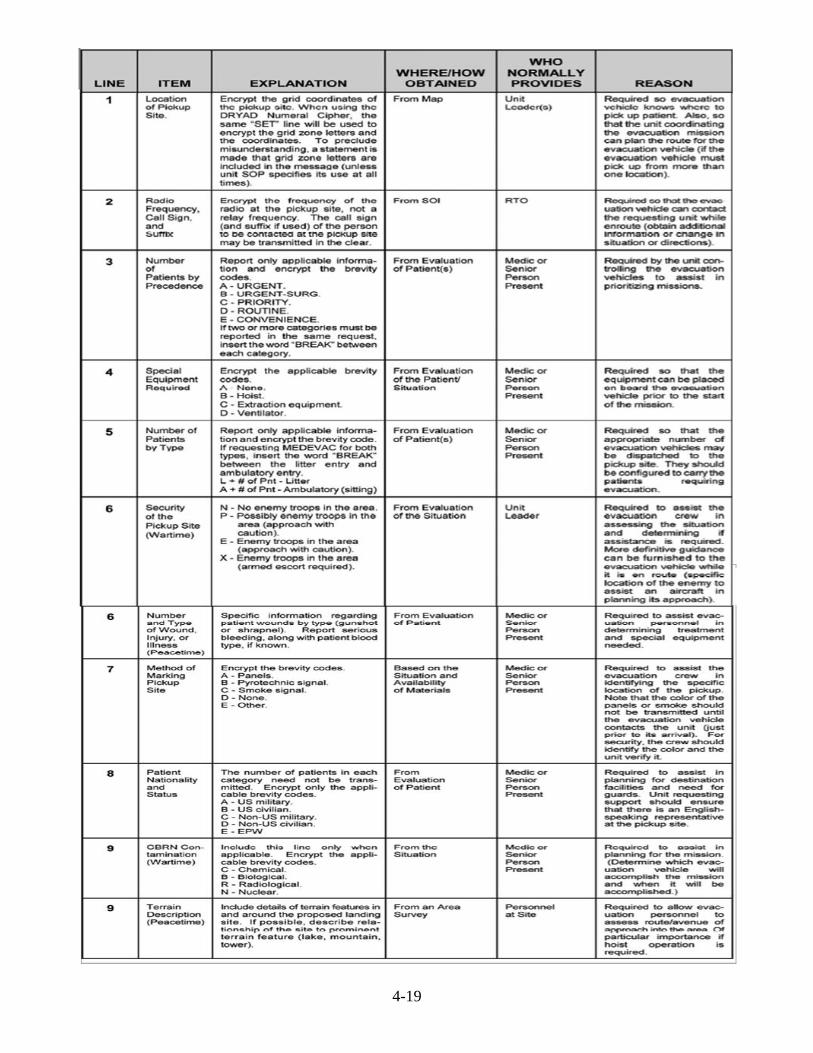
4-19
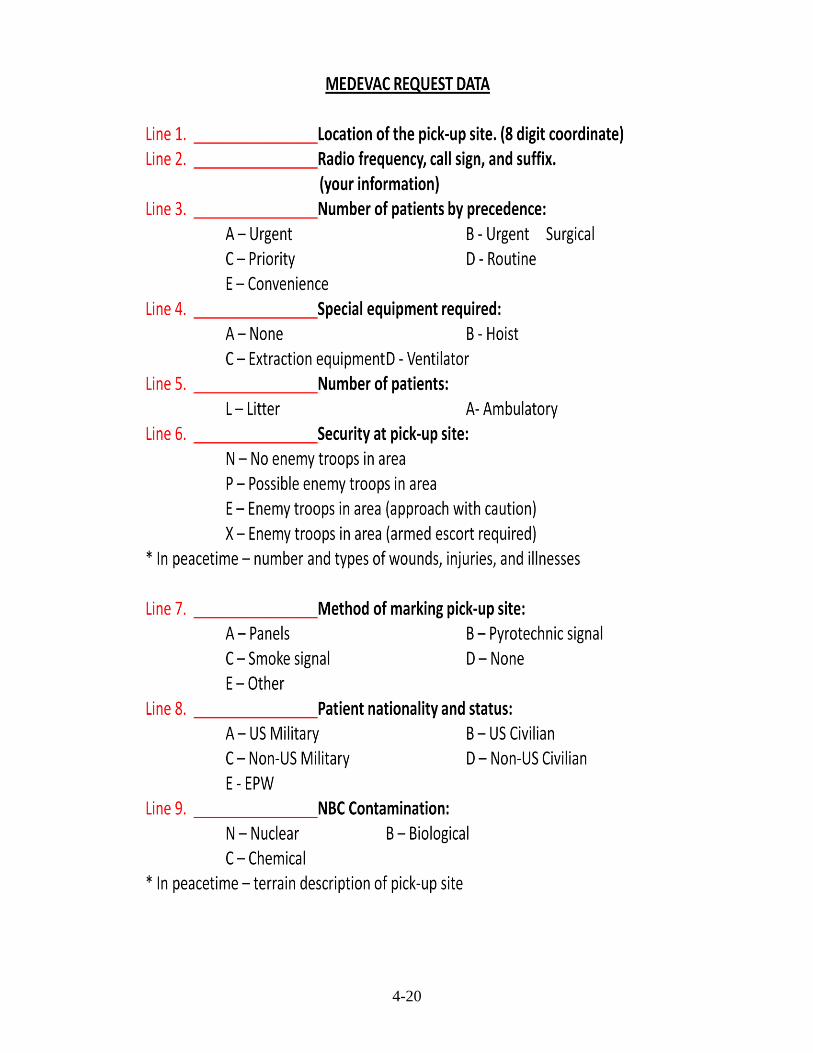
4-20
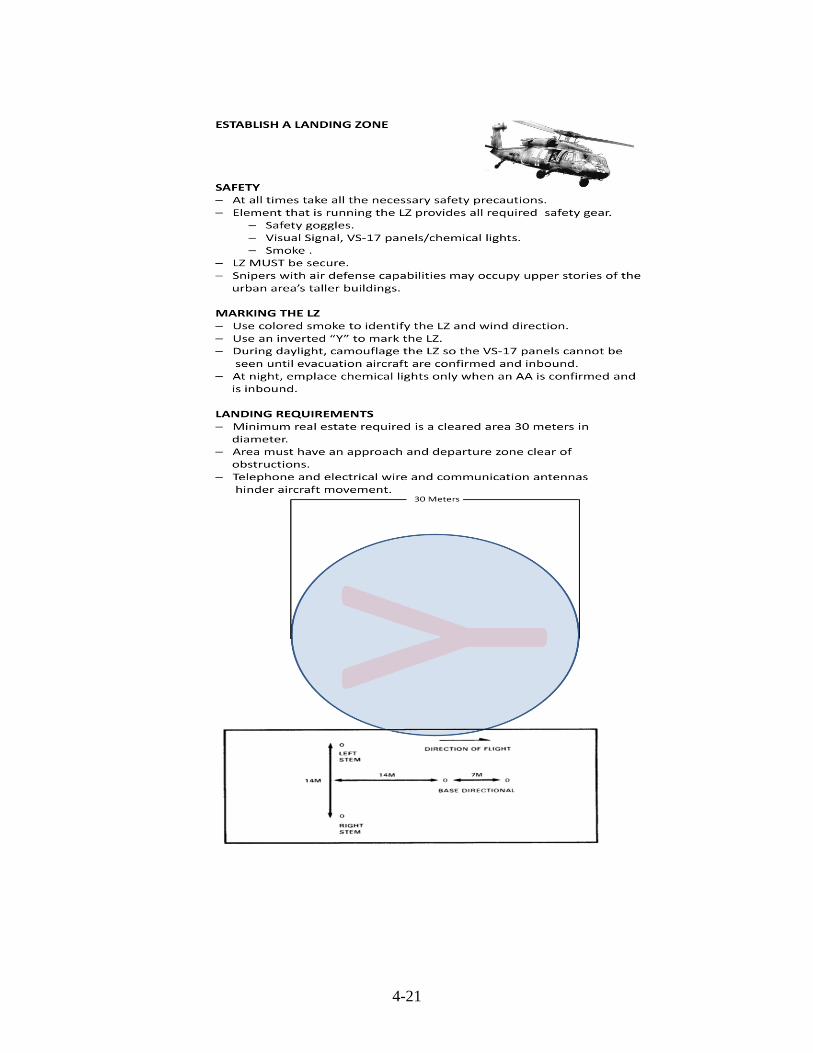
4-21
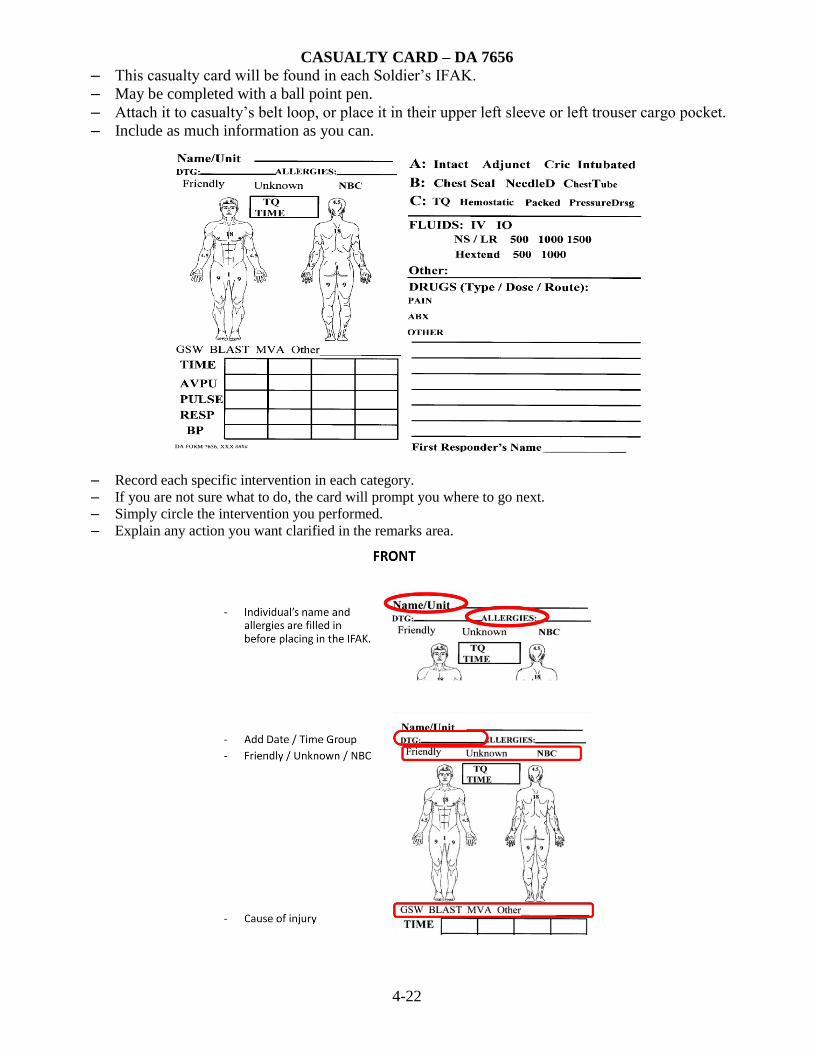
4-22
CASUALTY CARD – DA 7656
– This casualty card will be found in each Soldier’s IFAK.
– May be completed with a ball point pen.
– Attach it to casualty’s belt loop, or place it in their upper left sleeve or left trouser cargo pocket.
– Include as much information as you can.
– Record each specific intervention in each category.
– If you are not sure what to do, the card will prompt you where to go next.
– Simply circle the intervention you performed.
– Explain any action you want clarified in the remarks area.
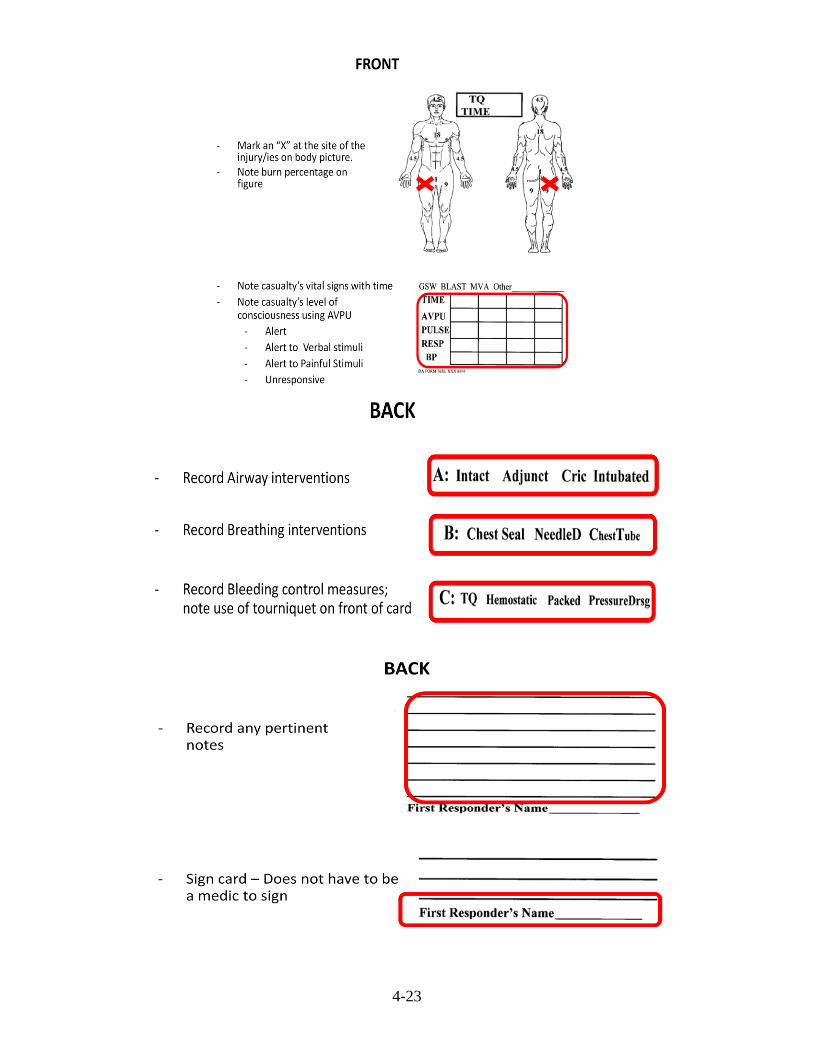
4-23
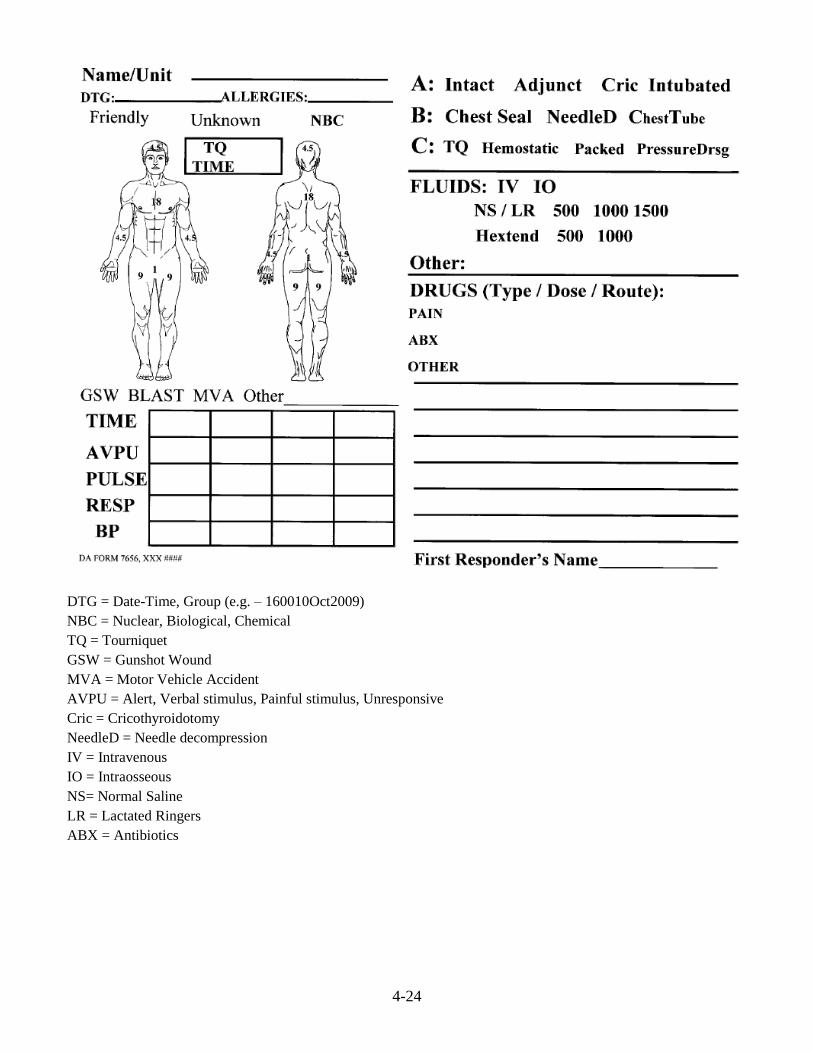
4-24
DTG = Date-Time, Group (e.g. – 160010Oct2009)
NBC = Nuclear, Biological, Chemical
TQ = Tourniquet
GSW = Gunshot Wound
MVA = Motor Vehicle Accident
AVPU = Alert, Verbal stimulus, Painful stimulus, Unresponsive
Cric = Cricothyroidotomy
NeedleD = Needle decompression
IV = Intravenous
IO = Intraosseous
NS= Normal Saline
LR = Lactated Ringers
ABX = Antibiotics
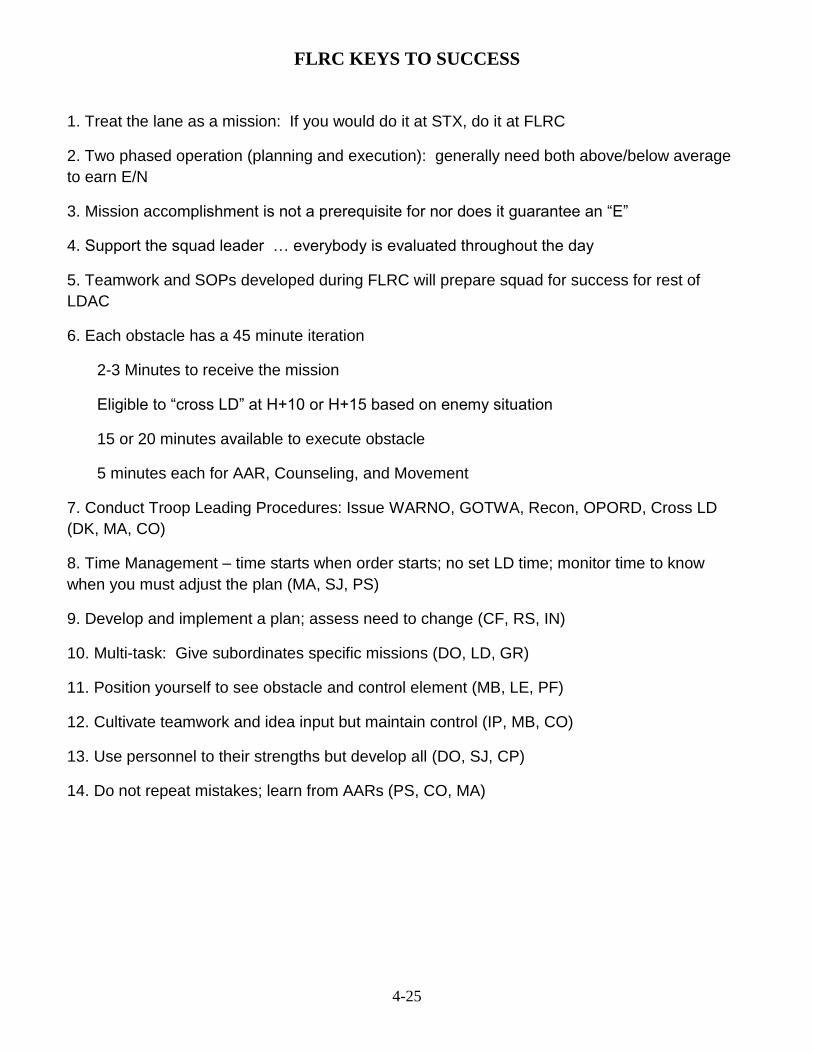
4-25
FLRC KEYS TO SUCCESS
1. Treat the lane as a mission: If you would do it at STX, do it at FLRC
2. Two phased operation (planning and execution): generally need both above/below average
to earn E/N
3. Mission accomplishment is not a prerequisite for nor does it guarantee an “E”
4. Support the squad leader … everybody is evaluated throughout the day
5. Teamwork and SOPs developed during FLRC will prepare squad for success for rest of
LDAC
6. Each obstacle has a 45 minute iteration
2-3 Minutes to receive the mission
Eligible to “cross LD” at H+10 or H+15 based on enemy situation
15 or 20 minutes available to execute obstacle
5 minutes each for AAR, Counseling, and Movement
7. Conduct Troop Leading Procedures: Issue WARNO, GOTWA, Recon, OPORD, Cross LD
(DK, MA, CO)
8. Time Management – time starts when order starts; no set LD time; monitor time to know
when you must adjust the plan (MA, SJ, PS)
9. Develop and implement a plan; assess need to change (CF, RS, IN)
10. Multi-task: Give subordinates specific missions (DO, LD, GR)
11. Position yourself to see obstacle and control element (MB, LE, PF)
12. Cultivate teamwork and idea input but maintain control (IP, MB, CO)
13. Use personnel to their strengths but develop all (DO, SJ, CP)
14. Do not repeat mistakes; learn from AARs (PS, CO, MA)
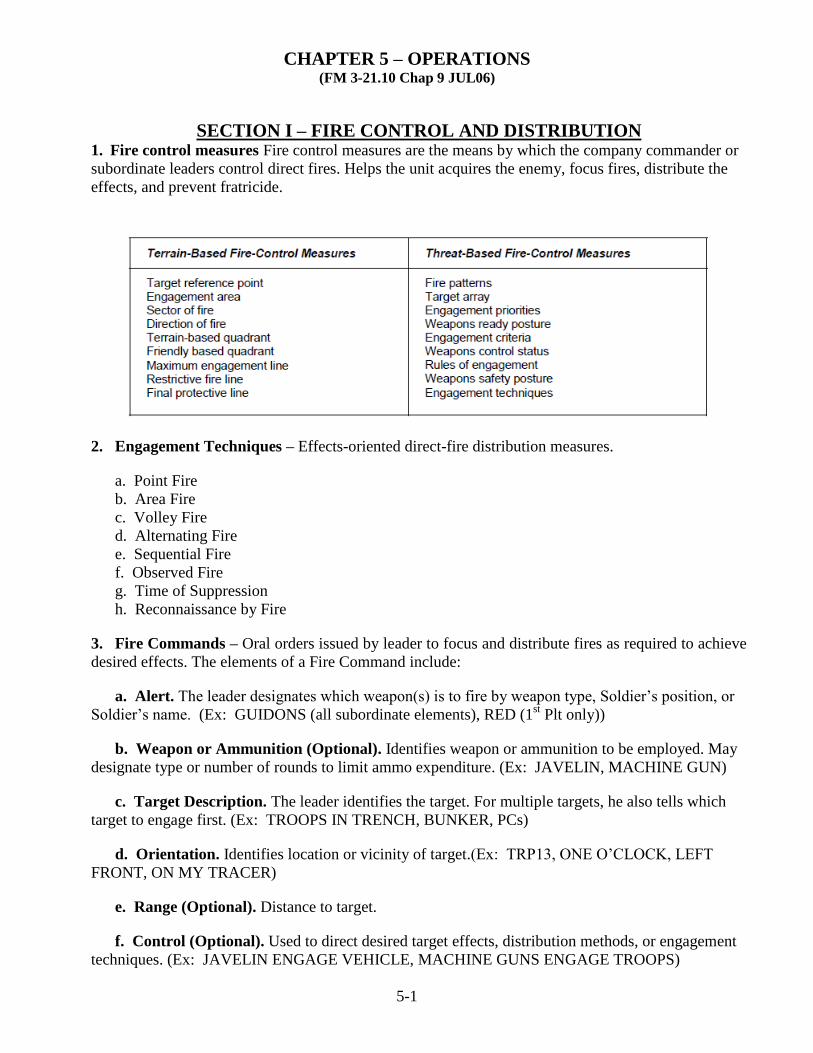
5-1
CHAPTER 5 – OPERATIONS (FM 3-21.10 Chap 9 JUL06)
SECTION I – FIRE CONTROL AND DISTRIBUTION 1. Fire control measures Fire control measures are the means by which the company commander or
subordinate leaders control direct fires. Helps the unit acquires the enemy, focus fires, distribute the
effects, and prevent fratricide.
2. Engagement Techniques – Effects-oriented direct-fire distribution measures.
a. Point Fire
b. Area Fire
c. Volley Fire
d. Alternating Fire
e. Sequential Fire
f. Observed Fire
g. Time of Suppression
h. Reconnaissance by Fire
3. Fire Commands – Oral orders issued by leader to focus and distribute fires as required to achieve
desired effects. The elements of a Fire Command include:
a. Alert. The leader designates which weapon(s) is to fire by weapon type, Soldier’s position, or
Soldier’s name. (Ex: GUIDONS (all subordinate elements), RED (1st Plt only))
b. Weapon or Ammunition (Optional). Identifies weapon or ammunition to be employed. May
designate type or number of rounds to limit ammo expenditure. (Ex: JAVELIN, MACHINE GUN)
c. Target Description. The leader identifies the target. For multiple targets, he also tells which
target to engage first. (Ex: TROOPS IN TRENCH, BUNKER, PCs)
d. Orientation. Identifies location or vicinity of target.(Ex: TRP13, ONE O’CLOCK, LEFT
FRONT, ON MY TRACER)
e. Range (Optional). Distance to target.
f. Control (Optional). Used to direct desired target effects, distribution methods, or engagement
techniques. (Ex: JAVELIN ENGAGE VEHICLE, MACHINE GUNS ENGAGE TROOPS)
5-2
g. Execution (Time). Specifies when direct fires should be initiated. (Ex: FIRE, AT MY
COMMAND, AT YOUR COMMAND, AT PHASE LINE ORANGE)
SECTION II – COMMUNICATION (FM 3-21.10 Pg 4-51 JUL06; FM 3-21.8 Pg 2-12 MAR07; FM 21-60 SEP87)
1. GENERAL - The three primary means of communication available to the infantry platoon are
radio, wire and messenger. Normally, the platoon uses one or all of these during an operation.
Additionally, the platoon leader plans an alternate means of communication in case the primary
means fails.
a. Radio - Radio is the least secure means of communication. Radio is susceptible to interception
and jamming. Proper radio procedures must be used to reduce the enemy's opportunity to hamper radio
communications.
-Change frequencies and call signs IAW unit SOI (Signal Operating Instructions)
-Use established formats (ex. SALUTE) to expedite transmissions
b. Messenger - Messenger is the most secure means of communications. Messengers should vary
their routes and schedules. Platoon leaders weigh the risk associated with using messengers. Although
secure, messengers are the slowest form of communication.
1. AN/PRC 119 SINCGARS
a. Characteristics and Capabilities
Single-Chanel Ground and Airborne Radio System (SINCGARS) is capable of voice and data
communication in two modes of operation: Single Channel (SC) and Frequency Hopping (FH).
SINGLE CHANNEL: When using the SC mode of operation, the Receiver/Transmitter (RT)
communicates on one frequency, digitally selected using a numeric keyboard. Up to 6 pre-set frequencies
can be loaded and stored in memory for use in the SC mode.
FREQUENCY HOPPING: SINCGARS also has the ability to secure transmissions through the use of a
transmission security key and frequency hopping to reduce or eliminate the threat of jamming and
direction-finding equipment. In order for your RT to use the FH mode of operation, it must be loaded with
FH data. (During Warrior Forge, SINCGARS will be used in SC mode only.)
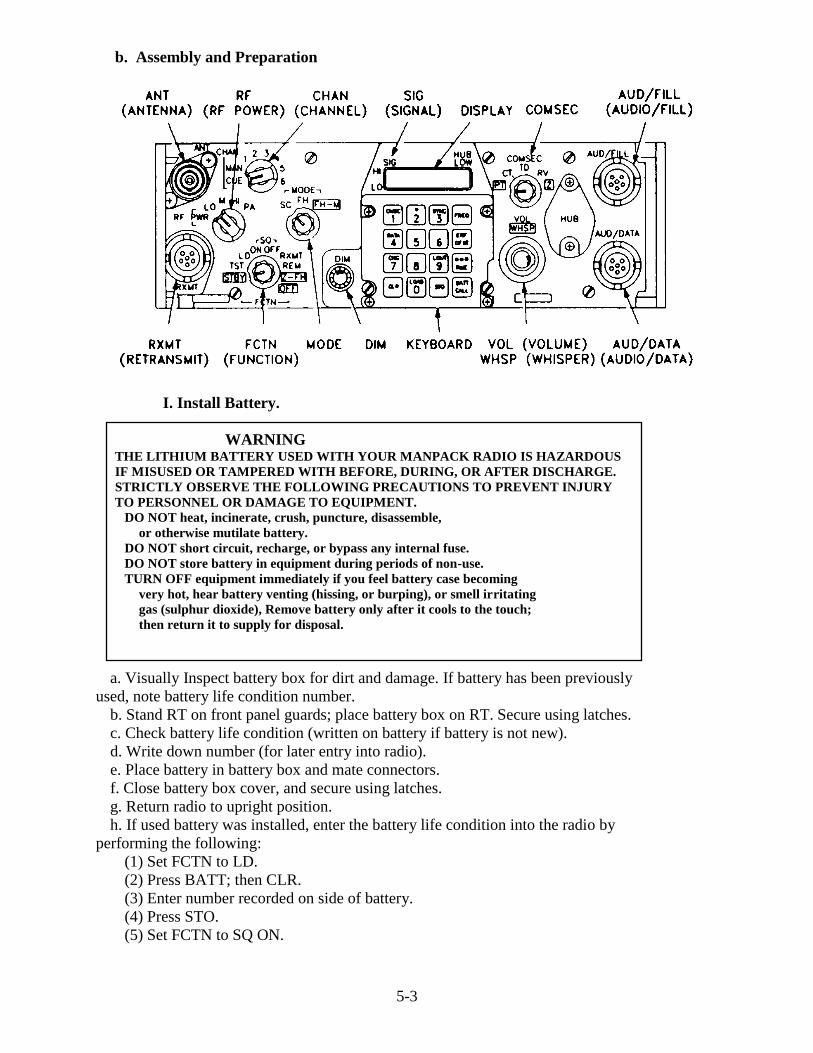
5-3
b. Assembly and Preparation
I. Install Battery.
WARNING THE LITHIUM BATTERY USED WITH YOUR MANPACK RADIO IS HAZARDOUS
IF MISUSED OR TAMPERED WITH BEFORE, DURING, OR AFTER DISCHARGE.
STRICTLY OBSERVE THE FOLLOWING PRECAUTIONS TO PREVENT INJURY
TO PERSONNEL OR DAMAGE TO EQUIPMENT.
DO NOT heat, incinerate, crush, puncture, disassemble,
or otherwise mutilate battery.
DO NOT short circuit, recharge, or bypass any internal fuse.
DO NOT store battery in equipment during periods of non-use.
TURN OFF equipment immediately if you feel battery case becoming
very hot, hear battery venting (hissing, or burping), or smell irritating
gas (sulphur dioxide), Remove battery only after it cools to the touch;
then return it to supply for disposal.
a. Visually Inspect battery box for dirt and damage. If battery has been previously
used, note battery life condition number.
b. Stand RT on front panel guards; place battery box on RT. Secure using latches.
c. Check battery life condition (written on battery if battery is not new).
d. Write down number (for later entry into radio).
e. Place battery in battery box and mate connectors.
f. Close battery box cover, and secure using latches.
g. Return radio to upright position.
h. If used battery was installed, enter the battery life condition into the radio by
performing the following:
(1) Set FCTN to LD.
(2) Press BATT; then CLR.
(3) Enter number recorded on side of battery.
(4) Press STO.
(5) Set FCTN to SQ ON.
5-4
II. Attach Antenna.
a. Screw whip into antenna base.
b. Hand tighten.
c. Carefully mate antenna base with RT ANT connector.
d. Hand tighten. (Important not to over-tighten.)
e. Position antenna as needed by bending goose neck.
NOTE: Keep antenna straight up if possible. If the antenna is bent to a horizontal position, it may
be necessary to turn the radio in order to receive and transmit messages.
CAUTION: Do not use antenna as a handle. Equipment damage may result.
III. Attach Handset.
Connect and secure handset connector to AUD/DATA connector. Make sure that keys line
up on handset connector and RT AUD/DATA connector; then push handset connector onto
AUD/DATA connector and twist right (clockwise) to lock in place. Push handset
connector in and twist left (counterclockwise) to remove handset.
c. Loading Frequencies
The procedure for loading SC frequencies requires setting the proper switches, pressing the correct
number keys for the frequency you wish to load, and storing the load in RT permanent memory by
pressing STO button.
1. Obtain authorized operating frequency from SOI, NCS or chain of command.
2. Set FCTN to LD.
3. Set MODE to SC.
4. Set CHAN to MAN, CUE, or desired channel (1 - 6) where frequency is to be stored.
5. Press FREQ (display will show "00000‖ or frequency to which RT is currently tuned).
6. Press CLR (display will show five lines).
7. Enter the numbers of the new frequency (using keyboard buttons). If you make a
mistake while entering a frequency, press CLR (this action will delete the last digit entered). Note: It is
important that you enter another number, or store a frequency within 7 seconds. Otherwise, the display
will go blank and you will have to re-enter the numbers. If you require more than 7 seconds to perform a
step, continue to press the last button, and the 7 second clock will be stopped.
8. Press STO (display will blink and show the frequency you just stored).
9. Repeat steps 1 thru 8 for additional frequencies that you wish to load.
10. Set CHAN to frequency you will be using.
11. Set FCTN to SQ ON (or normal operating position).
3. PROCEDURE WORDS (PROWORDS) AND SIGNALS
a. PROWORDS (1) Speed up communications
(2) Add a degree of security
(3) Help with mission command
(4) Prowords are established during tactical operations to describe objectives, phase
lines, check points and link ups and to keep voice transmission as short and clear as possible, radio
operators use them to take the place of long sentences.
b. Signals - Signals can be used in many forms during an operation. Signals are usually either
audio or visual. The key to the use of signals is ensuring everyone is aware of the signal and its meaning.
5-5
PROWORD Explanation
ALL AFTER The portion of the message to which I have reference
is all that which follows ______.
ALL BEFORE The portion of the message to which I have reference
is all that which precedes ______.
AUTHENTICATE The station called is to reply to the challenge which
follows
AUTHENTICATION IS The transmission authentication of this message is
______.
BREAK I hereby indicate the separation of the text from other
portions of the message.
CALL SIGN The group that follows is a call sign.
CORRECT You are correct, or what you have transmitted is
correct.
CORRECTION An error has been made in this transmission.
Transmission will continue with the last word correctly
transmitted.
An error has been made in this transmission (or
message indicated). The correct version is ______.
That which follows is a corrected version in answer to
your request for verification.
DISREGARD THIS
TRANSMISSION -- OUT This transmission is in error. Disregard it. This
PROWORD shall not be used to cancel any message
that has been completely transmitted and for which
receipt or acknowledgement has been received.
DO NOT ANSWER Stations called are not to answer this call, receipt for
this message, or otherwise to transmit in connection
with this transmission. When this PROWORD is
employed, the transmission shall be ended with the
PROWORD "OUT".
EXECUTE Carry out the purpose of the message or signal to
which this applies. To be used only with the executive
mode.
EXECUTE TO FOLLOW Action on the message or signal which follows is to be
carried out upon receipt of the PROWORD "EXECUTE".
To be used only with the delayed executive method.
FLASH Precedence FLASH
FROM The originator of this message is indicated by the
address designator immediately following.
I AUTHENTICATE The group that follows is the reply to your challenge to
authenticate.
5-6
IMMEDIATE Precedence IMMEDIATE.
IMMEDIATE EXECUTE Action on the message or signal following is to be
carried out on receipt of the word EXECUTE. To be
sued only with the Immediate Executive Method.
I READ BACK The following is my response to your instructions to
read back.
I SAY AGAIN I am repeating transmission or portion indicated.
I SPELL I shall spell the next word phonetically
I VERIFY That which follows has been verified at your request
and is repeated. To be used only as a reply to
VERIFY.
MORE TO FOLLOW Transmitting station has additional traffic for the
receiving station.
OUT This is the end of my transmission to you and no
answer is required or expected.
OVER This is the end of my transmission to you and a
response is necessary. Go ahead, transmit
PRIORITY Precedence PRIORITY
READ BACK Repeat this entire transmission back to me exactly as
received.
ROGER I have received your last transmission satisfactorily.
ROUTINE Precedence ROUTINE
SAY AGAIN Repeat all of your last transmission. Followed by
identification data means "Repeat _____ (portion
indicated)".
SILENCE
(Repeated three or more
times)
Cease transmission on this net immediately. Silence
will be maintained until lifted. (When an
authentication system is in force, the transmission
imposing silence is to be authenticated).
SILENCE LIFTED Silence is lifted. (When an authentication system is in
force, the transmission lifting silence is to be
authenticated).
SPEAK SLOWER Your transmission is at too fast a speed. Reduce
speed of transmission.
STOP REBROADCASTING Cut the automatic link between the two nets that are
being rebroadcast and revert to normal working.
THIS IS This transmission is from the station whose designator
immediately follows.
TIME That which immediately follows is the time or date
time-time group of the message.
UNKNOWN STATION The identity of the station with whom I am attempting
to establish communication is unknown.
VERIFY Verify entire message (or portion indicated) with the
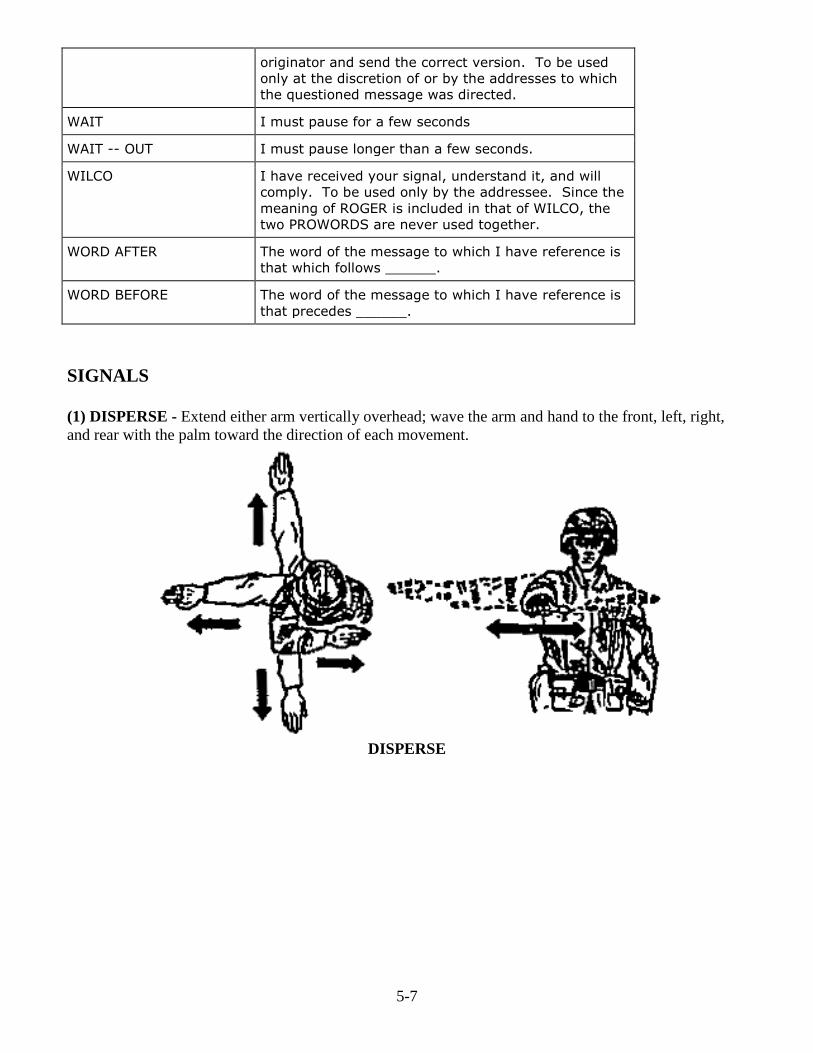
5-7
originator and send the correct version. To be used
only at the discretion of or by the addresses to which
the questioned message was directed.
WAIT I must pause for a few seconds
WAIT -- OUT I must pause longer than a few seconds.
WILCO I have received your signal, understand it, and will
comply. To be used only by the addressee. Since the
meaning of ROGER is included in that of WILCO, the
two PROWORDS are never used together.
WORD AFTER The word of the message to which I have reference is
that which follows ______.
WORD BEFORE The word of the message to which I have reference is
that precedes ______.
SIGNALS
(1) DISPERSE - Extend either arm vertically overhead; wave the arm and hand to the front, left, right,
and rear with the palm toward the direction of each movement.
DISPERSE
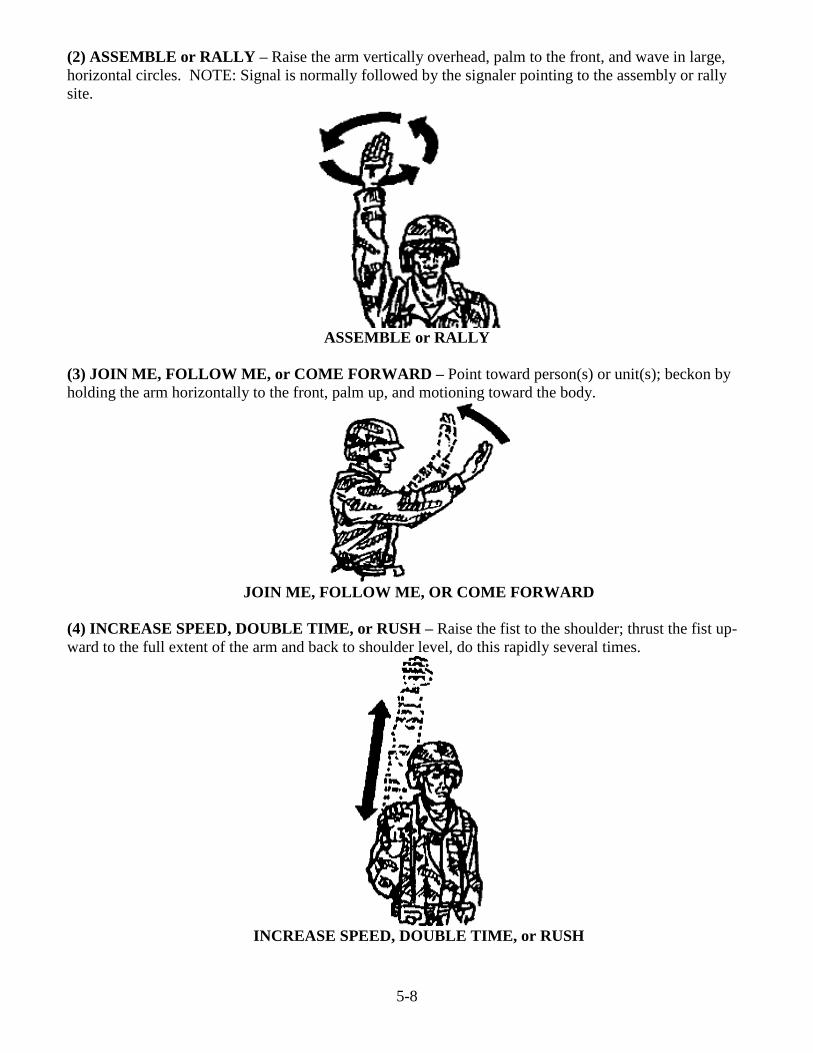
5-8
(2) ASSEMBLE or RALLY – Raise the arm vertically overhead, palm to the front, and wave in large,
horizontal circles. NOTE: Signal is normally followed by the signaler pointing to the assembly or rally
site.
ASSEMBLE or RALLY
(3) JOIN ME, FOLLOW ME, or COME FORWARD – Point toward person(s) or unit(s); beckon by
holding the arm horizontally to the front, palm up, and motioning toward the body.
JOIN ME, FOLLOW ME, OR COME FORWARD
(4) INCREASE SPEED, DOUBLE TIME, or RUSH – Raise the fist to the shoulder; thrust the fist up-
ward to the full extent of the arm and back to shoulder level, do this rapidly several times.
INCREASE SPEED, DOUBLE TIME, or RUSH
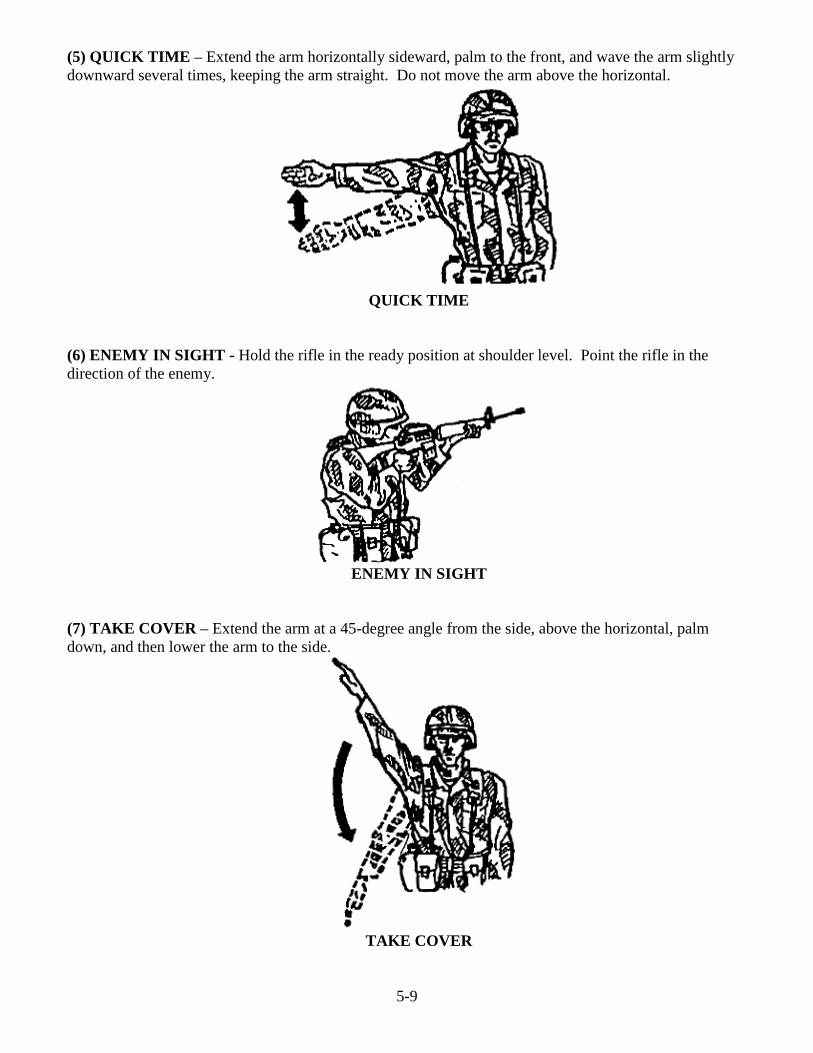
5-9
(5) QUICK TIME – Extend the arm horizontally sideward, palm to the front, and wave the arm slightly
downward several times, keeping the arm straight. Do not move the arm above the horizontal.
QUICK TIME
(6) ENEMY IN SIGHT - Hold the rifle in the ready position at shoulder level. Point the rifle in the
direction of the enemy.
ENEMY IN SIGHT
(7) TAKE COVER – Extend the arm at a 45-degree angle from the side, above the horizontal, palm
down, and then lower the arm to the side.
TAKE COVER
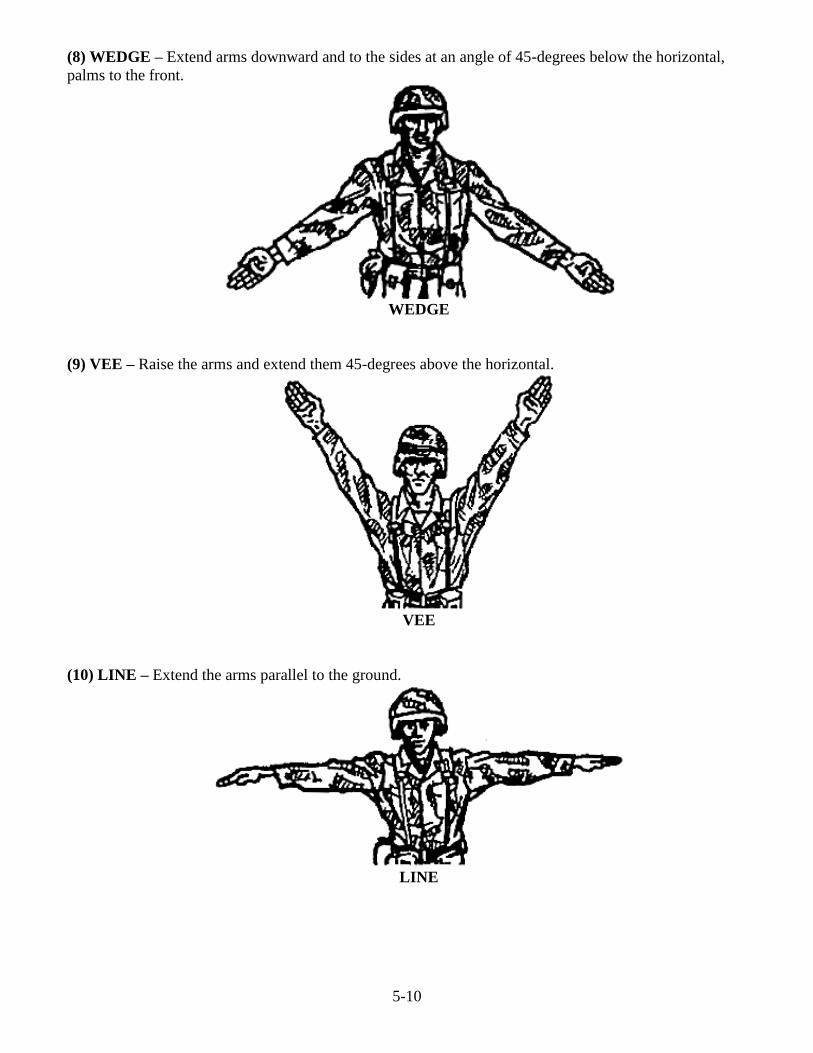
5-10
(8) WEDGE – Extend arms downward and to the sides at an angle of 45-degrees below the horizontal,
palms to the front.
WEDGE
(9) VEE – Raise the arms and extend them 45-degrees above the horizontal.
VEE
(10) LINE – Extend the arms parallel to the ground.
LINE
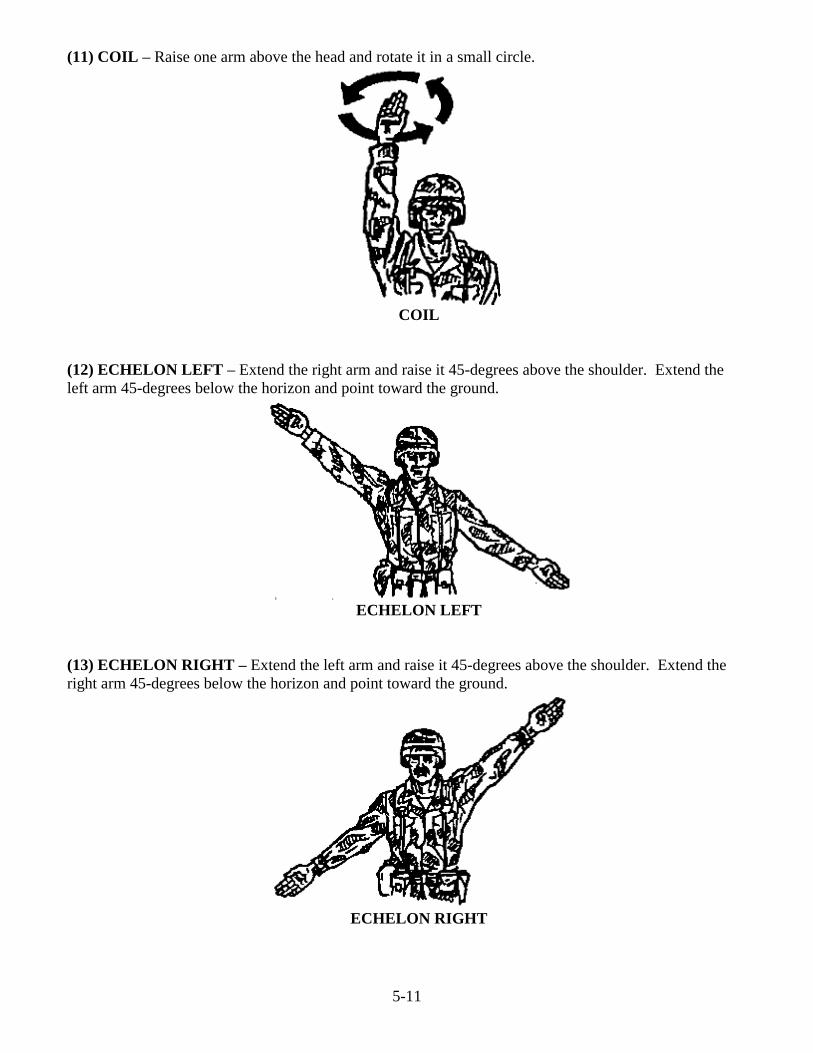
5-11
(11) COIL – Raise one arm above the head and rotate it in a small circle.
COIL
(12) ECHELON LEFT – Extend the right arm and raise it 45-degrees above the shoulder. Extend the
left arm 45-degrees below the horizon and point toward the ground.
ECHELON LEFT
(13) ECHELON RIGHT – Extend the left arm and raise it 45-degrees above the shoulder. Extend the
right arm 45-degrees below the horizon and point toward the ground.
ECHELON RIGHT
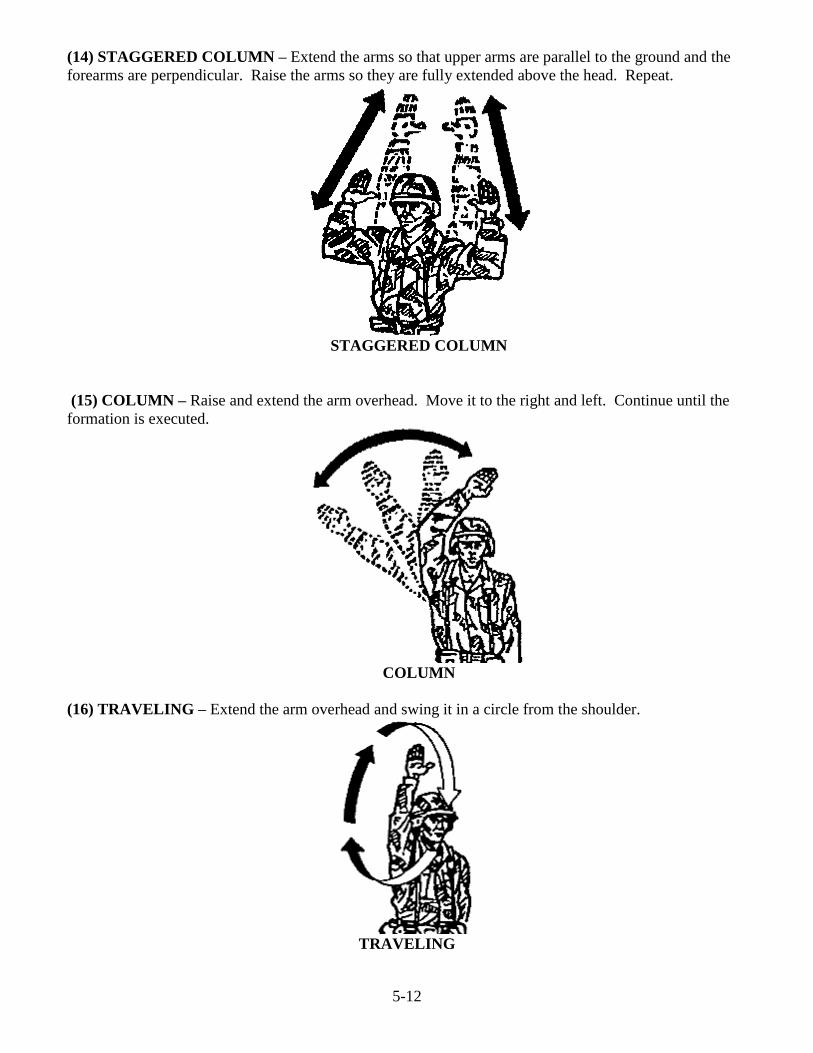
5-12
(14) STAGGERED COLUMN – Extend the arms so that upper arms are parallel to the ground and the
forearms are perpendicular. Raise the arms so they are fully extended above the head. Repeat.
STAGGERED COLUMN
(15) COLUMN – Raise and extend the arm overhead. Move it to the right and left. Continue until the
formation is executed.
COLUMN
(16) TRAVELING – Extend the arm overhead and swing it in a circle from the shoulder.
TRAVELING

5-13
(17) TRAVELING OVERWATCH – Extend both arms and raise them up and down.
TRAVELING OVERWATCH
(18) BOUNDING OVERWATCH, COVER MY MOVE – Extend one arm to a 45-degree angle.
Bend the arm and tap the helmet. Repeat.
BOUNDING OVERWATCH, COVER MY MOVE
(19) MOVE TO LEFT – Extend the arm to the left and raise it up and down.
MOVE TO LEFT
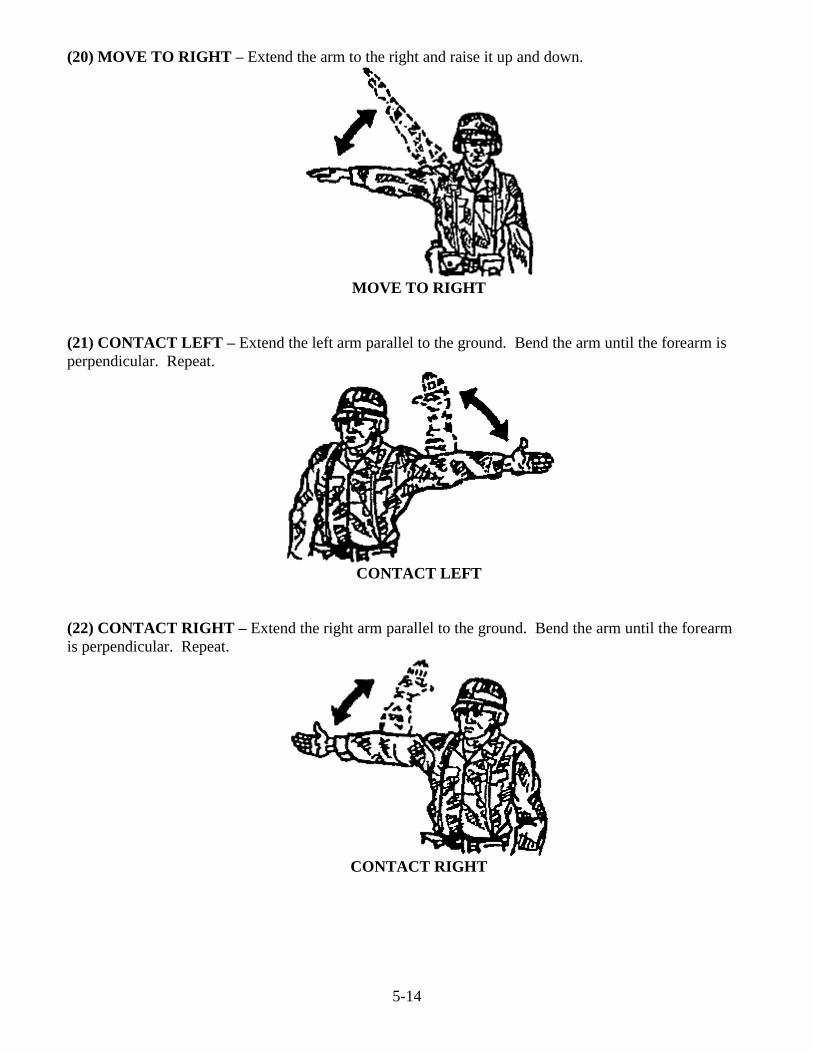
5-14
(20) MOVE TO RIGHT – Extend the arm to the right and raise it up and down.
MOVE TO RIGHT
(21) CONTACT LEFT – Extend the left arm parallel to the ground. Bend the arm until the forearm is
perpendicular. Repeat.
CONTACT LEFT
(22) CONTACT RIGHT – Extend the right arm parallel to the ground. Bend the arm until the forearm
is perpendicular. Repeat.
CONTACT RIGHT
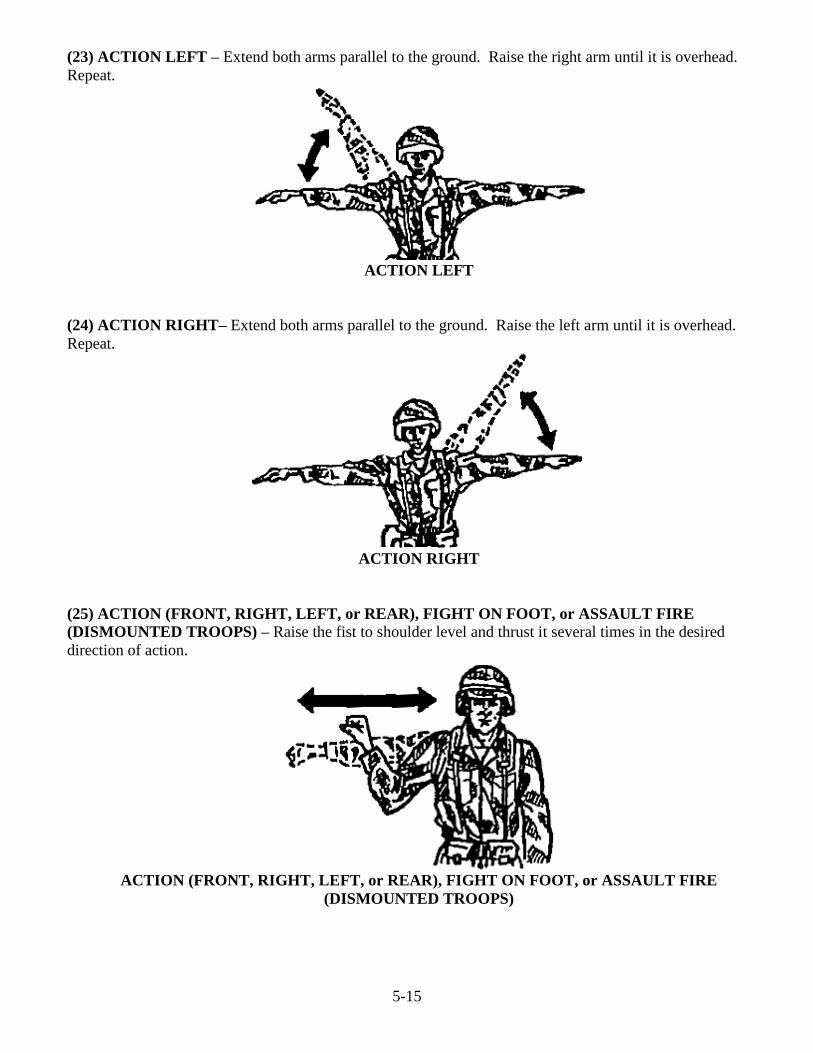
5-15
(23) ACTION LEFT – Extend both arms parallel to the ground. Raise the right arm until it is overhead.
Repeat.
ACTION LEFT
(24) ACTION RIGHT– Extend both arms parallel to the ground. Raise the left arm until it is overhead.
Repeat.
ACTION RIGHT
(25) ACTION (FRONT, RIGHT, LEFT, or REAR), FIGHT ON FOOT, or ASSAULT FIRE
(DISMOUNTED TROOPS) – Raise the fist to shoulder level and thrust it several times in the desired
direction of action.
ACTION (FRONT, RIGHT, LEFT, or REAR), FIGHT ON FOOT, or ASSAULT FIRE
(DISMOUNTED TROOPS)

5-16
(26) NUCLEAR, BIOLOGICAL, CHEMICAL ATTACK – Extend the arms and fists. Bend the arms
to the shoulders. Repeat.
NUCLEAR, BIOLOGICAL, CHEMICAL ATTACK
(27) MAP CHECK – Point at the palm of one hand with the Index finger of the other hand.
MAP CHECK
(28) PACE COUNT – Tap the heel of boot repeatedly with an open hand.
PACE COUNT
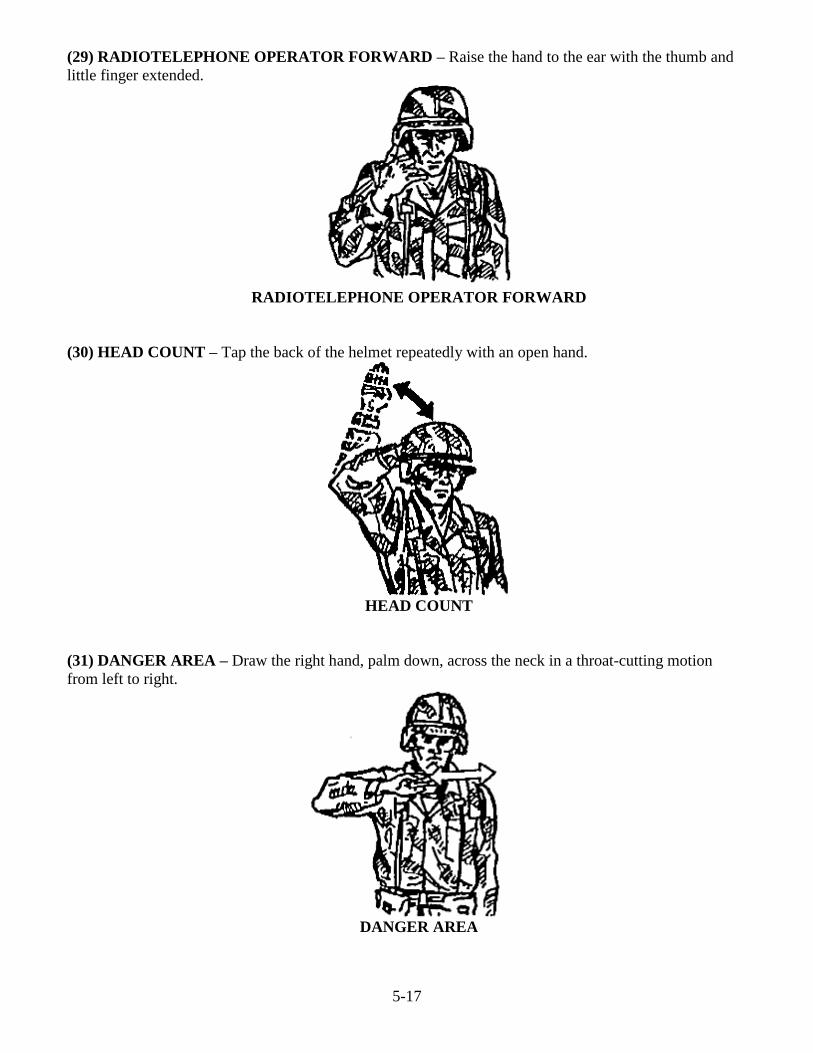
5-17
(29) RADIOTELEPHONE OPERATOR FORWARD – Raise the hand to the ear with the thumb and
little finger extended.
RADIOTELEPHONE OPERATOR FORWARD
(30) HEAD COUNT – Tap the back of the helmet repeatedly with an open hand.
HEAD COUNT
(31) DANGER AREA – Draw the right hand, palm down, across the neck in a throat-cutting motion
from left to right.
DANGER AREA
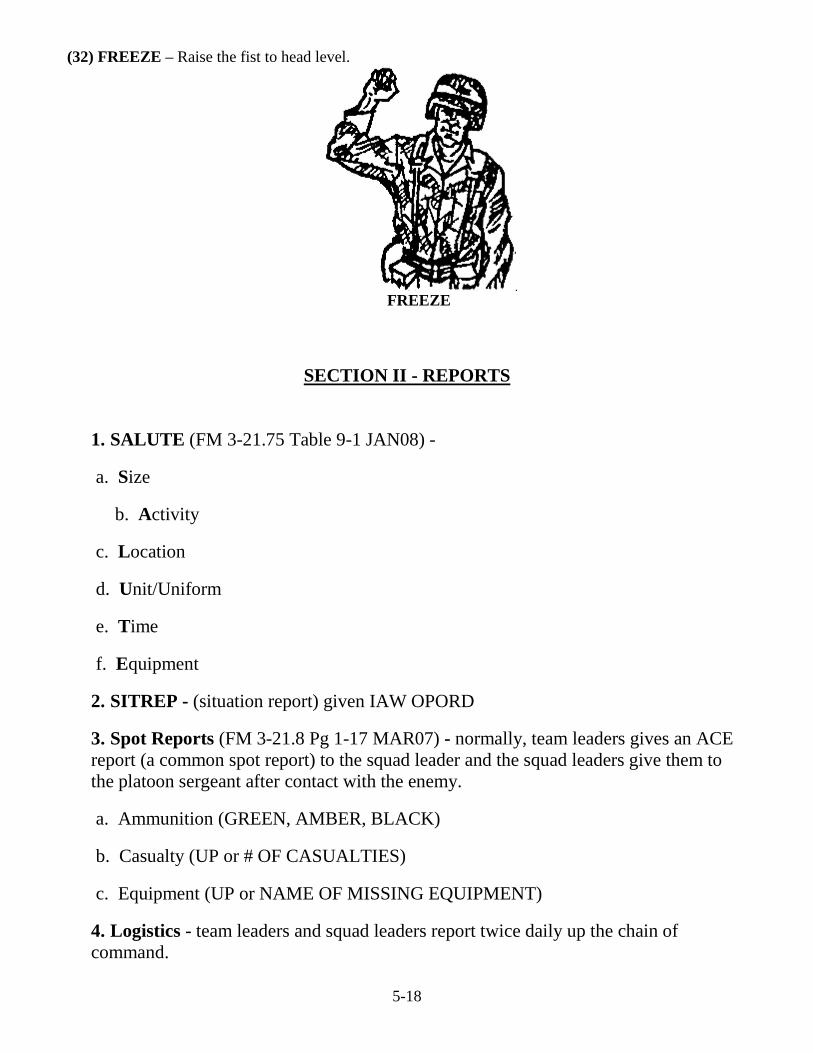
5-18
(32) FREEZE – Raise the fist to head level.
FREEZE
SECTION II - REPORTS
1. SALUTE (FM 3-21.75 Table 9-1 JAN08) -
a. Size
b. Activity
c. Location
d. Unit/Uniform
e. Time
f. Equipment
2. SITREP - (situation report) given IAW OPORD
3. Spot Reports (FM 3-21.8 Pg 1-17 MAR07) - normally, team leaders gives an ACE
report (a common spot report) to the squad leader and the squad leaders give them to
the platoon sergeant after contact with the enemy.
a. Ammunition (GREEN, AMBER, BLACK)
b. Casualty (UP or # OF CASUALTIES)
c. Equipment (UP or NAME OF MISSING EQUIPMENT)
4. Logistics - team leaders and squad leaders report twice daily up the chain of
command.
5-19
5. Sensitive item - status reported by team leaders and squad leaders up the chain of
command twice daily.
6. Personnel status - team leaders and squad leaders report twice daily. Normally,
reports are given at stand-to and before nightfall.
UNEXPLODED ORDNANCE/IED 9 LINE REPORT (FM 3-21.10 Pgs G-13, G-14 JUL06)
Many areas, especially previous battlefields, might be littered with a wide variety of sensitive and deadly
UXO. Soldiers need to follow these precautions on discovering a suspected UXO:
1. Do not move toward the UXO. Some types of ordnance have a magnetic or motion-sensitive fuse.
2. Never approach or pick up UXO even if identification is impossible from a distance. Observe the
UXO with binoculars if available.
3. Send a UXO report to higher HQ. Use radios at least 100 meters away from the ordnance. Some
UXO fuses might be set off by radio transmissions.
a. DTG: Date and time UXO was discovered.
b. Reporting Unit or Activity, and UXO Location: Grid coordinates.
c. Contact Method: How EOD team can contact the reporting unit.
d. Discovering Unit POC: MSE, or DSN phone number and unit frequency or call sign.
e. Type of UXO: Dropped, projected, thrown, or placed, and number of items discovered.
f. Hazards Caused by UXO: Report the nature of perceived threats such as a possible
chemical threat or a limitation of travel over key routes.
g. Resources Threatened: Report any equipment, facilities, or other assets threatened by the
UXO.
h. Impact on Mission: Your current situation and how the UXO affects your status.
i. Protective Measures: Describe what you have done to protect personnel and equipment
such as marking the area and informing local civilians.
4. Mark the area with mine tape or other obvious material at a distance from the UXO to warn others
of the danger. Proper markings will also help EOD personnel find the hazard in response to the UXO
report.
5. Evacuate the area while carefully scanning for other hazards.
6. Take protective measures to reduce the hazard to personnel and equipment. Notify local people in
the area.
REACT TO A POSSIBLE IMPROVISED EXPLOSIVE DEVICE (IED) (TC 093-89D-01 CTT 093-401-5050 MAY04)
Condition: During military operations you encounter a ―Possible Improvised Explosive Device (IED)‖.
Standard: Properly establish initial exclusion area, security, and report ―Possible Improvised Explosive
Device (IED)‖ to Higher HQ with 100% accuracy.
Performance Steps
1. Establish minimum initial exclusion area of 300 meters around ―Possible Improvised Explosive
Device (IED)‖.
2. Establish security:
5-20
a. Search secure area for possible secondary explosive device(s)/hazards, while
maintaining security.
b. Identify potential enemy force observation/vantage points.
c. Seek all available manmade or natural frontal and overhead cover.
d. Avoid establishing a ―reaction‖ pattern.
3. Forward information to Higher HQ using standard 9-line UXO Report.
4. Continue mission IAW Higher HQ guidance.
SECTION III – WEAPONS
1. Basic Safety:
a. Weapons on safe until target is identified and acquired
b. Muzzle Awareness
c. Finger outside of trigger well until sights are on the target
d. Every weapon is ALWAYS treated as loaded
2. Weapons Readiness
a. GREEN:
Weapon on Safe
Empty Magazine inserted in weapon
Bolt forward, ejection port cover closed
b. AMBER:
Weapon on Safe
Magazine with ammunition inserted in weapon
Bolt forward, NO round in chamber, ejection port cover closed.
c. RED:
Weapon on safe
Magazine with ammunition inserted in weapon
Round chambered, ejection port cover closed.
3. Clearing the M16/A1, M16/A2, or M4 Rifle -
a. Point the weapon in a safe direction. Place the selector lever on safe.
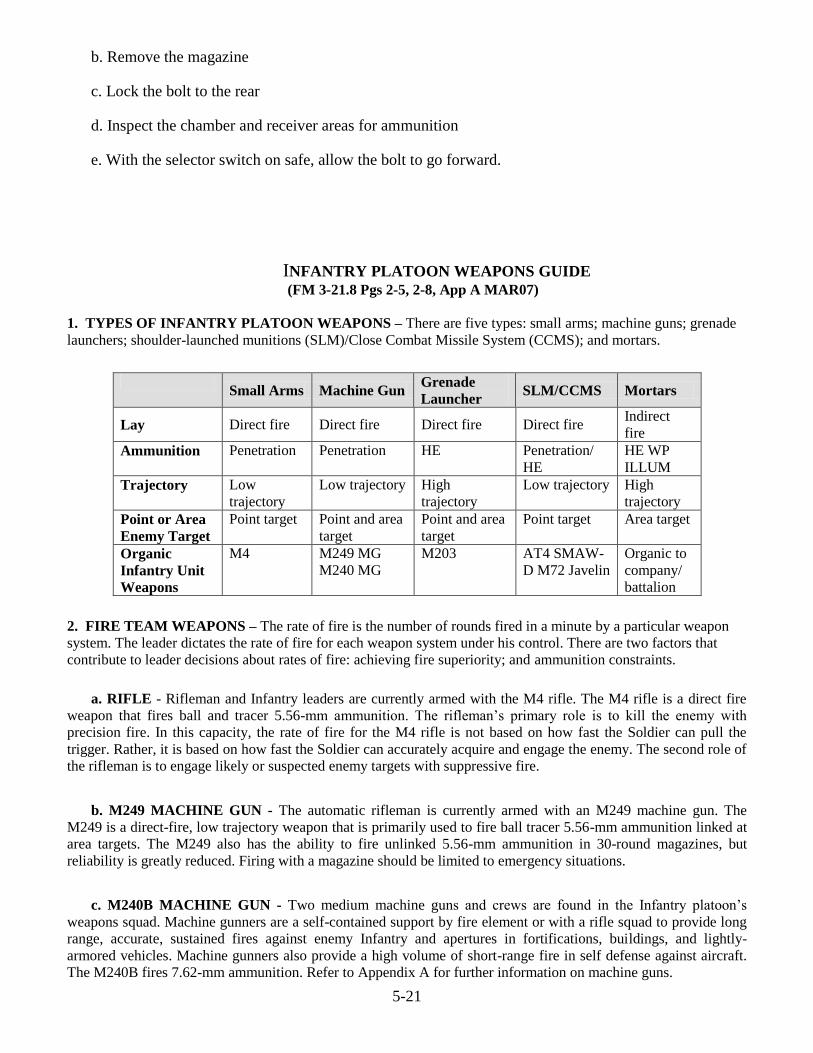
5-21
b. Remove the magazine
c. Lock the bolt to the rear
d. Inspect the chamber and receiver areas for ammunition
e. With the selector switch on safe, allow the bolt to go forward.
INFANTRY PLATOON WEAPONS GUIDE
(FM 3-21.8 Pgs 2-5, 2-8, App A MAR07)
1. TYPES OF INFANTRY PLATOON WEAPONS – There are five types: small arms; machine guns; grenade
launchers; shoulder-launched munitions (SLM)/Close Combat Missile System (CCMS); and mortars.
2. FIRE TEAM WEAPONS – The rate of fire is the number of rounds fired in a minute by a particular weapon
system. The leader dictates the rate of fire for each weapon system under his control. There are two factors that
contribute to leader decisions about rates of fire: achieving fire superiority; and ammunition constraints.
a. RIFLE - Rifleman and Infantry leaders are currently armed with the M4 rifle. The M4 rifle is a direct fire
weapon that fires ball and tracer 5.56-mm ammunition. The rifleman’s primary role is to kill the enemy with
precision fire. In this capacity, the rate of fire for the M4 rifle is not based on how fast the Soldier can pull the
trigger. Rather, it is based on how fast the Soldier can accurately acquire and engage the enemy. The second role of
the rifleman is to engage likely or suspected enemy targets with suppressive fire.
b. M249 MACHINE GUN - The automatic rifleman is currently armed with an M249 machine gun. The
M249 is a direct-fire, low trajectory weapon that is primarily used to fire ball tracer 5.56-mm ammunition linked at
area targets. The M249 also has the ability to fire unlinked 5.56-mm ammunition in 30-round magazines, but
reliability is greatly reduced. Firing with a magazine should be limited to emergency situations.
c. M240B MACHINE GUN - Two medium machine guns and crews are found in the Infantry platoon’s
weapons squad. Machine gunners are a self-contained support by fire element or with a rifle squad to provide long
range, accurate, sustained fires against enemy Infantry and apertures in fortifications, buildings, and lightly-
armored vehicles. Machine gunners also provide a high volume of short-range fire in self defense against aircraft.
The M240B fires 7.62-mm ammunition. Refer to Appendix A for further information on machine guns.
Small Arms Machine Gun
Grenade
Launcher SLM/CCMS Mortars
Lay Direct fire Direct fire Direct fire Direct fire Indirect
fire
Ammunition Penetration Penetration HE Penetration/
HE
HE WP
ILLUM
Trajectory Low
trajectory
Low trajectory High
trajectory
Low trajectory High
trajectory
Point or Area
Enemy Target
Point target Point and area
target
Point and area
target
Point target Area target
Organic
Infantry Unit
Weapons
M4 M249 MG
M240 MG
M203 AT4 SMAW-
D M72 Javelin
Organic to
company/
battalion
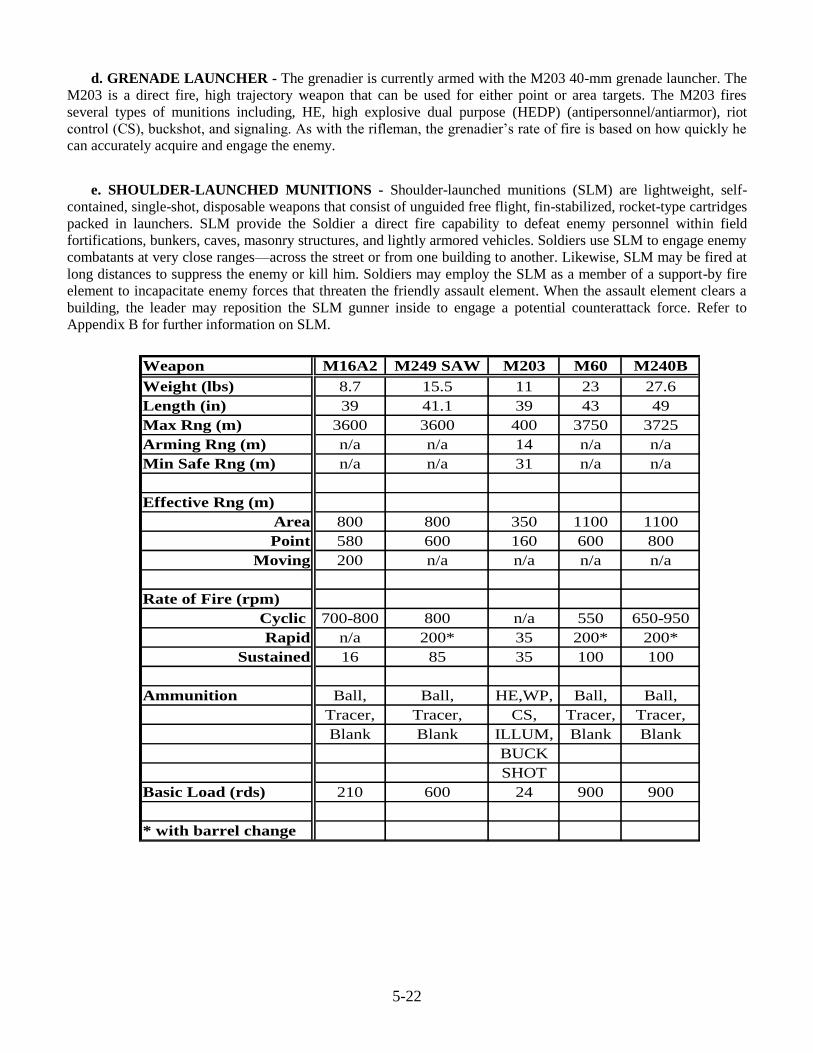
5-22
d. GRENADE LAUNCHER - The grenadier is currently armed with the M203 40-mm grenade launcher. The
M203 is a direct fire, high trajectory weapon that can be used for either point or area targets. The M203 fires
several types of munitions including, HE, high explosive dual purpose (HEDP) (antipersonnel/antiarmor), riot
control (CS), buckshot, and signaling. As with the rifleman, the grenadier’s rate of fire is based on how quickly he
can accurately acquire and engage the enemy.
e. SHOULDER-LAUNCHED MUNITIONS - Shoulder-launched munitions (SLM) are lightweight, self-
contained, single-shot, disposable weapons that consist of unguided free flight, fin-stabilized, rocket-type cartridges
packed in launchers. SLM provide the Soldier a direct fire capability to defeat enemy personnel within field
fortifications, bunkers, caves, masonry structures, and lightly armored vehicles. Soldiers use SLM to engage enemy
combatants at very close ranges—across the street or from one building to another. Likewise, SLM may be fired at
long distances to suppress the enemy or kill him. Soldiers may employ the SLM as a member of a support-by fire
element to incapacitate enemy forces that threaten the friendly assault element. When the assault element clears a
building, the leader may reposition the SLM gunner inside to engage a potential counterattack force. Refer to
Appendix B for further information on SLM.
Weapon M16A2 M249 SAW M203 M60 M240B
Weight (lbs) 8.7 15.5 11 23 27.6
Length (in) 39 41.1 39 43 49
Max Rng (m) 3600 3600 400 3750 3725
Arming Rng (m) n/a n/a 14 n/a n/a
Min Safe Rng (m) n/a n/a 31 n/a n/a
Effective Rng (m)
Area 800 800 350 1100 1100
Point 580 600 160 600 800
Moving 200 n/a n/a n/a n/a
Rate of Fire (rpm)
Cyclic 700-800 800 n/a 550 650-950
Rapid n/a 200* 35 200* 200*
Sustained 16 85 35 100 100
Ammunition Ball, Ball, HE,WP, Ball, Ball,
Tracer, Tracer, CS, Tracer, Tracer,
Blank Blank ILLUM, Blank Blank
BUCK
SHOT
Basic Load (rds) 210 600 24 900 900
* with barrel change
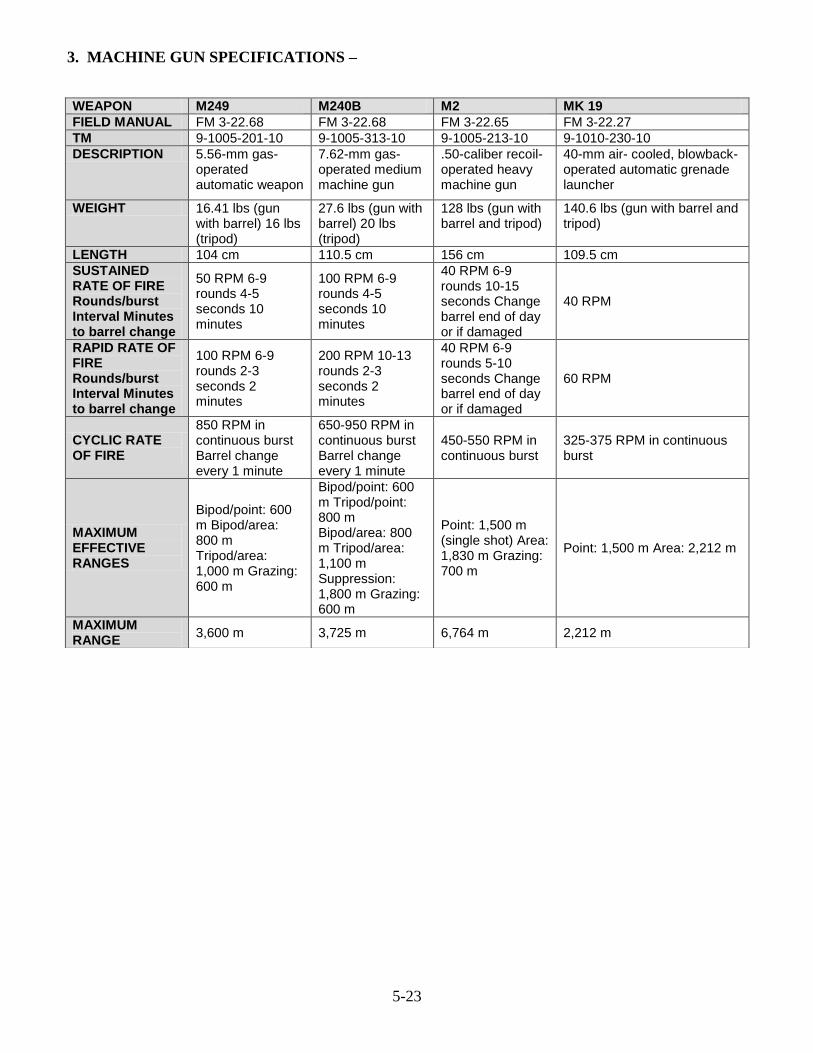
5-23
3. MACHINE GUN SPECIFICATIONS –
WEAPON M249 M240B M2 MK 19
FIELD MANUAL FM 3-22.68 FM 3-22.68 FM 3-22.65 FM 3-22.27
TM 9-1005-201-10 9-1005-313-10 9-1005-213-10 9-1010-230-10
DESCRIPTION 5.56-mm gas-operated automatic weapon
7.62-mm gas-operated medium machine gun
.50-caliber recoil-operated heavy machine gun
40-mm air- cooled, blowback- operated automatic grenade launcher
WEIGHT 16.41 lbs (gun with barrel) 16 lbs (tripod)
27.6 lbs (gun with barrel) 20 lbs (tripod)
128 lbs (gun with barrel and tripod)
140.6 lbs (gun with barrel and tripod)
LENGTH 104 cm 110.5 cm 156 cm 109.5 cm
SUSTAINED RATE OF FIRE Rounds/burst Interval Minutes to barrel change
50 RPM 6-9 rounds 4-5 seconds 10 minutes
100 RPM 6-9 rounds 4-5 seconds 10 minutes
40 RPM 6-9 rounds 10-15 seconds Change barrel end of day or if damaged
40 RPM
RAPID RATE OF FIRE Rounds/burst Interval Minutes to barrel change
100 RPM 6-9 rounds 2-3 seconds 2 minutes
200 RPM 10-13 rounds 2-3 seconds 2 minutes
40 RPM 6-9 rounds 5-10 seconds Change barrel end of day or if damaged
60 RPM
CYCLIC RATE OF FIRE
850 RPM in continuous burst Barrel change every 1 minute
650-950 RPM in continuous burst Barrel change every 1 minute
450-550 RPM in continuous burst
325-375 RPM in continuous burst
MAXIMUM EFFECTIVE RANGES
Bipod/point: 600 m Bipod/area: 800 m Tripod/area: 1,000 m Grazing: 600 m
Bipod/point: 600 m Tripod/point: 800 m Bipod/area: 800 m Tripod/area: 1,100 m Suppression: 1,800 m Grazing: 600 m
Point: 1,500 m (single shot) Area: 1,830 m Grazing: 700 m
Point: 1,500 m Area: 2,212 m
MAXIMUM RANGE
3,600 m 3,725 m 6,764 m 2,212 m
5-24
SECTION IV – RANGE CARDS AND SECTOR SKETCHES (STP 7-11B1-SM-TG Pg 218; FM 3-21.71 App H AUG02)
1. RANGE CARDS
a. The marginal information at the top of the card is listed as follows
(1) SQD, PLT, CO. The squad, platoon, and company designations are listed. Units higher
than company are not listed.
(2) MAGNETIC NORTH. The range card is oriented with the terrain and the direction of
magnetic north arrow is drawn.
b. The gunner's sector of fire is drawn in the sector sketch section. It is not drawn to scale, but the
data referring to the targets must be accurate.
(1) The weapon symbol is drawn in the center of the small circle.
(2) Left and right limits are drawn from the position. A circled "L" and "R" are placed at the
end of the appropriate limit lines.
(3) The value of each circle is determined by using a terrain feature farthest from the position
that is within the weapons capability. The distance to the terrain is determined and rounded off to the
next even hundred. The maximum number of circles that will divide evenly into the distance is
determined and divided. The result is the value for each circle. The terrain feature is then drawn on the
appropriate circle.
(4) All TRPs and reference points in sector are drawn, numbered consecutively and circled.
(5) Dead space is drawn in the sector.
(6) A maximum engagement line is drawn on range cards for anti-armor weapons.
(7) Weapon reference point is numbered last. Location uses a six-digit grid coordinate. When
there is no terrain feature to be designated, the location is shown as an eight-digit grid coordinate.
c. The data section is filled in as follows:
(1) POSITION IDENTIFICATION. Identified as Primary, Alternate, or Supplementary.
(2) DATE. Date and time the range card was completed.
(3) WEAPON. Indicates the weapons used.
(4) EACH CIRCLE EQUALS ______ METERS. Write distance in meters between circles.
(5) NO. Starting with left and right limits, TRPs and reference points listed in numerical order.
(6) DIRECTION/DEFLECTION. The direction listed in degrees, deflection listed in mils.
(7) ELEVATION. The elevation listed in mils.
(8) RANGE. Distance in meters to left and right limits, TRPs, and reference points.
(9) AMMO. Type of ammunition used.
(10) DESCRIPTION. Name of the object (e.g., FARMHOUSE, WOODLINE, HILLTOP).
(11) REMARKS. Record weapon reference point data and any additional information.
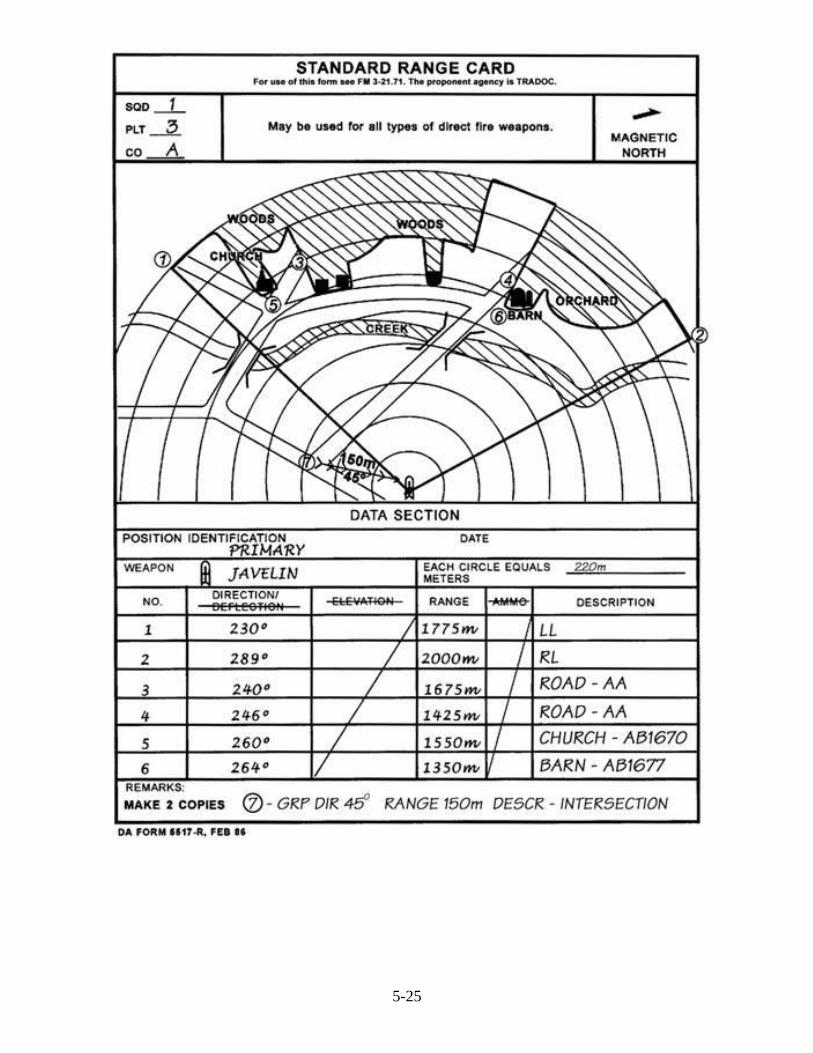
5-25
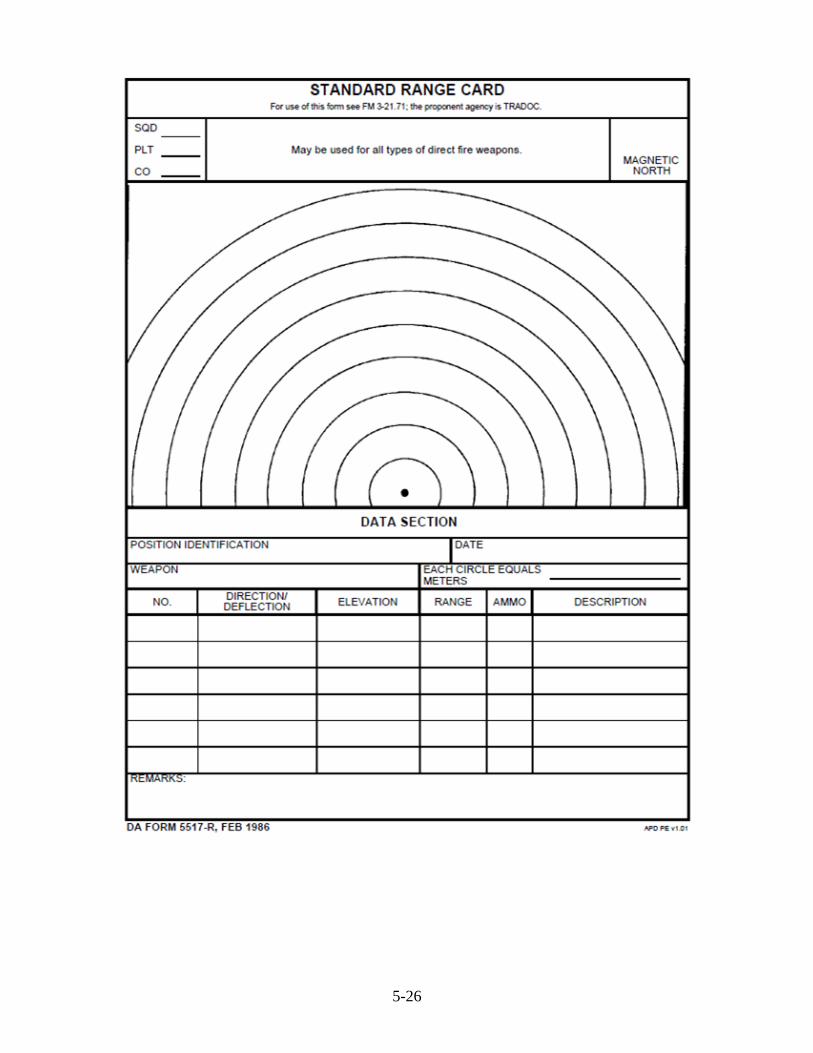
5-26
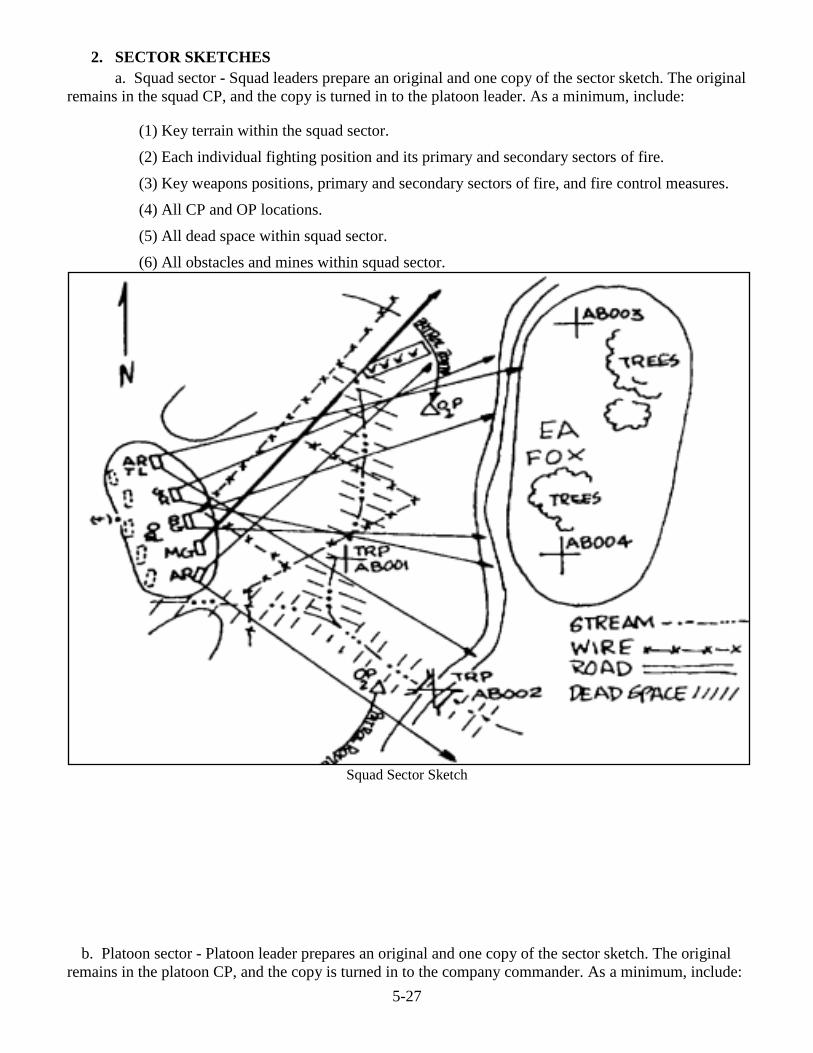
5-27
2. SECTOR SKETCHES
a. Squad sector - Squad leaders prepare an original and one copy of the sector sketch. The original
remains in the squad CP, and the copy is turned in to the platoon leader. As a minimum, include:
(1) Key terrain within the squad sector.
(2) Each individual fighting position and its primary and secondary sectors of fire.
(3) Key weapons positions, primary and secondary sectors of fire, and fire control measures.
(4) All CP and OP locations.
(5) All dead space within squad sector.
(6) All obstacles and mines within squad sector.
Squad Sector Sketch
b. Platoon sector - Platoon leader prepares an original and one copy of the sector sketch. The original
remains in the platoon CP, and the copy is turned in to the company commander. As a minimum, include:
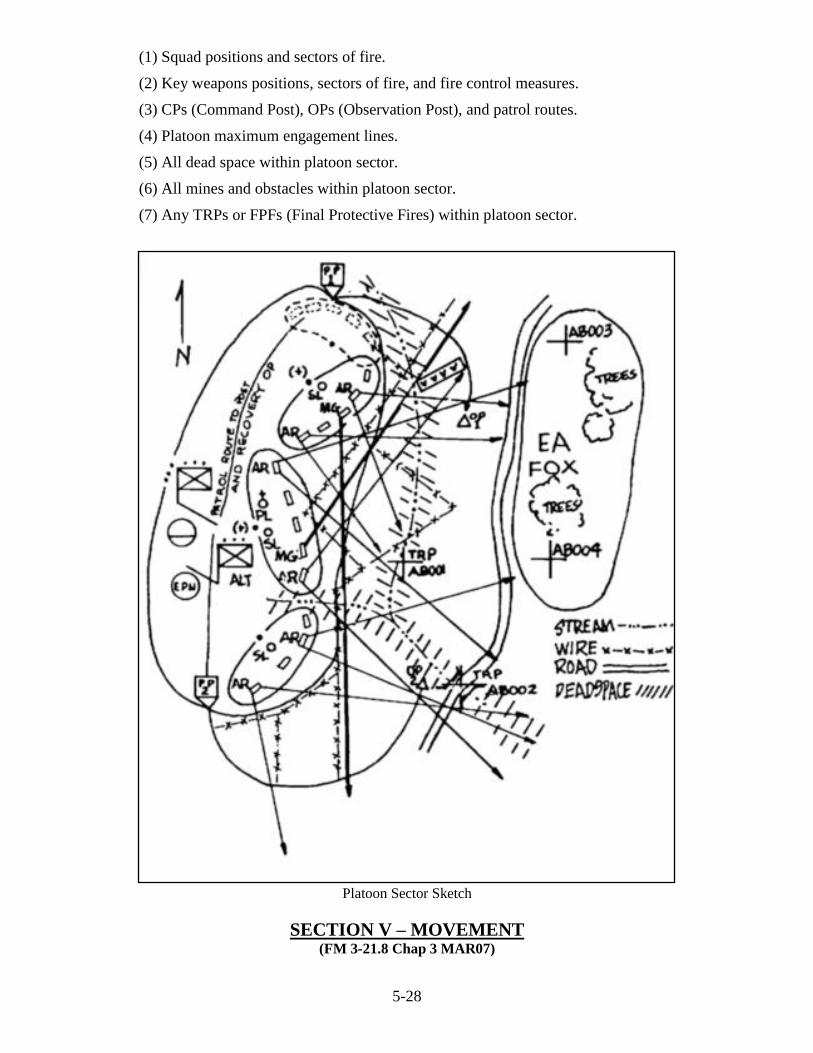
5-28
(1) Squad positions and sectors of fire.
(2) Key weapons positions, sectors of fire, and fire control measures.
(3) CPs (Command Post), OPs (Observation Post), and patrol routes.
(4) Platoon maximum engagement lines.
(5) All dead space within platoon sector.
(6) All mines and obstacles within platoon sector.
(7) Any TRPs or FPFs (Final Protective Fires) within platoon sector.
Platoon Sector Sketch
SECTION V – MOVEMENT (FM 3-21.8 Chap 3 MAR07)
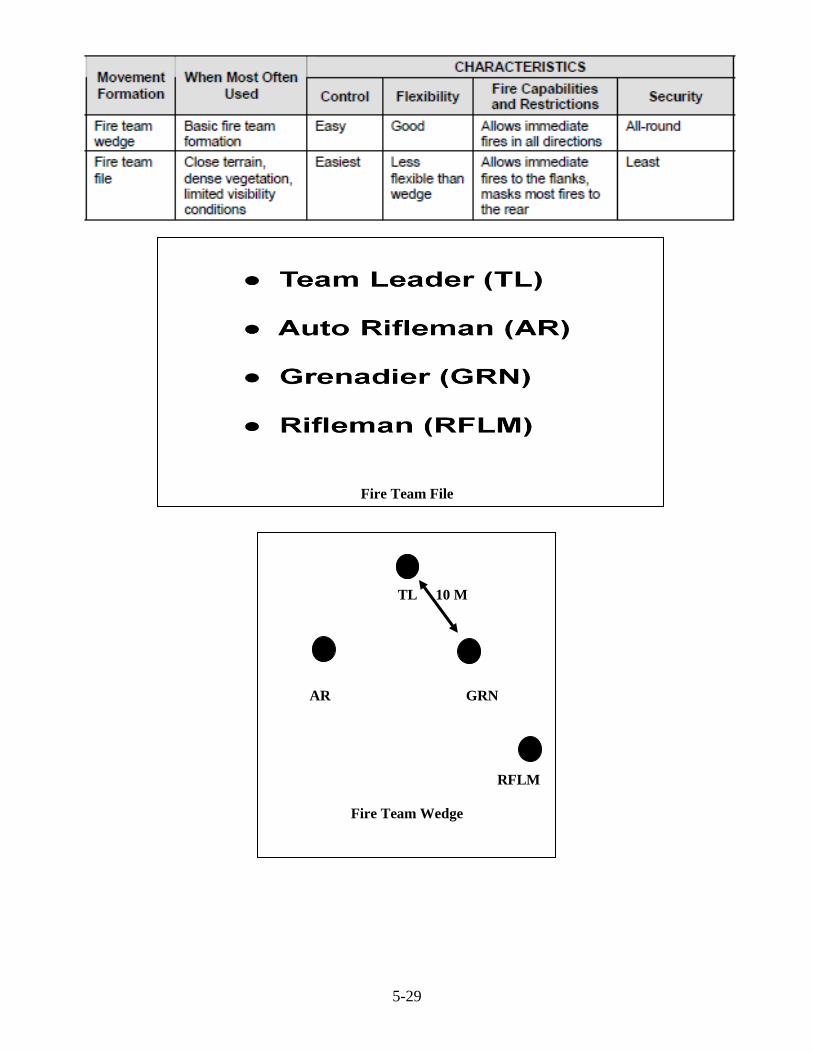
5-29
Fire Team File
TL 10 M
AR GRN
RFLM
Fire Team Wedge
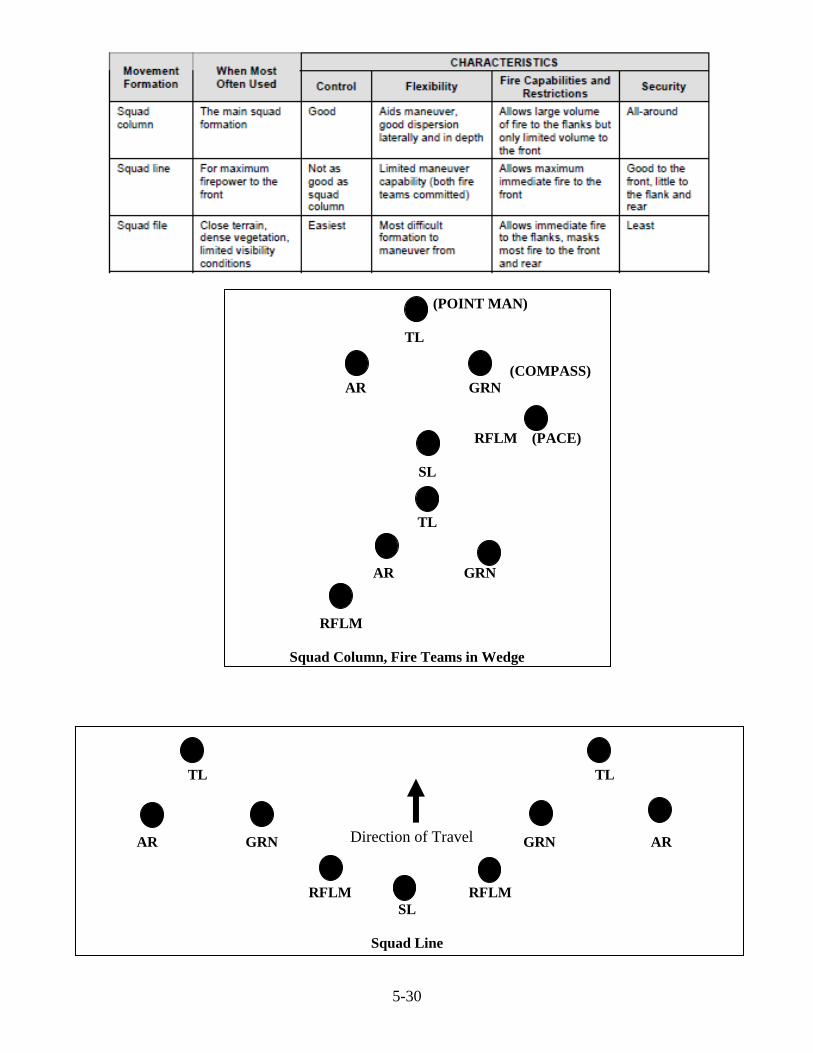
5-30
(POINT MAN)
TL
(COMPASS)
AR GRN
RFLM (PACE)
SL
TL
AR GRN
RFLM
Squad Column, Fire Teams in Wedge
TL TL
AR GRN GRN AR
RFLM RFLM
SL
Squad Line
Direction of Travel
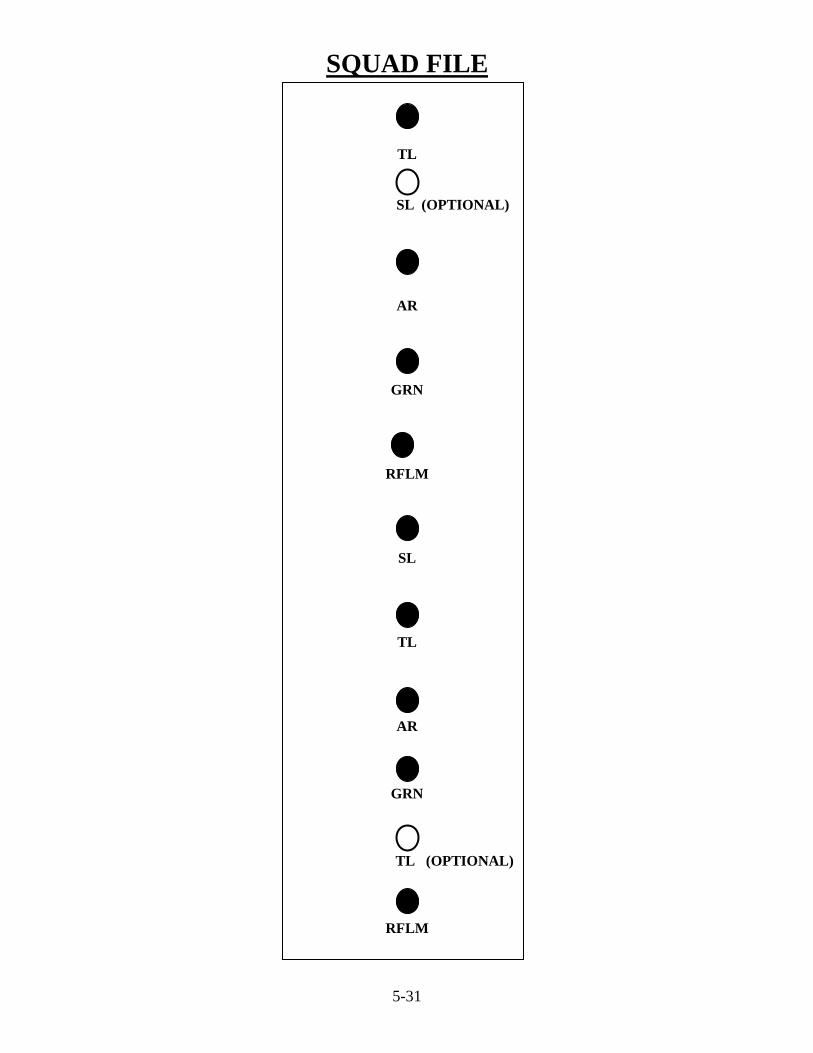
5-31
SQUAD FILE
TL
SL (OPTIONAL)
AR
GRN
RFLM
SL
TL
AR
GRN
TL (OPTIONAL)
RFLM
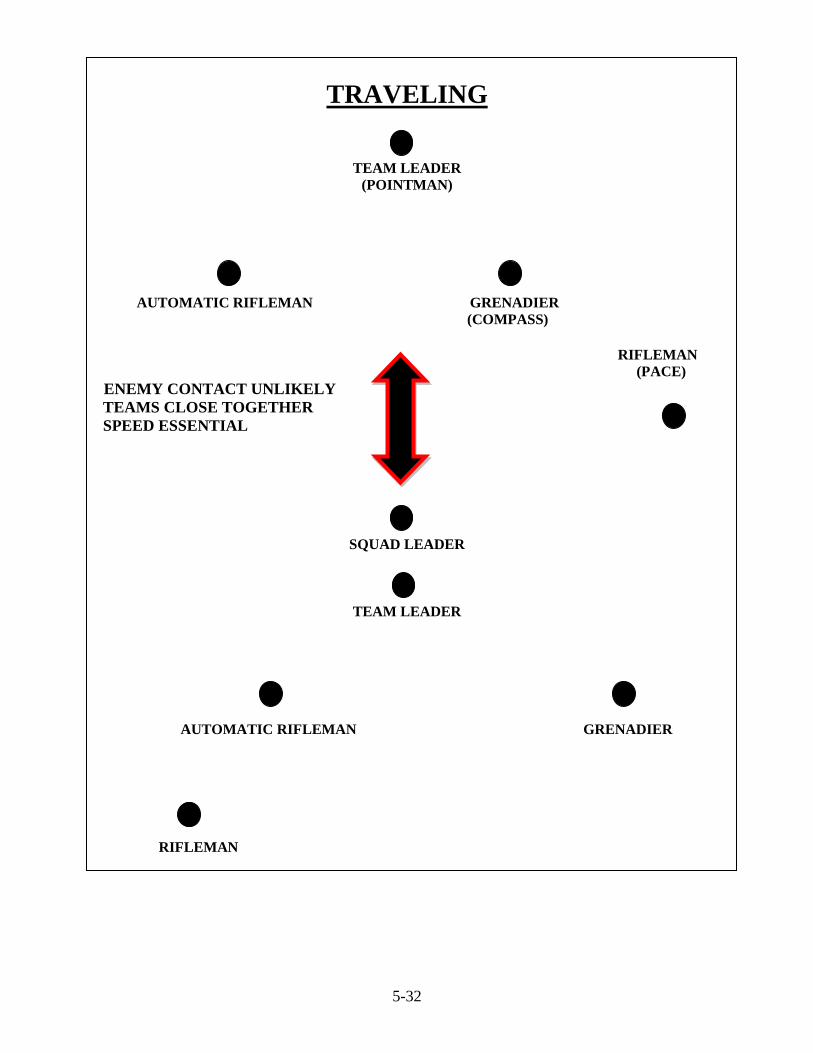
5-32
TRAVELING
TEAM LEADER
(POINTMAN)
AUTOMATIC RIFLEMAN GRENADIER
(COMPASS)
RIFLEMAN
(PACE)
ENEMY CONTACT UNLIKELY
TEAMS CLOSE TOGETHER
SPEED ESSENTIAL
SQUAD LEADER
TEAM LEADER
AUTOMATIC RIFLEMAN GRENADIER
RIFLEMAN
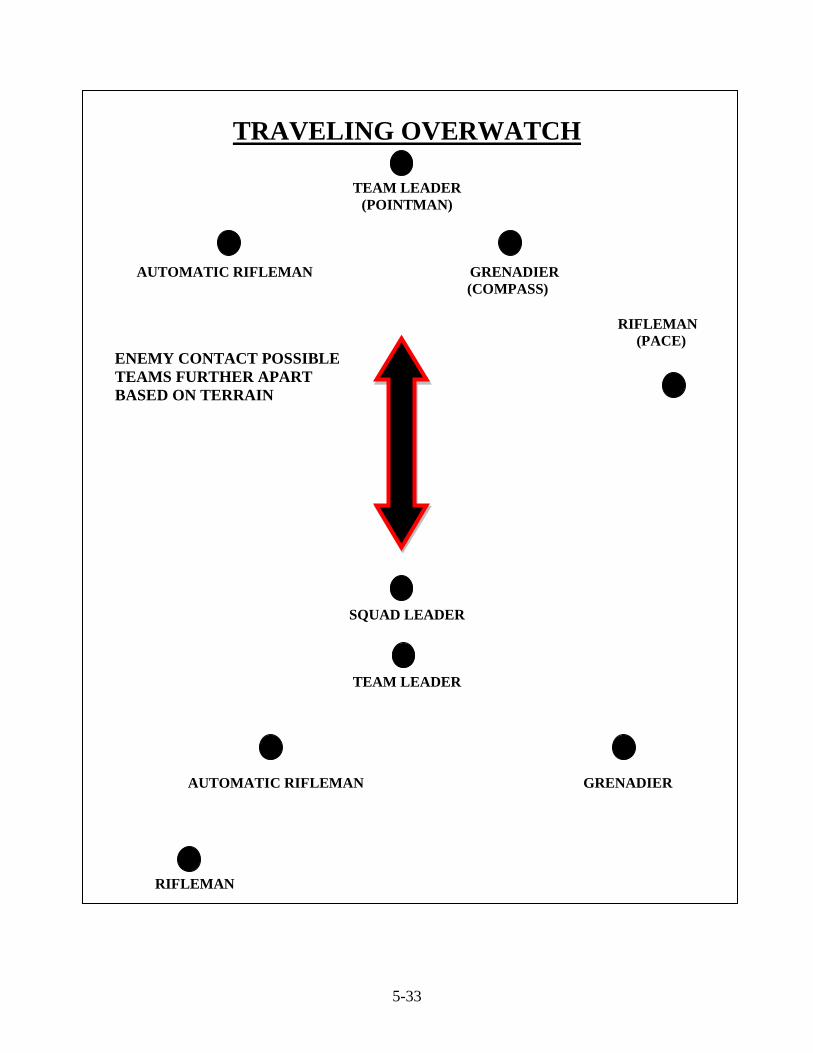
5-33
TRAVELING OVERWATCH
TEAM LEADER
(POINTMAN)
AUTOMATIC RIFLEMAN GRENADIER
(COMPASS)
RIFLEMAN
(PACE)
ENEMY CONTACT POSSIBLE
TEAMS FURTHER APART
BASED ON TERRAIN
SQUAD LEADER
TEAM LEADER
AUTOMATIC RIFLEMAN GRENADIER
RIFLEMAN
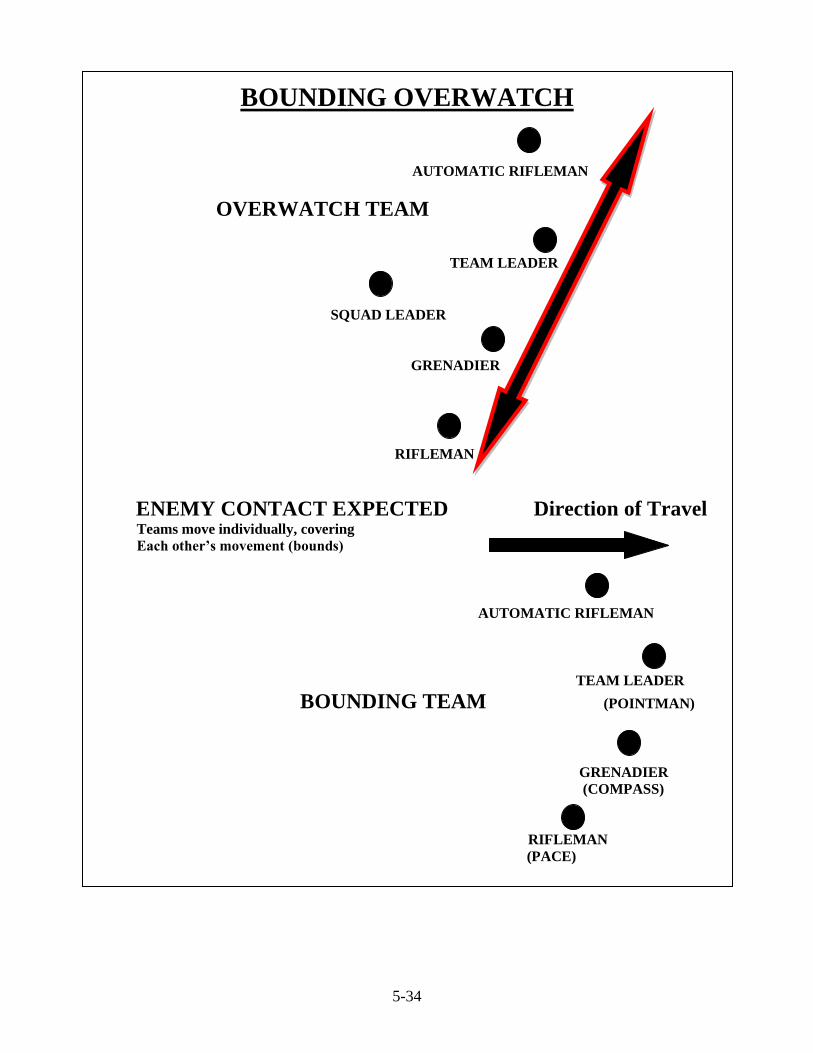
5-34
BOUNDING OVERWATCH
AUTOMATIC RIFLEMAN
OVERWATCH TEAM
TEAM LEADER
SQUAD LEADER
GRENADIER
RIFLEMAN
ENEMY CONTACT EXPECTED Direction of Travel Teams move individually, covering
Each other’s movement (bounds)
AUTOMATIC RIFLEMAN
TEAM LEADER
BOUNDING TEAM (POINTMAN)
GRENADIER
(COMPASS)
RIFLEMAN
(PACE)
5-35
SECTION VI - PRINCIPLES OF URBAN MOVEMENT (FM 3-06.11 FEB02, CALL Newsletter No. 03-4 MAY03)
1. Readjust your security. Maintain three-dimensional (air, ground, below ground) situational awareness.
2. Look for your next covered position and know where you are going before you leave your current
covered position. This should be coordinated with the overwatching team.
3. When initially breaching into a building, immediately secure the initial room and strong point any
opening into that room. When fighting building-to-building or breaching interior walls, do not allow your
fire team to be separated by more than one room.
4. When your team is the lead team in the order of movement, you will have to provide your own long
security if you move down the street to reach your next covered position.
5. Before your team can move to its next position or building, you must engage threat targets on the
opposite side of the street. Once this has been accomplished, you are ready to move to your next position.
6. Have a plan before moving. Plans may be in the form of a unit’s SOP.
7. Coordinate movements within your team to maintain security and firepower.
8. Maintain contact with and coordinate movements with the adjacent fire team.
9. Overwatch / sniper teams may be used to cover your team’s movement if the tactical situation permits.
When used, overwatch/sniper teams should be employed on the second or third floors of buildings
to give teams maximum overwatch of the fire teams/squads.
The overwatch/sniper teams should not go higher than the second or third floors. Remaining at
these levels allows the team to get out of the building quickly should overwhelming enemy forces
close in on their position.
Take steps to ensure that the overwatch/sniper teams do not have a break in contact with the main
assault force. This is especially critical and crucial while the fire teams/squad are crossing
intersections or performing turning movements.
10. If overwatch/sniper teams are used during fire team movements, the forward fire team should set up a
new overwatch/sniper position when the overwatch/sniper team to the rear can no longer effectively
provide cover. The rear overwatch/sniper team falls into the moving fire team and continues to move with
the assault force. Caution should be used to ensure that the assault force elements do not have a break in
contact. (Note: This technique can slow the assault force momentum.)
11. Disperse crew-served weapons among the assault force. When enemy fire is received, the crew-served
weapons engage/suppress enemy fire so that the remainder of the force can continue to maneuver. Employ
the 40-mm grenade launcher in the same fashion.
12. The crew-served weapons should provide outer security on the objective.
13. During night operations white light should be used sparingly while outside the objective buildings.
White light will only mark your position for the enemy. The use of night vision goggles (NVG) and
infrared (IR) sighting systems will reduce your signature, making it more difficult for the enemy. These
pieces of equipment must be used during training to maintain proficiency.
14. Use IR strobe lights to mark buildings that are strong-pointed for identification by close air support
(CAS) aircraft and attack aviation. However, ensure that you are able to retrieve the strobe before you
move out: once CAS aircraft / attack aviation identify the friendly positions, the surrounding area of
operations becomes a free-fire zone.
6-1
CHAPTER 6 - TACTICS
SECTION I – UNIT LEADER RESPONSIBILITIES (Maneuver Instructor Note)
1. Patrol Leader Responsibilities 2. Assistant Patrol Leader Responsibilities
a. Make the plan a. Making it happen
b. Unit rehearsals b. Special team rehearsals
c. Final inspections c. Initial inspection
d. Develop the timeline e. Enforcing timeline
e. Assault element f. Support element
f. Moves after 1st squad g. OPORD PARA 4
g. OPORD PARA 2 and 3 h. ACE report
h. Mission accomplishment i. Consolidation and reorganization
i. Salute report j. ORP activities
j. Actions on the objective k. Making security roster
k. Leader's Recon l. Accountability
l. Designating % security m. Maintenance
n. Patrol base activities
o. Stand-to
p. Soldier care issues
q. Packing list
r. Correcting breaks in contact
s. Noise and light discipline
t. Coordination for movement
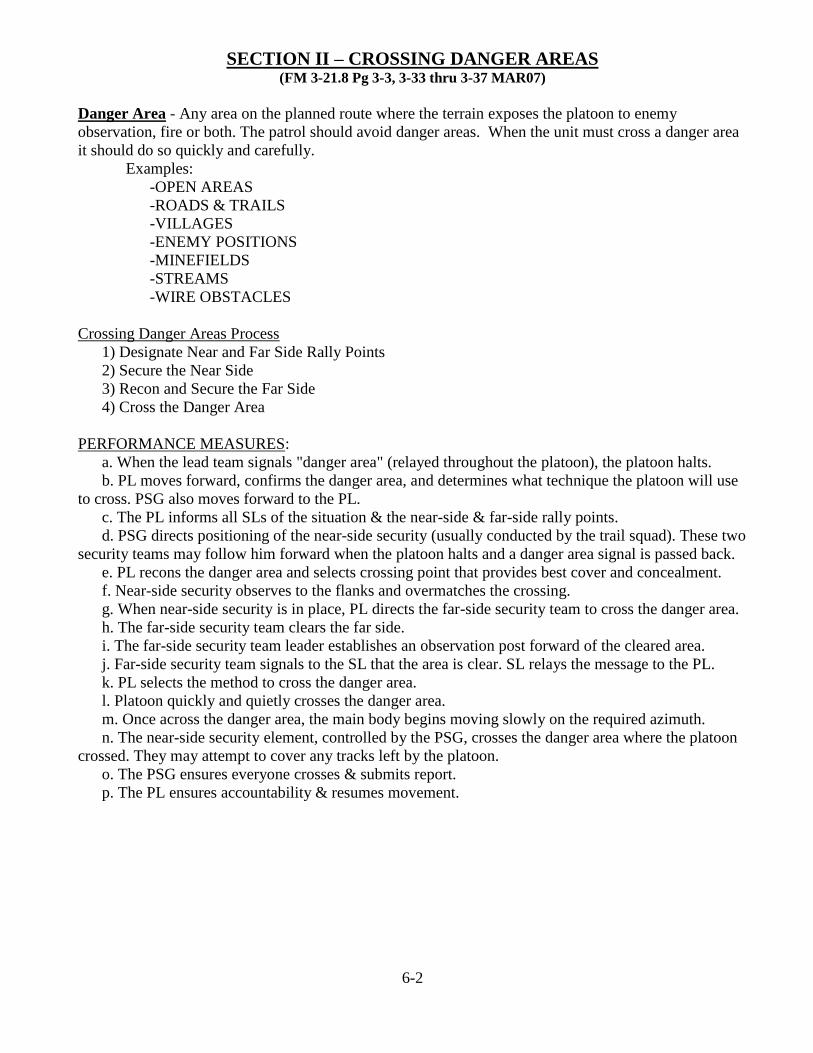
6-2
SECTION II – CROSSING DANGER AREAS (FM 3-21.8 Pg 3-3, 3-33 thru 3-37 MAR07)
Danger Area - Any area on the planned route where the terrain exposes the platoon to enemy
observation, fire or both. The patrol should avoid danger areas. When the unit must cross a danger area
it should do so quickly and carefully.
Examples:
-OPEN AREAS
-ROADS & TRAILS
-VILLAGES
-ENEMY POSITIONS
-MINEFIELDS
-STREAMS
-WIRE OBSTACLES
Crossing Danger Areas Process
1) Designate Near and Far Side Rally Points
2) Secure the Near Side
3) Recon and Secure the Far Side
4) Cross the Danger Area
PERFORMANCE MEASURES:
a. When the lead team signals "danger area" (relayed throughout the platoon), the platoon halts.
b. PL moves forward, confirms the danger area, and determines what technique the platoon will use
to cross. PSG also moves forward to the PL.
c. The PL informs all SLs of the situation & the near-side & far-side rally points.
d. PSG directs positioning of the near-side security (usually conducted by the trail squad). These two
security teams may follow him forward when the platoon halts and a danger area signal is passed back.
e. PL recons the danger area and selects crossing point that provides best cover and concealment.
f. Near-side security observes to the flanks and overmatches the crossing.
g. When near-side security is in place, PL directs the far-side security team to cross the danger area.
h. The far-side security team clears the far side.
i. The far-side security team leader establishes an observation post forward of the cleared area.
j. Far-side security team signals to the SL that the area is clear. SL relays the message to the PL.
k. PL selects the method to cross the danger area.
l. Platoon quickly and quietly crosses the danger area.
m. Once across the danger area, the main body begins moving slowly on the required azimuth.
n. The near-side security element, controlled by the PSG, crosses the danger area where the platoon
crossed. They may attempt to cover any tracks left by the platoon.
o. The PSG ensures everyone crosses & submits report.
p. The PL ensures accountability & resumes movement.
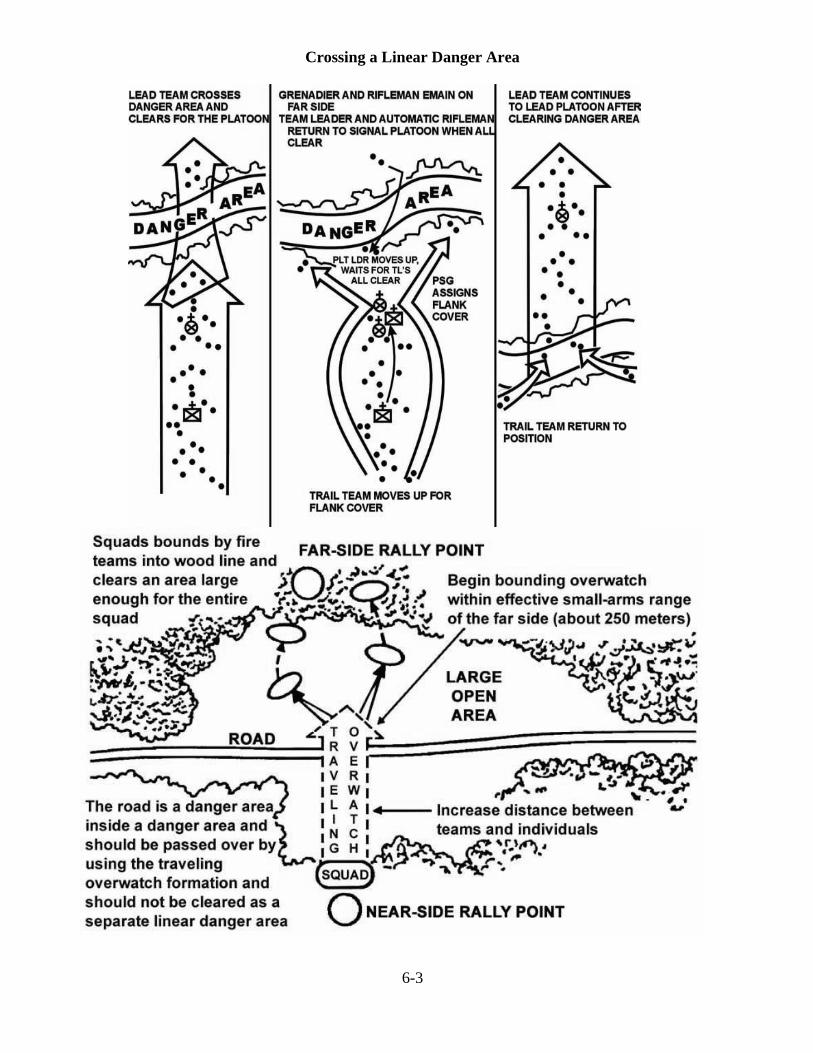
6-3
Crossing a Linear Danger Area
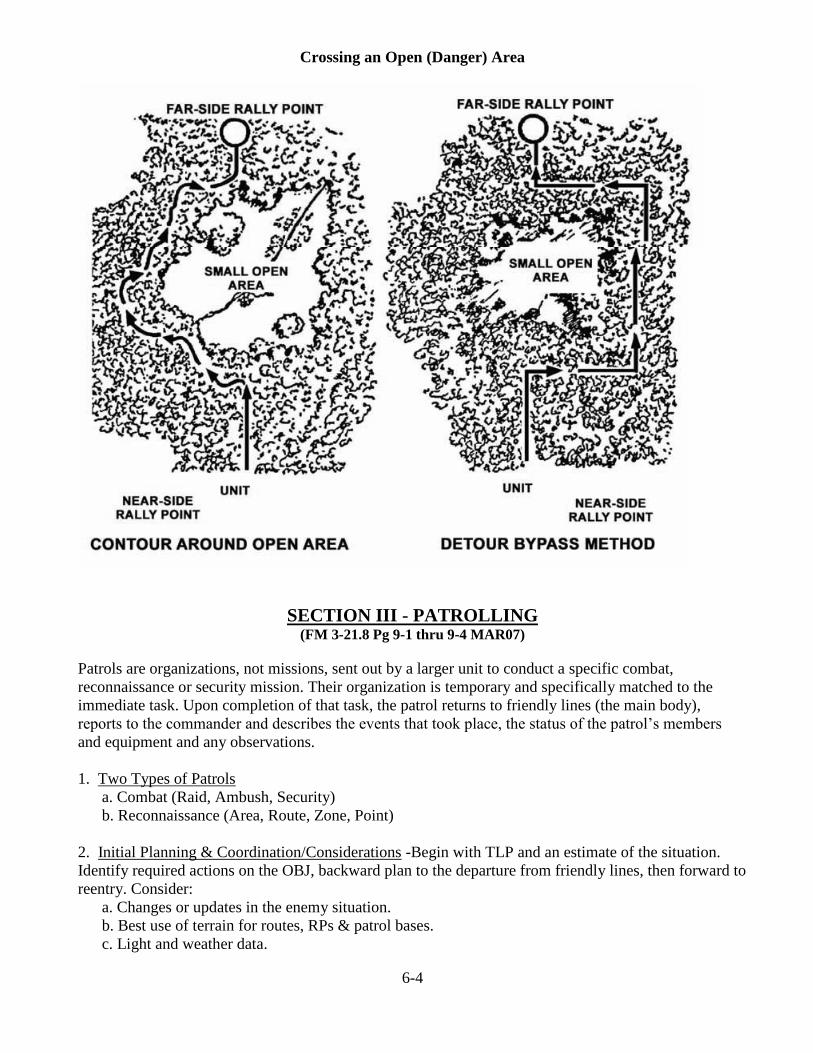
6-4
Crossing an Open (Danger) Area
SECTION III - PATROLLING
(FM 3-21.8 Pg 9-1 thru 9-4 MAR07)
Patrols are organizations, not missions, sent out by a larger unit to conduct a specific combat,
reconnaissance or security mission. Their organization is temporary and specifically matched to the
immediate task. Upon completion of that task, the patrol returns to friendly lines (the main body),
reports to the commander and describes the events that took place, the status of the patrol’s members
and equipment and any observations.
1. Two Types of Patrols
a. Combat (Raid, Ambush, Security)
b. Reconnaissance (Area, Route, Zone, Point)
2. Initial Planning & Coordination/Considerations -Begin with TLP and an estimate of the situation.
Identify required actions on the OBJ, backward plan to the departure from friendly lines, then forward to
reentry. Consider:
a. Changes or updates in the enemy situation.
b. Best use of terrain for routes, RPs & patrol bases.
c. Light and weather data.
6-5
d. Changes in the friendly situation.
e. Attachment of Soldiers with special skills or equipment.
f. Use and location of landing or pickup zones.
g. Fire support on the objective and along the route.
h. Rehearsals (terrain should be similar to the OBJ).
i. Special equipment and ammunition requirements.
j. Transportation support.
k. Signal plan (call signs, frequencies, code words, pyro).
A patrol is organized to perform specific tasks. It must secure itself, navigate accurately, identify and
cross danger areas, reconnoiter the patrol objective, conduct detailed searches and deal with casualties
and prisoners or detainees. As part of the planning process, the patrol leader identifies those tasks the
patrol must perform and decides which of the patrol’s elements will implement them. He should
maintain squad and fire team integrity, with squads and fire teams often performing more than one task.
1. Common Patrol Organization
-Headquarters Element (PL, APL, RTO, FO, additional mission required patrol attachments)
-Aid and Litter Team(s)
-Enemy POW/Detainee Team(s)
-Surveillance Team(s)
-En Route Recorder
-Compass and Pace Man
-Assault Team(s)
-Support Team(s)
-Breach Team(s)
-Search Team(s)
2. Combat Patrols (FM 3-21.8 Pg 9-2 & 9-14 MAR07) -Provide security and harass, destroy or capture
enemy troops, equipment or installations. When the commander gives a unit the mission to send out a
combat patrol, he intends for the patrol to make contact with the enemy and engage in close combat.
Three Types:
-Raid
-Ambush
-Security
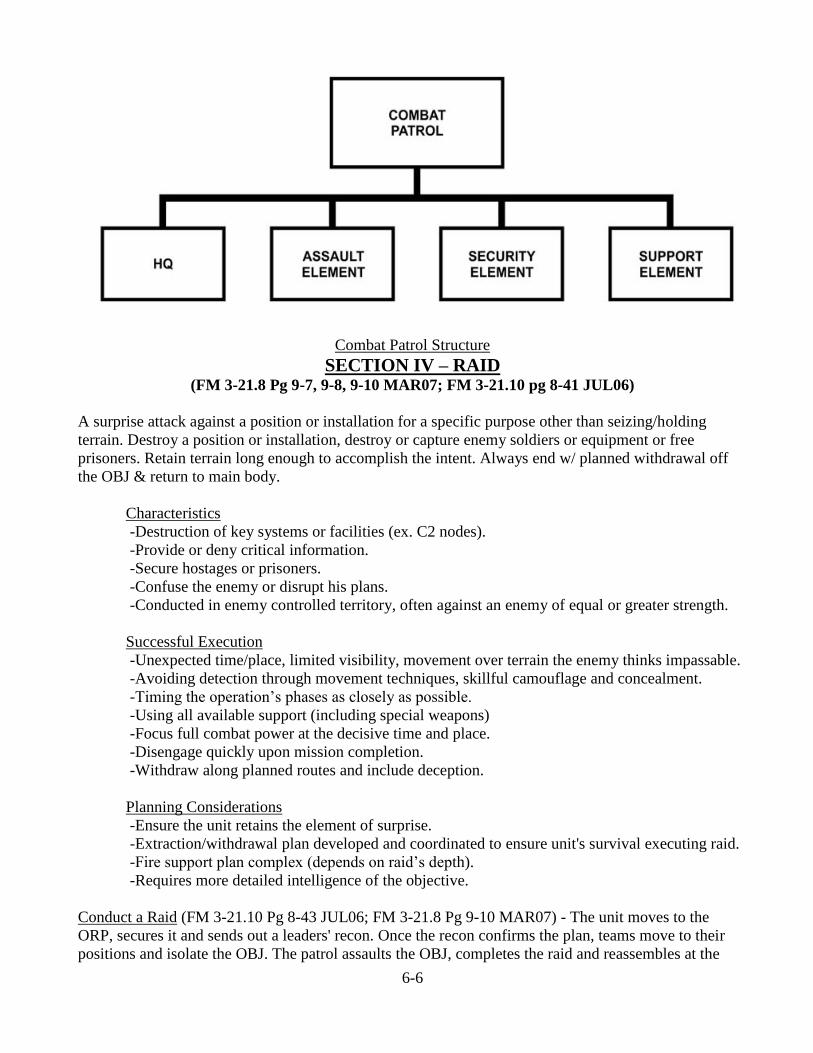
6-6
Combat Patrol Structure
SECTION IV – RAID (FM 3-21.8 Pg 9-7, 9-8, 9-10 MAR07; FM 3-21.10 pg 8-41 JUL06)
A surprise attack against a position or installation for a specific purpose other than seizing/holding
terrain. Destroy a position or installation, destroy or capture enemy soldiers or equipment or free
prisoners. Retain terrain long enough to accomplish the intent. Always end w/ planned withdrawal off
the OBJ & return to main body.
Characteristics
-Destruction of key systems or facilities (ex. C2 nodes).
-Provide or deny critical information.
-Secure hostages or prisoners.
-Confuse the enemy or disrupt his plans.
-Conducted in enemy controlled territory, often against an enemy of equal or greater strength.
Successful Execution
-Unexpected time/place, limited visibility, movement over terrain the enemy thinks impassable.
-Avoiding detection through movement techniques, skillful camouflage and concealment.
-Timing the operation’s phases as closely as possible.
-Using all available support (including special weapons)
-Focus full combat power at the decisive time and place.
-Disengage quickly upon mission completion.
-Withdraw along planned routes and include deception.
Planning Considerations
-Ensure the unit retains the element of surprise.
-Extraction/withdrawal plan developed and coordinated to ensure unit's survival executing raid.
-Fire support plan complex (depends on raid’s depth).
-Requires more detailed intelligence of the objective.
Conduct a Raid (FM 3-21.10 Pg 8-43 JUL06; FM 3-21.8 Pg 9-10 MAR07) - The unit moves to the
ORP, secures it and sends out a leaders' recon. Once the recon confirms the plan, teams move to their
positions and isolate the OBJ. The patrol assaults the OBJ, completes the raid and reassembles at the

6-7
ORP before tactically moving a safe distance away to recognize and disseminate information. The patrol
then returns to friendly lines/the main body.
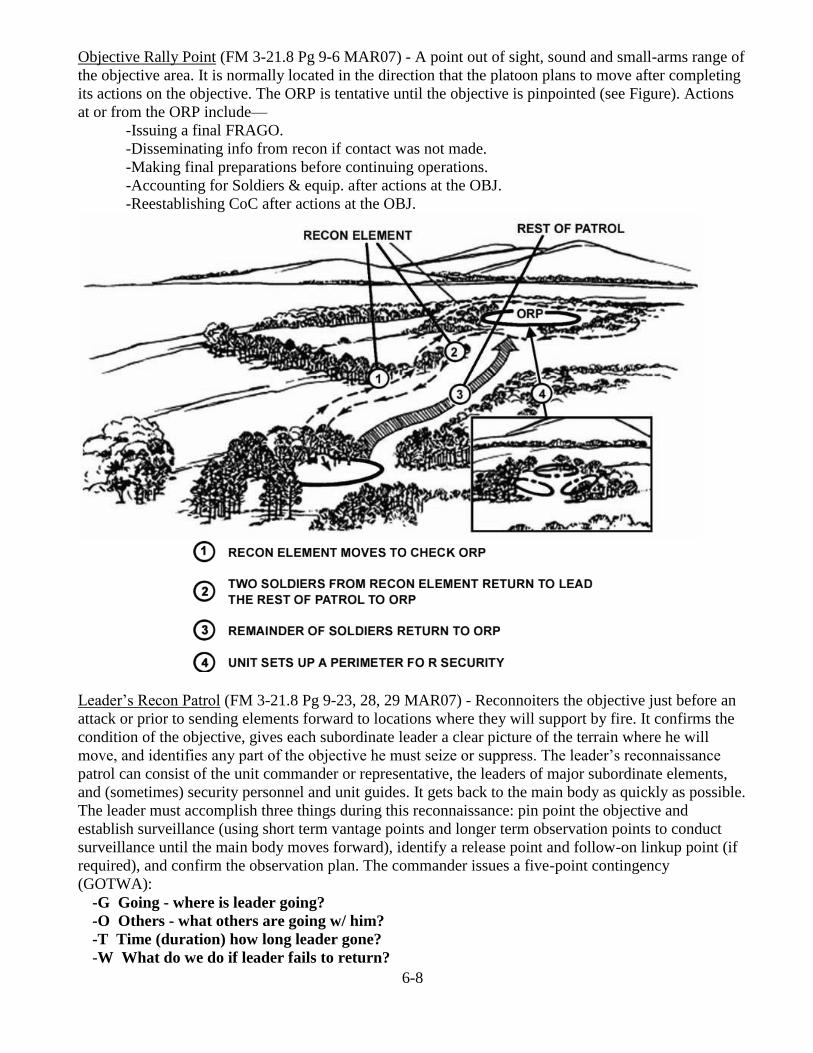
6-8
Objective Rally Point (FM 3-21.8 Pg 9-6 MAR07) - A point out of sight, sound and small-arms range of
the objective area. It is normally located in the direction that the platoon plans to move after completing
its actions on the objective. The ORP is tentative until the objective is pinpointed (see Figure). Actions
at or from the ORP include—
-Issuing a final FRAGO.
-Disseminating info from recon if contact was not made.
-Making final preparations before continuing operations.
-Accounting for Soldiers & equip. after actions at the OBJ.
-Reestablishing CoC after actions at the OBJ.
Leader’s Recon Patrol (FM 3-21.8 Pg 9-23, 28, 29 MAR07) - Reconnoiters the objective just before an
attack or prior to sending elements forward to locations where they will support by fire. It confirms the
condition of the objective, gives each subordinate leader a clear picture of the terrain where he will
move, and identifies any part of the objective he must seize or suppress. The leader’s reconnaissance
patrol can consist of the unit commander or representative, the leaders of major subordinate elements,
and (sometimes) security personnel and unit guides. It gets back to the main body as quickly as possible.
The leader must accomplish three things during this reconnaissance: pin point the objective and
establish surveillance (using short term vantage points and longer term observation points to conduct
surveillance until the main body moves forward), identify a release point and follow-on linkup point (if
required), and confirm the observation plan. The commander issues a five-point contingency
(GOTWA):
-G Going - where is leader going?
-O Others - what others are going w/ him?
-T Time (duration) how long leader gone?
-W What do we do if leader fails to return?
6-9
-A Actions - what actions do the departing reconnaissance element and main body plan to take
on contact?
Raid Actions on the Objective (FM 3-21.10 Pg 8-40 JUL06 - Patrol Leader initiates with fires onto the
objective from support and assault elements. Once the OBJ is suppressed the support team shifts/lifts its
fire and the assault team conducts a rapid and violent assault through the OBJ. The following actions
occur:
-Cross OBJ, Killing Enemy & Removing Weapons
-Teams Pull Back onto OBJ to Complete the Mission (ex. destroying equipment/installation)
-Patrol Teams Conduct Missions (simultaneously)
-Aid & Litter
-Search
-Recorder
-Demolition (charges set – not detonated)
-Pull off of OBJ (Demolition final step after last Soldier).
Raids are normally conducted on an objective that is a valuable asset to the enemy. The enemy has extra
forces in position to react to any threat. The assault element must conduct a rapid and precise assault
into and through the objective. The element must spend as little time as possible on the objective. Task
organization should include only the personnel and teams who are essential to complete the assigned
mission. This is particularly important during limited visibility, to reduce confusion and friendly
casualties. To help ensure rapid and thorough mission accomplishment, the assault team’s actions must
be thoroughly rehearsed.
SECTION V- DELIBERATE AMBUSH (FM 3-21.8 Pg 9-3 thru 9-22 MAR07)
Conducted against a specific target at a location chosen based on intelligence. Leaders plan and prepare
based on detailed information that allows them to anticipate enemy actions and enemy locations.
Detailed information includes:
-type and size of target
-organization or formation
-routes and direction of movement
-time the force will reach or pass certain points on its route
-weapons and equipment carried.
Three Elements:
1) Assault accomplish the mission during actions on the objective.
2) Support suppress or destroy enemy on the objective in support of the assault element.
3) Security assist in isolating the objective by preventing enemy from entering and leaving the
objective area as well as by ensuring the patrol’s withdrawal route remains open.
Scheme of maneuver:
-Troop Leading Procedures
-Departure from Friendly Lines
-Occupy Rally Points (initial, en route, objective, reentry, near/far side)
-Conduct Leader’s Recon
-Occupy Site/Position Elements
6-10
-Conduct Ambush
-Report to Higher Headquarters
3. Reconnaissance Patrols (FM 3-21.8 Pg 9-24, 25, 27, 28 MAR07)
a. Three Fundamentals of Reconnaissance
1) Gain Required Information (the patrol’s decisive action)
2) Avoid Detection (element organization is key)
3) Employ Security Measures (use remaining Soldiers)
b. Organizational Teams
1) Security
2) Reconnaissance
c. Organizational Team Structures
1) Recon elements separate from security elements. Used when security element is able to
support recon element from one location. Requires recon objective to be clearly defined and the area to
be fairly open.
2) Recon elements & security elements combine into R&S teams. Used when the recon objective
is not clearly defined or the teams are not mutually supporting and each reconnaissance potentially
needs its own security force. Within each R&S team, recon is done by one or two individuals while the
rest of the element provides security. Number of Soldiers in an R&S team varies depending on mission.
Usually a fire team is required for adequate recon while still providing team security.
3) R&S teams established with an additional, separate security element. The separate security
element can also act as a reserve or as a quick reaction force.
d. Planning Process
1) Determine the reconnaissance objective, an information requirement (IR) that corresponds to
the terrain and or enemy in a specific area, route, or zone - it may be designated by a control measure
such as a named area of interest, checkpoint, objective, route, phase lines or boundaries
2) Determine the observation plan that will enable the patrol to obtain the IR
3) Determine tactical movement necessary to position the patrol to achieve the observation plan
e. Types of Reconnaissance Patrols
1) Area: obtain information about a certain location & its area (road junctions, hills, bridges,
enemy positions). Location of the OBJ is shown by either grid coordinates or map overlay. Boundary
line encircles the area.
2) Zone: obtain information on all the enemy, terrain and routes within a specific zone. Zone
defined by boundaries.
3) Route: orients on a road, a narrow axis such as an infiltration lane or a general direction of
attack. A platoon conducts a hasty route reconnaissance when there is too little time for a detailed route
reconnaissance or when the mission requires less detailed information. Information sought in a hasty
route reconnaissance is restricted to the type of route (limited or unlimited), obstacle limitations
(maximum weight, height & width) and observed enemy.
Area Reconnaissance (FM 3-21.8 Pg 9-29 thru 9-31 MAR07)
Conducted to obtain information about a specified location and the area around it
Location may be given as a grid or an objective on an overlay
Patrol uses surveillance at OPs/vantage points around the objective from which to observe the
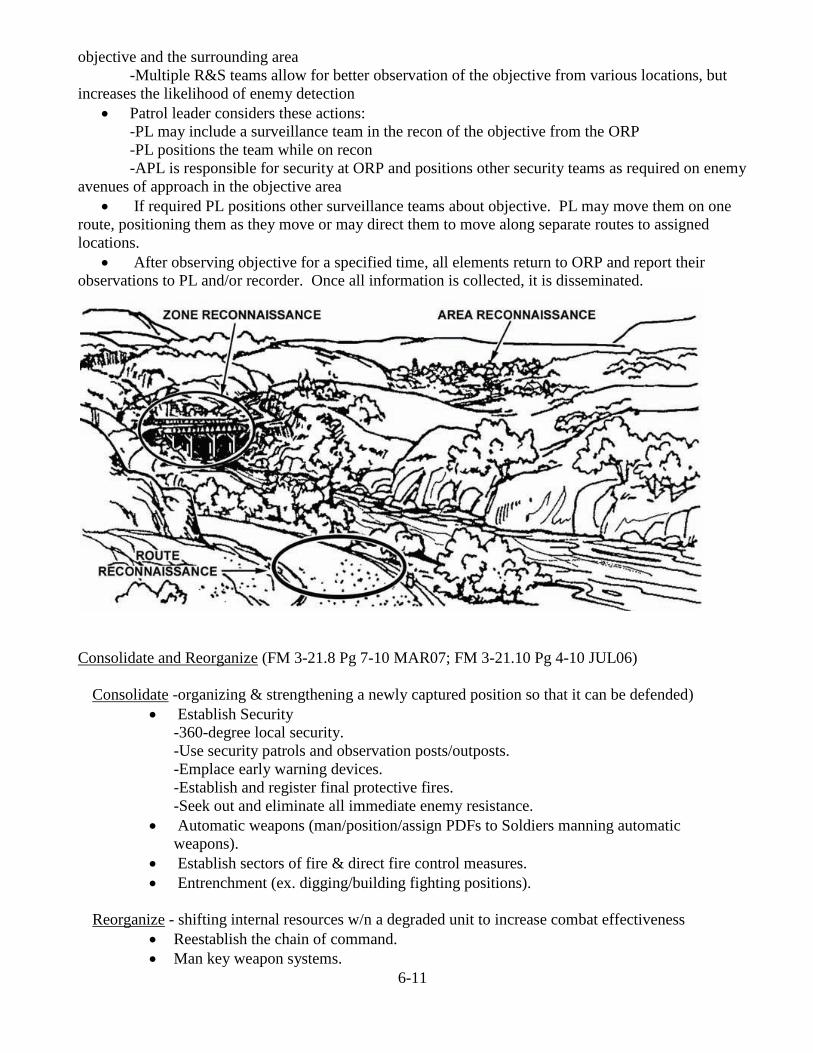
6-11
objective and the surrounding area
-Multiple R&S teams allow for better observation of the objective from various locations, but
increases the likelihood of enemy detection
Patrol leader considers these actions:
-PL may include a surveillance team in the recon of the objective from the ORP
-PL positions the team while on recon
-APL is responsible for security at ORP and positions other security teams as required on enemy
avenues of approach in the objective area
If required PL positions other surveillance teams about objective. PL may move them on one
route, positioning them as they move or may direct them to move along separate routes to assigned
locations.
After observing objective for a specified time, all elements return to ORP and report their
observations to PL and/or recorder. Once all information is collected, it is disseminated.
Consolidate and Reorganize (FM 3-21.8 Pg 7-10 MAR07; FM 3-21.10 Pg 4-10 JUL06)
Consolidate -organizing & strengthening a newly captured position so that it can be defended)
Establish Security
-360-degree local security.
-Use security patrols and observation posts/outposts.
-Emplace early warning devices.
-Establish and register final protective fires.
-Seek out and eliminate all immediate enemy resistance.
Automatic weapons (man/position/assign PDFs to Soldiers manning automatic
weapons).
Establish sectors of fire & direct fire control measures.
Entrenchment (ex. digging/building fighting positions).
Reorganize - shifting internal resources w/n a degraded unit to increase combat effectiveness
Reestablish the chain of command.
Man key weapon systems.
6-12
Maintain communications and reports, including:
-Restore commo w/ any unit temporarily out of commo.
-Send SITREP (at least mission accomplishment status).
-Identify & request resupply of critical shortages.
Resupply and redistribute ammunition & other supplies.
Perform special team actions such as:
-Consolidate and evacuate casualties, EPWs, enemy weapons, noncombatants/refugees
and damaged equipment (not necessarily in the same location).
-Treat and evacuate wounded personnel.
-Evacuate friendly KIA.
-Treat and process EPWs.
-Segregate and safeguard noncombatants/refugees.
-Search and mark positions to indicate cleared areas to other friendly forces.
SECTION VI – PATROL BASE (FM 3-21.10 Pg 5-20 thru 5-23, 8-49, 12-65, 66 JUL06)
A patrol base is a position set up when the patrol halts for an extended period in enemy territory (an
unprotected place). The unit must take active and passive security measures. Occupation depends on the
need for secrecy, but should not exceed 24 hours and the same location should not be occupied twice
(returned to once vacated).
Purposes
-Rest/Eat
-Change of Mission Adjustments
-Maintenance
-Planning/Issuing Orders
-Base for Concurrent/Consecutive Missions
-Avoid Detection, Hide
Site Selection/Considerations
-Covered and concealed location off any avenues of approach that allows 360 degree defense.
-Ability to abandoned patrol base quickly into a movement technique and/or alternate site.
-Fighting positions can be reinforced & supported.
-Team/Squad in reserve to support perimeter.
-Mortars located in center - increases coverage.
Patrol Base Priorities of Work (FM 3-21.10 Pg 5-39 JUL06) - A set method of controlling the
preparation and conduct of a defense. Unit TACSOP describes the priority of work including individual
duties. The commander changes priorities based on the situation. Everyone must have a priority of work
– leaders have a specific priority of work for their duty position. Several tasks are performed at the same
time as required.
-Post 360 degree security.
-Establish the company R&S operation.
-Position Javelins/machine guns/Soldiers (sectors of fire).
-Position other assets (ex. CP/HQ and mortars).
-Designate FPLs and FPFs.
-Prepare range cards and sector sketches.
-Improve/Prepare fighting positions.
6-13
-Install wire communications, if applicable.
-Emplace obstacles and mines.
-Mark TRPs and direct fire-control measures.
-Establish sleep and rest plan.
-Reconnoiter movements.
-Adjust positions and control measures as required.
-Continue to improve positions.
Departure from Friendly Lines (FM 3-21.8 Pgs 9-5 thru 9-6 MAR07):
a. Coordination with forward, adjacent and other patrolling unit leaders
(1) The platoon leader provides the forward unit leader with the unit identification, size of the
patrol, departure and return times, and area of operation
(2) The forward unit leader provides the platoon leader with the following:
(a) Additional information on terrain just outside the friendly unit lines
(b) Known or suspected enemy positions in the near vicinity
(c) Likely enemy ambush sites
(d) Latest enemy activity
(e) Detailed information on friendly positions, obstacles, and OPs
(f) Friendly unit fire plan
(g) Support the unit can provide (fire support, litter teams, guides, communications, and
reaction force)
b. Planning the departure of friendly lines (sequence of actions)
(1) Making contact with friendly guides at the contact point
(2) Moving to a coordinated initial rally point just inside friendly lines
(3) Completing final coordination
(4) Moving to and through the passage point
(5) Establishing a security-listening halt beyond the friendly unit’s final protective fires
Rally Points (FM 3-21.8 Pgs 9-6 thru 9-7 MAR07):
a. Selection/Characteristics of Rally Points (leader physically reconnoiters when possible, at least
conducts a map reconnaissance):
(1) Easy to recognize on the ground
(2) Cover and concealment
(3) Away from natural lines of drift
(4) Defendable for short periods
b. Types of Rally Points
(1) Initial Rally Point – inside friendly lines
(2) En Route Rally Point – designated based on terrain, vegetation, visibility
(3) Objective Rally Point – out of site/sound/small-arms range of objective; remains tentative
until objective is pinpointed; normally located along the direction of travel planned for after patrol
completes actions on the objective
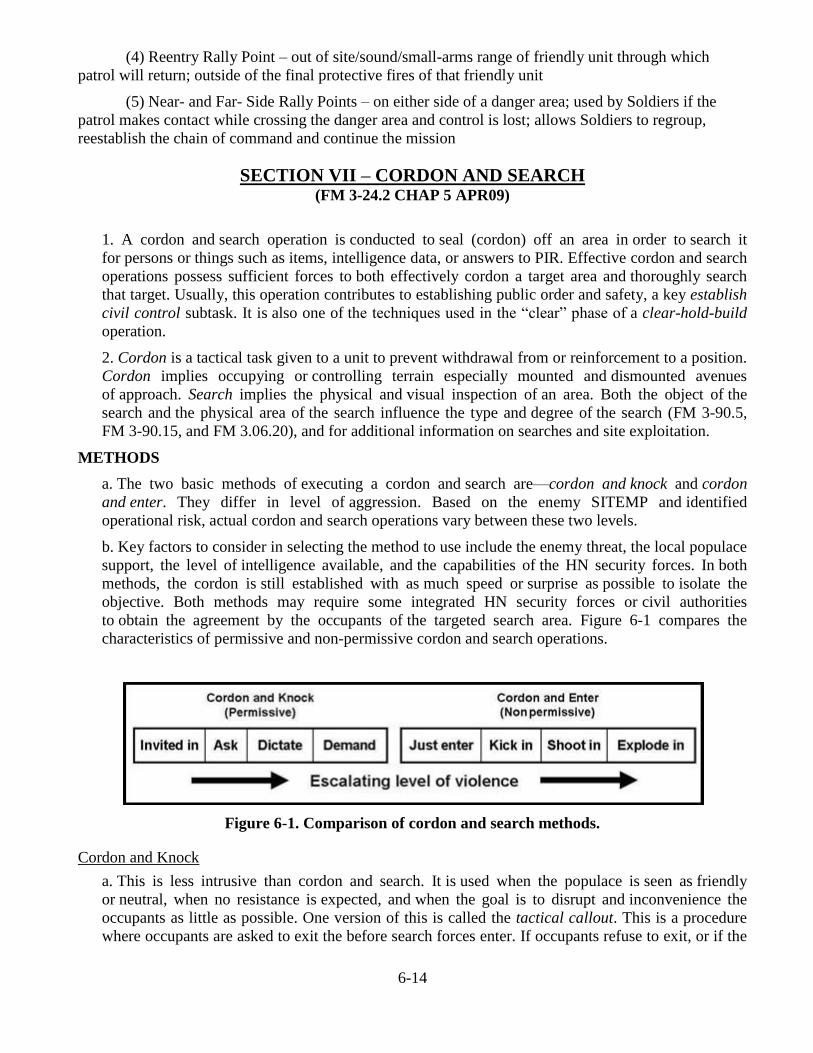
6-14
(4) Reentry Rally Point – out of site/sound/small-arms range of friendly unit through which
patrol will return; outside of the final protective fires of that friendly unit
(5) Near- and Far- Side Rally Points – on either side of a danger area; used by Soldiers if the
patrol makes contact while crossing the danger area and control is lost; allows Soldiers to regroup,
reestablish the chain of command and continue the mission
SECTION VII – CORDON AND SEARCH (FM 3-24.2 CHAP 5 APR09)
1. A cordon and search operation is conducted to seal (cordon) off an area in order to search it
for persons or things such as items, intelligence data, or answers to PIR. Effective cordon and search
operations possess sufficient forces to both effectively cordon a target area and thoroughly search
that target. Usually, this operation contributes to establishing public order and safety, a key establish
civil control subtask. It is also one of the techniques used in the ―clear‖ phase of a clear-hold-build
operation.
2. Cordon is a tactical task given to a unit to prevent withdrawal from or reinforcement to a position.
Cordon implies occupying or controlling terrain especially mounted and dismounted avenues
of approach. Search implies the physical and visual inspection of an area. Both the object of the
search and the physical area of the search influence the type and degree of the search (FM 3-90.5,
FM 3-90.15, and FM 3.06.20), and for additional information on searches and site exploitation.
METHODS
a. The two basic methods of executing a cordon and search are—cordon and knock and cordon
and enter. They differ in level of aggression. Based on the enemy SITEMP and identified
operational risk, actual cordon and search operations vary between these two levels.
b. Key factors to consider in selecting the method to use include the enemy threat, the local populace
support, the level of intelligence available, and the capabilities of the HN security forces. In both
methods, the cordon is still established with as much speed or surprise as possible to isolate the
objective. Both methods may require some integrated HN security forces or civil authorities
to obtain the agreement by the occupants of the targeted search area. Figure 6-1 compares the
characteristics of permissive and non-permissive cordon and search operations.
Figure 6-1. Comparison of cordon and search methods.
Cordon and Knock
a. This is less intrusive than cordon and search. It is used when the populace is seen as friendly
or neutral, when no resistance is expected, and when the goal is to disrupt and inconvenience the
occupants as little as possible. One version of this is called the tactical callout. This is a procedure
where occupants are asked to exit the before search forces enter. If occupants refuse to exit, or if the
6-15
ground commander believes that the potential exists for an insurgent encounter, he may escalate to
cordon and enter.
b. A second version of the cordon and knock is cordon and ask which means occupants or the local
Host Nation authorities are asked for permission to search a particular location. If permission
is denied, no entry occurs. However, the cordon and knock and the cordon and ask require some
degree of integration with HN security force or HN authorities to obtain the agreement by the
occupants of the target to the subsequent search. At a minimum, a sufficient number of translators,
preferably one with each element is required.
Cordon and Enter
This approach is intrusive. The intent is to rapidly breach barriers to gain entry into the search area,
typically using speed and surprise to allow the unit to quickly gain control. This action allows units
to maintain the initiative over a potentially unknown insurgent force operating in the search area.
Intrusive entry ranges from a Soldier simply opening a door without occupant permission,
to mechanical ballistic, or explosive breaching. In addition, mounted units can use vehicles
to breach. The cordon and enter approach does not explicitly require integrated HN security forces
or HN authorities, because occupants' permission is not required. However, during a
counterinsurgency, obtaining the leadership or direct support of the HN is always preferred.
Commanders assume operational risk in COIN by foregoing these considerations. Some
considerations when using the cordon and enter method follow. These considerations may be more
or less important than capturing the target individual, site, or equipment. Gains in security by violent
capture of a key insurgent leader may result in far more substantial losses along the other LOE:
· Risk to civilian occupants and bystanders.
· Collateral damage to infrastructure.
· Perception of the populace.
· Risk to Soldiers.
· Rehearsals.
· Level of training of breach element.
· Effects on subsequent tactical site exploitations.
APPROACHES
Leaders plan and execute cordon and search operations using either a systematic or selective
approach. A systematic approach is the search of all buildings in the targeted area, while a selective
approach is the search of specific locations within a targeted area. The approach used depends on
numerous factors. However, the purpose of the operation is still to capture the designated personnel,
site, or equipment.
CONSIDERATIONS
If intelligence indicates enemy presence, and the local populace is either neutral or supportive of the
insurgency, then the principles of speed and surprise are the keys to a successful cordon and search.
Specific considerations using elements of the mission variables are—
Mission
Leaders determine the focus and method of the cordon and search based on the anticipated threat
and the level of violence in the area of operations.
Enemy
6-16
Cordon elements cannot effectively block pedestrian egress or ingress. Therefore, commanders
should consider how to best physically stop pedestrian traffic. Lethal fire is not a universal means
of enforcing the nature of a cordon.
Troops and Support Available
The size and composition of the cordon and search force is based on the size of the area to be
cordoned, the size of the area to be searched and the suspected enemy SITEMP. Normally, a military
commander, with the police in support, best controls a search involving a battalion or larger force.
The police, with the military in support, best control a search involving smaller forces. Regardless
of the controlling agency, HN police are the best choice for performing the actual search. However,
they must be available in adequate numbers and be trained in search operations.
Time Available
As time available to plan and prepare for a cordon and search mission is generally limited, it is often
necessary to conduct planning while reconnaissance and intelligence collection are ongoing. The
size of the area, especially the interior layout of urban buildings, impacts force size and search time.
Leaders should plan on allowing time for follow-on missions based on exploitable information.
Civil Considerations
Cordon and search operations are a great opportunity for all Soldiers to conduct information
engagements with the population. Each Soldier should know and understand the information
engagement task and purpose.
PHASES
The phases of a cordon and search are the planning phase, reconnaissance phase, movement to the
objective phase, isolate the objective phase, search phase and the withdrawal phase.
Plan
a. Establishing the cordon requires detailed planning, effective coordination, and meticulous
integration and synchronization of available assets to achieve the desired effects. This requires the
commander to consider both lethal and nonlethal effects. Each subordinate cordon position such as a
traffic control point or blocking position must have a designated leader and a clearly understood task
and purpose.
b. A cordon and search operation can usually support the conduct engagement LOE. Commanders
must develop, integrate, and nest the information message in accordance with the purpose of the
search. Often the best message in COIN is one’s actions or that of the entire unit.
c. Search of an urban area varies from a few, easily isolated buildings to a large well developed
urban city. Leaders should divide the urban area to be searched into zones. Buildings should be
numbered and assigned specific search parties for coordination and clarity
Enablers
a. Assets employed during the cordon and search may include tactical PSYOP teams (TPTs), tactical
HUMINT teams (THTs), law enforcement professionals (LEPs), special advisors, attack,
reconnaissance, and assault aviation, CAS, SIGINT enablers, MASINT enablers, military working
dog teams, (MWDs) biometrics collection efforts, female searchers, and civil affairs teams (CATs,
Chapter 3).
b. A TPT is an outstanding combat multiplier. Messages broadcast in the local language during
cordon and search/knock operations facilitates situational awareness and understanding for the local
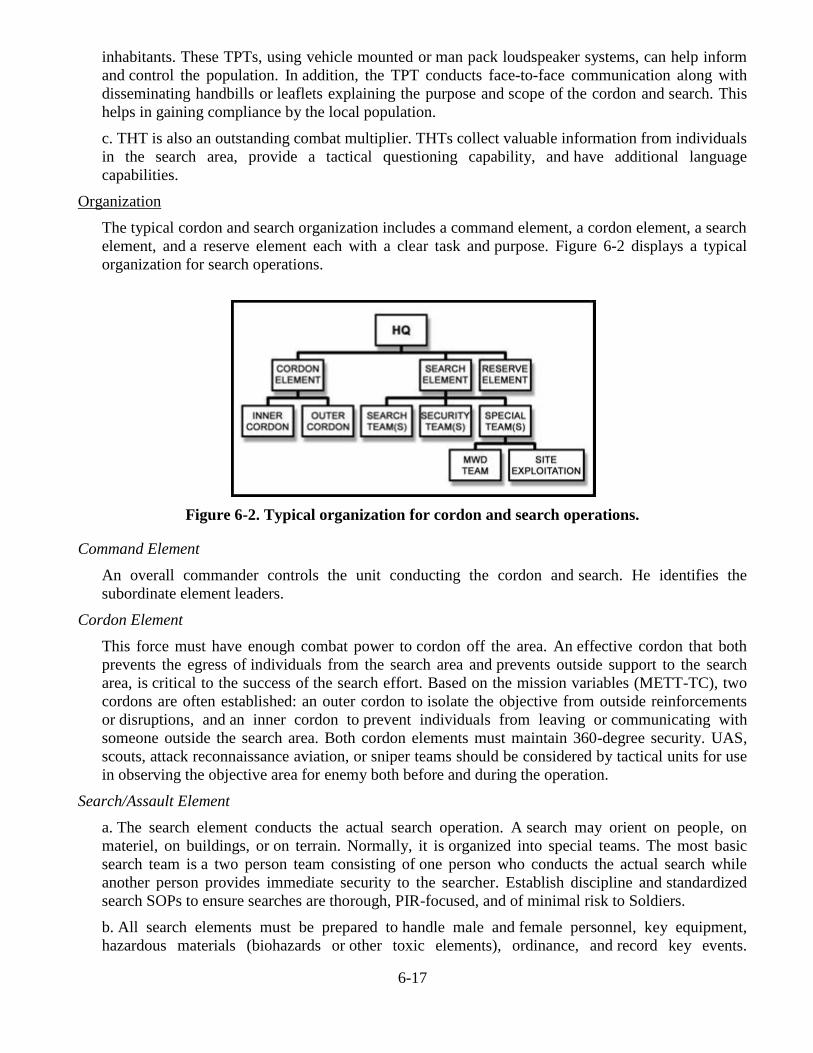
6-17
inhabitants. These TPTs, using vehicle mounted or man pack loudspeaker systems, can help inform
and control the population. In addition, the TPT conducts face-to-face communication along with
disseminating handbills or leaflets explaining the purpose and scope of the cordon and search. This
helps in gaining compliance by the local population.
c. THT is also an outstanding combat multiplier. THTs collect valuable information from individuals
in the search area, provide a tactical questioning capability, and have additional language
capabilities.
Organization
The typical cordon and search organization includes a command element, a cordon element, a search
element, and a reserve element each with a clear task and purpose. Figure 6-2 displays a typical
organization for search operations.
Figure 6-2. Typical organization for cordon and search operations.
Command Element
An overall commander controls the unit conducting the cordon and search. He identifies the
subordinate element leaders.
Cordon Element
This force must have enough combat power to cordon off the area. An effective cordon that both
prevents the egress of individuals from the search area and prevents outside support to the search
area, is critical to the success of the search effort. Based on the mission variables (METT-TC), two
cordons are often established: an outer cordon to isolate the objective from outside reinforcements
or disruptions, and an inner cordon to prevent individuals from leaving or communicating with
someone outside the search area. Both cordon elements must maintain 360-degree security. UAS,
scouts, attack reconnaissance aviation, or sniper teams should be considered by tactical units for use
in observing the objective area for enemy both before and during the operation.
Search/Assault Element
a. The search element conducts the actual search operation. A search may orient on people, on
materiel, on buildings, or on terrain. Normally, it is organized into special teams. The most basic
search team is a two person team consisting of one person who conducts the actual search while
another person provides immediate security to the searcher. Establish discipline and standardized
search SOPs to ensure searches are thorough, PIR-focused, and of minimal risk to Soldiers.
b. All search elements must be prepared to handle male and female personnel, key equipment,
hazardous materials (biohazards or other toxic elements), ordinance, and record key events.
6-18
They must be trained to understand and on order execute information engagements, tactical site
exploitation, detainee operations, and adjacent unit coordination. Search personnel must be trained
to operate with HN security forces and within the established ROE. First aid and other medical
training is critical. Soldiers must be proficient with signaling and marking devices as well
as detection and recording equipment. Biometric and video/audio recording device proficiency
is crucial in COIN search operations. Basic language training is essential to maintain effective
searches and overall operational tempo.
c. Typical search teams are organized in two- to three Soldier teams. Female Soldiers are a proven
combat multiplier during search operations, because few cultures tolerate males searching females.
Search teams clear each room or area in accordance with FM 3-21.8. Units should not confuse entry
methods and their levels of aggression with the requirement to respect the Host Nation’s people
and homes. Typically, once a room is cleared, one team member provides security while the other(s)
searches. All search element personnel are prepared to fight. Basic considerations for any search
team include the following:
· Detailed instructions including prohibited items such as weapons, chemicals, medicines,
and machine tools.
· Understanding of search restrictions and special considerations to include—
Searching of religious buildings.
Searching of females by female Soldiers.
Searching of historical, cultural, or governmental sites (unauthorized or hostile).
· Host nation security forces or local interpreters.
· Biometrics tools.
· Breaching kit.
· Vehicle access tools such as lock picks.
· Information engagement products and tools.
· Audio and video recording devices and data imaging devices.
· Markings and signaling techniques and any constraints.
· Respect for personal property.
· Tools to collect and record information for HUMINT.
· Necessity to maintain communication and report location.
· Standardization of maps, imagery, and labeling conventions.
Reserve Element
The reserve element or QRF must possess and maintain enough combat power to defeat the
insurgent forces template within the AO. The commander gives priorities for planning to the reserve
that could include to be prepared to execute any of the subordinate unit missions. Priorities can also
include additional missions such as CASEVAC or reinforcement. The reserve element leader
focuses efforts on synchronized communications, rehearsals, battle tracking, and positioning before
and during the operation.
Reconnaissance
Every target area should be reconnoitered prior to execution using many of the available resources.
If the target is part of a unit’s AO, then a patrol around the target may not be out of order. ISR
assets, attack reconnaissance aviation, local nationals, and imagery are other methods for conducting
reconnaissance. The reconnaissance plan must not provide the enemy with indicators of an
impending cordon and search. Given the nature of COIN, the reconnaissance phase could last an
extended period, as units identify the relative size and location of buildings, entry points, cordon
6-19
position and avenues of approach. Further tools for objective analysis may be obtained from attack
aviation photographs, maps, and local emergency services departments.
Movement to the Objective
The timing, routes, and execution of movement to the objective should consider the factors
of METT-TC, and whether it should be simultaneous or phased. If contact is made in the movement,
commanders should consider whether they wish to send forces forward to initiate the cordon.
Isolation of the Objective
Although analysis of the mission variables using METT-TC determines specifics, a unit typically
establishes the outer cordon first, establishes the inner cordon second, and moves the search element
to the objective last. Commanders should consider the value of using the opposite technique
of forming the cordons following rapid movement to the objective to gain surprise. Timing is when
executing either technique is important. The quicker these three events are accomplished, the less
time personnel on the objectives have to egress, find concealment, or destroy materials
or equipment.
Position the Reserve Element
The reserve element or QRF is a mobile force positioned in a nearby area, with multiple planned
ground, water, or air routes to the objective area. Its mission is to aid the search and security
elements if they require assistance or become unable to achieve their purpose.
Establish the Cordon
a. There are two techniques for emplacing the actual cordon positions: simultaneously
and sequentially. Careful consideration must be given to both, because each has advantages
and disadvantages. Units establishing a cordon position themselves to be able to block movement to
and from the objective area. This may be by observed fire, but usually it will be by physically
controlling routes. Cordon positions should be occupied rapidly just prior to the search element
reaching the objective. Establishing the cordon during a period of limited visibility increases
movement security but makes control difficult. Cordon positions, once occupied, will be detected by
locals as they conduct their daily business.
b. Both the outer and inner cordon leaders must maintain situational understanding of not only their
AOs, but also each other’s cordon and the progress of operations of the search element. In doing so,
they can anticipate insurgent activity; controls direct and indirect fires, and achieve their task
and purpose.
c. The various positions of the outer and inner cordons may include, vehicle mounted platoons
or sections, dismounted platoons or squads, interpreters, detainee security teams, crowd control
teams, tactical PSYOP teams, observation posts, traffic control points or blocking positions, Host
Nation security forces (military or police), and aviation assets.
d. The outer cordon usually focuses on traffic control points and blocking positions, while the inner
cordon focuses on overwatching the objective and preventing exfiltration or reposition of persons
within the search area. Figure 6-3 shows the typical establishment of a cordon and Figure 6-4 shows
the details of an inner cordon in an urban setting. Note the technique of assigning each building a
number to increase clarity and coordination between units.
6-20
Figure 6-3. Typical establishment of an urban cordon.
Figure 6-4. Urban inner cordon.
Search
a. A search may be oriented toward people, materiel, buildings, or terrain. It usually involves both
HN police and military personnel. It must be a systematic action to ensure that personnel,
documents, electronic data, and other material are identified, evaluated, collected, and protected
to develop intelligence and facilitate follow-on actions.
b. The tempo at which a search operation is conducted should be slow enough to allow for an
effective search, while not so slow that it allows the insurgent force time to react to the search.
Search teams must consider a return to an area after an initial search. This can surprise and remove
insurgents who may not have been detected or may have returned. All searches should create
6-21
pressure on insurgents and sympathizers to not stay in the area, but not inconvenience the local
residents to the degree that they will collaborate with the insurgents.
c. Special laws regulate the search powers of military forces. Misuse of search authority can
adversely affect the outcome of operations and future legal proceedings; therefore, all searches must
be lawful and properly recorded to be of value. These laws must be disseminated to the population
to ensure understanding and compliance. Additional information on searches can be found in FM
3-06.20. Search teams must have instructions for three basic categories:
Personnel - This includes both male and female and both persons of interest and other persons.
Physical Items - This includes weapons, equipment, documents, computers, and cameras.
Information Mediums - This includes data inside computers, cameras, and cell phones.
Withdrawal
During this phase, the unit may be the most vulnerable. To mitigate risk, a commander may
choose to—
· A relief in place.
· Stay-behind elements to cover the withdrawal.
· Different routes and timing.
· Simultaneous or phased withdrawals.

7-1
CHAPTER 7 - CBRN (STP 21-1-SMCT MAY11; STP 21-1-24 SMCT SEP09)
Chemical Biological Radiological and Nuclear (CBRN) is a committee at WF which will train Cadets
on CBRN Tasks and to develop confidence in the protective mask. Given appropriate training area with
CS Chamber and appropriate equipment, Cadets will train on select BOLC A Tasks IAW the
WARRIOR FORGE Master Training Schedule and develop a Situational Training Exercise that tests
the Cadets CBRN skills in a physically challenging environment (Cobalt Challenge). Cadets correctly
wear, operate and have confidence in their CBRN Clothing and equipment and appreciate the leadership
challenges and constraints associated with operating in a CBRN environment.
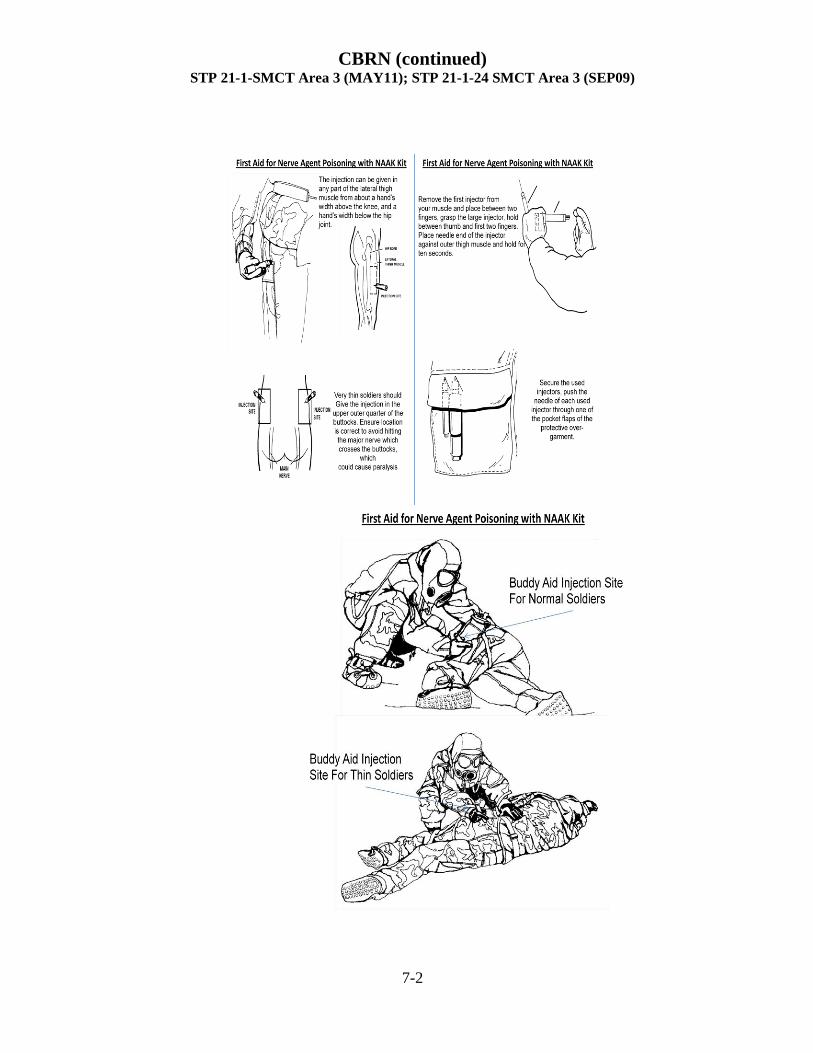
7-2
CBRN (continued) STP 21-1-SMCT Area 3 (MAY11); STP 21-1-24 SMCT Area 3 (SEP09)

NOTES

NOTES