Embed Size (px)
Citation preview


3
SAFETY PRECAUTIONS Read all of the instructions before using this appliance. When using this appliance, always exercise basic safety precautions, including the following:
Do not use if the power supply cord is damaged. If damaged, it must be replaced by qualified technician/electrician. This portable freezer is not intended for use by young children or infirm persons without supervision. Young children must be supervised to ensure they do not play with the appliance. Ensure the freezer is unplugged before cleaning or if not in use.To clean the freezer use only mild detergents or glass cleaning products. Never use harsh chemicals or solvents.Do not use this portable freezer with an extension cord or power strip. Please ensure that the appliance is plugged directly into the electrical outlet. When positioning the portable freezer, ensure that there is at least a 6” clearance at the sides of the portable freezer. This will allow for adequate ventilation of heat from the back of the freezer.Close the freezer lid immediately after putting in any items to maintain the internal temperature of the unit.Avoid placing the freezer near external heat sources or direct sunlight.Make sure the freezer is placed on a flat, level, and solid surface.Make sure that the surface on which the freezer is placed is strong enough to hold the freezer once it is fully loaded with items.The portable freezer is an electrical appliance. To avoid serious injury from electrical shock, do not operate the freezer with wet hands, while standing on a wet surface, or while standing in water. Do not expose this appliance to rain or excessive moisture.Do not turn the portable freezer upside down, on its side, or 45° or more off level. Never pull the power cord to disconnect the unit from an outlet. Grasp the plug directly and pull it from the outlet.Never lift or carry the freezer by the power cord.Keep the power cord away from heated surfaces.This portable freezer is designed for non-commercial use only.Do not plug this portable freezer into the power socket before setup is completed.An empty portable freezer can be dangerous for children or small animals. If disposing of the portable freezer remove gaskets, latches, lids and the entire door from your unused appliance so that children or small animals cannot become trapped inside.Do not cut or remove the third prong (the grounding prong) from the power cord.The cord should be secured behind the unit and should not be left exposed or dangling.Do not move this portable freezer without securing the lid in a closed and latched position.Performance may vary based on operational and ambient conditions.
8
When the ice layer on the inner cabinet sides is over 0.2”, the defrosting operation should be performed to improve the refrigerating efficiency. To do this,follow these steps below:
1. Turn off the power, and remove all items inside the freezer.2. Allow the ice to completely melt.
Tip: To remove unpleasant odors place a piece of charcoal in the chest
It is normal to hear gurgling sounds caused by the flow of refrigerant when each cooling cycle ends.
The surface temperature of the compressor can reach 158-194°F when running.
The noise emitted by the cooling fan on the condenser is a normal function.
It is normal for the fan in the power supply to run all the time.
Always disconnect the power supply before cleaning. Clean the inside of the cabinet whenever necessary using a solution of warm water and baking soda (1 tablespoon to every 2 liters of water). Dry with a soft cloth.
Do not use steel brushes or harsh detergents to clean the inner liner.
Dirt from the condenser should be cleaned by a qualified technician when necessary.
CLEANING YOUR PORTABLE FREEZER
Normal Operating Sounds and Functions
Defrosting and Deodorizing
Never remove ice with a sharp object or screwdriver.
7
Note: Do not use the refrigerator-freezer as a refrigerator when the ambienttemperature is lower than 41°F
Fresh foods should NOT be stored together with frozen foods.
When the temperature is set below 32°F, do not keep glass-bottled drinks suchas beer and lemonade or soda cans, as the glass and cans might shatter.
Temperature Adjustment
Food Storing
Speed mode setting
1
When the freezer is connected to the power outlet, press the “set” button, the LED will display the set freezing temperature of 0°FTemperature adjustment:
Press the“set” button.
While the LED is flashing, press “+” or “ —” button to reach the required temperature.
Gently press the “Mode” button to switch from Auto mode to Low speed mode. The LED light in yellow indicates “Auto mode” and in green indicates “Low speed mode”.
OFF mode setting
Press “Mode” button for 5 seconds, and machine switches off. The nixie display indicatordisplay on OFF.
When switched off, press on the “Mode” button, the machine exit OFF mode.
7
6 5
7
3
4
5
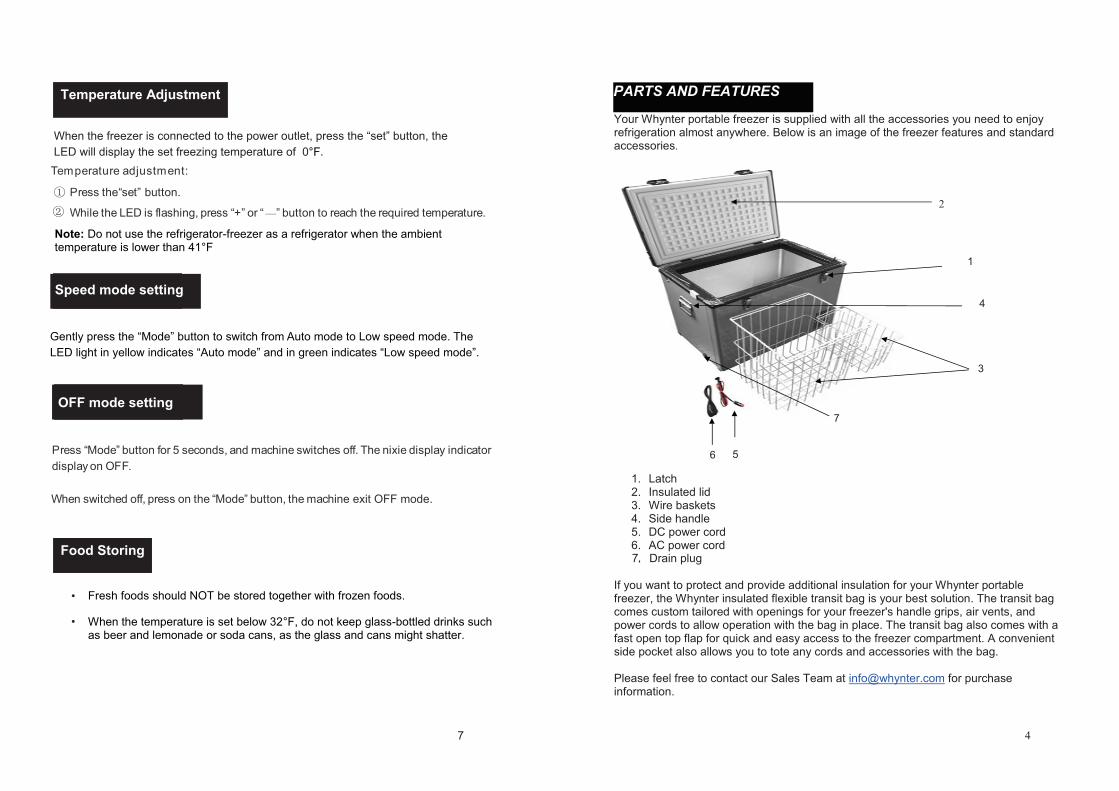
Position your portable freezer in a location where there is proper air circulation and electrical connections.Keep the portable freezer away from heat and direct sunlight if possible.This portable freezer is suitable for vehicle use and camping however, the appliance should never be exposed to rain.This portable freezer should not be placed in a built-in or recessed area. It is designed to be freestanding.The normal operation of the freezer depends on heat radiation from the condenser. For the initial use, remove all packaging and allow at least 6” of clearance around the perimeter of the freezer.
1. Remove all interior and exterior packaging.
2. Position the freezer in a dry and well-ventilated place. Keep the freezer away from direct sunlight, heaters and corrosive gases/chemicals.
3. Clean the interior surface with lukewarm water and a soft cloth.
4. When inserting the AC power-cord into the power socket, make sure the power socket is a grounded 115V~AC / 60Hz socket. Also, make sure that the unit’s grounding prong has not being tampered with.
Note: When inserting the DC power-cord, make sure the input is a 12V~DC / 24V power source.
5. When moving the freezer, always use both handles to the carry the unit as level as possible. This is in order to protect the compressor and the sealed system.
Movement and Installation Instructions
Proper Location
Because this unit is compressor basedappliance, ample space is required around the unit to allow it to exhaust
l
6
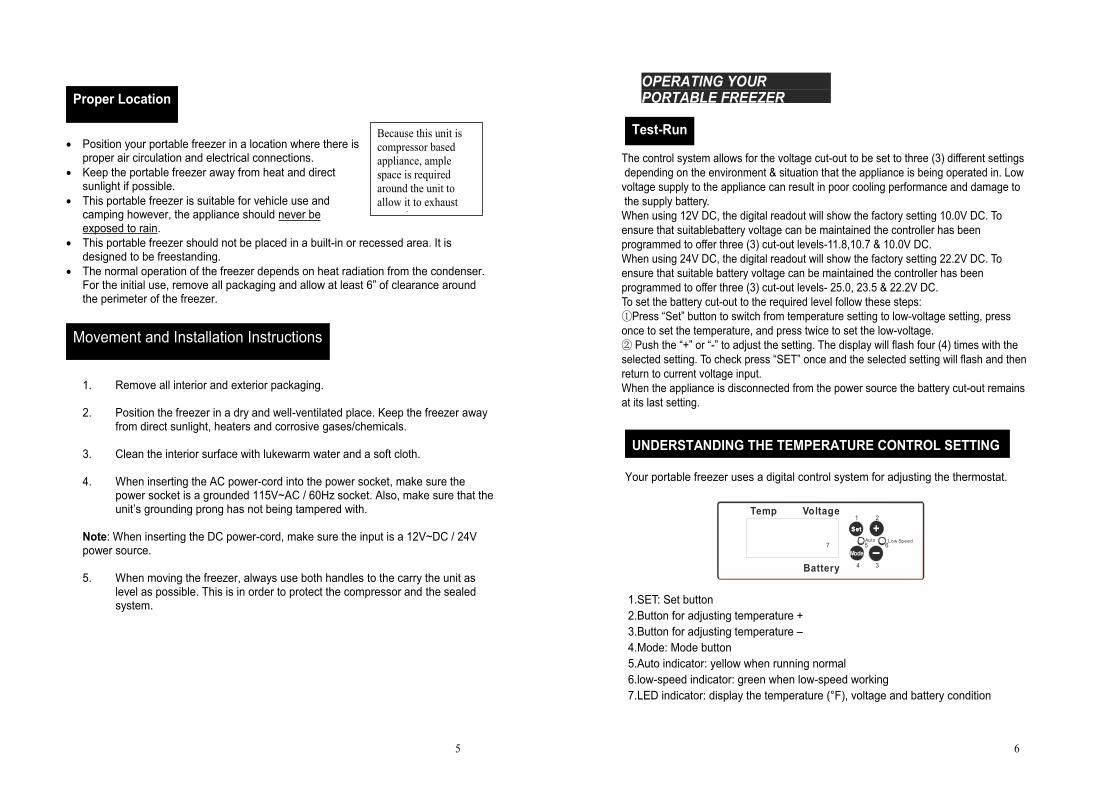
Your portable freezer uses a digital control system for adjusting the thermostat.
OPERATING YOURPORTABLE FREEZER
Test-Run
UNDERSTANDING THE TEMPERATURE CONTROL SETTING
The control system allows for the voltage cut-out to be set to three (3) different settings depending on the environment & situation that the appliance is being operated in. Low voltage supply to the appliance can result in poor cooling performance and damage to the supply battery.When using 12V DC, the digital readout will show the factory setting 10.0V DC. To ensure that suitablebattery voltage can be maintained the controller has beenprogrammed to offer three (3) cut-out levels-11.8,10.7 & 10.0V DC.When using 24V DC, the digital readout will show the factory setting 22.2V DC. To ensure that suitable battery voltage can be maintained the controller has been programmed to offer three (3) cut-out levels- 25.0, 23.5 & 22.2V DC.To set the battery cut-out to the required level follow these steps:
Press “Set” button to switch from temperature setting to low-voltage setting, press once to set the temperature, and press twice to set the low-voltage.
Push the “+” or “-” to adjust the setting. The display will flash four (4) times with the selected setting. To check press “SET” once and the selected setting will flash and then return to current voltage input.When the appliance is disconnected from the power source the battery cut-out remainsat its last setting.
Auto Low Speed
SetSet
Mode
+
-
Temp
Battery
Voltage1 2
34
57 6
1.SET: Set button2.Button for adjusting temperature +3.Button for adjusting temperature –4.Mode: Mode button5.Auto indicator: yellow when running normal6.low-speed indicator: green when low-speed working 7.LED indicator: display the temperature (°F), voltage and battery condition
![[General Freezer Catalog] - Mayekawa · IQF Line Freezer Total Service Spiral Freezer / Batch Freezer 4. SlimLight Freezer Dramatically improved performance and ease of use with the](https://img.pdfslide.us/doc/110x75/5ead01b8d725ef2de964d998/general-freezer-catalog-iqf-line-freezer-total-service-spiral-freezer-batch.jpg)