Embed Size (px)
Citation preview


1
INTRODUCTION . . . . . . . . . . . . . . . . . . . . . . . . . . . . . . . . . . . . . . .2
IMPORTANT . . . . . . . . . . . . . . . . . . . . . . . . . . . . . . . . . . . . . . . . . .3
ELECTRICAL INFORMATION . . . . . . . . . . . . . . . . . . . . . . . . . . . . .4
YOUR DIGITAL TV RECORDER . . . . . . . . . . . . . . . . . . . . . . . . . . .5
CONNECTING UP . . . . . . . . . . . . . . . . . . . . . . . . . . . . . . . . . . . . . .6
GETTING STARTED. . . . . . . . . . . . . . . . . . . . . . . . . . . . . . . . . . . . .7
YOUR REMOTE CONTROL. . . . . . . . . . . . . . . . . . . . . . . . . . . . . . .8
DAILY USE. . . . . . . . . . . . . . . . . . . . . . . . . . . . . . . . . . . . . . . . . . .11
ELECTRONIC PROGRAMME GUIDE . . . . . . . . . . . . . . . . . . . . . .13
RECORDING DIGITAL TV . . . . . . . . . . . . . . . . . . . . . . . . . . . . . . .15
PAUSING LIVE TV . . . . . . . . . . . . . . . . . . . . . . . . . . . . . . . . . . . . .19
PLAYING BACK RECORDINGS . . . . . . . . . . . . . . . . . . . . . . . . . .20
ARCHIVING RECORDINGS . . . . . . . . . . . . . . . . . . . . . . . . . . . . . .23
MAIN MENU . . . . . . . . . . . . . . . . . . . . . . . . . . . . . . . . . . . . . . . . .24
FAVOURITES LISTS . . . . . . . . . . . . . . . . . . . . . . . . . . . . . . . . . . .25
ALL CHANNELS LIST . . . . . . . . . . . . . . . . . . . . . . . . . . . . . . . . . .27
PARENTAL LOCK . . . . . . . . . . . . . . . . . . . . . . . . . . . . . . . . . . . . .28
CONFIGURATION SETTINGS . . . . . . . . . . . . . . . . . . . . . . . . . . . .29
TROUBLESHOOTING . . . . . . . . . . . . . . . . . . . . . . . . . . . . . . . . . .37
TECHNICAL SPECIFICATION . . . . . . . . . . . . . . . . . . . . . . . . . . . .40
END-USER LICENCE. . . . . . . . . . . . . . . . . . . . . . . . . . . . . . . . . . .42
AN IDEA TO CONSIDER . . . . . . . . . . . . . . . . . . . . . . . . . . . . . . . .44
TABLE OF CONTENTS
CONTENTS

2
Thank you for choosing the Pace Twin Digital TV Recorder. Please follow the instructions in this manual carefully to enjoy all the advantages of digital TV. We advise following the user instructions and recommendations supplied with your TV Recorder, especially for first-time use. Your TV Recorder fully complies with international DVB (Digital Video Broadcasting) standards. It is compatible with televisions and VCRs equipped with a standard SCART connector, also UHF, composite video or S-Video connectors.
Your TV Recorder's packaging includes cardboard and plastic which can be recycled to protect the environment.
Storage
If your TV Recorder is not used directly after purchase, it can be stored in its original packaging, in a cool dry place, at a temperature between -6°C and +50°C. Before use, wait until your TV Recorder has reached room temperature.
Maintenance
To clean your TV Recorder, dust with either a clean dry cloth, or one that has been slightly dampened with distilled water. Never use detergents of any kind. Before cleaning, always disconnect the power from your TV Recorder and unplug the aerial lead.
Information in this manual is correct at the time of going to print. Channel availability is subject to signal coverage and may change at the discretion of the broadcaster. Reception of these channels may depend on the type and condition of existing aerial equipment and installation.
If your TV aerial needs upgrading, we recommend that this is carried out by a professional installation engineer.
This document is copyrighted and may not, in whole or part, be copied, photocopied, reproduced, translated or reduced to any electronic or machine-readable form without prior consent in writing from Pace Micro Technology plc. © Pace Micro Technology 2002.
Pace
®
and are trademarks of Pace Micro Technology plc.
INTRODUCTION
RECOMMENDATIONS
DISCLAIMER
COPYRIGHT NOTICES
®
1
INTRODUCTION

3
Your TV Recorder has been manufactured to meet international safety standards, but you must take care to operate it safely.
It is important that you read these safety instructions. If you have any doubts about the installation, operation or safety of your TV Recorder, please contact the Technical Helpdesk* on
0870 120 0986
(national call rate) or e-mail
WARNING
Remember that contact with AC mains can be lethal or can cause severe electric shock. To avoid the risk of electric shock:
Never remove the top cover from your TV Recorder. There are no user-serviceable parts inside, but there are some high-voltage live parts.
Make sure all electrical connections are properly made.
Do not connect any equipment to the mains supply until you have properly connected all the other leads.
Disconnect the mains lead from the mains wall socket before you disconnect any equipment from your TV Recorder.
Never push anything into holes, slots or other openings in the case (except a viewing card into the slot provided, and only when you are requested to do so).
CAUTION
Do not use or store your TV Recorder in hot, cold, damp or dusty places.
Do not block the ventilation holes of your TV Recorder. Leave a gap of at least 10cm above and around it to allow for adequate ventilation. Never stand it on soft furnishings.
Do not put anything on your TV Recorder which might drip or spill into it. Never stand objects filled with liquids, such as vases, on top of your TV Recorder.
Do not place your TV Recorder in an unventilated cabinet or on top of a unit which emits heat (e.g. a VCR).
Never place naked flame sources, such as lighted candles, on top of your TV Recorder.
Do not pick up or otherwise move your TV Recorder while it is connected to the mains supply. If you want to move your TV Recorder, first disconnect it, then wait at least 30 seconds before continuing.
* Calls to the Helpdesk may be monitored or recorded for training purposes.
USING EQUIPMENT SAFELY
2
IMPORTANT

4
The supplied plug may be a non-rewireable type or a rewireable type. Both types contain an approved 3A fuse. If you need to replace the fuse, you must use an ASTA- or BSI-approved BS1362 fuse, rated at 3A and marked:
The
non-rewireable plug
has its fuse beneath a fuse cover on its face. Use a screwdriver to lever off the fuse cover, replace the fuse with a new one and refit its cover.
Never use a plug if its fuse cover is missing.
The fuse is inside the
rewireable plug
. Use a screwdriver to remove the plug’s back cover, then lever out the fuse and replace it with a new one. Replace the plug’s back cover.
If the supplied mains plug is not suitable for your mains socket-outlet, remove its fuse and then cut the plug off the lead. Destroy the severed plug immediately to avoid the shock hazard which would exist if this were to be plugged into a mains socket.
Fit an appropriate mains plug on the lead. If this plug contains a fuse, it should be as described above. If you are using a non-fused plug, an external fuse must not exceed 5A.
Your TV Recorder operates with 115 – 230V AC, 50/60Hz mains supplies.
Do not connect it to a DC power supply.
The supplied mains lead has a 2-way connector at one end and a mains plug at the other. Insert the 2-way connector into your TV Recorder
before
you insert the plug into the mains supply.
The only way to disconnect your TV Recorder from the mains is to remove the mains lead. Your TV Recorder must therefore be installed near to the mains socket-outlet, which should be easily accessible.
For information about the mains plug and its fuse, see above.
If you are in any doubt about the mains lead, its plug or its connection, consult a competent electrician.
MAINS PLUG AND ITS FUSE
CONNECTING TO THE MAINS SUPPLY
or
AM
3 AM
P
LN
E
FUSE of correct value
3
ELECTRICAL INFORMATION

5
This User Guide contains all you need to know about how to watch and record digital terrestrial TV using your Pace Digital TV Recorder.
It’s easy to install; just follow the instructions in the following sections,
which guide you through connecting and setting it up.
See also page 8, page 9 and page 10, which describe your TV Recorder’s remote control.
Before you start installing your TV Recorder, please check you have the following items:
• Your TV Recorder;
• A SCART lead;
• An RF lead;
• A mains lead;
• Your remote control;
• Two ‘AAA’ batteries for the remote control.
Viewing card slot – insert your viewing card here when you are requested to do so (for future use only)
Play indicator – lights when playing back a recording from the hard disk
Record indicator – lights when recording a programme to the hard disk
Clock/channel number display –shows the current time when switched off (in standby mode), and the current channel number when switched on. Also displays playback time elapsed and other status information.
Remote command indicator – lights when your TV Recorder receives a signal from the remote control
Standby button –to switch your TV Recorder on and off
Record button – record the currently-showing or selected programme
OK button – choose current selection, confirm settings etc.
Menu button – display the Main menu screen
TV1/TV2 button –to view the current output from the TV2/VCR SCART on a TV connected to the TV SCART (see page 12 for further details)
Arrow buttons – to move the selection, change channel lists, choose settings etc.
4
YOUR DIGITAL TV RECORDER

6
WARNING
Before you connect or disconnect your TV Recorder to/from any other equipment, make sure you disconnect all the equipment from the mains supply.
Typical connection method
The diagram below shows a typical method of connecting up your TV
Recorder to a TV and VCR. The leads you should use are drawn with solid lines between their connectors.
Leads drawn with dashed lines are optional; these are marked
A
,
B
,
C
and
D
, and are listed below the diagram.
Once all the connections are properly made, connect all equipment to the mains supply.
Optional connections
A
Composite video* lead to a VCR or TV (phono connector)
B
S-video* lead to a VCR or TV (mini-DIN connector)
C
Right and left stereo audio* leads to a VCR, TV or hi-fi amplifier (phono connectors)
D
Optical digital-audio* lead to a home cinema amplifier
* These outputs are based
only
on the current output from the TV SCART.
CONNECTING YOURTV RECORDER
PACE Micro Technology plc115-230V ~50/60Hz 36W max.
Made in France
Aerial
Ch21-69 TV
CompositeVideo
S Video
TV
TV2/VCR
DIGITAL AUDIO OUT
SERIAL INTERFACEL
R
AUDIO
TV
CAUTIONRISK OF ELECTRIC SHOCK
DO NOT OPEN
WARNING: TO PREVENT FIRE OR ELECTRICAL SHOCK HAZARD,DO NOT EXPOSE THIS PRODUCT TO RAIN OR MOISTURE, OR REMOVE COVER. NO USER SERVICEABLE PARTS INSIDE.REFER SERVICING TO QUALIFIED SERVICE PERSONNEL.
IN INOUT
A
B C D
VCRTV
TV Recorder
Mains lead
RF lead
RF leadSCART leadSCART leadRF lead
Aerial
5
CONNECTING UP

7
Insert the two batteries into your remote control unit, making sure you insert them the correct way round.
Once you have connected your TV Recorder to the mains supply, your TV Recorder’s clock display will light up, but will initially show ‘– – – –’.
Switch on your television and ensure that it is set to its ‘AV’ channel.
When you first switch your TV Recorder on, the
Language
menu displays. This allows you to choose a language to be used for all your TV Recorder’s menus and screens.
Use the buttons to select a language, then press the
OK
button on your remote control (see page 8).
Your TV Recorder will now initialise its hard disk. When this has completed, press the
OK
button to proceed to the next step.
Once the hard disk has been initialised, the
Scan for channels
screen displays and your TV Recorder automatically begins scanning for channels. The channel scan takes about three minutes.
Once the scan is complete, the number of
Channels found
displays and the word
Done
displays at the bottom of the screen.
Press the
OK
button to save all the found channels.
Note:
If you press the
Return
button, your TV Recorder will
not
save the found channels, and the
Language
menu will
be redisplayed.
When you have pressed
OK
, a list of channels displays on your screen. This is the
All channels
list. Select a channel to watch and press the
OK
button.
Now you can enjoy digital television, but please read the instructions in the rest of this User Guide in order to get the most from your TV Recorder.
You may need to change some of the configuration settings when you first install your TV Recorder, for example if you have a widescreen TV. For more information, see page 29.
Your TV Recorder comes with the latest digital TV technology. To keep up with new technology, new features may be developed which may then be transmitted to your TV Recorder as
software upgrades
. For more information, see page 35.
REMOTE CONTROL
SWITCHING YOURTV RECORDER ON
SETTING YOURTV RECORDER UP
CHANNEL SCAN
CONFIGURATION SETTINGS
YOUR TV RECORDER TOMORROW
6
GETTING STARTED

8
This page shows the buttons on your remote control that you need to set your TV Recorder up. All the other buttons are described on page 9 and page 10.
The features of your TV Recorder that can be accessed using the remote control are as follows.
1. Daily use
• switching on and off;
• changing channel;
• adjusting the volume;
• selecting the Favourites lists;
• displaying information on the current programme;
• displaying the Electronic Programme Guide (EPG) for current channel information and the TV Schedule;
• Recording programmes;
• Pausing live TV;
• Playing back programmes;
• Copying recordings to a VCR;
• activating/deactivating the Parental code.
2. Occasional use
• creating and organising the Favourites lists;
• updating the All channels list;
• changing the configuration settings.
Standby (S) button
Use the up and down arrows to select a language when you first set up your TV Recorder
Press OK to confirm a selection
Press Return to cancel a selection
7 YOUR REMOTE CONTROL
9
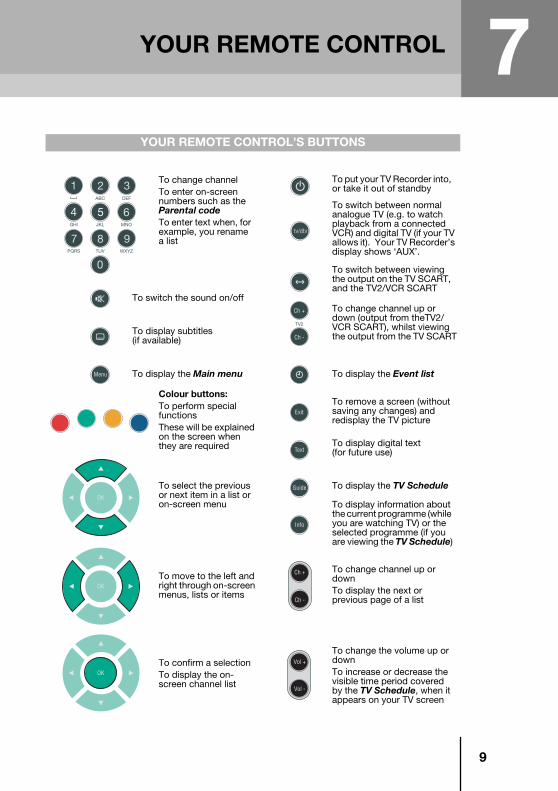
YOUR REMOTE CONTROL’S BUTTONS
To put your TV Recorder into, or take it out of standby
To switch the sound on/off
To change channelTo enter on-screen numbers such as the Parental codeTo enter text when, for example, you rename a list
To display the TV Schedule
To switch between normal analogue TV (e.g. to watch playback from a connected VCR) and digital TV (if your TV allows it). Your TV Recorder’s display shows ‘AUX’.
To switch between viewing the output on the TV SCART, and the TV2/VCR SCART
To change channel up or down (output from theTV2/VCR SCART), whilst viewing the output from the TV SCARTTo display subtitles
(if available)
To display the Main menu To display the Event list
Colour buttons:To perform special functionsThese will be explained on the screen when they are required
To remove a screen (without saving any changes) and redisplay the TV picture
To display digital text(for future use)
To select the previous or next item in a list or on-screen menu
To move to the left and right through on-screen menus, lists or items
To confirm a selectionTo display the on-screen channel list
To display information about the current programme (while you are watching TV) or the selected programme (if you are viewing the TV Schedule)
To change channel up or downTo display the next or previous page of a list
To change the volume up or downTo increase or decrease the visible time period covered by the TV Schedule, when it appears on your TV screen
7YOUR REMOTE CONTROL

10
RECORDING AND PLAYBACK FUNCTIONS
To return to the previous selection or screen (without saving any changes)
To display the on-screen channel list
To display the Recording library
To record a 30-minute clip of the channel you are currently watchingTo set a bookmark during playback of a recording
To record the programme you are currently watchingTo record the highlighted programme in the Now & Next banner or TV Schedule
To play back at normal speed from the current position
To start a live pause recording (see page 19)To pause playback, or resume playback if paused
To fast-forward (play forwards) at high speed
To rewind (play in reverse) at high speed
To skip forwards to the next bookmark
To skip backwards to the previous bookmark (or to the start of the recording if there is no previous bookmark)
To stop playback of a recording, or to exit from a live pause recording (see page 19)To cancel an existing “One-Touch”, “Clip” or scheduled recording
To show more information about the current recording
To resume forward playback at normal speed if pausedTo reset the playback speed to normal, then resume forward playback from the current position
To speed up or slow down playback (including live pause recordings), forwards and backwards, at multiple speeds
7 YOUR REMOTE CONTROL

11
Switching on and off
Whenever you are not using your TV Recorder you should put it into standby. You should not unplug it at the mains.
To take your TV Recorder out of standby, press the Standby (S) button.
To put your TV Recorder into standby, press the Standby (S) button.
Changing channel
You can change channel by:
• using the number buttons to select a channel number;
• using the Ch + and Ch – buttons;
• pressing the List button, then the buttons to go through the
current list *, then OK to change;
• selecting a channel from the TV Schedule.
When you change channel, an information banner appears at the bottom of the screen, which displays the channel number, channel name and current list* name.
Adjusting the volume
Use the Vol + and Vol – buttons to adjust the volume. Use the Mute (c) button to switch the sound off temporarily. A (c) symbol appears on the screen. Press the Mute (c) button again to switch the sound on again.
Using Favourites lists
You use Favourites lists to allow you to access your favourite channels quickly. (See page 25 to find out how to create your Favourites lists.)
While you are watching TV, you use the buttons to change the current list.
The name of the list displays in the information banner. You then use the
buttons to change channel up and down that list.
When you first use your TV Recorder there is only one list available: All channels. Once you have created some Favourites lists, these will become available.
Displaying the on-screen list
You can display the current list on your TV screen by pressing the List button. Use the buttons to go to the previous/next channel in the list, or the Ch + and Ch – buttons to go to the previous/next page. You can also use the buttons to display a different list.
Press the OK button to change to the selected channel.
Digital recording and playback
You can record digital TV programmes (see page 15). You can also pause live TV (see page 19), fast-forward/rewind recordings at high speed, and play back in slow motion (see page 20 for detailed information about playing back recordings).
* What are lists?
Your TV Recorder uses “lists” as a way of organising the channels. These are simply lists of channels. When you first use your TV Recorder, only one list is available: the All channels list.
However, you can also create Favourites lists, for example to group
together the channels you like to watch most often.
You use the buttons to change from one list to the next and the buttons to go to the previous/next channel in the list. For more information about lists, see above and page 25.
8DAILY USE

12
TV2/VCR SCART output
If you want to view the current output from the TV2/VCR SCART, on a TV connected to the TV SCART, press the TV1/TV2 (P) button.
Note: You cannot view the output as described above, when your TV Recorder is archiving (copying) a recording to your VCR (see page 23).
The picture on your TV screen will change to show what is currently being output from the TV2/VCR SCART of your TV Recorder.
Note: You cannot view interactive services or digital text on the output from the TV2/VCR SCART.
The picture appears in a small window, together with an information banner at the bottom of the screen, which displays the channel number, channel name and current list name.
While you are viewing this screen, you can affect the output from the TV2/VCR SCART as follows:
• display the on-screen list, by pressing the List button. Use the
buttons to go to the previous/next channel in the list. You can also use the buttons to display a different list. Press the OK button to change to the selected channel.
• change channel by pressing the Ch + and Ch – buttons.
• display information about the current channel by pressing the Info button (see Now & Next Programme Information on page 13).
To return to viewing the current output from the TV SCART, press the TV1/TV2 (P) button again.
Note: You can, if you wish, change the channel that is output from the TV2/VCR SCART without first using the TV1/TV2 (P) button. To do this, use the TV2 Ch + and TV2 Ch – buttons on your remote control.
8 DAILY USE

13
The Electronic Programme Guide (EPG) provides you with current programme and channel information and an on-screen TV Schedule.
This information is available only if provided by the broadcaster.
9ELECTRONIC PROGRAMME GUIDE
Press the Info button to display information on the current channel. The Now & Next banner appears, displaying the following information:
• the name of the channel;
• the current time and date;
• the name of the programme;
• the time the current programme begins and ends;
• a bar which fills in as the programme progresses;
• the name and the start and finish times of the programme showing next;
• information about the programme’s content. If the description is longer than the space allows, use the buttons to display all the information.
Use the buttons to switch between the current (now) and next programme.
You can also use the Ch + and Ch – buttons to change channel.
If you want to record the current or next programme to disk, press the Record (M) button when the programme’s full details are visible in the Now & Next information banner.
A red line appears in the progress bar, to indicate that the programme is scheduled for recording.
The new recording is also added to the Event list (see page 17).
To cancel an existing scheduled recording, press the Stop (L) button when the programme’s full details are visible in the Now & Next information banner.
To remove the Now & Next banner from the screen, press the Exit button or press the Info button again.
For more information about recording digital TV programmes, see page 15.
‘NOW & NEXT’PROGRAMME INFORMATION
14
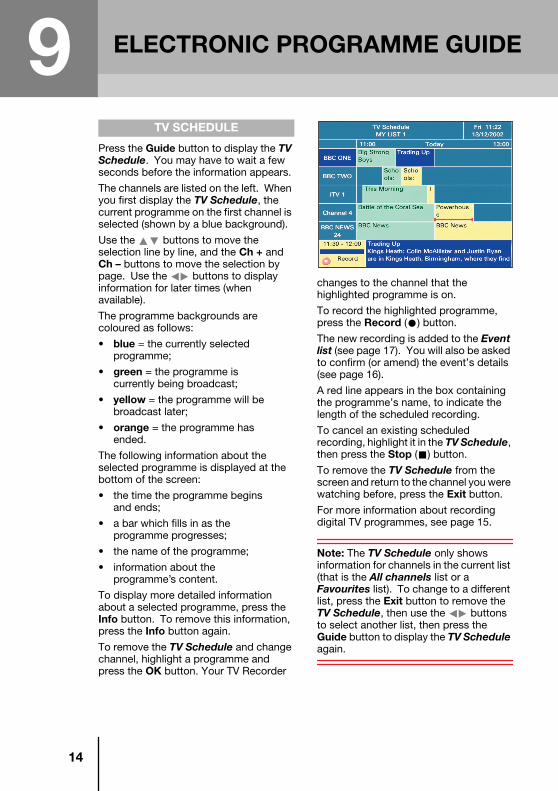
Press the Guide button to display the TV Schedule. You may have to wait a few seconds before the information appears.
The channels are listed on the left. When you first display the TV Schedule, the current programme on the first channel is selected (shown by a blue background).
Use the buttons to move the selection line by line, and the Ch + and Ch – buttons to move the selection by page. Use the buttons to display information for later times (when available).
The programme backgrounds are coloured as follows:
• blue = the currently selected programme;
• green = the programme is currently being broadcast;
• yellow = the programme will be broadcast later;
• orange = the programme has ended.
The following information about the selected programme is displayed at the bottom of the screen:
• the time the programme begins and ends;
• a bar which fills in as the programme progresses;
• the name of the programme;
• information about the programme’s content.
To display more detailed information about a selected programme, press the Info button. To remove this information, press the Info button again.
To remove the TV Schedule and change channel, highlight a programme and press the OK button. Your TV Recorder
changes to the channel that the highlighted programme is on.
To record the highlighted programme, press the Record (M) button.
The new recording is added to the Event list (see page 17). You will also be asked to confirm (or amend) the event’s details (see page 16).
A red line appears in the box containing the programme’s name, to indicate the length of the scheduled recording.
To cancel an existing scheduled recording, highlight it in the TV Schedule, then press the Stop (L) button.
To remove the TV Schedule from the screen and return to the channel you were watching before, press the Exit button.
For more information about recording digital TV programmes, see page 15.
Note: The TV Schedule only shows information for channels in the current list (that is the All channels list or a Favourites list). To change to a different list, press the Exit button to remove the TV Schedule, then use the buttons to select another list, then press the Guide button to display the TV Schedule again.
TV SCHEDULE
9 ELECTRONIC PROGRAMME GUIDE

15
If you want to immediately start recording the programme you are currently watching, simply press the Record (M) button once; the remainder of the programme will be recorded to disk.
If you also want to record the next programme on the current channel, press the Record (M) button a second time. You can repeat this action to schedule subsequent programmes for recording, provided that the relevant programme information is available.
The new recording(s) are added to the Event list (see page 17).
To cancel a “One-Touch” recording, press the Stop (L) button on your remote control.
To immediately start recording a 30-minute clip of the programme you are currently watching, press the Clip button once; the clip will be recorded to disk.
If you want to extend the clip by another 30 minutes, press the Clip button again, and so on.
The new recording is added to the Event list (see page 17).
To cancel a “Clip” recording, press the Stop (L) button on your remote control.
To display the Now & Next banner while you are watching live TV, press the Info button.
Use the buttons to switch between the current (now) and next programme. You can also use the Ch + and Ch – buttons to change channel.
If you want to record the current or next programme to disk, press the Record (M) button when the programme’s full details
are visible in the Now & Next information banner.
A red line appears in the progress bar, to indicate that the programme is scheduled for recording.
The new recording is also added to the Event list (see page 17).
To cancel an existing scheduled recording, press the Stop (L) button when the programme’s full details are visible in the Now & Next information banner.
To remove the Now & Next banner from the screen, press the Exit button or press the Info button again.
For more information about the Now & Next banner, see page 13.
To display the TV Schedule while you are watching live TV, press the Guide button. You may have to wait a few seconds before the information appears.
To record a highlighted programme, press the Record (M) button.
The new recording is added to the Event list (see page 17). You will also be asked to confirm (or edit, if you wish) the event’s details (see page 16).
A red bar appears in the box containing the programme’s name, to indicate that the programme is scheduled for recording.
To cancel an existing scheduled recording, highlight it in the TV Schedule, then press the Stop (L) button.
To remove the TV Schedule from the screen and return to the channel you were watching before, press the Exit button.
For more information about the TV Schedule, see page 14.
“ONE-TOUCH” RECORDING
“CLIP” RECORDING
“NOW & NEXT” RECORDING
RECORDING FROM THETV SCHEDULE
10RECORDING DIGITAL TV

16
When you choose to record a programme from the TV Schedule (see page 15), the Event confirmation window appears.
You can use this window to confirm or amend details of the event.
To confirm the existing event details, or any changes you make, press the OK button. To cancel any changes you make, press the Return button.
If you want to amend the event’s details, you use the buttons to highlight the item you want to change:
• to change the channel to be recorded, use the buttons.
• to change the name of the event, or the event information at the bottom of the window, use the number buttons on your remote control.
Note: You enter letters (shown underneath the buttons) by pressing a button until the letter you want appears on the screen. To delete letters, press the
button.
• to change the “target” where the event is to be recorded, use the
buttons. You can choose ‘TV SCART’, ‘VCR SCART’ or ‘Hard Disk’ as the target.
Note: You cannot record more than one event at the same time on your TV Recorder’s hard disk. See Conflicting Events on page 18.
• to change the start, duration and end times, and the date of the event, use the number buttons on your remote control. You can also use the buttons to move from one digit to another if you wish.
Note: When you change a time entry, your TV Recorder will automatically display the changed duration or end time as appropriate. If the end time you set is earlier than the start time, the event will end on the following day.
• to change how often an event repeats, use the buttons.You can choose ‘Once’, ‘Daily’, ‘Weekly’, ‘Weekdays’ or ‘Monthly’.
Just before an event is due to begin on the TV SCART, an associated message will appear on your TV screen. If your TV Recorder is in standby when any event is due to begin, it will turn on automatically.
When your TV Recorder schedules a “One-Touch” or “Clip” recording of a programme, an on-screen message to this effect will appear for a short period.
EVENT CONFIRMATION
ON-SCREEN MESSAGE
10 RECORDING DIGITAL TV

17
This is a list of scheduled events in time/date order. To display the Event list, press the Events (N) button on your remote control. (You can also use the Main menu to display the Event list – see page 24.)
For each event in the list, the following information appears:
• the event date, start/end times and duration;
• the channel name and programme title;
• the “target” for the event (‘TV’, ‘VCR’ or ‘HD’);
• a red dot to denote a currently-active event.
Note: Events that have completed or have been stopped are automatically deleted from the list.
Use the buttons to move the selection line by line. The current selection is shown with a blue background.
Use the buttons to switch between all events and those scheduled only for the TV SCART, TV2/VCR SCART or Hard Disk.
To remove the Event list from the screen and return to the channel you were watching before, press the Return button.
Editing events
To view details of, or edit, a highlighted event (except a current event), press the OK button. The Event confirmation window appears.
If you want to edit the event’s details, see page 16.
Deleting events
To delete a highlighted event, first press the Red button. Then press the Red button again to confirm the deletion, or press Return to cancel.
Listing repeating events
If you want to show every instance of events that repeat, press the Green button. To hide all future repeat events, press the Green button again.
If you want to add a new event to the list, press the Record (M) button. The Event confirmation window appears.
Some initial details are already filled in, but you can change these, and all other details of the new event, as described on page 16.
When you have made all the changes you want to make, press the OK button, or, if you decide to cancel the new event, press the Return button.
EVENT LIST
ADDING NEW EVENTS
10RECORDING DIGITAL TV

18
Whenever you add a new event, for example by using the Record (M) button, or by editing an event’s details in the Event confirmation window, your TV Recorder checks for conflicts with existing events. There may also be other occasions when a conflict can occur.
Some examples of conflicts are:
• when the start/end times of a new event would overlap an existing event on the same channel and “target” (‘TV SCART’, ‘TV2/VCR SCART’ or ‘Hard Disk’);
• when you attempt to record more than one event to disk at the same time;
• when you attempt to record events to more than two out of the three possible “targets” (‘TV SCART’, ‘TV2/VCR SCART’ or ‘Hard Disk’) at the same time;
• when you attempt to pause live TV while recording an event to disk. For more information about pausing live TV, see page 19.
If a conflict does occur when you add a new event, a message, similar to the one shown below, will appear on your TV screen.
When a recording to disk (except a live pause recording) is in progress, the TV2/VCR SCART output shows the same event. This means that you cannot change the channel that is output from the TV2/VCR SCART for the duration of the event.
When you add a new event to be recorded to disk, your TV Recorder will estimate if there is enough disk space remaining for the whole of the event.
If there is not enough space, a warning to this effect will appear on your TV screen.
Also, when a recording to disk is in progress, a warning will appear 10 minutes before no more space is left.
If all the space on the disk is used up, your TV recorder will stop recording.
You must therefore delete previous recordings to make room for new ones. See the Recording library on page 20.
CONFLICTING EVENTS TV2/VCR SCART OUTPUT
DISK SPACE WARNING
10 RECORDING DIGITAL TV

19
When you are watching a programme on a TV connected to the TV SCART (providing that a recording to disk is not already in progress) you can pause the programme.
To pause live TV, press the Pause (K) button on your remote control. The picture and sound will be “frozen” at that point, and your TV Recorder will immediately begin recording the programme to disk.
An on-screen symbol will also appear, showing the amount of time, in minutes and seconds, that the current picture is lagging behind the live TV programme.
Note: You cannot record interactive services using this feature.
At the same time as the recording is taking place, you can use the Play (B), Pause (K), Fast forward (F) and Rewind (G) buttons etc. on your remote control to view the already-recorded part. For full details of the buttons you can use when playing back recordings, see page 21.
If you rewind to the earliest available point, or fast-forward to very near the same point as live TV, normal playback speed will be resumed.
The available recording time (disk space) using this feature is limited to a pre-set period (you can change this using the menus). While you are playing back the recording, the programme will continue to be recorded, but over the top of the earliest part of the recording.
If all the space becomes used up while playback is paused, a warning will appear on-screen and recording will cease. However, you will still be able to view the recording using the buttons on your remote control, as described earlier.
Certain buttons on your remote control cannot be used while the live pause feature is active, and if you press any of these, an associated warning message will appear on your TV screen.
Note: If you press Exit, Return or the Standby (S) button, your TV Recorder will exit from live pause without warning,
To exit live pause and return to watching the live TV programme, first press the Stop (L) button on your remote control. Then press the Red button to confirm this action, or press Return to cancel.
Note: When you exit live pause, all of the recording is lost.
DISK SPACE LIMIT
REMOTE CONTROL RESTRICTIONS
EXITING LIVE PAUSE
11PAUSING LIVE TV

20
This is a list of existing recordings in time/date order. To display the Recording library, press the Library button on your remote control. (You can also use the Main menu to display the Recording library – see page 24.)
Note: Recordings that are currently in progress are shown here, in addition to their entry in the Event list (see page 17).
For each recording in the list, the following information appears:
• the date and start time that the recording was made;
• the duration of the recording;
• the programme title and channel name;
• a red dot to denote a recording that is currently in progress.
To the right of the list, you will see more information about the highlighted recording. Use the buttons to move the selection line by line.
To remove the Recording library from the screen and return to the channel you were watching before, press the Return button.
Playing back a recording
To play back the highlighted recording, press the OK button. For full details of the buttons you can use when playing back recordings, see page 21.
Editing recording information
To edit the title and/or the descriptive text associated with the highlighted recording, press the Green button. The Event confirmation window appears, as described on page 16, but with the above editing options only.
Deleting recordings
To delete a highlighted recording, or all tagged recordings, first press the Red button. Then press the Red button again to confirm the deletion, or press Return to cancel.
Tagging recordings
To tag a highlighted recording, press the Blue button. A tick in a circle will appear, to show that the recording will be included in those that you may want to delete all at once, or copy to your VCR.
To untag a highlighted recording, press the Blue button again.
Copying recordings to your VCR
To archive (copy) a highlighted recording, or all tagged recordings, to your VCR, press the Yellow button. For more information about copying recordings to your VCR, see page 23.
Displaying recording information
To show more detailed information about a highlighted recording, press the Info button. See Recording Information on page 22.
RECORDING LIBRARY
12 PLAYING BACK RECORDINGS
21
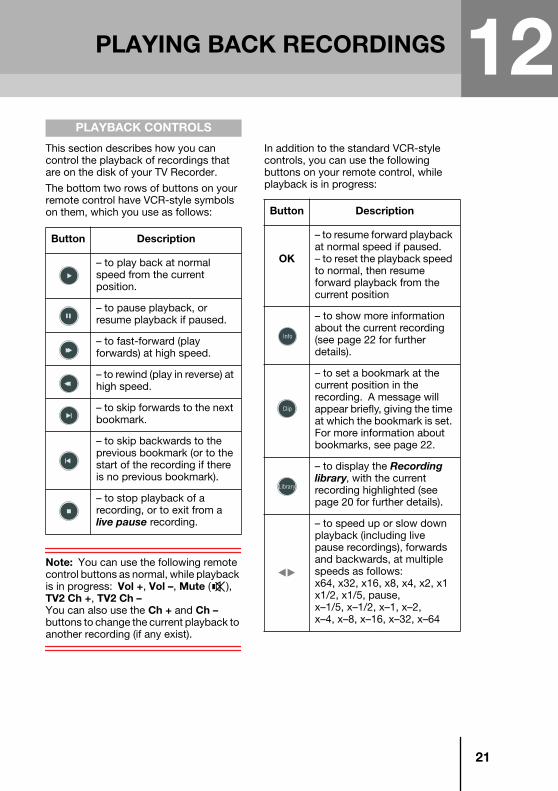
This section describes how you can control the playback of recordings that are on the disk of your TV Recorder.
The bottom two rows of buttons on your remote control have VCR-style symbols on them, which you use as follows:
Note: You can use the following remote control buttons as normal, while playback is in progress: Vol +, Vol –, Mute (c), TV2 Ch +, TV2 Ch –You can also use the Ch + and Ch – buttons to change the current playback to another recording (if any exist).
In addition to the standard VCR-style controls, you can use the following buttons on your remote control, while playback is in progress:
PLAYBACK CONTROLS
Button Description
– to play back at normal speed from the current position.
– to pause playback, or resume playback if paused.
– to fast-forward (play forwards) at high speed.
– to rewind (play in reverse) at high speed.
– to skip forwards to the next bookmark.
– to skip backwards to the previous bookmark (or to the start of the recording if there is no previous bookmark).
– to stop playback of a recording, or to exit from a live pause recording.
Button Description
OK
– to resume forward playback at normal speed if paused.– to reset the playback speed to normal, then resume forward playback from the current position
– to show more information about the current recording (see page 22 for further details).
– to set a bookmark at the current position in the recording. A message will appear briefly, giving the time at which the bookmark is set. For more information about bookmarks, see page 22.
– to display the Recording library, with the current recording highlighted (see page 20 for further details).
– to speed up or slow down playback (including live pause recordings), forwards and backwards, at multiple speeds as follows:x64, x32, x16, x8, x4, x2, x1x1/2, x1/5, pause,x–1/5, x–1/2, x–1, x–2,x–4, x–8, x–16, x–32, x–64
12PLAYING BACK RECORDINGS

22
Whenever you are playing back a recording (including a live pause recording), you can view more information about it.
To show the Recording information banner, press the Info button.
This banner displays the title of the recording, a progress bar with bookmark positions (if any exist) and the descriptive text associated with the recording. Also shown is the channel name and start time.
To view even more detailed information about the recording, press the Blue button. The following screen appears:
This screen displays additional recording information, such as:
• a list of bookmarks (if any exist);
• the channel name;
• the date, start/end times and duration of the recording.
To edit the title and/or the descriptive text associated with the recording, press the Red button. A window similar to Event confirmation appears (see page 16) but with the above editing options only.
To hide the Recording information banner or screen, press Return.
These are exact points, at the times you choose within a recording, which you can go to quickly when you play it back.
Setting and renaming bookmarks
To set a bookmark during playback, and whenever the Recording information banner is visible, press the Clip button.
If the Recording information banner is not visible, a message will appear briefly, giving the time at which the bookmark is set.
If the Recording information banner is visible, a new bookmark will appear on the progress bar at the position you set.
To rename a highlighted bookmark, first press the Yellow button.
Deleting bookmarks
When the detailed Recording information screen is visible, you use the
and buttons to highlight the previous/next bookmark (if any exist) on the progress bar. To delete a highlighted bookmark, press the Green button.
RECORDING INFORMATION
BOOKMARKS
12 PLAYING BACK RECORDINGS

23
This feature enables you to archive (copy) recordings, shown in the Recording library, from the disk to your VCR, via the TV2/VCR SCART connection.
To display the Recording library, press the Library button on your remote control. (You can also use the Main menu to display the Recording library – see page 24.)
Use the buttons to move the selection line by line.
To tag a highlighted recording, press the Blue button.
Your TV Recorder will display the total length (in hours and minutes) of video tape required for the recording.
To copy a highlighted recording, or all tagged recordings, to your VCR, press the Yellow button.
Recordings are copied at normal speed so, if a recording is two hours long, it will take two hours to copy it to your VCR.
You must ensure that your VCR is turned on and ready to record.
To confirm that you want to start the copying process, press the Red button or, to cancel, press the Return button.
Note: If the copying process would cause a conflict with existing scheduled events that use the disk or TV2/VCR SCART, a warning will appear on your TV screen. Also see Conflicting Events on page 18.
While copying a recording to your VCR is in progress, you cannot view the Recording library. An Archive Information screen will appear on your TV screen if you try to display the Recording library.
Note: You cannot pause live TV or use the “One Touch”, “Clip” or “Now & Next” disk recording functions while existing recordings are being copied to your VCR.
To find out if the copying process has ended, press the Library button on your remote control to display the Archive Information screen. The message (Complete) will appear to the right of all archived recordings.
COPYING RECORDINGSTO YOUR VCR
13ARCHIVING RECORDINGS

24
You access some of your TV Recorder’s features, particularly those which you use only occasionally, via the Main menu.
To display the Main menu, press the Menu button. Many other sub-menus and screens are available from the Main menu.
The menus are very easy to use. When the Main menu first displays, the first item in the list is highlighted. You use the
buttons to move the highlight up or down, and the buttons to move it left or right.
You use the OK button to make/confirm a selection or display the next menu/screen and you use the Return button to return to the previous menu/screen without saving any changes.
You use the Exit button to remove the menu and redisplay the TV picture.
The following sections describe all the available menus in more detail.
To display the Event list, highlight Events then press the button. This has the same effect as pressing the Events (N) button on your remote control (see page 17.)
To display the Recording library, highlight Recording library then press the button. This has the same effect as pressing the Library button on your remote control (see page 20.)
USING THE MAIN MENU EVENTS AND RECORDINGS
14 MAIN MENU

25
After your TV Recorder has scanned for channels, all the channels it has found are stored in the All channels list. (For more information about the All channels list, see page 27).
However, to make it quicker and simpler for you to find the channels you want to watch, you can organise the channels into lists of your favourite channels, known as Favourites lists. You can create up to 8 Favourites lists.
For example, each person in your household could have their own named Favourites list.
Press the Menu button to display the Main menu.
Highlight Your TV lists then press the button to display the Your TV lists menu.
Highlight and select one of the eight lists displayed on the screen. These lists are initially called List 1, List 2, ..., List 8.
The selected list screen is then displayed, as shown in the diagram below. At first, there will just be a list of numbers as no channels will have been selected.
Note: The same channel may appear in several lists.
ABOUT FAVOURITES LISTS
CREATING FAVOURITES LISTS
15FAVOURITES LISTS

26
Changing the list name
To change the name of the list, press the Blue button. The Rename list screen appears.
Note: You enter letters (shown underneath the buttons) by pressing a button until the letter you want appears on the screen. To delete letters, press the
button.
When you have finished entering the name, press the OK button or, to cancel, press the Return button.
Adding channels to the list
To add channels to the list, press the button. Use the buttons to change line and the Ch + and Ch – buttons to display the next or previous page of the list.
To select a channel to add to your Favourites list, highlight it then press the OK button. A cross (X) appears next to the name of the channel. To undo the selection, press the OK button again. You can select as many channels as you want.
To save your channels and return to the List screen, press the Blue button.
Changing the channel order
There are two different ways you can change the order of the channels in the list.
1. To move a channel up or down the list, use the buttons to highlight the channel, then press the Green button. Use the buttons to move the channel, then press the Green button again to place the channel in its new position.
2. To swap the position of two channels, highlight one of the channels then press the Yellow button. Enter the number of the channel that you want to swap it with, then press the OK button.
Removing channels from the list
To remove a channel from the list, highlight the channel then press the Red button. A red line appears through the channel’s name.
To remove the red line and keep the channel in the list, highlight the channel then press the Red button again.
Saving the changes
Once you have made all the changes you want to make to a Favourites list, press the OK button to save the changes. The Your TV lists menu redisplays. You can then continue creating and editing up to 8 Favourites lists.
15 FAVOURITES LISTS

27
The All channels list contains all the channels that are stored by your TV Recorder. This is the list that you choose from when you create your Favourites lists.
To edit the All channels list, press the Menu button, then select Channel list, then select Edit channel list.
Use the buttons to change line and the Ch + and Ch – buttons to display the previous or next page of the list.
Locking and unlocking channels
To lock or unlock a channel, highlight the channel then press the Yellow button. Locked channels have a padlock symbol to the right of the channel name.
If you then activate the Parental lock (see page 28) you cannot watch any of the locked channels, without entering the Parental code. For more information about Parental lock, see page 28.
Saving the changes
Once you have made all the changes you want to make to the All channels list, press the OK button to save the changes. The Channel list menu redisplays.
ABOUT THEALL CHANNELS LIST
EDITING THEALL CHANNELS LIST
16ALL CHANNELS LIST

28
You can use the Parental lock to prevent people who do not know the Parental code from watching channels you have locked and from using your TV Recorder’s menus.
The pre-set Parental code is 1234, but we recommend that you change it (see right) if you want to use the Parental lock.
To activate Parental lock, press the Menu button to display the Main menu, then select Parental lock. The message “Enter code to activate parental lock” displays, with a space for the Parental code. Use the number buttons to enter the Parental code, then press the OK button. The TV picture redisplays.
Now, anybody who does not know the Parental code cannot watch any channels that you have marked as locked in the All channels list (see page 27). Also, the menus are locked, so you will need to enter the Parental code to use the menus.
If you change to a locked channel, the message “Parental lock” will appear instead of the TV picture. If you want to watch the channel, press the OK button, then enter your Parental Code, then press the OK button. Or, you can just de-activate the Parental lock (see right).
* Calls to the Helpdesk may be monitored or recorded for training purposes.
To de-activate Parental lock, press the Menu button, then enter the Parental code to display the Main menu. Select Parental unlock from the menu, then press the Red button to confirm. The Main menu redisplays. To redisplay the TV picture, press the Exit button.
You can change the pre-set Parental code to a different number (up to 6 digits). To change the code, display the Main menu, then select Configuration. From the Configuration menu, select Preference, then Change Parental code. Enter the current code in the Old code space, then using the buttons to move between each line, enter your new code in the New code and Confirm new code spaces.
Press OK, then the Red button to save and confirm your new Parental code. The Preference menu redisplays. To redisplay the TV picture, press the Exit button.
Important: Do not forget the Parental code, as you will not be able to watch locked channels, or use the Main menu. If you should forget it, contact the Technical Helpdesk* on 0870 120 0986 (national call rate) or e-mail [email protected]
You use the Edit channel list screen, available from the Channel list menu to lock channels. See page 27 for more information.
ACTIVATING PARENTAL LOCK
WATCHING LOCKED CHANNELS
DE-ACTIVATINGPARENTAL LOCK
CHANGING THEPARENTAL CODE
LOCKING CHANNELS
17 PARENTAL LOCK
29
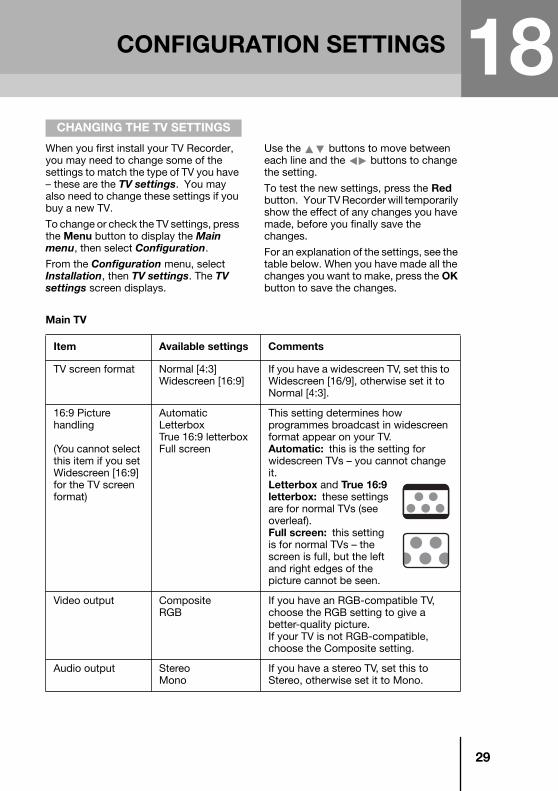
When you first install your TV Recorder, you may need to change some of the settings to match the type of TV you have – these are the TV settings. You may also need to change these settings if you buy a new TV.
To change or check the TV settings, press the Menu button to display the Main menu, then select Configuration.
From the Configuration menu, select Installation, then TV settings. The TV settings screen displays.
Use the buttons to move between each line and the buttons to change the setting.
To test the new settings, press the Red button. Your TV Recorder will temporarily show the effect of any changes you have made, before you finally save the changes.
For an explanation of the settings, see the table below. When you have made all the changes you want to make, press the OK button to save the changes.
Main TV
CHANGING THE TV SETTINGS
Item Available settings Comments
TV screen format Normal [4:3]Widescreen [16:9]
If you have a widescreen TV, set this to Widescreen [16/9], otherwise set it to Normal [4:3].
16:9 Picture handling
(You cannot select this item if you set Widescreen [16:9] for the TV screen format)
AutomaticLetterboxTrue 16:9 letterboxFull screen
This setting determines how programmes broadcast in widescreen format appear on your TV.Automatic: this is the setting for widescreen TVs – you cannot change it.Letterbox and True 16:9 letterbox: these settings are for normal TVs (see overleaf).Full screen: this setting is for normal TVs – the screen is full, but the left and right edges of the picture cannot be seen.
Video output CompositeRGB
If you have an RGB-compatible TV, choose the RGB setting to give a better-quality picture.If your TV is not RGB-compatible, choose the Composite setting.
Audio output StereoMono
If you have a stereo TV, set this to Stereo, otherwise set it to Mono.
18CONFIGURATION SETTINGS

30
TV2/VCR
‘Letterbox’ and ‘True 16:9 letterbox’ settings
If you choose the Letterbox setting, you will see the picture with horizontal black bars above and below. In addition, you may sometimes see narrow vertical black bars on either side of the picture, and the horizontal black bars may be thinner. This behaviour is determined by the broadcaster, in order to provide the best compromise when certain widescreen programmes are transmitted.
If you choose the True 16:9 letterbox setting, you will always see the whole picture, with horizontal black bars above and below only. This setting overrides the broadcaster’s intended setting.
Item Available settings Comments
TV screen format Normal [4:3]Widescreen [16:9]
If you have a widescreen TV, set this to Widescreen [16/9], otherwise set it to Normal [4:3].
16:9 Picture handling
(You cannot select this item if you set Widescreen [16:9] for the TV screen format)
AutomaticLetterboxTrue 16:9 letterboxFull screen
This setting determines how programmes broadcast in widescreen format appear on your TV.Automatic: this is the setting for widescreen TVs – you cannot change it.Letterbox and True 16:9 letterbox: these settings are for normal TVs (see below).Full screen: this setting is for normal TVs – the screen is full, but the left and right edges of the picture cannot be seen.
Video output CompositeS-Video
If you have an S-Video-compatible TV or VCR, choose the S-Video setting to give a better-quality picture.If your TV or VCR is not S-Video-compatible, choose the Composite setting.
Audio output StereoMono
If you have a stereo TV or VCR, set this to Stereo, otherwise set it to Mono.
18 CONFIGURATION SETTINGS

31
18CONFIGURATION SETTINGS
This menu allows you to change the following miscellaneous settings:
• Local time;
• Phono audio volume;
• RF modulator channel and source.
To change or check the miscellaneous settings, press the Menu button to display the Main menu, then select Configuration.
From the Configuration menu, select Installation, then Miscellaneous. The Miscellaneous screen displays.
Use the buttons to move between each line and the buttons to change the setting.
For an explanation of the settings, see the table below. When you have made all the changes you want to make, press the OK button to save the changes.
MISCELLANEOUS SETTINGS
Item Available settings Comments
Local time GMT (–12 to +13) There is normally no need to adjust this setting, as it is set automatically when your TV Recorder is first switched on
Phono audio volume
FixedVariable
This setting applies to the left and right audio outputs from the phono connectors on the rear panel of your TV Recorder.If you want the volume to remain at a fixed level, set this to Fixed.If you want the volume to change when you adjust the volume using your remote control, set this to Variable.
RF modulator: Channel
Source
21 ~ 69
Main TVTV2/VCR
This setting determines which RF channel is used for the modulated audio and video output from your TV Recorder (the factory setting is 21).
If you want the audio and video output from the TV SCART to be output on the RF channel set above, set this to Main TV. If you want the output from the TV2/VCR SCART instead, set it to TV2/VCR.

32
Programme language and subtitling
Some programmes may be transmitted in more than one language and/or with subtitles in more than one language. You can select which language is your preferred language when more than one is available.
To change or check the Language choice settings, press the Menu button to display the Main menu and select Configuration.
From the Configuration menu, select Preference, then Language choice. The Language choice screen displays. Use the buttons to move between each line and the buttons to change the setting.
For an explanation of the settings, see the table below. When you have made all the changes you want to make, press the OK button to save the changes.
CHANGING THELANGUAGE SETTINGS
Item Available settings Comments
Audio First languageSecond language
EnglishWelshGaelic
Choose your first choice and second choice for the audio language. If a TV programme is transmitted and neither of your preferred languages is available, the main language of that programme will be used.
SubtitlingFirst languageSecond language
EnglishWelshGaelic
Choose your first choice and second choice for the subtitling language. If a TV programme is transmitted with subtitles but neither of your preferred languages is available, the main language of that programme will be used.
SubtitlingAutomatic display
OnOff
If you select On, subtitles will always display if they are available.If you select Off, subtitles will not display.Note: when Automatic display is switched to Off, you can use the Subtitles (cccc) button on your remote control to switch subtitles on temporarily.
18 CONFIGURATION SETTINGS

33
Menu language
You can change the language that all the on-screen menus and screens display in.
To change the Menu language, press the Menu button to display the Main menu. The Language menu is always at the bottom of the list and is therefore easy to find even if your TV Recorder’s menus are displayed in an unknown language.
Press the button to display the Language menu, then use the buttons to choose a language. Press the OK button to select the language, then wait a few seconds to allow your TV Recorder to display the chosen language.
Your TV Recorder automatically scans for channels when you first set it up, as described on page 7. However, you can scan for channels whenever you want, for example if a new, free digital channel has been launched. You may also need to scan for channels if you move your TV Recorder to a new location, for example if you move house.
To scan for channels, press the Menu button to display the Main menu and select Channel list. From the Channel list menu, select Scan for channels.
The channel scan starts immediately and takes about three minutes. Once the scan is complete, the number of Channels found displays and the word Done displays at the bottom of the screen.
Press the OK button to save all the found channels.
IMPORTANT: If you press the Return button while your TV Recorder is scanning for channels, you will lose all the channels you previously had stored. You will therefore have to start a new scan for channels.
Once your TV Recorder has a new All channels list, you can create your Favourites lists, as described on page 25.
SCANNING FOR CHANNELS
18CONFIGURATION SETTINGS

34
To change or check your TV Recorder’s hard disk settings, press the Menu button to display the Main menu, then select Configuration.
From the Configuration menu, select Disk Settings. The Disk Settings screen displays.
Live pause space
You use this setting to choose the amount of disk space reserved for live pause recordings. Set this to Small, Medium or Large. These settings are equivalent to about 30, 60, or 120 minutes respectively.
Use the buttons to change the setting.
Note: If you decide to change this setting, your TV Recorder’s disk will be erased, and you will lose all your existing recordings.
To confirm that you want to change the setting, press the Red button or, to cancel, press the Return button.
Other functions
• Check – if you want your TV Recorder to check the disk for errors, press the Green button.
• Initialise – if you want your TV Recorder to initialise the disk, press the Red button.
Note: If you choose Initialise, your TV Recorder’s disk will be erased, and you will lose all your existing recordings.
To confirm that you want to initialise the disk, press the Red button or, to cancel, press the Return button.
Hard disk information
The Disk Settings screen also shows the following information about your TV Recorder’s hard disk:
• Disk space in use – this is a horizontal bar, the filled-in part of which shows how much of the total disk space has been used;
• Record time available – an estimate of the current recording time available, in hours and minutes.
When you have made all the changes you want to make, press the OK button to save the changes, or press Return to cancel.
HARD DISK CONFIGURATION
18 CONFIGURATION SETTINGS

35
You may need to refer to the Signal information and Product data screens if you have reason to contact the Technical Helpdesk. The information on these screens may help diagnose any difficulty you are experiencing.
You also use the menus to perform software upgrades to your TV Recorder as these become available (see right).
Signal information
Press the Menu button to display the Main menu, then select Signal information.
The Signal information screen displays technical information about the incoming signal from your TV aerial.
Product data
Press the Menu button to display the Main menu, select Configuration, then select Product data.
The Product data screen displays information about your TV Recorder itself.
Reset
This resets your TV Recorder to its factory settings.
Press the Menu button to display the Main menu, select Configuration, then select Reset.
When you select the Reset item, a screen displays asking you to confirm that you want to perform the reset. If you press the Red button to confirm, after the TV Recorder has reset itself, you will have to choose the Language again, then your TV Recorder will carry out its scan for channels.
Note: All the settings you have changed, for example the Parental code will be reset to the factory setting, and any Favourites lists you have created will be lost.
Before your TV Recorder scans for channels, you will be asked if you wish to keep your current disk settings. Press OK to continue or press the Red button to set up your TV Recorder’s disk and delete all recordings.
If you choose Setup disk, you will now see the Disk Settings screen (see page 34).
To keep you up-to-date with the latest developments in digital television, from time-to-time new features may be made available to your TV Recorder. To take advantage of these new features your TV Recorder must receive a software upgrade. But don’t panic – these upgrades are sent as part of the broadcasts your TV Recorder already receives. Simply follow the on-screen instructions as described on page 36.
Software upgrades will usually be made available for up to a week. Whenever there is a software upgrade available, a message will be sent to your TV Recorder. The message is sent as part of the BBC service, so you will need to be watching a BBC channel in order to receive this message.
TECHNICAL INFORMATION
AUTOMATICSOFTWARE UPGRADE
18CONFIGURATION SETTINGS

36
Receiving the upgrade information
When you change channel to a BBC channel, and an upgrade is available, the following message displays on your TV screen.
We recommend that you start the upgrade immediately.
Note: This may take up to 15 minutes.
If you do not want to upgrade immediately, you can either:
• set your TV Recorder to be upgraded automatically later on (in the middle of the night), or
• cancel the automatic upgrade. If so, we recommend you carry out a “Software upgrade from the Main menu” (see right).
Starting the upgrade immediately
To start the upgrade immediately, press the OK button. Another message displays, explaining more about the upgrade and giving you the choice of starting the upgrade or cancelling. Press the OK button to continue.
As the upgrade is carried out, a progress bar displays. When the upgrade is complete, your TV Recorder will store then start up with its new software.
IMPORTANT You must not switch your TV Recorder off while it is storing new software, regardless of how the upgrade procedure is initiated.
Setting your TV Recorder to be upgraded later on
To set your TV Recorder to be upgraded later on, press the Blue button. The following message displays.
Press the OK button. Your TV Recorder is set to upgrade at 3am.
Note: You should not put your TV Recorder into standby at all until after the upgrade has been carried out, as this will cancel the automatic upgrade.
Cancelling the automatic upgrade
If you select Do not upgrade, or if you cancel the automatic upgrade, we recommend that you carry out a “Software upgrade from the Main menu” (see below) as soon as possible to make sure you have all the latest features.
When there is one available, you can start an upgrade via the Main menu.
Press the Menu button to display the Main menu, select Configuration, then select Software upgrade.
Follow the on-screen instructions. Once the upgrade has started, a progress bar displays. When the upgrade is finished, your TV Recorder will start up with its new software.
SOFTWARE UPGRADEFROM THE MAIN MENU
18 CONFIGURATION SETTINGS

37
If you are experiencing difficulty with your TV Recorder, check the troubleshooting table below – this may provide the answer you are looking for.
If you still have problems after consulting the table, contact the Technical Helpdesk* on 0870 120 0986 (national call rate) or e-mail [email protected]
* Calls to the Helpdesk may be monitored or recorded for training purposes.
Problem Possible cause Suggested remedy
The clock/channel number display is not lit.
Your TV Recorder is not receiving power.
Make sure that the mains lead is properly plugged in and that the mains supply is switched on.Check the plug’s fuse (see page 4)If the display is still not lit, check that the mains wall socket has power (try plugging in a lamp). If it is OK, there may be a problem with your TV Recorder.
Your remote control will not operate your TV Recorder.
(i) Your TV Recorder is still in standby.
(ii) Something is blocking the path between your remote control and your TV Recorder.
(iii) The batteries in your remote control need replacing.
(i) Press the Standby (S) button on your remote control.
(ii) Check that nothing is blocking the path.
(iii) Replace both batteries in your remote control. Please remember that used alkaline batteries must never be thrown into a fire. We recommend disposing of them in an environmentally-friendly way.
When your TV Recorder first tries to find and store the digital channels, you see the message “No channels found” (or some of the publicised channels are missing from the All channels list).
(i) Your aerial is not properly connected to your TV Recorder.
(ii) Your aerial is not pointing in the right direction.
(iii) Your existing aerial may not be suitable for digital channels.
(iv) Digital terrestrial channels are not yet being transmitted in your area.
(i) Make sure that your aerial is properly connected to your TV Recorder.
(ii) Check if you can see the existing analogue channels (this will show that your aerial is pointing in the right direction).
(iii) Ask your retailer for information about what type of aerial you need.
(iv) Check with your retailer or the Technical Helpdesk that digital channels are available in your area. Finally, try scanning for channels again (see page 33).
19TROUBLESHOOTING

38
You cannot see digital channels any more after you have moved your TV Recorder to a different house.
The aerial at the new location may be receiving from a different transmitter.
Scan for channels again, as described on page 33.It could be that the aerial at your new house is not adequate to receive digital TV.
You see the on-screen message:“No channel (number)”.
You have selected a channel number button which currently has no channel associated with it.
In the future, this channel number may be used for a channel. In the meantime, select a different channel.
Subtitles do not appear although you have set them On in the Language settings menu.
Subtitles may not be transmitted with the programme.
The volume on digital terrestrial channels does not match the volume on the existing analogue channels (or your VCR).
The volume of your TV Recorder needs adjusting.
Use the Vol + and Vol – buttons on your remote control to adjust the volume.
The picture or a menu/screen appears to be either:(i) “squashed” (from side to side or from top to bottom); or(ii) cut off at the top and bottom of the screen.
The “TV screen format” setting in the TV settings menu has not been set to correspond with your TV.
Display the TV settings menu (see page 29). If you have a widescreen TV, set Widescreen [16:9] otherwise set Normal [4:3].Note: If you have a widescreen TV, its remote control may have a “zoom” button which alters the way that the picture appears on the screen, so you may also need to use this button.
Problem Possible cause Suggested remedy
19 TROUBLESHOOTING

39
The picture sometimes breaks up into “blocks”.
(i) If you have other devices connected to your TV aerial, there may not be enough signal strength for the set-up.
(ii) Objects such as trees, houses or passing traffic may be affecting the signal quality.(iii) Faulty connectors or leads may be affecting the signal quality.(iv) If the break-up is temporary but often, there may be interference caused by other electrical items in your home.
(i) Try connecting your aerial directly to your TV recorder. If this stops the picture breaking up then there is not enough signal strength to use additional devices. Consider improving your aerial or getting a booster amplifier – consult your retailer.(ii) You may need to improve your aerial installation – consult a professional installation engineer.
(iii) Try new connectors/leads.
(iv) Consult a qualified electrician.
Pressing tv/dtv does not switch between digital TV and an analogue channel.
Some makes of TV may not recognise this feature.
Problem Possible cause Suggested remedy
19TROUBLESHOOTING

40
Due to continued improvement, this specification may change without notice.
Operating voltage. . . . . . . . . . . 115 – 230V AC; 50/60Hz
Power consumption . . . . . . . . . 36W (maximum)
Weight . . . . . . . . . . . . . . . . . . . 3kg (packed, including accessories)
Dimensions (W x H x D) . . . . . . 355mm x 65mm x 270mm
Operating temperature range. . 0°C to +40°C
Storage temperature range . . . –6°C to +50°C
UHF Channel . . . . . . . . . . . . . . Channel 21-69, –75 to –20dBm
Bandwidth 8MHz
DVB compatible . . . . . . . . . . . . ETS 300 744
Decoding . . . . . . . . . . . . . . . . . MPEG2 compatible (DVB/Main Profile @ Main Level)
Video . . . . . . . . . . . . . . . . . . . . 1.5 – 15Mb/s (720 x 576)
Audio . . . . . . . . . . . . . . . . . . . . MPEG2 – Musicam (layer 1 & 2)
(32, 44.1, 48kHz)
GENERAL
UHF SIGNAL
DIGITAL SPECIFICATIONS
20 TECHNICAL SPECIFICATION

41
Mains input . . . . . . . . . . . . . . . IEC 320 2-pin
Aerial in . . . . . . . . . . . . . . . . . . IEC 169-2 female
RF out . . . . . . . . . . . . . . . . . . . IEC 165-2 male
TV SCART . . . . . . . . . . . . . . . . SCART (composite video in/out, RGB in/out)
TV2/VCR SCART . . . . . . . . . . . SCART (composite video in/out, S-Video out)
S-video out. . . . . . . . . . . . . . . . 4-way mini-DIN (based on TV SCART output)
Composite video out . . . . . . . . Phono socket
Audio out (left and right). . . . . . Phono sockets
Optical audio out . . . . . . . . . . . Optical digital-audio socket
RS-232 . . . . . . . . . . . . . . . . . . . DB-9 male, data communications equipment (DCE)
EIA/TIA-232-E ITU-TV.28 115.2kbit/s (max.)
Note: The RS-232 port is for service use only. Do not plug anything into this connector.
SCART lead (1.5 m); RF lead; UK mains lead
Remote control; 2 ‘AAA’ batteries; User Guide
REAR-PANEL CONNECTIONS
ACCESSORIES
This product complies with the following European Council Directives:
– 73/23/EEC (the Low Voltage Directive) as amended;
– 89/336/EEC (the EMC Directive) as amended.
20TECHNICAL SPECIFICATION
42
The Product (meaning the equipment or appliance to which this documentation relates) incorporates Software (the software applications, utilities and modules embedded within the Product) which is owned by Pace Micro Technology plc (‘Pace’) or its licensors. Before using the Product, please read the End-User Licence Conditions detailed below. If you do not agree to the terms and conditions of the End-User Licence, please do not proceed to use the Product – repack the Product unused and return it to your supplier who will refund the amount you paid for it to you.
Licence Grant, Conditions and Restrictions
1. Pace grants you a non-exclusive, world-wide (subject to export controls), non-transferable (except as permitted by 2 below), royalty-free licence to use the Software upon and with the Product.
2. You may not transfer any of your licence rights in the Software without the prior written consent of Pace, and if consent is provided then the Software shall only be transferred in conjunction with the transfer of the Product AND provided that the transferee has read and agreed to accept the terms and conditions of this licence.
3. You must ensure that the copyright, trademark and other protective notices contained in the Software are maintained and not altered or removed.
4. The Software provided hereunder is copyrighted and licensed (not sold). Pace especially does not transfer title or any ownership rights in the Software to you. The Software provided hereunder may contain or be derived from portions of materials provided to Pace under licence by a third party supplier.
5. Except as expressly permitted by statute you may not:
• use the Software in conjunction with any other computer hardware other than the Product;
• copy all or part of the Software;
• incorporate all (or any of) the Software into other programs developed by (or on behalf of) you and/or used by you;
• reverse-engineer, decompile or disassemble the Software;
• make the Software (or any part of it) available, or permit its redistribution, for use with any computer hardware other than the Product; or rent, lease, gift, loan, sell, distribute or transfer possession of the whole or any part of the Software.
6. You are not authorised to use your Pace Digital TV Recorder in a way which infringes the intellectual property rights of third parties. Copying programmes is unlawful under the Copyright, Designs and Patents Act 1988, except in a limited number of circumstances such as for the purpose of showing in schools (section 35) and timeshifting for private and domestic use (section 70).
Termination
This licence is effective until terminated. This licence will terminate automatically without notice if you fail to comply with any of its provisions.
END-USER LICENCE FOR PACE DIGITAL TV RECORDER
21 END-USER LICENCE

43
Disclaimer
1. The Software is (to the extent permitted by law) supplied ‘as is’ and Pace and its suppliers expressly exclude all warranties, express or implied, including (but not limited to) warranties of satisfactory quality, fitness for purpose and non-infringement (save to the extent that the same are not capable of exclusion at law).
2. In no circumstances will Pace be liable for any direct, indirect, consequential, or incidental damage (including loss of profits, business interruption, loss of data or the cost of procurement of substitute goods, technology or services) arising out of the use or the inability to use the Software (save to the extent that such liability is not capable of exclusion at law).
General
1. This End-User Licence will be governed by the laws of England and the User may only bring claims in the English Courts and Pace shall be entitled to bring a claim in the courts of any jurisdiction.
2. The above terms and conditions supersede any prior agreement, oral or written, between you and Pace relating to the Software.
21END-USER LICENCE

44
Description
Wireless audio/video senders use a radio frequency of 2.4 GHz to distribute audio and video signals around the house, eliminating the need to use long cables between rooms. This transmission method is completely legal in the UK, when you use approved equipment.
Some audio/video senders come with adaptors that plug into the SCART sockets of your existing equipment. If you use this type of sender with your TV Recorder, you can plug the transmit adaptor into the TV2/VCR SCART, or the TV SCART. You then plug the receive adaptor into the SCART socket of a TV or VCR elsewhere in your home.
Method 1 (transmit from the TV2/VCR SCART)
Using this method, you would be able to receive the output from the TV2/VCR SCART of your TV Recorder on a TV located in another room. However, you cannot see any menus or programme information etc. on this output. To change the output channel, you would normally use the TV2 Ch + and TV2 Ch – buttons on your TV Recorder’s remote control, in the room where your TV Recorder is situated.
Method 2 (transmit from the TV SCART)
Using this method, you would be able to receive the output from the TV SCART of your TV Recorder on a TV located in another room. Menus or programme information etc. would also appear on this output.
Some models of audio/video sender are fitted with an infra-red transmitter on a short lead, the lens of which you would place near to the front panel of your TV Recorder. You could then use your remote control in the room where the receive adaptor is located, to send commands to your TV Recorder via the wireless link. In this way, you would have full control over your TV Recorder’s functions even when you are in another room.
WIRELESS AUDIO/VIDEO SENDERS
22 AN IDEA TO CONSIDER . . .

Pace Micro Technology plcVictoria Road Saltaire Shipley
West Yorkshire BD18 3LF Englandwww.pace.co.uk
Pace®
and ®
are trademarks of Pace Micro Technology plc.
X150-067-IE01
®