Embed Size (px)
Citation preview
BIM Manual Antony McPhee Architect
Revit Naming Manual (Draft)
Table of Contents last revision Revit File Naming 08-AUG-08
View Naming 31-JAN-08
Wall, Floor, Roof, Ceiling Naming 02-FEB-09
Family Naming 28-AUG-08
Material Naming 05-FEB-08
Style & Pattern Naming 31-JAN-08
Drafting Object Naming 07-MAR-08
Annotation Object Naming 07-MAR-08
PDF & DWF File Naming 11-AUG-08
END OF SECTION
d:\!library\bim\revit naming\manuals\revit naming manual (draft).doc 2/2/2009 5:43 PM
© 2008 Antony McPhee
1 [22]
BIM Manual Antony McPhee Architect
Revit Naming Manual (Draft)
Subject: Revit File Naming Section 01
Author: AMc Appr. by:
Rev. Date: 08-AUG-08
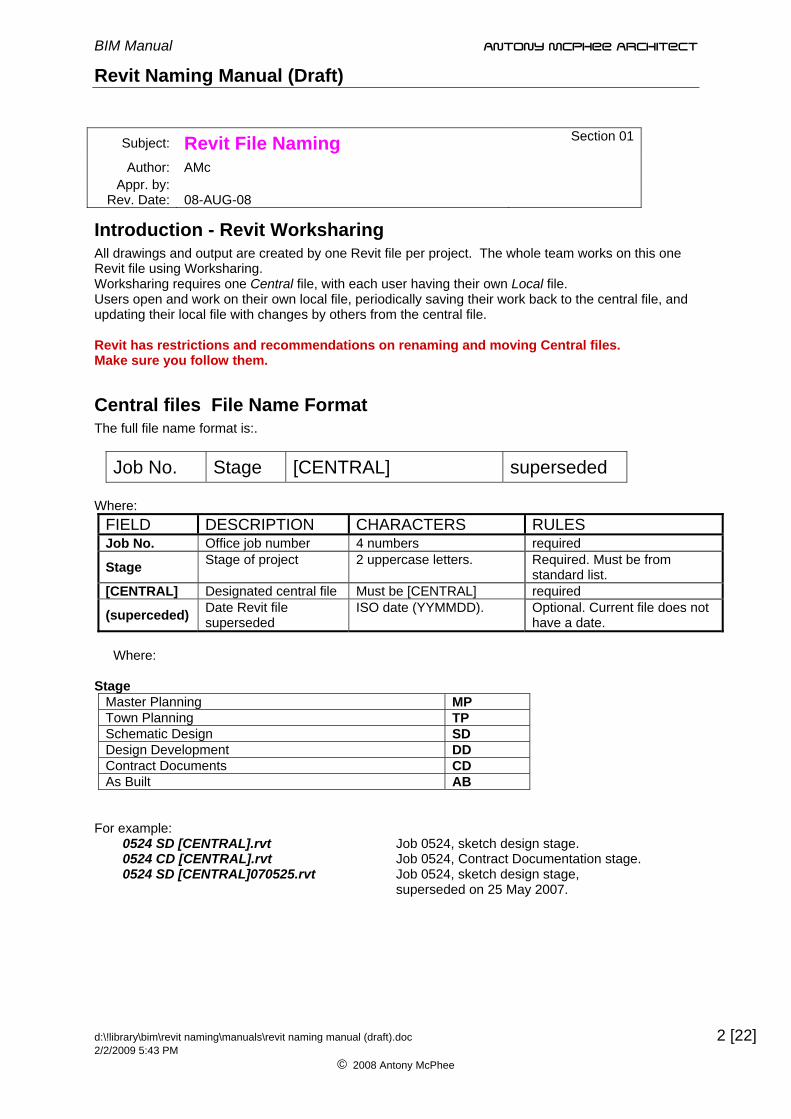
Introduction - Revit Worksharing All drawings and output are created by one Revit file per project. The whole team works on this one Revit file using Worksharing. Worksharing requires one Central file, with each user having their own Local file. Users open and work on their own local file, periodically saving their work back to the central file, and updating their local file with changes by others from the central file. Revit has restrictions and recommendations on renaming and moving Central files. Make sure you follow them.
Central files File Name Format The full file name format is:.
Job No. Stage [CENTRAL] superseded Where:
FIELD DESCRIPTION CHARACTERS RULES Job No. Office job number 4 numbers required
Stage Stage of project 2 uppercase letters. Required. Must be from standard list.
[CENTRAL] Designated central file Must be [CENTRAL] required
(superceded) Date Revit file superseded
ISO date (YYMMDD). Optional. Current file does not have a date.
Where:
Stage Master Planning MPTown Planning TP Schematic Design SD Design Development DD Contract Documents CD As Built AB
For example:
0524 SD [CENTRAL].rvt Job 0524, sketch design stage. 0524 CD [CENTRAL].rvt Job 0524, Contract Documentation stage. 0524 SD [CENTRAL]070525.rvt Job 0524, sketch design stage,
superseded on 25 May 2007.
d:\!library\bim\revit naming\manuals\revit naming manual (draft).doc 2/2/2009 5:43 PM
© 2008 Antony McPhee
2 [22]
BIM Manual Antony McPhee Architect
Revit Naming Manual (Draft)
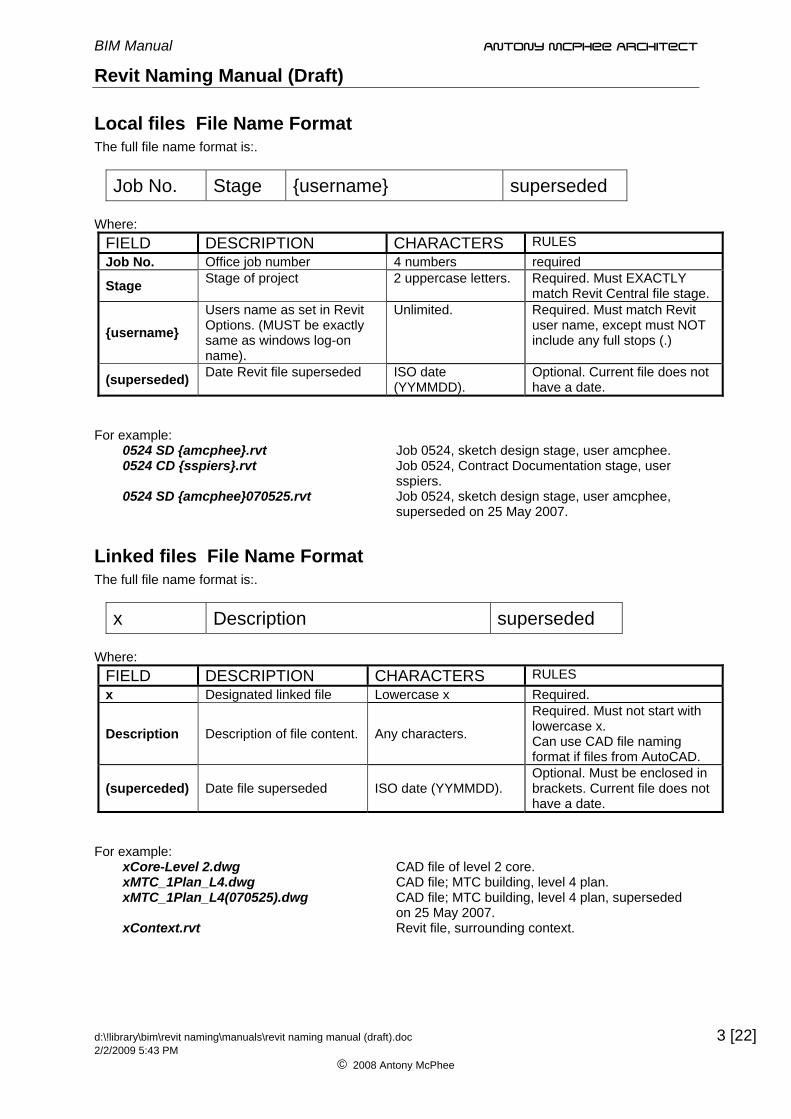
Local files File Name Format The full file name format is:.
Job No. Stage {username} superseded Where:
FIELD DESCRIPTION CHARACTERS RULES Job No. Office job number 4 numbers required
Stage Stage of project 2 uppercase letters. Required. Must EXACTLY match Revit Central file stage.
{username} Users name as set in Revit Options. (MUST be exactly same as windows log-on name).
Unlimited. Required. Must match Revit user name, except must NOT include any full stops (.)
(superseded) Date Revit file superseded ISO date (YYMMDD).
Optional. Current file does not have a date.
For example:
0524 SD {amcphee}.rvt Job 0524, sketch design stage, user amcphee. 0524 CD {sspiers}.rvt Job 0524, Contract Documentation stage, user
sspiers. 0524 SD {amcphee}070525.rvt Job 0524, sketch design stage, user amcphee,
superseded on 25 May 2007.
Linked files File Name Format The full file name format is:.
x Description superseded Where:
FIELD DESCRIPTION CHARACTERS RULES x Designated linked file Lowercase x Required.
Description Description of file content. Any characters.
Required. Must not start with lowercase x. Can use CAD file naming format if files from AutoCAD.
(superceded) Date file superseded ISO date (YYMMDD). Optional. Must be enclosed in brackets. Current file does not have a date.
For example: xCore-Level 2.dwg CAD file of level 2 core. xMTC_1Plan_L4.dwg CAD file; MTC building, level 4 plan. xMTC_1Plan_L4(070525).dwg CAD file; MTC building, level 4 plan, superseded
on 25 May 2007. xContext.rvt Revit file, surrounding context.
d:\!library\bim\revit naming\manuals\revit naming manual (draft).doc 2/2/2009 5:43 PM
© 2008 Antony McPhee
3 [22]
BIM Manual Antony McPhee Architect
Revit Naming Manual (Draft)
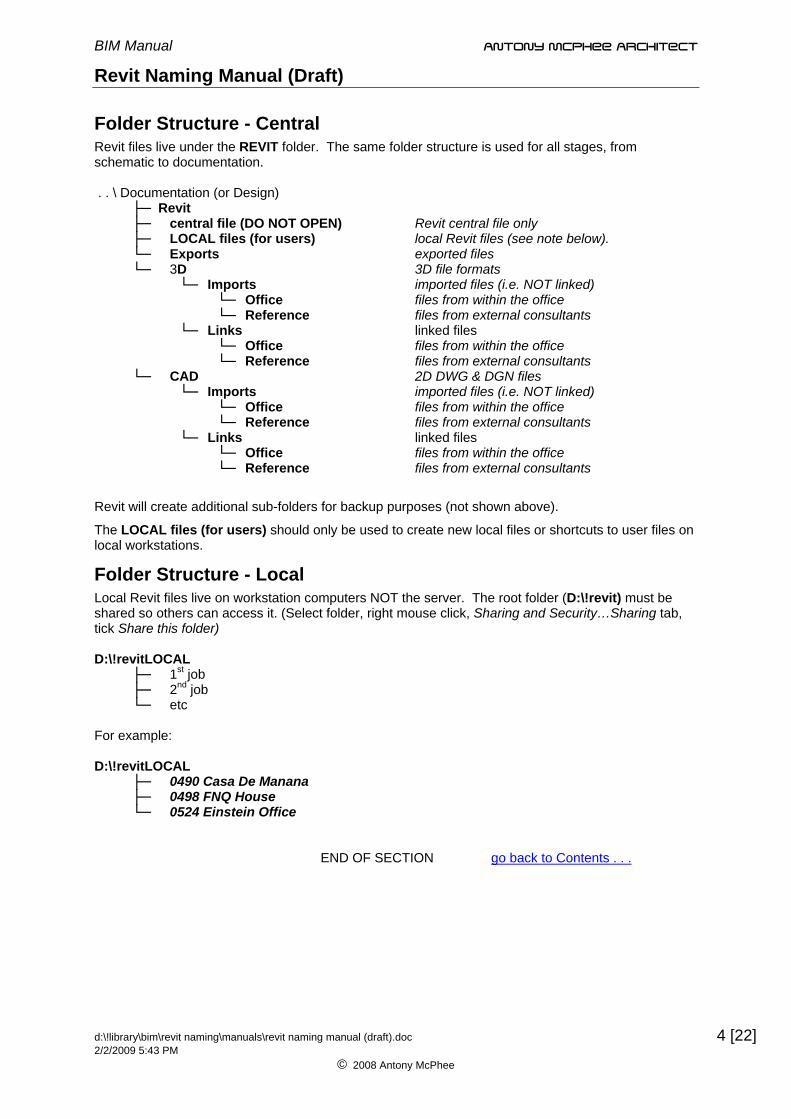
Folder Structure - Central Revit files live under the REVIT folder. The same folder structure is used for all stages, from schematic to documentation. . . \ Documentation (or Design)
├─ Revit ├─ central file (DO NOT OPEN) Revit central file only ├─ LOCAL files (for users) local Revit files (see note below). └─ Exports exported files └─ 3D 3D file formats
└─ Imports imported files (i.e. NOT linked) └─ Office files from within the office └─ Reference files from external consultants
└─ Links linked files └─ Office files from within the office └─ Reference files from external consultants
└─ CAD 2D DWG & DGN files └─ Imports imported files (i.e. NOT linked)
└─ Office files from within the office └─ Reference files from external consultants
└─ Links linked files └─ Office files from within the office └─ Reference files from external consultants
Revit will create additional sub-folders for backup purposes (not shown above).
The LOCAL files (for users) should only be used to create new local files or shortcuts to user files on local workstations.
Folder Structure - Local Local Revit files live on workstation computers NOT the server. The root folder (D:\!revit) must be shared so others can access it. (Select folder, right mouse click, Sharing and Security…Sharing tab, tick Share this folder) D:\!revitLOCAL
├─ 1st job ├─ 2nd job └─ etc
For example: D:\!revitLOCAL
├─ 0490 Casa De Manana ├─ 0498 FNQ House └─ 0524 Einstein Office
END OF SECTION go back to Contents . . .
d:\!library\bim\revit naming\manuals\revit naming manual (draft).doc 2/2/2009 5:43 PM
© 2008 Antony McPhee
4 [22]
BIM Manual Antony McPhee Architect
Revit Naming Manual (Draft)
Subject: View Naming Section 02
Author: AMc Appr. by:
Rev. Date: 31-JAN-08
Introduction The only type of views that require naming rules are the general Views used to draw in (Plans, Elevations etc). General views can be equated to AutoCAD model files. Sheet views contain other General Views. Sheet views can be equated to AutoCAD sheet or plot files. By default the name will always be the sheet number followed by the first line of the title block. General View names appear as the title of that view on a sheet (in the drawing reference). This can be over-ridden as general views have a separate parameter called Title on Sheet, which can be different from the View Name parameter. General view names are also used by default to name levels, although this can be over-ridden when creating or renaming views or levels.
General Naming Rules Views should generally follow these rules: • Put most important information to the left, with importance diminishing towards the right. (e.g. N-S
Section instead of Section N-S, Ground-Lower Plan instead of Lower Ground Plan). • Make sure view names are consistent, (e.g. either use Level 1, Level 2 etc or 1st Floor, 2nd Floor
etc.) • Be consistent with case. Use the same case for same type of view. (e.g. Use only lowercase for
general views that appear on a sheet, uppercase for actual Sheet view names). • Be literal – the name should be understandable by anyone. • Try and keep View name, Level name and name on sheet the same (default Revit behavior). It
makes it easier to find things, particularly from a printed drawing.
General Views General Views may or may not appear on a sheet. Sometimes it is useful to have views that are for modelling in only, where visibility of entities and categories don’t matter, and where there is no text and dimension clutter. We will call Modelling views Working views, views that appear on Sheets, Plot views.
Working View Names Precede Working View names with a full stop (.). Be descriptive in a way which helps those working on the project.
Plot View Names The name of a plot view will by default be used as its label on the sheet it appears. Take this into consideration when naming the views. Be descriptive in a way which helps those that will be issued the drawings. Note that if you get stuck the name on sheet can be over-ridden by changing the view’s parameter Title on Sheet. END OF SECTION go back to Contents . . .
d:\!library\bim\revit naming\manuals\revit naming manual (draft).doc 2/2/2009 5:43 PM
© 2008 Antony McPhee
5 [22]
BIM Manual Antony McPhee Architect
Revit Naming Manual (Draft)
Subject: Wall, Floor, Roof, Ceiling Naming Section 03
Author: AMc Appr. by:
Rev. Date: 02-FEB-09
Introduction Wall, Floor, Roof and Ceiling family objects do not exist as separate family files, they only exist within a Revit file. They can however be transferred between Revit projects. Use Transfer Project Standards command to import all types, or copy and paste individual objects of the desired type to import individual types. (Note that a Revit bug prevents you from transferring all categories in one go. If you need to import a lot of categories use the command multiple times).
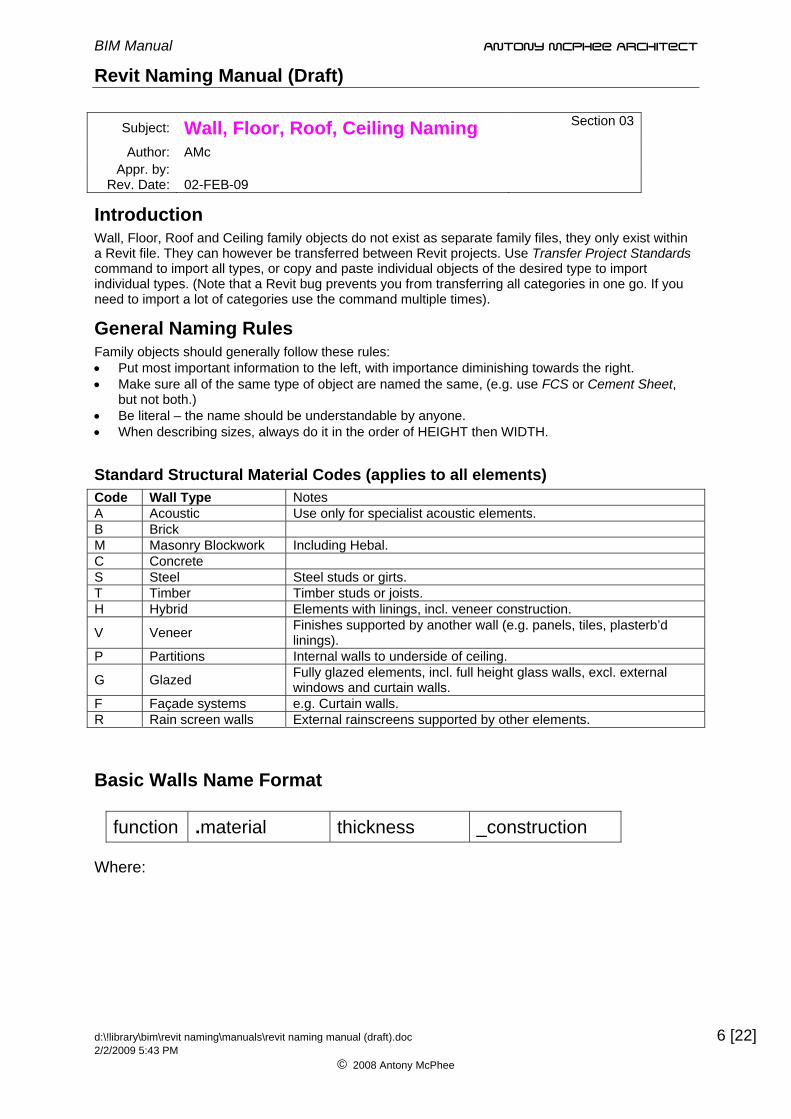
General Naming Rules Family objects should generally follow these rules: • Put most important information to the left, with importance diminishing towards the right. • Make sure all of the same type of object are named the same, (e.g. use FCS or Cement Sheet,
but not both.) • Be literal – the name should be understandable by anyone. • When describing sizes, always do it in the order of HEIGHT then WIDTH.
Standard Structural Material Codes (applies to all elements) Code Wall Type Notes A Acoustic Use only for specialist acoustic elements. B Brick M Masonry Blockwork Including Hebal. C Concrete S Steel Steel studs or girts. T Timber Timber studs or joists. H Hybrid Elements with linings, incl. veneer construction.
V Veneer Finishes supported by another wall (e.g. panels, tiles, plasterb’d linings).
P Partitions Internal walls to underside of ceiling.
G Glazed Fully glazed elements, incl. full height glass walls, excl. external windows and curtain walls.
F Façade systems e.g. Curtain walls. R Rain screen walls External rainscreens supported by other elements.
Basic Walls Name Format
function .material thickness _construction Where:
d:\!library\bim\revit naming\manuals\revit naming manual (draft).doc 2/2/2009 5:43 PM
© 2008 Antony McPhee
6 [22]
BIM Manual Antony McPhee Architect
Revit Naming Manual (Draft)
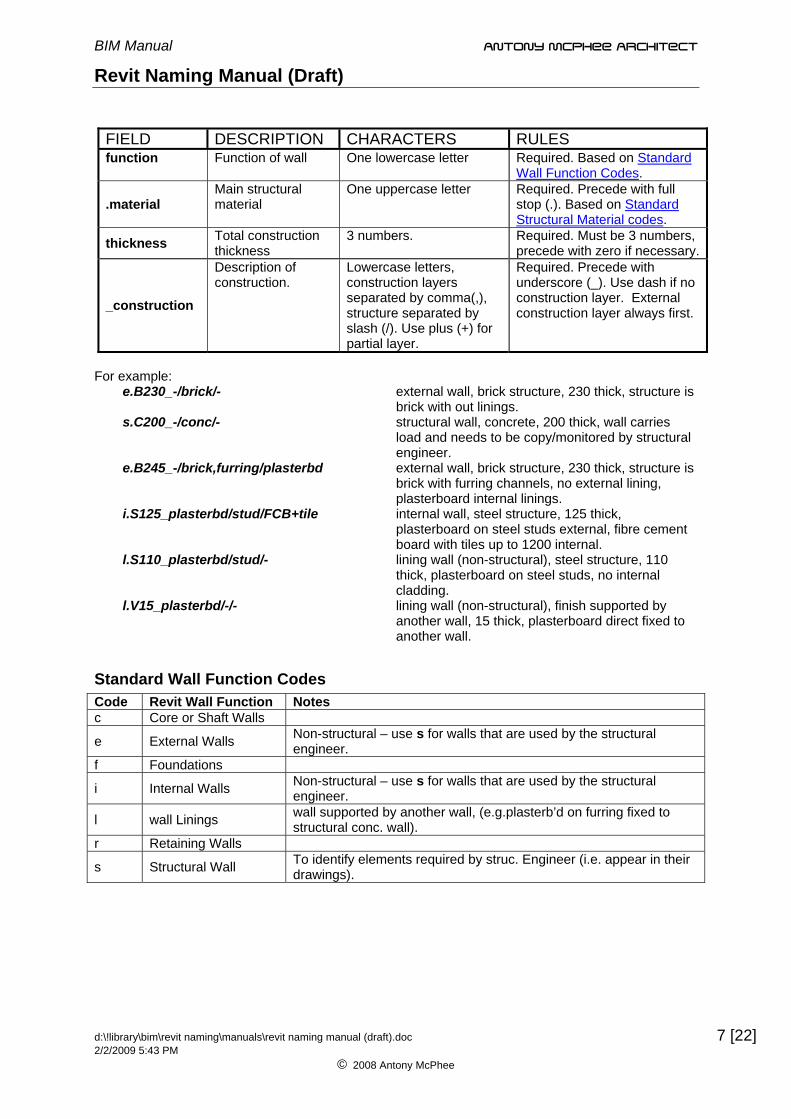
FIELD DESCRIPTION CHARACTERS RULES function Function of wall One lowercase letter Required. Based on Standard
Wall Function Codes.
.material Main structural material
One uppercase letter Required. Precede with full stop (.). Based on Standard Structural Material codes.
thickness Total construction thickness
3 numbers. Required. Must be 3 numbers, precede with zero if necessary.
_construction
Description of construction.
Lowercase letters, construction layers separated by comma(,), structure separated by slash (/). Use plus (+) for partial layer.
Required. Precede with underscore (_). Use dash if no construction layer. External construction layer always first.
For example:
e.B230_-/brick/- external wall, brick structure, 230 thick, structure is brick with out linings.
s.C200_-/conc/- structural wall, concrete, 200 thick, wall carries load and needs to be copy/monitored by structural engineer.
e.B245_-/brick,furring/plasterbd external wall, brick structure, 230 thick, structure is brick with furring channels, no external lining, plasterboard internal linings.
i.S125_plasterbd/stud/FCB+tile internal wall, steel structure, 125 thick, plasterboard on steel studs external, fibre cement board with tiles up to 1200 internal.
l.S110_plasterbd/stud/- lining wall (non-structural), steel structure, 110 thick, plasterboard on steel studs, no internal cladding.
l.V15_plasterbd/-/- lining wall (non-structural), finish supported by another wall, 15 thick, plasterboard direct fixed to another wall.
Standard Wall Function Codes Code Revit Wall Function Notes c Core or Shaft Walls
e External Walls Non-structural – use s for walls that are used by the structural engineer.
f Foundations
i Internal Walls Non-structural – use s for walls that are used by the structural engineer.
l wall Linings wall supported by another wall, (e.g.plasterb’d on furring fixed to structural conc. wall).
r Retaining Walls
s Structural Wall To identify elements required by struc. Engineer (i.e. appear in their drawings).
d:\!library\bim\revit naming\manuals\revit naming manual (draft).doc 2/2/2009 5:43 PM
© 2008 Antony McPhee
7 [22]
BIM Manual Antony McPhee Architect
Revit Naming Manual (Draft)
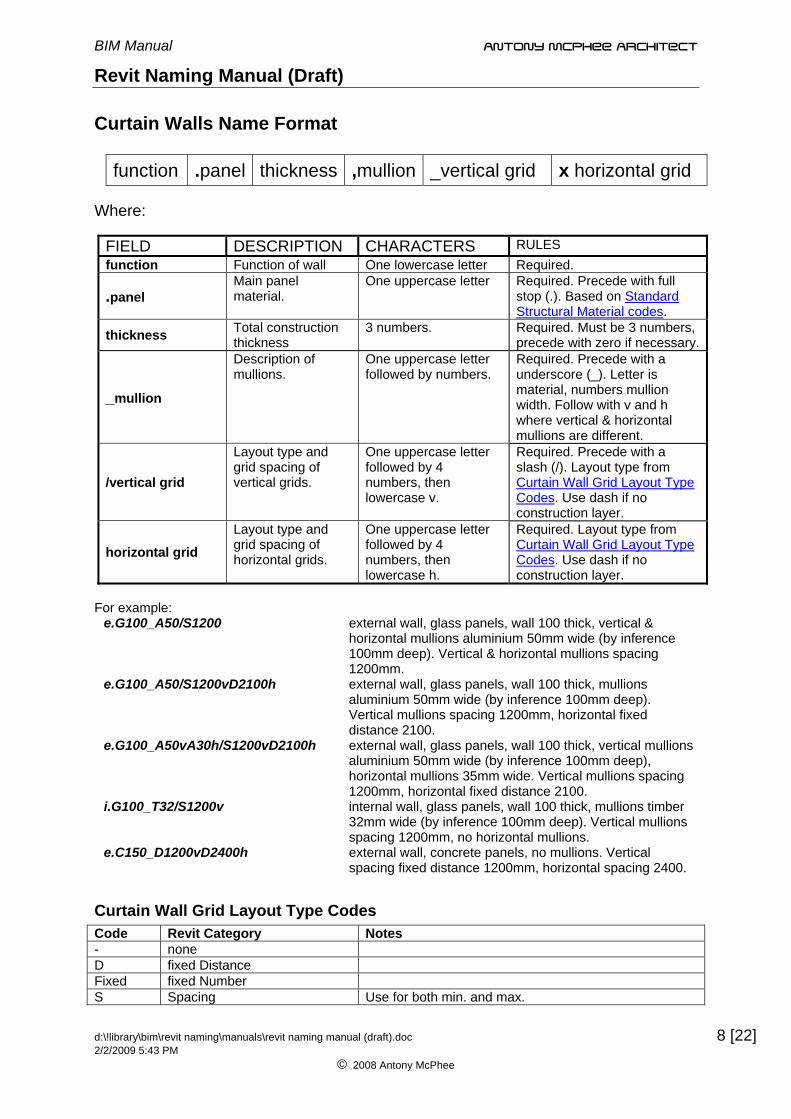
Curtain Walls Name Format
function .panel thickness ,mullion _vertical grid x horizontal grid Where:
FIELD DESCRIPTION CHARACTERS RULES function Function of wall One lowercase letter Required.
.panel Main panel material.
One uppercase letter Required. Precede with full stop (.). Based on Standard Structural Material codes.
thickness Total construction thickness
3 numbers. Required. Must be 3 numbers, precede with zero if necessary.
_mullion
Description of mullions.
One uppercase letter followed by numbers.
Required. Precede with a underscore (_). Letter is material, numbers mullion width. Follow with v and h where vertical & horizontal mullions are different.
/vertical grid
Layout type and grid spacing of vertical grids.
One uppercase letter followed by 4 numbers, then lowercase v.
Required. Precede with a slash (/). Layout type from Curtain Wall Grid Layout Type Codes. Use dash if no construction layer.
horizontal grid Layout type and grid spacing of horizontal grids.
One uppercase letter followed by 4 numbers, then lowercase h.
Required. Layout type from Curtain Wall Grid Layout Type Codes. Use dash if no construction layer.
For example:
e.G100_A50/S1200 external wall, glass panels, wall 100 thick, vertical & horizontal mullions aluminium 50mm wide (by inference 100mm deep). Vertical & horizontal mullions spacing 1200mm.
e.G100_A50/S1200vD2100h external wall, glass panels, wall 100 thick, mullions aluminium 50mm wide (by inference 100mm deep). Vertical mullions spacing 1200mm, horizontal fixed distance 2100.
e.G100_A50vA30h/S1200vD2100h external wall, glass panels, wall 100 thick, vertical mullions aluminium 50mm wide (by inference 100mm deep), horizontal mullions 35mm wide. Vertical mullions spacing 1200mm, horizontal fixed distance 2100.
i.G100_T32/S1200v internal wall, glass panels, wall 100 thick, mullions timber 32mm wide (by inference 100mm deep). Vertical mullions spacing 1200mm, no horizontal mullions.
e.C150_D1200vD2400h external wall, concrete panels, no mullions. Vertical spacing fixed distance 1200mm, horizontal spacing 2400.
Curtain Wall Grid Layout Type Codes Code Revit Category Notes- none D fixed Distance Fixed fixed Number S Spacing Use for both min. and max.
d:\!library\bim\revit naming\manuals\revit naming manual (draft).doc 2/2/2009 5:43 PM
© 2008 Antony McPhee
8 [22]
BIM Manual Antony McPhee Architect
Revit Naming Manual (Draft)
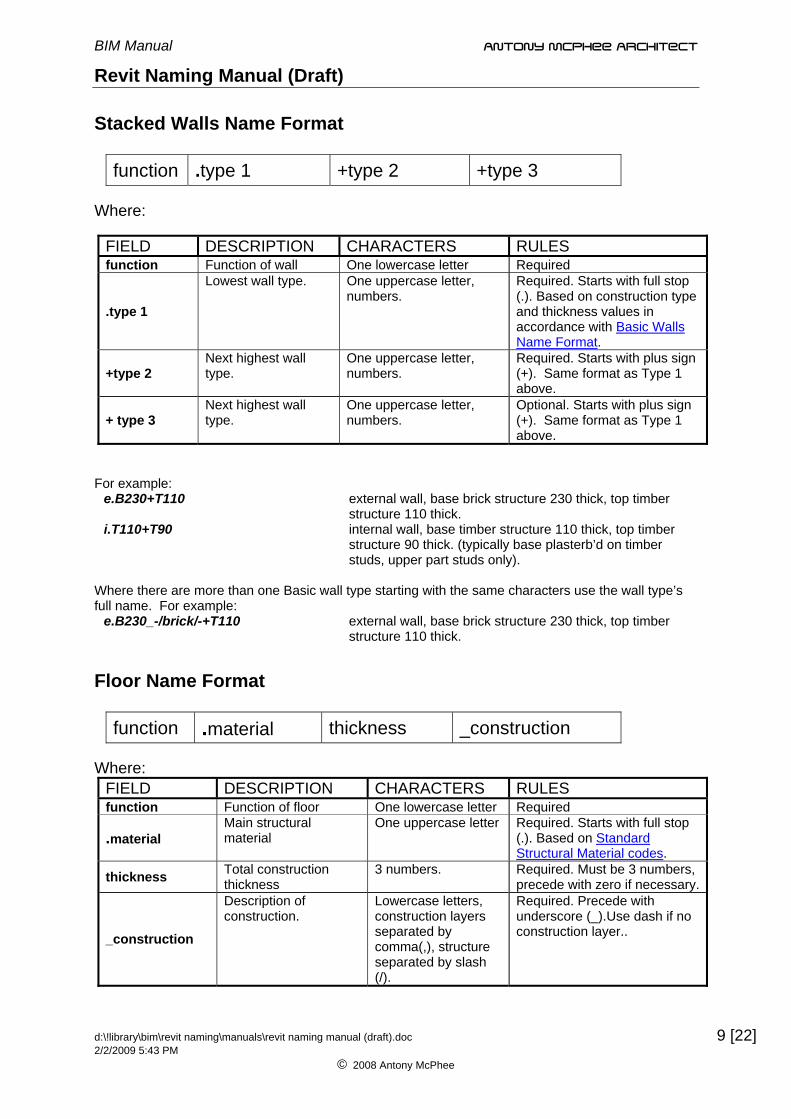
Stacked Walls Name Format
function .type 1 +type 2 +type 3 Where:
FIELD DESCRIPTION CHARACTERS RULES function Function of wall One lowercase letter Required
.type 1
Lowest wall type. One uppercase letter, numbers.
Required. Starts with full stop (.). Based on construction type and thickness values in accordance with Basic Walls Name Format.
+type 2 Next highest wall type.
One uppercase letter, numbers.
Required. Starts with plus sign (+). Same format as Type 1 above.
+ type 3 Next highest wall type.
One uppercase letter, numbers.
Optional. Starts with plus sign (+). Same format as Type 1 above.
For example:
e.B230+T110 external wall, base brick structure 230 thick, top timber structure 110 thick.
i.T110+T90 internal wall, base timber structure 110 thick, top timber structure 90 thick. (typically base plasterb’d on timber studs, upper part studs only).
Where there are more than one Basic wall type starting with the same characters use the wall type’s full name. For example:
e.B230_-/brick/-+T110 external wall, base brick structure 230 thick, top timber structure 110 thick.
Floor Name Format
function .material thickness _construction Where:
FIELD DESCRIPTION CHARACTERS RULES function Function of floor One lowercase letter Required
.material Main structural material
One uppercase letter Required. Starts with full stop (.). Based on Standard Structural Material codes.
thickness Total construction thickness
3 numbers. Required. Must be 3 numbers, precede with zero if necessary.
_construction
Description of construction.
Lowercase letters, construction layers separated by comma(,), structure separated by slash (/).
Required. Precede with underscore (_).Use dash if no construction layer..
d:\!library\bim\revit naming\manuals\revit naming manual (draft).doc 2/2/2009 5:43 PM
© 2008 Antony McPhee
9 [22]
BIM Manual Antony McPhee Architect
Revit Naming Manual (Draft)
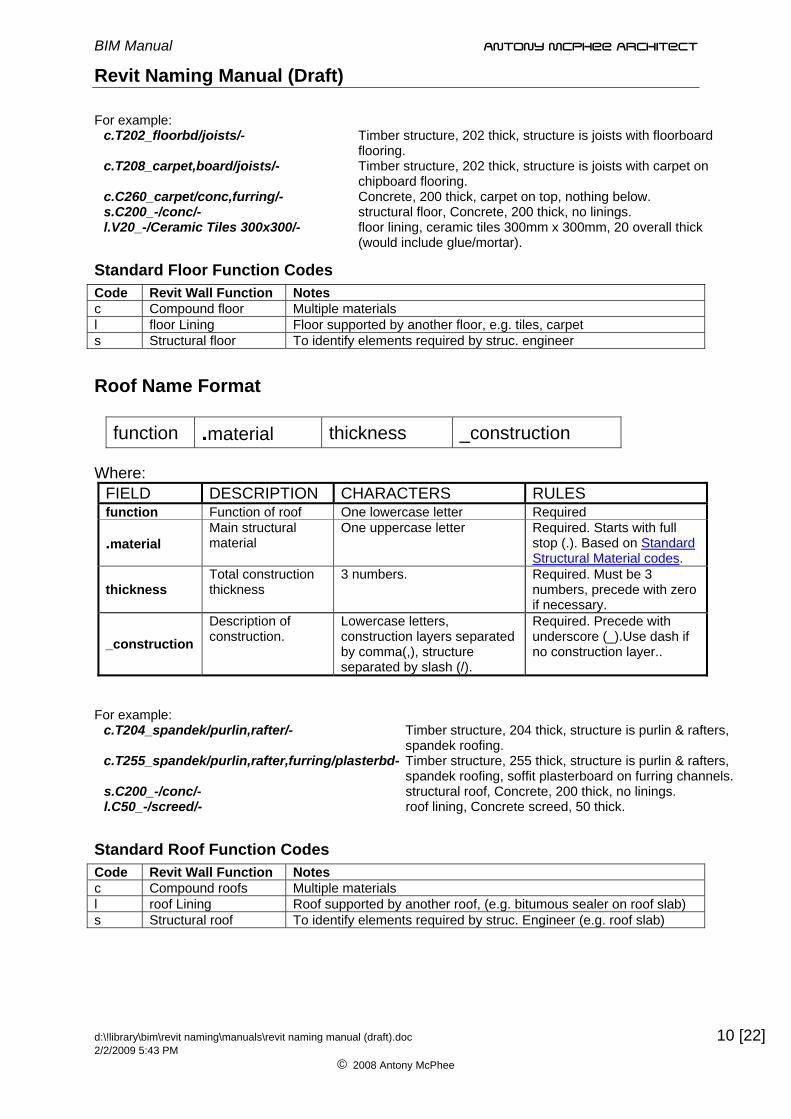
For example: c.T202_floorbd/joists/- Timber structure, 202 thick, structure is joists with floorboard
flooring. c.T208_carpet,board/joists/- Timber structure, 202 thick, structure is joists with carpet on
chipboard flooring. c.C260_carpet/conc,furring/- Concrete, 200 thick, carpet on top, nothing below. s.C200_-/conc/- structural floor, Concrete, 200 thick, no linings. l.V20_-/Ceramic Tiles 300x300/- floor lining, ceramic tiles 300mm x 300mm, 20 overall thick
(would include glue/mortar).
Standard Floor Function Codes Code Revit Wall Function Notesc Compound floor Multiple materials l floor Lining Floor supported by another floor, e.g. tiles, carpet s Structural floor To identify elements required by struc. engineer
Roof Name Format
function .material thickness _construction Where:
FIELD DESCRIPTION CHARACTERS RULES function Function of roof One lowercase letter Required
.material Main structural material
One uppercase letter Required. Starts with full stop (.). Based on Standard Structural Material codes.
thickness Total construction thickness
3 numbers. Required. Must be 3 numbers, precede with zero if necessary.
_construction Description of construction.
Lowercase letters, construction layers separated by comma(,), structure separated by slash (/).
Required. Precede with underscore (_).Use dash if no construction layer..
For example:
c.T204_spandek/purlin,rafter/- Timber structure, 204 thick, structure is purlin & rafters, spandek roofing.
c.T255_spandek/purlin,rafter,furring/plasterbd- Timber structure, 255 thick, structure is purlin & rafters, spandek roofing, soffit plasterboard on furring channels.
s.C200_-/conc/- structural roof, Concrete, 200 thick, no linings. l.C50_-/screed/- roof lining, Concrete screed, 50 thick.
Standard Roof Function Codes Code Revit Wall Function Notesc Compound roofs Multiple materials l roof Lining Roof supported by another roof, (e.g. bitumous sealer on roof slab) s Structural roof To identify elements required by struc. Engineer (e.g. roof slab)
d:\!library\bim\revit naming\manuals\revit naming manual (draft).doc 2/2/2009 5:43 PM
© 2008 Antony McPhee
10 [22]
BIM Manual Antony McPhee Architect
Revit Naming Manual (Draft)
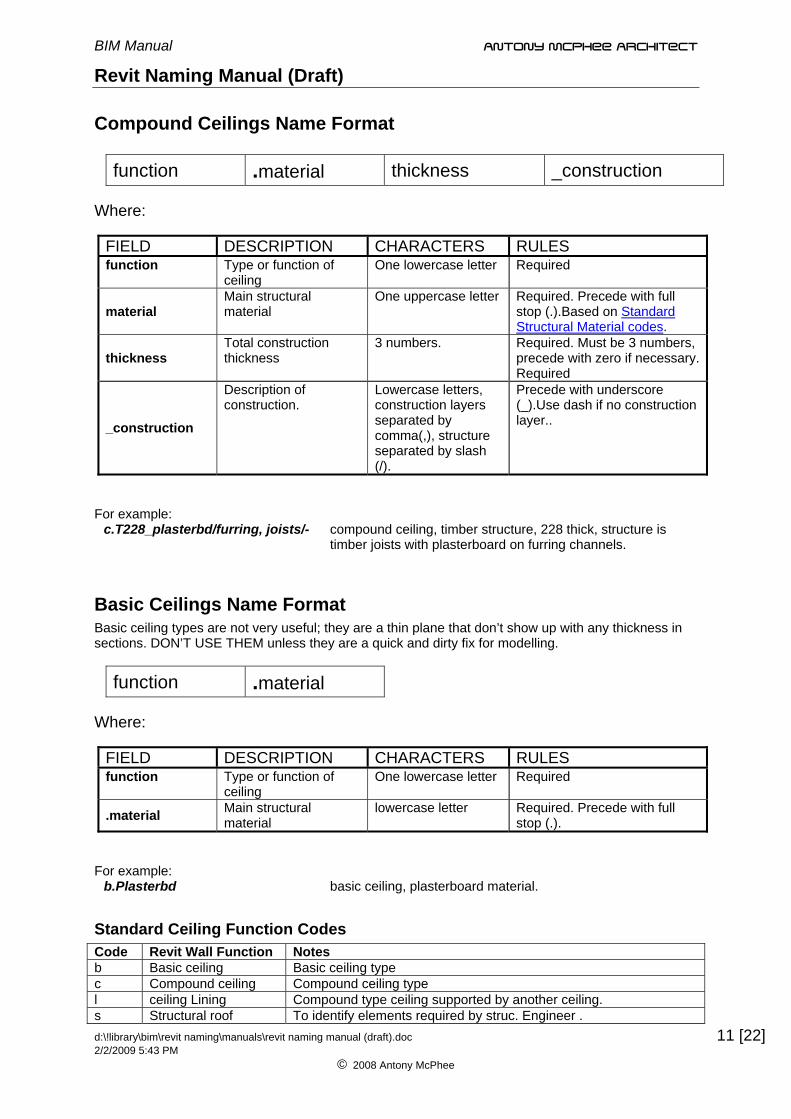
Compound Ceilings Name Format
function .material thickness _construction Where:
FIELD DESCRIPTION CHARACTERS RULES function Type or function of
ceiling One lowercase letter Required
material Main structural material
One uppercase letter Required. Precede with full stop (.).Based on Standard Structural Material codes.
thickness Total construction thickness
3 numbers. Required. Must be 3 numbers, precede with zero if necessary. Required
_construction
Description of construction.
Lowercase letters, construction layers separated by comma(,), structure separated by slash (/).
Precede with underscore (_).Use dash if no construction layer..
For example:
c.T228_plasterbd/furring, joists/- compound ceiling, timber structure, 228 thick, structure is timber joists with plasterboard on furring channels.
Basic Ceilings Name Format Basic ceiling types are not very useful; they are a thin plane that don’t show up with any thickness in sections. DON’T USE THEM unless they are a quick and dirty fix for modelling.
function .material Where:
FIELD DESCRIPTION CHARACTERS RULES function Type or function of
ceiling One lowercase letter Required
.material Main structural material
lowercase letter Required. Precede with full stop (.).
For example:
b.Plasterbd basic ceiling, plasterboard material.
Standard Ceiling Function Codes Code Revit Wall Function Notes b Basic ceiling Basic ceiling type c Compound ceiling Compound ceiling type l ceiling Lining Compound type ceiling supported by another ceiling. s Structural roof To identify elements required by struc. Engineer . d:\!library\bim\revit naming\manuals\revit naming manual (draft).doc 2/2/2009 5:43 PM
© 2008 Antony McPhee
11 [22]
BIM Manual Antony McPhee Architect
Revit Naming Manual (Draft)
END OF SECTION go back to Contents . . .
Subject: Family Naming Section 04
Author: AMc Appr. by:
Rev. Date: 18-MAR-08
Introduction Family objects are those that exist as separate files, for example Doors and Windows. This means their names must be valid file names.
Where to Put New & Edited Family Files Family files off the internet or elsewhere must be edited and cleaned up. (Change units to metric, purge, add sub-categories, and material & visibility parameters, refer to Creating Families manual). Save them in the relevant category folder in the office library using the name format described here. Delete the original file. DO NOT PUT ANY UN-EDITED FILES INTO ANY LIBRARY FOLDER. If you do only minor editing to a family file (e.g. change or add parameters) just resave it under its original name. If you do major editing (e.g. change or add geometry) save it under a new name in the Office library using the name format described here.
General Naming Rules Family objects should generally follow these rules:
• Put most important information to the left, with importance diminishing towards the right. • Make sure all of the same type of object are named the same, (e.g. use WC, not Toilet or
Suite.) • Be literal – the name should be understandable by anyone. • When describing sizes, always do it in the order of HEIGHT then WIDTH.
d:\!library\bim\revit naming\manuals\revit naming manual (draft).doc 2/2/2009 5:43 PM
© 2008 Antony McPhee
12 [22]
BIM Manual Antony McPhee Architect
Revit Naming Manual (Draft)
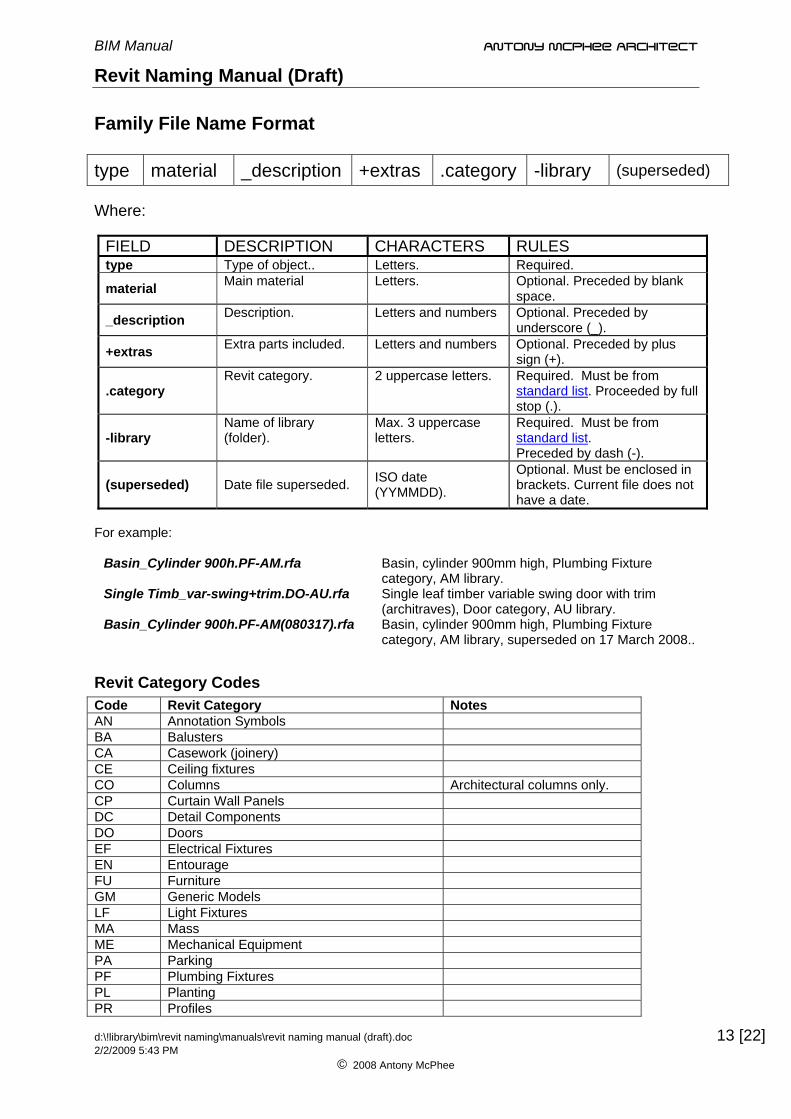
Family File Name Format
type material _description +extras .category -library (superseded) Where:
FIELD DESCRIPTION CHARACTERS RULES type Type of object.. Letters. Required.
material Main material Letters. Optional. Preceded by blank space.
_description Description. Letters and numbers Optional. Preceded by underscore (_).
+extras Extra parts included. Letters and numbers Optional. Preceded by plus sign (+).
.category Revit category. 2 uppercase letters. Required. Must be from
standard list. Proceeded by full stop (.).
-library Name of library (folder).
Max. 3 uppercase letters.
Required. Must be from standard list. Preceded by dash (-).
(superseded) Date file superseded. ISO date (YYMMDD).
Optional. Must be enclosed in brackets. Current file does not have a date.
For example:
Basin_Cylinder 900h.PF-AM.rfa Basin, cylinder 900mm high, Plumbing Fixture category, AM library.
Single Timb_var-swing+trim.DO-AU.rfa Single leaf timber variable swing door with trim (architraves), Door category, AU library.
Basin_Cylinder 900h.PF-AM(080317).rfa Basin, cylinder 900mm high, Plumbing Fixture category, AM library, superseded on 17 March 2008..
Revit Category Codes Code Revit Category Notes AN Annotation Symbols BA Balusters CA Casework (joinery) CE Ceiling fixtures CO Columns Architectural columns only. CP Curtain Wall Panels DC Detail Components DO Doors EF Electrical Fixtures EN Entourage FU Furniture GM Generic Models LF Light Fixtures MA Mass ME Mechanical Equipment PA Parking PF Plumbing Fixtures PL Planting PR Profiles
d:\!library\bim\revit naming\manuals\revit naming manual (draft).doc 2/2/2009 5:43 PM
© 2008 Antony McPhee
13 [22]
BIM Manual Antony McPhee Architect
Revit Naming Manual (Draft)
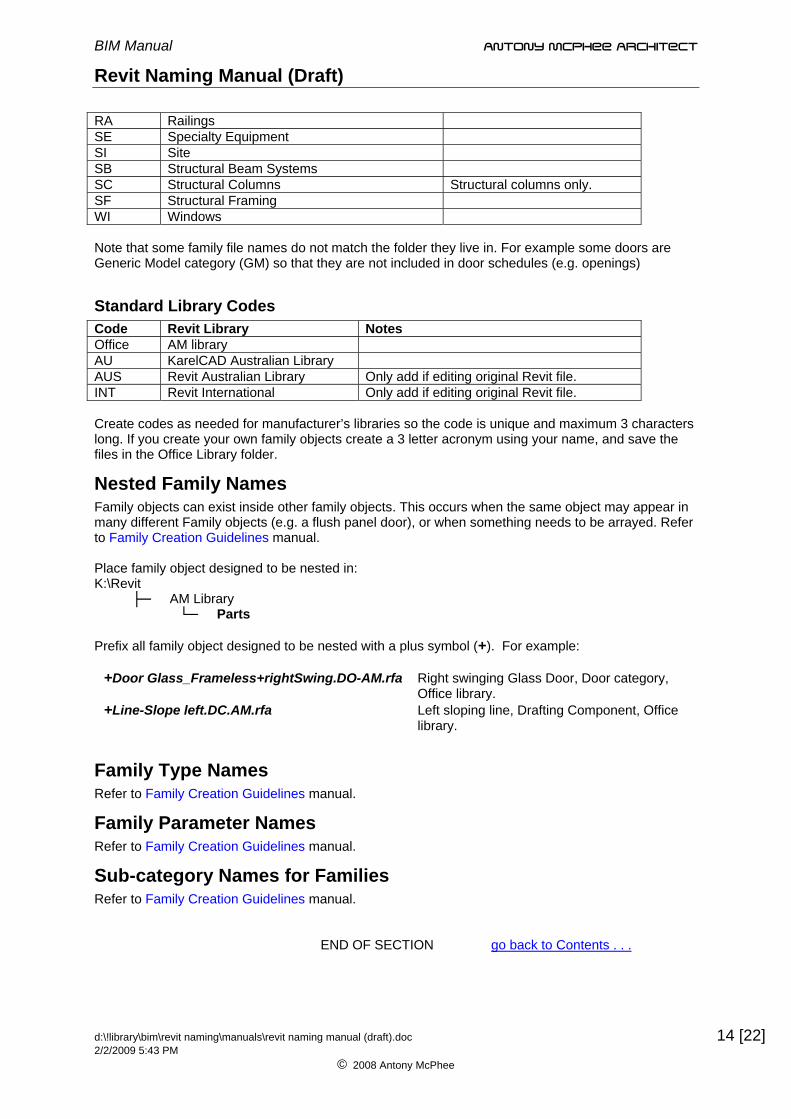
RA Railings SE Specialty Equipment SI Site SB Structural Beam Systems SC Structural Columns Structural columns only. SF Structural Framing WI Windows Note that some family file names do not match the folder they live in. For example some doors are Generic Model category (GM) so that they are not included in door schedules (e.g. openings)
Standard Library Codes Code Revit Library NotesOffice AM library AU KarelCAD Australian Library AUS Revit Australian Library Only add if editing original Revit file. INT Revit International Only add if editing original Revit file. Create codes as needed for manufacturer’s libraries so the code is unique and maximum 3 characters long. If you create your own family objects create a 3 letter acronym using your name, and save the files in the Office Library folder.
Nested Family Names Family objects can exist inside other family objects. This occurs when the same object may appear in many different Family objects (e.g. a flush panel door), or when something needs to be arrayed. Refer to Family Creation Guidelines manual. Place family object designed to be nested in: K:\Revit
├─ AM Library └─ Parts
Prefix all family object designed to be nested with a plus symbol (+). For example:
+Door Glass_Frameless+rightSwing.DO-AM.rfa Right swinging Glass Door, Door category, Office library.
+Line-Slope left.DC.AM.rfa Left sloping line, Drafting Component, Office library.
Family Type Names Refer to Family Creation Guidelines manual.
Family Parameter Names Refer to Family Creation Guidelines manual.
Sub-category Names for Families Refer to Family Creation Guidelines manual. END OF SECTION go back to Contents . . .
d:\!library\bim\revit naming\manuals\revit naming manual (draft).doc 2/2/2009 5:43 PM
© 2008 Antony McPhee
14 [22]
BIM Manual Antony McPhee Architect
Revit Naming Manual (Draft)
Subject: Material Naming Section 05
Author: AMC Appr. by: AMC Rev. Date: 05-FEB-08
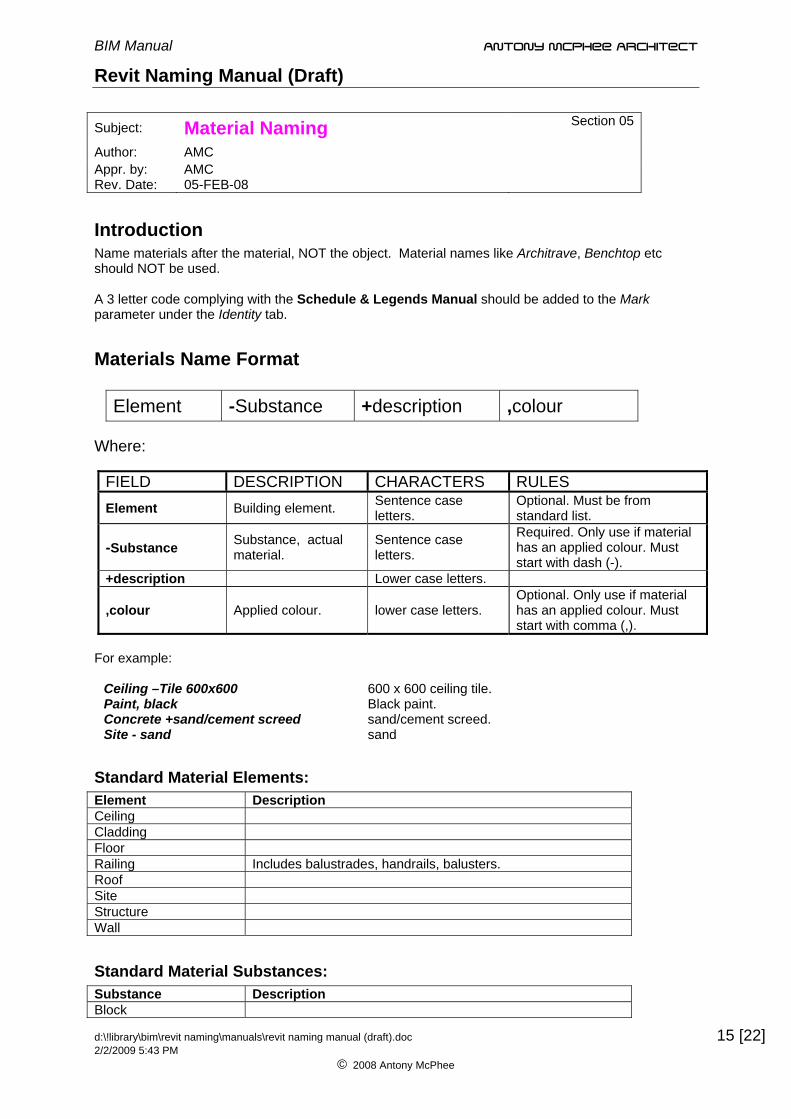
Introduction Name materials after the material, NOT the object. Material names like Architrave, Benchtop etc should NOT be used. A 3 letter code complying with the Schedule & Legends Manual should be added to the Mark parameter under the Identity tab.
Materials Name Format
Element -Substance +description ,colour Where:
FIELD DESCRIPTION CHARACTERS RULES
Element Building element. Sentence case letters.
Optional. Must be from standard list.
-Substance Substance, actual material.
Sentence case letters.
Required. Only use if material has an applied colour. Must start with dash (-).
+description Lower case letters.
,colour Applied colour. lower case letters. Optional. Only use if material has an applied colour. Must start with comma (,).
For example:
Ceiling –Tile 600x600 600 x 600 ceiling tile. Paint, black Black paint. Concrete +sand/cement screed sand/cement screed. Site - sand sand
Standard Material Elements: Element Description Ceiling Cladding Floor Railing Includes balustrades, handrails, balusters. Roof Site Structure Wall
Standard Material Substances: Substance Description Block
d:\!library\bim\revit naming\manuals\revit naming manual (draft).doc 2/2/2009 5:43 PM
© 2008 Antony McPhee
15 [22]
BIM Manual Antony McPhee Architect
Revit Naming Manual (Draft)
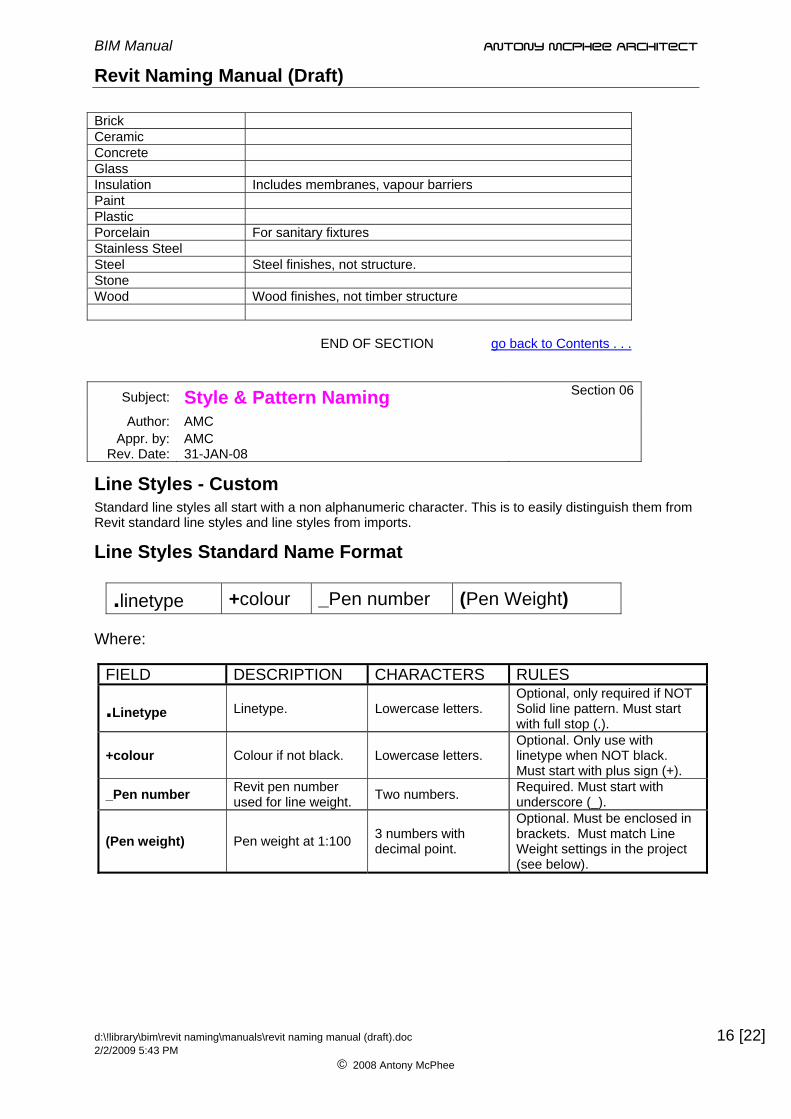
Brick Ceramic Concrete Glass Insulation Includes membranes, vapour barriers Paint Plastic Porcelain For sanitary fixtures Stainless Steel Steel Steel finishes, not structure. Stone Wood Wood finishes, not timber structure END OF SECTION go back to Contents . . .
Subject: Style & Pattern Naming Section 06
Author: AMC Appr. by: AMC
Rev. Date: 31-JAN-08
Line Styles - Custom Standard line styles all start with a non alphanumeric character. This is to easily distinguish them from Revit standard line styles and line styles from imports.
Line Styles Standard Name Format
.linetype +colour _Pen number (Pen Weight) Where:
FIELD DESCRIPTION CHARACTERS RULES
.Linetype Linetype. Lowercase letters. Optional, only required if NOT Solid line pattern. Must start with full stop (.).
+colour Colour if not black. Lowercase letters. Optional. Only use with linetype when NOT black. Must start with plus sign (+).
_Pen number Revit pen number used for line weight. Two numbers. Required. Must start with
underscore (_).
(Pen weight) Pen weight at 1:100 3 numbers with decimal point.
Optional. Must be enclosed in brackets. Must match Line Weight settings in the project (see below).
d:\!library\bim\revit naming\manuals\revit naming manual (draft).doc 2/2/2009 5:43 PM
© 2008 Antony McPhee
16 [22]
BIM Manual Antony McPhee Architect
Revit Naming Manual (Draft)
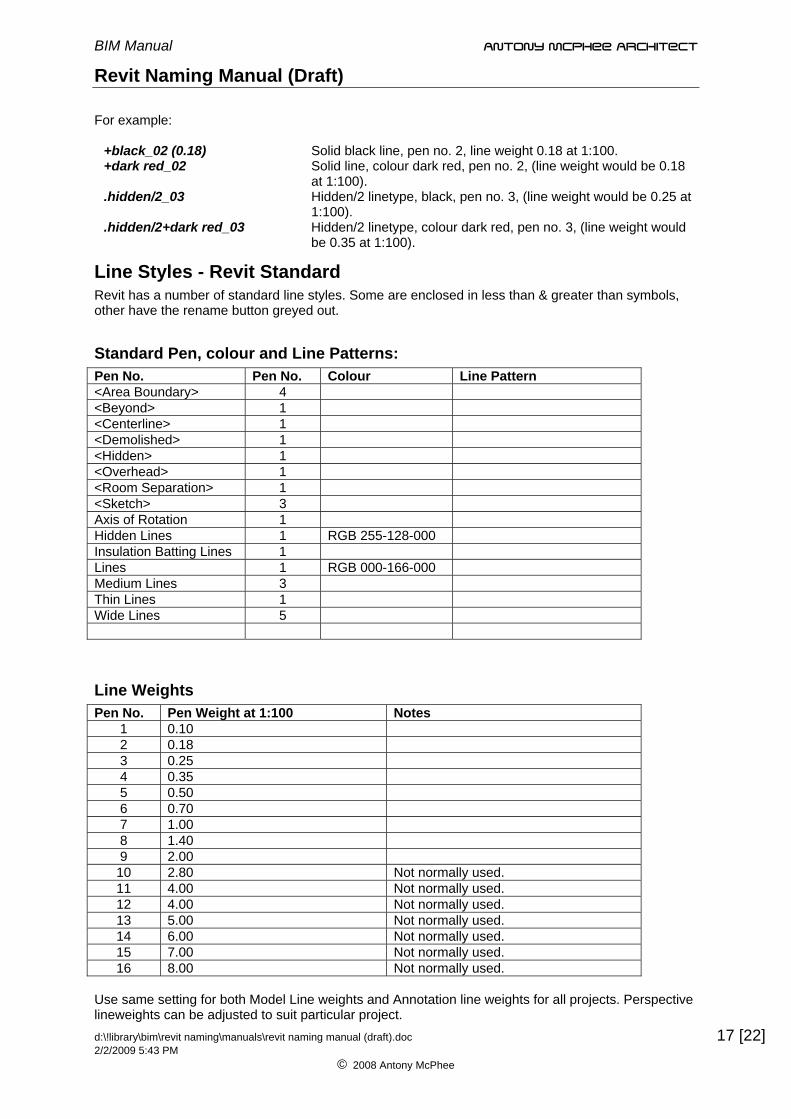
For example:
+black_02 (0.18) Solid black line, pen no. 2, line weight 0.18 at 1:100. +dark red_02 Solid line, colour dark red, pen no. 2, (line weight would be 0.18
at 1:100). .hidden/2_03 Hidden/2 linetype, black, pen no. 3, (line weight would be 0.25 at
1:100). .hidden/2+dark red_03 Hidden/2 linetype, colour dark red, pen no. 3, (line weight would
be 0.35 at 1:100).
Line Styles - Revit Standard Revit has a number of standard line styles. Some are enclosed in less than & greater than symbols, other have the rename button greyed out.
Standard Pen, colour and Line Patterns: Pen No. Pen No. Colour Line Pattern <Area Boundary> 4 <Beyond> 1 <Centerline> 1 <Demolished> 1 <Hidden> 1 <Overhead> 1 <Room Separation> 1 <Sketch> 3 Axis of Rotation 1 Hidden Lines 1 RGB 255-128-000 Insulation Batting Lines 1 Lines 1 RGB 000-166-000 Medium Lines 3 Thin Lines 1 Wide Lines 5
Line Weights Pen No. Pen Weight at 1:100 Notes
1 0.10 2 0.18 3 0.25 4 0.35 5 0.50 6 0.70 7 1.00 8 1.40 9 2.00 10 2.80 Not normally used. 11 4.00 Not normally used. 12 4.00 Not normally used. 13 5.00 Not normally used. 14 6.00 Not normally used. 15 7.00 Not normally used. 16 8.00 Not normally used.
Use same setting for both Model Line weights and Annotation line weights for all projects. Perspective lineweights can be adjusted to suit particular project. d:\!library\bim\revit naming\manuals\revit naming manual (draft).doc 2/2/2009 5:43 PM
© 2008 Antony McPhee
17 [22]
BIM Manual Antony McPhee Architect
Revit Naming Manual (Draft)
Line Patterns Line patterns are similar to AutoCAD linestyles, but are restricted to only dash and dot type patterns. Line Patterns only exist within a Revit file (i.e. not as a shared separate file like AutoCAD). Additional Line Patterns can be created within Revit, or imported from another Revit file using Transfer Project Standards.
General Naming Rules Line Pattern names should generally follow these rules:
• Put most important information to the left, with importance diminishing towards the right. (e.g. use Dash-long, not Long Dash)
• Make sure all of the same type of object are named the same, (e.g. use Border or DashDashDot, but not both.)
• Be literal – the name should be understandable by anyone.
Unusual patterns can be given literal descriptions. e.g. DashDotDotDot
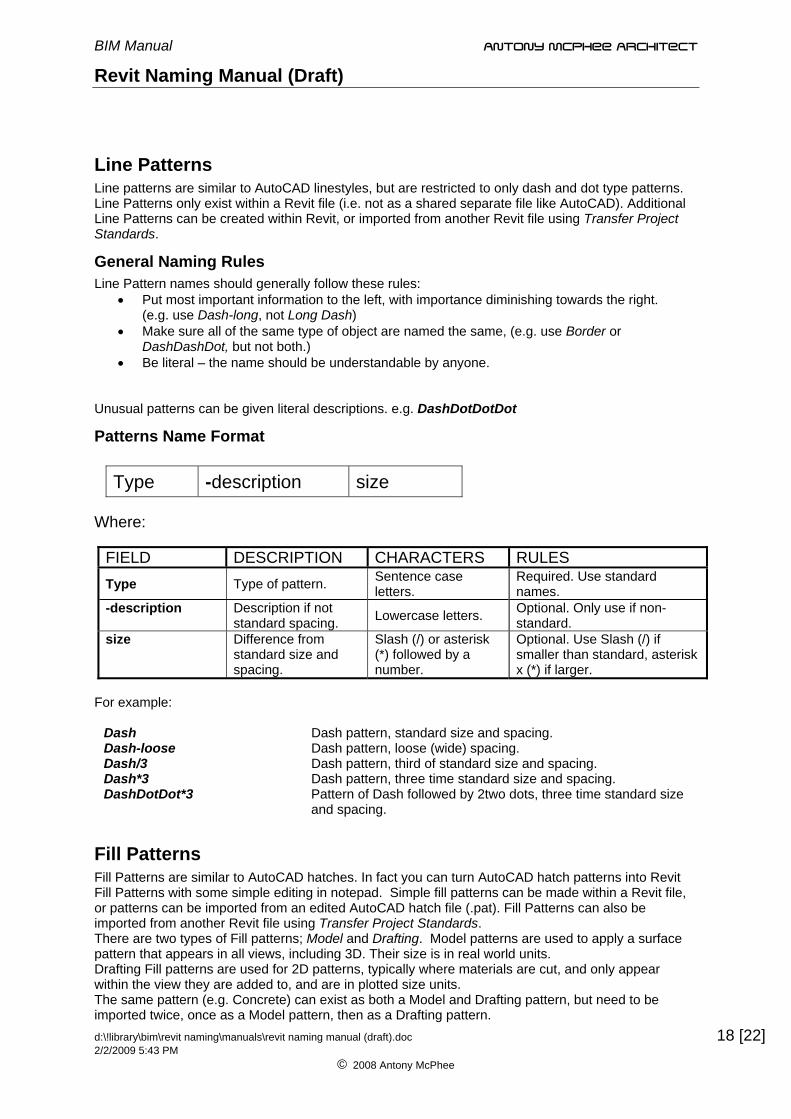
Patterns Name Format
Type -description size Where:
FIELD DESCRIPTION CHARACTERS RULES
Type Type of pattern. Sentence case letters.
Required. Use standard names.
-description Description if not standard spacing. Lowercase letters. Optional. Only use if non-
standard. size Difference from
standard size and spacing.
Slash (/) or asterisk (*) followed by a number.
Optional. Use Slash (/) if smaller than standard, asterisk x (*) if larger.
For example:
Dash Dash pattern, standard size and spacing. Dash-loose Dash pattern, loose (wide) spacing. Dash/3 Dash pattern, third of standard size and spacing. Dash*3 Dash pattern, three time standard size and spacing. DashDotDot*3 Pattern of Dash followed by 2two dots, three time standard size
and spacing.
Fill Patterns Fill Patterns are similar to AutoCAD hatches. In fact you can turn AutoCAD hatch patterns into Revit Fill Patterns with some simple editing in notepad. Simple fill patterns can be made within a Revit file, or patterns can be imported from an edited AutoCAD hatch file (.pat). Fill Patterns can also be imported from another Revit file using Transfer Project Standards. There are two types of Fill patterns; Model and Drafting. Model patterns are used to apply a surface pattern that appears in all views, including 3D. Their size is in real world units. Drafting Fill patterns are used for 2D patterns, typically where materials are cut, and only appear within the view they are added to, and are in plotted size units. The same pattern (e.g. Concrete) can exist as both a Model and Drafting pattern, but need to be imported twice, once as a Model pattern, then as a Drafting pattern. d:\!library\bim\revit naming\manuals\revit naming manual (draft).doc 2/2/2009 5:43 PM
© 2008 Antony McPhee
18 [22]
BIM Manual Antony McPhee Architect
Revit Naming Manual (Draft)
General Naming Rules Fill Pattern names should generally follow these rules:
• Put most important information to the left, with importance diminishing towards the right. (e.g. use Square 150, not 150 Square)
• Make sure all of the same type of object are named the same, (e.g. use Brick, not Brickwork or Masonry Brick.)
• Be literal – the name should be understandable by anyone. • It is not necessary to include units (mm) with numbers. • When describing sizes, always do it in the order of HEIGHT then WIDTH.
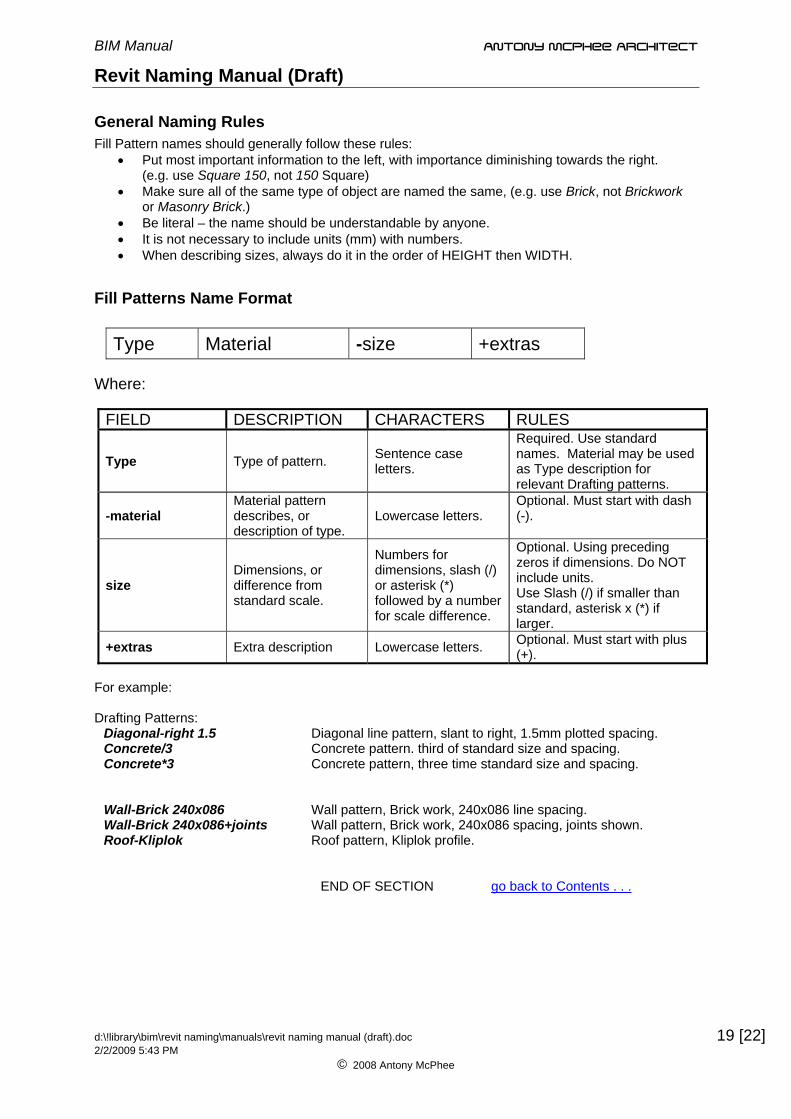
Fill Patterns Name Format
Type Material -size +extras Where:
FIELD DESCRIPTION CHARACTERS RULES
Type Type of pattern. Sentence case letters.
Required. Use standard names. Material may be used as Type description for relevant Drafting patterns.
-material Material pattern describes, or description of type.
Lowercase letters. Optional. Must start with dash (-).
size Dimensions, or difference from standard scale.
Numbers for dimensions, slash (/) or asterisk (*) followed by a number for scale difference.
Optional. Using preceding zeros if dimensions. Do NOT include units. Use Slash (/) if smaller than standard, asterisk x (*) if larger.
+extras Extra description Lowercase letters. Optional. Must start with plus (+).
For example: Drafting Patterns:
Diagonal-right 1.5 Diagonal line pattern, slant to right, 1.5mm plotted spacing. Concrete/3 Concrete pattern. third of standard size and spacing. Concrete*3 Concrete pattern, three time standard size and spacing.
Wall-Brick 240x086 Wall pattern, Brick work, 240x086 line spacing. Wall-Brick 240x086+joints Wall pattern, Brick work, 240x086 spacing, joints shown. Roof-Kliplok Roof pattern, Kliplok profile.
END OF SECTION go back to Contents . . .
d:\!library\bim\revit naming\manuals\revit naming manual (draft).doc 2/2/2009 5:43 PM
© 2008 Antony McPhee
19 [22]
BIM Manual Antony McPhee Architect
Revit Naming Manual (Draft)
Subject: Annotation Object Naming Section 08
Author: AMC Appr. by: AMC
Rev. Date: 07-MAR-08
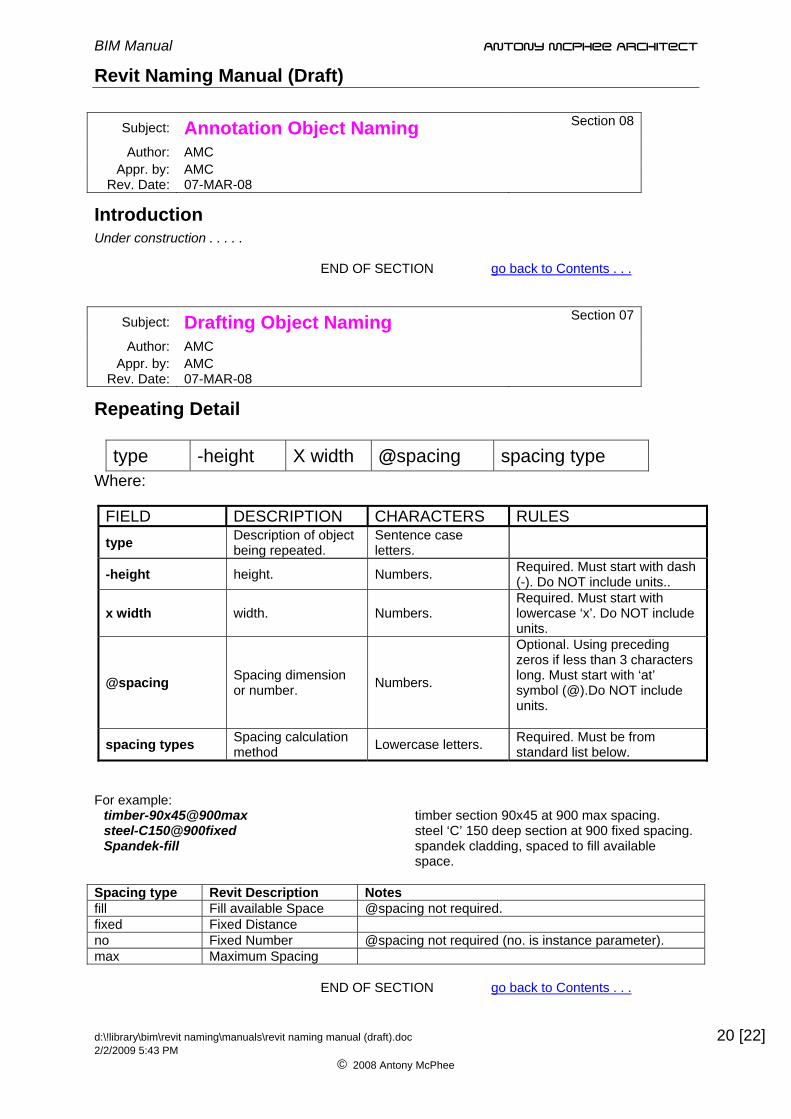
Introduction Under construction . . . . . END OF SECTION go back to Contents . . .
Subject: Drafting Object Naming Section 07
Author: AMC Appr. by: AMC
Rev. Date: 07-MAR-08
Repeating Detail
type -height X width @spacing spacing type Where:
FIELD DESCRIPTION CHARACTERS RULES
type Description of object being repeated.
Sentence case letters.
-height height. Numbers. Required. Must start with dash (-). Do NOT include units..
x width width. Numbers. Required. Must start with lowercase ‘x’. Do NOT include units.
@spacing Spacing dimension or number. Numbers.
Optional. Using preceding zeros if less than 3 characters long. Must start with ‘at’ symbol (@).Do NOT include units.
spacing types Spacing calculation method Lowercase letters. Required. Must be from
standard list below.
For example:
timber-90x45@900max timber section 90x45 at 900 max spacing. steel-C150@900fixed steel ‘C’ 150 deep section at 900 fixed spacing. Spandek-fill spandek cladding, spaced to fill available
space.
Spacing type Revit Description Notes fill Fill available Space @spacing not required. fixed Fixed Distance no Fixed Number @spacing not required (no. is instance parameter). max Maximum Spacing END OF SECTION go back to Contents . . .
d:\!library\bim\revit naming\manuals\revit naming manual (draft).doc 2/2/2009 5:43 PM
© 2008 Antony McPhee
20 [22]
BIM Manual Antony McPhee Architect
Revit Naming Manual (Draft)
Subject: Revit PDF & DWF File Naming Section 09
Author: AMc Appr. by:
Rev. Date: 11-AUG-08
Introduction Drawings are printed as PDF files or DWF files from Revit. The file name of PDF or DWF files must describe what drawing it contains. Note that PDF or DWF files are always issued containing only ONE drawing, unless the Team Leader has agreed to allow Multiple Page files to be issued (see below for naming convention). You can print multiple page files for check prints, or if you are prepared to split up the file before issuing. The format described below MUST be used for all PDF & DWF files of drawings.
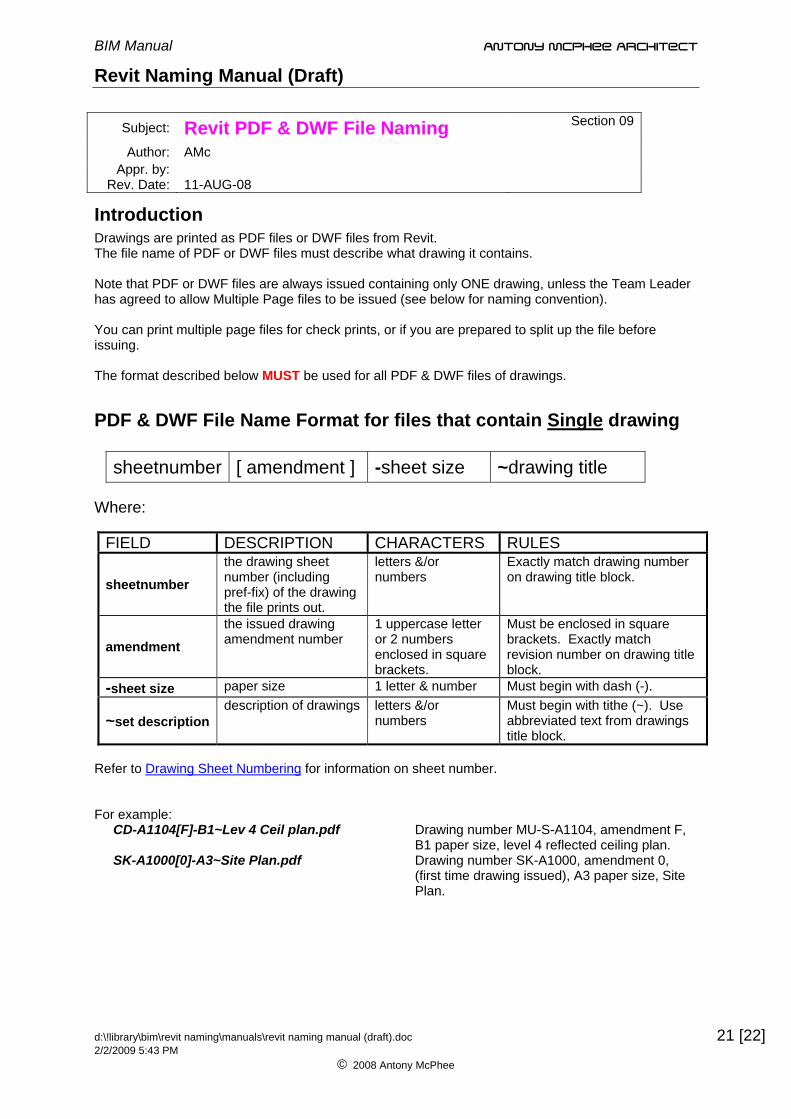
PDF & DWF File Name Format for files that contain Single drawing
sheetnumber [ amendment ] -sheet size ~drawing title Where:
FIELD DESCRIPTION CHARACTERS RULES
sheetnumber the drawing sheet number (including pref-fix) of the drawing the file prints out.
letters &/or numbers
Exactly match drawing number on drawing title block.
amendment the issued drawing amendment number
1 uppercase letter or 2 numbers enclosed in square brackets.
Must be enclosed in square brackets. Exactly match revision number on drawing title block.
-sheet size paper size 1 letter & number Must begin with dash (-).
~set description description of drawings letters &/or
numbers Must begin with tithe (~). Use abbreviated text from drawings title block.
Refer to Drawing Sheet Numbering for information on sheet number. For example:
CD-A1104[F]-B1~Lev 4 Ceil plan.pdf Drawing number MU-S-A1104, amendment F, B1 paper size, level 4 reflected ceiling plan.
SK-A1000[0]-A3~Site Plan.pdf Drawing number SK-A1000, amendment 0, (first time drawing issued), A3 paper size, Site Plan.
d:\!library\bim\revit naming\manuals\revit naming manual (draft).doc 2/2/2009 5:43 PM
© 2008 Antony McPhee
21 [22]
BIM Manual Antony McPhee Architect
Revit Naming Manual (Draft)
d:\!library\bim\revit naming\manuals\revit naming manual (draft).doc 22 [22] 2/2/2009 5:43 PM
© 2008 Antony McPhee
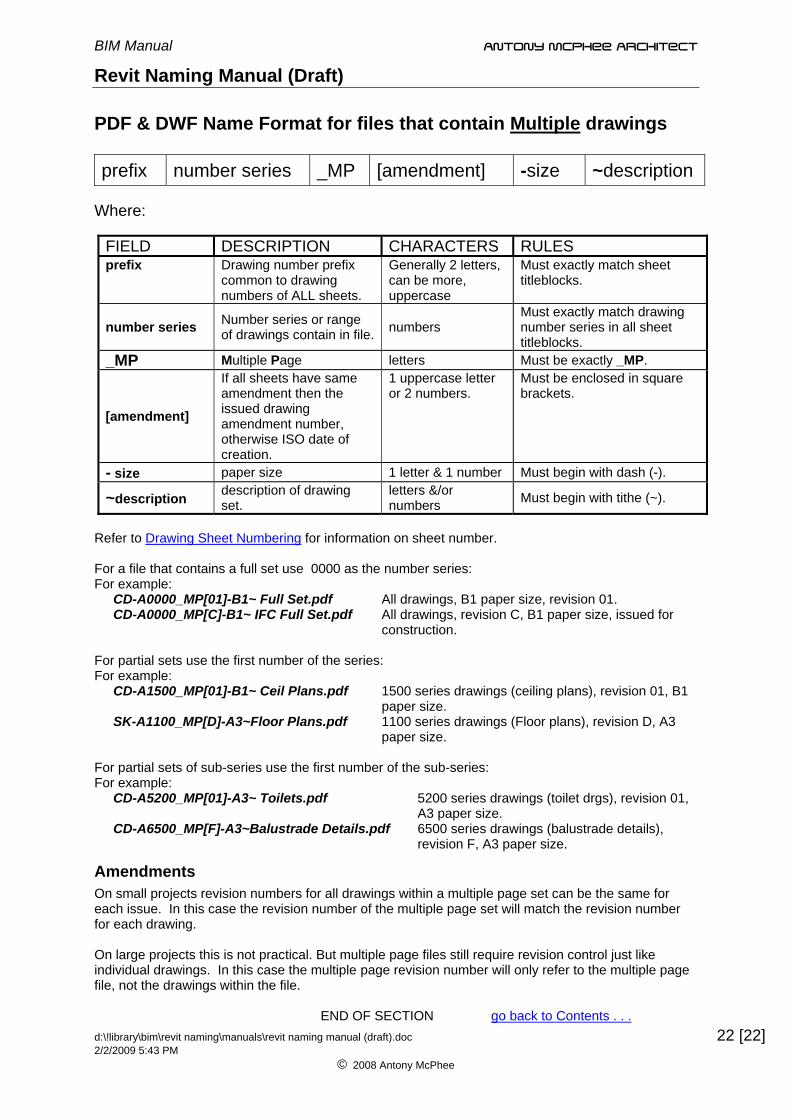
PDF & DWF Name Format for files that contain Multiple drawings
prefix number series _MP [amendment] -size ~description Where:
FIELD DESCRIPTION CHARACTERS RULES prefix Drawing number prefix
common to drawing numbers of ALL sheets.
Generally 2 letters, can be more, uppercase
Must exactly match sheet titleblocks.
number series Number series or range of drawings contain in file. numbers
Must exactly match drawing number series in all sheet titleblocks.
_MP Multiple Page letters Must be exactly _MP.
[amendment]
If all sheets have same amendment then the issued drawing amendment number, otherwise ISO date of creation.
1 uppercase letter or 2 numbers.
Must be enclosed in square brackets.
- size paper size 1 letter & 1 number Must begin with dash (-).
~description description of drawing set.
letters &/or numbers Must begin with tithe (~).
Refer to Drawing Sheet Numbering for information on sheet number. For a file that contains a full set use 0000 as the number series: For example:
CD-A0000_MP[01]-B1~ Full Set.pdf All drawings, B1 paper size, revision 01. CD-A0000_MP[C]-B1~ IFC Full Set.pdf All drawings, revision C, B1 paper size, issued for
construction. For partial sets use the first number of the series: For example:
CD-A1500_MP[01]-B1~ Ceil Plans.pdf 1500 series drawings (ceiling plans), revision 01, B1 paper size.
SK-A1100_MP[D]-A3~Floor Plans.pdf 1100 series drawings (Floor plans), revision D, A3 paper size.
For partial sets of sub-series use the first number of the sub-series: For example:
CD-A5200_MP[01]-A3~ Toilets.pdf 5200 series drawings (toilet drgs), revision 01, A3 paper size.
CD-A6500_MP[F]-A3~Balustrade Details.pdf 6500 series drawings (balustrade details), revision F, A3 paper size.
Amendments On small projects revision numbers for all drawings within a multiple page set can be the same for each issue. In this case the revision number of the multiple page set will match the revision number for each drawing. On large projects this is not practical. But multiple page files still require revision control just like individual drawings. In this case the multiple page revision number will only refer to the multiple page file, not the drawings within the file.
END OF SECTION go back to Contents . . .