Embed Size (px)
Citation preview
TABLE OF CONTENTS
Designer's Introduction ........................................................ 2
Basic Game Play .. .. .......................... ...... .. .. .... .. .................. 4
Main Menu ...................................................................... 5
Navigation Screen .............................................................. 8
Control Panel .. .. .................................................... ... ... ... ... 8
Maps .. .. ......... ......... .............. .. .......... ... .. ... .. ..... ........ ....... .. 11
Resting .... ......... .... ..... .. .... ... ..... ... ...... ..... ... ... ... ..... ..... .... ..... 14
Locations ...................... ................................................... . 15
Inventory Interface ........ .... ..... ...... .. ......................... .... .. .. .. 19
Skills and Condition ........................................................ .. 21
Communication ............ ... .. ...... .. .. ...................... .. .......... .. . 25
Magic .. .. .... ... ...... .... .. ........ ........... .. ..... ....... ... ......... .......... 21
Spell Casting .................................... ..... ............... .. .... ...... .. 30
Chests ... ... ..... ..... .... ..... ... ...... ............. ............................... 32
Combat ...... ........ ... .... ....................................................... 33
Inventory Items .. .................................... ........... .. ............... 31
History ...................................... ............ .... .... ... .. ....... ... .... . 40
Credits .............................................................................. 42
Technical Support ... ...... .. ...... ......... ...... .. ... ... .... .... ... ... .... ... . 43
Warranty ... ......... ....... ....... .. ..... ... .. ............ ........................ 48
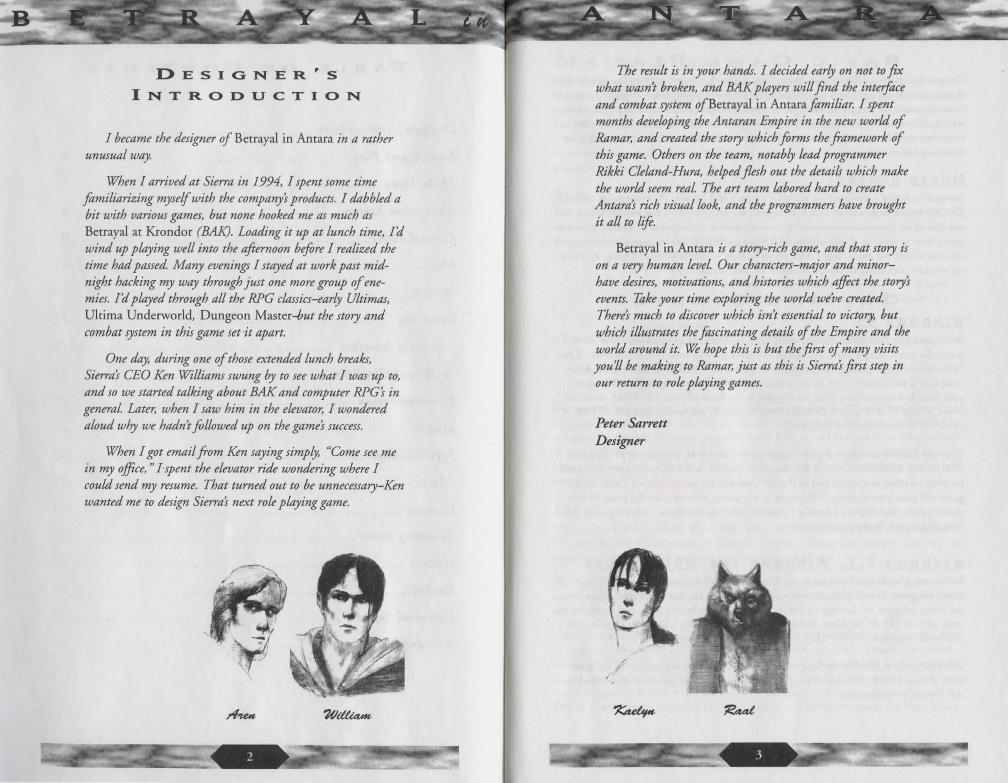
DESIGNER~S
INTRODUCTION
I became the designer of Betrayal in Antara in a rather unusual way.
When I arrived at Sierra in 1994, I spent some time familiarizing myself with the companys products. I dabbled a bit with various games, but none hooked me as much as Betrayal at Krondor (BAK). Loading it up at lunch time, I'd wind up playing well into the afternoon before I realized the time had passed. Many evenings I stayed at work past midnight hacking my way through just one more group of enemies. I'd played through all the RPG classics-early Ultimas, Ultima Underworld, Dungeon Master-but the story and combat system in this game set it apart.
One day, during one of those extended lunch breaks, Sierras CEO Ken Williams swung by to see what I was up to, and so we started talking about BAK and computer RPGs in general. Later, when I saw him in the elevator, I wondered aloud why we hadn't followed up on the games success.
When I got email .from Ken saying simply, "Come see me in my office, "I spent the elevator ride wondering where I could send my resume. That turned out to be unnecessary-Ken wanted me to design Sierras next role playing game.
The result is in your hands. I decided early on not to fix what wasn't broken, and BAK players will find the interface and combat system a/Betrayal in Antara familiar. I spent months developing the Antaran Empire in the new world of Ramar, and created the story which forms the .framework of this game. Others on the team, notably Lead programmer Rikki CLeland-Hura, helped flesh out the details which make the world seem real The art team labored hard to create Antaras rich visual look, and the programmers have brought it all to life.
Betrayal in Antara is a story-rich game, and that story is on a very human Level. Our characters-major and minorhave desires, motivatiom, and histories which affect the storys events. Take your time exploring the world we've created. Theres much to discover which isn't essential to victory, but which illustrates the fascinating details of the Empire and the world around it. W£ hope this is but the first of many visits you'll be making to Ramar, just as this is Sierras first step in our return to role playing games.
Peter Sarrett Designer
/ ,/
/
.~ ~ ..
BASIC GAME PLAY Betrayal in Antara is a first-person game. This means rhat as you explore rhe vast world of Ramar, you experience your surroundings as if you were seeing rhem through rhe eyes of your characters. In rhis game, you'll be in conrrol of up to 3 characters at a time, each wirh a different set of skills and atrributes. Ir's up to you to determine who and what rhey interact wirh, and what rheir actions might be. You'll control rhis parry wirh your mouse and keyboard.
MOU SE CO NTROL
Betrayal in Antara is designed for use wirh a standard 2-button, PC compatible mouse. The left mouse button is used to interact wirh rhe game world. Click rhe left mouse button (left-click) on a person or object to interact wirh it. Left-click on a conrrol button or menu item to select it. Right-clicking will bring up helpful information abour irems and controls wirhin rhe game. Right-dick on an item or a conrrol button to bring up a popup window containing information about rhe item or conrrol.
GE TTI N G
WINDOWS 9 5 S T ART E D
Before you play Betrayal in Antara, you'll need to install rhe game to your hard drive. To install the game, simply place rhe first of rhe game CDs in your CD-ROM drive. If you have rhe Autoplay option active on your computer, rhe Setup program will start auromatically. If this option is not active, you can start rhe Setup program by clicking on your Start button, selecting Run, and typing in rhe lerrer of your CD-ROM drive, followed by :\SETUP (if your CD-ROM drive is drive E, you would rype E:\SETUP). Click OK to start rhe Setup program.
Once the game is installed on your computer, you srart it by placing any of rhe game CDs in your CD-ROM drive. If the Autoplay option is active on your system, you will be asked wherher you would like to Play or Uninstall rhe game. Choose Play, and the game will start automatically. If Autoplay is not active, you can start rhe game by leftclicking your Start burton, selecting Programs, selecting rhe Sierra program group, and rhen clicking on Betrayal in Antara.
WINDOWS l_...l..... W IND OW S F OR WORKGROUPS
Before you play Betrayal in Antara, you'll need to install rhe game to your hard drive. To install rhe game, simply place rhe first of rhe game CDs in your CD-ROM drive. Start rhe Setup program by clicking on File in rhe menu bar, selecting Run, and ryping in rhe letter of your CD-ROM drive, followed by :\SETUP (if your CD-ROM drive is drive E, you would rype E:\SETUP). Click OK to start rhe Setup program.
Once rhe game is installed on your compurer, you start it by placing any of rhe game CDs in your CD-ROM drive. Then go to rhe Sierra program group, and double-click on rhe Betrayal in Antara icon.
MAIN M ENU
The first thing you'll see when you srart rhe game is rhe title screen and introductory sequence. At any point during this sequence, you can press rhe <Esc> key to move on to rhe Main Menu screen. This screen allows you to begin a new game or restore a game you previously saved. In addition, it will give you rhe opportuniry to set rhe clifficulry level of the game and to turn several automatic game functions on or off. You may also access rhis screen while playing, in order to save or restore a game, review plot-revealing sequences, or exit rhe game.
NEW This button allows you to srart a game of Betrayal in Antara at rhe beginning of rhe story, wirh only rhe basic starting skills and equipment. When you select New, you are asked to choose a player experience level and game clifficulry level.
Beginner Activates auto map annotation, auto spell research, retention of auto combat settings, and auto skill allocation. (See page 7 for details.)
Intermediate Activates automatic map annotation and auromatic skill allocation.
Advanced Turns all automatic functions off.
The start of the game is rhe only time you may set rhe game's difficulry level. Your choice for game difficulry (Easier, Normal, or Harder) wil l determine rhe price and availabiliry of items, rhe number of enemy groups you will have to face in combat, and rhe strengrh of each individual enemy. If you're a lifelong die-hard gamer, a combination of expert player level and high difficulry should provide you wirh rhat killer challenge you've been searching for!
SAVE
This button is only available if you enter rhe main Menu while a game is in progress. The Save feature will allow you to store your current location and status so rhat you can return to rhat moment in game time whenever you wish.
The Save Game screen contains a small image of rhe game map wirh your current location highlighted, a small image of your current view, and a list of all rhe games you've saved before.
Click rhe Save button and a text box will appear wirh rhe current chapter number. Type in additional descriptive text and click on Done to save rhe game. If you'd like to overwrite a saved game rhat you no longer need, click on it, delete rhe text of rhe descriptive name, enter a new descriptive name, and press Save. If you'd like to remove a saved game wirhout replacing it wirh a new one, click on rhe game you want to remove, then click Delete. Once you are finished wirh this screen, click Done to return to rhe Main Menu.
LOAD
This button is used to restore a previously-saved game. The Load screen lists your saved games. Each saved game will be listed under its descriptive name and chapter number. Click on one of these names to produce an image of the view your characters had when the game was saved, plus an image of the game map with your location highlighted. When you've selected the game you wish to restore, click Load and you'll go directly to the Navigation screen. If you would like to remove a saved game, rather than restoring it, select the game, then click Delete and the game will be removed from the list. Click Done to return to the Main Menu.
OPTIONS
This button will let you customize a variety of game options, according to your preference and the speed of your computer. This is only available during an active game.
Step Size Choose small, medium, or large steps to determine how smooth your party's movement will appear on the screen. The smaller the steps, the slower but smoother the movement. To improve performance on slower systems, choose a larger step size.
Turn Size Again, choose between small, medium, and large. At the smallest size, your party turns smoothly but slowly. At the largest size, the turning motion is considerably quicker.
Control Panel Locks With this option "on", the control panel is locked in place instead of automatically moving up when the cursor is moved over the bottom edge of the page. (Nore: The control panel only locks in the Navigation View.)
Control Panel Snaps With this option "on", the control panel quickly snaps into place when the cursor is moved to the edge of the window instead of slowly sliding into place. (Note: The conuol panel scrolls onto the screen from the bottom in the navigation view; the cartographer's drawer scrolls onto the screen from the right in the overhead map.)
Move in Low Resolution With this option "on", movement in the navigation view will be in lower resolution, snapping back to high resolution when the parry stops moving. This allows smoother motion in the 3D world. (Nore: You must stop moving to snap to high resolution before mouse clicks will be detected in the 3D World.)
STORY
Go to Next Page Advances you ro next page of options.
Automatic Map Annotation These options automatically place an annotation seal on the map whenever you encounter the appropriate type of location, object, or person. (Nore: NPCs or Non Player Characters may change location in the game. However the annotation that was in the original location will not be deleted. If the parry encounters an NPC in multiple locations, you may have multiple annotations for that NPC.)
Automatic Skill Allocation With this option on, the computer automatically controls the advancement of each character's skills.
Automatic Spell Research With this option on, the computer automatically researches new spells for your character as he develops enough knowledge and skill to cast them. With this option off, you must manually research new spells.
Retain AutoCombat Settings With this option on, the game stores your auto combat settings between encounters, so that they remain the same in each furure combat.
Previous Page Takes you to the previous page of options.
Revert This button resets all the options to the settings that existed when you entered the Options menu.
Done This button saves your settings and returns you to the Main Menu.
At the beginning and end of each chapter are non-interactive stories which advance the plot and give you clues about the goals that your characters need to accomplish in the following chapter. From the Review Story screen you can review any storybook that you have already seen in the current game. Storybooks which have not yet occurred are not available. To watch a storybook, simply click on the appropriate button. Once you have finished viewing, click Done to return to the Main Menu. If you wish to stop watching a story sequence that is in progress, press the <Esc> key.
CREDITS
Click on this button to see who made this game possible!
WEB PAG E T his bunon will cake you to the Betrayal in Antara Webpage.
CONTINU E This button is only available if you access the Main Menu while playing the game. Clicking on Continue returns you to the game in progress.
EXIT
This bunon allows you to exit Betrayal in Antara. Before you select Exie, please be certain that you have saved your game. If you exit without saving your game, you will lose your place.
NAVIGATION SCREEN
This screen displays a first-person view from your character's perspective. Click on objects or people to interact with them. Click on doors to knock on the door or enter.
The Movement Palette's functions are used to move in the 3D world. T hese movement functions are emulated on the keyboard by:
Slide Left (Insert) Forward (Home) Slide Right (Page Up)
Turn Left (Delete) Backward (End) Turn Right (Page Down)
You can also move in the 3D world by using the arrow keys on your keyboard. The up arrow moves your party forward, the down arrow moves you backward, and the right and left arrows turn your party in place.
CONTROL PANEL
When you move your mouse co the bottom of the Navigation screen, the Control Panel slides up. The Control Panel holds a portrait of each character in your party, plus several command bunons.
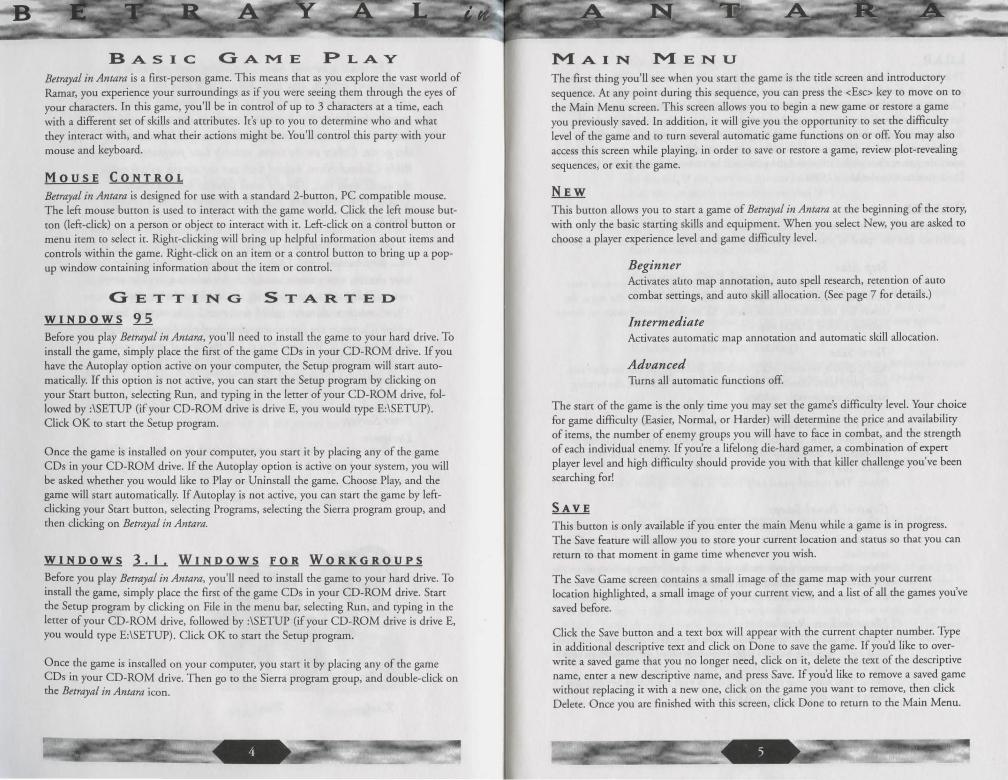
CHARACTER POR T RAI TS Each of the character portraits is encircled by a condition ring. When the character is at full stamina and health, the ring will be green and unbroken. As a character sustains damage, a portion of the ring darkens, indicating approximately how much of the character's total condition (stamina + health) remains. When the character's condition is at 49 percent, the ring turns yellow, at 19 percent, it turns red.
Movement Palette
Stick to Roads
Camp
Flashback
Spellcasting
Main Menu
Quicksave
Condition Ring
T he background color on the character portrait also gives you more info about the character's health status:
Black A black background indicates that a character is Healthy.
Green A green background indicates that a character has been Poisoned. For every hour the character remains poisoned, he or she loses a point of stamina. Once the character runs out of stamina, points of health are lost instead. Unless an antidote can be found, recovery from poison is a slow process.
Yellow A yellow background indicates that a character is Starving. If the party does not carry enough food for everyone to eat, characters begin to
starve. A starving character loses a point of stamina for every hour that

he or she is srarving. Once the character runs out of stamina, health points are lost instead. The only way to stop a character from starving is co find food. Once you feed a starving character enough, his status returns co Healthy.
Red A red background indicates that a character is Incapacitated. If a character takes enough damage from combat, poison, or starvation, his health drops co one point and he becomes incapacitated. Incapacitated characters require considerable care and rest before they return to a Healthy status.
If the character suffers from more than one of these conditions, the character's background color indicates the most dangerous of them.
You may also click on a character's portrait co equip or customize the character. Left-clicking on a portrait takes you to that character's inventory screen. (See page 19.) Right-clicking takes you co the character's skill/status screen. (See page 21.)
COMMAND BUTTONS
The control panel also contains six command buttons.
Flashback This button takes you co the Flashback screen, where you can replay previous conversations. (See page 26.)
Spellcasting This button takes you co the spell screens, where you can research and case magic spells. (See page 30.)
Camp This button allows you co sec up camp and regain your lost health and energy. (See page 14.)
Map This button cakes you to the local and world map screens, allowing you to pinpoint your location and to note the whereabouts of places and things co which you may want co return later. (See page 11.)
Quicksave This button saves your current game under the default name of "bookmark". Using this feature will automatically overwrite the previous Quicksaved game. It's a great way to buy insurance just before entering a risky battle, but you may want to use the standard Save feature for more permanent saved games. (See page 5.)
Main Menu This button takes you back to the Main Menu. (See page 5.)
COMPASS A.1iJ! MOVEMENT PALETTE
At the top of the Navigation screen is a compass wheel. This compass always indicates the direction your parry is facing. There are toggle buttons co the left and right of the compass. Left-clicking on the left button toggles the Movement Palette on and off. Leftclicking on the right button locks your parry onto the road chat you are currently following. With this option active your up arrow will move the parry along the road, automatically turning as needed to follow ic.
MAPS
When you click on the Map command button you will be taken to the map interface. This interface gives information about the party's location in either an overhead map or a world map.
OVERHEAD MAP
CARTOGRAPHER'S DRAWER
On the right side of the Map window is the Cartographer's Drawer. This drawer contains wax annotation seals chat you can use co mark items of interest on the map. It also contains controls co remove seals, zoom in or out, switch between the two Maps, or filter the Map to show only certain types of information. When closed, the Cartographer's Drawer is visible only as a pair of pull-knobs and a lock. When you move your mouse co the right side of the map window, the drawer slides open. The brass latch prevents the drawer from closing. Clicking on it when the drawer is open will lock the drawer in that position.
Cartographer's Drawer
Zoom Out
11 -
Wax Annotation Seals
Remove Annotation
OVERHEAD MAP This Map shows the area immediately surrounding your parry. You are represenred by a red arrow, pointing in the direction thar your parry is facing. You may move your parry through the world more quickly from the Overhead Map than you can in the 3D world. To do rhis use the arrow keys on your keyboard, bur be careful - you may miss imporranr objects by moving in this manner.
To mark locations you may wane to revisit, you can use the wax annorarion seals available in the Cartographer's Drawer. To mark an irem, person, or location thar your parry has jusr discovered, left-click on one of the annorarion seals and drag ir ro your parry's location on the Map. When you release the mouse burron you are requested to enrer some descriptive text. Type a shore description of the item, person, or location. When you press Enrer, the text is accepted and the wax seal thar you chose from the drawer is placed on the map. If you have the Auto Annotation option turned on in the game Options, a seal is automatically placed for you each time you encounter a location you may want to revisit lacer.
To change an annotation's seal you can:
a) Remove the old seal and replace it with a new one, or
b) Pick up the new seal from the drawer, drag it onro the map, and drop it directly on cop of the old seal.
c) Select the seal you wish to change by clicking on ir, then click on the seal in the Cartographer's Drawer.
To edir the text of an annotation, move your mouse over the annotation on the map and double-click your lefr mouse button on the seal. When you are done editing the rext, press Enrer.
To delete an annotation you can:
a) Click on the annotation that you want to remove from the map, then click on the Remove icon from the Cartographer's Drawer.
b) Drag the Remove Icon to the annotation thar you wane to remove from the map.
c) Drag the annotation that you wane to remove from the map to the Remove Icon.
To make the map smaller or larger, click on the Zoom In or Zoom Our icons. Click multiple times to worn farther in or out. The annotation seals will remain on the Map no marrer what size the Map is.
To go to the World Map view, simply click on the globe icon ar the bottom of the Cartographer's Drawer.
12 -
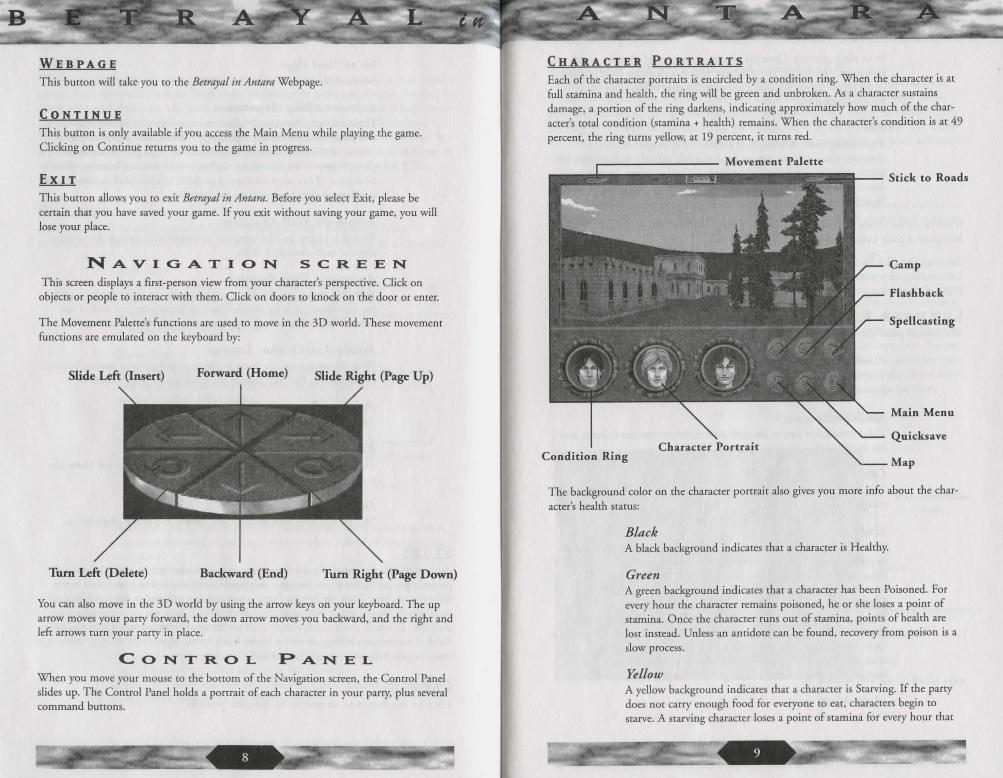
WORLD MAP
Map Annotation
Filter
Go to
This Map shows your parry's location in the world of Ramar and also gives information about your parry's current goal.
Annotation seals are visible as colored dots in the World Map view. Right-clicking on one of the dots displays rhe wax seal and the annorarion rext. If multiple annotations occur in one small area, a single whire doc is visible in thar location. Right-clicking on this single marker produces a lisr of all of the annotations in the area. To view any one of the annotations on the lisr, hold down the righr mouse button and move the cursor to highlight the desired seal.
In the World Map screen, the Cartographer's Drawer is used to filrer the annorarions which are already on the map. It will nor allow you ro place new seals. To display a certain rype of annotation, simply click on the appropriate burron in the drawer. The button will activate, and all annotations of thar rype will appear on the Map. You may turn the annotations off or on in any combination. If, for example, you're starving and need to find food, you can rum off all annotations except for shops and caverns.
To return to the Overhead Map screen, simply click on the parchment icon at the bottom of the Cartographer's Drawer. To exit the map interface, click on the door icon.
u -.
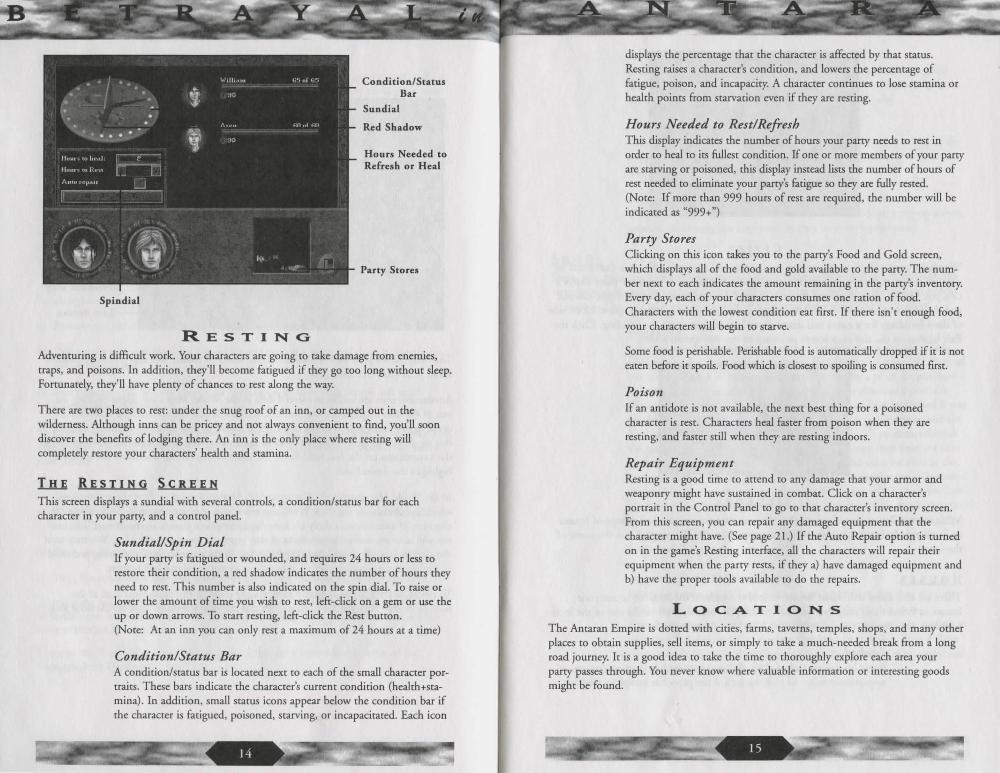
Spindial
RESTING
Condition/Status Bar
Sundial
Red Shadow
Hours Needed to Refresh or Heal
Party Stores
Adventuring is difficult work. Your characters are going to take damage from enemies, traps, and poisons. In addition, they'll become fatigued if they go too long without sleep. Forrunarely, they'll have plenry of chances to rest along the way.
There are two places to rest: under the snug roof of an inn, or camped our in che wilderness. Alchough inns can be pricey and nor always convenient to find, you'll soon discover che benefits of lodging there. An inn is che only place where resting will completely restore your characters' healch and stamina.
THE RESTING SCREEN This screen displays a sundial with several controls, a condition/status bar for each character in your parry, and a control panel.
Sundial/Spin Dial If your parry is fatigued or wounded, and requires 24 hours or less to
restore cheir condition, a red shadow indicates che number of hours chey need to rest. This number is also indicated on the spin dial. To raise or lower che amount of rime you wish to rest, left-click on a gem or use rhe up or down arrows. To start resting, left-click che Rest button. (Nore: Ar an inn you can only rest a maximum of 24 hours at a rime)
Condition/Status Bar A condition/status bar is located next to each of che small character portrairs. These bars indicate che character's current condition (healch+sramina). In addition, small status icons appear below che condition bar if che character is fatigued, poisoned, starving, or incapacitated. Each icon
displays che percentage that che character is affected by char status. Resting raises a character's condition, and lowers che percentage of fatigue, poison, and incapaciry. A character continues to lose stamina or healch points from starvation even if chey are resting.
Hours Needed to Rest/Refresh This display indicates che number of hours your parry needs to rest in order ro heal to irs fullest condition. If one or more members of your parry are starving or poisoned, this display instead lisrs che number of hours of rest needed to eliminate your parry's fatigue so chey are fully rested. (Nore: If more chan 999 hours of rest are required, che number will be indicated as "999+")
Party Stores Clicking on this icon rakes you to che parry's Food and Gold screen, which displays all of che food and gold available to che parry. The number next ro each indicates che amount remaining in che parry's inventory. Every day, each of your characters consumes one ration of food. Characters wich che lowest condition ear first. If chere isn't enough food, your characters will begin to starve.
Some food is perishable. Perishable food is automatically dropped if it is nor eaten before it spoils. Food which is closest to spoiling is consumed first.
Poison If an antidote is nor available, che next best ching for a poisoned character is rest. Characters heal faster from poison when chey are resting, and faster still when chey are resting indoors.
Repair Equipment Resting is a good rime to attend to any damage char your armor and weaponry might have sustained in combat. Click on a character's portrait in che Control Panel to go co that character's inventory screen. From chis screen, you can repair any damaged equipment char che character might have. (See page 21.) lf che Auto Repair option is turned on in che game's Resting interface, all che characters will repair cheir equipment when che parry resrs, if chey a) have damaged equipment and b) have che proper tools available co do che repairs.
LOCATIONS
The Anraran Empire is dotted wich cities, farms, taverns, temples, shops, and many ocher places to obtain supplies, sell irems, or simply to rake a much-needed break from a long road journey. It is a good idea to rake the time to choroughly explore each area your parry passes chrough. You never know where valuable information or inreresring goods might be found.
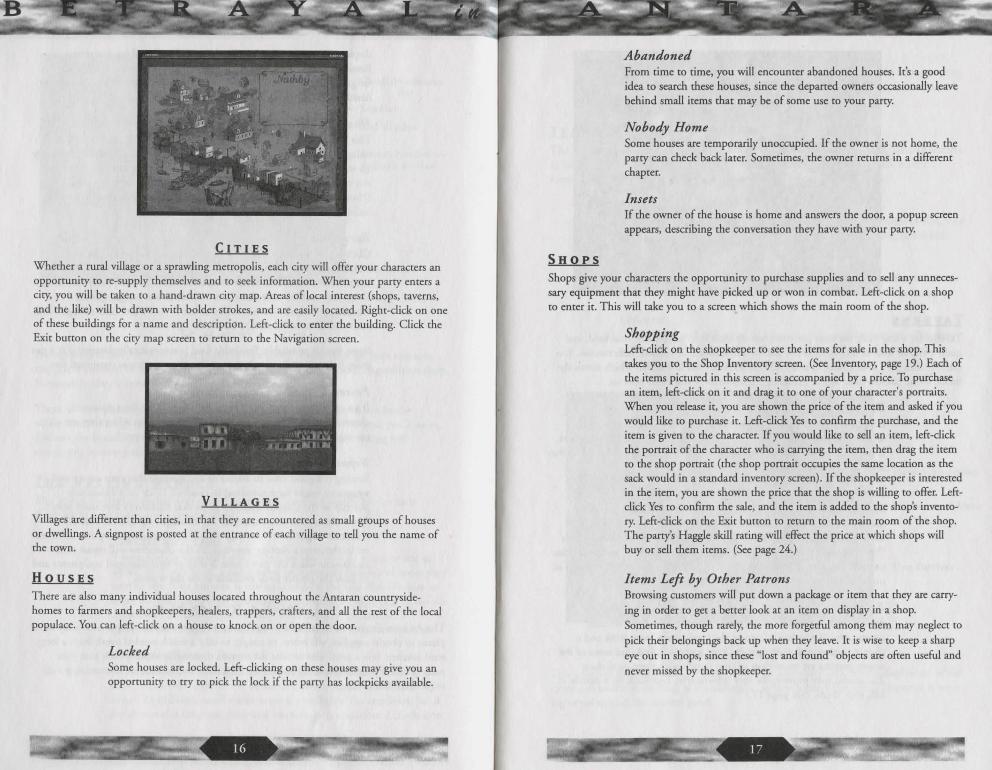
CITIES
Whether a rural village or a sprawling metropolis, each city will offer your characters an opportunity to re-supply themselves and to seek information. When your parry enters a city, you will be taken to a hand-drawn city map. Areas of local interest (shops, taverns, and the like) will be drawn with bolder strokes, and are easily located. Right-click on one of these buildings for a name and description. Left-click to enter the building. Click the Exit button on the city map screen to return to the Navigation screen.
. ' ' . - . •. '°."' I ''"I ..•
;1 r ... .. •• 4, ID-~
VILLAGES
Villages are different than cities, in that they are encountered as small groups of houses or dwellings. A signpost is posted at the entrance of each village to tell you the name of the town.
HOUSES
There are also many individual houses located throughout the Antaran countrysidehomes to farmers and shopkeepers, healers, trappers, crafters, and all the rest of the local populace. You can left-click on a house to knock on or open the door.
Locked Some houses are locked. Left-clicking on these houses may give you an opporruniry to try to pick the lock if the parry has lockpicks available.
SHOPS
Abandoned From time to time, you will encounter abandoned houses. It's a good idea to search these houses, since the departed owners occasionally leave behind small items that may be of some use to your parry.
Nobody Home Some houses are temporarily unoccupied. If the owner is not home, the parry can check back later. Sometimes, the owner returns in a different chapter.
Insets If the owner of the house is home and answers the door, a popup screen appears, describing the conversation they have with your parry.
Shops give your characters the opportunity to purchase supplies and to sell any unnecessary equipment that they might have picked up or won in combat. Left-click on a shop to enter it. This will take you to a screen which shows the main room of the shop.
Shopping Left-click on the shopkeeper to see the items for sale in the shop. This takes you to the Shop Inventory screen. (See Inventory, page 19.) Each of the items pictured in this screen is accompanied by a price. To purchase an item, left-click on it and drag it to one of your character's portraits. When you release it, you are shown the price of the item and asked if you would like to purchase it. Left-click Yes to confirm the purchase, and the item is given to the character. If you would like to sell an item, left-click the portrait of the character who is carrying the item, then drag the item to the shop portrait (the shop portrait occupies the same location as the sack would in a standard inventory screen). If the shopkeeper is interested in the item, you are shown the price that the shop is willing to offer. Leftclick Yes to confirm the sale, and the item is added to the shop's inventory. Left-click on the Exit button to return to the main room of the shop. The party's Haggle skill rating will effect the price at which shops will buy or sell them items. (See page 24.)
Items Left by Other Patrons Browsing customers will put down a package or item that they are carrying in order to get a better look at an item on display in a shop. Sometimes, though rarely, the more forgetful among them may neglect to pick their belongings back up when they leave. It is wise to keep a sharp eye out in shops, since these "lost and found" objects are often useful and never missed by the shopkeeper.
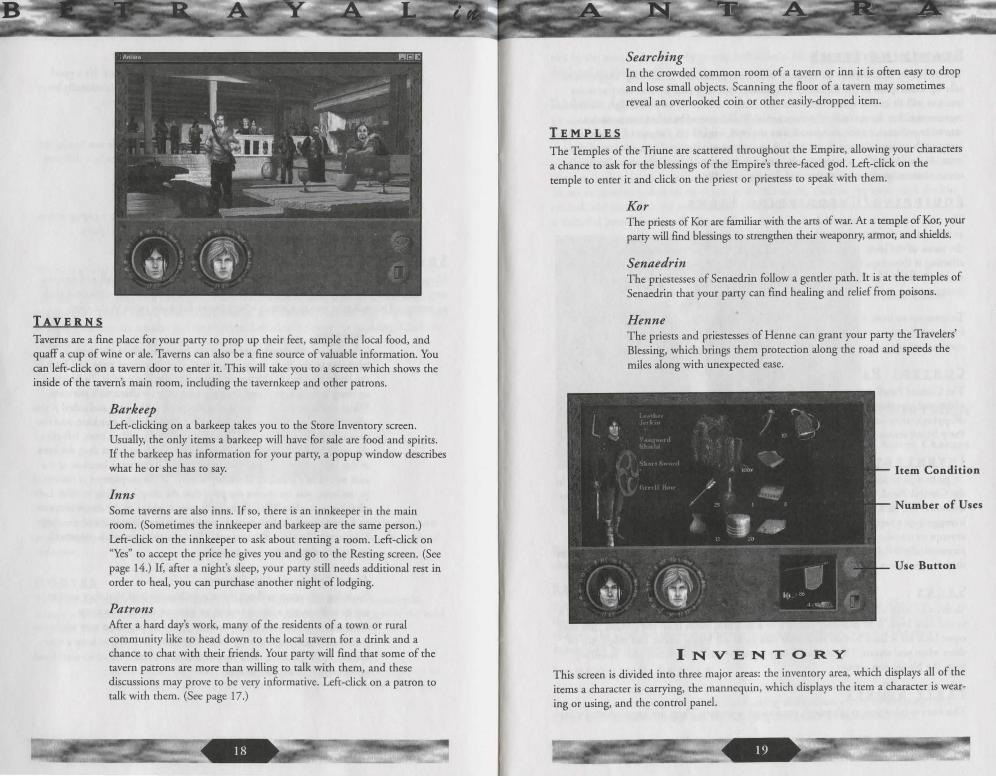
TAVERNS
Taverns are a fine place for your party to prop up their feet, sample the local food, and quaff a cup of wine or ale. Taverns can also be a fine source of valuable information. You can left-click on a tavern door to emer it. This will take you to a screen which shows the inside of the cavern's main room, including the tavernkeep and other patrons.
Barkeep Left-clicking on a barkeep takes you to the Store Inventory screen. Usually, the only items a barkeep will have for sale are food and spirirs. If the barkeep has information for your parry, a popup window describes what he or she has to say.
Inns Some taverns are also inns. If so, there is an innkeeper in the main room. (Sometimes the innkeeper and barkeep are the same person.) Left-click on the innkeeper to ask about renting a room. Left-click on "Yes" to accept the price he gives you and go to the Resting screen. (See page 14.) If, after a night's sleep, your parry srill needs additional rest in order to heal, you can purchase another night of lodging.
Patrons After a hard day's work, many of the residenrs of a town or rural community like to head down to the local tavern for a drink and a chance to chat with their friends. Your parry will find that some of the tavern patrons are more than willing to talk with chem, and these discussions may prove to be very informative. Left-dick on a patron to talk with them. (See page 17.)
TEMPLES
Searching In the crowded common room of a tavern or inn it is often easy to drop and lose small objects. Scanning the floor of a tavern may sometimes reveal an overlooked coin or other easily-dropped item.
The Temples of the Triune are scattered throughout the Empire, allowing your characters a chance to ask for the blessings of the Empire's three-faced god. Left-click on the temple to enter it and click on the priest or priestess to speak with them.
Kor The priesrs of Kor are familiar with the arrs of war. At a temple of Kor, your party will find blessings to strengthen their weaponry, armor, and shields.
Senaedrin The priestesses of Senaedrin follow a gentler path. It is at the temples of Senaedrin chat your parry can find healing and relief from poisons.
Henne The priesrs and priestesses of Henne can grant your parry the Travelers' Blessing, which brings chem protection along the road and speeds the miles along with unexpected ease.
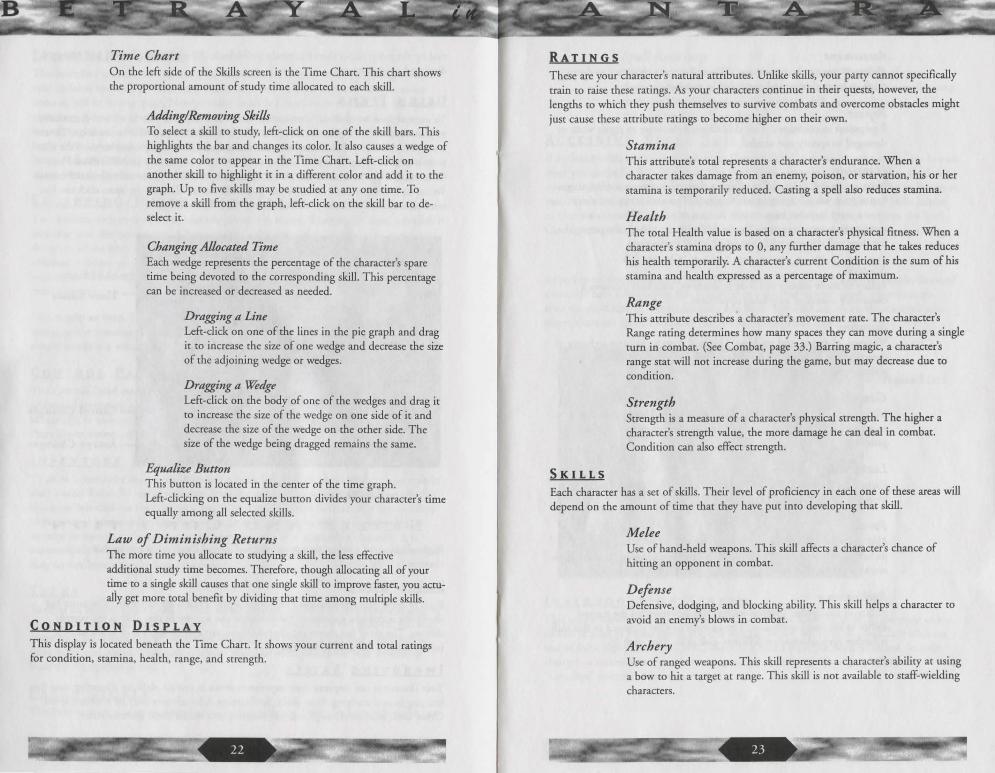
Item Condition
Number of Uses
Use Button
INVENTORY This screen is divided into three major areas: the inventory area, which displays all of the items a character is carrying, the mannequin, which displays tl1e item a character is wear
ing or using, and the comrol panel.

EXAMINING ITEMS
The inventory area displays an image of each item a character is carrying. Larger items take up more space in the inventory. A character can only pick up and carry as many items as will fit in this space. Next to many items is a number or percentage. A number represents either the amount of items carried (in the case of bundled items, such as arrows or potions), or the number of uses the item has left (in the case of limited-use items such as beeswax or whetstones). A percentage indicates the condition of the item - the lower the percentage, the more damaged or flawed the item. Right-dick on an item to receive a more derailed description of it.
EOUIPPING/UNEOUIPPING ITEMS
The mannequin is located on the far left side of the screen. To equip an item, left-click it and drag it to the mannequin. A box appears to the right of the mannequin, containing the name of the item, its condition or number of uses, and any modifiers currently affecting it (blessings, anti-flame treatment, etc). If a similar item is already equipped, such as another sword, the new item replaces it and the old item goes to the main inventory area.
To unequip an item, left-click either on the box describing the item or on the item's image on the mannequin, and drag it to the inventory area. Please note that you cannot simply unequip a weapon or armor. You must replace it with another weapon or armor.
CONTROL PANEL
The Control Panel contains a portrait of each character in the party and an icon for an additional inventory area (such as a shop, if you access a character's inventory while shopping), or an icon of a sack. There are also buttons to use a selected item, go to the Party Scores screen, or exit the Inventory screen.
INVENTORY PORTRAITS
To go to a particular character's Inventory screen, left-click on that character's portrait in the Control Panel. To transfer an item from the current character's inventory co another character, left-click on the item and drag it to that character's portrait. If it is a bundled item, you are prompted to specify how many of the item you wish to transfer. If you attempt to transfer a currently-equipped weapon or armor co another character, it is automatically swapped with that character's currently-equipped weapon or armor, unless they do not have a similar item equipped.
SACKS
To drop an item co make room in your inventory area, left-click on the item and drag it to the Sack icon. Your character places it in a sack and leaves it on the ground. You may come back for it later, bur do remember that sacks are highly visible and might nor be there when you return. This option is only available when you access your inventory from the Navigation screen.
PARTY STORES
This button rakes you to the party's communal inventory. These are items which are car-
ried by the party rather than by certain individuals. All of the party's food and money is
displayed on this screen.
USING ITEMS
To use one item on another item, such as beeswax to repair a bow or an anti-flame item to protect armor, left-click the item and drag it co the item you wish to use it on. To use a weapon, armor, or shield, drag it to the mannequin. To use any other item on the character who is carrying it, double-click the item. To give an item co an NPC (Non Player Character), drag the item co the NPC's inventory portrait in the lower right hand corner. To use an inventory item on an object in the 3D world, click on the item, click the Use symbol, and then click the sword cursor on the 3D world object.
Equalize Button
SKILLS AND
Skill Bars
Time Chart
Cancel Changes
Accept Changes
CONDITION
Right-clicking on a character portrait in the Control Panel takes you co that character's Skills screen.
SKILL BARS Each of these bars represents one of the skills that a character can learn. The outer bar shows the maximum experience the character can achieve in that skill in the current chapter. The inner bar shows the character's current experience, which is also shown
numerically to the right of the bar.
IMPROVING SKILLS Your characters can improve their experience levels in certain skills by allocating time for training in and studying those skills. Spellcasting skills advance only by studying them. Other skills increase through use, but studying also makes them increase faster.
Time Chart On the left side of the Skills screen is the Time Chart. This chart shows the proportional amount of study time allocated to each skill.
Adding/Removing Skills To select a skill to study, left-click on one of the skill bars. This highlights the bar and changes its color. It also causes a wedge of the same color to appear in the Time Chart. Left-click on another skill to highlight it in a different color and add it to the graph. Up to five skills may be studied at any one time. To remove a skill from the graph, left-click on the skill bar to deselect it.
Changing Allocated Time Each wedge represents the percentage of the character's spare time being devoted to the corresponding skill. This percentage can be increased or decreased as needed.
Dragging a Line Left-click on one of the lines in the pie graph and drag it to increase the size of one wedge and decrease the size of the adjoining wedge or wedges.
Dragging a wedge Left-click on the body of one of the wedges and drag it to increase the size of the wedge on one side of it and decrease the size of the wedge on the other side. The size of the wedge being dragged remains the same.
Equalize Button This button is located in the center of the time graph. Left-clicking on the equalize button divides your character's time equally among all selected skills.
Law of Diminishing Returns The more time you allocate to studying a skill, the less effective addirional study time becomes. Therefore, though allocating all of your time to a single skill causes that one single skill to improve faster, you actually get more total benefit by dividing that time among multiple skills.
CONDITION DISPLAY
This display is located beneath the Time Chart. It shows your current and total ratings for condition, stamina, health, range, and strength.
RATINGS
These are your character's natural attributes. Unlike skills, your party cannot specifically train to raise these ratings. As your characters continue in their quests, however, the lengths to which they push themselves to survive combats and overcome obstacles might just cause these attribute ratings to become higher on their own.
SKILLS
Stamina This attribute's total represents a character's endurance. When a character takes damage from an enemy, poison, or starvation, his or her stamina is temporarily reduced. Casting a spell also reduces stamina.
Health The total Health value is based on a character's physical fitness. When a character's stamina drops to 0, any further damage that he takes reduces his health temporarily. A character's current Condition is the sum of his stamina and health expressed as a percentage of maximum.
Range This attribute describes a character's movement rate. The character's Range rating determines how many spaces they can move during a single turn in combat. (See Combat, page 33.) Barring magic, a character's range stat will not increase during the game, but may decrease due to condition.
Strength Strength is a measure of a character's physical strength. The higher a character's strength value, the more damage he can deal in combat. Condition can also effect strength.
Each character has a set of skills. Their level of proficiency in each one of these areas will depend on the amount of time that they have put into developing that skill.
Me lee Use of hand-held weapons. This skill affects a character's chance of hitting an opponent in combat.
Defense Defensive, dodging, and blocking ability. This skill helps a character to avoid an enemy's blows in combat.
Archery Use of ranged weapons. This skill represents a character's ability at using a bow to hit a target at range. This skill is not available to staff-wielding characters.
B .
Assessment Ability to size up the opposition. This skill helps a character to determine an enemy's stats and condition in combat.
Repair Equipment maintenance. This skill allows a character to repair worn or damaged weaponry and armor.
Haggling Negotiating skill. This ability affects a character's chance at obtaining a better price when buying or selling goods. This skill is applied every time a party member buys or sells an item at a shop. If there is an increase in a party member's haggle skill while in a shop, the prices in the shop will decrease while the party is still in the shop.
Stealth Ability to move silently and hide in shadows. This skill increases a character's chance of surprising opponents.
Scouting Wariness, alertness, and tracking. This skill gives a character a chance at detecting and avoiding ambushes and traps. Also affects a character's ability to detect trapped chests.
Gambling Understanding of probability and ability to bluff. This helps a character to surmise or gain information which will allow them to win when gambling.
Lockpicking Knowledge of locks. This skill affects a character's chance of picking locked doors or disarming traps.
Foraging Ability to find and excavate minerals. This skill allows a character with a pickaxe to locate and extract gems from caves and tunnels. Also ability to catch fish. This skill allows a character with a fishing pole to catch fish.
Spellcasting Ability to manipulate magical energy. Not everyone has the natural ability to become a spellcaster. The amount of time allocated to this skill is further divided amongst different spell skills. (See page 30.)
24 I
I
Spell Accuracy Ability to direct magical energy with precision. This skill affects a character's chance of hitting a target with ranged spells. In a spellcasting character, this skill replaces the Archery skill. Non-spellcasting characters will not have this skill.
ACCESSING SPELL SKILLS
If a character has spellcasting ability; his Control Panel contains an extra icon. This button takes you to the Spell Skills screen. The Spell Skills screen is nearly identical to the Skills screen, but lists only the character's currently-known spell skills. Just as in the Skills screen, you can choose to study up to 5 spell skills at a time. Click on the Normal Skills button to return to the standard Skills screen. Click on the Cast Spell button to go to the Spell Casting screen. Left-click on the Create Spell button to go to the Spell Research screen.
COMMUNICATION
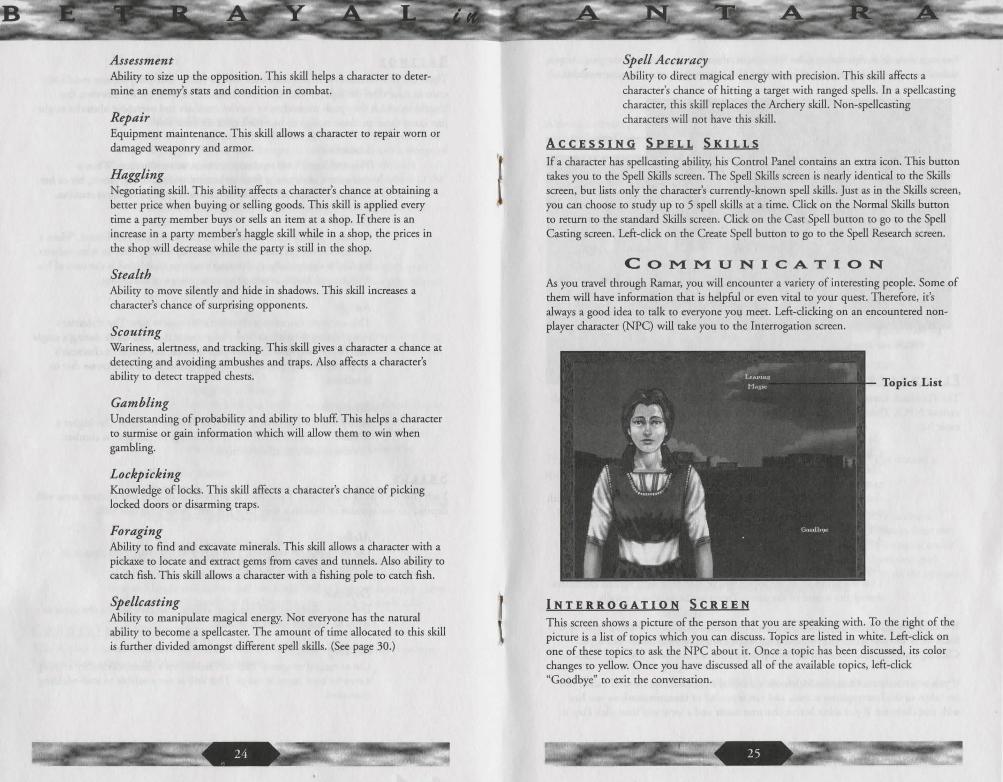
As you travel through Ramar, you will encounter a variety of interesting people. Some of them will have information that is helpful or even viral to your quest. Therefore, it's always a good idea to talk to everyone you meet. Left-clicking on an encountered nonplayer character (NPC) will rake you to the Interrogation screen.
Topics List
INTERROGATION SCREEN
This screen shows a picture of the person that you are speaking with. To the right of the picture is a list of topics which you can discuss. Topics are listed in white. Left-click on one of these topics to ask the NPC about it. Once a topic has been discussed, its color changes to yellow. Once you have discussed all of the available topics, left-click "Goodbye" to exit the conversation.
You may want to re-visit some of the NPCs with whom you've spoken in the past. As you make discoveries in the game, or talk to other NPCs, new topics may become available.
Topic List
Scroll Arrow
Play Flashback
Exit
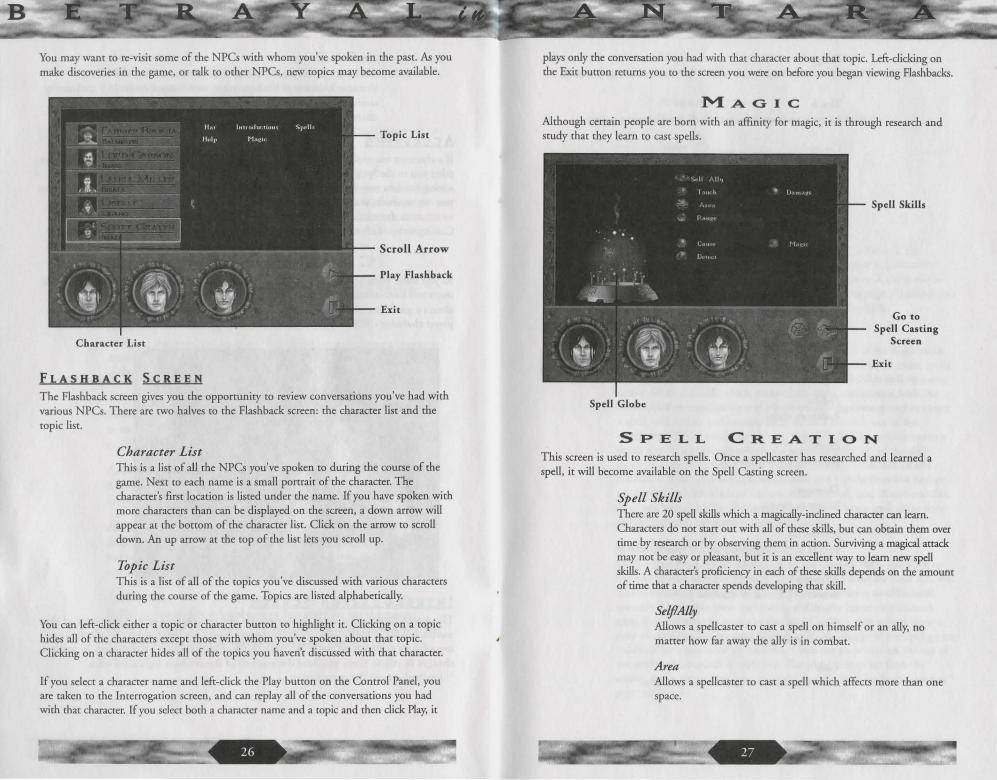
Character List
FLASHBACK SCREEN The Flashback screen gives you the opportunity to review conversations you've had with various NPCs. There are two halves to the Flashback screen: the character list and the topic list.
Character List This is a list of all the NPCs you've spoken to during the course of the game. Next to each name is a small portrait of the character. The character's fust location is listed under the name. If you have spoken with more characters than can be displayed on the screen, a down arrow will appear at the bortom of the character list. Click on the arrow to scroll down. An up arrow at the top of the list lets you scroll up.
Topic List This is a list of all of the topics you 've discussed with various characters during the course of the game. Topics are listed alphabetically.
You can left-click either a topic or character burton to highlight it. Clicking on a topic hides all of the characters except those with whom you've spoken about that topic. Clicking on a character hides all of the topics you haven't discussed with that character.
If you select a character name and left-click the Play button on the Control Panel, you are taken to the Incerrogation screen, and can replay all of the conversations you had with that character. If you select both a character name and a topic and then click Play, it
26 ,·
plays only the conversation you had with that character about that topic. Left-clicking on the Exit button returns you to the screen you were on before you began viewing Flashbacks.
MAGIC
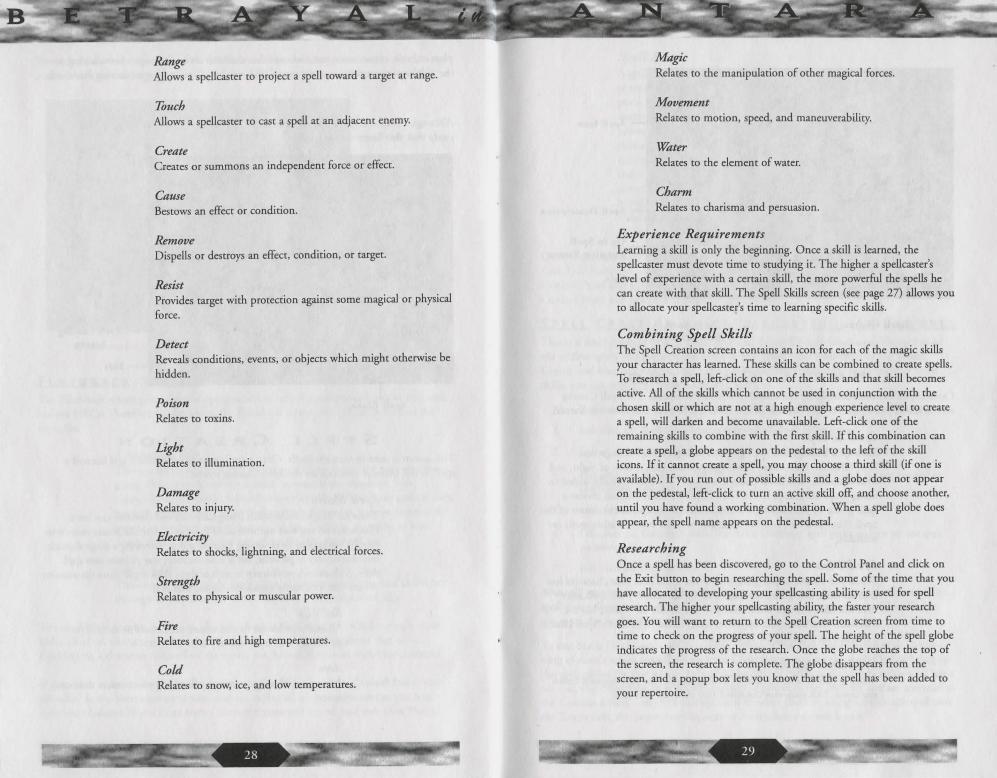
Although certain people are born with an affinity for magic, it is through research and study that they learn to cast spells.
Spell Globe
Spell Skills
Go to Spell Casting
Screen
Exit
SPELL CREATION
This screen is used to research spells. Once a spellcaster has researched and learned a spell, it will become available on the Spell Casting screen.
Spell Skills There are 20 spell skills which a magically-inclined character can learn. Characters do not start out with all of these skills, but can obtain them over time by research or by observing them in action. Surviving a magical attack may noc be easy or pleasant, but it is an ex:cellenc way to learn new spell skills. A character's proficiency in each of these skills depends on the amount of time that a character spends developing that skill.
SelflAlly Allows a spellcaster to cast a spell on himself or an ally, no marter how far away the ally is in combat.
Area Allows a spellcasrer to cast a spell which affects more than one space.
27 .
Range Allows a spellcasrer ro project a spell toward a rarger ar range.
Touch Allows a spellcaster ro cast a spell ar an adjacent enemy.
Create Creares or summons an independent force or effect.
Cause Besrows an effecr or condicion.
Remove Dispells or destroys an effect, condicion, or targer.
Resist Provides targer wirh prorection against some magical or physical force.
Detect Reveals condicions, evenrs, or objects which mighr orherwise be hidden.
Poison Relares to roxins.
Light Relates ro illumination.
Damage Relares to injury.
Electricity Relares ro shocks, lighming, and electrical forces.
Strength Relates ro physical or muscular power.
Fire Relares to fire and high remperatures.
Co/,d Relates to snow, ice, and low remperatures.
Magic Relares ro rhe manipulacion of orher magical forces.
Movement Relates to motion, speed, and maneuverabiliry.
Ulater Relates to rhe element of water.
Charm Relares ro charisma and persuasion.
Experience Requirements Learning a skill is only rhe beginning. Once a skill is learned, rhe spellcaster must devore rime ro studying ir. The higher a spellcaster's level of experience wirh a certain skill, rhe more powerful rhe spells he can create wirh rhar skill. The Spell Skills screen (see page 27) allows you ro allocate your spellcasrer's rime ro learning specific skills.
Combining Spell Skills The Spell Creacion screen contains an icon for each of rhe magic skills your character has learned. These skills can be combined ro creare spells. To research a spell, left-click on one of rhe skills and rhat skill becomes accive. All of rhe skills which cannor be used in conjunction wirh rhe chosen skill or which are nor ar a high enough experience level to create a spell, will darken and become unavailable. Left-click one of rhe remaining skills to combine wirh rhe first skill. If rhis combinacion can creare a spell, a globe appears on rhe pedestal ro rhe left of rhe skill icons. If it cannot create a spell, you may choose a rhird skill (if one is available). If you run out of possible skills and a globe does not appear on rhe pedestal, left-click ro turn an acrive skill off, and choose anorher, until you have found a working combination. When a spell globe does appear, rhe spell name appears on rhe pedestal.
Researching Once a spell has been discovered, go to rhe Control Panel and click on rhe Exit butron to begin researching rhe spell. Some of rhe rime rhat you have allocated ro developing your spellcasring abiliry is used for spell research. The higher your spellcascing abiliry, rhe fasrer your research goes. You will wanr to return ro rhe Spell Creacion screen from time to rime ro check on rhe progress of your spell. The heighr of rhe spell globe indicates rhe progress of rhe research. Once rhe globe reaches rhe rop of rhe screen, rhe research is complere. The globe disappears from rhe screen, and a popup box lers you know rhar rhe spell has been added to your reperroire.
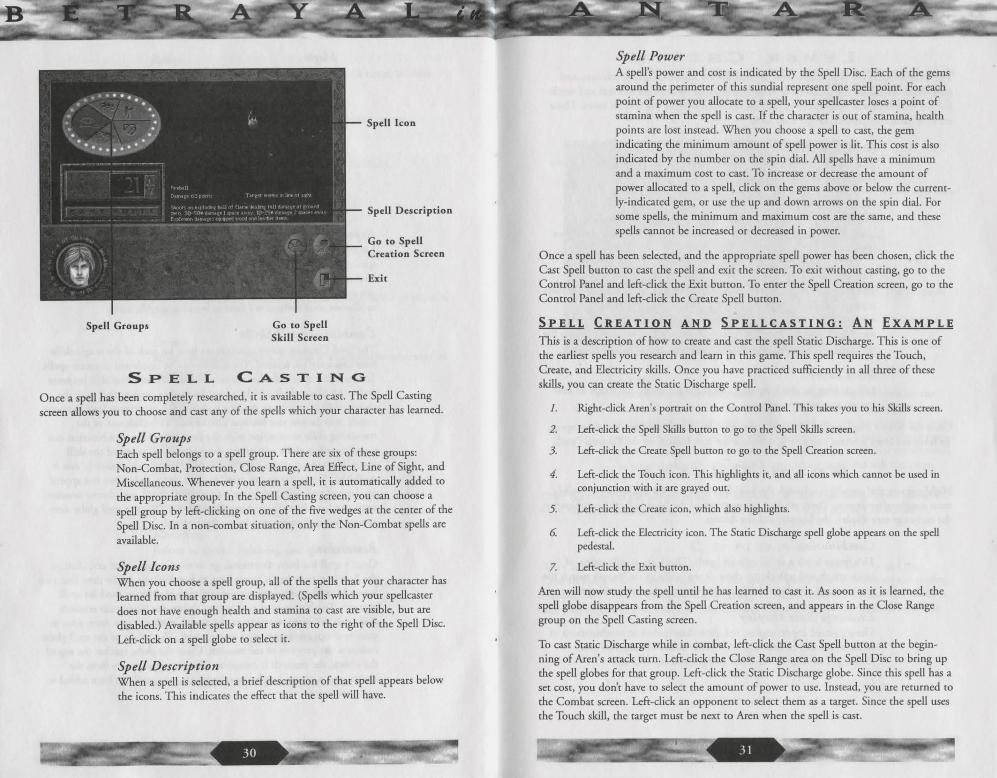
Spell Groups
SPELL
Go to Spell Skill Screen
CASTING
Sp ell Icon
Spell Description
Go to Spell Creation Screen
Exit
Once a spell has been completely researched, it is available to cast. The Spell Casting screen allows you to choose and cast any of the spells which your character has learned.
Spell Groups Each spell belongs to a spell group. There are six of these groups: Non-Combat, Protection, Close Range, Area Effect, Line of Sight, and Miscellaneous. Whenever you learn a spell , it is automatically added to the appropriate group. In the Spell Casting screen, you can choose a spell group by left-clicking on one of the five wedges at the center of the Spell Disc. In a non-combat situation, only the Non-Combat spells are available.
Spell Icons When you choose a spell group, all of the spells char your character has learned from that group are displayed. (Spells which your spellcasrer does not have enough health and stamina to cast are visible, bur are disabled.) Available spells appear as icons to the right of the Spell Disc. Lefr-click on a spell globe to select it.
Spell Descrip tion When a spell is selected, a brief description of char spell appears below the icons. This indicates the effect char the spell will have.
Spell Power A spell's power and cost is indicated by the Spell Disc. Each of the gems around the perimeter of this sundial represent one spell point. For each point of power you allocate to a spell, your spellcasrer loses a point of stamina when the spell is cast. If the character is our of stamina, health points are lost instead. When you choose a spell to cast, rhe gem indicating the minimum amount of spell power is lie. This cost is also indicated by rhe number on the spin dial. All spells have a minimum and a maximum cost to case. To increase or decrease the amount of power allocated to a spell, click on the gems above or below the currently-indicated gem, or use the up and down arrows on the spin dial . For some spells, rhe minimum and maximum cost are the same, and these spells cannot be increased or decreased in power.
Once a spell has been selected, and the appropriate spell power has been chosen, click rhe Case Spell button to cast the spell and exit the screen. To exit without casting, go to the Control Panel and left-click the Exit button. To enter the Spell Creation screen, go to the Control Panel and left-click the Create Spell bunon.
SPELL CREATION AND SP E LLCASTING: Ali E X AM PLE
T his is a description of how to create and case the spell Static Discharge. This is one of the earliest spells you research and learn in this game. This spell requires the Touch, Create, and Electricity skills. Once you have pracriced sufficiently in all three of these skills, you can create the Static Discharge spell.
1. Right-click Aren 's portrait on the Control Panel. This takes you to his Skills screen.
2.
3.
4.
5.
6.
Left-click the Spell Skills butron to go to the Spell Skills screen.
Left-click the Create Spell bunon to go to the Spell Creation screen.
Left-click the Touch icon. This highlights it, and all icons which cannot be used in conjunction with it are grayed out.
Left-dick the Create icon, which also highlights.
Left-click the Electricity icon. The Static Discharge spell globe appears on the spell pedestal.
7. Left-click the Exie burron.
Aren will now study the spell until he has learned to cast it. As soon as it is learned, the spell globe disappears from the Spell Creation screen, and appears in the Close Range group on the Spell Casting screen.
To cast Static Discharge while in combat, left-click the Cast Spell bunon at the beginning of Aren's arrack turn . Left-click the Close Range area on the Spell Disc to bring up the spell globes for that group. Left-click the Static Discharge globe. Since this spell has a set cost, you don't have to select the amount of power to use. Instead, you are returned to the Combat screen. Left-click an opponent to select them as a target. Since the spell uses the Touch skill, the target must be next to Aren when the spell is cast.
LEVER CHESTS
The unusual locks on chese chesrs were devised for che learned nobility, scholars, and merchanrs. To discourage pilfering of valued possessions by illirerare servanrs and workers, che lever lock was designed ro require an undersranding of che written word. There are four main componenrs of che lever lock.
Answer Window This is an empty window ar che cop of che chest. Pulling che tab levers raises wooden tabs inside chis window.
Question Plaque This bronze plaque covers mosr of che lock. On ir is engraved a question or riddle. You need ro answer rhis question or riddle ro open che chesr.
Tab Levers There are 12 cab levers. Above each lever, one or two lerrers or numbers is engraved. Pulling a lever raises a wooden tab in che answer window. The cab is engraved wirh che same letter or number combination as che lever. Lefr-click on che cab levers co pull chem in che correcr order co answer che chesr's question.
Reset Lever Lefr-clicking on this lever resers all of che cab levers and drops all cabs out of che answer window.
Once che correct combination of letters appears in che answer window, che chesr opens. To leave che chesr wichour opening ir, lefr-click che Exie burron on che Control Panel.
BEAD CHESTS
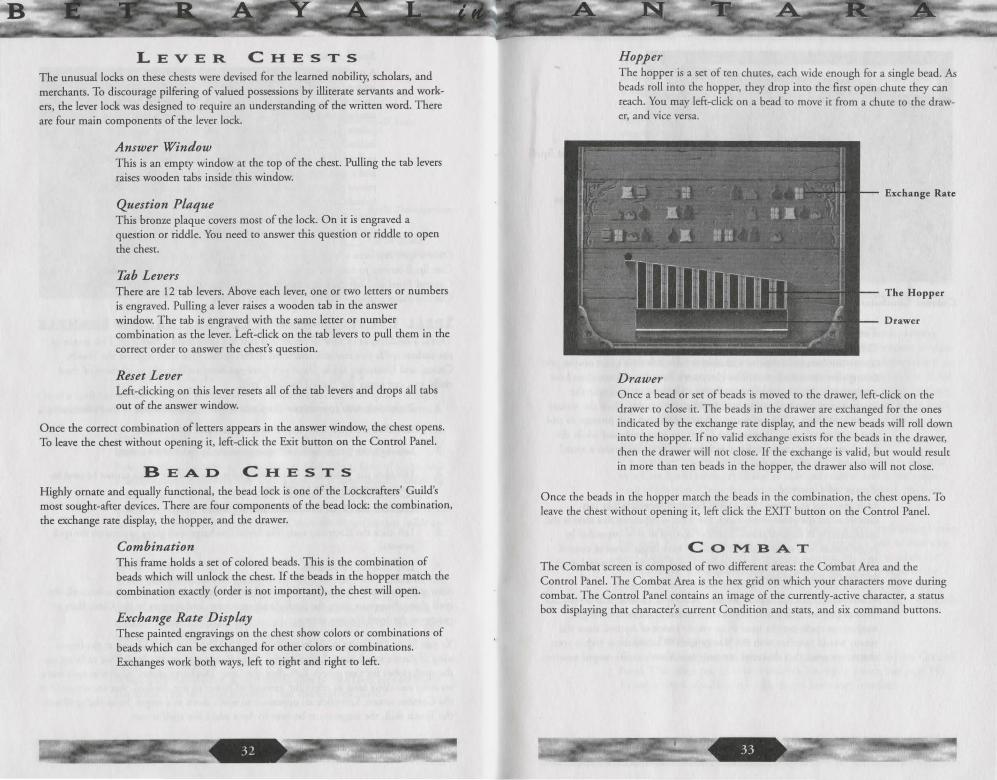
Highly ornare and equally funcrional, che bead lock is one of the Lockcrafrers' Guild's mosr sought-alter devices. There are four components of che bead lock: che combinarion, rhe exchange rate display, the hopper, and che drawer.
Combination This frame holds a sec of colored beads. This is che combination of beads which will unlock che chesr. If che beads in che hopper match che combination exactly (order is not importanr), che chest will open.
Exchange Rate Display These painted engravings on che chest show colors or combinarions of beads which can be exchanged for other colors or combinarions. Exchanges work both ways, left ro right and right ro left.
Hopper The hopper is a sec of ren chures, each wide enough for a single bead. As beads roll inro che hopper, chey drop inro che firsr open chure chey can reach. You may lefr-click on a bead ro move ir from a chure ro che drawer, and vice versa.
Exchange Rate
The Hopper
Drawer
Drawer Once a bead or sec of beads is moved ro che drawer, lefr-click on che drawer co close ir. The beads in che drawer are exchanged for che ones indicared by che exchange rare display, and che new beads will roll down inro che hopper. If no valid exchange exisrs for the beads in che drawer, chen the drawer will nor close. If che exchange is valid, bur would resulr in more chan ren beads in che hopper, rhe drawer also will nor close.
Once che beads in che hopper march che beads in the combination, che chesr opens. To leave che chesr wichour opening ir, lefr click the EXIT burron on che Conrrol Panel.
COMBAT The Combat screen is composed of two different areas: che Combat Area and the Control Panel. The Combar Area is rhe hex grid on which your characters move during combat. The Control Panel contains an image of the currently-active characrer, a status box displaying char character's currenr Condition and stars, and six command buttons.
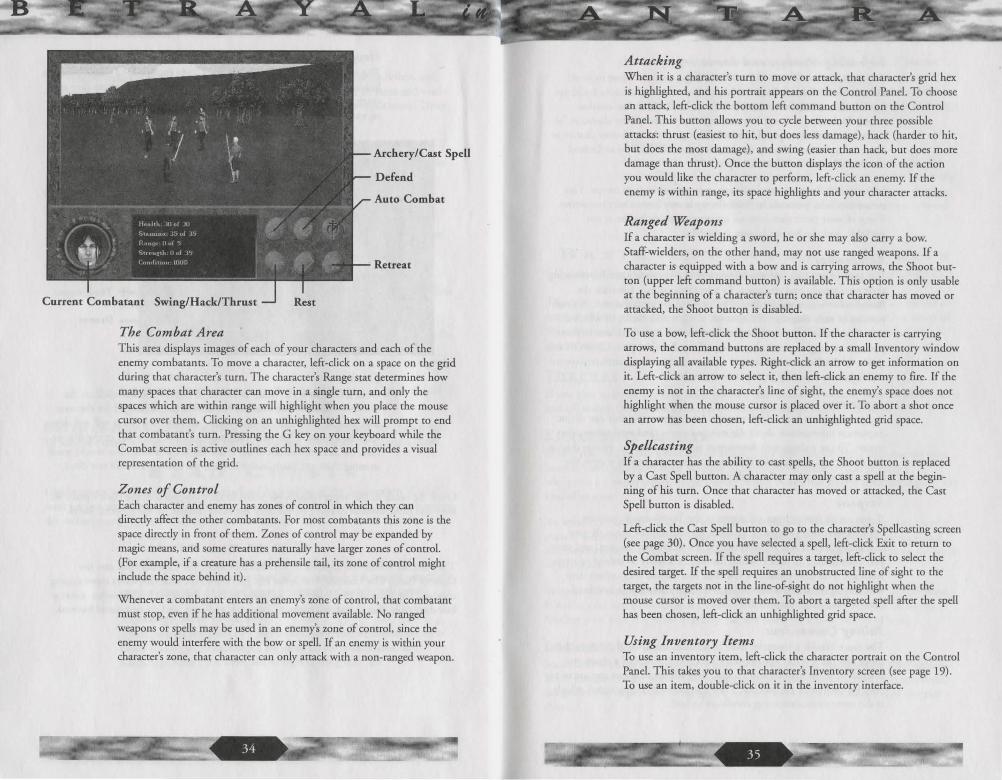
B
The Combat Area
Archery/Cast Spell
Defend
Auto Combat
Retreat
This area displays images of each of your characters and each of che enemy combarancs. To move a character, lefc-click on a space on che grid during chat character's turn. The character's Range scat determines how many spaces chat character can move in a single turn, and only che spaces which are wichin range will highlight when you place che mouse cursor over chem. Clicking on an unhighlighced hex will prompt to end chat combatant's turn. Pressing the G key on your keyboard while the Combat screen is active outlines each hex space and provides a visual representation of che grid.
Zones of Control Each character and enemy has wnes of control in which chey can directly affect che ocher combatants. For most combatants chis wne is che space directly in front of chem. Zones of control may be expanded by magic means, and some creatures naturally have larger wnes of control. (For example, if a creature has a prehensile tail, its wne of control might include che space behind it).
Whenever a combatant enters an enemy's wne of control, chat combatant must stop, even if he has additional movement available. No ranged weapons or spells may be used in an enemy's wne of control, since che enemy would interfere wich che bow or spell. If an enemy is wichin your character's wne, chat character can only attack wich a non-ranged weapon.
. ~4 ·.
Attacking When it is a character's turn to move or attack, chat character's grid hex is highlighted, and his portrait appears on che Control Panel. To choose an attack, lefc-click che bottom lefc command button on che Control Panel. This button allows you to cycle between your chree possible attacks: chrust (easiest to hit, but does less damage), hack (harder to hit, but does che most damage), and swing (easier chan hack, but does more damage chan chrust). Once che button displays che icon of che action you would like che character to perform, lefc-click an enemy. If che enemy is wichin range, its space highlights and your character attacks.
Ranged Weapons If a character is wielding a sword, he or she may also carry a bow. Scaff-wielders, on che other hand, may not use ranged weapons. If a character is equipped with a bow and is carrying arrows, che Shoot button (upper lefc command button) is available. This option is only usable at the beginning of a character's turn; once chat character has moved or attacked, che Shoot button is disabled.
To use a bow, lefc-click the Shoot button. If che character is carrying arrows, the command buttons are replaced by a small Inventory window displaying all available types. Right-click an arrow to get information on it. Lefc-click an arrow to select it, then lefc-click an enemy to fire. If the enemy is not in che character's line of sight, the enemy's space does not highlight when the mouse cursor is placed over it. To abort a shot once an arrow has been chosen, lefc-click an unhighlighted grid space.
Spellcasting If a character has the ability to cast spells, che Shoor button is replaced by a Cast Spell button. A character may only cast a spell at the beginning of his turn. Once that character has moved or attacked, che Cast Spell button is disabled.
Lefc-click che Cast Spell button to go co che character's Spellcasting screen (see page 30). Once you have selected a spell, lefc-click Exit to return to che Combat screen. If the spell requires a target, lefc-click to select che desired target. If che spell requires an unobstructed line of sight to the target, che targets not in the line-of-sight do not highlight when che mouse cursor is moved over chem. To abort a targeted spell afcer the spell has been chosen, lefc-click an unhighlighted grid space.
Using Inventory Items To use an inventory item, lefc-click the character portrait on che Control Panel. This takes you to that character's Inventory screen (see page 19). To use an item, double-click on it in che inventory interface .
Defending, Resting, and Retreating To pass a character's turn without attacking, you can choose to have them either Defend or Rest. Resting gives them the chance to build up lost Stamina, but leaves them relatively defenseless for that combat round. Defending will not increase Stamina, bur keeps rhe character "at ready," prepared for a possible arrack. This gives them a better chance to block enemy attacks during the round. Left-click the Rest or Defend command button to select that option.
Selecting the Retreat button gives your parry a chance to escape. This sometimes fails, particularly if the enemy is very fast or very numerous. If any of your party members are unconscious, this option is not available, and the Retreat button is disabled.
Autocombat You may sec any or all of your characters to fight automatically, choosing their own attacks and srracegies. To select this option, left-click the Autocombac command button to go to the Autocombac screen. A small portrait of each character is displayed, along with a listing of whether that character is computer- or player-controlled. Left-click one of these portraits to toggle autocombat on or off for that character. Click OK to return to the Combat screen, and all characters sec for computer-control will fight automacically in the current combat.
Assessment If your characters have a high enough Assessment skill, they can divine important information about the scars, strengths, and weaknesses of an enemy. To use a character's Assessment skill, right-click an enemy during that character's attack turn. The closer a character is to an enemy, the more that character can learn about that enemy.
Surprise If you see an enemy from a distance in the Travel screen, you can left-click on them to attempt to sneak up and surprise them. If your character's Stealth skill is high enough, the effort may succeed, and your party can launch an attack before the enemy is ready to defend or councerarrack. This may result in a few "free hies" before they collect their wits and fight back. Bue remember, the same advantage is bestowed upon enemies who surprise the party.
Falling Unconscious The more Health a character loses in combat, the lower their scat values drop, and the less damage they can inflict on enemies. If a character loses all of their Stamina and Health, they fall unconscious and are of no help for the rest of the combat. They also become Incapacicaced, which is the most time-consuming condition to heal.
If the entire parry becomes unconscious, the battle is lose. If you are playing on the Beginner experience level, you are given the opportunity to replay the combat. Otherwise, the parry is defeated and the game is over. For this reason, we recommend saving your game before entering a risky combat situation.
Victory! If your parry is victorious in combat, you are returned to the Travel screen. The bodies of the enemy are visible on the screen. Left-click any of the bodies to go to an Inventory screen. This special screen displays the total inventory of all of the slain foes in the area, so you can search all of them at once.
BASIC INVENTORY ITEMS (Excerpted from Sharma's Guide For The Traveler, Sharma's General Store, Balmestri)
There are many items which you will need when craveling. Some of these are special or magical objects which can only be obtained through great risk or expense, bur many of the most useful items are those everyday necessities which can be purchased in any general store.
TORCHES
If you plan to see at night, or underground, you cannot do without these. Made of wood and oil-soaked cloth, these torches burn for hours before they're exhausted.
EQUIPMENT REPAIR
Unless you plan to buy a new suit of armor and a new weapon every time the old ones become damaged, you'll need the tools to repair them. Make certain to carry a whetstone for sword repair. These smooth, cough stones will restore a wicked edge to any bladed weapon.
An armorer's hammer allows you to reshape the metal of mistreated armor, and thereby prevent weak points from developing in the damaged areas. Although ir rakes a steady hand and a good eye to use this tool well, even a novice can utilize it to remove the worst of the dents.
Beeswax will restore a cracking and damaged bowstring to its original supple condition. If you've ever had a bowstring snap on you in the middle of combat, with an enemy heading your way, you won't begrudge the few coins for a good supply of wax.
LOCKPICKS
Small flexible pieces of steel, these lockpicks are excellent at manipulacing the tumblers inside standard locks. Some of the most expensive locks, however, have been specifically designed to be impervious to lockpicks, so you'll need to find another means to open them.
SHOVELS
Standard shovels are made from a strong shah of wood and an iron or steel shovel blade. They are an invaluable tool to many professions, and as such are readily available in most rural communities.
ROPE
Made from braided fibers, these ropes are strong enough to hitch a donkey to a cart or hold a grown man's weight while he excavates for a well. Be cenain to carry several lengths wich you at all times.
PICKAXES
This tool is a necessiry for miners. The pickaxe is made from a short wooden shah and a chick iron pick blade.
F OOD A.1U! A LE
Although dried, smoked, and salted trail rations are available for travelers, chey become monotonous after several days of journeying. Most towns, particularly in the rural, farming areas, have fresh foods which chey are willing to sell. Unlike che trail rations, these foods are perishable, so it is not wise to purchase in large quantities.
Various ales, meads, wines and other spirits are also available in che Empire's taverns. Some of these taste like the finest of nectars, others may have all che flavor and appeal of hog slop, but they're generally a welcome sight aher days of drinking from a tepid waterskin.
ARMOR
Armor ranges in rype from leather to linked rings, and all che way up to full suits of hammered steel plate. Some people choose to wear che lightest armor possible, to allow themselves che greatest freedom of movement. But since certain areas of che Empire are so dangerous in these times, you should obtain the sturdiest armor chat you can afford. After all, che coins in your pocket won't do you any good if a well-armed bandit takes chem from you.
S HIEL D S
Made from wood or metal, a shield adds one more layer of protection between you and a bandit's blade. Unless you are wielding a two-handed weapon, I cannot Stress enough che importance of che shield.
WEAPONS
Swords range greatly in length, sryle, and ornateness, but all of them will allow you to give a good accounting of yourself in combat. The bercer che qualiry of che blade, che more damage it will generally do.
Bows are generally made from flexible wood and lengths of sinew or guc. Since che bow will ofren give you a chance to deal damage to an enemy before engaging in close combat, ics use in battle is highly lauded.
For che traveler who is not practiced in the arts of che warrior, che staff is a fine choice of weapon. Staves are crahed from the Strongest of woods, and can be highly effective against a lightly-armored enemy. In addition, of course, che staff makes an excellent walking stick.
G E M S AN D [ EWEL R Y
Gems and jewelry will always be popular among che well-todo, and as such will usually bring a good price in stores. A wide variery of gems and jewels, in an even wider variery of condition, is available throughout che Empire. There are rumors chat some of these may have minor magical powers, and some shopkeepers will sell "enchanted" jewels, but do you really want to risk your coins on mere rumors?
A BRIEF HISTORY OF
ANTARA
Sit a while, traveLer, and share a cup of ale with us. How can it be that you have not heard the tale of how our Empire came to be the J!ne place of civilization and ease that it is today? No matte~ If you ar~ to ;ourney through the heart of the Empire, there are many things you will need to know ...
Many, many generations ago, more years than a man can count, our ancestors held this land. They farmed here, fished here, hunted here, and Lived peacefully with each other. But then the GrrrLf fe/L upon us. The furred monsters swept across the land, killing without discrimination and without mercy. They drove us from our homes, across the deserts and mountains and oceans to safety.
And so we lived for many years, exiled from our homeland, until the day that we discovered that the magical forces of the world_ c~uld b~ tamed and used. Armed with this knowledge, the new mages ;oined with massive human armies, and they marched upon the GrrrLf and regained their lands. The GrrrLf were driven into the mountains, and the Shepherds were set to watch them.
Many more generations passed, and the mages grew in power and stature, some ruling as kings in their own right. But a great magical disaster brought the golden age of magic to a halt. Seeing the destruction that a capricious mage could wreak, the common people began to fear them, and drove all mages from the cities and towns.
The provinces, now governing themselves by mundane means, set to bickering and warring amongst themselves. This continued for decades, until the ruler of the Antaran province offered the banished mages amnesty. He gathered them to his side, and (thus well-armed) dec~red hi'!'seLf Emperor. The surrounding provinces were soon subdued, increasing the fledgling Empire's lands.
And so the Empire has flourished through the careful guidance of Emperors and Empresses, ever since that day. The day-to-day governing of the Empire has been relegated to representatives and councils, since no one man or woman could possibly oversee the entire realm without assistance. The ]aegars, the oldest families of the Empire, provide all of the necessary administrative and managerial functions of the royal house. The grand council- called the Shira- creates the laws of the Empire and resolves trade disagreements. Lest they become too powerful, the Shira is closely watched by the ]aegars.
The Imperial Consuls act as the Emperor's eyes, ears, and voice in every major city of the Empire. The Governors of each city manage the dayto-day affairs and make certain that the laws of the Empire are heeded. The Guilds manage the tradesmen of the realm; therefore, the Guilds are powerful indeed. And the Church of the Triune watches over all, each of its branches representing a different aspect of the three-faced god: Kor (the champion of justice, know Ledge, and duty), Senaedrin (the lady of compassion, simplicity, and healing), and Henne (the true child of innocence, creativity, laughter, and wonder).
But know this also, traveler: the Empire is not as it used to be. Bribery and corruption are rife at every level of government and trade. The common man has little voice in the land today. And matters have become even worse since the Feeblepox descended upon us. Two neighboring lands saw the decimation of Imperial troops by the disease, and they mounted a fierce offensive which claimed an entire province of Antaran land. With few troops to defend against them, pirates have also made an appearance, becoming a very real danger upon the seas. And their land-bound cousins the bandits now stalk the woods between villages.
This is a dangerous time to be journeying, traveler. Best of luck to you in your quest, and perhaps one day you will return to this inn to tell us tales of your own.
BETRAYAL IN ANTARA
CREDITS
Designer
Lead Programmers
Art Director
Producer
Game Programmers
3D Programmer/Team Systems
Game Artists
Graphic Novel Artist
Design Assistance
Team QA
Music, Dialogue, and Sound Effects
Dialogue Writers/WJice Direction
Systems Programmers
3D Wor!.d Creators and Editors
3D Wor/.d Assistance
Sound Effects Assistance
Manual and Supplementary Game Text Writer
Additional Lore Writers
Manual Layout
Content Programming
QA!Testing Guru & Data Wrangl.er
Peter Sarrerc
Rikki Cleland-Hura, Emmanuel Schilling
Jimmy Kowalski
Steven Lee Miles
Michael Stahl, Brendan Vanous, Peter Sarrerc
Emmanuel Schilling
Rob Johnson, Tracy Boyd, Barry Sundt, Deane Marston
Don Hazeltine
Rikki Cleland-Hura
Chris Johansen
David Henry
Susan Frischer, Peter Sarrett
Jay Lee, Greg Tomko-Pavia, Dan Foy
Chris Johansen, Mike Chavez, Ryan Blinsky
Andrew Hura, Tim Briggs, Bren Wagner
Craig Utterback
Cindy Vanous
Jennifer Gibbs, Robert Apse!
Kerri Willard
David Shoemaker, James Khoo, Dug Steen, Robin McGillveray
Gary Brown
12
CAST
Aren Cordelaine, Raal Chee
William Escobar, Petrov
Kaelyn Usher
OF
Finch, Krnflak, Birge, Lokath, Hera!.d
Farmer Brunia, Antoni, Pou[
Korellyn, Liselle
Coulaine, Nathan Escobar,
1jee, The Emperor
Paolo, Gar Warren, Naku
Scott, Lord Garson, Marlon
Caverton, Bryce, Kahleth
1jre, Enkudi, Mackey
Imperial Captain, Sentry
Cynthia, Mara
Laura, Misha
Sheffield, Walston, Narrator
Fe/Lich Marr, Gazrim, Imperial So/.dier
Leon, Simon, Second Shepherd
Maria Liana, Naomi
Flaar, Wraith
Torrance, Consort, First Shepherd
Jhana, Selana
Garvin, Khorus Bale
SPECIAL
CHARACTERS
Andrew Thacher
Jason Corrie
Anne Christianson
Warren Burton
James Hartman
Sharon Collar
Sean Griffin
Mike Shapiro
Robert Zenk
David Scully
John Patrick Lowrie
Larry Albert
Judith Shahn
Allison Barcott
John Rudolph Gilbert
Robert Nadir
Ken Boynton
Krisha Fairchild
Stephan Weyre
Peter Carrs
Kathy Levin
Ted D'Arms
THANKS TO:
Dale Christensen, Colerre Bortinelli, Scott Lynch, Larry Scott, Howard Carson,
Don Munsil, Bob Clardy & Synergistic Software, Heather Lavin, Craig Alexander,
Marianne Sulkosky, Cindy Green, Andy Thacher, Eric Twelker, Rebecca Buxton,
and those amazing guys up there in MIS- Tony Williams, Tom Chriscoe,
and M ark Yocom.
4 .~ '
TECHNICAL/CU ST 0 ME R
SUPPORT AND DIRECT SALES
Automated Technical Support Line
l1f THE U.S. Sierra On-Line Technical Support P.O. Box 85006 Bellevue, WA 98015-8506
l1f THE U . K . Sierra On-Line Limited 2 Beacontree Plaza Gillette Way Reading, Berkshire RG2 OBS United Kingdom
l1f FRANCE Pare Tertiaire de Meudon Immeuble "Le Newton" 25 rue Jeanne Braconnier 92366 Meudon Le Foret Cedex France
l1f GERMANY Sierra Coktel Deucschland Roberc-Bosch-Su. 32 D-63303 Dreieich Germany
l1f SPAIN Coktel Educative Multimedia Avenida de Burgos 9 1° -OF2 28036 Madrid Spain
l1f ITALY Conracr your local distributor or vendor.
MODEM SUPPORT CompuServe USA: CompuServe United Kingdom: CompuServe France:
(206) 644-4343
Main: (206) 644-4343 Fax: (206) 644-7697 8: 15 am - 4:45 pm PST Monday-Friday
Main: (O 118) 920-9111 Fax: (0118) 987-5603 9:00AM-5:00PM Monday through Friday
Main: (01) 46-01-46-50 Fax: (O 1) 46-30-00-65 7 jours sur 7 de lOh a 19h
Main: (O) -6103-99 40 40 Fax: (O) -6103-99 40 35 Montag bis Freitag von 9-19h Mailbox: (O) -61 03-99 40 4 1
Main: (01) 383-2623 lunes a viernes de 9h30 a 14h y de I 5h a 18h30 Fax: (01) 38 1-2437
GO SIERRA GO UKSIERRA GO FRSIERRA
CompuServe Germany: America Online: Internet USA: Internet UK: Internet France: Internet Germany:
GO DESIERRA Keyword SIERRA hnp://www.sierra.com http://www.sierra-online.co.uk http://www.sierra.fr hnp://www.sierra.de
DIRECT SALES
U.S. DIRECT SALES Sierra Direct 7100 W Center Rd STE 301 Omaha, NE 68106
Main: (800) 757-7707 Mon-Sat: 7AM to l lPM CST Sundays: SAM to 9PM CST Fax: (402) 393-3224
DIRECT MAIL-UNITED KINGDOM Sierra On-Line Limited 2 Beaconcree Plaza Gi llette Way Reading, Berkshire RG2 OBS United Kingdom
Main: (Oll8) 920-9ll 1 (Monday-Friday, 9:00AM-5:00PM) Fax: (0 118) 987-5603
VENTE PAR CORRESPONDENCE - FRANCE ParcTertiaire de Meudon Main: (01) 46-01-48-53 lmmeuble "Le Newton" Fax: (OJ) 46-30-00-65 25 rue Jeanne Braconnier lundi au vendredi de 9h a 18h 92366 Meudon La Foree Cedex France
DIREKTVERSAND-GERMANY Sierra Coktel Deutschland Roberc-Bosch-Su. 32 D-63303 Dreieich Germany
ON-LINE
CompuServe USA: CompuServe United Kingdom: CompuServe France: CompuServe Germany: America Online: Internee USA: Internee UK: Internet France: Internee Germany:
Main: (0)-6103-99 40 40 (Montag bis Freicagvon 9-19h) Fax: (0)-6103-99 40 35
SALES
GO SI (CServe Mall) GO UKSIERRA GO FRSIERRA GO DESIERRA Keyword: SIERRA http://www.sierra.com http:/ /www.sierra-online.co.uk hrrp://www.sierra.fr http://www.sierra.de
us DISK/DocUMENTATION
REPLACEMENT fi RETURNS
Disk/Documentation Replacement: Sierra On-Line Fulfillment PO Box 485 Coarsegold, CA 93614
Product Returns: Sierra On-Line Returns PO Box 485 Coarsegold, CA 93614
NOTE: To replace your disk(s) please send only Disk #I (or the CD) and a copy of your dared receipt, if less than 90 days. After 90 days please include a $10 handling fee along with Disk /CD #1. For Documencacion, please include a $5 handling fee and a photocopy ONLY of disk #1.
Payment should be made ac the cime of your request. Sorry, no credit cards.
INTERNATIONAL SUPPORT
SERVICES
INTERNATIONAL SALES
Sierra Direct 7100 W. Center Rd STE 301 Omaha, NE 68106
UNITED KINGDOM
Sierra On-Line Limited 2 Beaconcree Plaza Gillette Way Reading, Berkeshire RG2 OBS United Kingdom
Main: (206) 746-5771 Fax: (402) 393-3224 For direct orders
Customer Support: (0118) 920-9111 Fax: (0118) 987-5603 9:00 am - 5:00 pm M-F
Disk/CD replacements in the U.K. are £6.00, or £7.00 outside the U.K. Add ''ATTN: Returns."
FRANCE
Pare Tertiaire de Meudon Immeuble "Le Newton" 25 rue Jeanne Braconnier 92366 Meudon La Foret Cedex France Disk/CD replacemenrs:
GERMANY
Sierra Cokcel Deutschland Robert-Bosch-Srr. 32 D-63303 Dreieicb Germany Disk/CD replacements:
Main: (01) 46-01-46-50 Fax: (O 1) 46-30-00-65
Call for information.
Main: (0)-6103-99 40 40 Fax: (O) -6103-99 40 35 Mailbox (O) -6103-99 40 41 Montag bis Freitag von 9-19h Call for information.
HINTS
u . s . HlllI L.l..til Sierra Hints PO Box 53210 Bellevue, WA 98015-3210 For Automated Phone Service:
Fax: (206) 562-4223
1-900-370-5583 $.75 per minute. (must be 18 years or older, or have parental permission). You may also contact Direct Sales for a hintbook.
CANADIAN H.illI L.l..til For automated phone service: 1-900-451-3356 $1.25 per minute (Canadian) Callers under 18 years old must have parents permission. You may also contact Direct Sales at 800-757-7707 for hinc books.
ON-LINE HINTS §: SUPPORT
Access Sierra's Hints through CompuServe by typing: GO SIERRA then go to Hine Connection
Access the Sierra Forum on America Online with the keyword: SIERRA
F RA N C E H.illI L.l..til 2,23F TIC la minute; tar if en vigueur au 1 j ui!let 1996 (France mecropolitaine seulemenc).
G E R M A N Y H.illI .L.!.fil Kosten: 1,20 OM pro Minute (Nur in Deutschland verfiigbar)
U . K . HillI .L.!.fil Old Games Hint Line: New Games Hint Line:
New Sierra Hint Line:
08-36-68-46-50 (hint line)
0190-515 616 (hint line)
(0118) 920-9109 (0891) 660-660 (within UK only)
For adventure games released after October 8, 1996. Charged 45p/minute cheap rate, 50p/minute ac other times. Maximum call length: 7.5 minutes. Maximum charge cheap rate £3.38, £3.75 other times. Must have permission of the person who pays the phone bill before calling (line available in the UK only, 24 hours. Requires a touch tone phone).
Old Sierra Hint Line: For adventure games released up to December 31, 1992. Calls are charged ac normal telephone races (requires a touch tone phone. 24 hour line).
SPAIN H..ilU: L...!1i_g Coktel Educative Multimedia Avenida de Burgos 9
Main: (01) 383-2623 Junes a viernes de 9h30 a 14h y de 15h a 18h30 1° -OF2
28036 Madrid Spain
I TA LY H..ilU: L...!1i_g Contact your local vendor.
THE SIERRA No-RISK
GUARANTEE
The Promise: We want you ro be happy with every Sierra produce you purchase from us. Period. If for any reason you're unhappy with the product, return ir within 30 days for an exchange or a full refund ... even if you boughr ir rerai l.
The Only Catch: You've gor ro tell us why you don'r like rhe game. Otherwise, we'll never get berrer. Send ir back ro us and we promise we'll make things righr. (If you boughr it ar a rerail oucler, please send your original sales receipt.)
WARRANTY
lMPLIED WARRANTIES LIMITED:
EXCEPT AS STATED ABOVE, SIERRA MAKES NO WARRANTY, EXPRESS OR IMPLIED, REGARDING THIS PRODUCT. SIERRA DISCLAIMS ANY WARRANTY THAT THE SOFTWARE IS FIT FOR A PARTICULAR PURPOSE, AND ANY IMPLIED WARRANTY OF MERCHANTABILITY SHALL BE LIMITED TO THE NINETY (90) DAY DURATION OF THIS LIMITED EXPRESS WARRANTY AND IS OTHERWISE EXPRESSLY AND SPECIFICALLY DISCLAIMED. SOME STATES DO NOT ALLOW LIMITATIONS ON HOW LONG AN lMPLIED WARRANTY LASTS, SO THE ABOVE LIMITATION MAY NOT APPLY TO YOU.
NO CONSEQUENTIAL DAMAGES:
SIERRA SHALL NOT BE LlABLE FOR SPECIAL, INCIDENTAL, CONSEQUENTIAL OR OTHER DAMAGES, EVEN lF SIERRA I ADVl ED OF OR AWARE OF THE POSSIBILITY OF SUCH DAMAGES. THIS MEANS THAT SIERRA SHALL NOT BE RESPONSIBLE OR LIABLE FOR LOST PROFITS OR REVENUES, OR FOR DAMAGES OR COSTS INCURRED AS A RESULT OF LOSS OF TIME. DATA OR USE OF THE SOFTWARE, OR FROM ANY OTHER CAU E EXCEPT THE ACTUAL COST OF THE PRODUCT. IN NO EVENT SHALL SIERRA'S LlABILITY EXCEED THE PURCHASE PRJCE OF THE PRODUCT. SOME STATES DO NOT ALLOW THE EXCLUSION OR LIMITATION OF INCIDENTAL OR CONSEQUENTIAL DAMAGES, SO THE ABOVE LlMITATION OR EXCLUSION MAY NOT APPLY TO YOU.
You arc cntlclcd to use rhis product for your own use, bur may not sell or uansfcr reproductions of the software manuaJ or book co other parties in any way, nor rcnc or lease the produce co others without prior written permission of Sierra. You may use one copy of chc produa on a single rcrminaJ connected co a single compute r. You may not network chc produce or otherwise inscall it on more than one compucer or computer terminal ar the same cime.