Embed Size (px)
Citation preview
Resident Funds Management System ONLINE
- 1 -
Table of Contents Table of ContentsGetting Started .............................................................................................. 1 Getting Started ...................................................................................................................... 4 Overview ............................................................................................................................... 4 Contact National Datacare ....................................................................................................... 5 Send Data ............................................................................................................................. 5 Service Benefits ..................................................................................................................... 6 What's New ........................................................................................................................... 6 RFMS Concepts ...................................................................................................................... 7 Direct Deposits ....................................................................................................................... 7 Facility Accounts ..................................................................................................................... 7 Facility Deposits ..................................................................................................................... 8 Petty Cash Fund ..................................................................................................................... 8 Reports ................................................................................................................................. 8 Resident Accounts .................................................................................................................. 9 Withdrawals ........................................................................................................................... 9 Accounts ............................................................................................................................. 10 Checking Accounts ................................................................................................................ 10 Checking Account Deposits .................................................................................................... 10 Checking Account Overview ................................................................................................... 11 Corporate Concentration Accounts .......................................................................................... 11 Facility Petty Cash Fund ........................................................................................................ 12 Offsets ................................................................................................................................ 12 Ordering Checks ................................................................................................................... 14 Overdrafts ........................................................................................................................... 15 Petty Cash/Care Cost Checking Account Reconciliation ............................................................... 15 Printing Checks .................................................................................................................... 16 Trust Account Reconciliation ................................................................................................... 18 Signature Cards ................................................................................................................... 19 Stop Payments ..................................................................................................................... 20 Using the Register ................................................................................................................ 20 Voiding Checks ..................................................................................................................... 21 Wires and Electronic Funds Transfers....................................................................................... 22 Resident Accounts ................................................................................................................ 23 Burial Accounts .................................................................................................................... 23 Change Resident Account Information ..................................................................................... 23 Freeze Accounts ................................................................................................................... 24 Non-Transferring Accounts ..................................................................................................... 24 Re-Open Accounts ................................................................................................................ 24 Transferring Accounts ........................................................................................................... 25 Un-Freeze Accounts .............................................................................................................. 26 Close Accounts ..................................................................................................................... 27 Close Resident Account ......................................................................................................... 27 Closed Account Transaction Report ......................................................................................... 29 Closed Account/Reclamation Timeline ...................................................................................... 29 Closing an Account for a Living Resident .................................................................................. 29 Deceased Account Overview ................................................................................................... 30 Forfeiting Closing Interest ...................................................................................................... 30 Releasing Decedent Funds ..................................................................................................... 31 Open a Resident Account ....................................................................................................... 32 Completing the Resident Account Application ............................................................................ 32 How to Open a New Resident Account ..................................................................................... 32 Opening a New Resident Account on the Computer .................................................................... 33 Signatures ........................................................................................................................... 34
Resident Funds Management System ONLINE
- 2 -
Reports ............................................................................................................................... 34 $200 Letter ......................................................................................................................... 34 $200 Notification Summary Report .......................................................................................... 36 Abandoned Property Report ................................................................................................... 37 A/R Summary ...................................................................................................................... 37 Bank Account Statistics ......................................................................................................... 38 Batch Summary Report ......................................................................................................... 38 Check Listing ....................................................................................................................... 39 Checking Account Statement .................................................................................................. 40 Close Transaction ................................................................................................................. 40 Debit and Credit Transaction .................................................................................................. 41 Deposit Record ..................................................................................................................... 41 Deposit Transaction .............................................................................................................. 42 Direct Debit Record ............................................................................................................... 42 Direct Debit Rejects Transaction ............................................................................................. 43 Direct Deposit Enrollments ..................................................................................................... 44 Direct Deposit Name ............................................................................................................. 44 Direct Deposit Reclamation .................................................................................................... 45 Direct Deposit Status ............................................................................................................ 45 Disbursements vs Offsets ...................................................................................................... 46 Interest Paid ........................................................................................................................ 47 Message History Report ......................................................................................................... 48 Offsets vs Disbursements ...................................................................................................... 49 Reconciliation Reports Batch .................................................................................................. 50 Resident Account Family Statement ........................................................................................ 50 Resident Activity List ............................................................................................................. 51 Resident Addresses Report ..................................................................................................... 51 Resident Last Transaction Report ............................................................................................ 51 Resident Statement .............................................................................................................. 52 Service Charge Transaction .................................................................................................... 52 Status Logs ......................................................................................................................... 52 Transaction Type Summary .................................................................................................... 53 Trial Balance ........................................................................................................................ 53 Trust Account Reconciliation ................................................................................................... 53 User Listing ......................................................................................................................... 54 Vendor A/P Listing ................................................................................................................ 55 Vendor List .......................................................................................................................... 55 Vendor Outstanding Payables ................................................................................................. 55 Withdrawal Record ................................................................................................................ 56 Withdrawal Transaction ......................................................................................................... 56 Direct Deposits ..................................................................................................................... 57 Cancel Direct Deposit ............................................................................................................ 57 Deposit Transaction Report .................................................................................................... 57 Direct Deposits Overview ....................................................................................................... 57 Direct Deposit Timeline ......................................................................................................... 58 Reclamations ....................................................................................................................... 58 Federal Government Checks ................................................................................................... 59 Determining Claim Number and Rep Payee Status ..................................................................... 59 Federal Government Checks Overview ..................................................................................... 60 Minor Federal Government Agencies ........................................................................................ 61 Non-Federal Government Checks ............................................................................................ 62 Transactions ........................................................................................................................ 63 Custom Deposit and Withdrawal Description Codes .................................................................... 63 Direct Debit Transactions ....................................................................................................... 64 Direct Debit Overview ........................................................................................................... 65
Resident Funds Management System ONLINE
- 3 -
Direct Debit Timeline ............................................................................................................ 65 Enrolling for Direct Debit ....................................................................................................... 66 Entering Direct Debit Transactions .......................................................................................... 67 Making Resident Deposits ...................................................................................................... 68 Facility Deposits Overview ..................................................................................................... 68 Deposit Transfer Codes ......................................................................................................... 69 Manual Deposit Record Forms ................................................................................................ 70 Initial Deposits ..................................................................................................................... 71 Cash Deposits ...................................................................................................................... 72 Deposit Corrections ............................................................................................................... 72 Deposit Timeline ................................................................................................................... 74 Deposits at Local Branch ....................................................................................................... 74 Deposits Sweeps .................................................................................................................. 75 How to Make a Deposit .......................................................................................................... 77 Edit a Deposit Record ............................................................................................................ 78 Making Resident Withdrawals ................................................................................................. 78 Withdrawals Overview ........................................................................................................... 79 Withdrawal Timeline ............................................................................................................. 79 Withdrawal Corrections ......................................................................................................... 80 Automatic Care Cost Withdrawals ........................................................................................... 80 How to Withdraw Money From a Resident Account ..................................................................... 81 Edit a Withdrawal Record ....................................................................................................... 82 Manual Withdrawal Record Form ............................................................................................. 83 Rejected Withdrawals ............................................................................................................ 83 Vendor Module ..................................................................................................................... 84 Pay Vendors Module .............................................................................................................. 84 Recurring Records ................................................................................................................ 85 Create a Recurring Record ..................................................................................................... 85 Retrieve a Recurring Record ................................................................................................... 86 Transmissions ...................................................................................................................... 87 How to Transmit ................................................................................................................... 87 Administrative Tasks ............................................................................................................. 88 Communication .................................................................................................................... 88 Manage Permission/Groups .................................................................................................... 88 Manage Users ...................................................................................................................... 89 Preferences ......................................................................................................................... 89 Export ................................................................................................................................ 92 Settings .............................................................................................................................. 93 Facility Listing ...................................................................................................................... 93 Change User Password .......................................................................................................... 93 Adjusting Font Size ............................................................................................................... 94 One-Write System ................................................................................................................ 95 Loading the One-Write Peg Board ........................................................................................... 95 One-Write Overview .............................................................................................................. 95 Setting Up the One-Write System ........................................................................................... 96 Ordering One-Write System Supplies ....................................................................................... 97 Using the One-Write System .................................................................................................. 97 Entering Deposits ................................................................................................................. 97 Entering Withdrawals ............................................................................................................ 98
Resident Funds Management System ONLINE
- 4 -
Getting Started
Resident Fund Management Service
Welcome to the Resident Fund Management Service (RFMS) Online Help system. It is designed by National Datacare Corporation to assist you with all your financial needs. Please refer to the categories to the left for all your inquiries. RFMS benefits Contact us
Overview
ONLINE The Resident Fund Management Service (RFMS) is a financial service offered by National Datacare Corporation and a participating financial institution. It is a state-of-the-art, online fund management system for managing your resident trust fund account. RFMS benefits Contact us
Resident Funds Management System ONLINE
- 5 -
Contact National Datacare
Contact National Datacare
If you have a question about RFMS Online, first look in this online help system. If you can't find the answer, contact National Datacare. When you request support, you should have your RFMS facility ID on hand. Customer support is available from 8:00am-6:00pm (Eastern Time) Monday through Friday. Click here for mailing addresses. National Datacare can be reached by:
Telephone
(800) 632-7367 or (703) 263-9080
Fax
(703) 263-2575
E-mail [email protected]
Send Data
Send Data
Send all resident fund related materials, including deposits, to National Datacare. Do not send materials directly to the bank. This will only delay processing, as the bank will then have to forward the materials to National Datacare for proper handling. Do not mail and fax the same material to National Datacare as it may be processed twice. SEND FIRST CLASS MAIL TO: (You have been provided a stamp with this address.) NATIONAL DATACARE CORPORATION PROCESSING CENTER P.O. BOX 222430 CHANTILLY, VA 20153-2430 SEND EXPRESS MAIL TO: NATIONAL DATACARE CORPORATION 14155 NEWBROOK DRIVE - SUITE 200 CHANTILLY, VA 20151-2224
Resident Funds Management System ONLINE
- 6 -
Service Benefits
Service Benefits
Benefits to the facility:
Eliminates collecting and getting resident checks signed by using direct deposits. Improves cash flow by providing automatic care cost payments from monthly income. Provides for automatic personal allowance retention from income. Separates and never co-mingles resident and facility monies. Can be operated with on-line computer software or on a manual/mail-in basis. Prepares individual monthly resident statements for the facility. Handles medical assistance and private pay residents. Provides a complete audit trail and simplifies audits. Frees valuable staff time. Returns income checks to the source when a resident expires or transfers. Provides a uniform method of funds management to multi-facility corporations. Prepares, distributes and submits IRS Form 1099-INT for resident interest earned.
Benefits to the residents:
Provides individual interest bearing accounts. Eliminates lost, stolen, or mishandled checks with direct deposit. Provides easy access to their funds. Provides monthly/quarterly statements of their account. Provides for automatic pre-authorized payment of care costs. Provides bank security and FDIC insured accounts.
What's New
What's New
With RFMS now being on the Internet, your job is simplified. All you need is a high-speed Internet connection and a web browser (Internet Explorer is recommended). Here are some of the benefits.
No more transmissions: direct deposits and your transactions show up immediately. Your data is secure and private.
If you have multiple facilities, you can manage them through this online service. Easily enter and manage transactions. Run any of the supported reports to view your facility's data. A designated facility/corporate administrator can create user accounts with specific access.
See Also: Facility Listing Manage Users
Resident Funds Management System ONLINE
- 7 -
RFMS Concepts
Direct Deposits
Direct Deposits
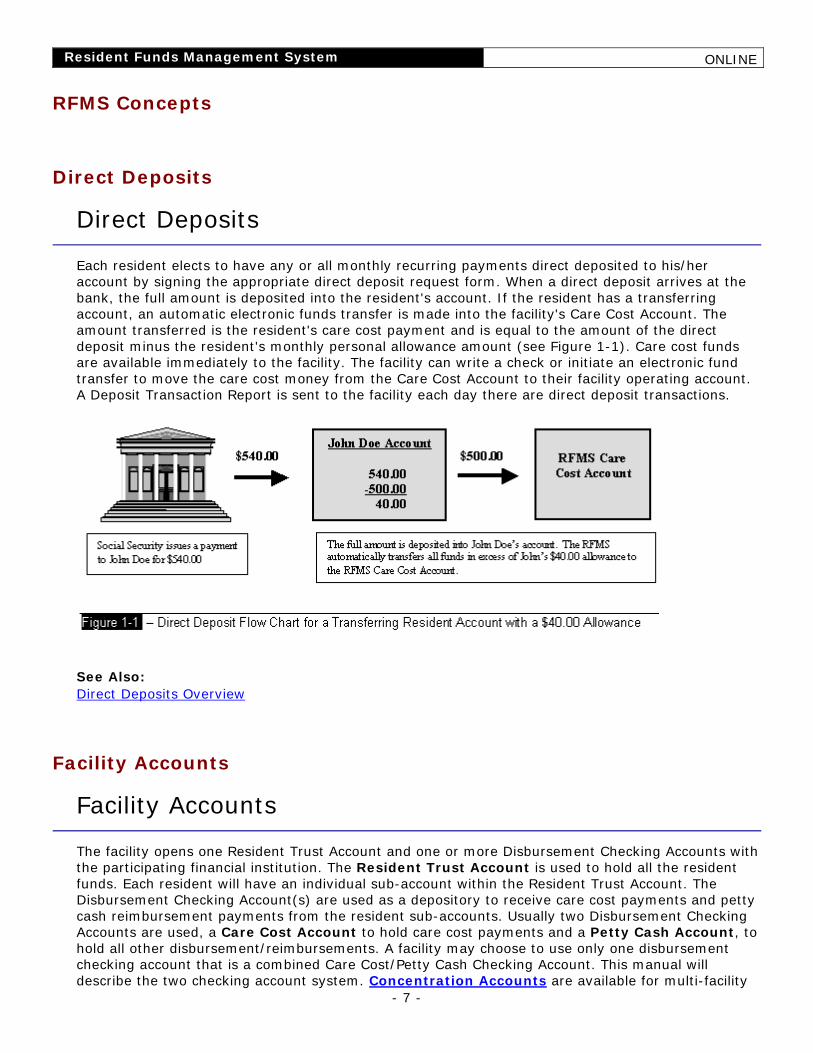
Each resident elects to have any or all monthly recurring payments direct deposited to his/her account by signing the appropriate direct deposit request form. When a direct deposit arrives at the bank, the full amount is deposited into the resident's account. If the resident has a transferring account, an automatic electronic funds transfer is made into the facility's Care Cost Account. The amount transferred is the resident's care cost payment and is equal to the amount of the direct deposit minus the resident's monthly personal allowance amount (see Figure 1-1). Care cost funds are available immediately to the facility. The facility can write a check or initiate an electronic fund transfer to move the care cost money from the Care Cost Account to their facility operating account. A Deposit Transaction Report is sent to the facility each day there are direct deposit transactions.
See Also: Direct Deposits Overview
Facility Accounts
Facility Accounts
The facility opens one Resident Trust Account and one or more Disbursement Checking Accounts with the participating financial institution. The Resident Trust Account is used to hold all the resident funds. Each resident will have an individual sub-account within the Resident Trust Account. The Disbursement Checking Account(s) are used as a depository to receive care cost payments and petty cash reimbursement payments from the resident sub-accounts. Usually two Disbursement Checking Accounts are used, a Care Cost Account to hold care cost payments and a Petty Cash Account, to hold all other disbursement/reimbursements. A facility may choose to use only one disbursement checking account that is a combined Care Cost/Petty Cash Checking Account. This manual will describe the two checking account system. Concentration Accounts are available for multi-facility
Resident Funds Management System ONLINE
- 8 -
organizations. Electronic fund transfers and wire transfers can be arranged from any Disbursement or Concentration Checking Account. Important In contrast to a “traditional style” resident fund system in which disbursements are made directly from the trust account, the RFMS system uses separate disbursement accounts. This means you must do a transaction against the resident accounts to move funds into your disbursement account each time you write a check. This enforces good accounting practices and makes reconciliations easier.
Facility Deposits
Facility Deposits
Checks and monies received at the facility are deposited to the resident's account by completing a Deposit Record. If a resident has a transferring account, a deposit transfer code is used to indicate if the deposit is subject to an automated care cost withdrawal payment. See the deposit section for a full description on how to make deposits.
Petty Cash Fund
Petty Cash Fund
A petty cash fund system is established at the facility to advance the residents personal spending money (cash). Advances are repaid to the facility by withdrawals made from the resident accounts and credited to the Petty Cash Account.
Reports
Reports
In addition to the deposit and withdrawal transaction reports, RFMS Online allows you to print a number of other reports including a trial balance report, $200 letter and resident statement. All available reports are covered in detail throughout this online help system.
In addition to the reports available through RFMS Online, each resident receives an itemized statement monthly or quarterly from National Datacare. The statement shows all deposits and withdrawals, plus any interest earned and paid. Resident statements are mailed in bulk to the facility. The facility receives monthly statements for their checking accounts and Resident Trust Account from the financial institution. IRS 1099 Interest Income forms are prepared and distributed to the facility and the IRS in accordance with IRS rules and regulations.
Resident Funds Management System ONLINE
- 9 -
Resident Accounts
Resident Accounts
Each participating resident opens an individual interest bearing sub-account within the Resident Trust Account, hereafter referred to as a resident account. Each resident account is FDIC insured up to $100,000. The resident, or his/her legal representative, must sign an application to open a resident account and authorize the facility to assist them in making deposits and withdrawals to and from the account.
There are three types of resident accounts within the RFMS system:
1) Transferring - usually used for Medical Assistance residents. A transferring account automatically debits the resident's care cost payments from checks deposited during each month (i.e. Social Security). The resident's account retains their monthly personal allowance amount. Each state sets the personal allowance amount given to Medical Assistance residents. It may include fixed additional allowances such as insurance premiums. The allowance amount may be different for each resident.
2) Non-Transferring - usually used for private pay residents and residents who receive Supplemental Security Income (SSI). A non-transferring account retains all deposits made to the resident's account. Care cost payments will not automatically be debited.
3) Burial - may be opened in addition to a non-transferring or a transferring account. The burial account can be revocable or irrevocable. It can also be interest bearing or non-interest bearing.
Withdrawals
Withdrawals
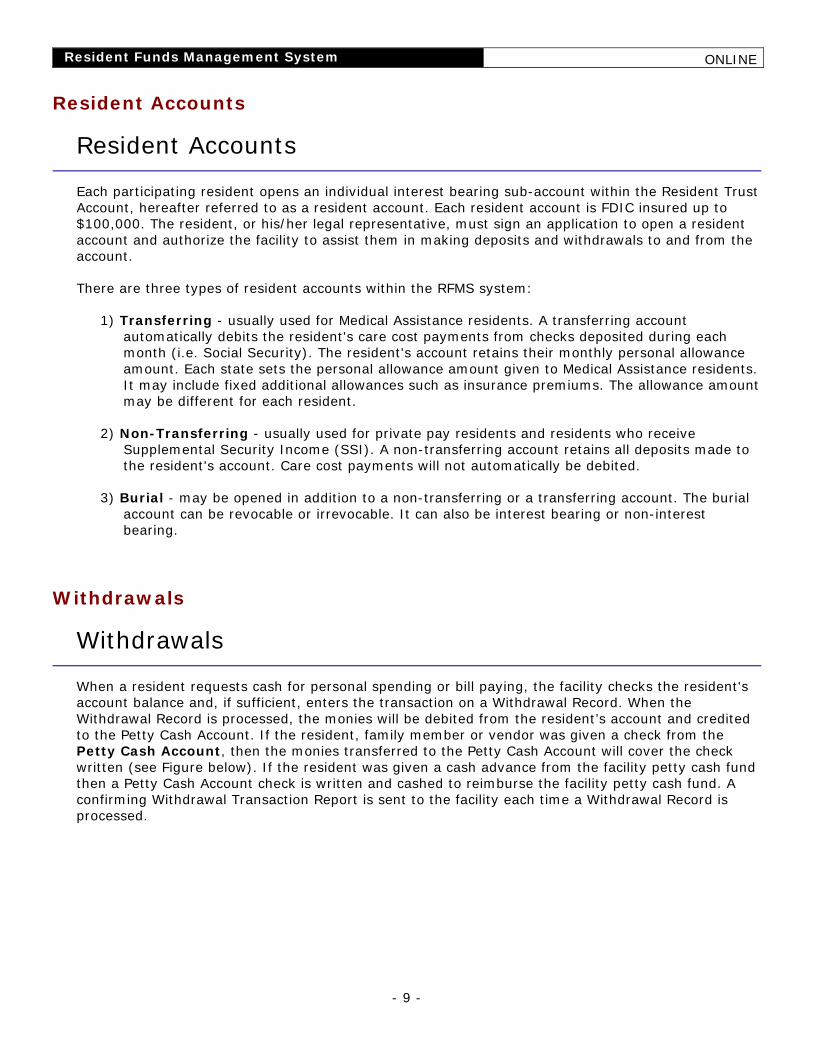
When a resident requests cash for personal spending or bill paying, the facility checks the resident's account balance and, if sufficient, enters the transaction on a Withdrawal Record. When the Withdrawal Record is processed, the monies will be debited from the resident’s account and credited to the Petty Cash Account. If the resident, family member or vendor was given a check from the Petty Cash Account, then the monies transferred to the Petty Cash Account will cover the check written (see Figure below). If the resident was given a cash advance from the facility petty cash fund then a Petty Cash Account check is written and cashed to reimburse the facility petty cash fund. A confirming Withdrawal Transaction Report is sent to the facility each time a Withdrawal Record is processed.
Resident Funds Management System ONLINE
- 10 -
See Also: How to Withdrawal Money From a Resident Account
Accounts
Checking Accounts
Checking Account Deposits
Checking Account Deposits
Deposits outside of the RFMS system to the facility checking account(s) are usually infrequent. Instances that may require that a deposit be made to the account include the initial deposit, check printing charges, stop payment fees, etc. To make these deposits, use a Deposit Ticket included with the checkbook. Enter the appropriate information and send the Deposit Ticket with the endorsed check(s) to National Datacare.
Resident Funds Management System ONLINE
- 11 -
Checking Account Overview
Checking Account Overview
During the startup phase, the facility chooses whether to have one or more checking accounts to operate the RFMS service. The facility may change their checking account options at any time by notifying National Datacare and completing new checking account signature cards. With one checking account, care cost payments and petty cash reimbursements are placed in the same checking account. This account is called the Disbursement Account. With two checking accounts, care cost payments are placed in a Care Cost Account and petty cash reimbursements are placed in a Petty Cash Account. Each account may have its own title and signature requirements. The two account option easily permits divided responsibility for care cost and petty cash accounting.
The primary purpose for the facility checking account(s) is to receive monies owed to the facility and vendors by the residents. Credits to the checking account(s) come from:
Automatic withdrawals for care cost payments (Deposit Records)
Withdrawal Records
Close Account Records
The facility writes checks to replenish the petty cash fund and to move care cost monies to another bank. The facility may also write checks to disburse funds to residents, family members and vendors. This permits the facility to maintain a smaller petty cash fund and to pay for such items as beauty shop bills, telephone charges, and insurance premiums by check.
Corporate Concentration Accounts
Corporate Concentration Accounts
A multi-facility corporation may choose to have one or more Corporate Concentration accounts. This option is most often linked with the facility two checking account feature and is used to consolidate funds from various facility Care Cost Accounts for transfer to a corporate account at another bank. With a Concentration Account, all the funds in the selected facility accounts are transferred daily and automatically credited to the Concentration Account. The corporation chooses the amounts and schedule for transfers to other banks. This feature eliminates the need for printing Care Cost Account checks and saves the facility the time and effort required to transfer the funds.
See Also: Checking Account Overview Facility Petty Cash Fund
Resident Funds Management System ONLINE
- 12 -
Facility Petty Cash Fund
Facility Petty Cash Fund
The facility establishes a petty cash fund at the facility to advance the residents monies for personal spending. The petty cash fund is facility money, not the residents. Upon submission of a Withdrawal Record to National Datacare, these cash advances are immediately withdrawn from the resident's account and deposited into the facility's Petty Cash Account. The petty cash fund is replenished by writing and cashing checks drawn on the facility's Petty Cash Account. The size of the petty cash fund is determined by the amount of advances and the frequency of Withdrawal Record submission. See Also: Corporate Concentration Accounts Checking Account Overview
Offsets
Offsets
The check register section allows you to reconcile your checking accounts by matching each disbursement or check to the corresponding credit or offset. The term "Offsets" refers to the matching Withdrawal, Deposit, or Close Record that generated the debit from the resident accounts for which a check is written. For example, you post Withdrawal Record # W0001 which debits several resident accounts for the beauty shop and credits your Petty Cash Account. The total amount of the Withdrawal Record is $75.00. You then issue Petty Cash Account check #1234 for $75.00 to the beautician. Withdrawal Record # W0001 is the OFFSET for check # 1234. A single check may have multiple offsetting records, but the total offset amount should always match the check amount.
NOTE: In order to simply reconciliations, it is strongly recommended that you enter withdrawal records such that each record is disbursed with a single check.
Any withdrawal from a resident account must match back to a check (or other debit to the checking account) that disburses the money to a resident, family member, facility account, or vendor. Always link the disbursement check(s) back to a Deposit/Withdrawal/Close Record. The Vendors module will automatically generate offsets for your withdrawal records and closed accounts for you. You will need to manually enter offsets into the system when you disburse funds that were generated by any other transaction type. This includes disbursing funds for automated care cost payments from direct deposits or facility deposits, and any other miscellaneous payments.
Add Offset
1. In Check Register under the Checks tab, locate desired check to add offset. 2. Click on Offsets. 3. Enter the offset record batch number, the date and the amount of the record or transaction
total. Click Add Offset. Repeat if necessary If there are more than one offsets for this check. The total offsets should always equal to the total check amount.
4. Click Close when completed and go back to step 1 and repeat process for a different check. 5. After the offsets are complete, click the Save button.
Resident Funds Management System ONLINE
- 13 -
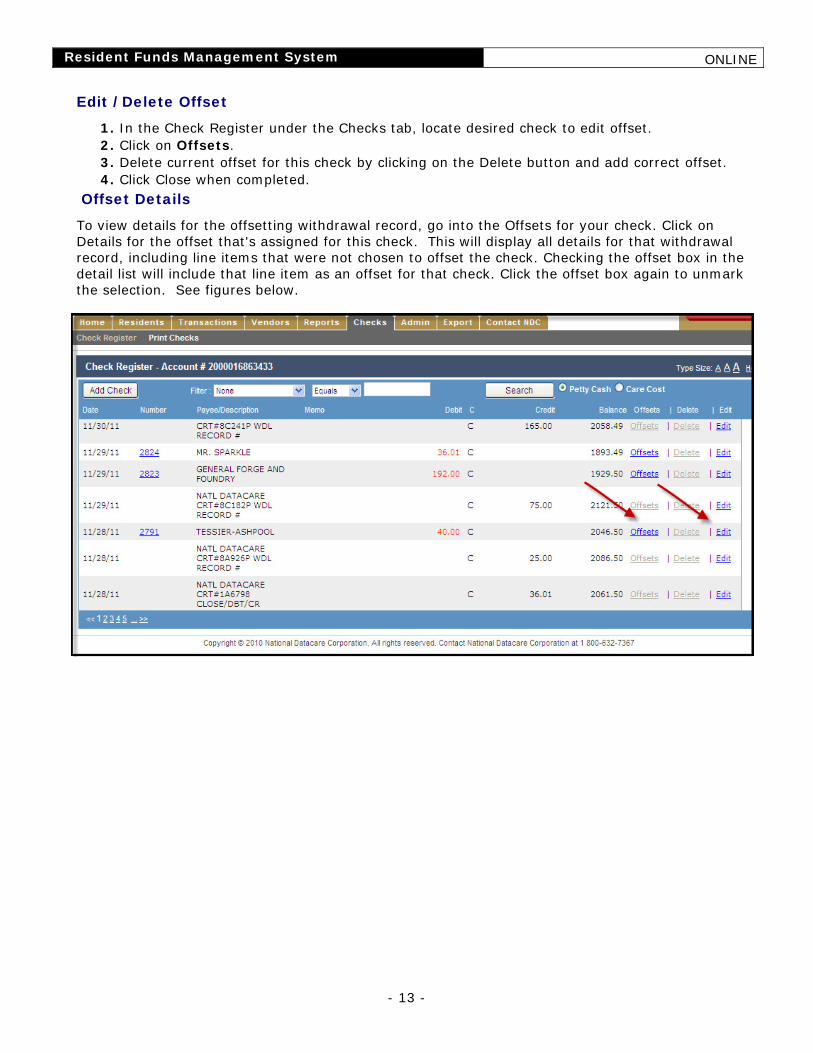
Edit / Delete Offset
1. In the Check Register under the Checks tab, locate desired check to edit offset. 2. Click on Offsets. 3. Delete current offset for this check by clicking on the Delete button and add correct offset. 4. Click Close when completed.
Offset Details
To view details for the offsetting withdrawal record, go into the Offsets for your check. Click on Details for the offset that's assigned for this check. This will display all details for that withdrawal record, including line items that were not chosen to offset the check. Checking the offset box in the detail list will include that line item as an offset for that check. Click the offset box again to unmark the selection. See figures below.
Resident Funds Management System ONLINE
- 14 -
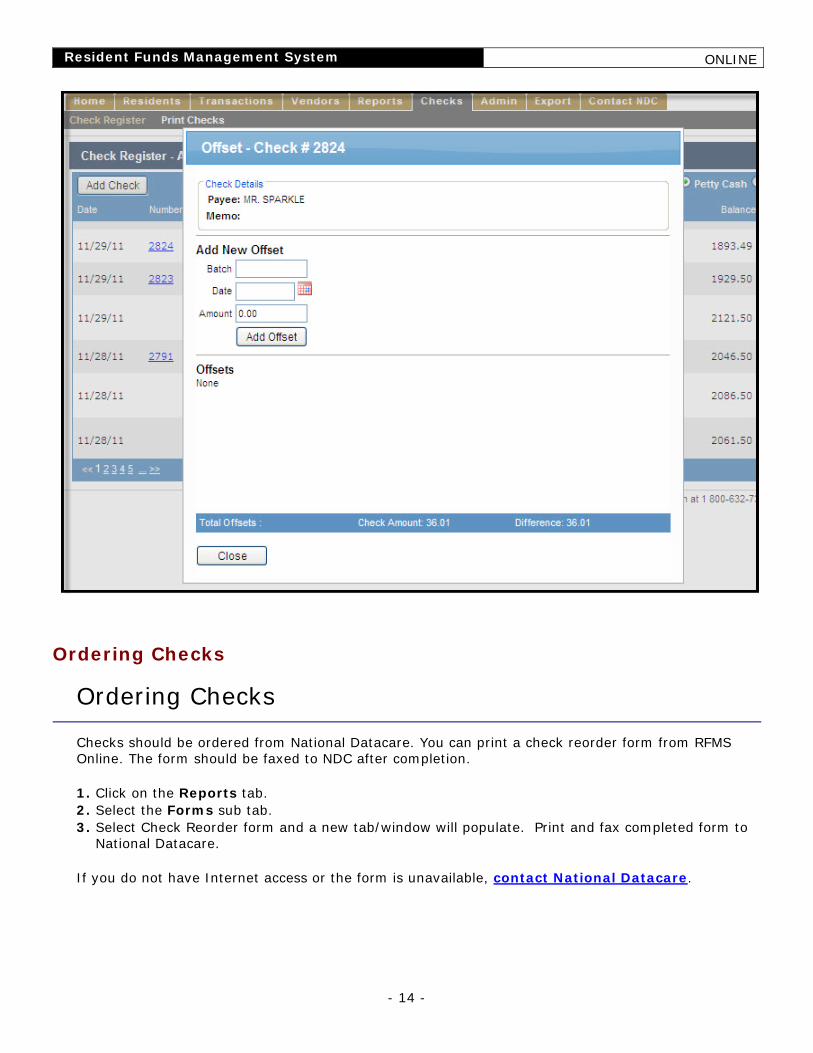
Ordering Checks
Ordering Checks
Checks should be ordered from National Datacare. You can print a check reorder form from RFMS Online. The form should be faxed to NDC after completion. 1. Click on the Reports tab. 2. Select the Forms sub tab. 3. Select Check Reorder form and a new tab/window will populate. Print and fax completed form to
National Datacare. If you do not have Internet access or the form is unavailable, contact National Datacare.
Resident Funds Management System ONLINE
- 15 -
Overdrafts
Overdrafts
The most common way an overdraft situation arises is when a check reaches the bank before the corresponding Withdrawal Record is received to move the funds into the checking account. A check given to a resident or vendor will clear within two days of being deposited or cashed at a local bank. National Datacare processes all Withdrawal Records received by 12:30 PM EST/EDT on the same day.
To avoid overdrafts:
To avoid overdrafts, wait for your transaction confirmation report from National Datacare before you issue the disbursing check. If this is not possible, be sure to enter and transmit the Withdrawal Record that corresponds to the check when the check is issued.
Petty Cash/Care Cost Checking Account Reconciliation
Petty Cash/Care Cost Checking Account Reconciliation
It is very important that you reconcile your checking account(s). Since the RFMS system has up-to-date information on your checking accounts, you can reconcile at any time (instead of waiting for the bank statement to arrive at the end of the month!). Any withdrawal from a resident account must match back to a check (or other debit to the checking account) that disburses the money to a resident, family member, facility deposit/withdrawal/close record. As with any bank account, you (not the bank/National Datacare) are responsible for reconciling your account. If you have a problem, National Datacare will gladly assist you after you have tried to reconcile your account, and can identify problem transactions.
All resident fund systems share the fact that any withdrawal from a resident account must match a cash receipt or check that disburses the money to a resident, family member, facility account, or vendor. If you keep this fact in mind, RFMS checking accounts will be easier to reconcile. Always link the disbursement check(s) back to a Direct Deposit Report, Deposit/Withdrawal Record or Close Account Transaction Report. Make sure that the total disbursement checks equal the total amount deposited into the checking account. One check may cover more than one resident transaction such as a combined check for the beauty shop services or petty cash reimbursement. It is recommended that you enter the Deposit/Withdrawal Record number, the batch number, or the advice slip date on the check stub and check. RFMS Online allows you to link the checks that you disburse with the offsetting record that moved the funds into the account. For details on how to use the offsets feature, see the Offsets topic.
NOTE: In order to simplify reconciliations, it is strongly recommended that you enter withdrawal records such that each record is disbursed with a single check.
With the built-in Vendor Module in RFMS Online, most of the checking account reconciliation is completed automatically when you issue checks. You will still need to manually enter offsets into the system when you disburse funds that were generated by any transaction type other than a withdrawal record or close account. This includes disbursing funds for automated care cost payments from direct deposits or facility deposits, and any other miscellaneous payments.
Resident Funds Management System ONLINE
- 16 -
Any withdrawal from a resident account must match back to a check (or other debit to the checking account) that disburses the money to a resident, family member, facility account, or vendor. Always link the disbursement check(s) back to a Deposit/Withdrawal/Close Record. The Vendor Module allows offsets for your withdrawal records and closed accounts to be generated automatically. You will need to manually enter offsets into the system when you disburse funds that were generated by any other transaction type. This includes disbursing funds for automated care cost payments from direct deposits or facility deposits, and any other miscellaneous payments.
RFMS checking accounts are not service charged for minimum balances or number of transactions. Service charges only apply for items like returned checks, NSF (not sufficient funds), overdraft charges, stop payments, wire fees and check printing charges. Contact National Datacare immediately regarding any service charge or fee that you believe is in error.
See Also: Disbursements vs Offsets Offsets vs Disbursements Checking Account Statement Check Listing
Printing Checks
Printing Checks
RFMS Online allows you to print disbursement checks from your computer. The system is designed to work with a laser printer and check stock that has one check per page located at the top of the page. These checks should be ordered from National Datacare. The check-printing feature allows you to individually enter and print checks. With the built-in Vendor Module, checks to disburse your withdrawal records and closed resident accounts are automatically generated for you. You will need to manually enter checks into the system when you disburse funds that were generated by any other transaction type. This includes disbursing funds for automated care cost payments from direct deposits or facility deposits, and any other miscellaneous payments.
Entering Checks
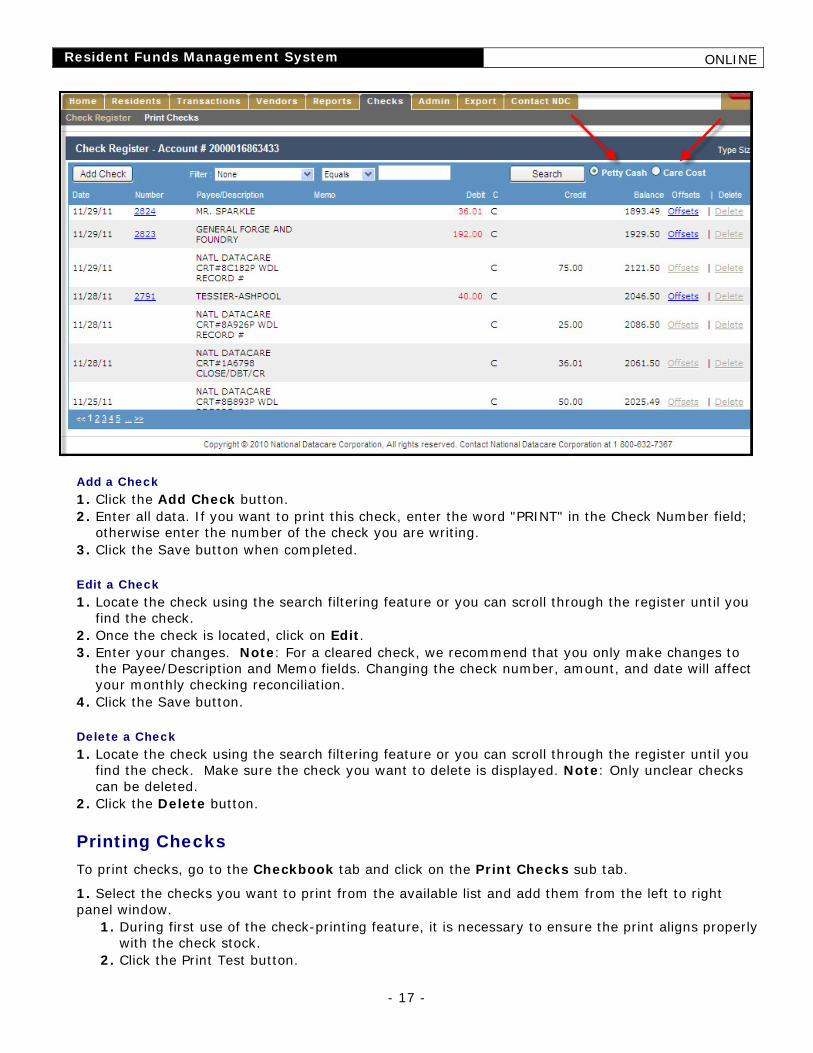
To enter individual checks, go to the Checkbook tab. Before creating a new check, make sure the proper account is selected in the top right hand corner: Petty Cash or Care Cost. See figure below.
Resident Funds Management System ONLINE
- 17 -
Add a Check 1. Click the Add Check button. 2. Enter all data. If you want to print this check, enter the word "PRINT" in the Check Number field;
otherwise enter the number of the check you are writing. 3. Click the Save button when completed. Edit a Check 1. Locate the check using the search filtering feature or you can scroll through the register until you
find the check. 2. Once the check is located, click on Edit. 3. Enter your changes. Note: For a cleared check, we recommend that you only make changes to
the Payee/Description and Memo fields. Changing the check number, amount, and date will affect your monthly checking reconciliation.
4. Click the Save button. Delete a Check 1. Locate the check using the search filtering feature or you can scroll through the register until you
find the check. Make sure the check you want to delete is displayed. Note: Only unclear checks can be deleted.
2. Click the Delete button.
Printing Checks
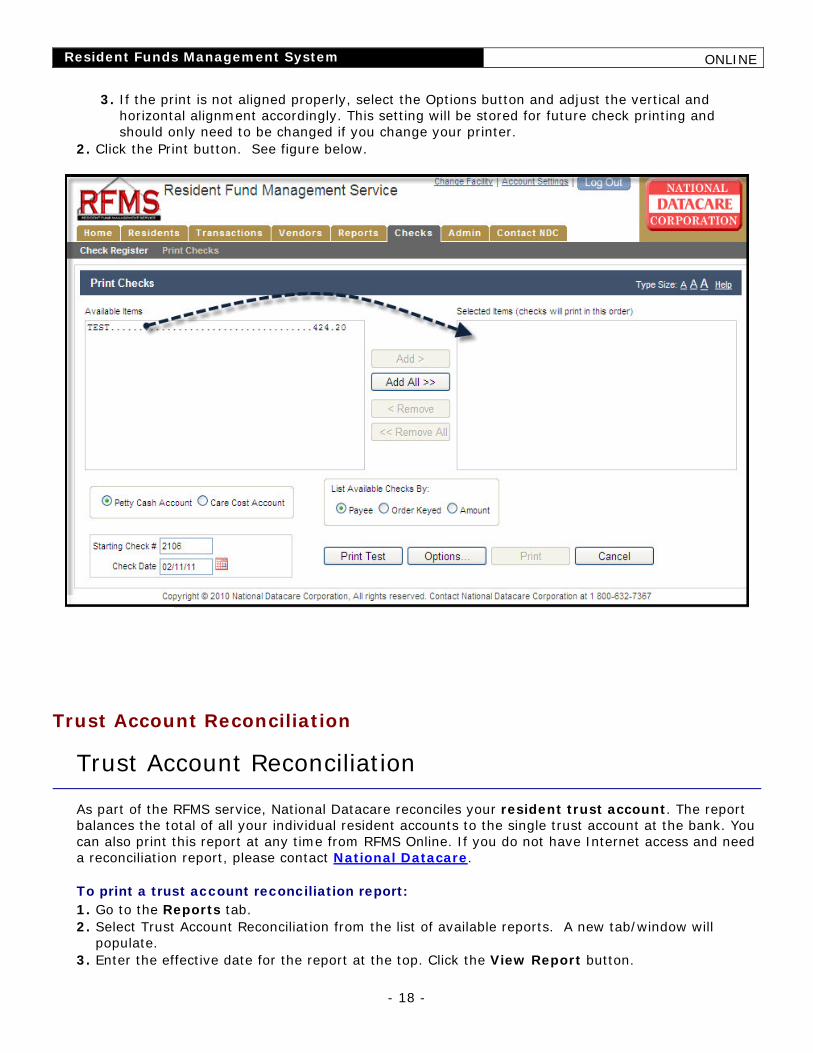
To print checks, go to the Checkbook tab and click on the Print Checks sub tab.
1. Select the checks you want to print from the available list and add them from the left to right panel window.
1. During first use of the check-printing feature, it is necessary to ensure the print aligns properly with the check stock.
2. Click the Print Test button.
Resident Funds Management System ONLINE
- 18 -
3. If the print is not aligned properly, select the Options button and adjust the vertical and horizontal alignment accordingly. This setting will be stored for future check printing and should only need to be changed if you change your printer.
2. Click the Print button. See figure below.
Trust Account Reconciliation
Trust Account Reconciliation
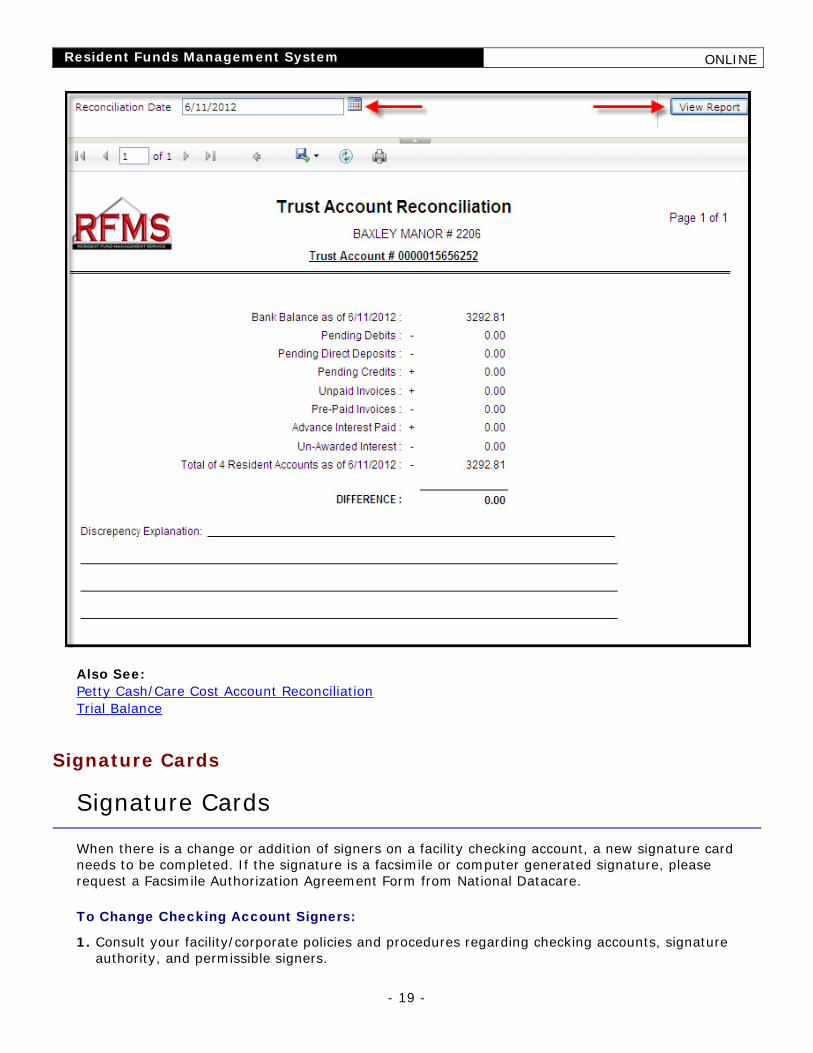
As part of the RFMS service, National Datacare reconciles your resident trust account. The report balances the total of all your individual resident accounts to the single trust account at the bank. You can also print this report at any time from RFMS Online. If you do not have Internet access and need a reconciliation report, please contact National Datacare.
To print a trust account reconciliation report: 1. Go to the Reports tab. 2. Select Trust Account Reconciliation from the list of available reports. A new tab/window will
populate. 3. Enter the effective date for the report at the top. Click the View Report button.
Resident Funds Management System ONLINE
- 19 -
Also See: Petty Cash/Care Cost Account Reconciliation Trial Balance
Signature Cards
Signature Cards
When there is a change or addition of signers on a facility checking account, a new signature card needs to be completed. If the signature is a facsimile or computer generated signature, please request a Facsimile Authorization Agreement Form from National Datacare. To Change Checking Account Signers:
1. Consult your facility/corporate policies and procedures regarding checking accounts, signature authority, and permissible signers.
Resident Funds Management System ONLINE
- 20 -
2. Request a new checking account signature card(s) by phone from National Datacare. Please provide the account number when you call.
3. Complete and sign the new signature card(s). 4. An officer, owner, or partner must sign the resolution. You may use your own corporation
resolution in lieu of the resolution on the bank resolution. 5. Retain a photocopy of the card(s) for your records 6. Mail the original signature card(s) to National Datacare. Faxes or photocopies are not acceptable.
Stop Payments
Stop Payments
You may print a stop payment form through RFMS Online.
1. Go to the Reports tab. 2. Click on the Bank Forms sub tab. 3. Select the appropriate bank stop payment form from the list and a new tab/window will populate.
Print and fax completed form to National Datacare. If you do not have Internet access or the form is unavailable, please contact National Datacare. There is a fee associated with a stop payment. The fee will be debited from the checking account.
Using the Register
Using the Register
The register selection helps you keep track of your checking account activity. All items that appear on your bank account statement are listed in the register. The RFMS automatically creates register entries each time new transactions are received. Transactions are listed in order by date. To access the register, select the Checks tab. Add a Check
Note: You can also enter checks into the register by selecting the Checks tab and Add Check.
1. Click the Add Check button. 2. Enter the information. 3. To add another item, go back to number 1 and repeat the process. 4. After the transaction is complete, click the Save button. Edit/Delete a Check
1. Locate the check by scrolling through the check register or use the search filtering feature. 2. Once located, click on Edit and enter your changes or click on Delete to permanently delete the
check from the register. Only unclear checks can be deleted. Note: For a cleared check, we recommend that you only make changes to the Payee/Description and Memo fields. Changing the check number, amount, and date will affect your monthly checking reconciliation.
3. Click the Save button when changes are completed. To edit another check, go back to step 1 and repeat the process.

Resident Funds Management System ONLINE
- 21 -
Clear/Void Check
1. The checking register provides a column for posted transactions and transactions that have been voided. The C column is automatically updated when transactions post in the account, a C (cleared) will appear in the column. If for any reason the check will not clear/post through the bank (such as a voided check, a stop payment, etc.), the facility can void that check.
2. Locate the unclear check and click on Edit. 3. Click on Void Check and click Save. 4. To void another check, go back to step 1 and repeat the process.
See Also: Vendor Module Offsets Checking Account Overview Facility Petty Cash Fund Corporate Concentration Accounts
Voiding Checks
Voiding Checks
Occasionally, you may need to void or reissue checks. Keep in mind that voiding a check does not prohibit it from clearing the bank. If the check has been disbursed, you may want to consider placing a stop payment on the check (see Stop Payments).
Void Check
1. The checking register provides a column for posted transactions and transactions that have been voided. The C column is automatically updated when transactions are posted in the account at the bank. A "C" (cleared) will appear in the column. If for any reason the transaction will not be cleared/posted through the bank (such as a voided check, a stop payment, etc.), the facility can void that transaction.
2. Locate the unclear check by scrolling through the register or use the search filtering feature. Click on Edit.
3. Click on Void Check and click Save. 4. To avoid another check, go back to step 1 and repeat the process. Reprint a Check With the Same Check Number
1. Go to the Checks tab and click on Add Check sub tab. 2. Locate the check by scrolling through the register or use the search filtering feature. 3. Select the check and click on Edit. 4. In the Check Number field, replace the check number with the word "PRINT". 5. Click the Save button. 6. Go to the Print Checks sub tab. Add the check from the Available Items window to the Selected
Items window (see figure below). 9. Click on Print.
Resident Funds Management System ONLINE
- 22 -
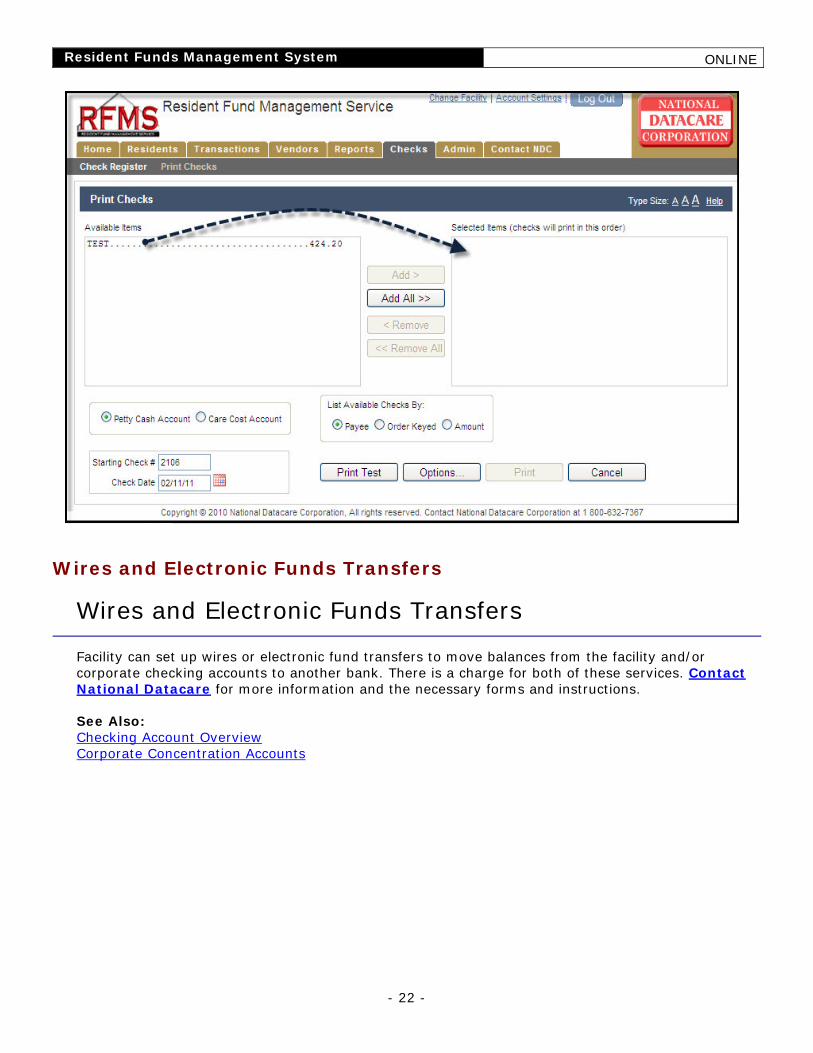
Wires and Electronic Funds Transfers
Wires and Electronic Funds Transfers
Facility can set up wires or electronic fund transfers to move balances from the facility and/or corporate checking accounts to another bank. There is a charge for both of these services. Contact National Datacare for more information and the necessary forms and instructions.
See Also: Checking Account Overview Corporate Concentration Accounts
Resident Funds Management System ONLINE
- 23 -
Resident Accounts
Burial Accounts
Burial Accounts
A revocable burial account may be closed before death. An irrevocable burial account can only be closed after death or if the resident transfers from the facility or the funds are transferred to another burial account. See Also: Non-Transferring Accounts Transferring Accounts
Change Resident Account Information
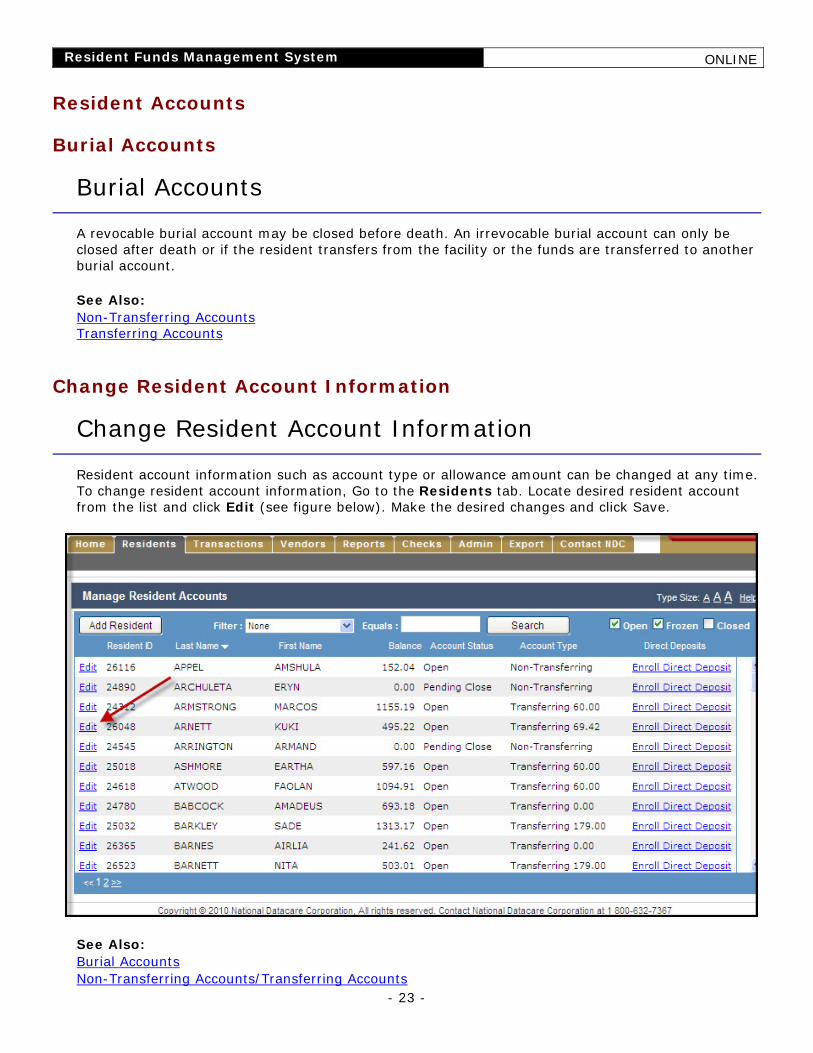
Change Resident Account Information
Resident account information such as account type or allowance amount can be changed at any time. To change resident account information, Go to the Residents tab. Locate desired resident account from the list and click Edit (see figure below). Make the desired changes and click Save.
See Also: Burial Accounts Non-Transferring Accounts/Transferring Accounts
Resident Funds Management System ONLINE
- 24 -
Freeze Accounts
Freeze Accounts
A resident's account may be frozen at any time. A frozen account will not allow withdrawals or deposits to be made by the facility. You can elect to accept or return future direct deposits. To freeze an account, go to the Residents tab. Select the resident account to freeze from the list and click Edit. Click on Freeze Account and select whether to accept future direct deposits. Click Save when completed. See Also: Close Resident Account Un-Freeze Accounts
Non-Transferring Accounts
Non-Transferring Accounts
A non-transferring resident account will retain all deposits made to the account. Non-transferring accounts are most often used for private pay residents and for residents who receive only Supplemental Security Income (SSI). See Also: Transferring Accounts How to Open a New Resident Account
Re-Open Accounts
Re-Open Accounts
Resident accounts can be re-opened at any time. All prior transactions from the original account will be available. To re-open an account, go to the Residents tab. Select the resident account to re-open from the list and click on Edit. Click on Re-Open Account and Click Save. See figure below.

Resident Funds Management System ONLINE
- 25 -
See Also: Close Resident Account
Transferring Accounts
Transferring Accounts
A transferring account will transfer all designated deposits less a monthly personal allowance amount to the facility Care Cost Account. This type of account is usually used for Medical Assistance residents. A designated deposit is either a direct deposit or a deposit code 1, 3, or 4 transaction on a deposit record. The transfer to the facility Care Cost Account occurs on the same day the deposit is credited to the resident's account. The amount transferred to the facility Care Cost Account should be applied to the facility’s accounts receivables for the resident’s cost of care (resource amount, liability portion, etc.). The resident’s allowance amount is provided when the account is opened and may be changed at any time. Each state sets the personal allowance amount given to Medical Assistance residents. It may include fixed additional allowances such as insurance premiums. The allowance amount may be different for each resident. The allowance will be deducted from the first deposit received each month that is large enough to take the full allowance amount. The allowance amount is given to the resident only once per month. If a resident is owed a previous month's allowance, a Code 3 deposit should be used.
Resident Funds Management System ONLINE
- 26 -
If the personal allowance amount is zero, all designated deposits will transfer to the facility Care Cost Account. This zero allowance amount feature is used when:
• the resident does not receive an allowance and all his/her income goes to pay for care.
• the resident has one check direct deposited and another check sent to the family with the family providing for the resident's personal needs and spending money.
In order for the resident to receive his/her allowance automatically each month, the resident must have a transferring account and at least one designated check each month that is large enough to provide the full allowance amount. In some states, if the resident's total monthly income is less than the state's personal allowance amount, then the state will supplement the monthly income so that the resident gets at least the full allowance amount. In this case, neither designated deposit is large enough to take the full allowance amount. Therefore, the resident's account should be set up as a non-transferring account so that both deposits will remain in the resident's account. Within the RFMS system, the last business day of the month is considered the first day of the following month for crediting the allowance amounts. This is done to provide for direct deposit instances when an organization pays the benefit early or when the due date falls on a weekend or holiday. For example, if Labor Day falls on September third all SSI, VA, RRB, CSC and SSA payments arrive on August 31st. In this case, the resident receives his/her September allowance on August 31st. Two allowances will appear on the August statement and no allowance will appear on the September statement. See Also: Non-Transferring Accounts Burial Accounts How to Open a New Resident Account
Un-Freeze Accounts
Un-Freeze Accounts
A frozen resident account can be returned to full active status by un-freezing the account. To un-freeze an account, go to the Residents tab. Select the resident account to un-freeze from the list and click on Edit. Click on Un-Freeze Account and then Save. See figure below.
Resident Funds Management System ONLINE
- 27 -
See Also: Freeze Accounts Re-Open Accounts
Close Accounts
Close Resident Account
Close Resident Account
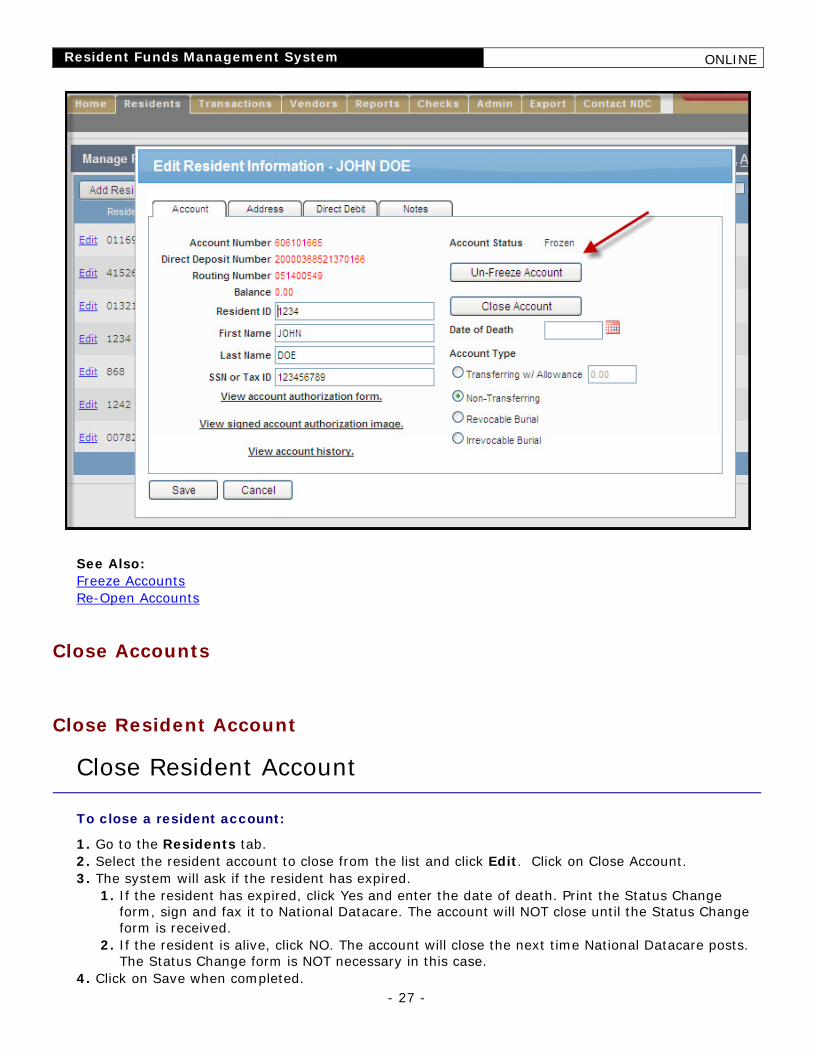
To close a resident account:
1. Go to the Residents tab. 2. Select the resident account to close from the list and click Edit. Click on Close Account. 3. The system will ask if the resident has expired.
1. If the resident has expired, click Yes and enter the date of death. Print the Status Change form, sign and fax it to National Datacare. The account will NOT close until the Status Change form is received.
2. If the resident is alive, click NO. The account will close the next time National Datacare posts. The Status Change form is NOT necessary in this case.
4. Click on Save when completed.
Resident Funds Management System ONLINE
- 28 -
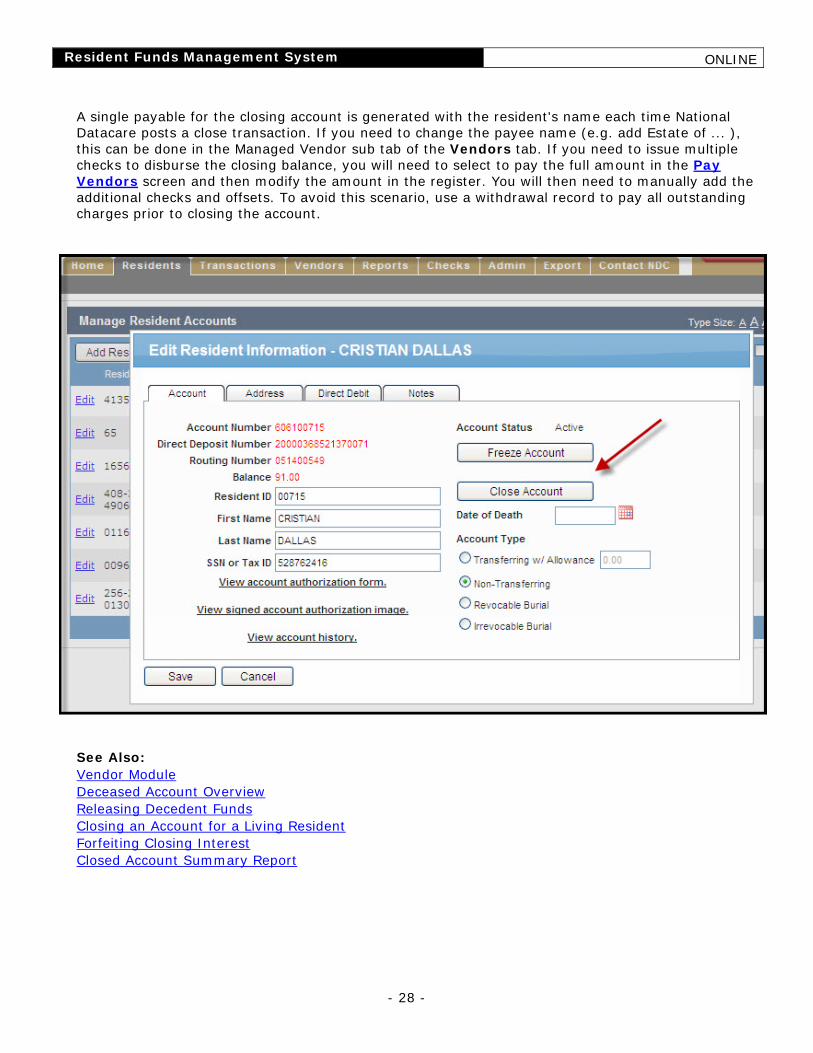
A single payable for the closing account is generated with the resident's name each time National Datacare posts a close transaction. If you need to change the payee name (e.g. add Estate of ... ), this can be done in the Managed Vendor sub tab of the Vendors tab. If you need to issue multiple checks to disburse the closing balance, you will need to select to pay the full amount in the Pay Vendors screen and then modify the amount in the register. You will then need to manually add the additional checks and offsets. To avoid this scenario, use a withdrawal record to pay all outstanding charges prior to closing the account.
See Also: Vendor Module Deceased Account Overview Releasing Decedent Funds Closing an Account for a Living Resident Forfeiting Closing Interest Closed Account Summary Report
Resident Funds Management System ONLINE
- 29 -
Closed Account Transaction Report
Closed Account Transaction Report
RFMS Online can produce a report for any closed account for a given date. This report is useful in identifying funds that need to be disbursed to a family member or turned over to your state's Abandoned Properties.
To run the Closed Account Transaction report: 1. Go to the Reports tab. 2. Choose Closed Transaction from the list of available reports. A new tab/window will populate. 3. Enter the Posting Date and Batch number. 4. Click View Report. See Also: Forfeiting Closing Interest
Closed Account/Reclamation Timeline
Closed Account/Reclamation Timeline
All closed accounts and reclamations resulting from a date of death must be communicated to National Datacare with a Status Change Form. In order for the account to close and any subsequent reclamations to be processed the same day, National Datacare must receive the Status Change by 11:30AM EST/EDT. Status Change forms received after that time will be processed the next business day.
Accounts closed without a date of death must be submitted by 12:30PM EST/EDT in order for the close to process that day. Please note that National Datacare processes at 12:30PM. Give yourself sufficient time for keying and submitting your closed accounts.
See Also: Closing an Account for a Living Resident Deceased Account Overview Closed Account Transaction Report
Closing an Account for a Living Resident
Closing an Account for a Living Resident
If the resident is alive and is leaving the facility or does not wish to participate in the program any longer, the facility may disburse the balance of funds to the resident. To close the account, see the Close Accounts section. The account should not be closed without the resident's or legal representative's authority. The facility should have on file or obtain support documentation from the legal representative confirming the role of the representative. Make sure the resident or his/her legal representative signs the form. An illegible signature or mark (X) requires two (2) witnesses.
Resident Funds Management System ONLINE
- 30 -
If applicable, provide the resident with a copy(s) of the Cancellation of Direct Deposit Authorization form letter. To print this form, go to the Reports tab and select the Forms sub tab. Select Cancellation of Direct Deposit from the available list of forms. The form letter is sent directly to the payment source to convert the direct deposit to a paper check. If the resident wants his/her check direct deposited to another financial institution, that institution should supply the necessary form(s). If the resident is moving to another facility that participates in the RFMS system, a new Account Application and direct deposit enrollment needs to be completed by the new facility. Upon receipt of the close transaction, National Datacare will compute and post interest to date, and transfer the balance to the facility's Petty Cash Account. The facility will receive a Close Report reflecting the closeout and the amount credited to the facility Petty Cash Account. The facility writes a petty cash check or disburses cash to the resident for the balance transferred to the Petty Cash Account less any outstanding withdrawals due to the facility. See Also: Deceased Account Overview Close Resident Account Freeze Accounts Re-Open Accounts
Deceased Account Overview
Deceased Account Overview
It is not necessary to close a resident’s account upon death. However, it is extremely important to notify National Datacare so that direct deposits received after the date of expiration will be returned to their source. To close an account for a deceased resident, follow the instructions for closing an account. To notify National Datacare that a resident is deceased without closing their account, go to the Residents tab. Locate the resident and click on Edit. Enter the date of death, click Save, and print the Status Change form when prompted. On the Status Change form, check “Do Not Close Account at this time”, sign the form and fax it to National Datacare. See Also: Releasing Decedent Funds Closing an Account for a Living Resident
Forfeiting Closing Interest
Forfeiting Closing Interest
The facility can check RFMS Online for current balance information, but the balance given does not include interest due. Interest will accrue until the date the account is closed. If you use a Withdrawal Record to withdrawal a resident's balance to $0.00 before closing the account, or write a check for the current account balance prematurely before account is fully closed, there may be closing interest added to the closing transaction. This interest is due to the resident, and should be disbursed by writing a check to the resident or his/her estate. You can also forfeit interest accumulated on a resident’s account.
Resident Funds Management System ONLINE
- 31 -
To print a Forfeit Interest Request form: 1. Go to Reports tab. 2. Choose Forfeit Interest Request Form under the Forms sub tab. 3. A new tab/window will populate. Print and fax completed form to National Datacare.
See Also: Close Resident Account Closing an Account for a Living Resident Deceased Account Overview
Releasing Decedent Funds
Releasing Decedent Funds
Monies in the resident's account at the time of death become part of the resident's estate. The authority of a resident's legal representative (e.g., guardian, conservator, custodian, representative payee, trustee) ends upon the resident's death. The money in the resident's estate is to be released by the facility. A Status Change form is used to notify National Datacare of the resident's death. Fax completed Status Change forms to National Datacare immediately following the resident's death.
The facility should release the funds in a resident's account in accordance with their state probate laws and health care facility regulations. The facility should obtain a proper releasing document from the individual/organization obtaining the funds. The facility should maintain a copy of the releasing document. As with any withdrawal, National Datacare relies on the facility to provide support documentation, i.e. the releasing document, when and if requested by National Datacare. If the facility releases the funds without a releasing document, they do so at their own liability should a dispute arise regarding the release of the funds from the account. Each state has its own probate and health care facility regulations and document requirements for releasing property and funds in an estate. Regulations and forms may be obtained from your county/city probate court and/or health care facility regulating agency. It is the facility's responsibility to comply with current state probate and health/welfare agency regulations and releasing documents. To assist the facility in obtaining the proper documentation from the next of kin, RFMS Online contains a sample document that can be copied onto facility letterhead or used as a starting point for a customized letter. To print the sample letter, go to Reports tab. Click the Forms sub tab and select the Facility Release of Decedent Funds form. For the facility to release funds, a Status Change form must be completed with the option to "Close the Account". National Datacare will not close a decedent account until the Status Change form is received. Upon receipt of the Status Change form, National Datacare will send back all non-entitled direct deposits to their source, set the account to non-transferring, and compute and post interest to date. The resident's account balance will be transferred to the facility's Petty Cash Account. National Datacare will send the facility a Close Report reflecting the closeout transactions. The facility checks the balance transferred to the Petty Cash Account and insures that there are no outstanding or pending withdrawals due the facility. The facility writes a petty cash check or disburses cash to the estate beneficiary for the balance transferred to the Petty Cash Account less any outstanding withdrawals. If the option was "Not to Close" the account, National Datacare will send back all non-entitled direct deposits to their source, set the account to non-transferring and non-interest bearing. The account
Resident Funds Management System ONLINE
- 32 -
will remain open until another Status Change form is sent to National Datacare requesting the account to be closed. See Also: Deceased Account Overview Close Resident Account Forfeiting Closing Interest
Open a Resident Account
Completing the Resident Account Application
Completing the Resident Account Application
Each resident may have only one resident account and only one burial account. Joint accounts are not permitted. National Datacare must receive a signed Application Agreement for each resident account. You have two options regarding how to complete the Application Agreement:
You can manually complete an Application Agreement, get it signed, and then key it through RFMS Online.
OR…
You can key the data into the computer first, print a completed Application Agreement by clicking on View Account Authorization Form in the Edit Resident Information screen, and then get it signed.
See Also: Signatures
How to Open a New Resident Account
How to Open a New Resident Account
Quick Guide to open a new resident account: 1. Complete a RFMS Authorization & Agreement To Handle Resident Funds form. 2. Enter the data through RFMS Online by going to the Residents tab and click on the Add
Resident button. 3. Enter the RFMS account number assigned by the system into the box at the top right corner of the
application. 4. Mail the original completed application form to National Datacare. Be sure to retain a copy for your
records See Also: Completing the Resident Account Application Signatures Opening a New Resident Account through RFMS Online
Resident Funds Management System ONLINE
- 33 -
Opening a New Resident Account on the Computer
Opening a New Resident Account Through RFMS Online
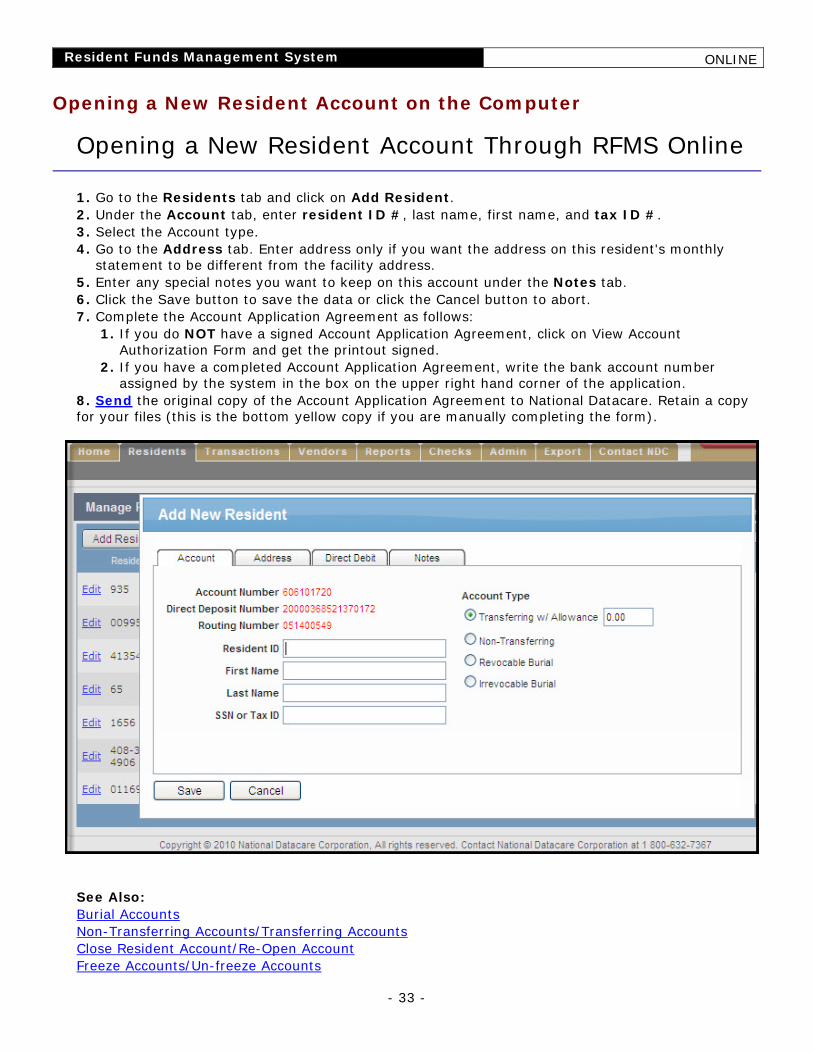
1. Go to the Residents tab and click on Add Resident. 2. Under the Account tab, enter resident ID #, last name, first name, and tax ID #. 3. Select the Account type. 4. Go to the Address tab. Enter address only if you want the address on this resident's monthly
statement to be different from the facility address. 5. Enter any special notes you want to keep on this account under the Notes tab. 6. Click the Save button to save the data or click the Cancel button to abort. 7. Complete the Account Application Agreement as follows:
1. If you do NOT have a signed Account Application Agreement, click on View Account Authorization Form and get the printout signed.
2. If you have a completed Account Application Agreement, write the bank account number assigned by the system in the box on the upper right hand corner of the application.
8. Send the original copy of the Account Application Agreement to National Datacare. Retain a copy for your files (this is the bottom yellow copy if you are manually completing the form).
See Also: Burial Accounts Non-Transferring Accounts/Transferring Accounts Close Resident Account/Re-Open Account Freeze Accounts/Un-freeze Accounts
Resident Funds Management System ONLINE
- 34 -
Signatures
Signatures
The account Application Agreement signature requirements are as follows: If the resident does not have a representative payee or a legal representative:
The resident must sign.
If the signature is legible, no witness is required. However, a witness may sign if he/she chooses.
If the signature is illegible or a mark "X", two (2) witnesses are required.
If the resident cannot make any mark at all, write: "Resident cannot sign and has acknowledged acceptance to us." The form must be signed by two witnesses.
Witnesses may be family members, friends or facility employees (as per your facility policies and procedures).
If the resident has a representative payee:
A representative payee takes precedence over a legal representative when dealing with Federal Government Agency payments/checks.
The representative payee must sign if a check for which he/she is representative payee is being direct deposited to the resident's account.
If the facility is the representative payee, the administrator must sign and indicate his/her title as Administrator/Rep Payee. If the resident does not have a representative payee but has a legal representative (e.g., guardian, custodian, conservator, power of attorney, trustee, etc.), the legal representative must sign and indicate his/her title.
Do not send the supporting legal documents to the RFMS Processing Center. Retain these documents in accordance with your facility policies and procedures.
See Also: Completing the Resident Account Application How To Open a New Resident Account Opening a New Resident Account through RFMS Online
Reports
$200 Letter
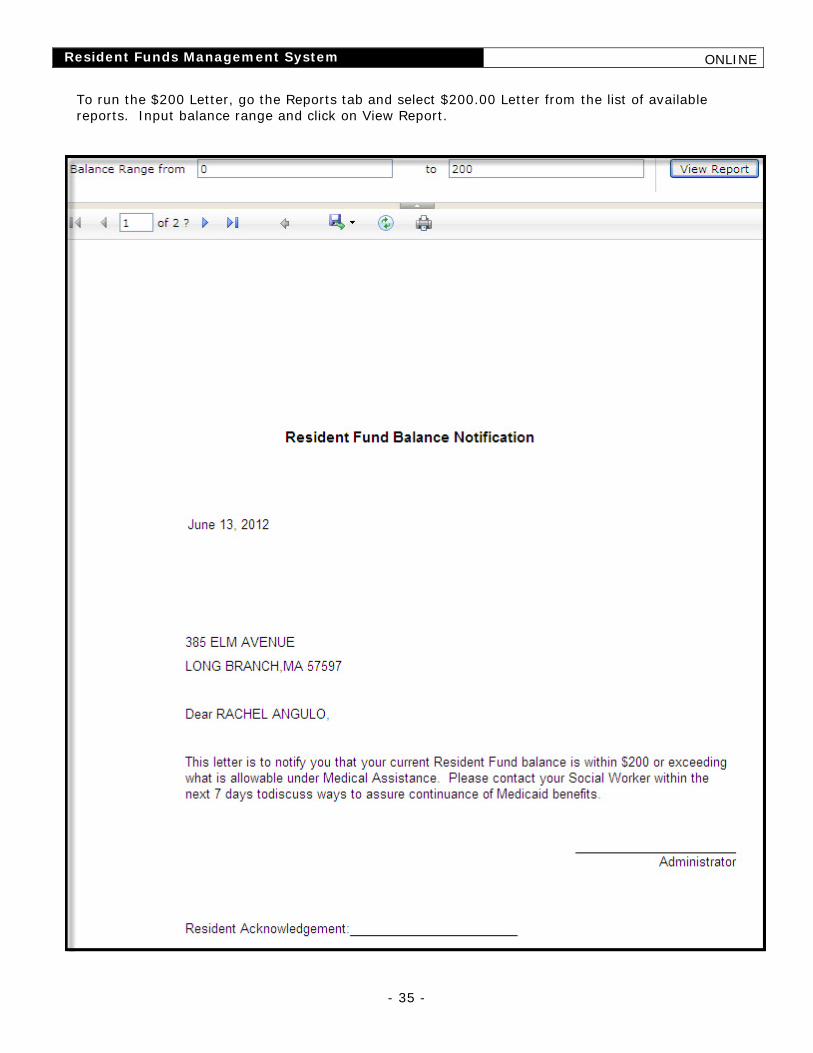
$200 Letter
Per OBRA regulations, a resident on medical assistance must be notified whenever their funds are within $200 of their resource asset limit. RFMS Online can produce a summary listing of the residents that need to be notified and a customizable individual Notification Letter for each resident.
Resident Funds Management System ONLINE
- 35 -
To run the $200 Letter, go the Reports tab and select $200.00 Letter from the list of available reports. Input balance range and click on View Report.
Resident Funds Management System ONLINE
- 36 -
$200 Notification Summary Report
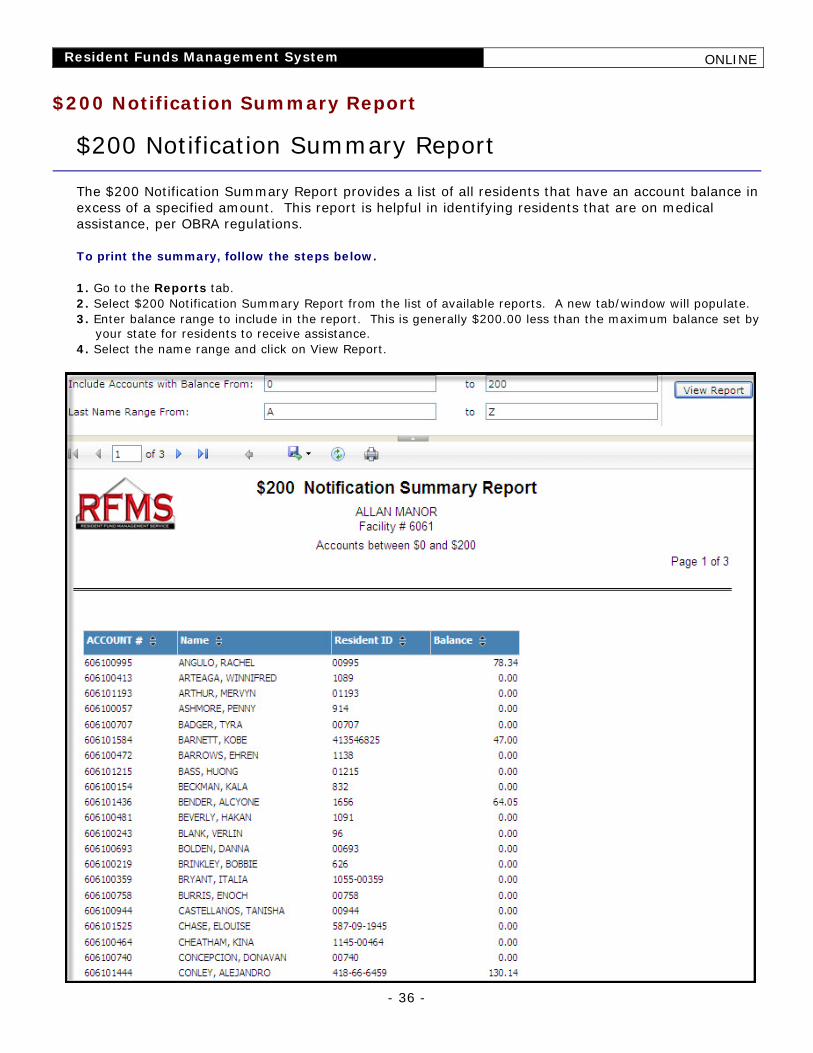
$200 Notification Summary Report
The $200 Notification Summary Report provides a list of all residents that have an account balance in excess of a specified amount. This report is helpful in identifying residents that are on medical assistance, per OBRA regulations.
To print the summary, follow the steps below.
1. Go to the Reports tab. 2. Select $200 Notification Summary Report from the list of available reports. A new tab/window will populate. 3. Enter balance range to include in the report. This is generally $200.00 less than the maximum balance set by
your state for residents to receive assistance. 4. Select the name range and click on View Report.

Resident Funds Management System ONLINE
- 37 -
Abandoned Property Report
Abandoned Property Report
RFMS Online has a new report that will assist you in identifying items that may need to be turned over to state's abandoned property department. This report lists all decedent resident accounts that currently have a balance. To run an Abandoned Property report, go to the Reports tab and select Abandoned Property from the list of available reports. A new tab/window will populate.
A/R Summary
A/R Summary
The A/R Summary report can be used to post care cost payments to your accounts receivable system. The report summarizes all care cost payments for a given time period for each resident. To run an A/R Summary report, go to the Reports tab and select A/R Summary from the list of available reports. A new tab/window will populate. Enter the date range for the report and click View Report.
Also See: Export
Resident Funds Management System ONLINE
- 38 -
Bank Account Statistics
Bank Account Statistics
You can run the Bank Account Statistics report to view the high, low, and average balances for all your bank accounts. To run the report, go to the Reports tab and select Bank Account Statistics from the list of available reports. A new tab/window will populate. Enter the date range for the report and click View Report.
Batch Summary Report
Batch Summary Report
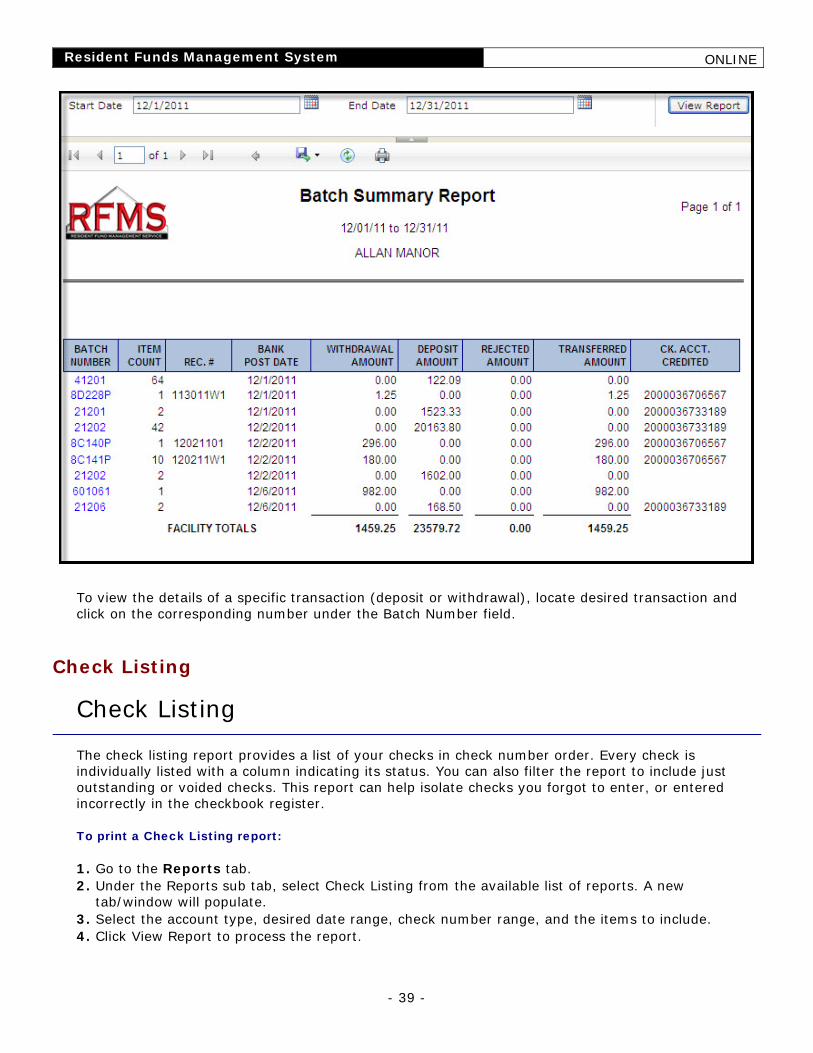
Confirmation reports can be summarized by RFMS in the Batch Summary report. This report is extremely useful in reconciling your account and identifying any rejected items. Each report has a batch number assigned to it. The first digit of the batch number identifies the type of report.
To print a Batch Summary report:
1. Go to the Reports tab. 2. Select Batch Summary Report from the list of available reports. A new tab/window will populate. 3. Select date range. 4. Click on View Report.
Resident Funds Management System ONLINE
- 39 -
To view the details of a specific transaction (deposit or withdrawal), locate desired transaction and click on the corresponding number under the Batch Number field.
Check Listing
Check Listing
The check listing report provides a list of your checks in check number order. Every check is individually listed with a column indicating its status. You can also filter the report to include just outstanding or voided checks. This report can help isolate checks you forgot to enter, or entered incorrectly in the checkbook register.
To print a Check Listing report:
1. Go to the Reports tab. 2. Under the Reports sub tab, select Check Listing from the available list of reports. A new
tab/window will populate. 3. Select the account type, desired date range, check number range, and the items to include. 4. Click View Report to process the report.
Resident Funds Management System ONLINE
- 40 -
See Also: Checking Account Statement Disbursements vs Offsets Offsets vs Disbursements Vendor A/P Listing Petty Cash/Care Cost Checking Account Reconciliation
Checking Account Statement
Checking Account Statement
RFMS Online provides up-to-date information on your facility checking accounts. You can print a statement on your checking accounts at any time.
To print a Checking Account Statement report:
1. Go to the Reports tab. 2. Choose Checking Account Statement from the available list of reports. A new tab/window will
populate. 3. Select the Statement Type: Bank or Register. Input desired date range and account type. 4. Click the View Report button.
See Also: Check Listing Disbursements vs Offsets Offsets vs Disbursements Vendor A/P Listing Petty Cash/Care Cost Checking Account Reconciliation
Close Transaction
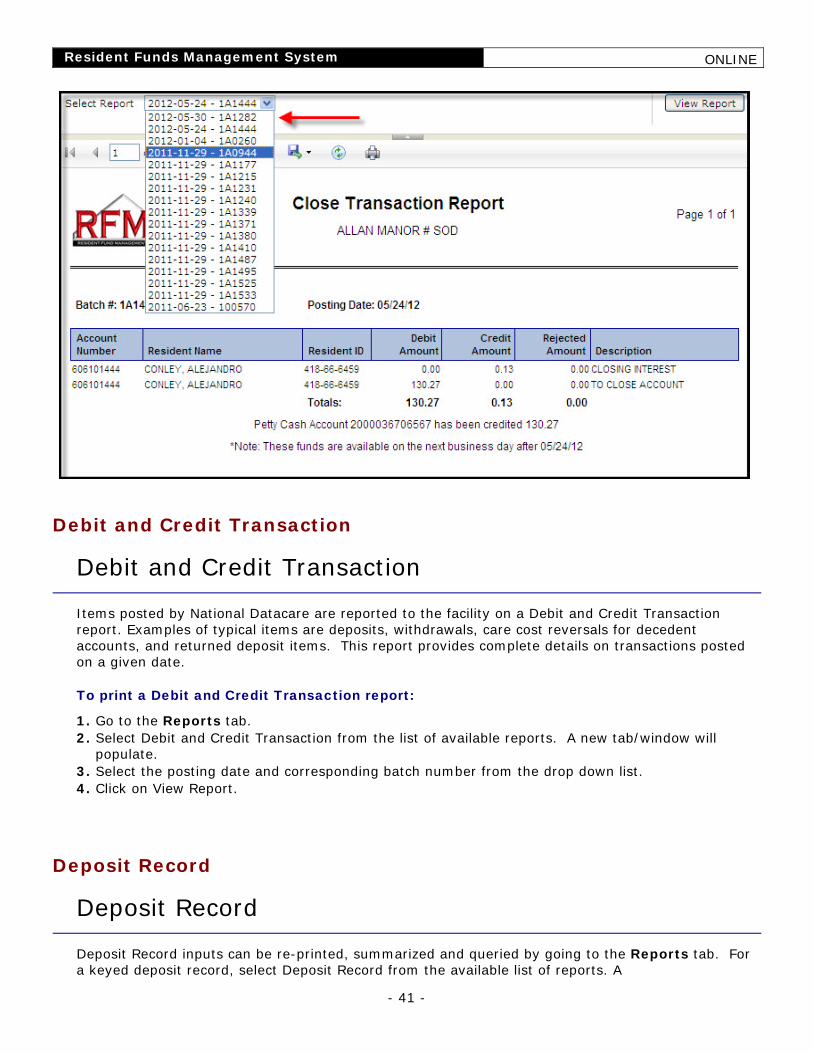
Close Transaction
RFMS Online can produce a confirmation report to show when a resident account is closed. To run the report, go to the Reports tab and select Close Transaction from the list of available reports. A new tab/window will populate. Enter the date and batch number of the posted transaction. Click View Report.
Resident Funds Management System ONLINE
- 41 -
Debit and Credit Transaction
Debit and Credit Transaction
Items posted by National Datacare are reported to the facility on a Debit and Credit Transaction report. Examples of typical items are deposits, withdrawals, care cost reversals for decedent accounts, and returned deposit items. This report provides complete details on transactions posted on a given date.
To print a Debit and Credit Transaction report:
1. Go to the Reports tab. 2. Select Debit and Credit Transaction from the list of available reports. A new tab/window will
populate. 3. Select the posting date and corresponding batch number from the drop down list. 4. Click on View Report.
Deposit Record
Deposit Record
Deposit Record inputs can be re-printed, summarized and queried by going to the Reports tab. For a keyed deposit record, select Deposit Record from the available list of reports. A
Resident Funds Management System ONLINE
- 42 -
new tab/window will populate. Select the record number with the corresponding batch number and amount. Click on View Report. It is important to print all records and verify that all transactions are correct. All input reports show the status of the record in the top right hand corner. You can print un-transmitted and transmitted deposit records in a detail format. This report helps you identify which records have not been transmitted to National Datacare. Deposit records are not posted until National Datacare receives the deposit record printout and the corresponding checks. After National Datacare has posted the record, the facility needs to transmit again to receive the confirmation report. See Also: How to Make a Deposit How to Transmit
Deposit Transaction
Deposit Transaction
Any direct deposits, scanned deposits, and over-the-counter deposits that National Datacare processes can be printed at any time. To print a detailed confirmation, go to Reports tab and select Deposit Transaction from the list of available reports. A new window/tab will populate. Select the posting date with the corresponding batch number and amount. Click on View Report. See Also: Batch Summary Report
Direct Debit Record
Direct Debit Record
Direct Debit Record inputs can be re-printed, summarized and queried by going to the Reports tab. For a keyed direct debit record, select Direct Debit Record from the available list of reports. A new tab/window will populate. Select the record number from the drop down list and click View Report. It is important to print all records and verify that all transactions are correct. All input reports show the status of the record in the top right hand corner. You can print un-transmitted and transmitted direct debit records in a detail format. This report helps you identify which records have not been transmitted to National Datacare. Direct debit records are not posted until National Datacare receives the record printout. After National Datacare has posted the record, the facility needs to transmit again to receive the confirmation report.
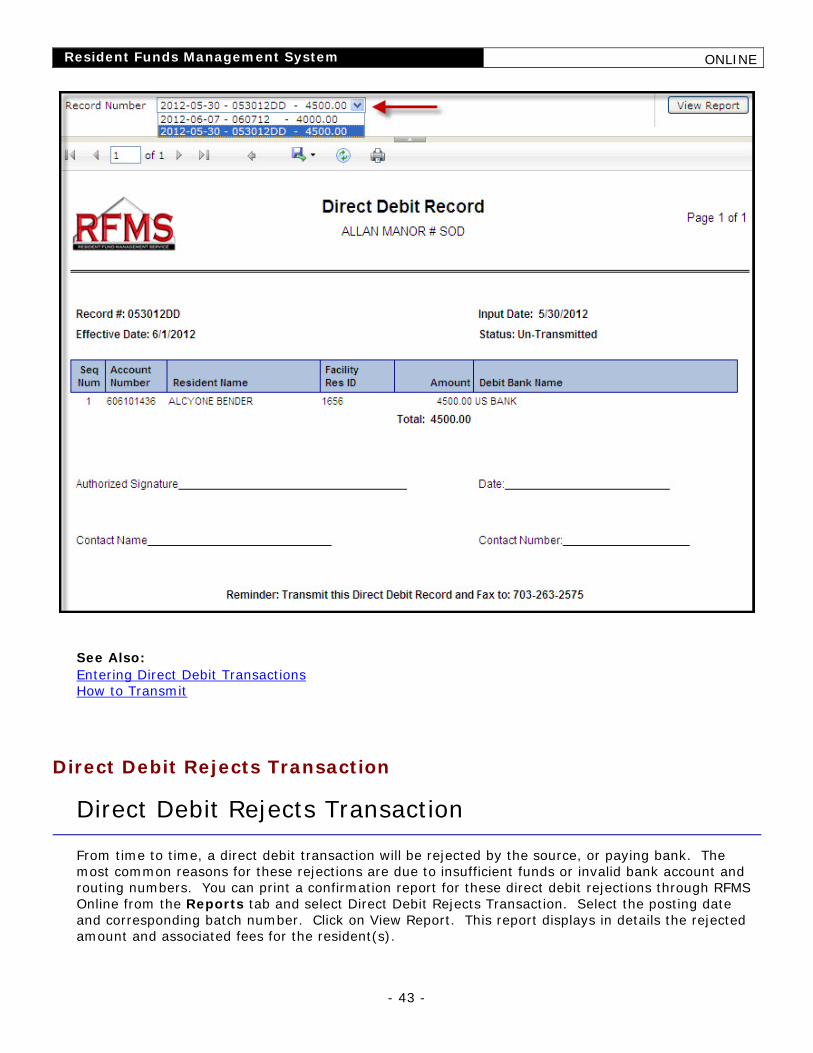
Resident Funds Management System ONLINE
- 43 -
See Also: Entering Direct Debit Transactions How to Transmit
Direct Debit Rejects Transaction
Direct Debit Rejects Transaction
From time to time, a direct debit transaction will be rejected by the source, or paying bank. The most common reasons for these rejections are due to insufficient funds or invalid bank account and routing numbers. You can print a confirmation report for these direct debit rejections through RFMS Online from the Reports tab and select Direct Debit Rejects Transaction. Select the posting date and corresponding batch number. Click on View Report. This report displays in details the rejected amount and associated fees for the resident(s).
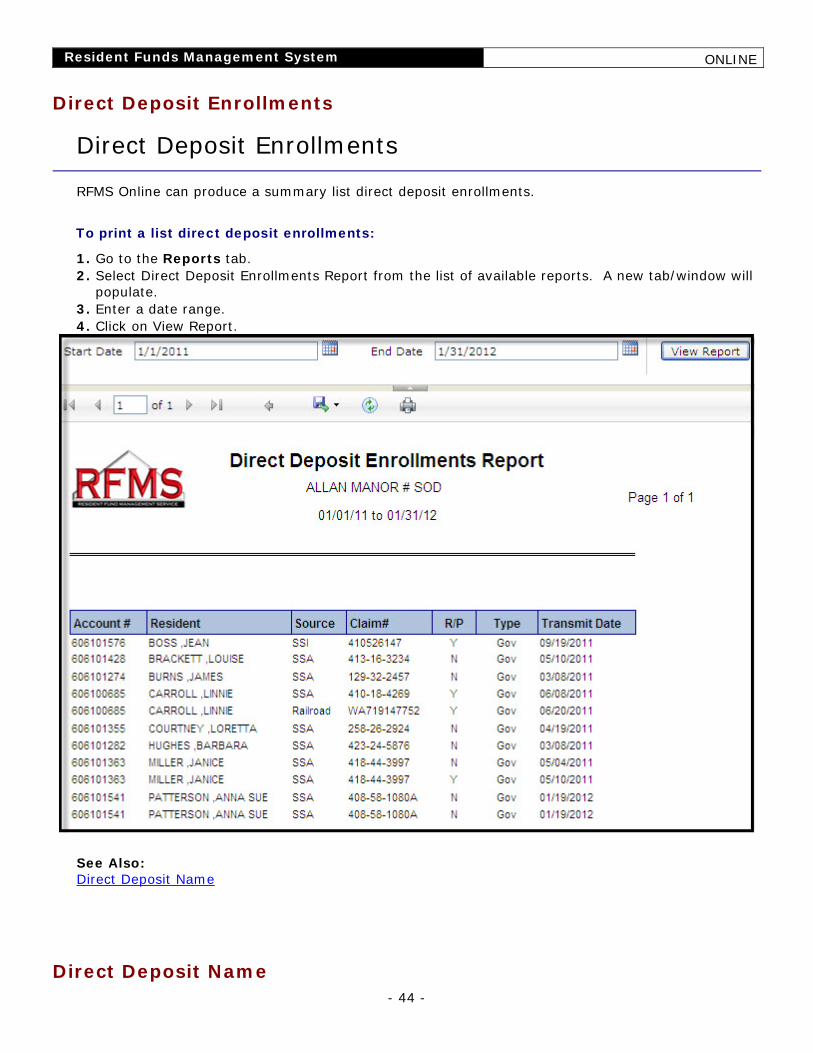
Resident Funds Management System ONLINE
- 44 -
Direct Deposit Enrollments
Direct Deposit Enrollments
RFMS Online can produce a summary list direct deposit enrollments.
To print a list direct deposit enrollments:
1. Go to the Reports tab. 2. Select Direct Deposit Enrollments Report from the list of available reports. A new tab/window will
populate. 3. Enter a date range. 4. Click on View Report.
See Also: Direct Deposit Name
Direct Deposit Name
Resident Funds Management System ONLINE
- 45 -
Direct Deposit Name
RFMS Online can produce a summary list of payee name on direct deposits. This report can be helpful in determining the payee information for direct deposits.
To print a list of payee name:
1. Go to the Reports tab. 2. Select Direct Deposit Name Report from the list of available reports. A new tab/window will
populate. 3. Enter a date range. 4. Click on View Report. See Also: Direct Deposit Enrollments
Direct Deposit Reclamation
Direct Deposit Reclamation
You can print a Direct Deposit Reclamation report for a resident that received a reclamation debit for a direct deposit that he/she was not entitled to. This confirmation report is helpful in determining if care cost should be refunded back into the resident's account and/or to fund the account should the debit cause the account to be in the negative.
To print a direct deposit reclamation report:
1. Go to the Reports tab. 2. Select Direct Deposit Reclamation from the list of available reports. A new tab/window will
populate. 3. Select the posting date and corresponding batch number from the dropdown list. 4. Click on View Report.
Direct Deposit Status
Resident Funds Management System ONLINE
- 46 -
Direct Deposit Status
RFMS Online can produce a list of status on direct deposit enrollments. You can use this report to determine which resident needs to be enrolled or re-enrolled if he/she is still receiving check payments.
To print a status list of direct deposit enrollments:
1. Go to the Reports tab. 2. Select Direct Deposit Status Rejections from the list of available reports. A new tab/window will
populate. 3. Enter a date range and select types of status to include on report. 4. Click on View Report.
Disbursements vs Offsets
Disbursements vs Offsets
The Disbursements with Offsets report provides a cross-reference sheet that lists checks (Disbursements) and their offsetting Deposit/Withdrawal Record(s). This report is extremely helpful in reconciliation. It tells you exactly what needs to be disbursed or what was over-disbursed. The status, settled or un-settled, of each item is provided. A zero in the Unsettled Amount column means that the amount withdrawn from the resident accounts was properly disbursed. Any amount other than zero in the Unsettled Amount column means the disbursed amount and the amount withdrawn from the resident accounts do not match.
To print a Disbursements vs Offsets report:
1. Go to the Reports tab. 2. Select Disbursements vs. Offsets from the available list of reports, . A new tab/window will
populate. 3. Select the date range and items to be included on the report. 4. Click the View Report button.
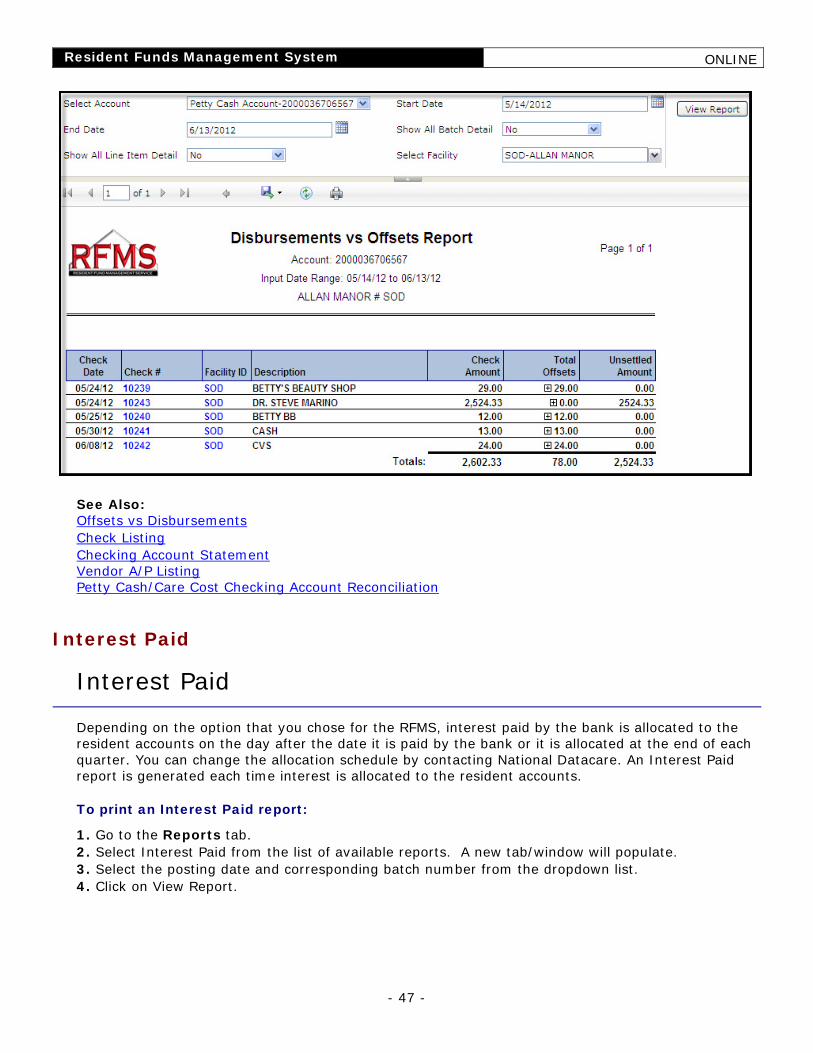
Resident Funds Management System ONLINE
- 47 -
See Also: Offsets vs Disbursements Check Listing Checking Account Statement Vendor A/P Listing Petty Cash/Care Cost Checking Account Reconciliation
Interest Paid
Interest Paid
Depending on the option that you chose for the RFMS, interest paid by the bank is allocated to the resident accounts on the day after the date it is paid by the bank or it is allocated at the end of each quarter. You can change the allocation schedule by contacting National Datacare. An Interest Paid report is generated each time interest is allocated to the resident accounts.
To print an Interest Paid report:
1. Go to the Reports tab. 2. Select Interest Paid from the list of available reports. A new tab/window will populate. 3. Select the posting date and corresponding batch number from the dropdown list. 4. Click on View Report.
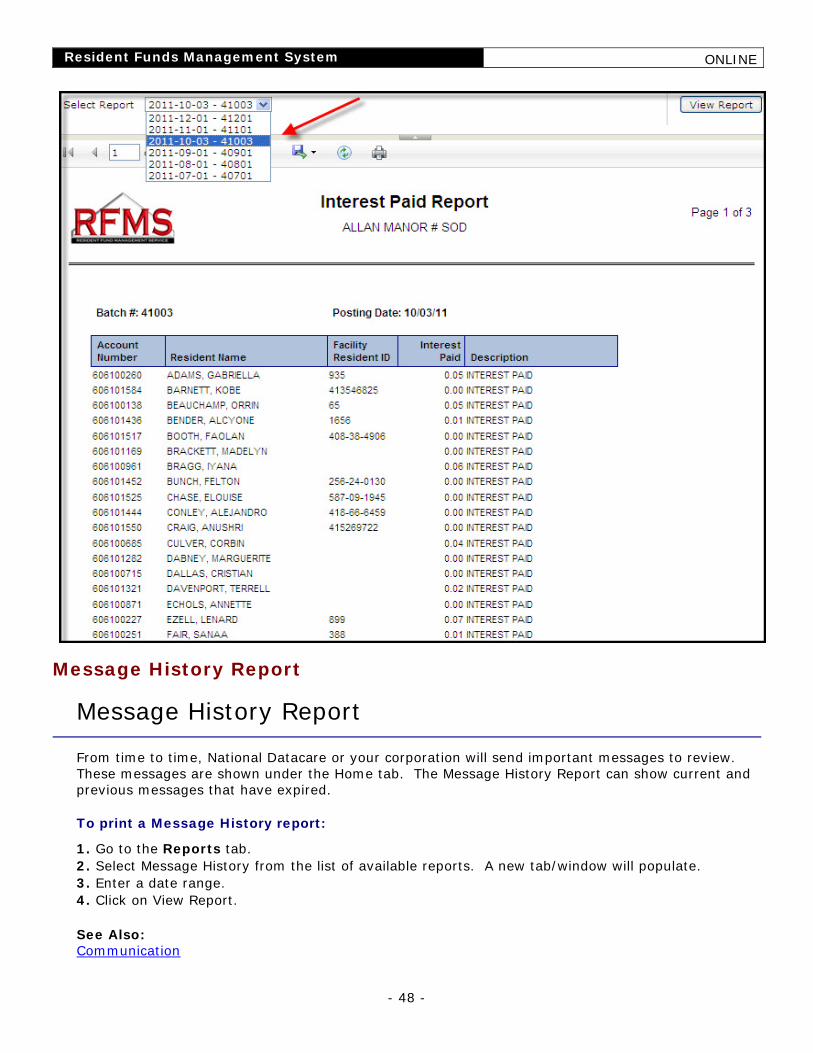
Resident Funds Management System ONLINE
- 48 -
Message History Report
Message History Report
From time to time, National Datacare or your corporation will send important messages to review. These messages are shown under the Home tab. The Message History Report can show current and previous messages that have expired.
To print a Message History report:
1. Go to the Reports tab. 2. Select Message History from the list of available reports. A new tab/window will populate. 3. Enter a date range. 4. Click on View Report. See Also: Communication
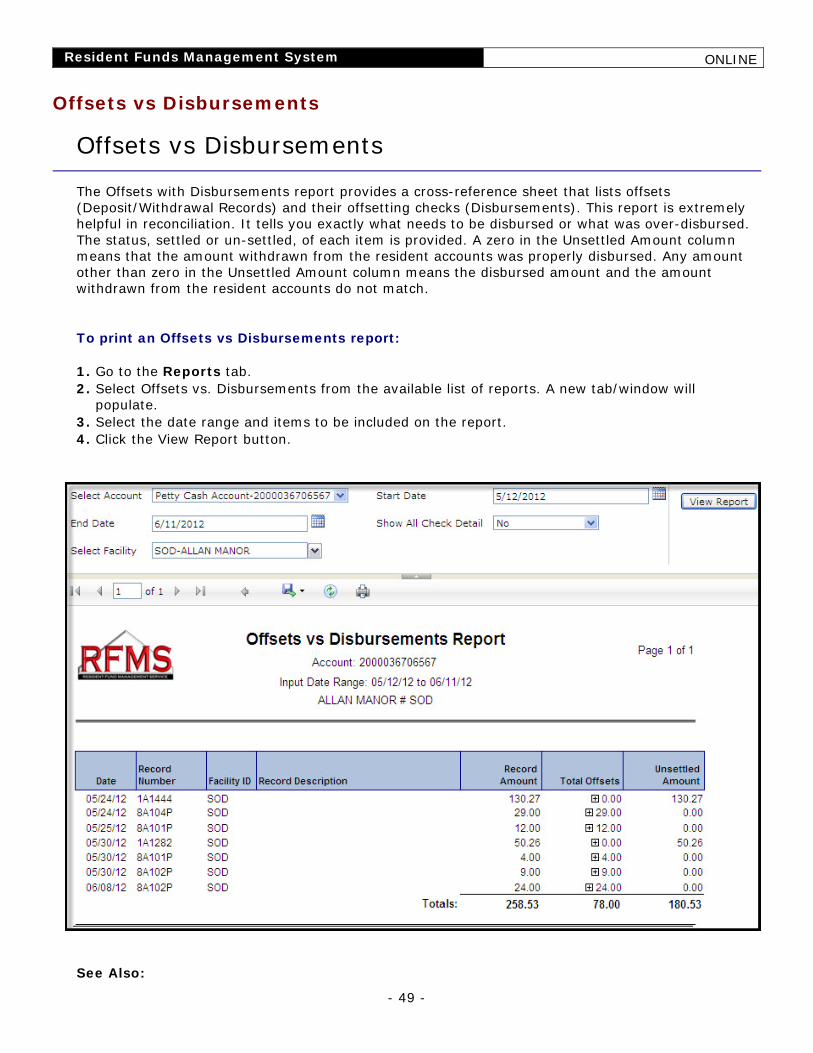
Resident Funds Management System ONLINE
- 49 -
Offsets vs Disbursements
Offsets vs Disbursements
The Offsets with Disbursements report provides a cross-reference sheet that lists offsets (Deposit/Withdrawal Records) and their offsetting checks (Disbursements). This report is extremely helpful in reconciliation. It tells you exactly what needs to be disbursed or what was over-disbursed. The status, settled or un-settled, of each item is provided. A zero in the Unsettled Amount column means that the amount withdrawn from the resident accounts was properly disbursed. Any amount other than zero in the Unsettled Amount column means the disbursed amount and the amount withdrawn from the resident accounts do not match.
To print an Offsets vs Disbursements report:
1. Go to the Reports tab. 2. Select Offsets vs. Disbursements from the available list of reports. A new tab/window will
populate. 3. Select the date range and items to be included on the report. 4. Click the View Report button.
See Also:
Resident Funds Management System ONLINE
- 50 -
Reconciliation Reports Batch
Reconciliation Reports Batch
You can print multiple reports at once when you are doing your month-end reconciliation for your checking account. The Reconciliation Reports Batch can save time by printing all necessary reports to help you reconcile instead of printing each report individually.
To print a Reconciliation Reports Batch:
1. Go to the Reports tab. 2. Select Reconciliation Reports Batch from the available list of reports. A new tab/window will
populate. 3. Select desired date and reports to be included. 4. Click the View Report button.
See Also: Disbursements vs Offsets Offsets vs Disbursements Check Listing Checking Account Statement Vendor A/P Listing Petty Cash/Care Cost Checking Account Reconciliation
Resident Account Family Statement
Resident Account Family Statement
When a family member requests an account statement for a resident, you can print a statement from RFMS Online. This report is designed specifically for the resident's family.
To print a resident account family statement report:
1. Go to the Reports tab. 2. Select Resident Account Family Statement from the available list of reports. A new tab/window will
populate. 3. Select desired date range and resident(s) from the drop down list. 4. Click on View Report.
See Also: Resident Statement
Resident Funds Management System ONLINE
- 51 -
Resident Activity List
Resident Activity List
RFMS Online can produce a report that lists residents with a blank column for any facility specific needs. This can be used as a checklist for resident activities.
To print a resident activity list report:
1. Go to the Reports tab. 2. Select Resident Activity List from the available list of reports. A new tab/window will populate. 3. Select desired resident(s) from the drop down list. 4. Click on View Report.
Resident Addresses Report
Resident Addresses Report
RFMS Online can print a list of mailing address labels, which is formatted and printed on the Avery 5160 label template.
To print a resident address list:
1. Go to the Reports tab. 2. Select Resident Addresses from the available list of reports. A new tab/window will populate. 3. Click on the printer icon.
Resident Last Transaction Report
Resident Last Transaction Report
RFMS Online can provide a summary list of residents and their last transaction. To print a resident last transaction report: 1. Go to the Reports tab. 2. Select Resident Last Transaction from the list of available reports. A new tab/window will populate. 3. Click on the arrow next to a column title to sort the report.
Resident Funds Management System ONLINE
- 52 -
Resident Statement
Resident Statement
An up-to-the minute history statement of a resident account can be obtained from RFMS Online. To print a resident statement: 1. Go to the Reports tab. 2. Select Resident Statement from the list of available reports. A new tab/window will populate. 3. Select the resident(s) that you want to view statements for from the dropdown list. If the desired
account is closed, it may not appear in the list. In this case, select the Show Closed Accounts box to refresh the list. Input the date range and other items to include on the statement. Click View Report.
Service Charge Transaction
Service Charge Transaction
Any service charge billed to the resident account can be printed through RFMS Online. To print a service charge transaction report: 1. Go to the Reports tab. 2. Select Service Charge Transaction from the list available reports. A new tab/window will populate. 3. Select from the dropdown list and click View Report.
Status Logs
Status Logs
RFMS Online tracks and records user logins, inputs, and errors. This report is useful for corporate audits. To print a status log report: 1. Go to the Reports tab. 2. Select Status Logs from the list available reports. A new tab/window will populate. 3. Enter desired date range and categories to include in the report. 4. Click on View Report.

Resident Funds Management System ONLINE
- 53 -
Transaction Type Summary
Transaction Type Summary
The Transaction Type Summary report will group transactions for a particular resident based on the transaction description. To run a Transaction Type Summary report, go to Reports and select Transaction Type Summary from the list of available reports. A new tab/window will populate. Select the resident(s), date range, and any items to include in the report. Click View Report.
Trial Balance
Trial Balance
A listing of all resident accounts with their balance, status, and other information is available through RFMS Online. The bank balance column on the report contains the current balance in each resident’s account. The pending balance column reflects the bank balance adjusted for any outstanding withdrawals or deposits. Outstanding items are transactions that you have keyed but have not been posted by National Datacare. By default, pending deposits are included in the pending balance. When disbursing funds, you should use the pending balance value to determine if a resident has sufficient funds.
To run a trial balance report: 1. Go to the Reports tab. 2. Select Trial Balance from the list of available reports. A new tab/window will populate. 3. Select the effective date for the balances, the number of days range to include closed accounts,
and other items to include on the report. Click View Report.
See Also: Trust Account Reconciliation
Trust Account Reconciliation
Trust Account Reconciliation
As part of the RFMS service, National Datacare reconciles your resident trust account. The report balances the total of all your individual resident accounts to the single trust account at the bank. You can also print this report at any time from RFMS Online. If you do not have Internet access and need a reconciliation report, please contact National Datacare.
To print a trust account reconciliation report:
1. Go to the Reports tab. 2. Select Trust Account Reconciliation from the list of available reports. A new tab/window will
populate. 3. Enter the effective reconciliation date for the report and click on View Report.
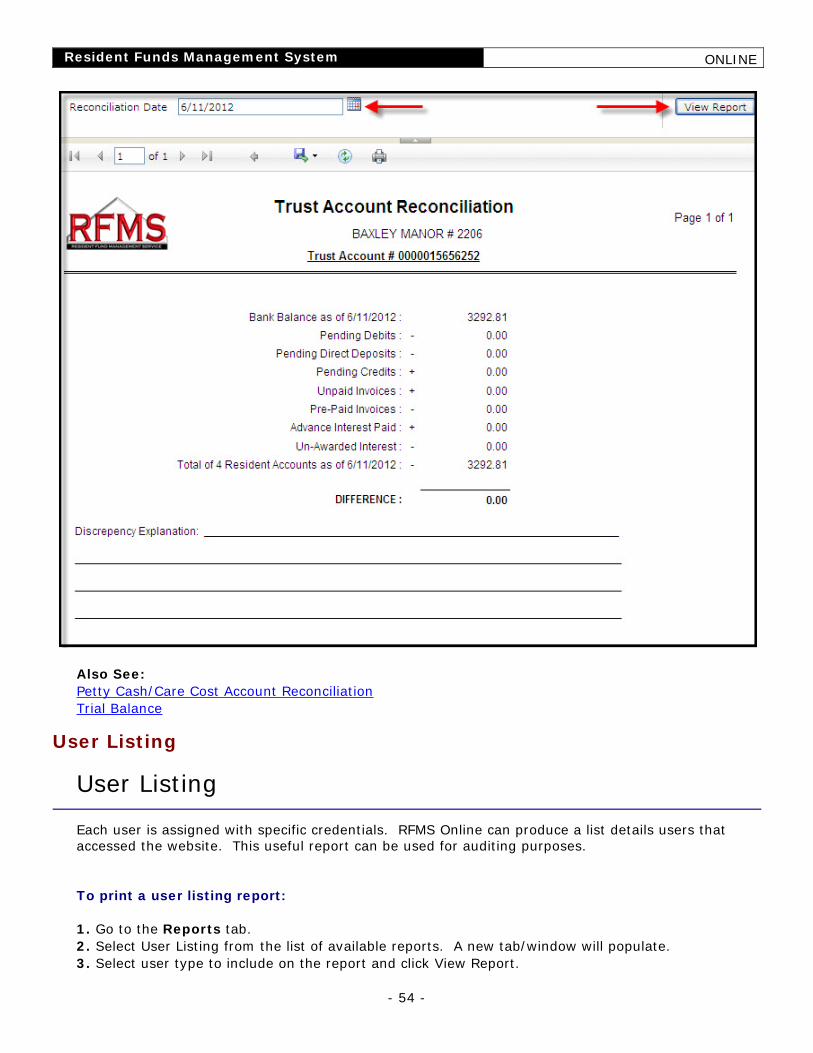
Resident Funds Management System ONLINE
- 54 -
Also See: Petty Cash/Care Cost Account Reconciliation Trial Balance
User Listing
User Listing
Each user is assigned with specific credentials. RFMS Online can produce a list details users that accessed the website. This useful report can be used for auditing purposes.
To print a user listing report:
1. Go to the Reports tab. 2. Select User Listing from the list of available reports. A new tab/window will populate. 3. Select user type to include on the report and click View Report.
Resident Funds Management System ONLINE
- 55 -
Vendor A/P Listing
Vendor A/P Listing
The Vendor A/P Listing report lists all vendors to which checks were written for any date range you choose, and details the check numbers and amounts.
To print a vendor A/P Listing report:
1. Go to the Reports tab. 2. Select Vendor A/P Listing from the list of available reports. A new tab/window will populate. 3. Select date range and vendors to include on the report. 4. Click on View Report.
See Also: Check Listing Disbursements vs Offsets Offsets vs Disbursements Checking Account Statement Vendor List
Vendor List
Vendor List
RFMS Online can produce a list of all your vendors and their information.
To print a vendor list report:
1. Go to the Reports tab. 2. Select Vendor List from the list of available reports. A new tab/window will populate. 3. Select items to include on the report. 4. Click on View Report.
See Also: Vendor A/P Listing
Vendor Outstanding Payables
Vendor Outstanding Payables
You can print a list of outstanding vendor payables that require check disbursements. This report can be used to determine which vendor needs to be paid out and which has already been paid.
Resident Funds Management System ONLINE
- 56 -
To print a vendor outstanding payables report:
1. Go to the Reports tab. 2. Select Vendor Outstanding Payables from the list of available reports. A new tab/window will
populate. 3. Select vendor(s) to include on the report. 4. Click on View Report.
See Also: Vendor List Vendor A/P Listing
Withdrawal Record
Withdrawal Record
Withdrawal Record inputs can be re-printed, summarized and queried by going to the Reports tab. For a keyed withdrawal record, select Withdrawal Record from the available list of reports. A new tab/window will populate. Select the record with its corresponding input date/amount and click on View Report. It is important to print all records and verify that all transactions are correct. All input reports show the status of the record in the top right hand corner. You can print un-transmitted and transmitted withdrawal records in a detail format. This report helps you identify which records have not been transmitted to National Datacare. The facility must transmit the withdrawal record to National Datacare by 12:30 PM Eastern in order for the withdrawal to post the same day. After National Datacare has posted the record, the facility needs to transmit again to receive the confirmation report. See Also: How to Withdrawal Money From a Resident Account How to Transmit
Withdrawal Transaction
Withdrawal Transaction
Any withdrawals processed by National Datacare can be printed at any time. To print a detailed confirmation of a withdrawal transaction, go to Reports tab and select Withdrawal Transaction from the list of available reports. A new tab/window will populate. Select the posting date and corresponding batch number from the dropdown list and click View Report. See Also: Batch Summary Report
Resident Funds Management System ONLINE
- 57 -
Direct Deposits
Cancel Direct Deposit
Cancel Direct Deposit
There are two ways to cancel any direct deposit:
Complete the Cancellation of Direct Deposit Authorization form letter.
Complete a new direct deposit form provided by the new financial institution or benefit source.
Instructions for canceling direct deposits are detailed in the section on closing resident accounts. See Also: Direct Deposits Overview Federal Government Checks Overview How to Enroll for a Non-Federal Direct Deposit
Deposit Transaction Report
Deposit Transaction Report
A Deposit Transaction Report is generated every day a direct deposit is posted for a resident. Any direct deposits received for a closed or decedent account will be listed so that you know the payment was returned. See Also: Direct Deposits Overview Federal Government Checks Overview Non-Federal Government Checks
Direct Deposits Overview
Direct Deposits Overview
With the RFMS system, any recurring benefit check received by the resident can be direct deposited into their account. Direct deposit is much safer then receiving checks in the mail and it benefits the resident by insuring that their funds are available as soon as possible. For the facility, direct deposit eliminates handling paper checks and guarantees payment of the resident’s care cost payment portion With direct deposits, the resident's recurring income payments go directly to the financial institution on prescribed days depending on their source. On the day the funds arrive, the total amount is
Resident Funds Management System ONLINE
- 58 -
deposited into the resident's account. If the resident has a non-transferring account, the entire deposit amount stays in the account. If the resident has a transferring account, the system determines if the resident has received his/her allowance for the month and if the deposit is large enough to take the full allowance amount.
If the resident has already received the allowance or if the deposit is not large enough to take the full allowance amount, then the entire amount of the deposit will be transferred to the facility Care Cost Account.
If the deposit is large enough and the resident has not received the allowance amount, then the allowance amount is retained in the resident's account. The remainder of the deposit is debited and transferred to the facility Care Cost Account to pay for care cost.
Direct Deposit transactions are posted before deposit record transactions. Items are processed from low to high dollar amounts.
Direct deposits come from two sources, federal government agencies and the private sector (i.e. state/local government and private companies). Depending on the source, different procedures are used to enroll the resident for direct deposit. These procedures are covered in the remainder of this chapter. All direct deposit enrollments may be submitted at the same time the resident's account is opened or at any time thereafter.
Direct Deposit Timeline
Direct Deposit Timeline
Federal Direct Deposits such as Social Security and Supplemental Security Income are electronically enrolled by the facility through RFMS Online. These direct deposits are submitted to the United States Treasury twice per month. These submissions normally take place between the 5th and the 17th. However, in the event that either of these dates falls on a weekend, the timeline will be adjusted. To verify any given month’s specific submission schedule, please contact National Datacare.
Other direct deposits, such as those for other Federal benefits or private benefits, do not take place on a known timeline. How quickly those direct deposits are processed depends solely on the institution paying the benefit. Most enrollments for direct deposits from private sources begin within several months of the initial enrollment.
See Also: Federal Government Checks Overview Non-Federal Government Checks
Reclamations
Reclamations
A reclamation occurs when a resident receives a direct deposit to which he/she was not entitled. This usually occurs when a check is deposited after the resident's date of death. For this reason, it is extremely important to enter the date of death in RFMS Online and to notify National Datacare by Status Change Form as soon as a resident expires. This will prevent future direct deposits posting to

Resident Funds Management System ONLINE
- 59 -
the resident's account and the facility Care Cost Account. If a check does post that the resident was not entitled to, National Datacare will debit the entire check amount from the resident's account and return it to the source. By default, funds transferred to your facility Care Cost Account for care cost will not be automatically reversed to pay for a reclamation. This helps prevent overdraft situations and insufficient funds being available for disbursement checks that you write. It is the facility's responsibility to deposit the care cost portion (with a deposit record) back into the resident's account. A Direct Deposit Reclamation Report will be generated whenever a direct deposit is returned. Please contact National Datacare if you want to have the care cost amount automatically debited from the facility Care Cost Account when a reclamation occurs. It is the facility’s responsibility to have sufficient funds available in the Care Cost Account for the debit. If the Care Cost Account does not have enough funds to cover the debit, there may be overdraft charges posted to the account. To assist you in identifying all reclamations during a given time period, you can run a Direct Deposit Reclamation Report from RFMS Online. To run this report, go to Reports tab and select Direct Deposit Reclamation from the list of available reports. See Also: Direct Deposits Overview Close Resident Account Freeze Accounts
Federal Government Checks
Determining Claim Number and Rep Payee Status
Determining Claim Number and Rep Payee Status
It is imperative to use the proper claim number and rep payee indicator when doing direct deposit enrollments. The figure below displays where to find this information on a federal government check.
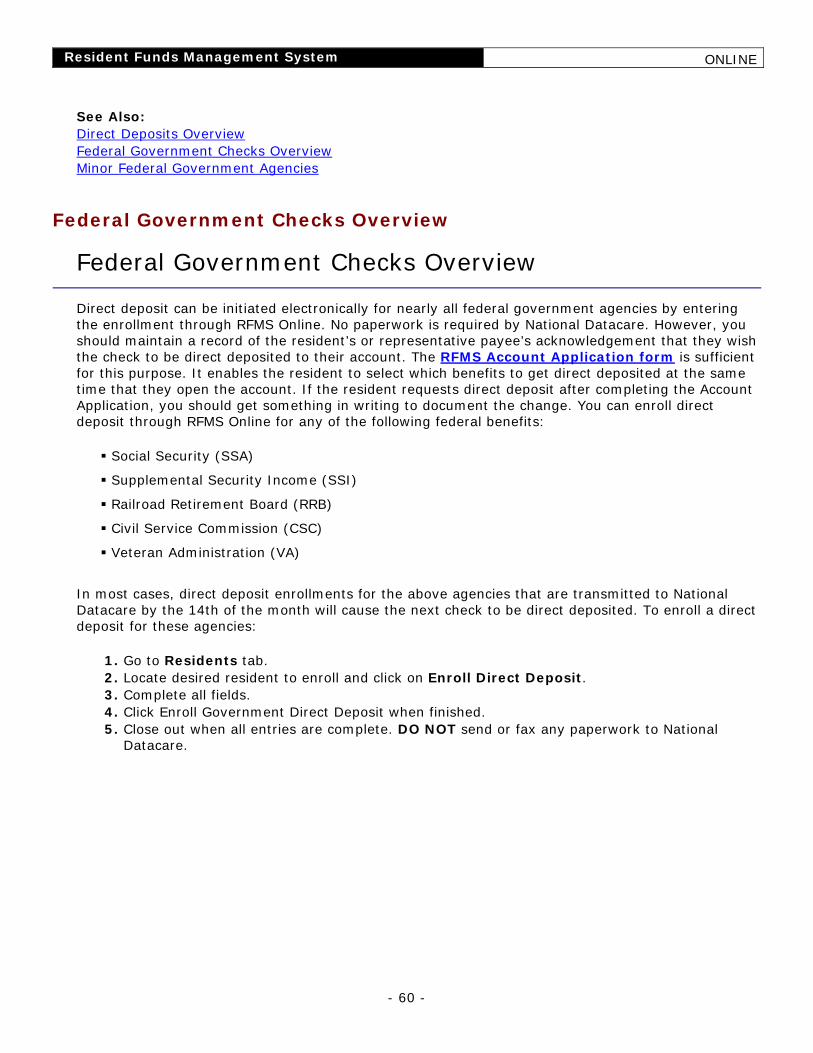
Resident Funds Management System ONLINE
- 60 -
See Also: Direct Deposits Overview Federal Government Checks Overview Minor Federal Government Agencies
Federal Government Checks Overview
Federal Government Checks Overview
Direct deposit can be initiated electronically for nearly all federal government agencies by entering the enrollment through RFMS Online. No paperwork is required by National Datacare. However, you should maintain a record of the resident’s or representative payee’s acknowledgement that they wish the check to be direct deposited to their account. The RFMS Account Application form is sufficient for this purpose. It enables the resident to select which benefits to get direct deposited at the same time that they open the account. If the resident requests direct deposit after completing the Account Application, you should get something in writing to document the change. You can enroll direct deposit through RFMS Online for any of the following federal benefits:
Social Security (SSA)
Supplemental Security Income (SSI)
Railroad Retirement Board (RRB)
Civil Service Commission (CSC)
Veteran Administration (VA)
In most cases, direct deposit enrollments for the above agencies that are transmitted to National Datacare by the 14th of the month will cause the next check to be direct deposited. To enroll a direct deposit for these agencies:
1. Go to Residents tab. 2. Locate desired resident to enroll and click on Enroll Direct Deposit. 3. Complete all fields. 4. Click Enroll Government Direct Deposit when finished. 5. Close out when all entries are complete. DO NOT send or fax any paperwork to National
Datacare.
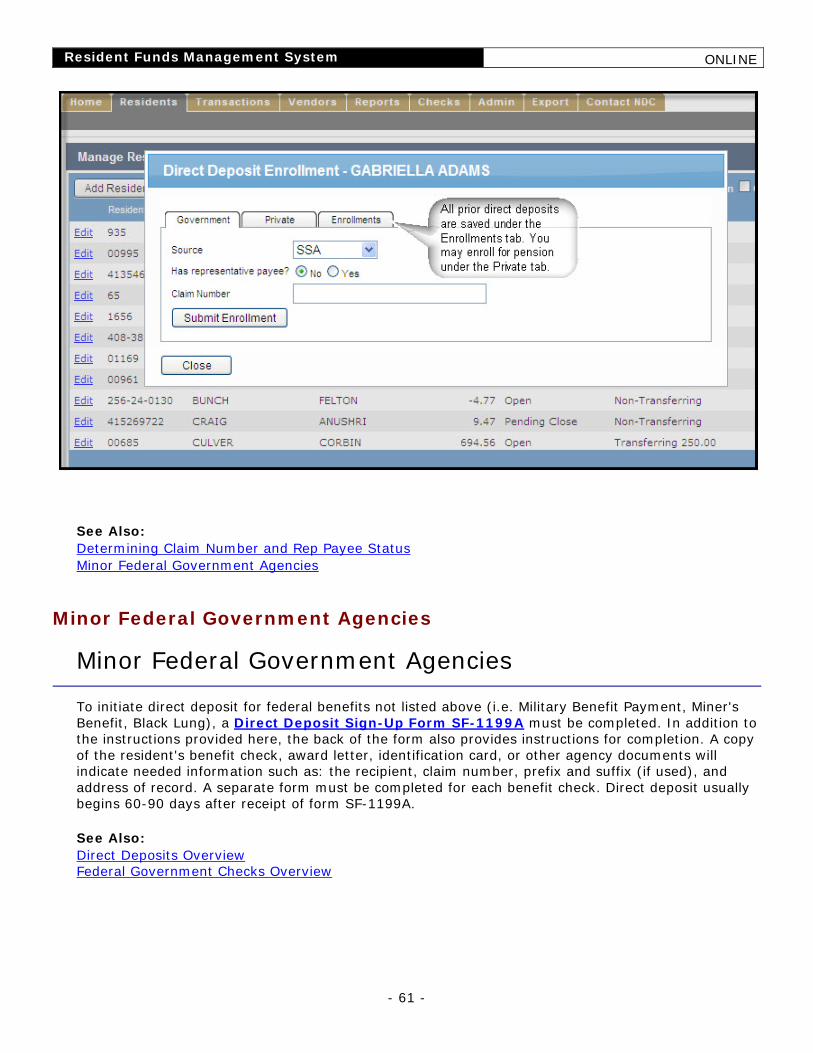
Resident Funds Management System ONLINE
- 61 -
See Also: Determining Claim Number and Rep Payee Status Minor Federal Government Agencies
Minor Federal Government Agencies
Minor Federal Government Agencies
To initiate direct deposit for federal benefits not listed above (i.e. Military Benefit Payment, Miner's Benefit, Black Lung), a Direct Deposit Sign-Up Form SF-1199A must be completed. In addition to the instructions provided here, the back of the form also provides instructions for completion. A copy of the resident's benefit check, award letter, identification card, or other agency documents will indicate needed information such as: the recipient, claim number, prefix and suffix (if used), and address of record. A separate form must be completed for each benefit check. Direct deposit usually begins 60-90 days after receipt of form SF-1199A. See Also: Direct Deposits Overview Federal Government Checks Overview
Resident Funds Management System ONLINE
- 62 -
Non-Federal Government Checks
Non-Federal Government Checks
Many private/state organizations require their own direct deposit enrollment form be used. Where possible, National Datacare has an image of the form available for printing through RFMS Online. You may also download the required form directly from our website at http://www.nationaldatacare.com. If the pension company does not require a specific form, you can complete a generic direct deposit request letter through RFMS Online. A copy of the resident's benefit check, award letter, identification card, or other documents will indicate needed information such as: the recipient, claim number, prefix and suffix (if used), and address of record. It is helpful to attach a copy of the check to the direct deposit form. Retain a copy of the check and the envelope. In many cases, the return address on the envelope is the only address provided to contact the organization.
To enroll for a non-federal government direct deposit, follow the steps below.
1. Go to the Residents tab. 2. Locate the resident to enroll and click on Enroll Direct Deposit. 3. Click on the Private tab for private pension enrollment. 4. To see if the pension company provides their own form, click on the dropdown for Choose
Private Pension. 5. If the pension you wish to enroll is on the list, select it. The pension form will automatically
populate with prefilled information of the pension company. You may change any desired information on the form.
6. Enter the claim number and click Enroll Private Pension Direct Deposit. Click OK when you get the prompt to print the form. Fax or mail completed form to National Datacare to process.
7. If the pension is not on the list, enter the information in the appropriate fields. A claim number, Source name, and full address are required.
8. Click on Enroll Private Pension Direct Deposit once all fields have been completed. 9. When prompted to print the form, click OK. Have the form signed by the resident or other
applicable party. If the resident signs and his/her signature is illegible, it must be witnessed by two people. If the resident mark (X), his/her acknowledged acceptance must be witnessed by two people. If the resident cannot sign at all, please check with the organization as to what other supporting documents are needed along with the direct deposit form (e.g. a doctor's letter).
10. Send this form to National Datacare. National Datacare will complete the form and forward it to the named organization. Some organizations will respond with a request to use their form (many forms are available on the NDC Web Site), but most will honor the resident's request letter.
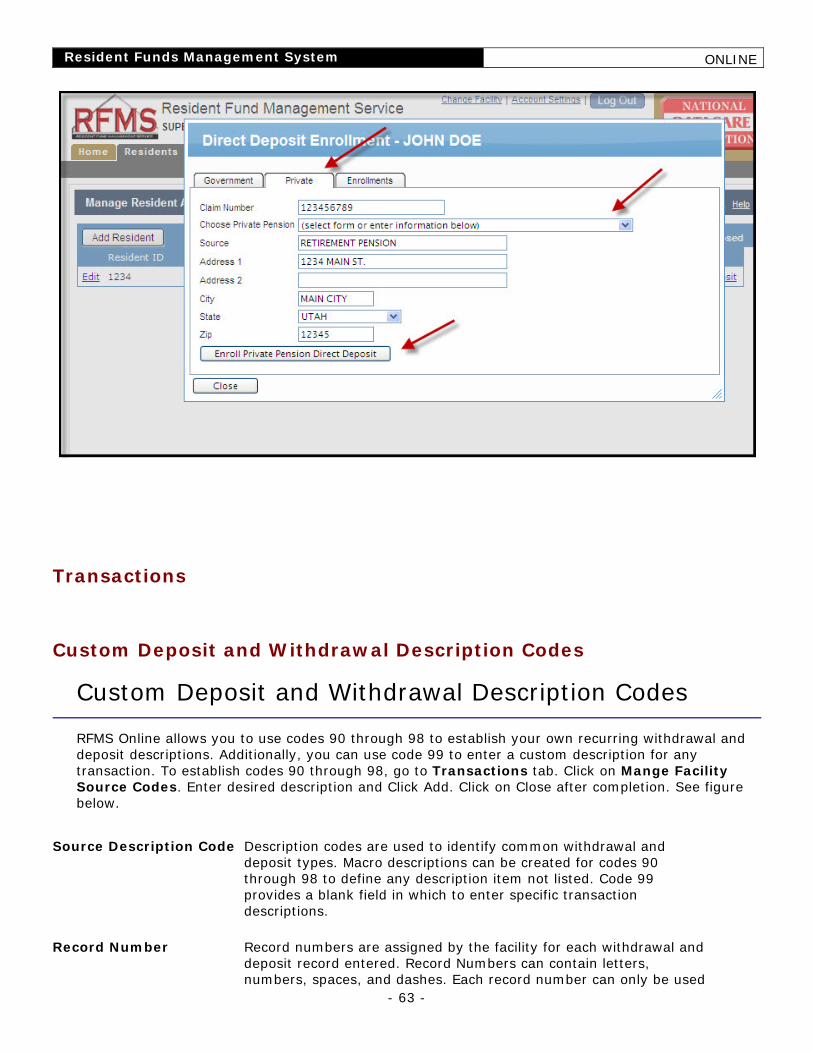
Resident Funds Management System ONLINE
- 63 -
Transactions
Custom Deposit and Withdrawal Description Codes
Custom Deposit and Withdrawal Description Codes
RFMS Online allows you to use codes 90 through 98 to establish your own recurring withdrawal and deposit descriptions. Additionally, you can use code 99 to enter a custom description for any transaction. To establish codes 90 through 98, go to Transactions tab. Click on Mange Facility Source Codes. Enter desired description and Click Add. Click on Close after completion. See figure below.
Source Description Code Description codes are used to identify common withdrawal and deposit types. Macro descriptions can be created for codes 90 through 98 to define any description item not listed. Code 99 provides a blank field in which to enter specific transaction descriptions.
Record Number Record numbers are assigned by the facility for each withdrawal and deposit record entered. Record Numbers can contain letters, numbers, spaces, and dashes. Each record number can only be used
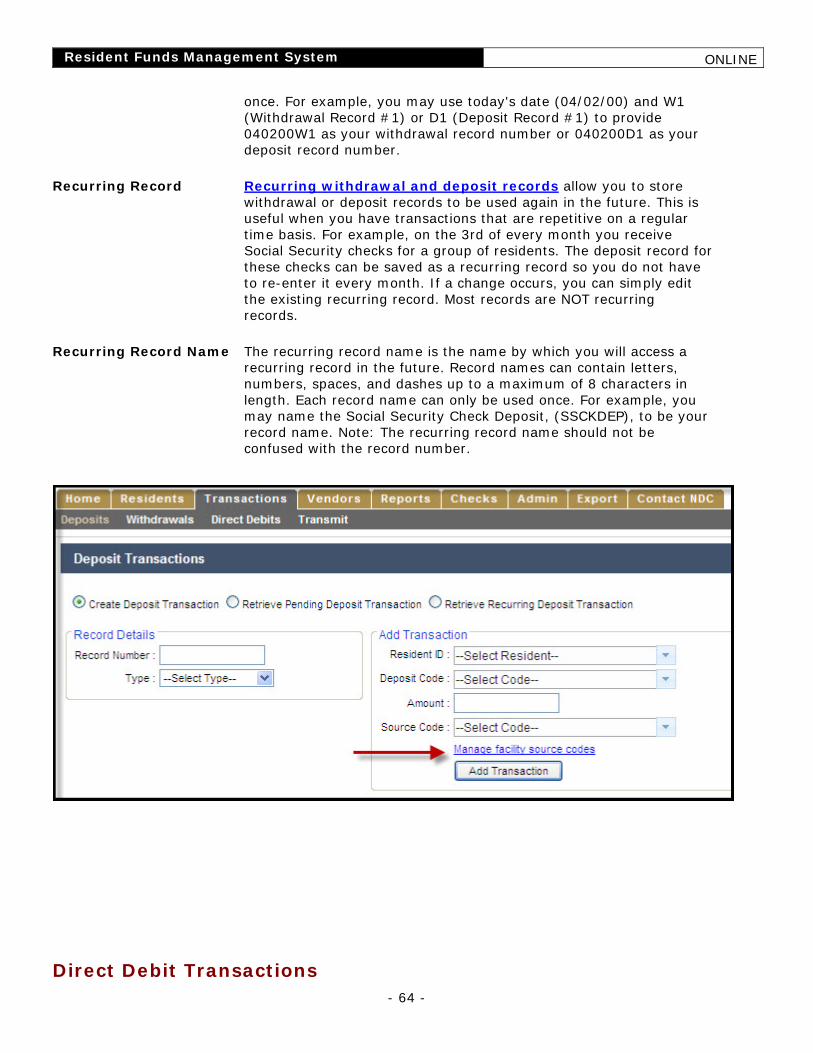
Resident Funds Management System ONLINE
- 64 -
once. For example, you may use today's date (04/02/00) and W1 (Withdrawal Record #1) or D1 (Deposit Record #1) to provide 040200W1 as your withdrawal record number or 040200D1 as your deposit record number.
Recurring Record Recurring withdrawal and deposit records allow you to store withdrawal or deposit records to be used again in the future. This is useful when you have transactions that are repetitive on a regular time basis. For example, on the 3rd of every month you receive Social Security checks for a group of residents. The deposit record for these checks can be saved as a recurring record so you do not have to re-enter it every month. If a change occurs, you can simply edit the existing recurring record. Most records are NOT recurring records.
Recurring Record Name The recurring record name is the name by which you will access a recurring record in the future. Record names can contain letters, numbers, spaces, and dashes up to a maximum of 8 characters in length. Each record name can only be used once. For example, you may name the Social Security Check Deposit, (SSCKDEP), to be your record name. Note: The recurring record name should not be confused with the record number.
Direct Debit Transactions
Resident Funds Management System ONLINE
- 65 -
Direct Debit Overview
Direct Debit Overview
With the RFMS Direct Debit system, your residents or family members no longer have to write and mail checks every month to pay their bill. Instead, they pre-arrange to make their payments to you, automatically, electronically, and on time. Direct debits can be arranged from a family member bank account at any bank. For your facility, direct debits collect payments faster, improve cash flow, assist you in identifying potential collection problems early, and lower your administrative and accounting costs. To establish a direct debit for a resident, the owner of the account to be debited must complete an Authorization for Pre-Authorized Debits form. The original copy of this form is sent to National Datacare. Each billing period, the facility enters a Direct Debit Record through RFMS Online that specifies exactly how much to debit from each participant's account. When a direct debit is processed, the participant's bank account is debited and the resident's account is credited for the specified amount. The entire amount is swept through the resident's account and credits to the facility's care cost account. See Also: Enrolling for Direct Debit Entering Direct Debit Transactions
Direct Debit Timeline
Direct Debit Timeline
Direct Debits require a number of steps to be completed. Leaving out any of these steps can cause delays in the processing of direct debits, or can keep the transaction from processing at all. The following summarizes the timeline in the Direct Debit process.
Initial Setup and Direct Debit
Day 1: Facility Faxes and transmits Direct Debit Authorization and Agreement form to NDC before 11:30AM Eastern. Facility Faxes and transmits Direct Debit Record to NDC before 11:30AM Eastern.
Day 2-4: Bank Pre-Notes account for authorization to Direct Debit (3 Business Days)
Day 5: National Datacare sends Direct Debit file to bank for processing. Day 6: National Datacare posts Direct Debit to the Debit account and posts credit to the Resident and Care Cost Accounts.
Subsequent Direct Debits
Day 1: Facility faxes and transmits Direct Debit Record to NDC before 11:30AM Eastern. National Datacare sends Direct Debit file to bank for Processing.
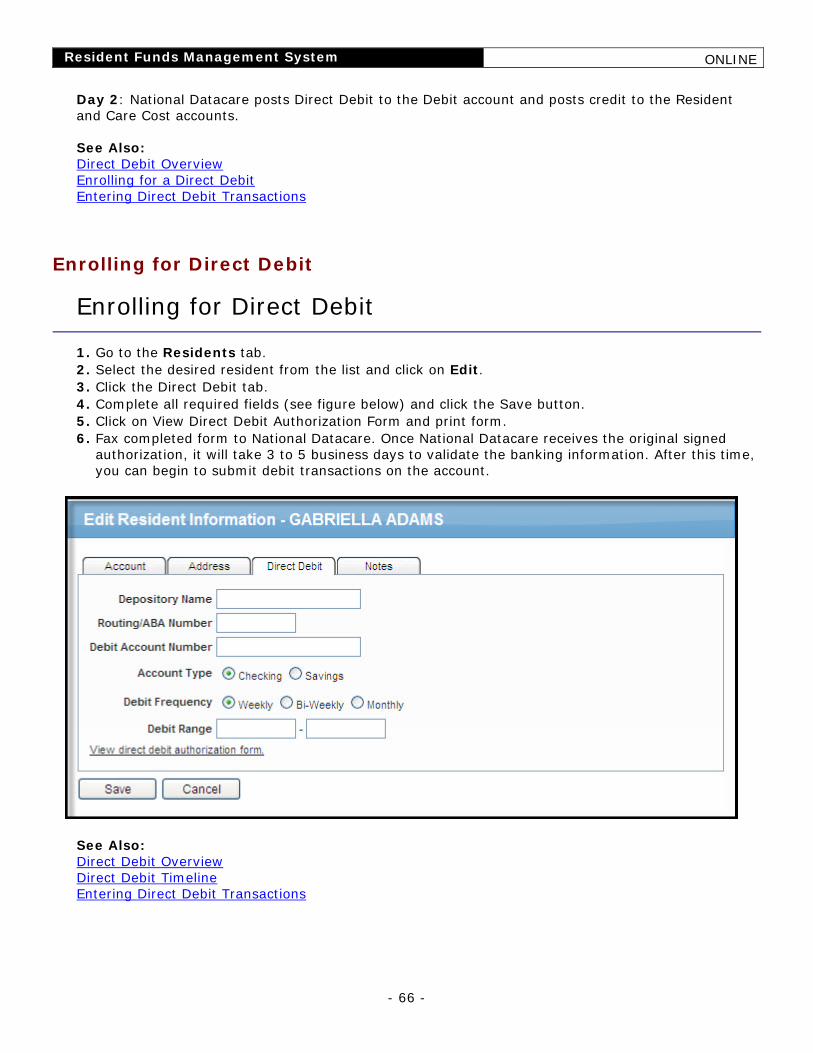
Resident Funds Management System ONLINE
- 66 -
Day 2: National Datacare posts Direct Debit to the Debit account and posts credit to the Resident and Care Cost accounts.
See Also: Direct Debit Overview Enrolling for a Direct Debit Entering Direct Debit Transactions
Enrolling for Direct Debit
Enrolling for Direct Debit
1. Go to the Residents tab. 2. Select the desired resident from the list and click on Edit. 3. Click the Direct Debit tab. 4. Complete all required fields (see figure below) and click the Save button. 5. Click on View Direct Debit Authorization Form and print form. 6. Fax completed form to National Datacare. Once National Datacare receives the original signed
authorization, it will take 3 to 5 business days to validate the banking information. After this time, you can begin to submit debit transactions on the account.
See Also: Direct Debit Overview Direct Debit Timeline Entering Direct Debit Transactions
Resident Funds Management System ONLINE
- 67 -
Entering Direct Debit Transactions
Entering Direct Debit Transactions
To initiate a debit from an outside bank account, you must complete a Direct Debit record. To Create a New Direct Debit Record:
1. Go to the Transactions tab and select the Direct Debits sub tab. 2. Enter the Record Number under Record Details. 3. Enter the effective date for the debit(s). 4. Click the mouse on the Resident ID field and select desired resident. Note: if the resident is not
listed on the dropdown, you have not enrolled the resident for Direct Debit. You need to do this prior to entering a record.
5. The bank name and account number will auto-populate once you select the resident. 6. Enter the debit amount and click Add Transaction. 7. To enter another resident, go back to step 4 and repeat the process. 8. You have the option to save the entries as a recurring record. Click No if you don't want this
record to be a recurring record. Otherwise, click Yes and specify a recurring record name. 9. Click the Save button.
10. Click Print Transaction Input Report and verify the debit record input report. Sign this report and fax to National Datacare.
11. Transmit to National Datacare after all debit records have been entered in the system. It is not necessary to transmit after each individual record. Upon receipt of your transmission and signed debit record, National Datacare will post the debits on the effective date. A Deposit Transaction Report will be generated to confirm that the items have been credited to the resident accounts.
To Edit a Direct Debit Record:
1. From the Debit Records sub tab, click the dial Retrieve Pending Direct Debit Transaction. 2. Select the record number from the dropdown. 3. Make the desired changes to the record and click Save. 4. Be sure to print the Transaction Input Report for the changes, fax, and transmit the record to
National Datacare to process. 5. To delete the record, click on Delete Entire Record. Note: You can only edit/delete a record that
has not been transmitted.
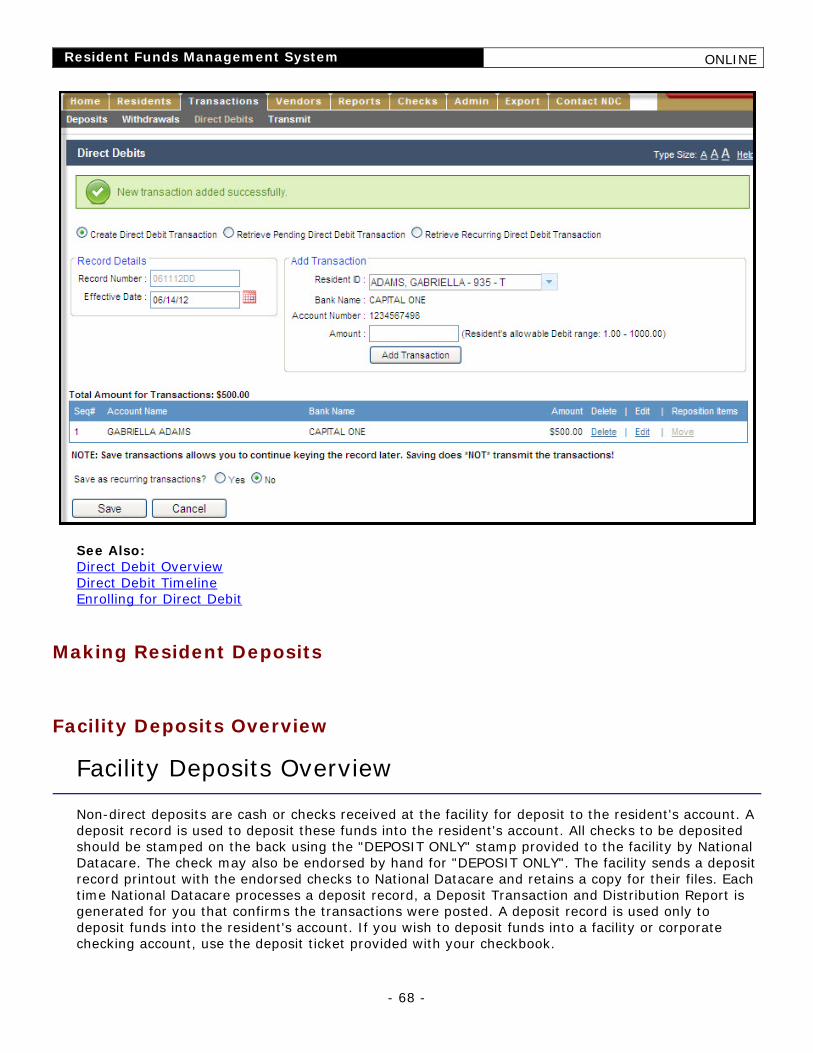
Resident Funds Management System ONLINE
- 68 -
See Also: Direct Debit Overview Direct Debit Timeline Enrolling for Direct Debit
Making Resident Deposits
Facility Deposits Overview
Facility Deposits Overview
Non-direct deposits are cash or checks received at the facility for deposit to the resident's account. A deposit record is used to deposit these funds into the resident's account. All checks to be deposited should be stamped on the back using the "DEPOSIT ONLY" stamp provided to the facility by National Datacare. The check may also be endorsed by hand for "DEPOSIT ONLY". The facility sends a deposit record printout with the endorsed checks to National Datacare and retains a copy for their files. Each time National Datacare processes a deposit record, a Deposit Transaction and Distribution Report is generated for you that confirms the transactions were posted. A deposit record is used only to deposit funds into the resident's account. If you wish to deposit funds into a facility or corporate checking account, use the deposit ticket provided with your checkbook.
Resident Funds Management System ONLINE
- 69 -
State regulations and facility policy may direct that the resident receive a deposit receipt. National Datacare does not require a receipt or the resident's signature. The Account Application suffices regarding the resident's permission and authorization to make deposits. In processing deposit records, National Datacare posts deposits from low to high dollar amount. All deposits are posted before withdrawals (debits). Any un-posted deposit items ("Account No Finds"; "Account Closed"; etc.) will be rejected and the funds will be credited to the facility’s Petty Cash Account. See Also: Deposit Transfer Codes How to Make a Deposit
Deposit Transfer Codes
Deposit Transfer Codes
Deposit transfer codes are used to indicate the manner in which a deposit on a deposit record is to be handled. They are located at the bottom left corner of the deposit record and at the center of the RFMS One-Write Deposit Receipt. A Deposit transfer code must be entered for each transaction on a deposit record. If a resident has a non-transferring or burial account, the total deposit will be placed into the resident's account and remain there, regardless of which deposit transfer code is used. The four (4) Deposit Transfer Code options are:
Code 1 The deposit will be subject to an automatic care cost payment. The system determines if the resident has received his/her allowance for the current month and if the deposit is large enough to take the entire allowance amount.
If the resident has already received his/her allowance for the month or if the deposit is not large enough to take the full allowance amount, then the entire deposit is debited from the resident account as a care cost payment and credited to the facility Care Cost Account.
If the resident has not received his/her allowance for the month and the deposit is large enough to take the full allowance amount, then the allowance amount is retained in the resident's account. The remainder of the deposit is debited from the resident account as a care cost payment and credited to the facility Care Cost Account.
Code 2 The entire deposit will be retained in the resident's account, regardless of account type. Code 2 permits deposits of birthday money, cash gifts, work

Resident Funds Management System ONLINE
- 70 -
earnings, adjustments, etc., which are not subject to care cost payments.
Code 3 This option is used to provide for an allowance amount that the resident was entitled to, but did not receive in a prior month. The allowance amount will be retained from this deposit and will not affect the current month's allowance amount. The deposit less the allowance amount will be debited as a care cost payment and credited to the facility Care Cost Account.
Code 4 This option will cause the entire deposit to be debited as a care cost payment and credited to the facility Care Cost Account.
Manual Deposit Record Forms
Manual Deposit Record Forms
You can use an RFMS Deposit Record (see below) form to log deposits for later entry into the computer. The Deposit Record form simplifies entry into the computer and helps keep track of deposits when a computer is not available. However, the manual deposit record form is optional and is NOT required by National Datacare. Some facilities elect to skip the manual deposit record form and key checks directly into the computer. In either case, National Datacare only needs the computer printed deposit record. You may print a blank deposit record after logging into RFMS Online.
1. Go to the Reports tab. 2. Click on the Forms sub tab. 3. Select Deposit Record from the available list of reports. A new tab/window will populate.
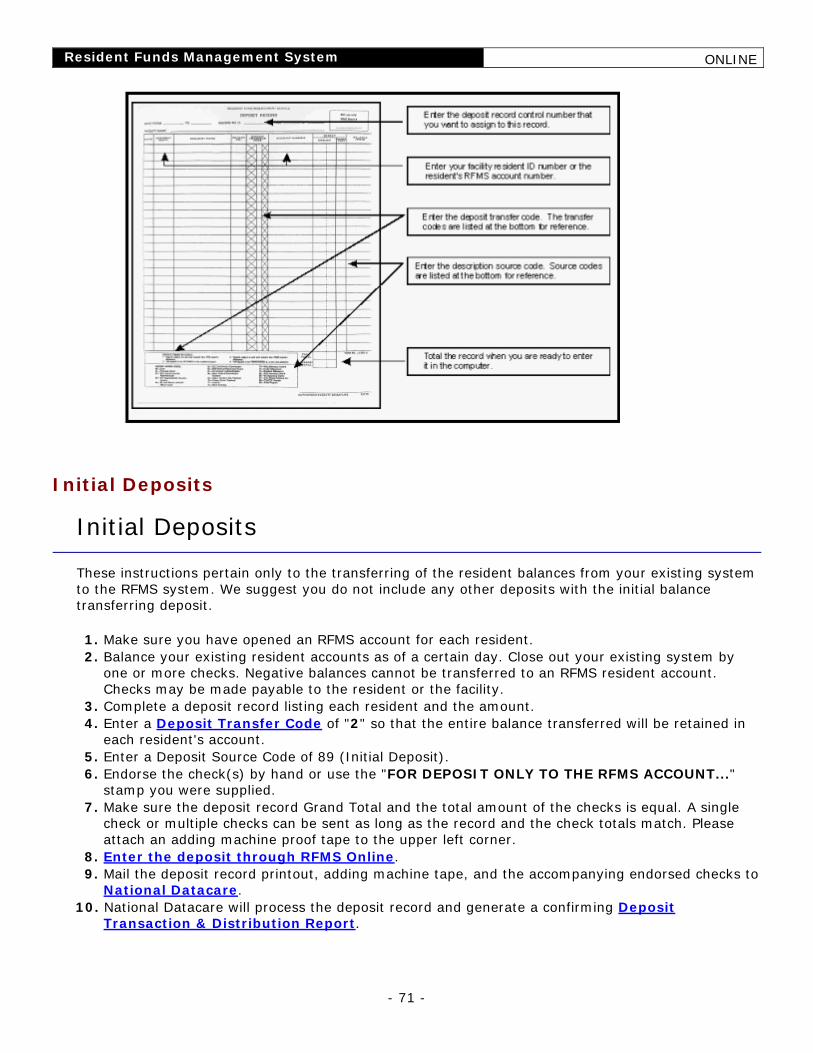
Resident Funds Management System ONLINE
- 71 -
Initial Deposits
Initial Deposits
These instructions pertain only to the transferring of the resident balances from your existing system to the RFMS system. We suggest you do not include any other deposits with the initial balance transferring deposit. 1. Make sure you have opened an RFMS account for each resident. 2. Balance your existing resident accounts as of a certain day. Close out your existing system by
one or more checks. Negative balances cannot be transferred to an RFMS resident account. Checks may be made payable to the resident or the facility.
3. Complete a deposit record listing each resident and the amount. 4. Enter a Deposit Transfer Code of "2" so that the entire balance transferred will be retained in
each resident's account. 5. Enter a Deposit Source Code of 89 (Initial Deposit). 6. Endorse the check(s) by hand or use the "FOR DEPOSIT ONLY TO THE RFMS ACCOUNT..."
stamp you were supplied. 7. Make sure the deposit record Grand Total and the total amount of the checks is equal. A single
check or multiple checks can be sent as long as the record and the check totals match. Please attach an adding machine proof tape to the upper left corner.
8. Enter the deposit through RFMS Online. 9. Mail the deposit record printout, adding machine tape, and the accompanying endorsed checks to
National Datacare. 10. National Datacare will process the deposit record and generate a confirming Deposit
Transaction & Distribution Report.
Resident Funds Management System ONLINE
- 72 -
Cash Deposits
Cash Deposits
A resident may receive cash at the facility that is to be deposited to his/her account. Do not send cash in the mail to National Datacare. Convert cash to a check or money order. Based upon your facility policies, you may use any of the following procedures to convert cash:
• Convert the cash to a check using a checking account other than the RFMS Petty Cash Account.
• Convert the cash to a Money Order, Cashier's Check or other form of "one-time" check.
• Cash can be converted to a check through the RFMS system by depositing the cash into the RFMS Petty Cash Box and writing a check from the facility Petty Cash Account. To reconcile the Petty Cash Box, subtract the cash deposit amount you put in the box from your next Petty Cash reimbursement check.
Deposit Corrections
Deposit Corrections
The following cases provide instructions to correct miss-postings for some common scenarios. If your case is not described below, or you need additional help, call National Datacare. CASE #1 - A deposit of $100 was made to John's account that should have gone to Mary's account.
The entire deposit of $100 is still in John's account.
Complete a Withdrawal Record transaction with Withdrawal Description Code of 19 (Debit Adjustment) to debit John's account for $100.
Write a Petty Cash Account check to Mary for $100.
Complete a deposit record transaction with the original Deposit Source Code to credit Mary's account $100.
CASE #2 - A deposit of $100 was made to John's account that should have gone to Mary's account.
The entire deposit of $100 was transferred to the Care Cost Account, the $100 is still in the Care Cost Account and you have Care Cost Account checks.
Write a Care Cost Account check to John for $100.
Complete a deposit record transaction with a Deposit Source Code of 74 (Credit Adjustment) to credit John's account.
Complete a Withdrawal Record transaction with Withdrawal Description Code of 19 (Debit Adjustment) to debit John's account for $100.
Write a Petty Cash Account check to Mary for $100.
Complete a deposit record transaction with the original Deposit Source Code to credit Mary's account $100.
Resident Funds Management System ONLINE
- 73 -
CASE #3 - A deposit of $100 was made to John's account that should have gone to Mary's account. The entire deposit of $100 was transferred to the Care Cost Account and has been transferred to a corporate account or you do not have Care Cost Account checks.
Obtain a corporate refund check to John for $100.
Complete a deposit record transaction with a Deposit Source Code of 74 (Credit Adjustment) to credit John's account.
Complete a Withdrawal Record transaction with Withdrawal Description Code of 19 (Debit Adjustment) to debit John's account for $100.
Write a Petty Cash Account check to Mary for $100.
Complete a deposit record transaction with the original Deposit Source Code to credit Mary's account $100.
CASE #4 - A deposit of $100 was made to John's account that should have gone to Mary's account.
John's account retained an allowance amount of $30. The remaining $70 was transferred to the Care Cost Account. You have Care Cost Account checks and the $70 is still in the Care Cost Account.
Write a Care Cost Account check to John for $70.
Complete a deposit record transaction with a Deposit Source Code of 74 (Credit Adjustment) to credit John's account.
Complete a Withdrawal Record transaction with Withdrawal Description Code of 19 (Debit Adjustment) to debit John's account for $100.
Write a Petty Cash Account check to Mary for $100.
Complete a deposit record transaction with the original Deposit Source Code to credit Mary's account $100.
Call National Datacare. The allowance-received indicator for John's account has to be examined and possibly reset.
CASE #5 - A deposit of $100 was made to John's account that should have gone to Mary's account.
John's account retained an allowance amount of $30 and $70 was transferred to the Care Cost Account. You do not have Care Cost Account checks or the $70 was transferred to your corporate operating account.
Obtain a corporate refund check to John for $70.
Complete a deposit record transaction with a Deposit Source Code of 74 (Credit Adjustment) to credit John's account.
Complete a Withdrawal Record transaction with Withdrawal Description Code of 19 (Debit Adjustment) to debit John's account for $100.
Write a Petty Cash Account check to Mary for $100.
Complete a deposit record transaction with the original Deposit Source Code to credit Mary's account $100.
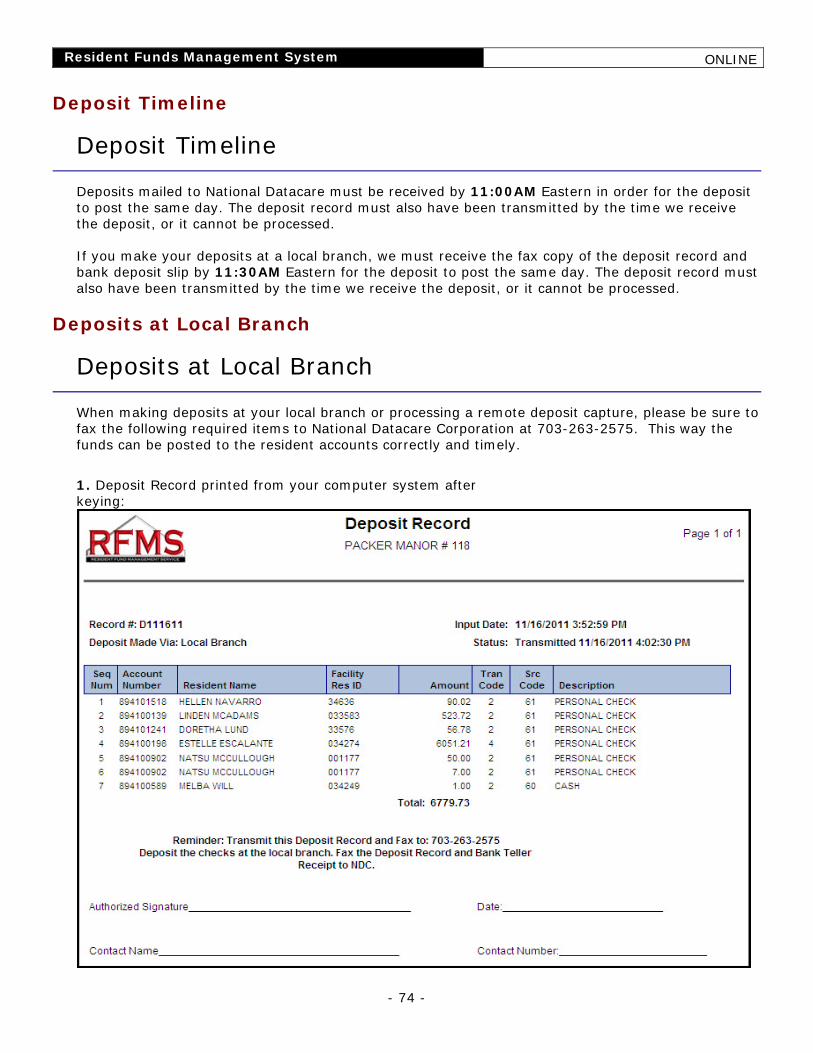
Resident Funds Management System ONLINE
- 74 -
Deposit Timeline
Deposit Timeline
Deposits mailed to National Datacare must be received by 11:00AM Eastern in order for the deposit to post the same day. The deposit record must also have been transmitted by the time we receive the deposit, or it cannot be processed.
If you make your deposits at a local branch, we must receive the fax copy of the deposit record and bank deposit slip by 11:30AM Eastern for the deposit to post the same day. The deposit record must also have been transmitted by the time we receive the deposit, or it cannot be processed.
Deposits at Local Branch
Deposits at Local Branch
When making deposits at your local branch or processing a remote deposit capture, please be sure to fax the following required items to National Datacare Corporation at 703-263-2575. This way the funds can be posted to the resident accounts correctly and timely.
1. Deposit Record printed from your computer system after keying:
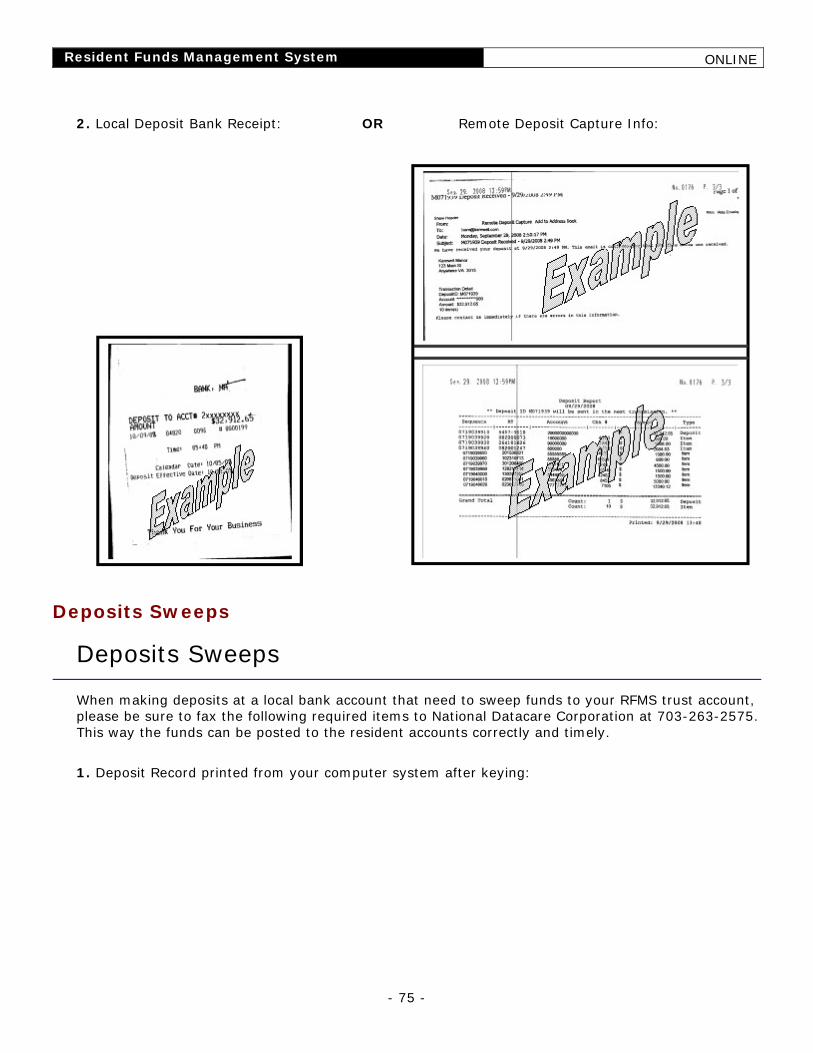
Resident Funds Management System ONLINE
- 75 -
2. Local Deposit Bank Receipt: OR Remote Deposit Capture Info:
Deposits Sweeps
Deposits Sweeps
When making deposits at a local bank account that need to sweep funds to your RFMS trust account, please be sure to fax the following required items to National Datacare Corporation at 703-263-2575. This way the funds can be posted to the resident accounts correctly and timely.
1. Deposit Record printed from your computer system after keying:
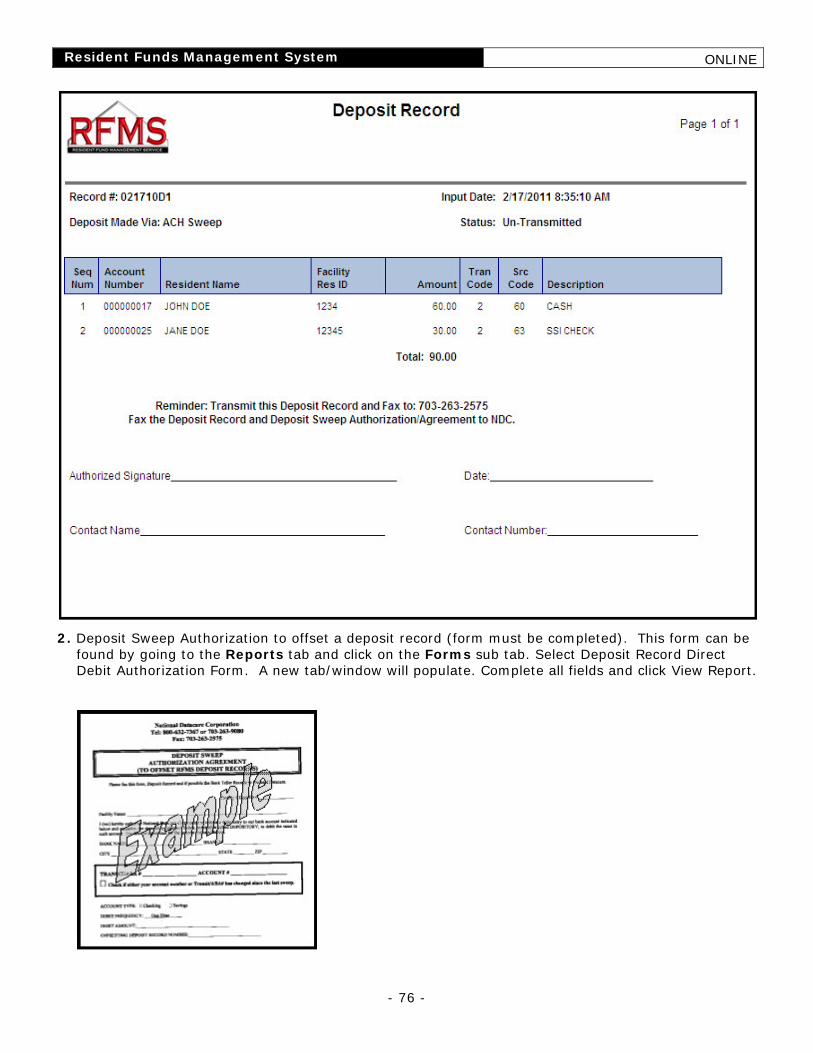
Resident Funds Management System ONLINE
- 76 -
2. Deposit Sweep Authorization to offset a deposit record (form must be completed). This form can be found by going to the Reports tab and click on the Forms sub tab. Select Deposit Record Direct Debit Authorization Form. A new tab/window will populate. Complete all fields and click View Report.
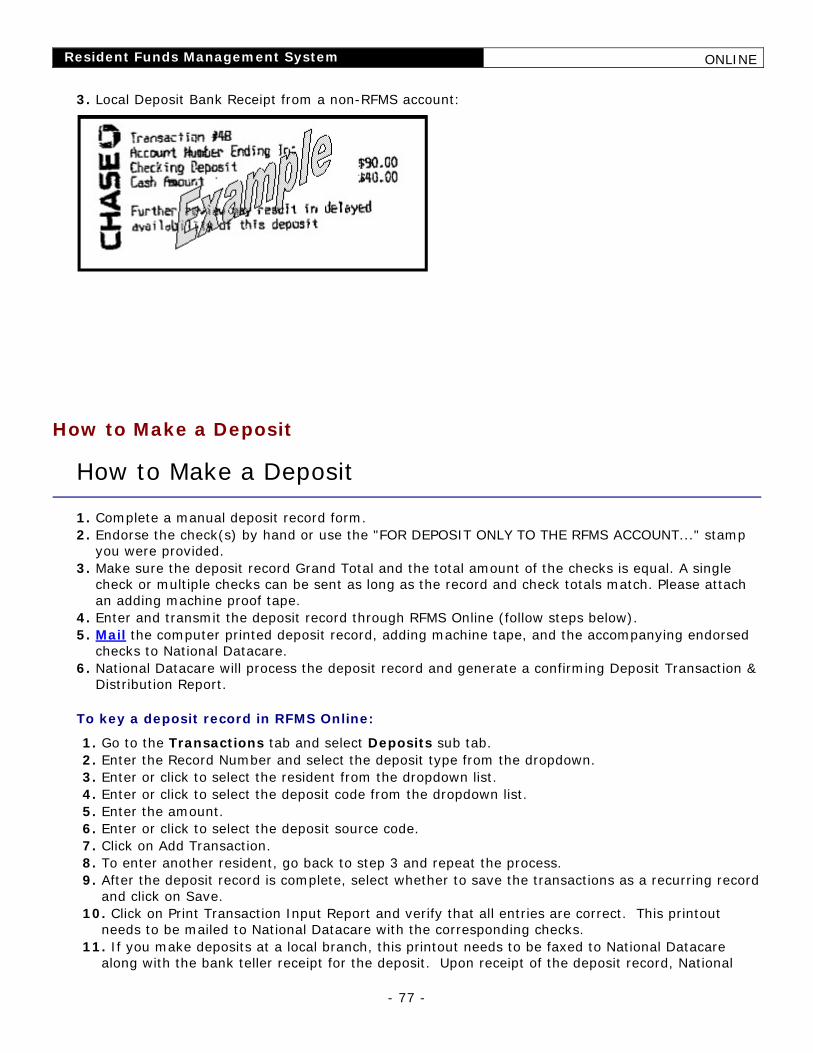
Resident Funds Management System ONLINE
- 77 -
3. Local Deposit Bank Receipt from a non-RFMS account:
How to Make a Deposit
How to Make a Deposit
1. Complete a manual deposit record form. 2. Endorse the check(s) by hand or use the "FOR DEPOSIT ONLY TO THE RFMS ACCOUNT..." stamp
you were provided. 3. Make sure the deposit record Grand Total and the total amount of the checks is equal. A single
check or multiple checks can be sent as long as the record and check totals match. Please attach an adding machine proof tape.
4. Enter and transmit the deposit record through RFMS Online (follow steps below). 5. Mail the computer printed deposit record, adding machine tape, and the accompanying endorsed
checks to National Datacare. 6. National Datacare will process the deposit record and generate a confirming Deposit Transaction &
Distribution Report. To key a deposit record in RFMS Online:
1. Go to the Transactions tab and select Deposits sub tab. 2. Enter the Record Number and select the deposit type from the dropdown. 3. Enter or click to select the resident from the dropdown list. 4. Enter or click to select the deposit code from the dropdown list. 5. Enter the amount. 6. Enter or click to select the deposit source code. 7. Click on Add Transaction. 8. To enter another resident, go back to step 3 and repeat the process. 9. After the deposit record is complete, select whether to save the transactions as a recurring record
and click on Save. 10. Click on Print Transaction Input Report and verify that all entries are correct. This printout
needs to be mailed to National Datacare with the corresponding checks. 11. If you make deposits at a local branch, this printout needs to be faxed to National Datacare
along with the bank teller receipt for the deposit. Upon receipt of the deposit record, National
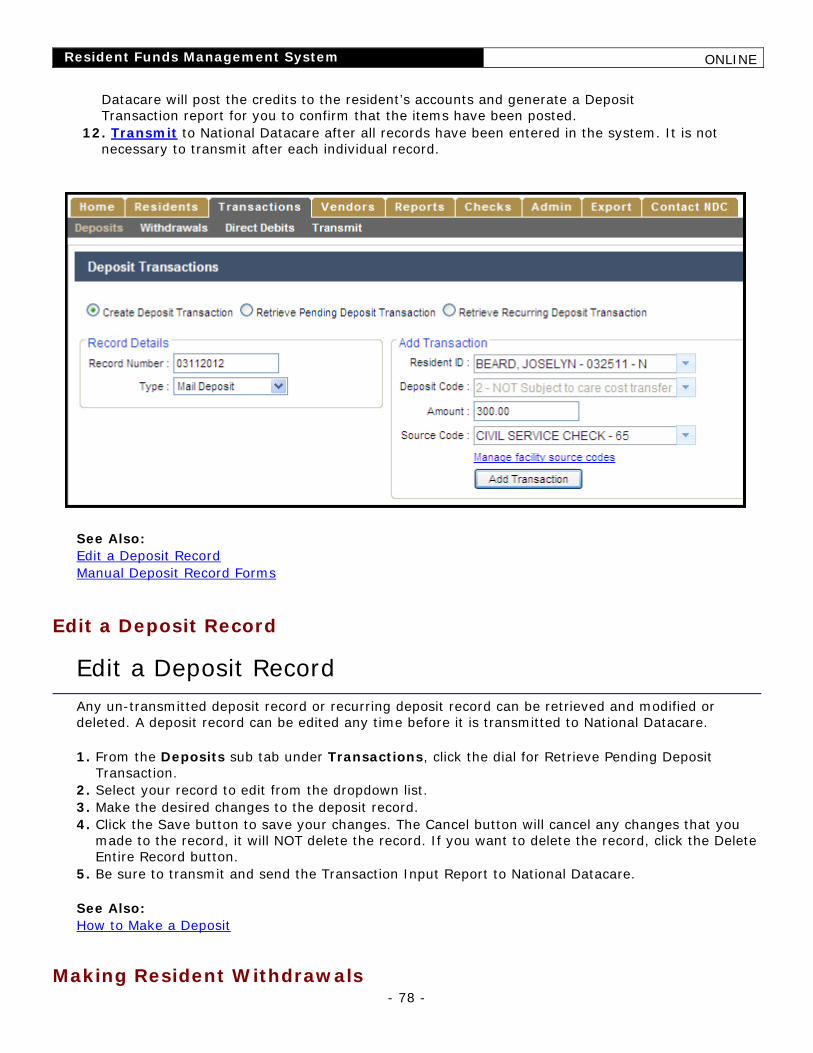
Resident Funds Management System ONLINE
- 78 -
Datacare will post the credits to the resident’s accounts and generate a Deposit Transaction report for you to confirm that the items have been posted.
12. Transmit to National Datacare after all records have been entered in the system. It is not necessary to transmit after each individual record.
See Also: Edit a Deposit Record Manual Deposit Record Forms
Edit a Deposit Record
Edit a Deposit Record
Any un-transmitted deposit record or recurring deposit record can be retrieved and modified or deleted. A deposit record can be edited any time before it is transmitted to National Datacare. 1. From the Deposits sub tab under Transactions, click the dial for Retrieve Pending Deposit
Transaction. 2. Select your record to edit from the dropdown list. 3. Make the desired changes to the deposit record. 4. Click the Save button to save your changes. The Cancel button will cancel any changes that you
made to the record, it will NOT delete the record. If you want to delete the record, click the Delete Entire Record button.
5. Be sure to transmit and send the Transaction Input Report to National Datacare. See Also: How to Make a Deposit
Making Resident Withdrawals
Resident Funds Management System ONLINE
- 79 -
Withdrawals Overview
Withdrawals Overview
The resident obtains access to his/her funds by requesting cash, merchandise, or services from the facility. The facility checks the resident's account balance and accordingly advances the resident the requested amount. Withdrawal transactions are logged on a Withdrawal Record and entered through RFMS Online. Funds withdrawn from the resident accounts are transferred to the facility Petty Cash Account or Care Cost Account. State regulations and facility policy may direct that the resident sign a receipt at the time of the withdrawal. National Datacare does not require a receipt or the resident's signature. The signed Application gives the facility permission to make withdrawals for the resident. Withdrawal records need to be transmitted to National Datacare as soon as possible so that the funds can be transferred to the facility Petty Cash Account to cover the checks you write. To ensure that there is never an overdraft, wait for the confirming Withdrawal Transaction Report before disbursing/cashing checks. This may not always be practical, so in this it is imperative that you enter the withdrawals and transmit them the same day that you disburse/cash the corresponding checks. Upon receipt of your withdrawal record transmission, National Datacare will debit the resident accounts and credit the designated facility checking account. National Datacare will generate a Withdrawal Transaction Report to confirm that your transactions were processed. When the system posts a Withdrawal Record, the resident account is debited and the selected facility checking account is credited for the given amount. The facility then issues a check to cover the resident's request. The facility may write checks to cover large withdrawals or other expenses incurred by the resident such as phone bills, insurance premiums, and beauty shop services. Each check should have an offsetting Withdrawal Record(s). This information is essential for reconciliation. The Withdrawal Record is used to make withdrawals from resident accounts only. Facility checking account withdrawals are made by writing checks. Standard banking procedure processes deposits before withdrawals. This sequence allows you to make a withdrawal and a covering deposit on the same day. All Withdrawal Record transactions for the day are posted in order from low to high dollar amount. See Also: How to Withdraw Money From a Resident Account
Withdrawal Timeline
Resident Funds Management System ONLINE
- 80 -
Withdrawals Timeline
Facility-transmitted withdrawal records must be transmitted to us by 12:30PM Eastern in order for the withdrawal to post the same day. Please note that National Datacare processes at 12:30PM. Give yourself sufficient time for keying and transmitting your records.
Handwritten withdrawal records to be keyed by National Datacare must be received via fax by 11:30AM Eastern in order for the transaction to post that day.
Withdrawal Corrections
Withdrawals Corrections
The following cases provide instructions to correct miss-postings for some common scenarios. If your case is not described below, or you need additional help, call National Datacare. CASE #1 - John's account was debited $25 that should have been debited from Mary's account.
John's account had sufficient funds and the transaction was debited and credited to the Petty Cash Account or Care Cost Account and you have checks for the credited account.
Write a check from the credited checking account to John for $25.
Complete a deposit record transaction using Deposit Source Code of 74 (Credit Adjustment) to credit John's account.
Complete a Withdrawal Record transaction to debit Mary's account the original $25.
CASE #2 - John's account was debited $25 that should have been debited from Mary's account.
John's account had sufficient funds, the transaction was debited and credited to the Petty Cash Account or Care Cost Account, and you do not have checks for the credited account.
Obtain a refund check from corporate to John for $25.
Complete a deposit record transaction using Deposit Source Code of 74 (Credit Adjustment) to credit John's account.
Complete a Withdrawal Record transaction to debit Mary's account for the original $25.
CASE #3 - John's account was debited $25 that should have been debited from Mary's account.
However, John's account had insufficient funds and the transaction was therefore rejected.
John's account was unaffected; do nothing with John's account.
Complete a Withdrawal Record transaction to debit Mary's account the original $25.
Automatic Care Cost Withdrawals
Resident Funds Management System ONLINE
- 81 -
Automatic Care Cost Withdrawals
If the resident has a transferring account and a direct deposit or deposit record code 1, 3 or 4 transaction is submitted, then the amount of the deposit less the monthly personal allowance amount will be debited from the resident's account and transferred to the facility Care Cost Account. The allowance amount will be retained once a month from the first deposit large enough to retain the full allowance amount. The full amount of any other designated deposit during the month will be transferred to the facility Care Cost Account to pay for care. Automatic withdrawal transactions are performed on the same day the deposit is made. A Deposit Transaction and Distribution Report is generated every time an automatic withdrawal occurs.
How to Withdraw Money From a Resident Account
How to Withdraw Money From a Resident Account
When a resident requests cash for personal spending or bill paying, the facility checks the resident's account balance and accordingly advances the resident money from the petty cash fund. The resident acknowledges receipt of the funds as per facility policy. The transaction is typically entered on a paper withdrawal record (see steps below) and later input into the computer.
1. Complete a manual withdrawal record. 2. Total the amount column. 3. Enter the withdrawal record through RFMS Online, print it and transmit. 4. Attach the computer printout to your original withdrawal record. DO NOT send National Datacare a
copy. Your transmission is all that is needed to process the withdrawals. 5. National Datacare will process the Withdrawal Record and generate a confirming Withdrawal
Transaction Report. To enter the withdrawal record through RFMS Online, follow steps below.
1. Go to the Transactions tab and select the Withdrawals sub tab. 2. Enter the Record Number. This number must be unique from other records. 3. If the facility has two checking accounts, click the option button to select the desired account. If
the facility has only one checking account, disregard this option, the single checking account will be credited.
4. Enter or click to select the resident from the dropdown list. 5. Enter the withdrawal amount. 6. Select the vendor that needs to be paid for this transaction. Click on Add New Vendor to create
a new vendor in the system. 7. Enter the 2-digit withdrawal code or click to select from the dropdown list. 8. Click Add Transaction when completed. 9. To enter another resident, go back to step 4 and repeat the process.
10. After the withdrawal record is complete, select whether to save your entries as a recurring record and click Save.
11. Click Print Transaction Input Report and verify the withdrawal record. Do not send or fax this report to National Datacare. It is for your files only. Many facilities attach this printout to the original manual withdrawal record as confirmation that it has been entered in the computer.
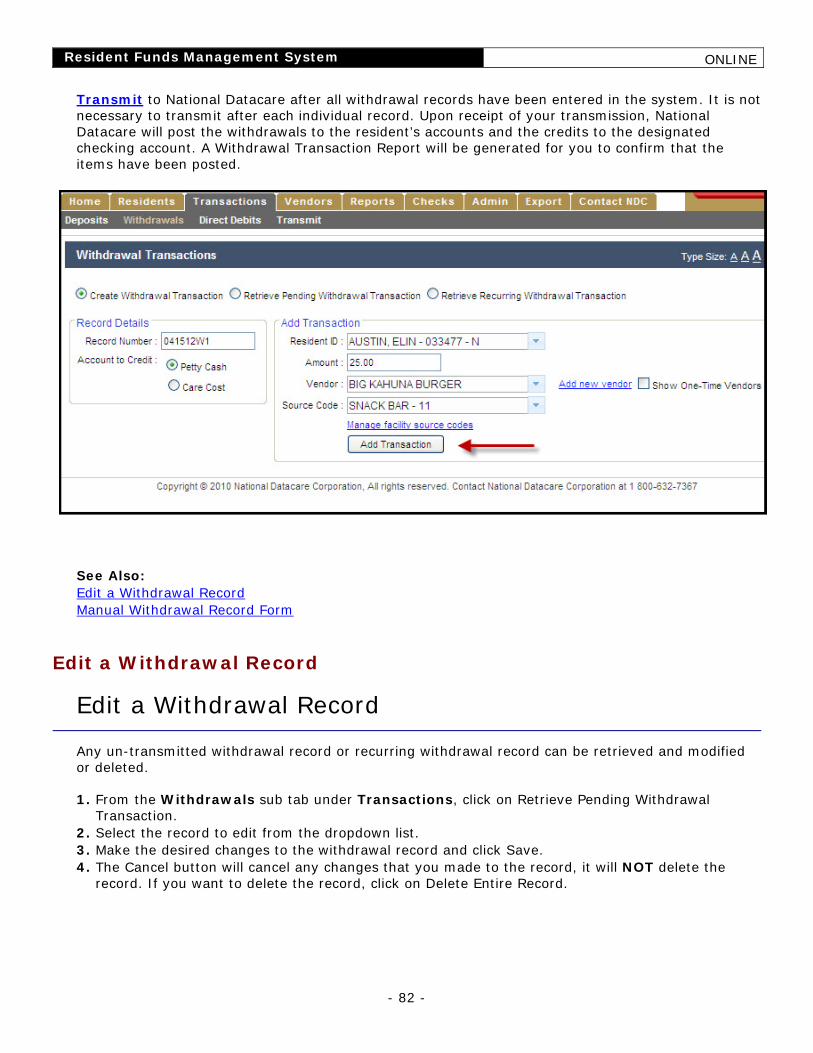
Resident Funds Management System ONLINE
- 82 -
Transmit to National Datacare after all withdrawal records have been entered in the system. It is not necessary to transmit after each individual record. Upon receipt of your transmission, National Datacare will post the withdrawals to the resident’s accounts and the credits to the designated checking account. A Withdrawal Transaction Report will be generated for you to confirm that the items have been posted.
See Also: Edit a Withdrawal Record Manual Withdrawal Record Form
Edit a Withdrawal Record
Edit a Withdrawal Record
Any un-transmitted withdrawal record or recurring withdrawal record can be retrieved and modified or deleted.
1. From the Withdrawals sub tab under Transactions, click on Retrieve Pending Withdrawal Transaction.
2. Select the record to edit from the dropdown list. 3. Make the desired changes to the withdrawal record and click Save. 4. The Cancel button will cancel any changes that you made to the record, it will NOT delete the
record. If you want to delete the record, click on Delete Entire Record.
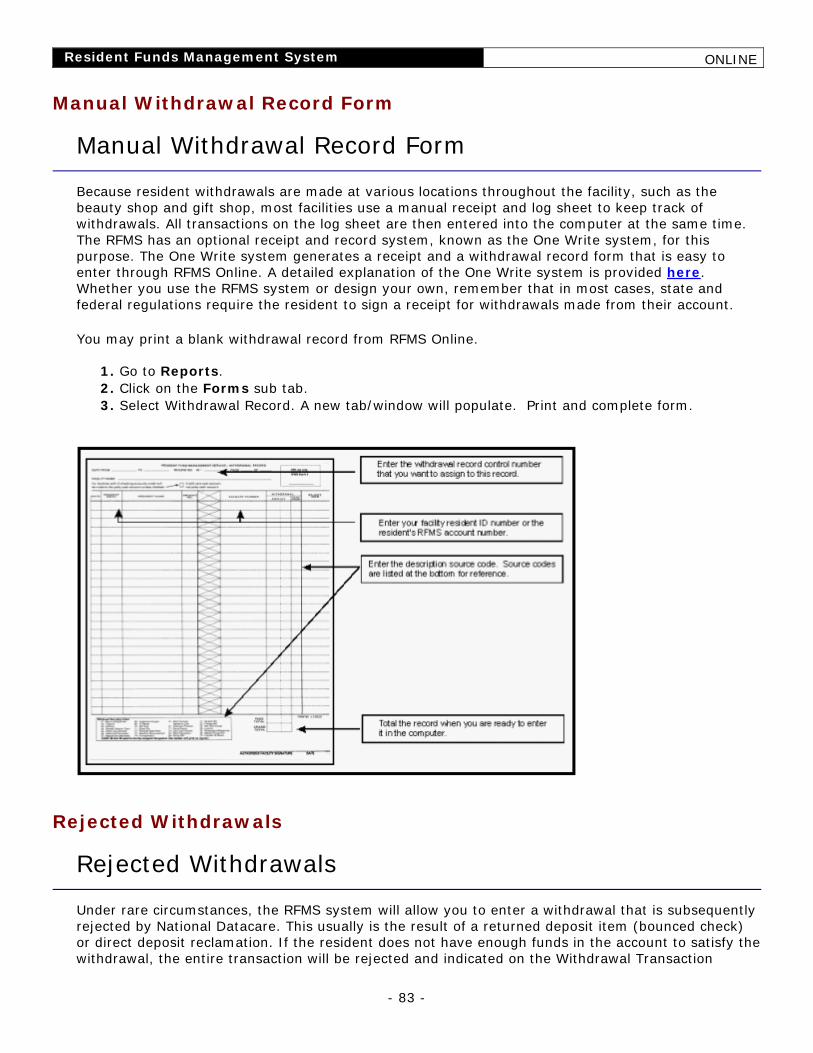
Resident Funds Management System ONLINE
- 83 -
Manual Withdrawal Record Form
Manual Withdrawal Record Form
Because resident withdrawals are made at various locations throughout the facility, such as the beauty shop and gift shop, most facilities use a manual receipt and log sheet to keep track of withdrawals. All transactions on the log sheet are then entered into the computer at the same time. The RFMS has an optional receipt and record system, known as the One Write system, for this purpose. The One Write system generates a receipt and a withdrawal record form that is easy to enter through RFMS Online. A detailed explanation of the One Write system is provided here. Whether you use the RFMS system or design your own, remember that in most cases, state and federal regulations require the resident to sign a receipt for withdrawals made from their account. You may print a blank withdrawal record from RFMS Online.
1. Go to Reports. 2. Click on the Forms sub tab. 3. Select Withdrawal Record. A new tab/window will populate. Print and complete form.
Rejected Withdrawals
Rejected Withdrawals
Under rare circumstances, the RFMS system will allow you to enter a withdrawal that is subsequently rejected by National Datacare. This usually is the result of a returned deposit item (bounced check) or direct deposit reclamation. If the resident does not have enough funds in the account to satisfy the withdrawal, the entire transaction will be rejected and indicated on the Withdrawal Transaction
Resident Funds Management System ONLINE
- 84 -
Report as NSF (Non-Sufficient Funds). National Datacare does not review NSF transactions. The facility is responsible for resubmitting the transaction when the resident has sufficient balance.
Vendor Module
Vendor Module
RFMS Online has a built-in Vendor module. The Vendor module allows you to designate the vendor that needs to be paid each time that you enter a withdrawal record item. A vendor is required for each record item on a withdrawal record. When you receive your withdrawal confirmation report, the system generates an outstanding payable item for the designated vendor. You can then select the items to pay and the system will create checks to issue. The Vendor system will also automatically create offsets for these checks in your register thereby automatically reconciling you checking account. See Also: Pay Vendors Module
Pay Vendors Module
Pay Vendors Module
Once you have received your withdrawal confirmation report, you will be able to create checks for your vendors.
1. Go to the Vendors tab and select the Pay Vendors sub tab. 2. The Payments Due tab will display all vendors that need to be paid. Select a vendor and click
the Select Payment Details tab. 3. Put a check mark next to each individual item that you want to pay. Click Pay Selected. Each
time that you click the Pay Selected button, a separate check will be generated. 4. If you want to pay all items with individual checks, click on Select All and click the Pay &
Generate Individual Checks button. 5. Checks are now ready to be issued. Use the following procedure that applies to you:
If you are printing checks on a laser printer:
1. Go to the Checks tab and click on Print Checks sub tab. 2. Select the checks to print by moving them from the left hand panel to the right hand panel
with the Add button. 3. Enter the starting check number in the lower left hand corner of the window. 4. Click Print. Note: before printing your first check, be sure to set proper vertical and
horizontal alignments. You can set the alignments by clicking on Options in the Print Checks menu or in the Admin/Preferences menu.
If you are hand writing checks:
1. Go to Checks and Check Register. 2. All checks that need to be issued will have the word PRINT in the check number column.
To change "Print" to a check number, click on Edit. In the Check Number field, replace the word PRINT with the corresponding check number in the item.
3. Click Save.
Resident Funds Management System ONLINE
- 85 -
Recurring Records
Recurring Records
This option is used to store withdrawal or deposit records to be used again in the future. This is useful when you have transactions that are repetitive on a regular time basis. For example, on the third of every month you receive Social Security checks for a group of residents. The deposit record for these checks can be saved as a recurring record so you do not have to re-enter it every month. If a change occurs, you can simply edit the existing recurring record. See Also: Create a Recurring Record Retrieve a Recurring Record
Create a Recurring Record
Create a Recurring Record
1. Create a new withdrawal or deposit record. 2. Before saving a record, there is a dialog prompting to save as recurring transactions (see figure
below). By default, the option is set to "No". 3. Select Yes and enter the recurring record name. 4. Click the Save button.
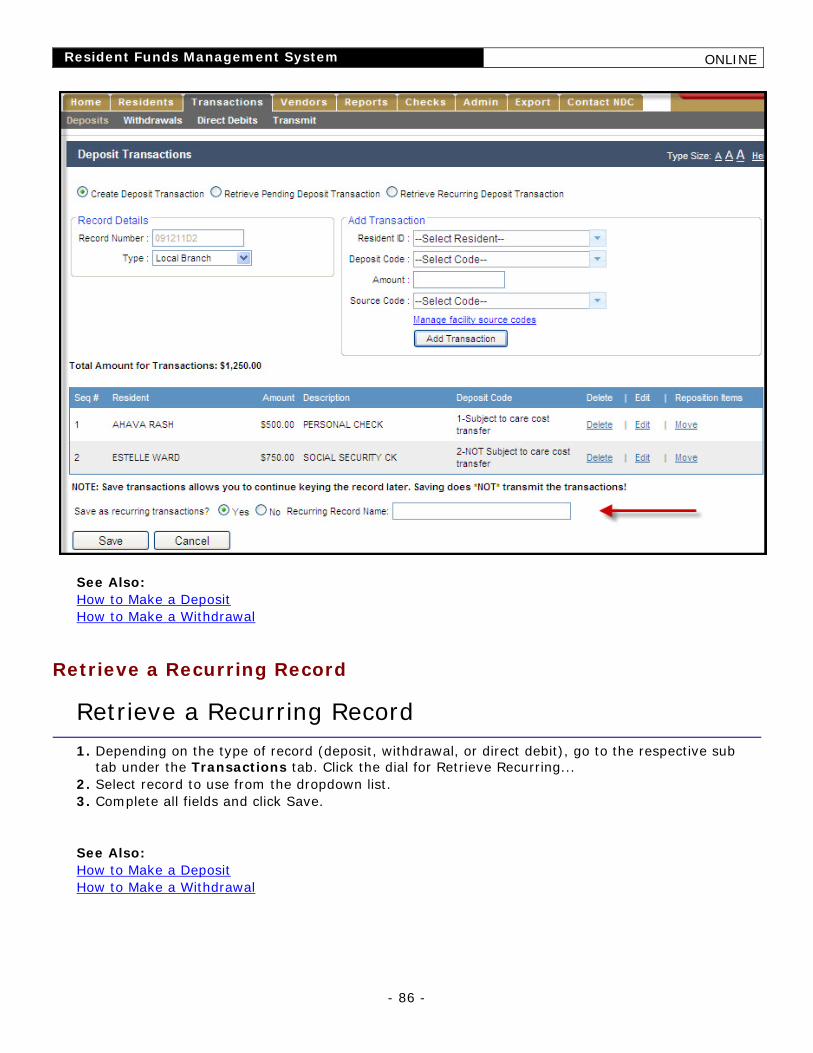
Resident Funds Management System ONLINE
- 86 -
See Also: How to Make a Deposit How to Make a Withdrawal
Retrieve a Recurring Record
Retrieve a Recurring Record
1. Depending on the type of record (deposit, withdrawal, or direct debit), go to the respective sub
tab under the Transactions tab. Click the dial for Retrieve Recurring... 2. Select record to use from the dropdown list. 3. Complete all fields and click Save. See Also: How to Make a Deposit How to Make a Withdrawal

Resident Funds Management System ONLINE
- 87 -
Transmissions
Transmissions
It is imperative that you transmit to National Datacare every time you key a transaction such as a deposit or withdrawal. During each transmission, the system submits your input for processing by National Datacare and the bank. For any other data entry inputs, such as creating a new resident account or enrolling direct deposit, you are not required to transmit. This information is automatically submitted when you save your changes.
See Also: How to Transmit
How to Transmit
How to Transmit
To transmit transactions to National Datacare:
1. Go to the Transactions tab and click on the Transmit sub tab. 2. Check the records you want to transmit. 3. Click on Transmit to send data. 4. You will be notified when the transmission is complete.
Resident Funds Management System ONLINE
- 88 -
Administrative Tasks
Administrative Tasks
National Datacare will create and assign an administrative user to manage your RFMS Online. A user with administrative privileges can create, edit, and delete users and permission groups. Permission groups can be tailored to your policies. If you require a login for RFMS Online for a new user or deleting an existing user from the system, please contact your RFMS Online administrator. If you do not know who your RFMS Online administrator is, please contact National Datacare.
See Also: Manager Users Manage Permission/Groups
Communication
Communication
An administrative user have the ability to send messages to a single or all facilities within the corporation. This useful tool can help communicate important messages. The message appears under the Home tab when a user logs into RFMS Online. Follow the steps below to send a message to one or all facilities.
1. Click on the Admin tab and select the Communication sub tab. 2. Select to send to a Single Facility or All Facilities within a Corporation. 3. Select options for the message. 4. Enter desired message. 5. Click on Send Message. Users can view expired message by running the Message History Report under the Reports tab.
See Also: Message History Report
Manage Permission/Groups
Manage Permission/Groups
Follow the steps below to create specific permission/groups for users within your corporation. Note: Prior to creating new users, you must create a user group with desired permission settings.
1. Click on the Admin tab and select the Manage Permission/Groups sub tab. 2. Click on Add Group. 3. Complete all fields and select desired settings.
Resident Funds Management System ONLINE
- 89 -
4. Click on Save once completed or Cancel to abort. 5. You can create as many groups as you want. To Edit or Delete a group name, simply select a group from your list under the Manage Permission/Groups sub tab and click on Edit or Delete.
See Also: Manage Users
Manage Users
Manage Users
Follow the steps below to create a new user.
1. Click on the Admin tab and select the Manage Users sub tab. 2. Click on Add User. 3. Complete all fields under the User and Login Details boxes. 4. Set desired Password Expiration Day. 5. Click on the Permission tab and select desired permission for the user group. 6. Click Save when finished.
See Also: User Listing Manage Permission/Groups
Preferences
Preferences
Facility Info
To change facility information such as address and phone number, follow the steps below.
1. Click on the Admin tab and select the Preferences sub tab. 2. Complete desired changes. Note: Be sure to enter the correct facility information since this
information will be printed on your blank check stocks. 3. Click on Save when finished or Cancel to abort.
Printing Blank Check Stock
To print from blank check stock, follow the steps below.
1. From the Preferences sub tab under Admin, click on Yes to Use Blank Check Stock. 2. Click on Save when finished or Cancel to abort.
Resident Funds Management System ONLINE
- 90 -
Automatically Print Signature on Checks
To have the system print your signature on blank check stocks instead of handwriting every time you print checks, follow the steps below. 1. Before the system can print your signature on checks, you need to save a copy of signature in the
form of JPEG or BMP format on your computer. If you have the equipment, you can scan and save your signature on your computer.
2. Once you have your signature saved, go to the Admin tab and select the Preferences sub tab. 3. Click on Browse under Use Signature File. 4. Locate your saved signature and click OK. The system will now automatically print your signature
on blank check stocks. Note: Be precise when signing and saving your signature since the bank determines whether to pay a check based on the accuracy of your signature.
Check Alignment
To ensure that blank check stocks are printed correctly, we recommend that you set proper alignments before printing on actual checks.
1. Click on the Admin tab and select the Preferences sub tab. 2. Set desired values for Vertical and Horizontal alignment settings. 3. Click on Save when complete or Cancel to abort. Once saved, these settings will apply to future
check prints. Follow the steps below to print a test check to ensure proper alignment.
1. Click on the Checks tab and select the Print Checks sub tab. 2. Click on Print Test. A new tab/window will populate. 3. Print the test check and compare it with an actual blank stock. Make necessary adjustment and
repeat if necessary until alignment is correct.
Editing $200 Notification Letter
To edit the wording on the $200 Notification letter, follow the steps below.
1. Click on the Admin tab and select the Preferences sub tab. 2. Complete desired changes in the $200 Notification box. 3. Click on Save when complete or Cancel to abort.
Resident Statement Report
To display residents by their assigned ID when running the Resident Statement report, follow steps below. 1. Click on the Admin tab and select the Preferences sub tab. 2. Click the checkbox under Resident Statement Report. 3. Click on Save.
Vendor Preferences
You can set the system to prompt for a vendor when entering a withdrawal record to your Care Cost account. By default, this is not required by the system. 1. Click on the Admin tab and select the Preferences sub tab. 2. Click the checkbox under Vendor Preferences. 3. Click on Save.
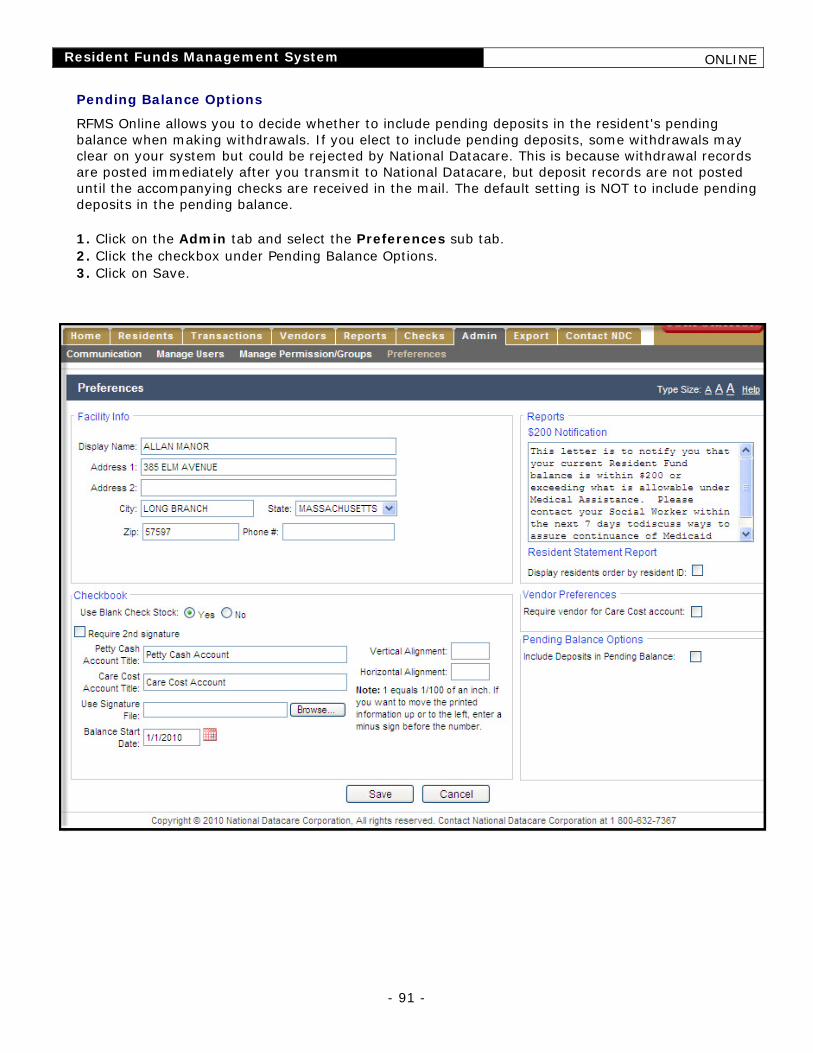
Resident Funds Management System ONLINE
- 91 -
Pending Balance Options
RFMS Online allows you to decide whether to include pending deposits in the resident's pending balance when making withdrawals. If you elect to include pending deposits, some withdrawals may clear on your system but could be rejected by National Datacare. This is because withdrawal records are posted immediately after you transmit to National Datacare, but deposit records are not posted until the accompanying checks are received in the mail. The default setting is NOT to include pending deposits in the pending balance. 1. Click on the Admin tab and select the Preferences sub tab. 2. Click the checkbox under Pending Balance Options. 3. Click on Save.
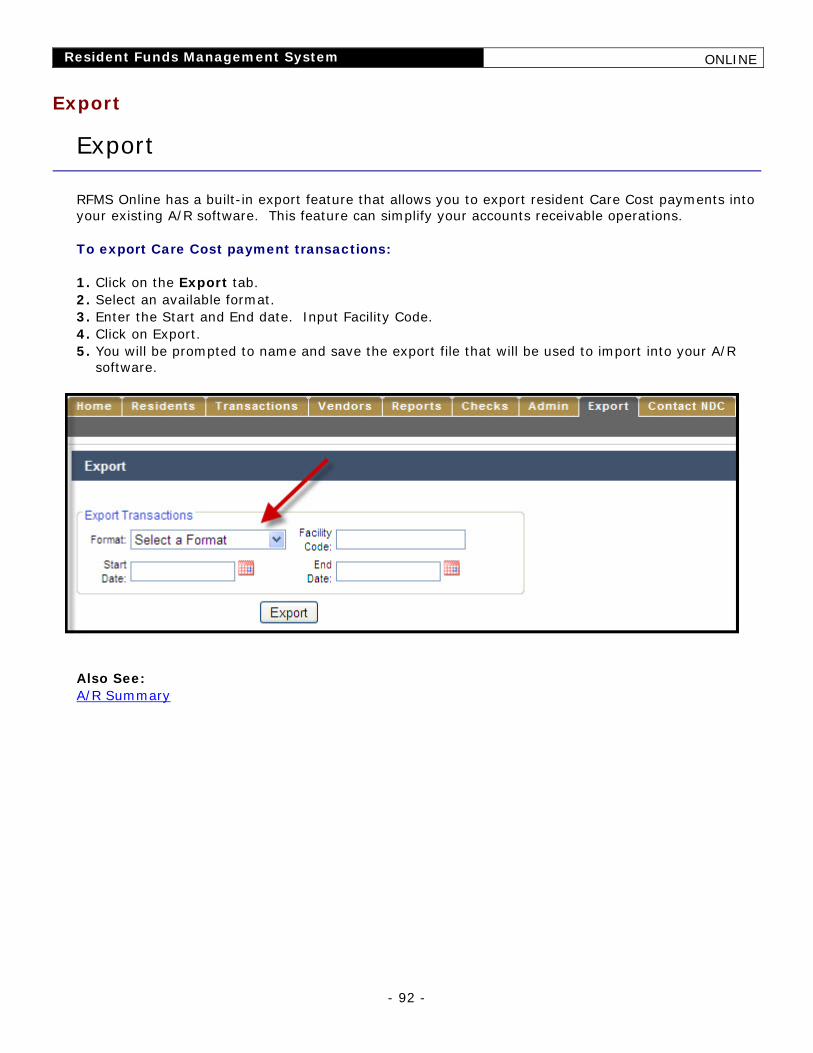
Resident Funds Management System ONLINE
- 92 -
Export
Export
RFMS Online has a built-in export feature that allows you to export resident Care Cost payments into your existing A/R software. This feature can simplify your accounts receivable operations.
To export Care Cost payment transactions:
1. Click on the Export tab. 2. Select an available format. 3. Enter the Start and End date. Input Facility Code. 4. Click on Export. 5. You will be prompted to name and save the export file that will be used to import into your A/R
software.
Also See: A/R Summary
Resident Funds Management System ONLINE
- 93 -
Settings
Facility Listing
Facility Listing
With RFMS being on the web, you can work remotely with the RFMS system as long as you have Internet connection and a web browser. Depending on your user credentials, you have the ability to manage RFMS for multiple facilities within your corporation. Please refer to your facility/corporate administrator to see if you have credentials to do this. Once logged in, follow the steps below to change between facilities through RFMS Online.
1. Click on Change Facility (located in upper right hand corner next to Account Settings). 2. From the list of available facilities, locate desired facility and click on Select. Otherwise, click on
Close to abort. If your facility is not listed as an option, refer to your RFMS Online administrator to grant you proper access.
3. The system will automatically switch to that facility and all of its information including resident accounts, check accounts, etc.
4. The Facility Name and ID number will display at the top next to the RFMS logo to ensure that you selected the proper facility. You can also view a list of your facilities if you go the Home tab and select Facility List.
Note: When inputting new information, be sure you select the proper facility.
Change User Password
Changing User/Password Info
For security purposes, you are encouraged to change the password for RFMS Online every 60 days. You will need to have your current password in order to change to a different password. Follow the steps below after you're logged in and change desired password, email address, or phone number (see figure below).
1. Click on Account Settings (located in upper right hand corner next to Log Out). 2. Under Change Password, complete all fields. 3. Password is case sensitive and must meet requirements described in red. 4. Click on Save when finished or Cancel to abort. 5. Should you forget your current password, you can click on Forgot Password at the login
screen. To get your password, you must answer the security question that you had created during the initial login process.

Resident Funds Management System ONLINE
- 94 -
Adjusting Font Size
Adjusting Font Size
To adjust the font size for display purposes, click on desired Type Size (see figure below). Note: this will not affect the font size when you print various reports.
Resident Funds Management System ONLINE
- 95 -
One-Write System
Loading the One-Write Peg Board
Loading the One-Write Peg Board
1. With the metal-hinged clamp to the left, open the pegboard (see Figure 7-1 in manual). 2. Press the white tabs (A) and open the clamp as far as possible. This action rotates a narrow metal
strip called the ejector plate (B). 3. Move the ejector plate (B) all the way to the left. 4. Load one or two copies of the transaction record (deposit or withdrawal with the covering tissue
carbons) by placing its holes over the metal pegs of the pegboard. 5. Move the ejector plate (B) all the way to the right so that it is touching the top of the
deposit/withdrawal record. 6. Load a sheet of corresponding deposit/withdrawal receipts onto the pegs with the carbon strip of
the first receipt covering the first blank line of the deposit/withdrawal record. The ejector plate (B) should now be between the receipts and the top of the deposit/withdrawal record.
7. Close the clamp and lock it shut by pressing down on the black buttons at the top and bottom. 8. The pegboard is now properly loaded and ready for use.
See Also: One-Write Overview Setting Up the One-Write System Ordering One-Write System Supplies Entering Deposits Entering Withdrawals
One-Write Overview
One-Write Overview
The RFMS One-Write System (also known as a peg board system) was designed by National Datacare for the RFMS. The system provides a simple, accurate, and economical method of entering transactions, making receipts, and keeping records. As the One-Write name implies, the system will create several forms with a single written entry. The forms generated include:
a 2 part transaction receipt
a Deposit/Withdrawal transaction Record
an individual resident ledger card
A pegboard folder is used to hold and align the multiple forms and carbon sheets while entries are made. Please see Loading the One-Write Peg Board.
Resident Funds Management System ONLINE
- 96 -
One-Write System Benefits
provides receipts for the facility and the resident.
saves time by creating all necessary forms with one entry.
eliminates hand copying and photocopying transactions.
improves accuracy by eliminating copying errors.
provides control with pre-numbered receipts for sequential transaction accounting.
can be customized. The facility may use only those parts of the system that suit their needs. For more information on this option, contact National Datacare.
See Also: Loading the One-Write Peg Board Setting up the One-Write System Ordering One-Write System Supplies Entering Deposits Entering Withdrawals
Setting Up the One-Write System
Setting Up the One-Write System
These instructions involve the use of the pegboards, Deposit/Withdrawal Receipts, Deposit/Withdrawal Records, and resident ledger cards. Examine these items and have them handy as you read these instructions. One pegboard is used for Withdrawal transactions and the other pegboard is used for Deposit transactions. The system is ready for use when a copy of a Deposit or Withdrawal Record (with attached carbons) and a single sheet of corresponding receipts are loaded onto the pegboard. Many facilities elect not to use ledger cards with the RFMS system since resident statements can be obtained at any time through RFMS Online. However, if you want use ledger cards, select the ledger card for the desired resident, insert and align the card so that the next blank line on the card is directly under the first line of the two-part receipt. You are now ready to make an entry. You are making multiple copies of the transaction entry. It is best to use an "accountant's fine" ballpoint pen and to press hard. Please print the resident's name rather than use script writing. National Datacare does not need a copy of your original withdrawal or deposit records. These records are used by you for data entry into RFMS Online. You should retain the original transaction record, both copies of the receipt, and the ledger card. See Also: Loading the One-Write Peg Board One-Write Overview Ordering One-Write System Supplies Entering Deposits Entering Withdrawals
Resident Funds Management System ONLINE
- 97 -
Ordering One-Write System Supplies
Ordering One-Write System Supplies
You may print a supply order form through RFMS Online. 1. Go to the Reports tab. 2. Click on the Forms sub tab. 3. Select One-Write Order Form. A new tab/window will populate. Print and fax completed form to
National Datacare. See Also: Loading the One-Write Peg Board One-Write Overview Setting Up the One-Write System Entering Deposits Entering Withdrawals
Using the One-Write System
Entering Deposits
Entering Deposits
1. Load the pegboard with deposit records and receipts. 2. If applicable, insert the resident's ledger card behind the receipts and on top of the blue carbon
sheet. 3. Enter the transaction on the receipt. 4. Tear off the 2 part receipts and sign it per facility policies. 5. File the receipts in accordance with facility procedures. File the resident's ledger card. 6. Repeat steps 2 through 5 for all transactions. 7. Endorse all checks using the RFMS "Deposit Only" stamp provided by National Datacare or hand
write "Deposit Only". If you have a cash deposit, convert it to a check. 8. Run an adding machine tape on the Deposit Record entries and the checks to be deposited. Make
sure the totals match. Attach the tapes to the upper left corner. 9. Enter the record through RFMS Online. You MUST print a copy of the deposit record for National
Datacare. We suggest that you print a second copy and attach it to the original record for your files. Transmit the deposit record to National Datacare.
10. Send the computer generated deposit record printout and the corresponding checks to National Datacare. Retain the original deposit record for your files.
See Also: Loading the One-Write Peg Board One-Write Overview Setting Up the One-Write System Ordering One-Write System Supplies Entering Withdrawals
Resident Funds Management System ONLINE
- 98 -
Entering Withdrawals
Entering Withdrawals
1. Load the pegboard with withdrawal records and receipts. 2. If applicable, insert the resident's ledger card behind the receipts and on top of the blue carbon
sheet. 3. Enter the transaction on the receipt. 4. Tear off the 2 part receipts and have the resident sign it per facility policy. 5. File the receipts in accordance with facility procedures. File the resident's ledger card. 6. Repeat steps 2 through 5 for all transactions. 7. Run an adding machine tape on the Withdrawal Record entries. Attach the tape to the upper left
corner. 8. Enter the record through RFMS Online. We suggest that you print and sign the withdrawal record
from the RFMS software and attach it to the original record. Transmit the withdrawal record to National Datacare.
9. DO NOT fax or mail the original or computer printed withdrawal record to National Datacare. Your transmission is all that is required for a withdrawal record to be processed.
See Also: Loading the One-Write Peg Board One-Write Overview Setting Up the One-Write System Ordering One-Write System Supplies Entering Deposits