Embed Size (px)
Citation preview

Page i
Table of Contents
CHAPTER 1 - INTRODUCTION..................................................................................................................................1
ABOUT THIS DOCUMENT ................................................................................................................................................1 HOW TO USE THIS BOOK.................................................................................................................................................1 WHAT’S NEW IN THE SAS/ACCESS INTERFACE TO R/3................................................................................................1 CONFIGURATIONS OF THE SAS/ACCESS INTERFACE TO R/3 SYSTEM ..........................................................................2
The Components of the SAS/ACCESS Interface to R/3.............................................................................................2 Basic Configurations................................................................................................................................................3 Other Configurations ...............................................................................................................................................4 Communications.......................................................................................................................................................5 Related Publications.................................................................................................................................................6
CHAPTER 2 - PRE-INSTALLATION..........................................................................................................................7
OVERVIEW .....................................................................................................................................................................7 SYSTEM REQUIREMENTS................................................................................................................................................7
Operating System .....................................................................................................................................................7 The SAS System ........................................................................................................................................................7 Required SAS Products ............................................................................................................................................7 R/3 System ................................................................................................................................................................8 Disk Space ................................................................................................................................................................8 Connectivity..............................................................................................................................................................8
AUTHORIZATION PROFILES ............................................................................................................................................9
CHAPTER 3 - INSTALLING THE SAS/ACCESS INTERFACE TO R/3 ..............................................................11
OVERVIEW ...................................................................................................................................................................11 POST-INSTALLATION SET-UP FOR THE SAS RFC SERVER............................................................................................11
Overview ................................................................................................................................................................11 Windows NT, SAS System host ...............................................................................................................................11 Windows NT, remote server ...................................................................................................................................12 UNIX, SAS System host ..........................................................................................................................................12 UNIX, remote server...............................................................................................................................................13
INSTALLING THE R/3 COMPONENTS .............................................................................................................................13 Prerequisites...........................................................................................................................................................13 Assistance...............................................................................................................................................................13 Overview ................................................................................................................................................................13 How to create function modules .............................................................................................................................14 Step 1, Create the function group “ZSAS”.............................................................................................................15 Step 2, Install the ABAP/4 function module “Z_SAS_READ_TABLE_CPIC”.......................................................15 Step 3, Install the ABAP/4 function module “Z_SAS_G_SET_LIST_SELECT” ....................................................16 Step 4, Install the ABAP/4 function module “Z_SAS_G_SET_TREE_IMPORT” ..................................................17 Step 5, Install the ABAP/4 program “ZSASRDTB” ...............................................................................................18 Step 6, Maintain the communication parameters in R/3 table “TXCOM”.............................................................20 Step 7, Transport the ABAP/4 Function Module and Program..............................................................................21
THE DATA DICTIONARY EXTRACT...............................................................................................................................21 Step 1, Start the RFC server ...................................................................................................................................22 Step 2, Logon to the R/3 System .............................................................................................................................23 Step 3, Start the extraction program ......................................................................................................................24 Step 4, Logoff from the R/3 System.........................................................................................................................25 Data Dictionary Extract in batch ...........................................................................................................................25 Separate Data Dictionary Extract(s)......................................................................................................................25
CHAPTER 4 - START THE INTERFACE.................................................................................................................27
TEST THE INSTALLATION..............................................................................................................................................27 Functionality ..........................................................................................................................................................27

Page ii
APPENDIX A - UPGRADING FROM RELEASE 1.1 TO RELEASE 3.0 ..............................................................29
GENERAL .....................................................................................................................................................................29 DESCRIPTORS...............................................................................................................................................................29 CONNECTIONS..............................................................................................................................................................29 SAS VIEWS..................................................................................................................................................................29
APPENDIX B - UPGRADING FROM RELEASE 2.0 TO RELEASE 3.0...............................................................31
DESCRIPTORS...............................................................................................................................................................31 CONNECTIONS..............................................................................................................................................................31 SAS VIEWS..................................................................................................................................................................31 DATA DICTIONARY EXTRACT ......................................................................................................................................31
APPENDIX C - SELECTED R/3 TRANSACTION CODES ....................................................................................33
APPENDIX D - ERROR MESSAGES.........................................................................................................................35
ALL OPERATING SYSTEMS...........................................................................................................................................35 CPIC User Authorization .......................................................................................................................................35 Gateway Service not found.....................................................................................................................................35 Hostname not found................................................................................................................................................35 No logical assign for filename................................................................................................................................35
UNIX...........................................................................................................................................................................35 Correct version of RFC SDK..................................................................................................................................35 Linking the SAS RFC Server on AIX ......................................................................................................................36 Linking the SAS RFC Server on HP-UX.................................................................................................................36 Internal data table ended prematurely ...................................................................................................................36
APPENDIX E - INSTALLATION FOR R/3 RELEASE 2.2......................................................................................37
Step 1, Create the function group "ZSAS"..............................................................................................................37 Step 2, Create the structure "SASLIST" .................................................................................................................37 Step 3, Install the ABAP/4 function module Z_SAS_READ_TABLE_CPIC ...........................................................38 Step 4, Maintain the communication parameters in R/3 table “TXCOM”............................................................39 Step 5, Transport the ABAP/4 Function Module and Program..............................................................................39
APPENDIX F - Q&A.....................................................................................................................................................41
APPENDIX G - PRE-INSTALLATION CHECKLIST .............................................................................................43
SECTION A GENERAL INFORMATION............................................................................................................................43 SECTION B SAS ENVIRONMENT...................................................................................................................................44
SAS/ACCESS Interface to R/3, Application............................................................................................................44 Data Dictionary Extract(s).....................................................................................................................................45 SAS Views on separate machine.............................................................................................................................45
SECTION C SYSTEM R/3 ENVIRONMENT ......................................................................................................................46 General Information...............................................................................................................................................46 RFC Server.............................................................................................................................................................46 R/3 System ..............................................................................................................................................................47 SAPGUI..................................................................................................................................................................47
APPENDIX H - INSTALLATION INFORMATION ................................................................................................49

Page iii
APPENDIX I - BATCH RFC INSTALLATION ........................................................................................................51
OVERVIEW ...................................................................................................................................................................51 INSTALLATION .............................................................................................................................................................51
Step 1, Install the ABAP/4 function module "Z_SAS_BATCH_INTERFACE_4" ...................................................52 Step 2, Install the ABAP/4 Program ZSASRDBT ...................................................................................................54 Step 3, Maintain the RFC Destinations ..................................................................................................................55 Step 4, Create Variants ..........................................................................................................................................57 Step 5, Transport the ABAP/4 Function Module and Program..............................................................................59 Step 6, Set up User Authorizations .........................................................................................................................59
LOCATION OF THE BATCH RFC SERVER ......................................................................................................................59 STARTING THE BATCH RFC SERVER............................................................................................................................59
For UNIX................................................................................................................................................................59 For Windows NT ....................................................................................................................................................60
APPENDIX J - USING TRANSPORT TO INSTALL SAP OBJECTS....................................................................61
INSTALLATION .............................................................................................................................................................61
APPENDIX K - INSTALL BAPI CONNECTOR.......................................................................................................63
INTRODUCTION ............................................................................................................................................................63 BASIC CONFIGURATION ...............................................................................................................................................63 AUTHORIZATION..........................................................................................................................................................64 WINDOWS NT..............................................................................................................................................................64 UNIX...........................................................................................................................................................................64
GLOSSARY ...................................................................................................................................................................65

Page iv

Page 1
Chapter 1 - Introduction
About this document This document covers the installation of the SAS/ACCESS® Interface to R/3 System for the SAS® System, Release 8.2.
How to use this book In Chapter 1, you will find an overview of the architecture of the SAS/ACCESS Interface to R/3. Read this chapter and decide which configuration you want to use for your installation.
Chapter 2 lists system requirements and pre-requisites. You will find tips about how to set up and test pre-requisites before you proceed with the installation.
To simplify and document the installation, two lists are provided:
• pre-installation checklist (Appendix G)
The pre-installation checklist must be completed prior to installation. Do not proceed with installation until all the items on the checklist are correctly completed.
• installation checklist (Appendix H)
During installation, complete the installation checklist. This information is important as it documents the installation and facilitates upgrades, etc.
These checklists are an important aid to successfully install the SAS/ACCESS Interface to R/3.
Chapter 3 explains the installation of the SAS/ACCESS Interface to R/3 step by step.
Chapter 4 explains how to start the interface and how to verify the installation.
Read appendices A and B if you have been using an earlier release of the SAS/ACCESS Interface to R/3.
For a list of R/3 transaction codes that are useful during installation and verification, see Appendix C.
If you encounter problems during the installation, check if the symptoms are described in Appendix D. You might find a solution there.
What’s new in the SAS/ACCESS Interface to R/3 In previous versions of the SAS/ACCESS Interface to R/3, the RFC Server has been linked at installation time. It is no longer necessary to link the RFC server during the installation. The RFC SDK from SAP R/3 is no longer a requirement.
A new batch RFC server is provided as a feature of the SAS/ACCESS Interface to R/3. See Appendix I Batch RFC Installation (on page 57) for information about how to set up the batch RFC server.
The SAS/ACCESS Interface to R/3 now has a general interface to call ABAP/4 RFC functions. On Windows NT® this new feature requires Version 4 (or above) of the DLL librfc32.dll. Check the version in the properties of your librfc32.dll.

2 SAS/ACCESS Interface to R/3 Installation Instructions
The functionality to read hierarchies/sets from the SAP R/3 system has been added to the SAS/ACCESS Interface to R/3. Two new function modules must be installed in the R/3 System to implement this functionality. See "Step 3, Install the ABAP/4 function module 'Z_SAS_G_SET_LIST_SELECT' " (on page 16) and "Step 4, Install the ABAP/4 function module 'Z_SAS_G_SET_TREE_IMPORT' " (on page 17). Version 4 of the librfc32.dll is required.
The authorizations have been updated to include the required authorization objects for R/3 Release 4.
In previous versions of SAS/ACCESS, manual installation of ABAP function modules and program is needed. To simplify the installation procedure and reduce the human error during manual installation, a transport containing all the function modules and program is also shipped with the product. User can now use the SAP transport system to import and activate these function modules and program. Refer to Appendix J - Using transport to install SAP objects (on page 69) for details.
Configurations of the SAS/ACCESS Interface to R/3 System The SAS/ACCESS Interface to R/3 System can be configured in many different ways. This section describes the components of the SAS/ACCESS Interface to R/3 and basic configurations.
The Components of the SAS/ACCESS Interface to R/3 The components that make up the SAS/ACCESS Interface to R/3 System are
1. SAS/ACCESS Interface to R/3 Application
2. Data Dictionary Extract
3. SAS Views of the R/3 data
4. SAS RFC Server
The SAS RFC Server connects to the R/3 System via the R/3 System Application Server.
SAS/ACCESS to R/3 Application This is the user interface to navigate the metadata, store selections, and generate the SAS Views to access the R/3 data.
Data Dictionary Extract This is a copy of metadata from the R/3 Data Dictionary. The metadata is stored in SAS data sets that provide information about tables, fields, data models, and entity types in the R/3 System. For example, one table lists all the tables defined to the R/3 System (typically 20 to 50 thousand logical tables); another lists all the fields for each table (typically 400 to 800 thousand fields).
The Data Dictionary Extract is usually installed on the same box as the user interface of the SAS/ACCESS Interface to R/3 or on a fileserver.
The Data Dictionary Extract can be on a separate machine provided that machine has
• SAS System
• SAS/SHARE® or SAS/CONNECT®
SAS Views of the R/3 Data These are generated by the SAS/ACCESS to R/3 Application.
To use the SAS Views on a particular machine, the SAS/ACCESS Interface to R/3 must be installed.
SAS Views can be used in batch mode.

SAS/ACCESS Interface to R/3 Installation Instructions 3
SAS RFC Server Normally the SAS RFC Server is installed either on the same machine as the SAS/ACCESS to R/3 Application or the R/3 System (Application Server).
The SAS RFC Server must be installed under Windows NT® or UNIX®. It cannot be installed under Windows95 or Windows 3.1. However, the SAS RFC Server can be installed on a machine without the SAS System.
R/3 System (Application Server) The SAS RFC Server communicates with the R/3 System Application Server. The installation of the SAS/ACCESS Interface to R/3 includes a number of ABAP/4 objects and appropriate connection parameters.
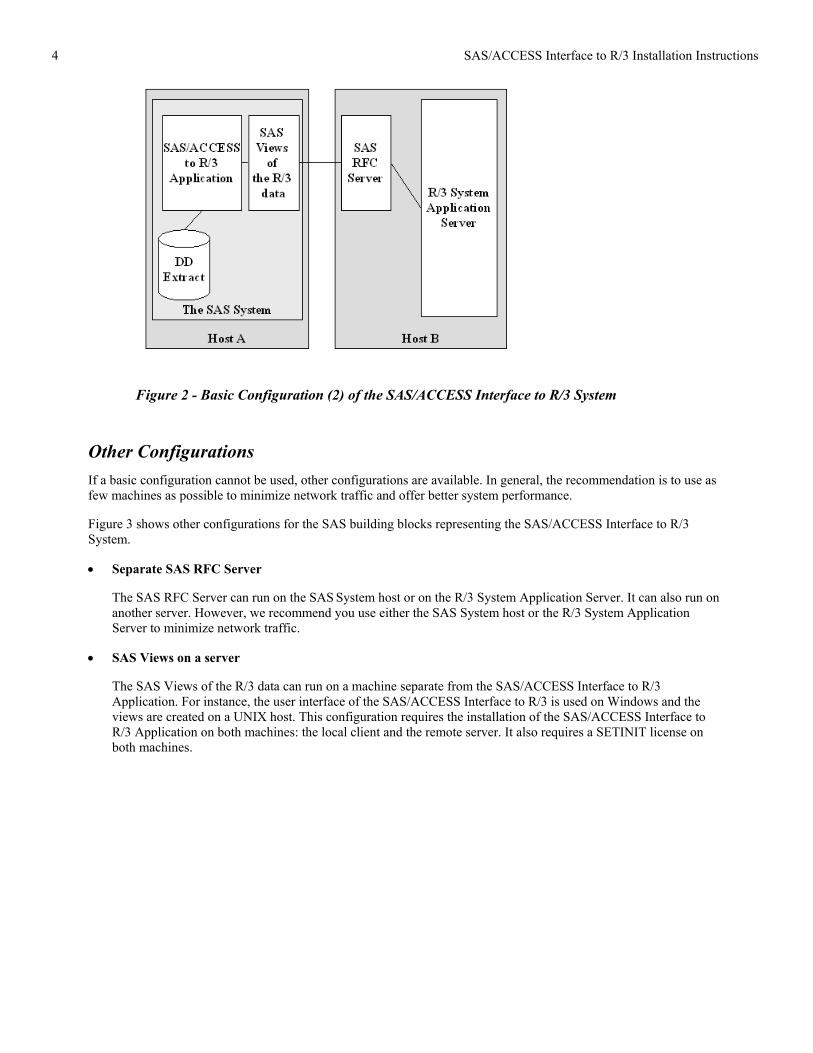
Basic Configurations Figures 1 and 2 show basic configurations for the SAS/ACCESS Interface to R/3. In the first configuration the four SAS components of the Interface are all on the same machine:
• SAS/ACCESS to R/3 Application
• Data Dictionary Extract
• SAS Views of the R/3 data
• SAS RFC Server
In Figure 1, the RFC Server is installed on the same host as the SAS System; in Figure 2 it is on the same host as the R/3 System Application Server.
Figure 1 - Basic Configuration (1) of the SAS/ACCESS Interface to R/3 System
4 SAS/ACCESS Interface to R/3 Installation Instructions
Figure 2 - Basic Configuration (2) of the SAS/ACCESS Interface to R/3 System
Other Configurations If a basic configuration cannot be used, other configurations are available. In general, the recommendation is to use as few machines as possible to minimize network traffic and offer better system performance.
Figure 3 shows other configurations for the SAS building blocks representing the SAS/ACCESS Interface to R/3 System.
• Separate SAS RFC Server
The SAS RFC Server can run on the SAS System host or on the R/3 System Application Server. It can also run on another server. However, we recommend you use either the SAS System host or the R/3 System Application Server to minimize network traffic.
• SAS Views on a server
The SAS Views of the R/3 data can run on a machine separate from the SAS/ACCESS Interface to R/3 Application. For instance, the user interface of the SAS/ACCESS Interface to R/3 is used on Windows and the views are created on a UNIX host. This configuration requires the installation of the SAS/ACCESS Interface to R/3 Application on both machines: the local client and the remote server. It also requires a SETINIT license on both machines.

SAS/ACCESS Interface to R/3 Installation Instructions 5
• Separate Data Dictionary Extract
The Data Dictionary Extract is on a different machine than the SAS/ACCESS to R/3 Application.
Figure 3 - Other Configurations of the SAS/ACCESS Interface to R/3
Communications This section describes the communication protocols used between the building blocks of the SAS/ACCESS Interface to R/3. Understanding this is important for determining the parameters used to connect to the R/3 System from the SAS System.
Figure 4 -Communication within the SAS/ACCESS Interface to R/3 System

6 SAS/ACCESS Interface to R/3 Installation Instructions
1. Between the SAS Views and the SAS RFC Server, TCP/IP is used.
(The default TCP/IP port number is 6991).
2. Between the SAS RFC Server and the R/3 System (Application Server), usually TCP/IP is used. (Other communication protocols can be used. For more information, refer to the RFC documentation from SAP AG).
Parameters for this link are referred to as RFC parameters and are sometimes stored in a “sideinfo” file.
3. Between the ABAP/4 function module and program CPI-C is used.
The parameters for this communication link are defined in the R/3 table “TXCOM”.
The default destination used by the SAS/ACCESS Interface to R/3 is “SELF”.
Related Publications • SAS/ACCESS® Interface to R/3 System: User's Guide, Release 3.0, First Edition
• SAS® Companion for UNIX Environments, Version 8
• SAS® Companion for Microsoft Windows Environment, Version 8
In addition, the SAS Installation Instructions and System Requirements for the respective platform may be useful.

Page 7
Chapter 2 - Pre-Installation
Overview This chapter outlines the pre-requisites to install and run the SAS/ACCESS Interface to R/3. Some of these pre-requisites require the involvement of other staff, such as the R/3 System administrator.
System Requirements The installer requires valid operating system user IDs and passwords. For a multi-machine installation, appropriate access to the network and all machines must be included. For Windows NT, administrator privilege is required.
Operating System SAS/ACCESS Interface to R/3, RFC Server
The RFC Server that is part of the SAS/ACCESS Interface to R/3 requires Windows NT, AIX, Compaq Tru64 UNIX (formerly Compaq's Digital UNIX), HP-UX, or Solaris. To install and run the RFC Server as a Windows NT service, NT 4.0 or higher and Windows NT administrator privilege are required.
SAS/ACCESS Interface to R/3, Application
For a list of operating system requirements for the SAS/ACCESS Interface to R/3 user interface, see the system requirements for Version 8 of the SAS System.
The SAS System SAS/ACCESS Interface to R/3, RFC Server
The RFC Server can run on a machine without the SAS System being installed.
SAS/ACCESS Interface to R/3, Application
The SAS System Version 8 is required.
Required SAS Products • Base SAS
• SAS/ACCESS Interface to R/3 Software
In addition:
• to use the “Export metadata to Warehouse Administrator” feature, you will need SAS/Warehouse Administrator® Software
• to use the SAS client/server support, you will need SAS/CONNECT or SAS/SHARE

8 SAS/ACCESS Interface to R/3 Installation Instructions
R/3 System Release
R/3, Release 3.0A or above.
For Windows NT, the librfc32.dll must be available at run time. To use the new functionality to call R/3 function modules the DLL must be Version 4 or higher. Check the version in the property page of the librfc32.dll.
SAPGUI
During the installation of the SAS/ACCESS Interface to R/3 software a SAPGUI is required.
User IDs
R/3 user identifications and passwords are required. The user IDs must have appropriate authorizations to access data and use communication methods. See Authorization Profiles (on page 9) for more information about customizing the authorization.
To install and run the SAS/ACCESS Interface to R/3, the following R/3 user IDs are required:
1. RFC user
This is an R/3 user ID that is used for the communication link between the SAS RFC Server and the R/3 Application Server. The user type of this ID can be dialog or CPIC.
Typically, there are several RFC user IDs (one per person). However, to fit varying customer requirements, the RFC and CPIC user IDs can be using one ID which is defined as a CPIC user type.
2. CPIC user
This is an R/3 user ID that is used “internally” for the communication between the ABAP/4 function module and the ABAP/4 program. The user ID must be defined as a CPIC user type.
3. ABAP/4 Developer user (for installation only)
For the installation of components, (e.g., function module and ABAP/4 program) in the R/3 system, an ABAP/4 developer user ID is required. For R/3 Release 3.0 and above, a developer user must be registered in the OSS system. The first time a developer user creates a new object, the OSS Access key is entered. Since this user ID is only used for the installation, a suitable existing developer user ID can be used.
Disk Space Refer to the System Requirements documents for the amount of space needed for the SAS/ACCESS Interface to R/3 on the various UNIX and Windows platforms.
Additionally disk space for the data dictionary extract is required. The space requirement varies, but is typically up to 300Mb.
The SAS RFC Server space requirement is 1.5MB.
Connectivity The SAS RFC Server and the SAS Data Step use TCP/IP socket programming. The TCP/IP network protocol must be installed to use the SAS/ACCESS Interface to R/3. The default port used by the interface is 6991.
The SAS RFC Server and the R/3 Application Server usually use TCP/IP communication. Refer to the RFC documentation from SAP AG. The host of the R/3 Application Server must be known to the host of the RFC Server.

SAS/ACCESS Interface to R/3 Installation Instructions 9
Alternatively, you can use the IP address to identify the R/3 Application Server. The TCP/IP services file must contain entries for the services, ports, and protocols used for the communication. The following is an example for entries in the services file: sapdp00 3200/tcp sapdp01 3201/tcp ... sapdp99 3299/tcp sapgw00 3300/tcp sapgw01 3301/tcp ... sapgw99 3399/tcp sapsp00 3400/tcp sapsp01 3401/tcp ... sapsp99 3499/tcp
Note: If the SAPGUI is installed on the machine, the TCP/IP Services file already contains these entries.
Authorization Profiles To install and use the SAS/ACCESS Interface to R/3, a user ID with certain authorizations is required. An authorization has an authorization object. Several authorizations can be bundled together into an authorization profile.
The ABAP/4 developer user ID requires the standard R/3 developer authorizations.
The RFC and CPIC user IDs require authorizations for the following authorization objects:
Object Minimum Requirement for Values
Example for predefined Authorization
Notes
S_RFC (Auth. check for RFC access)
ACTVT: *
RFC_NAME: *
RFC_TYPE: *
S_RFC_ALL
starting with R/3 Release 3.1G
S_CPIC (CPIC calls from ABAP/4 programs)
ABAPFORM: *
ACTVT: 37, 51
CPICDEST: SELF
PROGRAM: SAPLZSAS, ZSASRDTB
S_CPIC_ALL
S_TABU_DIS (Table Maintenance via standard tools such as SM31)
ACTVT: 03
DICBERCLS: *
S_TABU_SHOW
The existing authorizations, such as S_CPIC_ALL and S_TABU_SHOW, can be used as standard. Both these authorizations are in authorization profile A_ANZEIGE.

10 SAS/ACCESS Interface to R/3 Installation Instructions
Alternatively, you can set up new authorizations and a new profile. To do this:
1. Ask the R/3 System administrator to set up a new authorization called (for example) SASCPIC. This authorization should be created from the object class ‘Basis: Administration’ and the object ‘CPIC calls from ABAP/4 programs’. The values should be: ABAP/4 program name:
ZSASRDTB and SAPLZSAS (or SAPLXXXX, where XXXX is the name of the Function Group chosen for the SAS-supplied Function Module).
Activity: 37 and 51.
Name of the ABAP/4 FORM routine: FLDDESC FLDDESC2 GETDATA and TABDESC (or simply: *)
Symbolic destination: SELF (or the name chosen for the TXCOM entry).
2. Now, create a new single profile called (for example) SASCPIC. Insert the previously created authorization (SASCPIC) into the profile. Select this authorization from the object class “Basis: Administration” and select SASCPIC from the list.
Also consider adding other authorities to the new profile, such as S_TABU_SHOW (Table Maintenance via standard tools such as SM31).
3. The RFC user(s) and CPIC user(s) should be assigned the authorization profile SASCPIC.
To see the R/3 transaction codes for those tasks, refer to Appendix C.

Page 11
Chapter 3 - Installing the SAS/ACCESS Interface to R/3
Overview During the installation of the SAS System Version 8 select to install the SAS/ACCESS Interface to R/3 along with the other products you want to install. Refer to the installation instructions for the SAS System Version 8.2 for your operating system.
Post-Installation Set-up for the SAS RFC Server
Overview This section describes the setup for the SAS RFC Server after the software has been loaded from the SAS installation CD.
Select one of the following scenarios according to the decisions you made about the configuration of your SAS/ACCESS Interface to R/3. The SAS RFC Server is either installed on the same host as the SAS System or on a remote server. Remote server, in this case, means remote to the SAS System, which also includes the case where the SAS RFC Server is installed on the same host as the R/3 Application Server.
• Windows NT, SAS System host (see below) • Windows NT, remote server (see page 12) • UNIX, SAS System host (see page 12) • UNIX, remote server (see page 13)
Proceed with the section appropriate to your configuration.
Windows NT, SAS System host The SAS RFC Server is installed as an NT service during the installation of the SAS/ACCESS Interface to R/3 Software.
1. If the DLL librfc32.dll is not installed in your Windows system directory, make it available to the SAS RFC Server. Typically the file is in: c:\sappc\sapgui\rfcsdk\bin
To make it available:
• copy it to the install directory (e.g., !SASROOT\access\sasexe) or • add its directory to PATH or • copy it to one of the PATH directories.
2. You have several options to start the SAS RFC Server. You can either start the SAS RFC Server manually or change its properties to start the service automatically when the PC is rebooted.
• Starting as an NT Service
1. Display the Services, (on NT 4.0: Start | Settings | Control Panel | Services). 2. Click the sasrfc Service. 3. Click the Start button.
The optional parameter for the TCP/IP port may be used.

12 SAS/ACCESS Interface to R/3 Installation Instructions
• Automatic Startup as an NT Service
1. Display the Services, (on NT 4.0: Start | Settings | Control Panel | Services). 2. Select the sasrfc Service. 3. Click the Startup button. 4. Change the Startup Type to Automatic and click OK. 5. Reboot the PC.
Windows NT, remote server 1. Create a directory for the SAS RFC Server (for example, c:\SAS\SASRFC).
2. Download the file ntsasrfc.exe from the box where the SAS/ACCESS Interface to R/3 is installed to the installation directory on the Windows NT box. If you download the file from a UNIX box, the file is located in !SASROOT/misc/dbi; on Windows, the file is in !SASROOT\access\sasmisc.
3. Double-click on the self-extracting ntsasrfc.exe file to extract the files into the installation directory.
4. To install the SAS RFC Service, start a MS-DOS command prompt and enter the following commands: cd \SAS\SASRFC sasrfc -install
5. If the DLL librfc32.dll is not installed in your Windows system directory, make it available to the SAS RFC Server. Typically the file is in c:\sappc\sapgui\rfcsdk\bin.
To make it available:
• copy it to the install directory (e.g., c:\SAS\SASRFC) or • add its directory to PATH or • copy it to one of the PATH directories
6. You have several options to start the SAS RFC Server. You can either start the SAS RFC Server manually or change its properties to start the service automatically when the PC is rebooted.
• Starting as an NT Service
1. Display the Services, (on NT 4.0: Start | Settings | Control Panel | Services). 2. Click the sasrfc Service. 3. Click the Start button.
The optional parameter for the TCP/IP port may be used.
• Automatic Startup as an NT Service
1. Display the Services, (on NT 4.0: Start | Settings | Control Panel | Services). 2. Select the sasrfc Service. 3. Click the Startup button. 4. Change the Startup Type to Automatic and click OK. 5. Reboot the PC.
UNIX, SAS System host No further actions required.

SAS/ACCESS Interface to R/3 Installation Instructions 13
UNIX, remote server 1. Create a directory for the SAS RFC Server (for example, /usr/local/sas/sasrfc).
2. Download the tar file from the box where the SAS/ACCESS Interface to R/3 is installed to the installation directory on the UNIX box. Select the appropriate file for your UNIX system. If you download the file from another UNIX box, the files are located in !SASROOT/misc/dbi, on Windows in !SASROOT\access\sasmisc. Select
• aixrrfc.tar for AIX • aosfrfc.tar for Compaq Tru64 UNIX (formerly Compaq's Digital UNIX) • hpuxrfc.tar for HP-UX • sol2rfc.tar for Solaris
3. Change to the target installation directory. For the example created in step 1, the command is cd /usr/local/sas/sasrfc.
4. To extract the files, run the following command. Replace hpuxrfc.tar with the correct filename. tar xvf hpuxrfc.tar
Installing the R/3 Components
Prerequisites 1. SAPGUI
The installation of the components in the R/3 system requires the SAPGUI software to be installed on your PC or workstation.
Note: It is not necessary to have the SAPGUI installed on the same PC or workstation where the SAS/ACCESS Interface to R/3 is going to be installed, but you need access to a SAPGUI during the installation.
2. ABAP/4 Developer User ID
A valid R/3 user ID and password is required. The user ID must be registered with the OSS system because new ABAP/4 objects (e.g., a function group, function module, and report) are created in the R/3 system. The first time a developer creates or modifies an object, they must enter the registration key obtained from the OSS system.
Assistance If your experience with the R/3 ABAP/4 workbench is limited, it is strongly recommended to get assistance from your R/3 System administrator to perform these tasks.
Overview This section describes the steps to install components of the SAS/ACCESS Interface to R/3 in your R/3 system. It describes how to configure your R/3 System for the SAS interface.
This section describes the basic steps to install a function group, function modules, and ABAP/4 programs. The description is based on R/3 Release 3.0E system. Other releases might be slightly different. For instructions for Release 2.2 of the R/3 System, refer to Appendix E. Differences for R/3 Release 4.0 and above are marked with "Note for Rel.4.0 and above". Skip this part if you are familiar with the ABAP/4 workbench.

14 SAS/ACCESS Interface to R/3 Installation Instructions
Then the specific attributes and parameters to set up the SAP R/3 components are described. Follow these instructions to install the components.
Usually, the components should be installed in your R/3 development system. After the interface has been tested, the R/3 Transport System is used to deliver the objects into your QA or production system.
Note: If you plan to deliver the objects to another instance of the R/3 System, do not select “Local Object” when saving the ABAP/4 function module and program in the development system since “Local Object” cannot be transported to other systems.
Note: Release 8.2 is also shipped with a SAP transport that contains all SAP objects. You can use SAP Transport system to input all the objects into SAP. Refer to Appendix K for more information.
Log on to the R/3 System with the developer user ID using the SAPGUI.
How to create function modules 1. Go to the ABAP/4 Function Library: Initial Screen window by selecting Function Library from the ABAP/4
workbench or by entering the transaction code: /nse37
2. Enter the name of the function module in the Function module field.
3. Click the Create button. This displays the Function Module Create: Administration window. If the function module already exists, check the component Source code in the Object components box and click the Change button. The Function Module: Edit window then appears.
4. Enter the function group in the Classification box (e.g., ZSAS).
Note for Rel. 4.0 and above: In the Enter function group dialog box, enter the name of the function group (e.g., ZSAS). This displays the Create Function Module window. Initially the Administration page is selected.
5. Enter the attributes for the function module by selecting the application, entering a short text, and selecting the processing type. For all functions installed for the SAS/ACCESS Interface to R/3, the processing type “Remote Function Call supported” must be selected.
6. Save the new function module by clicking the Save button or selecting Function module→Save from the pulldown menu.
7. To define the import and export parameters, go back to the ABAP/4 Function Library: Initial Screen, select the import/export parameters interface, and select the Change button. The Function Module Change: Import/Export parameters window appears. Enter the import and export parameters with their reference types.
Note for Rel. 4.0 and above: Select the import or export page of the Create Function Module window to define the import and export parameters.
8. To define the table parameters of the Remote Function Call program go back to the ABAP/4 Function Library: Initial Screen, select the component Table parameters/exceptions interface, and click the Change button. The Function Module Change: Table Parameters/Exceptions window appears. Enter the table parameters and reference structures and the exceptions in the appropriate fields.
Note for Rel. 4.0 and above: Select the Tables page of the Create Function Module window to define these table parameters.
9. Save the function module and go back to the ABAP/4 Function Library: Initial Screen.
10. If the SAPGUI is on a different machine than the SAS/ACCESS Interface to R/3 System, download the ABAP/4 source files from the SAS directory to the SAPGUI machine. On Windows NT, the source files are located in directory !SASROOT\access\sasmisc; on UNIX, in !SASROOT/misc/dbi.

SAS/ACCESS Interface to R/3 Installation Instructions 15
11. To upload the source code, select the component Source code and click the Change button. The Function
Module: Edit window appears. Select Utilities →Upload from the pulldown menu. In the Import from a Local File dialog window, enter the name of the external file and click OK.
12. Save the function module.
13. To activate the function module, select Function module → Activate from the pulldown menu.
Step 1, Create the function group “ZSAS” Create a new function group for the function modules of the SAS/ACCESS Interface to R/3. The name of the function group must start with “Z” or “Y”, such as “ZSAS”.
1. Go to the ABAP/4 Function Library: Initial Screen window by selecting Function Library from the ABAP/4 workbench or by entering the transaction code: /nse37
2. Go to the Create Function Group window by selecting Goto → Function groups → Create group from the pulldown menu.
3. Enter the name of the new function group in the Function group field (e.g., ZSAS).
4. In the Short text field enter a description of the function group (e.g., SAS/ACCESS Interface to R/3 System).
5. Click the Save button. The Create object catalog entry window appears. Select the object catalog development class that the R/3 System administrator recommends. To select from the list of classes starting with Z, use the down arrow icon and enter Z*.
6. Click the Create Request button to create a new transport request number. The new number is displayed (e.g., A01K902092). This transport request number is required later to transport these objects to other R/3 Systems like Production.
7. Enter a description (e.g., SAS/ACCESS Interface to R/3 System transport).
8. Confirm the entry and close the Create Object Catalog Entry window.
Step 2, Install the ABAP/4 function module “Z_SAS_READ_TABLE_CPIC” For general information, see "How to create function modules" on page 14.
1. Enter the function name: Z_SAS_READ_TABLE_CPIC
2. Enter the function group: ZSAS
3. Enter the attributes:
Application S (for Basis) or leave blank (for all applications).
Short text SAS/ACCESS Interface to R/3 System: Read Tables.
Processing type Choose Remote Function Call supported.
Table 1 - Attributes for Function Z_SAS_READ_TABLE_CPIC

16 SAS/ACCESS Interface to R/3 Installation Instructions
4. Enter the TABLE parameters:
Table parameters Ref. Structure
Z_SAS_WTAB ABAPTEXT
Z_SAS_LTAB LISTZEILE
Z_SAS_PTAB ABAPTEXT
Z_SAS_DTAB LISTZEILE
Table 2 - Table Parameters for Function Z_SAS_READ_TABLE_CPIC
5. Upload the source code from !SASROOT/misc/dbi/fread30.ab4 or !SASROOT\access\sasmisc\fread30.ab4.
Step 3, Install the ABAP/4 function module “Z_SAS_G_SET_LIST_SELECT” Note: The function module is new for SAS Release 8.1. It is used to read hierarchies/sets from the R/3 system. The function module only needs to be installed for R/3 Release 4.0 and above. For general information, see "How to create function modules" on page 14.
1. Enter the function name: Z_SAS_G_SET_LIST_SELECT
2. Enter the function group: ZSAS
3. Enter the attributes:
Application S (for Basis) or leave blank (for all applications).
Short text SAS/ACCESS Interface to R/3 System: Sets.
Processing type Choose Remote Function Call supported.
Table 3 - Attributes for Function Z_SAS_G_SET_LIST_SELECT
4. Enter the IMPORT parameters:
Import parameter Ref. field/structure Proposal Optional
CLIENT SY-MANDT Yes
SETCLASS RGSBS-CLASS Yes
SHORTNAME RGSBS-TITLE Yes
KOKRS SETHIER-KOKRS ‘*’ Yes
KTOPL SETHIER-KTOPL ‘*’ Yes
Table 4 - Import Parameters for Function Z_SAS_G_SET_LIST_SELECT

SAS/ACCESS Interface to R/3 Installation Instructions 17
5. Enter the TABLE parameters:
Table parameter Ref. Structure
MATCHING_SETS SETLIST
TEXTS LISTZEILE
Table 5 - Table Parameters for Function Z_SAS_G_SET_LIST_SELECT
6. Upload the source code from !SASROOT/misc/dbi/zsasglst.ab4 or !SASROOT\access\sasmisc\zsasglst.ab4.
Step 4, Install the ABAP/4 function module “Z_SAS_G_SET_TREE_IMPORT” Note: The function module is new for SAS Release 8.1. It is used to read hierarchies/sets from the R/3 system. For general information, see "How to create function modules" on page 14.
1. Enter the function name: Z_SAS_G_SET_TREE_IMPORT
2. Enter the function group: ZSAS
3. Enter the attributes:
Application S (for Basis) or leave blank (for all applications).
Short text SAS/ACCESS Interface to R/3 System: Sets.
Processing type Choose Remote Function Call supported.
Table 6 - Attributes for Function Z_SAS_G_SET_TREE_IMPORT
4. Enter the IMPORT parameters:
Import parameter Ref. field/structure Proposal Optional
CLIENT SY-MANDT SY-MANDT Yes
FIELDNAME RGSMH-FIELD SPACE Yes
LANGU SY-LANGU SY-LANGU Yes
NO_DESCRIPTIONS SY-DATAR SPACE Yes
NO_RW_INFO SY-DATAR SPACE Yes
SETID SETHIER-SETID
TABNAME RGSMH-TABLE SPACE Yes
NO_VARIABLE_REPLACEMENT SY-DATAR SPACE Yes
ROOT_HEADER_ONLY SY-DATAR SPACE Yes
NO_TABLE_BUFFERING SY-DATAR SPACE Yes
Table 7 - Import Parameters for Function Z_SAS_G_SET_TREE_IMPORT

18 SAS/ACCESS Interface to R/3 Installation Instructions
5. Enter the EXPORT parameters:
Export parameter Ref. field/structure
SET_NOT_TRANSPARENT SY-DATAR
Table 8 - Export Parameters for Function Z_SAS_G_SET_TREE_IMPORT
6. Enter the TABLE parameters:
Table parameter Ref. Structure Optional
SET_HIERARCHY SETHIER Yes
SET_VALUES SETVALUES Yes
Table 9 - Table Parameters for Function Z_SAS_G_SET_TREE_IMPORT
7. Enter the Exceptions:
Exception
SET_NOT_FOUND
ILLEGAL_FIELD_REPLACEMENT
ILLEGAL_TABLE_REPLACEMENT
Table 10 - Exceptions for Function Z_SAS_G_SET_TREE_IMPORT
8. Upload the source code from !SASROOT/misc/dbi/zsastree.ab4 or !SASROOT\access\sasmisc\zsastree.ab4.
Step 5, Install the ABAP/4 program “ZSASRDTB” 1. Create a new program.
Go to the ABAP/4 Editor: Initial Screen window by selecting ABAP/4 program from the ABAP/4 workbench or by entering the transaction code: /nse38.
In the Program field, enter the name of the ABAP/4 report i.e. ZSASRDTB.
Click the Create button. The ABAP/4: Program Attributes window appears.

SAS/ACCESS Interface to R/3 Installation Instructions 19
2. Define the program attributes.
Select the following parameters:
Title SAS/ACCESS Interface to R/3 System: Read Tables.
Type 1 (Online program; Executable program)
Status K (Customer production program)
Application S (Basis)
Authorization group leave blank or fill in program group provided by R/3 System Administrator. This allows to group programs for authorization checks.
Development class select the development class assigned by the R/3 System Administrator. The development class is important for the transport to other systems.
Logical database leave blank or D$ (Processing without database)
From Application leave blank or S (Basis System)
Selection screen leave blank
Table 11 - Attributes for Program ZSASRDTB.
Save the new ABAP/4 program by clicking the Save button or selecting Program →Save from the pulldown menu
The Create Object Catalog Entry window appears. Tab into the transport request field and use the down arrow icon to select the previously assigned transport request number. For example, A01K90202 SAS/ACCESS Interface to R/3, Release 3.
Close the Create Object Catalog Entry window. Go back to the ABAP/4 Editor: Initial Screen window.
3. Upload the ABAP/4 source code.
If the SAPGUI is on a different machine than the SAS/ACCESS Interface to R/3 System, download the file zsasrdtb.ab4 to the SAPGUI machine. On Windows NT, the file is located in directory !SASROOT\access\sasmisc; on UNIX, in !SASROOT/misc/dbi.
To upload the source code select the component Source code and click the Change button. The ABAP/4 Editor: Edit Program window appears.
Select Utilities → Upload from the pulldown menu.
In the Import from a Local File dialog window enter the name of the external file (e.g., on UNIX !SASROOT/misc/dbi/zsasrdtb4; on Windows, !SASROOT\sasmisc\zsasrdtb.ab4 and click OK.
4. Check the syntax.
To check the syntax of the ABAP/4 program click the Check button or select Program → Check → Current Program from the pulldown menu.
5. Save the ABAP/4 program.

20 SAS/ACCESS Interface to R/3 Installation Instructions
Step 6, Maintain the communication parameters in R/3 table “TXCOM” As shown in Figure 4 (on page 5), the ABAP/4 function module and program used by the SAS/ACCESS Interface to R/3 communicate via CPI-C. The parameters for this communication link are defined in the R/3 table “TXCOM”. The default destination used by the SAS/ACCESS Interface to R/3 is “SELF”.
To define this destination and its parameters in the R/3 System:
1. Go to the Table Maintenance window by entering the transaction code: /nsm31. 2. In the table field enter the table name TXCOM and then click the Maintain button. The Maintain Table
window appears. 3. To add a new entry to the table TXCOM select XCOM entry → Create from the pulldown menu. 4. In the fields in the Create XCOM Entry window enter the parameters for the connection. An example follows.
Note: The values in the following table are just examples. Enter the correct values for the local R/3 System. The values in italic are likely to be different.
Field Example Comment
Dest. SELF the symbolic destination
LU host1 the logical unit. If the partner program is an R/3 System the logical unit is the R/3 hostname
TP sapdp00 the transaction program, of the form sapdpnn where nn is the value of the system number (SYS).
Log I the communication type. I for internal connection from one R/3 System to another R/3 System.
Gateway host host1 name of the machine where the gateway is installed and running
Gateway service sapgw00 the TCP/IP service of the gateway, of the form sapgwnn where nn is the value
of the system number (SYS).
Table 12 - TXCOM Parameters
5. Save the entry by clicking the Save button.
Notes:
1. TXCOM entries are case-sensitive. When creating TXCOM entries, the case entered needs to correspond exactly as it appears in the install instructions.
2. If the name of the gateway host exceeds the length of the input field, define a key for this host in table THOST.
3. If you have problems finding the correct entries for the gateway host and gateway service, check:
• the active gateway via ABAP/4 report RSPFPAR using transaction SE38. Check the entries: rdisp/gateway rdisp/gwservice
• the gateway and the services entry in the profile DEFAULT.PFL by: rdisp/gateway = <GW host name> rdisp/gwservice = <sapgwnn>
where the GW host name is the host where the R/3 gateway process runs. It must be defined unambiguously in /etc/hosts.

SAS/ACCESS Interface to R/3 Installation Instructions 21
Step 7, Transport the ABAP/4 Function Module and Program Once the function module and program are installed, they must be released from the R/3 Development system and then transported. This allows SAS Views to read data from different R/3 Systems such as Development and Production.
To do this:
1. From the R/3 System Main menu, go to the ABAP/4 Development Workbench: Tools → ABAP/4 Workbench
2. From the pulldown menu, select Overview → Workbench Organiser.
3. Click the Display button on the bottom left of the screen.
4. A tree appears that displays the transportable items. Select the previously assigned transport request number (e.g., A01K902092 SAS/ACCESS Interface to R/3, Release 2).
5. Click the - sign and then click on the new sublevel that appears. Continue doing this until no further sublevel appears. (It is important to reach the lowest sublevel since a parent can only be released after all its children have been released).
6. Select the lowest item by clicking on it and then release it by clicking the Release button. (When released, an item changes its background color). Release the next lowest item in the same way. Ensure all levels of the request are released.
7. When the top level is released (after all its children have been released) the export is automatically started. The SAPGUI displays a message.
8. When complete, check that no errors occurred by returning to the main workbench screen. Select Goto → Transport log from the pulldown menu.
9. If no errors occurred, inform the R/3 System administrator of the transport request number for the import to other R/3 Systems. If necessary, this transfer can be performed later when the application goes into production.
The Data Dictionary Extract The SAS/ACCESS Interface to R/3 uses a copy of metadata from the R/3 System for navigation and to generate the program to read R/3 data. Extracting the necessary metadata from the R/3 data dictionary is part of the installation process. Before starting the dictionary extract process the RFC Server must be installed and the R/3 System must be configured for the SAS/ACCESS Interface to R/3.
If the R/3 Systems such as Development and Production are at the same level/version/release, then extract only the data dictionary from the R/3 Development system. However, if the level/version/release of other system(s) are different from that of Development, extract the data dictionary for each different system. This is necessary since the metadata is different for each level/version/release of the R/3 System.
If new R/3 System structures are added or existing ones changed, re-extract the metadata to reflect those changes.

22 SAS/ACCESS Interface to R/3 Installation Instructions
Step 1, Start the RFC server Note: For complete instructions regarding how to start and stop the RFC server, refer to SAS/ACCESS- Interface to R/3 System: User's Guide, Release 3.0, First Edition.
For UNIX
When the RFC server is successfully linked to the RFC SDK library, it is located in !SASROOT/saspgm/bin/sasrfc
Enter the command: sasrfc [-p portno] [-d 0|1|2] (e.g. sasrfc -p 6992 -d 1)
where
• portno is the port number, default 6991
• d is the diagnostic level, default 0
• [ ... ] indicates optional
• | indicates a choice of values.
When using diagnostic level 0, the server runs as a daemon process. After successful initialization, all messages are routed to syslog.
When using diagnostic level 1, the server runs as a normal process. Messages are routed to file sasrfc.log.
Diagnostic level 2 is the same as diagnostic level 1 with the addition of extra diagnostic messages.
For Windows NT
Use either of the following methods to start the SAS RFC Server on Windows NT:
• Starting as a Console Application
In a DOS window, change to the install directory and start the server with the debug parameter. For example, cd \sas\access\sasexe sasrfc -debug
The default TCP/IP port is 6991. Use an optional parameter to specify an alternative e.g. sasrfc -debug -p 6991
To stop the server, use CTRL+C.
• Starting as an NT Service
1. Display the Services using Start | Settings | Control Panel | Services. 2. Click the sasrfc Service. 3. Click the Start button.
The optional parameter for the TCP/IP port may be used.

SAS/ACCESS Interface to R/3 Installation Instructions 23
Step 2, Logon to the R/3 System Use the GUI of the SAS/ACCESS Interface to R/3 to connect to the R/3 System. To start the GUI, enter %r3access in the command line of the SAS session. Double-click the Logon icon. In the Logon to R/3 window and the Advanced Parameters window, enter the connection parameters. Table 13 lists the connection parameters and a description.
(To review the communication requirements, refer to Figure 4 on page 5).
Enter the connection parameters:
Parameter Comment
Connection ID SAS internal connection identifier (7 characters, SAS name), default: CONN1
TCP/IP host name of the RFC server host; default: localhost
TCP/IP port port number for RFC server; default: 6991
User ID (RFC) mandatory, R/3 user ID
Password (RFC) mandatory, R/3 password
Client (RFC) mandatory, R/3 client. Client is always three characters - include leading zeros e.g. 040.
Language (RFC) mandatory, R/3 logon language.
Destination (RFC) name of the RFC destination as defined in a ‘sideinfo’ file. If a ‘sideinfo’ file is used, specify the RFC destination and leave the RFC host field blank. Either the RFC destination or the RFC host must be specified, but not both.
Host (RFC) host name of the R/3 target system. Specify the host name in this field only if no ‘sideinfo’ file is used. Either the RFC destination or the RFC host must be specified, but not both.
System number system number of the R/3 target system. The default value is 0.
Gateway service the gateway service of the intermediate gateway of the form sapgwnn where nn is the system number. The default service is sapgw00.
Gateway host the hostname of the intermediate gateway
R/3 function module
the R/3 function module used for the SAS/ACCESS Interface to R/3 System. Default: Z_SAS_READ_TABLE_CPIC.
User ID (CPIC) the R/3 user ID used internally to communicate between the ABAP/4 function module and the ABAP/4 program to read the R/3 data. This user ID must be CPIC enabled. Do not enter the CPIC user ID, if the RFC user ID can be used as a default.
Client (CPIC) R/3 client, for explanation see User ID (CPIC).
Password (CPIC) R/3 password, for explanation see User ID (CPIC).
Language (CPIC) R/3 logon language, for explanation see User ID (CPIC).
Destination (CPIC) the name of the CPIC destination internally used for communication between the ABAP/4 function module and the ABAP/4 program. The destination must be defined in the R/3 table TXCOM. Default: SELF.
Table 13 - Connection Parameters

24 SAS/ACCESS Interface to R/3 Installation Instructions
Note 1: Two R/3 Systems such as Development and Production can run on one machine. If no “sideinfo” file is available, set the system number (SYS) and gateway service (GWSERV) fields in the connection parameters to access the correct R/3 System.
Note 2: The “sideinfo” file contains side information to communicate between the SAS RFC Server and the R/3 System (Application Server) (ABAP/4 function module). Its contents are similar to the connection parameters in the R/3 table TXCOM. For example, DEST=mydest LU=host1 TP=sapdp00 GWHOST=host1 GWSERV=sapgw00 PROTOCOL=I
Using a “sideinfo” file with the SAS RFC Server
For UNIX
1. Edit/create the sideinfo file (named sideinfo) 2. Copy the sideinfo file to the desired location, such as !SASROOT/saspgm/bin. 3. Set the environment variable SIDE_INFO to the fully qualified path name. For example,
for csh setenv SIDE_INFO /usr/local/sas/saspgm/bin/sideinfo
for ksh export SIDE_INFO=/usr/local/sas/saspgm/bin/sideinfo
For Windows NT
1. Edit/create the sideinfo file (named sideinfo). 2. Copy the sideinfo file to the desired location, such as !SASROOT\access\sasexe. 3. Set the environment variable SIDE_INFO to the fully qualified path name. For example,
SET SIDE_INFO=c:\sas\sr3\sideinfo
Step 3, Start the extraction program A wizard interface guides you through loading the metadata into SAS. To start the wizard, double-click on the Wizard to Load Metadata icon.
The Welcome window is displayed. Click on the Next button.
In the Metadata Destination window, select the SAS library for the metadata extract. The library R3LIB is the default value used in the SAS/ACCESS Interface to R/3. Click on the Next button.
In the Metadata Selection window, select the metadata to be extracted from the R/3 system. You can subset the metadata extract by selecting or deselecting components of the metadata. To subset the table and field extraction, select the Range button and enter a range of tables in the Table Subset window. In the Metadata Selection window, click on the Next button.
In the Parameter window enter the connection ID, the language for the metadata extract, and the R/3 Release. Select if the new metadata should be merged into the existing extract. Click on the Next button.
In the Select File window, you can enter a file name for the SAS extraction program to be saved to. You can use the file to repeat the metadata extract or set up SAS batch jobs for the extract. Click on the Next button.
In the Begin Metadata Extract window, review your settings and click on the Finish button to start the metadata extract.

SAS/ACCESS Interface to R/3 Installation Instructions 25
Step 4, Logoff from the R/3 System Use the GUI to log off.
Installation of the basic configuration is now complete. To ensure it has been successful, start the SAS/ACCESS Interface to R/3 (see page 22) and test the installation.
Data Dictionary Extract in batch The SAS sample program sr3bprof.sas contains an example of how to create a profile entry with the connection parameters and how to log on to R/3 using the profile.
Modify the sample program sr3bprof.sas to log on to R/3 in batch. For example: /* Use sr3bprof.sas to create the profile. */ /* Logon to R/3. See program sr3bprof.sas */ %r3connb(profile=&profile, libref=&library, function=OPEN); /* Assign the libref for the Data Dictionary Extract(s). */ libname r3lib 'the-location-of-the-Extracts'; /* Extract the Data Dictionary Information. */ %extrr3dd(conn=&cconn, language=E, merge=N, outlib=R3LIB); /* Logoff. */ %r3connb(conn=&conn, function=CLOSE);
Separate Data Dictionary Extract(s) To install, run the Data Dictionary extraction program on the remote machine.

26 SAS/ACCESS Interface to R/3 Installation Instructions

Page 27
Chapter 4 - Start the Interface
To start the SAS/ACCESS Interface to R/3 System from the SAS System, enter one of the following commands on the SAS command line: %r3access or afa c=sashelp.sr3.primary.scl
Test the installation 1. Click the “List of tables” icon on the GUI. 2. Enter the table name “T001”. 3. Click the Properties button. 4. Click the Show Data button.
If the table T001 is displayed correctly, then the installation is working correctly.
Functionality If no connection to the R/3 System is available, most of the functionality of the SAS/ACCESS Interface to R/3, such as navigating the data model, creating SAS Views to R/3 tables, and exporting metadata, is unaffected.
However, data extraction requires that the SAS RFC Server be running. If the SAS RFC Server is not running, a return code is generated. See "Start the RFC Server" on page 22. For more information, refer to SAS/ACCESS® Interface to R/3 System: User's Guide, Release 3.0, First Edition.

28 SAS/ACCESS Interface to R/3 Installation Instructions

Page 29
Appendix A - Upgrading from Release 1.1 to Release 3.0
General Release 1.1 was replaced by Release 2.0. If you have been using the SAS/ACCESS Interface to R/3, Release 2.0, see Appendix B.
To install Release 3.0 where Release 1.1 has been previously installed, carry out the installation instructions but note the following conversion issues.
In general, there is upward compatibility between Release 1.1 and Release 3.0. This means that Release 3.0 works with descriptors, connections, and SAS Views created under Release 1.1. However, in some cases, a conversion process is needed; see the below for details.
Release 1.1 does not support descriptors and connections created under Release 2.0 or Release 3.0. If these releases are run at the same time, keep separate libraries for Release 1.1, Release 2.0, and Release 3.0.
Descriptors A conversion utility is supplied to make the descriptors created under Release 1.1 visible under Release 3.0. To do this:
1. Copy the R11LIB.R3DESC catalog to R30LIB.R3DESC.
2. A) To convert all Release 1.1 descriptors in a SAS catalog submit the conversion macro: %r3descnv(lib=R30LIB)
B) To convert a single Release 1.1 descriptor in the copied catalog (for example R20LIB.R3DESC.R11DESC.SLIST) in a SAS catalog, submit the conversion macro: %r3descnv(lib=R30LIB, ent=R11DESC)
3. Repeat for all Release 1.1 R3DESC catalogs and descriptors needed under Release 3.0.
Connections A conversion utility is supplied to convert Release 1.1 connection objects into Release 3.0 connection profiles. To do so:
1. A) To convert all Release 1.1 connection objects in SAS catalog R11LIB.R3CONN, submit the conversion macro: %r3concnv(incat=R11LIB.R3CONN, outlib=R30LIB); run;
B) To convert a single Release 1.1 connection object, such as R11LIB.R3CONN.TESTCONN.SOURCE, submit the conversion macro: %r3concnv(incat=R11LIB.R3CONN, outlib=R30LIB, ent=TESTCONN); run;
SAS Views There are no conversion issues for the SAS Views created under Release 1.1.

30 SAS/ACCESS Interface to R/3 Installation Instructions

Page 31
Appendix B - Upgrading from Release 2.0 to Release 3.0
We recommend you re-install the RFC Server and upload the new source code for the ABAP/4 program and function module.
Since Release 2.0 of the SAS/ACCESS Interface to R/3 was based on Release 6.12 of the SAS System, and Release 3.0 is based on Version 8, the following conversion issues occur.
Descriptors Descriptors written with the SAS/ACCESS Interface to R/3 Release 2.0 can be read using Release 3.0 of the interface.
The descriptors cannot be updated.
To copy the descriptors into a Version 8 library, run the following program. The libref V6LIB is assigned to the Release 6.12 library, and V8LIB is assigned to the new Version 8 library. proc copy out=V8LIB in=V6LIB; select r3desc /memtype=CATALOG; select _r3desc_ /memtype=DATA; run;
Connections The old connection profiles can be read. However, we recommend you copy the old profile data sets into a new Version 8 library. The connection profiles are stored in <libref>.R3CONN.
SAS Views The views created with Release 2.0 of the interface can be read in Release 3.0.
Data Dictionary Extract Data dictionary extracts for Release 2.0 of the interface can be used with the new release.
32 SAS/ACCESS Interface to R/3 Installation Instructions
Page 33
Appendix C - Selected R/3 Transaction Codes
This is a list of transaction codes that might be useful during installation.
Enter the transaction code in the SAPGUI command line preceded by /n (i.e., a slash followed by the letter "n"). For example, to call the ABAP/4 Editor, enter /nse38
Note: Commands are not case-sensitive.
• Authorizations, Profiles, and Users
SU01 Maintain Users
SU02 Maintain Profiles
SU03 Maintain Authorizations
• ABAP/4 Functions and Programs
SE37 Function Library
Alternatively, from the R/3 System Main menu select: Tools → ABAP/4 Workbench
Click the Function Library button to view the ABAP/4 Function Library: Initial Screen window.
SE38
ABAP/4 Editor
Alternatively, from the R/3 System Main menu, select Tools → ABAP/4 Workbench Click the ABAP/4 Editor button to view the ABAP/4 Editor: Initial Screen window.
• View tables and table maintenance
SE16 Display a table
SM31 Table maintenance
• System log
ST22 ABAP/4 dump analysis
SM21 System log
• RFC Destinations
SM59 Display and maintain RFC destinations

34 SAS/ACCESS Interface to R/3 Installation Instructions
Page 35
Appendix D - Error Messages
All Operating Systems
CPIC User Authorization ERROR : RFC operation/code CallReceive ERROR : info : ERROR : key : COMMUNICATION_INIT_NO_AUTH ERROR : status : EXCEPTION SYSTEM_FAILURE RAISED ERROR : message : No authorization for CPIC destination SELF . ERROR : internal : ERROR : getdata
The destination SELF is created during the installation of SAS/ACCESS Interface to R/3 System (by updating table TXCOM).
The rules for using CPIC destinations were changed at release 3.1H. Now it is necessary to authorize the RFC user as well as the CPIC user to use CPIC comms.
Set the minimum permissions needed (see page 9) since it is usually undesirable to give all permissions to the RFC user(s).
Gateway Service not found ERROR: Gateway service sapgwnn not found
Check that the TCP/IP services file contains the required entries. See also "Connectivity" (page 8) in Chapter 2.
Hostname not found ERROR: Host hostname not found
Check that the TCP/IP hosts file contains an entry for the specified host or use the IP address. See "Connectivity" (page 8) in Chapter 2.
No logical assign for filename... ERROR: No logical assign for filename CONN1D. ERROR: No logical assign for filename CONN1R.
This error occurs if a previously created SAS view is read and the connection ID, such as CONN1, used while the view was created, is not connected to the R/3 System. To establish the connection, use the Logon icon of the SAS/ACCESS Interface to R/3.
UNIX Correct version of RFC SDK R/3 System error code : CALL_FUNCTION_WRONG_VALUE_LENG in the dev_rfc trace file and a core dump.
This problem might be resolved by using a later version of the RFC SDK, preferably one in which the file include/saprfc.h contains the line #define RFC_VERSION 3

36 SAS/ACCESS Interface to R/3 Installation Instructions
Linking the SAS RFC Server on AIX At install time, with recent levels of AIX (such as 4.2) and R/3 3.1, “unresolved symbol” errors may appear. The error message is ld: 0711-317 ERROR: Undefined symbol: .__set_errno128
For symbol errno_128, an extra link parameter “-lm” is needed. Follow the instructions in the section "UNIX, remote server" (see page 13) to link the RFC Server on the AIX box. When executing the install script, select the command file “ld30_5” from the provided list.
Linking the SAS RFC Server on HP-UX At install time with HP-UX 11.0, the following error message appears: ld: Unsatisfied symbols: ldexp (code) frexp (code) matherr
To solve this problem, follow the instructions in the "UNIX, remote server" (see page 13) to link the RFC Server on the local HP-UX box. When executing the install script, select the command file “ld30_3” from the provided list.
Internal data table ended prematurely On UNIX, an error has been reported when extracting the TABLES and FIELDS information. Th symptom is the message “ERROR Internal data table ended prematurely”.
No fix is available, but a workaround is to run the RFC Server with diagnostics enabled. See the SAS/ACCESS® Interface to R/3 System: User's Guide, Release 3.0, Chapter 5.

Page 37
Appendix E - Installation for R/3 Release 2.2
Log on to the R/3 System with the developer user ID using the SAPGUI.
Step 1, Create the function group "ZSAS" Create a new function group for the function module “ Z_SAS_READ_TABLE_CPIC. The name of the function group is, for example, ZSAS.
1. Go to the ABAP/4 Function Library: Initial Screen window by selecting Function Library from the ABAP/4 workbench or by entering the transaction code: /nse37
2. Go to the Create Function Group window by selecting Goto → Function groups → Create group from the pulldown menu.
Enter the name of the new function group in the Function group field, (e.g., ZSAS).
In the Short text field, enter a description of the function group (e.g., SAS/ACCESS Interface to R/3 System).
Click the Save button. The Create object catalog entry window appears. Select the object catalog development class that the R/3 System administrator recommends. To select from the list of classes starting with Z, use the down arrow icon and enter Z*.
Click the Create Request button to create a new transport request number. The new number is displayed (e.g., A01K902092). This transport request number is required later to transport these objects to other R/3 Systems such as Production.
Enter a description (e.g., SAS/ACCESS Interface to R/3 System transport).
Confirm the entry and close the Create Object Catalog Entry window.
Step 2, Create the structure "SASLIST" To install the function module in an R/3 Release 2.2 System, define the structure SASLIST.
1. Go back to the R/3 System Main menu.
Go to the ABAP/4 Development Workbench by selecting Tools → ABAP/4 Workbench.
Click the Data Dictionary button to view the Dictionary: Initial Screen.
2. Enter the name SASLIST in the Object name field and click the Structures radio box.
To create the structure, click the Create button.
Enter the following values
• Field: LINE • Data elem.: LISTLINE
and save the new structure.

38 SAS/ACCESS Interface to R/3 Installation Instructions
Step 3, Install the ABAP/4 function module Z_SAS_READ_TABLE_CPIC To install the ABAP/4 function module Z_SAS_READ_TABLE_CPIC:
1. Create the function module.
Go to the ABAP/4 Function Library: Initial Screen window by entering the transaction code: /nse37
Enter the name of the function module in the Function module field (i.e., Z_SAS_READ_TABLE_CPIC).
Click the Create button. This displays the Function Module Create: Administration window. (Press Enter to ignore any warning messages.) If the function module already exists, check the component Source code in the Object components box and click the Change button. The Function Module: Edit Z_SAS_READ_TABLE_CPIC window then appears.
Enter the function group in the Classification box.
Enter the following parameters for the function module:
Application S (for Basis) or leave blank (for all applications).
Short text SAS/ACCESS Interface to R/3 System: Read Tables.
Processing type Choose Remote Function Call supported.
Table 14 - Parameter for Function Z_SAS_READ_TABLE_CPIC
Save the new function module by clicking the Save button or selecting Function module → Save from the pulldown menu.
2. Define the interface.
To define the table parameters of the Remote Function Call program, go back to the ABAP/4 Function Library: Initial Screen, select the component Table parameters/exceptions interface, and click the Change button. The Function Module Change: Table Parameters/Exceptions window appears.
Enter the following Table parameters and Reference structures in the appropriate fields:
Table parameters Ref. Structure
Z_SAS_WTAB ABAPTEXT
Z_SAS_LTAB SASLIST
Z_SAS_PTAB ABAPTEXT
Z_SAS_DTAB SASLIST
Table 15 - Table Parameters for Function Z_SAS_READ_TABLE_CPIC for R/3 Release 2.2
Save the function module and go back to the ABAP/4 Function Library: Initial Screen.

SAS/ACCESS Interface to R/3 Installation Instructions 39
3. Upload the ABAP/4 source code.
If the SAPGUI is on a different machine than the SAS/ACCESS Interface to R/3 System, download the file fread30.ab4 to the SAPGUI machine. On Windows NT, the file is located in directory !SASROOT\access\sasmisc; on UNIX, in !SASROOT/misc/dbi.
To upload the source code, select the component Source code and click the Change button. The Function Module: Edit window appears.
Select Utilities → Upload from the pulldown menu.
In the Import from a Local File dialog window, enter the name of the external file (e.g., on UNIX !SASROOT/misc/dbi/fread30.ab4; for Windows, !SASROOT\access\sasmisc\fread30.ab4) and click OK.
Save the function module.
4. Activate the function module.
To activate the function module select Function module → Activate from the pulldown menu.
Step 4, Maintain the communication parameters in R/3 table “TXCOM” See Step 6, Maintain the communication parameters in R/3 table “TXCOM” in Chapter 3 (page 20).
Step 5, Transport the ABAP/4 Function Module and Program See Step 7, Transport the ABAP/4 Function module and Program in Chapter 3 (page 21).

40 SAS/ACCESS Interface to R/3 Installation Instructions

Page 41
Appendix F - Q&A
How do I change an expired password for a CPI-C user ID?
Use the following procedure:
1. Have the R/3 System administrator change the user type to Dialog. 2. Use the SAPGUI to log on using this R/3 user ID and change the password. Log off. 3. Have the R/3 System administrator change the user type back to CPIC.


Page 43
Appendix G - Pre-installation Checklist
Before installing the SAS/ACCESS Interface to R/3, the following information must be available.
Documenting this information (together with the Installation table that follows) simplifies installation and on-going maintenance considerably
The checklist is broken down into sections A, B, and C. Section A is general information and can be provided by the SAS Account Rep. Section B should be completed by the person maintaining the SAS environment. The person maintaining the R/3 environment should complete section C.
Section B clarifies where SAS/ACCESS Interface to R/3 is to be installed and where the extracted R/3 metadata is to reside. Section C clarifies where SAP AG RFC Software Development Kit resides and which R/3 systems you want to access.
Section A General Information
When:
Company name:
Address:
Name of SAS Account rep: Phone number: E-mail:
Name of SAS person responsible for the installation:Phone number: E-mail:
Name of Customer Contact: Phone number: E-mail:

44 SAS/ACCESS Interface to R/3 Installation Instructions
Section B SAS Environment
SAS/ACCESS Interface to R/3, Application Name of SAS contact: Phone number: E-mail:
Name of Network contact: Phone number: E-mail:
Hostname:
IP address:
Operating System/version no:
OS User ID/Password:
If Windows: User ID has administrator rights? Yes
Windows: Screen-saver password (or disabled):
Path where The SAS System is installed, i.e. c:\Program Files\SAS Institute\SAS\V8, /usr/local/sas
SAS setinit includes SAS/ACCESS to R/3 (provided by SAS Institute): Yes
If UNIX: has X-Windows? Yes
UNIX root password:
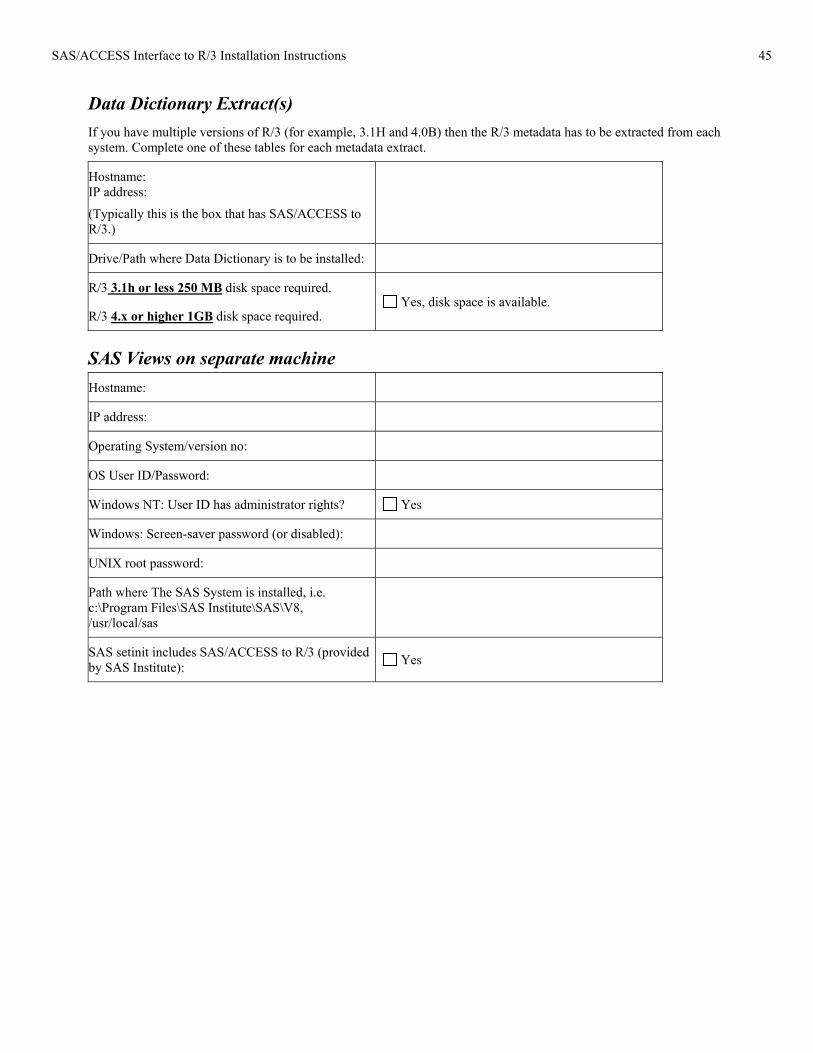
SAS/ACCESS Interface to R/3 Installation Instructions 45
Data Dictionary Extract(s) If you have multiple versions of R/3 (for example, 3.1H and 4.0B) then the R/3 metadata has to be extracted from each system. Complete one of these tables for each metadata extract.
Hostname: IP address:
(Typically this is the box that has SAS/ACCESS to R/3.)
Drive/Path where Data Dictionary is to be installed:
R/3 3.1h or less 250 MB disk space required.
R/3 4.x or higher 1GB disk space required. Yes, disk space is available.
SAS Views on separate machine Hostname:
IP address:
Operating System/version no:
OS User ID/Password:
Windows NT: User ID has administrator rights? Yes
Windows: Screen-saver password (or disabled):
UNIX root password:
Path where The SAS System is installed, i.e. c:\Program Files\SAS Institute\SAS\V8, /usr/local/sas
SAS setinit includes SAS/ACCESS to R/3 (provided by SAS Institute): Yes

46 SAS/ACCESS Interface to R/3 Installation Instructions
Section C System R/3 Environment
General Information Name of R/3 administrator available to help with install: Phone number: E-mail:
Name of R/3 System developer available to help with install: Phone number: E-mail:
Alternately, ABAP/4 developer user ID.
Client: User ID: Password: OSS access key (if user ID not previously used for development):
If ABAP/4 developer user ID not available, normal dialog user.
Client: User ID: Password:
RFC Server Complete one of these tables for each RFC server.
Hostname:
IP address:
Location of RFC SDK i.e. /usr/sap/TST/exe/run/rfcsdk
Windows NT: Location of librfc32.dll i.e. c:\sappc\sapgui\rfcsdk\bin
TCP/IP port no. (default 6991)
TCP/IP hosts file entry for R/3 System (Application Server) i.e. 1.2.3.4 r3server
TCP/IP services file entries i.e. sapdp00 3200/tcp

SAS/ACCESS Interface to R/3 Installation Instructions 47
R/3 System This is information about the R/3 System that you want to pull data from. Complete one of these tables for each R/3 System instance you want to access.
Application server hostname:
IP address:
R/3 System Release/level i.e. 3.1h:
System ID i.e. A01
Sideinfo file is used for communication parameters? Yes No
If yes, full path and name of sideinfo file:
RFC User ID – dialog user.
Client: User ID: Password:
CPIC user ID – CPIC enabled.
Client: User ID: Password:
System number (SYS) i.e. 00
Language i.e. E for English
Gateway host: (if different)
Gateway service i.e. sapgw00
Transaction program i.e. sapdp00
SAPGUI SAPGUI is installed on hostname:
UNIX: has X-Windows? Yes


Page 49
Appendix H - Installation Information
During installation, note the following information.
Location of Data Dictionary Extract(s) i.e. c:\sas\A01\r3lib
Name of new function group i.e. ZSAS
Transport request number: i.e. A01K902092

50 SAS/ACCESS Interface to R/3 Installation Instructions

Page 51
Appendix I - Batch RFC Installation
Overview
The batch RFC server software allows for concurrent processing of data transfer requests using SAP batch processing functionality. Using the batch RFC server eliminates the need to use two dialog processes that are currently used with the standard RFC server. The batch RFC server allows for long extracts without the worry of timing out.
The following diagram depicts the basic architecture.
Figure 5 -Batch RFC Server Basic Architecture
Installation This chapter describes the steps to install components of the SAS/ACCESS Interface to R/3 in your R/3 system. It describes how to configure your R/3 System for the SAS interface. The description is based on a R/3 Release 4.5B system. Other releases might be slightly different. The batch RFC server runs on R/3 Release 3.0 and higher.
The batch RFC server requires an ABAP/4 function module and an ABAP/4 program with a corresponding variant. Also, the user ID that is used within SAS/ACCESS Interface to R/3 needs to have authorization to submit batch jobs “already released”.
Usually, the components should be installed in your R/3 development system. After the interface has been tested, the R/3 Transport System is used to deliver the objects into your Quality/Test or production system.
Note: If you plan to deliver the objects to another instance of the R/3 System, do not select “Local Object” when saving the ABAP/4 function module and program in the development system since this restricts use to the R/3 Development System only.
Log on to the R/3 System with the developer user ID using the SAPGUI.
SAP AG R/3
ApplicationServer
ApplicationServer
ApplicationServer
SAS/ACCESS to R/3 Batch RFCServer

52 SAS/ACCESS Interface to R/3 Installation Instructions
Step 1, Install the ABAP/4 function module "Z_SAS_BATCH_INTERFACE_4" To install the ABAP/4 function module Z_SAS_BATCH_INTERFACE_4, you need to create a function module using the ABAP/4 function library, define the interface for the function module, upload the function module source code included in the SAS/ACCESS Interface to R/3 software package, and then activate the function module.
1. Create the function module.
Go to the ABAP/4 Function Library: Initial Screen window by selecting Function Builder from the ABAP/4 workbench or by entering the transaction code: /nse37
Enter the name of the function module in the Function module field (i.e., Z_SAS_BATCH_INTERFACE_4).
Click the Create button. This displays the Function Module Create: Administration window. (Press Enter to ignore any warning messages.) If the function module already exists, check the component Source code in the Object components box and click the Change button. The Function Module: Edit Z_SAS_BATCH_INTERFACE_4 window then appears.
Enter the function group in the Classification box (e.g., ZSAS).
Note for Rel. 4.0 and above: In the Enter function group dialog box, enter the name of the function group (e.g., ZSAS). This displays the Create Function Module window. Initially the Administration page is selected.
Enter the following parameters for the function module:
Application S (for Basis) or leave blank (for all applications).
Short text SAS/ACCESS Interface to R/3 System: Batch Interface
Processing type Choose Remote Function Call supported.
Table 16 - Parameter for Function Z_SAS_BATCH_INTERFACE_4
Save the new function module by clicking the Save button or selecting Function module → Save from the pulldown menu.
2. Define the interface.
To define the import parameters of the Remote Function Call program go back to the ABAP/4 Function Builder: Initial Screen, select the tab Import. The Function Module Change: Import Parameters window appears.
Enter the following Import parameters and Reference structures in the appropriate fields:
Import parameter Ref. Field/Structure Proposal
Z_SAS_JOBNAME TBTCJOB-JOBNAME ‘ ‘
Z_SAS_REPORT VARID-REPORT ‘’
Z_SAS_VARIANT VARID-VARIANT ‘’
Z_SAS_TGTSYSTEM TBTCJOB-BTCSYSTEM SY-HOST
Table 17 - Import Parameters for Function Z_SAS_BATCH_INTERFACE_4

SAS/ACCESS Interface to R/3 Installation Instructions 53
To define the export parameters of the Remote Function Call program, select the Export tab. The Function Module Change: Export Parameters window appears.
Enter the following Export parameters and Reference structures in the appropriate fields:
Export parameters Ref. Structure
Z_SAS_PROGID LISTZEILE
Z_SAS_JOBNO TBTCJOB-JOBCOUNT
Z_SAS_SYSINFO RFCSI
Z_SAS_BIW_ACTIVE DD03L-KEYFLAG
Table 18 - Export Parameters for Function Z_SAS_BATCH_INTERFACE_4
To define the table parameters of the Remote Function Call program, select the Tables tab. The Function Module Change: Export Parameters window appears.
Enter the following Export parameters and Reference structures in the appropriate fields:
Table parameters Ref. Structure
Z_SAS_PROGIDS LISTZEILE
Z_SAS_DESTS LISTZEILE
Table 19 - Table Parameters for Function Z_SAS_BATCH_INTERFACE_4
To define the exception parameters of the Remote Function Call program, select the Exceptions tab. The Function Module Change: Exception Parameters window appears.
Enter the following Export parameters and Reference structures in the appropriate fields:
Exception
NO_VARIANTS
Table 20 - Exception Parameters for Function Z_SAS_BATCH_INTERFACE_4
Save the function module and go back to the ABAP/4 Function Builder: Initial Screen.
3. Upload the ABAP/4 source code.
If the SAPGUI is on a different machine than the SAS/ACCESS Interface to R/3 System, download the file sasrfcbf.ab4 to the SAPGUI machine. On Windows NT, the file is located in directory !SASROOT\access\sasmisc; on UNIX in !SASROOT/misc/dbi.
To upload the source code, select the component Source code and click the Change button. The Function Module: Edit window appears.
Select Utilities -> Upload from the pulldown menu.

54 SAS/ACCESS Interface to R/3 Installation Instructions
In the Import from a Local File dialog window, enter the name of the external file (e.g., on UNIX, !SASROOT/misc/dbi/sasrfcbf.ab4; for Windows, !SASROOT\access\sasmisc\sasrfcbf.ab4) and click OK.
Save the function module.
4. Activate the function module.
To activate the function module select Function module →Activate from the pulldown menu.
Step 2, Install the ABAP/4 Program ZSASRDBT The ABAP/4 program ZSASRDBT is supplied on your SAS/ACCESS Interface to R/3 software package. The following steps will lead you through creating a new program via the ABAP/4 workbench, defining program attributes, creating an object catalog entry, and finally uploading the program source code.
1. Create a new program.
Go to the ABAP Editor: Initial Screen window by selecting ABAP program from the ABAP workbench or by entering the transaction code: /nse38.
In the Program field, enter the name of the ABAP/4 report (i.e., ZSASRDBT).
Click the Create button. The ABAP/4: Program Attributes window appears.
2. Define the program attributes.
Select the following parameters:
Title SAS/ACCESS Interface to R/3 System: Read Tables – Batch.
Type 1 (Online program; Executable program)
Status K (Customer production program)
Application S (Basis)
Authorization group Leave blank or fill in program group provided by R/3 System Administrator. This allows to group programs for authorization checks.
Development class Select the development class assigned by the R/3 System Administrator. The development class is important for the transport to other systems.
Logical database Leave blank or D$ (Processing without database)
From Application Leave blank or S (Basis System)
Selection screen Leave blank
Table 21 - Attributes for Program ZSASRDBT.
Save the new ABAP/4 program by clicking the Save button or selecting Program → Save from the pulldown menu.
The Create Object Catalog Entry window appears. Tab into the transport request field and use the down arrow icon to select the previously assigned transport request number (for example, A01K90202 SAS/ACCESS Interface to R/3 Batch RFC).
Close the Create Object Catalog Entry window. Go back to the ABAP Editor: Initial Screen window.

SAS/ACCESS Interface to R/3 Installation Instructions 55
3. Upload the ABAP/4 source code.
If the SAPGUI is on a different machine than the SAS/ACCESS Interface to R/3 System, download the file zsasrdbt.ab4 to the SAPGUI machine. On Windows NT, the file is located in directory !SASROOT\access\sasmisc; on UNIX, in !SASROOT/misc/dbi.
To upload the source code, select the component, Source Code, and click the Change button. The ABAP Editor: Edit Program window appears.
Select Utilities → Upload from the pulldown menu.
In the Import from a Local File dialog window, enter the name of the external file (e.g., on UNIX !SASROOT/misc/dbi/zsasrdbt.ab4; on Windows !SASROOT\sasmisc\zsasrdbt.ab4) and click OK.
4. Check the syntax.
To check the syntax of the ABAP/4 program click the Check button or select Program → Check → Current Program.from the pulldown menu.
5. Save the ABAP/4 program.
Step 3, Maintain the RFC Destinations SAP uses RFCs to communicate with other computers and programs on its network. In order for this to take place, there are administrative set-up steps to define these computers and the logical processes that run on the network. The transaction where this set-up takes place is SM59. For the purpose of the batch RFC server, we are only concerned with the TCP/IP connection set-up.
In order to implement the batch RFC functionality, you will need to set up RFC destinations.
Example:
When setting up RFC destinations, the number of background processes should be considered. For example, assuming a SAP system has been configured to have six background processes, the following may be set up.
Three destination groups: 1DESTGRP, 2DESTGRP, 3DESTGRP. These would be set up in SM59.
Under 1DESTGRP there may be two concurrent processes available for that destination group, this would be reflected by adding the following destinations: 1DESTGRP1, 1DESTGRP2 (Following the pattern 'NAMEX', where 'NAME' is the name of your destination group and 'X' is 1, 2, etc. In this case, 'NAME' becomes '1DESTGRP'.).
If we also wanted two concurrent processes available for 2DESTGRP and 3DESTGRP, we would create the following:
2DESTGRP1, 2DESTGRP2, 3DESTGRP1, 3DESTGRP2
As with the current RFC server, a single instance of the RFC server can handle multiple R/3 servers.
Now we would be able to start up to three different batch RFC servers. You could also have three different batch RFC servers set up that access data against the same SAP system by user group (i.e., Financial, Production, IT). In this case, the batch RFC server would be started up to point to a different variant which would then point to a different set of program IDs to send the requested data through.

56 SAS/ACCESS Interface to R/3 Installation Instructions
Figure 6 - Start-up Parameters and Data Transfer
The above diagram shows the relationship between the start up parameters for the batch RFC server and the way SAP will handle transferring data from SAP to the Batch RFC server.
The RFC Destination (located under SM59, TCP/IP connections) allows the batch program running in SAP to know where the batch RFC server is running. The batch program uses this destination to send back the requested data. For example, 1DESTGRP could be created to represent the location “test” with the following attributes:
RFC Destination 1DESTGRP
Connection Type T (TCP/IP Connection)
Activation Type Registration
Program ID TEST.1SASRFCEX
Table 22 - Example Destination Parameters
The batch RFC server process allows for concurrency by using a naming convention when setting up RFC Destinations: NAMEX where “NAME” depicts the destination group and "X" is a number (1, 2, 3, etc.). For example, if three users were requesting data from SAP into SAS, an RFC destination would be created with the name 1DESTGRP (destination group). In this example, the batch RFC server software expects a group destination and two destinations to point to this group. The additional destinations would be named 1DESTGRP1 and 1DESTGRP2. The batch RFC server process would utilize these destinations when sending the requested data back to SAS. The attributes of the destination are the same except for the name and the program ID. The program ID must be unique. In this example, a 1 or 2 would be added onto the program ID to make it unique.
A Destination Group should contain at least two destinations to allow the Metadata Extraction to run.
If a “single-threaded” configuration is necessary, set up two destinations in a destination group, run the Metadata Extract, and then delete the second destination.
SAP AG R/3
DestinationGroup
DestinationGroup
DestinationGroup
SAS/ACCESS to R/3 Batch RFCServer
ABAPVariant
ABAPVariant
ABAPVariant
Batch RFCServer
Batch RFCServer

SAS/ACCESS Interface to R/3 Installation Instructions 57
RFC Destination 1DESTGRP1
Connection Type T (TCP/IP Connection)
Activation Type Registration
Program ID TEST.1SASRFCEX1
RFC Destination 1DESTGRP2
Connection Type T (TCP/IP Connection)
Activation Type Registration
Program ID TEST.1SASRFCEX2
RFC Destination 1DESTGRP3
Connection Type T (TCP/IP Connection)
Activation Type Registration
Program ID TEST.1SASRFCEX3
Table 23 - Example Destination Group Parameters
Note: The case used when defining the program ID should be consistent. This program ID should be globally unique.
Step 4, Create Variants For each defined destination group, a variant needs to be created that references a destination group. Note: Variants are client-dependent. A variant is a SAP convention that allows parameters to be passed to an ABAP program at runtime. It offers a flexible method of setting ABAP parameters without making a change to the ABAP program. A variant contains the values that are expected by the ABAP program at runtime. By going to transaction SE38 and selecting the variant radio button for a given program, the user can set the runtime values. The ABAP was written using “Select-Options” statements where the input variables are defined.
Using the example used when creating destinations, three variants would be created for Program ZSASRDBT (go to transaction SE38, select radio-button variant, select Change, and Create Variant/Sub-Objects Values). The default value for G_BUFMAX is 10000. G_RETRYN and G_RETRYD are parameters that are used for handling communication failures between SAP and the batch RFC server. The G_RETRYN is the number of retries that will be used to send data. The G_RETRYD is the time that the program waits in seconds between trying to send the data. Worthwhile performance gains can be made in fast network configurations by specifying larger values for G_BUFMAX (i.e. 1000000) and small values for G_RETRYN (e.g., 2) and G_RETRYD (e.g., 1).
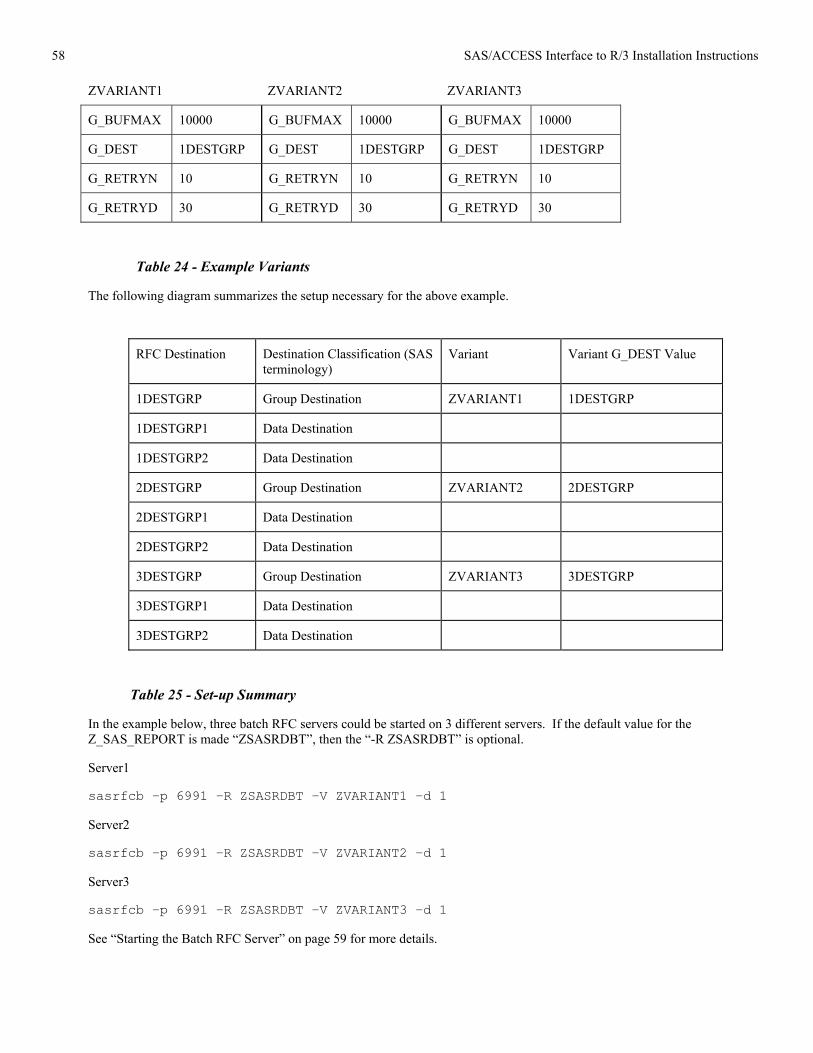
58 SAS/ACCESS Interface to R/3 Installation Instructions
ZVARIANT1 ZVARIANT2 ZVARIANT3
G_BUFMAX 10000 G_BUFMAX 10000 G_BUFMAX 10000
G_DEST 1DESTGRP G_DEST 1DESTGRP G_DEST 1DESTGRP
G_RETRYN 10 G_RETRYN 10 G_RETRYN 10
G_RETRYD 30 G_RETRYD 30 G_RETRYD 30
Table 24 - Example Variants
The following diagram summarizes the setup necessary for the above example.
RFC Destination Destination Classification (SAS terminology)
Variant Variant G_DEST Value
1DESTGRP Group Destination ZVARIANT1 1DESTGRP
1DESTGRP1 Data Destination
1DESTGRP2 Data Destination
2DESTGRP Group Destination ZVARIANT2 2DESTGRP
2DESTGRP1 Data Destination
2DESTGRP2 Data Destination
3DESTGRP Group Destination ZVARIANT3 3DESTGRP
3DESTGRP1 Data Destination
3DESTGRP2 Data Destination
Table 25 - Set-up Summary
In the example below, three batch RFC servers could be started on 3 different servers. If the default value for the Z_SAS_REPORT is made “ZSASRDBT”, then the “-R ZSASRDBT” is optional.
Server1
sasrfcb –p 6991 –R ZSASRDBT –V ZVARIANT1 –d 1
Server2
sasrfcb –p 6991 –R ZSASRDBT –V ZVARIANT2 –d 1
Server3
sasrfcb –p 6991 –R ZSASRDBT –V ZVARIANT3 –d 1
See “Starting the Batch RFC Server” on page 59 for more details.

SAS/ACCESS Interface to R/3 Installation Instructions 59
Step 5, Transport the ABAP/4 Function Module and Program If it is necessary to deploy this code to other systems such as test and production, transport the function module and ABAP objects using the transport system/workbench organizer.
Step 6, Set up User Authorizations In order to use the batch RFC server, the R/3 user needs to be set up with a profile with access to S_BTCH_JOB authorization group, such as
S_BTCH_JOB with operation RELE
The following authorization groups also need to be added to the profile for RFC and Table access:
S_RFC
S_TABU_DIS
Location of the Batch RFC Server The batch RFC server is supported on the following platforms: AIX, Solaris, HP-UX 11.x, Alpha Tru 64 Unix, Windows. If you have licensed the SAS/ACCESS Interface to R/3 product on any of these platforms, then you will receive the Batch RFC Server when you install the SAS/ACCESS Interface to R/3 product. If you decide to run the Batch RFC Server on a platform other than the one that you licensed SAS/ACCESS Interface to R/3, then you can install the Batch RFC Server from the CD titled “Batch RFC Server for SAS/ACCESS Interface to R/3”. Please see the “readme.txt” file on the CD for instructions on installing the Batch RFC Server on alternate platforms.
Starting the Batch RFC Server
For UNIX As part of the standard install, the Batch RFC Server is located in !SASROOT/saspgm/dbi/bin. If you installed the Batch RFC Server from the CD titled “Batch RFC Server for SAS/ACCESS Interface to R/3” then it will be located where you specified in the install process.
Set up your load library environment variable to point to the ACE and TAO shared libraries. For the following examples, assume that the full path of !SASROOT/saspgm/dbi/bin is /sas/saspgm/dbi/bin.
Depending on the UNIX system you are working with, the environment variable(s) are different.
For AIX, set LIBPATH=$LIBPATH:/sas/saspgm/dbi/bin
For Digital UNIX, set LD_LIBRARY_PATH=$LD_LIBRARY_PATH:/sas/saspgm/dbi/bin
For HPUX, set LD_LIBRARY_PATH=$LD_LIBRARY_PATH:/sas/saspgm/dbi/bin SHLIB_PATH=:/sas/saspgm/dbi/bin
For SUN, set LIBPATH=$LIBPATH:/sas/saspgm/dbi/bin
Go to the directory containing the sasrfcb code, usually !SASROOT/saspgm/dbi/bin.

60 SAS/ACCESS Interface to R/3 Installation Instructions
Enter the command:
./sasrfcb –p portno -R ZSASRDBT –V Variant –d 0|1|2
where
• portno is the port number
• d is the diagnostic level
• […] indicates optional
• | indicates a choice of values
For example, ./sasrfcb –p 6991 –R ZSASRDBT –V ZVARIANT1 –d 1
Note: The batch RFC server currently cannot be started as a daemon.
For Windows NT Start as a Console Application.
In a DOS window, change to the install directory and start the server as follows:
sasrfcb –p portno -R ZSASRDBT –V Variant –d 0|1|2
where
• portno is the port number
• d is the diagnostic level
• […] indicates optional
• | indicates a choice of values
For example, ./sasrfcb –p 6991 –R ZSASRDBT –V VARIANT1 –d 1
When using the SAS GUI, all the Login setup parameters are the same as for the regular RFC server, except that no CPIC information is required.
Note: The Batch RFC Server currently cannot be started as a service.

Page 61
Appendix J - Using Transport to Install SAP objects
Installation
A transport file has been included in your Access to R/3 software package. This transport file includes all of the components needed to run SAS ACCESS/R3. To upload the transport file to your R3 systems, follow the instructions below:
1. Move the transport files into the appropriate directories on your R3 systems.
NT: Copy the R900207.SI1 file located in !sasroot/sasmisc to <drive>:\usr\sap\trans\data. Copy the K900207.SI1 file located in !sasroot/sasmisc to <drive>:\usr\sap\trans\cofiles.
UNIX: Copy the R900207.SI1 file located in !sasroot/misc/dbi to /usr/sap/trans/data. Copy the K900207.SI1 file located in !sasroot/misc/dbi to /usr/sap/trans/cofiles.
2. Go to the transport program directory of the R3 system you want to apply the transport.
NT: <drive>:\usr\sap\trans\bin
UNIX: /usr/sap/trans
3. Load the transport into the transport buffer with the following command:
tp addtobuffer SI1K900207 <target sid>
4. Import the transport.
Test your connection to the target system and then import the transport with the following commands:
tp connect <target sid>
tp import SI1K900207 <target sid> client=<target client> U2
Note: The U2 option allows the original to be overwritten if you have installed these ABAP objects for 8.1 release.
5. Check the exit code. If you receive an error of 8 or higher, the import failed. You must resolve the problem and reimport the transport. Check the transport log for more information.

62 SAS/ACCESS Interface to R/3 Installation Instructions

Page 63
Appendix K - Install BAPI Connector
Introduction The BAPI connector was developed in Release 8.2 to allow calls from SAS to any RFC function. This includes those BAPIs implemented as RFCs in SAP R/3. The SAP functions called using BAPI connector have to be RFC-enabled, synchronous, and have no user interaction. Currently, the BAPI connector is only supported for Windows NT, Compaq Tru64 UNIX, HP-UX, Solaris, and AIX platforms.
The interface can also be used to read data from SAP R/3 systems, perform certain calculations in R/3, and then load data into an R/3 system.
In order to use the BAPI connector, the librfc32.dll on Windows NT has to be installed. When SAPGUI is installed, the librfc32.dll should be installed in your Windows system directory.
Figure 7 - BAPI Connector Basic Configuration
Basic Configuration 1. SAS creates input files for callrfc.
2. SAS starts callrfc executable and passes info via parameters.
3. callrfc parses input parameters and reads input files.
4. callrfc calls R/3 RFC function.
5. R/3 RFC function passes parameters and tables back to callrfc.
6. callrfc writes metadata and data for output parameters and tables into external files.
7. callrfc finishes and control goes back to the SAS System.
8. SAS reads metadata and using meta information generates SAS data steps to read data.

64 SAS/ACCESS Interface to R/3 Installation Instructions
Authorization The user must have permission for Remote Function Calls in order to run the BAPI connector.
Please note that certain BAPIs may require additional authorizations depending on the way the BAPI is implemented and which authorization object it uses.
Windows NT You may install either SAS/ACCESS Interface to R3 or SAS/ACCESS Interface to R3 – BAPI Connector, or both. The default selection under Windows NT when selecting SAS/ACCESS to R3 product is all. To install the BAPI connector only, follow the steps below:
1. Select SAS/ACCESS Interface To R3 product.
2. Press the Option button, The Select Sub-components”window will display with all entries selected.
3. Select Common Files and SAS/ACCESS Interface to R3 – BAPI Connector by deselecting SAS/ACCESS Interface to R3. Please note that the Common files entry is required. You can optionally select Samples and Help Files for systems with IE.
4. Press OK.
UNIX The installation under UNIX is similar to that under Windows NT, but there is no Common Files entry. You are offered two options: SAS/ACCESS Interface to R3 and SAS/ACCESS Interface to R3 – BAPI connector. To install the BAPI connector only, select SAS/ACCESS Interface to R3 – BAPI connector, then proceed.

Page 65
Glossary
ABAP/4 development user An ABAP/4 development user is a R/3 user ID with ABAP/4 developer permission. It is used to create the ABAP/4 function group, the function module and the report that are part of the SAS/ACCESS Interface to R/3. For R/3 Release 3.0 and above a developer user also require an OSS Access key. An development user ID is only required while installing the SAS/ACCESS Interface to R/3.
Authorization The R/3 System has a powerful tool to restrict or grant permission to access certain objects in the R/3 System or to perform certain actions. The SAS/ACCESS Interface to R/3 need not only the permission to read tables but permission for communication as well.
Client In commercial, organizational and technical terms, a self-contained unit in an R/3 system, for example, a company group, a business unit, or a corporation, with separate master records and its own set of tables.
CPI-C The Common Programming Interface - Communications (CPI-C) is an interface for direct program-to-program communication for applications. The SAS/ACCESS Interface to R/3 uses the ABAP/4 implementation of the CPI-C protocol for internal communication and data transfer between two ABAP/4 programs.
CPIC user References to a CPIC user indicate a R/3 user ID with the user type CPIC. The CPIC user ID is used by the SAS/ACCESS Interface to R/3 for the communication between the function module and the report internally in the R/3 Application server.
Data Dictionary Extract The SAS/ACCESS Interface to R/3 Application provides a navigation tool based on metadata from the R/3 Data Dictionary. The tool operates on a copy of the metadata - the Data Dictionary Extract.
OSS Access key An OSS Access key is a string of characters ABAP/4 developers must enter the first time they create or modify ABAP/4 objects like programs, function modules and function groups. An OSS Access key can be obtained from SAP AG's Online Service System (OSS).
R/3 System Application Server The components of the three-tier client/server architecture of the R/3 System are: database, application and presentation layer. The SAS/ACCESS Interface to R/3 communicates with the application server.

66 SAS/ACCESS Interface to R/3 Installation Instructions
RFC The Remote Function Call (RFC) interface is SAP AG's implementation of a remote procedure call. It is provided for integration of R/2 and R/3 Systems and external programs. The SAS/ACCESS Interface to R/3 uses the RFC interface for communication and data transfer between the R/3 System and the SAS RFC Server.
RFC SDK The RFC Software Development Kit (RFC SDK) contains a library and source files to implement the communication between an external program and a function module in the R/3 System. The SAS RFC Server needs the libraries from the RFC SDK. On UNIX platforms the name of the library is librfc.a, on Windows NT librfc32.dll. On Windows NT the RFC SDK need not be installed if librfc32.dll is already available.
RFC user References to a RFC user indicate a R/3 user ID that is used by the SAS/ACCESS Interface to R/3 for the communication between the SAS RFC server and the function module in the R/3 Application server. The user type of this ID can be dialog or CPIC. It is possible to use one CPIC enabled user ID for the RFC user and for the CPIC user (see CPIC user in glossary).
SAS/ACCESS Interface to R/3 Application This is the GUI of the SAS/ACCESS Interface to R/3. The GUI is used to navigate the metadata extracted from R/3. It generates SAS source code to read data from an R/3 System.
SAS RFC Server The SAS RFC Server is a program provided with the SAS/ACCESS Interface to R/3. It is the component for the communication between the SAS System and the R/3 System. On UNIX platforms the SAS RFC Server must be linked to the library from the RFC SDK. Several configurations are possible: The SAS RFC Server can be installed on the box where the SAS System is installed, on the box of the R/3 Application Server or on any other box in the network. It is recommended to use either of the first two options.
SAS Views of R/3 data The SAS Views of R/3 data are SAS DATA Step Views that read R/3 tables. These views use the socket access method to communicate with the SAS RFC Server which gets the data from the R/3 System. The SAS source code for the views is generated by the SAS/ACCESS Interface to R/3.
SAPGUI The SAPGUI is the front-end for the R/3 System. During the installation of the SAS/ACCESS Interface to R/3 a SAPGUI is required to install parts of the interface in the R/3 System.
Sideinfo file The sideinfo file contains connection parameters. The environment variable SIDE_INFO defines the path for the sideinfo file. If the environment variable SIDE_INFO is not set, the sideinfo file must be located in the working directory. For the SAS/ACCESS Interface to R/3 the sideinfo file can be used to define the parameters for the communication between the SAS RFC Server and a R/3 System.

SAS/ACCESS Interface to R/3 Installation Instructions 67
TXCOM The R/3 table TXCOM is a side info table that is installed in each R/3 System. For the SAS/ACCESS Interface to R/3 the connection parameters for the CPI-C communication between two ABAP/4 programs in the same R/3 System must be defined in the TXCOM table.

68 SAS/ACCESS Interface to R/3 Installation Instructions