Embed Size (px)
Citation preview

2. Basic Boat
Table of Contents: Portland Pudgy Technical Information ........................................................................................ 1
Dimensions, Weight, Capacity, Buoyancy and Freeboard ........................................................... 1 Materials and Construction .......................................................................................................... 2
Basic Boat Components ................................................................................................................. 3 Description of Basic Boat Components........................................................................................ 3
Oars ................................................................................................................................................. 4 Assembling the Oars .................................................................................................................... 4 Breaking Down and Stowing the Oars ......................................................................................... 4
Oarlocks .......................................................................................................................................... 5 Setting the Oars in the Oarlocks ................................................................................................... 5
Method A. Setting the Oarlocks to Allow Locking the Oars when Shipped ........................... 5 Method B. Setting the Oars to Allow Speedy Removal from Sockets ..................................... 6
Middle Seat ..................................................................................................................................... 7 Adjusting the Middle Seat Position .............................................................................................. 7 Removing the Middle Seat ........................................................................................................... 7
Rear (Aft) Seat ................................................................................................................................ 8 Front (Bow) Seat ............................................................................................................................. 8 Bridle ............................................................................................................................................... 8 Compass .......................................................................................................................................... 9 Motor Mounts ................................................................................................................................. 9
Mounting a Motor ........................................................................................................................ 9 Access Hatches ................................................................................................................................ 9
Storage in the Interior Hatches or Rear Hatch ............................................................................ 10 Interior Access Hatches .......................................................................................................... 10 Rear Access Hatch .................................................................................................................. 10 Opening the Rear Hatch ......................................................................................................... 11
Transporting the Portland Pudgy ............................................................................................... 11 Rolling the Pudgy ....................................................................................................................... 11 Carrying the Pudgy by Hand ...................................................................................................... 11 Transporting the Pudgy on the Roof of the Car .......................................................................... 11 Towing the Pudgy ...................................................................................................................... 11 Hanging the Pudgy from Arm Davits ......................................................................................... 12

Securing to the Cabin Roof or on Deck ...................................................................................... 12 Carrying the Pudgy on a Swim Platform .................................................................................... 12
Mooring, Anchoring, or Docking the Pudgy .............................................................................. 13 Security ....................................................................................................................................... 13
Motoring ........................................................................................................................................ 13 Coast Guard Regulations ............................................................................................................ 13
Righting the Pudgy if Capsized ................................................................................................... 14 In Case of Capsize: General Information ................................................................................... 14 Procedure for Righting the Pudgy .............................................................................................. 14
Boarding the Portland Pudgy ...................................................................................................... 15 Climbing In from the Water ....................................................................................................... 15
Climbing in from the Water: Procedure.................................................................................. 15 Routine Safety Issues .................................................................................................................... 16
Field of Vision ............................................................................................................................ 16 Using the Portland Pudgy in an Emergency ............................................................................... 16
Abandon Ship Plan ..................................................................................................................... 17 Note on Cold Water Hazard ....................................................................................................... 17
Ditch Bag and Other Safety Items .......................................................................................... 17 Emergency Deployment ............................................................................................................. 17 Sail Kit, Overview ...................................................................................................................... 18 Exposure Canopy, Overview ...................................................................................................... 18
Maintenance .................................................................................................................................. 18 Cleaning the Pudgy ..................................................................................................................... 18 Surface Repair ............................................................................................................................ 18 UV Protection ............................................................................................................................. 19 Storage ........................................................................................................................................ 19 Temperature ................................................................................................................................ 19 Removing Water from Cockpit .................................................................................................. 19 Water in the Interior Chambers .................................................................................................. 19
Basic Boat Index ........................................................................................................................... 21

Portland Pudgy Safety Dinghy: 2. Basic Boat 1
PORTLAND PUDGY TECHNICAL INFORMATION
Photo of basic boat (oars and oarlocks, not shown, are included)
Dimensions, Weight, Capacity, Buoyancy and Freeboard Dimensions may vary slightly due to manufacturing processes. See the drawings on the following page.
Length: 92.4 inches (2.35 m)
Width: 53.2 inches (1.35 m)
Transom Height: 26.2 inches (.665 m) (bottom of wheel to top of transom).
Overall Height: 27 inches (highest point with boat resting on flat surface).
Weight of basic dinghy. Including seats, motor mounts, and basic hardware, the basic boat weighs about 128 pounds (58 kg). With basic lifeboat components (oars, exposure canopy, sail kit, sea anchor it weighs about 168 pounds (76.2 kg).
Freeboard. In a USCG test, carrying 557 pounds (252.65 kg), the Pudgy has ten inches (.254 m) of freeboard.
Capacity: The US Coast Guard specifies the following maximum capacity:
• With a two HP motor: four persons or 476 pounds (215.9 kg), or 557 pounds (252.65 kg), motor, persons, and gear.
• With no motor: 501 pounds. (227.25 kg) persons or 557 pounds. (252.65 kg), persons and gear.
Note that the short shaft motor mount reduces the capacity.
Buoyancy and Flotation. In a USCG test, it took 1855 pounds (841.41 kg) to submerge the dinghy to its gunwales.

2 Portland Pudgy Safety Dinghy: 2. Basic Boat
The drawings above are for customer use only. They are not to be reproduced in any form. (Dimensions in inches)
Materials and Construction The Portland Pudgy hull is made of rotation-molded high-quality UV-resistant polyethylene. It is an integral single form, with no connecting joints or seams. The form has double walls, enclosing an interior space, thus forming a double hull.
Nominal wall thickness is three-sixteenths inches (.47625 cm). Compound curves, reveals, and reliefs provide extra rigidity. Boats since mid 2011 have additional reinforcements in the floor.
The lower part of the interior chamber, under the floor is filled with USCG-approved closed-cell polyurethane foam (2.2 pounds per cubic foot) or (.9979 kg per cubic .3048 m).
The seats are of rotation-molded polyethylene reinforced with aluminum I-beams.
Temperature Range. All plastic materials become more brittle as temperatures decrease and are subject to distortion as temperatures increase. Avoid undue impact and stress in high or low temperatures. Operating temperature range for hull: -30° F to 130° F (-34.44 to 54.444 Celsius). Operating temperature range for hatches: -20° F to 160° F (-28.89 to 71.111 Celsius).
Strong Points. The strongest attachment points in the basic boat are:
• The four through holes (three-quarter-inch diameter) (1.905 cm diameter), in the walls of the boat near the gunwales
• The stainless steel tow-eyes with watertight gaskets and polyethylene backer plates
• The optional lifting/safety harness eyes with backer plates.
In addition, polypropylene grab-lines are installed in built-in pad-eyes that are an integral part of the boat. The grab-lines are fastened in place with stainless steel screws.
The front and rear seats are bolted in place and have built-in holes for attachments. Note that the middle seat is removable and is NOT a strong point.
Portland Pudgy Safety Dinghy: 2. Basic Boat 3
If any of the aforementioned non-metallic parts show signs of deterioration, visible surface cracks, or permanent deformation, they must be replaced.
Openings in Hull, Deck, and Superstructure. Holes are cut for gasketed, water-tight access hatches, the compass, and for attaching optional equipment such as the electrical system.
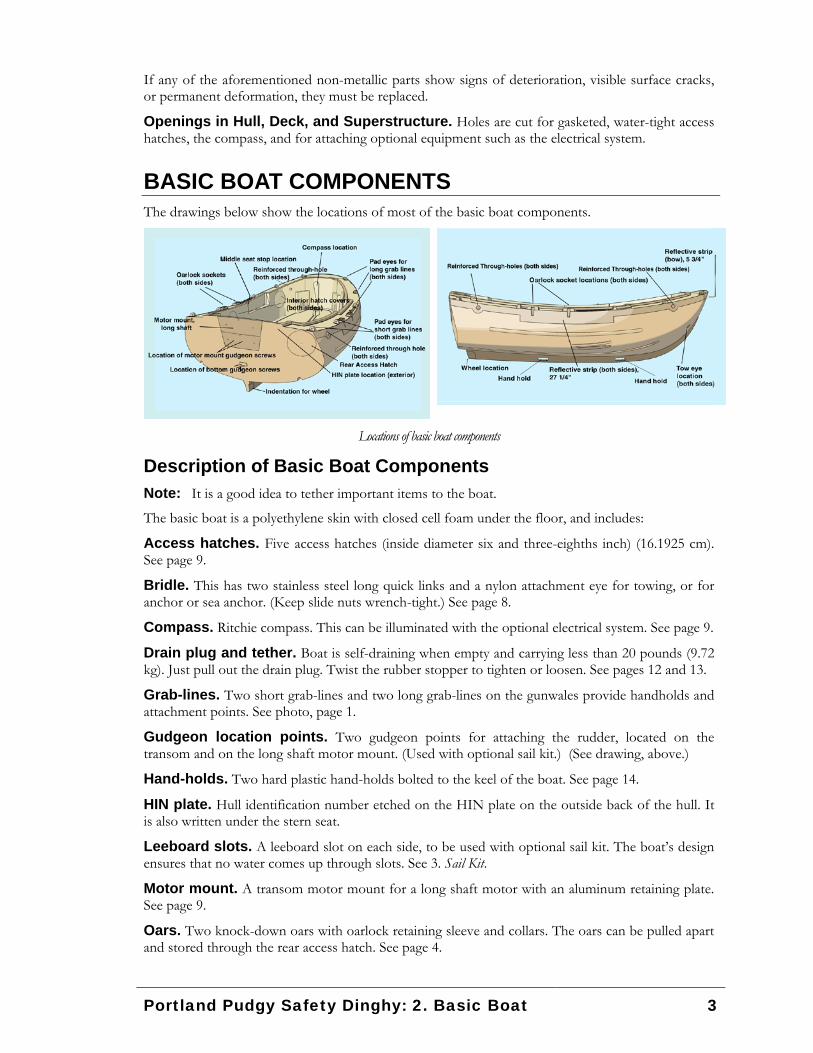
BASIC BOAT COMPONENTS The drawings below show the locations of most of the basic boat components.
Locations of basic boat components
Description of Basic Boat Components Note: It is a good idea to tether important items to the boat.
The basic boat is a polyethylene skin with closed cell foam under the floor, and includes:
Access hatches. Five access hatches (inside diameter six and three-eighths inch) (16.1925 cm). See page 9.
Bridle. This has two stainless steel long quick links and a nylon attachment eye for towing, or for anchor or sea anchor. (Keep slide nuts wrench-tight.) See page 8.
Compass. Ritchie compass. This can be illuminated with the optional electrical system. See page 9.
Drain plug and tether. Boat is self-draining when empty and carrying less than 20 pounds (9.72 kg). Just pull out the drain plug. Twist the rubber stopper to tighten or loosen. See pages 12 and 13.
Grab-lines. Two short grab-lines and two long grab-lines on the gunwales provide handholds and attachment points. See photo, page 1.
Gudgeon location points. Two gudgeon points for attaching the rudder, located on the transom and on the long shaft motor mount. (Used with optional sail kit.) (See drawing, above.)
Hand-holds. Two hard plastic hand-holds bolted to the keel of the boat. See page 14.
HIN plate. Hull identification number etched on the HIN plate on the outside back of the hull. It is also written under the stern seat.
Leeboard slots. A leeboard slot on each side, to be used with optional sail kit. The boat’s design ensures that no water comes up through slots. See 3. Sail Kit.
Motor mount. A transom motor mount for a long shaft motor with an aluminum retaining plate. See page 9.
Oars. Two knock-down oars with oarlock retaining sleeve and collars. The oars can be pulled apart and stored through the rear access hatch. See page 4.

4 Portland Pudgy Safety Dinghy: 2. Basic Boat
Oarlocks and oarlock sockets. Two stainless steel oarlocks and four stainless steel sockets let you position the oars (in conjunction with the middle seat) for rowing comfort. See page 5.
Reflective strips. Three SOLAS-approved reflective strips: one on the bow, and one on each side. See photo, page 1.
Seats. Three seats, including a middle seat with stainless steel pin hinges to adjust rowing positions. See pages 6 through 8.
Through holes. Four reinforced through holes for use as strong fastening points. See Strong Points, page 2.
Tow eyes. Two stainless steel towing eyes with backer disks. Used for attaching the bridle. See Bridle, page 8.
Wheel. Double wheel at the back of the keel allows you to roll the boat on a landing ramp or dock. See page 11.
OARS
When you receive the boat, the oarlocks need to be placed on the oars.
Note: It’s important to decide whether to set the oarlock key (the small metal tab at the bottom of the oarlock shaft) facing the blade or the handle of the oar. Either way of setting the oarlock key is secure while rowing, but will determine whether or not the oars can be locked in place when shipped (blades pulled up out of the water and handles resting on the gunwale or tucked under forward grab-lines). See Setting the Oars in the Oarlocks on page 5.
Note: In saltwater conditions, the oar joint should be rinsed with fresh water frequently. We also recommend that you periodically apply a thin coating of waterproof grease.
Assembling the Oars If the two sections are disconnected, push the bottom section of the oar (with blade) into the upper section (with handle). Ensure that the push button in the oar shaft pops up all the way, so that the two oar sections are locked together. See photo, right.
Breaking Down and Stowing the Oars Before you break down the oars, if the oarlock is on the oar, make sure it is secure between the two collars on the retaining sleeve. (It will sink if dropped into the water.)
Thumb near button above oar blade
1. Push in the button connecting the two sections of the oar, and hold it down while you slide the two sections apart.
2. Slide the oar sections into the rear access hatch, being careful not to jam them against the leeboard slot sleeve.
Portland Pudgy Safety Dinghy: 2. Basic Boat 5
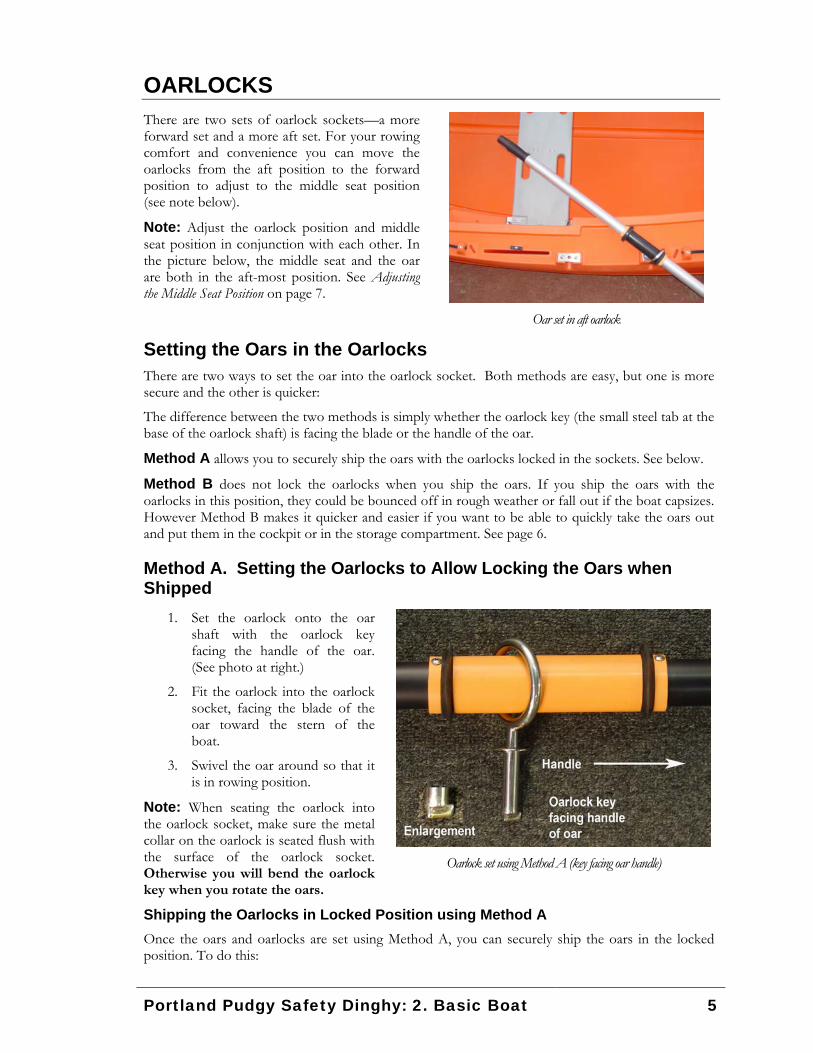
OARLOCKS There are two sets of oarlock sockets—a more forward set and a more aft set. For your rowing comfort and convenience you can move the oarlocks from the aft position to the forward position to adjust to the middle seat position (see note below).
Note: Adjust the oarlock position and middle seat position in conjunction with each other. In the picture below, the middle seat and the oar are both in the aft-most position. See Adjusting the Middle Seat Position on page 7.
Oar set in aft oarlock
Setting the Oars in the Oarlocks There are two ways to set the oar into the oarlock socket. Both methods are easy, but one is more secure and the other is quicker:
The difference between the two methods is simply whether the oarlock key (the small steel tab at the base of the oarlock shaft) is facing the blade or the handle of the oar.
Method A allows you to securely ship the oars with the oarlocks locked in the sockets. See below.
Method B does not lock the oarlocks when you ship the oars. If you ship the oars with the oarlocks in this position, they could be bounced off in rough weather or fall out if the boat capsizes. However Method B makes it quicker and easier if you want to be able to quickly take the oars out and put them in the cockpit or in the storage compartment. See page 6.
Method A. Setting the Oarlocks to Allow Locking the Oars when Shipped
1. Set the oarlock onto the oar shaft with the oarlock key facing the handle of the oar. (See photo at right.)
2. Fit the oarlock into the oarlock socket, facing the blade of the oar toward the stern of the boat.
3. Swivel the oar around so that it is in rowing position.
Note: When seating the oarlock into the oarlock socket, make sure the metal collar on the oarlock is seated flush with the surface of the oarlock socket. Otherwise you will bend the oarlock key when you rotate the oars.
Oarlock set using Method A (key facing oar handle)
Shipping the Oarlocks in Locked Position using Method A Once the oars and oarlocks are set using Method A, you can securely ship the oars in the locked position. To do this:

6 Portland Pudgy Safety Dinghy: 2. Basic Boat
1. Tuck the oar handle under the aft section of the forward grab-line in the bow and keep sliding the oar forward until the oar blade hits the oarlock. The oarlock key is at a 180° angle from the key slot and the oarlock is securely locked in place. See photo below.
2. With the oar handle secured under the grab-line and oarlock locked in place, the oar is secure enough to be used as a hand-hold. You may need to tether the oar in place when towing to prevent its sliding backward.
Oars shipped in locked position (see Method A. Setting the Oarlocks to Allow Locking the Oars when Shipped, above)
Removing the Oarlock from the Socket using Method A To remove the oarlock from the socket using Method A, you must either:
• Turn the oar parallel to the side wall of the hull, with the blade toward the bow. This aligns the oarlock key with the socket’s key slot so that you can lift the oar from the socket, OR
• Break down the oar and remove the two oar segments from the oarlock. (When breaking down the oar, first be sure the oarlock is firmly seated between the two collars of the retaining sleeve. Otherwise it could fall off and sink.)
Method B. Setting the Oars to Allow Speedy Removal from Sockets Be aware that if you ship the oars when you use Method B, they could get bounced from the oarlocks, or fall off if capsized.
1. Set the oarlock on the shaft of the oar with the oarlock key facing the blade of the oar.
2. Fit the oarlock into the oarlock socket.
3. Turn the oar so that it is in rowing position.
Oarlock set using Method B (key facing oar blade)
Removing the oarlock from the socket using Method B Turn the oar so that the oar blade is toward the stern and the oar shaft is parallel to the side wall of the hull. The oarlock key is now aligned with the socket’s key slot and you can easily lift the oarlock from the socket.

Portland Pudgy Safety Dinghy: 2. Basic Boat 7
MIDDLE SEAT You can flip the middle seat forward or back for your rowing comfort and for balancing the boat when carrying passengers or lots of supplies. In the photo at right, note the pin hinge that lets you flip the seat into the desired position. Also note the small metal tab (near lower left of photo that holds the seat in place. Simply press it in to release the seat to allow adjusting the position.)
You also can remove the middle seat to give you more room in the cockpit. For sleeping in the boat, it is necessary to remove the middle seat.
Note: Adjust the oarlock position and seat position in conjunction with each other. See Setting the Oars in the Oarlocks on page 5. When rowing with two or four persons in the boat, you will probably want to move the middle seat and the oarlocks to their more forward positions.
Middle seat
The handholds in the middle seat make it easy to pull yourself in from the water. The longer performance leeboards can be stowed under the middle seat, using the Velcro strap supplied. Note that this makes it harder to grip the handholds in the middle seat.
Note: Because the middle seat is designed to be removable, it is NOT a strong attachment point. Do not attach safety harnesses or sea anchors to the middle seat.
Adjusting the Middle Seat Position Squeeze down the small metal clip on the port side of the seat while you flip the seat with the other hand.
Removing the Middle Seat 1. Swivel the middle seat, so that it’s vertical.
2. Sit on the floor of the boat with your back pressed against the side wall next to the seat and both feet pushing against the opposite wall next to the seat.
3. Press with your feet next to the middle seat until you can just lift the seat out of the hole on that side of the boat. Be careful to maintain the pressure on the walls of the boat so that the pin hinge does not scrape the wall of the boat.
You put the seat back in by reversing this process.
Note: Because the middle seat is removable, the handholds in the seat are NOT strong attachment points (for example for safety harnesses).

8 Portland Pudgy Safety Dinghy: 2. Basic Boat
REAR (AFT) SEAT You can stow the rudder (in kick-up position) and the two standard leeboards under the aft seat.
To hold things in place under the aft seat, use a bungee cord.
Run the cord through the two outside holes in the seat and attach the ends to the pad eye near the drain plug.
Because the aft seat is bolted in place, the holes through the seat are strong attachment points. See Materials and Construction on page 2.
Rear seat with rudder and standard leeboards underneath
FRONT (BOW) SEAT If you are using the sail kit, the round hole in the bow seat is used to stabilize the mast. See 3. Sail Kit for more information.
You can stow the sea anchor under the seat in the bow, as shown in photo at right. See 5. Para-Anchor for more information.
Because the bow seat is bolted in place, the holes through the seat are strong attachment points. See Materials and Construction on page 2.
Para-anchor stowed under front (bow) seat
BRIDLE When you receive your Portland Pudgy directly from the factory, the bridle is already clipped onto the tow eyes on either side of the bow of the boat. The two quick links are used for attaching the bridle to the Pudgy.
Use the attachment eye in the center of the bridle to attach a painter for towing or tying up the boat, or for attaching a tether, anchor, para-anchor, or rode.
CAUTION: Keep the slide nuts on the long quick links wrench tight.
Portland Pudgy bridle
If you are using your Portland Pudgy as a lifeboat, do not fasten the emergency painter to the bridle. Instead fasten the painter to a forward through hole. This allows you to use the bridle with the sea anchor, and in addition, it is easier to reach the painter to unfasten or sever it, if it is fastened to a through hole. Please see 4. Exposure Canopy for more information.
Portland Pudgy Safety Dinghy: 2. Basic Boat 9
COMPASS The Ritchie compass is installed in the fore cockpit of the basic boat. It is a directional compass and cannot be calibrated. Depending on your location, you will have to calculate the deviation from true north.
If you have the optional electrical system, you can illuminate the LED light of the compass. See 7. Electrical System.
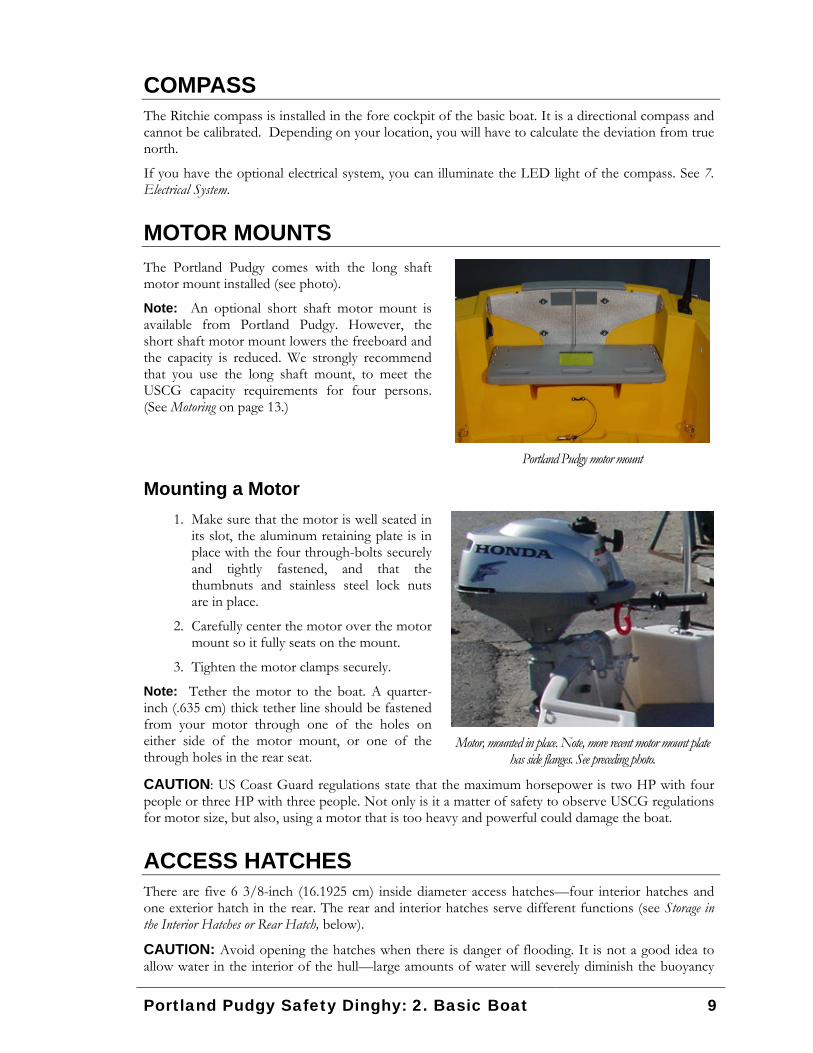
MOTOR MOUNTS The Portland Pudgy comes with the long shaft motor mount installed (see photo).
Note: An optional short shaft motor mount is available from Portland Pudgy. However, the short shaft motor mount lowers the freeboard and the capacity is reduced. We strongly recommend that you use the long shaft mount, to meet the USCG capacity requirements for four persons. (See Motoring on page 13.)
Portland Pudgy motor mount
Mounting a Motor 1. Make sure that the motor is well seated in
its slot, the aluminum retaining plate is in place with the four through-bolts securely and tightly fastened, and that the thumbnuts and stainless steel lock nuts are in place.
2. Carefully center the motor over the motor mount so it fully seats on the mount.
3. Tighten the motor clamps securely.
Note: Tether the motor to the boat. A quarter-inch (.635 cm) thick tether line should be fastened from your motor through one of the holes on either side of the motor mount, or one of the through holes in the rear seat.
Motor, mounted in place. Note, more recent motor mount plate
has side flanges. See preceding photo.
CAUTION: US Coast Guard regulations state that the maximum horsepower is two HP with four people or three HP with three people. Not only is it a matter of safety to observe USCG regulations for motor size, but also, using a motor that is too heavy and powerful could damage the boat.
ACCESS HATCHES There are five 6 3/8-inch (16.1925 cm) inside diameter access hatches—four interior hatches and one exterior hatch in the rear. The rear and interior hatches serve different functions (see Storage in the Interior Hatches or Rear Hatch, below).
CAUTION: Avoid opening the hatches when there is danger of flooding. It is not a good idea to allow water in the interior of the hull—large amounts of water will severely diminish the buoyancy

10 Portland Pudgy Safety Dinghy: 2. Basic Boat
of the boat. Lesser amounts of water allowed to remain in the interior will eventually damage the foam that fills the bottom of the hull. See Water in Interior Chambers on page 19.
To open the access hatch, turn the hatch cover so that its raised guide line is aligned with the guide line on the outer ring. The hatch will pop open. See photo at right. Note that you can feel these raised guide lines in the dark.)
To close the hatch, align the two guide lines and push it in gently to set the hatch cover in place, push and then turn the hatch cover to seal it closed.
Note: The access hatches must be opened carefully when at sea.
Access hatch guide lines aligned, for opening
IMPORTANT: For easy opening and closing, in saltwater conditions, rinse the hatches with fresh water. Encrusted salt can jam the hatch. In general, keep the “O” ring (the black rubber gasket on which the retaining ring that the hatch cover is seated) lubricated with light weight waterproof marine grease, petroleum jelly, or brake fluid. Apply lubricant with a small brush.
Tips If You Lose a Hatch Cover The access hatch covers are secured by tethers and should not be lost. If a tether is lost or damaged, replace it as soon as possible.
If you lose the rear hatch cover, temporarily replace it with an interior hatch cover until you get a new one. (Contact Portland Pudgy, Inc. for a new hatch cover.)
In case you lose an interior hatch cover, carry sturdy balloons in your ditch bag. You can put an inflated balloon in the hatch opening.
Storage in the Interior Hatches or Rear Hatch The interior access hatches and the rear access hatch serve different functions, as described below.
Interior Access Hatches The interior access hatches are used for storing the exposure canopy, nav light, and para-anchor, as well as other items such as GPS, ditch bag, food, water, fishing gear, pump, tools, etc. In pre-2011 models, the electrical system’s battery is accessed through the port aft interior access hatch.
IMPORTANT: Keep the items mentioned above (ditch bag, etc.) accessible via the interior access hatches, because you should not open the rear hatch in heavy seas.
Rear Access Hatch The rear access hatch is used for storing the oars and the sail assembly and tiller (see instructions for storing sail kit in 3. Sail Kit).
Note: When you open the rear hatch you must be aware of distributing your weight properly to keep the boat balanced and the hatch well above the water.
Always keep a firm grip with one hand on anything you take out of the rear hatch.
CAUTION: The rear hatch should not be opened in heavy seas because water could enter the opening. The rear hatch must be opened carefully when at sea.

Portland Pudgy Safety Dinghy: 2. Basic Boat 11
Opening the Rear Hatch With Two or More Persons Aboard With two or more persons aboard, one person should open the rear hatch with the other person(s) positioned in the bow of the boat, as a counterbalance.
With One Person Aboard If there is only one person aboard, keep your weight positioned as far as possible toward the bow and the port side of the boat. (Practice this.)
TRANSPORTING THE PORTLAND PUDGY Rolling the Pudgy The Pudgy can be rolled on the ground, pavement, or dock using the wheel set in the keel, at the stern of the boat. For one person, it’s convenient to hold the grablines or the clips of the bridle when rolling the Pudgy.
Carrying the Pudgy by Hand You can carry the Pudgy using the grab-lines. You can also ship the oars securely (see Method A for shipping the oars, on page 5) and use the oars as hand holds for carrying.
Transporting the Pudgy on the Roof of the Car Pass webbing (heavy duty polyester webbing is best) or strong half-inch (1.27 cm) line through the through-holes in the walls of the boat near gunwales to attach the Pudgy onto the roof of your car. Whether or not you have a roof rack, we recommend that you fasten the Pudgy down by passing the line or webbing in the through holes, and then through the doors, under your car roof, as follows. Open the doors (front and back) and pass the line or webbing through them and under the roof of the car. Fasten line or webbing very securely to avoid slippage, and then close the doors on the line or webbing. (If you don’t have a roof rack, you might want to use a moving blanket under the Pudgy to protect your car roof and door gaskets.)
Towing the Pudgy The bridle that comes with your Portland Pudgy should be attached to the tow eyes on either side of the bow of the Pudgy. Firmly secure the towing boat’s tow-line to attachment eye of the Pudgy’s bridle. Make sure that the clip of the bridle is straight. If twisted, it can unclip. The tow line should always be secured in such a way that it can be released from the mother boat when under load.
Optimum length of tow line is relative to sea conditions. It is usually best for the line to be paid out so that the Pudgy floats level and is at a reasonable distance from the transom of the mother boat, riding on the back side of any swell formed. The Pudgy should ride in the middle of the wake, not on the edge.

12 Portland Pudgy Safety Dinghy: 2. Basic Boat
TIP: When towing, if the boat is empty or carrying 20 pounds (9.72 kg) or less, you can remove the drain plug so that if water splashes in, it will drain out.
Hanging the Pudgy from Arm Davits You can hang the Pudgy from arm davits using the optional davit harness and lifting eyes. The four lifting eyes are set low in the interior side wall of the cockpit (they also serve as fastening points for safety harnesses).
The eyes are used to lift the Pudgy up by davits or other means, but the boat should not be hung continuously from the davit eyes. The lifting eyes will remain fastened to the davits to prevent the boat being knocked from the harness, but they should not bear the Pudgy’s weight once the Pudgy is in position. The davit harness should bear the weight. See 10. Davit Harness.
Alternate method of lifting onto davits: You may also lift the Portland Pudgy onto davits using the four through-holes in the side walls of the boat. You can pass line through the through holes and lift the Pudgy, and then fasten the Pudgy into a davit harness. You can use the through-holes to fasten the Pudgy to the davits to prevent the Pudgy being knocked from the harness. The davit harness however, should bear the weight.
WARNING: When the environmental temperature is hot, the hull in continuous hot sun will reach much higher temperatures. As with all polymers, exposure to high temperatures can subject the material to distortion especially when it is under continued pressure (for example hanging from davits). This is why it is necessary to use a davit harness when hanging your Pudgy from davits, to support the Pudgy from its underside.
CAUTION: If storing the boat upright or on davits (in davit harness), the drain plug should be removed if you are expecting rain or heavy weather.
Do not attempt to lift the Pudgy with personnel or heavy equipment in the dinghy.
Securing to the Cabin Roof or on Deck When securing the Pudgy on deck or roof, use a minimum of half-inch (1.27 cm) polyester line, or heavy duty one-inch (2.54 cm) polyester webbing. Pass lines or webbing through the four through-holes in the walls of the boat to securely fasten the Pudgy to the roof of the cabin or on deck. For blue water sailing and cruising, be sure the attachment point for the line or webbing is through-bolted to the mother boat. See 4. Exposure Canopy for more information.
You can use the hand-holds in the keel for additional strapping. The hand-holds in the keel are NOT adequate as the primary fastening points. Use the through-holes.
Carrying the Pudgy on a Swim Platform A removable, rugged stainless steel, davit system, made by Weaver Industries, especially for use with the Portland Pudgy. This davit system lets you carry the Pudgy on almost any boat with a swim platform. It includes:
• Two removable heavy-duty eye pins and backer plates
• Two snap davit heads for swim platform.
It is used with stand-off arms (not included).
The Weaver davit pins fit though the already existing through holes in the Pudgy's side wall.
Weaver swim platform davits

Portland Pudgy Safety Dinghy: 2. Basic Boat 13
MOORING, ANCHORING, OR DOCKING THE PUDGY Use line or rode attached to the bridle to moor, anchor, or dock your Portland Pudgy. If you use an anchor, you must choose one that is appropriate for the size of the boat in specific weather conditions. Portland Pudgy, Inc. supplies an optional cleat for docking.
Any dinghy can rub against the mother boat or the dock. To avoid damaging the Pudgy or the mother boat, we recommend the ladder/fender, which is attached using the through-holes on the sides (see 9. Ladder/Fender), and a bow bumper. Both of these are optional accessories you can get from Portland Pudgy, Inc.
Drain Plug. To tighten or loosen the drain plug, twist the rubber stopper. If the Pudgy is empty or carrying less than 20 pounds (9.72 kg)), you can leave the drain plug out when the boat is moored or anchored, to allow it to drain. Note that all of the optional equipment together (exposure canopy, sail kit, sea anchor, electrical system, pump) adds about 60 pounds (27.216 kg) additional weight.
Bow bumper
Ladder/fender on boat
Security When tying up at a dock, you can use a strong cable bicycle lock to guard against theft. Pass the end of the lock through one of the through holes under the gunwale. One end of the cable must be less than three-quarter-inch (1.9 cm) diameter. Keep the lock well lubricated. Salt water can make the lock seize up.
Small cabinet locks can be installed on the access hatches.
MOTORING Coast Guard Regulations The US Coast Guard specifies the following maximum capacity:
With a two HP motor: four persons or 476 pounds (215.9 kg), or 557 pounds (252.65 kg), motor, persons, and gear.
Note: If you use the short shaft motor mount, the capacity is reduced. The short shaft motor mount is designed only for older style two-cycle small engines with a narrow motor casing. The newer short shaft four-cycle engines have wider motor casings—too wide to allow for proper steering, because they sit down low in the motor mount slot. (The long shaft four-cycle motors work fine, because they sit above the motor mount slot.)
IMPORTANT: Not only is it important, for safety reasons, to observe Coast Guard regulations for motor size, but also, using a motor that is too heavy and powerful could damage the boat.
Note: If you want to use a three HP motor when using the boat with three persons or less, contact us about adjusting the flotation to meet USCG regulations.

14 Portland Pudgy Safety Dinghy: 2. Basic Boat
RIGHTING THE PUDGY IF CAPSIZED The Pudgy is extremely stable compared to other boats its size. However, it can capsize. If the Pudgy tips over, it floats upside down very high, and there is a large quantity of trapped air underneath. A very important feature of the Pudgy is that because of the thick side walls, when it is righted it comes up nearly dry. This can literally be life saving: no sitting in a swamped boat!
To avoid capsizing, as with any dinghy, try to keep your own and your passengers’ weight and other load evenly distributed when moving around in the boat. Do not attempt to stand or step on gunwales. When sailing, as the boat heels, counterbalance by shifting to leeward. When climbing into the Pudgy from the water, if there is strong wind or heavy sea, climb in from the windward side, so that the boat will not be blown over on top of you.
Generally, as with any boat, in heavy seas, keep the Pudgy headed into the wind and do not allow it to broach. The use of a sea anchor is highly recommended for heavy seas and wind. (See 5. Para-Anchor.)
In Case of Capsize: General Information There are two hand-holds in the keel and two grooves at either side of the keel, designed to help in righting the boat. The grooves can be used for initially holding onto the boat, and they assist in reaching up to the hand holds. The boat is unstable upside-down and will roll quite easily, provided you have the minimum weight (see Note 2, below).
In any survival situation it is critical to stay in contact with the boat, because the slightest breeze or pressure can move the boat rapidly away from you. A tether line is optimum, but be sure the length of line is great enough to allow you to move freely out of the way as the boat rolls over. Always keep a physical connection to the boat. Hold onto the bridle or a grab-line if possible.
Note 1: Protect your head if the boat capsizes or if you are righting the boat. Get clear of the boat (but stay tethered). Practice tipping the boat over and righting it in shallow water, so you know how you best respond. You need to move back so as not to get hit by the Pudgy as it completes its roll.
Note 2: If a person weighing less than 90 pounds (40.82 kg) is using the boat, before going out in the boat, attach a loop of rope to each hand hold in the keel. The person can hold on to the loop instead of the hand holds. (The loop lets you lean back further and thus have more leverage for rolling the boat over). Persons under 90 pounds may not be heavy enough to right the boat in calm water without a loop of rope for leverage.
Note 3: For a nearly dry boat, avoid bearing down with your feet or knees as the boat is rolling back into righted position. As the boat gets about halfway back, it rolls quite quickly, so it’s unnecessary to bear down.
Procedure for Righting the Pudgy 1. Grab each hand hold in the keel (or if applicable, to the loop of line attached to the hand
holds—see second note above).
2. Depending on your height, put your knees or your feet on the side of the boat. If you have a ladder/fender you can stand on that. See 9. Boarding Ladder/Fender (MFC).
3. Lean backward, until the boat rolls over. As the boat rolls over, be careful to move out of the way, so that it doesn’t hit you as it turns over.
4. As the boat rolls over to its righted position—to help it scoop up less water and come up nearly dry—try not to bear down with too much weight on the boat as it completes its roll.

Portland Pudgy Safety Dinghy: 2. Basic Boat 15
BOARDING THE PORTLAND PUDGY Although the Pudgy is very stable, you must board it as you would board any other hard shell dinghy. That is, you do not step on the gunwale as you enter the boat. Step from the dock into the cockpit, with your weight toward the center of the cockpit. Note that all horizontal surfaces (seats, gunwales, and sole) are textured, anti-skid.
Climbing In from the Water You can climb into the boat from the stern or from either side. Climbing in from the stern is more stable, but it is a higher and much more difficult climb and can’t be done if the motor, rudder, or exposure canopy is in place.
If you climb in from the side (which is surprisingly easy), the greater your weight, the more the boat will tip up towards you. This actually makes climbing in easier, because there is less freeboard. It is unlikely to capsize when you climb in if you follow the instructions below. Again, you should practice this in calm water to get a feel for it.
Note: In windy conditions, climb in from the windward side so that the wind can’t catch the boat and flip it over on you.
Climbing in from the Water: Procedure 1. Hold onto the side of the boat or grab-line and pull yourself up, while kicking with your feet
out as horizontal as possible to the water.
2. Once you’ve gotten your chest on the gunwale, grab onto the hand-holds on the center seat, and continue kicking out and up, and pulling yourself into the boat.
Note: If you have an optional Portland Pudgy ladder/fender, you can yank down the handle to pull out the ladder. Then follow steps 1 and 2, above, and use a low rung of the ladder as a stirrup to push horizontally out with your feet, as you pull yourself in. (See 9. Boarding Ladder/Fender.)

16 Portland Pudgy Safety Dinghy: 2. Basic Boat
ROUTINE SAFETY ISSUES The cockpit is fourteen inches (35.56 cm) deep at the side wall, so under normal conditions there should be no danger of falling overboard. Common sense should regulate your and your passengers’ behavior in the boat. For example, keep your weight distributed evenly in the boat, to avoid tipping the boat and losing your balance. Do not attempt to step or stand on the gunwales.
In heavy seas, it is a good idea to fasten yourself to the boat. Safety harnesses are optimum. Portland Pudgy offers optional lifting/safety harness eyes. You can clip your safety harnesses onto these. If you do not have this equipment, you can still fasten yourself to the boat with line. There are several fastening points: five feet of grab-line along each side of the boat, handholds in the fore and aft seats (NOT the middle seat, which is removable), and four through-holes in the sides of the boat. At the very least, in extremely rough conditions, hold onto the grab-lines or handholds. (See Materials and Construction, page 2.)
As stated at the beginning of this manual (Note on Safety), all users of the Portland Pudgy should do their own research and read and study safety at sea. All procedures should be practiced in calm, safe waters.
Children using the boat should be carefully monitored and supervised by a responsible adult who has immediate access to them by boat or other means. Children in particular should always wear life vests.
Never leave a pet alone in the boat, tied to any attachment point. It could jump overboard while tethered to the boat.
Field of Vision When used as a rowboat or motorboat, the field of vision from anywhere in the boat is 360 degrees.
When using the sail kit, sit down in the cockpit rather than on a seat. It is more comfortable. Look under the boom or through the window in the sail to be aware of your surroundings. If you sit on a seat or gunwale when sailing, your field of vision will be limited to a certain extent on the leeward side, by the sail.
USING THE PORTLAND PUDGY IN AN EMERGENCY The basic Portland Pudgy is very buoyant and made of unsinkable material. However, if you intend to use your Portland Pudgy as a survival craft, we strongly recommend that in addition to the oars, you have the para-anchor, lifting/safety harness eyes, exposure canopy, bailing pump, and multifunction cylinder. If you want the option of sailing to shipping lanes or safety, you should obviously have the sail kit. If you preset your exposure canopy, you need a boat cover (see 4. Exposure Canopy).
IMPORTANT: Do not abandon ship until all attempts to control damage have been tried and the boat is definitely about to sink or be consumed by fire. Send out distress signals before abandoning ship.
Common thinking is that you should stay in one place and wait to be rescued, and that it is safest to stay with your mother vessel if at all possible. If separated from mother boat, you do not have an EPIRB that works, or if you are in waters where rescue is unlikely, then it is the captain’s call whether to remain relatively stationary or to be proactive with your Portland Pudgy and head toward safety.
See 4. Exposure Canopy for detailed information about using the Pudgy in an emergency.

Portland Pudgy Safety Dinghy: 2. Basic Boat 17
Abandon Ship Plan Before the need to abandon ship arises, you should have a clear abandon ship plan. It should be in writing, and known to all crew and passengers. It should specify procedures for deploying the Pudgy, including:
• putting the Pudgy in the water,
• boarding the Pudgy,
• keeping the Pudgy connected to the vessel being abandoned while passengers board,
• if absolutely necessary, severing that connection once everyone is aboard the Pudgy or tethered to it, and
• use of the exposure canopy and sea anchor if available.
You should have an abandon ship drill, including practice boarding the Pudgy from the boat and climbing into the Portland Pudgy from the water.
Note on Cold Water Hazard If at all possible, avoid going into the water first before boarding the Pudgy, especially if the water is cold. No one (not even a strong swimmer) is immune to cold water shock and hypothermia, which are extremely rapidly debilitating and potentially lethal.
Ditch Bag and Other Safety Items Get an emergency painter for attaching the Pudgy to the mother boat. See 4. Exposure Canopy for more information.
Keep a ditch bag in your Pudgy, accessible through an interior hatch. The Pudgy is not equipped with a ditch bag. Please research this. For example, see “Equipped to Survive” at www.equipped.com/abndonship.htm.
Other equipment to be stowed includes exposure canopy, sea anchor (a critical piece of safety equipment), oars, safety harness(es), bailing bucket and sponge, pump, and sail kit.
All of these items (except oars and sail kit) should be accessible through an interior hatch, as the rear hatch should not be opened in heavy seas.
Emergency Deployment Important: See 4. Exposure Canopy for more detailed information on using the Portland Pudgy as a lifeboat.
If the Pudgy is tied to the cabin roof or on deck, fasten her down securely, yet so that she is easy to deploy in an emergency. All crew should know how to speedily deploy the Pudgy. Stow oars through the rear access hatch. If there’s a life line around the deck, fit it with pelican hooks for easy disconnection. See Securing to the Cabin Roof or on Deck on page 12, and see 4. Exposure Canopy for more detailed information.
Before the Pudgy goes in the water, make sure that she is securely tethered to the vessel being abandoned, and that all needed items are aboard. Once everyone is aboard, stay tethered with the emergency painter unless the mother boat is actually sinking, in danger of exploding, or poses some other extreme danger.
All passengers and crew should be wearing life vests. If possible, all passengers and crew should be tethered to the Pudgy lifting/safety harness eyes or other strong attachment points (see Materials and Construction on page 2). Again, send out a distress signal before abandoning ship. Have a knife on your person, or fastened in the Pudgy, near the emergency painter, so you can cut the painter if necessary. See 4. Exposure Canopy for more information.

18 Portland Pudgy Safety Dinghy: 2. Basic Boat
Sail Kit, Overview (Do Not Use in Heavy Weather) If you have a sail kit, the mast, gaff, sail assembly and the tiller should be stowed inside the rear hatch. (See section 3. Sail Kit for more information.)
In heavy weather, do not remove these items from the rear access hatch and do not attempt to sail the Pudgy. Water can enter the rear hatch if you open it in heavy weather, and it may be dangerous and futile to attempt to sail in such conditions. If the rudder/tiller unit is in place in heavy weather, you should remove it and secure it under the rear seat if possible. Be very careful, because the rudder will sink. Keep the rudder attached to the tiller, because if they are dropped into the water, the tiller will keep the rudder afloat for awhile.
For detailed instructions, see 3. Sail Kit.
Exposure Canopy, Overview The basic Portland Pudgy boat is unsinkable, but the optional exposure canopy (when inflated) adds 430 pounds of buoyancy, and protects against heavy weather and exposure.
Note that the boat can be sailed with the exposure canopy inflated.
Note also that you can pre-set the exposure canopy so that it will be ready for emergency use.
You can also row the Pudgy with the fore and aft sections of the exposure canopy pre-set and furled on the fore and aft gunwales.
For detailed instruction, see 4. Exposure Canopy.
MAINTENANCE Cleaning the Pudgy You can use most household cleaning products on the Portland Pudgy (Fantastic spray cleaner works well). Powdered cleansers are NOT recommended as they may abrade the surface. Power washing with a pressure washer is very effective.
DO NOT use steel wool or hard scouring pads, as they will abrade the surface.
DO NOT use sulphuric or nitric acid or other harsh chemicals on your Portland Pudgy.
DO NOT use turpentine, benzene, kerosene, or gasoline.
You can use paint or lacquer thinner for oil or grease stains, but wash it off immediately with soap and water.
You can use a vacuum cleaner with a hose to clean the interior of the hull.
Surface Repair If your Portland Pudgy is punctured or cracked, take it to a specialist in the repair of polyethylene kayaks. Polyethylene can be welded very effectively, but it only should be done by an expert. Also, it can be treated to remove or reduce scratches or abrasions, but again, this should only be done by an expert, and with great caution.
Most caulking, glues, or other adhesives will not adhere to the surface. Some anti-fouling paints stick to the surface of the Portland Pudgy. You can contact us for more information.
DO NOT sand the surface without first talking to the manufacturer.
DO NOT varnish, or polyurethane the surface.

Portland Pudgy Safety Dinghy: 2. Basic Boat 19
UV Protection The Portland Pudgy hull is made of tough, UV-resistant high-quality polyethylene resin (the same material used in kayaks and other high-quality marine products), but to maximize its lifetime you should try to minimize its exposure to sunlight when possible. It is advisable to use a boat cover (available from Portland Pudgy, Inc.). You can also enhance UV protection by using 303 Aerospace Protectant or equal, available at marine stores. (Read directions.)
When you store the boat, it’s best to cover it or keep it in the shade.
Storage Although the Pudgy is UV-treated, you will prolong the life of your boat if you avoid storing it in direct sunlight for long periods of time. We recommend using a boat cover.
Store it upside down on a dry surface with the inside hatches open to help any moisture that’s inside to run out of the boat and/or evaporate.
See Temperature, below.
Temperature Heat: When the outside temperature is hot, the hull in the hot sun will reach much higher temperatures. As with all polymers, exposure to high environmental temperatures will subject the material to distortion when under pressure (for example, hanging from davits). If you must keep your Portland Pudgy in the hot sun for extended periods, in order to maximize its lifetime, it is advisable to cover the boat. Do not subject the hull to pressure in situations where the hull temperature exceeds 125 F (51.667 Celsius). (See Hanging the Pudgy from Davits on page 11.)
Cold: The Portland Pudgy can be operated in temperatures as low as minus 30 degrees Fahrenheit (-34.44 Celsius).
Ordinary low winter temperatures will not harm the boat. In extremely cold temperatures—minus 30 F (-34.44 C) or more degrees below zero—the material of the hull becomes more brittle, and the hatches lose forty percent of their strength.
Removing Water from Cockpit Carry a bailing scoop or bucket and sponge to remove water from the cockpit.
The boat has a drain plug in the floor at the stern of the cockpit. The drain plug is tethered to a pad eye on the stern wall of the boat. Always make sure the plug is tethered to the pad eye. The plug can be tightened or loosened by twisting.
The basic boat is self-draining (with drain unplugged) when empty or when carrying 20 pounds (9.72 kg). or less. We recommend removing the drain plug when mooring, docking, or towing the empty boat, or when storing the boat or hanging it from davits.
To drain the cockpit when the boat is empty or carrying 20 pounds or less, simply remove the plug from the drain hole in the floor of the cockpit (at the stern) and allow the water to drain. (Remember to replace the drain plug before you re-board the boat!)
To remove water from the cockpit when the boat is carrying more than 20 pounds, use a pump or bailing bucket and sponge, as you would any other dinghy.
Water in the Interior Chambers If water enters the interior of the hull, the most effective method for removing it is to use the optional one-quarter-inch (.64 cm) diameter Beckson pump, with gasket and cover, on the port gunwale. If you don’t have the optional built-in pump, pump it out through one of the hatches. Sponge out the last drops. (You can use the pump to remove water from the cockpit as well). See 8. Pump.

20 Portland Pudgy Safety Dinghy: 2. Basic Boat
If the boat is on a solid surface, open the rear hatch, tip the boat up on the transom to allow water to drain, and then sponge out. Replace the rear hatch cover and let any additional water evaporate by leaving side hatches open.
Portland Pudgy Safety Dinghy: 2. Basic Boat 21
BASIC BOAT INDEX abandon ship plan, 17
access hatch, 9
interior, 10
rear, 10, 11
attachment points, 2
basic boat components, 3
boarding the Pudgy, 15
bow bumper, 13
bridle, 8
capacity, 1, 13
capsize, 14
CAUTION
motor mount, 9
hatches, 9
rear hatch, 10
drain plug, 12
tow eyes, 8
cleaning the Pudgy, 18
climbing into the boat, 15
compass, 9
davits, 12
davits, temperature warning, 12
dimensions
of Portland Pudgy, 1
ditch bag
assembling, 17
not supplied, 17
drain plug, 11, 13
emergency deployment, 17
emergency use of Pudgy, 17
exposure canopy (general information), 18
grab-lines, 11, 15
hand-holds, 14, 15
hypothermia, 17
ladder/fender, 13, 14, 15
maintenance, 18
materials and construction, 2
mooring, anchoring, docking, 13
motor mount, 9
short shaft, 13
motor size, 13
USCG regulations, 9
motoring, 13
oarlocks, 5
oars, 4
painter (emergency), 17
righting the Pudgy, 14
safety (general info), 16
sail kit (general info on emergency use), 18
seat
front, 8
middle, 7
rear, 8
security, 13
shipping the oars, 6
storage, 19
strong points, 3
swim platform
carrying Pudgy on, 12
temperature, 2, 19
through-holes, 12
towing, 11
transporting the Pudgy, 11
US Coast Guard
regulations, 1, 13
UV protection, 19
water in cockpit or interior, 19
wheel, 11

22 Portland Pudgy Safety Dinghy: 2. Basic Boat