Embed Size (px)
Citation preview
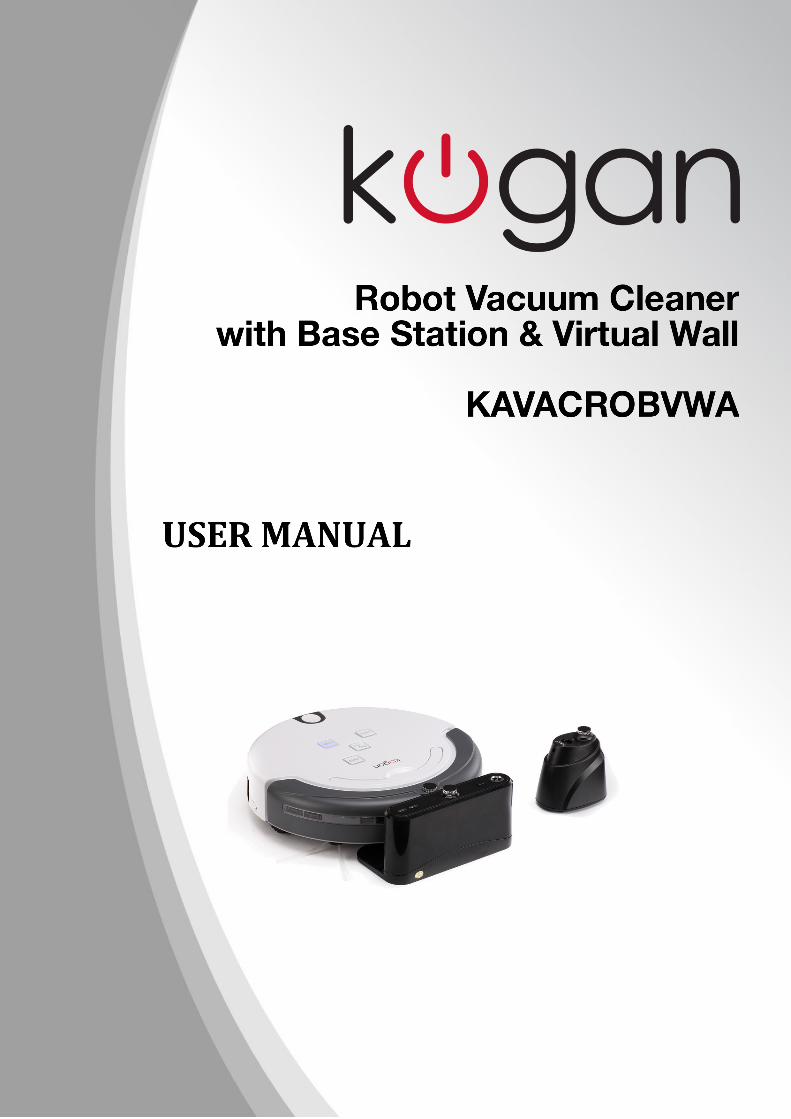
Table of ContentsSafety Precautions.............................................................................................................................2Product Application..........................................................................................................................2Components of the Cleaner...........................................................................................................2Introduction..........................................................................................................................................3
Panel...................................................................................................................................................3Function Information on Panel................................................................................................3Product Layout..............................................................................................................................4
Installation of Docking Station and Charging........................................................................4Docking Station.............................................................................................................................4Manual Charging............................................................................................................................5Automatic Charging.....................................................................................................................5
Assembly & Disassembly of Cleaning of Dust Bin...............................................................6Assembly & Disassembly of Dust Bin...................................................................................6Cleaning of Dust Bin and Blower............................................................................................7
Main and Side Brush Maintenance..............................................................................................7Assembly & Disassembly of Main Brush..............................................................................7Assembly and Disassembly of Side Brush..........................................................................8Cleaning the Main Brush............................................................................................................8
Left, Right and Front Wheel Maintenance..............................................................................8Cleaning of the left/right wheel..............................................................................................8Assembly, Disassembly & Cleaning of front wheel.........................................................8Cleaning Sensor and Infrared Transparent Window......................................................9
Replacing Battery..............................................................................................................................9Battery Replacement in Main Body.......................................................................................9Battery Replacement in Space Isolator...............................................................................9Battery Replacement in Remote Control............................................................................9Battery Safety...............................................................................................................................10
Remote Control................................................................................................................................10Controller Layout........................................................................................................................10Function Descriptions of Remote Control .......................................................................10
Auto Charging Docking Station..................................................................................................11Docking Station Display and Control Panel.......................................................................11Function Descriptions of Docking Station.........................................................................11
Space Isolator....................................................................................................................................12Space Isolator Display and Control Panel.........................................................................12Function of Space Isolator.......................................................................................................12Installation......................................................................................................................................13
Troubleshooting................................................................................................................................14Technical Specifications................................................................................................................14
Robot Vacuum..............................................................................................................................14Remote Control ...........................................................................................................................15Docking Station............................................................................................................................15Space Isolator...............................................................................................................................15
1
Safety Precautions• Do not attempt to perform repairs on this unit yourself. There are no user
serviceable parts inside. • Do not touch the power cord or accessories with a wet hand, as this may
result in an electric shock.• Do not allow any body parts to enter into the brush/wheel mechanisms of
the robot, as this may cause personal injury.• Do not charge the robot using any method other than the chargers
supplied. Use of incorrect chargers may result in product damage, electric shock or fire.
• Do not allow the robot to vacuum up hot objects such as cigarette ashes, matchsticks or other combustible products.
• Before use, pick up all easily removed objects from the floor (tissues, foodwrappers, string, twigs etc..), as it may cause damage to the vacuum sucking up sizeable objects and will also fill the storage bin quicker.
• Please use the robot vacuum with caution around small children and animals as it may distress them.
• Do not stand or sit on the robot vacuum, as it may break the unit.• Do not use the robot vacuum to clean up spilled liquids.• Do not put the vacuum on tables or benches to vacuum, as it may fall off
small spaces and be damaged.• Do not use the vacuum to clean outdoor areas.• Do not use the cleaner for commercial purposes.• Do not allow children to operate the vacuum.
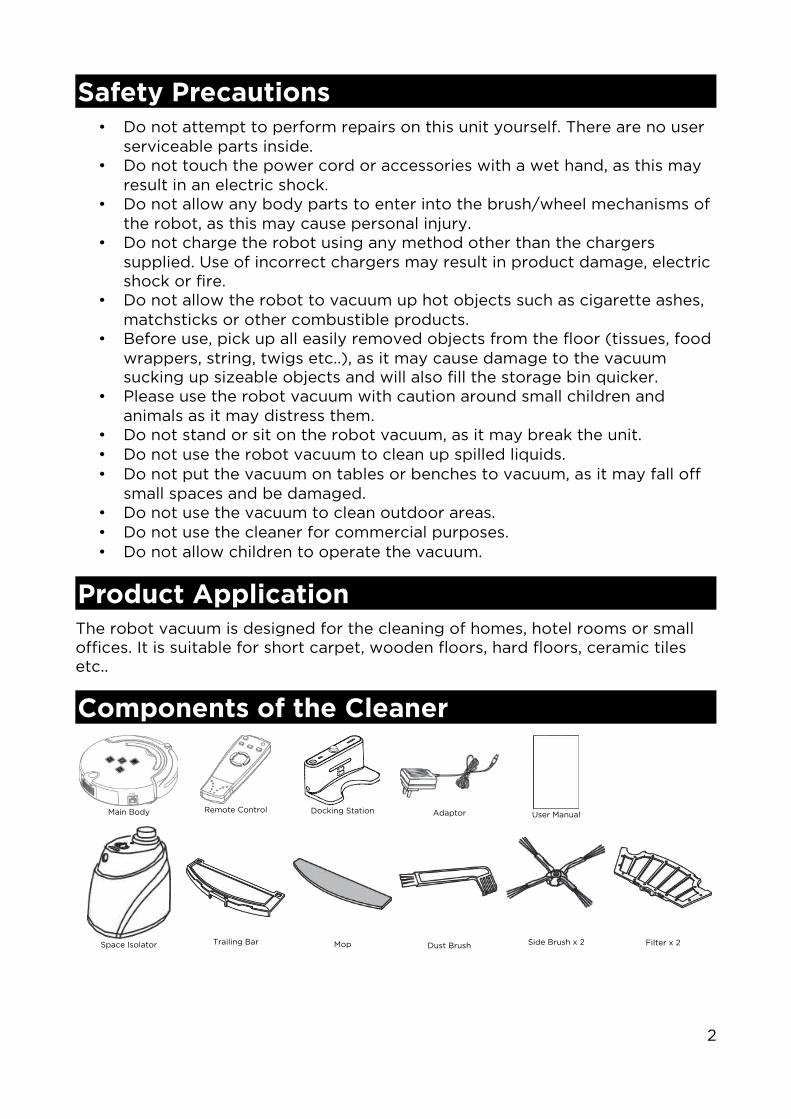
Product ApplicationThe robot vacuum is designed for the cleaning of homes, hotel rooms or small offices. It is suitable for short carpet, wooden floors, hard floors, ceramic tiles etc..
Components of the Cleaner
Main Body Remote Control Docking Station Adaptor User Manual
Space Isolator Trailing Bar Mop Dust Brush Side Brush x 2 Filter x 2
2
Introduction
Panel
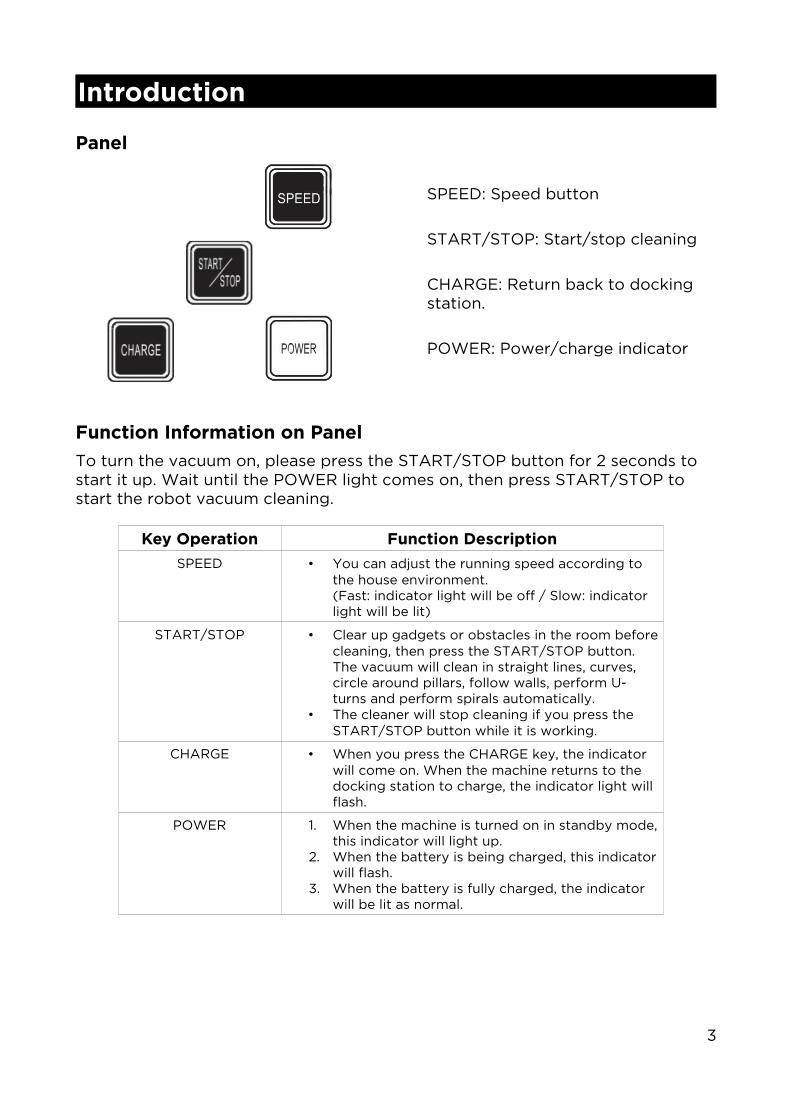
SPEED: Speed button
START/STOP: Start/stop cleaning
CHARGE: Return back to docking station.
POWER: Power/charge indicator
Function Information on Panel
To turn the vacuum on, please press the START/STOP button for 2 seconds to start it up. Wait until the POWER light comes on, then press START/STOP to start the robot vacuum cleaning.
Key Operation Function Description
SPEED • You can adjust the running speed according to the house environment.(Fast: indicator light will be off / Slow: indicator light will be lit)
START/STOP • Clear up gadgets or obstacles in the room beforecleaning, then press the START/STOP button. The vacuum will clean in straight lines, curves, circle around pillars, follow walls, perform U-turns and perform spirals automatically.
• The cleaner will stop cleaning if you press the START/STOP button while it is working.
CHARGE • When you press the CHARGE key, the indicator will come on. When the machine returns to the docking station to charge, the indicator light will flash.
POWER 1. When the machine is turned on in standby mode,this indicator will light up.
2. When the battery is being charged, this indicatorwill flash.
3. When the battery is fully charged, the indicator will be lit as normal.
3
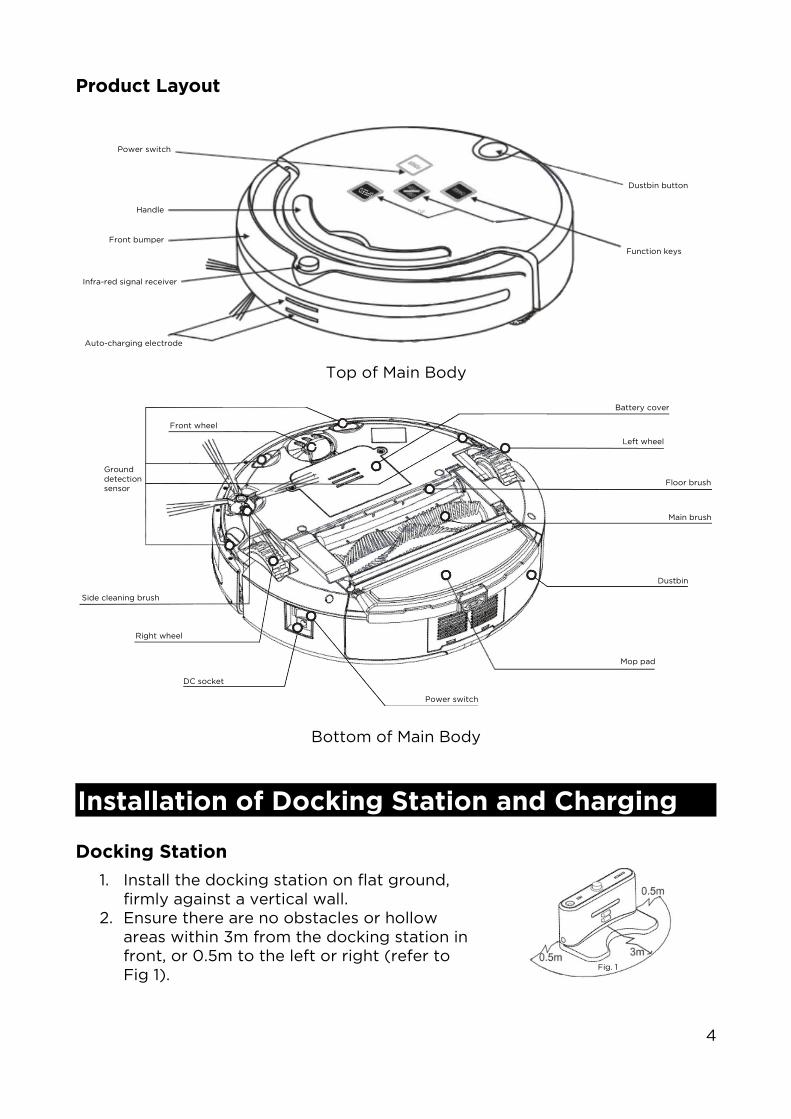
Product Layout
Top of Main Body
Bottom of Main Body
Installation of Docking Station and Charging
Docking Station
1. Install the docking station on flat ground,firmly against a vertical wall.
2. Ensure there are no obstacles or hollow areas within 3m from the docking station infront, or 0.5m to the left or right (refer to Fig 1).
4
Power switch
Handle
Front bumper
Infra-red signal receiver
Auto-charging electrode
Dustbin button
Function keys
Front wheel
Grounddetectionsensor
Side cleaning brush
Right wheel
DC socket
Power switch
Mop pad
Dustbin
Main brush
Floor brush
Left wheel
Battery cover
Fig. 1
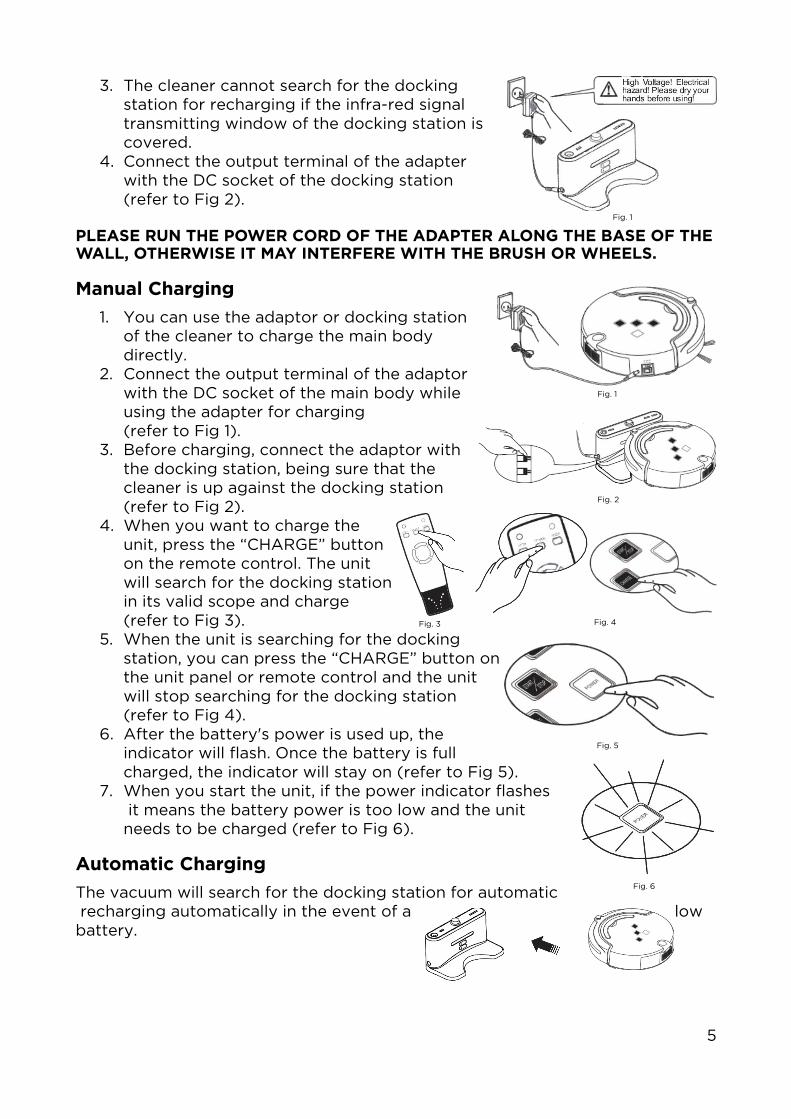
3. The cleaner cannot search for the dockingstation for recharging if the infra-red signaltransmitting window of the docking station iscovered.
4. Connect the output terminal of the adapter with the DC socket of the docking station (refer to Fig 2).
PLEASE RUN THE POWER CORD OF THE ADAPTER ALONG THE BASE OF THEWALL, OTHERWISE IT MAY INTERFERE WITH THE BRUSH OR WHEELS.
Manual Charging
1. You can use the adaptor or docking stationof the cleaner to charge the main bodydirectly.
2. Connect the output terminal of the adaptorwith the DC socket of the main body whileusing the adapter for charging (refer to Fig 1).
3. Before charging, connect the adaptor withthe docking station, being sure that thecleaner is up against the docking station (refer to Fig 2).
4. When you want to charge theunit, press the “CHARGE” buttonon the remote control. The unitwill search for the docking stationin its valid scope and charge (refer to Fig 3).
5. When the unit is searching for the dockingstation, you can press the “CHARGE” button onthe unit panel or remote control and the unitwill stop searching for the docking station(refer to Fig 4).
6. After the battery's power is used up, theindicator will flash. Once the battery is full charged, the indicator will stay on (refer to Fig 5).
7. When you start the unit, if the power indicator flashes it means the battery power is too low and the unit needs to be charged (refer to Fig 6).
Automatic Charging
The vacuum will search for the docking station for automatic recharging automatically in the event of a low battery.
5
Fig. 1
Fig. 1
Fig. 2
Fig. 3 Fig. 4
Fig. 5
Fig. 6

Assembly & Disassembly of Cleaning of Dust Bin
Assembly & Disassembly of Dust Bin
1. Extract the dust bin by pressing the button on it. (Refer to fig. 1 & 2)
Fig. 1 Fig. 2
2. Press the ellipse buttonon the dust bin, and theblow will pop up automatically (refer to fig. 3).
Fig. 3
3. Reverse the blower, release the 2 fasteners and open the cover (refer to fig. 4 & 5). Fig. 4 Fig. 5
4. Open the bracket and the filter will appear (refer to fig. 6).
Fig. 6
5. Change a new filter. Press the semicircle bracket with one hand to release the fastener from the filter screen and remove the filter grid, then replace with the new filter (refer to fig. 7).
Fig. 7
6. Reverse the dust bin, remove the mop, release the trailing bar, then unplug the right andleft fasteners on the bottom of the dust bin (refer to fig 8 & 9). All parts should be assembled as they were before disassembly.
Fig. 8 Fig. 9
NOTE: Don't use the mop and trailing bar on carpet or uneven ground.
6
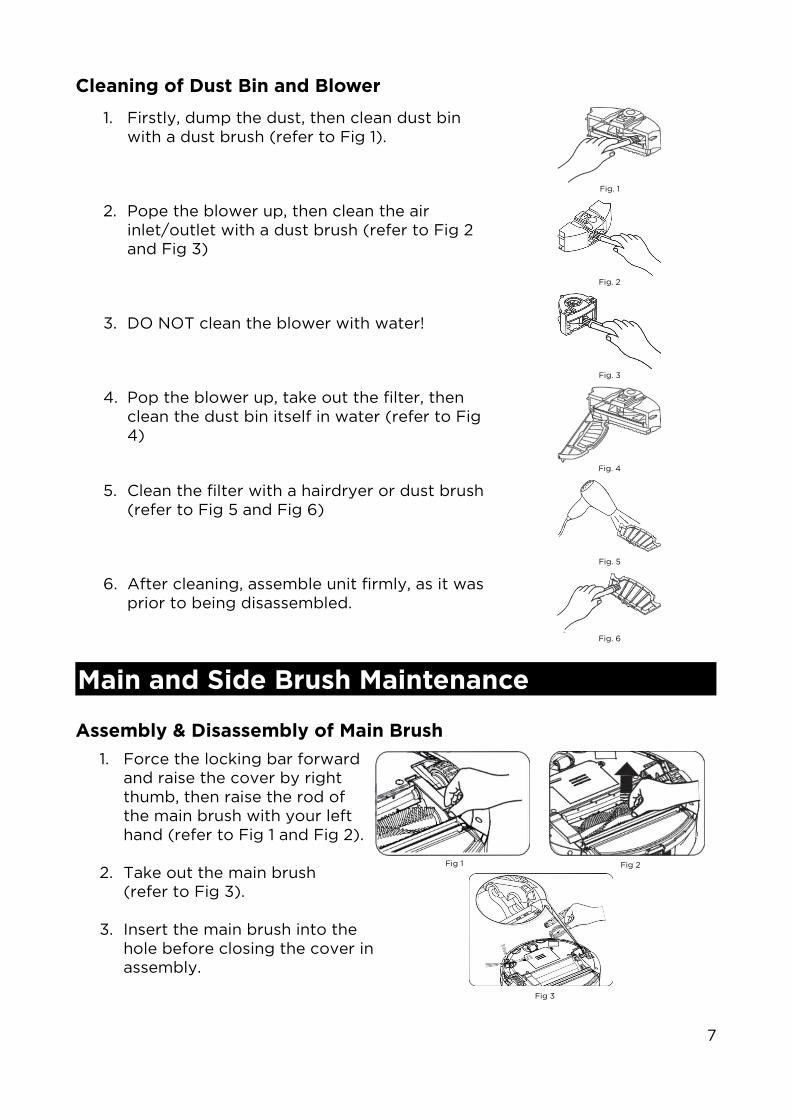
Cleaning of Dust Bin and Blower
1. Firstly, dump the dust, then clean dust bin with a dust brush (refer to Fig 1).
Fig. 1
2. Pope the blower up, then clean the air inlet/outlet with a dust brush (refer to Fig 2 and Fig 3)
Fig. 2
3. DO NOT clean the blower with water!
Fig. 3
4. Pop the blower up, take out the filter, then clean the dust bin itself in water (refer to Fig 4)
Fig. 4
5. Clean the filter with a hairdryer or dust brush (refer to Fig 5 and Fig 6)
Fig. 5
6. After cleaning, assemble unit firmly, as it was prior to being disassembled.
Fig. 6
Main and Side Brush Maintenance
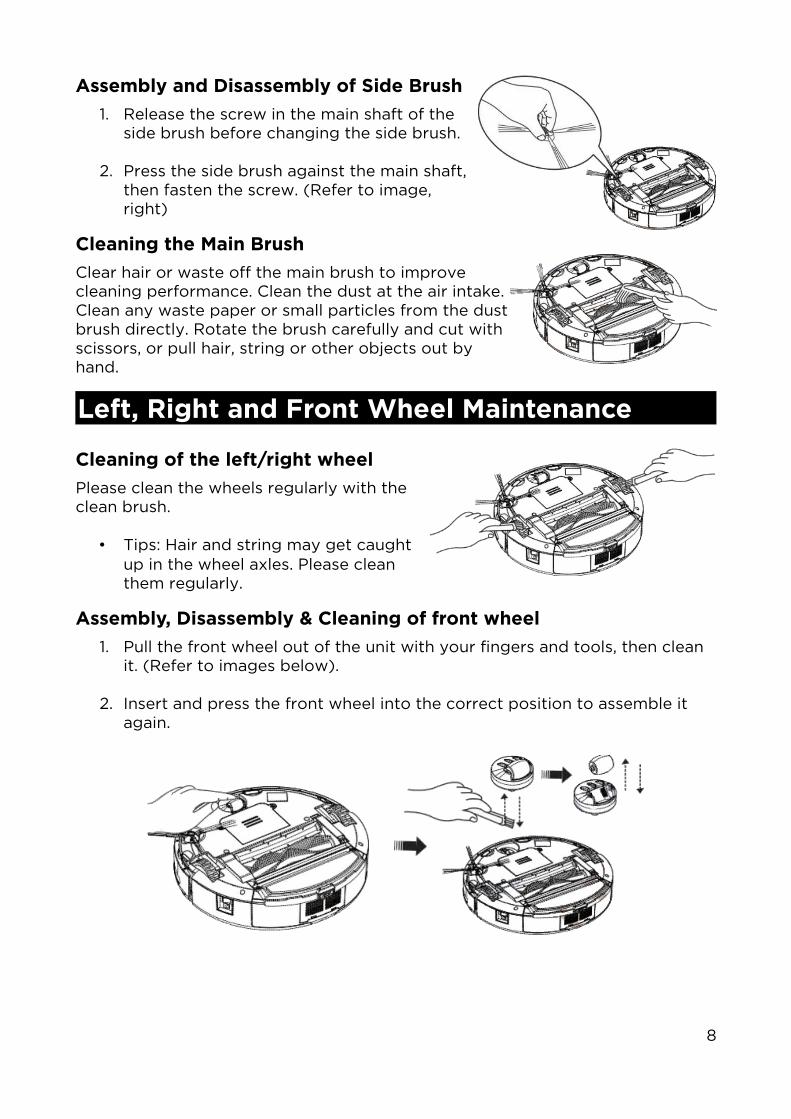
Assembly & Disassembly of Main Brush
1. Force the locking bar forwardand raise the cover by rightthumb, then raise the rod ofthe main brush with your lefthand (refer to Fig 1 and Fig 2).
2. Take out the main brush(refer to Fig 3).
3. Insert the main brush into the hole before closing the cover in assembly.
7
Fig 1 Fig 2
Fig 3
Assembly and Disassembly of Side Brush
1. Release the screw in the main shaft of theside brush before changing the side brush.
2. Press the side brush against the main shaft,then fasten the screw. (Refer to image,right)
Cleaning the Main Brush
Clear hair or waste off the main brush to improvecleaning performance. Clean the dust at the air intake.Clean any waste paper or small particles from the dustbrush directly. Rotate the brush carefully and cut withscissors, or pull hair, string or other objects out byhand.
Left, Right and Front Wheel Maintenance
Cleaning of the left/right wheel
Please clean the wheels regularly with theclean brush.
• Tips: Hair and string may get caughtup in the wheel axles. Please cleanthem regularly.
Assembly, Disassembly & Cleaning of front wheel
1. Pull the front wheel out of the unit with your fingers and tools, then clean it. (Refer to images below).
2. Insert and press the front wheel into the correct position to assemble it again.
8

Cleaning Sensor and Infrared Transparent Window
1. Clean the sensor and infrared transparent window with a cotton swab or soft cloth.
2. The ground detection sensor and infrared transparent window are in the bottom of the cleaner (refer to images below).
3. Please keep the transparent window clean as this will ensure the unit functions correctly at all times.
Replacing Battery
Battery Replacement in Main Body
1. Release the screw with ascrewdriver, open the base plateand take out the battery (refer toFig 1 and Fig 2).
2. Place the batteries carefullytaking note of the positive andnegative polarities to avoid unitdamage.
3. Please put the cleaner in a charging state while the unit is not being used. This will prolong the life of the batteries.
Battery Replacement in Space Isolator
1. Release the screw with a screwdriver,then open the base plate.
2. Place the batteries carefully takingnote of the positive and negativepolarities to avoid unit damage.
3. Please remove the battery if the unitis not going to be used for a longtime.
Battery Replacement in Remote Control
1. Open the battery cover, then replacethe batteries (see Fig 1).
2. Place the batteries carefully, takingnote of the positive and negativepolarities to avoid unit damage (seeFig 2).
3. Please remove the battery if the remote control is not going to be used for a long time.
9
Fig. 1 Fig. 2
Fig. 1 Fig. 2

Battery Safety
• Take battery out of unit before disposing of the vacuum.• Please remember to turn off the switch before taking out the battery from
the main body or from the space isolator.• Please do not expose battery to hot temperatures, nor to water.• The battery should be disposed of. Do not throw into a fire or discard with
the household waste.
Remote Control
Controller Layout
Layout Key Description
1. Power Key
2. Power Indicator
3. AUTO: the unit will work in automatic mode
4. CHARGE: the unit will seek the docking station
5. SPEED: adjust the travelling speed of unit
6. FORWARD: move unit forward
7. BACK: move unit backwards
8. LEFT: turn unit left
9. RIGHT: turn unit right
Function Descriptions of Remote Control
Power Turn on the power switch of the unit. When the display function is innormal status, press this to start or stop the unit.When the unit is running, press this in various modes to stop the operation.
AUTO The unit will work according to the “auto cleaning” mode.
CHARGE While the cleaner is in standby mode or running, the cleaner will search out the docking station after you have pressed this key. When the cleaner stops running, it will start recharging after you press the key again.
SPEED You can adjust the moving speed of the vacuum to suit your household environment.
10
Auto Charging Docking Station
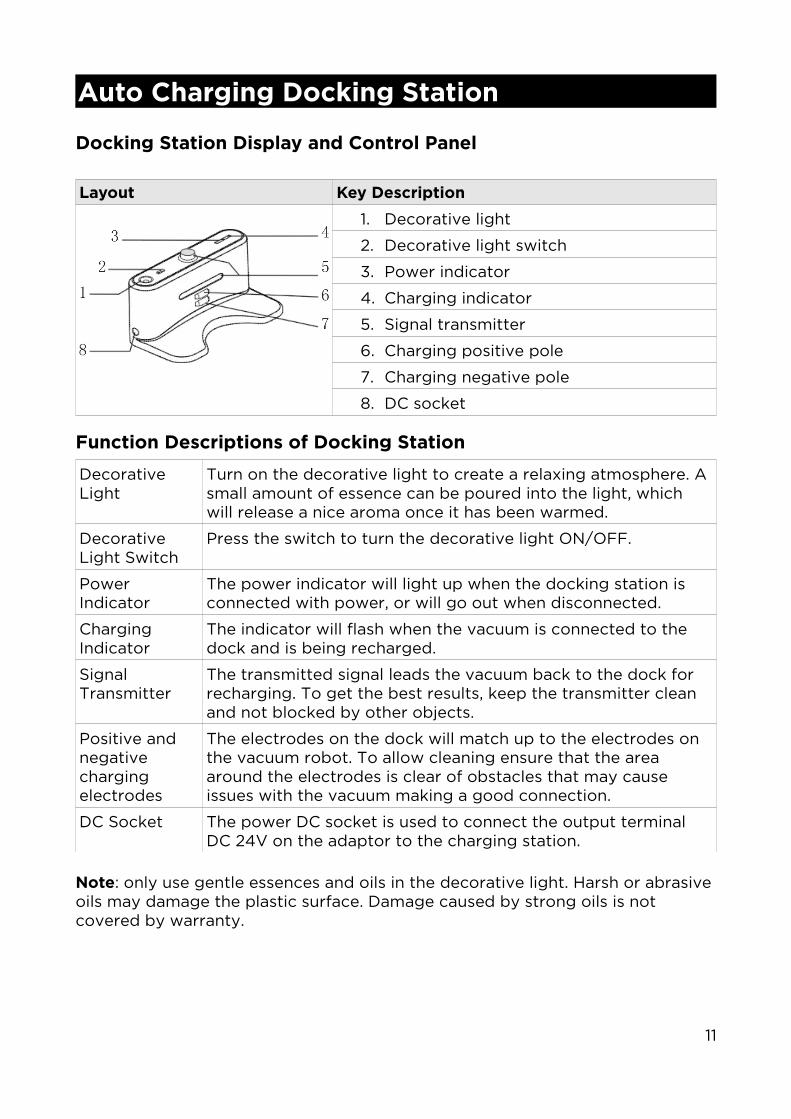
Docking Station Display and Control Panel
Layout Key Description
1. Decorative light
2. Decorative light switch
3. Power indicator
4. Charging indicator
5. Signal transmitter
6. Charging positive pole
7. Charging negative pole
8. DC socket
Function Descriptions of Docking Station
Decorative Light
Turn on the decorative light to create a relaxing atmosphere. A small amount of essence can be poured into the light, which will release a nice aroma once it has been warmed.
Decorative Light Switch
Press the switch to turn the decorative light ON/OFF.
Power Indicator
The power indicator will light up when the docking station is connected with power, or will go out when disconnected.
Charging Indicator
The indicator will flash when the vacuum is connected to the dock and is being recharged.
Signal Transmitter
The transmitted signal leads the vacuum back to the dock for recharging. To get the best results, keep the transmitter clean and not blocked by other objects.
Positive and negative charging electrodes
The electrodes on the dock will match up to the electrodes on the vacuum robot. To allow cleaning ensure that the area around the electrodes is clear of obstacles that may cause issues with the vacuum making a good connection.
DC Socket The power DC socket is used to connect the output terminal DC 24V on the adaptor to the charging station.
Note: only use gentle essences and oils in the decorative light. Harsh or abrasiveoils may damage the plastic surface. Damage caused by strong oils is not covered by warranty.
11

Space Isolator
Space Isolator Display and Control Panel
Layout Key Description
1. Toggle Switch
2. Signal Head
3. Near-infrared Transmitting Head
4. Power Indicator
Function of Space Isolator
The space isolator will block areas by sending out an infrared signal, which will prevent the vacuum from entering the areas.
Toggle Switch You can switch the functionality by sliding the toggle switch between off, low, middle and high.
• Off: unit will be off• Low: Will keep vacuum a distance of 4m away• Middle: Will keep vacuum a distance of 6m away• High: Will keep vacuum a distance of 8m away
Signal Head Projects a beam that the vacuum will not travel through.
Near-infrared Transmitting Head
Projects a radial region around the unit that the vacuum will not travel into or through.
• Open the battery cover before use, then place 2 x D batteries (not included) into the battery compartment correctly, making sure the polarities match up.
• Battery consumption duration is related to the selected transmitting distance and working duration. When possible, use the low distance setting to save the battery power, and don't forget to turn the unit off when the vacuum is not being used.
12
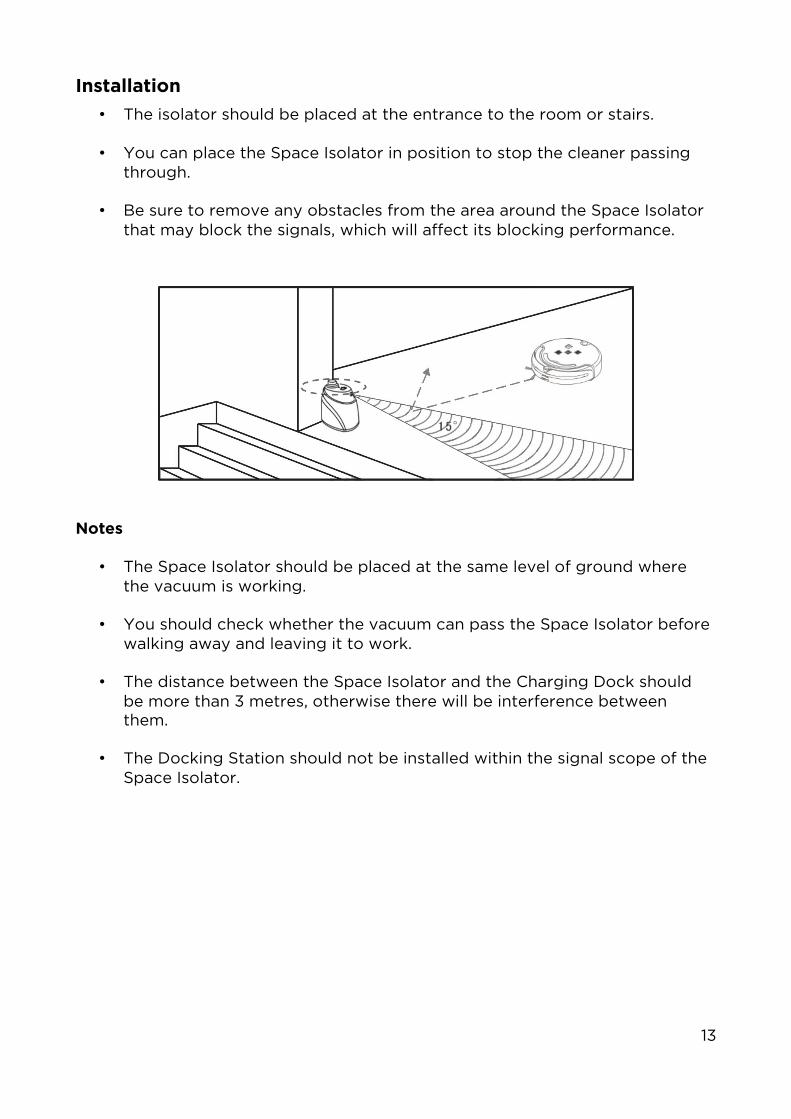
Installation
• The isolator should be placed at the entrance to the room or stairs.
• You can place the Space Isolator in position to stop the cleaner passing through.
• Be sure to remove any obstacles from the area around the Space Isolator that may block the signals, which will affect its blocking performance.
Notes
• The Space Isolator should be placed at the same level of ground where the vacuum is working.
• You should check whether the vacuum can pass the Space Isolator before walking away and leaving it to work.
• The distance between the Space Isolator and the Charging Dock should be more than 3 metres, otherwise there will be interference between them.
• The Docking Station should not be installed within the signal scope of the Space Isolator.
13
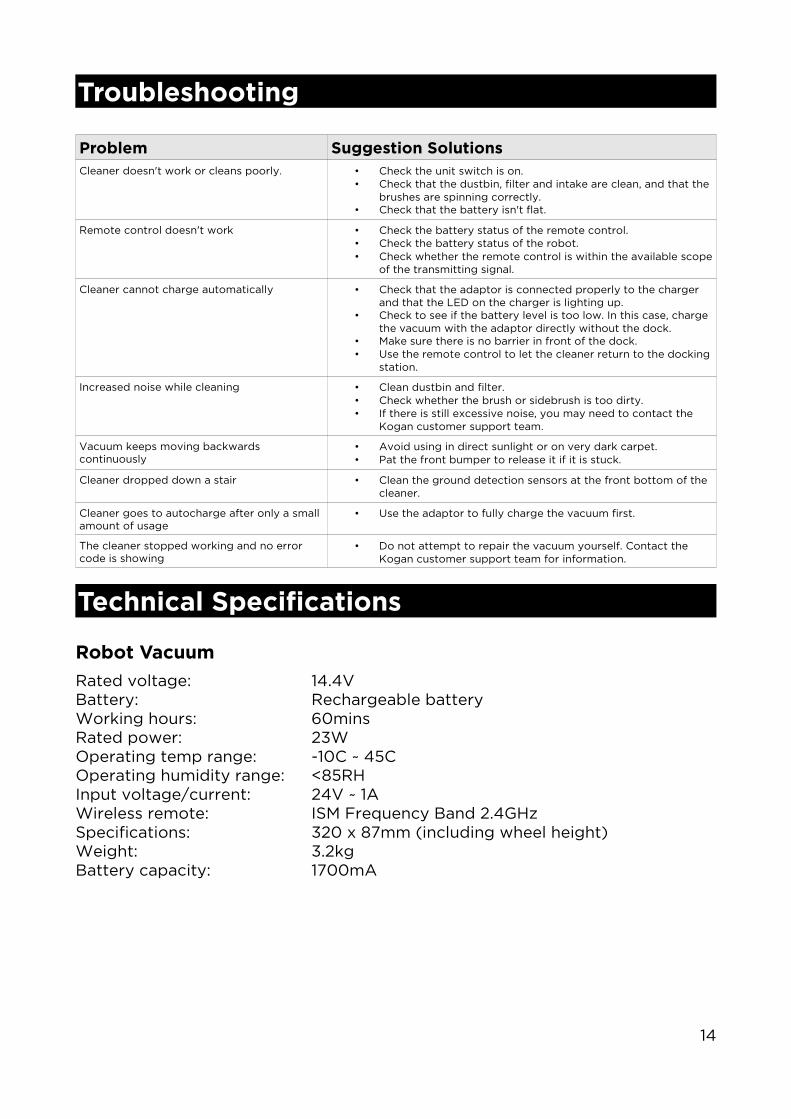
Troubleshooting
Problem Suggestion SolutionsCleaner doesn't work or cleans poorly. • Check the unit switch is on.
• Check that the dustbin, filter and intake are clean, and that the brushes are spinning correctly.
• Check that the battery isn't flat.
Remote control doesn't work • Check the battery status of the remote control.• Check the battery status of the robot.• Check whether the remote control is within the available scope
of the transmitting signal.
Cleaner cannot charge automatically • Check that the adaptor is connected properly to the charger and that the LED on the charger is lighting up.
• Check to see if the battery level is too low. In this case, charge the vacuum with the adaptor directly without the dock.
• Make sure there is no barrier in front of the dock.• Use the remote control to let the cleaner return to the docking
station.
Increased noise while cleaning • Clean dustbin and filter.• Check whether the brush or sidebrush is too dirty.• If there is still excessive noise, you may need to contact the
Kogan customer support team.
Vacuum keeps moving backwards continuously
• Avoid using in direct sunlight or on very dark carpet.• Pat the front bumper to release it if it is stuck.
Cleaner dropped down a stair • Clean the ground detection sensors at the front bottom of the cleaner.
Cleaner goes to autocharge after only a small amount of usage
• Use the adaptor to fully charge the vacuum first.
The cleaner stopped working and no error code is showing
• Do not attempt to repair the vacuum yourself. Contact the Kogan customer support team for information.
Technical Specifications
Robot Vacuum
Rated voltage: 14.4VBattery: Rechargeable batteryWorking hours: 60minsRated power: 23WOperating temp range: -10C ~ 45COperating humidity range: <85RHInput voltage/current: 24V ~ 1AWireless remote: ISM Frequency Band 2.4GHzSpecifications: 320 x 87mm (including wheel height)Weight: 3.2kgBattery capacity: 1700mA
14
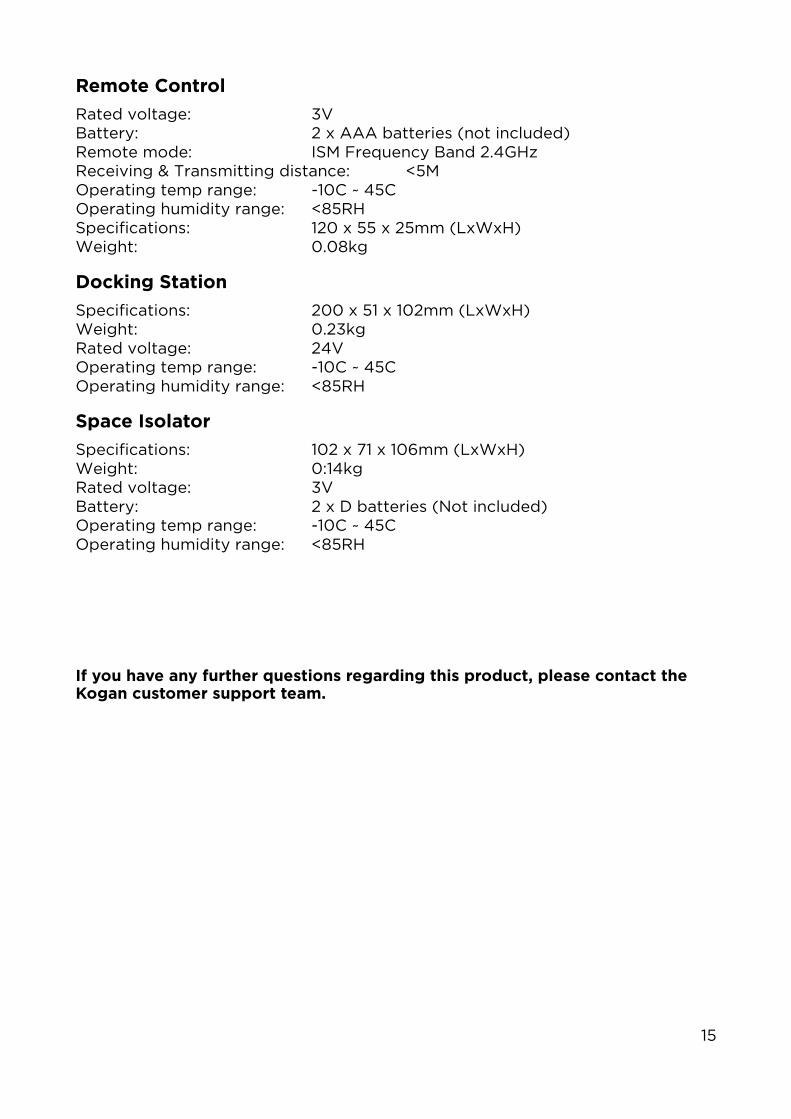
Remote Control
Rated voltage: 3VBattery: 2 x AAA batteries (not included)Remote mode: ISM Frequency Band 2.4GHzReceiving & Transmitting distance: <5MOperating temp range: -10C ~ 45COperating humidity range: <85RHSpecifications: 120 x 55 x 25mm (LxWxH)Weight: 0.08kg
Docking Station
Specifications: 200 x 51 x 102mm (LxWxH)Weight: 0.23kgRated voltage: 24VOperating temp range: -10C ~ 45COperating humidity range: <85RH
Space Isolator
Specifications: 102 x 71 x 106mm (LxWxH)Weight: 0:14kgRated voltage: 3VBattery: 2 x D batteries (Not included)Operating temp range: -10C ~ 45COperating humidity range: <85RH
If you have any further questions regarding this product, please contact the Kogan customer support team.
15