Embed Size (px)
Citation preview

http://www.BioAxxis.com
BioAxxis® ThumbLock® 1
Table of Contents
1. Items Included with the BioAxxis® ThumbLock® Audit Trail Software: 2 2. IMPORTANT NOTE: ...............................................................................2 3. Supported Operating Systems: .............................................................2
Section 1 Installing the BioAxxis® ThumbLock® AT Software...............3 Section 2 Uninstalling the BioAxxis® ThumbLock® AT Software..........4 Section 3 Creating/Modifying the Super Administrator and General Administrators ......................................................................................6
Section 4 Logging into the BioAxxis® ThumbLock® AT Software (Super and General Administrators)...................................................10 Section 5 Deleting General Administrator Accounts ........................12 Section 6 Setting up and Modifying Individual/Multiple BioAxxis® ThumbLocks® for Audit Trail Records..................................................14 Section 7 Adding/Modifying Users at Individual Locks for Audit Trail Association..........................................................................................17Section 8 Assigning User/s to Multiple Locks for Audit Trail Association..........................................................................................20 Section 9 Deleting Users from the AT Software ...............................24 Section 10 Viewing/Printing/Exporting System Logs in the AT Software..............................................................................................28 Section 11 Exporting Audit Trail Records from the BioAxxis® ThumbLock® to the Flash Drive...........................................................32 Section 12 Importing Audit Trail Records from the Flash Drive into the AT Software ..................................................................................35 Section 13 Viewing, Printing and Exporting Downloaded Audit Trail Records ...............................................................................................38
4. Support Information: ..........................................................................42
http://www.BioAxxis.com
BioAxxis® ThumbLock® 2
BioAxxis® ThumbLock® Audit Trail Software
User Manual
1. Items Included with the BioAxxis® ThumbLock® Audit
Trail Software:
• Software CD, including User Manual
• Flash Drive
2. IMPORTANT NOTE:
Prior to setting up the PCMU software, be sure to do the following:
• Set up correct Date/Time settings at the BioAxxis® ThumbLock® (reference ThumbLock® User Manual for details).
• Create Lock ID at the BioAxxis® ThumbLock® (reference ThumbLock® User Manual)
3. Supported Operating Systems:
Win 2000 Service Pack 3, IE6.0 or above, Win 2000 Service Pack 4, Win XP Service Pack 2 and above, Win Server 2003 and Windows Vista

http://www.BioAxxis.com
BioAxxis® ThumbLock® 3
Section 1 Installing the BioAxxis® ThumbLock® AT Software
1a) Insert Audit Trail CD into CD ROM drive
1b) CD should auto‐run the .exe file. If it does, then follow the system prompts to install the software. If the auto‐run feature does not execute, then use the following steps:
• 1bi) Open your CD drive in My Computer
• 1bii) Double click on the setup.exe (installation will now take place, follow system prompts to complete installation)
1c) Once installation is complete, a shortcut named, “ThumbLock® Management” will be present on your desktop.
http://www.BioAxxis.com
BioAxxis® ThumbLock® 4
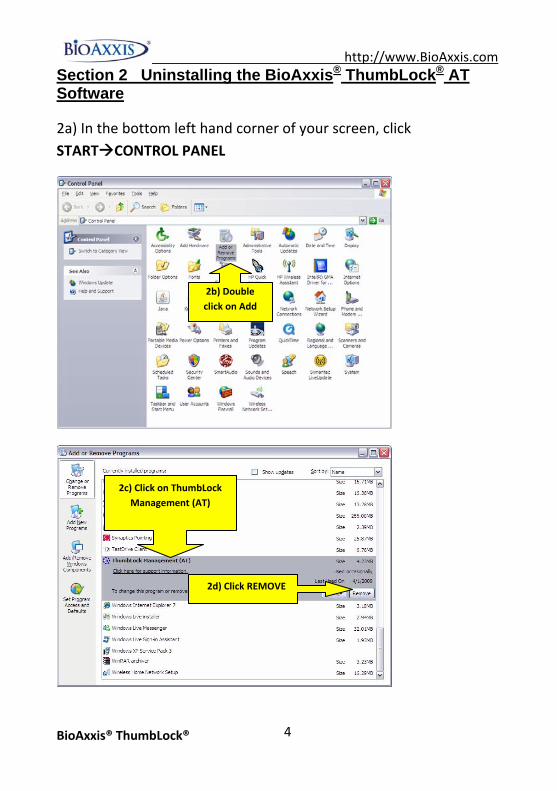
Section 2 Uninstalling the BioAxxis® ThumbLock® AT Software
2a) In the bottom left hand corner of your screen, click START CONTROL PANEL
2b) Double click on Add
2c) Click on ThumbLock Management (AT)
2d) Click REMOVE

http://www.BioAxxis.com
BioAxxis® ThumbLock® 5
2e) If you are sure,
then click YES
2f) Follow un‐install software prompts thru completion. When un‐installation is complete the ThumbLock Management shortcut icon on the desktop will be removed.
http://www.BioAxxis.com
BioAxxis® ThumbLock® 6
Section 3 Creating/Modifying the Super Administrator and General Administrators
NOTE: Only the Super Administrator can Add and Delete other Administrators as well as perform every other programming function in the AT software. The AT software has one Super Administrator that can be created and multiple General Administrators.
The multiple General Administrators can perform all functions in the AT software, except for changes or deletions of other administrators. However, they can make changes to themselves.
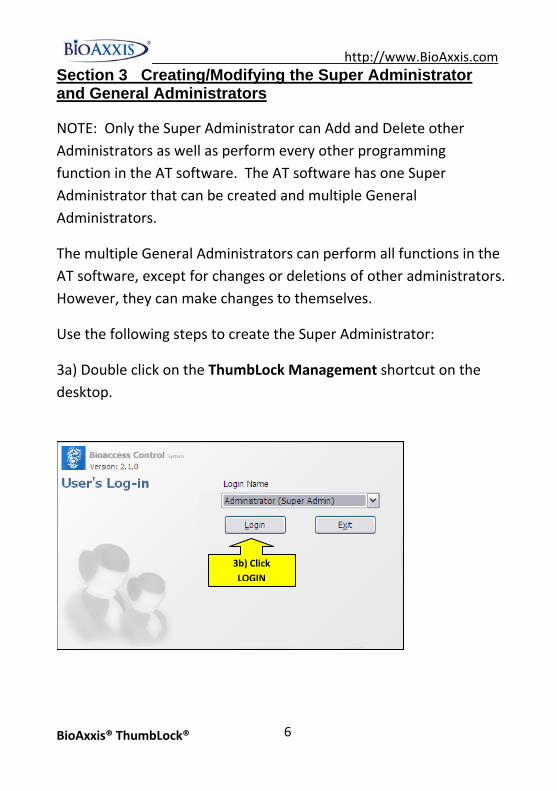
Use the following steps to create the Super Administrator:
3a) Double click on the ThumbLock Management shortcut on the desktop.
3b) Click LOGIN

http://www.BioAxxis.com
BioAxxis® ThumbLock® 7
3c) Until the Super Administrator is created, a password does not need to be entered. Click OK with the password field blank.
3d) Click on SYSTEM, then choose MODIFY CURRENT ADMINISTRATOR

http://www.BioAxxis.com
BioAxxis® ThumbLock® 8
3e) LOGIN NAME can be changed from the default of ADMINISTRATOR to whatever you choose.
3f) Enter the alpha‐numeric password you would like. It can be any amount of characters and numbers. Re‐enter the same password in the Confirm Password field.
3g) Click OK
3h) The Super Administrator can also create multiple General Administrators. To do this, use the following steps:
3i) Click on SYSTEM, then choose ADD SYSTEM DMINISTRATOR
http://www.BioAxxis.com
BioAxxis® ThumbLock® 9
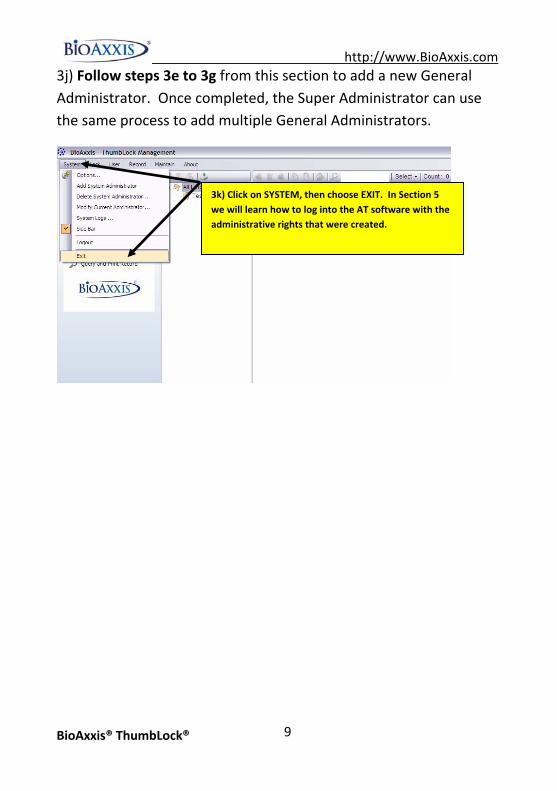
3j) Follow steps 3e to 3g from this section to add a new General Administrator. Once completed, the Super Administrator can use the same process to add multiple General Administrators.
3k) Click on SYSTEM, then choose EXIT. In Section 5 we will learn how to log into the AT software with the administrative rights that were created.

http://www.BioAxxis.com
BioAxxis® ThumbLock® 10
Section 4 Logging into the BioAxxis® ThumbLock® AT Software (Super and General Administrators)
4a) Double click on the ThumbLock Management icon that is located on your desktop.
4b) From the drop down menu, choose which Administrator to log in as.
4c) Click LOGIN

http://www.BioAxxis.com
BioAxxis® ThumbLock® 11
4d) Enter your PASSWORD and click OK.
4e) If successful, you will be in the Home screen of the AT software.

http://www.BioAxxis.com
BioAxxis® ThumbLock® 12
Section 5 Deleting General Administrator Accounts
NOTE: Only the Super Administrator can Delete other Administrators, therefore you must be a Super Administrator and logged in as a Super Administrator to perform the following function:
5a) Click on SYSTEM, then choose DELETE SYSTEM
5b) Choose the General Administrator to be deleted and click DELETE.
5c) Click YES

http://www.BioAxxis.com
BioAxxis® ThumbLock® 13
5d) General Admin has been successfully deleted, click CANCEL.

http://www.BioAxxis.com
BioAxxis® ThumbLock® 14
Section 6 Setting up and Modifying Individual/Multiple BioAxxis® ThumbLocks® for Audit Trail Records
IMPORTANT NOTE:
Prior to setting up the BioAxxis® ThumbLocks® in the AT software, be sure to do the following:
• Set up correct Date/Time settings at the BioAxxis® ThumbLock® (reference ThumbLock User Manual for details).
• Create Lock ID at the BioAxxis® ThumbLock® (reference ThumbLock User Manual).
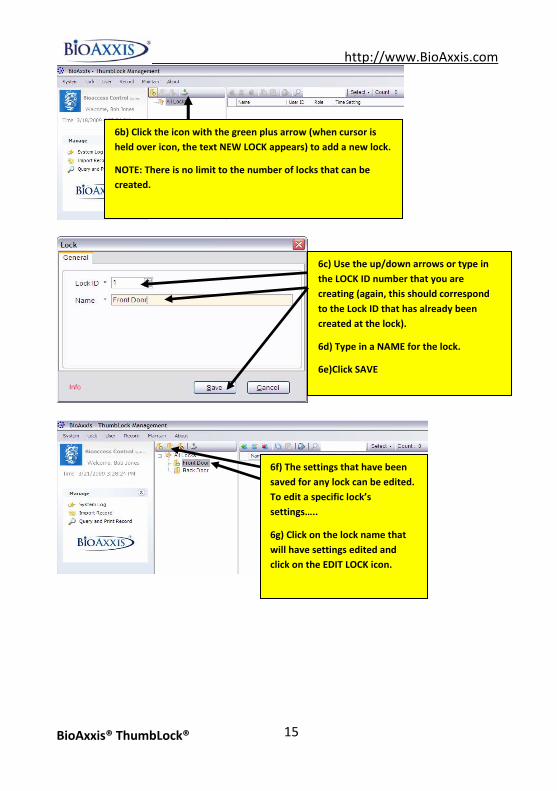
6a) There are two ways to set up the ThumbLocks…..you can either use the drop down menu OR the easy to see icons above ALL LOCKS. To keep things simple, we will use the icons located above ALL LOCKS.
http://www.BioAxxis.com
BioAxxis® ThumbLock® 15
6b) Click the icon with the green plus arrow (when cursor is held over icon, the text NEW LOCK appears) to add a new lock.
NOTE: There is no limit to the number of locks that can be created.
6c) Use the up/down arrows or type in the LOCK ID number that you are creating (again, this should correspond to the Lock ID that has already been created at the lock).
6d) Type in a NAME for the lock.
6e)Click SAVE
6f) The settings that have been saved for any lock can be edited. To edit a specific lock’s settings…..
6g) Click on the lock name that will have settings edited and click on the EDIT LOCK icon.
http://www.BioAxxis.com
BioAxxis® ThumbLock® 16
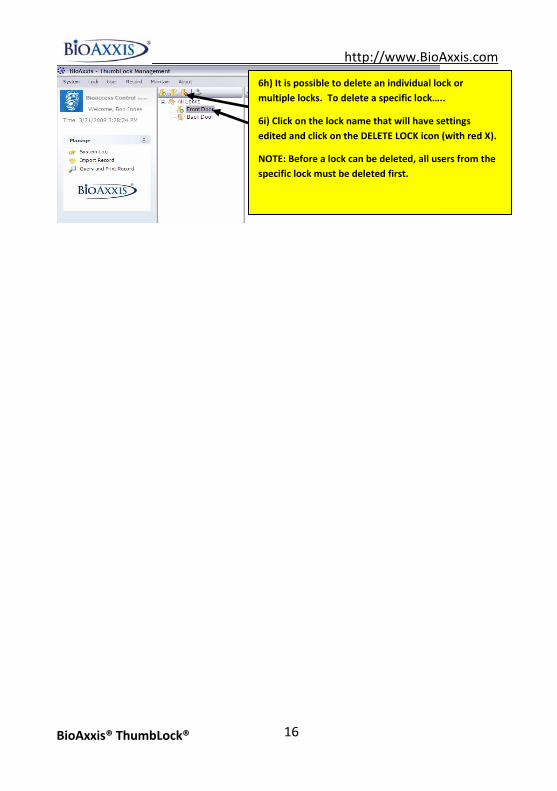
6h) It is possible to delete an individual lock or multiple locks. To delete a specific lock…..
6i) Click on the lock name that will have settings edited and click on the DELETE LOCK icon (with red X).
NOTE: Before a lock can be deleted, all users from the specific lock must be deleted first.

http://www.BioAxxis.com
BioAxxis® ThumbLock® 17
Section 7 Adding/Modifying Users at Individual Locks for Audit Trail Association
7a) Highlight the lock for a User/s to be added to.
NOTE: It is critical that all User ID and User Name associations be written down prior to adding the User ID and User Names to the AT software, so all downloaded Audit Trail information will be accurate.
7b) There are two ways to add users to a specific lock…..you can either use the drop down menu OR use the easy to see icon with a green plus symbol. To keep things simple, we will use the icon with the green plus symbol.
http://www.BioAxxis.com
BioAxxis® ThumbLock® 18
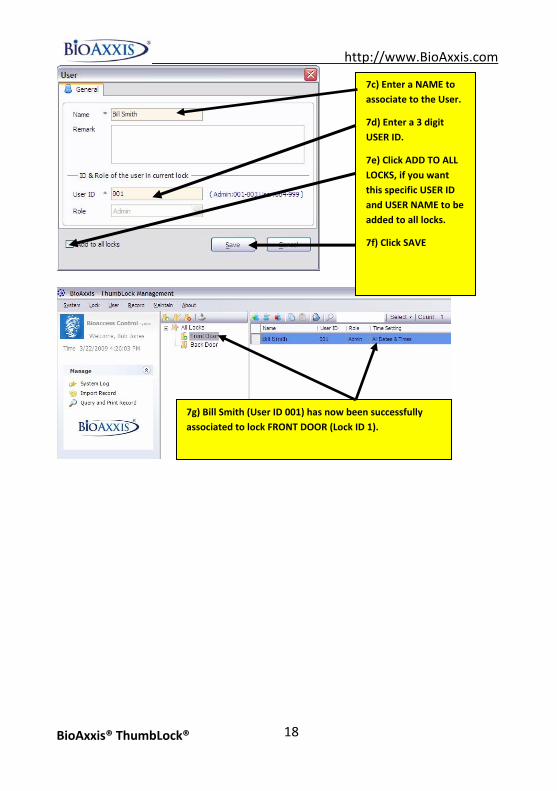
7c) Enter a NAME to associate to the User.
7d) Enter a 3 digit USER ID.
7e) Click ADD TO ALL LOCKS, if you want this specific USER ID and USER NAME to be added to all locks.
7f) Click SAVE
7g) Bill Smith (User ID 001) has now been successfully associated to lock FRONT DOOR (Lock ID 1).
http://www.BioAxxis.com
BioAxxis® ThumbLock® 19
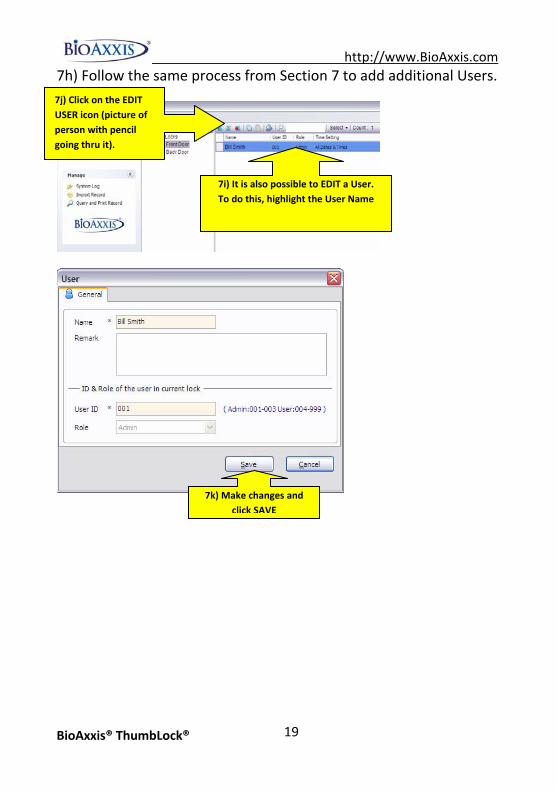
7h) Follow the same process from Section 7 to add additional Users.
7j) Click on the EDIT USER icon (picture of person with pencil going thru it).
7i) It is also possible to EDIT a User. To do this, highlight the User Name
7k) Make changes and click SAVE
http://www.BioAxxis.com
BioAxxis® ThumbLock® 20
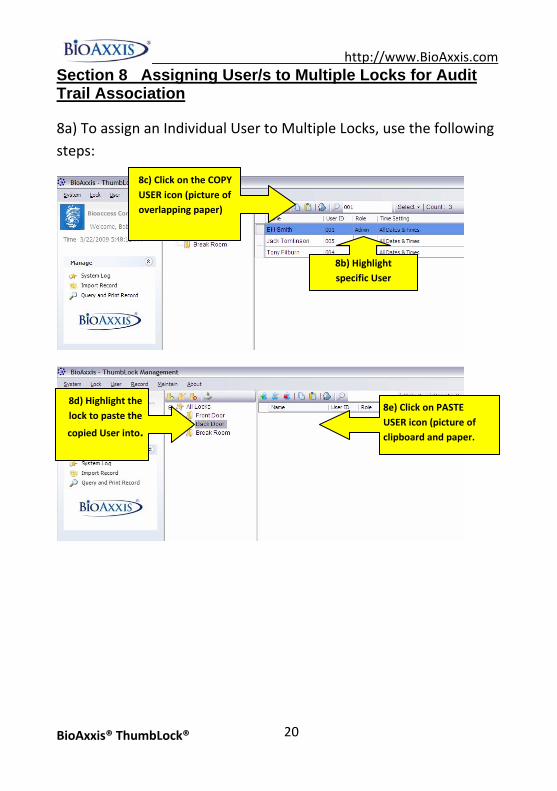
Section 8 Assigning User/s to Multiple Locks for Audit Trail Association
8a) To assign an Individual User to Multiple Locks, use the following steps:
8c) Click on the COPY USER icon (picture of overlapping paper)
8b) Highlight specific User
8d) Highlight the lock to paste the
copied User into.
8e) Click on PASTE USER icon (picture of clipboard and paper.
http://www.BioAxxis.com
BioAxxis® ThumbLock® 21
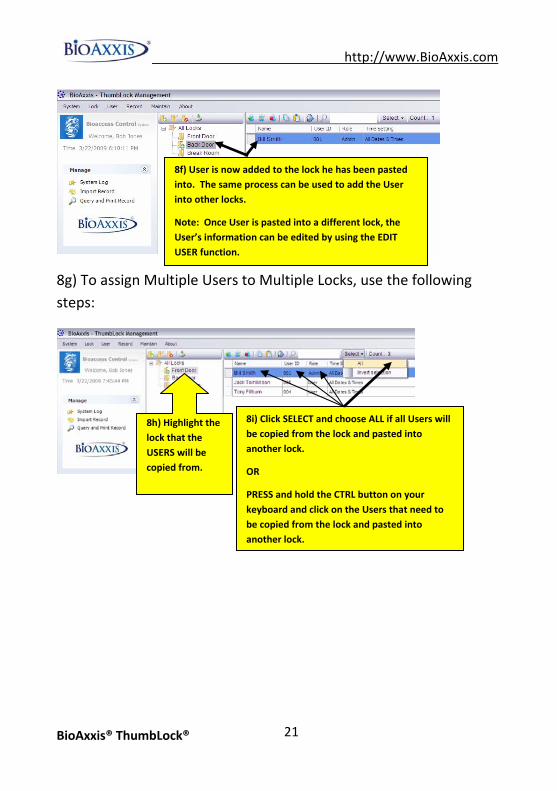
8f) User is now added to the lock he has been pasted into. The same process can be used to add the User into other locks.
Note: Once User is pasted into a different lock, the User’s information can be edited by using the EDIT USER function.
8g) To assign Multiple Users to Multiple Locks, use the following steps:
8i) Click SELECT and choose ALL if all Users will be copied from the lock and pasted into another lock.
OR
PRESS and hold the CTRL button on your keyboard and click on the Users that need to be copied from the lock and pasted into another lock.
8h) Highlight the lock that the USERS will be copied from.
http://www.BioAxxis.com
BioAxxis® ThumbLock® 22
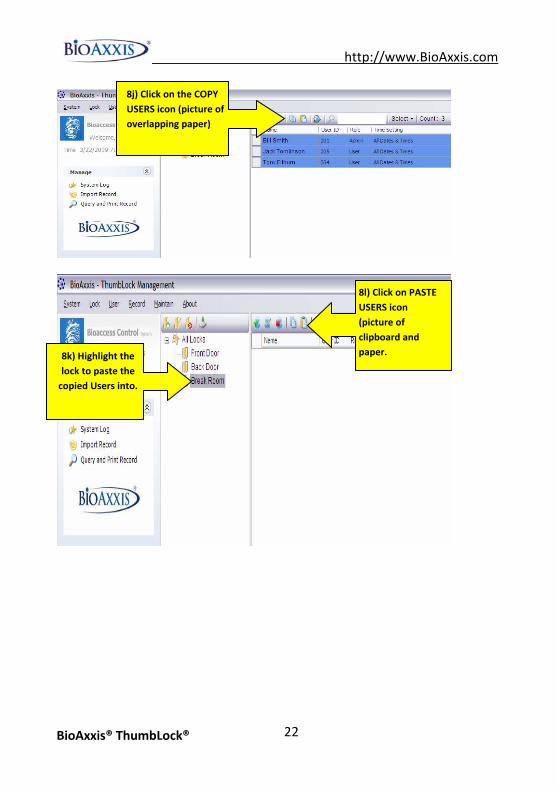
8j) Click on the COPY USERS icon (picture of overlapping paper)
8l) Click on PASTE USERS icon (picture of clipboard and paper. 8k) Highlight the
lock to paste the copied Users into.

http://www.BioAxxis.com
BioAxxis® ThumbLock® 23
8m) Users have been added to the lock that they were pasted into. The same process can be used to add Multiple Users into other locks.
Note: Once Users are pasted into different locks, the Users information can be edited by using the EDIT USERS function.
http://www.BioAxxis.com
BioAxxis® ThumbLock® 24
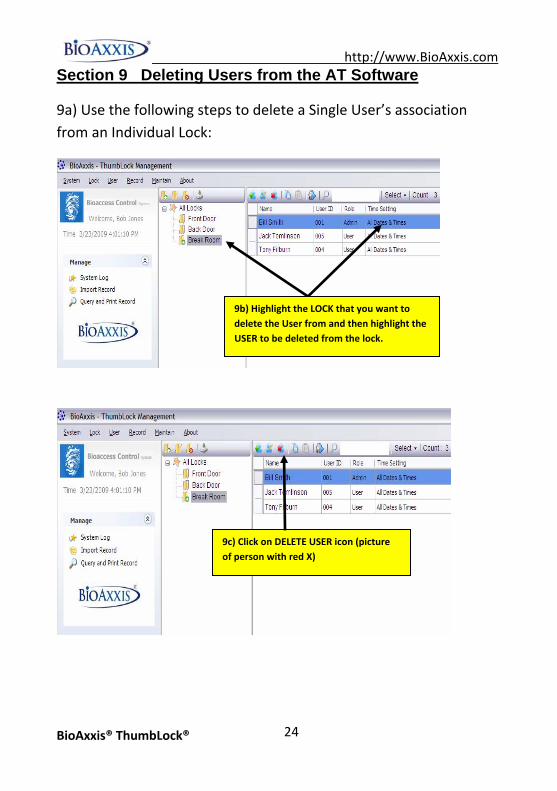
Section 9 Deleting Users from the AT Software
9a) Use the following steps to delete a Single User’s association from an Individual Lock:
9b) Highlight the LOCK that you want to delete the User from and then highlight the USER to be deleted from the lock.
9c) Click on DELETE USER icon (picture of person with red X)
http://www.BioAxxis.com
BioAxxis® ThumbLock® 25
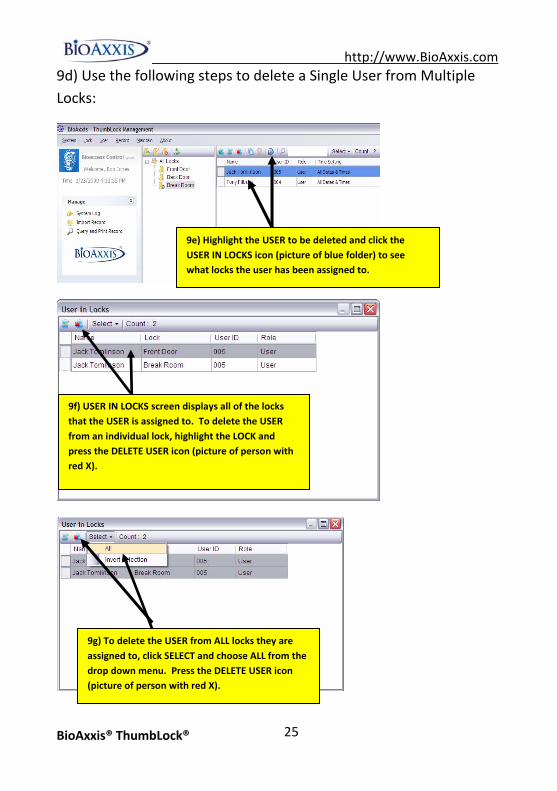
9d) Use the following steps to delete a Single User from Multiple Locks:
9e) Highlight the USER to be deleted and click the USER IN LOCKS icon (picture of blue folder) to see what locks the user has been assigned to.
9f) USER IN LOCKS screen displays all of the locks that the USER is assigned to. To delete the USER from an individual lock, highlight the LOCK and press the DELETE USER icon (picture of person with red X).
9g) To delete the USER from ALL locks they are assigned to, click SELECT and choose ALL from the drop down menu. Press the DELETE USER icon (picture of person with red X).

http://www.BioAxxis.com
BioAxxis® ThumbLock® 26
9h) Use the following steps to delete Multiple Users from an Individual Lock:
9i) Highlight the LOCK that you want to delete multiple Users (but NOT ALL USERS) from and PRESS and hold the CTRL button on your keyboard and click on the Users that will be deleted from the lock.
9j) Click on DELETE USERS icon (picture of person with red X)
http://www.BioAxxis.com
BioAxxis® ThumbLock® 27
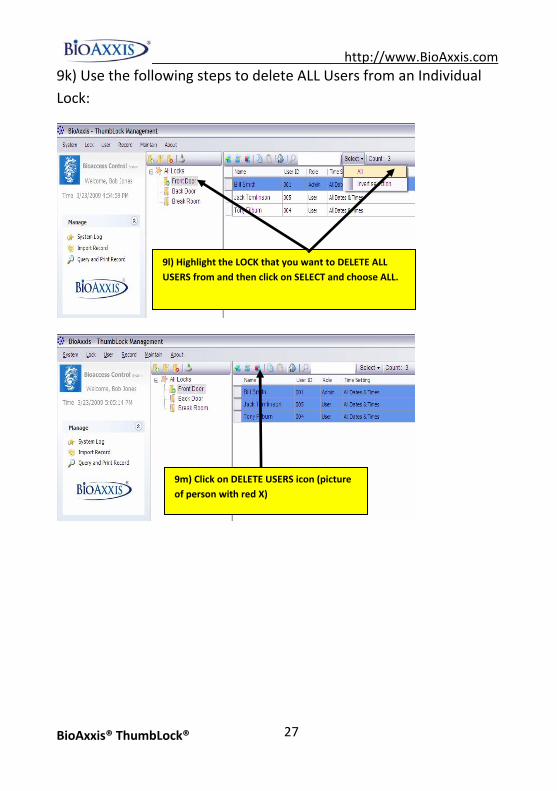
9k) Use the following steps to delete ALL Users from an Individual Lock:
9l) Highlight the LOCK that you want to DELETE ALL USERS from and then click on SELECT and choose ALL.
9m) Click on DELETE USERS icon (picture of person with red X)
http://www.BioAxxis.com
BioAxxis® ThumbLock® 28
Section 10 Viewing/Printing/Exporting System Logs in the AT Software
Note: System Log records display all programming that has been done in the AT Software by Date/Time, Admin and Operation. This is not to be confused with imported Audit Trail Records (Section 11).
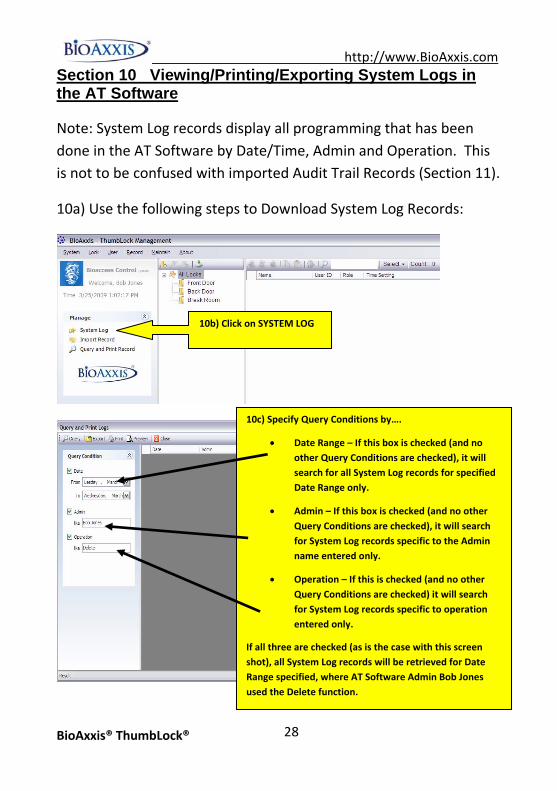
10a) Use the following steps to Download System Log Records:
10b) Click on SYSTEM LOG
10c) Specify Query Conditions by….
• Date Range – If this box is checked (and no other Query Conditions are checked), it will search for all System Log records for specified Date Range only.
• Admin – If this box is checked (and no other Query Conditions are checked), it will search for System Log records specific to the Admin name entered only.
• Operation – If this is checked (and no other Query Conditions are checked) it will search for System Log records specific to operation entered only.
If all three are checked (as is the case with this screen shot), all System Log records will be retrieved for Date Range specified, where AT Software Admin Bob Jones used the Delete function.
http://www.BioAxxis.com
BioAxxis® ThumbLock® 29
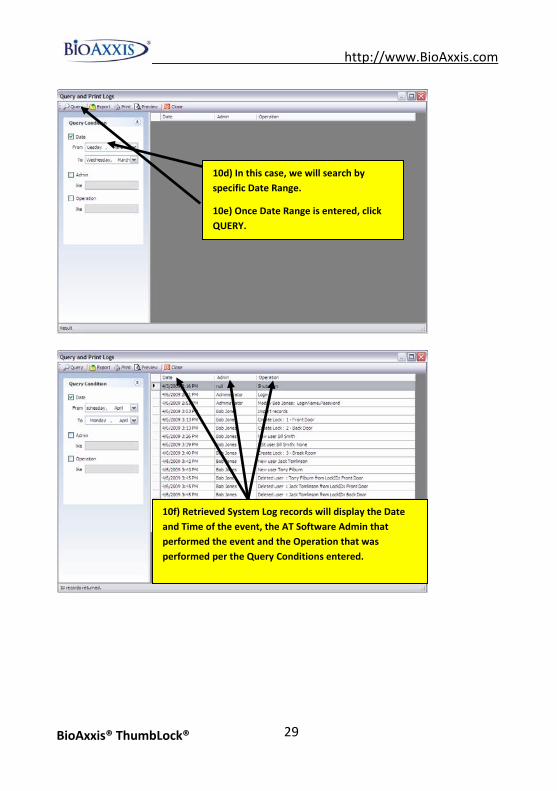
10d) In this case, we will search by specific Date Range.
10e) Once Date Range is entered, click QUERY.
10f) Retrieved System Log records will display the Date and Time of the event, the AT Software Admin that performed the event and the Operation that was performed per the Query Conditions entered.

http://www.BioAxxis.com
BioAxxis® ThumbLock® 30
10g) To PRINT retrieved records, click the PRINT
button.
10h) To EXPORT retrieved data to an MS EXCEL file, click on the EXPORT button
http://www.BioAxxis.com
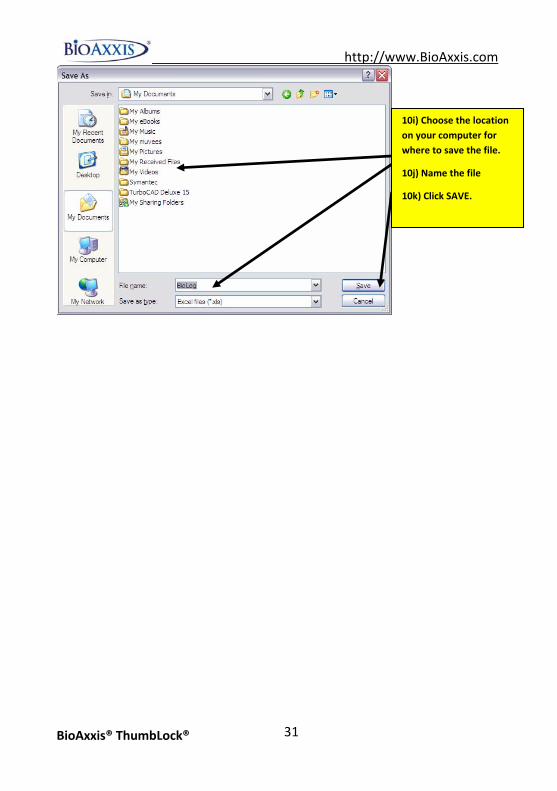
BioAxxis® ThumbLock® 31
10i) Choose the location on your computer for where to save the file.
10j) Name the file
10k) Click SAVE.

http://www.BioAxxis.com
BioAxxis® ThumbLock® 32
Section 11 Exporting Audit Trail Records from the BioAxxis® ThumbLock® to the Flash Drive
11a) Plug Flash Drive into the USB port located at the bottom of the Interior Unit
11b) Click on “M”
NOTE:
• “M” is the Menu option. This controls all Menu Options on the BioAxxis® ThumbLock®.
• “E” is for Exit. When this is pressed the existing menu will be closed. If pressed multiple times, the message “BYE” will appear, all Menu screens are exited and LCD will power off.
• UP and DOWN arrows scrolls thru menu options.
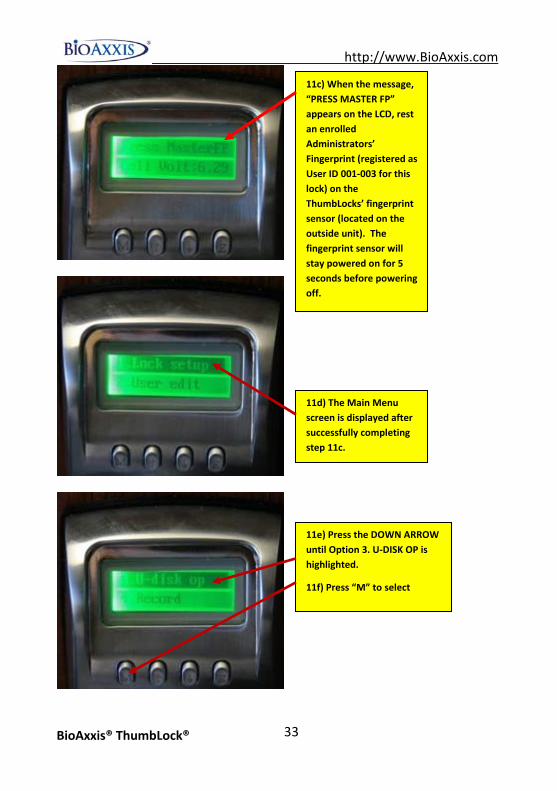
http://www.BioAxxis.com
BioAxxis® ThumbLock® 33
11c) When the message, “PRESS MASTER FP” appears on the LCD, rest an enrolled Administrators’ Fingerprint (registered as User ID 001‐003 for this lock) on the ThumbLocks’ fingerprint sensor (located on the outside unit). The fingerprint sensor will stay powered on for 5 seconds before powering off.
11d) The Main Menu screen is displayed after successfully completing step 11c.
11e) Press the DOWN ARROW until Option 3. U‐DISK OP is highlighted.
11f) Press “M” to select

http://www.BioAxxis.com
BioAxxis® ThumbLock® 34
11g) Press Option 3.1 RECORD OUT to begin download of audit trail records to the flash drive.
11h) When the Audit Trail Download is complete, the LCD will revert back to 3.1 RECORD OUT (highlighted) on the LCD.
11i) Press “E” (for Exit), until the LCD powers off.
11j) Remove the Flash Drive from the bottom of the BioAxxis® ThumbLock®

http://www.BioAxxis.com
BioAxxis® ThumbLock® 35
Section 12 Importing Audit Trail Records from the Flash Drive into the AT Software
12a) Plug Flash Drive into available USB Port on your PC/Laptop
12b) Click IMPORT RECORD
12c) Click BROWSE

http://www.BioAxxis.com
BioAxxis® ThumbLock® 36
12d) Choose the file from your flash drive, where the four digit file name corresponds to the LOCK ID number that the Audit Trail records have been downloaded from.
12e) Click OPEN
12f) Click IMPORT

http://www.BioAxxis.com
BioAxxis® ThumbLock® 37
12g) When audit trail records have been successfully downloaded, the message COMPLETED appears.
12h) Click CLOSE
http://www.BioAxxis.com
BioAxxis® ThumbLock® 38
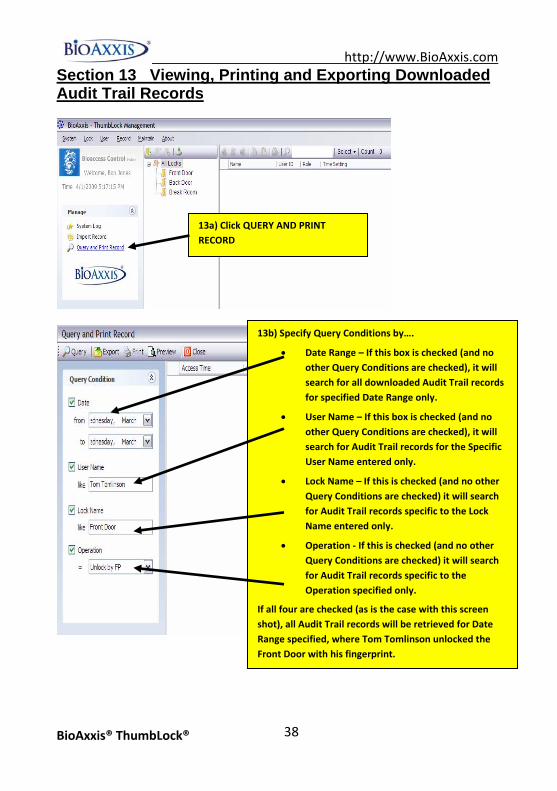
Section 13 Viewing, Printing and Exporting Downloaded Audit Trail Records
13a) Click QUERY AND PRINT RECORD
13b) Specify Query Conditions by….
• Date Range – If this box is checked (and no other Query Conditions are checked), it will search for all downloaded Audit Trail records for specified Date Range only.
• User Name – If this box is checked (and no other Query Conditions are checked), it will search for Audit Trail records for the Specific User Name entered only.
• Lock Name – If this is checked (and no other Query Conditions are checked) it will search for Audit Trail records specific to the Lock Name entered only.
• Operation ‐ If this is checked (and no other Query Conditions are checked) it will search for Audit Trail records specific to the Operation specified only.
If all four are checked (as is the case with this screen shot), all Audit Trail records will be retrieved for Date Range specified, where Tom Tomlinson unlocked the Front Door with his fingerprint.
http://www.BioAxxis.com
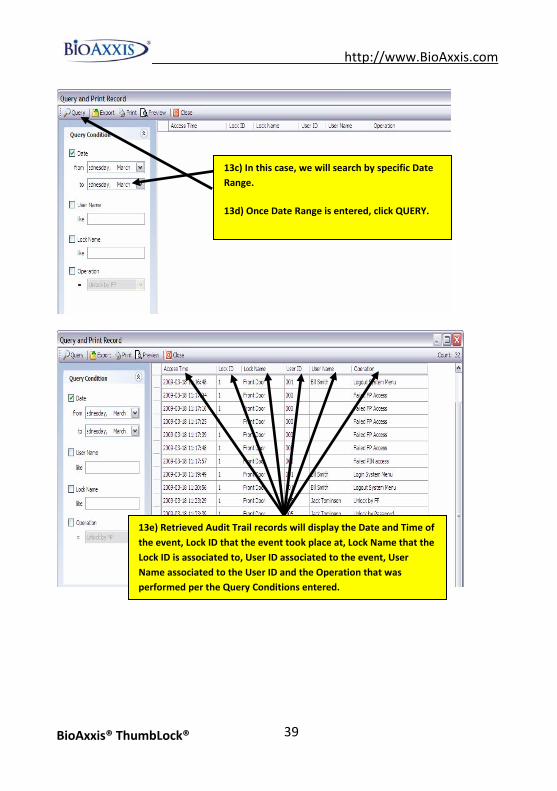
BioAxxis® ThumbLock® 39
13c) In this case, we will search by specific Date Range.
13d) Once Date Range is entered, click QUERY.
13e) Retrieved Audit Trail records will display the Date and Time of the event, Lock ID that the event took place at, Lock Name that the Lock ID is associated to, User ID associated to the event, User Name associated to the User ID and the Operation that was performed per the Query Conditions entered.

http://www.BioAxxis.com
BioAxxis® ThumbLock® 40
13f) To PRINT retrieved records, click the PRINT
button.
13g) To EXPORT retrieved data to an MS EXCEL file, click on the EXPORT button

http://www.BioAxxis.com
BioAxxis® ThumbLock® 41
13h) Choose the location on your computer for where to save the file.
13i) Name the file
13j) Click SAVE.

http://www.BioAxxis.com
BioAxxis® ThumbLock® 42
4. Support Information:
For warranty support please call BioAxxis Development Corporation directly at 315‐635‐5540 OR e‐mail [email protected] .
BIOAXXIS® BRAND LIMITED WARRANTY COVERAGE
“REPAIR OR REPLACE”
BIOAXXIS Limited Warranty Coverage begins on BioAxxis® brand products from the date of purchase or original registration for the following products and time periods…
BioAxxis® BD1 Two Years
BioAxxis® BD1-HS Two Years
BioAxxis® L113 Two Years
BioAxxis® MA1 Two Years
BioAxxis® MA1AT Two Years
BioAxxis® PCL-1 Two Years
BioAxxis® ThumbLock® Two Years

http://www.BioAxxis.com
BioAxxis® ThumbLock® 43
BIOAXXIS offers the following limited warranty on our BioAxxis® brand products….
If the installed products listed above experience any mechanical or electronic failure caused by defects in material, design or manufacturing workmanship during the warranty period as defined above, BIOAXXIS will either repair or replace the product for customer at the full expense of BIOAXXIS, including Ground shipping of replacement parts or products to customer.
BIOAXXIS determination of whether to repair or replace product (irrespective of customer or other 3rd party opinion) shall be at BIOAXXIS full and exclusive discretion. This determination will be final and conclusive in all respects.
Limited Warranty does not cover the following…
1. Product finish (unless expressly stated in product specifications)
2. Abused or misused products
3. Installation damage or neglect
4. Return Shipping charges on RMA
5. Expedited (2nd Day or Overnight) shipping of warranty replacements
Any BioAxxis® products advertised by any reseller for less than the current published MAP price will immediately cancel that reseller’s ability to resell BioAxxis® products.
In no event shall BIOAXXIS be liable for any incidental or consequential damages arising from the sale or use of the product.

http://www.BioAxxis.com
BioAxxis® ThumbLock® 44
If Limited Warranty Coverage has been verified and a covered defect acknowledged by BIOAXXIS, please call for an RMA Number per stipulations in our Return Policy and send to…
BioAxxis Development Corporation Attn: Returned Merchandise Authorization 15 East Genesee Street Baldwinsville, New York 13027 1-315-635-5540


![„ELISENHOHE“ INgislkmainzbingen.service24.rlp.de/.../BPlan.07339005.205.0.plan.pdf · CQ _i CD CO Q]: = CD S- >® ts c O CD zr o 3-> 3a 3. o^ 13 tt —h§ ® CDc3 q. CDCD](https://img.pdfslide.us/doc/110x75/5fb6ba6cb501c306c5417d09/aelisenhoheaoe-cq-i-cd-co-q-cd-s-ts-c-o-cd-zr-o-3-3a-3-o-13.jpg)